Embed Size (px)
Citation preview
Preserve It Fresh, Preserve It SafeVolume 3, Issue 5 September/October 2017
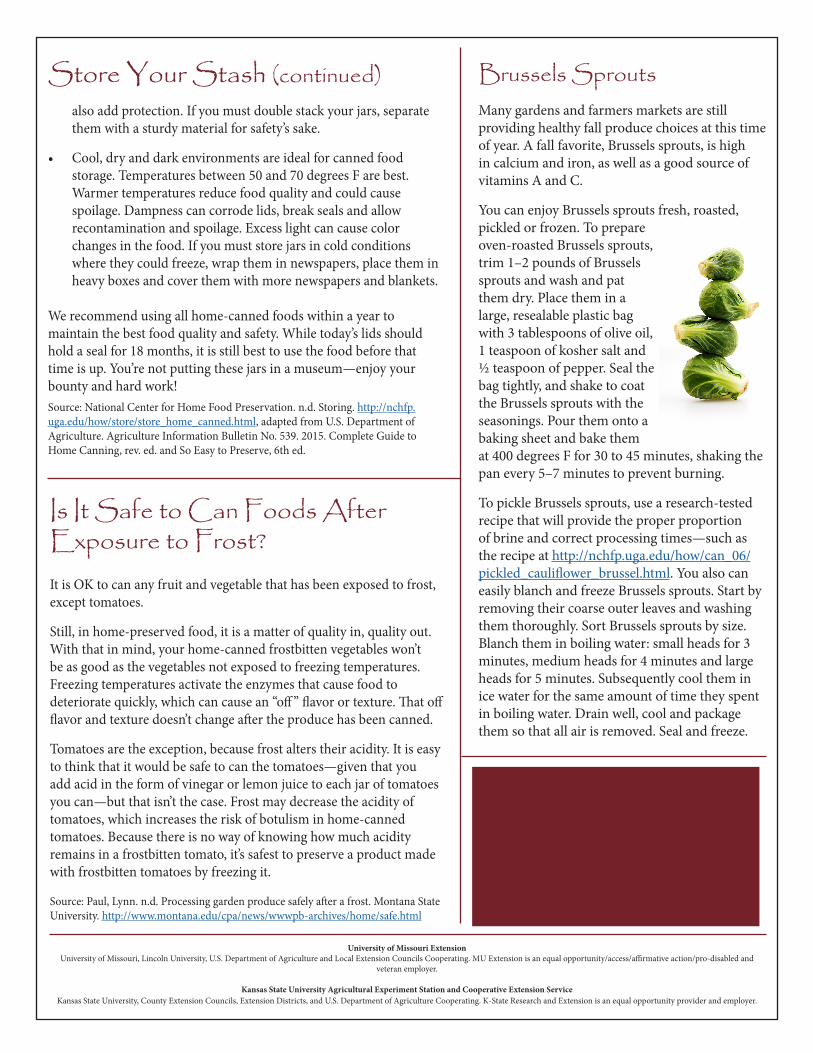
Now that you’ve gone through the work of safely preserving your food, it’s time to store it safely. Here are some tips to optimize the shelf life of the food you canned.
• After cooling the jars 12 to 24 hours, check their lid seals and remove the rings. Wash the lids and jars without disturbing the sealed lids to remove any food residue, which can cause mold to grow on jar surfaces. Rinse and dry the jars. Leave the rings off so that you can easily detect broken seals. If you leave the rings on, be sure the jar screw areas and rings are clean and dry to prevent rusting.
• If any jars are not sealed, place them in the refrigerator and use the food within a few days. Canning jars also can be used in the freezer. Leave around 1 inch of headspace to allow for expansion during freezing.
• Label and date the jars to make it easier to later identify the food and when you canned it. Today’s lids provide a space for the processing date.
• Store jars in single layers on shelves to reduce the risk of damage. Empty jar boxes or plastic jar storage containers
(continued on following page)
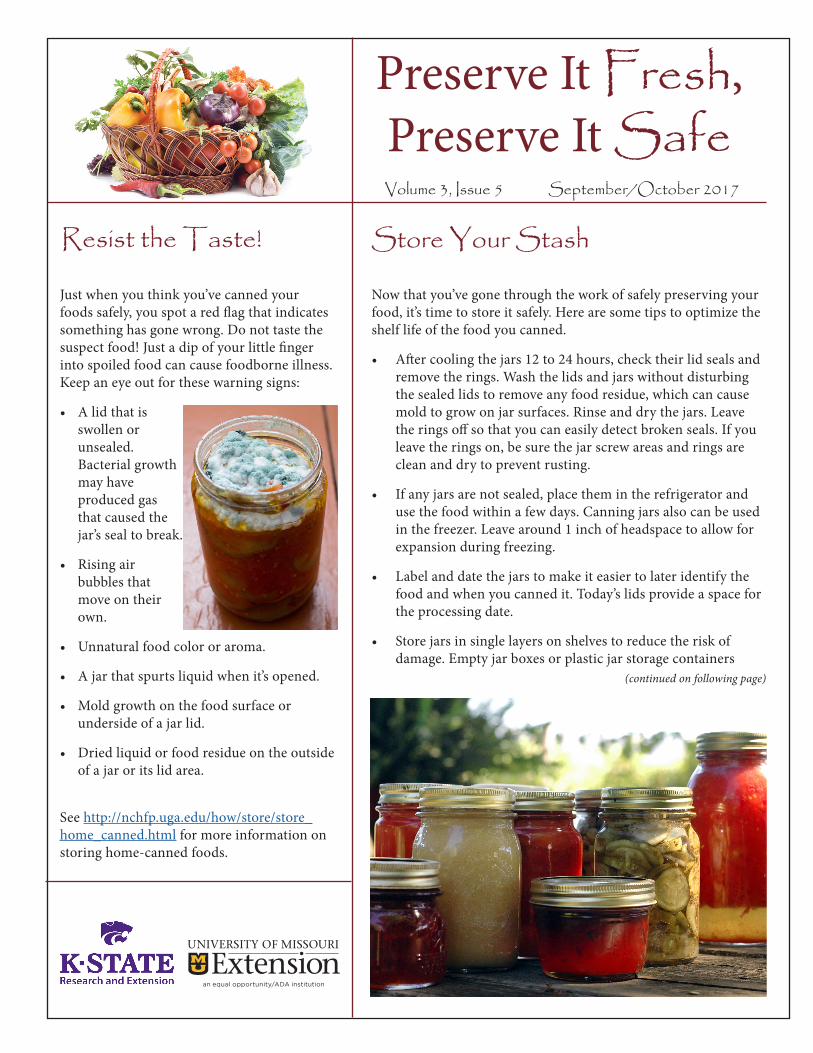
Store Your StashJust when you think you’ve canned your foods safely, you spot a red flag that indicates something has gone wrong. Do not taste the suspect food! Just a dip of your little finger into spoiled food can cause foodborne illness. Keep an eye out for these warning signs:
• A lid that is swollen or unsealed. Bacterial growth may have produced gas that caused the jar’s seal to break.
• Rising air bubbles that move on their own.
• Unnatural food color or aroma.
• A jar that spurts liquid when it’s opened.
• Mold growth on the food surface or underside of a jar lid.
• Dried liquid or food residue on the outside of a jar or its lid area.
See http://nchfp.uga.edu/how/store/store_home_canned.html for more information on storing home-canned foods.
Resist the Taste!
an equal opportunity/ADA institution
Local Contact Information:
University of Missouri Extension University of Missouri, Lincoln University, U.S. Department of Agriculture and Local Extension Councils Cooperating. MU Extension is an equal opportunity/access/affirmative action/pro-disabled and
veteran employer.
Kansas State University Agricultural Experiment Station and Cooperative Extension ServiceKansas State University, County Extension Councils, Extension Districts, and U.S. Department of Agriculture Cooperating. K-State Research and Extension is an equal opportunity provider and employer.
Brussels Sprouts also add protection. If you must double stack your jars, separate them with a sturdy material for safety’s sake.
• Cool, dry and dark environments are ideal for canned food storage. Temperatures between 50 and 70 degrees F are best. Warmer temperatures reduce food quality and could cause spoilage. Dampness can corrode lids, break seals and allow recontamination and spoilage. Excess light can cause color changes in the food. If you must store jars in cold conditions where they could freeze, wrap them in newspapers, place them in heavy boxes and cover them with more newspapers and blankets.
We recommend using all home-canned foods within a year to maintain the best food quality and safety. While today’s lids should hold a seal for 18 months, it is still best to use the food before that time is up. You’re not putting these jars in a museum—enjoy your bounty and hard work!Source: National Center for Home Food Preservation. n.d. Storing. http://nchfp.uga.edu/how/store/store_home_canned.html, adapted from U.S. Department of Agriculture. Agriculture Information Bulletin No. 539. 2015. Complete Guide to Home Canning, rev. ed. and So Easy to Preserve, 6th ed.
Store Your Stash (continued)Many gardens and farmers markets are still providing healthy fall produce choices at this time of year. A fall favorite, Brussels sprouts, is high in calcium and iron, as well as a good source of vitamins A and C.
You can enjoy Brussels sprouts fresh, roasted, pickled or frozen. To prepare oven-roasted Brussels sprouts, trim 1–2 pounds of Brussels sprouts and wash and pat them dry. Place them in a large, resealable plastic bag with 3 tablespoons of olive oil, 1 teaspoon of kosher salt and ½ teaspoon of pepper. Seal the bag tightly, and shake to coat the Brussels sprouts with the seasonings. Pour them onto a baking sheet and bake them at 400 degrees F for 30 to 45 minutes, shaking the pan every 5–7 minutes to prevent burning.
To pickle Brussels sprouts, use a research-tested recipe that will provide the proper proportion of brine and correct processing times—such as the recipe at http://nchfp.uga.edu/how/can_06/pickled_cauliflower_brussel.html. You also can easily blanch and freeze Brussels sprouts. Start by removing their coarse outer leaves and washing them thoroughly. Sort Brussels sprouts by size. Blanch them in boiling water: small heads for 3 minutes, medium heads for 4 minutes and large heads for 5 minutes. Subsequently cool them in ice water for the same amount of time they spent in boiling water. Drain well, cool and package them so that all air is removed. Seal and freeze.
It is OK to can any fruit and vegetable that has been exposed to frost, except tomatoes.
Still, in home-preserved food, it is a matter of quality in, quality out. With that in mind, your home-canned frostbitten vegetables won’t be as good as the vegetables not exposed to freezing temperatures. Freezing temperatures activate the enzymes that cause food to deteriorate quickly, which can cause an “off ” flavor or texture. That off flavor and texture doesn’t change after the produce has been canned.
Tomatoes are the exception, because frost alters their acidity. It is easy to think that it would be safe to can the tomatoes—given that you add acid in the form of vinegar or lemon juice to each jar of tomatoes you can—but that isn’t the case. Frost may decrease the acidity of tomatoes, which increases the risk of botulism in home-canned tomatoes. Because there is no way of knowing how much acidity remains in a frostbitten tomato, it’s safest to preserve a product made with frostbitten tomatoes by freezing it.
Source: Paul, Lynn. n.d. Processing garden produce safely after a frost. Montana State University. http://www.montana.edu/cpa/news/wwwpb-archives/home/safe.html
Is It Safe to Can Foods After Exposure to Frost?