Embed Size (px)
Citation preview

Marketing Materials
Product Sheets
Pricing
NOTE: INSTALLATION OF THESE SHOWER UNITS MAY BE SUBJECT TO CODE APPROVAL. Refer to job prints and/or consult with architect to see if your installation must comply with ADA.
These shower units install differently from typical residential showers. Installation may need to conform to requirements of the Americans With Disabilities Act (ADA) and other local codes. These requirements relate to the height of the threshold in relation to the finished floor. Certain showers will install directly on the sub floor and others will require a recess or pit. These showers require special preparation of the installation site, and very specific installation procedures to assure the shower drains properly and meets code requirements.
STORAGE & HANDLINGDo not store units out of doors.- Keep out of sunlight and exposure to weather.1. Most handling damage is the result of impact blows to the back side of the shower units.
2. Stress cracks can develop when shipping boards are removed before unit is positioned for final installation in bathroom.3. Placing objects inside of tub can cause scratches, abrasions or nicks to the finished surface.4. Storing units outside right-side up can cause the sunlight to discolor the acrylic finish. Also, unit becomes unstable and is easily knocked over by wind or bumping.5. The back side of the shower unit is not waterproof. Unit must be stored so that water will drain off of unit and not accumulate in any one spot. Water can permeate the back laminates and soak the glassed in wood supports causing bulges in the finished surface.6. Never drag these units on any surface. Always transport the unit by hand using (2) people or a two-wheel dolly.7. Never let these units drop from any height, not even an inch.8. Never clean the shower finished surface with metal tools of any kind, including razors.
Tools & Materials you might need for proper installation
Materials:• 2 - 1 gallon buckets of solid wood flooring adhesive or
100% silicone adhesive (non-shrink)• 20 - 1.25” wood screws• 1 - 5 gallon bucket (to mix thin set in)• 1/8” shims (provided with the shower)• 3 - 8’ 2x4s• 1 - 8” piece of 2x4• 1 - 24” piece of 2x4• 2 large soft cloths• 3 gallons of water (for testing the draft to the drain)• Drain (provided with the shower)• Epoxy - for optional EasyBase™ installation
Tools:• Caulking gun• Hammer• Drill• 1/8” drill bit• Screwdriver• Screwdriver attachment to match screws• 4’ level• 2’ level• Torpedo level
• Grout Mixer• Black marker (to mark the threshold)
Helpful Hints for Installation:• 2 - 5.5” pieces of PVC - These can be used to lay
the product face down and roll it up to the framing pocket rather than sliding or picking it up.
• Please place cardboard from the carton into the bottom of the shower during installation to prevent damage to the finished surface.
• When placing shower into the frame pocket, you can use the handle of the hammer to align the pipe with the drain hole.
For INSTALLATION USING EPOXY ADHESIVE refer to last
page of instructions.
Marketing Materials
Product Sheets
Pricing
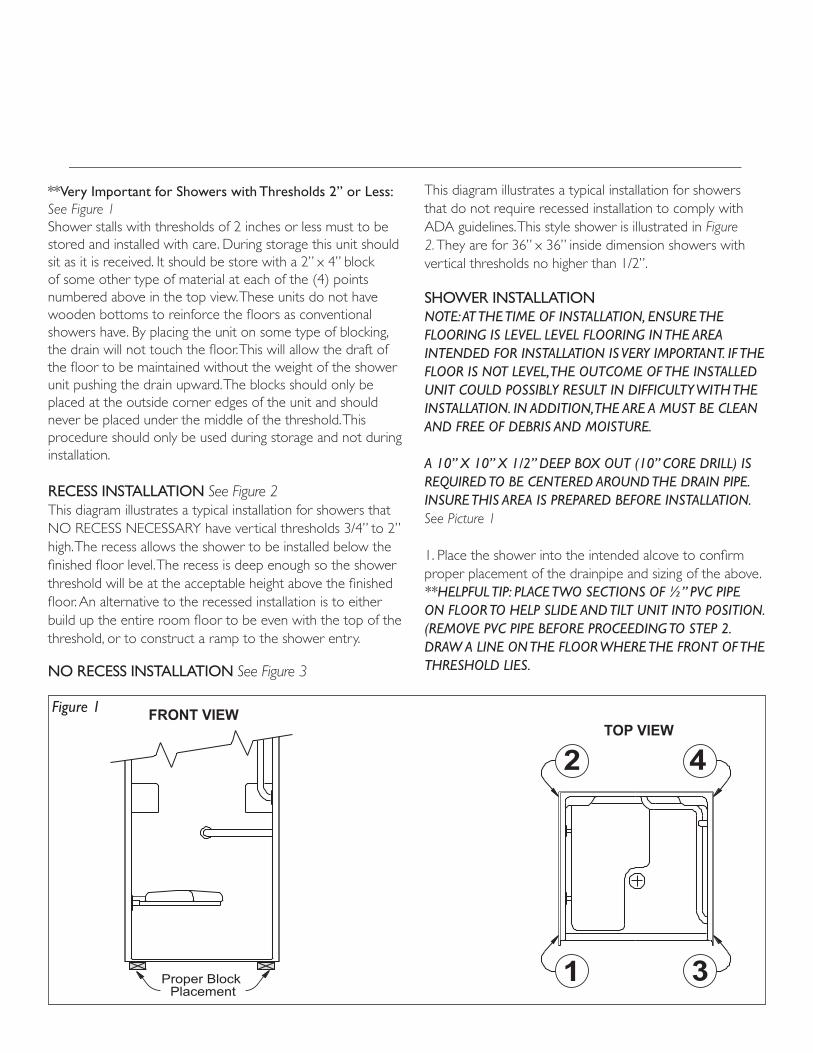
**Very Important for Showers with Thresholds 2” or Less: See Figure 1Shower stalls with thresholds of 2 inches or less must to be stored and installed with care. During storage this unit should sit as it is received. It should be store with a 2” x 4” block of some other type of material at each of the (4) points numbered above in the top view. These units do not have wooden bottoms to reinforce the floors as conventional showers have. By placing the unit on some type of blocking, the drain will not touch the floor. This will allow the draft of the floor to be maintained without the weight of the shower unit pushing the drain upward. The blocks should only be placed at the outside corner edges of the unit and should never be placed under the middle of the threshold. This procedure should only be used during storage and not during installation.
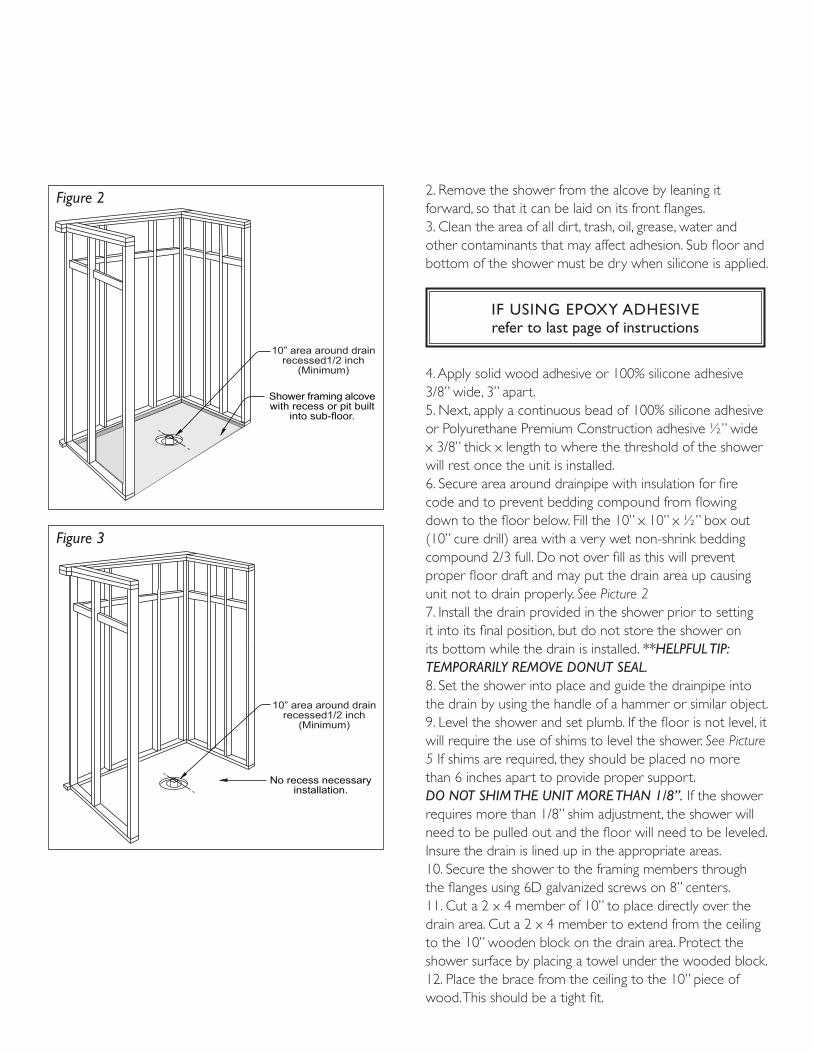
RECESS INSTALLATION See Figure 2This diagram illustrates a typical installation for showers that NO RECESS NECESSARY have vertical thresholds 3/4” to 2” high. The recess allows the shower to be installed below the finished floor level. The recess is deep enough so the shower threshold will be at the acceptable height above the finished floor. An alternative to the recessed installation is to either build up the entire room floor to be even with the top of the threshold, or to construct a ramp to the shower entry.
NO RECESS INSTALLATION See Figure 3
STORAGE AND HANDLING1. Most handling damage is the result of impact blows to the back side of the shower units.
2. Stress cracks can develop when shipping boards are removed before unit is positioned for final installation in bathroom.
3. Placing objects inside of tub can cause scratches, abrasions or nicks to the finished surface.
4. Storing units outside right-side up can cause the sunlight to discolor the finish. Also, unit becomes unstable and is easily knocked over by wind or bumping.
5. The backside of the shower unit is not water proof. Unit must be stored so that water will drain off of and not accumulate in any one spot. Water can permeate the back laminates and soak the glassed in wood supports causing bulges in the finished surface.
6. Never drag these units on any surface. Always transport the unit by hand using (2) people or a two-wheel dolly.
7. Never let these units drop from any height, not even an inch.
8. Never clean the shower finished surface with metal tools of any kind, including razors.
FRONT VIEWTOP VIEW
2
1
4
3
* * VERY IMPORTANT FOR SHOWERS WITH THRESHOLDS 2 INCHES OR LESS:
Proper Block Placement
Shower stalls with thresholds of 2 inches or less must to be stored and installed with care. During storage this unitshould sit as it is received. It should be store with a 2” x 4” block of some other type of material at each of the (4)points numbered above in the top view. These units do not have wooden bottoms to reinforce the floors as conventionalshowers have. By placing the unit on some type of blocking, the drain will not touch the floor. This will allow the draftof the floor to be maintained without the weight of the shower unit pushing the drain upward. The blocks should onlybe placed at the outside corner edges of the unit and should never be placed under the middle of the threshold.This procedure should only be used during storage and not during installation.
1
These shower units install differently from typical residential showers. Installation may need to conform torequirements of the Americans With Disabillities Act (ADA) and other local codes. These requirements relateto the height of the threshold in relation to the finished floor. Certain showers will install directly on the sub floorand others will require a recess or pit. These showers require special preparation of the installation site, andvery specific installation procedures to assure the shower drains properly and meets code requirements.
NOTE: INSTALLATION OF THESE SHOWER UNITS MAY BE SUBJECT TO CODE APPROVALRefer to job prints and/or consult with architect to see if your installation must comply with ADA.
FIGURE 1
FOR Factory Help! If you have never performed an installation of a Praxis brand barrier free shower withlow profile threshold, we encourage you to request phone support or jobsite training by our local representative.To do so please contact Jerry Hanna via email [email protected] or call: 724-658-6686 ext 29.
Figure 1
This diagram illustrates a typical installation for showers that do not require recessed installation to comply with ADA guidelines. This style shower is illustrated in Figure 2. They are for 36” x 36” inside dimension showers with vertical thresholds no higher than 1/2”.
SHOWER INSTALLATIONNOTE: AT THE TIME OF INSTALLATION, ENSURE THE FLOORING IS LEVEL. LEVEL FLOORING IN THE AREA INTENDED FOR INSTALLATION IS VERY IMPORTANT. IF THE FLOOR IS NOT LEVEL, THE OUTCOME OF THE INSTALLED UNIT COULD POSSIBLY RESULT IN DIFFICULTY WITH THE INSTALLATION. IN ADDITION, THE ARE A MUST BE CLEAN AND FREE OF DEBRIS AND MOISTURE.
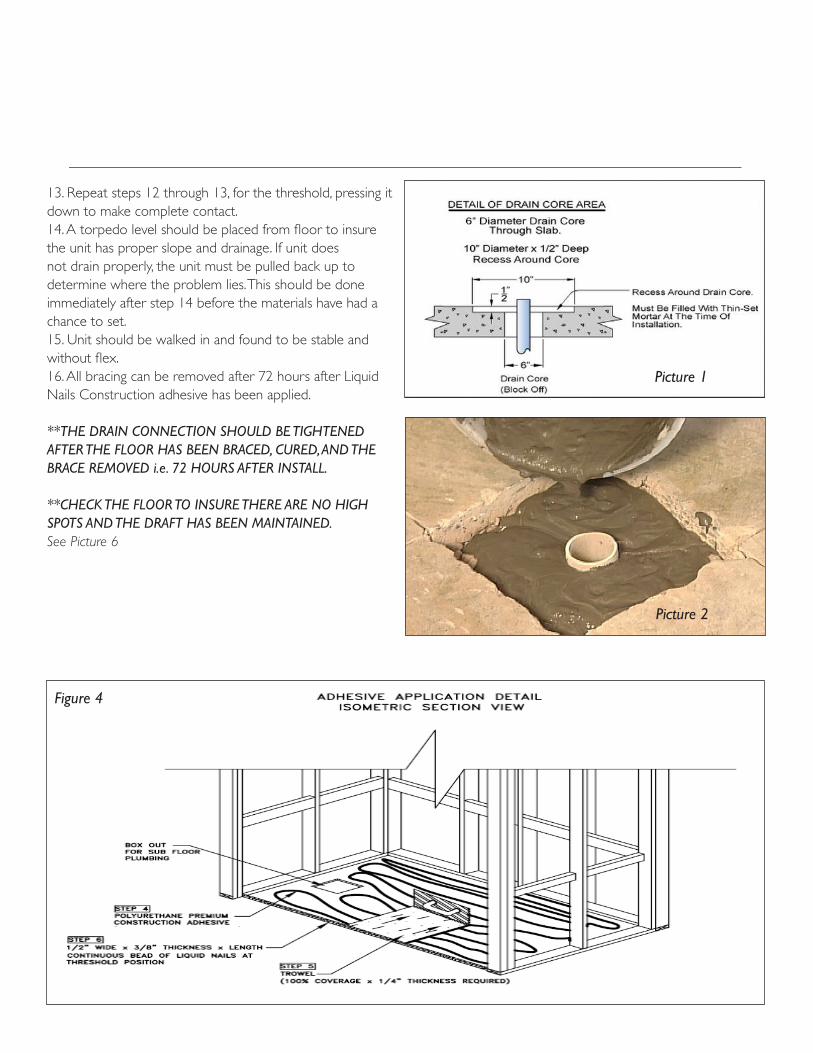
A 10” X 10” X 1/2” DEEP BOX OUT (10” CORE DRILL) IS REQUIRED TO BE CENTERED AROUND THE DRAIN PIPE. INSURE THIS AREA IS PREPARED BEFORE INSTALLATION. See Picture 1
1. Place the shower into the intended alcove to confirm proper placement of the drainpipe and sizing of the above. **HELPFUL TIP: PLACE TWO SECTIONS OF ½” PVC PIPE ON FLOOR TO HELP SLIDE AND TILT UNIT INTO POSITION. (REMOVE PVC PIPE BEFORE PROCEEDING TO STEP 2. DRAW A LINE ON THE FLOOR WHERE THE FRONT OF THE THRESHOLD LIES.
Marketing Materials
Product Sheets
Pricing
2. Remove the shower from the alcove by leaning it forward, so that it can be laid on its front flanges. 3. Clean the area of all dirt, trash, oil, grease, water and other contaminants that may affect adhesion. Sub floor and bottom of the shower must be dry when silicone is applied.
4. Apply solid wood adhesive or 100% silicone adhesive 3/8” wide, 3” apart.5. Next, apply a continuous bead of 100% silicone adhesive or Polyurethane Premium Construction adhesive ½” wide x 3/8” thick x length to where the threshold of the shower will rest once the unit is installed. 6. Secure area around drainpipe with insulation for fire code and to prevent bedding compound from flowing down to the floor below. Fill the 10” x 10” x ½” box out (10” cure drill) area with a very wet non-shrink bedding compound 2/3 full. Do not over fill as this will prevent proper floor draft and may put the drain area up causing unit not to drain properly. See Picture 27. Install the drain provided in the shower prior to setting it into its final position, but do not store the shower on its bottom while the drain is installed. **HELPFUL TIP: TEMPORARILY REMOVE DONUT SEAL.8. Set the shower into place and guide the drainpipe into the drain by using the handle of a hammer or similar object.9. Level the shower and set plumb. If the floor is not level, it will require the use of shims to level the shower. See Picture 5 If shims are required, they should be placed no more than 6 inches apart to provide proper support. DO NOT SHIM THE UNIT MORE THAN 1/8”. If the shower requires more than 1/8” shim adjustment, the shower will need to be pulled out and the floor will need to be leveled. Insure the drain is lined up in the appropriate areas. 10. Secure the shower to the framing members through the flanges using 6D galvanized screws on 8” centers. 11. Cut a 2 x 4 member of 10” to place directly over the drain area. Cut a 2 x 4 member to extend from the ceiling to the 10” wooden block on the drain area. Protect the shower surface by placing a towel under the wooded block. 12. Place the brace from the ceiling to the 10” piece of wood. This should be a tight fit.
No recess necessaryinstallation.
Shower framing alcovewith recess or pit built
into sub-floor.
10” area around drainrecessed1/2 inch
(Minimum)10” area around drain
recessed1/2 inch(Minimum)
Figure 2
No recess necessaryinstallation.
Shower framing alcovewith recess or pit built
into sub-floor.
10” area around drainrecessed1/2 inch
(Minimum)10” area around drain
recessed1/2 inch(Minimum)
Figure 3
IF USING EPOXY ADHESIVErefer to last page of instructions
Marketing Materials
Product Sheets
Pricing
13. Repeat steps 12 through 13, for the threshold, pressing it down to make complete contact. 14. A torpedo level should be placed from floor to insure the unit has proper slope and drainage. If unit does not drain properly, the unit must be pulled back up to determine where the problem lies. This should be done immediately after step 14 before the materials have had a chance to set. 15. Unit should be walked in and found to be stable and without flex. 16. All bracing can be removed after 72 hours after Liquid Nails Construction adhesive has been applied.
**THE DRAIN CONNECTION SHOULD BE TIGHTENED AFTER THE FLOOR HAS BEEN BRACED, CURED, AND THE BRACE REMOVED i.e. 72 HOURS AFTER INSTALL.
**CHECK THE FLOOR TO INSURE THERE ARE NO HIGH SPOTS AND THE DRAFT HAS BEEN MAINTAINED. See Picture 6
Figure 4
Picture 1
Picture 2
Marketing Materials
Product Sheets
Pricing
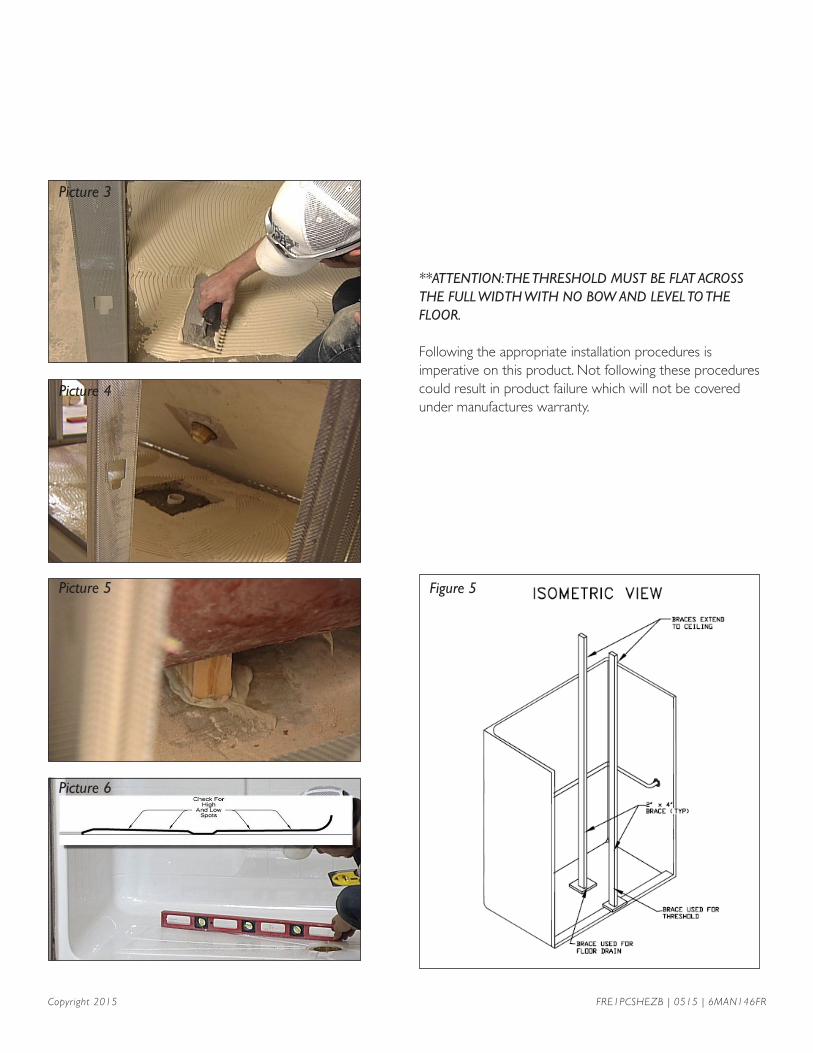
**ATTENTION: THE THRESHOLD MUST BE FLAT ACROSS THE FULL WIDTH WITH NO BOW AND LEVEL TO THE FLOOR.
Following the appropriate installation procedures is imperative on this product. Not following these procedures could result in product failure which will not be covered under manufactures warranty.
Picture 3
Picture 4
Picture 5 Figure 5
Picture 6
Copyright 2015 FRE1PCSHEZB | 0515 | 6MAN146FR

Installation Using Epoxy Adhesive
Marketing Materials
Product Sheets
Pricing
1. Ensure the stud pocket is the correct dimension, including the location of the drain hole and recessed cut out.
2. Ensure the fl oor is level and free of any debris, including dust and dirt (will impair adhesion).
3. Install the drain fi tting and prepare the drain pipe.
4. Place the pan/shower into the pocket and check for proper level and alignment. Adjust accordingly.
5. Dry fi t all walls as stated in the standard installation instruction (for sectional models only).
6. Mark the location and prepare the pan/shower as stated in the standard installation instructions.
7. Tilt pan out of the way or remove the shower and apply adhesive in the following manner: a. Apply adhesive in small mounds ¾” in height. b. Mounds must be NO MORE than 6” apart and applied in a grid-like manner.
c. Place adhesive over entire pocket surface, beginning at the back and working toward the front.
d. Ensure material is applied near the drain cutout/ box out.
8. Place pan/shower back into position and ensure it is level.
9. Apply a small amount of adhesive between two pieces of scrap material. This will be checked later to verify set time.
10. Secure the unit as stated in the standard installation instructions.
11. Allow 2 hours minimum for the adhesive to set. Verify by checking the scrap pieces from step 9.
12. Continue the installation as stated in the standard installation instructions.
Copyright 2015 FREEPOXY/0515