Embed Size (px)
Citation preview
Teaching Primary Music
The purpose of music in Primary is to teach our precious children the gospel of Jesus Christ…the melodies, words, and messages of primary songs will stay in their hearts throughout their lives. However, this is not always an easy task as the chorister must not only teach the song but help the children understand it’s gospel message and maintain their attention.
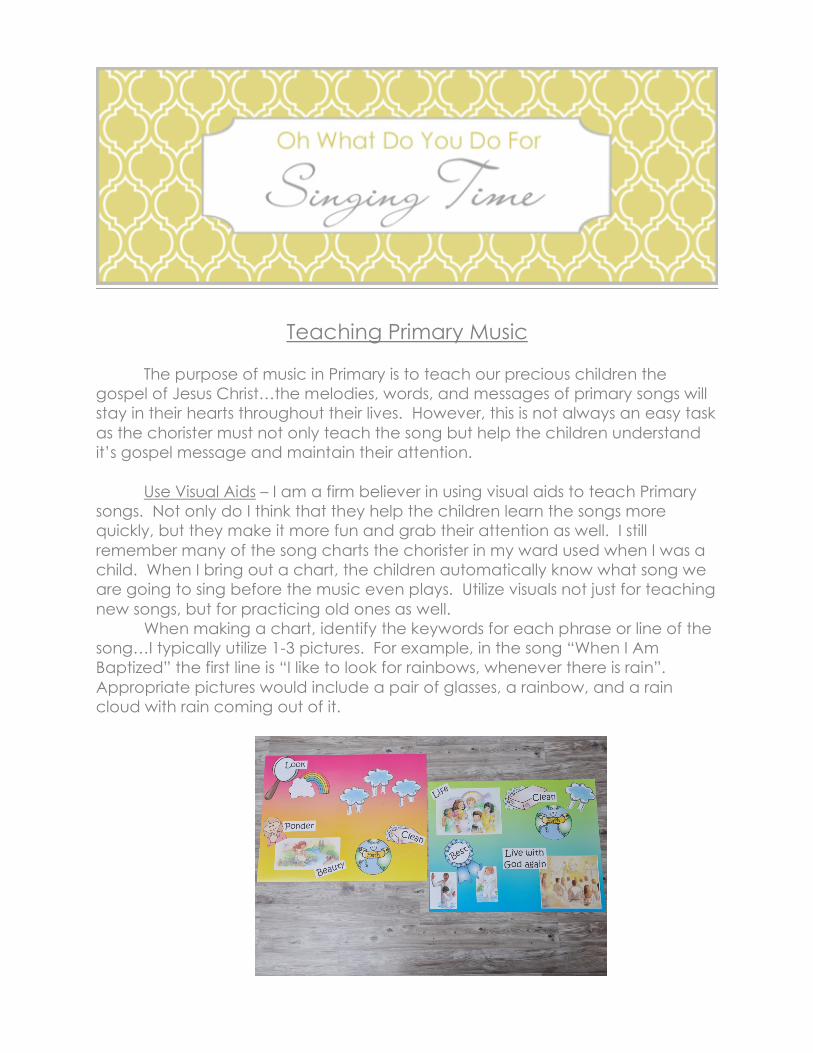
Use Visual Aids – I am a firm believer in using visual aids to teach Primary
songs. Not only do I think that they help the children learn the songs more quickly, but they make it more fun and grab their attention as well. I still remember many of the song charts the chorister in my ward used when I was a child. When I bring out a chart, the children automatically know what song we are going to sing before the music even plays. Utilize visuals not just for teaching new songs, but for practicing old ones as well.
When making a chart, identify the keywords for each phrase or line of the song…I typically utilize 1-3 pictures. For example, in the song “When I Am Baptized” the first line is “I like to look for rainbows, whenever there is rain”. Appropriate pictures would include a pair of glasses, a rainbow, and a rain cloud with rain coming out of it.
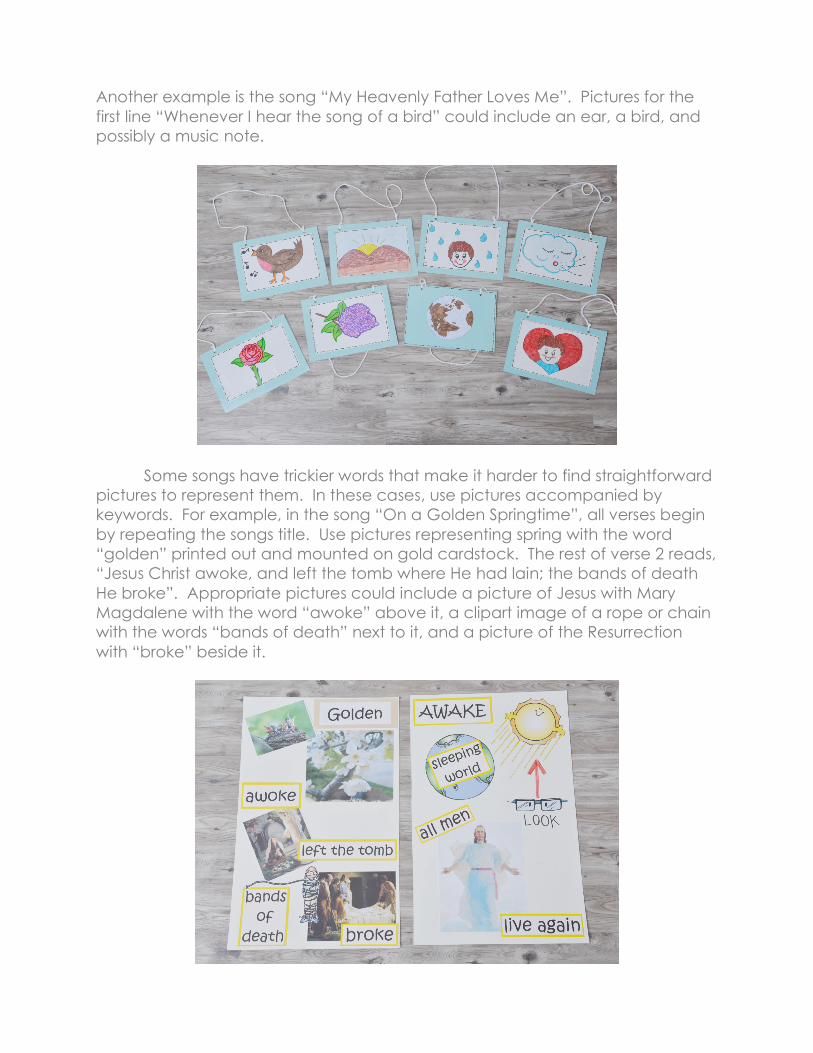
Another example is the song “My Heavenly Father Loves Me”. Pictures for the first line “Whenever I hear the song of a bird” could include an ear, a bird, and possibly a music note.
Some songs have trickier words that make it harder to find straightforward pictures to represent them. In these cases, use pictures accompanied by keywords. For example, in the song “On a Golden Springtime”, all verses begin by repeating the songs title. Use pictures representing spring with the word “golden” printed out and mounted on gold cardstock. The rest of verse 2 reads, “Jesus Christ awoke, and left the tomb where He had lain; the bands of death He broke”. Appropriate pictures could include a picture of Jesus with Mary Magdalene with the word “awoke” above it, a clipart image of a rope or chain with the words “bands of death” next to it, and a picture of the Resurrection with “broke” beside it.
The use of pictures is very important as many of the children in Junior Primary cannot read. Therefore, word strips or posters with just the words written out on them are not going to be effective teaching aids. In addition, if posters have all of the words written out verbatim, the children will simply read the text while singing and it will take longer for them to commit the songs to memory. Also remember to make your visuals large enough so that children in the back of the room can see them too. An 8 ½ x 11 sheet of paper is probably not going to be big enough…a good rule of thumb is to make your visuals at least half the size of a poster board. Be creative when making your visuals. Rather than making every one on a square poster board, try to make each one look different. Think of various ways they can be utilized. For example:
-Visuals that can hang around the children’s necks. -Visuals with the pages attached at the top with rings so they can be
easily flipped. -Visuals attached to tongue depressors or dowels so the children can hold
them up in the air. -Visuals created to represent keywords or concepts. For example, making
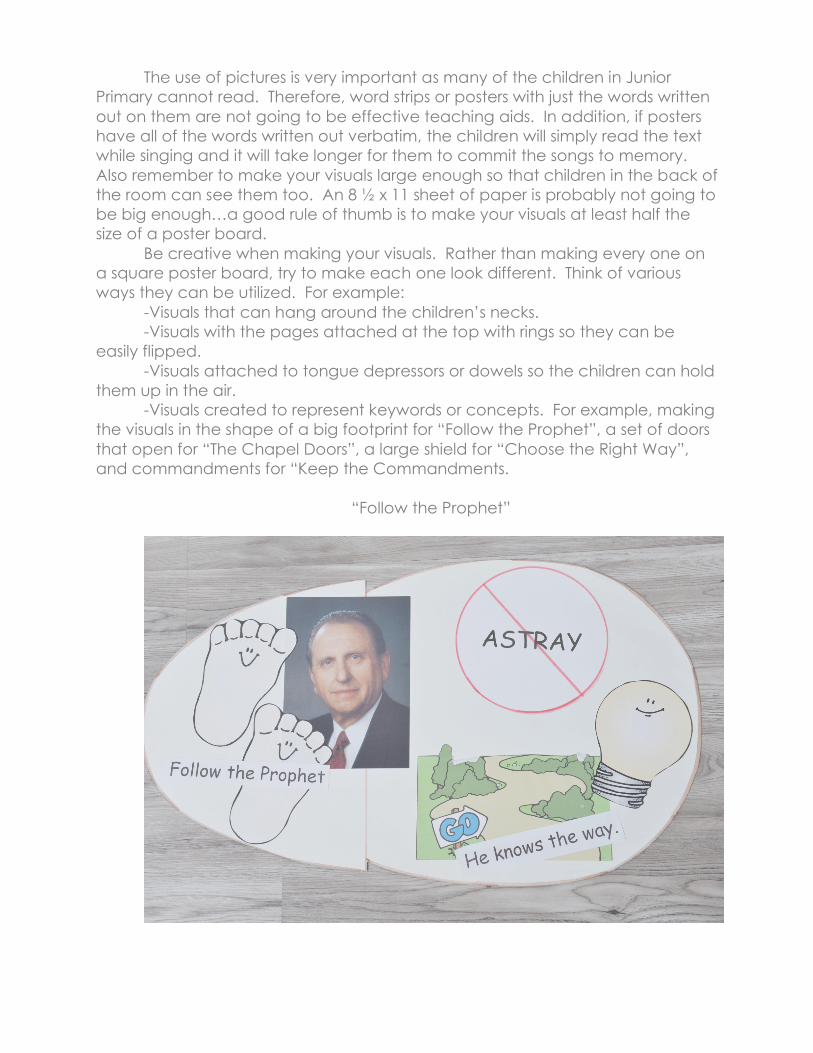
the visuals in the shape of a big footprint for “Follow the Prophet”, a set of doors that open for “The Chapel Doors”, a large shield for “Choose the Right Way”, and commandments for “Keep the Commandments.
“Follow the Prophet”
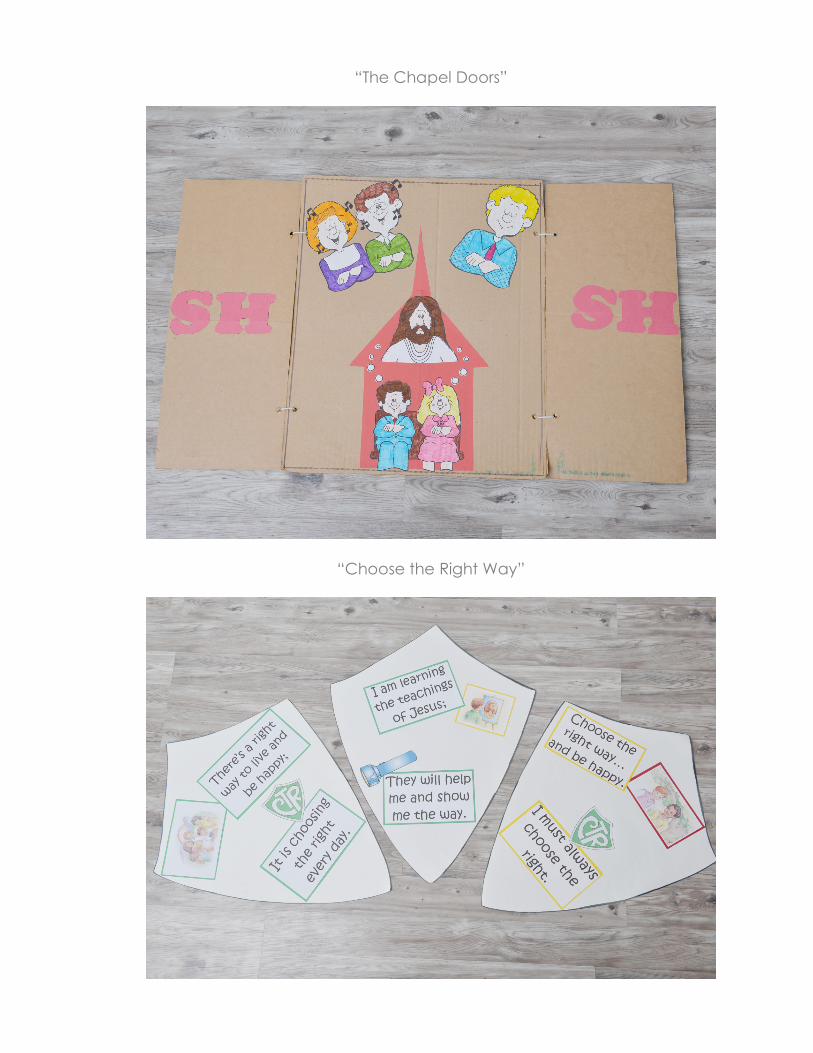
“The Chapel Doors”
“Choose the Right Way”

“Keep the Commandments”
-Visuals made to look like a book with 3 evenly spaced rings on the side to attach the pages.
“Tell Me the Stories of Jesus” and “Nephi’s Courage”
When first learning a new song, utilize a chart every time it’s sung. As the
children become more comfortable with the song, cover up some of the
pictures or words with paper. Gradually take away pages of the chart until eventually it isn’t needed at all.
Emphasize Gospel Principles – Whether singing time is first or second in the
Primary schedule, it is an excellent time to teach gospel principles. Primary music teaches the gospel through the words of the songs. Moreover, it testifies of gospel truths and allows the children to feel the influence of the Holy Ghost while singing. Singing time can be either an introduction to or a reinforcement of topics taught during Sharing time. When planning, consult the Outline for Sharing Time. In addition to a monthly theme and song, it provides weekly themes as well. Develop singing time activities based on these topics (see www.ohwhatdoyoudoforsingingtime.blogspot.com for weekly posts of such activities). Choose songs for singing time that emphasize material taught during sharing time (see accompanying handout “Primary Song Ideas for 2013”). Opening and closing exercises are also an excellent time to sing these songs.
Bearing your testimony is not something you would necessarily expect to do while teaching Primary music, but it is an excellent way to invite the spirit and testify of the gospel truths found in the songs. Consider ending your singing time with a brief testimony of the weekly theme or the song you have taught. Share your love of the Savior and the blessings we have all been given. Help the children understand the joy that can come from singing through your example; that singing is one way they can bear testimony and feel of the spirit. If you love it, they’ll love it, and their testimonies will thereby be strengthened.
When teaching a song, don’t be afraid to stop and have discussions. You want the children to understand what they are singing about. Explain what difficult words in the song mean. For example, when teaching “Praise to the Man”, an entire week was spent playing a game that focused on the song’s difficult vocabulary. Ask the children questions pertaining to the song’s message and tell them to listen for the answer while you or they sing. Reinforce song concepts by sharing personal stories and/or discussing blessings you have received in your own life.
Other Teaching Methods – In addition to visual aids, ACTIONS are very
useful when teaching a song. Again, they help to focus the children’s attention. The key is to use consistent actions for each song. Actions for “My Heavenly Father Loves Me” would be as follows:
-“Whenever I hear the song of a bird” – Cup your ear & flap your hands. -“Or look at the blue, blue sky” – Point to your eyes & point upward. -“Whenever I feel the rain on my face” – Move your fingers like rain & point to your face. -“Or the wind as it rushes by” – Sweep your arms quickly through the air in front of your body. -“Whenever I touch a velvet rose” – Touch the air with your finger. -“Or walk by our lilac tree” – March in place or move two fingers like their walking.
-“I’m glad that I live in this beautiful world” – Smile while singing & point to your mouth. Make a circle by cupping your hands together. -“Heavenly Father created for me” – Sweep your arms in a big circle overhead & point to yourself. Teach the children MELODIES and RHYTHM to help them understand what
their voices are supposed to do. It often helps to give them a visual of the melody. Indicate higher and lower pitches by moving your hand up and down while singing. Other ideas include: Drawing the melody on the board and pointing to it as they sing; Giving them an object like a paintbrush, straw, or skinny dowel to use as a conducting wand to draw the melody in the air; Using a sock puppet to draw the melody in the air while the children copy your movements; Using noisemakers to count the beat of the music; Making a conducting elephant (large elephant drawn on poster board with a hole cut where the trunk goes so that an arm can be inserted through it) and have the children help conduct the music.
Lastly, remember REPETITION, REPETITION, and more REPETITION! Singing songs frequently and repeating them in a variety of ways helps the children learn new songs. See www.thechildrensing.blogspot.com for many creative and effective teaching methods.
*The following sources were utilized for pictures on song charts: 1. Sunday Savers Singing Fun: I Know my Savior Lives CD-ROM by Mary H.
Ross and Jennette Guymon-King 2. Primary Partners Clip Art on CD-ROM by Jennette Guymon-King 3. Primary Clip Art by Val Chadwick Bagley 4. LDS Gospel Library (http://www.lds.org/media-
library/images/categories/gospel-art) 5. LDS Clipart (www.ldsclipart.com) 6. Misplaced book from the Finch Family Games series (Highland, UT)