Embed Size (px)
Citation preview

Book Design 1
Principles and Process

2 Book Design 1
Level HE4 – 40 CATS
Copyright images courtesy of the V & A
and the Bridgeman Art Library
Unattributed images from tutors and friends
Written and designed by Jane Parry
Open College of the Arts
Redbrook Business Park
Wilthorpe Road
Barnsley S75 1JN
Telephone: 01226 730 495
Email: [email protected]
www.oca-uk.com
Registered charity number: 327446
OCA is a company limited by guarantee and
registered in England under number 2125674
Copyright OCA 2012
Document control number: BD1pp030912
No part of this publication may be reproduced, stored in a retrieval system, or transmitted in any form or by any
means – electronic, mechanical, photocopy, recording or otherwise – without prior permission of the publisher
Front cover illustration
Cover design for the poem ‘About This’ by Vladimir Mayakovsky

Book Design 1 3
Times suggested here are only a guideline: you may want to spend a lot more. Research and writing time, time for
reflecting and logging your learning are included.
Approximate time in hours
Introduction Book design software Paper
Part one Beginning 30
Projects What is book design?
Printing and publishing
The creative design process
Assignment one Introducing yourself – ‘zine
Part two Form and function 90 Projects The anatomy of a book
Book genres
Front cover
Approaches to design
Assignment two Jacket design
Contents

4 Book Design 1
Part three Principles 90
Projects Typography
Working with images
Layout
Assignment three My Little Book of...
Part four Materials and processes 90
Projects Paper
Managing colour
The printing process
Alternative approaches
Assignment four Altered book
Part five Production 100
Projects Publishing models
Workflow
Assignment five Your choice
Reading and resources Guidelines for submission for formal assessment

Book Design 1 5
Introduction
Your OCA Student Handbook should be able to answer most questions about the basics of this course and all other OCA courses so keep this to hand.
Course aimsThe unit aims to:• provide a broad contextual overview of book design and publishing • appreciate the role of design principles and narrative in book construction• introduce and develop practical skills in book design and construction• develop ideas and research into finished outcomes• develop self reflective and critical skills.
Course outcomesBy the end of the course you’ll be able to:• demonstrate a broad contextual understanding of book design and publishing • generate ideas, research, and proposals that demonstrate an awareness of design principles• employ basic skills in book design, layout and construction • present ideas, prototypes and visual outcomes effectively • present evidence of critical thinking through reflective writing.

6 Book Design 1
Your tutorYour tutor is your main point of contact with OCA. Before you start work make sure that you’re clear about your tuition arrangements. The OCA tuition system is explained in some detail in your Student Handbook.
If you haven’t already done so, please write a paragraph or two about your experience to date. Add background information about anything that you think may be relevant for your tutor to know about you (your profile) – for example, your own practice, your reasons for exploring this subject, what you expect to achieve from taking the course. Email or post your profile to your tutor as soon as possible. This will help them understand how best to support you during the course.
Arrange with your tutor how you’ll deal with any queries that arise between assignments. This could be by email, telephone or post. You may agree, for instance, that you’ll scan or photograph sketchbook images and upload them to the OCA website or a free website such as Flickr or Picassa in between tutorials, if you need your tutor to comment on something in particular, or if you have a problem that you need help with.
You may want to consider setting up your own blog, as a way of sharing your ongoing progress with your tutor. A blog can be treated as an online sketchbook containing your work, links to research and reflections, and can be set up for free using websites such as Blogger, Tumblr or Wordpress.
Send or show your tutor a cross-section of the work that you’ve done for each assignment in addition to the finished piece(s). This should be preliminary work for the final assignment piece as well as a sample of the work you’ve done for the various exercises. You could scan or photograph the relevant pages of your learning log and email them to your tutor and then post the final assignment piece, or you could post your learning log as an online blog on the OCA website so that your tutor can see how your work is developing between assignments. It’s particularly important that your tutor sees regular evidence of your development.
Make sure that you label any work that you send to your tutor with your name, student number and the assignment number. Your tutor will get back to you as soon as possible after receiving your assignment but this may take a little time. Continue with the course while you’re waiting.
Make pencil notes on the back of all your work as it develops. This will enable your tutor immediately to see what thoughts and issues you’ve had with each piece of work.
Book Design 1 7
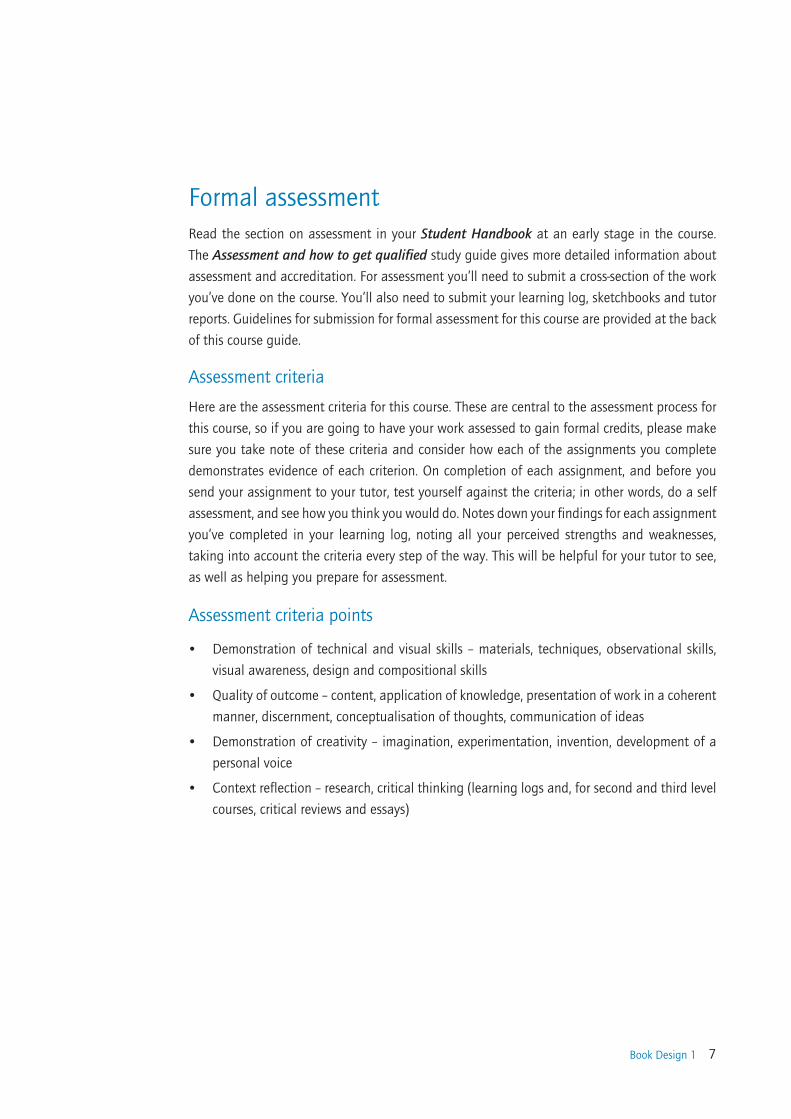
Formal assessmentRead the section on assessment in your Student Handbook at an early stage in the course. The Assessment and how to get qualified study guide gives more detailed information about assessment and accreditation. For assessment you’ll need to submit a cross-section of the work you’ve done on the course. You’ll also need to submit your learning log, sketchbooks and tutor reports. Guidelines for submission for formal assessment for this course are provided at the back of this course guide.
Assessment criteria
Here are the assessment criteria for this course. These are central to the assessment process for this course, so if you are going to have your work assessed to gain formal credits, please make sure you take note of these criteria and consider how each of the assignments you complete demonstrates evidence of each criterion. On completion of each assignment, and before you send your assignment to your tutor, test yourself against the criteria; in other words, do a self assessment, and see how you think you would do. Notes down your findings for each assignment you’ve completed in your learning log, noting all your perceived strengths and weaknesses, taking into account the criteria every step of the way. This will be helpful for your tutor to see, as well as helping you prepare for assessment.
Assessment criteria points
• Demonstration of technical and visual skills – materials, techniques, observational skills, visual awareness, design and compositional skills
• Quality of outcome – content, application of knowledge, presentation of work in a coherent manner, discernment, conceptualisation of thoughts, communication of ideas
• Demonstration of creativity – imagination, experimentation, invention, development of a personal voice
• Context reflection – research, critical thinking (learning logs and, for second and third level courses, critical reviews and essays)

8 Book Design 1
Your learning logKeeping a learning log is an integral part of this and every other OCA course. If you’re new to OCA courses, read the Keeping sketchbooks and learning logs study guide for further information.
Planning aheadThis Level 1 course represents 400 hours of learning time. You should allow around 20% of this time for reflection and learning log development. The course is divided into five parts. Within each part are several exercises, research points and reflection questions to prompt you to use your learning log.
The times given are only approximate. The time you spend on each exercise will depend on how quickly you work, the time available to you, how easy or hard you find each exercise and how quickly you want to complete the course. Don’t worry if you take more or less time than suggested provided that you’re not getting too bogged down in a particular part of the course and that your tutor is happy with the work that you’re producing. If it helps, draft a rough study plan and revisit this at the end of each part.

Book Design 1 9
ReadingYou’ll find a suggested further reading list at the end of this course guide and a regularly updated version on the OCA website.
Referencing your reading
Whenever you read something that you might want to refer to in your projects and assignments, get into the habit of taking down the full reference to the book, article or website straight away. You must fully reference any other work that you draw on if you plan to go for formal assessment. To do this you should use the Harvard system of referencing – there is a guide to referencing using the Harvard system on the OCA website. Getting down the full reference at the time will save you the frustration of having to hunt for the details of a half remembered reference long after the event – and will ensure that you don’t inadvertently plagiarise someone else’s work.

10 Book Design 1
Book design softwareYou can’t do this course without using specialist design computer software, particularly if you’re considering having your work formally assessed and/or moving towards working as a professional graphic designer. If you haven’t used this type of software before, it’s important to spend some time now working out exactly what you’ll need and how to use it. This will save you a lot of time and frustration later in the course.
As a book designer, you handle all the material – text and images – that forms the cover and contents of the book. This material is usually provided to you digitally and also as ‘hard copy’ paper printouts. To open and manipulate these digital documents, and subsequently lay them out in the book’s pages, you’ll need a reasonably powerful computer and three pieces of soft-ware to deal with word processing, photo manipulation and desktop publishing (DTP).
Word processing software
Microsoft Word is the industry standard. Having MS Word will enable you to open the text documents that you are sent by a client or editor.
Photo manipulation software
Photo manipulation software is a powerful tool for altering digital images in broad-sweeping or more subtle and sophisticated ways. The industry standard is Adobe Photoshop, available for both PCs and Macs, but Corel PHOTO-PAINT and freeware options such as PhotoPlus or Gimp will do the job as well. If you do decide to buy the full version of Photoshop make sure you take advantage of the student price available to OCA students. Details are on the student website, www.oca-student.com
This software is vital for opening and checking image formats, sizes and properties, and for changing them as necessary. It allows you to crop images and change hue, brightness and resolution, for example. You can edit images at high resolution, perhaps retouching certain areas, extending the canvas or cutting out images using paths to create a white or transparent background. These and other useful functions are just part of the scope of this software.
Photoshop works on the principle of separate and independent layers within one document. Once you’ve become familiar with Photoshop you can begin to work quite intuitively with the tools (which have familiar names and functions such as pencils, brushes, erasers, etc.) to create layered images. The beauty of this software is that it is fast and will give you immediate visual results.
Book Design 1 11
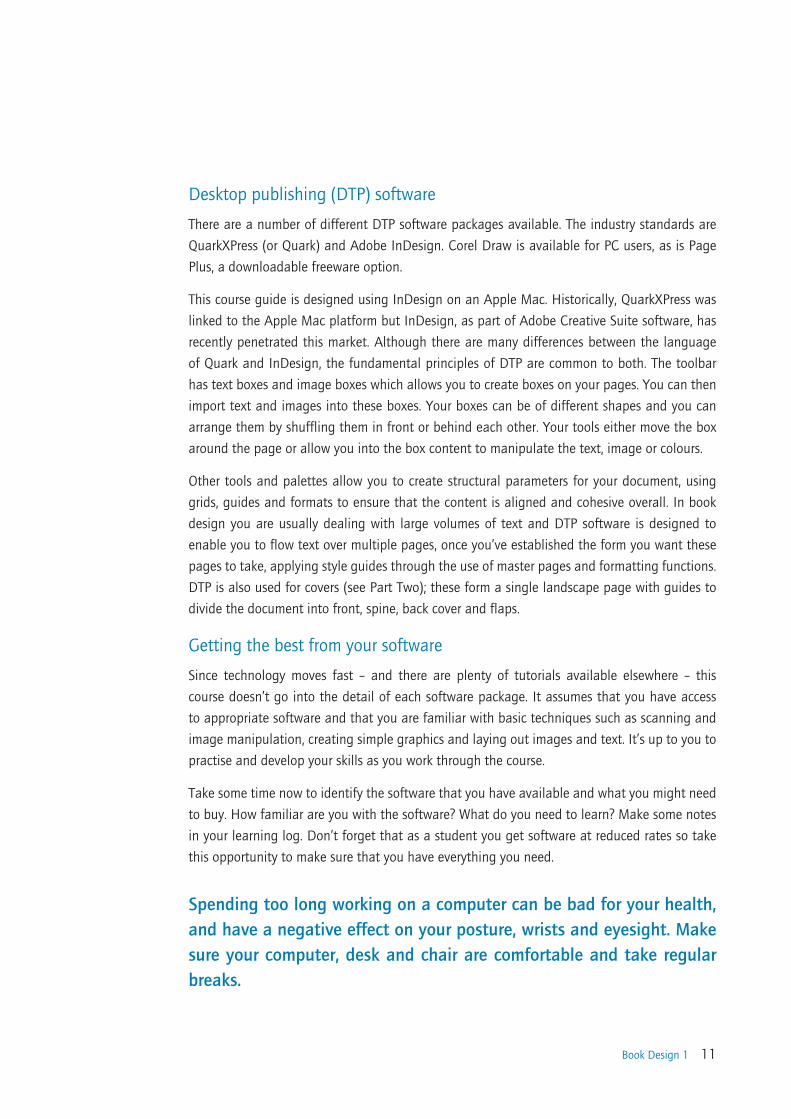
Desktop publishing (DTP) software
There are a number of different DTP software packages available. The industry standards are QuarkXPress (or Quark) and Adobe InDesign. Corel Draw is available for PC users, as is Page Plus, a downloadable freeware option.
This course guide is designed using InDesign on an Apple Mac. Historically, QuarkXPress was linked to the Apple Mac platform but InDesign, as part of Adobe Creative Suite software, has recently penetrated this market. Although there are many differences between the language of Quark and InDesign, the fundamental principles of DTP are common to both. The toolbar has text boxes and image boxes which allows you to create boxes on your pages. You can then import text and images into these boxes. Your boxes can be of different shapes and you can arrange them by shuffling them in front or behind each other. Your tools either move the box around the page or allow you into the box content to manipulate the text, image or colours.
Other tools and palettes allow you to create structural parameters for your document, using grids, guides and formats to ensure that the content is aligned and cohesive overall. In book design you are usually dealing with large volumes of text and DTP software is designed to enable you to flow text over multiple pages, once you’ve established the form you want these pages to take, applying style guides through the use of master pages and formatting functions. DTP is also used for covers (see Part Two); these form a single landscape page with guides to divide the document into front, spine, back cover and flaps.
Getting the best from your software
Since technology moves fast – and there are plenty of tutorials available elsewhere – this course doesn’t go into the detail of each software package. It assumes that you have access to appropriate software and that you are familiar with basic techniques such as scanning and image manipulation, creating simple graphics and laying out images and text. It’s up to you to practise and develop your skills as you work through the course.
Take some time now to identify the software that you have available and what you might need to buy. How familiar are you with the software? What do you need to learn? Make some notes in your learning log. Don’t forget that as a student you get software at reduced rates so take this opportunity to make sure that you have everything you need.
Spending too long working on a computer can be bad for your health, and have a negative effect on your posture, wrists and eyesight. Make sure your computer, desk and chair are comfortable and take regular breaks.
12 Book Design 1
Which paper?Paper is the basic tool of your trade. The majority of the exercises in this course rely on paper as part of the finished designs so you need to familiarise yourself with the options available to you. If you’re going to get your design work professionally printed you’ll need to talk to a printer about your choice of paper and paper finishes. Even if you’re just using your home printer it’s worth becoming aware of the paper ‘stock’ available to you.
Paper is made out of organic cellulose fibres held together at a molecular level. Generally it is made out of wood but it can also be made out of old rags, hemp, nettles, straw, bamboo, cotton, papyrus and other types of grasses. These are broken down into wood pulp either mechanically- or chemically. Chemically-made wood pulp is used for printing. It uses agents such as calcium to break up the wood fibres, leaving them more intact and giving a higher quality paper. The demand for finer, better quality papers has increased and paper is now bleached by chlorine-free, non-toxic methods. Paper can be made by machine, as in the case of most commercially available papers, but it can also be easily made by hand. Paper is an excellent material to recycle and most papers already include 30% recycled material.

Book Design 1 13
Different types of paper
Paper comes in all sorts of different kinds and qualities, including boards and card. It is usually described by its weight and finish.
The weight of paper provides a way of specifying paper by ‘thickness’. Paper is counted (with each sheet a metre square) in reams (500 sheets). This measurement can then be applied to any size of paper, so that 100gsm (grams per square metre) paper is the same thickness regardless of sheet size. Standard photocopying paper is usually 80gsm while a brochure would have pages of 100 or 130gsm and a cover of 250 or 350gsm.
Paper can be dyed to any colour, but professional printing is always done on white stock. It can be finished in many different ways; for example, gloss paper is highly finished with a shiny texture, silk paper is smooth. If you want a totally matt paper (often used for forms as it is easier to write on and for an ‘arty’ finish) you would probably use a cartridge paper.
The advent of high quality digital printing in almost every high street has made high finished standards much more achievable – although you might be amazed at what can be achieved with a photocopier and coloured 80gsm paper!
The kind of stock you choose will be informed by the nature of the job you’re doing. You need to check paper quality – the weight and finish of the paper – with your client. Most printers can give you a swatch of the papers they recommend for you to share with your client and keep for future reference.
14 Book Design 1
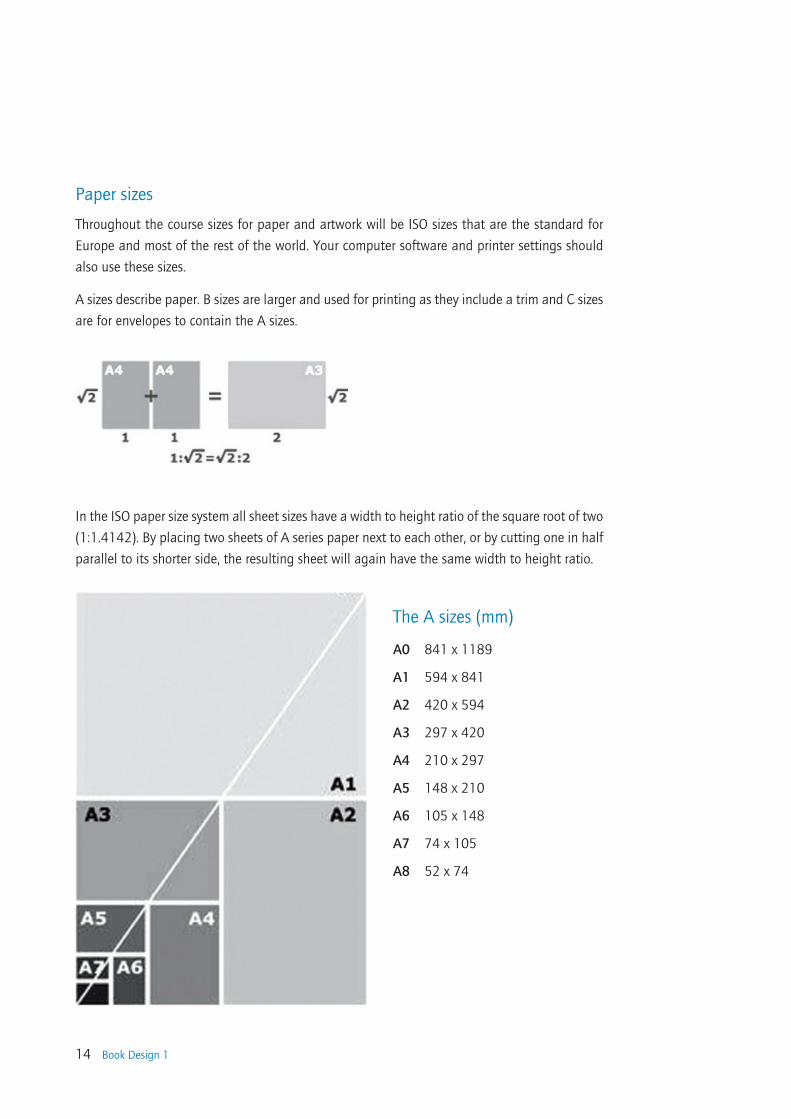
Paper sizes
Throughout the course sizes for paper and artwork will be ISO sizes that are the standard for Europe and most of the rest of the world. Your computer software and printer settings should also use these sizes.
A sizes describe paper. B sizes are larger and used for printing as they include a trim and C sizes are for envelopes to contain the A sizes.
In the ISO paper size system all sheet sizes have a width to height ratio of the square root of two (1:1.4142). By placing two sheets of A series paper next to each other, or by cutting one in half parallel to its shorter side, the resulting sheet will again have the same width to height ratio.
The A sizes (mm)
A0 841 x 1189
A1 594 x 841
A2 420 x 594
A3 297 x 420
A4 210 x 297
A5 148 x 210
A6 105 x 148
A7 74 x 105
A8 52 x 74

Book Design 1 15
Book Design 1
Part one
Beginning
The Journey is the Destination © Dan Eldon

16 Book Design 1
Book design is the arrangement and shaping of text and image content within the parameters of a front and back cover. Book design has a long history which is inextricably linked to technological developments, for example in printing.
As a profession book design has taken various forms, from the hieroglyphic columns in the scrolls of Ancient Egypt, through to online electronic books available to download today. Essentially, though, the requirements of the job remain the same: to communicate text and image-based messages to an audience. So while the technical skills have evolved almost beyond measure – from papyrus through parchment and paper to the digital platform we are now familar with – the skill remains in organising and arranging content, so that it is presented in a pleasing and coherent way which makes it easy for the reader to assimilate. Book design is the shaping of content; it is the bridge between the original manuscript and the end user.
Book design is collaborative, and a designer usually works with a range of people within the publishing and printing industries. A printed book is therefore the culmination of a group effort, between author, publisher, editor, designer and printer at least; often other specialists are also involved to realise the book.
Your first task on this course is to plan how you’ll record your progress as a book designer.
Project What is book design?

Book Design 1 17
Exercise: Your learning logAs you make your way through this course, you are going to be reading, writing, thinking and experimenting with book design. All your enquiries into the many aspects of book design need to be well documented, via annotation, drawing, photography and any other appropriate means, in your learning log.
Part notebook, part sketchbook, part journal, your learning log will be a book all about books! Specifically, your own enquiries, developments and discoveries regarding this wide-ranging subject, both in response to set coursework and from a more self-directed perspective – allowing you to explore ideas that aren’t necessarily part of your set work. Your learning log is somewhere for you to record your development on the course and also, importantly, somewhere for you to ‘play’ with ideas, to experiment and explore your personal responses to given themes.
Your first brief is to create your learning log.
This can take any form – a hardback A5 sketchbook, for example, or something entirely less conventional. Your learning log is unique to you, so make that evident in a highly visual way. Dan Eldon’s journals are a good example of an artist’s visual response to his particular journey. Visit www.daneldon.org to view some pages.
You may decide to post selected pages from your hard copy learning log onto your online blog, or use pages you have created online to form hard copy pages for your learning log. This way of working can promote an integrated approach across the two platforms, the physical book form and the online resource.
Manual of Instructions for the Assembly of Etant Donnes
Marcel Duchamp1966
18 Book Design 1
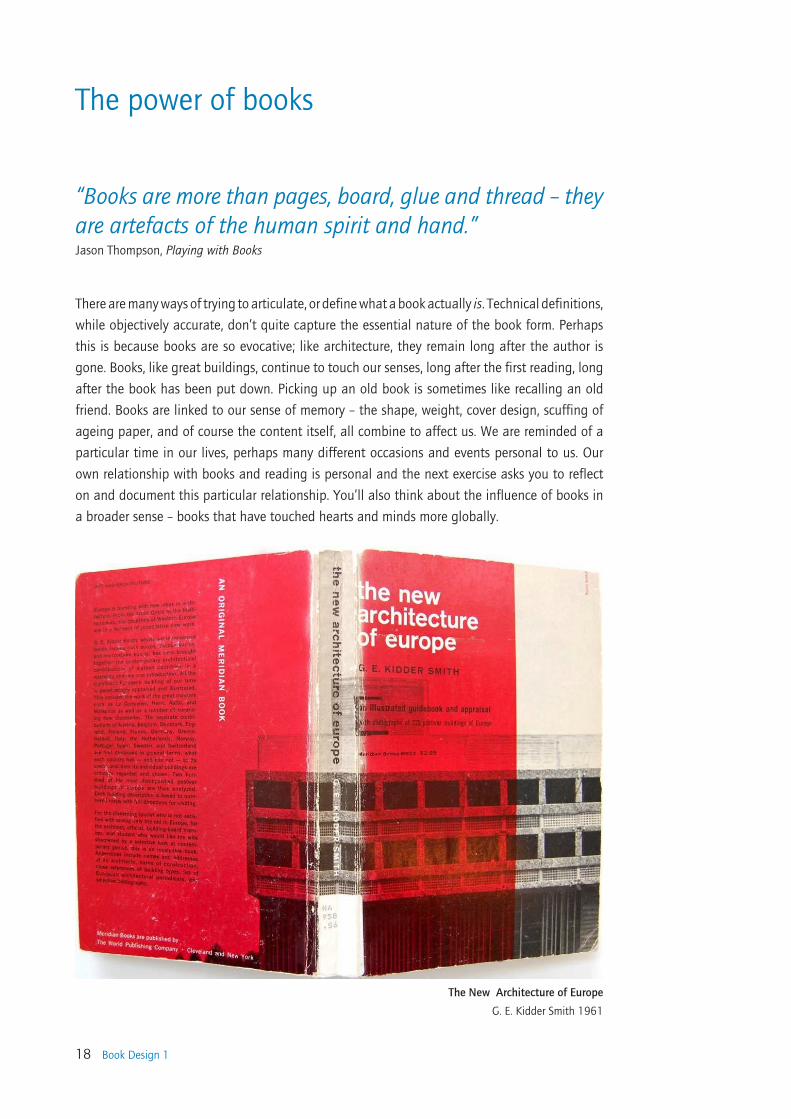
“Books are more than pages, board, glue and thread – they are artefacts of the human spirit and hand.”Jason Thompson, Playing with Books
There are many ways of trying to articulate, or define what a book actually is. Technical definitions, while objectively accurate, don’t quite capture the essential nature of the book form. Perhaps this is because books are so evocative; like architecture, they remain long after the author is gone. Books, like great buildings, continue to touch our senses, long after the first reading, long after the book has been put down. Picking up an old book is sometimes like recalling an old friend. Books are linked to our sense of memory – the shape, weight, cover design, scuffing of ageing paper, and of course the content itself, all combine to affect us. We are reminded of a particular time in our lives, perhaps many different occasions and events personal to us. Our own relationship with books and reading is personal and the next exercise asks you to reflect on and document this particular relationship. You’ll also think about the influence of books in a broader sense – books that have touched hearts and minds more globally.
The power of books
The New Architecture of Europe
G. E. Kidder Smith 1961

Book Design 1 19
Exercise: Influential booksGlobal: Objective
Think about the influence of books globally. Can you think of some seminal works that have informed worldwide politics, religion and science? Darwin’s On the Origin of Species, The Bible, The Koran... when we appreciate the breadth and influence of these works we begin to appreciate the extent of a book’s potential impact. Books carry and communicate ideas; powerful messages can be contained within seemingly innocuous bound paper pages. In your learning log, create a short list of books, with accompanying images, which you believe to be important in a global context. These may be scientific, historical, political, geographic, fictional, poetic or religious texts – think of the impact of books as broadly and generally as you can. Write a sentence or two for each book explaining the reasons behind your choice. Remember to be objective in this part of the exercise – think about the global significance of your chosen books rather than your own personal response to them.
Personal: Subjective
Now consider the importance of books to you on a personal or subjective level. Think back to the earliest books you came across as a child, through your teenage years and early adulthood to where you are now. There may be half a dozen books which stick in your memory or are important to you in some way. There may be many more than that. It may be an early reading book, a particular image or short rhyme which helped you recognise letterforms. It may be the distressed metallic silver cover of a Salinger novel you read as a teenager, or the book you bought on impulse after work one day, seduced by the tactile quality of the cover.
In your learning log, use photographs and annotation to create another illustrated list documenting the books that are important to you, for whatever reason. Did any of these books appear on your earlier list?
A teacher reads the Koran to a group of Arab boys, Algeria, 1928

20 Book Design 1
“Book: A portable container consisting of a series of printed and bound pages that preserves, announces, expounds, and transmits knowledge to a literate readership across time and space.” Andrew Haslam, Book Design
The UK ranks with the USA and China in the number of new titles published each year. Per capita, Britain is the largest publisher worldwide. Publishing is big business and the London and Frankfurt Book Fairs are key annual events in the publishing industry calendar. According to Jason Thompson (Playing with Books), the publishing industry produced over three billion books in 2008.
Accurate figures for the amount of books that are currently in global circulation are not easily available. How can they be? Given the sheer volume of titles that are produced, year on year, we can only really estimate a figure, and this is a daunting task in itself.
So where do all the unwanted books go? All the many thousands of titles which have served their purpose and are now defunct: cookery books, poetry books, outmoded manuals, novels, guides, annuals, big books, little books, fat ones and thin ones, hardback and softback. Ultimately, of course, and rather unsentimentally, books are pulped or sent to landfill.

Book Design 1 21
Origins
The earliest forms of books were produced by Egyptian scribes over 4,000 years ago. The language and terminology we use in book design today stems from these early origins and has been preserved throughout the millennia.
In the ancient world images and vertical text were hand-drawn onto palm leaves, then later onto papyrus scrolls. Skilled hand-lettering was laborious and time-consuming and a world apart from the printing methods of today.
Papyrus was made from the pith of the papyrus plant and was rather like thick paper. It was used throughout the ancient world until the development of parchment. Parchment was a superior material to papyrus. Made from dried, treated animal skin, parchment could be written on on both sides and was more pliable than papyrus, which meant that it could be folded. Folding a large parchment sheet in half created two folios – a word we still use today to number pages. Folding the sheet in half again created a quarto (4to) and folding that in half again made eight pages – an octavo (8vo).
The development of parchment created a break with the scroll form. Folded pages were now piled together and bound along one edge to create a codex, a manuscript text bound in book form.
“Making a manuscript was slow and demanding; sometimes routinely laborious, sometimes creatively glorious, and always expensive.”Curator’s Introduction, British Library Illuminated Manuscripts
The term manuscript comes from the Latin for hand ‘manus’ and writing ‘scriptum’. Illuminated manuscripts, often containing religious, historical or instructive texts, were coloured with rich and delicate pigments, often with the addition of gold leaf. These were objects of rare beauty. Bound manuscripts were produced in Britain from around 600 to 1600.
A brief history of book design
The Four Evangelists, from Book of Kells, Irish School, 9th century

22 Book Design 1
The printed word
Scrolls, parchment, codex...when we imagine the processes involved in the production of books using these methods, we begin to appreciate what a rarity books were. The advent of movable type brought about a massive revolution in the way books were designed, produced and perceived. Sandcast type was used in Korean book design from around 1230 and woodblocks were used to print paper money and cards in China from the seventh century. Paper, invented in China, spread through the Islamic world to reach medieval Europe in the 13th century, where the first paper mills were built.
“...parchments replaced papyrus, books replaced scrolls, printing replaced hand-written books and digital replaced metal…”Nadine Monem, Font: The Sourcebook
Johann Gutenberg produced the first western book printed using movable type in 1454. This was the Gutenberg Bible or ‘42-line Bible’. This led the way for a revolution in the way books were designed and printed. Having set the metal type, the printer could then produce multiple copies. Consider the impact of that, compared with the laborious earlier model of the individual scribe.
The Invention by Gutenberg of Moveable Type Printing, from ‘First Book of
French History’ by A Aymard, published by Hachette, 1933

Book Design 1 23
The printing process made books much more widely available to a larger audience. By 1500, printing presses in Western Europe had produced more than twenty million books.
Private English presses such as Doves Press and the Ashendene Press typified the publishing industry in the early part of the twentieth century. The influential designer, craftsman, artist and writer William Morris (1834–96) founded the Kelmscott Press in 1891; this was dedicated to publishing limited edition, illuminated style books. The designer Eric Gill (1882–1940), a fellow member of the Arts and Crafts movement, designed books for both English and German publishers. Gill also produced The Canterbury Tales (1931) for Golden Cockerel Press, which was one of the last English presses still going strong after 1925.
While English and German publishers were known for the quality and craftsmanship of their typography and overall book design, French publishers such as Ambroise Vollard (1866–1939)focused on the illustrative elements of book design. ‘Livres de luxe’ were expensive editions of books illustrated by contemporary artists such as Bonnard, Chagall, Degas, Dufy and Picasso.
Artistic movements had a real and direct impact on book design in the twentieth century, with the Fauvists, Futurists, Dadaists, Constructivists and Bauhaus feeding into a febrile pot of manifestos, ideas and approaches to typography and book design.
Allen Lane founded Penguin Books in England in 1935, with the aim of producing affordable books for the masses. The books were characterised by strong typographic and design principles. In the early 1950s designers Jan Tschichold and Ruari McLean created modernist iconographic cover designs for Penguin books (see Part Two).
Advancing print technologies, letterpress, offset lithography and the development of graphic design, gave rise to a plethora of colour printed material, making book design one of the earliest and best examples of mass communication.
Project Printing and publishing

24 Book Design 1
Research pointNow and throughout the course, take every opportunity to explore the vast range of book designs. Visit public or university libraries, stately homes, new and second-hand bookshops. Trawl through family and friends’ bookshelves, look through publishers’ catalogues. Use the internet too. Although most of the exercises in this course relate to paper-based book design practices, look at the range of ebooks and other digital material available.
Handle as many books as you can. What do they look like? How do they feel? What are they made of? How easy is the print to read? What sort of imagery do they contain? Who has designed them? How does the design relate to the content?
You’ll be exploring these issues in more detail as you work through the course. Get into the habit of looking at books and their design wherever you can and make notes in your learning log. In this way you’ll amass a whole host of ideas that you can adapt in your own design work.
The next exercise gives you the opportunity to practise folding paper to create a simple book, a technique that has changed little since the early days of the printed book.
The Works of Geoffrey Chaucer William Morris 1896, Kelmscott Press
title page and frontispiece (woodcut and black type on paper)
Book Design 1 25
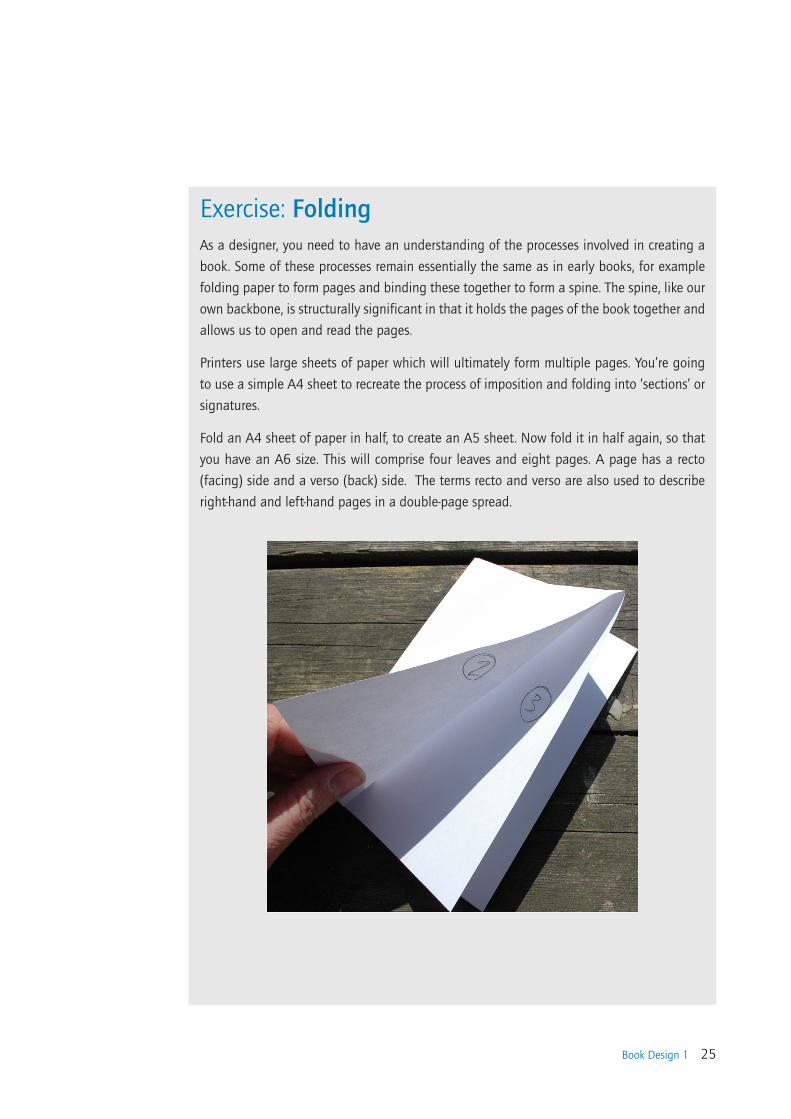
Exercise: FoldingAs a designer, you need to have an understanding of the processes involved in creating a book. Some of these processes remain essentially the same as in early books, for example folding paper to form pages and binding these together to form a spine. The spine, like our own backbone, is structurally significant in that it holds the pages of the book together and allows us to open and read the pages.
Printers use large sheets of paper which will ultimately form multiple pages. You’re going to use a simple A4 sheet to recreate the process of imposition and folding into ‘sections’ or signatures.
Fold an A4 sheet of paper in half, to create an A5 sheet. Now fold it in half again, so that you have an A6 size. This will comprise four leaves and eight pages. A page has a recto (facing) side and a verso (back) side. The terms recto and verso are also used to describe right-hand and left-hand pages in a double-page spread.
26 Book Design 1
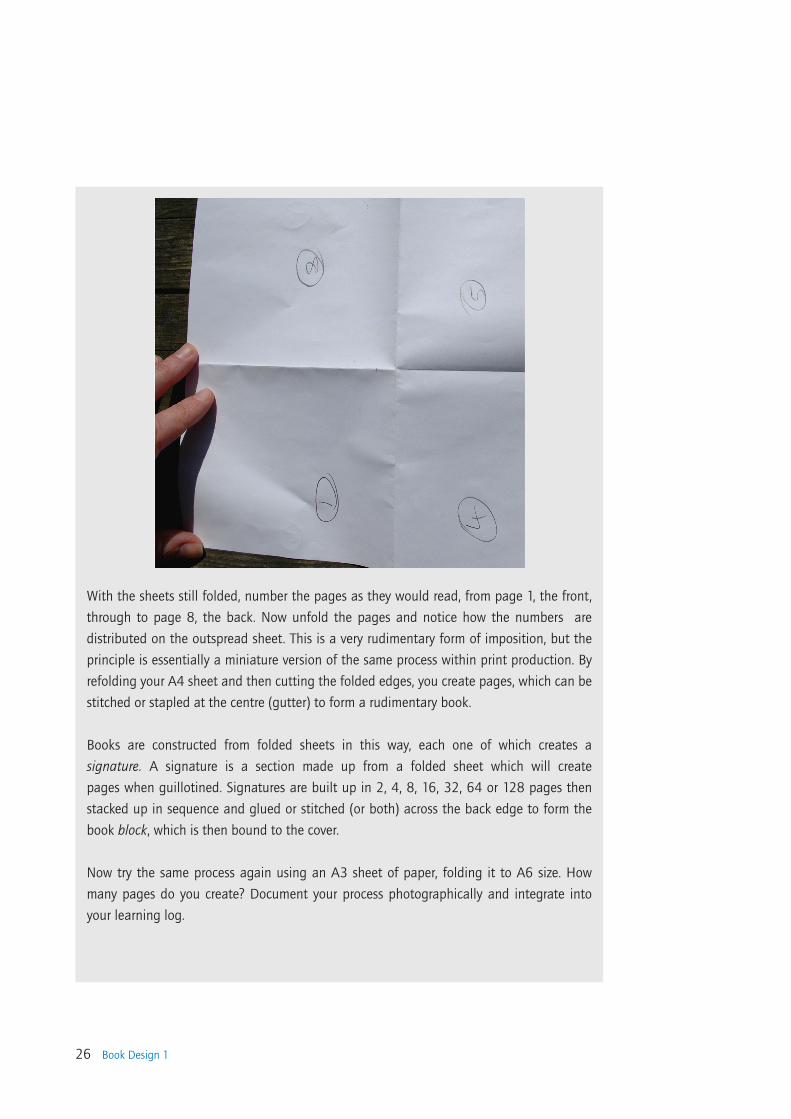
With the sheets still folded, number the pages as they would read, from page 1, the front, through to page 8, the back. Now unfold the pages and notice how the numbers are distributed on the outspread sheet. This is a very rudimentary form of imposition, but the principle is essentially a miniature version of the same process within print production. By refolding your A4 sheet and then cutting the folded edges, you create pages, which can be stitched or stapled at the centre (gutter) to form a rudimentary book.
Books are constructed from folded sheets in this way, each one of which creates a signature. A signature is a section made up from a folded sheet which will create pages when guillotined. Signatures are built up in 2, 4, 8, 16, 32, 64 or 128 pages then stacked up in sequence and glued or stitched (or both) across the back edge to form the book block, which is then bound to the cover.
Now try the same process again using an A3 sheet of paper, folding it to A6 size. How many pages do you create? Document your process photographically and integrate into your learning log.

Book Design 1 27
The digital era
The 1980s and 1990s saw the burgeoning of desktop publishing (DTP). Book design was no longer bound by the constraints of metal typesetting. Apple Macintosh computer systems enabled book designers to integrate text and images into multiple pages digitally, on-screen. This move away from traditional design and printing processes created massive upheaval in the publishing industry, and many long-established forms of working were usurped by the new digital technology.
A new wave of graphic and book designers emerged who embraced the new technology and, like the Futurists and Dadaists before them, questioned and experimented with some of the conventional approaches to typography and book design. Designers such as Neville Brody (Fuse magazine) and David Carson (The End of Print) captured the experimental mood of the time. The revolution in printing processes continues apace today, but the book in its traditional form remains a pervasive presence alongside its digital counterparts – the ebook is a good example.
The internet has revolutionised the way book designers work, making distance book design work a commonplace reality. In addition, a huge and often overwhelming range of fonts, images and resources is immediately available online. The word ‘font’ has entered everyday vocabulary – even for schoolchildren – and choosing the best font for the job is now something that many of us do almost without thinking. DTP means that everyone can potentially access what they need to design a book. From a purist perspective, the inherent danger with this creative freedom is that poor design choices result from uninformed ‘quick-fix’ solutions. The positive aspect is that the designer has never before had so many options to choose from, in terms of typography, design and production values.
Love Train, article from ID Magazine, Dec to Jan issue 1988-89
28 Book Design 1
Research point: FanzinesThe 1970s punk era was a subcultural response to mainstream society. Part of the punk response to mainstream print was the rise of fanzines. These were small, hand-made publications, often printed using photocopiers, stencil and other ‘hands-on’ processes, which explored a wide range of political, humourous, poetical and other themes not necessarily represented in more conventional print.
Research the theme of fanzines from a design perspective. Document examples with annotations in your learning log. You’ll be using your research findings when you come to do your first assignment.
Exercise: Sourcing booksLater in the course you will be working with found books in some detail, so this exercise sets you the task of sourcing some inexpensive hardback books which interest you, but which are not precious. Aim to collect several titles that engage you, either for their production values – the way they have been printed and bound – imagery or content, or a combination of all these factors and more.
Good places to look for cheap hardback books are flea markets, jumble sales, car boot sales, junk shops, ex-library stock, second-hand bookshops, attics, garages... books are not difficult to find. Document your selected book(s) photographically with annotations in your learning log.
Analyse the binding style of the books you’ve collected. How does the book block adhere to the cover? How does it adhere to the spine? Is it stitched or glued? You’ll notice that in case-bound or hardback books, the sections, or signatures, are sewn together and glued to the spine. Paperback books, on the other hand, are more likely to be ’perfect-bound’, where the pages are glued together and then directly onto the covering.
Book Design 1 29
The role of the designerThe designer is responsible for the visual elements on the page, the structure, arrangement and layout of typography and images. The designer’s role is collaborative and communicative. It can be highly creative, particularly when the role crosses over into art direction; where this is the case, the designer’s ideas play a major part in shaping the visual book form.
Depending on the publishing and production model used (see Part Five), the designer may be largely responsible for aspects of the proposal, development and realisation of the book form and may oversee the control of various elements as the book makes its way through the production process, ultimately checking printer’s proofs and ‘signing off’ a project when it is ready to go to print.
There is a clear distinction between the editorial and designing roles. The editor deals with all the text, the designer with the images and layout. As a designer it is your role to deal with the arrangement of the text and images but never to edit the text. Although errors in the text may be apparent to you, never make corrections without first alerting the client and the editor.
Book design is related to graphic design and a similar working process underpins much of the creative thinking and evolution of any particular design job. As a book designer, you’ll work on a variety of titles, usually to a ‘brief’ – a specific set of requirements for a particular project. The brief may be set by an external agency, or it may be self-initiated. The scope of the brief may vary in terms of how much creative input you get to exercise. For example, you may be provided with text and images, along with clear guidelines as to how these are to be set out. Alternatively, you may be provided with a brief outline of content and title and asked to ‘come up with ideas’ – to devise concepts for cover images, for example. The creative design process underpins this activity. It includes the following stages:
Ideas generation
Research
Development
Visuals
Presentation
Project The creative design process

30 Book Design 1
This process is not prescriptive, and the key phases often overlap and link quite organically; research and development are intrinsically interlinked, for example. The creative design process forms a recognised method of working through a design brief and has strong underlying principles on which to base your design practice.
In general, design work follows this cyclical process, on a micro and macro scale, many times in its incarnation and evolution, to refine and ultimately conclude the design. In the next exercise, you’ll employ this process in the generation and development of ideas around a set theme.
Book Design 1 31
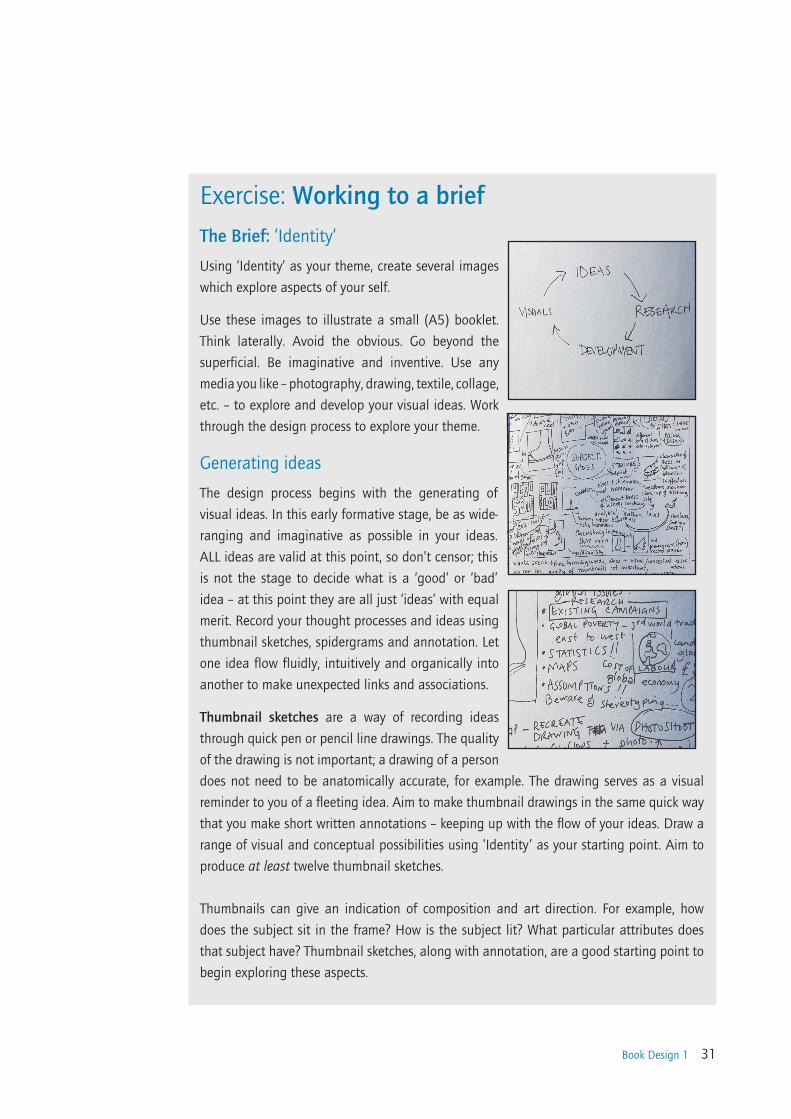
Exercise: Working to a briefThe Brief: ‘Identity’
Using ‘Identity’ as your theme, create several images which explore aspects of your self.
Use these images to illustrate a small (A5) booklet. Think laterally. Avoid the obvious. Go beyond the superficial. Be imaginative and inventive. Use any media you like – photography, drawing, textile, collage, etc. – to explore and develop your visual ideas. Work through the design process to explore your theme.
Generating ideas
The design process begins with the generating of visual ideas. In this early formative stage, be as wide-ranging and imaginative as possible in your ideas. ALL ideas are valid at this point, so don’t censor; this is not the stage to decide what is a ‘good’ or ‘bad’ idea – at this point they are all just ‘ideas’ with equal merit. Record your thought processes and ideas using thumbnail sketches, spidergrams and annotation. Let one idea flow fluidly, intuitively and organically into another to make unexpected links and associations.
Thumbnail sketches are a way of recording ideas through quick pen or pencil line drawings. The quality of the drawing is not important; a drawing of a person does not need to be anatomically accurate, for example. The drawing serves as a visual reminder to you of a fleeting idea. Aim to make thumbnail drawings in the same quick way that you make short written annotations – keeping up with the flow of your ideas. Draw a range of visual and conceptual possibilities using ‘Identity’ as your starting point. Aim to produce at least twelve thumbnail sketches.
Thumbnails can give an indication of composition and art direction. For example, how does the subject sit in the frame? How is the subject lit? What particular attributes does that subject have? Thumbnail sketches, along with annotation, are a good starting point to begin exploring these aspects.

32 Book Design 1
Review and selection
Review your thumbnail sketches and analyse each one through a process of critical evaluation. Which ideas are you drawn to? Which ideas have ‘legs’ – possible interesting outcomes which are worth pursuing? Often the ideas which are strongest are those which have depth, or many layers of association. Perhaps you are intuitively drawn to a particular idea. Select several ideas/thumbnails which you would like to develop further.
Research and development
The form your research will take depends on the individual elements of your idea. It may be that you need to make some objective drawings, for example, to understand your subject better, and to consider aspects of composition. Other research activities include arranging a photoshoot to further explore your visual ideas, or going online to source material that informs your ideas. You can use both primary and secondary sources of research in this way.
Research feeds into the development of your visual work, informing and advancing your ideas. Document this phase of the work accordingly.
Visuals
This is the culmination of all your preliminary work. Work up some more developed visual sketches. These can be hand-drawn illustrations, photographs, and/or include typography. The presentation can be a little rough around the edges but should show the main elements of the design.
Presentation
Present your ideas as finished visual images. Aim to produce at least three images which respond to the brief ‘Identity’. Document your final images in your learning log, along with the creative design process you have followed. Create digital files of your images, making sure these are a reasonable resolution – 180dpi is a good minimum, 300dpi is optimum.(If you are not sure what’s meant by ‘resolution’ or ‘dpi’, look ahead to the section ‘More on using software’ at the end of Part Two.)

Book Design 1 33
This first assignment is about introducing yourself so that your tutor can get to know you, your interests and your work better. This assignment is not submitted for formal assessment.
What was the last book you read? What was the first book you read? What’s your favourite cover design? What are your ‘top ten’ titles? Our relationship with books is highly individual.
Introduce yourself to your tutor by reflecting on and explaining something about your relationship with books. Communicate this through the hands-on sense of immediacy and energy that is an attribute of fanzine design, and use the fanzine model as a vehicle for your content.
Design an eight-page simple folded and stapled fanzine that says something about who you are, your interests in books and your wider cultural influences or interests.
Use text and image material you have generated in the earlier exercises as content for your fanzine, create new content, or use a combination of both.
You can use any medium or materials you want to. You may want to work much larger and reduce your artwork to submit it.
Keep notes to accompany the making of the ‘zine in your learning log. These notes could cover why you decided to portray what you did, what you included and what you omitted.
It is not your tutor’s job to formally assess your work at any time, but to give you constructive feedback to help you develop your skills.
Reflection
Before you send this assignment to your tutor, take a look at the assessment criteria for this course, which will be used to mark your work when you get your work formally assessed. The assessment criteria are listed in the Introduction to this course.
Review how you think you have done against the criteria and make notes in your learning log. Send these reflections to your tutor, along with your work, your sketchbook, supporting studies and your learning log (or link to your blog).
Email your work to your tutor making sure that each file has your name, student number and assignment number on it. You can scan or photograph learning log notes and sketchbook pages as well if you want.
If you are sending supporting material by post make sure your name and student number and assignment number are on the back of the work and send it to your tutor.
Assignment one
Introducing yourself - ‘zine