Embed Size (px)
Citation preview
Privacy and Personal Data Collection Disclosure
Certain features available in Trend Micro products collect and send feedback regarding product usage and detection information to Trend Micro. Some of this data is considered personal in certain jurisdictions and under certain regulations. If you do not want Trend Micro to collect personal data, you must ensure that you disable the related features.
The following link outlines the types of data that the Security Management System collects and provides detailed instructions on how to disable the specific features that feedback the information.
https://success.trendmicro.com/data-collection-disclosure
Data collected by Trend Micro is subject to the conditions stated in the Trend Micro Privacy Policy:
https://www.trendmicro.com/en_us/about/legal/privacy-policy-product.html
Legal Notice
© Copyright 2020 Trend Micro Incorporated. All rights reserved.
Trend Micro, the Trend Micro t-ball logo, TippingPoint, and Digital Vaccine are trademarks or registered trademarks of Trend Micro Incorporated. All other product or company names may be trademarks or registered trademarks of their owners.
Publication: July 2020
1
System overviewThe TippingPoint system is a high-speed, comprehensive security system that includes the Intrusion Prevention System (IPS),Local Security Manager (LSM), Digital Vaccine, the Security Management System Appliance, and the Core Controller.
Enterprise security schemes once consisted of a conglomeration of disparate, static devices from multiple vendors. Today,TippingPoint’s security system provides the advantages of a single, integrated, highly adaptive security system that includespowerful hardware and an intuitive management interface.
This topic includes the following information:
• TippingPoint architecture
• Security Management System (SMS)
• Intrusion Prevention System devices
• Core Controller
• High availability
• Threat Suppression Engine
• Threat Management Center
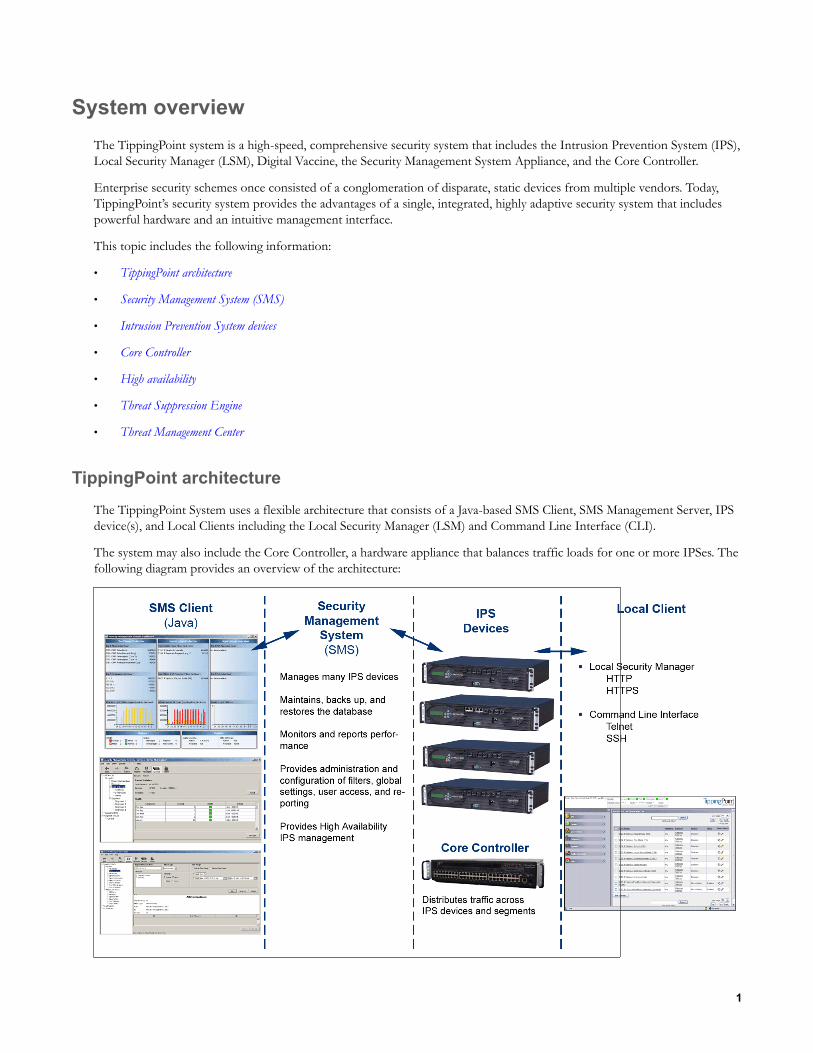
TippingPoint architectureThe TippingPoint System uses a flexible architecture that consists of a Java-based SMS Client, SMS Management Server, IPSdevice(s), and Local Clients including the Local Security Manager (LSM) and Command Line Interface (CLI).
The system may also include the Core Controller, a hardware appliance that balances traffic loads for one or more IPSes. Thefollowing diagram provides an overview of the architecture:
IPS Command Line Interface Reference
2
Figure 1. TippingPoint architecture
Security Management System (SMS)
Describes the core components of the SMS.
The SMS core components include:
• SMS Secure Server —hardware appliance for managing multiple devices
• SMS Home Page — web-based interface with links to current client software, documentation, and the ThreatManagement Center
• SMS Management Client — Java-based application for Windows or Linux workstations used to manage yourTippingPoint system
• Graphical User Interface (GUI)
• Dashboard
• Command Line Interface (CLI)
The SMS communicates with managed devices that are installed in your network.
The SMS architecture also includes the following components:
• Threat Management Center (TMC) — Centralized service center that monitors global threats and distributes up-to-date attack filter packages, software updates, and product documentation.
• Digital Vaccine (DV) — Update service that includes up-to-date filter packages for protecting your network.
• Managed Devices — TippingPoint IPS or Core Controller devices that are installed in your network.
SMS server
The SMS Server is an enterprise-class management platform that provides centralized administration, configuration,monitoring and reporting for well over a hundred TippingPoint IPS devices.
The SMS provides the following functionality:
• Enterprise-wide device status and behavior monitoring — Stores logs and device status information, managesupdates, and monitors filter, device, software, and network status.
• IPS networking and configuration — Stores device information and configures devices according to the settings thatare modified, imported, or distributed by clients. These settings affect the flow and detection of traffic according todevice, segment, or segment group.
• Filter customization — Stores filter customizations in profiles as maintained by the SMS client. These settings aredistributed and imported to devices, which can be reviewed and modified by local clients. If a device is managed by theSMS Server, the local clients cannot modify settings.
• Filter and software distribution — Monitors and maintains the distribution and import of filters, Digital Vaccinepackages, and software for the TippingPoint Operating System and SMS client. The SMS client and Central ManagementServer can distribute these packages according to segment group settings. The Central Management Server maintains alink to the Threat Management Center (TMC) for downloading and installing package updates.
IPS Command Line Interface Reference
3
SMS clientThe TippingPoint Security Management System (SMS) client provides services and functions to monitor, manage, andconfigure the entire TippingPoint system.
This client is a Java-based application installed and accessed on a computer running the appropriate operating system. Eachuser receives a specific user level with enhanced security measures to protect access and configuration of the system.
You can install and use the SMS client on computers with Microsoft Windows, Mac, or Linux operating systems.
The SMS features a policy-based operational model for scalable and uniform enterprise management. It enables behavior andperformance analysis with trending reports, correlation and real-time graphs. Reporting includes all, specific, and top attacksand their sources and destinations, as well as all, specific, and top peers and filters for misuse and abuse (peer-to-peer piracy)attacks. You can create, save, and schedule reports using report templates. All reports are run against system and audit logsstored for each device managed by the system. These logs detail triggered filters. You can modify, update, and controldistribution of these filters according to segment groups for refined intrusion prevention.
The SMS dashboard provides at-a-glance monitors with launch capabilities into the targeted management applications thatprovide global command and control of TippingPoint. Included in the SMS dashboard display are the following items:
• Entries for the top five filters triggered over the past hour in various categories
• A graph of triggered filters over the past 24 hours
• The health status of devices
• Update versions for software of the system
Through the Dashboard, you gain an overview of the current performance of your system, including notifications of updatesand possible issues with devices monitored by the SMS.
Intrusion Prevention System devicesIntrusion Prevention System (IPS) devices protect your network with the Threat Suppression Engine (TSE) by scanning,detecting, and responding to network traffic according to the filters, action sets, and global settings maintained on each deviceby a client.
Each device provides intrusion prevention for your network according to the number of network connections and hardwarecapabilities. IPS devices also have built-in intrinsic high-availability features, guaranteeing that the network keeps running inthe event of system failure.
TippingPoint Intrusion Prevention Systems are optimized to provide high resiliency, and high-availability security for remotebranch offices, small-to-medium and large enterprises and collocation facilities. Each IPS can protect network segments fromboth external and internal attacks.
Multiple TippingPoint devices can be deployed to extend this unsurpassed protection to hundreds of enterprise zones. Youcan monitor and manage the devices by using the local client available on each device, or by using the SMS client to monitorand manage well over a hundred devices. The TippingPoint N-Platform and NX-Platform devices support IPv6, tunneling(including GRE and multi-layer tunnels), and inspection bypass rules for trusted traffic.
IPS local clientsThe TippingPoint System provides various points of interaction, management, and configuration of the IPS.
The clients include graphical user interfaces (GUI) and command line interfaces (CLI). These clients include the following:
• Local Security Manager (LSM) — Web-based GUI for managing one IPS device. The LSM provides HTTP andHTTPS (secure management) access. This access requires access from a supported web browser (Internet Explorer,
IPS Command Line Interface Reference
4
Mozilla Firefox, and Netscape). Using the LSM, you have a graphical display for reviewing, searching, and modifyingsettings. The GUI interface also provides reports to monitor the device traffic, triggered filters, and packet statistics.
• Command Line Interface (CLI) — Command line interface for reviewing and modifying settings on the device. TheCLI is accessible through Telnet and SSH (secure access).
• LCD Panel — Several IPS TippingPoint devices provide an LCD panel to view, configure, and modify some devicesettings.
Core Controller
The TippingPoint Core Controller is a hardware-based device that enables inspection of up to 20Gbps of traffic by sendingthe traffic to as many as 24 IPS device segments.
The Core Controller can control traffic across its three 10GbE network segment pairs and across multiple TippingPoint E-Series IPS devices. IPS devices are connected by 1GbE uplinks, and each packet that is received on a 10GbE Core Controllerinterface passes through a load balancer that then determines the IPS connection to use for transmitting the packet.
The Core Controller provides:
• 10GbE bidirectional traffic inspection and policy enforcement
• High Availability with an optional Smart ZPHA module
• Central management through the SMS
Note
The Core Controller can be used with the 2400E and 5000E IPS devices, and with all N-Platform and NX-Platform devices.
High availability
TippingPoint devices are designed to guarantee that your network traffic always flows at wire speeds in the event of internaldevice failure.
The TippingPoint System provides Network High Availability settings for Intrinsic Network HA (INHA) and TransparentNetwork HA (TNHA). These options enact manually or automatically, according to settings you enter using the clients (LSMand SMS) or LCD panel for IPS devices. Zero-Power High Availability (ZPHA) is available for the IPS as an external modulardevice, as optional bypass I/O modules on NX-Platform devices, and for the Core Controller as an optional Smart ZPHAmodule.
The IPS uses INHA for individual device deployment and TNHA for devices deployed in redundant configurations in whichone device takes over for another in the event of system failure. With INHA, a failure puts the device into Layer-2 Fallbackmode and permits or blocks traffic on each segment. In TNHA, multiple IPS devices are synchronized so that when onedevice experiences a system failure, traffic is routed to the other device with no interruption in intrusion prevention services.
SMS high availability provides continuous administration through an active-passive SMS system configuration. A passive SMSis configured, synchronized with the active system, and waits in standby mode and monitors the health of the active system. Ifthe health or communications check of the active system fails, the passive SMS will be activated.
The ZPHA modular device can be attached to an IPS to route traffic in the event of power loss. Smart ZPHA modules,which are wired into the device, and bypass I/O modules, which are installed directly into NX-Platform devices, perform thesame function.

IPS Command Line Interface Reference
5
Threat Suppression EngineThe Threat Suppression Engine (TSE) is a line-speed hardware engine that contains all the functions needed for IntrusionPrevention.
TSE features include:
• IP defragmentation
• TCP flow reassembly
• Statistical analysis
• Traffic shaping
• Flow blocking
• Flow state tracking
• Application-layer parsing of over 170 network protocols
The TSE reconstructs and inspects flow payloads by parsing the traffic at the application layer. As each new packet of thetraffic flow arrives, the engine re-evaluates the traffic for malicious content. The instant the engine detects malicious traffic, itblocks all current and all subsequent packets pertaining to the traffic flow. The blocking of the traffic and packets ensures thatthe attack never reaches its destination.
The combination of high-speed network processors and custom chips provides the basis for IPS technology. These highlyspecialized traffic classification engines enable the IPS to filter with extreme accuracy at gigabit speeds and microsecondlatencies. Unlike software-based systems whose performance is affected by the number of filters installed, the highly-scalablecapacity of the hardware engine allows thousands of filters to run simultaneously with no impact on performance or accuracy.
Threat Management CenterThe Threat Management Center (TMC) is a centralized service center that monitors global threats and distributes up-to-dateattack filter packages, software updates, and product documentation.
The TMC collects threat information and creates Digital Vaccine packages that are made available on the TMC website. Thepackages include filters that block malicious traffic and attacks on your network. The filters provide the following protections:
• Application Protection — Defend against known and unknown exploits that target applications and operatingsystems:
• Attack Protection filters — Detect and block traffic known to be malicious, suspicious, and to have known securityimplications. These filters include vulnerabilities and exploits filters.
• Security Policy filters — Detect and block traffic that might or might not be malicious. This traffic might bedifferent in its format or content from standard business practice, aimed at specific software or operating systems,or contrary to your company’s security policies.
• Reconnaissance filters — Detect and block scans, sweeps, and probes for vulnerabilities and information aboutyour network. These filters include probes and sweeps/scans filters.
• Informational filters — Detect and block classic Intrusion Detection System (IDS) infiltration.
• Infrastructure Protection — Protect network bandwidth and network infrastructure elements, such as routers andfirewalls, from attack using a combination of filter types:
• Network Equipment Protection filters — Protect networked equipment from attacks.
• Traffic Normalization filters — Detect and block abnormal or malicious traffic.
IPS Command Line Interface Reference
6
• Performance Protection — Allow key applications to have a prioritized bandwidth-access setting that ensures mission-critical applications have adequate performance during times of high congestion:
• Misuse and Abuse filters — Protect the resources and usage of file sharing across networks and personalcomputers. These filters protect peer-to-peer services.
• Traffic Management filters — Protect the network by shielding against IP addresses or permitting only a set of IPaddresses.
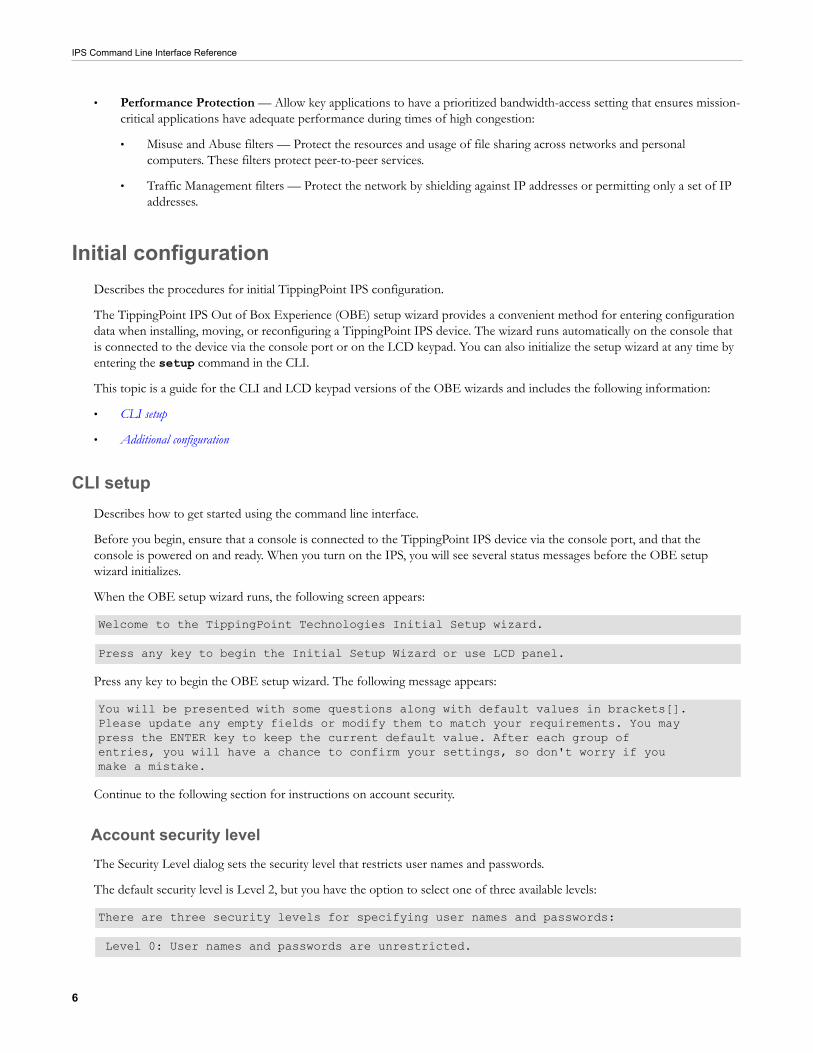
Initial configurationDescribes the procedures for initial TippingPoint IPS configuration.
The TippingPoint IPS Out of Box Experience (OBE) setup wizard provides a convenient method for entering configurationdata when installing, moving, or reconfiguring a TippingPoint IPS device. The wizard runs automatically on the console thatis connected to the device via the console port or on the LCD keypad. You can also initialize the setup wizard at any time byentering the setup command in the CLI.
This topic is a guide for the CLI and LCD keypad versions of the OBE wizards and includes the following information:
• CLI setup
• Additional configuration
CLI setupDescribes how to get started using the command line interface.
Before you begin, ensure that a console is connected to the TippingPoint IPS device via the console port, and that theconsole is powered on and ready. When you turn on the IPS, you will see several status messages before the OBE setupwizard initializes.
When the OBE setup wizard runs, the following screen appears:
Welcome to the TippingPoint Technologies Initial Setup wizard.
Press any key to begin the Initial Setup Wizard or use LCD panel.
Press any key to begin the OBE setup wizard. The following message appears:
You will be presented with some questions along with default values in brackets[]. Please update any empty fields or modify them to match your requirements. You may press the ENTER key to keep the current default value. After each group of entries, you will have a chance to confirm your settings, so don't worry if you make a mistake.
Continue to the following section for instructions on account security.
Account security levelThe Security Level dialog sets the security level that restricts user names and passwords.
The default security level is Level 2, but you have the option to select one of three available levels:
There are three security levels for specifying user names and passwords:
Level 0: User names and passwords are unrestricted.
IPS Command Line Interface Reference
7
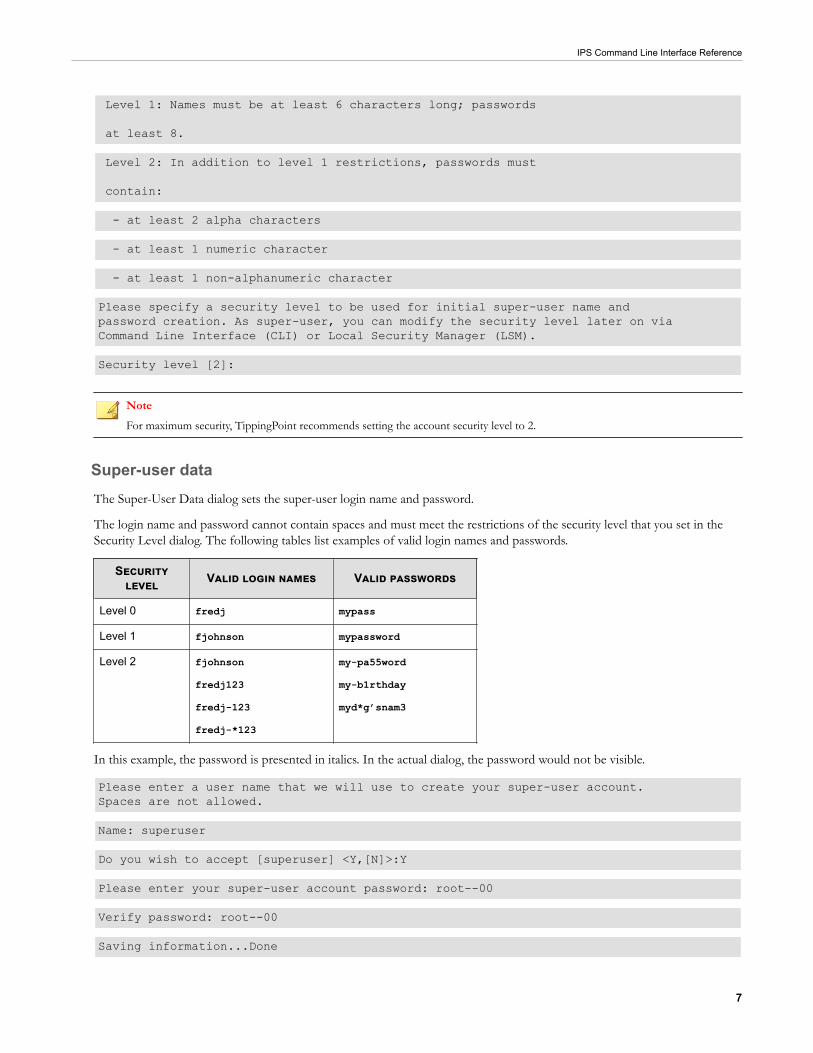
Level 1: Names must be at least 6 characters long; passwords
at least 8.
Level 2: In addition to level 1 restrictions, passwords must
contain:
- at least 2 alpha characters
- at least 1 numeric character
- at least 1 non-alphanumeric character
Please specify a security level to be used for initial super-user name and password creation. As super-user, you can modify the security level later on via Command Line Interface (CLI) or Local Security Manager (LSM).
Security level [2]:
NoteFor maximum security, TippingPoint recommends setting the account security level to 2.
Super-user dataThe Super-User Data dialog sets the super-user login name and password.
The login name and password cannot contain spaces and must meet the restrictions of the security level that you set in theSecurity Level dialog. The following tables list examples of valid login names and passwords.
Securitylevel Valid login names Valid passwords
Level 0 fredj mypass
Level 1 fjohnson mypassword
Level 2 fjohnson
fredj123
fredj-123
fredj-*123
my-pa55word
my-b1rthday
myd*g’snam3
In this example, the password is presented in italics. In the actual dialog, the password would not be visible.
Please enter a user name that we will use to create your super-user account. Spaces are not allowed.
Name: superuser
Do you wish to accept [superuser] <Y,[N]>:Y
Please enter your super-user account password: root--00
Verify password: root--00
Saving information...Done
IPS Command Line Interface Reference
8
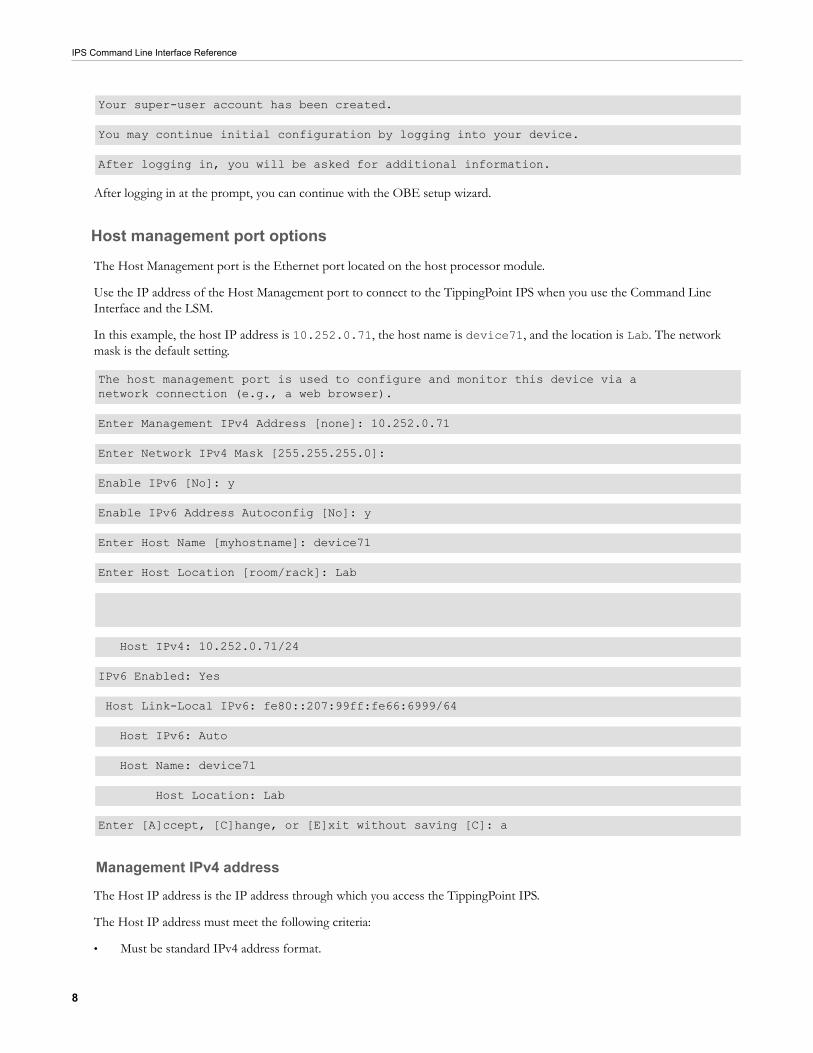
Your super-user account has been created.
You may continue initial configuration by logging into your device.
After logging in, you will be asked for additional information.
After logging in at the prompt, you can continue with the OBE setup wizard.
Host management port options
The Host Management port is the Ethernet port located on the host processor module.
Use the IP address of the Host Management port to connect to the TippingPoint IPS when you use the Command LineInterface and the LSM.
In this example, the host IP address is 10.252.0.71, the host name is device71, and the location is Lab. The networkmask is the default setting.
The host management port is used to configure and monitor this device via a network connection (e.g., a web browser).
Enter Management IPv4 Address [none]: 10.252.0.71
Enter Network IPv4 Mask [255.255.255.0]:
Enable IPv6 [No]: y
Enable IPv6 Address Autoconfig [No]: y
Enter Host Name [myhostname]: device71
Enter Host Location [room/rack]: Lab
Host IPv4: 10.252.0.71/24
IPv6 Enabled: Yes
Host Link-Local IPv6: fe80::207:99ff:fe66:6999/64
Host IPv6: Auto
Host Name: device71
Host Location: Lab
Enter [A]ccept, [C]hange, or [E]xit without saving [C]: a
Management IPv4 address
The Host IP address is the IP address through which you access the TippingPoint IPS.
The Host IP address must meet the following criteria:
• Must be standard IPv4 address format.
IPS Command Line Interface Reference
9
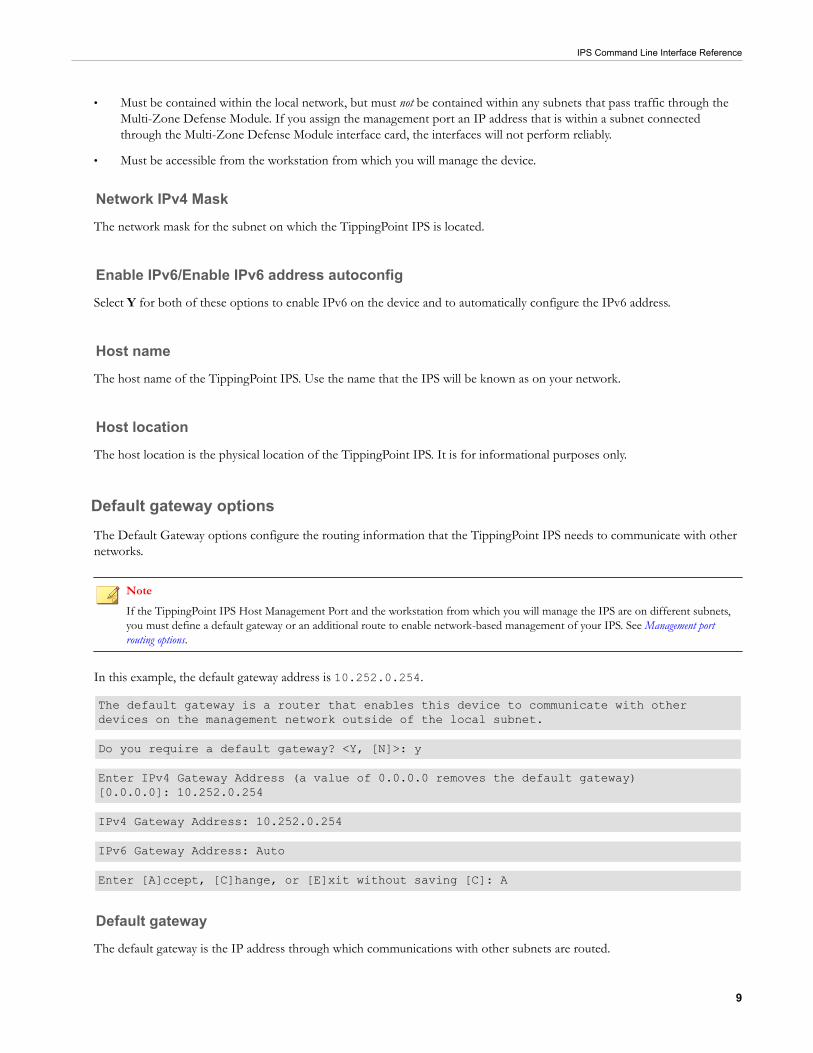
• Must be contained within the local network, but must not be contained within any subnets that pass traffic through theMulti-Zone Defense Module. If you assign the management port an IP address that is within a subnet connectedthrough the Multi-Zone Defense Module interface card, the interfaces will not perform reliably.
• Must be accessible from the workstation from which you will manage the device.
Network IPv4 Mask
The network mask for the subnet on which the TippingPoint IPS is located.
Enable IPv6/Enable IPv6 address autoconfig
Select Y for both of these options to enable IPv6 on the device and to automatically configure the IPv6 address.
Host name
The host name of the TippingPoint IPS. Use the name that the IPS will be known as on your network.
Host location
The host location is the physical location of the TippingPoint IPS. It is for informational purposes only.
Default gateway optionsThe Default Gateway options configure the routing information that the TippingPoint IPS needs to communicate with othernetworks.
NoteIf the TippingPoint IPS Host Management Port and the workstation from which you will manage the IPS are on different subnets,you must define a default gateway or an additional route to enable network-based management of your IPS. See Management portrouting options.
In this example, the default gateway address is 10.252.0.254.
The default gateway is a router that enables this device to communicate with other devices on the management network outside of the local subnet.
Do you require a default gateway? <Y, [N]>: y
Enter IPv4 Gateway Address (a value of 0.0.0.0 removes the default gateway) [0.0.0.0]: 10.252.0.254
IPv4 Gateway Address: 10.252.0.254
IPv6 Gateway Address: Auto
Enter [A]ccept, [C]hange, or [E]xit without saving [C]: A
Default gateway
The default gateway is the IP address through which communications with other subnets are routed.
IPS Command Line Interface Reference
10
If the TippingPoint IPS sends a message to an IP address outside of its subnet, the message and the reply go through thedefault gateway.
You can specify both an IPv4 and an IPv6 address.
TipUsing additional routes instead of a default gateway helps assure that your Management Port only communicates with explicitlyauthorized network segments. See Management port routing options.
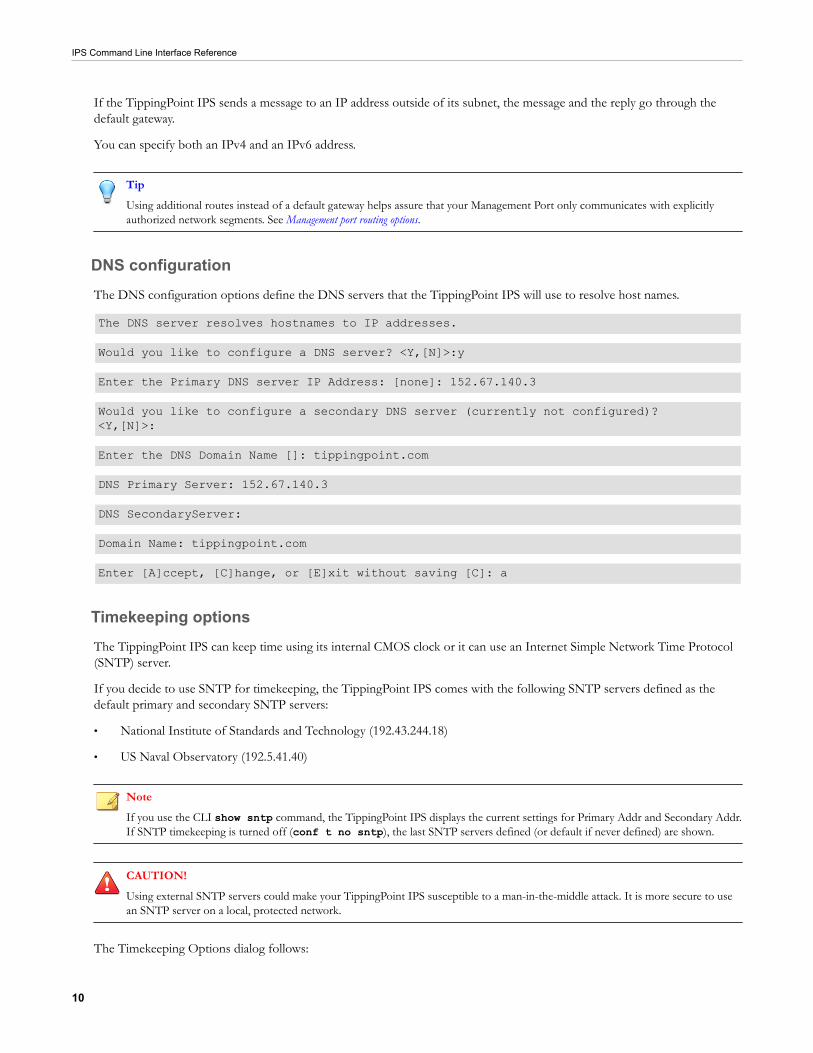
DNS configurationThe DNS configuration options define the DNS servers that the TippingPoint IPS will use to resolve host names.
The DNS server resolves hostnames to IP addresses.
Would you like to configure a DNS server? <Y,[N]>:y
Enter the Primary DNS server IP Address: [none]: 152.67.140.3
Would you like to configure a secondary DNS server (currently not configured)? <Y,[N]>:
Enter the DNS Domain Name []: tippingpoint.com
DNS Primary Server: 152.67.140.3
DNS SecondaryServer:
Domain Name: tippingpoint.com
Enter [A]ccept, [C]hange, or [E]xit without saving [C]: a
Timekeeping optionsThe TippingPoint IPS can keep time using its internal CMOS clock or it can use an Internet Simple Network Time Protocol(SNTP) server.
If you decide to use SNTP for timekeeping, the TippingPoint IPS comes with the following SNTP servers defined as thedefault primary and secondary SNTP servers:
• National Institute of Standards and Technology (192.43.244.18)
• US Naval Observatory (192.5.41.40)
NoteIf you use the CLI show sntp command, the TippingPoint IPS displays the current settings for Primary Addr and Secondary Addr.If SNTP timekeeping is turned off (conf t no sntp), the last SNTP servers defined (or default if never defined) are shown.
CAUTION!Using external SNTP servers could make your TippingPoint IPS susceptible to a man-in-the-middle attack. It is more secure to usean SNTP server on a local, protected network.
The Timekeeping Options dialog follows:
IPS Command Line Interface Reference
11
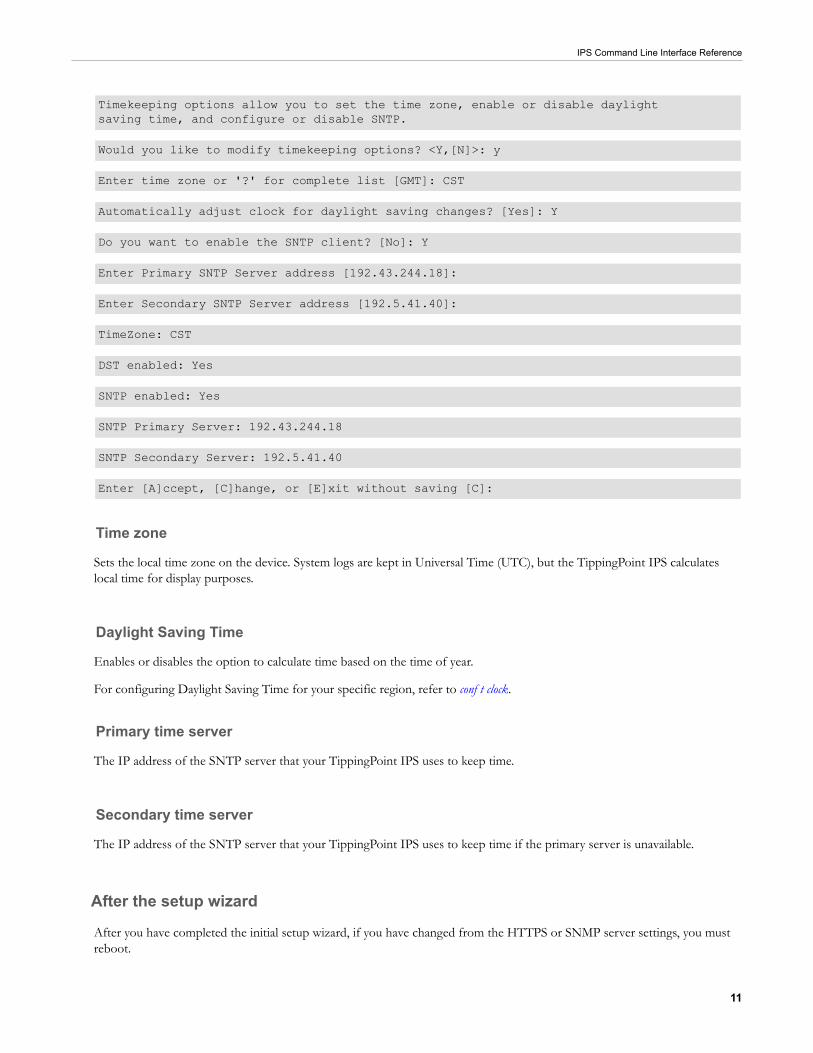
Timekeeping options allow you to set the time zone, enable or disable daylight saving time, and configure or disable SNTP.
Would you like to modify timekeeping options? <Y,[N]>: y
Enter time zone or '?' for complete list [GMT]: CST
Automatically adjust clock for daylight saving changes? [Yes]: Y
Do you want to enable the SNTP client? [No]: Y
Enter Primary SNTP Server address [192.43.244.18]:
Enter Secondary SNTP Server address [192.5.41.40]:
TimeZone: CST
DST enabled: Yes
SNTP enabled: Yes
SNTP Primary Server: 192.43.244.18
SNTP Secondary Server: 192.5.41.40
Enter [A]ccept, [C]hange, or [E]xit without saving [C]:
Time zone
Sets the local time zone on the device. System logs are kept in Universal Time (UTC), but the TippingPoint IPS calculateslocal time for display purposes.
Daylight Saving Time
Enables or disables the option to calculate time based on the time of year.
For configuring Daylight Saving Time for your specific region, refer to conf t clock.
Primary time server
The IP address of the SNTP server that your TippingPoint IPS uses to keep time.
Secondary time server
The IP address of the SNTP server that your TippingPoint IPS uses to keep time if the primary server is unavailable.
After the setup wizard
After you have completed the initial setup wizard, if you have changed from the HTTPS or SNMP server settings, you mustreboot.
IPS Command Line Interface Reference
12
Use the reboot command in the CLI. After the IPS reboots, you can use the Local Security Manager GUI to performmonitoring and configuration tasks or use the setup command in the CLI to perform additional configuration tasks. SeeAdditional configuration.
Additional configurationProvides links to topics that describe various configuration tasks.
After you have completed the initial setup wizard through the Command Line Interface or on the LCD screen, you canfurther configure your TippingPoint IPS. These subsequent setup options include the following:
• Web, CLI, and SNMP server options
• Restricted SMS access
• Ethernet port settings
• Management port routing options
• Default alert information
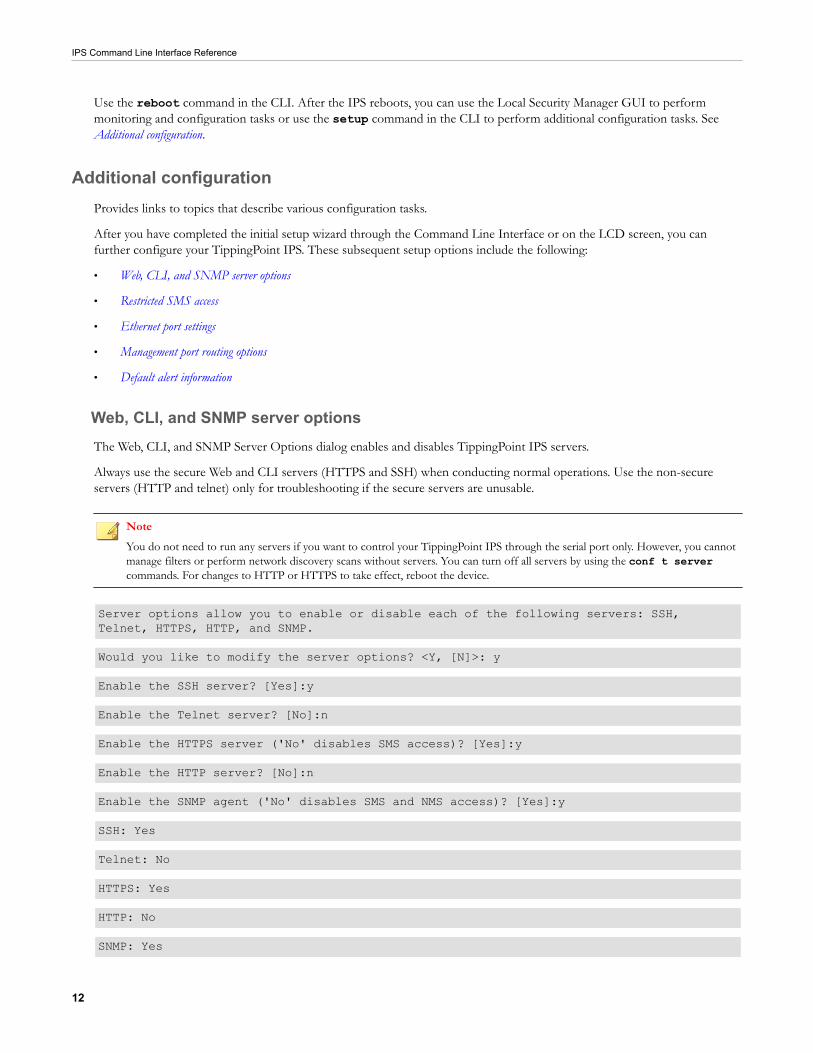
Web, CLI, and SNMP server optionsThe Web, CLI, and SNMP Server Options dialog enables and disables TippingPoint IPS servers.
Always use the secure Web and CLI servers (HTTPS and SSH) when conducting normal operations. Use the non-secureservers (HTTP and telnet) only for troubleshooting if the secure servers are unusable.
NoteYou do not need to run any servers if you want to control your TippingPoint IPS through the serial port only. However, you cannotmanage filters or perform network discovery scans without servers. You can turn off all servers by using the conf t servercommands. For changes to HTTP or HTTPS to take effect, reboot the device.
Server options allow you to enable or disable each of the following servers: SSH, Telnet, HTTPS, HTTP, and SNMP.
Would you like to modify the server options? <Y, [N]>: y
Enable the SSH server? [Yes]:y
Enable the Telnet server? [No]:n
Enable the HTTPS server ('No' disables SMS access)? [Yes]:y
Enable the HTTP server? [No]:n
Enable the SNMP agent ('No' disables SMS and NMS access)? [Yes]:y
SSH: Yes
Telnet: No
HTTPS: Yes
HTTP: No
SNMP: Yes
IPS Command Line Interface Reference
13
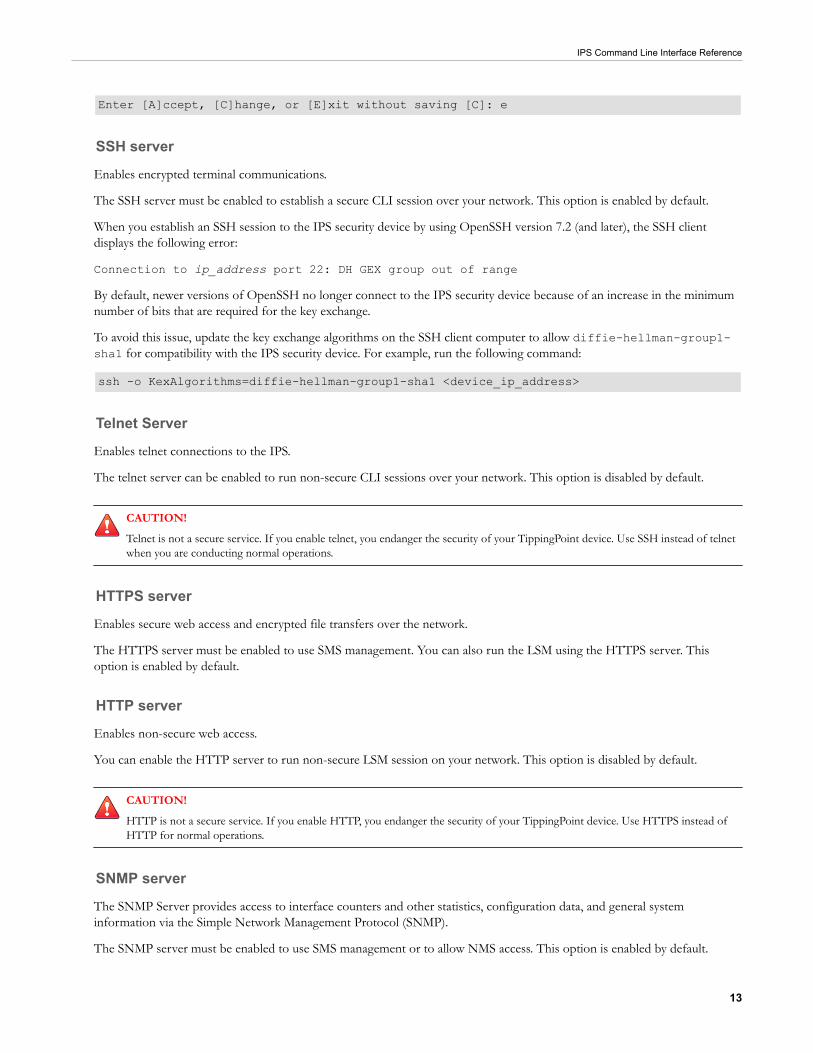
Enter [A]ccept, [C]hange, or [E]xit without saving [C]: e
SSH server
Enables encrypted terminal communications.
The SSH server must be enabled to establish a secure CLI session over your network. This option is enabled by default.
When you establish an SSH session to the IPS security device by using OpenSSH version 7.2 (and later), the SSH clientdisplays the following error:
Connection to ip_address port 22: DH GEX group out of range
By default, newer versions of OpenSSH no longer connect to the IPS security device because of an increase in the minimumnumber of bits that are required for the key exchange.
To avoid this issue, update the key exchange algorithms on the SSH client computer to allow diffie-hellman-group1-sha1 for compatibility with the IPS security device. For example, run the following command:
ssh -o KexAlgorithms=diffie-hellman-group1-sha1 <device_ip_address>
Telnet Server
Enables telnet connections to the IPS.
The telnet server can be enabled to run non-secure CLI sessions over your network. This option is disabled by default.
CAUTION!
Telnet is not a secure service. If you enable telnet, you endanger the security of your TippingPoint device. Use SSH instead of telnetwhen you are conducting normal operations.
HTTPS server
Enables secure web access and encrypted file transfers over the network.
The HTTPS server must be enabled to use SMS management. You can also run the LSM using the HTTPS server. Thisoption is enabled by default.
HTTP server
Enables non-secure web access.
You can enable the HTTP server to run non-secure LSM session on your network. This option is disabled by default.
CAUTION!
HTTP is not a secure service. If you enable HTTP, you endanger the security of your TippingPoint device. Use HTTPS instead ofHTTP for normal operations.
SNMP server
The SNMP Server provides access to interface counters and other statistics, configuration data, and general systeminformation via the Simple Network Management Protocol (SNMP).
The SNMP server must be enabled to use SMS management or to allow NMS access. This option is enabled by default.
IPS Command Line Interface Reference
14
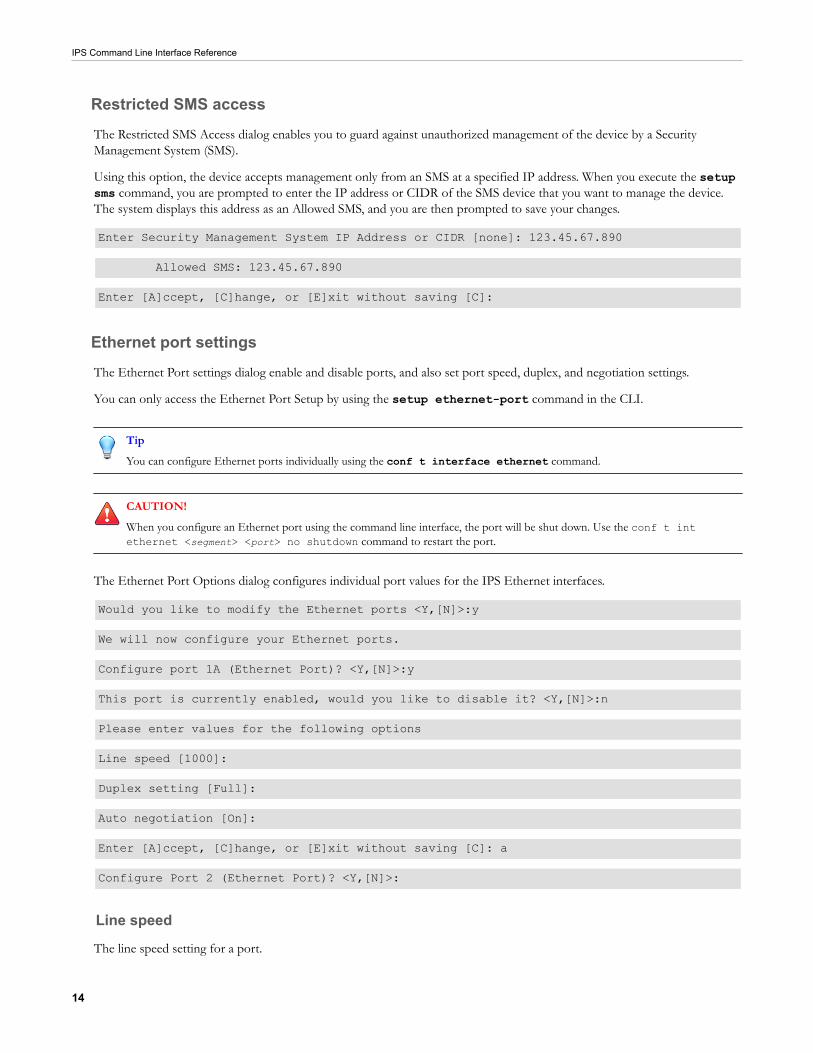
Restricted SMS access
The Restricted SMS Access dialog enables you to guard against unauthorized management of the device by a SecurityManagement System (SMS).
Using this option, the device accepts management only from an SMS at a specified IP address. When you execute the setupsms command, you are prompted to enter the IP address or CIDR of the SMS device that you want to manage the device.The system displays this address as an Allowed SMS, and you are then prompted to save your changes.
Enter Security Management System IP Address or CIDR [none]: 123.45.67.890
Allowed SMS: 123.45.67.890
Enter [A]ccept, [C]hange, or [E]xit without saving [C]:
Ethernet port settings
The Ethernet Port settings dialog enable and disable ports, and also set port speed, duplex, and negotiation settings.
You can only access the Ethernet Port Setup by using the setup ethernet-port command in the CLI.
Tip
You can configure Ethernet ports individually using the conf t interface ethernet command.
CAUTION!
When you configure an Ethernet port using the command line interface, the port will be shut down. Use the conf t intethernet <segment> <port> no shutdown command to restart the port.
The Ethernet Port Options dialog configures individual port values for the IPS Ethernet interfaces.
Would you like to modify the Ethernet ports <Y,[N]>:y
We will now configure your Ethernet ports.
Configure port 1A (Ethernet Port)? <Y,[N]>:y
This port is currently enabled, would you like to disable it? <Y,[N]>:n
Please enter values for the following options
Line speed [1000]:
Duplex setting [Full]:
Auto negotiation [On]:
Enter [A]ccept, [C]hange, or [E]xit without saving [C]: a
Configure Port 2 (Ethernet Port)? <Y,[N]>:
Line speed
The line speed setting for a port.
IPS Command Line Interface Reference
15
You can set a port to 10, 100, or 1000 Kbps.
Duplex setting
The duplex setting for the port. Copper can be set to full or half. Fiber ports can be set to full.
Auto negotiation
The auto negotiation setting determines whether the port negotiates its speed based on the connection it can make.
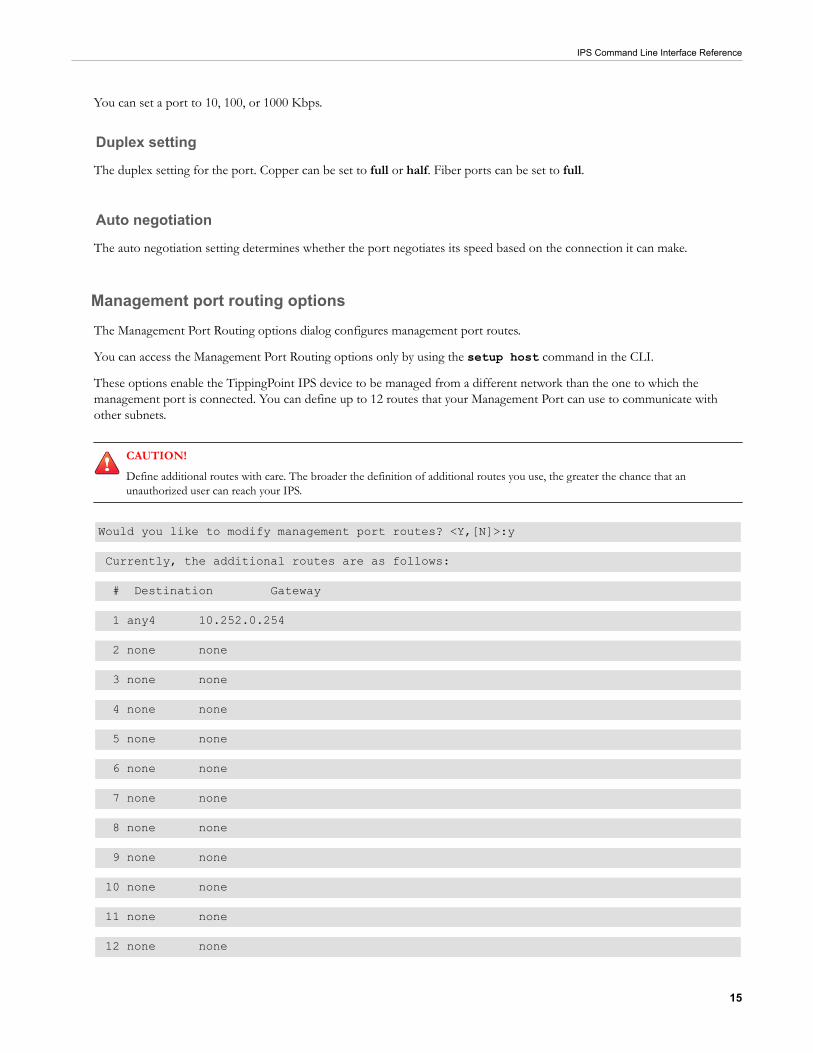
Management port routing optionsThe Management Port Routing options dialog configures management port routes.
You can access the Management Port Routing options only by using the setup host command in the CLI.
These options enable the TippingPoint IPS device to be managed from a different network than the one to which themanagement port is connected. You can define up to 12 routes that your Management Port can use to communicate withother subnets.
CAUTION!
Define additional routes with care. The broader the definition of additional routes you use, the greater the chance that anunauthorized user can reach your IPS.
Would you like to modify management port routes? <Y,[N]>:y
Currently, the additional routes are as follows:
# Destination Gateway
1 any4 10.252.0.254
2 none none
3 none none
4 none none
5 none none
6 none none
7 none none
8 none none
9 none none
10 none none
11 none none
12 none none
IPS Command Line Interface Reference
16
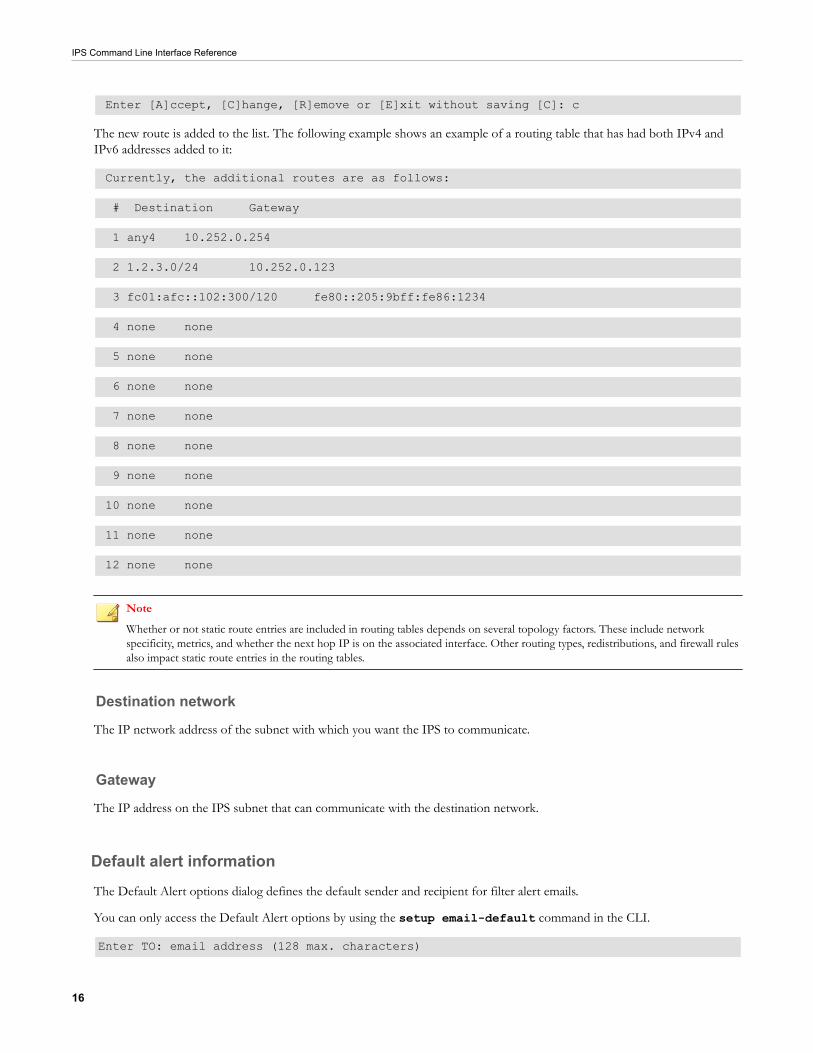
Enter [A]ccept, [C]hange, [R]emove or [E]xit without saving [C]: c
The new route is added to the list. The following example shows an example of a routing table that has had both IPv4 andIPv6 addresses added to it:
Currently, the additional routes are as follows:
# Destination Gateway
1 any4 10.252.0.254
2 1.2.3.0/24 10.252.0.123
3 fc01:afc::102:300/120 fe80::205:9bff:fe86:1234
4 none none
5 none none
6 none none
7 none none
8 none none
9 none none
10 none none
11 none none
12 none none
Note
Whether or not static route entries are included in routing tables depends on several topology factors. These include networkspecificity, metrics, and whether the next hop IP is on the associated interface. Other routing types, redistributions, and firewall rulesalso impact static route entries in the routing tables.
Destination network
The IP network address of the subnet with which you want the IPS to communicate.
Gateway
The IP address on the IPS subnet that can communicate with the destination network.
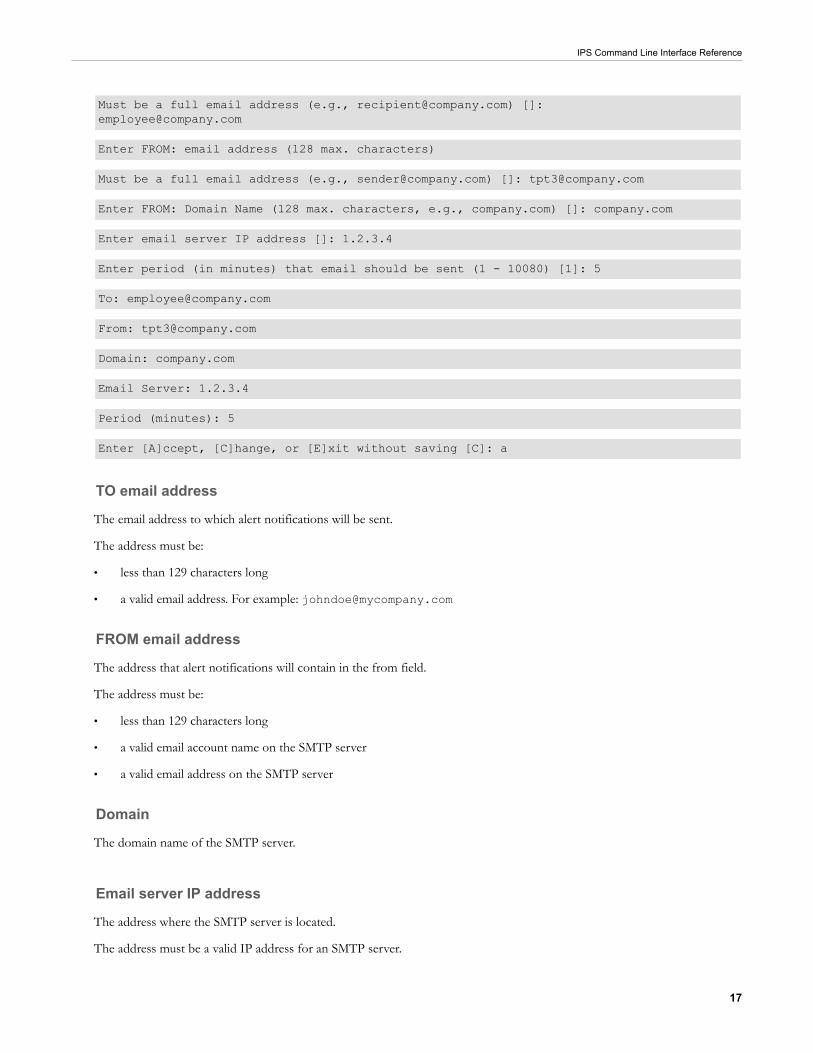
Default alert information
The Default Alert options dialog defines the default sender and recipient for filter alert emails.
You can only access the Default Alert options by using the setup email-default command in the CLI.
Enter TO: email address (128 max. characters)
IPS Command Line Interface Reference
17
Must be a full email address (e.g., [email protected]) []: [email protected]
Enter FROM: email address (128 max. characters)
Must be a full email address (e.g., [email protected]) []: [email protected]
Enter FROM: Domain Name (128 max. characters, e.g., company.com) []: company.com
Enter email server IP address []: 1.2.3.4
Enter period (in minutes) that email should be sent (1 - 10080) [1]: 5
From: [email protected]
Domain: company.com
Email Server: 1.2.3.4
Period (minutes): 5
Enter [A]ccept, [C]hange, or [E]xit without saving [C]: a
TO email address
The email address to which alert notifications will be sent.
The address must be:
• less than 129 characters long
• a valid email address. For example: [email protected]
FROM email address
The address that alert notifications will contain in the from field.
The address must be:
• less than 129 characters long
• a valid email account name on the SMTP server
• a valid email address on the SMTP server
Domain
The domain name of the SMTP server.
Email server IP address
The address where the SMTP server is located.
The address must be a valid IP address for an SMTP server.
IPS Command Line Interface Reference
18
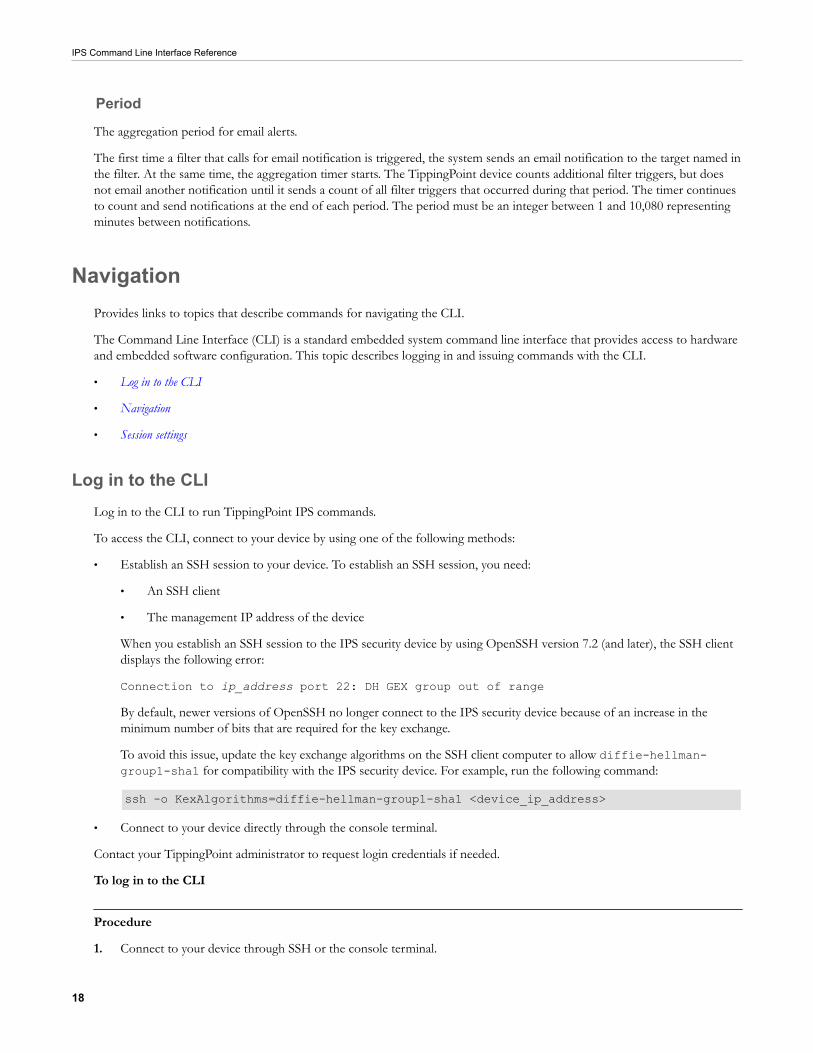
Period
The aggregation period for email alerts.
The first time a filter that calls for email notification is triggered, the system sends an email notification to the target named inthe filter. At the same time, the aggregation timer starts. The TippingPoint device counts additional filter triggers, but doesnot email another notification until it sends a count of all filter triggers that occurred during that period. The timer continuesto count and send notifications at the end of each period. The period must be an integer between 1 and 10,080 representingminutes between notifications.
NavigationProvides links to topics that describe commands for navigating the CLI.
The Command Line Interface (CLI) is a standard embedded system command line interface that provides access to hardwareand embedded software configuration. This topic describes logging in and issuing commands with the CLI.
• Log in to the CLI
• Navigation
• Session settings
Log in to the CLILog in to the CLI to run TippingPoint IPS commands.
To access the CLI, connect to your device by using one of the following methods:
• Establish an SSH session to your device. To establish an SSH session, you need:
• An SSH client
• The management IP address of the device
When you establish an SSH session to the IPS security device by using OpenSSH version 7.2 (and later), the SSH clientdisplays the following error:
Connection to ip_address port 22: DH GEX group out of range
By default, newer versions of OpenSSH no longer connect to the IPS security device because of an increase in theminimum number of bits that are required for the key exchange.
To avoid this issue, update the key exchange algorithms on the SSH client computer to allow diffie-hellman-group1-sha1 for compatibility with the IPS security device. For example, run the following command:
ssh -o KexAlgorithms=diffie-hellman-group1-sha1 <device_ip_address>
• Connect to your device directly through the console terminal.
Contact your TippingPoint administrator to request login credentials if needed.
To log in to the CLI
Procedure
1. Connect to your device through SSH or the console terminal.
IPS Command Line Interface Reference
19
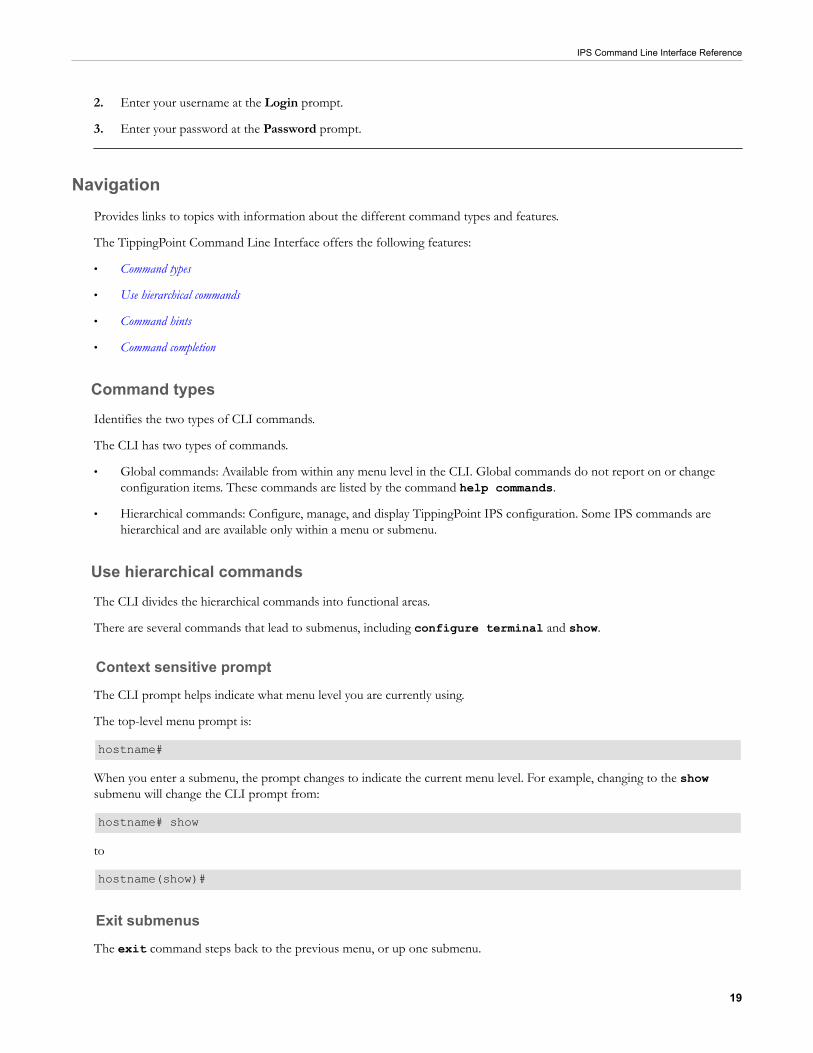
2. Enter your username at the Login prompt.
3. Enter your password at the Password prompt.
NavigationProvides links to topics with information about the different command types and features.
The TippingPoint Command Line Interface offers the following features:
• Command types
• Use hierarchical commands
• Command hints
• Command completion
Command typesIdentifies the two types of CLI commands.
The CLI has two types of commands.
• Global commands: Available from within any menu level in the CLI. Global commands do not report on or changeconfiguration items. These commands are listed by the command help commands.
• Hierarchical commands: Configure, manage, and display TippingPoint IPS configuration. Some IPS commands arehierarchical and are available only within a menu or submenu.
Use hierarchical commandsThe CLI divides the hierarchical commands into functional areas.
There are several commands that lead to submenus, including configure terminal and show.
Context sensitive prompt
The CLI prompt helps indicate what menu level you are currently using.
The top-level menu prompt is:
hostname#
When you enter a submenu, the prompt changes to indicate the current menu level. For example, changing to the showsubmenu will change the CLI prompt from:
hostname# show
to
hostname(show)#
Exit submenus
The exit command steps back to the previous menu, or up one submenu.
IPS Command Line Interface Reference
20
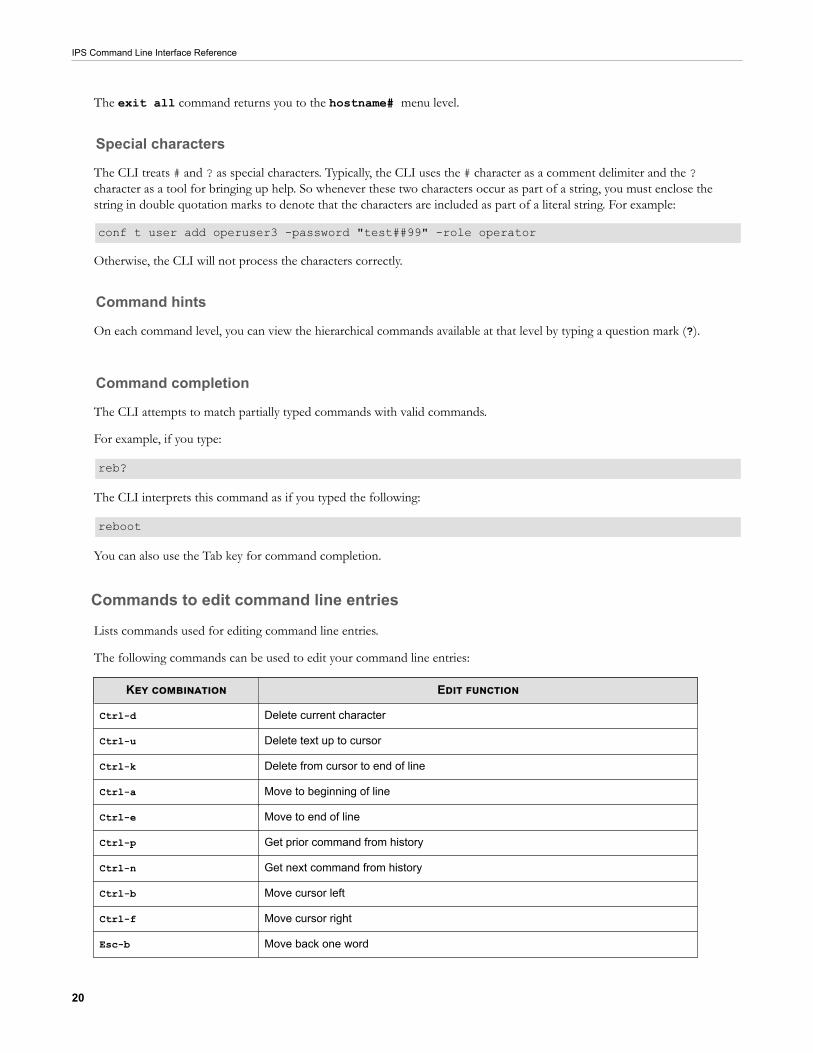
The exit all command returns you to the hostname# menu level.
Special characters
The CLI treats # and ? as special characters. Typically, the CLI uses the # character as a comment delimiter and the ?character as a tool for bringing up help. So whenever these two characters occur as part of a string, you must enclose thestring in double quotation marks to denote that the characters are included as part of a literal string. For example:
conf t user add operuser3 -password "test##99" -role operator
Otherwise, the CLI will not process the characters correctly.
Command hints
On each command level, you can view the hierarchical commands available at that level by typing a question mark (?).
Command completion
The CLI attempts to match partially typed commands with valid commands.
For example, if you type:
reb?
The CLI interprets this command as if you typed the following:
reboot
You can also use the Tab key for command completion.
Commands to edit command line entries
Lists commands used for editing command line entries.
The following commands can be used to edit your command line entries:
Key combination Edit function
Ctrl-d Delete current character
Ctrl-u Delete text up to cursor
Ctrl-k Delete from cursor to end of line
Ctrl-a Move to beginning of line
Ctrl-e Move to end of line
Ctrl-p Get prior command from history
Ctrl-n Get next command from history
Ctrl-b Move cursor left
Ctrl-f Move cursor right
Esc-b Move back one word
IPS Command Line Interface Reference
21
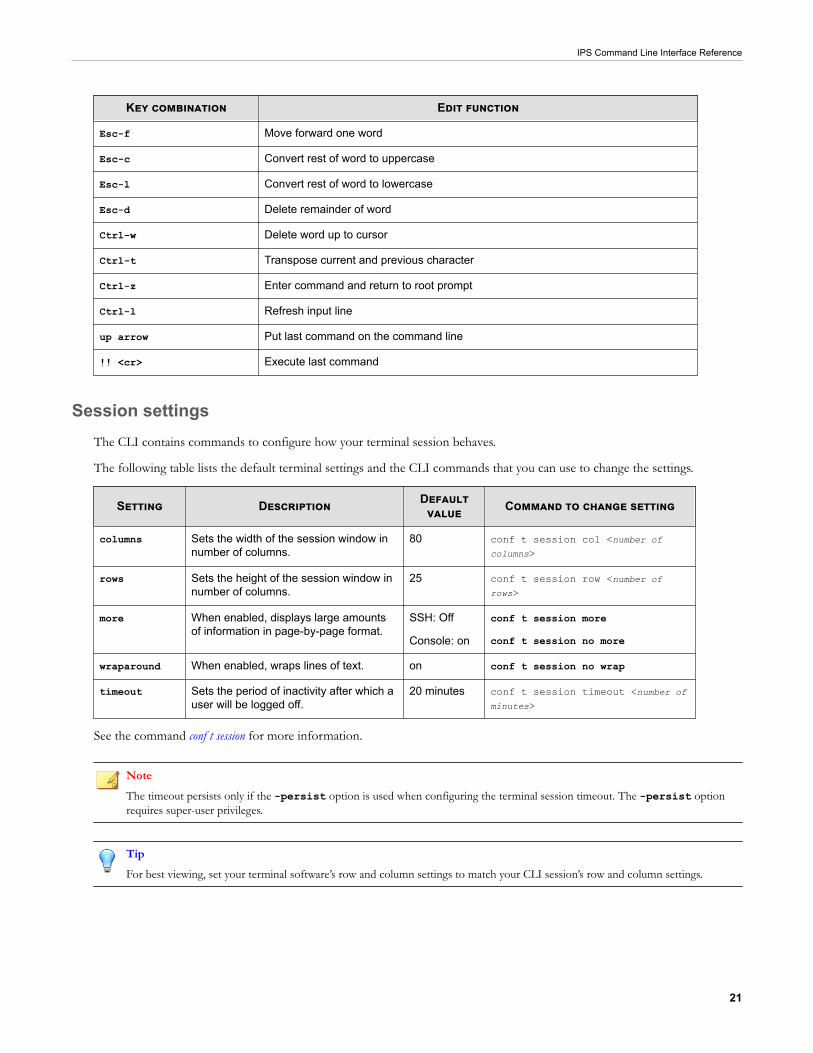
Key combination Edit function
Esc-f Move forward one word
Esc-c Convert rest of word to uppercase
Esc-l Convert rest of word to lowercase
Esc-d Delete remainder of word
Ctrl-w Delete word up to cursor
Ctrl-t Transpose current and previous character
Ctrl-z Enter command and return to root prompt
Ctrl-l Refresh input line
up arrow Put last command on the command line
!! <cr> Execute last command
Session settingsThe CLI contains commands to configure how your terminal session behaves.
The following table lists the default terminal settings and the CLI commands that you can use to change the settings.
Setting Description Defaultvalue Command to change setting
columns Sets the width of the session window innumber of columns.
80 conf t session col <number ofcolumns>
rows Sets the height of the session window innumber of columns.
25 conf t session row <number ofrows>
more When enabled, displays large amountsof information in page-by-page format.
SSH: Off
Console: on
conf t session more
conf t session no more
wraparound When enabled, wraps lines of text. on conf t session no wrap
timeout Sets the period of inactivity after which auser will be logged off.
20 minutes conf t session timeout <number ofminutes>
See the command conf t session for more information.
NoteThe timeout persists only if the -persist option is used when configuring the terminal session timeout. The -persist optionrequires super-user privileges.
TipFor best viewing, set your terminal software’s row and column settings to match your CLI session’s row and column settings.

IPS Command Line Interface Reference
22
TippingPoint IPS commandsThis topic provides links to topics with reference information for the Command Line Interface (CLI) for the TippingPointIPS.
Conventions
Describes the organizational and stylistic conventions used in the CLI.
This topic is divided into sections by top-level commands. Some top-level commands, such as configure terminal, havebeen split up for easier reference. Each command section has the following information:
• Description
• Required privileges
• Subcommands and/or options
• Examples of usage
Variables are enclosed in angle brackets. For example, a snapshot name variable is represented as <snapshot name>.Optional flags and variables are enclosed in square brackets. For example, an optional profile name is represented as [-profile <profile name>].
CAUTION!
The square brackets are included in usage examples for clarification purposes only. Do not type these brackets when entering acommand.
Global commands
The commands in this topic manage your CLI session.
The settings and results do not persist across multiple sessions. These commands are available to all users and user roles.
• alias
• clear
• cls
• exit
• help
• history
• logout
• quit
• tree
• who
• whoami
IPS Command Line Interface Reference
23
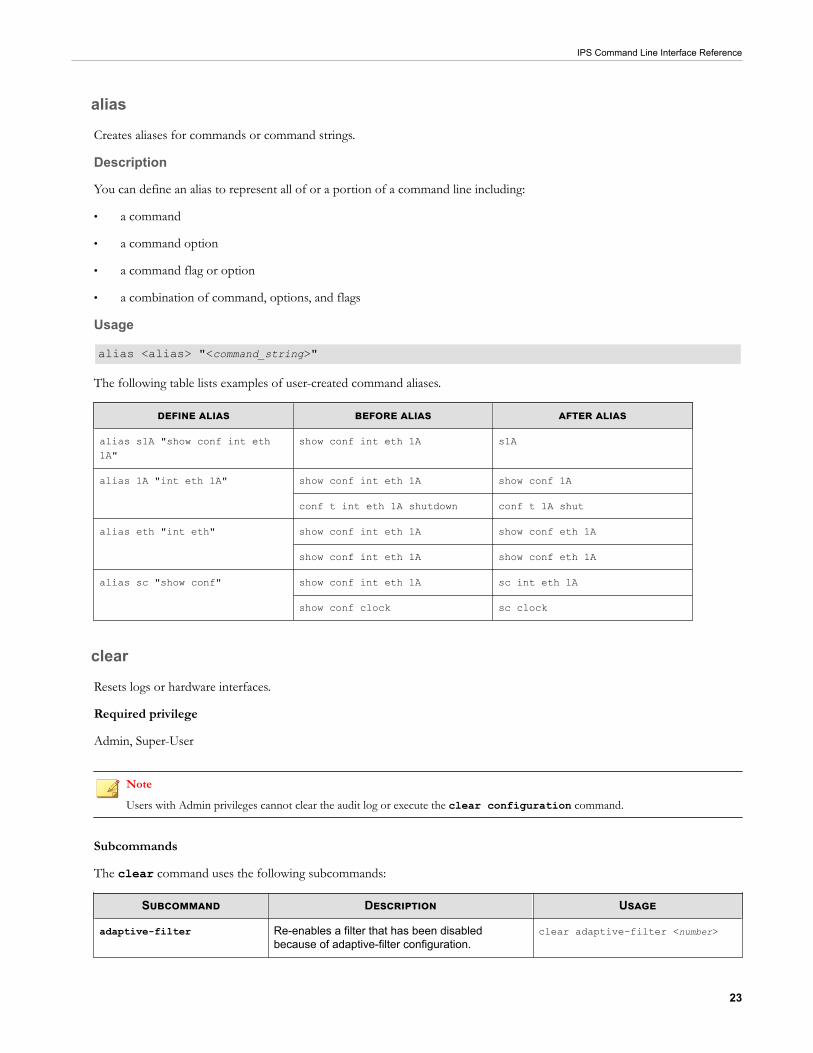
alias
Creates aliases for commands or command strings.
Description
You can define an alias to represent all of or a portion of a command line including:
• a command
• a command option
• a command flag or option
• a combination of command, options, and flags
Usage
alias <alias> "<command_string>"
The following table lists examples of user-created command aliases.
define alias before alias after alias
alias s1A "show conf int eth1A"
show conf int eth 1A s1A
alias 1A "int eth 1A" show conf int eth 1A show conf 1A
conf t int eth 1A shutdown conf t 1A shut
alias eth "int eth" show conf int eth 1A show conf eth 1A
show conf int eth 1A show conf eth 1A
alias sc "show conf" show conf int eth 1A sc int eth 1A
show conf clock sc clock
clear
Resets logs or hardware interfaces.
Required privilege
Admin, Super-User
Note
Users with Admin privileges cannot clear the audit log or execute the clear configuration command.
Subcommands
The clear command uses the following subcommands:
Subcommand Description Usage
adaptive-filter Re-enables a filter that has been disabledbecause of adaptive-filter configuration.
clear adaptive-filter <number>
IPS Command Line Interface Reference
24
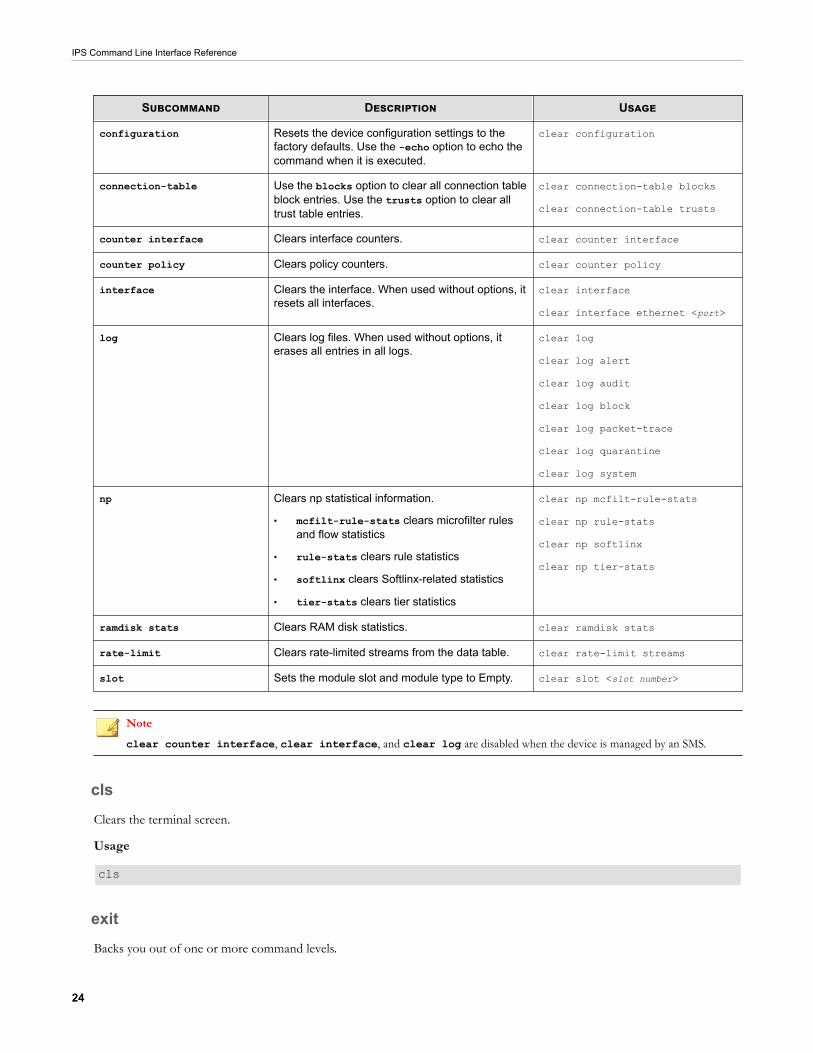
Subcommand Description Usage
configuration Resets the device configuration settings to thefactory defaults. Use the -echo option to echo thecommand when it is executed.
clear configuration
connection-table Use the blocks option to clear all connection tableblock entries. Use the trusts option to clear alltrust table entries.
clear connection-table blocks
clear connection-table trusts
counter interface Clears interface counters. clear counter interface
counter policy Clears policy counters. clear counter policy
interface Clears the interface. When used without options, itresets all interfaces.
clear interface
clear interface ethernet <port>
log Clears log files. When used without options, iterases all entries in all logs.
clear log
clear log alert
clear log audit
clear log block
clear log packet-trace
clear log quarantine
clear log system
np Clears np statistical information.
• mcfilt-rule-stats clears microfilter rulesand flow statistics
• rule-stats clears rule statistics
• softlinx clears Softlinx-related statistics
• tier-stats clears tier statistics
clear np mcfilt-rule-stats
clear np rule-stats
clear np softlinx
clear np tier-stats
ramdisk stats Clears RAM disk statistics. clear ramdisk stats
rate-limit Clears rate-limited streams from the data table. clear rate-limit streams
slot Sets the module slot and module type to Empty. clear slot <slot number>
Note
clear counter interface, clear interface, and clear log are disabled when the device is managed by an SMS.
clsClears the terminal screen.
Usage
cls
exitBacks you out of one or more command levels.
IPS Command Line Interface Reference
25
For detailed information about command hierarchy, see Use hierarchical commands.
Usage
exit
exit all
help
Displays documentation about the specified command.
At the CLI prompt, you can access the help topics for commands. You can also specify help for commands and edit keys.
Usage
help
help commands
help edit
history
Displays a list of commands that have been executed during the current CLI session.
Usage
history
logout
Logs you out of the TippingPoint IPS.
Usage
logout
quit
Logs you out of the TippingPoint IPS.
Usage
quit
tree
Displays the full command tree.
Usage
tree
IPS Command Line Interface Reference
26
who
Shows the usernames, connection methods, IP addresses, and login times of all the users who are currently logged in to IPS.
By default, the login time is shown in the time zone that you set during setup or with the conf t clock command. Use the-utc option to view the login times in Universal Time.
Required Privilege
Admin, Super-User
Usage
who
who -utc
whoami
Displays the username, role, and path of the currently logged-in user.
Usage
whoami
TippingPoint Operating System commandsThe commands in this topic configure, manage, and display information about the Tipping Point Operating System (TOS)and its users.
• boot
• compact-flash
• configure terminal
• debug
• fips
• halt
• high-availability
• ping
• quarantine
• reboot
• setup
• show
• show configuration
• show np tier-stats
• show stacking
IPS Command Line Interface Reference
27
• snapshot
• tech-support-report
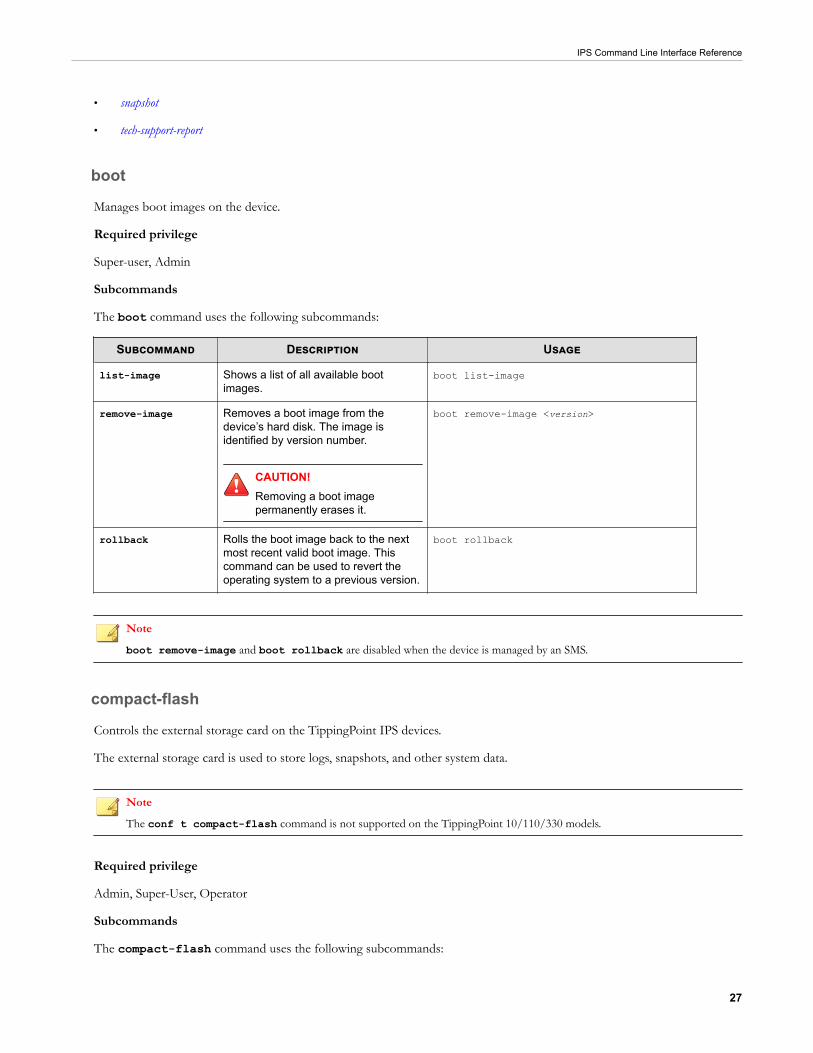
boot
Manages boot images on the device.
Required privilege
Super-user, Admin
Subcommands
The boot command uses the following subcommands:
Subcommand Description Usage
list-image Shows a list of all available bootimages.
boot list-image
remove-image Removes a boot image from thedevice’s hard disk. The image isidentified by version number.
CAUTION!Removing a boot imagepermanently erases it.
boot remove-image <version>
rollback Rolls the boot image back to the nextmost recent valid boot image. Thiscommand can be used to revert theoperating system to a previous version.
boot rollback
Note
boot remove-image and boot rollback are disabled when the device is managed by an SMS.
compact-flash
Controls the external storage card on the TippingPoint IPS devices.
The external storage card is used to store logs, snapshots, and other system data.
Note
The conf t compact-flash command is not supported on the TippingPoint 10/110/330 models.
Required privilege
Admin, Super-User, Operator
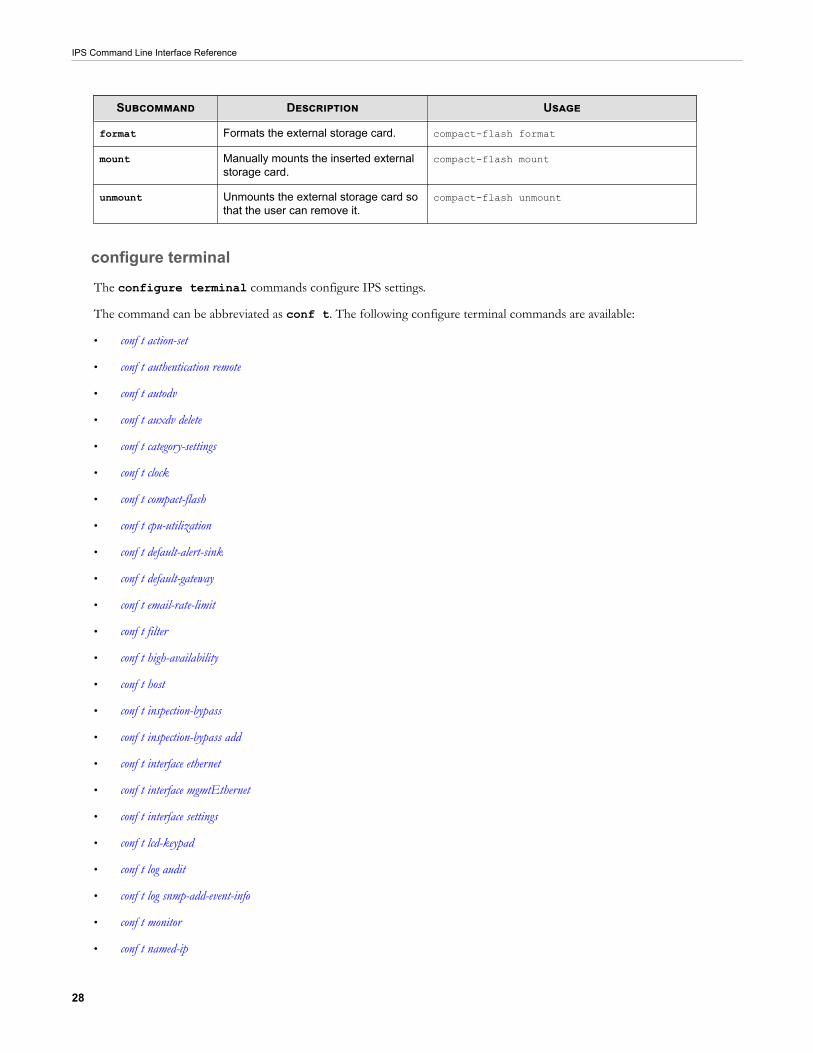
Subcommands
The compact-flash command uses the following subcommands:
IPS Command Line Interface Reference
28
Subcommand Description Usage
format Formats the external storage card. compact-flash format
mount Manually mounts the inserted externalstorage card.
compact-flash mount
unmount Unmounts the external storage card sothat the user can remove it.
compact-flash unmount
configure terminal
The configure terminal commands configure IPS settings.
The command can be abbreviated as conf t. The following configure terminal commands are available:
• conf t action-set
• conf t authentication remote
• conf t autodv
• conf t auxdv delete
• conf t category-settings
• conf t clock
• conf t compact-flash
• conf t cpu-utilization
• conf t default-alert-sink
• conf t default-gateway
• conf t email-rate-limit
• conf t filter
• conf t high-availability
• conf t host
• conf t inspection-bypass
• conf t inspection-bypass add
• conf t interface ethernet
• conf t interface mgmtEthernet
• conf t interface settings
• conf t lcd-keypad
• conf t log audit
• conf t log snmp-add-event-info
• conf t monitor
• conf t named-ip
IPS Command Line Interface Reference
29
• conf t nms
• conf t notify-contact
• conf t port
• conf t profile
• conf t protection-settings
• conf t radius-server
• conf t ramdisk
• conf t remote-syslog
• conf t reputation
• conf t reputation group
• conf t segment
• conf t server
• conf t service-access
• conf t session
• conf t sms
• conf t sntp
• conf t traffic-mgmt
• conf t tse
• conf t user
• conf t user options
• conf t virtual-port
• conf t virtual-segment
• conf t vlan-translation
conf t action-set
Configures new or existing action sets.
The subcommands specify the actions taken.
Required privilege
Admin, Super-User
Subcommands
The conf t action-set command uses the following subcommands.
CAUTION!The square brackets are included in usage examples for clarification purposes only, to indicate which flags and variables are optional.Do not type these brackets when entering a command.
IPS Command Line Interface Reference
30
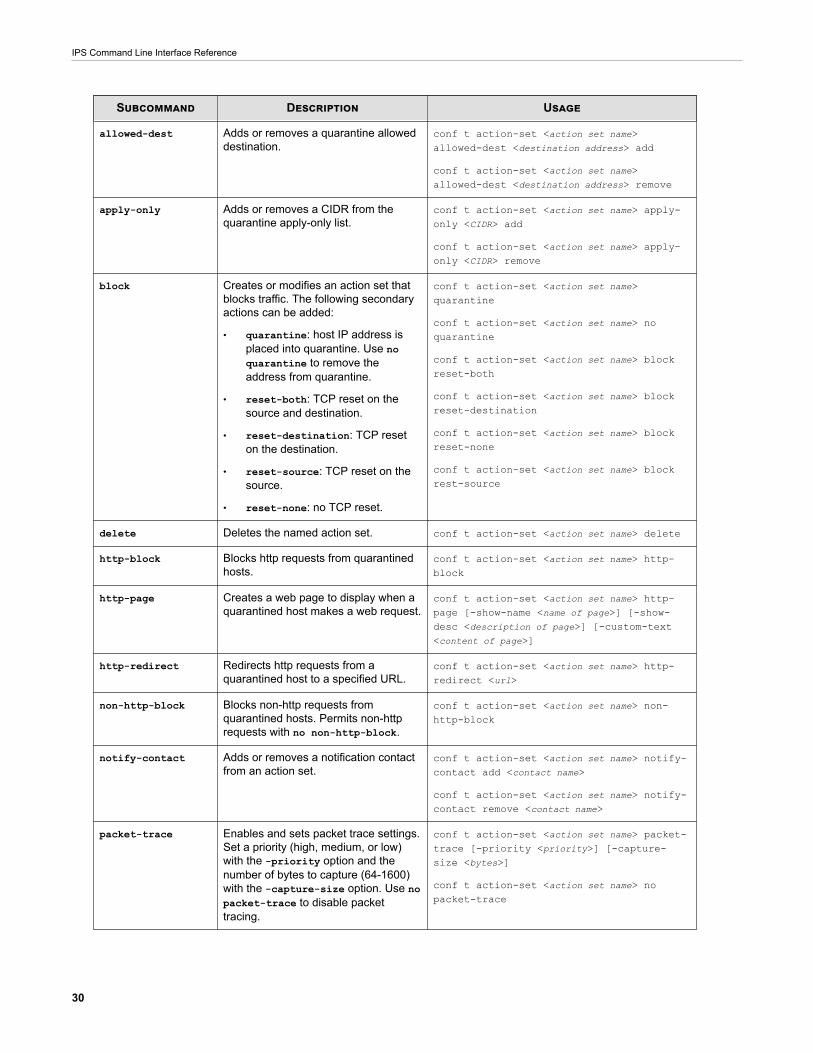
Subcommand Description Usage
allowed-dest Adds or removes a quarantine alloweddestination.
conf t action-set <action set name>allowed-dest <destination address> add
conf t action-set <action set name>allowed-dest <destination address> remove
apply-only Adds or removes a CIDR from thequarantine apply-only list.
conf t action-set <action set name> apply-only <CIDR> add
conf t action-set <action set name> apply-only <CIDR> remove
block Creates or modifies an action set thatblocks traffic. The following secondaryactions can be added:
• quarantine: host IP address isplaced into quarantine. Use noquarantine to remove theaddress from quarantine.
• reset-both: TCP reset on thesource and destination.
• reset-destination: TCP reseton the destination.
• reset-source: TCP reset on thesource.
• reset-none: no TCP reset.
conf t action-set <action set name>quarantine
conf t action-set <action set name> noquarantine
conf t action-set <action set name> blockreset-both
conf t action-set <action set name> blockreset-destination
conf t action-set <action set name> blockreset-none
conf t action-set <action set name> blockrest-source
delete Deletes the named action set. conf t action-set <action set name> delete
http-block Blocks http requests from quarantinedhosts.
conf t action-set <action set name> http-block
http-page Creates a web page to display when aquarantined host makes a web request.
conf t action-set <action set name> http-page [-show-name <name of page>] [-show-desc <description of page>] [-custom-text<content of page>]
http-redirect Redirects http requests from aquarantined host to a specified URL.
conf t action-set <action set name> http-redirect <url>
non-http-block Blocks non-http requests fromquarantined hosts. Permits non-httprequests with no non-http-block.
conf t action-set <action set name> non-http-block
notify-contact Adds or removes a notification contactfrom an action set.
conf t action-set <action set name> notify-contact add <contact name>
conf t action-set <action set name> notify-contact remove <contact name>
packet-trace Enables and sets packet trace settings.Set a priority (high, medium, or low)with the -priority option and thenumber of bytes to capture (64-1600)with the -capture-size option. Use nopacket-trace to disable packettracing.
conf t action-set <action set name> packet-trace [-priority <priority>] [-capture-size <bytes>]
conf t action-set <action set name> nopacket-trace
IPS Command Line Interface Reference
31
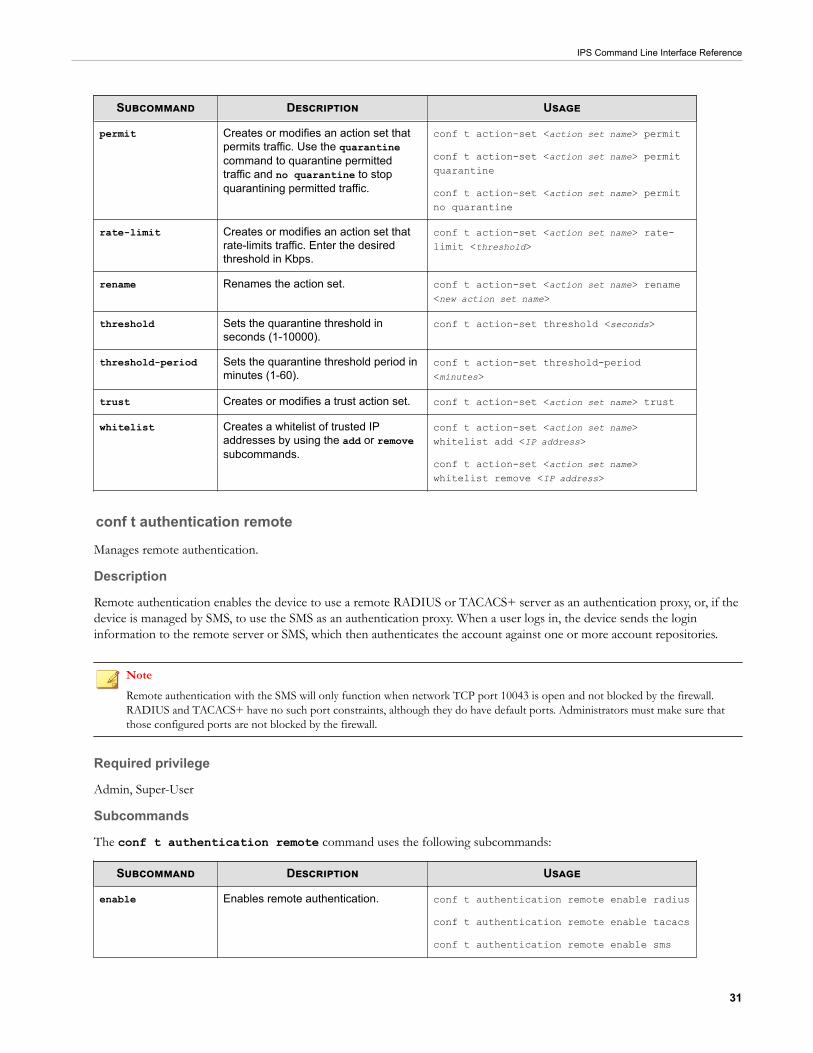
Subcommand Description Usage
permit Creates or modifies an action set thatpermits traffic. Use the quarantinecommand to quarantine permittedtraffic and no quarantine to stopquarantining permitted traffic.
conf t action-set <action set name> permit
conf t action-set <action set name> permitquarantine
conf t action-set <action set name> permitno quarantine
rate-limit Creates or modifies an action set thatrate-limits traffic. Enter the desiredthreshold in Kbps.
conf t action-set <action set name> rate-limit <threshold>
rename Renames the action set. conf t action-set <action set name> rename<new action set name>
threshold Sets the quarantine threshold inseconds (1-10000).
conf t action-set threshold <seconds>
threshold-period Sets the quarantine threshold period inminutes (1-60).
conf t action-set threshold-period<minutes>
trust Creates or modifies a trust action set. conf t action-set <action set name> trust
whitelist Creates a whitelist of trusted IPaddresses by using the add or removesubcommands.
conf t action-set <action set name>whitelist add <IP address>
conf t action-set <action set name>whitelist remove <IP address>
conf t authentication remote
Manages remote authentication.
Description
Remote authentication enables the device to use a remote RADIUS or TACACS+ server as an authentication proxy, or, if thedevice is managed by SMS, to use the SMS as an authentication proxy. When a user logs in, the device sends the logininformation to the remote server or SMS, which then authenticates the account against one or more account repositories.
Note
Remote authentication with the SMS will only function when network TCP port 10043 is open and not blocked by the firewall.RADIUS and TACACS+ have no such port constraints, although they do have default ports. Administrators must make sure thatthose configured ports are not blocked by the firewall.
Required privilege
Admin, Super-User
Subcommands
The conf t authentication remote command uses the following subcommands:
Subcommand Description Usage
enable Enables remote authentication. conf t authentication remote enable radius
conf t authentication remote enable tacacs
conf t authentication remote enable sms

IPS Command Line Interface Reference
32
Subcommand Description Usage
disable Disables remote authentication. conf t authentication remote disable
timeout Sets the remote authentication servertimeout. The value should be greaterthan the timeout configured on theSMS.
NoteThis subcommand is valid onlywith SMS remote authentication.
conf t authentication remote timeout<seconds>
conf t autodv
Enables and disables the automatic download service for Digital Vaccine (DV) updates.
This command requires a day of week and time of day for the download. If required, use the -period option to set thenumber of days between checks.
Required privilege
Admin, Super-User
Usage
conf t autodv day <day of week> time <time of day> -period <number of days>
conf t no autodv
conf t auxdv delete
Deletes an Auxiliary DV package installation from the device.
NoteThis command is disabled when the device is under SMS control.
Required privilege
Admin, Super-User
Usage
conf t auxdv delete <type>
Usage notes
<type> represents the name of the Auxiliary DV package being deleted. To view the installed Auxiliary DV packages, runthe show auxdv command.
TOS version 3.7 and later supports multiple types of Auxiliary DVs. Ensure that you specify the correct type when runningthis command.
conf t category-settings
Enables and disables filter categories.
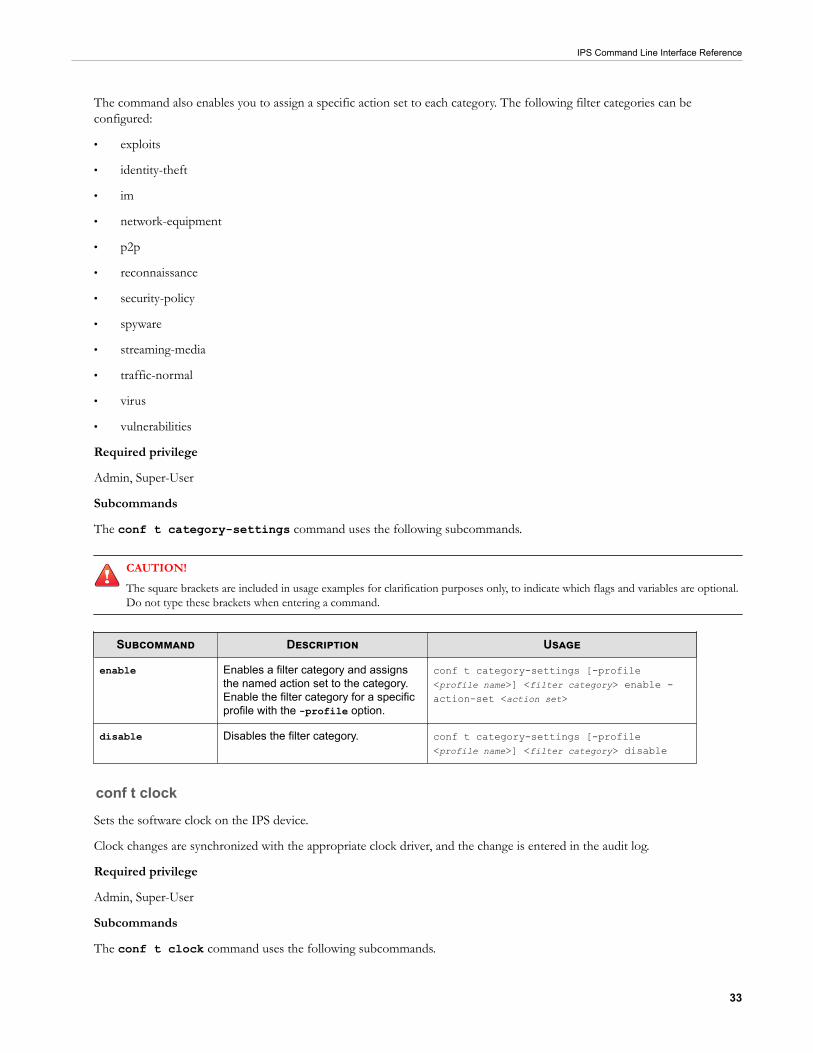
IPS Command Line Interface Reference
33
The command also enables you to assign a specific action set to each category. The following filter categories can beconfigured:
• exploits
• identity-theft
• im
• network-equipment
• p2p
• reconnaissance
• security-policy
• spyware
• streaming-media
• traffic-normal
• virus
• vulnerabilities
Required privilege
Admin, Super-User
Subcommands
The conf t category-settings command uses the following subcommands.
CAUTION!The square brackets are included in usage examples for clarification purposes only, to indicate which flags and variables are optional.Do not type these brackets when entering a command.
Subcommand Description Usage
enable Enables a filter category and assignsthe named action set to the category.Enable the filter category for a specificprofile with the -profile option.
conf t category-settings [-profile<profile name>] <filter category> enable -action-set <action set>
disable Disables the filter category. conf t category-settings [-profile<profile name>] <filter category> disable
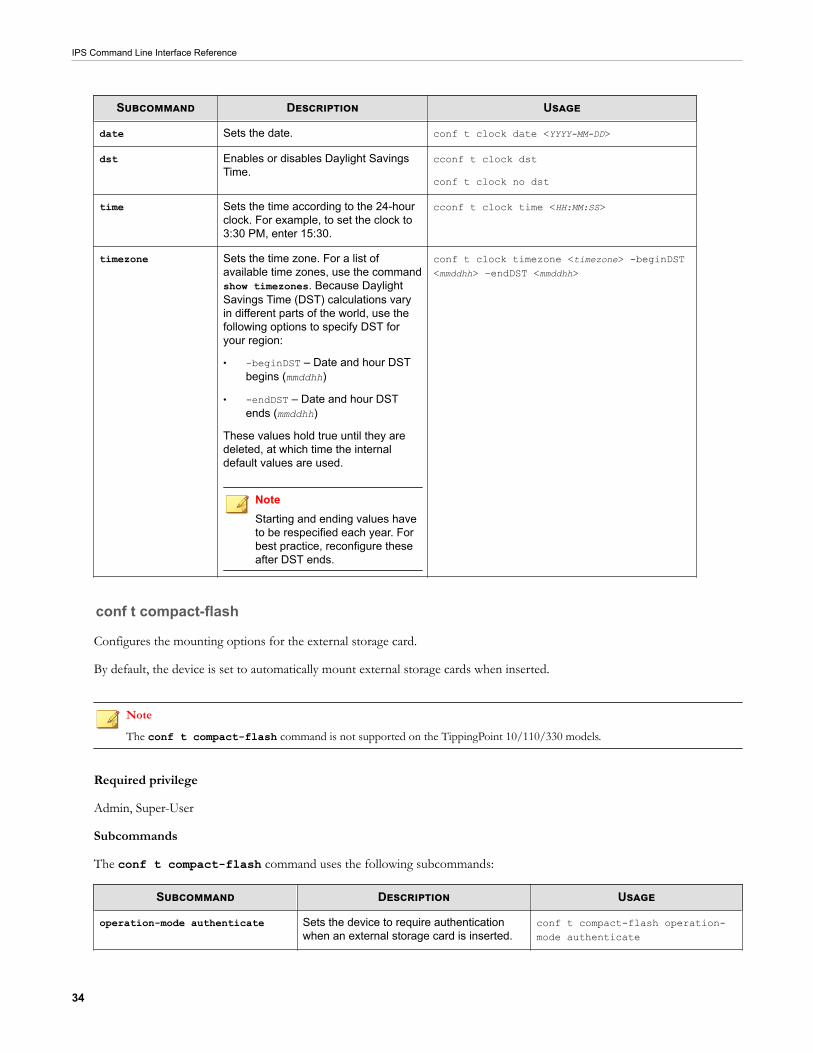
conf t clock
Sets the software clock on the IPS device.
Clock changes are synchronized with the appropriate clock driver, and the change is entered in the audit log.
Required privilege
Admin, Super-User
Subcommands
The conf t clock command uses the following subcommands.
IPS Command Line Interface Reference
34
Subcommand Description Usage
date Sets the date. conf t clock date <YYYY-MM-DD>
dst Enables or disables Daylight SavingsTime.
cconf t clock dst
conf t clock no dst
time Sets the time according to the 24-hourclock. For example, to set the clock to3:30 PM, enter 15:30.
cconf t clock time <HH:MM:SS>
timezone Sets the time zone. For a list ofavailable time zones, use the commandshow timezones. Because DaylightSavings Time (DST) calculations varyin different parts of the world, use thefollowing options to specify DST foryour region:
• -beginDST – Date and hour DSTbegins (mmddhh)
• -endDST – Date and hour DSTends (mmddhh)
These values hold true until they aredeleted, at which time the internaldefault values are used.
NoteStarting and ending values haveto be respecified each year. Forbest practice, reconfigure theseafter DST ends.
conf t clock timezone <timezone> -beginDST<mmddhh> -endDST <mmddhh>
conf t compact-flash
Configures the mounting options for the external storage card.
By default, the device is set to automatically mount external storage cards when inserted.
Note
The conf t compact-flash command is not supported on the TippingPoint 10/110/330 models.
Required privilege
Admin, Super-User
Subcommands
The conf t compact-flash command uses the following subcommands:
Subcommand Description Usage
operation-mode authenticate Sets the device to require authenticationwhen an external storage card is inserted.
conf t compact-flash operation-mode authenticate
IPS Command Line Interface Reference
35
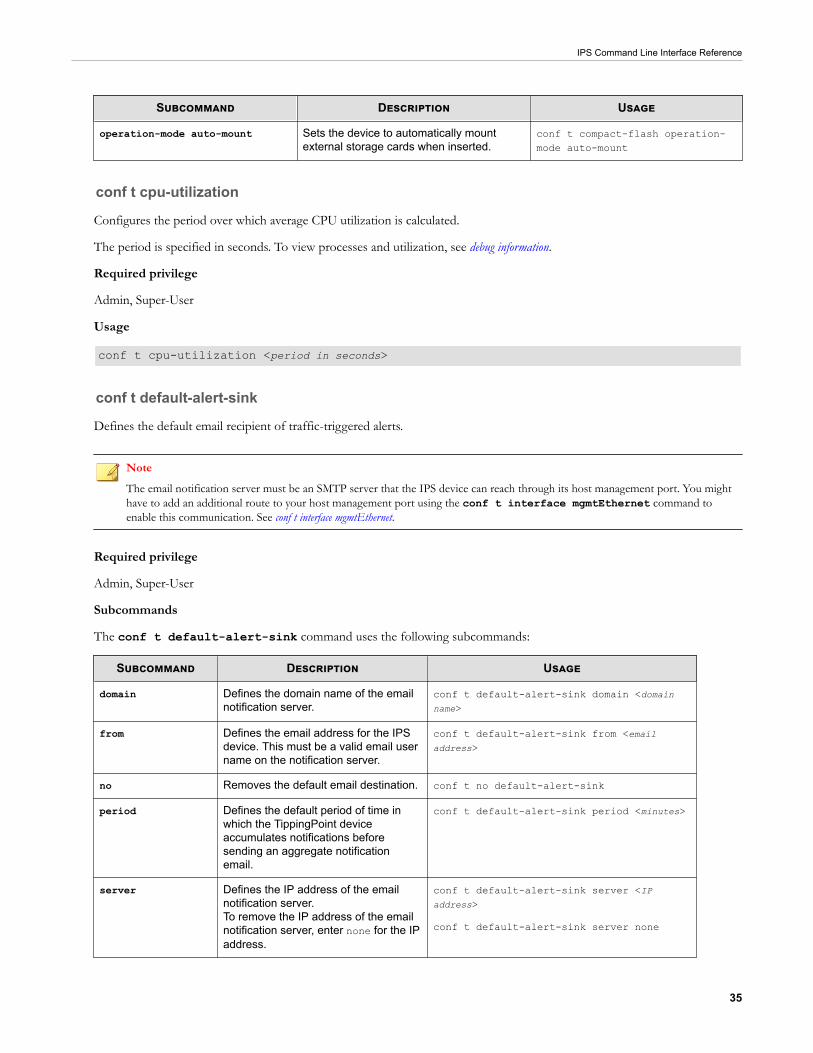
Subcommand Description Usage
operation-mode auto-mount Sets the device to automatically mountexternal storage cards when inserted.
conf t compact-flash operation-mode auto-mount
conf t cpu-utilization
Configures the period over which average CPU utilization is calculated.
The period is specified in seconds. To view processes and utilization, see debug information.
Required privilege
Admin, Super-User
Usage
conf t cpu-utilization <period in seconds>
conf t default-alert-sink
Defines the default email recipient of traffic-triggered alerts.
Note
The email notification server must be an SMTP server that the IPS device can reach through its host management port. You mighthave to add an additional route to your host management port using the conf t interface mgmtEthernet command toenable this communication. See conf t interface mgmtEthernet.
Required privilege
Admin, Super-User
Subcommands
The conf t default-alert-sink command uses the following subcommands:
Subcommand Description Usage
domain Defines the domain name of the emailnotification server.
conf t default-alert-sink domain <domainname>
from Defines the email address for the IPSdevice. This must be a valid email username on the notification server.
conf t default-alert-sink from <emailaddress>
no Removes the default email destination. conf t no default-alert-sink
period Defines the default period of time inwhich the TippingPoint deviceaccumulates notifications beforesending an aggregate notificationemail.
conf t default-alert-sink period <minutes>
server Defines the IP address of the emailnotification server.To remove the IP address of the emailnotification server, enter none for the IPaddress.
conf t default-alert-sink server <IPaddress>
conf t default-alert-sink server none
IPS Command Line Interface Reference
36
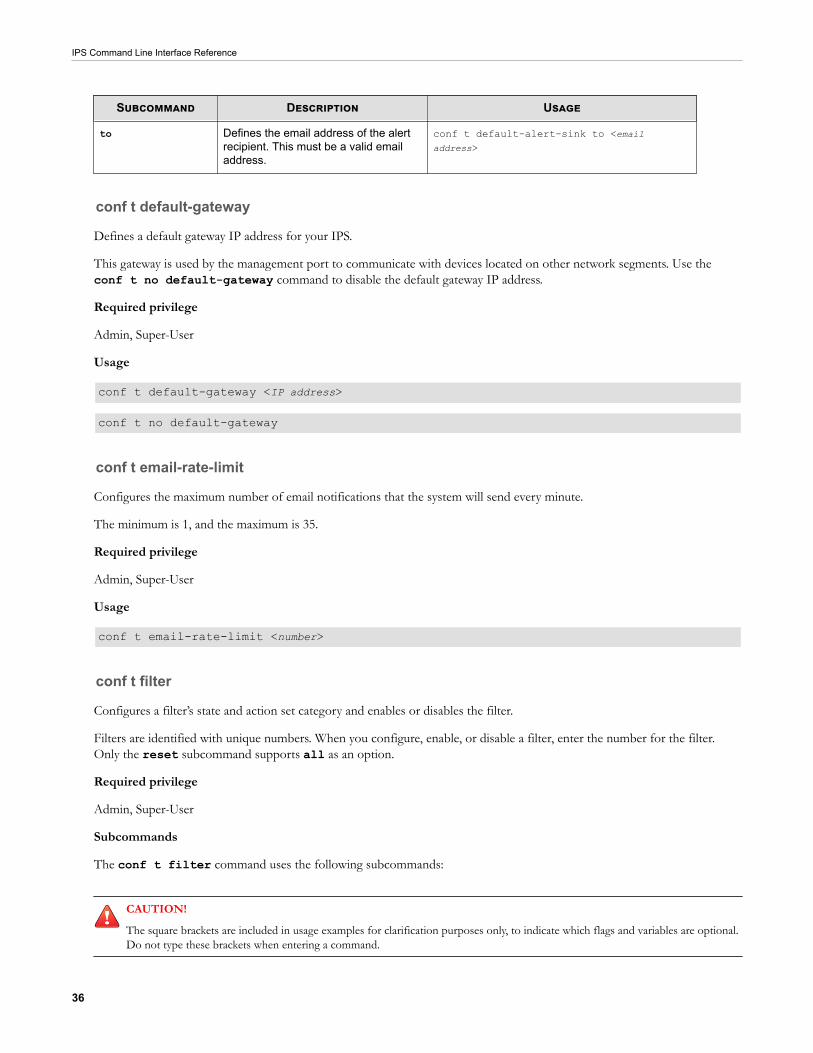
Subcommand Description Usage
to Defines the email address of the alertrecipient. This must be a valid emailaddress.
conf t default-alert-sink to <emailaddress>
conf t default-gateway
Defines a default gateway IP address for your IPS.
This gateway is used by the management port to communicate with devices located on other network segments. Use theconf t no default-gateway command to disable the default gateway IP address.
Required privilege
Admin, Super-User
Usage
conf t default-gateway <IP address>
conf t no default-gateway
conf t email-rate-limit
Configures the maximum number of email notifications that the system will send every minute.
The minimum is 1, and the maximum is 35.
Required privilege
Admin, Super-User
Usage
conf t email-rate-limit <number>
conf t filter
Configures a filter’s state and action set category and enables or disables the filter.
Filters are identified with unique numbers. When you configure, enable, or disable a filter, enter the number for the filter.Only the reset subcommand supports all as an option.
Required privilege
Admin, Super-User
Subcommands
The conf t filter command uses the following subcommands:
CAUTION!
The square brackets are included in usage examples for clarification purposes only, to indicate which flags and variables are optional.Do not type these brackets when entering a command.
IPS Command Line Interface Reference
37
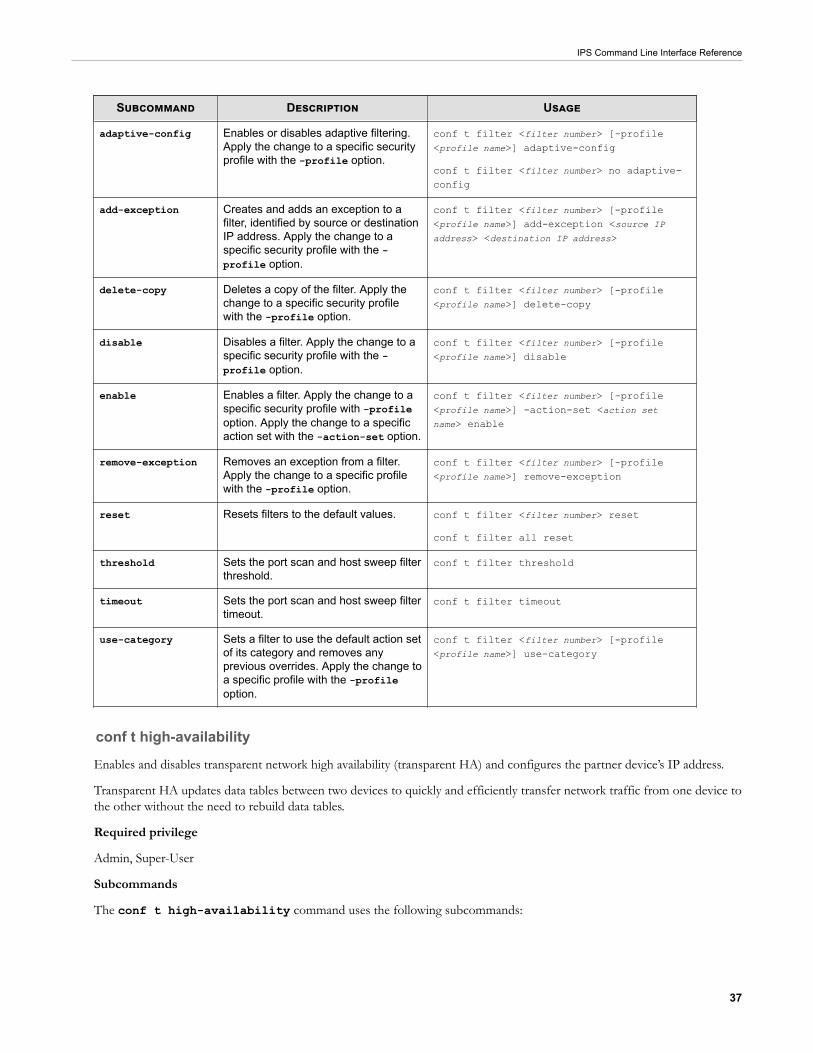
Subcommand Description Usage
adaptive-config Enables or disables adaptive filtering.Apply the change to a specific securityprofile with the -profile option.
conf t filter <filter number> [-profile<profile name>] adaptive-config
conf t filter <filter number> no adaptive-config
add-exception Creates and adds an exception to afilter, identified by source or destinationIP address. Apply the change to aspecific security profile with the -profile option.
conf t filter <filter number> [-profile<profile name>] add-exception <source IPaddress> <destination IP address>
delete-copy Deletes a copy of the filter. Apply thechange to a specific security profilewith the -profile option.
conf t filter <filter number> [-profile<profile name>] delete-copy
disable Disables a filter. Apply the change to aspecific security profile with the -profile option.
conf t filter <filter number> [-profile<profile name>] disable
enable Enables a filter. Apply the change to aspecific security profile with -profileoption. Apply the change to a specificaction set with the -action-set option.
conf t filter <filter number> [-profile<profile name>] -action-set <action setname> enable
remove-exception Removes an exception from a filter.Apply the change to a specific profilewith the -profile option.
conf t filter <filter number> [-profile<profile name>] remove-exception
reset Resets filters to the default values. conf t filter <filter number> reset
conf t filter all reset
threshold Sets the port scan and host sweep filterthreshold.
conf t filter threshold
timeout Sets the port scan and host sweep filtertimeout.
conf t filter timeout
use-category Sets a filter to use the default action setof its category and removes anyprevious overrides. Apply the change toa specific profile with the -profileoption.
conf t filter <filter number> [-profile<profile name>] use-category
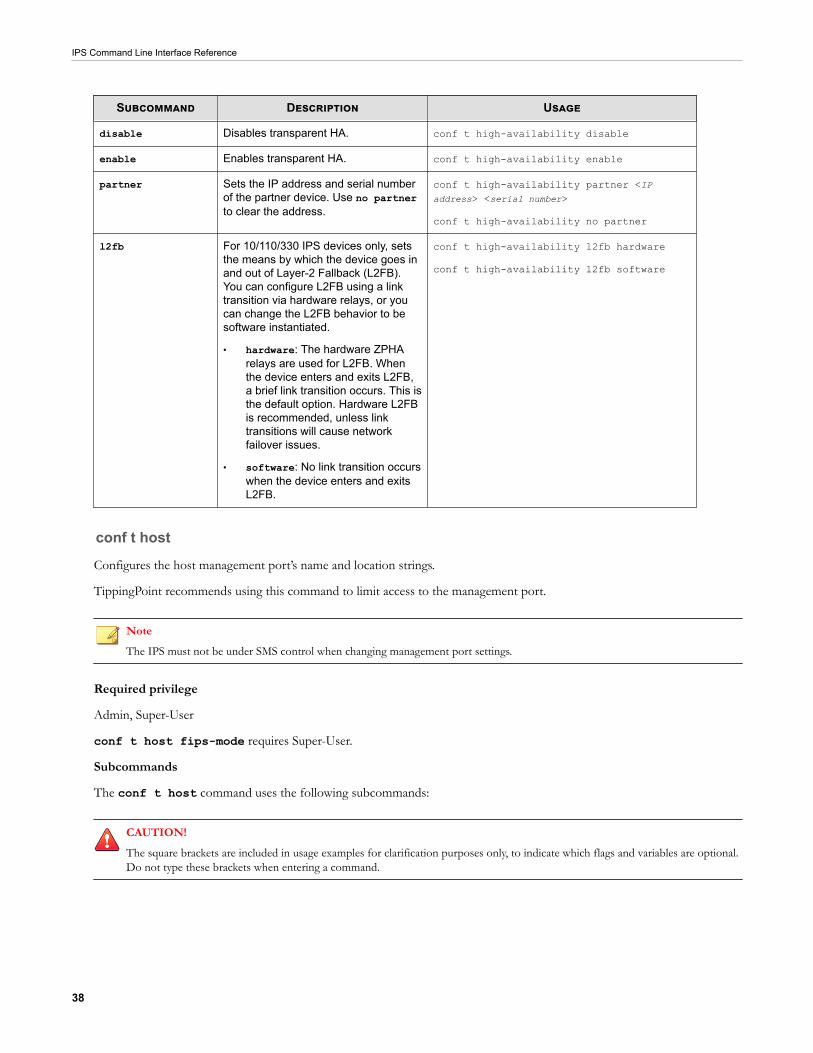
conf t high-availability
Enables and disables transparent network high availability (transparent HA) and configures the partner device’s IP address.
Transparent HA updates data tables between two devices to quickly and efficiently transfer network traffic from one device tothe other without the need to rebuild data tables.
Required privilege
Admin, Super-User
Subcommands
The conf t high-availability command uses the following subcommands:
IPS Command Line Interface Reference
38
Subcommand Description Usage
disable Disables transparent HA. conf t high-availability disable
enable Enables transparent HA. conf t high-availability enable
partner Sets the IP address and serial numberof the partner device. Use no partnerto clear the address.
conf t high-availability partner <IPaddress> <serial number>
conf t high-availability no partner
l2fb For 10/110/330 IPS devices only, setsthe means by which the device goes inand out of Layer-2 Fallback (L2FB).You can configure L2FB using a linktransition via hardware relays, or youcan change the L2FB behavior to besoftware instantiated.
• hardware: The hardware ZPHArelays are used for L2FB. Whenthe device enters and exits L2FB,a brief link transition occurs. This isthe default option. Hardware L2FBis recommended, unless linktransitions will cause networkfailover issues.
• software: No link transition occurswhen the device enters and exitsL2FB.
conf t high-availability l2fb hardware
conf t high-availability l2fb software
conf t host
Configures the host management port’s name and location strings.
TippingPoint recommends using this command to limit access to the management port.
NoteThe IPS must not be under SMS control when changing management port settings.
Required privilege
Admin, Super-User
conf t host fips-mode requires Super-User.
Subcommands
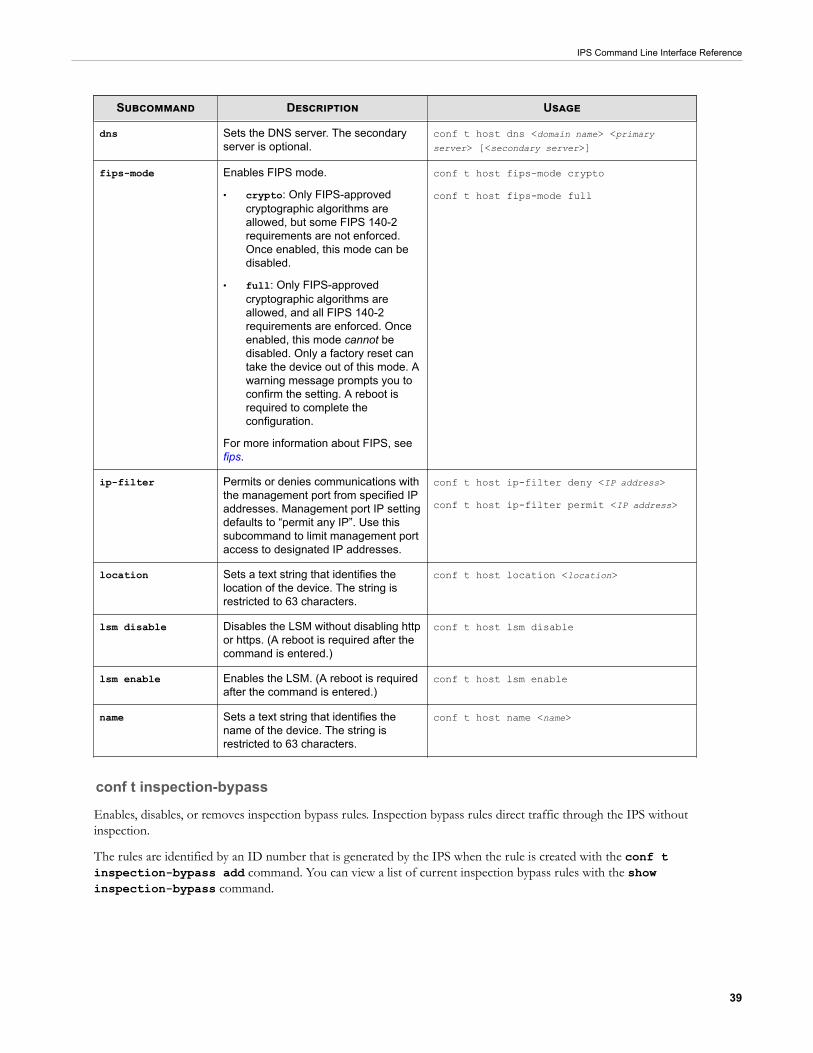
The conf t host command uses the following subcommands:
CAUTION!The square brackets are included in usage examples for clarification purposes only, to indicate which flags and variables are optional.Do not type these brackets when entering a command.
IPS Command Line Interface Reference
39
Subcommand Description Usage
dns Sets the DNS server. The secondaryserver is optional.
conf t host dns <domain name> <primaryserver> [<secondary server>]
fips-mode Enables FIPS mode.
• crypto: Only FIPS-approvedcryptographic algorithms areallowed, but some FIPS 140-2requirements are not enforced.Once enabled, this mode can bedisabled.
• full: Only FIPS-approvedcryptographic algorithms areallowed, and all FIPS 140-2requirements are enforced. Onceenabled, this mode cannot bedisabled. Only a factory reset cantake the device out of this mode. Awarning message prompts you toconfirm the setting. A reboot isrequired to complete theconfiguration.
For more information about FIPS, seefips.
conf t host fips-mode crypto
conf t host fips-mode full
ip-filter Permits or denies communications withthe management port from specified IPaddresses. Management port IP settingdefaults to “permit any IP”. Use thissubcommand to limit management portaccess to designated IP addresses.
conf t host ip-filter deny <IP address>
conf t host ip-filter permit <IP address>
location Sets a text string that identifies thelocation of the device. The string isrestricted to 63 characters.
conf t host location <location>
lsm disable Disables the LSM without disabling httpor https. (A reboot is required after thecommand is entered.)
conf t host lsm disable
lsm enable Enables the LSM. (A reboot is requiredafter the command is entered.)
conf t host lsm enable
name Sets a text string that identifies thename of the device. The string isrestricted to 63 characters.
conf t host name <name>
conf t inspection-bypass
Enables, disables, or removes inspection bypass rules. Inspection bypass rules direct traffic through the IPS withoutinspection.
The rules are identified by an ID number that is generated by the IPS when the rule is created with the conf tinspection-bypass add command. You can view a list of current inspection bypass rules with the showinspection-bypass command.
IPS Command Line Interface Reference
40
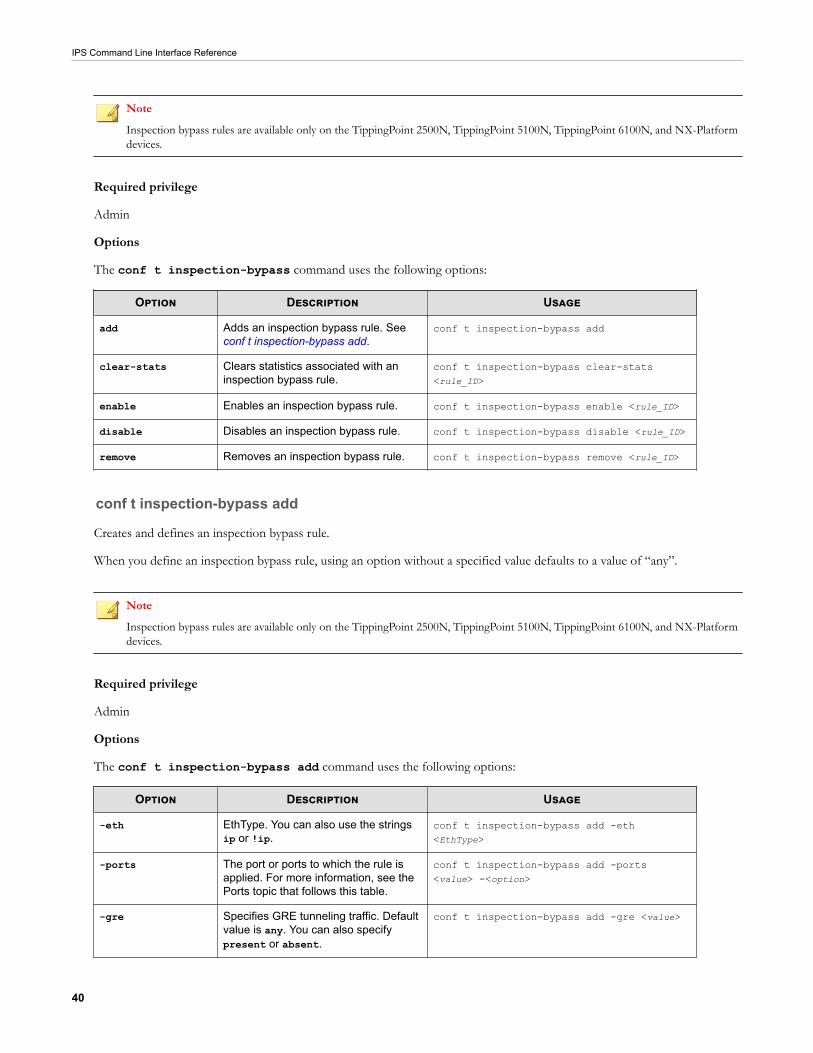
Note
Inspection bypass rules are available only on the TippingPoint 2500N, TippingPoint 5100N, TippingPoint 6100N, and NX-Platformdevices.
Required privilege
Admin
Options
The conf t inspection-bypass command uses the following options:
Option Description Usage
add Adds an inspection bypass rule. Seeconf t inspection-bypass add.
conf t inspection-bypass add
clear-stats Clears statistics associated with aninspection bypass rule.
conf t inspection-bypass clear-stats<rule_ID>
enable Enables an inspection bypass rule. conf t inspection-bypass enable <rule_ID>
disable Disables an inspection bypass rule. conf t inspection-bypass disable <rule_ID>
remove Removes an inspection bypass rule. conf t inspection-bypass remove <rule_ID>
conf t inspection-bypass add
Creates and defines an inspection bypass rule.
When you define an inspection bypass rule, using an option without a specified value defaults to a value of “any”.
Note
Inspection bypass rules are available only on the TippingPoint 2500N, TippingPoint 5100N, TippingPoint 6100N, and NX-Platformdevices.
Required privilege
Admin
Options
The conf t inspection-bypass add command uses the following options:
Option Description Usage
-eth EthType. You can also use the stringsip or !ip.
conf t inspection-bypass add -eth<EthType>
-ports The port or ports to which the rule isapplied. For more information, see thePorts topic that follows this table.
conf t inspection-bypass add -ports<value> -<option>
-gre Specifies GRE tunneling traffic. Defaultvalue is any. You can also specifypresent or absent.
conf t inspection-bypass add -gre <value>
IPS Command Line Interface Reference
41
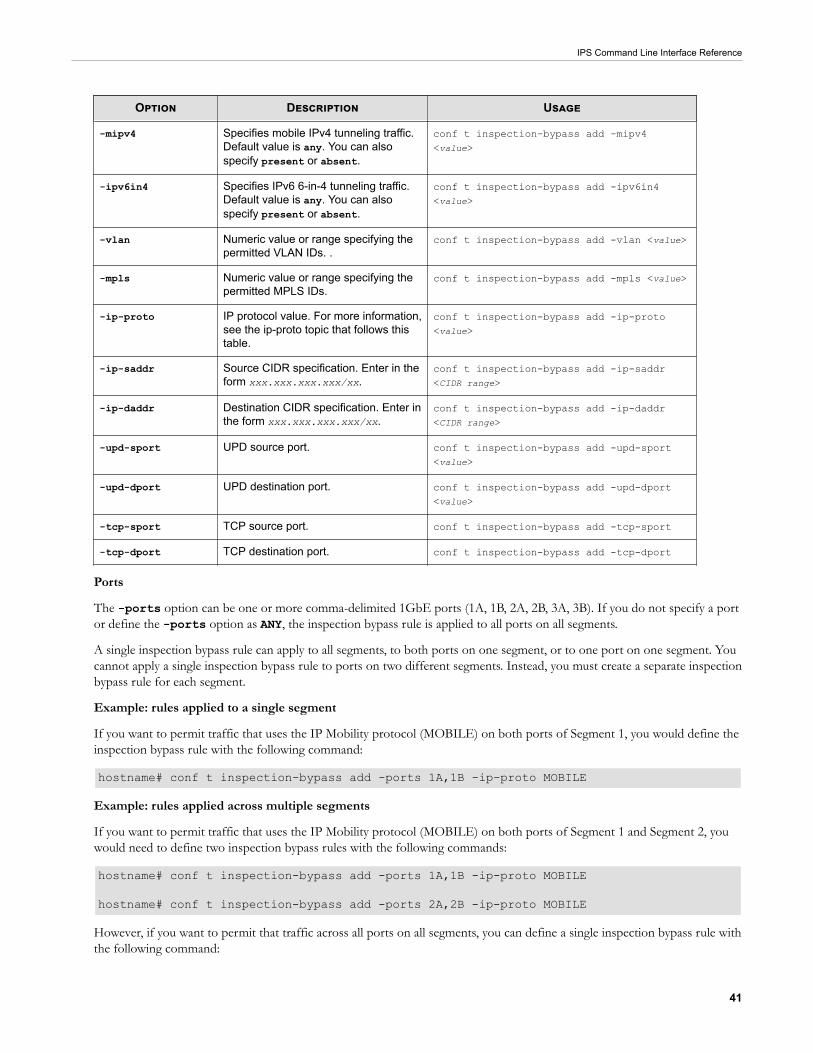
Option Description Usage
-mipv4 Specifies mobile IPv4 tunneling traffic.Default value is any. You can alsospecify present or absent.
conf t inspection-bypass add -mipv4<value>
-ipv6in4 Specifies IPv6 6-in-4 tunneling traffic.Default value is any. You can alsospecify present or absent.
conf t inspection-bypass add -ipv6in4<value>
-vlan Numeric value or range specifying thepermitted VLAN IDs. .
conf t inspection-bypass add -vlan <value>
-mpls Numeric value or range specifying thepermitted MPLS IDs.
conf t inspection-bypass add -mpls <value>
-ip-proto IP protocol value. For more information,see the ip-proto topic that follows thistable.
conf t inspection-bypass add -ip-proto<value>
-ip-saddr Source CIDR specification. Enter in theform xxx.xxx.xxx.xxx/xx.
conf t inspection-bypass add -ip-saddr<CIDR range>
-ip-daddr Destination CIDR specification. Enter inthe form xxx.xxx.xxx.xxx/xx.
conf t inspection-bypass add -ip-daddr<CIDR range>
-upd-sport UPD source port. conf t inspection-bypass add -upd-sport<value>
-upd-dport UPD destination port. conf t inspection-bypass add -upd-dport<value>
-tcp-sport TCP source port. conf t inspection-bypass add -tcp-sport
-tcp-dport TCP destination port. conf t inspection-bypass add -tcp-dport
Ports
The -ports option can be one or more comma-delimited 1GbE ports (1A, 1B, 2A, 2B, 3A, 3B). If you do not specify a portor define the -ports option as ANY, the inspection bypass rule is applied to all ports on all segments.
A single inspection bypass rule can apply to all segments, to both ports on one segment, or to one port on one segment. Youcannot apply a single inspection bypass rule to ports on two different segments. Instead, you must create a separate inspectionbypass rule for each segment.
Example: rules applied to a single segment
If you want to permit traffic that uses the IP Mobility protocol (MOBILE) on both ports of Segment 1, you would define theinspection bypass rule with the following command:
hostname# conf t inspection-bypass add -ports 1A,1B -ip-proto MOBILE
Example: rules applied across multiple segments
If you want to permit traffic that uses the IP Mobility protocol (MOBILE) on both ports of Segment 1 and Segment 2, youwould need to define two inspection bypass rules with the following commands:
hostname# conf t inspection-bypass add -ports 1A,1B -ip-proto MOBILE
hostname# conf t inspection-bypass add -ports 2A,2B -ip-proto MOBILE
However, if you want to permit that traffic across all ports on all segments, you can define a single inspection bypass rule withthe following command:
IPS Command Line Interface Reference
42
hostname# conf t inspection-bypass add -ip-proto MOBILE
When no segment is specified, the command defaults apply the inspection bypass rule to all ports on all segments.
ip-proto
A full list of IP protocol values can be found at the Internet Assigned Numbers Authority website at http://www.iana.org/assignments/protocol-numbers.
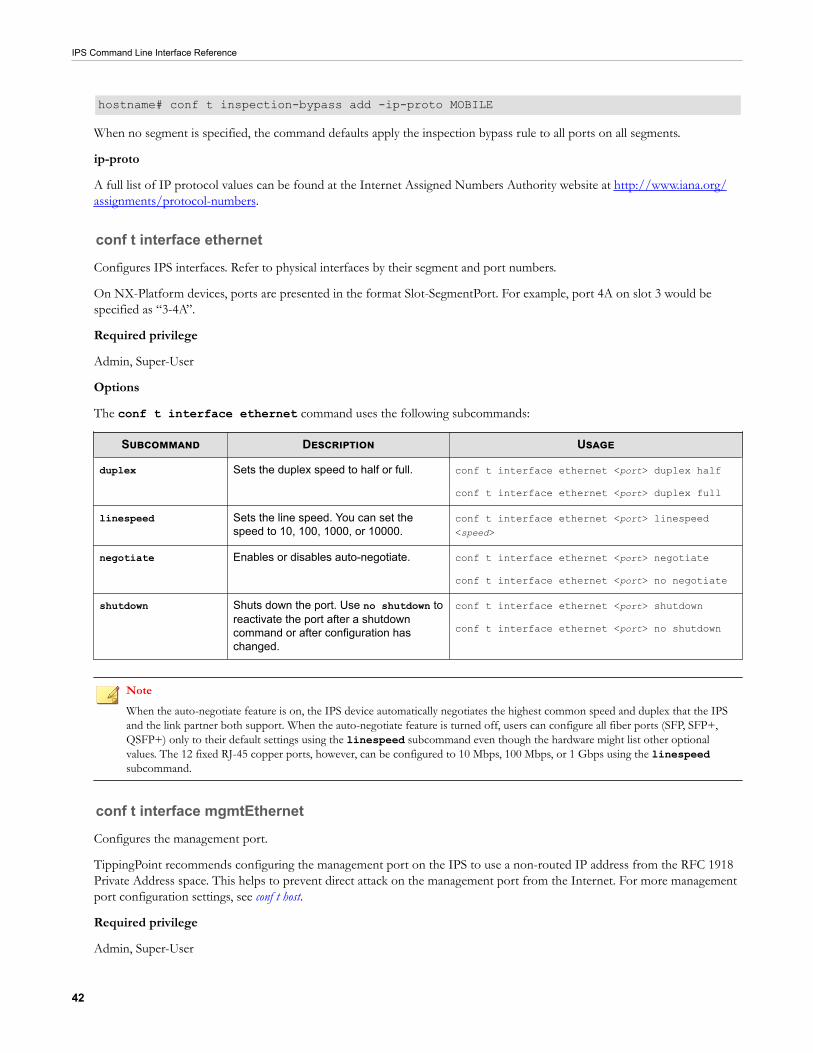
conf t interface ethernet
Configures IPS interfaces. Refer to physical interfaces by their segment and port numbers.
On NX-Platform devices, ports are presented in the format Slot-SegmentPort. For example, port 4A on slot 3 would bespecified as “3-4A”.
Required privilege
Admin, Super-User
Options
The conf t interface ethernet command uses the following subcommands:
Subcommand Description Usage
duplex Sets the duplex speed to half or full. conf t interface ethernet <port> duplex half
conf t interface ethernet <port> duplex full
linespeed Sets the line speed. You can set thespeed to 10, 100, 1000, or 10000.
conf t interface ethernet <port> linespeed<speed>
negotiate Enables or disables auto-negotiate. conf t interface ethernet <port> negotiate
conf t interface ethernet <port> no negotiate
shutdown Shuts down the port. Use no shutdown toreactivate the port after a shutdowncommand or after configuration haschanged.
conf t interface ethernet <port> shutdown
conf t interface ethernet <port> no shutdown
NoteWhen the auto-negotiate feature is on, the IPS device automatically negotiates the highest common speed and duplex that the IPSand the link partner both support. When the auto-negotiate feature is turned off, users can configure all fiber ports (SFP, SFP+,QSFP+) only to their default settings using the linespeed subcommand even though the hardware might list other optionalvalues. The 12 fixed RJ-45 copper ports, however, can be configured to 10 Mbps, 100 Mbps, or 1 Gbps using the linespeedsubcommand.
conf t interface mgmtEthernet
Configures the management port.
TippingPoint recommends configuring the management port on the IPS to use a non-routed IP address from the RFC 1918Private Address space. This helps to prevent direct attack on the management port from the Internet. For more managementport configuration settings, see conf t host.
Required privilege
Admin, Super-User
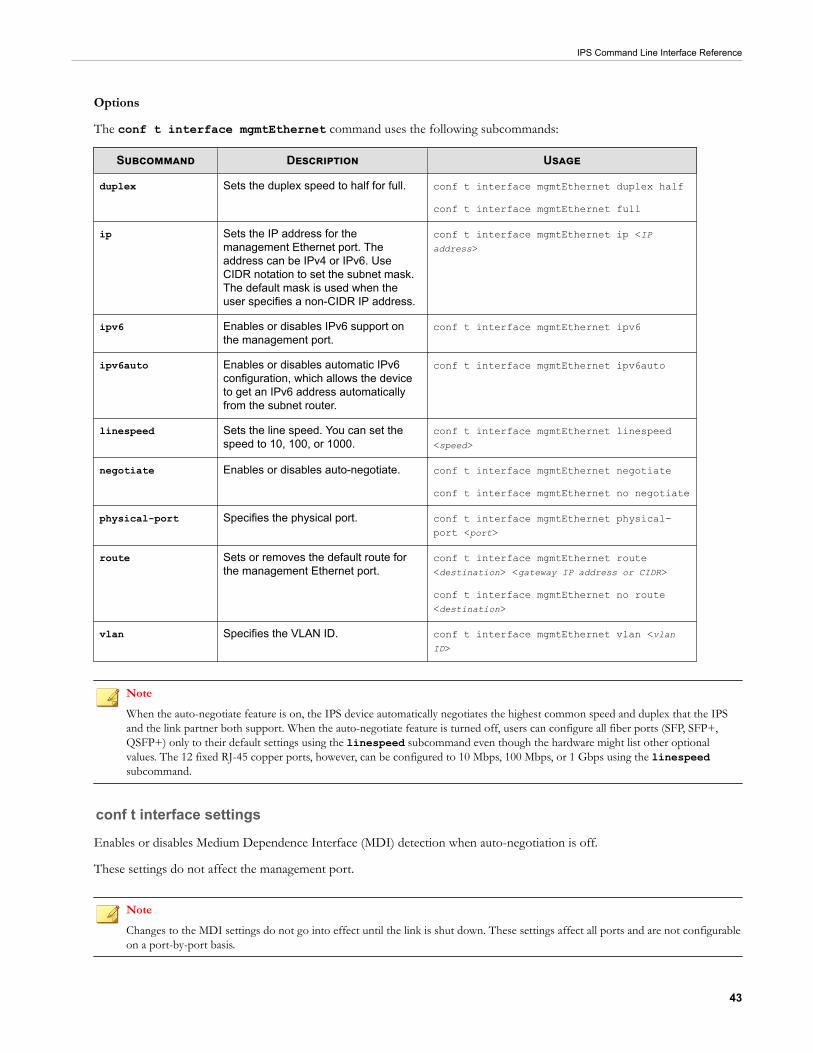
IPS Command Line Interface Reference
43
Options
The conf t interface mgmtEthernet command uses the following subcommands:
Subcommand Description Usage
duplex Sets the duplex speed to half for full. conf t interface mgmtEthernet duplex half
conf t interface mgmtEthernet full
ip Sets the IP address for themanagement Ethernet port. Theaddress can be IPv4 or IPv6. UseCIDR notation to set the subnet mask.The default mask is used when theuser specifies a non-CIDR IP address.
conf t interface mgmtEthernet ip <IPaddress>
ipv6 Enables or disables IPv6 support onthe management port.
conf t interface mgmtEthernet ipv6
ipv6auto Enables or disables automatic IPv6configuration, which allows the deviceto get an IPv6 address automaticallyfrom the subnet router.
conf t interface mgmtEthernet ipv6auto
linespeed Sets the line speed. You can set thespeed to 10, 100, or 1000.
conf t interface mgmtEthernet linespeed<speed>
negotiate Enables or disables auto-negotiate. conf t interface mgmtEthernet negotiate
conf t interface mgmtEthernet no negotiate
physical-port Specifies the physical port. conf t interface mgmtEthernet physical-port <port>
route Sets or removes the default route forthe management Ethernet port.
conf t interface mgmtEthernet route<destination> <gateway IP address or CIDR>
conf t interface mgmtEthernet no route<destination>
vlan Specifies the VLAN ID. conf t interface mgmtEthernet vlan <vlanID>
Note
When the auto-negotiate feature is on, the IPS device automatically negotiates the highest common speed and duplex that the IPSand the link partner both support. When the auto-negotiate feature is turned off, users can configure all fiber ports (SFP, SFP+,QSFP+) only to their default settings using the linespeed subcommand even though the hardware might list other optionalvalues. The 12 fixed RJ-45 copper ports, however, can be configured to 10 Mbps, 100 Mbps, or 1 Gbps using the linespeedsubcommand.
conf t interface settings
Enables or disables Medium Dependence Interface (MDI) detection when auto-negotiation is off.
These settings do not affect the management port.
Note
Changes to the MDI settings do not go into effect until the link is shut down. These settings affect all ports and are not configurableon a port-by-port basis.
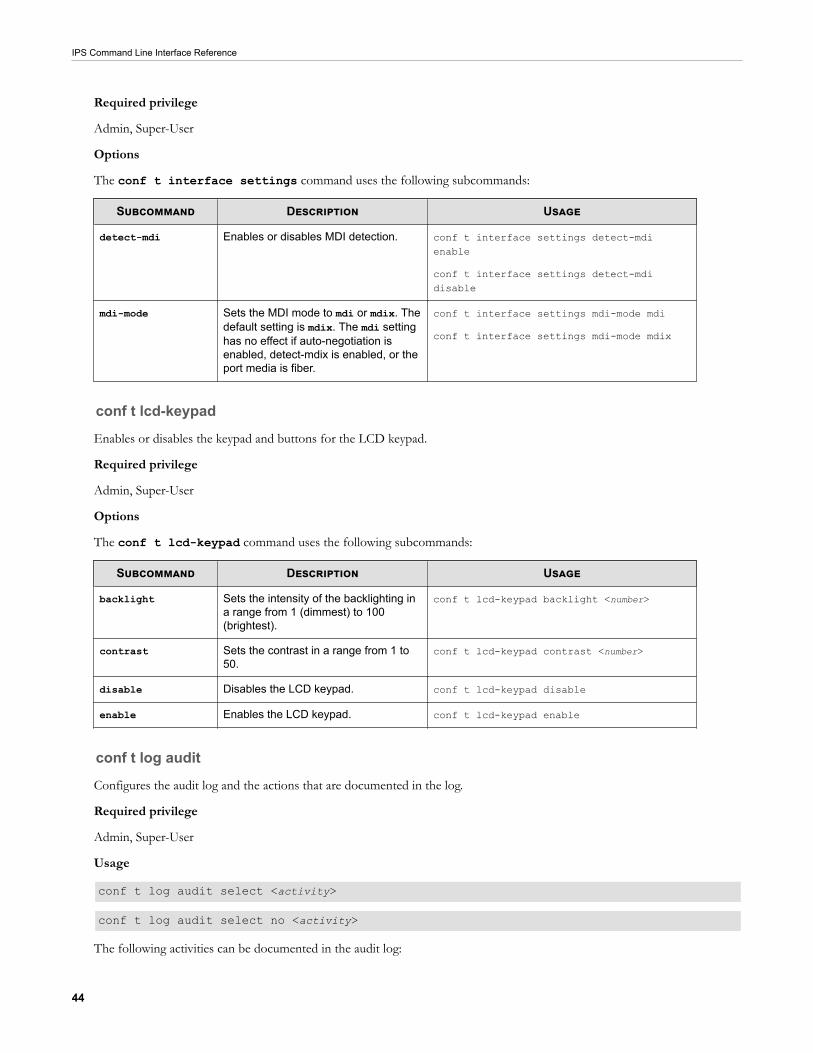
IPS Command Line Interface Reference
44
Required privilege
Admin, Super-User
Options
The conf t interface settings command uses the following subcommands:
Subcommand Description Usage
detect-mdi Enables or disables MDI detection. conf t interface settings detect-mdienable
conf t interface settings detect-mdidisable
mdi-mode Sets the MDI mode to mdi or mdix. Thedefault setting is mdix. The mdi settinghas no effect if auto-negotiation isenabled, detect-mdix is enabled, or theport media is fiber.
conf t interface settings mdi-mode mdi
conf t interface settings mdi-mode mdix
conf t lcd-keypad
Enables or disables the keypad and buttons for the LCD keypad.
Required privilege
Admin, Super-User
Options
The conf t lcd-keypad command uses the following subcommands:
Subcommand Description Usage
backlight Sets the intensity of the backlighting ina range from 1 (dimmest) to 100(brightest).
conf t lcd-keypad backlight <number>
contrast Sets the contrast in a range from 1 to50.
conf t lcd-keypad contrast <number>
disable Disables the LCD keypad. conf t lcd-keypad disable
enable Enables the LCD keypad. conf t lcd-keypad enable
conf t log audit
Configures the audit log and the actions that are documented in the log.
Required privilege
Admin, Super-User
Usage
conf t log audit select <activity>
conf t log audit select no <activity>
The following activities can be documented in the audit log:
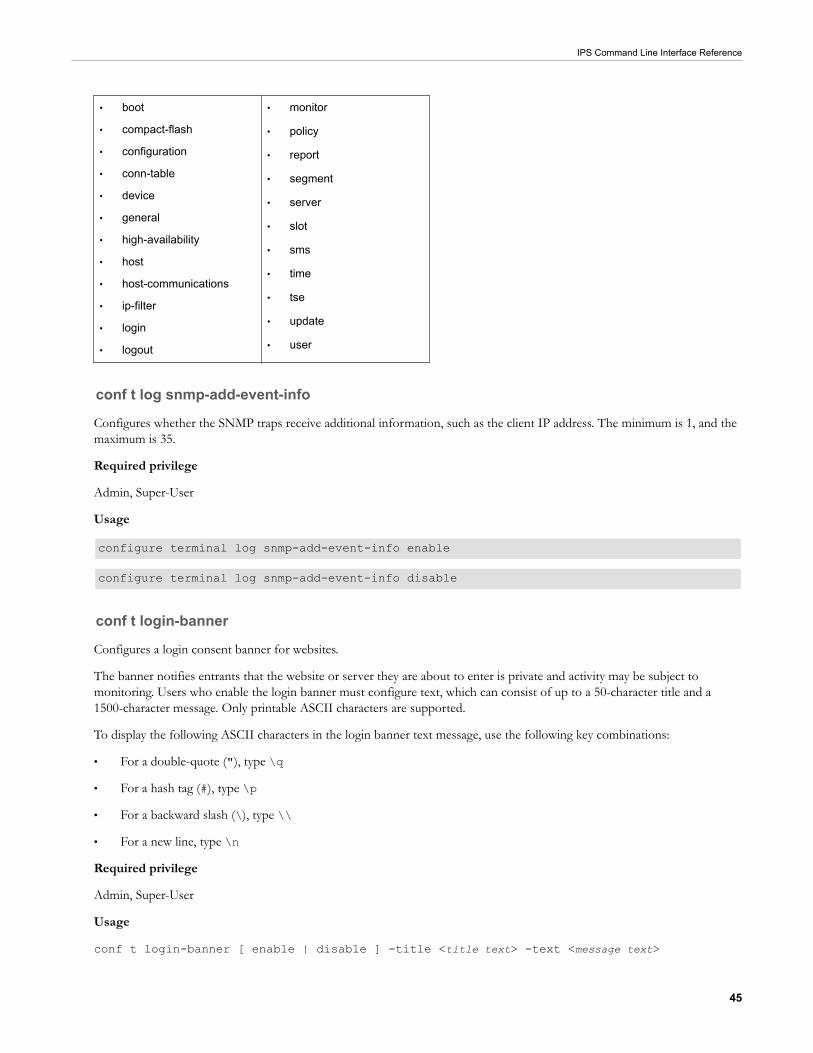
IPS Command Line Interface Reference
45
• boot
• compact-flash
• configuration
• conn-table
• device
• general
• high-availability
• host
• host-communications
• ip-filter
• login
• logout
• monitor
• policy
• report
• segment
• server
• slot
• sms
• time
• tse
• update
• user
conf t log snmp-add-event-info
Configures whether the SNMP traps receive additional information, such as the client IP address. The minimum is 1, and themaximum is 35.
Required privilege
Admin, Super-User
Usage
configure terminal log snmp-add-event-info enable
configure terminal log snmp-add-event-info disable
conf t login-banner
Configures a login consent banner for websites.
The banner notifies entrants that the website or server they are about to enter is private and activity may be subject tomonitoring. Users who enable the login banner must configure text, which can consist of up to a 50-character title and a1500-character message. Only printable ASCII characters are supported.
To display the following ASCII characters in the login banner text message, use the following key combinations:
• For a double-quote ("), type \q
• For a hash tag (#), type \p
• For a backward slash (\), type \\
• For a new line, type \n
Required privilege
Admin, Super-User
Usage
conf t login-banner [ enable | disable ] -title <title text> -text <message text>
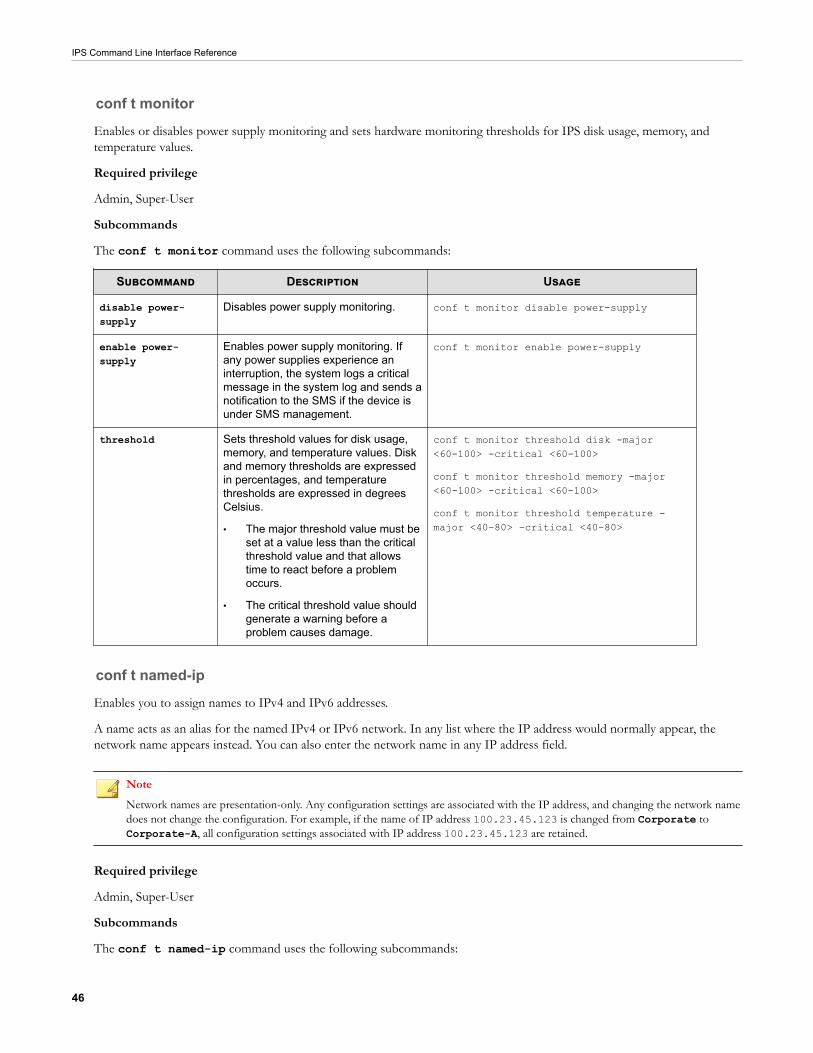
IPS Command Line Interface Reference
46
conf t monitor
Enables or disables power supply monitoring and sets hardware monitoring thresholds for IPS disk usage, memory, andtemperature values.
Required privilege
Admin, Super-User
Subcommands
The conf t monitor command uses the following subcommands:
Subcommand Description Usage
disable power-supply
Disables power supply monitoring. conf t monitor disable power-supply
enable power-supply
Enables power supply monitoring. Ifany power supplies experience aninterruption, the system logs a criticalmessage in the system log and sends anotification to the SMS if the device isunder SMS management.
conf t monitor enable power-supply
threshold Sets threshold values for disk usage,memory, and temperature values. Diskand memory thresholds are expressedin percentages, and temperaturethresholds are expressed in degreesCelsius.
• The major threshold value must beset at a value less than the criticalthreshold value and that allowstime to react before a problemoccurs.
• The critical threshold value shouldgenerate a warning before aproblem causes damage.
conf t monitor threshold disk -major<60-100> -critical <60-100>
conf t monitor threshold memory -major<60-100> -critical <60-100>
conf t monitor threshold temperature -major <40-80> -critical <40-80>
conf t named-ip
Enables you to assign names to IPv4 and IPv6 addresses.
A name acts as an alias for the named IPv4 or IPv6 network. In any list where the IP address would normally appear, thenetwork name appears instead. You can also enter the network name in any IP address field.
NoteNetwork names are presentation-only. Any configuration settings are associated with the IP address, and changing the network namedoes not change the configuration. For example, if the name of IP address 100.23.45.123 is changed from Corporate toCorporate-A, all configuration settings associated with IP address 100.23.45.123 are retained.
Required privilege
Admin, Super-User
Subcommands
The conf t named-ip command uses the following subcommands:
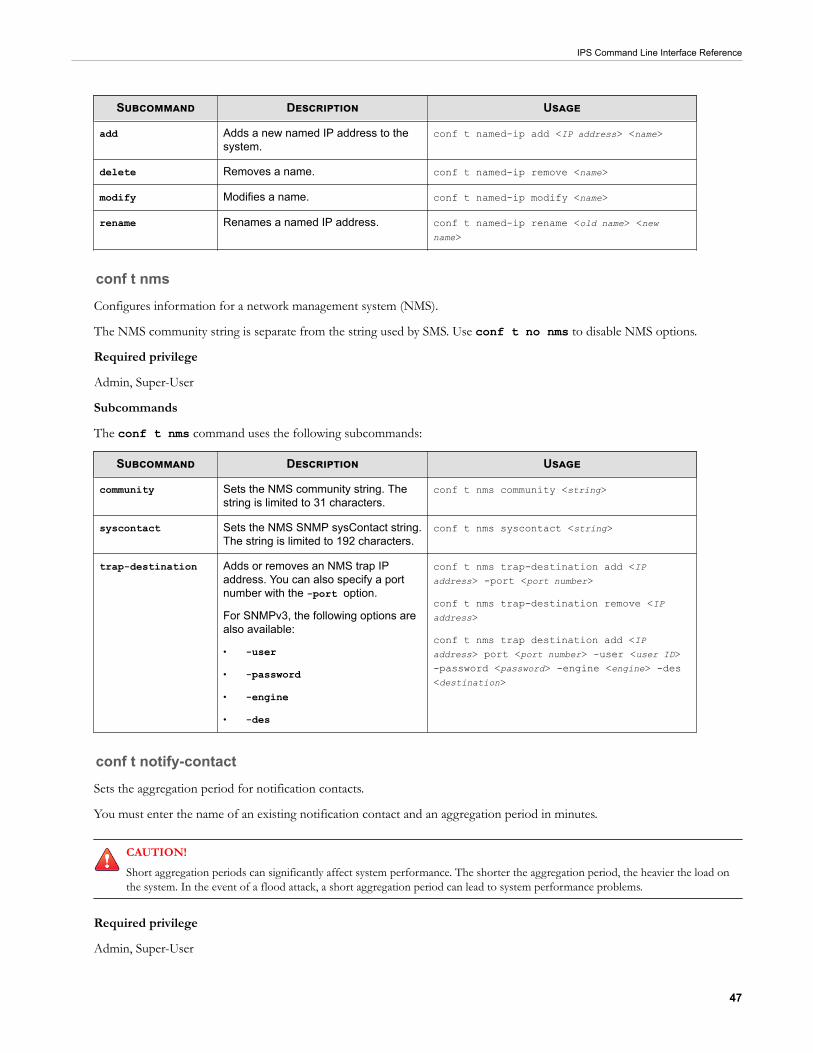
IPS Command Line Interface Reference
47
Subcommand Description Usage
add Adds a new named IP address to thesystem.
conf t named-ip add <IP address> <name>
delete Removes a name. conf t named-ip remove <name>
modify Modifies a name. conf t named-ip modify <name>
rename Renames a named IP address. conf t named-ip rename <old name> <newname>
conf t nmsConfigures information for a network management system (NMS).
The NMS community string is separate from the string used by SMS. Use conf t no nms to disable NMS options.
Required privilege
Admin, Super-User
Subcommands
The conf t nms command uses the following subcommands:
Subcommand Description Usage
community Sets the NMS community string. Thestring is limited to 31 characters.
conf t nms community <string>
syscontact Sets the NMS SNMP sysContact string.The string is limited to 192 characters.
conf t nms syscontact <string>
trap-destination Adds or removes an NMS trap IPaddress. You can also specify a portnumber with the -port option.
For SNMPv3, the following options arealso available:
• -user
• -password
• -engine
• -des
conf t nms trap-destination add <IPaddress> -port <port number>
conf t nms trap-destination remove <IPaddress>
conf t nms trap destination add <IPaddress> port <port number> -user <user ID>-password <password> -engine <engine> -des<destination>
conf t notify-contactSets the aggregation period for notification contacts.
You must enter the name of an existing notification contact and an aggregation period in minutes.
CAUTION!Short aggregation periods can significantly affect system performance. The shorter the aggregation period, the heavier the load onthe system. In the event of a flood attack, a short aggregation period can lead to system performance problems.
Required privilege
Admin, Super-User

IPS Command Line Interface Reference
48
Usage
conf t notify-contact <contact name> <aggregation period>
conf t ntp
Configures NTP timekeeping options.
CAUTION!Using external NTP servers could possibly make your IPS susceptible to a man-in-the-middle attack. It is more secure to use anNTP server on a local, protected network.
Required privilege
Admin, Super-User
Options
The conf t ntp command uses the following options:
Subcommand Description Usage
add-key Adds a key for authenticating. Optionsinclude:
• -index: the Key ID, required forauthentication, as a unique integervalue ranging from 1–65535 thatone or more servers reference.
• -value: the authenticationpassword string ranging from 1–32characters.
conf t ntp add-key -index <number> -value<string>
add-server Adds a server for authenticating.Options include:
• -host: specifies the hostname orIP address of the NTP server.
• -index: references the defined keyfor authentication.
• -version: (optional) indicates theversion of the NTP protocol that isrunning on the server. Default is 3.
• -preferred: (optional) indicateswhether this is the preferredserver. Default is no.
• -auth: enables or disablesauthentication. Default is disable.
conf t ntp add-server -host <host> -index<number> -version <number> -preferred [ yes| no ] -auth [ enable | disable ]
-polling period The -polling period option isspecified in 16, 32, or 64 seconds.Default is 16.
conf t ntp -polling-period [16|32|64]
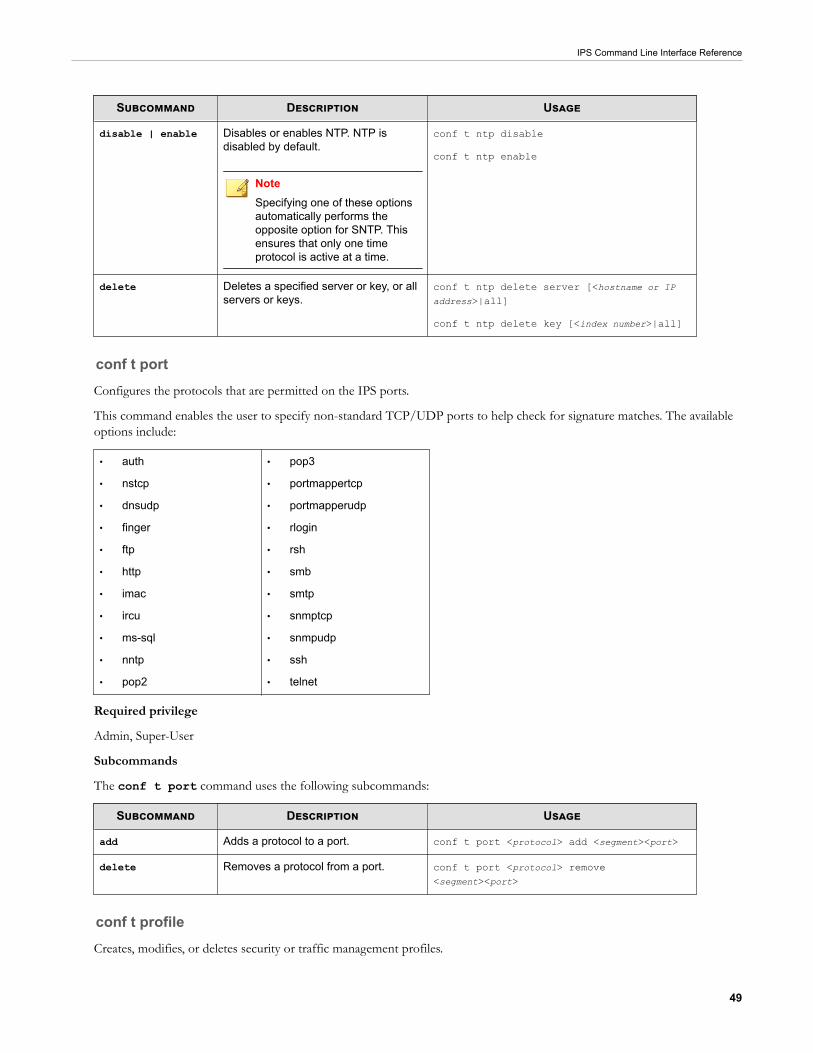
IPS Command Line Interface Reference
49
Subcommand Description Usage
disable | enable Disables or enables NTP. NTP isdisabled by default.
NoteSpecifying one of these optionsautomatically performs theopposite option for SNTP. Thisensures that only one timeprotocol is active at a time.
conf t ntp disable
conf t ntp enable
delete Deletes a specified server or key, or allservers or keys.
conf t ntp delete server [<hostname or IPaddress>|all]
conf t ntp delete key [<index number>|all]
conf t portConfigures the protocols that are permitted on the IPS ports.
This command enables the user to specify non-standard TCP/UDP ports to help check for signature matches. The availableoptions include:
• auth
• nstcp
• dnsudp
• finger
• ftp
• http
• imac
• ircu
• ms-sql
• nntp
• pop2
• pop3
• portmappertcp
• portmapperudp
• rlogin
• rsh
• smb
• smtp
• snmptcp
• snmpudp
• ssh
• telnet
Required privilege
Admin, Super-User
Subcommands
The conf t port command uses the following subcommands:
Subcommand Description Usage
add Adds a protocol to a port. conf t port <protocol> add <segment><port>
delete Removes a protocol from a port. conf t port <protocol> remove<segment><port>
conf t profileCreates, modifies, or deletes security or traffic management profiles.

IPS Command Line Interface Reference
50
NoteIf you use an SMS to configure your profiles or devices with any UTF-8 encoding, make sure that you have UTF-8 encoding enabledfor the web browser you use to launch the LSM interface and the terminal emulator you use to launch the command line interface.
Required privilege
Admin, Super-User
Subcommands
The conf t profile command uses the following subcommands:
Subcommand Description Usage
add-pair Adds a port pairing to a profile. conf t profile <profile name> add-pair<port pair>
client-ip Enables or disables a client IP addresson a profile.
conf t profile client-ip enable
conf t profile client-ip disable
delete Deletes an existing profile. conf t profile <profile name> delete
description Enters a description string for theprofile.
conf t profile <profile name> description"<description>"
deployment Sets the deployment mode.Deployment modes offer increasedflexibility for filter settings. TippingPointprovides recommended settingscustomized for different deploymenttypes, including Core, Edge, orPerimeter. Use show deployment-choices to see your options.
conf t profile deployment core
conf t profile deployment edge
conf t profile deployment perimeter
conf t profile deployment default
http-context Enables or disables HTTP URIinformation to identify the name of aweb resource.
conf t profile http-context enable
conf t profile http-context disable
remove-pair Removes a port pairing from a profile. conf t profile <profile name> remove-pair<port pair>
rename Renames a profile. conf t profile <profile name> rename <newprofile name>
security Creates a security profile. You can adda description string with the -description option.
conf t profile <profile name> security
conf t profile <profile name> security -description"<description>"
traffic-mgmt Creates a traffic management profile.You can add a description string withthe -description option.
conf t profile <profile name> traffic-mgmt
conf t profile <profile name> traffic-mgmt-description "<description>"
conf t protection-settingsCreates global exceptions and apply-only restrictions for Application Protection, Infrastructure Protection, and PerformanceProtection filters.
You must specify the profile to which the settings apply.
Required privilege

IPS Command Line Interface Reference
51
Admin, Super-User
Subcommands
The conf t protection-settings command uses the following subcommands:
Subcommand Description Usage
app-except Adds or removes a global exception forApplication Protection andInfrastructure Protection filters.
conf t protection-settings app-except add<source IP address> <destination IP address> -profile <profile name>
conf t protection-settings app-exceptremove <source IP address> <destination IPaddress> -profile <profile name>
app-limit Adds or removes an apply-onlyrestriction for Application Protectionand Infrastructure Protection filters.
conf t protection-settings app-limit add<source IP address> <destination IP address> -profile <profile name>
conf t protection-settings app-limitremove <source IP address> <destination IPaddress> -profile <profile name>
dns-except Adds or removes a DNS exception forApplication Protection andInfrastructure Protection filters.
conf t protection-settings dns-except add<DNS> -profile <profile name>
conf t protection-settings dns-exceptremove <DNS> -profile <profile name>
ip-except Adds or removes an IP addressexception for Application Protectionand Infrastructure Protection filters.This exception applies to source anddestination IP addresses.
conf t protection-settings ip-except add<IP address> -profile <profile name>
conf t protection-settings ip-exceptremove <IP address> -profile <profile name>
perf-limit Adds or removes an apply-onlyrestriction for Performance Protectionfilters.
conf t protection-settings perf-limit add<source IP address> <destination IP address> -profile <profile name>
conf t protection-settings perf-limitremove <source IP address> <destination IPaddress> -profile <profile name>
conf t radius-server
Configures a RADIUS server to be used for remote authentication for the device.
Required privilege
Super-User
Subcommands
The conf t radius-server command uses the following subcommands:
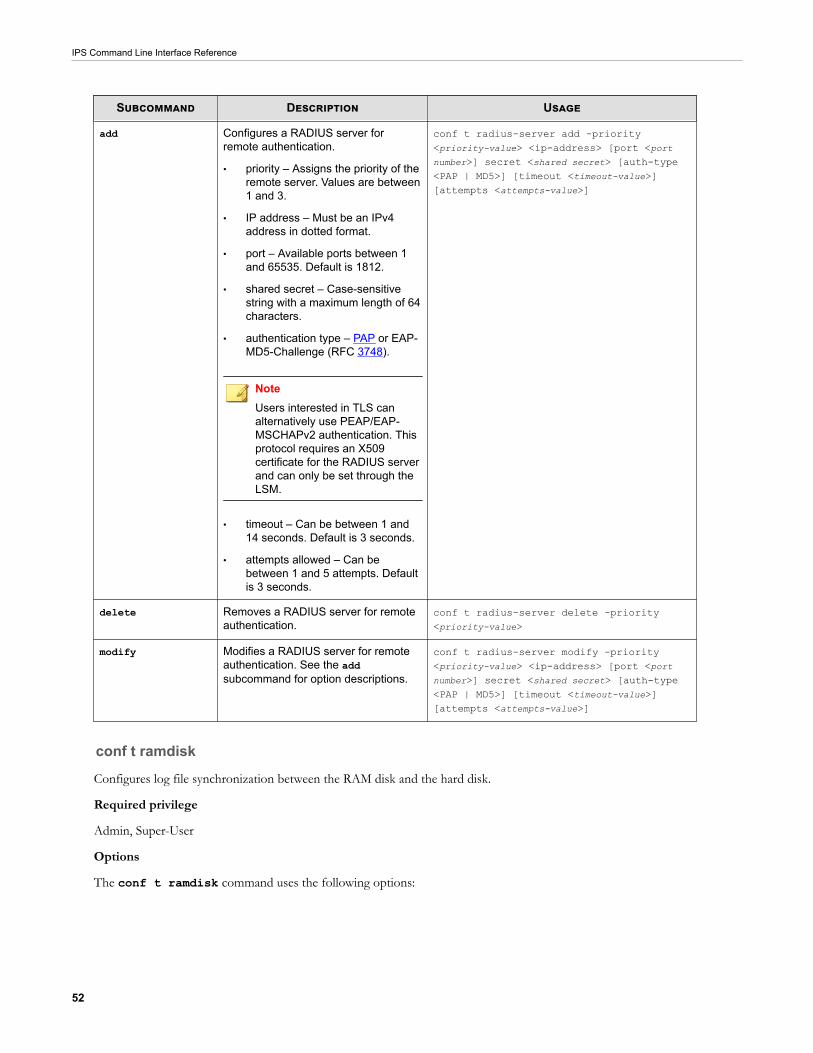
IPS Command Line Interface Reference
52
Subcommand Description Usage
add Configures a RADIUS server forremote authentication.
• priority – Assigns the priority of theremote server. Values are between1 and 3.
• IP address – Must be an IPv4address in dotted format.
• port – Available ports between 1and 65535. Default is 1812.
• shared secret – Case-sensitivestring with a maximum length of 64characters.
• authentication type – PAP or EAP-MD5-Challenge (RFC 3748).
NoteUsers interested in TLS canalternatively use PEAP/EAP-MSCHAPv2 authentication. Thisprotocol requires an X509certificate for the RADIUS serverand can only be set through theLSM.
• timeout – Can be between 1 and14 seconds. Default is 3 seconds.
• attempts allowed – Can bebetween 1 and 5 attempts. Defaultis 3 seconds.
conf t radius-server add -priority<priority-value> <ip-address> [port <portnumber>] secret <shared secret> [auth-type<PAP | MD5>] [timeout <timeout-value>][attempts <attempts-value>]
delete Removes a RADIUS server for remoteauthentication.
conf t radius-server delete -priority<priority-value>
modify Modifies a RADIUS server for remoteauthentication. See the addsubcommand for option descriptions.
conf t radius-server modify -priority<priority-value> <ip-address> [port <portnumber>] secret <shared secret> [auth-type<PAP | MD5>] [timeout <timeout-value>][attempts <attempts-value>]
conf t ramdisk
Configures log file synchronization between the RAM disk and the hard disk.
Required privilege
Admin, Super-User
Options
The conf t ramdisk command uses the following options:

IPS Command Line Interface Reference
53
Subcommand Description Usage
force-sync Immediately synchronizes the RAMdisk with the hard disk. You cansynchronize all files, or specify alert,audit, block, or sys.
conf t ramdisk force-sync all
conf t ramdisk force-sync <file>
sync-interval Sets the synchronization interval inseconds. With a value of 0 (zero), allwrites are immediately written to thehard disk. With a value of -1, the file iswritten to the hard disk when a conf tramdisk force-sync command isexecuted, the device is rebooted orhalted, or when the device enters highavailability fallback mode.
You must specify alert, audit, block,or sys.
conf t ramdisk sync-interval <file>
conf t remote-syslog
Configures a remote recipient of IPS attack and block messages in syslog format.
Many operating systems provide the ability to receive remote syslog messages, and third-party remove syslog packages are alsoavailable.
Note
Designating a remote syslog server does not automatically send attack and block notifications to that server. You must also select theRemote System Log contact by going to the Filters/Vulnerability filters/Action Sets area in the LSM and either creating or editing anaction set. After you apply these changes, active filters that are associated with this action set will send remote messages to thedesignated server.
CAUTION!
Use remote syslog only on a secure, trusted network. Remote syslog, in adherence to RFC 3164, sends clear text log messages usingthe UDP protocol. It does not offer any additional security protections. You should not use remote syslog unless you can be surethat syslog messages will not be intercepted, altered, or spoofed by a third party.
Required privilege
Admin, Super-User
Options
The conf t remote-syslog command uses the following subcommands:
Subcommand Description Usage
add-event-info Enables or disables additionalinformation, including client IP address,on the remote syslog.
conf t remote-syslog add-event-info enable
conf t remote-syslog add-event-infodisable
audit Enables or disables remote syslog forthe Audit log.
conf t remote-syslog audit <IP address> -port <port>
conf t remote-syslog no audit
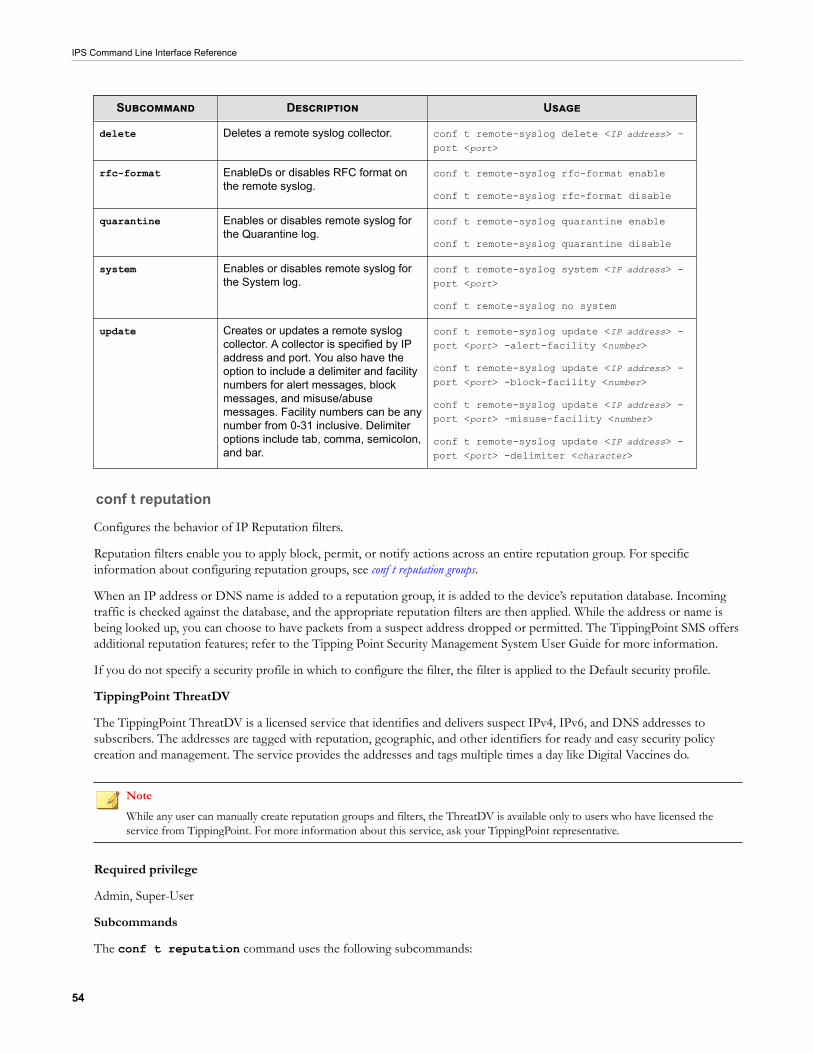
IPS Command Line Interface Reference
54
Subcommand Description Usage
delete Deletes a remote syslog collector. conf t remote-syslog delete <IP address> -port <port>
rfc-format EnableDs or disables RFC format onthe remote syslog.
conf t remote-syslog rfc-format enable
conf t remote-syslog rfc-format disable
quarantine Enables or disables remote syslog forthe Quarantine log.
conf t remote-syslog quarantine enable
conf t remote-syslog quarantine disable
system Enables or disables remote syslog forthe System log.
conf t remote-syslog system <IP address> -port <port>
conf t remote-syslog no system
update Creates or updates a remote syslogcollector. A collector is specified by IPaddress and port. You also have theoption to include a delimiter and facilitynumbers for alert messages, blockmessages, and misuse/abusemessages. Facility numbers can be anynumber from 0-31 inclusive. Delimiteroptions include tab, comma, semicolon,and bar.
conf t remote-syslog update <IP address> -port <port> -alert-facility <number>
conf t remote-syslog update <IP address> -port <port> -block-facility <number>
conf t remote-syslog update <IP address> -port <port> -misuse-facility <number>
conf t remote-syslog update <IP address> -port <port> -delimiter <character>
conf t reputation
Configures the behavior of IP Reputation filters.
Reputation filters enable you to apply block, permit, or notify actions across an entire reputation group. For specificinformation about configuring reputation groups, see conf t reputation groups.
When an IP address or DNS name is added to a reputation group, it is added to the device’s reputation database. Incomingtraffic is checked against the database, and the appropriate reputation filters are then applied. While the address or name isbeing looked up, you can choose to have packets from a suspect address dropped or permitted. The TippingPoint SMS offersadditional reputation features; refer to the Tipping Point Security Management System User Guide for more information.
If you do not specify a security profile in which to configure the filter, the filter is applied to the Default security profile.
TippingPoint ThreatDV
The TippingPoint ThreatDV is a licensed service that identifies and delivers suspect IPv4, IPv6, and DNS addresses tosubscribers. The addresses are tagged with reputation, geographic, and other identifiers for ready and easy security policycreation and management. The service provides the addresses and tags multiple times a day like Digital Vaccines do.
Note
While any user can manually create reputation groups and filters, the ThreatDV is available only to users who have licensed theservice from TippingPoint. For more information about this service, ask your TippingPoint representative.
Required privilege
Admin, Super-User
Subcommands
The conf t reputation command uses the following subcommands:
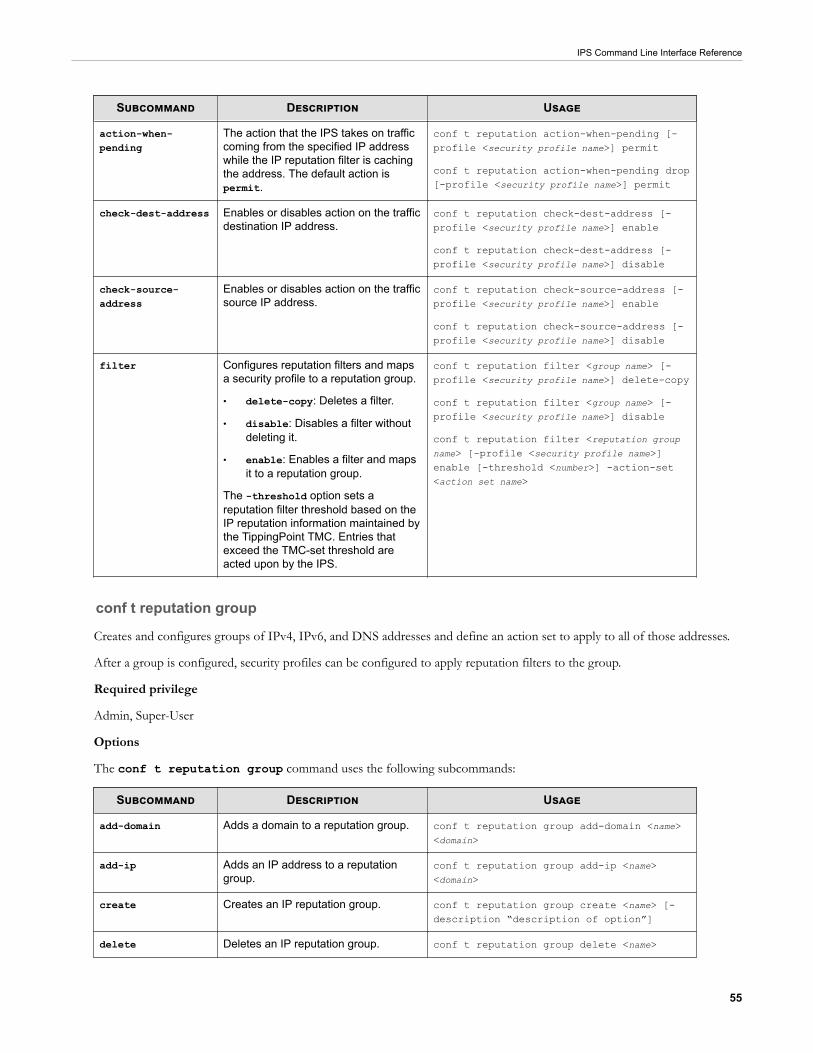
IPS Command Line Interface Reference
55
Subcommand Description Usage
action-when-pending
The action that the IPS takes on trafficcoming from the specified IP addresswhile the IP reputation filter is cachingthe address. The default action ispermit.
conf t reputation action-when-pending [-profile <security profile name>] permit
conf t reputation action-when-pending drop[-profile <security profile name>] permit
check-dest-address Enables or disables action on the trafficdestination IP address.
conf t reputation check-dest-address [-profile <security profile name>] enable
conf t reputation check-dest-address [-profile <security profile name>] disable
check-source-address
Enables or disables action on the trafficsource IP address.
conf t reputation check-source-address [-profile <security profile name>] enable
conf t reputation check-source-address [-profile <security profile name>] disable
filter Configures reputation filters and mapsa security profile to a reputation group.
• delete-copy: Deletes a filter.
• disable: Disables a filter withoutdeleting it.
• enable: Enables a filter and mapsit to a reputation group.
The -threshold option sets areputation filter threshold based on theIP reputation information maintained bythe TippingPoint TMC. Entries thatexceed the TMC-set threshold areacted upon by the IPS.
conf t reputation filter <group name> [-profile <security profile name>] delete-copy
conf t reputation filter <group name> [-profile <security profile name>] disable
conf t reputation filter <reputation groupname> [-profile <security profile name>]enable [-threshold <number>] -action-set<action set name>
conf t reputation group
Creates and configures groups of IPv4, IPv6, and DNS addresses and define an action set to apply to all of those addresses.
After a group is configured, security profiles can be configured to apply reputation filters to the group.
Required privilege
Admin, Super-User
Options
The conf t reputation group command uses the following subcommands:
Subcommand Description Usage
add-domain Adds a domain to a reputation group. conf t reputation group add-domain <name><domain>
add-ip Adds an IP address to a reputationgroup.
conf t reputation group add-ip <name><domain>
create Creates an IP reputation group. conf t reputation group create <name> [-description “description of option”]
delete Deletes an IP reputation group. conf t reputation group delete <name>
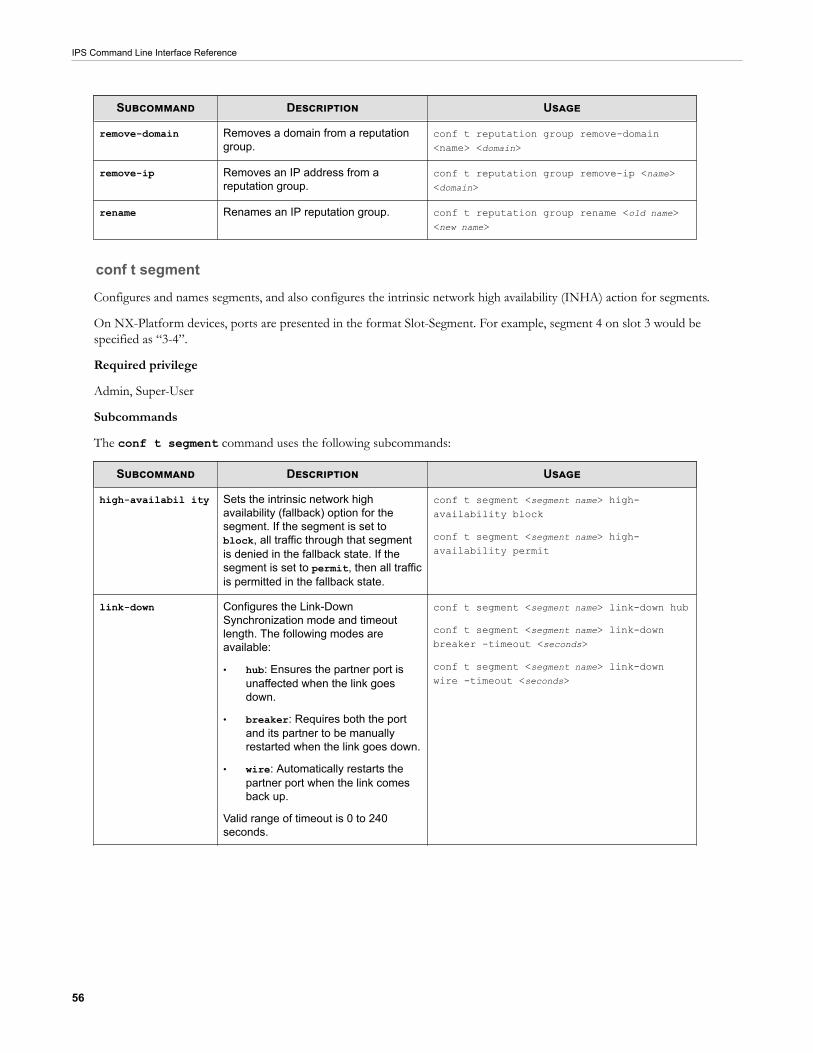
IPS Command Line Interface Reference
56
Subcommand Description Usage
remove-domain Removes a domain from a reputationgroup.
conf t reputation group remove-domain<name> <domain>
remove-ip Removes an IP address from areputation group.
conf t reputation group remove-ip <name><domain>
rename Renames an IP reputation group. conf t reputation group rename <old name><new name>
conf t segment
Configures and names segments, and also configures the intrinsic network high availability (INHA) action for segments.
On NX-Platform devices, ports are presented in the format Slot-Segment. For example, segment 4 on slot 3 would bespecified as “3-4”.
Required privilege
Admin, Super-User
Subcommands
The conf t segment command uses the following subcommands:
Subcommand Description Usage
high-availabil ity Sets the intrinsic network highavailability (fallback) option for thesegment. If the segment is set toblock, all traffic through that segmentis denied in the fallback state. If thesegment is set to permit, then all trafficis permitted in the fallback state.
conf t segment <segment name> high-availability block
conf t segment <segment name> high-availability permit
link-down Configures the Link-DownSynchronization mode and timeoutlength. The following modes areavailable:
• hub: Ensures the partner port isunaffected when the link goesdown.
• breaker: Requires both the portand its partner to be manuallyrestarted when the link goes down.
• wire: Automatically restarts thepartner port when the link comesback up.
Valid range of timeout is 0 to 240seconds.
conf t segment <segment name> link-down hub
conf t segment <segment name> link-downbreaker -timeout <seconds>
conf t segment <segment name> link-downwire -timeout <seconds>
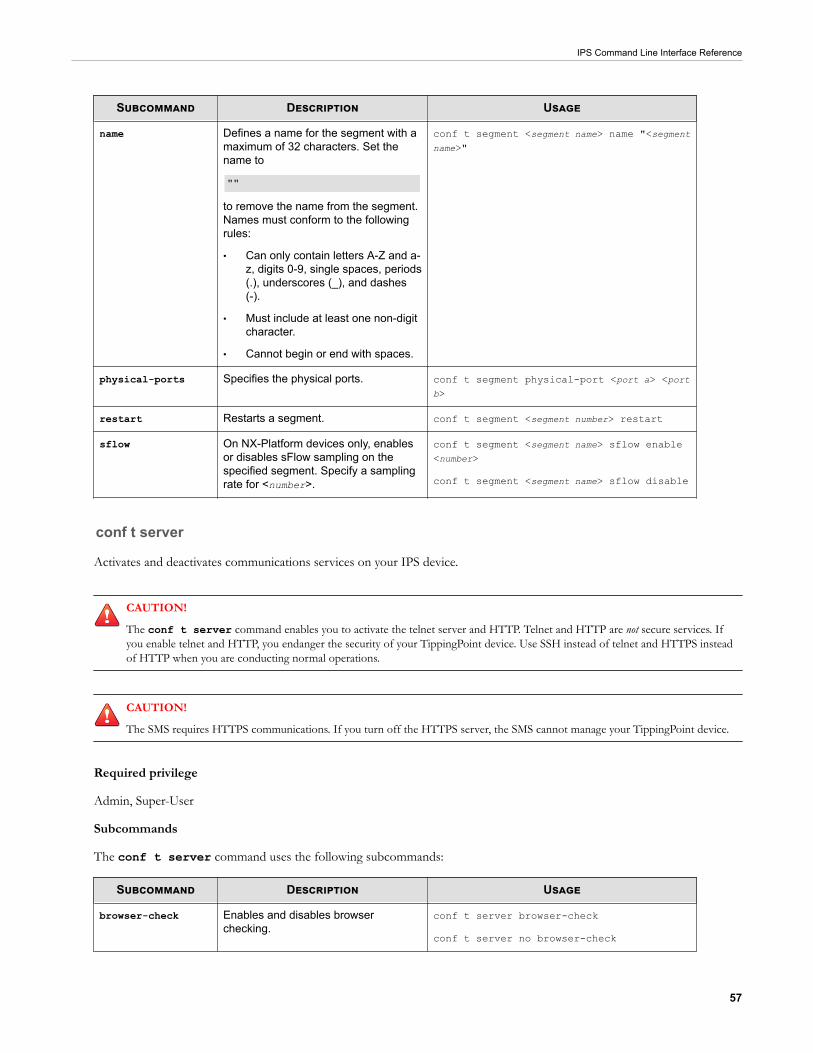
IPS Command Line Interface Reference
57
Subcommand Description Usage
name Defines a name for the segment with amaximum of 32 characters. Set thename to
""
to remove the name from the segment.Names must conform to the followingrules:
• Can only contain letters A-Z and a-z, digits 0-9, single spaces, periods(.), underscores (_), and dashes(-).
• Must include at least one non-digitcharacter.
• Cannot begin or end with spaces.
conf t segment <segment name> name "<segmentname>"
physical-ports Specifies the physical ports. conf t segment physical-port <port a> <portb>
restart Restarts a segment. conf t segment <segment number> restart
sflow On NX-Platform devices only, enablesor disables sFlow sampling on thespecified segment. Specify a samplingrate for <number>.
conf t segment <segment name> sflow enable<number>
conf t segment <segment name> sflow disable
conf t server
Activates and deactivates communications services on your IPS device.
CAUTION!
The conf t server command enables you to activate the telnet server and HTTP. Telnet and HTTP are not secure services. Ifyou enable telnet and HTTP, you endanger the security of your TippingPoint device. Use SSH instead of telnet and HTTPS insteadof HTTP when you are conducting normal operations.
CAUTION!
The SMS requires HTTPS communications. If you turn off the HTTPS server, the SMS cannot manage your TippingPoint device.
Required privilege
Admin, Super-User
Subcommands
The conf t server command uses the following subcommands:
Subcommand Description Usage
browser-check Enables and disables browserchecking.
conf t server browser-check
conf t server no browser-check
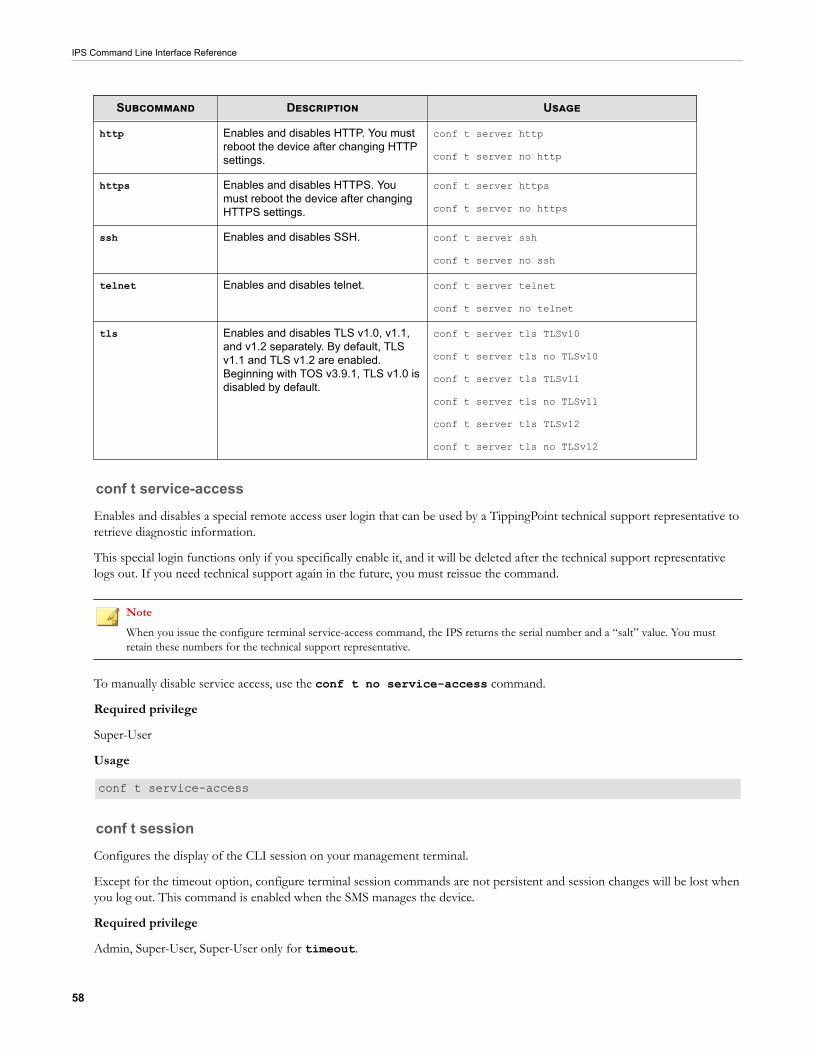
IPS Command Line Interface Reference
58
Subcommand Description Usage
http Enables and disables HTTP. You mustreboot the device after changing HTTPsettings.
conf t server http
conf t server no http
https Enables and disables HTTPS. Youmust reboot the device after changingHTTPS settings.
conf t server https
conf t server no https
ssh Enables and disables SSH. conf t server ssh
conf t server no ssh
telnet Enables and disables telnet. conf t server telnet
conf t server no telnet
tls Enables and disables TLS v1.0, v1.1,and v1.2 separately. By default, TLSv1.1 and TLS v1.2 are enabled.Beginning with TOS v3.9.1, TLS v1.0 isdisabled by default.
conf t server tls TLSv10
conf t server tls no TLSv10
conf t server tls TLSv11
conf t server tls no TLSv11
conf t server tls TLSv12
conf t server tls no TLSv12
conf t service-access
Enables and disables a special remote access user login that can be used by a TippingPoint technical support representative toretrieve diagnostic information.
This special login functions only if you specifically enable it, and it will be deleted after the technical support representativelogs out. If you need technical support again in the future, you must reissue the command.
NoteWhen you issue the configure terminal service-access command, the IPS returns the serial number and a “salt” value. You mustretain these numbers for the technical support representative.
To manually disable service access, use the conf t no service-access command.
Required privilege
Super-User
Usage
conf t service-access
conf t session
Configures the display of the CLI session on your management terminal.
Except for the timeout option, configure terminal session commands are not persistent and session changes will be lost whenyou log out. This command is enabled when the SMS manages the device.
Required privilege
Admin, Super-User, Super-User only for timeout.
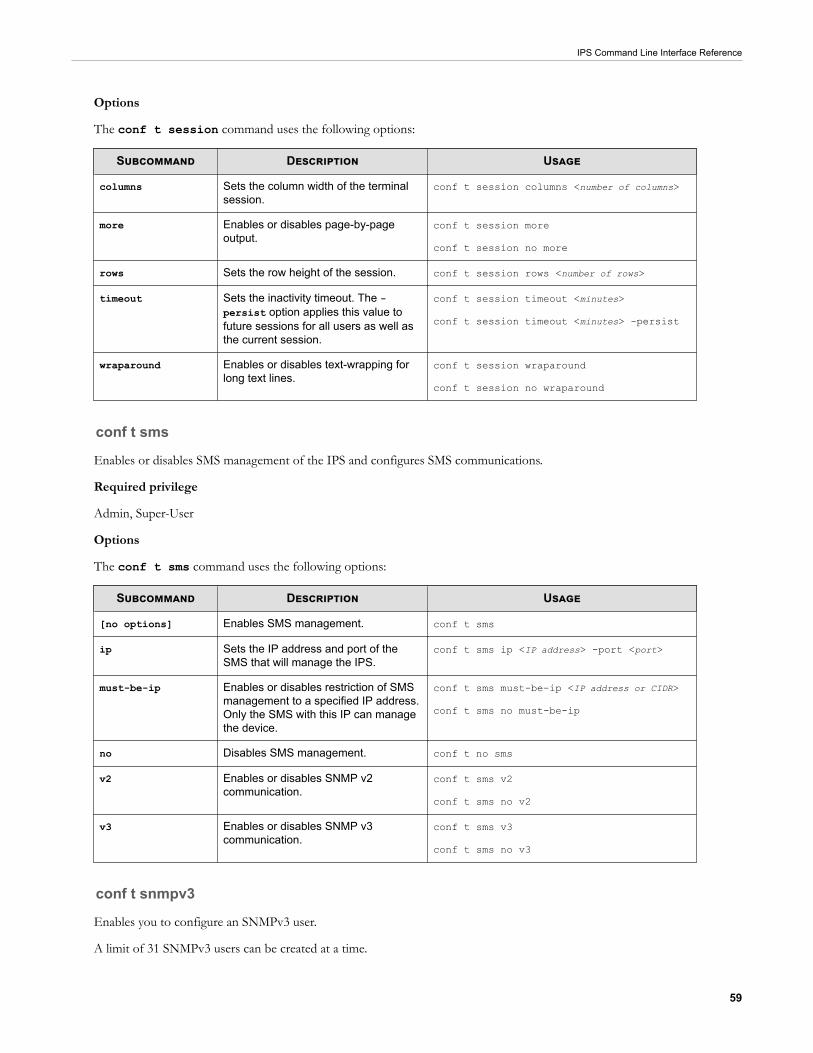
IPS Command Line Interface Reference
59
Options
The conf t session command uses the following options:
Subcommand Description Usage
columns Sets the column width of the terminalsession.
conf t session columns <number of columns>
more Enables or disables page-by-pageoutput.
conf t session more
conf t session no more
rows Sets the row height of the session. conf t session rows <number of rows>
timeout Sets the inactivity timeout. The -persist option applies this value tofuture sessions for all users as well asthe current session.
conf t session timeout <minutes>
conf t session timeout <minutes> -persist
wraparound Enables or disables text-wrapping forlong text lines.
conf t session wraparound
conf t session no wraparound
conf t sms
Enables or disables SMS management of the IPS and configures SMS communications.
Required privilege
Admin, Super-User
Options
The conf t sms command uses the following options:
Subcommand Description Usage
[no options] Enables SMS management. conf t sms
ip Sets the IP address and port of theSMS that will manage the IPS.
conf t sms ip <IP address> -port <port>
must-be-ip Enables or disables restriction of SMSmanagement to a specified IP address.Only the SMS with this IP can managethe device.
conf t sms must-be-ip <IP address or CIDR>
conf t sms no must-be-ip
no Disables SMS management. conf t no sms
v2 Enables or disables SNMP v2communication.
conf t sms v2
conf t sms no v2
v3 Enables or disables SNMP v3communication.
conf t sms v3
conf t sms no v3
conf t snmpv3
Enables you to configure an SNMPv3 user.
A limit of 31 SNMPv3 users can be created at a time.

IPS Command Line Interface Reference
60
Required privilege
Admin
Subcommands
The conf t snmpv3 command uses the following subcommands:
Subcommand Description Usage
add Creates a new SNMPv3 user.
• -name: SNMPv3 username.
• -authkey: (Required)Authentication key or password. Ifyou specify an asterisk (*) for thepassword, you will be prompted forthe password. Minimum of 8characters.
• -authalgorithm: Authenticationalgorithm. Can be either md5 orsha. The default is sha.
• -privkey: Privacy key forSNMPv3 responses. If you specifyan asterisk (*) for the password,you will be prompted for thepassword. Minimum of 8characters. If this option is omitted,the value suppled for -authkey isused.
• -privalgorithm: Privacyalgorithm for SNMPv3 responses.Can be either des or aes. Thedefault is aes.
conf t snmpv3 add -name <username> -authkey <password> -authalgorithm <value> -privkey <key value> -privalgorithm <value>
delete Removes an SNMPv3 user. NoSNMPv3 requests will succeed until areplacement SNMPv3 user is defined.
conf t snmpv3 delete -name <username>
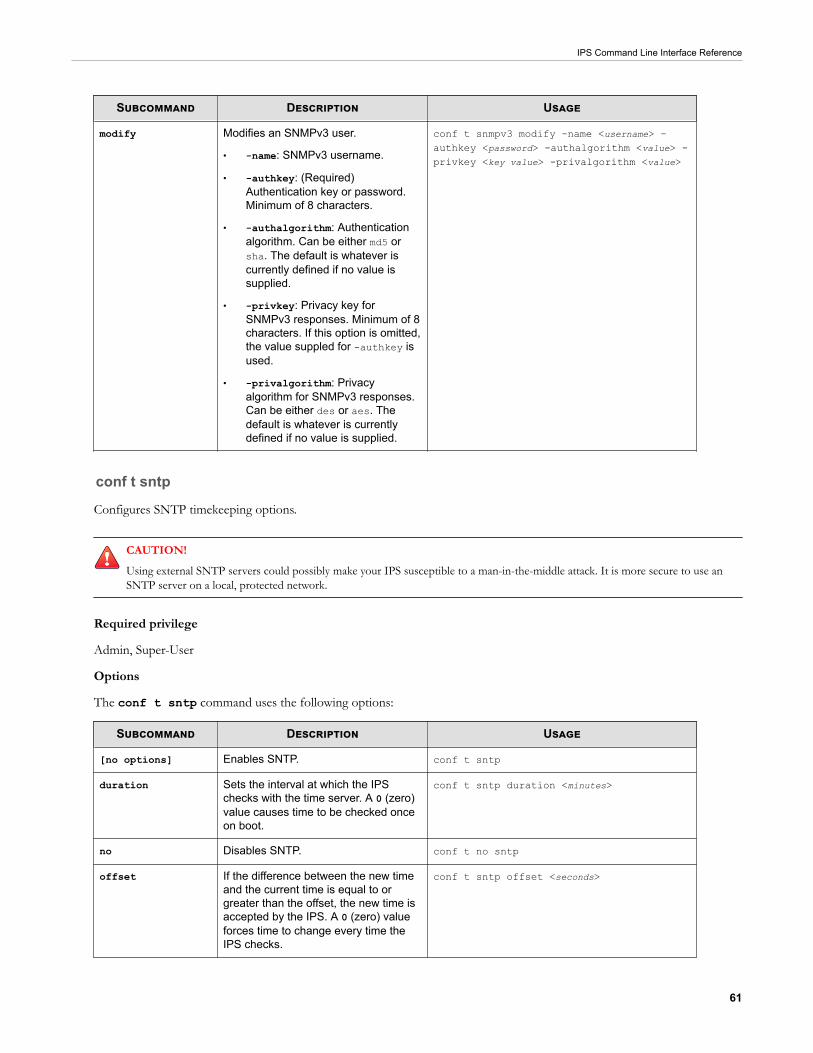
IPS Command Line Interface Reference
61
Subcommand Description Usage
modify Modifies an SNMPv3 user.
• -name: SNMPv3 username.
• -authkey: (Required)Authentication key or password.Minimum of 8 characters.
• -authalgorithm: Authenticationalgorithm. Can be either md5 orsha. The default is whatever iscurrently defined if no value issupplied.
• -privkey: Privacy key forSNMPv3 responses. Minimum of 8characters. If this option is omitted,the value suppled for -authkey isused.
• -privalgorithm: Privacyalgorithm for SNMPv3 responses.Can be either des or aes. Thedefault is whatever is currentlydefined if no value is supplied.
conf t snmpv3 modify -name <username> -authkey <password> -authalgorithm <value> -privkey <key value> -privalgorithm <value>
conf t sntp
Configures SNTP timekeeping options.
CAUTION!
Using external SNTP servers could possibly make your IPS susceptible to a man-in-the-middle attack. It is more secure to use anSNTP server on a local, protected network.
Required privilege
Admin, Super-User
Options
The conf t sntp command uses the following options:
Subcommand Description Usage
[no options] Enables SNTP. conf t sntp
duration Sets the interval at which the IPSchecks with the time server. A 0 (zero)value causes time to be checked onceon boot.
conf t sntp duration <minutes>
no Disables SNTP. conf t no sntp
offset If the difference between the new timeand the current time is equal to orgreater than the offset, the new time isaccepted by the IPS. A 0 (zero) valueforces time to change every time theIPS checks.
conf t sntp offset <seconds>
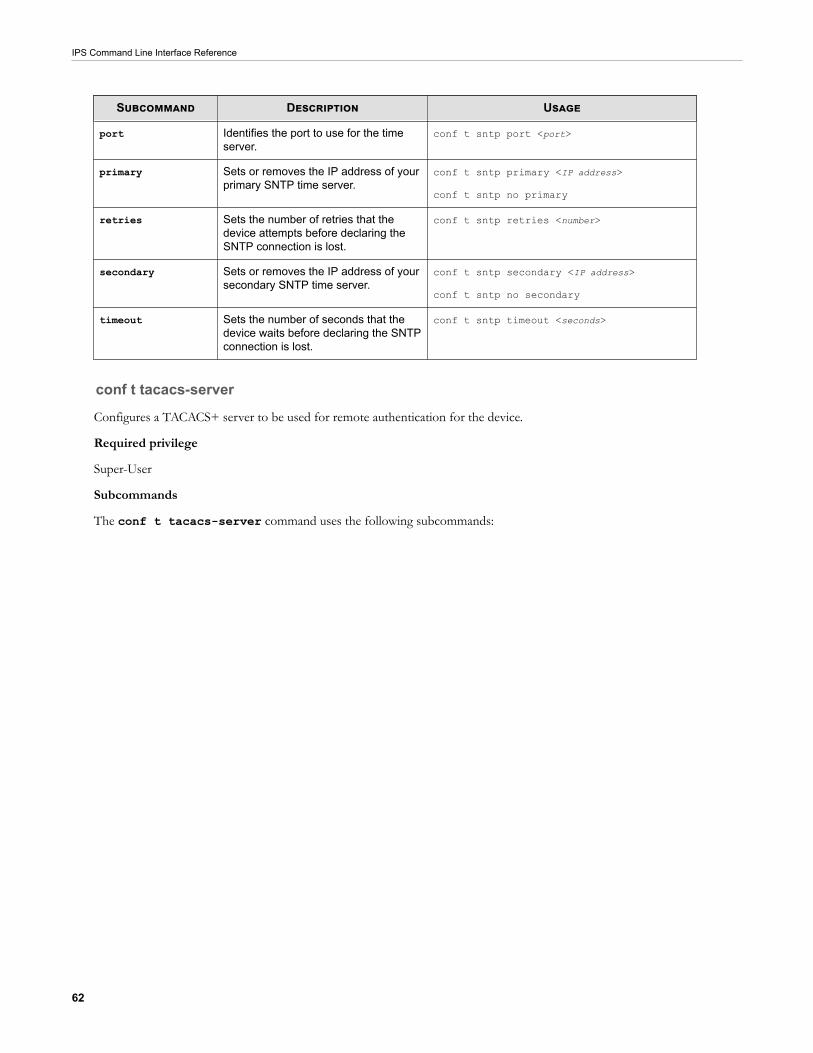
IPS Command Line Interface Reference
62
Subcommand Description Usage
port Identifies the port to use for the timeserver.
conf t sntp port <port>
primary Sets or removes the IP address of yourprimary SNTP time server.
conf t sntp primary <IP address>
conf t sntp no primary
retries Sets the number of retries that thedevice attempts before declaring theSNTP connection is lost.
conf t sntp retries <number>
secondary Sets or removes the IP address of yoursecondary SNTP time server.
conf t sntp secondary <IP address>
conf t sntp no secondary
timeout Sets the number of seconds that thedevice waits before declaring the SNTPconnection is lost.
conf t sntp timeout <seconds>
conf t tacacs-server
Configures a TACACS+ server to be used for remote authentication for the device.
Required privilege
Super-User
Subcommands
The conf t tacacs-server command uses the following subcommands:
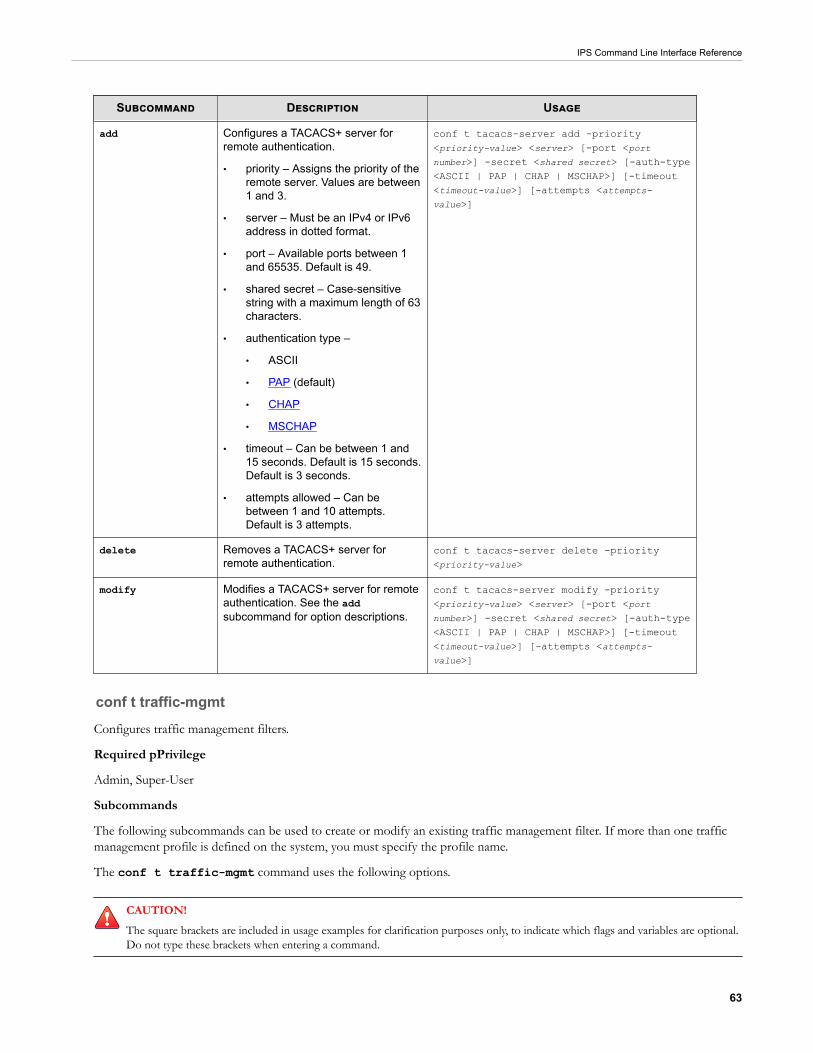
IPS Command Line Interface Reference
63
Subcommand Description Usage
add Configures a TACACS+ server forremote authentication.
• priority – Assigns the priority of theremote server. Values are between1 and 3.
• server – Must be an IPv4 or IPv6address in dotted format.
• port – Available ports between 1and 65535. Default is 49.
• shared secret – Case-sensitivestring with a maximum length of 63characters.
• authentication type –
• ASCII
• PAP (default)
• CHAP
• MSCHAP
• timeout – Can be between 1 and15 seconds. Default is 15 seconds.Default is 3 seconds.
• attempts allowed – Can bebetween 1 and 10 attempts.Default is 3 attempts.
conf t tacacs-server add -priority<priority-value> <server> [-port <portnumber>] -secret <shared secret> [-auth-type<ASCII | PAP | CHAP | MSCHAP>] [-timeout<timeout-value>] [-attempts <attempts-value>]
delete Removes a TACACS+ server forremote authentication.
conf t tacacs-server delete -priority<priority-value>
modify Modifies a TACACS+ server for remoteauthentication. See the addsubcommand for option descriptions.
conf t tacacs-server modify -priority<priority-value> <server> [-port <portnumber>] -secret <shared secret> [-auth-type<ASCII | PAP | CHAP | MSCHAP>] [-timeout<timeout-value>] [-attempts <attempts-value>]
conf t traffic-mgmtConfigures traffic management filters.
Required pPrivilege
Admin, Super-User
Subcommands
The following subcommands can be used to create or modify an existing traffic management filter. If more than one trafficmanagement profile is defined on the system, you must specify the profile name.
The conf t traffic-mgmt command uses the following options.
CAUTION!The square brackets are included in usage examples for clarification purposes only, to indicate which flags and variables are optional.Do not type these brackets when entering a command.
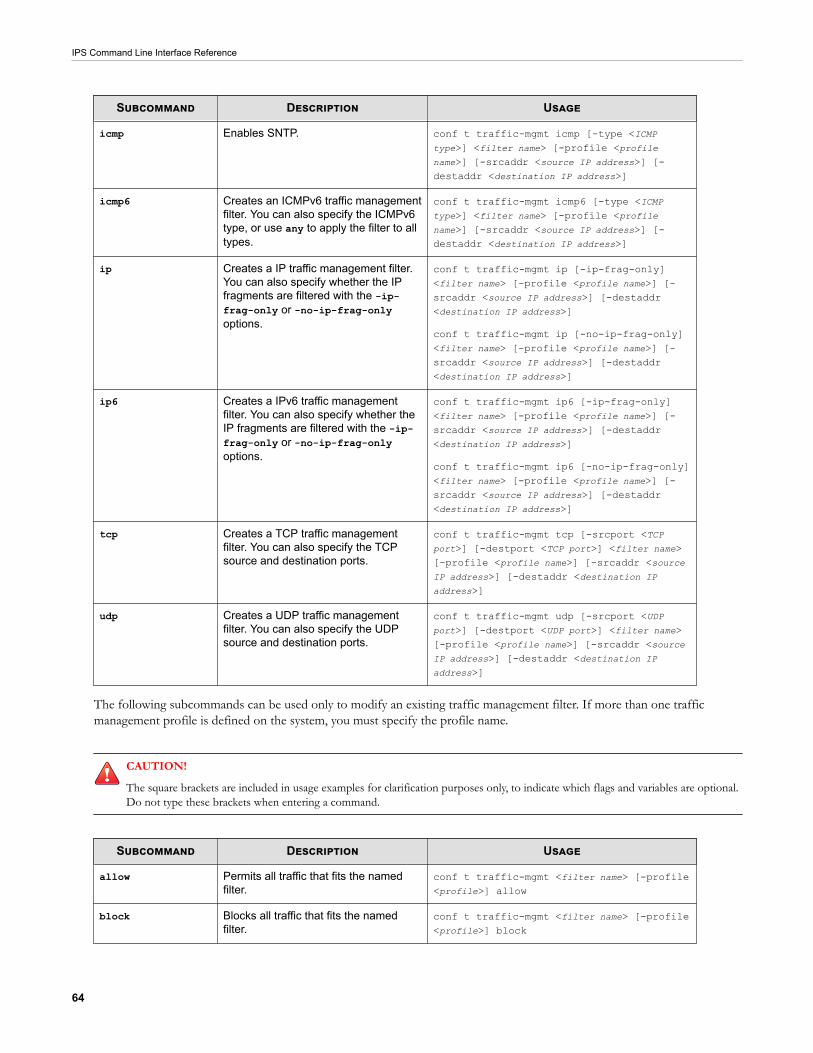
IPS Command Line Interface Reference
64
Subcommand Description Usage
icmp Enables SNTP. conf t traffic-mgmt icmp [-type <ICMPtype>] <filter name> [-profile <profilename>] [-srcaddr <source IP address>] [-destaddr <destination IP address>]
icmp6 Creates an ICMPv6 traffic managementfilter. You can also specify the ICMPv6type, or use any to apply the filter to alltypes.
conf t traffic-mgmt icmp6 [-type <ICMPtype>] <filter name> [-profile <profilename>] [-srcaddr <source IP address>] [-destaddr <destination IP address>]
ip Creates a IP traffic management filter.You can also specify whether the IPfragments are filtered with the -ip-frag-only or -no-ip-frag-onlyoptions.
conf t traffic-mgmt ip [-ip-frag-only]<filter name> [-profile <profile name>] [-srcaddr <source IP address>] [-destaddr<destination IP address>]
conf t traffic-mgmt ip [-no-ip-frag-only]<filter name> [-profile <profile name>] [-srcaddr <source IP address>] [-destaddr<destination IP address>]
ip6 Creates a IPv6 traffic managementfilter. You can also specify whether theIP fragments are filtered with the -ip-frag-only or -no-ip-frag-onlyoptions.
conf t traffic-mgmt ip6 [-ip-frag-only]<filter name> [-profile <profile name>] [-srcaddr <source IP address>] [-destaddr<destination IP address>]
conf t traffic-mgmt ip6 [-no-ip-frag-only]<filter name> [-profile <profile name>] [-srcaddr <source IP address>] [-destaddr<destination IP address>]
tcp Creates a TCP traffic managementfilter. You can also specify the TCPsource and destination ports.
conf t traffic-mgmt tcp [-srcport <TCPport>] [-destport <TCP port>] <filter name>[-profile <profile name>] [-srcaddr <sourceIP address>] [-destaddr <destination IPaddress>]
udp Creates a UDP traffic managementfilter. You can also specify the UDPsource and destination ports.
conf t traffic-mgmt udp [-srcport <UDPport>] [-destport <UDP port>] <filter name>[-profile <profile name>] [-srcaddr <sourceIP address>] [-destaddr <destination IPaddress>]
The following subcommands can be used only to modify an existing traffic management filter. If more than one trafficmanagement profile is defined on the system, you must specify the profile name.
CAUTION!
The square brackets are included in usage examples for clarification purposes only, to indicate which flags and variables are optional.Do not type these brackets when entering a command.
Subcommand Description Usage
allow Permits all traffic that fits the namedfilter.
conf t traffic-mgmt <filter name> [-profile<profile>] allow
block Blocks all traffic that fits the namedfilter.
conf t traffic-mgmt <filter name> [-profile<profile>] block
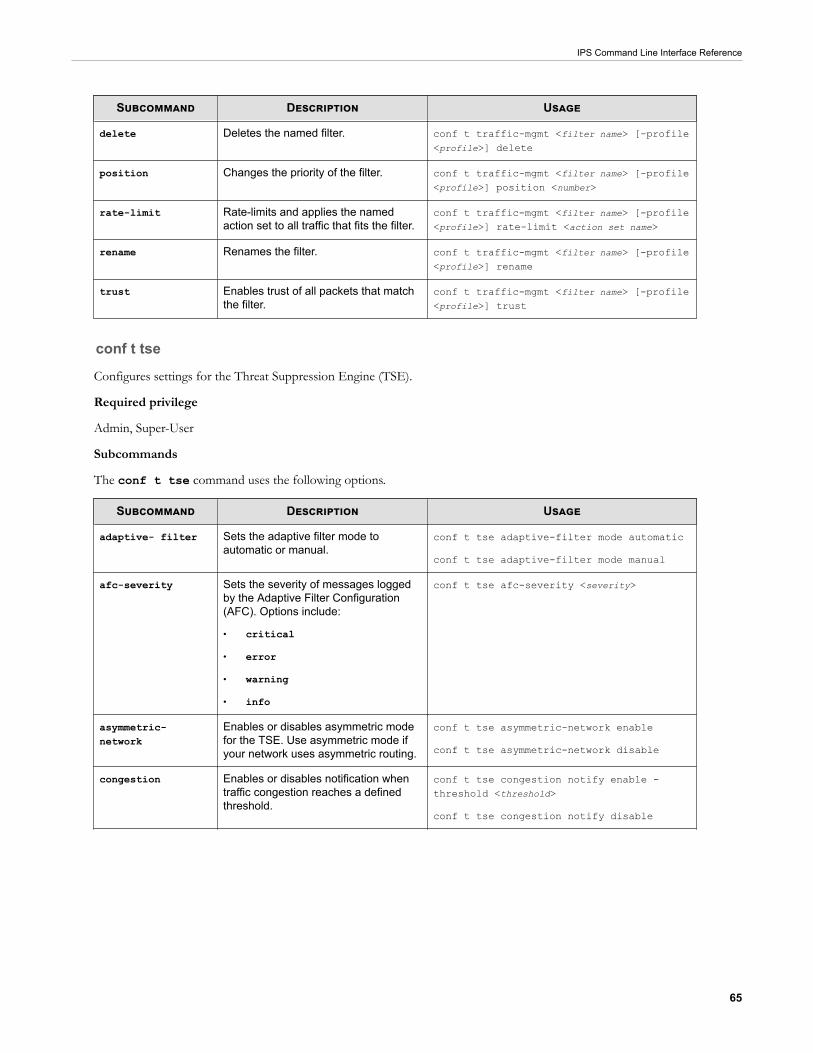
IPS Command Line Interface Reference
65
Subcommand Description Usage
delete Deletes the named filter. conf t traffic-mgmt <filter name> [-profile<profile>] delete
position Changes the priority of the filter. conf t traffic-mgmt <filter name> [-profile<profile>] position <number>
rate-limit Rate-limits and applies the namedaction set to all traffic that fits the filter.
conf t traffic-mgmt <filter name> [-profile<profile>] rate-limit <action set name>
rename Renames the filter. conf t traffic-mgmt <filter name> [-profile<profile>] rename
trust Enables trust of all packets that matchthe filter.
conf t traffic-mgmt <filter name> [-profile<profile>] trust
conf t tse
Configures settings for the Threat Suppression Engine (TSE).
Required privilege
Admin, Super-User
Subcommands
The conf t tse command uses the following options.
Subcommand Description Usage
adaptive- filter Sets the adaptive filter mode toautomatic or manual.
conf t tse adaptive-filter mode automatic
conf t tse adaptive-filter mode manual
afc-severity Sets the severity of messages loggedby the Adaptive Filter Configuration(AFC). Options include:
• critical
• error
• warning
• info
conf t tse afc-severity <severity>
asymmetric-network
Enables or disables asymmetric modefor the TSE. Use asymmetric mode ifyour network uses asymmetric routing.
conf t tse asymmetric-network enable
conf t tse asymmetric-network disable
congestion Enables or disables notification whentraffic congestion reaches a definedthreshold.
conf t tse congestion notify enable -threshold <threshold>
conf t tse congestion notify disable

IPS Command Line Interface Reference
66
Subcommand Description Usage
connection- table Sets the timeout for the connectiontables.
• non-tcp-timeout: Defines thetimeout for non-TCP connections.The range is 30 to 1800 seconds.
• timeout: Defines the globalconnection table timeout. Therange is 30 to 1800 seconds.
• trust-timeout: Defines thetimeout for the trust table. Therange is 30 to 1800 seconds.
conf t tse connection-table non-tcp-timeout <seconds>
conf t tse connection-table timeout<seconds>
conf t tse connection-table trust-timeout<seconds>
gzip- compression Enables or disables GZIPdecompression.
conf t tse gzip-compression enable
conf t tse gzip-compression disable
http-encoded-resp Specifies inspection of encoded HTTPresponses.
• accelerated: Hardwareacceleration is used to detect anddecode encoded HTTP responses.
• inspect: Enables strict detectionand decoding of HTTP responses.
• ignore: The device does notdetect or decode HTTP responses.
• url-ncr: Decodes URL and NCRencoding.
conf t tse http-encoded-resp accelerated
conf t tse http-encoded-resp inspect
conf t tse http-encoded-resp ignore
conf t tse http-encoded-resp url-ncr[enable | disable]
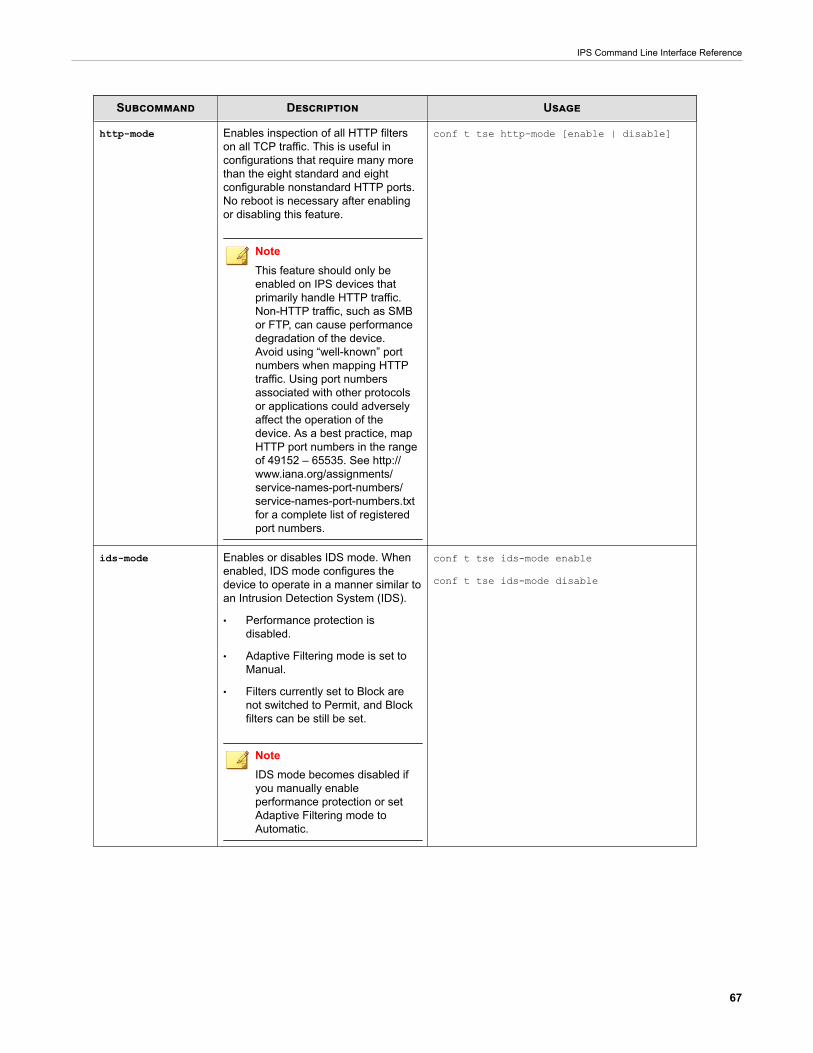
IPS Command Line Interface Reference
67
Subcommand Description Usage
http-mode Enables inspection of all HTTP filterson all TCP traffic. This is useful inconfigurations that require many morethan the eight standard and eightconfigurable nonstandard HTTP ports.No reboot is necessary after enablingor disabling this feature.
NoteThis feature should only beenabled on IPS devices thatprimarily handle HTTP traffic.Non-HTTP traffic, such as SMBor FTP, can cause performancedegradation of the device.Avoid using “well-known” portnumbers when mapping HTTPtraffic. Using port numbersassociated with other protocolsor applications could adverselyaffect the operation of thedevice. As a best practice, mapHTTP port numbers in the rangeof 49152 – 65535. See http://www.iana.org/assignments/service-names-port-numbers/service-names-port-numbers.txtfor a complete list of registeredport numbers.
conf t tse http-mode [enable | disable]
ids-mode Enables or disables IDS mode. Whenenabled, IDS mode configures thedevice to operate in a manner similar toan Intrusion Detection System (IDS).
• Performance protection isdisabled.
• Adaptive Filtering mode is set toManual.
• Filters currently set to Block arenot switched to Permit, and Blockfilters can be still be set.
NoteIDS mode becomes disabled ifyou manually enableperformance protection or setAdaptive Filtering mode toAutomatic.
conf t tse ids-mode enable
conf t tse ids-mode disable
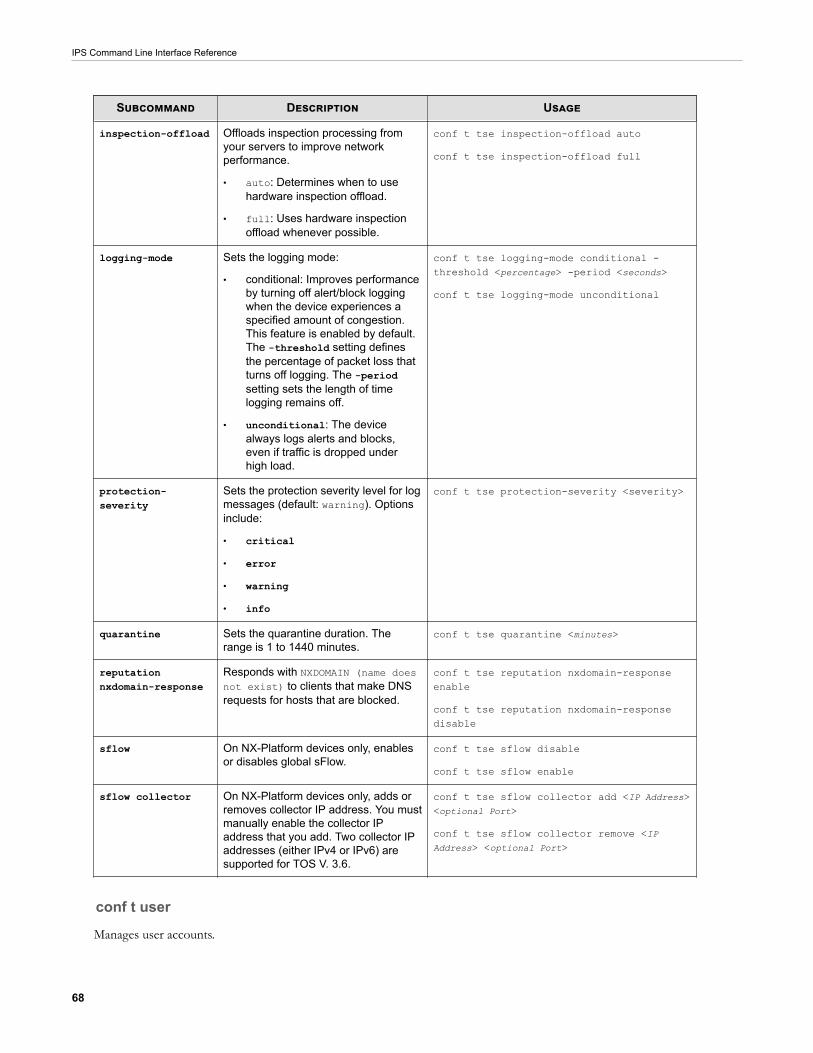
IPS Command Line Interface Reference
68
Subcommand Description Usage
inspection-offload Offloads inspection processing fromyour servers to improve networkperformance.
• auto: Determines when to usehardware inspection offload.
• full: Uses hardware inspectionoffload whenever possible.
conf t tse inspection-offload auto
conf t tse inspection-offload full
logging-mode Sets the logging mode:
• conditional: Improves performanceby turning off alert/block loggingwhen the device experiences aspecified amount of congestion.This feature is enabled by default.The -threshold setting definesthe percentage of packet loss thatturns off logging. The -periodsetting sets the length of timelogging remains off.
• unconditional: The devicealways logs alerts and blocks,even if traffic is dropped underhigh load.
conf t tse logging-mode conditional -threshold <percentage> -period <seconds>
conf t tse logging-mode unconditional
protection-severity
Sets the protection severity level for logmessages (default: warning). Optionsinclude:
• critical
• error
• warning
• info
conf t tse protection-severity <severity>
quarantine Sets the quarantine duration. Therange is 1 to 1440 minutes.
conf t tse quarantine <minutes>
reputationnxdomain-response
Responds with NXDOMAIN (name doesnot exist) to clients that make DNSrequests for hosts that are blocked.
conf t tse reputation nxdomain-responseenable
conf t tse reputation nxdomain-responsedisable
sflow On NX-Platform devices only, enablesor disables global sFlow.
conf t tse sflow disable
conf t tse sflow enable
sflow collector On NX-Platform devices only, adds orremoves collector IP address. You mustmanually enable the collector IPaddress that you add. Two collector IPaddresses (either IPv4 or IPv6) aresupported for TOS V. 3.6.
conf t tse sflow collector add <IP Address><optional Port>
conf t tse sflow collector remove <IPAddress> <optional Port>
conf t user
Manages user accounts.
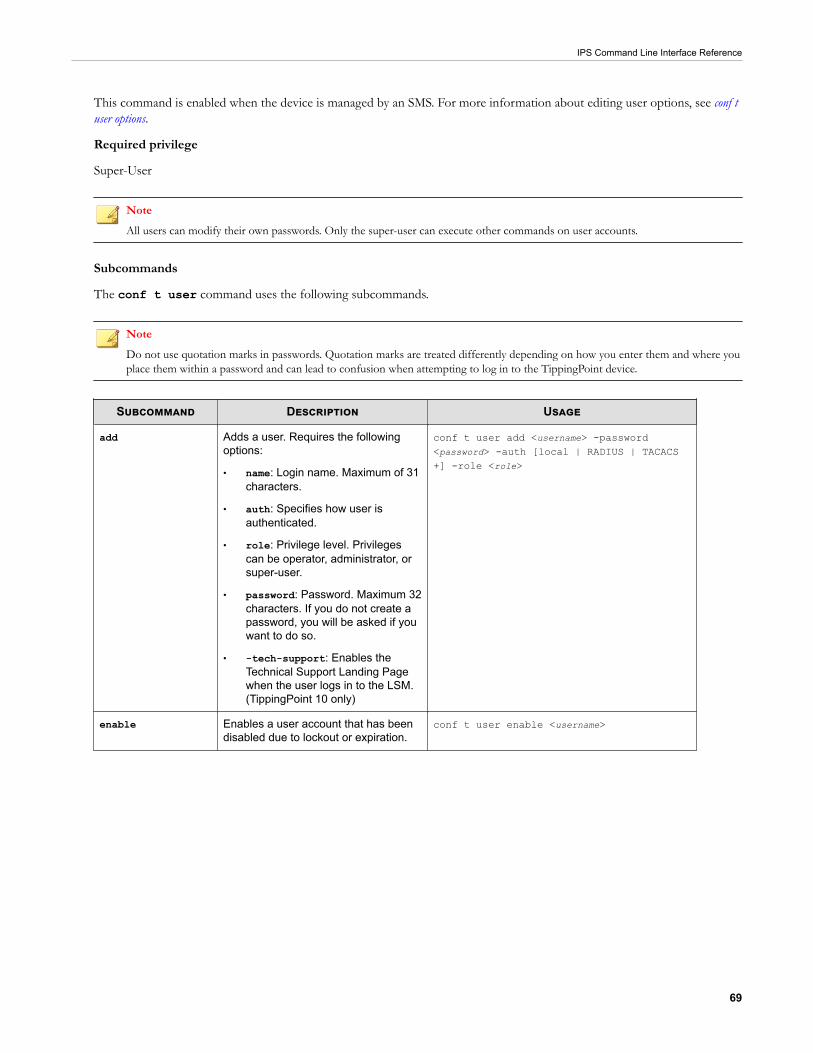
IPS Command Line Interface Reference
69
This command is enabled when the device is managed by an SMS. For more information about editing user options, see conf tuser options.
Required privilege
Super-User
NoteAll users can modify their own passwords. Only the super-user can execute other commands on user accounts.
Subcommands
The conf t user command uses the following subcommands.
NoteDo not use quotation marks in passwords. Quotation marks are treated differently depending on how you enter them and where youplace them within a password and can lead to confusion when attempting to log in to the TippingPoint device.
Subcommand Description Usage
add Adds a user. Requires the followingoptions:
• name: Login name. Maximum of 31characters.
• auth: Specifies how user isauthenticated.
• role: Privilege level. Privilegescan be operator, administrator, orsuper-user.
• password: Password. Maximum 32characters. If you do not create apassword, you will be asked if youwant to do so.
• -tech-support: Enables theTechnical Support Landing Pagewhen the user logs in to the LSM.(TippingPoint 10 only)
conf t user add <username> -password<password> -auth [local | RADIUS | TACACS+] -role <role>
enable Enables a user account that has beendisabled due to lockout or expiration.
conf t user enable <username>
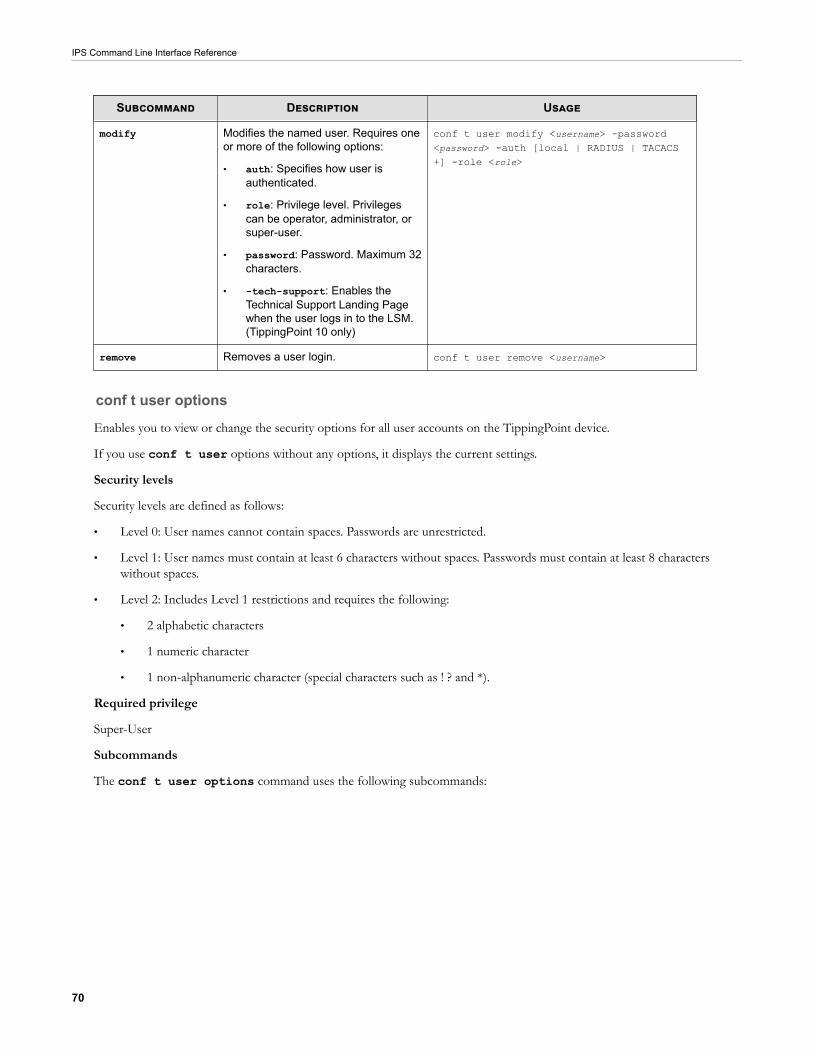
IPS Command Line Interface Reference
70
Subcommand Description Usage
modify Modifies the named user. Requires oneor more of the following options:
• auth: Specifies how user isauthenticated.
• role: Privilege level. Privilegescan be operator, administrator, orsuper-user.
• password: Password. Maximum 32characters.
• -tech-support: Enables theTechnical Support Landing Pagewhen the user logs in to the LSM.(TippingPoint 10 only)
conf t user modify <username> -password<password> -auth [local | RADIUS | TACACS+] -role <role>
remove Removes a user login. conf t user remove <username>
conf t user options
Enables you to view or change the security options for all user accounts on the TippingPoint device.
If you use conf t user options without any options, it displays the current settings.
Security levels
Security levels are defined as follows:
• Level 0: User names cannot contain spaces. Passwords are unrestricted.
• Level 1: User names must contain at least 6 characters without spaces. Passwords must contain at least 8 characterswithout spaces.
• Level 2: Includes Level 1 restrictions and requires the following:
• 2 alphabetic characters
• 1 numeric character
• 1 non-alphanumeric character (special characters such as ! ? and *).
Required privilege
Super-User
Subcommands
The conf t user options command uses the following subcommands:
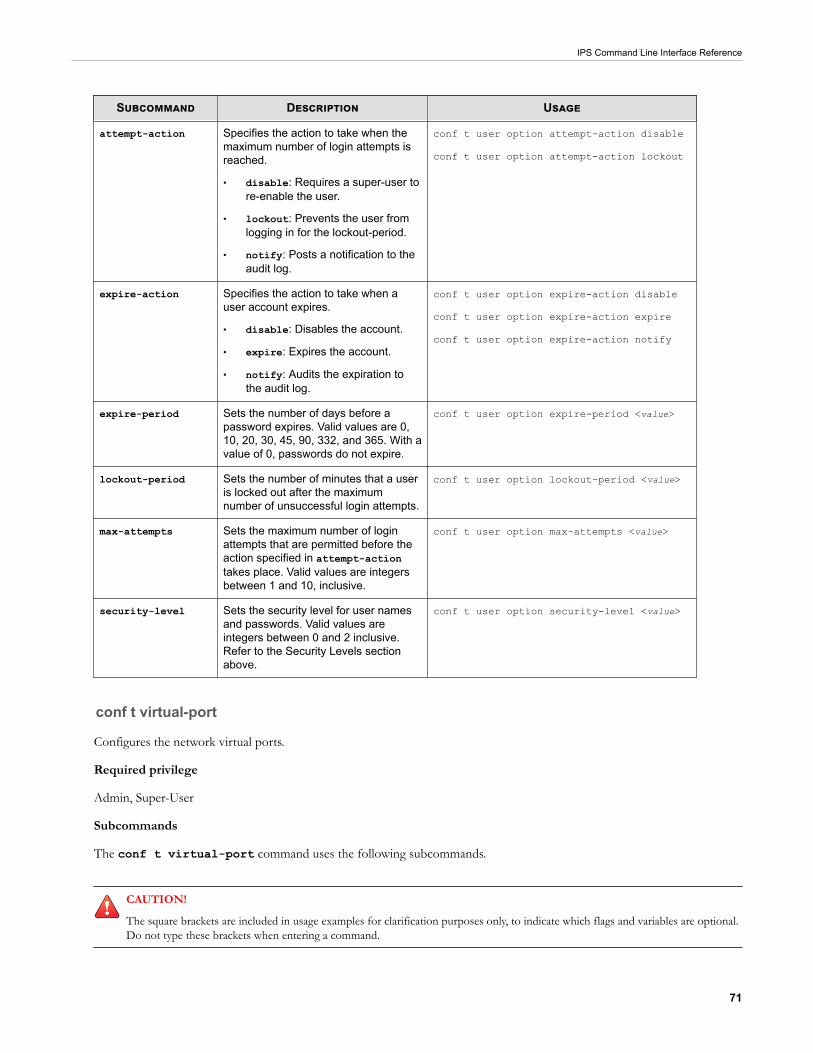
IPS Command Line Interface Reference
71
Subcommand Description Usage
attempt-action Specifies the action to take when themaximum number of login attempts isreached.
• disable: Requires a super-user tore-enable the user.
• lockout: Prevents the user fromlogging in for the lockout-period.
• notify: Posts a notification to theaudit log.
conf t user option attempt-action disable
conf t user option attempt-action lockout
expire-action Specifies the action to take when auser account expires.
• disable: Disables the account.
• expire: Expires the account.
• notify: Audits the expiration tothe audit log.
conf t user option expire-action disable
conf t user option expire-action expire
conf t user option expire-action notify
expire-period Sets the number of days before apassword expires. Valid values are 0,10, 20, 30, 45, 90, 332, and 365. With avalue of 0, passwords do not expire.
conf t user option expire-period <value>
lockout-period Sets the number of minutes that a useris locked out after the maximumnumber of unsuccessful login attempts.
conf t user option lockout-period <value>
max-attempts Sets the maximum number of loginattempts that are permitted before theaction specified in attempt-actiontakes place. Valid values are integersbetween 1 and 10, inclusive.
conf t user option max-attempts <value>
security-level Sets the security level for user namesand passwords. Valid values areintegers between 0 and 2 inclusive.Refer to the Security Levels sectionabove.
conf t user option security-level <value>
conf t virtual-port
Configures the network virtual ports.
Required privilege
Admin, Super-User
Subcommands
The conf t virtual-port command uses the following subcommands.
CAUTION!
The square brackets are included in usage examples for clarification purposes only, to indicate which flags and variables are optional.Do not type these brackets when entering a command.
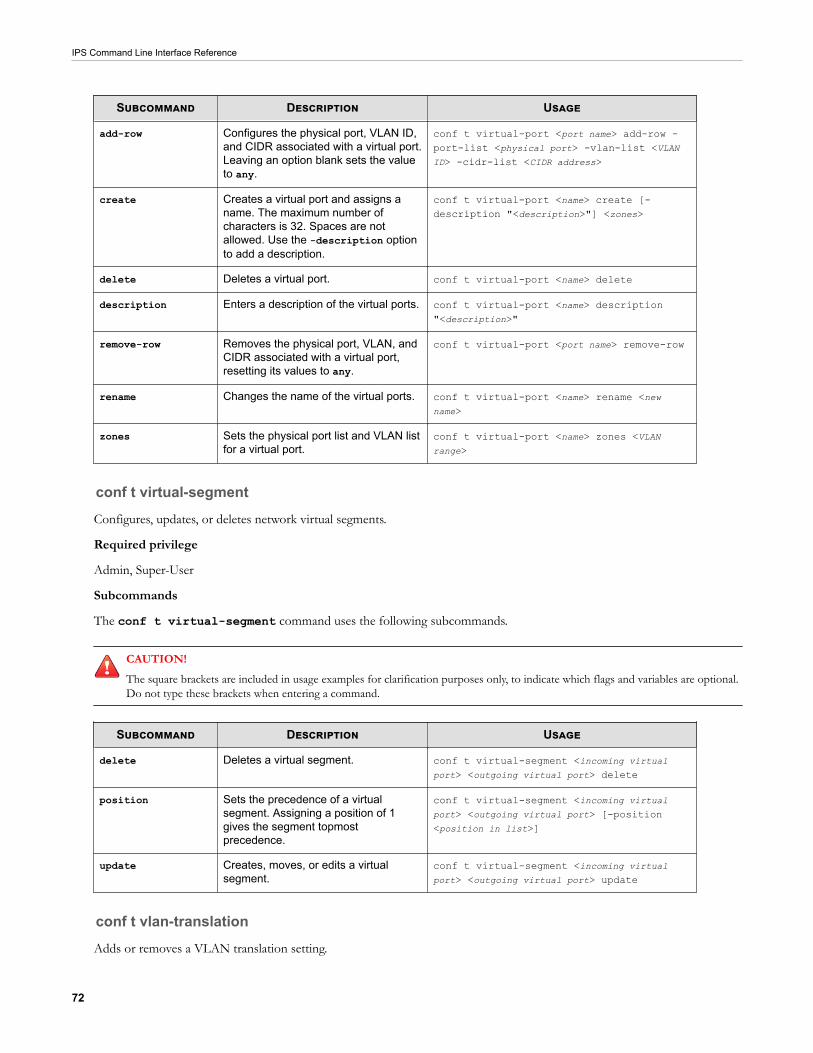
IPS Command Line Interface Reference
72
Subcommand Description Usage
add-row Configures the physical port, VLAN ID,and CIDR associated with a virtual port.Leaving an option blank sets the valueto any.
conf t virtual-port <port name> add-row -port-list <physical port> -vlan-list <VLANID> -cidr-list <CIDR address>
create Creates a virtual port and assigns aname. The maximum number ofcharacters is 32. Spaces are notallowed. Use the -description optionto add a description.
conf t virtual-port <name> create [-description "<description>"] <zones>
delete Deletes a virtual port. conf t virtual-port <name> delete
description Enters a description of the virtual ports. conf t virtual-port <name> description"<description>"
remove-row Removes the physical port, VLAN, andCIDR associated with a virtual port,resetting its values to any.
conf t virtual-port <port name> remove-row
rename Changes the name of the virtual ports. conf t virtual-port <name> rename <newname>
zones Sets the physical port list and VLAN listfor a virtual port.
conf t virtual-port <name> zones <VLANrange>
conf t virtual-segmentConfigures, updates, or deletes network virtual segments.
Required privilege
Admin, Super-User
Subcommands
The conf t virtual-segment command uses the following subcommands.
CAUTION!The square brackets are included in usage examples for clarification purposes only, to indicate which flags and variables are optional.Do not type these brackets when entering a command.
Subcommand Description Usage
delete Deletes a virtual segment. conf t virtual-segment <incoming virtualport> <outgoing virtual port> delete
position Sets the precedence of a virtualsegment. Assigning a position of 1gives the segment topmostprecedence.
conf t virtual-segment <incoming virtualport> <outgoing virtual port> [-position<position in list>]
update Creates, moves, or edits a virtualsegment.
conf t virtual-segment <incoming virtualport> <outgoing virtual port> update
conf t vlan-translationAdds or removes a VLAN translation setting.
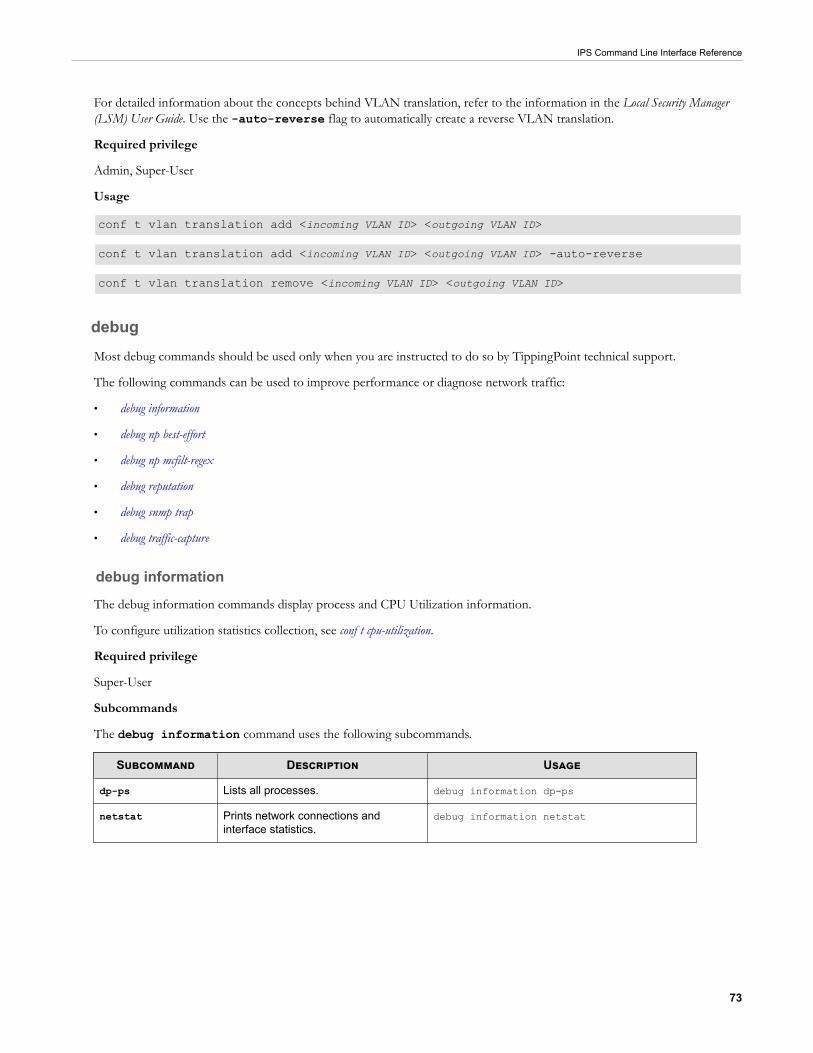
IPS Command Line Interface Reference
73
For detailed information about the concepts behind VLAN translation, refer to the information in the Local Security Manager(LSM) User Guide. Use the -auto-reverse flag to automatically create a reverse VLAN translation.
Required privilege
Admin, Super-User
Usage
conf t vlan translation add <incoming VLAN ID> <outgoing VLAN ID>
conf t vlan translation add <incoming VLAN ID> <outgoing VLAN ID> -auto-reverse
conf t vlan translation remove <incoming VLAN ID> <outgoing VLAN ID>
debugMost debug commands should be used only when you are instructed to do so by TippingPoint technical support.
The following commands can be used to improve performance or diagnose network traffic:
• debug information
• debug np best-effort
• debug np mcfilt-regex
• debug reputation
• debug snmp trap
• debug traffic-capture
debug information
The debug information commands display process and CPU Utilization information.
To configure utilization statistics collection, see conf t cpu-utilization.
Required privilege
Super-User
Subcommands
The debug information command uses the following subcommands.
Subcommand Description Usage
dp-ps Lists all processes. debug information dp-ps
netstat Prints network connections andinterface statistics.
debug information netstat
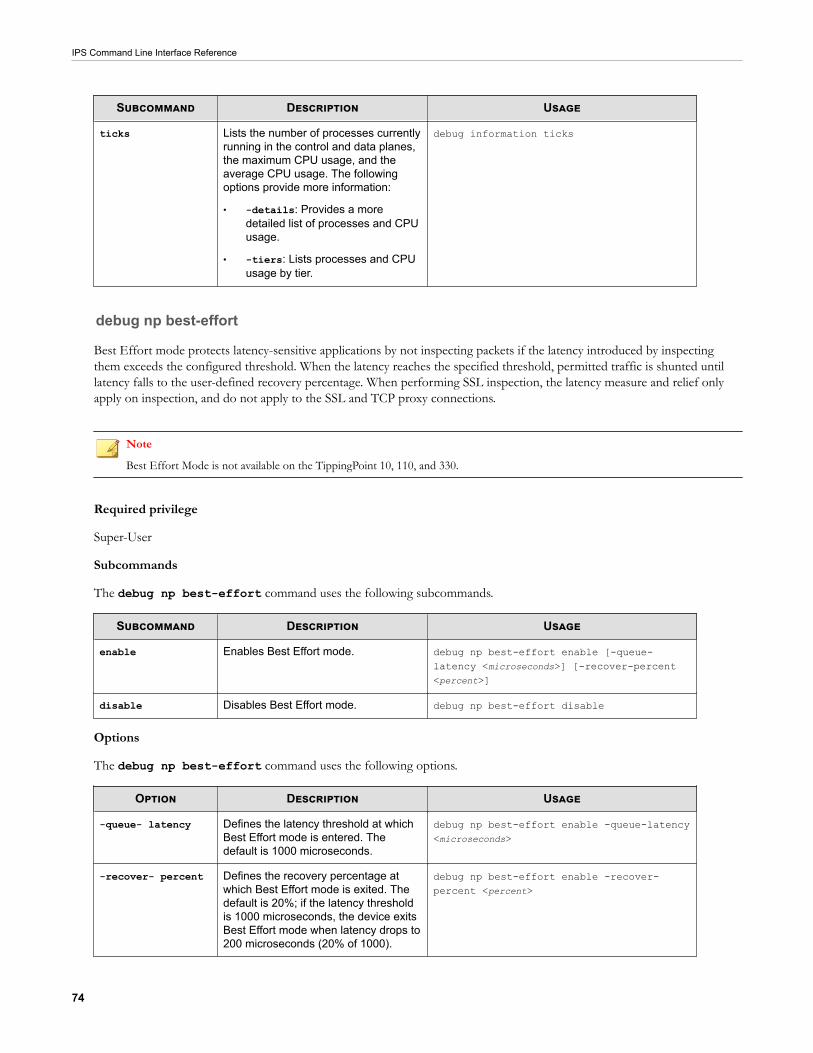
IPS Command Line Interface Reference
74
Subcommand Description Usage
ticks Lists the number of processes currentlyrunning in the control and data planes,the maximum CPU usage, and theaverage CPU usage. The followingoptions provide more information:
• -details: Provides a moredetailed list of processes and CPUusage.
• -tiers: Lists processes and CPUusage by tier.
debug information ticks
debug np best-effort
Best Effort mode protects latency-sensitive applications by not inspecting packets if the latency introduced by inspectingthem exceeds the configured threshold. When the latency reaches the specified threshold, permitted traffic is shunted untillatency falls to the user-defined recovery percentage. When performing SSL inspection, the latency measure and relief onlyapply on inspection, and do not apply to the SSL and TCP proxy connections.
Note
Best Effort Mode is not available on the TippingPoint 10, 110, and 330.
Required privilege
Super-User
Subcommands
The debug np best-effort command uses the following subcommands.
Subcommand Description Usage
enable Enables Best Effort mode. debug np best-effort enable [-queue-latency <microseconds>] [-recover-percent<percent>]
disable Disables Best Effort mode. debug np best-effort disable
Options
The debug np best-effort command uses the following options.
Option Description Usage
-queue- latency Defines the latency threshold at whichBest Effort mode is entered. Thedefault is 1000 microseconds.
debug np best-effort enable -queue-latency<microseconds>
-recover- percent Defines the recovery percentage atwhich Best Effort mode is exited. Thedefault is 20%; if the latency thresholdis 1000 microseconds, the device exitsBest Effort mode when latency drops to200 microseconds (20% of 1000).
debug np best-effort enable -recover-percent <percent>
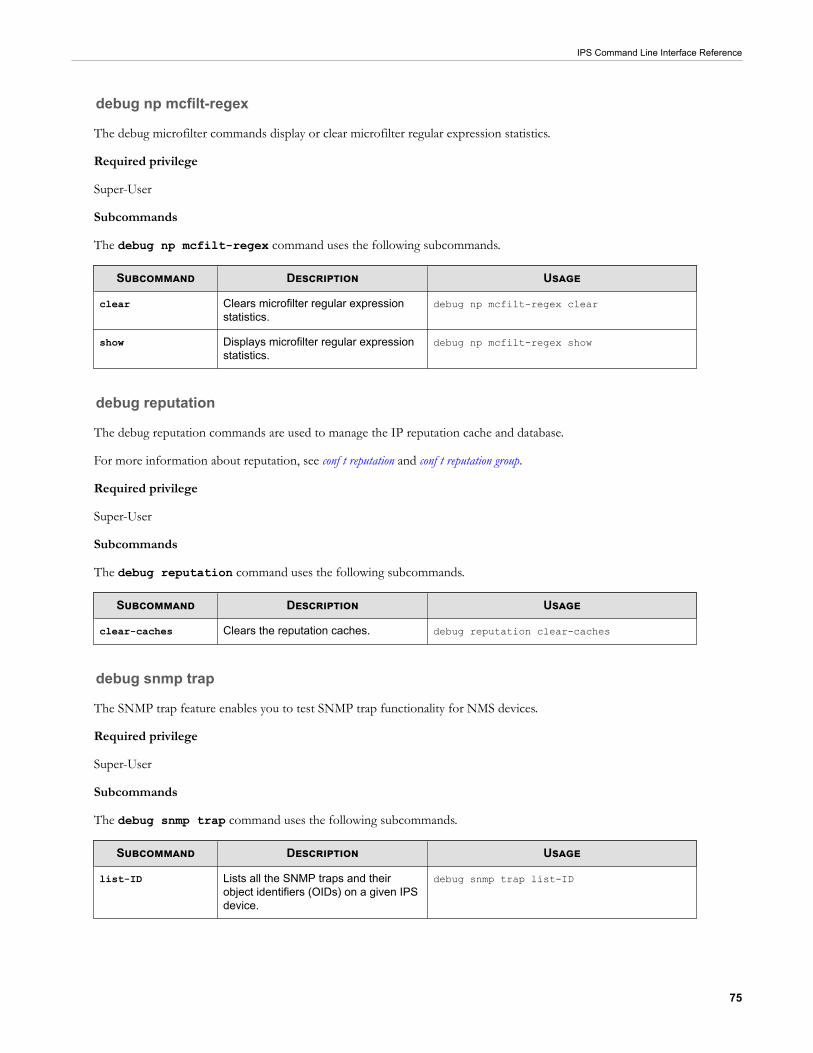
IPS Command Line Interface Reference
75
debug np mcfilt-regex
The debug microfilter commands display or clear microfilter regular expression statistics.
Required privilege
Super-User
Subcommands
The debug np mcfilt-regex command uses the following subcommands.
Subcommand Description Usage
clear Clears microfilter regular expressionstatistics.
debug np mcfilt-regex clear
show Displays microfilter regular expressionstatistics.
debug np mcfilt-regex show
debug reputation
The debug reputation commands are used to manage the IP reputation cache and database.
For more information about reputation, see conf t reputation and conf t reputation group.
Required privilege
Super-User
Subcommands
The debug reputation command uses the following subcommands.
Subcommand Description Usage
clear-caches Clears the reputation caches. debug reputation clear-caches
debug snmp trap
The SNMP trap feature enables you to test SNMP trap functionality for NMS devices.
Required privilege
Super-User
Subcommands
The debug snmp trap command uses the following subcommands.
Subcommand Description Usage
list-ID Lists all the SNMP traps and theirobject identifiers (OIDs) on a given IPSdevice.
debug snmp trap list-ID
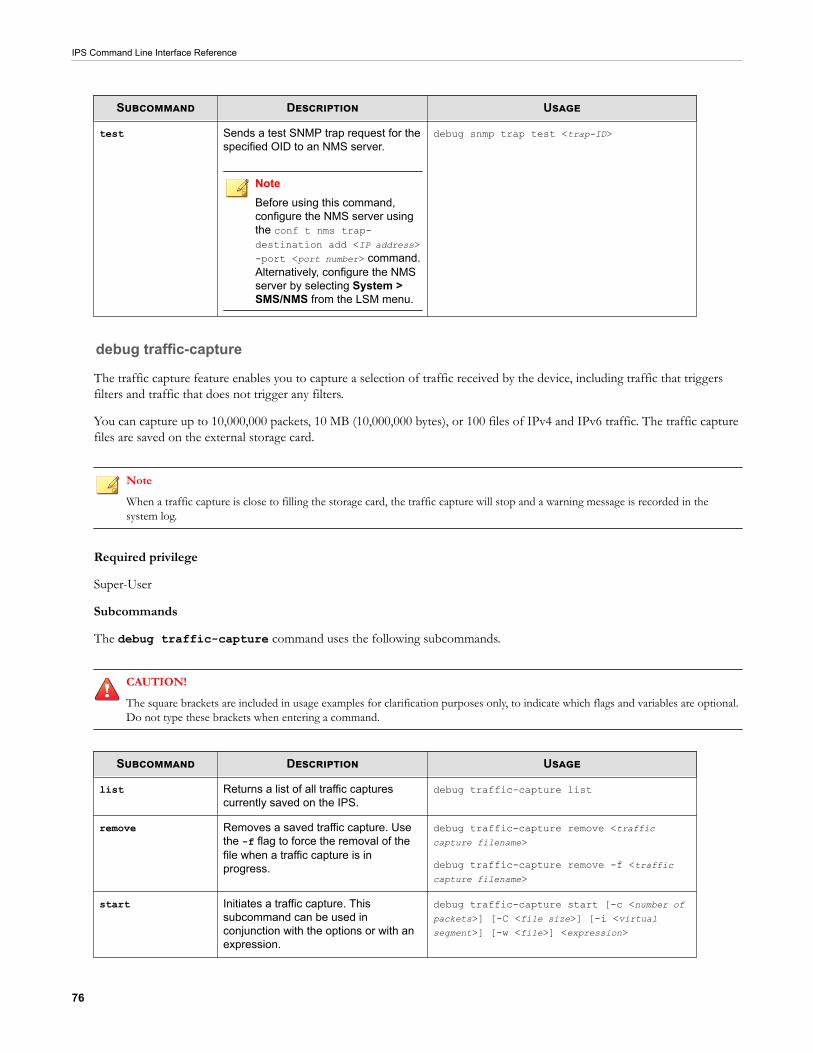
IPS Command Line Interface Reference
76
Subcommand Description Usage
test Sends a test SNMP trap request for thespecified OID to an NMS server.
NoteBefore using this command,configure the NMS server usingthe conf t nms trap-destination add <IP address>-port <port number> command.Alternatively, configure the NMSserver by selecting System >SMS/NMS from the LSM menu.
debug snmp trap test <trap-ID>
debug traffic-capture
The traffic capture feature enables you to capture a selection of traffic received by the device, including traffic that triggersfilters and traffic that does not trigger any filters.
You can capture up to 10,000,000 packets, 10 MB (10,000,000 bytes), or 100 files of IPv4 and IPv6 traffic. The traffic capturefiles are saved on the external storage card.
Note
When a traffic capture is close to filling the storage card, the traffic capture will stop and a warning message is recorded in thesystem log.
Required privilege
Super-User
Subcommands
The debug traffic-capture command uses the following subcommands.
CAUTION!
The square brackets are included in usage examples for clarification purposes only, to indicate which flags and variables are optional.Do not type these brackets when entering a command.
Subcommand Description Usage
list Returns a list of all traffic capturescurrently saved on the IPS.
debug traffic-capture list
remove Removes a saved traffic capture. Usethe -f flag to force the removal of thefile when a traffic capture is inprogress.
debug traffic-capture remove <trafficcapture filename>
debug traffic-capture remove -f <trafficcapture filename>
start Initiates a traffic capture. Thissubcommand can be used inconjunction with the options or with anexpression.
debug traffic-capture start [-c <number ofpackets>] [-C <file size>] [-i <virtualsegment>] [-w <file>] <expression>
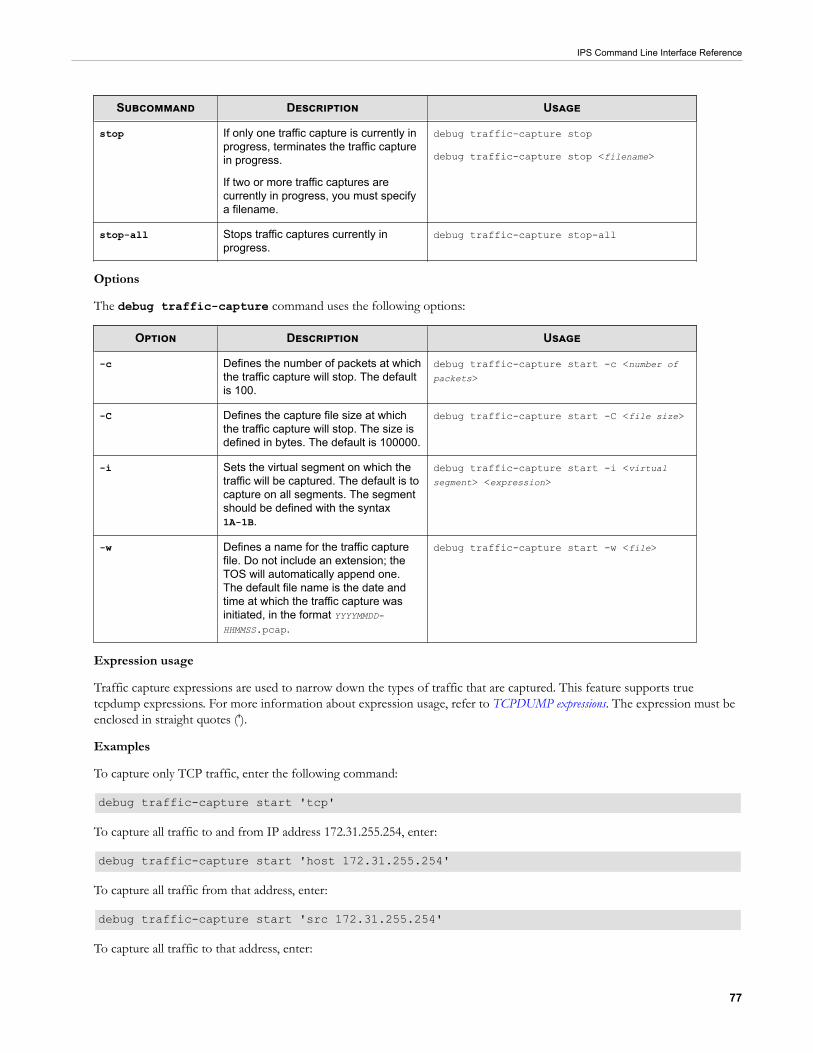
IPS Command Line Interface Reference
77
Subcommand Description Usage
stop If only one traffic capture is currently inprogress, terminates the traffic capturein progress.
If two or more traffic captures arecurrently in progress, you must specifya filename.
debug traffic-capture stop
debug traffic-capture stop <filename>
stop-all Stops traffic captures currently inprogress.
debug traffic-capture stop-all
Options
The debug traffic-capture command uses the following options:
Option Description Usage
-c Defines the number of packets at whichthe traffic capture will stop. The defaultis 100.
debug traffic-capture start -c <number ofpackets>
-C Defines the capture file size at whichthe traffic capture will stop. The size isdefined in bytes. The default is 100000.
debug traffic-capture start -C <file size>
-i Sets the virtual segment on which thetraffic will be captured. The default is tocapture on all segments. The segmentshould be defined with the syntax1A-1B.
debug traffic-capture start -i <virtualsegment> <expression>
-w Defines a name for the traffic capturefile. Do not include an extension; theTOS will automatically append one.The default file name is the date andtime at which the traffic capture wasinitiated, in the format YYYYMMDD-HHMMSS.pcap.
debug traffic-capture start -w <file>
Expression usage
Traffic capture expressions are used to narrow down the types of traffic that are captured. This feature supports truetcpdump expressions. For more information about expression usage, refer to TCPDUMP expressions. The expression must beenclosed in straight quotes (').
Examples
To capture only TCP traffic, enter the following command:
debug traffic-capture start 'tcp'
To capture all traffic to and from IP address 172.31.255.254, enter:
debug traffic-capture start 'host 172.31.255.254'
To capture all traffic from that address, enter:
debug traffic-capture start 'src 172.31.255.254'
To capture all traffic to that address, enter:
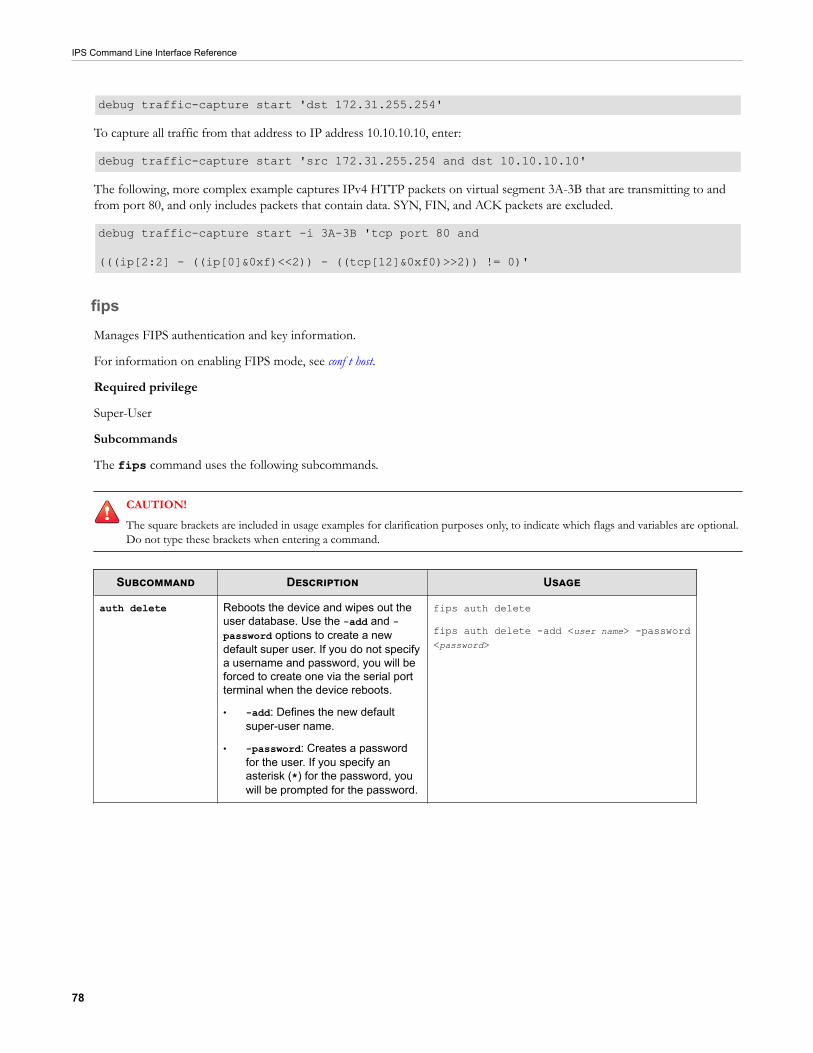
IPS Command Line Interface Reference
78
debug traffic-capture start 'dst 172.31.255.254'
To capture all traffic from that address to IP address 10.10.10.10, enter:
debug traffic-capture start 'src 172.31.255.254 and dst 10.10.10.10'
The following, more complex example captures IPv4 HTTP packets on virtual segment 3A-3B that are transmitting to andfrom port 80, and only includes packets that contain data. SYN, FIN, and ACK packets are excluded.
debug traffic-capture start -i 3A-3B 'tcp port 80 and
(((ip[2:2] - ((ip[0]&0xf)<<2)) - ((tcp[12]&0xf0)>>2)) != 0)'
fipsManages FIPS authentication and key information.
For information on enabling FIPS mode, see conf t host.
Required privilege
Super-User
Subcommands
The fips command uses the following subcommands.
CAUTION!The square brackets are included in usage examples for clarification purposes only, to indicate which flags and variables are optional.Do not type these brackets when entering a command.
Subcommand Description Usage
auth delete Reboots the device and wipes out theuser database. Use the -add and -password options to create a newdefault super user. If you do not specifya username and password, you will beforced to create one via the serial portterminal when the device reboots.
• -add: Defines the new defaultsuper-user name.
• -password: Creates a passwordfor the user. If you specify anasterisk (*) for the password, youwill be prompted for the password.
fips auth delete
fips auth delete -add <user name> -password<password>
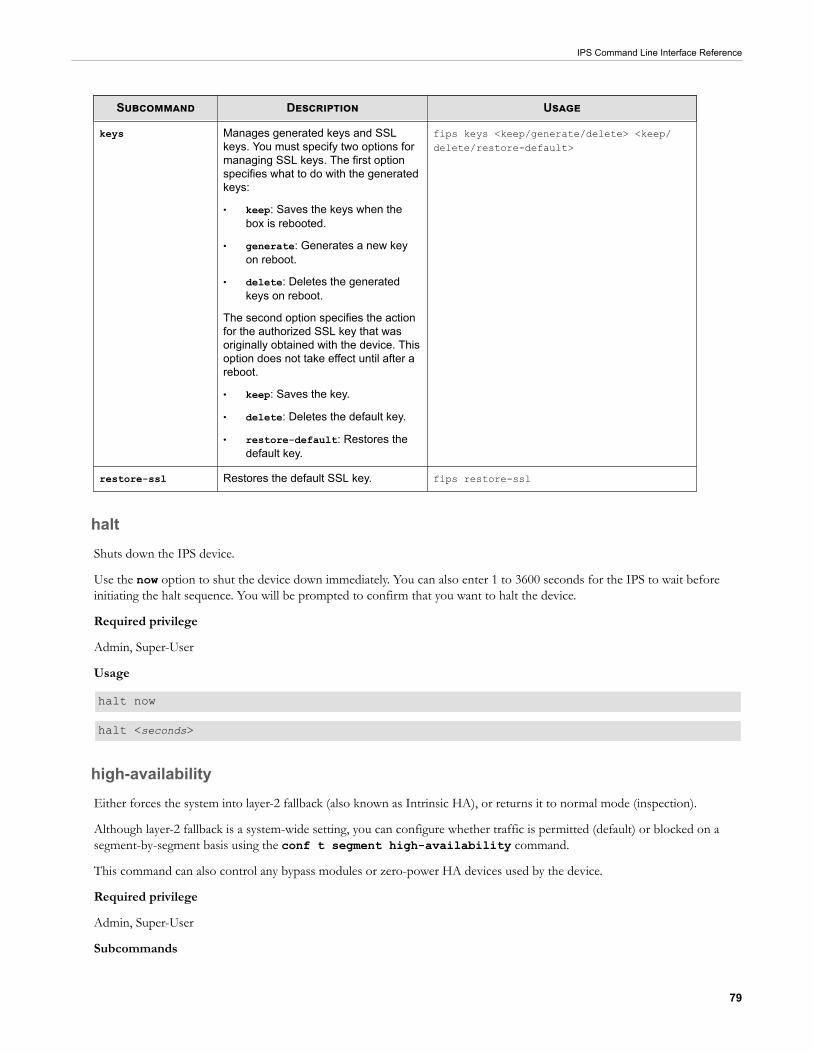
IPS Command Line Interface Reference
79
Subcommand Description Usage
keys Manages generated keys and SSLkeys. You must specify two options formanaging SSL keys. The first optionspecifies what to do with the generatedkeys:
• keep: Saves the keys when thebox is rebooted.
• generate: Generates a new keyon reboot.
• delete: Deletes the generatedkeys on reboot.
The second option specifies the actionfor the authorized SSL key that wasoriginally obtained with the device. Thisoption does not take effect until after areboot.
• keep: Saves the key.
• delete: Deletes the default key.
• restore-default: Restores thedefault key.
fips keys <keep/generate/delete> <keep/delete/restore-default>
restore-ssl Restores the default SSL key. fips restore-ssl
haltShuts down the IPS device.
Use the now option to shut the device down immediately. You can also enter 1 to 3600 seconds for the IPS to wait beforeinitiating the halt sequence. You will be prompted to confirm that you want to halt the device.
Required privilege
Admin, Super-User
Usage
halt now
halt <seconds>
high-availabilityEither forces the system into layer-2 fallback (also known as Intrinsic HA), or returns it to normal mode (inspection).
Although layer-2 fallback is a system-wide setting, you can configure whether traffic is permitted (default) or blocked on asegment-by-segment basis using the conf t segment high-availability command.
This command can also control any bypass modules or zero-power HA devices used by the device.
Required privilege
Admin, Super-User
Subcommands
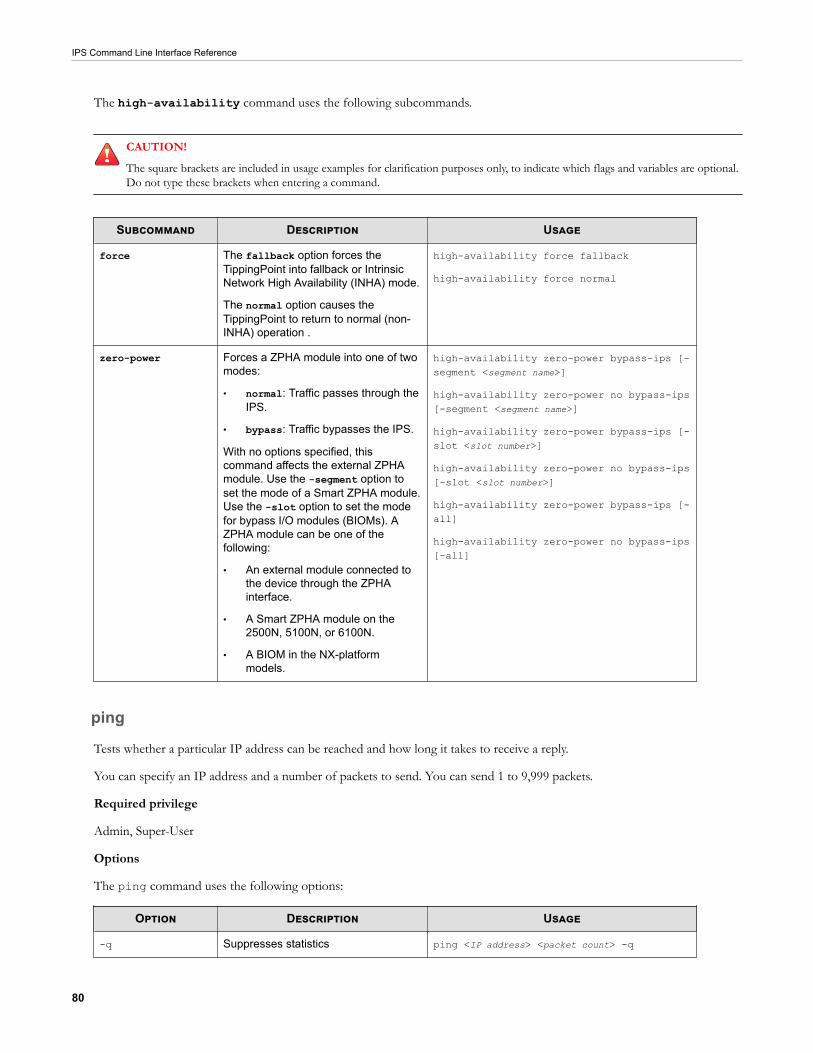
IPS Command Line Interface Reference
80
The high-availability command uses the following subcommands.
CAUTION!
The square brackets are included in usage examples for clarification purposes only, to indicate which flags and variables are optional.Do not type these brackets when entering a command.
Subcommand Description Usage
force The fallback option forces theTippingPoint into fallback or IntrinsicNetwork High Availability (INHA) mode.
The normal option causes theTippingPoint to return to normal (non-INHA) operation .
high-availability force fallback
high-availability force normal
zero-power Forces a ZPHA module into one of twomodes:
• normal: Traffic passes through theIPS.
• bypass: Traffic bypasses the IPS.
With no options specified, thiscommand affects the external ZPHAmodule. Use the -segment option toset the mode of a Smart ZPHA module.Use the -slot option to set the modefor bypass I/O modules (BIOMs). AZPHA module can be one of thefollowing:
• An external module connected tothe device through the ZPHAinterface.
• A Smart ZPHA module on the2500N, 5100N, or 6100N.
• A BIOM in the NX-platformmodels.
high-availability zero-power bypass-ips [-segment <segment name>]
high-availability zero-power no bypass-ips[-segment <segment name>]
high-availability zero-power bypass-ips [-slot <slot number>]
high-availability zero-power no bypass-ips[-slot <slot number>]
high-availability zero-power bypass-ips [-all]
high-availability zero-power no bypass-ips[-all]
ping
Tests whether a particular IP address can be reached and how long it takes to receive a reply.
You can specify an IP address and a number of packets to send. You can send 1 to 9,999 packets.
Required privilege
Admin, Super-User
Options
The ping command uses the following options:
Option Description Usage
-q Suppresses statistics ping <IP address> <packet count> -q
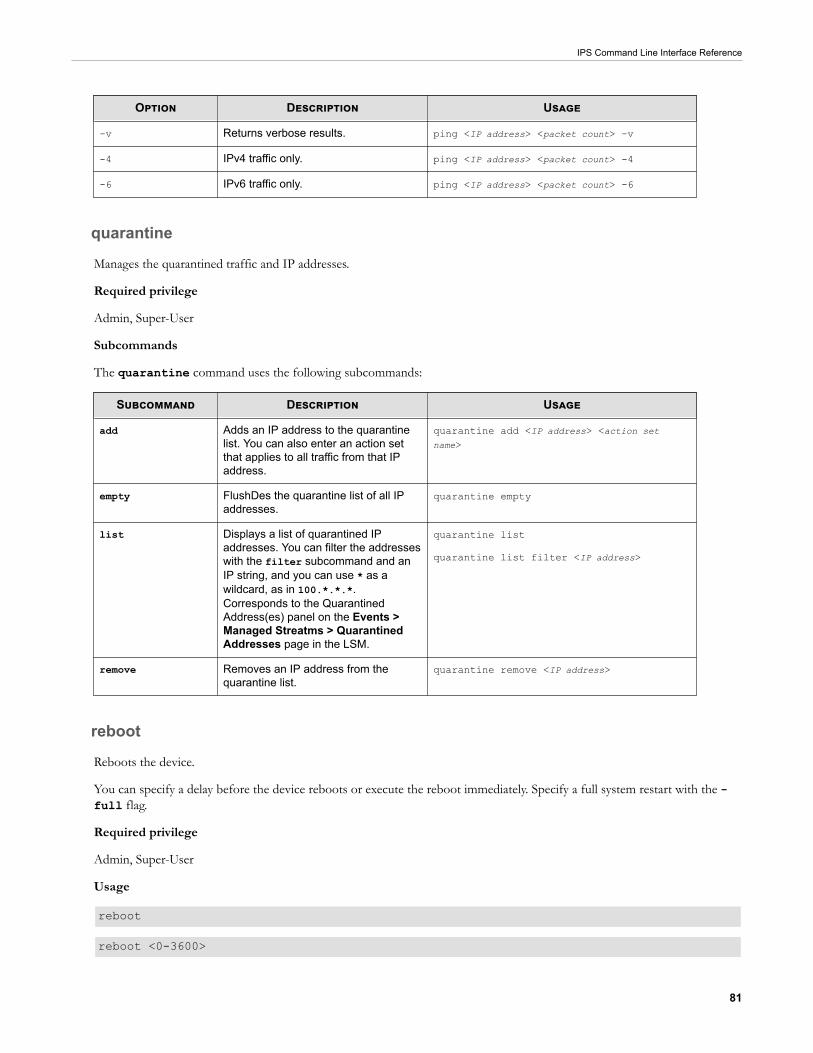
IPS Command Line Interface Reference
81
Option Description Usage
-v Returns verbose results. ping <IP address> <packet count> -v
-4 IPv4 traffic only. ping <IP address> <packet count> -4
-6 IPv6 traffic only. ping <IP address> <packet count> -6
quarantine
Manages the quarantined traffic and IP addresses.
Required privilege
Admin, Super-User
Subcommands
The quarantine command uses the following subcommands:
Subcommand Description Usage
add Adds an IP address to the quarantinelist. You can also enter an action setthat applies to all traffic from that IPaddress.
quarantine add <IP address> <action setname>
empty FlushDes the quarantine list of all IPaddresses.
quarantine empty
list Displays a list of quarantined IPaddresses. You can filter the addresseswith the filter subcommand and anIP string, and you can use * as awildcard, as in 100.*.*.*.Corresponds to the QuarantinedAddress(es) panel on the Events >Managed Streatms > QuarantinedAddresses page in the LSM.
quarantine list
quarantine list filter <IP address>
remove Removes an IP address from thequarantine list.
quarantine remove <IP address>
reboot
Reboots the device.
You can specify a delay before the device reboots or execute the reboot immediately. Specify a full system restart with the -full flag.
Required privilege
Admin, Super-User
Usage
reboot
reboot <0-3600>
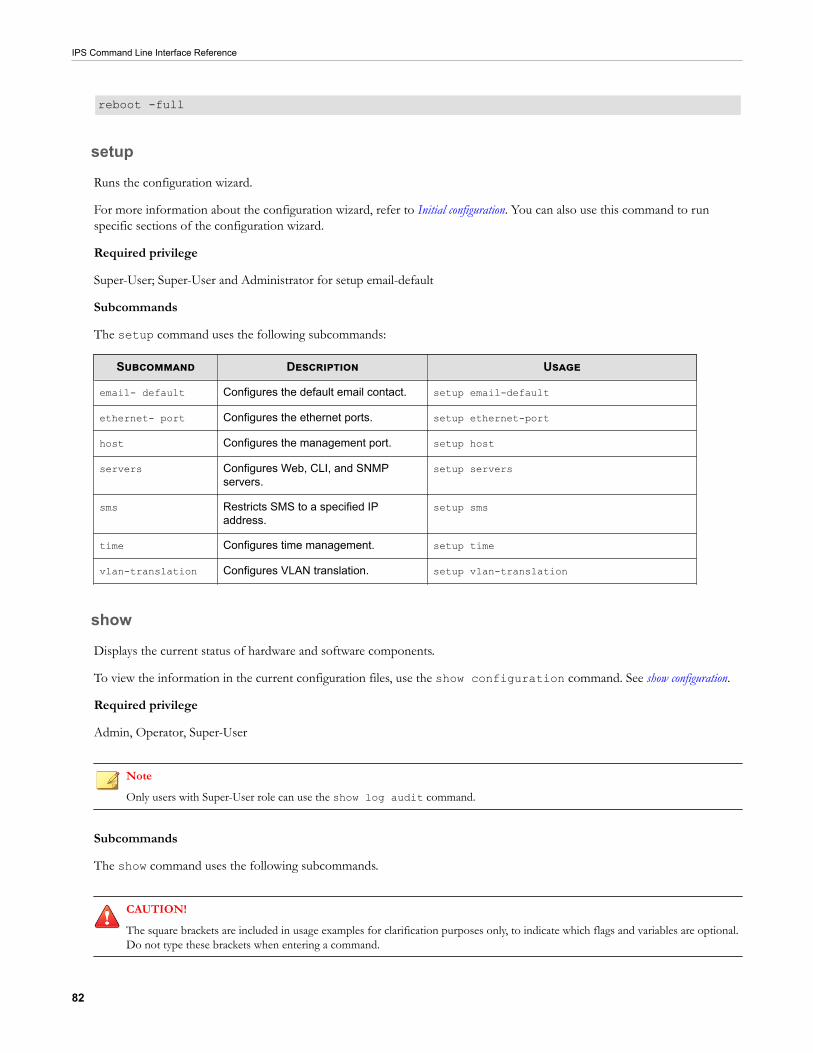
IPS Command Line Interface Reference
82
reboot -full
setup
Runs the configuration wizard.
For more information about the configuration wizard, refer to Initial configuration. You can also use this command to runspecific sections of the configuration wizard.
Required privilege
Super-User; Super-User and Administrator for setup email-default
Subcommands
The setup command uses the following subcommands:
Subcommand Description Usage
email- default Configures the default email contact. setup email-default
ethernet- port Configures the ethernet ports. setup ethernet-port
host Configures the management port. setup host
servers Configures Web, CLI, and SNMPservers.
setup servers
sms Restricts SMS to a specified IPaddress.
setup sms
time Configures time management. setup time
vlan-translation Configures VLAN translation. setup vlan-translation
show
Displays the current status of hardware and software components.
To view the information in the current configuration files, use the show configuration command. See show configuration.
Required privilege
Admin, Operator, Super-User
Note
Only users with Super-User role can use the show log audit command.
Subcommands
The show command uses the following subcommands.
CAUTION!
The square brackets are included in usage examples for clarification purposes only, to indicate which flags and variables are optional.Do not type these brackets when entering a command.

IPS Command Line Interface Reference
83
Subcommand Description Usage
action-sets Displays all action sets with theirsettings and contacts.
show action-sets
arp Displays the link level ARP table. show arp
autodv Displays the state of the automatic DVfeature.
show autodv
auxdv Displays the Auxiliary DV packagesthat are installed on the device.
show auxdv
clock Displays the time and timezone for theinternal clock.
show clock
show clock -details
compact-flash Displays whether the storage card ismounted, and if so, its model number,serial number, revision number,capacity, operation mode, and mountstatus.
show compact-flash
default-alert-sink Displays the to and from addressesand SMTP settings for the default alertsink.
show default-alert-sink
default-gateway Displays the IP address of the defaultgateway.
show default-gateway
deployment-choices Displays the deployment modesavailable for the device.
show deployment-choices
dns Displays the DNS that the device isusing.
show dns
filter Displays description, status, and DVpackage information for a filterspecified by filter number.
show filter <number>
fips Displays FIPS and key information.Use the -details option for moreinformation.
show fips
show fips -details
health Displays the disk space, memoryusage, power supply status,temperature, fans, I2C bus timeouts,and voltage of the device.
show health
show health disk-space
show health fan
show health i2c-bus
show health memory
show health power-supply
show health temperature
show health voltage
high-availability Displays the current HA status. On NX-platforms, the status of each moduleslot is displayed as being either normalor IPS bypass.
show high-availability
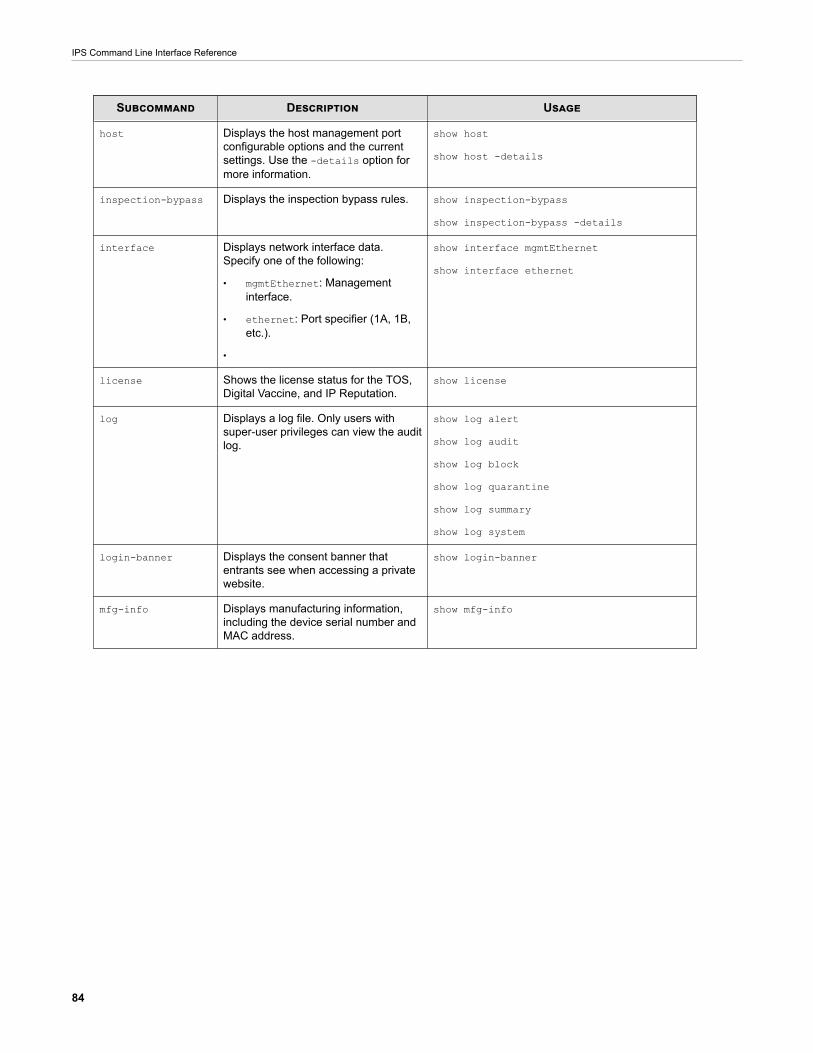
IPS Command Line Interface Reference
84
Subcommand Description Usage
host Displays the host management portconfigurable options and the currentsettings. Use the -details option formore information.
show host
show host -details
inspection-bypass Displays the inspection bypass rules. show inspection-bypass
show inspection-bypass -details
interface Displays network interface data.Specify one of the following:
• mgmtEthernet: Managementinterface.
• ethernet: Port specifier (1A, 1B,etc.).
•
show interface mgmtEthernet
show interface ethernet
license Shows the license status for the TOS,Digital Vaccine, and IP Reputation.
show license
log Displays a log file. Only users withsuper-user privileges can view the auditlog.
show log alert
show log audit
show log block
show log quarantine
show log summary
show log system
login-banner Displays the consent banner thatentrants see when accessing a privatewebsite.
show login-banner
mfg-info Displays manufacturing information,including the device serial number andMAC address.
show mfg-info
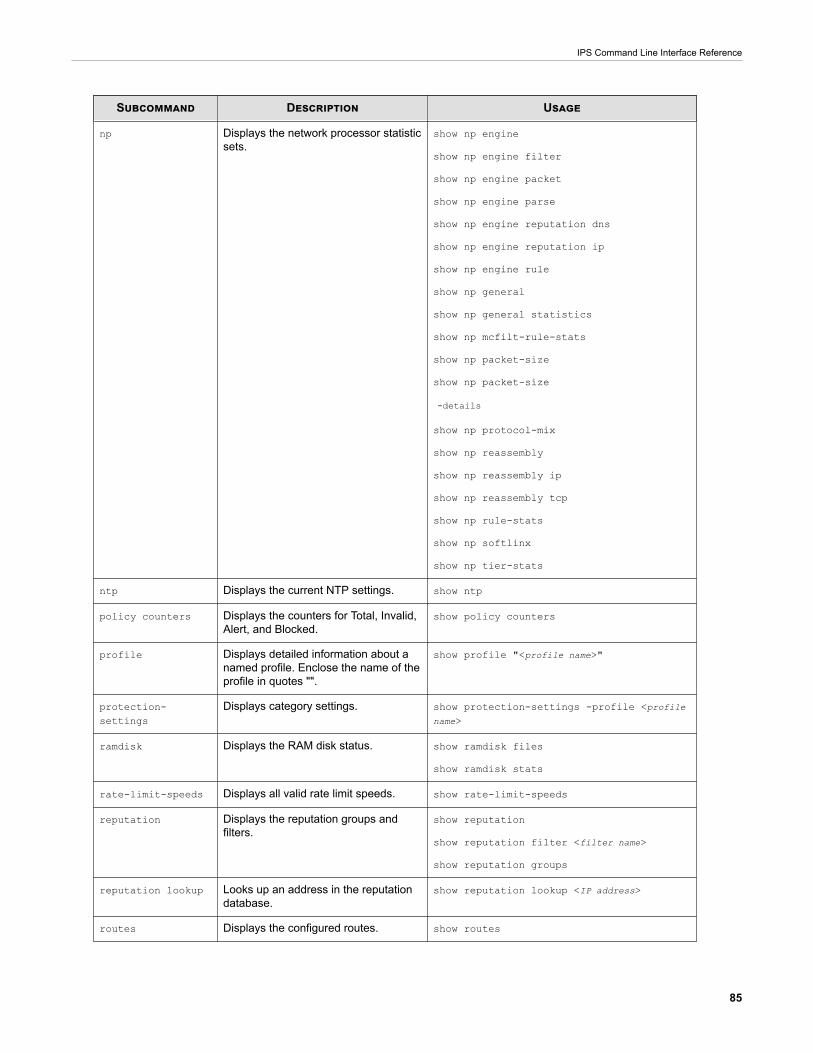
IPS Command Line Interface Reference
85
Subcommand Description Usage
np Displays the network processor statisticsets.
show np engine
show np engine filter
show np engine packet
show np engine parse
show np engine reputation dns
show np engine reputation ip
show np engine rule
show np general
show np general statistics
show np mcfilt-rule-stats
show np packet-size
show np packet-size
-details
show np protocol-mix
show np reassembly
show np reassembly ip
show np reassembly tcp
show np rule-stats
show np softlinx
show np tier-stats
ntp Displays the current NTP settings. show ntp
policy counters Displays the counters for Total, Invalid,Alert, and Blocked.
show policy counters
profile Displays detailed information about anamed profile. Enclose the name of theprofile in quotes "".
show profile "<profile name>"
protection-settings
Displays category settings. show protection-settings -profile <profilename>
ramdisk Displays the RAM disk status. show ramdisk files
show ramdisk stats
rate-limit-speeds Displays all valid rate limit speeds. show rate-limit-speeds
reputation Displays the reputation groups andfilters.
show reputation
show reputation filter <filter name>
show reputation groups
reputation lookup Looks up an address in the reputationdatabase.
show reputation lookup <IP address>
routes Displays the configured routes. show routes
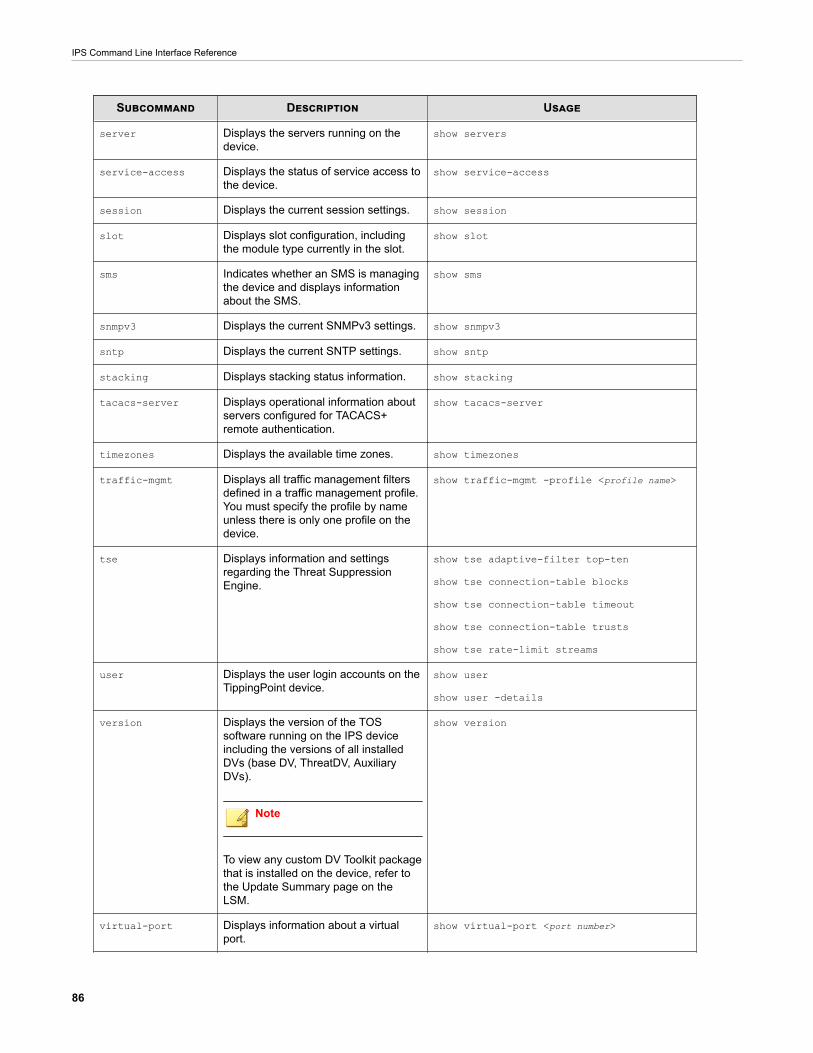
IPS Command Line Interface Reference
86
Subcommand Description Usage
server Displays the servers running on thedevice.
show servers
service-access Displays the status of service access tothe device.
show service-access
session Displays the current session settings. show session
slot Displays slot configuration, includingthe module type currently in the slot.
show slot
sms Indicates whether an SMS is managingthe device and displays informationabout the SMS.
show sms
snmpv3 Displays the current SNMPv3 settings. show snmpv3
sntp Displays the current SNTP settings. show sntp
stacking Displays stacking status information. show stacking
tacacs-server Displays operational information aboutservers configured for TACACS+remote authentication.
show tacacs-server
timezones Displays the available time zones. show timezones
traffic-mgmt Displays all traffic management filtersdefined in a traffic management profile.You must specify the profile by nameunless there is only one profile on thedevice.
show traffic-mgmt -profile <profile name>
tse Displays information and settingsregarding the Threat SuppressionEngine.
show tse adaptive-filter top-ten
show tse connection-table blocks
show tse connection-table timeout
show tse connection-table trusts
show tse rate-limit streams
user Displays the user login accounts on theTippingPoint device.
show user
show user -details
version Displays the version of the TOSsoftware running on the IPS deviceincluding the versions of all installedDVs (base DV, ThreatDV, AuxiliaryDVs).
Note
To view any custom DV Toolkit packagethat is installed on the device, refer tothe Update Summary page on theLSM.
show version
virtual-port Displays information about a virtualport.
show virtual-port <port number>
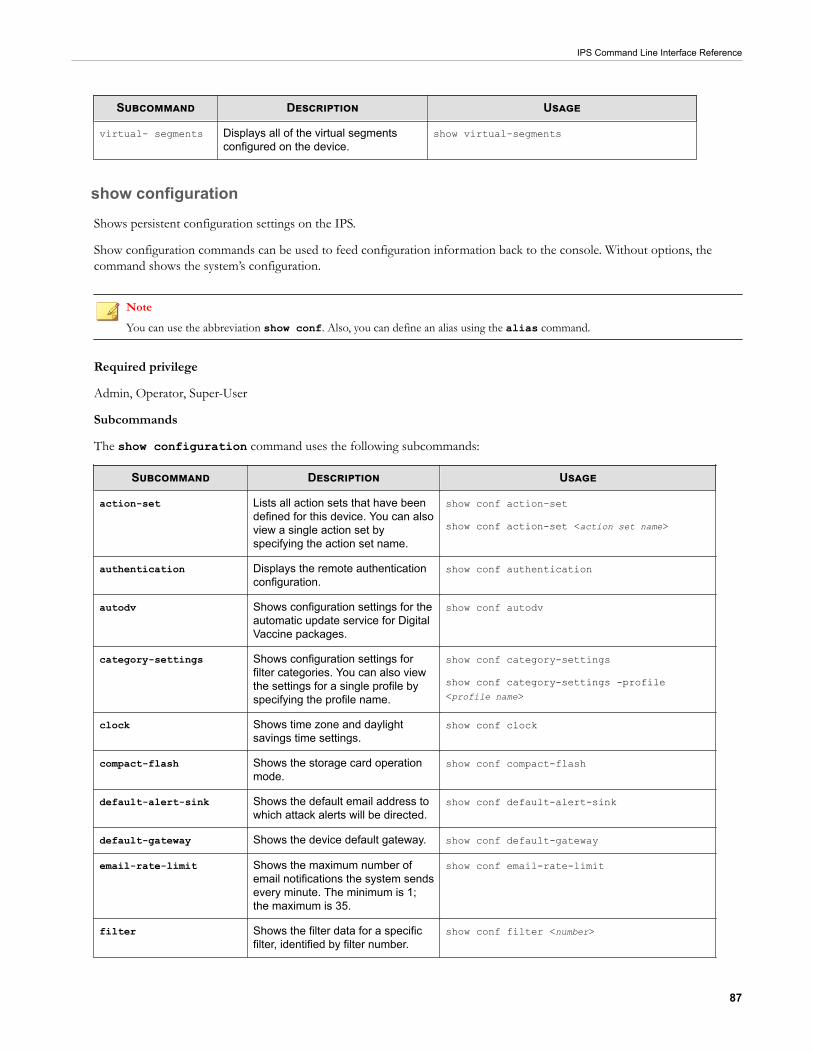
IPS Command Line Interface Reference
87
Subcommand Description Usage
virtual- segments Displays all of the virtual segmentsconfigured on the device.
show virtual-segments
show configuration
Shows persistent configuration settings on the IPS.
Show configuration commands can be used to feed configuration information back to the console. Without options, thecommand shows the system’s configuration.
Note
You can use the abbreviation show conf. Also, you can define an alias using the alias command.
Required privilege
Admin, Operator, Super-User
Subcommands
The show configuration command uses the following subcommands:
Subcommand Description Usage
action-set Lists all action sets that have beendefined for this device. You can alsoview a single action set byspecifying the action set name.
show conf action-set
show conf action-set <action set name>
authentication Displays the remote authenticationconfiguration.
show conf authentication
autodv Shows configuration settings for theautomatic update service for DigitalVaccine packages.
show conf autodv
category-settings Shows configuration settings forfilter categories. You can also viewthe settings for a single profile byspecifying the profile name.
show conf category-settings
show conf category-settings -profile<profile name>
clock Shows time zone and daylightsavings time settings.
show conf clock
compact-flash Shows the storage card operationmode.
show conf compact-flash
default-alert-sink Shows the default email address towhich attack alerts will be directed.
show conf default-alert-sink
default-gateway Shows the device default gateway. show conf default-gateway
email-rate-limit Shows the maximum number ofemail notifications the system sendsevery minute. The minimum is 1;the maximum is 35.
show conf email-rate-limit
filter Shows the filter data for a specificfilter, identified by filter number.
show conf filter <number>
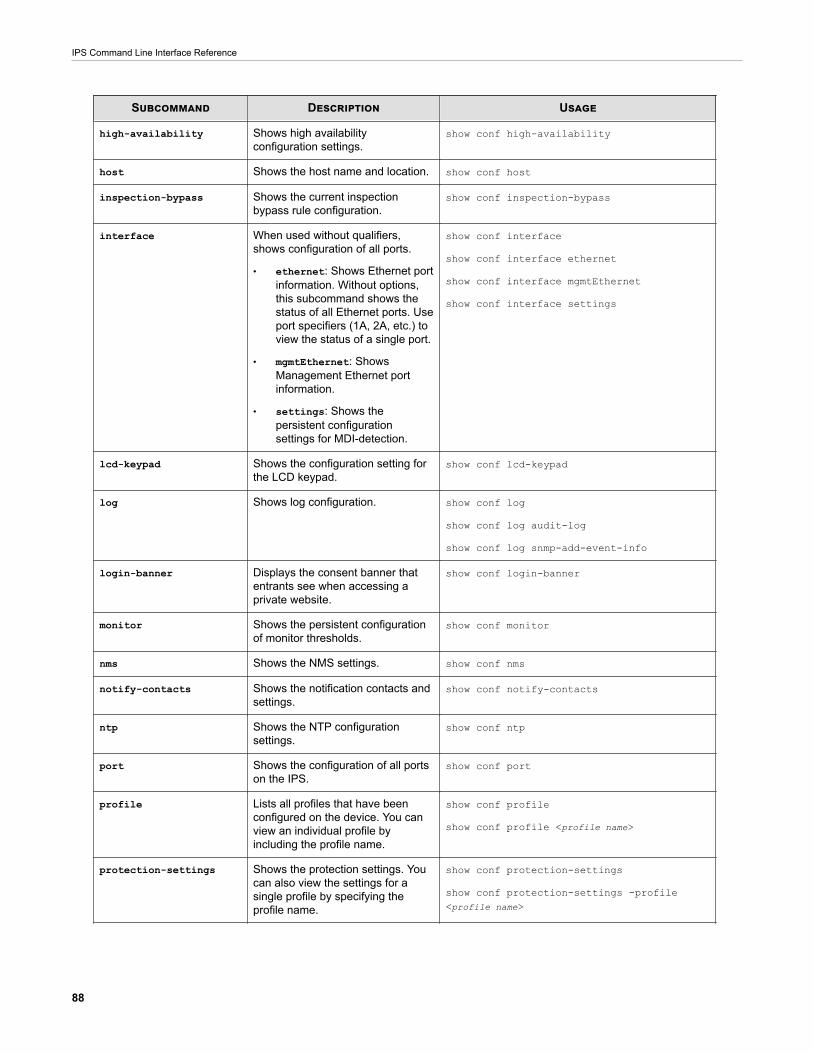
IPS Command Line Interface Reference
88
Subcommand Description Usage
high-availability Shows high availabilityconfiguration settings.
show conf high-availability
host Shows the host name and location. show conf host
inspection-bypass Shows the current inspectionbypass rule configuration.
show conf inspection-bypass
interface When used without qualifiers,shows configuration of all ports.
• ethernet: Shows Ethernet portinformation. Without options,this subcommand shows thestatus of all Ethernet ports. Useport specifiers (1A, 2A, etc.) toview the status of a single port.
• mgmtEthernet: ShowsManagement Ethernet portinformation.
• settings: Shows thepersistent configurationsettings for MDI-detection.
show conf interface
show conf interface ethernet
show conf interface mgmtEthernet
show conf interface settings
lcd-keypad Shows the configuration setting forthe LCD keypad.
show conf lcd-keypad
log Shows log configuration. show conf log
show conf log audit-log
show conf log snmp-add-event-info
login-banner Displays the consent banner thatentrants see when accessing aprivate website.
show conf login-banner
monitor Shows the persistent configurationof monitor thresholds.
show conf monitor
nms Shows the NMS settings. show conf nms
notify-contacts Shows the notification contacts andsettings.
show conf notify-contacts
ntp Shows the NTP configurationsettings.
show conf ntp
port Shows the configuration of all portson the IPS.
show conf port
profile Lists all profiles that have beenconfigured on the device. You canview an individual profile byincluding the profile name.
show conf profile
show conf profile <profile name>
protection-settings Shows the protection settings. Youcan also view the settings for asingle profile by specifying theprofile name.
show conf protection-settings
show conf protection-settings -profile<profile name>

IPS Command Line Interface Reference
89
Subcommand Description Usage
radius-server Shows the properties of anyRADIUS servers configured forremote authentication.
show conf radius-server
ramdisk Shows the RAM disk configuration. show conf ramdisk
remote Shows any RADIUS or SMSservers configured for remoteauthentication.
show conf remote
remote-syslog Shows the remote syslogconfiguration and the IP address ofthe remote log.
show conf remote-syslog
reputation Shows the configuration ofreputation filters and groups, and ofthe IP Reputation feature.
show conf reputation
show conf reputation group
show conf reputation filter
segment Shows the segment configuration.You can view an individual segmentby including the segment name.
show conf segment
show conf segment <segment name>
server Shows the device serverconfiguration.
show conf server
service-access Shows whether service access isenabled or disabled.
show conf service-access
session Shows the session timeout settings.Use show session to view thecurrent session configuration.
show conf session
sms Shows if SMS is enabled and otherSMS configuration settings.
show conf sms
snmpv3 Shows whether an SNMPv3 userhas been defined.
show conf snmpv3
sntp Shows the SNTP configuration. show conf sntp
tacacs-server Shows the properties of anyTACACS+ servers configured forremote authentication.
show conf tacacs-server
traffic-mgmt Shows the traffic managementconfiguration.
show conf traffic-mgmt
tse Shows the TSE information,including connection table timeout,sFlow (NX-platform devices only),asymmetric network setting,adaptive aggregation threshold,adaptive filter mode, and IDS mode.
show conf tse
user Shows user options. Use the -details option to view additionalinformation.
show conf user
show conf user -details
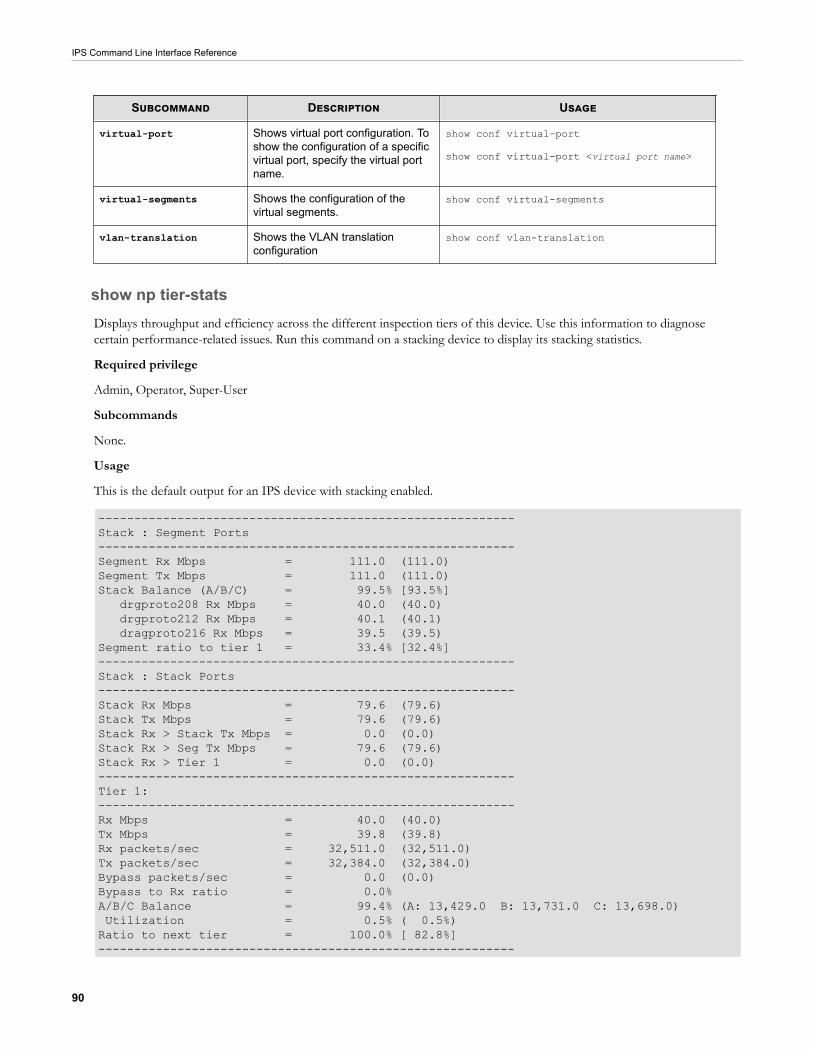
IPS Command Line Interface Reference
90
Subcommand Description Usage
virtual-port Shows virtual port configuration. Toshow the configuration of a specificvirtual port, specify the virtual portname.
show conf virtual-port
show conf virtual-port <virtual port name>
virtual-segments Shows the configuration of thevirtual segments.
show conf virtual-segments
vlan-translation Shows the VLAN translationconfiguration
show conf vlan-translation
show np tier-statsDisplays throughput and efficiency across the different inspection tiers of this device. Use this information to diagnosecertain performance-related issues. Run this command on a stacking device to display its stacking statistics.
Required privilege
Admin, Operator, Super-User
Subcommands
None.
Usage
This is the default output for an IPS device with stacking enabled.
----------------------------------------------------------Stack : Segment Ports----------------------------------------------------------Segment Rx Mbps = 111.0 (111.0)Segment Tx Mbps = 111.0 (111.0)Stack Balance (A/B/C) = 99.5% [93.5%] drgproto208 Rx Mbps = 40.0 (40.0) drgproto212 Rx Mbps = 40.1 (40.1) dragproto216 Rx Mbps = 39.5 (39.5)Segment ratio to tier 1 = 33.4% [32.4%]----------------------------------------------------------Stack : Stack Ports----------------------------------------------------------Stack Rx Mbps = 79.6 (79.6)Stack Tx Mbps = 79.6 (79.6)Stack Rx > Stack Tx Mbps = 0.0 (0.0)Stack Rx > Seg Tx Mbps = 79.6 (79.6)Stack Rx > Tier 1 = 0.0 (0.0)----------------------------------------------------------Tier 1:----------------------------------------------------------Rx Mbps = 40.0 (40.0)Tx Mbps = 39.8 (39.8)Rx packets/sec = 32,511.0 (32,511.0)Tx packets/sec = 32,384.0 (32,384.0)Bypass packets/sec = 0.0 (0.0)Bypass to Rx ratio = 0.0%A/B/C Balance = 99.4% (A: 13,429.0 B: 13,731.0 C: 13,698.0) Utilization = 0.5% ( 0.5%)Ratio to next tier = 100.0% [ 82.8%]----------------------------------------------------------
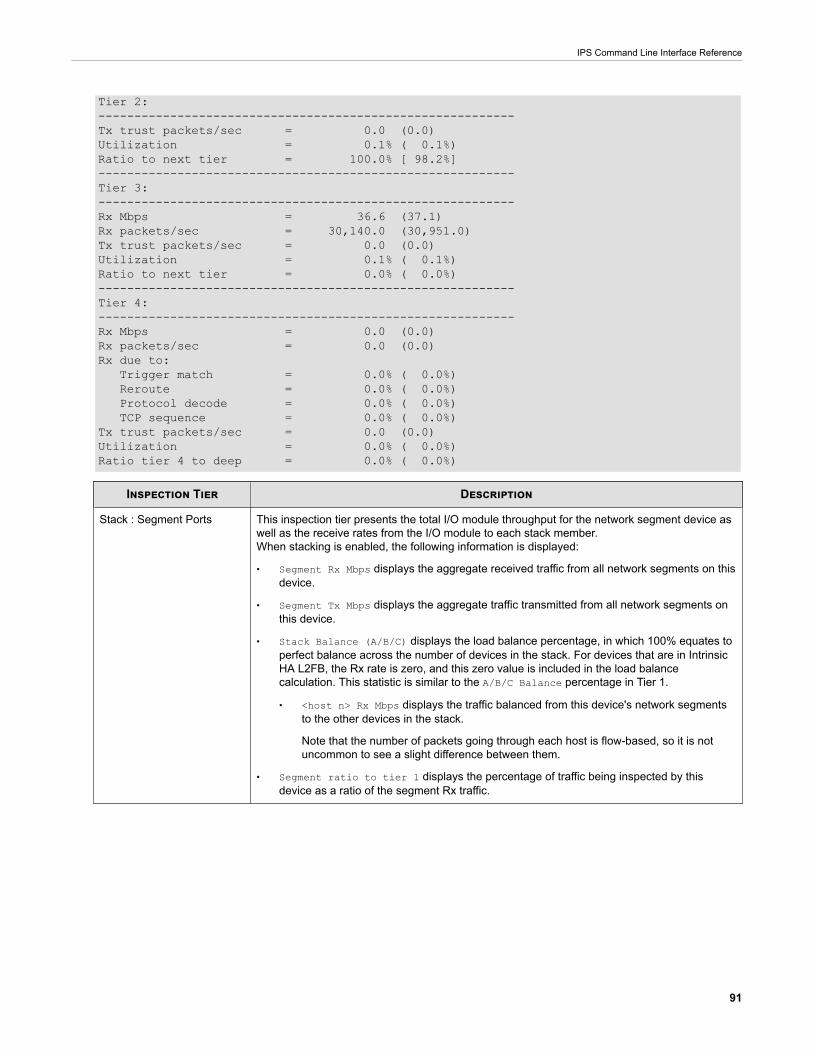
IPS Command Line Interface Reference
91
Tier 2: ----------------------------------------------------------Tx trust packets/sec = 0.0 (0.0)Utilization = 0.1% ( 0.1%)Ratio to next tier = 100.0% [ 98.2%]----------------------------------------------------------Tier 3: ----------------------------------------------------------Rx Mbps = 36.6 (37.1)Rx packets/sec = 30,140.0 (30,951.0)Tx trust packets/sec = 0.0 (0.0)Utilization = 0.1% ( 0.1%)Ratio to next tier = 0.0% ( 0.0%)----------------------------------------------------------Tier 4: ----------------------------------------------------------Rx Mbps = 0.0 (0.0)Rx packets/sec = 0.0 (0.0)Rx due to: Trigger match = 0.0% ( 0.0%) Reroute = 0.0% ( 0.0%) Protocol decode = 0.0% ( 0.0%) TCP sequence = 0.0% ( 0.0%)Tx trust packets/sec = 0.0 (0.0)Utilization = 0.0% ( 0.0%)Ratio tier 4 to deep = 0.0% ( 0.0%)
Inspection Tier Description
Stack : Segment Ports This inspection tier presents the total I/O module throughput for the network segment device aswell as the receive rates from the I/O module to each stack member.When stacking is enabled, the following information is displayed:
• Segment Rx Mbps displays the aggregate received traffic from all network segments on thisdevice.
• Segment Tx Mbps displays the aggregate traffic transmitted from all network segments onthis device.
• Stack Balance (A/B/C) displays the load balance percentage, in which 100% equates toperfect balance across the number of devices in the stack. For devices that are in IntrinsicHA L2FB, the Rx rate is zero, and this zero value is included in the load balancecalculation. This statistic is similar to the A/B/C Balance percentage in Tier 1.
• <host n> Rx Mbps displays the traffic balanced from this device's network segmentsto the other devices in the stack.
Note that the number of packets going through each host is flow-based, so it is notuncommon to see a slight difference between them.
• Segment ratio to tier 1 displays the percentage of traffic being inspected by thisdevice as a ratio of the segment Rx traffic.
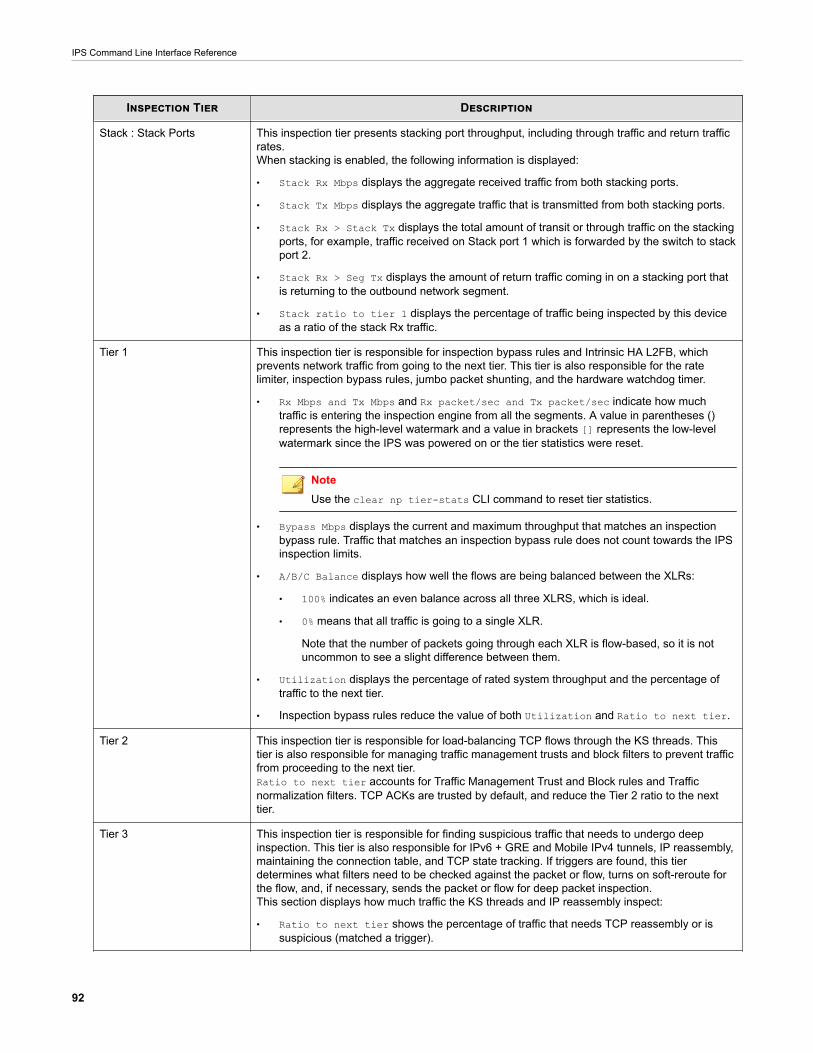
IPS Command Line Interface Reference
92
Inspection Tier Description
Stack : Stack Ports This inspection tier presents stacking port throughput, including through traffic and return trafficrates.When stacking is enabled, the following information is displayed:
• Stack Rx Mbps displays the aggregate received traffic from both stacking ports.
• Stack Tx Mbps displays the aggregate traffic that is transmitted from both stacking ports.
• Stack Rx > Stack Tx displays the total amount of transit or through traffic on the stackingports, for example, traffic received on Stack port 1 which is forwarded by the switch to stackport 2.
• Stack Rx > Seg Tx displays the amount of return traffic coming in on a stacking port thatis returning to the outbound network segment.
• Stack ratio to tier 1 displays the percentage of traffic being inspected by this deviceas a ratio of the stack Rx traffic.
Tier 1 This inspection tier is responsible for inspection bypass rules and Intrinsic HA L2FB, whichprevents network traffic from going to the next tier. This tier is also responsible for the ratelimiter, inspection bypass rules, jumbo packet shunting, and the hardware watchdog timer.
• Rx Mbps and Tx Mbps and Rx packet/sec and Tx packet/sec indicate how muchtraffic is entering the inspection engine from all the segments. A value in parentheses ()represents the high-level watermark and a value in brackets [] represents the low-levelwatermark since the IPS was powered on or the tier statistics were reset.
NoteUse the clear np tier-stats CLI command to reset tier statistics.
• Bypass Mbps displays the current and maximum throughput that matches an inspectionbypass rule. Traffic that matches an inspection bypass rule does not count towards the IPSinspection limits.
• A/B/C Balance displays how well the flows are being balanced between the XLRs:
• 100% indicates an even balance across all three XLRS, which is ideal.
• 0% means that all traffic is going to a single XLR.
Note that the number of packets going through each XLR is flow-based, so it is notuncommon to see a slight difference between them.
• Utilization displays the percentage of rated system throughput and the percentage oftraffic to the next tier.
• Inspection bypass rules reduce the value of both Utilization and Ratio to next tier.
Tier 2 This inspection tier is responsible for load-balancing TCP flows through the KS threads. Thistier is also responsible for managing traffic management trusts and block filters to prevent trafficfrom proceeding to the next tier.Ratio to next tier accounts for Traffic Management Trust and Block rules and Trafficnormalization filters. TCP ACKs are trusted by default, and reduce the Tier 2 ratio to the nexttier.
Tier 3 This inspection tier is responsible for finding suspicious traffic that needs to undergo deepinspection. This tier is also responsible for IPv6 + GRE and Mobile IPv4 tunnels, IP reassembly,maintaining the connection table, and TCP state tracking. If triggers are found, this tierdetermines what filters need to be checked against the packet or flow, turns on soft-reroute forthe flow, and, if necessary, sends the packet or flow for deep packet inspection.This section displays how much traffic the KS threads and IP reassembly inspect:
• Ratio to next tier shows the percentage of traffic that needs TCP reassembly or issuspicious (matched a trigger).

IPS Command Line Interface Reference
93
Inspection Tier Description
Tier 4 This inspection tier is responsible for TCP reassembly and threat verification which includesheader-based checks, protocol decoders, content search, and regular expression matching.This tier is also responsible for action handling, regardless of whether the packet is dropped,rate limited, or rate limited in the connection table.
• Rx due to indicates why traffic is going to deep packet inspection:
• Trigger match. Displays the percentage of traffic that matched a trigger.
• Rx due to Reroute. When a packet matches a trigger the following packets whichbelong to the same flow are required for threat verification.
• TCP sequence. If traffic cannot be reordered by KS threads using loopy packet, it mustgo to Tier 4 for reordering.
• Ratio to next tier. Displays the percentage of traffic that matched a filter, regardless ofthe Action Set.
Tuning is required if congestion is occurring or if an IPS is being operated close to its maximumrated throughput. The deeper a flow is inspected, the more processing is required. Therefore,the most performance gains that can be attained by optimizing the KS threads at this level(Tiers 3 and 4). The three most process-intensive operations are:
• IP reassembly
• Threat verification
• TCP packet reordering
show stackingEnter this command to show stacking status information.
Required privilege
Admin, Operator, Super-User
Use
The following example shows the default output for a device that does not support stacking. To support stacking, the devicemust be a supported model running TippingPoint Operating System (TOS) v3.9.0 (or later).
ips# show stackingThis device does not support stacking.
The following example shows the default output for a supported device that is not a member of the stack. Unlike the SMS,the device does not validate the presence of the 40 GbE QSFP+ NX module in slot 4.
ips# show stackingStack member summary--------------------Stacking enabled : NoStacking active : NoStack member state : Device Ready to Inspect - NormalStack master : No
The following example shows the output for the same device after adding it to a stack of three devices.
ips# show stackingStack member summary--------------------Stacking enabled : Yes
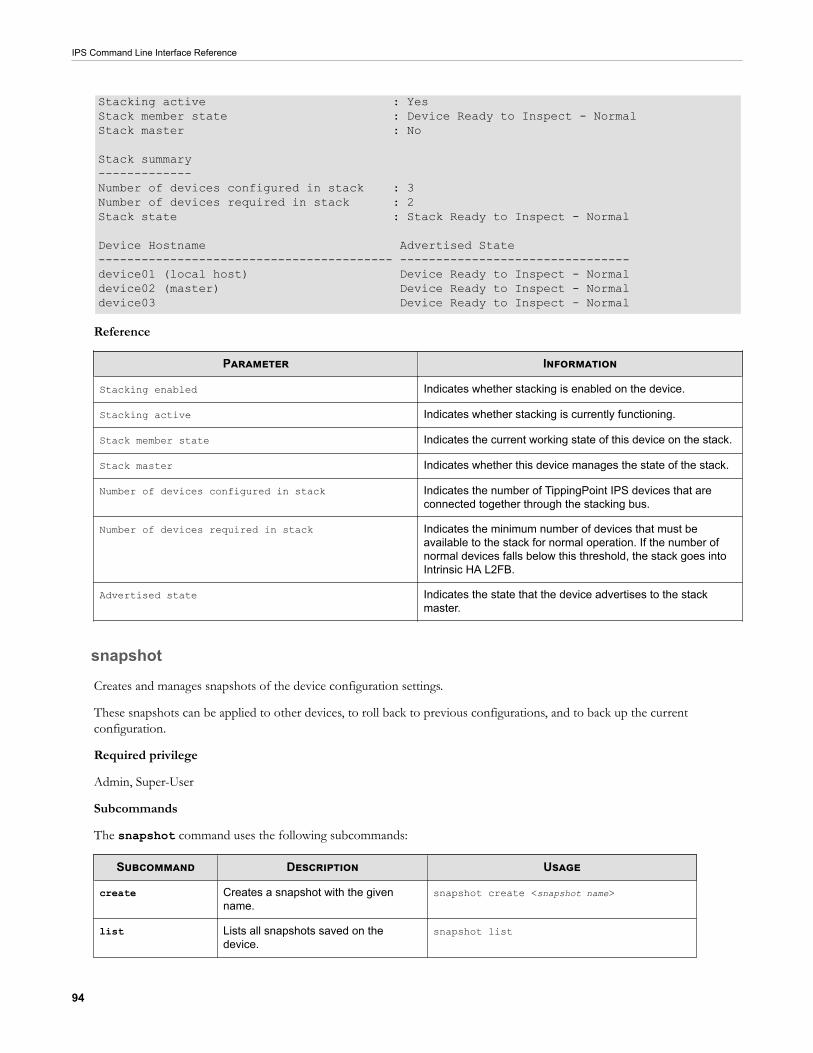
IPS Command Line Interface Reference
94
Stacking active : YesStack member state : Device Ready to Inspect - NormalStack master : No
Stack summary-------------Number of devices configured in stack : 3Number of devices required in stack : 2Stack state : Stack Ready to Inspect - Normal
Device Hostname Advertised State----------------------------------------- --------------------------------device01 (local host) Device Ready to Inspect - Normaldevice02 (master) Device Ready to Inspect - Normaldevice03 Device Ready to Inspect - Normal
Reference
Parameter Information
Stacking enabled Indicates whether stacking is enabled on the device.
Stacking active Indicates whether stacking is currently functioning.
Stack member state Indicates the current working state of this device on the stack.
Stack master Indicates whether this device manages the state of the stack.
Number of devices configured in stack Indicates the number of TippingPoint IPS devices that areconnected together through the stacking bus.
Number of devices required in stack Indicates the minimum number of devices that must beavailable to the stack for normal operation. If the number ofnormal devices falls below this threshold, the stack goes intoIntrinsic HA L2FB.
Advertised state Indicates the state that the device advertises to the stackmaster.
snapshot
Creates and manages snapshots of the device configuration settings.
These snapshots can be applied to other devices, to roll back to previous configurations, and to back up the currentconfiguration.
Required privilege
Admin, Super-User
Subcommands
The snapshot command uses the following subcommands:
Subcommand Description Usage
create Creates a snapshot with the givenname.
snapshot create <snapshot name>
list Lists all snapshots saved on thedevice.
snapshot list
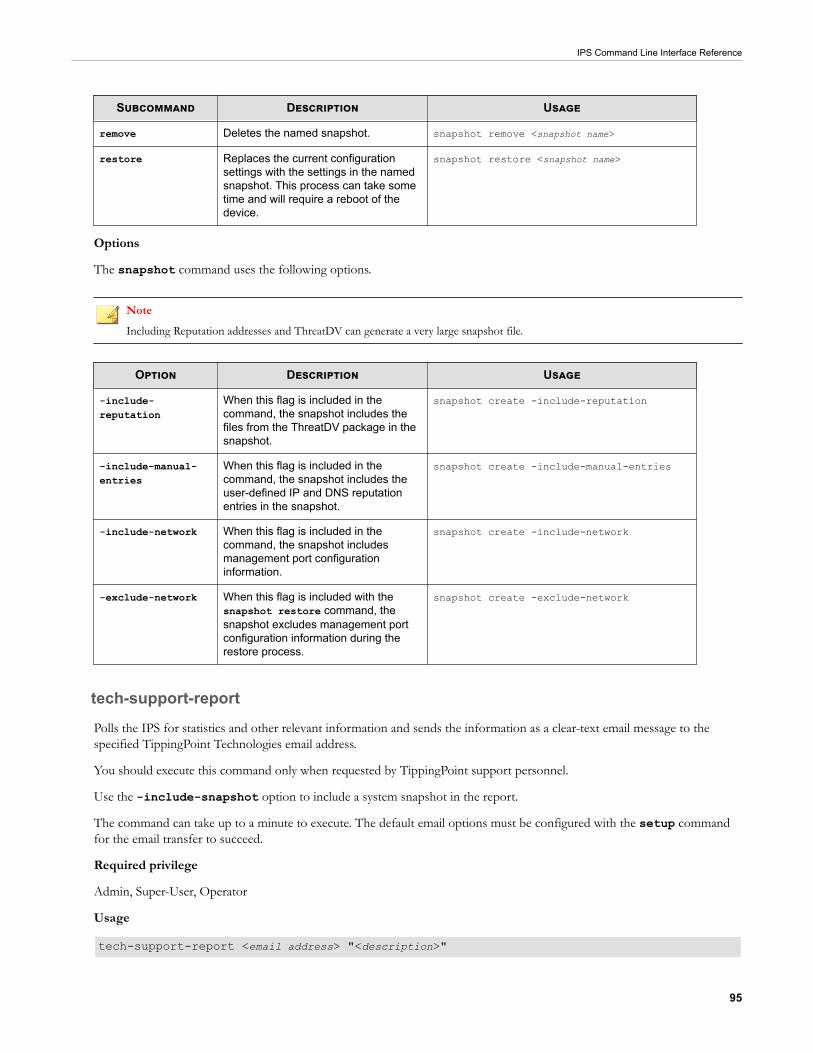
IPS Command Line Interface Reference
95
Subcommand Description Usage
remove Deletes the named snapshot. snapshot remove <snapshot name>
restore Replaces the current configurationsettings with the settings in the namedsnapshot. This process can take sometime and will require a reboot of thedevice.
snapshot restore <snapshot name>
Options
The snapshot command uses the following options.
Note
Including Reputation addresses and ThreatDV can generate a very large snapshot file.
Option Description Usage
-include-reputation
When this flag is included in thecommand, the snapshot includes thefiles from the ThreatDV package in thesnapshot.
snapshot create -include-reputation
-include-manual-entries
When this flag is included in thecommand, the snapshot includes theuser-defined IP and DNS reputationentries in the snapshot.
snapshot create -include-manual-entries
-include-network When this flag is included in thecommand, the snapshot includesmanagement port configurationinformation.
snapshot create -include-network
-exclude-network When this flag is included with thesnapshot restore command, thesnapshot excludes management portconfiguration information during therestore process.
snapshot create -exclude-network
tech-support-reportPolls the IPS for statistics and other relevant information and sends the information as a clear-text email message to thespecified TippingPoint Technologies email address.
You should execute this command only when requested by TippingPoint support personnel.
Use the -include-snapshot option to include a system snapshot in the report.
The command can take up to a minute to execute. The default email options must be configured with the setup commandfor the email transfer to succeed.
Required privilege
Admin, Super-User, Operator
Usage
tech-support-report <email address> "<description>"

IPS Command Line Interface Reference
96
tech-support-report <email address> "<description>" -include-snapshot
TCPDUMP expressionsThe debug traffic capture command uses TCPDUMP expressions to define the traffic captures.
For more information about TCPDUMP expressions, see the TCPDUMP man page at http://www.tcpdump.org/.


![Impulsivity and Information Disclosure: Implications …...The term privacy paradox is used to refer to the disclosure of private information, despite privacy concern [2]. Sometimes,](https://img.pdfslide.net/doc/110x75/5f294965c1d353601f384a16/impulsivity-and-information-disclosure-implications-the-term-privacy-paradox.jpg)