Embed Size (px)
Citation preview
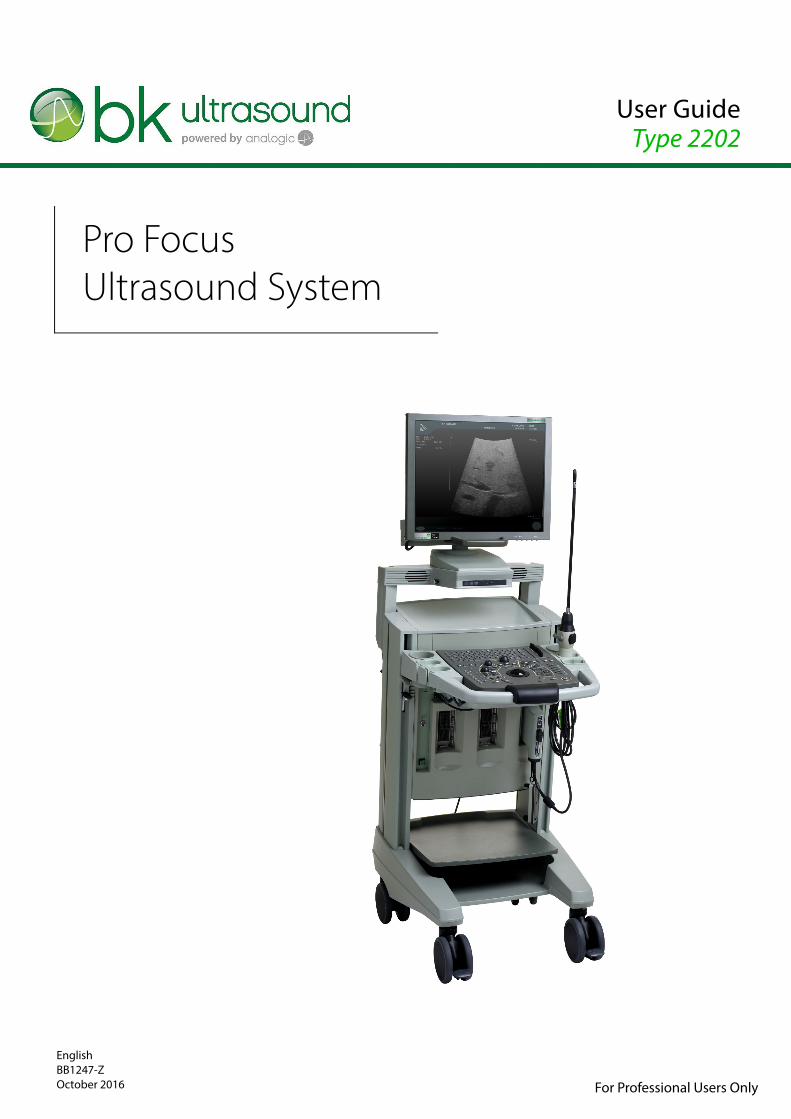
English BB1247-ZOctober 2016 For Professional Users Only
User GuideType 2202
Pro Focus Ultrasound System

© 2016 BK Medical
Information in this document may be subject to change without notice.
LEGAL MANUFACTURER
BK MEDICALMileparken 34
2730 Herlev
Denmark
Tel.:+45 4452 8100 / Fax:+45 4452 8199
www.bkultrasound.com
Email: [email protected]
If you have comments about the user documentation, please write to us at the email address above. We would like to hear from you.
BK Medical Customer SatisfactionInput from our customers helps us improve our products and services. As part of our customersatisfaction program, we contact a sample of our customers a few months after they receive their orders.If you receive an email message from us asking for your feedback, we hope you will be willing toanswer some questions about your experience buying and using our products. Your opinions areimportant to us. You are of course always welcome to contact us via your BK Medical representative orby contacting us directly.
Scanner Software• NOT FAULT TOLERANT. THE SOFTWARE IS NOT FAULT TOLERANT. BK Medical HAS
INDEPENDENTLY DETERMINED HOW TO USE THE SOFTWARE IN THE DEVICE, AND MS HASRELIED UPON BK Medical TO CONDUCT SUFFICIENT TESTING TO DETERMINE THAT THESOFTWARE IS SUITABLE FOR USE.
• EXPORT RESTRICTIONS. You acknowledge that Windows XP Embedded is of US-origin. You agree tocomply with all applicable international and national laws that apply to Windows XP Embedded, including theU.S. Export Administration Regulations, as well as end-user, end-use and country destination restrictions issuedby U.S. and other governments. For additional information on exporting Windows XP Embedded, see http://www.microsoft.com/exporting/
• The Pro Focus 2202 Ultrasound Scanner is closed. Any modification of or installation of software to the systemmay compromise safety and function of the system. Any modification of or installation of software without writtenpermission from B-K Medical will immediately void any warranty supplied by BK Medical. Such changes willalso void any service contract and result in charges to the customer for restoration of the original Pro Focus 2202system.
Trademarks:DICOM is the registered trademark of the National Electrical Manufacturers Association for its standards publications relating to digital communications of medical information. Microsoft and Windows are registered trademarks of Microsoft Corporation in the United States and other countries. SonoVue is a registered trademark of Bracco S.p.A. DEFINITY is a registered trademark of Bristol-Myers Squibb Medical Imaging FireWire is a trademark of Apple Computer, Inc. CIV-Flex is a trademark of CIVCO Medical Instruments Co., Inc.

Contents
Chapter 1 General and Safety Information . . . . . . . . . . . . . . . . . . . . . . . . . . . . . . . . . . . . . . . . . . . . . 7User Documentation . . . . . . . . . . . . . . . . . . . . . . . . . . . . . . . . . . . . . . . . . . . . . . . 7
Safety Information . . . . . . . . . . . . . . . . . . . . . . . . . . . . . . . . . . . . . . . . . . . . . 8Typographical Conventions . . . . . . . . . . . . . . . . . . . . . . . . . . . . . . . . . . . . . . 8Terminology . . . . . . . . . . . . . . . . . . . . . . . . . . . . . . . . . . . . . . . . . . . . . . . . . . 8
About the System . . . . . . . . . . . . . . . . . . . . . . . . . . . . . . . . . . . . . . . . . . . . . . . . . 9Imaging Modes . . . . . . . . . . . . . . . . . . . . . . . . . . . . . . . . . . . . . . . . . . . . . . . . 9Pro Packages. . . . . . . . . . . . . . . . . . . . . . . . . . . . . . . . . . . . . . . . . . . . . . . . . . 9Safety Symbols on the System . . . . . . . . . . . . . . . . . . . . . . . . . . . . . . . . . . . 10
General Safety Precautions . . . . . . . . . . . . . . . . . . . . . . . . . . . . . . . . . . . . . . . . . 12Explosion Hazards . . . . . . . . . . . . . . . . . . . . . . . . . . . . . . . . . . . . . . . . . . . . 13Electrical Safety . . . . . . . . . . . . . . . . . . . . . . . . . . . . . . . . . . . . . . . . . . . . . . 13ESD Training . . . . . . . . . . . . . . . . . . . . . . . . . . . . . . . . . . . . . . . . . . . . . . . . 13Interference. . . . . . . . . . . . . . . . . . . . . . . . . . . . . . . . . . . . . . . . . . . . . . . . . . 14Installation . . . . . . . . . . . . . . . . . . . . . . . . . . . . . . . . . . . . . . . . . . . . . . . . . . 15Transducers. . . . . . . . . . . . . . . . . . . . . . . . . . . . . . . . . . . . . . . . . . . . . . . . . . 15Remote Control. . . . . . . . . . . . . . . . . . . . . . . . . . . . . . . . . . . . . . . . . . . . . . . 16Other Safety Considerations. . . . . . . . . . . . . . . . . . . . . . . . . . . . . . . . . . . . . 16Service and Repair . . . . . . . . . . . . . . . . . . . . . . . . . . . . . . . . . . . . . . . . . . . . 19Connecting Other Equipment . . . . . . . . . . . . . . . . . . . . . . . . . . . . . . . . . . . . 19
Network Connection . . . . . . . . . . . . . . . . . . . . . . . . . . . . . . . . . . . . . . . . . . . . . . 20Network Security . . . . . . . . . . . . . . . . . . . . . . . . . . . . . . . . . . . . . . . . . . . . . 21Network Printing . . . . . . . . . . . . . . . . . . . . . . . . . . . . . . . . . . . . . . . . . . . . . 21Computer Security . . . . . . . . . . . . . . . . . . . . . . . . . . . . . . . . . . . . . . . . . . . . 21Wireless Networks . . . . . . . . . . . . . . . . . . . . . . . . . . . . . . . . . . . . . . . . . . . . 21
Acoustic Output. . . . . . . . . . . . . . . . . . . . . . . . . . . . . . . . . . . . . . . . . . . . . . . . . . 24General . . . . . . . . . . . . . . . . . . . . . . . . . . . . . . . . . . . . . . . . . . . . . . . . . . . . . 24Monitor Display . . . . . . . . . . . . . . . . . . . . . . . . . . . . . . . . . . . . . . . . . . . . . . 25Thermal and Mechanical Indices . . . . . . . . . . . . . . . . . . . . . . . . . . . . . . . . . 25Acoustic Output Measurement . . . . . . . . . . . . . . . . . . . . . . . . . . . . . . . . . . . 26Functions Affecting Acoustic Output. . . . . . . . . . . . . . . . . . . . . . . . . . . . . . 26Default Acoustic Output. . . . . . . . . . . . . . . . . . . . . . . . . . . . . . . . . . . . . . . . 27
Clinical Measurements: Ranges and Accuracies. . . . . . . . . . . . . . . . . . . . . . . . . 27Geometric Measurements . . . . . . . . . . . . . . . . . . . . . . . . . . . . . . . . . . . . . . . 29Time Measurements . . . . . . . . . . . . . . . . . . . . . . . . . . . . . . . . . . . . . . . . . . . 29Doppler Measurements. . . . . . . . . . . . . . . . . . . . . . . . . . . . . . . . . . . . . . . . . 30
References . . . . . . . . . . . . . . . . . . . . . . . . . . . . . . . . . . . . . . . . . . . . . . . . . . . . . . 30
Chapter 2 Getting Started . . . . . . . . . . . . . . . . . . . . . . . . . . . . . . . . . . . . . . . . . . . . . . . . . . . . . . . . . . . 33General Information . . . . . . . . . . . . . . . . . . . . . . . . . . . . . . . . . . . . . . . . . . . . . . 33Adjusting the Keyboard Panel and Monitor . . . . . . . . . . . . . . . . . . . . . . . . . . . . 34
Docking the Flat Screen on Arm . . . . . . . . . . . . . . . . . . . . . . . . . . . . . . . . . 34Turning the System On and Off . . . . . . . . . . . . . . . . . . . . . . . . . . . . . . . . . . . . . 35System Busy . . . . . . . . . . . . . . . . . . . . . . . . . . . . . . . . . . . . . . . . . . . . . . . . . . . . 35Checking the Date . . . . . . . . . . . . . . . . . . . . . . . . . . . . . . . . . . . . . . . . . . . . . . . . 35
3

4
Settings on the Monitor . . . . . . . . . . . . . . . . . . . . . . . . . . . . . . . . . . . . . . . . . . . . 36Brightness . . . . . . . . . . . . . . . . . . . . . . . . . . . . . . . . . . . . . . . . . . . . . . . . . . . 36Factory Defaults . . . . . . . . . . . . . . . . . . . . . . . . . . . . . . . . . . . . . . . . . . . . . . 37Menu Window on LCD Flat Screen . . . . . . . . . . . . . . . . . . . . . . . . . . . . . . . 37
Adjusting the Reading Lights . . . . . . . . . . . . . . . . . . . . . . . . . . . . . . . . . . . . . . . 37Setting up a New Patient . . . . . . . . . . . . . . . . . . . . . . . . . . . . . . . . . . . . . . . . . . . 37
Opening the Patient Window . . . . . . . . . . . . . . . . . . . . . . . . . . . . . . . . . . . . 38Changing Pro Package or Preset in the Patient Window . . . . . . . . . . . . . . . 38New Patient Information from a DICOM Worklist . . . . . . . . . . . . . . . . . . . 39Entering Dates . . . . . . . . . . . . . . . . . . . . . . . . . . . . . . . . . . . . . . . . . . . . . . . 41Keeping Image Settings . . . . . . . . . . . . . . . . . . . . . . . . . . . . . . . . . . . . . . . . 41Keeping Patient-Related Data . . . . . . . . . . . . . . . . . . . . . . . . . . . . . . . . . . . 42Pausing and Later Continuing an Examination . . . . . . . . . . . . . . . . . . . . . . 42Discontinue Examination with MPPS Server Configured . . . . . . . . . . . . . . 43
Ending an Examination . . . . . . . . . . . . . . . . . . . . . . . . . . . . . . . . . . . . . . . . . . . . 43Connecting and Selecting Transducers . . . . . . . . . . . . . . . . . . . . . . . . . . . . . . . . 43
Connecting a Transducer . . . . . . . . . . . . . . . . . . . . . . . . . . . . . . . . . . . . . . . 43Selecting a Transducer . . . . . . . . . . . . . . . . . . . . . . . . . . . . . . . . . . . . . . . . . 44Selecting the Imaging Plane . . . . . . . . . . . . . . . . . . . . . . . . . . . . . . . . . . . . . 45
Pro Packages and Presets. . . . . . . . . . . . . . . . . . . . . . . . . . . . . . . . . . . . . . . . . . . 45Selecting a Pro Package or Preset. . . . . . . . . . . . . . . . . . . . . . . . . . . . . . . . . 46Saving a Preset . . . . . . . . . . . . . . . . . . . . . . . . . . . . . . . . . . . . . . . . . . . . . . . 46
Selecting or Changing the Imaging Mode. . . . . . . . . . . . . . . . . . . . . . . . . . . . . . 47Performing a Biopsy or Puncture Procedure (including Brachytherapy) . . . . . . 47Remote Control . . . . . . . . . . . . . . . . . . . . . . . . . . . . . . . . . . . . . . . . . . . . . . . . . . 50
Cleaning and Disinfection . . . . . . . . . . . . . . . . . . . . . . . . . . . . . . . . . . . . . . 50
Chapter 3 The User Interface . . . . . . . . . . . . . . . . . . . . . . . . . . . . . . . . . . . . . . . . . . . . . . . . . . . . . . . . . 51Keyboard Panel Controls. . . . . . . . . . . . . . . . . . . . . . . . . . . . . . . . . . . . . . . . . . . 51
The Control Panel. . . . . . . . . . . . . . . . . . . . . . . . . . . . . . . . . . . . . . . . . . . . . 52The Trackball and Trackball Keys . . . . . . . . . . . . . . . . . . . . . . . . . . . . . . . . 53Basic Keys . . . . . . . . . . . . . . . . . . . . . . . . . . . . . . . . . . . . . . . . . . . . . . . . . . 55B-Mode Keys . . . . . . . . . . . . . . . . . . . . . . . . . . . . . . . . . . . . . . . . . . . . . . . . 56B-Mode Adjustment Keys . . . . . . . . . . . . . . . . . . . . . . . . . . . . . . . . . . . . . . 56Power and Color Mode Keys . . . . . . . . . . . . . . . . . . . . . . . . . . . . . . . . . . . . 58Doppler and M-Mode Keys . . . . . . . . . . . . . . . . . . . . . . . . . . . . . . . . . . . . . 58Doppler Adjustment Keys . . . . . . . . . . . . . . . . . . . . . . . . . . . . . . . . . . . . . . 59User-Defined Keys . . . . . . . . . . . . . . . . . . . . . . . . . . . . . . . . . . . . . . . . . . . . 60Image Annotation Keys . . . . . . . . . . . . . . . . . . . . . . . . . . . . . . . . . . . . . . . . 61Miscellaneous Keys . . . . . . . . . . . . . . . . . . . . . . . . . . . . . . . . . . . . . . . . . . . 62TGC Sliders . . . . . . . . . . . . . . . . . . . . . . . . . . . . . . . . . . . . . . . . . . . . . . . . . 63Keyboard . . . . . . . . . . . . . . . . . . . . . . . . . . . . . . . . . . . . . . . . . . . . . . . . . . . 63
Controls on the Monitor . . . . . . . . . . . . . . . . . . . . . . . . . . . . . . . . . . . . . . . . . . . 64Point and Click . . . . . . . . . . . . . . . . . . . . . . . . . . . . . . . . . . . . . . . . . . . . . . . 65
Foot Switch . . . . . . . . . . . . . . . . . . . . . . . . . . . . . . . . . . . . . . . . . . . . . . . . . . . . . 66Remote Control . . . . . . . . . . . . . . . . . . . . . . . . . . . . . . . . . . . . . . . . . . . . . . . . . . 66
The Remote Control and Its Functions. . . . . . . . . . . . . . . . . . . . . . . . . . . . . 67Pairing the Remote Control with the System . . . . . . . . . . . . . . . . . . . . . . . . 67Sleep . . . . . . . . . . . . . . . . . . . . . . . . . . . . . . . . . . . . . . . . . . . . . . . . . . . . . . 68

Mouse Function . . . . . . . . . . . . . . . . . . . . . . . . . . . . . . . . . . . . . . . . . . . . . . 68Replacing Batteries. . . . . . . . . . . . . . . . . . . . . . . . . . . . . . . . . . . . . . . . . . . . 68Cleaning and Disinfection . . . . . . . . . . . . . . . . . . . . . . . . . . . . . . . . . . . . . . 68
Transducers . . . . . . . . . . . . . . . . . . . . . . . . . . . . . . . . . . . . . . . . . . . . . . . . . . . . . 69
Chapter 4 Technical Guide . . . . . . . . . . . . . . . . . . . . . . . . . . . . . . . . . . . . . . . . . . . . . . . . . . . . . . . . . . . 71Operating Environment . . . . . . . . . . . . . . . . . . . . . . . . . . . . . . . . . . . . . . . . . . . . 71The Rear of the System . . . . . . . . . . . . . . . . . . . . . . . . . . . . . . . . . . . . . . . . . . . . 71
Cables Types and Lengths . . . . . . . . . . . . . . . . . . . . . . . . . . . . . . . . . . . . . . 73Monitors . . . . . . . . . . . . . . . . . . . . . . . . . . . . . . . . . . . . . . . . . . . . . . . . . . . . 74Audio Input and Output . . . . . . . . . . . . . . . . . . . . . . . . . . . . . . . . . . . . . . . . 74Documentation Accessories . . . . . . . . . . . . . . . . . . . . . . . . . . . . . . . . . . . . . 75
Foot-Switch Connector . . . . . . . . . . . . . . . . . . . . . . . . . . . . . . . . . . . . . . . . . . . . 76Electrical Connections. . . . . . . . . . . . . . . . . . . . . . . . . . . . . . . . . . . . . . . . . . . . . 76
Power Supply Cord. . . . . . . . . . . . . . . . . . . . . . . . . . . . . . . . . . . . . . . . . . . . 76Connecting Other Equipment . . . . . . . . . . . . . . . . . . . . . . . . . . . . . . . . . . . . 77
Dismantling the System for Transportation . . . . . . . . . . . . . . . . . . . . . . . . . . . . 79Keyboard Base and Panel . . . . . . . . . . . . . . . . . . . . . . . . . . . . . . . . . . . . . . . 79Monitor . . . . . . . . . . . . . . . . . . . . . . . . . . . . . . . . . . . . . . . . . . . . . . . . . . . . . 80Monitor Base . . . . . . . . . . . . . . . . . . . . . . . . . . . . . . . . . . . . . . . . . . . . . . . . 80
HistoScanning . . . . . . . . . . . . . . . . . . . . . . . . . . . . . . . . . . . . . . . . . . . . . . . . . . . 81Using the System with a Lithotriptor . . . . . . . . . . . . . . . . . . . . . . . . . . . . . . . . . 82References . . . . . . . . . . . . . . . . . . . . . . . . . . . . . . . . . . . . . . . . . . . . . . . . . . . . . . 82
Appendix 1 Specifications and Indications for Use . . . . . . . . . . . . . . . . . . . . . . . . . . . . . . . . . . . . . . . 83Indications for Use . . . . . . . . . . . . . . . . . . . . . . . . . . . . . . . . . . . . . . . . . . . . . . . 83Contraindications. . . . . . . . . . . . . . . . . . . . . . . . . . . . . . . . . . . . . . . . . . . . . . . . . 83
Appendix A Glossary. . . . . . . . . . . . . . . . . . . . . . . . . . . . . . . . . . . . . . . . . . . . . . . . . . . . . . . . . . . . . . . . . . . 87
English source versionBB1247-Z
5

6

Pr
Chapter 1General and Safety Information
This guide is an abridged version of the Extended User Guide. It contains basic information about the Pro Focus 2202 Ultrasound System (in the following referred to as the Pro Focus) from BK Medical:
• safety information
• turning on the system and getting started
• the user interface
• technical guide – what to connect whereIntended use The system is a 2D and 3D ultrasound echo and flow imaging system for diagnosis,
data processing and transfer, and guidance of puncture and biopsy.
NOTE: Some of the functionality and options described in this guide may not be available with your version of the system.
User DocumentationBefore using the system, please make yourself familiar with the information in the accompanying user information documents. Some documents are printed, and you will find the remaining documents on the accompanying User Documentation CD (BB1984). Make sure that you also read the transducer user guide and specifications for each transducer that you use.
Table 1-1. User information documentation that accompanies the equipment.
Document Information
System User Guide Introductory information, safety information, getting started.
Getting Started User interface, basic operating instructions.
System Extended User Guide Information about advanced functions, glossary.
Product Data for system Specifications for the system, including disinfection methods that can be used. Indications for use for each transducer that can be used with the system.
Technical Data (BZ2100) Acoustic output data, clinical measurements (ranges and accuracies), factory default power levels and data about EMC (electromagnetic compatibility) for all transducers. Pro Package calculation formulas.
Care, Cleaning and Safety Cleaning, disinfection, sterilization, checking, storing and disposing of BK Medical equipment. Includes environmental limits.
Transducer User Guide Specific instructions for the transducer and puncture attachments
Product Data for each transducer Specifications for the transducer, including disinfection methods that can be used.
o Focus 2202 User Guide (BB1247-Z) General and Safety Information 7

8 Ch
Improper use Failure to follow safety instructions or use for purposes other than those described in the user guides constitutes improper use.
Safety Information
This user guide contains cautions, warnings and other information about what you must do to ensure the safe and proper performance of the ultrasound system. You must also follow local government rules and guidelines at all times.
Important safety information is indicated in the user guide by means of special formatting.
NOTE: Notes contain information that you should be aware of.
Typographical Conventions
The following typographical conventions are used in this manual:
FREEZE – a function, something you can do by using the keyboard panel or the graphical user interface on the monitor
Freq. – text that can be selected or clicked on the monitor
[Power]– a key on the keyboard panel
Book Titles – names of books and scientific journals
[1] References. Literature references are found at the end of the chapter.
Terminology
Instructions
You control the system by using the graphical user interface on the monitor, pressing keys on the control panel, or typing on the keyboard. Instructions in this user guide tell you what sort of action to take.
WARNING Warnings contain information that is important for avoiding personal injury.
Caution: Cautions contain information and instructions that must be followed to avoid damaging equipment, data or software.
apter 1 October 2016 Pro Focus 2202 User Guide (BB1247-Z)

Pr
Table 1-2. Click, Press and Type.
About the SystemThe system can be used for continuous operation, but imaging duration for individual patients must not exceed 60 minutes. We recommend, however, that you turn off the system at the end of each workday.
The Pro Focus 2202 Ultrasound System is easy to use. You can perform most system operations using just the trackball and the trackball keys to interact with controls on the monitor. Dedicated keys on the control panel make other operations quick and easy.
Imaging Modes
The Pro Focus lets you use various imaging modes:
• B-mode (brightness mode) for real-time imaging of soft tissues: includes harmonic imaging and IQPACTM with Enhanced Tissue Definition (ETD) and Angular Compound Imaging (ACI)
• Color mode (CFM, color flow mapping, color Doppler mode) for information about flow direction and velocity
• Power mode (power Doppler mode) for higher sensitivity to flow information: includes directional Power Doppler
• Doppler mode (spectral Doppler mode) for information about the spectrum of flow velocities as a function of time
• CW Doppler mode (continuous wave Doppler) for information about high-velocity flow
• M-mode for information about tissue motion as a function of time
NOTE: Not all imaging modes may be available with your version of the system.
Pro Packages
Pro Packages contain default presets and calculation formulas that make it quick and convenient to use the system for specific applications.
When the instructions say It means
Click Power Use the trackball to point at the word “Power” on the monitor, and then press [A] (Select) on the control panel.
Press [ Power] Press the Power key on the control panel.
Press [ Sound B] Press the Sound key on the control panel.
Type Power Type the word “Power” on the keyboard.
o Focus 2202 User Guide (BB1247-Z) General and Safety Information 9

10 Ch
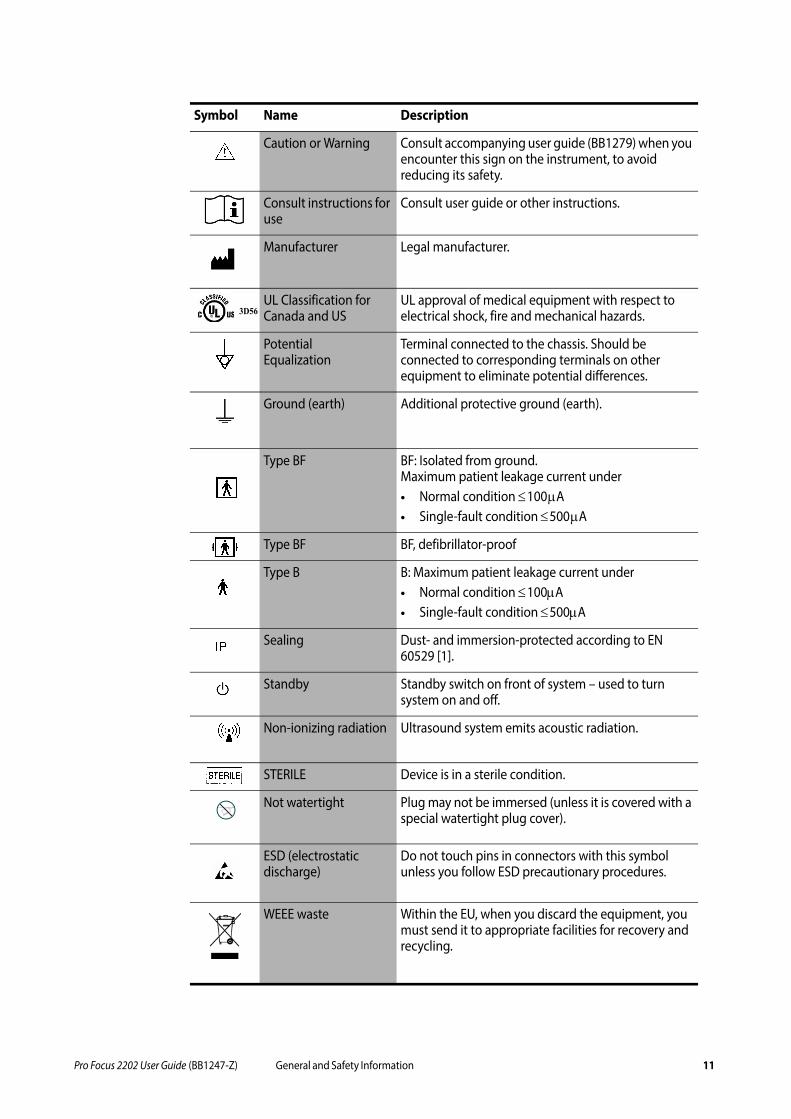
Safety Symbols on the System
Important safety information is indicated in the user guide and on the system itself by means of special symbols and formatting.
Table 1-3 contains brief explanations of the symbols used to label the system. (Some labels in the table may appear on the transducer rather than the system itself.)
NOTE especially the following:
When you encounter this sign on the system, consult the user guide for important safety information.
BK Medical disclaims all responsibility for the operating safety, reliability and performance of the equipment if these symbols and warnings are disregarded in any way.
!
apter 1 October 2016 Pro Focus 2202 User Guide (BB1247-Z)
Pr
Symbol Name Description
Caution or Warning Consult accompanying user guide (BB1279) when you encounter this sign on the instrument, to avoid reducing its safety.
Consult instructions for use
Consult user guide or other instructions.
Manufacturer Legal manufacturer.
UL Classification for Canada and US
UL approval of medical equipment with respect to electrical shock, fire and mechanical hazards.
Potential Equalization
Terminal connected to the chassis. Should be connected to corresponding terminals on other equipment to eliminate potential differences.
Ground (earth) Additional protective ground (earth).
Type BF BF: Isolated from ground. Maximum patient leakage current under • Normal condition 100A • Single-fault condition 500A
Type BF BF, defibrillator-proof
Type B B: Maximum patient leakage current under • Normal condition 100A• Single-fault condition 500A
Sealing Dust- and immersion-protected according to EN 60529 [1].
Standby Standby switch on front of system – used to turn system on and off.
Non-ionizing radiation Ultrasound system emits acoustic radiation.
STERILE Device is in a sterile condition.
Not watertight Plug may not be immersed (unless it is covered with a special watertight plug cover).
ESD (electrostatic discharge)
Do not touch pins in connectors with this symbol unless you follow ESD precautionary procedures.
WEEE waste Within the EU, when you discard the equipment, you must send it to appropriate facilities for recovery and recycling.
3D56
o Focus 2202 User Guide (BB1247-Z) General and Safety Information 11
12 Ch
Table 1-3. Symbols on the system.
General Safety PrecautionsThe ultrasound system is designed and tested in accordance with EN/IEC 60601-1 [2] and EN 60601–2–37 [3]. It complies with requirements for Class 1 (protective earth) devices of EN/IEC 60601-1 [2]. It also complies with UL 60601-1 [4] and CSA C22.2 No. 601.1–M90 [5]. It fulfills the requirements for dust protection (IP20) for ordinary equipment specified in EN 60529 [1].
Before you use the system, make sure that all the safety requirements described in this chapter have been satisfied.
China ROHS 25 Years Lifetime
Environmentally Friendly Use Period for ROHS is 25 years.
Specified Radio Equipment
(On remote control UA1237.) This equipment conforms to Japanese Radio Law regulations concerning frequency and power.
Symbol Name Description
Caution: Federal law in North America restricts this device to sale to, or on the order of, a physician.
Equipmentfailure
WARNING If at any time the system malfunctions, or the image is severely distorted or degraded, or you suspect in any way that the system is not functioning correctly:• Remove all transducers from contact with the patient.• Turn off the system. Unplug the system from the wall and make sure it cannot be used
until it has been checked.• Do not try to repair the system yourself.• Contact your BK Medical representative or hospital technician.
Isolating thesystem
WARNING The power supply cord connects the system to the line voltage. To isolate the system, you must unplug the power supply cord from the wall outlet. Do this before you try to make any repairs to the system.
Conden-sation
Caution: Large variations in temperature or humidity may cause water to condense inside the system. If this happens, the system may fail to operate properly. Always let the system come to room temperature before you plug it in. • Wait at least 2 hours after the system has been subjected to major changes in
temperature or humidity.• If there is visible evidence of condensation, wait at least 8 hours.
apter 1 October 2016 Pro Focus 2202 User Guide (BB1247-Z)
Pr
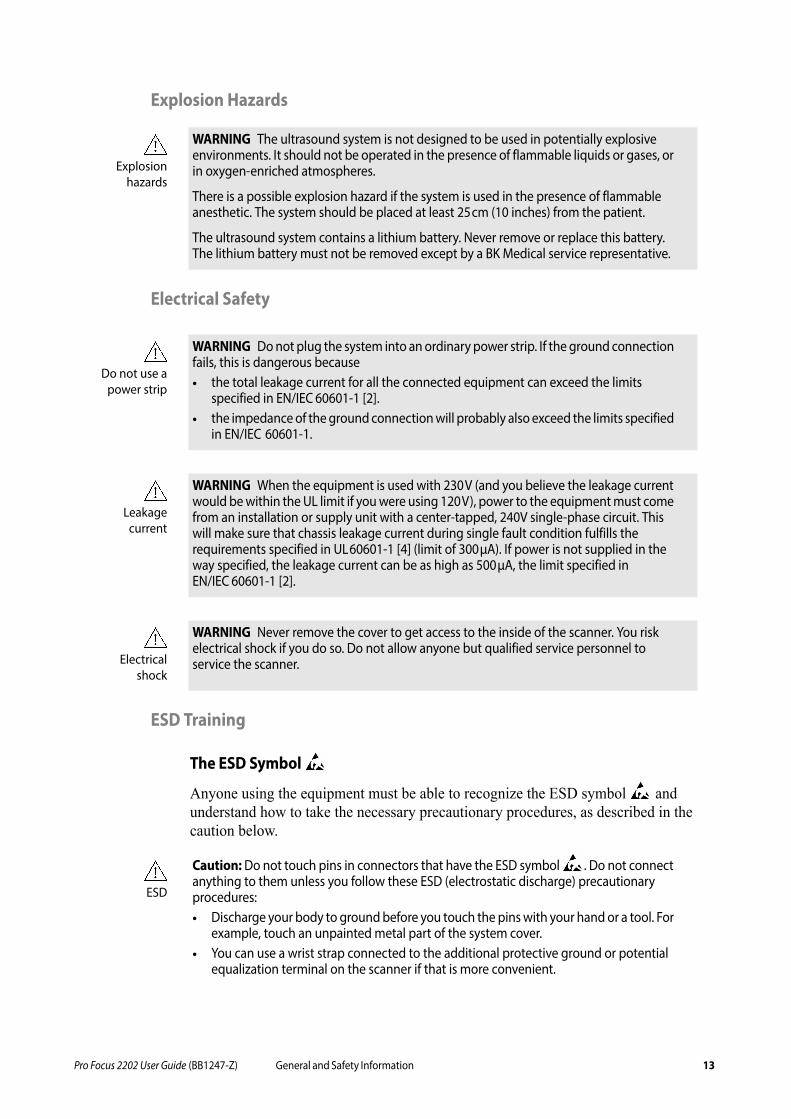
Explosion Hazards
Electrical Safety
ESD Training
The ESD Symbol
Anyone using the equipment must be able to recognize the ESD symbol and understand how to take the necessary precautionary procedures, as described in the caution below.
Explosionhazards
WARNING The ultrasound system is not designed to be used in potentially explosive environments. It should not be operated in the presence of flammable liquids or gases, or in oxygen-enriched atmospheres.
There is a possible explosion hazard if the system is used in the presence of flammable anesthetic. The system should be placed at least 25cm (10 inches) from the patient.
The ultrasound system contains a lithium battery. Never remove or replace this battery. The lithium battery must not be removed except by a BK Medical service representative.
Do not use apower strip
WARNING Do not plug the system into an ordinary power strip. If the ground connection fails, this is dangerous because• the total leakage current for all the connected equipment can exceed the limits
specified in EN/IEC 60601-1 [2].• the impedance of the ground connection will probably also exceed the limits specified
in EN/IEC 60601-1.
Leakagecurrent
WARNING When the equipment is used with 230V (and you believe the leakage current would be within the UL limit if you were using 120V), power to the equipment must come from an installation or supply unit with a center-tapped, 240V single-phase circuit. This will make sure that chassis leakage current during single fault condition fulfills the requirements specified in UL60601-1 [4] (limit of 300μA). If power is not supplied in the way specified, the leakage current can be as high as 500μA, the limit specified in EN/IEC 60601-1 [2].
Electricalshock
WARNING Never remove the cover to get access to the inside of the scanner. You risk electrical shock if you do so. Do not allow anyone but qualified service personnel to service the scanner.
ESD
Caution: Do not touch pins in connectors that have the ESD symbol . Do not connect anything to them unless you follow these ESD (electrostatic discharge) precautionary procedures:• Discharge your body to ground before you touch the pins with your hand or a tool. For
example, touch an unpainted metal part of the system cover.• You can use a wrist strap connected to the additional protective ground or potential
equalization terminal on the scanner if that is more convenient.
o Focus 2202 User Guide (BB1247-Z) General and Safety Information 13

14 Ch
Interference
The Pro Focus 2202 Ultrasound System is suitable for use in all establishments, other than domestic establishments and those directly connected to the public low-voltage power supply network that supplies buildings used for domestic purposes.
Electrical Noise
Electromagnetic Interference
Medical electrical equipment requires special precautions regarding EMC (electromagnetic compatibility) [6]. You must follow the instructions in this chapter when you install the system and put it into service.
If the image is distorted, it may be necessary to position the system further from sources of electromagnetic interference or to install magnetic shielding.
EMC noise can reduce the usable image depth. Therefore, in order to avoid having to repeat an ultrasound examination, you must make sure beforehand that the ultrasound system can be used for the examination. Repeating an examination can be regarded as a potential risk that should be avoided, especially if the examination involves transducers used intracorporeally or transducers used for puncture.
RF (Radio Frequency) Interference
Portable and mobile RF (radio frequency) communication equipment can affect the system, but the system will remain safe and meet essential performance requirements.
An ultrasound system intentionally receives RF electromagnetic energy for the purpose of its operation. The transducers are very sensitive to frequencies within their signal frequency range (0.3MHz to 50MHz). Therefore RF equipment operating in this frequency range can affect the ultrasound image. However, if disturbances occur, they will appear as white lines in the ultrasound picture and cannot be confused with physiological signals.
Electricalnoise
WARNING Electrical noise from nearby devices such as electrosurgical devices – or from devices that can transmit electrical noise to the AC line – may cause disturbances in ultrasound images. This could increase the risk during diagnostic or interventional procedures.
Otherequipment
nearby
WARNING Do not use this equipment adjacent to other equipment. If you must place it next to or stacked with other equipment, verify that it operates normally there and neither causes nor is affected by electromagnetic interference.
Caution: Other equipment may interfere with the system, even if that other equipment complies with CISPR (International Special Committee on Radio Interference) emission requirements.
apter 1 October 2016 Pro Focus 2202 User Guide (BB1247-Z)

Pr
Installation
Originalpower cords
If the original power cords are missing or damaged, you must order new ones from your local BK Medical representative.
Transducers
BK Medical transducers fulfill EMC requirements when they are outside as well as inside the patient’s body.
Caution: If you use accessories, transducers or cables with the system, other than those specified, increased emission or decreased immunity of the system may result.
Installationsafety
require-ments
WARNING To ensure safe performance, a qualified electrical engineer or hospital safety personnel must verify that the ultrasound system is correctly installed and that it complies with the safety requirements described below: • Use only the original power supply cord. This must be fitted with a hospital-approved
three-prong grounded power plug. See “Power Supply Cord” on page 76.• Use only the original monitor power cord to connect the monitor to the system.• The equipment must only be connected to a grounded AC power supply (or wall
outlet) that meets EN/IEC/NEC requirements or applicable local regulations. The examination room’s grounding system should be checked regularly by a qualified electronics engineer or hospital safety personnel.
• Never use extension cords. The increased length of the cord will increase the resistance of the protective ground conductor beyond an acceptable level.
• Keep power cords, sockets and plugs clean and dry at all times.
Secure thepower
supply cord
WARNING Make sure that the power supply cord cannot be accidentally disconnected from the wall or the system.
Electricalshock
WARNING The transducer sockets contain terminals with 5V. Do not touch the patient while you are touching an uncovered socket.
Type Btransducers
WARNING When using Type B (non-isolated) transducers, carefully check all electrical equipment within the patient area. Also, consider using additional protective grounding.
Electricalburns
WARNING Do not leave transducers in contact with the patient when using HF electrosurgical equipment.
o Focus 2202 User Guide (BB1247-Z) General and Safety Information 15
16 Ch
Care
Please refer to the Care, Cleaning & Safety manual for information about caring for transducers.
Remote Control
If you use a wireless remote control UA1237 with the system, be sure to read about how to use it in Chapter 3, “The User Interface”.
The remote control uses short wave radio waves to communicate with the system.
This device complies with Part 15 of the FCC Rules. Operation is subject to the following two conditions:
1 This device may not cause harmful interference, and
2 This device must accept any interference received, including interference that may cause undesired operation.
Other Safety Considerations
Mechanical failure or unintended use of ultrasound equipment can result in physical injury to patients or operators.
Surfacetemperature
on array
WARNING Do not turn the transducer on and allow it to scan into mid-air without ultrasound gel applied to the surface of the array. Doing so may cause the surface temperature on the array to heat up to 27 °C above room temperature (measured according to EN60601–2–37 [3]). To avoid this, freeze the image when the transducer is not used for imaging.
Creutzfeldt-Jakob
disease
WARNING C-J-1
Do not use a transducer for neurosurgical applications if the patient is suspected of having Creutzfeldt-Jakob disease. If a neurosurgical transducer has been used on a patient suspected of or diagnosed as being Creutzfeldt-Jakob positive, the transducer must be destroyed, following approved procedures for your hospital.
Active at adistance
WARNING The remote control is active at a distance of at least 10 meters from the system, even if the system is in a different room.
Caution: The remote control can be disrupted by other equipment operating at the same frequency of 2.5 GHz.
apter 1 October 2016 Pro Focus 2202 User Guide (BB1247-Z)
Pr
MeasurementsPay careful attention when you position cursors to make measurements on an image or on a Doppler curve.
Vector Flow Imaging1
Mechanicalinjury
WARNING Be careful to avoid the following potential sources of injury:• Parts of the body can be pinched by moveable parts of the system, such as the
keyboard panel and the monitor.• Tilting the system can cause it to be unstable and injure someone. • Do not lean or sit on the keyboard or any other part of the system. The keyboard panel
or monitor can break if subjected to heavy weights or impact.
Polygonmeasuring
tool
WARNING When you use the polygon measuring tool, if the sides of the polygon intersect (as in forming a curve like a figure eight, for example), the area calculation is incorrect. In this case, the calculated area of the polygon is the area of the bigger loop minus the area of the smaller loop.
UsingDoppler
curves
WARNING Drawings of Doppler curves, manual and automatic, are meant as tools for positioning cursors so that measurements based on the curves can be calculated automatically. The system has no facilities for checking whether the automatic measurements are reasonable. Curves drawn on very noisy spectra may lead to misplacement of measurement cursors. Make sure that measurement cursors are positioned so that the results are reasonable. If they are not, you must adjust the position of the cursors manually.
Nuchaltranslucency
Caution: You must be adequately trained before you attempt to make nuchal translucency measurements.
1. VFI is not licensed by Health Canada.
Artifacts
WARNING
Before you turn on VFI, check the B-mode image to make sure there are no artifacts visible in the blood vessel. If there are strong artifacts in the B-mode image, the arrows in VFI may be pulled to point in a more axial direction (toward or away from the transducer), especially in low flow situations with correspondingly low PRF. These artifacts will not affect the color mode (CFM) image, so it is important to check in B-mode.
Arrowaliasing
WARNING
Check to make sure the VFI arrows are not aliasing before you activate the assisted Doppler gate placement. Otherwise, the Doppler gate will not be positioned correctly.
o Focus 2202 User Guide (BB1247-Z) General and Safety Information 17

18 Ch
Puncture and Brachytherapy
3D Safety Considerations
Pay particular care to the following safety issues when operating the 3D system. For more detailed 3D operating instructions see the Extended User Guide.
If you start to make a measurement on a 3D data set acquired using the untracked freehand method, the following warning appears on the monitor to remind you that the measurement will not be accurate.
Warning onmonitor
Diametermarkers
WARNING
Check to make sure that the diameter markers correspond to the inner vessel wall and that the connecting line between the markers is perpendicular to the direction of the vessel. Otherwise, the real-time volume flow measurement may not be precise.
Doppler gatelarge
enough
WARNING
Check to make sure that the Doppler gate covers the entire vessel. Otherwise, the real-time volume flow measurement may not be precise.
Doppler gateover only
one vessel
WARNING
Check to make sure that the Doppler gate only covers one vessel. Otherwise, the real-time volume flow measurement may not be precise.
Dopplerspectrum
aliasing
WARNING
Check to make sure that the Doppler spectrum does not alias. Otherwise, the real-time volume flow measurement may not be precise.
WARNING If you create a user-defined brachy matrix, it is your responsibility to verify that the matrix that appears on the monitor corresponds to the physical brachy matrix you are using.
WARNING Changes you make to the offset of a programmable puncture guide or brachy matrix will affect ALL programmable puncture guides and brachy matrices. This could lead to incorrect puncture lines or matrix positions for a different guide than the one you wanted to change.
Untrackedfreehand
WARNING You cannot make accurate measurements on a 3D data set acquired using the untracked freehand method.
apter 1 October 2016 Pro Focus 2202 User Guide (BB1247-Z)

Pr
Picture in Picture
Contrast Imaging
Quality of Printed Images
Service and Repair
Connecting Other Equipment
3D measure-ments
WARNING Measurements obtained with the 3D system and used in diagnosis must be carefully and thoughtfully performed to ensure accurate quantitative assessment. Before you perform a calculation, make sure that all necessary calibrations and measurements are made.
If you suspect that the 3D system’s calibration is inaccurate (that is, the measurements are not as expected), contact your local BK Medical service representative to check and confirm the system’s proper operation.
Do not coverpatient ID or
otherimportant
information
WARNING When you use Picture in Picture, do not cover critical information (such as TI or MI) on the monitor. Make sure that all important information will appear if you print or save the ultrasound image.
Highacoustic
outputduring
Bubble Burst
Caution: When you turn on Bubble Burst, the acoustic output limits are increased to 1.9 (MI). This change overrides any limits you have set. During Bubble Burst, the acoustic output will exceed normal contrast imaging values and may approach the higher (Bubble Burst) limits. (See “Thermal and Mechanical Indices” on page 25.)
Print quality
Caution: The quality of a printed ultrasound Image may vary, depending on the printer.
Authorizedpersonnel
WARNING Service and repair of BK Medical electromedical equipment must be carried out only by the manufacturer or its authorized representatives. BK Medical reserves the right to disclaim all responsibility, including but not limited to responsibility for the operating safety, reliability and performance of equipment serviced or repaired by other parties. After service or repairs have been carried out, a qualified electrical engineer or hospital technician should verify the safety of all equipment.
WARNING Consult this user guide before connecting other equipment to terminals marked with .!
o Focus 2202 User Guide (BB1247-Z) General and Safety Information 19
20 Ch
To fulfill EMC requirements, do not attach cables to the system unless they are the same type as listed in Table 4-2 on page 74 and do not exceed the maximum length given in the table. Do not attach transducers and other accessories unless the user guide for the transducer or accessory states that it can be used with this system. Attaching other equipment may cause an increase in electromagnetic emissions or may cause the system to be more sensitive to electromagnetic interference.
The system must not be galvanically connected to a computer network (DICOM) that has not been isolated. If the network is not isolated, the system must be connected via a network isolator DP0925 (see Accessories in Product Data sheet).
Network ConnectionBK Medical’s range of ultrasound systems comply with the DICOM standard for handling, storing, printing and transmitting information in medical imaging. DICOM includes a file format definition and a network communication protocol which facilitates the exchange of data between electronic medical systems.
For detailed information about:
• network requirements
• network configuration
• workflow between devices
• technical specifications
• safety specifications
see BK Medical’s DICOM conformance statement at http://www.bkmed.com/DICOM_en.htm
Medicalequipment
WARNING Equipment that complies with the requirements of EN/IEC 60601–1 [2], UL 60601-1 [4] or CSA C22.2 No. 601.1–M90 [5] can be connected to the system, but the power for the equipment must come from the auxiliary power output on the system or from an independent wall power outlet. You can use the isolated auxiliary power outlets on the system to connect equipment such as a monitor or video printer requiring a total of 350VA or less. Otherwise, you can plug the system and other equipment into an external common isolation transformer in order to control the leakage current during a ground connection fault. Follow the guidelines in EN60601–1–1 [7]. If in doubt, contact your local BK Medical representative.
Non-medicalequipment:
location,standards
and powersupply
WARNING If you connect non-medical equipment (instruments that do not comply with safety requirements for medical equipment), this equipment must be placed outside the patient environment (1.5m from the bed, for example). The equipment must fulfill the relevant EN standard or other applicable national or international standard.
The power for the equipment must come from the auxiliary power output on the system. You can use the isolated auxiliary power outlets on the system to connect equipment such as a monitor or video printer requiring a total of 350VA or less. Otherwise, you can plug the system and other equipment into an external common isolation transformer in order to control the leakage current during a ground connection fault. Follow the guidelines in EN60601–1–1 [7]. If in doubt, contact your local BK Medical representative.
apter 1 October 2016 Pro Focus 2202 User Guide (BB1247-Z)
Pr
Network Security
It is the responsibility of the on-site personnel or technician to maintain the IT-network and identify, analyze, evaluate and control new risks caused by a change in the network configuration.
If the applicable network connection does not meet the required characteristics of the IT-network, the following hazardous situations may occur:
• Corrupt patient data due to network errors, see patient ID warning on page 37.
• System is unable to use the network due to faulty or overloaded network, see training requirements warning on page 24.
• System overloads the network causing other equipment to fail.
Networkguidelines
NOTE: If your system interacts with other equipment directly or indirectly you must ensure that your network is properly dimensioned and that critical equipment is placed on a separate network. Otherwise you could risk overloading the network and your equipment failing.
Network Printing
For printing on network printers, BK Medical support protocols PCL 5, PCL 6 and PS (Post Script).
Computer Security
When the Pro Focus is connected to a hospital network, BK Medical does not take any responsibility for computer viruses from the network that may infect the Pro Focus. We recommend that the system is protected by a network firewall.
Wireless Networks1
The system can be connected to a wireless network for printing and archiving data. This requires the optional wireless license for the system, and a Wi-Fi adapter that is supplied by BK Medical when you buy this option. The Wi-Fi adapter is inserted into one of the USB connectors located on the rear of the system (see Fig 4-2 in Chapter 4, “Technical Guide” on page 71).
For information on how to install a license on the system, see the Setting Up and Customizing Your System chapter in the Pro Focus 2202 Advanced User Guide (BB1946).
Checkexternal
media
Caution: You must perform a virus check on any external storage medium (USB device or CD) to make sure that it is virus-free before you connect it to the system.
1. Wi-Fi on Pro Focus 2202 UltraView systems has not been licensed by Health Canada.
Caution: Do not use a USB extension cable to connect a Wi-Fi adapter to the system. If you do, the wireless network may become unstable due to electromagnetic interference.
o Focus 2202 User Guide (BB1247-Z) General and Safety Information 21

22 Ch
Connecting to a Wireless Network
You must establish a secure wireless network at your hospital, clinic or institution, including a password for the network, before you can use the system’s Wi-Fi for printing and archiving.
To use Wi-Fi on the system you need to install a license. When you have installed the license, a Wi-Fi logo is visible in the lower middle part of the screen of the main screen.
To connect to a wireless network, click the Wi-Fi logo, choose the appropriate network, and type in the password.
You only have to type in a password the first time you connect to a specific network. When you turn on the system an attempt is made to reconnect to the network that the system was connected to before it was turned off.
apter 1 October 2016 Pro Focus 2202 User Guide (BB1247-Z)
Pr
Weak vs.strong signal
The bars in the Wi-Fi logo represents the signal strength. The more lit bars in the logo, the stronger the signal.
No wirelessconnection
When the system is not connected to a wireless network, the Wi-Fi logo has a red ‘x’ over it.
An advanced Wi-Fi setting option is available on the system using Windows configurations. Always follow the security procedures that have been established for your hospital, clinic or institution, as well as national guidelines. Contact your BK Medical service representative for more information.
When you transmit data over a wireless network, some special considerations apply. In particular, the network connections must be set up correctly. See training requirements warning on page 24.
NOTE: The system only supports one network at a time.
If the system loses connection with the network while transmitting (for example, because it is moved out of range of the network during a transmission), the pending data is stored temporarily and re-transmitted when the connection is re-established.
For information on saving and printing using the DICOM protocol, see the Documentation chapter in Pro Focus 2202 Extended User Guide (BB1279).
Additional Characteristics
Frequency band 2.412~2.4835 GHz
Data throughput Max. 150 Mbps
Latency Depends on network setup
Integrity Full integrity of archiving operations
Security characteristics Support for WEP, WPA and WPA2 encryption. Enterprise encryption (802.1x) requires assistance from an authorized BK Medical technician.
Spectrum management None required
Caution: The network must be set up correctly so that data is sent to the correct location. Otherwise data can be lost or accessed by unauthorized people.
Caution: A safe encrypted protocol for data transmission, approved by the hospital, must be used. This is to prevent unauthorized people from getting access to the data.
o Focus 2202 User Guide (BB1247-Z) General and Safety Information 23

24 Ch
Acoustic Output
General
Medical research has yet to prove whether or not ultrasound causes biological effects. Therefore, prudent use considerations require you to follow certain guidelines [3].
Prudent Use
• Image patients only when clinical reasons make it necessary.
• Keep exposure time as short as possible.
• Be careful to prepare the patient correctly so that you get the best possible image.
• Start imaging at a low acoustic output level (see “Thermal and Mechanical Indices” on page 25) and increase the level only as much as necessary to obtain a satisfactory image.
• If you switch from an application requiring high acoustic output levels (see “Functions Affecting Acoustic Output” on page 26), to one that requires lower levels (fetal imaging, for example), be sure to reset the levels before you image. (For example, start in B-mode.)
• Take into account all the types of tissue that may be affected. For example, when imaging a breast, it may be appropriate to monitor the TI in bone rather than in soft tissue because the ribs will be subjected to ultrasound.
Acoustic output data for transducers used with the system are given in Technical Data (BZ2100). The uncertainty level for each parameter is also listed. For definitions of the parameters, refer to the Food and Drug Administration (FDA) Guide [8] as well as EN 60601-2-37 [3] and AIUM/NEMA standards [9,10].
In North America, the FDA requires all ultrasound equipment to be cleared before it is marketed in the United States.
Exposurelevel
WARNING Always keep the exposure level (the acoustic output level and the exposure time) as low as possible.
Trainingrequire-
ments
WARNING Before you attempt to use BK Medical equipment, you should be trained in ultrasonography or be under the supervision of someone who is trained in ultrasonography. You should also be thoroughly familiar with the safe operation of your ultrasound system: read all the user documentation that accompanies it. Always use the transducer best suited to the examination.
In addition, if your system interacts with other equipment directly or indirectly, you need to be trained in making sure the interactions are both safe and secure.
No further training is required, but BK Medical offers training in how to use the system. Consult your BK Medical representative for information.
apter 1 October 2016 Pro Focus 2202 User Guide (BB1247-Z)

Pr
The routes (or tracks) available for clearance by the FDA are well-defined. Track 3 is for diagnostic ultrasound systems that follow the Output Display Standard. Under Track 3, acoustic output will not be evaluated on an application-specific basis, but the maximum derated Spatial Peak–Temporal Average Intensity (ISPTA) must be 720mW/cm2, the maximum Mechanical Index (MI) must be 1.9, and the maximum Thermal Index (TI) must be 6. All BK Medical transducers for use with the Pro Focus 2202 Ultrasound System are Track 3.
Monitor Display
The Mechanical Index (MI) and Thermal Index (TI) can be viewed in all imaging modes.
Thermal and Mechanical Indices
The MI and TI indices are intended to allow users to implement the ALARA [11, 12] (As Low As Reasonably Achievable) principle using an indicator related to a potential bioeffect.
The full details of the indices are given in references [3] and [10], but the formulas are given below.
MI Formula
where the variables are defined in the table below.
TI Formula
where the variables are defined in the table below.
Bloodperfusion and
TI
As a rule of thumb, the Thermal Index (TI) indicates the highest expected temperature increase in degrees Celsius. It is based on an average level of blood perfusion. The displayed TI may underestimate the temperature rise in poorly
Variable Definition
Pr0.3(zsp) Peak Rarefactional Pressure (MPa), derated by 0.3dB/cm·MHz, measured at zsp, the point on the beam axis where pulse intensity integral (PII0.3) is maximum
fc measured center frequency (in MHz)
Variable Definition
W0 time-averaged acoustic power of the source or other power parameter (W)
Wdeg estimated power necessary to raise the temperature of the target tissue one degree Celsius (W/°C)
MIPr0,3 zsp
fc
------------------------=
TIW0
Wdeg-------------=
o Focus 2202 User Guide (BB1247-Z) General and Safety Information 25

26 Ch
perfused tissues; you must take this into account when deciding on the maximum TI you will allow. Conversely, in areas with a rich perfusion of blood the temperature increase will be less than the displayed TI indicates.
Fever A temperature increase of one degree Celsius increase in a patient with fever may cause complications in certain circumstances; it may be safer to delay the investigation.
Acoustic Output Measurement
All values are measured in water according to the EN and AIUM/NEMA display standards [3, 9, 10]. For the some of the acoustic parameters, an estimated in situ derated value is given. This is derived assuming a tissue attenuation of 0.3 dB/cm·MHz when the estimated in situ derated value (I) is described by the following equation:
I formula
where the variables are defined in the table below.
It should be stressed that the in situ values given are only applicable when there is attenuating tissue between the transducer face and the focal point.
Possibility of Adverse Effects
Although it is believed that diagnostic ultrasound causes no significant biological effects in mammalian tissue [3, 10], the user should be aware of the hypothetical possibilities of adverse effects [11, 13, 14].
Fetal imaging Current scientific and clinical concern over possible adverse effects is particularly focused on fetal ultrasound imaging. It is due to the increased sensitivity of mammalian cells and organs at this phase of their development and the fact that such a risk could have profound implications on public health. If you use high acoustic output levels for some reason (see “Functions Affecting Acoustic Output”, below), be sure to return to B-mode alone and turn down the power level before you do any fetal imaging.
Functions Affecting Acoustic Output
The system has a control function that ensures that neither the ISPTA nor MI nor TI value exceeds the maximum allowable value. When necessary, the system will reduce the output voltage and/or PRF (pulse repetition frequency) to the transducer in order to comply with requirements.
Variable Definition
IW Intensity in water at the position where I is maximum
f transducer frequency (in MHz)
z distance (in cm) from the transducer face to the position where I is maximum
I Iwexp 0,069fz– =
apter 1 October 2016 Pro Focus 2202 User Guide (BB1247-Z)

Pr
Some of the system functions can affect the acoustic output, as listed here. (Instructions for using these functions are given in the relevant sections of this user guide.)
• Sizing functions such as ROI (region of interest) – in general, smaller size results in higher acoustic intensity because the pulse repetition frequency (PRF) is higher or the ultrasound beam is more strongly focused.
• Focus – in general, strongly focusing the beam makes the acoustic intensity higher.
• Frame rate – higher frame rate results in higher acoustic intensity.
• Range – increasing the Doppler range increases the acoustic intensity by increasing the PRF.
• CFM Resolution – higher resolution increases the acoustic output.
• Color box size – narrowing the color box generally increases the acoustic output within it.
The user can set a Thermal Index limit. This will provide an upper limit for acoustic output.
Default Acoustic Output
After the system has been turned off, the transducers will start in the default setup when the system is turned on again. The default setup may be factory-defined or defined by the user.
The factory-defined default setup values of acoustic output for each transducer are listed in Technical Data (BZ2100).
These setups have been optimized to give the best compromise between low acoustic output and enough power to obtain the image features as quickly as possible. This is part of the ALARA principle. The factory default setup for all transducers is B-Mode to ensure the lowest acoustic output when you start imaging.
When you enter a new patient ID, the transducer setup will be reset to the default setup. You can prevent this from happening – see “Keeping Image Settings” on page 41.
Fetal imaging When you use transducers intended for fetal imaging, it is important to make sure that the default settings are appropriate and to reset to the default setting before imaging a new patient.
Clinical Measurements: Ranges and AccuraciesThis section states the accuracies for measurements made using the BK Medical range of ultrasound systems. A table containing accuracies for specific transducers can be found in Technical Data (BZ2100).
o Focus 2202 User Guide (BB1247-Z) General and Safety Information 27
28 Ch
The measurement accuracies are based on the assumption of “ideal” tissue, that is, a tissue characterized by a sound velocity of 1540 m/s. When making clinical measurements with ultrasound, errors may arise which are not taken into account in this section. For example:
• the sound velocity may vary from approximately 1450 m/s in fatty tissue to 1585 m/s in muscle. This can, in simple cases, give rise to errors of up to 6% for linear measurements. This inaccuracy may be further increased by refraction occurring at tissue boundaries.
• the user can introduce errors when using approximate formulas, when positioning the system’s calipers with respect to the ultrasound image and when outlining structures in the image.
• the ellipsoid volume approximation, described in this user guide, is only applicable when the cross section of the structure being studied approximates an ellipse (the circle being a special ellipse), and when the structure is roughly symmetrical about the selected axis of rotation
NOTE: The choice of the axis of rotation is important for the calculation of the volume. A vertical axis gives a different volume than a horizontal axis.
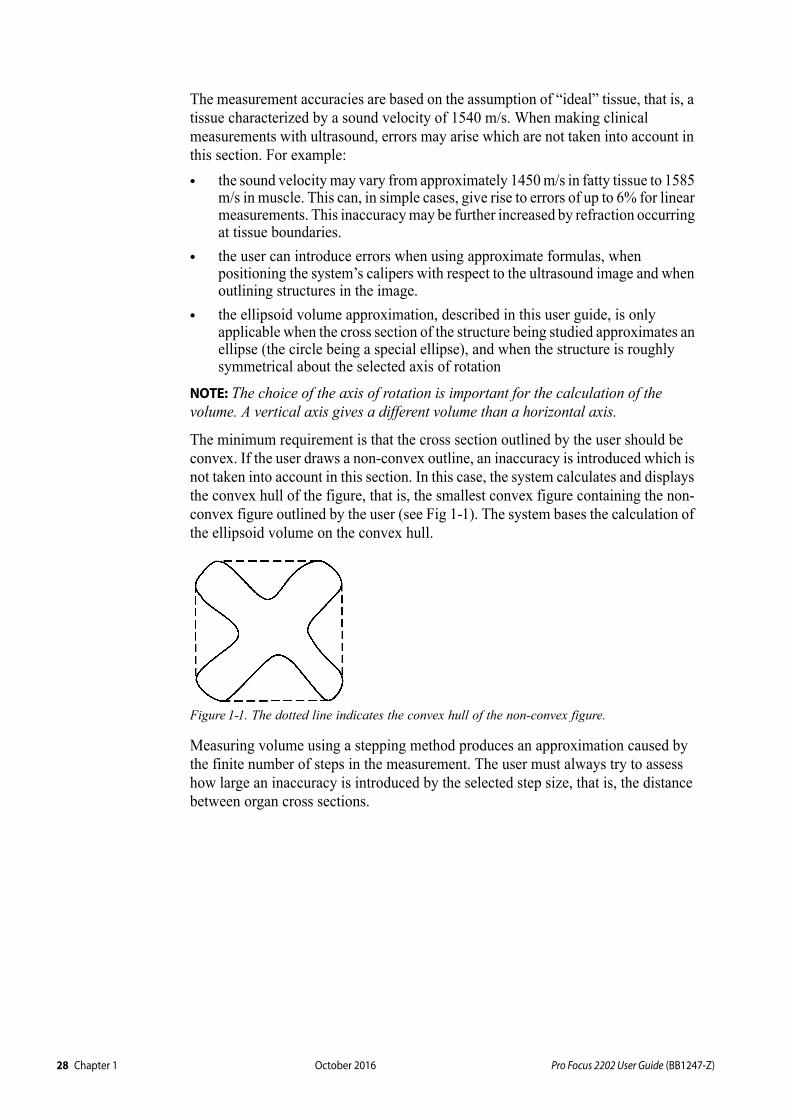
The minimum requirement is that the cross section outlined by the user should be convex. If the user draws a non-convex outline, an inaccuracy is introduced which is not taken into account in this section. In this case, the system calculates and displays the convex hull of the figure, that is, the smallest convex figure containing the non-convex figure outlined by the user (see Fig 1-1). The system bases the calculation of the ellipsoid volume on the convex hull.
Figure 1-1. The dotted line indicates the convex hull of the non-convex figure.
Measuring volume using a stepping method produces an approximation caused by the finite number of steps in the measurement. The user must always try to assess how large an inaccuracy is introduced by the selected step size, that is, the distance between organ cross sections.
apter 1 October 2016 Pro Focus 2202 User Guide (BB1247-Z)

Pr
Geometric Measurements
2D Measurements
The geometric measurements performed by BK Medical ultrasound systems are distance, perimeter, area and ellipsoid volume. The accuracy of these measurements is influenced by the following factors:
• transducer geometry
• rounding of results
• resolution of digital image memory
3D Measurements
The 3D volume is found by summing the marked area in the individual slices and multiplying by a factor that includes the distance between the slices and their relative orientation.
To obtain the accuracies listed in the table in Technical Data (BZ2100), you must ensure that the calculation is based on contributions from at least 10 slices for very regular shapes and more for irregular shapes. It must also be possible to discriminate the boundary of the object from the surrounding tissue.
Volumeaccuracy
The volume accuracy in the table is given as a percentage of the captured 3D volume starting with the first slice and ending with the last slice that intersects the object of interest.
If the 2D ROI (region of interest) is set to be much larger than the object, the accuracy as a percentage of the object volume can be much worse (higher percent).
NOTE: To ensure that the accuracy of your volume measurement is as high as possible, make sure that the object you are interested in fills the region of interest as much as possible.
Distance andarea accuracy
The accuracy of a distance measurement on a 3D image will never be better than 6%; the accuracy of an area measurement on a 3D image will never be better than 6%.
In the table in Technical Data (BZ2100), the overall measurement accuracy for a full range measurement is given in the right-hand column for each measurement. The footnote below the table states the digital image resolution.
Time Measurements
In M-mode and spectral Doppler mode, data is displayed along a time axis. It is possible to measure time differences. The accuracy for a time difference measurement is:
• rounded to the nearest: 0.01s
• accuracy: 0.01 x twhere t is the full time scale of the image field.
o Focus 2202 User Guide (BB1247-Z) General and Safety Information 29

30 Ch
Doppler Measurements
In measuring blood flow velocity it is assumed that the measured power spectral distribution of the Doppler signal equals the blood cell velocity distribution.
The measurement accuracy of blood flow velocity is heavily dependent on the angle between the ultrasound beam and the velocity vector of the blood cells. The velocity accuracies given in Technical Data (BZ2100) are valid for = 55. To find the percentage accuracy for other angles, multiply the stated accuracy by
If the blood velocity exceeds the selected velocity range, aliasing occurs, corresponding to an overload condition of the measurement system.
References[1] EN 60529:1991+A1:2000. Specification for degrees of protection provided by enclosures
(IP code).
[2] EN/IEC 60601-1:1990+A1:1993+A2:1995+A13:1996 Medical electrical equipment. Part 1: General requirements for safety.EN/IEC 60601-1:2006 3rd Ed. Medical electrical equipment. Part 1: General requirements for basic safety and essential performance.
[3] EN 60601-2-37:2001+A1:2005+A2:2005 Medical electrical equipment – Part 2-37: Par-ticular requirements for the safety of ultrasonic medical diagnostic and monitoring equip-ment.EN 60601-2-37:2008 Medical electrical equipment – Part 2-37: Particular requirements for the basic safety and essential performance of ultrasonic medical diagnostic and moni-toring equipment.
[4] UL 60601-1:2003 Medical Electrical Equipment – Part 1. General Requirements for Safety.
[5] CSA C22.2 No. 601.1–M90 Medical Electrical Equipment – Part 1. General Requirements for safety.
[6] EN 60601-1-2:2001 + A1:2006 Medical electrical equipment - Part 1-2: General require-ments for safety. Collateral standard: Electromagnetic Compatibility-Requirements and tests. EN 60601-1-2:2007 Medical electrical equipment - Part 1-2: General requirements for basic safety and essential performance. Collateral standard: Electromagnetic Compatibil-ity-Requirements and tests.
[7] EN 60601–1–1:2001 Medical electrical equipment –Part 1-1: General requirements for safety. Collateral standard: Safety requirements for medical electrical systems.
[8] Information for Manufacturers Seeking Marketing Clearance of Diagnostic Ultrasound Sys-tems and Transducers. FDA Center for Devices and Radiological Health. September 2008.
[9] Acoustic Output Measurement Standard for Diagnostic Ultrasound Equipment. AIUM/NEMA. 2004.
[10] Standard for Real-Time Display of Thermal and Mechanical Acoustic Output Indices on Diagnostic Ultrasound Equipment. AIUM/NEMA. 2004.
[11] Medical Ultrasound Safety. AIUM. 2009.
[12] ALARA Training Program. Ultrasound III Training. B-K Medical. 1993.
[13] Bioeffects considerations for the safety of diagnostic ultrasound. Journal of Ultrasound in Medicine, Vol. 7, No. 9 (supplement). September 1988.
cos 1,8+ cos–cos
---------------------------------------------------
100 0,5+
apter 1 October 2016 Pro Focus 2202 User Guide (BB1247-Z)

Pr
[14] The safety of diagnostic ultrasound. The British Institute of Radiology. 1987.
AIUM: American Institute of Ultrasound in Medicine
CSA: Canadian Standards Association
EN: European Standards
FDA: Food and Drug Administration (USA)
IEC: International Electrotechnical Commission
NEC: National Electrical Code
NEMA: National Electrical Manufacturers Association
UL: Underwriters Laboratories Inc., USA
o Focus 2202 User Guide (BB1247-Z) General and Safety Information 31

32 Ch
apter 1 October 2016 Pro Focus 2202 User Guide (BB1247-Z)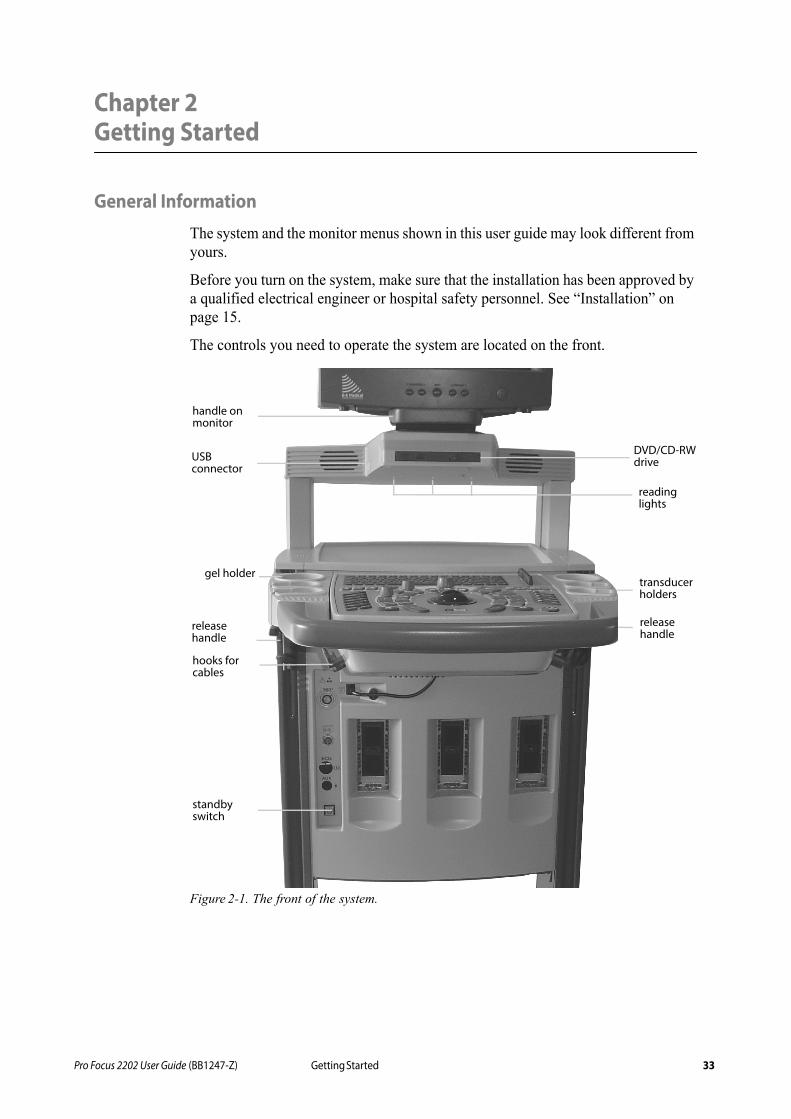
Pr
Chapter 2Getting Started
General InformationThe system and the monitor menus shown in this user guide may look different from yours.
Before you turn on the system, make sure that the installation has been approved by a qualified electrical engineer or hospital safety personnel. See “Installation” on page 15.
The controls you need to operate the system are located on the front.
Figure 2-1. The front of the system.
release handle
USB connector
DVD/CD-RW drive
standby switch
hooks for cables
handle on monitor
release handle
transducer holders
reading lights
gel holder
o Focus 2202 User Guide (BB1247-Z) Getting Started 33

34 Ch
Adjusting the Keyboard Panel and MonitorYou can easily adjust the position of the keyboard panel and monitor to make imaging comfortable for the operator. Instructions vary depending on the type of monitor and keyboard you have.
Up and down To adjust the height of the keyboard panel and monitor:
1 Grab the panel on both sides and pull up on the two release handles (see Fig 2-1).Move the panel up or down.
2 Release the handles.
Angle To change the viewing angle of the monitor:
• Use the handle on the front of the monitor to swivel it from side to side and tilt the monitor up or down.
Adjustingresistance of
the flatscreen
Figure 2-2. Thumb screw for adjusting resistance on the back of the LCD flat screen monitor.
To adjust the force required to change the viewing angle of the flat screen monitor:
• Use the thumb screw on the back of the LCD flat screen to increase or decrease the monitor’s sensitivity to angle adjustments.
Hand Rest
The removable hand rest (UA0967) can be used to make working with the keyboard panel more comfortable. See Care, Cleaning & Safety.
Docking the Flat Screen on Arm
The flat screen monitor on the articulating arm can be docked. This prevents it from moving around, which is particularly important when the system is being moved to another location.
To dock the LCD flat screen:
1 Standing in front of the system, maneuver the flat screen on the arm so that the front of the monitor is over the front of the system body.
2 Holding the monitor handle, guide the monitor back.
3 Still holding the handle, press so that the monitor clicks into place.
thumb screw
Caution: Avoid using excessive force when docking the flat screen monitor.
apter 2 October 2016 Pro Focus 2202 User Guide (BB1247-Z)

Pr
Turning the System On and OffTo turn the system on and off, use the green standby switch on the front of the system.
To turn the system on:
• Press the standby switch ONCE. A startup screen with progress bar is displayed. Wait until the startup screen disappears and the display on the monitor is stable, indicating that the system is ready to use. Do not try to use the system until it is fully ready.
To turn the system off:
• Make sure the system is completely up and running. Then press the standby switch ONCE.
System BusyWhen the system is busy, that is, performing an operation that takes some time, a spinning disk appears above the Freeze control on the monitor.
Checking the DateCheck that the date and time displayed on the monitor are correct before you start imaging a new patient (or at least at the beginning of each day).
Caution: We recommend that you dock the flat screen monitor before you wheel it around the hospital.
Caution: Do not put any weight on the arm nor use it as a lever. The arm is only designed to support the weight of the flat screen monitor.
Wait afteryou press
standbyswitch
Wait tounplug
Caution: Whenever you turn the system on or off, you must give the operating system of the system PC enough time to save and recover open files and unsaved data. Otherwise, a serious system failure may occur that requires technical support.
Never unplug the system from the wall without turning off the standby switch and waiting for its light to go out.
If you turn off the system without following the recommended procedure (for example, if you unplug it while it is running), the next time you turn the system on, it may take a longer time to start, and the system may be permanently damaged.
Caution: Wait until the spinning disk disappears before you press any keys on the system or buttons on the transducer.
WARNING An incorrect date or time will make documentation of the image incorrect and may also cause some calculated values to be incorrect.
o Focus 2202 User Guide (BB1247-Z) Getting Started 35

36 Ch
One cause of an incorrect date is battery failure. The battery fails very rarely. If it does fail, the system will usually not operate at all, so you will know to call a technician. However, under certain unusual circumstances the system will operate, but the date will be incorrectly set to a default date.
Settings on the MonitorInstructions for the monitor vary depending on whether your system is fitted with an LCD flat screen monitor or an LCD flat screen monitor mounted on the articulating arm.
Brightness
Your system may be used with different levels of room lighting. Whenever the lighting changes significantly, you should adjust the monitor brightness.
NOTE: Do not press the [ + ] button on the 19” LCD flat screen monitor or the [ ] button on the 17” LCD flat screen monitor. These activate the contrast menu. The contrast settings should only be adjusted by the hospital technician or by your BK Medical service representative.
On 19” LCDmonitor
Figure 2-3. 19” flat screen monitor buttons.
To adjust the monitor brightness on the 19” LCD flat screen monitor:
1 Freeze the image.
2 Press [Alt+Shift+G] on the keyboard.
A series of gray bars appears on a black background.
3 Press [ - ] once to enable brightness.
4 Then press [ + ] to increase or press [ - ] to decrease brightness.
Subsequent presses either increase or decrease the brightness.
On 17” LCDmonitor
Figure 2-4. 17” flat screen monitor buttons.
To adjust the monitor brightness on the 17” LCD flat screen monitor:
1 Freeze the image.
2 Press [Alt+Shift+G] on the keyboard.
A series of gray bars appears on a black background.
3 Press [ ] once to enable brightness.
AUTO MENU - + POWER
Do not press this
On/Off
Do not press this
On/Off
apter 2 October 2016 Pro Focus 2202 User Guide (BB1247-Z)

Pr
4 Then press [ ] to increase or press [ ] to decrease brightness.
Subsequent presses either increase or decrease the brightness.
Factory Defaults
If the monitor image appears skew or too large, or the brightness and contrast settings appear incorrect, you can restore the factory default settings.
On LCDmonitor
To restore the factory default settings on the LCD flat screen monitor:
1 Click View Archive at the bottom left of the monitor.
2 Point at USB Eject (do NOT click) so the frame around the monitor control becomes visible.
3 Press [ AUTO ] twice.
Menu Window on LCD Flat ScreenAdvanced
optionsOn the flat screen monitor, advanced options (which enable you to finely tune the appearance of images on the monitor) are available via the Menu window.
For most users, it is not necessary to adjust these settings because the default settings provide the optimal ultrasound image in most cases. Contact the hospital technician or a BK Medical service representative to adjust the gamma settings or the aspect-ratio controls.
Adjusting the Reading LightsAfter you have turned on the system, you can adjust the brightness of the 3 reading lights under the DVD drive. (See Fig 2-1.)
To adjust the reading light brightness:
• Click Light under Image on the right side of the monitor and drag the slider ((or point at Light and press [+/-]).
Setting up a New PatientBefore you image a new patient, you must open the Patient window and enter some information about the patient, including the patient ID. The fields in the Patient window contain information about the patient and the examination.
Patient IDrequired
WARNING You must enter a new patient ID before you scan a new patient. Otherwise the documentation will not contain the correct patient identification, and you will not be able to capture images and clips. We recommend that you enter the complete name of the patient.
Verifypatient ID
WARNING Verify that the patient name and ID are correct.
o Focus 2202 User Guide (BB1247-Z) Getting Started 37

38 Ch
Opening the Patient Window
There are 3 ways to open the Patient window.
Opening thePatient
window
To open the Patient window:
• Press [r ID].
or
• Click Enter Patient.... or the name of the previous patient in the identification area on the monitor.
or
• Click New Examination in the Archive window.
The Patient window opens.
Figure 2-5. The Patient window.
Change thePro Package
first
Some fields in the Patient window are different, depending on which Pro Package is selected. Therefore, if you want to change the Pro Package, make sure you do it before you enter information about the patient. See the next section for how to do this.
If DICOM® is installed on your system, the Patient window may contain a worklist, as in Fig 2-6.
Auto-complete
When you start to type the patient’s name or ID, the system searches the patient database for patient names that match the entered data. A list of possible matches appears, and you can select the one you want and click it or use the arrow keys on the keyboard to select it and press [Enter].
To select the patient from the patient archiving system:
• Click . . . next to the Patient ID field.
The Archive window opens.
Changing Pro Package or Preset in the Patient WindowWhen the Patient window opens, a default Pro Package and a default preset are displayed in the window.
apter 2 October 2016 Pro Focus 2202 User Guide (BB1247-Z)

Pr
To change Pro Package or preset in the Patient window:
1 Point at the name of the Pro Package or preset.
2 Press [+/-] to toggle through the available choices.
Click to savepatient data
and go to ProPackage
menuwindow
If you click one of the default setups (instead of toggling through the choices), the data in the Patient window are saved and the Pro Package menu window appears. You can select a different Pro Package and preset from the menu. See “Selecting a Pro Package or Preset” on page 46. After you select something from the menu, the Pro Package menu window closes. If you have selected a new preset, imaging begins. If you have selected a new Pro Package, the image is frozen when the Patient window closes.
Using the Patient WindowTAB to move
betweenfields
After you have entered information in a field, press [Tab] to move from field to field. (You can also move the cursor to a field by clicking the field.)
ENTER closeswindow
Do not press [Enter] (Return) unless you want to close the window. [Enter] on the keyboard is the same as OK in the window.)
Re-openingPatient
window
If you decide to enter more patient data after you have started the examination (or if you have closed the Patient window by mistake before you have finished entering data), you can re-open the window. To re-open the Patient window, click the patient name at the top of the monitor. When the (blank) Patient window opens, click Edit to restore the previously entered patient data to the fields
NOTE: Any information you enter after you re-open the Patient window will not be transferred to the patient archiving system.
New Patient Information from a DICOM Worklist
DICOM® is not installed as a default on the system. If DICOM is installed, the system may be set up so that you can retrieve a worklist of patients and then select a patient from the worklist.
Caution: Changing the DICOM setup can cause your system not to work properly. For example, you may be unable to print to a DICOM printer. All changes to the DICOM setup should be made by qualified service personnel only. Do not try to change the DICOM setup yourself.
o Focus 2202 User Guide (BB1247-Z) Getting Started 39

40 Ch
Figure 2-6. The Patient window with worklist.
Depending on how your DICOM system is set up, the worklist may appear as soon as you open the Patient window. If the worklist is blank, you can retrieve the information.
To retrieve a worklist:
1 Use the drop-down window in the upper right corner to select the dates or the patients you want the list to include.
If you choose the Patient option in the drop-down window, you can filter the information so that only certain patients are displayed by entering patient name, patient ID, accession number and procedure ID in the appropriate fields.
NOTE: The Accession Number and Req. Procedure ID fields do not appear by default. You must activate the fields in the Patient Setup window (click Customize... under Image on the right side of the monitor. Then click the Patient tab).
2 Click Update.
The worklist appears in the window. If there are more patients than can fit in the window, you can scroll down to see the rest of the list.
Sorting To sort the worklist by name, or any other column in the worklist, click the column heading.
To select a patient from the worklist:
1 Click the row that contains the patient.
Now that patient is shown in the fields below the worklist.
2 If required, enter additional information in the fields in the window.
3 Press OK to start the examination.
apter 2 October 2016 Pro Focus 2202 User Guide (BB1247-Z)
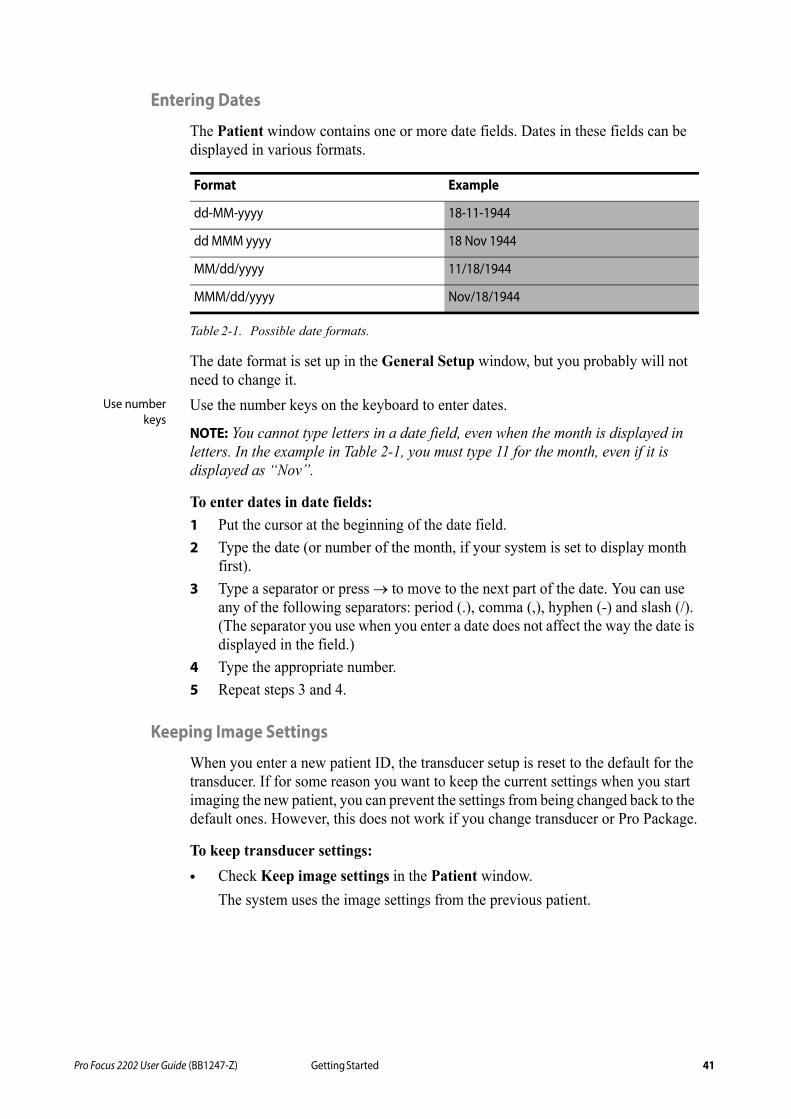
Pr
Entering Dates
The Patient window contains one or more date fields. Dates in these fields can be displayed in various formats.
Table 2-1. Possible date formats.
The date format is set up in the General Setup window, but you probably will not need to change it.
Use numberkeys
Use the number keys on the keyboard to enter dates.
NOTE: You cannot type letters in a date field, even when the month is displayed in letters. In the example in Table 2-1, you must type 11 for the month, even if it is displayed as “Nov”.
To enter dates in date fields:
1 Put the cursor at the beginning of the date field.
2 Type the date (or number of the month, if your system is set to display month first).
3 Type a separator or press to move to the next part of the date. You can use any of the following separators: period (.), comma (,), hyphen (-) and slash (/). (The separator you use when you enter a date does not affect the way the date is displayed in the field.)
4 Type the appropriate number.
5 Repeat steps 3 and 4.
Keeping Image Settings
When you enter a new patient ID, the transducer setup is reset to the default for the transducer. If for some reason you want to keep the current settings when you start imaging the new patient, you can prevent the settings from being changed back to the default ones. However, this does not work if you change transducer or Pro Package.
To keep transducer settings:
• Check Keep image settings in the Patient window.
The system uses the image settings from the previous patient.
Format Example
dd-MM-yyyy 18-11-1944
dd MMM yyyy 18 Nov 1944
MM/dd/yyyy 11/18/1944
MMM/dd/yyyy Nov/18/1944
o Focus 2202 User Guide (BB1247-Z) Getting Started 41

42 Ch
Keeping Patient-Related Data
When you enter a new patient ID, the patient-related data are reset to the default values. Patient-related data include the following:
• preset
• Bodymark
• Measurements
• Labels
You can start a new examination with the patient-related information from the current patient.
To keep patient-related data:
1 At the bottom of the Patient window, click Edit.
2 A new checkbox, Keep patient-related data, appears. Make sure that it contains a checkmark.
The system uses the patient-related data from the previous patient. You can edit the information, including changing the patient name.
NOTE: You must check both Keep image settings and Keep patient-related data if you want to return to the previous frozen image when you close the Patient window. If you do not check both boxes, the system starts imaging when you close the window, and measurements you have made are lost.
Pausing and Later Continuing an ExaminationIt is possible to pause an exam and then resume it later.
To pause an exam:
1 Start an exam. Capture some images. (This is not essential.)
2 In the Archive window, click Pause/Continue Examination.
To resume a paused exam:
1 In the Archive window, select a paused examination from the list.
2 Click Pause/Continue Examination.
To pause an exam and simultaneously resume one that was previously paused:
1 Start an exam. Capture some images. (This is not essential.)
2 In the Archive window, select the paused examination you wish to resume.
3 Click Pause/Continue Examination.
4 The current exam is paused and the selected one is resumed.
apter 2 October 2016 Pro Focus 2202 User Guide (BB1247-Z)
Pr
Discontinue Examination with MPPS Server Configured
If an MPPS server is configured, you can discontinue the current examination. Click Discontinue Examination to end the examination; the system will send a DISCONTINUE message back to the MPPS server. You will be prompted to confirm that the examination must be discontinued. Discontinuing the examination clears the current patient data and closes the Patient Window.
Discontinued examinations can be retrieved from the Patient List for later completion; see the Documentation chapter in the Extended User Guide for more details. The 2202 Service Manual (BI2201) contains instructions for service personnel to use when configuring a MPPS server.
If you try to start or resume examinations on patients with discontinued examinations, you will be prompted to choose between these options:
• Continue the existing examination
• Delete existing examination and start a new
• Cancel
Ending an ExaminationAn examination is automatically ended if you start a new one.
To end an examination without starting a new one:
• Press (long) [r ID].
Connecting and Selecting Transducers
Connecting a Transducer
On the front of the system body are 3 sockets for connecting array transducers. There can be a socket for connecting mechanical transducers.
Keep cablestidy
Under the keyboard panel are a number of hooks that can help keep transducer cables tidy and out of the way. (See Fig 2-1.)
o Focus 2202 User Guide (BB1247-Z) Getting Started 43

44 Ch
Figure 2-7. The transducer sockets.
To connect a transducer
1 Insert the transducer plug into the socket.
2 Turn the locking lever on the transducer plug clockwise.
To disconnect a transducer:
1 Turn the locking lever on the plug counterclockwise.
2 Remove the plug from the socket.
Transducer Holders
The 4 transducer holders beside the keyboard panel keep the transducers you need safe and ready for use. Transducer-holder inserts (DZ9756) are available to hold the smaller transducers in the BK Medical range. See the 2202 Product Data sheet for a list of accessories that can be ordered to use with the system.
Gel Holders
The two gel holders behind the transducer holders hold gel containers ready for use.
Selecting a Transducer
You can choose to image with any of the transducers that are connected to the system. The type number of the transducer currently selected is displayed, together with the imaging frequency, in the Identification area at the top of the monitor. See page 64.
socket for mechanical transducer (optional)
sockets for array transducers
3D mover socket (optional)
ECG (optional)
Typenumber
displayedmust matchnumber ontransducer
WARNING Before you start to image, make sure that the type number of the transducer you have selected matches the number displayed on the monitor. If they do not match, the puncture line on the monitor may not correspond to the true puncture path in the tissue. In case of any inconsistency, stop imaging, turn off the system, and contact your local BK Medical representative.
apter 2 October 2016 Pro Focus 2202 User Guide (BB1247-Z)

Pr
To select a different transducer that can be used with the same Pro Package:
• Point at the transducer type number on the monitor and press [+/-] to select the transducer you want.
or
• Press the button on the transducer itself (if it has a button).
To change Pro Package as well as transducer, or to see all connected transducers and the Pro Packages that support them, see “Selecting a Pro Package or Preset” on page 46.
Selecting the Imaging Plane
If you are using a transducer with more than one plane, you can select the imaging plane (sagittal, transverse or endfire). The current imaging plane (T, S or E) is displayed on the at the top of the monitor after the transducer type number.
To select the imaging plane:
• Press the appropriate button on the transducer. For details, see the user guide for the transducer.
or
• Click T, S or E (whichever is displayed) on the monitor and select the value you want, or point at T, S or E and press [+/-].
The imaging plane in the selected view is updated to the one you select.
Pro Packages and PresetsEach Pro Package contains all the measurement and calculation tools you need for a particular application area. It also contains appropriate presets for the various transducers that can be used with the Pro Package. Each transducer may have more than one preset, but one setup will be the default one.
The following Pro Packages are available on the system:
* These Pro Packages are available on the Pro Focus 2202 UltraView 800 system only.
A preset contains information about the imaging modes that are being used and all the imaging information for those modes.
• Abdomen • Pediatric*
• Brachy • Pelvic Floor
• Cardiac • Regional Anesthesia (UGRA Anes)*
• Colorectal* • Small Parts
• MSK • Surgery
• Neuro • Urology
• OB/Gyn • Vascular
o Focus 2202 User Guide (BB1247-Z) Getting Started 45

46 Ch
Selecting a Pro Package or Preset
The system starts imaging with the default preset for the transducer and Pro Package you are using.
The Pro Package and preset currently selected are displayed in the Identification area of the monitor. See page 64.
To select a Pro Package or preset:
1 Press [c] or click the Pro Package or preset displayed in the identification area of the monitor.
The Pro Package Menu window appears. It contains a column for each connected transducer. The column lists the Pro Packages and presets that you can use with that transducer.
Figure 2-8. The Pro Package Menu window.
2 Select the Pro Package and preset you want.
3 Click Close.
Saving a Preset
When you have changed the setup, you can save it as a new preset.
To save a preset:
1 Click Save under Image on the right side of the monitor.
The Save Preset window appears.
Figure 2-9. The Save Preset window.
apter 2 October 2016 Pro Focus 2202 User Guide (BB1247-Z)

Pr
2 Enter a name for the preset and select the options you want, for example, whether you want the setup to be the default for the transducer with the current Pro Package. (Puncture guide or brachy matrix settings will be saved as part of the setup.)
3 Click Save.
Selecting or Changing the Imaging ModeThe system is set up to start imaging in B-mode, unless something else is specified in the Pro Package you are using.
To add modes to B-mode, press the key for the mode you want to add.
Performing a Biopsy or Puncture Procedure (including Brachytherapy)When you use a puncture guide to perform a biopsy or puncture procedure, a puncture line is superimposed on the image.
Brachy matrixor
transperinealmatrix
When you use a transducer for brachytherapy or prostate transperineal biopsy, a needle guide matrix is superimposed on the image.
NOTE: If the image depth is set very low (in order to see tissue close to the transducer with high magnification), depending on your settings, the needle tip echo can be outside the displayed image area. In order to see the needle tip in this case, zoom out so the full needle path is visible or pan the image to the side (to keep the high magnification).
Checkpuncture
guide typenumber
WARNING Always check the type number of the puncture guide displayed on the monitor to make sure that it corresponds to the puncture guide that you are actually using. If the number is incorrect, the puncture line on the monitor may not correspond to the true puncture path in the tissue.
Watch theneedle tip
WARNING The puncture line on the image is an indication of the expected needle path. The needle tip echo should be monitored at all times so any deviation from the desired path can be corrected.
Verify matrixtype and
coordinates
WARNING For brachytherapy and prostate transperineal biopsy, make sure that the matrix type and coordinates indicated on the monitor agree with the actual matrix template you are using.
Verify matrixalignment
WARNING Before you use the matrix for seed implantation or transperineal biopsy, check the matrix offset value to verify that it corresponds with the chosen matrix. Then check the matrix alignment. See Care, Cleaning & Safety.
o Focus 2202 User Guide (BB1247-Z) Getting Started 47

48 Ch
Activateguide or
matrix
To superimpose a puncture line or matrix on an ultrasound image:
• Press [w].
The default puncture guide or matrix appears. Set default To set a different puncture line or matrix to be the default:
• After you have selected the puncture line or matrix you want (and made any other setup changes you want), save your settings as a new preset (see page 46). Specify that you want the new setup to be your default.
To highlight the dot on a matrix where you expect to see the needle:
• Click one of the dots on the matrix.
A blue square appears in its place.
• To highlight a different dot, click it. The previously highlighted dot returns to normal and the new one is highlighted.
Figure 2-10. A matrix on the image area.
To select a different puncture guide or matrix:
1 Click the Type number or matrix name displayed at the top of the image area.
The Puncture Guide menu appears. It contains the puncture guides and matrices that are available for the selected transducer.
Figure 2-11. The Puncture Guide menu.
2 Click the puncture guide or matrix you want.
Click here to select a different matrix or puncture guide
apter 2 October 2016 Pro Focus 2202 User Guide (BB1247-Z)
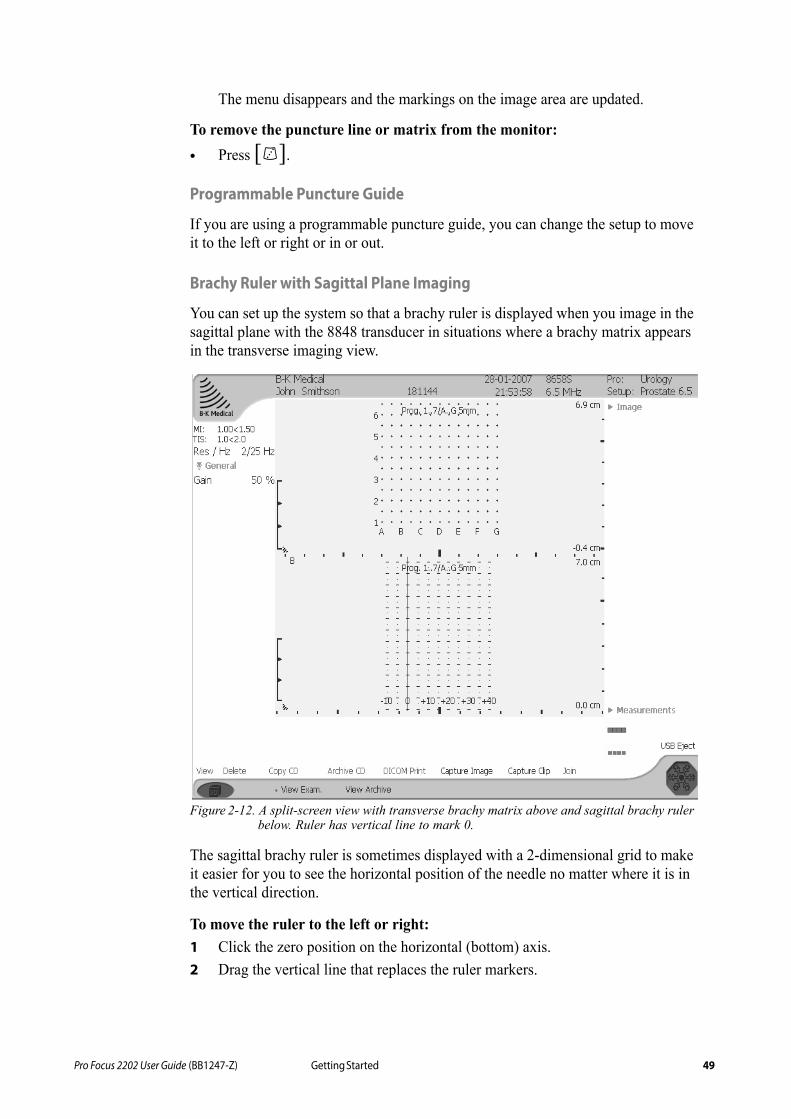
Pr
The menu disappears and the markings on the image area are updated.
To remove the puncture line or matrix from the monitor:
• Press [w].
Programmable Puncture Guide
If you are using a programmable puncture guide, you can change the setup to move it to the left or right or in or out.
Brachy Ruler with Sagittal Plane Imaging
You can set up the system so that a brachy ruler is displayed when you image in the sagittal plane with the 8848 transducer in situations where a brachy matrix appears in the transverse imaging view.
Figure 2-12. A split-screen view with transverse brachy matrix above and sagittal brachy ruler below. Ruler has vertical line to mark 0.
The sagittal brachy ruler is sometimes displayed with a 2-dimensional grid to make it easier for you to see the horizontal position of the needle no matter where it is in the vertical direction.
To move the ruler to the left or right:
1 Click the zero position on the horizontal (bottom) axis.
2 Drag the vertical line that replaces the ruler markers.
o Focus 2202 User Guide (BB1247-Z) Getting Started 49

50 Ch
3 Click when the line is positioned where you want the new zero position of the ruler.
The vertical line disappears and the ruler markers appear in their new positions.
NOTE: You can set up the system so that a vertical 0 line is always visible, along with the markers (as shown in Fig 2-12).
User-Definable Matrix and Ruler
You can also define your own matrix and ruler.
Remote ControlFor a description of the controls on the wireless remote control UA1237 and how to pair it with the system, see Chapter 3, “The User Interface”.
The remote control uses short wave radio waves to communicate with the system. Before you use it, be sure to read the warning and other safety information in the section “Remote Control” on page 16.
Cleaning and Disinfection
For details of cleaning and disinfecting the remote control, see Care, Cleaning & Safety.
apter 2 October 2016 Pro Focus 2202 User Guide (BB1247-Z)

Pr
Chapter 3The User Interface
The Pro Focus system has 4 types of controls, in addition to buttons on the transducers:
• keyboard panel controls (keys)
• controls on the monitor
• foot switch (optional)
• keys on the optional wireless remote control
This chapter gives an overview of the various controls and how they are used in general. Detailed information about using individual controls is contained in the Pro Focus 2202 Extended User Guide (BB1279). The monitor menus shown in this user guide may look different from the version on your system.
Keyboard Panel ControlsThe Pro Focus keyboard panel contains:
• an alphanumeric keyboard
• a control panel with special system control keys.
o Focus 2202 User Guide (BB1247-Z) The User Interface 51

52 Ch
Figure 3-1. The keyboard panel.
The Control Panel
Each control key has a backlighted label that is visible when the functionality of the key is available. Keys turn green to indicate an active function.
There are several types of control keys, categorized according to how you use them.
Keyboard
Control panel
apter 3 October 2016 Pro Focus 2202 User Guide (BB1247-Z)

Pr
Key types
Table 3-1. Control key types.
Press (long) In some situations, pressing a key normally and pressing it for a longer time (at least one second) have different effects. The longer presses are indicated in this user guide by press (long). A long press usually turns off a function.
The Trackball and Trackball Keys
The trackball, together with the [A] (Select) keys and the [+/-] key, can be used to operate the on-screen controls.
Figure 3-2. The trackball and trackball keys.
Trackball with Select KeysLike a mouse The trackball and [A] (Select) keys are used together like a PC mouse.
• Rolling the trackball moves the cursor and other objects on the monitor.
• Pressing one of the [A] keys is like clicking a left mouse button.
Key Type Example Action
Trackball Trackball Rolling the trackball moves a cursor on the monitor.
+/- [+/-] Pressing the key adjusts a value or moves a cursor stepwise up or down (pressing the + side increases the value, pressing the - side decreases it). A long press repeats the action.
Press [Color] Pressing the key activates a function or turns something on or off. Sometimes a long press (at least one second) is required to turn it off.
Dial [Gain] Turning adjusts the gain. Turn clockwise to increase the gain, turn counterclockwise to decrease the gain.
Rocker [Scale z] Same as for the [+/-] key (the + side being closest to the trackball, the - side furthest away from the trackball).
Slider TGC controls Moving the slider adjusts a value continuously.
Select keys
trackball
+/- key
o Focus 2202 User Guide (BB1247-Z) The User Interface 53
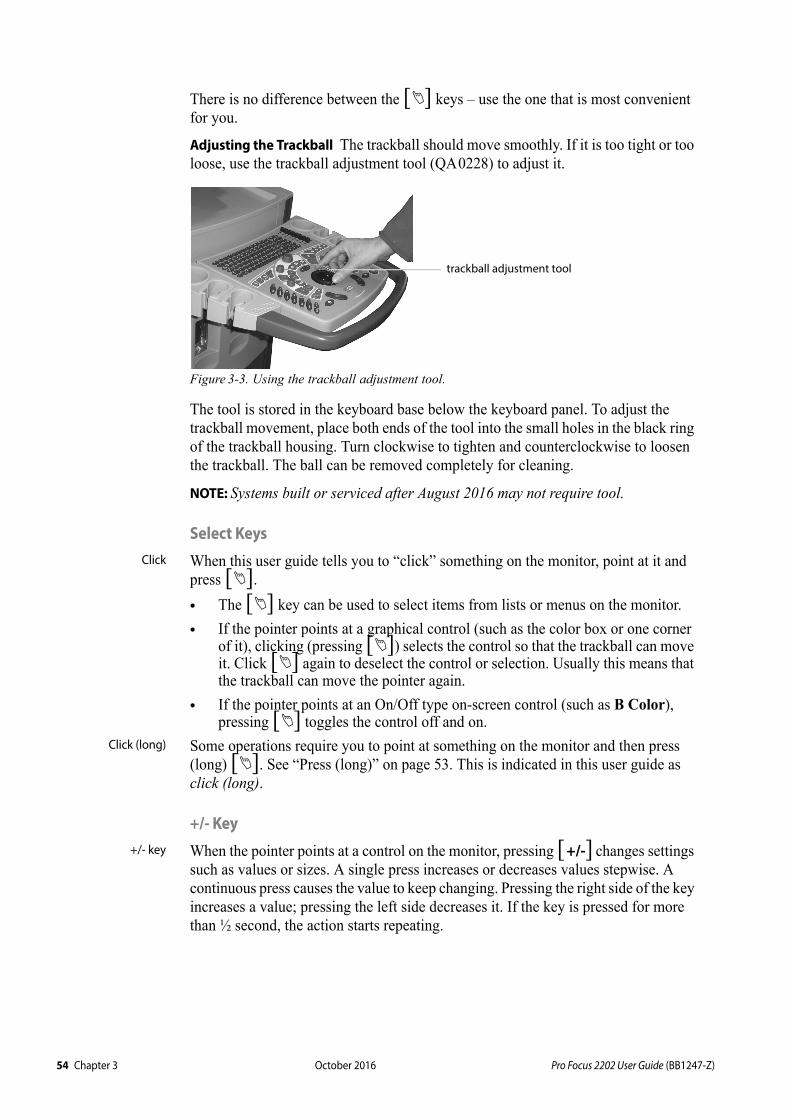
54 Ch
There is no difference between the [A] keys – use the one that is most convenient for you.
Adjusting the Trackball The trackball should move smoothly. If it is too tight or too loose, use the trackball adjustment tool (QA0228) to adjust it.
Figure 3-3. Using the trackball adjustment tool.
The tool is stored in the keyboard base below the keyboard panel. To adjust the trackball movement, place both ends of the tool into the small holes in the black ring of the trackball housing. Turn clockwise to tighten and counterclockwise to loosen the trackball. The ball can be removed completely for cleaning.
NOTE: Systems built or serviced after August 2016 may not require tool.
Select KeysClick When this user guide tells you to “click” something on the monitor, point at it and
press [A].
• The [A] key can be used to select items from lists or menus on the monitor.
• If the pointer points at a graphical control (such as the color box or one corner of it), clicking (pressing [A]) selects the control so that the trackball can move it. Click [A] again to deselect the control or selection. Usually this means that the trackball can move the pointer again.
• If the pointer points at an On/Off type on-screen control (such as B Color), pressing [A] toggles the control off and on.
Click (long) Some operations require you to point at something on the monitor and then press (long) [A]. See “Press (long)” on page 53. This is indicated in this user guide as click (long).
+/- Key+/- key When the pointer points at a control on the monitor, pressing [+/-] changes settings
such as values or sizes. A single press increases or decreases values stepwise. A continuous press causes the value to keep changing. Pressing the right side of the key increases a value; pressing the left side decreases it. If the key is pressed for more than ½ second, the action starts repeating.
trackball adjustment tool
apter 3 October 2016 Pro Focus 2202 User Guide (BB1247-Z)
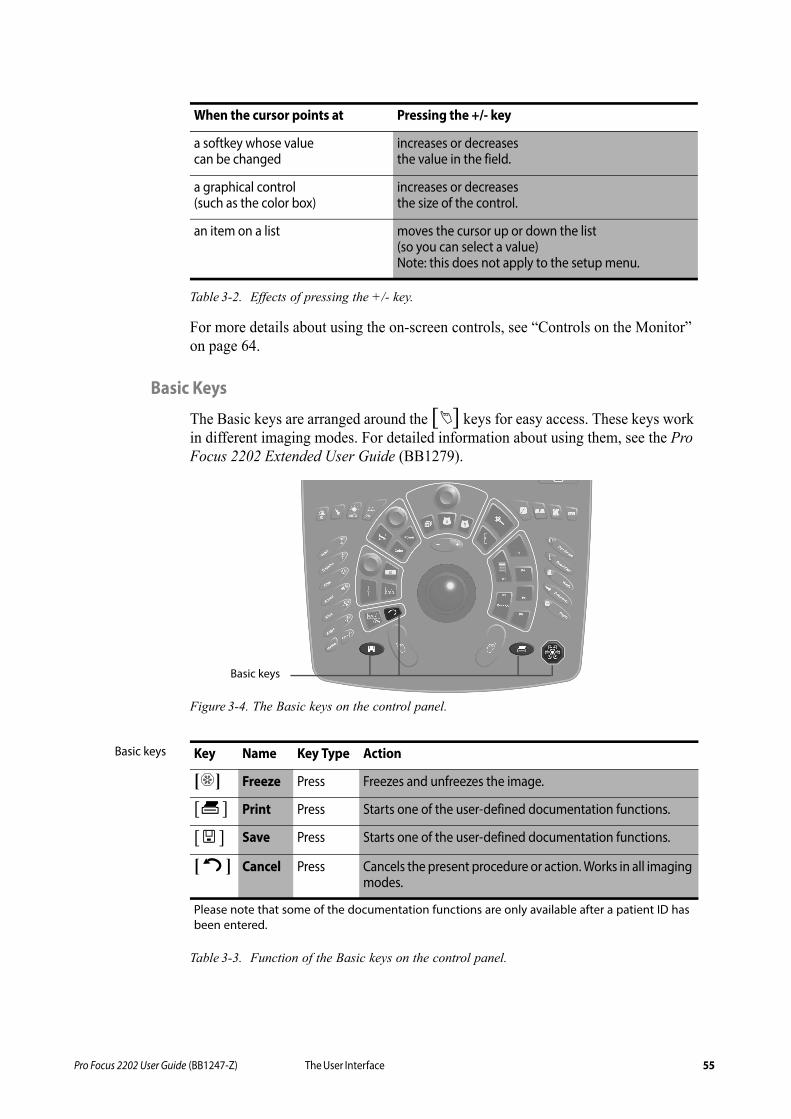
Pr
Table 3-2. Effects of pressing the +/- key.
For more details about using the on-screen controls, see “Controls on the Monitor” on page 64.
Basic Keys
The Basic keys are arranged around the [A] keys for easy access. These keys work in different imaging modes. For detailed information about using them, see the Pro Focus 2202 Extended User Guide (BB1279).
Figure 3-4. The Basic keys on the control panel.
Basic keys
Table 3-3. Function of the Basic keys on the control panel.
When the cursor points at Pressing the +/- key
a softkey whose value can be changed
increases or decreases the value in the field.
a graphical control (such as the color box)
increases or decreases the size of the control.
an item on a list moves the cursor up or down the list (so you can select a value)Note: this does not apply to the setup menu.
Basic keys
Key Name Key Type Action
[p] Freeze Press Freezes and unfreezes the image.
[v ] Print Press Starts one of the user-defined documentation functions.
[ y ] Save Press Starts one of the user-defined documentation functions.
[ i ] Cancel Press Cancels the present procedure or action. Works in all imaging modes.
Please note that some of the documentation functions are only available after a patient ID has been entered.
o Focus 2202 User Guide (BB1247-Z) The User Interface 55

56 Ch
B-Mode Keys
The B-mode keys are centered above the trackball. For detailed information about using them, see the Pro Focus 2202 Extended User Guide (BB1279).
Figure 3-5. The B-mode keys on the control panel.
B-mode keys
Table 3-4. Function of the B-mode keys on the control panel.
B-Mode Adjustment Keys
The B-Mode Adjustment keys are grouped on the right side of the control panel. For detailed information about using them, see the Pro Focus 2202 Extended User Guide (BB1279).
B-mode keys
Key Name Key Type Action
[ Gain ] B Gain/Cine Dial Adjusts the overall gain. If the image is frozen, turning activates the Cine scroll, but you can toggle it back to controlling the gain.
[ f ] B-mode Press If other modes than B are active, return to B-mode only. If only B-mode is active, return to last mode combination.
[ a ] 3D Press Turns 3D imaging on (if the 3D Pro Package is installed). If 3D is already active, it steps through the different 3D states. A long press turns 3D imaging off.
[ q ] Harmonic Press Turns harmonic imaging on and off.
apter 3 October 2016 Pro Focus 2202 User Guide (BB1247-Z)
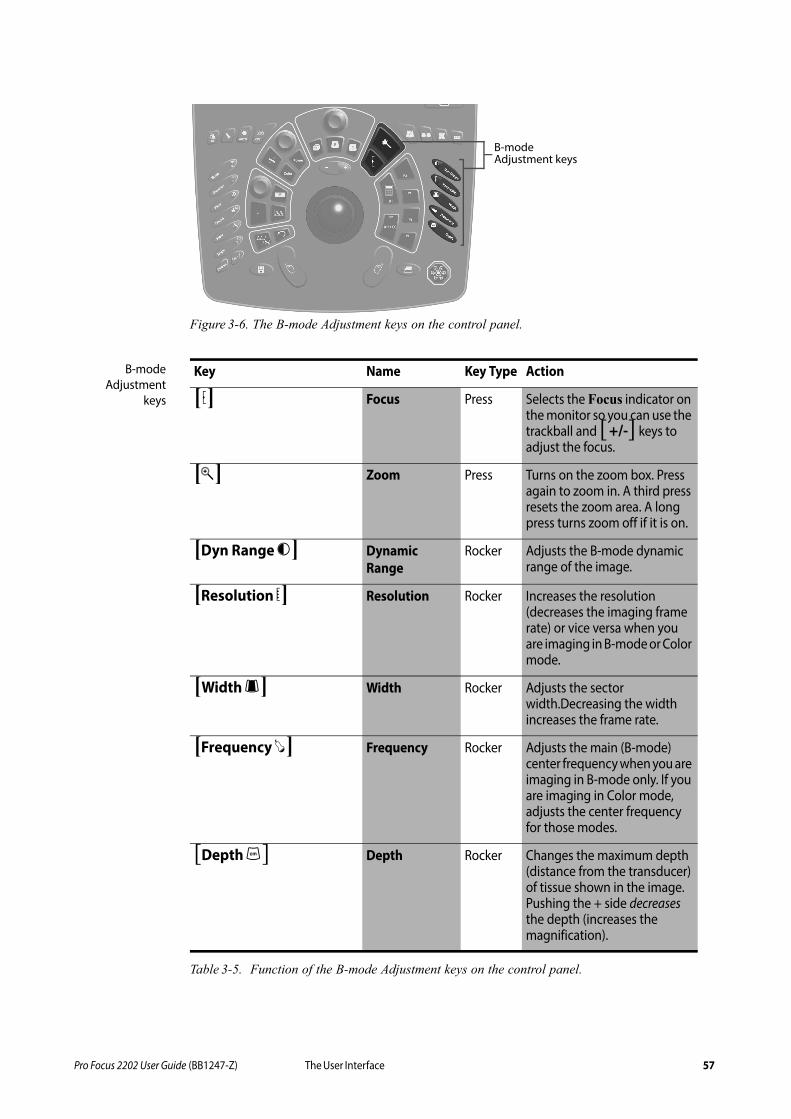
Pr
Figure 3-6. The B-mode Adjustment keys on the control panel.
B-modeAdjustment
keys
Table 3-5. Function of the B-mode Adjustment keys on the control panel.
B-mode Adjustment keys
Key Name Key Type Action
[ o] Focus Press Selects the Focus indicator on the monitor so you can use the trackball and [+/-] keys to adjust the focus.
[H] Zoom Press Turns on the zoom box. Press again to zoom in. A third press resets the zoom area. A long press turns zoom off if it is on.
[Dyn Range n] Dynamic Range
Rocker Adjusts the B-mode dynamic range of the image.
[Resolution x] Resolution Rocker Increases the resolution (decreases the imaging frame rate) or vice versa when you are imaging in B-mode or Color mode.
[Width G] Width Rocker Adjusts the sector width.Decreasing the width increases the frame rate.
[Frequency c] Frequency Rocker Adjusts the main (B-mode) center frequency when you are imaging in B-mode only. If you are imaging in Color mode, adjusts the center frequency for those modes.
[Depth l] Depth Rocker Changes the maximum depth (distance from the transducer) of tissue shown in the image. Pushing the + side decreases the depth (increases the magnification).
o Focus 2202 User Guide (BB1247-Z) The User Interface 57
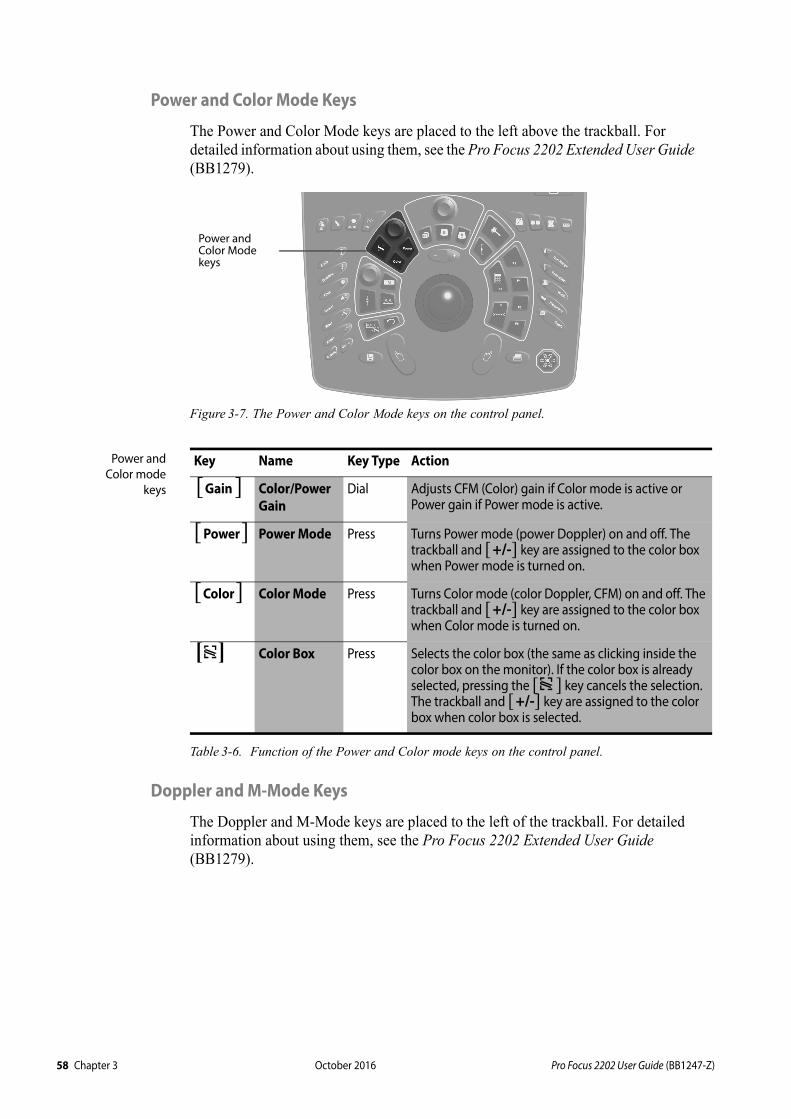
58 Ch
Power and Color Mode Keys
The Power and Color Mode keys are placed to the left above the trackball. For detailed information about using them, see the Pro Focus 2202 Extended User Guide (BB1279).
Figure 3-7. The Power and Color Mode keys on the control panel.
Power andColor mode
keys
Table 3-6. Function of the Power and Color mode keys on the control panel.
Doppler and M-Mode Keys
The Doppler and M-Mode keys are placed to the left of the trackball. For detailed information about using them, see the Pro Focus 2202 Extended User Guide (BB1279).
Power and Color Mode keys
Key Name Key Type Action
[Gain ] Color/Power Gain
Dial Adjusts CFM (Color) gain if Color mode is active or Power gain if Power mode is active.
[Power] Power Mode Press Turns Power mode (power Doppler) on and off. The trackball and [+/-] key are assigned to the color box when Power mode is turned on.
[Color] Color Mode Press Turns Color mode (color Doppler, CFM) on and off. The trackball and [+/-] key are assigned to the color box when Color mode is turned on.
[j] Color Box Press Selects the color box (the same as clicking inside the color box on the monitor). If the color box is already selected, pressing the [j ] key cancels the selection. The trackball and [+/-] key are assigned to the color box when color box is selected.
apter 3 October 2016 Pro Focus 2202 User Guide (BB1247-Z)
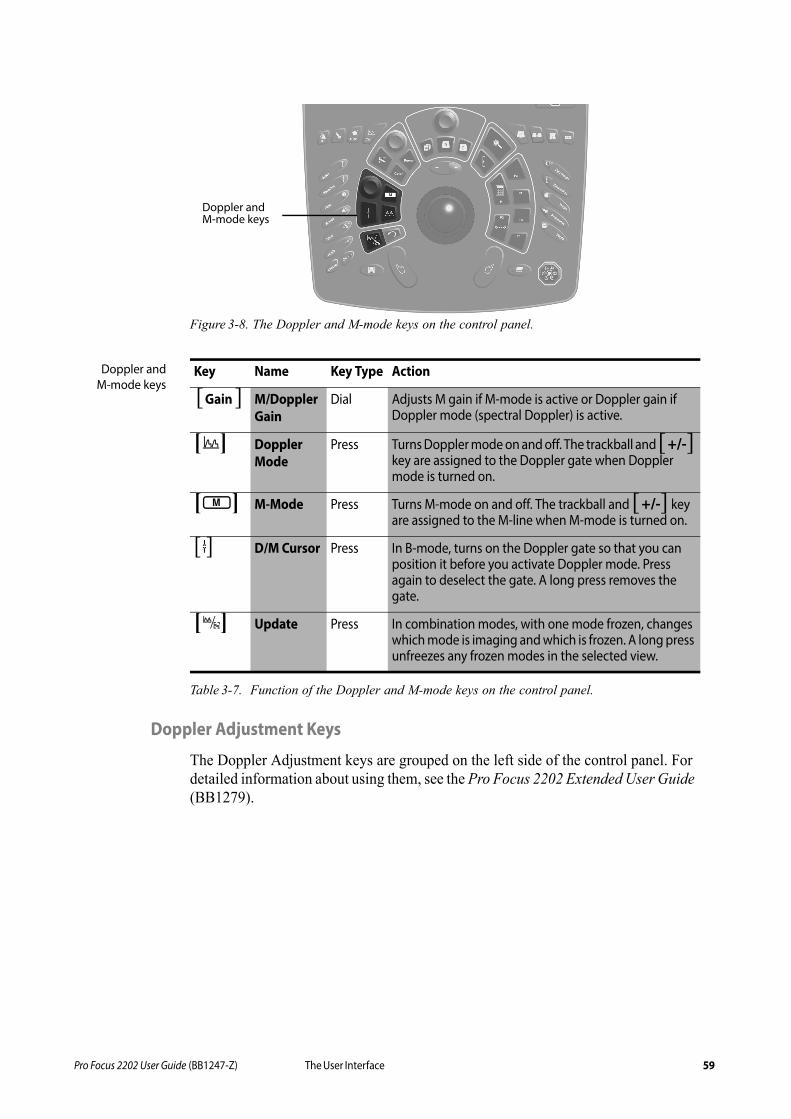
Pr
Figure 3-8. The Doppler and M-mode keys on the control panel.
Doppler andM-mode keys
Table 3-7. Function of the Doppler and M-mode keys on the control panel.
Doppler Adjustment Keys
The Doppler Adjustment keys are grouped on the left side of the control panel. For detailed information about using them, see the Pro Focus 2202 Extended User Guide (BB1279).
Doppler and M-mode keys
Key Name Key Type Action
[Gain ] M/Doppler Gain
Dial Adjusts M gain if M-mode is active or Doppler gain if Doppler mode (spectral Doppler) is active.
[k] Doppler Mode
Press Turns Doppler mode on and off. The trackball and [+/-] key are assigned to the Doppler gate when Doppler mode is turned on.
[u] M-Mode Press Turns M-mode on and off. The trackball and [+/-] key are assigned to the M-line when M-mode is turned on.
[ m] D/M Cursor Press In B-mode, turns on the Doppler gate so that you can position it before you activate Doppler mode. Press again to deselect the gate. A long press removes the gate.
[E] Update Press In combination modes, with one mode frozen, changes which mode is imaging and which is frozen. A long press unfreezes any frozen modes in the selected view.
o Focus 2202 User Guide (BB1247-Z) The User Interface 59
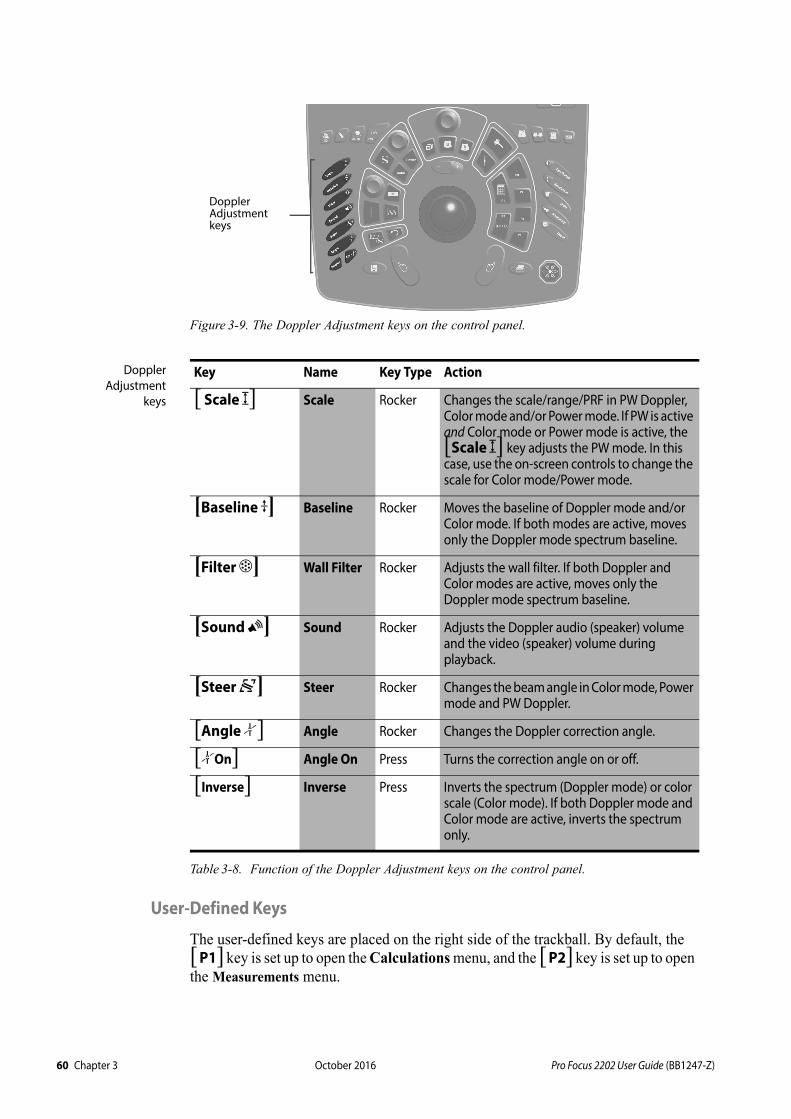
60 Ch
Figure 3-9. The Doppler Adjustment keys on the control panel.
DopplerAdjustment
keys
Table 3-8. Function of the Doppler Adjustment keys on the control panel.
User-Defined Keys
The user-defined keys are placed on the right side of the trackball. By default, the [P1] key is set up to open the Calculations menu, and the [P2] key is set up to open the Measurements menu.
Doppler Adjustment keys
Key Name Key Type Action
[ Scale z] Scale Rocker Changes the scale/range/PRF in PW Doppler, Color mode and/or Power mode. If PW is active and Color mode or Power mode is active, the [Scale z] key adjusts the PW mode. In this case, use the on-screen controls to change the scale for Color mode/Power mode.
[Baseline e] Baseline Rocker Moves the baseline of Doppler mode and/or Color mode. If both modes are active, moves only the Doppler mode spectrum baseline.
[Filter F] Wall Filter Rocker Adjusts the wall filter. If both Doppler and Color modes are active, moves only the Doppler mode spectrum baseline.
[Sound B] Sound Rocker Adjusts the Doppler audio (speaker) volume and the video (speaker) volume during playback.
[Steer D] Steer Rocker Changes the beam angle in Color mode, Power mode and PW Doppler.
[Angle b] Angle Rocker Changes the Doppler correction angle.
[bOn] Angle On Press Turns the correction angle on or off.
[Inverse] Inverse Press Inverts the spectrum (Doppler mode) or color scale (Color mode). If both Doppler mode and Color mode are active, inverts the spectrum only.
apter 3 October 2016 Pro Focus 2202 User Guide (BB1247-Z)
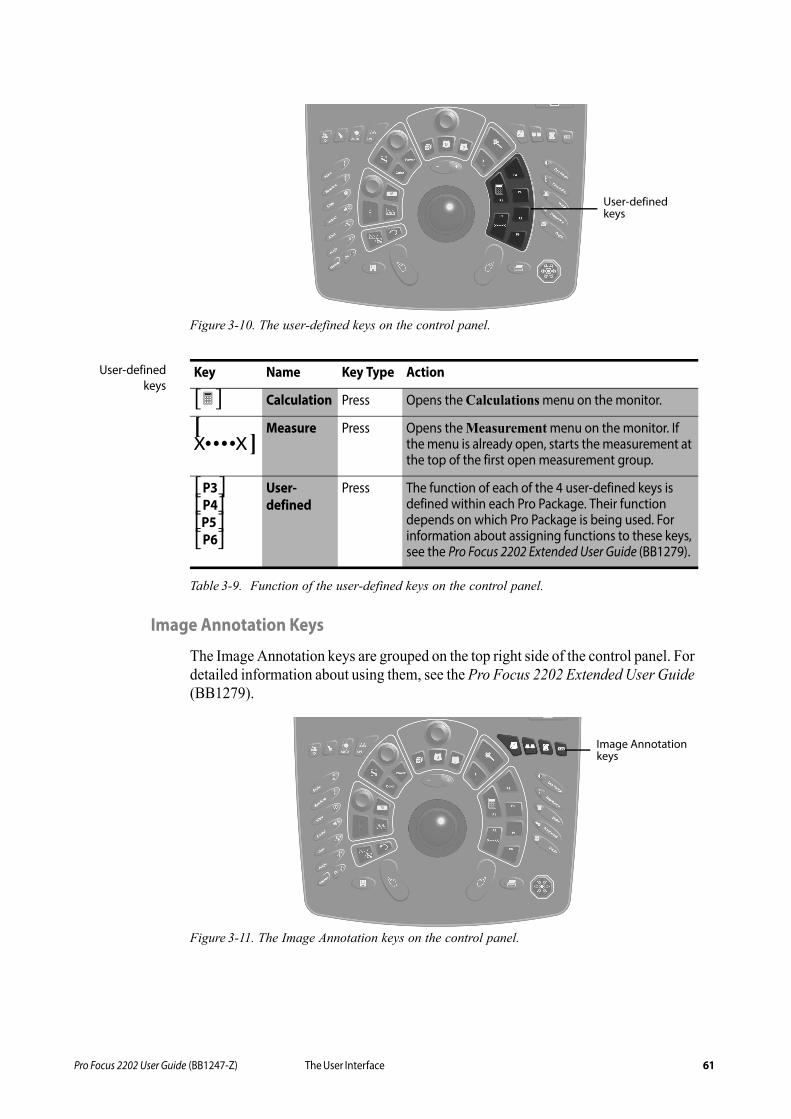
Pr
Figure 3-10. The user-defined keys on the control panel.
User-definedkeys
Table 3-9. Function of the user-defined keys on the control panel.
Image Annotation Keys
The Image Annotation keys are grouped on the top right side of the control panel. For detailed information about using them, see the Pro Focus 2202 Extended User Guide (BB1279).
Figure 3-11. The Image Annotation keys on the control panel.
User-defined keys
Key Name Key Type Action
[h ] Calculation Press Opens the Calculations menu on the monitor.
[t]
Measure Press Opens the Measurement menu on the monitor. If the menu is already open, starts the measurement at the top of the first open measurement group.
[P3] [P4] [P5] [P6]
User-defined
Press The function of each of the 4 user-defined keys is defined within each Pro Package. Their function depends on which Pro Package is being used. For information about assigning functions to these keys, see the Pro Focus 2202 Extended User Guide (BB1279).
Image Annotation keys
o Focus 2202 User Guide (BB1247-Z) The User Interface 61

62 Ch
ImageAnnotation
keys
Table 3-10.Function of the Image Annotation keys on the control panel.
Miscellaneous Keys
The keys on the top left side of the control panel have varied functions.
Figure 3-12. The Miscellaneous keys on the control panel.
Miscella-neous keys
Table 3-11. Function of the Miscellaneous Control keys.
Key Name Key Type Action
[w] Puncture Press Turns a puncture or biopsy line on or off.
[C] Split Screen
Press Splits the screen so two views are displayed. If the screen is already split, pressing C shifts between which view is active. A long press turns split screen off if it is on.
[g] Bodymark Press Opens the Bodymark window so you can place a bodymark on the image. Press to close the Bodymark window again. A long press removes bodymarks.
[s] Label Press Opens the Label window so you can add text or arrows to the image. A long press removes all labels and arrows.
Miscellaneous keys
Key Name Key Type Action
[r] ID Press Opens the Patient window so you can enter data about a new patient. A long press ends the current examination.
[c] Transducer/Pro Package
Press Opens the Pro Package menu on the monitor so you can choose a transducer, a Pro Package or preset.
[d] Auto Press Adjusts parameters or resets parameters to factory default.
[CW k] CW Doppler Press Turns CW Doppler on and off. The trackball is assigned to the CW Doppler line when CW Doppler mode is turned on.
apter 3 October 2016 Pro Focus 2202 User Guide (BB1247-Z)

Pr
TGC Sliders
The 8 TGC sliders to the upper right of the keyboard are used to adjust the Time Gain Control at various depths in the image.
Figure 3-13. The TGC sliders on the keyboard panel.
Each slider controls 1/8th of the depth of the displayed imaged area. The top slider affects the top of the image and the bottom slider the bottom. (With 360° transducers, the top slider adjusts the part of the image that is most central – that is, closest to the transducer. The bottom slider adjusts the part of the image farthest from the transducer.)
Move the sliders to the right to increase gain. Move the sliders to the left to decrease gain.
Each slider is related to a part of the monitor rather than a part of the tissue being imaged. Therefore, if you move, resize or invert the image area, you may have to use the sliders to readjust the TGC in order to get the best image.
Keyboard
In addition to the control keys, the keyboard panel contains an alphanumeric keyboard for entering information into the system.
The [F1] to [F10] keys are user-definable keys. The [F8] and [F10] keys have default functions assigned:
F8 and F10
Table 3-12.Default function of the F8 and F10 keys.
TGC sliders
Key Name Default Function
[F8] F8 Displays a report. A report is defined for each Pro Package. The content of the report will vary, depending on the Pro Package and the measurements you have made.
[F10] F10 Displays an arrow on the image and allows you to add text to the image.
o Focus 2202 User Guide (BB1247-Z) The User Interface 63

64 Ch
Controls on the Monitor
Figure 3-14. The parts of the display on the monitor. The layout shown here may be different from the one on your monitor.
Image area • The Ultrasound Image area is in the center. This area displays the current imaging and/or frozen views. Graphical on-screen controls such as the zoom box, color box and focus indicator are located in this area.
Identificationarea
• The Identification area is at the top.
This contains identifying information about the hospital and patient, the date and time, the transducer type and imaging frequency (and imaging plane, for a biplane transducer), and the name of the Pro Package and preset.
Data area • The Data area is on the left side. It displays data that must be documented with the image. Information displayed in this area is automatically updated.
The Data area has a data section at the top that contains the relevant settings for image parameters. It has a measurement section at the bottom. The measurement section displays the results of current measurements you have made.
ImageDocumenta-
tion area
• The Image area, the Identification area and the Data area make up the Image Documentation area and will appear in documentation (except for the Pro Package and preset names).
Image andMeasurement
area
• The Image and Measurement area is to the right. You may need to click Image to see the image tools or click Measurements to see the measurement tools. This area will not appear in documentation.
Image area
Same function as y on the control panel
Same function as p on the control panel
apter 3 October 2016 Pro Focus 2202 User Guide (BB1247-Z)
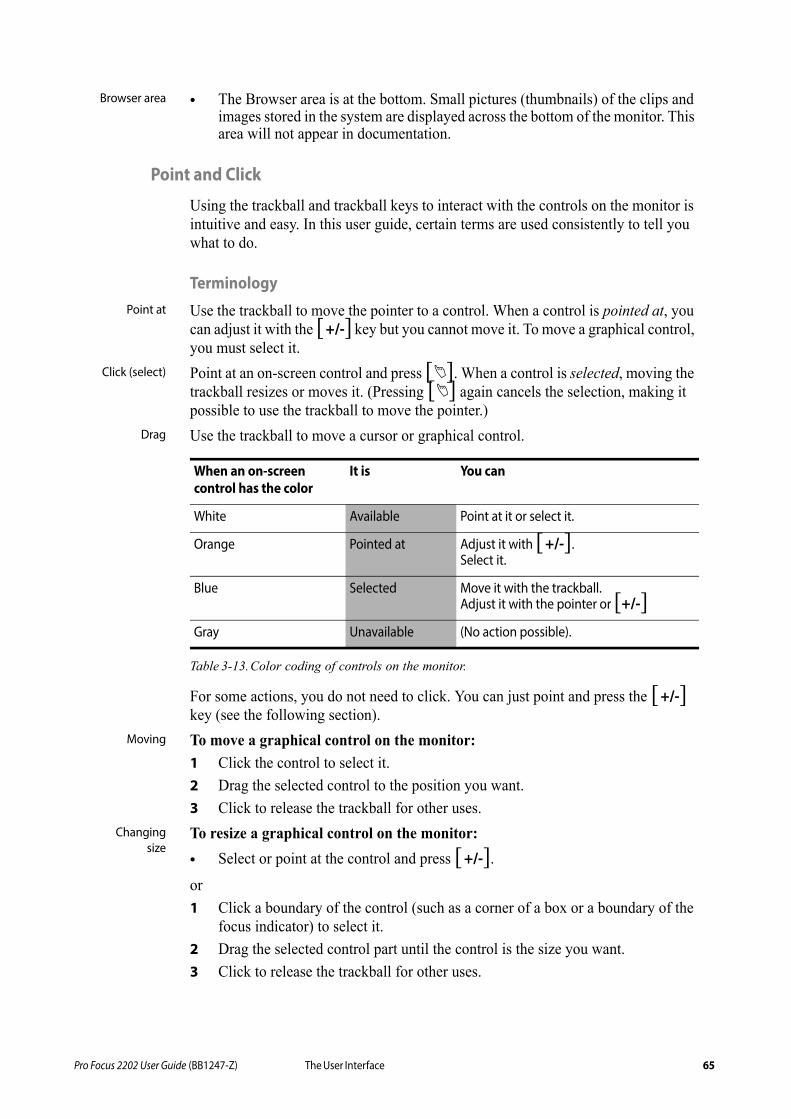
Pr
Browser area • The Browser area is at the bottom. Small pictures (thumbnails) of the clips and images stored in the system are displayed across the bottom of the monitor. This area will not appear in documentation.
Point and Click
Using the trackball and trackball keys to interact with the controls on the monitor is intuitive and easy. In this user guide, certain terms are used consistently to tell you what to do.
TerminologyPoint at Use the trackball to move the pointer to a control. When a control is pointed at, you
can adjust it with the [+/-] key but you cannot move it. To move a graphical control, you must select it.
Click (select) Point at an on-screen control and press [A]. When a control is selected, moving the trackball resizes or moves it. (Pressing [A] again cancels the selection, making it possible to use the trackball to move the pointer.)
Drag Use the trackball to move a cursor or graphical control.
Table 3-13.Color coding of controls on the monitor.
For some actions, you do not need to click. You can just point and press the [+/-] key (see the following section).
Moving To move a graphical control on the monitor:
1 Click the control to select it.
2 Drag the selected control to the position you want.
3 Click to release the trackball for other uses.
Changingsize
To resize a graphical control on the monitor:
• Select or point at the control and press [+/-].
or
1 Click a boundary of the control (such as a corner of a box or a boundary of the focus indicator) to select it.
2 Drag the selected control part until the control is the size you want.
3 Click to release the trackball for other uses.
When an on-screen control has the color
It is You can
White Available Point at it or select it.
Orange Pointed at Adjust it with [+/-].Select it.
Blue Selected Move it with the trackball.Adjust it with the pointer or [+/-]
Gray Unavailable (No action possible).
o Focus 2202 User Guide (BB1247-Z) The User Interface 65

66 Ch
Softkeys
The monitor contains many softkeys for functions whose value can be adjusted or changed. These softkeys appear as words or abbreviations on the monitor.
Softkeys withvalues
To select a value for a softkey:
1 Click the softkey.
A list of possible values appears.
2 Click the value you want.
You can also use [+/-] to scroll up and down in the list and then press [A].
NOTE: Not all softkeys may be visible. Click the expand menu symbol to see all items in a menu. To change the setup for how menus appear, see Pro Focus 2202 Extended User Guide (BB1279).
Slidersoftkeys
Some softkeys have a slider that you move with the trackball.
On/Offsoftkeys
Some softkeys have only two values, On and Off.
To change the setting of an On/Off softkey:
• Click it.
or
• Point at it and press [+/-] to toggle the value.Small green
lightA small green light next to the key indicates that it is set to On.
Foot SwitchThe optional foot switch has 2 or 3 pedals. You can assign a function to each pedal, and the same pedal can have different functions for different Pro Packages. For information about assigning functions to the pedals, see Pro Focus 2202 Extended User Guide (BB1279).
To use the foot switch:
• Press the appropriate pedal.
NOTE: Releasing the pedal does not operate or reverse the function.
Remote ControlThe wireless remote control UA1237 is an option available for the Pro Focus UltraView. It uses short wave radio waves to communicate with the system and control many of its functions.
apter 3 October 2016 Pro Focus 2202 User Guide (BB1247-Z)

Pr
The Remote Control and Its Functions
Figure 3-15. The remote control, with the location of its various controls.
The remote control uses short wave radio waves to communicate with the system.
Pairing the Remote Control with the System1 Plug the Mini Bluetooth Adapter into a USB connector on the system. (Use the
one that came with the remote control.)
2 Press any key on the remote control to wake it up.
3 Hold down the P and AUTO keys on the remote control for three seconds.
The remote control emits two beeps.
4 Release the keys after the second beep.
The blue diode starts blinking fast.
A dialog box appears on the monitor. This may take up to two minutes.
5 Click Accept to pair the system with the remote control (indicated by its serial no.).
The pairing process takes up to one minute.
Blue diode. Blinks to show remote control is awake
Toggle imaging modes: B > Color > Doppler > B ...(User-definable)
Adjust gain for one mode only, the first in this list that is active: Doppler, Color, Power, B-mode
Start/Stop imaging
Capture an image to the system hard disk or print it. (User-definable)
Battery level. Blinks to warn that batteries must be replaced soon
Start a default measurement (User-definable)
In B-mode, adjust Depth. If Doppler is on, adjust Doppler PRF. If Color is on but not Doppler, adjust Color PRF
Adjust value or size of zoom box, etc. Holding down the key repeats the action
Select
Change exam type (list will appear on monitor)
User-defined
Hold down P and AUTO for three seconds when pairing with the system
Optimize image and Doppler settings
o Focus 2202 User Guide (BB1247-Z) The User Interface 67

68 Ch
When pairing is done, the remote control emits a beep and the blue diode blinks to show the remote control is awake.
NOTE: The pairing process may time out. Try again if this happens.
NOTE: If the cursor starts drifting on the monitor, place the remote control in its holder and leave it for 30 seconds to recalibrate.
If you have more than one remote control, be sure you know which system each is paired with; the system and remote control remain paired even if the remote control is taken away to be disinfected. Pairing lasts until you pair the remote control with another system or pair another remote control with the system. Therefore, it is important to keep track of which remote control is paired with which system.
Before each use, verify that the remote control is working correctly.
Sleep
If the remote control is not used or moved for 5 minutes, it goes to sleep to save battery power. To wake it up, press any key.
Mouse Function
You can use the remote control as an air-tracking mouse to operate controls on the system monitor.
To move the cursor, tilt the remote control; that is, move the front end up, down, or side-to-side. The mouse will not respond if you keep it level.
NOTE: You do not need to point it at the monitor. The cursor responds to changes in the position of the remote control, not to the position itself.
To select an object on the monitor, move the remote control so that the cursor is on the object, then press Select.
Replacing Batteries
To replace the batteries in the remote control:
1 Remove the battery cap.
2 Insert 2 batteries LR6 size AA 1.5 volt.
3 Screw the battery cap on tight until the arrow points to the area of the battery cap with a large gap between the ridges.
When the battery cap is screwed on tight, the remote control is watertight and can be immersed.
Cleaning and Disinfection
For details of cleaning and disinfecting the remote control, see Care, Cleaning & Safety.
apter 3 October 2016 Pro Focus 2202 User Guide (BB1247-Z)

Pr
TransducersControlbutton
Some transducers have a control button that you can press to Start or Stop imaging (freeze frame).
Long press You can set up your system so that a long press (more than one second) starts one of the user-defined documentation functions, such as capturing an image. See the Pro Focus 2202 Extended User Guide (BB1279) for information about setting up user-defined keys.
If the transducer has more than one control button, you can set up a user-defined long press function for each control button.
Each time the control button is pressed, a ‘beep’ is emitted.
o Focus 2202 User Guide (BB1247-Z) The User Interface 69

70 Ch
apter 3 October 2016 Pro Focus 2202 User Guide (BB1247-Z)
Pr
Chapter 4Technical Guide
This chapter contains information about the electrical requirements and operating conditions for the system as well as important information about attaching other equipment and so on. Before you turn on the system, make sure that the installation has been approved by a qualified service technician or by hospital safety personnel. See Safety Precautions in Chapter 1, “General and Safety Information”.
Operating EnvironmentThe Pro Focus can be operated safely within the following operating condition limits:
Table 4-1. Operating condition limits.
The Rear of the SystemThe rear of the system body (see Fig 4-1 and Fig 4-2) contains a large number of connectors for connecting different equipment.
Condition Limits
Ambient operating temperature 10C to 40C (50F to 104F)
Humidity max. 85% RH non-condensing
Atmospheric pressure between 700 hPa and 1060 hPa
WARNING Follow the guidelines in EN60601-1-1[1] when you connect the system to other equipment. See “General Safety Precautions” on page 12.
Explosionhazard
WARNING During use, the system must be at least 25 cm (10in) from the patient to minimize the risk of igniting explosive gases.
The system is not intended for use in potentially explosive environments and should be kept well away from flammable gases and liquids. It should not be used in oxygen-enriched atmospheres. Avoid excessive heat, dust and direct sunlight.
o Focus 2202 User Guide (BB1247-Z) Technical Guide 71
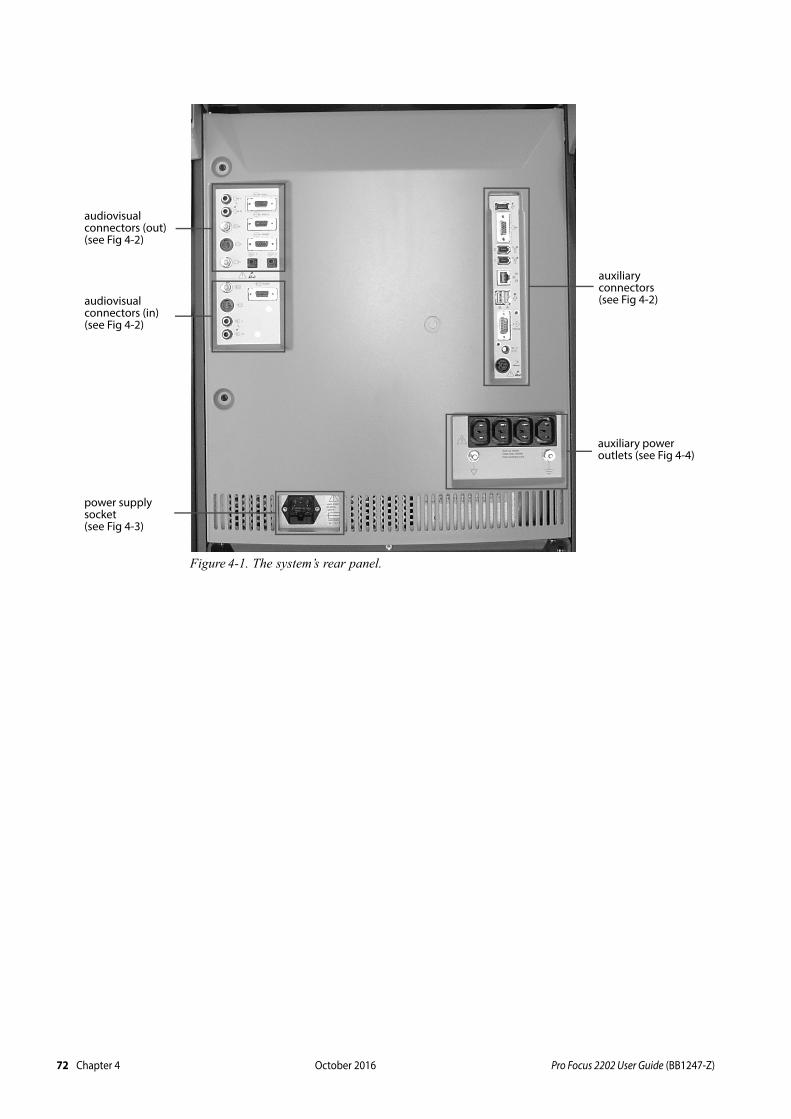
72 C
Figure 4-1. The system’s rear panel.
audiovisual connectors (out)(see Fig 4-2)
power supply socket(see Fig 4-3)
auxiliary power outlets (see Fig 4-4)
auxiliary connectors(see Fig 4-2)audiovisual
connectors (in)(see Fig 4-2)
hapter 4 October 2016 Pro Focus 2202 User Guide (BB1247-Z)

Pr
v
v
Figure 4-2. The peripheral connectors on the rear of the system.
Bold arrows indicate connections installed at the factory. Do not change these connections.
Cables Types and Lengths
Table 4-2 specifies the cables that were used to test the electromagnetic compatibility (EMC) of the system. EMC data for all transducers used with this system are in the Technical Data (BZ2100) section on the CD that accompanies this user guide. The CD also contains a list of accessories used in testing for EMC compliance.
To fulfill EMC requirements, do not attach cables to the system unless they are the same type as listed in the table and do not exceed the maximum length given in the table.
system monitor
documentation trigger connectors
not available
LAN (DICOM)
foot switch(2 pedals)
color video printer or external video monitor
RGBS source, e.g. camera
CD writer inmonitor base
external VGA monitor
internal usemonitor base
USB printer(B/W or color)
foot switch(3 pedals)
not in use
not in use
audio out
B/W videoprinter (out)
color videoprinter/recorder
(out) (composite)
video camera /ideo recorder (in)
(Composite)
audio in
color videoprinter/recorder
(out) (S-VHS)
video camera /ideo recorder (in)
(S-VHS)
o Focus 2202 User Guide (BB1247-Z) Technical Guide 73
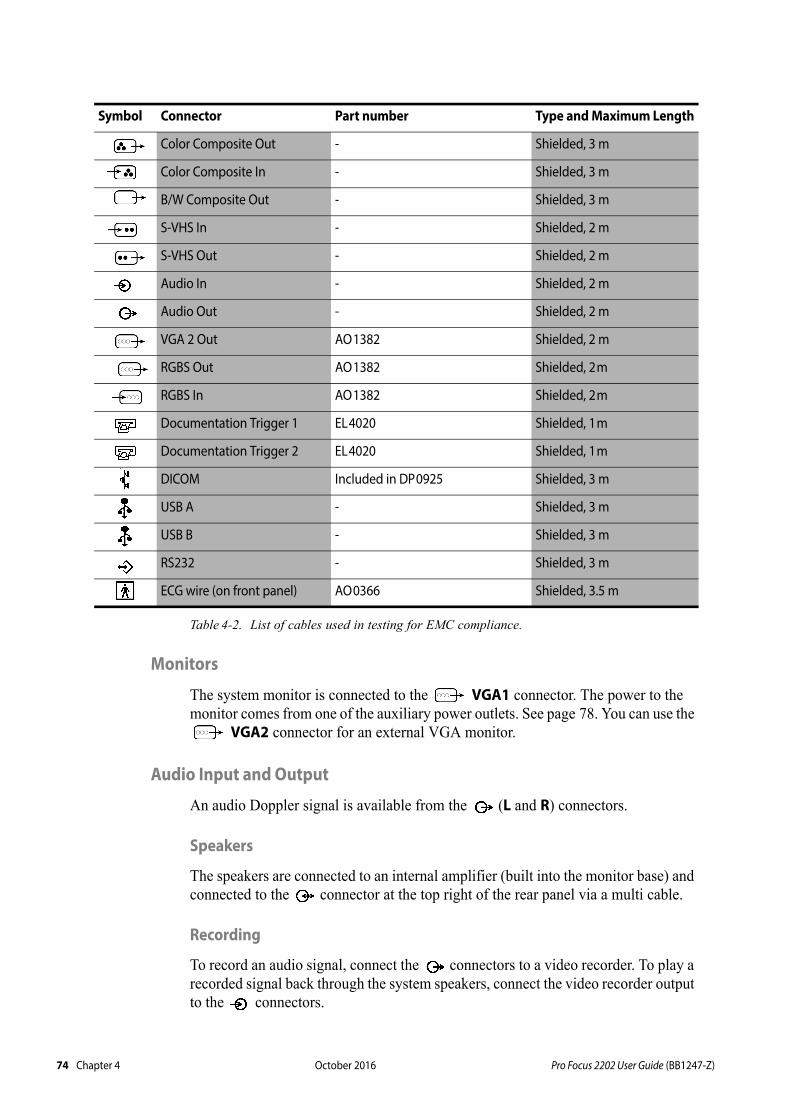
74 C
Table 4-2. List of cables used in testing for EMC compliance.
Monitors
The system monitor is connected to the VGA1 connector. The power to the monitor comes from one of the auxiliary power outlets. See page 78. You can use the
VGA2 connector for an external VGA monitor.
Audio Input and Output
An audio Doppler signal is available from the (L and R) connectors.
Speakers
The speakers are connected to an internal amplifier (built into the monitor base) and connected to the connector at the top right of the rear panel via a multi cable.
Recording
To record an audio signal, connect the connectors to a video recorder. To play a recorded signal back through the system speakers, connect the video recorder output to the connectors.
Symbol Connector Part number Type and Maximum Length
Color Composite Out - Shielded, 3 m
Color Composite In - Shielded, 3 m
B/W Composite Out - Shielded, 3 m
S-VHS In - Shielded, 2 m
S-VHS Out - Shielded, 2 m
Audio In - Shielded, 2 m
Audio Out - Shielded, 2 m
VGA 2 Out AO1382 Shielded, 2 m
RGBS Out AO1382 Shielded, 2m
RGBS In AO1382 Shielded, 2m
Documentation Trigger 1 EL4020 Shielded, 1m
Documentation Trigger 2 EL4020 Shielded, 1m
DICOM Included in DP0925 Shielded, 3 m
USB A - Shielded, 3 m
USB B - Shielded, 3 m
RS232 - Shielded, 3 m
ECG wire (on front panel) AO0366 Shielded, 3.5 m
hapter 4 October 2016 Pro Focus 2202 User Guide (BB1247-Z)

Pr
Documentation Accessories
The optional digital B/W printer (EQ4100) which should be connected to the port A.
If you install other documentation accessories, always follow the installation and verification instructions in the user guide that accompanies them. See “Connecting Other Equipment” on page 19.
Always use the cables specified in the 2202 Product Data sheet.
PAL/NTSC
The format for the video output that is sent to a video printer or video recorder can be either PAL or NTSC.
To set the format for video output from the system:
1 Make sure that the PAL/NTSC switch on the rear of the printer is set to the appropriate format.
2 Open the General Setup window.
3 Select the video output setting you want, and close the window.
Video Documentation Equipment
Table 4-3 gives an overview of video documentation connections. See also Table 4-2.
Table 4-3. Overview of video documentation connections.
Equipment Signal type Connector Comments
Video printer, B/W Composite Out
Video printer, Color RGBS Out The R, G, and B signal levels are 0.7Vpp/75 . The S (Sync.) signal level is TTL.
Video printer, Color Composite Out
Video recorder Composite Out
Video recorder Composite In For playback
Video recorder S-VHS Out
Video recorder S-VHS In For playback
Video monitor, B/W Composite Out
Video monitor, Color RGBS Out Only one piece of external equipment can be connected to the connector.
Video camera RGBS In
Video camera Composite In
Video camera S-VHS In
RGBS
RGBS
RGBS
RGBS
o Focus 2202 User Guide (BB1247-Z) Technical Guide 75

76 C
Documentation Trigger Connectors
In order to use the foot switch or [v ] key to print the image on the monitor, connect 1 or 2 to the trigger input of a video printer.
USB DevicesUSB
connectorunder
monitor
Images can be saved to a USB storage device through the USB connector on the left side of the DVD drive.
External harddrive
The power available from the USB connector on the left side of the DVD drive is limited. If you are using an external hard drive, attach only a data transfer cable to this connector. Do not use it for supplying power to the hard drive.
Consult your BK Medical service representative if you have questions about connecting an external hard drive.
The DVD writer built into the monitor base is connected to the connector at the top right of the rear panel.
connector A on the back of the system is reserved for use with USB printers (black and white or color). connector B on the back of the system is reserved for use with the optional 3-pedal foot switch.
NOTE: The USB ports on the system are USB 2.0 ports. However, in order to get high-speed performance, the equipment you connect to them must be labeled “certified Hi-Speed USB”.
Foot-Switch ConnectorThere are two connectors for the optional foot switches (see page 66), one for a 2-pedal and one for a 3-pedal foot switch (see Fig 4-2 on page 73).
Electrical Connections
Power Supply Cord
The system comes with a power supply cord that is specific to your region. The connector (see Fig 4-3) is on the lower left side of the rear panel.
Caution: Do not attach 2 USB storage devices (for example a memory stick and an external hard drive) to the system at the same time.
hapter 4 October 2016 Pro Focus 2202 User Guide (BB1247-Z)
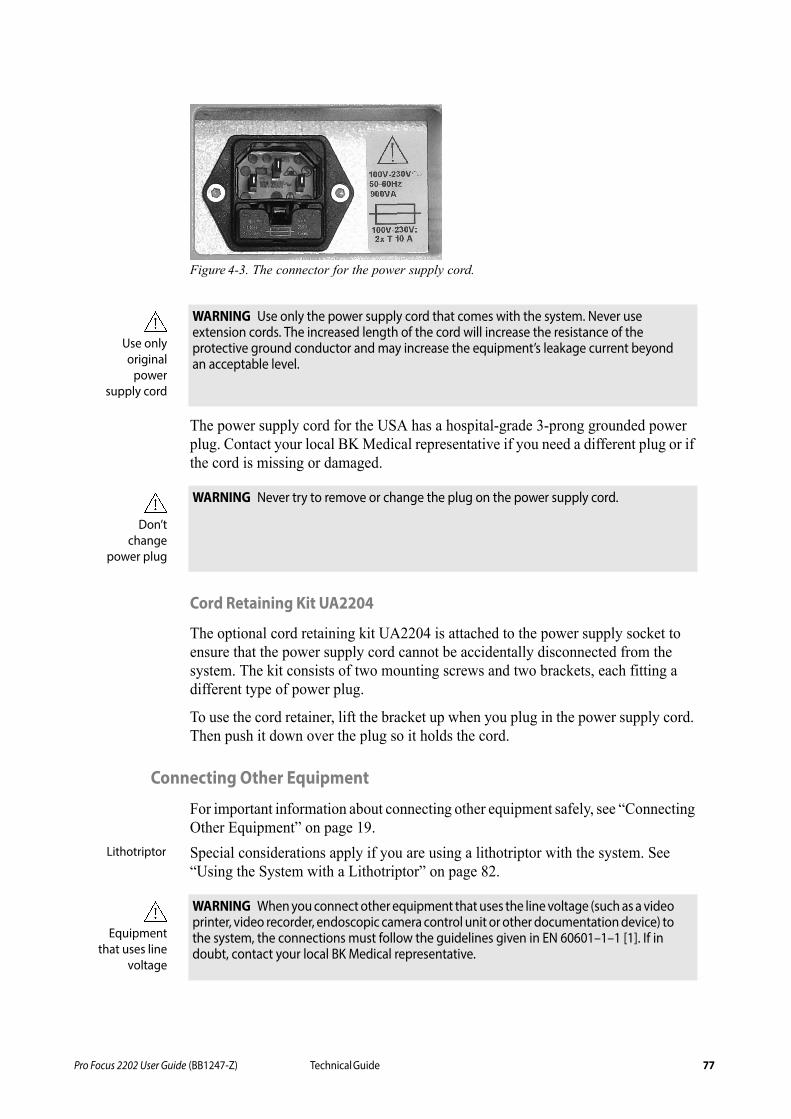
Pr
Figure 4-3. The connector for the power supply cord.
The power supply cord for the USA has a hospital-grade 3-prong grounded power plug. Contact your local BK Medical representative if you need a different plug or if the cord is missing or damaged.
Cord Retaining Kit UA2204
The optional cord retaining kit UA2204 is attached to the power supply socket to ensure that the power supply cord cannot be accidentally disconnected from the system. The kit consists of two mounting screws and two brackets, each fitting a different type of power plug.
To use the cord retainer, lift the bracket up when you plug in the power supply cord. Then push it down over the plug so it holds the cord.
Connecting Other Equipment
For important information about connecting other equipment safely, see “Connecting Other Equipment” on page 19.
Lithotriptor Special considerations apply if you are using a lithotriptor with the system. See “Using the System with a Lithotriptor” on page 82.
Use onlyoriginal
powersupply cord
WARNING Use only the power supply cord that comes with the system. Never use extension cords. The increased length of the cord will increase the resistance of the protective ground conductor and may increase the equipment’s leakage current beyond an acceptable level.
Don’tchange
power plug
WARNING Never try to remove or change the plug on the power supply cord.
Equipmentthat uses line
voltage
WARNING When you connect other equipment that uses the line voltage (such as a video printer, video recorder, endoscopic camera control unit or other documentation device) to the system, the connections must follow the guidelines given in EN 60601–1–1 [1]. If in doubt, contact your local BK Medical representative.
o Focus 2202 User Guide (BB1247-Z) Technical Guide 77

78 C
Using the RS232 and LAN Connectors
You can connect other equipment to the RS232 and LAN connectors on the back of the system (see Fig 4-2). You can connect a HistoScanning1 workstation to the LAN connector.
Auxiliary Power Outlets
To minimize leakage currents, plug all other equipment into the isolated auxiliary power outlets on the bottom right of the rear panel. There are 4 auxiliary outlets, as shown in Fig 4-4.
Figure 4-4. Auxiliary power outlets.
The voltage and frequency of these outlets is the same as from the power supply cord. The thermal fuses limit the power that can be drawn from the outlets to a safe level, but the available total output from the auxiliary outlets must not exceed 80VA if the black and white printer EQ4071 is attached to the system. (Actually, the total output is limited to 350VA, but the system monitor, using 150VA, is permanently plugged into one of the outlets, and the USB black and white printer uses 120VA. This leaves 80VA for other accessories.)
Additional Protective Ground
An additional protective ground can be connected to the terminal below the auxiliary power outlets (see Fig 4-4).1. HistoScanning is not market cleared by the FDA for sale in the USA and not licensed by Health Canada.
Powerisolation
requirements
WARNING Electrical equipment that is connected to the RS232 and LAN connectors must get its power from the system’s isolated auxiliary power outlets (see below) if it does not comply with EN/IEC 60601-1 [2]. In particular, if you connect an IEC 60950 apparatus, such as a PC, it must be outside the patient area and get its power from the system.
Standbyswitch doesnot turn off
outlets
Caution: The 4 auxiliary power outlets are still “live” even when the standby switch on the front is turned off. In order to remove voltage from these outlets, you must unplug the power supply cord from the wall outlet.
potential equalization terminal
protective ground terminal
hapter 4 October 2016 Pro Focus 2202 User Guide (BB1247-Z)

Pr
Potential Equalization
The potential equalization terminal below the auxiliary power outlets (see Fig 4-4) is connected to the system chassis. It can be connected to corresponding terminals on other equipment to eliminate potential differences.
Dismantling the System for TransportationThe keyboard panel, keyboard base, monitor and monitor base can be removed to make it easier to transport the system.
Figure 4-5. Removing the keyboard base.
Keyboard Base and Panel
To remove the keyboard base and panel:
1 Move the keyboard base to the top position.
2 Unplug the keyboard panel from the front of the system.
3 Lift and remove the keyboard panel (see Fig 4-5).
4 Remove the 2 sliding covers from the system.
5 Loosen the black screws under each side of the keyboard base.
6 Press the black release handles and lift the keyboard base out of the groove.
7 Replace the sliding covers.
To replace the keyboard base and panel:
1 Remove the 2 sliding covers from the system.
2 Slide the keyboard base back into the grooves.
3 Tighten the black screws.
4 Reconnect the keyboard panel to the front of the system.
5 Replace the keyboard panel.
sliding covers
release handles
monitor base
keyboard panel
keyboard base
screws
o Focus 2202 User Guide (BB1247-Z) Technical Guide 79
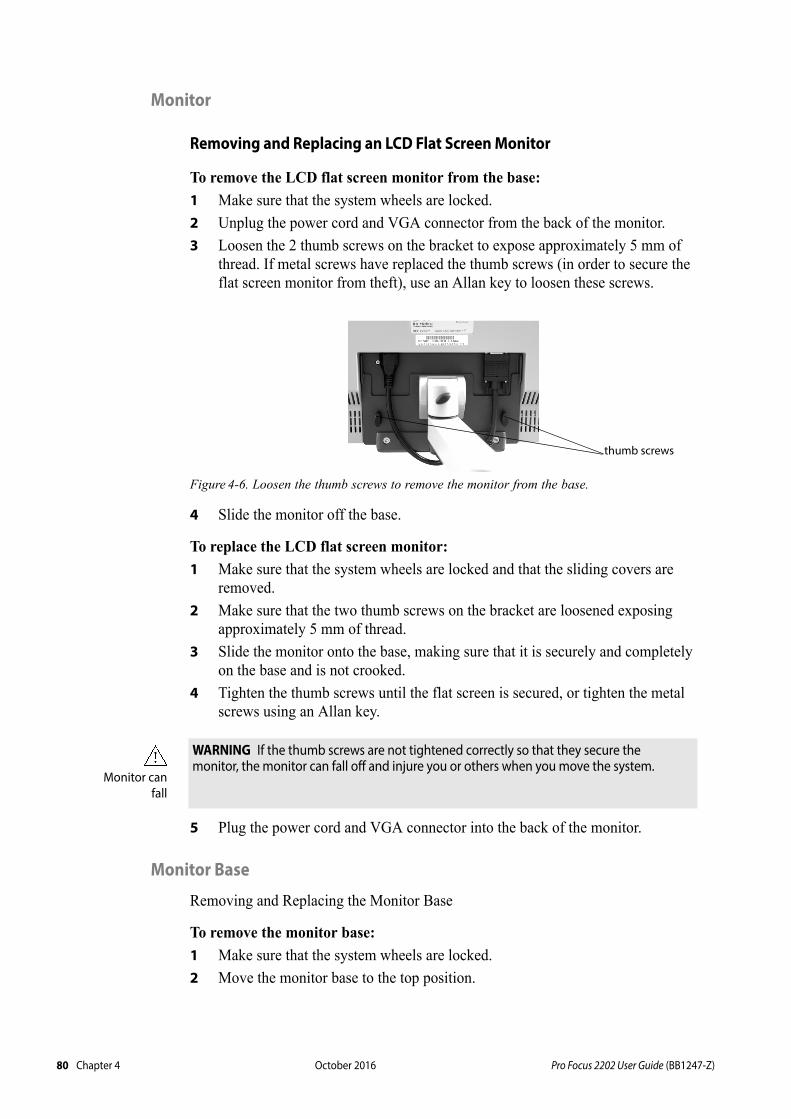
80 C
Monitor
Removing and Replacing an LCD Flat Screen Monitor
To remove the LCD flat screen monitor from the base:
1 Make sure that the system wheels are locked.
2 Unplug the power cord and VGA connector from the back of the monitor.
3 Loosen the 2 thumb screws on the bracket to expose approximately 5 mm of thread. If metal screws have replaced the thumb screws (in order to secure the flat screen monitor from theft), use an Allan key to loosen these screws.
Figure 4-6. Loosen the thumb screws to remove the monitor from the base.
4 Slide the monitor off the base.
To replace the LCD flat screen monitor:
1 Make sure that the system wheels are locked and that the sliding covers are removed.
2 Make sure that the two thumb screws on the bracket are loosened exposing approximately 5 mm of thread.
3 Slide the monitor onto the base, making sure that it is securely and completely on the base and is not crooked.
4 Tighten the thumb screws until the flat screen is secured, or tighten the metal screws using an Allan key.
5 Plug the power cord and VGA connector into the back of the monitor.
Monitor Base
Removing and Replacing the Monitor Base
To remove the monitor base:
1 Make sure that the system wheels are locked.
2 Move the monitor base to the top position.
thumb screws
Monitor canfall
WARNING If the thumb screws are not tightened correctly so that they secure the monitor, the monitor can fall off and injure you or others when you move the system.
hapter 4 October 2016 Pro Focus 2202 User Guide (BB1247-Z)

Pr
3 Disconnect 2 monitor connections on the rear panel of the system: the VGA1 connector and the power cord (see Fig 4-2).
4 Disconnect 2 monitor base connections (internal connection and USB for DVD writer) at the top right of the rear panel (see Fig 4-2).
5 Remove the 2 sliding covers from the system (see Fig 4-5).
6 Use a TORX 30 screwdriver or an NV4 Allen key to remove the 2 screws on the hook bars (see Fig 4-7) that are attached to the back of the monitor base.
7 Loosen the 2 black screws on the hook bars. (Do not remove them.)
8 Hold the monitor base under the DVD drive, and lift the hook bars carefully out of the grooves.
To replace the monitor base:
1 Make sure that the system wheels are locked and that the sliding covers are removed.
2 Slide the hook bars of the monitor base into the grooves (see Fig 4-7). Make sure that the hooks are in place at the top of each groove so that the monitor base is supported correctly.
3 Use a TORX 30 screwdriver or an NV4 Allen key to screw the 2 screws into the hook bars.
Figure 4-7. Hooks and grooves for holding monitor base.
4 Tighten the black screws on the hook bars.
5 Replace the sliding covers.
6 On the rear of the system, reconnect the 2 connections to the monitor (VGA1 and auxiliary power outlet) and the 2 connections to the monitor base (internal connector and top USB connector). (See Fig 4-2.)
HistoScanning1
The scanner units to be used with HistoScanning™ systems from AMD have an extra connector on the back of the system, on the lower left side. It is used to take raw data, before it has been converted to an image on the monitor, out of the system.
To use the Pro Focus for HistoScanning, you must have a HistoScanning license installed.
grooves
hook
hook bar
black screw
TORX screw
1. HistoScanning is not market cleared by the FDA for sale in the USA and not licensed by Health Canada.
o Focus 2202 User Guide (BB1247-Z) Technical Guide 81

82 C
Figure 4-8. Connector for HistoScanning.
Using the System with a LithotriptorYou must have a license installed in order to use a lithotriptor with the system.
You must always follow instructions in the manufacturer’s user guide for the lithotriptor.
Power Connections
If you are using the system with a lithotriptor, make sure that the lithotriptor complies with the guidelines in EN/IEC 60601-1 [2]. Connect both the system and the lithotriptor directly to independent wall outlets.
Connecting the System to the Lithotriptor
You can use the RS232 connector on the back of the system (see Fig 4-2) to connect a lithotriptor.
You must follow the connection instructions in the manufacturer’s user guide for the lithotriptor system. The connections must follow the guidelines given in EN 60601–1–1 [1].
References[1] EN 60601–1–1:2001 Medical electrical equipment – Part 1-1: General requirements for
safety. Collateral standard: Safety requirements for medical electrical systems.
[2] EN/IEC 60601–1:1990+A1:1993+A2:1995+A13:1996 Medical electrical equipment. Part 1: General requirements for safety.EN/IEC 60601-1:2006 3rd Ed. Medical electrical equipment. Part 1: General requirements for basic safety and essential performance.
HistoScanning connector
hapter 4 October 2016 Pro Focus 2202 User Guide (BB1247-Z)

Pr
Appendix 1Specifications and Indications for Use
Specifications for the system are included in the Product Data sheet for the system, which forms part of this user guide.
Indications for Use The system is intended for use by qualified physicians for ultrasound evaluation. Specific clinical applications and exam types include the following types of imaging:
• Abdominal
• Adult cephalic
• Cardiac (not for direct use on the heart)
• Fetal
• Intraoperative
• Intraoperative neurological
• Musculoskeletal conventional
• Musculoskeletal superficial
• Neonatal Cephalic1
• Obstetrics
• Pediatric
• Peripheral vascular
• Small organ
• Transrectal
• Transurethral
• Transvaginal
Indicated uses are different for different transducers. The Product Data sheet for the system contains a table listing the indicated uses for each transducer that can be used with the system.
ContraindicationsThe Pro Focus 2202 ultrasound system is not intended for ophthalmic use or any use causing the acoustic beam to pass through the eye.
1. Neonatal cephalic imaging on the Pro Focus 2202 UltraView has not been CE approved or licensed by Health Canada.
o Focus 2202 User Guide (BB1247-Z) 83

84 A
ppendix 1 October 2016 Pro Focus 2202 User Guide (BB1247-Z)