Embed Size (px)
Citation preview

BEMER USA
1 / 14
PRO – Operating Supplement
BEMER Pro MAIN COMPONENTS:
What comes with your BEMER Pro Set
• B.Box Pro, • B.Body Fixing Strap,
• B.Body Pro, • Glasses,
• B.Pad, • Car Adapter Plug,
• B.Grip, • Foot Protector,
• B.Spot, • Wall Mount,
• B.Light, • 4 power cords,
• B.Scan, • Quick Start Guide,
B. Body (the full body applicator).
You can lie on either side of it.
You can put it on top of your body
if that is more comfortable (e.g. for
people who are immobile or bed ridden).
It does not have to be totally flat,
and can be covered by a sheet or towel for cleanliness.
NOTE:
Lie with your head at the end with
the BEMER logo where the power
cord exits.

BEMER USA
2 / 14
B. Pad
The B.Pad is a long belt-like local applicator with Velcro at both
ends.
It is used over any specific local area of the body.
E.g.: It can be wrapped around a leg, arm, and neck or around
the head. It also can be laid flat along the spine or across the abdomen or the lower back.
This is the easiest accessory to use while traveling.
B. Grip holds the B.Spot and B.Light
To hold the B.Spot or B.Light in place over a specific area, you can use the B.Grip fixing strap as shown in the picture below.
The B.Spot is a round and very
targeted local applicator.
It emits the strongest possible intensity
at Intensity 10.
It is normal for the B.Spot to make a slight whirring and clicking sound
when in use.

BEMER USA
3 / 14
The B. Light is an LED red light
that is used directly on the skin.
It only penetrates into the layers
of the skin.
It can touch the skin surface or
can be held slightly above.
NOTE:
Wear the green glasses for protection if you are using it near
the eyes and avoid looking
directly at the Light. The
flickering can be very irritating.
Cover the applicator with clear foil for cleanliness.
The B.Body, the B.Pad, the B.Spot and the B.Light all connect to one of the 2 magnetic ports on the
right side of the B.Box.
A1 is the top port.
A2 is the bottom port is.
Suggestion:
Use A1 only for the B. Body
to avoid any confusion with
other accessories.
A2 Port can be used to connect the B.Pad, B.Spot or
B.Light.
IMPORTANT NOTE:
Connect the magnetic plugs
gently!
Attach from an angle:
top – down
outside – in
bottom - up
BEMER USA
4 / 14
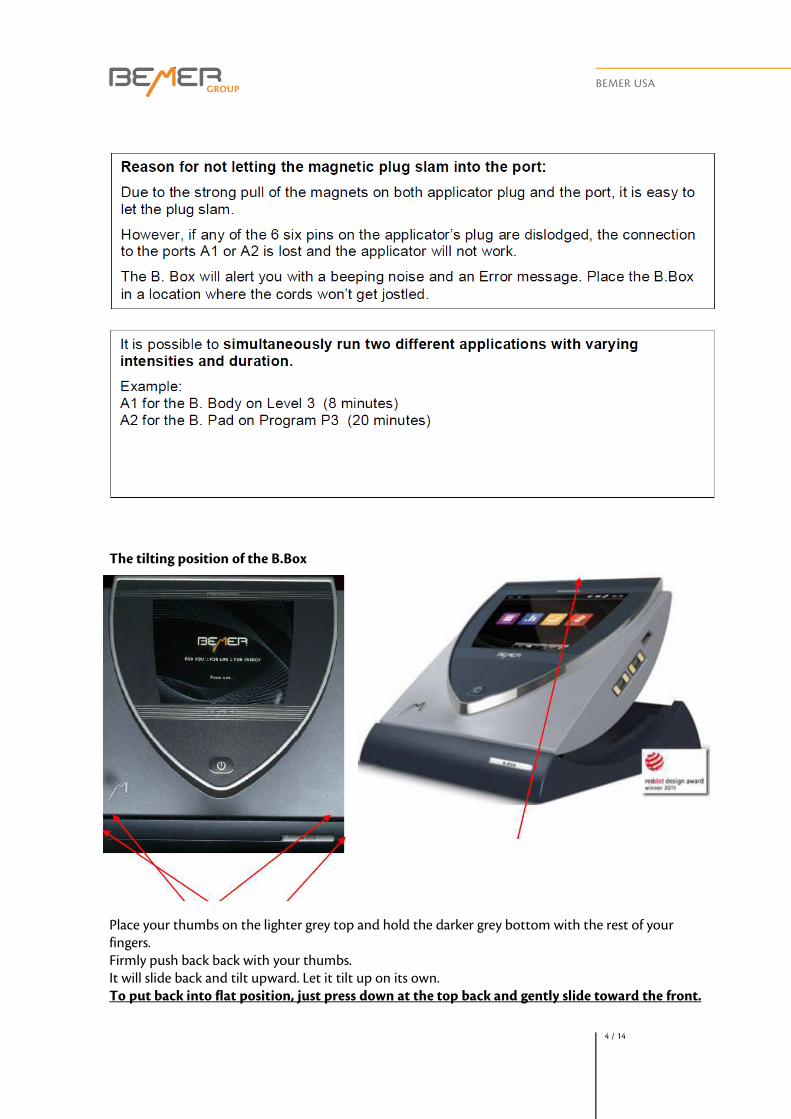
The tilting position of the B.Box
Place your thumbs on the lighter grey top and hold the darker grey bottom with the rest of your
fingers.
Firmly push back back with your thumbs.
It will slide back and tilt upward. Let it tilt up on its own.
To put back into flat position, just press down at the top back and gently slide toward the front.

BEMER USA
5 / 14
RUNNING YOUR BEMER
Turn on B.Box – it will take approx. 45 seconds to activate the computer inside.
The first screen shows 4 icons
You will see 4 Modes
The Basic Plan For Use with B.Body

BEMER USA
6 / 14
Connect B. Body plug to A1 port
Push A1 icon on the bottom of B.
Box screen (be sure it is
highlighted)
Push Intensity icon
Example: Push Level Intensity 2
Push Start
NOTE:
The B.Body graphic on the right of
the screen is now blinking.
There is also one beeping sound.

BEMER USA
7 / 14
Understanding the Plus Signal
On: when you see this icon
Off: when you push the “Plus”button and
the icon above disappears
The Plus Signal on the B.Box
It can be used with either the Intensities or the Programs, and it is recommended for use earlier in the
day, not in the evening to avoid possible sleeplessness.
NOTE: By default the Plus Signal is on when the unit turns on.
To deactivate it:
o Select any applicator and any application setting.
o Before pushing “Start”, push the Plus Signal icon at the bottom of the screen. You will see that Plus
Signal icon above disappears.
BEMER Pro Program Mode
Note: When the Plus is on, every 20
seconds the energy output of the electromagnetic field (in this example
Intensity Level 3) will jump to Intensity
Level 10. This is based on the
scientificobservationthat this additional stimulus leads to more efficacy.
However, it may be too much stimulation
for some people, especially in the evening.

BEMER USA
8 / 14
Program 1 (8 minutes):
Intensity 2 for 2 minutes
Intensity 3 for 2 minutes
Intensity 4 for 4 minutes
Note: each bar of the graph denotes a 2 minutes
period of the entire session.
Program 2 (16 minutes):
Intensity 2 for 4 minutes
Intensity 3 for 4 minutes
Intensity 4 for 4 minutes
Intensity 6 for 4 minutes
Program 3 (20 minutes):
Intensity 6 for 4 minutes
Intensity 7 for 4 minutes
Intensity 8 for 4 minutes
Intensity 9 for 4 minutes
Intensity 10 for 4 minutes

BEMER USA
9 / 14
Running a second Application
Example:
Connect the B. Pad plug to A2 port
Push A2 icon on the bottom of B. Box screen (be sure it is highlighted)
Push Program Mode icon
Example: Push P 2
Push Start
NOTE:
The B.Pad graphic is now
blinking. The upper left of the screen
shows:
A1: how many minutes remain
for the chosen application, A 2: how many minutes remain
for the chosen application
NOTE: A1 and A2 now are running simultaneously.

BEMER USA
10 / 14
To Set the Sleep Program:
The Sleep program should only be started in the 7th week after using the Basic Plan.
NOTE:
Be sure that you have set the Clock to its
correct local time. If not, go to
SET icon
on the bottom right hand side of the initial
screen.
Press Clock
NOTE:
If you haven’t set the clock, the sleep program
will not work properly
Military time is used counting from 00:00 to 24:00 (On the Settings screen you can also adjust the
brightness of the display and the volume of the
beeps).
To set timeand minutes, you will use:
Up and down arrowsto adjust for exact wake hour
and minutes
Left and right arrowsto switch back and forth
between hour and minutes.
Hit SAVE!

BEMER USA
11 / 14
Why a Night Program?
• Supports redistribution of blood to the organs involved in:
• Detoxification
• Regeneration
• Repair
• Organs involved are:
• Liver,
• Kidneys,
• Gastro-intestinal tract
• Skin
Push A1 icon on the B.Box and attach your body to the A1 Port.
Push the SPECIAL icon
To set wake up time, you will use:
Up and down arrows to adjust for exact wake
up hour and minutes
Left and right arrows to switch back and forth
between hour and minutes.
Press OK
NOTE:
The Night Program only works when the amount of sleep is from 6 hours up to 10 hours of sleep. This is reflected by the time linenumber. This number needs to be white. The “OK” button is then
highlighted.
If the timeline number is in red showing either less than 6 hours or more than 10 hours, simply
adjust your wake up time.

BEMER USA
12 / 14
Press “Start”
The left bar is now highlighted
and the B.Body Graphic is
blinking.
NOTE:
The Sleep Program the first 2
hours after activation; then it
turns off and restarts the last 2
hours prior to your wake up time.
This is preset and cannot be
adjusted.
Place the B.Light into the B.Grip holder
Connect B.Light to any port
Press LIGHT
Select the desired amount of minutes
L1 = 2 min L2 = 4 min
L3 = 6 min L4 = 8 min
NOTE:
Depending on the sensitivity of
skin, you may want to start with 2
minutes.
Every several days you may increase
time until you reach L 4.

BEMER USA
13 / 14
Select the desired intensity.
Intensity 10 achieves the deepest penetration into the skin and is
highlighted.
NOTE:
Depending on the sensitivity of skin,
you may want to start with lower
intensities. Every several days you may
increase intensity until you reach 10.
Push Start
The B.Light graphic is now blinking.
ADDITIONAL INFORMATION:
Switching between A1 & A2 ports:
Push A1 or A2 at the bottom of
the screen respectively.
The one you push will be highlighted on the B. Box. This is
the port that is now ready for
operation when you attach the
applicator.
NOTE:
If the port is not highlighted, the
applicator will not be operable.
NOTE: If using the light in the face, it is advisable to utilize the glasses.
For severe skin issues: from chronic wounds to severe skin disturbances, it is advisable to also
seek advice from our medical hotline. Ask your distributor about it.

BEMER USA
14 / 14
To change accessories and settings using A2 Port:
For example:
You want to set up a B.Pad session on A2
o Push A2 and be sure it is highlighted
o Connect power cable for B.Pad to A2 port
o Push the Program icon
o Select P1, 2 or 3
o Press start.
Now you want to use the B. Spot and a different program:
o Push A2 and be sure it is highlighted
o Connect power cable for B.Spot to A2 port
o Press ‘Back’ button till you get back to the screen with the 4 icons.
o Press the Program icon
o Select P 1, 2, or 3
o Then press start
YOU CAN NOW START USING THE BASIC PLAN TO BE FOUND IN THE QUICK START GUIDE. It is
also in the “Tip for Using your BEMER”. BE SURE TO READ THIS DOCUMENT.
THIS BASIC PLAN WAS DEVELOPED AFTER RESEARCH AND EXPERIENCE INDICATED THAT THESE
SETTINGS WERE THE MOST EFFECTIVE FOR THE MAXIMUM BENEFIT, DESPITE INDIVIDUAL AGES
AND CONDITIONS.
Don’t be afraid to experiment; you can do no harm to yourself when using the BEMER. Some settings
will just be better for some people than others. It is important to listen to your body; you will know
what it needs and what feels best.