Embed Size (px)
Citation preview
1
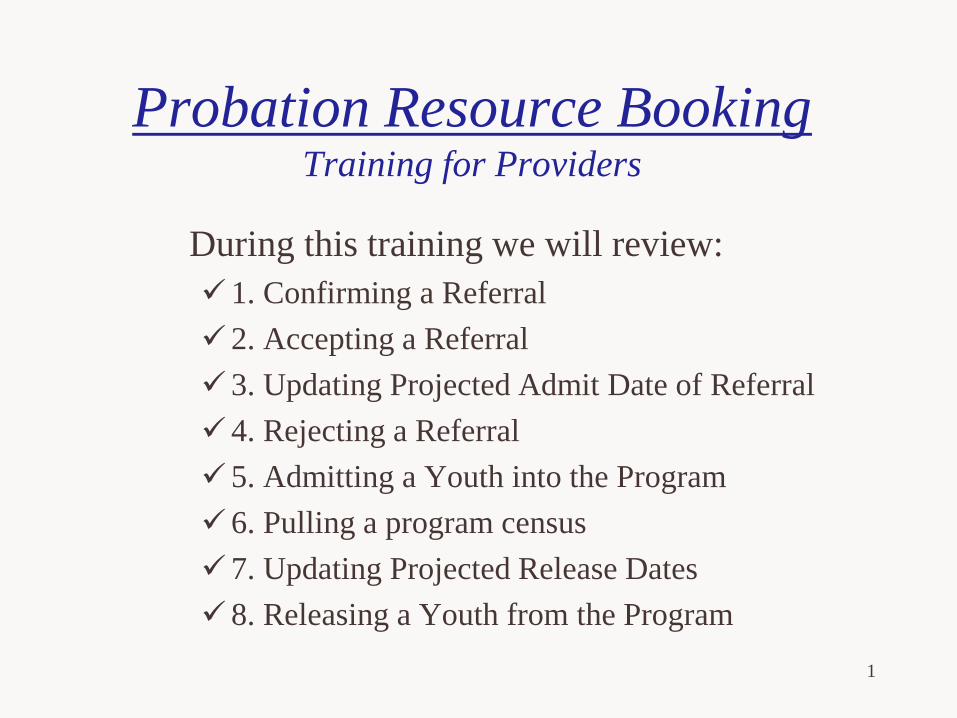
Probation Resource Booking Training for Providers
During this training we will review: 1. Confirming a Referral 2. Accepting a Referral 3. Updating Projected Admit Date of Referral 4. Rejecting a Referral 5. Admitting a Youth into the Program 6. Pulling a program census 7. Updating Projected Release Dates 8. Releasing a Youth from the Program
2
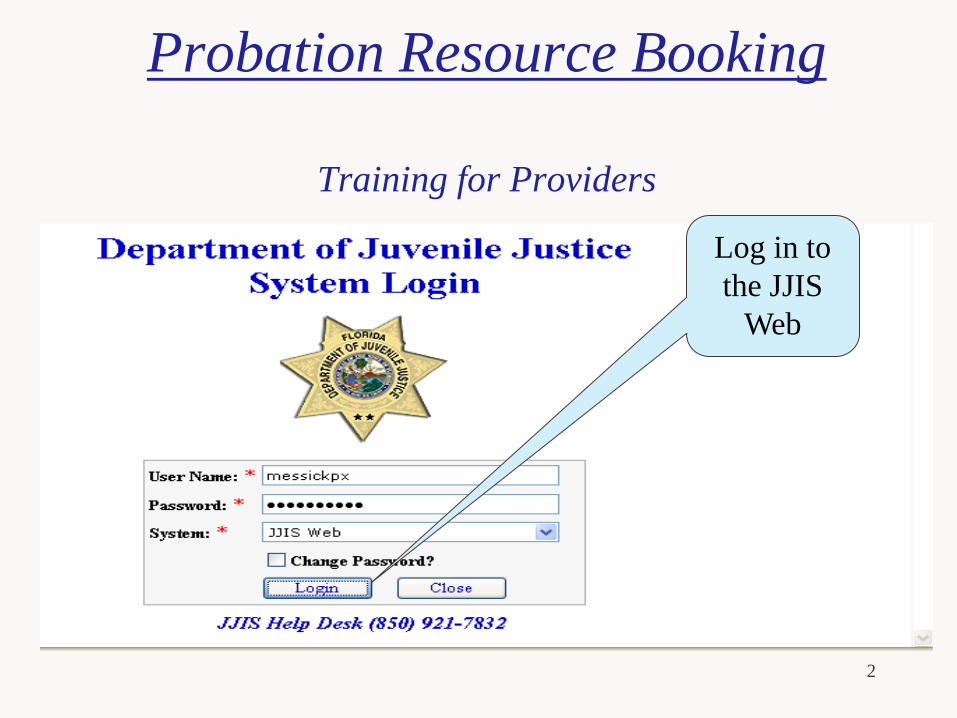
Log in to the JJIS
Web
Probation Resource Booking
Training for Providers
Creating the Referral
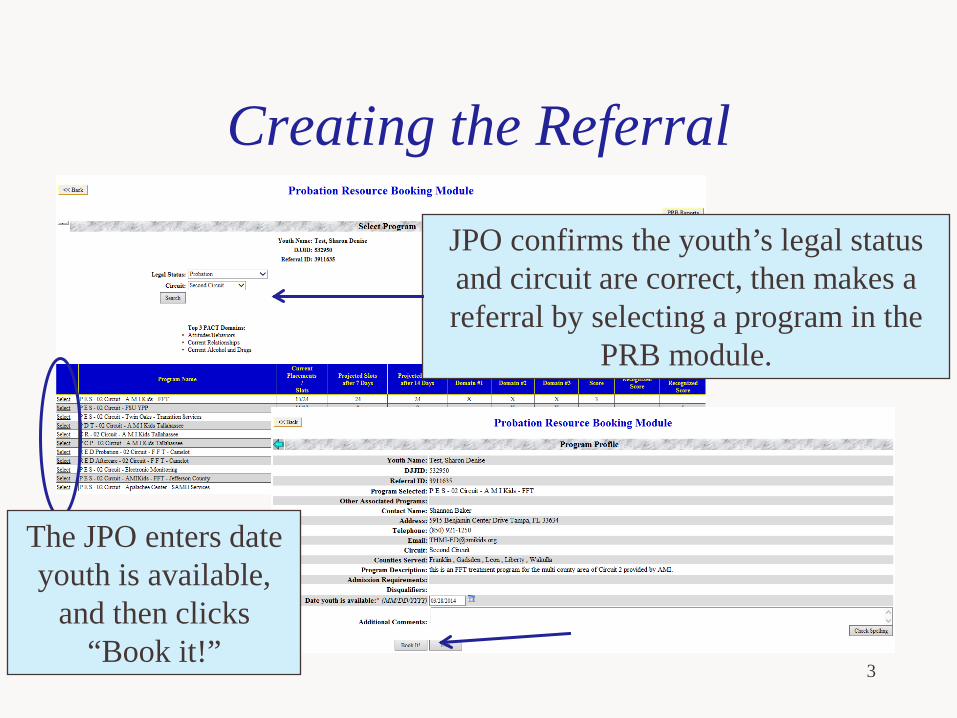
3
JPO confirms the youth’s legal status and circuit are correct, then makes a referral by selecting a program in the
PRB module.
The JPO enters date youth is available,
and then clicks “Book it!”
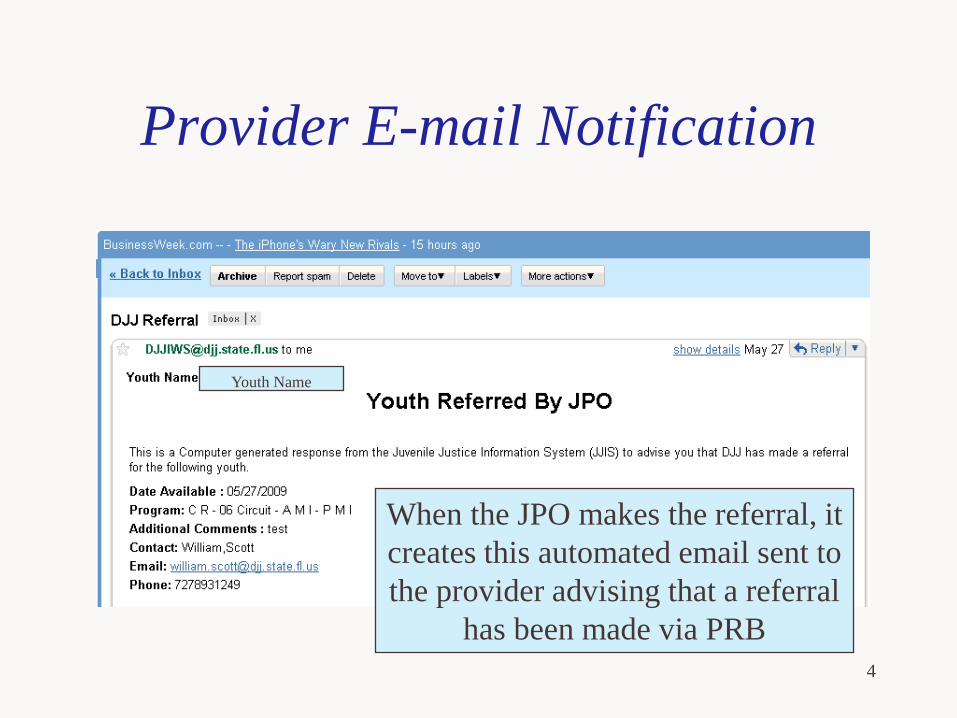
4
Provider E-mail Notification
When the JPO makes the referral, it creates this automated email sent to the provider advising that a referral
has been made via PRB
Youth Name
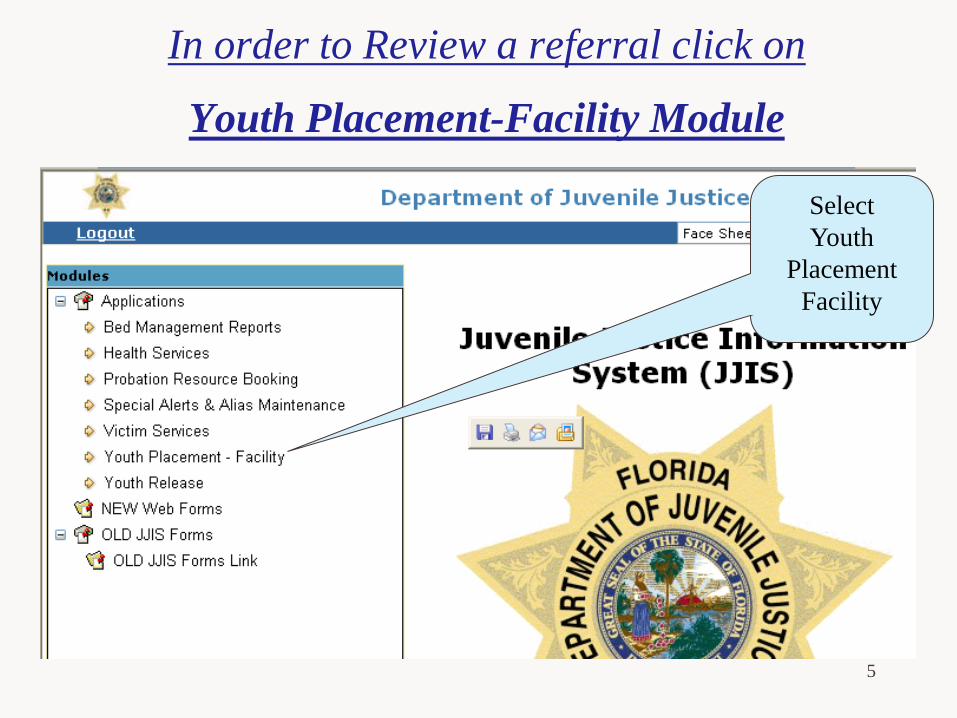
5
Select Youth
Placement Facility
In order to Review a referral click on
Youth Placement-Facility Module
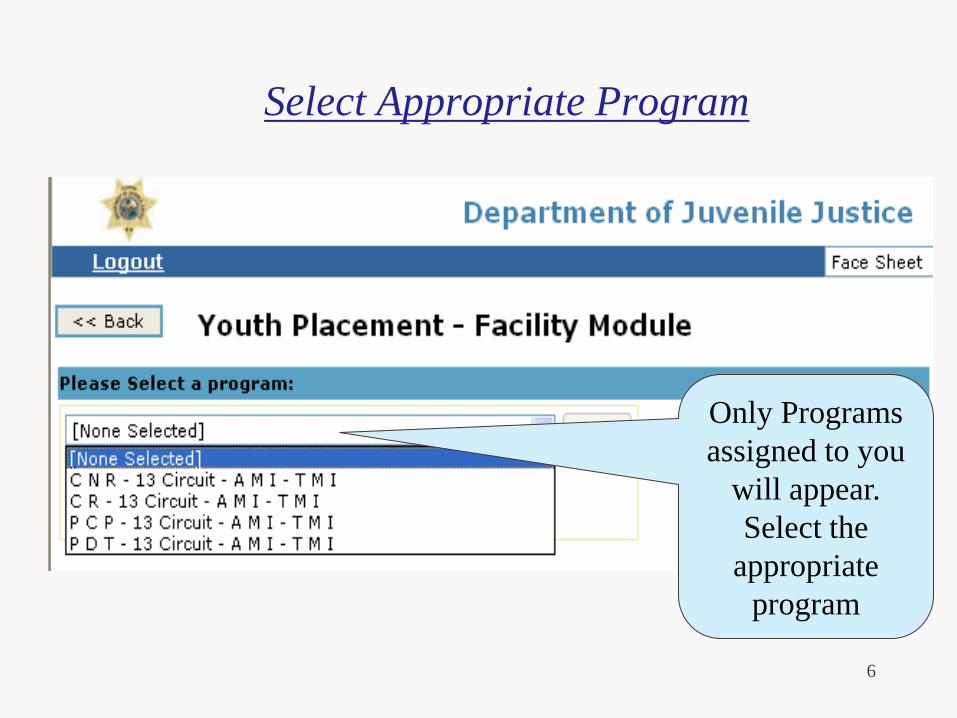
6
Select Appropriate Program
Only Programs assigned to you
will appear. Select the
appropriate program
7
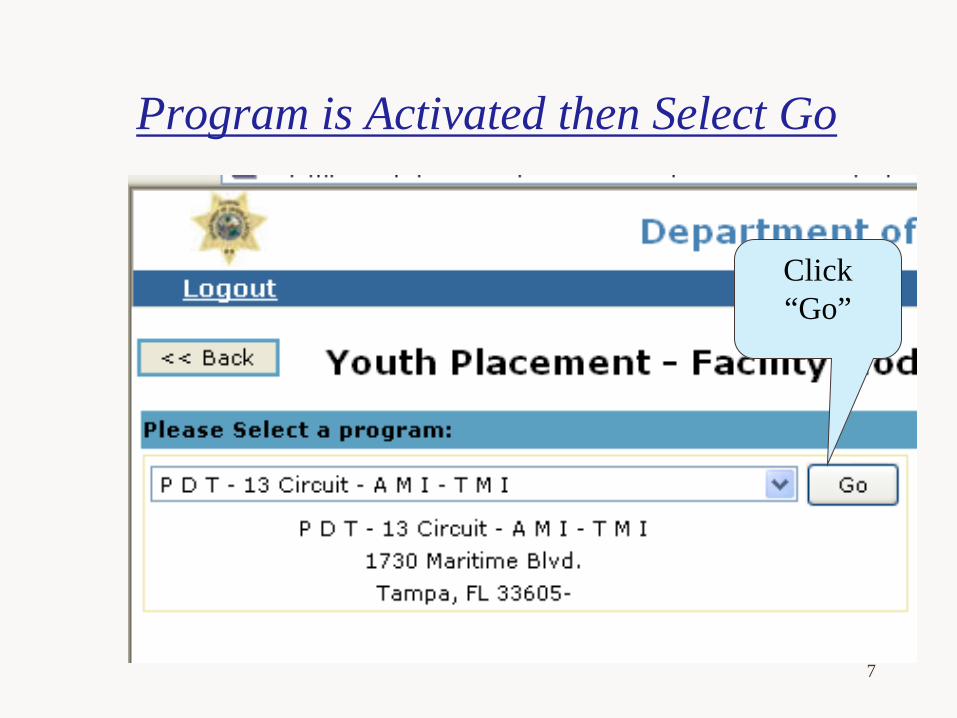
Click “Go”
Program is Activated then Select Go
8
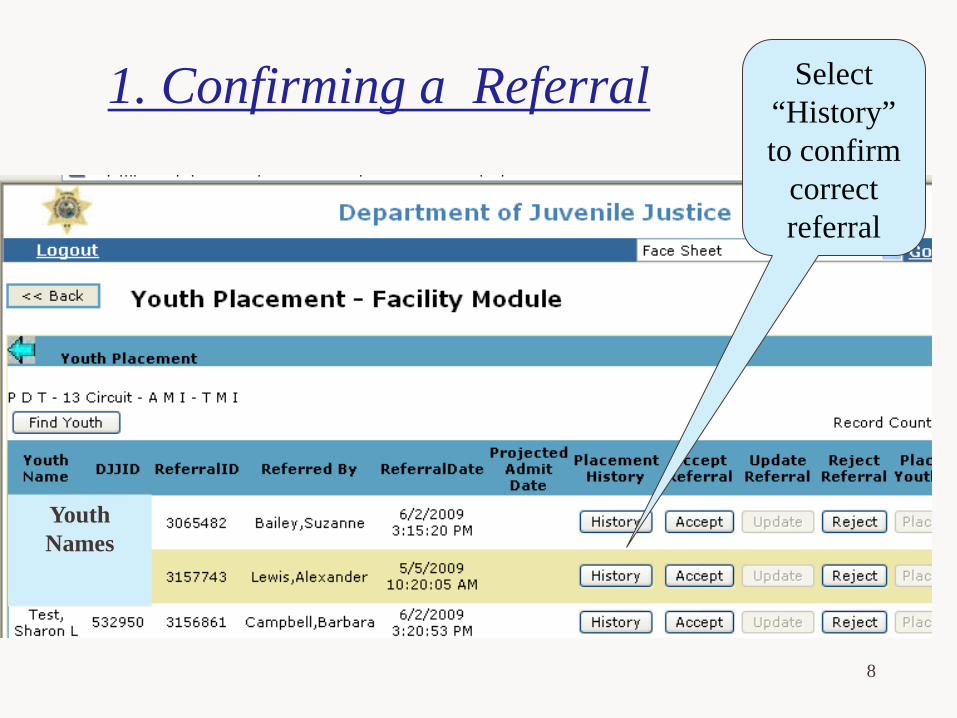
Select “History” to confirm
correct referral
1. Confirming a Referral
Youth Names
9
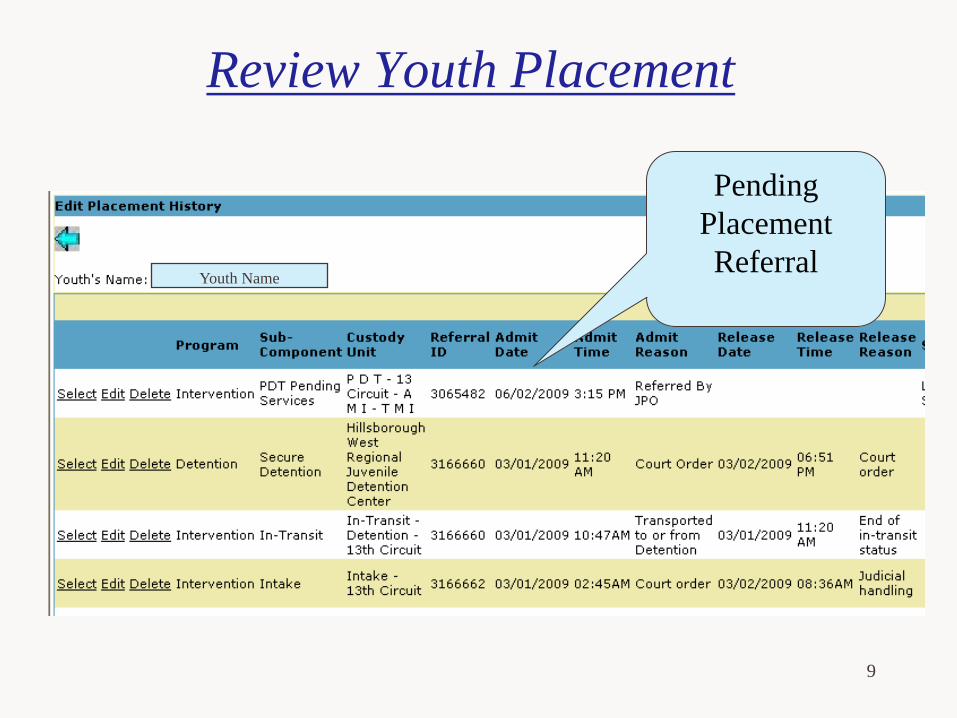
Pending Placement Referral
Review Youth Placement
Youth Name

10
Click “Accept”
2. Accepting the Referral in JJIS
Youth Names
11
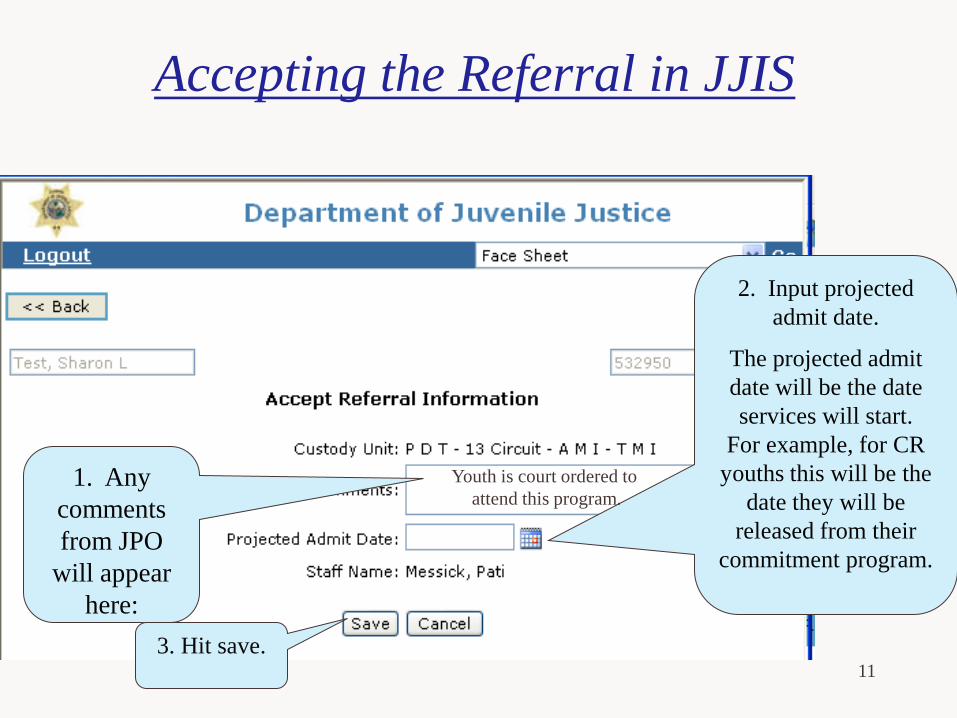
1. Any comments from JPO
will appear here:
2. Input projected admit date.
The projected admit date will be the date services will start.
For example, for CR youths this will be the
date they will be released from their
commitment program.
Accepting the Referral in JJIS
Youth is court ordered to attend this program.
3. Hit save.
12
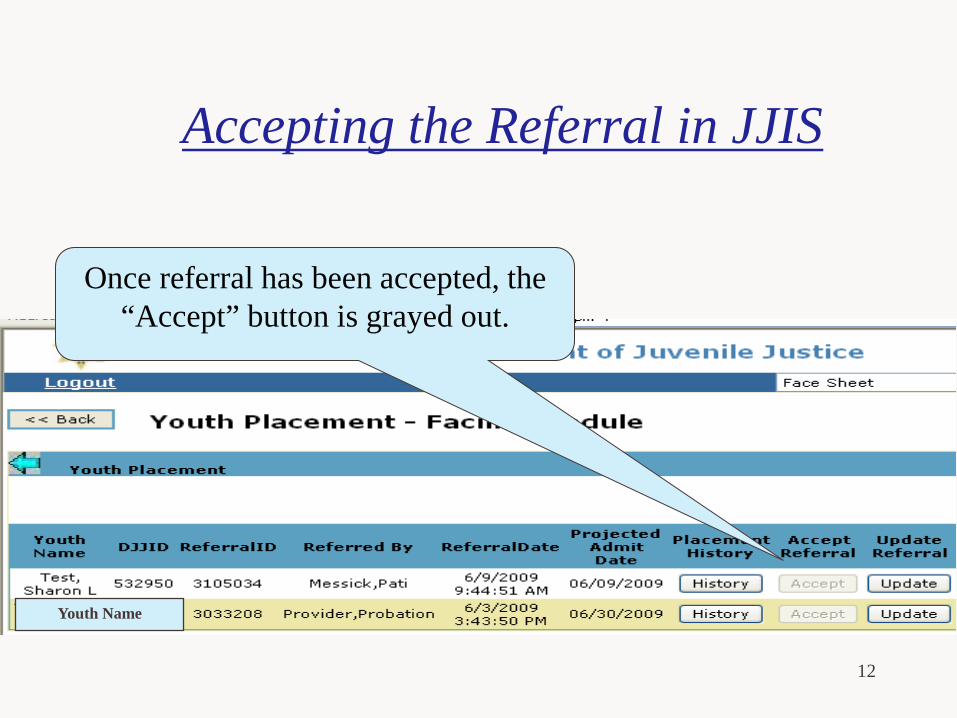
Accepting the Referral in JJIS
Once referral has been accepted, the “Accept” button is grayed out.
Youth Name
13
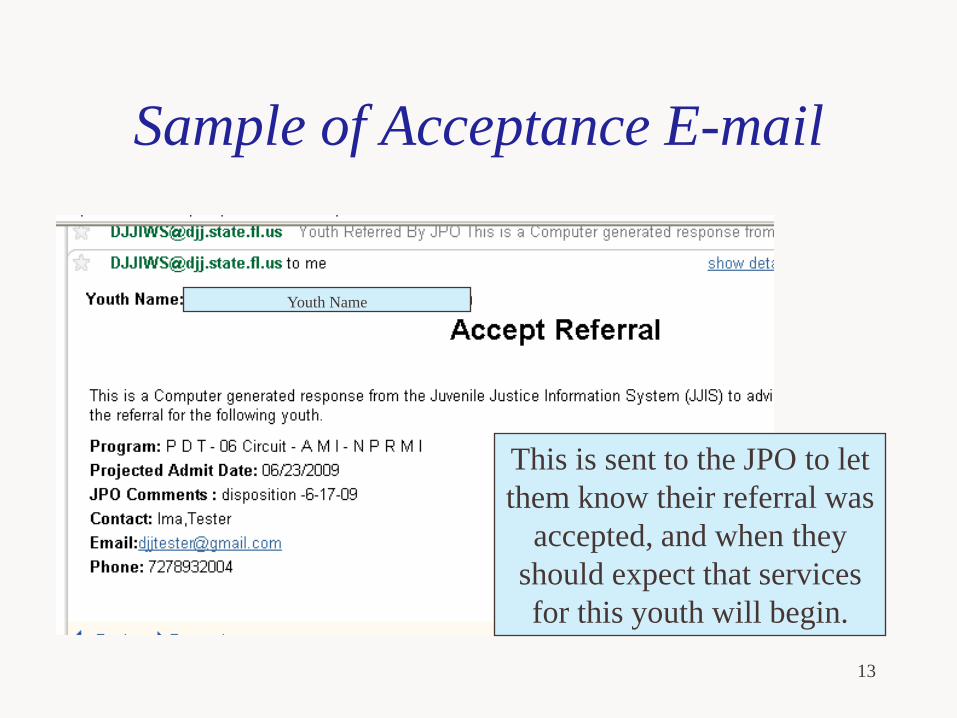
Sample of Acceptance E-mail
This is sent to the JPO to let them know their referral was
accepted, and when they should expect that services for this youth will begin.
Youth Name
14
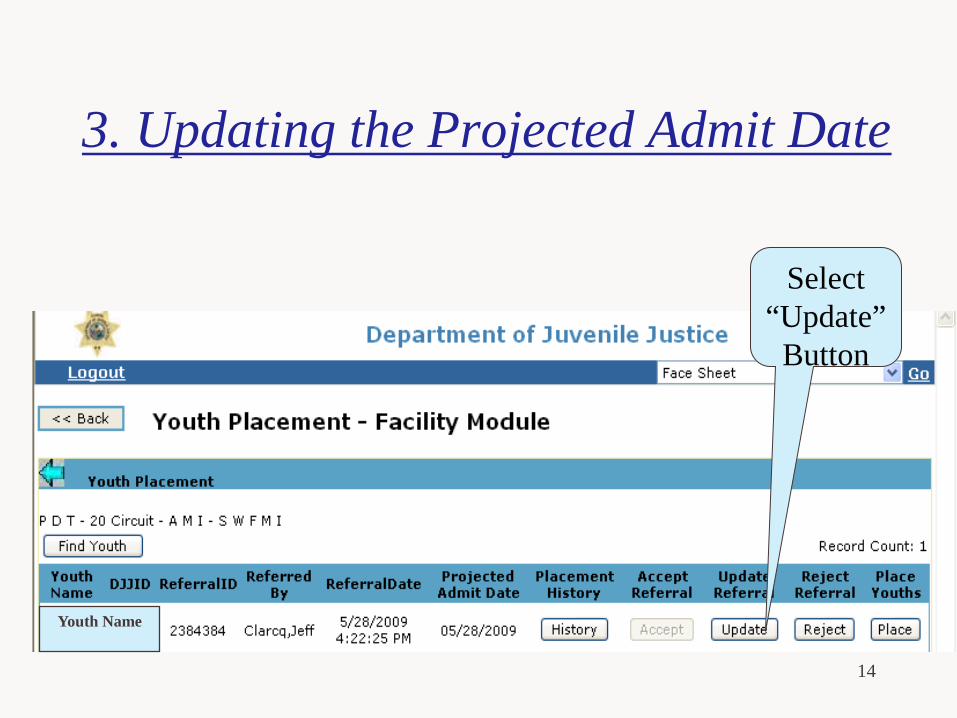
3. Updating the Projected Admit Date
Select “Update”
Button
Youth Name

15
Updating the Projected Admit Date
Step 1: Enter New Projected
Date Step 2: Click
“Save”
Youth Name
16
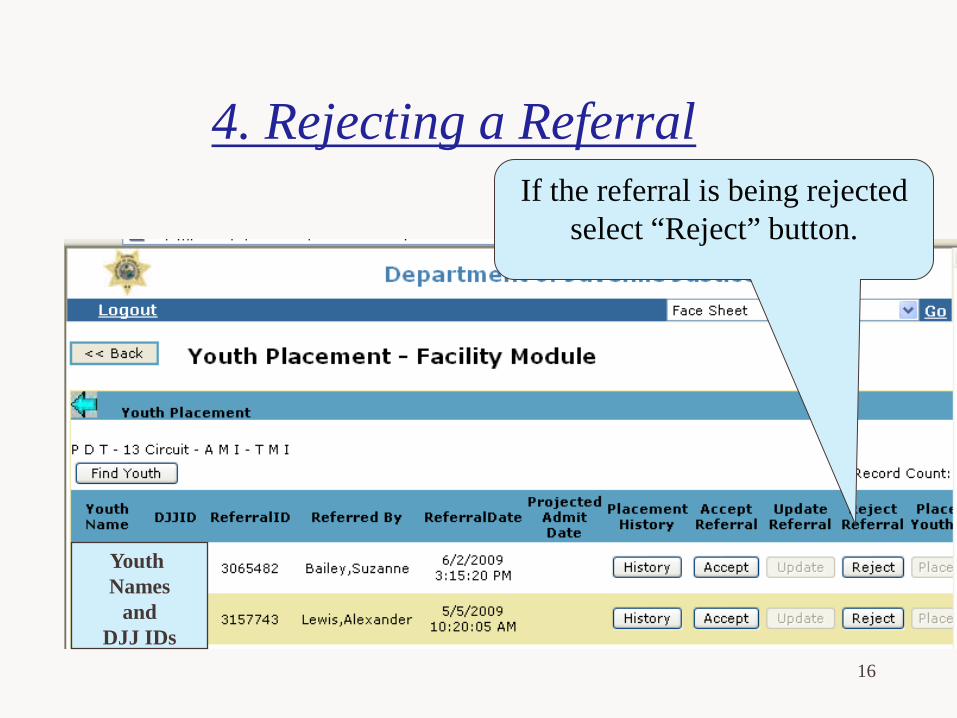
If the referral is being rejected select “Reject” button.
4. Rejecting a Referral
Youth Names
and DJJ IDs
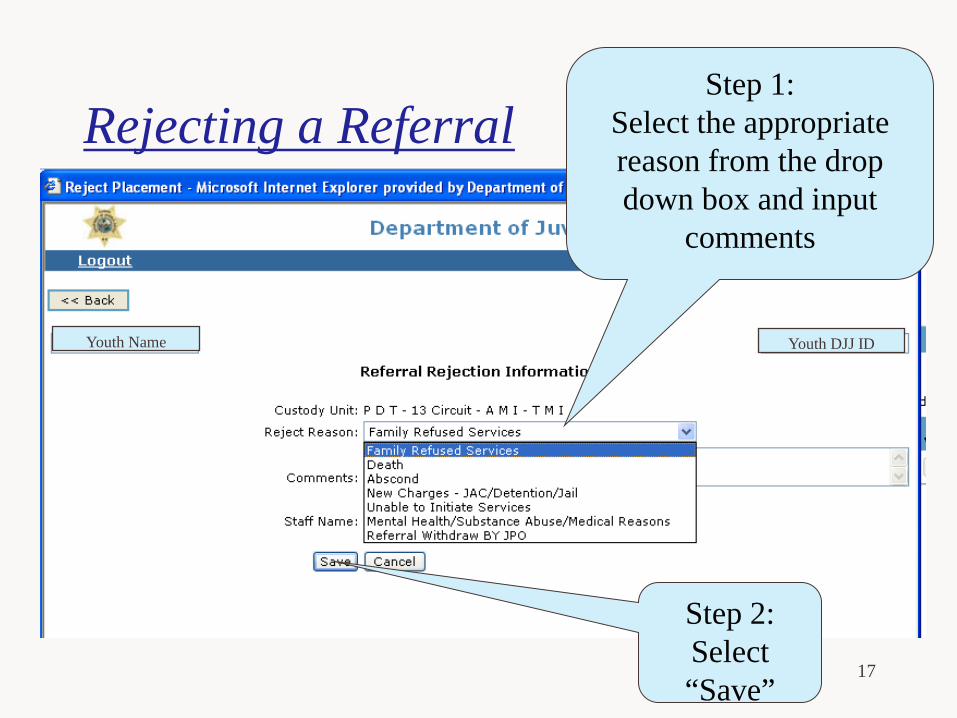
17
Rejecting a Referral Step 1:
Select the appropriate reason from the drop down box and input
comments
Step 2: Select “Save”
Youth Name Youth DJJ ID
18
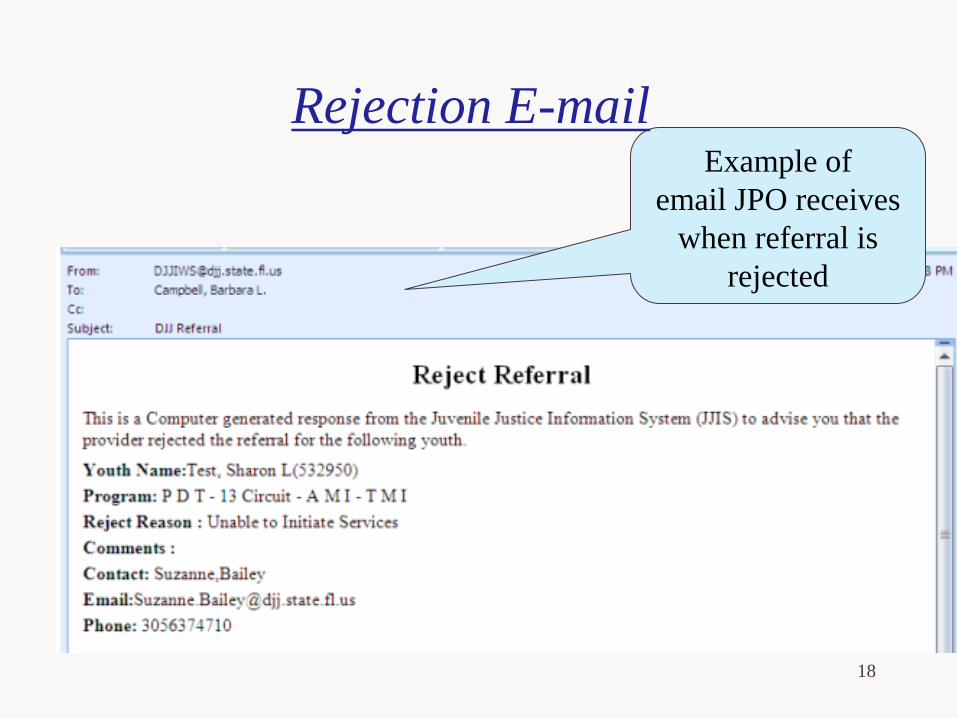
Example of email JPO receives
when referral is rejected
Rejection E-mail
19
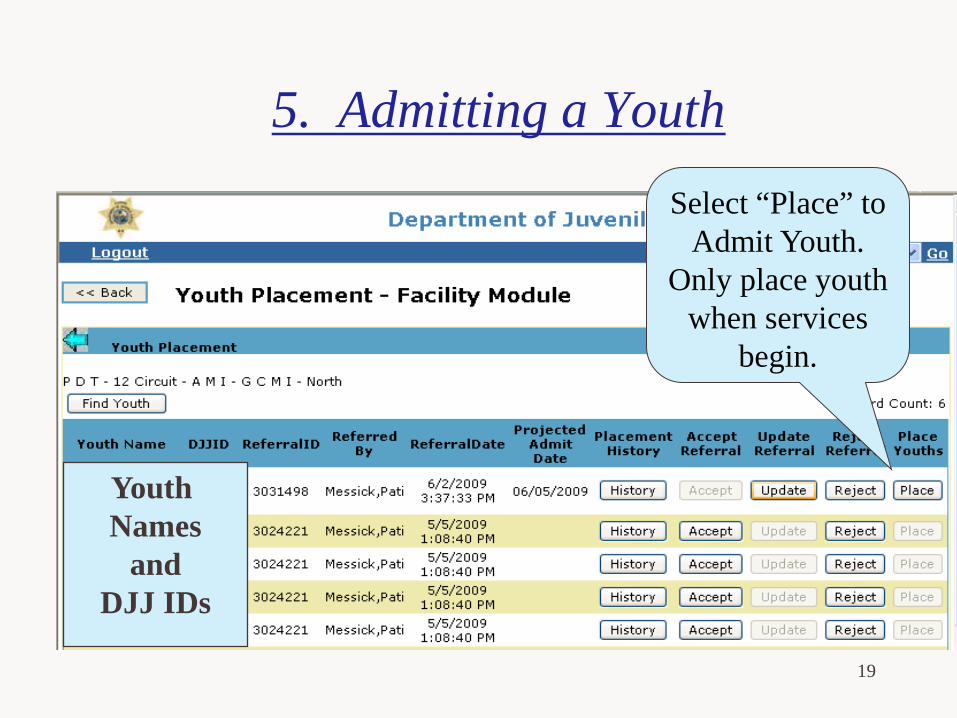
Select “Place” to Admit Youth.
Only place youth when services
begin.
5. Admitting a Youth
Youth Names
and DJJ IDs
20
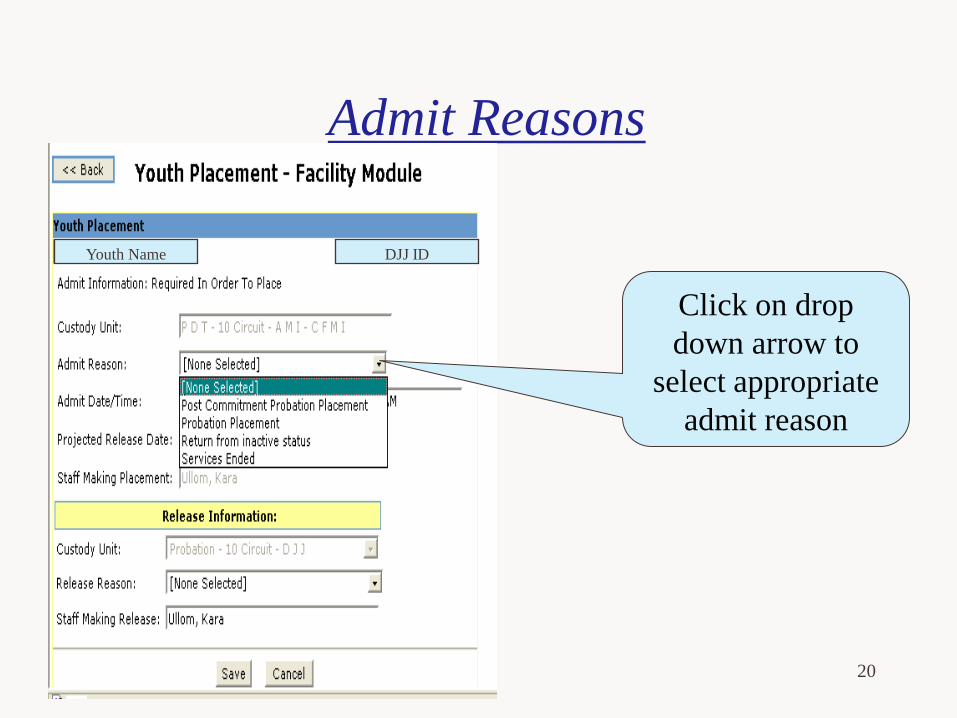
Admit Reasons
Click on drop down arrow to
select appropriate admit reason
Youth Name DJJ ID
21
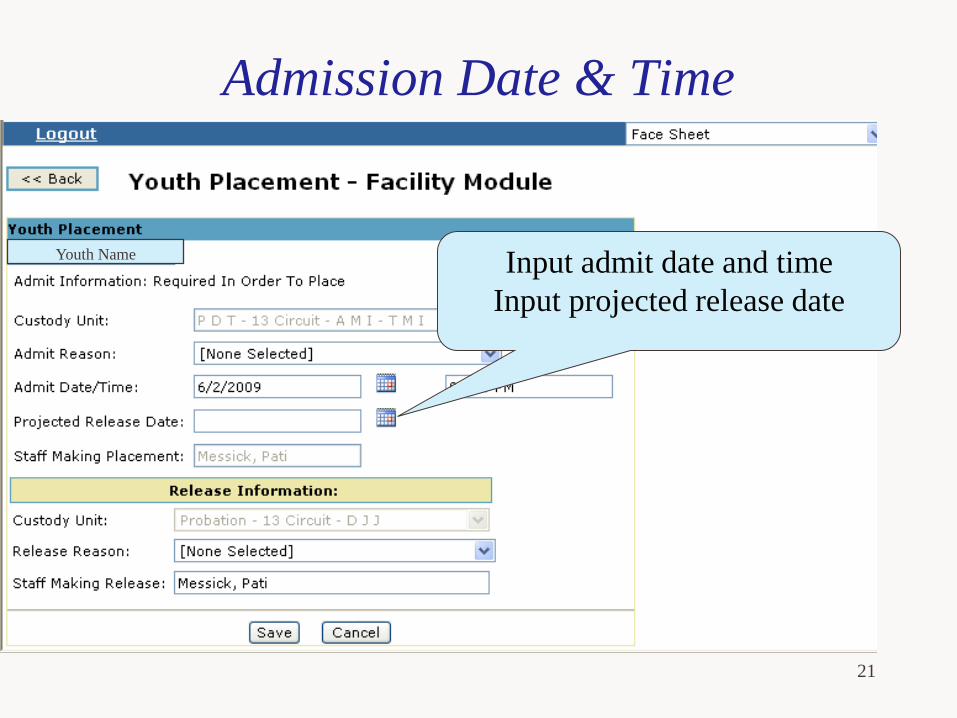
Admission Date & Time
Input admit date and time Input projected release date
Youth Name

22
Important: -This is release reason
from the probation placement.
- Select the appropriate Release Reason from
drop down box
-Release should only be required when
admitting into Day Tx programs.
Release From Probation
Youth Name DJJ ID
23
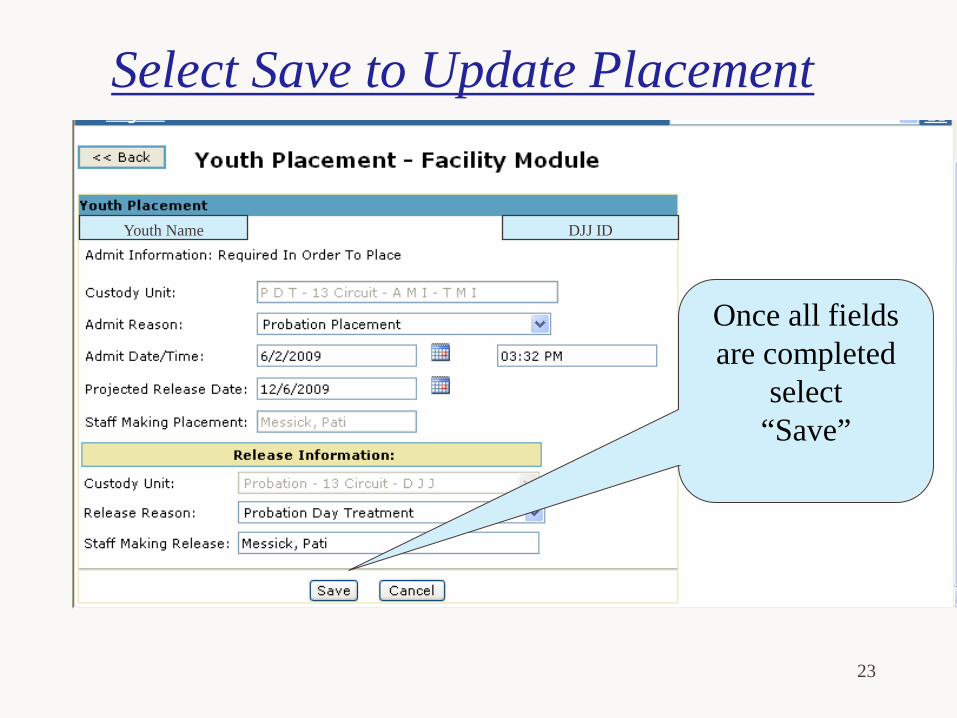
Once all fields are completed
select “Save”
Select Save to Update Placement
Youth Name DJJ ID
24
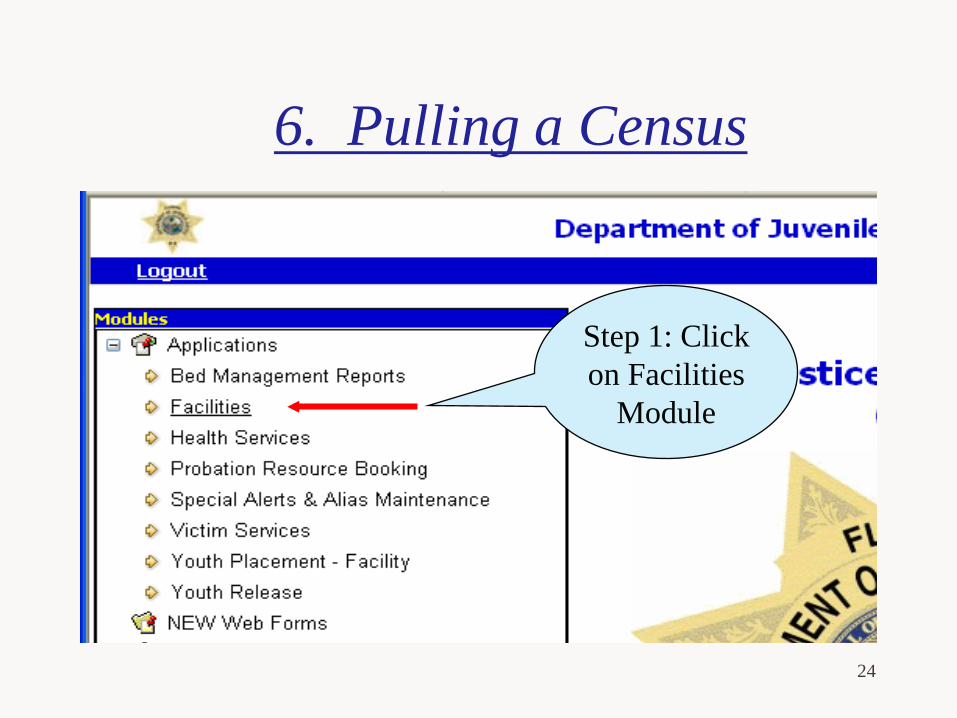
6. Pulling a Census
Step 1: Click on Facilities
Module
25
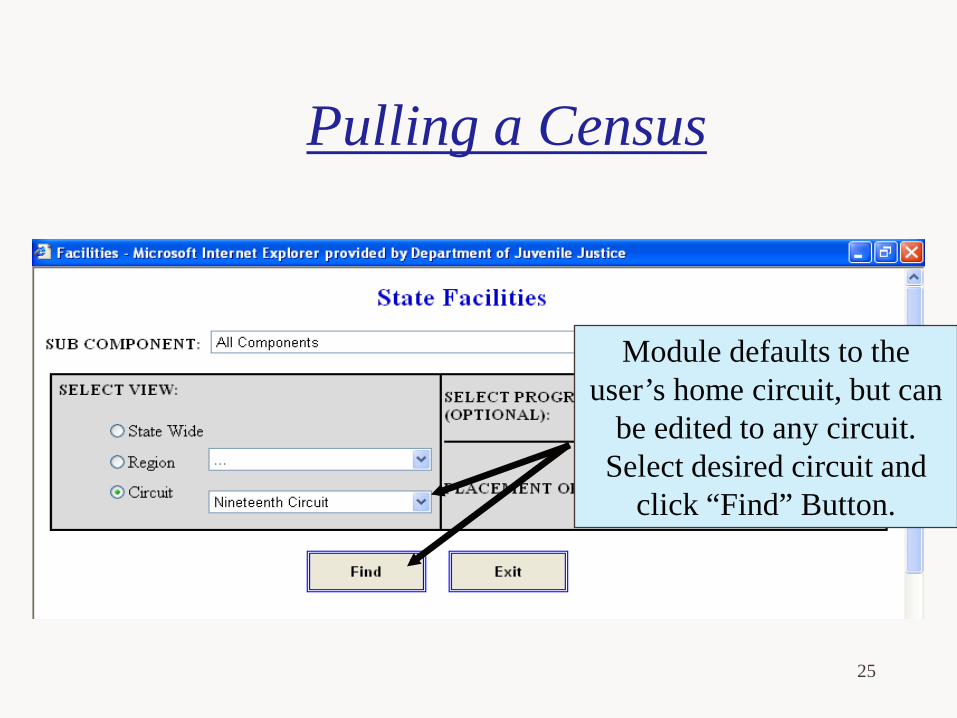
Pulling a Census
Module defaults to the user’s home circuit, but can
be edited to any circuit. Select desired circuit and
click “Find” Button.
26
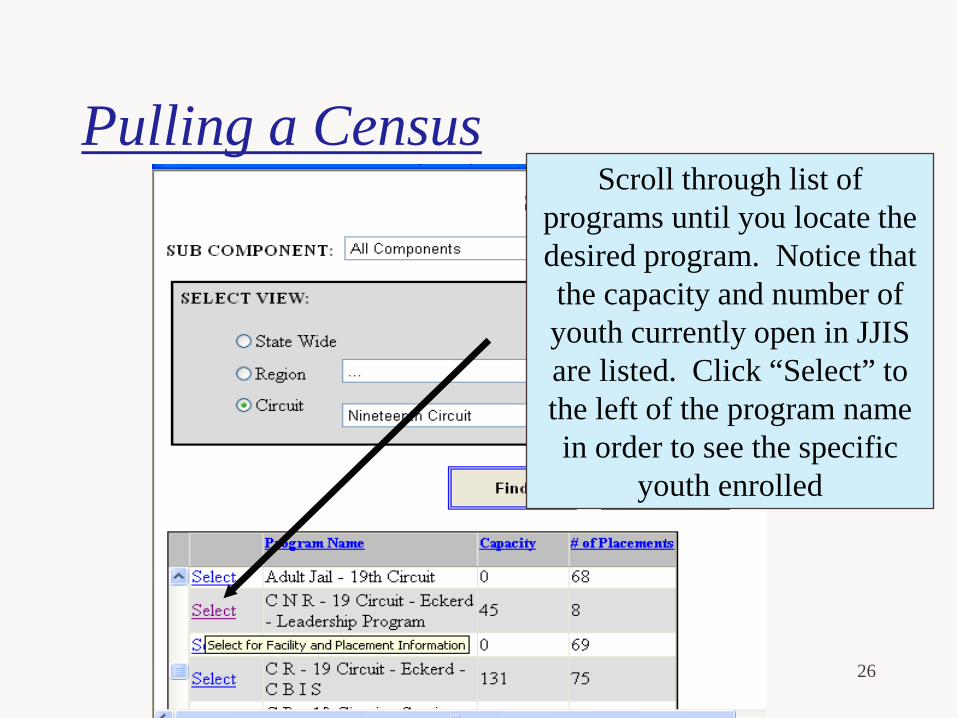
Pulling a Census Scroll through list of
programs until you locate the desired program. Notice that the capacity and number of youth currently open in JJIS are listed. Click “Select” to the left of the program name in order to see the specific
youth enrolled

27
Pulling a Census A list of youth with an
open placement will show on the right hand side of the screen. For a copy of
the youths face sheet, click “Select” next to the
youth’s name.
Youth Names and DJJ IDs
28
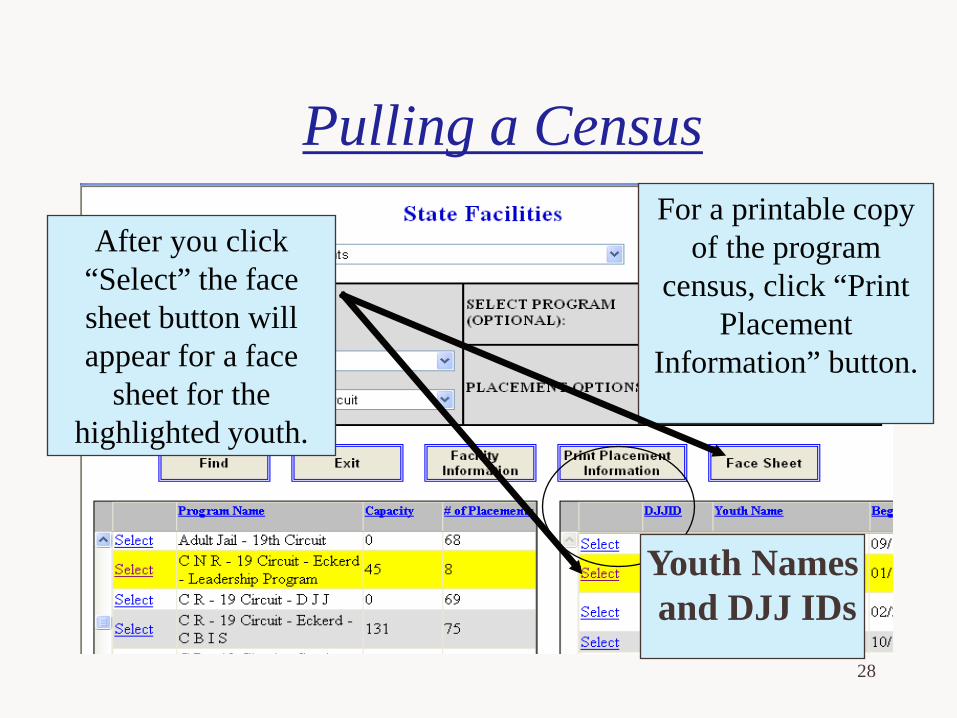
Pulling a Census For a printable copy
of the program census, click “Print
Placement Information” button.
After you click “Select” the face sheet button will appear for a face
sheet for the highlighted youth.
Youth Names and DJJ IDs
29
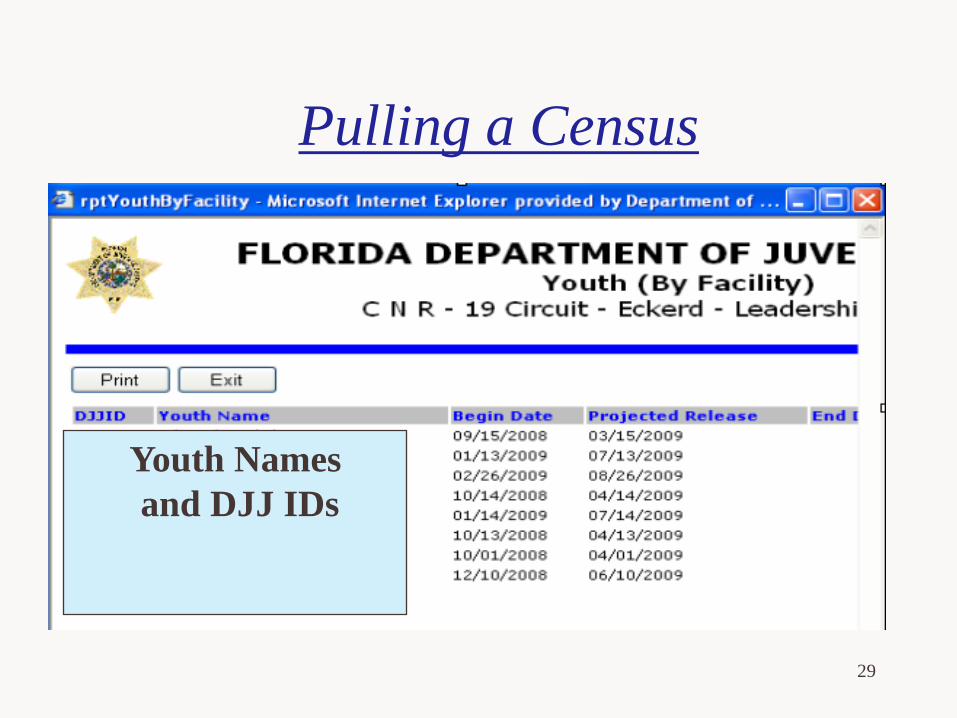
Pulling a Census
Youth Names and DJJ IDs
30
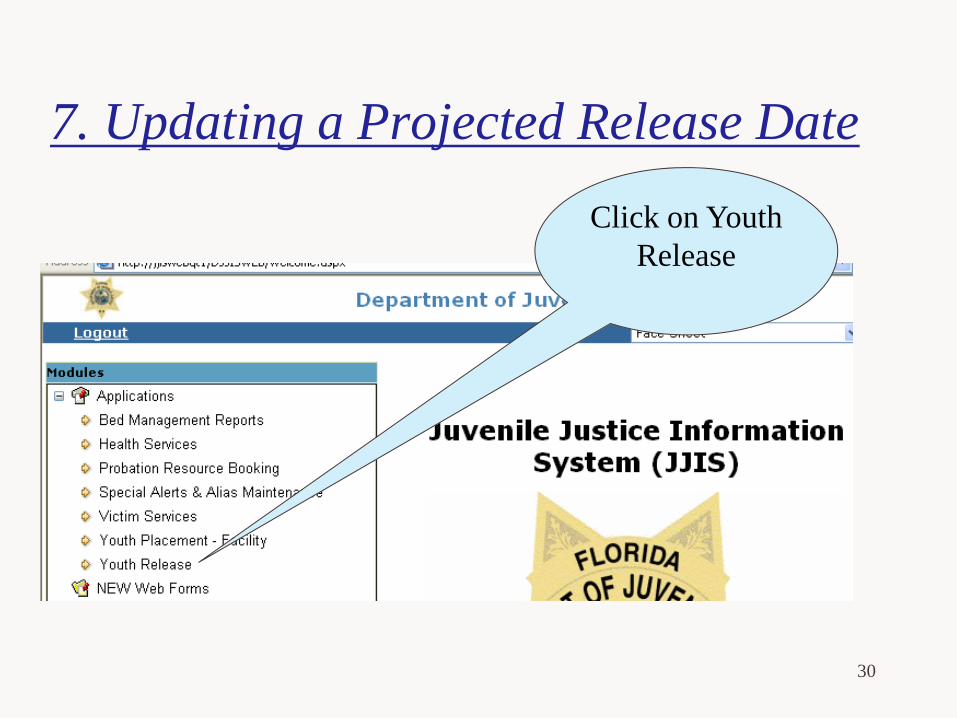
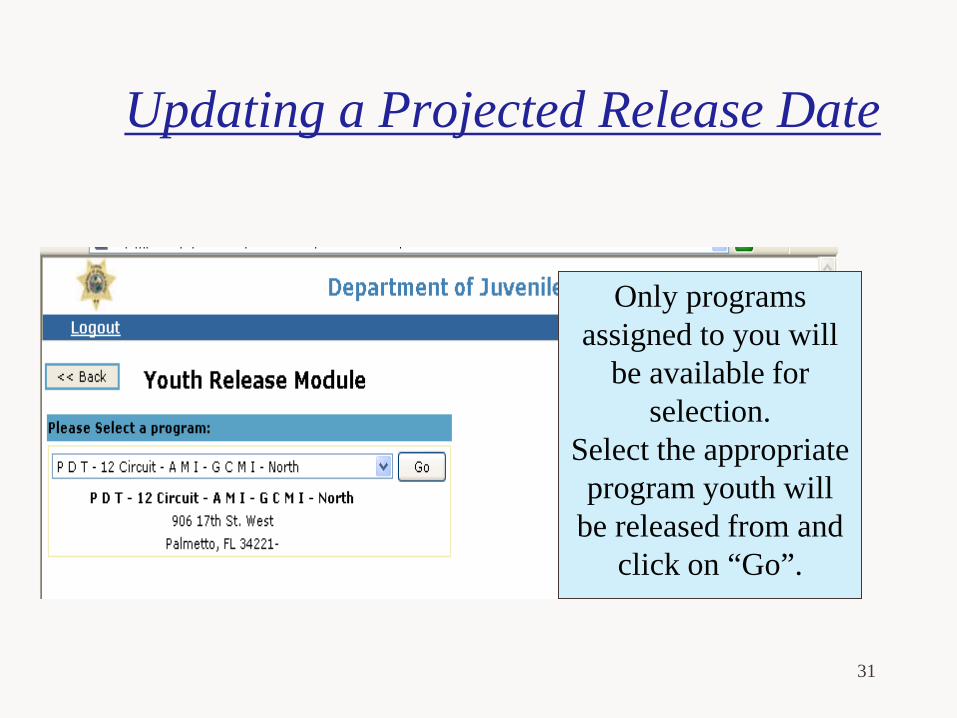
7. Updating a Projected Release Date
Click on Youth Release
31
Only programs assigned to you will
be available for selection.
Select the appropriate program youth will
be released from and click on “Go”.
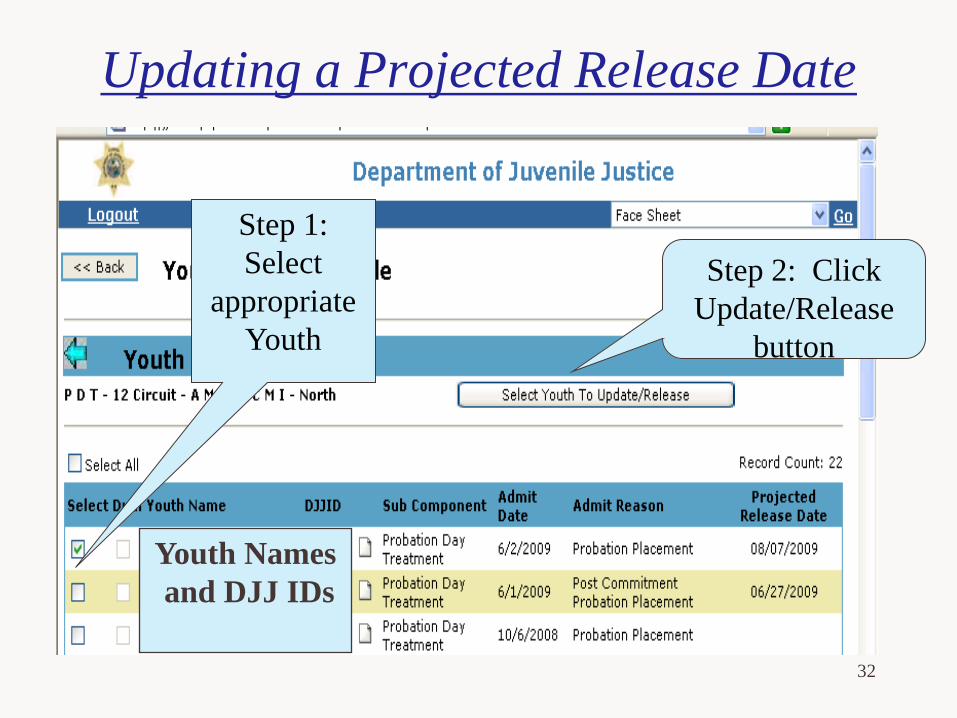
Updating a Projected Release Date
32
Step 2: Click Update/Release
button
Step 1: Select
appropriate Youth
Updating a Projected Release Date
Youth Names and DJJ IDs
33
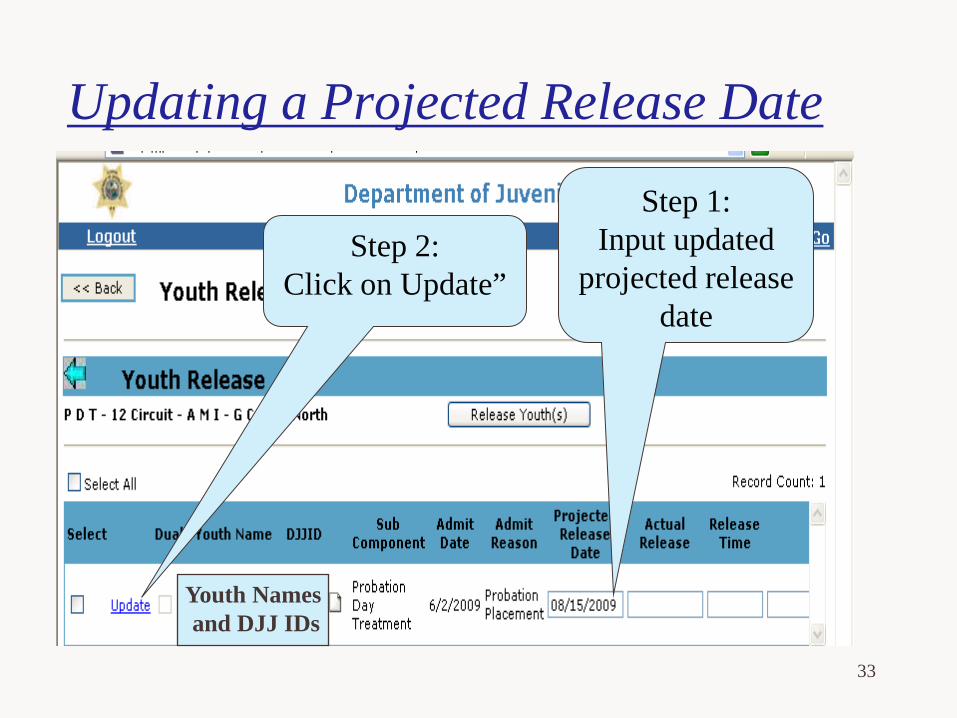
Step 2: Click on Update”
Step 1: Input updated
projected release date
Updating a Projected Release Date
Youth Names and DJJ IDs
34
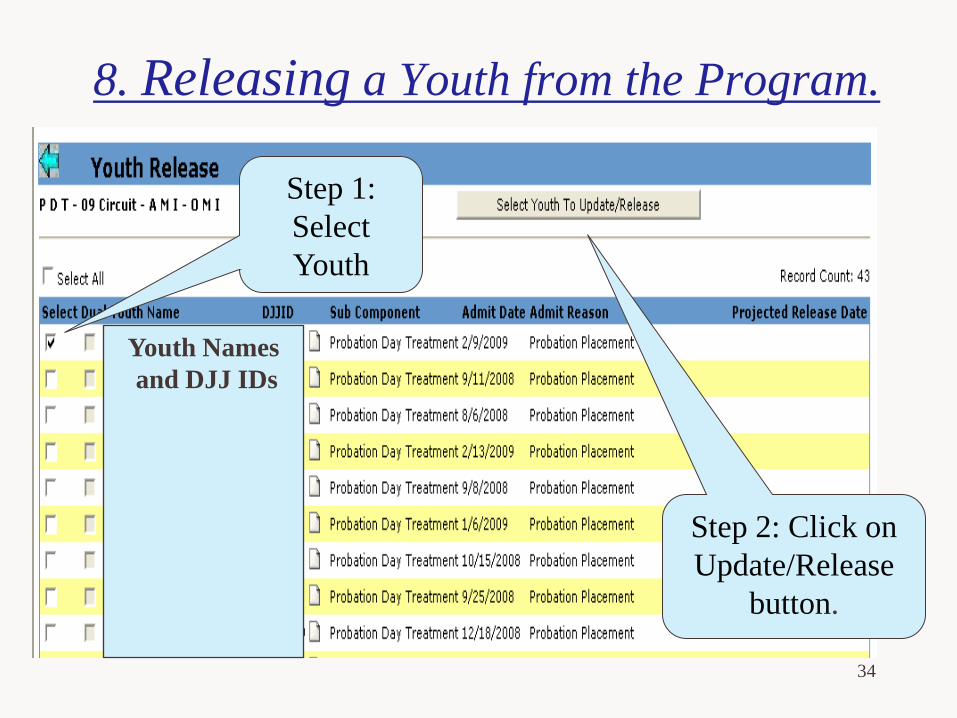
Step 2: Click on Update/Release
button.
8. Releasing a Youth from the Program.
Youth Names and DJJ IDs
Step 1: Select Youth
35
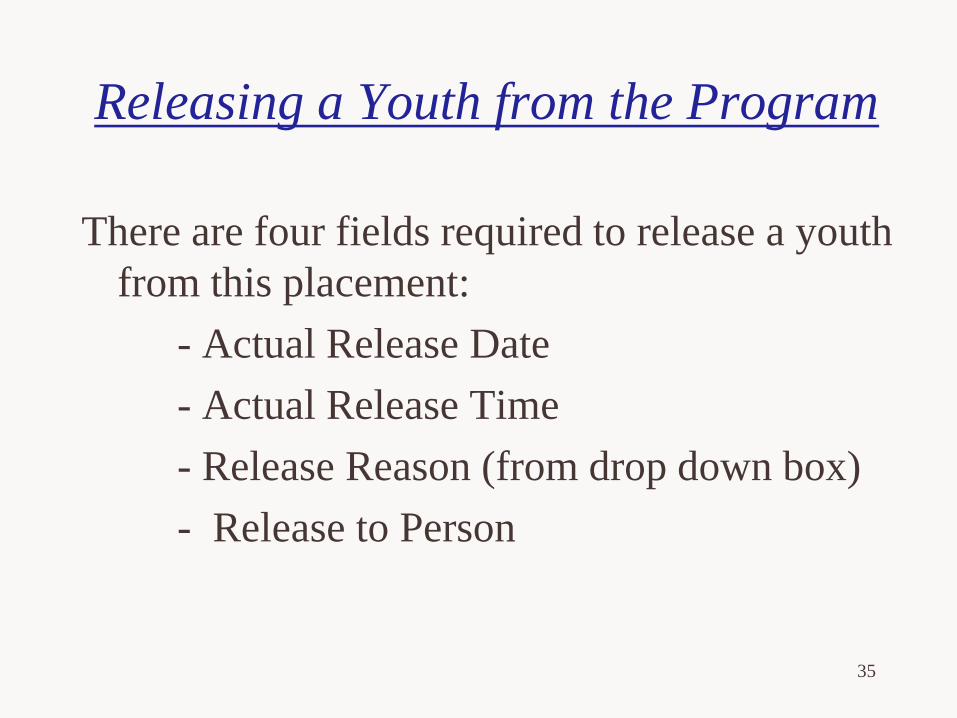
Releasing a Youth from the Program
There are four fields required to release a youth from this placement:
- Actual Release Date - Actual Release Time - Release Reason (from drop down box) - Release to Person
36
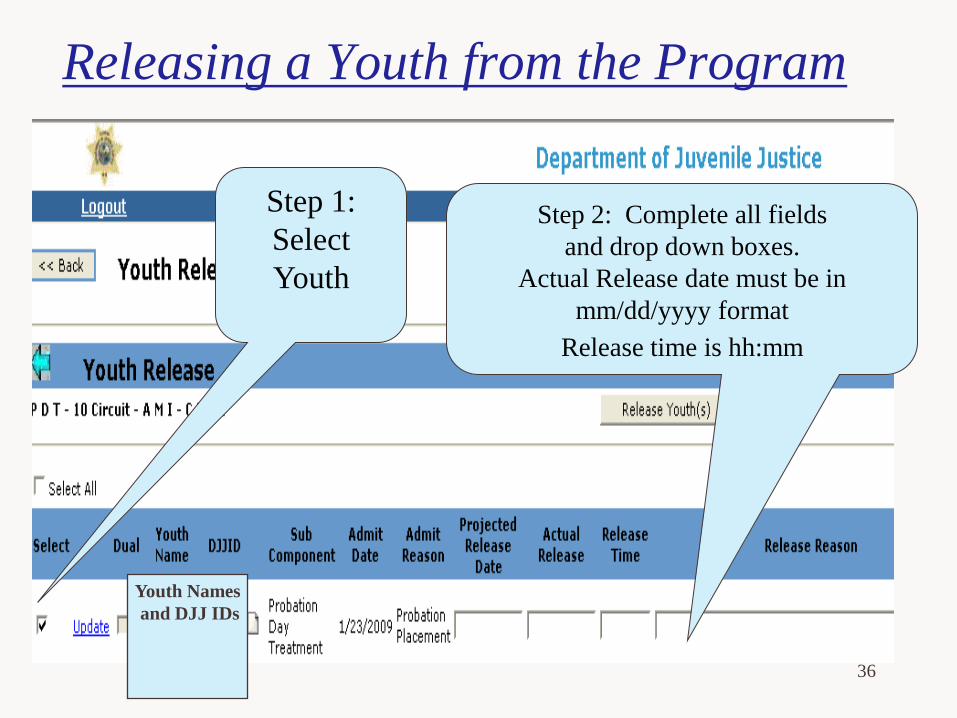
Step 1: Select Youth
Step 2: Complete all fields and drop down boxes.
Actual Release date must be in mm/dd/yyyy format
Release time is hh:mm
Releasing a Youth from the Program
Youth Names and DJJ IDs
37
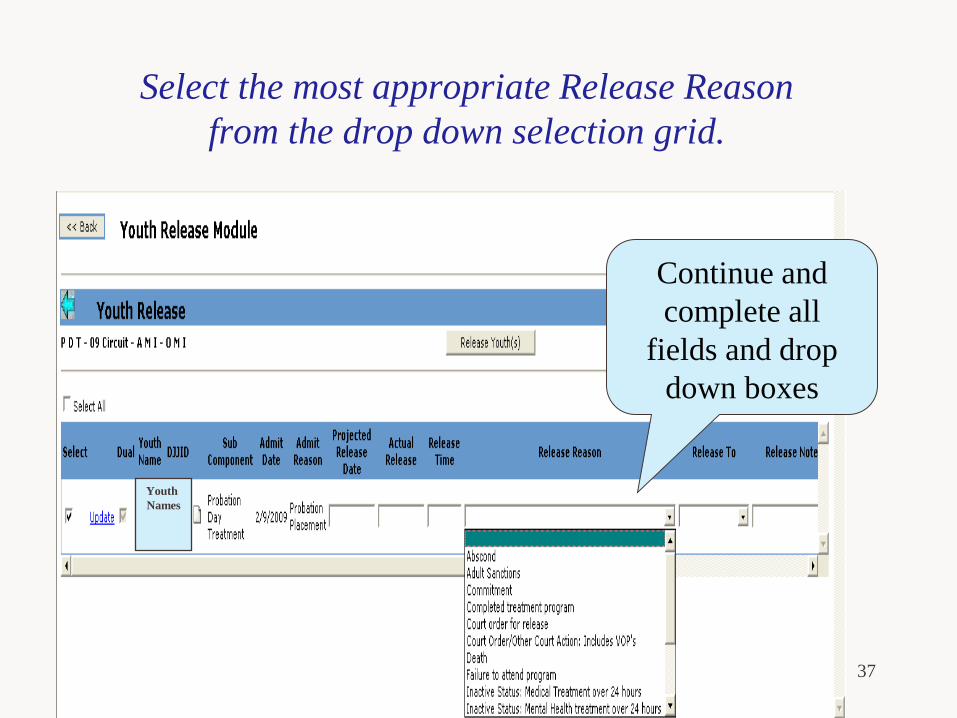
Continue and complete all
fields and drop down boxes
Select the most appropriate Release Reason from the drop down selection grid.
Youth Names
38
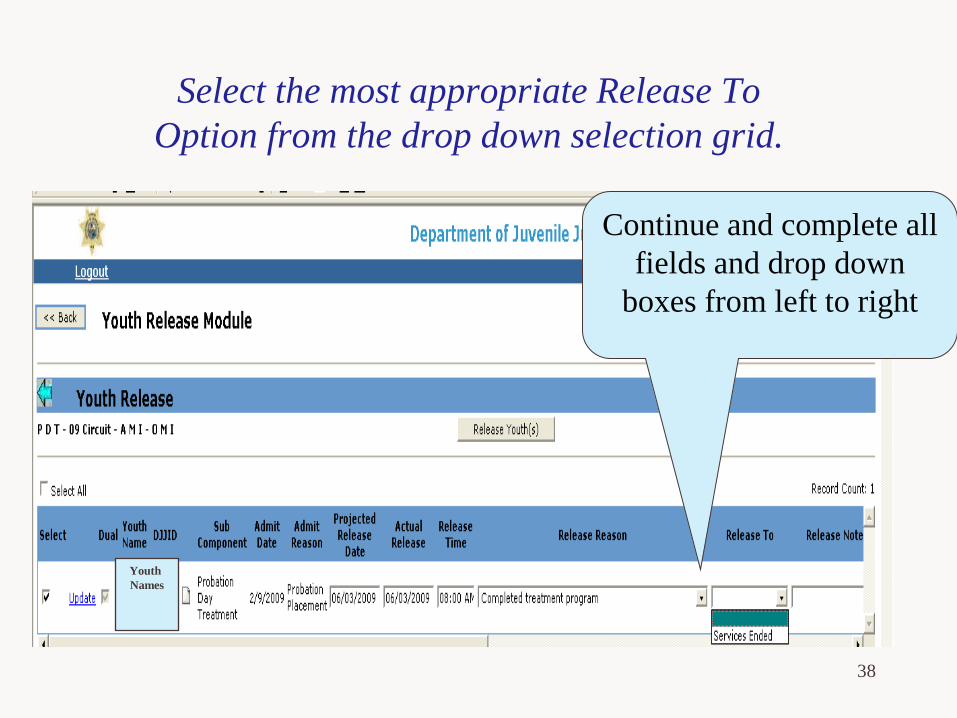
Continue and complete all fields and drop down
boxes from left to right
Select the most appropriate Release To Option from the drop down selection grid.
Youth Names
39
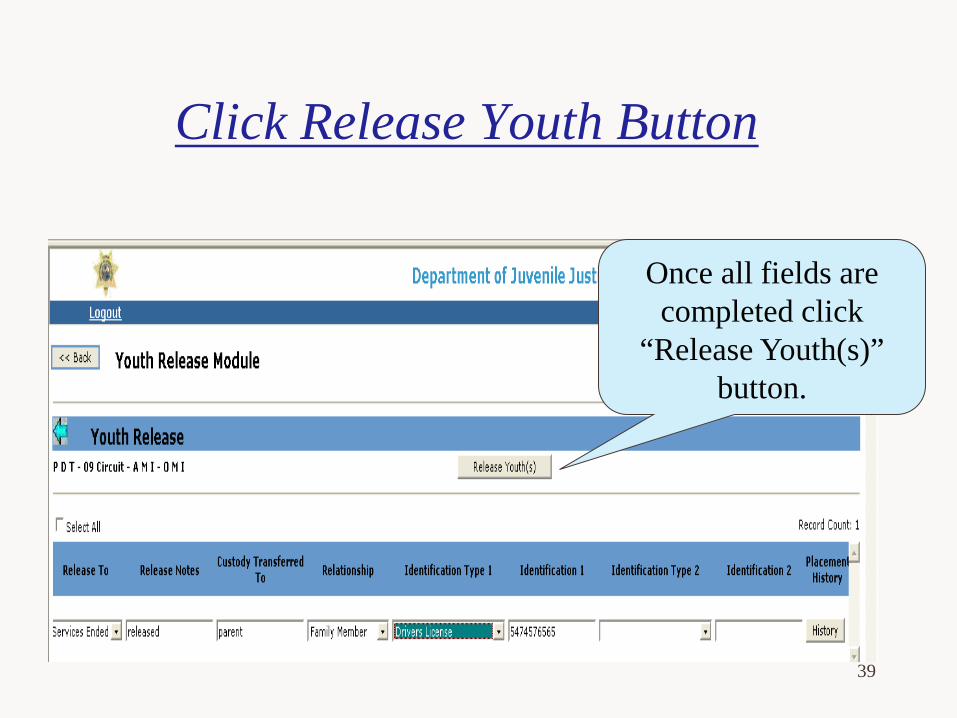
Once all fields are completed click
“Release Youth(s)” button.
Click Release Youth Button
40
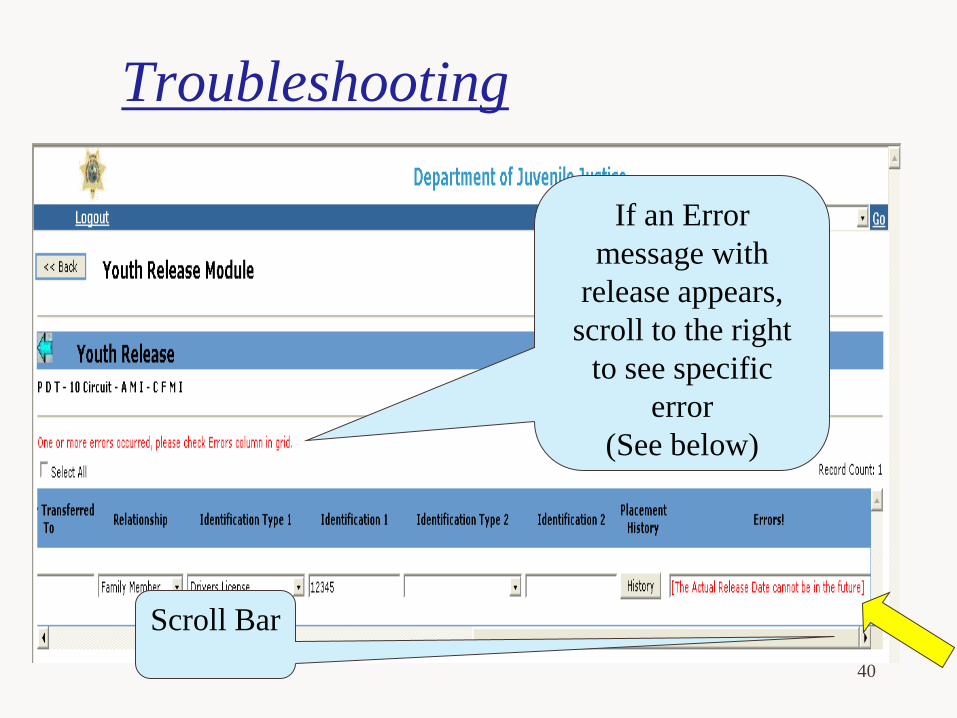
If an Error message with
release appears, scroll to the right
to see specific error
(See below)
Scroll Bar
Troubleshooting
41
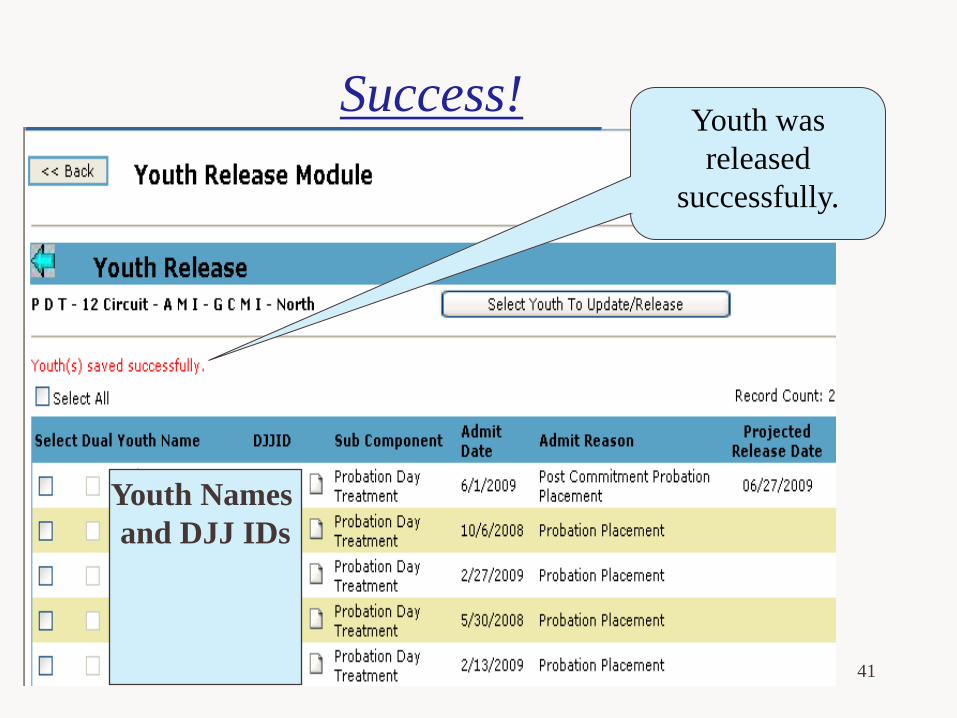
Youth was released
successfully.
Success!
Youth Names and DJJ IDs
42
Confirm Release by viewing Facesheet
When youth is released, JPO will be notified by a placement activity report and an end services placement will be entered in JJIS automatically.
If you have any questions, contact your local DIO
43