Embed Size (px)
Citation preview
609
PROCEDURE
72
Pulmonary Artery Catheter Insertion (Assist) and Pressure Monitoring Reba McVay
PURPOSE: Pulmonary artery (PA) catheters are used to determine hemodynamic status in critically ill patients. PA catheters provide information about right-sided and left-sided intracardiac pressures and cardiac output. Additional functions available are fi beroptic monitoring of mixed venous oxygen saturation, intracardiac pacing, and assessment of right-ventricular volumes and ejection fraction. Hemodynamic information obtained with a PA catheter is used to aid diagnosis and guide therapeutic intervention, including administration of fl uids and diuretics and titration of vasoactive and inotropic medications.
PREREQUISITE NURSING KNOWLEDGE
• Knowledge of the normal cardiovascular and pulmonary anatomy and physiology is needed.
• Knowledge of principles of aseptic technique is essential. • Basic dysrhythmia recognition and treatment of life-
threatening dysrhythmias should be understood. • Advanced cardiac life support (ACLS) knowledge and
skills are needed. • Knowledge of the components of the PA catheter ( Fig.
72-1 ) and the location of the PA catheter in the heart and PA ( Fig. 72-2 ) is necessary.
• Knowledge of the setup of the hemodynamic monitoring system (see Procedure 75 ) is needed.
• Understanding of normal hemodynamic values (see Table 64-1 ) is essential.
• The PA catheter contains a proximal injectate lumen port, a PA distal lumen port, a thermistor connector, and a balloon-infl ation port with valve. Some catheters also have two infusion ports, right atrial (RA) and right ven-tricular (RV) lumens that can be used for infusion of medications and intravenous fl uids.
• The PA distal lumen is used to monitor systolic, diastolic, and mean pressures in the PA. This lumen also allows for sampling of mixed venous blood. The proximal injectate lumen is used to monitor the RA pressure and inject the solution used to obtain cardiac output (CO). The balloon-infl ation port is used to advance the PA catheter tip to the wedge position and measure the pulmonary artery occlu-sion pressure (PAOP).
• PAOP may be referred to as pulmonary artery wedge pres-sure or the pulmonary capillary wedge pressure.
• The PA diastolic pressure and the PAOP are indirect measures of left ventricular (LV) end-diastolic pressure.
Usually, the PAOP is approximately 1 to 4 mm Hg less than the pulmonary artery diastolic pressure (PADP). Because these two pressures are similar, the PADP is commonly followed, which minimizes the frequency of balloon infl ation, thus decreasing the potential of balloon rupture and PA trauma.
• Differences between the PADP and the PAOP may exist for patients with pulmonary hypertension, chronic obstruc-tive lung disease, acute respiratory distress syndrome, pulmonary embolus, and tachycardia.
• See Procedure 71 for common indications for insertion of a PA catheter.
• Hemodynamic monitoring with a PA catheter has no abso-lute contraindications, but an assessment of risk versus benefi t to the patient should be considered. Relative con-traindications to PA catheter insertion include presence of fever, presence of a mechanical tricuspid valve, presence of an endocardial pacemaker, and a coagulopathic state. A patient with left bundle-branch block may have a right bundle-branch block develop during PA catheter insertion, resulting in complete heart block. In these patients, a temporary pacemaker should be readily available.
• PA pressures may be elevated as a result of PA hyperten-sion, pulmonary disease, mitral valve disease, LV failure, atrial or ventricular left-to-right shunt, pulmonary emboli, or hypervolemia.
• PA pressures may be low due to hypovolemia or low pulmonary vascular resistance (e.g., vasodilation).
• Transduced waveforms that are viewable during insertion include RA, RV, PA, and PA occlusion (PAO; Figs. 71-2 and 72-3 ).
• The RA and PAO waveforms have a , c , and v waves: ❖ The a wave refl ects atrial contraction, the c wave
refl ects closure of the atrioventricular valve, and the v wave refl ects passive fi lling of the atria during ven-tricular systole ( Figs. 72-4 and 72-5 ).
610 Unit II Cardiovascular System
Figure 72-1 Anatomy of the pulmonary artery (PA) catheter. The standard 7.5-Fr thermodilution PA catheter is 110 cm in length and contains four lumens. It is constructed of radiopaque polyvinyl chloride. Black markings are on the catheter in 10-cm increments beginning at the distal end. At the distal end of the catheter is a latex rubber balloon of 1.5-mL capacity, which, when infl ated, extends slightly beyond the tip of the catheter without obstructing it. Balloon infl ation cushions the tip of the catheter and prevents contact with the right-ventricular wall during insertion. The balloon also acts to fl oat the catheter into position and allows measurement of the pulmonary artery occlusion pressure. The narrow black bands represent 10-cm lengths, and the wide black bands indicate 50-cm lengths. (From Visalli F, Evans P: The Swan-Ganz catheter: A program for teaching safe effective use, Nursing 81[11]:1, 1981.)
Figure 72-2 Pulmonary artery (PA) catheter location within the heart. Pulmonary artery occlusion pressure (PAOP) is an indirect measure of left-atrial (LA) and left-ventricular (LV) end-diastolic pressure. Pulmonary artery occlusion pressure (PAOP) is also referred to as pulmonary artery wedge pressure (PAWP). (From Kersten LD: Comprehensive respiratory nursing , Philadelphia, 1989, Saunders.)

72 Pulmonary Artery Catheter Insertion (Assist) and Pressure Monitoring 611
❖ Elevated a waves in the PAOP waveform may occur in patients with mitral valve stenosis, acute LV ischemia or infarction, LV failure, and AV dissociation.
❖ Elevated v waves in the RAP/CVP waveform may occur in patients with tricuspid valve insuffi ciency.
❖ Elevated v waves in the PAOP waveform may occur in patients with mitral valve insuffi ciency or a ruptured papillary muscle.
• Insertion and placement verifi cation should occur as fol-lows: ❖ The PA catheter is typically inserted through the sub-
clavian, internal jugular, or femoral veins.
❖ The a wave refl ects ventricular fi lling at end diastole. The mean of the a wave is determined by averag-ing the top and bottom values of the a wave.
❖ Elevated a and v waves may be evident in right atrial pressure (RAP/central venous pressure [CVP]) and in PAOP waveforms. These elevations may occur in patients with cardiac tamponade, constrictive pericar-dial disease, and hypervolemia.
❖ Elevated a waves in the RAP/CVP waveform may occur in patients with pulmonic or tricuspid valve ste-nosis, RV ischemia or infarction, RV failure, PA hyper-tension, and atrioventricular (AV) dissociation.
Figure 72-3 Schematic of waveform progression as a pulmonary artery (PA) catheter is inserted through the various cardiac chambers. (From Abbott Critical Care Systems, Mountain View, CA.)
Figure 72-4 Identifi cation of a , c , and v waves in the waveform for right-atrial and central venous pressure. Atrial waveforms are characterized by three components: a , c , and v waves. The a wave refl ects atrial contraction, the c wave refl ects closure of the tricuspid valve, and the v wave refl ects passive fi lling of the atria. (From Ahrens TS, Taylor LK: Hemodynamic waveform analysis , Phila-delphia, 1992, Saunders.)
612 Unit II Cardiovascular System
• Antiseptic solution (e.g., 2% chlorhexidine–based prepa-ration)
• Head covers, fl uid-shield masks, sterile gowns, sterile gloves, nonsterile gloves, and full sterile drapes
• 1% lidocaine without epinephrine • Sterile basin or cup • Sterile water or normal saline solution • Sterile dressing supplies • Stopcocks (may be included in some pressure-tubing sys-
tems) • Sterile injectable or noninjectable caps • Leveling device (low-intensity laser or carpenter level) Additional equipment, to have available as needed, includes the following: • Fluoroscope or ultrasound machine • Emergency resuscitation equipment • Temporary pacing equipment • Indelible marker • Transducer holder and IV pole • Heparin • 3-mL syringe, slip tip and Luer-Lock • Chlorhexidine-impregnated sponge
PATIENT AND FAMILY EDUCATION
• Provide the patient and family with information about the PA catheter, the reason for the PA catheter, and an explanation of the equipment. Rationale: The patient and family will understand the procedure, why it is needed, and how it will help manage care. Patient and family anxiety may decrease.
• Explain the patient ’ s expected participation during the procedure. Rationale: This explanation will encourage patient assistance.
❖ The standard 7.5 Fr PA catheter is 110 cm long and has black markings at 10-cm increments and wide black markings at 50-cm increments (see Fig. 72-1 ). The catheter should reach the PA after being advanced approximately 40 to 55 cm from the internal jugular vein, 35 to 50 cm from the subclavian vein, and 60 cm from the femoral vein.
❖ Verifi cation of PA catheter position is validated with waveform analysis. Correct catheter position shows a PAO waveform when the balloon is infl ated and a PA waveform when the balloon is defl ated.
❖ Confi rmation of the PA catheter position is also verifi ed with chest radiography.
❖ The PA catheter balloon contains latex, which may cause allergic reactions. Latex-free catheters are avail-able.
EQUIPMENT
• PA catheter (non–heparin-coated PA catheters and latex-free PA catheters are available)
• Percutaneous sheath introducer kit and sterile catheter sleeve
• Pressure modules and cables for interface with the monitor • Cardiac output cable with a thermistor/injectate sensor
and/or continuous CO monitor • Pressure-transducer system, including fl ush solution rec-
ommended according to institutional standards, a pressure bag or device, pressure tubing with transducers, and fl ush device (see Procedure 75 )
• Dual-channel recorder • Sterile normal saline intravenous (IV) solution for fl ush-
ing of the introducer and catheter infusion ports
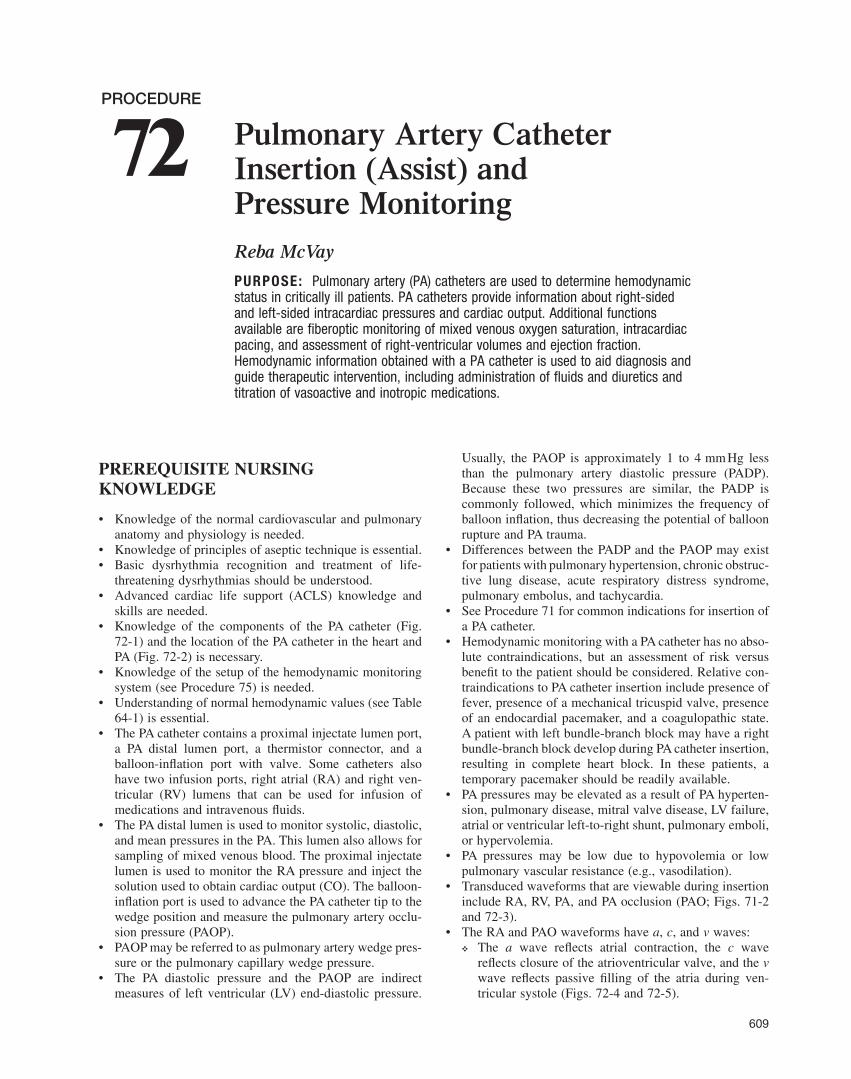
Figure 72-5 Normal pulmonary artery occlusion pressure (PAOP) waveform. Note the delay in the a, c, and v waves because of the time needed for the mechanical events to show a pressure change. This waveform is from a spontaneously breathing patient. The arrow indicates end expira-tion, where the mean of a wave pressure is measured. Pulmonary artery occlusion pressure (PAOP) is also referred to as pulmonary artery wedge pressure (PAWP).
72 Pulmonary Artery Catheter Insertion (Assist) and Pressure Monitoring 613
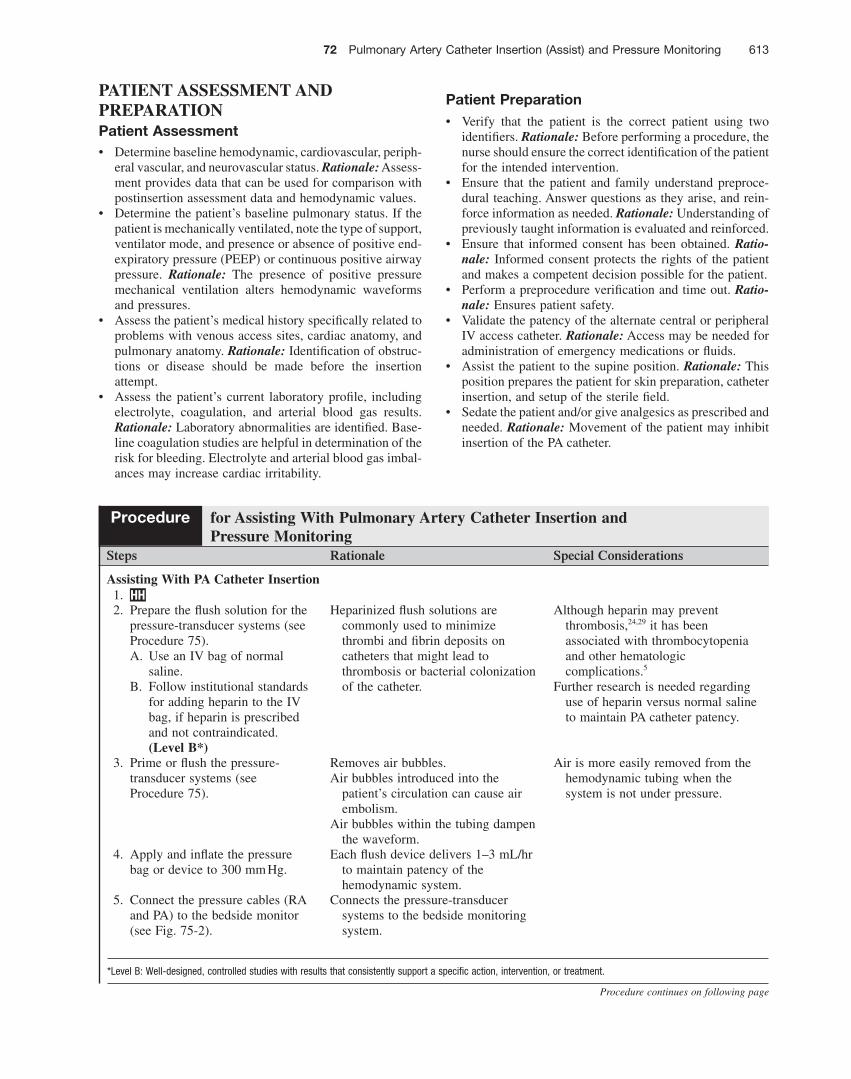
PATIENT ASSESSMENT AND PREPARATION Patient Assessment • Determine baseline hemodynamic, cardiovascular, periph-
eral vascular, and neurovascular status. Rationale: Assess-ment provides data that can be used for comparison with postinsertion assessment data and hemodynamic values.
• Determine the patient ’ s baseline pulmonary status. If the patient is mechanically ventilated, note the type of support, ventilator mode, and presence or absence of positive end-expiratory pressure (PEEP) or continuous positive airway pressure. Rationale: The presence of positive pressure mechanical ventilation alters hemodynamic waveforms and pressures.
• Assess the patient ’ s medical history specifi cally related to problems with venous access sites, cardiac anatomy, and pulmonary anatomy. Rationale: Identifi cation of obstruc-tions or disease should be made before the insertion attempt.
• Assess the patient ’ s current laboratory profi le, including electrolyte, coagulation, and arterial blood gas results. Rationale: Laboratory abnormalities are identifi ed. Base-line coagulation studies are helpful in determination of the risk for bleeding. Electrolyte and arterial blood gas imbal-ances may increase cardiac irritability.
Patient Preparation • Verify that the patient is the correct patient using two
identifi ers. Rationale: Before performing a procedure, the nurse should ensure the correct identifi cation of the patient for the intended intervention.
• Ensure that the patient and family understand preproce-dural teaching. Answer questions as they arise, and rein-force information as needed. Rationale: Understanding of previously taught information is evaluated and reinforced.
• Ensure that informed consent has been obtained. Ratio-nale: Informed consent protects the rights of the patient and makes a competent decision possible for the patient.
• Perform a preprocedure verifi cation and time out. Ratio-nale: Ensures patient safety.
• Validate the patency of the alternate central or peripheral IV access catheter. Rationale: Access may be needed for administration of emergency medications or fl uids.
• Assist the patient to the supine position. Rationale: This position prepares the patient for skin preparation, catheter insertion, and setup of the sterile fi eld.
• Sedate the patient and/or give analgesics as prescribed and needed. Rationale: Movement of the patient may inhibit insertion of the PA catheter.
Steps Rationale Special Considerations
Assisting With PA Catheter Insertion 1. HH 2. Prepare the fl ush solution for the
pressure-transducer systems (see Procedure 75 ). A. Use an IV bag of normal
saline. B. Follow institutional standards
for adding heparin to the IV bag, if heparin is prescribed and not contraindicated. (Level B * )
Heparinized fl ush solutions are commonly used to minimize thrombi and fi brin deposits on catheters that might lead to thrombosis or bacterial colonization of the catheter.
Although heparin may prevent thrombosis, 24,29 it has been associated with thrombocytopenia and other hematologic complications. 5
Further research is needed regarding use of heparin versus normal saline to maintain PA catheter patency.
3. Prime or fl ush the pressure-transducer systems (see Procedure 75 ).
Removes air bubbles. Air bubbles introduced into the
patient ’ s circulation can cause air embolism.
Air bubbles within the tubing dampen the waveform.
Air is more easily removed from the hemodynamic tubing when the system is not under pressure.
4. Apply and infl ate the pressure bag or device to 300 mm Hg.
Each fl ush device delivers 1–3 mL/hr to maintain patency of the hemodynamic system.
5. Connect the pressure cables (RA and PA) to the bedside monitor (see Fig. 75-2 ).
Connects the pressure-transducer systems to the bedside monitoring system.
Procedure for Assisting With Pulmonary Artery Catheter Insertion and Pressure Monitoring
Procedure continues on following page
* Level B: Well-designed, controlled studies with results that consistently support a specifi c action, intervention, or treatment.
614 Unit II Cardiovascular System
Steps Rationale Special Considerations
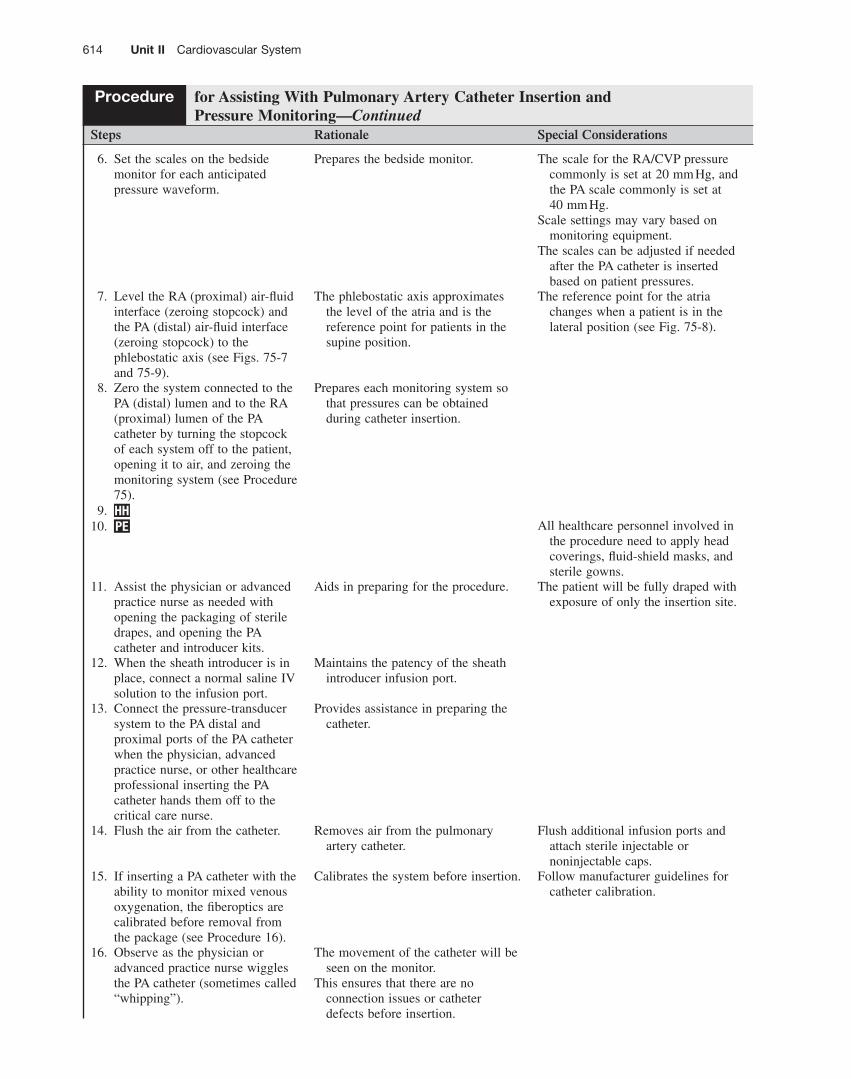
6. Set the scales on the bedside monitor for each anticipated pressure waveform.
Prepares the bedside monitor. The scale for the RA/CVP pressure commonly is set at 20 mm Hg, and the PA scale commonly is set at 40 mm Hg.
Scale settings may vary based on monitoring equipment.
The scales can be adjusted if needed after the PA catheter is inserted based on patient pressures.
7. Level the RA (proximal) air-fl uid interface (zeroing stopcock) and the PA (distal) air-fl uid interface (zeroing stopcock) to the phlebostatic axis (see Figs. 75-7 and 75-9 ).
The phlebostatic axis approximates the level of the atria and is the reference point for patients in the supine position.
The reference point for the atria changes when a patient is in the lateral position (see Fig. 75-8 ).
8. Zero the system connected to the PA (distal) lumen and to the RA (proximal) lumen of the PA catheter by turning the stopcock of each system off to the patient, opening it to air, and zeroing the monitoring system (see Procedure 75 ).
Prepares each monitoring system so that pressures can be obtained during catheter insertion.
9. HH 10. PE All healthcare personnel involved in
the procedure need to apply head coverings, fl uid-shield masks, and sterile gowns.
11. Assist the physician or advanced practice nurse as needed with opening the packaging of sterile drapes, and opening the PA catheter and introducer kits.
Aids in preparing for the procedure. The patient will be fully draped with exposure of only the insertion site.
12. When the sheath introducer is in place, connect a normal saline IV solution to the infusion port.
Maintains the patency of the sheath introducer infusion port.
13. Connect the pressure-transducer system to the PA distal and proximal ports of the PA catheter when the physician, advanced practice nurse, or other healthcare professional inserting the PA catheter hands them off to the critical care nurse.
Provides assistance in preparing the catheter.
14. Flush the air from the catheter. Removes air from the pulmonary artery catheter.
Flush additional infusion ports and attach sterile injectable or noninjectable caps.
15. If inserting a PA catheter with the ability to monitor mixed venous oxygenation, the fi beroptics are calibrated before removal from the package (see Procedure 16 ).
Calibrates the system before insertion. Follow manufacturer guidelines for catheter calibration.
16. Observe as the physician or advanced practice nurse wiggles the PA catheter (sometimes called “whipping”).
The movement of the catheter will be seen on the monitor.
This ensures that there are no connection issues or catheter defects before insertion.
Procedure for Assisting With Pulmonary Artery Catheter Insertion and Pressure Monitoring—Continued
72 Pulmonary Artery Catheter Insertion (Assist) and Pressure Monitoring 615
Steps Rationale Special Considerations
17. The physician or advanced practice nurse will insert the PA catheter through a sterile catheter sleeve (see Procedure 71 ).
Maintains sterility of the PA catheter to allow repositioning of the catheter. 8
Additional research is needed to determine how long the sleeve remains sterile.
18. As insertion begins, continuously monitor and print the electrocardiogram (ECG) and PA distal pressure waveform strip.
Provides documentation of RA, RV, and PA pressures during insertion and dysrhythmia occurrence during insertion.
A dual-channel recorder is preferred so the ECG and the PA waveform can be simultaneously recorded.
19. After the tip of the PA catheter is in the right atrium, infl ate the balloon with no more than 1.25–1.5 mL of air and close the gate valve or the stopcock ( Fig. 72-6 ).
The infl ated balloon helps to advance the PA catheter through the right side of the heart and into the PA, minimizing the chance of endocardial damage.
Closing the gate valve or the stopcock holds air in the balloon during insertion.
The presence of the tip of the catheter in the right atrium is determined by observing the waveform (for RA/CVP waveform with a , c , v waves) from the catheter ’ s distal lumen during insertion (see Fig. 72-3 ).
Use the syringe from the PA insertion kit. It will not allow more than 1.5 mL of air to be used.
Clearly communicate with the physician, advanced practice nurse, or other healthcare professional inserting the catheter:
A. If the provider requests, “Infl ate the balloon.”
B. The critical care nurse should respond, “Infl ating the balloon” and “Balloon infl ated and locked.”
20. Observe for RA, RV, PA, and then PAO waveforms (see Fig. 72-3 ).
Placement in the PA is validated with waveform analysis.
Monitor the ECG tracing as the PA catheter is inserted because ventricular dysrhythmias may result from RV irritability.
RV pressures are obtained only during insertion.
21. Verify that the PA catheter tip is in the proper position. A. When the balloon is defl ated,
the PA waveform is displayed on the monitor.
B. When the balloon is infl ated, the PAO waveform is displayed on the monitor.
When the balloon is infl ated, the catheter fl oats from the PA to a smaller pulmonary arteriole.
The catheter usually reaches the PA after being advanced approximately 40–55 cm from the internal jugular vein, 35–50 cm from the subclavian vein, and 60 cm from the femoral vein.
Placement may vary depending on patient size.
A chest radiograph is obtained to verify catheter position.
Procedure for Assisting With Pulmonary Artery Catheter Insertion and Pressure Monitoring—Continued
Procedure continues on following page
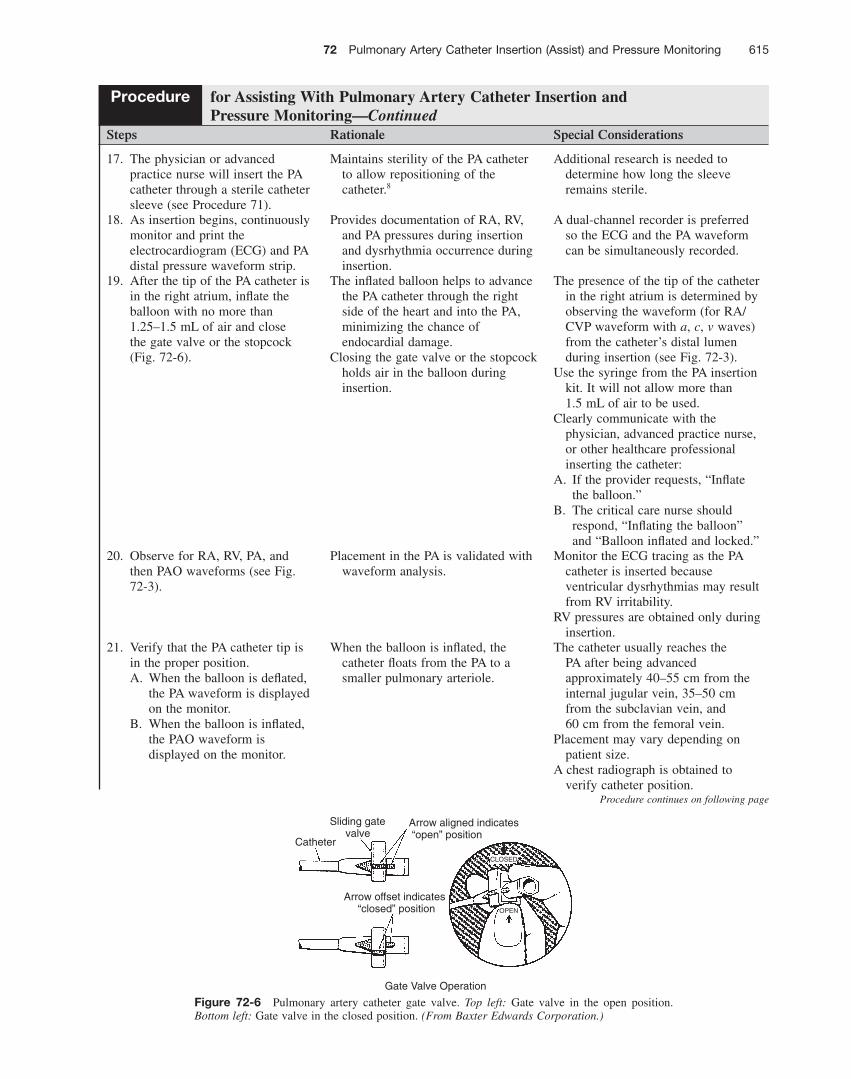
Figure 72-6 Pulmonary artery catheter gate valve. Top left: Gate valve in the open position. Bottom left: Gate valve in the closed position. (From Baxter Edwards Corporation.)
CLOSED
OPEN
Sliding gatevalve
Catheter
Arrow aligned indicates “open” position
Arrow offset indicates “closed” position
Gate Valve Operation
616 Unit II Cardiovascular System
Steps Rationale Special Considerations
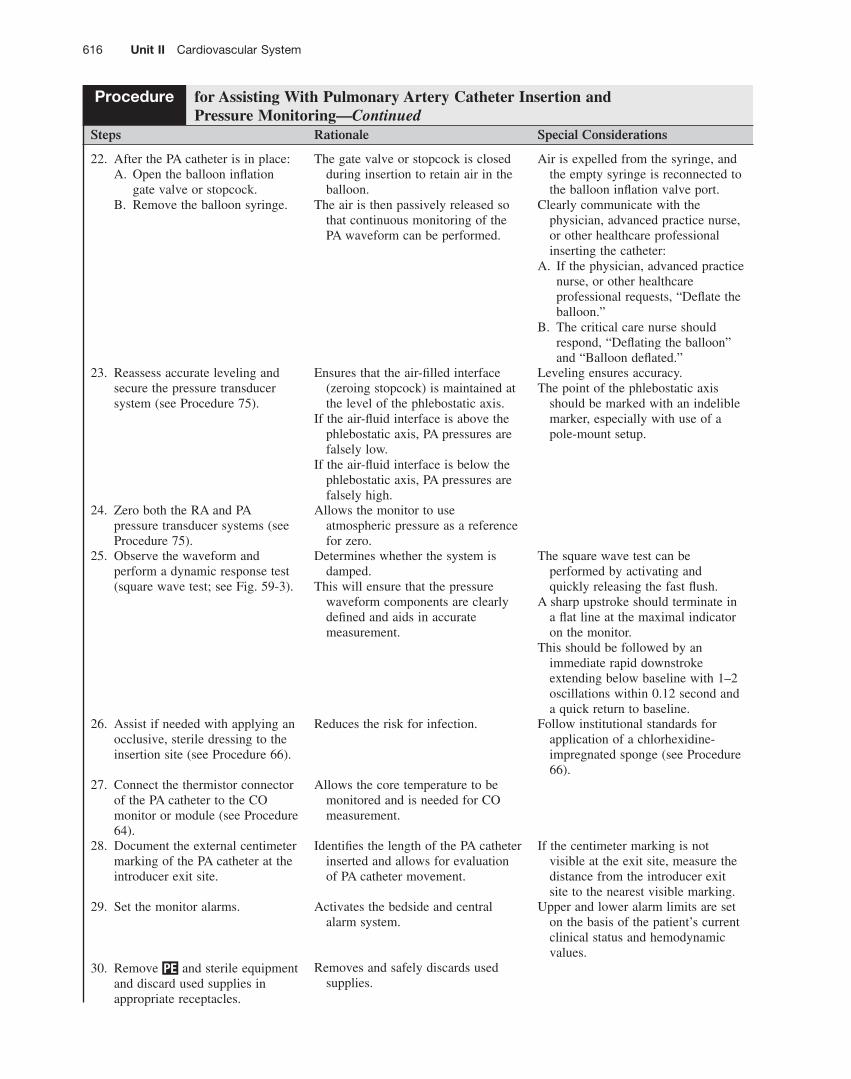
22. After the PA catheter is in place: A. Open the balloon infl ation
gate valve or stopcock. B. Remove the balloon syringe.
The gate valve or stopcock is closed during insertion to retain air in the balloon.
The air is then passively released so that continuous monitoring of the PA waveform can be performed.
Air is expelled from the syringe, and the empty syringe is reconnected to the balloon infl ation valve port.
Clearly communicate with the physician, advanced practice nurse, or other healthcare professional inserting the catheter:
A. If the physician, advanced practice nurse, or other healthcare professional requests, “Defl ate the balloon.”
B. The critical care nurse should respond, “Defl ating the balloon” and “Balloon defl ated.”
23. Reassess accurate leveling and secure the pressure transducer system (see Procedure 75 ).
Ensures that the air-fi lled interface (zeroing stopcock) is maintained at the level of the phlebostatic axis.
If the air-fl uid interface is above the phlebostatic axis, PA pressures are falsely low.
If the air-fl uid interface is below the phlebostatic axis, PA pressures are falsely high.
Leveling ensures accuracy. The point of the phlebostatic axis
should be marked with an indelible marker, especially with use of a pole-mount setup.
24. Zero both the RA and PA pressure transducer systems (see Procedure 75 ).
Allows the monitor to use atmospheric pressure as a reference for zero.
25. Observe the waveform and perform a dynamic response test (square wave test; see Fig. 59-3 ).
Determines whether the system is damped.
This will ensure that the pressure waveform components are clearly defi ned and aids in accurate measurement.
The square wave test can be performed by activating and quickly releasing the fast fl ush.
A sharp upstroke should terminate in a fl at line at the maximal indicator on the monitor.
This should be followed by an immediate rapid downstroke extending below baseline with 1–2 oscillations within 0.12 second and a quick return to baseline.
26. Assist if needed with applying an occlusive, sterile dressing to the insertion site (see Procedure 66 ).
Reduces the risk for infection. Follow institutional standards for application of a chlorhexidine-impregnated sponge (see Procedure 66 ).
27. Connect the thermistor connector of the PA catheter to the CO monitor or module (see Procedure 64 ).
Allows the core temperature to be monitored and is needed for CO measurement.
28. Document the external centimeter marking of the PA catheter at the introducer exit site.
Identifi es the length of the PA catheter inserted and allows for evaluation of PA catheter movement.
If the centimeter marking is not visible at the exit site, measure the distance from the introducer exit site to the nearest visible marking.
29. Set the monitor alarms. Activates the bedside and central alarm system.
Upper and lower alarm limits are set on the basis of the patient ’ s current clinical status and hemodynamic values.
30. Remove PE and sterile equipment and discard used supplies in appropriate receptacles.
Removes and safely discards used supplies.
Procedure for Assisting With Pulmonary Artery Catheter Insertion and Pressure Monitoring—Continued
72 Pulmonary Artery Catheter Insertion (Assist) and Pressure Monitoring 617
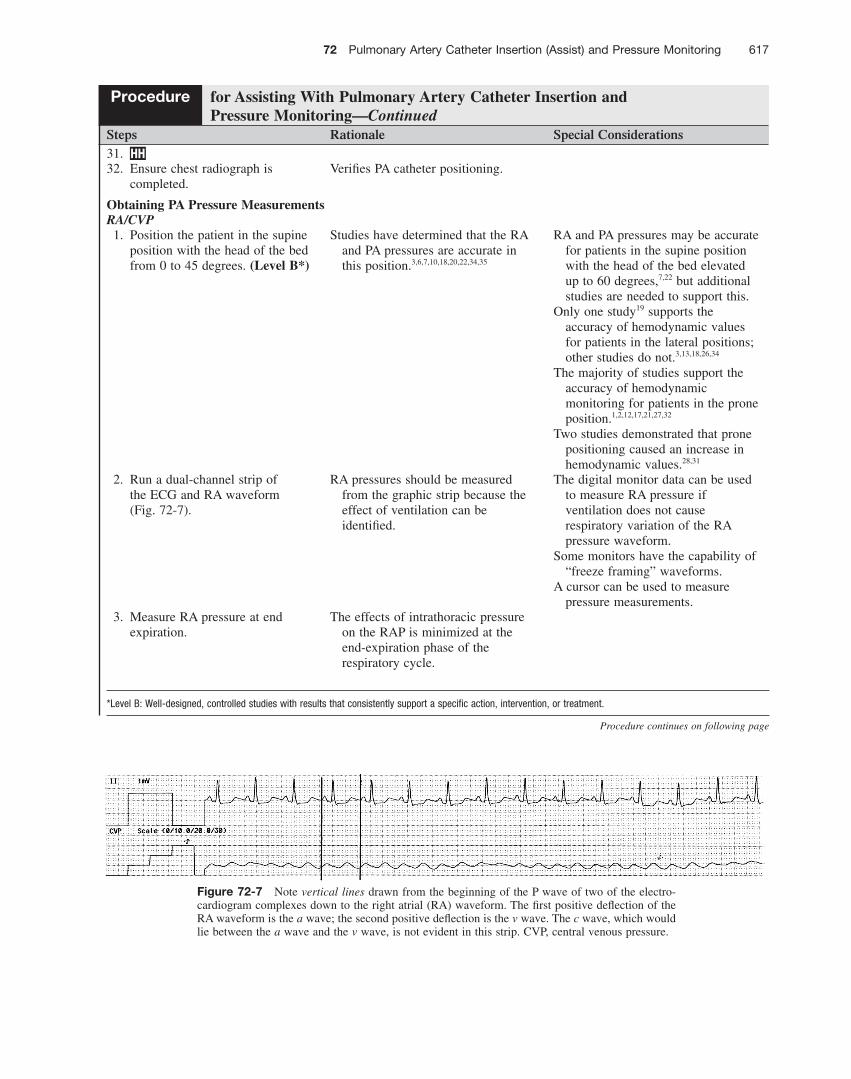
Figure 72-7 Note vertical lines drawn from the beginning of the P wave of two of the electro-cardiogram complexes down to the right atrial (RA) waveform. The fi rst positive defl ection of the RA waveform is the a wave; the second positive defl ection is the v wave. The c wave, which would lie between the a wave and the v wave, is not evident in this strip. CVP, central venous pressure.
Procedure continues on following page
*Level B: Well-designed, controlled studies with results that consistently support a specifi c action, intervention, or treatment.
Steps Rationale Special Considerations 31. HH 32. Ensure chest radiograph is
completed. Verifi es PA catheter positioning.
Obtaining PA Pressure Measurements RA/CVP 1. Position the patient in the supine
position with the head of the bed from 0 to 45 degrees. (Level B * )
Studies have determined that the RA and PA pressures are accurate in this position. 3,6,7,10,18,20,22,34,35
RA and PA pressures may be accurate for patients in the supine position with the head of the bed elevated up to 60 degrees, 7,22 but additional studies are needed to support this.
Only one study 19 supports the accuracy of hemodynamic values for patients in the lateral positions; other studies do not. 3,13,18,26,34
The majority of studies support the accuracy of hemodynamic monitoring for patients in the prone position. 1,2,12,17,21,27,32
Two studies demonstrated that prone positioning caused an increase in hemodynamic values. 28,31
2. Run a dual-channel strip of the ECG and RA waveform ( Fig. 72-7 ).
RA pressures should be measured from the graphic strip because the effect of ventilation can be identifi ed.
The digital monitor data can be used to measure RA pressure if ventilation does not cause respiratory variation of the RA pressure waveform.
Some monitors have the capability of “freeze framing” waveforms.
A cursor can be used to measure pressure measurements.
3. Measure RA pressure at end expiration.
The effects of intrathoracic pressure on the RAP is minimized at the end-expiration phase of the respiratory cycle.
Procedure for Assisting With Pulmonary Artery Catheter Insertion and Pressure Monitoring—Continued

618 Unit II Cardiovascular System
Steps Rationale Special Considerations
4. With the dual-channel recorded strip, draw a vertical line from the beginning of the P wave of one of the ECG complexes down to the RA waveform. Repeat this with the next ECG complex (see Fig. 72-7 ).
Compares electrical activity with mechanical activity. Usually three waves are present on the RA waveform.
At times, the c wave is not present.
5. Align the PR interval with the RA waveform.
The a wave correlates with this interval.
6. Identify the a wave. The a wave is seen approximately 80–100 ms after the P wave.
The c wave follows the a wave, and the v wave follows the c wave.
The a wave refl ects atrial contraction. The c wave refl ects closure of the
tricuspid valve. The v wave refl ects passive fi lling of the atria.
7. Identify the scale setting of the RA waveform on the monitor ( Fig. 72-8 ).
Optimizes the view of the waveform and aids in measurement of the pressure.
The RAP scale commonly is set at 20 mm Hg and may be adjusted to the patient ’ s RAP to optimize the view of the waveform.
Scale settings may vary based on monitoring equipment.
8. Measure the mean of the a wave to obtain the RAP (see Fig. 72-8 ).
The a wave represents atrial contraction and refl ects right ventricular fi lling at end diastole.
Procedure for Assisting With Pulmonary Artery Catheter Insertion and Pressure Monitoring—Continued
Figure 72-8 Obtaining measurements of right-atrial and central venous pressures (RA/CVP). Aligning the a wave on the RA/CVP waveform with the PR interval on the electrocardiogram facilitates accurate measurement of RA/CVP at end diastole. (From Ahrens TS, Taylor LK: Hemo-dynamic waveform analysis , Philadelphia, 1992, Saunders.)
72 Pulmonary Artery Catheter Insertion (Assist) and Pressure Monitoring 619
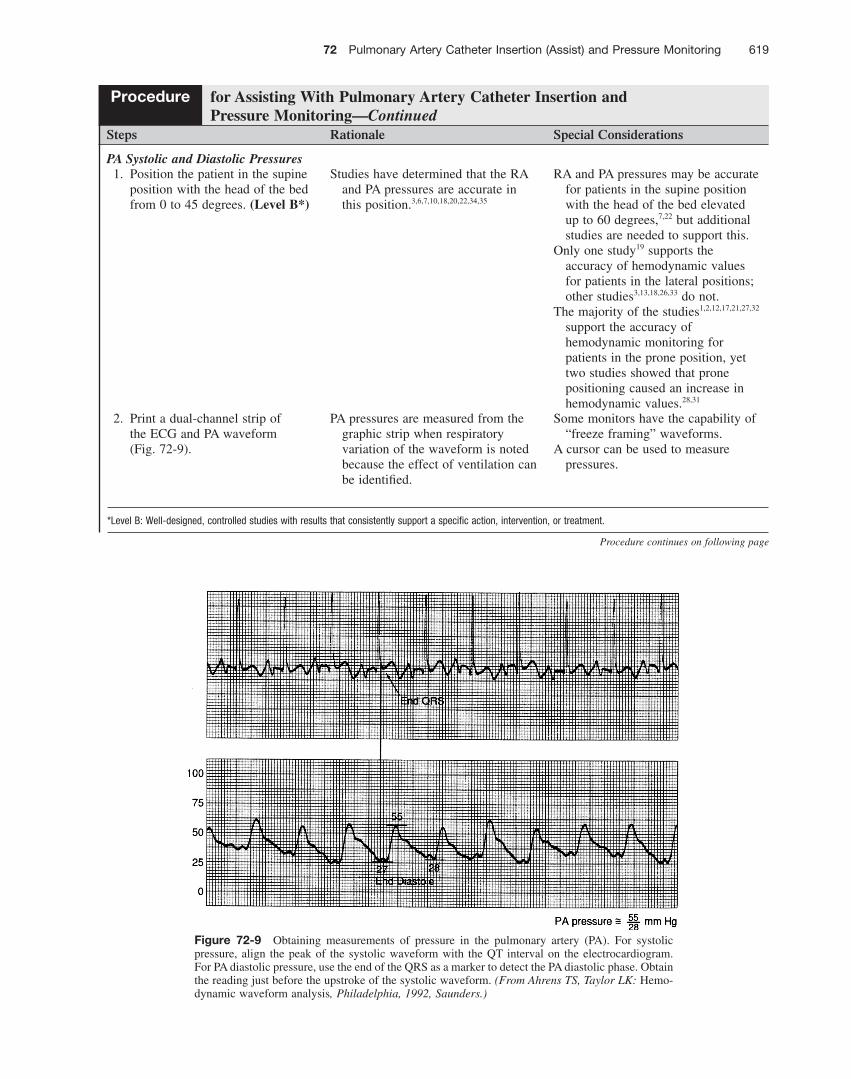
Figure 72-9 Obtaining measurements of pressure in the pulmonary artery (PA). For systolic pressure, align the peak of the systolic waveform with the QT interval on the electrocardiogram. For PA diastolic pressure, use the end of the QRS as a marker to detect the PA diastolic phase. Obtain the reading just before the upstroke of the systolic waveform. (From Ahrens TS, Taylor LK: Hemo-dynamic waveform analysis , Philadelphia, 1992, Saunders.)
*Level B: Well-designed, controlled studies with results that consistently support a specifi c action, intervention, or treatment.
Steps Rationale Special Considerations
PA Systolic and Diastolic Pressures 1. Position the patient in the supine
position with the head of the bed from 0 to 45 degrees. (Level B * )
Studies have determined that the RA and PA pressures are accurate in this position. 3,6,7,10,18,20,22,34,35
RA and PA pressures may be accurate for patients in the supine position with the head of the bed elevated up to 60 degrees, 7,22 but additional studies are needed to support this.
Only one study 19 supports the accuracy of hemodynamic values for patients in the lateral positions; other studies 3,13,18,26,33 do not.
The majority of the studies 1,2,12,17,21,27,32 support the accuracy of hemodynamic monitoring for patients in the prone position, yet two studies showed that prone positioning caused an increase in hemodynamic values. 28,31
2. Print a dual-channel strip of the ECG and PA waveform ( Fig. 72-9 ).
PA pressures are measured from the graphic strip when respiratory variation of the waveform is noted because the effect of ventilation can be identifi ed.
Some monitors have the capability of “freeze framing” waveforms.
A cursor can be used to measure pressures.
Procedure for Assisting With Pulmonary Artery Catheter Insertion and Pressure Monitoring—Continued
Procedure continues on following page
620 Unit II Cardiovascular System
Steps Rationale Special Considerations
3. Measure the PA pressure at end expiration.
The effects of intrathoracic pressure on the PAP is minimized at the end-expiration phase of the respiratory cycle.
4. Identify the QT interval on the ECG strip.
Represents ventricular depolarization.
5. Align the QT interval with the PA waveform.
Allows comparison of cardiac electrical activity with mechanical activity.
6. Identify the scale setting of the PA waveform on the monitor.
Optimizes the view of the waveform and aids in measurement of the pressure.
The PAP scale commonly is set at 40 mm Hg and may be adjusted to the patient ’ s PAP to optimize the view of the waveform.
Scale settings may vary based on monitoring equipment.
7. Measure the PA systolic pressure at the peak of the systolic waveform on the PA waveform (see Fig. 72-9 ).
Refl ects the highest PA systolic pressure.
8. Align the end of the QRS complex with the PA waveform (see Fig. 72-9 ).
Compares electrical activity with mechanical activity.
The end of the QRS complex correlates with ventricular end-diastolic pressure.
9. Measure the PA diastolic pressure at the point of the intersection of this line (see Fig. 72-9 ).
This point occurs just before the upstroke of the systolic pressure.
PAOP 1. Position the patient in the supine
position with the head of the bed from 0 to 45 degrees. (Level B * )
Studies have determined that the RA and PA pressures are accurate in this position. 3,6,7,10,18,20,22,34,35
RA and PA pressures may be accurate for patients in the supine position with the head of the bed elevated up to 60 degrees, 7,22 but additional studies are needed to support this.
Only one study 19 supports the accuracy of hemodynamic values for patients in the lateral positions; other studies 3,13,18,26,33 do not.
The majority of the studies 1,2,12,17,21,27,32 support the accuracy of hemodynamic monitoring for patients in the prone position, but two studies demonstrated that prone positioning caused an increase in hemodynamic values. 28,31
2. Fill the PA balloon syringe with 1.5 mL of air.
More than 1.5 mL of air may rupture the PA balloon and the pulmonary arteriole.
3. Connect the PA balloon syringe to the gate valve or stopcock of the balloon port of the PA catheter (see Fig. 72-6 ).
This port is designed for balloon air infl ation.
Procedure for Assisting With Pulmonary Artery Catheter Insertion and Pressure Monitoring—Continued
*Level B: Well-designed, controlled studies with results that consistently support a specifi c action, intervention, or treatment.
72 Pulmonary Artery Catheter Insertion (Assist) and Pressure Monitoring 621
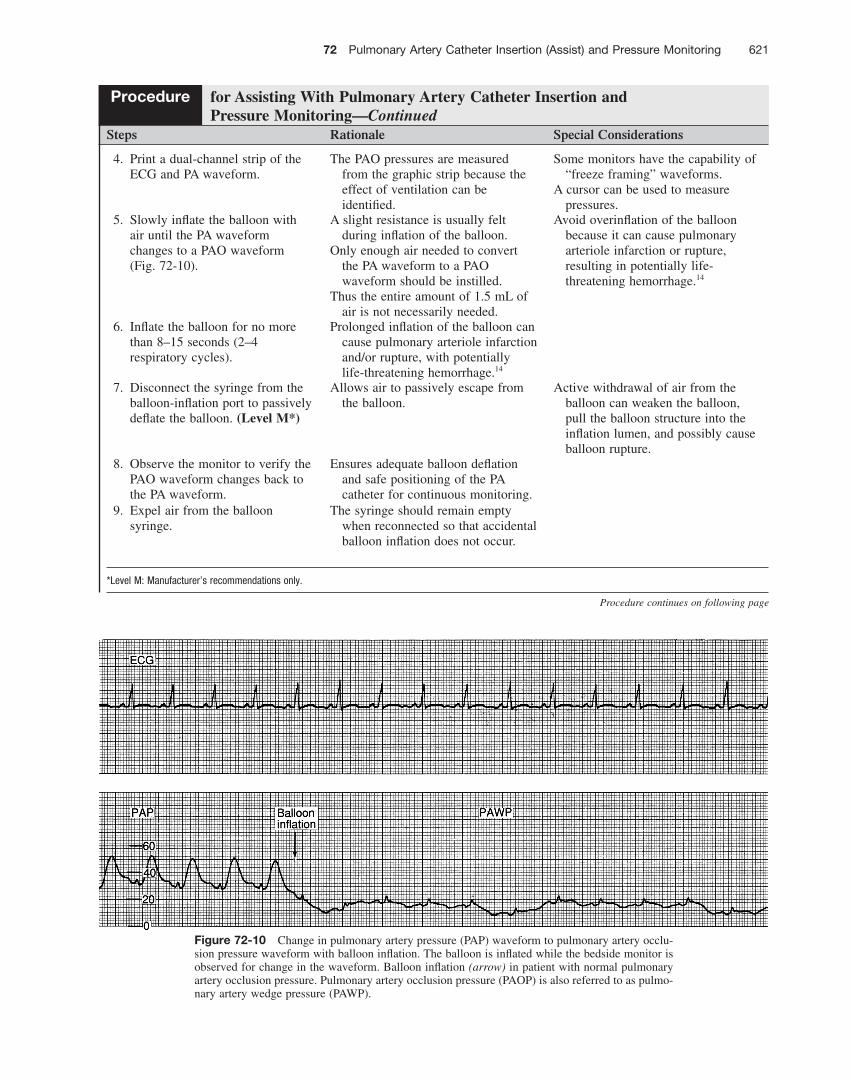
Figure 72-10 Change in pulmonary artery pressure (PAP) waveform to pulmonary artery occlu-sion pressure waveform with balloon infl ation. The balloon is infl ated while the bedside monitor is observed for change in the waveform. Balloon infl ation (arrow) in patient with normal pulmonary artery occlusion pressure. Pulmonary artery occlusion pressure (PAOP) is also referred to as pulmo-nary artery wedge pressure (PAWP).
Steps Rationale Special Considerations
4. Print a dual-channel strip of the ECG and PA waveform.
The PAO pressures are measured from the graphic strip because the effect of ventilation can be identifi ed.
Some monitors have the capability of “freeze framing” waveforms.
A cursor can be used to measure pressures.
5. Slowly infl ate the balloon with air until the PA waveform changes to a PAO waveform ( Fig. 72-10 ).
A slight resistance is usually felt during infl ation of the balloon.
Only enough air needed to convert the PA waveform to a PAO waveform should be instilled.
Thus the entire amount of 1.5 mL of air is not necessarily needed.
Avoid overinfl ation of the balloon because it can cause pulmonary arteriole infarction or rupture, resulting in potentially life-threatening hemorrhage. 14
6. Infl ate the balloon for no more than 8–15 seconds (2–4 respiratory cycles).
Prolonged infl ation of the balloon can cause pulmonary arteriole infarction and/or rupture, with potentially life-threatening hemorrhage. 14
7. Disconnect the syringe from the balloon-infl ation port to passively defl ate the balloon. (Level M * )
Allows air to passively escape from the balloon.
Active withdrawal of air from the balloon can weaken the balloon, pull the balloon structure into the infl ation lumen, and possibly cause balloon rupture.
8. Observe the monitor to verify the PAO waveform changes back to the PA waveform.
Ensures adequate balloon defl ation and safe positioning of the PA catheter for continuous monitoring.
9. Expel air from the balloon syringe.
The syringe should remain empty when reconnected so that accidental balloon infl ation does not occur.
Procedure for Assisting With Pulmonary Artery Catheter Insertion and Pressure Monitoring—Continued
* Level M: Manufacturer ’ s recommendations only.
Procedure continues on following page
622 Unit II Cardiovascular System
Steps Rationale Special Considerations
10. Reconnect the empty balloon syringe to the balloon-infl ation port.
The syringe that is manufactured for the PA catheter should be connected to the PA balloon port to avoid loss of the custom designed syringe.
This syringe can be fi lled with only 1.5 mL of air, thus serving as a safety feature to minimize the chance of balloon overinfl ation.
11. Follow institutional standard regarding keeping the gate valve or the stopcock open.
The most important considerations are that the balloon syringe is attached to the balloon-infl ation port, the syringe is empty, and the PA distal waveform refl ects a pulmonary artery waveform.
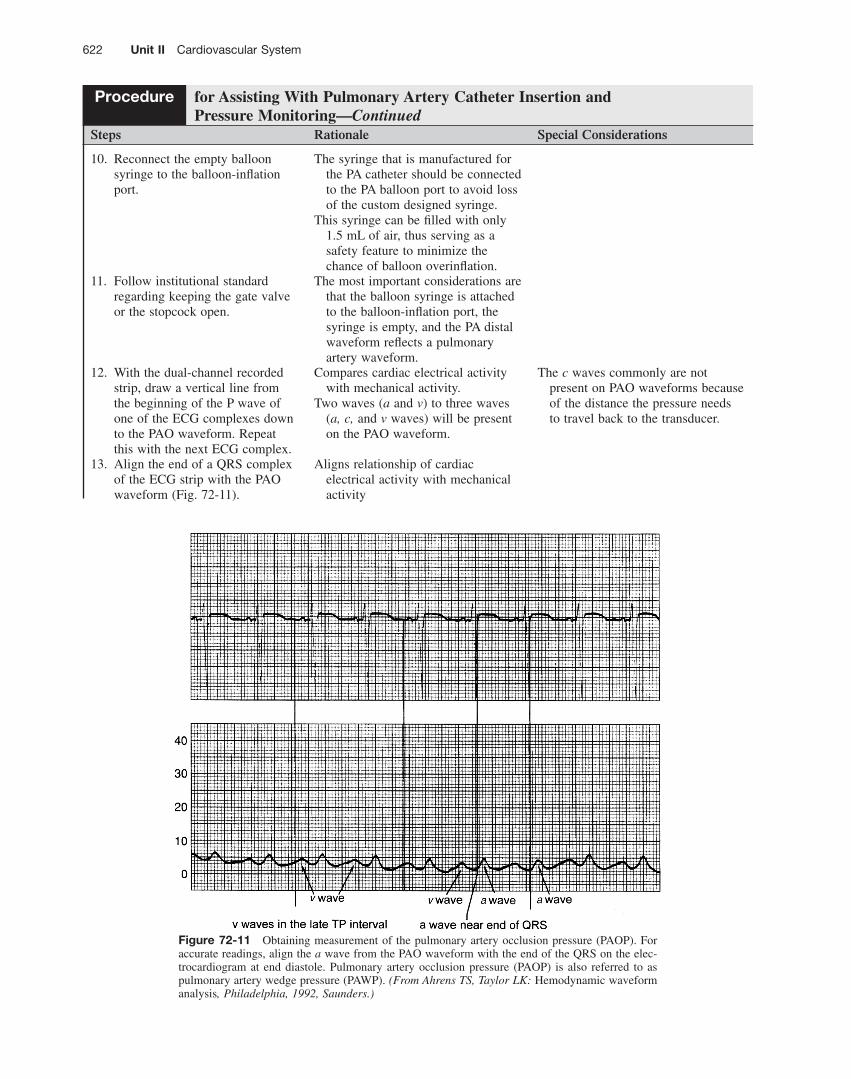
12. With the dual-channel recorded strip, draw a vertical line from the beginning of the P wave of one of the ECG complexes down to the PAO waveform. Repeat this with the next ECG complex.
Compares cardiac electrical activity with mechanical activity.
Two waves ( a and v ) to three waves ( a, c, and v waves) will be present on the PAO waveform.
The c waves commonly are not present on PAO waveforms because of the distance the pressure needs to travel back to the transducer.
13. Align the end of a QRS complex of the ECG strip with the PAO waveform ( Fig. 72-11 ).
Aligns relationship of cardiac electrical activity with mechanical activity
Procedure for Assisting With Pulmonary Artery Catheter Insertion and Pressure Monitoring—Continued
Figure 72-11 Obtaining measurement of the pulmonary artery occlusion pressure (PAOP). For accurate readings, align the a wave from the PAO waveform with the end of the QRS on the elec-trocardiogram at end diastole. Pulmonary artery occlusion pressure (PAOP) is also referred to as pulmonary artery wedge pressure (PAWP). (From Ahrens TS, Taylor LK: Hemodynamic waveform analysis , Philadelphia, 1992, Saunders.)
72 Pulmonary Artery Catheter Insertion (Assist) and Pressure Monitoring 623
Steps Rationale Special Considerations
14. Identify the a wave (see Fig. 72-11 ).
The a wave correlates with the end of the QRS complex.
The c wave follows the a wave, and the v wave follows the c wave.
If only two waves are present, the fi rst wave is the a wave and the second wave is the v wave.
15. Identify the scale of the PAO tracing.
Aids in determination of pressure measurement.
The PA scale commonly is set at 40 mm Hg.
16. Measure the mean of the a wave to obtain the PAOP (see Fig. 72-5 ).
The a wave represents atrial contraction and refl ects LV fi lling at end diastole.
If PEEP is being used and the PEEP is more than 10 cm H 2 O, adjustments in determination of the pressures may be necessary.
Follow institutional standards. 17. Compare the PADP with the
PAOP. The PAOP is commonly 1–4 mm Hg
less than the PADP. PADPs that correlate with PAOPs
represent LV fi lling pressures.
Signifi cant differences between PADP and PAOP may exist for patients with pulmonary hypertension, chronic obstructive lung disease, acute respiratory distress syndrome, pulmonary embolus, and tachycardia.
18. Follow PADP if a close correlation is found between PADP and PAOP.
Considered an accurate measurement of LV fi lling pressures.
Minimizes the number of times the PA balloon is infl ated.
19. Follow the PAOP if > 4 mm Hg of difference is found between PAOP and PADP.
Ensures the accuracy of measurements.
Measurement of Hemodynamic Pressures at End Expiration 1. Measure all hemodynamic
pressures at end expiration to ensure accuracy.
Atmospheric and alveolar pressures are approximately equal at end expiration. Intrathoracic pressure is closest to zero at end expiration.
Measurement of hemodynamic pressures is most accurate at end expiration because pulmonary pressures have minimal effect on intracardiac pressures.
2. Determine end expiration by observing the rise and fall of the chest during breathing and use of printed graphics of hemodynamic, respiratory, capnography, or continuous airway pressure waveforms.
Aids in the determination of the end expiratory phase of ventilation.
Determining End Expiration for the Patient Breathing Spontaneously 1. Record a strip of the PA
waveform. A labeled recording aids in
determination of accurate hemodynamic pressure values.
In patients who are breathing spontaneously, the normal inspiratory : expiratory ratio is approximately 1 : 2.
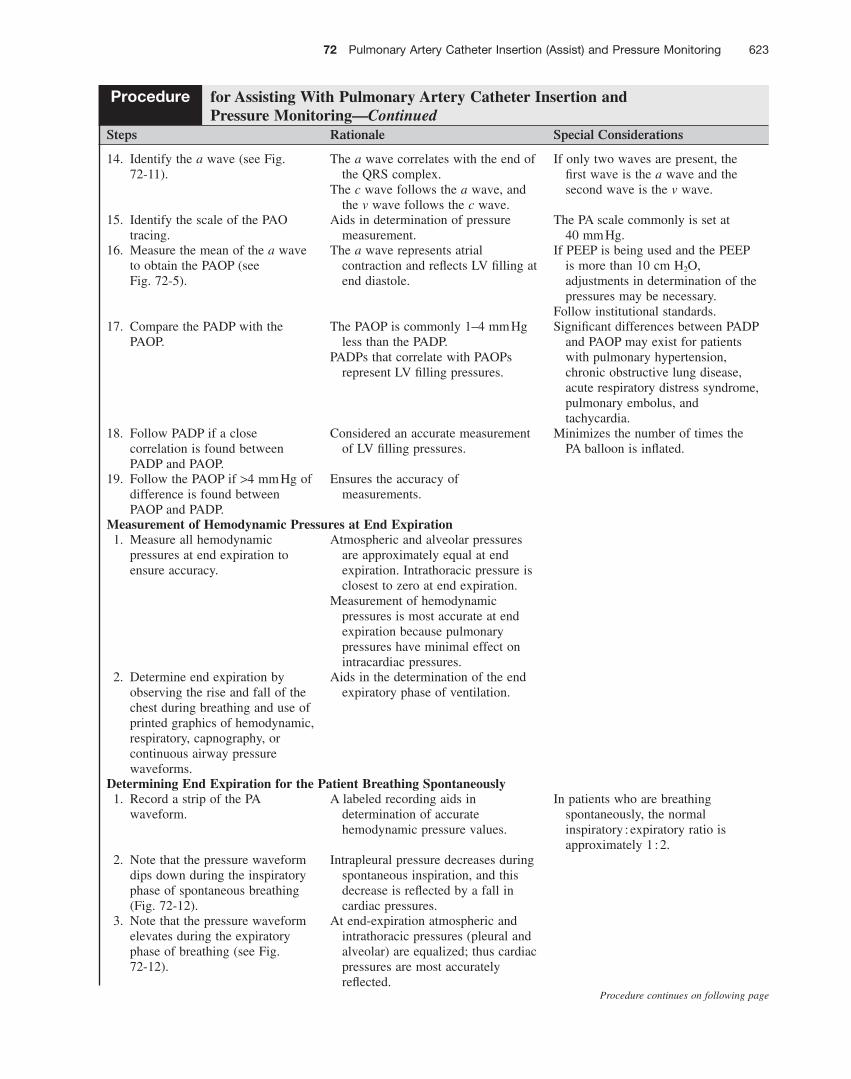
2. Note that the pressure waveform dips down during the inspiratory phase of spontaneous breathing ( Fig. 72-12 ).
Intrapleural pressure decreases during spontaneous inspiration, and this decrease is refl ected by a fall in cardiac pressures.
3. Note that the pressure waveform elevates during the expiratory phase of breathing (see Fig. 72-12 ).
At end-expiration atmospheric and intrathoracic pressures (pleural and alveolar) are equalized; thus cardiac pressures are most accurately refl ected.
Procedure for Assisting With Pulmonary Artery Catheter Insertion and Pressure Monitoring—Continued
Procedure continues on following page
624 Unit II Cardiovascular System
Figure 72-12 Respiratory fl uctuations of pulmonary artery pressure (PAP) waveform in a spon-taneously breathing patient. The location of inspiration (I) is marked on the waveform. The points just before inspiration are end expiration, where readings are taken.
Steps Rationale Special Considerations
4. Measure the pressure at the end of the expiratory phase (see Fig. 72-12 ).
Ensures accurate and consistent pressure measurements.
Determining End Expiration for the Patient Receiving Positive Pressure Mechanical Ventilation 1. Record a strip of the PA
waveform. A labeled recording aids in
determination of accurate hemodynamic pressure values.
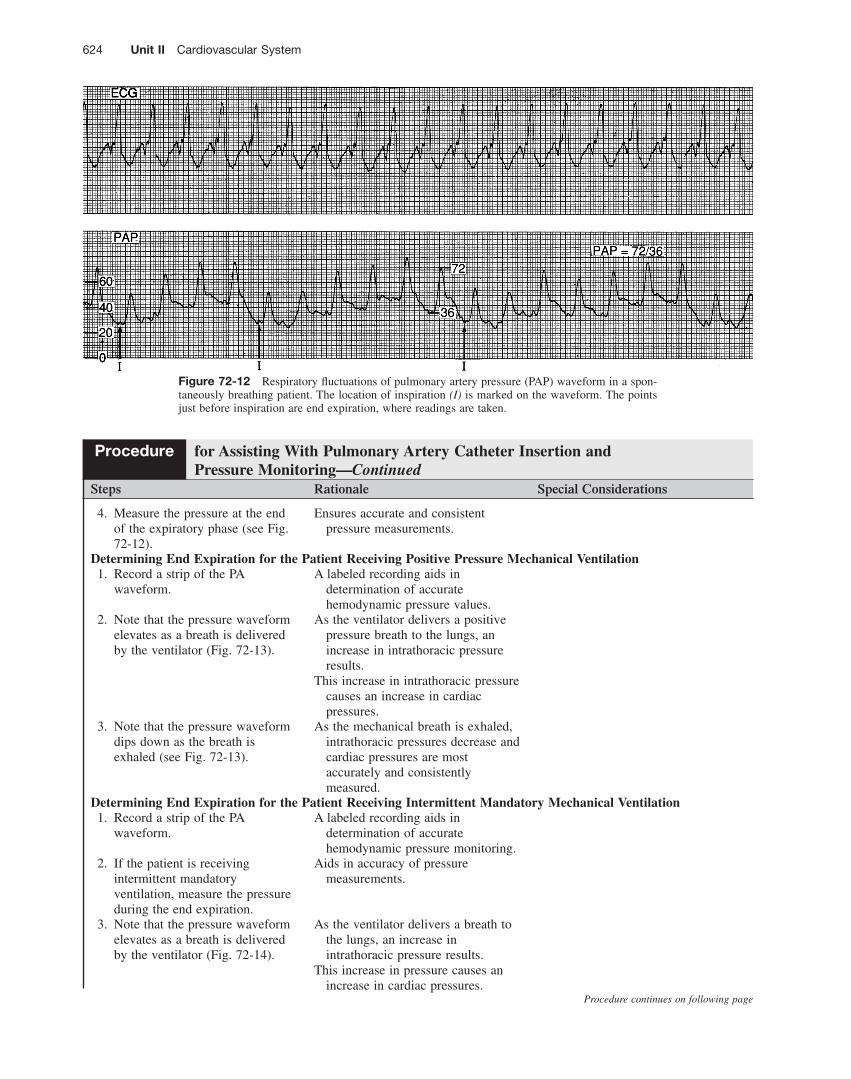
2. Note that the pressure waveform elevates as a breath is delivered by the ventilator ( Fig. 72-13 ).
As the ventilator delivers a positive pressure breath to the lungs, an increase in intrathoracic pressure results.
This increase in intrathoracic pressure causes an increase in cardiac pressures.
3. Note that the pressure waveform dips down as the breath is exhaled (see Fig. 72-13 ).
As the mechanical breath is exhaled, intrathoracic pressures decrease and cardiac pressures are most accurately and consistently measured.
Determining End Expiration for the Patient Receiving Intermittent Mandatory Mechanical Ventilation 1. Record a strip of the PA
waveform. A labeled recording aids in
determination of accurate hemodynamic pressure monitoring.
2. If the patient is receiving intermittent mandatory ventilation, measure the pressure during the end expiration.
Aids in accuracy of pressure measurements.
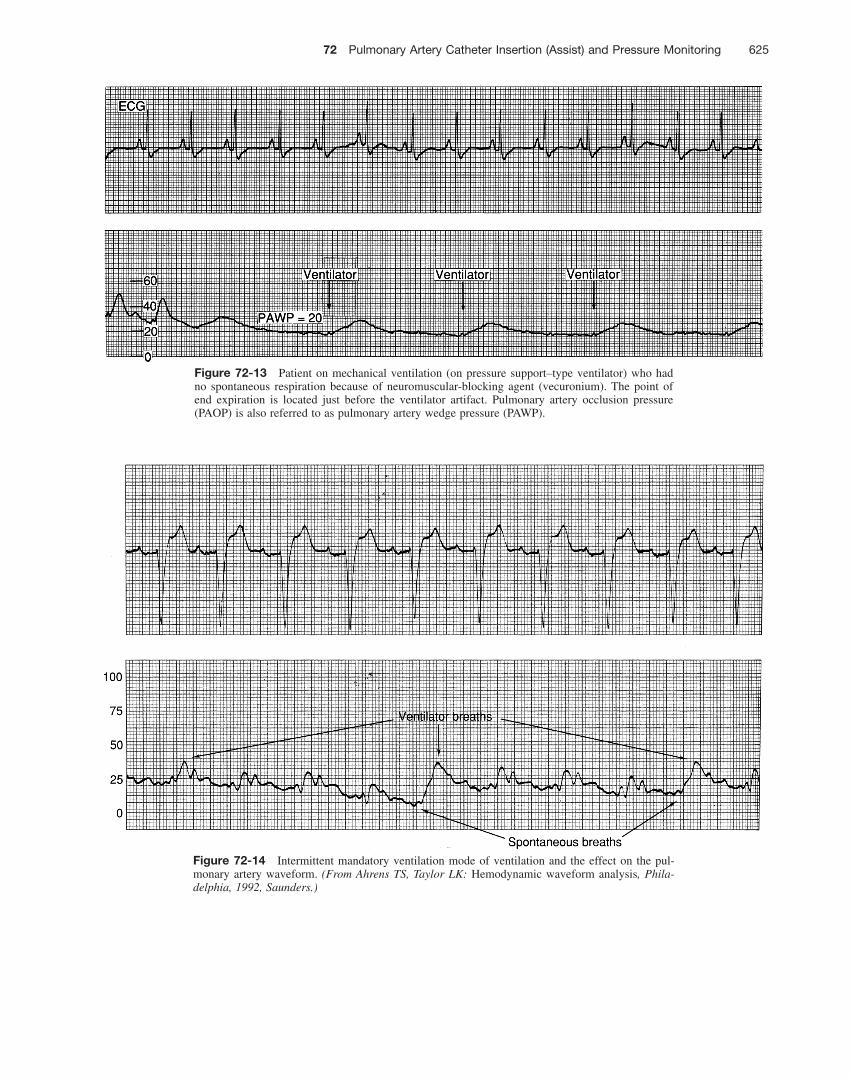
3. Note that the pressure waveform elevates as a breath is delivered by the ventilator ( Fig. 72-14 ).
As the ventilator delivers a breath to the lungs, an increase in intrathoracic pressure results.
This increase in pressure causes an increase in cardiac pressures.
Procedure for Assisting With Pulmonary Artery Catheter Insertion and Pressure Monitoring—Continued
Procedure continues on following page
72 Pulmonary Artery Catheter Insertion (Assist) and Pressure Monitoring 625
Figure 72-13 Patient on mechanical ventilation (on pressure support–type ventilator) who had no spontaneous respiration because of neuromuscular-blocking agent (vecuronium). The point of end expiration is located just before the ventilator artifact. Pulmonary artery occlusion pressure (PAOP) is also referred to as pulmonary artery wedge pressure (PAWP).
Figure 72-14 Intermittent mandatory ventilation mode of ventilation and the effect on the pul-monary artery waveform. (From Ahrens TS, Taylor LK: Hemodynamic waveform analysis , Phila-delphia, 1992, Saunders.)
626 Unit II Cardiovascular System
Steps Rationale Special Considerations
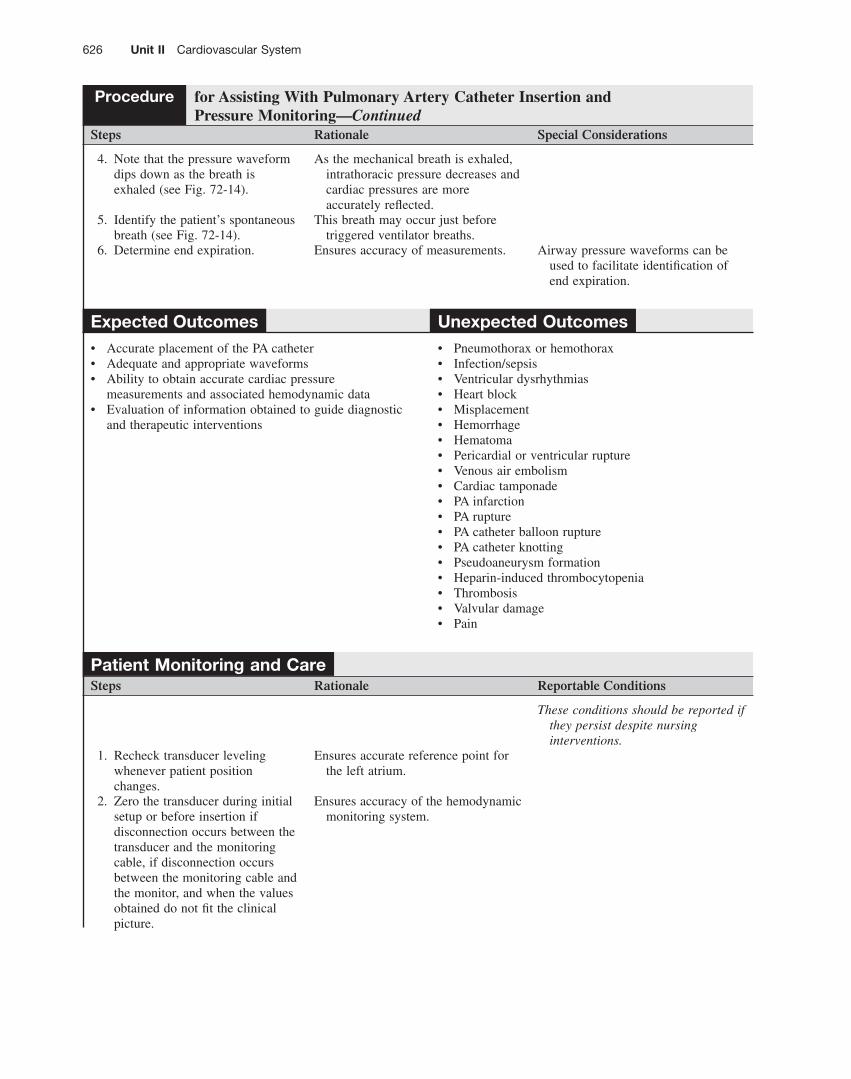
4. Note that the pressure waveform dips down as the breath is exhaled (see Fig. 72-14 ).
As the mechanical breath is exhaled, intrathoracic pressure decreases and cardiac pressures are more accurately refl ected.
5. Identify the patient ’ s spontaneous breath (see Fig. 72-14 ).
This breath may occur just before triggered ventilator breaths.
6. Determine end expiration. Ensures accuracy of measurements. Airway pressure waveforms can be used to facilitate identifi cation of end expiration.
Procedure for Assisting With Pulmonary Artery Catheter Insertion and Pressure Monitoring—Continued
Expected Outcomes • Accurate placement of the PA catheter • Adequate and appropriate waveforms • Ability to obtain accurate cardiac pressure
measurements and associated hemodynamic data • Evaluation of information obtained to guide diagnostic
and therapeutic interventions
Unexpected Outcomes • Pneumothorax or hemothorax • Infection/sepsis • Ventricular dysrhythmias • Heart block • Misplacement • Hemorrhage • Hematoma • Pericardial or ventricular rupture • Venous air embolism • Cardiac tamponade • PA infarction • PA rupture • PA catheter balloon rupture • PA catheter knotting • Pseudoaneurysm formation • Heparin-induced thrombocytopenia • Thrombosis • Valvular damage • Pain
Patient Monitoring and Care Steps Rationale Reportable Conditions
These conditions should be reported if they persist despite nursing interventions.
1. Recheck transducer leveling whenever patient position changes.
Ensures accurate reference point for the left atrium.
2. Zero the transducer during initial setup or before insertion if disconnection occurs between the transducer and the monitoring cable, if disconnection occurs between the monitoring cable and the monitor, and when the values obtained do not fi t the clinical picture.
Ensures accuracy of the hemodynamic monitoring system.
72 Pulmonary Artery Catheter Insertion (Assist) and Pressure Monitoring 627
Patient Monitoring and Care Steps Rationale Reportable Conditions
3. Place sterile injectable or noninjectable caps on all stopcocks. Replace with new sterile caps whenever the caps are removed.
Stopcocks can be a source of contamination.
Stopcocks that are part of the initial setup are packaged with vented caps.
Vented caps need to be replaced with sterile injectable or noninjectable caps to maintain a closed system and reduce the risk of contamination and infection.
4. Monitor the pressure-transducer system (pressure tubing, transducer, stopcocks, etc.) for air and eliminate air from the system.
Air in the transducer system affects the accuracy of pressure measurements.
Air emboli are also potentially fatal.
• Suspected air emboli
5. Continuously monitor hemodynamic waveforms and obtain hemodynamic values (pulmonary artery systolic pressure, PADP, RAP) hourly and as necessary with condition changes and to evaluate therapy interventions. Follow institutional standards for obtaining hemodynamic values.
Provides for continuous waveform analysis and assessment of patient status.
• Abnormal hemodynamic waveforms or pressures
6. Obtain CO, cardiac index, and systemic vascular resistance and additional parameters after catheter insertion and as necessary per patient condition and interventions.
Monitors patient status and response to therapeutic interventions.
• Abnormal hemodynamic parameters or signifi cant changes in hemodynamic parameters
7. Change the hemodynamic monitoring system (fl ush solution, pressure tubing, transducers, and stopcocks) every 96 hours. (Level B * ) The fl ush solution may need to be changed more frequently if near empty of solution.
The Centers for Disease Control and Prevention (CDC), 23 the Infusion Nurses Society, 16 and research fi ndings 23,25 recommend that the hemodynamic fl ush system can be used safely for 96 hours.
This recommendation is based on research conducted with disposable pressure-monitoring systems used for peripheral and central lines.
8. Perform a dynamic response test (square wave test) at the start of each shift, with a change of the waveform, or after the system is opened to air (see Fig. 59-3 ).
An optimally damped system provides an accurate waveform.
• Overdamped or underdamped waveforms that cannot be corrected with troubleshooting procedures
9. Label the tubing with the date and time the system was prepared.
Identifi es when the system needs to be changed.
10. Maintain the pressure bag or device at 300 mm Hg.
At 300 mm Hg, each fl ush device delivers approximately 1–3 mL/hr to maintain patency of the system.
—Continued
Procedure continues on following page
* Level B: Well-designed, controlled studies with results that consistently support a specifi c action, intervention, or treatment.
628 Unit II Cardiovascular System
Patient Monitoring and Care Steps Rationale Reportable Conditions
11. Do not fast fl ush the distal lumen of the PA catheter for longer than 2 seconds. 9
PA rupture may occur with prolonged fl ushing of high-pressure fl uid.
• Hemoptysis
12. Never fl ush the distal lumen of the PA catheter when the balloon is wedged in the pulmonary artery.
Excessive PA pressure may cause PA damage or rupture.
• Hemoptysis
13. Use aseptic technique when withdrawing from or fl ushing the PA catheter.
Prevents contamination of the system and related infection.
14. Clear the system, including stopcocks, of all traces of blood after blood withdrawal.
Blood can become a medium for bacterial growth. 24
Clots also may be fl ushed into the catheter if all blood is not eliminated.
15. Maintain sterility and integrity of the plastic sleeve covering the PA catheter.
Any tear in the sleeve breaks the sterile barrier, making catheter repositioning no longer possible.
• Defects in the integrity of the plastic sleeve
16. Blood products and albumin should never be infused through the PA catheter.
Viscous blood may occlude the catheter.
The accuracy of the PA monitoring system may be adversely affected.
17. IV fl uids are never infused via the distal lumen of the PA catheter and are sometimes infused via the proximal lumen of the PA catheter when IV access is necessary.
PA monitoring is not possible, and a life-threatening situation can occur (e.g., undetected wedged PA catheter).
18. Replace gauze dressings every 2 days and transparent dressings at least every 5–7 days and more frequently as needed. 15,16,24,30 (Level D * )
Decreases the risk for infection at the catheter site.
The Centers for Disease Control and Prevention (CDC) and the Infusion Nurses Society recommend replacing the dressing when it becomes damp, loosened, or soiled or when inspection of the site is necessary. 15,16,24
• Signs or symptoms of infection
19. Perform central venous catheter site care (see Procedure 66 ).
Ensures consistency of dressing change and indicates when the next change will occur.
20. Print PA waveform strips to place on the patient ’ s chart at the start of each shift and whenever a change in the waveform occurs.
The printed waveform allows assessment of the adequacy of the waveform, the presence of damping, and if respiratory variation is present.
—Continued
* Level D: Peer-reviewed professional and organizational standards with the support of clinical study recommendations.
72 Pulmonary Artery Catheter Insertion (Assist) and Pressure Monitoring 629
References and Additional Readings For a complete list of references and additional readings for this procedure, scan this QR code with any freely available smartphone code reader app, or visit http://booksite.elsevier.com/9780323376624 .
Documentation should include the following: • Patient and family education • Completion of informed consent • Universal protocol requirements • Insertion of the PA catheter • External centimeter marking of PA catheter noted at
exit site • Patient tolerance of procedure • Confi rmation of PA catheter placement (e.g.,
waveforms, chest radiograph) • Date and time of PA catheter site care and dressing
change
Patient Monitoring and Care Steps Rationale Reportable Conditions
21. Assess the need for the PA catheter daily. If long-term use of the PA catheter is needed, consider changing the PA catheter every 7 days. (Level B * )
The Centers for Disease Control and Prevention (CDC) 24 and research fi ndings 4,11 recommend that PA catheters do not need to be changed more frequently than every 7 days.
There are no specifi c recommendations regarding routine replacement of PA catheters that need to be in place for > 7 days. 11,24
Guidewire exchanges should not be used routinely. A guidewire exchange should only be used to replace a catheter that is malfunctioning. 24
• Signs and symptoms of infection at the PA catheter insertion site
• Signs and symptoms of sepsis
22. Follow institutional standards for assessing pain. Administer analgesia as prescribed.
Identifi es need for pain interventions. • Continued pain despite pain interventions
—Continued
Documentation
• Pain assessment, interventions, and effectiveness • Cardiac rhythm during PA catheter insertion and
monitoring • Site assessment • PA pressures (RA/CVP, RV, PA systolic, diastolic,
mean, and PAOP) • Waveforms (RA/CVP, RV, pulmonary artery pressure,
PAOP) • CO/CI and systemic vascular resistance • Occurrence of unexpected outcomes and
interventions
*Level B: Well-designed, controlled studies with results that consistently support a specifi c action, intervention, or treatment.