Embed Size (px)
Citation preview
Progress® DataDirect®Hybrid Data PipelineDeployment andBest PracticesGuide
Release 4.6.1


Copyright
© 2019 Progress Software Corporation and/or its subsidiaries or affiliates. All rightsreserved.These materials and all Progress® software products are copyrighted and all rights are reserved by ProgressSoftware Corporation. The information in these materials is subject to change without notice, and ProgressSoftware Corporation assumes no responsibility for any errors that may appear therein. The references in thesematerials to specific platforms supported are subject to change.
Corticon, DataDirect (and design), DataDirect Cloud, DataDirect Connect, DataDirect Connect64, DataDirectXML Converters, DataDirect XQuery, DataRPM, Deliver More Than Expected, Icenium, Kendo UI, Kinvey,NativeScript, OpenEdge, Powered by Progress, Progress, Progress Software Developers Network, Rollbase,SequeLink, Sitefinity (and Design), Sitefinity, SpeedScript, Stylus Studio, TeamPulse, Telerik, Telerik (andDesign), Test Studio, and WebSpeed are registered trademarks of Progress Software Corporation or one ofits affiliates or subsidiaries in the U.S. and/or other countries. Analytics360, AppServer, BusinessEdge, DataDirectAutonomous REST Connector, DataDirect Spy, SupportLink, DevCraft, Fiddler, JustAssembly, JustDecompile,JustMock, NativeChat, NativeScript Sidekick, OpenAccess, ProDataSet, Progress Results, Progress Software,ProVision, PSE Pro, SmartBrowser, SmartComponent, SmartDataBrowser, SmartDataObjects, SmartDataView,SmartDialog, SmartFolder, SmartFrame, SmartObjects, SmartPanel, SmartQuery, SmartViewer, SmartWindow,and WebClient are trademarks or service marks of Progress Software Corporation and/or its subsidiaries oraffiliates in the U.S. and other countries. Java is a registered trademark of Oracle and/or its affiliates. Any othermarks contained herein may be trademarks of their respective owners.
Updated: 2019/10/14
3Progress DataDirect Hybrid Data Pipeline: Deployment and Best Practices Guide: Version Release 4.6.1

Progress DataDirect Hybrid Data Pipeline: Deployment and Best Practices Guide: Version Release 4.6.14
Copyright
Table of Contents
Progress DataDirect Hybrid Data Pipeline Deployment and Best PracticesGuide............................................................................................................7
Product requirements..............................................................................................................................7Deployment guidelines..........................................................................................................................10
Deployment scenarios.................................................................................13Load balancer deployment....................................................................................................................14
Login credentials for load balancer deployment.........................................................................15Load balancer configuration.......................................................................................................15System database for load balancer deployment........................................................................22Shared files and the key location for load balancer deployment................................................25Access ports for load balancer deployment...............................................................................26SSL certificates for load balancer deployment...........................................................................27Client application configuration for load balancer deployment...................................................27Browser configuration for load balancer deployment.................................................................28
Standalone deployment........................................................................................................................28Login credentials for standalone deployment.............................................................................29System database for standalone deployment............................................................................30Shared files and the key location for standalone deployment....................................................33Access ports for standalone deployment...................................................................................34SSL certificates for standalone deployment...............................................................................35Application and driver configuration for standalone deployment...............................................40Firewall and port redirection using iptables for standalone deployment....................................40
Exposing on-premises data sources to cloud-based applications........................................................42Connecting an application in the cloud to on-premises data sources...................................................42External JRE support and integration...................................................................................................43
Modify the external JRE for a non-FIPS environment................................................................44Modify the external JRE for a FIPS environment.......................................................................45Configure the server to use the external JRE............................................................................45Configure the On-Premises Connector to use the external JRE...............................................46
Backing up Hybrid Data Pipeline deployments.........................................47Backing up a load balancer deployment...............................................................................................47Backing up a standalone deployment...................................................................................................49
Configuring system database failover.......................................................51Configuring system database failover during installation......................................................................51
5Progress DataDirect Hybrid Data Pipeline: Deployment and Best Practices Guide: Version Release 4.6.1
Contents
Configuring system database failover during upgrade..........................................................................54The AlternateServers connection property...........................................................................................57
Planning for growth.....................................................................................59Adding nodes to the load balancer deployment....................................................................................59
Upgrading load balancer deployments......................................................61Upgrading the test environment followed by upgrade of the production environment..........................61
Upgrading the test environment.................................................................................................62Upgrading the production environment......................................................................................63
Cloning and upgrading a deployment followed by updating the DNS...................................................65Creating a clone of the production environment........................................................................65Upgrading the cloned environment and updating the DNS........................................................67
Rolling back to previous version if upgrade fails...................................................................................69
Replacing a load balancer...........................................................................71
Updating SSL certificates............................................................................73Updating an environment to use an SSL certificate issued by a well-known CA..................................74
Updating certificates using the installation program in a load balancer environment (well-knownCA)........................................................................................................................................74
Updating certificates manually in a load balancer environment (well-known CA)......................77Updating an environment to use an SSL certificate issued by a less-well-known CA..........................82
Updating certificates using the installation program in a load balancer environment (less-well-knownCA)........................................................................................................................................82
Updating certificates manually in a load balancer environment (less-well-known CA)..............85
Recovering nodes running behind a load balancer..................................91Replacing a failed node behind a network load balancer.....................................................................92
Recovering an external system database..................................................95Modify settings upgrade for system database recovery........................................................................96Express upgrade system database recovery........................................................................................98
Disaster recovery for a network load balancer deployment..................101Recovering from complete system failure...........................................................................................102
Progress DataDirect Hybrid Data Pipeline: Deployment and Best Practices Guide: Version Release 4.6.16
Contents
1Progress DataDirect Hybrid Data PipelineDeployment and Best Practices Guide
Welcome to the Progress® DataDirect® Hybrid Data Pipeline Deployment and Best Practices Guide. This guideprovides documentation on deploying and backing up Hybrid Data Pipeline in addition to detailed instructionfor handling specific upgrade and recovery scenarios. Most scenarios are discussed in the context of a productionenvironment with Hybrid Data Pipeline running on one or more nodes behind a load balancer. However, muchof the information provided may be applied to standalone deployments when Hybrid Data Pipeline is deployedon a standalone machine.
For details, see the following topics:
• Product requirements
• Deployment guidelines
Product requirementsHybrid Data Pipeline provides access to multiple data sources through a single, unified interface. The HybridData Pipeline server can be supported with the installation and configuration of additional components suchas the On-Premises Connector, the ODBC driver, and the JDBC driver.
Note: For REST-based data access for mobile apps and desktop applications, no local software is needed.
Before proceeding with the installation of the server or additional components, confirm that your environmentmeets the requirements described in the following sections.
7Progress DataDirect Hybrid Data Pipeline: Deployment and Best Practices Guide: Version Release 4.6.1
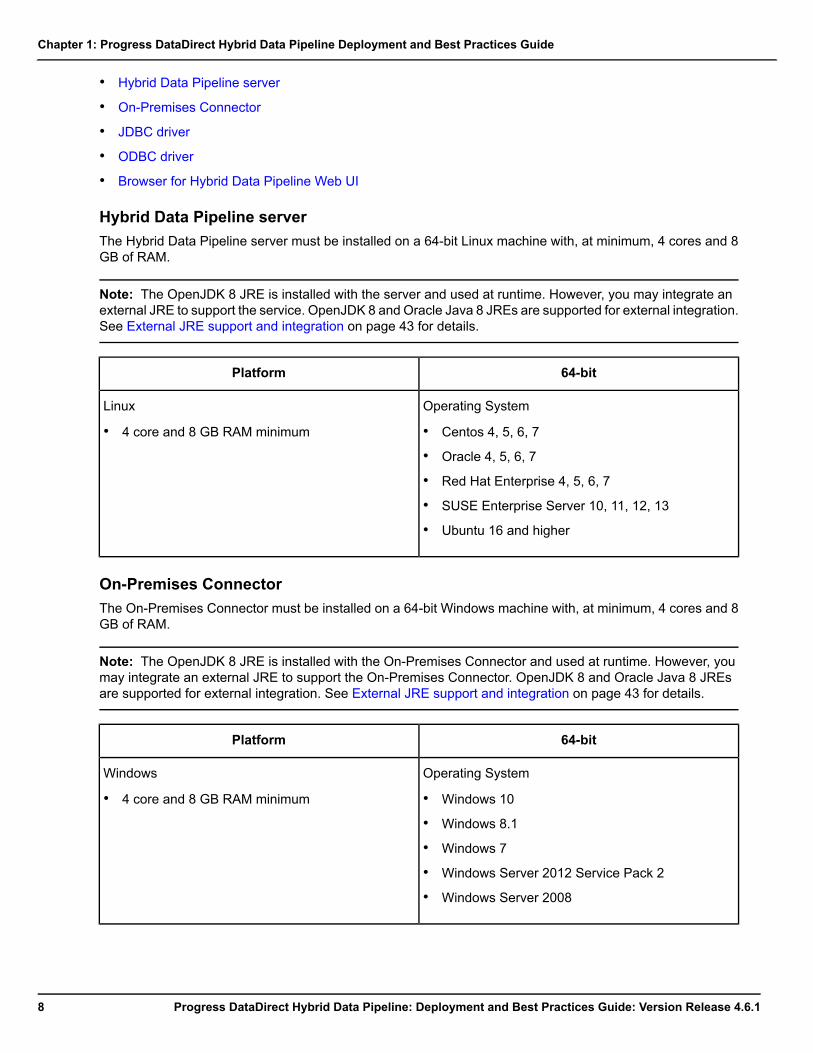
• Hybrid Data Pipeline server
• On-Premises Connector
• JDBC driver
• ODBC driver
• Browser for Hybrid Data Pipeline Web UI
Hybrid Data Pipeline serverThe Hybrid Data Pipeline server must be installed on a 64-bit Linux machine with, at minimum, 4 cores and 8GB of RAM.
Note: The OpenJDK 8 JRE is installed with the server and used at runtime. However, you may integrate anexternal JRE to support the service. OpenJDK 8 and Oracle Java 8 JREs are supported for external integration.See External JRE support and integration on page 43 for details.
64-bitPlatform
Operating System
• Centos 4, 5, 6, 7
• Oracle 4, 5, 6, 7
• Red Hat Enterprise 4, 5, 6, 7
• SUSE Enterprise Server 10, 11, 12, 13
• Ubuntu 16 and higher
Linux
• 4 core and 8 GB RAM minimum
On-Premises ConnectorThe On-Premises Connector must be installed on a 64-bit Windows machine with, at minimum, 4 cores and 8GB of RAM.
Note: The OpenJDK 8 JRE is installed with the On-Premises Connector and used at runtime. However, youmay integrate an external JRE to support the On-Premises Connector. OpenJDK 8 and Oracle Java 8 JREsare supported for external integration. See External JRE support and integration on page 43 for details.
64-bitPlatform
Operating System
• Windows 10
• Windows 8.1
• Windows 7
• Windows Server 2012 Service Pack 2
• Windows Server 2008
Windows
• 4 core and 8 GB RAM minimum
Progress DataDirect Hybrid Data Pipeline: Deployment and Best Practices Guide: Version Release 4.6.18
Chapter 1: Progress DataDirect Hybrid Data Pipeline Deployment and Best Practices Guide

JDBC driverAn installation of the JDBC driver requires 21 MB of hard disk space at minimum. A supported JVM must bedefined on your system path. The following JVM implementations are supported.
JVM (32-bit and 64-bit JVMs supported)
• Oracle Java 8 and 11
• OpenJDK 8 and 11
ODBC driverAn installation of the ODBC driver requires 132 MB of hard disk space at minimum. The following platformsare supported.
64-bit32-bitPlatform
• 7.1
• 6.1
• 5.3 Fixpack 5 or higher
• 7.1
• 6.1
• 5.3 Fixpack 5
AIX
na• 11i Version 3.0 (B.11.3x)
• 11i Version 2.0 (B.11.23)
HP-UX PA-RISC
• 11i Version 3.0 (B.11.3x)
• 11i Version 2.0 (B.11.23)
• 11i Version 3.0 (B.11.3x)
• 11i Version 2.0 (B.11.23)
HP-UX IPF
• CentOS Linux 4, 5, 6, 7
• Debian 7.11, 8.5
• Oracle Linux 4, 5, 6, 7
• Red Hat Enterprise 4, 5, 6, 7
• SUSE Enterprise Server 10, 11,12
• Ubuntu 14.04, 16.04
• CentOS Linux 4, 5, 6, 7
• Debian 7.11, 8.5
• Oracle Linux 4, 5, 6, 7
• Red Hat Enterprise 4, 5, 6, 7
• SUSE Enterprise Server 10, 11,12
• Ubuntu 14.04, 16.04
Linux
• Oracle Solaris 11, 11 Express
• Oracle Solaris 8, 9, 10
• Oracle Solaris 11, 11 Express
• Oracle Solaris 8, 9, 10
Oracle Solaris on SPARC
na• Oracle Solaris 11, 11 Express
• Oracle Solaris 10
Oracle Solaris x86: Intel
9Progress DataDirect Hybrid Data Pipeline: Deployment and Best Practices Guide: Version Release 4.6.1
Product requirements
64-bit32-bitPlatform
• Oracle Solaris 11, 11 Express
• Oracle Solaris 10
naOracle Solaris x64: Intel and AMD
• Windows 10
• Windows 8.1
• Windows 7
• Windows Server 2016
• Windows Server 2012
• Windows Server 2008
• Windows 10
• Windows 8.1
• Windows 7
• Windows Server 2016
• Windows Server 2012
• Windows Server 2008
Windows
Browser for Hybrid Data Pipeline Web UIThe following browsers are supported.
VersionBrowser
Chrome 53.0 and higherChrome
42 and higherEdge
Firefox 48 and higherFirefox
Internet Explorer 11.0 and higherInternet Explorer
Safari 9.1 and higherSafari
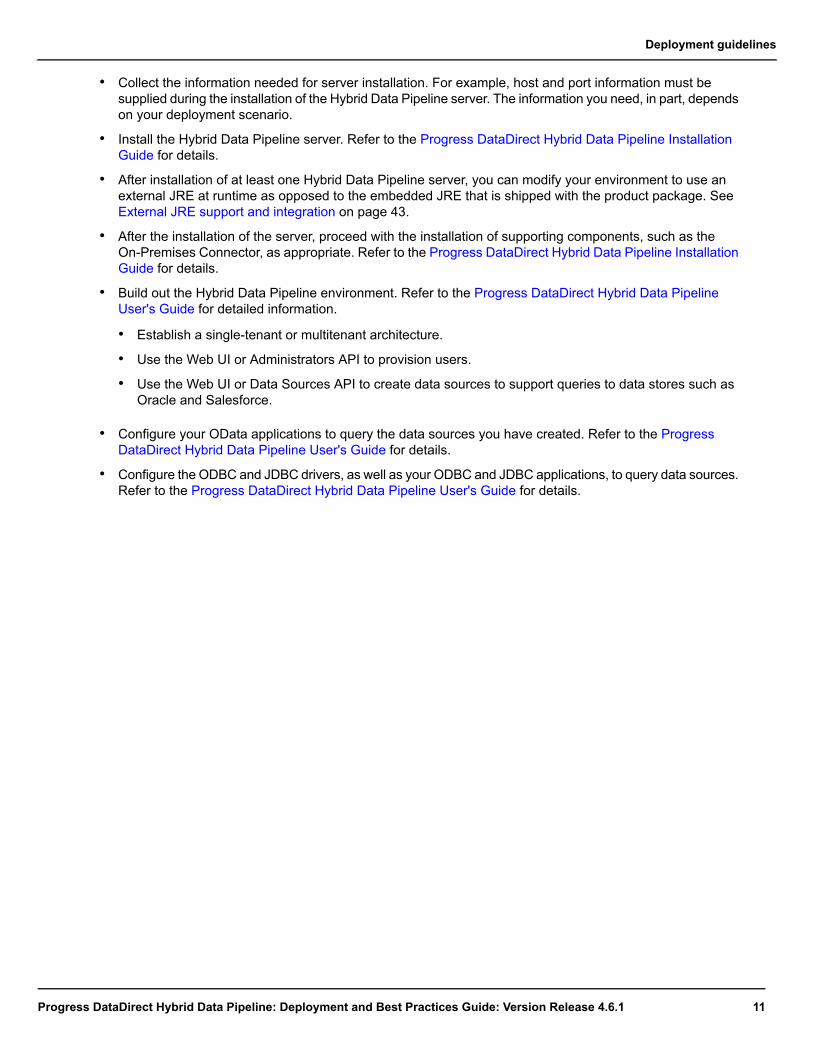
Deployment guidelinesHybrid Data Pipeline is a highly adaptable software service that can be securely integrated into a variety ofnetwork environments. Follow these guidelines to get your Hybrid Data Pipeline environment up and running.
• Determine how to deploy Hybrid Data Pipeline. Configurations and best practices depend in part on whetheryou are deploying the service on a standalone node or deploying the service on one or more nodes behinda load balancer. See Deployment scenarios on page 13 for detailed information.
• Determine which components you need to install and configure in addition to the Hybrid Data Pipeline server.The ODBC driver must be installed to support ODBC applications, and the JDBC driver to support JDBCapplications. The On-Premises Connector can be installed for direct, secure access to on-premises datasources.
• Ensure that Product requirements on page 7 are met for each component you are installing. At this time,the Hybrid Data Pipeline server must be installed on a Linux 64-bit machine with, at minimum, 4 cores and8 GB of RAM.
Progress DataDirect Hybrid Data Pipeline: Deployment and Best Practices Guide: Version Release 4.6.110
Chapter 1: Progress DataDirect Hybrid Data Pipeline Deployment and Best Practices Guide
• Collect the information needed for server installation. For example, host and port information must besupplied during the installation of the Hybrid Data Pipeline server. The information you need, in part, dependson your deployment scenario.
• Install the Hybrid Data Pipeline server. Refer to the Progress DataDirect Hybrid Data Pipeline InstallationGuide for details.
• After installation of at least one Hybrid Data Pipeline server, you can modify your environment to use anexternal JRE at runtime as opposed to the embedded JRE that is shipped with the product package. SeeExternal JRE support and integration on page 43.
• After the installation of the server, proceed with the installation of supporting components, such as theOn-Premises Connector, as appropriate. Refer to the Progress DataDirect Hybrid Data Pipeline InstallationGuide for details.
• Build out the Hybrid Data Pipeline environment. Refer to the Progress DataDirect Hybrid Data PipelineUser's Guide for detailed information.
• Establish a single-tenant or multitenant architecture.
• Use the Web UI or Administrators API to provision users.
• Use the Web UI or Data Sources API to create data sources to support queries to data stores such asOracle and Salesforce.
• Configure your OData applications to query the data sources you have created. Refer to the ProgressDataDirect Hybrid Data Pipeline User's Guide for details.
• Configure the ODBC and JDBC drivers, as well as your ODBC and JDBC applications, to query data sources.Refer to the Progress DataDirect Hybrid Data Pipeline User's Guide for details.
11Progress DataDirect Hybrid Data Pipeline: Deployment and Best Practices Guide: Version Release 4.6.1
Deployment guidelines

Progress DataDirect Hybrid Data Pipeline: Deployment and Best Practices Guide: Version Release 4.6.112
Chapter 1: Progress DataDirect Hybrid Data Pipeline Deployment and Best Practices Guide
2Deployment scenarios
Hybrid Data Pipeline can be deployed on a standalonemachine or on one or more nodes behind a load balancer.Many configurations and best practices are contingent on how Hybrid Data Pipeline has been deployed.
For a production environment, Hybrid Data Pipeline should be deployed on one or more nodes behind a loadbalancer to support scalability and availability. In a load balancer deployment, client application requests mustbe directed to the load balancer which forwards requests to the node or nodes running the service. Whenmultiple nodes have been deployed, requests are distributed across the cluster. See Load balancer deploymenton page 14 for more information.
When deployed on a standalone node, the service is installed on a single host machine that manages allqueries, simplifying maintenance and administration. A standalone deployment is not recommended for aproduction environment because it does not provide the scalability and availability of a load balancer deployment.However, a standalone deployment may be required due to resource limitations and other restrictions. If astandalone deployment is required in production, then, as a matter of best practices, the deployment shouldinclude an external system database and a user-specified key location. See Standalone deployment on page28 for details.
Important: There is currently no migration path from a standalone deployment to a load balancer deployment.Therefore, a standalone deployment is not recommended for environments where scaling up the service maybe desired. A standalone node deployment is also not recommended for security and system recovery purposes.If you want to move from a test environment to a production environment, you should begin by deploying HybridData Pipeline on a single node behind a load balancer. When deploying the service on a single node behinda load balancer, you can increase availability and scalability as demanded, and address security and recoveryconcerns as required.
Whether you deploy the service on a standalone node or behind a load balancer, Hybrid Data Pipeline can berun on-premises or in the cloud. See the following topics for more information.
• Exposing on-premises data sources to cloud-based applications on page 42
13Progress DataDirect Hybrid Data Pipeline: Deployment and Best Practices Guide: Version Release 4.6.1
• Connecting an application in the cloud to on-premises data sources on page 42.
In addition, after at least one installation of the Hybrid Data Pipeline server, you can modify your environmentto use an external JRE at runtime as opposed to the embedded JRE that is shipped with the product package.See External JRE support and integration on page 43.
For details, see the following topics:
• Load balancer deployment
• Standalone deployment
• Exposing on-premises data sources to cloud-based applications
• Connecting an application in the cloud to on-premises data sources
• External JRE support and integration
Load balancer deploymentHybrid Data Pipeline configuration depends in part on whether you are deploying the service on a standalonenode or deploying the service on one or more nodes behind a load balancer. A load balancer deployment offershigh availability and scalability, and is therefore the best option for production environments. In a load balancerdeployment, the service is installed on one or more nodes behind a load balancer. Requests are handled bythe load balancer which distributes requests across nodes.
Hybrid Data Pipeline is largely configured during the installation process. When installing the service on multiplenodes behind a load balancer, the initial installation of the Hybrid Data Pipeline server is used as a templatefor installations on additional nodes. The following configuration details should be addressed before installationto ensure a successful load balancer deployment.
• Login credentials for load balancer deployment on page 15
Passwords for the default administrator and user accounts must be specified during installation of the HybridData Pipeline server. When initially logging in to the Web UI or using the API, you must authenticate as oneof these users.
• Load balancer configuration on page 15
Hybrid Data Pipeline can be deployed on one or more nodes behind a load balancer to provide high availabilityand scalability. Hybrid Data Pipeline supports two types of load balancers.
• Network load balancers that support the TCP tunneling protocol (such as HAProxy)
• Cloud load balancers that support the WebSocket protocol (such as the AWS application load balancerand the Azure application gateway)
• System database for load balancer deployment on page 22
A system database is required for storing user and configuration information. For load balancer deployments,an external database is required to serve as the system database. As a best practice, the external systemdatabase should be replicated, or mirrored, to promote the continuous availability of the service.
• Shared files and the key location for load balancer deployment on page 25
The specification of a key location is required during installation. The installation program writes sharedfiles used in the operation of the data access service to this directory. As a matter of best practices, the keylocation should be secured on a machine separate from the machines hosting the Hybrid Data Pipelineservice or the machine hosting the system database.
Progress DataDirect Hybrid Data Pipeline: Deployment and Best Practices Guide: Version Release 4.6.114
Chapter 2: Deployment scenarios
• Access ports for load balancer deployment on page 26
The access ports used for Hybrid Data Pipeline should be enabled for incoming traffic and unallocated forother purposes.
• SSL certificates for load balancer deployment on page 27
SSL/TLS encrypted communications between client applications and the load balancer are supported. Inaddition, all communications between the On-Premises Connector and the load balancer are SSL/TLSencrypted. SSL connections between the load balancer and the Hybrid Data Pipeline nodes are currentlynot supported.
• Client application configuration for load balancer deployment on page 27
Applications and drivers must be properly configured to ensure a successful deployment of the service.
• Browser configuration for load balancer deployment on page 28
For load balancer deployments, the browser you use to connect to the Web UI must have cookies enabled.
Login credentials for load balancer deploymentYou must specify passwords for the default d2cadmin and d2cuser accounts during installation of the HybridData Pipeline server. The default password policy is not enforced during installation of the server. However,best practices recommend that you follow the default password policy when specifying these account passwords.When initially logging in to the Web UI or using Hybrid Data Pipeline APIs, you must authenticate as one ofthese users.
Hybrid Data Pipeline default password policy
After installation, Hybrid Data Pipeline enforces the following password policy by default.
• The password must contain at least 8 characters.
• The password must not contain more than 12 characters. A password with a length of 12 characters isacceptable.
• The password must not contain the username.
• Characters from at least three of the following four groups must be used in the password:
• Uppercase letters A-Z
• Lowercase letters a-z
• Numbers 0-9
• Non-white space special characters
Load balancer configurationThe Hybrid Data Pipeline product package does not include a load balancer. However, Hybrid Data Pipelinecan be deployed on one or more nodes behind a load balancer to provide high availability and scalability. HybridData Pipeline supports two types of load balancers: network load balancers that support the TCP tunnelingprotocol and cloud load balancers that support the WebSocket protocol. In turn, the load balancer must beconfigured to support the Hybrid Data Pipeline environment according to the following criteria.
• The load balancer must be configured to accept HTTPS connections on port 443 and unencrypted HTTPconnections on port 80.
15Progress DataDirect Hybrid Data Pipeline: Deployment and Best Practices Guide: Version Release 4.6.1
Load balancer deployment

• The load balancer must be configured for SSL termination to support encrypted communications betweenclients and the load balancer. The configuration of the load balancer depends in part on the type of SSLcertificate supplied. See SSL certificates for load balancer deployment on page 27 for details.
• The load balancer must support session affinity. The load balancer must either be configured to supply itsown cookies or to pass the cookies generated by the Hybrid Data Pipeline service back to the client. TheHybrid Data Pipeline service provides a cookie named C2S-SESSION that can be used by the load balancer.For ODBC and JDBC applications, the ODBC and JDBC drivers automatically use cookies for sessionaffinity. OData applications should be configured to echo cookies for optimal performance.
• The load balancer must pass the hostname in the Host header when a request is made to an individualHybrid Data Pipeline node. For example, if the hostname used to access the cluster is hdp.mycorp.comand the individual nodes behind the load balancer have the hostnames hdpsvr1.mycorp.com,hdpsvr2.mycorp.com, hdpsvr3.mycorp.com, then the Host header in the request forwarded to theHybrid Data Pipeline node must be the load balancer hostname hdp.mycorp.com.
• The load balancer must supply the X-Forwarded-Proto header to indicate to the Hybrid Data Pipeline nodewhether the request was received by the load balancer as an HTTP or HTTPS request.
• The load balancer must supply the X-Forwarded-For header for IP address filtering. The X-Forwarded-Forheader is also required if the client IP address is needed for Hybrid Data Pipeline access logs. If theX-Forwarded-For header is not supplied, the IP address in the access logs will always be the load balancer'sIP address.
• The load balancer may be configured to run HTTP health checks against nodes with the Health Check API.
• Additional configuration is required for the following scenarios.
• If you are using the On-Premises Connector with a network load balancer such as HAProxy, seeConfiguring a network load balancer with the On-Premises Connector on page 16 for additionalconfiguration requirements.
• If you are using the On-Premises Connector with a cloud load balancer such as the AWS ApplicationLoad Balancer or the Azure Application Gateway, see Configuring a cloud load balancer with theOn-Premises Connector on page 19 for additional configuration details.
Configuring a network load balancer with the On-Premises ConnectorWhen running Hybrid Data Pipeline behind a network load balancer with an On-Premises Connector, the loadbalancer must be configured to route requests for on-premises data sources to the correct server nodes.
There are two general steps involved in configuring your load balancer to support on-premises data access.First, a custom Access Control List must be created to direct requests for the On-Premises Connector to clusternodes. Second, a backend notification pool that specifies the on-premises port for each cluster node must becreated. The following instructions explain how an HAProxy load balancer can be configured to support HybridData Pipeline access to backend data sources using the On-Premises Connector. These instructions may beadapted for other load balancers, such as NGINX and F5.
The Hybrid Data Pipeline installation program automatically generates an HAProxy configuration file for eachinstallation of the server. These HAProxy configuration files are written to the HAProxy subdirectory in the keylocation directory specified during installation. These files must be merged to create a single HAProxyconfiguration file for a load balancer deployment of Hybrid Data Pipeline.
Take the following steps to create an HAProxy configuration file for a load balancer deployment using theOn-Premises Connector.
1. Create an Access Control List (ACL) to direct requests for the On-Premises Connector to each Hybrid DataPipeline server.
Progress DataDirect Hybrid Data Pipeline: Deployment and Best Practices Guide: Version Release 4.6.116
Chapter 2: Deployment scenarios

Note: Options 1 and 2 below may be used in combination.
• Option 1. Use a custom header to direct requests. Each entry should be prefaced with acl.
In this example, the custom header X-DataDirect-OPC-Host is used to direct requests to the serverservice2.myserver.com through the default On-Premises Port 40501.
acl is_opa_hdr_service2_myserver_com_40501 hdr(X-DataDirect-OPC-Host)-i opa_service2_myserver_com_40501use_backend opa_service2_myserver_com_40501 if is_opa_hdr_service2_myserver_com_40501
• Option 2. Use URL routing to direct requests. Each entry should be prefaced with acl.
In this example, URL routing is used to direct requests to the server service2.myserver.com throughthe default On-Premises Port 40501.
acl is_opa_url_service2_myserver_com_40501 path_end-i /connect/opa_service2_myserver_com_40501use_backend opa_service2_myserver_com_40501 if is_opa_url_service2_myserver_com_40501
2. Add each Hybrid Data Pipeline server to the backend notification pool section using the server keyword.
In the following example, the server server2.myserver.com has been added to the backendhdp_notification_pool section, and health checks have been enabled at the root with the optionhttpchk property.
backend hdp_notification_poolmode httpoption http-tunnelbalance roundrobinoption httpchk HEAD /http-check expect status 200
#HDP Notification Server Definitionsserver server1.myserver.com 11.22.111.105:11280 checkserver server2.myserver.com 11.22.111.106:11280 check
3. Create a backend pool that specifies the On-Premises Port for each Hybrid Data Pipeline server that supportsthe On-Premises Connector by adding a backend section to the configuration file.
For example, the following backend section is for a node on the service2.myserver.com server usingthe default On-Premises Port 40501. Health checks have been enabled at the root with the optionhttpchk property.
backend opa_service2_myserver_com_40501mode httpoption http-tunneloption httpchk HEAD /http-check expect status 200server service2.myserver.com 11.22.111.106:40501 check
4. Add each Hybrid Data Pipeline server to the default backend pool using the server keyword.
In the following example, server2.myserver.com has been added to the backendhdp_default_backend pool, and health checks have been enabled by specifying the /api/healthcheckendpoint with the option httpchk property.
backend hdp_default_backendmode httpbalance roundrobinoption httpchk HEAD /api/healthcheck
17Progress DataDirect Hybrid Data Pipeline: Deployment and Best Practices Guide: Version Release 4.6.1
Load balancer deployment
http-check expect status 200cookie HDP_SESSION insert nocache
#HDP Server Definitionsserver service1.myserver.com 11.22.11.105:8080 check cookie service1.myserver.com
server service2.myserver.com 11.22.111.106:8080 check cookie service2.myserver.com
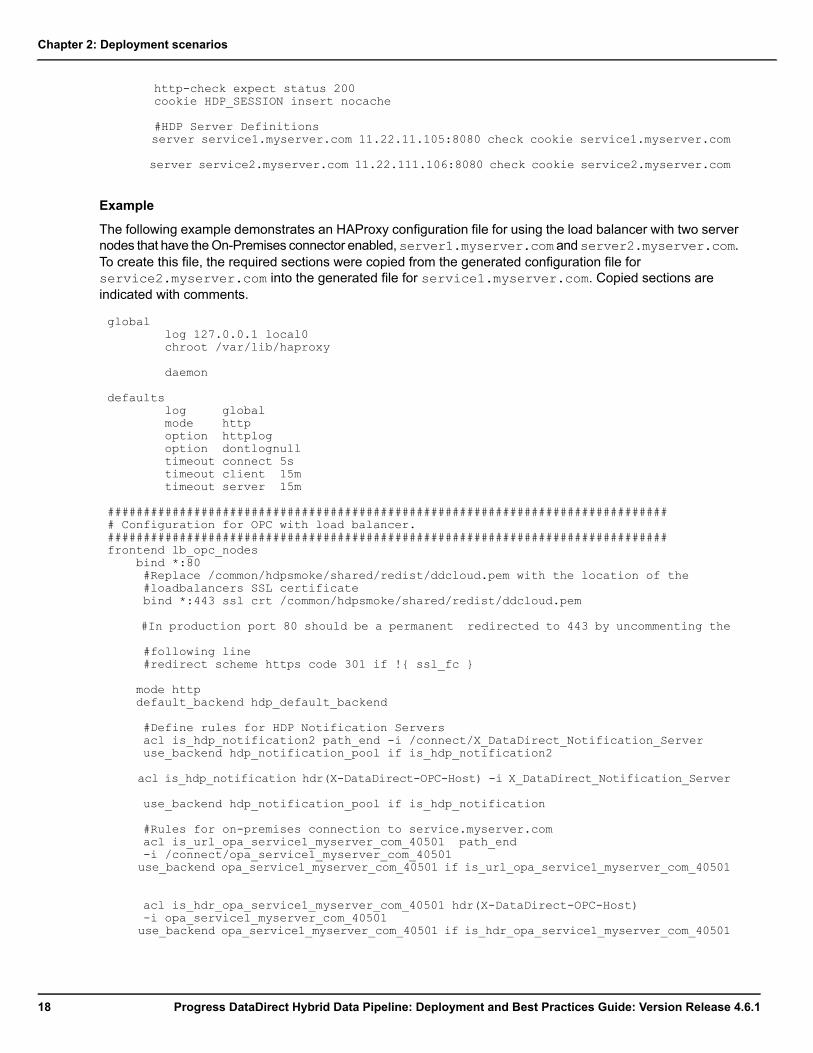
Example
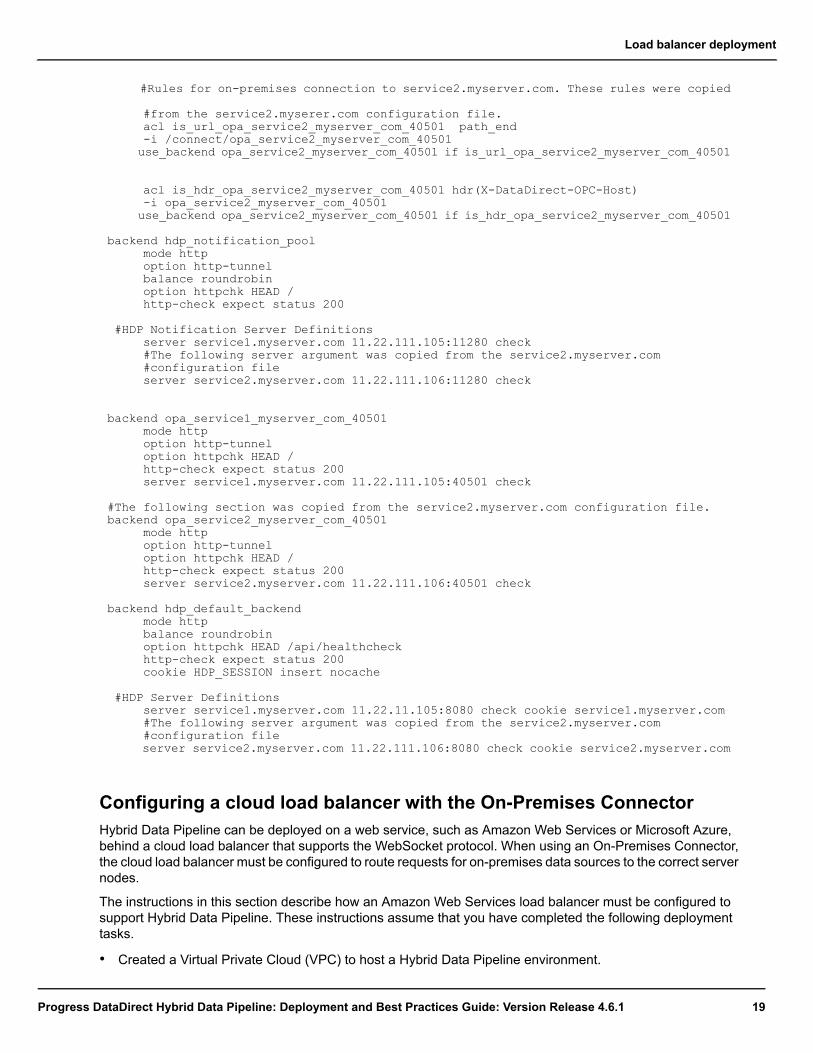
The following example demonstrates an HAProxy configuration file for using the load balancer with two servernodes that have theOn-Premises connector enabled,server1.myserver.com andserver2.myserver.com.To create this file, the required sections were copied from the generated configuration file forservice2.myserver.com into the generated file for service1.myserver.com. Copied sections areindicated with comments.
globallog 127.0.0.1 local0chroot /var/lib/haproxy
daemon
defaultslog globalmode httpoption httplogoption dontlognulltimeout connect 5stimeout client 15mtimeout server 15m
############################################################################### Configuration for OPC with load balancer.##############################################################################frontend lb_opc_nodes
bind *:80#Replace /common/hdpsmoke/shared/redist/ddcloud.pem with the location of the#loadbalancers SSL certificatebind *:443 ssl crt /common/hdpsmoke/shared/redist/ddcloud.pem
#In production port 80 should be a permanent redirected to 443 by uncommenting the
#following line#redirect scheme https code 301 if !{ ssl_fc }
mode httpdefault_backend hdp_default_backend
#Define rules for HDP Notification Serversacl is_hdp_notification2 path_end -i /connect/X_DataDirect_Notification_Serveruse_backend hdp_notification_pool if is_hdp_notification2
acl is_hdp_notification hdr(X-DataDirect-OPC-Host) -i X_DataDirect_Notification_Server
use_backend hdp_notification_pool if is_hdp_notification
#Rules for on-premises connection to service.myserver.comacl is_url_opa_service1_myserver_com_40501 path_end-i /connect/opa_service1_myserver_com_40501use_backend opa_service1_myserver_com_40501 if is_url_opa_service1_myserver_com_40501
acl is_hdr_opa_service1_myserver_com_40501 hdr(X-DataDirect-OPC-Host)-i opa_service1_myserver_com_40501use_backend opa_service1_myserver_com_40501 if is_hdr_opa_service1_myserver_com_40501
Progress DataDirect Hybrid Data Pipeline: Deployment and Best Practices Guide: Version Release 4.6.118
Chapter 2: Deployment scenarios
#Rules for on-premises connection to service2.myserver.com. These rules were copied
#from the service2.myserer.com configuration file.acl is_url_opa_service2_myserver_com_40501 path_end-i /connect/opa_service2_myserver_com_40501use_backend opa_service2_myserver_com_40501 if is_url_opa_service2_myserver_com_40501
acl is_hdr_opa_service2_myserver_com_40501 hdr(X-DataDirect-OPC-Host)-i opa_service2_myserver_com_40501use_backend opa_service2_myserver_com_40501 if is_hdr_opa_service2_myserver_com_40501
backend hdp_notification_poolmode httpoption http-tunnelbalance roundrobinoption httpchk HEAD /http-check expect status 200
#HDP Notification Server Definitionsserver service1.myserver.com 11.22.111.105:11280 check#The following server argument was copied from the service2.myserver.com#configuration fileserver service2.myserver.com 11.22.111.106:11280 check
backend opa_service1_myserver_com_40501mode httpoption http-tunneloption httpchk HEAD /http-check expect status 200server service1.myserver.com 11.22.111.105:40501 check
#The following section was copied from the service2.myserver.com configuration file.backend opa_service2_myserver_com_40501
mode httpoption http-tunneloption httpchk HEAD /http-check expect status 200server service2.myserver.com 11.22.111.106:40501 check
backend hdp_default_backendmode httpbalance roundrobinoption httpchk HEAD /api/healthcheckhttp-check expect status 200cookie HDP_SESSION insert nocache
#HDP Server Definitionsserver service1.myserver.com 11.22.11.105:8080 check cookie service1.myserver.com#The following server argument was copied from the service2.myserver.com#configuration fileserver service2.myserver.com 11.22.111.106:8080 check cookie service2.myserver.com
Configuring a cloud load balancer with the On-Premises ConnectorHybrid Data Pipeline can be deployed on a web service, such as Amazon Web Services or Microsoft Azure,behind a cloud load balancer that supports the WebSocket protocol. When using an On-Premises Connector,the cloud load balancer must be configured to route requests for on-premises data sources to the correct servernodes.
The instructions in this section describe how an Amazon Web Services load balancer must be configured tosupport Hybrid Data Pipeline. These instructions assume that you have completed the following deploymenttasks.
• Created a Virtual Private Cloud (VPC) to host a Hybrid Data Pipeline environment.
19Progress DataDirect Hybrid Data Pipeline: Deployment and Best Practices Guide: Version Release 4.6.1
Load balancer deployment
• Created AWS compute instances in the VPC for each node that will be used to support the Hybrid DataPipeline environment.
• Provisioned an RDS database instance to operate as a system database for storing user and configurationinformation.
• Created a file system on a node in the VPC to be used as the key location for shared files.
• Installed the Hybrid Data Pipeline server on each node that will be hosting the service.
• The key location specified during the initial installation must reside on a node in the VPC.
• The system database specified during initial installation must be the RDS database instance for storinguser and configuration information.
• Created an AWS Application Load Balancer in the VPC to connect to Hybrid Data Pipeline.
The following general steps must be taken to configure routing and listening rules in the AWS Application LoadBalancer. The corresponding topics provide detailed instruction for each step.
1. Create a target group for default routing to the Hybrid Data Pipeline service API on page 20
2. Create a target group for notifications on page 20
3. Create a target group for on-premises access on page 21
4. Configure target routing on page 21
Once the Application Load Balancer has been configured with listener and target group rules, you can installOn-Premises Connectors.
Create a target group for default routing to the Hybrid Data Pipeline service APITake the following steps to create a target group for default routing.
1. Use the AWS console to create a load balancer target group.
2. Specify target group details.
Name - <Name for your HDP cluster nodes>Protocol – HTTPPort 8080Target type – InstanceVPC <Name of your VPC>
3. Set up health checks.
Protocol: HTTPPort: 8080Path: /api/healthcheck
4. Save the target group.
5. Register each Hybrid Data Pipeline instance as a target on port 8080.
6. Set the stickiness attribute for the target group to 5 minutes.
Create a target group for notificationsTake the following steps to create a target group for notifications.
Progress DataDirect Hybrid Data Pipeline: Deployment and Best Practices Guide: Version Release 4.6.120
Chapter 2: Deployment scenarios

1. Use the AWS console to create a load balancer target group.
2. Specify target group details.
Target Group Name: <Name for your Notification Server Group>Protocol HTTPPort 11280Target type instanceVPC <Name of your VPC>
3. Set up health checks.
Protocol: HTTPPath: /Port: Select traffic port
4. Save the target group.
5. Register each Hybrid Data Pipeline instance as a target on port 11280.
6. Disable stickiness via the stickiness attribute.
Create a target group for on-premises accessTake the following steps to create a target group for on-premises access.
1. Use the AWS console to create a load balancer target group.
2. Specify target group details.
Target Group Name: <Name for your 1st OPA Target Group>Protocol HTTPPort 40501Target type instanceVPC <Name of your VPC>
3. Set up health checks.
Protocol: HTTPPath: /Port: Select traffic port
4. Save the target group.
5. Register the first Hybrid Data Pipeline instance as a target on port 40501.
6. Disable stickiness via the stickiness attribute.
7. Repeat steps 1 through 6 for each Hybrid Data Pipeline instance.
Configure target routingTake the following steps to configure target routing.
1. Create a rule to route to the notifications target group by setting Path is to/connect/X_DataDirect_Notification_Server.
21Progress DataDirect Hybrid Data Pipeline: Deployment and Best Practices Guide: Version Release 4.6.1
Load balancer deployment
Note: For load balancers that support routing with HTTP headers, the headerX-DataDirect-OPC-Host:X_DataDirect_Notification_Server should be used.
2. For each node running the Hybrid Data Pipeline service, create a rule to route to the correspondingon-premises access target by setting Path is to /connect/<opa_routing_key>.
Note: The format of the <opa_routing_key> is opa_<hosturl>_<opaport> where <hosturl> isthe hostname specified during installation with dot characters replaced by underscores, and <opaport>is the On-Premises Access port number. For example, the routing key for nc-d2c02.americas.test.comon port 40501 would be opa_nc-d2c73_americas_test_com_40501.
3. Create a default routing rule. The Forward to attribute should be set to the Hybrid Data Pipeline serviceAPI target group.
Important: Setting the default rule for routing requests to the Hybrid Data Pipeline service API must becompleted after creating the rules for routing to the On-Premises Access and Notifications servers.
System database for load balancer deploymentHybrid Data Pipeline requires a system database for storing user and configuration information. When deployingthe service behind a load balancer, you must use a supported external database. An external system databaseensures that user and configuration information is consistent across multiple nodes behind the load balancer.These nodes use the system information on the external system database to access data and return successfulqueries. In addition, an external system database provides better security and more flexibility for backing upsystem information. As a best practice, the external system database should be replicated, or mirrored, topromote the continuous availability of the service. Configuring Hybrid Data Pipeline to use a system databaseoccurs during installation.
External system databasesHybrid Data Pipeline requires a system database for storing sensitive information used in the operation of thedata access service. For a standalone node deployment, you can opt to use either the embedded internaldatabase or a supported external database. For a load balancer deployment, youmust use an external database.Depending on the external database you are using, certain requirements must be met. See the followingsections for details.
• Supported databases on page 22
• Oracle requirements
• MySQL Community Edition requirements on page 23
• Microsoft SQL Server requirements on page 24
• PostgreSQL requirements on page 24
Supported databases
Note: Hybrid Data Pipeline supports Amazon RDS instances that are compatible with these supported databaseversions.
Progress DataDirect Hybrid Data Pipeline: Deployment and Best Practices Guide: Version Release 4.6.122
Chapter 2: Deployment scenarios
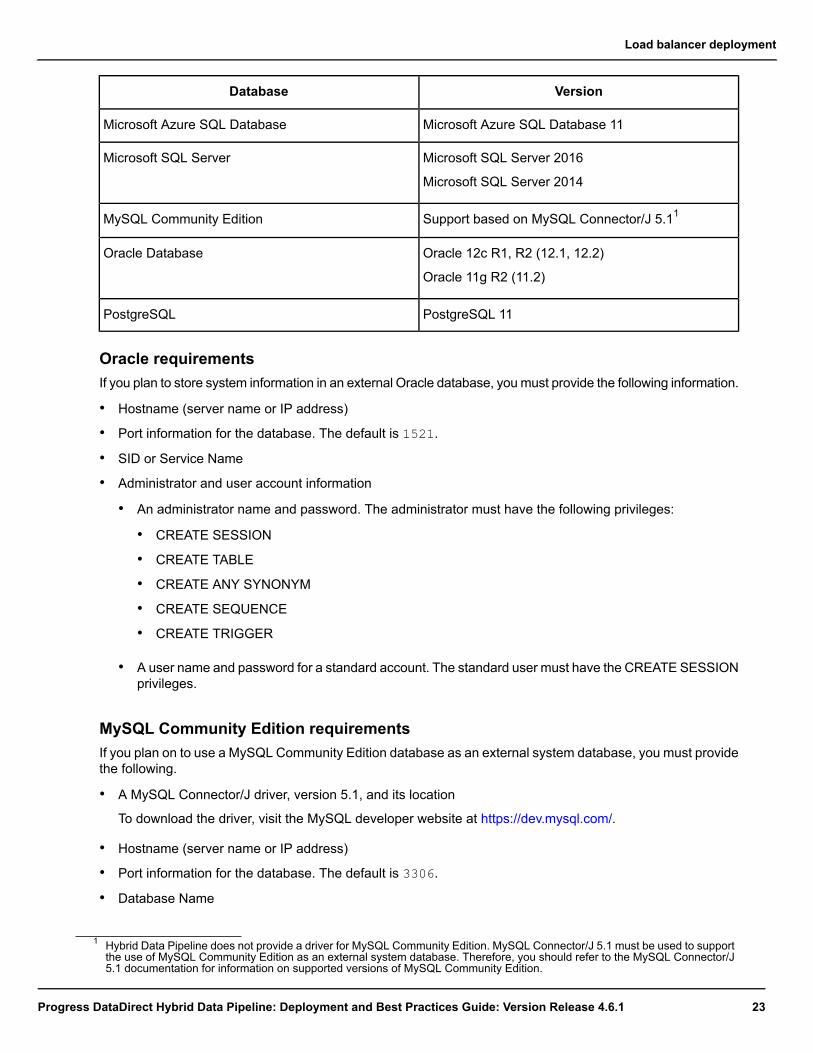
VersionDatabase
Microsoft Azure SQL Database 11Microsoft Azure SQL Database
Microsoft SQL Server 2016
Microsoft SQL Server 2014
Microsoft SQL Server
Support based on MySQL Connector/J 5.11MySQL Community Edition
Oracle 12c R1, R2 (12.1, 12.2)
Oracle 11g R2 (11.2)
Oracle Database
PostgreSQL 11PostgreSQL
Oracle requirementsIf you plan to store system information in an external Oracle database, youmust provide the following information.
• Hostname (server name or IP address)
• Port information for the database. The default is 1521.
• SID or Service Name
• Administrator and user account information
• An administrator name and password. The administrator must have the following privileges:
• CREATE SESSION
• CREATE TABLE
• CREATE ANY SYNONYM
• CREATE SEQUENCE
• CREATE TRIGGER
• A user name and password for a standard account. The standard user must have the CREATE SESSIONprivileges.
MySQL Community Edition requirementsIf you plan on to use a MySQL Community Edition database as an external system database, you must providethe following.
• A MySQL Connector/J driver, version 5.1, and its location
To download the driver, visit the MySQL developer website at https://dev.mysql.com/.
• Hostname (server name or IP address)
• Port information for the database. The default is 3306.
• Database Name
1 Hybrid Data Pipeline does not provide a driver for MySQL Community Edition. MySQL Connector/J 5.1 must be used to supportthe use of MySQL Community Edition as an external system database. Therefore, you should refer to the MySQL Connector/J5.1 documentation for information on supported versions of MySQL Community Edition.
23Progress DataDirect Hybrid Data Pipeline: Deployment and Best Practices Guide: Version Release 4.6.1
Load balancer deployment
• Administrator and user account information:
• An administrator user name and password. The administrator must have the following privileges:
• ALTER
• CREATE
• DROP
• DELETE
• INDEX
• INSERT
• REFERENCES
• SELECT
• UPDATE
• A user name and password for a standard account. The standard user must have the following privileges:
• DELETE
• INSERT
• SELECT
• UPDATE
Microsoft SQL Server requirementsIf you plan to store system information in an external SQL Server database, you must take the following stepswhen setting up the SQL Server database.
1. Create a database schema to be used for storing Hybrid Data Pipeline system information.
2. Create an administrator who can access the newly created schema. The administrator must have theCREATE TABLE privileges.
3. Create a user who can access the newly created schema. The user must have the CREATE SESSIONprivileges.
After the SQL Server database has been setup, you must provide the following information during installation:
• Hostname (server name or IP address)
• Port information for the database. The default is 1433.
• Database Name
• Schema Name
• Administrator and user account information
• An administrator name and password. The administrator must have the CREATE TABLE privileges.
• A user name and password for a standard account. The user must have the CREATESESSION privileges.
PostgreSQL requirementsIf you plan to store system information on an external PostgreSQL database, you must take the following stepswhen setting up the PostgreSQL database.
Progress DataDirect Hybrid Data Pipeline: Deployment and Best Practices Guide: Version Release 4.6.124
Chapter 2: Deployment scenarios
1. Enable the citext PostgreSQL extension.
2. Create a database schema to be used for storing Hybrid Data Pipeline system information.
3. Create an administrator who can access the newly created schema. The administrator must have privilegesto create tables.
4. Create a user who can access the newly created schema. The user must have privileges to select, insert,update, delete, and sequence tables.
After the PostgreSQL database has been setup, you must provide the following information during installation:
• Hostname (server name or IP address)
• Port information for the database. The default is 5432.
• Database Name
• Administrator and user account information
• An administrator name and password. The administrator must have privileges to create tables.
• A user name and password for a standard account. The user must have privileges to select, insert,update, delete, and sequence tables.
Shared files and the key location for load balancer deploymentHybrid Data Pipeline requires the specification of a key location during installation. The installation programwrites shared files used in the operation of the data access service to this directory. For a load balancerdeployment, the key location must be accessible to the node or nodes running the service.
Shared filesThe following files are stored in the key location for a load balancer deployment.
• .backup: A backup copy of the contents of the install directory from the previous install. This is used torestore the contents of the directory if there is an error during an upgrade.
• key: Reference to the file containing the encryption key for the Hybrid Data Pipeline database.
• key00: Encryption key for the system database. This key is used to encrypt sensitive information such asdata source user IDs and passwords, security tokens, access tokens and other user or data source identifyinginformation. If this is not present, or was over written during the installation, then you will not be able decryptany of the encrypted information in the system database.
• key-cred: Encryption key for credentials contained in Hybrid Data Pipeline configuration files. Examplesof credentials in the config files include the user ID and password information for the system database.
• db/*: Encrypted information about the system database. The contents of these files are encrypted usingthe key-cred key. Used by the installer when performing an upgrade or installing on an additional node.If these are not present, or do not have valid encoding, the installation or upgrade will fail.
• dddrivers/*: A directory of internally supported drivers that have been updated after a product upgrade.
• drivers/*: The directory used for integrating third party drivers with Hybrid Data Pipeline.
• plugins/*: JAR files for external authentication plugins.
• authKey: Authentication key for the On-Premises Connector. This key is used to encrypt the user ID andpassword information in the On-Premises Connector configuration file. The key in this file is encrypted usinga key built into the On-Premises Connector. This encrypted key is included in the OnPremise.properties
25Progress DataDirect Hybrid Data Pipeline: Deployment and Best Practices Guide: Version Release 4.6.1
Load balancer deployment

configuration file distributed with the On-Premises Connector. If this is overwritten or incorrect, theOn-Premises Connector will not be able to authenticate with Hybrid Data Pipeline.
• ddcloud.jks: Sun SSL keystore. This keystore contains the Hybrid Data Pipeline server SSL certificateif the SSL termination is done at the Hybrid Data Pipeline server.
• ddcloud.bks: Bouncy Castle SSL keystore. This keystore contains the same SSL certificate as theddcloud.jks keystore. This keystore is in the Bouncy Castle keystore format and is used when the serveris configured to run in FIPS compliant mode. Should only be present with FIPS enabled.
• ddcloudTrustStore.jks: Sun SSL truststore. This trustore contains the root CA certificate needed tovalidate the server SSL certificate. This truststore is distributed with the On-Premises Connector and withthe ODBC and JDBC drivers, allowing these components to validate the Hybrid Data Pipeline servercertificate.
• ddcloudTrustStore.bks: Bouncy Castle SSL truststore. Should only be present with FIPS enabled.This truststore contains the root CA certificate needed to validate the server SSL certificate in the BouncyCastle keystore format. The Bouncy Castle SSL library does not use the default Java cacerts file, so thistruststore is populated with the contents of the default cacerts file and the root certificate needed to validatethe Hybrid Data Pipeline server certificate. Should only be present with FIPS enabled.
• key-opc: Contains the unencrypted encryption key. The authKey above contains the encrypted versionof this key. This key is not shipped with the On-Premises Connector.
• global.properties: Stores properties and other information shared between nodes in a cluster.
• redist/*: Redistributable files. These files are used to install the On-Premises Connector and the ODBCand JDBC drivers.
Access ports for load balancer deploymentMultiple access ports on nodes hosting the Hybrid Data Pipeline server must be opened and unassigned toother functions. The following tables document the required ports and default port numbers. The installationprogram for the Hybrid Data Pipeline server confirms that default ports are available and allows new port valuesto be assigned when needed. Port values are passed during the installation of Hybrid Data Pipeline servers.
Server Access PortA Server Access Port must be opened for the load balancer. As a matter of best practices, the load balancershould be configured for SSL/TLS termination.
DescriptionDefaultName
Port that exposes Hybrid Data Pipeline8080HTTP Port
Server Internal PortsThe Shutdown Port must be opened. However, as a matter of best practice, the Shutdown Port should not beavailable outside the firewall of the Hybrid Data Pipeline server. For a load balancer installation, the InternalAPI Port on any node must be open to all the other nodes in the cluster. The Internal API Port should not beavailable outside the firewall.
DescriptionDefaultName
Non-SSL port for the Internal API8190Internal API Port
Shutdown port8005Shutdown Port
Progress DataDirect Hybrid Data Pipeline: Deployment and Best Practices Guide: Version Release 4.6.126
Chapter 2: Deployment scenarios
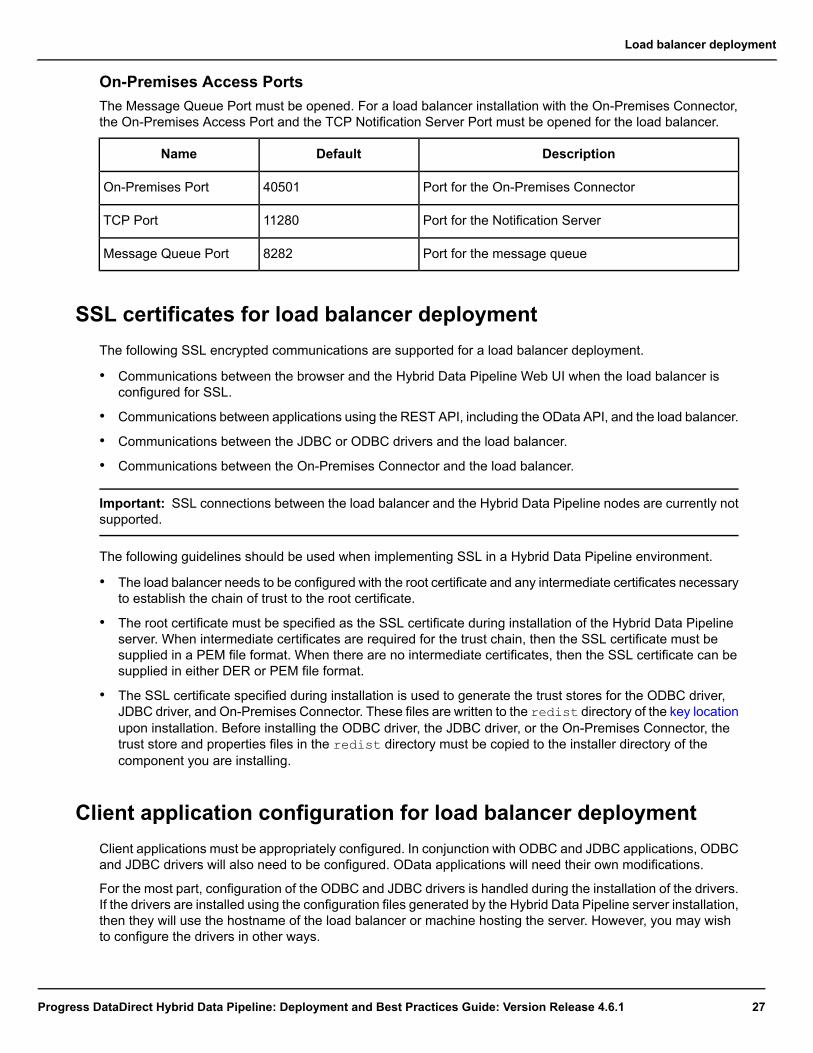
On-Premises Access PortsThe Message Queue Port must be opened. For a load balancer installation with the On-Premises Connector,the On-Premises Access Port and the TCP Notification Server Port must be opened for the load balancer.
DescriptionDefaultName
Port for the On-Premises Connector40501On-Premises Port
Port for the Notification Server11280TCP Port
Port for the message queue8282Message Queue Port
SSL certificates for load balancer deploymentThe following SSL encrypted communications are supported for a load balancer deployment.
• Communications between the browser and the Hybrid Data Pipeline Web UI when the load balancer isconfigured for SSL.
• Communications between applications using the REST API, including the OData API, and the load balancer.
• Communications between the JDBC or ODBC drivers and the load balancer.
• Communications between the On-Premises Connector and the load balancer.
Important: SSL connections between the load balancer and the Hybrid Data Pipeline nodes are currently notsupported.
The following guidelines should be used when implementing SSL in a Hybrid Data Pipeline environment.
• The load balancer needs to be configured with the root certificate and any intermediate certificates necessaryto establish the chain of trust to the root certificate.
• The root certificate must be specified as the SSL certificate during installation of the Hybrid Data Pipelineserver. When intermediate certificates are required for the trust chain, then the SSL certificate must besupplied in a PEM file format. When there are no intermediate certificates, then the SSL certificate can besupplied in either DER or PEM file format.
• The SSL certificate specified during installation is used to generate the trust stores for the ODBC driver,JDBC driver, and On-Premises Connector. These files are written to the redist directory of the key locationupon installation. Before installing the ODBC driver, the JDBC driver, or the On-Premises Connector, thetrust store and properties files in the redist directory must be copied to the installer directory of thecomponent you are installing.
Client application configuration for load balancer deploymentClient applications must be appropriately configured. In conjunction with ODBC and JDBC applications, ODBCand JDBC drivers will also need to be configured. OData applications will need their own modifications.
For the most part, configuration of the ODBC and JDBC drivers is handled during the installation of the drivers.If the drivers are installed using the configuration files generated by the Hybrid Data Pipeline server installation,then they will use the hostname of the load balancer or machine hosting the server. However, you may wishto configure the drivers in other ways.
27Progress DataDirect Hybrid Data Pipeline: Deployment and Best Practices Guide: Version Release 4.6.1
Load balancer deployment
OData applications must be modified to use the hostname of the load balancer for HTTP or HTTPS requests.Additionally, for optimal performance, OData applications should be configured to echo cookies for sessionaffinity. OData applications must also be configured appropriately for SSL. See Node-to-node communicationin OData Hybrid Data Pipeline load balancer environment on page 28 for details on communication betweennodes when an OData client cannot be configured to echo cookies.
Node-to-node communication in OData Hybrid Data Pipeline load balancerenvironmentIn an OData Hybrid Data Pipeline load balancer environment, the load balancer and OData clients should beconfigured to handle cookies to achieve session affinity and optimize OData query performance. The loadbalancer should supply its own cookies or pass the cookies generated by the Hybrid Data Pipeline serviceback to the OData client. In turn, the OData client should echo cookies to allow the load balancer to directquery requests to the node that initially received the query.
However, it is not always possible to configure an OData client to echo cookies. In such cases, Hybrid DataPipeline uses an internal mechanism called the distributed file persistence manager. When a query is executedthat requires file persistence, execution results are stored temporarily on the node that initially received thequery. The manager associates the query with the node and the execution results stored there. If a requestfrom the same query is routed to a different node in the cluster, the manager obtains the persisted executionresults from the original node. The query results are then returned to the client by the node that received therequest.
The distributed file persistence manager requires node-to-node communication using the HTTP protocol toachieve session affinity. The Internal API Port specified during Hybrid Data Pipeline server installation is theport used for this node-to-node communication. Data remains secure in the following respects. First, the InternalAPI Port (8190 default) is not exposed externally to the public facing network. Each node registers itself usingthis port, and communications are restricted. Second, a UUID is generated during the node registration process.This UUID is passed in as an HTTP header to confirm the validity of node-to-node communications. Third, theservice stores persisted files on only a temporary basis.
Browser configuration for load balancer deploymentFor load balancer deployments of Hybrid Data Pipeline, the browser you use to connect to the Web UI musthave cookies enabled.
Standalone deploymentHybrid Data Pipeline configuration depends in part on whether you are deploying the service on a standalonenode or deploying the service on one or more nodes behind a load balancer. The standalone deploymentsimplifies installation and administration of the service. For this reason, the standalone deployment is an efficientway to test proof of concepts and evaluate the service. In a standalone deployment, the service is installed ona single host machine and queries must be directed to this machine.
Hybrid Data Pipeline is largely configured during the installation process. The following configuration detailsshould be addressed before installation to ensure a successful standalone deployment.
• Login credentials for standalone deployment on page 29
Passwords for the default administrator and user accounts must be specified during installation of the HybridData Pipeline server. When initially logging in to the Web UI or using the API, you must authenticate as oneof these users.
Progress DataDirect Hybrid Data Pipeline: Deployment and Best Practices Guide: Version Release 4.6.128
Chapter 2: Deployment scenarios
• System database for standalone deployment on page 30
A system database is required for storing user and configuration information. For standalone deployments,you can use either the embedded internal database or a supported external database to serve as the systemdatabase. However, an external system database should be used in production environments.
• Shared files and the key location for standalone deployment on page 33
The installation program creates shared files used in the operation of the data access service. Duringinstallation, you choose where and how these files should be stored. In a production environment, the filesused to connect to the system database should be secured on a machine separate from the machineshosting the Hybrid Data Pipeline service and the system database. In addition, all shared files should bebacked up as a matter of best practices. In the case of system failure, these backups can be used to restorethe service.
• Access ports for standalone deployment on page 34
The access ports used for Hybrid Data Pipeline should be enabled for incoming traffic and unallocated forother purposes.
• SSL certificates for standalone deployment on page 35
To implement SSL/TLS in a Hybrid Data Pipeline environment, an SSL certificate file must be specifiedduring installation. For standalone deployments, a self-signed certificate is available for testing or evaluationpurposes, but a PEM file should be specified to enable SSL in a production environment.
• Application and driver configuration for standalone deployment on page 40
Applications and drivers must be properly configured to ensure a successful deployment of the service.
• Firewall and port redirection using iptables for standalone deployment on page 40
Hybrid Data Pipeline Web UI and API endpoints are exposed by default on port 8080 for HTTP connectionsor port 8443 for HTTPS connections. The iptables firewall utility can be used to route connections from thestandard HTTP port 80 and HTTPS port 443 to these endpoints.
Login credentials for standalone deploymentYou must specify passwords for the default d2cadmin and d2cuser accounts during installation of the HybridData Pipeline server. The default password policy is not enforced during installation of the server. However,best practices recommend that you follow the default password policy when specifying these account passwords.When initially logging in to the Web UI or using Hybrid Data Pipeline APIs, you must authenticate as one ofthese users.
Hybrid Data Pipeline default password policy
After installation, Hybrid Data Pipeline enforces the following password policy by default.
• The password must contain at least 8 characters.
• The password must not contain more than 12 characters. A password with a length of 12 characters isacceptable.
• The password must not contain the username.
• Characters from at least three of the following four groups must be used in the password:
• Uppercase letters A-Z
• Lowercase letters a-z
29Progress DataDirect Hybrid Data Pipeline: Deployment and Best Practices Guide: Version Release 4.6.1
Standalone deployment
• Numbers 0-9
• Non-white space special characters
System database for standalone deploymentHybrid Data Pipeline requires a system database for storing user and configuration information. When deployingthe service on a standalone node, you can opt to use either the embedded internal database or a supportedexternal database. A standalone installation with an internal system database is the quickest way to get HybridData Pipeline up and running. With this deployment, the service can be installed and administered from a singlemachine. This deployment is an efficient way to test and evaluate the service. However, for a productionenvironment, an external system database should be used. An external system database provides bettersecurity and more flexibility for backing up system information. As a best practice, the external system databaseshould be replicated, or mirrored, to promote the continuous availability of the service. Configuring Hybrid DataPipeline to use a system database occurs during installation.
External system databasesHybrid Data Pipeline requires a system database for storing sensitive information used in the operation of thedata access service. For a standalone node deployment, you can opt to use either the embedded internaldatabase or a supported external database. For a load balancer deployment, youmust use an external database.Depending on the external database you are using, certain requirements must be met. See the followingsections for details.
• Supported databases on page 30
• Oracle requirements
• MySQL Community Edition requirements on page 31
• Microsoft SQL Server requirements on page 32
• PostgreSQL requirements on page 32
Supported databases
Note: Hybrid Data Pipeline supports Amazon RDS instances that are compatible with these supported databaseversions.
VersionDatabase
Microsoft Azure SQL Database 11Microsoft Azure SQL Database
Microsoft SQL Server 2016
Microsoft SQL Server 2014
Microsoft SQL Server
Support based on MySQL Connector/J 5.12MySQL Community Edition
2 Hybrid Data Pipeline does not provide a driver for MySQL Community Edition. MySQL Connector/J 5.1 must be used to supportthe use of MySQL Community Edition as an external system database. Therefore, you should refer to the MySQL Connector/J5.1 documentation for information on supported versions of MySQL Community Edition.
Progress DataDirect Hybrid Data Pipeline: Deployment and Best Practices Guide: Version Release 4.6.130
Chapter 2: Deployment scenarios
VersionDatabase
Oracle 12c R1, R2 (12.1, 12.2)
Oracle 11g R2 (11.2)
Oracle Database
PostgreSQL 11PostgreSQL
Oracle requirementsIf you plan to store system information in an external Oracle database, youmust provide the following information.
• Hostname (server name or IP address)
• Port information for the database. The default is 1521.
• SID or Service Name
• Administrator and user account information
• An administrator name and password. The administrator must have the following privileges:
• CREATE SESSION
• CREATE TABLE
• CREATE ANY SYNONYM
• CREATE SEQUENCE
• CREATE TRIGGER
• A user name and password for a standard account. The standard user must have the CREATE SESSIONprivileges.
MySQL Community Edition requirementsIf you plan on to use a MySQL Community Edition database as an external system database, you must providethe following.
• A MySQL Connector/J driver, version 5.1, and its location
To download the driver, visit the MySQL developer website at https://dev.mysql.com/.
• Hostname (server name or IP address)
• Port information for the database. The default is 3306.
• Database Name
• Administrator and user account information:
• An administrator user name and password. The administrator must have the following privileges:
• ALTER
• CREATE
• DROP
• DELETE
• INDEX
• INSERT
31Progress DataDirect Hybrid Data Pipeline: Deployment and Best Practices Guide: Version Release 4.6.1
Standalone deployment
• REFERENCES
• SELECT
• UPDATE
• A user name and password for a standard account. The standard user must have the following privileges:
• DELETE
• INSERT
• SELECT
• UPDATE
Microsoft SQL Server requirementsIf you plan to store system information in an external SQL Server database, you must take the following stepswhen setting up the SQL Server database.
1. Create a database schema to be used for storing Hybrid Data Pipeline system information.
2. Create an administrator who can access the newly created schema. The administrator must have theCREATE TABLE privileges.
3. Create a user who can access the newly created schema. The user must have the CREATE SESSIONprivileges.
After the SQL Server database has been setup, you must provide the following information during installation:
• Hostname (server name or IP address)
• Port information for the database. The default is 1433.
• Database Name
• Schema Name
• Administrator and user account information
• An administrator name and password. The administrator must have the CREATE TABLE privileges.
• A user name and password for a standard account. The user must have the CREATESESSION privileges.
PostgreSQL requirementsIf you plan to store system information on an external PostgreSQL database, you must take the following stepswhen setting up the PostgreSQL database.
1. Enable the citext PostgreSQL extension.
2. Create a database schema to be used for storing Hybrid Data Pipeline system information.
3. Create an administrator who can access the newly created schema. The administrator must have privilegesto create tables.
4. Create a user who can access the newly created schema. The user must have privileges to select, insert,update, delete, and sequence tables.
After the PostgreSQL database has been setup, you must provide the following information during installation:
• Hostname (server name or IP address)
• Port information for the database. The default is 5432.
Progress DataDirect Hybrid Data Pipeline: Deployment and Best Practices Guide: Version Release 4.6.132
Chapter 2: Deployment scenarios

• Database Name
• Administrator and user account information
• An administrator name and password. The administrator must have privileges to create tables.
• A user name and password for a standard account. The user must have privileges to select, insert,update, delete, and sequence tables.
Shared files and the key location for standalone deploymentHybrid Data Pipeline requires the specification of a key location during installation. For a standalone deployment,if you use the default key location, the installation program writes the shared files used in the operation of thedata access service to the local keystore directory (<install_dir>/ddcloud/keystore). If you specify adifferent location as the key location, the installation program writes the shared files to two separate locations.The files necessary for connecting to the system database are stored in the specified location, while files tiedto the Hybrid Data Pipeline server are stored in the local keystore directory(<install_dir>/ddcloud/keystore).
In a production environment, the files used to connect to the system database should be secured on a machineseparate from the machines hosting the Hybrid Data Pipeline service and the system database. Therefore, aseparate location should be specified for the key location.
Whether located in a single directory or two separate directories, all shared files should be backed up as amatter of best practices. In the case of system failure, these backups can be used to restore the service.
Note: During installation of the Hybrid Data Pipeline server, four configuration and certificate files are generated.These files are used in the installation of components, including the ODBC driver, the JDBC driver, and theOn-Premises Connector. In a standalone node installation, the location of these files is independent of theshared location. These files are written to the <install_dir>/redist directory.
Shared filesThe following files are used to connect to the system database. When the default location is used for the keylocation, these files are stored in the local keystore directory (<install_dir>/ddcloud/keystore). Whena non-default location is used, these files are stored in the location specified during installation.
• .backup: A backup copy of the contents of the install directory from the previous install. This is used torestore the contents of the directory if there is an error during an upgrade.
• key: Reference to the file containing the encryption key for the Hybrid Data Pipeline database.
• key00: Encryption key for the system database. This key is used to encrypt sensitive information such asdata source user IDs and passwords, security tokens, access tokens and other user or data source identifyinginformation. If this is not present, or was over written during the installation, then you will not be able decryptany of the encrypted information in the system database.
• key-cred: Encryption key for credentials contained in Hybrid Data Pipeline configuration files. Examplesof credentials in the config files include the user ID and password information for the system database.
• db/*: Encrypted information about the system database. The contents of these files are encrypted usingthe key-cred key. Used by the installer when performing an upgrade or installing on an additional node.If these are not present, or do not have valid encoding, the installation or upgrade will fail.
• dddrivers/*: A directory of internally supported drivers that have been updated after a product upgrade.
• drivers/*: The directory used for integrating third party drivers with Hybrid Data Pipeline.
• plugins/*: JAR files for external authentication plugins
33Progress DataDirect Hybrid Data Pipeline: Deployment and Best Practices Guide: Version Release 4.6.1
Standalone deployment
The following files are tied to the Hybrid Data Pipeline server. They are stored in the local keystore directory(<install_dir>/ddcloud/keystore) whether or not the default key location is specified during installation.
• authKey: Authentication key for the On-Premises Connector. This key is used to encrypt the user ID andpassword information in the On-Premises Connector configuration file. The key in this file is encrypted usinga key built into the On-Premises Connector. This encrypted key is included in the OnPremise.propertiesconfiguration file distributed with the On-Premises Connector. If this is overwritten or incorrect, theOn-Premises Connector will not be able to authenticate with Hybrid Data Pipeline.
• ddcloud.jks: Sun SSL keystore. This keystore contains the Hybrid Data Pipeline server SSL certificateif the SSL termination is done at the Hybrid Data Pipeline server.
• ddcloud.bks: Bouncy Castle SSL keystore. This keystore contains the same SSL certificate as theddcloud.jks keystore. This keystore is in the Bouncy Castle keystore format and is used when the serveris configured to run in FIPS compliant mode. Should only be present with FIPS enabled.
• ddcloudTrustStore.jks: Sun SSL truststore. This trustore contains the root CA certificate needed tovalidate the server SSL certificate. This truststore is distributed with the On-Premises Connector and withthe ODBC and JDBC drivers, allowing these components to validate the Hybrid Data Pipeline servercertificate.
• ddcloudTrustStore.bks: Bouncy Castle SSL truststore. Should only be present with FIPS enabled.This truststore contains the root CA certificate needed to validate the server SSL certificate in the BouncyCastle keystore format. The Bouncy Castle SSL library does not use the default Java cacerts file, so thistruststore is populated with the contents of the default cacerts file and the root certificate needed to validatethe Hybrid Data Pipeline server certificate. Should only be present with FIPS enabled.
• key-opc: Contains the unencrypted encryption key. The authKey above contains the encrypted versionof this key. This key is not shipped with the On-Premises Connector.
Access ports for standalone deploymentMultiple access ports on the machine hosting the Hybrid Data Pipeline server must be opened and unassignedto other functions. The following tables document the required ports and default port numbers for standalonedeployments. The installation program for the Hybrid Data Pipeline server confirms that default ports areavailable and allows new port values to be assigned when needed. Port values are passed during the installationof Hybrid Data Pipeline servers.
Server Access PortFor a standalone installation, a Server Access Port must be available across the firewall of the Hybrid DataPipeline server. Using an HTTPS port is recommended.
DescriptionDefaultName
Port that exposes Hybrid Data Pipeline8080HTTP Port
SSL port that exposes Hybrid Data Pipeline8443HTTPS Port
Server Internal PortsThe Shutdown Port must be opened. However, as a matter of best practice, the Shutdown Port should not beavailable outside the firewall of the Hybrid Data Pipeline server. For a standalone node installation, a port forthe Internal API must be opened. Using the Internal API SSL Port is recommended.
Progress DataDirect Hybrid Data Pipeline: Deployment and Best Practices Guide: Version Release 4.6.134
Chapter 2: Deployment scenarios
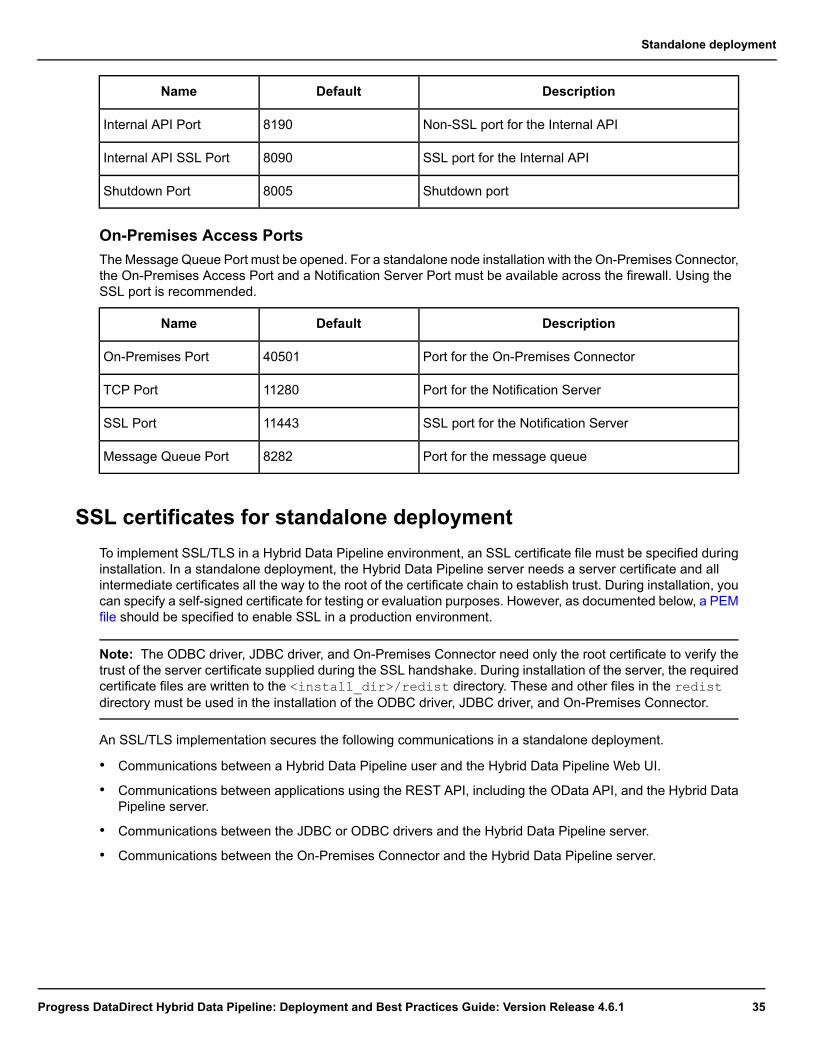
DescriptionDefaultName
Non-SSL port for the Internal API8190Internal API Port
SSL port for the Internal API8090Internal API SSL Port
Shutdown port8005Shutdown Port
On-Premises Access PortsTheMessage Queue Port must be opened. For a standalone node installation with the On-Premises Connector,the On-Premises Access Port and a Notification Server Port must be available across the firewall. Using theSSL port is recommended.
DescriptionDefaultName
Port for the On-Premises Connector40501On-Premises Port
Port for the Notification Server11280TCP Port
SSL port for the Notification Server11443SSL Port
Port for the message queue8282Message Queue Port
SSL certificates for standalone deploymentTo implement SSL/TLS in a Hybrid Data Pipeline environment, an SSL certificate file must be specified duringinstallation. In a standalone deployment, the Hybrid Data Pipeline server needs a server certificate and allintermediate certificates all the way to the root of the certificate chain to establish trust. During installation, youcan specify a self-signed certificate for testing or evaluation purposes. However, as documented below, a PEMfile should be specified to enable SSL in a production environment.
Note: The ODBC driver, JDBC driver, and On-Premises Connector need only the root certificate to verify thetrust of the server certificate supplied during the SSL handshake. During installation of the server, the requiredcertificate files are written to the <install_dir>/redist directory. These and other files in the redistdirectory must be used in the installation of the ODBC driver, JDBC driver, and On-Premises Connector.
An SSL/TLS implementation secures the following communications in a standalone deployment.
• Communications between a Hybrid Data Pipeline user and the Hybrid Data Pipeline Web UI.
• Communications between applications using the REST API, including the OData API, and the Hybrid DataPipeline server.
• Communications between the JDBC or ODBC drivers and the Hybrid Data Pipeline server.
• Communications between the On-Premises Connector and the Hybrid Data Pipeline server.
35Progress DataDirect Hybrid Data Pipeline: Deployment and Best Practices Guide: Version Release 4.6.1
Standalone deployment
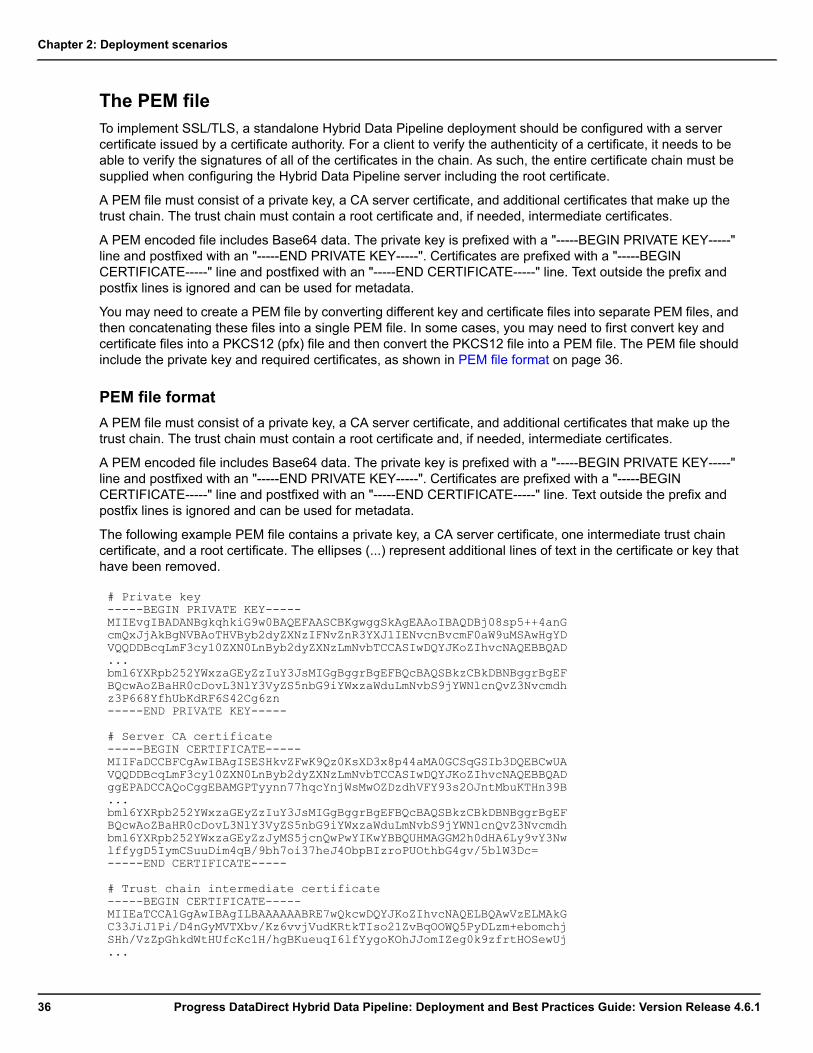
The PEM fileTo implement SSL/TLS, a standalone Hybrid Data Pipeline deployment should be configured with a servercertificate issued by a certificate authority. For a client to verify the authenticity of a certificate, it needs to beable to verify the signatures of all of the certificates in the chain. As such, the entire certificate chain must besupplied when configuring the Hybrid Data Pipeline server including the root certificate.
A PEM file must consist of a private key, a CA server certificate, and additional certificates that make up thetrust chain. The trust chain must contain a root certificate and, if needed, intermediate certificates.
A PEM encoded file includes Base64 data. The private key is prefixed with a "-----BEGIN PRIVATE KEY-----"line and postfixed with an "-----END PRIVATE KEY-----". Certificates are prefixed with a "-----BEGINCERTIFICATE-----" line and postfixed with an "-----END CERTIFICATE-----" line. Text outside the prefix andpostfix lines is ignored and can be used for metadata.
You may need to create a PEM file by converting different key and certificate files into separate PEM files, andthen concatenating these files into a single PEM file. In some cases, you may need to first convert key andcertificate files into a PKCS12 (pfx) file and then convert the PKCS12 file into a PEM file. The PEM file shouldinclude the private key and required certificates, as shown in PEM file format on page 36.
PEM file formatA PEM file must consist of a private key, a CA server certificate, and additional certificates that make up thetrust chain. The trust chain must contain a root certificate and, if needed, intermediate certificates.
A PEM encoded file includes Base64 data. The private key is prefixed with a "-----BEGIN PRIVATE KEY-----"line and postfixed with an "-----END PRIVATE KEY-----". Certificates are prefixed with a "-----BEGINCERTIFICATE-----" line and postfixed with an "-----END CERTIFICATE-----" line. Text outside the prefix andpostfix lines is ignored and can be used for metadata.
The following example PEM file contains a private key, a CA server certificate, one intermediate trust chaincertificate, and a root certificate. The ellipses (...) represent additional lines of text in the certificate or key thathave been removed.
# Private key-----BEGIN PRIVATE KEY-----MIIEvgIBADANBgkqhkiG9w0BAQEFAASCBKgwggSkAgEAAoIBAQDBj08sp5++4anGcmQxJjAkBgNVBAoTHVByb2dyZXNzIFNvZnR3YXJlIENvcnBvcmF0aW9uMSAwHgYDVQQDDBcqLmF3cy10ZXN0LnByb2dyZXNzLmNvbTCCASIwDQYJKoZIhvcNAQEBBQAD...bml6YXRpb252YWxzaGEyZzIuY3JsMIGgBggrBgEFBQcBAQSBkzCBkDBNBggrBgEFBQcwAoZBaHR0cDovL3NlY3VyZS5nbG9iYWxzaWduLmNvbS9jYWNlcnQvZ3Nvcmdhz3P668YfhUbKdRF6S42Cg6zn-----END PRIVATE KEY-----
# Server CA certificate-----BEGIN CERTIFICATE-----MIIFaDCCBFCgAwIBAgISESHkvZFwK9Qz0KsXD3x8p44aMA0GCSqGSIb3DQEBCwUAVQQDDBcqLmF3cy10ZXN0LnByb2dyZXNzLmNvbTCCASIwDQYJKoZIhvcNAQEBBQADggEPADCCAQoCggEBAMGPTyynn77hqcYnjWsMwOZDzdhVFY93s2OJntMbuKTHn39B...bml6YXRpb252YWxzaGEyZzIuY3JsMIGgBggrBgEFBQcBAQSBkzCBkDBNBggrBgEFBQcwAoZBaHR0cDovL3NlY3VyZS5nbG9iYWxzaWduLmNvbS9jYWNlcnQvZ3Nvcmdhbml6YXRpb252YWxzaGEyZzJyMS5jcnQwPwYIKwYBBQUHMAGGM2h0dHA6Ly9vY3NwlffygD5IymCSuuDim4qB/9bh7oi37heJ4ObpBIzroPUOthbG4gv/5blW3Dc=-----END CERTIFICATE-----
# Trust chain intermediate certificate-----BEGIN CERTIFICATE-----MIIEaTCCA1GgAwIBAgILBAAAAAABRE7wQkcwDQYJKoZIhvcNAQELBQAwVzELMAkGC33JiJ1Pi/D4nGyMVTXbv/Kz6vvjVudKRtkTIso21ZvBqOOWQ5PyDLzm+ebomchjSHh/VzZpGhkdWtHUfcKc1H/hgBKueuqI6lfYygoKOhJJomIZeg0k9zfrtHOSewUj...
Progress DataDirect Hybrid Data Pipeline: Deployment and Best Practices Guide: Version Release 4.6.136
Chapter 2: Deployment scenarios

dHBzOi8vd3d3Lmdsb2JhbHNpZ24uY29tL3JlcG9zaXRvcnkvMDMGA1UdHwQsMCowKKAmoCSGImh0dHA6Ly9jcmwuZ2xvYmFsc2lnbi5uZXQvcm9vdC5jcmwwPQYIKwYBK1pp74P1S8SqtCr4fKGxhZSM9AyHDPSsQPhZSZg=-----END CERTIFICATE-----
# Trust chain root certificate-----BEGIN CERTIFICATE-----MIIDdTCCAl2gAwIBAgILBAAAAAABFUtaw5QwDQYJKoZIhvcNAQEFBQAwVzELMAkGYWxTaWduIG52LXNhMRAwDgYDVQQLEwdSb290IENBMRswGQYDVQQDExJHbG9iYWxTaWduIFJvb3QgQ0EwggEiMA0GCSqGSIb3DQEBAQUAA4IBDwAwggEKAoIBAQDaDuaZ...jc6j40+Kfvvxi4Mla+pIH/EqsLmVEQS98GPR4mdmzxzdzxtIK+6NiY6arymAZavp38NflNUVyRRBnMRddWQVDf9VMOyGj/8N7yy5Y0b2qvzfvGn9LhJIZJrglfCm7ymPHMUfpIBvFSDJ3gyICh3WZlXi/EjJKSZp4A==-----END CERTIFICATE-----
See alsoThe PEM file on page 36Generating a PEM file on page 37
Generating a PEM fileA PEM file must consist of a private key, a CA server certificate, and additional certificates that make up thetrust chain. The trust chain must contain a root certificate and, if needed, intermediate certificates.
You may need to create a PEM file by converting different key and certificate files into separate PEM files, andthen concatenating these files into a single PEM file. In some cases, you may need to first convert key andcertificate files into a PKCS12 file and then convert the PKCS12 file into a PEM file. The resulting PEM fileshould include the private key and required certificates, as shown in PEM file format on page 36.
The following sections describe a number of ways to convert key and certificate files, using OpenSSL or theJava keytool as appropriate.
• Converting a PKCS12 (pfx) file to a PEM file on page 37
• Converting a Java jks keystore file to a PKCS12 file on page 38
• Converting PKCS7 (p7b) file certificates to PEM file certificates on page 38
• Converting PKCS7 file certificates to PKCS12 file certificates and adding the private key to the PKCS12 fileon page 39
• Converting DER certificates to PEM file certificates on page 39
• Creating a PEM file from a private key and Base64 encoded certificates on page 39
Converting a PKCS12 (pfx) file to a PEM file1. Use the following OpenSSL command to determine whether the private key is password protected.
openssl pkcs12 -info -in target.pfx
a. If the key is password protected, you will be prompted for a password. Proceed to Step 2.
b. If the key is not password protected, then information on the PKCS12 file, such as file structure andalgorithms used, is provided. Proceed to Step 5.
2. Enter the password when prompted. Information on the PKCS12 file, such as file structure and algorithmsused, is provided.
37Progress DataDirect Hybrid Data Pipeline: Deployment and Best Practices Guide: Version Release 4.6.1
Standalone deployment

3. Use the following OpenSSL command to extract the private key from the PKCS12 file.
openssl pkcs12 -in target.pfx -nocerts -out ppkey.pem
4. Remove the passphrase from the private key. Then, skip to Step 6.
openssl rsa -in ppkey.pem -out privatekey.pem
5. Use the following OpenSSL command to extract the private key from the PKCS12 file.
openssl pkcs12 -in target.pfx -nocerts -out privatekey.pem
6. Extract the root certificates from the PKCS12 file.
openssl pkcs12 -in rootcert.pfx -cacerts -nodes -nokeys > rootcert.pem
7. Extract server certificates from the PKCS12 file.
openssl pkcs12 -in servercert.pfx -clcerts -nodes -nokeys > servercert.pem
8. Concatenate the certificates and private key in a single PEM file. In this example, the Linux/UNIX catcommand is used to concatenate root certificate, server certificate, and private key.
cat rootcert.pem servercert.pem privatekey.pem > server.bundle.pem
9. Confirm that the PEM file has the private key and the required certificates as described in PEM file formaton page 36.
The resulting server.bundle.pem file should be specified during the installation of the Hybrid Data Pipelineserver.
Converting a Java jks keystore file to a PKCS12 fileA Java jks keystore file must first be converted to a PKCS12 file. The PKCS12 file can then be converted to aPEM file.
1. Use the following Java keytool command to convert the jks file into a pfx file.
keytool -importkeystore -srckeystore keystore.jks -srcstoretype JKS -deststoretypePKCS12 -destkeystore target.pfx
2. Enter the keystore password and keystore file alias when prompted.
3. Use the resulting target.pfx file to create a PEM file by following the instructions in Converting a PKCS12(pfx) file to a PEM file on page 37.
Converting PKCS7 (p7b) file certificates to PEM file certificatesThese instructions assume that the private key is already available as a PEM file.
Progress DataDirect Hybrid Data Pipeline: Deployment and Best Practices Guide: Version Release 4.6.138
Chapter 2: Deployment scenarios

1. Use the following OpenSSL command to convert PKCS7 file certificates to PEM file certificates.
openssl pkcs7 -print_certs -in certificates.p7b -out certificates.pem
2. Concatenate the certificate and private key files. In this example, the Linux/UNIX cat command is used.
cat certificates.pem privatekey.pem > server.bundle.pem
3. Confirm that the resulting PEM file has the private key and the required certificates as described in PEMfile format on page 36.
The resulting server.bundle.pem file should be specified during the installation of the Hybrid Data Pipelineserver.
Converting PKCS7 file certificates to PKCS12 file certificates and adding the privatekey to the PKCS12 fileAfter the certificate and private key files have been converted to the PKCS12 format, the PKCS12 file can thenbe converted to a PEM file.
1. Use the following OpenSSL command to convert a PKCS7 file to a PKCS12 file.
openssl pkcs7 -print_certs -in certificate.p7b -out certificate.cer
2. Use the following command to add the private key to the PKCS12 file.
openssl pkcs12 -export -in certificate.cer -inkey privatekey.key -out target.pfx-certfile CACert.cer
3. Use the resulting target.pfx file to create a PEM file by following the instructions in Converting a PKCS12(pfx) file to a PEM file on page 37.
Converting DER certificates to PEM file certificatesThe DER extension is used for binary DER files. These files may also use the CER and CRT extensions.
These instructions assume that the private key is already available as a PEM file.
1. Use the following OpenSSL command to convert DER certificates to PEM file certificates.
openssl x509 -inform der -in certificates.cer -out certificates.pem
2. Concatenate the certificate and private key files. In this example, the Linux/UNIX cat command is used.
cat certificates.pem privatekey.pem > server.bundle.pem
3. Confirm that the PEM file has the private key and the required certificates as described in PEM file formaton page 36.
The resulting server.bundle.pem file should be specified during the installation of the Hybrid Data Pipelineserver.
Creating a PEM file from a private key and Base64 encoded certificatesPEM files use Base64 encoding. Therefore, no conversion process is required. However, the Base64 encodedcertificates and the private key must be concatenated in a single PEM file.
These instructions assume that the private key is already available as a PEM file.
39Progress DataDirect Hybrid Data Pipeline: Deployment and Best Practices Guide: Version Release 4.6.1
Standalone deployment
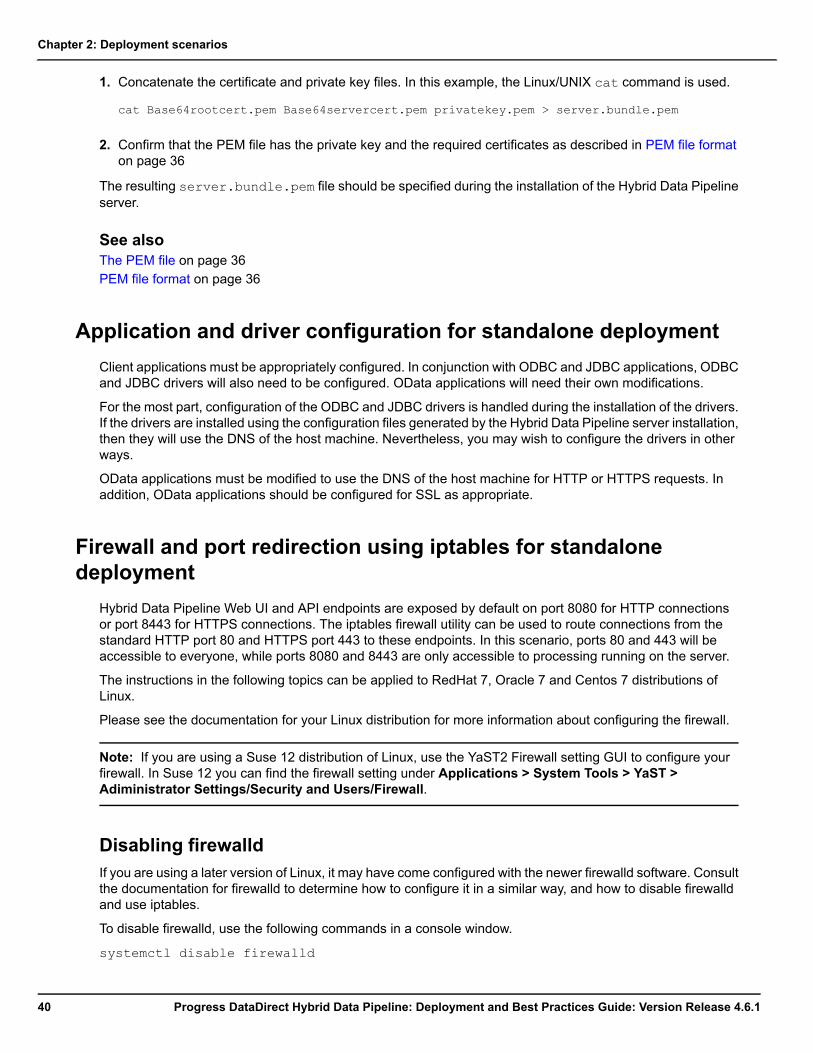
1. Concatenate the certificate and private key files. In this example, the Linux/UNIX cat command is used.
cat Base64rootcert.pem Base64servercert.pem privatekey.pem > server.bundle.pem
2. Confirm that the PEM file has the private key and the required certificates as described in PEM file formaton page 36
The resulting server.bundle.pem file should be specified during the installation of the Hybrid Data Pipelineserver.
See alsoThe PEM file on page 36PEM file format on page 36
Application and driver configuration for standalone deploymentClient applications must be appropriately configured. In conjunction with ODBC and JDBC applications, ODBCand JDBC drivers will also need to be configured. OData applications will need their own modifications.
For the most part, configuration of the ODBC and JDBC drivers is handled during the installation of the drivers.If the drivers are installed using the configuration files generated by the Hybrid Data Pipeline server installation,then they will use the DNS of the host machine. Nevertheless, you may wish to configure the drivers in otherways.
OData applications must be modified to use the DNS of the host machine for HTTP or HTTPS requests. Inaddition, OData applications should be configured for SSL as appropriate.
Firewall and port redirection using iptables for standalonedeployment
Hybrid Data Pipeline Web UI and API endpoints are exposed by default on port 8080 for HTTP connectionsor port 8443 for HTTPS connections. The iptables firewall utility can be used to route connections from thestandard HTTP port 80 and HTTPS port 443 to these endpoints. In this scenario, ports 80 and 443 will beaccessible to everyone, while ports 8080 and 8443 are only accessible to processing running on the server.
The instructions in the following topics can be applied to RedHat 7, Oracle 7 and Centos 7 distributions ofLinux.
Please see the documentation for your Linux distribution for more information about configuring the firewall.
Note: If you are using a Suse 12 distribution of Linux, use the YaST2 Firewall setting GUI to configure yourfirewall. In Suse 12 you can find the firewall setting under Applications > System Tools > YaST >Adiministrator Settings/Security and Users/Firewall.
Disabling firewalldIf you are using a later version of Linux, it may have come configured with the newer firewalld software. Consultthe documentation for firewalld to determine how to configure it in a similar way, and how to disable firewalldand use iptables.
To disable firewalld, use the following commands in a console window.
systemctl disable firewalld
Progress DataDirect Hybrid Data Pipeline: Deployment and Best Practices Guide: Version Release 4.6.140
Chapter 2: Deployment scenarios
systemctl stop firewalld
Installing iptablesInstalling iptable requires root privileges.
1. Log in with an admin account.
2. Run sudo -s
3. Use yum to install the iptables services:
a) yum install iptables
b) yum install iptables-ipv6
Creating the iptables configuration fileCreate the file /etc/sysconfig/iptables containing the content displayed here (your configuration may be slightlydifferent). This will require root privileges.
# Generated by iptables-save v1.4.21 on Thu Jun 23 09:05:43 2016*nat:PREROUTING ACCEPT [1100:133346]:INPUT ACCEPT [1:48]:OUTPUT ACCEPT [0:0]:POSTROUTING ACCEPT [0:0]-A PREROUTING -p tcp -m tcp --dport 80 -j REDIRECT --to-ports 8080-A PREROUTING -p tcp -m tcp --dport 443 -j REDIRECT --to-ports 8443-A PREROUTING -p tcp --dport 8080 -j MARK --set-mark 1-A PREROUTING -p tcp --dport 8443 -j MARK --set-mark 2COMMIT# Completed on Thu Jun 23 09:05:43 2016# Generated by iptables-save v1.4.21 on Thu Jun 23 09:05:43 2016*filter:INPUT ACCEPT [0:0]:FORWARD ACCEPT [0:0]:OUTPUT ACCEPT [378:34583]-A INPUT -m state --state RELATED,ESTABLISHED -j ACCEPT-A INPUT -p icmp -j ACCEPT-A INPUT -i lo -j ACCEPT-A INPUT -p tcp -m state --state NEW -m tcp --dport 22 -j ACCEPT-A INPUT -m mark --mark 1 -j DROP-A INPUT -p tcp -m state --state NEW -m tcp --dport 8080 -j ACCEPT-A INPUT -m mark --mark 2 -j DROP-A INPUT -p tcp -m state --state NEW -m tcp --dport 8443 -j ACCEPT-A INPUT -p tcp -m state --state NEW -m tcp --dport 80 -j ACCEPT-A INPUT -p tcp -m state --state NEW -m tcp --dport 443 -j ACCEPT-A INPUT -j REJECT --reject-with icmp-host-prohibited-A FORWARD -j REJECT --reject-with icmp-host-prohibitedCOMMIT# Completed on Thu Jun 23 09:05:43 2016
Starting the iptables serviceStart the iptables service using the service command.
service iptables start
41Progress DataDirect Hybrid Data Pipeline: Deployment and Best Practices Guide: Version Release 4.6.1
Standalone deployment
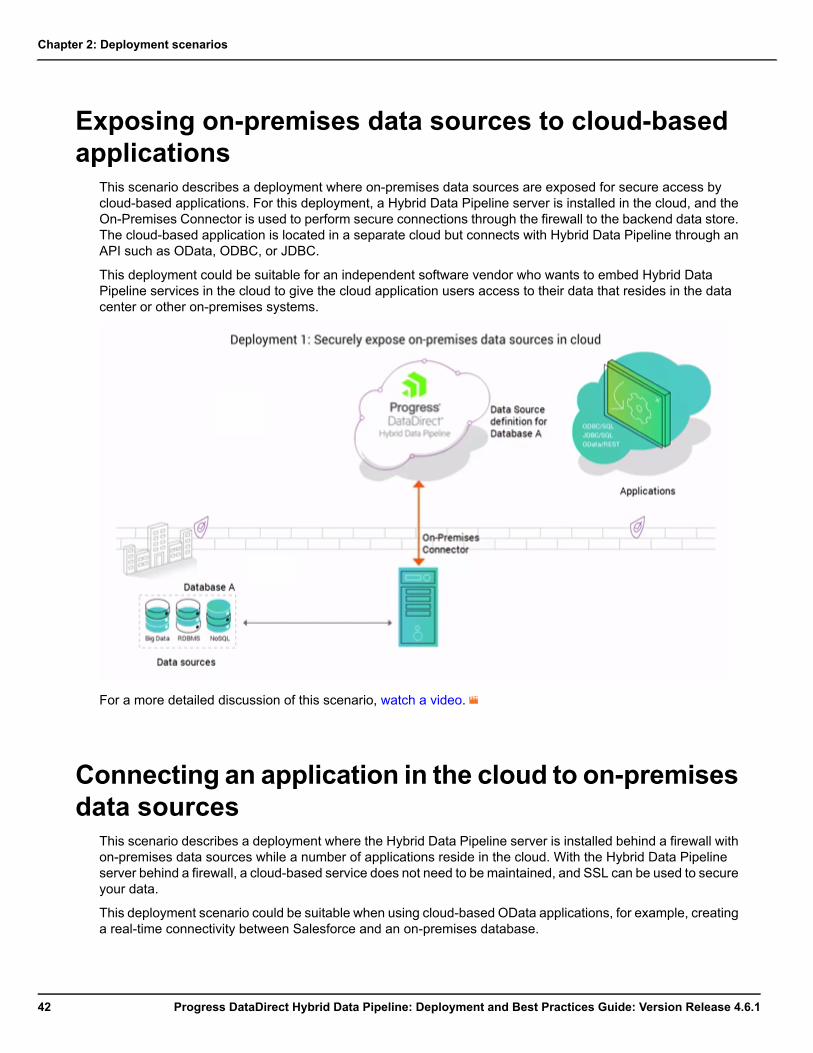
Exposing on-premises data sources to cloud-basedapplications
This scenario describes a deployment where on-premises data sources are exposed for secure access bycloud-based applications. For this deployment, a Hybrid Data Pipeline server is installed in the cloud, and theOn-Premises Connector is used to perform secure connections through the firewall to the backend data store.The cloud-based application is located in a separate cloud but connects with Hybrid Data Pipeline through anAPI such as OData, ODBC, or JDBC.
This deployment could be suitable for an independent software vendor who wants to embed Hybrid DataPipeline services in the cloud to give the cloud application users access to their data that resides in the datacenter or other on-premises systems.
For a more detailed discussion of this scenario, watch a video.
Connecting an application in the cloud to on-premisesdata sources
This scenario describes a deployment where the Hybrid Data Pipeline server is installed behind a firewall withon-premises data sources while a number of applications reside in the cloud. With the Hybrid Data Pipelineserver behind a firewall, a cloud-based service does not need to be maintained, and SSL can be used to secureyour data.
This deployment scenario could be suitable when using cloud-based OData applications, for example, creatinga real-time connectivity between Salesforce and an on-premises database.
Progress DataDirect Hybrid Data Pipeline: Deployment and Best Practices Guide: Version Release 4.6.142
Chapter 2: Deployment scenarios
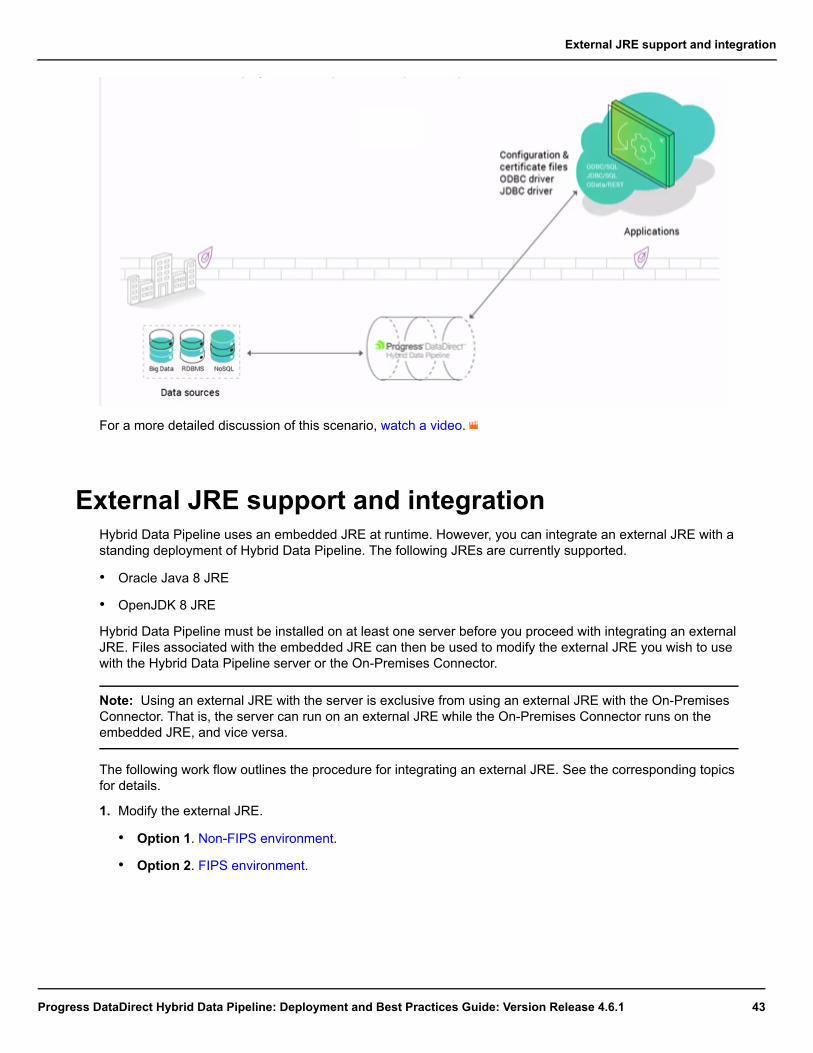
For a more detailed discussion of this scenario, watch a video.
External JRE support and integrationHybrid Data Pipeline uses an embedded JRE at runtime. However, you can integrate an external JRE with astanding deployment of Hybrid Data Pipeline. The following JREs are currently supported.
• Oracle Java 8 JRE
• OpenJDK 8 JRE
Hybrid Data Pipeline must be installed on at least one server before you proceed with integrating an externalJRE. Files associated with the embedded JRE can then be used to modify the external JRE you wish to usewith the Hybrid Data Pipeline server or the On-Premises Connector.
Note: Using an external JRE with the server is exclusive from using an external JRE with the On-PremisesConnector. That is, the server can run on an external JRE while the On-Premises Connector runs on theembedded JRE, and vice versa.
The following work flow outlines the procedure for integrating an external JRE. See the corresponding topicsfor details.
1. Modify the external JRE.
• Option 1. Non-FIPS environment.
• Option 2. FIPS environment.
43Progress DataDirect Hybrid Data Pipeline: Deployment and Best Practices Guide: Version Release 4.6.1
External JRE support and integration
Note: FIPS is not supported for the On-Premises Connector with either embedded or external JREs.
2. If integrating the external JRE with the server, configure the server to use the JRE.
3. If integrating the external JRE with the On-Premises Connector, configure the connector to use the JRE.
Modify the external JRE for a non-FIPS environmentTake the following steps to modify an external JRE for a non-FIPS environment.
Note:
• <hdp_install_dir> is the installation directory of the Hybrid Data Pipeline server.
• <external_jre_home> is the home directory of the external JRE.
1. Enable the Unlimited Strength Jurisdiction Policy according to the JRE vendor documentation. Dependingon the vendor and version, the Unlimited Strength Jurisdiction Policy may be enabled by default.
Note: Enabling the Unlimited Strength Jurisdiction Policy is the only modification required for using anexternal JRE with the On-Premises Connector. Therefore, the remaining steps can be ignored if the JREis to be used only with the On-Premises Connector.
2. Copy the <hdp_install_dir>/ddcloud/utils/jre/lib/ext/bc-fips-1.0.0.jar file to the<external_jre_home>/lib/ext directory.
3. Merge the contents of the embedded JRE<hdp_install_dir>/ddcloud/utils/jre/lib/security/java.policy.sun file into the externalJRE <external_jre_home>/lib/security/java.policy file.
Note:
• Any previously made customizations to the <external_jre_home>/lib/security/java.policyshould be preserved.
• Any permissions for data sources in the embedded JRE java.policy.sun file should be carried overto the external JRE java.policy file.
4. Merge the contents of the embedded JRE<hdp_install_dir>/ddcloud/utils/jre/lib/security/java.security.sun file into theexternal JRE <external_jre_home>/lib/security/java.security file.
Note:
• Any previouslymade customizations to the <external_jre_home>/lib/security/java.securityshould be preserved.
• Any properties enabled in the embedded JRE java.security.sun file should be carried over to theexternal JRE java.security file.
What to do next:
• Configure the server to use the external JRE.
• Configure the On-Premises Connector to use the external JRE.
Progress DataDirect Hybrid Data Pipeline: Deployment and Best Practices Guide: Version Release 4.6.144
Chapter 2: Deployment scenarios
Modify the external JRE for a FIPS environmentTake the following steps to modify an external JRE for a FIPS environment.
Note: FIPS is not supported for the On-Premises Connector with either embedded or external JREs.
Note:
• <hdp_install_dir> is the installation directory of the Hybrid Data Pipeline server.
• <external_jre_home> is the home directory of the external JRE.
1. Enable the Unlimited Strength Jurisdiction Policy according to the JRE vendor documentation. Dependingon the vendor and version, the Unlimited Strength Jurisdiction Policy may be enabled by default.
2. Copy the <hdp_install_dir>/ddcloud/utils/jre/lib/ext/bc-fips-1.0.0.jar file to the<external_jre_home>/lib/ext directory.
3. Merge the contents of the embedded JRE<hdp_install_dir>/ddcloud/utils/jre/lib/security/java.policy.bcfips file into theexternal JRE <external_jre_home>/lib/security/java.policy file.
Note:
• Any previously made customizations to the <external_jre_home>/lib/security/java.policyshould be preserved.
• Any permissions for data sources in the embedded JRE java.policy.bcfips file should be carriedover to the external JRE java.policy file.
4. Merge the contents of the embedded JRE<hdp_install_dir>/ddcloud/utils/jre/lib/security/java.security.bcfips file into theexternal JRE <external_jre_home>/lib/security/java.security file.
Note:
• Any previouslymade customizations to the <external_jre_home>/lib/security/java.securityshould be preserved.
• Any properties enabled in the embedded JRE java.security.bcfips file should be carried over tothe external JRE java.security file.
What to do next:
Configure the server to use the external JRE.
Configure the server to use the external JREOnce you have modified the external JRE, you can configure the server to use the external JRE by performingan upgrade installation of the server. During the upgrade, you will be prompted specify whether you are usingthe embedded JRE or an external JRE. If you select external JRE, you must specify the path to the externalJRE.
Note: For complete upgrade instructions, refer to the Progress DataDirect Hybrid Data Pipeline InstallationGuide.
45Progress DataDirect Hybrid Data Pipeline: Deployment and Best Practices Guide: Version Release 4.6.1
External JRE support and integration
If you are using a response file to perform a silent upgrade, best practices recommend that you use theinstallation program to generate the response file. However, you may opt to edit the response file manually. Ifediting the response file manually, you must add Java configuration options to the response file. The optionsand values depend on whether the response file is based on the GUI installation template or the console modeinstallation template.
GUI mode
#Java Configuration#------------------SPECIFY_JAVA_HOME_NO=0SPECIFY_JAVA_HOME_YES=1HDP_JAVA_HOME_DIR=/usr/lib/jvm/jre-1.8.0-openjdk-1.8.0.181-3.b13.el7_5.x86_64
SPECIFY_JAVA_HOME_NO indicates whether you are using an external JRE. If you are using an external JRE,specify 0.
SPECIFY_JAVA_HOME_YES indicates whether you are using an external JRE. If you are using an externalJRE, specify 1.
HDP_JAVA_HOME_DIR specifies the path to the external JRE to be used at runtime.
Console mode
#Java Configuration#------------------SPECIFY_JAVA_HOME_YESNO=\"Yes\",\"\"HDP_JAVA_HOME_DIR_CONSOLE=\"/usr/lib/jvm/java-1.8.0-openjdk-1.8.0.102-4.b14.el7.x86_64/jre\"
Important: The escape characters, as shown in this example, are required for a response file based on theconsole mode template.
SPECIFY_JAVA_HOME_YESNO indicates whether you are using an external JRE. If you are using an externalJRE, specify Yes.
HDP_JAVA_HOME_DIR_CONSOLE specifies the path to the external JRE to be used at runtime.
What to do next:
If integrating the external JRE with the On-Premises Connector, configure the connector to use the JRE.
Configure the On-Premises Connector to use the external JRETo use an external JRE with an On-Premises Connector, the JRE's Unlimited Strength Jurisdiction Policy mustbe enabled. No other modifications to the JRE are required to use it with an On-Premises Connector. Dependingon the vendor and version of the JRE, the Unlimited Strength Jurisdiction Policy may be enabled by default.
Once the Unlimited Strength Jurisdiction Policy has been enabled, you can configure the On-Premises Connectorto use the external JRE when installing or upgrading the connector. During installation or upgrade, you will beprompted to specify whether you are using the embedded JRE or an external JRE. If you select external JRE,you must specify the path to the external JRE. For complete installation instructions, refer to the ProgressDataDirect Hybrid Data Pipeline Installation Guide.
Progress DataDirect Hybrid Data Pipeline: Deployment and Best Practices Guide: Version Release 4.6.146
Chapter 2: Deployment scenarios
3Backing up Hybrid Data Pipelinedeployments
Hybrid Data Pipeline should be fully backed up to support the recovery and upgrade scenarios described inthis guide. For production environments, we recommend deploying Hybrid Data Pipeline behind a load balancerto support scalability and availability. However, a standalone deployment of Hybrid Data Pipeline may berequired due to resource limitations and other restrictions. Therefore, instructions are provided for backing upstandalone as well as load balancer deployments of Hybrid Data Pipeline.
For details, see the following topics:
• Backing up a load balancer deployment
• Backing up a standalone deployment
Backing up a load balancer deploymentA load balancer deployment includes the following traits: an external system database, a key location, a loadbalancer, and the Hybrid Data Pipeline server running on one or more nodes behind the load balancer. Backingup a load balancer deployment involves backing up files or systems that correspond to each of these traits.
System databaseHybrid Data Pipeline requires a system database for storing user and configuration information. When deployingthe service behind a load balancer, you must use a supported external database.
47Progress DataDirect Hybrid Data Pipeline: Deployment and Best Practices Guide: Version Release 4.6.1
To promote the continuous availability of the service, the system database should be replicated or mirrored,and the system database should be routinely backed up. In the event that the system database fails, the backupdatabase can be integrated with the connectivity service by performing an upgrade installation of the serveron the node or nodes supporting the service. See Recovering an external system database on page 95 formore information.
Note: Describing the backup procedure for the system database is beyond the scope of this document. Referto your database vendor documentation for instructions on backing up the database.
Key locationHybrid Data Pipeline requires the specification of a key location during installation. The installation programwrites shared files used in the operation of the Hybrid Data Pipeline server to this directory. The key locationmust be backed up for recovery of individual nodes or recovery of the service as a whole.
Note: The KEY_LOCATION property in the <install_dir>/ddcloud/update.properties file (where<install_dir> is the installation directory of a Hybrid Data Pipeline server) contains the path of the keylocation.
Warning: The key location directory contains encryption keys that are used to protect sensitive datain the system database. If the keys are lost, any previously configured data sources would not be usable.Access to the backup of the key location directory should be secured using the same access controlsas the key location directory itself.
The key location contains the following files that are critical for recovery. (For details, see Shared files and thekey location for load balancer deployment on page 25.)
• Global properties file
• Redistributable files
• System database encryption keys
• System database encrypted information
• On-Premises Connector authentication key
• On-Premises Connector encryption key
• SSL keystore
• SSL truststore
• Third party JDBC drivers that have been integrated with Hybrid Data Pipeline
• Installer-generated .cfg files created for each cluster node. These files can be used to formulate thehaproxy.cfg file and thus the HAProxy load balancer configuration. The information in the .cfg files canalso be useful for configuring other types of load balancers.
Load balancerThe Hybrid Data Pipeline product package does not include a load balancer. However, Hybrid Data Pipelinecan be deployed on one or more nodes behind a load balancer to provide high availability and scalability. Tosupport system recovery and upgrade, the following load balancer configuration and routing information shouldbe backed up. (For details, see Load balancer deployment on page 14.)
• The SSL certificate used to provide SSL termination at the load balancer should be backed up. The backupshould be secured with the same access controls as the standing certificate.
Progress DataDirect Hybrid Data Pipeline: Deployment and Best Practices Guide: Version Release 4.6.148
Chapter 3: Backing up Hybrid Data Pipeline deployments
• The settings for session affinity should be documented.
• The host names passed in the Host header should be documented.
• The configuration for supplying the X-Forwarded-Proto header should be documented.
• The configuration for supplying the X-Forwarded-For header if the client IP address is needed for HybridData Pipeline access logs should be documented.
• Routing and port information for configuration of default routing and for configuration of routing to on-premisesdata stores. See Configuring a network load balancer with the On-Premises Connector on page 16 fordetails.
Note: If you are using HAProxy as your load balancer, you should backup the haproxy.cfg file as amatter of best practice. Once you spin up HAProxy on a new machine, you can quickly configure HAProxyto handle Hybrid Data Pipeline requests by adding the haproxy.cfg file to the /etc/haproxy folder andexecuting the command /etc/init.d/haproxy reload.
Server nodesIndividual server nodes do not themselves need to be backed up for recovery or upgrade purposes. However,you may wish to back up the installation directories for reference information such as installation log files. Bestpractices also recommend making a backup copy of the installation program for the particular version of HybridData Pipeline that is deployed.
Backing up a standalone deploymentFor a production environment that requires a standalone deployment, the deployment should, as a matter ofbest practices, include an external system database and a user-specified key location. An SSL certificate shouldalso be specified during installation to enable SSL. To properly back up a standalone deployment, each ofthese parts of the deployment should be backed up. In addition, the server installation directory itself shouldbe backed up.
System databaseHybrid Data Pipeline requires a system database for storing user and configuration information. When deployingthe service on a standalone node, you can opt to use either the embedded internal database or an externaldatabase. For a production environment, a supported external database should be used as a matter of bestpractices.
To promote the continuous availability of the service, the system database should be replicated, or mirrored,according to the database vendor documentation. In the event that the system database fails, the mirror canbe integrated with the connectivity service by performing an upgrade installation of the server on the machinesupporting the service. See Recovering an external system database on page 95 for more information.
Key locationHybrid Data Pipeline requires the specification of a key location during installation. For a standalone deployment,you can specify a default location, which writes encryption keys and other shared files to the installation directoryof the host machine, or you can specify a location on a separate machine. In a production environment, thefiles used to connect to the system database should be secured on a separate machine.
49Progress DataDirect Hybrid Data Pipeline: Deployment and Best Practices Guide: Version Release 4.6.1
Backing up a standalone deployment
The key location contains the files that are used to connect to the system database, including encryption keysand encrypted information. This information must be available to recover the service. Therefore, the key locationdirectory must be backed up. See Shared files and the key location for standalone deployment on page 33 fordetailed information on the files in the key location.
Note: The KEY_LOCATION property in the <install_dir>/ddcloud/update.properties file (where<install_dir> is the installation directory of the Hybrid Data Pipeline server) contains the path of the keylocation.
Warning: The key location directory contains encryption keys that are used to protect sensitive datain the system database. Access to the backup of the key location directory should be secured using thesame access controls as the key location directory itself.
Installation directoryThe Hybrid Data Pipeline installation directory contains a number of files required for the recovery of a standalonenode deployment. These files include the On-Premises authentication and encryption keys, the SSL keystore,and the SSL trustore. In addition, the installation directory includes log files that could be useful to evaluateissues with the service. Therefore, the installation directory must be backed up. See Shared files and the keylocation for standalone deployment on page 33 for detailed information on the shared files written to theinstallation directory.
Best practices also recommend making a backup copy of the installation program for the particular version ofHybrid Data Pipeline that is deployed.
Warning: The installation directory contains encryption keys that are used to protect sensitive data inthe system database. Access to the backup of the key location directory should be secured using thesame access controls as the key location directory itself.
SSL certificateIn a standalone deployment, the SSL certificate must include a server certificate and all intermediate certificatesall the way to the root of the certificate chain to establish trust. A server certificate issued by a CA (certificateauthority) should be used. The server certificate must be in PEM file format and must include all intermediatecertificates all the way to the root of the certificate chain to establish trust. In a recovery scenario, the PEM filemust be specified in the installation of the server after system failure. Therefore, a backup of the PEM fileshould be made. The backup should be secured with the same access controls as the one used in the standinginstallation of the server.
Progress DataDirect Hybrid Data Pipeline: Deployment and Best Practices Guide: Version Release 4.6.150
Chapter 3: Backing up Hybrid Data Pipeline deployments
4Configuring system database failover
Hybrid Data Pipeline requires a system database (sometimes referred to as an account database) for storinguser and configuration information. When deploying the service behind a load balancer, you must use asupported external database. To promote the continuous availability of the service, Oracle, SQL Server, andPostgreSQL system databases can be configured to fail over to alternate servers.
Failover configuration of a system database must take place during installation or upgrade of the service. Thedatabase initially specified as the system database during installation of the Hybrid Data Pipeline server functionsas the primary server. In turn, alternate servers can be specified in a connection string as Advanced Optionsduring the initial installation, or subsequent upgrade, of the service. To ensure the continuous operation of theservice, all alternate servers should be regularly synced with the primary database server.
For details, see the following topics:
• Configuring system database failover during installation
• Configuring system database failover during upgrade
• The AlternateServers connection property
Configuring system database failover duringinstallation
Take the following steps to configure system database failover during initial installation of the service.
1. From a command-line prompt, navigate to the directory where you saved the product file. Alternatively,place the product file directory on your path before proceeding to the next step.
51Progress DataDirect Hybrid Data Pipeline: Deployment and Best Practices Guide: Version Release 4.6.1
The product file has the format PROGRESS_DATADIRECT_HDP_SERVER_nn_LINUX_64_INSTALL.bin,where nn is the version of the product.
2. Make the file an executable using the chmod command. Then, press ENTER. For example:
chmod +x ./PROGRESS_DATADIRECT_HDP_SERVER_nn_LINUX_64_INSTALL.bin
3. Run the executable.
• Console mode
./PROGRESS_DATADIRECT_HDP_SERVER_nn_LINUX_64_INSTALL.bin -i console
• GUI mode
./PROGRESS_DATADIRECT_HDP_SERVER_nn_LINUX_64_INSTALL.bin
Note: If the installer cannot continue with a GUI installation, a message is displayed and the installationcontinues in console mode
4. Specify an installation directory.
5. Provide the hostname of the machine on which you are installing the Hybrid Data Pipeline server.
6. Select the Custom installation type.
7. Provide the following information as prompted by the installation program.
• Passwords for default accounts
• Key location
• SSL certificate information
8. Select the type of external system database you want to use to store system information.
Note: Failover configuration is supported for the Oracle, SQL Server, and PostgreSQL databases.
• Select Oracle, and continue at Step 9 on page 52.• Select MSSQLServer, and continue at Step 10 on page 53.• Select PostgreSQL, and continue at Step 11 on page 53.
9. Provide the Oracle connection information.
a) Provide the name of the host.
b) Provide the port number.
c) Provide the required connection type information.
• If you connect using the Oracle System Identifier (SID), enter the SID.
• If you connect using the Service Name, enter the database service name that specifies the databasethat is used for the connection. The service name is a string that is the global database name—aname that typically comprises the database name and domain name.
Progress DataDirect Hybrid Data Pipeline: Deployment and Best Practices Guide: Version Release 4.6.152
Chapter 4: Configuring system database failover

d) When prompted for Advanced Options, specify alternate servers with the AlternateServers connectionproperty in a connection string. For example:
AlternateServers=(server2:1521;SID=ORCL2,server3:1521;SID=ORCL3)
See The AlternateServers connection property on page 57 for further details.
Important: User credentials and schema details for alternate servers should be same as those of theprimary server. In addition, all alternate servers should be regularly synced with the primary databaseserver.
e) Optionally, specify additional connection parameters in theAdvancedOptions connection string. Settingsshould be entered as a semicolon-separated list of parameter=value pairs. For example, you mayenter to following options to configure SSL:
encryptionMethod=SSL;trustStore=/common/Oracle/trustStore.jks;trustStorePassword=secret
f) Continue at Step 12 on page 54
10. Provide the SQL Server connection information.
a) Type the name of the host.
b) Type the port number.
c) Type the database name.
d) Type the name of the schema.
e) When prompted for Advanced Options, specify alternate servers with the AlternateServers connectionproperty in a connection string. For example:
AlternateServers=(server2:1433;ServerName=sqlserv2,server3:1433;ServerName=sqlserv3)
See The AlternateServers connection property on page 57 for further details.
Important: User credentials and schema details for alternate servers should be same as those of theprimary server. In addition, all alternate servers should be regularly synced with the primary databaseserver.
f) Optionally, specify additional connection parameters in theAdvancedOptions connection string. Settingsshould be entered as a semicolon-separated list of parameter=value pairs.
g) Continue at Step 12 on page 54
11. Provide the PostgreSQL connection information.
a) Type the name of the host.
b) Type the port number.
c) Type the database name.
d) Type the name of the schema.
e) When prompted for Advanced Options, specify alternate servers with the AlternateServers connectionproperty in a connection string. For example:
AlternateServers=(server2:5432;ServerName=pgserv2,server3:5432;ServerName=pgserv3)
53Progress DataDirect Hybrid Data Pipeline: Deployment and Best Practices Guide: Version Release 4.6.1
Configuring system database failover during installation
See The AlternateServers connection property on page 57 for further details.
Important: User credentials and schema details for alternate servers should be same as those of theprimary server. In addition, all alternate servers should be regularly synced with the primary databaseserver.
f) Optionally, specify additional connection parameters in theAdvancedOptions connection string. Settingsshould be entered as a semicolon-separated list of parameter=value pairs.
g) Continue at Step 12 on page 54
12. Provide the database credential information for a user with administrator privileges and for a user withoutadministrator privileges.
Note: Administrator credentials are only required at install time to create the database schema. Administratorcredentials are not used by the product at run time.
a) Type the administrator user name. The administrator user must have certain privileges that are specificto the database vendor. For a list of required privileges, see External system databases on page 22.
b) You are prompted to provide the Admin Password. Type the password for a administrator account forthe external database.
c) You are prompted to provide the username for a user who does not have administrator privileges. Typea user name. The standard user must have certain privileges that are specific to the database vendor.For a list of required privileges, see External system databases on page 22.
d) You are prompted to provide the user password. Type the user password.
13. Specify port numbers and On-Premises Connection configuration information as prompted.
14. Review the installation summary, and proceed with the installation.
15. Perform installations on any additional nodes supporting the service.
Results:
The Hybrid Data Pipeline service has been deployed with a system database configured to failover to alternateservers should the primary server hosting the system database become unavailable.
Configuring system database failover during upgradeTake the following steps to configure system database failover by upgrading a standing installation of HybridData Pipeline.
1. From a command-line prompt, navigate to the directory where you saved the product file. Alternatively,place the product file directory on your path before proceeding to the next step.
The product file has the format PROGRESS_DATADIRECT_HDP_SERVER_nn_LINUX_64_INSTALL.bin,where nn is the version of the product.
2. Make the file an executable using the chmod command. Then, press ENTER. For example:
chmod +x ./PROGRESS_DATADIRECT_HDP_SERVER_nn_LINUX_64_INSTALL.bin
3. Run the executable.
Progress DataDirect Hybrid Data Pipeline: Deployment and Best Practices Guide: Version Release 4.6.154
Chapter 4: Configuring system database failover
• Console mode
./PROGRESS_DATADIRECT_HDP_SERVER_nn_LINUX_64_INSTALL.bin -i console
• GUI mode
./PROGRESS_DATADIRECT_HDP_SERVER_nn_LINUX_64_INSTALL.bin
Note: If the installer cannot continue with a GUI installation, a message is displayed and the installationcontinues in console mode
4. Specify the installation directory of a machine running the server in your cluster.
5. Provide the hostname of the machine on which you are performing the upgrade.
6. Select a Modify settings upgrade.
7. Confirm or provide values for settings and parameters as prompted.
8. Select the type of external system database you are using in your standing deployment of the service.
Note: Failover configuration is supported for the Oracle, SQL Server, and PostgreSQL databases.
• Select Oracle, and continue at Step 9 on page 55.• Select MSSQLServer, and continue at Step 10 on page 56.• Select PostgreSQL, and continue at Step 11 on page 56.
9. Provide the Oracle connection information.
a) Provide the name of the host.
b) Provide the port number.
c) Provide the required connection type information.
• If you connect using the Oracle System Identifier (SID), enter the SID.
• If you connect using the Service Name, enter the database service name that specifies the databasethat is used for the connection. The service name is a string that is the global database name—aname that typically comprises the database name and domain name.
d) When prompted for Advanced Options, specify alternate servers with the AlternateServers connectionproperty in a connection string. For example:
AlternateServers=(server2:1521;SID=ORCL2,server3:1521;SID=ORCL3)
See The AlternateServers connection property on page 57 for further details.
Important: User credentials and schema details for alternate servers should be same as those of theprimary server. In addition, all alternate servers should be regularly synced with the primary databaseserver.
55Progress DataDirect Hybrid Data Pipeline: Deployment and Best Practices Guide: Version Release 4.6.1
Configuring system database failover during upgrade
e) Optionally, specify additional connection parameters in theAdvancedOptions connection string. Settingsshould be entered as a semicolon-separated list of parameter=value pairs. For example, you mayenter to following options to configure SSL:
encryptionMethod=SSL;trustStore=/common/Oracle/trustStore.jks;trustStorePassword=secret
f) Continue at Step 12 on page 57.
10. Provide the SQL Server connection information.
a) Type the name of the host.
b) Type the port number.
c) Type the database name.
d) Type the name of the schema.
e) When prompted for Advanced Options, specify alternate servers with the AlternateServers connectionproperty in a connection string. For example:
AlternateServers=(server2:1433;ServerName=sqlserv2,server3:1433;ServerName=sqlserv3)
See The AlternateServers connection property on page 57 for further details.
Important: User credentials and schema details for alternate servers should be same as those of theprimary server. In addition, all alternate servers should be regularly synced with the primary databaseserver.
f) Optionally, specify additional connection parameters in theAdvancedOptions connection string. Settingsshould be entered as a semicolon-separated list of parameter=value pairs.
g) Continue at Step 12 on page 57.
11. Provide the PostgreSQL connection information.
a) Type the name of the host.
b) Type the port number.
c) Type the database name.
d) Type the name of the schema.
e) When prompted for Advanced Options, specify alternate servers with the AlternateServers connectionproperty in a connection string. For example:
AlternateServers=(server2:5432;ServerName=pgserv2,server3:5432;ServerName=pgserv3)
See The AlternateServers connection property on page 57 for further details.
Important: User credentials and schema details for alternate servers should be same as those of theprimary server. In addition, all alternate servers should be regularly synced with the primary databaseserver.
f) Optionally, specify additional connection parameters in theAdvancedOptions connection string. Settingsshould be entered as a semicolon-separated list of parameter=value pairs.
g) Continue at Step 12 on page 57.
Progress DataDirect Hybrid Data Pipeline: Deployment and Best Practices Guide: Version Release 4.6.156
Chapter 4: Configuring system database failover
12. Provide the database credential information for a user with administrator privileges and for a user withoutadministrator privileges.
Note: Administrator credentials are only required at install time to create the database schema. Administratorcredentials are not used by the product at run time.
a) Type the administrator user name. The administrator user must have certain privileges that are specificto the database vendor. For a list of required privileges, see External system databases on page 22.
b) You are prompted to provide the Admin Password. Type the password for a administrator account forthe external database.
c) You are prompted to provide the username for a user who does not have administrator privileges. Typea user name. The standard user must have certain privileges that are specific to the database vendor.For a list of required privileges, see External system databases on page 22.
d) You are prompted to provide the user password. Type the user password.
13. Specify port numbers and On-Premises Connection configuration information as prompted.
14. Review the upgrade summary, and proceed with the upgrade.
15. Perform an Express upgrade on any additional nodes running the service.
Results:
The Hybrid Data Pipeline service has been upgraded such that the system database will failover to alternateservers should the primary server hosting the system database become unavailable.
The AlternateServers connection propertyFailover configuration is supported for Oracle, SQL Server, and PostgreSQL databases by specifying theAlternateServers connection property in theAdvanced Options connection string during installation or upgradeof the Hybrid Data Pipeline server. The syntax for the connection depends on which database you are using.
• Oracle AlternateServers syntax
• SQL Server and PostgresSQL AlternateServers syntax
Oracle AlternateServers syntaxThe value of the AlternateServers property is a string with the following syntax.
(servername1[:port1][;property=value[;...]][,servername2[:port2][;property=value[;...]]]...)
where:
servername1 is the server name of the first alternate database server, and servername2 is the server nameof the second alternate database server. The server name is required for each alternate server entry.
port1 is the port number on which the first alternate database server is listening, and port2 is the port numberon which the second alternate database server is listening. The port number is optional for each alternateserver entry. If unspecified, the port number specified for the primary server is used. If a port number isunspecified for the primary server, a default port number of 1521 is used.
57Progress DataDirect Hybrid Data Pipeline: Deployment and Best Practices Guide: Version Release 4.6.1
The AlternateServers connection property
property=value is either the ServiceName or SID connection property. These connection properties areoptional for each alternate server entry and are mutually exclusive. For example:
AlternateServers=(server2:1521;ServiceName=TEST2,server3:1521;ServiceName=TEST3)
or
AlternateServers=(server2:1521;SID=ORCL2,server3:1521;SID=ORCL3)
If you do not specify the ServiceName or SID connection property in the alternate server string, the connectionto that alternate server uses the property specified for the primary server.
SQL Server and PostgresSQL AlternateServers syntaxThe value of the AlternateServers property is a string with the following syntax.
(servername1[:port1][;property=value[;...]][,servername2[:port2][;property=value[;...]]]...)
If connecting to named instances, the syntax of alternate servers takes the following format.
(servername1\\instance1[;property=value][,servername2\\instance2[;property=value]]
where:
servername1 is the IP address or server name of the first alternate database server, and servername2 isthe IP address or server name of the second alternate database server. The IP address or server name isrequired for each alternate server entry.
instance1 is the named instance on the first alternate database server, and instance2 is the named instanceon the second alternate database server. If connecting to named instances, the named instance is requiredfor each alternate server entry.
port1 is the port number on which the first alternate database server is listening, and port2 is the port numberon which the second alternate database server is listening. The port number is optional for each alternateserver entry. If unspecified, the port number specified for the primary server is used. If a port number isunspecified for the primary server, a default port number of 1433 is used. (For SQL Server, the default is 1433.For PostgreSQL, the default is 5432.)
property=value is the DatabaseName connection property. This property is optional for each alternateserver entry. For example:
AlternateServers=(AlternateServers=(server2:1433;DatabaseName=TEST2,server3:1433;DatabaseName=TEST3)
Or, for named instances:
AlternateServers=(server2\\instance2:1433;DatabaseName=TEST2,server3\\instance3:1433;DatabaseName=TEST3)
If you do not specify the DatabaseName connection property in the alternate server string, the connection tothat alternate server uses the property specified for the primary server.
Progress DataDirect Hybrid Data Pipeline: Deployment and Best Practices Guide: Version Release 4.6.158
Chapter 4: Configuring system database failover

5Planning for growth
A Hybrid Data Pipeline load balancer deployment is the best option for deploying the service in a productionenvironment. A load balancer deployment allows high availability and scalability. When initially deploying HybridData Pipeline, you can limit installation of the server to a single node behind a load balancer. As the volumeof requests to backend data stores increases, you can increase capacity by increasing the number of nodesrunning the service behind the load balancer. With proper load balancer configuration, requests will be distributedacross the nodes of the Hybrid Data Pipeline cluster.
Note: If you are running a cloud load balancer such as the AWS Application Load Balancer or the AzureApplication Gateway, you should consult your vendor documentation about managing compute capacity, inaddition to reviewing the procedures provided in the following topic.
For details, see the following topics:
• Adding nodes to the load balancer deployment
Adding nodes to the load balancer deploymentBefore you begin:
• The Hybrid Data Pipeline deployment should be backed up according to Backing up Hybrid Data Pipelinedeployments on page 47.
• You should have the installation program for the version of the product you are currently using.
About this task:
Adding an additional node to a Hybrid Data Pipeline load balancer deployment has two general steps.
59Progress DataDirect Hybrid Data Pipeline: Deployment and Best Practices Guide: Version Release 4.6.1
• The server must be installed on a machine that will run behind the load balancer.
• The load balancer must be configured to handle requests coming into the connectivity service.
Note that during the initial installation of the Hybrid Data Pipeline server, the installer writes properties files,encryption keys, and system information to the key location. When performing subsequent installations onadditional nodes, the key location must be specified to ensure consistent configuration of the service acrossnodes. For installations on additional nodes, the installer bypasses prompts for load balancing, SSL, systemdatabase, and On-Premises Connector configurations, as this information is provided by the files written to thekey location.
1. From a command-line prompt, navigate to the directory where you saved the product file. Alternatively,place the product file directory on your path before proceeding to the next step.
The product file has the format PROGRESS_DATADIRECT_HDP_SERVER_nn_LINUX_64_INSTALL.bin,where nn is the version of the product.
2. Make the file an executable using the chmod command. Then, press ENTER. For example:
chmod +x ./PROGRESS_DATADIRECT_HDP_SERVER_nn_LINUX_64_INSTALL.bin
3. Run the executable.
• Console mode
./PROGRESS_DATADIRECT_HDP_SERVER_nn_LINUX_64_INSTALL.bin -i console
• GUI mode
./PROGRESS_DATADIRECT_HDP_SERVER_nn_LINUX_64_INSTALL.bin
Note: If the installer cannot continue with a GUI installation, a message is displayed and the installationcontinues in console mode
4. Specify an installation directory.
5. Provide the hostname of the machine on which you are installing the Hybrid Data Pipeline server.
6. Select the Custom installation type.
7. Provide the key location and other information as prompted.
8. Review the installation summary, and proceed with the installation.
9. Add host and port information of the new node as required by the load balancer.
10. For deployments that include the On-Premises Connector, configure the load balancer to handle requeststo backend data stores.
See the following topics for detailed information.
• Configuring a network load balancer with the On-Premises Connector on page 16
• Configuring a cloud load balancer with the On-Premises Connector on page 19
What to do next:
Monitor your environment to ensure that requests are being distributed by the load balancer and results arebeing properly returned to client applications.
Progress DataDirect Hybrid Data Pipeline: Deployment and Best Practices Guide: Version Release 4.6.160
Chapter 5: Planning for growth

6Upgrading load balancer deployments
In this section, we consider two upgrade scenarios. The first scenario assumes that two separate Hybrid DataPipeline clusters have been deployed: a test environment and a production environment. In this scenario, werecommend an upgrade of the test environment, followed by an upgrade of the production environment. Thesecond scenario does not presume the existence of a test environment. In this case, we recommend creatinga clone of the cluster, upgrading the clone, and then updating the DNS record for the load balancer.
For details, see the following topics:
• Upgrading the test environment followed by upgrade of the production environment
• Cloning and upgrading a deployment followed by updating the DNS
• Rolling back to previous version if upgrade fails
Upgrading the test environment followed by upgradeof the production environment
When separate test and production environments are available, we recommend an upgrade of the testenvironment, followed by an upgrade of the production environment. Since steps may vary, instruction for eachtype of upgrade are provided in the following topics.
• Upgrading the test environment on page 62
• Upgrading the production environment on page 63
61Progress DataDirect Hybrid Data Pipeline: Deployment and Best Practices Guide: Version Release 4.6.1
Upgrading the test environmentBefore you begin:
• The Hybrid Data Pipeline deployment should be backed up according to Backing up Hybrid Data Pipelinedeployments on page 47.
• You should have the installation program for the version of the product you are upgrading to.
About this task:
Take the following steps to upgrade your test environment.
1. According to your database vendor documentation, take a snapshot of the system database to ensure youhave the latest configuration and credential information.
2. Perform an upgrade on one of the nodes in your environment.
a) From a command-line prompt, navigate to the directory where you saved the product file. Alternatively,place the product file directory on your path before proceeding to the next step.
The product file has the format PROGRESS_DATADIRECT_HDP_SERVER_nn_LINUX_64_INSTALL.bin,where nn is the version of the product.
b) Make the file an executable using the chmod +x command. For example:
chmod +x ./PROGRESS_DATADIRECT_HDP_SERVER_nn_LINUX_64_INSTALL.bin
c) Run the executable.
• GUI mode
./PROGRESS_DATADIRECT_HDP_SERVER_nn_LINUX_64_INSTALL.bin
Note: If the installer cannot continue with a GUI installation, a message is displayed and the installationcontinues in console mode
• Console mode
./PROGRESS_DATADIRECT_HDP_SERVER_nn_LINUX_64_INSTALL.bin -i console
d) When prompted, enter the directory of the installation you want to upgrade.
e) When prompted, choose an upgrade installation on the existing installation.
f) When prompted, choose the type of upgrade you want to perform.
• Select Express to persist established settings.
• Select Modify settings to change established settings.
g) Review port numbers and accept or change values as appropriate.
h) Review the upgrade summary, and proceed with the upgrade.
Important: If the upgrade fails, you can rollback to the previous version of the service, as described inRolling back to previous version if upgrade fails on page 69.
3. Perform an Express upgrade on each of the remaining nodes in the cluster.
Progress DataDirect Hybrid Data Pipeline: Deployment and Best Practices Guide: Version Release 4.6.162
Chapter 6: Upgrading load balancer deployments
a) Run the executable.
• GUI mode
./PROGRESS_DATADIRECT_HDP_SERVER_nn_LINUX_64_INSTALL.bin
Note: If the installer cannot continue with a GUI installation, a message is displayed and the installationcontinues in console mode
• Console mode
./PROGRESS_DATADIRECT_HDP_SERVER_nn_LINUX_64_INSTALL.bin -i console
b) When prompted, enter the directory of the installation you want to upgrade.
c) When prompted, choose an upgrade installation on the existing installation.
d) When prompted, choose an Express upgrade.
e) Review the upgrade summary, and proceed with the upgrade.
4. After each node has been upgraded, test the upgraded version of the service.
What to do next:
Once you have thoroughly tested the environment to ensure that the upgraded version of the service is performingas expected, you may proceed with upgrading your production environment.
Upgrading the production environmentBefore you begin:
• The Hybrid Data Pipeline deployment should be backed up according to Backing up Hybrid Data Pipelinedeployments on page 47.
• You should have the installation program for the version of the product you are upgrading to.
About this task:
Once you have confirmed that the upgraded test environment is performing as expected, take the followingsteps to upgrade the production environment.
1. Block all traffic coming into the service.
Note: By blocking traffic to the service, you are ensuring that no changes to the system database are madeduring the upgrade process.
2. According to your database vendor documentation, take a snapshot of the system database to ensure youhave the latest configuration and credential information.
3. Perform an upgrade on one of the nodes in your environment.
a) From a command-line prompt, navigate to the directory where you saved the product file. Alternatively,place the product file directory on your path before proceeding to the next step.
The product file has the format PROGRESS_DATADIRECT_HDP_SERVER_nn_LINUX_64_INSTALL.bin,where nn is the version of the product.
b) Make the file an executable using the chmod +x command. For example:
63Progress DataDirect Hybrid Data Pipeline: Deployment and Best Practices Guide: Version Release 4.6.1
Upgrading the test environment followed by upgrade of the production environment

chmod +x ./PROGRESS_DATADIRECT_HDP_SERVER_nn_LINUX_64_INSTALL.bin
c) Run the executable.
• GUI mode
./PROGRESS_DATADIRECT_HDP_SERVER_nn_LINUX_64_INSTALL.bin
Note: If the installer cannot continue with a GUI installation, a message is displayed and the installationcontinues in console mode
• Console mode
./PROGRESS_DATADIRECT_HDP_SERVER_nn_LINUX_64_INSTALL.bin -i console
d) When prompted, enter the directory of the installation you want to upgrade.
e) When prompted, choose an upgrade installation on the existing installation.
f) When prompted, choose the type of upgrade you want to perform.
• Select Express to persist established settings.
• Select Modify settings to change established settings.
g) Review port numbers and accept or change values as appropriate.
h) Review the upgrade summary, and proceed with the upgrade.
Important: If the upgrade fails, you can rollback to the previous version of the service, as described inRolling back to previous version if upgrade fails on page 69.
4. Perform an Express upgrade on each of the remaining nodes in the cluster.
a) Run the executable.
• GUI mode
./PROGRESS_DATADIRECT_HDP_SERVER_nn_LINUX_64_INSTALL.bin
Note: If the installer cannot continue with a GUI installation, a message is displayed and the installationcontinues in console mode
• Console mode
./PROGRESS_DATADIRECT_HDP_SERVER_nn_LINUX_64_INSTALL.bin -i console
b) When prompted, enter the directory of the installation you want to upgrade.
c) When prompted, choose an upgrade installation on the existing installation.
d) When prompted, choose an Express upgrade.
e) Review the upgrade summary, and proceed with the upgrade.
Progress DataDirect Hybrid Data Pipeline: Deployment and Best Practices Guide: Version Release 4.6.164
Chapter 6: Upgrading load balancer deployments
5. After each node has been upgraded, test the upgraded version of the service.
6. Once you have thoroughly tested the environment to ensure that the upgraded version of the service isperforming as expected, unblock traffic coming into the service.
What to do next:
As a matter of best practices, monitor functionality and performance in the upgraded production environment.
Cloning and upgrading a deployment followed byupdating the DNS
When a separate test environment is not in place, the upgrade process should begin with cloning the productionenvironment and then upgrading this cloned environment. After the upgrade, the DNS record of the loadbalancer should be updated such that the hostname of the load balancer resolves to the IP address of the loadbalancer clone, thus routing traffic to the upgraded version of the service. See the following topics for step-by-stepinstructions.
• Creating a clone of the production environment on page 65
• Upgrading the cloned environment and updating the DNS on page 67
Creating a clone of the production environmentBefore you begin:
• The Hybrid Data Pipeline deployment should be backed up according to Backing up Hybrid Data Pipelinedeployments on page 47.
• You should have the installation program for the version of the product you are currently using.
• You should have load balancer SSL certificate files used for server installation and load balancer configuration.(Depending on your environment, a single SSL certificate file may be used.)
• You should have the credentials for the system database.
About this task:
Take the following steps to create a clone of your production environment.
1. According to your database vendor documentation, create a clone or replica of the system database.
2. Copy the contents of the key location to a new key location to be used in the cloned environment.
3. Delete the <key_location>/db directory and the <key_locaton>/global.properties file from thecloned key location.
4. Spin up a server to host a new load balancer for the cloned environment.
Note: Load balancer configuration takes place in Step 7 after the nodes for the cloned environment havebeen installed.
5. Perform a Custom installation on a new machine with the version of the product used in the standingdeployment of the server.
65Progress DataDirect Hybrid Data Pipeline: Deployment and Best Practices Guide: Version Release 4.6.1
Cloning and upgrading a deployment followed by updating the DNS
Note: The purpose of this installation is to create a clone of the standing deployment. Therefore, with theexception of hostname and system database information, the values specified should be the same as thosespecified during the previous installation or upgrade of the service.
a) From a command-line prompt, navigate to the directory where you saved the product file. Alternatively,place the product file directory on your path before proceeding to the next step.
The product file has the format PROGRESS_DATADIRECT_HDP_SERVER_nn_LINUX_64_INSTALL.bin,where nn is the version of the product.
b) Make the file an executable using the chmod command. Then, press ENTER. For example:
chmod +x ./PROGRESS_DATADIRECT_HDP_SERVER_nn_LINUX_64_INSTALL.bin
c) Run the executable.
• Console mode
./PROGRESS_DATADIRECT_HDP_SERVER_nn_LINUX_64_INSTALL.bin -i console
• GUI mode
./PROGRESS_DATADIRECT_HDP_SERVER_nn_LINUX_64_INSTALL.bin
Note: If the installer cannot continue with a GUI installation, a message is displayed and the installationcontinues in console mode
d) Accept or enter the fully qualified hostname for the Hybrid Data Pipeline server. By default, the installersuggests the name of the current machine.
e) When prompted, choose a Custom installation.
f) Specify the key location created in Step 2. This is the key location for the cloned environment.
g) When prompted, provide the load balancer SSL certificate file. This should be the same file that wasprovided in the standing deployment of the server.
h) When prompted, enter the host and credential information for the system database clone.
Important: The information provided should be the information for the system database clone createdin Step 1.
i) Review and confirm port numbers.
j) Review the installation summary, and proceed with the installation.
6. Perform a Custom installation on each additional node in the cloned environment.
Note: When performing subsequent installations on additional nodes, you must specify the key locationcreated in Step 2 (and specified in Step 5, Substep f). The installer uses the files written to the key locationduring the initial installation to install the server on additional nodes. Hence, for installations on additionalnodes, the installer bypasses prompts for load balancing, SSL, external database, and On-PremisesConnector configurations.
a) Run the executable.
• Console mode
Progress DataDirect Hybrid Data Pipeline: Deployment and Best Practices Guide: Version Release 4.6.166
Chapter 6: Upgrading load balancer deployments
./PROGRESS_DATADIRECT_HDP_SERVER_nn_LINUX_64_INSTALL.bin -i console
• GUI mode
./PROGRESS_DATADIRECT_HDP_SERVER_nn_LINUX_64_INSTALL.bin
Note: If the installer cannot continue with a GUI installation, a message is displayed and the installationcontinues in console mode
b) Accept or enter the fully qualified hostname for the Hybrid Data Pipeline server. By default, the installersuggests the name of the current machine.
c) When prompted, choose a Custom installation.
d) Specify the key location for the cloned environment established in Step 2.
e) Review port numbers.
f) Review the installation summary, and proceed with the installation.
7. Configure the load balancer spun up in Step 4 for the cloned environment.
Note: The load balancer must be configured to manage incoming traffic among the nodes in the clonedenvironment. If the On-Premises Connector is being used to connect with a data store behind a firewall,the load balancer must also be configured to communicate with the On-Premises Connector. In addition,you will need to specify the SSL certificate file to enable SSL termination in the load balancer. See Loadbalancer configuration on page 15 for details.
8. Test the cloned environment to ensure it is performing as expected.
What to do next:
Once you have tested the cloned environment, you may proceed with upgrading the cloned environment.
Upgrading the cloned environment and updating the DNSAbout this task:
Take the following steps to upgrade the cloned environment and update the DNS to use this new, upgradedenvironment.
1. After you have created a clone of the production environment, block traffic coming into the productionenvironment.
Note: By blocking traffic to the service, you are ensuring that no changes to the system database are madeduring the upgrade process.
2. According to your database vendor documentation, take a snapshot of the production system database.
3. According to your database vendor documentation, update the system database clone with the productiondatabase snapshot to ensure you have the latest configuration and credential information.
4. Perform an upgrade on one of the nodes in the cloned environment.
a) From a command-line prompt, navigate to the directory where you saved the product file. Alternatively,place the product file directory on your path before proceeding to the next step.
67Progress DataDirect Hybrid Data Pipeline: Deployment and Best Practices Guide: Version Release 4.6.1
Cloning and upgrading a deployment followed by updating the DNS

The product file has the format PROGRESS_DATADIRECT_HDP_SERVER_nn_LINUX_64_INSTALL.bin,where nn is the version of the product.
b) Make the file an executable using the chmod command. Then, press ENTER. For example:
chmod +x ./PROGRESS_DATADIRECT_HDP_SERVER_nn_LINUX_64_INSTALL.bin
c) Run the executable.
• GUI mode
./PROGRESS_DATADIRECT_HDP_SERVER_nn_LINUX_64_INSTALL.bin
Note: If the installer cannot continue with a GUI installation, a message is displayed and the installationcontinues in console mode
• Console mode
./PROGRESS_DATADIRECT_HDP_SERVER_nn_LINUX_64_INSTALL.bin -i console
d) When prompted, enter the directory of the installation you want to upgrade.
e) When prompted, choose an upgrade installation on the existing installation.
f) When prompted, choose the type of upgrade you want to perform.
• Select Express to persist established settings.
• Select Modify settings to change established settings.
g) Review port numbers and accept or change values as appropriate.
h) Review the upgrade summary, and proceed with the upgrade.
Important: If the upgrade fails, you can rollback to the previous version of the service, as described inRolling back to previous version if upgrade fails on page 69.
5. Perform an Express upgrade on each of the remaining nodes in the cloned environment.
a) Run the executable.
• GUI mode
./PROGRESS_DATADIRECT_HDP_SERVER_nn_LINUX_64_INSTALL.bin
Note: If the installer cannot continue with a GUI installation, a message is displayed and the installationcontinues in console mode
• Console mode
./PROGRESS_DATADIRECT_HDP_SERVER_nn_LINUX_64_INSTALL.bin -i console
b) When prompted, enter the directory of the installation you want to upgrade.
c) When prompted, choose an upgrade installation on the existing installation.
Progress DataDirect Hybrid Data Pipeline: Deployment and Best Practices Guide: Version Release 4.6.168
Chapter 6: Upgrading load balancer deployments

d) When prompted, choose an Express upgrade.
e) Review the upgrade summary, and proceed with the upgrade.
6. Test the upgraded, cloned environment to ensure that the upgraded version of the service is performing asexpected.
7. Once you have thoroughly tested the environment to ensure that the upgraded version of the service isperforming as expected, update the DNS record of the current production load balancer such that thehostname of the load balancer resolves to the IP address of the load balancer clone. With the DNS recordupdate, the cloned environment becomes your newly upgraded production environment.
Important: The name of the server hosting the load balancer must remain the same between the upgradedversion of the product and the previous version.
8. Unblock traffic coming into the service.
What to do next:
As a matter of best practices, monitor functionality and performance in the upgraded production environment.
Once you have confirmed that the upgraded production environment is operating as expected, you can freethe original production machines.
Rolling back to previous version if upgrade failsIn the event that an upgrade fails, you can rollback to the previous version of the service. First, the systemdatabase should be restored with the last snapshot of the system database. Next, the keystore location shouldbe restored with the backup of the keystore location (see "Backing up a Hybrid Data Pipeline load balancerdeployment" for more information). Then, test the service to ensure that it is behaving as expected.
To further investigate the failure, review the installation log files. The installer generates a number of log filesduring the installation process. The location of these files depends on the success of the upgrade.
• If the installer successfully creates the product installation directory, the installer generates the followinglog files.
• <install_dir>/_ProgressHDPServer_installation/Logs/Progress_DataDirect_Hybrid_Data_Pipeline_Server_Install_<timestamp>.log
• <install_dir>/ddcloud/deploy.log
• <install_dir>/ddcloud/final.log
• <install_dir>/ddcloud/error.log
• If the installation or upgrade fails such that the installer does not create the installation directory, the installerwrites a file namedProgress__DataDirect_Hybrid_Data_Pipeline_Server_InstallFailed.txtto the machine’s default temporary directory.
• When a silent installation or upgrade fails, the installer writes a file named SilentInstallerError.logto the user's home directory.
• When hostname and port validation are skipped by specifying validation settings in the silent installationresponse file, the installer generates the file SilentInstallInfo.log in the user's home directory.
For further assistance, contact Progress DataDirect Technical Support.
69Progress DataDirect Hybrid Data Pipeline: Deployment and Best Practices Guide: Version Release 4.6.1
Rolling back to previous version if upgrade fails

Progress DataDirect Hybrid Data Pipeline: Deployment and Best Practices Guide: Version Release 4.6.170
Chapter 6: Upgrading load balancer deployments
7Replacing a load balancer
As a matter of best practices, you should be prepared to replace or recover a network load balancer that handlesrequests for your Hybrid Data Pipeline service. The following guidelines should be followed to ensure quickrecovery of the service in case your network load balancer fails.
• Back up all load balancer configuration information, as described in Backing up Hybrid Data Pipelinedeployments on page 47.
• The SSL certificate used to provide SSL termination at the load balancer should be backed up. Thebackup should be secured with the same access controls as the standing certificate.
• The settings for session affinity should be documented.
• The host names passed in the Host header should be documented.
• The configuration for supplying the X-Forwarded-Proto header should be documented.
• The configuration for supplying the X-Forwarded-For header if the client IP address is needed for HybridData Pipeline access logs should be documented.
• Routing and port information for configuration of default routing and for configuration of routing toon-premises data stores. See Configuring a network load balancer with the On-Premises Connector onpage 16 for details.
Note: If you are using HAProxy as your load balancer, you should backup the haproxy.cfg file as amatter of best practice. Once you spin up HAProxy on a newmachine, you can quickly configure HAProxyto handle Hybrid Data Pipeline requests by adding the haproxy.cfg file to the /etc/haproxy folderand executing the command /etc/init.d/haproxy reload.
• Consider having a backup load balancer in place and ready to handle requests for the service should thestanding load balancer go down.
71Progress DataDirect Hybrid Data Pipeline: Deployment and Best Practices Guide: Version Release 4.6.1

• Be prepared to direct traffic to a backup load balancer. Once you have a backup load balancer in place,you should be prepared to update the DNS record of the load balancer such that the hostname of the loadbalancer resolves to the IP address of the backup load balancer. Note that the name of the server hostingthe load balancer must remain the same between the standing load balancer and the backup with which itis being replaced.
Note: If you are running a cloud load balancer such as the AWS Application Load Balancer or the AzureApplication Gateway, best practices recommend that you document and backup your load balancer configuration.Refer to your cloud load balancer vendor documentation for details. For information specific to Hybrid DataPipeline deployments using cloud load balancers, see Configuring a cloud load balancer with the On-PremisesConnector on page 19.
Progress DataDirect Hybrid Data Pipeline: Deployment and Best Practices Guide: Version Release 4.6.172
Chapter 7: Replacing a load balancer
8Updating SSL certificates
The process you follow to update SSL certificates in a Hybrid Data Pipeline environment depends on whetheryou are updating your environment to use an SSL certificate issued by a well-known certificate authority (CA)or a less-well-known CA.
Note: For Hybrid Data Pipeline, a less-well-known CA is a CA that is not included in the list of well-knownCA's in the Java TrustStore. A common example of a less-well-known CA would be an internal CA that issuesSSL certificates within an organization to support in-house operations. An internal CA can serve as an alternativeto issuing a self-signed certificate.
The instructions provided in Updating an environment to use an SSL certificate issued by a well-known CA onpage 74 should be used to handle the following use cases.
• Updating from a self-signed certificate to a certificate issued by a well-known CA
• Updating a certificate issued by a well-known CA to a new certificate issued by a well-known CA
• Updating a certificate issued by a less-well-known CA to a new certificate issued by a well-known CA
The instructions provided in Updating an environment to use an SSL certificate issued by a less-well-knownCA on page 82 should be used to handle the following use cases.
• Updating from a self-signed certificate to a certificate issued by a less-well-known CA
• Updating from a self-signed certificate to a new self-signed certificate
• Updating a certificate issued by a less-well-known CA to a new certificate issued by a less-well-known CA
• Updating a certificate issued by a well-known CA to a new certificate issued by a less-well-known CA
For details, see the following topics:
• Updating an environment to use an SSL certificate issued by a well-known CA
73Progress DataDirect Hybrid Data Pipeline: Deployment and Best Practices Guide: Version Release 4.6.1
• Updating an environment to use an SSL certificate issued by a less-well-known CA
Updating an environment to use an SSL certificateissued by a well-known CA
The procedures for updating an environment to a certificate issued by a well-known CA may differ dependingon whether you choose to use the Hybrid Data Pipeline installation program to generate certificate files forclient-side components, or choose to manually generate certificate files for these components. (Client-sidecomponents include the ODBC driver, the JDBC driver, and the On-Premises Connector.)
Important: We recommend that the installation program be used to generate certificate files whenever possible.
For detailed instructions, see the topic that applies to your use case.
• Updating certificates using the installation program in a load balancer environment (well-known CA) onpage 74
• Updating certificates manually in a load balancer environment (well-known CA) on page 77
Updating certificates using the installation program in a loadbalancer environment (well-known CA)
Before you begin:
• The Hybrid Data Pipeline deployment should be backed up according to Backing up Hybrid Data Pipelinedeployments on page 47.
• All traffic coming into the service should be blocked.
• Stop the service on each of the nodes in the cluster by running the stop service script (stop.sh) in theddcloud subdirectory of the installation directory. Note that shutting down Hybrid Data Pipeline can takeup to 2.5 minutes. Wait until you see the Shutdown complete message displayed on the console beforetaking any additional actions.
About this procedure:
The procedure for updating a load balancer deployment with an SSL certificate issued by a well-known CAbegins with configuring your load balancer to use the new SSL certificate. Additional steps may be required ifyou are using client-side components such as the ODBC driver, the JDBC driver, or the On-Premises Connector.Specifically, in some circumstances, client-side certificate files must be regenerated to maintain SSL connectivity.While manual instruction is provided in Updating certificatesmanually in a load balancer environment (well-knownCA) on page 77, we strongly recommend that the installation program be used to generate certificate files asdescribed in the component-specific procedures below.
Configuring your load balancerThe load balancer used to manage Hybrid Data Pipeline requests must be configured to use the SSL certificateissued by the well-known CA. The server certificate should consist of the certificate issued by the CA and theprivate key generated from this certificate. You should refer to your load balancer vendor documentation fordetails on specifying an SSL server certificate.
Progress DataDirect Hybrid Data Pipeline: Deployment and Best Practices Guide: Version Release 4.6.174
Chapter 8: Updating SSL certificates

Note: If you are using HAProxy as your load balancer, you will need to update the certificate file specified inthe haproxy.cfg file. For example, bind *:443 ssl crt /hdpenv/ssl/<new_cert_file>.pem.Then, reload the haproxy.cfg file with the command /etc/init.d/haproxy reload.
If your deployment of Hybrid Data Pipeline does not include any client-side components, you must restart theservice by running the start service script (start.sh) in the ddcloud subdirectory of the installation directoryfor each node in the cluster. Once the service has been restarted, the process for updating the SSL certificateis complete.
If you are using client-side components, additional steps may be required. See the following sections for details.
• Maintaining ODBC connectivity
• Maintaining JDBC connectivity
• Maintaining on-premises connectivity
Maintaining ODBC connectivityTo maintain ODBC connectivity, you must perform an upgrade installation of the Hybrid Data Pipeline serverto generate new configuration and certificate files based on the newly issued SSL certificate. Then, the ODBCdriver must be reinstalled with the new configuration and certificate files to complete client-side integration ofthe newly issued SSL certificate.
After you have configured your load balancer to use the new SSL certificate, take the following steps to maintainODBC connectivity.
1. Perform a Modify settings upgrade on one of the nodes in your environment. The installation programmust be for the same version of the product used in the standing deployment of the server. When prompted,specify the full path to the new SSL certificate. The specified file must include the trust chain down to theroot certificate. PEM, DER, and Base64 encodings are supported (see SSL certificates for load balancerdeployment on page 27 for details).
Note: Refer to the Progress DataDirect Hybrid Data Pipeline Installation Guide for more information onperforming upgrades.
2. Perform an Express upgrade on each of the remaining nodes in the cluster. The installation program mustbe for the same version of the product used in the standing deployment of the server.
3. Reinstall the ODBC driver with the newly generated configuration and certificate files. These files will belocated in the redist folder in the key location. (The key location can be found in the update.propertiesfile in the installation directory for any server node.) The ODBC driver must be reinstalled with the updatedconfiguration and certificate files. When you run the ODBC driver installation program, the new configurationand certificate files must be located in the same directory as the driver installation program.
Note: The ODBC driver installation program must be the same version used to install the standing versionof the component.
4. After reinstalling the ODBC driver, test your environment to ensure that ODBC connectivity is working withthe SSL update.
5. After confirming ODBC connectivity, unblock traffic coming into the service.
75Progress DataDirect Hybrid Data Pipeline: Deployment and Best Practices Guide: Version Release 4.6.1
Updating an environment to use an SSL certificate issued by a well-known CA

Maintaining JDBC connectivityWhen updating your environment to use an SSL certificate issued by a well-known CA, you will not need toupgrade the server or reinstall the JDBC driver in most circumstances because the Java TrustStore containsa list of well-known CA certificates.
However, it is possible that an SSL certificate issued by a well-known CA is not included on the list of well-knownCA certificates in the Java TrustStore. In this scenario, you will need to perform an upgrade of the Hybrid DataPipeline server to generate new configuration and certificate files. Then, you will need to reinstall the JDBCdriver with the new configuration and certificate files. This procedure is described in the following steps.
Note: If you have already upgraded the server for ODBC connectivity, there is no reason to upgrade the serveragain. You can simply reinstall the JDBC driver as described in Step 3.
1. Perform a Modify settings upgrade on one of the nodes in your environment. The installation programmust be for the same version of the product used in the standing deployment of the server. When prompted,specify the full path to the new SSL certificate. The specified file must include the trust chain down to theroot certificate. PEM, DER, and Base64 encodings are supported (see SSL certificates for load balancerdeployment on page 27 for details).
Note: Refer to the Progress DataDirect Hybrid Data Pipeline Installation Guide for more information onperforming upgrades.
2. Perform an Express upgrade on each of the remaining nodes in the cluster. The installation program mustbe for the same version of the product used in the standing deployment of the server.
3. Reinstall the JDBC driver with the newly generated configuration and certificate files. These files will belocated in the redist folder in the key location. (The key location can be found in the update.propertiesfile in the installation directory for any server node.) The JDBC driver must be reinstalled with the updatedconfiguration and certificate files. When you run the JDBC driver installation program, the new configurationand certificate files must located in the same directory as the driver installation program.
4. After reinstalling the JDBC driver, test your environment to ensure that JDBC connectivity is working withthe SSL update.
5. After confirming JDBC connectivity, unblock traffic coming into the service.
Maintaining on-premises connectivityWhen updating your environment to use an SSL certificate issued by a well-known CA, you will not need toupgrade the server or reinstall the On-Premises Connector in most circumstances because the Java TrustStorecontains a list of well-known CA certificates.
However, it is possible that an SSL certificate issued by a well-known CA is not included on the list of well-knownCA certificates in the Java TrustStore. In this scenario, you will need to perform an upgrade of the Hybrid DataPipeline server to generate new configuration and certificate files. Then, you will need to reinstall the On-PremisesConnector with the new configuration and certificate files. This procedure is described in the following steps.
Note: If you have already upgraded the server for ODBC or JDBC connectivity, there is no reason to upgradethe server again. You can simply reinstall the On-Premises Connector as described in Step 3.
1. Perform a Modify settings upgrade on one of the nodes in your environment. The installation programmust be for the same version of the product used in the standing deployment of the server. When prompted,specify the full path to the new SSL certificate. The specified file must include the trust chain down to theroot certificate. PEM, DER, and Base64 encodings are supported (see SSL certificates for load balancerdeployment on page 27 for details).
Progress DataDirect Hybrid Data Pipeline: Deployment and Best Practices Guide: Version Release 4.6.176
Chapter 8: Updating SSL certificates

Note: Refer to the Progress DataDirect Hybrid Data Pipeline Installation Guide for more information onperforming upgrades.
2. Perform an Express upgrade on each of the remaining nodes in the cluster. The installation program mustbe for the same version of the product used in the standing deployment of the server.
3. Reinstall the On-Premises Connector with the newly generated configuration and certificate files. Thesefiles will be located in the redist folder in the key location. (The key location can be found in theupdate.properties file in the installation directory for any server node.) The On-Premises Connectormust be reinstalled with the new configuration and certificate files. When you run the On-Premises Connectorinstallation program, the new configuration and certificate files must be located in the same directory as theOn-Premises Connector installation program.
4. After reinstalling the On-Premises Connector, test your environment to ensure that connectivity to on-premisesdata sources is working with the SSL update.
5. After confirming on-premises connectivity, unblock traffic coming into the service.
Updating certificates manually in a load balancer environment(well-known CA)
Before you begin:
• The Hybrid Data Pipeline deployment should be backed up according to Backing up Hybrid Data Pipelinedeployments on page 47.
• All traffic coming into the service should be blocked.
• Stop the service on each of the nodes in the cluster by running the stop service script (stop.sh) in theddcloud subdirectory of the installation directory. Note that shutting down Hybrid Data Pipeline can takeup to 2.5 minutes. Wait until you see the Shutdown complete message displayed on the console beforetaking any additional actions.
About this procedure:
The procedure for updating a load balancer deployment with an SSL certificate issued by a well-known CAbegins with configuring your load balancer to use the new SSL certificate. Additional steps may be required ifyou are using client-side components such as the ODBC driver, the JDBC driver, or the On-Premises Connector.Specifically, in some circumstances, client-side certificate files must be regenerated to maintain SSL connectivity.While instruction to manually generate certificate files is provided in this topic, we strongly recommend that theinstallation program be used to generate certificates as described in Updating certificates using the installationprogram in a load balancer environment (well-known CA) on page 74.
Configuring your load balancerThe load balancer used to manage Hybrid Data Pipeline requests must be configured to use the SSL certificateissued by the well-known CA. The server certificate should consist of the certificate issued by the CA and theprivate key generated from this certificate. You should refer to your load balancer vendor documentation fordetails on specifying an SSL server certificate.
Note: If you are using HAProxy as your load balancer, you will need to update the certificate file specified inthe haproxy.cfg file. For example, bind *:443 ssl crt /hdpenv/ssl/<new_cert_file>.pem.Then, reload the haproxy.cfg file with the command /etc/init.d/haproxy reload.
77Progress DataDirect Hybrid Data Pipeline: Deployment and Best Practices Guide: Version Release 4.6.1
Updating an environment to use an SSL certificate issued by a well-known CA
If your deployment of Hybrid Data Pipeline does not include any client-side components, you must restart theservice by running the start service script (start.sh) in the ddcloud subdirectory of the installation directoryfor each node in the cluster. Once the service has been restarted, the process for updating the SSL certificateis complete.
If you are using client-side components, additional steps may be required. See the following sections for details.
• Maintaining ODBC connectivity
• Maintaining JDBC connectivity
• Maintaining on-premises connectivity
Maintaining ODBC connectivityTo maintain ODBC connectivity, a new ddcloud.pem server certificate must be generated from the newlyissued SSL certificate. Then, the ODBC driver must be reinstalled with the new ddcloud.pem to completethe client-side integration of the newly issued SSL certificate.
After you have configured your load balancer to use the new SSL certificate, take the following steps to maintainODBC connectivity.
1. Generate a new ddcloud.pem server certificate.
• Option 1. If working from a PEM file, execute the following commands.
openssl crl2pkcs7 -nocrl -certfile <cert_file_path>/newcert.pem
openssl pkcs7 -print_certs -out ddcloud.pem
• Option 2. If working from a file in DER encoded binary X.509 file format (such as a .cert, .cer or.crt file), execute the following command.
openssl x509 -inform der -in <cert_file_path>/newcert.cer -out ddcloud.pem
2. Copy the new ddcloud.pem file to the <key_location>/redist directory where the <key_location>is the key location directory specified during installation or previous upgrade of the Hybrid Data Pipelineserver. (The key location can be found in the update.properties file in the installation directory for anyserver node.) For example:
cp ddcloud.pem <key_location>/redist/ddcloud.pem
3. FIPS implementations only. For each machine running the server, navigate to the<hdp_install_dir>/ddcloud directory and run the enable_fips.sh script with the force argument.For example:
enable_fips.sh force
4. Reinstall the ODBC driver with the configuration and certificate files in the <key_location>/redistfolder, which includes the new ddcloud.pem. The ODBC driver must be reinstalled with all configurationand certificate files. When you run the ODBC driver installation program, the new certificate file (as well asthe TrustStore and configuration files) must located in the same directory as the driver installation program.
Note: The ODBC driver installation program must be the same version used to install the standing versionof the component.
Progress DataDirect Hybrid Data Pipeline: Deployment and Best Practices Guide: Version Release 4.6.178
Chapter 8: Updating SSL certificates

5. After reinstalling the ODBC driver, test your environment to ensure that ODBC connectivity is working withthe SSL update.
6. After confirming ODBC connectivity, unblock traffic coming into the service.
Maintaining JDBC connectivityWhen updating your environment to use an SSL certificate issued by a well-known CA, you will not needregenerate certificate files or reinstall the JDBC driver in most circumstances because the Java TrustStorecontains a list of well-known CA certificates.
However, it is possible that an SSL certificate issued by a well-known CA is not included on the list of well-knownCA certificates in the Java TrustStore. In this scenario, you will need to generate new certificate files based onthe newly issued SSL certificate. Then, you will need to reinstall the JDBC driver with the new certificate files.This procedure is described in the following steps.
1. Generate a new ddcloud.pem server certificate.
Note: If you created a new ddcloud.pem for ODBC connectivity, you do not need to regenerate the fileagain. Simply use the new ddcloud.pem you have already created in Step 2.
• Option 1. If working from a PEM file, execute the following commands.
openssl crl2pkcs7 -nocrl -certfile <cert_file_path>/newcert.pem
openssl pkcs7 -print_certs -out ddcloud.pem
• Option 2. If working from a file in DER encoded binary X.509 file format (such as a .cert, .cer or.crt file), execute the following command.
openssl x509 -inform der -in <cert_file_path>/newcert.cer -out ddcloud.pem
2. Create the TrustStore ddcloudTrustStore.jks by executing the following command.
<hdp_install_dir>/jre/bin/keytool -importcert -file ddcloud.pem-keystore ddcloudTrustStore.jks -storetype JKS -storepass datadirect-noprompt
3. Create the KeyStore ddcloud.jks by executing the following command.
cp ddcloudTrustStore.jks ddcloud.jks
4. Copy the ddcloudTrustStore.jks file to the <key_location> and <key_location>/redistdirectories where the <key_location> is the key location directory specified during installation or previousupgrade of the Hybrid Data Pipeline server. (The key location can be found in the update.propertiesfile in the installation directory for any server node.) For example:
cp ddcloudTrustStore.jks <key_location>/ddcloudTrustStore.jks
cp ddcloudTrustStore.jks <key_location>/redist/ddcloudTrustStore.jks
5. Copy the ddcloudTrustStore.jks file to the <hdp_install_dir>/ddcloud/keystore directoryof each node running the Hybrid Data Pipeline server. For example:
cp ddcloudTrustStore.jks <hdp_install_dir>/ddcloud/keystore/ddcloudTrustStore.jks
79Progress DataDirect Hybrid Data Pipeline: Deployment and Best Practices Guide: Version Release 4.6.1
Updating an environment to use an SSL certificate issued by a well-known CA

6. Copy the ddcloud.jks file to the <key_location> directory.
cp ddcloud.jks <key_location>/ddcloud.jks
7. Copy the ddcloud.jks file to the <hdp_install_dir>/ddcloud/keystore directory of each noderunning the Hybrid Data Pipeline server. For example:
cp ddcloud.jks <hdp_install_dir>/ddcloud/keystore/ddcloud.jks
8. Copy the new ddcloud.pem file to the <key_location>/redist directory.
cp ddcloud.pem <key_location>/redist/ddcloud.pem
9. Reinstall the JDBC driver with the configuration and certificate files in the <key_location>/redistfolder, which includes the new certificate files. The JDBC driver must be reinstalled with all configurationand certificate files. When you run the JDBC driver installation program, the new certificate files and theconfiguration files must located in the same directory as the driver installation program.
Note: The JDBC driver installation program must be the same version used to install the standing versionof the component.
10. After reinstalling the JDBC driver, test your environment to ensure that JDBC connectivity is working withthe SSL update.
11. After confirming JDBC connectivity, unblock traffic coming into the service.
Maintaining on-premises connectivityWhen updating your environment to use an SSL certificate issued by a well-known CA, you will not needregenerate certificate files or reinstall the On-Premises Connector in most circumstances because the JavaTrustStore contains a list of well-known CA certificates.
However, it is possible that an SSL certificate issued by a well-known CA is not included on the list of well-knownCA certificates in the Java TrustStore. In this scenario, you will need to generate new certificate files based onthe newly issued SSL certificate. Then, you will need to reinstall the On-Premises Connector with the newcertificate files. This procedure is described in the following steps.
1. Generate a new ddcloud.pem server certificate.
Note: If you created a new ddcloud.pem for ODBC or JDBC connectivity, you do not need to regeneratethe file again. Simply use the new ddcloud.pem you have already created in Step 2 below.
• Option 1. If working from a PEM file, execute the following commands.
openssl crl2pkcs7 -nocrl -certfile <cert_file_path>/newcert.pem
openssl pkcs7 -print_certs -out ddcloud.pem
Progress DataDirect Hybrid Data Pipeline: Deployment and Best Practices Guide: Version Release 4.6.180
Chapter 8: Updating SSL certificates
• Option 2. If working from a file in DER encoded binary X.509 file format (such as a .cert, .cer or.crt file), execute the following command.
openssl x509 -inform der -in <cert_file_path>/newcert.cer -out ddcloud.pem
2. Create the TrustStore ddcloudTrustStore.jks by executing the following command.
<hdp_install_dir>/jre/bin/keytool -importcert -file ddcloud.pem-keystore ddcloudTrustStore.jks -storetype JKS -storepass datadirect-noprompt
3. Create the KeyStore ddcloud.jks by executing the following command.
cp ddcloudTrustStore.jks ddcloud.jks
4. Copy the ddcloudTrustStore.jks file to the <key_location> and <key_location>/redistdirectories where the <key_location> is the key location directory specified during installation or previousupgrade of the Hybrid Data Pipeline server. (The key location can be found in the update.propertiesfile in the installation directory for any server node.) For example:
cp ddcloudTrustStore.jks <key_location>/ddcloudTrustStore.jks
cp ddcloudTrustStore.jks <key_location>/redist/ddcloudTrustStore.jks
5. Copy the ddcloudTrustStore.jks file to the <hdp_install_dir>/ddcloud/keystore directoryof each node running the Hybrid Data Pipeline server. For example:
cp ddcloudTrustStore.jks <hdp_install_dir>/ddcloud/keystore/ddcloudTrustStore.jks
6. Copy the ddcloud.jks file to the <key_location> directory.
cp ddcloud.jks <key_location>/ddcloud.jks
7. Copy the ddcloud.jks file to the <hdp_install_dir>/ddcloud/keystore directory of each noderunning the Hybrid Data Pipeline server. For example:
cp ddcloud.jks <hdp_install_dir>/ddcloud/keystore/ddcloud.jks
8. Copy the new ddcloud.pem file to the <key_location>/redist directory.
cp ddcloud.pem <key_location>/redist/ddcloud.pem
9. Reinstall the On-Premises Connector with the configuration and certificate files in the<key_location>/redist folder, which includes the new certificate files. The On-Premises Connectormust be reinstalled with all configuration and certificate files. When you run the On-Premises Connectorinstallation program, the new certificate files and the configuration files must located in the same directoryas the On-Premises Connector installation program.
Note: The On-Premises Connector installation program must be the same version used to install thestanding version of the component.
10. After reinstalling the On-Premises Connector, test your environment to ensure that connectivity to on-premisesdata sources is working with the SSL update.
11. After confirming on-premises connectivity, unblock traffic coming into the service.
81Progress DataDirect Hybrid Data Pipeline: Deployment and Best Practices Guide: Version Release 4.6.1
Updating an environment to use an SSL certificate issued by a well-known CA
Updating an environment to use an SSL certificateissued by a less-well-known CA
The procedures for updating an environment to a certificate issued by a less-well-known CAmay differ dependingon whether you choose to use the Hybrid Data Pipeline installation program to generate certificate files forclient-side components, or choose to manually generate certificate files for these components. (Client-sidecomponents include the ODBC driver, the JDBC driver, and the On-Premises Connector.)
Important: We recommend that the installation program be used to generate certificate files whenever possible.
For detailed instructions, see the topic that applies to your use case.
• Updating certificates using the installation program in a load balancer environment (less-well-known CA)on page 82
• Updating certificates manually in a load balancer environment (less-well-known CA) on page 85
Updating certificates using the installation program in a loadbalancer environment (less-well-known CA)
Before you begin:
• The Hybrid Data Pipeline deployment should be backed up according to Backing up Hybrid Data Pipelinedeployments on page 47.
• All traffic coming into the service should be blocked.
• Stop the service on each of the nodes in the cluster by running the stop service script (stop.sh) in theddcloud subdirectory of the installation directory. Note that shutting down Hybrid Data Pipeline can takeup to 2.5 minutes. Wait until you see the Shutdown complete message displayed on the console beforetaking any additional actions.
About this procedure:
The procedure for updating a load balancer deployment with an SSL certificate issued by a less-well-knownCA begins with configuring your load balancer to use the new SSL certificate. Additional steps are required ifyou are using client-side components such as the ODBC driver, the JDBC driver, or the On-Premises Connector.While manual instruction is provided in Updating certificates manually in a load balancer environment(less-well-known CA) on page 85, we strongly recommend that the installation program be used to generatecertificate files as described in the component-specific procedures below.
Configuring your load balancerThe load balancer used to manage Hybrid Data Pipeline requests must be configured to use the SSL certificateissued by the well-known CA. The server certificate should consist of the certificate issued by the CA and theprivate key generated from this certificate. You should refer to your load balancer vendor documentation fordetails on specifying an SSL server certificate.
Note: If you are using HAProxy as your load balancer, you will need to update the certificate file specified inthe haproxy.cfg file. For example, bind *:443 ssl crt /hdpenv/ssl/<new_cert_file>.pem.Then, reload the haproxy.cfg file with the command /etc/init.d/haproxy reload.
Progress DataDirect Hybrid Data Pipeline: Deployment and Best Practices Guide: Version Release 4.6.182
Chapter 8: Updating SSL certificates

If your deployment of Hybrid Data Pipeline does not include any client-side components, you must restart theservice by running the start service script (start.sh) in the ddcloud subdirectory of the installation directoryfor each node in the cluster. Once the service has been restarted, the process for updating the SSL certificateis complete.
If you are using client-side components, additional steps are required. See the following sections for details.
• Maintaining ODBC connectivity
• Maintaining JDBC connectivity
• Maintaining on-premises connectivity
Maintaining ODBC connectivityTo maintain ODBC connectivity, you must perform an upgrade installation of the Hybrid Data Pipeline serverto generate new configuration and certificate files based on the newly issued SSL certificate. Then, the ODBCdriver must be reinstalled with the new configuration and certificate files to complete client-side integration ofthe newly issued SSL certificate.
After you have configured your load balancer to use the new SSL certificate, take the following steps to maintainODBC connectivity.
1. Perform a Modify settings upgrade on one of the nodes in your environment. The installation programmust be for the same version of the product used in the standing deployment of the server. When prompted,specify the full path to the new SSL certificate. The specified file must include the trust chain down to theroot certificate. PEM, DER, and Base64 encodings are supported (see SSL certificates for load balancerdeployment on page 27 for details).
Note: Refer to the Progress DataDirect Hybrid Data Pipeline Installation Guide for more information onperforming upgrades.
2. Perform an Express upgrade on each of the remaining nodes in the cluster. The installation program mustbe for the same version of the product used in the standing deployment of the server.
3. Reinstall the ODBC driver with the newly generated configuration and certificate files. These files will belocated in the redist folder in the key location. (The key location can be found in the update.propertiesfile in the installation directory for any server node.) The ODBC driver must be reinstalled with the updatedconfiguration and certificate files. When you run the ODBC driver installation program, the new configurationand certificate files must be located in the same directory as the driver installation program.
Note: The ODBC driver installation program must be the same version used to install the standing versionof the component.
4. After reinstalling the ODBC driver, test your environment to ensure that ODBC connectivity is working withthe SSL update.
5. After confirming ODBC connectivity, unblock traffic coming into the service.
Maintaining JDBC connectivityTo maintain JDBC connectivity, you must perform an upgrade installation of the Hybrid Data Pipeline serverto generate new configuration and certificate files based on the newly issued SSL certificate. Then, the JDBCdriver must be reinstalled with the new configuration and certificate files to complete client-side integration ofthe newly issued SSL certificate.
After you have configured your load balancer to use the new SSL certificate, take the following steps to maintainJDBC connectivity.
83Progress DataDirect Hybrid Data Pipeline: Deployment and Best Practices Guide: Version Release 4.6.1
Updating an environment to use an SSL certificate issued by a less-well-known CA
Note: If you have already upgraded the server for ODBC connectivity, there is no reason to upgrade the serveragain. You can simply reinstall the JDBC driver as described in Step 3.
1. Perform a Modify settings upgrade on one of the nodes in your environment. The installation programmust be for the same version of the product used in the standing deployment of the server. When prompted,specify the full path to the new SSL certificate. The specified file must include the trust chain down to theroot certificate. PEM, DER, and Base64 encodings are supported (see SSL certificates for load balancerdeployment on page 27 for details).
Note: Refer to the Progress DataDirect Hybrid Data Pipeline Installation Guide for more information onperforming upgrades.
2. Perform an Express upgrade on each of the remaining nodes in the cluster. The installation program mustbe for the same version of the product used in the standing deployment of the server.
3. Reinstall the JDBC driver with the newly generated configuration and certificate files. These files will belocated in the redist folder in the key location. (The key location can be found in the update.propertiesfile in the installation directory for any server node.) The JDBC driver must be reinstalled with the updatedconfiguration and certificate files. When you run the JDBC driver installation program, the new configurationand certificate files must located in the same directory as the driver installation program.
4. After reinstalling the JDBC driver, test your environment to ensure that JDBC connectivity is working withthe SSL update.
5. After confirming JDBC connectivity, unblock traffic coming into the service.
Maintaining on-premises connectivityTo maintain on-premises connectivity, you must perform an upgrade installation of the Hybrid Data Pipelineserver to generate new configuration and certificate files based on the newly issued SSL certificate. Then, theOn-Premises Connector must be reinstalled with the new configuration and certificate files to complete client-sideintegration of the newly issued SSL certificate.
After you have configured your load balancer to use the new SSL certificate, take the following steps to maintainon-premises connectivity.
Note: If you have already upgraded the server for ODBC or JDBC connectivity, there is no reason to upgradethe server again. You can simply reinstall the On-Premises Connector as described in Step 3.
1. Perform a Modify settings upgrade on one of the nodes in your environment. The installation programmust be for the same version of the product used in the standing deployment of the server. When prompted,specify the full path to the new SSL certificate. The specified file must include the trust chain down to theroot certificate. PEM, DER, and Base64 encodings are supported (see SSL certificates for load balancerdeployment on page 27 for details).
Note: Refer to the Progress DataDirect Hybrid Data Pipeline Installation Guide for more information onperforming upgrades.
2. Perform an Express upgrade on each of the remaining nodes in the cluster. The installation program mustbe for the same version of the product used in the standing deployment of the server.
3. Reinstall the On-Premises Connector with the newly generated configuration and certificate files. Thesefiles will be located in the redist folder in the key location. (The key location can be found in theupdate.properties file in the installation directory for any server node.) The On-Premises Connectormust be reinstalled with the new configuration and certificate files. When you run the On-Premises Connector
Progress DataDirect Hybrid Data Pipeline: Deployment and Best Practices Guide: Version Release 4.6.184
Chapter 8: Updating SSL certificates

installation program, the new configuration and certificate files must be located in the same directory as theOn-Premises Connector installation program.
4. After reinstalling the On-Premises Connector, test your environment to ensure that connectivity to on-premisesdata sources is working with the SSL update.
5. After confirming on-premises connectivity, unblock traffic coming into the service.
Updating certificates manually in a load balancer environment(less-well-known CA)
Before you begin:
• The Hybrid Data Pipeline deployment should be backed up according to Backing up Hybrid Data Pipelinedeployments on page 47.
• All traffic coming into the service should be blocked.
• Stop the service on each of the nodes in the cluster by running the stop service script (stop.sh) in theddcloud subdirectory of the installation directory. Note that shutting down Hybrid Data Pipeline can takeup to 2.5 minutes. Wait until you see the Shutdown complete message displayed on the console beforetaking any additional actions.
About this procedure:
The procedure for updating a load balancer deployment with an SSL certificate issued by a well-known CAbegins with configuring your load balancer to use the new SSL certificate. Additional steps are required if youare using client-side components such as the ODBC driver, the JDBC driver, or the On-Premises Connector.While instruction to manually generate certificate files is provided in this topic, we strongly recommend that theinstallation program be used to generate certificates as described in Updating certificates using the installationprogram in a load balancer environment (less-well-known CA) on page 82.
Configuring your load balancerThe load balancer used to manage Hybrid Data Pipeline requests must be configured to use the SSL certificateissued by the well-known CA. The server certificate should consist of the certificate issued by the CA and theprivate key generated from this certificate. You should refer to your load balancer vendor documentation fordetails on specifying an SSL server certificate.
Note: If you are using HAProxy as your load balancer, you will need to update the certificate file specified inthe haproxy.cfg file. For example, bind *:443 ssl crt /hdpenv/ssl/<new_cert_file>.pem.Then, reload the haproxy.cfg file with the command /etc/init.d/haproxy reload.
If your deployment of Hybrid Data Pipeline does not include any client-side components, you must restart theservice by running the start service script (start.sh) in the ddcloud subdirectory of the installation directoryfor each node in the cluster. Once the service has been restarted, the process for updating the SSL certificateis complete.
If you are using client-side components, additional steps may be required. See the following sections for details.
• Maintaining ODBC connectivity
• Maintaining JDBC connectivity
• Maintaining on-premises connectivity
85Progress DataDirect Hybrid Data Pipeline: Deployment and Best Practices Guide: Version Release 4.6.1
Updating an environment to use an SSL certificate issued by a less-well-known CA

Maintaining ODBC connectivityTo maintain ODBC connectivity, a new ddcloud.pem server certificate must be generated from the newlyissued SSL certificate. Then, the ODBC driver must be reinstalled with the new ddcloud.pem to completethe client-side integration of the newly issued SSL certificate.
After you have configured your load balancer to use the new SSL certificate, take the following steps to maintainODBC connectivity.
1. Generate a new ddcloud.pem server certificate.
• Option 1. If working from a PEM file, execute the following commands.
openssl crl2pkcs7 -nocrl -certfile <cert_file_path>/newcert.pem
openssl pkcs7 -print_certs -out ddcloud.pem
• Option 2. If working from a file in DER encoded binary X.509 file format (such as a .cert, .cer or.crt file), execute the following command.
openssl x509 -inform der -in <cert_file_path>/newcert.cer -out ddcloud.pem
2. Copy the new ddcloud.pem file to the <key_location>/redist directory where the <key_location>is the key location directory specified during installation or previous upgrade of the Hybrid Data Pipelineserver. (The key location can be found in the update.properties file in the installation directory for anyserver node.) For example:
cp ddcloud.pem <key_location>/redist/ddcloud.pem
3. FIPS implementations only. For each machine running the server, navigate to the<hdp_install_dir>/ddcloud directory and run the enable_fips.sh script with the force argument.For example:
enable_fips.sh force
4. Reinstall the ODBC driver with the configuration and certificate files in the <key_location>/redistfolder, which includes the new ddcloud.pem. The ODBC driver must be reinstalled with all configurationand certificate files. When you run the ODBC driver installation program, the new certificate file (as well asthe TrustStore and configuration files) must located in the same directory as the driver installation program.
Note: The ODBC driver installation program must be the same version used to install the standing versionof the component.
5. After reinstalling the ODBC driver, test your environment to ensure that ODBC connectivity is working withthe SSL update.
6. After confirming ODBC connectivity, unblock traffic coming into the service.
Maintaining JDBC connectivityTo maintain JDBC connectivity, new certificate must be generated from the newly issued SSL certificate. Then,the JDBC driver must be reinstalled with the new certificate files to complete the client-side integration of thenewly issued SSL certificate.
After you have configured your load balancer to use the new SSL certificate, take the following steps to maintainJDBC connectivity.
1. Generate a new ddcloud.pem server certificate.
Progress DataDirect Hybrid Data Pipeline: Deployment and Best Practices Guide: Version Release 4.6.186
Chapter 8: Updating SSL certificates
Note: If you created a new ddcloud.pem for ODBC connectivity, you do not need to regenerate the fileagain. Simply use the new ddcloud.pem you have already created in Step 2.
• Option 1. If working from a PEM file, execute the following commands.
openssl crl2pkcs7 -nocrl -certfile <cert_file_path>/newcert.pem
openssl pkcs7 -print_certs -out ddcloud.pem
• Option 2. If working from a file in DER encoded binary X.509 file format (such as a .cert, .cer or.crt file), execute the following command.
openssl x509 -inform der -in <cert_file_path>/newcert.cer -out ddcloud.pem
2. Create the TrustStore ddcloudTrustStore.jks by executing the following command.
<hdp_install_dir>/jre/bin/keytool -importcert -file ddcloud.pem-keystore ddcloudTrustStore.jks -storetype JKS -storepass datadirect-noprompt
3. Create the KeyStore ddcloud.jks by executing the following command.
cp ddcloudTrustStore.jks ddcloud.jks
4. Copy the ddcloudTrustStore.jks file to the <key_location> and <key_location>/redistdirectories where the <key_location> is the key location directory specified during installation or previousupgrade of the Hybrid Data Pipeline server. (The key location can be found in the update.propertiesfile in the installation directory for any server node.) For example:
cp ddcloudTrustStore.jks <key_location>/ddcloudTrustStore.jks
cp ddcloudTrustStore.jks <key_location>/redist/ddcloudTrustStore.jks
5. Copy the ddcloudTrustStore.jks file to the <hdp_install_dir>/ddcloud/keystore directoryof each node running the Hybrid Data Pipeline server. For example:
cp ddcloudTrustStore.jks <hdp_install_dir>/ddcloud/keystore/ddcloudTrustStore.jks
6. Copy the ddcloud.jks file to the <key_location> directory.
cp ddcloud.jks <key_location>/ddcloud.jks
7. Copy the ddcloud.jks file to the <hdp_install_dir>/ddcloud/keystore directory of each noderunning the Hybrid Data Pipeline server. For example:
cp ddcloud.jks <hdp_install_dir>/ddcloud/keystore/ddcloud.jks
8. Copy the new ddcloud.pem file to the <key_location>/redist directory.
cp ddcloud.pem <key_location>/redist/ddcloud.pem
9. Reinstall the JDBC driver with the configuration and certificate files in the <key_location>/redistfolder, which includes the new certificate files. The JDBC driver must be reinstalled with all configurationand certificate files. When you run the JDBC driver installation program, the new certificate files and theconfiguration files must located in the same directory as the driver installation program.
87Progress DataDirect Hybrid Data Pipeline: Deployment and Best Practices Guide: Version Release 4.6.1
Updating an environment to use an SSL certificate issued by a less-well-known CA
Note: The JDBC driver installation program must be the same version used to install the standing versionof the component.
10. After reinstalling the JDBC driver, test your environment to ensure that JDBC connectivity is working withthe SSL update.
11. After confirming JDBC connectivity, unblock traffic coming into the service.
Maintaining on-premises connectivityTo maintain on-premises connectivity, new certificate must be generated from the newly issued SSL certificate.Then, the On-Premises Connector must be reinstalled with the new certificate files to complete the client-sideintegration of the newly issued SSL certificate.
After you have configured your load balancer to use the new SSL certificate, take the following steps to maintainon-premises connectivity.
1. Generate a new ddcloud.pem server certificate.
Note: If you created a new ddcloud.pem for ODBC or JDBC connectivity, you do not need to regeneratethe file again. Simply use the new ddcloud.pem you have already created in Step 2 below.
• Option 1. If working from a PEM file, execute the following commands.
openssl crl2pkcs7 -nocrl -certfile <cert_file_path>/newcert.pem
openssl pkcs7 -print_certs -out ddcloud.pem
• Option 2. If working from a file in DER encoded binary X.509 file format (such as a .cert, .cer or.crt file), execute the following command.
openssl x509 -inform der -in <cert_file_path>/newcert.cer -out ddcloud.pem
2. Create the TrustStore ddcloudTrustStore.jks by executing the following command.
<hdp_install_dir>/jre/bin/keytool -importcert -file ddcloud.pem-keystore ddcloudTrustStore.jks -storetype JKS -storepass datadirect-noprompt
3. Create the KeyStore ddcloud.jks by executing the following command.
cp ddcloudTrustStore.jks ddcloud.jks
4. Copy the ddcloudTrustStore.jks file to the <key_location> and <key_location>/redistdirectories where the <key_location> is the key location directory specified during installation or previousupgrade of the Hybrid Data Pipeline server. (The key location can be found in the update.propertiesfile in the installation directory for any server node.) For example:
cp ddcloudTrustStore.jks <key_location>/ddcloudTrustStore.jks
cp ddcloudTrustStore.jks <key_location>/redist/ddcloudTrustStore.jks
Progress DataDirect Hybrid Data Pipeline: Deployment and Best Practices Guide: Version Release 4.6.188
Chapter 8: Updating SSL certificates

5. Copy the ddcloudTrustStore.jks file to the <hdp_install_dir>/ddcloud/keystore directoryof each node running the Hybrid Data Pipeline server. For example:
cp ddcloudTrustStore.jks <hdp_install_dir>/ddcloud/keystore/ddcloudTrustStore.jks
6. Copy the ddcloud.jks file to the <key_location> directory.
cp ddcloud.jks <key_location>/ddcloud.jks
7. Copy the ddcloud.jks file to the <hdp_install_dir>/ddcloud/keystore directory of each noderunning the Hybrid Data Pipeline server. For example:
cp ddcloud.jks <hdp_install_dir>/ddcloud/keystore/ddcloud.jks
8. Copy the new ddcloud.pem file to the <key_location>/redist directory.
cp ddcloud.pem <key_location>/redist/ddcloud.pem
9. Reinstall the On-Premises Connector with the configuration and certificate files in the<key_location>/redist folder, which includes the new certificate files. The On-Premises Connectormust be reinstalled with all configuration and certificate files. When you run the On-Premises Connectorinstallation program, the new certificate files and the configuration files must located in the same directoryas the On-Premises Connector installation program.
Note: The On-Premises Connector installation program must be the same version used to install thestanding version of the component.
10. After reinstalling the On-Premises Connector, test your environment to ensure that connectivity to on-premisesdata sources is working with the SSL update.
11. After confirming on-premises connectivity, unblock traffic coming into the service.
89Progress DataDirect Hybrid Data Pipeline: Deployment and Best Practices Guide: Version Release 4.6.1
Updating an environment to use an SSL certificate issued by a less-well-known CA

Progress DataDirect Hybrid Data Pipeline: Deployment and Best Practices Guide: Version Release 4.6.190
Chapter 8: Updating SSL certificates
9Recovering nodes running behind a loadbalancer
In a production environment, Hybrid Data Pipeline should be deployed on one or more nodes behind a loadbalancer. If a host machine goes down or becomes unavailable, best practices recommend that you maintainperformance by replacing the failed node. For a deployment with a network load balancer, the following generalsteps apply.
1. Install the server on a new node.
2. Configure the load balancer to use the new node.
3. Remove references and routing information for the failed node from the load balancer.
Note: If you are running a cloud load balancer such as the AWS Application Load Balancer or the AzureApplication Gateway, you should consult your vendor documentation about managing compute capacity. Forinformation specific to Hybrid Data Pipeline deployments using cloud load balancers, see Configuring a cloudload balancer with the On-Premises Connector on page 19.
For details, see the following topics:
• Replacing a failed node behind a network load balancer
91Progress DataDirect Hybrid Data Pipeline: Deployment and Best Practices Guide: Version Release 4.6.1
Replacing a failed node behind a network loadbalancer
Before you begin:
• The Hybrid Data Pipeline deployment should be backed up according to Backing up Hybrid Data Pipelinedeployments on page 47.
• You should have the installation program for the version of the product you are currently using.
About this task:
To replace a failed node, you must install the Hybrid Data Pipeline server on a new host machine and configureyour network load balancer to use the new node. In addition, references and routing information related to thefailed node should be removed from the load balancer configuration.
Note that during the initial installation of the Hybrid Data Pipeline server, the installer writes properties files,encryption keys, and system information to the key location. When performing subsequent installations onadditional nodes, the key location must be specified to ensure consistent configuration of the service acrossnodes. For installations on additional nodes, the installer bypasses prompts for load balancing, SSL, systemdatabase, and On-Premises Connector configurations, as this information is provided by the files written to thekey location.
1. From a command-line prompt, navigate to the directory where you saved the product file. Alternatively,place the product file directory on your path before proceeding to the next step.
The product file has the format PROGRESS_DATADIRECT_HDP_SERVER_nn_LINUX_64_INSTALL.bin,where nn is the version of the product.
2. Make the file an executable using the chmod command. Then, press ENTER. For example:
chmod +x ./PROGRESS_DATADIRECT_HDP_SERVER_nn_LINUX_64_INSTALL.bin
3. Run the executable.
• Console mode
./PROGRESS_DATADIRECT_HDP_SERVER_nn_LINUX_64_INSTALL.bin -i console
• GUI mode
./PROGRESS_DATADIRECT_HDP_SERVER_nn_LINUX_64_INSTALL.bin
Note: If the installer cannot continue with a GUI installation, a message is displayed and the installationcontinues in console mode
4. Specify an installation directory.
5. Provide the hostname of the machine on which you are installing the Hybrid Data Pipeline server.
6. Select the Custom installation type.
7. Provide the key location and other information as prompted.
8. Review the installation summary, and proceed with the installation.
9. Configure the network load balancer.
Progress DataDirect Hybrid Data Pipeline: Deployment and Best Practices Guide: Version Release 4.6.192
Chapter 9: Recovering nodes running behind a load balancer

a) Configure the network load balancer to use the new node.
b) For deployments that include the On-Premises Connector, configure the load balancer to handle requeststo backend data stores. (See Configuring a network load balancer with the On-Premises Connector onpage 16 for details.)
c) Remove references and routing information related to the failed node from the load balancer configuration.
What to do next:
Monitor your environment to ensure that requests are being distributed by the load balancer and results arebeing properly returned to client applications.
93Progress DataDirect Hybrid Data Pipeline: Deployment and Best Practices Guide: Version Release 4.6.1
Replacing a failed node behind a network load balancer

Progress DataDirect Hybrid Data Pipeline: Deployment and Best Practices Guide: Version Release 4.6.194
Chapter 9: Recovering nodes running behind a load balancer
10Recovering an external system database
Hybrid Data Pipeline requires a system database (sometimes referred to as an account database) for storinguser and configuration information. When deploying the service behind a load balancer, you must use asupported external database. To promote the continuous availability of the service, the system database shouldbe replicated or mirrored, and the system database should be routinely backed up. In the event that the systemdatabase fails, the backup database can be integrated with the standing deployment of Hybrid Data Pipeline.
Integrating the backup system database with a standing deployment requires performing an upgrade of theserver on each node in the deployment. This is a two part process. First, a Modify settings upgrade must beperformed on one of the nodes in the cluster. Second, an Express upgrade must be performed on eachadditional node in the cluster. These upgrades must be performed with the same version of the product usedin the standing deployment of the service. Before you proceed with this two-part process, you must have thefollowing information and resources.
• A mirror of the external system database.
• The installation program. The installation program must be for the same version of the product used in thestanding deployment of the server.
• Administrator and user credentials for the external system database. The credentials of the mirror databaseshould be the same as those of the original database.
For details, see the following topics:
• Modify settings upgrade for system database recovery
• Express upgrade system database recovery
95Progress DataDirect Hybrid Data Pipeline: Deployment and Best Practices Guide: Version Release 4.6.1
Modify settings upgrade for systemdatabase recoveryThe first step in recovering from an external database failure is to perform a Modify settings upgrade on oneof the nodes in your cluster. This upgrade effectively integrates the node with the mirror of your external systemdatabase. In addition, the settings you specify for this upgrade provide the default settings for the Expressupgrades that must be performed on any additional nodes in the cluster.
Take the following steps to perform the Modify settings upgrade.
1. From a command-line prompt, navigate to the directory where you saved the product file. Alternatively,place the product file directory on your path before proceeding to the next step.
The product file has the format PROGRESS_DATADIRECT_HDP_SERVER_nn_LINUX_64_INSTALL.bin,where nn is the version of the product.
2. Make the file an executable using the chmod +x command. For example:
chmod +x ./PROGRESS_DATADIRECT_HDP_SERVER_nn_LINUX_64_INSTALL.bin
3. Run the executable.
• GUI mode
./PROGRESS_DATADIRECT_HDP_SERVER_nn_LINUX_64_INSTALL.bin
Note: If the installer cannot continue with a GUI installation, a message is displayed and the installationcontinues in console mode
• Console mode
./PROGRESS_DATADIRECT_HDP_SERVER_nn_LINUX_64_INSTALL.bin -i console
4. When prompted, enter the directory of the installation you want to upgrade.
5. When prompted, choose an upgrade installation on the existing installation.
6. When prompted, choose a Modify settings upgrade.
Important: A number of settings can be changed during aModify settings upgrade. However, for systemdatabase recovery, only the settings related to the system database should be modified. All other settingsmust remain the same.
7. Choose the type of external database you are using in your Hybrid Data Pipeline deployment.
• Select Oracle, and continue at Step 8 on page 96.• Select MySQLCommunity, and continue at Step 9 on page 97.• Select MSSQLServer, and continue at Step 10 on page 97.• Select PostgreSQL, and continue at Step 11 on page 97.
8. Provide the connection information for the mirror of your Oracle database.
a) Type the name of the host.
b) Type the port number.
Progress DataDirect Hybrid Data Pipeline: Deployment and Best Practices Guide: Version Release 4.6.196
Chapter 10: Recovering an external system database
c) Select the connection type. Do one of the following:
• If you connect using the Oracle System Identifier (SID), select Connect using SID and enter theSID.
• Select Connect using Service Name, then type the database service name that specifies thedatabase that is used for the connection. The service name is a string that is the global databasename. The global database name typically comprises the database name and domain name.
d) Optionally, when prompted for Advanced Options, specify additional connection parameters and theirvalues to be included the connection url. Values should be entered as a semicolon-separated list ofparameter=value. For example, you may enter to following options to configure SSL:
encryptionLevel=Required;encryptionTypes=(AES256);dataIntegrityLevel=Required;dataIntegrityTypes=(SHA1);encryptionMethod=SSL;keyStore=/common/Oracle/trustStore.jks;keyStorePassword=secret;serverType=dedicated;authenticationMethod=ntlm;hostNameInCertificate=oracle;editionName=hybrid
e) Continue at Step 12 on page 98.
9. Provide connection information for the mirror of your MySQL Community Edition database.
a) Type the name of the host.
b) Type the port number.
c) Type the database name.
d) Optionally, when prompted for Advanced Options, specify additional connection parameters and theirvalues to be included the connection url. Values should be entered as a ampersand-separated list ofparameter=value.
e) Continue at Step 12 on page 98.
10. Provide the connection information for the mirror of your SQL Server database.
a) Type the name of the host.
b) Type the port number.
c) Type the database name.
d) Type the name of the schema.
e) Optionally, in the Advanced Options field, specify additional connection parameters and their valuesto be included in the connection URL. Values should be entered as a semicolon-separated list ofparameter=value.
f) Continue at Step 12 on page 98.
11. Provide the connection information for the mirror of your PostgreSQL database.
a) Type the name of the host.
b) Type the port number.
c) Type the database name.
d) Type the name of the schema.
97Progress DataDirect Hybrid Data Pipeline: Deployment and Best Practices Guide: Version Release 4.6.1
Modify settings upgrade for system database recovery
e) Optionally, in the Advanced Options field, specify additional connection parameters and their valuesto be included in the connection URL. Values should be entered as a semicolon-separated list ofparameter=value.
f) Continue at Step 12 on page 98.
12. Provide the external database credential information.
Note: The credentials of the mirror database should be the same as those of the original database.
• Provide the administrator user name. The administrator user must have certain privileges that are specificto the database vendor. For a list of required privileges, see External system databases on page 22.
• Provide the password for the external database administrator account.
• Provide the standard user name. The standard user must have certain privileges that are specific to thedatabase vendor. For a list of required privileges, see External system databases on page 22.
• Provide the password for the external database standard user account.
13. Review port numbers and accept the previously specified values. Port numbers should be the same asthose specified in the previous installation or upgrade.
14. Review the upgrade summary, and proceed with the upgrade.
What to do next:
Youmust now perform an Express upgrade on each of the remaining nodes in the Hybrid Data Pipeline cluster.See Express upgrade system database recovery on page 98 for step-by-step instructions.
Express upgrade system database recoveryAfter performing the initialModify settings upgrade on a cluster node, youmust proceed with Express upgradeson the remaining nodes in the cluster to integrate the mirror of your external system database with your standinginstallation of Hybrid Data Pipeline.
Take the following steps to perform the Express upgrade.
1. From a command-line prompt, navigate to the directory where you saved the product file. Alternatively,place the product file directory on your path before proceeding to the next step.
The product file has the format PROGRESS_DATADIRECT_HDP_SERVER_nn_LINUX_64_INSTALL.bin,where nn is the version of the product.
2. Make the file an executable using the chmod +x command. For example:
chmod +x ./PROGRESS_DATADIRECT_HDP_SERVER_nn_LINUX_64_INSTALL.bin
3. Run the executable.
• GUI mode
./PROGRESS_DATADIRECT_HDP_SERVER_nn_LINUX_64_INSTALL.bin
Note: If the installer cannot continue with a GUI installation, a message is displayed and the installationcontinues in console mode
Progress DataDirect Hybrid Data Pipeline: Deployment and Best Practices Guide: Version Release 4.6.198
Chapter 10: Recovering an external system database
• Console mode
./PROGRESS_DATADIRECT_HDP_SERVER_nn_LINUX_64_INSTALL.bin -i console
4. When prompted, enter the directory of the installation you want to upgrade.
5. When prompted, choose an upgrade installation on the existing installation.
6. When prompted, choose an Express upgrade.
7. Review the upgrade summary, and proceed with the upgrade.
What to do next:
Review the installation log files for a record of any problems that may have occurred during the upgrade.
The installer generates a number of log files during the installation process. The location of these files dependson the success of the upgrade.
• If the installer successfully creates the product installation directory, the installer generates the followinglog files.
• <install_dir>/_ProgressHDPServer_installation/Logs/Progress_DataDirect_Hybrid_Data_Pipeline_Server_Install_<timestamp>.log
• <install_dir>/ddcloud/deploy.log
• <install_dir>/ddcloud/final.log
• <install_dir>/ddcloud/error.log
• If the installation or upgrade fails such that the installer does not create the installation directory, the installerwrites a file namedProgress__DataDirect_Hybrid_Data_Pipeline_Server_InstallFailed.txtto the machine’s default temporary directory.
• When a silent installation or upgrade fails, the installer writes a file named SilentInstallerError.logto the user's home directory.
• When hostname and port validation are skipped by specifying validation settings in the silent installationresponse file, the installer generates the file SilentInstallInfo.log in the user's home directory.
For further assistance, contact Progress DataDirect Technical Support.
99Progress DataDirect Hybrid Data Pipeline: Deployment and Best Practices Guide: Version Release 4.6.1
Express upgrade system database recovery

Progress DataDirect Hybrid Data Pipeline: Deployment and Best Practices Guide: Version Release 4.6.1100
Chapter 10: Recovering an external system database
11Disaster recovery for a network load balancerdeployment
Backing up a Hybrid Data Pipeline deployment is a precondition for full recovery of a Hybrid Data Pipelineservice. As described in Backing up Hybrid Data Pipeline deployments on page 47, the following features ofa Hybrid Data Pipeline load balancer deployment should be backed up.
• System database
• Key location
• Load balancer and load balancer configurations (including certificates used to provide SSL termination)
In a complete system failure scenario, the Hybrid Data Pipeline service can be recovered with these backups.The recovery begins with restoring the system database and reestablishing a key location. The server mustthen be reinstalled on host machines, and the load balancer must be setup and configured to manage requests.In addition, if any client-side components (such as the On-Premises Connector or the ODBC and JDBC drivers)were lost during the failure event, these components must be reinstalled.
Note: If you are running a cloud load balancer such as the AWS Application Load Balancer or the AzureApplication Gateway, you should consult your vendor documentation about backing up your deployment. Forinformation specific to Hybrid Data Pipeline deployments using cloud load balancers, see Configuring a cloudload balancer with the On-Premises Connector on page 19.
For details, see the following topics:
• Recovering from complete system failure
101Progress DataDirect Hybrid Data Pipeline: Deployment and Best Practices Guide: Version Release 4.6.1
Recovering from complete system failureBefore you begin:
• The Hybrid Data Pipeline deployment should be backed up according to Backing up Hybrid Data Pipelinedeployments on page 47.
• You should have the installation program for the version of the product used in the previous deployment ofthe service.
• You should have load balancer SSL certificate files used for server installation and load balancer configuration.(Depending on your environment, a single SSL certificate file may be used.)
• You should have the credentials for the system database.
About this task:
Take the following steps to restore the service after a disaster or other system-wide failure.
1. Restore the system database on a new machine, according to your database vendor documentation.
2. Copy the contents of the backup key location to a new key location accessible to the nodes in the newenvironment.
3. Delete the <key_location>/db directory and the <key_locaton>/global.properties file from thekey location.
4. Spin up a server to host a new load balancer for the new environment.
Note: Load balancer configuration takes place in Step 7 after the nodes for the new environment havebeen installed.
5. Perform a Custom installation on a new machine with the version of the product used in the standingdeployment of the server.
Note: The purpose of this installation is to restore the previous deployment of the service. Therefore, withthe exception of hostname and system database information, the values specified should be the same asthose specified during the previous installation or upgrade of the service.
a) From a command-line prompt, navigate to the directory where you saved the product file. Alternatively,place the product file directory on your path before proceeding to the next step.
The product file has the format PROGRESS_DATADIRECT_HDP_SERVER_nn_LINUX_64_INSTALL.bin,where nn is the version of the product.
b) Make the file an executable using the chmod command. Then, press ENTER. For example:
chmod +x ./PROGRESS_DATADIRECT_HDP_SERVER_nn_LINUX_64_INSTALL.bin
c) Run the executable.
• Console mode
./PROGRESS_DATADIRECT_HDP_SERVER_nn_LINUX_64_INSTALL.bin -i console
• GUI mode
./PROGRESS_DATADIRECT_HDP_SERVER_nn_LINUX_64_INSTALL.bin
Progress DataDirect Hybrid Data Pipeline: Deployment and Best Practices Guide: Version Release 4.6.1102
Chapter 11: Disaster recovery for a network load balancer deployment
Note: If the installer cannot continue with a GUI installation, a message is displayed and the installationcontinues in console mode
d) Accept or enter the fully qualified hostname for the Hybrid Data Pipeline server. By default, the installersuggests the name of the current machine.
e) When prompted, choose a Custom installation.
f) Specify the key location created in Step 2. This is the key location for the new environment.
g) When prompted, provide the load balancer SSL certificate file. This should be the file, or a backup ofthe file, used in the previous deployment of the service.
h) When prompted, enter the host and credential information of the restored system database.
Important: The information provided should be the information for the system database restored inStep 1.
i) Review and confirm port numbers.
j) Review the installation summary, and proceed with the installation.
6. Perform a Custom installation on each additional node in the new environment.
Note: When performing subsequent installations on additional nodes, you must specify the key locationcreated in Step 2 (and specified in Step 5, Substep f). The installer uses the files written to the key locationduring the initial installation to install the server on additional nodes. Hence, for installations on additionalnodes, the installer bypasses prompts for load balancing, SSL, external database, and On-PremisesConnector configurations.
a) Run the executable.
• Console mode
./PROGRESS_DATADIRECT_HDP_SERVER_nn_LINUX_64_INSTALL.bin -i console
• GUI mode
./PROGRESS_DATADIRECT_HDP_SERVER_nn_LINUX_64_INSTALL.bin
Note: If the installer cannot continue with a GUI installation, a message is displayed and the installationcontinues in console mode
b) Accept or enter the fully qualified hostname for the Hybrid Data Pipeline server. By default, the installersuggests the name of the current machine.
c) When prompted, choose a Custom installation.
d) Specify the key location for the new environment established in Step 2.
e) Review port numbers.
f) Review the installation summary, and proceed with the installation.
7. Configure the load balancer spun up in Step 4 for the new environment.
103Progress DataDirect Hybrid Data Pipeline: Deployment and Best Practices Guide: Version Release 4.6.1
Recovering from complete system failure
Note: The load balancer must be configured to manage incoming traffic among the nodes in the newenvironment. If the On-Premises Connector is being used to connect with a data store behind a firewall,the load balancer must also be configured to communicate with the On-Premises Connector. In addition,you will need to specify the SSL certificate file to enable SSL termination in the load balancer. See Loadbalancer configuration on page 15 for details.
8. Reinstall client-side components (such as the On-Premises Connector or the ODBC and JDBC drivers). Ifthe load balancer configuration (SSL certificate or hostname) changed during reinstallation of the server,client-side components will need to be reinstalled. The component(s) must be reinstalled with the configurationand certificate files written to the redist folder during installation of the server on nodes in the newenvironment.
The four configuration and certificate files are:
• config.properties
• OnPremise.properties
• ddcloud.pem
• ddcloudTrustStore.jks
Note: Refer to the Progress DataDirect Hybrid Data Pipeline Installation Guide for details.
9. Test the restored service to ensure it is performing as expected.
What to do next:
As a matter of best practices, monitor functionality and performance in the newly restored environment.
Progress DataDirect Hybrid Data Pipeline: Deployment and Best Practices Guide: Version Release 4.6.1104
Chapter 11: Disaster recovery for a network load balancer deployment