Embed Size (px)
Citation preview

SONIC®
PROGRESS®
®®
SonicMQ
Configuration and Management Guide

Progress® SonicMQ® Configuration and Management Guide 8.5
© 2011 Progress Software Corporation and/or its subsidiaries or affiliates. All rights reserved.
These materials and all Progress® software products are copyrighted and all rights are reserved by Progress
Software Corporation. The information in these materials is subject to change without notice, and Progress
Software Corporation assumes no responsibility for any errors that may appear therein. The references in these
materials to specific platforms supported are subject to change.
Actional, Apama, Artix, Business Empowerment, Business Making Progress, DataDirect (and design), DataDirect
Connect, DataDirect Connect64, DataDirect Technologies, DataDirect XML Converters, DataDirect XQuery,
DataXtend, Dynamic Routing Architecture, EdgeXtend, Empowerment Center, Fathom, Fuse Mediation Router,
Fuse Message Broker, Fuse Services Framework, IntelliStream, IONA, Making Software Work Together,
Mindreef, ObjectStore, OpenEdge, Orbix, PeerDirect, POSSENET, Powered by Progress, PowerTier, Progress,
Progress DataXtend, Progress Dynamics, Progress Business Empowerment, Progress Empowerment Center,
Progress Empowerment Program, Progress OpenEdge, Progress Profiles, Progress Results, Progress Software
Business Making Progress, Progress Software Developers Network, Progress Sonic, ProVision, PS Select,
Savvion, SequeLink, Shadow, SOAPscope, SOAPStation, Sonic, Sonic ESB, SonicMQ, Sonic Orchestration
Server, SpeedScript, Stylus Studio, Technical Empowerment, WebSpeed, Xcalia (and design), and Your Software,
Our Technology-Experience the Connection are registered trademarks of Progress Software Corporation or one of
its affiliates or subsidiaries in the U.S. and/or other countries. AccelEvent, Apama Dashboard Studio, Apama Event
Manager, Apama Event Modeler, Apama Event Store, Apama Risk Firewall, AppsAlive, AppServer, ASPen, ASP-
in-a-Box, BusinessEdge, Cache-Forward, CloudEdge, DataDirect Spy, DataDirect SupportLink, Fuse, FuseSource,
Future Proof, GVAC, High Performance Integration, ObjectStore Inspector, ObjectStore Performance Expert,
OpenAccess, Orbacus, Pantero, POSSE, ProDataSet, Progress Arcade, Progress CloudEdge, Progress Control
Tower, Progress ESP Event Manager, Progress ESP Event Modeler, Progress Event Engine, Progress RFID,
Progress RPM, PSE Pro, SectorAlliance, SeeThinkAct, Shadow z/Services, Shadow z/Direct, Shadow z/Events,
Shadow z/Presentation, Shadow Studio, SmartBrowser, SmartComponent, SmartDataBrowser, SmartDataObjects,
SmartDataView, SmartDialog, SmartFolder, SmartFrame, SmartObjects, SmartPanel, SmartQuery, SmartViewer,
SmartWindow, Sonic Business Integration Suite, Sonic Process Manager, Sonic Collaboration Server, Sonic
Continuous Availability Architecture, Sonic Database Service, Sonic Workbench, Sonic XML Server, The Brains
Behind BAM, WebClient, and Who Makes Progress are trademarks or service marks of Progress Software
Corporation and/or its subsidiaries or affiliates in the U.S. and other countries. Java is a registered trademark of
Oracle and/or its affiliates. Any other marks contained herein may be trademarks of their respective owners.
Third Party Acknowledgements:
Progress Sonic v8.5 incorporates Model Objects Framework v2.0 from ModelObjects Group. Such technology is
subject to the following terms and conditions: The ModelObjects Group Software License, Version 1.0 - Copyright
(c) 2000-2001 ModelObjects Group. All rights reserved. Redistribution and use in source and binary forms, with
or without modification, are permitted provided that the following conditions are met: 1. Redistributions of source
code must retain the above copyright notice, this list of conditions and the following disclaimer. 2. Redistributions
in binary form must reproduce the above copyright notice, this list of conditions and the following disclaimer in the
documentation and/or other materials provided with the distribution. 3. The end-user documentation included with

the redistribution, if any, must include the following acknowledgement: "This product includes software developed
by the ModelObjects Group (http://www.modelobjects.com)." Alternatively, this acknowledgement may appear in
the software itself, if and wherever such third-party acknowledgements normally appear. 4. The name
"ModelObjects" must not be used to endorse or promote products derived from this software without prior written
permission. For written permission, please contact [email protected]. 5. Products derived from this
software may not be called "ModelObjects", nor may ModelObjects" appear in thier name, without prior written
permission of the ModelObjects Group. THIS SOFTWARE IS PROVIDED "AS IS" AND ANY EXPRESSED OR
IMPLIED WARRANTIES, INCLUDING, BUT NOT LIMITED TO, THE IMPLIED WARRANTIES OF
MERCHANTABILITY AND FITNESS FOR A PARTICULAR PURPOSE ARE DISCLAIMED. IN NO EVENT
SHALL THE MODEL OBJECTS GROUP OR ITS CONTRIBUTORS BE LIABLE FOR ANY DIRECT,
INDIRECT, INCIDENTAL, SPECIAL, EXEMPLARY, OR CONSEQUENTIAL DAMAGES (INCLUDING,
BUT NOT LIMITED TO, PROCUREMENT OF SUBSTITUTE GOODS OR SERVICES; LOSS OF USE,
DATA, OR PROFITS; OR BUSINESS INTERRUPTION) HOWEVER CAUSED AND ON ANY THEORY OF
LIABILITY, WHETHER IN CONTRACT, STRICT LIABILITY, OR TORT (INCLUDING NEGLIGENCE OR
OTHERWISE) ARISING IN ANY WAY OUT OF THE USE OF THIS SOFTWARE, EVEN IF ADVISED OF
THE POSSIBILITY OF SUCH DAMAGE.
Progress Sonic v8.5 incorporates OpenSAML Java Distribution v1.0.1. Such technology is subject to the following
terms and conditions: The OpenSAML License, Version 1. Copyright (c) 2002 - University Corporation for
Advanced Internet Development, Inc. All rights reserved. Redistribution and use in source and binary forms, with
or without modification, are permitted provided that the following conditions are met: Redistributions of source
code must retain the above copyright notice, this list of conditions and the following disclaimer. Redistributions in
binary form must reproduce the above copyright notice, this list of conditions and the following disclaimer in the
documentation and/or other materials provided with the distribution, if any, must include the following
acknowledgment: "This product includes software developed by the University Corporation for Advanced Internet
Development (http://www.ucaid.edu)Internet2 Project. Alternately, this acknowledegement may appear in the
software itself, if and wherever such third-party acknowledgments normally appear. Neither the name of
OpenSAML nor the names of its contributors, nor Internet2, nor the University Corporation for Advanced Internet
Development, Inc., nor UCAID may be used to endorse or promote products derived from this software without
specific prior written permission. For written permission, please contact [email protected]. Products
derived from this software may not be called OpenSAML, Internet2, UCAID, or the University Corporation for
Advanced Internet Development, nor may OpenSAML appear in their name, without prior written permission of
the University Corporation for Advanced Internet Development. THIS SOFTWARE IS PROVIDED BY THE
COPYRIGHT HOLDERS AND CONTRIBUTORS "AS IS" AND WITH ALL FAULTS. ANY EXPRESS OR
IMPLIED WARRANTIES, INCLUDING, BUT NOT LIMITED TO, THE IMPLIED WARRANTIES OF
MERCHANTABILITY, FITNESS FOR A PARTICULAR PURPOSE, AND NON-INFRINGEMENT ARE
DISCLAIMED AND THE ENTIRE RISK OF SATISFACTORY QUALITY, PERFORMANCE, ACCURACY,
AND EFFORT IS WITH LICENSEE. IN NO EVENT SHALL THE COPYRIGHT OWNER, CONTRIBUTORS
OR THE UNIVERSITY CORPORATION FOR ADVANCED INTERNET DEVELOPMENT, INC. BE LIABLE
FOR ANY DIRECT, INDIRECT, INCIDENTAL, SPECIAL, EXEMPLARY, OR CONSEQUENTIAL
DAMAGES (INCLUDING, BUT NOT LIMITED TO, PROCUREMENT OF SUBSTITUTE GOODS OR
SERVICES; LOSS OF USE, DATA, OR PROFITS; OR BUSINESS INTERRUPTION) HOWEVER CAUSED
AND ON ANY THEORY OF LIABILITY, WHETHER IN CONTRACT, STRICT LIABILITY, OR TORT

(INCLUDING NEGLIGENCE OR OTHERWISE) ARISING IN ANY WAY OUT OF THE USE OF THIS
SOFTWARE, EVEN IF ADVISED OF THE POSSIBILITY OF SUCH DAMAGE.
Progress Sonic v8.5 incorporates BasicLogin.java, SimpleCallbackHandler.java, SimplePasswordUser.java,
SampleLoginModule.java, SamplePrincipal.java from Sun Microsystems, Inc. These technologies are subject to
the following terms and conditions: Copyright 2000-2002 Sun Microsystems, Inc. All Rights Reserved.
Redistribution and use in source and binary forms, with or without modification, are permitted provided that the
following conditions are met: -Redistributions of source code must retain the above copyright notice, this list of
conditions and the following disclaimer. -Redistribution in binary form must reproduce the above copyright notice,
this list of conditions and the following disclaimer in the documentation and/or other materials provided with the
distribution. Neither the name of Sun Microsystems, Inc. or the names of contributors may be used to endorse or
promote products derived from this software without specific prior written permission. This software is provided
"AS IS," without a warranty of any kind. ALL EXPRESS OR IMPLIED CONDITIONS, REPRESENTATIONS
AND WARRANTIES, INCLUDING ANY IMPLIED WARRANTY OF MERCHANTABILITY, FITNESS FOR
A PARTICULAR PURPOSE OR NON-INFRINGEMENT, ARE HEREBY EXCLUDED. SUN AND ITS
LICENSORS SHALL NOT BE LIABLE FOR ANY DAMAGES OR LIABILITIES SUFFERED BY LICENSEE
AS A RESULT OF OR RELATING TO USE, MODIFICATION OR DISTRIBUTION OF THE SOFTWARE
OR ITS DERIVATIVES. IN NO EVENT WILL SUN OR ITS LICENSORS BE LIABLE FOR ANY LOST
REVENUE, PROFIT OR DATA, OR FOR DIRECT, INDIRECT, SPECIAL, CONSEQUENTIAL,
INCIDENTAL OR PUNITIVE DAMAGES, HOWEVER CAUSED AND REGARDLESS OF THE THEORY OF
LIABILITY, ARISING OUT OF THE USE OF OR INABILITY TO USE SOFTWARE, EVEN IF SUN HAS
BEEN ADVISED OF THE POSSIBILITY OF SUCH DAMAGES. You acknowledge that Software is not
designed, licensed or intended for use in the design, construction, operation or maintenance of any nuclear facility.
Progress Sonic v8.5 incorporates Saxon XSLT and XQuery Processor v8.9.0.4 from Saxonica Limited
(http://www.saxonica.com/) which is available from SourceForge (http://sourceforge.net/projects/saxon/). PSC
will, at Licensee's request, provide copies of the source code for this third party technology, including
modifications, if any, made by PSC. PSC may charge reasonable shipping and handling charges for such
distribution. Licensee may also obtain the source code through http://communities.progress.com/pcom/docs/DOC-
16051 by following the instructions set forth therein. - Mozilla Public License Version 1.0 (the "License"); you may
not use this file except in compliance with the License. You may obtain a copy of the License at
http://www.mozilla.org/MPL. Software distributed under the License is distributed on an "AS IS" basis,
WITHOUT WARRANTY OF ANY KIND, either express or implied. See the License for the specific language
governing rights and limitations under the License. The Original Code of Saxon comprises all those components
which are not explicitly attributed to other parties. The Initial Developer of the Original Code is Michael Kay. Until
February 2001 Michael Kay was an employee of International Computers Limited (now part of Fujitsu Limited),
and original code developed during that time was released under this license by permission from International
Computers Limited. From February 2001 until February 2004 Michael Kay was an employee of Software AG, and
code developed during that time was released under this license by permission from Software AG, acting as a
"Contributor". Subsequent code has been developed by Saxonica Limited, of which Michael Kay is a Director,
again acting as a "Contributor". A small number of modules, or enhancements to modules, have been developed by
other individuals (either written specially for Saxon, or incorporated into Saxon having initially been released as
part of another open source product). Such contributions are acknowledged individually in comments attached to
the relevant code modules. All Rights Reserved.
Progress Sonic v8.5 incorporates Mozilla Rhino v1.5R3. The contents of this file are subject to the Netscape Public
License Version 1.1 (the "License"); you may not use this file except in compliance with the License. You may
obtain a copy of the License at http://www.mozilla.org/NPL/. Software distributed under the License is distributed
on an "AS IS" basis, WITHOUT WARRANTY OF ANY KIND, either express or implied. See the License for the
specific language governing rights and limitations under the License. The Original Code is Mozilla Communicator
client code, released March 31, 1998. The Initial Developer of the Original Code is Netscape Communications
Corporation. Portions created by Netscape are Copyright (C) 1998-1999 Netscape Communications Corporation.
All Rights Reserved. PSC will, at Licensee's request, provide copies of the source code for this third party
technology, including modifications, if any, made by PSC. PSC may charge reasonable shipping and handling
charges for such distribution. Licensee may also obtain the source code through
http://communities.progress.com/pcom/docs/DOC-16051 by following the instructions set forth therein.
Progress Sonic v8.5 incorporates Apache Ant-Contrib 1.0B3. Such technology is subject to the following terms
and conditions: The Apache Software License, Version 1.1 - Copyright (c) 2001-2003 Ant-Contrib project. All
rights reserved. Redistribution and use in source and binary forms, with or without modification, are permitted
provided that the following conditions are met: 1. Redistributions of source code must retain the above copyright
notice, this list of conditions and the following disclaimer. 2. Redistributions in binary form must reproduce the
above copyright notice, this list of conditions and the following disclaimer in the documentation and/or other
materials provided with the distribution. 3. The end-user documentation included with the redistribution, if any,
must include the following acknowlegement: "This product includes software developed by the Ant-Contrib
project (http://sourceforge.net/projects/ant-contrib)." Alternately, this acknowlegement may appear in the software
itself, if and wherever such third-party acknowlegements normally appear. 4. The name Ant-Contrib must not be
used to endorse or promote products derived from this software without prior written permission. For written
permission, please contact [email protected]. 5. Products derived from this software
may not be called "Ant-Contrib" nor may "Ant-Contrib" appear in their names without prior written permission of
the Ant-Contrib project. THIS SOFTWARE IS PROVIDED ``AS IS'' AND ANY EXPRESSED OR IMPLIED
WARRANTIES, INCLUDING, BUT NOT LIMITED TO, THE IMPLIED WARRANTIES OF
MERCHANTABILITY AND FITNESS FOR A PARTICULAR PURPOSE ARE DISCLAIMED. IN NO EVENT
SHALL THE ANT-CONTRIB PROJECT OR ITS CONTRIBUTORS BE LIABLE FOR ANY DIRECT,
INDIRECT, INCIDENTAL, SPECIAL, EXEMPLARY, OR CONSEQUENTIAL DAMAGES (INCLUDING,
BUT NOT LIMITED TO, PROCUREMENT OF SUBSTITUTE GOODS OR SERVICES; LOSS OF USE,
DATA, OR PROFITS; OR BUSINESS INTERRUPTION) HOWEVER CAUSED AND ON ANY THEORY OF
LIABILITY, WHETHER IN CONTRACT, STRICT LIABILITY, OR TORT (INCLUDING NEGLIGENCE OR
OTHERWISE) ARISING IN ANY WAY OUT OF THE USE OF THIS SOFTWARE, EVEN IF ADVISED OF
THE POSSIBILITY OF SUCH DAMAGE.
Progress Sonic v8.5 incorporates Xalan Java XSLT Parser v2.4.1 from the Apache Foundation. Such technology
is subject to the following terms and conditions: The Apache Software License, Version 1.1 - Copyright (c) 1999
The Apache Software Foundation. All rights reserved. Redistribution and use in source and binary forms, with or
without modification, are permitted provided that the following conditions are met: 1. Redistributions of source
code must retain the above copyright notice, this list of conditions and the following disclaimer. 2. Redistributions
in binary form must reproduce the above copyright notice, this list of conditions and the following disclaimer in the

documentation and/or other materials provided with the distribution. 3. The end-user documentation included with
the redistribution, if any, must include the following acknowledgment: "This product includes software developed
by the Apache Software Foundation (http://www.apache.org/)." Alternately, this acknowledgment may appear in
the software itself, if and wherever such third-party acknowledgments normally appear. 4. The names "Xalan" and
"Apache Software Foundation" must not be used to endorse or promote products derived from this software without
prior written permission. For written permission, please contact [email protected]. 5. Products derived from this
software may not be called "Apache", nor may "Apache" appear in their name, without prior written permission of
the Apache Software Foundation. THIS SOFTWARE IS PROVIDED ``AS IS'' AND ANY EXPRESSED OR
IMPLIED WARRANTIES, INCLUDING, BUT NOT LIMITED TO, THE IMPLIED WARRANTIES OF
MERCHANTABILITY AND FITNESS FOR A PARTICULAR PURPOSE ARE DISCLAIMED. IN NO EVENT
SHALL THE APACHE SOFTWARE FOUNDATION OR ITS CONTRIBUTORS BE LIABLE FOR ANY
DIRECT, INDIRECT, INCIDENTAL, SPECIAL, EXEMPLARY, OR CONSEQUENTIAL DAMAGES
(INCLUDING, BUT NOT LIMITED TO, PROCUREMENT OF SUBSTITUTE GOODS OR SERVICES; LOSS
OF USE, DATA, OR PROFITS; OR BUSINESS INTERRUPTION) HOWEVER CAUSED AND ON ANY
THEORY OF LIABILITY, WHETHER IN CONTRACT, STRICT LIABILITY, OR TORT (INCLUDING
NEGLIGENCE OR OTHERWISE) ARISING IN ANY WAY OUT OF THE USE OF THIS SOFTWARE, EVEN
IF ADVISED OF THE POSSIBILITY OF SUCH DAMAGE.
==========================================
This software consists of voluntary contributions made by many individuals on behalf of the Apache Software
Foundation and was originally based on software copyright (c) 1999, Lotus Development Corporation.,
http://www.lotus.com. For more information on the Apache Software Foundation, please see
(http://www.apache.org/).
Progress Sonic v8.5 incorporates Xerces v2.6.2 from the Apache Foundation. Such technology is subject to the
following terms and conditions: The Apache Software License, Version 1.1 - Copyright (c) 1999-2004 The Apache
Software Foundation. All rights reserved. Redistribution and use in source and binary forms, with or without
modification, are permitted provided that the following conditions are met: 1. Redistributions of source code must
retain the above copyright notice, this list of conditions and the following disclaimer. 2. Redistributions in binary
form must reproduce the above copyright notice, this list of conditions and the following disclaimer in the
documentation and/or other materials provided with the distribution. 3. The end-user documentation included with
the redistribution, if any, must include the following acknowledgment: "This product includes software developed
by the Apache Software Foundation (http://www.apache.org/)." Alternately, this acknowledgment may appear in
the software itself, if and wherever such third-party acknowledgments normally appear. 4. The names "Xerces" and
"Apache Software Foundation" must not be used to endorse or promote products derived from this software without
prior written permission. For written permission, please contact [email protected]. 5. Products derived from this
software may not be called "Apache", nor may "Apache" appear in their name, without prior written permission of
the Apache Software Foundation. THIS SOFTWARE IS PROVIDED ``AS IS'' AND ANY EXPRESSED OR
IMPLIED WARRANTIES, INCLUDING, BUT NOT LIMITED TO, THE IMPLIED WARRANTIES OF
MERCHANTABILITY AND FITNESS FOR A PARTICULAR PURPOSE ARE DISCLAIMED. IN NO EVENT
SHALL THE APACHE SOFTWARE FOUNDATION OR ITS CONTRIBUTORS BE LIABLE FOR ANY
DIRECT, INDIRECT, INCIDENTAL, SPECIAL, EXEMPLARY, OR CONSEQUENTIAL DAMAGES
(INCLUDING, BUT NOT LIMITED TO, PROCUREMENT OF SUBSTITUTE GOODS OR SERVICES; LOSS

OF USE, DATA, OR PROFITS; OR BUSINESS INTERRUPTION) HOWEVER CAUSED AND ON ANY
THEORY OF LIABILITY, WHETHER IN CONTRACT, STRICT LIABILITY, OR TORT (INCLUDING
NEGLIGENCE OR OTHERWISE) ARISING IN ANY WAY OUT OF THE USE OF THIS SOFTWARE, EVEN
IF ADVISED OF THE POSSIBILITY OF SUCH DAMAGE.
================================================================
This software consists of voluntary contributions made by many individuals on behalf of the Apache Software
Foundation and was originally based on software copyright (c) 1999, International Business Machines, Inc.,
http://www.ibm.com. For more information on the Apache Software Foundation, please see
(http://www.apache.org/).
Progress Sonic v8.5 incorporates RSS4J v0.9.2. Such technology is subject to the following terms and conditions:
Copyright (c) 1999-2002 ChurchillObjects.com All rights reserved. Redistribution and use in source and binary
forms, with or without modification, are permitted provided that the following conditions are met: Redistributions
of source code must retain the above copyright notice, this list of conditions and the following disclaimer.
Redistributions in binary form must reproduce the above copyright notice, this list of conditions and the following
disclaimer in the documentation and/or other materials provided with the distribution. Neither the name of the
copyright holder nor the names of its contributors may be used to endorse or promote products derived from this
software without specific prior written permission. THIS SOFTWARE IS PROVIDED BY THE COPYRIGHT
HOLDERS AND CONTRIBUTORS "AS IS" AND ANY EXPRESS OR IMPLIED WARRANTIES,
INCLUDING, BUT NOT LIMITED TO, THE IMPLIED WARRANTIES OF MERCHANTABILITY AND
FITNESS FOR A PARTICULAR PURPOSE ARE DISCLAIMED. IN NO EVENT SHALL THE REGENTS OR
CONTRIBUTORS BE LIABLE FOR ANY DIRECT, INDIRECT, INCIDENTAL, SPECIAL, EXEMPLARY,
OR CONSEQUENTIAL DAMAGES (INCLUDING, BUT NOT LIMITED TO, PROCUREMENT OF
SUBSTITUTE GOODS OR SERVICES; LOSS OF USE, DATA, OR PROFITS; OR BUSINESS
INTERRUPTION) HOWEVER CAUSED AND ON ANY THEORY OF LIABILITY, WHETHER IN
CONTRACT, STRICT LIABILITY, OR TORT, INC
Progress Sonic v8.5 incorporates Crimson v1.1.3. Such technology is subject to the following terms and
conditions: The Apache Software License, Version 1.1. Copyright (c) 1999-2003 The Apache Software
Foundation. All rights reserved. Redistribution and use in source and binary forms, with or without modification,
are permitted provided that the following conditions are met: 1. Redistributions of source code must retain the
above copyright notice, this list of conditions and the following disclaimer. 2. Redistributions in binary form must
reproduce the above copyright notice, this list of conditions and the following disclaimer in the documentation
and/or other materials provided with the distribution. 3. The end-user documentation included with the
redistribution, if any, must include the following acknowledgment: "This product includes software developed by
the * Apache Software Foundation (http://www.apache.org/)." Alternately, this acknowledgment may appear in
the software itself, if and wherever such third-party acknowledgments normally appear. 4. The names "Xerces" and
"Apache Software Foundation" must not be used to endorse or promote products derived from this software without
prior written permission. For written permission, please contact [email protected]. 5. Products derived from this
software may not be called "Apache", nor may "Apache" appear in their name, without prior written * permission
of the Apache Software Foundation. THIS SOFTWARE IS PROVIDED ``AS IS'' AND ANY EXPRESSED OR
IMPLIED WARRANTIES, INCLUDING, BUT NOT LIMITED TO, THE IMPLIED WARRANTIES OF
MERCHANTABILITY AND FITNESS FOR A PARTICULAR PURPOSE ARE DISCLAIMED. IN NO EVENT

SHALL THE APACHE SOFTWARE FOUNDATION OR ITS CONTRIBUTORS BE LIABLE FOR ANY
DIRECT, INDIRECT, INCIDENTAL, SPECIAL, EXEMPLARY, OR CONSEQUENTIAL DAMAGES
(INCLUDING, BUT NOT LIMITED TO, PROCUREMENT OF SUBSTITUTE GOODS OR SERVICES; LOSS
OF USE, DATA, OR PROFITS; OR BUSINESS INTERRUPTION) HOWEVER CAUSED AND * ON ANY
THEORY OF LIABILITY, WHETHER IN CONTRACT, STRICT LIABILITY, OR TORT (INCLUDING
NEGLIGENCE OR OTHERWISE) ARISING IN ANY WAY OUT OF THE USE OF THIS SOFTWARE, EVEN
IF ADVISED OF THE POSSIBILITY OF SUCH DAMAGE.
====================================================================
This software consists of voluntary contributions made by many individuals on behalf of the Apache Software
Foundation and was * originally based on software copyright (c) 1999, International * Business Machines, Inc.,
http://www.ibm.com. For more * information on the Apache Software Foundation, please see *
(http://www.apache.org/).
Progress Sonic v8.5 incorporates Jing 20030619 and Trang 20030619. Such technology is subject to the following
terms and conditions: Copyright (c) 2002, 2003 Thai Open Source Software Center Ltd. All rights reserved.
Redistribution and use in source and binary forms, with or without modification, are permitted provided that the
following conditions are met: Redistributions of source code must retain the above copyright notice, this list of
conditions and the following disclaimer. Redistributions in binary form must reproduce the above copyright notice,
this list of conditions and the following disclaimer in the documentation and/or other materials provided with the
distribution. Neither the name of the Thai Open Source Software Center Ltd nor the names of its contributors may
be used to endorse or promote products derived from this software without specific prior written permission. THIS
SOFTWARE IS PROVIDED BY THE COPYRIGHT HOLDERS AND CONTRIBUTORS "AS IS" AND ANY
EXPRESS OR IMPLIED WARRANTIES, INCLUDING, BUT NOT LIMITED TO, THE IMPLIED
WARRANTIES OF MERCHANTABILITY AND FITNESS FOR A PARTICULAR PURPOSE ARE
DISCLAIMED. IN NO EVENT SHALL THE REGENTS OR CONTRIBUTORS BE LIABLE FOR ANY
DIRECT, INDIRECT, INCIDENTAL, SPECIAL, EXEMPLARY, OR CONSEQUENTIAL DAMAGES
(INCLUDING, BUT NOT LIMITED TO, PROCUREMENT OF SUBSTITUTE GOODS OR SERVICES; LOSS
OF USE, DATA, OR PROFITS; OR BUSINESS INTERRUPTION) HOWEVER CAUSED AND ON ANY
THEORY OF LIABILITY, WHETHER IN CONTRACT, STRICT LIABILITY, OR TORT (INCLUDING
NEGLIGENCE OR OTHERWISE) ARISING IN ANY WAY OUT OF THE USE OF THIS SOFTWARE, EVEN
IF ADVISED OF THE POSSIBILITY OF SUCH DAMAGE.
Progress Sonic v8.5 incorporates RSSUTILS v1.1. Such technology is subject to the following terms and
conditions: Copyright 2003 Sun Microsystems, Inc. ALL RIGHTS RESERVED Use of this software is authorized
pursuant to the terms of the license found at http://developer.java.sun.com/berkeley_license.html Copyright 2003
Sun Microsystems, Inc. All Rights Reserved. Redistribution and use in source and binary forms, with or without
modification, are permitted provided that the following conditions are met:
-Redistribution of source code must retain the above copyright notice, this list of conditions and the following
disclaimer.
-Redistribution in binary form must reproduce the above copyright notice, this list of conditions and the following
disclaimer in the documentation and/or other materials provided with the distribution.
Neither the name of Sun Microsystems, Inc. or the names of contributors may be used to endorse or promote

products derived from this software without specific prior written permission. This software is provided "AS IS,"
without a warranty of any kind. ALL EXPRESS OR IMPLIED CONDITIONS, REPRESENTATIONS AND
WARRANTIES, INCLUDING ANY IMPLIED WARRANTY OF MERCHANTABILITY, FITNESS FOR A
PARTICULAR PURPOSE OR NON-INFRINGEMENT, ARE HEREBY EXCLUDED. SUN MICROSYSTEMS,
INC. ("SUN") AND ITS LICENSORS SHALL NOT BE LIABLE FOR ANY DAMAGES SUFFERED BY
LICENSEE AS A RESULT OF USING, MODIFYING OR DISTRIBUTING THIS SOFTWARE OR ITS
DERIVATIVES. IN NO EVENT WILL SUN OR ITS LICENSORS BE LIABLE FOR ANY LOST REVENUE,
PROFIT OR DATA, OR FOR DIRECT, INDIRECT, SPECIAL, CONSEQUENTIAL, INCIDENTAL OR
PUNITIVE DAMAGES, HOWEVER CAUSED AND REGARDLESS OF THE THEORY OF LIABILITY,
ARISING OUT OF THE USE OF OR INABILITY TO USE THIS SOFTWARE, EVEN IF SUN HAS BEEN
ADVISED OF THE POSSIBILITY OF SUCH DAMAGES. You acknowledge that this software is not designed,
licensed or intended for use in the design, construction, operation or maintenance of any nuclear facility.
Progress Sonic v8.5 incorporates DSTC Xs3P version 1.1 from DSTC Pty Ltd. PSC will, at Licensee's request,
provide copies of the source code for this third party technology, including modifications, if any, made by PSC.
PSC may charge reasonable shipping and handling charges for such distribution. Licensee may also obtain the
source code through http://communities.progress.com/pcom/docs/DOC-16051 by following the instructions set
forth therein. - DSTC Public License. The contents of this file are subject to the DSTC Public License Version 1.1
(the 'License') (provided herein); you may not use this file except in compliance with the License. Software
distributed under the License is distributed on an 'AS IS' basis, WITHOUT WARRANTY OF ANY KIND, either
express or implied. See the License for the specific language governing rights and limitations under the License.
The Original Code is xs3p. The Initial Developer of the Original Code is DSTC. Portions created by DSTC are
Copyright (c) 2001, 2002 DSTC Pty Ltd. All Rights Reserved.
August 2011


Contents
Preface . . . . . . . . . . . . . . . . . . . . . . . . . . . . . . . . . . . . . . . . . . . . . . . . . . . . . . . . . . . . . . . . . . . . . . 21Typographical Conventions . . . . . . . . . . . . . . . . . . . . . . . . . . . . . . . . . . . . . . . . . . . . . . . . . . . . . . . . . 23Progress Sonic Documentation . . . . . . . . . . . . . . . . . . . . . . . . . . . . . . . . . . . . . . . . . . . . . . . . . . . . . . 24
SonicMQ Documentation . . . . . . . . . . . . . . . . . . . . . . . . . . . . . . . . . . . . . . . . . . . . . . . . . . . . . 24Other Documentation in the SonicMQ Product Family . . . . . . . . . . . . . . . . . . . . . . . . . . . . . . 25
Worldwide Technical Support . . . . . . . . . . . . . . . . . . . . . . . . . . . . . . . . . . . . . . . . . . . . . . . . . . . . . . . 27
Part I: Getting Started . . . . . . . . . . . . . . . . . . . . . . . . . . . . . . . . . . . . . . . . . . . . . . . . . 29
Chapter 1: Sonic Management Environment . . . . . . . . . . . . . . . . . . . . . . . . . . 31Introduction . . . . . . . . . . . . . . . . . . . . . . . . . . . . . . . . . . . . . . . . . . . . . . . . . . . . . . . . . . . . . . . . . . . . . 32Toolset . . . . . . . . . . . . . . . . . . . . . . . . . . . . . . . . . . . . . . . . . . . . . . . . . . . . . . . . . . . . . . . . . . . . . . . . . 33Configuration Management . . . . . . . . . . . . . . . . . . . . . . . . . . . . . . . . . . . . . . . . . . . . . . . . . . . . . . . . . 34Runtime Monitoring and Management . . . . . . . . . . . . . . . . . . . . . . . . . . . . . . . . . . . . . . . . . . . . . . . . 35
Chapter 2: Sonic Management Console . . . . . . . . . . . . . . . . . . . . . . . . . . . . . . . . 37Running the Sonic Management Console . . . . . . . . . . . . . . . . . . . . . . . . . . . . . . . . . . . . . . . . . . . . . . 38
Starting the Management Console . . . . . . . . . . . . . . . . . . . . . . . . . . . . . . . . . . . . . . . . . . . . . . 38Starting a Domain Manager . . . . . . . . . . . . . . . . . . . . . . . . . . . . . . . . . . . . . . . . . . . . . . . . . . . 38Connecting a Sonic Management Console to a Domain Manager . . . . . . . . . . . . . . . . . . . . . . 39
Sonic Management Console Views . . . . . . . . . . . . . . . . . . . . . . . . . . . . . . . . . . . . . . . . . . . . . . . . . . . 44Configure View . . . . . . . . . . . . . . . . . . . . . . . . . . . . . . . . . . . . . . . . . . . . . . . . . . . . . . . . . . . . . 44Manage View . . . . . . . . . . . . . . . . . . . . . . . . . . . . . . . . . . . . . . . . . . . . . . . . . . . . . . . . . . . . . . 50
Progress SonicMQ Configuration and Management Guide 8.5 11

Contents
Sonic Management Console Features . . . . . . . . . . . . . . . . . . . . . . . . . . . . . . . . . . . . . . . . . . . . . . . . . .51Menus . . . . . . . . . . . . . . . . . . . . . . . . . . . . . . . . . . . . . . . . . . . . . . . . . . . . . . . . . . . . . . . . . . . . .51Status Bar . . . . . . . . . . . . . . . . . . . . . . . . . . . . . . . . . . . . . . . . . . . . . . . . . . . . . . . . . . . . . . . . . .55Toolbar . . . . . . . . . . . . . . . . . . . . . . . . . . . . . . . . . . . . . . . . . . . . . . . . . . . . . . . . . . . . . . . . . . . .56Field Labels . . . . . . . . . . . . . . . . . . . . . . . . . . . . . . . . . . . . . . . . . . . . . . . . . . . . . . . . . . . . . . . .57Tables . . . . . . . . . . . . . . . . . . . . . . . . . . . . . . . . . . . . . . . . . . . . . . . . . . . . . . . . . . . . . . . . . . . . .57
Setting Preferences . . . . . . . . . . . . . . . . . . . . . . . . . . . . . . . . . . . . . . . . . . . . . . . . . . . . . . . . . . . . . . . .58Sonic Management Console Preferences . . . . . . . . . . . . . . . . . . . . . . . . . . . . . . . . . . . . . . . . . .58Clearing Preferences. . . . . . . . . . . . . . . . . . . . . . . . . . . . . . . . . . . . . . . . . . . . . . . . . . . . . . . . . .60Message Viewer Preferences . . . . . . . . . . . . . . . . . . . . . . . . . . . . . . . . . . . . . . . . . . . . . . . . . . .60
Viewing Sonic Management Console Messages . . . . . . . . . . . . . . . . . . . . . . . . . . . . . . . . . . . . . . . . .62Exiting the Sonic Management Console . . . . . . . . . . . . . . . . . . . . . . . . . . . . . . . . . . . . . . . . . . . . . . . .64
Part II: Configuring the Sonic Management Environment . .65
Chapter 3: Introduction to Configuration . . . . . . . . . . . . . . . . . . . . . . . . . . . . . . .67Configuration Domains . . . . . . . . . . . . . . . . . . . . . . . . . . . . . . . . . . . . . . . . . . . . . . . . . . . . . . . . . . . . .68
Viewing and Editing Domain Properties . . . . . . . . . . . . . . . . . . . . . . . . . . . . . . . . . . . . . . . . . .69Connecting to Configuration Domains. . . . . . . . . . . . . . . . . . . . . . . . . . . . . . . . . . . . . . . . . . . .77Disconnecting from a Configuration Domain . . . . . . . . . . . . . . . . . . . . . . . . . . . . . . . . . . . . . .81
Creating, Reusing, and Propagating Configurations. . . . . . . . . . . . . . . . . . . . . . . . . . . . . . . . . . . . . . .81Creating Configurations from Types . . . . . . . . . . . . . . . . . . . . . . . . . . . . . . . . . . . . . . . . . . . . .82Using Templates . . . . . . . . . . . . . . . . . . . . . . . . . . . . . . . . . . . . . . . . . . . . . . . . . . . . . . . . . . . . .85Copying Configurations . . . . . . . . . . . . . . . . . . . . . . . . . . . . . . . . . . . . . . . . . . . . . . . . . . . . . . .94Renaming Configurations. . . . . . . . . . . . . . . . . . . . . . . . . . . . . . . . . . . . . . . . . . . . . . . . . . . . . .96Moving Configurations. . . . . . . . . . . . . . . . . . . . . . . . . . . . . . . . . . . . . . . . . . . . . . . . . . . . . . . .96Deleting Configurations . . . . . . . . . . . . . . . . . . . . . . . . . . . . . . . . . . . . . . . . . . . . . . . . . . . . . . .96Upgrading Configurations . . . . . . . . . . . . . . . . . . . . . . . . . . . . . . . . . . . . . . . . . . . . . . . . . . . . .97Configuration Changes: Dynamic or Requiring Reload. . . . . . . . . . . . . . . . . . . . . . . . . . . . . . .98Organizing Configurations with Folders . . . . . . . . . . . . . . . . . . . . . . . . . . . . . . . . . . . . . . . . .101
Annotating Configurations . . . . . . . . . . . . . . . . . . . . . . . . . . . . . . . . . . . . . . . . . . . . . . . . . . . . . . . . .102Adding and Editing Annotations . . . . . . . . . . . . . . . . . . . . . . . . . . . . . . . . . . . . . . . . . . . . . . .105
Maintaining Management Security . . . . . . . . . . . . . . . . . . . . . . . . . . . . . . . . . . . . . . . . . . . . . . . . . . .106Configure Permissions . . . . . . . . . . . . . . . . . . . . . . . . . . . . . . . . . . . . . . . . . . . . . . . . . . . . . . .107Manage Permissions . . . . . . . . . . . . . . . . . . . . . . . . . . . . . . . . . . . . . . . . . . . . . . . . . . . . . . . . .108Setting Configure Permissions . . . . . . . . . . . . . . . . . . . . . . . . . . . . . . . . . . . . . . . . . . . . . . . . .109Setting Manage Permissions. . . . . . . . . . . . . . . . . . . . . . . . . . . . . . . . . . . . . . . . . . . . . . . . . . .110
12 Progress SonicMQ Configuration and Management Guide 8.5

Contents
Chapter 4: Configuring Containers and Collections. . . . . . . . . . . . . . . . . 111Containers and Components . . . . . . . . . . . . . . . . . . . . . . . . . . . . . . . . . . . . . . . . . . . . . . . . . . . . . . . 112
How Container Configurations Are Defined and Implemented . . . . . . . . . . . . . . . . . . . . . . . 112Configuring Containers . . . . . . . . . . . . . . . . . . . . . . . . . . . . . . . . . . . . . . . . . . . . . . . . . . . . . . 116Deleting Container Configurations . . . . . . . . . . . . . . . . . . . . . . . . . . . . . . . . . . . . . . . . . . . . . 135Generating Container Setup Files . . . . . . . . . . . . . . . . . . . . . . . . . . . . . . . . . . . . . . . . . . . . . . 135Encrypting a Container’s Persistent Cache . . . . . . . . . . . . . . . . . . . . . . . . . . . . . . . . . . . . . . . 137Configuring Container Components . . . . . . . . . . . . . . . . . . . . . . . . . . . . . . . . . . . . . . . . . . . . 137
Host Manager. . . . . . . . . . . . . . . . . . . . . . . . . . . . . . . . . . . . . . . . . . . . . . . . . . . . . . . . . . . . . . . . . . . 141Configuring Host Managers . . . . . . . . . . . . . . . . . . . . . . . . . . . . . . . . . . . . . . . . . . . . . . . . . . 142
Collections . . . . . . . . . . . . . . . . . . . . . . . . . . . . . . . . . . . . . . . . . . . . . . . . . . . . . . . . . . . . . . . . . . . . . 143Component Collections . . . . . . . . . . . . . . . . . . . . . . . . . . . . . . . . . . . . . . . . . . . . . . . . . . . . . . 144Container Collections . . . . . . . . . . . . . . . . . . . . . . . . . . . . . . . . . . . . . . . . . . . . . . . . . . . . . . . 153
Chapter 5: Configuring Framework Components . . . . . . . . . . . . . . . . . . . . 157Resilience and Recovery of Framework Components. . . . . . . . . . . . . . . . . . . . . . . . . . . . . . . . . . . . 158Configuring Directory Service Components . . . . . . . . . . . . . . . . . . . . . . . . . . . . . . . . . . . . . . . . . . . 159
Configuring a Directory Service Object . . . . . . . . . . . . . . . . . . . . . . . . . . . . . . . . . . . . . . . . . 159Configuring a Backup Directory Service . . . . . . . . . . . . . . . . . . . . . . . . . . . . . . . . . . . . . . . . 163Configuring Replication Connections for Directory Service Peers . . . . . . . . . . . . . . . . . . . . 164Directory Service Boot Files . . . . . . . . . . . . . . . . . . . . . . . . . . . . . . . . . . . . . . . . . . . . . . . . . . 174Encrypting the Directory Service and its Boot Files . . . . . . . . . . . . . . . . . . . . . . . . . . . . . . . . 176Connecting Off Line . . . . . . . . . . . . . . . . . . . . . . . . . . . . . . . . . . . . . . . . . . . . . . . . . . . . . . . . 180Crash Recovery . . . . . . . . . . . . . . . . . . . . . . . . . . . . . . . . . . . . . . . . . . . . . . . . . . . . . . . . . . . . 181
Configuring Agent Manager Components. . . . . . . . . . . . . . . . . . . . . . . . . . . . . . . . . . . . . . . . . . . . . 181Configuring a Backup Agent Manager . . . . . . . . . . . . . . . . . . . . . . . . . . . . . . . . . . . . . . . . . . 185
Activation Daemon . . . . . . . . . . . . . . . . . . . . . . . . . . . . . . . . . . . . . . . . . . . . . . . . . . . . . . . . . . . . . . 187Adding a Container to an Activation List . . . . . . . . . . . . . . . . . . . . . . . . . . . . . . . . . . . . . . . . 189Viewing the Containers In an Activation Daemon’s Activation List . . . . . . . . . . . . . . . . . . . 192
Collections Monitors . . . . . . . . . . . . . . . . . . . . . . . . . . . . . . . . . . . . . . . . . . . . . . . . . . . . . . . . . . . . . 193Configuring a Collections Monitor . . . . . . . . . . . . . . . . . . . . . . . . . . . . . . . . . . . . . . . . . . . . . 194Specifying Collections to Monitor . . . . . . . . . . . . . . . . . . . . . . . . . . . . . . . . . . . . . . . . . . . . . 198Viewing the Collections Monitored by a Collections Monitor . . . . . . . . . . . . . . . . . . . . . . . . 199
Progress SonicMQ Configuration and Management Guide 8.5 13

Contents
Part III: Configuring SonicMQ Messaging . . . . . . . . . . . . . . . . . . . . . .201
Chapter 6: Configuring SonicMQ Brokers . . . . . . . . . . . . . . . . . . . . . . . . . . . . .203Brokers . . . . . . . . . . . . . . . . . . . . . . . . . . . . . . . . . . . . . . . . . . . . . . . . . . . . . . . . . . . . . . . . . . . . . . . .204
Creating and Editing Broker Configurations . . . . . . . . . . . . . . . . . . . . . . . . . . . . . . . . . . . . . .204Configuring Broker Properties . . . . . . . . . . . . . . . . . . . . . . . . . . . . . . . . . . . . . . . . . . . . . . . . .207Load Balancing. . . . . . . . . . . . . . . . . . . . . . . . . . . . . . . . . . . . . . . . . . . . . . . . . . . . . . . . . . . . .245
Clusters . . . . . . . . . . . . . . . . . . . . . . . . . . . . . . . . . . . . . . . . . . . . . . . . . . . . . . . . . . . . . . . . . . . . . . . .250Configuring Clusters. . . . . . . . . . . . . . . . . . . . . . . . . . . . . . . . . . . . . . . . . . . . . . . . . . . . . . . . .250Deleting Clusters . . . . . . . . . . . . . . . . . . . . . . . . . . . . . . . . . . . . . . . . . . . . . . . . . . . . . . . . . . .256
Chapter 7: Configuring Broker Replication. . . . . . . . . . . . . . . . . . . . . . . . . . . .257Backup Brokers. . . . . . . . . . . . . . . . . . . . . . . . . . . . . . . . . . . . . . . . . . . . . . . . . . . . . . . . . . . . . . . . . .258
Configuring Backup Brokers . . . . . . . . . . . . . . . . . . . . . . . . . . . . . . . . . . . . . . . . . . . . . . . . . .258Backup Broker Menu Commands . . . . . . . . . . . . . . . . . . . . . . . . . . . . . . . . . . . . . . . . . . . . . .264
Replication Connections . . . . . . . . . . . . . . . . . . . . . . . . . . . . . . . . . . . . . . . . . . . . . . . . . . . . . . . . . . .266Configuring Broker Replication Properties . . . . . . . . . . . . . . . . . . . . . . . . . . . . . . . . . . . . . . .266Creating Replication Connections . . . . . . . . . . . . . . . . . . . . . . . . . . . . . . . . . . . . . . . . . . . . . .269Editing Replication Connections . . . . . . . . . . . . . . . . . . . . . . . . . . . . . . . . . . . . . . . . . . . . . . .272Viewing Replication Connections . . . . . . . . . . . . . . . . . . . . . . . . . . . . . . . . . . . . . . . . . . . . . .273Deleting Replication Connections . . . . . . . . . . . . . . . . . . . . . . . . . . . . . . . . . . . . . . . . . . . . . .274
Chapter 8: Configuring Acceptors . . . . . . . . . . . . . . . . . . . . . . . . . . . . . . . . . . . . . .275Overview of Acceptors . . . . . . . . . . . . . . . . . . . . . . . . . . . . . . . . . . . . . . . . . . . . . . . . . . . . . . . . . . . .276Broker-wide Acceptor Properties . . . . . . . . . . . . . . . . . . . . . . . . . . . . . . . . . . . . . . . . . . . . . . . . . . . .277
Configuring Broker-wide Acceptor Properties. . . . . . . . . . . . . . . . . . . . . . . . . . . . . . . . . . . . .277Using Duplicate Acceptors . . . . . . . . . . . . . . . . . . . . . . . . . . . . . . . . . . . . . . . . . . . . . . . . . . . .280Viewing Configured Acceptors . . . . . . . . . . . . . . . . . . . . . . . . . . . . . . . . . . . . . . . . . . . . . . . .282
Configuring TCP Acceptors . . . . . . . . . . . . . . . . . . . . . . . . . . . . . . . . . . . . . . . . . . . . . . . . . . . . . . . .283Dynamic Changes in Acceptors . . . . . . . . . . . . . . . . . . . . . . . . . . . . . . . . . . . . . . . . . . . . . . . .286
Securing an Acceptor . . . . . . . . . . . . . . . . . . . . . . . . . . . . . . . . . . . . . . . . . . . . . . . . . . . . . . . . . . . . .287Secure Sockets Layer (SSL) . . . . . . . . . . . . . . . . . . . . . . . . . . . . . . . . . . . . . . . . . . . . . . . . . . .287
Configuring HTTP(S) Tunneling Acceptors. . . . . . . . . . . . . . . . . . . . . . . . . . . . . . . . . . . . . . . . . . . .294Configuring HTTP(S) Direct Acceptors . . . . . . . . . . . . . . . . . . . . . . . . . . . . . . . . . . . . . . . . . . . . . . .297
Configuring HTTP(S) Direct Basic Protocol Handlers . . . . . . . . . . . . . . . . . . . . . . . . . . . . . .298Configuring HTTP(S) Direct for SOAP Protocol Handlers . . . . . . . . . . . . . . . . . . . . . . . . . . .309Configuring HTTP(S) Direct for JMS Protocol Handlers . . . . . . . . . . . . . . . . . . . . . . . . . . . .314Configuring HTTP(S) Direct Web Service Protocol Handlers . . . . . . . . . . . . . . . . . . . . . . . .320
14 Progress SonicMQ Configuration and Management Guide 8.5

Contents
Chapter 9: Configuring Routings . . . . . . . . . . . . . . . . . . . . . . . . . . . . . . . . . . . . . . 329Routing Nodes . . . . . . . . . . . . . . . . . . . . . . . . . . . . . . . . . . . . . . . . . . . . . . . . . . . . . . . . . . . . . . . . . . 330Routing Definitions . . . . . . . . . . . . . . . . . . . . . . . . . . . . . . . . . . . . . . . . . . . . . . . . . . . . . . . . . . . . . . 335
Configuring DRA Routing Definitions . . . . . . . . . . . . . . . . . . . . . . . . . . . . . . . . . . . . . . . . . . 335Connection Lists in Routing . . . . . . . . . . . . . . . . . . . . . . . . . . . . . . . . . . . . . . . . . . . . . . . . . . 340Configuring HTTP Direct Routing Definitions. . . . . . . . . . . . . . . . . . . . . . . . . . . . . . . . . . . . 341Viewing Routing Definitions . . . . . . . . . . . . . . . . . . . . . . . . . . . . . . . . . . . . . . . . . . . . . . . . . 356Deleting Routing Definitions . . . . . . . . . . . . . . . . . . . . . . . . . . . . . . . . . . . . . . . . . . . . . . . . . 357
Global Subscription Rules . . . . . . . . . . . . . . . . . . . . . . . . . . . . . . . . . . . . . . . . . . . . . . . . . . . . . . . . . 357Configuring Global Subscription Rules . . . . . . . . . . . . . . . . . . . . . . . . . . . . . . . . . . . . . . . . . 358Viewing Global Subscription Rules . . . . . . . . . . . . . . . . . . . . . . . . . . . . . . . . . . . . . . . . . . . . 360Deleting Global Subscription Rules . . . . . . . . . . . . . . . . . . . . . . . . . . . . . . . . . . . . . . . . . . . . 360
Chapter 10: Configuring Queues . . . . . . . . . . . . . . . . . . . . . . . . . . . . . . . . . . . . . . . 361Queues on Brokers. . . . . . . . . . . . . . . . . . . . . . . . . . . . . . . . . . . . . . . . . . . . . . . . . . . . . . . . . . . . . . . 362
Configuring General Queue-handling Properties on a Broker . . . . . . . . . . . . . . . . . . . . . . . . 362Viewing Queues on Brokers . . . . . . . . . . . . . . . . . . . . . . . . . . . . . . . . . . . . . . . . . . . . . . . . . . 364
Individual Queues . . . . . . . . . . . . . . . . . . . . . . . . . . . . . . . . . . . . . . . . . . . . . . . . . . . . . . . . . . . . . . . 365Configuring Queues . . . . . . . . . . . . . . . . . . . . . . . . . . . . . . . . . . . . . . . . . . . . . . . . . . . . . . . . 365Deleting Queues . . . . . . . . . . . . . . . . . . . . . . . . . . . . . . . . . . . . . . . . . . . . . . . . . . . . . . . . . . . 370System Queues . . . . . . . . . . . . . . . . . . . . . . . . . . . . . . . . . . . . . . . . . . . . . . . . . . . . . . . . . . . . 370
Queues on Clusters . . . . . . . . . . . . . . . . . . . . . . . . . . . . . . . . . . . . . . . . . . . . . . . . . . . . . . . . . . . . . . 373
Part IV: Managing the Sonic Management Environment . . 375
Chapter 11: Monitoring the Sonic Management Environment . . . . . 377Overview of Monitoring . . . . . . . . . . . . . . . . . . . . . . . . . . . . . . . . . . . . . . . . . . . . . . . . . . . . . . . . . . 378Metrics . . . . . . . . . . . . . . . . . . . . . . . . . . . . . . . . . . . . . . . . . . . . . . . . . . . . . . . . . . . . . . . . . . . . . . . . 379
Component and Container-wide Metrics . . . . . . . . . . . . . . . . . . . . . . . . . . . . . . . . . . . . . . . . 380Instance Metrics . . . . . . . . . . . . . . . . . . . . . . . . . . . . . . . . . . . . . . . . . . . . . . . . . . . . . . . . . . . 383Viewing Metrics . . . . . . . . . . . . . . . . . . . . . . . . . . . . . . . . . . . . . . . . . . . . . . . . . . . . . . . . . . . 390Resetting Metrics. . . . . . . . . . . . . . . . . . . . . . . . . . . . . . . . . . . . . . . . . . . . . . . . . . . . . . . . . . . 399
Alerts . . . . . . . . . . . . . . . . . . . . . . . . . . . . . . . . . . . . . . . . . . . . . . . . . . . . . . . . . . . . . . . . . . . . . . . . . 400Specifying Alert Thresholds . . . . . . . . . . . . . . . . . . . . . . . . . . . . . . . . . . . . . . . . . . . . . . . . . . 400Specifying Instance Alert Thresholds . . . . . . . . . . . . . . . . . . . . . . . . . . . . . . . . . . . . . . . . . . . 401Alert Notification Repeats When Still Over a Threshold . . . . . . . . . . . . . . . . . . . . . . . . . . . . 402
Notifications. . . . . . . . . . . . . . . . . . . . . . . . . . . . . . . . . . . . . . . . . . . . . . . . . . . . . . . . . . . . . . . . . . . . 403Monitoring Notifications. . . . . . . . . . . . . . . . . . . . . . . . . . . . . . . . . . . . . . . . . . . . . . . . . . . . . 405
Progress SonicMQ Configuration and Management Guide 8.5 15

Contents
Monitoring Forwarded Notifications . . . . . . . . . . . . . . . . . . . . . . . . . . . . . . . . . . . . . . . . . . . .407Changing the Maximum Number of Notifications Displayed . . . . . . . . . . . . . . . . . . . . . . . . .412Clearing Notifications. . . . . . . . . . . . . . . . . . . . . . . . . . . . . . . . . . . . . . . . . . . . . . . . . . . . . . . .412Removing Notification Watches. . . . . . . . . . . . . . . . . . . . . . . . . . . . . . . . . . . . . . . . . . . . . . . .413Specifying Notification Preferences . . . . . . . . . . . . . . . . . . . . . . . . . . . . . . . . . . . . . . . . . . . . .413Session Consumer Instance Notifications . . . . . . . . . . . . . . . . . . . . . . . . . . . . . . . . . . . . . . . .414Notifications of a Subscriber Starting and Stopping Flow To Disk . . . . . . . . . . . . . . . . . . . . .416
Chapter 12: Configuring Security . . . . . . . . . . . . . . . . . . . . . . . . . . . . . . . . . . . . . . .419Overview . . . . . . . . . . . . . . . . . . . . . . . . . . . . . . . . . . . . . . . . . . . . . . . . . . . . . . . . . . . . . . . . . . . . . . .420Authentication Domains . . . . . . . . . . . . . . . . . . . . . . . . . . . . . . . . . . . . . . . . . . . . . . . . . . . . . . . . . . .421
Configuring an Internal Authentication Domain . . . . . . . . . . . . . . . . . . . . . . . . . . . . . . . . . . .422Configuring an External Authentication Domain. . . . . . . . . . . . . . . . . . . . . . . . . . . . . . . . . . .423Users and Groups . . . . . . . . . . . . . . . . . . . . . . . . . . . . . . . . . . . . . . . . . . . . . . . . . . . . . . . . . . .434
Authorization Policies. . . . . . . . . . . . . . . . . . . . . . . . . . . . . . . . . . . . . . . . . . . . . . . . . . . . . . . . . . . . .442Configuring a Set of Authorization Policies. . . . . . . . . . . . . . . . . . . . . . . . . . . . . . . . . . . . . . .442Access Control Lists . . . . . . . . . . . . . . . . . . . . . . . . . . . . . . . . . . . . . . . . . . . . . . . . . . . . . . . . .443Quality of Protection. . . . . . . . . . . . . . . . . . . . . . . . . . . . . . . . . . . . . . . . . . . . . . . . . . . . . . . . .449
Chapter 13: Managing Containers and Collections . . . . . . . . . . . . . . . . . .453Containers and Their Components . . . . . . . . . . . . . . . . . . . . . . . . . . . . . . . . . . . . . . . . . . . . . . . . . . .454
Viewing a Container and Its Components . . . . . . . . . . . . . . . . . . . . . . . . . . . . . . . . . . . . . . . .454Color Highlights on Managed Containers . . . . . . . . . . . . . . . . . . . . . . . . . . . . . . . . . . . . . . . .456Container Runtime Properties. . . . . . . . . . . . . . . . . . . . . . . . . . . . . . . . . . . . . . . . . . . . . . . . . .457Setting Up Remote Containers Through a Host Manager . . . . . . . . . . . . . . . . . . . . . . . . . . . .462Launching Containers. . . . . . . . . . . . . . . . . . . . . . . . . . . . . . . . . . . . . . . . . . . . . . . . . . . . . . . .466Shutting Down Containers . . . . . . . . . . . . . . . . . . . . . . . . . . . . . . . . . . . . . . . . . . . . . . . . . . . .472Using a Container’s Command Line . . . . . . . . . . . . . . . . . . . . . . . . . . . . . . . . . . . . . . . . . . . .473Container Logging . . . . . . . . . . . . . . . . . . . . . . . . . . . . . . . . . . . . . . . . . . . . . . . . . . . . . . . . . .474Managing Components. . . . . . . . . . . . . . . . . . . . . . . . . . . . . . . . . . . . . . . . . . . . . . . . . . . . . . .490Container-wide Metrics . . . . . . . . . . . . . . . . . . . . . . . . . . . . . . . . . . . . . . . . . . . . . . . . . . . . . .491Container-wide Notifications . . . . . . . . . . . . . . . . . . . . . . . . . . . . . . . . . . . . . . . . . . . . . . . . . .493
Collections. . . . . . . . . . . . . . . . . . . . . . . . . . . . . . . . . . . . . . . . . . . . . . . . . . . . . . . . . . . . . . . . . . . . . .495Component Collections . . . . . . . . . . . . . . . . . . . . . . . . . . . . . . . . . . . . . . . . . . . . . . . . . . . . . .495Container Collections . . . . . . . . . . . . . . . . . . . . . . . . . . . . . . . . . . . . . . . . . . . . . . . . . . . . . . . .497
Running Diagnostics on Containers and Collections . . . . . . . . . . . . . . . . . . . . . . . . . . . . . . . . . . . . .499Syntax of Sonic Diagnostic Instructions. . . . . . . . . . . . . . . . . . . . . . . . . . . . . . . . . . . . . . . . . .499Using the Sonic Diagnostics Window . . . . . . . . . . . . . . . . . . . . . . . . . . . . . . . . . . . . . . . . . . .500
16 Progress SonicMQ Configuration and Management Guide 8.5

Contents
Chapter 14: Managing Framework Components . . . . . . . . . . . . . . . . . . . . . 505Directory Service . . . . . . . . . . . . . . . . . . . . . . . . . . . . . . . . . . . . . . . . . . . . . . . . . . . . . . . . . . . . . . . . 506
Fault Tolerant Roles and States. . . . . . . . . . . . . . . . . . . . . . . . . . . . . . . . . . . . . . . . . . . . . . . . 506Directory Service Runtime Properties. . . . . . . . . . . . . . . . . . . . . . . . . . . . . . . . . . . . . . . . . . . 507Directory Service Operations . . . . . . . . . . . . . . . . . . . . . . . . . . . . . . . . . . . . . . . . . . . . . . . . . 511Directory Service Logging . . . . . . . . . . . . . . . . . . . . . . . . . . . . . . . . . . . . . . . . . . . . . . . . . . . 514Directory Service Notifications. . . . . . . . . . . . . . . . . . . . . . . . . . . . . . . . . . . . . . . . . . . . . . . . 514
Agent Manager . . . . . . . . . . . . . . . . . . . . . . . . . . . . . . . . . . . . . . . . . . . . . . . . . . . . . . . . . . . . . . . . . 515Fault Tolerant Roles and States. . . . . . . . . . . . . . . . . . . . . . . . . . . . . . . . . . . . . . . . . . . . . . . . 516Agent Manager Runtime Properties . . . . . . . . . . . . . . . . . . . . . . . . . . . . . . . . . . . . . . . . . . . . 517Agent Manager Operations . . . . . . . . . . . . . . . . . . . . . . . . . . . . . . . . . . . . . . . . . . . . . . . . . . . 522Agent Manager Logging . . . . . . . . . . . . . . . . . . . . . . . . . . . . . . . . . . . . . . . . . . . . . . . . . . . . . 523Agent Manager PollThreads Metrics and Alert Notifications. . . . . . . . . . . . . . . . . . . . . . . . . 523Agent Manager Notifications . . . . . . . . . . . . . . . . . . . . . . . . . . . . . . . . . . . . . . . . . . . . . . . . . 523
Activation Daemon . . . . . . . . . . . . . . . . . . . . . . . . . . . . . . . . . . . . . . . . . . . . . . . . . . . . . . . . . . . . . . 524Activation Daemon Runtime Properties . . . . . . . . . . . . . . . . . . . . . . . . . . . . . . . . . . . . . . . . . 524Viewing an Activation Daemon’s List of Containers . . . . . . . . . . . . . . . . . . . . . . . . . . . . . . . 527Activating and Deactivating Containers . . . . . . . . . . . . . . . . . . . . . . . . . . . . . . . . . . . . . . . . . 530Other Activation Daemon Operations. . . . . . . . . . . . . . . . . . . . . . . . . . . . . . . . . . . . . . . . . . . 531Activation Daemon Notifications . . . . . . . . . . . . . . . . . . . . . . . . . . . . . . . . . . . . . . . . . . . . . . 531
Collections Monitor . . . . . . . . . . . . . . . . . . . . . . . . . . . . . . . . . . . . . . . . . . . . . . . . . . . . . . . . . . . . . . 532Collections Monitor Runtime Properties. . . . . . . . . . . . . . . . . . . . . . . . . . . . . . . . . . . . . . . . . 533Viewing the Component Collections Being Monitored . . . . . . . . . . . . . . . . . . . . . . . . . . . . . 537Collections Monitor Operations . . . . . . . . . . . . . . . . . . . . . . . . . . . . . . . . . . . . . . . . . . . . . . . 538Collections Monitor Notifications. . . . . . . . . . . . . . . . . . . . . . . . . . . . . . . . . . . . . . . . . . . . . . 538Collections Monitor Metrics and Alert Notifications . . . . . . . . . . . . . . . . . . . . . . . . . . . . . . . 539
Part V: Managing SonicMQ Messaging . . . . . . . . . . . . . . . . . . . . . . . . . 541
Chapter 15: Managing SonicMQ Brokers . . . . . . . . . . . . . . . . . . . . . . . . . . . . . 543Broker Runtime Properties . . . . . . . . . . . . . . . . . . . . . . . . . . . . . . . . . . . . . . . . . . . . . . . . . . . . . . . . 544Broker Operations, Storage Actions, and Activation . . . . . . . . . . . . . . . . . . . . . . . . . . . . . . . . . . . . 551
Broker Operations . . . . . . . . . . . . . . . . . . . . . . . . . . . . . . . . . . . . . . . . . . . . . . . . . . . . . . . . . . 551Storage Operations . . . . . . . . . . . . . . . . . . . . . . . . . . . . . . . . . . . . . . . . . . . . . . . . . . . . . . . . . 553Synchronizing Storage . . . . . . . . . . . . . . . . . . . . . . . . . . . . . . . . . . . . . . . . . . . . . . . . . . . . . . 558Activating Brokers . . . . . . . . . . . . . . . . . . . . . . . . . . . . . . . . . . . . . . . . . . . . . . . . . . . . . . . . . 559Flushing and Updating Cached Certificate Revocation Lists . . . . . . . . . . . . . . . . . . . . . . . . . 561
Compacting Storage. . . . . . . . . . . . . . . . . . . . . . . . . . . . . . . . . . . . . . . . . . . . . . . . . . . . . . . . . . . . . . 561
Progress SonicMQ Configuration and Management Guide 8.5 17

Contents
Broker-wide Monitoring . . . . . . . . . . . . . . . . . . . . . . . . . . . . . . . . . . . . . . . . . . . . . . . . . . . . . . . . . . .563Broker-wide Metrics. . . . . . . . . . . . . . . . . . . . . . . . . . . . . . . . . . . . . . . . . . . . . . . . . . . . . . . . .563Broker-wide Notifications and Alerts. . . . . . . . . . . . . . . . . . . . . . . . . . . . . . . . . . . . . . . . . . . .565
Interbroker Notifications . . . . . . . . . . . . . . . . . . . . . . . . . . . . . . . . . . . . . . . . . . . . . . . . . . . . . . . . . . .569Cluster Flow Control Notifications . . . . . . . . . . . . . . . . . . . . . . . . . . . . . . . . . . . . . . . . . . . . .569Routing Connection (DRA) Flow Control Notifications . . . . . . . . . . . . . . . . . . . . . . . . . . . . .573
Chapter 16: Managing SonicMQ Broker Activities . . . . . . . . . . . . . . . . . . .579Introduction . . . . . . . . . . . . . . . . . . . . . . . . . . . . . . . . . . . . . . . . . . . . . . . . . . . . . . . . . . . . . . . . . . . . .580Advertised Global Queues . . . . . . . . . . . . . . . . . . . . . . . . . . . . . . . . . . . . . . . . . . . . . . . . . . . . . . . . .581
Viewing Advertised Global Queues . . . . . . . . . . . . . . . . . . . . . . . . . . . . . . . . . . . . . . . . . . . . .581Clearing Advertised Global Queues . . . . . . . . . . . . . . . . . . . . . . . . . . . . . . . . . . . . . . . . . . . . .582
Connections. . . . . . . . . . . . . . . . . . . . . . . . . . . . . . . . . . . . . . . . . . . . . . . . . . . . . . . . . . . . . . . . . . . . .582Viewing Connections . . . . . . . . . . . . . . . . . . . . . . . . . . . . . . . . . . . . . . . . . . . . . . . . . . . . . . . .583Dropping Connections . . . . . . . . . . . . . . . . . . . . . . . . . . . . . . . . . . . . . . . . . . . . . . . . . . . . . . .585Connection Instance Metrics, Alerts, and Notifications. . . . . . . . . . . . . . . . . . . . . . . . . . . . . .586
Durable Subscriptions . . . . . . . . . . . . . . . . . . . . . . . . . . . . . . . . . . . . . . . . . . . . . . . . . . . . . . . . . . . . .588Viewing Durable Subscriptions . . . . . . . . . . . . . . . . . . . . . . . . . . . . . . . . . . . . . . . . . . . . . . . .588Using the Durable Subscriptions Table . . . . . . . . . . . . . . . . . . . . . . . . . . . . . . . . . . . . . . . . . .593Deleting Durable Subscriptions . . . . . . . . . . . . . . . . . . . . . . . . . . . . . . . . . . . . . . . . . . . . . . . .594Browsing Durable Subscriptions . . . . . . . . . . . . . . . . . . . . . . . . . . . . . . . . . . . . . . . . . . . . . . .595Deleting Individual Messages. . . . . . . . . . . . . . . . . . . . . . . . . . . . . . . . . . . . . . . . . . . . . . . . . .597Monitoring Durable Subscriptions . . . . . . . . . . . . . . . . . . . . . . . . . . . . . . . . . . . . . . . . . . . . . .597
Global Subscriptions . . . . . . . . . . . . . . . . . . . . . . . . . . . . . . . . . . . . . . . . . . . . . . . . . . . . . . . . . . . . . .598Showing or Hiding Nodes With Remote Subscriptions . . . . . . . . . . . . . . . . . . . . . . . . . . . . . .599Refreshing Global Subscriptions . . . . . . . . . . . . . . . . . . . . . . . . . . . . . . . . . . . . . . . . . . . . . . .600Reconciling Global Subscriptions . . . . . . . . . . . . . . . . . . . . . . . . . . . . . . . . . . . . . . . . . . . . . .600Global Subscription Expiration . . . . . . . . . . . . . . . . . . . . . . . . . . . . . . . . . . . . . . . . . . . . . . . .601Deleting Global Subscriptions . . . . . . . . . . . . . . . . . . . . . . . . . . . . . . . . . . . . . . . . . . . . . . . . .601Monitoring Global Subscriptions . . . . . . . . . . . . . . . . . . . . . . . . . . . . . . . . . . . . . . . . . . . . . . .602
Queues. . . . . . . . . . . . . . . . . . . . . . . . . . . . . . . . . . . . . . . . . . . . . . . . . . . . . . . . . . . . . . . . . . . . . . . . .602Viewing Queues . . . . . . . . . . . . . . . . . . . . . . . . . . . . . . . . . . . . . . . . . . . . . . . . . . . . . . . . . . . .603Refreshing Queues . . . . . . . . . . . . . . . . . . . . . . . . . . . . . . . . . . . . . . . . . . . . . . . . . . . . . . . . . .604Clearing Messages from a Queue . . . . . . . . . . . . . . . . . . . . . . . . . . . . . . . . . . . . . . . . . . . . . . .604Showing and Hiding System Queues . . . . . . . . . . . . . . . . . . . . . . . . . . . . . . . . . . . . . . . . . . . .604Browsing Queues . . . . . . . . . . . . . . . . . . . . . . . . . . . . . . . . . . . . . . . . . . . . . . . . . . . . . . . . . . .605Queue Instance Metrics and Alerts. . . . . . . . . . . . . . . . . . . . . . . . . . . . . . . . . . . . . . . . . . . . . .605
18 Progress SonicMQ Configuration and Management Guide 8.5

Contents
Routing Statistics . . . . . . . . . . . . . . . . . . . . . . . . . . . . . . . . . . . . . . . . . . . . . . . . . . . . . . . . . . . . . . . . 606SOAP Reliable Sequences . . . . . . . . . . . . . . . . . . . . . . . . . . . . . . . . . . . . . . . . . . . . . . . . . . . . . . . . . 607XA Transactions . . . . . . . . . . . . . . . . . . . . . . . . . . . . . . . . . . . . . . . . . . . . . . . . . . . . . . . . . . . . . . . . 608
Viewing XA Transactions . . . . . . . . . . . . . . . . . . . . . . . . . . . . . . . . . . . . . . . . . . . . . . . . . . . . 609Refreshing the XA Transaction View . . . . . . . . . . . . . . . . . . . . . . . . . . . . . . . . . . . . . . . . . . . 610Committing Prepared XA Transactions . . . . . . . . . . . . . . . . . . . . . . . . . . . . . . . . . . . . . . . . . 610Rolling Back Prepared XA Transactions . . . . . . . . . . . . . . . . . . . . . . . . . . . . . . . . . . . . . . . . 610
Part VI: Additional Tools . . . . . . . . . . . . . . . . . . . . . . . . . . . . . . . . . . . . . . . . . . . . 611
Chapter 17: Using the JMS Administered Objects Tool. . . . . . . . . . . . . 613Overview of JMS Administered Objects . . . . . . . . . . . . . . . . . . . . . . . . . . . . . . . . . . . . . . . . . . . . . . 614Connecting to JMS Administered Object Stores . . . . . . . . . . . . . . . . . . . . . . . . . . . . . . . . . . . . . . . . 614
Connecting to the Internal JNDI Object Store . . . . . . . . . . . . . . . . . . . . . . . . . . . . . . . . . . . . 614Connecting to an External JNDI Object Store . . . . . . . . . . . . . . . . . . . . . . . . . . . . . . . . . . . . 617Connecting to a Serialized Object Store . . . . . . . . . . . . . . . . . . . . . . . . . . . . . . . . . . . . . . . . . 619
Working with JMS Administered Objects. . . . . . . . . . . . . . . . . . . . . . . . . . . . . . . . . . . . . . . . . . . . . 620Adding Connection Factory Objects . . . . . . . . . . . . . . . . . . . . . . . . . . . . . . . . . . . . . . . . . . . . 620Adding Destination Objects . . . . . . . . . . . . . . . . . . . . . . . . . . . . . . . . . . . . . . . . . . . . . . . . . . 632Adding Sub-context to the Internal JNDI Store . . . . . . . . . . . . . . . . . . . . . . . . . . . . . . . . . . . 634Editing Administered Objects . . . . . . . . . . . . . . . . . . . . . . . . . . . . . . . . . . . . . . . . . . . . . . . . . 635Deleting Administered Objects . . . . . . . . . . . . . . . . . . . . . . . . . . . . . . . . . . . . . . . . . . . . . . . . 636
Chapter 18: Integrating SonicMQ with Actional . . . . . . . . . . . . . . . . . . . . . . 637
Chapter 19: Using JSR 160 Compliant Consoles . . . . . . . . . . . . . . . . . . . . 641Overview . . . . . . . . . . . . . . . . . . . . . . . . . . . . . . . . . . . . . . . . . . . . . . . . . . . . . . . . . . . . . . . . . . . . . . 642Using JConsole to Examine a Sonic Domain Manager . . . . . . . . . . . . . . . . . . . . . . . . . . . . . . . . . . . 642Using the JConsole Application Window . . . . . . . . . . . . . . . . . . . . . . . . . . . . . . . . . . . . . . . . . . . . . 644
MBeans Tab . . . . . . . . . . . . . . . . . . . . . . . . . . . . . . . . . . . . . . . . . . . . . . . . . . . . . . . . . . . . . . 644Sonic MBean Attributes, Operations, and Notifications. . . . . . . . . . . . . . . . . . . . . . . . . . . . . 645
Appendix A: OEM Considerations . . . . . . . . . . . . . . . . . . . . . . . . . . . . . . . . . . . . . 649Custom Branding the Sonic Management Console . . . . . . . . . . . . . . . . . . . . . . . . . . . . . . . . . . . . . . 650
Index . . . . . . . . . . . . . . . . . . . . . . . . . . . . . . . . . . . . . . . . . . . . . . . . . . . . . . . . . . . . . . . . . . . . . . . 653
Progress SonicMQ Configuration and Management Guide 8.5 19

Contents
20 Progress SonicMQ Configuration and Management Guide 8.5

Preface
This guide is intended for software developers and system administrators. You can use this guide for configuring, monitoring, and managing SonicMQ messaging brokers and other distributed application components. To make full use of this guide, you should be familiar with the basic concepts of messaging.
This guide contains the following parts:
● Part I, “Getting Started” discusses the tools and APIs that the Sonic Management Environment provides to configure, monitor, and manage all aspects of a SonicMQ deployment. It describes how to connect to the domain manager and start the Sonic Management Console. It also describes the configuration, management, and file views, as well as the Sonic Management Console’s context-sensitive menus, status bar, toolbar, and labels and explains how to specify preferences and view application messages.
● Part II, “Configuring the Sonic Management Environment” describes the centralized storage of configuration and related information maintained by the Directory Service, how to create and propagate new configurations and configuration changes throughout a deployment. It tells how to create and edit container configurations, and how to add components to and remove components from containers. It also describes how to create and edit collection configurations. It introduces fault tolerance and configuration of the Directory Service and Agent Manager components, how to generate Directory Service boot files, as well as encryption, backup and restoration, and crash recovery. Finally, it describes how to configure Activation Daemons and add containers to an Activation Daemon’s configuration list, how to configure a Host Manager, and how to configure a Collections Monitor and specify collections to monitor.
Progress SonicMQ Configuration and Management Guide 8.5 21

Preface
● Part III, “Configuring SonicMQ Messaging” describes how to configure brokers and clusters. It next describes how to configure backup brokers and replication connections for fault tolerance. It then describes how to configure broker-wide acceptor properties and TCP, HTTP Tunneling, and HTTP direct acceptors, with and without SSL. It explains routing nodes and how to configure routing properties, DRA and HTTP Direct routing definitions, and global subscription rules. It introduces queues and how to configure general queue-handling properties on a broker, and view queues on brokers. It also describes how to configure and delete queues, including system queues and how to view queues on a cluster. Finally, this part includes an overview of SonicMQ management security and describes authentication and how to configure internal and external Authentication Domains, as well as how to configure, view and delete users and groups. It also describes how to create a set of a authorization policies, and how to configure, view, and delete ACLs and QoP.
● Part IV, “Managing the Sonic Management Environment” describes metrics, alerts, and notifications. It also describes how to launch and shut down containers, container logging and monitoring, and manage container components and collections of containers and components. It also describes the runtime management and monitoring of the framework components—the Directory Service, Agent Manager, Activation Daemon, and Collections Monitor.
● Part V, “Managing SonicMQ Messaging” describes broker runtime properties, operations, and monitoring. It also covers advertised global queues, connections, durable subscriptions, global subscriptions, queues, routing statistics, and XA transactions.
● Part VI, “Additional Tools” describes how to use the JMS Administered Objects tool to connect to internal and external JNDI object stores as well as serialized object stores and add, edit, and delete connection factory objects and destination objects. Describes how a SonicMQ broker instrumented for Actional is fully setup and then visualized in Actional. Decsribes how Sonic’s provides administrative access to JConsole and other third-party consoles that fully support the Java Specification Request (JSR) 160, “Java Management Extensions (JMX) Remote API”.
(The JMS Test Client is described in the Progress SonicMQ Application Programming Guide.)
22 Progress SonicMQ Configuration and Management Guide 8.5

Typographical Conventions
Typographical Conventions This section describes the text-formatting conventions used in this guide and a description of notes, warnings, and important messages. This guide uses the following typographical conventions:
● Bold typeface in this font indicates keyboard key names (such as Tab or Enter) and the names of windows, menu commands, buttons, and other Sonic user-interface elements. For example, “From the File menu, choose Open.”
● Bold typeface in this font emphasizes new terms when they are introduced.
● Monospace typeface indicates text that might appear on a computer screen other than the names of Sonic user-interface elements, including:
■ Code examples and code text that the user must enter
■ System output such as responses and error messages
■ Filenames, pathnames, and software component names, such as method names
● Bold monospace typeface emphasizes text that would otherwise appear in monospace typeface to emphasize some computer input or output in context.
● Monospace typeface in italics or Bold monospace typeface in italics (depending on context) indicates variables or placeholders for values you supply or that might vary from one case to another.
This manual uses the following syntax notation conventions:
● Brackets ([ ]) in syntax statements indicate parameters that are optional.
● Braces ({ }) indicate that one (and only one) of the enclosed items is required. A vertical bar (|) separates the alternative selections.
● Ellipses (...) indicate that you can choose one or more of the preceding items.
This guide highlights special kinds of information by shading the information area, and indicating the type of alert in the left margin.
Note A Note flag indicates information that complements the main text flow. Such information is especially helpful for understanding the concept or procedure being discussed.
Important An Important flag indicates information that must be acted upon within the given context to successfully complete the procedure or task.
Warning A Warning flag indicates information that can cause loss of data or other damage if ignored.
Progress SonicMQ Configuration and Management Guide 8.5 23

Preface
Progress Sonic DocumentationSonic installations always have a welcome page that provides links to Sonic documentation, release notes, communities, and support. See the release’s Product Update Bulletin book to see what’s new and what’s changed since prior releases.
The Sonic documentation set includes the following books and API references.
SonicMQ DocumentationSonicMQ installations provide the following documentation:
● Progress Sonic Installation and Upgrade Guide — The essential guide for installing, upgrading, and updating SonicMQ on distributed systems, using the graphical, console or silent installers, and scripted responses. Describes on-site tasks such as defining additional components that use the resources of an installation, defining a backup broker, creating activation daemons and encrypting local files. Also describes the use of characters and provides local troubleshooting tips.
● Getting Started with Progress SonicMQ — Provides an introduction to the scope and concepts of SonicMQ messaging. Describes the features and benefits of SonicMQ messaging in terms of its adherence to the JavaSoft JMS specification and its rich extensions. Provides step by step instructions for sample programs that demonstrate JMS behaviors and usage scenarios. Concludes with a glossary of terms used throughout the SonicMQ documentation set.
● Progress SonicMQ Configuration and Management Guide — Describes the configuration toolset for objects in a domain. Also shows how to use the JNDI store for administered objects, how integration with Progerss Actional is implemented, and how to use JSR 160 compliant consoles. Shows how to manage and monitor deployed components including metrics and notifications.
● Progress SonicMQ Deployment Guide — Describes how to architect components in broker clusters, the Sonic Continuous Availability Architecture™ and Dynamic Routing Architecture®. Shows how to use the protocols and security options that make your deployment a resilient, efficient, controlled structure. Covers all the facets of HTTP Direct, a Sonic technique that enables SonicMQ brokers to send and receive pure HTTP messages.
● Progress SonicMQ Administrative Programming Guide — Shows how to create applications that perform management, configuration, runtime and authentication functions.
● Progress SonicMQ Application Programming Guide— Takes you through the Java sample applications to describe the design patterns they offer for your applications.
24 Progress SonicMQ Configuration and Management Guide 8.5

Progress Sonic Documentation
Details each facet of the client functionality: connections, sessions, transactions, producers and consumers, destinations, messaging models, message types and message elements. Complete information is included on hierarchical namespaces, recoverable file channels and distributed transactions.
● Progress SonicMQ Performance Tuning Guide — Illustrates the buffers and caches that control message flow and capacities to help you understand how combinations of parameters can improve both throughput and service levels. Shows how to tune TCP under Windows and Linux for the Sonic Continuous Availability Architecture™.
● SonicMQ API Reference — Online JavaDoc compilation of the exposed SonicMQ Java messaging client APIs.
● Management Application API Reference — Online JavaDoc compilation of the exposed SonicMQ management configuration and runtime APIs.
● Metrics and Notifications API Reference — Online JavaDoc of the exposed SonicMQ management monitoring APIs.
● Progress Sonic Event Monitor User’s Guide — Packaged with the SonicMQ installer, this guide describes the Progress Sonic logging framework to track, record or redirect metrics and notifications that monitor and manage applications.
Other Documentation in the SonicMQ Product FamilyThe Progress Sonic download site provides access to additional client and JCA adapter products and documentation:
● Progress SonicMQ .NET Client Guide — Packaged with the SonicMQ .NET client download, this guide takes you through the C# sample applications and describes the design patterns they offer for your applications. Details each facet of the client functionality: connections, sessions, transactions, producers and consumers, destinations, messaging models, message types and message elements. Includes complete information on hierarchical namespaces and distributed transactions. The package also includes online API reference for the Sonic .NET client libraries, and samples for C++ and VB.NET.
● Progress SonicMQ C Client Guide — Packaged with the SonicMQ C/C++/COM client download, this guide presents the C sample applications and shows how to enhance the samples, focusing on connections, sessions, messages, producers and consumers in both the point-to-point and publish/subscribe messaging models. Provides tips and techniques for C programmers and gives detailed information about using XA resources for distributed transactions. The package also includes online API reference for the SonicMQ C client.
Progress SonicMQ Configuration and Management Guide 8.5 25
Preface
● Progress SonicMQ C++ Client Guide — Packaged with the SonicMQ C/C++/COM client download, this guide presents the C++ sample applications and shows how to enhance the samples, focusing on connections, sessions, messages, producers and consumers in both the point-to-point and publish/subscribe messaging models. Provides tips and techniques for C++ programmers and gives detailed information about using XA resources for distributed transactions. The package also includes online API reference for the SonicMQ C++ client.
● Progress SonicMQ COM Client Guide — Packaged with the SonicMQ C/C++/COM client download for Windows, this guide presents the COM sample applications under ASP, and Visual C++. Shows how to enhance the samples, focusing on connections, sessions, messages, producers and consumers in both the point-to-point and publish/subscribe messaging models. Provides tips and techniques for COM programmers. The package also includes online API reference for the SonicMQ COM client.
● Progress SonicMQ 8.5 Resource Adapter for JCA User’s Guide for WebSphere — Packaged with this JCA adapter in a separate download, this guide describes the Sonic Resource Adapter for JCA and using it with a WebSphere application server.
● Progress SonicMQ 8.5 Resource Adapter for JCA User’s Guide for Weblogic — Packaged with this JCA adapter in a separate download, this guide describes the Sonic Resource Adapter for JCA and using it with a Weblogic application server.
● Progress SonicMQ 8.5 Resource Adapter for JCA User’s Guide for JBoss — Packaged with this JCA adapter in a separate download, this guide describes the Sonic Resource Adapter for JCA and using it with a JBoss application server.
26 Progress SonicMQ Configuration and Management Guide 8.5

Worldwide Technical Support
Worldwide Technical Support Progress Software’s support staff can provide assistance from the resources on their Web site at www.progress.com/sonic. There you can access technical support for licensed Progress Sonic products to help you resolve technical problems that you encounter when installing or using Progress Sonic products
When contacting Technical Support, please provide the following information:
● The release version number and serial number of SonicMQ that you are using. This information is listed on the license addendum. It is also at the top of the SonicMQ Broker console window and might appear as follows:SonicMQ Continuous Availability Edition [Serial Number nnnnnnn]Release nnn Build Number nnn Protocol nnn
● The release version number and serial number of Sonic ESB that you are using. This information is listed on the license addendum. It is also near the top of the console window for a Sonic ESB Container. For example:Sonic ESB Continuous Availability Edition [Serial Number: nnnnnnn]Release nnn Build Number nnn
● The platform on which you are running Progress Sonic products, and any other relevant environment information.
● The Java Virtual Machine (JVM) your installation uses.● Your name and, if applicable, your company name.● E-mail address, telephone, and fax numbers for contacting you.
Progress SonicMQ Configuration and Management Guide 8.5 27

Preface
28 Progress SonicMQ Configuration and Management Guide 8.5

Part I Getting Started
Part I introduces you to SonicMQ configuration, monitoring, and management in these chapters:
● Chapter 1, “Sonic Management Environment” discusses the tools and APIs that the Sonic Management Environment provides to configure, monitor, and manage all aspects of a SonicMQ deployment. This book focuses on the Sonic Management Console.
● Chapter 2, “Sonic Management Console” describes how to connect to the domain manager and start the Sonic Management Console. It also describes the configuration, management, and file views, as well as the Sonic Management Console’s context-sensitive menus, status bar, toolbar, and labels. It explains how to specify preferences, view application messages, and exit the Sonic Management Console.
To familiarize yourself with client functionality in SonicMQ, you can run the samples and learn about JMS messaging in Getting Started with Progress SonicMQ and then the “Examining the SonicMQ JMS Samples” chapter in the Progress SonicMQ Application Programming Guide.
Progress SonicMQ Configuration and Management Guide 8.5 29

30 Progress SonicMQ Configuration and Management Guide 8.5
Chapter 1 Sonic Management Environment
This chapter contains the following sections:
● “Introduction” describes how you can use the Sonic Management Environment to configure, monitor, and manage all aspects of a SonicMQ deployment.
● “Toolset” describes the options for administering a SonicMQ deployment.
● “Configuration Management” discusses the tools and APIs that the Sonic Management Environment provides to quickly make configuration additions and changes to installed SonicMQ deployments.
● “Runtime Monitoring and Management” discusses the tools and APIs that the Sonic Management Environment provides to effectively monitor and manage SonicMQ deployments.
Progress SonicMQ Configuration and Management Guide 8.5 31

Chapter 1: Sonic Management Environment
IntroductionThe Sonic Management Environment provides an environment in which to configure, monitor, and manage all aspects of a SonicMQ deployment. The environment is scalable from simple standalone deployments (with a single SonicMQ message broker) to hundreds of brokers distributed across geographic and system boundaries including the Internet and, optionally, SonicMQ DRA nodes.
With the Sonic Management Environment, you can create and maintain configuration for multiple SonicMQ brokers and related aspects in a central location. The Directory Service is responsible for managing access to a disk-based store of configuration information and selectively distributing the information to all aspects of a deployment using a reliable SonicMQ messaging transport. (For more information, see “Configuration Domains” on page 68.)
The Sonic Management Environment utilizes an implementation of JavaSoft’s Java Management Extensions (JMX) specification. External management applications interact with the Sonic Management Environment using JMX-based APIs, over a reliable SonicMQ messaging transport. A sophisticated graphical management application, the Sonic Management Console, is supplied to graphically configure, monitor and manage SonicMQ deployments. Alternatively, you can integrate SonicMQ administration into your own or third party management applications using the published SonicMQ management APIs.
32 Progress SonicMQ Configuration and Management Guide 8.5

Toolset
ToolsetSeveral options exist for administering a SonicMQ deployment; all are built using the management programming model and APIs. The programming model defines the programming design patterns and conventions that must be applied to the information produced and consumed by the management APIs.
You can use the following management APIs to administer a SonicMQ deployment:
● Configuration API — For configuring all aspects of SonicMQ and the management framework, including collections, containers, brokers, clusters, queues, and routings.
● Runtime API — For monitoring and managing running containers and components in your management applications.
● PASS SPIs — For implementing Pluggable Authentication and Security Service (PASS) functionality in SonicMQ.
● Java Naming and Directory Interface (JNDI) API — For creating and maintaining JMS Administered Objects in the built in (or a third party) JNDI SPI.
These APIs are described in the Progress SonicMQ Administrative Programming Guide and the Progress SonicMQ Application Programming Guide. Also see the API Online Reference (JavaDoc) documents, JavaDocs at the remote documentation site accessible from the welcome.htm file in your installation root, or from the package you install locally from either the Sonic download site or media.
There is also a command line tool for importing and exporting configurations and aiding with centralized install upgrading and patching (configAdmin.bat on Windows; configAdmin.sh on UNIX/Linux.) It is mostly useful for advanced users and Progress Sonic consultants.
Progress SonicMQ Configuration and Management Guide 8.5 33

Chapter 1: Sonic Management Environment
Configuration Management The Sonic Management Environment provides tools and APIs to quickly make configuration additions and changes to installed SonicMQ deployments. The Sonic Management Console is the primary tool for configuration management. The Sonic Management Console displays a tree of folders and configurations, and allows administrators to:
● Modify existing or SonicMQ broker and related configurations
● Create new SonicMQ brokers and related configurations by copying, extending (via templates), or starting from scratch
● Remove obsolete configurations
● Modify the organization of the configuration directories and entities to match their business-specific organization (for example, by region or application)
Administrators interact with the Sonic Management Console’s familiar user interface to:
● Navigate configuration directories and entities via a tree (in the left panel) and context-specific right panel
● Enter configuration information in specific dialog boxes
Each process hosting a SonicMQ broker or related components (called a container) has a persistent cache of relevant configuration entities. This cache is populated on demand by requesting configuration entities from a running Directory Service. As administrators perform configuration management, the incremental changes recorded by the Directory Service are propagated to relevant containers. The broker or other component does not have to be running in order to perform configuration management.
34 Progress SonicMQ Configuration and Management Guide 8.5

Runtime Monitoring and Management
Runtime Monitoring and ManagementThe Sonic Management Environment provides tools and APIs to effectively monitor and manage SonicMQ deployments. Monitoring is performed by observing the runtime status of deployed components, their runtime properties and metrics, and listening for management notifications. Operational management is achieved by performing management actions against a particular SonicMQ broker or related component. The Sonic Management Console is the primary tool for performing monitoring and operational management. The console displays a tree of containers and their hosted components, and allows administrators to:
● View current runtime properties and operational information
● Summarize and plot metrics exposed by components
● Receive management notifications and display information encapsulated in those notifications pertaining to the event that triggered the notification
● Perform management actions on a container or component
Similar to configuration management, administrators interact with the Sonic Management Console by navigating a tree and context-specific panels, and by viewing details using specific dialog boxes.
Management of a SonicMQ deployment is an iterative process of monitoring changes to the runtime environment, responding to those changes in one or more ways, and monitoring the changed environment, as shown in Figure 1.
Figure 1. Iterative Management of SonicMQ Deployments
Configure MonitorOperationally
Manage
Progress SonicMQ Configuration and Management Guide 8.5 35
Chapter 1: Sonic Management Environment
Administrators can change configuration settings to respond to observed deployment behavior. For example, monitoring a plot of a queue size metric or the receipt of a flow control notification might indicate a pattern of queue usage that requires a larger queue size to be set. Also, administrators can perform a management operation to react to a warning notification. For example, receipt of a container’s log threshold notification would indicate the log should be archived and reset. (For more information, see “Monitoring the Sonic Management Environment” on page 377.)
The most visual aspect of monitoring is observing runtime state (online, offline, etc.). The state of each container and its components (including SonicMQ brokers and related components) is maintained by the Agent Manager. The Sonic Management Console displays the state of all containers/components by requesting that information from the Agent Manager.
36 Progress SonicMQ Configuration and Management Guide 8.5
Chapter 2 Sonic Management Console
This chapter contains the following sections:
● “Running the Sonic Management Console” describes how to connect to the domain manager and start the Sonic Management Console.
● “Sonic Management Console Views” describes the configuration view, the management view, and the file view.
● “Sonic Management Console Features” describes the Sonic Management Console’s context-sensitive main and pop-up menus, status bar, toolbar, and field labels.
● “Setting Preferences” describes how to specify general, message viewer, metrics, and notifications preferences in the Sonic Management Console, and how to reset those preferences.
● “Viewing Sonic Management Console Messages” describes how to view application messages.
● “Exiting the Sonic Management Console” describes how to exit the Sonic Management Console.
Progress SonicMQ Configuration and Management Guide 8.5 37

Chapter 2: Sonic Management Console
Running the Sonic Management ConsoleThe Sonic Management Console facilitates configuring, managing, and monitoring by securely connecting to active SonicMQ domains.
Before starting the Sonic Management Console, learn about security and communication protocols in the Progress SonicMQ Deployment Guide. In this guide, also learn more about:
● Enabling security in “Securing an Acceptor” on page 287.
● The domain manager in “Configuration Domains” on page 68.
● Management framework fault tolerance in “Resilience and Recovery of Framework Components” on page 158.
Starting the Management ConsoleThe Sonic Management Console does not require a broker or Domain Manager to run.
◆ To start the Sonic Management Console:
● On Windows, select:Start > Programs > Progress > Sonic 8.5 > Sonic Management Console.
● On UNIX or Linux, in a new console window set to the SonicMQ install directory, type ./bin/startmc.sh and press Return.
SonicMQ opens the Sonic Management Console.
Starting a Domain ManagerOne or more Domain Managers must be running so that the Sonic Management Console can connect to each domain through its management broker.
◆ To start a domain manager:
● On Windows, select:Start > Programs > Progress > Sonic 8.5 > Start DomainManager.
● On UNIX or Linux, open a new console window at install_dir/Containers/Domain1.DomainManager, type launchcontainer.sh, and press Return.
The container starts, and then the management broker that it hosts, the domain Directory Service and other management components.
38 Progress SonicMQ Configuration and Management Guide 8.5

Running the Sonic Management Console
Connecting a Sonic Management Console to a Domain ManagerWhen the Sonic Management Console opens, it presents the Create Connection dialog box with the default connection’s settings:
When you first create a management connection, an arbitrary name is displayed for the connection while the domain and connection URL are set to the default values Domain1 and port 2506 on the local host.
If your management broker installation was installed with security enabled—Sonic Workbench defaults to enabling security while SonicMQ Development and Domain Manager installations do not—you must provide authentication information to establish a management connection. If security is enabled, the default user name, Administrator, is displayed.
Note If the Sonic Management Console window fails to appear, you might have to edit the startmc.bat or startmc.sh file. See the release notes for more information.
Property Description
Connection Name Identity to associate with this connection of the Management Console.
Domain Name Name assigned to the Domain Manager where you want to connect.
Progress SonicMQ Configuration and Management Guide 8.5 39

Chapter 2: Sonic Management Console
1. If you want this connection to be the default connection presented when you start the Sonic Management Console, select Default Connection.
Connection URL(s) URL(s) of the management broker(s). If more then one, use a comma-separated list. The list can include primary and backup brokers in replicated broker pairs, for example: tcp://active.broker.com:2506,tcp://standby.broker.com:2506
It can also include the URLs of clustered brokers. (It defaults to the default acceptor on the management broker.)
User Name If you enabled security when you installed the domain manager, enter the user name to provide for authentication to the domain manager.
Password Enter the password for the user name you entered. The password for the default user Administrator is Administrator. For more information, see the “Password Controlled Components and Functions” section of the “Security Considerations in System Design” chapter in the Progress SonicMQ Deployment Guide.
Property Description
40 Progress SonicMQ Configuration and Management Guide 8.5

Running the Sonic Management Console
2. Choose the Advanced tab to adjust timeouts and to specify established management nodes and fault tolerant management communications in this connection:
Property Description
Management Node
Enter the name of a management node. This assumes that the connection URL is to a local broker that has this named routing definition to provide Dynamic Routing to the management node.
Initial Connect Timeout
Specifies the maximum time for the Sonic Management Console to connect to domain manager message brokers or transparently reconnect in the event of temporary failure. The default is 10 seconds and the minimum is also 10 seconds. (See “Timeout Settings” on page 79.)
Progress SonicMQ Configuration and Management Guide 8.5 41

Chapter 2: Sonic Management Console
Socket Connect Timeout
Specifies a time limit on individual socket connect attempts, thereby allowing the client to try other URLs in a connection URL list in a controlled fashion. A positive integer value indicates the number of seconds to allow for the socket connection to be established. Setting a value of 0, the default value, means the socket connect request does not time out.
The Socket Connect Timeout setting interacts with the Initial Connect Timeout setting. The socket connect timeout should enable an attempt at every listed URL. For example, where a URL list contains six URLs, the default setting for the Initial Connect Timeout of 60 seconds would require that the Socket Connect Timeout value be set to 10 seconds.
Request Timeout
Change the setting to modify the maximum time for round-trip management requests between the Sonic Management Console and manageable resources; the default is 30 seconds and the minimum is 10 seconds. (See “Timeout Settings” on page 79.)
Listener Timeout
Sets the elapsed time after the last renewal before subscriptions run out.
The default value is 600 seconds—ten minutes.
Listener Renewal Interval
Sets the elapsed time between notification listener subscription renewals.
The default value is 30 seconds.
Load Balancing
Select to enable load balancing.
The management connection from the Sonic Management Console can be load balanced between management brokers when there is more than one such broker configured in a cluster. By default, any broker in a cluster is capable of redirecting incoming connections to another broker in the same cluster. (For more information, see “Load Balancing” on page 245.)
Enable Compression
Select to enable compression of request and response actions between the Sonic Management Console and the Directory Service. For large-scale deployments, this feature improves performance.
Property Description
42 Progress SonicMQ Configuration and Management Guide 8.5

Running the Sonic Management Console
3. Click OK. A Connecting... dialog box opens and the status bar indicate that the Sonic Management Console is connecting to the domain manager:
The domain manager and the broker for management communications must be running for the Sonic Management Console to connect. (See “Configuration Domains” on page 68.)
(Click Cancel to terminate a connection attempt and open the Sonic Management Console without connecting.)
Note If you use SSL and you have configuration domains that require different sets of certificates, then you must start separate Sonic Management Consoles with different Java system properties:-DSSL_CA_CERTIFICATES_DIR=C:\mysystem\certs\CA -DSSL_CERTIFICATE_CHAIN=C:\mysystem\certs\client.p7c -DSSL_PRIVATE_KEY=C:\mysystem\certs\clientKey.pkcs8 -DSSL_PRIVATE_KEY_PASSWORD=password -DSSL_CERTIFICATE_CHAIN_FORM=PKCS7
For more information on using SSL and settings when JSSE is in use, see the Progress SonicMQ Deployment Guide.
Progress SonicMQ Configuration and Management Guide 8.5 43

Chapter 2: Sonic Management Console
The Sonic Management Console opens a connection window in the Configure view:
Sonic Management Console ViewsThe connection window in the Sonic Management Console displays two tabs reflecting different views of the Sonic Management Environment:
● Configure — To create and configure Sonic components, and to create, open, delete, import, and export files in the Directory Service (see “Configure View”).
● Manage — To perform runtime monitoring and management (see “Manage View” on page 50).
Configure View Use the Configure view to create new configurations and modify existing configurations. A configuration domain is accessed using the root of the tree in the Sonic Management Console.
If you accepted the default settings during a SonicMQ Development installation, or Domain Manager installation for only SonicMQ, the domain’s name is Domain1, its container is DomainManager and its management broker is MgmtBroker. See “Configuration Domains” on page 68 for an explanation of domains.
44 Progress SonicMQ Configuration and Management Guide 8.5

Sonic Management Console Views
See the Progress Sonic ESB Configuration and Management Guide for information about how Sonic ESB and Sonic Workbench components are visualized in the Sonic Management Console.
Six default folders are displayed under the domain in the Sonic Management Console, as shown on page 44.
When you expand these folders, you can also see their subfolders and configuration elements. The folders and subfolders under the domain correspond to the main entities that can be configured with the Sonic Management Console, as shown:
Progress SonicMQ Configuration and Management Guide 8.5 45
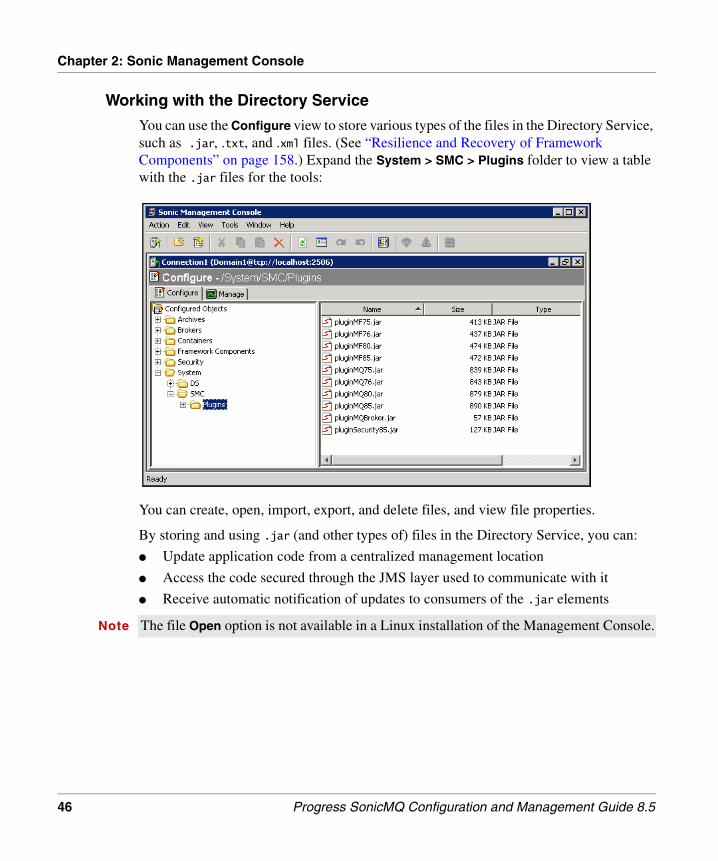
Chapter 2: Sonic Management Console
Working with the Directory Service
You can use the Configure view to store various types of the files in the Directory Service, such as .jar, .txt, and .xml files. (See “Resilience and Recovery of Framework Components” on page 158.) Expand the System > SMC > Plugins folder to view a table with the .jar files for the tools:
You can create, open, import, export, and delete files, and view file properties.
By storing and using .jar (and other types of) files in the Directory Service, you can:
● Update application code from a centralized management location
● Access the code secured through the JMS layer used to communicate with it
● Receive automatic notification of updates to consumers of the .jar elements
Note The file Open option is not available in a Linux installation of the Management Console.
46 Progress SonicMQ Configuration and Management Guide 8.5

Sonic Management Console Views
You can right-click on a file in the file system to perform several operations:
You can also organize the files with folders (see “Organizing Configurations with Folders” on page 101).
Progress SonicMQ Configuration and Management Guide 8.5 47

Chapter 2: Sonic Management Console
Importing Files
The following procedure describes how to import files into the Directory Service.
◆ To import a file into the Directory Service:
1. Open the Sonic Management Console and connect to a domain, as described in “Running the Sonic Management Console” on page 38. Select the Configure tab.
2. Select a location in the tree, right click, and click Import. The Select Import File dialog box opens:
3. Select the file and click Import. The Sonic Management Console imports the file to the location you selected.
Exporting Files
The following procedure describes how to export files from the Directory Service.
◆ To export a file from the Directory Service:
1. Open the Sonic Management Console and connect to a domain, as described in “Running the Sonic Management Console” on page 38. Select the Configure tab.
2. Select a file in the table, right click, and click Export. The Select Export Location dialog box opens.
3. Browse to the location for the exported file and click Export.
48 Progress SonicMQ Configuration and Management Guide 8.5

Sonic Management Console Views
Viewing File Properties
The following procedure describes how to view the properties of files in the Configure view.
◆ To view file properties
❖ In the Configure view, select a file in the table, right click, and select Properties. A Properties dialog box opens displaying information about the file:
Configuration is described in:
● Part II, “Configuring the Sonic Management Environment” starting on page 65
● Part III, “Configuring SonicMQ Messaging” starting on page 201.
Progress SonicMQ Configuration and Management Guide 8.5 49

Chapter 2: Sonic Management Console
Manage ViewUse the Manage view to perform all runtime monitoring and management. This includes lifecycle operations, for example, starting and stopping brokers. It also includes viewing runtime properties and configuring and viewing metrics, notifications, and alerts.
By default, there are five folders under the domain in the Manage tab and they correspond to the folders in the Configure view:
When you expand the folders, you see that only the Containers folder has subnodes. That is because the Manage view shows only manageable entities.
Management is described in:
● Part IV, “Managing the Sonic Management Environment,” starting on page 375
● Part V, “Managing SonicMQ Messaging,” starting on page 541
50 Progress SonicMQ Configuration and Management Guide 8.5

Sonic Management Console Features
Sonic Management Console FeaturesThe Sonic Management Console provides context-sensitive main and pop-up menus, toolbar, and status bar.
MenusThe menus are context sensitive, providing a choice of commands depending upon the view and what you select in the tree or table. You can access many of the commands available from the Action, Edit, and View menus by selecting a folder or configuration and activating its pop-up menu. The commands also vary depending upon whether you select the folder or configuration in the tree or the table. Pop-up menus associated with the unpopulated areas of tables and entities in the tree are also available by right-clicking.
Action Menu
The Action menu commands vary depending on the view and the specific folder or configuration you select in the tree or table. The following commands are usually available in both the Configure and Manage views (other commands are described with the entities that provide them):
Command Description
Connect > New Connection...
Makes a new connection (see “Connecting to Configuration Domains” on page 77)
Disconnect Closes a connection (see “Disconnecting from a Configuration Domain” on page 81)
Properties Edits configuration properties (for example, see “Configuring General Broker Properties” on page 208)
Exit Exits the Sonic Management Console (see “Exiting the Sonic Management Console” on page 64)
Progress SonicMQ Configuration and Management Guide 8.5 51

Chapter 2: Sonic Management Console
Additional Action menu commands usually available in the Configure view include:
Additional Action menu commands usually available in the Manage view include:
Command Description
New Creates a new folder or configuration (see “Creating and Renaming Folders” on page 101).
Import Imports a file or configuration (see “Importing Files” on page 48). (Importing a configuration is an advanced feature for use with the guidance of Sonic Professional Services or Sonic Technical Support.)
Export Exports a file or configuration (see “Exporting Files” on page 48). (Exporting a configuration is an advanced feature for use with the guidance of Sonic Professional Services or Sonic Technical Support.)
Delete Deletes a folder or configuration (see “Deleting Configurations” on page 96).
Rename Renames a folder or configuration (see “Renaming Configurations” on page 96).
Command Description
Operations The actions are related to the type of managed object. Most objects provide for start, stop, reload, clear error, and reset metrics. Other actions include:
● Container — Launch, restart, shutdown, clear the message log, save the contents of the message log to a file, suspend the container from an active role.
● Broker — Initialize storage, Synchronize storage, Activate broker, Force a CRL cache flush and update.
● Directory Service — Reload external authentication domain.
Notifications... Specify and view notifications (see “Notifications” on page 403).
Metrics... Specify and view metrics (see “Metrics” on page 379).
Properties Edit a configuration’s runtime properties (for example, see “Broker Runtime Properties” on page 544).
52 Progress SonicMQ Configuration and Management Guide 8.5

Sonic Management Console Features
Edit Menu
The Edit menu commands use the clipboard to store text or configurations. The commands vary depending on the view and the specific folder or configuration you select in the tree or table; there are other commands described with the entities that provide them. The Edit menu commands include:
When neither Paste As... command is available, the menu position is inactive and labeled Paste Special.
View Menu
Use the View menu to access these commands:
Command Description
Cut Move text or configuration to the clipboard where it can then be pasted (see “Moving Configurations” on page 96).
Copy Create a duplicate of text or a configuration (see “Copying Configurations” on page 94 for an example).
Paste Paste a duplicate of text or configuration (see “Copying Configurations” on page 94 for an example).
Paste as Configuration
When a template has been copied, paste the template as a configuration (see “Copying a Template and Pasting it as a Template” on page 90).
Paste as Template When a configuration has been copied, paste the configuration as a template (see “Copying a Template and Pasting it as a Configuration” on page 90).
Command Description
Tool Bar Show or hide the tool bar (see “Toolbar” on page 56).
Status Bar Show or hide the status bar (see “Status Bar” on page 55).
Message Viewer Show or hide the Message Viewer (see “Message Viewer Preferences” on page 60).
Refresh Refresh the display.
Progress SonicMQ Configuration and Management Guide 8.5 53

Chapter 2: Sonic Management Console
Tools Menu
Use the Tools menu to access these tools and commands:
Window Menu
You can keep multiple workspace windows open, for example one for each configuration domain. Use the Window menu to access these commands:
Goto ‘Manage’ Go to the configuration in the Manage view from the selected configuration in the Configure view.
Goto ‘Configure’ Go to the configuration in the Configure view from the selected configuration in the Manage view (if the container is running).
Goto ‘Template’ Go to the template that the configuration is derived from.
Annotations On configuration objects and instances that support annotations, opens the Edit Annotation dialog box so that you can maintain metadata about the selected object or instance. See “Annotating Configurations” on page 102 for information about using annotations.
Command Description
Command Description
JMS Administered Objects
Launch the JMS Administered Object tool (see “Using the JMS Administered Objects Tool” on page 613).
JMS Test Client Launch the JMS Test Client (see the “JMS Test Client” chapter in the Progress SonicMQ Application Programming Guide).
Export Directory Service
Export the Directory Service storage while online (see the release notes for more information on this command; typically you would use the procedures described in “Backup and Restoration” on page 511).
Preferences Specify preferences (see “Setting Preferences” on page 58).
Command Description
Tile Horizontally Make all open windows visible and tile them horizontally.
54 Progress SonicMQ Configuration and Management Guide 8.5

Sonic Management Console Features
You can also use the Window menu to switch to another open connection to a domain.
Help Menu
Use the Help menu to view version information about SonicMQ.
Status BarThe status bar is context sensitive and displays information about Sonic Management Console actions, for example, Connecting to Connection1, as shown on page 43. The status bar might also display a progress bar when the Sonic Management Console is loading a large number of containers, brokers, users, and/or groups.
Tile Vertically Make all open windows visible and tile them vertically.
Cascade Make all open windows visible and cascade them diagonally.
Command Description
Progress SonicMQ Configuration and Management Guide 8.5 55

Chapter 2: Sonic Management Console
ToolbarThe toolbar provides short cuts to the most important menu commands. Its commands depend upon which view you are in and what you select in the tree.
Use the Toolbar icons to access these commands:
Icon Description
Create a new connection. See “Connecting to Configuration Domains” on page 77.
Create a new folder. See “Creating and Renaming Folders” on page 101.
Create a new configuration (see “Creating, Reusing, and Propagating Configurations” on page 81).
Cut the selected text or configuration to the clipboard where it can then be pasted (or deleted) (see “Moving Configurations” on page 96).
Create a duplicate of the component’s configuration by copying selected item to the clipboard; see “Copying Configurations” on page 94 for an example.
Paste item from the clipboard. See “Copying Configurations” on page 94 for an example.
Delete the selected item. See “Deleting Configurations” on page 96.
Refresh the information in the view.
Show the Message Viewer (see “Viewing Sonic Management Console Messages” on page 62).
Go to the configuration in the Manage view from the selected configuration in the Configure view.
Go to the configuration in the Configure view from the selected configuration in the Manage view (if the container is running).
Edit the properties of a configuration, for example, see “Configuring Containers” on page 116.
Specify and view metrics (see “Metrics” on page 379).
Specify and view notifications (see “Notifications” on page 403).
56 Progress SonicMQ Configuration and Management Guide 8.5

Sonic Management Console Features
Field LabelsFields in dialog boxes have the following notations:
● Label has asterisk (*) — Value is required
● Label is in red color — Value is required (and no default value)
● Label is in bold/italics — Current value is from a template
TablesWhen you select a configuration or folder in the tree in the left panel, the right panel usually contains a table listing information about the selected configuration or folder. You can right click on the table heading and customize the table’s appearance, as shown:
You can right click on the column heading on any table in the Sonic Management Console to customize the columns:
● Show or hide specific columns
● View all columns
● Automatically distribute the columns
Progress SonicMQ Configuration and Management Guide 8.5 57

Chapter 2: Sonic Management Console
Setting PreferencesUse the Tools > Preferences menu command to open the User Preferences dialog box and specify the settings in the four tabs:
● General — See “Sonic Management Console Preferences” on page 58
● Message Viewer — See “Message Viewer Preferences” on page 60
● Metrics — See “Specifying Metrics Viewing Preferences” on page 398
● Notifications — See “Specifying Notification Preferences” on page 413
Sonic Management Console PreferencesThe following procedure describes how to specify settings for the Sonic Management Console.
◆ To set preferences for the Sonic Management Console:
1. In any view, select Tools > Preferences.... The User Preferences dialog box opens with the General tab:
58 Progress SonicMQ Configuration and Management Guide 8.5

Setting Preferences
2. You can specify the following preferences:
3. To apply changes to the settings, click OK.
Sonic Management Console applies your changes.
Preference Description
Save Window Sizes
Save the size when you exit windows and dialog boxes.
Save Window Positions
Save the position when you exit windows and dialog boxes.
Agent Manager Poll Frequency
Frequency to poll the Agent Manager for the runtime status of the deployed domain (see “Agent Manager” on page 515 for more information).
Request Timeout Maximum time for round-trip management requests between the Sonic Management Console and manageable resources; the default is 30 seconds (see “Timeout Settings” on page 79).
Maximum Cache Size
Number of different connections displayed by Action > Connect (see page 78). This allows you to view connections for up to 20 domains. The default is 10 and the minimum is 1.
Note Sonic Management Console preferences are stored using the Java Preferences API (java.util.prefs). (On Windows, preferences are stored in the Windows Registry.) The Java Preferences API allows applications to store and retrieve user and system preferences. There are two trees of preference nodes, one for user preferences and one for system preferences. Each user has a separate user preference tree, and all users in a given system share the same system preference tree. Therefore, if you do multiple installs, there is only one set of preferences per user.
Progress SonicMQ Configuration and Management Guide 8.5 59

Chapter 2: Sonic Management Console
Clearing PreferencesYou can use the User Preferences dialog box to clear all user preferences.
◆ To clear all user preferences:
1. In any view, select Tools > Preferences.... The User Preferences dialog box opens with the General tab.
2. Under User Preferences, click Reset to clear all preferences. (This takes effect when you click Reset.)
Message Viewer PreferencesThe message viewer displays trace information as a running list of Sonic Management Console status messages, warnings, and error messages for the current application session. You can specify the maximum number of messages to display and specify sending the log to a file. The following procedure describes how to specify message viewer preferences.
◆ To specify message viewer preferences:
1. In any view, select Tools > Preferences... . The User Preferences dialog box opens.
Note Before resetting preferences, you should make a note of any connection or other information you want to retain and recreate. For example, any alternative connections will be deleted along with the connection URLs. (See page 38 for an example of connection information that will have to be recreated.)
60 Progress SonicMQ Configuration and Management Guide 8.5

Setting Preferences
2. Select the Message Viewer tab:
3. Under Screen, specify a number for Show last N messages.
4. Under File, specify:
■ Log to file — Check to send the message log to a file
■ Log path — Path and filename of the log file
Select ... to browse and select a path and file.
Click Clear if you want to clear the log file.
5. Click OK to apply these settings.
Progress SonicMQ Configuration and Management Guide 8.5 61

Chapter 2: Sonic Management Console
Viewing Sonic Management Console MessagesThe following procedure describes how to view Sonic Management Console messages in the Message Viewer.
◆ To view Sonic Management Console messages in the Message Viewer:
1. In any view, select View > Message Viewer. The Message Viewer opens:
You can sort the Sonic Management Console messages by:
Column Description
Type Error, Information, Status, Warning
Message Actual trace message
Time Date and time
62 Progress SonicMQ Configuration and Management Guide 8.5

Viewing Sonic Management Console Messages
2. If you double-click a row in the table (or select it, right-click, and select Properties), a Message Log Details window opens showing details:
3. An additional icon, , indicates an error with an associated Java stack trace. In this case, you can select the Trace tab to view the stack trace:
You can select text and use Ctrl+C to copy the text and paste it into a text file.
Progress SonicMQ Configuration and Management Guide 8.5 63

Chapter 2: Sonic Management Console
In the Message Viewer, you can:
■ Select one or more messages, right-click, and select Clear Selected to clear the selected messages.
■ Right-click in the white space and select Clear All to clear all messages.
■ Click Close to close this window.
Exiting the Sonic Management ConsoleThe following procedure describes how to exit the Sonic Management Console.
◆ To exit the Sonic Management Console:
❖ Select Action > Exit.
After confirming that you want to exit, the Sonic Management Console closes.
64 Progress SonicMQ Configuration and Management Guide 8.5
Part II Configuring the Sonic Management Environment
Part II describes how to create and modify configurations and configure the framework components in the following chapters:
● Chapter 3, “Introduction to Configuration” describes how to use the centralized configuration features managed by the Directory Service and how to create new configurations and propagate configuration changes throughout a deployment. It also describes how to organize configurations using folders.
● Chapter 4, “Configuring Containers and Collections” explains the roles of containers and components in the Sonic Management Environment, how to create, edit, and delete container configurations, and how to add components to and remove components from containers. It describes how to generate container setup files and encrypt a container’s persistent cache. It also explains component collections and container collections and how to create and edit collection configurations and members of collections.
● Chapter 5, “Configuring Framework Components” describes how to configure the Directory Service and Agent Manager components, how to generate Directory Service boot files, configure these components for fault tolerance, use encrypted storage, backup and restoration, and crash recovery. It also describes how to configure Activation Daemons and add containers to an Activation Daemon’s activation list. Finally, it describes how to configure a Collections Monitor and specify component collections to monitor.
Progress SonicMQ Configuration and Management Guide 8.5 65

Part II: Configuring the Sonic Management Environment
66 Progress SonicMQ Configuration and Management Guide 8.5

Chapter 3 Introduction to Configuration
This chapter contains the following sections:
● “Configuration Domains” describes the centralized configuration and related information maintained by the Directory Service.
● “Creating, Reusing, and Propagating Configurations” describes how to create new configurations from types or templates and propagate configuration changes throughout a deployment. It also describes how to organize configurations using folders.
● “Annotating Configurations” describes how to maintain metadata text on configuration objects, their respective subordinate objects, and object instances that support this feature.
● “Maintaining Management Security” describes how to design, implement, and maintain secure viewing and changing of configurations and who initiation of operations in the domain.
Progress SonicMQ Configuration and Management Guide 8.5 67

Chapter 3: Introduction to Configuration
Configuration DomainsA configuration domain represents all the configuration information managed by a single Directory Service. The Directory Service provides a centralized point of access, maintenance, and management of configuration and related information.
A container maintains a cached subset of configuration information relevant to itself and the components it hosts. This cache is reconciled at container startup, as configuration changes are made or other significant events occur, such as restart of the Directory Service.
A deployment of the Sonic Management Environment can be as simple as a single container hosting a single application component (a domain of one), to a domain consisting of many containers hosting many application components.
Within a domain, the domain manager includes a Directory Service, Agent Manager, and management broker(s), which can be distributed across multiple containers. The container that hosts the Directory Service must also host a SonicMQ broker, the management broker. Management brokers are designated to route all management communications, including requests for metrics information and notification subscriptions and delivery of notifications.
In addition to the Directory Service, a domain also has one Agent Manager to monitor the runtime status of all the containers (and their components) in a domain. (See “Resilience and Recovery of Framework Components” on page 158 and “Agent Manager” on page 515 for information on these components.) A domain can also have one or more Activation Daemons to launch containers. (See “Activation Daemon” on page 187.)
68 Progress SonicMQ Configuration and Management Guide 8.5

Configuration Domains
Figure 2 shows a domain with two containers. The management broker, Agent Manager, and Directory Service are in the domain manager container.
The Sonic Management Environment supports multiple versions of products. This allows older configurations to be maintained while you incrementally add new configurations and/or update older configurations.
For more information:
● See the Progress Sonic Installation and Upgrade Guide for information on installing a domain.
● See the “Distributing Components” chapter in the Progress SonicMQ Deployment Guide for information on the domain manager and different deployment options.
● For information about deployment modeling, see the Progress Sonic Deployment Manager User’s Guide.
● For information on making the domain manager fault tolerant, see “Resilience and Recovery of Framework Components” on page 158 and the “Fault Tolerant Management” chapter in the Progress SonicMQ Deployment Guide.
Viewing and Editing Domain PropertiesThe following procedure describes how to view and edit domain properties.
◆ To view and edit domain properties:
1. Open the Sonic Management Console and connect to a domain, as described in “Running the Sonic Management Console” on page 38 and select the Configure tab.
Figure 2. Example of Containers and Components in a Domain
Domain
Container2
Container1
BrokerDomainManager
Agent Manager
Directory Service
JNDI Store
Progress SonicMQ Configuration and Management Guide 8.5 69

Chapter 3: Introduction to Configuration
2. Select the Configured Objects node, and then click the Properties toolbar button.
The Edit Domain Properties dialog box opens:
The first three properties are properties common to every folder:
Property Description
Location The location of the folder—in this case, at the root.
Type of File The internal name of the folder—in this case, ConfigAdmin.
(On any other “folder”, the type is Folder.)
System Specifies that this is a system object. In this case, it is selected to indicate that it cannot be deleted.
70 Progress SonicMQ Configuration and Management Guide 8.5

Configuration Domains
The General tab includes the current connection parameters of this Sonic Management Console instance:
3. Select the Installed Tools tab:
The Installed Tools tab lists:
Property Description
Connection Name Name given to the connection.
Domain Name Name of the domain.
Connection URL(s) Connection URLs of the SMC to the domain.
User Name Name of the administrative user that made the connection.
Property Description
Name Name of the tool.
Product Version Version number of the tool. See the compatility tables in the upgrade chapter of the Progress Sonic Installation and Upgrade Guide to see how the current release allows versioning.
Config Version The version number of the schema.
Revision The revision number.
Progress SonicMQ Configuration and Management Guide 8.5 71

Chapter 3: Introduction to Configuration
4. Select the Security tab:
Note Management Security — Implementing management security requires you to:
● Configure security-enabled management brokers to set the user name in the JMSXUserID of each message. See page 209 for information on the Set JMSXUserID option on the management brokers. (Then restart the brokers.)
● Choose Enforce Management Security Permissions in this dialog box.
You can also:
● Define groups that represent a set of responsibilities. See “Configuring Groups and Their Members” on page 439, and then add users to the groups that define their responsibilities.
● Define access control on management subjects for standalone role-based groups. See “Configuring ACLS for Administrative Access” on page 446.
● Set management security (see “Maintaining Management Security” on page 106):
■ That allow principals to establish management connection.
■ That define permissions on folders to restrict access.
■ That define permissions on folders for the role’s responsibilities.
See the “Management Security Permissions” chapter of the Progress SonicMQ Deployment Guide for a general discussion of management security.
72 Progress SonicMQ Configuration and Management Guide 8.5

Configuration Domains
The Security tab lets you set the following properties in the Management Permissions section:
Property Description
Enforce Management Security Permissions
Checking this option enables permissions checking
When you select this option, you are choosing to define, check and enforce permissions to change configurations and manage operations.
Before checking this option, be sure you have reviewed and adhered to the checklist for implementation of management security, as described on the preceding page and detailed in the Progress SonicMQ Deployment Guide.
When you enable this option, you can accept the creation of default access policies for members of the Administrators group; this is recommended.
Only the Administrator user can enable the feature.
Clearing this option disables permissions checking
IMPORTANT: Choosing to clear this option clears all management security settings.
● When you disable management security, groups that were enabled for administrative access are allowed to perform any administrative action. You can delete groups that were assigned roles. (When a group is deleted, all the users are removed from the group.)
● Once you have cleared the option, permissions you created are cleared. Selecting the feature again requires re-establishing Administrators policies and recreating all the permissions on objects, files, and folders.
Only the Administrator user can disable the feature.
Authentication Domain
When management security is enabled, the Authentication Domain you select specifies that the authentication domain that manages all administrative users and groups for the domain.
This authentication domain must be the same one currently used for administrative connections. If you have more than one authentication domain, change this parameter to that name.
Only the Administrator user can modify this option.
Progress SonicMQ Configuration and Management Guide 8.5 73

Chapter 3: Introduction to Configuration
If you enabled management security, you are prompted to create a set of default permissions for members of the Administrators group. (The default management permissions are configure and manage settings that give full control to the Administrators group.) If you do not choose to create the default permissions, only the Administrator user will be able to access management functions.
5. Select the Logging and Auditing tab:
In the Centralized Logging section of the Logging and Auditing tab, you can set the following properties:
Property Description
Enforce Centralized Logging
When selected, the central log records log information from every container in the domain, whether each container chose the log to file or log to central file. By default, central logging is not enforced.
Central Log Directory
Defines the current central log file directory, stored on the system that hosts the domain’s Agent Manager. The default directory is sonic_install_dir/Containers/domain_name.dm_container/domain
_name.log. In a Domain Manager on a Windows system, the default path of the central log directory log would be C:\Program Files\Progress\Sonic\Containers\Domain1.DomainManager\Domain1.log.
74 Progress SonicMQ Configuration and Management Guide 8.5

Configuration Domains
In the Auditing section of the Logging and Auditing tab, you can enable audit functions:
See the Progress SonicMQ Deployment Guide for more information on auditing of configuration changes and management operations.
Log File Size Threshold
The size of the central log file in bytes, at which point a notification (system.log.Threshold) is generated by the Agent Manager. After a notification is sent, the threshold’s size is increased by 10%. This attribute has similar functionality to the container attribute of the same name. The default 3554432—32 MB.
Log File Rollover Size Threshold
The size of the central log file in bytes, at which point a rollover can occur. It is tested at the rollover point in time, midnight every day. If the current log file does not exceed the threshold, then rollover does not occur. The default value is 4194304—4 MB.
Property Description
Audit Configuration Changes
Selecting the option enables generation of an audit trail of configuration changes performed through the Configure tab of the Sonic Management Console or in the Config API.
Clearing the option disables the feature.
Audit Management Operations
Selecting the option enables generation of an audit trail of management operations executed through the Manage tab of the Sonic Management Console or in the Runtime API.
Clearing the option disables the feature.
Propagate Audit Events to Domain Manager
Selecting the option indicates that all audit events should also propagate to the Agent Manager for centralized audit trail generation.
Default Log4j Config File
The path to a default log4j configuration file stored in the Directory Service that specifies log4j appenders to which audit events are sent.
Property Description
Progress SonicMQ Configuration and Management Guide 8.5 75

Chapter 3: Introduction to Configuration
6. Select the Advanced tab.
The Advanced tab lists the following read-only properties:
7. When you have completed your changes to the Logging and Auditing tab of Domain Properties dialog, click OK to save the changes.
Property Description
Request Timeout
Maximum time for round-trip management requests between the Sonic Management Console and manageable resources; the default is 30 seconds and the minimum is 10 seconds. (See “Timeout Settings” on page 79).
Load Balancing
If enabled, specifies that the management connection from the Sonic Management Console is load balanced between management brokers when there is more than one such broker configured in a cluster. (By default, any broker in a cluster is capable of redirecting incoming connections to another broker in the same cluster. (For more information, see “Load Balancing” on page 245.)
Routing Through Management Node
Engages the option to connect to the domain manager through dynamic routing. (See the “Multiple Nodes and Dynamic Routing” chapter in the Progress SonicMQ Deployment Guide.)
Management Node
Enter the name of a management node. This assumes that the connection URL is to a local broker that has this named routing definition to provide Dynamic Routing to the management node.
Note To view or edit domain connection properties, select Action > Connect and select the connection.
76 Progress SonicMQ Configuration and Management Guide 8.5

Configuration Domains
Connecting to Configuration DomainsWhen connecting to a domain, the Sonic Management Console is connecting to the domain manager broker(s), broker(s) designated for management communications. (By default, the broker(s) also transport regular JMS application traffic.)
The Sonic Management Console must be able to communicate with the domain manager for runtime management.
Creating a Connection Definition
The following procedure describes how to create a new connection definition.
◆ To create a connection definition:
1. With the Sonic Management Console running, select Action > Connect > New Connection. The Create Connection dialog box opens, as shown on page 39.
2. Follow Step 1 on page 40 through Step 3 on page 43.
The following example shows a comma separated list of connection URLs:
Progress SonicMQ Configuration and Management Guide 8.5 77

Chapter 3: Introduction to Configuration
Using Existing Domain Connection Definitions
You can connect using existing domain connection definitions. (You can configure the display to show to up to 20 domain connections, as described on page 59 in the “Sonic Management Console Preferences” section.) The following procedure describes how to connect to a domain using an existing connection.
◆ To use existing domain connections:
1. Select Action > Connect. The existing domain connection definitions are listed:
2. Select a connection and continue to connect by following Step 1 on page 40 through Step 3 on page 43.
78 Progress SonicMQ Configuration and Management Guide 8.5

Configuration Domains
Connecting to Multiple Configuration Domains
You can configure, connect to, and view multiple domains, as shown:
Timeout Settings
This section provides more information about the Request Timeout, Initial Connect Timeout, and Socket Connect Timeout properties used in Management Console and container connection to a Domain Manager:
● Request Timeout — Specifies the nominal maximum time for round-trip management requests between the Sonic Management Console and manageable resources. Examples of such requests include the Sonic Management Console getting configuration information from the Directory Service and runtime activities such as starting and stopping a component. You can change this setting, for example, to increase it if you expect the connection to be slow. (SonicMQ automatically increases this setting by a preset factor for time-consuming activities such as browsing durable
Progress SonicMQ Configuration and Management Guide 8.5 79

Chapter 3: Introduction to Configuration
subscriptions.) The default value for a request timeout is 30 seconds and the minimum value is 10 seconds.
Specify the Request Timeout setting:
■ For a Management Console connection, in the Advanced tab of the Create Connection dialog box, as shown on page 41.
■ As the preferred default value for Management Console connections on a system, in the General tab of the User Preferences dialog box, as shown on page 59.
■ For container configurations, on the Advanced tab of the Container Properties dialog box, as shown on page 130.
● Initial Connect Timeout — Specifies the amount of time that management communications can use to initially attempt to connect to the URLs in the connection URL list, and to reconnect to the URLs in the connection URL list in the event of connection failure.
The default value for a connect timeout is 10 seconds.
Specify the Initial Connect Timeout setting:
■ For a Management Console connection, in the Advanced tab of the Create Connection dialog box, as shown on page 41.
■ For container configurations, on the Advanced tab of the Container Properties dialog box, as shown on page 130.
● Socket Connect Timeout — Sets a time limit on individual socket connect attempts, thereby allowing the client to try other URLs in a connection URL list in a measured way. A positive integer value indicates the number of seconds to allow for the socket connection to be established. Setting a value of 0, the default value, means the socket connect request does not time out.
Specify the Socket Connect Timeout setting:
■ For a Management Console connection, in the Advanced tab of the Create Connection dialog box, as shown on page 41.
■ For container configurations, on the Advanced tab of the Container Properties dialog box, as shown on page 130.
The Socket Connect Timeout setting interacts with the Initial Connect Timeout setting. The socket connect timeout should enable an attempt at every listed URL. For example, where a URL list contains six URLs, the default setting for the Initial Connect Timeout of 30 seconds would require that the Socket Connect Timeout value be set to 5 seconds.
Timeouts can occur on requests for large amounts of data or in the case of management communications infrastructure failure. If a timeout occurs, a window opens to advise you. However, this window is local to the Sonic Management Console; a successful reply or
80 Progress SonicMQ Configuration and Management Guide 8.5

Creating, Reusing, and Propagating Configurations
failure indicator might still arrive after the timeout. Depending upon fault tolerance configuration, requests might actually take longer to fail than the request timeout value. This is because backups might be tested prior to ultimate failure. The information appears as a line in the Message Viewer. If you double-click that line in the Message Viewer table, a Message Log Details window opens showing the details. (See “Viewing Sonic Management Console Messages” on page 62.)
Disconnecting from a Configuration DomainFollow this procedure to disconnect from a domain.
◆ To disconnect from a domain:
❖ In an open Sonic Management Console, select Action > Disconnect or close the workspace window for that domain connection. The Sonic Management Console disconnects from the domain.
Creating, Reusing, and Propagating ConfigurationsThe Sonic Management Environment facilitates the creation and propagating of new configurations and configuration changes throughout a deployment. The following sections describe the various ways to create configurations:
● “Creating Configurations from Types” on page 82
● “Creating Configurations from Templates” on page 89
● “Copying Configurations” on page 94
Note Connecting Off Line — There is a technique for direct connection to the Directory Service store that should only be used if you made a configuration error on the broker that provides management connections for the Directory Service. See “Connecting Off Line” on page 180 for details about this technique.
Progress SonicMQ Configuration and Management Guide 8.5 81

Chapter 3: Introduction to Configuration
Creating Configurations from TypesA type is an abstract definition of a configuration, such as a container, or a set of configuration elements, such as a broker. A configuration instance is a specific implementation of an abstract definition, including its data and customizations. For example, Broker1 is a configuration of the Broker type.
You can create a configuration ahead of time before deploying it. The configuration is not actually deployed until a container or its components that use the configuration are started. (For information on deploying configurations, see “Adding a Component Identity to a Component Collection” on page 151 and “Setting Up Remote Containers Through a Host Manager” on page 462.)
The following procedure describes how to create a configuration from a type.
82 Progress SonicMQ Configuration and Management Guide 8.5

Creating, Reusing, and Propagating Configurations
◆ To create a configuration from a type:
1. Select Action > New... > Configuration. The Create Configuration dialog box opens:
2. In the From Types tab, select Configuration.
3. Select a configuration type.
4. Select the Product Version from the list of supported versions (if the component has multiple versions).
5. Click OK.
Progress SonicMQ Configuration and Management Guide 8.5 83

Chapter 3: Introduction to Configuration
Then follow the steps in the corresponding section for the type you select::
Type Section and Page
Activation Daemon “Activation Daemon” on page 187
Agent Manager “Configuring Agent Manager Components” on page 181
Authentication Domain
“Authentication Domains” on page 421
Authentication SPI “Configuring an Authentication SPI” on page 424
Authorization Policy “Configuring a Set of Authorization Policies” on page 442
Broker “Creating and Editing Broker Configurations” on page 204
Certificates Store Certificates Store information on page 212
Cluster “Configuring Clusters” on page 250
Collections Monitor “Configuring a Collections Monitor” on page 194
Component Collection
“Creating Component Collections” on page 144
Container “Configuring Containers” on page 116
Container Collection
“Creating Container Collections” on page 153
Directory Service “Configuring a Directory Service Object” on page 159
Host Manager “Host Manager” on page 141
Logger See the Sonic Event Monitor User’s Guide
Management SPI “Configuring a Management SPI” on page 426
WebService Protocol
“Configuring HTTP(S) Direct Web Service Protocol Handlers” on page 320
84 Progress SonicMQ Configuration and Management Guide 8.5

Creating, Reusing, and Propagating Configurations
Using TemplatesA template is a specialized configuration that can be used to create configurations. A template is a configuration that cannot be deployed; it is used only for creating deployable configurations. Templates are created as templates and remain templates until they are deleted. A derived configuration is a configuration in the Directory Service that is derived from a template.
Using a template to create configurations allows you to reflect changes across multiple configurations in a distributed environment. A configuration object is linked to a template when the object is derived from a template. If you change a value in a template that has derived configurations, the change is automatically propagated to all derived configurations (unless overridden). A derived configuration can override properties from the template, and those properties are not reflected back to the template. To go back to a template value, see “Reverting to a Template Value” on page 92. For information on facilitating deployment using templates, see the “Using Configuration Templates” chapter in the Progress SonicMQ Deployment Guide.
Rules for Using Configuration Templates
The rules for configuration templates are:
● Templates are configuration patterns. They cannot be deployed, and do not have meaning at runtime. For example, myBrokerTemplate cannot be added to a container or become a member of a cluster.
● The subordinate objects to a template are implicitly propagated as subordinate objects on the linked configurations.
● Templates cannot include explicit references to other templates. You can have a container template and a broker template but you cannot have a broker-in-a-container template. Instead, derive a container from a container template then derive a broker from a broker template. Then add the linked broker to the linked container.
● Copying and pasting a linked configuration creates a new configuration, linked to the source configuration’s template, yet with the same overrides as the source object.
● A specific configuration cannot reference a template in its properties. All references in a configuration must be to configurations.
● Template changes are immediately updated to their linked configurations.
● You must not delete a template until all derived configurations are deleted.
Progress SonicMQ Configuration and Management Guide 8.5 85

Chapter 3: Introduction to Configuration
● Only one level of templating is allowed.
Creating Templates
You can create a template from one of the defined types, or you can copy a configuration and paste it as a template.
Creating a Template from a Type
The following procedure describes how to create a template from a type.
◆ To create a template from a type:
1. Select a location in the tree and select Action > New... > Configuration. The Create Configuration dialog box opens.
2. In the From Types tab, under Create New, select Template:
3. Select a configuration type.
4. Select the Product Version from the list of supported versions (if the component has multiple versions).
5. Click OK. The dialog box opens for the new template.
Note Templates for containers and instances of containers derived from templates are not able to create backup containers.
86 Progress SonicMQ Configuration and Management Guide 8.5

Creating, Reusing, and Propagating Configurations
Follow the steps in the corresponding section for the type you select::
6. Specify the required properties and click OK.
The Sonic Management Console adds the template to the tree and table. The template name appears in bold italic type, as shown.
When you hold your mouse pointer over a template, you can view an information panel similar to this for the template:
Type Section and Page
Activation Daemon “Activation Daemon” on page 187
Broker “Creating and Editing Broker Configurations” on page 204
Cluster “Configuring Clusters” on page 250
Container “Configuring Containers” on page 116
Logger Sonic Event Monitor User’s Guide
Progress SonicMQ Configuration and Management Guide 8.5 87

Chapter 3: Introduction to Configuration
Creating a Template by Copying an Existing Configuration
The following procedure describes how to create a template by copying and pasting an existing configuration.
◆ To create a template by copying and pasting an existing configuration:
1. Select an existing configuration.
2. Right-click and select Copy.
3. Select a location in the tree, right-click, and select Paste as Template.
The Sonic Management Console creates the template and adds it to the tree and table. The template name appears in bold italic type, as shown:
88 Progress SonicMQ Configuration and Management Guide 8.5

Creating, Reusing, and Propagating Configurations
Creating Configurations from Templates
To create a configuration from a template, create a template of the required type and then reuse the template to create as many configurations as you require.
◆ To create a configuration from a template:
1. Select a location in the tree and right-click or use the Action menu and select New... > Configuration.
2. In the Create Configuration dialog box, select the From Templates tab.
3. Select one of the defined templates, for example a container template, as shown, and click OK:
A New dialog box opens, for example, the New Container dialog box. The Bold italic print indicates that the displayed value is from the template:
4. Specify the appropriate configuration properties and click OK. The Sonic Management Console creates the derived configuration.
Progress SonicMQ Configuration and Management Guide 8.5 89

Chapter 3: Introduction to Configuration
When you hold your mouse pointer over an instance derived from a template, you can view an information panel similar to this:
The information indicates that this instance is not a template, but is derived from—and will respond to changes in—the template indicated.
Copying a Template and Pasting it as a Template
The following procedure describes how to copy a template and paste it as a template. This procedure creates a direct copy of the template.
◆ To copy a template and paste it as a template:
1. Select a template and select Edit > Copy.
2. Select a location in the tree and select Edit > Paste.
The Sonic Management Console and pastes it in the tree and table. The template name is preceded by Copy of and displays in bold italic print.
Copying a Template and Pasting it as a Configuration
The following procedure describes how to copy a template and paste it as a configuration. This creates a configuration that is derived from the template.
◆ To copy a template and paste it as a configuration:
1. Select a template and select Edit > Copy.
2. Select a location in the tree and select Edit > Paste as Configuration.
The Sonic Management Console pastes a copy of the template in the tree and table. The template name is preceded by Instance of and displays in a normal font.
90 Progress SonicMQ Configuration and Management Guide 8.5

Creating, Reusing, and Propagating Configurations
Overrides in Configurations Linked to Template
While a configuration derived from a template responds to the changes in properties in the template object and its implicit references, the properties of the instance and its referenced objects can still be changed. Thereafter, a property that is changed no longer responds to template changes. A template-derived property is displayed in bold italic font. However, it is displayed in a plain font when it has been overridden. The following figure shows a broker’s Advanced property Load Balancing Weight as a template-derived value and then as an override value:
For examples of overrides, consider the following changes in the configuration of myBroker1, a broker configuration linked to the template myBrokerTemplate:
● Changing the broker Load Balancing Weight from the template’s value of 1 to a preferred value such as 2, as shown.
● Adding a queue, Q99 that will only exist on myBroker1.
● Modifying the queue SampleQ1 that was derived from the template to change its maximum size to 2000 Kilobytes.
● Deleting SampleQ2. You can delete the derived instance of an object that was derived from an implicit reference to the template.
Progress SonicMQ Configuration and Management Guide 8.5 91

Chapter 3: Introduction to Configuration
Reverting to a Template Value
The Sonic Management Console allows you to view the overriden properties in an instance of template configuration. For each property, you can see the instance value and the template value. By reverting to the template value, you remove the overriden value and the property reverts to the template value. The following procedure describes how to revert properties in an instance to template values.
◆ To revert properties in an instance to template values:
1. Select the instance of the template, right click, and select Revert. The Revert to Template dialog box opens.
2. You can expand the appropriate folders to see the template values that were overridden, for example, Status Poll Interval and Status Poll Timeout in the Monitoring folder:
3. Select any properties that you want to revert and click OK.
The values are restored to their template values. (You can confirm this by selecting the configuration, clicking the Properties icon, and viewing the Properties dialog box.)
Warning Do not revert the instance name to the name of the template.
92 Progress SonicMQ Configuration and Management Guide 8.5

Creating, Reusing, and Propagating Configurations
Creating Backup Brokers from Templates
Creating a template for a primary broker configuration type is equivalent to creating a template for a broker configuration type. A primary broker template can be configured to replicate to a backup broker. It controls creation of the backup broker template. Any instance of a primary broker created from this template creates an instance of a backup broker template. The backup broker template instance is created automatically under the same view path with its name in the following format: [Primary instance name] and [backup broker template name] delimited by "_" character.
You can rename it later and move it under a different folder in the Configure view.
To delete a broker template:
● If a broker template is configured with a backup broker, then the backup broker template is deleted automatically if there are no linked instances for both templates.
● If a broker template is configured without backup a broker template, it follows the rules for template deletion. (You cannot delete a template until all derived configurations are deleted.)
Progress SonicMQ Configuration and Management Guide 8.5 93

Chapter 3: Introduction to Configuration
Copying ConfigurationsCopying and pasting a configuration creates an exact copy of the configuration but does not maintain a link to the original configuration definition—any subsequent changes made to the copy do not affect the original definition or the reverse. You can copy any configuration except an Authentication Domain or set of authorization policies.
The following procedure describes how to copy a container configuration.
◆ To copy a container configuration:
1. In the Configure tab, select the container you want to copy, right-click, and select Copy, as shown.
2. Select the folder where you want to paste the new container, right-click, and select Paste.
94 Progress SonicMQ Configuration and Management Guide 8.5

Creating, Reusing, and Propagating Configurations
The Sonic Management Console pastes the container where you specified in the tree. If there is a configuration with the same name in that place in the tree, the original name is prefixed by Copy of or Copy (n), as shown. If there is no configuration with the same name in that place, it uses the original name. For example:
To rename the container, see “Renaming Configurations” on page 96.
Note You can copy a configuration that is linked to a template and choose Paste as Configuration. The characteristics and the template link of the original configuration are identical in the copy including any overrides of template settings. While they both respond to changes in the template, the original and the copy are not linked to each other.
Progress SonicMQ Configuration and Management Guide 8.5 95

Chapter 3: Introduction to Configuration
Renaming ConfigurationsYou can rename configurations; however, you should exercise caution in renaming, especially a running broker or container. If you rename a broker, its storage must be reinitialized (see “Storage Operations” on page 553).
◆ To rename a configuration:
1. Select the configuration, right-click, and select Rename. The Rename dialog box opens.
2. Enter or modify the name.
3. Select OK. The Sonic Management Console applies the new name to the configuration.
Moving ConfigurationsThe following procedure describes how to move configurations.
◆ To move a configuration:
1. Select the configuration in the Configure tab, right click, and select Cut.
2. Select the location in the configuration tree, right click, and select Paste.
After you confirm you want to paste the configuration, the Sonic Management Console pastes the selected configuration in the new location.
Deleting ConfigurationsBefore deleting a component or container configuration:● Components or containers should first be removed from any collections that include
them.● If deployed to a container, remove the component configuration from the container. ● Stop the container if it is running.
The following procedure describes how to delete configurations.
◆ To delete a configuration:
❖ Select the configuration in the Configure tab, right click and select Delete.
After you confirm you want to delete the configuration, the Sonic Management Console deletes the selected configuration.
96 Progress SonicMQ Configuration and Management Guide 8.5

Creating, Reusing, and Propagating Configurations
Upgrading ConfigurationsYou can upgrade the configuration of configuration objects to the version of the domain. That means that the physical installation that uses the configuration needs its physical installation upgraded correspondingly.
◆ To upgrade configurations:
1. Select the configuration you want to upgrade in the Configure tab.
2. Choose Action > Upgrade. The Confirm Upgrade dialog box opens, as shown in this example:
This example attempts to upgrade a component that depends on other components. The upgrade of the configuration of all the related components will occur when this action is allowed to complete.
The scenario expressed in this example is a container that hosts an activation daemon that has the container that hosts the broker in its activation list. The broker has a backup broker configured that runs in its own container, presumably on a separate system. Choosing any one of these configurations will upgrade all the other configurations.
You can click Cancel to stop the process to stop the dependent components and to plan the tactics for performing physical upgrades on remote systems. See the Progress Sonic Installation and Upgrade Guide for more about upgrading configurations.
Progress SonicMQ Configuration and Management Guide 8.5 97

Chapter 3: Introduction to Configuration
3. When broker configurations are included in the upgraded components, you must be able to provide an appropriate 8.5 control number.
4. Click OK. The Sonic Management Console upgrades the selected configuration.
Configuration Changes: Dynamic or Requiring ReloadThe following table lists configuration changes in broker configurations and whether they are dynamic or require reloading of the broker (or restarting the container). The next table lists other configuration and whether changes are dynamic or require reloading of the component (or restarting the container). Reloading removes a component from the container and re-creates it with any configuration changes not handled dynamically.
Table 1. Broker and Cluster Changes: Dynamic or Requiring Reload
Entity Change Result
Broker Change load balancing weight Dynamic
Metrics refresh interval and collection interval Dynamic
Change other broker properties: SSL properties, tuning, message storage Reload
Change option to set JMSXUserID (available only when security is enabled) Note: Enabling security on a broker is distinctly not dynamic and requires more than a reload. See “Actions That Require Re-initialization of a Broker’s Data Store” on page 553 for more information about changing security enablement.
Dynamic
Change advanced properties Reload
Cluster Add/remove running broker to/from cluster Reload
Broker-wide acceptor properties
Primary broker acceptor, interbroker acceptor, minimum, maximum, client idle timeout, client read timeout, broker read timeout, default routing URL
Reload
Acceptors Add/delete/change TCP and SSL acceptors Dynamic
Add/delete/change HTTP(S) Tunneling acceptors Reload
Add/delete/change HTTP(S) Direct acceptors for the URL and port Dynamic
Add/delete/change HTTP(S) Direct acceptor’s protocols (types, parameters, URL lists, and their settings)
Reload
Add/delete/change HTTP(S) Direct acceptor’s Web Service Protocols Reload
98 Progress SonicMQ Configuration and Management Guide 8.5

Creating, Reusing, and Propagating Configurations
Routing on a broker
Change routing timeout, enable global subscription forwarding, global subscription expiration, routing node name, timeout, connect idle timeout, reconnect interval, connect attempt interval, connect retry interval, connect retry count
Reload
Routing definitions
Add/delete routing definition Dynamic
Change DRA routing definition: outbound broker name, username/password, connection idle timeout, global subscription expiration, advertise global queues, static routings enabled, connection URLs, load balancing enabled and sequential
Dynamic
Change DRA node name, idle timeout, use certificate CN Reload
Change HTTP Direct routing definition (except properties common to all routing definitions)
Reload
Change Broker Proxy Override settings Dynamic
Global Subscriptions
Add/delete global subscription Dynamic
Change existing global subscription Reload
Queue-handling on a broker
Change cleanup interval, number of delivery threads, enable queue cleanup, maximum temporary queue size
Reload
Queues Add/delete queues Dynamic
Change maximum size, save threshold, global/local setting, read-exclusive setting, and clustered/non-clustered setting.
Dynamic
Table 1. Broker and Cluster Changes: Dynamic or Requiring Reload (continued)
Entity Change Result
Table 2. Changes to Other Configurations: Dynamic or Requiring Reload
Entity Change Result
Authentication Add/delete user Dynamic
Change user password Dynamic
Add/delete group Dynamic
Add/delete user to/from group Dynamic
Progress SonicMQ Configuration and Management Guide 8.5 99

Chapter 3: Introduction to Configuration
ACLs Add/delete ACL Dynamic
Change ACL: principal, principal type, resource name, resource type, and action Reload
Note: See the chapter “Client Sessions” of the SonicMQ Application Programming Guide for information on the propagation of ACL changes on a broker to active message producers and message consumers.
QoPs Add/delete QoP Dynamic
Change QoP setting: none/integrity/privacy Dynamic
Directory Service
Change fault tolerance settings Restart container
Agent Manager
Change fault tolerance settings Reload
Activation Daemon
Add/delete/change containers/settings in activation list Dynamic
Collections Monitor
Change storage settings Reload
Add/delete collections to monitor Dynamic
Table 2. Changes to Other Configurations: Dynamic or Requiring Reload (continued)
Entity Change Result
100 Progress SonicMQ Configuration and Management Guide 8.5

Creating, Reusing, and Propagating Configurations
Organizing Configurations with FoldersYou can create new folders and use them to group configurations and templates in the tree. For example, you could group containers according to their geographic location or according to specific applications. You can create folders at any level and nest them to as many levels as you want. You can cut/paste configurations or templates to move them from one folder to another. Folders display in the Manage view, even though they will be empty if they do not contain runnable objects.
Creating and Renaming Folders
The following procedure describes how to add a folder to the domain tree. When you create a folder, you give it a name. You can rename it later.
◆ To create a folder:
1. Select a location in the Configure tab of the Sonic Management Console at the root of the folder in which you want the folder.
2. Right-click and choose New > Folder. The Create Folder dialog box opens.
3. Enter a name for the folder and click OK. The folder is added to the tree.
Deleting Folders
You can delete folders, with the exception of system folders (for example, Framework Components). However, a folder must be empty before you delete it. To delete a folder, select the folder in the Configure tab of the Sonic Management Console, right-click and select Delete. The selected folder is deleted.
Important A hierarchical structure of folders must be less than 20 levels deep.
Warning Under some supported Microsoft Windows platform versions, the length of file path names is limited to 255 characters. Attempts to export configurations with longer path names on these Window platforms could produce unexpected results.
Note Plan the level where you want to create a new folder as you cannot move folders.
Progress SonicMQ Configuration and Management Guide 8.5 101

Chapter 3: Introduction to Configuration
Annotating ConfigurationsYou can add text information to configuration objects to store metadata about the object. The layout and content of an annotation is user defined.
Use cases of metadata include the following:
● Management framework objects — Management containers, Agent Managers, Directory Services, and Activation Daemons:
■ Identity and location of the system that hosts the components.
■ Responsible personnel and their contact identities such as email, phone number, beeper.
■ Time zone variance.
■ Asset identity to track installation, maintenance, and version upgrades.
● Monitoring objects — Container collections, component collections, collections monitors, and Sonic Event Monitor loggers:
■ Purpose of the grouping of components or collections.
■ Actions and contacts when operational personnel observe anomalies.
■ Link addresses for service level history and governance.
● Messaging broker objects — Brokers and their backups, clusters, acceptors, queues, and Web service protocols:
■ Responsible personnel and their contact identities.
■ For individual acceptors, the anticipated traffic and its originators. Also for HTTP direct acceptors, the purpose of the patterns of URL extensions subordinate to the acceptor.
● Security objects — Authentication domains, authorization policies, ACLs, QoPs, and certificate stores:
■ Differentiation of multiple domains.
■ Responsible security managers and their contact identities.
■ For individual ACLs and QoPs, the purpose of a pattern or rule.
102 Progress SonicMQ Configuration and Management Guide 8.5

Annotating Configurations
The following table identifies whether you can access the Edit Annotations dialog box for a configuration object, for the objects that are subordinate to certain configuration objects, and the named instances of the object or subordinate object.
Table 3. Facility to Annotate Objects, Subordinate Objects, and Instances
Section Object Subordinate Objects Instances
Files No
Folders No
Sonic Event Monitor
Logger Yes
Sonic Management Environment
Activation Daemon Yes Containers No
Agent Manager Yes
Collections Monitor Yes Collections No
Component Collection Yes Components No
Container Yes Components No
Container Collection Yes Containers No
Directory Service Yes
Sonic Security
Authentication Domain Yes Groups No Group name Yes
Users No User name Yes
Authentication SPI No
Management SPI No
Progress SonicMQ Configuration and Management Guide 8.5 103

Chapter 3: Introduction to Configuration
SonicMQ Authorization Policy Yes ACLs No ACL definition Yes
QoPs No QoP definition Yes
Broker Yes Acceptors Yes Acceptor name Yes
Queues Yes Queue name No
Replication Connections No Replication Connection name
No
Routing Definitions No Node name No
Global Subscription No Topic name No
Backup Broker Yes
Certificates Store Yes Certificates No
Cluster Yes Members No Member name No
Queues Yes Queue name No
Routing Definitions No Node name No
Global Subscription No Topic name No
WebService Protocol Yes URL Extensions No
Table 3. Facility to Annotate Objects, Subordinate Objects, and Instances (continued)
Section Object Subordinate Objects Instances
104 Progress SonicMQ Configuration and Management Guide 8.5

Annotating Configurations
Adding and Editing AnnotationsUse the Sonic Management Console to select objects and instances, and then maintain information about the selected item.
◆ To add or edit annotations:
1. In the Sonic Management Console, connect to a domain where you want to maintain annotations.
2. Select the object or instance that supports the annotation facility (see Table 3 on page 103):
a. In the left panel, expand folders to navigate to an object you want to annotate.
b. If you want to annotate subordinate objects, expand the selected object, and then click on the subordinate object you want to annotate.
c. If you want to annotate a named instance of the object or one of its subordinate object, in the right panel click on the instance you want to annotate.
3. Open the Edit Annotations dialog box by either:
■ Right clicking on the item, and then choosing Annotations on the menu.
■ Choosing the menu action View > Annotations.
The Edit Annotation dialog box opens.
4. In the dialog box, enter text or paste copied text.
The following illustration shows the type of metadata text that might be entered for a SonicMQ broker:
5. Click OK when the annotation is complete.
Progress SonicMQ Configuration and Management Guide 8.5 105

Chapter 3: Introduction to Configuration
Maintaining Management SecurityWhen you have enabled management security, you define the allowed permissions for principals on folders, configuration objects, and files.
The five aspects of permission settings on a selected object are:
● Namespace — Is the selection a folder, a configuration object, a non-configuration object, or a file?
● Principals — To which (users or members of groups) does the setting apply?
● Type — Are Configure permissions or Manage permissions intended?
● Scope — How far should the settings propagate to folders, subfolders, files, and components of containers?
● Permissions — What is permitted and what is denied?
On a given type and namespace, one scope and one set of permissions can be defined uniquely for each principal added to the type/namespace.
Items that Enable Setting Management Security
Configure permissions can be applied to any file, folder, or configuration object in the domain.
Manage permissions can be applied to containers, and components of containers. Folders let you set manage permissions that will apply to any containers that are in their scope.
Principals
Principals are users or groups that have been enabled for administrative access.
When you choose to add principals to a permission setting, you select each of the users and groups to which you want to provide the specified permissions. If you set a permission on a user, that permission overrides any group setting that might apply. See the Progress SonicMQ Deployment Guide for more information.
Note You could also perform these tasks through the DS API. See Progress SonicMQ Administrative Programming Guide for more information.
Note To enable groups for access to administrative topics, see the Progress SonicMQ Deployment Guide.
106 Progress SonicMQ Configuration and Management Guide 8.5

Maintaining Management Security
Configure PermissionsThe scope for configure permissions specifies the application of the permissions to the selected object and the inheritance of the permissions by subnodes and files. If you set a permission for a folder that inherits permission from a parent folder, the setting in the child folder overrides the parent’s setting. See the Progress SonicMQ Deployment Guide for more information.
Configure permissions either grant or deny administrative functions in the permission categories. The categories of configure permissions that can be allowed or denied are:
■ Full control — Sets all the other permissions to the selected option.
■ Read — Allows or denies viewing folders or objects in the Sonic Management Console or in lists.
■ Write — Allows or denies creation and update of objects in its scope. Also determines whether the principal can rename or move the object.
When an object is renamed, its defined management permissions are not affected.
In order to move an object, write permission is required on both the source and destination folder. After an object has moved, its individual management permissions transfer to the new location; however, the item is subject to the permissions inherited through its new folder hierarchy.
■ Delete — Allows or denies deletion of objects in its scope.
■ Set permissions— Allows or denies setting administrative access permissions.
Note Invisible contents in read-denied folders — When read permission is denied on a folder, the folder is visible on the left panel of the Sonic Management Console but it has no apparent contents. For example, if you do not have Read permission on the Framework Components folder, clicking on the folder does not expand the folder or reveal its contents.
When you structure your configuration folders and administrative permission patterns in similar patterns, the results can produce strong administrative roles and responsibilities free of complexity, ambiguity, conflicts, and overrides. See the pattern examples described as best practices in the Progress SonicMQ Deployment Guide.
Progress SonicMQ Configuration and Management Guide 8.5 107

Chapter 3: Introduction to Configuration
Manage PermissionsThe scope for manage permissions specifies the application of the permissions to the selected object and the inheritance of the permissions by subnodes and files. Manage permission scope can be set on a folder, a container, or a component in a container:
● On a folder, the scope can apply to the folder and can be extended to its subfolders. Also the scope can apply to only containers, only components, or both containers and their respective components.
● When specified on a selected container, the scope can apply to only the container, only its components, or both the container and its components.
● When specified on a selected component in a container, the scope defaults to its only possible value, that component only.
Manage permissions either grant or deny administrative functions in the permission categories. The categories of manage permissions that can be allowed or denied are:
● Full control — Sets all the other permissions to the selected option.
● Lifecycle control — Allows or denies starting and stopping containers and components.
● Enable/Disable Metrics — Select to receive specified metrics in the session.
● Subscribe to notifications — Select to receive specified notifications in the session.
● Set attributes — Set tracing and metrics intervals (as available) on runtime configuration objects.
● Other actions — Non-lifecycle operations such as datastore initialization, and compaction.
● Get information — Visibility of the state of configured objects and to manipulate their informational data.
108 Progress SonicMQ Configuration and Management Guide 8.5

Maintaining Management Security
Setting Configure PermissionsConfigure permissions and manage permissions are maintained in separate dialog boxes. The settings you make on one are not propagated to the other.
◆ To set configure permissions on a folder, a configuration, or a file:
1. Right-click on the object on which you want to set configure permissions.
2. On the drop-down menu, choose Management Security > Configure Permissions. The Edit Configure Permissions dialog box opens.
3. Add principals:
a. In the Principals section, click Add. The Select Principal dialog box opens.
b. Select a user or group as a principal for the permissions you want to set, and then click Add.
c. Continue to add users and groups until your set of principals for the settings on the folder are complete, and then click OK.
d. To remove principals, click on the principal name you want to remove, and then click Remove. The selected principal is removed.
4. Click the drop-down menu and select the scope you want for the permissions you want to set.
5. On each of the configure permission types, choose to either grant or deny the permission.
6. When you have completed the configure permissions, click OK.
Progress SonicMQ Configuration and Management Guide 8.5 109

Chapter 3: Introduction to Configuration
Setting Manage Permissions
◆ To set manage permissions on a container or a component:
1. Right-click on the object on which you want to set manage permissions.
2. On the drop-down menu, choose Management Security > Manage Permissions. The Edit Manage Permissions dialog box opens.
3. Add principals:
a. In the Principals section, click Add. The Select Principal dialog box opens.
b. Select a user or group as a principal for the permissions you are going to set, and then click Add.
c. Continue to add users and groups until your set of principals for the settings on the folder are complete, and then click OK.
d. To remove principals, click on the principal name you want to remove, and then click Remove. The selected principal is removed.
4. Click the drop-down menu and select the scope you want for the permissions you will set.
5. On each of the manage permission types, choose to either grant or deny the permission.
6. When you have completed the manage permissions, click OK.
110 Progress SonicMQ Configuration and Management Guide 8.5

Chapter 4 Configuring Containers and Collections
This chapter contains the following sections:
● “Containers and Components” explains the roles of containers and components in the Sonic Management Environment, how to create, edit, and delete container configurations, and how to add components to and remove components from containers. it also describes how to generate container setup files, launch containers, and encrypt a container’s persistent cache.
● “Host Manager” explains how a container running on a remote host can provide administrative access to setup and launching of additional containers in the scope of the remote host installation location.
● “Collections” explains component collections and container collections and how to create and edit collection configurations and add and remove members of collections.
Progress SonicMQ Configuration and Management Guide 8.5 111

Chapter 4: Configuring Containers and Collections
Containers and ComponentsA container is a Java process that hosts one or more Sonic Management Environment-compliant components in a controlled execution environment (JVM). Components are manageable objects that either:
● Support the Sonic Management Environment or provide management services to other components. These supporting (also known as framework) components include the Directory Service, Agent Manager, Activation Daemon, and Collections Monitor.
● Provide services to the messaging infrastructure—for example, SonicMQ brokers.
● Provide application level services—for example, Sonic ESB services and processes.
Each component is hosted in a container and each container can host multiple components. All management communications between containers and between management applications and containers is SonicMQ JMS-based.
Components are Sonic Management Environment-compliant if they follow the patterns and programming model defined by the Sonic Management Environment. To external management applications, components are exposed as JMX MBeans. (See the Progress SonicMQ Administrative Programming Guide.)
A container provides the services that components require to start and obtain their configuration, expose their management API, and log messages to the container console and/or a log file.
How Container Configurations Are Defined and ImplementedComponents are loaded based on container configuration information. Once running, a container responds to configuration changes to add or remove components from the container’s list of hosted components.
The configuration information for a container and its hosted components is maintained in the Directory Service. Containers maintain a local cache that partially replicates the configuration information stored by the Directory Service. A container is responsible for receiving all update notifications from the Directory Service, using those notifications to keep the cache up-to-date, and also pass them to those components that are capable of handling “real-time” configuration changes. For example, SonicMQ brokers dynamically add and remove queues as their queue configuration changes. (For information on the Directory Service, see “Resilience and Recovery of Framework Components” on page 158.)
112 Progress SonicMQ Configuration and Management Guide 8.5
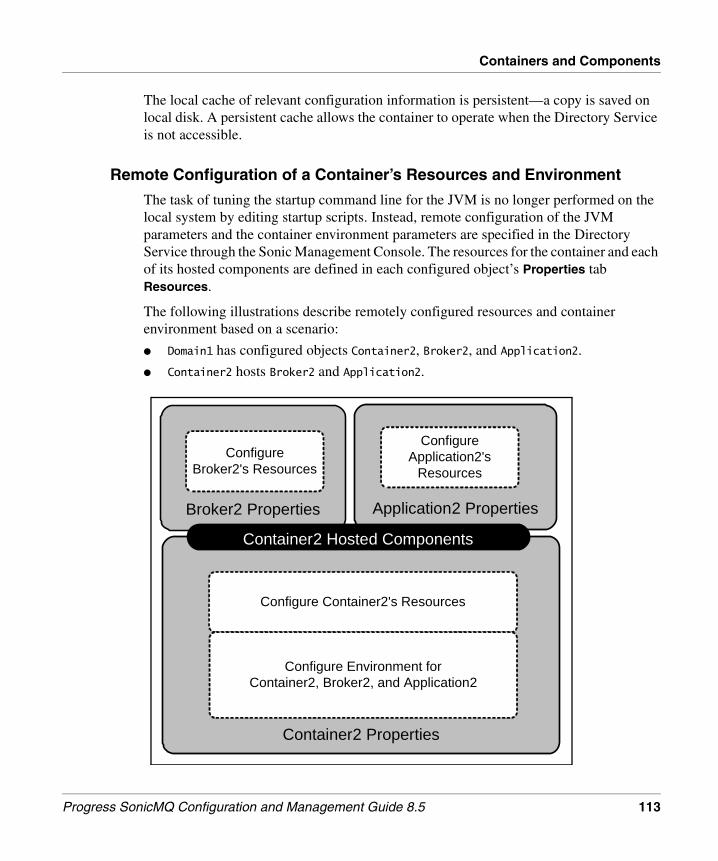
Containers and Components
The local cache of relevant configuration information is persistent—a copy is saved on local disk. A persistent cache allows the container to operate when the Directory Service is not accessible.
Remote Configuration of a Container’s Resources and Environment
The task of tuning the startup command line for the JVM is no longer performed on the local system by editing startup scripts. Instead, remote configuration of the JVM parameters and the container environment parameters are specified in the Directory Service through the Sonic Management Console. The resources for the container and each of its hosted components are defined in each configured object’s Properties tab Resources.
The following illustrations describe remotely configured resources and container environment based on a scenario:
● Domain1 has configured objects Container2, Broker2, and Application2.
● Container2 hosts Broker2 and Application2.
Container2 Properties
Configure Container2's Resources
Configure Environment for Container2, Broker2, and Application2
Broker2 Properties
ConfigureBroker2's Resources
Application2 Properties
ConfigureApplication2's
Resources
Container2 Hosted Components
Progress SonicMQ Configuration and Management Guide 8.5 113

Chapter 4: Configuring Containers and Collections
Launching a Container
On the system where Container2 is deployed, appropriate files are installed for the container, the broker, and the client services used by the application.
Starting a container uses a launcher JVM so that the remotely configured environment settings and resources for the container can be applied at startup of the configured JVM for the container, as illustrated:
In this illustration, the launch script initiates the procedure, starting its JVM, and then making a management connection to the domain. When successful in establishing management communications, the launcher updates the configuration and declared resources of the container in its cache. The launcher then creates a startup script from the environment parameters and stops, calling for the startup of the script it created as it closes the launcher JVM.
System Where Container2 is Deployed
File System
Memory
Launcher JVM
1. Launch
container.ini
launchcontainer
3. Create Startup Script
launchcontainer.ini.bat
ConfiguredJVM
Other files and libraries
2
1. Launch and create Management Connection2. Update cached configuration for Container23. Create startup script for container
Launcher JVM exits.
Launcher JVM
Cache Configurations & CAR files
Domain1.Container2.cache
Container2
Application2
Broker2
114 Progress SonicMQ Configuration and Management Guide 8.5

Containers and Components
Starting a Container With Its Updated Configuration
The startup script sets up the local environment then locates the JVM specified in the container’s Environment configuration. The JVM starts its JRE with the parameters and classpaths provided from the configuration, as shown in the following illustration. After re-establishing a management connection, the configurations of the hosted components are updated in the container’s persistent local cache. The container starts and its hosted components then start in the container, using their respective resources and prepended classpaths.
The startup script is discarded. The next launch-then-startup procedure creates the startup script that it uses.
System Where Container2 is Deployed
File System
Memory
Start as Scripted
Launcher JVM
ConfiguredJVM
Cache Configurations & CAR files
Domain1.Container2.cache
Container2
Application2
Broker2
Launch
container.inilaunchcontainer
Gen Startup Script
Configured Container JVM
4. Set the environment and working directory Start the JVM Re-establish Management Communications5. Update cached configuration for Broker26. Update cached configuration for Application27. Start Container2 using its resources and cache Start Broker2 using its resources and cache Start Application2 using its resources and cache
5
6
Container2
Broker2 Application2
7
4. C
all
Progress SonicMQ Configuration and Management Guide 8.5 115

Chapter 4: Configuring Containers and Collections
Configuring ContainersThe following procedure describes how to create and modify container configurations. For information on deploying a container, see the “Extending and Activating Components” chapter in the Progress Sonic Installation and Upgrade Guide. For information on launching containers, see “Setting Up Remote Containers Through a Host Manager” on page 462.
This procedure creates a container configuration definition from a type. (You can also use a template, see “Using Templates” on page 85, or copy another container, see “Copying Configurations” on page 94.)
◆ To create or edit a container configuration:
1. To create a new container configuration, open the Sonic Management Console, connect to a domain as described in “Running the Sonic Management Console” on page 38. Select a location on the tree in the Configure tab, right-click, and select New > Configuration....
The Create Configuration dialog box opens, as shown on page 83.
2. In the list on the From Types tab, select Shortcut to Container. Choose the Product Version you want for the container, and then click OK.
You can create several versions of containers depending on the version you need for the container and the hosted components. Versions must be synchronized as follows:
■ Version 7.5 for a hosted MQ 7.5 component or a 7.5 MF/Security component
■ Version 7.6 for a hosted MQ 7.6 component or a 7.6 MF/Security component
■ Version 8.0 for a hosted MQ8.0 component or an 8.0MF/Security component
■ Version 8.5 for a hosted MQ 8.5 component or an 8.5MF/Security component
Note A running container must be uniquely named within a domain. A check is completed on container startup to ensure no other configuration of the named container is running in the same domain.
116 Progress SonicMQ Configuration and Management Guide 8.5
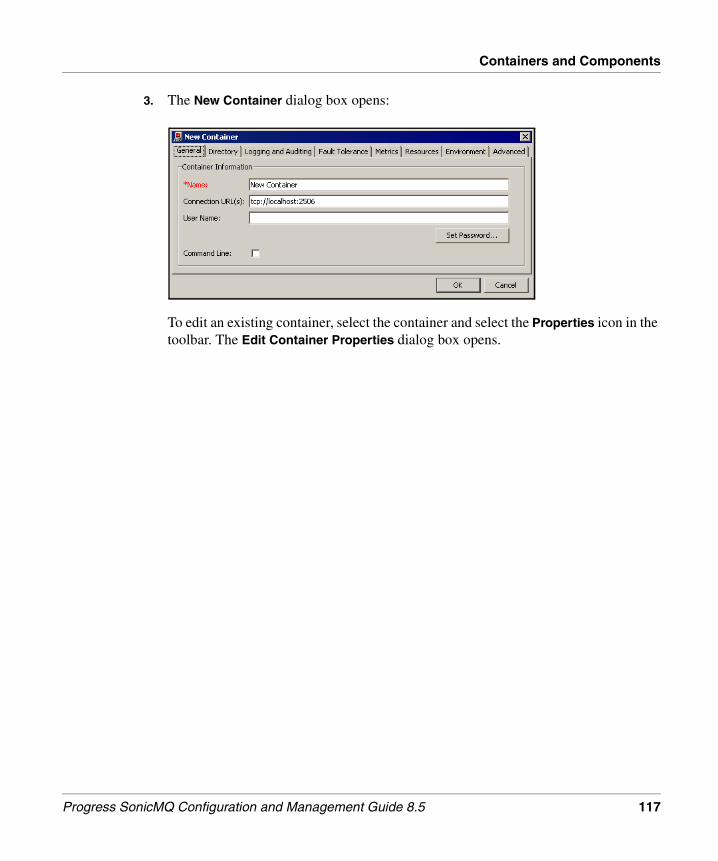
Containers and Components
3. The New Container dialog box opens:
To edit an existing container, select the container and select the Properties icon in the toolbar. The Edit Container Properties dialog box opens.
Progress SonicMQ Configuration and Management Guide 8.5 117

Chapter 4: Configuring Containers and Collections
4. Specify this Container Information in the General tab; the only required fields are Name and Connection URL(s):
5. Select the Directory tab:
Property Description
Name A name for the container. (For information on naming restrictions, see the Appendix of the Progress Sonic Installation and Upgrade Guide.) If you are editing an existing container, you cannot change its name.
Connection URL(s)
URL(s) for the management broker. It can be a comma-delimited list for a cluster of management brokers.
User Name If security is enabled on any management brokers, you must specify a user name that has administrative privileges (a member of the Administrators group or a group that has ACLs that grant access to management topics) for the Authentication Domain assigned to the management broker(s).
Click Set Password to set and confirm the password.
Command Line
Select to activate the command line in the container’s console window at runtime (see “Using a Container’s Command Line” on page 473).
Notes Even when security is not enabled, use the same string (or an empty string) for every container’s user name. (For more information, see the “Password Controlled Components and Functions” section of the “Security Considerations in System Design” chapter in the Progress SonicMQ Deployment Guide.)
118 Progress SonicMQ Configuration and Management Guide 8.5

Containers and Components
6. Specify the following properties:
For more information, see “Encrypting a Container’s Persistent Cache” on page 137. For information on management security, see “Overview” on page 420.
Property Description
Persistent Cache: Location
Path for the persistent cache directory. The default value is “.”, the container’s working directory. The path must already exist on the local system. Select Set Password to set the password to enable encryption of the cache file.
If you choose to use dynamic routing through a management node, the location of the cache you generate manually must use this path. (See the “Multiple Nodes and Dynamic Routing” chapter in the Progress SonicMQ Deployment Guide.)
Persistent Cache: Maximum In-Memory Size
Size in bytes of the in-memory configuration cache. If the cache exceeds its threshold value, data is discarded on a least-recently-used (LRU) basis. If the configuration data cannot be obtained from the in-memory cache, the persistent cache is tried; otherwise, the configuration data is requested from the Directory Service.
Persistent Cache: Maximum On-Disk Size
Maximum size in bytes of the configuration cache on disk. There is no default value—in other words, an undefined cache size on the assigned location is constrained only by the physical disk capacity.
Ping IntervalDirectory Service
Number of minutes for the container to wait between verifying the Directory Service is available. The container can then know if access to the Directory Service is lost and the container can reconcile the local cache with the Directory Service when access resumes.
Progress SonicMQ Configuration and Management Guide 8.5 119

Chapter 4: Configuring Containers and Collections
7. Select the Logging and Auditing tab:
8. In the Logging section, specify the following properties:
Property Description
Log To Console
Select to send container log messages to the container process output (stdout).
Log To File Select to send container log messages to a local log file.
Log Directory
Full pathname of container’s log file. If not specified (left blank), the container defaults to a file named domain.container.log in the container’s working directory.
Log File Size Threshold
The size of the container log file in bytes, at which point a notification (system.log.Threshold) is generated by the Agent Manager. After a notification is sent, the threshold’s size is increased by 10%. This attribute has similar functionality to the container attribute of the same name. The default 16777216—16 MB.
Log File Rollover Size Threshold
The size of the container log file in bytes, at which point a rollover can occur. It is tested at the rollover point in time, midnight every day. If the current log file does not exceed the threshold, then rollover does not occur. The default value is 1048576—1 MB.
120 Progress SonicMQ Configuration and Management Guide 8.5

Containers and Components
Log to Central File
Specifies that this container will propagate log information to the central log. Not all information is forwarded to the central log; see “Content of Console, Container, and Central Logs” on page 479 for details.
If the option to enforce centralized logging is enabled for the entire domain (see “Enforce Centralized Logging” on page 74), this option on each container is ignored.
Tracing Mask
Sum of the integer values for each tracing bit mask. This setting makes the settings permanent.(In contrast with tracing settings set on the runtime components which apply to the current session only.
To get the appropriate summary value for the specified component type, see the runtime tracing information in “Container Logging” on page 474, and then sum the bit mask number of the options you want to set.
Note that setting tracing masks on configurations (rather than runtime where they are discarded at the next restart) means they will always be active, which could cause a huge amount of information to be recorded in the log.
Tracing messages are recorded only in the local log, not in the central log.
Enable Actional Log Interceptor
Enables this container to create application log entries that correlate to intercepted interactions, and record the entries in the Sonic logging framework. You can specify two Java system properties (on the container’s Environment tab) to modify the interceptor’s behavior:
● com.progress.sonic.actional.soniclog.maxMsgSize The integer value of the maximum size (in bytes) of log events reported to Actional by the interceptor. Messages larger than this value will be trimmed. The default value is -1 which means no limit on message sizes.
● com.progress.sonic.actional.soniclog.disableLogOutputThe boolean value that specifies whether the log event should be passed on to the Container logging mechanism or to stop logging the message once the interceptor has processed it. The default value is false—the log message is handled by both the interceptor and the container logging mechanism.
This feature requires an Actional Agent running on the local system.
Property Description
Progress SonicMQ Configuration and Management Guide 8.5 121

Chapter 4: Configuring Containers and Collections
9. In the Auditing section, specify the following properties:
10. To view the container’s fault tolerant role, and specify container failover settings, select the Fault Tolerance tab:
11. Specify appropriate values for fault tolerance configuration properties:
Property Description
Override Domain default
Selecting the option means that you want to specify a container-specific override to the domain configuration. Clearing the option uses the pattern defined for the domain in general.
Log4j Config File When the Override Domain default option is selected, you can specify the location of the configuration file that specifies the log4j output destinations for audit records.
Fault Tolerance Setting Description
Role Fault tolerance role of the container instance:● Not Fault Tolerant● PRIMARY — Primary container● BACKUP — Backup container
Failure Detection Interval
If the Role is PRIMARY or BACKUP, the frequency (in seconds) at which the standby container test s whether to failover and become the active container.
Failure Detection Timeout
The ping request timeout, in seconds.
122 Progress SonicMQ Configuration and Management Guide 8.5
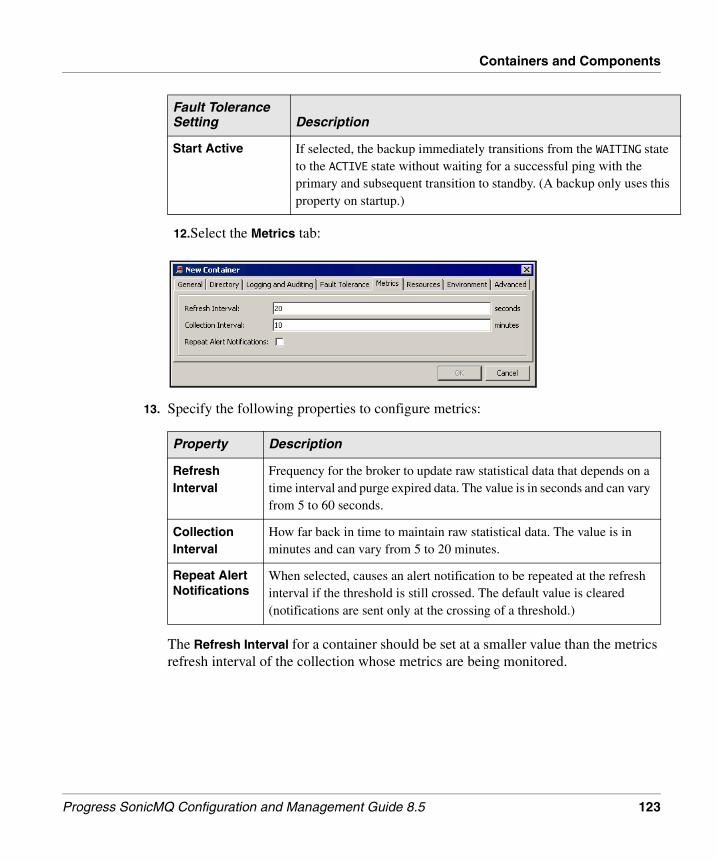
Containers and Components
12.Select the Metrics tab:
13. Specify the following properties to configure metrics:
The Refresh Interval for a container should be set at a smaller value than the metrics refresh interval of the collection whose metrics are being monitored.
Start Active If selected, the backup immediately transitions from the WAITING state to the ACTIVE state without waiting for a successful ping with the primary and subsequent transition to standby. (A backup only uses this property on startup.)
Property Description
Refresh Interval
Frequency for the broker to update raw statistical data that depends on a time interval and purge expired data. The value is in seconds and can vary from 5 to 60 seconds.
Collection Interval
How far back in time to maintain raw statistical data. The value is in minutes and can vary from 5 to 20 minutes.
Repeat Alert Notifications
When selected, causes an alert notification to be repeated at the refresh interval if the threshold is still crossed. The default value is cleared (notifications are sent only at the crossing of a threshold.)
Fault Tolerance Setting Description
Progress SonicMQ Configuration and Management Guide 8.5 123

Chapter 4: Configuring Containers and Collections
14. Select the Resources tab:
15. Specify the following properties to configure resources for the container:
Property Description
Container Archive
Specifies the container/component archive file that contains the libraries for this container. The name is appended to each of the archive search path entries defined on the Environment tab to define a fully-enunciated location.
Actional SDK Archive
Specifies the Progress Actional SDK archive file for this container. When an updated Actional SDK file is available, and you choose to locate in a different path or name, you can specify that this container use the updated Actional SDK file.
Actional Plug Maker Archive
Specifies the Progress Actional Plug Maker archive file for this container. When an updated Actional Plug Maker file is available, and you choose to locate in a different path or name, you can specify that this container use the updated Actional Plug Maker file.
124 Progress SonicMQ Configuration and Management Guide 8.5

Containers and Components
16. Select the Environment tab:
This tab shows some common Java VM options, and a Java system property.
Prepend Classpath
Sets classpath entries for additional libraries and library versions that supersede any identical classes already specified. A well-formed classpath entry is a URL with any valid protocol, including sonichome:/// and sonicfs:///. The first listed classpath takes the highest priority over later listed entries and the corresponding classes in the archive. Classpaths you add to a container are for the container, not its hosted components. Most hosted components have their own resource configuration.
Property Description
Important While you could add Java system properties in the Java VM options section, some Sonic features review the Java system properties to determine other settings. You should avoid adding -D settings in the Java VM options, and set them in the System Property dialog box instead.
Progress SonicMQ Configuration and Management Guide 8.5 125

Chapter 4: Configuring Containers and Collections
The example of a New System Property would have been entered by clicking New, and then entering the variable and its value, as follows:
Note that a -D is implicit—it will be prepended when the property is on the commandline. This specific system property resolves an issue at startup of the Domain Manager’s container, where you usually see a warning, as shown:
As the management broker has not yet started, this is a benign error but it wastes ten seconds. With System Property sonicsw.mf.skipInitialConnect set to true, you see:
[date 13:25:00] (info) "Domain1.DomainManager" starting...[date 13:25:10] (warning) Management connect failure: java.net.ConnectException: Connection refused: connect: tcp://myDMhost:2506[date 13:25:10] (info) ...connect failed, retrying...[date 13:25:10] (info) Loaded ID=AGENT
[date 13:35:00] (info) "Domain1.DomainManager" starting...[date 13:35:01] (info) Loaded ID=AGENT
126 Progress SonicMQ Configuration and Management Guide 8.5

Containers and Components
17. Specify the following properties to configure the environment variables and settings that will be passed to the container and each of the components it hosts:
Property Description
Archive Search Path
For this container and each component hosted by this container, provides the path roots in which to look for the resource archive specified by the archive name. The default value of sonicfs:///Archives means that the management framework container archive is looked for as sonicfs:///Archives/MF/8.0/MFcontainer.car (in the sonicfs file system in the Directory Service).
The value can be multiple semi-colon delimited path roots in which to look for the resource archive specified by the archive name. For example, with the value of sonichome:///Archives;sonicfs:///Archives, the management framework container archive is looked for first as sonichome:///Archives/MF/8.0/MFcontainer.car (in the local installation). If it is not found there, then it is looked for as sonicfs:///Archives/MF/8.0/MFcontainer.car.
Java Home For this container and each component hosted by this container, provides the complete path to the Java installation that will provide the Java Runtime Environment.
Native Library Search Path
For this container and each component hosted by this container, lists one or more paths to required native libraries that are accessible on the system where the container is located.
Progress SonicMQ Configuration and Management Guide 8.5 127

Chapter 4: Configuring Containers and Collections
Java VM Options
For this container and each component hosted by this container, provides a way to define arguments that will propagate to the command line of the startup script of the JVM.
When the domain has a large number of components, specify a large heap size for the container that launches the Directory Service. For example, to set an inital heap size of 64 MB and a maximum of 1GB, add -X64m -Xmx1024m. But when extending the heap size, verify that there is adequate memory on the system so that gains in heap performance do not cause page swapping.
If your installation is on a system that can use a 64-bit JVM, install the appropriate JVM including 64-bit JVM extensions, and then add the -d64 argument to the Java VM Options line.
Java System Properties
For this container and each component hosted by this container, provides a way define the -D properties that will propagate to the command line of the startup script of the JVM. As illustrated in the dialog box onpage 126, the -D is not part of the entry text—it will be prepended to each line item in the generated startup script.
Property Description
128 Progress SonicMQ Configuration and Management Guide 8.5

Containers and Components
Note Configuring Interceptors - When using Progress Actional Management Server with Sonic ESB, you might need to add additional Actional interceptors to a Sonic container to improve its visibility.
Common use cases for adding interceptors to a Sonic container are:
● Using the Actional JDBC interceptor to instrument the database interactions of a Sonic Database service.
● Using the Actional Servlet and CXF interceptors to instrument the SOAP and REST interactions of a Sonic Connect service.
To set up the interceptor on the container, do the following:
a. Import the interceptor JARs into sonicfs.
a. On the container’s Resources tab, enter the classpath of each of the interceptor JARs.
b. On the container’s Environment tab, set a com.actional.aops system property for each interceptor to enable it.
Sonic automatically enables the Actional PlugMaker Java agent when the property has been set.
For example, to enable the Actional JDBC interceptor:
● Add the classpath of actional-jdbc-interceptor.jar as a prepended classpath.
● Add the system property named com.actional.aops with the value com/actional/lg/interceptor/jdbc/jdbc.aop.
Refer to Progress Actional’s Interceptor Guide for details about the com.actional.aops property.
See the Progress Sonic ESB Configuration and Management Guide chapter “Using Actional with Sonic Components” for more information about Actional Servlet and CXF interceptors to instrument the SOAP and REST interactions of a Sonic Connect service.
Progress SonicMQ Configuration and Management Guide 8.5 129

Chapter 4: Configuring Containers and Collections
18. Select the Advanced tab:
130 Progress SonicMQ Configuration and Management Guide 8.5

Containers and Components
19. Specify the following Advanced properties in the Monitoring section:
Property Description
Status Poll Interval
Interval in seconds between polling for container status by the Agent Manager (see “Agent Manager” on page 515).
If the container is deployed in a remote node, set the interval so the Agent Manager polls less frequently than the routing connection timeout, since a routing connection can timeout:
● If you set the poll interval less than or equal to the Connect Idle Timeout, the connection will not time out (see ).
● If set to 0, there is no polling and the only status recorded by the Agent Manager will be what is observed through notifications such as container start and shutdown.
This interval should be set to 0 or to a very high value in deployment that uses management communications through dynamic routing. (See the “Multiple Nodes and Dynamic Routing” chapter in the Progress SonicMQ Deployment Guide.)
Status Poll Timeout
Time in seconds after which the Agent Manager will stop trying to obtain the container’s status and assume the container’s status is unknown.
Progress SonicMQ Configuration and Management Guide 8.5 131

Chapter 4: Configuring Containers and Collections
20. Specify the following Advanced properties in the Tuning section:
Property Description
Max Management Thread Pool Size
Maximum number of threads to allocate to transient container activities.
Min Management Thread Pool Size
Minimum number of threads to allocate to transient container activities.
Notification Dispatch Queue Size
The size of the queue that holds notifications for management clients. The default value is 100000 notifications. The value 0 specifies that there is no limit, effectively disabling the feature.
When the feature is disabled, out-of-memory situations could occur when storms of notifications combine with slow or stopped delivery of the notifications and result in memory overflow.
The behavior of the feature is:
● Warnings are generated when the queue size passes 50% of its capacity, and again when 75% of capacity is passed.
● When the queue is full, the oldest notifications in the queue are dropped to make room in the queue for new notifications. Log entries are made when notifications are dropped.
Setting the value to less than the default value should be done carefully so that notifications are not being dropped in normal operation.
See “Metrics” on page 379 for information on container metrics to view the system.notifications that indicate the notifications awaiting dispatch, dropped, and maximum notifications awaiting dispatch.
132 Progress SonicMQ Configuration and Management Guide 8.5

Containers and Components
21. Specify the following Advanced properties in the Connection section:
Property Description
Management Node
Enter the name of a management node. This assumes that the connection URL is to a local broker that has this named routing definition to provide Dynamic Routing to the management node. (See the “Multiple Nodes and Dynamic Routing” chapter in the Progress SonicMQ Deployment Guide.)
Initial Connect Timeout
Specifies the maximum time for the container to connect to messaging brokers or transparently reconnect in the event of temporary failure. The default is 10 seconds and the minimum is also 10 seconds. (See “Timeout Settings” on page 79.)
Socket Connect Timeout
Specifies a time limit on individual socket connect attempts, thereby allowing the client to try other URLs in a connection URL list in a controlled fashion. A positive integer value indicates the number of seconds to allow for the socket connection to establish. Setting a value of 0, the default value, means the socket connect request does not time out.
The Socket Connect Timeout setting interacts with the Initial Connect Timeout setting. The socket connect timeout should enable an attempt at every listed URL. For example, where a URL list contains six URLs, the default setting for the Initial Connect Timeout of 60 seconds require that the Socket Connect Timeout value be set to 10 seconds.
Request Timeout
Change the setting to modify the maximum time for round-trip management requests between the container and manageable resources; the default is 30 seconds and the minimum is 10 seconds. (See “Timeout Settings” on page 79.)
Load Balancing
Select to enable load balancing. The management connection from the container can be load balanced between management brokers when there is more than one such broker configured in a cluster. (By default, any broker in a cluster is capable of redirecting incoming connections to another broker in the same cluster. For more information, see “Load Balancing” on page 245.)
Note For Connections and Central Connections, see “Timeout Settings” on page 79 in this book, and the “Fault Tolerant Management” and the “Multiple Nodes and Dynamic Routing” chapters in the Progress SonicMQ Deployment Guide for more on Connection URL(s) and Management Node settings in advanced topologies.
Progress SonicMQ Configuration and Management Guide 8.5 133

Chapter 4: Configuring Containers and Collections
22. Specify the following Advanced properties in the Central Connection section:
23. Click OK.
The Sonic Management Console saves the container’s configuration in the domain’s Directory Service store.
Property Description
Enable Central Connection
Enables the parameters and functionality of central connection for a container when the container will host a broker routing management connections to a management node.
Connection URLs
URL(s) for the central management broker. It can be a comma-delimited list for a cluster of management brokers.
User Name If security is enabled on any central management brokers, you must specify a user name that has administrative privileges (a member of the Administrators group or a group that has ACLs that grant access to management topics) for the Authentication Domain assigned to the central management broker(s).
Click Set Password to set and confirm the password.
Initial Connect Timeout
Specifies the maximum time for the container to connect to central messaging brokers or transparently reconnect in the event of temporary failure. The default is 10 seconds and the minimum is also 10 seconds. (See “Timeout Settings” on page 79.)
Socket Connect Timeout
Specifies a time limit on individual socket connect attempts, thereby allowing the client to try other URLs in a connection URL list in a controlled fashion.
Request Timeout
Change the setting to modify the maximum time for round-trip management requests between the container and manageable resources; the default is 30 seconds and the minimum is 10 seconds. (See “Timeout Settings” on page 79.)
Load Balancing
Select to enable load balancing. The central management connection from the container can be load balanced between management brokers when there is more than one such broker configured in a cluster.
134 Progress SonicMQ Configuration and Management Guide 8.5

Containers and Components
Deleting Container ConfigurationsYou must shut down a container before you can delete its configuration. Containers should first be removed from any collections that include them.
◆ To delete a container:
❖ Select the container you want to delete, right-click, and select Delete.
The Sonic Management Console deletes the container configuration.
Generating Container Setup FilesA container requires minimal information to start up. That information—a subset of the container’s complete configuration—is specified in name-value parameters in a text file. When you install a container launcher and choose to configure a container, you indirectly create a setup file that the local Launcher uses to configure the container in the domain’s Directory Service, and set up the container’s folder and startup files locally.
In some circumstances, you might need to first create the container configuration in the Directory Service, and then generate a setup file that can run in the setup utility on the distributed host to create the container folder, and connect to the management broker.
● When you update configuration information for a container that is not running, the container does not update its container.ini file. When you generate a .setup file from the configuration, and then run setup at the remote site, the .ini file is updated.
● When you install a Sonic Launcher with no container, you can generate a .setup file for a container configured in the domain that has not been setup, transport the .setup file to the remote system, and then run setup for the container.
● When you want a Sonic Launcher to serve more than one domain domain, you can generate a .setup file for a new container configured in the other domain, transport the .setup file to the remote system, and then run setup for the container. The remote host’s container folder structure could look like this:Containers
HQ_Domain.ctStore171EMEA_Domain.ctStore171
Note Deleting a container does not delete any of its components’ configuration definitions from the Directory Service. A component’s configuration definition is only deleted from the Directory Service when it is explicitly selected and deleted.
Progress SonicMQ Configuration and Management Guide 8.5 135

Chapter 4: Configuring Containers and Collections
◆ To generate a container setup file:
1. Create a container in the Directory Service through the Sonic Management Console.
2. Save the container configuration.
3. Right-click on the container name, and then choose Generate Setup File, as shown for container ct2:
4. In the Generate Setup File dialog box:
a. Specify a local File Path and name for the setup file. If you specify a folder hierarchy, the folders must exist. The file name is preset as container_name.setup.
b. If a Windows Service will be setup on the remote system, enter its name so that it be appended to the generated setup file for implementation on the remote system when the setup runs on the remote host.
The Generate Setup File dialog might look like this for container ct2:
5. Click OK to save the generated file.
The content of the file for this example is:
6. Transport the generated container setup file to its designated host system
Figure 3. Generating a Setup File for a Container
LOG_FILE=./Domain1.ct2.logCONTAINER_PATH=/Containers/ct2ConnectionURLs=tcp://myManagementBroker:2506DOMAIN_NAME=Domain1WINDOWS_SERVICE_NAME=Sonic ct2 Service
136 Progress SonicMQ Configuration and Management Guide 8.5

Containers and Components
7. On the distributed host where a Sonic Launcher has been installed, run setup with the file (in this example, ct2.setup) in the form setup /c ct2.setup. The distributed host will now have a folder in sonic_install_dir/Containers named Domain1.ct2.
8. Open a console to the new container’s folder, and run the launchcontainer script.
The container starts, connects to the domain, updates its cache, and starts components.
See “Launching Containers from the Command Line” on page 467 for information on container working directory and launch commands.
Encrypting a Container’s Persistent CacheTo encrypt data in a container’s persistent cache, set the password in the container’s Edit Container Properties dialog box in the Directory tab under Persistent Cache (see page 118).
Configuring Container Components Components are manageable objects that reside within a container and provide either application or management level services, for example a SonicMQ broker or an Activation Daemon.
The following sections describe how to add and edit components in a container and remove components from a container.
Adding a Component to or Editing a Component in a Container
Follow this procedure to add a component to or edit the deployment properties of a component in a container. If a container is running when you add a component to the container, the component is automatically loaded. The starting of the component depends on whether it has Auto Start enabled.
Note A container must not host more than one broker.
Progress SonicMQ Configuration and Management Guide 8.5 137

Chapter 4: Configuring Containers and Collections
◆ To add a component to or edit a component in a container:
1. To add a component to a container, select a container (in the tree or table), right-click, and select Add Component.... The New Container Component dialog box opens:
To edit a component already in a container, select the component in its container’s table and select the Properties icon. The Edit Container Component Properties dialog box opens.
If you are editing a component already in a container, you cannot change Name or Component. (You must remove and re-add the component.)
Specify the following under General:
Warning The name of the broker hosted by the container that also hosts the Directory Service must be established at the time of installation.
Property Description
Name Name to identify this instance of the component in the container. Component names must be unique within a container. (For information on naming restrictions, see the Appendix of the Progress Sonic Installation and Upgrade Guide.)
Component Select ... to open the Component Chooser and select a deployable component configuration from the tree.
138 Progress SonicMQ Configuration and Management Guide 8.5

Containers and Components
The Deployment Parameters and the Native Libraries tabs are advanced features and are not used when deploying a component into a container.
2. Click OK. The Sonic Management Console adds the component to the container or modifies the component as you specified.
Auto Start Select for the container to automatically start the component when the container loads the component (putting the component into an online state).Deselect, for example when adding a broker before intitializing the broker’s message store.
Tracing Mask Sum of the integer values for each tracing bit mask. This setting makes the settings permanent; otherwise the tracing settings last for the current session only.
To get the appropriate summary value for the specified component type, see the runtime tracing information and then sum the bit mask number of the options you want to set. See:
● “Directory Service Runtime Properties” on page 509
● “Agent Manager Runtime Properties” on page 519
● “Activation Daemon Runtime Properties” on page 526
● “Collections Monitor Runtime Properties” on page 535
● “Broker Runtime Properties” on page 548
Note that setting tracing masks on configurations (rather than runtime where they are discarded at the next restart) means they will always be active, which could cause an very large amount of information to be recorded in the log.
Tracing messages are recorded only in the local log, not in the central log.
Property Description
Progress SonicMQ Configuration and Management Guide 8.5 139

Chapter 4: Configuring Containers and Collections
Viewing the Components in a Container
Follow this procedure to view the configured components hosted by a container.
◆ To view the components configured to be hosted by a container:
❖ Select a container under the Containers folder in the Configure tab of the SMC:
The rows in the container’s table in the right panel list the components configured to be hosted by the container. The sample container shown includes:
■ MgmtBroker— See “Configuring SonicMQ Brokers” on page 203
■ Agent Manager — See “Agent Manager” on page 515
■ Directory Service— See “Directory Service” on page 506
The columns in the container’s table include:
Property Description
Component Configuration view name and identity of the component
Name Component name (or identity) to be assigned to the component when running in the container
Auto Start Whether the container should start the component when the container loads the component (putting the component into an online state), True or False
140 Progress SonicMQ Configuration and Management Guide 8.5

Host Manager
Removing a Component from a Container
Follow this procedure to remove a component from a container. If a container is running when you delete the component, the component is unloaded.
◆ To remove a component from a container:
1. Select a component in a container’s table, right-click, and select Remove Component.
2. Confirm that you want to remove the component.
The Sonic Management Console removes the component from the container.
Host ManagerThe host manager framework component implements an interface for remote methods in the installation location where a management container that has the Host Manager as a component is running. A host manager can:
● Launch containers at its remote location.
● Setup configured containers at its remote location.
Management APIs are available that enable you to use a Host Manager to:
● Download files into the container’s file system.
● Upload files from the container’s file system.
● Delete files from the container’s file system.
● List directories in the host’s file system
● Retrieve the system properties of the JVM that hosts the container.
● Execute scripts and programs remotely and retrieve the resulting output.
Note Host Manager in contrast to Activation Daemon — While the functions of configuring and running containers can be done centrally through Activation Daemons, containers activated by Activation Daemons impose some limitations, and do not offer the extended functionality that host managers provide. See “Activation Daemon” on page 187 for more information about Activation Daemons.
Progress SonicMQ Configuration and Management Guide 8.5 141

Chapter 4: Configuring Containers and Collections
Configuring Host ManagersThe following procedure describes how to create and modify container configurations. For information on creating a host manager during the setup of a container, see the “Using Progress Sonic Launcher Installer” and “Setting Up Containers” chapters in the Progress Sonic Installation and Upgrade Guide. For information on launching containers, see “Setting Up Remote Containers Through a Host Manager” on page 462.
◆ To create or edit a host manager configuration:
1. To create a new host manager configuration, open the Sonic Management Console, connect to a domain as described in “Running the Sonic Management Console” on page 38.
2. Select a location in the Configure tab, right-click, and select New > Configuration....
3. In the list on the From Types tab, expand the Sonic Management Environment folder, choose Host Manager, and then click OK.
4. The New Host Manager dialog box opens, as shown:
5. Enter your preferred name for the host manager.
6. If you have been instructed to modify the .car file name, or to specify some prepend classpaths, click the Resources tab to specify those details.
7. Click OK.
When the Host Manager is added to a container, it will enable its functionality in the container’s runtime. See “Setting Up Remote Containers Through a Host Manager” on page 462 for information about using the host manager to set up and launch remote containers.
142 Progress SonicMQ Configuration and Management Guide 8.5

Collections
CollectionsA collection is a logical grouping of either components or containers that is maintained as a configuration in the Directory Service. The same container or component can be included in multiple collections. There are two types of collections:
● Component collections — One or more components within the same domain (see “Component Collections” on page 144)
● Container collections — One or more containers within the same domain (see “Container Collections” on page 153)
You might typically use a collection to monitor and manage an application that spans multiple containers or components. For example, a collection might define:
● The components that represent a particular application
● The containers within a geographical region or set of server machines
Progress SonicMQ Configuration and Management Guide 8.5 143

Chapter 4: Configuring Containers and Collections
Component CollectionsA component collection can contain components of different types and versions. Most typically, you might create a logical collection of brokers that could be on multiple machines and use the collection to reload them all at once. (See “Broker Operations, Storage Actions, and Activation” on page 551.)
Creating Component Collections
The following procedure describes how to create a component collection from a type. (You can also copy another component collection, see “Copying Configurations” on page 94.)
◆ To create a component collection:
1. Open the Sonic Management Console, connect to a domain as described in “Running the Sonic Management Console” on page 38, and select the Configure tab.
2. Select a location (in the tree at the root level or in a folder), right-click, and select New > Configuration... .
The Create Configuration dialog box opens, as shown on page 83.
3. In the From Types tab, expand the Sonic Management Environment folder, select Component Collection, and click OK.
Note Collections Monitors — When you configure a component collection, you can specify metrics and notifications for monitoring by a Collections Monitor:
● List of notification types to be forwarded by a Collections Monitor
● Set of notification monitoring definitions, each definition defining:
■ List of notifications to monitor
■ Interval over which to monitor the notifications
■ High and/or low notification count threshold
● Set of metrics monitoring definitions, each defining the list of metrics to monitor
For information on viewing these notifications and metrics, see:
● “Monitoring Forwarded Notifications” on page 407
● “Viewing Aggregated Metrics” on page 394
For information on Collections Monitors, see “Collections Monitors” on page 193.
144 Progress SonicMQ Configuration and Management Guide 8.5
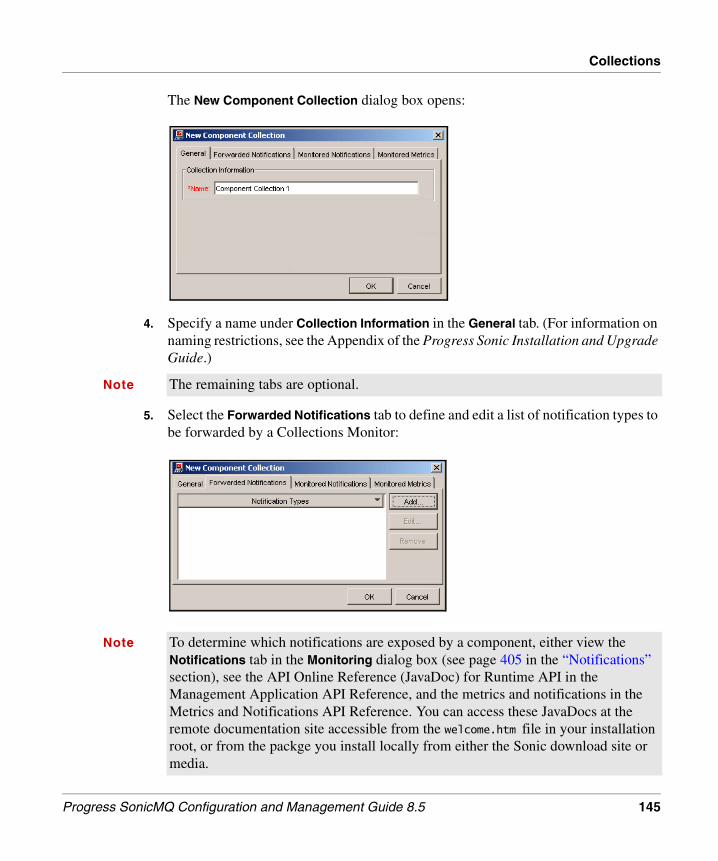
Collections
The New Component Collection dialog box opens:
4. Specify a name under Collection Information in the General tab. (For information on naming restrictions, see the Appendix of the Progress Sonic Installation and Upgrade Guide.)
5. Select the Forwarded Notifications tab to define and edit a list of notification types to be forwarded by a Collections Monitor:
Note The remaining tabs are optional.
Note To determine which notifications are exposed by a component, either view the Notifications tab in the Monitoring dialog box (see page 405 in the “Notifications” section), see the API Online Reference (JavaDoc) for Runtime API in the Management Application API Reference, and the metrics and notifications in the Metrics and Notifications API Reference. You can access these JavaDocs at the remote documentation site accessible from the welcome.htm file in your installation root, or from the packge you install locally from either the Sonic download site or media.
Progress SonicMQ Configuration and Management Guide 8.5 145

Chapter 4: Configuring Containers and Collections
6. Click Add. The Add Notification Type dialog box opens:
c. Specify the Notification Type in the following format:category.subcategory.event name
For example:application.alert.connection.messages.DeliveredPerSecond
d. Click OK to return to the Forwarded Notifications tab. The notification is then listed under Notification Types.
You can also:
■ Click Edit to open the Edit Notification Type dialog box to edit a listed notification.
■ Click Remove to remove the notification from the list.
Notes ● Notification names use a period-separated string format. If the instance name portion of the of the string contains a period (.) or a percent (%), you must escape it using a percent before the period or percent.
● The Sonic Management Console validates only the format, not the name. If you enter an incorrect name, it will be ignored at runtime.
146 Progress SonicMQ Configuration and Management Guide 8.5

Collections
7. Select the Monitored Notifications tab to define and edit notification monitoring set definitions:
8. Click Add. The New Notification Monitor dialog box opens to specify or edit notification monitor configuration properties:
Note To determine which notifications are exposed by a component, either view the Notifications tab in the Monitoring dialog box (see page 405 in the “Notifications” section), or see the Runtime API Online Reference.
Progress SonicMQ Configuration and Management Guide 8.5 147

Chapter 4: Configuring Containers and Collections
9. Specify under General:
You can choose to have a high threshold, a low threshold, or both. Choosing to set neither threshold will result in no trigger of notifications and therefore should be avoided.
10. Under Notifications, click Add. The Add Notification Type dialog box opens:
a. Specify the Notification Type in the following format: category.subcategory.event name
For example:application.alert.queue.messages.Count
b. Click OK to return to the New Notification Monitor tab. The notification is listed under Notification Types.
You can also:
■ Click Edit to open the Edit Notification Type dialog box to edit a listed notification.
■ Click Remove to remove the notification from the list.
11. Click OK to return to the Monitored Notifications tab.
Property Description
Monitor Name Any meaningful alpha-numeric name for this monitor
High Threshold High notification count threshold
Low Threshold Low notification count threshold
Interval Interval over which to monitor the notification
Notes ● Notification names use a period-separated string format. If the instance name portion of the of the string contains a period (.) or a percent (%), you must escape it using a percent before the period or percent.
● The Sonic Management Console validates only the format, not the name. If you enter an incorrect name, it will be ignored at runtime.
148 Progress SonicMQ Configuration and Management Guide 8.5

Collections
12. Select the Monitored Metrics tab:
13. Specify the Metrics Refresh Interval, the frequency for a Collections Monitor to poll the components in the collection for monitored metrics. The integer value is in seconds and must be 60 seconds (its default value) or greater.
The Metrics Refresh Interval for a collection should be set as large as possible and, in any case, should not be less than the metrics refresh interval for the components in the collection whose metrics are being monitored. Setting the interval on the collection at at a small value makes it problematic for Collections Monitor writes to keep pace with the unrecorded metrics and notifications—a pace that is not settable as it is dependent upon disk, application, and operating system performance.
Component metrics are gathered in intervals between 5 and 60 seconds, while the collections monitor gathers those metrics at intervals of 60 seconds or more.
14. Under Metrics, click Add. The Add Metric Name dialog box opens:
Note To determine which metrics are exposed by a component, either view the Metrics tab in the Monitoring dialog box (page 380 in the “Metrics” section), or see the Runtime API in the Management Application API Reference.
Progress SonicMQ Configuration and Management Guide 8.5 149

Chapter 4: Configuring Containers and Collections
a. Specify the Metric Name in the following format: category.subcategory.metrics name
For example:broker.messages.Delivered.
b. Click OK to return to the Monitored Metrics tab. The metric is listed under Metrics Names.
You can also:
■ Click Edit to open the Edit Metric Name dialog box to edit a listed metric.
■ Click Remove to remove a metric from the list.
15. Click OK. The Sonic Management Console adds the new component collection to the tree at the location you selected.
Notes ● Metric names use a period-separated string format. If the instance name portion of the of the string contains a period (.) or a percent (%), you must escape using a percent before the period or percent. For example, for a connection instance named conn.1, enter the metric’s name as connection.messages.DeliveredPerSecond.conn%.1
● The Sonic Management Console validates only the format, not the names. If you enter an incorrect name, it will be ignored at runtime.
150 Progress SonicMQ Configuration and Management Guide 8.5

Collections
Adding a Component Identity to a Component Collection
Follow this procedure to add a component identity to a component collection.
◆ To add a component identity to a component collection:
1. In the Configure tab, select a component collection, right-click, and select Add Component.... The Add Component to Collection dialog box opens:
2. Select a component and click Add:
Note The dialog box shows two containers each hosting a broker. The example shown in the following figure shows that Container 1A_1 was selected so that its agent’s metrics could be monitored, The broker hosted in that container and the other broker were then added to the component collection.
The configuration objects in this component collection are described further in “Collections Monitors” on page 193.
Progress SonicMQ Configuration and Management Guide 8.5 151

Chapter 4: Configuring Containers and Collections
The Sonic Management Console adds the selected components identities to the collection:
Deleting a Component Identity from a Component Collection
The following procedure describes how to delete a component identity from a component collection.
◆ To delete a component identity from a component collection:
❖ In the Configure tab, select a component in the component collection’s table, right-click, and select Delete.
The Sonic Management Console deletes the component identity from the component collection.
152 Progress SonicMQ Configuration and Management Guide 8.5

Collections
Container CollectionsThe following sections describe how to create and configure container collections.
Creating Container Collections
Follow this procedure to create a container collection from a type. (You can copy another container collection, see “Copying Configurations” on page 94.)
◆ To create a container collection:
1. Open the Sonic Management Console, connect to a domain as described in “Running the Sonic Management Console” on page 38, and select the Configure tab.
2. Select a location (in the tree at the root level or in a folder), right click, and select New > Configuration... .
The Create Configuration dialog box opens, as shown on page 83.
3. In the From Types tab, expand the Sonic Management Environment folder and select Container Collection. The New Container Collection dialog box opens:
4. Specify a name under Collection Information. (For information on naming restrictions, see the Appendix of the Progress Sonic Installation and Upgrade Guide.)
5. Click OK. The Sonic Management Console adds the new collection to the tree at the location you selected.
Progress SonicMQ Configuration and Management Guide 8.5 153

Chapter 4: Configuring Containers and Collections
Adding a Container Identity to a Container Collection
Follow this procedure to add a container identity to a container collection.
◆ To add a container identity to a collection:
1. In the Configure tab, select a container collection, right-click, and select Add Container.... The Add Container to Collection dialog box opens:
2. Select a container and click Add. The Sonic Management Console adds the container to the collection. You can continue adding containers as required:
154 Progress SonicMQ Configuration and Management Guide 8.5

Collections
Deleting a Container Identity from a Container Collection
The following procedure describes how to delete a container identity from a container collection.
◆ To delete a container identity from a container collection:
❖ In the Configure tab, select a container in the container collection’s table, right-click, and select Delete.
The Sonic Management Console deletes the container identity from the container collection.
Progress SonicMQ Configuration and Management Guide 8.5 155

Chapter 4: Configuring Containers and Collections
156 Progress SonicMQ Configuration and Management Guide 8.5

Chapter 5 Configuring Framework Components
This chapter describes how to configure framework components in the following sections:
● “Resilience and Recovery of Framework Components” introduces fault tolerance for the Directory Service and Agent Manager components.
● “Configuring Directory Service Components” discusses configuring the Directory Service and how to configure it for fault tolerance and replication connections. Also describes how to generate DS boot files, perform encryption, decryption, backup, restoration, and crash recovery.
● “Configuring Agent Manager Components” discusses configuring the Agent Manager and how to configure it for fault tolerance.
● “Activation Daemon” describes how to configure an Activation Daemon and add containers to an Activation Daemon’s configuration list.
● “Collections Monitors” describes how to configure a Collections Monitor and specify collections to monitor.
Progress SonicMQ Configuration and Management Guide 8.5 157
Chapter 5: Configuring Framework Components
Resilience and Recovery of Framework ComponentsSonicMQ’s centralized configuration, management, and monitoring of distributed deployments through a domain manager can be configured to provide seamless failover and recovery from a remote location.
Fault tolerant in the management framework requires two domain manager installations. In one domain, new configuration objects are defined for the backup domain’s broker, fault tolerant management components. Network paths are defined to establish replication of the Directory Service store. The boot files for the backup components’ container uses its installed software to establish the domain manager peer.
The configuration of a backup for the Directory Service configuration object lets you define one or more replication connections. These replication connections enable the backup location to seamlessly failover to the same store at a different physical location.
The backup Agent Manager provides fault tolerance for its services. Of the primary/backup components, only one Agent Manager is actively maintaining domain state and handling requests to obtain domain state or perform operations on collections. That component is said to be the active Agent Manager; the other is the standby Agent Manager.
The framework components failover in concert; that is, if the primary Agent Manager is active and then fails but the active, primary Directory Service is operational, both components are forced to failover to the backup configurations.
There are several tasks that fully define fault tolerant management services. This chapter describes each framework component configuration task in detail. Other tasks include:
● Installing the set of software for the local and the remote site.
● Clustering management brokers. The topology for fault tolerant management requires clustering of the management brokers in the local and remote locations.
● Updating container configurations.
● Updating boot files for the containers and the Directory Service peers.
For more comprehensive information on fault tolerant management services, see the “Fault Tolerant Management” chapter in the Progress SonicMQ Deployment Guide.
Important Upgrading Fault Tolerant Management Framework — If you implemented fault tolerant management prior to V7.5, the alternative techniques—shared store strategy or remote site with a read-only copy of a recent Directory Service store—are no longer available. See the upgrade procedures for “Upgrading Fault Tolerant Management Framework Topologies” in the Progress Sonic Installation and Upgrade Guide.
158 Progress SonicMQ Configuration and Management Guide 8.5
Configuring Directory Service Components
Configuring Directory Service ComponentsThe Directory Service retains configuration information for all the configuration objects in the domain in a persistent store. The Directory Service sends relevant configuration changes to containers and components, and a container caches that information, and then reconciles the cache upon major events, such as container startup or Directory Service restart. The Sonic Management Console listens for Directory Service changes and refreshes its configurations. The Directory Service uses optimistic currency control and versioning to maintain integrity under concurrent access by management applications.
The interaction that a runtime component, such as a container, has with its Directory Service does not require the container to access the Directory Service whenever the container requires information. Containers maintain a local cache of their configuration with relevant configuration information for easy access and for reference when the Directory Service is not accessible.
Containers read configurations and invoke runtime operations. Changes to configurations and invocation of operations in the domain are achieved through administration tools— the Sonic Management Console, the dsadmin tool (see “Backup and Restoration” on page 511), and applications that use the Sonic management APIs. (See the Progress SonicMQ Administrative Programming Guide for information about the Configuration and Runtime APIs.)
You should fully secure access to the Directory Service store through the normal file system security that your operating system provides. You can also encrypt the Directory Service store and the Directory Service boot file (see “Encrypting the Directory Service and its Boot Files” on page 176).
Configuring a Directory Service ObjectOnly one Directory Service has an active role at any one time. That could be either one Directory Service configuration object for non-fault-tolerant use, or a pair of primary/backup Directory Service configuration objects where one is active and its peer is standing by. Deploy each Directory Service configuration in a separate container. Only one Directory Service—a standalone, or a fault tolerant pair—can run at a given time.
Typically, you would accept the Directory Service (named DIRECTORY SERVICE) created with a new domain manager installation and, when you want to create fault tolerant management, derive a backup Directory Service from it. That action changes the existing Directory Service configuration from Not Fault Tolerant to the Primary role and defines a special configuration, Directory Service (Backup), in the Backup role.
Progress SonicMQ Configuration and Management Guide 8.5 159

Chapter 5: Configuring Framework Components
For completeness purposes, the following procedure describes how to create a Directory Service configuration.
◆ To create a Directory Service configuration:
1. Open the Sonic Management Console, connect to a domain as described in “Running the Sonic Management Console” on page 38, select a location on the tree in the Configure tab (for example, the Framework Components folder), right-click, and select New > Configuration.... The Create Configuration dialog box opens, as shown on page 83.
2. In the list on the From Types tab, expand the Sonic Management Environment folder and select Directory Service. The New Directory Service dialog box opens:
3. Specify a Name for the Directory Service. You cannot use the reserved name, DIRECTORY SERVICE.
The Fault Tolerance Role is Not Fault Tolerant when you create the new configuration. It will change to Primary upon creation of a backup Directory Service. See “Configuring a Backup Directory Service” on page 163.
4. Select the Data Storage tab:
160 Progress SonicMQ Configuration and Management Guide 8.5
Configuring Directory Service Components
The Domain Name is always the current domain. It cannot be modified.
The Host Directory is the path for the deployed Directory Service to locate its directory store. The default value is “.” indicating that the relative location of the domain’s host directory to the working directory of the container is identical:sonic_install_dir/MQ8.5
5. Setting the password for encrypting Directory Service storage requires that you follow through by generating a new boot file, and then attuning the contents of the unencrypted store to the password to encrypt the Directory Service store.
Before choosing this option, see “Encrypting the Directory Service Store” on page 176.
6. Select OK in the New Directory Service Properties dialog box. The Sonic Management Console saves the new Directory Service configuration.
Note If you modify the Directory Service configuration, you must regenerate the boot file (see “Directory Service Boot Files” on page 174).
Progress SonicMQ Configuration and Management Guide 8.5 161

Chapter 5: Configuring Framework Components
◆ To change a Directory Service configuration:
1. Open the Sonic Management Console, connect to a domain as described in “Running the Sonic Management Console” on page 38, navigate to the configuration of the Directory Service configuration you want to change.
2. Click on it, and then choose Properties.
The Edit Directory Service Properties dialog box opens:
On the General tab, you cannot modify the Name or the Fault Tolerance Role.
Note When a Directory Service configuration is modified, its boot file must be regenerated and redeployed to replace the existing Directory Service boot file. The hosting container must then be restarted to pick up the configuration changes.
162 Progress SonicMQ Configuration and Management Guide 8.5

Configuring Directory Service Components
Configuring a Backup Directory ServiceA Directory Service is enabled to generate and interact with a backup of the Directory Service and establish replication connections between the Directory Service stores. It is important that you have installed set of software for a domain manager (with the same domain name and the same security options yet a different broker name) at the remote location so that you can identify its broker, hostname, and the installation path in the backup configuration. When the remote domain manager is fully-reconfigured, it will run the backup components.
◆ To create a backup Directory Service configuration:
1. Open the Sonic Management Console, connect to the domain, and navigate to the Directory Service configuration you want to backup. The default Directory Service is Framework Components/DIRECTORY SERVICE.
2. Right-click on it. If the Directory Service you selected has not yet defined a backup, the option Create Backup DS is enabled. Select that option.
A new configuration object is created adjacent to the one you selected. The new object has the same name as the original one with (Backup) appended to the name. The new object is given the Fault Tolerance Role of Backup while the original object is toggled to the Fault Tolerance Role of Primary.
3. Right-click on the new backup configuration, and then choose Properties.
4. On the Data Storage tab, confirm or adjust the Host Directory parameter to specify the installation path on the backup system.
5. Click OK if you made changes, click Cancel if the path is correct as shown.
6. Right-click on the primary DS configuration, and then choose Generate Boot File.
Save the generated file as ds.xml on the Primary system.
7. Right-click on the backup DS configuration, and then choose Generate Boot File.
Save the generated file as ds.xml in a way that lets you replace the same file in the SonicMQ installation root on the Backup system. (Not on the Primary system!)
The implementation of the backup Directory Service requires you to define replication connections.
For comprehensive information on fault tolerant management services as well as an example, see the “Fault Tolerant Management” chapter in the Progress SonicMQ Deployment Guide.
Progress SonicMQ Configuration and Management Guide 8.5 163

Chapter 5: Configuring Framework Components
Configuring Replication Connections for Directory Service Peers
◆ To create and define replication connections for the Directory Service stores:
1. After you create a backup Directory Service configuration object, the original object adds a sub-configuration level for definition of the replication connections that will synchronize the primary and backup Directory Service stores. Expand the Directory Service object to expose its Replication Connections, as illustrated:
2. There are two property sheets that apply to DS replication connections:
■ Parameters that apply in general to Directory Service replication connections. (See page 165.)
■ Properties of each Directory Service replication connection. (See page 171.)
Important Replication Connection Timeout — A JVM system property lets you tune how long Directory Service instances wait for the replication peer before continuing with the startup sequence standalone. Note that, even when starting standalone, the peers reconnect as soon as possible, and then determine their correct state. When set low, this timeout speeds up the startup of the Primary when the Backup is not started, typically in development mode.
The system property should be set in the command line of the launchcontainer script as:
-Dsonicsw.ds.replication.connection.timeout=value
The countdown value will propagate to the runtime container. While you could set the property on the container properties Environment tab in “Java System Properties” (with the name sonicsw.ds.replication.connection.timeout and an integer value), you would experience a distracting delay waiting to start the timeout countdown.
The default value is 40 seconds for the Directory Service instance that was active (or standalone) during the previous session, and 90 seconds for the Directory Service instance that was standby during the previous session. A low value is in the range of 10 seconds. Values higher than the default values are generally not useful.
164 Progress SonicMQ Configuration and Management Guide 8.5

Configuring Directory Service Components
Parameters of Directory Service Replication
Properties defined at the root of a Directory Service’s Replication Connections apply to all replication definitions used in the domain. That means that the tuning parameters, and the SSL parameters when SSL is selected, apply to every replication definition you create.
◆ To edit the parameters of Directory Service replication:
1. Right-click on Replication Connections, and then choose Properties. The Edit Directory Service Replication Properties dialog box opens:
2. On the General tab, specify the following replication details:
Note SSL Keystore and Truststore — If you intend to use SSL for DS replication, you must know the path to these stores, if you are not connected locally. They cannot be stored in the Directory Service and you cannot navigate to them on a remote system.
Property Description
Retry Interval Sets how long to wait before trying to reestablish DS replication operations. The positive integer value specifies time in seconds. The default value is 180 seconds—3 minutes.
Ping Interval Sets the time interval between operational tests of DS replication. The replication operation is monitored with a heartbeat controlled by the Ping Interval property. The positive integer value specifies time in seconds. The default value is 30 seconds.
Progress SonicMQ Configuration and Management Guide 8.5 165

Chapter 5: Configuring Framework Components
Failure Detection Timeout
Sets the delay before the Directory Service instance in the standby role initiates failover after losing connection to the active Directory Service. A positive integer value specifies time in seconds; the value 0 specifies that immediate failover should occur. The default value is 0.
Max Replication Log Size
Determines the maximum log size that is kept by the active DS to synchronize a lagging behind synchronizing standby. A longer synchronization protocol is required when required log date is missing. The default value, 80 MB, allows for about 10,000 pages. That value should ensure that data-copying synchronization is rare.
Replicated Transaction Timeout
Number of seconds a transaction in the active DS will wait for its modifications to be replicated. If -1, the default value, is specified, transactions wait forever (or until the connection with the peer is lost). Specifying 0 indicates that transactions do not wait.
Property Description
166 Progress SonicMQ Configuration and Management Guide 8.5

Configuring Directory Service Components
Dual Active Resolution
When the option is selected, the Primary Directory Service responds to a dual-active condition by taking the active role while the Backup Directory Service takes the standby role. This response expresses a preference for continuous availability of the Directory Service, at the risk of losing updates that occurred if the backup Directory Service was previously the one in the active role.
When the option is cleared, a dual-active scenario forces both Directory Service peers to shut down and await manual administrative resolution.
Backup Failover Read-only
Select the option so that, when the backup Directory Service assumes the active role, the Directory Service store is static. It is read-only, and it accepts no changes. When the primary recovers, it assumes the active role again. As a result, a dual-active scenario cannot occur.
Clear the option so that, when the backup Directory Service assumes the active role, it is write-enabled and behaves identical to the primary. When the primary recovers, it assumes the standby role and synchronizes with the active backup.
The option for Backup Failover Read-only is, by default, cleared. That means that—when you create a backup—the backup will be write-enabled. While this is typically the preferred behavior, you can declare that, in the event that the backup takes the active role, no changes will be allowed to the Directory Service. When you do this, failover to the backup is guaranteed to never get an unresolvable dual-active scenario after recovery of the primary component. But making the backup read-only will need an explicit failback to resume a write-enabled Directory Service. See the example in the “Fault Tolerant Management” chapter of the Progress SonicMQ Deployment Guide
Property Description
Progress SonicMQ Configuration and Management Guide 8.5 167

Chapter 5: Configuring Framework Components
3. If you intend to use SSL with your replication connections, click the SSL tab.
4. In the Cipher Suite section, click the pulldown to select the cipher suite you want to use for SSL encryption.
Note SSL for Directory Service replication requires JVM 1.5.
Important The sample SSL certificates packaged with SonicMQ limit the cipher suites you can use to the following:● TLS_DHE_DSS_WITH_AES_128_CBC_SHA
● SSL_DHE_DSS_WITH_3DES_EDE_CBC_SHA
● SSL_DHE_DSS_WITH_DES_CBC_SHA
● SSL_DHE_DSS_EXPORT_WITH_DES40_CBC_SHA
168 Progress SonicMQ Configuration and Management Guide 8.5

Configuring Directory Service Components
5. In the Keystore section, specify the following properties:
6. In the Truststore section, specify the following properties:
7. In the Other SSL Connection Properties section, specify the following properties:
8. Click OK to close the dialog and accept your changes.
Property Description
Primary Location Location of the keystore on the host of primary Directory Service.
Primary Password Password required to access the content of the keystore.
Backup Location Location of the keystore on the host of backup Directory Service.
Backup Password Password required to access the content of the keystore.
Property Description
Primary Location Location of the truststore on the host system of the primary Directory Service.
Primary Password Password required to access the content of the truststore.
Backup Location Location of the truststore on the host system of the backup Directory Service.
Backup Password Password required to access the content of the truststore.
Property Description
Handshake Timeout
Specifies how long an SSL link should wait for the SSL handshake to complete. A failure in the completion of the handshake within the specified timeout causes the SSL link to close. The positive integer value specifies time in seconds. The default value is 20 seconds.
Close Timeout Specifies how long an SSL link waits for the SSL close handshake to complete. Failure in the completion of the handshake within the specified timeout causes the SSL close handshake to abort and the underlying TCP link to close. The positive integer value specifies time in seconds. The default value is 10 seconds.
Progress SonicMQ Configuration and Management Guide 8.5 169
Chapter 5: Configuring Framework Components
Using the Sample Keystore and Truststore for DS Replication
You can evaluate the use of SSL in DS replication by using the sample keystore and truststore included in the product installation.
◆ To use the sample keystore and truststore:
1. Use the Sonic Management Console to set up a backup Directory Service, as described on page 163.
2. Note the Sonic installation location on the system that hosts the primary Domain Manager, and on the system that hosts the backup Domain Manager.
3. On the Configure tab, open Framework Components folder, and then expand the Directory Service configuration. Right-click on Replication Connections, and then choose Properties. The Edit Directory Service Replication Properties dialog box opens. Choose the SSL tab.
4. Select a Cipher Suite from the pulldown list.
5. In the Keystore section:
a. Enter the location on the system hosting the primary Directory Service.
The keystore sample is located at sonic_install_root\MQ8.5\certs\ds_replication\key.ks. The default installation location uses the Windows path C:\Sonic\MQ8.5\certs\ds_replication\keys.ks.You might also make it a location relative to the container’s working directory, such as (when at the SonicMQ root): .\certs\ds_replication\key.ks.
b. Enter the sample’s password, blackbird.
c. Similarly, enter the keystore location on the system hosting the backup Directory Service, and the sample’s password, blackbird.
6. In the Truststore section:
a. Enter the location on the system hosting the primary Directory Service.
The truststore sample in the same folder as the keystore sample. The truststore sample file is keyTrust.ks. Enter the sample’s password, blackbird.
b. Similarly, enter the truststore location on the system hosting the backup Directory Service, and the sample’s password, blackbird.
170 Progress SonicMQ Configuration and Management Guide 8.5

Configuring Directory Service Components
The dialog, when the primary Domain Manager is installed at C:\SonicPrimaryDM and its backup is installed at C:\SonicBackupDM would look like this:
Directory Service Replication Connection Definitions
Replication definitions that you define can be one connection between the two Directory Services to enable replication, or multiple, redundant replication connections.
◆ To establish one replication connection for basic Directory Service replication:
1. Expand the Directory Service to display the Replication Connections.
2. Right-click on Replication Connections, and then choose New Replication Connection. The New Replication Connection dialog box opens.
3. Enter a Name.
4. Choose a protocol. If you choose SSL, the SSL parameters at the root of replication connections must be defined and those parameters are applied to this configuration.
Progress SonicMQ Configuration and Management Guide 8.5 171

Chapter 5: Configuring Framework Components
5. Enter the hostname or IP address of the primary Directory Service. Then specify an unused port on the host system. Do the same for the backup’s host and port.
6. For the Weight on a basic replication connection, accept the default value 1.
7. Click OK.
When the primary and backup containers start, they make this replication connection.
When you create redundant DS replication connections, there are additional considerations. The weight factor of each replication connection determines its priority in carrying replication data.
The Directory Service replication connections should coordinate with the other connections on its network. Where multiple network interfaces exist on systems, the connections for management communication, DS replication, and interbroker communication in the cluster should strive to all be on the same network and all failover to the same next network to give the greatest chance of continued service.
◆ To establish redundant Directory Service replication connections:
1. Expand the Directory Service to display the Replication Connections.
2. Right-click on Replication Connections, and then choose New Replication Connection. The New Replication Connection dialog box opens.
3. Enter a Name. Enter a different name than the one on the existing definition.
4. Choose a protocol. If you choose SSL, the SSL parameters at the root of replication connections must be defined and are applied to this configuration.
5. Enter the hostname or IP address of the backup Directory Service. This should be a different NIC and therefore a different IP address. Specify an available port that is not already defined for acceptors on the primary management broker. Do the same for the backup’s host and port.
6. The weight value you enter determines the priority of the connection for carrying the replication traffic. When multiple replication connections are functioning, the one with the highest weight is used first. Should that connection fail, the remaining connections are evaluated and the one with the highest weight is used next.
Note Limitations to IPv6 Support on Windows — Some Windows systems have problems with IPv6 that cannot be addressed in currently supported JVMs. Sonic 8.0 does not support IPv6 on Windows for areas of SonicMQ that use NIO, namely Directory Service Replication
172 Progress SonicMQ Configuration and Management Guide 8.5

Configuring Directory Service Components
7. Repeat this process to define your set of weighted redundant Directory Service Replication Connections.
When the primary and backup containers start, they make all the replication connections. The replication connection with the highest weight value assumes the replication traffic.
The configured Directory Service replication connections might look like this:
You can adjust the weight of replication connections. Any other parameter changes require that you delete the definition and recreate it with your preferred parameters.
Important The definition of a Backup Directory Service and replication connections is an important facet of fault tolerant management services but additional configurations tasks are required to complete its implementation. For comprehensive information on fault tolerant management services as well as an example, see the “Fault Tolerant Management” chapter in the Progress SonicMQ Deployment Guide.
Progress SonicMQ Configuration and Management Guide 8.5 173

Chapter 5: Configuring Framework Components
Directory Service Boot FilesThe Directory Service uses an XML-formatted boot file to read its configuration. The Directory Service boot file is normally located in the working directory from which the Directory Service is started, together with the configuration of the management container that launches the management broker and the Agent Manager.
Generating a new Directory Service boot file is a straightforward action initiated from a Directory Service or Directory Service (Backup) configuration object.
The following procedure describes how to generate a Directory Service boot file from the Sonic Management Console.
◆ To generate a Directory Service boot file from the Sonic Management Console:
1. Open the Sonic Management Console and connect to a domain, as described in “Running the Sonic Management Console” on page 38 and select the Configure tab.
2. Select the Directory Service configuration object, right-click, and select Generate Boot File. The Select Boot File Location dialog box opens.
3. Specify the path and name of the boot file with a .xml extension.
4. Select Generate. SonicMQ generates the boot file as specified.
The following is an example of a DS boot file for a non-fault tolerant Directory Service:
<?xml version="1.0" encoding="UTF-8"?><Domain name="Domain1" xmlns:xsi="http://www.w3.org/2001/XMLSchema-instance" xmlns="http://www.sonicsw.com/mf" xsi:schemaLocation="http://www.sonicsw.com/mf MFConfigurationElements.xsd"> <ConfigElement> <ElementID name="/directory/1313609934230_1" creationTimestamp="1314041363766" type="MF_DIRECTORY_SERVICE" releaseVersion="105" version="1" /> <AttributeSet> <AttributeSet> <AttributeName name="FILE_SYSTEM_STORAGE" /> </AttributeSet> <Attribute name="HOST_DIRECTORY" value="c:\Program files\Progress\Sonic85DM_b392\Containers\Domain1.DomainManager" type="string" /> <AttributeSet> <AttributeName name="CONFIG_ELEMENT_REFERENCES" /> </AttributeSet> <AttributeSet> <AttributeName name="_MF_SYSTEM_ATTRIBUTES" /> </AttributeSet> <Attribute name="CLASSNAME" value="com.sonicsw.mf.framework.directory.DSComponent" type="string" /> </AttributeSet> </ConfigElement></Domain>
174 Progress SonicMQ Configuration and Management Guide 8.5

Configuring Directory Service Components
Progress SonicMQ Configuration and Management Guide 8.5 175
The following is an example of a DS boot file for a primary Directory Service:
Notice that the Directory Service boot file includes backup DS information, SSL information as described in the sample, and the sample replication connections.
<AttributeSet> <Attribute value="com.sonicsw.mf.framework.directory.DSComponent" type="string" name="CLASSNAME" /> <AttributeSet> <AttributeName name="REPLICATION_PARAMETERS" /> <AttributeSet> <AttributeName name="SSL_PARAMETERS" /> <Attribute value="blackbird" type="string" name="BACKUP_KEY_STORE_PASSWORD" /> <Attribute value="blackbird" type="string" name="PRIMARY_TRUST_STORE_PASSWORD" /> <Attribute value="blackbird" type="string" name="PRIMARY_KEY_STORE_PASSWORD" /> <Attribute value="C:\SonicPrimaryDM\MQ8.5\certs\ds_replication\key.ks"
type="string" name="PRIMARY_KEY_STORE_FILE" /> <Attribute value="blackbird" type="string" name="BACKUP_TRUST_STORE_PASSWORD" /> <Attribute value="C:\SonicBackupDM\MQ8.5\certs\ds_replication\keyTrust.ks"
type="string" name="BACKUP_TRUST_STORE_FILE" /> <Attribute value="C:\SonicBackupDM\MQ8.5\certs\ds_replication\key.ks"
type="string" name="BACKUP_KEY_STORE_FILE" /> <Attribute value="TLS_KRB5_EXPORT_WITH_DES_CBC_40_MD5" type="string" name="CIPHER_SUITE" /> <Attribute value="C:\SonicPrimaryDM\MQ8.5\certs\ds_replication\keyTrust.ks"
type="string" name="PRIMARY_TRUST_STORE_FILE" /> </AttributeSet> </AttributeSet> <Attribute value="." type="string" name="HOST_DIRECTORY" /> <AttributeSet> <AttributeName name="FILE_SYSTEM_STORAGE" /> </AttributeSet> </AttributeSet> </ConfigElement> <ConfigElement> <ElementID type="MF_REPLICATION_CONNECTION" creationTimestamp="1173123515349"
releaseVersion="105" name="/replicationConnections/1173123515109_11" version="9" /> <AttributeSet> <AttributeSet> <AttributeName name="REPLICATION_CONNECTIONS" /> <AttributeSet> <AttributeName name="One_NIC" /> <Attribute value="11.22.33.2" type="string" name="BACKUP_ADDR" /> <Attribute value="11.22.33.1" type="string" name="PRIMARY_ADDR" /> <Attribute value="One_NIC" type="string" name="NAME" /> </AttributeSet> <AttributeSet> <AttributeName name="Another_NIC" /> <Attribute value="5" type="integer" name="WEIGHT" /> <Attribute value="44.55.66.2" type="string" name="BACKUP_ADDR" /> <Attribute value="44.55.66.1" type="string" name="PRIMARY_ADDR" /> <Attribute value="Another_NIC" type="string" name="NAME" /> </AttributeSet> </AttributeSet> </AttributeSet> </ConfigElement></Domain>

Chapter 5: Configuring Framework Components
Encrypting the Directory Service and its Boot FilesYou can encrypt the content of the Directory Service storage. You can also encrypt its boot files, a good practice since they might contain sensitive information such as administrative user names and passwords in readable text. The procedural steps are:
1. “Encrypting the Directory Service Store” on page 176.
2. “Encrypting the Directory Service Bootfile” on page 178.
3. “Starting the Container with the Encrypted Bootfiles” on page 179.
4. “Cleaning up” on page 180.
Encrypting the Directory Service Store
The following procedure describes how to encrypt the Directory Service (or change its password).
◆ To encrypt the Directory Service storage or to change the password:
1. With the Domain Manager stopped, backup the entire DomainManager directory, typically sonic_install_dir/Containers/Domain1.DomainManager.
2. Start the DomainManager.
3. Edit the file ds.xml at that location to change the HOST_DIRECTORY value to its explicit path. The default location in a Windows installation would be:C:\Program Files\Progress\Sonic\Containers\Domain1.DomainManager
4. Rename the modified ds.xml to ds_ORG.xml. The next procedure creates a new one.
5. Start the Sonic Management Console, and then connect to the domain.
6. On the Configure tab, navigate to Framework Components/Directory Service:
a. Right-click on Directory Service, and then choose Properties.
b. Select the Data Storage tab:
❑ Change Host Directory to the same explicit path as you did in Step 3.
❑ Click Set Password, enter your preferred password, and then click OK in both dialog boxes. The log notes that the new ds.xml file was generated.
7. Navigate to Containers/DomainManager:
a. Right-click on DomainManager, and then choose Generate Setup File.
b. Save the file, DomainManager.setup, at a location that is easy to access, such as C:\ (If you enter a folder path, the folder tree must exist.)
176 Progress SonicMQ Configuration and Management Guide 8.5

Configuring Directory Service Components
8. Stop the DomainManager.
9. Dump the Directory Service store:
a. Rename ds.xml to ds_PWD.xml, then rename dsORG.xml to ds.xml.
b. Open a console window to MQ8.5_install_root to export the entire structure of the existing Directory Service store.
,
c. Create a new directory named at a temp location such as c:\temp\dumpFolder at the root of the work area.
d. Perform the dump action, as follows
❑ On Windows, enter:bin\dsAdmin /a d /d ..\Containers\Domain1.DomainManager\ds.xml
/f c:\temp\dumpInfo /s c:\temp\dumpFolder
❑ On UNIX/Linux, enter:bin/dsAdmin -a d -d ../Containers/Domain1.DomainManager/ds.xml
-f /temp/dumpInfo -s /temp/dumpFolder
The configurations and files are dumped.
10. Delete the existing Directory Service folder, sonic_install_dir/Containers/Domain1.DomainManager/Domain1.
Now, you will seed the DS using the ds.xml boot file that has the password. The loading process encrypts the exported configuration data as it repopulates the DS.
11. Rename ds.xml to ds_DUMPER.xml, and then rename dsPWD.xml to ds.xml.
12. Load a new Directory Service store using the boot file with the password in a console window located at MQ8.5_install_root:
❑ On Windows, use the dsAdmin.bat script and enter: bin\dsAdmin /a l /d ..\Containers\Domain1.DomainManager\ds.xml
/f c:\temp\dumpInfo /s c:\temp\dumpFolder
❑ On UNIX/Linux, use the dsAdmin.sh script and enter:bin/dsAdmin -a l -d ../Containers/Domain1.DomainManager/ds.xml
-f /temp/dumpInfo -s /temp/dumpFolder
13. Start the container that hosts the Directory Service.
The Directory Service is encrypted.
Note The following procedures position you at MQ root so the location of the Directory Service store and ds.xml is entered as a relative path, and the dump files are located in a temporary directory.
Progress SonicMQ Configuration and Management Guide 8.5 177

Chapter 5: Configuring Framework Components
After encrypting the Directory Service, you should also encrypt the bootfiles—the Directory Service ds.xml file, (which contains the password used to encrypt the Directory Service), and the DomainManager container setup.
Encrypting the Directory Service Bootfile
The Password Based Encryption command-line tool (PBETool) included in the SonicMQ installation is used to encrypt the Directory Service bootfile, ds.xml.
◆ To encrypt the Directory Service boot file:
1. In the sonic_install_dir\Containers\Domain1.DomainManager directory, rename ds.xml to ds_CLEAR.xml
2. Open a console window to sonic_install_dir\Containers\Domain1.DomainManager:
■ On Windows, enter:..\..\MQ8.5\bin\pbetool /m encrypt
/c ds_CLEAR.xml /e ds.xml /p pwd
Important The management container’s bootfile that launches the Directory Service is closely tied to the Directory Service boot file, ds.xml. You must encrypt both and provide the same password for both encryptions.
Password Based Encryption — When you invoke the PBETool, you specify a clear-text version of the source file. The contents of this file are read into a byte-array in memory. An encryption key is derived from the password you provide, and the byte-array is DES-encrypted using that key. The PBETool uses a Message Authentication Code (MAC) to check the integrity of the encrypted file, based on a secret key. (The MAC is produced using the cryptographic hash function, MD5 or SHA1. The MAC of the original clear-text file is generated and is embedded in the encrypted data.) When decrypting the file, the embedded digest is compared against the digest computed from the decrypted data. The entire encrypted output, including the file size, is base64 encoded. (Base64 encoding is a method for encoding binary files so that they can be transferred easily.) The result is written to the file you specify. The PBETool parameters on Windows systems are as follows. (Replace the initial slash (/) by a dash (-) for UNIX or Linux systems.)
● /m mode — Mode that the tool will run in: encrypt or decrypt
● /c clear-text-file — Name of the file that contains the clear-text data. This is the input-source-file for an encryption or the output-destination-file for a decryption.
● /e encrypted-data-file — Name of the file that contains the encrypted data.
● /p password — Password used to create the key to encrypt or decrypt the file.
● /h — Lists the command-line options for the PBETool.
178 Progress SonicMQ Configuration and Management Guide 8.5

Configuring Directory Service Components
■ On UNIX/Linux, enter:../../MQ8.5/bin/pbetool.sh -m encrypt
-c ds_CLEAR.xml -e ds.xml -p pwd
The Directory Service boot file is ds.xml is created with encrypted content.
Setting up the Domain Manager’s Container with Encryption
The last step is to reconfigure the container so that it also encrypts is contents, and then forwards its password to the DS boot file..
◆ To reconfigure the Domain Manager’s container with encryption:
1. Locate the setup file you generated earlier in this procedure.
2. Open a console window in the installation’s Launcher directory.
3. Change to the appropriate version’s directory, such as, 8.5.0.392
4. Change to the container_setup directory.
5. Enter:
■ On Windows:setup.bat /c setupFile /u user /p userPassword /e pwd
■ On UNIX/Linux:setup.sh -c setupFile -u user -p userPassword -e pwd
where:
❑ propertiesFile is the file you generated earlier
❑ user is an administrator in the domain
❑ userPassword is the user’s password
❑ encryptionPwd is exactly the same password you used to encrypt ds.xml
For example:setup.bat /c c:\DomainManager.setup /u Administrator /p Administrator /e pwd
The DomainManager container is re-setup.
Starting the Container with the Encrypted Bootfiles
The container setup created an additional set_encryption_pwd script in the working directory of the container. It stores the container’s encrypted password.
Important Immediately proceed to re-setup the Domain Manager’s container, encrypted with the same password.
Progress SonicMQ Configuration and Management Guide 8.5 179

Chapter 5: Configuring Framework Components
◆ To start the encrypted Domain Manager:
❖ Stop the running Domain Manager
❖ Either:
■ Choose Start Domain Manager on the Start > Program Files >Progress >Sonic menu.
■ In sonic_install_root\Containers\Domain1.DomainManager, run the launchcontainer script with no additional parameters.
The Domain Manager starts. Its Directory Service and bootfiles are encrypted.
Cleaning up
You can delete the intermediate files ds_ORG.xml, ds_PWD.xml, ds_DUMPER.xml, ds_CLEAR.xml, and the entire temp directory.
Connecting Off LineThe Sonic Management Console usually interacts with a running Directory Service, but you can also interact directly with the configuration store if the Directory Service is offline, provided that you are on the system where the Domain Manager is installed.
In this case, you can access the Directory Service directly by entering the path to the Directory Service boot file, for example, .\ds.xml.
The boot file (ds.xml) is specified instead of the connection URL, either:
● From the Sonic Management Console (in the Create Connection dialog box shown on page 39) (on the local machine).
● When accessing from dsadmin.bat or dsadmin.sh.
Important If you are using management security in the domain, only the Administrator user can use this type of connection.
Warning The offline mode is for emergency use only when you cannot get the Directory Service and/or the broker hosting the management communications to start up.
Note If the Directory Service boot file has been encrypted, enter its password in the password parameter of the connection. However, if it is not encrypted and you provide a password, you get an error about decrypting.
180 Progress SonicMQ Configuration and Management Guide 8.5

Configuring Agent Manager Components
Crash RecoveryDirectory Service storage updates are atomic, no matter how many entities are modified. Either all the modifications succeed or they all fail. When the Directory Service starts after an abnormal shutdown, it completes a committed transaction or rolls back a transaction that did not commit before the Directory Service crashed.
Restarting the Directory Service initiates a recovery procedure that scans the directory structure to repair damaged information. The process rolls back or commits transactions in process. The startup time of the Directory Service after an abnormal shutdown takes longer than a normal startup.
Configuring Agent Manager ComponentsAn Agent Manager maintains a record of the runtime status of the containers and components in a domain. (For more information on the runtime management capabilities of the Agent Manager, see “Agent Manager” on page 515.)
The following restrictions apply to an Agent Manager:
● You can create and deploy multiple Agent Manager configurations, but only one Agent Manager can be active at any one time.
● You must not deploy more than one Agent Manager configuration in a single management container.
● If multiple Agent Managers are loaded to running containers, invalid deployments (such as two primary Agent Managers) will cause shutdown of all hosting containers pending manual resolution.
While you could create and deploy multiple Agent Manager configurations, only one Agent Manager has an active role at any one time. Typically, you would accept the Agent Manager (named AGENT MANAGER) created with a new domain manager installation and, when you want to create fault tolerant management, derive a backup Agent Manager from it. That action changes the existing Agent Manager configuration from Not Fault Tolerant to the Primary role and defines a new configuration of a special configuration, Agent Manager (Backup), in the Backup role.
For completeness purposes, the following procedure describes how to create an Agent Manager configuration.
Progress SonicMQ Configuration and Management Guide 8.5 181

Chapter 5: Configuring Framework Components
◆ To create an Agent Manager configuration:
1. Open the Sonic Management Console, connect to the domain you are managing, select a location on the tree in the Configure tab (for example, the Framework Components folder), right-click, and select New > Configuration.... The Create Configuration dialog box opens.
2. In the list on the From Types tab, expand the Sonic Management Environment folder and select Agent Manager. The New Agent Manager dialog box opens:
3. Specify a Name for the Agent Manager. You cannot use the reserved name, AGENT MANAGER.
The Fault Tolerance Role is NOT FAULT TOLERANT when you create the new configuration, and changes automatically to Primary upon creation of a backup Agent Manager.
4. Select the Metrics tab:
182 Progress SonicMQ Configuration and Management Guide 8.5
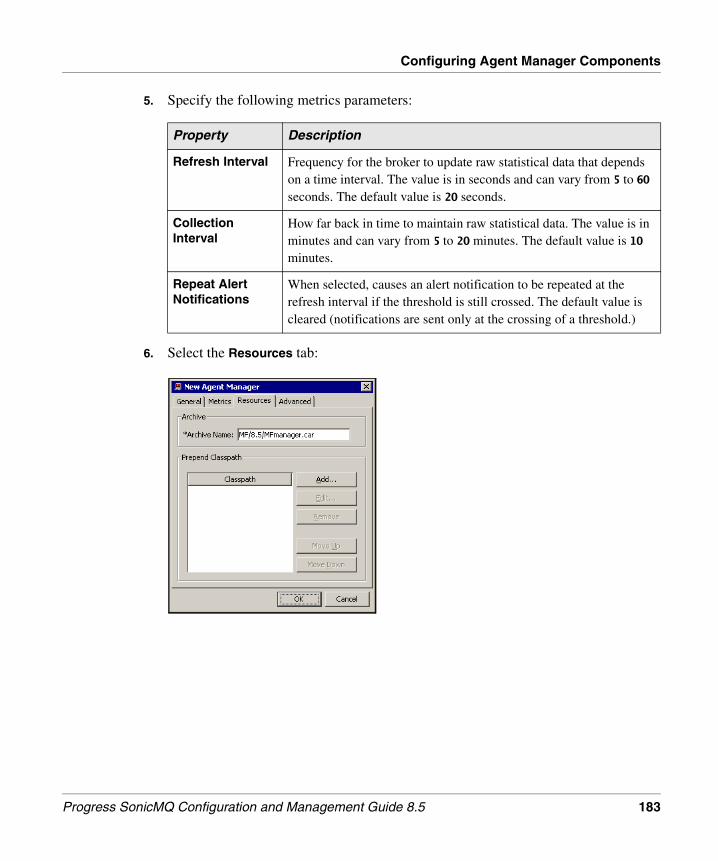
Configuring Agent Manager Components
5. Specify the following metrics parameters:
6. Select the Resources tab:
Property Description
Refresh Interval Frequency for the broker to update raw statistical data that depends on a time interval. The value is in seconds and can vary from 5 to 60 seconds. The default value is 20 seconds.
Collection Interval
How far back in time to maintain raw statistical data. The value is in minutes and can vary from 5 to 20 minutes. The default value is 10 minutes.
Repeat Alert Notifications
When selected, causes an alert notification to be repeated at the refresh interval if the threshold is still crossed. The default value is cleared (notifications are sent only at the crossing of a threshold.)
Progress SonicMQ Configuration and Management Guide 8.5 183

Chapter 5: Configuring Framework Components
7. Optionally, specify the following properties to configure resources:
8. Select the Advanced tab:
9. Specify the following properties for the status polling thread pool:
10. Select OK in the New Agent Manager dialog box.
◆ To change an Agent Manager configuration:
1. Open the Sonic Management Console, connect to a domain as described in “Running the Sonic Management Console” on page 38, navigate to the configuration of the Agent Manager configuration you want to change.
2. Click on it, and then choose Properties.
Property Description
Archive Name
Specifies the archive file that contains the libraries for this Agent Man-ager. The name is appended to each of the archive search path entries defined on the host container’s Environment tab to define a fully-enun-ciated location.
Prepend Classpath
Sets classpath entries for additional libraries and library versions that supersede any identical classes already specified. A well-formed class-path entry is a URL with any valid protocol, including sonichome:/// and sonicfs:///. Note that this property is not generally needed.
Property Description
Min Threads The minimum number of threads. The default value is 0.
Max Threads The maximum number of threads. The default value is 50. The minimum is 20 and the maximum value is 1000. The most effective setting is generally one thread for every five containers in the domain.
184 Progress SonicMQ Configuration and Management Guide 8.5

Configuring Agent Manager Components
The Edit Agent Manager Properties dialog box opens:
On the General tab, you cannot modify the Name or the Fault Tolerance Role.
3. If you created a backup Agent Manager and you are editing the primary Agent Manager, an additional property is available, Failure Detection Interval.
The failure detection interval indicates how long after apparent failure the Agent Manager should retry connection before initiating failover of all the active management services to the standby services. The default value is 5 seconds.
Configuring a Backup Agent ManagerA backup Agent Manager backup can be deployed at a backup site and monitor the state if its primary peer. When both peers in the primary-backup pair are running, one has the active role while the other takes the standby role. When the active Agent Manager fails, the standby forces the management services to failover to assume the active role.
◆ To create a backup Agent Manager configuration:
1. Open the Sonic Management Console, connect to the domain, and navigate to the Directory Service configuration you want to backup. The default Agent Manager is Framework Components/AGENT MANAGER.
2. Right-click on it. If the Agent Manager you selected has not yet defined a backup, the option Create Backup Agent Manager is enabled. Select that option.
A new configuration object is created adjacent to the one you selected. The new object has the same name as the original one with (Backup) appended to the name. The new object is given the Fault Tolerance Role of Backup while the original object is toggled to the Fault Tolerance Role of Primary.
3. If you need to adjust the Resources or the Advanced properties on the backup Agent Manager, right-click on the new backup configuration, and then choose Properties.
Progress SonicMQ Configuration and Management Guide 8.5 185

Chapter 5: Configuring Framework Components
Change the properties to your preferred values.
Click OK if you made changes, click Cancel if the values are correct as shown.
The Sonic Management Console modifies the Agent Manager as you specified.
For comprehensive information on fault tolerant management services as well as an example, see the “Fault Tolerant Management” chapter in the Progress SonicMQ Deployment Guide.
186 Progress SonicMQ Configuration and Management Guide 8.5
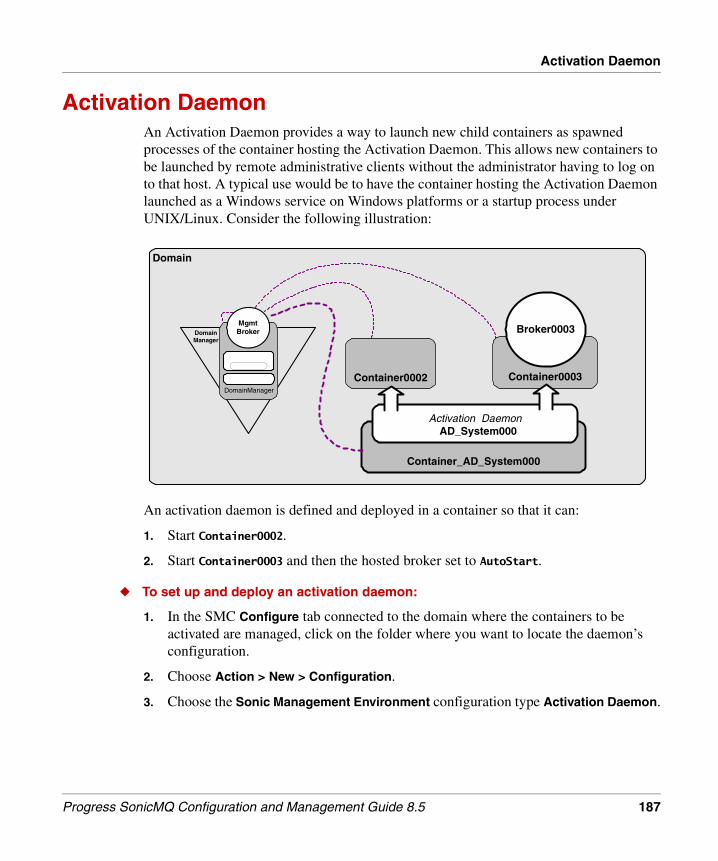
Activation Daemon
Activation DaemonAn Activation Daemon provides a way to launch new child containers as spawned processes of the container hosting the Activation Daemon. This allows new containers to be launched by remote administrative clients without the administrator having to log on to that host. A typical use would be to have the container hosting the Activation Daemon launched as a Windows service on Windows platforms or a startup process under UNIX/Linux. Consider the following illustration:
An activation daemon is defined and deployed in a container so that it can:
1. Start Container0002.
2. Start Container0003 and then the hosted broker set to AutoStart.
◆ To set up and deploy an activation daemon:
1. In the SMC Configure tab connected to the domain where the containers to be activated are managed, click on the folder where you want to locate the daemon’s configuration.
2. Choose Action > New > Configuration.
3. Choose the Sonic Management Environment configuration type Activation Daemon.
Domain
Container0003Container0002
Broker0003
DomainManager
MgmtBrokerDomain
Manager
Container_AD_System000
Activation Daemon AD_System000
Progress SonicMQ Configuration and Management Guide 8.5 187

Chapter 5: Configuring Framework Components
4. The New Activation Daemon dialog box opens:
5. Specify Name, the name of the Activation Daemon, under Activation Information, such as AD_System000.
6. Select the Resources tab:
7. Optionally, specify the following properties to configure resources:
8. Select OK. The Sonic Management Console creates the Activation Daemon.
Property Description
Archive Name
Specifies the container/component archive file that contains the libraries for this Activation Daemon. The name is appended to each of the archive search path entries defined on the host container’s Environment tab to define a fully-enunciated location.
Prepend Classpath
Sets classpath entries for additional libraries that supersede any classes already specified. A well-formed classpath entry is a URL with any valid protocol, including sonichome:/// and sonicfs:///.
188 Progress SonicMQ Configuration and Management Guide 8.5
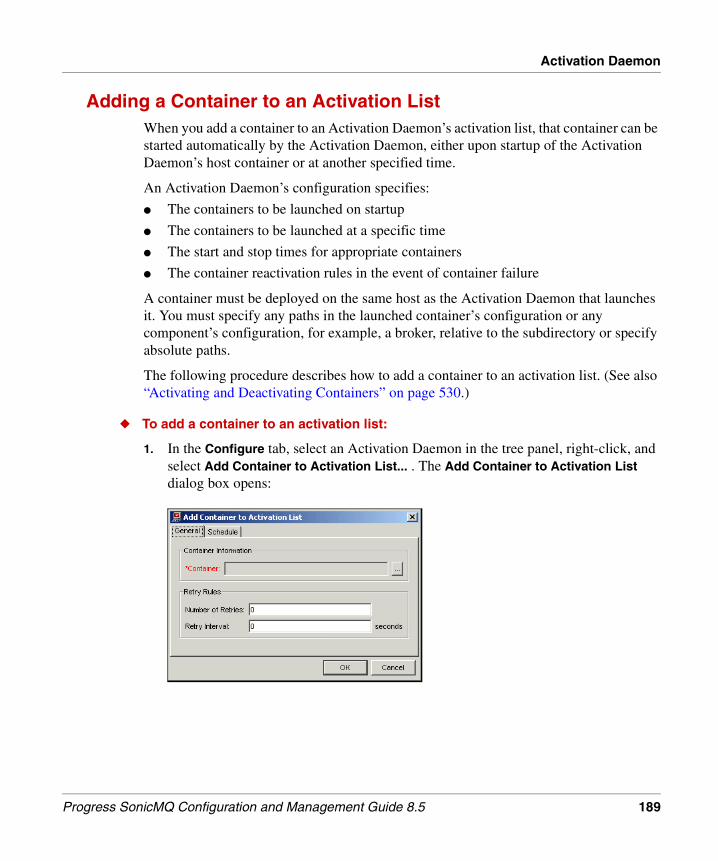
Activation Daemon
Adding a Container to an Activation ListWhen you add a container to an Activation Daemon’s activation list, that container can be started automatically by the Activation Daemon, either upon startup of the Activation Daemon’s host container or at another specified time.
An Activation Daemon’s configuration specifies:
● The containers to be launched on startup
● The containers to be launched at a specific time
● The start and stop times for appropriate containers
● The container reactivation rules in the event of container failure
A container must be deployed on the same host as the Activation Daemon that launches it. You must specify any paths in the launched container’s configuration or any component’s configuration, for example, a broker, relative to the subdirectory or specify absolute paths.
The following procedure describes how to add a container to an activation list. (See also “Activating and Deactivating Containers” on page 530.)
◆ To add a container to an activation list:
1. In the Configure tab, select an Activation Daemon in the tree panel, right-click, and select Add Container to Activation List... . The Add Container to Activation List dialog box opens:
Progress SonicMQ Configuration and Management Guide 8.5 189

Chapter 5: Configuring Framework Components
2. Specify the following:
3. You can optionally select the Schedule tab to specify an activation schedule:
4. Select Add... .The New Schedule Entry dialog box opens:
Property Description
Container Container name (select ... to select a container)
Number of Retries
Number of times the Activation Daemon should attempt to start the child container
Retry Interval Number of seconds between attempts by the Activation Daemon to start the child container
190 Progress SonicMQ Configuration and Management Guide 8.5

Activation Daemon
5. Under Action, specify:
6. Select OK to add the entry to the activation schedule and return to the Schedule tab.
The columns in the Schedule table include:
7. Select OK and return to the Add Container to Activation List dialog box.
8. Select OK. The Sonic Management Console associates the Activation Daemon with the container you selected and uses the activation schedule you specified.
Property Description
Action Select Start or Stop
Occurs Type Select Daily, Weekly, Monthly, or Yearly
Time Time of day
Day If Occurs Type is:
● Weekly, select the day of the week● Occurs Type is Monthly or Yearly, select the day of the month
Month If Occurs Type is yearly, select the month
Property Description
Action Start or Stop
Type Daily, Weekly, Monthly, or Yearly
Time Time of day
Date If Type is:
● Daily — Blank
● Weekly — Day of the week
● Monthly — Day in month
● Yearly — Day of the week and month in a year
Note An Activation Daemon’s activation list can contain multiple entries and the Activation Daemon might not be running when a scheduled time is reached. When the Activation Daemon starts up again, it performs its activities at the actual scheduled times, skipping any activities it missed.
Progress SonicMQ Configuration and Management Guide 8.5 191

Chapter 5: Configuring Framework Components
Viewing the Containers In an Activation Daemon’s Activation ListThe following procedure describes how to view the containers that use a specific Activation Daemon.
◆ To view the containers that use an Activation Daemon:
1. In the Configure tab, select an Activation Daemon in the tree panel. The rows in the Activation Daemon’s table list the containers that use this Activation Daemon:
The containers are listed by:
2. To change any options for an Activation Daemon in a container deployment, select the container in the Activation Daemon’s table, select the Properties icon, and open the Add Container to Activation List dialog box. You can modify the Activation Daemon’s schedule and other settings.
Property Description
Container Name of the container referenced
Number of Retries Number of times the AD should attempt to start the child container
Retry Interval Number of seconds between attempts to start the child container
192 Progress SonicMQ Configuration and Management Guide 8.5

Collections Monitors
Collections MonitorsCollections Monitors are components that perform monitoring functions across the components of a component collection. Collections Monitors can perform the following functions on one or more component collections:
● Notification forwarding
● Notification monitoring
● Metrics aggregation
The following illustration shows a Collections Monitor deployed in a container. The Collections Monitor hosts two component collections, each of which has two brokers in its collection. An additional component in component collection CC_1A is the AGENT of the Container 1A_1 which allows the metrics of the container’s agent to be monitored.
There are two aspects to Collections Monitor configuration:
● Defining what should be monitored for a specific component collection (see “Component Collections” on page 144)
● Defining which component collections should be monitored by a specific Collections Monitor (see “Specifying Collections to Monitor” on page 198)
Domain
DSBrokerDomain
Manager
AM
DS
Container CM_1
Broker1A_1
Broker1A_2
Broker1B_1
Broker1B_2
Container1A_2
Container1B_2
Container1B_1
Container1A_1
AGENT
Collections Monitor CM_1
ComponentCollection CC_1A
ComponentCollection CC_1B
Specifiedmetrics,
alerts, andnotifications
Progress SonicMQ Configuration and Management Guide 8.5 193

Chapter 5: Configuring Framework Components
Configuring a Collections MonitorThe following procedure describes how to configure a Collections Monitor.
◆ To create or edit a Collections Monitor:
1. To create a new Collections Monitor configuration, open the Sonic Management Console, connect to a domain as described in “Running the Sonic Management Console” on page 38, select a location on the tree in the Configure tab, right-click, and select New > Configuration.... The Create Configuration dialog box opens, as shown on page 83.
2. In the list on the From Types tab, expand the Sonic Management Environment folder and select Collections Monitor. The New Collections Monitor dialog box opens:
To edit an existing Collections Monitor, select the Collections Monitor and select the Properties icon in the toolbar. The Edit Collections Monitor Properties dialog box opens.
3. For a new Collections Monitor, specify a Name in the General tab.
4. The Listener Renewal Interval for Notifications indicates how frequently the collections monitor will renew its notification listener subscriptions before expiring. Failure to renew results in the listener subscription expiring after 2 hours.
The default value is 30 seconds.
194 Progress SonicMQ Configuration and Management Guide 8.5

Collections Monitors
5. Select the Storage tab:
6. Specify:
7. Select the Metrics tab:
Property Description
History Duration Duration (hours) for which historical monitoring data will be held
Location Directory to store historical monitoring data
Max Size Maximum size (in megabytes) of data stored
Note Any change to a Collections Monitor’s fault tolerance settings requires a reload of the component.
Progress SonicMQ Configuration and Management Guide 8.5 195

Chapter 5: Configuring Framework Components
8. Specify the following metrics parameters:
9. Select the Resources tab:
Property Description
Refresh Interval Frequency for the collections monitor to update raw statistical data that depends on a time interval. The value is in seconds and can vary from 5 to 60 seconds. The default value is 20 seconds.
Collection Interval
How far back in time to maintain raw statistical data. The value is in minutes and can vary from 5 to 20 minutes. The default value is 10 minutes.
Repeat Alert Notifications
When selected, causes an alert notification to be repeated at the refresh interval if the threshold is still crossed. The default value is cleared (notifications are sent only at the crossing of a threshold.)
196 Progress SonicMQ Configuration and Management Guide 8.5

Collections Monitors
10. Optionally, specify the following properties to configure resources:
11. Optionally, select the Resources tab to specify an archive and prepend a classpath for a custom Collections Monitor. See Step 6 on page 183 for details on using the Resources tab.
12. Select OK. The Sonic Management Console adds the new Collections Monitor to the tree or modifies the Collections Monitor to reflect your settings.
13. Create a container to host the collections monitor as a component and then generate a boot file for the container. See page 137 for details on creating a container.
Property Description
Archive Name
Specifies the archive file that contains the libraries for this Agent Man-ager. The name is appended to each of the archive search path entries defined on the host container’s Environment tab to define a fully-enun-ciated location.
Prepend Classpath
Sets classpath entries for additional libraries and library versions that supersede any identical classes already specified. A well-formed class-path entry is a URL with any valid protocol, including sonichome:/// and sonicfs:///. Note that this property is not generally needed.
Progress SonicMQ Configuration and Management Guide 8.5 197

Chapter 5: Configuring Framework Components
Specifying Collections to MonitorThe following procedure describes how to specify which component collections should be monitored by a specific Collections Monitor. (See “Creating Component Collections” on page 144 to create a component collection.)
◆ To specify a component collection for a Collections Monitor:
1. To add a component collection to a Collections Monitor, select a Collections Monitor, right-click, and select Add Component Collection.... A dialog box opens to let you choose existing component collections in the domain:
2. Select a component collection from the tree.
3. Click OK. The collection is listed in the table for the Collections Monitor.
198 Progress SonicMQ Configuration and Management Guide 8.5

Collections Monitors
Viewing the Collections Monitored by a Collections MonitorFollow this procedure to view the defined list of the component collections for a Collections Monitor.
◆ To view the collections being monitored by a Collections Monitor:
1. Select the Collections Monitor in the Configure tab of the Sonic Management Console:
The Collections Monitor’s table lists the component collections by their view names.
Progress SonicMQ Configuration and Management Guide 8.5 199

Chapter 5: Configuring Framework Components
200 Progress SonicMQ Configuration and Management Guide 8.5

Part III Configuring SonicMQ Messaging
Part III describes how to create and modify configurations in the following chapters:
● Chapter 6, “Configuring SonicMQ Brokers” describes how to configure brokers and clusters, add and remove brokers from clusters, and delete clusters.
● Chapter 7, “Configuring Broker Replication” describes how to configure backup brokers and replication connections between primary and backup brokers for fault tolerances.
● Chapter 8, “Configuring Acceptors” explains acceptors and how to configure broker-wide acceptor properties. It also describes how to configure TCP, HTTP Tunneling, and HTTP direct acceptors, with and without SSL.
● Chapter 9, “Configuring Routings” explains routing nodes and how to configure routing properties, how to configure, view, and delete DRA and HTTP direct routing definitions, and how to configure, view, and delete global subscription rules.
● Chapter 10, “Configuring Queues”introduces queues and how to configure general queue-handling properties on a broker, and how to configure general queue-handling properties on a broker and how to view queues on brokers It also describes how to configure and delete queues, including system queues and how to view queues on a cluster.
Progress SonicMQ Configuration and Management Guide 8.5 201

Part III: Configuring SonicMQ Messaging
202 Progress SonicMQ Configuration and Management Guide 8.5

Chapter 6 Configuring SonicMQ Brokers
This chapter describes contains the following sections:
● “Brokers” describes how to configure brokers.
● “Clusters” describes how to configure clusters, add and remove brokers from clusters, and delete clusters.
Note See the following documents for information on installing SonicMQ:
● The Progress Sonic Installation and Upgrade Guide describes the prerequisites, procedures, and options for installing SonicMQ components.
● The Progress SonicMQ Deployment Guide describes SonicMQ production deployments, starting by presenting architectures, topologies, and components including broker clusters, and the Dynamic Routing Architecture. It also presents SonicMQ's high availability features of fault tolerant clients, backup brokers, and replicated management components.
● The release notes describe known issues in the SonicMQ release.
Progress SonicMQ Configuration and Management Guide 8.5 203

Chapter 6: Configuring SonicMQ Brokers
Brokers In an installation of SonicMQ, the default name of the broker for management communications is MgmtBroker. The DomainManager container, installed by default, contains the management broker.
Creating and Editing Broker ConfigurationsThe following procedure describes how to create or edit a broker configuration. This procedure creates a broker configuration from a type. (You can use a template, see “Using Templates” on page 85, or copy another broker configuration, see “Copying Configurations” on page 94.) After you create a broker configuration, you must add the broker to a container so the broker will be runnable (see “Adding a Component to or Editing a Component in a Container” on page 137).
If you change a broker’s configuration properties, you usually have to reload the broker (see “Configuration Changes: Dynamic or Requiring Reload” on page 98).
◆ To create or edit a broker configuration:
1. To create a broker configuration, open the Sonic Management Console, connect to a domain as described in “Running the Sonic Management Console” on page 38, and select a location in the tree in the Configure tab. Right-click and select New > Configuration. The Create Configuration dialog box opens, as shown on page 83.
204 Progress SonicMQ Configuration and Management Guide 8.5

Brokers
2. In the From Types tab, select Create New Configuration, then select Shortcut to Broker and click OK. The New Broker dialog box opens:
Progress SonicMQ Configuration and Management Guide 8.5 205

Chapter 6: Configuring SonicMQ Brokers
3. You must specify the following required information to create a new broker (the remaining properties have default values or are optional):
4. Select Product Information to open the Broker Production Information dialog box:
Property Description
Name Each broker must have a unique name in a container. The length of the name (constrained to 15 characters in version 7 and earlier) has only practical limits. All alphanumeric characters, ASCII punctuation and symbols are allowed except double quote ("), pound (#), dollar sign ($), percent sign (%), asterisk (*), period (.), slash (/), and backslash (\). Note that spaces are not allowed.
Control Number The control code licensed for your use that determines the configuration options you want for this broker, for example, continuous availability.
Note It is a good practice to use unique names for all of the brokers that use the same Authentication Domain. When you create a security-enabled broker, a user is automatically created with the same name as the broker. If more than one broker in a domain has the same name, those brokers share the same user.
206 Progress SonicMQ Configuration and Management Guide 8.5

Brokers
The product information depends on the edition of SonicMQ that you install.
5. Click OK or Cancel to return to the New Broker dialog box.
To configure other, optional properties for a broker configuration, see “Configuring Broker Properties” on page 207.
6. Click OK in the New Broker Properties dialog box. The Sonic Management Console adds or edits the broker configuration.
Configuring Broker PropertiesThe following sections describe how to configure optional properties for a broker configuration:
● “Configuring General Broker Properties” on page 208
● “Configuring a Broker’s SSL Properties” on page 216
● “Configuring Broker Tuning Properties” on page 226
● “Configuring Message Storage” on page 230
● “Configuring Duplicate Detection” on page 232
● “Broker Metrics Properties” on page 235
● “Configuring Broker Resource Properties” on page 236
● “Configuring Advanced Broker Properties” on page 238
Warning Evaluation Mode is selected on evaluation installations. This setting relaxes the timing of hard disk write operations to improve performance for persistent and transacted messages, but can allow messages to be lost in the case of system failure. This mode allows SonicMQ to emulate the default behavior of certain competing messaging products that exhibit this potentially dangerous behavior and enables SonicMQ to be directly compared with these products.
It is not recommended that you select Evaluation Mode in production or for product comparisons where true guaranteed delivery is required. The use of nonpersistent messages is recommended only when message loss is acceptable during a system failure.
Progress SonicMQ Configuration and Management Guide 8.5 207

Chapter 6: Configuring SonicMQ Brokers
For information on which broker properties are dynamic and which require reloading of the broker, see “Configuration Changes: Dynamic or Requiring Reload” on page 98.
Configuring General Broker Properties
The following procedure describes how to configure general properties for a broker.
◆ To configure general broker properties:
1. For a new broker configuration, follow Step 1 on page 204 through Step 5 on page 207.
For an existing broker configuration, select the broker and select the Properties icon. The Edit Broker dialog box opens.
2. Select the General tab, as shown on page 205.
3. If the broker will be a member of a cluster, specify the name of the Cluster. Click the drop-down list for Clusters, as illustrated in a domain where two clusters are defined. Chooose the cluster that this broker will join, as shown:
(For information on clustering, see “Configuring Clusters” on page 250.)
4. Under Security, specify the broker’s security properties (if the broker is, or intends to be, a member of a cluster, every cluster member must have the same security settings):
Important When you change some parameters of a broker’s configuration, the broker’s data storage mechanism must be initialized. You can avoid re-initialization when you create the data store by assuring that the following settings will not need to be changed later:
● On the General tab:
■ The name of the broker
■ The Security option (Turning on or turning off security)
■ The QoP Cipher Suite and its parameters
● On the Tuning tab, the size of the recovery log (you can make it larger later, but you cannot decrease it later without re-initializing the store)
Important To change the name of an existing broker, you must initialize the broker’s data store. See “Actions That Require Re-initialization of a Broker’s Data Store” on page 553.
208 Progress SonicMQ Configuration and Management Guide 8.5

Brokers
a. Select Enable Security to enable security. Clear the option to disable security.
b. The option to Set JMSXUserID is available when security is enabled. Selecting the option requires the security-enabled broker to set the JMS defined property JMSXUserID in each message’s header with the identity of the user that sent the message.
When implementing management security, this option must be selected on the management broker, and—when using a management broker cluster—every broker in the management cluster.
c. Once security is enabled, you must specify the name of the Authentication Domain used by the broker. Click the drop-down list for Authentication Domain, as illustrated in a domain where three authentication domains are established in addition to the default authentication domain. Click on the authentication domain that will maintain users and groups for this broker. For example:
(See Step 6 on page 251 to specify this on a cluster and see “Authentication Domains” on page 421 for more information.)
Important Changing the security option makes the existing data store inaccessible. See “Actions That Require Re-initialization of a Broker’s Data Store” on page 553
Note Propagating the preferred JMSXUserID across Dynamic Routings — When you choose to Set JMSXUserID on a broker, you can specify on each of the broker’s routing definitions whether the identity of the message producer user (the default), or the identity of the routing user is sent to the remote node. For more information, see “Configuring DRA Routing Definitions” on page 335.
Progress SonicMQ Configuration and Management Guide 8.5 209

Chapter 6: Configuring SonicMQ Brokers
d. Specify the name of the Authorization Policy where the broker (or cluster) obtains QoP settings and ACLs. Click the drop-down list for Authorization Policy, as illustrated in a domain where three authorization policies are established in addition to the default policies. Click on the authorization policy that will maintain authentication for this broker. For example:
Policies are generally bound to an authentication domain because policy definitions are differentiated by user names, group names, and group members that can be authenticated. You could create flexible constructs that enable one set of group policies to apply to many authentication domains but the maintenance overhead to keep it generally applicable might be more that updating paired authentication domains and authorization policies.
(See Step 6 on page 251 to specify this on a cluster and see “Configuring a Set of Authorization Policies” on page 442 for more information.)
e. If security is enabled, click Set Broker Password to open the Set Broker Password dialog box and set and confirm the password.
Important Enabling security on an existing broker that is not security-enabled requires that you stop the broker, reinitialize the storage, and restart the broker (see “Storage Operations” on page 553).
When brokers are created with security enabled, a user is created with the same name as the broker. The same password must be used for the broker as for the Authentication Domain. If you change the user and/or password, you must do so for both the broker and the Authentication Domain. You must also regenerate the boot file. (For more information, see the “Password Controlled Components and Functions” section of the “Security Considerations in System Design” chapter in the Progress SonicMQ Deployment Guide.)
If a broker is a member of a cluster, the name and password authenticate the broker to other members in the cluster. (For more information, see the “Interbroker Authentication” section of the “Clustered Brokers” chapter of the Progress SonicMQ Deployment Guide.)
210 Progress SonicMQ Configuration and Management Guide 8.5

Brokers
f. If security is enabled, click Set QoP Cipher Suite to open the Edit QoP Cipher Suite Properties dialog box:
g. Under QoP Cipher Suite Details specify:
You can choose from a variety of ciphers and use your existing security mechanisms with SonicMQ with little or no modification. See the “Security Considerations in System Design” chapter in the Progress SonicMQ Deployment Guide for more information.
Use Sonic Cipher Suite Select to use the default cipher suite.
Cipher: DES, DESede, Blowfish, or AES
CBC, ECB, or PCBC
PKCS5 Padding
Digest: MD5
SHA
Key Choose the key length from the values for the selected cipher when alternate values available:
● DES: 56● DESede: 56, or 112● Blowfish: 32, 56, 112, 168, or 448● AES: 128, 192, or 256
Warning If you change any of the cipher suite details for a broker, you must initialize the data store. (See “Storage Operations” on page 553.) You might lose messages that were encrypted with the previous cipher suite and not persisted yet.
Progress SonicMQ Configuration and Management Guide 8.5 211

Chapter 6: Configuring SonicMQ Brokers
5. If you want the broker to perform WS-Security related processing, select a name from the Certificates Store drop-down (under WebService).
The certificates store contains certificates (in X.509.v3 format) required by the broker to perform WS-Security-related processing. The certificates in the store are those of external parties with which the broker interacts. The broker uses the certificate store for both inbound and outbound processing. For inbound processing, it uses the certificates in the store to validate the identity of external parties (this is necessary if the certificate of the external party is not embedded in the message and the broker must look up the certificate). For outbound processing, it uses the store to encrypt data (using the public keys of external parties). When you install SonicMQ, an empty certificates store (named Default Certificate Store) is provided for you. You can use this store or create your own. For information about how the broker supports Web Services, see the Part V of the SonicMQ Deployment Guide.
212 Progress SonicMQ Configuration and Management Guide 8.5

Brokers
6. To specify other WS-Security related settings, choose WS-Security. The Edit WebService Security Properties dialog opens:
This dialog box has four sections:
■ Keystore — This section specifies the location of a keystore and a password required to access entries in the keystore. A keystore is a file in JKS (Java Keystore) format that contains private keys and their related certificates. The broker uses the information in the keystore for inbound and outbound processing. For inbound processing, the broker uses private keys in the store to decrypt data; for outbound, the broker uses the private keys to digitally sign data and attaches their related certificates for authentication by external parties.
■ Truststore — This section specifies the location of a truststore and a password required to access entries in the truststore. A truststore is a file in JKS format that contains certificates the broker uses to establish trust between SonicMQ and external parties. The broker uses the information in the truststore strictly for inbound processing. If a certificate is present in the store, the broker trusts the external party; otherwise, the party is not trusted. The truststore you specify is the
Progress SonicMQ Configuration and Management Guide 8.5 213

Chapter 6: Configuring SonicMQ Brokers
broker’s default. This default can be overridden by a Web Service Protocol associated with an HTTP Direct acceptor.
■ User Name Token — This section specifies a username and an associated password. The broker uses these values to establish the default identity of the sending party when sending outbound messages to external parties. The username and password provide only one way for the broker to establish the identity of the sending party; the other way is to use an X.509.v3 certificate. An application programmer specifies, on a per-message basis, which way the broker establishes the identity of the sending party. The default identity used by the broker for the sending party can be overridden by a Web Service Protocol routing definition. An application programmer can also override the default identity of the sending party on a per-message basis.
■ X.509.v3 Token — This section specifies an X.509.v3 certificate and an associated password. The broker uses this certificate to establish the default identity of the sending party when sending outbound messages to external parties. The X.509.v3 certificate provides only one way for the broker to establish its default identity; the other way is to use a username and password. An application programmer specifies, on a per-message basis, which way the broker establishes its identity. The broker’s default identity can be overridden per endpoint by a Web Service Protocol routing definition. An application programmer can also override the broker’s identity on a per-message basis.
214 Progress SonicMQ Configuration and Management Guide 8.5
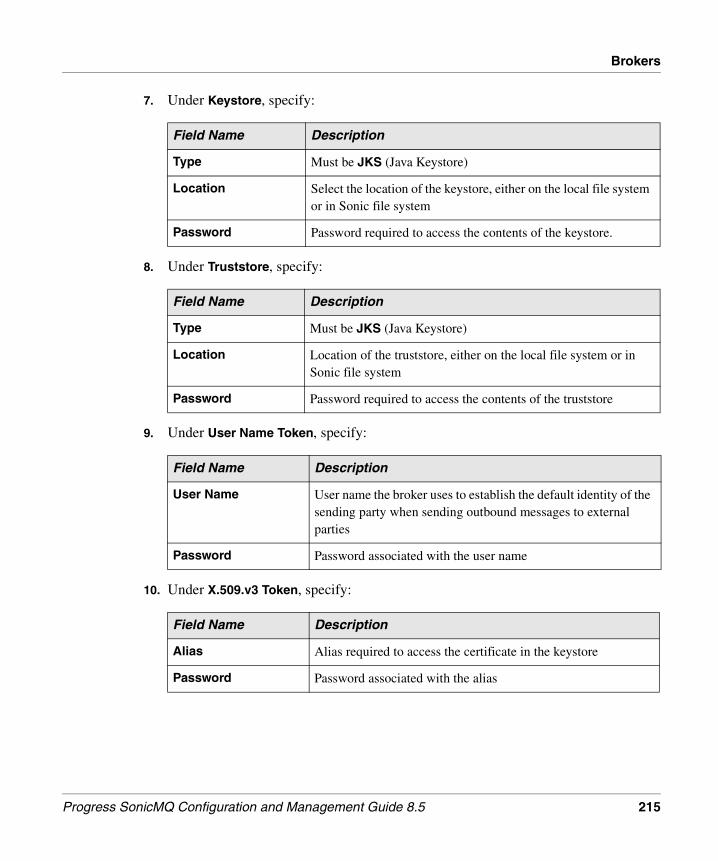
Brokers
7. Under Keystore, specify:
8. Under Truststore, specify:
9. Under User Name Token, specify:
10. Under X.509.v3 Token, specify:
Field Name Description
Type Must be JKS (Java Keystore)
Location Select the location of the keystore, either on the local file system or in Sonic file system
Password Password required to access the contents of the keystore.
Field Name Description
Type Must be JKS (Java Keystore)
Location Location of the truststore, either on the local file system or in Sonic file system
Password Password required to access the contents of the truststore
Field Name Description
User Name User name the broker uses to establish the default identity of the sending party when sending outbound messages to external parties
Password Password associated with the user name
Field Name Description
Alias Alias required to access the certificate in the keystore
Password Password associated with the alias
Progress SonicMQ Configuration and Management Guide 8.5 215

Chapter 6: Configuring SonicMQ Brokers
Configuring a Broker’s SSL Properties
The following procedure describes how to specify SSL properties on a new or existing broker. (For more information on SSL, see the Progress SonicMQ Deployment Guide).
◆ To configure SSL properties for a broker:
1. For a new broker configuration, create a broker as described in Step 1 on page 204 through Step 5 on page 207.
For an existing broker configuration, select the broker and select the Properties icon. The Edit Broker dialog box opens.
2. Select the SSL tab:
The JSSE cipher suites on a new broker are an empty list, an indication that all supported suites available in the JSSE implementation can be accepted. If you do not choose any ciphers when you create the broker, the complete default set of ciphers is in effect in its default sequence.
3. You can define specific ciphers you prefer to allow broker-wide. (You will be able to override the broker-wide list later, such as SSL acceptor definitions.)
Note Management clients use a single security identity to connect to primary and secondary connections, whether the identity is a user/password and/or certificate. Therefore, management brokers must be configured with the same security configuration even if they do not belong to the same cluster. (For more information, see the “Password Controlled Components and Functions” section of the “Security Considerations in System Design” chapter in the Progress SonicMQ Deployment Guide.)
216 Progress SonicMQ Configuration and Management Guide 8.5

Brokers
a. To select preferred Ciphers, click Add. The Add Ciphers dialog box opens:
Either select one or more ciphers from the list, or enter the name of a valid cipher.
When you click OK, your selections are added to the SSL tab’s displayed list.
b. To edit a cipher name, select the name, and then click Edit to open the Edit Ciphers dialog box. Edit the name, and then click OK.
c. To remove listed ciphers, select one or more listed ciphers to remove, and then click Remove.
4. You can set the order that the broker will present the ciphers when it initiates an SSL connection to another broker by clicking on a listed cipher and then clicking Move Up or Move Down until the list is in your preferred sequence.
Progress SonicMQ Configuration and Management Guide 8.5 217

Chapter 6: Configuring SonicMQ Brokers
5. Click the JSSE Keystore and Truststore button to open the Edit JSSE Parameters Properties dialog box:
a. In the Keystore section:
a. Choose JKS or PKCS12 as the Type.
b. Type the Location of the Keystore. You can also choose to browse the local file system and the SonicFS for store locations. There is no default.
c. Type the Password for the Keystore.
d. Type the Alias name for the Keystore. The alias distinguishes the key pairs in the store to apply in this instance.
e. Type the Key Password for the Keystore. This password protects the individual key (entry) in a key store, so that security principals can share a keystore yet maintain the privacy of their secret key.
b. In the Truststore section:
❑ The Type is set to JKS.
❑ Type the Location of the Truststore. You can also choose to browse the local file system and the SonicFS for store locations. There is no default.
❑ Type the Password for the Truststore.
c. In the Trustmanager section, type the class name for the Trustmanager if you prefer to use a custom Trustmanager that has been implemented.
218 Progress SonicMQ Configuration and Management Guide 8.5

Brokers
Using RSA SSL Libraries
If you have RSA libraries licensed from RSA Security, you can choose to use RSA SSL rather than JSSE. Using RSA libraries supports Certificate Revocation Lists.
1. On the SSL tab, select Use RSA SSL:
2. You can define specific ciphers you prefer to allow broker-wide. (You will be able to override the broker-wide list later, such as SSL acceptor definitions.)
Important RSA Cipher Suites — The cipher suites listed use the JSSE standard names described in the Sun JSSE Reference Guide. If you have RSA libraries and a contractual relationship with RSA, the RSA cipher suites that correspond to the JSSE cipher suite name are referenced in the RSA libraries.
Unsupported RSA Cipher Suites — The following RSA cipher suites can not be mapped to any equivalent JSSE cipher suites:● RSA_With_RC2_CBC_MD5
The following RSA suites provide key exchange without authentication:● DH_DSS_Export_With_DES_40_CBC_SHA
● DH_DSS_With_AES_128_CBC_SHA
● DH_DSS_With_AES_256_CBC_SHA
● DH_RSA_With_AES_128_CBC_SHA
● DH_RSA_With_AES_256_CBC_SHA
The following suite is a no-op: Null_With_Null_Null (no-op)
Progress SonicMQ Configuration and Management Guide 8.5 219

Chapter 6: Configuring SonicMQ Brokers
a. To select preferred Ciphers, click Add. The Add Ciphers dialog box opens:
Either select one or more ciphers from the list, or enter the name of a valid cipher.
When you click OK, your selections are added to the SSL tab’s displayed list.
b. To edit a cipher name, select the name, and then click Edit to open the Edit Ciphers dialog box. Edit the name, and then click OK.
c. To remove listed ciphers, select one or more listed ciphers to remove, and then click Remove.
3. You can set the order that the broker will present the ciphers when it initiates an SSL connection to another broker by clicking on a listed cipher and then clicking Move Up or Move Down until the list is in your preferred sequence.
4. Click Certificate Chain & CA Directory to open the Edit Certificate Chain & CA Directory Properties dialog box:
220 Progress SonicMQ Configuration and Management Guide 8.5

Brokers
5. In the CA Certificates section:
a. Specify the Directory for all trusted certificates for client authentication.
b. If you intend to use Certificate Revocation Lists, perform the procedure “Using RSA Certificate Revocation Lists” on page 222.
6. In the Certificate Chain section:
a. Specify the following properties:
b. Click Set Private Key to open the Edit SSL Private Key Properties dialog box:
❑ Specify Key, the pathname of the file containing the private key for SSL.
❑ Click Set Password to set the password used to encrypt the private key.
7. Click OK on both dialog boxes to return to the SSL tab.
Property Description
Format Select a format for the file containing the broker certificate chain:
● PKCS7 (the default format)● PKCS12
● LIST
Path Name For PKCS7 or PKCS12, the file and pathname of the file containing the certificate chain.
For LIST, a comma-delimited list of pathnames of files containing each individual certificate in the chain list.
(An absolute directory location must be specified on the machine where the broker is deployed.)
Progress SonicMQ Configuration and Management Guide 8.5 221

Chapter 6: Configuring SonicMQ Brokers
Using RSA Certificate Revocation Lists
In a broker’s SSL configuration, if you are using authorized RSA libraries, you can choose to configure certificate revocation lists for CA certificates. The lists that are retrieved are cached on the broker, refreshed at a specified interval, and can be set to expire after a set time interval (after which clients for that CA are denied new connections.)
◆ To configure CRL Caches on a broker:
1. On the SSL tab of a broker’s Properties, click the Certificate Revocation Lists button. The Edit Certificate Revocation List Properties dialog box opens:
2. Choose the option Enable Certificate Revocation.
3. Click the Add button to add a CRL cache for a certificate authority that will be applied by this broker. The New CRL Cache dialog box opens:
The CRL Cache is defined by the Distinguished Name (DN) of the LDAP record whose CRL attribute contains a list in X.509 schema format that was updated in the LDAP store from a Certificate Authority’s distribution point.
Important The LDAP store and its maintenance to keep CRL caches properly stored, formatted, and accessible is not within the scope of Sonic’s products.
222 Progress SonicMQ Configuration and Management Guide 8.5

Brokers
4. Perform one of the following in the New CRL Cache dialog box:
■ Enter the LDAP DN for a CA whose CRL attribute you want to retrieve from the LDAP server and then cache on the broker.
■ Click Import to browse to a CA certificate file that can provide the certificate’s data that identifies its LDAP DN.
5. Enter a value for the Refresh Interval of the cached image of the CRL to specify the number of seconds that will elapse before that cache is refreshed automatically. The default value is 86400 seconds (one day).
6. Enter a value for this CRL’s Cache Lifetime that indicates the number of hours that the cached CRL from this CA can be used. The default value is -1, the value that indicates that this cache will never expire.
If the cache lifetime is a positive integer:
■ When the refresh interval is less than the lifetime, the cache will refresh at the specified intervals throughout the lifetime. If refresh intervals are unsuccessful, the broker logs the failed attempts to reach the LDAP server.
■ When the lifetime is less than the refresh interval, the cache will never refresh.
■ When the lifetime expires without being refreshed, the specified CRL cache rejects connections from any clients that present certificates from that CA.
7. Click OK when you finish defining the parameters of this CRL cache.
After you create a CRL cache, you can choose to edit its properties (but not its LDAP DN) or delete it.
8. Enter other CRL caches to be accessed for this broker from stored data on the specified LDAP server.
Important The issuer of a certificate must be in the truststore in order for a broker to evaluate that a certificate is revoked.
A trusted certificate cannot be revoked. That applies to every certificate in the broker’s CA directory/trust store.
Progress SonicMQ Configuration and Management Guide 8.5 223

Chapter 6: Configuring SonicMQ Brokers
9. After you define the CRL caches for the broker, select the Primary LDAP Server tab:
a. Enter the URL of the LDAP server. The prefix ldap:// is prepended to your entry.
b. Choose the preferred Connection: Authentication option:
❑ None, the default value, means no authentication on the LDAP connection.
❑ SIMPLE, where the Connection: User and Connection: Password are used.
c. To use SSL with your connection, check the SSL option:
❑ The prefix ldaps:// is prepended to your URL entry.
❑ Enter the SSL Parameters: Truststore information for Location and Password.
❑ Choose the preferred Connection: Authentication option under SSL:- None, the default value, means no authentication on the LDAP connection.
- External, which requires you to enter the SSL Parameters: Keystoreinformation of Type, Location and Password. The default Type is JKS, the Java keystore, keystore.jks. You can choose PKCS12 instead.
224 Progress SonicMQ Configuration and Management Guide 8.5

Brokers
10. Click the Backup LDAP Server tab. Define the backup LDAP server (an LDAP server set up to perform the same functions as the primary LDAP server) by defining its parameters and settings for the designated CAs.
11. After you define the CAs and LDAP servers that distribute the CRLs for this broker, click OK.
When you restart the broker, the certificate revocation functionality is applied to clients attempting SSL connections through certificates.
Progress SonicMQ Configuration and Management Guide 8.5 225

Chapter 6: Configuring SonicMQ Brokers
Configuring Broker Tuning Properties
The following procedure describes how to specify broker tuning properties for a new or existing broker. For more information on setting tuning properties, see the Progress SonicMQ Performance Tuning Guide.
◆ To configure tuning properties for a broker:
1. For a new broker configuration, follow Step 1 on page 204 through Step 5.
For an existing broker configuration, select the broker and then select the Properties icon. The Edit Broker Properties dialog box opens.
2. Select the Tuning tab:
226 Progress SonicMQ Configuration and Management Guide 8.5

Brokers
3. The Buffer Sizes section contains properties to configure the message buffer used to hold messages that might have to be processed on the broker. These buffers are configured to allow concurrent processing on the broker. Specify:
Property Description
Outgoing Buffer Size
Threshold size of the broker-side output buffers used to send outgoing messages to clients. When the outgoing buffer approaches or exceeds the threshold size, publishing clients are throttled. Setting this to a larger value allows more messages to be buffered for each client at the risk of increasing message latency.
Guaranteed Buffer Size
Threshold size of the broker-side buffers used to maintain a list of messages waiting to be acknowledged by a topic subscriber. When the volume of unacknowledged messages approaches or exceeds the threshold, publishers to the topic are throttled.
Wait Buffer Size
Threshold size of the broker-side buffers for outgoing waiting messages. The wait buffer holds messages that arrive for a subscriber while a durable connection is being restored after being disconnected. When this buffer approaches or exceeds its threshold size, publishers are throttled. Typically, you should increase this property when large messages are in use.
Pub/Sub DB Buffer Size
Buffer sizes for holding Pub/Sub messages waiting to be written to the persistent storage mechanism for disconnected durable subscriptions. If the buffer fills, then publishers that are sending messages to disconnected durable subscriptions must wait.
PTP DB Buffer Size
Buffer sizes for holding PTP messages waiting to be written to the persistent storage mechanism for queues whose queue SaveThreshold has been exceeded (to set SaveThreshold, see “Configuring Queues” on page 365). If the buffer fills, queue senders adding messages to the queue must wait.
Progress SonicMQ Configuration and Management Guide 8.5 227

Chapter 6: Configuring SonicMQ Brokers
4. The Recovery Log section contains properties to configure the recovery log. The recovery log records events and messages that must be preserved in the event of a broker failure. Events and messages are written sequentially to the recovery log. As new messages arrive, the log grows. As time passes, previously recorded events and messages become obsolete and are no longer needed. Specify:
Property Description
Location Pathname of the broker recovery log directory (relative to the installation directory or absolute; an absolute directory location must be specified on the machine where the broker is deployed).If not specified, the path is MQ8.5_install_root/log.
Size Maximum size in bytes of each of the two broker recovery logs; the default value is 100MB for the files that are created when the logs are created.
Decreasing the log size requires initialization of the broker’s data store and logs. See the note below,
Block Size Optimizes the writing of log events to the recovery log file from memory. Disk controllers and drivers have their own limits when they write data to disk (and these limits do not necessarily match the block size of the file system). For most systems, a value of 8192 (8KB) works well. The optimal value for this property depends on the system and device.
Changing the log’s block size requires initialization of the broker’s data store and logs.
Buffer Size Sets the size of the message buffer used to absorb any bursts in message delivery rate (the buffer holds messages and internal events to be logged until they are flushed to disk).
XONCE Recovery
This option is reserved for special use. Unless specifically instructed by your Sonic representative to clear (deselect) this option, the option should always be selected (checked).
Important If you set the log to a modest size, you can make it larger later without any impact; however, the broker cannot release the disk space used by an allocated log file. If you need to decrease the size of the log, you are compelled to re-initialize the data store and its logs. See “Storage Operations” on page 553 for more information.
228 Progress SonicMQ Configuration and Management Guide 8.5
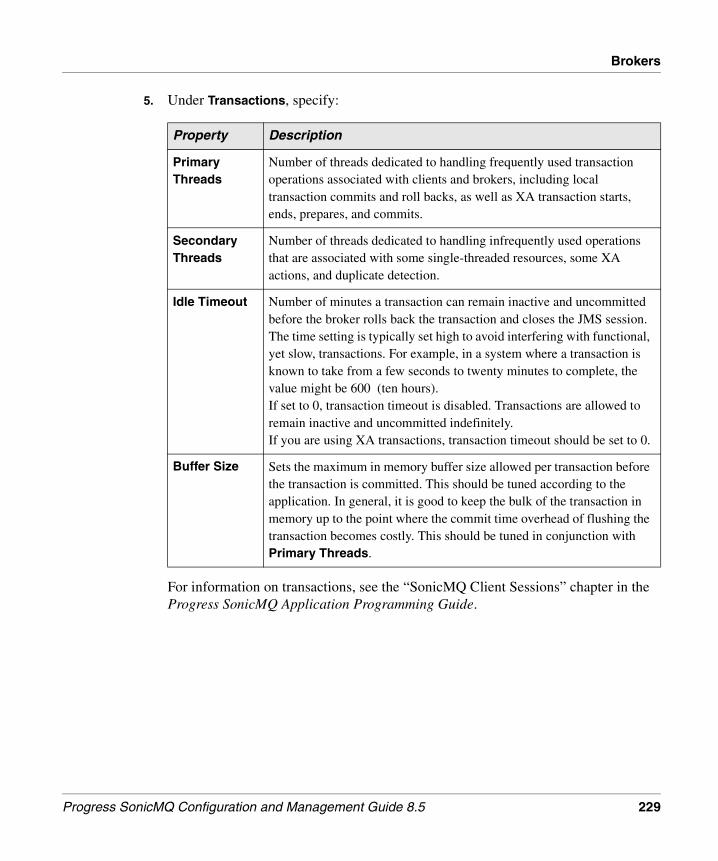
Brokers
5. Under Transactions, specify:
For information on transactions, see the “SonicMQ Client Sessions” chapter in the Progress SonicMQ Application Programming Guide.
Property Description
Primary Threads
Number of threads dedicated to handling frequently used transaction operations associated with clients and brokers, including local transaction commits and roll backs, as well as XA transaction starts, ends, prepares, and commits.
Secondary Threads
Number of threads dedicated to handling infrequently used operations that are associated with some single-threaded resources, some XA actions, and duplicate detection.
Idle Timeout Number of minutes a transaction can remain inactive and uncommitted before the broker rolls back the transaction and closes the JMS session. The time setting is typically set high to avoid interfering with functional, yet slow, transactions. For example, in a system where a transaction is known to take from a few seconds to twenty minutes to complete, the value might be 600 (ten hours). If set to 0, transaction timeout is disabled. Transactions are allowed to remain inactive and uncommitted indefinitely.If you are using XA transactions, transaction timeout should be set to 0.
Buffer Size Sets the maximum in memory buffer size allowed per transaction before the transaction is committed. This should be tuned according to the application. In general, it is good to keep the bulk of the transaction in memory up to the point where the commit time overhead of flushing the transaction becomes costly. This should be tuned in conjunction with Primary Threads.
Progress SonicMQ Configuration and Management Guide 8.5 229

Chapter 6: Configuring SonicMQ Brokers
6. With flow to disk publishing, publishers can continue publishing even after the buffers in the broker fill up. The broker starts writing messages to the persistent storage mechanism when the subscriber buffers fill up. As the subscriber processes messages, the broker retrieves messages from the persistent storage mechanism and puts them in the buffer so the subscriber can then process them. (See also Maximum Topic DB Size on page 231.)
Specify the following property:
For more information on flow to disk publishing, see the Progress SonicMQ Application Programming Guide and the Progress SonicMQ Performance Tuning Guide.
Configuring Message Storage
In Pub/Sub messaging, messages for disconnected durable subscribers are stored in the embedded persistent storage mechanism. In PTP messaging, queued messages are offloaded to the same embedded persistent storage mechanism whenever a queue's save threshold is exceeded.
The following procedure describes how to specify message storage settings for a new or existing broker.
Property Description
Flow to Disk Select to specify that whenever a subscriber's in-memory buffer is full, the broker should offload the messages for that subscriber to the persistent storage mechanism without blocking the publisher(s).
Deselect to specify that whenever any subscriber's buffer is full, the publisher is blocked until the subscriber processes more messages.
Note Management Brokers — Enabling the Flow to Disk option is recommended for Domain Manger brokers—ones that routinely handle management messaging traffic.
230 Progress SonicMQ Configuration and Management Guide 8.5

Brokers
◆ To configure message storage properties for a broker:
1. For a new broker configuration, follow Step 1 on page 204 through Step 5.
For an existing broker configuration, select the broker and select the Properties icon. The Edit Broker dialog box opens.
2. Select the Storage tab:
3. Specify message storage properties:
Property Description
Store Type The single pre-selected option is Embedded
Location Specify the path to the store folder.
Maximum Topic DB Size
Maximum size in megabytes of DB storage to be used for flow to disk messages and messages for disconnected durable subscribers. The default value is 0, which means that there is no limit.
Note Once the Maximum Topic DB Size is reached, publishing applications are flow-controlled if the subscriber's in-memory buffer is full. The publisher becomes unblocked when the size of the persistent storage space falls below the value of the Maximum Topic DB Size property minus the value of the TOPIC_DB_SIZE_RESTART_THRESHOLD property. This property can be specified in the Advanced tab of the broker configuration. The default value is 1 MB. (See “Configuring Broker Resource Properties” on page 236.)
Progress SonicMQ Configuration and Management Guide 8.5 231
Chapter 6: Configuring SonicMQ Brokers
Configuring Duplicate Detection
The following procedure describes how to specify duplicate detection settings for a new or existing broker. By default, the persistent data for duplicate detection is in the broker’s persistent storage mechanism. For information on duplicate message detection, see the “SonicMQ Client Sessions” chapter in the Progress SonicMQ Application Programming Guide.
Shared duplicate detection is important for broker replication:
● If you additionally enable Enable Shared Duplicate Detection, the primary and backup brokers can share an external distributed data store for duplicate detection. Therefore, you do not have to keep duplicate detection information synchronized as with other broker’s stored data.
● If you do not enable Enable Shared Duplicate Detection, the duplicate detection information in the message store is unique to each broker and must be synchronized between a primary and backup broker.
The “Configuring Broker Replication” chapter starting on page 203 explains primary and backup brokers.
232 Progress SonicMQ Configuration and Management Guide 8.5

Brokers
◆ To configure duplicate detection properties for a broker:
1. For a new broker configuration, follow Step 1 on page 204 through Step 5.
For an existing broker configuration, select the broker and select the Properties icon. The Edit Broker Properties dialog box opens.
2. Select the Duplicate tab to specify duplicate detection:
3. To enable duplicate transaction detection using either the default embedded broker message store or an external JDBC database, select Enable Duplicate Detection.
4. To enable duplicate detection distributed across many brokers using an external, distributed JDBC database, select Enable Shared Duplicate Detection.
Progress SonicMQ Configuration and Management Guide 8.5 233

Chapter 6: Configuring SonicMQ Brokers
5. If you select Enable Shared Duplicate Detection, you must also specify the JDBC properties:
Property Description
Connection URL JDBC URL for the shared storage used for duplicate message detection.
JDBC Driver JDBC driver for the shared storage used for duplicate message detection.
User Name Database user name (if required) for the shared storage used for duplicate message detection.
To set the password, click Set Password.
Properties Properties file (.cfg file)
Click ... to open the Open dialog box to browse for and select the file.
Table Name Name of the table used to store data for duplicate message detection. The default value is the value of the broker’s name property followed by the string, TxnIndices.
234 Progress SonicMQ Configuration and Management Guide 8.5

Brokers
Broker Metrics Properties
The following procedure describes how to configure notification and alert intervals for a new or existing broker.
◆ To configure metric properties for a broker:
1. For a new broker configuration, follow Step 1 on page 204 through Step 5.
For an existing broker configuration, select the broker and select the Properties icon. The Edit Broker Properties dialog box opens.
2. Select the Metrics tab:
3. Specify:
Property Description
Refresh Interval
Frequency for the broker to update raw statistical data that depends on a time interval and purge expired data. The value is in seconds and can vary from 5 to 60 seconds.
Collection Interval
How far back in time to maintain raw statistical data. The value is in minutes and can vary from 5 to 20 minutes.
Repeat Alert Notifications
When selected, causes an alert notification to be repeated at the refresh interval if the threshold is still crossed. The default value is cleared (notifications are sent only at the crossing of a threshold.)
Progress SonicMQ Configuration and Management Guide 8.5 235

Chapter 6: Configuring SonicMQ Brokers
Configuring Broker Resource Properties
The following procedure describes how to configure archive and classpath properties for a new or existing broker.
◆ To configure archive and classpath properties for a broker:
1. For a new broker configuration, follow Step 1 on page 204 through Step 5.
For an existing broker configuration, select the broker and select the Properties icon. The Edit Broker Properties dialog box opens.
2. Select the Resources tab:
3. Specify the following properties to configure resources for the broker (not the management container in which the broker is hosted):
The Resources tab is an advanced feature and not for general use. For an example of using this tab, see the “Broker Replication” chapter in Progress SonicMQ Deployment Guide.
Property Description
Archive Name
Specifies the component archive file that contains the libraries for this broker.
Prepend Classpath
Sets classpath entries for additional libraries and versions that supersede any identical classes already specified. A well-formed classpath entry is a URL with any valid protocol, including sonichome:/// and sonicfs:///.
236 Progress SonicMQ Configuration and Management Guide 8.5

Brokers
Configuring Broker Monitoring Properties
The following procedure describes how to integrate a broker with Progress Actional.
◆ To configure Actional integration properties for monitoring a broker:
1. For a new broker configuration, follow Step 1 on page 204 through Step 5.
For an existing broker configuration, select the broker and select the Properties icon. The Edit Broker Properties dialog box opens.
2. Select the Monitoring tab:
3. Specify the following properties to configure Actional instrumentation of the broker:
The Monitoring tab is a feature that requires Progress Actional products to provide visibility, control, and enforcement of deployed assets. This Sonic release is compatible with Actional release 8.2.3. For more information, see their Web site at www.progress.com/actional.
Property Description
Enable Actional Instrumentation
Select this option to let the broker provide information to Actional applications running on the host system. By default, the option is not selected (unchecked). There is no overhead if the option is selected and no Actional software is installed or running.
Payload Content When Actional instrumentation is enabled, declares whether the instrumentation can include the message header or body. The default value is NONE. The pulldown menu lets you specify HEADER, BODY, or ALL (header and body).
Note Performance Impact — Enabling Actional instrumentation has an effect on performance. It is a good practice to test performance with and without instrumentation to quantify the impact in your environment.
Progress SonicMQ Configuration and Management Guide 8.5 237

Chapter 6: Configuring SonicMQ Brokers
Configuring Advanced Broker Properties
The following procedure describes how to configure notifications, alerts, connections, tunneling, and advanced properties for a new or existing broker.
◆ To configure advanced properties for a broker:
1. For a new broker configuration, follow Step 1 on page 204 through Step 5.
For an existing broker configuration, select the broker and select the Properties icon. The Edit Broker Properties dialog box opens.
2. Select the Advanced tab:
238 Progress SonicMQ Configuration and Management Guide 8.5

Brokers
3. In the Notifications / Alerts section, specify:
Property Description
DMQ Notify Factor
To generate a notification when the DMQ starts to fill, set this value as a percentage of the DMQ size (if the DMQ fills, the broker is shut down; see“Dead Message Queue” on page 371).
Recovery Log Notify Factor
Warning level for generating an administrative event when the size of a sync point written to the recovery log exceeds a percentage of the total log file size. By setting this, you can monitor peak usage of the log file during load testing or deployment to ensure the log file does not exceed its capacity and shut down the broker. The default value is 50% full.
Note When monitoring this event, the peak percentage of sync point size to log file size should not exceed 50%. If it does, increase the size of the log file accordingly. There is one sync point per recovery log. A syncpoint occurs every time the broker switches log files.
You can affect the frequency of the sync points indirectly by changing the log size. The smaller the log size, the more frequent the sync points. If there are frequent sync points, the sync point size is smaller than if the sync points are less frequent.
The log file has to be large enough to accommodate all the events (both sync point and non-sync point) that are written during the sync point interval. When the log file reaches the end, it tries to do a sync point. During a sync point, the broker writes out all the information needed for recovery (for example, active messages, transactions, users).
Progress SonicMQ Configuration and Management Guide 8.5 239

Chapter 6: Configuring SonicMQ Brokers
4. Under Connections and under Proxy, specify:
Property Description
TCP Nodelay Select to disable the Nagle algorithm. If not selected, the Nagle algorithm allows buffering of small data before sending the data as a fully constructed IP packet. Overall performance usually improves when the Nagle algorithm is disabled, because there are no delays due to the buffering that occurs when the algorithm is enabled. (For more information about using the Nagle algorithm, see the Progress SonicMQ Performance Tuning Guide.)
Domain Suffix Search Order
List of possible domains to be used when attempting to establish a connection to a specified host.
For example, a broker within an organization might attempt to connect to another broker somewhere else within the organization (possibly within a different domain) to route messages. The Domain Suffix Search Order specifies the various domain names and the order in which they will be used when attempting to connect to a specific host, without requiring the full domain name to be specified for each host URL. (A semicolon, “;”, is used as the delimiter.)
An example is DOMAIN_SUFFIX_SEARCH_ORDER=foo.com;bar.com
Each domain suffix is tried in succession until the name is successfully resolved or the last domain/host combination is tried. If the name is not successfully resolved, an UnknownHostException is thrown, and the domain/host information used for that last connection attempt appears in the exception.
If absolute host names are to be used, the Domain Suffix Search Order property should not be set.
Enable Load Balancing
Select to enable load balancing. By default, any broker in a cluster is capable of redirecting incoming connections to another broker in the same cluster. Incoming connections can come from a routing broker or a JMS client. (For more information, see “Load Balancing” on page 245.)
240 Progress SonicMQ Configuration and Management Guide 8.5

Brokers
Load Balancing Weight
Configures weighted load balancing by specifying an optional load balancing weight for each broker in a cluster. The default weight is 1.
If a broker’s weight is specified as n (greater than 1), connect attempts are redirected to that broker n times in a round-robin cycle. Load balancing weights can be combined with multiple acceptors with the same name, resulting in n*m turns for each round-robin cycle, where n is the weight and m is the number of equivalent acceptors (acceptors with the same name on that broker).
If a weight of 0 is specified, the broker is excluded from load balancing and does not allow connections to be redirected. This is useful if you want to take a machine out of service.
This property is dynamic; you do not have to reload the broker after changing this setting.
(For more information, see “Load Balancing” on page 245.)
Client Reconnect Timeout
Number of seconds for the broker to maintain state for a fault-tolerant connection that fails. Fault-tolerant client connections must recover within this time; otherwise the client connection is dropped by the broker. If the client sets a lower value, that value is used. If the client sets a higher value, the broker value is used. The client is not made aware of a lower broker value and could reconnect ready to continue when the broker has already dropped the connection. Make the value high enough to honor reasonably high client settings.
Max Connections
Select Unlimited for unlimited connections or deselect and specify the number of connections that can be made by JMS clients.
ProxyURL
URL of the broker-wide forward proxy server for the routing broker, if one is configured. Per-routing proxy settings can be specified on routing definitions. See Step 7 on page 338 for configuration of broker proxy override in routing definitions.
Proxy Username
User to authenticate on the brokerwide forward proxy server for the routing broker.
Proxy Password
Password of the Proxy Username.
Property Description
Progress SonicMQ Configuration and Management Guide 8.5 241

Chapter 6: Configuring SonicMQ Brokers
5. Under Properties, click Edit to specify additional Advanced Properties as name-value pairs. The Edit Advanced Properties dialog box opens:
You can use this dialog box to enter advanced broker properties,. Enter Name and Value pairs. You can click:
❑ Add to add Name and Value pairs to the list❑ Edit to edit previously entered Name and Value pairs❑ Remove to remove previously entered Name and Value pairs from the list
When you finish, click OK to return to the Advanced tab.
Selected Advanced Broker Properties
Advanced broker properties include the following name-value pairs:
● BROKER_CLUSTER_PARAMETERS.LOAD_BALANCER — When set to progress.message.broker.RoundRobinByAcceptor, replaces the default load balancer with this predefined alternative. See “Using Alternative Load Balancing Mechanisms” on page 248 for more information.
● BROKER_FAULT_TOLERANT_PARAMETERS.FT_REPLICATE_NON_PERSISTENT — When set to true, changes the delivery mode of messages set as NON_PERSISTENT to NON_PERSISTENT_REPLICATED. The broker must be licensed for fault tolerance and replicating to a backup broker for this feature to have an effect. For more information, see the “NON_PERSISTENT_REPLICATED Delivery Mode” section of the “SonicMQ Connections” chapter of the SonicMQ Application Programming Guide.
Warning The Edit Advanced Properties dialog box is for advanced users and should be used only with the guidance of Sonic Technical Support.
242 Progress SonicMQ Configuration and Management Guide 8.5

Brokers
● BROKER_PUBSUB_PARAMETERS.CHECK_DB_SIZE_ON_PUBLISH — When set to true, an exception is returned to a JMS publisher when the publisher's message causes TopicDbSize to be exceeded.
● BROKER_PUBSUB_PARAMETERS.FLOW_TO_DISK_NOTIFY — Specifies whether flow to disk notifications are enabled for the broker. By default, they are enabled. These notifications indicate which subscribers cause in-memory buffers to fill and induce the broker to start flowing messages to disk. There are two notifications: EndFlowToDisk and StartFlowToDisk.
● BROKER_PUBSUB_PARAMETERS.SHARED_SUBS_RECOVERY_TIMEOUT — Enables adjustment of the number of milliseconds that members of a group of shared subscribers will wait for resolution of indoubt messages to fault-tolerant members that are recovering (from client failure or broker failover) before reallocating any such messages to other group members. The default value is 60000—60 seconds. Setting this property to a higher value reduces the likelihood that a recovering group member receives messages that have already been reallocated to another member.
The timer starts when the first recovering member reconnects to the group. While the group has members with indoubt resolution pending, all delivery to the group is deferred, and all new received messages are saved into the database for the group to be delivered when doubt is resolved, SHARED_SUBS_RECOVERY_TIMEOUT is reached, or all indoubt fault-tolerant group members pass their reconnect timeout.
The timer starts generating messages about the group’s status to the log after thirty seconds to note how many fault-tolerant members are being resolved. Subsequent entries note when resolution completes, or the number of unresolved members after the timeout occurs.
● BROKER_REPLICATION_PARAMETERS.START_ACTIVE — When set to true, a replicating broker transitions directly from the WAITING state to the STANDALONE state on startup. When the broker configuration is loaded and this parameter is set to true, a warning is printed on the broker’s console. This setting should be cleared as soon as possible.
● BROKER_REPLICATION_PARAMETERS.FAILURE_DETECT_CALLBACK — Allows for specification of a package-qualified class name of a user-provided callback to confirm failure detection. This property is optional in broker replication.
● BROKER_REPLICATION_PARAMETERS.PREFERRED_ACTIVE — Specifies that one member of the primary/backup pair is designated as the system that should have preference when both systems are WAITING and synchronized.
● BROKER_SECURITY_PARAMETERS.ENABLE_QOP_SECURITY — When set to false, disables Quality of Protection (QoP) in a security-enabled broker configuration, resulting in better performance. The default value is true. This setting must be consistent on all brokers in a cluster.
Progress SonicMQ Configuration and Management Guide 8.5 243

Chapter 6: Configuring SonicMQ Brokers
244 Progress SonicMQ Configuration and Management Guide 8.5
Changing this parameter requires initialization of the broker’s data store. See the procedure in the section “Enabling Broker Security Without Enabling Quality of Protection” in the Progress Sonic Installation and Upgrade Guide.
● CONFIG_ELEMENT_REFERENCES.ACCEPTOR_CONFIG_ELEMENT_REF.DEFAULT_ACCEPTORS.
DEFAULT_ROUTING_URL — Specifies the URL to be used when the outbound connection times out or fails, and the remote node has to reconnect to resolve indoubt messages for the original node.
● CONNECTION_TUNING_PARAMETERS.CONNECT_PING_TIMEOUT — Provides a mechanism to force an existing connection to disconnect if it does not respond to a ping in the specified timeout interval. The connecting thread waits for the specified number of milliseconds. When the timeout expires, the existing connection closes and the new connection is allowed. A setting of zero (0) specifies immediate disconnection of the existing connection. If this property is not set, the broker uses its default value of 30000—30 seconds.
● CONNECTION_TUNING_PARAMETERS.MAX_MSG_SIZE — Specifies the maximum acceptable message size by setting its value as a non-negative integer value that specifies the allowed per-message size limit in megabytes. The default value is 10 MB. Setting the value to zero (0) disables the feature.
● CONNECTION_TUNING_PARAMETERS.MAX_SESSIONS_PER_CONNECTION — Specifies the maximum number of sessions that can be created per connection by setting the limit as a positive integer. The default value is 0 which disables the feature and allows unlimited sessions per connection.
● CONNECTION_TUNING_PARAMETERS.MAX_TEMPORARY_QUEUES_PER_SESSION — Specifies the maximum number of temporary queues that can be created per session by setting the limit as a positive integer. The default value is 0 which disables the feature and allows unlimited temporary queues per session.
● CONNECTION_TUNING_PARAMETERS.BROKER_CONNECT_TIMEOUT — Sets the time limit (in milliseconds) for a broker blocking on a socket read before the authentication handshake completes. The default value is 30 seconds.
● CONNECTION_TUNING_PARAMETERS.BROKER_PING_INTERVAL — Sets the number of milliseconds of inactivity before the broker pings a connection. The default value is 60000—60 seconds.
● CONNECTION_TUNING_PARAMETERS.BROKER_PING_TIMEOUT — The number of seconds after which the broker closes a client connection if no ping response is received. Note the following:
■ By default, the timeout feature is disabled. The timeout value defaults to 0.
■ Enable the timeout feature by setting the advanced parameter to a value (in seconds) of 30 or more.
■ Setting the value to 1 through 29 is not invalid but will be interpreted as 30.

Brokers
■ The BROKER_PING_TIMEOUT should allow two BROKER_PING_INTERVALs to elapse.
● WS_SECURITY_PARAMETERS.WS_SIGNATURE_PREFIXLIST_REQUIRED — When set to true, adds the InclusiveNamespaces elements with the PrefixList attribute to a digital signature. The default value, false, lets MS WES 2.0 process a digital signature.
See Progress SonicMQ Performance Tuning Guide for more advanced broker properties.
Load BalancingLoad-balancing allows a broker to be redirected to another broker for the purpose of redistributing load. Load balancing is a method of distributing connections over several brokers in a cluster to avoid creating a bottleneck that might result from overloading a broker. SonicMQ implements load balancing by using a round-robin algorithm.
When a client connects to a broker in a cluster and asks for a load-balanced connection, and if the algorithm selects a different broker, a URL is returned that redirects it to a different broker in the cluster.
Automatically Generated Acceptor Names
A SonicMQ broker can be configured with one or more acceptors. SonicMQ allows load-balanced clients, using different protocols and SSL configuration, to connect to different brokers in a cluster. Load balancing occurs over identically named acceptors on brokers within in a cluster. You can create your own names or use the automatically generated names. SonicMQ associates an automatically generated name with each acceptor.
Important The unit of measure for BROKER_PING_INTERVAL is milliseconds, and the unit of measure for BROKER_PING_TIMEOUT is seconds. Therefore, if you set the TIMEOUT to its minimum value of 30, the appropriate value for the INTERVAL should be about 15000.
See the “Setting Brokers to Clean Up Connections Not Detected on the Socket” section of the “Tuning JMS Clients” chapter of the Progress SonicMQ Performance Tuning Guide for more information about these advanced parameters.
Note JMSXUserID is not an advanced broker property — Prior to V7.6, to set JMSXUserID (so that the broker adds that property with the user’s name on each message), you needed to set an advanced broker property SET_JMSXUSERID. That setting is now a checkbox on the General tab (see page 209). As such, it is no longer a known advanced broker property.
Progress SonicMQ Configuration and Management Guide 8.5 245

Chapter 6: Configuring SonicMQ Brokers
Load balancing redirects a connect attempt by a load-balanced client in a round-robin fashion to one of the brokers in a cluster, choosing from the brokers in the cluster that are configured with a matching acceptor name. When defining acceptor names, the administrator assumes the responsibility of configuring acceptors with the same name within a cluster to support equivalent protocols.
Multiple Acceptors with the Same Protocol
By default, all acceptors with the same protocol are considered equivalent and are mapped to the same generated acceptor name. If a broker has more than one equivalent acceptor, load balancing counts each equivalent acceptor on each broker as a separate “turn” for round-robin redirection, effectively giving each broker a weight equivalent to the number of acceptors for that given protocol.
The gateway broker is the broker to which the client initially connects. The behavior of the gateway broker is slightly different than other brokers for performance reasons. Redirection never takes place from one acceptor of the gateway broker to another, but the number of equivalent acceptors on the gateway broker are counted as a load balancing weight for that protocol when assigning load balancing turns.
Note A gateway broker is always part of the broker group that it controls and is always included in the round-robin load balancing for this group.
Note The client has no knowledge of the acceptor name mechanism. The gateway broker maps the client-specified URL to a particular acceptor socket. This socket, in turn, is directly associated with an acceptor configured on that broker. The load balancing agent then uses the acceptor name to determine whether and where to redirect the connection.
246 Progress SonicMQ Configuration and Management Guide 8.5

Brokers
Weighted Round-robin Load Balancing
Round-robin load balancing takes into account an optional weight for each broker, through the Load Balancing Weight setting in each broker’s properties, as shown:
The default weight is 1. If a broker’s weight is specified as n greater than 1, connect attempts are redirected to that broker n times in a round-robin cycle.
Load balancing weights can be combined with multiple acceptors for a given protocol, resulting in n*m turns for each round-robin cycle, where n is the weight and m is the number of equivalent acceptors on that broker for a given protocol.
Note There is no particular advantage to using multiple acceptors with the same name on the same broker. In general, if you have multiple entries with the same protocol, you should give them different names.
Progress SonicMQ Configuration and Management Guide 8.5 247

Chapter 6: Configuring SonicMQ Brokers
Enabling Load Balancing
The following sections explain how load balancing is enabled on the receiving and initiating ends of a connection.
By default, round-robin load balancing is enabled for all brokers in a cluster. To turn off load balancing at a broker, deselect Enable Load Balancing on a broker’s properties dialog box.
You can reconfigure a cluster while the round-robin load balancing agent is running. The agent will include new brokers for round-robin connections and stop redirecting connections to brokers that have left the cluster.
The client (or routing connection) must explicitly ask for load balancing as part of the connection settings. This indicates that the client (or broker acting as a client) is willing to have its connection redirected to a different broker.
A client can explicitly enable or disable load balancing for a particular connection request. If the client enables load balancing, the redirection happens transparently to the client.
Using Alternative Load Balancing Mechanisms
The default load balancing mechanism can be replaced.
Behavior of the Default Load Balancing Algorithm
The default load balancer implements a weight-based round-robin which balances connections evenly across the cluster but is acceptor name agnostic. Consider a cluster of two brokers (B1, B2) each configured with one acceptor named SENDER and one acceptor named RECEIVER (each with a weight of 1). Assume that two senders (S1, S2) and two receivers (R1, R2) are connecting to B1 in the following order:
1. S1->SENDER@B1 2. R1->RECEIVER@B13. S2->SENDER@B14. R2->RECEIVER@B1
Connections are evenly distributed across the brokers, so the load balancing algorithm connects both senders to one broker and both receivers to the other, as follows:
1. S1->SENDER@B12. R1->RECEIVER@B1-> RECEIVER@B23. S2->SENDER@B14. R2->RECEIVER@B1-> RECEIVER@B2
248 Progress SonicMQ Configuration and Management Guide 8.5

Brokers
Behavior of the Alternative Load Balancing Algorithm
The alternative load balancing algorithm does round robin by acceptor. Similar to the default load balancer, its difference is that it distributes connections evenly across the cluster based on the acceptor on which the connection was established, provided that acceptor names define the preferred distribution. Using this load balancer in the preceding scenario, each broker gets two connections per broker, one sender and one receiver:
1. S1->SENDER@B1
2. R1->RECEIVER@B1
3. S2->SENDER@B1-> SENDER@B2
4. R2->RECEIVER@B1-> RECEIVER@B2
Connections are now evenly distributed based on the acceptor on which the connection was established.
Using the Alternative Load Balancing Algorithm
To apply the alternative load balancing, specify the advanced broker property BROKER_CLUSTER_PARAMETERS.LOAD_BALANCER with the value of the alternative’s class, progress.message.broker.RoundRobinByAcceptor.
Be sure to set the load balancer property on all the cluster members, or at least all the brokers that will be gateways for new connections.
Note Custom Load Balancing Algorithms — If you are interested in defining a custom load balancing algorithm, consult with your Progress representative.
Progress SonicMQ Configuration and Management Guide 8.5 249

Chapter 6: Configuring SonicMQ Brokers
ClustersA cluster is a group of interconnected brokers. Each broker within the cluster communicates directly with every other broker in the cluster. Each broker participating in the cluster must have a unique name.
If a broker is a member of a cluster, the routing node name, authorization domain, authorization policies, routing definitions, and remote subscription rules of the cluster override the broker’s local configuration. The queues of a cluster (clusterwide queues) are used in conjunction with the set of queues defined for each individual broker. A clusterwide queue must not have the same name as a queue defined on an individual broker.
See the “Clustered Brokers” chapter in the Progress SonicMQ Deployment Guide for more information on clustering concepts.
Configuring ClustersThe following procedure describes how to create and edit clusters of brokers. This procedure describes how to create a cluster from a type. (You can also use a template, see “Using Templates” on page 85 or copy another cluster, see “Copying Configurations” on page 94.)
◆ To create a cluster:
1. Open the Sonic Management Console and connect to a domain as described in “Running the Sonic Management Console” on page 38 and select the Configure tab.
2. Select a place in the tree, right-click, and select New > Configuration.
The Create Configuration dialog box opens, as shown on page 83.
250 Progress SonicMQ Configuration and Management Guide 8.5
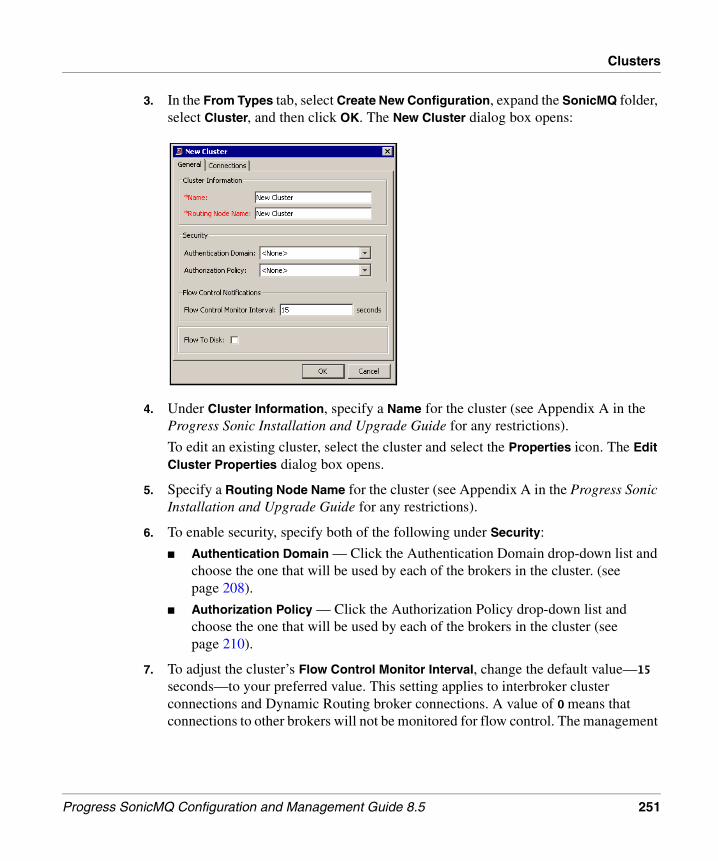
Clusters
3. In the From Types tab, select Create New Configuration, expand the SonicMQ folder, select Cluster, and then click OK. The New Cluster dialog box opens:
4. Under Cluster Information, specify a Name for the cluster (see Appendix A in the Progress Sonic Installation and Upgrade Guide for any restrictions).
To edit an existing cluster, select the cluster and select the Properties icon. The Edit Cluster Properties dialog box opens.
5. Specify a Routing Node Name for the cluster (see Appendix A in the Progress Sonic Installation and Upgrade Guide for any restrictions).
6. To enable security, specify both of the following under Security:
■ Authentication Domain — Click the Authentication Domain drop-down list and choose the one that will be used by each of the brokers in the cluster. (see page 208).
■ Authorization Policy — Click the Authorization Policy drop-down list and choose the one that will be used by each of the brokers in the cluster (see page 210).
7. To adjust the cluster’s Flow Control Monitor Interval, change the default value—15 seconds—to your preferred value. This setting applies to interbroker cluster connections and Dynamic Routing broker connections. A value of 0 means that connections to other brokers will not be monitored for flow control. The management
Progress SonicMQ Configuration and Management Guide 8.5 251
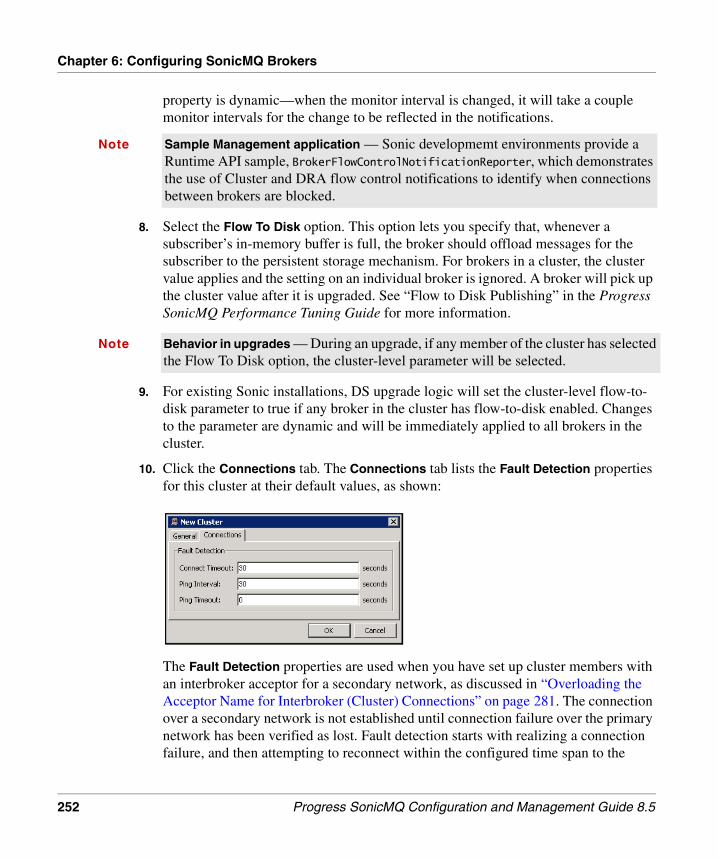
Chapter 6: Configuring SonicMQ Brokers
property is dynamic—when the monitor interval is changed, it will take a couple monitor intervals for the change to be reflected in the notifications.
8. Select the Flow To Disk option. This option lets you specify that, whenever a subscriber’s in-memory buffer is full, the broker should offload messages for the subscriber to the persistent storage mechanism. For brokers in a cluster, the cluster value applies and the setting on an individual broker is ignored. A broker will pick up the cluster value after it is upgraded. See “Flow to Disk Publishing” in the Progress SonicMQ Performance Tuning Guide for more information.
9. For existing Sonic installations, DS upgrade logic will set the cluster-level flow-to-disk parameter to true if any broker in the cluster has flow-to-disk enabled. Changes to the parameter are dynamic and will be immediately applied to all brokers in the cluster.
10. Click the Connections tab. The Connections tab lists the Fault Detection properties for this cluster at their default values, as shown:
The Fault Detection properties are used when you have set up cluster members with an interbroker acceptor for a secondary network, as discussed in “Overloading the Acceptor Name for Interbroker (Cluster) Connections” on page 281. The connection over a secondary network is not established until connection failure over the primary network has been verified as lost. Fault detection starts with realizing a connection failure, and then attempting to reconnect within the configured time span to the
Note Sample Management application — Sonic developmemt environments provide a Runtime API sample, BrokerFlowControlNotificationReporter, which demonstrates the use of Cluster and DRA flow control notifications to identify when connections between brokers are blocked.
Note Behavior in upgrades — During an upgrade, if any member of the cluster has selected the Flow To Disk option, the cluster-level parameter will be selected.
252 Progress SonicMQ Configuration and Management Guide 8.5
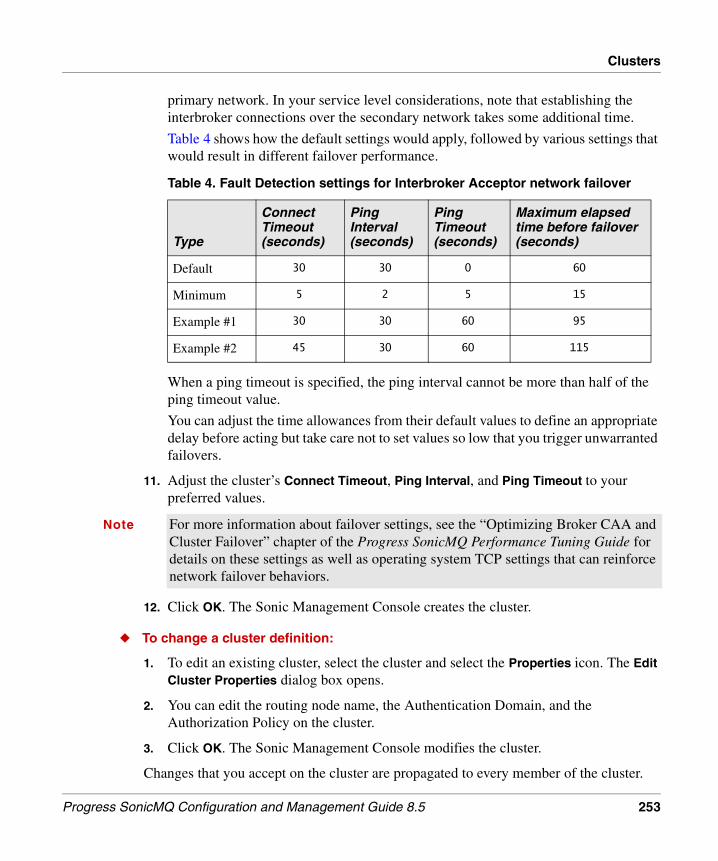
Clusters
primary network. In your service level considerations, note that establishing the interbroker connections over the secondary network takes some additional time.
Table 4 shows how the default settings would apply, followed by various settings that would result in different failover performance.
When a ping timeout is specified, the ping interval cannot be more than half of the ping timeout value.
You can adjust the time allowances from their default values to define an appropriate delay before acting but take care not to set values so low that you trigger unwarranted failovers.
11. Adjust the cluster’s Connect Timeout, Ping Interval, and Ping Timeout to your preferred values.
12. Click OK. The Sonic Management Console creates the cluster.
◆ To change a cluster definition:
1. To edit an existing cluster, select the cluster and select the Properties icon. The Edit Cluster Properties dialog box opens.
2. You can edit the routing node name, the Authentication Domain, and the Authorization Policy on the cluster.
3. Click OK. The Sonic Management Console modifies the cluster.
Changes that you accept on the cluster are propagated to every member of the cluster.
Table 4. Fault Detection settings for Interbroker Acceptor network failover
Type
Connect Timeout (seconds)
Ping Interval (seconds)
Ping Timeout (seconds)
Maximum elapsed time before failover (seconds)
Default 30 30 0 60
Minimum 5 2 5 15
Example #1 30 30 60 95
Example #2 45 30 60 115
Note For more information about failover settings, see the “Optimizing Broker CAA and Cluster Failover” chapter of the Progress SonicMQ Performance Tuning Guide for details on these settings as well as operating system TCP settings that can reinforce network failover behaviors.
Progress SonicMQ Configuration and Management Guide 8.5 253

Chapter 6: Configuring SonicMQ Brokers
Adding Brokers to Cluster Configurations
The following procedure describes how to add existing brokers to a cluster. If you have not already created brokers for a new cluster, see “Creating and Editing Broker Configurations” on page 204.
◆ To add brokers to a cluster:
1. In the Configure tab, under a cluster, select Members, right-click, and select Add Broker. The Add Cluster Member(s) dialog box opens:
2. Browse to select brokers:
3. Click OK.
Important ● You can add only security-enabled brokers to a secure cluster and add only nonsecurity-enabled brokers to a nonsecure cluster.
● The node name on each of the brokers will be suppressed while the broker is a cluster member, reflecting instead the node name defined on the cluster.
● When you use fault tolerant broker pairs, adding the primary broker to a cluster implicitly adds its backup to the cluster.
Note A clusterwide queue must not have the same name as a queue defined on a broker.
Important When a running broker is added to a cluster, it must be reloaded to pick up the configuration information specified by the cluster, for example, Authentication Domain, authorization domain, routing configuration, clustered queue information, and interbroker acceptor configuration for each broker. (See “Reloading Brokers” on page 552 and “Configuration Changes: Dynamic or Requiring Reload” on page 98.)
254 Progress SonicMQ Configuration and Management Guide 8.5
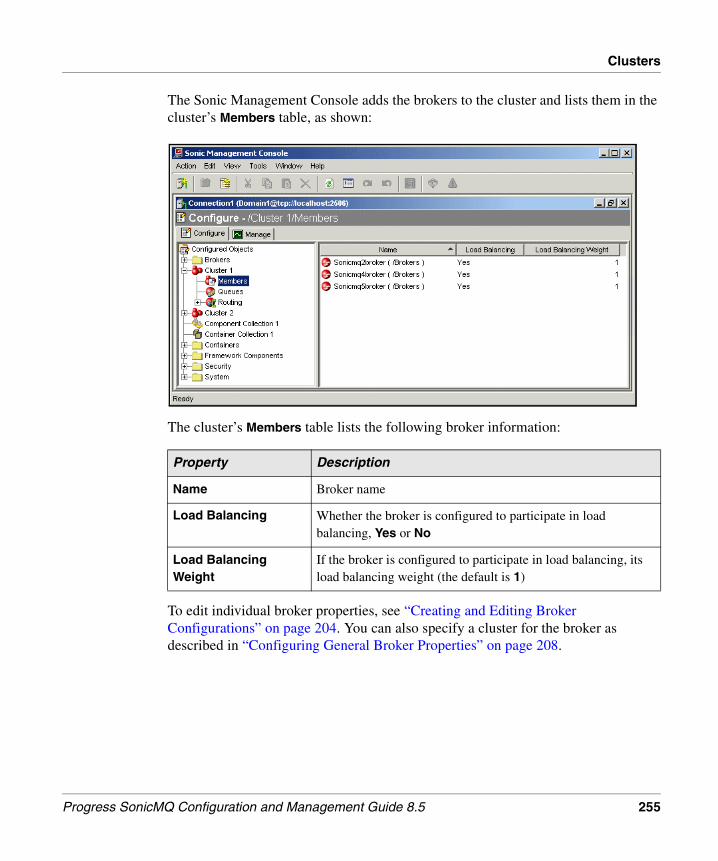
Clusters
The Sonic Management Console adds the brokers to the cluster and lists them in the cluster’s Members table, as shown:
The cluster’s Members table lists the following broker information:
To edit individual broker properties, see “Creating and Editing Broker Configurations” on page 204. You can also specify a cluster for the broker as described in “Configuring General Broker Properties” on page 208.
Property Description
Name Broker name
Load Balancing Whether the broker is configured to participate in load balancing, Yes or No
Load Balancing Weight
If the broker is configured to participate in load balancing, its load balancing weight (the default is 1)
Progress SonicMQ Configuration and Management Guide 8.5 255

Chapter 6: Configuring SonicMQ Brokers
Removing Brokers From Cluster Configurations
The following procedure describes how to remove brokers from a cluster.
◆ To remove brokers from a cluster:
❖ In the Configure tab, under a cluster, select Members. In the Members table, select one or more brokers, right-click, and select Delete.
The Sonic Management Console removes the brokers from the cluster.
Deleting ClustersThe following procedure describes how to delete a cluster.
◆ To delete a cluster:
❖ In the Configure tab, select a cluster, right-click, and select Delete.
The Sonic Management Console deletes the cluster.
Any member brokers in the cluster are removed as members. Each broker resumes its pre-existing routing node name, authentication domain, and authorization policy, which are once again modifiable.
Warning You can lose messages when you remove brokers from clusters. All messages sent to a clustered queue through a client connected to the broker being removed are lost. (The clustered queue is not deleted; it is only removed from the broker that is removed.)
Note A broker must be reloaded when it is removed from a cluster, so it can pick up the proper configuration regarding its authentication domain, authorization domain, and routing configuration.
256 Progress SonicMQ Configuration and Management Guide 8.5

Chapter 7 Configuring Broker Replication
This chapter contains the following sections describing how to configure broker replication:
● “Backup Brokers” describes how to configure backup brokers
● “Replication Connections” describes how to configure replication connections between primary and backup brokers for fault tolerance
Progress SonicMQ Configuration and Management Guide 8.5 257

Chapter 7: Configuring Broker Replication
Backup BrokersBefore configuring brokers for replication, you should read the “Broker Replication” chapter in the Progress SonicMQ Deployment Guide.
A backup broker is deployed to provide failover if its primary broker fails. Primary and backup brokers communicate over a private network to replicate data and monitor each other's status and detect failures.
A primary broker and its backup broker are treated as a pair. In a primary/backup pair:
● The backup broker configuration specifies a subset of the properties specified by the primary broker. The rest of a backup broker’s configuration is retrieved from the primary broker's configuration.
● The backup broker can have a different list of acceptors than its primary broker.
● The backup broker does not need to be added to a cluster when the primary broker becomes a member of a cluster. Its membership is implied.
Configuring Backup BrokersAny broker can be a primary broker and can be configured to replicate to a backup broker at any time without reinitializing storage. A backup broker is configured explicitly as a backup broker of an existing broker and remains a backup broker. Primary and backup brokers must reside in the same configuration domain.
The following procedure describes how to create or edit a backup broker configuration. If you change a broker’s configuration properties, you usually have to reload the broker (see “Configuration Changes: Dynamic or Requiring Reload” on page 98).
Important To configure backup brokers for a primary broker, the primary broker must be created with a SonicMQ Continuous Availability Edition license code. If your primary broker was not configured with a Continuous Availability license code, the option to configure a backup broker will be unavailable.
Warning This procedure describes only how to create a backup broker configuration. Be sure to complete the process of deploying a backup broker once you start. For example, if you select the Create Backup Broker command for the management broker and do not complete the entire process, you will not be able to restart the management broker. (See the “Installing SonicMQ Components” and “Extending and Activating Components” chapters in the Progress Sonic Installation and Upgrade Guide for all the steps to create a backup broker.)
258 Progress SonicMQ Configuration and Management Guide 8.5
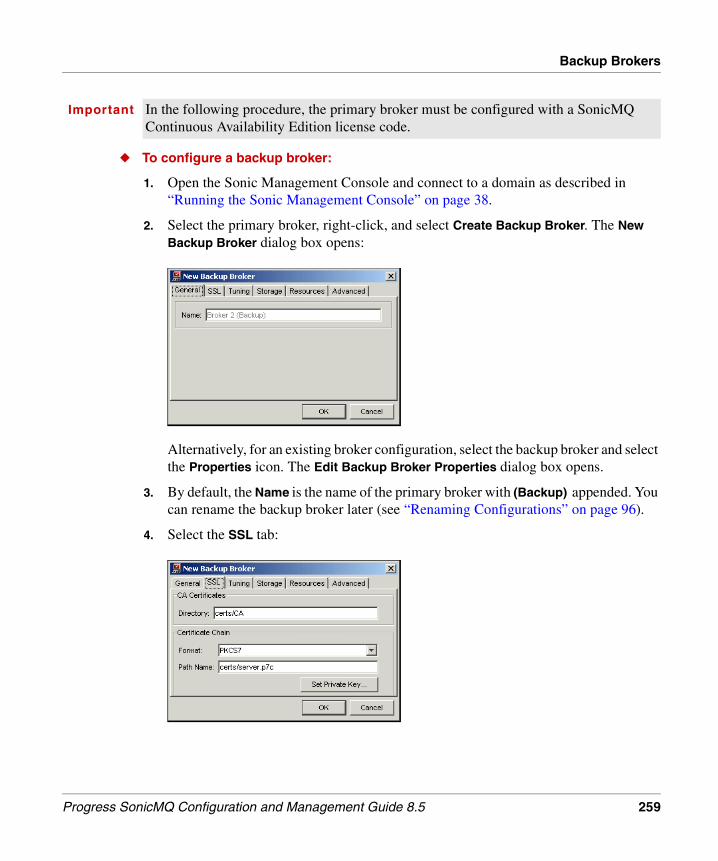
Backup Brokers
◆ To configure a backup broker:
1. Open the Sonic Management Console and connect to a domain as described in “Running the Sonic Management Console” on page 38.
2. Select the primary broker, right-click, and select Create Backup Broker. The New Backup Broker dialog box opens:
Alternatively, for an existing broker configuration, select the backup broker and select the Properties icon. The Edit Backup Broker Properties dialog box opens.
3. By default, the Name is the name of the primary broker with (Backup) appended. You can rename the backup broker later (see “Renaming Configurations” on page 96).
4. Select the SSL tab:
Important In the following procedure, the primary broker must be configured with a SonicMQ Continuous Availability Edition license code.
Progress SonicMQ Configuration and Management Guide 8.5 259
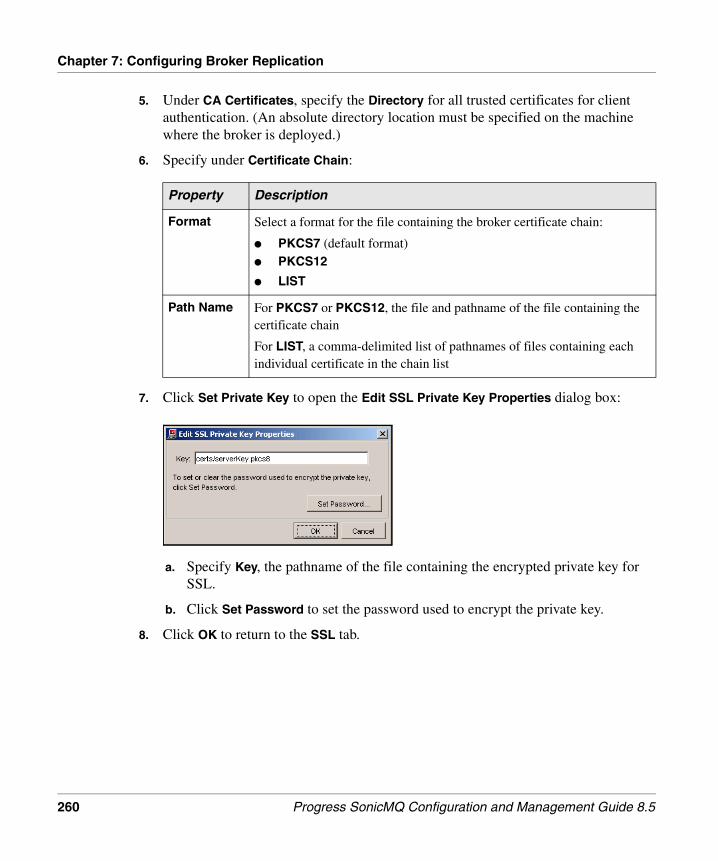
Chapter 7: Configuring Broker Replication
5. Under CA Certificates, specify the Directory for all trusted certificates for client authentication. (An absolute directory location must be specified on the machine where the broker is deployed.)
6. Specify under Certificate Chain:
7. Click Set Private Key to open the Edit SSL Private Key Properties dialog box:
a. Specify Key, the pathname of the file containing the encrypted private key for SSL.
b. Click Set Password to set the password used to encrypt the private key.
8. Click OK to return to the SSL tab.
Property Description
Format Select a format for the file containing the broker certificate chain:
● PKCS7 (default format)● PKCS12
● LIST
Path Name For PKCS7 or PKCS12, the file and pathname of the file containing the certificate chain
For LIST, a comma-delimited list of pathnames of files containing each individual certificate in the chain list
260 Progress SonicMQ Configuration and Management Guide 8.5

Backup Brokers
9. Select the Tuning tab:
The recovery log records events and messages that must be preserved in the event of a broker failure. Events and messages are written sequentially to the recovery log. The Location is the pathname of the broker recovery log directory (relative to the installation directory or absolute). (An absolute directory location must be specified on the machine where the broker is deployed.) If not specified, the path is MQ8.5_install_root/log. (See “Activation Daemon” on page 187.)
10. Select the Storage tab:
11. Specify message storage properties:
Property Description
Store Type Embedded (pre-defined).
Location Specify the path to the backup broker’s store.
Progress SonicMQ Configuration and Management Guide 8.5 261

Chapter 7: Configuring Broker Replication
12. Specify the following properties to configure resources for the broker (not the management container in which the broker is hosted):
The Resources tab is an advanced feature and not for general use. For an example of using this tab, see the “Broker Replication” chapter in the Progress SonicMQ Deployment Guide.
13. Select the Advanced tab:
Property Description
Archive Name
Specifies the component archive file that contains the libraries for this broker.
Prepend Classpath
Sets classpath entries for additional libraries and library versions that supersede any identical classes already specified. A well-formed classpath entry is a URL with any valid protocol, including sonichome:/// and sonicfs:///.
262 Progress SonicMQ Configuration and Management Guide 8.5

Backup Brokers
14. Specify the following optional, advanced properties:
15. Under Properties, click Edit to specify additional Advanced Properties. (See Step 5 on page 242 for more information.)
16. Click OK in the New Backup Broker dialog box. The Sonic Management Console adds or edits the backup broker configuration.
For information on which broker properties are dynamic and which require reloading of the broker, see “Configuration Changes: Dynamic or Requiring Reload” on page 98.
Property Description
Load Balancing Weight
Configures weighted load balancing by specifying an optional load balancing weight for each broker in a cluster. The default weight is 1.
If a broker’s weight is specified as n (greater than 1), connect attempts are redirected to that broker n times in a round-robin cycle. Load balancing weights can be combined with multiple acceptors with the same name, resulting in n*m turns for each round-robin cycle, where n is the weight and m is the number of equivalent acceptors (acceptors with the same name on that broker.
If a weight of 0 is specified, the broker is excluded from load balancing and does not allow connections to be redirected. This is useful if you want to take a machine out of service.
This property is dynamic; you do not have to reload the broker after changing this setting.
(For more information, see “Load Balancing” on page 245.)
Proxy URL URL of the forward proxy server for the routing broker, if one is configured. A client-side forward proxy server is a third-party server that lies between one or more SonicMQ clients (or servers acting as clients) and a firewall.
Important A backup broker is initially configured with the same acceptors as its primary broker. Immediately after creating the backup broker, you should modify its acceptors to reflect the appropriate hostname and port of the backup broker. (See “Configuring Acceptors” on page 275 and “Using Duplicate Acceptors” on page 280.)
Progress SonicMQ Configuration and Management Guide 8.5 263

Chapter 7: Configuring Broker Replication
Backup Broker Menu CommandsIf you right-click on a backup broker node or a backup broker in a table, you can access several commands:
264 Progress SonicMQ Configuration and Management Guide 8.5

Backup Brokers
Many of the commands behave the same way as they do for other configurations (such as those described in “Menus” on page 51). However, some commands differ depending upon whether the broker is a standalone broker, a primary broker, or a backup broker:
Command Role Description
Goto Primary Broker
Backup Go to the associated primary broker configuration in the Configure view.
Delete Standalone Delete broker configuration.
Primary Deleting a primary broker configuration also deletes the associated backup configuration (after confirmation).
Backup Delete the backup broker, and remove its reference from primary broker configuration.
Rename All Renaming a broker configuration changes its view name. The broker name is a shared property for a primary/backup pair.
Warning Before deleting a backup broker configuration, you must ensure that the backup broker to be deleted is not in the STANDALONE replication state (that is it has the most recent recoverable state when it was last running), or data might be lost. (For information on replication states, see page 547.)
You should:
1. Start the primary broker (see “Starting Brokers” on page 551).
2. Start the backup broker (see “Starting Brokers” on page 551).
3. Let the primary and backup brokers perform online synchronization (see “Synchronizing Storage” on page 558).
4. Shut down the backup broker (see “Stopping Brokers” on page 551).
5. Delete the backup broker configuration.
Progress SonicMQ Configuration and Management Guide 8.5 265

Chapter 7: Configuring Broker Replication
Replication ConnectionsA replication connection is a configured network path between primary and broker, specifying the network endpoints and properties required to establish a replication connection. Only one connection is used for replication at a time, but the brokers can switch to another connection without interrupting replication if one connection fails. You can define multiple replication connections to use multiple redundant network paths, if available. The backup broker uses the information from the primary broker’s configuration. For comprehensive information on hardware requirements and other aspects of replication connections, see the Progress SonicMQ Deployment Guide.
You configure replication properties for a primary broker under the Replication Connections node under a Broker node.
The replication configuration of a primary broker consists of:
● A set of broker replication properties. See “Configuring Broker Replication Properties” on page 266.
● A list replication connections. See “Creating Replication Connections” on page 269.
Configuring Broker Replication PropertiesFor fault tolerance, a primary broker must have a set of replication properties.
Each broker attempts to connect each defined replication connection at startup. While not connected, each defined connection attempts to connect regularly at the configured Retry Interval.
Both primary and backup brokers actively establish replication connections and monitor their state. When not carrying replication traffic, a connection is checked regularly to make sure it is still connected. If it is not carrying replication traffic, the connection is monitored with a heartbeat controlled by the Ping Interval property.
The following procedure describes how to configure broker replication properties.
266 Progress SonicMQ Configuration and Management Guide 8.5

Replication Connections
◆ To configure broker replication properties:
1. In the Configure tab under a broker configuration, select the Replication Connections node folder and click the Properties icon. The Edit Broker Replication Properties dialog box opens:
2. In the Replication section, specify these broker replication properties:
Property Description
Retry Interval The interval, in seconds, after which each broker will try to reestablish replication connection. The default value is 180.
Replicate Persistent
Controls when the standby broker in a replicated broker pair acknowledges replication:
● If deselected, immediately on receipt. This should provide better performance.
● If selected, only after it has persisted the data. This protects against data loss in case of rapid consecutive failures of both brokers, and also if the first broker loses its storage media.
Progress SonicMQ Configuration and Management Guide 8.5 267

Chapter 7: Configuring Broker Replication
3. In the Fault Detection section, adjust the broker replication failover properties:
The connectios over redundant networks are established alll at the same time. Fault detection starts with realizing a connection failure, and then attempting one or more times to connect again to the that network. This happens asynchronously to the switch over. In your service level considerations, note that establishing the sequence of failure over all replications connections and then failover of the broker and the client connections takes some additional time.
Table 5 shows how the default settings would apply, followed by various settings that would result in different failover performance.
Property Description
Connect Timeout The interval, in seconds, after which each broker claims failure of an attempt to establish a connection. The default value is 30.
Ping Interval The interval, in seconds, after which each broker will try to reestablish replication connection. The default value is 30.
Ping Timeout The interval, in seconds, after which each broker pings a replication connection, to make sure it is still connected. The default value is 0.
Failure Detect Timeout
The number of seconds a broker in the STANDBY state will wait, after losing all replication connections, before failing over to the STANDALONE state. During this time, all replication connections are retried at 1 second intervals. The default value is 0 which means that failover is immediate.
Table 5. Fault Detection settings for Replicated Broker network failovers
Type
Connect Timeout (seconds)
Ping Interval (seconds)
Ping Timeout (seconds)
Maximum elapsed time before failover on two networks (seconds)
Default 30 30 0 60
Minimum 5 2 5 15
Example #1 30 30 60 95
Example #2 45 30 60 115
268 Progress SonicMQ Configuration and Management Guide 8.5

Replication Connections
When a ping timeout is specified, the ping interval cannot be more than half of the ping timeout value.
You can adjust the time allowances from their default values to define an appropriate delay before acting but take care not to set values so low that you trigger unwarranted failovers.
4. Adjust the broker’s replication connection Connect Timeout, Ping Interval, and Ping Timeout to your preferred values.
5. Click OK. The Sonic Management Console configures the broker replication properties.
Creating Replication ConnectionsA replication connection defines both endpoints of a network path used between primary and backup broker for replication and failure detection.
A list replication connections can be defined within the primary broker configuration. Since the definitions contain both network endpoints, the backup broker does not define a similar list, and simply uses the information from the primary's configuration.
An administrator defines replication connections within a primary broker configuration by giving them unique names (unique within that primary), and specifying the properties. The network endpoint addresses and ports are always required.
A replication connection definition added to the configuration takes effect immediately at both brokers if they are running. Each broker creates a socket listener on its local address, and start trying to connect to the other broker's address.
The following procedure describes how to define a replication connection.
Note For more information about failover settings, see the “Optimizing Broker CAA and Cluster Failover” chapter of the Progress SonicMQ Performance Tuning Guide for details on these settings as well as operating system TCP settings that can reinforce network failover behaviors.
Progress SonicMQ Configuration and Management Guide 8.5 269

Chapter 7: Configuring Broker Replication
◆ To define a new replication connection:
1. Right click on the Replication Connections node or right click on the table background and select New Replication Connection... . The New Replication Connection dialog box opens:
Note Support for IPv6 — For a platform (hardware, JVM, and system configuration) that supports IPv6, you can define acceptors in IPv6 syntax. The following excerpt shows some loopback addresses in IPv4 and IPv6 (for use in development and testing) and well-formed URLs for IPv4 and IPv6:
270 Progress SonicMQ Configuration and Management Guide 8.5

Replication Connections
2. Enter the appropriate values for the properties:
3. Click OK. The Sonic Management Console creates the replication connection and lists it in the Replication Connections table.
Property Description
Name A user-assigned, unique name for the replication connection. Used to identify the connection in the UI and in administrative notifications.
Protocol SonicMQ protocol used for the connection (TCP or SSL).
Primary (Hostname or IP Address)
IP address or hostname on which the primary listens for connection attempts for this connection. The same network address is used as the local interface when the primary initiates connections to the backup for this connection.
Primary Port TCP port on which the primary listens for connection attempts for this connection.
Backup (Hostname or IP Address)
IP address or hostname on which the backup listens for connection attempts for this connection.
Backup Port TCP port on which the backup listens for connection attempts for this connection.
Weight Controls which of several available connections is used for replication. The connected connection with the highest weight is selected. A weight of 0 disables replication on that connection (it can still be used for pinging).
Warning Use the network or host name for the Primary (Hostname or IP Address) and Backup (Hostname or IP Address). Do not use “localhost” or “127.0.0.1”.
Progress SonicMQ Configuration and Management Guide 8.5 271

Chapter 7: Configuring Broker Replication
Editing Replication ConnectionsThe following procedure describes how to modify replication connections. You can modify the Weight. (For more information on this property, see Progress SonicMQ Deployment Guide.) The modification takes effect at the broker immediately. To change other properties (Name, Protocol, Primary Address, Primary Port, Backup Address, or Backup Port), you must delete the connection and recreate it.
◆ To edit replication connections:
1. Select the Replication Connections node.
2. Select a replication connection in the table, right-click, and select Properties. The Edit Replication Connection Properties dialog box opens:
3. Modify the Weight.
4. Click OK. The Sonic Management Console edits the replication connection configuration. The modification takes effect at the broker immediately.
272 Progress SonicMQ Configuration and Management Guide 8.5

Replication Connections
Viewing Replication ConnectionsThe following procedure describes how to view replication connections.
◆ To view replication connections:
❖ Select the Replication Connections node:
The table shows the defined replication connections for this instance of the broker with the following information:
■ Name — Name given to the replication connection
■ Primary broker URL — Protocol, hostname, and port properties of the replication connection on the primary broker
■ Backup broker URL — Protocol, hostname, and port properties of the replication connection on the backup broker
■ Weight — The weight of the connect ion where larger integer values indicates a higher weight than lower values
Progress SonicMQ Configuration and Management Guide 8.5 273

Chapter 7: Configuring Broker Replication
Deleting Replication ConnectionsThe following procedure describes how to delete replication connections.
◆ To delete replication connections:
1. Expand the broker configuration where you want to delete a replication connection.
2. Select the Replication Connections node.
3. Select a replication connection in the table, right-click, and select Delete. The deletion of a replication connection takes effect immediately, and causes the connection to be disconnected.
Important Deleting the last defined replication connection puts the standby broker back in the WAITING state and will display a warning message for confirmation.
274 Progress SonicMQ Configuration and Management Guide 8.5
Chapter 8 Configuring Acceptors
This chapter describes how to configure acceptors in the following sections:
● “Overview of Acceptors” explains acceptors and how to plan your acceptors.
● “Broker-wide Acceptor Properties” describes how to configure broker-wide acceptor properties and view a broker’s configured acceptors.
● “Configuring TCP Acceptors” describes how to configure TCP acceptors.
● “Securing an Acceptor” explains how to implement security in your messaging application using Secure Socket Layer (SSL).
● “Configuring HTTP(S) Tunneling Acceptors” describes how to configure HTTP acceptors with and without SSL.
● “Configuring HTTP(S) Direct Acceptors” describes how to configure HTTP Direct Basic, HTTP Direct for SOAP, and HTTP Direct for JMS acceptors, with and without SSL.
The “HTTP(S) Direct Sample Applications” chapter of the Progress SonicMQ Deployment Guide describes how to run the HTTP(S) Direct inbound sample applications that are provided with SonicMQ.
Progress SonicMQ Configuration and Management Guide 8.5 275

Chapter 8: Configuring Acceptors
Overview of AcceptorsA SonicMQ broker is configured with one or more acceptors. An acceptor describes a protocol, host name, and port with which a client can connect to a broker. When a SonicMQ broker starts up, it initiates protocol listeners on various ports as acceptors for incoming traffic.
Plan your acceptors and URL extensions in advance so the naming will be scalable and extensible. To better understand acceptors, see the Progress SonicMQ Deployment Guide.
You can configure a broker with one or more acceptors. For each acceptor, you designate which type of connection it can receive. You can configure multiple acceptors, for example, to:
● Support different protocols for different connections. For example, some clients might connect with the broker using TCP, while others connect using HTTP.
● Have brokers in a cluster connecting with each other using TCP for performance, while having clients connect with the cluster using SSL for security reasons.
● Have only some acceptors include mutual authentication.
● Use different sets of certificates on different acceptors.
● Support load balancing across a subset of brokers in a cluster.
You configure default broker-wide properties for all of a broker’s acceptors. You can also configure properties on individual acceptors that override the default values. A SonicMQ broker can have acceptors configured for:
● TCP — The default; see “Configuring TCP Acceptors” on page 283
● SSL — See “Securing an Acceptor” on page 287
● HTTP(S) Tunneling — See “Configuring HTTP(S) Tunneling Acceptors” on page 294
● HTTP(S) Direct — See “Configuring HTTP(S) Direct Acceptors” on page 297
Note A running broker responds dynamically to configuration changes associated with TCP and SSL acceptor types (but not HTTP(S) type acceptors). For example, as TCP or SSL type acceptors are added to a broker configuration, the running broker will automatically start accepting incoming connections on the newly defined acceptor as soon as the broker receives the configuration changes. (A broker must be reloaded to reflect HTTP(S) type acceptor changes.)
276 Progress SonicMQ Configuration and Management Guide 8.5

Broker-wide Acceptor Properties
Broker-wide Acceptor PropertiesThe following procedure describes how to configure the default broker-wide properties and view the acceptors on a broker. You can override these default values when you configure individual acceptors.
Configuring Broker-wide Acceptor PropertiesThe following procedure describes how to configure broker-wide acceptor properties.
◆ To configure broker-wide acceptor properties:
1. In the Configure tab, under a broker configuration, select the Acceptors node and click the Properties icon. The Edit Acceptors Properties dialog box opens.
2. Specify the following information in the General tab under Defaults:
Property Description
Default Acceptor The name of the acceptor to use when no acceptor is specified.
Interbroker Acceptor
Name of the interbroker acceptor used for interbroker connection. It is the same as the default broker acceptor unless overriden (not editable unless the broker is in a cluster).
You can specify a redundant network for the interbroker acceptor. In that case, the instance of the name you choose specifies the primary interbroker acceptor. See “Overloading the Acceptor Name for Interbroker (Cluster) Connections” on page 281 for details.
Progress SonicMQ Configuration and Management Guide 8.5 277

Chapter 8: Configuring Acceptors
If the broker is a member of a cluster, click Reset to reset the interbroker acceptor to the default acceptor.
Click ... to open the Choose a Default Acceptor dialog box and select from a list of acceptors:
3. To specify HTTP acceptor properties, select the HTTP tab:
Notes ● There must be at least one acceptor defined, and the role of the default acceptor must be assigned to one of the defined acceptors.
● The URL of each acceptor must be unique or a runtime failure will occur at startup.
● Do not use localhost as the interbroker acceptor,
278 Progress SonicMQ Configuration and Management Guide 8.5

Broker-wide Acceptor Properties
4. Specify the following properties under Threads and Timeouts:
5. Click OK. The Sonic Management Console applies the broker-wide acceptor properties. If you change a broker’s configuration properties, you must reload the broker (see “Configuration Changes: Dynamic or Requiring Reload” on page 98).
Property Description
Minimum Minimum number of threads to allocate to process incoming HTTP requests.
Maximum Maximum number of threads to allocate to process incoming HTTP requests. When an HTTP connection is closed, the threads dedicated to that connection are returned to the pool for the next request. When the limit is reached, incoming connections must wait for threads to become available.
Client Idle Timeout
Number of milliseconds to allow a client to be idle (the default is 10000, ten seconds).Under HTTP, a client must initiate every exchange to work with this request/response protocol. As a result, a broker cannot know if a client is idle, has exited, or is experiencing communications problems. If the broker does not receive a request from a client for the entire span of the specified timeout, the broker assumes that the connection is lost and frees resources held for the client.
Client Read Timeout
Number of milliseconds an HTTP thread should wait before returning a “no data” response to the client.
Broker Read Timeout
Number of milliseconds an HTTP thread should wait while reading a socket before closing the socket and returning itself to the pool.
Progress SonicMQ Configuration and Management Guide 8.5 279

Chapter 8: Configuring Acceptors
Using Duplicate AcceptorsYou can create multiple acceptors in a broker with the same name. This capability can be used to enhance fault tolerant client connections or to provide redundancy to interbroker connections.
Overloading the Acceptor Name for Fault Tolerant Client Connections
The same acceptor name can be used on multiple acceptors. When you give several acceptors the same name, fault tolerant client connections are provided a list of all the acceptors that have the same name as the acceptor on which the connection was made. This list, the broker reconnect URLs, provides the alternate network paths that the client connection can use to resume its connection when a network failure happens. For example:
When replicated brokers are used, the acceptor name is passed to the backup broker where similarly named acceptors define the broker standby reconnect URLs. For more information, see the “Connection Methods for Fault Tolerance” section of the “SonicMQ Connections” chapter in the Progress SonicMQ Application Programming Guide.
280 Progress SonicMQ Configuration and Management Guide 8.5

Broker-wide Acceptor Properties
Overloading the Acceptor Name for Interbroker (Cluster) Connections
When each member broker in a cluster defines two acceptors with the same name and then chooses one of those acceptors as the primary interbroker acceptor, the selected acceptor is the primary connection point for cluster connections and the other acceptor of the same name is the secondary connection point for cluster connections. You should try to define the primary interbroker acceptor that is on the same network as every other cluster member’s primary interbroker acceptor.
In the following illustration, two acceptors named Cluster1 were created on a broker, and one of those two selected as the primary interbroker acceptor. After selection, opening the dialog to choose the interbroker acceptor highlights the one selected as the primary:
One connection is used for interbroker messaging traffic at a time, with preference given to the primary connection. An active secondary connection fails back to the primary connection when the primary is accepting connections. Defining more than two acceptors for this purpose results in indeterminate selection of the secondary interbroker acceptor.
Interbroker primary and secondary path configurations are static across a cluster. When you add or change the configuration of a broker's interbroker acceptor, you must reload all the brokers in the cluster.
Progress SonicMQ Configuration and Management Guide 8.5 281

Chapter 8: Configuring Acceptors
Viewing Configured AcceptorsThe following procedure describes how to view the acceptors on a broker.
◆ To view a broker’s acceptors:
1. Open the Sonic Management Console and connect to a domain, as described in “Running the Sonic Management Console” on page 38, and select the Configure tab.
2. Under a broker configuration, select Acceptors:
The Acceptors table lists the acceptors for a broker configuration by:
The same acceptor name can be used on multiple acceptors.
Property Description
Name Name of the acceptor
Type Protocol of the acceptor
URL URL of the acceptor
282 Progress SonicMQ Configuration and Management Guide 8.5

Configuring TCP Acceptors
Configuring TCP AcceptorsTransport Control Protocol (TCP) is the default protocol of a SonicMQ broker installation. TCP is a connection-oriented protocol that establishes a connection with another host before it sends its data. Before a connection is started between two hosts, control messages are exchanged (known as a handshake) to initiate the connection.
The following procedure describes how to create or edit a TCP acceptor.
◆ To create or edit a TCP acceptor:
1. To create a TCP acceptor, in the Configure tab under a broker configuration, right-click the Acceptors node and select New > TCP/SSL. The New TCP/SSL Acceptor dialog box opens:
To edit an existing TCP acceptor, select the acceptor and select the Properties icon in the toolbar. The Edit TCP Acceptor Properties dialog box opens.
Note Support for IPv6 — For a platform (hardware, JVM, and system configuration) that supports IPv6, you can define acceptors in IPv6 syntax. The following excerpt shows some loopback addresses in IPv4 and IPv6 (for use in development and testing) and well-formed URLs for IPv4 and IPv6:
Progress SonicMQ Configuration and Management Guide 8.5 283

Chapter 8: Configuring Acceptors
2. Specify the following under Parameters:
3. Leave SSL deselected.
4. Click OK. The Sonic Management Console creates the TCP acceptor and adds it to the list in the Acceptors table or modifies the existing TCP acceptor.
Property Description
Name Name of the acceptor
URL tcp: // (IP address or hostname) and the port for the acceptor.
External URL When configured (with the same protocol and your preferred URL and port), defines the address that the broker sends to clients and other brokers when it identifies this acceptor.
Max Connection Send Buffer Size
The maximum buffer size for outgoing messages. Messages are buffered into a buffer of this size before attempting to write to the socket to reduce the number of socket write calls. The positive integer value is the number of bytes. The default value is 8192 bytes.
Max Connection Receive Buffer Size
The maximum buffer size for receipt of data. This buffer is used to reduce the number of read calls made to the socket. The positive integer value is the number of bytes. The default value is 8192 bytes.
Note When you append the text “#ONLY” to the port (for example, tcp://1.2.3.4:56#ONLY) you specify that the acceptor can be bound only to the IP or host specified in the URL.
However, the use of #ONLY is limited to individual broker acceptors. On other acceptors (broker replication connections, Directory Service replication connections, interbroker connections, and routing connections) the behavior of #ONLY is implicit.
Warning Use the actual network or host name for the URL. Do not use “localhost” or “127.0.0.1”. Be sure to correct the name if you rehost the broker as an unresolvable acceptor host name causes an error.
284 Progress SonicMQ Configuration and Management Guide 8.5

Configuring TCP Acceptors
Using an External URL for Address Translation
Address translation enables computers placed in between clients and brokers to protect the location of protected systems and direct access to them. There are principal mechanisms that perform address translation:
● Network Address Translation (NAT) firewall — A NAT firewall maps external addresses made visible to clients to specified internal addresses on a broker inside the firewall. Set the same protocol for the external URL as the acceptor to which it will forward the connection request.
● SSL Accelerator — When clients connect using SSL protocols to an external URL on an SSL accelerator device, the accelerator forwards the connection to the related TCP acceptor on the broker. Correspondingly, an SSL accelerator forwards HTTPS external URLs to the related HTTP acceptor on the broker.
There are three aspects of SonicMQ connections that take advantage of the external URL feature when address translation is in use:
● Fault tolerant client connections — When a client establishes a fault tolerant connection, the client is provided with the URL of the standby broker so that, in that event of a detected failure of the active broker, the client can resume its session on the broker that is assumed to have now taken the active role. By supplying the client with the external URL of an acceptor, the address translation mechanism resumes the connection to the other broker in the replicated pair.
● Load balanced brokers and clients — When brokers are configured to perform load balancing and clients set connections to accept load balancing, the URL of the redirected broker is sent to the client. Using an external URL through an address translation mechanism passes the acceptor’s reconnect external URL to the client.
● Dynamic Routing Architecture — When a DRA reverse connection (from the remote broker to the connected broker) is required and address translation was used for the connected broker, an external URL provides the address that will be translated.
Note If all acceptors use the same URL then, instead of an external URL on each acceptor, set that URL in the advanced broker property DEFAULT_ROUTING_URL. See “Selected Advanced Broker Properties” on page 242 for details on this property name and how to enter it.
Progress SonicMQ Configuration and Management Guide 8.5 285

Chapter 8: Configuring Acceptors
Dynamic Changes in AcceptorsChanges to the configuration of some acceptors are automatically propagated to the broker for which they are defined. When the broker is running, the changes are acted on immediately after you save the changes in the Directory Service. This dynamic update of acceptors applies as follows:
The acceptor list propagated to fault tolerant and load balancing brokers reflects all active acceptors correctly.
In the following figure, some TCP and SSL acceptors were changed in the Sonic Management Console and reflected in the broker’s console window:
s
The acceptors that were added, modified or deleted include:
● TCP acceptor, AnotherAcceptor, is added to accept connections on port 2516.
● SSL acceptor, An_SSL_Acceptor, is added to accept connections on port 3506.
● SSL acceptor, An_SSL_Acceptor, is changed to use port 4506.
● TCP acceptor, AnotherAcceptor, is deleted.
Acceptor Type Comments
TCP Dynamic
SSL
HTTP(S) Tunneling Not dynamic, requires broker reload
HTTP(S) Direct Changes to the acceptor URL and its port are dynamic
Changes (additions, modifications, or deletion) to an acceptor’s protocols (types, parameters, URL lists, and their settings) do not update dynamically. They require broker reload
Important Where the acceptors on brokers are dynamic, if you reconfigure interbroker acceptors, restart the member brokers in the cluster to propagate the changes to each member.
286 Progress SonicMQ Configuration and Management Guide 8.5

Securing an Acceptor
Securing an AcceptorYou can implement strong security in your messaging application by using Secure Socket Layer (SSL) to encrypt messages at the connection level for secure data transfers. In any connection using SSL, the broker first sends a certificate to the client to authenticate itself. Only when the client determines that it is connected to the intended broker does it send any information to that broker. The client then sends information to authenticate itself to the broker. Broker-wide SSL properties are overriden by properties with the same name specified for an individual SSL acceptor.
For information on authentication:
● See “Authentication Domains” on page 421
● For information on authorization domains, see “Configuring a Set of Authorization Policies” on page 442
● For more information, see the Progress SonicMQ Deployment Guide.
The following sections describe the SSL acceptor, and then HTTP(S) tunneling and HTTP(S) Direct.
Secure Sockets Layer (SSL)The technique for setting up SSL varies depending on the cipher suite provider designated on the broker. If you selected to use RSA SSL on the broker, the SSL acceptors will all use RSA SSL. See “Configuring a Broker’s SSL Properties” on page 216 for information on requirements for using RSA.
SSL acceptors are dynamically updated. Maintenance is propagated to the broker location where a new one is immediately implemented, a changed one is immediately modified, a deleted one is immediately stopped. (See “Dynamic Changes in Acceptors” on page 286.)
Progress SonicMQ Configuration and Management Guide 8.5 287
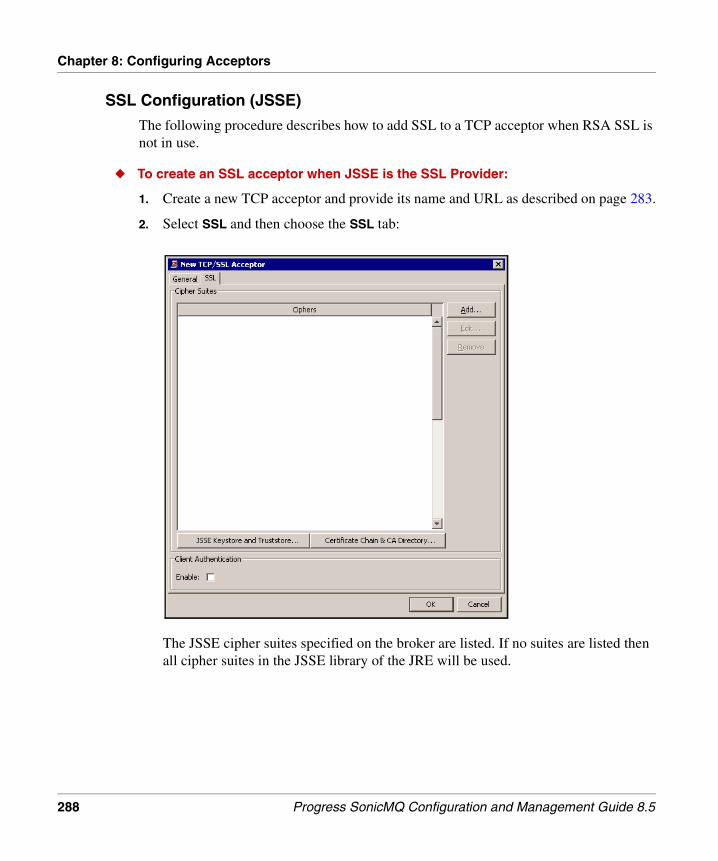
Chapter 8: Configuring Acceptors
SSL Configuration (JSSE)
The following procedure describes how to add SSL to a TCP acceptor when RSA SSL is not in use.
◆ To create an SSL acceptor when JSSE is the SSL Provider:
1. Create a new TCP acceptor and provide its name and URL as described on page 283.
2. Select SSL and then choose the SSL tab:
The JSSE cipher suites specified on the broker are listed. If no suites are listed then all cipher suites in the JSSE library of the JRE will be used.
288 Progress SonicMQ Configuration and Management Guide 8.5

Securing an Acceptor
3. Specify the following properties:
4. Click the JSSE Keystore and Truststore button to open the Edit JSSE Parameters Properties dialog box:
Property Description
Cipher Suites The ciphers listed are the current list of JSSE ciphers currently specified for the broker in the sequence that the broker has organized them. While the broker’s current set of ciphers are provided as defaults to the new acceptor, the acceptor can add or remove ciphers from its list and any changes to the broker’s list of ciphers will not propagate to the SSL acceptors.
Select a cipher from the drop-down list and click Add to add it to the list under Ciphers. You can enter a cipher if your cipher is not listed and it is supported by the underlying provider.
You can remove a cipher from the list by selecting the cipher and selecting Remove.
Client Authentication: Enable
Select to choose client authentication. For a general discussion of client authentication, see the “Client Authentication” section of the “Channel Encryption” chapter of the Progress SonicMQ Deployment Guide.
Progress SonicMQ Configuration and Management Guide 8.5 289

Chapter 8: Configuring Acceptors
a. In the Keystore section:
a. Choose JKS or PKCS12 as the Type.
b. Type the Location of the Keystore. You can also choose to browse the local file system and the SonicFS for store locations. There is no default.
c. Type the Password for the Keystore.
d. Type the Alias name for the Keystore. The alias distinguishes the key pairs in the store to apply in this instance.
e. Type the Key Password for the Keystore. This password protects the individual key (entry) in a key store, so that security principals can share a keystore yet maintain the privacy of their secret key.
b. In the Truststore section:
❑ The Type is set to JKS.
❑ Type the Location of the Truststore. You can also choose to browse the local file system and the SonicFS for store locations. There is no default.
❑ Type the Password for the Truststore.
c. In the Trustmanager section, type the class name for the Trustmanager if you prefer to use a custom Trustmanager that has been implemented.
Click OK. The Sonic Management Console creates the SSL acceptor for the JSSE provider and adds it to the list in the Acceptors table.
290 Progress SonicMQ Configuration and Management Guide 8.5

Securing an Acceptor
SSL Configuration (RSA)
The following procedure describes how to add SSL to a TCP acceptor when you are using licensed B-Safe SSL-J libraries from RSA Security. See “Configuring a Broker’s SSL Properties” on page 216 for information on requirements for using RSA.
◆ To create an SSL acceptor that uses RSA libraries:
1. Create a new TCP acceptor and provide its name and URL as described on page 283.
2. Select SSL and then choose the SSL tab:
The ciphers listed are the list of JSSE ciphers currently specified for the broker in the sequence that the broker has organized them. If no ciphers are listed, the broker has accepted the complete default list of ciphers in its stated sequence.
While the broker’s current set of ciphers are provided as defaults to the new acceptor, the acceptor can add or remove ciphers from its list and any changes to the broker’s list of ciphers is not propagated to the SSL acceptors.
Note that the JSSE KeyStore and Truststore button is not enabled, an indicator that the broker has elected the Use RSA SSL option.
Progress SonicMQ Configuration and Management Guide 8.5 291

Chapter 8: Configuring Acceptors
3. Click RSA Certificates to open the Edit RSA Parameters Properties dialog box:
4. In the CA Certificates section:
a. Specify the Directory for all trusted certificates for client authentication.
b. If you intend to use Certificate Revocation Lists, perform the procedure “Using RSA Certificate Revocation Lists” on page 222.
5. In the Certificate Chain section:
a. Specify the following properties:
Property Description
Format Select a format for the file containing the broker certificate chain:
● PKCS7 (the default format)● PKCS12
● LIST
Path Name For PKCS7 or PKCS12, the file and pathname of the file containing the certificate chain.
For LIST, a comma-delimited list of pathnames of files containing each individual certificate in the chain list.
(An absolute directory location must be specified on the machine where the broker is deployed.)
292 Progress SonicMQ Configuration and Management Guide 8.5

Securing an Acceptor
b. Click Set Private Key to open the Edit SSL Private Key Properties dialog box:
❑ Specify Key, the pathname of the file containing the private key for SSL.
❑ Click Set Password to set the password used to encrypt the private key.
6. Click OK. The Sonic Management Console creates the TCP acceptor with SSL and adds it to the list in the Acceptors table.
Progress SonicMQ Configuration and Management Guide 8.5 293

Chapter 8: Configuring Acceptors
Configuring HTTP(S) Tunneling AcceptorsProxy servers and firewalls commonly allow only HTTP-based traffic to pass through. You can establish a direct connection between client and server using the Hypertext Transfer Protocol (HTTP) tunneling protocol.
The following procedure describes how to create or edit an HTTP tunneling or HTTPS tunneling (HTTP tunneling with SSL) acceptor.
◆ To create or edit an HTTP or HTTPS tunneling acceptor:
1. In the Configure tab, under a broker configuration, right-click the Acceptors node and select New > HTTP(S) Tunneling. The New HTTP(S) Tunneling Acceptor dialog box opens:
To edit an existing HTTP(S) tunneling acceptor, select the acceptor, then click the Properties icon in the toolbar. The Edit HTTP(S) Acceptor Properties dialog box opens.
Note Limitations to IPv6 Support on Windows — Some Windows systems have problems with IPv6 that cannot be addressed in currently supported JVMs. Sonic 8.0 does not support IPv6 on Windows for areas of SonicMQ that use NIO, namely:
● Directory Service Replication
● HTTP Tunnelling acceptors
294 Progress SonicMQ Configuration and Management Guide 8.5

Configuring HTTP(S) Tunneling Acceptors
2. Specify the following under Parameters:
Property Description
Name Name of the acceptor.
URL tcp: // (IP address or hostname) and the port for the acceptor.
External URL When configured (with the same protocol and your preferred URL and port), defines the address that the broker sends to clients and other brokers when it identifies this acceptor.
Max Connection Send Buffer Size
The max buffer size for outgoing messages. Messages are buffered into a buffer of this size before attempting to write to the socket to reduce the number of socket write calls. The positive integer value is the number of bytes. The default value is 131072 bytes.
Max Connection Receive Buffer Size
The max buffer size for receipt of data. This buffer is used to reduce the number of read calls made to the socket. The positive integer value is the number of bytes. The default value is 131072 bytes.
Progress SonicMQ Configuration and Management Guide 8.5 295

Chapter 8: Configuring Acceptors
3. For the SSL checkbox:
■ Leave it deselected for HTTP tunneling. The URL field has http:// as a prefix.
■ Select SSL to HTTPs tunneling. The URL field has https:// as a prefix.
4. Enter the URL (IP address or hostname) and the port for the acceptor.
5. If you selected SSL:
a. Select the SSL tab, which is similar to the tab shown on page 288. (The settings reflect the broker-wide settings in the Edit Acceptors Properties dialog box.)
b. Specify the remaining settings as described in Step 2 on page 288.
6. Click OK. The Sonic Management Console creates or edits the HTTP or HTTPS tunneling acceptor.
7. Because changes to HTTP(S) Tunneling acceptors are not dynamic, you must reload the broker to update the acceptor information (see “Reloading Brokers” on page 552).
Enable Legacy HTTP Server
Select this option to add HTTP compatibility for version 1.0 to the acceptor’s functionality. Selecting this feature ensures compatibility with a wider range of deployed proxies, but might impact the acceptor’s general performance.
Clear this option to disable HTTP compatibility for version 1.0. When this option is cleared, the option to Enable HTTP Pipelining is available.
Enable HTTP Pipelining
Select this option to allow the HTTP client pipeline—to issue a series of requests without waiting for the response between writing each request. The SonicMQ client makes use of HTTP pipelining to improve performance.
As it is optional for HTTP proxies to support pipelining, many proxies do not provide pipelining support. To allow for that circumstance, the broker attempts to detect at the time of connection whether any intermediate proxy would prevent HTTP request pipelining. The detection process can slow down connection establishment if a proxy doesn’t support pipelining. When this happens a message is printed to the broker’s log indicating that pipeline capability could not be verified.
Clear this option to disable HTTP pipelining for the acceptor.
Pipelining support is not available when using the legacy HTTP server.
Property Description
296 Progress SonicMQ Configuration and Management Guide 8.5

Configuring HTTP(S) Direct Acceptors
Configuring HTTP(S) Direct AcceptorsSonicMQ provides ways to convert and validate between HTTP and JMS message data. HTTP Direct acceptors can be used to receive HTTP documents of any format. Protocol handlers registered on the acceptor handle the translation from HTTP to JMS. The HTTP(S) Direct acceptor allows the broker to integrate with applications via an HTTP server.
Standard HTTP messages can include the Basic authentication header used for authentication (and then, when authenticated, used for that user's authorizations). A Basic authentication user is used for access control on the remote HTTP server, and is configured when defining an outbound HTTP route.
You can configure multiple protocol handlers for one acceptor. Different protocol handlers can be configured to monitor different URLs on the same acceptor, provided each of the URLs is unique.
The HTTP Direct protocol handlers are:
● HTTP(S) Direct Basic — See “Configuring HTTP(S) Direct Basic Protocol Handlers” on page 298.
● HTTP(S) Direct for SOAP — See “Configuring HTTP(S) Direct for SOAP Protocol Handlers” on page 309.
● HTTP(S) Direct for JMS — See “Configuring HTTP(S) Direct for JMS Protocol Handlers” on page 314.
● HTTP(S) WebService Protocol — See “Configuring HTTP(S) Direct Web Service Protocol Handlers” on page 320.
For more information, see the Progress SonicMQ Deployment Guide.
Note Limited dynamic updates of HTTP Direct Acceptors — HTTP Direct acceptors are dynamically updated to a limited extent. URL and port changes are dynamic but protocol handlers and URL extensions do not update dynamically. The acceptor is propagated to the broker location where a new one is immediately implemented, a changed one is immediately modified (to the extent of the URL and port), and a deleted one is immediately stopped. (See “Dynamic Changes in Acceptors” on page 286.)
If you change the protocol handlers and URL extensions of an HTTP Direct acceptor, reload the broker to update the acceptor information. (See “Reloading Brokers” on page 552.)
Progress SonicMQ Configuration and Management Guide 8.5 297

Chapter 8: Configuring Acceptors
Configuring HTTP(S) Direct Basic Protocol HandlersThe following sections describe how to configure HTTP(S) Direct basic protocol handlers:
● “HTTP(S) Direct Basic Receive Protocol Handlers” on page 299
● “HTTP(S) Direct Basic Oneway Send Protocol Handlers” on page 304
● “HTTP(S) Direct Basic Content Reply Send Protocol Handlers” on page 307
Note Support for IPv6 — For a platform (hardware, JVM, and system configuration) that supports IPv6, you can define acceptors in IPv6 syntax. The following excerpt shows some loopback addresses in IPv4 and IPv6 (for use in development and testing) and well-formed URLs for IPv4 and IPv6:
298 Progress SonicMQ Configuration and Management Guide 8.5

Configuring HTTP(S) Direct Acceptors
HTTP(S) Direct Basic Receive Protocol Handlers
Follow this procedure to create or edit an HTTP or HTTPS Direct Basic receive protocol handler.
◆ To create or edit an HTTP(S) Direct Basic receive protocol handler:
1. In the Configure tab, under a broker configuration, right-click the Acceptors node and select New HTTP (S) Direct. The New HTTP(S) Direct Acceptor dialog box opens:
To edit an existing HTTP or HTTPS Direct protocol handler, select the protocol handler, then click the Properties icon in the toolbar. The Edit HTTP(S) Direct Acceptor Properties dialog box opens.
2. Specify Name, the name of the acceptor under Parameters.
3. If you do not want to use SSL, leave SSL deselected and specify:
■ URL http:// — Enter the URL (IP address or hostname) and the port for the acceptor.
(If you want to use SSL, follow Step 3 on page 289.)
Warning Use the actual network or host name for the URL. Do not use “localhost” or “127.0.0.1”. Be sure to correct the name if you rehost the broker as an unresolvable acceptor host name causes an error.
Progress SonicMQ Configuration and Management Guide 8.5 299

Chapter 8: Configuring Acceptors
Existing protocol handlers installed on this acceptor are listed under Protocols by:
4. Select Add > HTTP Direct Basic. The New HTTP Direct Basic Protocol dialog box opens:
5. Specify the following under Parameters in the General tab:
Any URLs are listed under URL List by:
Property Description
Name Name of the acceptor
Type Protocol of the acceptor
Property Description
Name Name for this protocol handler
Type DIRECT (not editable)
Property Description
URL Extension Name you define for the URL
Mode Receive, one-way send, or content-reply send
300 Progress SonicMQ Configuration and Management Guide 8.5

Configuring HTTP(S) Direct Acceptors
6. To specify a Receive URL, select New... > Receive. The New Direct Receive URL dialog box opens:
7. Specify the following in the General tab:
Destination Queue name or topic name
Type QUEUE or TOPIC
Property Description
Note Getting Files from SonicFS — You can use an HTTP Direct Basic Receive acceptor to retrieve files from a folder in the Domain Manager’s Directory Service store by specifying a URL extension for the receive URL and the destination name as sonicfs:///folderPath. For example, if the file a.txt is stored in the Directory Service store as /Other/Info/a.txt, specify sonicfs:///Other/Info in the rule. Then, when the HTTP inbound specifies sonicfs:///Other/Info /a.txt, it will receive the file a.txt.
Property Description
URL Extension URL path extension.
Destination Type QUEUE.
Destination Name
Name of an administratively created queue on the broker or a global queue in a cluster.
Progress SonicMQ Configuration and Management Guide 8.5 301

Chapter 8: Configuring Acceptors
8. To specify access control, select the Access Control tab:
9. Specify:
10. Click OK and return to the New HTTP Direct Basic Protocol dialog box.
User Name Optional when security is not enabled on the broker.
Select AUTHENTICATED from the drop down list to force the client to provide an SSL certificate.
Timeout Maximum number of seconds to wait for an available message.
Property Description
HTTP Basic Authentication
Select to use Basic authentication.
Acceptor Configuration
Select to use the configuration specified for User Name in the General tab.
SSL Certificate Select to use certificate authentication (if the acceptor is HTTPS).
Property Description
302 Progress SonicMQ Configuration and Management Guide 8.5

Configuring HTTP(S) Direct Acceptors
11. Select the Content Map tab:
This tab lists the predefined mappings from MIME types to JMS. The content type specified in an HTTP request is used to create the appropriate type of JMS message. You can override the default content mappings.
12. To define your own mappings, select a mapping, click Edit, revise the HTTP Content Type field, and select the JMS Message Type:■ XML
■ TEXT ■ MULTIPART
■ BYTES
13. Click Add to create new mappings.
You can also click:
■ Edit to modify existing mappings
■ Remove to delete existing mappings
14. When you finish specifying properties, click OK in the New HTTP Direct Basic Protocol dialog box.
15. Click OK in the New HTTP(S) Direct Acceptor dialog box.
The Sonic Management Console creates the new HTTP or HTTPS Direct Basic receive protocol handler and adds it to the list in the Acceptors table or modifies the existing protocol handler.
Important Modifications to an existing acceptor’s protocol handlers are not dynamic. See the note on page 297.
Progress SonicMQ Configuration and Management Guide 8.5 303

Chapter 8: Configuring Acceptors
16. If you changed the protocol and URL extensions of a deployed HTTP Direct acceptor, reload the broker to update the acceptor information (see “Reloading Brokers” on page 552).
HTTP(S) Direct Basic Oneway Send Protocol Handlers
Follow this procedure to create or edit an HTTP or HTTPS Direct Basic oneway send protocol handler.
◆ To create or edit an HTTP(S) Direct Basic oneway send protocol handler:
1. Follow Step 1 on page 299 through Step 5 on page 300.
To edit an existing HTTP or HTTPS Direct for Basic oneway send URL protocol handler, select the protocol handler, then click the Properties icon in the toolbar and follow Step 2 on page 299 and Step 5 on page 300.
2. To specify a one-way send URL, select New... > Oneway Send. The New Direct One Way Send URL dialog box opens:
304 Progress SonicMQ Configuration and Management Guide 8.5

Configuring HTTP(S) Direct Acceptors
3. Specify the following on the General tab:
Property Description
URL Extension URL path extension.
Destination Type TOPIC, QUEUE or URL. Using URL lets you specify a sonic:///url or a jndi:/// lookup
Destination Name
Name of the queue or topic.
User Name User name for inbound traffic to the broker. Optional when security is not enabled on the broker.
Select AUTHENTICATED from the drop down list to force the client to provide an SSL certificate.
Delivery Mode Select PERSISTENT, NON_PERSISTENT, or DISCARDABLE.(For information on delivery modes, see the “Message Producers and Consumers” chapter in the Progress SonicMQ Application Programming Guide.)
Priority 0 (lowest), 1, 2, 3, 4, 5, 6, 7, 8, or 9 (highest).
Time to Live Number of milliseconds for messages to live (60000 is 1 minute; 0 is infinite).
Progress SonicMQ Configuration and Management Guide 8.5 305

Chapter 8: Configuring Acceptors
4. To specify message delivery properties, select the Undelivered tab:
5. Set the following properties to specify the behavior of the HTTP protocol handler when it receives a MIME message and converts it to a JMS message:
6. To specify access control, follow Step 8 on page 302 through Step 10 on page 302.
7. Follow Step 11 on page 303 through Step 15 on page 303 to complete the HTTP or HTTPS Direct Basic oneway send protocol handler.
8. If you changed the protocol and URL extensions of a deployed HTTP Direct acceptor, reload the broker to update the acceptor information (see “Reloading Brokers” on page 552).
Property Description
Notify Select to notify the administrator when a message is undeliverable.
Preserve Select so when the broker tries to resend the message a preconfigured number of times and all attempts fail, the broker places the undeliverable message on the Dead Message Queue (DMQ).
Destination Name
Enter the name of the queue or topic to which undeliverable messages will be sent.
Destination Type
Specify whether the destination is a queue or topic.
Important Modifications to an existing acceptor’s protocol handlers are not dynamic. See the note on page 297
306 Progress SonicMQ Configuration and Management Guide 8.5

Configuring HTTP(S) Direct Acceptors
HTTP(S) Direct Basic Content Reply Send Protocol Handlers
Follow this procedure to create or edit an HTTP or HTTPS Direct Basic content reply send protocol handler.
◆ To create or edit an HTTP(S) Direct Basic content reply send protocol handler:
1. Follow Step 1 on page 299 through Step 5 on page 300.
To edit an existing HTTP or HTTPS Direct Basic content reply sending URL protocol handler, select the protocol handler, then click the Properties icon in the toolbar and follow Step 2 on page 299 and Step 5 on page 300.
2. To specify a content reply sending URL, select New... > Content Reply Send. The New Direct Content Reply Send URL dialog box opens:
Note Do not attempt to use an HTTP Direct Basic Content Reply Send to retrieve files from the Sonic file system, sonicfs. Use an HTTP Direct Basic Receive, as described on page 301.
Progress SonicMQ Configuration and Management Guide 8.5 307

Chapter 8: Configuring Acceptors
3. Specify the following on the General tab:
4. To specify message delivery properties, follow Step 4 and Step 5 on page 306.
5. To specify access control, follow Step 8 on page 302 through Step 10 on page 302.
6. Follow Step 11 on page 303 through Step 15 on page 303 to complete the HTTP or HTTPS Direct Basic content reply send protocol handler.
7. If you changed the protocol and URL extensions of a deployed HTTP Direct acceptor, reload the broker to update the acceptor information (see “Reloading Brokers” on page 552).
Property Description
URL Extension URL path extension.
Destination Type Select QUEUE or TOPIC.
Destination Name Name of the queue or topic.
User Name User name for inbound traffic to the broker. Optional when security is not enabled on the broker.
Select AUTHENTICATED from the drop down list to force the client to provide an SSL certificate.
Delivery Mode Select PERSISTENT, NON_PERSISTENT, or DISCARDABLE.
Priority 0 (lowest), 1, 2, 3, 4, 5, 6, 7, 8, or 9 (highest).
Time to Live Number of milliseconds for messages to live (60000 is 1 minute; 0 is infinite).
Timeout Maximum time to wait for an available message (in seconds).
Important Modifications to an existing acceptor’s protocol handlers are not dynamic. See the note on page 297.
308 Progress SonicMQ Configuration and Management Guide 8.5

Configuring HTTP(S) Direct Acceptors
Configuring HTTP(S) Direct for SOAP Protocol HandlersThe following sections describe how to configure HTTP(S) Direct for SOAP protocol handlers:
● “HTTP(S) Direct for SOAP Receive Protocol Handlers” on page 309
● “HTTP(S) Direct for SOAP Oneway Send Protocol Handlers” on page 311
● “HTTP(S) Direct for SOAP Content Reply Send Protocol Handlers” on page 313
HTTP(S) Direct for SOAP Receive Protocol Handlers
Follow this procedure to create or edit an HTTP or HTTPS Direct for SOAP receive protocol handler.
◆ To create or edit an HTTP(S) Direct for SOAP receive protocol handler:
1. Follow Step 1 on page 299 through Step 3 on page 299.
To edit an existing HTTP or HTTPS Direct for SOAP protocol handler, select the protocol handler, then click the Properties icon in the toolbar and follow Step 2 on page 299 and Step 3 on page 299.
2. Select Add > HTTP Direct for SOAP. The New HTTP Direct for SOAP Protocol dialog box opens:
Progress SonicMQ Configuration and Management Guide 8.5 309

Chapter 8: Configuring Acceptors
3. Specify the following under Parameters in the General tab:
Any URLs are listed under URL List by:
4. To specify a Receive URL, follow Step 6 on page 301 through Step 9 on page 302.
5. Click OK and return to the New HTTP Direct for SOAP Protocol dialog box.
6. Select the Content Map tab:
This tab lists the predefined mappings from MIME types to JMS. The content type specified in an HTTP request is used to create the appropriate type of JMS message. You can override the default content mappings.
Property Description
Name Name for this protocol handler
Type SOAP (not editable)
Property Description
URL Extension Name you define for the URL
Mode Receive, one-way send, or content-reply send
Destination Queue name or topic name
Type QUEUE or TOPIC
310 Progress SonicMQ Configuration and Management Guide 8.5

Configuring HTTP(S) Direct Acceptors
7. To define your own mappings, select a mapping, click Edit, revise the HTTP Content Type field, and select the JMS Message Type:■ XML
■ TEXT ■ MULTIPART■ XML/Multipart Message
8. Click Add to create new mappings.
You can also click:
■ Edit to modify existing mappings
■ Remove to delete existing mappings
9. When you finish specifying properties, click OK in the New HTTP Direct for SOAP Protocol dialog box.
10. Click OK in the New HTTP(S) Direct Acceptor dialog box.
The Sonic Management Console creates the new HTTP or HTTPS Direct for SOAP receive protocol handler and adds it to the list in the Acceptors table or modifies the existing protocol handler.
11. If you changed the protocol and URL extensions of a deployed HTTP Direct acceptor, reload the broker to update the acceptor information (see “Reloading Brokers” on page 552).
HTTP(S) Direct for SOAP Oneway Send Protocol Handlers
Follow this procedure to create or edit an HTTP or HTTPS Direct for SOAP oneway send protocol handler.
◆ To create or edit an HTTP(S) Direct for SOAP oneway send protocol handler:
1. Follow Step 1 on page 299 through Step 3 on page 299.
To edit an existing HTTP or HTTPS Direct protocol handler, select the protocol handler, then click the Properties icon in the toolbar and follow Step 2 on page 299 and Step 3 on page 299.
2. To specify an HTTP or HTTPS Direct for SOAP protocol handler, follow Step 2 on page 309 through Step 3 on page 310.
Important Modifications to an existing acceptor’s protocol handlers are not dynamic. See the note on page 297.
Progress SonicMQ Configuration and Management Guide 8.5 311

Chapter 8: Configuring Acceptors
3. To specify a one-way send URL, follow Step 2 on page 304 through Step 5 on page 306.
4. Click OK and return to the New HTTP Direct for SOAP Protocol dialog box.
5. Specify content mapping by following Step 6 on page 310 through Step 8 on page 311.
6. When you finish specifying, properties, click OK in the New HTTP Direct for SOAP Protocol dialog box.
7. Click OK in the New HTTP(S) Direct Acceptor dialog box.
The Sonic Management Console creates the new HTTP or HTTPS Direct for SOAP oneway send protocol handler and adds it to the list in the Acceptors table or modifies the existing protocol handler.
8. If you changed the protocol and URL extensions of a deployed HTTP Direct acceptor, reload the broker to update the acceptor information (see “Reloading Brokers” on page 552).
Important Modifications to an existing acceptor’s protocol handlers are not dynamic. See the note on page 297.
312 Progress SonicMQ Configuration and Management Guide 8.5

Configuring HTTP(S) Direct Acceptors
HTTP(S) Direct for SOAP Content Reply Send Protocol Handlers
Follow this procedure to create or edit an HTTP or HTTPS Direct for SOAP content reply send protocol handler.
◆ To create or edit an HTTP(S) Direct for SOAP content reply send protocol handler:
1. Follow Step 1 on page 299 through Step 3 on page 299.
To edit an existing HTTP or HTTPS Direct protocol handler, select the protocol handler, then click the Properties icon in the toolbar and follow Step 2 on page 299 and Step 3 on page 299.
2. To specify an HTTP or HTTPS Direct for SOAP protocol handler, follow Step 2 on page 309 through Step 3 on page 310.
3. To specify a content reply sending URL, follow Step 2 on page 307 through Step 3 on page 308.
4. Click OK and return to the New HTTP Direct for SOAP Protocol dialog box.
5. Specify content mapping by following Step 6 on page 310 through Step 8 on page 311.
6. When you finish specifying, properties, click OK in the New HTTP Direct for SOAP Protocol dialog box.
7. Click OK in the New HTTP(S) Direct Acceptor dialog box.
The Sonic Management Console creates the new HTTP or HTTPS Direct for SOAP content reply send protocol handler and adds it to the list in the Acceptors table or modifies the existing protocol handler.
8. If you changed the protocol and URL extensions of a deployed HTTP Direct acceptor, reload the broker to update the acceptor information (see “Reloading Brokers” on page 552).
Important Modifications to an existing acceptor’s protocol handlers are not dynamic. See the note on page 297
Progress SonicMQ Configuration and Management Guide 8.5 313

Chapter 8: Configuring Acceptors
Configuring HTTP(S) Direct for JMS Protocol HandlersThe following sections describe how to configure HTTP(S) Direct for JMS protocol handlers:
● “HTTP(S) Direct for JMS Receive Protocol Handlers” on page 314
● “HTTP(S) Direct for JMS Oneway Send Protocol Handlers” on page 317
● “HTTP(S) Direct for JMS Content Reply Send Protocol Handlers” on page 318
HTTP(S) Direct for JMS Receive Protocol Handlers
The following procedure describes how to create or edit an HTTP or HTTPS Direct for JMS receive protocol handler.
◆ To create or edit an HTTP(S) Direct for JMS receive protocol handler:
1. To create a HTTP or HTTPS Direct for JMS protocol handler, follow Step 1 on page 299 through Step 3 on page 299.
To edit an existing HTTP or HTTPS Direct for JMS protocol handler, select the protocol handler, click the Properties icon in the toolbar, and follow Step 2 on page 299 and Step 3 on page 299.
2. Select Add > HTTP Direct for JMS. The New HTTP Direct for JMS Protocol dialog box opens:
314 Progress SonicMQ Configuration and Management Guide 8.5

Configuring HTTP(S) Direct Acceptors
3. Specify the following under Parameters in the General tab:
Any URLs are listed by:
4. To specify a receiving URL, select New > Receive. The New Direct Receive URL dialog box opens:
5. Specify:
Property Description
Name Name for this protocol handler
Type JMS (not editable)
Property Description
URL Extension Name you define for the URL
Mode Receive, one-way send, or content-reply send
Property Description
URL Extension URL path extension
User Username. Optional when security is not enabled on the broker.
Select AUTHENTICATED from the drop down list to force the client to provide an SSL certificate.
Progress SonicMQ Configuration and Management Guide 8.5 315

Chapter 8: Configuring Acceptors
6. To specify access control, select the Access Control tab:
7. Specify:
8. Click OK to return to the New HTTP Direct for JMS Protocol dialog box.
9. Specify content mapping by following Step 11 on page 303 through Step 13 on page 303.
10. Click OK to return to the New Direct Acceptor dialog box.
11. Click OK. The Sonic Management Console creates the new HTTP for JMS receive protocol handler and adds it to the list in the Acceptors table or modifies the existing protocol handler.
Property Description
HTTP Header Property(X-JMS-User, X-JMS-Password)
Select to use JMS header properties
HTTP Basic Authentication
Select to use Basic authentication
Acceptor Configuration
Select to use the configuration specified for User Name in the General tab
SSL Certificate Select to use certificate authentication (if the acceptor is HTTPS)
Important Modifications to an existing acceptor’s protocol handlers are not dynamic. See the note on page 297.
316 Progress SonicMQ Configuration and Management Guide 8.5
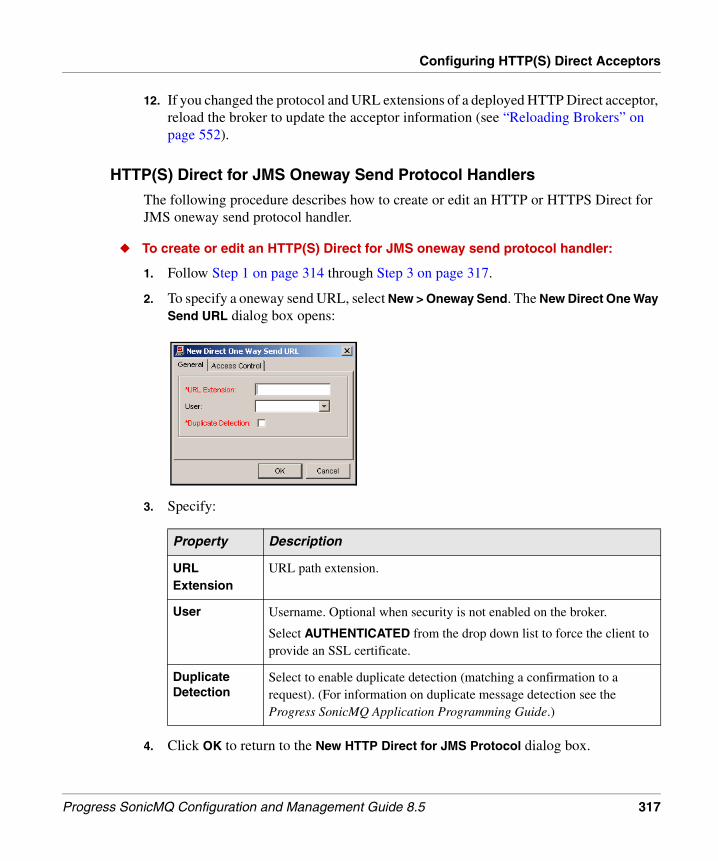
Configuring HTTP(S) Direct Acceptors
12. If you changed the protocol and URL extensions of a deployed HTTP Direct acceptor, reload the broker to update the acceptor information (see “Reloading Brokers” on page 552).
HTTP(S) Direct for JMS Oneway Send Protocol Handlers
The following procedure describes how to create or edit an HTTP or HTTPS Direct for JMS oneway send protocol handler.
◆ To create or edit an HTTP(S) Direct for JMS oneway send protocol handler:
1. Follow Step 1 on page 314 through Step 3 on page 317.
2. To specify a oneway send URL, select New > Oneway Send. The New Direct One Way Send URL dialog box opens:
3. Specify:
4. Click OK to return to the New HTTP Direct for JMS Protocol dialog box.
Property Description
URL Extension
URL path extension.
User Username. Optional when security is not enabled on the broker.
Select AUTHENTICATED from the drop down list to force the client to provide an SSL certificate.
Duplicate Detection
Select to enable duplicate detection (matching a confirmation to a request). (For information on duplicate message detection see the Progress SonicMQ Application Programming Guide.)
Progress SonicMQ Configuration and Management Guide 8.5 317
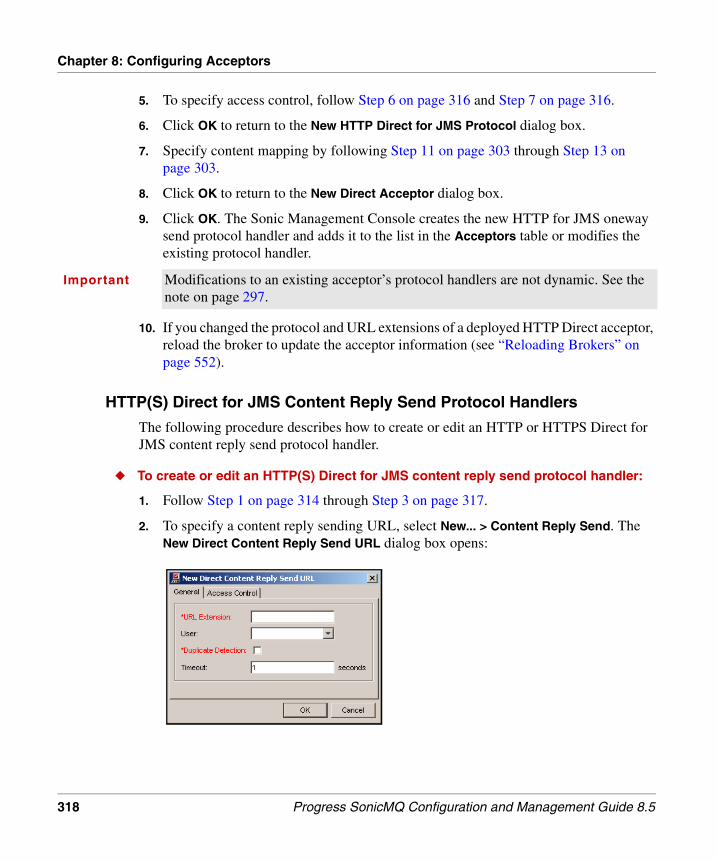
Chapter 8: Configuring Acceptors
5. To specify access control, follow Step 6 on page 316 and Step 7 on page 316.
6. Click OK to return to the New HTTP Direct for JMS Protocol dialog box.
7. Specify content mapping by following Step 11 on page 303 through Step 13 on page 303.
8. Click OK to return to the New Direct Acceptor dialog box.
9. Click OK. The Sonic Management Console creates the new HTTP for JMS oneway send protocol handler and adds it to the list in the Acceptors table or modifies the existing protocol handler.
10. If you changed the protocol and URL extensions of a deployed HTTP Direct acceptor, reload the broker to update the acceptor information (see “Reloading Brokers” on page 552).
HTTP(S) Direct for JMS Content Reply Send Protocol Handlers
The following procedure describes how to create or edit an HTTP or HTTPS Direct for JMS content reply send protocol handler.
◆ To create or edit an HTTP(S) Direct for JMS content reply send protocol handler:
1. Follow Step 1 on page 314 through Step 3 on page 317.
2. To specify a content reply sending URL, select New... > Content Reply Send. The New Direct Content Reply Send URL dialog box opens:
Important Modifications to an existing acceptor’s protocol handlers are not dynamic. See the note on page 297.
318 Progress SonicMQ Configuration and Management Guide 8.5

Configuring HTTP(S) Direct Acceptors
3. Specify on the General tab:
4. To specify access control, follow Step 6 on page 316 and Step 7 on page 316.
5. To specify content mapping, follow Step 11 on page 303 through Step 13 on page 303.
6. Click OK to return to the New Direct Acceptor dialog box.
7. Click OK. The Sonic Management Console creates the new HTTP for JMS content reply send protocol handler and adds it to the list in the Acceptors table or modifies the existing protocol handler.
If you changed the protocol and URL extensions of a deployed HTTP Direct acceptor, reload the broker to update the acceptor information (see “Reloading Brokers” on page 552).
Property Description
URL Extension
URL path extension.
User Username. Optional when security is not enabled on the broker.
Select AUTHENTICATED from the drop down list to force the client to provide an SSL certificate.
Duplicate Detection
Select to enable duplicate detection (matching a confirmation to a request). (For information on duplicate message detection see the Progress SonicMQ Application Programming Guide.)
Timeout Maximum number seconds to wait for a reply message.
Important Modifications to an existing acceptor’s protocol handlers are not dynamic. See the note on page 297.
Progress SonicMQ Configuration and Management Guide 8.5 319

Chapter 8: Configuring Acceptors
Configuring HTTP(S) Direct Web Service Protocol HandlersA Web Service protocol handler enables a SonicMQ broker to process SOAP messages as required by the WS-Security and WS-ReliableMessaging specifications.
A Web Service protocol handler extends the capabilities of the HTTP Direct for SOAP protocol handlers in some ways, and limits those capabilities in other ways. It extends the capabilities by supporting the WS-Security and WS-ReliableMessaging standards; it constrains the capabilities by requiring single-part SOAP messages (not SOAP with attachments).
To add a Web Service protocol handler to an HTTP Direct acceptor, you must perform the following high-level steps:
● First, define a Web Service Protocol configuration. This configuration is domain-wide in scope, which means that you can add it to multiple acceptors. The acceptors can belong to one or more brokers (clustered or not clustered), as long as the brokers share destinations specified by the protocol handler.
● Second, add one or more endpoint URLs to the Web Service Protocol configuration. Each endpoint URL associates a URL extension with a JMS destination. When a message is received on the broker, the broker checks the URL extension (the tail part of the URL, which is relative to the hostname and port of the acceptor) to determine where the message should be delivered. When you configure an endpoint URL, you specify a URL extension, the associated destination, and other settings that affect the message’s QoS. From the perspective of an external party, each endpoint URL is the provider of a Web service.
● Third, add the Web Service Protocol to the HTTP Direct acceptor.
The following sections describe each of these high-level steps.
320 Progress SonicMQ Configuration and Management Guide 8.5

Configuring HTTP(S) Direct Acceptors
◆ To define a Web Service Protocol configuration:
1. In the Configure tab, right-click a suitable folder, and select New > Configuration.
The Create Configuration dialog box opens:
2. Expand the SonicMQ folder, select WebService Protocol, and choose OK.
The New WebService Protocol dialog box opens:
3. In the General tab, enter a name in the Name field.
Progress SonicMQ Configuration and Management Guide 8.5 321

Chapter 8: Configuring Acceptors
4. If you need to define a new mapping between a MIME type and JMS, choose the Content Map tab.
5. Click OK.
◆ To add an Endpoint URL to a Web Service Protocol configuration:
1. In the Configure tab, right-click the Web Service Protocol configuration, and choose Add Endpoint URL.
The New WebService Endpoint URL dialog box opens:
322 Progress SonicMQ Configuration and Management Guide 8.5

Configuring HTTP(S) Direct Acceptors
2. Specify on the General tab:
Property Description
URL Extension URL path extension that is relative to the hostname and port specified by the HTTP Direct acceptor.
Destination Type Type of destination to which the message is delivered by the broker. Valid values are QUEUE, TOPIC, and URL. If you choose QUEUE, the queue must be defined on the broker for the acceptor to work correctly. If you choose URL, the value you specify is a JNDI URL used to do a JNDI lookup of the destination in the domain’s JNDI store.
Destination Name Name of a queue, name of a topic, or a JNDI URL (which resolves to a queue or topic name).
User Name Name used to perform ACL checks on receipt of inbound message.
Delivery Mode PERSISTENT, NON_PERSISTENT, or DISCARDABLE.
Priority 0 (lowest), 1, 2, 3, 4, 5, 6, 7, 8, or 9 (highest).
Time To Live Number of milliseconds for messages to live (60000 is 1 minute; 0 is infinite).
Timeout For synchronous Web Service invocations, which require a reply to be posted to a temporary JMS ReplyTo destination, maximum time to wait for the reply to be posted (in seconds).
WSDL Location Location of a WSDL file in the domain. The WSDL file contains the Web Service interface associated with the URL extension; it also contains WS-Policy assertions (for WS-Security and WS-ReliableMessaging). These assertions affect how the broker enforces the effective policy of the message.
SOAP Roles One or more SOAP roles played by the broker when processing messages. By default, the broker’s SOAP role is ultimateReceiver. The broker’s SOAP roles determine how it processes SOAP headers in the inbound message.
Progress SonicMQ Configuration and Management Guide 8.5 323

Chapter 8: Configuring Acceptors
3. Specify on the Undelivered tab:
4. Specify on the Access Control tab:
Property Description
Notify Indicates whether the administrator is notified when a message is undeliverable. If selected, the administrator is notified; otherwise, the administrator is not notified.
Preserve Indicates whether the broker preserves the message when a message is undeliverable. If selected, the broker preserves the message; otherwise, the broker does not preserve the message.
Destination Name
Name of the queue or topic to which undeliverable messages are sent.
Destination Type QUEUE or TOPIC.
Property Description
HTTP Basic Authentication Indicates whether Basic authentication is used.
Acceptor Configuration Indicates whether the configuration specified for User Name in the General tab is used.
SSL Certificate Indicates whether certificate authentication is used (if the acceptor is HTTPS).
324 Progress SonicMQ Configuration and Management Guide 8.5

Configuring HTTP(S) Direct Acceptors
5. Specify on the WS-Security tab:
6. Choose OK.
Property Description
Truststore File in JKS format containing the X.509.v3 certificates of trusted parties. If the certificate of the party sending the message is not in the truststore, the broker rejects the message as originating from an untrusted party.
X.509.v3 Token X.509.v3 certificate the broker attaches to outbound response messages. When an external party sends a request message, the broker might send a synchronous response. When sending such a response, the broker may sign and attach the X.509.v3 certificate to the response message, establishing the identity of the party sending the response message.
A default identity can be configured for each broker, which the broker uses when sending outbound synchronous responses. This default identity can be overridden by an acceptor’s endpoint URL configuration, if required. Also, each message can override the configured identities, if required.
Certificate-to-Username Mapping
Indicates whether the broker compares the certificate identity in the inbound message to user names specified in the broker’s authentication domain. If the broker finds a matching user name, the broker uses the entry in the authentication domain for access control.
Progress SonicMQ Configuration and Management Guide 8.5 325

Chapter 8: Configuring Acceptors
◆ To add a WebService Protocol to an HTTP Direct acceptor:
1. In the Configure tab, right-click the acceptor, and choose Properties.
The Edit HTTP(S) Direct Acceptor Properties dialog box opens:
2. In the General tab, select Add > Choose Web Service Protocol.
326 Progress SonicMQ Configuration and Management Guide 8.5

Configuring HTTP(S) Direct Acceptors
3. The Choose WebService Protocol dialog box opens:
4. Select a WebService protocol and choose OK.
The WebService protocol appears in the Protocol section of the Edit HTTP(S) Direct Acceptor Properties window:
Progress SonicMQ Configuration and Management Guide 8.5 327

Chapter 8: Configuring Acceptors
Important If you are using a Sonic WebService routing definition to invoke remote Web Service endpoints, and asynchronous addressing is configured, the URL extension /wsa must be declared in the WebService Protocol definition that is associated with the Routings Acceptor that is configured to receive the reply and fault traffic.
Asynchronous addressing is configured by specifying a Routings Acceptor in the WebService routing definition used to invoke the remote Web Service. Asynchronous addressing means that reply and fault traffic related to the outbound Web Service request is delivered to the Routings Acceptor in an independent incoming HTTP(S) transport connection. This differs from Synchronous addressing (sometimes called anonymous addressing) where faults and replies are received on the HTTP transport response to the outbound request.
When asynchronous addressing is used, the broker generates WS-A addresses for reply, fault or Reliable Messaging acknowledgement purposes. The following extensions are used for these broker generated addresses:/wsa/From/..../wsa/FaultTo/..../wsa/ReplyTo/..../wsa/AcksTo/....
You must ensure the following when configuring asynchronous addressing:
● The Routings Acceptor must have a WebServices Protocol definition assigned.
● The WebServices Protocol definition must define the endpoint url extension /wsa. The destination name and type are not relevant because of the special prefix being used. So, for example, the definition extension /wsa, destination type QUEUE, destination name NOTAPPLICABLE are recommended.
A similar problem occurs if a Sonic-hosted WebService is invoked by a remote client, the operation is two-way and Reliable Messaging is applied. A broke-generated address (/wsa/AcksTo/…) is used to receive Reliable Messaging acknowledgements. The broker generated address used the same host and port that received in invocation.
Therefore, it is recommend that the endpoint url extension /wsa be added to all WebServices Protocol definitions.
328 Progress SonicMQ Configuration and Management Guide 8.5

Chapter 9 Configuring Routings
This chapter describes how to configure routings in the following sections:
● “Routing Nodes” explains routing nodes and how to configure routing properties.
● “Routing Definitions” describes how to configure, view, and delete DRA and HTTP Direct routing definitions.
● “Global Subscription Rules” describes how to configure, view, and delete global subscription rules.
The “HTTP(S) Direct Sample Applications” chapter of the Progress SonicMQ Deployment Guide describes how to run the HTTP(S) Direct outbound sample applications that are provided with SonicMQ.
Progress SonicMQ Configuration and Management Guide 8.5 329
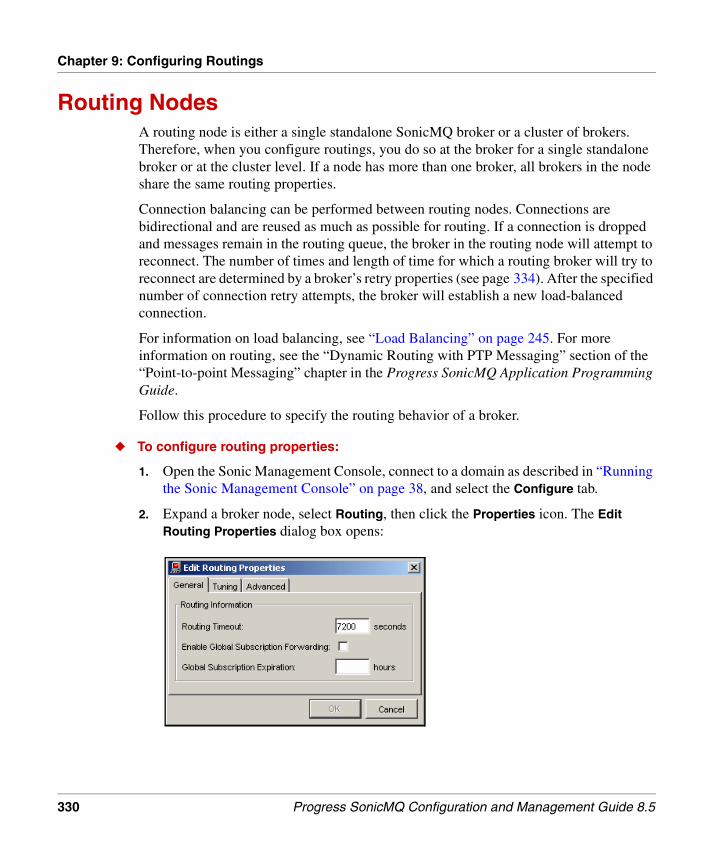
Chapter 9: Configuring Routings
Routing NodesA routing node is either a single standalone SonicMQ broker or a cluster of brokers. Therefore, when you configure routings, you do so at the broker for a single standalone broker or at the cluster level. If a node has more than one broker, all brokers in the node share the same routing properties.
Connection balancing can be performed between routing nodes. Connections are bidirectional and are reused as much as possible for routing. If a connection is dropped and messages remain in the routing queue, the broker in the routing node will attempt to reconnect. The number of times and length of time for which a routing broker will try to reconnect are determined by a broker’s retry properties (see page 334). After the specified number of connection retry attempts, the broker will establish a new load-balanced connection.
For information on load balancing, see “Load Balancing” on page 245. For more information on routing, see the “Dynamic Routing with PTP Messaging” section of the “Point-to-point Messaging” chapter in the Progress SonicMQ Application Programming Guide.
Follow this procedure to specify the routing behavior of a broker.
◆ To configure routing properties:
1. Open the Sonic Management Console, connect to a domain as described in “Running the Sonic Management Console” on page 38, and select the Configure tab.
2. Expand a broker node, select Routing, then click the Properties icon. The Edit Routing Properties dialog box opens:
330 Progress SonicMQ Configuration and Management Guide 8.5

Routing Nodes
3. Specify under Routing Information in the General tab:
4. Select the Tuning tab:
5. Set the Dynamic Routing Threads value to specify how many threads can be used by this broker to establish Dynamic Routing connections to other brokers or to move messages out of Dynamic Routing pending queues. The default value is 10.
Property Description
Routing Timeout
Number of seconds a message is retained in the routing queue if a routing connection cannot be established. After this period, the message expires. Depending on message settings, the message can be transferred to the Dead Message Queue and an administrative notification sent. This property is broker-specific, and timing starts from the first attempt to deliver the message to an adjoining routing node.
The default value is 7200 seconds—2 hours. You can choose to set the value as low as 0 (undeliverable messages are immediately placed in the Dead Message Queue) or as high as the absolute maximum, Long.MAX_VALUE/1000 or (263-1). As the value resets at every restart, 31536000 seconds—one year—should, in production systems, never timeout if maintenance restarts are scheduled at least once a year.
Enable Global Subscription Forwarding
Select to enable the routing node to forward global subscriptions (see “Global Subscription Rules” on page 357).
Global Subscription Expiration
Default value for the expiration period in hours for global subscriptions if the node that requested them is not accessible (“Global Subscription Rules” on page 357).
Progress SonicMQ Configuration and Management Guide 8.5 331

Chapter 9: Configuring Routings
6. Set the HTTP Direct Dispatch Threads values to specify how many threads are used in support of outbound HTTP direct.
7. Select the Advanced tab:
Property Description
Total The total number of threads assigned to HTTP Direct outbound dispatches. The default value is 10 and the minimum value is 1.
Reserved for Group Requests
The subset of the Total HTTP Direct Dispatch Threads that are reserved for group requests (an advanced concept used by other Progress Sonic products that use SonicMQ as the messaging bus.) The default is to reserve 0 threads for group requests.
332 Progress SonicMQ Configuration and Management Guide 8.5
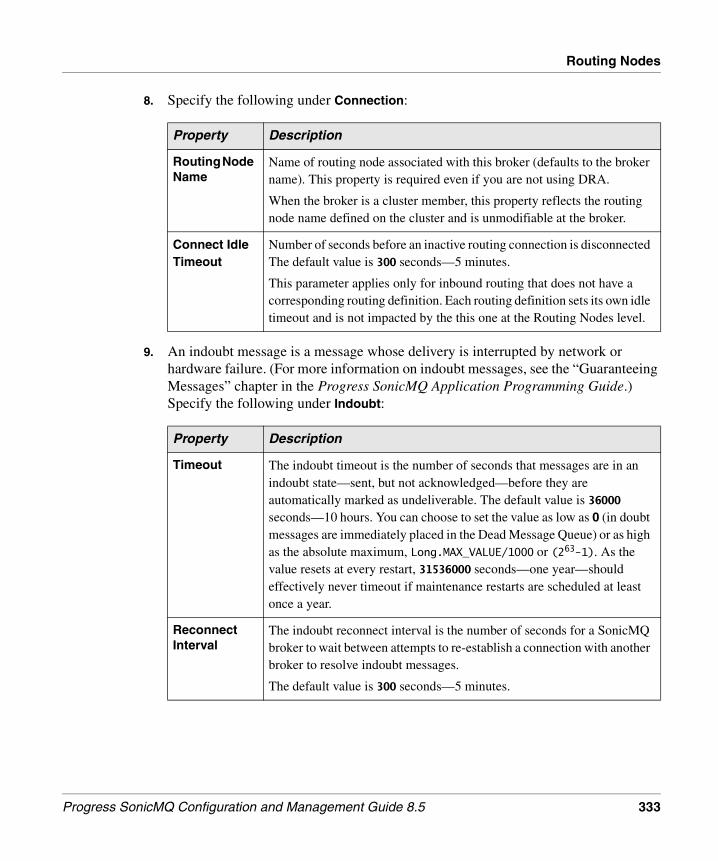
Routing Nodes
8. Specify the following under Connection:
9. An indoubt message is a message whose delivery is interrupted by network or hardware failure. (For more information on indoubt messages, see the “Guaranteeing Messages” chapter in the Progress SonicMQ Application Programming Guide.) Specify the following under Indoubt:
Property Description
Routing Node Name
Name of routing node associated with this broker (defaults to the broker name). This property is required even if you are not using DRA.
When the broker is a cluster member, this property reflects the routing node name defined on the cluster and is unmodifiable at the broker.
Connect Idle Timeout
Number of seconds before an inactive routing connection is disconnected The default value is 300 seconds—5 minutes.
This parameter applies only for inbound routing that does not have a corresponding routing definition. Each routing definition sets its own idle timeout and is not impacted by the this one at the Routing Nodes level.
Property Description
Timeout The indoubt timeout is the number of seconds that messages are in an indoubt state—sent, but not acknowledged—before they are automatically marked as undeliverable. The default value is 36000 seconds—10 hours. You can choose to set the value as low as 0 (in doubt messages are immediately placed in the Dead Message Queue) or as high as the absolute maximum, Long.MAX_VALUE/1000 or (263-1). As the value resets at every restart, 31536000 seconds—one year—should effectively never timeout if maintenance restarts are scheduled at least once a year.
Reconnect Interval
The indoubt reconnect interval is the number of seconds for a SonicMQ broker to wait between attempts to re-establish a connection with another broker to resolve indoubt messages.
The default value is 300 seconds—5 minutes.
Progress SonicMQ Configuration and Management Guide 8.5 333

Chapter 9: Configuring Routings
10. Specify the following Retry properties:
11. Specify the Flow Control Notification property:
12. Click OK. The Sonic Management Console modifies the broker routing properties. If you change a broker’s configuration properties, you must reload the broker (see “Configuration Changes: Dynamic or Requiring Reload” on page 98).
Property Description
Connect Attempt Interval
Number of seconds to wait after all attempts to re-establish a connection with a routing node have failed before repeating a sequence of connection attempts. This occurs when connections are first made, when connections have timed out, or failed connections have been retried Connect Retry Count times. Defaults to 30 seconds.
Connect Retry Interval
Number of seconds between retries, in the event that a broker in a routing node has become disconnected from another broker and is attempting to reconnect. Defaults to 30 seconds.
Connect Retry Count
Number of times that a broker in a routing node will attempt to re-establish its original connection, if the connection has failed and messages remain in the routing queue. Defaults to 1.
Property Description
Flow Control Monitor Interval
Number of seconds in the broker’s monitoring interval for Dynamic Routing flow control notifications. The default value—15 seconds—can be set to a positive integer value of 5 (seconds) or greater, or set to 0 to indicate that the broker is not to be monitored for flow control. Changing this property is immediately propagated to the broker; however, it might take a couple monitor intervals for the change to be reflected in the notifications.
When the broker is a member of a cluster, the Flow Control Monitor Interval setting on the cluster is evaluated, and this setting on the broker is ignored.
Note Sample Management application — Sonic developmemt environments provide a Runtime API sample, BrokerFlowControlNotificationReporter, which demonstrates the use of Cluster and DRA flow control notifications to identify when connections between brokers are blocked.
334 Progress SonicMQ Configuration and Management Guide 8.5

Routing Definitions
Routing DefinitionsYou specify routing definitions either on a standalone broker or on a cluster. (You cannot specify routing definitions on a broker that is a member of a cluster.) If a node has more than one broker, all brokers in the node share the same routing definitions.
The following sections describe how to create, edit, and view routing definitions.
Configuring DRA Routing DefinitionsSonicMQ’s Dynamic Routing Architecture (DRA) provides a robust, secure way to send messages from a broker on one node to a destination on another node.
The following procedure describes how to create and edit a DRA routing definition.
◆ To create or edit a DRA routing definition:
1. Open the Sonic Management Console, connect to a domain as described in “Running the Sonic Management Console” on page 38, and select the Configure tab.
2. To create a new DRA routing definition, expand a standalone broker or cluster node, select Routing > Definitions, right-click, and select New > Dynamic Routing. The New Routing Definition - Dynamic Routing dialog box opens:
To edit an existing DRA routing definition, select the routing definition in the Routings table and click the Properties icon. The Edit Routing Definition Properties dialog box opens.
Progress SonicMQ Configuration and Management Guide 8.5 335

Chapter 9: Configuring Routings
3. Specify the following under Parameters:
Property Description
Node Name Name of routing node; the routing node name is identical for every broker in a cluster.If you are editing an existing definition, you cannot change Node Name.
Idle Timeout Number of seconds before an inactive routing connection is disconnected. The default is 0 (infinite). (Note that this parameter is specific to this routing definition; the value of the Connect Idle Timeout parameter at the Routing Nodes level applies only for inbound routing that does not have a correspondent routing definition.)
Global Subscription Expiration
Expiration period in hours for global subscriptions if the node that requested them is not accessible. The default is 0 (infinite).
Routings Acceptor
Provides the name of the acceptor to provide as the reverse URL for Dynamic Routing involving a firewall with Network Address Translation (NAT). This enables a DRA connection over this routing to provide the peer with a routing-specific reconnection URL if it needs to reestablish the connection when a routing connection failure is detected.
If no value is entered for the Routings Acceptor, the Acceptor property Primary Broker Acceptor is provided as the reverse URL, and, if that is not defined, the default routing URL is exchanged.
Advertise Global Queues
Select to send information about all known global queues in the node to the routing destination node for dynamic routing.
Static Routings
Select to always use the outgoing routing definition data to initiate connections; deselect to allow remote nodes to dynamically override the connection information for this node.
336 Progress SonicMQ Configuration and Management Guide 8.5

Routing Definitions
4. Select the Connection tab:
Propagate JMSXUserID
A feature in security-enabled brokers adds the message producer’s authenticated user name to the incoming message in the header’s JMSXUserID field. (See the broker setting on page 205 and the description of its use on page 209.)
Routing definitions default to propagating the value in a message’s JMSXUserID field across Dynamic Routing connections. Management security permissions are dependent on the JMSXUserID, especially in topologies that use management over Dynamic Routing.
When this property is cleared, the identity is the authenticated routing user on the source node, so that an administrator would have to base an authorization scheme on routing user identities rather than administrator identities. That scheme is practical for intercompany routings where privacy warrants suppressing the initiating producer in favor of the routing user.
Property Description
Progress SonicMQ Configuration and Management Guide 8.5 337

Chapter 9: Configuring Routings
5. Specify the following under Parameters:
6. Under Connection URLs, specify a URL in the URL field and click Add... to add it to the list.
The URLs can be a subset of the broker URLs in the remote routing node. A connection to a routing node is made using one of these connection URLs. When a routing connection is active, that connection is used and the connection URL list is not examined.
7. Select the Advanced tab:
Property Description
Use Certificate CN
Select to use the common name (CN) from the certificate. You must have SSL to use certificates.
User Name If Use Certificate CN is deselected, specify a user and password that will be used by the remote node to authenticate the local node, and then click Set Password to set the user’s password.
Load Balancing
Select to enable connect-time load balancing when connecting to a broker that supports it.
Sequential Select for sequential selection from the list of connection URLs to brokers in the remote node starting with the first URL; deselect to start with a random element in the list.
Outbound Broker
Name of outbound broker. This can only be set for a cluster; this setting forces all outbound connections anywhere in the cluster to be made from this broker. If blank, routing is made from the existing connection or any broker. If set, a hop is made to this broker. If this broker is unavailable, a connection cannot be made from the outside.
338 Progress SonicMQ Configuration and Management Guide 8.5

Routing Definitions
8. Specify the following under Broker Proxy Override:
9. To set the broker proxy override values to the broker’s Proxy values, click Reset.
10. Click OK. The Sonic Management Console creates the new DRA routing definition and adds it to the Routing Definitions table or modifies the existing DRA routing definition.
If you change the DRA Node Name, Idle Timeout, or Use Certificate CN properties, you must reload the broker (see “Configuration Changes: Dynamic or Requiring Reload” on page 98).
Property Description
URL The URL of the broker proxy. The value shown by default is not functional. Change the value to your preferred broker proxy URL.
Username Authentication information for the outbound broker proxy. The value shown by default is not functional. Enter a name to use for basic authentication on the defined proxy server.
Password The password for the Username. The value shown by default is not functional.
Progress SonicMQ Configuration and Management Guide 8.5 339

Chapter 9: Configuring Routings
Connection Lists in RoutingA client (or routing node) can connect to any broker in a list that you supply, so a connection can be made even if some of the brokers in the list are not available. Connection lists are based on a client (or routing connection) specifying a list of brokers in a cluster to which it might initially connect. If one connection attempt fails, other brokers from the list are tried until either a connection is made or the list is exhausted.
You can specify a list access method to determine which broker will be tried first. List access can be either sequential or random. With sequential access, the first broker in the list is tried first. Sequential access is simple and works well for many applications. With random access, the broker to try first is selected randomly. Random start can be used to increase throughput for high-traffic scenarios by not overloading the brokers at the start of the list. With either a sequential or random start, the subsequent connection attempts are made in the order the brokers occur in the list, and to all brokers in the list.
This figure shows a routing definition with a list of connection URLs and the selected options to use load balancing and sequential access to the listed URls.
All outbound routing connections from a routing node can be configured for a broker or cluster. When the broker attempts to create this routing connection, the Connection URL list indicates the host port and protocol for each of the connections that might be used for routing.
340 Progress SonicMQ Configuration and Management Guide 8.5

Routing Definitions
Configuring HTTP Direct Routing DefinitionsIn addition to routing messages to SonicMQ brokers and clusters, routing definitions can be used to send JMS messages as HTTP requests to external Web servers. The following sections describe how to create and edit HTTP Direct outbound routing definitions:
● “Configuring an HTTP Direct Basic Routing Definition” on page 341
● “Configuring an HTTP Direct for SOAP Routing Definition” on page 347
● “Configuring an HTTP Direct for JMS Routing Definition” on page 348
● “Configuring a WebService Protocol Routing Definition” on page 351
Configuring an HTTP Direct Basic Routing Definition
Follow this procedure to create or edit an HTTP Direct Basic outbound routing definition.
◆ To create or edit an HTTP Direct Basic routing definition:
1. Open the Sonic Management Console, connect to a domain as described in “Running the Sonic Management Console” on page 38, and select the Configure tab.
2. To create a new routing definition, expand the broker or cluster node, select Routing > Definitions, right-click, and select New > HTTP Direct Basic. The New Routing Definition - HTTP Direct Basic dialog box opens:
Progress SonicMQ Configuration and Management Guide 8.5 341

Chapter 9: Configuring Routings
To edit an existing HTTP Direct Basic routing definition, select the routing definition in the Routings table and click the Properties icon. The Edit Routing Definition - HTTP Direct Basic dialog box opens.
3. Under the General tab, specify the following Parameters:
Property Description
Node Name Node name used to direct messages to a routing node (a Web server or the equivalent). It must be must be unique on each unclustered broker or cluster.
If you are editing an existing routing definition, you cannot modify the node name.
URL IP address or hostname and the port of the Web server (or equivalent) the routing is going to. This address could also include an extension such as http://sales.mycorp.com:1234/orders.
Group Messages by URL
Clear this option to indicate that all messages sent through this routing definition should be delivered in the order they were sent by the client applications and that all messages sent using this routing definition will be sent through a single pending queue.
When selected (the default), each message sent to this routing definition to be examined for the URL when the destination is created in the form routing_node_name::http://destinationURL. The broker uses the value of that destination URL to group messages for the same destination, sending them through a separate pending queue. See “Grouping Messages by Destination URL” in the Progress SonicMQ Deployment Guide chapter “HTTP Direct Acceptors and Routing.”
Content Reply
Select to create content reply routing; deselect for one-way HTTP messaging.
Retry Interval The number of seconds between attempts by the broker to make the outbound connection to a Web server or equivalent.
Outbound Broker
When the routing definition is on a cluster of brokers, specifies the broker member of the cluster that will be used for this routing.
342 Progress SonicMQ Configuration and Management Guide 8.5

Routing Definitions
4. Under Authentication, specify the User Name, the name to use in BASIC authentication with the Web server (or equivalent). If the routing connection is a trusted site or a web service that has no authentication mechanism bound, enter the text AUTHENTICATED.
To set or clear the password, select Set Password.
5. If you deselected Content Reply, select the Oneway tab:
6. Specify the following under Parameters in the Oneway tab:
Note The URL does not have to be unique. Several routing definitions can specify the same IP address or hostname. If you do not specify a protocol, the default for HTTP Direct is http://. You can choose to use https:// and then set up SSL parameters for the JVM.
Because the targets are remote and the port is evaluated on the remote system, ports can be reused. If you do not specify a port:
● DRA routing definitions expect to find port 2506 accepting connections.
● HTTP Direct outbound expects to find port 80 accepting connections.
● HTTPS Direct outbound will fail. You must use a port value even if it is the standard default value, 443.
Property Description
Timeout Number of seconds the broker should wait for HTTP response.
Retries Number of times the broker should attempt to make the outbound connection. Requests are retried when:
● The outbound connection cannot be made.
● The Web server does not respond.
● The Web server responds with a timeout or busy status.
Progress SonicMQ Configuration and Management Guide 8.5 343

Chapter 9: Configuring Routings
7. If you selected Content Reply under the General tab, select the Content Reply tab:
8. Specify under Parameters:
9. The table lists the predefined mappings from HTTP to JMS. Under Content Map, enter a mapping for the HTTP Content Type field.
10. Select a JMS Content Type:■ XML
■ TEXT ■ MULTIPART
■ BYTES
Property Description
Reply User User to authorize publishing or sending to the JMSReplyTo (only if content reply is used)
Reply Timeout
Number of seconds the broker should wait for a data response
Reply Retries Number of times the broker should attempt to make the outbound connection
344 Progress SonicMQ Configuration and Management Guide 8.5
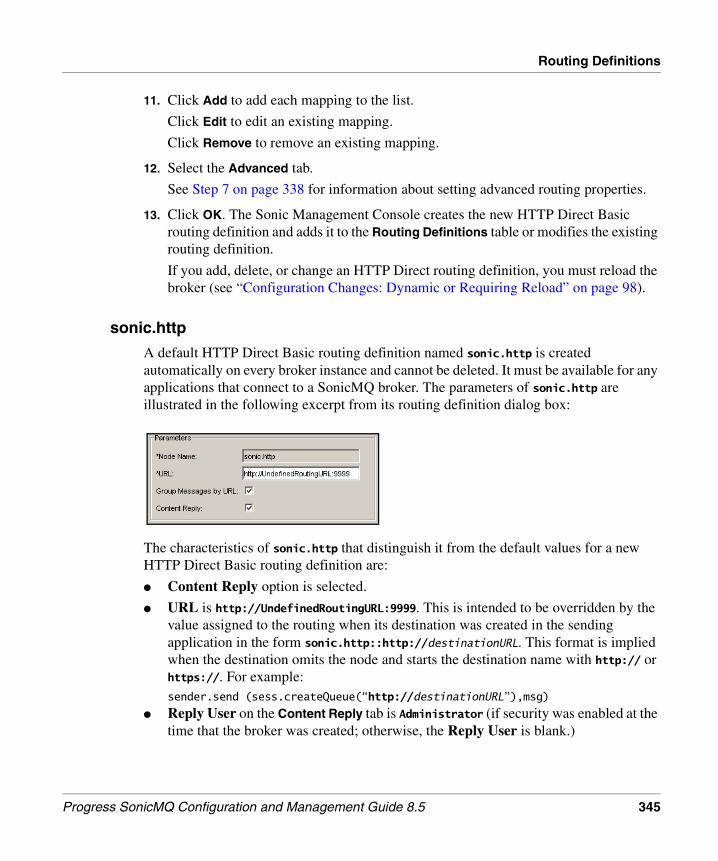
Routing Definitions
11. Click Add to add each mapping to the list.
Click Edit to edit an existing mapping.
Click Remove to remove an existing mapping.
12. Select the Advanced tab.
See Step 7 on page 338 for information about setting advanced routing properties.
13. Click OK. The Sonic Management Console creates the new HTTP Direct Basic routing definition and adds it to the Routing Definitions table or modifies the existing routing definition.
If you add, delete, or change an HTTP Direct routing definition, you must reload the broker (see “Configuration Changes: Dynamic or Requiring Reload” on page 98).
sonic.http
A default HTTP Direct Basic routing definition named sonic.http is created automatically on every broker instance and cannot be deleted. It must be available for any applications that connect to a SonicMQ broker. The parameters of sonic.http are illustrated in the following excerpt from its routing definition dialog box:
The characteristics of sonic.http that distinguish it from the default values for a new HTTP Direct Basic routing definition are:
● Content Reply option is selected.
● URL is http://UndefinedRoutingURL:9999. This is intended to be overridden by the value assigned to the routing when its destination was created in the sending application in the form sonic.http::http://destinationURL. This format is implied when the destination omits the node and starts the destination name with http:// or https://. For example:sender.send (sess.createQueue(“http://destinationURL”),msg)
● Reply User on the Content Reply tab is Administrator (if security was enabled at the time that the broker was created; otherwise, the Reply User is blank.)
Progress SonicMQ Configuration and Management Guide 8.5 345

Chapter 9: Configuring Routings
The case for using multiple routing definitions for HTTP Direct outbound is to strictly allow different default values on per message overrides. If you always override all properties, then the default routing definition sonic.http can satisfy all uses in your deployment.
When routing requests cannot resolve to a routing node, sonic.http provides routing node reverse lookup but uses the security settings associated with sonic.http. Adding additional HTTP Direct routing definitions lets you define security settings appropriate to a target location. Set up a routing node for each security context with an appropriate URL so that routing requests resolve to the correct routing and its associated security settings.
Note The user Administrator, as the default user in SonicMQ, has the ability to perform all tasks and has universal permissions. It is recommended that the SonicMQ system administrator establish an explicit Reply User account with configured ACLs that restrict the queues to which replies can be written.
Important While sonic.http is the default routing node on each broker, if you intend to use WS-* invocations, you can use sonic.http as the routing node but it will use default configuration properties for WS-Security, and WS-ReliableMessaging. As there is no default Routings Acceptor, only synchronous communications would be allowed.
You can create one or more WebService Protocol routing definitions with a defined Routings Acceptor and your preferred WS-Security, and WS-ReliableMessaging settings. Then, when you use URLs that resolve to a Web Service Protocol routing definition, you can use asynchronous requests.
346 Progress SonicMQ Configuration and Management Guide 8.5

Routing Definitions
Configuring an HTTP Direct for SOAP Routing Definition
Follow this procedure to create or edit an HTTP Direct for SOAP outbound routing definition.
◆ To create or edit an HTTP Direct for SOAP routing definition:
1. Open the Sonic Management Console, connect to a domain as described in “Running the Sonic Management Console” on page 38, and select the Configure tab.
2. To create a new routing definition, expand a broker or cluster configuration and select Routing > Definitions > New > HTTP Direct for SOAP. The New Routing Definition - HTTP Direct for SOAP dialog box opens:
To edit an existing HTTP Direct Basic routing definition, select the routing definition in the Routings table and click the Properties icon. The Edit Routing Definition - HTTP Direct for SOAP dialog box opens.
3. Follow Step 3 on page 342 through Step 12 on page 345.
4. Click OK. The Sonic Management Console creates a new HTTP for SOAP routing definition and adds it to the Routing Definitions table or modifies the existing routing definition.
Progress SonicMQ Configuration and Management Guide 8.5 347

Chapter 9: Configuring Routings
If you add, delete, or change an HTTP Direct outbound routing definition, you must reload the broker (see “Configuration Changes: Dynamic or Requiring Reload” on page 98).
Configuring an HTTP Direct for JMS Routing Definition
Follow this procedure to create or edit an outbound HTTP Direct for JMS routing definition.
◆ To create or edit an HTTP for JMS routing definition:
1. Open the Sonic Management Console, connect to a domain as described in “Running the Sonic Management Console” on page 38, and select the Configure tab.
2. To create a new routing definition, expand a broker or cluster node, select Routing > Definitions, right-click, and select New > HTTP Direct for JMS. The New Routing Definition - HTTP Direct for JMS dialog box opens:
To edit an existing HTTP Direct for JMS routing definition, select the routing definition in the Routings table and click the Properties icon. The Edit Routing Definition - HTTP Direct for JMS dialog box opens.
If you add, delete, or change an HTTP Direct outbound routing definition, you must reload the broker (see “Configuration Changes: Dynamic or Requiring Reload” on page 98).
348 Progress SonicMQ Configuration and Management Guide 8.5

Routing Definitions
3. Specify the following properties in the General tab:
Property Description
Node Name Node name used to direct messages to a routing node (a Web server or the equivalent).
If you are editing an existing routing definition, you cannot modify the node name.
URL IP address or hostname and the port of the Web server (or equivalent) the routing is going to. This address could also include an extension such as http://sales.mycorp.com:1234/orders.
Group Messages by URL
Clear this option to indicate that all messages sent through this routing definition should be delivered in the order they were sent by the client applications and that all messages sent using this routing definition will be sent through a single pending queue.
When selected (the default), each message sent to this routing definition to be examined for the URL when the destination is created in the form routing_node_name::http://destinationURL. The broker uses the value of that destination URL to group messages for the same destination, sending them through a separate pending queue. See “Grouping Messages by Destination URL” in the Progress SonicMQ Deployment Guide chapter “HTTP Direct Acceptors and Routing.”
User Name Name to use in Basic authentication with the Web server (or equivalent).
Enter a user name and then click Set Password, or, if the routing connection is a trusted site or a web service that has no authentication mechanism bound, enter the text AUTHENTICATED.
Retry Interval Number of seconds between attempts by the broker to make the outbound connection to a Web server (or equivalent).
Outbound Broker
On a routing definition at the cluster level, a broker member of the cluster can be specified as the Outbound Broker for this routing.
Progress SonicMQ Configuration and Management Guide 8.5 349

Chapter 9: Configuring Routings
4. Select the Oneway tab:
5. Specify the following:
6. Select the Advanced tab.
See Step 7 on page 338 for information about setting advanced routing properties.
Note The URL does not have to be unique. Several routing definitions can specify the same IP address or hostname. If you do not specify a protocol, the default for HTTP Direct is http://. You can choose to use https:// and then set up SSL parameters for the JVM.
Because the targets are remote and the port is evaluated on the remote system, ports can be reused. If you do not specify a port:
● DRA routing definitions expect to find port 2506 accepting connections.
● HTTP Direct outbound expects to find port 80 accepting connections.
● HTTPS Direct outbound will fail. You must use a port value even if it is the standard default value, 443.
Property Description
Timeout Number of seconds the broker should wait for HTTP response.
Retries Number of times the broker should attempt to make the outbound connection. Requests are retried when:
● The outbound connection cannot be made.
● The Web server does not respond.
● The Web server responds with a timeout or busy status.
350 Progress SonicMQ Configuration and Management Guide 8.5

Routing Definitions
7. Click OK. The Sonic Management Console creates a new HTTP Direct for JMS routing definition and adds it to the Routing Definitions table or edits the existing routing definition.
If you add, delete, or change an HTTP Direct outbound routing definition, you must reload the broker (see “Configuration Changes: Dynamic or Requiring Reload” on page 98).
Configuring a WebService Protocol Routing Definition
Follow this procedure to create or edit an WebService Protocol outbound routing definition.
◆ To create or edit an WebService Protocol routing definition:
1. Open the Sonic Management Console, connect to a domain as described in “Running the Sonic Management Console” on page 38, and select the Configure tab.
2. To create a new routing definition, expand a broker or cluster configuration and select Routing > Definitions > New > WebService Protocol. The New Routing Definition - WebService Protocol dialog box opens:
Progress SonicMQ Configuration and Management Guide 8.5 351

Chapter 9: Configuring Routings
3. Select the General tab, and specify the following:
Property Description
Node Name Node name used to direct messages to a routing node (a Web server or the equivalent).
If you are editing an existing routing definition, you cannot modify the node name.
URL IP address or hostname and the port of the Web server (or equivalent) the routing is going to. This address could also include an extension such as http://sales.mycorp.com:1234/orders.
Group Messages by URL
Clear this option to indicate that all messages sent through this routing definition should be delivered in the order they were sent by the client applications and that all messages sent using this routing definition will be sent through a single pending queue.
When selected (the default), each message sent to this routing definition to be examined for the URL when the destination is created in the form routing_node_name::http://destinationURL. The broker uses the value of that destination URL to group messages for the same destination, sending them through a separate pending queue. See “Grouping Messages by Destination URL” in the Progress SonicMQ Deployment Guide chapter “HTTP Direct Acceptors and Routing.”
User Name Name to use in Basic authentication with the Web server (or equivalent).
Enter a user name and then click Set Password, or, if the routing connection is a trusted site or a web service that has no authentication mechanism bound, enter the text AUTHENTICATED.
Retry Interval Number of seconds between attempts by the broker to make the outbound connection to a Web server (or equivalent).
Outbound Broker
On a routing definition at the cluster level, a broker member of the cluster can be specified as the Outbound Broker for this routing.
352 Progress SonicMQ Configuration and Management Guide 8.5

Routing Definitions
4. On the General tab, choose WS-Security.
The Edit WebService Security Properties dialog box opens:
5. Specify the following, and then click OK:
Section Property Description
Username Token
User Name User name the broker adds to the outbound message to identify the sending party. This property, if specified, overrides the broker-wide setting.
Password Password associated with the user name.
X.509.v3 Token
Alias Alias used to access a certificate in the broker’s keystore. The broker uses the certificate to sign an outbound message; the broker also adds the certificate to the outbound messages to identify the sending party. This property, if specified, overrides the broker’s default. An application programmer can override this value on a per-message basis.
Password Password associated with the certificate.
Progress SonicMQ Configuration and Management Guide 8.5 353
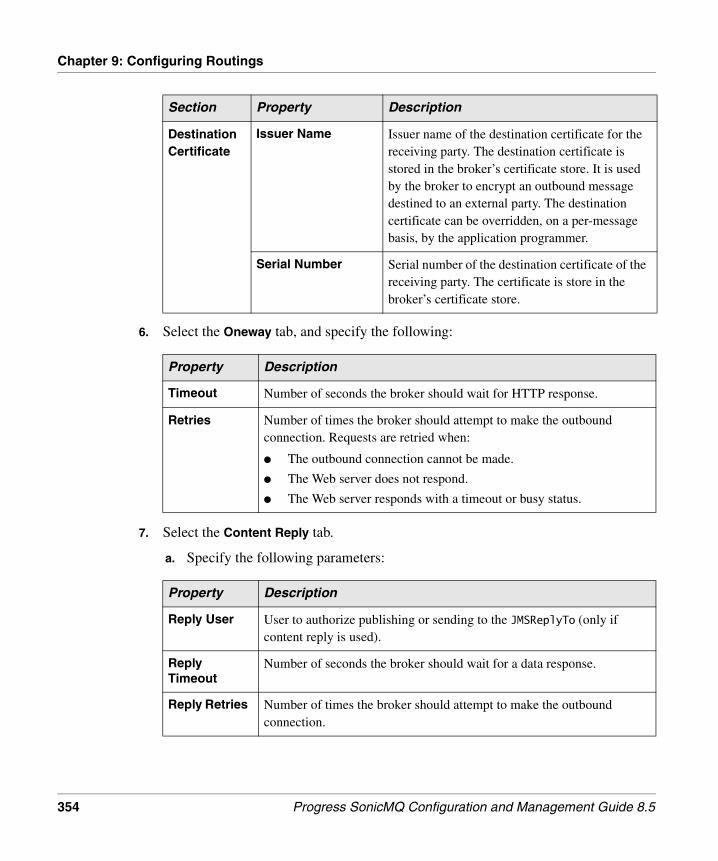
Chapter 9: Configuring Routings
6. Select the Oneway tab, and specify the following:
7. Select the Content Reply tab.
a. Specify the following parameters:
Destination Certificate
Issuer Name Issuer name of the destination certificate for the receiving party. The destination certificate is stored in the broker’s certificate store. It is used by the broker to encrypt an outbound message destined to an external party. The destination certificate can be overridden, on a per-message basis, by the application programmer.
Serial Number Serial number of the destination certificate of the receiving party. The certificate is store in the broker’s certificate store.
Property Description
Timeout Number of seconds the broker should wait for HTTP response.
Retries Number of times the broker should attempt to make the outbound connection. Requests are retried when:
● The outbound connection cannot be made.
● The Web server does not respond.
● The Web server responds with a timeout or busy status.
Property Description
Reply User User to authorize publishing or sending to the JMSReplyTo (only if content reply is used).
Reply Timeout
Number of seconds the broker should wait for a data response.
Reply Retries Number of times the broker should attempt to make the outbound connection.
Section Property Description
354 Progress SonicMQ Configuration and Management Guide 8.5

Routing Definitions
b. Under Content Map, enter a mapping for the HTTP Content Type field. The table lists the predefined mappings from HTTP to JMS—XML, TEXT, MULTIPART, and BYTES.
Click Add to add each mapping to the list, click Edit to edit an existing mapping, or click Remove to remove an existing mapping.
8. Select the RM tab, and specify the following Reliable Messaging parameters:
9. Select the Advanced tab.
See Step 7 on page 338 for information about setting advanced routing properties.
10. Click OK. The Sonic Management Console creates the new WebService protocol routing definition and adds it to the Routing Definitions table or modifies the existing routing definition.
11. If you add, delete, or change a Web Service Protocol routing definition, you must reload the broker (see “Configuration Changes: Dynamic or Requiring Reload” on page 98).
Property Description
Idle Timeout Specifies an activity timeout (in milliseconds) to apply to reliable send sequences originating from the broker. The default value, 0, indicates that sequences that are idle should never timeout.
This parameter is applied when the sending JMS client does not specify a wsrm:InactivityTimeout element in the RM Policy Assertion associated with the send.
Sequence Expiration
Specifies the requested duration (in seconds) for reliable sequences that are requested by the broker for sending to remote Web Services. The default value, 0, indicates that sequences should never expire.
This parameter is applied when the sending JMS client does not specify a wsrm:Expires element in the wsrm:CreateSequence request sent to the remote Web Service.
Progress SonicMQ Configuration and Management Guide 8.5 355
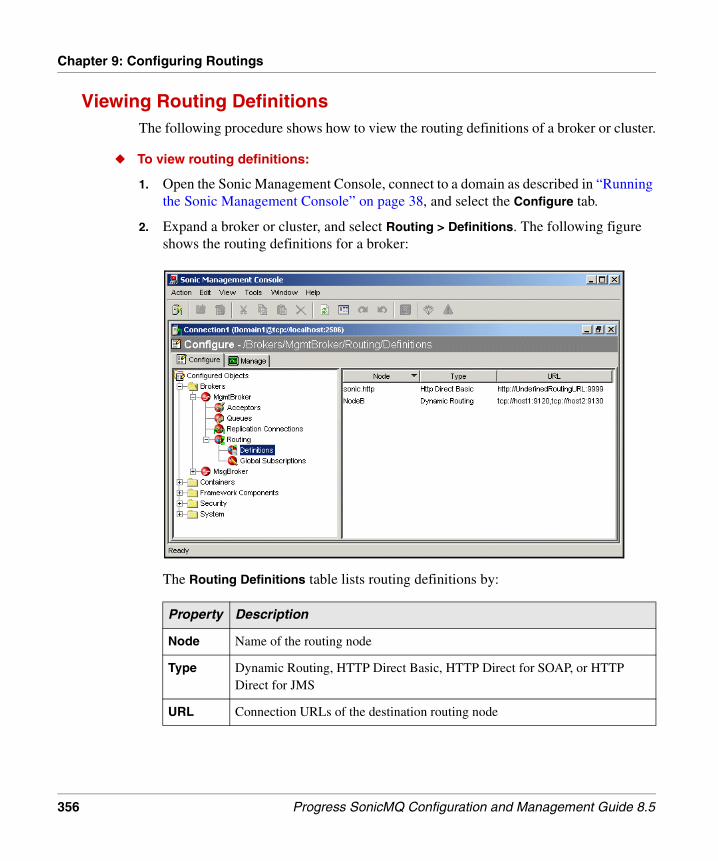
Chapter 9: Configuring Routings
Viewing Routing DefinitionsThe following procedure shows how to view the routing definitions of a broker or cluster.
◆ To view routing definitions:
1. Open the Sonic Management Console, connect to a domain as described in “Running the Sonic Management Console” on page 38, and select the Configure tab.
2. Expand a broker or cluster, and select Routing > Definitions. The following figure shows the routing definitions for a broker:
The Routing Definitions table lists routing definitions by:
Property Description
Node Name of the routing node
Type Dynamic Routing, HTTP Direct Basic, HTTP Direct for SOAP, or HTTP Direct for JMS
URL Connection URLs of the destination routing node
356 Progress SonicMQ Configuration and Management Guide 8.5

Global Subscription Rules
Deleting Routing DefinitionsThe following procedure describes how to delete a routing definition.
◆ To delete a routing definition:
❖ Select a routing definition in the Routings table, right-click, and click Delete.
SonicMQ deletes the routing definition. If delete an HTTP Direct outbound routing definition, you must reload the broker (see “Configuration Changes: Dynamic or Requiring Reload” on page 98).
Global Subscription RulesGlobal subscription rules are used to connect the topic spaces of two nodes. An administrator creates rules for propagating subscriptions on matching topics to other nodes. A subscribing node’s administrator can control which local subscriptions are propagated to which nodes by configuring propagation rules that map each topic to a list of remote nodes. If a node has more than one broker, all brokers in the node share the same rules.
A routing node can be a forwarding node that is both a remote subscriber and a remote publisher for a given topic, in effect chaining together multiple remote subscriptions. These nodes forward messages published on those nodes that match the subscription.
For example, if node A creates a global subscription rule for a particular topic on node B, which in turn creates a global subscription rule for the same topic on node C, a message published at node C to that topic is delivered to B, which in turn delivers it to A.
Progress SonicMQ Configuration and Management Guide 8.5 357

Chapter 9: Configuring Routings
Table 6 shows the structure for global subscription rules and has the scope of an entire node (cluster).
When a propagation rule is deleted or updated, existing remote subscriptions created earlier are immediately affected:
● If a rule is deleted, all remote subscriptions associated with the rule are deleted in the publishing nodes.
● If a list of nodes is updated, the corresponding remote subscriptions are deleted in the publishing nodes that are no longer listed by the rule.
● If forwarding is turned off, the corresponding remote subscriptions forwarded from other remote nodes are deleted in the publishing nodes.
For information on viewing and reconciling global subscriptions, see “Global Subscriptions” on page 598. For a complete discussion of global subscriptions, see the Progress SonicMQ Deployment Guide.
Configuring Global Subscription RulesThe following procedure describes how to create a new global subscription rule or edit an existing global subscription rule.
◆ To create or edit global subscription rules:
1. To create a new global subscription rule, in the Configure tab, expand a broker or cluster node, select Routing > Global Subscriptions, right-click, and select New Global Subscription Rule.
Table 6. Global Subscription Rules
Field Type Description
Topic name String, conforms to usual valid topic name syntax for topic subscribers, including wildcard characters, * and #.
Shared subscription topics, for example, [[group]]topic, are not allowed.
Specifies which subscriptions should be propagated. A subscription made by a JMS client is propagated if its topic matches the string specified in this field.
Node list A list of DRA node names or # to represent all known node names.
The remote nodes to which subscriptions that match this topic should be propagated.
Note Temporary topics cannot be propagated to other nodes.
358 Progress SonicMQ Configuration and Management Guide 8.5

Global Subscription Rules
2. The New Global Subscription Rule dialog box opens:
To edit a global subscription rule, select a subscription rule in the Global Subscriptions table and click the Properties icon. The Edit Global Subscription Rule Properties dialog box opens.
3. Enter a Topic Name. (The topic name can be a pattern.)
The Nodes section lists corresponding nodes. You can specify a list of nodes to propagate the subscription to. You can propagate to all routings known to the subscribing node.
4. Click Add... to open the Add Routing Nodes dialog box listing the outbound routing definitions for this broker. (# is the wildcard character that designates all nodes.)
5. Select routing nodes and click OK to return to the New Global Subscription dialog box.
(Click Remove to remove nodes.)
6. Click OK to confirm your settings. The Sonic Management Console creates the global subscription rule and adds it to the Global Subscription Rules table or modifies the existing global subscription rule.
Progress SonicMQ Configuration and Management Guide 8.5 359

Chapter 9: Configuring Routings
Viewing Global Subscription RulesThe Global Subscriptions folder displays a list of remote subscription rules and allows you to add new ones through its menu.
◆ To view global subscription rules:
1. Int the Configure tab. and expand a standalone broker or a cluster and select Routing > Global Subscriptions, as shown:
The Global Subscriptions table lists any existing global subscriptions by:
■ Topic — Topic name (can be a pattern).
■ Nodes — Nodes to which a subscription is to be propagated. (Use the character # to indicate all known nodes.)
Deleting Global Subscription RulesThe following procedure describes how to delete global subscription rules.
◆ To delete a global subscription rule:
❖ In the Configure tab, select a subscription rule in the Global Subscriptions table, right-click, and click Delete. The Sonic Management Console deletes the global subscription rule.
360 Progress SonicMQ Configuration and Management Guide 8.5

Chapter 10 Configuring Queues
This chapter describes how to configure queues in the following sections:
● “Queues on Brokers”introduces queues and how to configure general queue-handling properties on a broker and how to view queues on brokers.
● “Individual Queues” describes how to configure and delete queues, including system queues.
● “Queues on Clusters” describes how to view queues on a cluster.
Progress SonicMQ Configuration and Management Guide 8.5 361

Chapter 10: Configuring Queues
Queues on BrokersQueues are destinations are in Point-to-Point (PTP) messaging, where one client produces a message and one client consumes it. Queues are created explicitly with a set of defined parameters and sizes. See the “Point-to-point Messaging” chapter in the Progress SonicMQ Application Programming Guide for a thorough discussion of queues. See “Using the JMS Administered Objects Tool” on page 613 for information on using queue administered objects. For information on using security on queues, see “Access Control Lists” on page 443, “Quality of Protection” on page 449, and the Progress SonicMQ Deployment Guide.
Configuring General Queue-handling Properties on a BrokerThis procedure describes how to configure queue-handling properties on a broker.
◆ To configure general queue-handling properties on a broker:
1. Expand a broker configuration and select Queues, then click the Properties icon. The Edit Queues Properties dialog box opens:
362 Progress SonicMQ Configuration and Management Guide 8.5

Queues on Brokers
2. Specify the following under Default Properties:
Click OK. The Sonic Management Console sets the queue handling properties on the broker configuration. If you change a broker’s queue handling properties, you have to reload the broker (see “Configuration Changes: Dynamic or Requiring Reload” on page 98).
Property Description
Cleanup Interval If Enable Queue Cleanup is selected, you can specify the approximate time interval in seconds between successive searches for expired messages.
Number of Delivery Threads
Number of dispatch threads created (and started) for dequeueing messages from queues. Increasing the number of dispatch threads can improve performance when using queues. However, as the thread count grows, internal resource contention will limit further improvement.
Enable Queue Cleanup
Select to enable periodic checking of queues for expired messages.
Maximum Temporary Queue Size
Maximum size (in KBytes) of temporary queues created by applications connected to this broker.
Progress SonicMQ Configuration and Management Guide 8.5 363

Chapter 10: Configuring Queues
Viewing Queues on BrokersThis procedure tells how to view the queues on a broker.
◆ To view the queues on a broker:
1. Open the Sonic Management Console, connect to a domain as described in “Running the Sonic Management Console” on page 38, and select the Configure tab.
2. Expand a broker configuration and select Queues. The Queues table lists the queues on the broker.
You can right-click on the Queues node and select Show System Queues to view the system queues in the Queues table:
The Queues table lists the queues on the broker with properties described in “Configuring Queues” on page 365. For information on systems queues, see “System Queues” on page 370.
364 Progress SonicMQ Configuration and Management Guide 8.5

Individual Queues
Individual QueuesThe following sections describe how to configure and delete queues and discuss system queues.
Configuring QueuesA SonicMQ administrator creates clustered queues at the cluster level. The following procedure describes how to create or edit a queue, including clustered queues.
◆ To create or edit a queue:
1. To create a queue, expand a broker or cluster configuration, select Queues, right-click, and select New Queue. The New Queue dialog box opens:
To edit a queue, select the queue in the Queues table and click the Properties icon. The Edit Queue Properties dialog box opens.
Note that the name is not modifiable.
Progress SonicMQ Configuration and Management Guide 8.5 365

Chapter 10: Configuring Queues
2. On the General tab, specify the following properties for the queue:
Property Description
Name Name of the queue; if a clustered queue, the queue name must not match a queue name on any broker in the cluster.
If you are editing an existing queue, you cannot modify its name.
Save Threshold
Maximum total size in KB of messages that can reside in memory at one time on each broker in the cluster. As additional messages are sent to the queue, they are saved in the data store.
Maximum Size
Maximum total size in KB of enqueued messages stored on each broker in a cluster. If a queue receives a message that causes its maximum capacity to be exceeded, sending to the queue is delayed until the total queue size drops below the maximum.
Global Select to allow applications connected to other brokers in the cluster or brokers in other nodes to send to the queue. (See “Advertised Global Queues” on page 581 for information on global queues.) (The DMQ must be local.)
Exclusive Select to allow only one user to read from the queue. If more than one user has permission to receive from a read-only queue, the second user will get a JMS exception when they create a queue viewer or queue browser as long as the first user remains connected.
Clustered queues cannot be exclusive. The DMQ can be exclusive.
366 Progress SonicMQ Configuration and Management Guide 8.5

Individual Queues
3. Click the Message Groups tab if you want to enable or disable message group handling for the queue. In a new queue definition, the Enable message group handling option is cleared and its properties are not available.
If you are modifying a queue that has the option set, clearing the Enable message group handling option stops the functionality on the queue.
Progress SonicMQ Configuration and Management Guide 8.5 367

Chapter 10: Configuring Queues
4. Select Enable message group handling to choose the option and make its properties available for your changes, as shown:
Important When message group handling is enabled on a queue, message selectors on that queue are not valid. Applications that receive messages on a queue that is enabled for message grouping will fail if the application uses message selectors.
Property Description
Enable message group handling
Select to enable message group handling on the selected queue.
Property name for grouping
Specifies the header property on a message whose value determines message group allocation. The default value is the JMSX property JMSXGroupID.
Max. wait time after first receiver
Specifies a delay after the first consumer is available to avoid forcing all the message groups that receiver. The default value is 10 seconds.
368 Progress SonicMQ Configuration and Management Guide 8.5
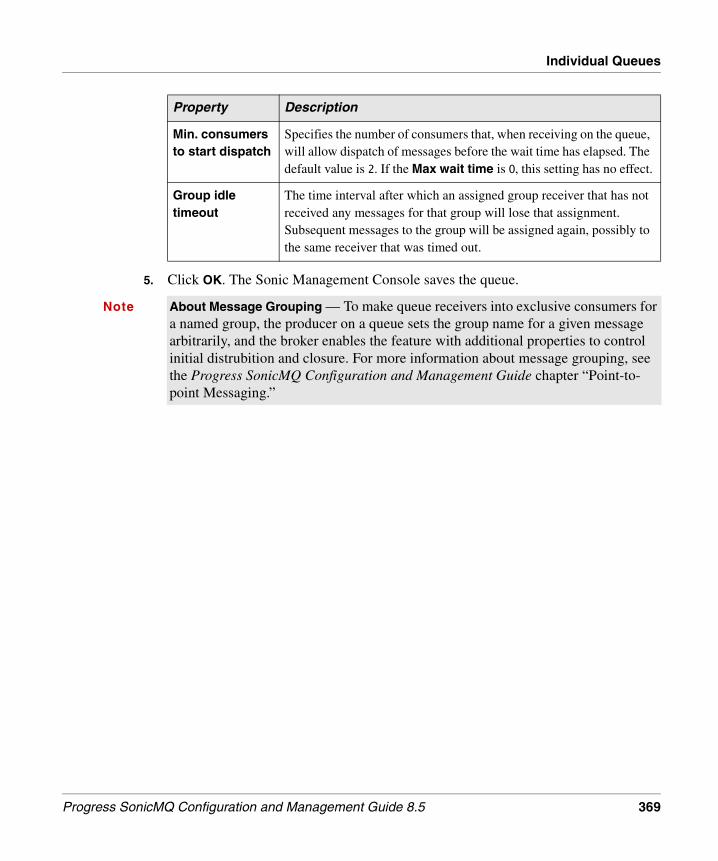
Individual Queues
5. Click OK. The Sonic Management Console saves the queue.
Min. consumers to start dispatch
Specifies the number of consumers that, when receiving on the queue, will allow dispatch of messages before the wait time has elapsed. The default value is 2. If the Max wait time is 0, this setting has no effect.
Group idle timeout
The time interval after which an assigned group receiver that has not received any messages for that group will lose that assignment. Subsequent messages to the group will be assigned again, possibly to the same receiver that was timed out.
Property Description
Note About Message Grouping — To make queue receivers into exclusive consumers for a named group, the producer on a queue sets the group name for a given message arbitrarily, and the broker enables the feature with additional properties to control initial distrubition and closure. For more information about message grouping, see the Progress SonicMQ Configuration and Management Guide chapter “Point-to-point Messaging.”
Progress SonicMQ Configuration and Management Guide 8.5 369

Chapter 10: Configuring Queues
Deleting QueuesThe following procedure describes how to delete a queue.
◆ To delete a queue:
1. Expand a broker or cluster configuration, and select Queues.
2. Select a queue in the Queues table, right-click, and click Delete.
The Sonic Management Console deletes the specified queue.
System QueuesSystem queues are created automatically by SonicMQ and include the Dead Message Queue (DMQ) and routing queues, as well as internal queues for the Sonic Management Environment.
Routing Queue
For routing between nodes, the SonicMQ broker has a routing queue that holds messages that are to be routed to remote nodes. The routing queue stores the messages until a routing connection is established, and the messages are then forwarded to the remote routing node. (This queue is SonicMQ.routingQueue.)
The maximum size of this queue is set through the Sonic Management Console, as with regular queues. The combined size of all messages destined for all remote nodes triggers flow control for messages to remote nodes. The maximum queue size for the routing queue should be sized to handle the combined needs of all routing connections.
You should monitor the routing queues (see “Routing Statistics” on page 606). For information on viewing messages waiting on the routing queue, see “Routing Statistics” on page 606; also see the Progress SonicMQ Deployment Guide.
Note When a queue is deleted, any undelivered messages on the queue are deleted and do not go to the DMQ. If a broker is offline when a queue is deleted, the queue’s contents are deleted when the broker next goes online.
370 Progress SonicMQ Configuration and Management Guide 8.5

Individual Queues
Dead Message Queue
Dead messages are messages that expire or are otherwise undeliverable and can be retained in the Dead Message Queue (DMQ). If your application specifies the DMQ option for every message, then all undeliverable messages are sent to the DMQ. When messages exceed their time to live and should expire or cannot be delivered due to routing failures, the broker saves the messages in the DMQ and/or generates an administrative notification.
The DMQ has the following properties:
● Created and populated on every broker
● Always named SonicMQ.deadMessage
● Simple queue (not clustered or global)
● Cannot be deleted
NON_PERSISTENT messages are not retained in the DMQ after the shutdown of a broker. These messages must be processed in the same broker session in which they occur, otherwise they are discarded.
In broker-to-broker routing across routing nodes, messages can be undeliverable because of timeouts and network failures. Undeliverable messages include:
● Unroutable messages — Arrive at a routing queue where the information on the routing is missing or incomplete.
● Indoubt messages — Forwarded to another routing node, but where the handshaking required for once-and-only-once delivery of messages was interrupted due to network or hardware failure and cannot be re-established within the indoubt timeout.
● Expired messages — Do not progress during routing for a configured period of time, specified by the time to live on the message or the routing timeout.
You can modify all properties of the DMQ, except the name and Global setting. The settings for the save threshold and maximum queue size are highly specific to an application. Therefore, you should change these from their default settings to values appropriate to your application. The administrator can modify access control for the DMQ the same way as for nonsystem queues.
See the “Guaranteeing Messages” chapter in the Progress SonicMQ Application Programming Guide for more information on the DMQ and the “Examining the SonicMQ JMS Samples” chapter for an example that shows you how to use applications to monitor the broker’s DMQ.
Progress SonicMQ Configuration and Management Guide 8.5 371

Chapter 10: Configuring Queues
Handling a Full DMQ
It is very important for an application to monitor the DMQ, as the broker shuts down if the DMQ exceeds its configured capacity. Before shutting down, the DMQ raises an administrative event when the DMQ exceeds a fraction of its maximum size. The DMQ Notify Factor defaults to 85 (%); you can reset this value in the Advanced tab of the Edit Broker Properties dialog box (see page 236). The notification is Application.Alert.State.DMQCapacity. (For information on specifying and viewing notifications, see “Notifications” on page 403. For monitoring the DMQ, see “Broker-wide Notifications and Alerts” on page 565.)
When the DMQ fills up (to its maximum queue size), the broker stops processing messages after enqueuing the message that caused the DMQ to exceed its maximum size. In this way, no messages are lost.
If a broker shuts down because the DMQ is full, you can restart the broker after resetting the maximum size. The broker then starts up with a new maximum size for the DMQ. Assuming the new value is sufficiently large, the queue can be processed or cleared. After the queue is processed, you can rest the DMQ to its original settings.
If the broker is not in the container hosting the Directory Service, you can use the Sonic Management Console or Configuration API to increase the size of the DMQ. (See the Progress SonicMQ Administrative Programming Guide.)
If this broker is in the container hosting the Directory Service, you can connect directly to the Directory Service (see “Connecting Off Line” on page 180).
Showing and Hiding System Queues
The following procedure describes how to show or hide system queues, including the DMQ and the routing queue.
◆ To show or hide system queues:
❖ Expand a broker configuration and select Queues:
■ If system queues are not displayed in the Queues table, right-click, and select System Queues. The Queues table displays system queues.
■ If system queues are displayed in the Queues table, right-click, and select System Queues. The Queues table hides system queues.
372 Progress SonicMQ Configuration and Management Guide 8.5

Queues on Clusters
Queues on ClustersClustered queues are defined for the cluster. When a broker joins the cluster, it automatically creates a configuration of the queue with the specified name and properties. Senders put messages in the queue on the broker they are connected to. Receivers read from the queue on the broker they are connected to.
An instance of each clustered queue is created on every broker in the cluster. When a property is changed for a clustered queue, the change is applied to every instance of the clustered queue in the cluster. For example, all instances of a clustered queue have the same maximum queue size setting. One configuration definition is applied to each broker as it joins the cluster with the same configuration properties as for nonclustered queues.
If any broker in a cluster goes down as a result of software or hardware failure, all the messages on the clustered queue instances on that broker become unavailable until the broker is restarted. Since the clustered queue exists on all other brokers in the cluster:
● Access for sending continues uninterrupted for clients connected elsewhere in the cluster.
● Access for receiving and browsing continues uninterrupted for clients connected elsewhere in the cluster; however, trapped messages are not available for browsing or receiving.
The following procedure describes how to view the queues on a cluster.
Progress SonicMQ Configuration and Management Guide 8.5 373

Chapter 10: Configuring Queues
◆ To view the queues on a cluster:
1. Open the Sonic Management Console, connect to a domain as described in “Running the Sonic Management Console” on page 38, and select the Configure tab.
2. Expand a cluster configuration and select Queues, as shown:
The Queues table lists the queues on the cluster with the same properties as for broker queues.
374 Progress SonicMQ Configuration and Management Guide 8.5

Part IV Managing the Sonic Management Environment
The Sonic Management Environment enables you to monitor and manage all components in a highly distributed SonicMQ messaging infrastructure from a central location. Monitoring and management can be performed across containers, clusters, and routing nodes. It can be used to manage and observe metrics, notifications and logs for a wide range of SonicMQ components.
Part IV describes runtime management and monitoring in the Sonic Management Console in these chapters:
● Chapter 11, “Monitoring the Sonic Management Environment” introduces the instrumentation provided by the Sonic Management Environment and describes broker and container-wide metrics, aggregated metrics, and instance metrics. It also describes alert thresholds, including instance alerts. and notifications, including forwarded notifications.
● Chapter 12, “Configuring Security” provides an overview of SonicMQ management security. It describes authentication and how to configure internal and external Authentication Domains, and how to configure, view and delete users and groups. It also describes how to create a set of a authorization policies, and how to configure, view, and delete ACLs and QoP.
● Chapter 13, “Managing Containers and Collections” describes how to view the components in a container, view and edit container runtime properties, launch and shut down containers, container logging and monitoring, and managing components. It also describes how to view and manage container and component collections.
● Chapter 14, “Managing Framework Components” describes the runtime management, operations, and monitoring of a Directory Service, Agent Manager, Activation Daemon, and Collections Monitor.
Progress SonicMQ Configuration and Management Guide 8.5 375

Part IV: Managing the Sonic Management Environment
376 Progress SonicMQ Configuration and Management Guide 8.5
Chapter 11 Monitoring the Sonic Management Environment
This chapter describes SonicMQ monitoring in the following sections:
● “Overview of Monitoring” is an introduction to the instrumentation provided by the Sonic Management Environment to monitor changes in the runtime environment and facilitate informed management decisions.
● “Metrics” describes how to enable and view component and container-wide metrics, instance metrics, and aggregated metrics.
● “Alerts” explains alerts and describes how to specify alert thresholds, including instance alerts.
● “Notifications” explains notifications and describes how to enable and watch notifications, including forwarded notifications.
Progress SonicMQ Configuration and Management Guide 8.5 377

Chapter 11: Monitoring the Sonic Management Environment
Overview of MonitoringThe Sonic Management Environment provides comprehensive instrumentation to monitor changes in the runtime environment and facilitate informed management decisions. These monitoring capabilities include the ability to:
● View and record various metrics that interpret raw statistical information captured for important aspects of the runtime environment
● Subscribe and view notifications that encapsulate information about critical events that occur in the runtime environment
These monitoring facilities are backed up by operational facilities to further interrogate the runtime environment. For example, broker connections can be monitored by plotting a metric for the number of connections, or by subscribing to notifications generated when a threshold is exceeded on that metric. Having detected an undesirable condition, an operator can interrogate a list of connections to the SonicMQ broker to determine the type of connection, the connection host IP address, and the associated user identity.
Progress Sonic provides the following instrumentation:
● Metrics — Values at an instance in time calculated from raw statistical data (see “Metrics” on page 379)
● Alerts — Notifications triggered when an associated metric passes a specified threshold (see “Alerts” on page 400)
● Notifications — Encapsulations of significant event details and forwarded to listeners (see “Notifications” on page 403)
Sonic’s metrics and alerts can be enabled at configuration time or runtime. Metric and alert enablement at runtime will not persist across container or component restarts. Certain limitations apply when enabling at configuration time:
Configure Manage
Metrics Non-Instance Yes Yes, overrides Configure
Instance Patterns Yes Yes, overrides Configure
Alerts Non-Instance Yes Yes
Instance Patterns Yes Yes
Notifications Instance Patterns No Yes
378 Progress SonicMQ Configuration and Management Guide 8.5

Metrics
MetricsA metric is an interpretation of a statistic. There can be multiple interpretations of a single set of statistical data (for example, total, average, maximum, and minimum). A metric is a single value at an instance in time calculated from raw statistical data, for example, a counter, or a rate per second calculated over a collection interval.
The Sonic Management Console polls containers, and components for metric values. You can specify the metrics to be polled and the polling interval. Many metrics optionally support high and/or low alert thresholds; one or more alerts can be enabled for a metric that supports them. Metrics and alerts are dynamic—they can be enabled or disabled while the broker is running. Metrics and alerts enabled at configuration time are re-enabled upon restarting the container.
SonicMQ supports metrics on:
● Components — See “Broker-wide Metrics” on page 563
● Containers — See “Container-wide Metrics” on page 491
In addition, SonicMQ supports aggregate metrics via Collections Monitors; see “Collections Monitor” on page 532.
Instance metrics are created, recorded, and reported based on the existence of a specific instance, for example, of a queue or connection. Instance metrics can be enabled or disabled using patterns that can include the wildcard character, for example, b*. For information on SonicMQ instance metrics, see:
● “Queue Instance Metrics and Alerts” on page 605
● “Connection Instance Metrics, Alerts, and Notifications” on page 586
You can view metrics using a Metrics Watcher (see “Viewing Metrics” on page 390).
Refresh Interval and Collection Interval
You can dynamically configure the refresh interval and collection interval on a broker in the Metrics tab of the Runtime Broker Properties dialog box (see Step 8 on page 549 and Step 9 on page 550 to set these intervals). You can also specify the refresh interval on a component collection for aggregated metrics (see Step 13 on page 149).
The metrics refresh interval can be set to a positive integer value of 5 or larger for each collection. The metrics refresh interval for a collection should be reasonably large, and always larger than the metrics refresh interval for each of the components in the collection whose metrics are being monitored. Setting the value too low could hamper storage writes by the collections monitor.
Progress SonicMQ Configuration and Management Guide 8.5 379

Chapter 11: Monitoring the Sonic Management Environment
Component and Container-wide MetricsThe following sections describe how to enable and disable broker and container-wide metrics. For information on the specific metrics, see:
● “Broker-wide Metrics” on page 563
● “Container-wide Metrics” on page 491
Enabling Component and Container-wide Metrics
The following procedure describes how to enable metrics for a broker or container.
When you enable metrics on a component on the Configure tab:
● The component's container saves the metric settings to the Directory Service.
● The component's container applies the stored metric setting to the component when it starts.
● Patterns on queues will include temporary queues that match the pattern.
When you enable metrics on a component on the Manage tab:
● The component's container applies the metric settings while the container and its components are running.
● Changes in the runtime override the configured settings.
● Metrics on specific instances are runtime only and are dropped when the container stops.
● All metric settings and overrides are dropped when the container stops.
◆ To enable metrics:
1. Open the Sonic Management Console, and connect to the domain you are managing.
2. Select the Configure tab to specify persistent settings, or select the Manage tab to specify temporary or overriding settings.
3. Select the container or the broker (as a component of a container) where you want to enable metrics.
Note Metrics on ESB services — All ESB services deployed in an ESB container support metrics and notifications. See the “Monitoring Service Metrics and Notifications” section of the chapter “ESB Containers” in the Progress Sonic ESB Configuration and Management Guide for more information.
Note Metrics monitored by a Collections Monitor are automatically enabled. If these metrics are disabled, they are automatically re-enabled.
380 Progress SonicMQ Configuration and Management Guide 8.5

Metrics
4. Right-click, and select Metrics....
■ From the Configure tab, the Monitoring dialog box opens on its one tab, the Metrics tab, for example, for a container:
■ From the Manage tab, the Monitoring dialog box opens with its Metrics tab, for example, for the same container:
Progress SonicMQ Configuration and Management Guide 8.5 381

Chapter 11: Monitoring the Sonic Management Environment
5. Select a metric, right-click, and select Enable. The Sonic Management Console enables the metric you selected and modifies the icon:
You can also select a group of metrics by selecting the parent folder, right-click, and select Enable. The Sonic Management Console enables the group of metrics you selected. For example, this figure shows container metrics with system.memory.CurrentUsage and all of the system.threads metrics enabled:
You can then right-click and choose:■ Disable — See “Disabling Container and Component-wide Metrics” on page 383■ Watch — See “Viewing Metrics” on page 390■ Alerts — See “Alerts” on page 400■ Instances — See “Instance Metrics” on page 383 (if it is an instance metric)
Also, see “Resetting Metrics” on page 399.
382 Progress SonicMQ Configuration and Management Guide 8.5

Metrics
Disabling Container and Component-wide Metrics
The following procedure describes how to disable metrics.
◆ To disable metrics:
❖ Select an enabled metric or group of metrics (parent folder) in the Metrics dialog box, right-click, and click Disable.
The Sonic Management Console disables the metric.
Instance MetricsInstance metrics are created, recorded, and reported based on the existence of a specific instance, for example, of a queue or connection. You can use the asterisk (*) character to specify patterns of instances and enable and disable instance metrics on one or more instances or groups of instances.
Enabling or disabling a group of metrics immediately propagates this change to all existing matching instances. Even if an instance matching the pattern does not exist at the time the pattern is specified, the pattern will apply to future instances that do match the pattern.
For example, if a connection is created and its Connect ID matches an enabled connection instance metric pattern, then that metric is immediately active for that connection.
Instance metrics can be enabled or disabled by specifying:
● The ID of an individual instance metric, including the instance name, for example, connection.messages.DeliverePerSecond.myConnectId
● All instance metrics of this class, for example, queue.messages.MaxDepth
● A pattern in place of the instance name, for example, queue.messages.MaxDepth.A*
The following sections describe how to enable and disable instance metrics at the group and instance levels. For information on specific instance metrics, see:
● “Connection Instance Metrics, Alerts, and Notifications” on page 586
● “Queue Instance Metrics and Alerts” on page 605
Progress SonicMQ Configuration and Management Guide 8.5 383

Chapter 11: Monitoring the Sonic Management Environment
Enabling Instance Metrics at the Group Level
The following procedure describes how to enable instance metrics on all instances or in a group (at the folder level).
◆ To enable metrics on all instances in a group:
1. Open the Sonic Management Console, and connect to the domain you are managing.
2. Select the Configure tab to specify persistent settings, or select the Manage tab to specify temporary or overriding settings.
3. Select the container or broker where you want to enable metrics.
4. Select an instance metric, right-click on it, and choose Enable.
■ From the Configure tab, the Monitoring dialog box opens on its one tab. This figure shows queue.messages.Count metrics enabled for all queues on the component. Note that you cannot expand to see specific instances:
384 Progress SonicMQ Configuration and Management Guide 8.5

Metrics
■ From the Manage tab, the Monitoring dialog box opens. This figure shows queue.messages.Count metrics can be expanded to see the queues on the component:
The cross icons show where the metric is enabled, including the higher level folders, messages and queue.
Note Broker queue metrics are provided for the system queue SonicMQ.routingQueue but not for the system queue SonicMQ.deadMessage. You can work around that constraint by having applications specify user-defined dead message queues. See the chapter “Guaranteeing Messages” in the Progress SonicMQ Application Programming Guide for more information.
Progress SonicMQ Configuration and Management Guide 8.5 385

Chapter 11: Monitoring the Sonic Management Environment
5. Right-click an instance metric and select Instances to open the Instance Enablement dialog box:
In this figure, the enabled pattern is *, which means that all instances in the group are enabled.
Disabling Instance Metrics at the Group Level
The following procedure describes how to disable metrics for groups of instances.
◆ To disable instance metrics:
1. If a metric was enabled at the group level, select the metric, right click, and select Disable.
The Sonic Management Console disables the selected metric for all instances.
386 Progress SonicMQ Configuration and Management Guide 8.5

Metrics
Enabling Instance Metrics on Patterns and at the Instance Level
The following procedure describes how to enable metrics on all instances, patterns of instances, or—at runtime, specific selected instances.
◆ To enable instance metrics:
1. Open the Sonic Management Console, and connect to the domain you are managing.
2. Select the Configure tab to specify persistent settings, or select the Manage tab to specify temporary/overriding settings and specific instance settings.
3. Select the container or broker where you want to enable instance metrics.
■ From the Configure tab, right-click on an instance metric, and then choose Instance Patterns. In the Instance Pattern Enablement dialog box, click Add. The Instance Pattern Chooser opens:
You can choose to:
❑ Enable all instance metrics of this type.
❑ Define a pattern to specify one or more instances by using a * as a wildcard.
Note Using Patterns
● You can enter a pattern for instances that do not exist (yet). The wildcard instance does not appear in the tree until there is an actual instance that matches the pattern.
● If you enter an exact instance pattern, it displays in the tree even if there are no matches yet (in that case it is grayed). However, wildcard patterns never display in the tree; only currently matching instances display
● Temporary Queues — You can define patterns to select TemporaryQueues if the temporary queues were created with a customId String embedded in the name. See “Temporary Queues” in the “SonicMQ Client Sessions” chapter of the Progress SonicMQ Application Programming Guide for more information about setting custom identifiers.
Progress SonicMQ Configuration and Management Guide 8.5 387

Chapter 11: Monitoring the Sonic Management Environment
■ From the Manage tab, right-click on an instance metric, and then choose Instances. In the Instance Enablement dialog box, click Add. The Instance Chooser opens:
You can choose to:
❑ Enable all instance metrics of this type.
❑ Define a pattern to specify one or more instances by using a * as a wildcard.
❑ Select specific instances from the list of instances known by the component.
❑ Select Show System Instance to show system instance metrics (for example, to show the routing queue).
388 Progress SonicMQ Configuration and Management Guide 8.5

Metrics
❑ For queue metrics, select Show Temporary Queue Instances to also list instances of temporary queues.
4. Click the Refresh icon to refresh the statistical data and the display.
5. Click OK in the Instance Chooser and Instance Enablement dialog boxes.
6. Click OK to complete the metrics settings.The cross icons reflect where the metric is enabled, including the higher level folders, messages and queue.
Disabling Instance Metrics at the Instance Level
The following procedure describes how to disable instance metrics.
◆ To disable instance metrics:
1. If a metric was enabled for one or more instances, select the metric, right-click, and select Disable.
The Sonic Management Console disables the selected metric for the selected instances.
Note Broker queue metrics are provided for the system queue SonicMQ.routingQueue but not for the system queue SonicMQ.deadMessage. You can work around that constraint by having applications specify user-defined dead message queues. See the chapter “Guaranteeing Messages” in the Progress SonicMQ Application Programming Guide for more information.
Important If you specify a wildcard (*) pattern and later disable it, this just removes the “*” pattern at the parent level, not patterns at the child level.
Important If an instance matches multiple specified patterns, all such patterns must be disabled to disable metrics on that instance.
Progress SonicMQ Configuration and Management Guide 8.5 389

Chapter 11: Monitoring the Sonic Management Environment
Viewing MetricsAfter you enable metrics, you can view metrics in secondary Metrics Watcher windows. A Metrics Watcher shows three different views of the same data:
● The Latest tab is a bar chart showing the selected metrics’ latest values as received from the component being watched.
● The History tab is a line graph showing the selected metrics’ values as a trend since the metric was added to the Metrics Watcher.
● Both the Latest tab and the History tab also contain a table that is as a legend for the metrics displayed.
You view Metrics Watchers per component, container, or domain. The context for a Metrics Watcher depends on the current domain (Sonic Management Console workspace window). However, you can select multiple metrics to watch within a Metrics Watcher. You can keep Metrics Watchers open while performing other configuration and runtime management work. The following procedure describes how to view metrics in a Metrics Watcher.
◆ To view metrics in a metrics watcher:
1. Open the Sonic Management Console, and connect to the domain you are managing.
2. Select the Manage tab.
3. Select the container or broker where you want to view metrics.
4. Select a metric, right-click, select Watch, and select whether to watch that metric by:
■ Component
■ Container
■ Domain
The Sonic Management Console adds a spyglass to the icon for each watched metric and opens a Metrics Watcher for the component, container, or domain.
Note Metric values are not typically available immediately after enabling; you must wait at least one refresh and/or metrics poll cycle to see the values.
390 Progress SonicMQ Configuration and Management Guide 8.5
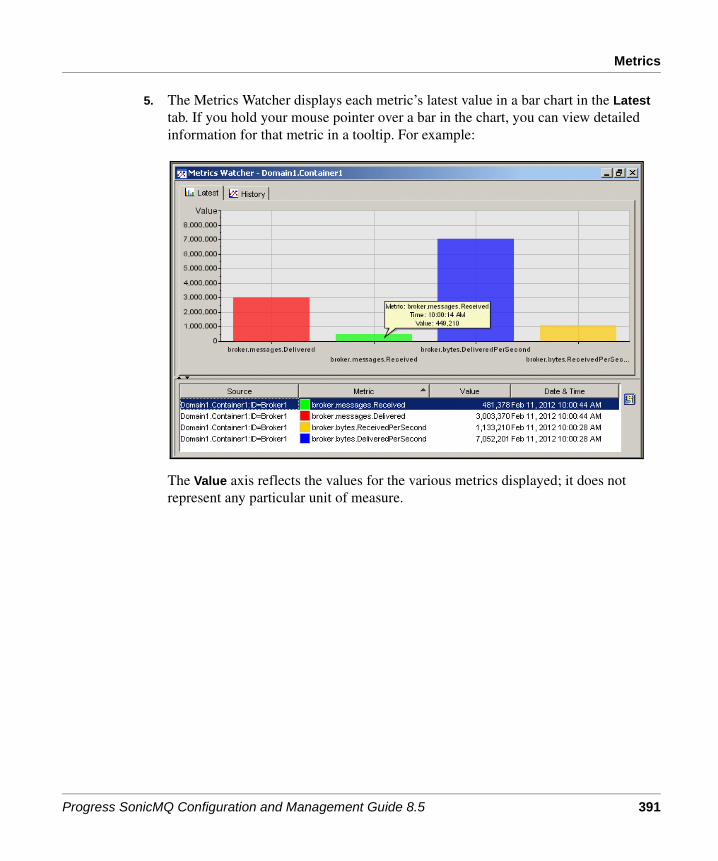
Metrics
5. The Metrics Watcher displays each metric’s latest value in a bar chart in the Latest tab. If you hold your mouse pointer over a bar in the chart, you can view detailed information for that metric in a tooltip. For example:
The Value axis reflects the values for the various metrics displayed; it does not represent any particular unit of measure.
Progress SonicMQ Configuration and Management Guide 8.5 391

Chapter 11: Monitoring the Sonic Management Environment
6. You can drag the chart with your mouse to show the metrics in three dimensions. For example:
The table below the chart serves as a legend of the metrics and shows:
Column Description
Source The fully qualified name of the source component of the metric (only for container or domain watcher).
Metric The metric’s hierarchical identifier string.
Value The metric’s value.
Date & Time The date and time the metric was gathered on the host machine. (This might not be the same time as the management machine.)
392 Progress SonicMQ Configuration and Management Guide 8.5
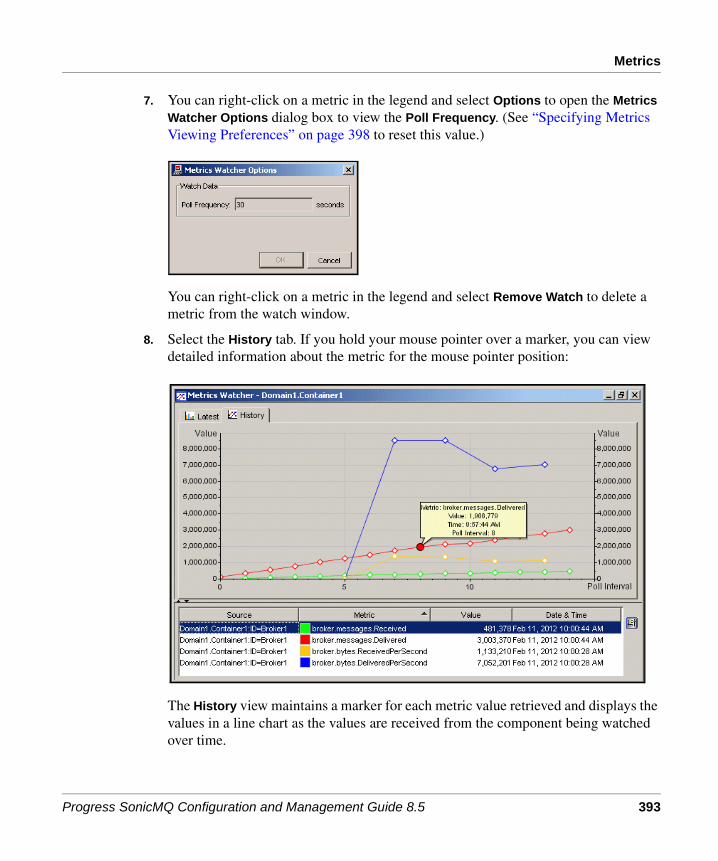
Metrics
7. You can right-click on a metric in the legend and select Options to open the Metrics Watcher Options dialog box to view the Poll Frequency. (See “Specifying Metrics Viewing Preferences” on page 398 to reset this value.)
You can right-click on a metric in the legend and select Remove Watch to delete a metric from the watch window.
8. Select the History tab. If you hold your mouse pointer over a marker, you can view detailed information about the metric for the mouse pointer position:
The History view maintains a marker for each metric value retrieved and displays the values in a line chart as the values are received from the component being watched over time.
Progress SonicMQ Configuration and Management Guide 8.5 393

Chapter 11: Monitoring the Sonic Management Environment
The Value axis reflects the values for the various metrics displayed; it does not represent any particular unit of measure. The Poll Interval reflects the poll frequency (see “Specifying Metrics Viewing Preferences” on page 398
You can use the mouse to manipulate the view:
To add new metrics to the Metrics Watcher, return to the Metrics tab of the Monitoring dialog box.
You can resize, minimize, tile, or cascade the windows to view the Metrics Watcher and other workspace windows. (See “Window Menu” on page 54.)
Viewing Aggregated Metrics
A Collections Monitor can be configured to poll components in a components collection for their metric data and then aggregate the metric values.
Before viewing aggregated metrics, you must:
1. Create a component collection and specify what metrics to aggregate (see “Creating Component Collections” on page 144).
2. Create a Collections Monitor (see “Configuring a Collections Monitor” on page 194).
3. Specify the component collection for the Collections Monitor to monitor (see “Specifying Collections to Monitor” on page 198).
Action Shortcut
To zoom in.
Press and hold the Shift key. Select a region with a mouse on X axis
Press and hold the Shift key. Select a rectangular region directly on the chart.
To unzoom. Press and hold the Shift key. Click anywhere on the chart.
To scroll the view in either direction horizontally.
Drag the mouse on the X axis.
To scroll the view in either direction horizontally and vertically.
Click the Ctrl key.
394 Progress SonicMQ Configuration and Management Guide 8.5

Metrics
The following procedure describes how to view aggregated metrics in a Metrics Watcher.
◆ To view aggregated metrics:
1. In the Manage tab, select a Collections Monitor in the tree in the left panel. The component collections are listed in the table in the right panel by name.
2. Select a component collection in the table, right click, and select Aggregated Metrics. The Aggregated Metrics tab in the Monitoring dialog box shows the metrics that the Collections Monitor is aggregating:
3. Select each metric, right click, and select Watch. The Sonic Management Console adds a spyglass to the icon for each metric selected and opens a Metrics Watcher.
Progress SonicMQ Configuration and Management Guide 8.5 395

Chapter 11: Monitoring the Sonic Management Environment
The Latest tab in the Metrics Watcher displays each metric’s latest aggregate values as bars in series:
396 Progress SonicMQ Configuration and Management Guide 8.5
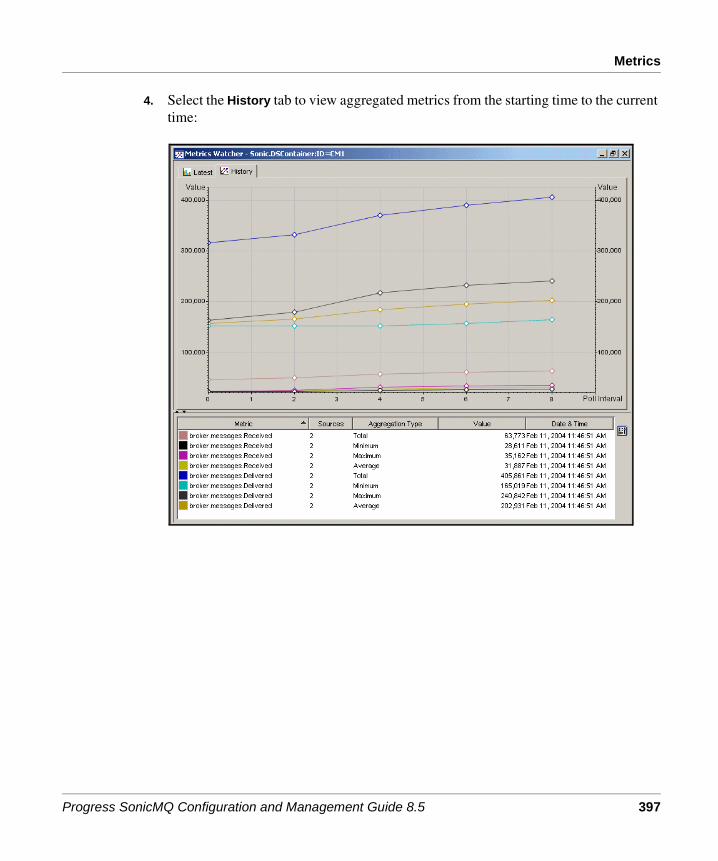
Metrics
4. Select the History tab to view aggregated metrics from the starting time to the current time:
Progress SonicMQ Configuration and Management Guide 8.5 397

Chapter 11: Monitoring the Sonic Management Environment
The columns in the legend include:
Specifying Metrics Viewing Preferences
The following procedure describes how to set metrics viewing preferences.
◆ To specify metrics viewing:
1. Select Tools > Preferences... . The User Preferences dialog box opens.
2. Select the Metrics tab:
Column Description
Metric The metric’s hierarchical identifier string.
Sources Number of components contributing to the aggregated results. (Individual components in a collection might not be online when a component's metrics are requested or be unable to respond within a reasonable time.)
Aggregation Type Total, average, maximum, minimum.
Value The aggregated result.
Date & Time An average of the currency time of all the contributing metrics.
398 Progress SonicMQ Configuration and Management Guide 8.5

Metrics
3. Under Metric Data and Plot Window Defaults, specify:
Resetting MetricsYou can reset metrics to an initial value specific and appropriate for each metric. For example:
● A total count is reset to 0.
● Rate calculations are restarted. The average is restarted from that point in time.
However, a count (for example, a connection count) is not affected.
The following procedure describes how to reset all metrics for an entire broker or container.
◆ To reset metrics:
❖ Select a container or broker, right-click, and select Operations > Reset Metrics.
The Sonic Management Console resets all metrics for the selected container or broker.
Property Description
Poll Frequency Specifies the frequency (in seconds) for watched metrics to be retrieved from their source components.
Default Max Plot Points
Maximum number of points shown in a Metrics Watcher. (This value affects the amount of memory used by the Metrics Watcher.)
Aggregate Poll Frequency
Specifies the frequency (in seconds) for watched aggregated metrics to be retrieved from their source components.
Progress SonicMQ Configuration and Management Guide 8.5 399

Chapter 11: Monitoring the Sonic Management Environment
AlertsAn alert is a configurable mechanism that triggers a notification when an associated metric passes a specified threshold. For many metrics, you can enable one or more alerts with high and/or low thresholds. An alert can be broker- or container-wide or it can be an instance alert associated with a connection or queue instance metric. An option can be set on a component to repeat an alert notification after a specified period if the metric is still across a threshold.
Alerts are dynamic; that is, they can be enabled or disabled while the broker is running. They are re-enabled on restart. Alerts can be enabled and disabled independently of their associated metric. That is, an alert can be enabled for a metric that is not yet enabled. In this case, when the metric is enabled, the alert becomes active. Disabling an alert does not disable the metric. Disabling a metric disables its alerts.
For information on specific alerts, see:
● “Broker-wide Notifications and Alerts” on page 565
● “Container-wide Metrics” on page 491
● “Connection Instance Metrics, Alerts, and Notifications” on page 586
● “Queue Instance Metrics and Alerts” on page 605
Specifying Alert ThresholdsThe following procedure describes how to specify alert thresholds.
◆ To specify alert thresholds:
1. Open the Sonic Management Console, and connect to the domain you are managing.
2. Select the Configure tab to specify persistent settings, or select the Manage tab to specify temporary or overriding settings.
3. Right-click on a metric that has a bell icon and select Alerts... . The Alerts dialog box opens:
400 Progress SonicMQ Configuration and Management Guide 8.5

Alerts
4. Specify:
■ High Thresholds — One or a comma-delimited list of thresholds
■ Low Thresholds — One or a comma-delimited list of thresholds
5. Click OK to return to the Metrics dialog box. The Sonic Management Console applies the specified thresholds to the alert.
Specifying Instance Alert ThresholdsAn instance alert is an alert associated with an instance metric. Alerts for instance metrics can be enabled or disabled:
● Through the parent instance metric, for all instances of the metric
● (At runtime only) For a single instance of the metric
Instance alerts cannot be enabled through patterns. If the metric is enabled through a set of patterns, alerts on all instances of this metric are enabled for the same subset of enabled metric instances.
If you specify alert thresholds for an entire group of connections or queues, you can add additional thresholds for individual connection or queue instances.
For information on specific instance alerts, see “Connection Instance Metrics, Alerts, and Notifications” on page 586 and “Queue Instance Metrics and Alerts” on page 605.
◆ To add settings for an individual instance to the group setting:
1. Open the Sonic Management Console, and connect to the domain you are managing.
2. Select the Manage tab.
3. Select the container or broker where you want to enable instance metrics.
Note Not all metrics support both high and low thresholds; you can only enter values in the available fields.
Progress SonicMQ Configuration and Management Guide 8.5 401

Chapter 11: Monitoring the Sonic Management Environment
4. Select a folder that allows instance metrics (for example, Connection > Messages on a broker), right-click on it, and choose Enable.
5. Select a child instance under an enabled group metric, right click, and select Alerts. The Alerts dialog box opens:
The Parent Highs and Parent Lows reflect the thresholds specified for all instances in the group (see “Specifying Alert Thresholds” on page 400).
6. Specify thresholds for the instance:
■ High Thresholds — One or a comma-delimited list of thresholds
■ Low Thresholds — One or a comma-delimited list of thresholds
7. Click OK to return to the Metrics dialog box.
The Sonic Management Console applies the thresholds to the alert for the instance.
Alert Notification Repeats When Still Over a ThresholdThe initial alert describes the date/time at the notification source that the threshold was initially crossed. If there are multiple thresholds defined for a given metric, the date/time will be updated to reflect the most recent threshold that was crossed; however, if no additional threshold is broken, a repeat metric alert notification will contain the same date/time as previously sent.
Note Not all metrics support both high and low thresholds, in which you can only enter values in the appropriate field.
Important Both alerts and metrics must be enabled for an alert to be generated. Both persist until each is disabled. If you disable the metric but do not remove the threshold, the threshold is still present (but no alert notification will be generated). (Disabling an alert and clearing its associated threshold value are synonymous.)
402 Progress SonicMQ Configuration and Management Guide 8.5

Notifications
Each repeat alert indicates whether the metric alert notification is a repeat of a previously sent metric alert notification. If there are multiple thresholds defined for a given metric, the attribute value will reflect whether the alert is the first alert (where value = false) that is being sent regarding a particular threshold having been crossed.
NotificationsNotifications are emitted by runtime objects. Listeners on a runtime object can choose notifications that are of interest. The behavior of the listeners is different for the Sonic Management Console and management applications. Figure 4 illustrates both types of notification delivery mechanisms.
In Figure 4, Management Application A specifies instances of a runtime object by defining rules that enable notification types to be selected through a filter (ref. 1A)and then further filtering by successive attribute filters. The filter is registered with the management broker of the target object’s domain (ref. 2A) so that a listener with its filter can be forwarded to the runtime object(s). Notifications that survive the filtering process are returned to the application (ref. 3A.) When the management application stops, its listener is removed.
In Sonic Management Console Manage operations, you can choose the notification types you want to receive and whether you want the notifications to be those emitted by the container of the current selection, the component of the current selection, or for the entire domain. As shown in Figure 4, the user chooses notifications to watch (ref. 1B), the
Figure 4. Two Notification Listeners on a Messaging Broker
Broker
1
1
ManagementBroker
MessagingBroker
1A: RegisterNotificationListenerwith Filter
3A: Filterednotificationsdelivered toManagementApplication
Notifications
2A, 2B: Listeners aresent to the object's
configuration on thecontainer's management
connection
1B: ChooseNotificationsto Watch
3B: Watchednotificationsdelivered to theManagementConsole
Listener B
ManagementApplication A
ClientApplication
ManagementConsole
Listener A with Filter
Progress SonicMQ Configuration and Management Guide 8.5 403

Chapter 11: Monitoring the Sonic Management Environment
listener is forwarded to the runtime object(s) (ref. 2B), and notifications of the selected types are returned (ref. 3B.) When the Sonic Management Console session ends, its listener is removed.
Notifications are associated with the delivery of event information; notifications encapsulate event details. Management clients subscribe to notifications and extract event details from notifications. The Sonic Management Console subscribes to notifications and displays the notifications in a Watch window in a table. You can open Watch windows per domain, container, or component.
Notifications have a hierarchical name identifier and encapsulate a set of properties specific to the type of notification. For information on specific notifications, see:
● “Broker-wide Notifications and Alerts” on page 565
● “Container-wide Notifications” on page 493
● “Connection Notifications” on page 587
● “Directory Service Notifications” on page 514
● “Agent Manager Notifications” on page 523
● “Activation Daemon Notifications” on page 531
● “Collections Monitor Notifications” on page 538
404 Progress SonicMQ Configuration and Management Guide 8.5

Notifications
Monitoring NotificationsYou can subscribe to notifications of interest and view notifications already subscribed to and received. Notifications can be tracked or monitored using the following procedures.
The following procedure describes how to monitor notifications.
◆ To monitor notifications:
1. Open the Sonic Management Console, connect to a domain as described in “Running the Sonic Management Console” on page 38, and select the Manage tab.
2. Select a container or broker, for example, Containers > DomainManager, right-click and select Notifications.....
A Monitoring dialog box opens with its Notifications tab, for example, for a container:
3. Select one or more notifications, and for each notification, select Watch and select whether to watch:■ By Component
■ By Container
■ By Domain
Note Before viewing alert notifications, you must:
1. Define an alert (see “Specifying Alert Thresholds” on page 400).
2. Enable the metric (see “Enabling Component and Container-wide Metrics” on page 380, “Enabling Instance Metrics at the Group Level” on page 384, or “Enabling Instance Metrics on Patterns and at the Instance Level” on page 387).
Progress SonicMQ Configuration and Management Guide 8.5 405

Chapter 11: Monitoring the Sonic Management Environment
The Sonic Management Console adds a spyglass to the icon for the notification and opens a Notifications Watcher. You can open Notifications Watchers to watch by component, container, and/or domain:
4. You can sort the information in the table by:
The default is to list the notifications in the order they are received.
You can minimize, tile, or cascade the windows to view the Notifications Watcher and other workspace windows. (See “Window Menu” on page 54.)
Column Description
Source Component’s runtime identity (only for container or domain watcher)
Hostname Name of the host running the component (only for container or domain watcher)
Notification Notification type (hierarchal identifier of the notification)
Severity Info, Warning, or Severe
Log Type Information, Warning, Error, Success Audit, or Failure Audit
Sequence Unique number for the notification, assigned by the component since loaded or reloaded
Date & Time Date and time the event occurred
406 Progress SonicMQ Configuration and Management Guide 8.5

Notifications
You can keep one or more Notifications Watchers open while performing other configuration and runtime management work.
Monitoring Forwarded NotificationsThe Sonic Management Console allows subscription to forwarded or threshold notifications and displays the monitored results in a Notifications Watcher.
Before viewing forwarded notifications, you must:
1. Create a component collection and specify what notifications to monitor and forward (see “Creating Component Collections” on page 144).
2. Create a Collections Monitor (see “Configuring a Collections Monitor” on page 194).
3. Specify the component collection for the Collections Monitor to monitor (see “Specifying Collections to Monitor” on page 198).
The following procedure describes how to view forwarded notifications.
◆ To view forwarded notifications:
1. In the Manage tab, select a Collections Monitor in the tree in the left panel. The component collections are listed in the table in the right panel by name.
2. Select a component collection in the table, right click, and select Forwarded Notifications... . The Forwarded Notifications tab in the Monitoring dialog box shows the notifications that the Collections Monitor is forwarding:
Warning Closing the Notifications Watcher removes the subscription to the notifications.
Progress SonicMQ Configuration and Management Guide 8.5 407

Chapter 11: Monitoring the Sonic Management Environment
3. Select a notification, right click, and select Watch. The Sonic Management Console adds a spyglass to the icon for each notification selected:
4. The Sonic Management Console opens a Forwarded Notifications Watcher to monitor the selected notifications:
408 Progress SonicMQ Configuration and Management Guide 8.5

Notifications
The Forwarded Notifications Watcher legend has the following columns:
5. You can select a notification in the table, right click, and select:
Column Description
Source Component’s runtime identity
Hostname Name of the host running the component
Notification Notification type (hierarchal identifier of the notification).
Severity Info, Warning, or Severe
Log Type Information, Warning, Error, Success Audit, or Failure Audit
Sequence Unique number for the notification, assigned by the component since (re)load
Date & Time Date and time the event occurs
Command Description
Options… Opens the Notifications Options dialog box to specify the maximum number of notifications to display (the default is 200)
Clear > Clears notifications
Remove Watch Removes one or more notifications watches
Progress SonicMQ Configuration and Management Guide 8.5 409
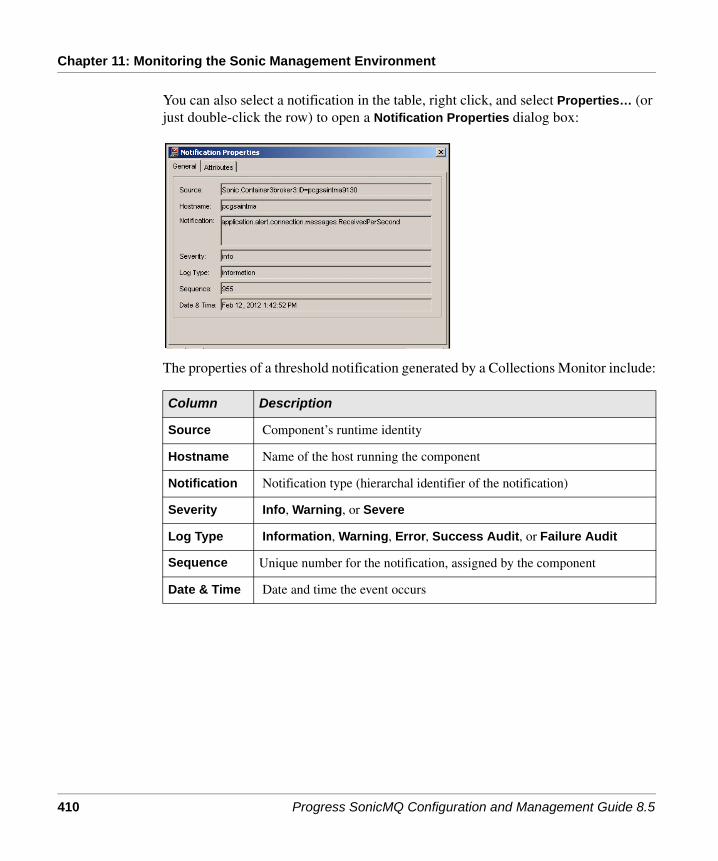
Chapter 11: Monitoring the Sonic Management Environment
You can also select a notification in the table, right click, and select Properties… (or just double-click the row) to open a Notification Properties dialog box:
The properties of a threshold notification generated by a Collections Monitor include:
Column Description
Source Component’s runtime identity
Hostname Name of the host running the component
Notification Notification type (hierarchal identifier of the notification)
Severity Info, Warning, or Severe
Log Type Information, Warning, Error, Success Audit, or Failure Audit
Sequence Unique number for the notification, assigned by the component
Date & Time Date and time the event occurs
410 Progress SonicMQ Configuration and Management Guide 8.5

Notifications
You can select the Attributes tab to view Attribute Name and Value pairs:
You can click the left and right arrows to move through the notifications.
6. Click Close to close the Notification Properties window.
Progress SonicMQ Configuration and Management Guide 8.5 411

Chapter 11: Monitoring the Sonic Management Environment
Changing the Maximum Number of Notifications DisplayedThe following procedure describes how to change the maximum number of notifications displayed. (This setting overrides the default value specified by selecting Tools > Preferences... > Notifications; see “Specifying Notification Preferences” on page 413).
◆ To change the maximum number of notifications displayed:
1. Follow Step 1 on page 405 through Step 4 on page 406.
2. Right-click in the Notifications Watcher and select Options. The Notification Options dialog box opens:
3. Specify the maximum number of notifications to display (the default is 200).
4. Click OK. The Sonic Management Console uses this maximum in the Notifications Watcher and if the limit is reached, information is removed on a FIFO basis.
Clearing NotificationsThe following procedure describes how to clear notifications.
◆ To clear notifications:
1. Follow Step 1 on page 405 through Step 4 on page 406.
2. Select a notification row, right-click, select Clear, and select Selected, Selected Type, or All.
The Sonic Management Console clears the specified notifications.
412 Progress SonicMQ Configuration and Management Guide 8.5

Notifications
Removing Notification WatchesThe following procedure describes how to remove individual notification watches or all notification watches. (This removes only the subscriptions to the notifications not the notifications.)
◆ To remove one or more notification watches:
1. Follow Step 1 on page 405 through Step 4 on page 406.
2. To remove:
■ One or more notification watches, select the notification rows, right-click, and select Remove. The Sonic Management Console removes the specified notification watches.
■ All watches, close the window. The Sonic Management Console removes all notification watches.
Specifying Notification PreferencesThe following procedure describes how to specify the maximum number of notifications to display in a Notifications Watcher.
◆ To specify notification viewing preferences:
1. Select Tools > Preferences... . The User Preferences dialog box opens.
2. Select the Notifications tab:
3. Specify the Default Max Notifications, the maximum number of notifications (the default is 200).
The Sonic Management Console uses this maximum in the Notifications Watcher, unless overridden.
Progress SonicMQ Configuration and Management Guide 8.5 413

Chapter 11: Monitoring the Sonic Management Environment
Session Consumer Instance NotificationsYou can use the Sonic Management Console to watch for consumer notifications when consumer events are emitted from a container, a component, or anywhere in the domain.
Each of the session consumer types has a start and end notification type. The application session notification types for the messaging models emit notifications as noted:
● Queues: ■ StartReceive, EndReceive
● Topics under a subscription name:■ Subscribe, Unsubscribe
■ SubscriberResume, SubscriberPause (Durable subscriptions)
See “Application Consumer Notifications” on page 568 for more information about each type.
The following table shows attributes of all consumer event notifications.
Note You can also use the Management API to set a listener on a container or component. The techniques in the API are constrained to a component and can refine the notifications delivered by filtering types and attributes of notifications. See “Management Notifications” in the SonicMQ Administrative Programming Guide.
Attribute Value Description
Broker The name of the broker that generated the notification.
Routing The routing node name of the broker that generated the notification.
Topic The topic name pattern when the consumer is a subscriber or durable subscriber.
Subscription The subscription name when the consumer is a durable subscriber.
Queue The queue name when the consumer is a queue receiver.
User The user identity associated with the consumer. This is an empty string if no user name is provided.
ClientID The JMS ClientID associated with the consumer. This is an empty string if not defined or if the consumer is not a durable subscriber.
ConnectID The SonicMQ ConnectID associated with the consumer.If this is an empty string, a value is assigned to the ConnectID in the notification.
414 Progress SonicMQ Configuration and Management Guide 8.5

Notifications
See the SonicMQ Administrative Programming Guide for guidance on programming management applications to listen for notifications and how to use filters to deliver a defined subset of the generated notifications to the application.
Topic The subscription topic name. This might include a pattern when hierarchical namespaces are in use.
SubscriptionName The subscription name when the subscription is for a durable subscription. This is an empty string if not defined or if the consumer is not a durable subscriber.
Queue The receive queue name.
Attribute Value Description
Notes ● When using global subscriptions, brokers that create remote subscriptions generate session notifications.
● When using fault tolerant client connections, a client reconnect timeout causes the broker to generate:
■ An Unsubscribe notification for each subscription that was active
■ A SubscriberPause notification for each durable subscription that was connected
■ An EndReceive notification for each queue receiver that was active
● Session notifications are not sent for:
■ Proxy receivers for clusterwide access to queues
■ Proxy subscribers for durable subscriptions
Progress SonicMQ Configuration and Management Guide 8.5 415

Chapter 11: Monitoring the Sonic Management Environment
Notifications of a Subscriber Starting and Stopping Flow To DiskYou can use the Sonic Management Console to watch for subscribers that start the flow to disk mechanism and for those same subscribers when they stop flowing to disk.
The Publish and Subscribe Flow To Disk feature provides relief from flow control induced by slow subscribers by flowing messages to disk rather than stalling publishers. Techniques for watching Flow To Disk such as setting a threshold on the TopicDbSize and setting alerts are useful, but monitoring the size of the database provides no information about the subscriber or subscribers responsible for causing the message buffers to fill. Flow To Disk Notifications overcomes this limitation.
A subscriber can explicitly enable Flow To Disk or accept the broker-wide Flow To Disk parameter set on the broker’s Properties Tuning tab. The broker’s default value for the Flow To Disk parameter is false—the option is cleared.
When Flow To Disk is enabled for a subscriber (either directly, or inherited from the broker-wide setting) and the Flow To Disk Notifications feature is enabled on the broker, the broker issues a notification every time the subscriber’s messages start to Flow To Disk, and when the subscriber’s messages stop flowing to disk. Each notification includes details of the related subscriber. This allows a stalled subscriber to be identified, thereby providing administrators with critical information that can be used to resolve the problem.
The Flow To Disk Notifications feature is enabled by default. If you have Flow To Disk enabled but are not interested in these notifications, you can disable these notifications by setting the advanced broker property BROKER_PUBSUB_PARAMETERS.FLOW_TO_DISK_NOTIFY to false.
The notifications issued by a SonicMQ broker are:
● application.flowcontrol.StartFlowToDisk — When the broker starts writing messages to disk for the identified subscriber
● application.flowcontrol.EndFlowToDisk — When the broker stops writing messages to disk for the identified subscriber
Note You can also use the Management API to set a listener on a container or component. See “Management Notifications” in the SonicMQ Administrative Programming Guide.
416 Progress SonicMQ Configuration and Management Guide 8.5

Notifications
The attributes of these notifications are:
Attribute Value Description
Broker The name of the broker that generated the notification.
Routing The routing node name of the broker (or broker cluster) that generated the notification.
SubscriptionConnectID The SonicMQ ConnectID associated with the subscriber. If this is an empty string, the value generated by the broker as the ConnectID is used in the notification.
SubscriptionUser The user identity associated with the subscriber. This is an empty string if no user name is provided.
DurableClientID The client ID of the subscriber when the subscriber is durable. This is an empty string if not defined or if the consumer is not a durable subscriber.
DurableSubscriptionName The subscription name when the subscription is for a durable subscription. This is an empty string if not defined or if the consumer is not a durable subscriber.
SubscriptionTopic The subscription topic name. This might include a pattern when hierarchical namespaces are in use.
Progress SonicMQ Configuration and Management Guide 8.5 417

Chapter 11: Monitoring the Sonic Management Environment
418 Progress SonicMQ Configuration and Management Guide 8.5

Chapter 12 Configuring Security
This chapter describes how to configure security in these sections:
● “Overview” is a general security outline.
● “Authentication Domains” describes authentication and how to configure internal and external Authentication Domains, and how to configure, view and delete users and groups.
● “Authorization Policies” describes how to create a set of a authorization policies, and how to configure, view, and delete ACLs and QoP.
Note For information about defining administrative permissions to maintain configurations and perform runtime actions, see “Maintaining Management Security” on page 106 and the concepts detailed in the “Management Security” chapter of the Progress SonicMQ Deployment Guide.
Progress SonicMQ Configuration and Management Guide 8.5 419

Chapter 12: Configuring Security
OverviewThere are several aspects to security in a SonicMQ deployment:
● Authentication of Users — Providing security-enabled brokers to validate authentic users. (see “Authentication Domains” on page 421.)
● Authorization on Destinations and Routing — Access Control Lists (ACLs) for management communications (see “Authorization Policies” on page 442) and for JNDI lookup (see “Connecting to the Internal JNDI Object Store” on page 614.)
● Management Security — Establishes role-based permissions for administrative actions in a domain (see “Maintaining Management Security” on page 106.)
● Management Auditing — Retains an audit trail of configuration changes and runtime operations provides a change history of a domain. When implemented together with management security, records the authenticated user that performed each change or action. (See the “Auditing Configuration and Management” chapter in the Progress SonicMQ Deployment Guide.)
● Transport security — Establishes message transport encryption and integrity through Sonic’s QoP (see “Quality of Protection” on page 449) and over a Secure Socket Layer (SSL) (see “Securing an Acceptor” on page 287.)
● Password-based encryption of files for installed files — Files that expose authentication data in text in system installation’s can be encrypted:
■ Boot files (see “Directory Service Boot Files” on page 174)
■ Cache (see “Encrypting the Directory Service and its Boot Files” on page 176)
■ Directory Service store (see “Encrypting the Directory Service Store” on page 176)
420 Progress SonicMQ Configuration and Management Guide 8.5

Authentication Domains
Authentication DomainsAuthentication is the process by which an entity proves its identity, for example, by providing a password. A SonicMQ broker (or cluster) must have security enabled to enforce password-based or certificate-based client authentication. (See “Configuring General Broker Properties” on page 208.)
Before configuring brokers (or clusters) to enable security, review your enterprise’s security needs and read the information on planning for security in the “Security Considerations in System Design” chapter in the Progress SonicMQ Deployment Guide. For information on SSL, see “Securing an Acceptor” on page 287. Also, see the “SonicMQ Connections” chapter in the Progress SonicMQ Application Programming Guide for information on SonicMQ’s Pluggable Authentication and Security Service (PASS).
If you intend to use management security, review the design patterns in “Administrative Permissions” chapter in the Progress SonicMQ Deployment Guide and the configuration information later in this chapter, “Authorization Policies” on page 442 before defining groups as you might want to define groups as roles for administrative users and management communications, and groups for messaging users.
SonicMQ can use an internal Authentication Domain, as described in the following section. It can also access an external security store, as described in “Configuring an External Authentication Domain” on page 423.
Important When first started, a security-enabled broker has a default user, Administrator, with a default password, Administrator. You should change the password as soon as possible for security reasons.
Important Enabling security on an existing broker that was not security-enabled requires that you initialize the storage and restart the broker (see “Storage Operations” on page 553).
Progress SonicMQ Configuration and Management Guide 8.5 421

Chapter 12: Configuring Security
Configuring an Internal Authentication DomainThe following procedure describes how to create an internal Authentication Domain from a type.
◆ To configure an internal Authentication Domain:
1. Open the Sonic Management Console, connect to a domain as described in “Running the Sonic Management Console” on page 38, and select the Configure tab.
2. Select a location in the tree, right-click, and select New > Configuration....
The Create Configuration dialog box opens, as shown on page 83.
3. In the From Types tab, expand the Sonic Security folder and select Authentication Domain. The New Authentication Domain dialog box opens:
4. Specify the Domain Name.
5. Leave Use External Domain deselected to use an internal Authentication Domain. (See “Configuring an External Authentication Domain” on page 423 to configure an external domain.)
6. Click OK. The Sonic Management Console creates the new Authentication Domain with the users and groups described in “Users and Groups” on page 434.
Important If you intend to define the new Authentication Domain as an External Domain, you must select this option now. You cannot choose to change it later.
422 Progress SonicMQ Configuration and Management Guide 8.5

Authentication Domains
Configuring an External Authentication DomainSonicMQ’s Pluggable Authentication and Security Service (PASS) supports two different security storage systems. The first is the traditional local security store where users are stored in the Directory Service. The second type is used to access an external security store using the Authentication SPI and Management SPI.
The PASS Service Provider Interfaces (SPIs) provide:
● Login SPI —To authenticate JMS client applications with one or more external security domains residing on the client side. Since passwords in an external security store are stored in an unknown format, password transformation is also supported by the Login SPI. The Login SPI can be plugged into the Sonic JMS client through a connection factory or using a VM argument. (For more information on the Login SPI, see the Progress SonicMQ Administrative Programming Guide.)
● Authentication SPI — For delegation mode authentication of JMS clients connecting to the broker, the broker is configured with an external Authentication Domain with an Authentication SPI.
● Management SPI — Retrieves the user and group from any third party security store. Implementing this SPI enables you to view the users and groups present on the external security store using the Sonic Management Console.
The complete process to configure an external Authentication Domain involves:
1. Create an Authentication SPI. See “Configuring an Authentication SPI” on page 424
2. Create a Management SPI. See “Configuring a Management SPI” on page 426
3. Create an external Authentication Domain. See “Creating or Editing an External Authentication Domain” on page 428
4. Create an authorization policy and associate it with the newly created Authentication Domain. See “Configuring a Set of Authorization Policies” on page 442.
5. Associate a broker with the external Authentication Domain to validate users. See Step 4 in “Configuring General Broker Properties” on page 208.
6. Reload the users and groups in the external Authentication Domain. See “Reloading an External Authentication Domain” on page 433.
(There is a sample that demonstrates external authentication provided with SonicMQ. It is described in the “Security Considerations in System Design” chapter of the Progress SonicMQ Deployment Guide.)
Progress SonicMQ Configuration and Management Guide 8.5 423

Chapter 12: Configuring Security
Configuring an Authentication SPI
The following procedure describes how to configure an Authentication SPI for use in an external Authentication Domain.
◆ To create or edit an Authentication SPI:
1. Open the Sonic Management Console, connect to a domain as described in “Running the Sonic Management Console” on page 38, and select the Configure tab.
2. Select a location in the tree (for example, the Security folder), right-click, and select New > Configuration....
The Create Configuration dialog box opens, as shown on page 83.
3. In the From Types tab, expand the Sonic Security folder, select Authentication SPI, and click OK. The New Authentication SPI dialog box opens:
4. Specify the following properties:
Property Description
SPI Name Name of the SPI
Classname The name of the class that implements the SPI
424 Progress SonicMQ Configuration and Management Guide 8.5

Authentication Domains
5. Click Add to open the Add Classpath dialog box, enter a classpath, and click OK:
In the New Authentication SPI dialog box, you can:
■ Select a classpath and click Edit to open the Edit Classpath dialog box and edit the classpath from the list.
■ Select a classpath and click Remove to remove the classpath from the list.
■ Select a classpath and click Move Up or Move down to change the position of the classpath in the list.
6. Click OK. The Sonic Management Console creates the Authentication SPI configuration.
After creating an Authentication SPI, you can create a Management SPI, as described in the next section.
Progress SonicMQ Configuration and Management Guide 8.5 425

Chapter 12: Configuring Security
Configuring a Management SPI
A Management SPI enables you to view the read-only users and groups present on any external security store. The following procedure describes how to configure a Management SPI to use in an external Authentication Domain.
◆ To create or edit a management SPI:
1. Open the Sonic Management Console, connect to a domain as described in “Running the Sonic Management Console” on page 38, and select the Configure tab.
2. Select a location in the tree (for example, the Security folder), right-click, and select New > Configuration....
The Create Configuration dialog box opens, as shown on page 83.
3. In the From Types tab, expand the Sonic Security folder and select Management SPI. The New Management SPI dialog box opens:
426 Progress SonicMQ Configuration and Management Guide 8.5

Authentication Domains
4. Specify the following properties:
5. Click Add to open the Add Classpath dialog box, enter a classpath, and click OK.
In the New Management SPI dialog box, you can:
■ Select a classpath and click Edit to open the Edit Classpath dialog box and edit the classpath from the list.
■ Select a classpath and click Remove to remove the classpath from the list.
■ Select a classpath and click Move Up or Move down to change the position of the classpath in the list.
6. Click OK. The Sonic Management Console creates the Management SPI configuration.
After creating an Authentication SPI and a Management SPI, you are ready to create an external Authentication Domain, as described in the next section.
Property Description
SPI Name Name of the SPI
Classname The name of the class that implements the SPI
Load on Startup
● If selected, the users and groups from the external store are fetched when the Directory Service is started.
● If deselected, the external principals are not fetched automatically.
Note To fetch external principals manually, see “Reloading an External Authentication Domain” on page 433.
Progress SonicMQ Configuration and Management Guide 8.5 427

Chapter 12: Configuring Security
Creating or Editing an External Authentication Domain
You can view the external users and groups in an external Authentication Domain from the Sonic Management Console. When an external domain is modified, you can refresh the users and groups displayed in the external domain.
The following procedure describes how to create an external Authentication Domain. (You must first configure an Authentication SPI and a Management SPI, as described in the previous sections. If an Authentication SPI is configured for the external domain, a Management SPI must be present as well.)
◆ To create or edit an external Authentication Domain:
1. Follow Step 1 on page 422 through Step 4 on page 422.
2. Select Use External Domain.
3. Select the AuthSPI tab:
4. Select the Authentication SPI Name.
428 Progress SonicMQ Configuration and Management Guide 8.5
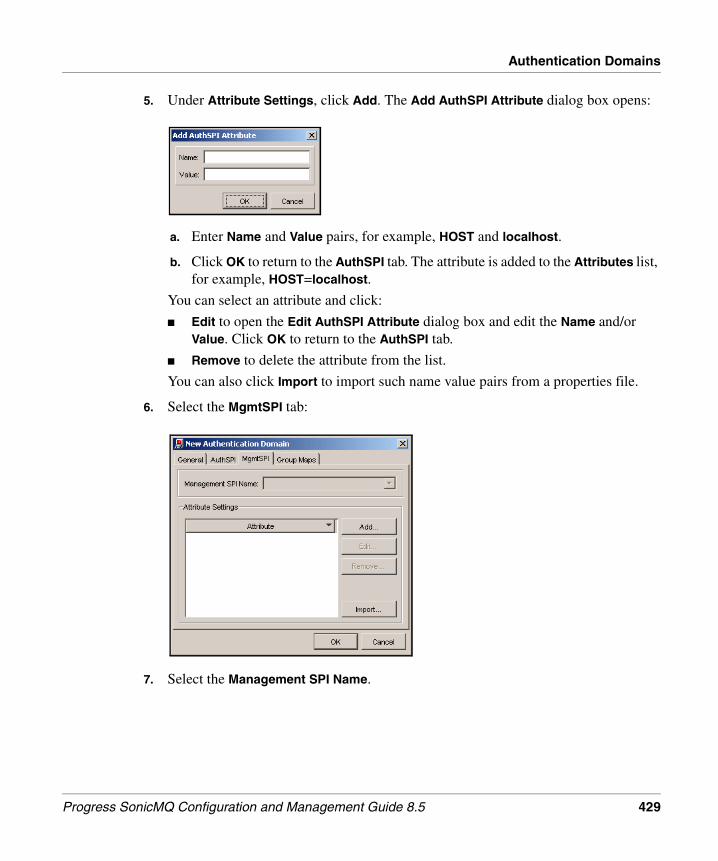
Authentication Domains
5. Under Attribute Settings, click Add. The Add AuthSPI Attribute dialog box opens:
a. Enter Name and Value pairs, for example, HOST and localhost.
b. Click OK to return to the AuthSPI tab. The attribute is added to the Attributes list, for example, HOST=localhost.
You can select an attribute and click:
■ Edit to open the Edit AuthSPI Attribute dialog box and edit the Name and/or Value. Click OK to return to the AuthSPI tab.
■ Remove to delete the attribute from the list.
You can also click Import to import such name value pairs from a properties file.
6. Select the MgmtSPI tab:
7. Select the Management SPI Name.
Progress SonicMQ Configuration and Management Guide 8.5 429

Chapter 12: Configuring Security
8. Under Attribute Settings, click Add. The Add MgmtSPI Attribute dialog box opens:
a. Enter Name and Value pairs, for example, HOST and localhost.
b. Click OK to return to the MgmtSPI tab. The attribute is added to the Attributes list, for example, HOST=localhost.
You can select an attribute and click:
■ Edit to open the Edit MgmtSPI Attribute dialog box and edit the Name and/or Value. Click OK to return to the MgmtSPI tab.
■ Remove to delete the attribute from the list.
You can also click Import to import such name value pairs from a properties file.
430 Progress SonicMQ Configuration and Management Guide 8.5

Authentication Domains
9. Select the Group Maps tab:
10. Click Add. The Add Group Map dialog box opens:
a. Enter a mapping of Internal Group Name and External Group Names, for example, PUBLIC and Accounting Managers.
b. Click OK to return to the Group Maps tab. The attribute is added to the list under Map. For example, PUBLIC=Accounting Managers.
Important When creating a new Authentication Domain, defining group maps does not offer internal or external group names on the dropdown lists of the Add Group Map dialog box. The internal group list is not created until you have established the authentication domain and the external group list is created only after you connected to the external domain. Complete the creation process so that the default groups and users get established, then set up other internal groups, and establish connection to external groups. At that point, editing the properties of the established authentication domain will offer the internal and external group names for group mapping.
Important Group mapping does not create or validate the internal or external group names.
Progress SonicMQ Configuration and Management Guide 8.5 431

Chapter 12: Configuring Security
You can select a mapping and click:
■ Edit to open the Edit Group Map dialog box and edit the Name and/or Value. Click OK to return to the Group Map tab.
■ Remove to delete the mapping from the list.
To add multiple external groups to an internal group, use commas to separate the names, for example:PUBLIC=Accounting Managers,HR Managers,PD Managers
11. Click OK. The Sonic Management Console creates the external Authentication Domain. In addition to the users and groups described in “Users and Groups” on page 434, the Sonic Management Console creates two other default folders:■ External Users
■ External Groups
432 Progress SonicMQ Configuration and Management Guide 8.5

Authentication Domains
Reloading an External Authentication Domain
When an external Authentication Domain is modified, you can reload the users and groups in the external domain using the Sonic Management Console. Administrators can also use a script as described in the file that accompanies the samples that demonstrate advanced security features using the PASS SPIs:MQ8.5_install_root\samples\AdvancedSecurity\readme.htm
◆ To reload the users and groups in an external Authentication Domain:
1. In the Manage tab, select the Directory Service, right-click, and select Operations > Reload External Authentication Domain... . The External Authentication Domain dialog box opens:
2. Select the external Authentication Domain and click Reload. The Directory Service reloads the users and groups in the external Authentication Domain.
Progress SonicMQ Configuration and Management Guide 8.5 433

Chapter 12: Configuring Security
Users and GroupsWhen security is enabled for a broker, clients (including administration clients) must provide a valid user name for identification and a password (or certificates) for authentication. These users are referred to as principals.
A user name or group name consists of a string of Unicode characters. See the Appendix of the Progress Sonic Installation and Upgrade Guide for any restricted characters for user names and group names. (For information on naming restrictions, see the Appendix of the Progress Sonic Installation and Upgrade Guide.)
A password consists of a string of Unicode characters. SonicMQ provides password security by not sending the user’s password across the network to protect confidential information. (The exception is in the case of delegation mode. In this case, the password needs to be encrypted or transformed. The Login SPI implementation is used on the client side to perform those tasks.)
SonicMQ uses a challenge/response protocol where the broker sends a challenge (based on the user’s password) back to the client, which must respond successfully to be granted access.
Three groups are created when an Authentication Domain is created, PUBLIC, Administrators, and TxnAdministrators. The Administrator user is automatically assigned to these groups. A user that intends to do management tasks must have administrative privileges—a member of the Administrators group or a group that has ACLs that grant access to management topics. (See “Access Control Lists” on page 443.) The following principals are created automatically:
Principal Name Type Description
Administrator User The default password is Administrator.
Broker_name User Created if you assign a domain to a broker; the default password is SonicMQ.
Administrators Group Contains the Administrator user.
PUBLIC Group Contains the Administrator user and the name of the broker.
TxnAdministrators Group Contains the Administrator user.
434 Progress SonicMQ Configuration and Management Guide 8.5

Authentication Domains
Warnings ● When users are created, they are automatically in the PUBLIC group and should not be removed from the PUBLIC group.
● The Administrator principal can be assigned a new password but cannot be deleted. A good practice is to promptly assign a new password to the user Administrator as soon as you create the domain, and to use a password that is not used for the user Administrator in other domains.
● Do not delete or modify the PUBLIC group name; it is reserved by SonicMQ.
● You cannot delete the Administrators group.
● Do not create both a user and a group with the same name.
● You cannot change the name of a user.
● You should use unique names for all of the brokers that use the same Authentication Domain. When you create a security-enabled broker, a user is automatically created with the same name as the broker. If more than one broker in a domain has the same name, those brokers share the same user. When a broker is deleted, the user with that name is deleted. If there are other brokers in the domain with the same name, they will lose their user. To restore the user, deselect Security to turn off security, and then select Security to turn on security (see page 209).
Progress SonicMQ Configuration and Management Guide 8.5 435

Chapter 12: Configuring Security
Configuring Users and Their Group Memberships
The following procedure describes how to add or edit a user and specify its group memberships and its password.
◆ To add a new user to an Authentication Domain or edit an existing user:
1. To add a new user, in the Configure tab under an Authentication Domain, select Users, right-click, and select New User.... The New Authentication Domain User dialog box opens:
To edit an existing user’s properties, select the user in the Users table and click the Properties icon. The Edit Authentication Domain User Properties dialog box opens.
2. Specify the User Name. Select Import User... to import a certificate that identifies a user. The Import Certificate Chain File dialog box opens for you to select a chain file and click Open.
3. Under Password, select Set Password to set the password.
Important You cannot change the name of a user.
436 Progress SonicMQ Configuration and Management Guide 8.5

Authentication Domains
4. Select the Group Memberships tab:
5. Click Add. The Add User dialog box opens to specify the group memberships of the user:
6. Select one or more groups from the Available Groups list and click OK. The groups you selected are added to the Group list in the Group Memberships tab.
7. Click OK. The Sonic Management Console adds the user to the Authentication Domain or edits the user’s properties.
Note Groups as Administrative Roles — In management security, groups are enabled for management communication and the domain is set to enforce management permissions. See the “Administrative Permissions” chapter of the Progress SonicMQ Deployment Guide for a general discussion of management security.
Progress SonicMQ Configuration and Management Guide 8.5 437

Chapter 12: Configuring Security
Viewing Users in an Authentication Domain
The following procedure describes how to view the users in an Authentication Domain.
◆ To view users in an Authentication Domain:
❖ Expand an Authentication Domain and select Users.
The Users table lists the users in the Authentication Domain. This figure shows the users in the default, installed Authentication Domain:
Deleting Users
Follow this procedure to delete a user from an Authentication Domain.
◆ To delete a user:
1. In the Configure tab under an Authentication domain, select Users.
2. Select a user in the Users table, right-click, and click Delete.
3. The Sonic Management Console deletes the user from any groups it belonged to and deletes it from the Authentication Domain.
Note You cannot delete users in external authentication domains through the Sonic Management Console or Sonic Management APIs.
438 Progress SonicMQ Configuration and Management Guide 8.5

Authentication Domains
Configuring Groups and Their Members
The following procedure describes how to add a new group to an Authentication Domain or edit a group’s properties, including adding users to and removing users from the group.
◆ To add or edit a group:
1. To add a new group, expand an Authentication Domain and select Groups, right-click, and select New Group.... The New Authentication Domain Group dialog box opens:
To edit the properties of an existing group, select the group in the Groups table and click the Properties icon. The Edit Authentication Domain Group Properties dialog box opens.
2. Specify a Group Name in the General tab.
3. Select the Group Members tab:
Progress SonicMQ Configuration and Management Guide 8.5 439

Chapter 12: Configuring Security
4. Click Add to open the Add User dialog box to select members:
You can select Show External Users to display any external users so you can associate external users with the appropriate internal groups.
5. Select one or more users from the Available Users list and click OK. The users you selected are added to the Member list in the Group Members tab.
6. Click OK to confirm your changes. The Sonic Management Console adds the new group to the Groups table or edits the group’s properties, including the users in the group.
Note You can add external principals to internal groups via group mapping (see Step 9 on page 431 and Step 10 on page 431).
440 Progress SonicMQ Configuration and Management Guide 8.5

Authentication Domains
Viewing Groups in an Authentication Domain
The following procedure describes how to view the groups in an Authentication Domain.
◆ To view groups in an Authentication Domain:
❖ In the Configure tab under an Authentication Domain, select Groups.
The Groups table lists the groups in the Authentication Domain. This figure shows the groups in the default, installed Authentication Domain:
Deleting Groups
The following procedure describes how to delete a group from an Authentication Domain.
◆ To delete a group from an Authentication Domain:
❖ Select a group in the Groups table, right-click, and click Delete.
The Sonic Management Console removes any users from that group and deletes the group from the Authentication Domain.
Note You cannot delete groups in external authentication domains through the Sonic Management Console or Sonic Management APIs.
Progress SonicMQ Configuration and Management Guide 8.5 441

Chapter 12: Configuring Security
Authorization PoliciesAuthorization controls the granting of specific rights to a user and/or group and generally involves the administration of an access control list. See the “Security Considerations in System Design” chapter in the Progress SonicMQ Deployment Guide for information on the concepts of authorization policies.
Configuring a Set of Authorization PoliciesThe following procedure describes how to create or edit a set of authorization policies.
◆ To configure a set of authorization policies:
1. To create a set of authorization policies, select a location in the tree in the Configure tab, right-click, and select New > Configuration. The Create Configuration dialog box opens, as shown on page 83.
2. In the From Types tab, expand the SonicMQ folder, select Create New Configuration, and select Authorization Policy. The New Authorization Policy dialog box opens:
To edit an existing set of authorization policies, select the authorization policies and click the Properties icon. The Edit Security Policy Properties dialog box opens.
3. Specify the Name of the authorization policy.
4. Specify the Authentication Domain, the associated Authentication Domain of the principals to be used for the access control lists (ACLs).
Use the pull-down list to select a domain.
5. Click OK. The Sonic Management Console creates or edits the set of authorization policies.
442 Progress SonicMQ Configuration and Management Guide 8.5

Authorization Policies
Access Control ListsSonicMQ manages access control with Access Control Lists (ACLs). You can create ACLs for topics, queues, and nodes. (ACLs on nodes define routing users; for more information, see “Configuring Routings” on page 329.) Authorization policies defined for a cluster apply to every broker in the cluster.
In SonicMQ, a principal refers to an individual user or group. The system administrator defines ACLs on a queue or a topic to grant or deny permissions to produce or consume messages from that queue or topic.
SonicMQ installs a group principal, PUBLIC, which represents all authenticated users in the system. By default, members in this group are given basic messaging permissions on all queues and topics. To change this default behavior, remove the ACL entry for PUBLIC from the # topic.
Controlling Read Access to the Dead Message Queue
You can control Receive access to the dead message queue, SonicMQ.deadMessage, the system queue where messages that are flagged to be preserved are stored when they expire or are undeliverable. You can set individual users or groups of users to implement this feature.
If you choose to implement Receive access control to the dead message queue, you might want to DENY Receive access to the common group PUBLIC and then:
● GRANT Receive access to groups and users allowed to consume from the DMQ
● GRANT Browse access to groups and users allowed to review yet not consume from the DMQ
Note PUBLIC is useful for creating ACLs that grant an authenticated user permission to perform an operation on a topic or queue.
Progress SonicMQ Configuration and Management Guide 8.5 443

Chapter 12: Configuring Security
Configuring ACLs for Topics, Queues, and Routing Nodes
The following procedure describes how to create or edit an ACL for a topic, queue, or routing node. You can use ACLs on a publishing node to deny global subscriptions, based on the identity of the routing user. The target destination grants or denies permission based on the routing node user. (For information on routing, see “Configuring Routings” on page 329; for information on global subscription rules, see “Global Subscription Rules” on page 357.)
◆ To create or edit an ACL:
1. Select ACLs under a Policies folder, right-click, and select New ACL....
The New Authorization Policy ACL dialog box opens:
To edit a security ACL, select an ACL in the ACLs table and click the Properties icon. The Edit Authorization Policy ACL Properties dialog box opens.
2. Specify the Authentication Domain, the name of the Authentication Domain of the principal.
If you are editing an existing ACL, you cannot change this name.
3. Specify the Principal, the name of a user or group:
Note For more information, including using template characters for wild cards in a hierarchy, see the “Authorization Policies Through Access Control Lists” section of the “Security Considerations in System Design” chapter in the Progress SonicMQ Deployment Guide.
444 Progress SonicMQ Configuration and Management Guide 8.5

Authorization Policies
a. Click ... to open the Select Principal dialog box. You can select Include Users and/or Show System Principals:
b. Select a principal and click OK in the New Security Policy ACL dialog box.
4. In the Authorization Policy ACL dialog box, specify the remaining properties:
5. Click OK.
Property Value
Principal Type User or Group
Resource Type Queue, Topic, Node, or URL
Resource Name Name of the queue, topic, or node. For a URL, the DNS portion of the HTTP(S) URL.
Permission Grant or Deny
Action ● For a Queue, the action can be Send, Receive, or Browse● For a Topic, the action can be Subscribe or Publish● For a Node, the action is Route● For a URL, the action is Send
Important If you are creating an ACL that is identical to an existing ACL except for the permission, you are alerted that you might not want to create it. As creating identical ACL definitions with conflicting permissions will result in ambiguous interpretation, you should choose No, and then edit the existing ACL to change its permissions.
Progress SonicMQ Configuration and Management Guide 8.5 445
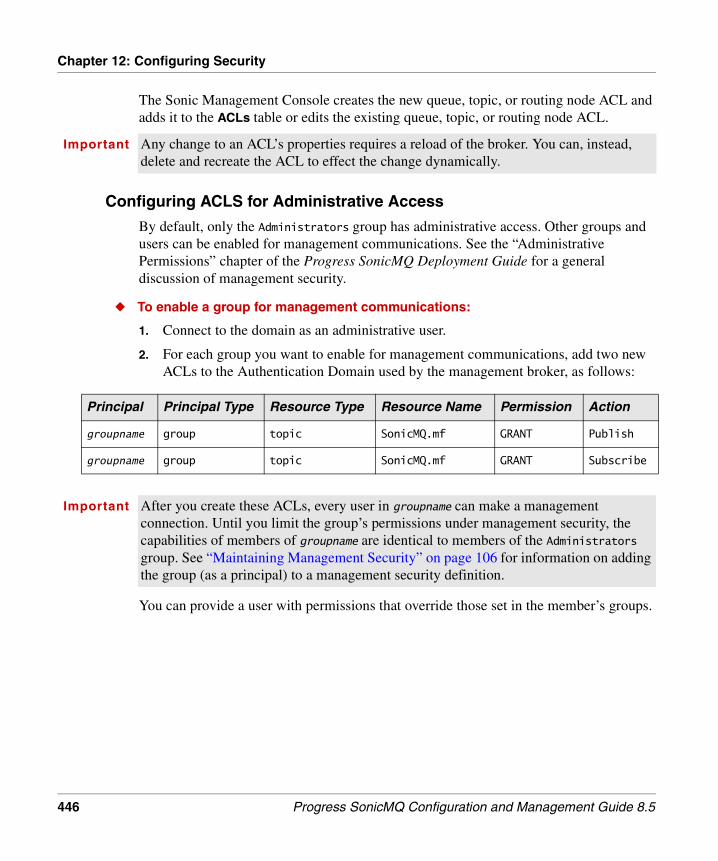
Chapter 12: Configuring Security
The Sonic Management Console creates the new queue, topic, or routing node ACL and adds it to the ACLs table or edits the existing queue, topic, or routing node ACL.
Configuring ACLS for Administrative Access
By default, only the Administrators group has administrative access. Other groups and users can be enabled for management communications. See the “Administrative Permissions” chapter of the Progress SonicMQ Deployment Guide for a general discussion of management security.
◆ To enable a group for management communications:
1. Connect to the domain as an administrative user.
2. For each group you want to enable for management communications, add two new ACLs to the Authentication Domain used by the management broker, as follows:
You can provide a user with permissions that override those set in the member’s groups.
Important Any change to an ACL’s properties requires a reload of the broker. You can, instead, delete and recreate the ACL to effect the change dynamically.
Principal Principal Type Resource Type Resource Name Permission Action
groupname group topic SonicMQ.mf GRANT Publish
groupname group topic SonicMQ.mf GRANT Subscribe
Important After you create these ACLs, every user in groupname can make a management connection. Until you limit the group’s permissions under management security, the capabilities of members of groupname are identical to members of the Administrators group. See “Maintaining Management Security” on page 106 for information on adding the group (as a principal) to a management security definition.
446 Progress SonicMQ Configuration and Management Guide 8.5

Authorization Policies
◆ To enable a user for management communications:
1. Connect to the domain as an administrative user.
2. For each user you want to enable for management communications, add two new ACLs to the Authentication Domain used by the management broker, as follows:
See “Maintaining Management Security” on page 106 for information on adding the user (as a principal) to a management security definition.
Viewing ACLs
The following procedure describes how to view ACLs.
◆ To view ACLs:
❖ In the Configure tab under an authorization domain, select ACLs.
The ACLs table lists all of the ACLs. The table in the following figure lists the default, installed ACLs (you can also right click and select to show system ACLs):
Principal Principal Type Resource Type Resource Name Permission Action
username user topic SonicMQ.mf GRANT Publish
username user topic SonicMQ.mf GRANT Subscribe
Progress SonicMQ Configuration and Management Guide 8.5 447

Chapter 12: Configuring Security
Deleting ACLs
The following procedure describes how to delete an ACL.
◆ To delete an ACL:
1. Select ACLs under a Policies node.
2. Select an ACL in the ACLs table, right-click, and click Delete.... The Sonic Management Console deletes the ACL.
448 Progress SonicMQ Configuration and Management Guide 8.5
Authorization Policies
Quality of ProtectionSonicMQ provides data protection through a set of Quality of Protection (QoP) options. Quality of Protection options are based on topics (in the Publish and Subscribe domain) or on queues (in the PTP domain). The system administrator sets Quality of Protection policies on topics or queues. The policy can be none, integrity, or privacy. These policies can be set for an individual topic or queue, or for all topics or queues that match a template.
QoP options allow a system administrator to specify whether a message will have no protection, integrity, or privacy and integrity. Message protection takes place when a Quality of Protection (QoP) value of integrity or privacy and integrity is specified for a topic or queue:
● Integrity — Ensures that the message is not altered in transit. Integrity verifies that the message content upon delivery matches its original published form. Corruption of data can be accidental or intentional. Communications programs commonly use a checksum algorithm to check transmitted data for accidental corruption. Specialized cryptographic checksums, called message digests, can check transmitted data for intentional corruption as well. To validate the integrity of message content, SonicMQ uses the cryptographic checksum Message Digest 5 (MD5) algorithm along with a secret key to produce a Message Authentication Code (MAC). MACs are equivalent to encrypted digests and are used to protect the integrity of a message.
● Privacy — In addition to integrity, privacy ensures that the message cannot be intercepted and read while in transit. SonicMQ gives a message privacy by using encryption. Encryption scrambles the message content before sending it over the wire and restores the original form upon delivery. If the message is intercepted before delivery (that is, someone attempts to read or modify it as it goes over the wire) the data is not in readable form.
Integrity ensures that the message is not altered in transit, whereas privacy additionally ensures that the message cannot be intercepted and read while in transit. Since SonicMQ always ensures that a message that has privacy also has integrity, the term privacy can be used for both privacy and integrity.
Important Quality of Protection requires that the broker be security-enabled.
Important When you enable security, you enable authentication, authorization, and QoP. As there is a considerable overhead to QoP even when set to None on the most generic pattern, you can set an advanced property on each broker that disables QoP functionality yet enforces the authentication and authorization aspects of security. See “Configuring Advanced Broker Properties” on page 238 for information on this parameter and its impact.
Progress SonicMQ Configuration and Management Guide 8.5 449
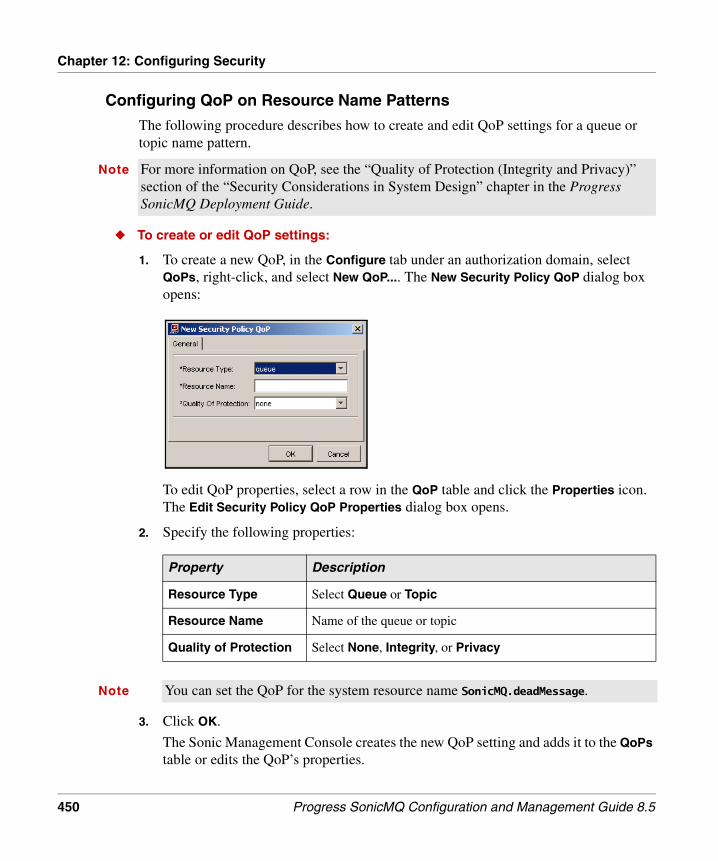
Chapter 12: Configuring Security
Configuring QoP on Resource Name Patterns
The following procedure describes how to create and edit QoP settings for a queue or topic name pattern.
◆ To create or edit QoP settings:
1. To create a new QoP, in the Configure tab under an authorization domain, select QoPs, right-click, and select New QoP.... The New Security Policy QoP dialog box opens:
To edit QoP properties, select a row in the QoP table and click the Properties icon. The Edit Security Policy QoP Properties dialog box opens.
2. Specify the following properties:
3. Click OK.
The Sonic Management Console creates the new QoP setting and adds it to the QoPs table or edits the QoP’s properties.
Note For more information on QoP, see the “Quality of Protection (Integrity and Privacy)” section of the “Security Considerations in System Design” chapter in the Progress SonicMQ Deployment Guide.
Property Description
Resource Type Select Queue or Topic
Resource Name Name of the queue or topic
Quality of Protection Select None, Integrity, or Privacy
Note You can set the QoP for the system resource name SonicMQ.deadMessage.
450 Progress SonicMQ Configuration and Management Guide 8.5

Authorization Policies
Viewing QoPs
The following procedure describes how to view QoPs.
◆ To view QoPs:
❖ In the Configure tab under an authorization domain, select QoPs.
The QoPs table lists all of the QoPs. The table in the following figure shows the default, installed QoPs (you can also right click and select to show system QoPs):
Deleting QoPs on Resource Name Patterns
Follow this procedure to delete QoP settings from destinations.
◆ To delete QoP settings from destinations:
1. For the authorization policy where you want to delete a QoP setting, select QoPs.
2. Select a QoP policy in the table, right-click, and click Delete....
The Sonic Management Console deletes the QoP setting.
Progress SonicMQ Configuration and Management Guide 8.5 451

Chapter 12: Configuring Security
452 Progress SonicMQ Configuration and Management Guide 8.5

Chapter 13 Managing Containers and Collections
This chapter describes the runtime management of containers and collections in these sections:
● “Containers and Their Components” describes how to view the components in a container, view and edit container runtime properties, launch and shut down containers, container logging and monitoring, and managing components.
● “Collections” describes how to view and manage container collections and component collections.
● “Running Diagnostics on Containers and Collections” describes how scripted diagnostics can assess runtime conditions in containers and container collections.
Progress SonicMQ Configuration and Management Guide 8.5 453

Chapter 13: Managing Containers and Collections
Containers and Their ComponentsThe following sections describe how to manage containers and their components, edit a container’s runtime properties, and launch and shut down containers. See “Containers and Components” on page 112 for an d of containers and components.
This section includes:
● “Viewing a Container and Its Components”
● “Container Runtime Properties” on page 457
● “Setting Up Remote Containers Through a Host Manager” on page 462
● “Shutting Down Containers” on page 472
● “Using a Container’s Command Line” on page 473
● “Container Logging” on page 474
● “Managing Components” on page 490
● “Container-wide Metrics” on page 491
● “Container-wide Notifications” on page 493
Viewing a Container and Its ComponentsContainers and folders that include containers provide visual information and properties.
◆ To view containers at folder level:
❖ On the Manage tab, select a folder that includes container configurations:
454 Progress SonicMQ Configuration and Management Guide 8.5

Containers and Their Components
The table lists the containers in the folder and the following information:
◆ To view a container and its components:
❖ Select a running container in the Manage tab:
The container’s table lists the components in the container by:
Property Description
Name Name of the container
Type Container
Host Installed location of the container
State Status of the component, Online, Offline, or Unknown
Property Description
Name Name of the component
State Status of the component, Online, Offline, or Unknown
LastError Last error (if any) flagged by the component
Progress SonicMQ Configuration and Management Guide 8.5 455

Chapter 13: Managing Containers and Collections
Color Highlights on Managed ContainersContainers viewed on the Manage tab provide a color highlight on the container icon that indicates the state of the container and its components. Consider an installation where you installed a Domain Manager, and then setup another broker (Br1) hosted in its own container (ctBr1). Once you start the DomainManager and connect the SMC, the DomainManager container is green and its components are also green. They are all Online.
The container for broker Br1, ctBr1 is red. It is Offline. It lists no components.
When you start the ctBr1 container, it is yellow until all its components are online. Here, the broker was not set to auto-start so it is a listed component yet red because it is offline.
When you start a hosted component that takes a while to start, you might see a light blue highlight on the components that are in the process of starting.
When the container and all its components are Online, each of them has green highlight.
When management communications stop with the SMC running, all the containers and components in the SMC are highlighted in blue. Their state is Unknown.
456 Progress SonicMQ Configuration and Management Guide 8.5

Containers and Their Components
Container Runtime PropertiesFollow this procedure to view and edit a container’s runtime properties.
◆ To view and edit a container’s runtime properties:
1. Select a container under the Containers folder in the Manage tab and click the Properties icon. The Edit Runtime Container Properties dialog box opens:
The General tab shows:
Property Description
Name Name of the container
Config ID Container’s identity in the Directory Service
Uptime How long the container has been in an online state
Current State The status of the container, Online, Offline, or Unknown
Last Error Level Severity of the last error flagged (or Unknown if not set)
Last Error Last error flagged
Hostname Host system or IP address where the container is running
Progress SonicMQ Configuration and Management Guide 8.5 457

Chapter 13: Managing Containers and Collections
2. Select the Loading tab:
Loader Details include the following information:
3. Select the Tracing tab:
Property Description
Class Java class of the container
Classpath Classpath of the JARs loaded by the container
Release Version Version of the container
458 Progress SonicMQ Configuration and Management Guide 8.5

Containers and Their Components
4. Select and/or deselect tracing bit masks to send messages to the container’s message log (see “Container Logging” on page 474).
5. Select the Metrics tab:
6. Specify these metrics settings:
For information on metrics, see “Metrics” on page 379.
Property Description
Refresh Interval Frequency for the broker to update raw statistical data that depends on a time interval and purge expired data. The value is in seconds and can vary from 5 to 60 seconds.
Collection Interval How far back in time to maintain raw statistical data. The value is in minutes and can vary from 5 to 20 minutes.
Repeat Alert Notifications
When selected, causes an alert notification to be repeated at the refresh interval if the threshold is still crossed. The default value is cleared (notifications are sent only at the crossing of a threshold.)
Progress SonicMQ Configuration and Management Guide 8.5 459

Chapter 13: Managing Containers and Collections
7. Select the Logging tab to specify whether to log container messages to the container’s Java console and/or to a file:
8. To log container messages to a log file, specify the following properties under Log to File:
9. Under Log to Console, select Enabled if you want to log container messages to the Java console window for the container’s JVM.
Property Description
Enabled Select to send container log messages to a file.
Location Pathname of the container log file.
File Size Current size in bytes of the container log file.
File Size Threshold
The size of the log file in bytes, at which point a notification (system.log.Threshold) is generated by the Agent Manager. After a notification is sent, the threshold’s size is increased by 10%. This attribute has similar functionality to the container attribute of the same name. The default 16777216—16 MB.
File Rollover Size Threshold
The size of the log file in bytes, at which point a rollover can occur. It is tested at the rollover point in time, midnight every day. If the current log file does not exceed the threshold, then rollover does not occur. The default value is 1048576—1 MB.
460 Progress SonicMQ Configuration and Management Guide 8.5

Containers and Their Components
10. Select the Fault Tolerance tab:
11. The following information is shown under Fault Tolerance Settings:
12. Select the Advanced tab:
Property Description
Role Shows the fault-tolerant role of the container:
● Primary ● Backup ● Not fault tolerant
State Shows the fault-tolerant state of the container:
● WAITING ● ACTIVE● STANDBY● Not Fault Tolerant.
Allow Failover Select to allow failover (only if the fault-tolerant role of the container is Primary or Backup).
Progress SonicMQ Configuration and Management Guide 8.5 461

Chapter 13: Managing Containers and Collections
13. The following information is shown under Management Thread Pool:
You can change these settings. See page 132 in “Configuring Containers.”
14. Select Command Line to use the container’s Java console window. (See “Using a Container’s Command Line” on page 473.)
15. Click OK to apply any changes.
Setting Up Remote Containers Through a Host ManagerThere are several ways to set up a container:
● Use the feature of the Sonic Launcher Installer that defines a configuration, and management connection, and then configures it in the Directory Service, and sets up the container locally. See the “Using Progress Sonic Launcher Installer” and “Setting Up Containers” chapters in the Progress Sonic Installation and Upgrade Guide for more information.
● Configure a container in the Directory Service, generate a setup file to transport to a remote location that has a Sonic Launcher installed, and then run the setup utility. See “Generating Container Setup Files” on page 135 and the “Setting Up Containers” chapter in the Progress Sonic Installation and Upgrade Guide.
● Configure a container in the Directory Service, and then have a container that is running a Host Manager pass the setup information to the remote location where it is setup and started. See the following procedure.
● Extract a container setup file from another domain or hand author a set of property name-values that define a configuration, and then have a container that is running a Host Manager pass the setup information to the remote location where it is setup and started. See the procedure.
Property Description
Max Threads Maximum number of threads to allocate to internal container operations
Min Threads Minimum number of threads to allocate to internal container operations
462 Progress SonicMQ Configuration and Management Guide 8.5
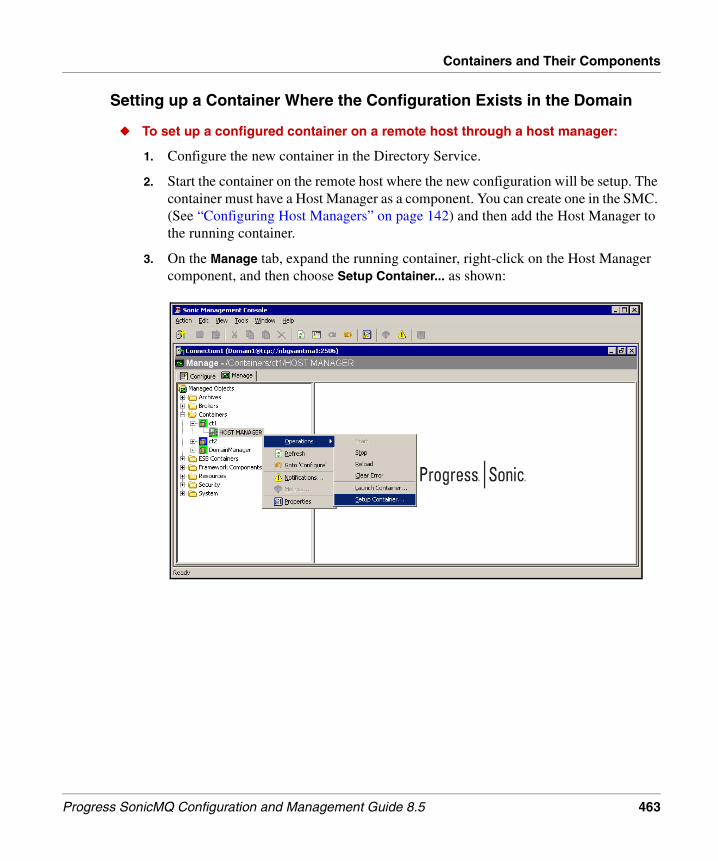
Containers and Their Components
Setting up a Container Where the Configuration Exists in the Domain
◆ To set up a configured container on a remote host through a host manager:
1. Configure the new container in the Directory Service.
2. Start the container on the remote host where the new configuration will be setup. The container must have a Host Manager as a component. You can create one in the SMC. (See “Configuring Host Managers” on page 142) and then add the Host Manager to the running container.
3. On the Manage tab, expand the running container, right-click on the Host Manager component, and then choose Setup Container... as shown:
Progress SonicMQ Configuration and Management Guide 8.5 463

Chapter 13: Managing Containers and Collections
4. In the Setup Remote Container dialog box, choose the Setup an already configured container option, and then enter or lookup the path to the container configuration in the Directory Service, as shown for container ct2 in the Containers folder:
5. You can choose to add a Windows Service on a target Windows system by entering a name for the service. The suggested pattern is Sonic container_name Service.
6. You can encrypt the container.ini file that will be created in the container’s installation location by entering text in the INI Encryption Password entry area.
7. Click OK.
The container is setup at the installation location managed by this Host Manager.
Setting up a Container Where the Configuration Is Not in the Domain
◆ To set up an unconfigured container on a remote host through a host manager:
1. Start the container on the remote host where the new configuration will be setup. The container must have a Host Manager as a component.
2. On the Manage tab, expand the running container, right-click on the Host Manager component, and then choose Setup Container.
464 Progress SonicMQ Configuration and Management Guide 8.5

Containers and Their Components
3. In the Setup Remote Container dialog box, leave the Setup an already configured container option cleared. If the properties are defined in a file, click Load to read the properties of a container that is not configured in the domain.
When a generated setup file is loaded, it might look as shown:
4. You can use the Add and Remove buttons to define your preferred property list (or simply create the entire set of properties this way.)
Important The file must be use .setup file syntax, not container.ini syntax.
Progress SonicMQ Configuration and Management Guide 8.5 465

Chapter 13: Managing Containers and Collections
The following table is a summary of setup properties you might use here. See the chapter “Setting Up Containers” in the Progress Sonic Installation and Upgrade Guide for more details and the complete list of setup parameters.
5. You can encrypt the container.ini file that will be created in the container’s installation location by entering text in the INI Encryption Password entry area.
6. Click OK.
The container is setup at the installation location managed by this Host Manager.
Launching ContainersThere are several ways to launch a container:
● From the command line or a script (see “Launching Containers from the Command Line” on page 467)
● From the program group (Windows Start menu)
● As a Windows Service (see “Running Containers as Windows Services” on page 467)
● From the Sonic Management Console through a running Activation Daemon (see “Using Activation Daemons to Launch Containers” on page 471)
● On schedule through an Activation Daemon’s activation list (see “Adding a Container to an Activation List” on page 189)
● Through a Host Manager in a running container. On the Manage tab, expand the running container, right-click on the Host Manager component, choose Launch Container, and then enter another container name setup at the container’s location. If the remote container has a Windows Service, you can choose to launch the container by starting the Windows Service.
Property Name Default Value
DOMAIN Domain1
ConnectionURLs tcp://localhost:2506
CONTAINER_PATH /Containers/hostname
WINDOWS_SERVICE_NAME Sonic CONTAINER_NAME Service
WS_AUTOSTART_OPTION
LOG_FILE ./DOMAIN_NAME.CONTAINER_NAME.log
CONNECT_TIMEOUT 30 (seconds)
REQUEST_TIMEOUT 30 (seconds)
466 Progress SonicMQ Configuration and Management Guide 8.5

Containers and Their Components
Launching Containers from the Command Line
Before using the command line to launch a container, you must first setup a container. Once setup, you can start a container using the launchcontainer script in its working directory.
◆ To launch a container from the command line on Windows:
1. Open a command prompt window at sonic_install_root\Containers.
2. Change to the subdirectory of the container you want to launch.
3. Enter: launchcontainer.bat
◆ To launch a container from a UNIX or Linux console window:
1. Open a console window at sonic_install_root/Containers.
2. Change to the subdirectory of the container you want to launch.
3. Enter: launchcontainer.sh
Running Containers as Windows Services
You can have a container launched as a Windows Service. There are several ways to establish a Windows Service for a container:
● Every Sonic Version 8 installer provides the option to create a Windows Service while the container configuration is created.
● Manually created configurations can be have their container setup file tailored to set the name.windows.service.name property (where name is the container name) set to the Windows Service name.
Important Only one instance of a container can be running in a domain. When a subsequent instance of domain_name.contaner_name tries to start, the management connection sends a severe notice to the second instance that the container appears to running elsewhere. The new container process then initiates shutting itself down and exits. The running instance continues to function correctly.
Progress SonicMQ Configuration and Management Guide 8.5 467

Chapter 13: Managing Containers and Collections
Using the winservice Scripts
Every container directory has a preconfigured script that supports the following life cycle functionality:
● Service installation
● Service startup and auto start on host boot
● Service shutdown (either manual or system shutdown)
● Service removal
The Windows service is started under a Windows system account whose processes (and their spawned processes) run irrespective of whether a regular user account logs on or off Windows. This applies to spawned processes of such spawned processes. For example, if the service launches a container that hosts an Activation Daemon component that launches other containers (spawned by that Activation Daemon instance), then those spawned containers behave like their parent container and do not shut down when a regular user account logs off Windows.
Windows is responsible for launching all services flagged to auto start when it boots up. Likewise, the Service Control Manager (SCM) is responsible for stopping all services at Windows system shutdown. The Windows service responds to each of these requests. On shutdown, the service attempts to shut down the container it is responsible for.
If you have Windows system account privileges to log on to the Windows system, you can start and stop the Windows service through the SCM. If a container launched by a Sonic service is stopped through the Sonic Management Console or through the SonicMQ API, then the parent Sonic service stops reporting this to the SCM.
A Sonic Windows Service does not interact with the Windows Console as some Windows services do.
If a container launched by the Windows service does not have LogToFile enabled, logged messages will be lost. Therefore you should select Enabled under LogToFile in the container’s configuration (see Step 8 on page 460).
Note If an Activation Daemon is hosted in a container launched by a Windows service, that Activation Daemon is responsible for stopping any of its spawned containers, not the service.
468 Progress SonicMQ Configuration and Management Guide 8.5

Containers and Their Components
Managing Windows Service for a Container
The following procedure describes how to maintain the lifecycle of a Windows service.
◆ To install a Windows service for a container:
1. Open a command prompt in the working directory of a Sonic container.
2. Enter: winservice /install
You might need to start the service after initial installation. You should confirm after a reboot that the service autostarted, and that the container and its components are running.
◆ To start a Windows service for a container:
1. Open a command prompt in the working directory of a Sonic container.
2. Enter: winservice /start
◆ To stop a Windows service for a container:
1. Open a command prompt in the working directory of a Sonic container.
2. Enter: winservice /stop
◆ To remove a Windows service for a container:
1. Open a command prompt in the working directory of a Sonic container.
2. Enter: winservice /remove
◆ To reinstall a Windows service for a container:
Reinstall calls winservice to—in turn—wait_for_stop, remove, install, and start.
1. Open a command prompt in the working directory of a Sonic container.
2. Enter: winservice_reinstall
Note Windows waits for 20 seconds before shutting down Services during Windows shutdown or reboot. If a Sonic container running as a Windows Service takes longer than that to cleanly shutdown, a Windows reboot might result in killing a Sonic container process before its orderly shutdown has completed.
You can extend the allowed time by modifying the WaitToKillServiceTimeout value in the Windows Registry (at HKEY_LOCAL_MACHINE\SYSTEM\CurrentControlSet\Control) to the integer number of milliseconds that will allow adequate time for complete container shutdown before the container process is killed.
Progress SonicMQ Configuration and Management Guide 8.5 469
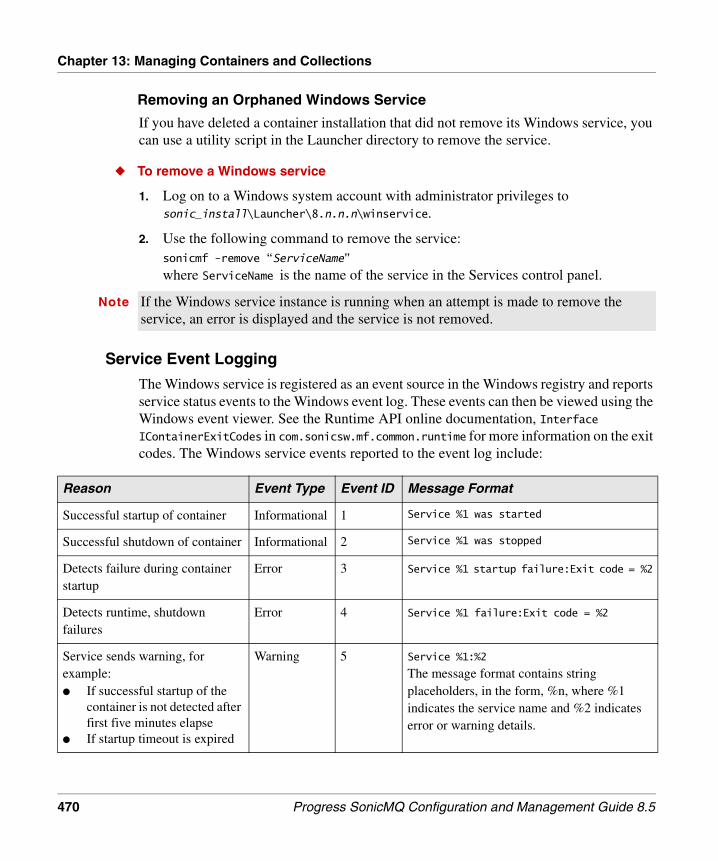
Chapter 13: Managing Containers and Collections
Removing an Orphaned Windows Service
If you have deleted a container installation that did not remove its Windows service, you can use a utility script in the Launcher directory to remove the service.
◆ To remove a Windows service
1. Log on to a Windows system account with administrator privileges to sonic_install\Launcher\8.n.n.n\winservice.
2. Use the following command to remove the service:sonicmf -remove “ServiceName”
where ServiceName is the name of the service in the Services control panel.
Service Event Logging
The Windows service is registered as an event source in the Windows registry and reports service status events to the Windows event log. These events can then be viewed using the Windows event viewer. See the Runtime API online documentation, Interface IContainerExitCodes in com.sonicsw.mf.common.runtime for more information on the exit codes. The Windows service events reported to the event log include:
Note If the Windows service instance is running when an attempt is made to remove the service, an error is displayed and the service is not removed.
Reason Event Type Event ID Message Format
Successful startup of container Informational 1 Service %1 was started
Successful shutdown of container Informational 2 Service %1 was stopped
Detects failure during container startup
Error 3 Service %1 startup failure:Exit code = %2
Detects runtime, shutdown failures
Error 4 Service %1 failure:Exit code = %2
Service sends warning, for example:● If successful startup of the
container is not detected after first five minutes elapse
● If startup timeout is expired
Warning 5 Service %1:%2
The message format contains string placeholders, in the form, %n, where %1 indicates the service name and %2 indicates error or warning details.
470 Progress SonicMQ Configuration and Management Guide 8.5

Containers and Their Components
Using Activation Daemons to Launch Containers
An Activation Daemon can launch specified containers according to its configured schedule or on demand. (To associate a container with an Activation Daemon, see “Adding a Container to an Activation List” on page 189.)
◆ To launch a container via an Activation Daemon, you must follow these steps:
1. Create an Activation Daemon, as described in “Activation Daemon” on page 187.
2. Create a container to host the Activation Daemon, as described in “Configuring Containers” on page 116.
3. Add the Activation Daemon to a container, as described in “Adding a Component to or Editing a Component in a Container” on page 137.
4. Generate a boot file for the Activation Daemon’s host container, as described in “Generating Container Setup Files” on page 135.
5. Optionally, you can specify when to start the container, as described in “Adding a Container to an Activation List” on page 189. If no container startup schedule is specified in the activation list, it launches the container at Activation Daemon startup.
6. Launch the Activation Daemon’s host container (see “Launching Containers from the Command Line” on page 467 or “Running Containers as Windows Services” on page 467). The container is started automatically by the Activation Daemon if configured to do so.
◆ To launch a container in an AD on demand from the Sonic Management Console:
1. Open the Sonic Management Console, connect to a domain as described in “Running the Sonic Management Console” on page 38, and select the Manage tab.
2. Select a container that is offline, right-click, and select Operations > Launch.
3. The Launch ContainerName dialog box opens with a list of the running Activation Daemons in the domain.
In the following example, the container being launched is New Container:
4. Select a listed container, and then click Launch. The AD launches the container.
Progress SonicMQ Configuration and Management Guide 8.5 471

Chapter 13: Managing Containers and Collections
Shutting Down ContainersA container should be shutdown gracefully. Once you initiate a shutdown command, wait for it to complete its tasks before taking any further actions.
To shut down a container and wait for orderly completion, do one of the following:
● Launch the shutdowncontainer script in the container’s working directory (for example, sonic_install_dir/Containers/Domain1.ctBr1)
● On the Sonic Management Console’s Manage tab, right-click on the container, and then select Operations > Shutdown.
● Enter the shutdown command in the container’s command line (see “Using a Container’s Command Line” on page 473).
● When running as a Windows Service, either stop it in the Services console, or enter the winservice /stop command in the container’s command line.
● Run an administrative program that uses the Runtime API. See the Progress SonicMQ Administrative Programming Guide samples shutdown.java and shutdown.js.
● Schedule shutdown of the container in its Activation Daemon’s activation list (see “Adding a Container to an Activation List” on page 189).
● Pressing Ctrl+C in the container’s console window.
472 Progress SonicMQ Configuration and Management Guide 8.5
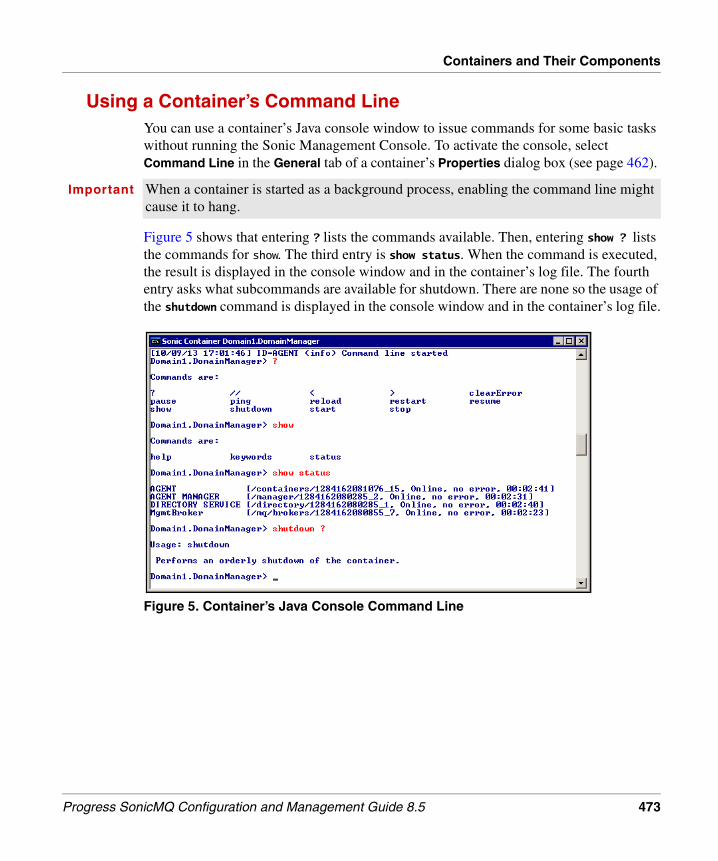
Containers and Their Components
Using a Container’s Command Line You can use a container’s Java console window to issue commands for some basic tasks without running the Sonic Management Console. To activate the console, select Command Line in the General tab of a container’s Properties dialog box (see page 462).
Figure 5 shows that entering ? lists the commands available. Then, entering show ? lists the commands for show. The third entry is show status. When the command is executed, the result is displayed in the console window and in the container’s log file. The fourth entry asks what subcommands are available for shutdown. There are none so the usage of the shutdown command is displayed in the console window and in the container’s log file.
Important When a container is started as a background process, enabling the command line might cause it to hang.
Figure 5. Container’s Java Console Command Line
Progress SonicMQ Configuration and Management Guide 8.5 473

Chapter 13: Managing Containers and Collections
Container LoggingAt runtime, a Sonic management container produces application notification and status messages for the container and the components that the container hosts. This information provides valuable insight to the container and the hosted components. The mechanisms for logging are shown in Figure 6.
Each of these container logging mechanisms is presented in the following pages.
Figure 6. Container and domain settings that record and display container log entries
Domain Manager system Remote Adminstrator system running the SMC
SonicMQ container
Container console log
Container Log File
Central Log File
LOGENTRY
?
MESSAGE .
Local systemwhere container runs
Yes
Yes
Yes
Container Logging
Central Logging
Console Logging Container Property:Log To Console
Container Property:Log To File
Domain Property:Enforce Centralized Logging
Container Property:Log To Central File
Segment ofCentral Logto Log Viewer
Segment ofContainer Logto Log Viewer
474 Progress SonicMQ Configuration and Management Guide 8.5
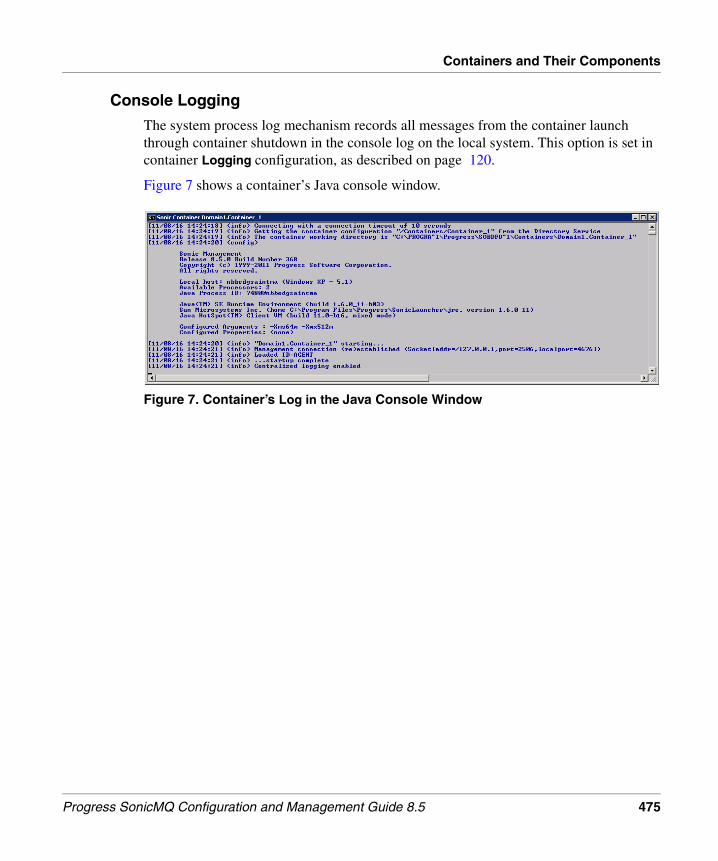
Containers and Their Components
Console Logging
The system process log mechanism records all messages from the container launch through container shutdown in the console log on the local system. This option is set in container Logging configuration, as described on page 120.
Figure 7 shows a container’s Java console window.
Figure 7. Container’s Log in the Java Console Window
Progress SonicMQ Configuration and Management Guide 8.5 475

Chapter 13: Managing Containers and Collections
Container Logging
The container log on the local system records all messages and loggable events for its container. When the container is running, you can request a log view from a remote management application such as the Sonic Management Console. An extract of the log is transferred to the management application.
Using the SMC, you can open a Log Viewer window to display as much of the log as fit its buffer. The container log uses a rolling log mechanism, and thresholds to control its size.
Figure 8. Container’s Log File Viewed Remotely Through the SMC
476 Progress SonicMQ Configuration and Management Guide 8.5

Containers and Their Components
Central Logging
Central logging records a subset of the log entries for containers when it is active. (See “Content of Console, Container, and Central Logs” below.)
In Figure 9, the content of the central log shows that Container_1 and Container_2 were running and initiated shutdown at almost the same time so their entries are interleaved in the central log. Container_1 is launched again. The container log and console log for the containers show details about the final steps of shutdown and the initial steps of startup that are not recorded in the central log.
The central log appends the container identity to each entry as it receives it yet maintains the original timestamp. The entries in the central log are appended as they are received. As a result, they might show delays for remote systems or slow networks. Further, timestamp order is impacted by the clocks of the machines that host the source containers.
Figure 9. Central Log File
Progress SonicMQ Configuration and Management Guide 8.5 477

Chapter 13: Managing Containers and Collections
A log message could arrive at the Domain Manager for inclusion in the central log after the central log has rolled over to an archive. In this exceptional circumstance, it is possible for messages in one log version to reflect a timestamp that was prior to the log rollover.
Central logging is maintained using a best-effort quality of service. Log messages are not guaranteed to be propagated to the central log, and, when issues are found in the central log, administrators should access the container’s logs. Messages destined for the central log could be lost under these circumstances:
● As containers send log messages asynchronously to the Domain Manager, a container could terminate abruptly before sending all its log messages.
● The Domain Manager is unavailable.
● Outages in management communications, such as network failures.
● Log messages expire. They are sent to the Domain Manager with a time-to-live setting based on the sending container’s request timeout on the management connection (30 seconds, by default).
Central logging can include selected containers or all containers:
● Central Logging Only for Selected Containers — On a container’s properties, selecting Log to Central File sends its log messages to the central log, whether or not the local log file and console are enabled. This option is set in container Logging configuration, as described on page 120.
● Central Logging Enforced for All Containers — At the root level of the Configure tab, the domain property Enforce Centralized Logging overrides any container-level settings, requiring every container in the domain to submit its log entries to the central log. This mechanism provides a good record for long-term compliance and accountability requirements in the enterprise.
The central log is activated as soon as a container chooses to log to central file, or the domain-wide option is selected (as described on page 74.)
These mechanisms for container logging are independent. You can choose any or all of them. When central logging is in effect, you should still consider enabling Log to File to capture the complete details of the container’s events. By default, console logging and container logging are enabled.
Note You can receive notifications when log size thresholds are reached. See “System Log Notifications” on page 493.
478 Progress SonicMQ Configuration and Management Guide 8.5
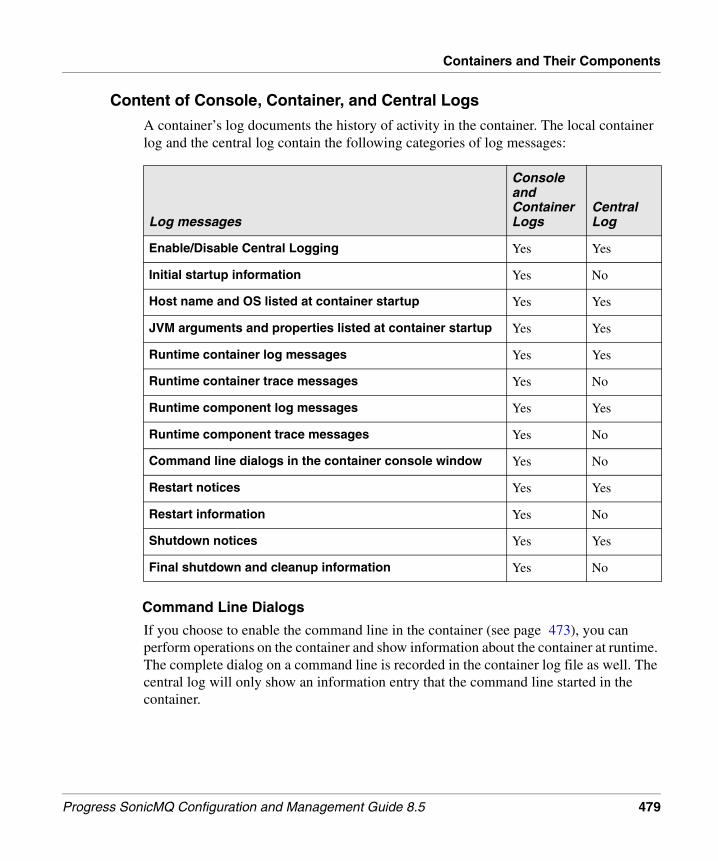
Containers and Their Components
Content of Console, Container, and Central Logs
A container’s log documents the history of activity in the container. The local container log and the central log contain the following categories of log messages:
Command Line Dialogs
If you choose to enable the command line in the container (see page 473), you can perform operations on the container and show information about the container at runtime. The complete dialog on a command line is recorded in the container log file as well. The central log will only show an information entry that the command line started in the container.
Log messages
Console and Container Logs
Central Log
Enable/Disable Central Logging Yes Yes
Initial startup information Yes No
Host name and OS listed at container startup Yes Yes
JVM arguments and properties listed at container startup Yes Yes
Runtime container log messages Yes Yes
Runtime container trace messages Yes No
Runtime component log messages Yes Yes
Runtime component trace messages Yes No
Command line dialogs in the container console window Yes No
Restart notices Yes Yes
Restart information Yes No
Shutdown notices Yes Yes
Final shutdown and cleanup information Yes No
Progress SonicMQ Configuration and Management Guide 8.5 479

Chapter 13: Managing Containers and Collections
Tracings in Logs
The local logs—the console log and the container log file—can record details on specific functions not normally logged. These tracings are set on containers and components hosted in containers.
You can set the runtime container trace options on the SMC Manage tab on the Tracing tab of a container’s Properties, as described in “Container Runtime Properties” on page 458
The sum of the container’s bit mask integers can permanently set the selected tracing options by entering the sum of the integers in the runtime settings in the Tracing Mask parameter of the Logging and Auditing tab of a container’s Properties in SMC Configure tab.
You can set the runtime trace options for hosted components on the SMC Manage tab on the Tracing tab of a component’s Properties, as described in:
● “Directory Service Runtime Properties” on page 509
● “Agent Manager Runtime Properties” on page 519
● “Activation Daemon Runtime Properties” on page 526
● “Collections Monitor Runtime Properties” on page 535
● “Broker Runtime Properties” on page 548
480 Progress SonicMQ Configuration and Management Guide 8.5

Containers and Their Components
Host and Environment Information in Logs
When the container starts up, it records several aspects of its environment that are particularly useful when remotely viewing central logs and container logs. The following excerpt from a container log at startup highlights the host and environment information:
The information includes:
● The host system name and its operating system, plus:
■ The machine’s Available Processors
■ This process’ Java Process ID
● The Java Runtime Environment running the container and its hosted components
● From the container’s configuration properties Environment tab:
■ The container’s Java VM Options
■ The container’s Java System Properties
Archiving and Rolling Over Container Logs
As container logs can become quite large, Sonic provides ways for logs to be archived at specified time intervals and sizes. The archived log is stamped with its archive date and the current log is cleared. The container log and the central log parameters let you specify file size limits and rollover thresholds that force archiving and clearing of the active log.
Log file rollover is applicable to both a container's log and the centralized log when centralized logging is enabled. When a container is running, an attempt to rollover its log
[date:time] (config)
Sonic Management Release 8.5.0 Build Number 392 Copyright (c) 1999-2011 Progress Software Corporation. All rights reserved.
Local host: nbbedgsaintma (Windows XP - 5.1) Available Processors: 2 Java Process ID: 7480@nbbedgsaintma
Java(TM) SE Runtime Environment (build 1.6.0_11-b03) Sun Microsystems Inc.
(home C:\Program Files\Progress\SonicLauncher\jre, version 1.6.0_11) Java HotSpot(TM) Client VM (build 11.0-b16, mixed mode)
Configured Arguments : -Xms64m -Xmx512m Configured Properties: <none>
[date:time] (info) "Domain1.Container_1" starting...
Progress SonicMQ Configuration and Management Guide 8.5 481

Chapter 13: Managing Containers and Collections
will occur every night at midnight. If the log file size is greater than its LOG_FILE_ROLLOVER_SIZE_THRESHOLD, the current log file is archived. This technique prevents archiving of small archive files. When rollover occurs, the current log file is renamed to:
sonic_install_dir/Containers/domain.container/domain.container.log.yyyy-mm-dd
(where yyyy-mm-dd is the date just ended), and a new log file created with the name:
sonic_install_dir/Containers/domain.container/domain.container.log.
The log directory for the container ct11 with daily rollover in the domain dm1 might look like this:
On the Domain Manager system, the central log with daily rollover for domain dm1 might look like this:
You should plan to routinely transfer older archived logs from local systems to store them in a hardened location, and then purge them on the container’s system to recover disk space and get the benefit of rolling logs.
Viewing Container Logs and the Central Log
Container logs and the central log can be viewed on the system where they are stored and remotely though a Sonic Management Console connected to the domain.
Local Viewing of Logs
If you have access to the systems where logs are stored, you can access those logs whether the container is running or not. A container’s configuration specifies where it stores its log locally. By default, the storage location of a container’s log is a folder on (or mapped to) the system where the container runs in a subfolder of the sonic_install_dir/MQ8.5 directory named domain_name.container_name.log. The folder contains the active log, domain_name.container_name.log as well as any archives created and stamped with the date as a suffix.
C:\Program Files\Progress\Sonic\Containers\dm1.ct11\dm1.ct11.log\dm1.ct11.log.2011.03.08C:\Program Files\Progress\Sonic\Containers\dm1.ct11\dm1.ct11.log\dm1.ct11.log.2011.03.09C:\Program Files\Progress\Sonic\Containers\dm1.ct11\dm1.ct11.log\dm1.ct11.log.2011.03.10C:\Program Files\Progress\Sonic\Containers\dm1.ct11\dm1.ct11.log\dm1.ct11.log.2011.03.11C:\Program Files\Progress\Sonic\Containers\dm1.ct11\dm1.ct11.log\dm1.ct11.log.2011.03.12
C:\Program Files\Progress\Sonic\Containers\dm1.DomainManager\dm1.log\dm1.log.2011.03.08C:\Program Files\Progress\Sonic\Containers\dm1.DomainManager\dm1.log\dm1.log.2011.03.09C:\Program Files\Progress\Sonic\Containers\dm1.DomainManager\dm1.log\dm1.log.2011.03.10C:\Program Files\Progress\Sonic\Containers\dm1.DomainManager\dm1.log\dm1.log.2011.03.11C:\Program Files\Progress\Sonic\Containers\dm1.DomainManager\dm1.log\dm1.log.2011.03.12
482 Progress SonicMQ Configuration and Management Guide 8.5

Containers and Their Components
The central log is similar, located on the system where the Domain Manager runs, in a subfolder of the sonic_install_dir/MQ8.5 directory named domain_name.log. The folder contains the active central log, domain_name.log as well as any archives created and stamped with the date as a suffix.
You can use text editing techniques on the log when you open it in a local text editor. If the log is running, you should copy the log to another name before manipulating its content, as you have opened the active log, not a snapshot of the log.
Remote Viewing of Logs
A remote administrator system running the Sonic Management Console can request a view of the log of any running container in the domain, or the central log stored on the Domain Manager system. An extract of the requested log displays the content in the SMC’s Log Viewer window.
◆ To view logs remotely:
1. In the Sonic Management Console, connect to the domain.
2. On the Manage tab:
■ For a container’s log, navigate to its running container (green highlight), and then right-click on it. Choose Container Log > View.
■ For the central log, right-click on the root, Managed Objects, and then choose Centralized Log > View.
Progress SonicMQ Configuration and Management Guide 8.5 483

Chapter 13: Managing Containers and Collections
3. The Log Viewer opens—in the following example, with the central log.
When you access a log remotely, you get a snapshot of the log at the moment of the request, and—if the log size is greater than the viewer’s buffer—a limited amount of the log’s tail. (For information about setting the amount displayed, see page 487.)
If the log is small, the complete log displays in the log viewer.
484 Progress SonicMQ Configuration and Management Guide 8.5

Containers and Their Components
In the following illustration, the view buffer is 200 KB and the log is 200KB:
When the log is larger than the buffer, the tail of the log initially displays in the log viewer, as illustrated:
When a large log loads into the Log Viewer, the log viewer displays with current log tail—content starting at the end and going toward the top only as far as the defined buffer size. In the large log shown above, the slider at the bottom of the window adjusted its scope so that the slider shows about 30% of the log is in view, as shown:
If you grab and move the slider to the right, it reduces the displayed (and searchable) text toward the end of the log. If you grab and move the slider to the left, it moves the buffered segment of the log in the viewer, as illustrated:
Segmentin Log Viewer
200 KB
Segmentin Log Viewer
5 MB
Segment in Log Viewer
5 MB
Progress SonicMQ Configuration and Management Guide 8.5 485

Chapter 13: Managing Containers and Collections
Click and hold the slider to see the current size of the log segment in view, as shown in this example where 7% of the log is in view:
4. Right click in the text area to display the Log Viewer tools menu. (You can also click the tool icons at the top of the window for the same action.)
The Log Viewer tools are as follows:
a. Click and drag over text or choose Select All, and then click Copy to move that text into your system’s text buffer.
b. Choose Clear Log to flush the text out of the current log. You get a warning before the action takes place. (This action is identical to the Operations > Clear Log command on the container.)
c. Click Refresh to update the view with the latest log.
d. Choose Find to open the find toolbar at the bottom of the window.
Enter text in the Find box to initiate the search. If there are no instances of the text as you type it, the background of the entry area is highlighted in red. When there are instances of your text, the first one is highlighted in the current section in view. Click Next and Previous to move to other instances. You can chose case sensitivity for your search text by selecting Match Case. Click the red X to close the Find toolbar.
486 Progress SonicMQ Configuration and Management Guide 8.5
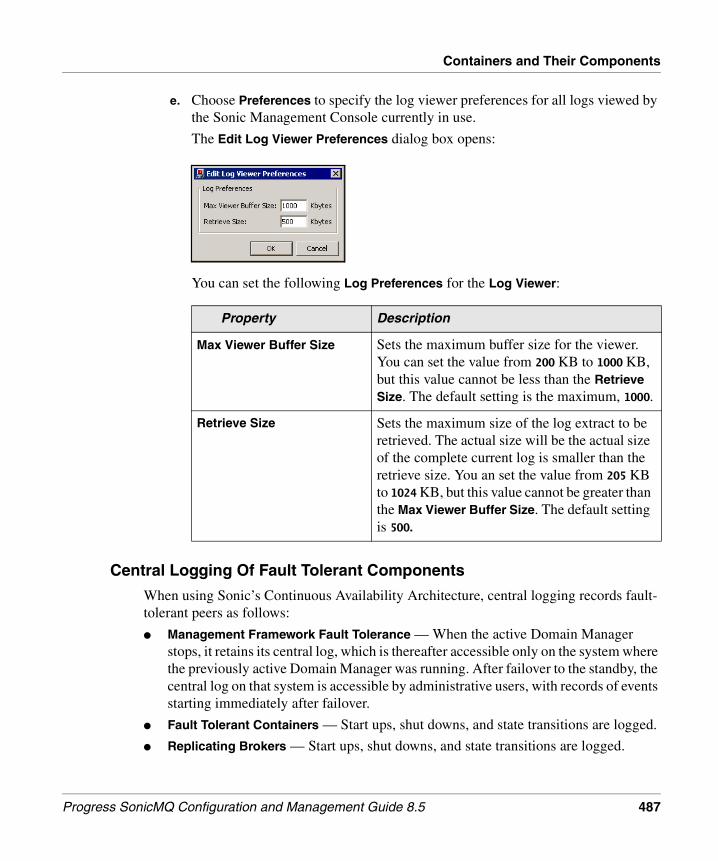
Containers and Their Components
e. Choose Preferences to specify the log viewer preferences for all logs viewed by the Sonic Management Console currently in use.
The Edit Log Viewer Preferences dialog box opens:
You can set the following Log Preferences for the Log Viewer:
Central Logging Of Fault Tolerant Components
When using Sonic’s Continuous Availability Architecture, central logging records fault-tolerant peers as follows:
● Management Framework Fault Tolerance — When the active Domain Manager stops, it retains its central log, which is thereafter accessible only on the system where the previously active Domain Manager was running. After failover to the standby, the central log on that system is accessible by administrative users, with records of events starting immediately after failover.
● Fault Tolerant Containers — Start ups, shut downs, and state transitions are logged.
● Replicating Brokers — Start ups, shut downs, and state transitions are logged.
Property Description
Max Viewer Buffer Size Sets the maximum buffer size for the viewer. You can set the value from 200 KB to 1000 KB, but this value cannot be less than the Retrieve Size. The default setting is the maximum, 1000.
Retrieve Size Sets the maximum size of the log extract to be retrieved. The actual size will be the actual size of the complete current log is smaller than the retrieve size. You an set the value from 205 KB to 1024 KB, but this value cannot be greater than the Max Viewer Buffer Size. The default setting is 500.
Progress SonicMQ Configuration and Management Guide 8.5 487

Chapter 13: Managing Containers and Collections
Code Sample 1 shows commented excerpts of a central log where two replicating broker peers transition through stopping the active peer, failing over to the standby peer, and then restarting of the previously active peer to take the standby role.
Code Sample 1. Annotated Excerpt of Central Logging Entries of Broker Failover and Recovery
//Replicating peers: Primary in the ACTIVE state, Backup in the STANDBY state.[date hh:mm:00] FT_B.ID=Backup (info) Replication State is STANDBY[date hh:mm:00] FT_P.ID=Primary (info) Replication State is ACTIVE
//Active broker shuts down and the standby notices.[date hh:mm:02] FT_P (info) Shutdown initiated[date hh:mm:04] FT_P.ID=Primary (info) TCP_ACCEPTOR: no longer accepting connections on tcp://HostP:25061[date hh:mm:04] FT_P.ID=Primary (info) Closing all client connections[date hh:mm:04] FT_P.ID=Primary (info) Closing down all replication connection(s)[date hh:mm:04] FT_P.ID=Primary (info) FirstNIC: no longer accepting connections on tcp://HostP:22516[date hh:mm:04] FT_B.ID=Backup (info) Disconnected from PRIMARY on FirstNIC tcp://HostP:22516[date hh:mm:04] FT_B.ID=Backup (info) Connecting to peer FT broker...[date hh:mm:04] FT_P.ID=Primary (info) Waiting for the threads to shut down[date hh:mm:04] FT_B.ID=Backup (info) Replication complete.[date hh:mm:04] FT_P.ID=Primary (info) SonicMQ Broker stopped
//Failover to the standby and into STANDALONE state.[date hh:mm:05] FT_B.ID=Backup (warning) Failed to connect to peer FT broker, retry after 180000 ms.[date hh:mm:05] FT_P (info) Unloaded ID=Primary[date hh:mm:05] FT_B.ID=Backup (info) Restoring queues ......[date hh:mm:06] FT_B.ID=Backup (info) TCP_ACCEPTOR: accepting connections on tcp://HostP:25061[date hh:mm:06] FT_B.ID=Backup (info) SonicMQ Broker started[date hh:mm:06] FT_B.ID=Backup (info) Replication State is STANDALONE
//Primary broker restarts, syncs up, and then takes the STANDBY state[date hh:mm:27] FT_P (config)
Sonic Management... (container startup)SonicMQ Continuous Availability Edition [Serial Number nnn]... (FT Broker startup)
[date hh:mm:30] FT_P.ID=Primary (info) Registering node "sonic.http" of "$RNN.sonic$http.$HTTP.undefinedroutingurl.9999" for routing node reverse lookup[date hh:mm:31] FT_P.ID=Primary (info) FirstNIC: accepting connections on tcp://HostP:22516[date hh:mm:31] FT_P.ID=Primary (info) Replication State is STARTUP[date hh:mm:31] FT_P.ID=Primary (info) Replication State is WAITING[date hh:mm:31] FT_P.ID=Primary (info) Connecting to peer FT broker...[date hh:mm:31] FT_P (info) ...startup complete[date hh:mm:31] FT_P (info) Centralized logging enabled[date hh:mm:31] FT_P.ID=Primary (info) Connected to BACKUP on FirstNIC tcp://HostB:22526[date hh:mm:32] FT_P.ID=Primary (info) Starting replication...[date hh:mm:32] FT_P.ID=Primary (info) Replication State is STANDBY_SYNC[date hh:mm:32] FT_B.ID=Backup (info) Replication State is ACTIVE_SYNC
//Replicating peers: Primary in the STANDBY state, Backup in the ACTIVE state.[date hh:mm:34] FT_P.ID=Primary (info) Replication State is STANDBY[date hh:mm:34] FT_B.ID=Backup (info) Replication State is ACTIVE
488 Progress SonicMQ Configuration and Management Guide 8.5

Containers and Their Components
Operation of Saving a Container’s Log to a File
Instead of viewing a portion of the log and copying it, you can choose to save the current log of a running container to a file you specify on (or mapped on) the system where the container is running. Unless you then clear the log, the log continues without any impact from your save operation.
◆ To manually save a container log to a file:
1. In the Sonic Management Console, connect to the container’s domain, and select the Manage tab.
2. Select the container, right-click, and select Container Log > Save Log to File.... The Save Container Log File dialog box opens:
3. Enter a file name for the log file. The file name must include a path that is valid for the machine hosting the container. A relative location is relative to the sonic_install_dir/MQ8.5 root.
4. Click OK.
The container’s log file is saved on the local system with your specified name.
Operation of Clearing the Container’s Log
While the rolling archive log mechanism assures saving the current log and then clearing it, you can use the following procedure to clear the log whenever you want.
◆ To manually clear the container’s log:
1. In the Sonic Management Console, connect to the container’s domain, and select the Manage tab.
2. Select the container, right-click, and select Container Log > Clear.
The container’s log file is initialized.
Progress SonicMQ Configuration and Management Guide 8.5 489

Chapter 13: Managing Containers and Collections
Managing ComponentsThe following sections describe how to start, stop, and reload a component in a container and clear the last error.
Starting a Component
You can only start components that have first been loaded by the container. The following procedure describes how to start a component that is stopped (offline).
◆ To start a component:
❖ In the Manage tab, select a component, right-click, and select Operations > Start.
The Sonic Management Console starts the component. Its state is now online.
Stopping a Component
Follow this procedure to stop a component, changing its state from online to offline. (Stopping a component does not remove a component from a container.)
◆ To stop a component:
❖ In the Manage tab, select a component, right-click, and select Operations > Stop.
The Sonic Management Console stops the component. Its state is now offline.
Reloading a Component
Follow this procedure to reload a component in a container. Reloading removes a component from the container and re-creates it with any configuration changes that are not handled dynamically, for example, acceptors or security. After reloading, the component is in the same state it was in before reloading (offline or online). (See “Configuration Changes: Dynamic or Requiring Reload” on page 98.)
◆ To reload a component in a container:
❖ In the Manage tab, select a component in a container, right-click, and select Operations > Reload.
The Sonic Management Console reloads the component and restores it to its state before reloading, for example, online or offline.
Important Unlike other components such as an Activation Daemon, if a broker is stopped, the broker cannot be restarted until it has been reloaded.
490 Progress SonicMQ Configuration and Management Guide 8.5

Containers and Their Components
Clearing Errors
The following procedure describes how to clear the last error currently flagged in the Status section in the General tab of an Edit Runtime Properties dialog box.
◆ To clear the last error:
❖ Select the component, right-click, and select Operations > Clear Error.
The Sonic Management Console clears the last error.
Container-wide MetricsContainer-wide monitoring includes the metrics described in the following sections. For general information on specifying and viewing metrics, see “Metrics” on page 379. For information clearing metrics, see “Resetting Metrics” on page 399.
System Memory Metrics
The system.memory.* container-wide metrics include::
Note While a component is being reloaded, management requests on that component are blocked and might time out if the component reload takes a significant amount of time.
Metric Description
CurrentUsage Heap space (in bytes) used by the container and its hosted components. Supports high thresholds for alert notifications. (See “Specifying Alert Thresholds” on page 400 to set the alert thresholds).
MaxUsage Maximum heap space (in bytes) used by the container and its hosted components since the last metrics reset.
Progress SonicMQ Configuration and Management Guide 8.5 491

Chapter 13: Managing Containers and Collections
System Notifications Metrics
The system.notifications.* container-wide metrics include::
System Threads Metrics
The system.threads.* container-wide metrics include:
Metric Description
AwaitingDispatch The number of management notifications awaiting dispatch. Supports high thresholds for alert notifications.
Dropped Number of times a management notification was dropped before dispatch to listeners. Evaluated over the last 30 minutes.
MaxAwaitingDispatch The maximum number of management notifications awaiting dispatch since last metrics reset.
Metric Description
CurrentTotal Snapshot of the number of threads currently used by the container and its hosted components. Supports high thresholds for alert notifications. (See “Specifying Alert Thresholds” on page 400 to set the alert thresholds).
CurrentPoolSize Current size of the thread pool used to service transient management tasks. Supports high thresholds for alert notifications. (See “Specifying Alert Thresholds” on page 400 to set the alert thresholds).
MaxPoolSize Maximum size of the thread pool used to service transient management tasks since the last metrics reset
PoolWaits Number of times transient management tasks had to wait because a pooled thread was not available to immediately service the task. Supports high thresholds for alert notifications. (See “Specifying Alert Thresholds” on page 400 to set the alert thresholds).
492 Progress SonicMQ Configuration and Management Guide 8.5
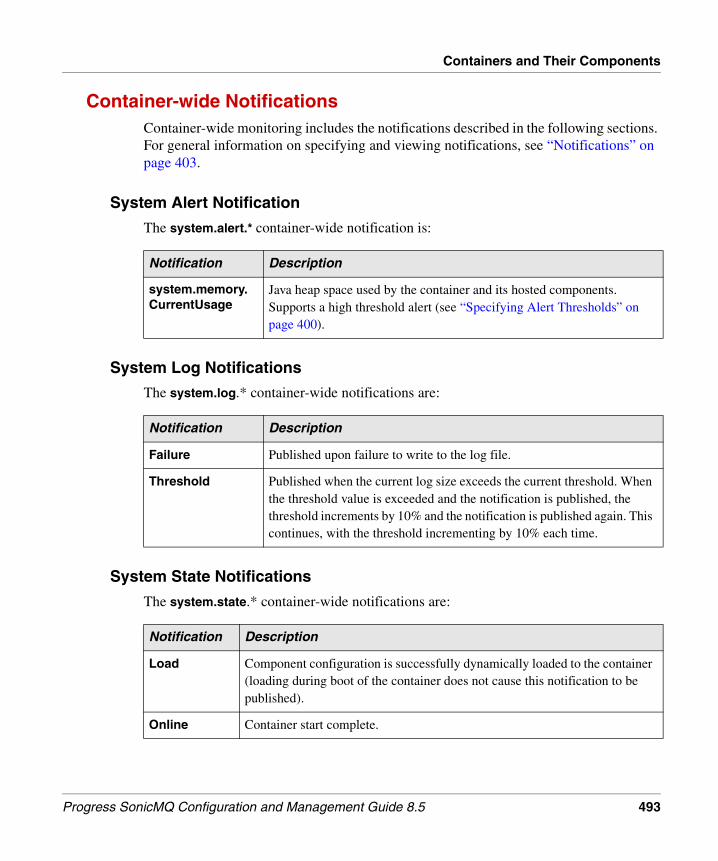
Containers and Their Components
Container-wide NotificationsContainer-wide monitoring includes the notifications described in the following sections. For general information on specifying and viewing notifications, see “Notifications” on page 403.
System Alert Notification
The system.alert.* container-wide notification is:
System Log Notifications
The system.log.* container-wide notifications are:
System State Notifications
The system.state.* container-wide notifications are:
Notification Description
system.memory.CurrentUsage
Java heap space used by the container and its hosted components. Supports a high threshold alert (see “Specifying Alert Thresholds” on page 400).
Notification Description
Failure Published upon failure to write to the log file.
Threshold Published when the current log size exceeds the current threshold. When the threshold value is exceeded and the notification is published, the threshold increments by 10% and the notification is published again. This continues, with the threshold incrementing by 10% each time.
Notification Description
Load Component configuration is successfully dynamically loaded to the container (loading during boot of the container does not cause this notification to be published).
Online Container start complete.
Progress SonicMQ Configuration and Management Guide 8.5 493

Chapter 13: Managing Containers and Collections
Shutdown At the start of a controlled shutdown.
Unload Component configuration is successfully dynamically unloaded from the container. (Unloading during shutdown of the container does not cause this notification to be published.)
Notification Description
494 Progress SonicMQ Configuration and Management Guide 8.5

Collections
CollectionsSee “Collections” on page 143 for an explanation of collections. You might typically use a collection to monitor aspects of an application that spans multiple components or containers. For example, a collection might define:● The components that represent a particular application● The containers within a geographical region or set of server machines
Component CollectionsSee “Component Collections” on page 144 for an explanation of component collections. Also, see “Collections Monitor” on page 532 for information on using a Collections Monitor to poll components in a components collection for their metric data, aggregate those metric values, and monitor and forward notifications.
Viewing the State of Component Collections
The components in a collection can have different values for the same property. Therefore, you can view runtime properties only for an individual component. However, you can view aggregate and individual runtime state for a component collection in the runtime tree. The following procedure describes how to view the state of a component collection.
◆ To view the state of a component collection:
❖ In the Manage tab, select a component collection:
Progress SonicMQ Configuration and Management Guide 8.5 495
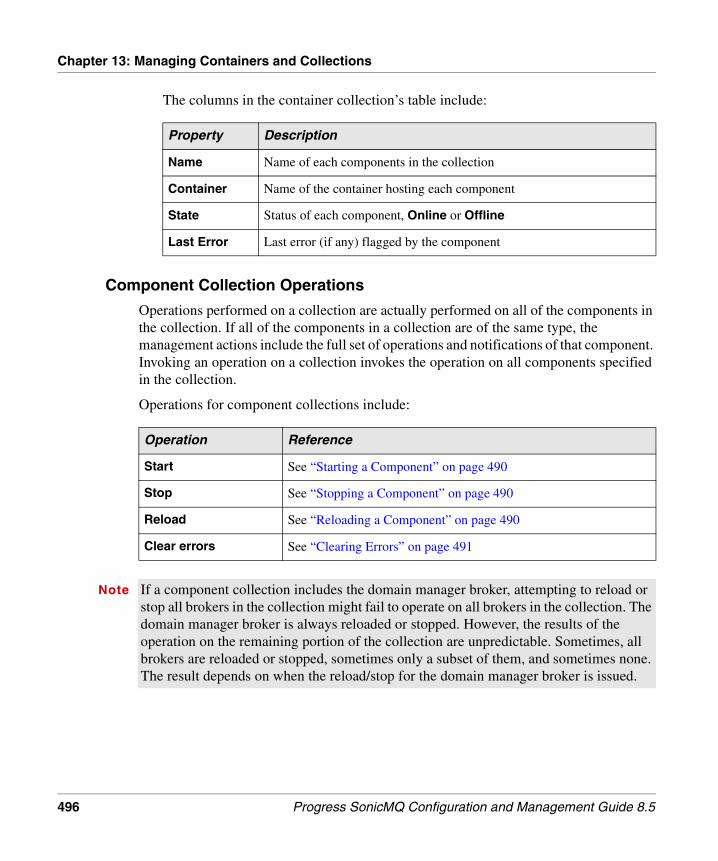
Chapter 13: Managing Containers and Collections
The columns in the container collection’s table include:
Component Collection Operations
Operations performed on a collection are actually performed on all of the components in the collection. If all of the components in a collection are of the same type, the management actions include the full set of operations and notifications of that component. Invoking an operation on a collection invokes the operation on all components specified in the collection.
Operations for component collections include:
Property Description
Name Name of each components in the collection
Container Name of the container hosting each component
State Status of each component, Online or Offline
Last Error Last error (if any) flagged by the component
Operation Reference
Start See “Starting a Component” on page 490
Stop See “Stopping a Component” on page 490
Reload See “Reloading a Component” on page 490
Clear errors See “Clearing Errors” on page 491
Note If a component collection includes the domain manager broker, attempting to reload or stop all brokers in the collection might fail to operate on all brokers in the collection. The domain manager broker is always reloaded or stopped. However, the results of the operation on the remaining portion of the collection are unpredictable. Sometimes, all brokers are reloaded or stopped, sometimes only a subset of them, and sometimes none. The result depends on when the reload/stop for the domain manager broker is issued.
496 Progress SonicMQ Configuration and Management Guide 8.5

Collections
Container CollectionsSee “Container Collections” on page 153 for an explanation of container collections. The following sections describe runtime management of container collections.
Viewing the State of Container Collections
The containers in a collection can have different values for the same property. Therefore, you can view runtime properties only for an individual container. However, you can view aggregate and individual runtime status for a container collection in the runtime tree.
◆ To view the state of a container collection:
❖ In the Manage tab, select a container collection:
The container collection’s table lists the containers in the collection by:
Property Description
Name Name of each containers in the collection
Host Machine hosting the container
State State of the containers, Online, Offline, or Unknown
Progress SonicMQ Configuration and Management Guide 8.5 497

Chapter 13: Managing Containers and Collections
Container Collection Operations
Operations performed on a collection actually are performed on all of the containers that comprise the collection. Management actions for a collection of containers are a subset of all the supported actions for a container. Invoking an operation on a collection invokes the operation on all of the containers in the collection.
Operations for container collections include:
Operation Reference
Restart Stops and restarts all containers in the collection that are running when the operation is initiated.
Shut down See “Shutting Down Containers” on page 472
Clear Log See “Operation of Clearing the Container’s Log” on page 489
Invoke Diagnostics See the following section.
498 Progress SonicMQ Configuration and Management Guide 8.5

Running Diagnostics on Containers and Collections
Running Diagnostics on Containers and CollectionsWhen Progress Sonic support wants you to invoke diagnostics on a container (and its components), or a container collection, they provide you a diagnostic script or list of instructions. You load and run the instructions, and then copy the resulting diagnostics, logs, and outputs in your return mail to the support team.
You can invoke diagnostics by:
● Opening the Sonic Diagnostics window for a container or collection, and then entering instructions or an instructions file.
● Placing an instructions file in the working directory of one or more containers.
Syntax of Sonic Diagnostic InstructionsThe syntax of each instruction line in a list or script of commands is:
subsystem_name operation [prop1=val1 prop2=val2 ...]
Diagnostic instructions you might want to run include the following:
Diagnostic Command
To get a description of thread diagnostics jvm.threads describe
To get a description of heap diagnostics jvm.heap describe
To generate a thread dump jvm.threads dumpState
To generate a heap dump jvm.heap dumpState
Progress SonicMQ Configuration and Management Guide 8.5 499

Chapter 13: Managing Containers and Collections
Using the Sonic Diagnostics WindowThe Sonic Diagnostics widow lets you specify a container or container collection on which to run the instructions that you specify. While you are not required to have access to the one or more systems where the diagnostics will run, the results files are written only to each container’s working directory.
◆ To invoke diagnostics on a container or a container collection:
1. On the Manage tab in the Sonic Management Console, navigate to the running container or container collection you want to diagnose.
2. Right click on the container or container collection you are diagnosing, and then choose Operations > Invoke Diagnostics, as shown:
The Sonic Diagnostics window opens for the selected container or container collection, as shown:
500 Progress SonicMQ Configuration and Management Guide 8.5

Running Diagnostics on Containers and Collections
The Action menu contains the following commands:
The Edit menu contains the following commands:
The commands that have icons are also located on the toolbar in the window.
3. In the Sonic Diagnostics window, either:
■ Type or use Edit tools to enter diagnostic commands in the Instructions area.
■ Choose Action > Open Instructions File and locate a stored text file that contains the instructions you want to load. You can edit the text after you open a file.
4. Choose Action > Run.
5. After the diagnostic instructions are executed, the Diagnostic status area shows the results. For example, entering jvm.threads describe as the instruction outputs basic information when run, as shown:
Progress SonicMQ Configuration and Management Guide 8.5 501

Chapter 13: Managing Containers and Collections
The output is sent to the Diagnostic Status section of the Sonic Diagnostics window.
6. After a diagnosis has completed, you can:
■ Choose Action > Save to store the current diagnosis text in a file. The diagnosis typically indicates that the results were sent to the container’s log. There, it might be noted that the actual diagnostic output is in a specified disk-based file.
■ Choose Edit > Copy to Clipboard to store the instructions and the diagnostic status on the system clipboard. Paste the clipboard contents into a text file or email response that you forward to Progress Sonic support with the container log, any diagnostic output files, and your customer and problem tracking identifiers.
■ Choose Action > Reset to clear both text areas.
7. Choose Action > Exit to close the Sonic Diagnostics window.
Example of a Sonic Diagnosis
Assume that you want to dump Container_1’s threads when it is running on Sun 1.5 JVM.
1. Start Container_1.
2. In the SMC, navigate to Container_1 on the Manage tab.
3. Right-click then choose Operations > Invoke Diagnostics.
4. In the Instruction area of the Sonic Diagnostics window, enter:jvm.threads dumpState
5. Choose Action > Run. The diagnostic actions occur.
The results of the diagnosis are as follows:
502 Progress SonicMQ Configuration and Management Guide 8.5

Running Diagnostics on Containers and Collections
● The Sonic Diagnostics window records the generation of the output, as shown:
● The container’s log and console window recorded the JVM actions, as follows:(info) Executing remote diagnostics instructions
● The thread status is dumped into a file in the working directory.
❍ JVM 1.5: jvm.threads.state
❍ JVM1.6: container_name.date.jvm.threads.state
● If the file does not exist, it is created. If the file does exist, the new diagnostics run is appended to the existing content of the file.
When the container is running in JVM1.6, the report contains:
● Full lock information including monitors (object locks)
● Deadlock detection
● Per-thread CPU usage info for the interval between two thread dumps (if they are taken within 15 minutes of each other) to help identify spinning threads. (Requires that the JVM supports and has enabled ThreadMXBean.isThreadCpuTimeEnabled()).
Using a Diagnostics Instruction File to Invoke Diagnostics
When a file named SonicDiagnostics.txt with the diagnostic instructions to run is located in a working directory, it is invoked as follows:.
● When you start any container that uses that working directory, the specified diagnostic instructions run.
Progress SonicMQ Configuration and Management Guide 8.5 503

Chapter 13: Managing Containers and Collections
● Every running container that uses that working directory checks the file every 20 seconds to see if it has changed; in which case, the currently specified diagnostic instructions run.
● Adding a SonicDiagnostics.txt file into a working directory invokes the diagnostic instructions in the file within 20 seconds on all running containers that use that working directory.
In this usage, the status output is sent to a file named SonicDiagnostics.status in the container’s working directory.
The output for the instruction jvm.threads dumpState is appended to the results in the output file to build a thread history report.
504 Progress SonicMQ Configuration and Management Guide 8.5

Chapter 14 Managing Framework Components
This chapter contains these sections:
● “Directory Service” describes Directory Service fault tolerance, how to view and edit runtime properties, and the Directory Service operations, logging, and notifications.
● “Agent Manager” describes Agent Manager fault tolerance, how to view and edit runtime properties, and the Agent Manager operations, logging, and notifications.
● “Activation Daemon” describes how to view and edit an Activation Daemon’s runtime properties, view an Activation Daemon’s list of containers, and how to activate and deactivate containers, and perform other Activation Daemon operations. It also describes Activation Daemon notifications.
● “Collections Monitor” describes how to view and edit a Collections Monitor’s runtime properties, view the component collections monitored by a Collections Monitor, clear a Collections Monitor’s history, and perform other Collections Monitor operations. It also describes Collections Monitor notifications.
Progress SonicMQ Configuration and Management Guide 8.5 505
Chapter 14: Managing Framework Components
Directory ServiceAs explained in “Resilience and Recovery of Framework Components” on page 158, a Directory Service persists configuration information to a directory store. By defining a domain manager with primary and backup components plus continuous replication of Directory Service updates, the domain manager provides continuously available configuration services.
Fault Tolerant Roles and StatesA Directory Service is initially not fault tolerant. By electing to create a backup configuration, the original Directory Service is redefined as the primary and the new configuration is the backup (see “Configuring a Directory Service Object” on page 159). A component's runtime role (online or offline) is not related to its configuration role.
At runtime, the Directory Service fault-tolerant peers take one of two roles:
● Active role — Actively managing the Directory Service store and handling requests to update or change Directory Service store contents.
● Standby role — Performs failure detection on the active Directory Service to determine if the standby should become active. If the standby is unable to ping the active Directory Service, it will transition to the active role. In this role, the Directory Service in the Active role is replicated to the Directory Service in the Standby role.
States describe fault tolerant peer relationships and functions related to the roles:
● waiting — Before taking any role, the Directory Service at startup assesses its state when it last shutdown and whether it has transactions that were not replicated. When its peer comes online, the peer logic determines which role (if any) each peer takes, or if the peer is not found in a reasonable amount of time, whether the waiting peer is qualified to take the Active role.
● active — The active state is the one state of the Active role.
● Standby readiness:
■ standby_ready — The standby_ready state indicates that the peer is prepared to take the Active role when the currently Active (or formerly Active) is unavailable.
■ synchronization_standby — The state where the standby needs some missing changes from the active’s logs in order to be current.
■ deep_synchronization_standby — The state where the complete Directory Service store of the active Directory Service must be copied.
For thorough discussion of fault tolerant management and state models for the roles and states, see the Progress SonicMQ Deployment Guide.
506 Progress SonicMQ Configuration and Management Guide 8.5

Directory Service
Directory Service Runtime PropertiesThe following procedure describes how to view and edit Directory Service runtime properties.
◆ To view and edit Directory Service runtime properties:
1. Open the Sonic Management Console, connect to a domain as described in “Running the Sonic Management Console” on page 38, and select the Manage tab.
2. Expand a container configuration and select Directory Service, right-click, and select Properties. The Edit Runtime Directory Service Properties dialog box opens with its General tab.
The following illustration shows the General properties of peer Directory Services that provide fault tolerant management:
Progress SonicMQ Configuration and Management Guide 8.5 507

Chapter 14: Managing Framework Components
The General tab’s Identity section displays:
The General tab’s Status section displays:
The General tab’s Online Backup Progress section displays:
Property Description
Name Name of the Directory Service.
ConfigID Identity in the Directory Service
Uptime How long the Directory Service has been running
Property Description
Current State Overall state of the Directory Service
Last Error Level Severity of the last error flagged
Last Error Descriptive text underlying the last error flagged.
Property Description
Alert message When fault tolerant management is in use, the backup status of the standby Directory Service notes that it cannot provide a backup.
In Progress If able to backup, displays False when backup is not in progress, and True when backup is in progress.
Start Time Records the start time of the most recent or current backup.
Completion Time Records the completion time of the most recent full backup.
Location Shows the path location of the output from the last online backup.
508 Progress SonicMQ Configuration and Management Guide 8.5

Directory Service
3. Select the Loading tab:
Loader Details include:
4. Select the Tracing tab:
Property Description
Class Directory Service component Java classname.
Classpath Classpath for all of the .jar files required to run the Directory Service
Release Version Release version of the Directory Service
Progress SonicMQ Configuration and Management Guide 8.5 509

Chapter 14: Managing Framework Components
5. Select and/or deselect tracing bit masks to record a particular trace to the container’s message log (see “Container Logging” on page 474). Selecting the Fault Detection bit traces all Directory Service fault tolerance and replication activities.
6. Select the Fault Tolerance tab.
This example shows a Directory Service that is not set up for fault tolerant management:
The following two examples show the Directory Service peers in fault tolerant management:
7. The Fault Tolerance tab shows fault tolerant Directory Service properties (see “Fault Tolerant Roles and States” on page 506) and lets you choose to allow failover:
Property Description
Role Shows the fault-tolerant role of the Directory Service:
● PRIMARY ● BACKUP
When fault tolerant Directory Services have not been established, the role is Not Fault Tolerant.
510 Progress SonicMQ Configuration and Management Guide 8.5

Directory Service
8. Click OK to apply any changes you made to the Directory Service’s runtime properties. The Sonic Management Console applies the changes.
Directory Service OperationsSee “Clearing Errors” on page 491 to clear any Directory Service error that is flagged.
See “Reloading an External Authentication Domain” on page 433 to reload users and groups in an external domain.
Backup and Restoration
The following sections describe offline and online backup and restoring the Directory Service from backup.
Offline Backup
You can copy the Directory Service store to back it up offline.
◆ To backup the Directory Service store offline:
1. Shut down the Directory Service.
2. Copy the entire MQ8.5_install_root\domain_name directory to another location, for example:backups\Domain1\
State Shows the fault-tolerant state of the Directory Service:
● Waiting ● Active● Standby● Standby; Synchronizing● Standby; Copying data (deep synchronization)
When fault tolerant Directory Services have not been established, the state is Not Fault Tolerant.
Allow Failover Select to allow failover (only if the fault-tolerant role of the Directory Service is PRIMARY or BACKUP).
Property Description
Important Do not modify the domain directory name in the Directory Service, for example, Domain1.
Progress SonicMQ Configuration and Management Guide 8.5 511

Chapter 14: Managing Framework Components
Online Backup
When the Directory Service is online, the store used by the Directory Service in the Active role can be backed up while it is operational. You can use the Sonic Management Console, the Sonic Management API, or the DSAdmin tool to initiate the Directory Service backup.
◆ To use the SMC to perform online backup of the active Directory Service store:
1. In the Manage tab, select Directory Service.
2. Right-click and then choose Operations > Perform Online Backup.
3. The Directory Service Online Backup dialog box opens, as shown:
4. Specify the Backup Path.
5. Select Overwrite if you are confident that an existing backup at the specified path can be destroyed. Clear the Overwrite option if you want an exception to be thrown if an overwrite condition exists.
6. Click OK to start the online backup of the Directory Service store.
7. When the backup completes, copy it to a secure archive location.
Note The management API’s com.sonicsw.mf.mgmtapi.runtime interface IDirectoryServiceProxy lets you start the DS backup process asynchronously with: startBackup(String backupDir, boolean overwrite [true|false])
For example, startBackup(“c:/DS_Backups/Domain1_20111231”,true)
512 Progress SonicMQ Configuration and Management Guide 8.5
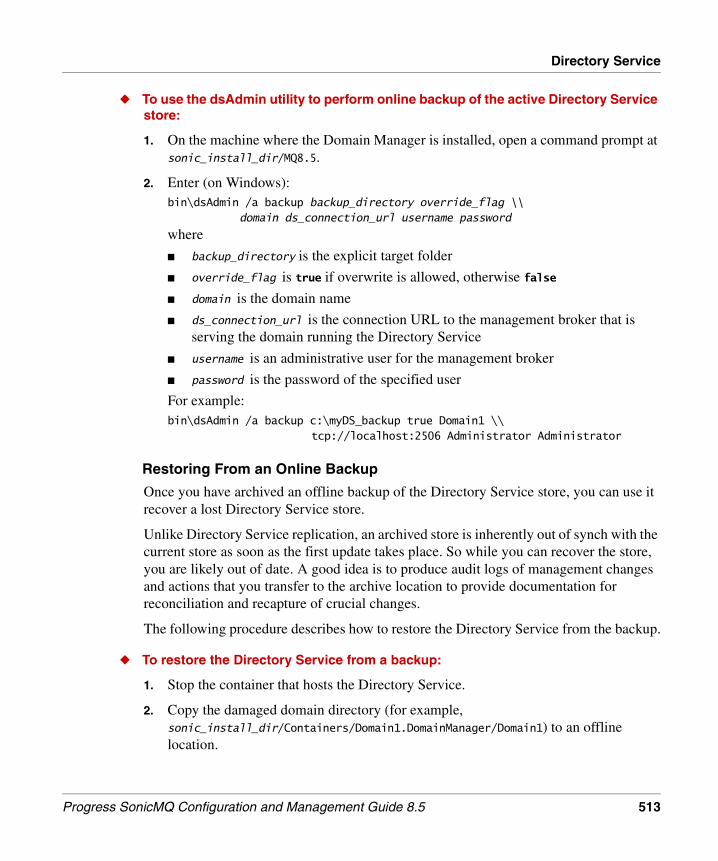
Directory Service
◆ To use the dsAdmin utility to perform online backup of the active Directory Service store:
1. On the machine where the Domain Manager is installed, open a command prompt at sonic_install_dir/MQ8.5.
2. Enter (on Windows):bin\dsAdmin /a backup backup_directory override_flag \\
domain ds_connection_url username password
where
■ backup_directory is the explicit target folder
■ override_flag is true if overwrite is allowed, otherwise false
■ domain is the domain name
■ ds_connection_url is the connection URL to the management broker that is serving the domain running the Directory Service
■ username is an administrative user for the management broker
■ password is the password of the specified user
For example:bin\dsAdmin /a backup c:\myDS_backup true Domain1 \\
tcp://localhost:2506 Administrator Administrator
Restoring From an Online Backup
Once you have archived an offline backup of the Directory Service store, you can use it recover a lost Directory Service store.
Unlike Directory Service replication, an archived store is inherently out of synch with the current store as soon as the first update takes place. So while you can recover the store, you are likely out of date. A good idea is to produce audit logs of management changes and actions that you transfer to the archive location to provide documentation for reconciliation and recapture of crucial changes.
The following procedure describes how to restore the Directory Service from the backup.
◆ To restore the Directory Service from a backup:
1. Stop the container that hosts the Directory Service.
2. Copy the damaged domain directory (for example, sonic_install_dir/Containers/Domain1.DomainManager/Domain1) to an offline location.
Progress SonicMQ Configuration and Management Guide 8.5 513

Chapter 14: Managing Framework Components
3. Delete the contents of Directory Service store folder in the damaged domain directory. For example, sonic_install_dir/Containers/Domain1.DomainManager/Domain1.
4. Retrieve the archived backup, and then unpack it into the domain directory you just cleared.
When you restart the container that hosts the Directory Service store, it uses the restored backup as the current store.
Directory Service LoggingSee “Container Logging” on page 474 for information on container logging. Additional trace messages will be sent to the container log when:
● A backup Directory Service transitions to a standby role
● A failover fails
● A failover occurs
● The failover runtime attribute is reset
Directory Service NotificationsFor general information on specifying and viewing notifications, see “Notifications” on page 403. Directory Service notifications include:
Notification Description
configuration.storage.Change Configuration change(s) propagated by the Directory Service
system.state.Failover Standby service has failed over to become the active service
system.state.Offline Directory Service stop complete
system.state.Online Directory Service start complete
514 Progress SonicMQ Configuration and Management Guide 8.5

Agent Manager
Agent ManagerAn Agent Manager supports:
● Obtaining the current runtime status of all the containers (and their components) in a domain or a subset of the domain (collection of containers or components)
● Setting runtime properties across a collection of components (usually in multiple containers)
● Executing operations across a collection of components (usually in multiple containers)
● Forwarding state notifications it receives
All state notifications are sent to the Agent Manager so it can maintain the current runtime status of an entire domain by:
● Determining an initial state for each container in the domain and applying updates as it receives state change notifications from individual containers
● Periodically polling each container for its status
When the Agent Manager cannot contact a container, it assumes the container's status is offline. A container might not be contactable due to container failure, because the container was never started, or because of a long-term communications failure.
You can configure a polling interval, Status Poll Interval, on each container to specify the interval in seconds between polling for container status. If polling is not enabled (the Status Poll Interval is set to 0), the Agent Manager does not poll the container and will not detect container failures (those that prevent state change notifications from being sent, such as a crash of the host machine the container is running on). You can also configure a polling timeout (Status Poll Timeout) to specify the time in seconds after which the Agent Manager will stop trying to obtain the container’s status and assume the container’s status is unknown. These settings are in the Advanced tab for a container. (See “Configuring Containers” on page 116 and the Agent Manager Poll Frequency is in the General tab for “Sonic Management Console Preferences” on page 58.)
Progress SonicMQ Configuration and Management Guide 8.5 515

Chapter 14: Managing Framework Components
Fault Tolerant Roles and StatesA component's runtime state (online or offline) has no relationship to its fault tolerant state. A non-fault tolerant Agent Manager is always in a not fault tolerant state.
While it is loaded and its runtime status is online, a fault-tolerant Agent Manager can be either role:
● Active role — Actively maintains domain state and handles requests to obtain domain state or perform operations on collections.
● Standby role — Cannot service status or collection-based operational requests and does not attempt to establish domain-wide runtime state.
The active and standby roles are dynamic and they change during failover. For example, when a primary and backup are initially configured and their managing containers started, the primary will be the active and the backup will be the standby. If the primary then fails, the backup will become active and will remain active even when the container hosting the primary is restarted. Once the primary is restarted as a standby, a failure of the backup or a controlled failback triggered by an administrator will failover the primary into an active role.
A fault tolerant Agent Manager can be in the following states:
● WAITING state — When it is trying to determine whether it should serve in the active or standby role. It cannot service status or collection-based operational requests and does not attempt to establish domain-wide runtime state.
● ACTIVE state — Handles local and remote requests for domain state and operations on collections. It also actively monitors the state of containers in the domain.
● STANDBY state — Does not handle local and remote requests for domain state or operations on collections.
For thorough discussion of fault tolerance, including interpreting fault tolerant roles and states, see the Progress SonicMQ Deployment Guide.
516 Progress SonicMQ Configuration and Management Guide 8.5

Agent Manager
Agent Manager Runtime PropertiesThe following procedure describes how to view and edit Agent Manager runtime properties.
◆ To view and edit Agent Manager runtime properties:
1. In the Manage tab, select Containers > Container > Agent Manager and click the Properties icon. The Edit Runtime Agent Manager Properties dialog box opens with its General tab:
The General tab’s Identity section displays:
Property Description
Name Name of the Agent Manager.
ConfigID Identity in the Directory Service.
Uptime How long the Agent Manager. has been running
Progress SonicMQ Configuration and Management Guide 8.5 517

Chapter 14: Managing Framework Components
The General tab’s Status section displays:
2. Select the Loading tab:
Loader Details include:
Property Description
Current State Overall state of the Agent Manager.
Last Error Level Severity of the last error flagged
Last Error Descriptive text underlying the last error flagged.
Property Description
Class Java class
Classpath Classpath for all of the .jar files required to run the Agent Manager
Release Version Version of the Agent Manager
518 Progress SonicMQ Configuration and Management Guide 8.5
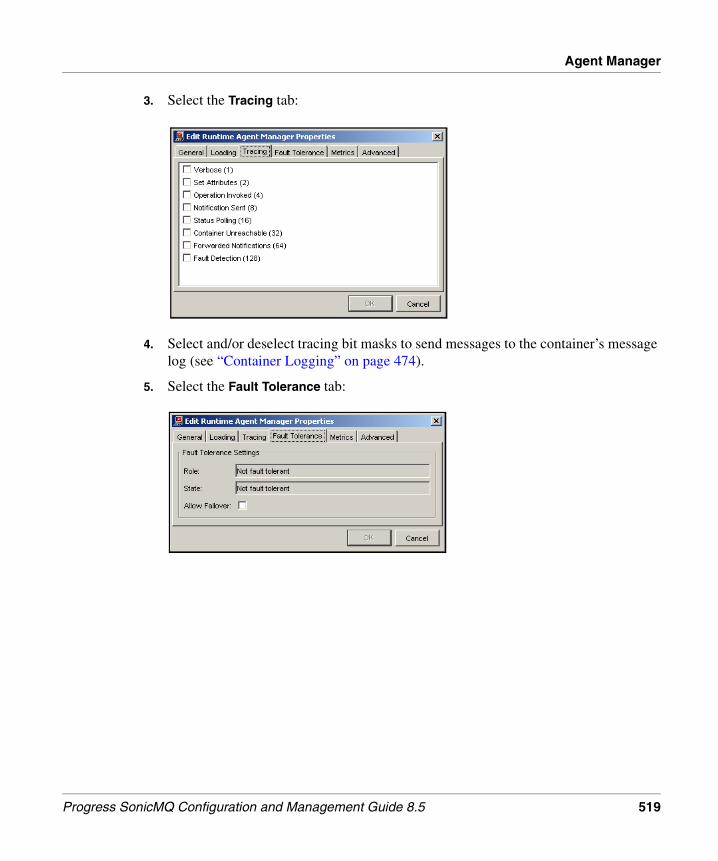
Agent Manager
3. Select the Tracing tab:
4. Select and/or deselect tracing bit masks to send messages to the container’s message log (see “Container Logging” on page 474).
5. Select the Fault Tolerance tab:
Progress SonicMQ Configuration and Management Guide 8.5 519

Chapter 14: Managing Framework Components
6. View and specify fault tolerant properties:
7. Select the Metrics tab:
Property Description
Role Shows the fault-tolerant role of the Agent Manager (see “Fault Tolerant Roles and States” on page 516): ● Primary ● Backup
When a fault tolerant Agent Manager has not been established, the role is Not Fault Tolerant.
State Shows the fault-tolerant state of the Agent Manager (see “Fault Tolerant Roles and States” on page 516): ● WAITING ● ACTIVE● STANDBY
When a fault tolerant Agent Manager has not been established, the state is Not Fault Tolerant.
Allow Failover
Select to allow failover (if the fault-tolerant role of the Agent Manager is Primary or Backup).
520 Progress SonicMQ Configuration and Management Guide 8.5

Agent Manager
8. Specify these metrics settings:
For information on metrics, see “Metrics” on page 379.
9. Select the Advanced tab:
10. View and specify status polling thread pool properties:
11. Click OK to apply any changes you made to the Agent Manager’s runtime properties. The Sonic Management Console applies the changes.
Property Description
Refresh Interval Frequency for the broker to update raw statistical data that depends on a time interval and purge expired data. The value is in seconds and can vary from 5 to 60 seconds.
Collection Interval How far back in time to maintain raw statistical data. The value is in minutes and can vary from 5 to 20 minutes.
Repeat Alert Notifications
When selected, causes an alert notification to be repeated at the refresh interval if the threshold is still crossed. The default value is cleared (notifications are sent only at the crossing of a threshold.)
Property Description
Min Threads The minimum number of threads. The default value is 0.
Max Threads The maximum number of threads. The default value is 50. The minimum is 20 and the maximum value is 1000. The most effective setting is generally one thread for every five containers in the domain.
Progress SonicMQ Configuration and Management Guide 8.5 521

Chapter 14: Managing Framework Components
Suspending the Active Role
When a fault tolerant Agent Manager is online and active, you can use this operation to force the Agent Manager to relinquish its active role to the current standby Agent Manager.
◆ To force an Agent Manager to suspend the active role:
1. Select an active Agent Manager in the Manage tab, and right-click and select Suspend Active Role. The Perform Operation dialog box opens.
2. Confirm that you want to suspend the active role. The Enter Time dialog box opens.
3. Enter the time in seconds for the active Agent Manager to wait for a standby Agent Manager to assume the active role, for example, 10 seconds:
4. Click OK. When the specified time has elapsed, the standby Agent Manager will take over the active role.
Agent Manager OperationsAgent Manager operations are similar to component operations:
Operation Reference
Start See “Starting a Component” on page 490
Stop See “Stopping a Component” on page 490
Reload See “Reloading a Component” on page 490
Clear errors See “Clearing Errors” on page 491
522 Progress SonicMQ Configuration and Management Guide 8.5

Agent Manager
Agent Manager LoggingSee “Container Logging” on page 474 for information on container logging. Additional trace messages are sent to the container log when:
● A backup Agent Manager transitions to a standby role
● A failover fails
● A failover occurs
● The failover runtime property is reset
Agent Manager PollThreads Metrics and Alert NotificationsThe system.pollthreads.* Agent Manager metrics include:
Agent Manager NotificationsAgent manager notifications include:
For information on specifying and viewing notifications, see “Notifications” on page 403.
Metric Description
CurrentPoolSize Current size of the pollthread pool used to service transient agent manager tasks (high thresholds for alert notifications).
MaxPoolSize Maximum size of the thread pool used to service transient agent manager tasks since the last metrics reset.
PoolWaits Number of times transient agent manager management tasks had to wait because a pooled thread was not available to immediately service the task ((high thresholds for alert notifications).
Notification Description
system.state.Failover Standby service has failed over to become the active service.
system.state.Offline Agent Manager stop is complete
system.state.Online Agent Manager start is complete
system.state.Startup Published each time an Agent Manager detects that a container has started
system.state.Unreachable Agent Manager cannot obtain a container’s runtime status
Progress SonicMQ Configuration and Management Guide 8.5 523

Chapter 14: Managing Framework Components
Activation DaemonSee “Activation Daemon” on page 187 for information on the role of Activation Daemons. For information on scheduling containers, see “Adding a Container to an Activation List” on page 189. Also, see “Using Activation Daemons to Launch Containers” on page 471. The following sections describe the runtime properties of Activation Daemons and their spawned containers, and how to activate and deactivate containers.
Activation Daemon Runtime PropertiesThe following procedure describes how to view and edit Activation Daemon runtime properties.
◆ To view and edit Activation Daemon runtime properties:
1. In the Manage tab, select Containers > Container > Activation Daemon and click the Properties icon. The Edit Runtime Activation Daemon Properties dialog box opens:
524 Progress SonicMQ Configuration and Management Guide 8.5

Activation Daemon
The General tab’s Identity section displays:
The General tab’s Status section displays:
2. Select the Loading tab:
Property Description
Name Name of the Activation Daemon
ConfigID Identity in the Directory Service
Uptime How long the Activation Daemon has been running
Property Description
Current State Overall state of the Activation Daemon
Last Error Level Severity of the last error flagged
Last Error Descriptive text underlying the last error flagged
Progress SonicMQ Configuration and Management Guide 8.5 525

Chapter 14: Managing Framework Components
Loader Details include:
3. Select the Tracing tab:
4. Select and/or deselect tracing bit masks to send messages to the container’s message log (see “Container Logging” on page 474).
5. Click OK to apply any changes you made to the Activation Daemon’s runtime properties. The Sonic Management Console applies the changes.
Property Description
Class Java class
Classpath Classpath for all of the .jar files required to run the Activation Daemon
Release Version Version of the Activation Daemon
526 Progress SonicMQ Configuration and Management Guide 8.5

Activation Daemon
Viewing an Activation Daemon’s List of ContainersYou add containers to an Activation Daemon’s activation list in the Configure tab (see “Adding a Container to an Activation List” on page 189). You can view a list of containers managed by an Activation Daemon and their runtime status in the Manage tab, as described in the following procedure.
◆ To view the containers managed by an Activation Daemon:
1. Select the Activation Daemon in the Manage tab. The table in the right pane lists the containers and their runtime status:
The Activation Daemons’s table lists the containers by:
Property Description
Name Name of the container
Status State of the container, Online, Offline, or Unknown
Exit Code Container process exit code (see Table 7 on page 528)
Progress SonicMQ Configuration and Management Guide 8.5 527

Chapter 14: Managing Framework Components
2. Right click a container in the table and click the Properties icon. The Activation Daemon Container Properties dialog box opens:
Table 7 lists the Activation Daemon container properties. (Also see the Runtime API online documentation, Interface IContainerExitCodes in com.sonicsw.mf.common.runtime for more information on the exit codes.)
Table 7. Activation Daemon Container Properties
Property Description
Name Name of the container.
State State of the container, Online, Offline, or Unknown.
Last Update
Last time that the state of the container was determined.
528 Progress SonicMQ Configuration and Management Guide 8.5

Activation Daemon
Exit code 0 Normal shutdown Normal shutdown
1 Unspecified failure Unclassified abnormal shutdown.
2 Invalid cmd line Container detects it was started with an invalid command line.
3 Boot file not found Container was unable to find its boot file(s).
4 DS failure exit code Unclassified Directory Service failure.
5 DS already running On startup, the Directory Service determined that an existing Directory Service was already running in the same configuration domain.
6 AM already running On startup, the Agent Manager determined that an existing Agent Manager was already running in the same deployment domain.
7 Cache failure Unclassified configuration cache failure.
8 Configuration failure Unclassified configuration failure.
9 Comms failure Permanent (non-recoverable) communications failure.
10 libX dir not found libX directory (for native libraries) does not exist. (See “Launching Containers from the Command Line” on page 467.)
11 DS dual active Two active fault tolerant Directory Services were detected.
12 Insufficient memory Insufficient memory.
13 Container already running
On startup, the container determined that an existing container with the same name was already running in the same deployment domain.
Table 7. Activation Daemon Container Properties (continued)
Property Description
Progress SonicMQ Configuration and Management Guide 8.5 529

Chapter 14: Managing Framework Components
3. Select the Log tab to view the log::
The Log tab displays 200 lines (the tail) from the container’s console messages.
Activating and Deactivating ContainersThe following procedure describes how to use an Activation Daemon to activate and deactivate containers.
◆ To activate or deactivate a container:
1. Select the Activation Daemon in the Manage tab. The table in the right pane lists the containers and their runtime status, as shown on page 527.
2. Select a container in the table, right click and select Operations:
■ Activate to activate an offline container
■ Deactivate to deactivate on online container
3. Choose View > Refresh (or click the Refresh tool button) to update the reported state of the activation daemon and its components.
The view shows the current state of the Activation Daemon and the components on its activation list.
530 Progress SonicMQ Configuration and Management Guide 8.5

Activation Daemon
Other Activation Daemon OperationsOther Activation Daemon operations are similar to component operations:
Activation Daemon NotificationsActivation Daemons generate the following notifications:
For general information on specifying and viewing notifications, see “Notifications” on page 403.
Operation Reference
Start See “Starting a Component” on page 490
Stop See “Stopping a Component” on page 490
Reload See “Reloading a Component” on page 490
Clear errors See “Clearing Errors” on page 491
Notification Description
system.state.Activate Published each time an Activation Daemon (re)activates a container.
system.state.Deactivate Published each time an Activation Daemon deactivates a spawned container.
system.state.Failure Published by an Activation Daemon when it detects that a spawned container process has failed (with a non-zero exit code).
system.state.Offline Activation Daemon stop complete.
system.state.Online Activation Daemon start complete.
Progress SonicMQ Configuration and Management Guide 8.5 531

Chapter 14: Managing Framework Components
Collections MonitorCollections monitors support:
● Metrics aggregation
● Monitoring forwarded notifications
● Monitoring threshold notifications defined in a component’s Collections Monitor sets (see system.monitor.Threshold in “Collections Monitor Notifications” on page 538)
A Collections Monitor can be configured to poll components in a component collection for their metric data and then aggregate the metric values. The Sonic Management Console subscribes to metrics of interest to show the aggregated results in Metrics Watchers (see “Viewing Aggregated Metrics” on page 394).
A Collections Monitor can forward a configured set of notifications sent by a component collection. (See “Monitoring Forwarded Notifications” on page 407). A Collections Monitor can also monitor notifications from a component collection and send threshold notifications if the volume of such notifications breaks configured threshold values (see system.monitor.Threshold in “Collections Monitor Notifications” on page 538).
A limited history of threshold and monitored notifications can by persisted by a Collections Monitor.
532 Progress SonicMQ Configuration and Management Guide 8.5

Collections Monitor
Collections Monitor Runtime PropertiesThe following procedure describes how to view and edit Collections Monitor runtime properties.
◆ To view and edit Collections Monitor runtime properties:
1. In the Manage tab, select a Collections Monitor and click the Properties icon. The Edit Runtime Collections Monitor Properties dialog box opens with its General tab:
The General tab’s Identity section displays:
Property Description
Name Name of the Collections Monitor.
ConfigID Identity in the Directory Service
Uptime How long the Collections Monitor has been running
Progress SonicMQ Configuration and Management Guide 8.5 533

Chapter 14: Managing Framework Components
The General tab’s Status section displays:
2. Select the Loading tab:
Loader Details include:
Property Description
Current State Overall state of the Collections Monitor
Last Error Level Severity of the last error flagged
Last Error Descriptive text underlying the last error flagged.
Property Description
Classname com.sonicsw.mf.framework.monitor.CollectionsMonitor
Classpath Displays path for all jars required to run the Collections Monitor
Release version Version number
534 Progress SonicMQ Configuration and Management Guide 8.5
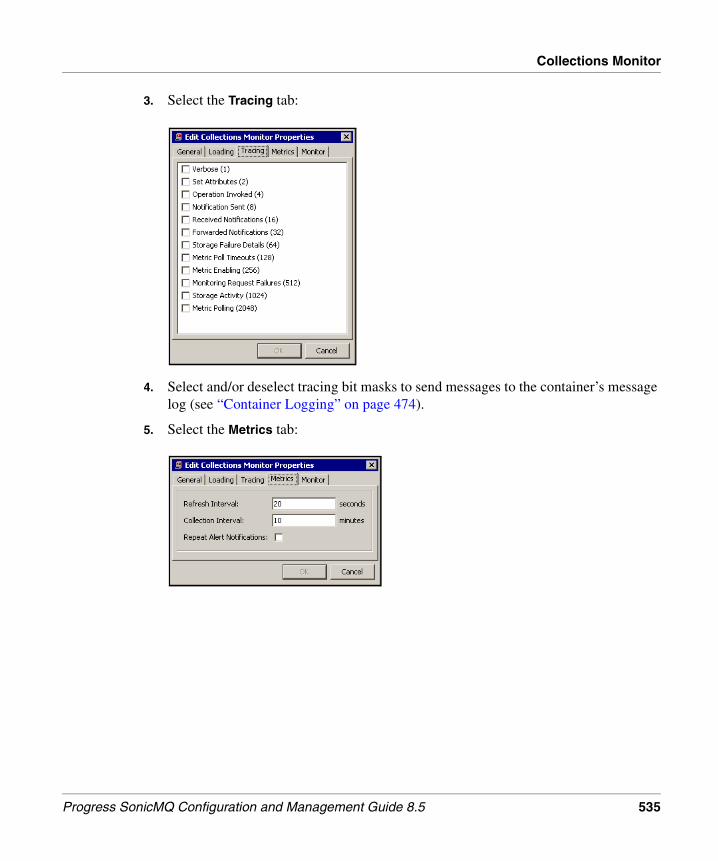
Collections Monitor
3. Select the Tracing tab:
4. Select and/or deselect tracing bit masks to send messages to the container’s message log (see “Container Logging” on page 474).
5. Select the Metrics tab:
Progress SonicMQ Configuration and Management Guide 8.5 535

Chapter 14: Managing Framework Components
6. Specify the following metrics parameters:
7. Select the Monitor tab:
8. Specify:
Property Description
Refresh Interval Frequency for the collections monitor to update raw statistical data that depends on a time interval. The value is in seconds and can vary from 5 to 60 seconds. The default value is 20 seconds.
Collection Interval
How far back in time to maintain raw statistical data. The value is in minutes and can vary from 5 to 20 minutes. The default value is 10 minutes.
Repeat Alert Notifications
When selected, causes an alert notification to be repeated at the refresh interval if the threshold is still crossed. The default value is cleared (notifications are sent only at the crossing of a threshold.)
Property Description
History Duration Duration (hours) for which historical monitoring data will be held
Save Monitored Notifications
Select to maintain a history of monitored notifications
Save Threshold Notifications
Select to maintain a history of threshold notifications
536 Progress SonicMQ Configuration and Management Guide 8.5

Collections Monitor
Viewing the Component Collections Being MonitoredThe following procedure describes how to view the component collections being monitored by a Collections Monitor.
◆ To view the component collections being monitored by a Collections Monitor:
❖ In the Manage tab, select the Collections Monitor. The component collections are listed in the table by name:
See the following sections for information on viewing aggregated metrics and forwarded notifications:
● “Viewing Aggregated Metrics” on page 394
● “Monitoring Forwarded Notifications” on page 407
Progress SonicMQ Configuration and Management Guide 8.5 537

Chapter 14: Managing Framework Components
Collections Monitor OperationsThe following sections describe the Collections Monitor operations.
Clearing a Collections Monitor’s History
The following procedure describes how to clear a Collections Monitor’s history.
◆ To clear a Collections Monitor’s history:
❖ Select a Collections Monitor node in the tree, right-click, and select Operations > Clear History to clear all notification/metric history maintained by this monitor.
Other Collections Monitor Operations
Other Collections Monitor operations are similar to other component operations:
Collections Monitor NotificationsCollections Monitors generate the following notifications:
Note Collections Monitors periodically remove expired historical data from storage when the data is older then the history duration set in a Collections Monitor's configuration.
Operation Reference
Start See “Starting a Component” on page 490
Stop See “Stopping a Component” on page 490
Reload See “Reloading a Component” on page 490
Clear errors See “Clearing Errors” on page 491
Notification Description
system.monitor.Threshold A monitored notification’s threshold is broken
system.state.Offline Collections Monitor’s stop is complete
system.state.Online Collections Monitor’s start is complete
538 Progress SonicMQ Configuration and Management Guide 8.5

Collections Monitor
Collections Monitor Metrics and Alert NotificationsThe storage.* Collections Monitor metrics include:
For general information on specifying and viewing notifications, see “Notifications” on page 403
Metric Description
storage.metrics.StoredPerMinute
The count of metrics collected per minute. (high thresholds for alert notifications).
storage.notifications.StoredPerMinute
The count of notifications collected per minute. (high thresholds for alert notifications).
Progress SonicMQ Configuration and Management Guide 8.5 539

Chapter 14: Managing Framework Components
540 Progress SonicMQ Configuration and Management Guide 8.5

Part V Managing SonicMQ Messaging
Part V describes runtime management and monitoring of SonicMQ messaging in these chapters:
● Chapter 15, “Managing SonicMQ Brokers” describes broker replication states and roles, how to view and edit broker runtime properties, broker operations, and broker-wide monitoring.
● Chapter 16, “Managing SonicMQ Broker Activities” describes how to manage and monitor advertised global queues, connections, durable subscriptions, global subscriptions, queues, routing statistics, and XA transactions.
Progress SonicMQ Configuration and Management Guide 8.5 541

Part V: Managing SonicMQ Messaging
542 Progress SonicMQ Configuration and Management Guide 8.5

Chapter 15 Managing SonicMQ Brokers
This chapter contains the following sections:
● “Broker Runtime Properties” describes how to view and edit broker runtime properties, including broker replication roles and states.
● “Broker Operations, Storage Actions, and Activation” describes starting, stopping, reloading, and activating brokers, clearing errors, and performing operations on multiple brokers. It also describes how to create, recreate, and delete a broker’s message store, as well as how to synchronize storage between replicated brokers.
● “Compacting Storage” describes the task you can perform through dbtool to compact storage that became unusually large.
● “Broker-wide Monitoring” describes broker-wide metrics, notifications, and alerts.
Progress SonicMQ Configuration and Management Guide 8.5 543

Chapter 15: Managing SonicMQ Brokers
Broker Runtime PropertiesThe following procedure describes how to view and edit a broker’s runtime properties. The only tabs with values you can set are the Tracing tab and the Metrics tab. To change any other settings, see “Creating and Editing Broker Configurations” on page 204 and “Configuring Backup Brokers” on page 258.
The Progress SonicMQ Deployment Guide provides comprehensive information on setting up and managing replicated brokers, as well as hardware requirements for redundant networks, and recovery from failover.
A primary and a backup broker actively connect and maintain all defined replication connections, and regularly heartbeat replication connections in both directions to detect failures. When a client connection failure is detected, fault-tolerant connections attempt to reconnect to the same broker, or to a backup broker if the original broker fails and was configured for broker replication.
A replicated broker can be in one of two roles:
● Active role — Broker is accepting connections and servicing operations
● Standby role — Broker is processing replication data, but is not accepting connections; it is ready for failover
Each role can include various replication states, which are displayed in the General tab of the broker’s Edit Runtime Broker Properties dialog box.
544 Progress SonicMQ Configuration and Management Guide 8.5

Broker Runtime Properties
◆ To view and edit a broker’s runtime properties:
1. Open the Sonic Management Console, connect to a domain as described in “Starting the Management Console” on page 38, select the Manage tab, and select a broker configuration:
The rows in the broker’s table correspond to the various activities on a broker (see “Managing SonicMQ Broker Activities” on page 579).
2. Select a broker configuration under a container or in the container’s table, then click the Properties icon.
Note If the broker is in the standby role, you cannot see the management subnodes depicting the various broker activities.
Progress SonicMQ Configuration and Management Guide 8.5 545

Chapter 15: Managing SonicMQ Brokers
3. The Edit Runtime Broker Properties dialog box opens:
The General tab shows the following information under Identity and Status:
Property Description
Name Fully qualified name of the broker configuration running in the container (also see the Broker tab for its other identities)
ConfigID Broker’s configuration identity (in the Directory Service)
Uptime How long the broker has been running
Current State Overall state of the broker
Last Error Level Severity of the last error flagged
Last Error Last error flagged
546 Progress SonicMQ Configuration and Management Guide 8.5

Broker Runtime Properties
The General tab also displays the Replication State:
State Description
STANDALONE Actively servicing client and cluster operations, but no standby broker is running.
ACTIVE Actively servicing client and cluster operations and synchronizing its state with a running standby broker.
ACTIVE SYNC Synchronizing the state of the other broker, while it continues to service new client operations.
STANDBY Has completed dynamic synchronization and is starting to receive live updates of operations from the active broker. If a failure is detected while in STANDBY state, the broker will failover to STANDALONE state and begin accepting failover connections as well as normal connections from new clients.
STANDBY SYNC Dynamically synchronizing with an active broker and preparing to go into the STANDBY state. A broker in this state does not take over for an active broker even if it detects a failure, since it does not have the context to continue client operations.
STARTUP Transitional state during startup, prior to the WAITING state.
WAITING Resolving its role; the broker is not accepting connections from clients or from other brokers in its cluster. By default, when a primary and backup are started, the first one to come up goes into the WAITING state until the second comes up and they establish a replication connection.
OFFLINE Broker is not running.
Progress SonicMQ Configuration and Management Guide 8.5 547

Chapter 15: Managing SonicMQ Brokers
4. Select the Loading tab:
Loader Details include:
5. Select the Tracing tab:
6. Select and/or deselect tracing bit masks to send messages to the container’s message log (see “Container Logging” on page 474).
Property Description
Class Java class of the broker
Classpath Classpath for the .jar files required to run the broker
Release Version Version number of the broker
548 Progress SonicMQ Configuration and Management Guide 8.5

Broker Runtime Properties
7. Select the Broker tab:
The Broker tab displays:
8. Select the Metrics tab:
Property Description
Broker Name Name of the broker
Routing Node Name Name of the routing node
Cluster Name Name of the cluster if the broker is a member of a cluster
Security Enabled Selected if the broker is security enabled
Progress SonicMQ Configuration and Management Guide 8.5 549

Chapter 15: Managing SonicMQ Brokers
9. Specify these metrics settings:
The Refresh Interval for a broker as a monitored component should be set at a smaller value than the metrics refresh interval of the collection whose metrics are being monitored. For information on metrics, see “Metrics” on page 379.
10. Click OK to apply any changes you made to the broker’s runtime properties.
Property Description
Refresh Interval Frequency for the broker to update raw statistical data that depends on a time interval and purge expired data. The value is in seconds and can vary from 5 to 60 seconds.
Collection Interval How far back in time to maintain raw statistical data. The value is in minutes and can vary from 5 to 20 minutes.
Repeat Alert Notifications
When selected, causes an alert notification to be repeated at the refresh interval if the threshold is still crossed. The default value is cleared (notifications are sent only at the crossing of a threshold.)
550 Progress SonicMQ Configuration and Management Guide 8.5

Broker Operations, Storage Actions, and Activation
Broker Operations, Storage Actions, and ActivationThe following sections describe broker operations, storage and CRL cache maintenance, and the command to force a waiting broker peer into the active state.
Broker OperationsThe following sections describe how to start, stop, and reload brokers, including multiple brokers, and clear errors. It also includes sections on creating, recreating, and deleting a broker’s message store, as well as how to synchronize storage between a pair of replicating brokers.
Starting Brokers
The following procedure describes how to manually start a broker that is stopped (offline). However, brokers are typically auto started by their containers. (To specify auto start, see “Adding a Component to or Editing a Component in a Container” on page 137.)
◆ To start a Broker:
❖ If the broker is listed as Offline in its container’s table, select the broker in the table, right-click, and select Operations > Start.
The Sonic Management Console starts the broker.
Stopping Brokers
Stopping a broker is required when you want to perform operations that can be invoked only when the broker is offline, for example storage initialization (see “Storage Operations” on page 553). The following procedure describes how to safely stop a broker.
Note Using Component Collections to Perform an Operation on Multiple Brokers — You can create a component collection containing brokers located on one machine or on multiple machines and perform operations on all of the brokers at once. (See “Creating Component Collections” on page 144.)
To perform operations on multiple brokers through the Sonic Managememt Console, select the Manage tab, select a component collection (of brokers), right-click, select Operations and select a broker operation: Start, Stop, Reload, or Clear Error
Progress SonicMQ Configuration and Management Guide 8.5 551

Chapter 15: Managing SonicMQ Brokers
◆ To safely shut down a SonicMQ broker:
1. If the broker is listed as Online in its container’s table, select the broker in the table, right-click, and select Operations > Stop.
2. Confirm that you want to perform this action. The Sonic Management Console shuts down the broker.
Reloading Brokers
Reloading removes a component from the container and re-creates it with any configuration changes that are not handled dynamically, for example, acceptors or security. After reloading, the broker is in the same state it was in before reloading (offline or online). (See “Configuration Changes: Dynamic or Requiring Reload” on page 98.) The following procedure describes how to reload a broker.
◆ To reload a broker:
❖ In the Manage tab, select a broker, right-click, and select Operations > Reload.
The Sonic Management Console reloads the broker and restores it to its state before reloading, for example, online or offline.
Clearing Errors
The following procedure describes how to clear any error that is currently flagged in the Status section in the General tab of the Edit Runtime Broker Properties dialog box.
◆ To clear an error currently flagged:
❖ In the Manage tab, expand a container configuration, select a broker, right-click, and select Operations > Clear Error.
The Sonic Management Console clears the error.
Important If a broker is stopped, the broker must be reloaded before it can be started. Other than starting the broker after message store initialization, stop and start are not that useful for a broker. Their effect on a broker is to close all connections and not allow new connections until the broker is started again.
Note Using Component Collections to Perform an Operation on Multiple Brokers — You can create a component collection containing brokers located on one machine or on multiple machines and perform operations on all of the brokers at once. (See “Creating Component Collections” on page 144.) To perform operations on multiple brokers through the Sonic Management Console, select the Manage tab, select a component collection (of brokers), right-click, select Operations and select a broker operation: Start, Stop, Reload, or Clear Error
552 Progress SonicMQ Configuration and Management Guide 8.5

Broker Operations, Storage Actions, and Activation
Storage OperationsSonicMQ brokers use persistent storage mechanisms to store messages and other information such as duplicate detection and durable subscriptions. When you install a broker—a messaging broker or a management broker for a domain manager—the broker is initialized during the installation process. If you extend a broker installation to add additional brokers, the first startup of a broker will initializes its logs and data store.
Actions That Require Re-initialization of a Broker’s Data Store
Changing any of the following configuration parameters on a broker require that the data store be re-initialized to complete the change:
● Enabling or disabling security on a broker after installation. (see Step 4 on page 208.)
● Resetting Quality of Protection (QoP) cipher suites. (see Step g on page 211.)
● Turning off QoP security (See Step 5 on page 242 and the property BROKER_SECURITY_PARAMETERS.ENABLE_QOP_SECURITY.)
● Changing the broker name. (See Step 2 on page 208.)
● Decreasing the size of the recovery log. You can make it larger later, but you cannot decrease it later without re-initializing the store. (See Step 4 on page 228.)
● Modifying the recovery log block size. (See Step 4 on page 228.)
● Modifying the type of data store (embedded or external) or its parameters. (See “Configuring Message Storage” on page 230.)
Alternative Techniques for Broker Initialization
There are various techniques for storage operations, depending on your situation:
● “Delete the Store and the Logs” on page 553.
● “On a Running Container, Recreate the Store and Logs Remotely” on page 554.
● “On a Restarted Container, Recreate the Store and Logs Remotely” on page 555.
● “Run the Utility Locally that Performs Broker Operations” on page 556.
Delete the Store and the Logs
When a broker starts without a store and recovery log, the store and logs are created using the broker’s parameters in the Directory Service.
● Advantages: Easy to implement.
● Limitations: Requires access to the local system for manual deletions.
Progress SonicMQ Configuration and Management Guide 8.5 553

Chapter 15: Managing SonicMQ Brokers
On a Running Container, Recreate the Store and Logs Remotely
By stopping the broker component while the container continues to run, you can initialize storage in most circumstances.
● Advantages: Easy to perform in the Management Console. Does not require access to the local system for deletions or configurations.
● Limitations: Does not work in some circumstances, such as changing from enabled to disabled security.
◆ To initialize a broker’s data store in the SMC by stopping only the Broker
1. In the Management Console connected to the broker’s domain, locate the container that hosts the broker on the Manage tab.
2. Right click on the broker as a component of its container, then choose Operations > Stop.
3. On the Management Console’s Manage tab, locate the running container (its icon should be yellow), and then click on the name of its hosted broker (it should be red).
4. Choose Action > Initialize Storage > All > Recreate. (You could also choose Delete and then Create.)
5. When the container window indicates that the action has completed, right click on the broker as a component of its container:
a. Choose Operations > Reload.
b. Choose Operations > Start.
554 Progress SonicMQ Configuration and Management Guide 8.5

Broker Operations, Storage Actions, and Activation
On a Restarted Container, Recreate the Store and Logs Remotely
By stopping the container and clearing its broker component from starting, you can initialize storage in all circumstances.
■ Advantages: Easy to perform in the Management Console.
■ Limitations: Could require access to the local system to restart the container.
◆ To initialize a broker’s data store to modify security
1. Stop the container that hosts the broker you want to initialize.
2. In the Sonic Managememt Console’s Configure tab, select the container name then right-click on the hosted broker name in the right panel. Choose Properties. Clear the AutoStart option, as shown:
3. Click OK.
4. Restart the container.
5. Choose the Manage tab. Expand the container, then click on the broker it hosts.
6. Right click and choose Initialize Storage > All > Recreate, as shown:
Figure 10. Shutting Off AutoStart
Progress SonicMQ Configuration and Management Guide 8.5 555

Chapter 15: Managing SonicMQ Brokers
The broker’s data store tables recreated in the target folder. You can observe the initialization activities in the container’s console window.
7. Right click on the container then choose Operations > Shutdown.
8. Right click on the container again then choose Goto ‘Configure’.
9. With the container selected, right click on the component Broker0003 on the right panel, choose Properties then select the AutoStart option, as shown:
10. Save the change.
When the container restarts, it starts the broker with the recreated tables.
Run the Utility Locally that Performs Broker Operations
Every installed SonicMQ has the utility and properties file that lets you initialize data stores locally without using the management console. You must edit the properties file to make it consistent with the configuration in the domain.
■ Advantages: None. You might find it easier to just delete the existing data store and recovery logs and restart the broker’s container to automatically recreate them from the Directory Service configuration. You can rebuild an existing broker’s store by using dbtool locally. This is particularly useful when you want to enable security on a broker, yet disable the Quality of Protection (QoP) security.
■ Limitations: Requires access to the local system.
◆ To Initialize a Broker’s Data Store on the local system using dbtool:
The db.ini file is created by the installer and is not maintained by the domain manager thereafter. Any changes that you do in the Directory Service must be manually adjusted in the db.ini file before runing dbtool.
For this example assume that container ct004 hosts broker004 in Domain1
1. Stop the broker’s container.
2. Copy the file db.ini from MQ8.5_install_root and paste it into the broker’s container folder, install_root\Containers\Domain1.ct004
Note You can also create Duplicate Detection storage if you intend to use that feature. See the Progress SonicMQ Configuration and Management Guide for more information.
556 Progress SonicMQ Configuration and Management Guide 8.5

Broker Operations, Storage Actions, and Activation
3. Edit the file to indicate the locations of the broker’s store and the security settings:
a. Set the broker's name to the name of the broker you are working on: BROKER_NAME=Broker004
b. Set the location for the db connection—in this example:LOG_PATH=install_root\Containers\Domain1.ct004\log
c. Specify security parameters appropriately and in agreement with the broker configuration settings:❑ When security is not enabled:
ENABLE_SECURITY=false. ❑ When security is enabled and QoP is disabled—as in this example:
ENABLE_SECURITY=true
ENABLE_QOPSECURITY=false
❑ When security is enabled and QoP not disabled:ENABLE_SECURITY=true
ENABLE_QOPSECURITY=true
d. Message store location—in this example where an embedded database is used:MQSTORE_DB_CONNECT=install_root\Containers\Domain1.ct004\SonicMQStore
e. Save the modified db.ini in the install_root\Containers\Domain1.ct004 folder.
4. In a console window opened at MQ8.5__install_dir, enter—in this example:bin\dbtool /f .\Containers\Domain1.ct004\db.ini /r all
Under UNIX or Linux, the commandline would be:bin/dbtool -f ./Containers/Domain1.ct004/db.ini -r all
When you restart the container and broker, the specified security options are in effect.
Duplicate Detection
If you choose to create, recreate, or delete Duplicate Detection, the Sonic Management Console applies the broker operation to only the duplicate detection store.
The creation, recreation, and deletion of Duplicate Detection tables is independent from operations on the data store and the recovery logs.
For information on the behavior of duplicate message detection, see the “SonicMQ Client Sessions” chapter in the Progress SonicMQ Application Programming Guide.
Progress SonicMQ Configuration and Management Guide 8.5 557

Chapter 15: Managing SonicMQ Brokers
Synchronizing StorageThe state of the two brokers in a primary/backup pair can become inconsistent over time due to failures, new installations, and operations that take place while one of the two brokers is down. Synchronization updates one broker's state to match the other. Another broker must first synchronize its state to that of the active broker. After this is done, updates to the active broker can be propagated live to the standby broker.
There are two types of synchronization:
● Online synchronization is the process of synchronizing two brokers while one is actively servicing messaging operations. It is triggered automatically when one broker starts up, connects to the other, and finds it active.
To provide recovery from a single failure without interrupting service, a broker restarting after a failure will synchronize to an active broker while the latter is running. This process involves synchronizing the target to a source state that is constantly changing, and it will compete to some degree for resources with service requests from clients at the active broker, so it generally takes significantly longer than static initialization and might affect performance while it is in process.
● Storage Synchronization is the process of synchronizing two brokers while they are both down. It is an administrative operation similar to storage initialization (see “Storage Operations” on page 553). The synchronization operation updates the storage of the broker on which it is invoked.
Both brokers must be stopped, and the broker being synchronized must have file access to the installation path of the other broker and to its message store. For storage synchronization to work in either direction as required, both brokers must have network access to each other's installation path. The broker on which it is invoked must also have access to the recovery logs of both brokers.
When both brokers are down, the state of a broker can be synchronized with the state of another broker by synchronizing the storage files and message store directly. If the target broker appears to have more recent state than the source broker, an error is generated and the operation stops.
The following procedure describes how to synchronize storage between the primary and backup brokers. The synchronize storage operation requires that both the target and source broker components be offline. Since synchronizing storage is a time consuming operation, the invoke timeout is increased to 2 minutes for this operation. (The default is 30 seconds.
558 Progress SonicMQ Configuration and Management Guide 8.5

Broker Operations, Storage Actions, and Activation
◆ To synchronize storage:
1. In the Manage tab, confirm that both the target and source brokers are offline, or stop the broker. (See “Stopping Brokers” on page 551.)
2. Select the source broker, right click, and select Synchronize Storage…. The Specify Source Storage Location dialog box opens:
3. Specify the file system path to the source broker's container’s working directory. The Sonic Management Console synchronizes the storage on the brokers.
Activating BrokersWhen using the Continuous Availibility feature of broker replication, one peer broker in the WAITING state can usually be directed by an administrator to recover from its local storage and become active, by invoking a management operation. If the START_ACTIVE property is set on the broker, it will do the same automatically on startup. (See the advanced broker property START_ACTIVE, described on “Selected Advanced Broker Properties” on page 242.)
Startup Roles in Replicated Brokers
When a replicating broker starts up, it must determine whether to become active with its current recoverable state, or to try to connect to a running peer broker and synchronize to that broker's state:
● A primary broker without a configured backup recovers from its local storage immediately. It transitions to the STANDALONE state, and stays in that state indefinitely (until it is shut down or fails).
● A backup broker, or a primary with a configured backup, normally attempts to establish all replication connections to its peer on startup. If none succeed, they are retried at regular intervals indefinitely. While in this state (the WAITING state), the broker does not accept any other connections and has yet to recover messaging state.
If the broker starting up does connect to a running peer, it will find it either in the STANDALONE state or in the WAITING state. If the other broker is STANDALONE, the one in the WAITING state transitions to STANDBY_SYNC and synchronizes.
If both brokers are waiting, the roles are resolved according to the following rules:
Progress SonicMQ Configuration and Management Guide 8.5 559

Chapter 15: Managing SonicMQ Brokers
● If only one of the two brokers is recovering from a previous STANDALONE state, that broker will become ACTIVE.
● If the brokers were static-synchronized prior to restarting, the primary becomes ACTIVE and the backup becomes STANDBY.
● If one broker was previously ACTIVE and the other STANDBY (concurrent failure of both brokers once fully synchronized), the brokers will resume their previous roles.
● If both brokers were previously STANDALONE, this implies they were previously partitioned (or manually activated without proper synchronization). Both brokers will shut down, and one of the two brokers must be reinitialized, and its state lost, before both brokers can resynchronize.
Manually Activating a Waiting CAA Broker
A fault tolerant broker cannot be activated (throws an exception) if the broker is restarting after a crash that ocured during or after online sync with its peer broker (it failed during standby sync, or in waiting after a connection failure during standby sync). In this case, the local storage is not necessarily consistent, and the broker cannot recover directly from it.
Administrators should not manually activate a broker unless they are certain that broker contains the most recent recoverable state. Manual activation is provided primarily as a means to force one of the brokers active if the other has been lost due to a catastrophic hardware failure, and its state will not be recoverable. Inappropriate manual activation can cause the recoverable states of the two brokers to become inconsistent and might ultimately lead to data loss or duplication.
The following procedure describes how to activate a waiting broker. This causes a broker in a WAITING state to transition to a STANDALONE state and recover from its own recoverable state.
◆ To activate a waiting broker:
❖ In the Manage tab, select the waiting peer broker, right click, and select Activate Broker.
The Sonic Management Console puts that broker into the active role.
560 Progress SonicMQ Configuration and Management Guide 8.5

Compacting Storage
Flushing and Updating Cached Certificate Revocation ListsOn the Sonic Management Console’s Manage tab, if you click on a running broker, you can choose Action > Force a CRL Cache Flush and Update.
When you select a listed CRL cache (as shown in the example) and click OK you force the cached CRL to be flushed on the running broker and an update of that CRL cache to be initiated immediately. For each CRL that is updated, the elapsed time in its refresh interval and elapsed time in its cache lifetime are reset.
Compacting StorageCompacting storage lets you release allocated, yet unused file system space in the datastore for a broker that is using the embedded store. Compacting storage retains all the data in the store, but frees up the unused file system storage. When a broker’s storage has been forced to grow large because of operational conditions (such as large messages and substantial numbers of undelivered messages), relief of those conditions does not reduce the size of the space allocated to the store. There is no overhead to having a large, substantially empty storage area.
Compacting the store when the growth of the store is a cyclical condition such as routine end-of-month volumes, is not recommended. However, when a store is clearly oversized, the action of compacting storage relieves the condition.
Important To compact storage, you must have available disk space that is equivalent to the size of the existing store, plus a few additional megabytes. If inadequate space is available on the same drive as the original store, use a working directory on another storage device.
Progress SonicMQ Configuration and Management Guide 8.5 561

Chapter 15: Managing SonicMQ Brokers
The administrative task of compacting storage uses the SonicMQ dbtool utility locally because the storage usage, disk space, and working directory are not easily observed from a remote system. The additional parameters and the action command for compaction are:
● file | f — As with all dbtool operations, you must provide the f parameter to identify the explicit path to the db.ini file of the data store you intend to compact.
● working_dir | w — Compacting storage is a create-copy-replace set of actions. As such, you might need to use the w parameter to specify a working directory on a device that has adequate storage to handle the intermediate files during the process.
● z — The action for compaction. The command must always follow the parameters.
◆ To use dbtool to compact a broker’s storage:
Assume that you want to compact a broker’s storage in a default Windows location (C:\Sonic), and you need to use another drive (D:) for the working directory.
1. Stop the broker. (See “Stopping Brokers” on page 551.)
2. Open a console window and change directory to sonic_install_dir\MQ8.5.
3. Enter: bin\dbtool /f db.ini /w D:\temp /z
The dbtool syntax under UNIX and Linux uses a dash instead of a forward slash. For example, a similar command on a Linux system would be:
./bin/dbtool.sh -f ./db.ini -w /usr/temp -z
The compaction operation might take a significant amount of time. Until the compaction action has completed, do not reload or start the broker, or attempt other storage operations.
You can use methods in the runtime management API, as used in the sample application DBCompaction.java sample, described in the chapter “Using the Runtime API for the Sonic Management Environment” in the Progress SonicMQ Administrative Programming Guide.
Sample DBCompaction Application
The runtime management API enables programmatic compacting of storage at remote locations. The sample named DBCompaction.java located at sonic_install_dir\MQ8.5\samples\Management\runtimeAPI\javaProxy shows how these methods enable and manage compaction. The sample provides a foundation for creating a programmatic storage compaction utility.
Important The utility will not create the working directory if it does not exist.
562 Progress SonicMQ Configuration and Management Guide 8.5
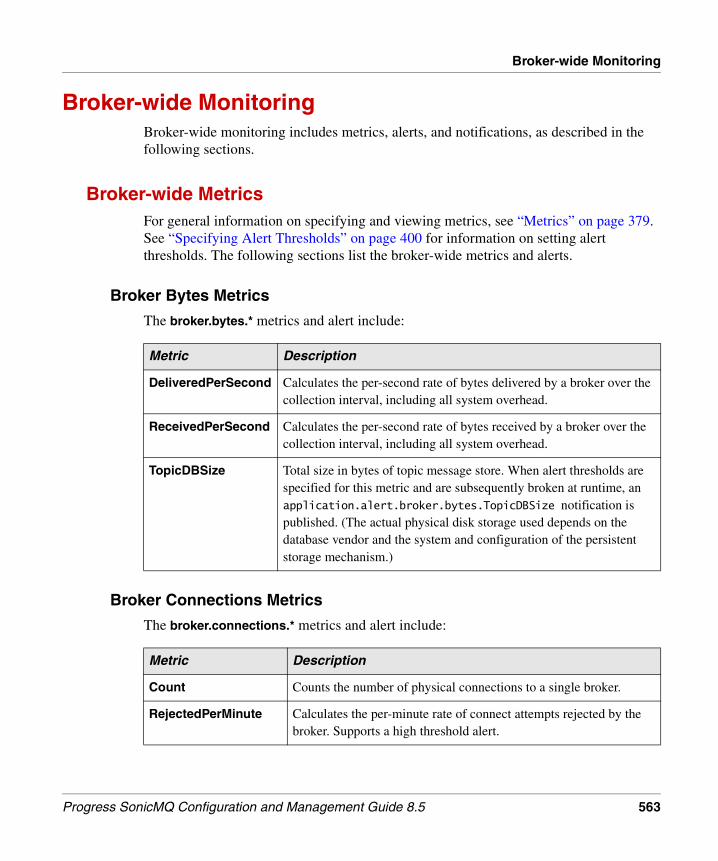
Broker-wide Monitoring
Broker-wide Monitoring Broker-wide monitoring includes metrics, alerts, and notifications, as described in the following sections.
Broker-wide MetricsFor general information on specifying and viewing metrics, see “Metrics” on page 379. See “Specifying Alert Thresholds” on page 400 for information on setting alert thresholds. The following sections list the broker-wide metrics and alerts.
Broker Bytes Metrics
The broker.bytes.* metrics and alert include:
Broker Connections Metrics
The broker.connections.* metrics and alert include::
Metric Description
DeliveredPerSecond Calculates the per-second rate of bytes delivered by a broker over the collection interval, including all system overhead.
ReceivedPerSecond Calculates the per-second rate of bytes received by a broker over the collection interval, including all system overhead.
TopicDBSize Total size in bytes of topic message store. When alert thresholds are specified for this metric and are subsequently broken at runtime, an application.alert.broker.bytes.TopicDBSize notification is published. (The actual physical disk storage used depends on the database vendor and the system and configuration of the persistent storage mechanism.)
Metric Description
Count Counts the number of physical connections to a single broker.
RejectedPerMinute Calculates the per-minute rate of connect attempts rejected by the broker. Supports a high threshold alert.
Progress SonicMQ Configuration and Management Guide 8.5 563

Chapter 15: Managing SonicMQ Brokers
Broker Messages Metrics
The broker.messages.* metrics include::
Metric Description
Delivered Counts the total number of application messages delivered by a broker since broker startup, or since the last metric reset directive.
DeliveredPerSecond Calculates the per-second rate of application messages received by a broker over the statistics collection interval.
Received Counts the total number of application messages received by a broker since broker startup or since the last metric reset directive, including messages sent by:
● JMS client
● Remote broker on a DRA connection
● Another broker in a cluster (interbroker)
● Administrative connection
ReceivedPerSecond Calculates the per-second rate of application messages received by a broker over the statistics collection interval.
564 Progress SonicMQ Configuration and Management Guide 8.5

Broker-wide Monitoring
Broker-wide Notifications and AlertsFor general information on specifying and viewing notifications, see “Notifications” on page 403; see “Specifying Alert Thresholds” on page 400 for information on setting alert thresholds. The following sections list the broker-wide alerts and notifications.
Application Alerts
The broker-wide application.alert.* alerts include:
Alert Description
broker.bytes.DeliveredPerSecond
Alert for broker instance metric, bytes DeliveredPerSecond (high and low thresholds)
broker.bytes.ReceivedPerSecond
Alert for broker instance metric, bytes ReceivedPerSecond (high and low thresholds)
broker.bytes.TopicDBSize
Alert for broker bytes metric, TopicDBSize (high thresholds)
broker.connections.Count
Alert for broker connection metric, Count (high thresholds)
broker.connections.RejectedPerMinute
Alert for broker connection metric, RejectedPerMinute (high thresholds)
connection.bytes.DeliveredPerSecond
Alert for connection instance metric, bytes DeliveredPerSecond (high and low thresholds)
connection.bytes.ReceivedPerSecond
Alert for connection instance metric, bytes ReceivedPerSecond (high and low thresholds)
connection.messages.DeliveredPerSecond
Alert for connection instance metric, messages DeliveredPerSecond (high and low thresholds)
connection.messages.ReceivedPerSecond
Alert for connection instance metric, messages ReceivedPerSecond (high and low thresholds)
queue.messages.Count Alert for queue instance metric, Count (high thresholds)
queue.messages.DeliveredPerSecond
Alert for queue instance metric, messages DeliveredPerSecond (high and low thresholds)
Progress SonicMQ Configuration and Management Guide 8.5 565

Chapter 15: Managing SonicMQ Brokers
Application Connection Notifications
The broker-wide application.connection.* notifications include:
Replication Connection Notifications
When replication connections are established, and when they fail, the broker detecting the failure will raise a notification to management console. The broker-wide application.connection.* notifications for replications connections are:
queue.messages.ReceivedPerSecond
Alert for queue instance metric, messages ReceivedPerSecond (high and low thresholds)
queue.messages.Size Alert for queue instance metric, Size (high thresholds)
Alert Description
Notification Description
Connect Connection connected
Disconnect Connection disconnected
Drop Connection dropped
Reconnect Connection reconnected
Redirect Connection redirected to another broker
Reject Connection attempt rejected
Notification Description
ReplicationConnect Recent failure might have been a transient one or confirms that a more serious failure has been corrected.
ReplicationDisconnect Indicates at least a loss of network redundancy in the system. A subsequent failure before the first one is corrected could lead to downtime.
ReplicationRetry Shows the number of replication channels and the next retry interval.
566 Progress SonicMQ Configuration and Management Guide 8.5

Broker-wide Monitoring
Application Flow Control Notifications
The broker-wide application.flowcontrol.* notifications include:
You can disable the flow to disk notifications by setting the advanced broker parameter, BROKER_PUBSUB_PARAMETERS.FLOW_TO_DISK_NOTIFY, to false. By default, this parameter is set to true.
Application Global Subscription Notifications
The broker-wide application.globalSubscriptions.* notifications include:
Application Message Notification
The broker-wide application.message.* notification is:
Notification Description
EndFlowToDisk Flow to disk stopped for subscriber
PubPause Publisher paused due to flow control
PubResume Publisher resumed after flow control
SendPause Sender paused due to flow control
SendResume Sender resumed after flow control
StartFlowToDisk Flow to disk started for subscriber
EndFlowToDisk Flow to disk ended for subscriber
Notification Description
SubscribeFailure Subscription undelivered to requested remote node
SubscriptionDeleted Remote subscription manually deleted
SubscriptionExpired Remote subscription has expired
Notification Description
Undelivered Message not delivered to requested destination (and set to JMS_SonicMQ_notifyUndelivered)
Progress SonicMQ Configuration and Management Guide 8.5 567

Chapter 15: Managing SonicMQ Brokers
Application Consumer Notifications The application.consumer.* notification types are:
Application State NotificationsThe broker-wide application.state.* notifications are:
System State NotificationsThe broker-wide system.state.* notifications are:
:
Notification Description Attributes
Subscribe A notification is emitted when an application subscribes to a topic pattern.
Topic name and subscription name
Unsubscribe A notification is emitted when an application unsubscribes from a topic pattern, whether explicitly in the application or because the session ended.
SubscriberResume A notification is emitted when a durable subscriber resubscribes to an established durable subscription.
SubscriberPause A notification is emitted when a durable subscriber closes its subscriber session without unsubscribing.
AcknowledgementPause
A notification is emitted when a durable subscriber pauses acknowledging messages.
StartReceive A notification is emitted when an application starts a queue receiver.
Queue name
EndReceive A notification is emitted when an application stops a queue receiver, whether done explicitly in the application or because the session ended.
DMQCapacity Dead message queue capacity warning
LogCapacity Recovery log capacity warning
ReplicationStateChange Replication state change.
Offline Broker stop complete
Online Broker start complete
568 Progress SonicMQ Configuration and Management Guide 8.5

Interbroker Notifications
Interbroker NotificationsFlow control notifications might show that an interbroker connection is causing publishers to flow-control, but the notifications do not provide enough information to determine why the interbroker connection is blocked.
The option to generate interbroker notifications and the frequency of such notifications is determined by the property Flow Control Monitor Interval on a cluster (overriding the setting on member brokers) and on each broker’s common routing properties. The default value is 15 seconds, and a value of 0 shuts off monitoring flow control. The management property is dynamic: when the monitor interval is changed, it will take a couple monitor intervals for the change to be reflected in the notifications.
To obtain the most complete information about DRA flow control conditions, cluster flow control notifications should be monitored in addition to DRA flow control notifications. Cluster flow control notifications will cover the scenario where one clustered broker is routing messages to a remote destination via another clustered broker and the cluster connection is blocked.
An attribute in a cluster flow control ‘pause’ notification indicates whether flow control on the connection is affecting routing traffic.
Cluster Flow Control NotificationsA cluster is a configuration of brokers working in concert in the same domain. As such, notifications from all the brokers in a cluster are accessible to an administrator of the domain.
When a cluster has a positive Flow Control Monitor Interval value, the cluster will provide two notifications: a pause notification to note that a broker connection is unable to send messages, and a resume notification to note that sending has resumed.
Note Sample Management application — Sonic developmemt environments provide a Runtime API sample, BrokerFlowControlNotificationReporter, which demonstrates the use of Cluster and DRA flow control notifications to identify when connections between brokers are blocked.
Progress SonicMQ Configuration and Management Guide 8.5 569

Chapter 15: Managing SonicMQ Brokers
The cluster application.flowcontrol.* notifications are::
Attributes of a ClusterConnectionPause Notification
The attributes of the application.flowcontrol.ClusterConnectionPause notification are:
Notification Description
ClusterConnectionPause To produce the pause notifications, the sending side of each broker connection in the cluster is checked once per interval to determine whether it is flow-controlled. If a connection has been flow controlled for a full interval, a notification is sent. The pause notification contains the list of resources that are blocking the connection. Both pubsub resources (blocking subscribers), and blocking global queues (or topics) are included in the notification. Pause notifications will be sent once per monitor interval for as long as the connection remains flow-controlled.
ClusterConnectionResume This notification is sent when sending on the cluster connection has resumed after the connection has been blocked for a full monitor interval. Sending can resume when a queue destination is no longer blocked, or the minimum priority of messages that can be sent has been adjusted downwards. There can be multiple resume notifications following a pause notification.
Attribute Description
Broker The name of the broker that generated the notification
Routing Routing node name of the broker that generated the notification
BlockedBroker The Broker name of the blocked connection (could be different from the broker that produced the notification). This is the sending broker.
BlockedPendingQueue The name of the queue containing messages for remote destinations that are blocked as a result of the blocked cluster connection. A non-zero length value for BlockedPendingQueue indicates that the RoutingQueue is filling up with messages waiting to go over the interbroker connection. For viewers of notifications, this serves as a hint that the cause of a backup in the RoutingQueue is the interbroker connection.
BlockingBroker The broker where the blocking resources reside (this is the receiving broker).
BlockingType Array of 1 or 2 elements, containing "PUBSUB", "PTP", depending on the additional info present in this notification.
570 Progress SonicMQ Configuration and Management Guide 8.5

Interbroker Notifications
A ClusterConnectionPause notification indicates that a connection to another broker has messages which it cannot send because it has been instructed to limit sending. More about the attributes:
● Blocked* attributes identify the sending side of the Connection
● BlockedBroker is the sending broker;
● Blocking* attributes identify the resources that are causing the connection to block.
● BlockingBroker is the receiving broker. The resources (subscriber data and destinations) are relative to the receiving broker.
● BlockingType indicates the type of flow control described in this notification. If BlockingType contains "PTP", the BlockingDestinations array contains additional info. If BlockingType contains "PUBSUB", the other Blocking* attributes contain additional info. A single notification may contain data for both blocking types. If any of the Blocking* data is not applicable, a zero-length array is returned.
● Broker is the name of the broker that produced the notification. No relationship can be assumed between the Broker value and the values for BlockedBroker or BlockingBroker. The Broker value will be one of {BlockedBroker, BlockingBroker}, but the specific one is implementation dependent and may change in the future.
● Routing value applies to all the brokers in the notification.
BlockingPriority The minimum priority of messages that can be sent.
BlockingDurableSubscriptionNames
Array of durable subscription names that are blocking the sending broker
BlockingDurableUsers Array of userIds of durable subscriptions blocking the sending broker
BlockingDurableConnectIDs Array of connectIds of connections that own blocking durable subscriptions
BlockingDurableClientIDs Array of clientIds of durable subscriptions that are blocking the sending broker
BlockingNonDurableUsers Array of userIds of nondurable subscriptions blocking the sending broker
BlockingNonDurableConnectIDs
Array of connectIds of connections that own blocking nondurable subscriptions
BlockingNonDurableTopics Array of topics of blocking nondurable subscriptions
BlockingDestinations Array of queue names that are blocking the sending broker
Attribute Description
Progress SonicMQ Configuration and Management Guide 8.5 571
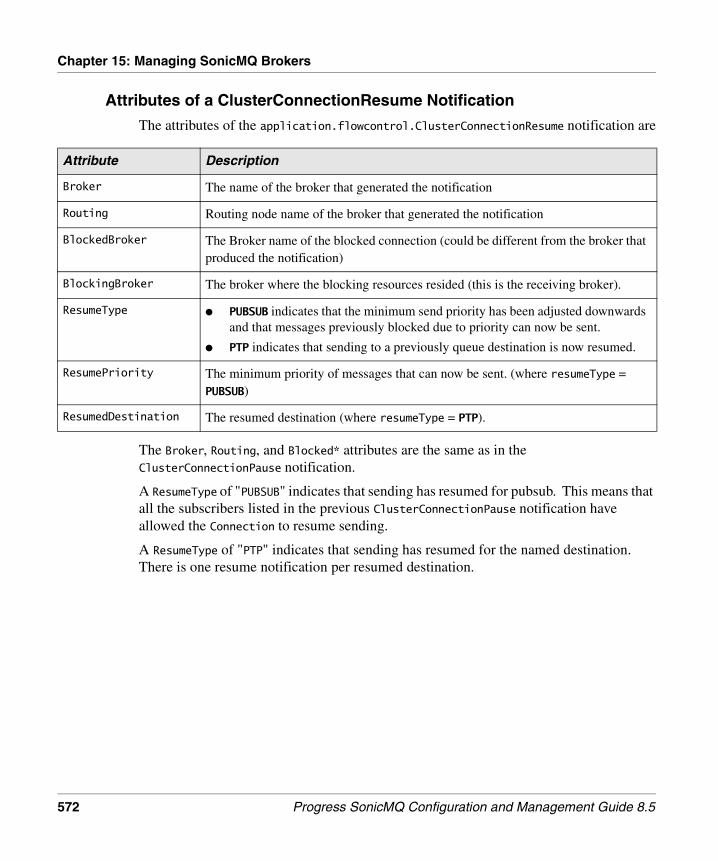
Chapter 15: Managing SonicMQ Brokers
Attributes of a ClusterConnectionResume Notification
The attributes of the application.flowcontrol.ClusterConnectionResume notification are
The Broker, Routing, and Blocked* attributes are the same as in the ClusterConnectionPause notification.
A ResumeType of "PUBSUB" indicates that sending has resumed for pubsub. This means that all the subscribers listed in the previous ClusterConnectionPause notification have allowed the Connection to resume sending.
A ResumeType of "PTP" indicates that sending has resumed for the named destination. There is one resume notification per resumed destination.
Attribute Description
Broker The name of the broker that generated the notification
Routing Routing node name of the broker that generated the notification
BlockedBroker The Broker name of the blocked connection (could be different from the broker that produced the notification)
BlockingBroker The broker where the blocking resources resided (this is the receiving broker).
ResumeType ● PUBSUB indicates that the minimum send priority has been adjusted downwards and that messages previously blocked due to priority can now be sent.
● PTP indicates that sending to a previously queue destination is now resumed.
ResumePriority The minimum priority of messages that can now be sent. (where resumeType = PUBSUB)
ResumedDestination The resumed destination (where resumeType = PTP).
572 Progress SonicMQ Configuration and Management Guide 8.5

Interbroker Notifications
Routing Connection (DRA) Flow Control NotificationsA routing connection provides a way for an application to dynamically route a message through a connected broker to a destination on another broker. As the brokers involved in a DRA routing connection could be in different management domains, the point of view of an administrator in one of those domains will be constrained.
Flow control notifications for dynamic routing are similar in concept to cluster flow control notifications. The outgoing side of the routing connection is monitored once per configured interval to check whether it is flow controlled. A connection is flow-controlled if it has messages to send, but is unable to send them because it has received a directive from its peer to limit sending. It can only send messages higher than a certain priority (Pub/Sub flow control) or messages that are not for blocked destinations (PTP flow control). If the connection has been flow-controlled for a whole monitor interval, a flow control ‘pause’ notification will be sent. Notifications will be sent once per monitor interval as long as the connection remains flow controlled.
A resume notification is sent when the connection receives a directive to resume sending. While the ‘pause’ notification combines pubsub and ptp data into a single notification, resume notifications are sent when the individual resume event occurs.
To provide the data for a notification, the sending connection identifies that it is flow controlled and the receiving broker supplies the details about blocking resources. The receiving broker sends the notification. When brokers are in the same management domain, the notifications are visible to administrators of both brokers.
However, for routing connections, sending broker and the receiving broker are often in different management domains. A notification produced by the receiving broker’s domain may not be visible in the sending broker’s domain. Furthermore, data from the receiving broker about blocking resources (subscribers) is not meaningful in the sending broker’s domain, and exposing the information would present a security violation. Even without all the data about the source of flow control, a sender-side notification can be useful in alerting an administrator to problems with the routing connection.
For this reason, DRA flow control notifications are produced on both the sending and the receiving brokers. Notifications generated on a sender side will have a different notification name than notifications generated on the receiver size. Users can select which notifications to subscribe to depending on their environment. The sender side notifications will not contain details of blocking subscribers, but will indicate the blocking type (pubsub or ptp) and blocking priority.
Progress SonicMQ Configuration and Management Guide 8.5 573

Chapter 15: Managing SonicMQ Brokers
Pause Notifications on Routing ConnectionsA ‘pause’ notification indicates that a DRA routing connection is unable to send messages. To produce the pause notifications, the sending side of each DRA connection is checked once per monitor interval to determine whether it is flow-controlled. If the connection has been flow controlled for a full interval, the routing connection application.flowcontrol.* Pause notifications sent are:
:
Pause notifications are produced once per monitor interval for as long as the connection remains flow-controlled.
Notification Description
RoutingConnectionPause Sent by the receiving broker. The pause notification contains the list of resources that are blocking the connection. Both pubsub resources (blocking subscribers), and blocking global queues (or topics) are included in the notification. This notification indicates that a connection to another broker has messages which it cannot send because it has been instructed to limit sending. The “Blockedxxx” attributes identify the sending side of the Connection. The “BlockedBroker” is the sending broker; the "BlockedRoutingNode" is the Routing Node of the sending broker.
The “Blockingxxx” attributes identify the resources that are causing the connection to block. The BlockingBroker is the receiving broker. The resources (subscriber data and destinations) are relative to the receiving broker. BlockingType indicates the type of flow control described in this notification. If BlockingType contains “PTP”, the BlockingDestinations array contains additional info. If BlockingType contains “PUBSUB”, the other Blockingxxx attributes contain additional info. A single notification may contain data for both blocking types. If any of the Blockingxxx data is not applicable, a zero-length array is returned.
RoutingConnectionSenderPause
Sent by the sending broker. This notification is similar to the RoutingConnectionPause notification, but it does not contain blocking subscriber information.
574 Progress SonicMQ Configuration and Management Guide 8.5

Interbroker Notifications
Attributes of a RoutingConnectionPause Notification
The attributes of the application.flowcontrol.RoutingConnectionPause notification are:
Attribute Description
Broker The name of the broker that generated the notification
Routing Routing node name of the broker that generated the notification
BlockedRoutingNode The routing node name of the broker that cannot send.
BlockedBroker The Broker name of the blocked connection (could be different from the broker that produced the notification). This is the sending broker.
BlockingRoutingNode The routing node name of the blocking broker.
BlockingBroker The broker where the blocking resources reside (this is the receiving broker).
BlockingType Array of 1 or 2 elements, containing "PUBSUB", "PTP", depending on the additional info present in this notification.
BlockingPriority The minimum priority of messages that can be sent.
BlockingDurableSubscriptionNames
Array of durable subscription names that are blocking the sending broker
BlockingDurableUsers Array of userIds of durable subscriptions blocking the sending broker
BlockingDurableConnectIDs Array of connectIds of connections that own blocking durable subscriptions
BlockingDurableClientIDs Array of clientIds of durable subscriptions that are blocking the sending broker
BlockingNonDurableUsers Array of userIds of nondurable subscriptions blocking the sending broker
BlockingNonDurableConnectIDs
Array of connectIds of connections that own blocking nondurable subscriptions
BlockingNonDurableTopics Array of topics of blocking nondurable subscriptions
BlockingDestinations Array of queue names that are blocking the sending broker
Progress SonicMQ Configuration and Management Guide 8.5 575

Chapter 15: Managing SonicMQ Brokers
Attributes of a RoutingConnectionSenderPause Notification
The attributes of the application.flowcontrol.RoutingConnectionSenderPause notification are:
Resume Notifications on RoutingConnections
Resume notifications are sent when sending on the DRA connection has resumed. Sending can resume when a queue destination is no longer blocked, or the minimum priority of messages that can be sent has been adjusted downwards. There can be multiple resume notifications following a pause notification.
The Broker, Routing, and Blocked* attributes are the same as in the RoutingConnectionPause notification.
A ResumeType of "PUBSUB" indicates that sending has resumed for pubsub. This means that all the subscribers listed in the previous ClusterConnectionPause notification have allowed the Connection to resume sending.
A ResumeType of "PTP" indicates that sending has resumed for the named destination. There is one resume notification per resumed destination.
Attribute Description
Broker The name of the broker that generated the notification
Routing Routing node name of the broker that generated the notification
BlockedRoutingNode The routing node name of the broker that cannot send.
BlockedBroker The Broker name of the blocked connection (could be different from the broker that produced the notification). This is the sending broker.
BlockingRoutingNode The routing node name of the blocking broker.
BlockingBroker The broker where the blocking resources reside (this is the receiving broker).
BlockingType Array of 1 or 2 elements, containing "PUBSUB", "PTP", depending on the additional info present in this notification.
BlockingPriority The minimum priority of messages that can be sent.
BlockingDestinations Array of queue names that are blocking the sending broker
576 Progress SonicMQ Configuration and Management Guide 8.5

Interbroker Notifications
The cluster application.flowcontrol.* Resume notifications are::
Attributes of a RoutingConnectionResume Notification
The attributes of the application.flowcontrol.RoutingConnectionResume notification are
Notification Description
RoutingConnectionResume
Notification sent when sending on the cluster connection has resumed after the connection has been blocked for a full monitor interval. Sending can resume when a queue destination is no longer blocked, or the minimum priority of messages that can be sent has been adjusted downwards. There can be multiple resume notifications following a pause notification. .
RoutingConnectionSenderResume
Attribute Description
Broker The name of the broker that generated the notification
Routing Routing node name of the broker that generated the notification
BlockedRoutingNode The routing node name of the formerly blocked broker
BlockedBroker The Broker name of the blocked connection (could be different from the broker that produced the notification)
BlockingBroker The broker where the blocking resources resided (this is the receiving broker).
BlockingRoutingNode The routing node name of the blocking broker
ResumeType ● PUBSUB indicates that the minimum send priority has been adjusted downwards and that messages previously blocked due to priority can now be sent.
● PTP indicates that sending to a previously queue destination is now resumed.
ResumePriority The minimum priority of messages that can now be sent. (where resumeType = PUBSUB)
ResumedDest The resumed destination (where resumeType = PTP).
Progress SonicMQ Configuration and Management Guide 8.5 577

Chapter 15: Managing SonicMQ Brokers
Attributes of a RoutingConnectionSenderResume Notification
The attributes of the application.flowcontrol.RoutingConnectionSenderResume notification are:
Attribute Description
Broker The name of the broker that generated the notification
Routing Routing node name of the broker that generated the notification
BlockedRoutingNode The routing node name of the formerly blocked broker
BlockedBroker The name of the formerly blocked broker (could be different from the broker that produced the notification)
BlockingRoutingNode The routing node name of the blocking broker
BlockingBroker The broker where the blocking resources resided (this is the receiving broker).
ResumeType ● PUBSUB indicates that the minimum send priority has been adjusted downwards and that messages previously blocked due to priority can now be sent.
● PTP indicates that sending to a previously queue destination is now resumed.
ResumePriority The minimum priority of messages that can now be sent. (where resumeType = PUBSUB)
ResumedDest The resumed destination (where resumeType = PTP).
578 Progress SonicMQ Configuration and Management Guide 8.5

Chapter 16 Managing SonicMQ Broker Activities
This chapter describes how to manage and monitor the following runtime activities on a broker:
● “Advertised Global Queues” — Describes how to view and clear global queues on other brokers in a cluster, global queues on nodes that connected previously but might be disconnected now, or have advertised to this node.
● “Connections” — Describes how to view and drop connections. It also describes the available connection instance metrics and connection notifications.
● “Durable Subscriptions” — Describes how to browse and delete durable subscriptions as well as individual messages. It also describes the available broker metric for durable subscriptions.
● “Global Subscriptions” — Describes how to view, refresh, reconcile, and delete global subscriptions. It also describes the available notifications.
● “Queues”— Describes how to view, refresh, and browse queues, as well as how to clear messages from queues. It also describes the available queue instance metrics.
● “Routing Statistics” — Describes how to view the count of messages waiting on the routing queue for a particular routing node.
● “XA Transactions” — Describes how to view and refresh XA transactions, as well as how to commit and roll back prepared transaction branches.
Progress SonicMQ Configuration and Management Guide 8.5 579

Chapter 16: Managing SonicMQ Broker Activities
IntroductionThis chapter describes how to manage and monitor the runtime activities on a broker displayed if you select a standalone or a primary broker in the Manage tab:
These broker activities are described in the following sections:
● “Advertised Global Queues” on page 581
● “Connections” on page 582
● “Durable Subscriptions” on page 588
● “Global Subscriptions” on page 598
● “Queues” on page 602.
● “Routing Statistics” on page 606
● “SOAP Reliable Sequences” on page 607
● “XA Transactions” on page 608
580 Progress SonicMQ Configuration and Management Guide 8.5

Advertised Global Queues
Advertised Global QueuesFor information on configuring global queues, see “Individual Queues” on page 365. See the “Clusters” chapter in the Progress SonicMQ Deployment Guide for information on cluster-wide access to global queues.
Advertised global queues include:
● Global queues on other brokers in a cluster
● Global queues on nodes that:
■ Connected previously but might be disconnected now
■ Have advertised to this node
Viewing Advertised Global QueuesThe following procedure describes how to view global queues advertised to this broker.
◆ To view advertised global queues:
1. Open the Sonic Management Console, connect to a domain as described in “Running the Sonic Management Console” on page 38, and select the Manage tab.
2. Under a broker configuration, select Advertised Global Queues:
Progress SonicMQ Configuration and Management Guide 8.5 581

Chapter 16: Managing SonicMQ Broker Activities
The Advertised Global Queues table lists the global queues known to the broker by:
Enter a prefix in Filter Using Prefix to apply a filter to the routing node names in the table and click Refresh to refresh the display.
Clearing Advertised Global QueuesThe following procedure describes how to clear one or more advertised global queues.
◆ To clear advertised global queues:
1. Under a broker configuration, select Global Queues, as shown on page 581.
2. Select one or more queues in the Global Queues table, right-click, and click Clear Advertised Global Queue(s).
The Sonic Management Console clears the selected queues.
ConnectionsSonicMQ uses several different types of connections, including:
● Client connection — Connection between an application client and a broker or cluster, including management applications such as the Sonic Management Console
● Interbroker connection — Connection between a brokers in a SonicMQ cluster (see “Configuring Clusters” on page 250).
● Routing connection — Connection between brokers or clusters in a routing network (see “Configuring DRA Routing Definitions” on page 335)
Property Description
Routing Node Name of the routing node
Global Queue Name of the global queue
Note Clearing this list can possibly cause new messages sent to the queue from this broker to create a new routing connection to the remote node.
Note Interbroker and routing connections have an active connection from one broker to an acceptor URL on the other, and a passive connection on the other broker. When viewing interbroker and routing connections, the passive side of a broker-to-broker connection displays Acceptor URL as n/a.
582 Progress SonicMQ Configuration and Management Guide 8.5

Connections
Viewing ConnectionsThe following procedure describes how to view connections.
◆ To view connections:
1. Open the Sonic Management Console, connect to a domain as described in “Running the Sonic Management Console” on page 38, and select the Manage tab.
2. Select a broker, expand it, and then click Connections.
The following window shows the connections on a management broker by the JMS Test Client, and the Chat sample:
The Durable Chat sample’s connection was selected, and that connection’s Durable Subscriber was selected. The lower left panel lists details about the subscriber, its session, and its connection.
Progress SonicMQ Configuration and Management Guide 8.5 583

Chapter 16: Managing SonicMQ Broker Activities
3. Right-click on the broker’s Connections and choose Show System Connections
4. The following window shows the system connections as well as the JMS Test Client, the DurableChat sample, and the Chat sample connections:
The ct2 management container’s connection was selected, and that connection’s session. The lower left panel lists details about the session, and its connection.
584 Progress SonicMQ Configuration and Management Guide 8.5

Connections
Viewing Session Names
When a JMS client has provided a name for a session, the session name becomes part of the application identifier. Then, connections can display the name of each session to make it easier to navigate to the associated consumers, as shown:
Dropping ConnectionsThe following procedure describes how to drop one or more connections.
◆ To drop a connection:
1. In the Manage tab, expand a broker and select Connections.
2. Select one or more connections in the Connections table, right-click, and select Drop Connection(s).
The Sonic Management Console drops the connections.
Progress SonicMQ Configuration and Management Guide 8.5 585

Chapter 16: Managing SonicMQ Broker Activities
Connection Instance Metrics, Alerts, and NotificationsYou can enable connection metrics for one or more connection instances or groups of connection instances. (Metrics cannot be enabled on internal non-JMS connections, such as interbroker or DRA connections.) For general information on specifying and viewing metrics, see “Metrics” on page 379. See “Instance Metrics” on page 383 for information on enabling and disabling instance metrics. See “Specifying Alert Thresholds” on page 400 for information on setting alert thresholds. For general information on specifying and viewing notifications, see “Notifications” on page 403.
Connection Instance Metrics
The connection.messages.* instance metrics are:
Metric Description
DeliveredPerSecond Per-second rate of application messages delivered by a specific connection. Messages are counted as they are being written to the wire. Supports high and low alert thresholds.
ReceivedPerSecond Per-second rate of application messages received by a specific connection. Application messages are counted as soon as they are read from the wire. Note that messages rejected because of PTP flow control are counted, potentially resulting in a message being counted as received multiple times. Supports high and low alert thresholds.
Received Total number of messages received from this connection in its lifetime.
Delivered Total number of messages delivered to this connection in its lifetime
586 Progress SonicMQ Configuration and Management Guide 8.5

Connections
The connection.bytes.* instance metrics are:
Connection Notifications
The application.connection.* notifications are:
Metric Description
DeliveredPerSecond Per-second rate of bytes delivered by a specific connection. Message bytes are counted as they are being written to the wire. Supports high and low alert thresholds.
ReceivedPerSecond Per-second rate of bytes received by a specific connection. Message bytes s are counted as soon as they are read from the wire. Note that message bytes in messages rejected because of PTP flow control are counted, potentially resulting in a message bytesbeing counted as received multiple times. Supports high and low alert thresholds.
Received Total number of message bytes received from this connection in its lifetime.
Delivered Total number of message bytes delivered to this connection in its lifetime
Notification Description
Connect Connection connected
Disconnect Connection disconnected
Drop Connection dropped
Reconnect Connection reconnected
Redirect Connection redirected to another broker
Reject Connection attempt rejected
ReplicationConnect Replication connection connected
ReplicationDisconnect Replication connection disconnected
Progress SonicMQ Configuration and Management Guide 8.5 587

Chapter 16: Managing SonicMQ Broker Activities
Durable SubscriptionsTopics are destinations in Pub/Sub messaging. When messages are published, they are delivered to all active subscribers. Durable subscriptions provide a mechanism to save messages for an unavailable client. See the “Publish and Subscribe Messaging” chapter in the Progress SonicMQ Application Programming Guide for more information on durable subscriptions.
Durable subscriptions are available cluster-wide. See the “Clustered Brokers” chapter in the Progress SonicMQ Deployment Guide for more information on clusterwide access to durable subscriptions.
Viewing Durable SubscriptionsDurable subscriptions are not configured; they are created by running a client application. They are displayed only in the Manage tab. Follow this procedure to view current durable subscriptions.
◆ To view durable subscriptions:
1. Open the Sonic Management Console, connect to a domain as described in “Running the Sonic Management Console” on page 38, and select the Manage tab.
588 Progress SonicMQ Configuration and Management Guide 8.5

Durable Subscriptions
2. Under the Containers folder, select a broker configuration > Durable Subscriptions:
The top panel lists Users and Groups:
■ A user is an individual durable subscriber (in this illustration, Vlad Dvorkin).
■ A group is one or more members of a shared subscription.
■ A group name qualified with a topic name is the name of the shared subscription—for example, [[g2]]Topic1. When a group qualified with a topic name is shown in the top panel, only durable members of that group are displayed in the lower panel.
■ A group name alone is the name of the shared multitopic subscription—for example, [[g1]]. When just group name is listed in the top panel, the lower panel summarizes the messages stored for the group.
Enter a prefix in Filter Using Prefix to apply a prefix to the user names in the table, and click Refresh to refresh the display.
Progress SonicMQ Configuration and Management Guide 8.5 589

Chapter 16: Managing SonicMQ Broker Activities
The lower panel lists all durable subscriptions currently known by the broker by:
Property Property Property Description
Subscription Name
User Basic Subscription name of the durable subscription.
MultiTopic
Shared
Shared MultiTopic
Group Shared
[[group]]topic
Shared Multitopic [[group]]
*
Topic User Basic A single topic name.
MultiTopic A set of topic names in MULTITOPIC durable subscriptions.
Shared A single topic name with a group prefix.
Shared MultiTopic A set of topic names in MULTITOPIC durable subscriptions and a group prefix.
Group Shared [[group]]topic
The [[group]]topic name.
Shared Multitopic [[group]]
A [[group]] of MULTITOPIC durable subscriptions and the set of topic names that represent the intersection of topics specified by all durable subscribers in the group.
Client ID User Basic JMS ClientID of the connection.
MultiTopic
Shared
Shared MultiTopic
Group Shared [[group]]topic
Shared Multitopic [[group]]
*
590 Progress SonicMQ Configuration and Management Guide 8.5

Durable Subscriptions
CountNumber of pending messages for disconnected subscribers.
(Not aggregated for all brokers in a cluster).
User Basic Messages stored for the subscriber to the topic.
MultiTopic Messages for component topics of the MULTITOPIC.
Shared Messages for the topic that will be delivered to connected members of the group. This value appears on every member as a common value.
Shared MultiTopic Messages for the intersection of topics in all members of the shared multitopic group. This a subset of what would be stored for a shared subscription or a multitopic subscription. This value appears on every member as a common value.
Group Shared [[group]]topic
Messages for the topic that will be delivered to connected members of the group. This value is shown for one member only; all other members show 0.
Shared Multitopic [[group]]
Messages for only the intersection of topics in all members of the group—shared or shared multitopic.
Size all all The sum of the size of the messages in the Count.
Last Connected
User Basic Time and date when last connected; otherwise, Connected.MultiTopic
Shared
Shared MultiTopic
Group Shared [[group]]topic
Time and date when any member was last connected; otherwise, Connected.
Shared Multitopic [[group]]
Message Selector
User Basic Whether the durable subscription defined a message selector.MultiTopic
Shared Whether the durable subscription had a message selector. Shared subscriptions require that all message selectors are identical.
Shared MultiTopic
Group Shared [[group]]topic
Shared Multitopic [[group]]
Property Property Property Description
Progress SonicMQ Configuration and Management Guide 8.5 591

Chapter 16: Managing SonicMQ Broker Activities
3. Select a durable subscription and right-click to view its properties:
Note Shared Durable Subscriptions to MultiTopics — In the window shown on page 589, the messages retained for durable subscribers show that subscription DurableMulti123 and SharedDurableMulti123 have different counts. That is because there can only be one multitopic group subscription per group identifier—a subscription that is the intersection of the component subscriptions’ topics.
This behavior lets a user change the group subscription topic set without having to unsubscribe it and lose messages. If subscription [[g1]]MULTITOPIC:Topic1||Topic2 were a separate subscription from [[g1]]MULTITOPIC:Topic1||Topic2||Topic3, then changing [[g1]]MULTITOPIC:Topic1||Topic2 to include Topic3 would be a different subscription without the previously saved messages on Topic1 and Topic2. In this case, deleting SharedDurableMulti12 would cause SharedDurableMulti123 to retain messages for Topic3. Then, adding SharedDurableMulti12 again would drop messages for Topic3.
This visualization of all the subscriptions lets you see the component subscriptions so that you can determine what subscriptions in the group are preventing the group from picking up a new topic. In the window shown on page 589, an administrator can see that SharedDurablMulti12 is preventing the group g1 from including topic3.
For more about the application aspects of shared subscriptions, see the “Multitopics” section of the chapter “Publish and Subscribe Messaging” in the Progress SonicMQ Application Programming Guide.
592 Progress SonicMQ Configuration and Management Guide 8.5

Durable Subscriptions
4. Click on the Topic line and then click Details to open the Topic Builder in view mode to display the durable subscription’s group name and topic names in a layout:
Using the Durable Subscriptions Table You can use the durable subscriptions table to:
● Find the number of messages for a durable subscriber or shared subscription group (not aggregated for all brokers in a cluster).
● View the size of messages (in bytes) pending for a durable subscriber or shared subscription group (not aggregated for all brokers in a cluster).
● Find the last time a particular disconnected durable subscriber was connected. The last connection time of a durable subscriber can differ, depending on the broker that is being queried. (The connection time is based on the local broker.)
● View the number of messages in a durable subscription on a broker.
● View the durable subscriptions for a user.
● Delete durable subscriptions for a user. (You cannot delete a connected durable subscription until you disconnect it.)
Note Two subscribers that are not members of a shared subscription yet receiving the same message show the size of the same message in their size value. SonicMQ actually stores the message content once and references it for both durable subscribers so the actual storage is not represented as the sum of the sizes.
Note Time is relative to the broker. All system clocks in a cluster have a certain amount of clock skew. The time in the persistent storage mechanism is updated as the local brokers are notified of client disconnections. This time is dependent on local system clock settings and other internal factors.
Progress SonicMQ Configuration and Management Guide 8.5 593

Chapter 16: Managing SonicMQ Broker Activities
Deleting Durable SubscriptionsThe following procedure describes how to delete one or more durable subscriptions. You can only do this if no active durable subscribers are connected. You cannot delete the group as a method of deleting all the durable subscriptions in the group.
◆ To delete one durable subscription:
1. Click on the durable subscription that you want to delete.
2. Right-click, and select Delete.
The Sonic Management Console deletes the subscription you selected.
◆ To delete multiple durable subscriptions:
1. Sort the durable subscriptions as best possible so that subscriptions you want to delete are contiguous.
2. Click and drag across the subscriptions you want to delete.
3. Right-click, and select Delete.
The Sonic Management Console deletes the subscriptions you selected.
Note After a durable subscription is deleted, a client application can reconnect and re-create the durable subscription but all previously stored messages are lost for that sender.
594 Progress SonicMQ Configuration and Management Guide 8.5

Durable Subscriptions
Browsing Durable SubscriptionsYou can use the Durable Subscription Browser to browse durable subscription information when there is no durable subscriber currently connected. If a durable subscriber connects for the subscription you are browsing, you will see a warning that a durable subscriber has connected and the browser will not display new messages.
Keep these restrictions in mind while browsing durable subscriptions:
● All the brokers in a cluster are browsed once. New messages can be added to a durable subscription, however the browser does not automatically refresh. You have to re-open the browser.
● If the browser browses a durable subscription to completion, the browser moves on to browse the next broker in the cluster. If additional messages are added to the original durable subscription, the browser does not automatically refresh; you must re-open the browser to see them.
● If messages are added to a durable subscription faster than the browser can successfully browse them, the browser does not move on to a different broker to retrieve message information.
● Information located on brokers that are dynamically added during a browse is not displayed in the browser; you must reopen the browser to see it.
● It is possible to browse the same message twice in the case of a subscriber that moves. When a search is performed on durable subscriptions, the first broker to respond with a satisfactory search result is displayed.
● Members of a shared subscription group use a common persistent store. When you are viewing durable subscriptions, if you select an individual member in the top panel, the durable subscription table shows all of the messages in the group’s common persistent store, regardless of whether another member originally received the messages. If you select a group name in the top panel, all of the durable members of the group are displayed in the durable subscription table, but all of the messages are listed under a single member, chosen at random. To browse the messages, you must select the member under whom the messages are listed.
● Message ordering is not guaranteed.
Progress SonicMQ Configuration and Management Guide 8.5 595

Chapter 16: Managing SonicMQ Broker Activities
◆ To browse durable subscriptions:
1. In the Durable Subscriptions table, select a durable subscription for a subscriber that is disconnected
2. Right-click, and select Browse > Local Subscriptions or Browse > Cluster-wide Subscriptions. The Durable Subscription Browser opens:
3. Click on a message in the upper panel.
4. Click the Header, Property, and Body tabs to examine the selected message.You can use the Durable Subscription Browser to:
● Browse messages pending delivery for a particular durable subscription given the topic, clientID, or the name that identifies the durable subscription.
● Search messages pending delivery by a specific JMSMessageID by entering the JMSMessageID in the Search field and clicking the Search icon.
Note You cannot search for a message with a particular JMSMessageID while there is a connected durable subscriber for the associated durable subscription.
596 Progress SonicMQ Configuration and Management Guide 8.5

Durable Subscriptions
● View the content of messages with a specified JMSMessageID.
● Search for a particular JMSMessageID within a specific durable subscription. This enables you to keep a log of past JMSMessageIDs and perform searches based on those values.
● Remove a particular message, given a JMSMessageID, from a specific subscriber.
You can change the Buffer size and use the First, Next, and Last buttons to browse through messages.
Deleting Individual MessagesThe following procedure describes how to delete individual messages in the durable subscription browser, including the cluster-wide subscription browser.
◆ To delete selected messages:
1. In the Durable Subscriptions table, select a durable subscription for a subscriber that is not connected, right-click, and select Browse > Local Subscriptions or Browse > Cluster-wide Subscriptions. The Durable Subscription Browser opens, as shown on page 596.
2. Select a message in the Durable Subscriptions table, right-click, and click Delete. The Sonic Management Console deletes the message.
Monitoring Durable SubscriptionsYou can view metrics on durable subscriptions with this broker metric:
● broker.bytes.DurableSize — Total size in bytes of messages stored on behalf of all durable subscribers. It supports a high threshold alert.
See “Metrics” on page 379 for information on specifying and viewing metrics. See “Specifying Alert Thresholds” on page 400 for information on setting alert thresholds.
Note You cannot remove messages for a particular JMSMessageID while there is a connected durable subscriber to the durable subscription containing the JMSMessageID.Attempting to remove a nonexistent message (because of message expiration or delivery) results in an error. Attempting to remove a message after a durable subscriber has connected results in an error.
Progress SonicMQ Configuration and Management Guide 8.5 597

Chapter 16: Managing SonicMQ Broker Activities
Global Subscriptions“Global Subscription Rules” on page 357 describes how to specify which local subscriptions are propagated to which nodes by configuring propagation rules that map a topic to a list of remote nodes. The administrator of a publishing node must know what remote subscriptions exist on a node. Routing connections are defined per remote node and include the node name, its list of URLs, and other characteristics, including the remote subscription expiration interval. To view global subscriptions:
1. Open the Sonic Management Console, connect to a domain as described in “Running the Sonic Management Console” on page 38, and select the Manage tab.
2. Under a broker configuration, select Global Subscriptions:
598 Progress SonicMQ Configuration and Management Guide 8.5
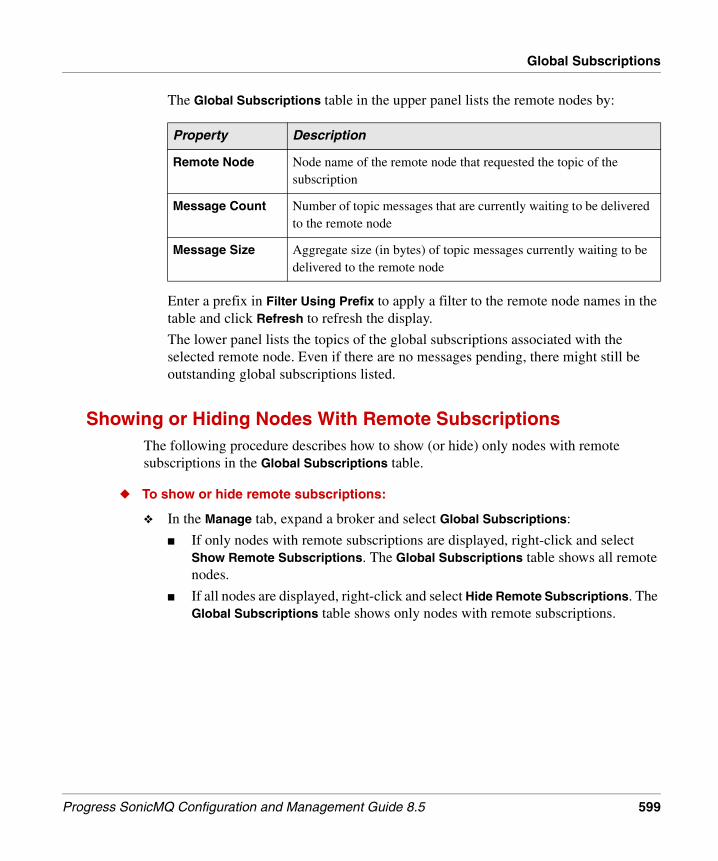
Global Subscriptions
The Global Subscriptions table in the upper panel lists the remote nodes by:
Enter a prefix in Filter Using Prefix to apply a filter to the remote node names in the table and click Refresh to refresh the display.
The lower panel lists the topics of the global subscriptions associated with the selected remote node. Even if there are no messages pending, there might still be outstanding global subscriptions listed.
Showing or Hiding Nodes With Remote SubscriptionsThe following procedure describes how to show (or hide) only nodes with remote subscriptions in the Global Subscriptions table.
◆ To show or hide remote subscriptions:
❖ In the Manage tab, expand a broker and select Global Subscriptions:
■ If only nodes with remote subscriptions are displayed, right-click and select Show Remote Subscriptions. The Global Subscriptions table shows all remote nodes.
■ If all nodes are displayed, right-click and select Hide Remote Subscriptions. The Global Subscriptions table shows only nodes with remote subscriptions.
Property Description
Remote Node Node name of the remote node that requested the topic of the subscription
Message Count Number of topic messages that are currently waiting to be delivered to the remote node
Message Size Aggregate size (in bytes) of topic messages currently waiting to be delivered to the remote node
Progress SonicMQ Configuration and Management Guide 8.5 599

Chapter 16: Managing SonicMQ Broker Activities
Refreshing Global SubscriptionsThe following procedure describes how to refresh the global subscriptions displayed.
◆ To refresh the global subscriptions:
1. In the Manage tab, under a broker configuration, select Global Subscriptions.
2. Right-click and select Refresh.
The Sonic Management Console refreshes the global subscriptions displayed.
Reconciling Global SubscriptionsSubscription reconciliation forces a connection to the remote node to be established (if necessary) and causes the two nodes to exchange any missing subscriptions. Examples of such situations are:
● The persistent storage mechanism on a remote node is re-initialized which causes it to lose information about remote subscriptions submitted to it by other nodes.
● A remote subscription has been deleted or has expired.
● A subscription request cannot be propagated to a remote node because of some problem related to the remote node, for example, a persistent network problem.
◆ To reconcile global subscriptions:
1. In the Manage tab, under a broker configuration, select Global Subscriptions.
2. In the Global Subscriptions table, select a remote node, right-click, and select Reconcile.
The Sonic Management Console reconciles the global subscriptions.
600 Progress SonicMQ Configuration and Management Guide 8.5

Global Subscriptions
Global Subscription ExpirationAn administrator of the publishing (forwarding) node can define a remote subscription expiration interval in hours to specify how long to retain remote subscriptions if the node that requested them is not accessible. It affects any remote subscription created on behalf of the remote node.
When a connection to a remote node is closed, SonicMQ keeps track of how long the connection between the current node and the remote node remains inactive. If the inactive time exceeds the expiration time interval, all remote subscriptions created on behalf of the remote node are deleted. A broker-wide property, Global Subscription Expiration, provides a default value for the remote subscriptions of those nodes that do not have routing connections defined. You specify this property in the General tab of the Edit Routing Properties dialog box. (See “Routing Nodes” on page 330.)
Deleting Global SubscriptionsYou can delete existing subscriptions from a remote node. This raises a management notification where deleted, not where the rule was defined. The administrator can remove a remote subscription by another node after it is created. Typically, this happens when the subscribing node becomes inaccessible for a long period of time. Messages that are to be sent to the subscribing node fill up the DRA routing queue and cause publishing applications in the publishing node to block.
If remote subscriptions are deleted, they are not deleted permanently. If the subscribing node connects to the publishing node, it might resubmit the same subscription. To permanently delete a remote subscription, the node administrator must first use ACLs to deny subscribe permission to the subscription’s topic to the routing user of the subscribing node and then delete the subscription.
◆ To delete global subscriptions:
1. In the Manage tab, under a broker configuration, select Global Subscriptions.
2. In the Global Subscriptions table, select a remote node, right-click, and select Delete.
The Sonic Management Console deletes all remote subscriptions from that node.
Notes ● You cannot delete individual remote subscriptions. You can only delete the entire list Deleting subscriptions should be used to reconcile global subscriptions.
● You should use ACLs to limit remote subscriptions if that is your goal. (See “Configuring ACLs for Topics, Queues, and Routing Nodes” on page 444.)
Progress SonicMQ Configuration and Management Guide 8.5 601

Chapter 16: Managing SonicMQ Broker Activities
Monitoring Global SubscriptionsYou can watch notifications on global subscriptions. Notifications are raised when subscriptions cannot propagate or are deleted. (See “Notifications” on page 403 for more information.)
The application.globalSubscriptions.* notifications are:
QueuesSee “Queues on Brokers” on page 362 for information on configuring queues. Runtime information for clustered queues is displayed with the runtime information for the broker whose runtime queue information is being viewed. For example, the number of messages displayed reflects the number of messages for a clustered queue configuration on a specific broker. (See “Advertised Global Queues” on page 581 for information on global queues.)
Notification Description
SubscribeFailure Subscription is not delivered to requested remote node
SubscriptionDeleted Remote subscription was manually deleted
SubscriptionExpired Remote subscription has expired
602 Progress SonicMQ Configuration and Management Guide 8.5

Queues
Viewing QueuesFollow this procedure to view and manage the runtime properties of the Queues folder.
◆ To view the Queues table:
1. Open the Sonic Management Console, connect to a domain as described in “Running the Sonic Management Console” on page 38, and select the Manage tab.
2. Expand a broker configuration and select Queues. The queues are listed in the right panel, as shown for the default Workbench broker, including the system queues:
The Queues table lists all the queues hosted by the broker by:
Enter a prefix in Filter Using Prefix to apply a filter to the queue names in the table and select Refresh to refresh the table.
Column Description
Queue Name of the queue
Messages Number of messages on the queue
Type Clustered, Global, System, and/or Temporary
Total Bytes The sum of the size of the messages on the queue
Progress SonicMQ Configuration and Management Guide 8.5 603

Chapter 16: Managing SonicMQ Broker Activities
Refreshing QueuesThe following procedure describes how to refresh the information displayed for queues.
◆ To refresh queue information:
❖ In the Manage tab, expand a broker configuration and select Queues > Refresh or select a queue configuration, right-click, and select Refresh.
The Sonic Management Console refreshes the Queues table or queue configuration information.
Clearing Messages from a QueueThe following procedure describes how to clear all messages currently on a queue.
◆ To clear messages from a queue:
1. Select the Manage tab, expand a broker configuration, and select Queues.
2. Right-click on a queue in the table and select Clear Messages.
The Sonic Management Console clears the messages from the queue.
Showing and Hiding System QueuesThe following procedure describes how to show or hide system queues, including the DMQ and the routing queues.
◆ To show or hide system queues:
❖ Expand a broker or cluster configuration and select Queues:
■ If system queues are not displayed in the Queues table, right-click, and select System Queues. The Queues table displays system queues.
■ If system queues are displayed in the Queues table, right-click, and select System Queues. The Queues table hides system queues.”Managing SonicMQ Broker
604 Progress SonicMQ Configuration and Management Guide 8.5

Queues
Browsing QueuesYou can use an application or the JMS Test Client tool to browse the messages on a queue. (The JMS Test client is available from the Tools menu.) The JMS Test client is described in the “JMS Test Client” chapter of the Progress SonicMQ Application Programming Guide. Also, see the “Examining the SonicMQ JMS Samples” chapter in Progress SonicMQ Application Programming Guide and “SonicMQ at Work” chapter in Getting Started with Progress SonicMQ.
Queue Instance Metrics and AlertsYou can enable metrics for one queue instance or groups of queue instances. Queue instance metrics can be enabled for administratively-created queues and temporary queues. For general information on specifying and viewing metrics, see “Metrics” on page 379. See “Instance Metrics” on page 383 for information on enabling and disabling instance metrics.
The queue.messages.* instance metrics are:
Note Broker queue metrics are provided for the system queue SonicMQ.routingQueue but not for the system queue SonicMQ.deadMessage. You can work around that constraint by having applications specify user-defined dead message queues. See the chapter “Guaranteeing Messages” in the Progress SonicMQ Application Programming Guide for more information.
Metric Description
Count Number of messages currently in a queue. Supports a high and a low alert threshold. (See “Alerts” on page 400 for information on specifying alert thresholds.)
DeliveredPerSecond Per-second rate of application messages delivered by a specific queue (including rejected messages.) Messages are counted once the dispatch thread reports that they were sent to a client. If messages are re-enqueued and sent again, they are counted again as being delivered.
MaxDepth Maximum number of messages in the queue over the last collection interval.
ReceivedPerSecond Per-second rate of application messages received by a specific queue. Messages are counted when they are first enqueued; re-enqueued messages are not counted.
Size Total size of messages currently in a queue. Supports a high and a low alert threshold. (See “Alerts” on page 400 for information on specifying alert thresholds.)
Progress SonicMQ Configuration and Management Guide 8.5 605

Chapter 16: Managing SonicMQ Broker Activities
Routing StatisticsThe routing statistics table provides a convenient way to view the count of messages waiting on the routing queue for a particular routing node. (For information on the routing queue, see “Routing Queue” on page 370.)
◆ To view routing statistics:
1. Open the Sonic Management Console, connect to a domain as described in “Running the Sonic Management Console” on page 38, and select the Manage tab.
2. Expand a broker configuration and select Routing Statistics to view the table. The following figure shows HTTP Direct routings grouped on specified URLs and ones that are not grouped:
Note The count of messages in the routing queue displayed can differ from the value in the Queues table for the SonicMQ.routingQueue (see “Showing and Hiding System Queues” on page 604). The discrepancy is because the count in the Queues table decrements when messages leave the routing queue but does not decrement in the Routing Statistics table until an acknowledgment is received.
606 Progress SonicMQ Configuration and Management Guide 8.5
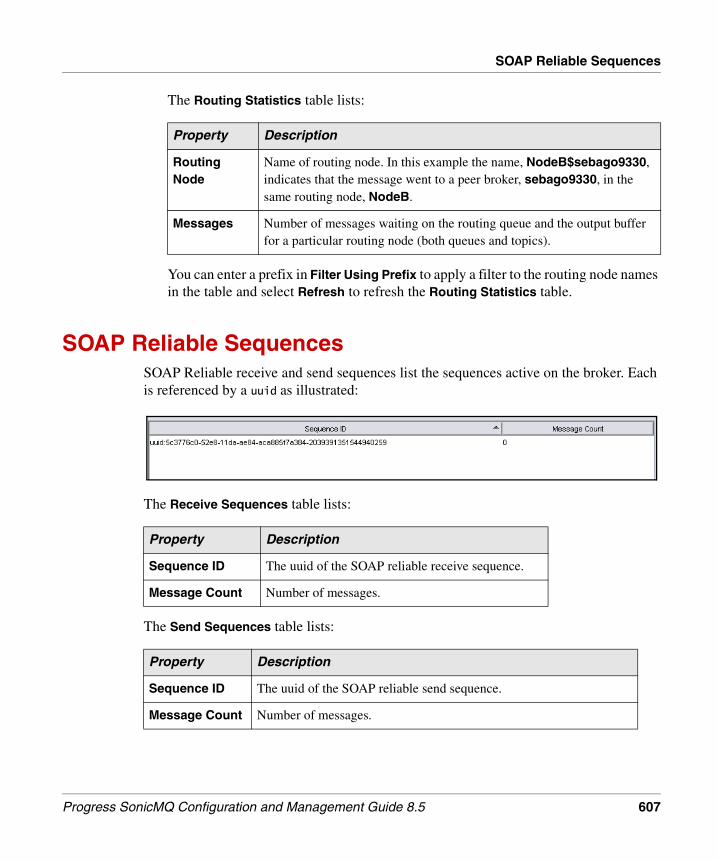
SOAP Reliable Sequences
The Routing Statistics table lists:
You can enter a prefix in Filter Using Prefix to apply a filter to the routing node names in the table and select Refresh to refresh the Routing Statistics table.
SOAP Reliable SequencesSOAP Reliable receive and send sequences list the sequences active on the broker. Each is referenced by a uuid as illustrated:
The Receive Sequences table lists:
The Send Sequences table lists:
Property Description
Routing Node
Name of routing node. In this example the name, NodeB$sebago9330, indicates that the message went to a peer broker, sebago9330, in the same routing node, NodeB.
Messages Number of messages waiting on the routing queue and the output buffer for a particular routing node (both queues and topics).
Property Description
Sequence ID The uuid of the SOAP reliable receive sequence.
Message Count Number of messages.
Property Description
Sequence ID The uuid of the SOAP reliable send sequence.
Message Count Number of messages.
Progress SonicMQ Configuration and Management Guide 8.5 607

Chapter 16: Managing SonicMQ Broker Activities
XA TransactionsThe Sonic Management Console includes an XA Transactions table for two primary uses:
● If you are testing or prototyping without an external transaction manager, you can use the Sonic Management Console to commit and roll back XA transactions.
● If you are in production and are using an external XA transaction manager, you can use the Sonic Management Console to clean up transactions that have not been handled by the external manager.
For more information on XA transactions, see the “Distributed Transactions Using XA Resources” chapter in the Progress SonicMQ Application Programming Guide.
Warning If you commit or roll back a transaction using the Sonic Management Console and later the external transaction manager tries to commit or roll back the transaction, there will be a conflict and a resulting error.
608 Progress SonicMQ Configuration and Management Guide 8.5

XA Transactions
Viewing XA Transactions If a transaction administrator connects to a broker that has orphaned XA transaction branches, the Sonic Management Console lists the prepared transaction branches.
◆ To view XA transactions:
❖ In the Manage tab, expand a broker configuration, and select XA Transactions:
The XA Transactions table lists XA transactions by:
Branch ID Globally unique ID composed of the global transaction ID and a branch ID
Use User who created the transaction
Application ID Auto-generated ID of the transaction owner
Note Transactions only display in the table if their creator is disconnected.
Progress SonicMQ Configuration and Management Guide 8.5 609

Chapter 16: Managing SonicMQ Broker Activities
Refreshing the XA Transaction ViewThe following procedure describes how to refresh the XA transaction information.
◆ To refresh the XA Transaction view:
1. In the Manage tab, under a broker configuration, select XA Transactions, right-click, and click Refresh.
The Sonic Management Console refreshes the list of prepared XA transactions.
Committing Prepared XA TransactionsIf the broker is taking part in a transaction and its XA branch is dangling or failed to complete, you can commit prepared transaction branches in the broker.
◆ To commit an XA Transaction:
1. In the Manage tab, under a broker configuration, select XA Transactions.
2. In the XA Transactions table, select the transaction, right-click, and select Commit.
The transaction is committed.
Rolling Back Prepared XA TransactionsIf the broker is taking part in a transaction and its XA branch is dangling or failed to complete, you can roll back prepared transaction branches in the broker.
◆ To roll back an XA Transaction:
1. In the Manage tab, under a broker configuration, select XA Transactions.
2. In the XA Transactions table, select the transaction, right-click, and select Roll Back.
The transaction is rolled back.
610 Progress SonicMQ Configuration and Management Guide 8.5

Part VI Additional Tools
Part VI describes other tools used in SonicMQ configuration:
● Chapter 17, “Using the JMS Administered Objects Tool” enables support for JMS administered objects and describes how to connect to internal and external JNDI object stores as well as serialized object stores. It also describes how to add, edit, and delete connection factory objects and destination objects.
● Chapter 18, “Integrating SonicMQ with Actional” extends the information on Actional instrumentation of a SonicMQ broker with some Actional views and settings.
● Chapter 19, “Using JSR 160 Compliant Consoles” describes how JMX consoles such as JConsole can provide additional monitoring and management of applications running on the Java platform.
Note The JMS Test Client, a tool for visually performing JMS client messaging functions, is described in the Progress SonicMQ Application Programming Guide.
Progress SonicMQ Configuration and Management Guide 8.5 611

Part VI: Additional Tools
612 Progress SonicMQ Configuration and Management Guide 8.5

Chapter 17 Using the JMS Administered Objects Tool
This chapter describes how to use the JMS Administered Objects tool and includes these sections:
● “Overview of JMS Administered Objects” introduces SonicMQ’s support for JMS administered objects.
● “Connecting to JMS Administered Object Stores” describes how to connect to internal and external JNDI object store as well as serialized object stores.
● “Working with JMS Administered Objects” describes how to add, edit, and delete connection factory objects and destination objects.
Progress SonicMQ Configuration and Management Guide 8.5 613

Chapter 17: Using the JMS Administered Objects Tool
Overview of JMS Administered ObjectsAs defined in the Java Messaging Service specification, “JMS administered objects are objects containing JMS configuration information that are created by a JMS administrator and later used by JMS clients.” JMS and other Java client applications typically bootstrap themselves by finding initial resources in JNDI stores. Resources include connection factory and destination JMS administered objects.
SonicMQ supports JMS administered objects by:
● Providing implementations that can be stored in JNDI stores (by implementing referenceable and serializable interfaces)
● Providing tools to store those objects in any JNDI-compliant store (including the SonicMQ internal JNDI store)
Connecting to JMS Administered Object StoresThe JMS administered object store can exist in a file system or a Java Naming and Directory Interface (JNDI) name space, either internal or external. See:
● “Connecting to the Internal JNDI Object Store” on page 614
● “Connecting to an External JNDI Object Store” on page 617
● “Connecting to a Serialized Object Store” on page 619
Connecting to the Internal JNDI Object Store The Directory Service can store JNDI objects in an internal object store. This internal JNDI repository stores the following types of Java objects:
● Java serializable objects
● Referenceable objects
By default, users in the PUBLIC group have read-only access to the internal JNDI store. If an administrator wants to give a particular user write access to the internal JNDI store, then the administrator must add a GRANT PUBLISH and GRANT SUBSCRIBE ACL for the SonicMQ.mf topic, which in turn, allows the user to do all management-based communications. For more information on ACLs, see “Access Control Lists” on page 443.
614 Progress SonicMQ Configuration and Management Guide 8.5

Connecting to JMS Administered Object Stores
The following procedure describes how to connect to the internal JNDI store. (For information on Directory Service Fault Tolerance, see “Resilience and Recovery of Framework Components” on page 158.)
◆ To connect to the internal JNDI store:
1. Open the Sonic Management Console as described in “Running the Sonic Management Console” on page 38, and then select Tools > JMS Administered Objects. The JMS Administered Objects tool opens.
2. Select JNDI Naming Service and then select Sonic Storage:
3. If the domain name is not the default Domain1, specify the domain name in Domain.
4. The appropriate Context Factory is entered automatically.
5. Specify the URL of the management broker as the Provider URL.
6. Specify an administrative User and Password.
Progress SonicMQ Configuration and Management Guide 8.5 615

Chapter 17: Using the JMS Administered Objects Tool
You can optionally enter additional properties in the Properties field (specific to the internal implementation), including:
Click Clear to clear the properties.
7. Select Connect to connect to the internal store. The object store is listed under Object Stores and under Established Stores.
To disconnect, select the store and select Disconnect.
Property Description
com.sonicsw.jndi.mfcontext.idleTimeout Connection idle timeout on JNDI operation calls in milliseconds.
(The default value is “300000”— five minutes; the minimum value is “60000” — one minute). The connection to the Directory Service is dropped if no activity takes place on the connection within the specified timeout. If the connection is dropped, it is transparently reestablished on subsequent activity (you might notice a small delay).
com.sonicsw.jndi.mfcontext.requestTimeout Timeout for JNDI requests in milliseconds (the default is 30000). If a JNDI request takes longer, the request fails. Depending on fault tolerance settings, the overall time before request failure might be some factor greater than the value of this property (as the request timeout is applied to each fault tolerant option).
com.sonicsw.jndi.mfcontext.connectTimeout Connect timeout to control the time to make an initial connection to the domain manager broker(s) and to reconnect in the event of a transient connection failure (in milliseconds; the default is 10000).
com.sonicsw.jndi.mfcontext.node DRA routing node through which JNDI communications with the Directory Service are delegated (the default is none).
616 Progress SonicMQ Configuration and Management Guide 8.5

Connecting to JMS Administered Object Stores
Connecting to an External JNDI Object StoreAn external JNDI-based object store maintains JMS administered objects in a specified JNDI naming service. (Unless you are using SSL, the user name and password are sent in clear text.) This figure is an example of a third-party tool for an external JNDI/LDAP store:
The following procedure describes how to connect to an external JNDI store.
◆ To connect to an external JNDI store:
1. Open the Sonic Management Console as described in “Running the Sonic Management Console” on page 38, and select Tools > JMS Administered Objects. The JMS Administered Objects tool opens.
2. Select JNDI Naming Service and deselect Sonic Storage.
3. Specify the Context Factory, for example, for an LDAP store:com.sun.jndi.ldap.LdapCtxFactory
4. Specify the Provider URL, for example, for an LDAP store on mypc:ldap://mypc.com:389/ou=jmsao,ou=sonic,dc=...
(The Provider URL must start with ldap:// if the external store is an LDAP store.)
5. If security is enabled on the external store, specify the User and Password.
6. You can optionally enter additional properties in Properties. (See your third party JNDI service provider’s documentation for these properties.) Select Clear to clear the properties.
Progress SonicMQ Configuration and Management Guide 8.5 617

Chapter 17: Using the JMS Administered Objects Tool
7. Select Connect to connect to the external store. The object store is listed under Object Stores and under Established Stores:
To disconnect, select the store and select Disconnect.
618 Progress SonicMQ Configuration and Management Guide 8.5

Connecting to JMS Administered Object Stores
Connecting to a Serialized Object StoreYou can store serialized JMS administered objects as files in a directory in your file system. The following procedure describes how to connect to a serialized object store in your file system.
◆ To connect to a serialized object store in your file system:
1. Open the Sonic Management Console as described in “Running the Sonic Management Console” on page 38, and select Tools > JMS Administered Objects. The JMS Administered Objects tool opens.
2. Select File System and specify a directory by typing a directory name in the Directory field (or select ... to open the folder selection dialog box).
3. Select Connect. The object store opens in the specified directory, and the object store is listed under Object Stores and under Established Stores:
Progress SonicMQ Configuration and Management Guide 8.5 619

Chapter 17: Using the JMS Administered Objects Tool
Working with JMS Administered ObjectsAdministered objects let developers of client applications use symbolic names to refer to destinations and connection factories. You set up an association between a lookup name and the data for a destination or connection factory administered object. A connection factory administered object provides the data to make a connection to a broker, and a destination administered object provides the path to a topic or queue.
The JMS specification does not spell out the details for destinations or connection factories, so JMS administered objects from different vendors can have different structures. You can create and maintain SonicMQ-specific destination and connection factory administered objects, either programmatically or with the JMS Administered Object Tool. For information on using administered objects in applications, see the Progress SonicMQ Application Programming Guide. For comprehensive coverage of fault tolerance, see the Progress SonicMQ Deployment Guide.
The following sections describe how to add and maintain connection factory and destination objects using the JMS Administered Objects tool.
Adding Connection Factory ObjectsJMS defines a connection factory object type. With JMS 1.0x, what the connection factory represented depended on the messaging model:
● With Publish and Subscribe messaging, a connection factory could be:■ TopicConnectionFactory
■ XATopicConnectionFactory
● With Point-to-point messaging, a connection factory could be:■ QueueConnectionFactory
■ XAQueueConnectonFactory
With JMS 1.1, connection factories are messaging domain independent and the behavior of JMS client applications can depend on the kind of destination used, not on the kind of connection factory used. With the JMS Administered Objects tool, you can still retrieve and modify messaging domain-specific connection factories and JMS client applications can continue to use messaging domain-specific factories until Sun deprecates usage of the messaging domain-specific API.
Note An advantage to using administered objects for XAConnectionFactory objects is that XA recovery clients that use the connection factory are assured that they are connected to the broker from which they are trying to recover indoubt transactions.
620 Progress SonicMQ Configuration and Management Guide 8.5

Working with JMS Administered Objects
Adding Connection Factory Objects to the Internal JNDI Store
This procedure shows how to add a connection factory object to the internal JNDI store.
◆ To add a connection factory to the internal JNDI store:
1. Under Object Stores in the left panel, select the connection and then select the Connection Factories tab in the right panel.
2. Select New and select the General tab in the Connection Factory Maintenance panel:
Progress SonicMQ Configuration and Management Guide 8.5 621

Chapter 17: Using the JMS Administered Objects Tool
3. In the Administration section, specify a Lookup Name of your choice for the connection factory object.
4. For the Factory Type, select the connection factory type from the list:■ ConnectionFactory ■ QueueConnectionFactory
■ TopicConnectionFactory
■ XAConnectionFactory
■ XAQueueConnectionFactory
■ XATopicConnectionFactory
5. In the Basic Connection Parameters section, specify the broker Connection URL(s). URLs are tried in sequential order starting from the beginning of the list, or in sequential order starting from a random entry in the list, depending upon the Sequential setting.
Enter one or more connection URLs in a comma-delimited list for creating connections to brokers. If the list contains more than one connection URL, each connection URL is in this form: {tcp://|ssl://|http://|https://}host{:2506|:port}[/subcontext} where:■ tcp, ssl, http, and https are possible connection protocols (if using SSL, be sure
the acceptor specified in the URL is SSL-enabled, see “Securing an Acceptor” on page 287)
■ host is a resolvable IP name or address ■ port is the port number for the connection ■ subcontext is the URL extension that specifies a location in a context hierarchy
With fault-tolerant connections, URL lists must also specify the URLs for replicated broker pairs.
For example:
■ You could store two connection URLs in a list as:tcp://brokerA:2506,tcp://brokerB:2507
■ You could store two connection URLs with subcontext as:tcp://brokerA:2506/req/soap/router,tcp://brokerA:2507/direct/reply
Note The remaining fields and tabs are optional.
622 Progress SonicMQ Configuration and Management Guide 8.5

Working with JMS Administered Objects
6. Specify the remaining properties in the Basic Connection Parameters section:
Property Description
Default User Name If security is enabled, enter a default user name.
Default Password If security is enabled, enter a default user password.
Confirm Password If security is enabled, enter the same password.
Connect ID Enter a convenient connection identifier to name a JMS client connection to the broker in a queue or topic session.
By leaving ConnectID blank (null), a single client can establish multiple simultaneous connections to the broker. By setting ConnectID to any other value, the specified client can establish only one simultaneous connection.
Client ID Enter a convenient client identifier. When no value is entered for the ClientID, the null value indicates that the user can set ClientID at connection time through a setClientID() method on the connection. If the factory has a ClientID other than null, it cannot be changed by the client using the ensuing connection.
Load Balancing Select to enable the requested connection to be redirected for load balancing if necessary. If not selected, the requested connection cannot be redirected. This field is not available for XA connection factory objects.
Sequential If selected, the first URL in Connection URL(s) is tried first. If deselected, the listed connection URLs are tried in random order. (This field is not available for XA connection factories.)
Ping Interval Seconds to wait between pinging the broker to see if the broker is still available (Setting the value to 0 means do not ping the broker).
Progress SonicMQ Configuration and Management Guide 8.5 623

Chapter 17: Using the JMS Administered Objects Tool
7. Select the Messaging tab to specify messaging properties:
624 Progress SonicMQ Configuration and Management Guide 8.5

Working with JMS Administered Objects
8. Specify under Publish/Subscribe:
Property Description
Durable Message Order
Select to have message ordering enforced for durable subscribers created on the connection. (For information on strict message ordering for clusterwide durable subscriptions, see the “Clustered Brokers” chapter in the Progress SonicMQ Deployment Guide and the “Publish and Subscribe Messaging” chapter in the Progress SonicMQ Application Programming Guide.)
Broker-side Selectors
Select to enable doing the selection on the broker; this is useful if the broker resources far exceed the resources of the client.(For information on messages selectors, see the “Client Sessions” and “Message Selectors” chapters in the Progress SonicMQ Application Programming Guide.)
Flow to Disk USE_BROKER_SETTING — Use the setting specified for the broker (see Step 6 on page 230).
ON — When a subscriber's in-memory buffer is full, the broker offloads messages for that subscriber to the persistent storage mechanism without blocking the publisher(s).
OFF — When at least one subscriber's buffer is full, the publisher is blocked until the subscriber processes more messages.
Note With Flow to Disk publishing, publishers can continue publishing even after the buffers in the broker fill up. The broker starts writing messages out to the persistent storage mechanism when the subscriber buffers fill up. As the subscriber processes messages, the broker retrieves messages from the persistent storage mechanism and puts them in the buffer for the subscriber to process them.
Progress SonicMQ Configuration and Management Guide 8.5 625
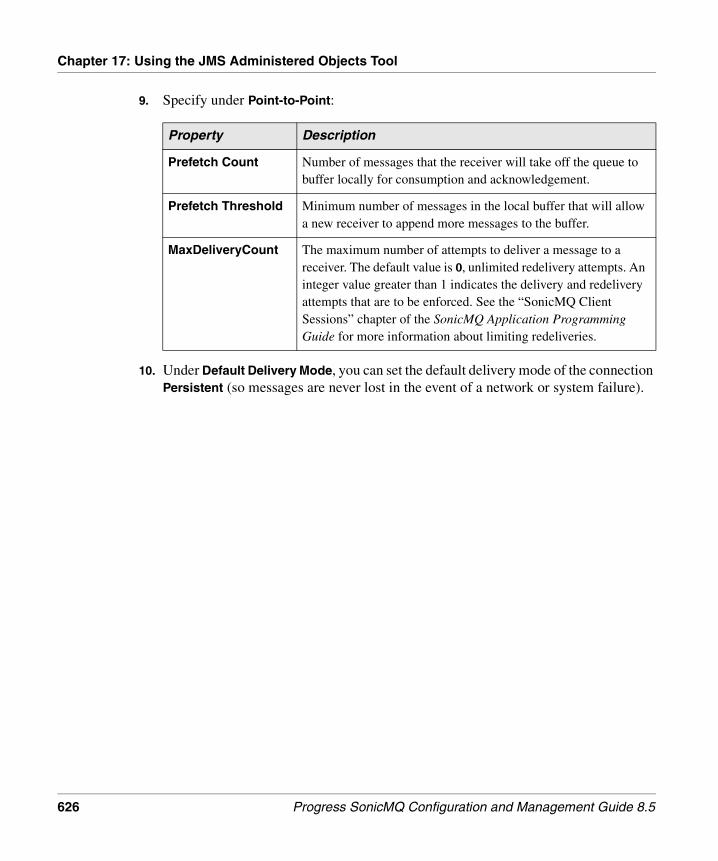
Chapter 17: Using the JMS Administered Objects Tool
9. Specify under Point-to-Point:
10. Under Default Delivery Mode, you can set the default delivery mode of the connection Persistent (so messages are never lost in the event of a network or system failure).
Property Description
Prefetch Count Number of messages that the receiver will take off the queue to buffer locally for consumption and acknowledgement.
Prefetch Threshold Minimum number of messages in the local buffer that will allow a new receiver to append more messages to the buffer.
MaxDeliveryCount The maximum number of attempts to deliver a message to a receiver. The default value is 0, unlimited redelivery attempts. An integer value greater than 1 indicates the delivery and redelivery attempts that are to be enforced. See the “SonicMQ Client Sessions” chapter of the SonicMQ Application Programming Guide for more information about limiting redeliveries.
626 Progress SonicMQ Configuration and Management Guide 8.5

Working with JMS Administered Objects
11. Specify under Asynchronous Delivery:
Property Description
Mode Initially DEFAULT, can be set to DEFAULT, ENABLED or DISABLED.
Doubt Window Entering a positive integer value n for the number of messages in the delivery doubt window means that the send call will block when n number of messages have not been reliably delivered to the broker. Therefore, setting this value limits the number of messages that can be lost in a failure.
Entering a value of 0 indicates that there is no explicit limit on the number of asynchronously produced messages at a given time.
The default value for the doubt window is 0.
Close Timeout Specifies how long to wait for undelivered or in-doubt messages to reach the broker. This setting assumes that applications are unwilling to wait for asynchronous message delivery to complete and are capable of handling message loss.
When the close timeout value is -1, close will block until message delivery is either complete or there is an exception in close.
When the close timeout value is greater than or equal to 0, any asynchronously produced message for which delivery guarantees cannot be met within the timeout are reported on the connection’s RejectionListener.
When using asynchronous delivery, you should enter a positive integer for the close timeout, or-1 so that the close blocks.
The default value for close timeout is 0.
Note For more information, see the “Asynchronous Message Delivery” section of the “SonicMQ Connections” chapter of the Progress SonicMQ Application Programming Guide.
Progress SonicMQ Configuration and Management Guide 8.5 627

Chapter 17: Using the JMS Administered Objects Tool
12. Under Message Batching, you can change the Default Batch Size to specify a value for the common batch size. During a transaction, messages can be batched on the client for later submission when the transaction is committed or whenever the batch size or the session’s ability to maintain the integrity of the transaction is at risk. Messages are batched for each destination within a session. When several destinations are used in a single transaction, messages are batched for each destination separately. (For more information, see the “Transactions” chapter in the Progress SonicMQ Performance Tuning Guide.)
13. Select the Advanced tab to specify additional properties:
628 Progress SonicMQ Configuration and Management Guide 8.5

Working with JMS Administered Objects
14. Under Client Persistence, select Enable Local Store if you want to store messages sent by a client in a local directory when the broker is not available.
15. If you select Enable Local Store, specify:
16. Under Security, specify the Login SPI Classname, the class name implementing the Login SPI. (For more information, see the Progress SonicMQ Administrative Programming Guide.)
17. Under Flow Control:
■ Monitor Interval — Enter a non-negative integer value to define the duration of the monitoring interval in seconds. A value of 0 indicates that flow control monitoring is disabled for all sessions on the connection. (When flow control blocking is sustained, an application producer session can be prevented from producing messages for a significant period of time—the monitoring interval.)
■ Minimize subscriber traffic — Select the checkbox to force TopicSubscribers and DurableSuscribers to attempt to flow control the broker as soon as messages are delivered into the client’s buffer. The subscriber could receive more messages
Note You can select Enable Local Store, but the client installations that use this feature must have installed the Client Plus feature that enables client persistence. (This feature is not available with all SonicMQ editions.)
Property Description
Local Store Directory
Directory in which messages will be stored on the local system,
Local Store Size
Size of local store in KB.
Reconnect Interval
How often to try to connect to the broker.
Reconnect Timeout
Number of seconds for the broker to maintain state for a fault-tolerant connection that fails. Fault-tolerant client connections must recover within this time; otherwise the client connection is dropped by the broker. If the client sets a lower value, that value is used. If the client sets a higher value, the broker value is used. The client is not made aware of a lower broker value and could reconnect ready to continue when the broker has already dropped the connection. Make the value high enough to honor reasonably high client settings.
Progress SonicMQ Configuration and Management Guide 8.5 629

Chapter 17: Using the JMS Administered Objects Tool
put on the wire by the broker before it receives the flow control message. Sending resumes when the subscriber's buffer becomes empty.
18. Select Enable Fault Tolerant to enable the use of fault tolerance.
19. If you select Enable Fault Tolerant, specify:
20. In the Socket Connection area, you can set the Timeout for client connections (not DRA connections). The Timeout sets a timeout on the socket after a specified time interval. Enter the positive integer number of milliseconds before a connection attempt should time out. Setting the value to 0, the default value, means to never time out.
See the chapter “SonicMQ Connections” in the SonicMQ Application Programming Guide for more information about this feature.
Property Description
Fault Tolerant Reconnect Timeout
Specifies how long the client will try to re-establish connection after failure. The default is 60 seconds; 0 means no timeout—the client will try indefinitely.
Initial Connect Timeout
Specifies the amount of time that management communications can use to initially attempt to connect to the URLs in the connection URL list, and to reconnect to the URLs in the connection URL list in the event of connection failure.
Client Transaction Buffer Size
Specifies the size, in bytes, that the client runtime is willing to buffer per transaction. If the buffer size is reached, JMS client sending threads will block until further messages are saved by the broker. The broker will apply a transaction buffer size that is the lesser of the client-specified value and the broker’s Transactions: Buffer Size (which has a default setting of 32768). The default value is 0, which means that the broker’s Transactions: Buffer Size is applied.
Note For more information about fault tolerant client parameters, see the “Fault Tolerant Connections” section of the “SonicMQ Connections” chapter of the SonicMQ Application Programming Guide.
630 Progress SonicMQ Configuration and Management Guide 8.5

Working with JMS Administered Objects
21. If you want to provide Message Compression on the connection, specify:
22. To reset the password, select (Re)set Password. The value in Default Password is confirmed and stored as the new password for User.
23. Select Update. The top panel displays the new connection factory.
Adding Connection Factory Objects to an External JNDI Store
Adding connection factories to an external JNDI store is similar to the procedure described in “Adding Connection Factory Objects to the Internal JNDI Store” on page 621. However, the Lookup Name in a JNDI/LDAP store is always preceded by “cn=”, for example, “cn=Accounting”.
Adding Connection Factory Objects to a Serialized Object Store
Adding connection factories to a store in your file system is similar to the procedure described in “Adding Connection Factory Objects to the Internal JNDI Store” on page 621. The name of the connection factory object is used to generate the filename for the object in an object store in your file system. (See “Adding Destination Objects to a Serialized Object Store” on page 633 for an example with destination objects.)
Property Description
Enable Compression
When selected, requires connections that use this connection factory to perform message compression before sending messages, and requires the broker to deliver compressed messages to connections that use this connection factory. The setting could be overridden by the client.
Custom Compression Factory
Specifies the custom class that defines message compression and decompression.
Progress SonicMQ Configuration and Management Guide 8.5 631

Chapter 17: Using the JMS Administered Objects Tool
Adding Destination ObjectsJMS defines a destination object type. What it represents depends on the messaging model:
● In the Publish and Subscribe messaging model, a destination is a topic
● In the Point-to-point messaging model, a destination is a queue
Adding Destination Objects to the Internal JNDI Store
The following procedure describes how to add destination objects to an internal JNDI store.
◆ To add a destination to the internal JNDI store:
1. Under Object Stores in the left panel, select the connection. The right panel has two tabs, Destinations and Connection Factories. The Destinations tab is selected by default. If destination objects already exist in the store, they are displayed.
2. Select New.
3. Enter a Lookup Name of your choice.
4. Select the Destination Type, Queue or Topic.
5. Enter the Destination Name, the name of the queue or topic.
6. Press Enter. The following figure shows three destination objects:
These destinations were created by the Sonic Deployment Manager’s JNDI sample, and show a clustered queue, a multitopic, and a group subscription to a multitopic.
632 Progress SonicMQ Configuration and Management Guide 8.5

Working with JMS Administered Objects
Adding Destination Objects to an External JNDI Store
To add destination objects to an external JNDI store, follow the procedure described in “Adding Destination Objects to the Internal JNDI Store” on page 632 with the exception that Lookup Name must be valid for the specific JNDI implementation. For example, for an LDAP store, the lookup name of the destination must be preceded by “cn=”, for example, “cn=Kansas Sales”.
Adding Destination Objects to a Serialized Object Store
To add destination objects to a serialized object store in your file system, follow the procedure described in “Adding Destination Objects to the Internal JNDI Store” on page 632.
The name of a destination is used to generate the filename for the object in an object store in your file system. For example, if the name of a destination object is Queue1, the filename is Queue1.sjo. The following figure shows two destination objects:
The next figure shows the same destination objects serialized to files:
Progress SonicMQ Configuration and Management Guide 8.5 633

Chapter 17: Using the JMS Administered Objects Tool
Adding Sub-context to the Internal JNDI StoreThe initial context in a JNDI store can result in a large flat file structure. You can add sub-contexts to distinguish categories and subcategories of administered objects.
The Sonic Deployment Manager provides a way to import and delete JNDI entries and sub-contexts that are easy to maintain and extend. See the SDM sample model JNDI for details.
◆ To add a sub-context to the internal JNDI store:
1. Create a connection to an internal object store.
2. Right click on the connection you want to extend with sub-contexts, and then choose Create Sub-Context, as shown:
3. In the Create Sub-Context dialog box, enter the name you want to use, and then click OK, as shown for an arbitrary category OEMs.
4. Right-click on a sub-context name to create subordinate levels.
Note Plan your entries and review your typing, as you cannot rename or relocate a sub-context, and deleting a sub-context also removes all its objects and subordinate sub-contexts.
634 Progress SonicMQ Configuration and Management Guide 8.5

Working with JMS Administered Objects
5. Click on a store name or subcontext name, and then enter destinations and connection factories that can be referenced by their sub-context. The following figure shows three connection factory objects:
These ConnectionFactories were created by the Sonic Deployment Manager’s JNDI/Import sample, and are located in the JNDI store at a subcontext of jms.sonic.
Editing Administered ObjectsThe following procedure describes how to edit a connection factory or destination object.
◆ To edit a connection factory or destination object:
1. Select the Connection Factories or Destinations tab and then select the object in the table.
2. With the exception of Lookup Name, modify the fields and check boxes as required.
3. Select Update. The object is updated.
Progress SonicMQ Configuration and Management Guide 8.5 635

Chapter 17: Using the JMS Administered Objects Tool
Deleting Administered ObjectsThe following procedure describes how to delete connection factory or destination objects from a JMS administered object store. This only removes the referenceable object (in a JNDI store) or serialized Java object (in a file system store), not the actual queue or topic.
◆ To delete an administered object from an object store:
1. Select the Connection Factories or Destinations tab and then select the object in the table.
2. Select Delete. The referenceable or serialized object is deleted.
636 Progress SonicMQ Configuration and Management Guide 8.5

Chapter 18 Integrating SonicMQ with Actional
SonicMQ interceptors provide service visibility through a stand-alone instance of Actional Agent. The MQ interceptor provides visibility in to the message flows in brokers. The Sonic interceptors are packaged and always installed with SonicMQ brokers. The interceptors require you to specifically enable them on each installed broker, as described in this chapter and in Progress Actional documentation.
Progress SonicMQ broker installations include the actional-sdk.jar in the SonicMQ library archives and the SonicMQ interceptor in the broker.jar.
When a SonicMQ broker is enabled for Actional instrumentation, and both the broker and agent are running, SonicMQ interceptors are in the flow between the message producers and message consumers. They intercept all inbound and outbound messages and feed information about those interactions to the agent as asynchronous events. The SonicMQ interceptor maps the messaging interactions on an instrumented broker to Actional levels as follows:
A SonicMQ message flow from producer to consumer, when visualized in the Actional Management Server, might look similar to the following:
where producer P1 published to topic T.1 on broker br3 (a member of Sonic cluster that is referenced as Sonic routing node A). Subscribers S1and S2 are active consumers on broker br3 with patterns that include the T.1 topic
Actional Level Sonic
1 Host Name
2 Sonic Node Name :: Broker Name
3 Destination Name
4 -
Figure 11. Actional Network view of a SonicMQ message flow
Progress SonicMQ Configuration and Management Guide 8.5 637

Chapter 18: Integrating SonicMQ with Actional
Enabling the SonicMQ Interceptor
The SonicMQ Interceptor is installed whenever a SonicMQ broker is installed on a system. The interceptor is not, by default, enabled. In order to use the Actional Agent to manage services and processes on a system, you must install and provision the Actional Agent on the system where the SonicMQ broker runs, and then enable the interceptor by making configuration changes to the SonicMQ broker, typically through the Sonic Management Console. Actional integration is set on each broker running on a system.
Related SonicMQ brokers placed on different systems (and therefore different Actional nodes) should have their Actional Agent instances managed on the same Actional Management Server to visualize interbroker flows such as clusters, Dynamic Routing, and Continuous Availability failover. Correspondingly, SonicMQ brokers registered in different SonicMQ domains but colocated on the same managed node will record their events on the same Actional Management Server.
◆ To enable SonicMQ instrumentation on a SonicMQ broker:
1. Follow the broker configuration procedure “To configure Actional integration properties for monitoring a broker:” on page 237.
The log of the management container that hosts the running broker immediately indicates the status of the instrumentation, as shown for this example:
2. On the management container that hosts the broker, you need to explicitly declare the location of the Actional Agent’s uplink.cfg file in the Sonic context.
a. In the Sonic Management Console, open the Properties dialog box of the broker’s management container where you enabled Actional instrumentation.
b. Choose the Environment tab.
c. Click New.
❑ For the Variable, enter com.actional.lg.interceptor.config.
❑ For the Value enter a location for the file, usually a new folder within the Actional Agent directory.
d. Click OK on the two dialog boxes.
Code Sample 2. Broker’s Container Log of Actional Instrumentation Information
[date-time] ID=Br1 (info) Actional instrumentation is enabled with payload capture disabled
[date-time] ID=Br1 (info) Successfully connected to Actional agent
638 Progress SonicMQ Configuration and Management Guide 8.5

The property is listed as shown, with your value entry:
When you restart t he container, the SonicMQ broker is fully instrumented for its Actional Agent.
Figure 12. Setting the uplink.cfg location on a broker’s management container
Progress SonicMQ Configuration and Management Guide 8.5 639

Chapter 18: Integrating SonicMQ with Actional
640 Progress SonicMQ Configuration and Management Guide 8.5

Chapter 19 Using JSR 160 Compliant Consoles
This chapter contains the following sections:
● “Overview” describes how Sonic’s exposure of JMX MBeans provides administrative access to JConsole and other third-party consoles that fully support the Java Specification Request (JSR) 160, “Java Management Extensions (JMX) Remote API”.
● “Using JConsole to Examine a Sonic Domain Manager”.
● “Using the JConsole Application Window”.
Progress SonicMQ Configuration and Management Guide 8.5 641

Chapter 19: Using JSR 160 Compliant Consoles
OverviewProgress Sonic provides a JSR 160 connector client to enable JMX consoles such as JConsole to connect to a managed Sonic JVM instance to gain visibility into JVM behaviors and limited access to Sonic components running in the JVM.
Sonic limits the access provided into Sonic components so that the advanced security features Sonic provides in its administrative tools—Sonic Management Console and management applications—are not compromised. Those features include authentication, authorization, encrypted communications, and fine-grained management permissions.
In order to access Sonic MBeans, the container to be analyzed needs no special setup or libraries. Some Sonic libraries must be on the JMX console’s classpath:● mgmt_client.jar
● sonic_Client.jar
If the container is hosting a SonicMQ broker, the following library must also be on the JMX console’s classpath:● sonic_mgmt_client.jar
The following example demonstrates how a JConsole connection to a Sonic Domain Manager looks.
Using JConsole to Examine a Sonic Domain ManagerThe following example connects a Java 6 JConsole to a Sonic Domain Manager.
◆ To set up and run JConsole:
1. As JConsole is packaged with Sun 1.5 and newer Java Development Kits (JDKs), install a JDK on the system where the JConsole will run. In this example, the JDK is installed at C:\jdk1.6.0_11.
2. Copy or install the required libraries onto the local system. In this example, the Sonic Domain Manager (which includes the required libraries) is installed atC:\Program Files\Progress\Sonic on the same system where JConsole will run.
3. Start the Sonic management container; in this example, Domain1.DomainManager.
642 Progress SonicMQ Configuration and Management Guide 8.5

Using JConsole to Examine a Sonic Domain Manager
4. Enter (as one line):C:\jdk1.6.0_11\bin\java.exe \-Djmx.remote.protocol.provider.pkgs=com.sonicsw.jmx.remote.protocol \-cp C:\jdk1.6.0_11\lib\tools.jar;
C:\jdk1.6.0_11\lib\jconsole.jar;C:\Program Files\Progress\Sonic\MQ8.0\lib\sonic_mgmt_client.jar;C:\Program Files\Progress\Sonic\MQ8.0\lib\mgmt_client.jar;C:\Program Files\Progress\Sonic\MQ8.0\lib\sonic_Client.jar \
sun.tools.jconsole.JConsole
5. In the Java Monitoring & Management Console window, the New Connection dialog box lets you define the connection:
On the local system, you could choose the process identifier (PID) to make the connection. For remote systems, use the syntax:
service:jmx:sonic+tcp://host:port/domain.container
where:
● host - hostname (or localhost)
● port - the broker TCP port accepting connections
● domain - the container’s Sonic domain name
● container - the container’s Sonic container name
For this example, the Remote Process entry would be:service:jmx:sonic+tcp://localhost:25193/Domain1.DomainManager
Progress SonicMQ Configuration and Management Guide 8.5 643

Chapter 19: Using JSR 160 Compliant Consoles
Using the JConsole Application WindowEach connection window provides information about the process to which it is connected. The first five JConsole tabs provide information that is not specific to Sonic, and is thoroughly described in Sun’s Java SE Monitoring and Management Guide:● Overview● Memory● Threads ● Classes● VM Summary
The sixth tab, MBeans, is where Sonic exposes its MBean.
MBeans TabThe Sonic MBean is labeled as domain.container, in this case Domain1.DomainManager.
As a Domain Manager, there are four exposed components in this container:● AGENT
● AGENT MANAGER
● DIRECTORY SERVICE
● MgmtBroker
An ESB Container, ESBVerificationContainer, was added to the DomainManager container to demonstrate ESB visibility. Other components that can be accessed are Activation Daemons, Collection Monitors, and Loggers.
644 Progress SonicMQ Configuration and Management Guide 8.5

Using the JConsole Application Window
Sonic MBean Attributes, Operations, and NotificationsEach item in the Sonic container exposes three sets of data: Attributes, Operations, and Notifications, as shown:
Attributes
Click on a component’s Attributes to display its list of attributes. Hovering over a label displays information about the selected item. Values in blue are modifiable.
Note Changing Attribute Values — Changes you attempt are validated as acceptable values. Management permissions might limit your ability to make changes. When auditing is enabled in the Domain Manager, changes are recorded in the audit trail.
Progress SonicMQ Configuration and Management Guide 8.5 645

Chapter 19: Using JSR 160 Compliant Consoles
Operations
Click on a component’s Operations to display its list of operations. Hovering over a label displays information about the selected item. Values that are greyed-out and not available actions.
646 Progress SonicMQ Configuration and Management Guide 8.5

Using the JConsole Application Window
Notifications
Click on a component’s Notifications to display its list of notifications.
Click Subscribe to receive all available notifications in the console.
Progress SonicMQ Configuration and Management Guide 8.5 647

Chapter 19: Using JSR 160 Compliant Consoles
648 Progress SonicMQ Configuration and Management Guide 8.5

Appendix A OEM Considerations
This appendix describes techniques that cusomers might want to apply to brand Sonic tools as a tool in their corporate toolset . The chapter includes the following topics:
● “Custom Branding the Sonic Management Console”
Progress SonicMQ Configuration and Management Guide 8.5 649

Appendix A: OEM Considerations
Custom Branding the Sonic Management ConsoleThe title and the graphics that identify Sonic in the Sonic Management Console can be changed to your preferred title and graphics.
◆ To custom brand the Sonic Management Console:
1. To change the title displayed:
a. Use your preferred text editor to open the file:sonic_install_dir/MQx.x/bin/branding.properties.
b. Change the value of application.title to your preferred name.
c. Save the edited file.
2. To change the icons and logo displayed:
a. Produce your graphic files as .gif files:
❑ Logo (200 x 117 pixels) named logo.gif
❑ Large icon in title bar (36 x 36 pixels) named Application.gif
❑ Small icon in title bar (18 x 18 pixels) named Application18.gif
b. Copy your graphics files.
c. Replace the files of the same name in sonic_install_dir/MQx.x/bin.
Note You can use your preferred name for these graphics files by adding their .gif files to the SonicMQ /bin directory, and then correspondingly changing their name references in the branding.properties file. For example:
application.logo=eglogo.gifapplication36.icon=egApplication.gifapplication18.icon=egApplication18.gif
650 Progress SonicMQ Configuration and Management Guide 8.5

Custom Branding the Sonic Management Console
3. When you start the management console, your changes are applied. For example:
4. When you choose Help > About in the management console, your logo is displayed. For example:
Progress SonicMQ Configuration and Management Guide 8.5 651

Appendix A: OEM Considerations
652 Progress SonicMQ Configuration and Management Guide 8.5

Index
Symbols#ONLY
in an acceptor definition 284
Numerics64-bit
Java VM option 128
Aacceptor
interbroker 281acceptor properties
broker read timeout 279cipher for SSL acceptor 289client idle timeout 279client read timeout 279Enable HTTP Pipelining 296Enable Legacy HTTP Server 296Max Connection Receive Buffer Size 295Max Connection Send Buffer Size 295maximum threads 279minimum threads 279name 284, 295, 299, 310, 315URL 295
acceptors 276broker-wide properties 277dynamic changes 286enable legacy HTTP server 296HTTP pipelining 296HTTP(S) Direct Basic 298HTTP(S) Direct for JMS 314
HTTP(S) Direct for SOAP 309HTTP(S) tunneling 294limiting the IP or host 284Max Connection Receive Buffer Size 295Max Connection Send Buffer Size 295name 284, 295, 299, 310, 315SSL 287
JSSE 288TCP 283URL 295
acceptors, broker-wide propertiesinterbroker acceptor 277
access controlendpoint URL 324
Access Control Lists. See ACLsaccess control, HTTP(S) Direct 302ACL properties
action 445principal 444principal type 445resource name 445resource type 445value 445
ACLs 443configuring 444deleting 448
action 445ACL property 445containers in Activation Daemon list 191
Action menu commands 51action, ACL property 445activating
containers 530waiting brokers 560
Activation Daemonarchive name 188
Progress SonicMQ Configuration and Management Guide 8.5 653

Index
classpath 188Activation Daemon properties
archive name 188Activation Daemons 187
activating containers 530adding containers to activation list 189class loader details 526deactivating containers 530name 188notifications 531operations 531retry rules 190runtime properties 524scheduling containers 190tracing 526viewing listed containers 192
addingbrokers to clusters 254component identity to component
collection 151components to container 137container identity to container collection 154
administered objects. See JMS administered objects
administrative notifications 371Administrator user 434Administrators group 434advanced backup broker properties 263advanced broker properties 242advertise global queues, DRA routing definition
property 336advertised global queues 581
clearing 582refreshing 582
AES 211Agent Manager 181, 515
backup 185class loader details 518configuring fault tolerance 182, 184, 520, 521fault tolerance 516logging 523monitoring containers 131notifications 523operations 522poll frequency 59runtime properties 517
suspending active role 522tracing 519
agent managerarchive name 184classpath 184, 197
Agent Manager propertiesallow failover 511, 520failure detection interval 183, 184, 196role 183, 184, 196, 520, 521state 520, 521
aggregated metricsspecifying 149viewing 394
alert notifications, repeat 123, 183, 196, 235, 459, 521, 536, 550
alerts 400application 565brokers 563, 565containers 491, 492instance 401queues 605threshold 400
aliasJSSE Keystore 218, 290x.509.v3 353
allow failoverAgent Manager property 511, 520
APIs 33application message log details 63application messages
viewing 62application.alert alerts 565application.connection notifications 414, 566,
587application.flowcontrol notifications 567application.global subscriptions
notifications 567application.message notifications 567application.session notifications 568application.state notifications 568archive name
Activation Daemon 188Activation Daemon property 188agent manager 184broker 236, 262collections monitor 197
654 Progress SonicMQ Configuration and Management Guide 8.5

Index
container 125audit
enable 75audit trail, enable 75auditing
log4j config file 122override domain default 122
Authentication Domains 421, 422adding groups 439adding users 436configuring 422for brokers 209for clusters 251, 253for routing definitions 338used for management permissions 73
Authentication SPI 423, 424authorization policies 442
ACLs 443configuring 442for clusters 251, 253specifying for a broker 210
auto start, component in container 137, 139
Bbacking up Directory Service
offline 511backup
Agent Manager 185backup address, replication connection
property 271backup broker properties
load balancing weight 263name 259
backup brokersadvanced properties 263configuring 258failover 258name 259proxy URL property 263recovery log 261templates 93
backup failover read-onlyDirectory Service replication 167
backup port, replication connection property 271
base64 encoding 178BASIC authentication 343block size (of recovery log) broker property 228Blowfish 211boot files
Directory Service 174generating 135, 174
brokerActional instrumentation 237archive name 236, 262classpath 236, 262monitoring 237outbound 342, 349, 352payload in Actional instrumentation 237
broker propertiesadvanced 242block size (of recovery log) 228BROKER_CONNECT_TIMEOUT 244buffer size 229buffer size (of broker recovery log) 228cipher suites 211client reconnect timeout 241CONNECT_PING_TIMEOUT 244control number 206directory (for certificates) 221, 260, 292DMQ notify factor 239domain suffix search order 240enable duplicate detection 233enable load balancing 240, 248enable shared duplicate detection 233ENABLE_QOP_SECURITY 243FAILURE_DETECT_CALLBACK 243flow to disk publishing 230FLOW_TO_DISK_NOTIFY 243FT_REPLICATE_NON_PERSISTENT 242guaranteed buffer size 227idle timeout 229load balancing weight 241location 231location (of recovery log) 228max connections 241MAX_MSG_SIZE 244maximum topic DB size 231name 206outgoing buffer size 227PREFERRED_ACTIVE 243
Progress SonicMQ Configuration and Management Guide 8.5 655

Index
primary threads 229proxy
password 241URL 241username 241
PTP DB buffer size 227Pub/Sub DB buffer size 227recovery log notify factor 239replication state 547secondary threads 229SET_JMSXUSERID 209size (of recovery log) 228START_ACTIVE 243store type 231table name for duplicate detection 234TCP nodelay 240wait buffer size 227WS_SIGNATURE_PREFIXLIST_REQUIRE
D 245XONCE Recovery option 228
broker proxy overridefor routing definitions 339
broker proxy override passwordrouting definition property 339
broker proxy override URL, routing definition property 339
broker proxy override usernamerouting definition property 339
broker read timeout, HTTP acceptor property 279
broker recovery log 228broker replication 258broker replication properties 266
connect timeout 268failure detect timeout 268ping interval 268ping timeout 268replicate persistent 267retry interval 267
BROKER_CONNECT_TIMEOUTbroker property 244
broker.bytes metrics 563broker.connections metrics 563broker.messages metrics 564brokers
alerts 563, 565Authentication Domain 209authorization policies 210broker-wide acceptor properties 277buffers 227certificate chain 221, 260, 292class loader details 548client authentication 221, 260, 292cluster participation 208commands for primary, backup, or
standalone 264configuring 204dynamic debugging 548enabling security 209evaluation mode 207message store 231metrics 563monitoring 563name 206notifications 565operations on multiple brokers 551, 552queue properties 362queues 364recovery log 228reloading 552removing from cluster 256routing definitions 356runtime properties 544specifying paths 221, 228, 260, 261, 292SSL private key 221, 260, 293starting 551startup roles 559stopping 551tracing 548transactions 229tuning 226viewing configured acceptors 282
broker-side selectorsJMS administered object property 625
browsing durable subscriptions 595buffer size
connection 284buffer size (for transactions)
broker property 229buffer size (of recovery log) broker property 228
656 Progress SonicMQ Configuration and Management Guide 8.5

Index
buffersacceptor, max connection receive 295acceptor, max connection send 295
buffers, on broker 227bytes in queue 603
CCA Certificates 221, 260, 292cache
data memory threshold 119Directory Service 159encrypting persistent container 137
CAR files 114, 125, 184, 188, 197, 236, 262central connection 134central container properties
connection URLs 134centralized logging 74
central log directory 74certificate
serial number, destination certificate 354certificate chain 221, 260, 292certificate chain format 221, 292certificate chain path 221, 292Certificate Revocation Lists 222certificate to username mapping
endpoint URL 325certificate, destination
outbound routing 354certificates 221, 260, 292
X.509.v3 214certificates store, WS-Security 212certificates, X.509.v3 token
endpoint URL 325cipher suites
specifying for broker 211cipher, SSL acceptor property 289classpath
Activation Daemon 188agent manager 184broker 236, 262collections monitor 197container 125
cleanup interval queue property 363clearing
advertised global queues 582
Collections Monitor’s history 538errors 491, 511, 552log file 64messages in queue 604notifications 412preferences 60
client authenticationon broker 221, 260, 292
client idle timeout, HTTP acceptor property 279client read timeout, HTTP acceptor property 279client reconnect timeout
broker property 241client transaction buffer size, JMS administered
object property 630ClientID, JMS administered object property 623cloning configurations 94close timeout
Directory Service replication 169close timeout, JMS administered object
property 627cluster
flow control notifications 570, 574, 577cluster properties
Authentication Domain 251, 253authorization policies 251, 253load balancing 255load balancing weight 255
clustered queuesconfiguring 365deleting 370
clusters 250adding brokers 254configuring 250deleting 256outbound broker 342, 349, 352queues 373removing brokers 256routing definitions 356specifying for brokers 208
collection intervalcollections monitor 536
collection interval (for metrics) 379agent manager runtime 521broker configuration 235broker runtime 550container configuration 123
Progress SonicMQ Configuration and Management Guide 8.5 657

Index
container runtime 459collections 143Collections Monitor
collections to monitor 198deployed in a managed container 198
collections monitorarchive name 197configuring metrics 195, 535
Collections Monitor propertieshistory duration 195, 536location 195name 194save history of monitored notifications 536save threshold notifications 536
Collections Monitors 193, 532class loader details 534clearing history 538component collections being monitored 537configuring 194dynamic debugging 535forwarded notifications 145monitored metrics 149monitored notifications 147notifications 539operations 538runtime properties 533tracing 535viewing component collections monitored 199
colors, container icons 456columns, displaying in tables 57command line
activating for container console 118container runtime property 462containers 473
committing prepared XA transactions 610component collections
adding component identities 151configuring 144deleting component identities 152forwarded notifications 145monitored by a Collections Monitor 198, 537monitored metrics 149monitored notifications 147operations 496runtime properties 495
component propertiesname 138
tracing mask 139components 112
clearing errors 491configuring deployment in container 137deploying 137hosted by a container 140in container 138reloading in container 490removing from container 141starting 490stopping 490
compress SMC responses from DS 42configuration changes
audit 75dynamic 98requiring reloading 98
configuration changes, audit 75configuration domains 68configuration types
creating configurations from 82configurations
copying 94creating from templates 85creating from types 82deleting 96linked to templates 91moving 96renaming 96subclassing 85upgrading 97
configure permissions 107configure view, Sonic Management Console 44configuring
acceptors 276ACLs 444Authentication Domains 422Authentication SPI 424authorization policies 442backup brokers 258broker replication properties 266brokers 204clustered queues 365clusters 250Collections Monitors 194component collections 144components in containers 137container collections 153
658 Progress SonicMQ Configuration and Management Guide 8.5

Index
containers 116external Authentication Domains 428global subscription rules 358groups 439host manager 142Management SPI 426primary brokers 258QoP 450queues 365replication connections 269replication properties 266routing definitions 335users 436
connect attempt interval, routing property 334connect idle timeout, routing property 131, 333connect retry count, routing property 334connect retry interval, routing property 334connect timeout
between Sonic Management Console and domain manager 42, 133
connect timeout, broker replication fault detection property 268
CONNECT_PING_TIMEOUTbroker property 244
ConnectID, JMS administered object property 623
connecting offline to Directory Service 180connecting to a domain 77connection buffer size 284connection definitions 77connection factory, JMS administered
object 620connection lists in routing 340connection name
configuration domain property 71for domain 39
connection URLscentral
container property 134container property 118domain 40, 71JMS administered object property 622routing definition property 338
connection.messages instance metrics 586, 587connections 582
displayed in Sonic Management Console 59
dropping 585metrics 586notifications 587runtime properties 582
console window, container 473consumer notifications 568container
archive name 125classpath 125environment 115resources 113setup file 135
container boot file, generating 135container cache, refreshing 68container collections
adding container identities 154configuring 153deleting container identities from 155operations 498runtime properties 497
container highlight colors 456container properties
command line 118, 462connection URLs 118data memory threshold 119Directory Service ping interval 119file (log) location 120location 119log file rollover size threshold 120log file size threshold 120log to central file 121log to console 120log to file 120log4j config file 122maximum number of threads 132name 118override domain default (auditing) 122status poll interval 131, 515status poll timeout 131, 515tracing mask 121
container runtime propertieslog file size threshold 75, 460
containers 112, 190actions in activation lists 191activating 530adding to activation list 189
Progress SonicMQ Configuration and Management Guide 8.5 659

Index
Agent Manager monitoring 131alerts 491, 492auto start component 139class loader details 458components in 138configuration 113configuring 116configuring component deployment 137console window 473deactivating 530deleting configuration 135deploying components in 137encrypting cache 137exit codes 470, 528fault tolerance 122hosted components 140launching as Windows Services 467launching from command line 467launching via Activation Daemons 471logging 120, 460metrics 491, 492name 118notifications 493number of retries in activation list 190reloading components 490removing components 141retry interval in activation list 190runtime properties 454scheduling actions 190threads 462tracing 459using command line 473
content mappingHTTP Direct routing definition 344, 355HTTP(S) Direct protocol handlers 303, 310
content reply send URLHTTP(S) Direct for SOAP 313HTTP(S) Direct protocol handlers 307
content reply, routing definition property 342, 344
control number, broker property 206copying configurations 94creating
See configuringCRL caches 222
Ddata memory threshold
container cache 119database (embedded)
compacting 561deactivating containers 530dead message queue 371dead messages 371debugging 139default batch size, JMS administered object
property 628default connection for Sonic Management
Console 40deleting
ACLs 448clustered queues 370clusters 256component identities from component
collections 152configurations 96container configurations 135container identities from container
collections 155durable subscriptions 594global subscription rules 360global subscriptions 601groups 441JMS administered objects 636messages 597QoP 451queues 370replication connections 274routing definitions 357template for backup broker 93templates 85users 438
delivery modeacceptor property 305, 308endpoint URL 323nonpersistent 371
delivery threads, queues 363deploying components in containers 137Deployment Parameters tab 139DES,DESede 211Destination 324
660 Progress SonicMQ Configuration and Management Guide 8.5

Index
destination certificateHTTP Direct routing definition property 354
destination nameendpoint URL 323
destination name (undelivered)endpoint URL 324
destination name, acceptor property 301, 305, 308
destination typeendpoint URL 323
destination type (undelivered)endpoint URL 324
destination type, acceptor property 301, 305, 308
destination, acceptor property 310destination, JMS administered object 632directory for certificates 221, 260, 292Directory Service 68, 159, 506
boot file 174cache 159class loader details 509clearing errors 511configuring fault tolerance 510connecting offline 180dynamic debugging 510exporting JAR files 48fault tolerance 506generating boot files 174importing JAR files 48logging 514notifications 514offline backup 511recovery 181restoring 513runtime properties 507tracing 510
Directory Service ping interval, container property 119
Directory Service propertieshost directory 161name 160, 182role 510state 511
Directory Service storeencryption 176password 161
disabling 449
groups of instance metrics 386instance metrics 389metrics 383, 389
disconnecting from a domain 81distinguished name
LDAP lookup for CRL 222DMQ 371
full 372modifying access control 371notify factor 372
DMQ notify factor broker property 239DMQ settings, endpoint URL 324domain connection definitions 78domain manager 40, 68domain name
configuration domain property 71domain properties 69
log file rollover size threshold 75domain suffix search order, broker property 240domains 68
connecting to 77connecting to multiple 79connection name 39connection properties 69connection URLs 71connection URLs of management broker 40disconnecting from 81name 39
doubt window, JMS administered object property 627
DRA routing definition propertiesadvertise global queues 336global subscription expiration 336node name 336routings acceptor 336static routings 336
DRA routing definitions 335configuring 335idle timeout 336
dropping connections 585dual active resolution
Directory Service replication 167duplicate detection, acceptor property 317, 319durable message order
JMS administered object property 625durable subscriptions 588
browsing 595
Progress SonicMQ Configuration and Management Guide 8.5 661
Index
deleting 594metrics 597MultiTopic 589refreshing 590shared 589
dynamic configuration changes 98dynamic debugging
Activation Daemons 526Agent Manager 519brokers 548Collections Monitors 535containers 459Directory Service 510
Dynamic Routing threads, routing property 331
EEdit menu commands 53embedded broker message store 231enable Actional instrumentation
broker 237enable duplicate detection, broker property 233enable fault tolerant
JMS administered object property 630enable global subscription forwarding, routing
property 331enable load balancing
broker property 240, 248enable local store, JMS administered object
property 629enable queue cleanup, queue property 363enable shared duplicate detection, broker
property 233ENABLE_QOP_SECURITY
broker property 243enabling
groups of instance metrics 384instance metrics 387metrics 380
encryptingDirectory Service store 176
endpoint URL 322access control 324
Endpoint URL propertydelivery mode 323destination name 323, 324
destination type 323, 324notify 324preserve 324priority 323SOAP roles 323time to live 323timeout 323URL extension 323user name 323WSDL location 323
enforce management security permissions 73errors, clearing 491, 552evaluation mode 207exclusive, queue property 366exit codes, containers 470, 528exiting Sonic Management Console 64expired messages 371exporting
configurations 52JAR files 48
external Authentication Domains 423, 428external broker message store 231
location 231
Ffactory type, JMS administered object
property 622failover
backup brokers 258failure detect timeout, broker replication
property 268failure detection interval
Agent Manager fault tolerance property 183, 184, 196
failure detection timeoutDirectory Service replication 166
FAILURE_DETECT_CALLBACKbroker property 243
fault detectionreplication connection, connect timeout 268replication connection, ping interval 268replication connection, ping timeout 268
fault toleranceAgent Manager 182, 184, 516, 520, 521containers 122
662 Progress SonicMQ Configuration and Management Guide 8.5

Index
Directory Service 506, 510fault tolerant client connections 280fault tolerant reconnect timeout, JMS
administered object property 630fields in dialog boxes 57file location, container property 120flow to disk
broker property 230JMS administered object property 625
FLOW_TO_DISK_NOTIFYbroker property 243
flowcontrol notifications 570, 574, 577folders 101
creating 101deleting 101properties 70renaming 101system 101
format for certificate chain 221, 292forwarded notifications 145, 407forwarding global subscriptions 331FT_REPLICATE_NON_PERSISTENT broker
property 242full control
configure permissions 107manage permissions 108
Ggenerating
container boot file 135Directory Service boot file 174
global queues 373, 581global subscription expiration 601
DRA routing definition property 336routing node property 331
global subscription rules 357, 598adding routing nodes 359configuring 358deleting 360
global subscription rules table 357, 598global subscriptions 598
deleting 601forwarding 331notifications 602reconciling 600
refreshing 599global, queue property 366group maps for external Authentication
Domains 431group memberships 440
users 436, 437group messages by URL, routing definition
property 342, 349, 352group requests
reserved HTTP Direct threads 332grouping in routing definition 342, 349, 352groups 434
adding to Authentication Domains 439Administrators 434configuring 439deleting 441PUBLIC 434refreshing 428shared subscriptions 589TxnAdministrator 434
guaranteed buffer size, broker property 227
Hhandshake timeout
Directory Service replication 169high notification count threshold 148history duration
Collections Monitor property 195, 536history of metrics 393host directory, Directory Service property 161host manager
configuring 142HTTP compatibility
legacy 1.0 296HTTP Direct dispatch threads, group
requests 332HTTP Direct dispatch threads, routing
property 332HTTP Direct routing definition properties
content reply 342, 344destination certificate 354group messages by URL 342, 349, 352node name 342, 349, 352oneway retries 350outbound broker 342, 349, 352
Progress SonicMQ Configuration and Management Guide 8.5 663

Index
reply retries 344reply timeout 344reply user 344retries (oneway) 343retry interval 342, 349, 352timeout (oneway) 343, 350URL 342, 349, 352user name 349, 352, 353
HTTP Direct routing definitions 341HTTP pipelining
HTTP Tunneling acceptor 296HTTP(S) Direct acceptor properties
access control 302delivery mode 305, 308destination 310destination name 301, 305, 308destination type 301, 305, 308duplicate detection 317, 319mode 310notify (undelivered) 306oneway send URL 304preserve (undelivered) 306priority 305, 308time to live 305, 308timeout 302, 308, 319type 310URL extension 301, 305, 308, 310, 315, 317,
319HTTP(S) Direct acceptors 297HTTP(S) Direct protocol handlers
content mapping 303, 310content reply send URL 307, 313JMS message type 303, 311oneway send URL 312, 317receive URL 310, 315
HTTP(S) tunneling acceptors 294
Iicons on toolbar 56idle timeout
broker transaction property 229DRA routing definition property 336
importingconfigurations 52JAR files 48
indoubt message 371initial connect timeout
between Sonic Management Console and management node 41, 133
central connection 134initial connect timeout, JMS administered object
property 630installed tools 71installing a Windows service 469instance alerts 401, 402instance metrics 383
connections 586disabling 389enabling 387queues 605
instrumentation 378instrumentation payload, broker 237instrumentation, broker 237integrity, in QoP 449interbroker acceptor 277internal JNDI object store 614interval to monitor notifications 148issuer
destination certificate, outbound routing 354
JJMS administered object properties
broker-side selectors 625client transaction buffer size 630ClientID 623close timeout 627ConnectID 623connection URL(s) 622default batch size 628doubt window 627durable message order, 625enable fault tolerant 630enable local store 629factory type 622fault tolerant reconnect timeout 630flow to disk 625initial connect timeout 630load balancing 623local store directory 629local store size 629
664 Progress SonicMQ Configuration and Management Guide 8.5
Index
Login SPI classname 629MaxDeliveryCount 626message compression 631mode, asynchronous delivery 627monitor interval 629persistent 626ping interval 623prefetch count 626prefetch threshold 626reconnect interval 629reconnect timeout 629sequential 623socket connection timeout 630
JMS administered object storeconnection factories 620, 621destinations 632external 617internal 614serialized 619
JMS administered objects 614deleting 636editing 635
JMS content typerouting definition property 344, 355
JMS header properties 316JMS message type
acceptor property 303, 311JNDI administered object store 617JNDI name space 614JSSE
Keystore 218, 290on an SSL acceptor 288parameters on the broker 218, 289Trustmanager 218, 290Truststore 218, 290
JVMlauncher 114
Kkey length
cipher 211Keystore
Directory Service replication 169keystore 218, 290Keystore, WS-Security 213
Llabels on fields in dialog boxes 57latest metrics 391launcher JVM 114launching containers 466
as Windows Services 467from command line 467via Activation Daemons 471
LDAPserver for CRL lookup, backup 225server for CRL lookup, primary 224
LDAP administered object store 617LDAP store
for CRL distribution lists 222legacy HTTP server
HTTP Tunneling acceptor 296legend of metrics 392lifetime
CRL cache 222listener renewal interval
connection 42load balancing 76, 245
central connection 134enabling on cluster 255JMS administered object property 623requests between Sonic Management Console
and remote domain manager 42, 133routing definition property 338weighted round-robin 247
load balancing weightbackup broker property 263broker property 241cluster property 255
local store directory, JMS administered object property 629
local store size, JMS administered object property 629
location(of recovery log), broker property 228broker property 231Collections Monitor property 195container property 119
log directorycentral logging 74
log fileclearing 64
Progress SonicMQ Configuration and Management Guide 8.5 665

Index
log file rollover size threshold, container property 120
log file rollover size threshold, domain property 75
log file sizerelation to sync point size 239
log file size threshold, container property 120log file size threshold, container runtime
property 75, 460log path for application messages 61log size
central log 74log to central file, container property 121log to console, container property 120log to file
container property 120sending application messages to a log file 61
log, audit 75log, viewing 63log4j
appenders for audit events 75log4j config file
container property 122logging 74
Agent Manager 523containers 120, 460Directory Service 514Windows service 470
logging, centralcontainer option 121
Login SPI 423Login SPI classname, JMS administered object
property 629low notification count threshold 148
Mmanage permissions 108manage view, Sonic Management Console 50managememt over DRA
connections 134management broker 68
connection URLs 40management communications 68management node
domain manager on DRA routing node 41, 76,
133management operations
audit 75management operations, audit 75management security 106, 420
enable 73Management SPI 423, 426management thread pool 462mapping groups for authentication 431max connection buffer size (receive) 284max connection buffer size (send) 284Max Connection Receive Buffer Size
HTTP Tunneling acceptor 295Max Connection Send Buffer Size
HTTP Tunneling acceptor 295max connections, broker property 241max replication log size
Directory Service replication 166max threads, container property 132MAX_MSG_SIZE, broker property 244MaxDeliveryCount, JMS administered object
property 626maximum cache size preference 59maximum connections on broker 241maximum message size 244maximum notifications displayed 412, 413maximum plot points 399maximum size, queue property 366maximum temporary queue size, queue
property 363maximum threads, acceptor property 279maximum topic DB size
broker property 231MD5 211members
brokers in cluster 255groups 437, 440users 437, 440
menusAction 51Edit 53Tools 54View 53Window 54
message compression, JMS administered object property 631
message database
666 Progress SonicMQ Configuration and Management Guide 8.5

Index
configuring 230synchronizing 558
message logclearing 64viewer preferences 60
message log details 63message store on broker 231message viewer 480
preferences 60messages
dead 371expired 371indoubt 371nonpersistent 371undeliverable 371unroutable 371
metrics 379broker.bytes 563broker.bytes.DurableSize 597broker.connections 563broker.messages 564broker-wide 380, 563collection interval 379
agent manager runtime 521broker configuration 235broker runtime 550container configuration 123container runtime 459
collections monitor 195, 535connection.messages 586, 587connections 586container-wide 380, 491, 492default max plot points 399disabling 383, 389disabling group of instances 386disabling instance 389durable subscriptions 597enabling 380enabling for group of instances 384instance 387, 389latest 391legend 392monitored from collection 149plot window defaults 399poll frequency 393, 399queues 605
refresh interval for metrics 379agent manager runtime 521broker configuration 235broker runtime 550component collection 149container configuration 123container runtime 459
refreshing 379resetting 399system.memory 491, 492system.pollthreads 523system.threads 492viewing history 393viewing preferences 398watcher 390
metrics refresh intervalcomponent collection 149
minimum threads, acceptor property 279mode, acceptor property 310mode, asynchronous delivery, JMS administered
object property 627monitor interval, JMS administered object
property 629monitored metrics 149monitored notifications 147monitoring 378
broker 237brokers 563connections 586containers 380notifications 405queues 605
moving configurations 96multiversioning 83, 86
NNagle algorithm 240names
Activation Daemon 188backup broker 259broker 206Collections Monitors 194components in containers 138configuration domain 71connection to configuration domain 71
Progress SonicMQ Configuration and Management Guide 8.5 667

Index
containers 118Directory Service 160, 182domain 39DRA routing node 336HTTP Direct routing node 342, 349, 352HTTP Direct routing user 349, 352, 353, 354HTTP(S) Direct Basic acceptor 299HTTP(S) Direct for JMS acceptor 315HTTP(S) Direct for SOAP acceptor 310queues 366replication connections 271routing nodes 333TCP acceptor 284, 295
Native Libraries tab 139node name
DRA routing definition property 336HTTP Direct routing definition property 342,
349, 352nonpersistent messages 371notification dispatch queue size 132notifications 404
Activation Daemons 531Agent Manager 523application.connection 414, 566, 587application.flowcontrol 567application.global subscriptions 567, 602application.message 567application.session 568application.state 568brokers 565clearing 412Collections Monitors 539connections 587container 493Directory Service 514flowcontrol 570, 574, 577forwarded 407forwarded from collection 145high threshold 148listener renewal interval, SMC 42low threshold 148maximum displayed 412, 413monitored from collection 147monitoring 405monitoring interval 148sessions 568
system.alert 493system.log 493system.state 493, 568threshold 407watcher 413
notify (undelivered), acceptor property 306notify factor 372notify undelivered
endpoint URL 324number of delivery threads, queues 363number of retries, for activation list 190
Ooffline backup of directory Service 511offline connection to Directory Service 180oneway retries, HTTP Direct routing definition
property 350oneway send URL
HTTP Direct for JMS 317HTTP(S) Direct acceptors 304HTTP(S) Direct for SOAP 312
operationsActivation Daemons 531Agent Manager 522Collections Monitors 538component collections 496container collections 498multiple brokers 551, 552
outbound broker 342, 349, 352outbound broker, routing definition property 338outgoing buffer size, broker property 227out-of-memory situations
avoiding 132override domain default (auditing)
container property 122
Ppassword
Directory Service store 161pathname for certificate chain 221, 292paths
broker configuration 221, 228, 260, 261, 292launched containers 189
668 Progress SonicMQ Configuration and Management Guide 8.5

Index
payload, Actional instrumentationbroker 237
pending queue 349, 352permission, ACL property 445permissions 445
enabling 73management 106
persistent, JMS administered object property 626
ping intervalcontainer property 119Directory Service replication 165JMS administered object property 623
ping interval, broker replication fault detection property 268
ping timeout, broker replication fault detection property 268
plot window defaults 399pluggable cipher suite 211policies, security 442poll frequency
Agent Manager 59of metrics 393, 399
preferencesclearing 60message log viewer 60message viewer 60resetting 60setting 58Sonic Management Console 58
PREFERRED_ACTIVE broker property 243prefetch count, JMS administered object
property 626prefetch threshold, JMS administered object
property 626prepend classpath
Activation Daemon 188agent managerr 184broker 236, 262collections monitor 197container 125
preserve (undelivered)acceptor property 306
preserve undeliveredendpoint URL 324
primary address, replication connection
property 271primary brokers 258primary interbroker acceptor 277primary port, replication connection
property 271primary threads (for transactions) broker
property 229principal type, ACL property 445principals 443
ACL property 444management permissions 106PUBLIC 443refreshing 427
priorityendpoint URL 323
priority, acceptor property 305, 308privacy, in QoP 449private key
for broker security 221, 260, 293product versions 83, 86, 97propagation rules 357, 598protocol handlers
HTTP(S) Direct Basic content reply 307HTTP(S) Direct Basic oneway send 304HTTP(S) Direct Basic receive 299HTTP(S) Direct for JMS content reply
send 318HTTP(S) Direct for JMS oneway send 317HTTP(S) Direct for JMS receive 314HTTP(S) Direct for SOAP content reply 313HTTP(S) Direct for SOAP oneway send 311HTTP(S) Direct for SOAP receive 309HTTP(S) Direct Web Service 320multiple 297
protocol, replication connection property 271proxy password, broker property 241proxy subscriptions 357, 598proxy URL, backup broker property 263proxy URL, broker property 241proxy Username, broker property 241PTP DB buffer size
broker property 227Pub/Sub DB buffer size
broker property 227PUBLIC group 434PUBLIC principal 443
Progress SonicMQ Configuration and Management Guide 8.5 669

Index
QQoP 449
configuring 450deleting 451integrity 449none 449pluggable cipher suite 211privacy 449resource name 450resource type 450specifying level 450
Quality of Protection. See QoPqueue
total bytes in queue 603queue properties
cleanup interval 363enable queue cleanup 363exclusive 366global 366maximum size 366maximum temporary queue size 363names 366save threshold 366
queuesbroker 362, 364cleaning up 363clearing messages 604cluster-wide access 373configuring 365deleting 370DMQ 371global 373instance metrics 605number of delivery threads 363refreshing 604routing queue 370runtime properties 603system 370
Rrandom list access 340receive sequences, SOAP 607receive URL
HTTP(S) Direct Basic protocol handler 301
HTTP(S) Direct for JMS protocol handler 315HTTP(S) Direct for SOAP protocol
handler 310receivers
notifications 568reconciling global subscriptions 600reconnect interval
JMS administered object property 629routing property 333
reconnect timeout, JMS administered object property 629
recovering, Directory Service 181recovery log 228
back up broker 261recovery log notify factor
broker property 239refresh interval 379
agent manager runtime 521broker configuration 235broker runtime 550collections monitor 536container configuration 123container runtime 459CRL cache 222
refreshingadvertised global queues 582container cache 68durable subscriptions 590global subscriptions 599metrics 379principals 427queues 604users and groups 428
refreshing XA transactions 610reliable sequences, SOAP 607reloading
brokers 552components in containers 490users and groups in an external Authentication
Domain 433reloading components after configuration
changes 98remote configuration 113remote subscriptions 357, 598removing
brokers from a cluster 256
670 Progress SonicMQ Configuration and Management Guide 8.5

Index
components from component collections 152components from containers 141containers from container collections 155notification watches 413
renaming configurations 96repeat alert notifications 123, 183, 196, 235,
459, 521, 536, 550replicate persistent, broker replication
property 267replicated transaction timeout
Directory Service replication 166replicating brokers 258replication connection properties
backup address 271backup port 271name 271primary address 271primary port 271protocol 271weight 271
replication connections 266defining 269deleting 274Directory Service store 171editing 272
replication properties 266replication state, broker property 547reply retries, HTTP Direct routing definition
property 344reply retries, Web Service protocol routing
definition property 354reply timeout, HTTP Direct routing definition
property 344reply timeout, Web Service protocol routing
definition property 354reply user
content reply outbound routing 354reply user HTTP Direct routing definition
property 344reply user Web Service protocol routing
definition property 354request timeout
between Sonic Management Console and domain manager 42, 76, 133
between Sonic Management Console and manageable resources 59, 79
central connection 134
resettingmetrics 399preferences 60
resource nameACL property 445QoP 450
resource typeACL property 445QoP property 450
resourcescontainer 113
restoring the Directory Service 513retries
oneway outbound routing 354retries (oneway), HTTP Direct routing definition
property 343retry interval
broker replication property 267Directory Service replication 165for activation list 190HTTP Direct routing definition 349, 352
retry interval, routing definition property 342reverting to template value 92RM idle timeout
Web Service protocol routing definition property 355
roleAgent Manager fault tolerance property 183,
184, 196, 520, 521Directory Service fault tolerance property 510
rolling back prepared XA transactions 610rollover sizer
central log 74round-robin load balancing 247routing 342, 349, 352routing connection lists 340routing definition properties
Authentication 338broker proxy override 339broker proxy override password 339broker proxy override URL 339broker proxy override username 339connection URLs 338load balancing 338outbound broker 338sequential 338use certificate CN 338
Progress SonicMQ Configuration and Management Guide 8.5 671

Index
user 338routing definitions
deleting 357DRA 335HTTP Direct 341HTTP Direct Basic 341HTTP Direct for JMS 348HTTP Direct for SOAP 347on broker 356on cluster 356
routing node name, routing property 333routing nodes 330
adding to global subscription rules table 359routing properties
(indoubt) timeout 333connect attempt interval 334connect idle timeout 131, 333connect retry count 334connect retry interval 334Dynamic Routing threads 331enable global subscription forwarding 331global subscription expiration 331HTTP Direct dispatch threads 332reconnect interval 333retry connect attempt interval 334routing node name 333routing timeout 331
routing queue 370, 607routing statistics 606routing timeout, routing property 331routing users 444routings acceptor
DRA routing definition property 336rules table 357, 598runtime 536
Ssave monitored notifications
Collections Monitor property 536save threshold notifications, Collections Monitor
property 536save threshold, queue property 366save window positions
setting preferences 59save window sizes
setting preferences 59scheduling containers via Activation
Daemon 190scripts
startmc 38SDM Model file elements
BrokerId 206Security (reference) 209TargetCluster 208
MQBase 206SDM Tuning file elements
BrokerParametersSecurity
Enabled 209SetJmsxUserId 209
WebServiceSecurity 212secondary threads (for transactions) broker
property 229security
authentication 421authorization policies 442enabling 209, 421enabling SSL 421groups 434management 106, 420SSL acceptors 287users 436
security policies 442send sequences, SOAP 607sequence expiration
Web Service protocol routing definition property 355
sequences, SOAP reliable 607sequential
JMS administered object property 623routing definition property 338
sequential list access 340serial number
destination certificate, outbound routing 354session consumer notifications 568sessions
notifications 568set as default connection
connection for Sonic Management Console 40set permissions 107, 108
672 Progress SonicMQ Configuration and Management Guide 8.5

Index
SET_JMSXUSERID broker property 209setting preferences 58
save window positions 59save window sizes 59
setup filecontainer 135
SHA,PKCS5 Padding 211shared duplicate detection, specifying on
broker 233shared durable subscriptions 589size (of recovery log), broker property 228SOAP messages
HTTP Web Service protocol handler 320SOAP reliable sequences 607SOAP roles
endpoint URL 323socket connect timeout
between Sonic Management Console and management node 42, 133
central connection 134socket connection timeout, JMS administered
object property 630Sonic internal JNDI storage 614Sonic Management Console 38
configure view 44exiting 64manage view 50setting preferences 58
Sonic Management Environment 35sonic.http 345SSL
acceptors 287configuration domains requiring self-
certification 43enabling 421for connection to CRL LDAP server 224private key 221, 260, 293
stack tracesviewing 63
START_ACTIVE broker property 243starting
brokers 551components 490
startmc script 38startup roles
brokers 559startup script 115
stateAgent Manager fault tolerance property 520,
521Directory Service fault tolerance property 511
static routings, DRA routing definitions 336status poll interval, container property 131, 515status poll timeout, container property 131, 515stopping
brokers 551components 490
storagecompacting 561
store type, broker property 231subclassing configurations 85subscribers
notifications 568subscription reconciliation 600support, technical 27suspending active role of Agent Manager 522sync point size 239synchronizing
message database store 558synchronizing storage, primary and backup
brokers 558system folders 101system queues 370
DMQ 371hiding 372, 604routing queue 370showing 372, 604
system.alert notifications 493system.log notifications 493system.memory metrics 491, 492system.pollthreads metrics 523system.state notifications 493, 568system.threads metrics 492
Ttable name, duplicate detection broker
property 234tables, displaying columns 57TCP acceptors 283TCP nodelay broker property 240technical support 27templates 86
Progress SonicMQ Configuration and Management Guide 8.5 673
Index
backup broker 93copying 90creating 86creating by copying an instance 88creating configurations from 85deleting 85deleting backup broker template 93for configurations 91overriding values 91pasting 90pasting as configurations 90pasting as instances 90reverting to template value 92
threadsacceptors 279brokers 229connecting 244containers 462Dynamic Routing (broker) 331HTTP Direct dispatch 332metrics 382, 492queues 363transient container activities 132
threshold notifications 407thresholds 402
for alerts 400for instance alerts 402high notification count 148low notification count 148
time to liveendpoint URL 323
time to live, acceptor property 305, 308timeout
acceptor property 302, 308, 319endpoint URL 323expiration 244initial connect (Administered Object CF) 630listener renewal (SMC) 42oneway outbound routing 354QoP
disabling 243reconnect (Administerd Object CF) 629socket block 244socket connection (Administered Object
CF) 630timeout (indoubt), routing property 333
timeout (oneway), HTTP Direct routing definition property 343, 350
tokensuser name 214, 353X.509.v3 214X.509.v3, endpoint URL 325
toolbar icons 56Tools menu commands 54topics 588total bytes in queue 603trace log
clearing 64viewer preferences 60
traces, viewing 63tracing
Activation Daemon 526Agent Manager 519brokers 548Collections Monitor 535component in container 139containers 459Directory Service 510viewing 480
tracing maskcomponent property 139container property 121
transaction buffer size 630transactions
configuring on broker 229primary threads 229secondary threads 229
Trustmanager 218, 290Truststore 218, 290
Directory Service replication 169WS-Security 213
tuning broker 226TxnAdministrators group 434type, acceptor property 310types, creating configurations from 82
Uundeliverable message 371undelivered settings 324unroutable message 371upgrading configurations 97
674 Progress SonicMQ Configuration and Management Guide 8.5

Index
URL 342, 349, 352URL extension
endpoint URL 323URL extension acceptor property
HTTP(S) Direct content reply 308HTTP(S) Direct for JMS content reply 319HTTP(S) Direct for JMS oneway send 317HTTP(S) Direct for JMS receive 315HTTP(S) Direct for SOAP 310
URL extension, acceptor property 301HTTP(S) Direct oneway send 305
URL, HTTP Direct routing definition property 342, 349, 352
URLsHTTP Tunneling acceptor 295
URLs, routing definition property 338use certificate CN, routing definition
property 338use routing
for remote management node 76user
routing definition properties 338user name
endpoint URL 323HTTP Direct routing definition property 349,
352, 353outbound routing 353token 214
usersadding to Authentication Domain 436configuring 436deleting 438group memberships 436, 437refreshing 428
Vversions
tools 83, 86upgrading 97
View menu commands 53viewing
acceptors 282ACLs 447advertised global queues 581aggregated metrics 394
application message log details 63application messages 62component collections being monitored 537connections 583containers in Activation Daemon’s activation
list 527containers using an Activation Daemon 192domain connections 78durable subscriptions 588forwarded notifications 407global subscription rules 360groups in an Authentication Domain 441message log 480metrics 390monitored component collections 199notification properties 410notifications 413QoPs 451queues 603queues on clusters 374replication connections 273routing definitions on broker or cluster 356routing statistics 606stack traces 63trace information 480users in an Authentication Domain 438XA transactions 609
Wwait buffer size
broker property 227watching
metrics 390notifications 413
Web servers 343Web Service
endpoint URL 322HTTP(S) Direct protocol handler 320
Web Service protocoladding to an acceptor 326create 321
Web Service protocol routing definition properties
reply retries 354reply timeout 354
Progress SonicMQ Configuration and Management Guide 8.5 675

Index
reply user 354RM idle timeout 355sequence expiration 355
Web ServicesWS-Security 212
weightcluster property 255load balancing 241, 263replication connection property 271replication connection property, editing 272round-robin load balancing 246, 247
Window menu commands 54Windows service 467
installing 469logging 470
WS_SIGNATURE_PREFIXLIST_REQUIREDbroker property 245
WSDL locationendpoint URL 323
WS-Security 212in outbound routing 353truststore
endpoint URL 325X.509.v3
token, endpoint URL 325
XX.509.v3
alias, outbound 353password, outbound 353token 214Truststore
endpoint URL 325XA transactions 608
committing 610refreshing 610rolling back 610
XONCE Recovery broker property 228
676 Progress SonicMQ Configuration and Management Guide 8.5


![backthepack flyer VS_2 8.5 x 8.5[1][1]](https://img.pdfslide.net/doc/110x75/587fcb331a28ab3b158b7027/backthepack-flyer-vs2-85-x-8511.jpg)