Embed Size (px)
Citation preview

deutschHandbuch
englishManual
françaisMode d‘emploi
nederlandsHandboek
italianoManuale
españolManual
polskiPodręcznik
danskManual
русский язык
Руководство по эксплуатации
PROGUARD CoffeeReverse Osmosis (RO) and Mineralisation System
version 02/2020

2
English Page 45 – 84 1 Introduction 2 Operating and Safety Instructions 3 General Product Information 4 Installation Requirements 5 Installation 6 Maintenance 7 Long Term System Shutdowns 8 Disassembly 9 Troubleshooting 10 Technical Data 11 Information For The End-user

45
EN
1 Introduction
1.1 Function and Application AreaPROGUARD Coffee is a non-electric system that combines several water treatment technologies. It is designed for the desalination of potable water and its subsequent mineralisation for the production of water of high sensory quality. The water thus produced is intended to be used as feed water for coffee, espresso and hot drinks machines only. The targeted mineralisation allows the aroma of hot drinks to fully develop. The previously performed desalination protects the hot drinks machine from particles, limescale, gypsum and corrosion.
1.2 List of AbbreviationsRO Reverse Osmosis°dH Degree of German hardnessTDS Total dissolved solidsµs/cm Microsiemens/cmApp (BRITA Professional Filter Service)
Application for computing devices such as notebooks, tablets or smartphones, hereinafter referred to as “App”.
1.3 Definition of Terms
Reverse Osmosis (RO)
A water filtration method that separates the incoming raw water into so-called permeate and concentrate. Within the scope of PROGUARD Coffee, a semi-permeable membrane is used that acts as a separator by allowing only water molecules and gases like carbon dioxide to pass while retaining larger molecules and ions. The RO-process is described in more detail in chapter 3.1: How Reverse Osmosis Works in PROGUARD Coffee.
Raw water Water that is provided by the municipal water main (usually untreated drinking water).
Permeate
The share of RO-treated water that passed through a semi-permeable membrane is called permeate. The membrane of PROGUARD Coffee retains 97 % of all salts in the water. Thus, permeate is very pure water that consists almost exclusively of water molecules.
Concentrate
The share of RO-treated water that did not pass through a semi-permeable membrane is called concentrate. In addition to the original salinity of the raw water, concentrate also contains all those salts that have been retained by the semi-permeable membrane.
Filtrate Permeate that has been post-filtered by a mineralisation cartridge in order to add the desired type of minerals in the desired degree.
Water hardness The sum of calcium and magnesium ions in the water. These ions can cause deposits like scale or gypsum.
Water hardness types and other salts
One can differentiate between two different types of water hardness: Carbonate hardness and permanent hardness.Carbonate hardness
Depending on the amount, carbonate hardness, also known as temporary hardness, can cause limescale deposits (kettle rock)
Permanent hardness
Depending on the amount, permanent hardness can cause gypsum deposits
Total hardness Sum of carbonate hardness and permanent hardness
Non-hardness Apart from the total hardness, water also contains non-hardness, mainly sodium chloride and sodium sulphate
Salt water Salt water contains a high share of non-hardness. It bears a much heightened risk of corrosion and has an adverse impact on the taste of coffee products.

46
EN
Conductivity
The conductivity level is determined by the amount of all salts present in the water. Together with the measured degree of carbonate hardness, it serves as a relatively good indicator to determine whether the local raw water causes, if untreated, an increased chance of corrosion in a downstream installed coffee machine.
TDS Indicates the sum of the dissolved solids (salts) in the water. The TDS value is derived from the measured conductivity.
Mineralisation
Within the scope of the PROGUARD Coffee product concept, mineralisation means the addition of the desired type of minerals (calcium hydrogen carbonate) to the previously desalinated water. Depending on the local raw water conditions, the mineralisation level can be customised to various degrees, resulting in low, medium or highly mineralised water, each degree with a different effect on the coffee taste.
App
The App makes a recommendation as to whether PROGUARD Coffee or any other solution of the BRITA Professional Filter portfolio is the appropriate product for the intended use. With regard to the installation of PROGUARD Coffee, the App is essential for determining various configuration criteria. For more information, refer to chapter 5.1: App (BRITA Professional Filter Service).
1.4 Disposal and RecyclingMake sure the disposal of PROGUARD Coffee, its refill components (e.g., cartridges) and its spare parts (e.g., non-electric pump) is in accordance with the local regulations. PURITY C filter cartridges can be returned to BRITA free of charge for recycling.
1.5 Warranty ProvisionsPROGUARD Coffee is subject to the statutory warranty to the original end user. The warranty period commences on the date of purchase and is administered as follows: • For a period of TWO YEARS the entire system and replaceable components (excluding
all PURITY C filter cartridges)• For a period of ONE YEAR all PURITY C filter cartridges
With the exception of the PURITY C filter cartridges, the non-electric pump and the tank, the PROGUARD Coffee system has a limited life-time of FIVE years and must be replaced after this period. • PURITY C filter cartridges have a limited life-time of ONE year maximum and must
be replaced after this period at the latest.• The tank has a limited life-time of TWO years maximum and must be replaced after this
period at the latest.• The non-electric pump has a limited life-time of THREE years maximum and must be
replaced after this period at the latest.
Certain elements of PROGUARD Coffee must be checked regularly by a service technician and/or the end user (see chapter 6: Maintenance). Failure to follow the recommended measures of the service technician will void warranty.
A warranty claim may only be asserted if all instructions in this manual are followed and observed.
1.6 Liability ExclusionThe installation of PROGUARD Coffee and the replacement of filter cartridges and spare parts must be performed precisely in accordance with the descriptions in this Installation and Operating Manual. BRITA shall not be held liable for any damage, including subsequent damage, arising from the incorrect installation or use of the product.BRITA reserves the right to alter its non-legally prescribed commitments or any other information provided in this manual without informing any of its customers.

47
EN
2 Operating and Safety Instructions
Read, understand, and follow all safety information contained in these instructions prior to installation and use of any PROGUARD Coffee component.
General! Warning
• To reduce the risk associated with the ingestion of contaminants: • Water used as intake water for PROGUARD Coffee must be of drinking water quality• In the case of an official order, for instance from local authorities, to boil tap water,
BRITA-filtered water must be boiled as well. When the requirement to boil water comes to an end, all filter cartridges must be replaced and the PROGUARD Coffee system including all connections and hoses be cleaned thoroughly.
• It is generally recommended to boil tap water for certain groups of people (e.g. people with weakened immune systems, babies). This also applies to filtered water.
• Installation and maintenance of PROGUARD Coffee, its refill components and its spare part MUST be carried out by specialist staff with an understanding of local and regional regulations/codes that may affect the installation requirements.
• To reduce the risk of physical injury: Depressurise PROGUARD Coffee as well as the PURITY C filter cartridges when maintaining or disassembling the unit as described in chapter 5: Installation and chapter 8: Disassembly.
! CautionTo reduce the risk associated with property damage including but not limited to water leakage:• Read and follow this Installation and Operating Manual before installation and use of this system.• Installation and use MUST comply with all state and local laws and regulations including
plumbing regulations/codes.• All parts must be installed in accordance with the country-specific guidelines on the installation of
drinking water facilities. A backflow must be prevented according to EN 1717 at least by backflow preventer Type EA.
• The appliance is intended to be permanently connected to the mains water supply.• Take care when using pliers or pipe wrenches to tighten plastic fittings, as damage may occur if
overtightening occurs.• Ensure all tubing and fittings are secure and free of leaks.• The disposable PURITY C filter cartridges MUST be replaced every 12 months or at the rated
capacity, whatever comes first, see chapter 5.1: App (BRITA Professional Filter Service). The filtrate should be tested periodically to verify that the system is working properly (see chapter 6: Maintenance).
• PROGUARD Coffee contains replaceable components that are critical to the efficiency of the system. Replacement of the reverse osmosis components MUST be done with the original BRITA refill components or spare parts defined by the manufacturer, to assure the same efficiency and contaminant reduction performance.
• The flawless function of the non-electric pump (built-in) is critical for the desired water quality. Unless the water tank is already fully filled with filtrate (no more required), a regular and audible click sound indicates its proper functioning.
• Regularly clean the outside of the RO system with a soft, damp cloth. Caution: Do not use any abrasive chemicals, cleaning solutions or astringent cleaning agents. InformationThe food grade quality provided by PROGUARD Coffee has been tested and confirmed by independent institutes. Product-specific certifications are located on the respective cartridge label.

48
EN
PURITY C filter cartridges ! Caution
• Note for people with kidney disease or dialysis patients: During the filter process the potassium levels may increase slightly. If you suffer from kidney disease and/or have to stick to a special potassium diet, we recommend you to consult your doctor beforehand.
• The filter system (filter cartridge and filter head) must not be opened or dismantled during operation. The filter cartridge must not be opened.
PURITY C500 MinUpAvoid strong impact once installed. In the event of strong impacts, brownish residues in the filtrate may appear. In this case, flush the PURITY C500 MinUp cartridge in the PURITY C pre-filter head until the water gets cleared (see chapter 9: Troubleshooting).
Storage tank ! Caution
• The tank pressure should be checked at least (!) yearly (see chapter 6: Maintenance).• Details concerning manufacturer, year of manufacture, serial number and the technical data are
provided on the name plate which is located at the top of the tank.• An inert gas, for instance nitrogen, MUST be used for the gas recharge.
3 General Product Information
3.1 How Reverse Osmosis Works in PROGUARD CoffeePROGUARD Coffee uses the mains water pressure to force water molecules through a semi-permeable membrane. The concentrate of PROGUARD Coffee with its concentrated amount of scale, gypsum, sodium chloride and sodium sulphate will be released to the drain. The permeate however is nearly free of ions and molecules other than water and carbon dioxide.
After being produced, the permeate gets mineralised afterwards to allow the coffee aroma to fully develop. The mineralised water is called filtrate. Depending on the local water conditions, the level of mineralisation can be customised to various degrees, resulting in rather low, medium or highly min-eralised water. All mineralisation degrees have a different effect on the taste of coffee.
Level of mineralisation Carbonate hardness (°dH) of the filtrate
Low approximately 2–3Medium approximately 3–5High approximately 5–6
3.2 Role and Functionality of The Main Components of PROGUARD COFFEE Pre-filter cartridge: PURITY C Quell ST (option 1 of 2)
Uses ion exchange technology to reduce the carbonate hardness of the raw water, thus preventing scale deposits in the downstream equipment. During the ion exchange process, carbon dioxide is formed in the water, resulting into the formation of carbonic acid. The properties of this carbonic acid are later used to increase the amount of minerals that can be released from the mineralisation cartridge PURITY C500 MinUp. The level of carbon dioxide can be varied by adjusting the bypass setting on the filter head of the PURITY C Quell ST cartridge. This results in up to three possible mineralisation levels that can be selected.Besides the use of ion exchange resin, activated carbon is used in the PURITY C Quell ST pre-filter as filter medium to protect the membrane in the PURITY C150 PROGUARD cartridge.

49
EN
Pre-filter cartridge: PURITY C50 Fresh (option 2 of 2)Activated carbon is used in the PURITY C50 Fresh pre-filter as a filter medium to protect the membrane in the PURITY C150 PROGUARD cartridge. With PURITY C50 Fresh as pre-filter, only one mineralisation level can be achieved.
The type of pre-filter (PURITY C Quell ST or PURITY C50 Fresh) and the choice of possible mineralisation level(s) is calculated by the App and determined by the local water quality.Membrane cartridge: PURITY C150 PROGUARDRemoves 97% of all salts in the water, e.g., sodium chloride and sodium sulphate. The resulting water is called permeate.Mineralisation cartridge: PURITY C500 MinUpIncreases the carbonate hardness in the water by releasing calcium hydrogen carbonate into the permeate. The resulting water is called filtrate. Depending on the local raw water quality, up to three carbonate hardness levels can be selected: low, medium or high. From the choices available, the coffee machine operator can select the degree of mineralisation that he likes to taste.Post-filter cartridge: PURITY C50 FreshUses activated carbon to avoid the risk of any potential taste and smell impairment.Pump (non-electric)A built-in non-electric pump is powered by the mains water pressure to pump the filtrate into the downstream storage tank and releases the concentrate-effluent to the drain. A minimum mains water pressure of 3 bar (dynamic) is required. In case of insufficient pressure, an electric booster pump must be installed at any position between the mains water supply and the pressure reducer that controls the inlet pressure.
G3/4" G3/4"
Regardless of the mains pressure level, an electric booster pump can be installed to increase the filtrate output of PROGUARD Coffee. The maximum inlet pressure must not exceed 8.6 bar. The maximum pressure the RO can be operated with is 6 bar. A pre-installed pressure reducer reduces the inlet pressure to the maximum permissible operating pressure of 6 bar. Pay attention to chapter 4.1: Operating Specifications.Operating pressure 3 bar 4 bar 5 bar 6 barFiltrate output ~10 l/h ~13 l/h ~16 l/h ~20 l/h
Storage tankActs as a filtrate reservoir to provide sufficient filtrate when the coffee machine’s water demand exceeds the regular filtrate output of PROGUARD Coffee.

50
EN
ManometerMeasures the pressure of the storage tank bladder. The pressure needle must lie within the specified parameter of 1.7–2.8 bar to ensure the flawless supply of filtrate. Explanations and measures for deviations from the normal range are given in chapter 9.1: Errors, Root Causes and Measures For The Service Technician.
0
1
23
4
5
6bar
EN 837-1
Tank
Kl.1,6
Made in Germany
Valve for the automatic bypassEnsures sufficient feed water to run the coffee machine at any time. The valve for the automatic bypass is installed after the pre-filter and opens automatically if the tank has run empty and the coffee machine’s current water (filtrate) demand exceeds the filtrate production rate of PROGUARD Coffee. The valve must never be turned off during operation of PROGUARD Coffee.
4 Installation Requirements
4.1 Operating SpecificationsInlet Pressure
Minimum
The minimum required inlet pressure is 3 bar. If 3 bar cannot be met by the local mains water supply, an electric booster pump must be installed in front of PROGUARD Coffee. For more information see chapter 5.3: Specification and Installation of an Electric Booster Pump.
Regardless of the level of the mains water supply pressure, an electric booster pump can be installed to increase the filtrate production rate of PROGUARD Coffee (litres/hour; see chapter 3.2 Role and Functionality of The Main Components of PROGUARD Coffee, Pump [non-electric])
Maximum (dynamic and/or static)
The maximum inlet pressure must not exceed 8.6 bar. The maximum pressure the RO can be operated with is 6 bar. A pre-installed pressure reducer reduces the inlet pressure to the maximum permissible operating pressure of 6 bar.
Outlet Pressure
Minimum
The minimum filtrate outlet pressure provided by PROGUARD Coffee is 1.3 bar. Make sure that the spatial distance (distance, height difference) between PROGUARD Coffee and the coffee machine is not too large in order to keep the resulting pressure loss as low as possible.
Maximum The maximum filtrate outlet pressure provided by PROGUARD Coffee is 2.7 bar.
51
EN
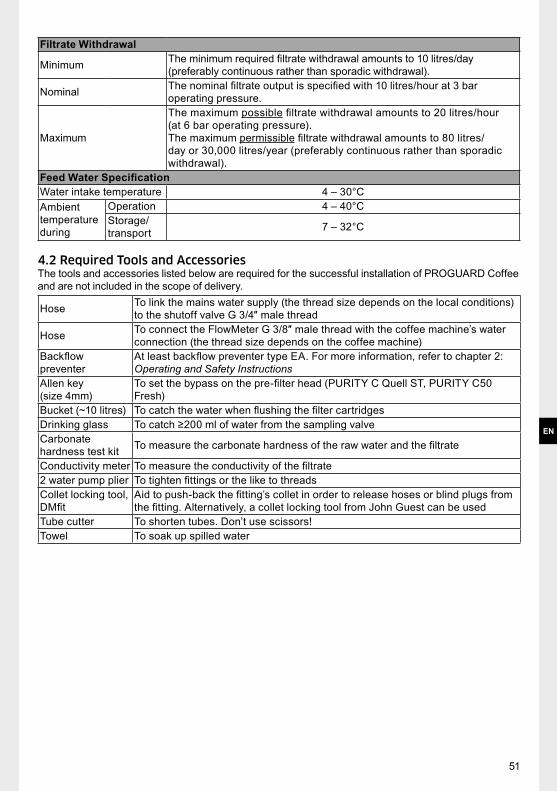
Filtrate Withdrawal
Minimum The minimum required filtrate withdrawal amounts to 10 litres/day (preferably continuous rather than sporadic withdrawal).
Nominal The nominal filtrate output is specified with 10 litres/hour at 3 bar operating pressure.
Maximum
The maximum possible filtrate withdrawal amounts to 20 litres/hour (at 6 bar operating pressure). The maximum permissible filtrate withdrawal amounts to 80 litres/day or 30,000 litres/year (preferably continuous rather than sporadic withdrawal).
Feed Water SpecificationWater intake temperature 4 – 30°CAmbient temperatureduring
Operation 4 – 40°CStorage/ transport 7 – 32°C
4.2 Required Tools and AccessoriesThe tools and accessories listed below are required for the successful installation of PROGUARD Coffee and are not included in the scope of delivery.
Hose To link the mains water supply (the thread size depends on the local conditions) to the shutoff valve G 3/4″ male thread
Hose To connect the FlowMeter G 3/8″ male thread with the coffee machine’s water connection (the thread size depends on the coffee machine)
Backflow preventer
At least backflow preventer type EA. For more information, refer to chapter 2: Operating and Safety Instructions
Allen key (size 4mm)
To set the bypass on the pre-filter head (PURITY C Quell ST, PURITY C50 Fresh)
Bucket (~10 litres) To catch the water when flushing the filter cartridgesDrinking glass To catch ≥200 ml of water from the sampling valveCarbonate hardness test kit To measure the carbonate hardness of the raw water and the filtrate
Conductivity meter To measure the conductivity of the filtrate2 water pump plier To tighten fittings or the like to threadsCollet locking tool, DMfit
Aid to push-back the fitting’s collet in order to release hoses or blind plugs from the fitting. Alternatively, a collet locking tool from John Guest can be used
Tube cutter To shorten tubes. Don’t use scissors!Towel To soak up spilled water

52
EN
5. Installation
5.1 App (BRITA Professional Filter Service)The App is a tool that can be downloaded free of charge from App stores (Android, iOS) and from https://www.brita.net. The App is required for the installation and maintenance process. It is the only option to determine the following configuration criteria:Configuration criteria Output values
Type of PROGUARD Coffee
PROGUARD Coffee 300PROGUARD Coffee 500PROGUARD Coffee 1100PROGUARD Coffee 50
Bypass setting of the pre-filter head 0%, 10%, 20%, 30%, 40%, 50%, 60%, 70%
Replacement date of the filter cartridges
Replacement date (always within the next 12 months)
The App requires the following input values:Input value UnitMains water supply pressure bar
Carbonate hardness °dH (alternatively °fH, °e)
Total hardness °dH (alternatively °fH, °e)Water consumption* water in litre coffee powder in kg
(conversion in litres)size and amount of cups (conversion in litres)
Preferred mineralisation level
low, medium, high
* Note this figure as you are required to enter it later into the FlowMeter during the installation process.

53
EN
5.2 Installation and Putting The System Into OperationStep #1 Preparation and positioning
1.1
• Make sure all installation requirements are met (see chapter 4: Installation Requirements) • Use the App to determine the suitable type and size of the pre-filter • Use the App to determine the recommended bypass setting of the pre-filter head • In case the App indicates the need of an electric booster pump, further information about
it can be found in chapter 5.3: Specification and Installation of an Electric Booster Pump.
1.2
Make sure to have sufficient space available for PROGUARD Coffee and its pre- and post-filter at the intended place of operation
620
mm
370 mm
560 mm
Pre-filterPost-filter

54
EN
Step #1 Preparation and positioning
1.3
• Unpack PROGUARD Coffee and all supplied components• Double check the parts and quantities provided
# Name
1 Housing 1x
2 PURITY C150 PROGUARD 1x
3 PURITY C500 MinUp 1x
4 C300/C500/C1100 Quell ST or C50 Fresh 1x
5 PURITY C50 Fresh 1x
6PURITY C pre-filter head 0–70 % G3/8″ (with wall mounting bracket)
1x
7 Manual 1x
8 Flushing head PROGUARD Coffee 1x
9 Shutoff valve G3/4″ - G3/4″ 1x
10 Pressure reducer G3/4″ - G3/4″ 1x
11 Waste water tube, LLDPE, John Guest, 2 m, 5/16″ 1x
12 Hose DN8 1.5 m G3/8″ - G3/8″ 1x
13 Hose DN8 1.5 m G3/4″ - G3/8″ 1x
14 Hose DN8 1.5 m G3/8″ - G3/8″ with bend 1x
15 Tube, LLDPE, John Guest, 25 cm, 5/16″ 1x
16 Cable tie 1x
17 FlowMeter G3/8″ - G3/8″ 1x
18 PURITY C 90° angle bend G3/8″ - G3/8″ 1x
19 90° angle DMT fitting with security clip 1x
20 Threaded insert 2x
11
8
6
1817
1312
19
14
9
6
21
20
15 16
10
7
3 4 5

55
EN
Step #1 Preparation and positioning
1.4
• Remove the metal cover at the front• Place PROGUARD Coffee in front of its intended place of operation
1.5
Required accessories that are not included in the scope of delivery:Hose (2x):• To link the mains water supply (the thread size depends on the local conditions) to the
shutoff valve G 3/4″ male thread• To connect the PURITY C50 Fresh filter head's G 3/8″ male thread with the coffee
machine’s water inlet connection (the thread size depends on the coffee machine)Backflow preventer (1x): • Make sure to install a backflow preventer that matches the local regulations. For more
information refer to chapter 2: Operating and Safety Instructions • Install the backflow preventer at any position between the mains water supply and the
pre-filter head’s male thread (inlet)
1.6
Checking the local waste water connection:• Make sure in advance that you can later hang the waste water tube deeply into the
water drain (syphon)• Make sure you can later fix the waste water tube with the cable tie
OK?
OK?
56
EN
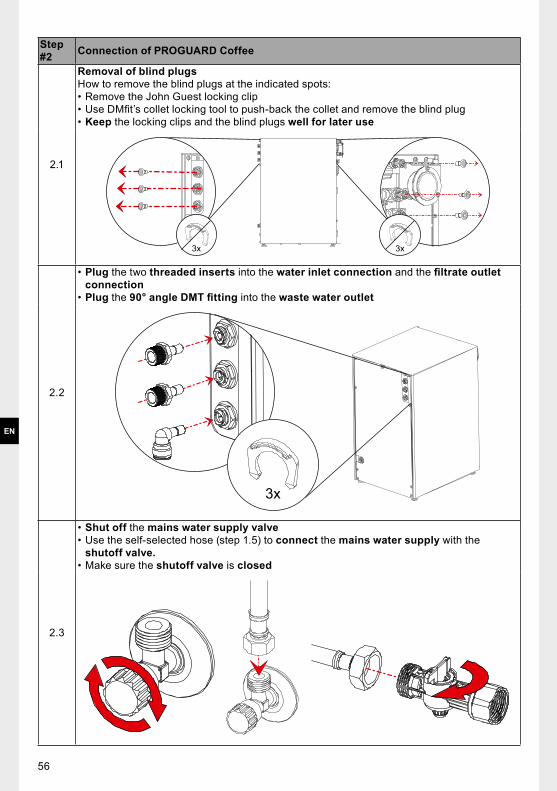
Step #2 Connection of PROGUARD Coffee
2.1
Removal of blind plugsHow to remove the blind plugs at the indicated spots:• Remove the John Guest locking clip • Use DMfit’s collet locking tool to push-back the collet and remove the blind plug • Keep the locking clips and the blind plugs well for later use
3x 3x
2.2
• Plug the two threaded inserts into the water inlet connection and the filtrate outlet connection
• Plug the 90° angle DMT fitting into the waste water outlet
3x
2.3
• Shut off the mains water supply valve• Use the self-selected hose (step 1.5) to connect the mains water supply with the
shutoff valve. • Make sure the shutoff valve is closed

57
EN
Step #2 Connection of PROGUARD Coffee
2.4
Screw the pressure reducer on the shutoff valve*** Make sure the imprinted arrow on the pressure reducer points away from the shutoff valve and goes with the water flow ***
2.5
Connecting PROGUARD Coffee via the pre-filter head:• Use the hose DN8 G 3/4″ – G 3/8″ to connect the pressure reducer’s G 3/4″ male
thread with the G 3/8″ male thread of the pre-filter head (inlet)• Do not yet connect the pre-filter cartridge (PURITY C Quell ST or PURITY C50 Fresh)
to the pre-filter head• Make sure the pre-filter head’s flush valve is closed. The flush valve is closed when
the grey slider is pushed inwards• Use the hose DN8 G 3/8″ – G3/8″ with bend to connect the G 3/8″ male thread of the
pre-filter head (outlet) with the threaded insert that is plugged into the water inlet connection of PROGUARD Coffee (step 2.2)

58
EN
Step #2 Connection of PROGUARD Coffee
2.6
• Make sure the locking handle of PURITY C150 PROGUARD’s firmly mounted filter head is open. Open the locking handle by bringing its two blue handles in an inclined position
• Make sure the bleed valve is closed• Make sure the sampling valve is closed• Make sure the flushing head valve is closed• Make sure the filtrate outlet valve is closed• Make sure the valve for the automatic bypass is closed
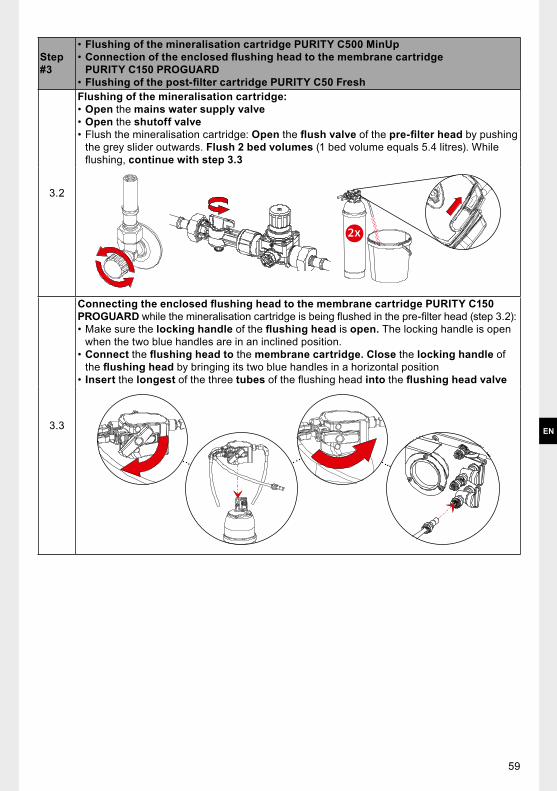
Step #3
• Flushing of the mineralisation cartridge PURITY C500 MinUp• Connection of the enclosed flushing head to the membrane cartridge
PURITY C150 PROGUARD• Flushing of the post-filter cartridge PURITY C50 Fresh
3.1
Preparations for the flushing process:• Make sure the locking handle of the pre-filter head is open. The locking handle is open
when the two blue handles are in an inclined position• Insert the mineralisation cartridge into the pre-filter head. Close the locking handle
of the pre-filter head by bringing its two blue handles in a horizontal position• Set the bypass of the pre-filter head to 0% (Allen key size 4mm)• Place a bucket (~10 litres) close to the mineralisation cartridge and hang its grey flushing
hose into the bucket
0 %
59
EN
Step #3
• Flushing of the mineralisation cartridge PURITY C500 MinUp• Connection of the enclosed flushing head to the membrane cartridge
PURITY C150 PROGUARD• Flushing of the post-filter cartridge PURITY C50 Fresh
3.2
Flushing of the mineralisation cartridge:• Open the mains water supply valve• Open the shutoff valve• Flush the mineralisation cartridge: Open the flush valve of the pre-filter head by pushing
the grey slider outwards. Flush 2 bed volumes (1 bed volume equals 5.4 litres). While flushing, continue with step 3.3
2x
3.3
Connecting the enclosed flushing head to the membrane cartridge PURITY C150 PROGUARD while the mineralisation cartridge is being flushed in the pre-filter head (step 3.2):• Make sure the locking handle of the flushing head is open. The locking handle is open
when the two blue handles are in an inclined position.• Connect the flushing head to the membrane cartridge. Close the locking handle of
the flushing head by bringing its two blue handles in a horizontal position• Insert the longest of the three tubes of the flushing head into the flushing head valve

60
EN
Step #3
• Flushing of the mineralisation cartridge PURITY C500 MinUp• Connection of the enclosed flushing head to the membrane cartridge
PURITY C150 PROGUARD• Flushing of the post-filter cartridge PURITY C50 Fresh
3.4
Detachment of the mineralisation cartridge from the pre-filter head:• After being sufficiently flushed, close the flush valve of the pre-filter head by pushing
the grey slider inwards• Open the locking handle of the pre-filter head by bringing its two blue handles in an
inclined position. Do not close the shutoff valve!• Open the flush valve of the pre-filter head to release the remaining inner pressure of the
cartridge by pushing the grey slider on the pre-filter head outwards. Catch the coming out water with the bucket
• Close the flush valve of the pre-filter head and pull the pre-filter head off the cartridge
1
2
3.5
• Insert the post-filter into the pre-filter head.• Close the pre-filter head’s locking handle by bringing its two blue handles in a horizontal
position• Make sure that the pre-filter head’s bypass is set to 0 % (Allen key size 4 mm)• Place a bucket close to the cartridge (~10 litres) and hang the cartridge’s grey flushing
hose into the bucket• Flush the post-filter cartridge: Open the pre-filter head’s flush valve by pushing the grey
slider outwards. Flush 2 bed volumesSize of post-filter 1 x bed volume (in litre) 2x bed volume (in litre)PURITY C50 Fresh 1 2
2x0 %

61
EN
Step #3
• Flushing of the mineralisation cartridge PURITY C500 MinUp• Connection of the enclosed flushing head to the membrane cartridge
PURITY C150 PROGUARD• Flushing of the post-filter cartridge PURITY C50 Fresh
3.5
Detachment of the post-filter cartridge from the pre-filter head:• After being sufficiently flushed, close the flush valve of the pre-filter head by pushing
the grey slider inwards• Open the locking handle of the pre-filter head by bringing its two blue handles in an
inclined position. Do not close the shutoff valve! • Open the flush valve of the pre-filter head to release the remaining inner pressure of the
cartridge by pushing the grey slider on the pre-filter head outwards. Catch the coming out water with the bucket
• Close the flush valve of the pre-filter head and pull the filter head off the cartridge
1
2

62
EN
Step #4
• Flushing of the pre-filter (PURITY C Quell ST or PURITY C50 Fresh)• Setting of the pre-filter head’s bypass to its final position
4.1
• Insert the pre-filter into the pre-filter head. • Close the pre-filter head’s locking handle by bringing its two blue handles in
a horizontal position• Make sure that the pre-filter head’s bypass is set to 0% (Allen key size 4mm)• Place a bucket close to the cartridge (~10 litres) and hang the cartridge’s grey flushing
hose into the bucket• Flush the pre-filter cartridge: Open the pre-filter head’s flush valve by pushing the grey
slider outwards. Flush 2 bed volumesSize of pre-filter 1 x bed volume (in litre) 2x bed volume (in litre)PURITY C300 Quell ST 2.9 5.8PURITY C500 Quell ST 5.4 10.8PURITY C1100 Quell ST 8.7 17.4PURITY C50 Fresh 1 2
• After being sufficiently flushed, close the flush valve of the pre-filter head by pushing the grey slider inwards. Leave the pre-filter cartridge in the pre-filter head
2x0 %
4.2
Set the bypass of the pre-filter head to its final position that has been calculated by the App (see step 1.1, Allen key size 4)

63
EN
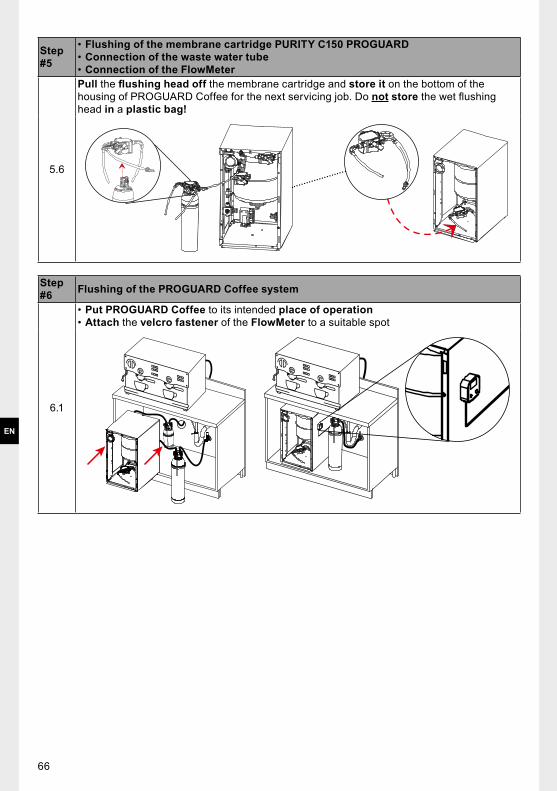
Step #5
• Flushing of the membrane cartridge PURITY C150 PROGUARD• Connection of the waste water tube• Connection of the FlowMeter
5.1
Flushing of the membrane cartridge (continuation of step 3.3):• Place the bucket (~10 litres) close to the cartridge and hang the two tubes of the flushing
head into the bucket• Open the flushing head valve• The membrane cartridge will now start to be flushed. Flush the cartridge for 30 minutes.
While flushing, carry out installation step 5.2 – 5.5 Note: It takes around 10 seconds until waste water flows out of one of the two flushing head’s outlet tubes and around another 20 seconds until permeate flows out of the other outlet tube Hint: In case of time critical installations at the customer’s site, the membrane cartridge can be pre-flushed in the PROGUARD Coffee system 1–2 days in advance (no longer!) at the service technician’s premises. Before installing the cartridge at its intended place of operation, it is critical to store it intermediately in vertical position to prevent dehydration and leakage
30 min.
5.2
Carry out installation step 5.2 – 5.5 while the membrane cartridge is being flushed (step 5.1)Usage of the waste water tube to connect the water drain with the 90° angle DMT fit-ting that is plugged into the waste water outlet of PROGUARD Coffee:• Hang the waste water tube deeply into the drain to prevent noise resulting from the out
coming water streams• Secure the position of the waste water tube with the cable tie at the water drain• If necessary, shorten the tube to the required length
Note: Use a tube cutter, not scissors!• Plug the waste water tube into the 90° angle DMT fitting at the waste water outlet of
PROGUARD Coffee
1x

64
EN
Step #5
• Flushing of the membrane cartridge PURITY C150 PROGUARD• Connection of the waste water tube• Connection of the FlowMeter
5.3
Connection of the FlowMeter:• Screw the G 3/8″ female thread of the 90° angle bend on the threaded insert that has
previously been plugged into the filtrate outlet connection of PROGUARD Coffee (step 2.2)• Screw the FlowMeter on the 90° angle bend G 3/8″ male thread
*** Make sure the imprinted arrow on the FlowMeter points away from the 90° angle bend and goes with the water flow ***
• Use the separately supplied FlowMeter manual to start programming the FlowMeter. You will be asked to enter the estimated yearly water consumption of the operated coffee machine into the FlowMeter. Make sure to enter exactly the same figure that you previously entered into the App (see chapter 5.1: App - BRITA Professional Filter Service).
• Put the FlowMeter on the top of the housing of PROGUARD Coffee. Do not yet attach the FlowMeter with the velcro fastener
5.4
Use the hose DN8 G 3/8″ – G 3/8″ to connect the FlowMeter with the filter head of the post-filter (inlet)

65
EN
Step #5
• Flushing of the membrane cartridge PURITY C150 PROGUARD• Connection of the waste water tube• Connection of the FlowMeter
5.5
Use the other of the two self-selected hoses (step 1.5) to connect the G 3/8" male thread of the post filter with the coffee machine’s water inlet connection
5.6
After 30 minutes flushing, detachment of the flushing head from the membrane cartridge PURITY C150 PROGUARD:• Shut the flushing head valve• Open the locking handle of the flushing head by bringing its two blue handles in
an inclined position• Wait until the remaining water that is still coming out of the flushing head’s two tubes
has ceased to flow. This can take up to 5 minutes. Alternatively, you can immediately pull-off the flushing head to speed up the process, resulting in water splashing out of the cartridge.
5 min.
Use DMfit’s collet locking tool to push-back the collet of the flushing head valve and pull the flushing head’s tube off
66
EN
Step #5
• Flushing of the membrane cartridge PURITY C150 PROGUARD• Connection of the waste water tube• Connection of the FlowMeter
5.6
Pull the flushing head off the membrane cartridge and store it on the bottom of the housing of PROGUARD Coffee for the next servicing job. Do not store the wet flushing head in a plastic bag!
Step #6 Flushing of the PROGUARD Coffee system
6.1
• Put PROGUARD Coffee to its intended place of operation• Attach the velcro fastener of the FlowMeter to a suitable spot

67
EN
Step #6 Flushing of the PROGUARD Coffee system
6.2
Insertion of the membrane cartridge and the mineralisation cartridge into the firmly mounted filter heads of PROGUARD Coffee:• Insert the PURITY C150 PROGUARD cartridge (left side) and the PURITY C500 MinUp
cartridge (right side) into their respective filter head• Close the filter heads’ locking handles by bringing the two blue handles in a horizontal
position respectively• As a result, a regular click-sound made by the non-electric pump should be noticeable.
PROGUARD Coffee is now put into operation• Within the next minutes, the pressure indicating needle of the manometer should
gradually move upwards into the green range
2x
6.3
Bleeding of PROGUARD Coffee:• Wait until the pressure needle of the manometer shows a value of at least 2 bar• Insert the 25cm black tube into the bleed valve• Place a bucket under the tube and open the bleed valve until the effluent is clear of
any air bubbles
≥2
1
2

68
EN
Step #6 Flushing of the PROGUARD Coffee system
6.3
Close the bleed valve and remove the 25cm black tube
6.4
Depending on the local mains water supply pressure wait 20 – 40 minutes until the tank is fully filled with filtrate. Once the tank is fully filled, the “click”-sound that was produced by the non-electric pump up to this point in time is silenced.
≥2,6 20 – 40 min.
6.5
Releasing of the accumulated tank water (filtrate):• Insert the black 25cm tube into the sampling valve• Place a bucket (~10 litres) beneath the tube• Open the sampling valve and wait until all storage water has been released from the tank• Close the sampling valve and discard the collected tank water into the drain
1 2

69
EN
Step #7 Taking of a water sample and testing the water parameters
7.1
Let PROGUARD Coffee run for 5 minutes
5 min.
7.2
Determining the parameter of the filtrate:Open the sampling valve, withdraw ≥200ml of filtrate, close the sampling valve and discard the ≥200ml into the drain
200 ml
Open the sampling valve again, withdraw new filtrate for the filtrate sample and close the sampling valve
~30 ml

70
EN
Step #7 Taking of a water sample and testing the water parameters
7.2
• Use a carbonate hardness test kit to check whether the filtrate sample’s carbonate hardness level lies within the desired range
• Use a conductivity meter to check whether the filtrate sample’s electrical conductivity lies within the desired range. Discard the filtrate sample after the test
5 ml
Desired mineralisation level of the filtrate
Carbonate hardness (°dH)
Conductivity (µS/cm)
TDS (mg/l)
Low approximately 2–3 60–120 40–80Medium approximately 3–5 120–180 80–130High approximately 5–6 180–210 130–150
The given conductivity and TDS values are standard values. Small deviations of the filtrate sample are of no concern. In case of clear deviations, refer to chapter 9: Troubleshooting
7.3
Remove the black 25cm tube from the sampling valve
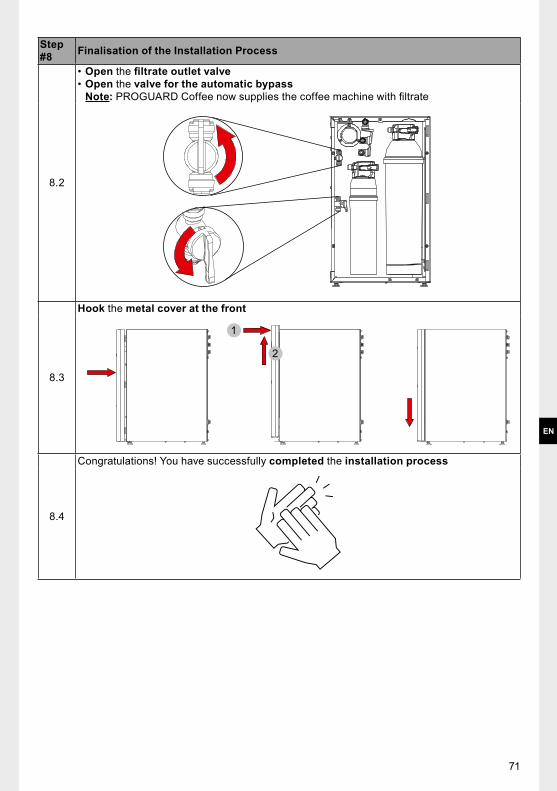
Step #8 Finalisation of the Installation Process
8.1
Reinstallation of the blind plugs at the front side of PROGUARD Coffee:• Plug the blind plugs that have been kept since step 2.1 back into their original position• Attach the John Guest locking clips
3x
71
EN
Step #8 Finalisation of the Installation Process
8.2
• Open the filtrate outlet valve• Open the valve for the automatic bypass
Note: PROGUARD Coffee now supplies the coffee machine with filtrate
8.3
Hook the metal cover at the front
1
2
8.4
Congratulations! You have successfully completed the installation process

72
EN
5.3 Product Specification Electric Booster PumpTo find out under what conditions the installation of an electric booster pump is advised or even necessary for the smooth operation of PROGUARD Coffee, refer to chapter 3.2: Role and Functionality of The Main Components of PROGUARD Coffee >> Pump (non-electric).
The following specification simply acts as a guideline to identify an electric booster pump that meets the technical requirements to help PROGUARD Coffee operate successfully.Feature Requirement
Outlet water pressure
3 bar to max. 8,6 bar
Note: The electric booster pump must be installed in front of the pressure reducer that is connected to the shutoff valve. The pressure reducer will reduce the (increased) inlet pressure to the maximum permissible operating pressure of 6 bar
Flow rate
The minimum required flow rate that the electric booster pump needs to supply to PROGUARD Coffee at the given line pressure is specified in the table below.
Pressure Flow rate3 bar 0.35 litre/minute4 bar 0.5 litre/minute5 bar 0.7 litre/minute6 bar 0.85 litre/minute
Switch-on/switch-off function
It is recommended to install an electric booster pump type that is automatically getting switched-on/off by the measured inlet and outlet water pressure.
Ideally, an electric booster pump is chosen that is equipped with a sensor to switch the booster pump on or off, depending on the storage tank’s water pressure. Install the sensor at the provided connection at the rear side of PROGUARD Coffee (John Guest 5/16”)
SENSOR
Assuming the booster pump you chose is equipped with a sensor (ideally, but no must-have), it is the sensor that has to be connected at the rear side of PROGUARD Coffee (not the booster pump itself).

73
EN
6 Maintenance
The PROGUARD Coffee system as a whole, its spare parts as well as its refill-parts is subject of regular maintenance. In order to ensure the reliable function of the RO as well as the operated down-stream device (coffee machine) and to prevent potential damage, it is important to adhere to the maintenance cycle outlined below.Maintenance to be performed Who How often
Replacement of PURITY C filter cartridges Service technicianAccording to exchange dates provided by the App
Double-check if the bypass position of the pre-filter head is set to the recommended position
Service technician At least 1x year
Tank pressure (tank needle on manometer, pre-pressure on tank air valve) Service technician At least 1x year
Measure filtrate quality (conductivity, carbonate hardness) Service technician At least 1x year
Check for leaks and kinks (hoses, tubes, adapters) Service technician At least 1x year
Replacement of storage tank Service technician At least 1x in 2 yearsReplacement of non-electric pump Service technician At least 1x in 3 yearsTank pressure
• Check if the manometer’s pressure needle is positioned in the green area
• The pressure gauge must not display a value above 2.8 bar. If so, call a service technician for recalibration or exchange of the manometer to ensure staying in the Pressure Equipment Directive
• If the pressure gauge displays a value of 1.3 – 1.7 bar, this indicates a high filtrate demand. Check again later, preferably not during peak usage times. Call service technician if the pressure needle is still within this range or very often in this range
• If the pressure gauge displays a value of <1.3 bar, call a service technician
Explanations and measures for deviations from the normal range are given in chapter 9.1: Errors, Root Causes and Measures For The Service Technician.
End-user At least 1x month
Check for a regular click-sound of the non-electric pump (preferably after the withdrawal of filtrate)
End-user At least 1x month
7 Long Term System Shutdowns
BRITA recommends not to decommission PROGUARD Coffee components for long periods. During extended periods of non-use, turn off the water supply to the unit and remove the PURITY C filter cartridges. When restarting the unit, the cartridges are to be reinstalled and flushed per instructions. The entire PROGUARD Coffee system is to be flushed thoroughly as well (see chapter 5.2: Installa-tion and Putting The System Into Operation).

74
EN
BRITA recommends flushing the filter cartridge with the volume of water indicated in the table below.
Filter cartridge Flushing volume after 2–3 days stagnation
Flushing volume after 4 weeks stagnation
PURITY C300 Quell ST 6 litres 60 litresPURITY C500 Quell ST 10 litres 100 litresPURITY C1100 Quell ST 18 litres 180 litresPURITY C50 Fresh 2 litres 20 litresPURITY C150 PROGUARD 3 litres 30 litresPURITY C500 MinUp 0 litres 0 litres
8 Disassembly
To change the place of operation or to disassemble and store PROGUARD Coffee, carry out the steps described below. PROGUARD Coffee must be reinstalled within the next 72 hours after disassembly.Steps Instructions
1 • Close the mains water supply valve• Remove the metal cover at the front
2
Discharge of the water tank:• Removal of the blind plug from the sampling valve:
• Remove the John Guest locking clip• Use the collet locking tool of DMfit to push-back the collet and remove the blind plug• Keep the locking clip and the blind plug well
• Insert the black 25cm tube into the sampling valve• Place a bucket (~10 litres) beneath the tube• Open the sampling valve and wait until all storage water has been released from the tank• Close the sampling valve and discard the collected tank water into the drain• Remove the 25cm tube from the sampling valve • Plug the blind plug back into the sampling valve• Attach the John Guest locking clip
3 Close the filtrate valve
4
Pulling off the pre-filter cartridge:• Open the locking handle of the pre-filter head by bringing its two blue handles in an
inclined position• Place a bucket close to the cartridge (~10 litres) and hang the cartridge’s grey flushing
hose into the bucket• Open the flush valve of the pre-filter head to release the remaining inner pressure of the
cartridge by pushing the grey slider on the pre-filter head outwards• Close the flush valve of the pre-filter head and pull the pre-filter head off the cartridge
5 Pulling off the post-filter cartridge:Proceed in the same way as for the pre-filter cartridge.
6
Pulling off the membrane and the mineralisation cartridge:• Note: In case the new place of operation is not located very closely from the previous one,
the cartridges must be pulled off in order to prevent damage to the installed mounts• Open the locking handles of the two firmly mounted filter heads. The locking handles
are open when their respective two blue handles are in an inclined position• Pull off both cartridges from their respective filter head
Note: Before reinstallation at their new place of operation, it is critical to store both cartridges intermediately in vertical position to prevent dehydration and leakage

75
EN
7
Disassembling of hoses:• Disassemble the hose that connects PROGUARD Coffee with the mains water supply• Pull the waste water tube out of the water drain• Disassemble the hose that connects PROGUARD Coffee with the coffee machine• If necessary for transport, disassemble all hoses from the rear side of PROGUARD
Coffee
8
Installation of PROGUARD Coffee:Follow the installation procedure as described in chapter 5: Installation and Putting The System Into OperationNote:PROGUARD Coffee must be reinstalled within the next 72 hours
9 Troubleshooting
9.1 Errors, Root Causes and Measures For The Service-technicianThe following table lists possible errors, their likely root causes and the recommended measures to fix the respective problem. The problem solving measures may only be carried out by a service technician.
# Error Root cause Measures service technician
1 No waterWater supply turned off Ensure water supplyShutoff valve and/or filtrate outlet valve turned off
Open shutoff valve (“M”) and/or filtrate outlet valve (“D”)
2 Insufficient water Valve for the automatic bypass turned off
Open valve for the automatic bypass (“E”)
3 Dissatisfaction with coffee taste
Customer is dissatisfied with the taste result of the chosen mineralisation level
Check and apply the possible mineralisation options in the App
Can RO-external influencing factors, e.g., use of other coffee beans, degree of grinding etc. be excluded?
Check with customer, if external factors can be excluded
Filter capacity of pre-filter is exhausted (PURITY C Quell ST, PURITY C50 Fresh)
Compare assumed and actual water consumption with the FlowMeter. If the actual water consumption is greater than assumed: Adjust the amount of water consumption in the App and the FlowMeter and replace the PURITY C pre-filter
Subsequent change of PURITY C Quell ST’s bypass setting
• Set the bypass to its original position
• If unknown, use the App to calculate the recommended bypass and adapt the bypass setting of the pre-filter head accordingly
• Note the result in the service log
Change of raw water quality
• Measure the raw water quality• Use the App to calculate the
recommended pre-filter and bypass setting
• Note the output values in the service log

76
EN
# Error Root cause Measures service technician
3 Dissatisfaction with coffee taste
Water consumption outside of product specification (too low, too high)
Make sure that the usual water consumption of the coffee machine meets the specifications of PROGUARD CoffeeMinimum required filtrate withdrawal
10 litres/day
Maximum permissible filtrate withdrawal
80 litres/day
30,000 litres/year
The water consumption of the coffee machine should not exceed the maximum filtrate production per hour (depending on the inlet pressure) too often, otherwise the bypass valve will open too often.3 bar ~10l/h4 bar ~13l/h5 bar ~16l/h6 bar ~20l/h
Regular supply of bypass water during peak demand
• Measure the line pressure• If the line pressure is <3 bar,
install a booster pump• Even at a line pressure of 3–5
bar, an installation is possible to increase the filtrate production per hour
Membrane clogged Replace the PURITY C150 PROGUARD cartridge
(Non-electric) pump defective Replace the (non-electric) pump
4Discolouration of filtrate (brownish or milky)
PURITY C500 MinUp was subjected to an impact
Flush the PURITY C500 MinUp cartridge until the discolouration in the filtrate has vanished
5
Issue with coffee machine (corrosion, limescale deposits, gypsum deposits)
Insufficient line pressureCheck the line pressure. If the line pressure is <3 bar, install an electric booster pump
Capacity of pre-filter is exhausted (PURITY C Quell ST, PURITY C50 Fresh)
Compare assumed and actual water consumption with the FlowMeter. If the actual water consumption is greater than assumed: Adjust the amount of water consumption in the App and the FlowMeter and replace the PURITY C pre-filter

77
EN
# Error Root cause Measures service technician
5
Issue with coffee machine (corrosion, limescale deposits, gypsum deposits)
Water consumption outside of product specification (too low, too high)
Make sure that the usual water consumption of the coffee machine meets the specifications of PROGUARD Coffee
Minimum required filtrate withdrawal
10 litres/day
Maximum permissible filtrate withdrawal
80 litres/day
30,000 litres/year
The water consumption of the coffee machine should not exceed the maximum filtrate production per hour (depending on the inlet pressure) too often, otherwise the bypass valve will open too often.3 bar ~10l/h4 bar ~13l/h5 bar ~16l/h6 bar ~20l/h
In case of limescale deposits: Bypass of the PURITY C Quell ST pre-filter not set correctly
• Measure the raw water quality• Use the app to calculate the
recommended bypass setting• If necessary, adjust the bypass
of the pre-filter head and note the result it in the service log
Membrane clogged Replace the PURITY C150 PROGUARD cartridge
(Non-electric) pump defective Replace the (non-electric) pump
6
Pressure needle on manometer:• Pressure
regularly <1,7 bar• Pressure
<1,2 bar
Insufficient line pressureCheck the line pressure. If the line pressure is <3 bar, install an electric booster pump
(Non-electric) pump defective Replace the (non-electric) pump
Temporary pressure drop into the red area (<1.3 bar)
Time-limited pressure drop into the red area is possible if the storage tank is empty AND water is drawn from the coffee machine at the same time (via the now automatically opened bypass valve) since the flow pressure (dynamic pressure) is lower than the back pressure (static pressure). As soon as water is no longer drawn off from the coffee machine, the needle moves back into the yellow range. The phenomenon is normal and is not a problem.
Permanent pressure rise into the yellow area (>2.8 bar)
A very quick, sudden stop of the water supply by the downstream coffee machine can lead to an increased pressure display on the manometer. As a result, the pressure needle remains in the upper yellow area (> 2.8 bar) until water is drawn from the coffee machine again. The phenomenon is due to the design of the coffee machine and is not a problem.
78
EN
# Error Root cause Measures service technician
7No click sounds of the (non-electric) pump anymore
Storage tank is fully filledCheck the manometer: “Okay”, if the pressure needle is positioned within the green range
Membrane clogged Replace the PURITY C150 PROGUARD cartridge
(Non-electric) pump defective (the manometer’s pressure needle is constantly positioned within the yellow coloured range)
Replace the (non-electric) pump
8 Leakage Leakage at junction Fix the leak (replace the affected hoses and fittings)
- Applies to all error types
Root cause cannot be identified on site
Complaint process via your local BRITA sales partner
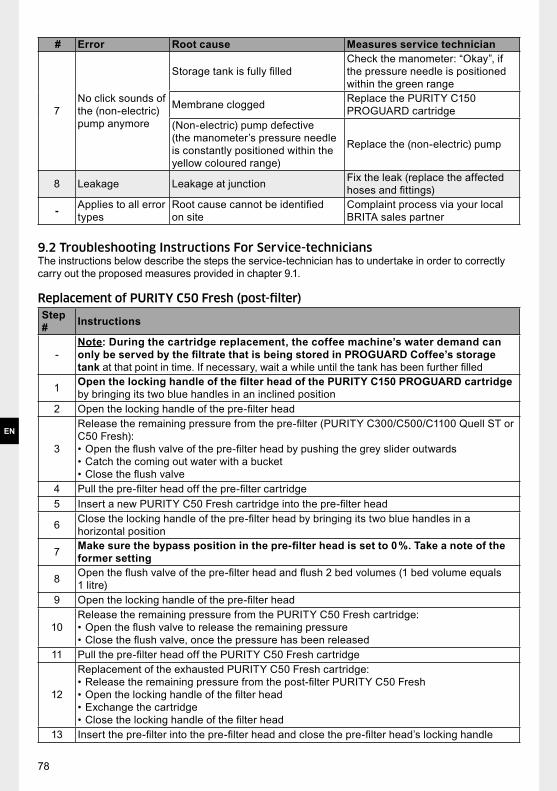
9.2 Troubleshooting Instructions For Service-techniciansThe instructions below describe the steps the service-technician has to undertake in order to correctly carry out the proposed measures provided in chapter 9.1.
Replacement of PURITY C50 Fresh (post-filter)Step # Instructions
-Note: During the cartridge replacement, the coffee machine’s water demand can only be served by the filtrate that is being stored in PROGUARD Coffee’s storage tank at that point in time. If necessary, wait a while until the tank has been further filled
1 Open the locking handle of the filter head of the PURITY C150 PROGUARD cartridge by bringing its two blue handles in an inclined position
2 Open the locking handle of the pre-filter head
3
Release the remaining pressure from the pre-filter (PURITY C300/C500/C1100 Quell ST or C50 Fresh): • Open the flush valve of the pre-filter head by pushing the grey slider outwards• Catch the coming out water with a bucket• Close the flush valve
4 Pull the pre-filter head off the pre-filter cartridge5 Insert a new PURITY C50 Fresh cartridge into the pre-filter head
6 Close the locking handle of the pre-filter head by bringing its two blue handles in a horizontal position
7 Make sure the bypass position in the pre-filter head is set to 0 %. Take a note of the former setting
8 Open the flush valve of the pre-filter head and flush 2 bed volumes (1 bed volume equals 1 litre)
9 Open the locking handle of the pre-filter head
10Release the remaining pressure from the PURITY C50 Fresh cartridge:• Open the flush valve to release the remaining pressure• Close the flush valve, once the pressure has been released
11 Pull the pre-filter head off the PURITY C50 Fresh cartridge
12
Replacement of the exhausted PURITY C50 Fresh cartridge:• Release the remaining pressure from the post-filter PURITY C50 Fresh• Open the locking handle of the filter head• Exchange the cartridge• Close the locking handle of the filter head
13 Insert the pre-filter into the pre-filter head and close the pre-filter head’s locking handle

79
EN
Step # Instructions
14 Set the bypass position in the pre-filter head to its original value (see step #7)15 Close the locking handle of the filter head of the PURITY C150 PROGUARD cartridge
Repl acement of PURITY C500 MinUpStep # Instructions
-Note: During the cartridge replacement, the coffee machine’s water demand can only be served by the filtrate that is being stored in PROGUARD Coffee’s storage tank at that this point in time. If necessary, wait a while until the tank has been further filled
1 Open the locking handle of the filter head of the PURITY C150 PROGUARD cartridge by bringing its two blue handles in an inclined position
2 Open the locking handle of the pre-filter head
3
Release the remaining pressure from the pre-filter (PURITY C300/C500/C1100 Quell ST or C50 Fresh): • Open the flush valve of the pre-filter head by pushing the grey slider outwards• Catch the coming out water with a bucket• Close the flush valve
4 Pull the pre-filter head off the pre-filter cartridge5 Insert a new PURITY C500 MinUp cartridge into the pre-filter head
6 Close the locking handle of the pre-filter head by bringing its two blue handles in a horizontal position
7 Make sure the bypass position in the pre-filter head is set to 0 %. Take a note of the former setting
8 Open the flush valve of the pre-filter head and flush 2 bed volumes (1 bed volume equals 5.4 litres)
9 Open the locking handle of the pre-filter head
10Release the remaining pressure from the PURITY C500 MinUp cartridge:• Open the flush valve to release the remaining pressure• Close the flush valve, once the pressure has been released
11 Pull the pre-filter head off the PURITY C500 MinUp cartridge
12
Replacement of the exhausted PURITY C500 MinUp cartridge:• Open the locking handle of the filter head• Exchange the cartridge• Close the locking handle of the filter head
13 Insert the pre-filter into the pre-filter head and close the pre-filter head’s locking handle14 Set the bypass position in the pre-filter head to its original value (see step #7)15 Close the locking handle of the filter head of the PURITY C150 PROGUARD cartridge
Replacement of The PURITY C Pre-Filter (C300/C500/C1100 Quell ST or C50 Fresh)Step # Instructions
-Note: During the cartridge replacement, the coffee machine’s water demand can only be served by the filtrate that is being stored in PROGUARD Coffee’s storage tank at that point in time. If necessary, wait a while until the tank has been further filled
1 Open the locking handle of the filter head of the PURITY C150 PROGUARD cartridge by bringing its two blue handles in an inclined position
2 Open the locking handle of the pre-filter head

80
EN
Step # Instructions
3
Release the remaining pressure from the pre-filter: • Open the flush valve of the pre-filter head by pushing the grey slider outwards• Catch the coming out water with a bucket• Close the flush valve
4 Pull the pre-filter head off the exhausted PURITY C pre-filter cartridge
5 Insert a new pre-filter cartridge into the pre-filter head and close the pre-filter head’s locking handle
6 Set the bypass position in the pre-filter head to 0 %. Take a note of the former setting
7
Flushing of the PURITY C pre-filter cartridge:• Open the flush valve of the pre-filter head and flush 2 bed volumes• After flushing, close the flush valveSize of pre-filter 1 x bed volume (in litre) 2x bed volume (in litre)PURITY C300 Quell ST 2.9 5.8PURITY C500 Quell ST 5.4 10.8PURITY C1100 Quell ST 8.7 17.4PURITY C50 Fresh 1 2
8 Set the bypass position in the pre-filter head to its original value (see step #6)9 Close the locking handle of the filter head of the PURITY C150 PROGUARD cartridge
Replacement of PURITY C150 PROGUARDStep # Instructions
-Note: Flushing of a new PURITY C150 PROGUARD cartridge has no impact on the water supply that is being delivered by PROGUARD Coffee to the coffee machine during this process
1 Insert a new PURITY C150 PROGUARD cartridge into the flushing head (the flushing head should have been stored at the bottom of the housing of PROGUARD Coffee)
2 Close the locking handle of the flushing head by bringing its two blue handles in a horizontal position
3 Remove the blind plug from the flushing head valve. Insert the longest of the three tubes of the flushing head into the flushing head valve
4 Open the flushing head valve and flush the PURITY C150 PROGUARD cartridge for 30 minutes. Catch the coming out water with a bucket
5
Close the flushing head valve
Note: Wait until the remaining water that is still coming out of the flushing head’s two tubes has ceased to flow. This can take up to 5 minutes. Alternatively, you can immediately pull-off the flushing head to speed up the process, resulting in water splashing out of the cartridge
6 Remove the flushing head’s tube from the flushing head valve and re-insert the blind plug. Pull the flushing head off the PURITY C150 PROGUARD cartridge
7 Store the flushing head on the bottom of the housing of PROGUARD Coffee for the next servicing job. Do not store the wet flushing head in a plastic bag!
8
Replace the exhausted PURITY C150 PROGUARD cartridge:• Open the locking handle of the filter head• Exchange the cartridge• Close the locking handle of the filter head
81
EN
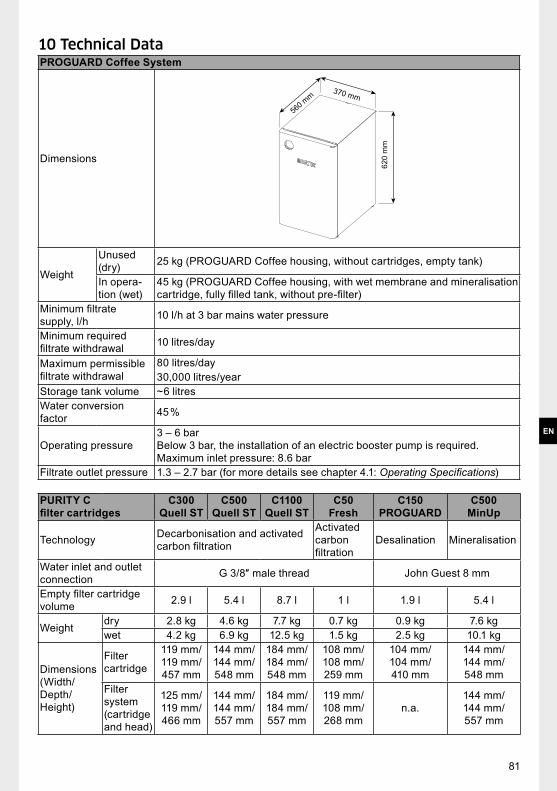
10 Technical DataPROGUARD Coffee System
Dimensions
620
mm
370 mm
560 mm
Weight
Unused (dry) 25 kg (PROGUARD Coffee housing, without cartridges, empty tank)
In opera-tion (wet)
45 kg (PROGUARD Coffee housing, with wet membrane and mineralisation cartridge, fully filled tank, without pre-filter)
Minimum filtrate supply, l/h 10 l/h at 3 bar mains water pressure
Minimum required filtrate withdrawal 10 litres/day
Maximum permissible filtrate withdrawal
80 litres/day30,000 litres/year
Storage tank volume ~6 litresWater conversion factor 45 %
Operating pressure3 – 6 bar Below 3 bar, the installation of an electric booster pump is required. Maximum inlet pressure: 8.6 bar
Filtrate outlet pressure 1.3 – 2.7 bar (for more details see chapter 4.1: Operating Specifications)
PURITY C filter cartridges
C300 Quell ST
C500 Quell ST
C1100 Quell ST
C50 Fresh
C150 PROGUARD
C500 MinUp
Technology Decarbonisation and activated carbon filtration
Activated carbon filtration
Desalination Mineralisation
Water inlet and outlet connection G 3/8″ male thread John Guest 8 mm
Empty filter cartridge volume 2.9 l 5.4 l 8.7 l 1 l 1.9 l 5.4 l
Weightdry 2.8 kg 4.6 kg 7.7 kg 0.7 kg 0.9 kg 7.6 kgwet 4.2 kg 6.9 kg 12.5 kg 1.5 kg 2.5 kg 10.1 kg
Dimensions(Width/Depth/Height)
Filter cartridge
119 mm/119 mm/457 mm
144 mm/144 mm/548 mm
184 mm/184 mm/548 mm
108 mm/108 mm/259 mm
104 mm/104 mm/410 mm
144 mm/144 mm/548 mm
Filter system (cartridge and head)
125 mm/119 mm/466 mm
144 mm/144 mm/557 mm
184 mm/184 mm/557 mm
119 mm/108 mm/268 mm
n.a.144 mm/144 mm/557 mm

82
EN
11 Information For The End-user
11.1 General Product InformationPROGUARD Coffee is a non-electric system that combines several water treatment technologies. It is designed for the desalination of potable water and its subsequent mineralisation for the production of water of high sensory quality. The water thus produced is intended to be used as feed water for coffee, espresso and hot drinks machines only. The targeted mineralisation allows the aroma of hot drinks to fully develop. Depending on the local water conditions, the level of mineralisation can be customised to various degrees, resulting in rather low, medium or highly mineralized water. All min-eralisation degrees have a different effect on the taste of coffee.Level of mineralisation Carbonate hardness (°dH) of the filtrateLow approximately 2–3Medium approximately 3–5High approximately 5–6
The previously performed desalination protects the hot drinks machine from particles, limescale, gypsum and corrosion.
11.2 Disposal and RecyclingMake sure the disposal of PROGUARD Coffee, its refill components (e.g., cartridges) and its spare parts (e.g., non-electric pump) is in accordance with the local regulations.
11.3 Warranty ProvisionsPROGUARD Coffee is subject to the statutory warranty to the original end user. The warranty period commences on the date of purchase and is administered as follows:• For a period of TWO YEARS the entire system and replaceable components (excluding all
PURITY C filter cartridges)• For a period of ONE YEAR all PURITY C filter cartridges
With the exception of the PURITY C filter cartridges, the non-electric pump and the tank, the PROGUARD Coffee system has a limited life-time of FIVE years and must be replaced after this period.• PURITY C filter cartridges have a limited life-time of ONE year maximum and must be replaced
after this period at the latest.• The tank has a limited life-time of TWO years maximum and must be replaced after this period
at the latest.• The non-electric pump has a limited life-time of THREE years maximum and must be replaced
after this period at the latest.
Failure to follow the recommended measures of the service technician will void warranty.
A warranty claim may only be asserted if all instructions in this manual are followed and observed.
11.4 Liability ExclusionThe installation of PROGUARD Coffee and the replacement of filter cartridges and spare parts must be performed precisely in accordance with the descriptions in this Installation and Operating Manual. BRITA shall not be held liable for any damage, including subsequent damage, arising from the incorrect installation or use of the product. BRITA reserves the right to alter its non-legally pre-scribed commitments or any other information provided in this manual without informing any of its customers.

83
EN
11.5 Operating and Safety InstructionsRead, understand, and follow all safety information contained in these instructions.
General! Warning
• To reduce the risk associated with the ingestion of contaminants: • In the case of an official order, for instance from local authorities, to boil tap water,
BRITA-filtered water must be boiled as well. When the requirement to boil water comes to an end, all filter cartridges must be replaced and the PROGUARD Coffee system including all connections and hoses be cleaned thoroughly.
• It is generally recommended to boil tap water for certain groups of people (e.g. people with weakened immune systems, babies). This also applies to filtered water.
• Installation and maintenance of PROGUARD Coffee, its refill components and its spare part MUST be carried out by specialist staff with an understanding of local and regional regulations/codes that may affect the installation requirements.
! Caution• The appliance is intended to be permanently connected to the mains water supply. • The disposable PURITY C filter cartridges MUST be replaced every 12 months or at the
rated capacity, whatever comes first. • The flawless function of the non-electric pump (built-in) is critical for the desired water quality. Unless
the water tank is already fully filled with filtrate (no more required), a regular and audible click sound indicates its proper functioning.
• Regularly clean the outside of the RO system with a soft, damp cloth. Caution: Do not use any abrasive chemicals, cleaning solutions or astringent cleaning agents.
PURITY C filter cartridges ! Caution
Note for people with kidney disease or dialysis patients: During the filter process the potassium levels may increase slightly. If you suffer from kidney disease and/or have to stick to a special potassium diet, we recommend you to consult your doctor beforehand.PURITY C500 MinUpAvoid strong impact once installed. In the event of strong impacts, brownish residues in the filtrate may appear (see chapter 9: Troubleshooting).

84
EN
11.6 MaintenanceThe PROGUARD Coffee system as a whole, its spare parts as well as its refill-parts is subject of regular maintenance. In order to ensure the reliable function of the RO as well as the operated downstream device (coffee machine) and to prevent potential damage, it is important to adhere to the maintenance cycle outlined below. Maintenance to be performed Who How oftenTank pressure• Check if the manometer’s pressure needle is
positioned in the green area• The pressure gauge must not display a value
above 2.8 bar. If so, call a service technician for recalibration or exchange of the manometer to ensure staying in the Pressure Equipment Directive
• If the pressure gauge displays a value of 1.3 – 1.7 bar, this indicates a high filtrate demand. Check again later, preferably not during peak usage times. Call service technician if the pressure needle is still within this range or very often in this range
• If the pressure gauge displays a value of <1.3 bar, call a service technician
Explanations and measures for deviations from the normal range are given in Chapter 9.1: Errors, Root Causes and Measures For The Service Technician.
End-user At least 1x month
Check for a regular click-sound of the non-electric pump (preferably after the withdrawal of filtrate) End-user At least 1x month
11.7 Long Term System ShutdownsBRITA recommends not to decommission PROGUARD Coffee components for long periods (see chap-ter 7: Long Term System Shutdowns). In case of extended periods of non-use, call a service technician.
11.8 TroubleshootingPossible problems with PROGUARD Coffee can be identified at the reverse osmosis unit itself, the downstream installed coffee machine or the coffee taste. To find out more about the potential causes of the detected or perceived fault, check if the issue is listed in the error directory of chapter 9.1: Errors, Root Causes and Measures For The Service Technician. Call and consult a service technician. Keep in mind that defects may only be solved by specialist staff with an understanding of local and regional regulations/codes that may affect the installation and re-installation requirements.

375
Dat
eM
easu
red
para
met
ers
Est
imat
ed
annu
al w
ater
co
nsum
ptio
n
Cho
sen
bypa
ss
sett
ing
pre-
filte
r hea
d
Cho
ice
of
pre-
filte
rIn
stal
latio
n da
teR
epla
cem
ent d
ate
calc
ulat
ed
by A
pp B
RIT
A P
rofe
ssio
nal
Filte
r Ser
vice
Nam
e &
sig
natu
re
dd.m
m.y
yyy
KH (°
dH)
litre
s%
□ C
300
Que
ll ST
Pre-
filte
r
dd.m
m.y
yyy
C30
0/50
0/11
00
Que
ll ST
or
C50
Fre
shdd
.mm
.yyy
y
Max
Mille
r
Max
Mill
erTH
(°dH
)□
C50
0 Q
uell
STC
150
PRO
GU
ARD
C15
0 PR
OG
UAR
Ddd
.mm
.yyy
y
Con
duct
ivity
(μ
s/cm
)□
C11
00 Q
uell
STC
500
Min
Up
C50
0 M
inU
pdd
.mm
.yyy
y
Inle
t pre
ssur
e
(bar
)□
C50
Fre
shC
50 F
resh
C50
Fre
shdd
.mm
.yyy
y
Use
of s
ofte
ner
□ ye
s □
noPe
rson
al n
otes
:
Y1 Y2 Y3
376
Dat
eM
easu
red
para
met
ers
Est
imat
ed
annu
al w
ater
co
nsum
ptio
n
Cho
sen
bypa
ss
sett
ing
pre-
filte
r hea
d
Cho
ice
of
pre-
filte
rIn
stal
latio
n da
teR
epla
cem
ent d
ate
calc
ulat
ed
by A
pp B
RIT
A P
rofe
ssio
nal
Filte
r Ser
vice
Nam
e &
sig
natu
re
dd.m
m.y
yyy
KH (°
dH)
litre
s%
□ C
300
Que
ll ST
Pre-
filte
r
dd.m
m.y
yyy
C30
0/50
0/11
00
Que
ll ST
or
C50
Fre
shdd
.mm
.yyy
y
Max
Mille
r
Max
Mill
erTH
(°dH
)□
C50
0 Q
uell
STC
150
PRO
GU
ARD
C15
0 PR
OG
UAR
Ddd
.mm
.yyy
y
Con
duct
ivity
(μ
s/cm
)□
C11
00 Q
uell
STC
500
Min
Up
C50
0 M
inU
pdd
.mm
.yyy
y
Inle
t pre
ssur
e
(bar
)□
C50
Fre
shC
50 F
resh
C50
Fre
shdd
.mm
.yyy
y
Use
of s
ofte
ner
□ ye
s □
noPe
rson
al n
otes
:
Y4 Y5

1041
172-
00-E
LA
For product-specific certifications, see product labelInformation in the instruction for use subject to change BRITA® is a registerd trademark of BRITA GmbH, Germany.
BRITA PROFESSIONAL FILTER SERVICE APP
The new Filter Service App is your ideal assistant. This unique,
comprehensive tool helps determine the right type and size of filter for your precise needs. It provides
detailed installation guidance for service engineers, calculates when cartridges will need replacing – and
has a wealth of other, innovative capabilities.
DOWNLOAD IT FOR FREE ON
OR VISIT https://professional.brita.net/app
BRITA GmbHHeinrich-Hertz-Str. 465232 TaunussteinGermanyTel. +49 (0) 6128 746-5765Fax +49 (0) 6128 [email protected]
BRITA Wasser- Filter-Systeme AGGassmatt 6 6025 Neudorf/LU SwitzerlandTel +41 41 932 42 30 Fax +41 41 932 42 31 [email protected] www.brita.ch
BRITA Water Filter Systems Ltd.BRITA House9 Granville WayBicesterOxfordshire OX26 4JTGreat Britaintel +44 (0) 844 742 4990fax +44 (0) 844 742 [email protected]
BRITA France SARL 52 boulevard de l’Yerres91030 EVRY CedexFranceTél +33 (0) 1 69 11 36 40Fax +33 (0) 1 69 11 25 [email protected]
BRITA GmbHNetherlands, Belgium, LuxemburgKanaaldijk Noord 109 G5642 JA EindhovenNetherlandstel +31 (0) 40 281 39 59fax +31 (0) 40 281 84 [email protected]
BRITA Italia S.r.l. Via Zanica, 19K24050 Grassobbio (BG)Italytel: +39 35 19 96 46 39fax: +39 35 19 96 22 [email protected]
BRITA Iberia, S.L.U.C/ Valencia 307 2º-4ª08009 - BarcelonaSpainTel. +34 (0) 93 342 75 70Fax. +34 (0) 93 342 75 [email protected]
BRITA Polska Sp. z o.o. Ołtarzew, ul. Domaniewska 605 - 850 Ożarów MazowieckiPolandtel +48 22 721 24 20fax +48 22 721 24 [email protected]
BRITA Nordic A/S Centervej 324180 SorøDenmarktel +45 70 27 32 [email protected]