Embed Size (px)
Citation preview
S U R V I V A L
G U I D E
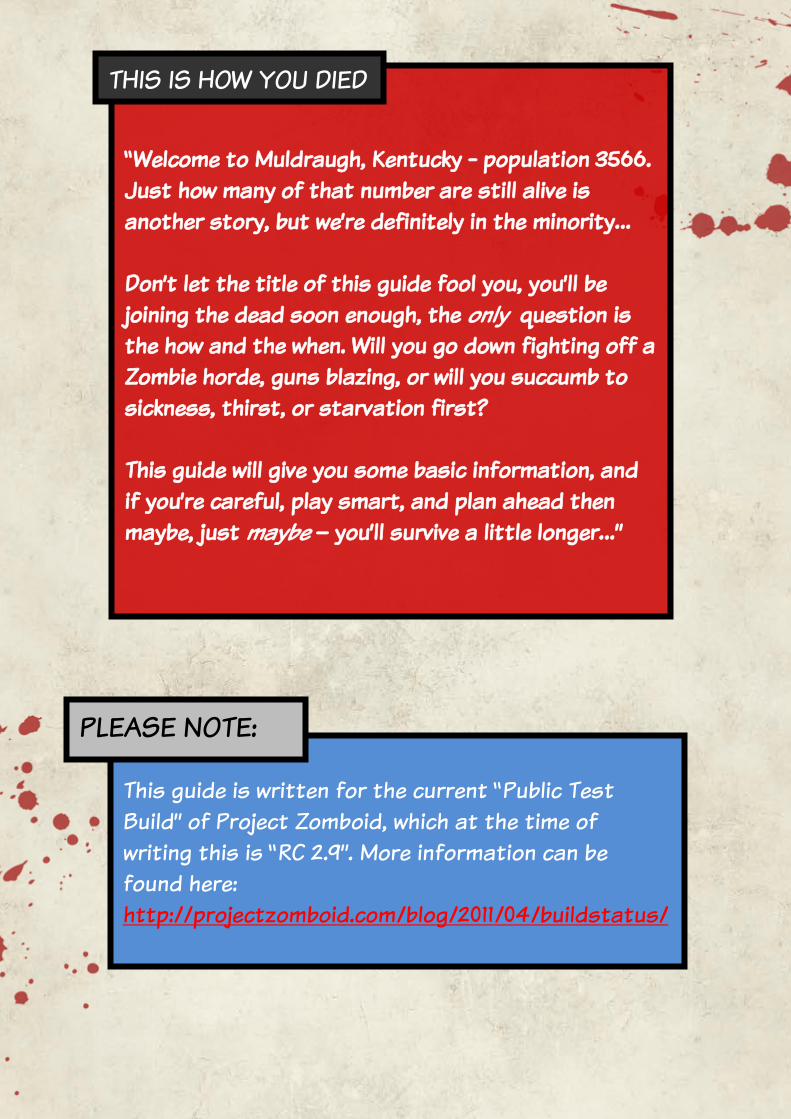
This guide is written for the current “Public Test Build” of Project Zomboid, which at the time of writing this is “RC 2.9”. More information can be found here: http://projectzomboid.com/blog/2011/04/buildstatus/
“Welcome to Muldraugh, Kentucky - population 3566. Just how many of that number are still alive is another story, but we’re definitely in the minority… Don’t let the title of this guide fool you, you’ll be joining the dead soon enough, the only question is the how and the when. Will you go down fighting off a Zombie horde, guns blazing, or will you succumb to sickness, thirst, or starvation first? This guide will give you some basic information, and if you’re careful, play smart, and plan ahead then maybe, just maybe – you’ll survive a little longer…”
THIS IS HOW YOU DIED
PLEASE NOTE:
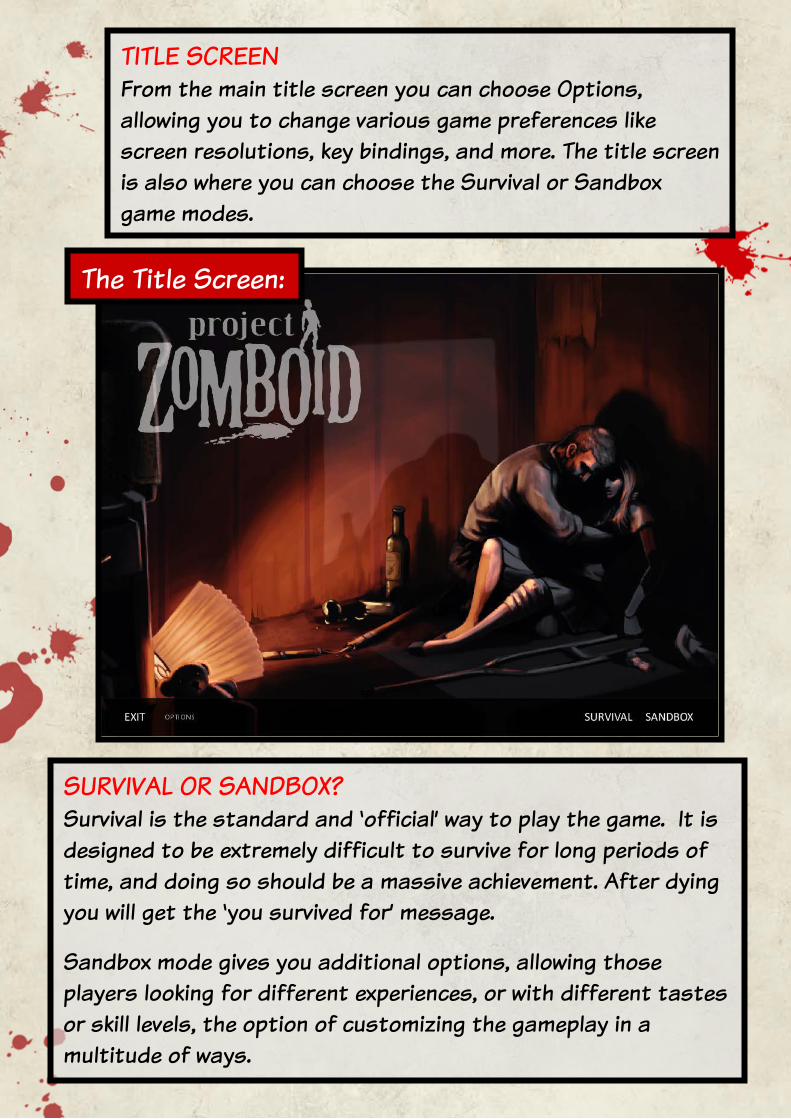
SURVIVAL OR SANDBOX? Survival is the standard and ‘official’ way to play the game. It is designed to be extremely difficult to survive for long periods of time, and doing so should be a massive achievement. After dying you will get the ‘you survived for’ message.
Sandbox mode gives you additional options, allowing those players looking for different experiences, or with different tastes or skill levels, the option of customizing the gameplay in a multitude of ways.
The Title Screen:
TITLE SCREEN From the main title screen you can choose Options, allowing you to change various game preferences like screen resolutions, key bindings, and more. The title screen is also where you can choose the Survival or Sandbox game modes.
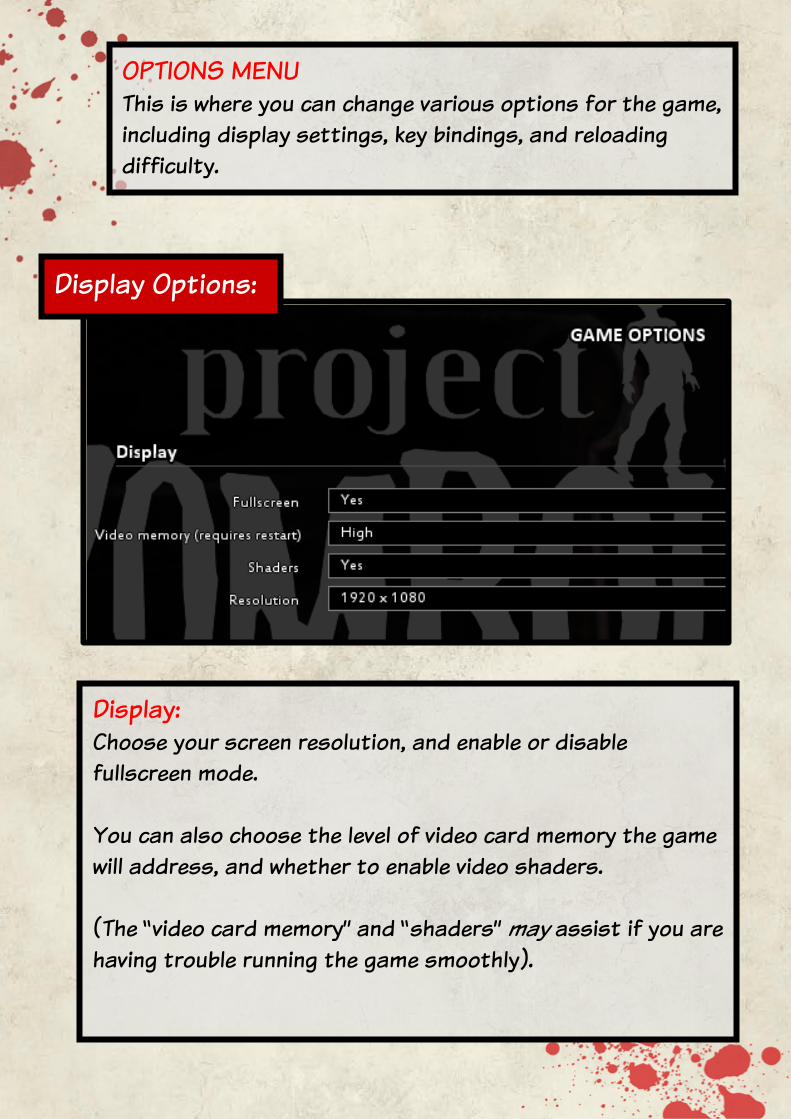
Display: Choose your screen resolution, and enable or disable fullscreen mode. You can also choose the level of video card memory the game will address, and whether to enable video shaders. (The “video card memory” and “shaders” may assist if you are having trouble running the game smoothly).
Display Options:
OPTIONS MENU This is where you can change various options for the game, including display settings, key bindings, and reloading difficulty.
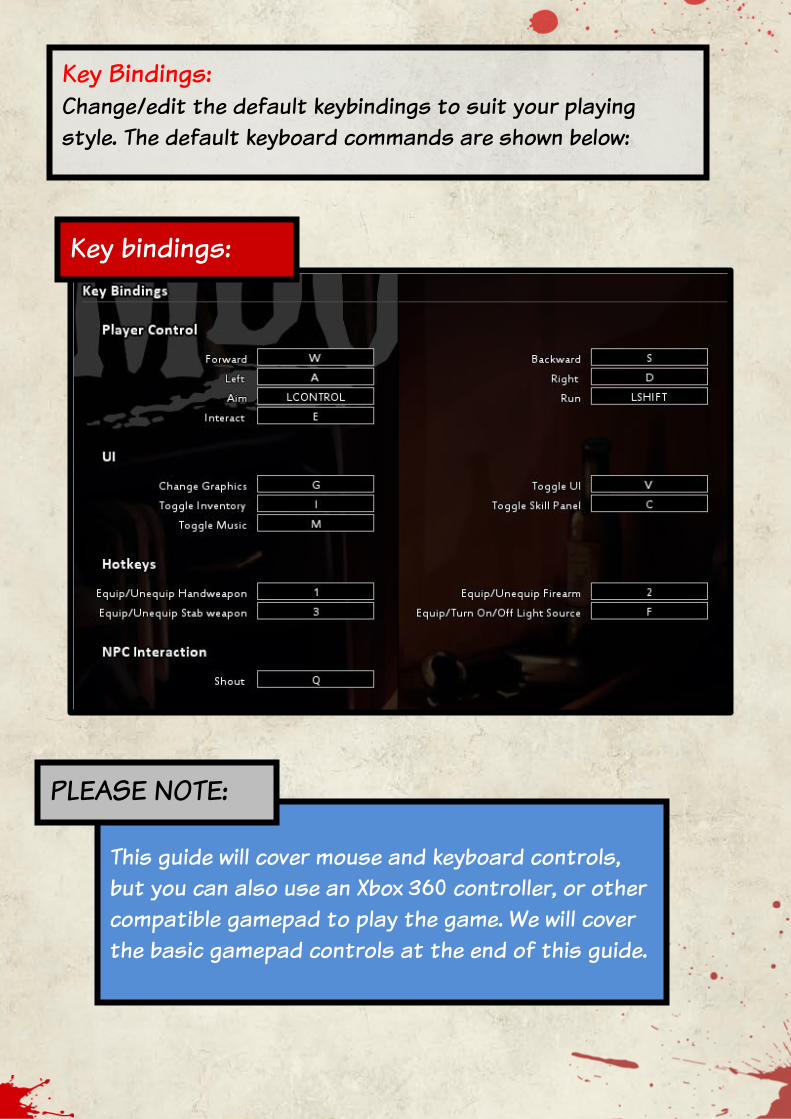
This guide will cover mouse and keyboard controls, but you can also use an Xbox 360 controller, or other compatible gamepad to play the game. We will cover the basic gamepad controls at the end of this guide.
PLEASE NOTE:
Key Bindings: Change/edit the default keybindings to suit your playing style. The default keyboard commands are shown below:
Key bindings:

Reloading: This option sets the default difficulty for the technique used when reloading pistols in the game. The three options are “Easy”, “Normal”, and “Hardcore”. The default mode is set to “Easy”.
In “Easy” mode, if you have a pistol and suitable ammunition in your inventory, you can right-click on the pistol and choose “reload”. (If you already have the pistol equipped as your primary weapon, you can press the “R” key to perform this function).
In “Normal” mode, you need to right-click the pistol and eject the magazine first. Then, you can right-click on the magazine and choose reload. Finally, you can right-click on the pistol and choose insert magazine. (If the pistol is already equipped, pressing “R” will eject/insert the magazine). In “Hardcore” mode, as well as having to eject the magazine to reload it, then insert the magazine into the pistol, you also have to “rack” the slide to chamber a round before firing with a fresh magazine. This is done by pressing the space bar.
Reload Options:
“SURVIVAL” *NOTE*: Survival and Sandbox games both use the same basic gameplay mechanics. We will be looking at the Survival mode, but will cover some of the differences in the Sandbox mode later in this guide.
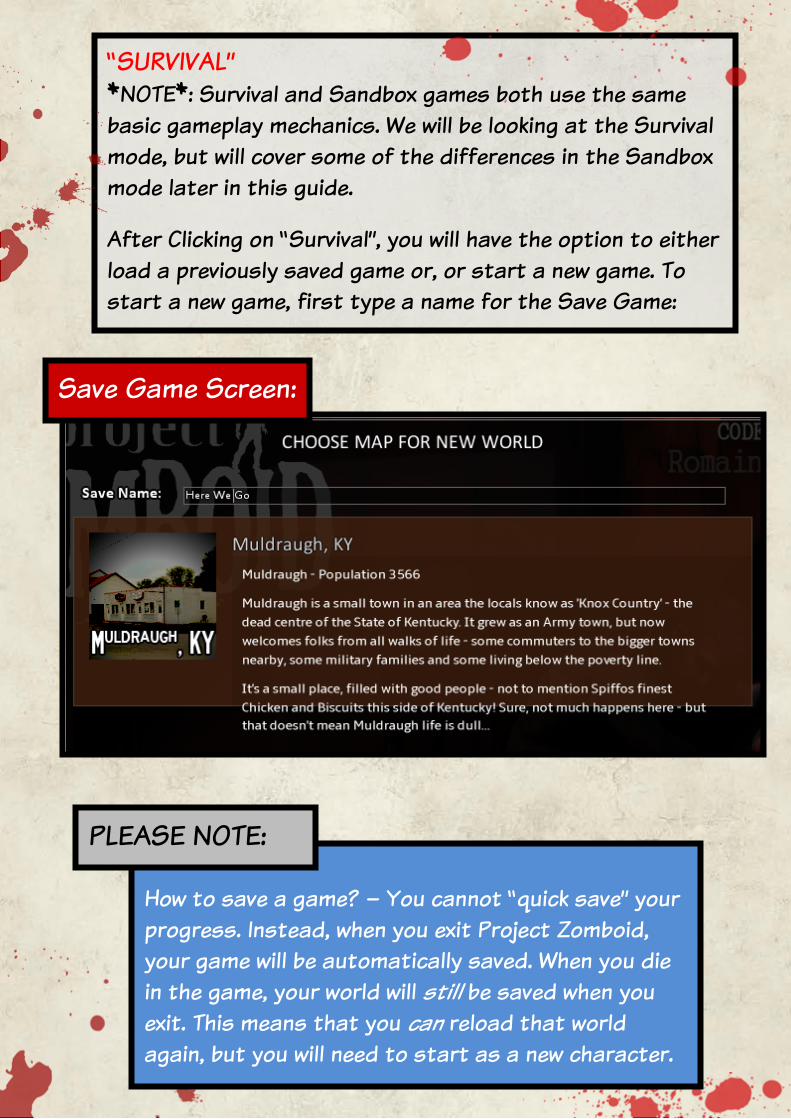
After Clicking on “Survival”, you will have the option to either load a previously saved game or, or start a new game. To start a new game, first type a name for the Save Game:
Save Game Screen:
How to save a game? – You cannot “quick save” your progress. Instead, when you exit Project Zomboid, your game will be automatically saved. When you die in the game, your world will still be saved when you exit. This means that you can reload that world again, but you will need to start as a new character.
PLEASE NOTE:
CHARACTER MENU The “Customise Character” and “Select Occupation and Traits” screens allow you to generate or create a new character, choose an Occupation, and assign them extra traits.
Customise Character Screen:
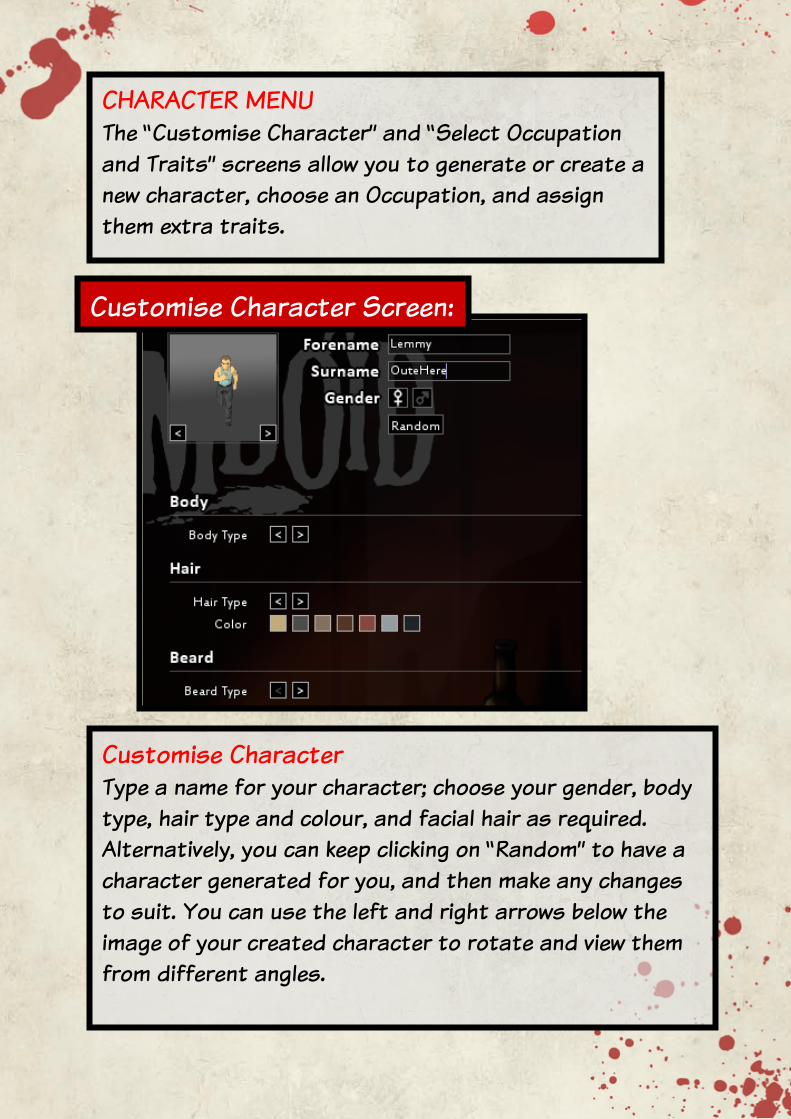
Customise Character Type a name for your character; choose your gender, body type, hair type and colour, and facial hair as required. Alternatively, you can keep clicking on “Random” to have a character generated for you, and then make any changes to suit. You can use the left and right arrows below the image of your created character to rotate and view them from different angles.
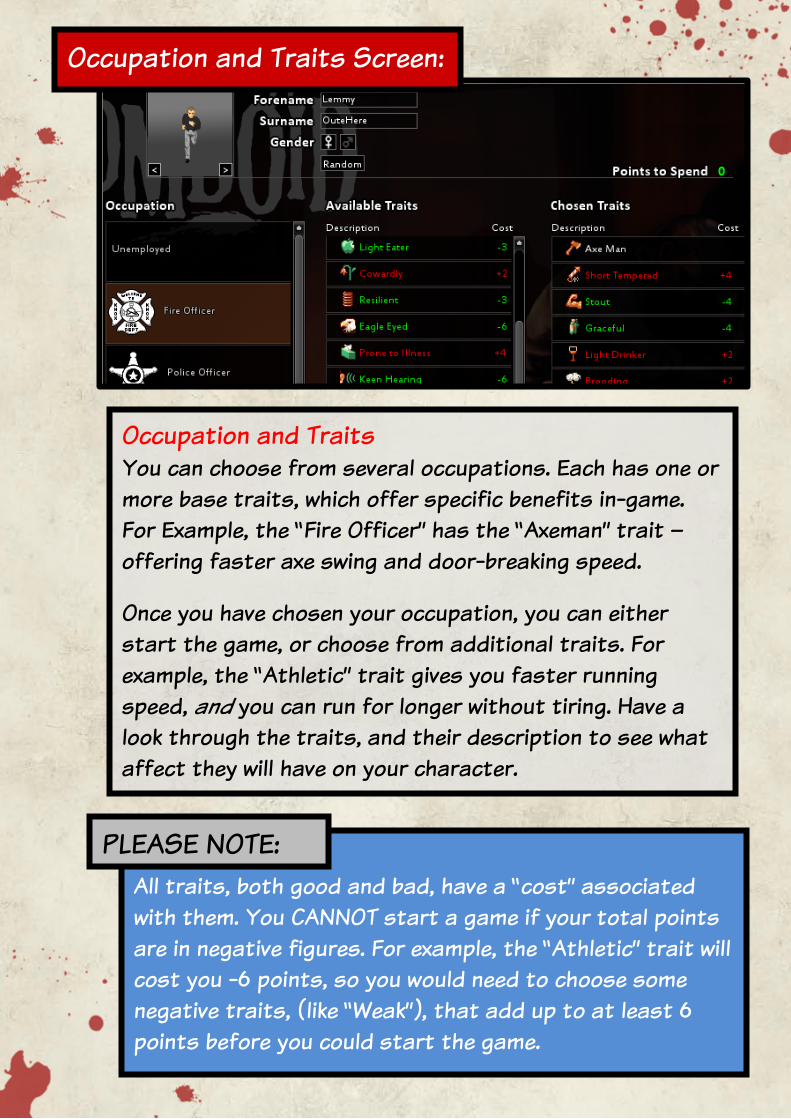
Occupation and Traits Screen:
Occupation and Traits You can choose from several occupations. Each has one or more base traits, which offer specific benefits in-game. For Example, the “Fire Officer” has the “Axeman” trait – offering faster axe swing and door-breaking speed.
Once you have chosen your occupation, you can either start the game, or choose from additional traits. For example, the “Athletic” trait gives you faster running speed, and you can run for longer without tiring. Have a look through the traits, and their description to see what affect they will have on your character.
All traits, both good and bad, have a “cost” associated with them. You CANNOT start a game if your total points are in negative figures. For example, the “Athletic” trait will cost you -6 points, so you would need to choose some negative traits, (like “Weak”), that add up to at least 6 points before you could start the game.
PLEASE NOTE:
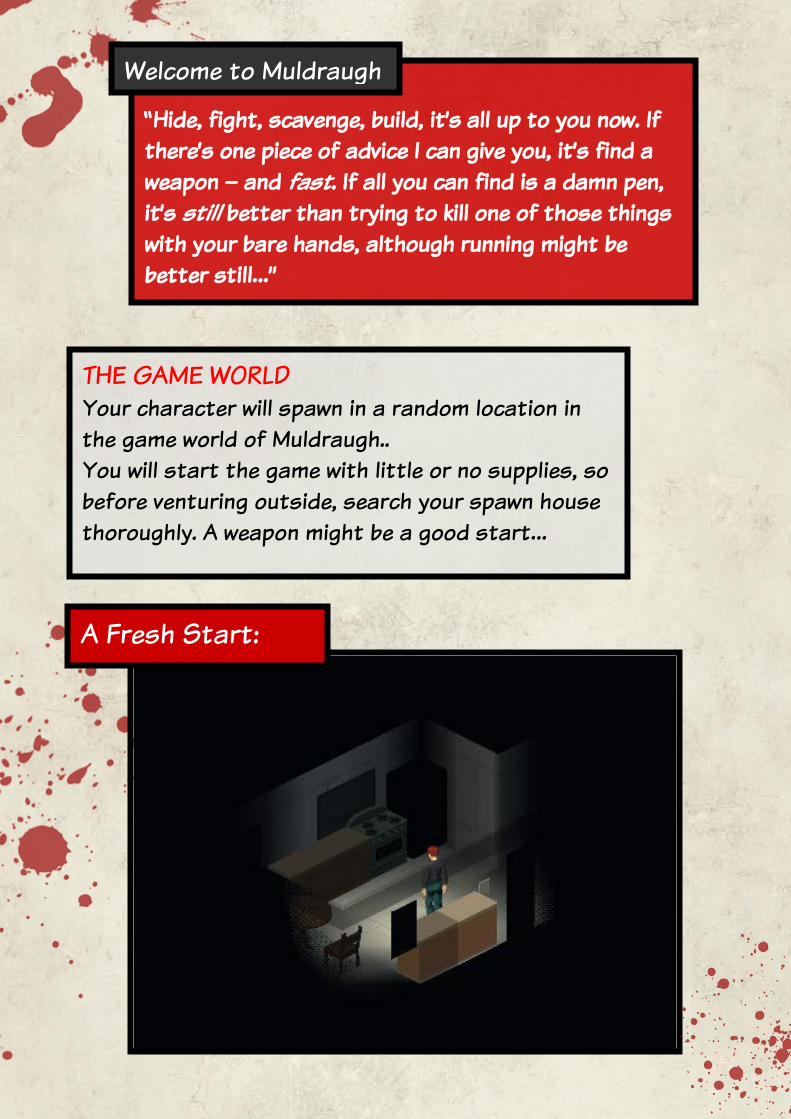
“Hide, fight, scavenge, build, it’s all up to you now. If there’s one piece of advice I can give you, it’s find a weapon – and fast. If all you can find is a damn pen, it’s still better than trying to kill one of those things with your bare hands, although running might be better still…”
Welcome to Muldraugh
A Fresh Start:
THE GAME WORLD Your character will spawn in a random location in the game world of Muldraugh.. You will start the game with little or no supplies, so before venturing outside, search your spawn house thoroughly. A weapon might be a good start…
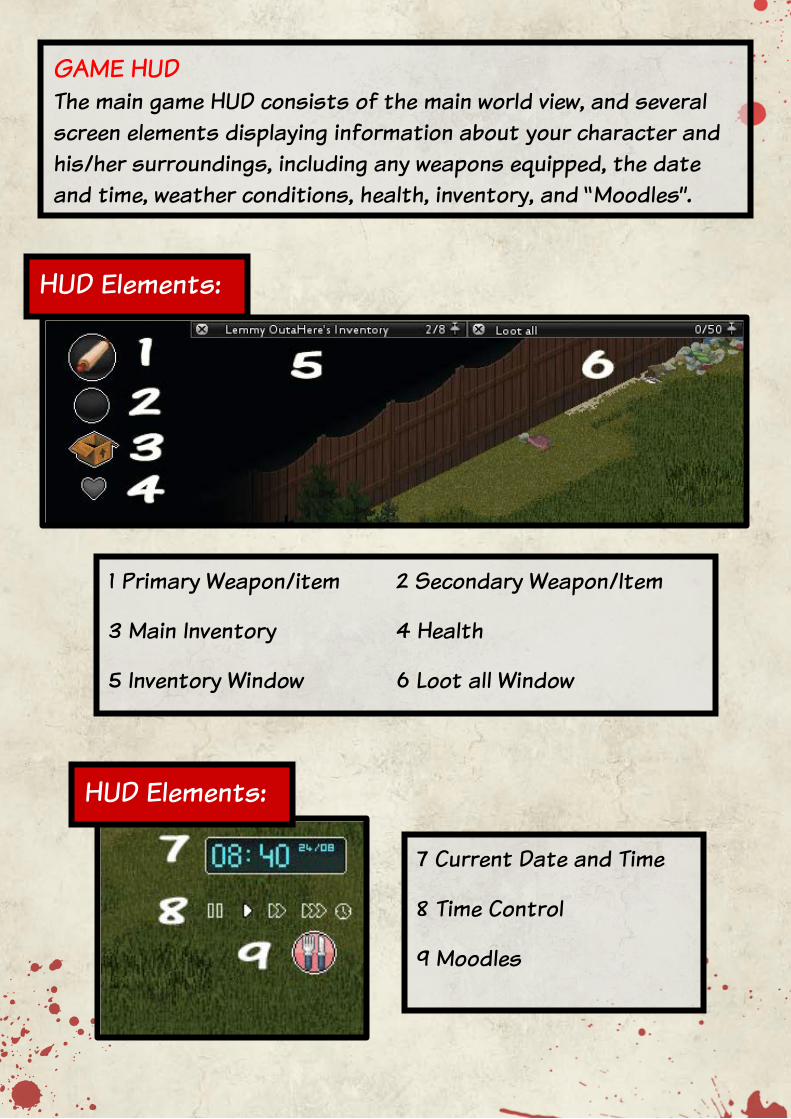
HUD Elements:
GAME HUD The main game HUD consists of the main world view, and several screen elements displaying information about your character and his/her surroundings, including any weapons equipped, the date and time, weather conditions, health, inventory, and “Moodles”.
1 Primary Weapon/item 2 Secondary Weapon/Item
3 Main Inventory 4 Health
5 Inventory Window 6 Loot all Window
7 Current Date and Time
8 Time Control
9 Moodles
HUD Elements:
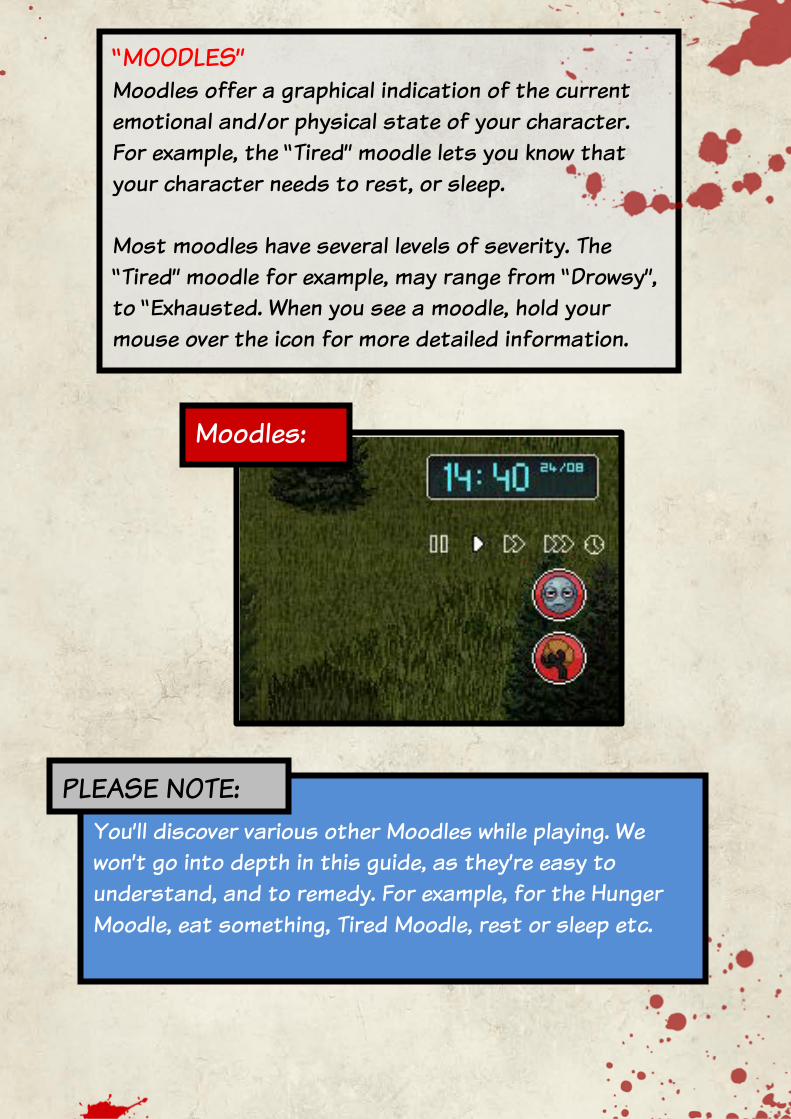
“MOODLES” Moodles offer a graphical indication of the current emotional and/or physical state of your character. For example, the “Tired” moodle lets you know that your character needs to rest, or sleep. Most moodles have several levels of severity. The “Tired” moodle for example, may range from “Drowsy”, to “Exhausted. When you see a moodle, hold your mouse over the icon for more detailed information.
Moodles:
You’ll discover various other Moodles while playing. We won’t go into depth in this guide, as they’re easy to understand, and to remedy. For example, for the Hunger Moodle, eat something, Tired Moodle, rest or sleep etc.
PLEASE NOTE:
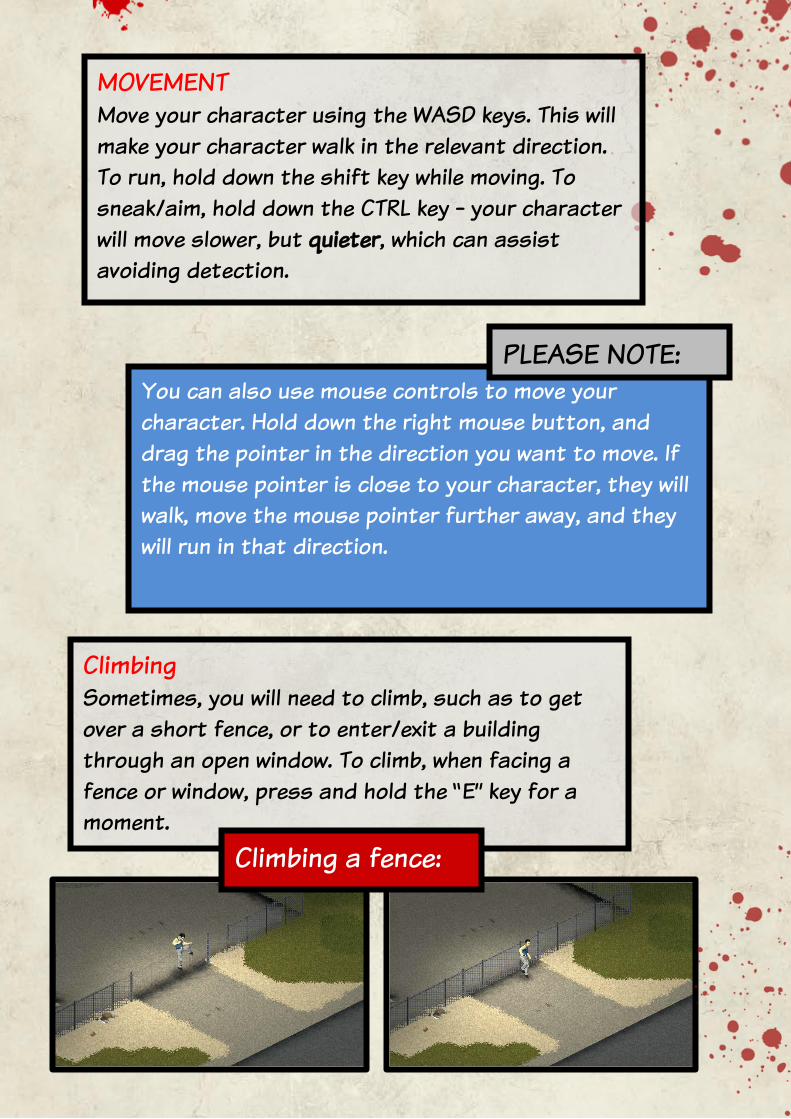
MOVEMENT Move your character using the WASD keys. This will make your character walk in the relevant direction. To run, hold down the shift key while moving. To sneak/aim, hold down the CTRL key - your character will move slower, but quieter, which can assist avoiding detection.
You can also use mouse controls to move your character. Hold down the right mouse button, and drag the pointer in the direction you want to move. If the mouse pointer is close to your character, they will walk, move the mouse pointer further away, and they will run in that direction.
PLEASE NOTE:
Climbing Sometimes, you will need to climb, such as to get over a short fence, or to enter/exit a building through an open window. To climb, when facing a fence or window, press and hold the “E” key for a moment. Climbing a fence:
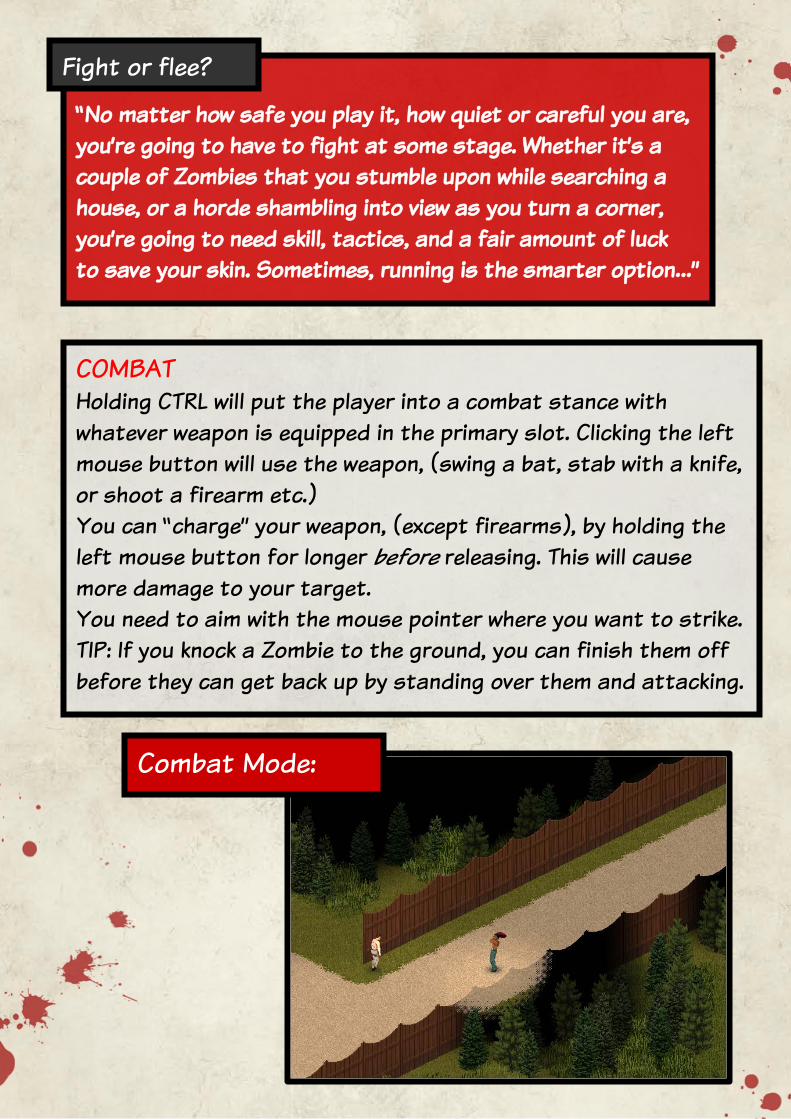
“No matter how safe you play it, how quiet or careful you are, you’re going to have to fight at some stage. Whether it’s a couple of Zombies that you stumble upon while searching a house, or a horde shambling into view as you turn a corner, you’re going to need skill, tactics, and a fair amount of luck to save your skin. Sometimes, running is the smarter option…”
Fight or flee?
COMBAT Holding CTRL will put the player into a combat stance with whatever weapon is equipped in the primary slot. Clicking the left mouse button will use the weapon, (swing a bat, stab with a knife, or shoot a firearm etc.) You can “charge” your weapon, (except firearms), by holding the left mouse button for longer before releasing. This will cause more damage to your target. You need to aim with the mouse pointer where you want to strike. TIP: If you knock a Zombie to the ground, you can finish them off before they can get back up by standing over them and attacking.
Combat Mode:
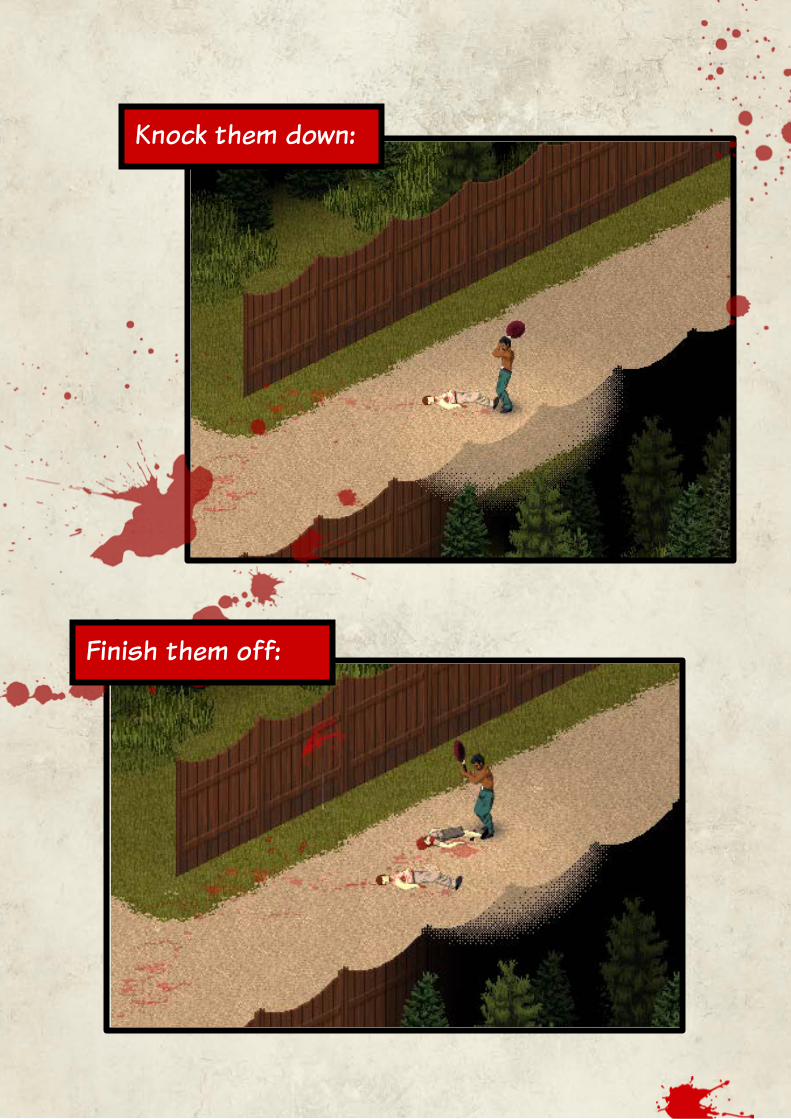
Knock them down:
Finish them off:
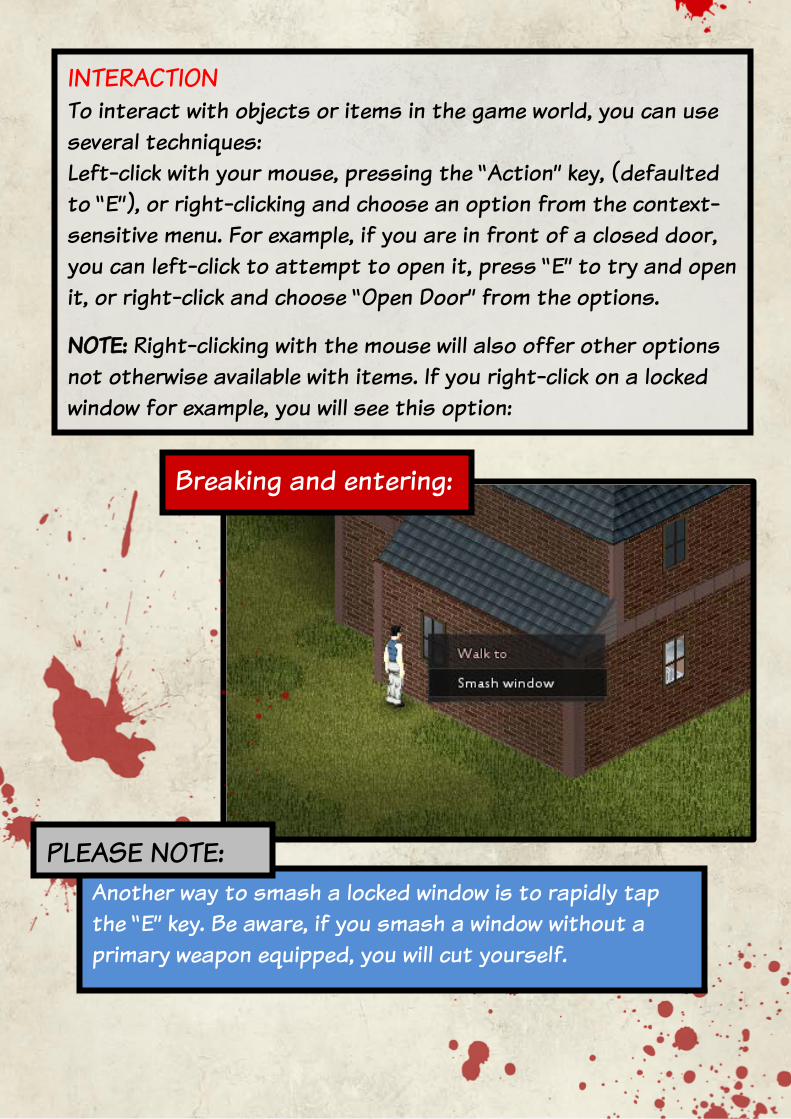
INTERACTION To interact with objects or items in the game world, you can use several techniques: Left-click with your mouse, pressing the “Action” key, (defaulted to “E”), or right-clicking and choose an option from the context-sensitive menu. For example, if you are in front of a closed door, you can left-click to attempt to open it, press “E” to try and open it, or right-click and choose “Open Door” from the options.
NOTE: Right-clicking with the mouse will also offer other options not otherwise available with items. If you right-click on a locked window for example, you will see this option:
Breaking and entering:
Another way to smash a locked window is to rapidly tap the “E” key. Be aware, if you smash a window without a primary weapon equipped, you will cut yourself.
PLEASE NOTE:
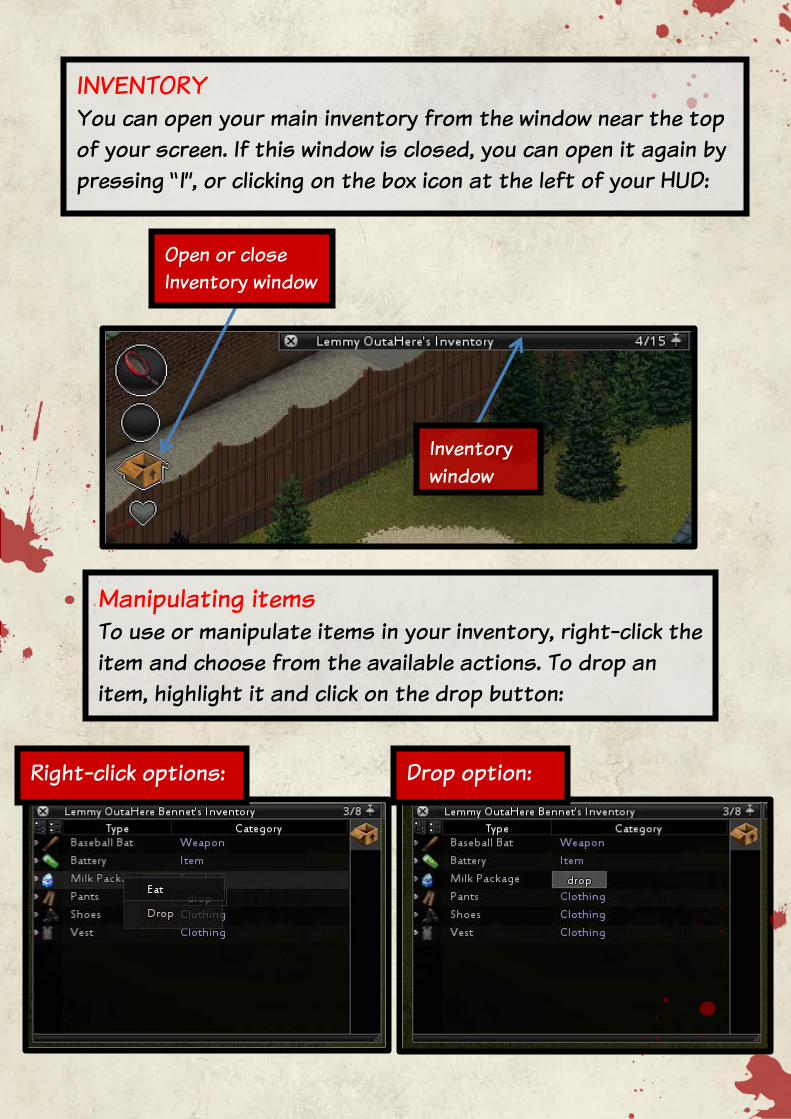
Manipulating items To use or manipulate items in your inventory, right-click the item and choose from the available actions. To drop an item, highlight it and click on the drop button:
INVENTORY You can open your main inventory from the window near the top of your screen. If this window is closed, you can open it again by pressing “I”, or clicking on the box icon at the left of your HUD:
Inventory window
Open or close Inventory window
Right-click options: Drop option:
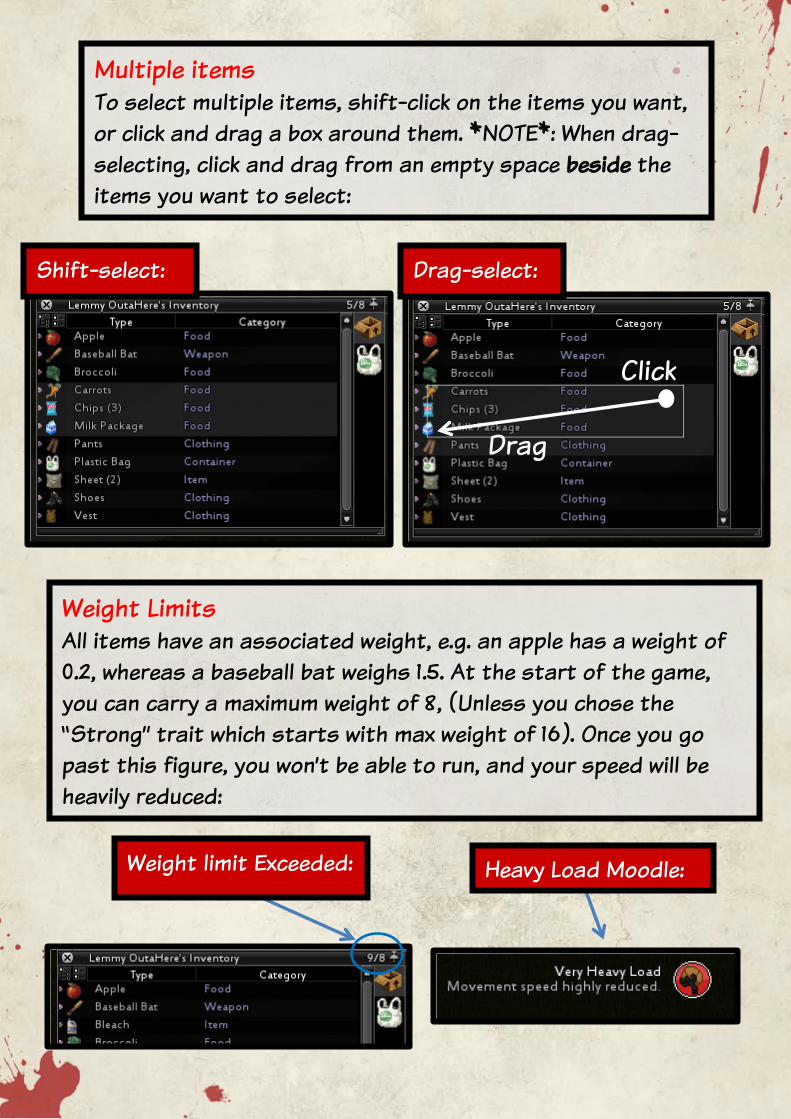
Multiple items To select multiple items, shift-click on the items you want, or click and drag a box around them. *NOTE*: When drag-selecting, click and drag from an empty space beside the items you want to select:
Shift-select: Drag-select:
Weight Limits All items have an associated weight, e.g. an apple has a weight of 0.2, whereas a baseball bat weighs 1.5. At the start of the game, you can carry a maximum weight of 8, (Unless you chose the “Strong” trait which starts with max weight of 16). Once you go past this figure, you won’t be able to run, and your speed will be heavily reduced:
Heavy Load Moodle: Weight limit Exceeded:
Click
Drag
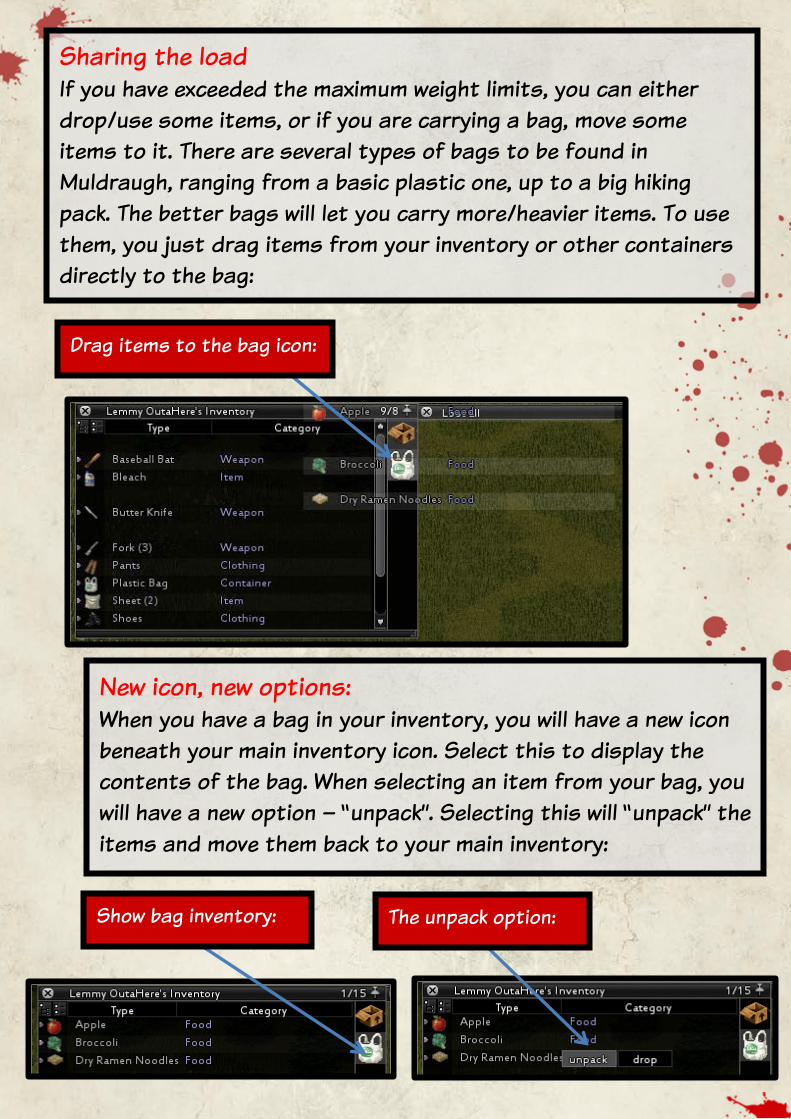
Sharing the load If you have exceeded the maximum weight limits, you can either drop/use some items, or if you are carrying a bag, move some items to it. There are several types of bags to be found in Muldraugh, ranging from a basic plastic one, up to a big hiking pack. The better bags will let you carry more/heavier items. To use them, you just drag items from your inventory or other containers directly to the bag:
New icon, new options: When you have a bag in your inventory, you will have a new icon beneath your main inventory icon. Select this to display the contents of the bag. When selecting an item from your bag, you will have a new option – “unpack”. Selecting this will “unpack” the items and move them back to your main inventory:
Drag items to the bag icon:
Show bag inventory: The unpack option:
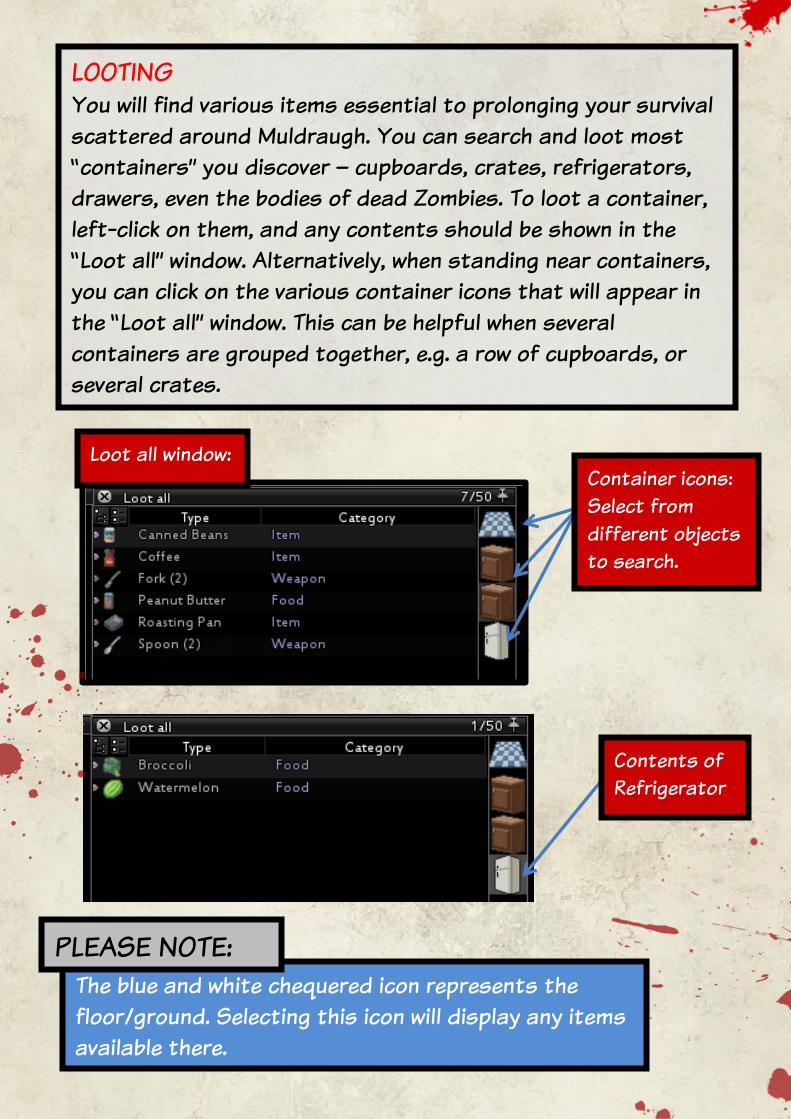
LOOTING You will find various items essential to prolonging your survival scattered around Muldraugh. You can search and loot most “containers” you discover – cupboards, crates, refrigerators, drawers, even the bodies of dead Zombies. To loot a container, left-click on them, and any contents should be shown in the “Loot all” window. Alternatively, when standing near containers, you can click on the various container icons that will appear in the “Loot all” window. This can be helpful when several containers are grouped together, e.g. a row of cupboards, or several crates.
Loot all window: Container icons: Select from different objects to search.
Contents of Refrigerator
The blue and white chequered icon represents the floor/ground. Selecting this icon will display any items available there.
PLEASE NOTE:
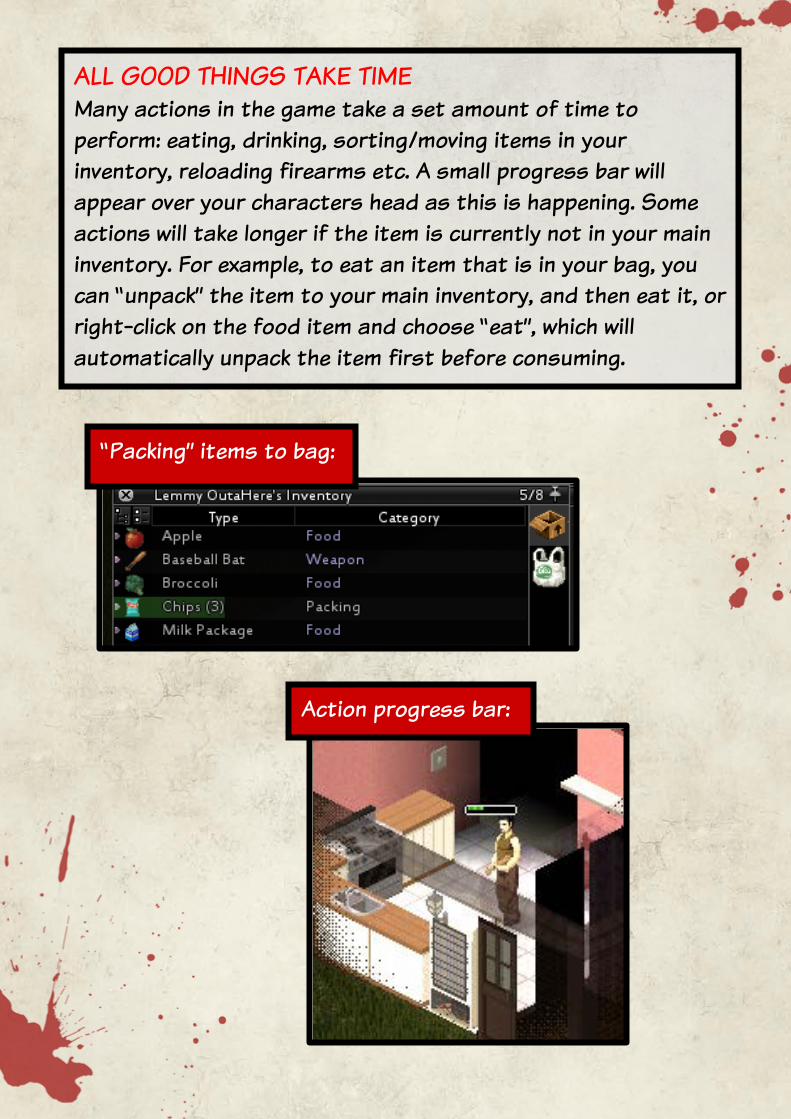
ALL GOOD THINGS TAKE TIME Many actions in the game take a set amount of time to perform: eating, drinking, sorting/moving items in your inventory, reloading firearms etc. A small progress bar will appear over your characters head as this is happening. Some actions will take longer if the item is currently not in your main inventory. For example, to eat an item that is in your bag, you can “unpack” the item to your main inventory, and then eat it, or right-click on the food item and choose “eat”, which will automatically unpack the item first before consuming.
“Packing” items to bag:
Action progress bar:
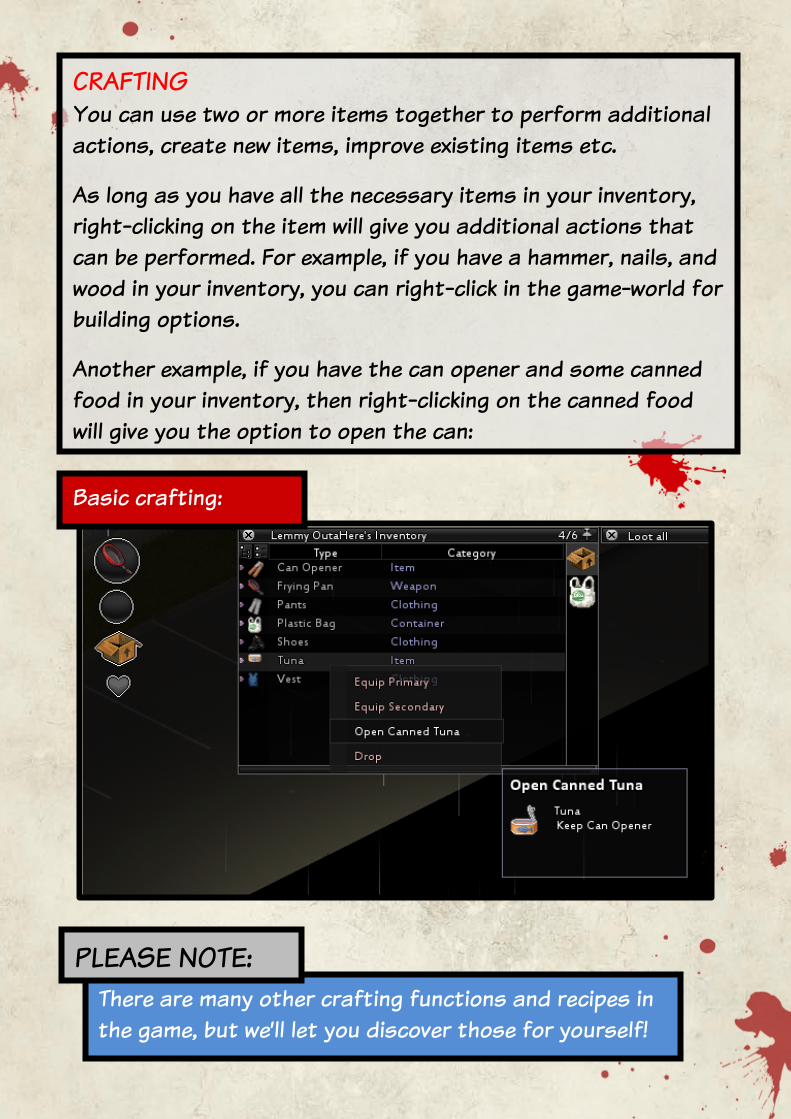
CRAFTING You can use two or more items together to perform additional actions, create new items, improve existing items etc.
As long as you have all the necessary items in your inventory, right-clicking on the item will give you additional actions that can be performed. For example, if you have a hammer, nails, and wood in your inventory, you can right-click in the game-world for building options.
Another example, if you have the can opener and some canned food in your inventory, then right-clicking on the canned food will give you the option to open the can:
Basic crafting:
There are many other crafting functions and recipes in the game, but we’ll let you discover those for yourself!
PLEASE NOTE:
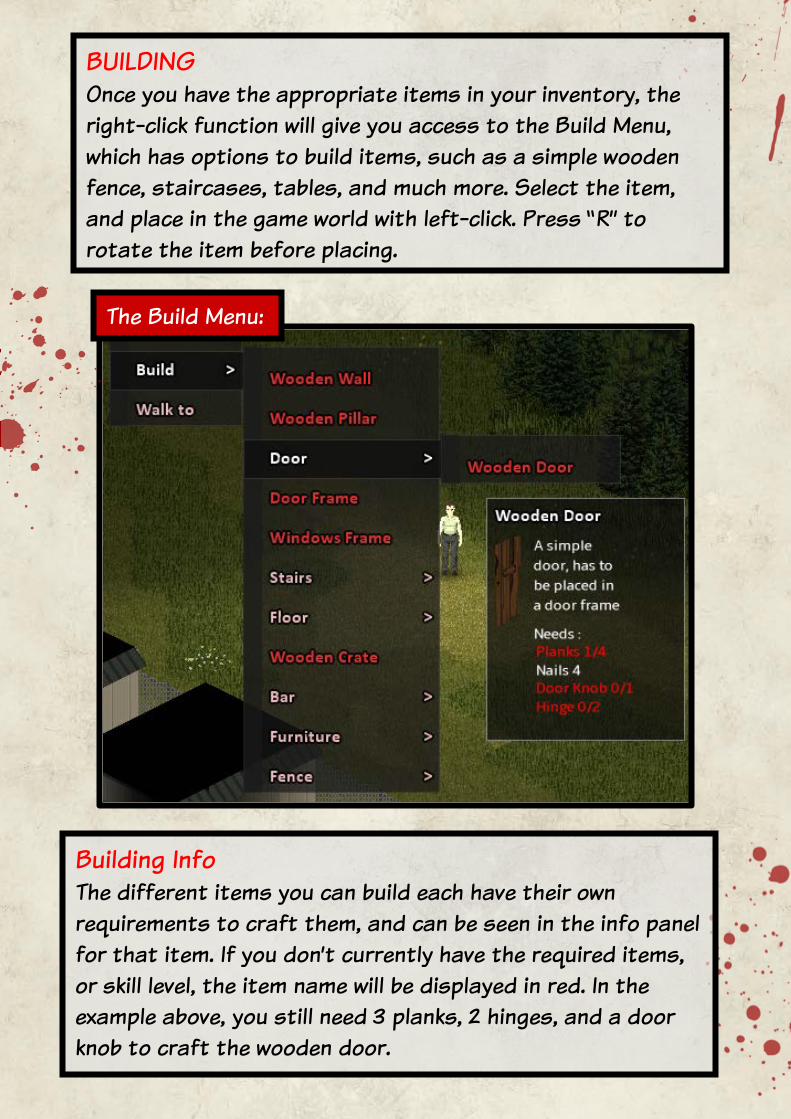
BUILDING Once you have the appropriate items in your inventory, the right-click function will give you access to the Build Menu, which has options to build items, such as a simple wooden fence, staircases, tables, and much more. Select the item, and place in the game world with left-click. Press “R” to rotate the item before placing.
The Build Menu:
Building Info The different items you can build each have their own requirements to craft them, and can be seen in the info panel for that item. If you don’t currently have the required items, or skill level, the item name will be displayed in red. In the example above, you still need 3 planks, 2 hinges, and a door knob to craft the wooden door.
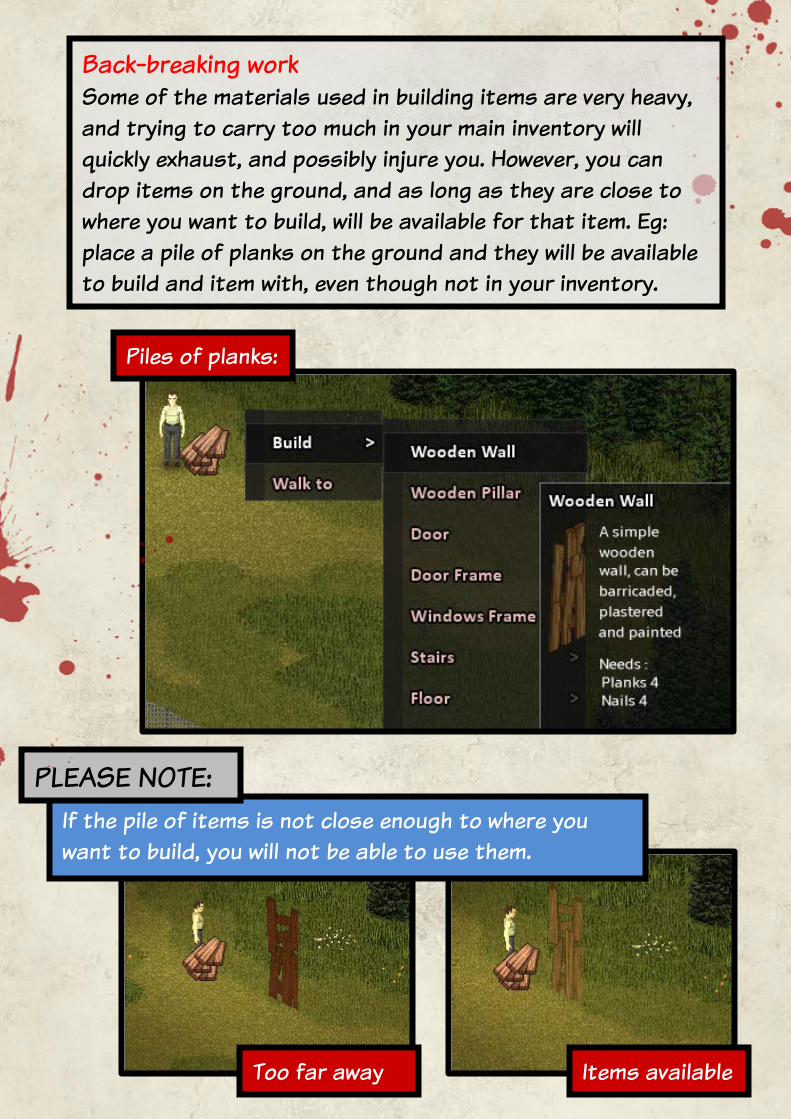
If the pile of items is not close enough to where you want to build, you will not be able to use them.
PLEASE NOTE:
Back-breaking work Some of the materials used in building items are very heavy, and trying to carry too much in your main inventory will quickly exhaust, and possibly injure you. However, you can drop items on the ground, and as long as they are close to where you want to build, will be available for that item. Eg: place a pile of planks on the ground and they will be available to build and item with, even though not in your inventory.
Piles of planks:
Too far away Items available
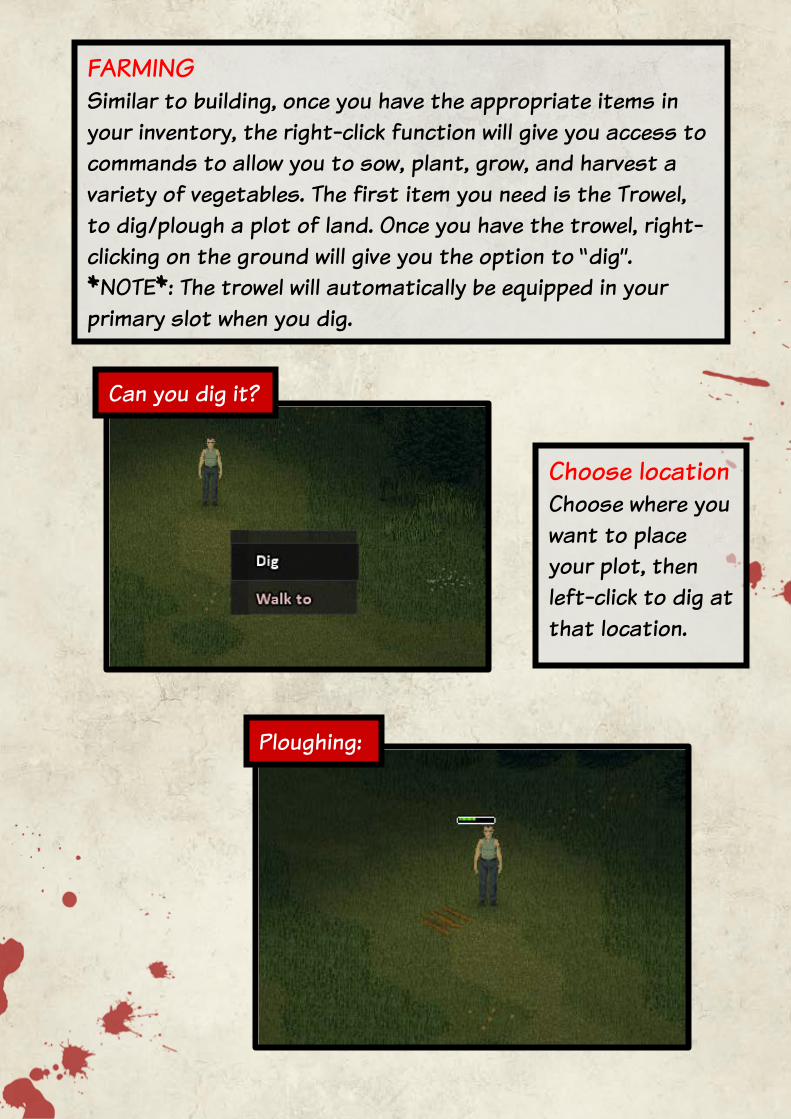
FARMING Similar to building, once you have the appropriate items in your inventory, the right-click function will give you access to commands to allow you to sow, plant, grow, and harvest a variety of vegetables. The first item you need is the Trowel, to dig/plough a plot of land. Once you have the trowel, right-clicking on the ground will give you the option to “dig”. *NOTE*: The trowel will automatically be equipped in your primary slot when you dig.
Can you dig it?
Choose location Choose where you want to place your plot, then left-click to dig at that location.
Ploughing:
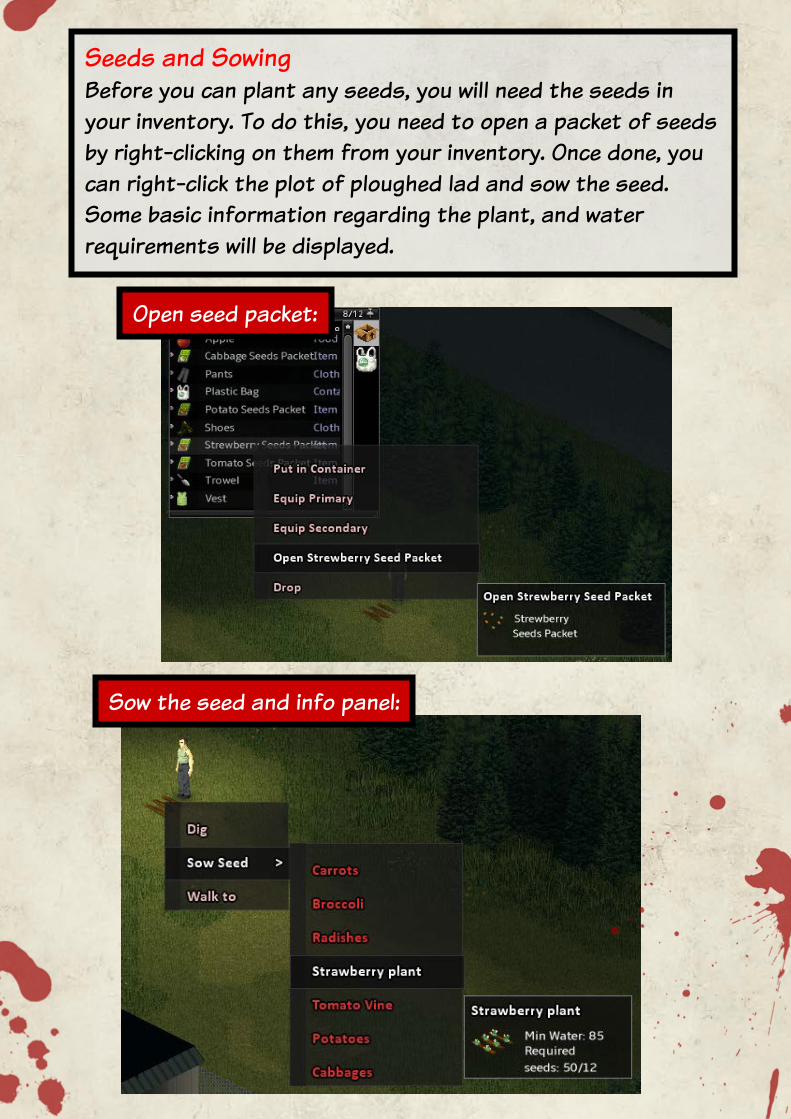
Seeds and Sowing Before you can plant any seeds, you will need the seeds in your inventory. To do this, you need to open a packet of seeds by right-clicking on them from your inventory. Once done, you can right-click the plot of ploughed lad and sow the seed. Some basic information regarding the plant, and water requirements will be displayed.
Open seed packet:
Sow the seed and info panel:
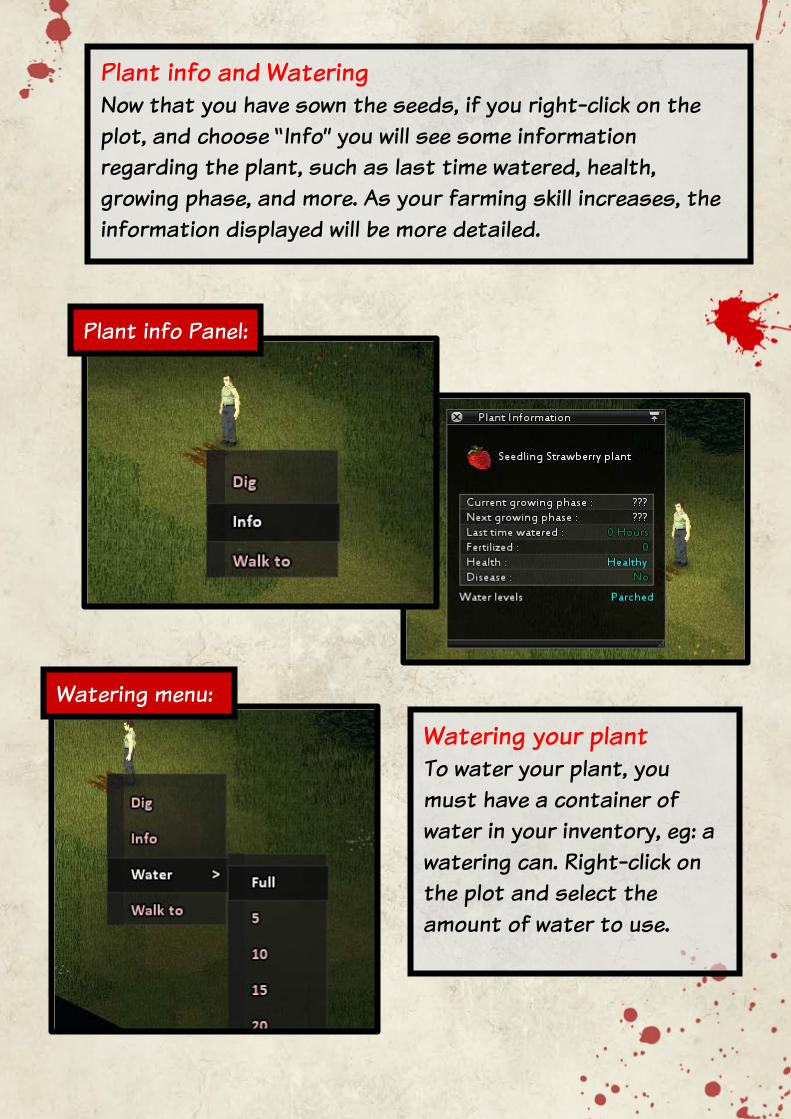
Plant info and Watering Now that you have sown the seeds, if you right-click on the plot, and choose “Info” you will see some information regarding the plant, such as last time watered, health, growing phase, and more. As your farming skill increases, the information displayed will be more detailed.
Plant info Panel:
Watering your plant To water your plant, you must have a container of water in your inventory, eg: a watering can. Right-click on the plot and select the amount of water to use.
Watering menu:
SKILLS As well as the base traits you choose when starting a new character, you can level-up several skills during the course of playing the game. To upgrade/level-up your skills, you need to gain experience, or “XP” points. To gain XP points in a particular skill, all you need to do is actively use it. For example, to upgrade you skill in combat using “blunt” weapons, (such as the baseball bat, rolling pin etc), then you just need to kill Zombies with that weapon. There is one other way to upgrade skills – by studying that subject. For example, if you find a book on Carpentry, reading that book will help level up that skill.
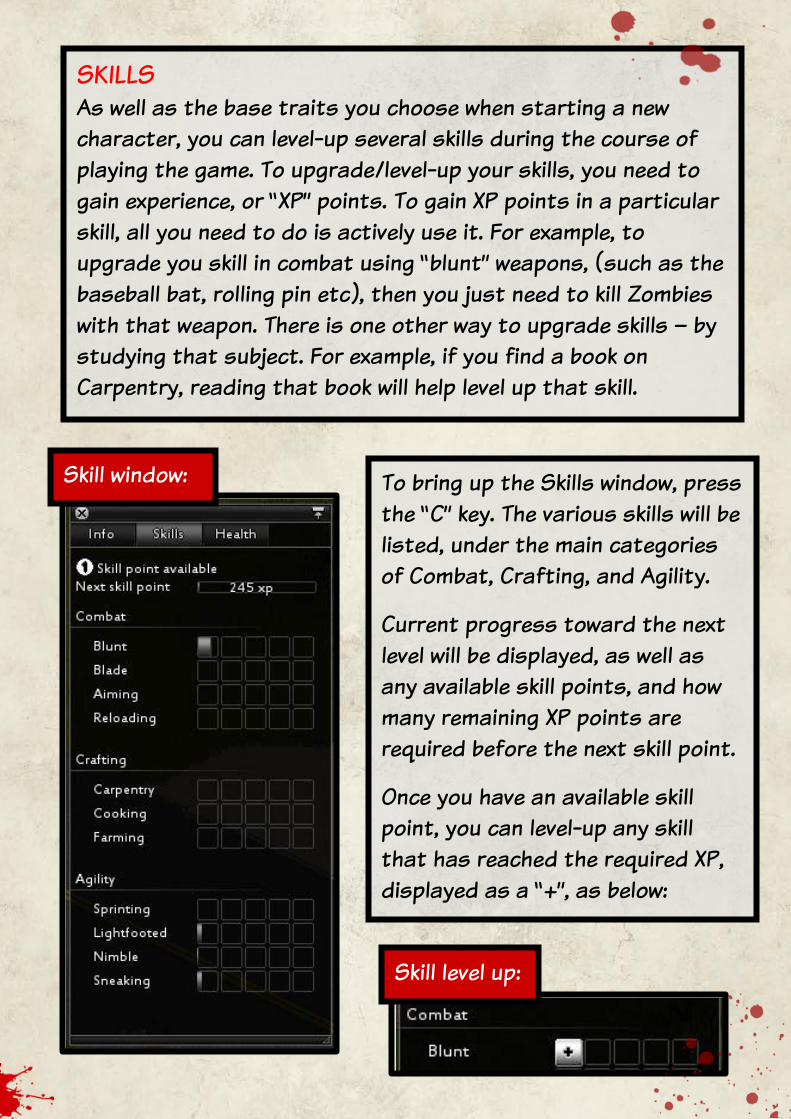
To bring up the Skills window, press the “C” key. The various skills will be listed, under the main categories of Combat, Crafting, and Agility.
Current progress toward the next level will be displayed, as well as any available skill points, and how many remaining XP points are required before the next skill point.
Once you have an available skill point, you can level-up any skill that has reached the required XP, displayed as a “+”, as below:
Skill window:
Skill level up:
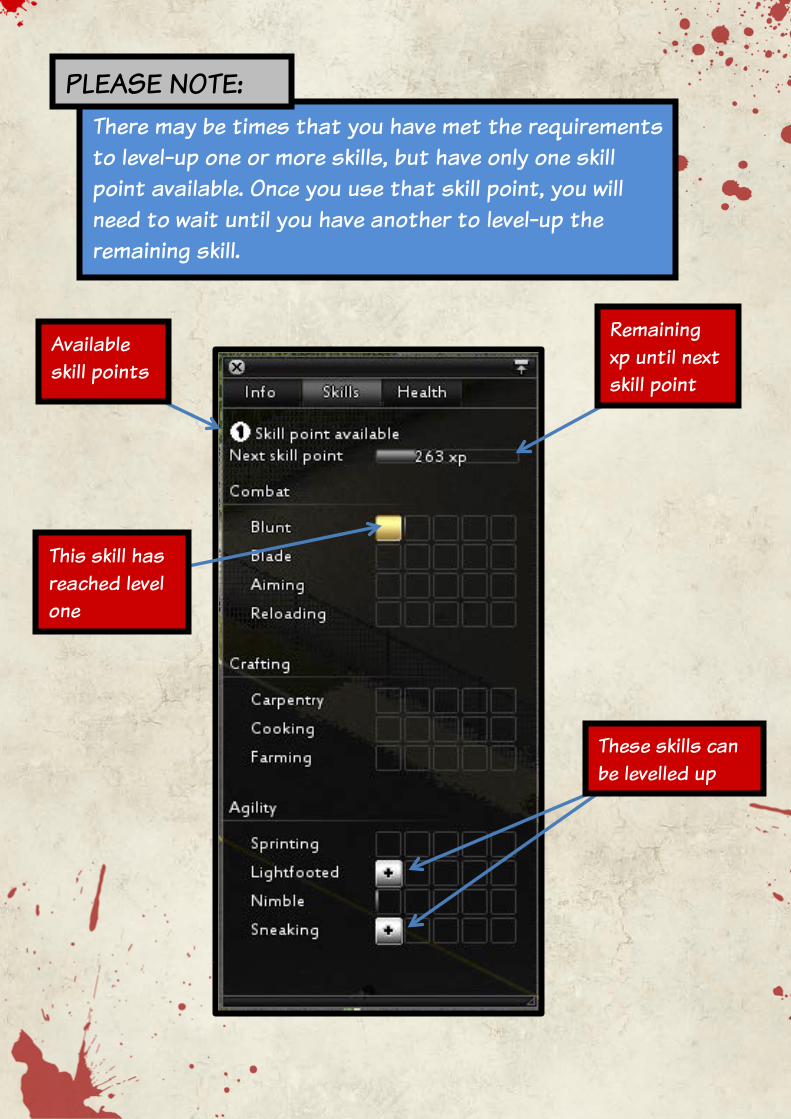
There may be times that you have met the requirements to level-up one or more skills, but have only one skill point available. Once you use that skill point, you will need to wait until you have another to level-up the remaining skill.
PLEASE NOTE:
Available skill points
Remaining xp until next skill point
This skill has reached level one
These skills can be levelled up
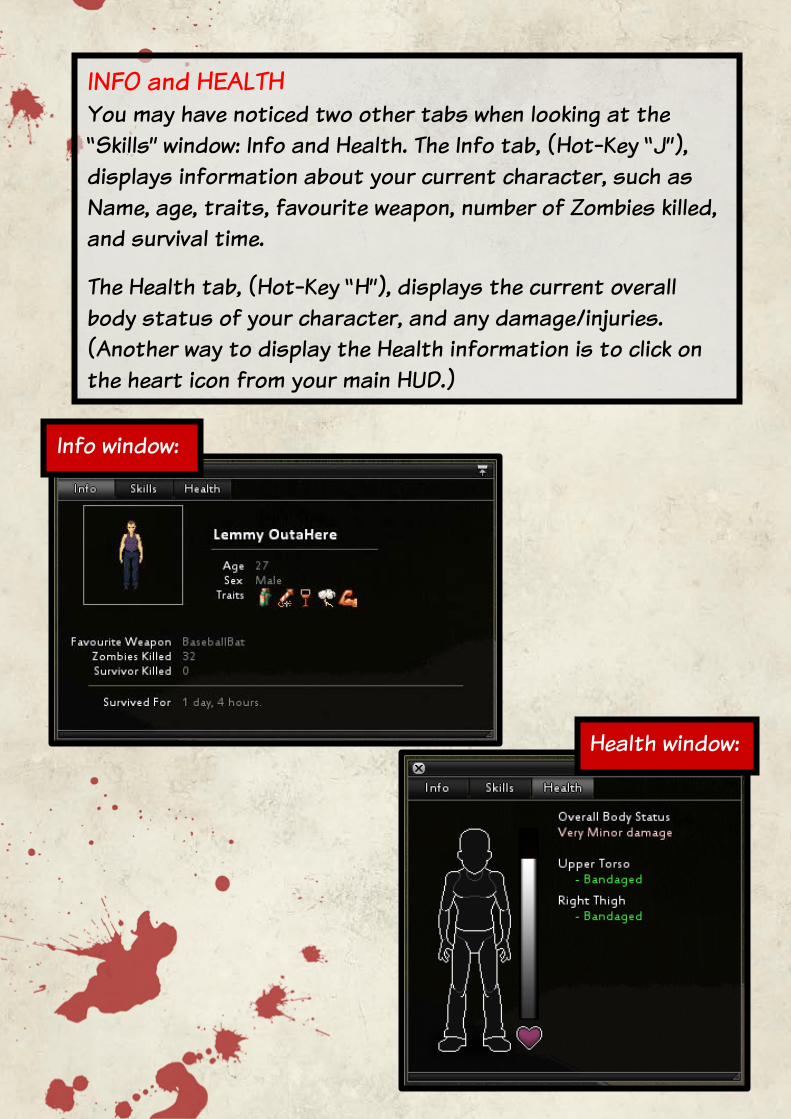
INFO and HEALTH You may have noticed two other tabs when looking at the “Skills” window: Info and Health. The Info tab, (Hot-Key “J”), displays information about your current character, such as Name, age, traits, favourite weapon, number of Zombies killed, and survival time.
The Health tab, (Hot-Key “H”), displays the current overall body status of your character, and any damage/injuries. (Another way to display the Health information is to click on the heart icon from your main HUD.)
Info window:
Health window:
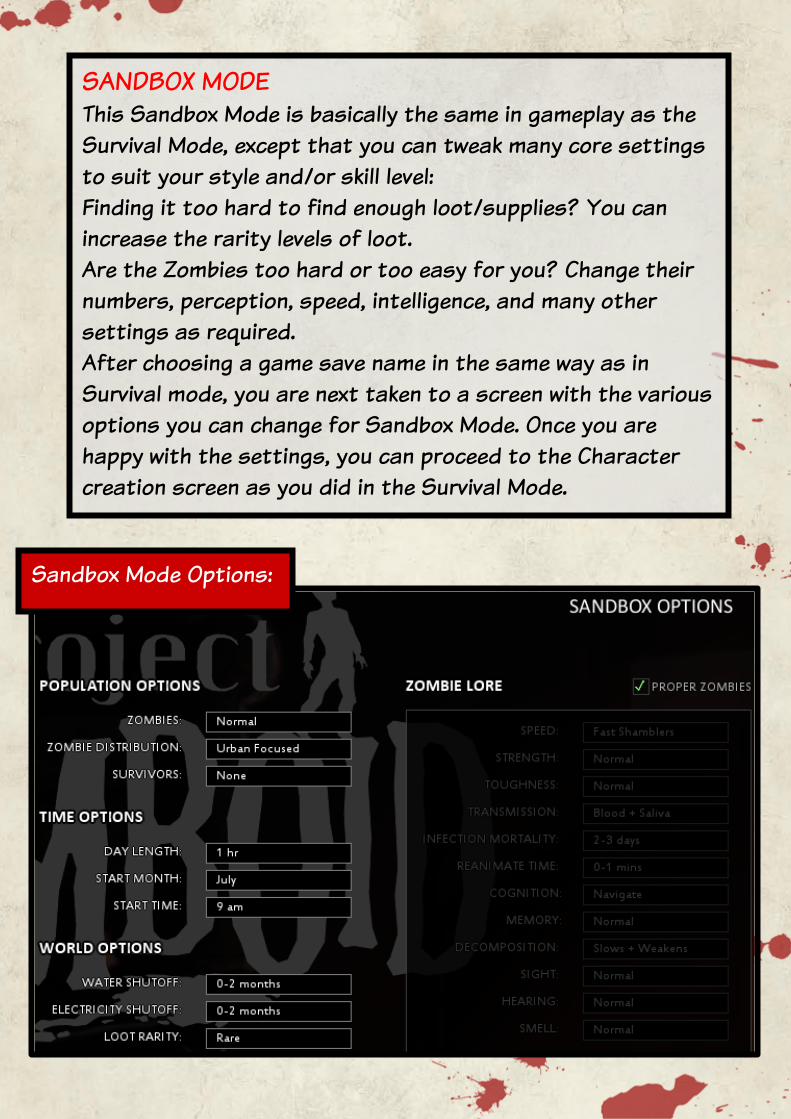
SANDBOX MODE This Sandbox Mode is basically the same in gameplay as the Survival Mode, except that you can tweak many core settings to suit your style and/or skill level: Finding it too hard to find enough loot/supplies? You can increase the rarity levels of loot. Are the Zombies too hard or too easy for you? Change their numbers, perception, speed, intelligence, and many other settings as required. After choosing a game save name in the same way as in Survival mode, you are next taken to a screen with the various options you can change for Sandbox Mode. Once you are happy with the settings, you can proceed to the Character creation screen as you did in the Survival Mode.
Sandbox Mode Options:
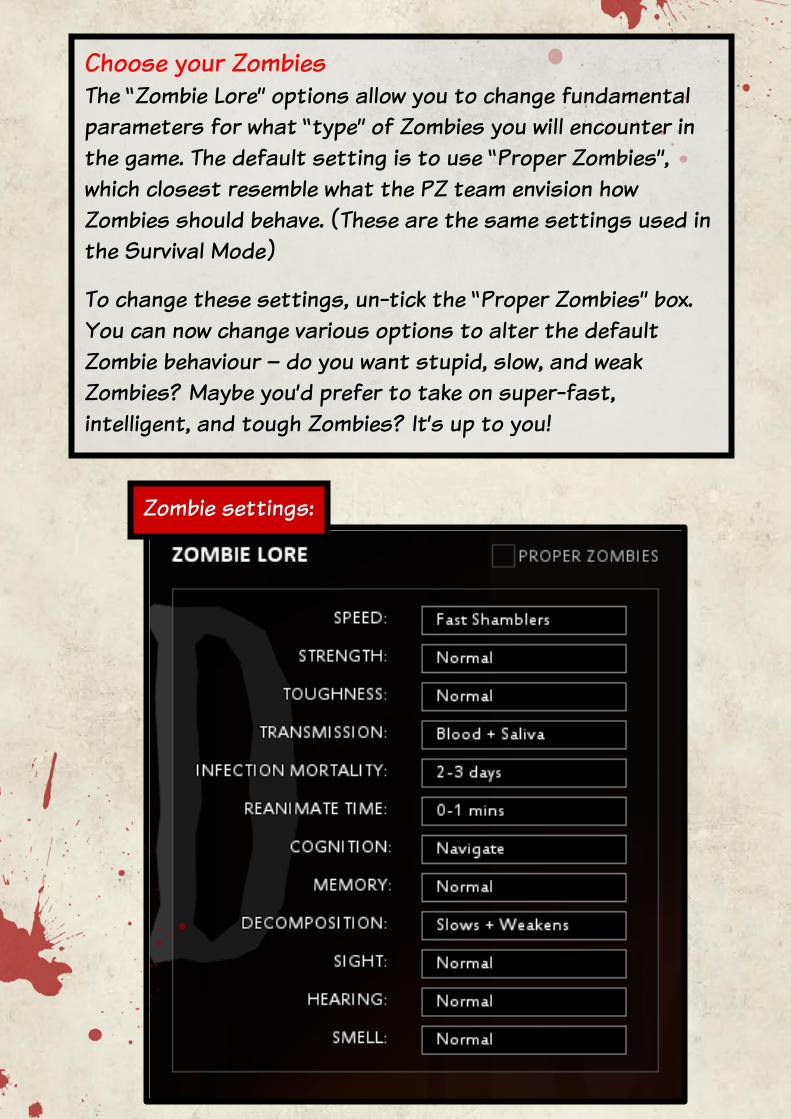
Choose your Zombies The “Zombie Lore” options allow you to change fundamental parameters for what “type” of Zombies you will encounter in the game. The default setting is to use “Proper Zombies”, which closest resemble what the PZ team envision how Zombies should behave. (These are the same settings used in the Survival Mode)
To change these settings, un-tick the “Proper Zombies” box. You can now change various options to alter the default Zombie behaviour – do you want stupid, slow, and weak Zombies? Maybe you’d prefer to take on super-fast, intelligent, and tough Zombies? It’s up to you!
Zombie settings:
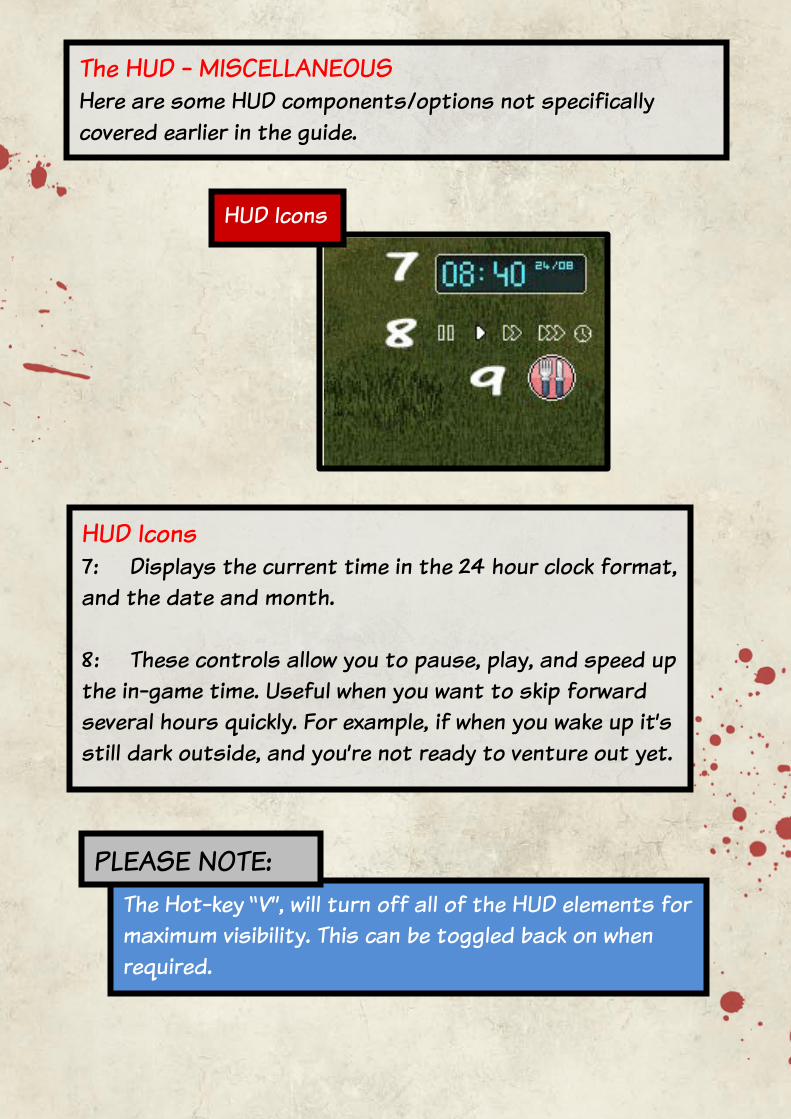
The Hot-key “V”, will turn off all of the HUD elements for maximum visibility. This can be toggled back on when required.
PLEASE NOTE:
HUD Icons 7: Displays the current time in the 24 hour clock format, and the date and month. 8: These controls allow you to pause, play, and speed up the in-game time. Useful when you want to skip forward several hours quickly. For example, if when you wake up it’s still dark outside, and you’re not ready to venture out yet.
The HUD - MISCELLANEOUS Here are some HUD components/options not specifically covered earlier in the guide.
HUD Icons
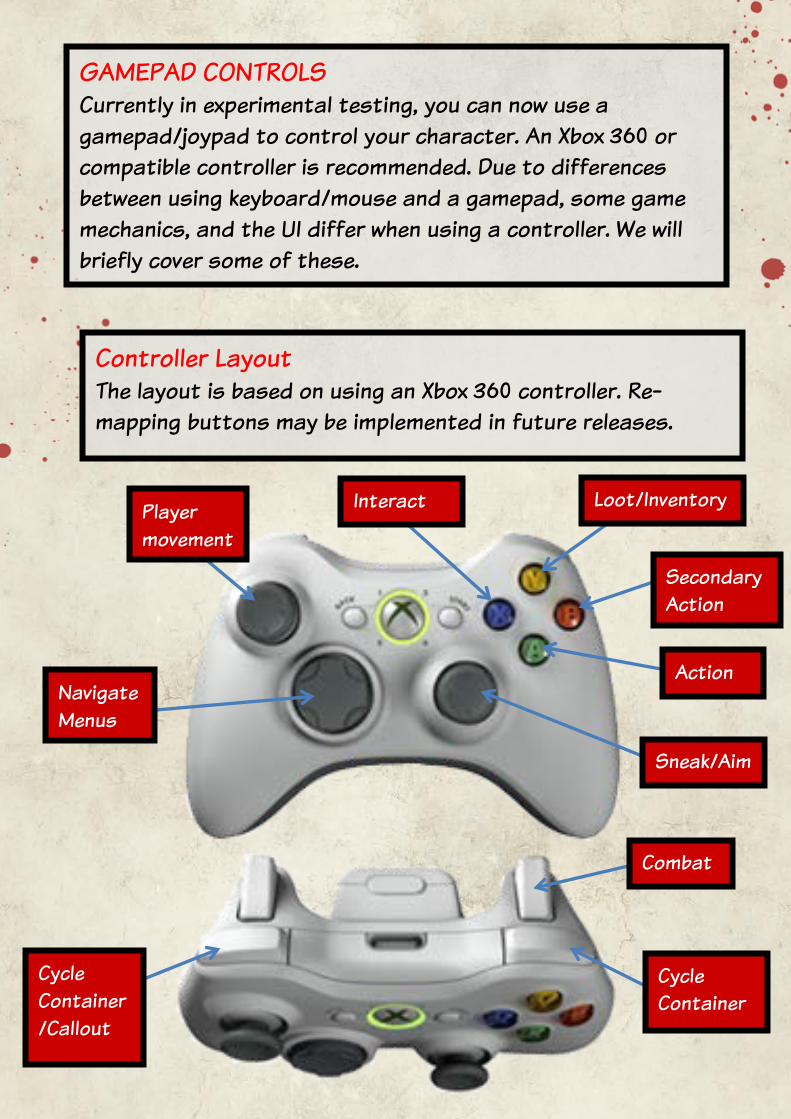
GAMEPAD CONTROLS Currently in experimental testing, you can now use a gamepad/joypad to control your character. An Xbox 360 or compatible controller is recommended. Due to differences between using keyboard/mouse and a gamepad, some game mechanics, and the UI differ when using a controller. We will briefly cover some of these.
Controller Layout The layout is based on using an Xbox 360 controller. Re-mapping buttons may be implemented in future releases.
Player movement
Navigate Menus
Sneak/Aim
Loot/Inventory
Combat
Cycle Container/Callout
Action
Interact
Secondary Action
Cycle Container
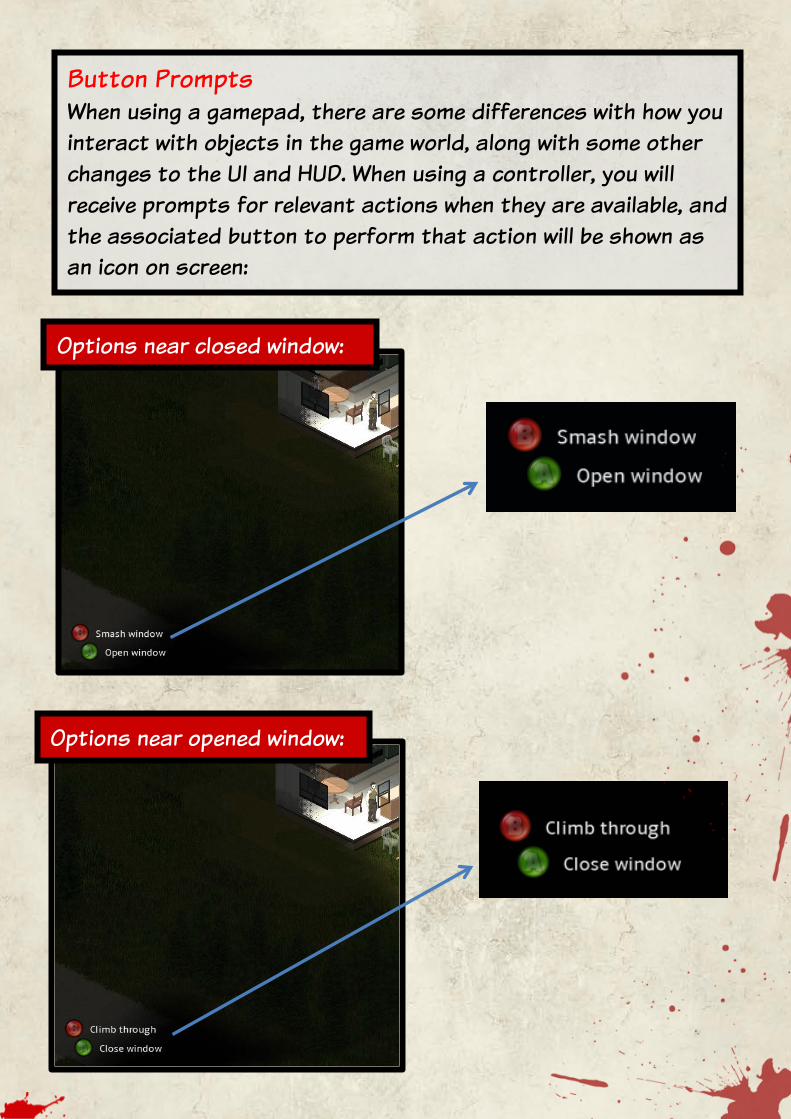
Button Prompts When using a gamepad, there are some differences with how you interact with objects in the game world, along with some other changes to the UI and HUD. When using a controller, you will receive prompts for relevant actions when they are available, and the associated button to perform that action will be shown as an icon on screen:
Options near closed window:
Options near opened window:
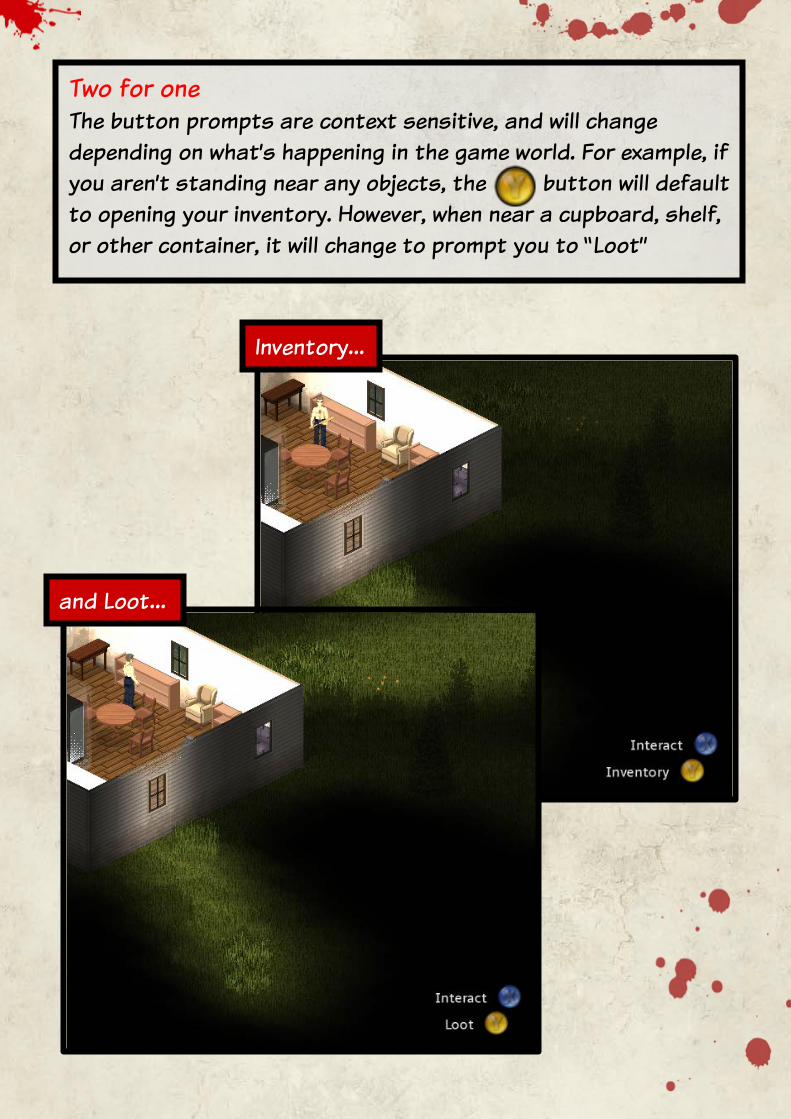
Two for one The button prompts are context sensitive, and will change depending on what’s happening in the game world. For example, if you aren’t standing near any objects, the button will default to opening your inventory. However, when near a cupboard, shelf, or other container, it will change to prompt you to “Loot”
Inventory…
and Loot…
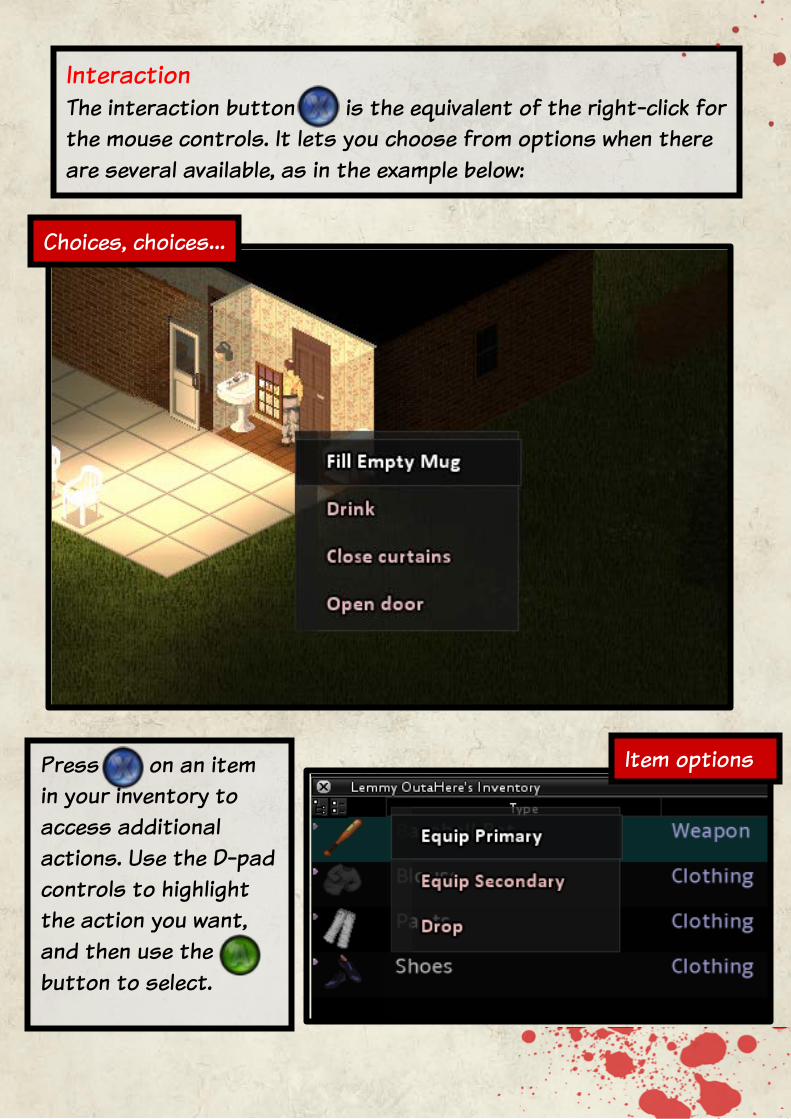
Interaction The interaction button is the equivalent of the right-click for the mouse controls. It lets you choose from options when there are several available, as in the example below:
Press on an item in your inventory to access additional actions. Use the D-pad controls to highlight the action you want, and then use the button to select.
Choices, choices…
Item options
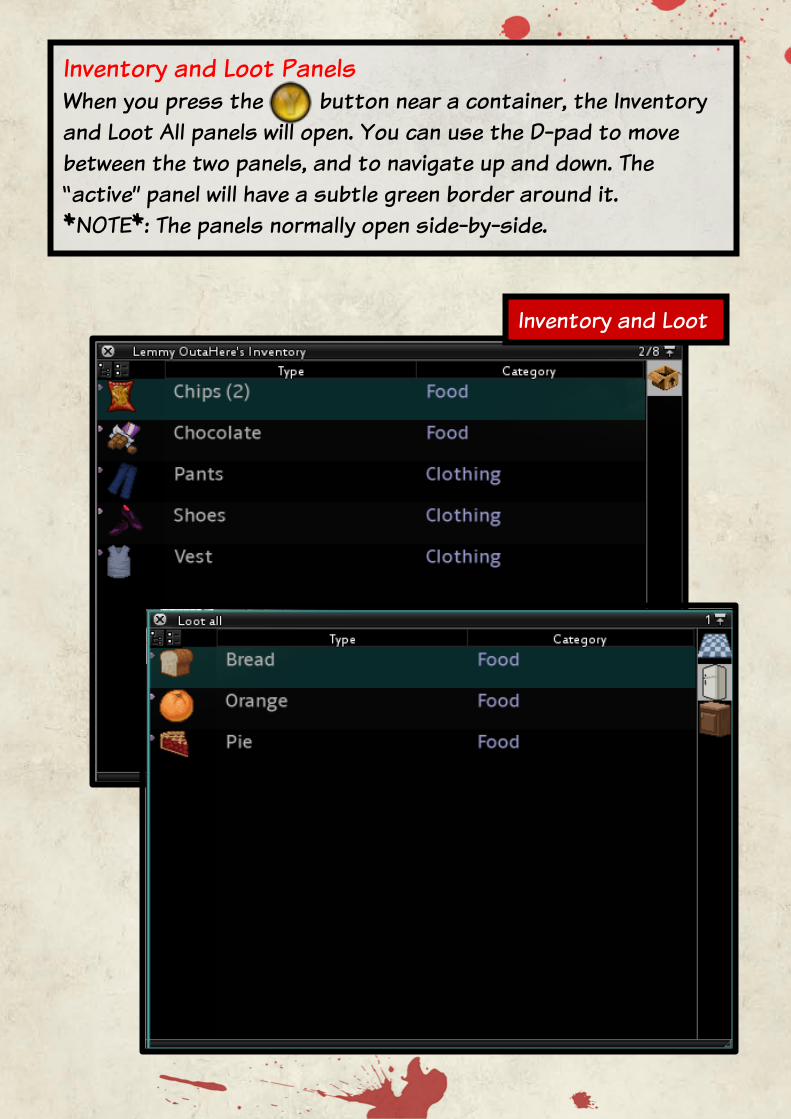
Inventory and Loot Panels When you press the button near a container, the Inventory and Loot All panels will open. You can use the D-pad to move between the two panels, and to navigate up and down. The “active” panel will have a subtle green border around it. *NOTE*: The panels normally open side-by-side.
Inventory and Loot
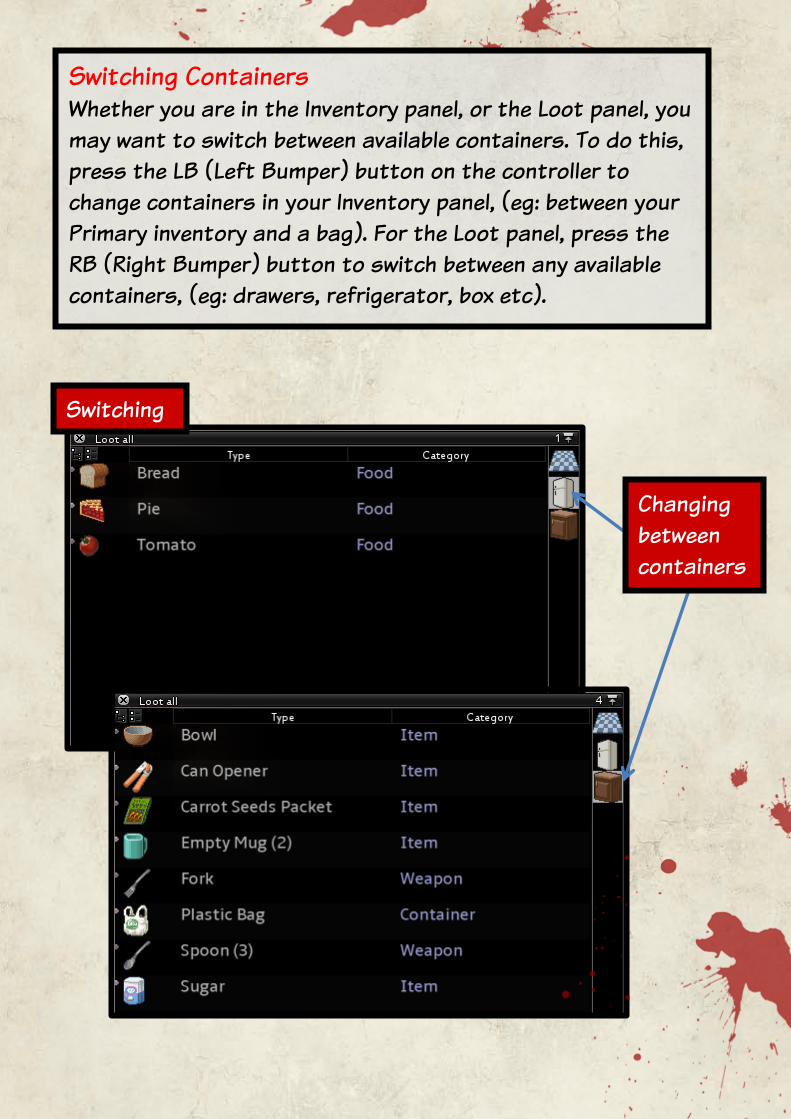
Switching Containers Whether you are in the Inventory panel, or the Loot panel, you may want to switch between available containers. To do this, press the LB (Left Bumper) button on the controller to change containers in your Inventory panel, (eg: between your Primary inventory and a bag). For the Loot panel, press the RB (Right Bumper) button to switch between any available containers, (eg: drawers, refrigerator, box etc).
Switching
Changing between containers

Due to controller support still being at an experimental stage, several in-game controls are currently disabled for controller use, for example, the “Building Menus” are not accessible via the controller.
PLEASE NOTE:
SPLIT SCREEN Currently in experimental testing, you can now play local “split-screen” co-op with up to four players, although probably best experienced with two players. To start a split screen game, start and setup a Survival or Sandbox game as per normal. Once the first player spawns, press on the controller, and you will be given the option to either “Take over player 1”, (for using a controller in single-player mode), or “Add another player”. For a split screen game, choose “Add new player”, then press again.
Let’s split!
All information in this manual is subject to change without notice, as Project Zomboid is still in active development, and features may change at any time.
DISCLAIMER:
LINKS and Disclaimer
Support Forum
http://theindiestone.com/community/viewforum.php?f=22
Project Zomboid – About and Contacts
http://projectzomboid.com/blog/about-us/
The Project Zomboid Wiki
http://pzwiki.net/wiki/Main_Page
Thanks to The Indie Stone – for developing THE Zombie Survival RPG game, and thanks to the great bunch of people that frequent the PZ forums… Manual created by: Mark “EreWeGo” Sanders
Thanks!