Embed Size (px)
Citation preview
ProSeries DMS |
Getting Started Guide
Copyright © 2008 Intuit Inc. All Rights Reserved.Intuit, the Intuit logo, QuickBooks, and ProSeries, among others, are registered trademarks of Intuit Inc. in the United States and other countries.
Other parties’ trademarks and/or service marks are the property of their respective owners and should be treated as such.
2
1
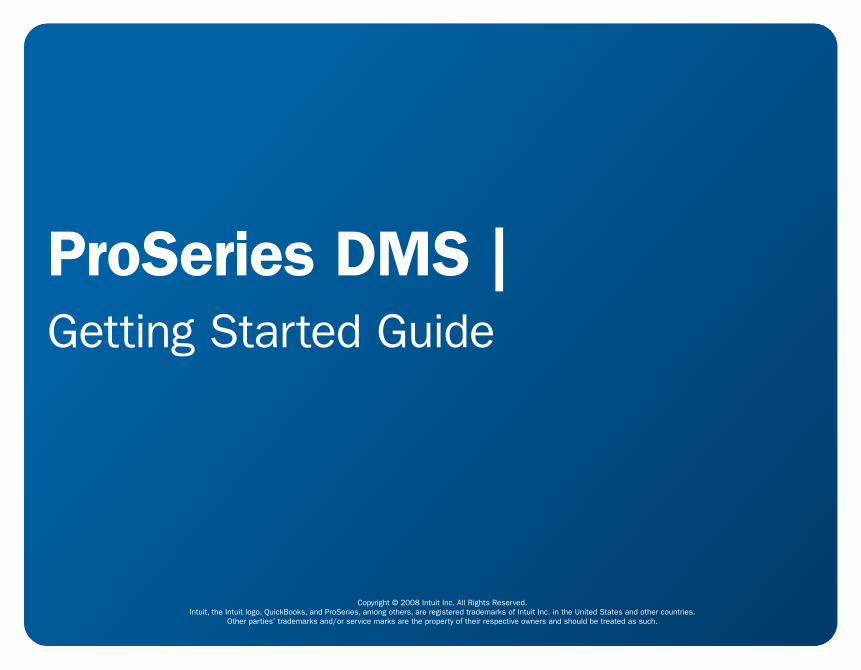
Step 1: Install DMS
NOTE FOR NEW USERS: You will be presented with a Setup Wizard that walks you through the steps on pages 2-4. If you choose not to follow the wizard, and want to perform the Setup manually later on, pages 2-4 will show you all the necessary steps.
1 In the Installation Wizard, follow the wizard prompts.
2 After starting DMS, click Create a Database.
3 Choose a location for your database, and then click OK.
NOTE: You must install DMS to a local computer. If you would like to share data with others in your fi rm, choose a network location for your database.
TIP: You can set user rights for other users in your fi rm in DMS Options. On the Tools menu, click Options, and then click the User Rights tab.
Table of Contents
Step 1 .........................................................2
Install DMS
Step 2 .........................................................3
Set Up a Folder Template
Step 3 .........................................................4
Import Clients from ProSeries
Step 4 .........................................................5
Getting Files into DMS - Print a Tax Return
Step 4 .........................................................6
Getting Files into DMS - Scan a Document
Step 4 .........................................................7
Getting Files into DMS - Import Files
Step 4 .........................................................8
Getting Files into DMS - Print Files
Step 5 .........................................................9
Annotate PDF Documents in DMS
Step 6 ...................................................... 10
Sending Files Out of DMS - E-Mail
Step 6 ...................................................... 11
Sending Files Out of DMS - Fax
2
3
3
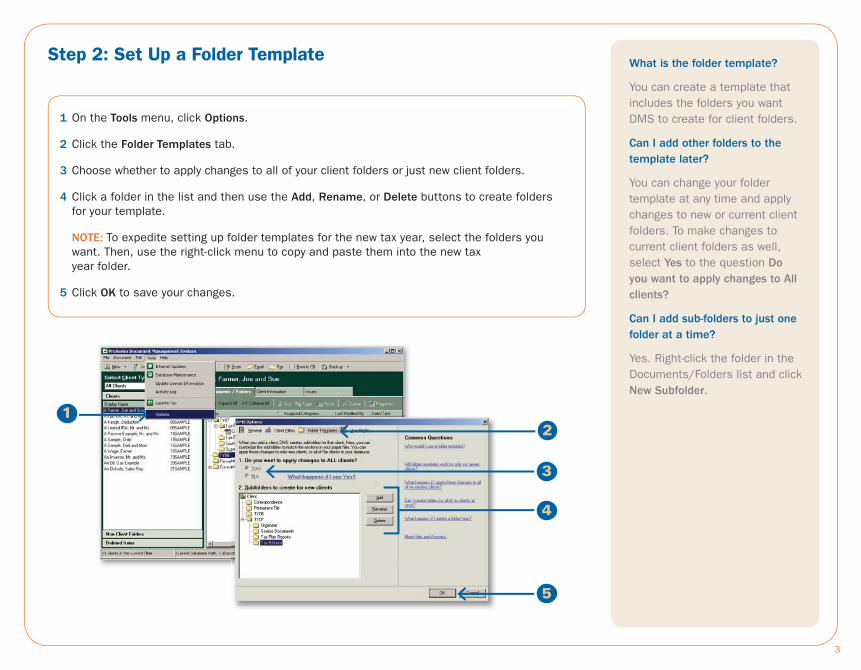
Step 2: Set Up a Folder Template
1 On the Tools menu, click Options.
2 Click the Folder Templates tab.
3 Choose whether to apply changes to all of your client folders or just new client folders.
4 Click a folder in the list and then use the Add, Rename, or Delete buttons to create folders for your template.
NOTE: To expedite setting up folder templates for the new tax year, select the folders you want. Then, use the right-click menu to copy and paste them into the new tax year folder.
5 Click OK to save your changes.
12
4
What is the folder template?
You can create a template that includes the folders you want DMS to create for client folders.
Can I add other folders to the template later?
You can change your folder template at any time and apply changes to new or current client folders. To make changes to current client folders as well, select Yes to the question Do you want to apply changes to All clients?
Can I add sub-folders to just one folder at a time?
Yes. Right-click the folder in the Documents/Folders list and click New Subfolder.
3
5
4
1
2
3
4
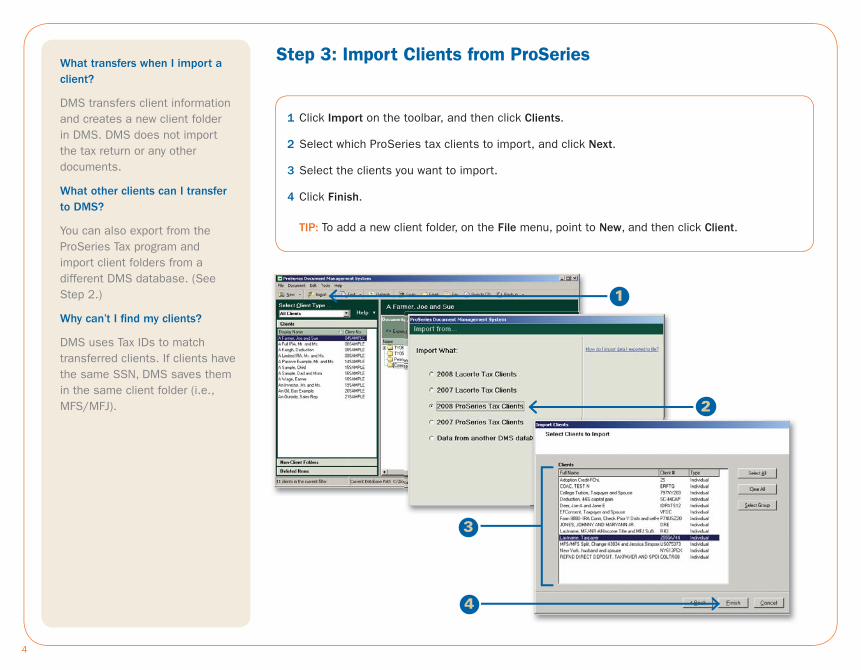
Step 3: Import Clients from ProSeries
1 Click Import on the toolbar, and then click Clients.
2 Select which ProSeries tax clients to import, and click Next.
3 Select the clients you want to import.
4 Click Finish.
TIP: To add a new client folder, on the File menu, point to New, and then click Client.
What transfers when I import a client?
DMS transfers client information and creates a new client folder in DMS. DMS does not import the tax return or any other documents.
What other clients can I transfer to DMS?
You can also export from the ProSeries Tax program and import client folders from a different DMS database. (See Step 2.)
Why can’t I fi nd my clients?
DMS uses Tax IDs to match transferred clients. If clients have the same SSN, DMS saves them in the same client folder (i.e., MFS/MFJ).
5
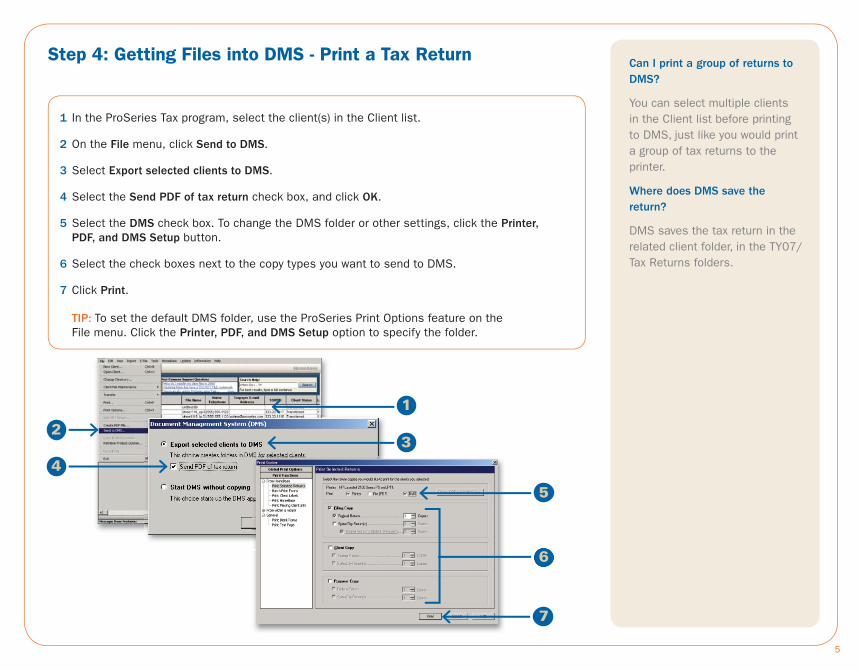
Can I print a group of returns to DMS?
You can select multiple clients in the Client list before printing to DMS, just like you would print a group of tax returns to the printer.
Where does DMS save the return?
DMS saves the tax return in the related client folder, in the TY07/Tax Returns folders.
Step 4: Getting Files into DMS - Print a Tax Return
1 In the ProSeries Tax program, select the client(s) in the Client list.
2 On the File menu, click Send to DMS.
3 Select Export selected clients to DMS.
4 Select the Send PDF of tax return check box, and click OK.
5 Select the DMS check box. To change the DMS folder or other settings, click the Printer, PDF, and DMS Setup button.
6 Select the check boxes next to the copy types you want to send to DMS.
7 Click Print.
TIP: To set the default DMS folder, use the ProSeries Print Options feature on the File menu. Click the Printer, PDF, and DMS Setup option to specify the folder.
2
1
6
3
4
7
5

6
Step 4: Getting Files into DMS - Scan a DocumentScanner Tips
Confused by what scanner to buy? We recommend:
• TWAIN, WIA compliant scanners like a Fujitsu scanner
• Auto Document Feeders (ADF) to scan multiple documents at once
• Fast scanning speed to scan quickly
See the ProSeries Web site under DMS for more information.
Why can’t DMS fi nd my scanner?
Verify:
• The scanner is TWAIN or WIA compliant.
• The scanner is plugged in and turned on.
• All scanner drivers are installed.
Scanning Tips
• Higher resolutions (DPI) have larger fi le sizes. You can lower resolution for scanning in the Scanner Properties section.
• We recommend using 150 DPI to scan documents.
1 Click Scan on the toolbar.
2 Verify the Scanner and any scanner settings. Then, click Scan.
3 Select the pages you want to save.
4 Type a name for the document in the File Name box.
5 Verify where you want to save the document in the Location box, or click to browse.
6 If you would like, add categories to the document in Categories or change the PDF Quality.
7 Click Save.
1
5
7
2
4
3
6
7
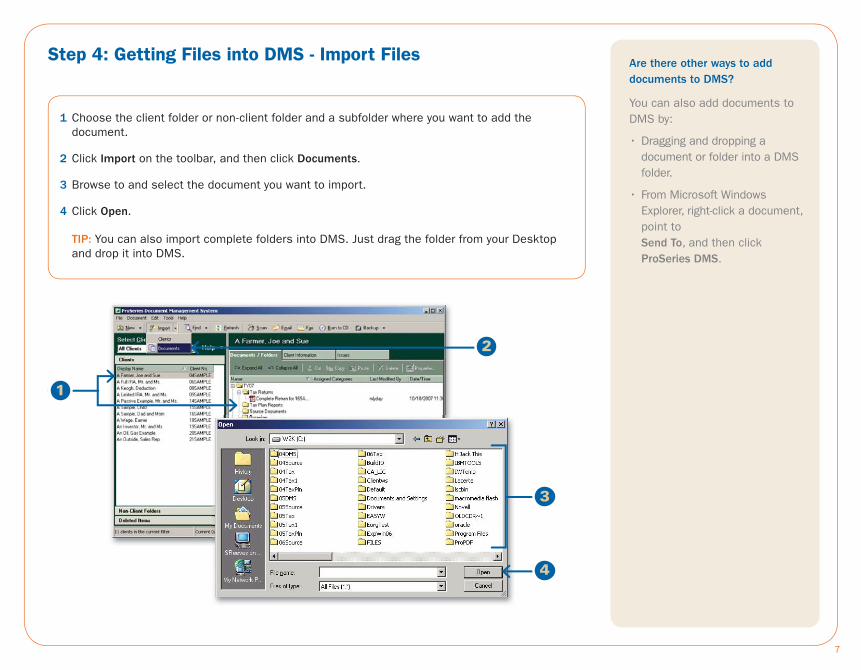
Step 4: Getting Files into DMS - Import Files
1 Choose the client folder or non-client folder and a subfolder where you want to add the document.
2 Click Import on the toolbar, and then click Documents.
3 Browse to and select the document you want to import.
4 Click Open.
TIP: You can also import complete folders into DMS. Just drag the folder from your Desktop and drop it into DMS.
2
111
Are there other ways to add documents to DMS?
You can also add documents to DMS by:
• Dragging and dropping a document or folder into a DMS folder.
• From Microsoft Windows Explorer, right-click a document, point to Send To, and then click ProSeries DMS.
3
4
8
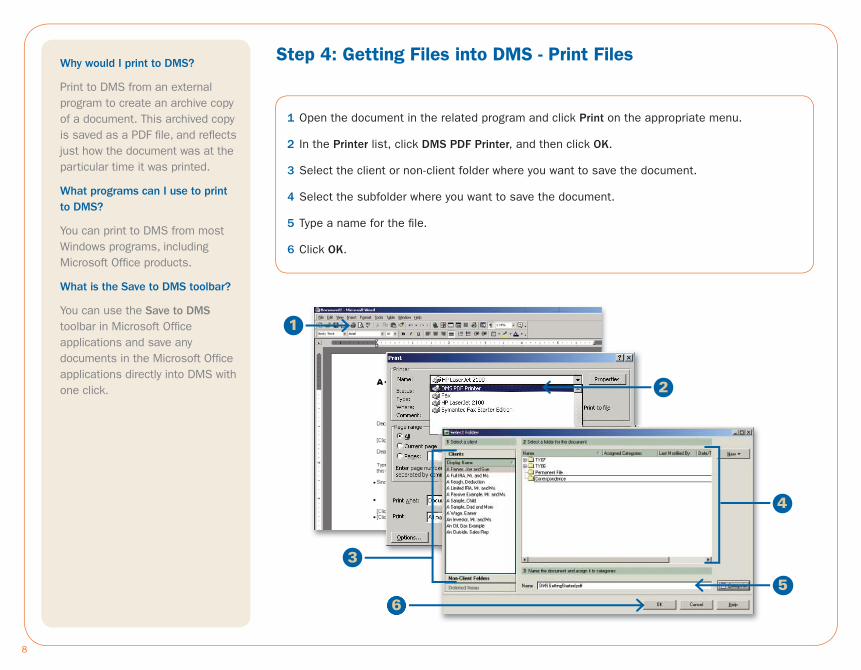
Step 4: Getting Files into DMS - Print FilesWhy would I print to DMS?
Print to DMS from an external program to create an archive copy of a document. This archived copy is saved as a PDF fi le, and refl ects just how the document was at the particular time it was printed.
What programs can I use to print to DMS?
You can print to DMS from most Windows programs, including Microsoft Offi ce products.
What is the Save to DMS toolbar?
You can use the Save to DMS toolbar in Microsoft Offi ce applications and save any documents in the Microsoft Offi ce applications directly into DMS with one click.
1 Open the document in the related program and click Print on the appropriate menu.
2 In the Printer list, click DMS PDF Printer, and then click OK.
3 Select the client or non-client folder where you want to save the document.
4 Select the subfolder where you want to save the document.
5 Type a name for the fi le.
6 Click OK.
1
4
5
3
2
6

9
Step 5: Annotate PDF Documents in DMS
1 Double-click the PDF document in the Documents/Folders list.
2 Choose an annotation from the toolbar.
3 Click and drag or click on the document where you want to add the annotation.
TIP: You can add, remove, and rotate pages in a PDF fi le. Find the page in the Pages list, and right-click.
1
What documents can I annotate?
You can annotate any PDF documents that are stored in DMS.
What annotations can I use?
You can add:
• Notes
• Highlighting
• Lines
• Image Stamps
• Shapes
• Stamps (with Dates & User Names)
What about when I e-mail or fax a document?
You can choose to include annotations when you email or fax a document.
2
3

10
Step 6: Sending Files Out of DMS - E-MailNOTES:
To include annotations with an attachment, select the check box in the Annotations column in the Attachments list.
To attach specifi c pages instead of the whole document, click the All Pages link next to the document in the Attachments list.
1 Select the fi le you want to email from the Documents/Folders list, and then click Email on the toolbar.
2 Add additional documents to the message and confi rm the email address.
3 Click Create Email.
TIPS: If there are multiple email addresses for this client, click the arrow next to E-Mail Address to select from a list of available email addresses.
You can password protect the PDF fi le you send by selecting the Password Protect… check box.
32
1
11
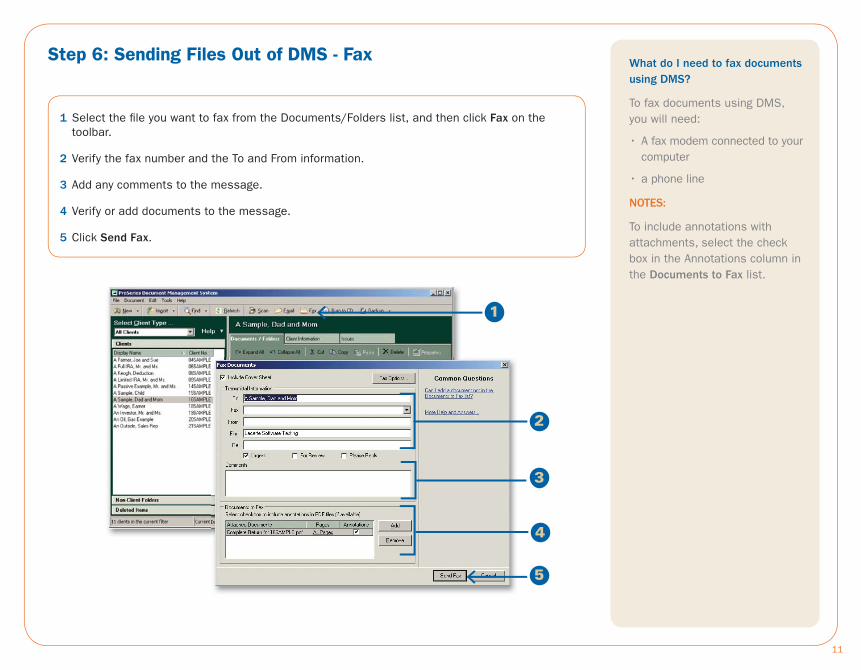
Step 6: Sending Files Out of DMS - Fax
1 Select the fi le you want to fax from the Documents/Folders list, and then click Fax on the toolbar.
2 Verify the fax number and the To and From information.
3 Add any comments to the message.
4 Verify or add documents to the message.
5 Click Send Fax.
1
What do I need to fax documents using DMS?
To fax documents using DMS, you will need:
• A fax modem connected to your computer
• a phone line
NOTES:
To include annotations with attachments, select the check box in the Annotations column in the Documents to Fax list.
2
333
4
5