Embed Size (px)
Citation preview
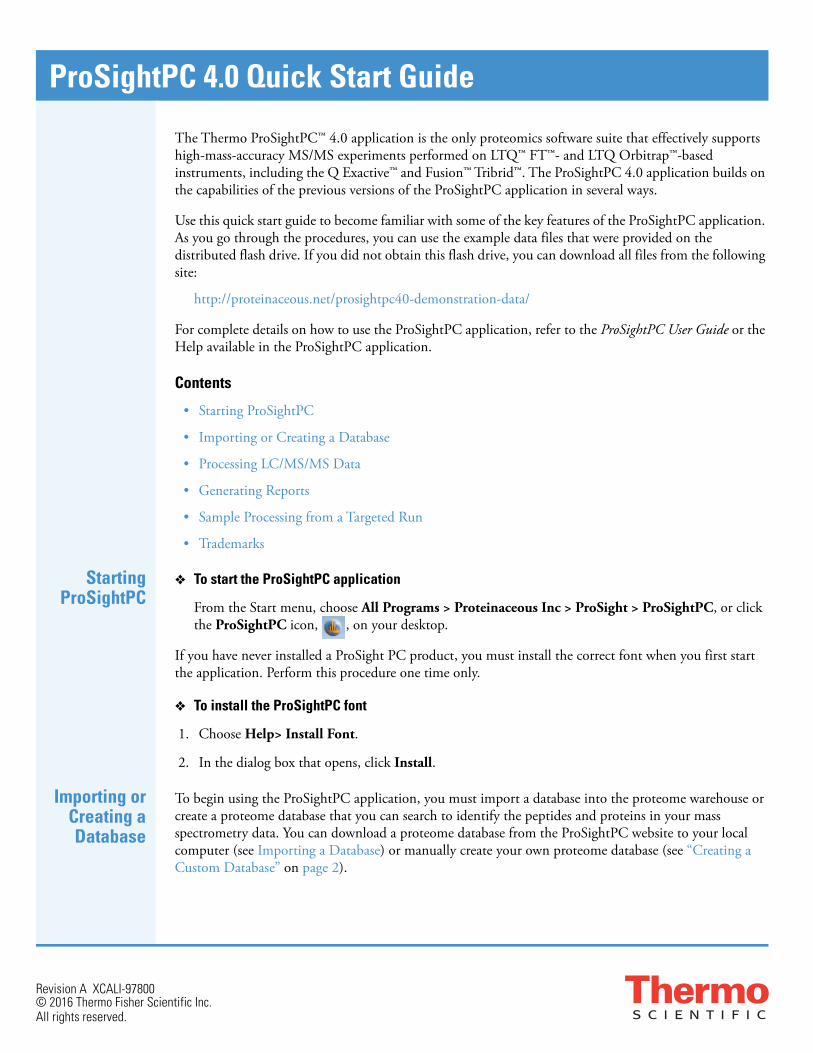
The Thermo ProSightPC™ 4.0 application is the only proteomics software suite that effectively supports high-mass-accuracy MS/MS experiments performed on LTQ™ FT™- and LTQ Orbitrap™-based instruments, including the Q Exactive™ and Fusion™ Tribrid™. The ProSightPC 4.0 application builds on the capabilities of the previous versions of the ProSightPC application in several ways.
Use this quick start guide to become familiar with some of the key features of the ProSightPC application. As you go through the procedures, you can use the example data files that were provided on the distributed flash drive. If you did not obtain this flash drive, you can download all files from the following site:
http://proteinaceous.net/prosightpc40-demonstration-data/
For complete details on how to use the ProSightPC application, refer to the ProSightPC User Guide or the Help available in the ProSightPC application.
Contents
• Starting ProSightPC
• Importing or Creating a Database
• Processing LC/MS/MS Data
• Generating Reports
• Sample Processing from a Targeted Run
• Trademarks
StartingProSightPC
To start the ProSightPC application
From the Start menu, choose All Programs > Proteinaceous Inc > ProSight > ProSightPC, or click the ProSightPC icon, , on your desktop.
If you have never installed a ProSight PC product, you must install the correct font when you first start the application. Perform this procedure one time only.
To install the ProSightPC font
1. Choose Help> Install Font.
2. In the dialog box that opens, click Install.
Importing orCreating aDatabase
To begin using the ProSightPC application, you must import a database into the proteome warehouse or create a proteome database that you can search to identify the peptides and proteins in your mass spectrometry data. You can download a proteome database from the ProSightPC website to your local computer (see Importing a Database) or manually create your own proteome database (see “Creating a Custom Database” on page 2).
ProSightPC 4.0 Quick Start Guide
© 2016 Thermo Fisher Scientific Inc.All rights reserved.
Revision A XCALI-97800

Importing aDatabase
You can copy existing proteome databases in PSCW (ProSightPC proteome warehouse) or XML file format.
To download a proteome database from the ProSightPC website
1. Choose Databases > Download ProSightPC Databases.
This step takes you to proteinaceous.net where you can access top-down and bottom-up databases.
2. Click the date of the database that you are interested in, for example, July 2016.
3. Click Archaebacteria, Eukaryotes, Prokaryotes, or Custom, as appropriate.
You must know the taxonomy of the species of the database that you want to download.
You can choose from one of the following types of databases:
• TD Complex PSCW: Includes N-terminal acetylation and initial methionine cleavage. This database contains 12 to 15 modifications per entry.
• TD Simple PSCW: Includes N-terminal acetylation and initial methionine cleavage. This database contains up to three modifications per entry.
• Bottom Up PSCW: Includes trypsin digestion using two missed cleavages.
• UniProt XML File: Recreates a PSCW database in the Database Manager.
The site automatically downloads the database once you select it. The downloaded database (a PSCW or an XML file) appears in the Downloads folder in the following directory:
C:\Users > your_name_folder > Downloads
4. Choose Databases > Database Manager, or click the View Database Info icon, , to open the Database Manager window.
5. Click in the toolbar of the Database Manager window.
6. Browse to the Downloads folder at the location just given.
If you do not want to place the imported PSCW or XML file in the default folder, navigate to the appropriate folder.
7. Right-click the selected folder and choose Paste.
Creating aCustom
Database
You can create top-down and middle-down/bottom-up proteome databases from an XML file, a UniProtKB XML file, a UniProKB flat file, or a FASTA file.
To create a proteome database with the Database Manager
1. Choose Databases > Create a Custom Database, or click in the Database Manager to open the Create New Database wizard.
–or–
Choose Databases > Database Manager, and then click Create Search Database.
2

The Welcome to the New Database Wizard page opens.
2. Click Next.
The Database Type page of the Create New Database wizard appears.
3. Do the following:
a. Select the type of database to build from these two options:
• Top Down (No Sample Proteolysis): Builds a database around whole, intact protein sequences and everything that could potentially happen to them in a biological system.
3

• Middle Down/Bottom Up (Sample Proteolysis): Builds a database around peptide sequences that arose from ex vivo proteolysis. If anything in your sample preparation protocol involves trypsin or Lys-C or any other proteolytic agent, select this option.
b. In the Direction area, select one of two check boxes for the direction of the database to build:
• Standard Database: Creates a database consisting of correct masses and forward sequences. A standard database is a typical protein database.
• Shuffled Database: Creates a nonsense database consisting of correct masses and sequences with randomized letters. Do not select this option unless it is absolutely necessary. You cannot use a reverse database in any other kind of experiment.
c. Click Next.
The Input File page appears.
4. Do the following:
a. In the File Location box, enter the name and path of the file containing the sequence information, or browse for it by clicking the Browse Folder icon. You can select a FASTA file, a UniProtKB XML file, or a UniProtKB flat file.
To interpret any symbols that might appear on the Input File page, refer to the ProSightPC User Guide.
b. Click Next.
4

The Initial Methionines page appears.
5. Do the following:
a. Select the method of handling initial methionines:
• (Recommended) Ensure Initial Methionine Cleavage: Ensures that each isoform generates two forms for each N-terminal sequence: one where the N-terminal methionine is present and one where it is cleaved off.
b. Specify the post-translational modifications (PTMs) that are presumed to exist on all proteins, even if the input does not contain them.
• Apply N-Terminal Acetylation: Adds N-terminal acetylation whenever it is possible, regardless of whether the input includes it. N-terminal acetylation is a very common PTM in eukaryotes.
• Apply N-Terminal Formylation: Adds N-terminal formylation. Select this check box if you are building a prokaryotic database. Prokaryotes often use N-formylmethionine to initiate translation.
c. Click Next.
The Complexity page appears.
5

6. Do the following:
a. If you want to include potential genetic variation as annotated in the UniProt™ database, select the Consider SNPs check box.
With this option, you can incorporate sequence polymorphisms into the database.
b. If you want to annotate known PTMs onto a protein, select the Consider PTMs check box.
For an example showing how to use this option, refer to the ProSightPC User Guide.
c. In the Maximum Features Per Sequence box, type the maximum number of features per input sequence.
As indicated on the Complexity page, a protein may have so many known modifications that it is not feasible to store all possible forms. On this page, you can set options to specify how to control this combinatorial expansion. If you are uncertain about the values to set, use the default values.
d. In the Maximum Mass (Da) box, enter the upper limit for which PTMs are included in the database.
For more information on this parameter, refer to the ProSightPC User Guide.
e. In the PTM selection box, select the check box for each PTM that you want included in the database.
If a check box for a PTM (or PTM category) is clear, those PTMs are not put into the database, whether or not they are present in the input data. This option is only available for UniProtKB XML and flat-formatted input data, because the standard FASTA format cannot encode information about PTMs.
f. Click Next.
If you selected the Middle Down/Bottom Up (Sample Proteolysis) option on the Database Type page, the Digestion page of the Create New Database Wizard opens. Use it to specify the parameters for a sample proteolysis.
7. On the Digestion page, do the following:
a. In the Method list, select the proteolytic method used to catalyze the breakdown of proteins into peptides.
b. In the Max Missed Cleavages box, type the maximum number of cleavage sites found in the generated peptides.
6

No (0) missed cleavages indicates that there are no cleavage sites in the generated peptides. One (1) missed cleavage indicates that each peptide has one site in it, two (2) missed cleavages indicate that each peptide has two sites in it, and so on. The Max Missed Cleavages box contains all values up to and including the set parameter. For example, if Max Missed Cleavages is set to 2, peptides with 0, 1, and 2 missed cleavages are generated. For a longer example, refer to the ProSightPC User Guide.
c. In the Minimum Peptide Mass (Da) box, type the minimum mass that a peptide must have, in daltons, before it is allowed to be put into the database.
No peptide less than the minimum peptide mass is put into the database; the ProSightPC application ignores and discards any theoretical peptide less than this mass. This parameter is useful because the application sometimes cannot identify particularly small peptides that have a very strong impact on database size.
d. In the Maximum Peptide Mass (Da) box, type the maximum mass that a peptide can have, in daltons, before it is allowed to be put into the database.
No peptide greater than this mass is put into the database.
e. Click Next.
The Database Description page appears.
8. Enter identifying information about the database that you want to create:
a. In the Database Name box, type the name of the database that you want to create. Use only letters, numbers, and underscores.
b. In the Description box, type a brief description of the database.
c. In the Organism box, type the name of the organism for the proteome database that you are creating.
d. (Optional) In the Strain box, type the strain designation for the proteome database that you are creating.
e. In the Owner box, type either your name or the name of the data source.
f. In the Last Update box, type the date when the database was last updated or click the down arrow to display a calendar and select a different date.
g. Click Finish.
7

9. On the Ready to Load page, click Go to create the new database.
Editing FixedModifications
You can customize the chemical modifications that you use to conduct a search by using the Fixed Modification Editor.
To edit fixed modifications
1. Choose Tools > Fixed Modification Editor to open the Fixed Modification Editor.
2. Do the following:
a. Scroll down to the last row, which is marked by an asterisk (*).
b. In the Name box, type the name of the modification.
c. In the Amino Acid box, type the symbol of the amino acid being modified.
d. In the Monoisotopic Mass box, type the monoisotopic mass of the chemical formula of the modification.
e. In the Average Mass box, type the average mass of the chemical formula of the modification.
f. In the XML Tag box, type a single word without spaces to indicate the modification.
3. Click Save.
The window closes. The modification appears when you create searches.
SettingParameters for
the Search
Specify the type of search to perform and set the parameters for that search. To do this, create a predefined search by following the instructions in “Adding Searches” on page 22.
8

ProcessingLC/MS/MS
Data
To process the LC/MS/MS data and search the imported database, you can use the High Throughput Wizard.
To open the High Throughput Wizard
• Choose ProSightHT > HighThroughput Wizard, or click the High Throughput Wizard icon, .
The Process a Dataset page appears.
SettingProcessing
Options
To set processing options
1. Select the Process Raw Files or the Process Puf Files option, depending on the type of data that you want to import.
• (Default) Process Raw Files: Converts LC/MS/MS raw data files to ProSightPC upload format (PUF) files, using an extension of the THRASH or the Xtract algorithm designed to analyze high-resolution profile LC/MS/MS data collected on Thermo Scientific™ Fourier Transform instruments, such as Orbitrap Elite.
Example raw data files are available from the following location for demonstration purposes:
http://proteinaceous.net/prosightpc40-demonstration-data/
• Process Puf Files: Processes PUF files.
2. To add a RAW or PUF file, click Add in the appropriate location, and then browse to the file in the dialog box that opens to select the file.
3. If you choose a raw data file, select one of the following options in the Choose a Process Algorithm area for importing the data files:
Thrash: Uses the THRASH algorithm to process the input file.
9

(Default) Xtract: Uses the Xtract algorithm to process the input file. This option reduces analysis and search time and, in general, gives better results.
Both Xtract and THRASH are algorithms that interpret resolved isotopic distributions and output neutral mass values. For more information on these algorithms, refer to the ProSightPC User Guide.
4. If you choose a raw data file, select a processing option in the Choose a Process Option area for importing the data files. The first three options specify a set of default settings for the Xtract and THRASH algorithms.
Middle Down
Top Down (MS3)
Top Down (MS2)
Custom: Click Advanced Settings and use the Advanced Settings dialog box to specify your own settings.
Refer to the ProSightPC User Guide for information on these defaults and for instructions on using custom settings.
5. (Optional) If you selected the Process Raw Files option, select the Save a Copy of the Puf Files for Future Processing check box to save a physical PUF file containing the results. Click Browse to browse to the directory where you want to save the PUF files.
This option is useful for rapidly re-searching the data instead of processing the raw data file again. If you do not select this option, the results reside in a ProSightPC repository. You can always import them into the ProSightPC application and save them as a PUF file.
6. (Optional) If you choose not to search the data against a proteome database, select the Skip Search Tree Logic check box.
7. On the completed Process a Dataset page of the High Throughput Wizard, click Next (see the next figure).
10

Selecting orCreating aRepository
You must select a repository, which is a database that stores the search results in the ProSightPC application.
To select or create a repository
1. On the Running HighThroughput Logic page of the wizard (see the next figure), do one of the following:
• Select an existing repository from the Repository list.
–or–
• Create a new repository by clicking New Repository, entering a new repository name in the New Repository dialog box—for example, repository_whey_casein—and clicking OK.
11

The Edit/Add Repositories dialog box appears, and the new name appears in the Repository list.
2. If you do not want to edit the repository, click Save. Otherwise, to edit the repository, follow the instructions in “Editing a Repository” in the ProSightPC User Guide, and click Save in the Edit/Add Repositories dialog box.
The name of the repository now appears in the Repository list of the Running HighThroughput Logic page of the High Throughput Wizard.
Selecting orCreating a
Search Tree
A search tree can hold one or more branch points. Each branch point in the tree contains one search. The simplest search tree has one branch point, which is the default for a new tree. You can create a new search or select an existing search.
To select an existing search tree
1. If you are running the example files, select Demo Search Tree from the Search Tree Name list.
2. Click Save.
Either select from the Repository list or create a new repository.
12
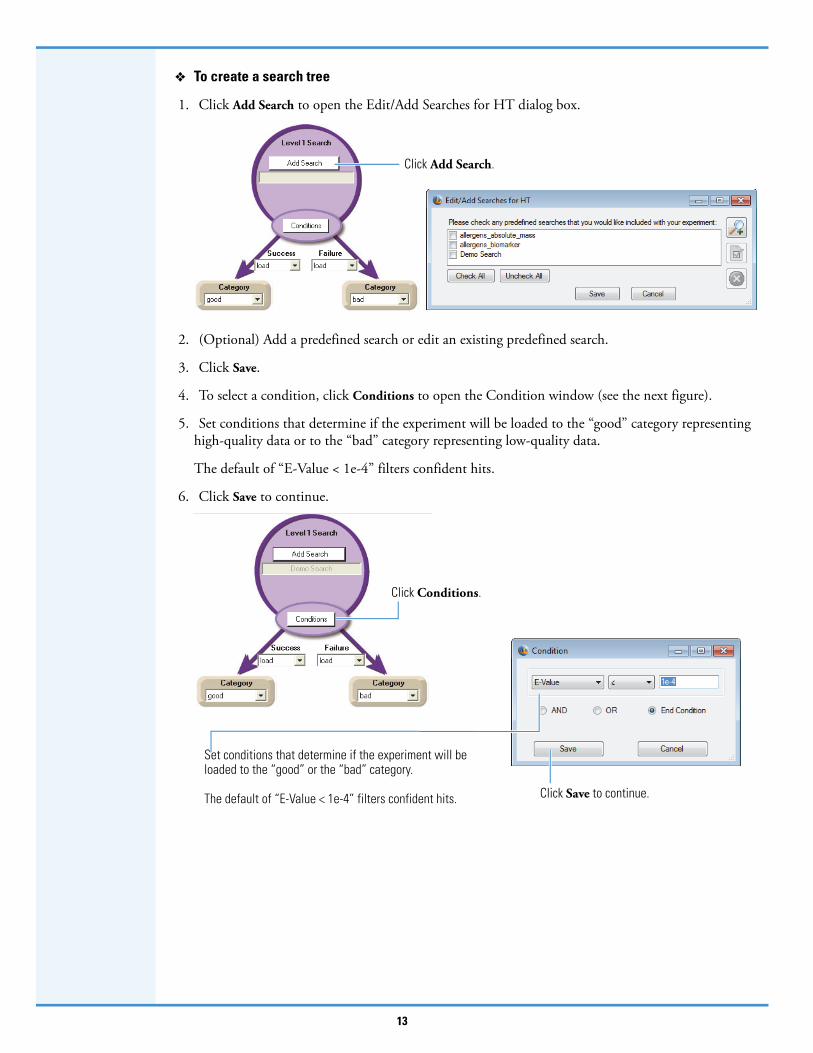
To create a search tree
1. Click Add Search to open the Edit/Add Searches for HT dialog box.
2. (Optional) Add a predefined search or edit an existing predefined search.
3. Click Save.
4. To select a condition, click Conditions to open the Condition window (see the next figure).
5. Set conditions that determine if the experiment will be loaded to the “good” category representing high-quality data or to the “bad” category representing low-quality data.
The default of “E-Value < 1e-4” filters confident hits.
6. Click Save to continue.
Click Add Search.
Click Conditions.
Set conditions that determine if the experiment will be loaded to the “good” or the “bad” category.
The default of “E-Value < 1e-4” filters confident hits. Click Save to continue.
13

7. (Optional) Select the options in the Experiment Filter box to ignore experiments that are not likely to yield matches.
8. (Optional) Specify a two-level search tree by changing Load to Run Search, and repeat this process.
9. Click Save to save the search tree before continuing.
The Save Search Tree dialog box opens.
To remove all experiment filters, clear this check box.
The default settings are as follows:* Experiments that contain less than 10 fragments* Experiments whose intact mass is less than 750 Da
To add a new branch point, change Load to Run Search, and repeat this process.
Click Save.
Type a search tree name and click OK twice.Click Next.
14

10. Type a search tree name and click OK twice.
A search tree is usually used more than once per project.
11. Click Next.
Viewing theSummary
To view a summary of your parameter settings
Review your parameter settings on the Summary page of the High Throughput Wizard.
Processing theData
To process the data
1. To begin the ProSightPC High Throughput processing, click Process at the bottom.
2. When the High Throughput Wizard finishes processing the data, click Finish.
Viewing theOutput
Once the search is complete (which might take several minutes, depending on the size of the raw data file, the complexity of the database, and the search parameters), you can view the repository report (see the next figure). You can use filter, import, and export options to view the report. For each raw data file, a table displaying all the matches found appears in the ProSightPC application. Each row represents the best match per MS/MS experiment (see “Generating Reports” on page 16).
15

GeneratingReports
You can generate a report for each repository, per category or per file.
To generate reports
1. Choose ProSightHT > Repository Report or Tools > Reports > Repository Report, or click the Repository Report icon, , to open the Repository Report window (see the next figure).
2. From the Repository list, select the name of the repository to generate a report for.
3. If you want to generate a report on all the experiments in a category, select the Category check box and then select the name of the category from the adjacent list. For example, to view only the “good” experiments, select the Good category.
4. If you want to generate a report on all the experiments in a specific file (good and bad), select the File check box, and then select the name of the file from the adjacent list or type the name of the file in the box.
The ProSightPC application finishes the first job and generates a report on a new page in the application while continuing to run the other jobs.
Repository report on a new page
16

5. Click Generate.
The application generates a report for each repository, per category or per file.
The Report page displays filter, import, and export information.
Displays the most common filters. For example, you can display only confident hits or hits with PTMs.
Select the columns to display.
Displays your own custom filters. For example, you can display only experiments with an intact mass > 8685.0 Da.
Imports selected experiments into the ProSightPC application for further investigation.
Exports selected experiments to a Microsoft™ Excel™ spreadsheet.
Select an experiment.
17
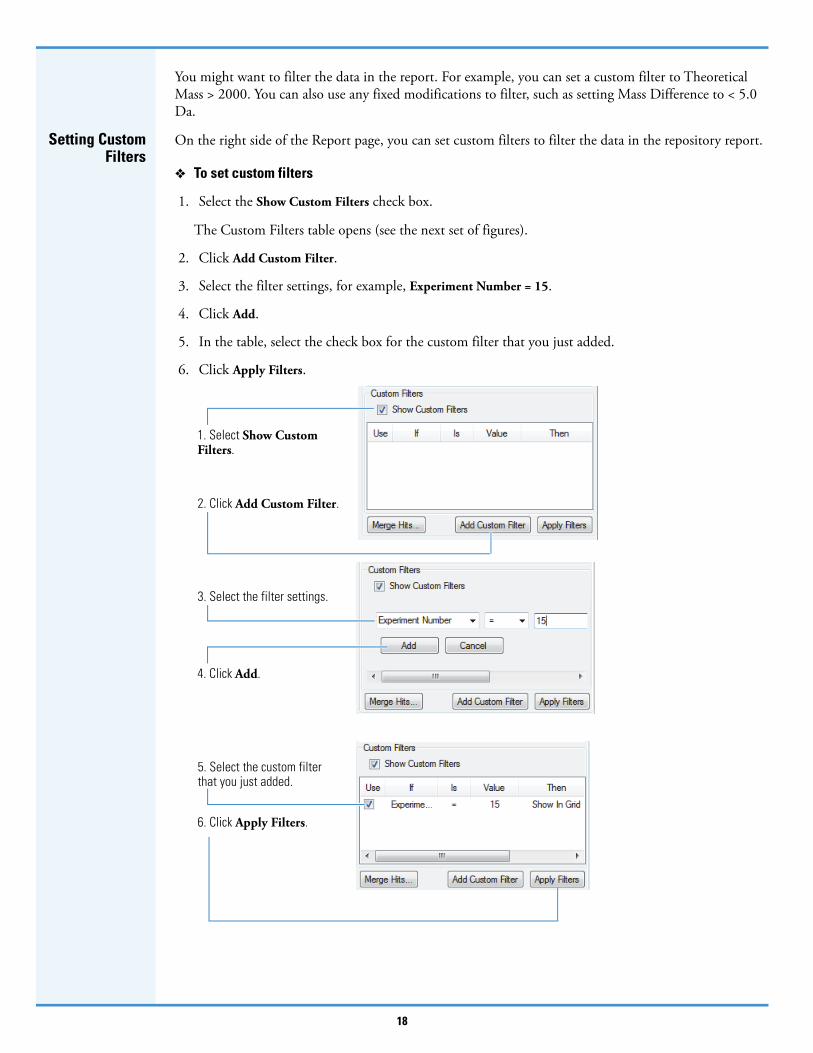
You might want to filter the data in the report. For example, you can set a custom filter to Theoretical Mass > 2000. You can also use any fixed modifications to filter, such as setting Mass Difference to < 5.0 Da.
Setting CustomFilters
On the right side of the Report page, you can set custom filters to filter the data in the repository report.
To set custom filters
1. Select the Show Custom Filters check box.
The Custom Filters table opens (see the next set of figures).
2. Click Add Custom Filter.
3. Select the filter settings, for example, Experiment Number = 15.
4. Click Add.
5. In the table, select the check box for the custom filter that you just added.
6. Click Apply Filters.
5. Select the custom filter that you just added.
4. Click Add.
3. Select the filter settings.
2. Click Add Custom Filter.
1. Select Show Custom Filters.
6. Click Apply Filters.
18

Importing andExporting
Experiments
You can import experiments from a repository into the ProSightPC application for manual validation and additional database searching. You can also take a set of results from the experiments that you import to the Sequence Gazer™ tool to see in more detail how your MS/MS data matches a retrieved protein or peptide. For more information on the Sequence Gazer, see “Sequence Gazer” on page 25.
Use any of the following methods to import experiments:
• Select the experiments and click Import.
• Right-click the experiments and choose Import.
• Double-click an experiment.
• Choose File > Import Data from Repository.
Save any changes that you made by exporting the experiments back to the repository or to a different repository.
Use any of the following methods to export experiments:
• Select the experiments that were imported and click Export to Repository.
• Right-click the experiments that were imported and choose Export to Repository.
• Right-click the experiment in the ProSightPC data grid, and choose Export Experiment to Repository.
• Choose File > Export Data to Repository.
SampleProcessing
from aTargeted Run
If you want to import a targeted raw data file as input or if you want to enter data manually into the ProSightPC application, you cannot use the High Throughput Wizard. You must enter data manually or use an analysis to infer mass (AIM) operation, which converts high-resolution mass spectral data from proteins or large peptides to neutral monoisotopic or average masses. The ProSightPC application uses these neutral mass values to identify and characterize proteins.
ImportingMS/MS Data
You can use either of two AIMs to import raw data files into a ProSightPC MS/MS experiment: THRASH and Xtract. (For information on these two algorithms, refer to the ProSightPC User Guide or the ProSightPC application Help.) You can also enter data manually.
Processing a Raw Data File with the THRASH Algorithm
To process a raw data file with the THRASH algorithm
1. Choose File > Import .raw > Profile, or click the Import Profile icon, .
The Build Experiment from Profile RAW Data window opens (see the next figure).
2. In the “RAW” file to be “THRASHed” box, browse to the raw data file to be imported.
3. In the Thrash Options area, enter the applicable parameters.
4. In the Type box under Precursor Mass, select the precursor type.
5. In the box below Type, type the precursor mass.
6. In the Fragmentation Method list, select the fragmentation method.
7. (Optional) Select a predefined search in the Predefined Search box. For the example file, select Demo Search.
8. Click OK.
19

The ProSightPC application creates a new MS/MS experiment with the data processed by the THRASH algorithm.
Processing a raw data file with the Xtract Algorithm
Use Xtract to create a raw data file containing the neutral monoisotopic mass values (refer to the ProSightPC User Guide or the ProSightPC application Help for more information).
To process a raw data file with the Xtract algorithm
1. Choose File > Import .raw > Post Xtract, or click the Import Xtract icon, .
The Build Experiment from Post Extract RAW Data window opens (see the next figure).
2. In the Post Xtract RAW File box, browse to a Post Xtract raw data file.
3. In the Precursor Mass area, type the precursor mass in the box next to m/z.
4. Select the mass type of the precursor ions that each Post Xtract file contains, either Average Mass or Monoisotopic Mass.
5. In the Fragmentation Ion Data area, select the mass type of the fragment ions that each Post Xtract file contains, either Average Mass or Monoisotopic Mass.
6. (Optional) Select a predefined search in the Predefined Search box.
7. (Optional) Select a predefined search.
2. Select the raw data file to be imported with the THRASH algorithm.
3. Enter the applicable parameters.
5. Type the precursor mass.
4. Select the precursor mass type.
6. Select the fragmentation method.
20

7. Click OK.
The ProSightPC application creates a new MS/MS experiment with the data processed by the Xtract algorithm.
Manually Entering the Data
You can manually enter the data (precursor and fragment masses) if you want to import a targeted raw data file as input.
To manually enter the data
1. Click the Add Experiment icon, , or choose Tools > Experiment Adder to open the Experiment Adder dialog box (see the next figure).
2. In the Fragmentation Methods area, select the fragmentation method.
3. In the Type list under Precursor Ion Data, select the precursor mass type, either Manual or Upload.
4. If you select Manual in the Type list, select the mass type of the precursor ion in the Mass Type area (either Monoisotopic or Average) and type the precursor mass.
If you select Upload in the Type list, a Text File box and a Browse button appear beneath the Type list. Type the path and name of the ASCII text file or files that contain the precursor ion data in the Text File box, or click Browse to browse for them.
5. (Optional) Select the appropriate check box for a predefined search at the bottom of the dialog box.
6. Click Create.
6. (Optional) Select a predefined search.
2. Select a Post Xtract raw data file.
4. Select the precursor ion mass type.
5. Select the fragment ion mass type.
3. Type the precursor mass.
21

All three options for importing MS/MS data into the ProSightPC application create new MS/MS experiments in the data grid (with or without searches, depending on whether you added one or more predefined searches).
AddingSearches
The ProSightPC application supports five different search modes. Each search mode represents a specific method used to query a proteome database within the proteome warehouse. For more information on search modes, refer to the ProSightPC User Guide or the ProSightPC application Help.
Adding a Predefined Search
Predefined searches are a strategy to simplify repeating identical searches on different sets of MS/MS data.
To add a single predefined search to an experiment
• In the data grid, right-click the appropriate experiment and choose Append Predefined Search > search_name.
The experiment that the search has been appended to appears in the data grid with the same experiment number in the Exp ID column and a different number in the Search ID column.
–or–
• Follow the next procedure, “To add multiple predefined searches to an experiment,” and select the appropriate search.
To add multiple predefined searches to an experiment
1. Right-click the experiment in the data grid and choose Append Predefined Searches. You can also choose Experiment Tools > Append Predefined Search.
The Append Predefined Searches to Experiment X dialog box opens (see the next figure).
5. (Optional) Select a predefined search.
3, 4. Select Manual in the Type list, select the precursor mass type, and type the precursor mass. Or, select Upload in the Type list, type the path and name of a text file in the Text File box, or browse for it.
2. Select the fragmentation method.
MS/MS experiment in the data grid
22

2. Select the predefined searches to append to the experiment and click Append. To select all of the searches listed, click Check All.
You can also execute the search from the Data Manager by clicking Run Search.
PerformingSearches
You have two options for searching: performing searches manually or performing them in batch mode.
Performing Searches Manually
If you have a limited number of searches that you want to perform, you can manually search the database.
To perform searches manually
• Right-click the experiment and choose Run Search x, where x is the number of the experiment that appears in the Search ID column.
• If you select more than one experiment or search, right-click and choose Run Searches.
Performing Searches in Batch Mode
With batch processing, you can queue and perform a large number of searches over any number of experiments in a single action.
To perform searches in batch mode
Choose Tools > Batch Run, or click the Batch Run icon, .
InterpretingResults
After performing the searches, double-click a search. A new tab opens with the experiment number.
Experiment Information
Click the display control arrows to expand or collapse the various displays. These arrows indicate that information related to a search is available. Click the display control arrow to reveal search information (see the next figure).
Tip To process several predefined searches automatically, see “To perform searches in batch mode” on page 23.
23

Search Information
Each results list displays the number of protein isoforms found. Click the appropriate arrow to display the results.
Display control arrows
Results list
24

Protein Isoform Information
Sequence Gazer
The Sequence Gazer is an interactive environment for querying MS/MS data against a known protein sequence. Use the Sequence Gazer to characterize identified proteins by selectively adding or removing PTMs or custom masses to amino acids within a protein sequence.
To access the Sequence Gazer
Click Take to Sequence Gazer (see the previous figure).
In the Sequence Gazer (see the next figure), you can examine the current experiment information (for precursor and fragment masses) to be queried against this sequence.
Statistics table
Short description of the protein isoform
Graphical representation of the protein isoforms (location of PTMs and matching fragment ions)
25

ProSight Lite
ProSight Lite is a free and simplified version of the ProSightPC application that is mostly used for single protein analysis by infusion. You can use it to view the marked-up spectrum results and, as with the Sequence Gazer feature, edit the sites of modifications. You can also use it to produce publication-ready fragment maps.
Follow this link to access a video containing more information about ProSight Lite and to install the application:
http://prosightlite.northwestern.edu
After installation of the ProSight Lite application is complete, follow these instructions.
To access ProSight Lite
1. Select the appropriate search and click its corresponding arrow in the Data Manager.
2. Locate the appropriate protein identification in the search results and expand the display.
3. Click Take to ProSight Lite.
The ProSight Lite window opens (see the next figure).
26

Trademarks ProSightPC and Sequence Gazer are registered trademarks of Proteinaceous, Inc. in the United States.
Q Exactive and Fusion are trademarks; and LTQ, LTQ FT, Orbitrap, and Thermo Scientific are registered trademarks of Thermo Fisher Scientific Inc. in the United States.
UniProt is a registered trademark of European Molecular Biology Laboratory Incorporated Association in the United States and other countries.
Microsoft and Excel are registered trademarks of Microsoft Corporation in the United States and other countries.
The THRASH procedure is based on routines in Numerical Recipes: The Art of Scientific Computing, published by Cambridge University Press, and is used by permission.
All other trademarks are the property of Thermo Fisher Scientific Inc. and its subsidiaries.
27