Embed Size (px)
Citation preview
This page is a part of ProSSHD online Help Manual.ProSSHD is an SSH client for Windows providing maximum security from PC to Host over a Company Lan/
Wan/Intranet or Internet. It brings you typical remote system administration, file transfers, and access to corporate resources over the Internet. Visit Home of ProSSHD for more information.
ProSSHD V1.1 Online Help manual
1. About This Manual2. Introducing to ProSSHD
What is in ProSSHD
3. The ProSSHD RequirementsPC Hardware & Software RequirementsHost Requirements
4. Installing ProSSHDRunning Setup
Extracting Package Installation FilesRunning SetupThe Silent Installation Mode
Running UNINSTALLUpgrading ProSSHDMulti-user Installation
5. The ProSSHD DatabaseKeyboard Definition Files
6. Configuring ProSSHDUsing ComSetup
The Communication Setup TabThe All Trace Tab
The Network trace BoxThe XwpPeg Utility
The TCP/IP Retransmission Timeout ParametersThe Run Box
The XwpSSHD service TabMain Features of XwpSSHDInstalling the XwpSSHD ServiceUninstalling the XwpSSHD ServiceUsing the XwpSSHD serviceUsing XwpSSHDPreparing Key-filesConfiguring XwpSSHDThe Properties BoxThe Windows Firewall Box
Configuration data for XwpSSHD
7. Telnet_SSHStarting and Terminating Telnet_SSH
Starting a Telnet SessionStarting an SSH SessionExample of Initiating a Telnet Session via SSHTerminating a SessionTelnet/SSH2 as SOCKS4 Proxy
Details of a SessionTelnet_SSH Menu Options
The Help MenuThe Commands MenuThe Edit MenuThe View Menu
The Options MenuThe Settings OptionThe Keys TabThe Type TabThe Text TabThe Text Tab for the XTERM TypeThe User Defined Tab
The Logging TabThe ExtScreen Tab
The Keyboard Mapping OptionList Assigned FunctionsEdit function
The Forwarding OptionThe Port Forwarding BoxThe X Forwarding BoxThe Save FWD Settings Option
Terminal Emulation in Telnet_SSHRunning Telnet_SSH with Command Line ParametersThe "[TELNET]" Section of the ini-file
Appendix A Keyboard Mapping File FormatKeyboard Mapping File FormatThe KEYS SectionThe COMPOSERS_XKK SectionAvailable Keyboard Mapping Files
Appendix B Description of Terminal CapabilitiesDescription of Terminal CapabilitiesTerminal Parameter Settings
Home | Product | Download | Order Now | Upgrade | Support | Pricing | Company Information | Contact Us
Copyright © 1999 - 2009 LabtamTM Inc.
This page is a part of ProSSHD online Help Manual.ProSSHD is an SSH client for Windows providing maximum security from PC to Host over a Company Lan/
Wan/Intranet or Internet. It brings you typical remote system administration, file transfers, and access to corporate resources over the Internet. Visit Home of ProSSHD for more information.
content | next >
1. About This Manual
This User's Manual describes how to install, configure and use the ProSSHD package on a 32-bit IBM PC or compatible personal computer running one of the following operating systems: MS Windows 9x/ME/NT4/2K/2K3/XP/Vista. A small volume of the manual reflects simplicity of using this software tool created nevertheless on the basis of up-to-date information technologies.
The following items will be covered:
● Purpose and composition of ProSSHD● Hardware & Software requirements of ProSSHD● Installation procedure for ProSSHD● ProSSHD database composition● Configuring ProSSHD● ProSSHD working sessions.
content | next >
Home | Product | Download | Order Now | Upgrade | Support | Pricing | Company Information | Contact Us
Copyright © 1999 - 2009 LabtamTM Inc.
This page is a part of ProSSHD online Help Manual.ProSSHD is an SSH client for Windows providing maximum security from PC to Host over a Company Lan/
Wan/Intranet or Internet. It brings you typical remote system administration, file transfers, and access to corporate resources over the Internet. Visit Home of ProSSHD for more information.
< previous | content | next >
2. Introducing to ProSSHD
ProSSHD is a non-complicated product for integrating the Microsoft Windows and TCP/IP network environments. ProSSHD is an inexpensive but effective way to transform a standard PC running under MS Windows (9x/ME/NT4/2K/2K3/XP/Vista) into a multi-function terminal. Being based on the TCP/IP open standards, the package integrates a PC into an interoperable computer network. The network of dissimilar computers and operating systems becomes perfectly transparent to you. ProSSHD enables you to work on your PC's screen with several applications executed simultaneously on various network nodes. As a result, a heterogeneous network appears to you as a unified large computer system arranged directly on your desktop.
By using the industry standard Secure Shell (SSH1/SSH2) protocol for remote logins, intended to provide secure encrypted communications between two untrusted hosts over an insecure network, the package brings you typical remote system administrating, file transferring, and access to corporate resources over the Internet. With its SSH1/SSH2 features support, the package brings Security to your PCs, company LAN/WAN, or Intranet.
< previous | content | next >
Home | Product | Download | Order Now | Upgrade | Support | Pricing | Company Information | Contact Us
Copyright © 1999 - 2009 LabtamTM Inc.
This page is a part of ProSSHD online Help Manual.ProSSHD is an SSH client for Windows providing maximum security from PC to Host over a Company Lan/
Wan/Intranet or Internet. It brings you typical remote system administration, file transfers, and access to corporate resources over the Internet. Visit Home of ProSSHD for more information.
2. Introducing to ProSSHD < previous | content | next >
What is in ProSSHD
ProSSHD is an integrated and powerful 32-bit software tool consisting of the following functional parts:
Telnet_SSH virtual terminal emulator
Telnet_SSH is a communications and terminal emulation program for logging into remote machine and executing commands in a remote machine. It allows you to connect to and communicate with hosts that support:
● The Telnet protocol and run a Telnet service over an insecure channel
● The Secure Shell protocol, SSH1/SSH2, and run an SSH1/SSH2 service to provide strong authentication and secure encrypted communications between two untrusted hosts over an insecure network. X11 connections and arbitrary TCP/IP ports can also be forwarded over the secure channel. TCP forwarding features make it possible to communicate across a firewall. The "Dynamic Port Forwarding" feature (an extension of the standard SSH1/SSH2 protocols for inter-task requests in multi-task environment) allows you to start other package's utilities (e.g., FTP) through established SSH1/SSH2 connections without direct access to remote hosts.
Telnet_SSH includes the following features:
● Compatibility with SSH protocol version 1.5 (a SSH1-client)
● Ciphers (for the SSH1-client): 3DES, Blowfish, DES, RC4
● Compatibility with SSH 2.0 protocol (a SSH2-client based on OpenSSH 3.4)
● Ciphers (for the SSH2-client): 3DES, Blowfish, CAST128, ARCFOUR, AES128, AES192, AES256-cbc
● Password authentication
● RSA authentication
● Compression support (with auto-selection of the compression mode supported by both sides)
● Connection forwarding, including full support for X-protocol connection forwarding
● "Dynamic Port Forwarding" that provides other tasks on the same PC with requested port forwarding.
While you are using Telnet_SSH, you can:
● Initiate and control remote login sessions in the Telnet or SSH1/SSH2 modes
● Set some options for particular implementations of Telnet_SSH
● Change fonts of text displayed in the Telnet_SSH window
● Select a terminal emulation mode in the Telnet_SSH session.
The Telnet_SSH program can emulate XTERM, AT386, ANSI, VT52, VT100, VT125, VT220 and VT240 terminals for character-mode applications. Advanced users can edit the terminal capabilities description file to suit to the special environment.
By using the Keyboard Mapping option (i.e. keymap editor invoking), you can load, change (re-define keys and create a new keyboard layout), and save any keyboard definition file.
XwpSSHD - SSH2-Server as MS Windows Service
XwpSSHD is a server program (daemon) for the SSH Secure Shell protocol version 2, or SSH2, that you can run as a standard MS Windows Service (MS Windows 2K/2003/XP/Vista).
The SSH protocol server/client programs provide secure encrypted communications between two untrusted hosts over an insecure network. An SSH client can connect securely to an SSH server, and then use the resulting secure link to access the server's resources.
A new daemon is spawned for each incoming connection instance. These daemons handle key exchange, encryption, client and server authentication, command execution, data exchange and data integrity verification.
Server authentication is performed using the DSA or the RSA public key algorithm. Client authentication can be performed using a public key algorithm such as DSA or RSA, a MS Username/Password, as well as a variety of other methods.
To provide the remote console service, a channel is created in the SSH session, and the channel is used to exchange data using a terminal emulation protocol such as ANSI or AT386-type. The SSH-client displays to the user a console window (with a command interpreter) within which the user can execute commands or run programs on the server as if the user were logged on locally.
Among other things, the SSH-client can transfer files (using the SFTP protocol) and forward (local-to-remote and remote-to-local using Dynamic Forwarding (SOCKS4)) other TCP/IP connections over the secure link.
You can control the behavior of SSH-Server as a MS Windows service as follows:
● Install and uinistall the SSH-Server service
● Configure startup options for the SSH-Server service (i.e., how it is started)
● Add/remove the SSH-Server service definition to/from Windows Firewall to allow (or not) the service to be accessed from local or remote SSH clients' computers
● Manage the service session: start, stop, pause, resume, or disable the service
● View network tracing log information between XwpSSHD and (remote) SSH clients.
2. Introducing to ProSSHD < previous | content | next >
Home | Product | Download | Order Now | Upgrade | Support | Pricing | Company Information | Contact Us
Copyright © 1999 - 2009 LabtamTM Inc.
This page is a part of ProSSHD online Help Manual.ProSSHD is an SSH client for Windows providing maximum security from PC to Host over a Company Lan/
Wan/Intranet or Internet. It brings you typical remote system administration, file transfers, and access to corporate resources over the Internet. Visit Home of ProSSHD for more information.
< previous | content | next >
3. The ProSSHD Requirements
Your computer system must meet the following hardware, software, host and network requirements for you to install and use ProSSHD.
PC Hardware & Software Requirements
● A standard 32-bit IBM PC (e.g., i486, or Pentium) or 100% compatible● 8 Mbytes RAM● Color graphics controller supporting SVGA video modes● Mouse Unit compatible with Microsoft Windows● 4 Mbytes free hard disk space.
Note that this disk requirement does not account for the disk cluster size. The larger the cluster size the greater the disk requirement.
In addition to the above requirements, you need one of the following operating systems:
● MS Windows 9x/ME/NT4/2K/2K3/XP/Vista● TCP/IP facility with Windows Sockets Interface.
Host Requirements
● TCP/IP protocols over Ethernet or Serial port connection● Virtual terminal protocol Telnet● SSH1/SSH2 encryption protocol● Login account on the host machine.
< previous | content | next >
Home | Product | Download | Order Now | Upgrade | Support | Pricing | Company Information | Contact Us
Copyright © 1999 - 2009 LabtamTM Inc.
This page is a part of ProSSHD online Help Manual.ProSSHD is an SSH client for Windows providing maximum security from PC to Host over a Company Lan/
Wan/Intranet or Internet. It brings you typical remote system administration, file transfers, and access to corporate resources over the Internet. Visit Home of ProSSHD for more information.
< previous | content | next >
4. Installing ProSSHD
This chapter describes how to install the ProSSHD software. The chapter assumes that you have one of the Microsoft Windows 9x/ME/NT4/2K/2K3/XP/Vista operating system installed as described in the corresponding user's guide for the product.
This chapter and the rest of the manual refer to the following two installation directories whose names you should specify at the installation steps:
● the home (or destination) directory (in which you install the package components files for all users)
● the configuration files directory (in which you store your particular configuration files, e.g. ini-files).
If you install ProSSHD in a directory different from the default, simply supply your directory name when appropriate directories are requested.
The installation of the package is carried out by running the Setup program.
< previous | content | next >
Home | Product | Download | Order Now | Upgrade | Support | Pricing | Company Information | Contact Us
Copyright © 1999 - 2009 LabtamTM Inc.
This page is a part of ProSSHD online Help Manual.ProSSHD is an SSH client for Windows providing maximum security from PC to Host over a Company Lan/
Wan/Intranet or Internet. It brings you typical remote system administration, file transfers, and access to corporate resources over the Internet. Visit Home of ProSSHD for more information.
4. Installing ProSSHD < previous | content | next >
Running Setup
The software product comes normally as a self-extracting archive file that contains the package installation files.
The installation procedure consists of two steps:
1. Extracting the package installation files into a temporary distributive directory
2. Running Setup from the distributive directory.
You can run Setup manually in the default mode or use the "silent" installation mode of Setup to simplify multiple secondary installations.
Extracting Package Installation Files
This section describes how to extract the package installation files from the self-extracting file (compressed and created by WinZip).
To extract the package installation files, you should do the following:
1. Download the self-extracting archive file to your hard disk
2. Execute the file and select OK.
In the dialog box that appears, you can enter a name for a temporary distributive directory in the Unzip to folder edit field or use the Browse button to select it. By default, the installation files will be extracted to the distributive directory shown in the field.
Later (after successful installation), you can remove the temporary distributive directory or use it to start Setup for multiple secondary installations.
3. Choose Unzip to start extracting the files and then installing the package automatically. The archive file will be uncompressed and the installation files will be placed in the specified distributive directory.
4. After extracting the package installation files, choose OK in the box appeared.
The installation procedure (i.e. running Setup) will start automatically from the temporary distributive directory if you enable the When done unzipping open: .\setup.exe check box.
Running Setup
As soon as you start the installation process, you will see a number of dialog boxes with instructions for each installation step. These boxes have three buttons. The Cancel button quits the installation process. The Back button returns you to the previous step. When you press the Next button, the Setup program proceeds to the next installation step.
At any step of installation, you can use the Cancel button. The Exit Setup window appears.
You can confirm exiting or choose to continue installing.
For the first installation of the package, the procedure steps are as follows (with the dialog's names):
Welcome
At this step, it is strongly recommended that you exit all MS Windows programs before running Setup.
Software License Agreement
At this step, you must choose whether you accept all the terms of the Software License Agreement shown within the window or not before running Setup.
User Information
In this box, you should enter the Person name, the Company name, and the product serial number (for registration purposes).
Choose Destination Location
In this box, you should specify the folder where the package will be installed in (i.e. the home directory for the package). You can use the default folder name, enter your destination folder name, or select another folder using the Browse button.
To install to the specified folder, click Next. If the folder does not exist, Setup will create it. If Setup detects the package in the directory you specified, then it will prompt you to upgrade the package. (See section Upgrading ProSSHD below.)
Setup Type
At this step, you can choose components of the package you want Setup to install.
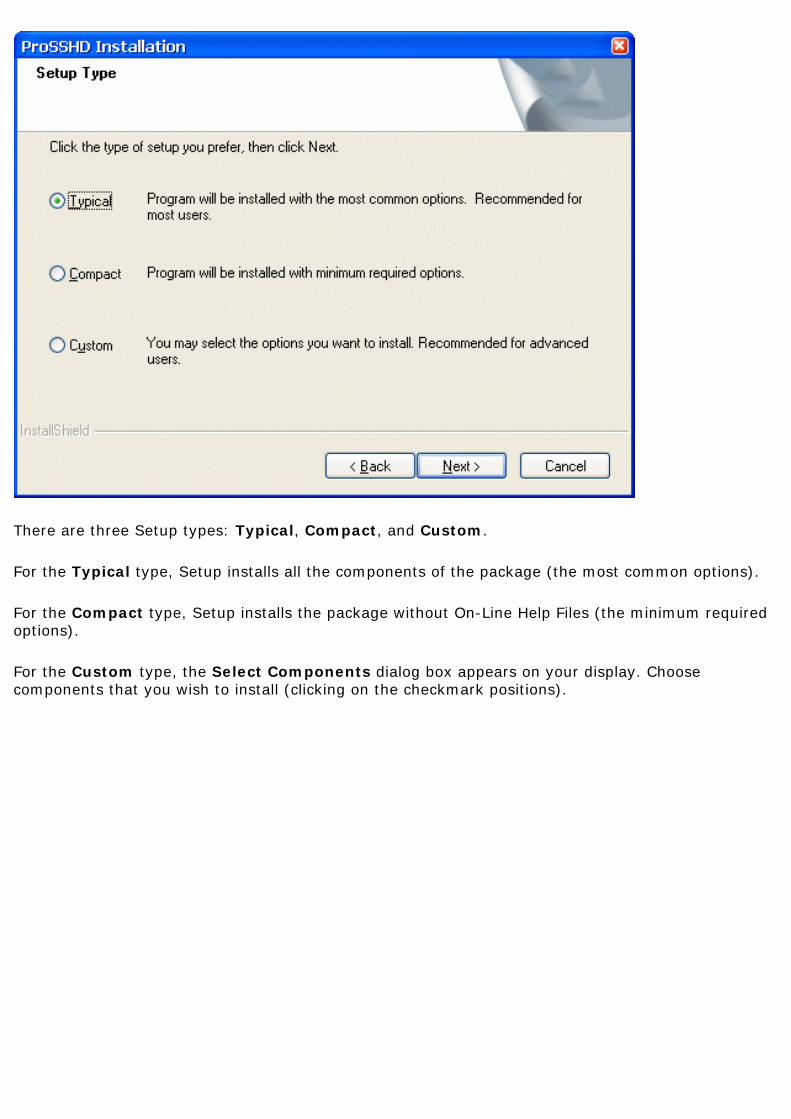
There are three Setup types: Typical, Compact, and Custom.
For the Typical type, Setup installs all the components of the package (the most common options).
For the Compact type, Setup installs the package without On-Line Help Files (the minimum required options).
For the Custom type, the Select Components dialog box appears on your display. Choose components that you wish to install (clicking on the checkmark positions).
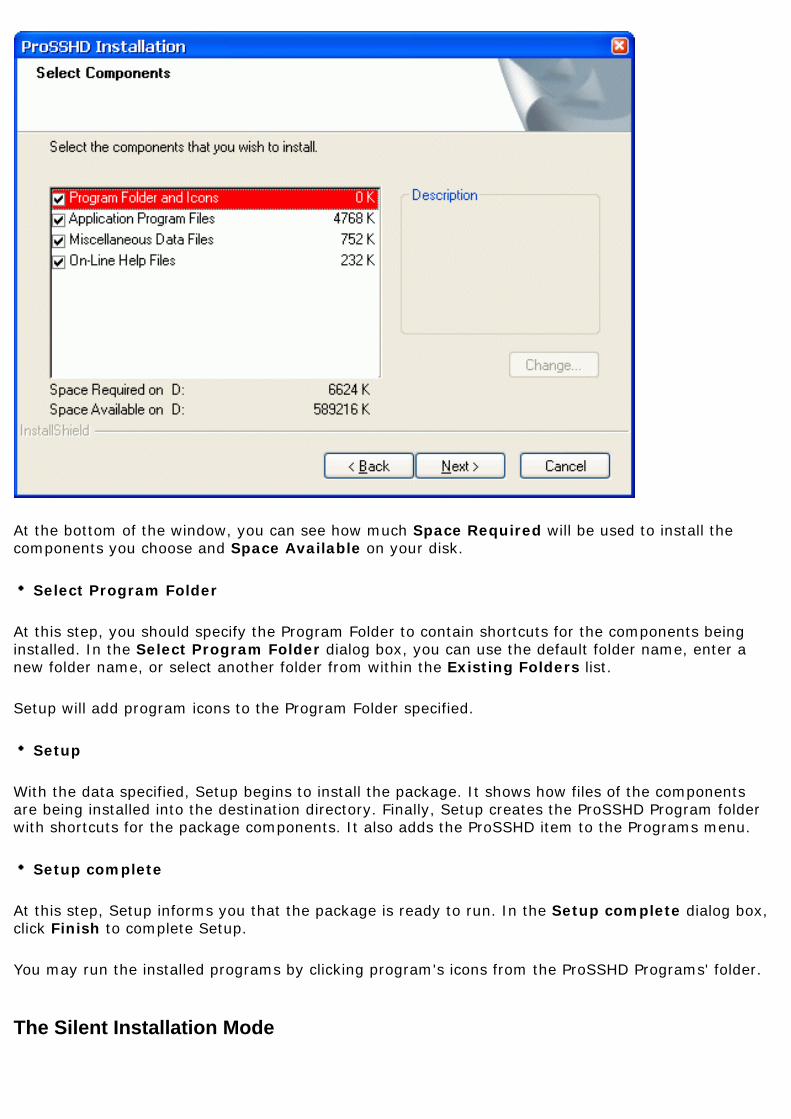
At the bottom of the window, you can see how much Space Required will be used to install the components you choose and Space Available on your disk.
Select Program Folder
At this step, you should specify the Program Folder to contain shortcuts for the components being installed. In the Select Program Folder dialog box, you can use the default folder name, enter a new folder name, or select another folder from within the Existing Folders list.
Setup will add program icons to the Program Folder specified.
Setup
With the data specified, Setup begins to install the package. It shows how files of the components are being installed into the destination directory. Finally, Setup creates the ProSSHD Program folder with shortcuts for the package components. It also adds the ProSSHD item to the Programs menu.
Setup complete
At this step, Setup informs you that the package is ready to run. In the Setup complete dialog box, click Finish to complete Setup.
You may run the installed programs by clicking program's icons from the ProSSHD Programs' folder.
The Silent Installation Mode
The "silent" installation mode of Setup may be used for multiple secondary installations on different computers working with similar package installation environment (i.e. drive letters, installation directory name, presence of the package, etc).
The "silent" installation process consists of the following two steps:
1. Normal first installing of the package with creating a script file
2. Using the script file for multiple secondary installations.
1) To install the package with creating the script file, setup.iss, run Setup with the options:
setup -r -f1PATH\setup.iss
The -f1 option enables you to specify an alternative file location and script file name. It is recommended to specify the absolute PATH for the option.
With these arguments, Setup performs normal installation of the package and creates the script file you specified in the command in the directory according to the specified PATH. The file contains data you specified for Setup to install the package. (See section Running Setup above.)
Setup performs secondary installations using the script file, so you have to specify no input data (you only watch "silently" how Setup works automatically).
2) To perform secondary installation, make sure that the script file created at the first step is located in the distributive directory (where the setup.exe file exists). If not, then copy the script file to the distributive directory, and then run Setup with the following command line:
setup -s -wauto
With this argument (and without the -f1 option), Setup will install the package according to the setup.iss script file. Setup will search for the file in the distributive directory.
Also, you can use the following command line to perform secondary installation:
setup -s
This is the same as the "-wauto" option with the only difference: the Finish dialog message is suppressed in this case.
When running an InstallScript MSI or InstallScript installation in silent mode (i.e., using the -s option), the log file, setup.log, is by default created in the same directory and with the same name (except for the extension) as the response file. The -f2 option enables you to specify an alternative file location and log file name. It is recommended to specify the absolute path for the option as in the following example:
.\PackInstall\Setup.exe -s -f1C:\PackInstall\Setup.iss -f2C:\PackInstall\Setup.log
After Setup has finished (successfully or not) you can find the ASCII tracing file, mkltrace.out, in the distributive directory and look it through for error messages. Note that the "silent" installation may require interactive actions if Setup detects serious problems.
Telnet
The Installation procedure (Setup) can read in a file you prepared beforehand to contain your settings for Telnet. The file must have the prosets.ini name and locate in the package distributive directory (where the setup.exe file is located). The settings will be placed in the xwp.ini file. This is especially useful for "silent" installations.
4. Installing ProSSHD < previous | content | next >
Home | Product | Download | Order Now | Upgrade | Support | Pricing | Company Information | Contact Us
Copyright © 1999 - 2009 LabtamTM Inc.

This page is a part of ProSSHD online Help Manual.ProSSHD is an SSH client for Windows providing maximum security from PC to Host over a Company Lan/
Wan/Intranet or Internet. It brings you typical remote system administration, file transfers, and access to corporate resources over the Internet. Visit Home of ProSSHD for more information.
4. Installing ProSSHD < previous | content | next >
Running UNINSTALL
You can uninstall the package by choosing the Uninstall item from the Program Folder. The program will prompt you to confirm removing the package from your computer.
When Uninstall completed, some elements might not be removed. You should manually remove items related to the application.
4. Installing ProSSHD < previous | content | next >
Home | Product | Download | Order Now | Upgrade | Support | Pricing | Company Information | Contact Us
Copyright © 1999 - 2009 LabtamTM Inc.
This page is a part of ProSSHD online Help Manual.ProSSHD is an SSH client for Windows providing maximum security from PC to Host over a Company Lan/
Wan/Intranet or Internet. It brings you typical remote system administration, file transfers, and access to corporate resources over the Internet. Visit Home of ProSSHD for more information.
4. Installing ProSSHD < previous | content | next >
Upgrading ProSSHD
If you specify the home directory that contains the package installation files, the Setup program will detect it and prompt you to upgrade or configure it.
If you choose YES, i.e. to upgrade the installed package, Setup brings up the Upgrade Type window. You can choose Typical, Compact, or Custom installation type (like you do it at step Setup Type of the normal installation sequence). This allows you to upgrade the package or to reconfigure it without reinstalling binary programs.
If you choose NO, Setup returns you to the Software License Agreement step of the normal installation sequence. This allows you to completely reinstall the package.
If you specify the destination directory that exists, Setup brings up the Choose Installation Type window.
In this box, if you choose Reinstall, Setup will return you to the Setup Type step.
If you choose Upgrade/configure, Setup returns you to the Upgrade Type step. If you choose Only Configure, Setup goes to the Select Components step. Then, in both cases, the Choose Configuration Location window appears.
In this box, you should specify the configuration directory (i.e. configuration path) in which you store your particular configuration files (e.g. ini-files) and the configuration components you selected. Then, Setup prompts you to Select Program Folder.
Note that if you choose Only Configure, then Setup will make no changes in the home directory of ProSSHD detected.
4. Installing ProSSHD < previous | content | next >
Home | Product | Download | Order Now | Upgrade | Support | Pricing | Company Information | Contact Us
Copyright © 1999 - 2009 LabtamTM Inc.
This page is a part of ProSSHD online Help Manual.ProSSHD is an SSH client for Windows providing maximum security from PC to Host over a Company Lan/
Wan/Intranet or Internet. It brings you typical remote system administration, file transfers, and access to corporate resources over the Internet. Visit Home of ProSSHD for more information.
4. Installing ProSSHD < previous | content | next >
Multi-user Installation
Multi-user installation is intended for installing a single copy of ProSSHD on a disk that will be shared by multiple users. ProSSHD must be configured for each user on each PC it will be used on. Corresponding files that define user's local ProSSHD configuration will be created in a specified directory (see Choose Configuration Location).
Multi-user installation is carried out as follows:
1. By running the Setup program, install the package on a disk that will be used for storing the shared copy (i.e. under the home directory of ProSSHD).
The next step must be done by every user of the shared copy.
2. Run the Setup program. In the installation dialogs, you must specify the home directory of ProSSHD for the shared copy (step Choose Destination Location), and a local directory where files defining a particular package configuration will be resident (step Choose Configuration Location).
Note that these secondary steps make no changes in the home directory of ProSSHD created at the first step.
4. Installing ProSSHD < previous | content | next >
Home | Product | Download | Order Now | Upgrade | Support | Pricing | Company Information | Contact Us
Copyright © 1999 - 2009 LabtamTM Inc.

This page is a part of ProSSHD online Help Manual.ProSSHD is an SSH client for Windows providing maximum security from PC to Host over a Company Lan/
Wan/Intranet or Internet. It brings you typical remote system administration, file transfers, and access to corporate resources over the Internet. Visit Home of ProSSHD for more information.
< previous | content | next >
5. The ProSSHD Database
The package database is represented by one ASCII file
● terminfo.ini
and also by 35 keyboard definition files with the file name extension .KMF.
The terminfo.ini file contains information for terminal emulation and is described in Appendix B.
< previous | content | next >
Home | Product | Download | Order Now | Upgrade | Support | Pricing | Company Information | Contact Us
Copyright © 1999 - 2009 LabtamTM Inc.
This page is a part of ProSSHD online Help Manual.ProSSHD is an SSH client for Windows providing maximum security from PC to Host over a Company Lan/
Wan/Intranet or Internet. It brings you typical remote system administration, file transfers, and access to corporate resources over the Internet. Visit Home of ProSSHD for more information.
5. The ProSSHD Database < previous | content | next >
Keyboard Definition Files
ProSSHD has 35 keyboard definition files allowing you to use one of the 35 international PC keyboards. Each of them corresponds to the country your keyboard was designed for. These files are listed in Appendix A.
Your Keyboard Definition file has the .KMF extension. It resides in the ProSSHD's configuration files directory (in the location you specified when installing ProSSHD).
The basic purpose of a keyboard file is to assign PC keys to generate specific keysyms. A keysym is a key code that corresponds to a specific symbol supported by the X protocol.
A Keyboard Definition file is an ASCII source file that defines what key sequence is sent to a client when you press a given key on your PC's keyboard (i.e. keyboard mapping).
You can customize a keyboard by one of two ways:
● By modifying a selected (on installation) keyboard file
● By choosing the userkbd.kmf keyboard file and then editing it.
These are some of the things you can do:
● Make any key on your keyboard send any supported X keysym to the host
● Make use of extra keys on non-standard keyboards to send special keysyms to the host or to a client.
You can view and modify Keyboard Definition Files by using the Telnet_SSH' Keyboard Mapping option. (See section The Keyboard Mapping Option in Chapter Telnet_SSH).
The Keyboard Mapping File format is described in Appendix A.
All keyboard files are written for keyboards with a separate cursor keypad. Note that there are two U.K. keyboard files supplied. One is for a 101-key U.K. keyboard, and other is for a 102-key keyboard. The 101-key U.K. keyboard is identical to the U.S. keyboard except that holding Shift and pressing 3 produces a POUND sign instead of a '#' sign.
To input the Euro currency sign, the recommended Alt_R+E combination was inserted into the following KMF-files:
us15.kmf, danish.kmf, belgian.kmf, decemfrc.kmf, decemfr.kmf, decemgr.kmf, decemuk.kmf, dutch.kmf, frencan.kmf, french.kmf, german.kmf, hungarn.kmf, italian.kmf, latinam.kmf, norwegia.kmf, portugue.kmf, slovenia.kmf, spanish.kmf, swedfinn.kmf, swedish.kmf, swissfre.kmf, swissger.kmf, uk102.kmf, and uk102m.kmf.
The msus.kmf, uk101.kmf, decemus.kmf, userkbd.kmf, us.kmf, dvorak.kmf, and jpn106.kmf files do not provide for the Alt_R+E input.
The us15.kmf file is a copy of the us.kmf file with the Alt_R key description changed from XK_Alt_R to XK_Mode_switch.
In many European languages (e.g., France, Germany), users need to enter some special characters by combining a Diacritic (or composer) character and a normal letter. KMF files allow for this feature for national keyboards.
Note: if you need to send the four MS Windows specific key combinations to X clients, you have to enter the substitution strings into the [XSETUP] section of the xwp.ini file (for package's communication programs can use them).
For example:
CtrlEsc2=255.173 To send Ctrl + Esc, press Ctrl+KEYPAD MINUS SIGN
CtrlAlt2=255.171 To send Ctrl + Alt, press Ctrl+KEYPAD PLUS SIGN
AltEsc2=255.173 To send Alt + Esc, press Alt+KEYPAD MINUS SIGN
AltTab2=255.171 To send Alt + Tab, press Alt+KEYPAD PLUS SIGN
5. The ProSSHD Database < previous | content | next >
Home | Product | Download | Order Now | Upgrade | Support | Pricing | Company Information | Contact Us
Copyright © 1999 - 2009 LabtamTM Inc.
This page is a part of ProSSHD online Help Manual.ProSSHD is an SSH client for Windows providing maximum security from PC to Host over a Company Lan/
Wan/Intranet or Internet. It brings you typical remote system administration, file transfers, and access to corporate resources over the Internet. Visit Home of ProSSHD for more information.
< previous | content | next >
6. Configuring ProSSHD
This chapter describes how to configure the ProSSHD package with the configuration utility. The utility allows you to set up ProSSHD for your preferences, your host system and your PC.
The configuration utility, ComSetup, included in ProSSHD allows you to make communication settings relating to the networking aspects of ProSSHD that operate with the TCP/IP transport interface.
< previous | content | next >
Home | Product | Download | Order Now | Upgrade | Support | Pricing | Company Information | Contact Us
Copyright © 1999 - 2009 LabtamTM Inc.

This page is a part of ProSSHD online Help Manual.ProSSHD is an SSH client for Windows providing maximum security from PC to Host over a Company Lan/Wan/Intranet or
Internet. It brings you typical remote system administration, file transfers, and access to corporate resources over the Internet. Visit Home of ProSSHD for more information.
6. Configuring ProSSHD < previous | content | next >
Using ComSetup
You can start ComSetup by clicking on the Settings item in the ProSSHD Programs' folder (i.e., from the Start/Programs/ProSSHD menu).
The Communication Setup tab will appear on your display:
The File/Open menu item of the Settings window lets you choose an .ini file (xwp.ini by default), then load its settings and make them current for applications to run. You can edit the settings before running your applications.
The File/Save as menu item of the Settings window lets you choose an .ini file (xwp.ini by default) to save current settings.
The Close menu item of the Settings window simply closes it.
By clicking Apply, any new settings you make to the Communication Setup tab will be saved in the xwp.ini file (by default).
The following sections are available:
● The Communication Setup Tab● The All Trace Tab● The XwpPeg Utility
The Communication Setup Tab
The following input fields are available:
Hosts File
This field is used to specify a location of the hosts file. You must enter the hosts file that is used by MS Windows (C:\WinNT\System32\drivers\etc\hosts for MS Windows NT4/2000/XP and C:\Windows\hosts for MS Windows 9x/ME).
The hosts file is a list of remote computers in the standard format (IP-address hostname aliases). The contents of the hosts file will be used by other programs of the package when you want to select a host to connect to from the host list box.
WinSock DLL
This field specifies the DLL that provides Windows Sockets Interface to existing TCP/IP stack. By default, wsock32.dll of the Microsoft Windows' TCP/IP will be used. You can specify to use any other TCP/IP stack by entering its 32-bit Windows Sockets Interface DLL.
Auto-start XwpPeg Package Watcher
With this check box enabled, the XwpPeg utility is started automatically with starting any package's application. Otherwise, you can launch XwpPeg manually.
Enable TCP/IP KeepAlive mode
This check box specifies the package's applications to use the TCP/IP feature, KeepAlive, when communicating with remote computers over your network. When enabled, this prevents your connection from interrupting by a remote computer when your PC does not send messages to it for a long time.
Enable Logotype
This check box toggles displaying the Logotype image each time the package's application starts up.
Disable Log Output
When selected, this check box prevents any program of the package from writing log information to the ".out" and ".ini" files.
Silent Bell
When enabled, this check box will block all sounds from all applications of the package (i.e., internal sounds and the TCP/IP protocol bell requests).
Not Warn to Save Settings
Normally, you should not forget to Apply your changes to a tab when you leave it. If this check box is clear, then the warning will appear each time you take to another tab or section of the window.
The warning will not appear if you select the check box.
Default
This button will initialise all these parameters to their default values.
The If non-single IP address Box
If your PC has more than one IP address (i.e. 'multi-home' PC – with non-single TCP/IP stack, e.g. for Ethernet + modem), then you should specify a mode for choosing one of them.
Always Use the First IP addressAlways Use the Last IP address
These modes allow ProSSHD's programs to automatically choose the local IP address.
Ask to Choose
You can set up this mode to specify that you will choose the address in the box brought up by the programs. The default mode is Ask to Choose.
The TCP/IP Info Box
Refresh
When you click on this button, ComSetup will search for available TCP/IP information and, if found, display in the info field the IP address and name of your PC according to mode settings.
Create 'sp_ghbn.out' Info file
If this check box is enabled, then all information found will be stored in the file. This allows you to check accessibility and obtain description of the TCP/IP stack used.
6. Configuring ProSSHD < previous | content | next >
Home | Product | Download | Order Now | Upgrade | Support | Pricing | Company Information | Contact Us
Copyright © 1999 - 2009 LabtamTM Inc.
This page is a part of ProSSHD online Help Manual.ProSSHD is an SSH client for Windows providing maximum security from PC to Host over a Company Lan/
Wan/Intranet or Internet. It brings you typical remote system administration, file transfers, and access to corporate resources over the Internet. Visit Home of ProSSHD for more information.
6. Configuring ProSSHD < previous | content | next >
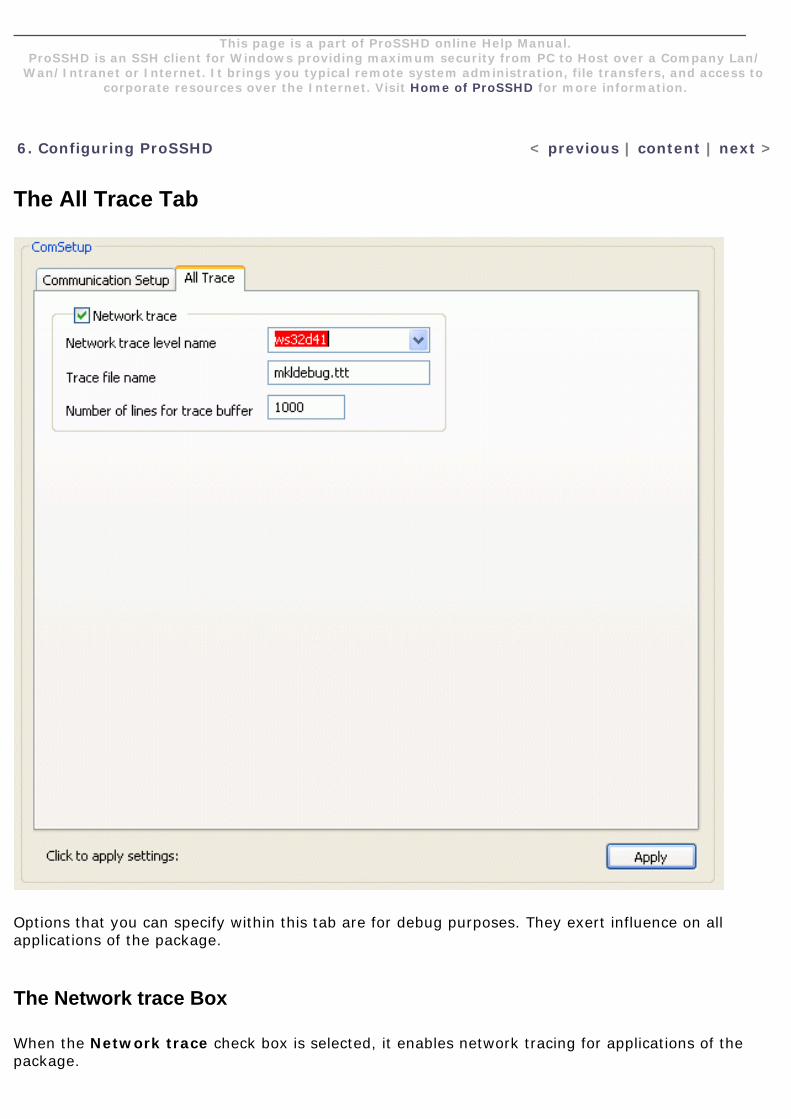
The All Trace Tab
Options that you can specify within this tab are for debug purposes. They exert influence on all applications of the package.
The Network trace Box
When the Network trace check box is selected, it enables network tracing for applications of the package.
Network trace level name
A value in this field that you can choose from the list box denotes a tracing level for collecting network trace information to the log file.
Trace file name
In this entry field, you can specify a name for a log file to store network trace data.
Number of lines for trace buffer
In this entry field, you can type in a length for the allocated memory (in number of lines) to flush it to the trace file.The value of 0 means a "very large" buffer (as much as your system allows).Caution: when a system crash happens, the data in the allocated memory is lost.
6. Configuring ProSSHD < previous | content | next >
Home | Product | Download | Order Now | Upgrade | Support | Pricing | Company Information | Contact Us
Copyright © 1999 - 2009 LabtamTM Inc.
This page is a part of ProSSHD online Help Manual.ProSSHD is an SSH client for Windows providing maximum security from PC to Host over a Company Lan/
Wan/Intranet or Internet. It brings you typical remote system administration, file transfers, and access to corporate resources over the Internet. Visit Home of ProSSHD for more information.
6. Configuring ProSSHD < previous | content | next >
The XwpPeg Utility
XwpPeg is a program designed to check the state of the package license accounts. XwpPeg informs users about exceeding the allocated license accounts over the specified limit. If all users of the same package have XwpPeg running simultaneously with running any package's application (and terminate after completion of the last one) then all those users will have true information about the number of concurrent package users who use package license accounts (i.e. the allocated accounts).
You can launch XwpPeg either automatically or manually. With the Auto-start XwpPeg Package Watcher check box enabled, XwpPeg is started automatically with starting any package's application.
Users can independently launch XwpPeg (before starting any package's application) to check/allocate one license account in advance. If the user starts XwpPeg manually then he/she must also manually terminate it to free the package license account allocated. Since XwpPeg is only informational, users can freely terminate it at any time; however they cannot automatically check the current number of concurrent users of the same package in that case.
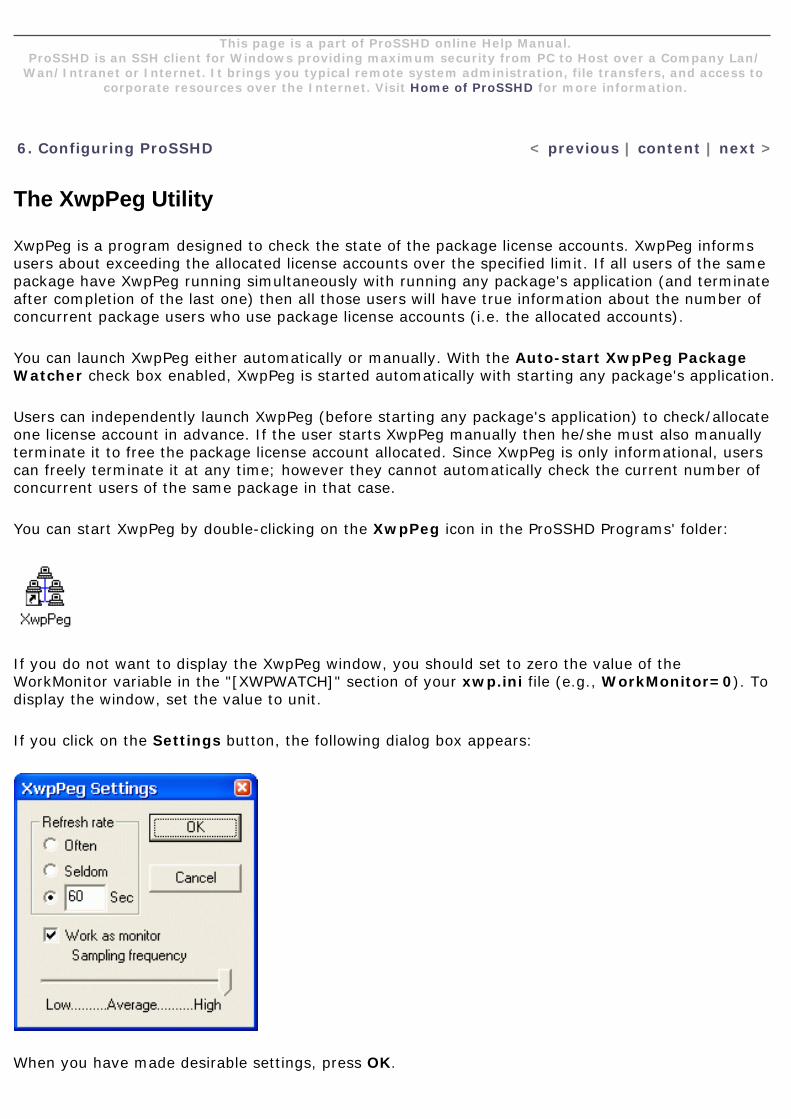
You can start XwpPeg by double-clicking on the XwpPeg icon in the ProSSHD Programs' folder:
If you do not want to display the XwpPeg window, you should set to zero the value of the WorkMonitor variable in the "[XWPWATCH]" section of your xwp.ini file (e.g., WorkMonitor=0). To display the window, set the value to unit.
If you click on the Settings button, the following dialog box appears:
When you have made desirable settings, press OK.
The TCP/IP Retransmission Timeout Parameters
TCP starts a retransmission timer when each outbound segment is handed down to IP. If no acknowledgment has been received for the data in a given segment before the timer expires, then the segment is retransmitted, up to the TcpMaxDataRetransmissions times. The default value for this parameter is 5.
When a TCP connection is established, the retransmission timer is initialised to three seconds; however, it is adjusted on the fly to match the characteristics of the connection using Smoothed Round Trip Time (SRTT) calculations (as described in RFC793). The timer for a given segment is doubled after each retransmission of that segment. Using this algorithm, TCP tunes itself to the normal delay of a connection. TCP connections over high-delay links will take much longer to time out than those over low-delay links.
By default, after the retransmission timer hits 240 seconds, it uses that value for retransmission of any segment that needs to be retransmitted. This can be a cause of long delays for a client to time out on a slow link.
MS Windows NT4/2000 provide a mechanism to control the initial retransmit time, and then the retransmit time is self-tuning. The following is based on the Microsoft Knowledge Base and Microsoft MSDN Library.
To change the initial retransmit timeout parameters, you can modify the following values in the following registry key:
HKEY_LOCAL_MACHINE\System\CurrentControlSet\Services\Tcpip\Parameters
Value Name: InitialRttData Type: REG_DWORDValid Range: 0-65535 (decimal)Default: 0xBB8 (3000 decimal)
The InitialRtt parameter controls the initial retransmission timeout used by TCP on each new connection. It applies to the connection request (SYN) and to the first data segment(s) sent on each connection. For example, the value data 5000 decimal sets the initial retransmit time to five seconds.
Value Name: TcpMaxDataRetransmissionsData Type: REG_DWORD - NumberValid Range: 0 - 0xFFFFFFFFDefault: 5
The TcpMaxDataRetransmissions parameter controls the number of times TCP retransmits an individual data segment (non-connect segment) before aborting the connection. The retransmission timeout is doubled with each successive retransmission on a connection. It is reset when responses resume. The base timeout value is dynamically determined by the measured round-trip time on the connection.
Caution
The above text contains information about editing the registry. Before you edit the registry, make sure you understand how to restore it if a problem occurs. Using Registry Editor incorrectly can cause serious problems that may require you to reinstall your operating system. Microsoft cannot
guarantee that problems resulting from the incorrect use of Registry Editor can be solved. Use Registry Editor at your own risk.
For information about how to edit and restore the registry, view the "Changing Keys and Values" and "Restoring the Registry" Help topics in Registry Editor (in Regedit.exe) or the "Add and Delete Information in the Registry", "Edit Registry Data", and "Restoring a Registry Key" Help topics (in Regedt32.exe).
Note that you should back up the registry before you edit it. If you are running MS Windows NT/2000, you should also update your Emergency Repair Disk (ERD).
6. Configuring ProSSHD < previous | content | next >
Home | Product | Download | Order Now | Upgrade | Support | Pricing | Company Information | Contact Us
Copyright © 1999 - 2009 LabtamTM Inc.
This page is a part of ProSSHD online Help Manual.ProSSHD is an SSH client for Windows providing maximum security from PC to Host over a Company Lan/
Wan/Intranet or Internet. It brings you typical remote system administration, file transfers, and access to corporate resources over the Internet. Visit Home of ProSSHD for more information.
6. Configuring ProSSHD < previous | content | next >
The Run Box
Options that you can select are for running services.
● The XwpSSHD service Tab
6. Configuring ProSSHD < previous | content | next >
Home | Product | Download | Order Now | Upgrade | Support | Pricing | Company Information | Contact Us
Copyright © 1999 - 2009 LabtamTM Inc.
This page is a part of ProSSHD online Help Manual.ProSSHD is an SSH client for Windows providing maximum security from PC to Host over a Company Lan/
Wan/Intranet or Internet. It brings you typical remote system administration, file transfers, and access to corporate resources over the Internet. Visit Home of ProSSHD for more information.
6. Configuring ProSSHD < previous | content | next >
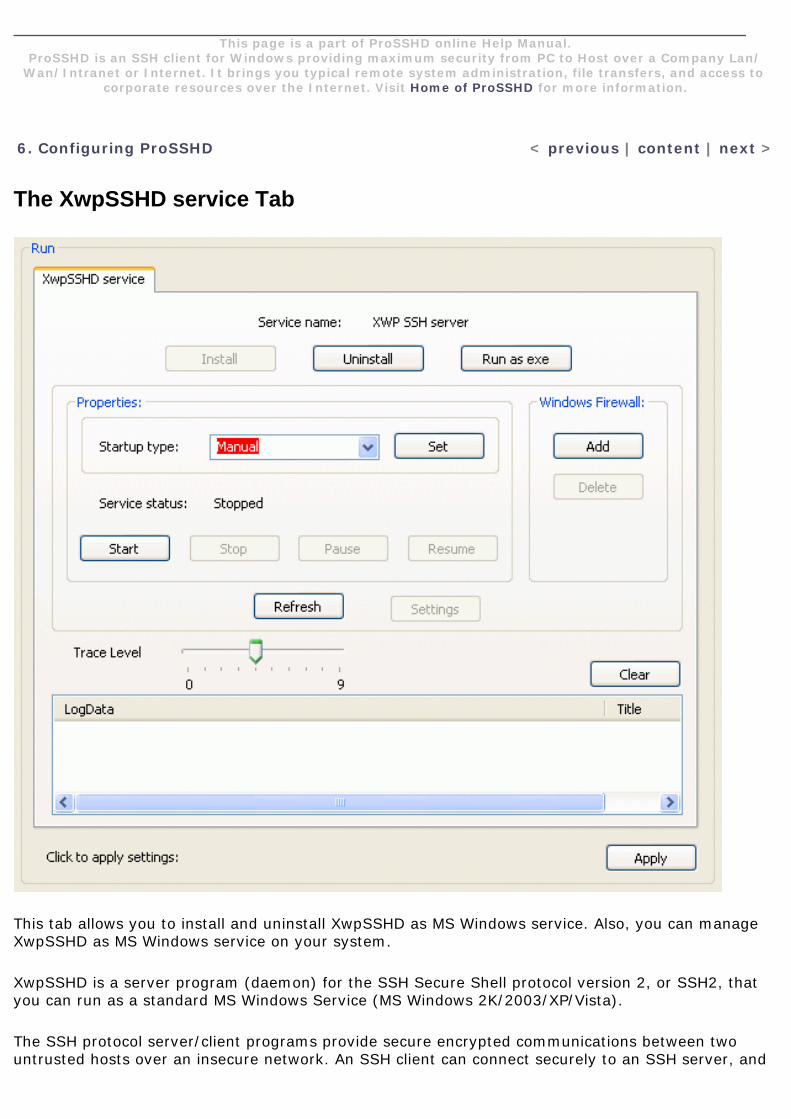
The XwpSSHD service Tab
This tab allows you to install and uninstall XwpSSHD as MS Windows service. Also, you can manage XwpSSHD as MS Windows service on your system.
XwpSSHD is a server program (daemon) for the SSH Secure Shell protocol version 2, or SSH2, that you can run as a standard MS Windows Service (MS Windows 2K/2003/XP/Vista).
The SSH protocol server/client programs provide secure encrypted communications between two untrusted hosts over an insecure network. An SSH client can connect securely to an SSH server, and
then use the resulting secure link to access the server's resources.
A new daemon is spawned for each incoming connection instance. These daemons handle key exchange, encryption, client and server authentication, command execution, data exchange and data integrity verification.
Server authentication is performed using the DSA or the RSA public key algorithm. Client authentication can be performed using a public key algorithm such as DSA or RSA, a MS Windows Username/Password, as well as a variety of other methods.
To provide the remote console service, a channel is created in the SSH session, and the channel is used to exchange data using a terminal emulation protocol such as ANSI or AT386-type. The SSH-client displays to the user a console window (with a command interpreter) within which the user can execute commands or run programs on the SSH-server as if the user were logged on locally.
Among other things, the SSH-client can transfer files (using the SFTP protocol) and forward (local-to-remote and remote-to-local using Dynamic Forwarding (SOCKS4)) other TCP/IP connections over the secure link.
Services overview
A service is an application type that runs in the background and is similar to UNIX daemon applications. Service applications typically provide features such as client/server applications, Web servers, database servers, and other server-based applications to users, both locally and across the network.
You can use MS services to:
● Start, stop, pause, resume, or disable services on remote and local computers (including remote computers running Windows NT 4.0.). You must have the appropriate permissions to start, stop, pause, restart, and disable services.
● Manage services on local and remote computers (on remote computers running Windows XP, Windows 2000, or Windows NT 4.0 only).
● Create custom names and descriptions for services so that you can easily identify them (on computers running Windows XP or Windows 2000 only).
● Configure startup options for MS services.● Set up recovery actions to take place if a service fails, for example, restarting the service
automatically or restarting the computer (on computers running Windows XP or Windows 2000 only).
● Enable or disable services for a particular hardware profile.● View the status and description of each service.
Services permissions
Each service has special permissions that you can grant or deny for each user or group. You can set permissions for individual services by using Security Templates.
According to MS Windows Help Manual, Services must log on to an account in order to access resources and objects on the operating system. Some services are configured by default to log on to the Local System account, which is a powerful account that has full access to the system. If a service logs on to the Local System account on a domain controller, that service has access to the entire domain. Other services are configured to log on to LocalService or NetworkService accounts, which are special built-in accounts that are similar to authenticated user accounts. These accounts have the same level of access to resources and objects as members of the Users groups.

This limited access helps safeguard your system if individual services or processes are compromised.
Services running as the LocalService account access network resources as a null session with no credentials. Services running as the NetworkService account access network resources using the credentials of the machine account.
Main Features of XwpSSHD
SSH is a very flexible protocol, and many different types of services can run on top of it. Additionally, the open architecture of SSH allows these services to run all at the same time without impeding each other. The advantage of services is that they can be started at boot time independently of any logon session, and will continue to run as users log on and off of the machine.
● The SSH Secure Shell 2 protocol, or SSH2, specifies how an SSH client can connect securely to an SSH server, and then use the resulting secure link to access the server's resources. Among other things, the SSH client can run programs, transfer files, and forward other TCP/IP connections over the secure link. SSH version 2 was designed in response to security faults discovered in SSH version 1 (i.e., to eliminate the risk of an insertion attack). XwpSSHD supports SSH version 2 only.
● The SSH protocol server/client programs provide secure encrypted communications between two untrusted hosts over an insecure network. The SSH server forks a new daemon for each incoming connection instance. The forked daemons handle key exchange, encryption, client and server authentication, command execution, data exchange and data integrity verification.Server authentication is performed using the DSA (Digital Signature Algorithm) or the RSA public key algorithm. Each host has a key using DSA encryption and is usually 1024 bits long (although, the user may create a different-sized key, if desired). The same key may be used on multiple machines.Client authentication can be performed using a public key algorithm such as DSA or RSA, a MS Windows Username/Password, as well as a variety of other methods.For encryption and data integrity verification, a number of algorithms are provided which every SSH2 product can implement in a modular fashion.
● One service that is used very often is the remote console. To provide this service, a channel is created in the SSH session, and the channel is used to exchange data using a terminal emulation protocol such as ANSI or AT386-type. The SSH-client displays to the user a console window (with a command interpreter) within which the user can execute commands or run programs on the SSH-server as if the user were logged on locally.
● SSH also provides a service known as the exec request, which is conceptually very similar to a remote console, only without the console. The exec request executes a program on the server like a remote console does, but the program's input and output are sent raw, without any terminal encoding. Exec requests are very useful for network automation purposes.
● A very popular service is port forwarding, or TCP/IP connection tunneling over the secure link (local-to-remote and remote-to-local using Dynamic Forwarding (SOCKS4)). With SSH port forwarding, it is possible to secure a TCP/IP connection established by an independent application that would otherwise be vulnerable to network attacks.At present time XwpSSHD does not support X11 Forwarding (not yet implemented).
● Transferring files between the SSH client and server can also be performed using protocols such as SCP and SFTP, both of which run on top of SSH. While SCP is essentially the old Unix rcp utility transplanted onto a different transport, SFTP is a very flexible remote file

manipulation protocol that can be used for a wide variety of purposes.
Installing the XwpSSHD service
Click Install to install XwpSSHD and to add the service to the Services list on your system.
The service name of the XwpSSHD service is XWP SSH server.
When started, XwpSSHD will be listening on port 22 (default) for SSH clients' requests.
To configure how XwpSSHD is started (Automatic or Manual), you should choose the Startup type and then press Set.
Uninstalling the XwpSSHD service
You can remove XwpSSHD from the Services list on your system by pressing Uninstall in the XwpSSHD service tab.
Click Yes to confirm removing XwpSSHD from the Services list on your system. You need not restart your PC.
Note that XwpSSHD correctly stops and disconnects active SSH clients, and closes the port used for communications on your computer when uninstalling XwpSSHD.
Using the XwpSSHD service
This section describes how to start and use XwpSSHD as a standard MS Windows service.
Trace Level
A slider position defines a tracing level for output network tracing log information into the LogData field for your XwpSSHD session.
LogData
In this field, network tracing log information between XwpSSHD and (remote) SSH clients is output (according to the Trace Level setting).
Using XwpSSHD
When a SSH client connects to the SSHD daemon:
● The client and server together, using the Diffie-Hellman key-exchange method, determine a 256-bit random number to use as the "session key". This key is used to encrypt all further communications in the session.
● The server informs the client which encryption methods it supports.
● The client selects the encryption algorithm from those offered by the server.
● The client and the server then enter a user authentication dialog. The server informs the client which authentication methods it supports, and the client then attempts to authenticate the user by using some or all of the authentication methods.
● If the client authenticates itself successfully, then the session is prepared. At this time the client may request things like:- forwarding TCP/IP connections- forwarding the authentication agent connection over the secure channel.
● Finally, the client either requests an interactive session or execution of a command. The client and the server enter session mode. In this mode, either the client or the server may send data at any time. Such data is forwarded to/from the virtual terminal or command on the server side, and the user terminal in the client side. When the user program terminates and all forwarded and other connections have been closed, the server sends command exit status to the client, and both sides exit.
Preparing Key-files
Before using XwpSSHD, key-files (for authentication and authorization SSH clients) should be generated and put properly on SSH clients' computers and on SSH server's one.
The authentication and authorization files must be located in the ssh subdirectory in the home directory of the package.
The default names for the files are as follows: public/private DSA host keys ssh_host_dsa_key.pub, ssh_host_dsa_key, public/private RSA host keys ssh_host_rsa_key.pub, ssh_host_rsa_key, authorized_keys, authorized_keys2.
XwpSSHD comes with pregenerated (sample) key-files, so these files are ready to be used if you want.
Configuring XwpSSHD
XwpSSHD comes preconfigured, so that after installation it can use the preset configuration to communicate with SSH clients.
When started, XwpSSHD reads a set of runtime configuration directives from the configuration file. These configuration directives control XwpSSHD behavior for various functions. The file contains keyword value pairs, one per line. Lines starting with # and empty lines are interpreted as comments. Keywords are case insensitive.
The SSHD configuration file must be located in the ssh subdirectory in the home directory of the package.
You can use the default values for the configuration directives listed in the file, or you can modify these values according to your needs. (The Settings button is not yet implemented.) If you make a change to the SSHD configuration file after you have enabled SSH, you must restart SSHD for these changes to take effect.
Note that when restart SSHD, all active SSH server sessions are terminated. Active SSH client
sessions are not affected.
Refresh
This button refreshes the status of the service.
The Properties Box
If you have a typical installation, many services are configured as Automatic (that is, they start automatically when the system starts or when the service is called for the first time). If a service is configured as Manual, you must start the service manually before it can be loaded by the operating system and made available for use. If a service is configured as Disabled, it cannot be started automatically or manually.
To configure how XwpSSHD is started, you can choose the Startup type and press Set. Then you can manage the service session by pressing the Start/Stop and Pause/Resume buttons with watching the Service status.
To start, stop, pause, resume, or restart a service (as administrator), you can also open the Services window (clicking Start/Settings/Control Panel/Administrative Tools/Services), right-click your service, and then click Start, Stop, Pause, Resume, or Restart.
The Windows Firewall Box
Windows Firewall monitors all aspects of the communications that are sent and received, and inspects the source and destination address of each message that it handles. In Microsoft Windows XP Service Pack 2 (SP2), Windows Firewall is turned on by default for all Internet and network connections. If you choose to install and run another firewall, turn off Windows Firewall.
When Windows Firewall is On, it blocks all unsolicited requests to connect to your computer, except for requests to programs or services selected on the Exceptions tab. When your computer gets an unsolicited request, Windows Firewall blocks the connection. If you choose to unblock the connection, Windows Firewall creates an exception. You can add a service as an exception so that the firewall will allow client's information to reach your computer and the service (through open ports for it). For programs that open ports automatically as needed to connect to your computer, Windows Firewall must allow the program to open the correct port. For these programs to work correctly, they must be listed on the Exceptions tab in Windows Firewall.
You can add a new service to your network by installing the service software on one of your network computers and then adding the service definition so that Internet Connection Sharing (ICS), if enabled, will allow the service to be accessed from the Internet. The information that you must enter to add a service definition includes: the description of the service (a name that you can easily recognize), the name or IP address of the computer hosting the service, and the TCP or UDP port number for the service (the port number that external computers use to contact this service).
Add
This button adds the XwpSSHD definition (i.e., the description of the service) to the Exceptions tab in Windows Firewall to allow the service to be accessed from SSH clients' computers.
When you add or change settings for a service or program, you must choose whether to open the port to any computer or only to computers on your network. If you choose Any computer in the
Advanced tab of Windows Firewall, anyone from the Internet or your network can connect to your computer. If you choose My network only, only computers on your local network can connect. If you prefer, you can click Custom, and then type a custom list of IP addresses and subnets that should be allowed access.
Delete
This button removes the XwpSSHD definition from the Exceptions tab in Windows Firewall.
6. Configuring ProSSHD < previous | content | next >
Home | Product | Download | Order Now | Upgrade | Support | Pricing | Company Information | Contact Us
Copyright © 1999 - 2009 LabtamTM Inc.
This page is a part of ProSSHD online Help Manual.ProSSHD is an SSH client for Windows providing maximum security from PC to Host over a Company Lan/
Wan/Intranet or Internet. It brings you typical remote system administration, file transfers, and access to corporate resources over the Internet. Visit Home of ProSSHD for more information.
6. Configuring ProSSHD < previous | content | next >
Configuration data for XwpSSHD
/etc/ssh/sshd_config contains configuration data for sshd. This file should be writable by root only, but it is recommended (though not necessary) that it be world-readable.
XwpSSHD reads configuration data from the xwp.ini file (or the file specified with -f on the command line). The file contains keyword-argument pairs, one per line. Lines starting with '#' and empty lines are interpreted as comments.
The possible keywords and their meanings are as follows (according to manuals) (note that keywords are case-insensitive and arguments are case-sensitive):
AcceptEnv
Specifies what environment variables sent by the client will be copied into the session's environ(7). See SendEnv in ssh_config(5) for how to configure the client. Note that environment passing is only supported for protocol 2. Variables are specified by name, which may contain the wildcard characters '*' and '?'. Multiple environment variables may be separated by whitespace or spread across multiple AcceptEnv directives. Be warned that some environment variables could be used to bypass restricted user environments. For this reason, care should be taken in the use of this directive. The default is not to accept any environment variables.
AllowGroups
This keyword can be followed by a list of group name patterns, separated by spaces. If specified, login is allowed only for users whose primary group or supplementary group list matches one of the patterns. '*' and '?' can be used as wildcards in the patterns. Only group names are valid; a numerical group ID is not recognized. By default, login is allowed for all groups.
AllowTcpForwarding
Specifies whether TCP forwarding is permitted. The default is "yes". Note that disabling TCP forwarding does not improve security unless users are also denied shell access, as they can always install their own forwarders.
AllowUsers
This keyword can be followed by a list of user name patterns, separated by spaces. If specified, login is allowed only for user names that match one of the patterns. '*' and '?' can be used as wildcards in the patterns. Only user names are valid; a numerical user ID is
not recognized. By default, login is allowed for all users. If the pattern takes the form USER@HOST then USER and HOST are separately checked, restricting logins to particular users from particular hosts.
AuthorizedKeysFile
Specifies the file that contains the public keys that can be used for user authentication. AuthorizedKeysFile may contain tokens of the form %T which are substituted during connection set-up. The following tokens are defined: %% is replaced by a literal '%', %h is replaced by the home directory of the user being authenticated and %u is replaced by the username of that user. After expansion, AuthorizedKeysFile is taken to be an absolute path or one relative to the user's home directory. The default is .ssh/authorized_keys.
Banner
In some jurisdictions, sending a warning message before authentication may be relevant for getting legal protection. The contents of the specified file are sent to the remote user before authentication is allowed. This option is only available for protocol version 2. By default, no banner is displayed.
Example: # no default banner path #Banner /some/path
ChallengeResponseAuthentication
Specifies whether challenge response authentication is allowed. The default is "yes".
Ciphers
Specifies the ciphers allowed for protocol version 2. Multiple ciphers must be comma-separated. The supported ciphers are "3des-cbc", "aes128-cbc", "aes192-cbc", "aes256-cbc", "aes128-ctr", "aes192-ctr", "aes256-ctr", "arcfour", "blowfish-cbc", and "cast128-cbc". The default is "aes128-cbc,3des-cbc,blowfish-cbc,cast128-cbc,arcfour,aes192-cbc,aes256-cbc, aes128-ctr,aes192-ctr,aes256-ctr"
ClientAliveInterval
Sets a timeout interval in seconds after which if no data has been received from the client, XwpSSHD will send a message through the encrypted channel to request a response from the client. The default is 0, indicating that these messages will not be sent to the client. This option applies to protocol version 2 only.
ClientAliveCountMax
Sets the number of client alive messages (see above) which may be sent without XwpSSHD receiving any messages back from the client. If this threshold is reached while client alive messages are being sent, XwpSSHD will disconnect the client, terminating the session. It is important to note that the use of client alive messages is very different from TCPKeepAlive
(below). The client alive messages are sent through the encrypted channel and therefore will not be spoofable. The TCP keepalive option enabled by TCPKeepAlive is spoofable. The client alive mechanism is valuable when the client or server depend on knowing when a connection has become inactive. The default value is 3. If ClientAliveInterval (above) is set to 15, and ClientAliveCountMax is left at the default, unresponsive ssh clients will be disconnected after approximately 45 seconds.
Compression
Specifies whether compression is allowed. The argument must be "yes" or "no". The default is "yes".
DenyGroups
This keyword can be followed by a list of group name patterns, separated by spaces. Login is disallowed for users whose primary group or supplementary group list matches one of the patterns. '*' and '?' can be used as wildcards in the patterns. Only group names are valid; a numerical group ID is not recognized. By default, login is allowed for all groups.
DenyUsers
This keyword can be followed by a list of user name patterns, separated by spaces. Login is disallowed for user names that match one of the patterns. '*' and '?' can be used as wildcards in the patterns. Only user names are valid; a numerical user ID is not recognized. By default, login is allowed for all users. If the pattern takes the form USER@HOST then USER and HOST are separately checked, restricting logins to particular users from particular hosts.
GatewayPorts
Specifies whether remote hosts are allowed to connect to ports forwarded for the client. By default, XwpSSHD binds remote port forwardings to the loopback address. This prevents other remote hosts from connecting to forwarded ports. GatewayPorts can be used to specify that XwpSSHD should bind remote port forwardings to the wildcard address, thus allowing remote hosts to connect to forwarded ports. The argument must be "yes" or "no". The default is "no".
GSSAPIAuthentication
Specifies whether user authentication based on GSSAPI is allowed. The default is "no". Note that this option applies to protocol version 2 only.
GSSAPICleanupCredentials
Specifies whether to automatically destroy the user's credentials cache on logout. The default is "yes". Note that this option applies to protocol version 2 only.
HostbasedAuthentication
Specifies whether rhosts or /etc/hosts.equiv authentication together with successful public key client host authentication is allowed (hostbased authentication). This option is similar to RhostsRSAAuthentication and applies to protocol version 2 only. The default is "no".
HostKey
Specifies a file containing a private host key used by SSH. The default is /etc/ssh/ssh_host_key for protocol version 1, and /etc/ssh/ssh_host_rsa_key and /etc/ssh/ssh_host_dsa_key for protocol version 2. Note that XwpSSHD will refuse to use a file if it is group/world-accessible. It is possible to have multiple host key files. "rsa1" keys are used for version 1 and "dsa" or "rsa" are used for version 2 of the SSH protocol.
Example: # HostKey for protocol version 1 #HostKey /etc/ssh/ssh_host_key # HostKeys for protocol version 2 #HostKey /etc/ssh/ssh_host_rsa_key #HostKey /etc/ssh/ssh_host_dsa_key
IgnoreRhosts
Specifies that .rhosts and .shosts files will not be used in RhostsRSAAuthentication or HostbasedAuthentication. /etc/hosts.equiv and /etc/ssh/shosts.equiv are still used. The default is "yes".
IgnoreUserKnownHosts
Specifies whether XwpSSHD should ignore the user's $HOME/.ssh/known_hosts during RhostsRSAAuthentication or HostbasedAuthentication. The default is "no".
KerberosAuthentication
Specifies whether the password provided by the user for PasswordAuthentication will be validated through the Kerberos KDC. To use this option, the server needs a Kerberos servtab which allows the verification of the KDC's identity. Te default is "no".
KerberosGetAFSToken
If AFS is active and the user has a Kerberos 5 TGT, attempt to aquire an AFS token before accessing the user's home directory. The default is "no".
KerberosOrLocalPasswd
If set then if password authentication through Kerberos fails then the password will be validated via any additional local mechanism such as /etc/passwd. The default is "yes".

KerberosTicketCleanup
Specifies whether to automatically destroy the user's ticket cache file on logout. The default is "yes".
KeyRegenerationInterval
In protocol version 1, the ephemeral server key is automatically regenerated after this many seconds (if it has been used). The purpose of regeneration is to prevent decrypting captured sessions by later breaking into the machine and stealing the keys. The key is never stored anywhere. If the value is 0, the key is never regenerated. The default is 3600 (seconds).
ListenAddresses
Specifies the local addresses XwpSSHD should listen on. The following forms may be used: ListenAddresses host|IPv4_addr|IPv6_addr ListenAddresses host|IPv4_addr:port ListenAddresses [host|IPv6_addr]:port If port is not specified, XwpSSHD will listen on the address and all prior Port options specified. The default is to listen on all local addresses. Multiple ListenAddresses options are permitted. Additionally, any Port options must precede this option for nonport qualified addresses.
Example: #ListenAddress 0.0.0.0 #ListenAddress ::
LoginGraceTime
The server disconnects after this time if the user has not successfully logged in. If the value is 0, there is no time limit. The default is 120 seconds.
LoginLevel
Gives the verbosity level that is used when logging messages from XwpSSHD. The possible values are: QUIET, FATAL, ERROR, INFO, VERBOSE, DEBUG, DEBUG1, DEBUG2 and DEBUG3. The default is INFO. DEBUG and DEBUG1 are equivalent. DEBUG2 and DEBUG3 each specify higher levels of debugging output. Logging with a DEBUG level violates the privacy of users and is not recommended.
MACs
Specifies the available MAC (message authentication code) algorithms. The MAC algorithm is used in protocol version 2 for data integrity protection. Multiple algorithms must be comma-separated. The default is "hmac-md5,hmac-sha1,hmac-ripemd160,hmac-sha1-96,hmac-md5-96".
MaxAuthTries
Specifies the maximum number of authentication attempts permitted per connection. Once the
number of failures reaches half this value, additional failures are logged. The default is 6.
MaxStartups
Specifies the maximum number of concurrent unauthenticated connections to the XwpSSHD daemon. Additional connections will be dropped until authentication succeeds or the LoginGraceTime expires for a connection. The default is 10. Alternatively, random early drop can be enabled by specifying the three colon separated values "start:rate:full" (e.g., "10:30:60"). XwpSSHD will refuse connection attempts with a probability of "rate/100" (30%) if there are currently "start" (10) unauthenticated connections. The probability increases linearly and all connection attempts are refused if the number of unauthenticated connections reaches "full" (60).
PasswordAuthentication
Specifies whether password authentication is allowed. The default is "yes".
Example: # To disable tunneled clear text passwords, change to no here! PasswordAuthentication no
PermitEmptyPasswords
When password authentication is allowed, it specifies whether the server allows login to accounts with empty password strings. The default is "no".
PermitRootLogin
Specifies whether root can login using ssh(1). The argument must be "yes", "without-password", "forced-commands-only" or "no". The default is "yes". If this option is set to "without-password", password authentication is disabled for root. Note that other authentication methods (e.g., keyboard-interactive/PAM) may still allow root to login using a password. If this option is set to "forced-commands-only", root login with public key authentication will be allowed, but only if the command option has been specified (which may be useful for taking remote backups even if root login is normally not allowed). All other authentication methods are disabled for root. If this option is set to "no", root is not allowed to login.
PermitUserEnvironment
Specifies whether ~/.ssh/environment and environment= options in ~/.ssh/authorized_keys are processed by XwpSSHD. The default is "no". Enabling environment processing may enable users to bypass access restrictions in some configurations using mechanisms such as LD_PRELOAD.
PidFile
Specifies the file that contains the process ID of the XwpSSHD daemon. The default is /var/run/XwpSSHD.pid.
Port
Specifies the port number that XwpSSHD listens on. The default is 22. Multiple options of this type are permitted. See also ListenAddresses.
PrintLastLog
Specifies whether XwpSSHD should print the date and time when the user last logged in. The default is "yes".
PrintMotd
Specifies whether XwpSSHD should print /etc/motd when a user logs in interactively. (On some systems it is also printed by the shell, /etc/profile, or equivalent.) The default is "yes".
Protocol
Specifies the protocol versions XwpSSHD supports. The possible values are "1" and "2". Multiple versions must be comma-separated. The default is "2,1". Note that the order of the protocol list does not indicate preference, because the client selects among multiple protocol versions offered by the server. Specifying "2,1" is identical to "1,2".
PubkeyAuthentication
Specifies whether public key authentication is allowed. The default is "yes". Note that this option applies to protocol version 2 only.
RhostsRSAAuthentication
Specifies whether rhosts or /etc/hosts.equiv authentication together with successful RSA host authentication is allowed. The default is "no". This option applies to protocol version 1 only.
RSAAuthentication
Specifies whether pure RSA authentication is allowed. The default is "yes". This option applies to protocol version 1 only.
ServerKeyBits
Defines the number of bits in the ephemeral protocol version 1 server key. The minimum value is 512, and the default is 768.
StrictModes
Specifies whether XwpSSHD should check file modes and ownership of the user's files and home directory before accepting login. This is normally desirable because novices sometimes accidentally leave their directory or files world-writable. The default is "yes".
Subsystem
Configures an external subsystem (e.g., file transfer daemon). Arguments should be a subsystem name and a command to execute upon subsystem request. By default no subsystems are defined. Note that this option applies to protocol version 2 only.
Example: # The command sftp-server implements the "sftp" file transfer subsystem. # override default of no subsystems Subsystem sftp /usr/lib/ssh/sftp-server
SyslogFacility
Gives the facility code that is used when logging messages from XwpSSHD. The possible values are: DAEMON, USER, AUTH, LOCAL0, LOCAL1, LOCAL2, LOCAL3, LOCAL4, LOCAL5, LOCAL6, LOCAL7. The default is AUTH.
TCPKeepAlive
Specifies whether the system should send TCP keepalive messages to the other side. If they are sent, death of the connection or crash of one of the machines will be properly noticed. However, this means that connections will die if the route is down temporarily, and some people find it annoying. On the other hand, if TCP keepalives are not sent, sessions may hang indefinitely on the server, leaving "ghost" users and consuming server resources. The default is "yes" (to send TCP keepalive messages), and the server will notice if the network goes down or the client host crashes. This avoids infinitely hanging sessions. To disable TCP keepalive messages, the value should be set to "no".
UseDNS
Specifies whether XwpSSHD should lookup the remote host name and check that the resolved host name for the remote IP address maps back to the very same IP address. The default is "yes".
UseLogin
Specifies whether login(1) is used for interactive login sessions. The default is "no". Note that login(1) is never used for remote command execution. Note also, that if this is enabled, X11Forwarding will be disabled because login(1) does not know how to handle xauth(1) cookies. If UsePrivilegeSeparation is specified, it will be disabled after authentication.
UsePAM
Enables the Pluggable Authentication Module interface. If set to "yes" this will enable PAM authentication using ChallengeResponseAuthentication and PAM account and session module processing for all authentication types. Because PAM challenge-response authentication usually serves an equivalent role to password authentication, you should disable either PasswordAuthentication or ChallengeResponseAuthentication. If UsePAM is enabled, you will not be able to run XwpSSHD as a non-root user. The default is "no".
UsePrivilegeSeparation
Specifies whether XwpSSHD separates privileges by creating an unprivileged child process to deal with incoming network traffic. After successful authentication, another process will be created that has the privilege of the authenticated user. The goal of privilege separation is to prevent privilege escalation by containing any corruption within the unprivileged processes. The default is "yes".
X11DisplayOffset
Specifies the first display number available for XwpSSHD's X11 forwarding. This prevents XwpSSHD from interfering with real X11 servers. The default is 10.
X11Forwarding
Specifies whether X11 forwarding is permitted. The argument must be "yes" or "no". The default is "no". When X11 forwarding is enabled, there may be additional exposure to the server and to client displays if the XwpSSHD proxy display is configured to listen on the wildcard address (see X11UseLocalhost below), however this is not the default. Additionally, the authentication spoofing and authentication data verification and substitution occur on the client side. The security risk of using X11 forwarding is that the client's X11 display server may be exposed to attack when the ssh client requests forwarding (see the warnings for ForwardX11 in ssh_config(5)). A system administrator may have a stance in which they want to protect clients that may expose themselves to attack by unwittingly requesting X11 forwarding, which can warrant a "no" setting. Note that disabling X11 forwarding does not prevent users from forwarding X11 traffic, as users can always install their own forwarders. X11 forwarding is automatically disabled if UseLogin is enabled.
X11UseLocalhost
Specifies whether XwpSSHD should bind the X11 forwarding server to the loopback address or to the wildcard address. By default, XwpSSHD binds the forwarding server to the loopback address and sets the hostname part of the DISPLAY environment variable to "localhost". This prevents remote hosts from connecting to the proxy display. However, some older X11 clients may not function with this configuration. X11UseLocalhost may be set to "no" to specify that the forwarding server should be bound to the wildcard address. The argument must be "yes" or "no". The default is "yes".
XAuthentication
Specifies the full pathname of the xauth(1) program. The default is /usr/X11R6/bin/xauth.
6. Configuring ProSSHD < previous | content | next >
Home | Product | Download | Order Now | Upgrade | Support | Pricing | Company Information | Contact Us
Copyright © 1999 - 2009 LabtamTM Inc.
This page is a part of ProSSHD online Help Manual.ProSSHD is an SSH client for Windows providing maximum security from PC to Host over a Company Lan/
Wan/Intranet or Internet. It brings you typical remote system administration, file transfers, and access to corporate resources over the Internet. Visit Home of ProSSHD for more information.
< previous | content | next >
7. Telnet_SSH
This chapter describes how to start and use the Telnet_SSH program supplied with ProSSHD.
Telnet_SSH is a communications and terminal emulation program for logging into remote machine and executing commands in a remote machine. It allows you to connect to and communicate with hosts that support:
● The Telnet protocol and run a Telnet service over an insecure channel
● The Secure Shell protocol, SSH, and run an SSH service to provide strong authentication and secure encrypted communications between two untrusted hosts over an insecure network. X11 connections and arbitrary TCP/IP ports can also be forwarded over the secure channel. TCP forwarding features make it possible to communicate across a firewall. The "Dynamic Port Forwarding" feature (an extension of the standard SSH1/SSH2 protocols for inter-task requests in multi-task environment) allows you to start other package's utilities (e.g., FTP) through established SSH1/SSH2 protocol connections without direct access to remote hosts.
To provide terminal emulation from your computer running MS Windows, the remote host must be configured with the TCP/IP program, the Telnet or SSH1/SSH2 service program (daemon), and a user account for your PC.
Telnet_SSH includes the following features:
● Compatibility with SSH protocol version 1.5 (a SSH1 client)
● Ciphers (for the SSH1 client): 3DES, Blowfish, DES, RC4
● Compatibility with SSH 2.0 protocol (a SSH2 client based on OpenSSH 3.4)
● Ciphers (for the SSH2 client): 3DES, Blowfish, CAST128, ARCFOUR, AES128, AES192, AES256-cbc
● Password authentication
● RSA authentication
● Compression support (with auto-selection of the compression mode supported by both sides)
● Connection forwarding, including full support for X-protocol connection forwarding
● "Dynamic Port Forwarding" that provides other tasks on the same PC with requested port forwarding.
Once you have established a connection, you can use Telnet_SSH to start X clients and perform other operations outside the X Window System environment.
While you are using Telnet_SSH, your PC emulates one of the following terminal types: XTERM,
ANSI, AT386; DEC VT52, VT100, VT125, VT220 or VT240, using connection-based services of TCP. You can specify the terminal emulation settings for the current connection by making the appropriate settings on the Settings option.
By using the Keyboard Mapping option (i.e. keymap editor invoking), you can load, change (re-define keys and create a new keyboard layout), and save any keyboard definition file.
You can start more than one Telnet_SSH session, and use Telnet_SSH to open multiple Telnet_SSH windows on a single host or different hosts at the same time.
< previous | content | next >
Home | Product | Download | Order Now | Upgrade | Support | Pricing | Company Information | Contact Us
Copyright © 1999 - 2009 LabtamTM Inc.
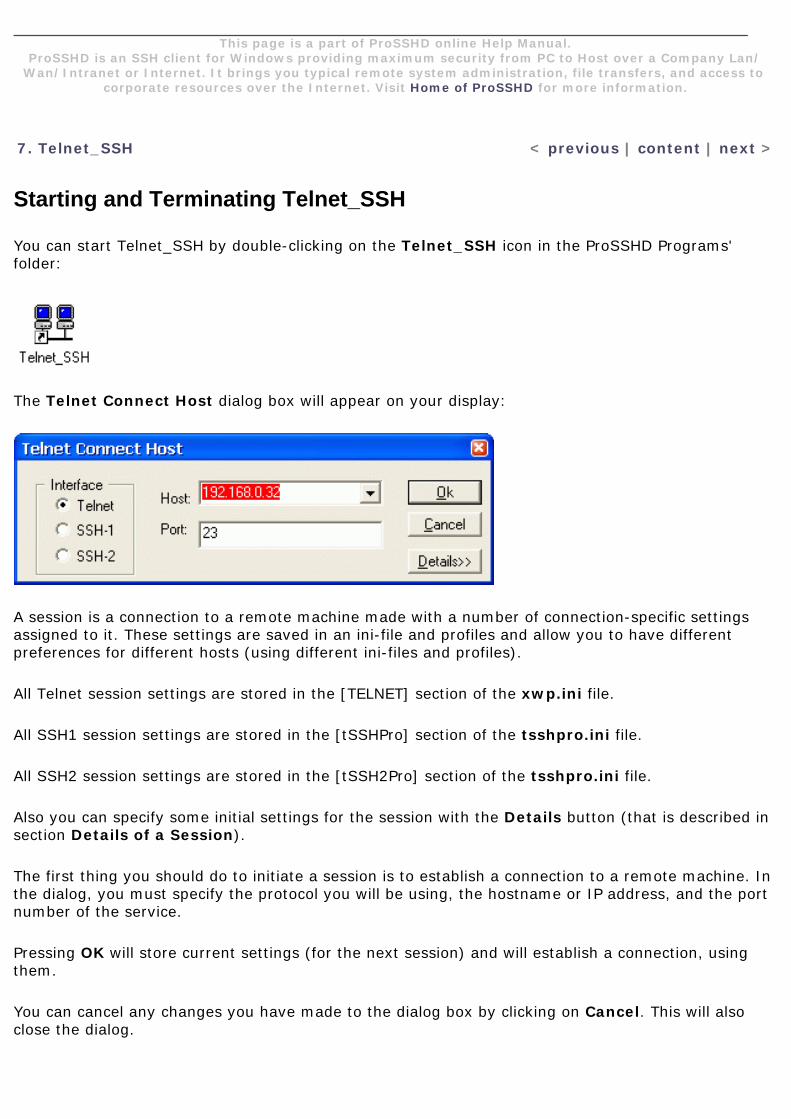
This page is a part of ProSSHD online Help Manual.ProSSHD is an SSH client for Windows providing maximum security from PC to Host over a Company Lan/
Wan/Intranet or Internet. It brings you typical remote system administration, file transfers, and access to corporate resources over the Internet. Visit Home of ProSSHD for more information.
7. Telnet_SSH < previous | content | next >
Starting and Terminating Telnet_SSH
You can start Telnet_SSH by double-clicking on the Telnet_SSH icon in the ProSSHD Programs' folder:
The Telnet Connect Host dialog box will appear on your display:
A session is a connection to a remote machine made with a number of connection-specific settings assigned to it. These settings are saved in an ini-file and profiles and allow you to have different preferences for different hosts (using different ini-files and profiles).
All Telnet session settings are stored in the [TELNET] section of the xwp.ini file.
All SSH1 session settings are stored in the [tSSHPro] section of the tsshpro.ini file.
All SSH2 session settings are stored in the [tSSH2Pro] section of the tsshpro.ini file.
Also you can specify some initial settings for the session with the Details button (that is described in section Details of a Session).
The first thing you should do to initiate a session is to establish a connection to a remote machine. In the dialog, you must specify the protocol you will be using, the hostname or IP address, and the port number of the service.
Pressing OK will store current settings (for the next session) and will establish a connection, using them.
You can cancel any changes you have made to the dialog box by clicking on Cancel. This will also close the dialog.
Telnet
This button specifies whether to use the standard TELNET protocol over an insecure channel to provide an interface for communications between clients and servers. In the Telnet mode, Telnet_SSH works as the Telnet client on your PC.
Note: a Telnet session is not encrypted; so it will transmit your user name, password and other sensitive or private information in an easily readable format.
SSH-1SSH-2
These buttons specify whether to use the SSH1 (or SSH2) protocol over an insecure channel to provide secure communications between clients and servers. In the SSH1/SSH2 modes, Telnet_SSH works as the SSH1/SSH2 client on your PC.
Note: SSH is a tool for secure remote login over insecure networks. It provides an encrypted terminal session with strong authentication of both the server and client, using public-key cryptography. An SSH session provides maximum security and privacy on the Internet and local networks. It encrypts all traffic (including passwords) to effectively eliminate eavesdropping, connection hijacking, and other network-level attacks.
SSH is an acronym for the Secure Shell protocol - a secure communications protocol used to encrypt network traffic between clients and servers that replaces existing TCP/IP protocols such as TELNET, RSH and RLOGIN. SSH must be supported by both the client and the server. SSH1 is the first version of the SSH protocol and SSH2 is the second one.
Host
This field specifies a hostname or IP address (network node specification) for the remote machine you want to connect to (and which provides the Telnet or SSH1/SSH2 service).
When you click on the scroll arrow beside the Host box, a drop-down box will display host definitions located in your hosts file. To select a host, click on an appropriate definition.
Port
This field specifies the port number of the Telnet or SSH1/SSH2 service on the remote machine you want to connect to.
For the Telnet mode, the default port number of the Telnet service is decimal 23.
For the SSH1/SSH2 mode, the default port number of the SSH1/SSH2 service is decimal 22.
Starting a Telnet Session
To establish Telnet connection, specify the Telnet mode, enter the network name or IP address for the host you want to connect to, then change the default Telnet port number if required, and press OK. Telnet_SSH connects and logs into the specified hostname.
Once you have connected to the host, the host name or IP address you specified appears at the top
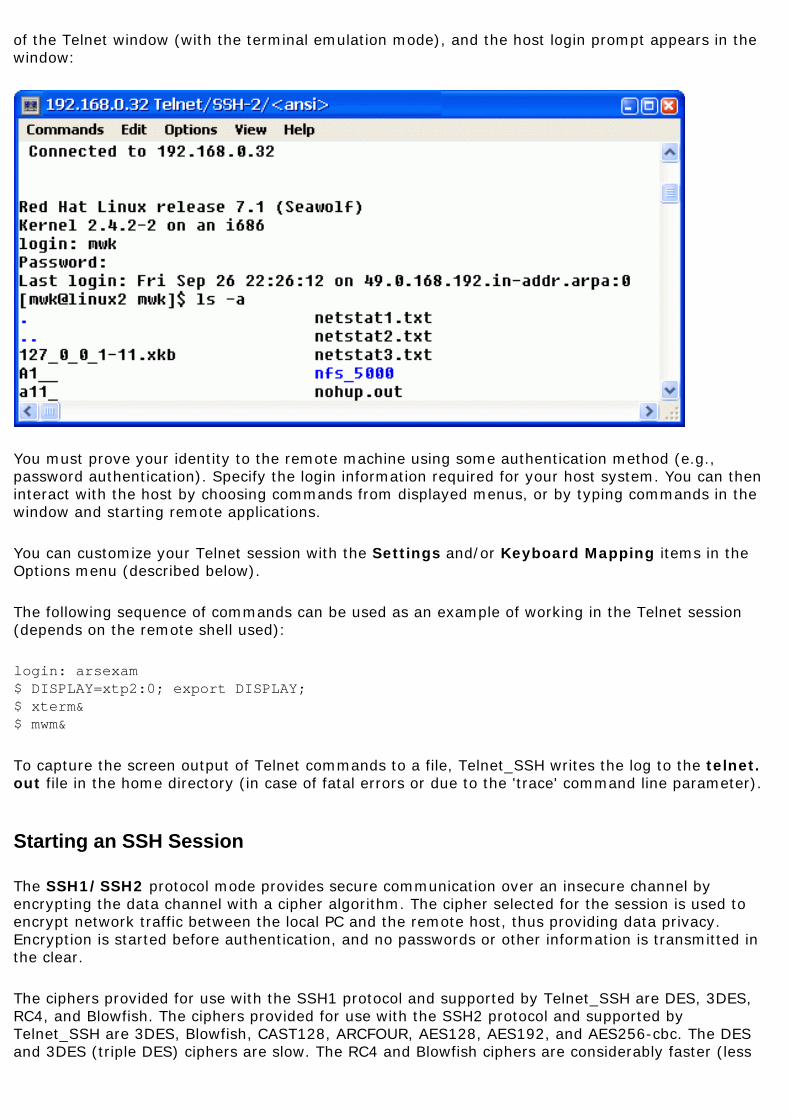
of the Telnet window (with the terminal emulation mode), and the host login prompt appears in the window:
You must prove your identity to the remote machine using some authentication method (e.g., password authentication). Specify the login information required for your host system. You can then interact with the host by choosing commands from displayed menus, or by typing commands in the window and starting remote applications.
You can customize your Telnet session with the Settings and/or Keyboard Mapping items in the Options menu (described below).
The following sequence of commands can be used as an example of working in the Telnet session (depends on the remote shell used):
login: arsexam$ DISPLAY=xtp2:0; export DISPLAY;$ xterm&$ mwm&
To capture the screen output of Telnet commands to a file, Telnet_SSH writes the log to the telnet.out file in the home directory (in case of fatal errors or due to the 'trace' command line parameter).
Starting an SSH Session
The SSH1/SSH2 protocol mode provides secure communication over an insecure channel by encrypting the data channel with a cipher algorithm. The cipher selected for the session is used to encrypt network traffic between the local PC and the remote host, thus providing data privacy. Encryption is started before authentication, and no passwords or other information is transmitted in the clear.
The ciphers provided for use with the SSH1 protocol and supported by Telnet_SSH are DES, 3DES, RC4, and Blowfish. The ciphers provided for use with the SSH2 protocol and supported by Telnet_SSH are 3DES, Blowfish, CAST128, ARCFOUR, AES128, AES192, and AES256-cbc. The DES and 3DES (triple DES) ciphers are slow. The RC4 and Blowfish ciphers are considerably faster (less

CPU intensive) than 3DES. You can specify ciphers Telnet_SSH will try to use with the SSH1 protocol. Telnet_SSH will try 3DES as the first cipher (by default).
Telnet_SSH supports optional compression of all data with gzip (including forwarded X11 and TCP/IP port data), which may result in significant speedups on slow connections. You can specify the compression level from 1 to 9 (default). Level 1 gives you fastest performance (with lowest compression) and level 9 - slowest performance (with highest compression).
Note: to work in the SSH1 protocol mode, you need the SSH1 daemon, .sshd, being run on the remote machine you want to communicate with (the SSH2 daemon, .sshd2, for the SSH2 mode respectively).
To establish SSH1/SSH2 connection, specify the SSH1/SSH2 mode, enter the hostname or IP address for the host you want to connect to, then change the default SSH1/SSH2 port number if required, and press OK. Telnet_SSH connects and logs into the specified hostname.
You can customize your SSH1/SSH2 session with the Settings and/or Keyboard Mapping items in the Options menu.
See the Forwarding item of the Option menu on how to specify necessary port forwarding and X11 forwarding settings to customize your SSH1/SSH2 session.
Once you have connected to the host, the SSH Authentication window appears:
Authentication is the process of verifying that an individual truly is who he or she claims to be. You must prove your identity to the remote system, using one of the three methods of authentication that Telnet_SSH supports for connecting to SSH servers: password authentication, RSA authentication, or keyboard-interactive authentication (for the SSH2 protocol).
Password authentication transmits the user's password to the server to authenticate the connection. The transmitted password is protected from network eavesdropping due to the cipher encryption of the data channel.
Keyboard-interactive authentication is a flexible authentication method using an arbitrary sequence of requests and responses. It is not only useful for challenge/response mechanisms, but it can also be used for asking the user for a new password when the old one has expired (for example).
RSA authentication uses a public/private key pair to authenticate the connection.
The scheme is based on public-key cryptography: there are cryptosystems where encryption and decryption are done using separate keys, and it is not possible to derive the decryption key from the encryption key. RSA is one such system. The general mechanism behind RSA authentication is that each user creates a public/private key pair for authentication purposes. The SSH server knows the public key, and only the user knows the private key. The file $HOME/.ssh/authorized_keys lists the public keys that are permitted for logging in. When the user logs in, the client SSH program tells the SSH server which key pair it would like to use for authentication. The server checks if this key is permitted, and if so, sends the user (actually the client SSH program running on behalf of the user) a "challenge", a random number, encrypted by the user's public key stored on the server. The challenge can only be decrypted using the proper private key. The user's client then authenticates the connection by successfully decrypting the challenge using the user's private key, proving that he/she knows the private key but without disclosing it to the server.
SSH server implements the RSA authentication protocol automatically. Normally the user creates his/her RSA key pair by running the ssh-keygen utility on the remote host. This stores the private key in $HOME/.ssh/identity and the public key in $HOME/.ssh/identity.pub in the user's home directory. The user should then copy (or append) the identity.pub file to $HOME/.ssh/authorized_keys in his/her home directory on the remote system.
The private key is often stored encrypted at the client machine in an identity file. The user should specify the identity file to be used for RSA authentication.
Passphrase is a password used to protect a private key from unauthorized use. The passphrase is firstly used when generating the public/private key pair by the ssh-keygen utility to encrypt the private key (i.e. the identity file at the server machine). The user must supply the passphrase before the digital signature can be generated.
RSA authentication offers a higher level of authentication security than password authentication by requiring both the private key and the passphrase that protects the private key in order to complete authentication.
In the SSH Authentication dialog, you should specify necessary settings for authentication.
User name
This field specifies the username used to log on to the remote machine.
Passphrase
If password authentication is selected (with Use plain password to log in enabled), you can enter your password in this field.
If RSA authentication is selected (with Use RSA key to log in enabled), you can enter your passphrase here.
It is recommended that a passphrase be assigned to all private keys to prevent unauthorized use, especially in environments where multiple individuals have access to the machine on which the private key files are stored. When using public key authentication, a private key with an assigned
passphrase will not be available if the correct passphrase is not supplied during the authentication process.
Use plain password to log in
When enabled, this radio button specifies to use password authentication.
If password authentication is selected, you can enter your password in the Passphrase entry field. If a password is not entered here, you will be prompted to enter it during the connection process.
Use RSA key to log in
When enabled, this radio button specifies to use RSA authentication.
If RSA authentication is selected, you should enter your passphrase in the Passphrase entry field. Also you should specify a location of the identity file to be used for this process. You can enter the filename in the entry field or select it with the Private key file button.
Private key file
When you press on this button the standard Open File window will appear. You can select your identity file for RSA authentication. RSA authentication will only be attempted if the identity file exists.
In order to use your private key you must transfer the identity file created by the ssh-keygen utility on the SSH server machine to a secure location on your PC for this file such that you are the only individual with access to it.
One way to transfer the identity file from the remote machine to your PC is to use an FTP client (in ASCII mode). Another way is to copy the contents of the identity file to the clipboard using a remote text editor and then to paste the contents of the clipboard to a file you created using a local text editor (e.g., Notepad).
Also, prior to using RSA authentication, the public key must be made available to the SSH server.
Use Keyboard-Interactive Mode
When enabled, this radio button specifies to use keyboard-interactive authentication.
Disconnect
You can immediately close a communication connection with this button.
Specify the login information required for your host system. When your identity has been accepted by the SSH server, the server either executes the given command, or logs into the machine and gives you a normal shell on the remote machine. All communication with the remote command or shell will be automatically encrypted.
Example of Initiating a Telnet Session via SSH
First, make sure that:
● your PC is accessible from your remote host (e.g., by using Ping)● your remote host is accessible from your PC● sshd-daemon (or sshd2-daemon) is running on your remote host.
If OK, then you may initiate the Telnet session via SSH like the following steps:
1. Double-click on the Telnet_SSH icon from the ProSSHD Programs' folder to start Telnet_SSH (the Telnet Connect Host window should appear)
2. Choose SSH-1 (or SSH-2) in the Interface section
3. Enter the network name or IP address for the remote host you want to connect to
4. Change the default SSH port number if required
5. Click OK to establish connection with the remote host (the SSH Authentication window should appear)
6. Choose to Use plain password to log in
7. Specify the login information required for your host system: User name and Password in the Passphrase field
8. Click OK to log in to the remote host (the Telnet_SSH window should appear).
Terminating a Session
You can terminate a Telnet_SSH session by choosing the Close command on the Control Menu box, or by selecting Exit on the Telnet_SSH Commands menu.
If you select Exit while a connection to a remote system is still active, Telnet_SSH disconnects you from the remote system automatically (properly closing all applications used).
Telnet/SSH2 as SOCKS4 Proxy
Telnet/SSH2 provides the "Dynamic Forwarding" feature that allows FTP, XStartup, and XServer/LbxLoxy to access protected hosts via SSH2-connection. Really "Dynamic Forwarding" is a well-known standard SOCKS4 proxy server. This means that it can be used to access remote hosts by a "crooked" way.
A typical sample example
Suppose that:
● You work on HOST1 (say, in Australia) under MS Windows and can use Telnet/SSH2● You have an intermediate HOST2 (say, Labopt.com in USA) with the modern SSH2-daemon● You want to access (from HOST1 using MSIE, Netscape...) the "overparticular" site (say,
"http://www.sho.com/" in USA) on HOST3 accessible only from USA hosts.
You can do the following:
1. Connect from HOST1 to HOST2 via SSH2 using Telnet/SSH2.With command "netstat -na", check that there created the "16001" LISTEN port.
2. Tune MSIE on HOST1 so as it will use the SOCKS proxy on the local PC.3. Run MSIE on HOST1 and try to connect to site "http://www.sho.com/" on HOST3.
Some notes
● Why only now.
All described above was possible all the time, but old SSH2-daemons have a bug which we had to work around in FTP, XStartup, and XServer/LbxLoxy. We did this via additional delay after successful connection. It was our specific. We know that the bug still existed in SSH-daemon of Linux RH 7.1. Now we see that the Linux RH 9 does not have this bug.
● What is this - port 16001 (is it always 16001 ?). NO !
Each Telnet/SSH2 session automatically creates one "Dynamic Forwarding" (i.e., SOCKS4) port starting at number 16001. If 16001 is busy (say, you connected to HOSTxxx via Telnet/SSH2), then the 2nd Telnet/SSH2 session will create the 16002 port number, and so on. Closing a session makes the corresponding port free.
7. Telnet_SSH < previous | content | next >
Home | Product | Download | Order Now | Upgrade | Support | Pricing | Company Information | Contact Us
Copyright © 1999 - 2009 LabtamTM Inc.
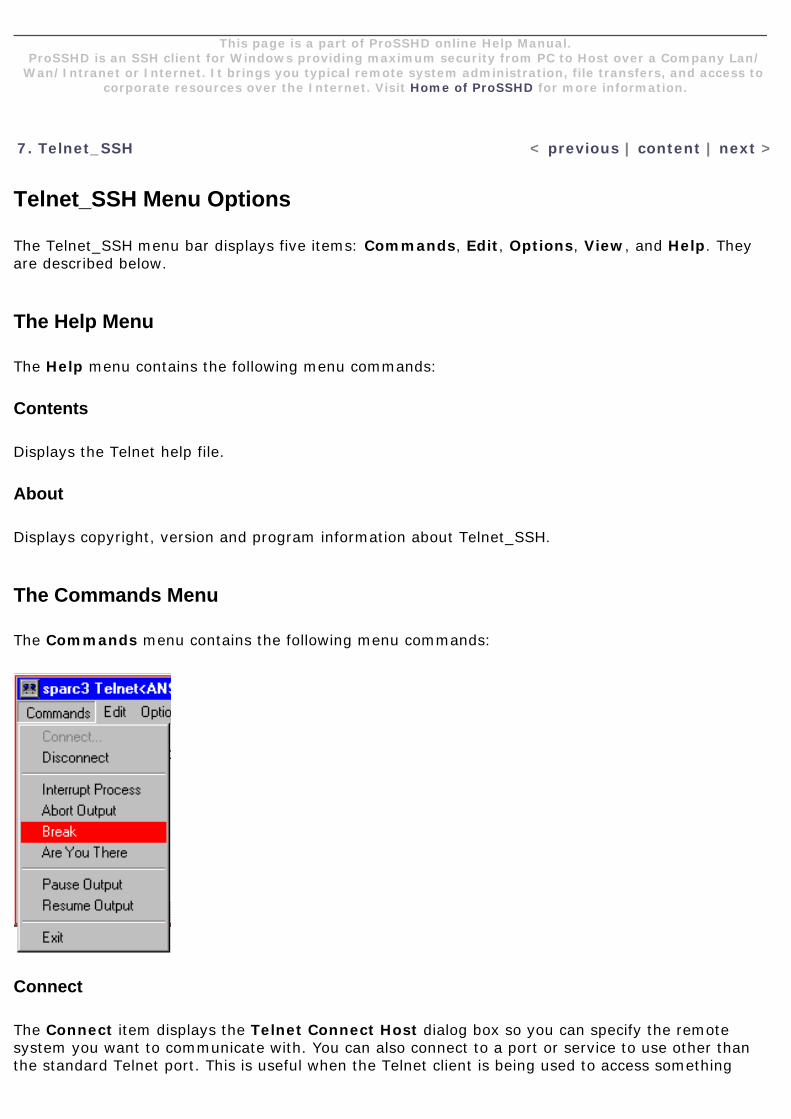
This page is a part of ProSSHD online Help Manual.ProSSHD is an SSH client for Windows providing maximum security from PC to Host over a Company Lan/
Wan/Intranet or Internet. It brings you typical remote system administration, file transfers, and access to corporate resources over the Internet. Visit Home of ProSSHD for more information.
7. Telnet_SSH < previous | content | next >
Telnet_SSH Menu Options
The Telnet_SSH menu bar displays five items: Commands, Edit, Options, View, and Help. They are described below.
The Help Menu
The Help menu contains the following menu commands:
Contents
Displays the Telnet help file.
About
Displays copyright, version and program information about Telnet_SSH.
The Commands Menu
The Commands menu contains the following menu commands:
Connect
The Connect item displays the Telnet Connect Host dialog box so you can specify the remote system you want to communicate with. You can also connect to a port or service to use other than the standard Telnet port. This is useful when the Telnet client is being used to access something
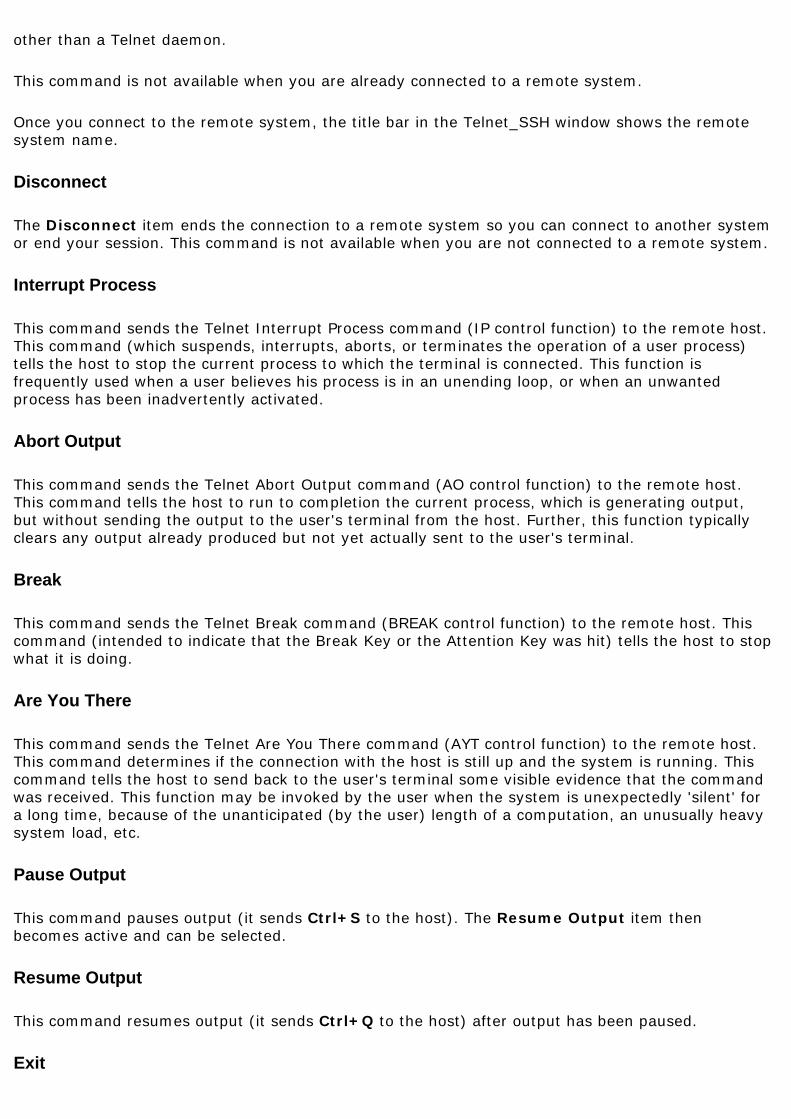
other than a Telnet daemon.
This command is not available when you are already connected to a remote system.
Once you connect to the remote system, the title bar in the Telnet_SSH window shows the remote system name.
Disconnect
The Disconnect item ends the connection to a remote system so you can connect to another system or end your session. This command is not available when you are not connected to a remote system.
Interrupt Process
This command sends the Telnet Interrupt Process command (IP control function) to the remote host. This command (which suspends, interrupts, aborts, or terminates the operation of a user process) tells the host to stop the current process to which the terminal is connected. This function is frequently used when a user believes his process is in an unending loop, or when an unwanted process has been inadvertently activated.
Abort Output
This command sends the Telnet Abort Output command (AO control function) to the remote host. This command tells the host to run to completion the current process, which is generating output, but without sending the output to the user's terminal from the host. Further, this function typically clears any output already produced but not yet actually sent to the user's terminal.
Break
This command sends the Telnet Break command (BREAK control function) to the remote host. This command (intended to indicate that the Break Key or the Attention Key was hit) tells the host to stop what it is doing.
Are You There
This command sends the Telnet Are You There command (AYT control function) to the remote host. This command determines if the connection with the host is still up and the system is running. This command tells the host to send back to the user's terminal some visible evidence that the command was received. This function may be invoked by the user when the system is unexpectedly 'silent' for a long time, because of the unanticipated (by the user) length of a computation, an unusually heavy system load, etc.
Pause Output
This command pauses output (it sends Ctrl+S to the host). The Resume Output item then becomes active and can be selected.
Resume Output
This command resumes output (it sends Ctrl+Q to the host) after output has been paused.
Exit
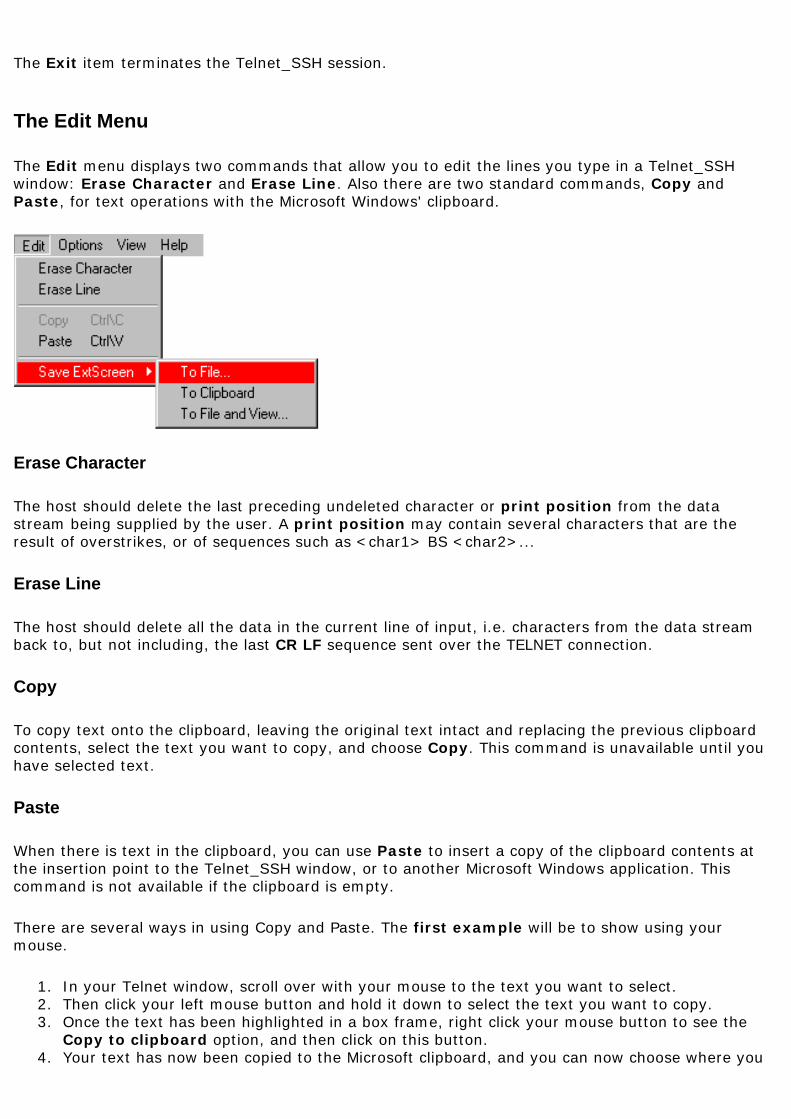
The Exit item terminates the Telnet_SSH session.
The Edit Menu
The Edit menu displays two commands that allow you to edit the lines you type in a Telnet_SSH window: Erase Character and Erase Line. Also there are two standard commands, Copy and Paste, for text operations with the Microsoft Windows' clipboard.
Erase Character
The host should delete the last preceding undeleted character or print position from the data stream being supplied by the user. A print position may contain several characters that are the result of overstrikes, or of sequences such as <char1> BS <char2>...
Erase Line
The host should delete all the data in the current line of input, i.e. characters from the data stream back to, but not including, the last CR LF sequence sent over the TELNET connection.
Copy
To copy text onto the clipboard, leaving the original text intact and replacing the previous clipboard contents, select the text you want to copy, and choose Copy. This command is unavailable until you have selected text.
Paste
When there is text in the clipboard, you can use Paste to insert a copy of the clipboard contents at the insertion point to the Telnet_SSH window, or to another Microsoft Windows application. This command is not available if the clipboard is empty.
There are several ways in using Copy and Paste. The first example will be to show using your mouse.
1. In your Telnet window, scroll over with your mouse to the text you want to select.2. Then click your left mouse button and hold it down to select the text you want to copy.3. Once the text has been highlighted in a box frame, right click your mouse button to see the
Copy to clipboard option, and then click on this button.4. Your text has now been copied to the Microsoft clipboard, and you can now choose where you

want to paste it.5. Click on where you want the text to be pasted, and then right click on the mouse and click on
the Paste from clipboard button. The original text that you copied was now pasted into the area you selected.
The second example will be to show using Menus.
1. With the same text to copy, you can highlight the text again. You will see a solid clear box appear around the selected text.
2. Click on the "Edit Menu" and then click on "Copy". This has now copied the selected text to the clipboard.
3. Now click to where you want the copied text pasted to. Click on the "Edit Menu" again and then click "Paste". This will paste the text into your chosen location.
To Copy and Paste, you can also use key combinations, "Ctrl+C"/"Ctrl+V" or "Ctrl_L+Shift_L+C"/"Ctrl_L+Shift_L+V".For more information, see settings CtrlCVmode and QuickClipBoard.
See also settings SelectRect and FineSelectMode that you can use to specify different modes for text selection in your Telnet window.
Save ExtScreen
● To FileThis option lets you save the output buffer of your session into a file.
● To ClipboardThis option lets you send the output buffer of your session to Clipboard.
● To File and ViewThis option allows you to save the output buffer of your session into a file and then to invoke Notepad for you to view or edit the text.
For example, to save a Telnet screen that you want to be written to a file, do the following as you are working in your Telnet window:
1. Click on "EDIT", then click on "Save ExtScreen" and then click on "To File and View".2. Then choose which location you want to save the file to and also what name you want
to call the file.3. After entering the file name and location where you are saving the Telnet screen, press
the Save button. After this the screen shot has been saved. Then you will see a Notepad window with the screen content appear.
The View Menu
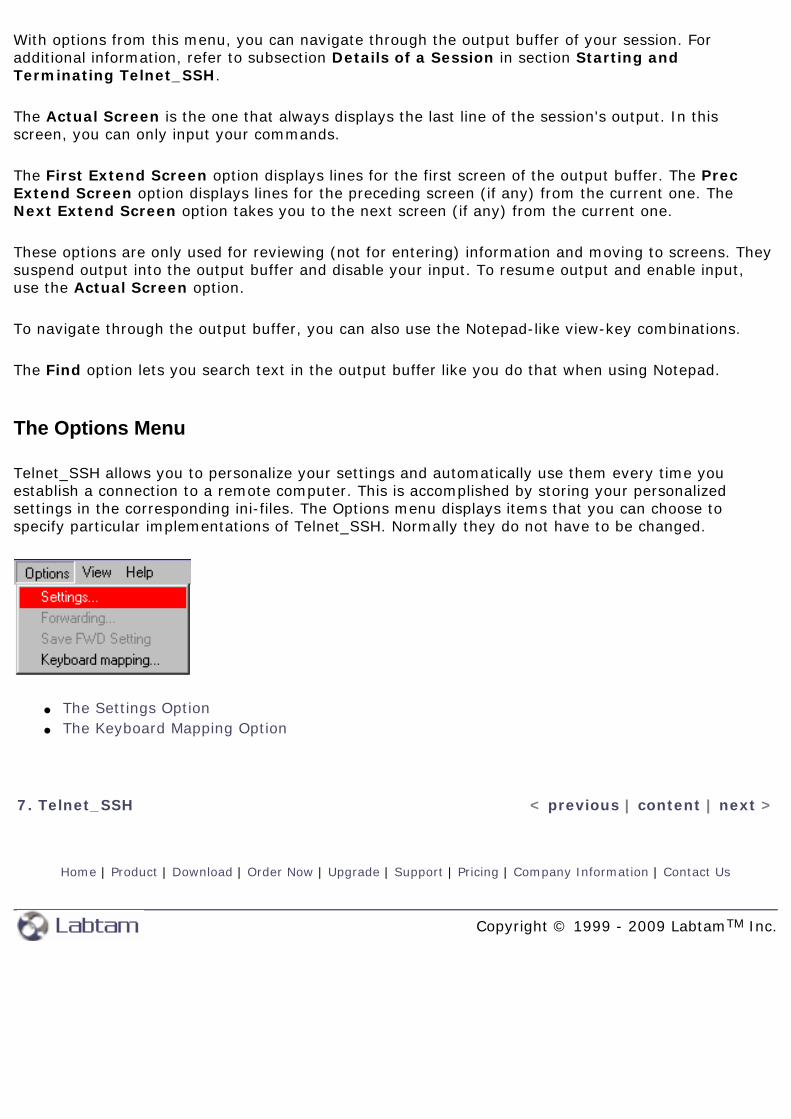
With options from this menu, you can navigate through the output buffer of your session. For additional information, refer to subsection Details of a Session in section Starting and Terminating Telnet_SSH.
The Actual Screen is the one that always displays the last line of the session's output. In this screen, you can only input your commands.
The First Extend Screen option displays lines for the first screen of the output buffer. The Prec Extend Screen option displays lines for the preceding screen (if any) from the current one. The Next Extend Screen option takes you to the next screen (if any) from the current one.
These options are only used for reviewing (not for entering) information and moving to screens. They suspend output into the output buffer and disable your input. To resume output and enable input, use the Actual Screen option.
To navigate through the output buffer, you can also use the Notepad-like view-key combinations.
The Find option lets you search text in the output buffer like you do that when using Notepad.
The Options Menu
Telnet_SSH allows you to personalize your settings and automatically use them every time you establish a connection to a remote computer. This is accomplished by storing your personalized settings in the corresponding ini-files. The Options menu displays items that you can choose to specify particular implementations of Telnet_SSH. Normally they do not have to be changed.
● The Settings Option● The Keyboard Mapping Option
7. Telnet_SSH < previous | content | next >
Home | Product | Download | Order Now | Upgrade | Support | Pricing | Company Information | Contact Us
Copyright © 1999 - 2009 LabtamTM Inc.
This page is a part of ProSSHD online Help Manual.ProSSHD is an SSH client for Windows providing maximum security from PC to Host over a Company Lan/
Wan/Intranet or Internet. It brings you typical remote system administration, file transfers, and access to corporate resources over the Internet. Visit Home of ProSSHD for more information.
7. Telnet_SSH < previous | content | next >
The Settings Option
You can specify the terminal emulation settings for the current connection by choosing the Settings item on the Options menu from the main window.
Also, you can click the Settings button in the Telnet Connect Host dialog box where you can also make some initial settings for your session (that are described in subsection Details of a Session in section Starting and Terminating Telnet_SSH).
The Telnet Settings window presents you with a dialog of six tabs that allow you to view and modify the current terminal emulation settings:
● The Keys Tab● The Type Tab● The Text Tab● The Text Tab for the XTERM Type● The User Defined Tab● The Logging Tab● The ExtScreen Tab
7. Telnet_SSH < previous | content | next >
Home | Product | Download | Order Now | Upgrade | Support | Pricing | Company Information | Contact Us
Copyright © 1999 - 2009 LabtamTM Inc.
This page is a part of ProSSHD online Help Manual.ProSSHD is an SSH client for Windows providing maximum security from PC to Host over a Company Lan/
Wan/Intranet or Internet. It brings you typical remote system administration, file transfers, and access to corporate resources over the Internet. Visit Home of ProSSHD for more information.
7. Telnet_SSH < previous | content | next >
The Keyboard Mapping Option
By using the Keyboard Mapping Option (i.e. keymap editor invoking), you can load, change (re-define keys and create a new keyboard layout), and save any keyboard definition file.
Keyboard files are text files that define the X Protocol Key Symbols (Keysyms) which are mapped to keys on your keyboard. By default, they have the extension KMF, and are located in the home directory. You specify the KMF file to be used by all ProSSHD's programs in the XSettings window.
The keyboard mapping file format uses scancodes which allow the terminal to transmit make and break codes for each keystroke corresponding to the hardware scan codes used by PC keyboards (scan set 1). Make means when the key is pressed; break means when the key is released. The Keyboard Mapping File Format is described in Appendix A.
The Keyboard Mapping dialog box of the keymap editor allows you to map Keysyms, Characters, or Compose Key Sequences to existing keys on your keyboard.
Keysyms is the encoding of a symbol to a key that exists on a physical keyboard.
Compose Key Sequences are key combinations to produce special Keysyms such as accented characters. These Keysyms are generated by typing two keystrokes. The first key is known as a composing key. Each Compose Sequence consists of two key combinations which generate a new pseudo key.
Modifiers are keys that modify the action of other keys. They are not to be confused with a Keysym. In X Keys they include Shift, Lock, Control, and Mod1 through Mod5. Mod1 through Mod5 are the logical keynames for modifier keys that vary from workstation to workstation. Caution should be used when assigning modifiers to latching keys (NumLock, ScrollLock, or CapsLock). Modifiers mapped to these keys should not be used to modify keys in compose sequences.
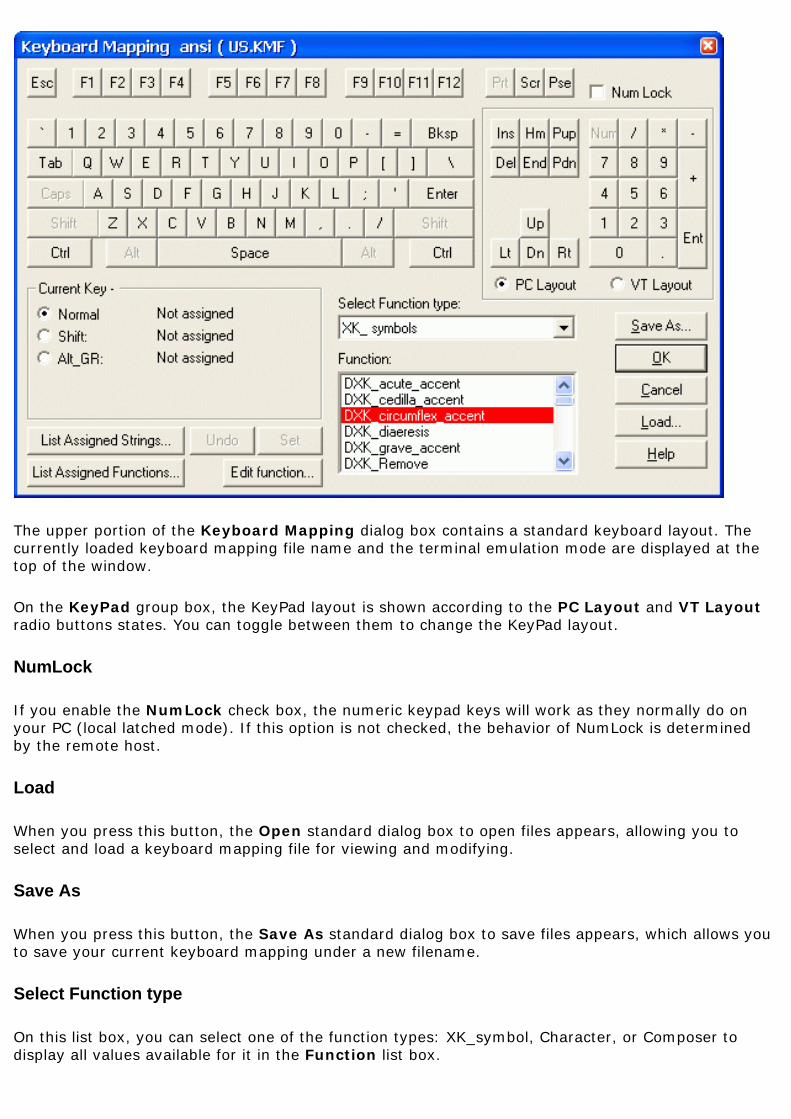
The upper portion of the Keyboard Mapping dialog box contains a standard keyboard layout. The currently loaded keyboard mapping file name and the terminal emulation mode are displayed at the top of the window.
On the KeyPad group box, the KeyPad layout is shown according to the PC Layout and VT Layout radio buttons states. You can toggle between them to change the KeyPad layout.
NumLock
If you enable the NumLock check box, the numeric keypad keys will work as they normally do on your PC (local latched mode). If this option is not checked, the behavior of NumLock is determined by the remote host.
Load
When you press this button, the Open standard dialog box to open files appears, allowing you to select and load a keyboard mapping file for viewing and modifying.
Save As
When you press this button, the Save As standard dialog box to save files appears, which allows you to save your current keyboard mapping under a new filename.
Select Function type
On this list box, you can select one of the function types: XK_symbol, Character, or Composer to display all values available for it in the Function list box.
Function
On this list box, you can select a value for:
● Assigning it to a key with the Set button● Modifying it with the Edit function button.
If the Function type selected is XK_symbol, a list is displayed containing all of the XKeysyms available.
If the Function type selected is Character, a list is displayed containing all of the characters available (including accented characters) with its (decimal/hex) keycode pairs.
If the Function type selected is Composer, a list is displayed containing all of the Compose Key Sequences available.
Set
When you click a key on the keyboard layout, it appears in the Current Key group box with its current definitions:
● Normal (unshifted/unmodified)● Shifted● Modified (with the Alt GR key).
When you have a value highlighted on the Function list box (of type: XK_symbol, Character, or Composer) and a key selected on the keyboard layout, you can press the Set button to change current values assigned to the key and displayed on the Current Key group box to the new value (according to the radio buttons' states).
Undo
Use this button to immediately restore the previous key value every time you press the Set button.
List Assigned Functions
When you press this button, a dialog box appears that allows you to view a list of functions already assigned to functional keys (for the current terminal emulation mode). The list contains function names (X Keysyms), function values (code sequences), and comments on them.
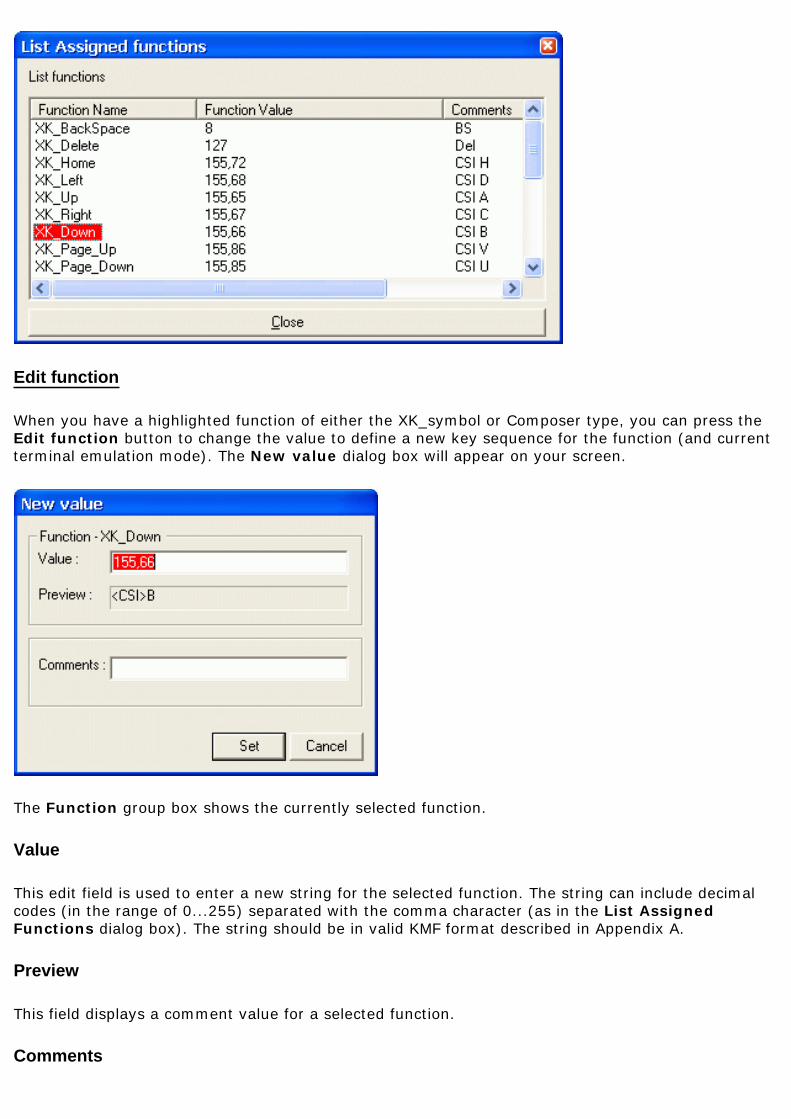
Edit function
When you have a highlighted function of either the XK_symbol or Composer type, you can press the Edit function button to change the value to define a new key sequence for the function (and current terminal emulation mode). The New value dialog box will appear on your screen.
The Function group box shows the currently selected function.
Value
This edit field is used to enter a new string for the selected function. The string can include decimal codes (in the range of 0...255) separated with the comma character (as in the List Assigned Functions dialog box). The string should be in valid KMF format described in Appendix A.
Preview
This field displays a comment value for a selected function.
Comments
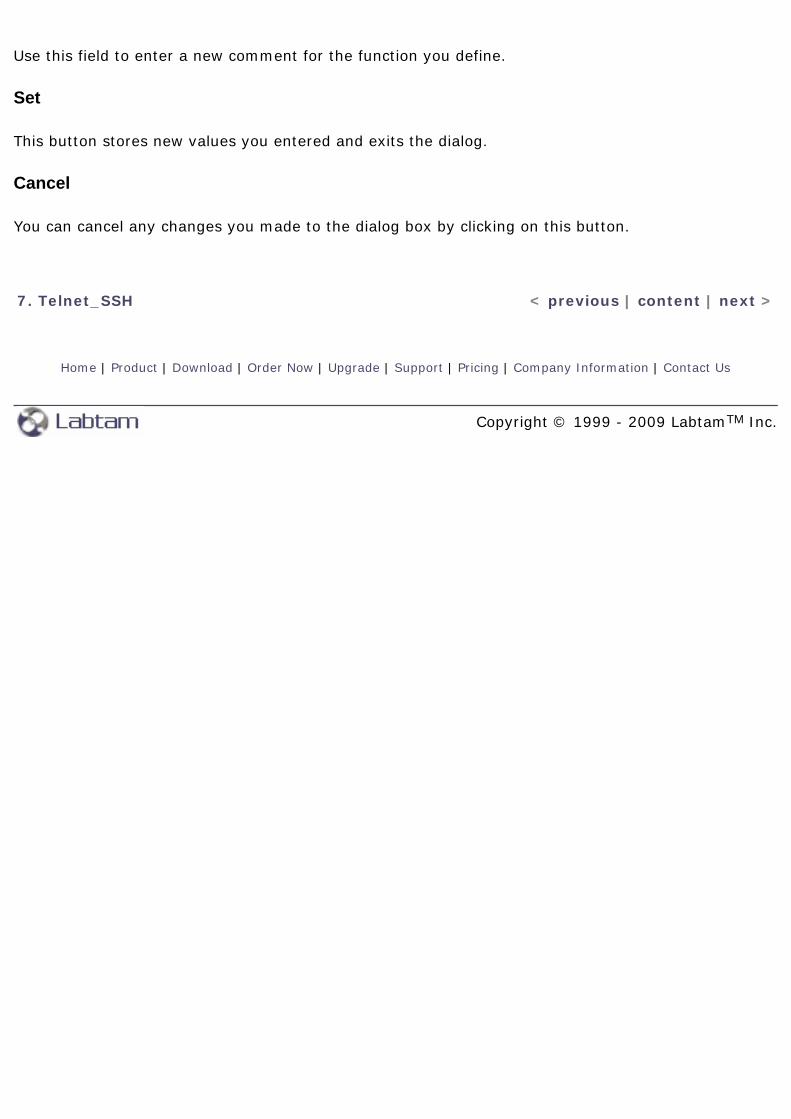
Use this field to enter a new comment for the function you define.
Set
This button stores new values you entered and exits the dialog.
Cancel
You can cancel any changes you made to the dialog box by clicking on this button.
7. Telnet_SSH < previous | content | next >
Home | Product | Download | Order Now | Upgrade | Support | Pricing | Company Information | Contact Us
Copyright © 1999 - 2009 LabtamTM Inc.
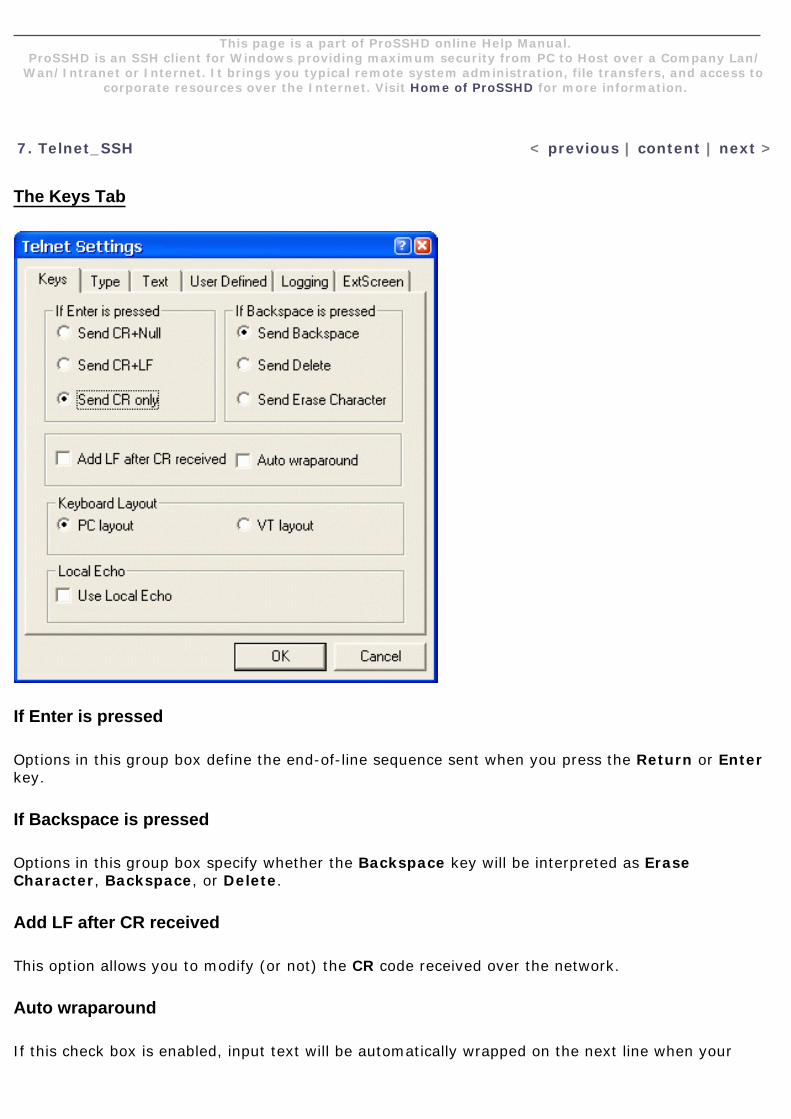
This page is a part of ProSSHD online Help Manual.ProSSHD is an SSH client for Windows providing maximum security from PC to Host over a Company Lan/
Wan/Intranet or Internet. It brings you typical remote system administration, file transfers, and access to corporate resources over the Internet. Visit Home of ProSSHD for more information.
7. Telnet_SSH < previous | content | next >
The Keys Tab
If Enter is pressed
Options in this group box define the end-of-line sequence sent when you press the Return or Enter key.
If Backspace is pressed
Options in this group box specify whether the Backspace key will be interpreted as Erase Character, Backspace, or Delete.
Add LF after CR received
This option allows you to modify (or not) the CR code received over the network.
Auto wraparound
If this check box is enabled, input text will be automatically wrapped on the next line when your
string is too long (i.e. any characters received when the cursor is at the right margin will be displayed on the next line).
Otherwise, input is stopped so you cannot enter more characters (i.e. any characters received when the cursor is at the right margin will be displayed just to the left of the right margin, replacing the current character displayed there).
Keyboard Layout
Options in this group box specify which keyboard layout will be used: PC layout or VT layout.
Local Echo
Some Telnet daemons may not support the standard Telnet protocol (and do not send a symbol of a pressed key). With the Use Local Echo check box enabled, you can display a key character regardless response from that Telnet daemon.
7. Telnet_SSH < previous | content | next >
Home | Product | Download | Order Now | Upgrade | Support | Pricing | Company Information | Contact Us
Copyright © 1999 - 2009 LabtamTM Inc.
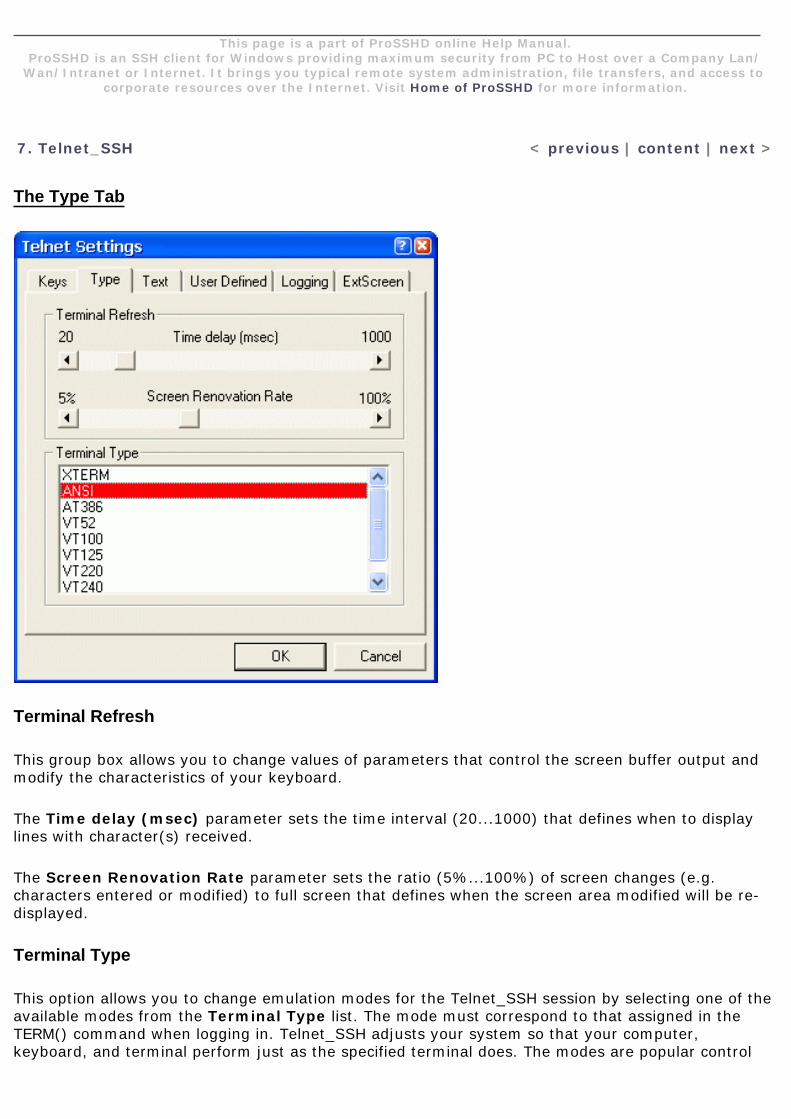
This page is a part of ProSSHD online Help Manual.ProSSHD is an SSH client for Windows providing maximum security from PC to Host over a Company Lan/
Wan/Intranet or Internet. It brings you typical remote system administration, file transfers, and access to corporate resources over the Internet. Visit Home of ProSSHD for more information.
7. Telnet_SSH < previous | content | next >
The Type Tab
Terminal Refresh
This group box allows you to change values of parameters that control the screen buffer output and modify the characteristics of your keyboard.
The Time delay (msec) parameter sets the time interval (20...1000) that defines when to display lines with character(s) received.
The Screen Renovation Rate parameter sets the ratio (5%...100%) of screen changes (e.g. characters entered or modified) to full screen that defines when the screen area modified will be re-displayed.
Terminal Type
This option allows you to change emulation modes for the Telnet_SSH session by selecting one of the available modes from the Terminal Type list. The mode must correspond to that assigned in the TERM() command when logging in. Telnet_SSH adjusts your system so that your computer, keyboard, and terminal perform just as the specified terminal does. The modes are popular control
sets used in terminals originally manufactured by Digital Equipment Corporation (DEC). If you are not sure which terminal to select, select VT-100 (ANSI escape sequences).
7. Telnet_SSH < previous | content | next >
Home | Product | Download | Order Now | Upgrade | Support | Pricing | Company Information | Contact Us
Copyright © 1999 - 2009 LabtamTM Inc.
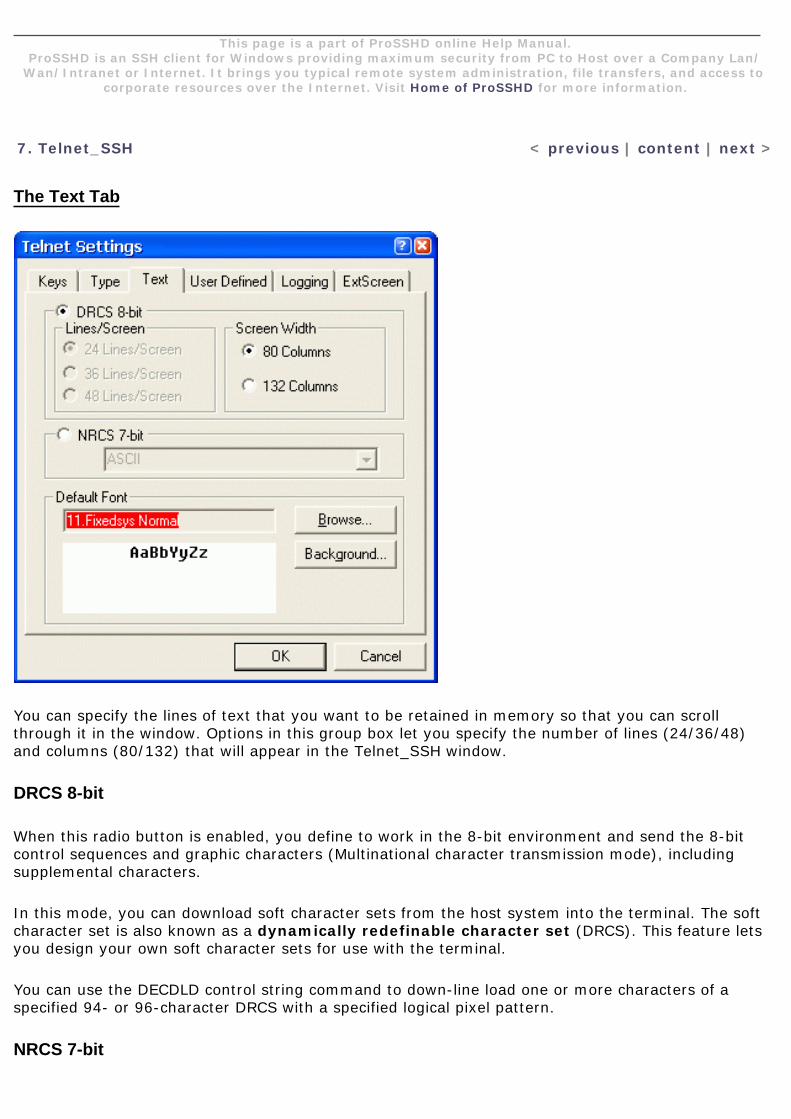
This page is a part of ProSSHD online Help Manual.ProSSHD is an SSH client for Windows providing maximum security from PC to Host over a Company Lan/
Wan/Intranet or Internet. It brings you typical remote system administration, file transfers, and access to corporate resources over the Internet. Visit Home of ProSSHD for more information.
7. Telnet_SSH < previous | content | next >
The Text Tab
You can specify the lines of text that you want to be retained in memory so that you can scroll through it in the window. Options in this group box let you specify the number of lines (24/36/48) and columns (80/132) that will appear in the Telnet_SSH window.
DRCS 8-bit
When this radio button is enabled, you define to work in the 8-bit environment and send the 8-bit control sequences and graphic characters (Multinational character transmission mode), including supplemental characters.
In this mode, you can download soft character sets from the host system into the terminal. The soft character set is also known as a dynamically redefinable character set (DRCS). This feature lets you design your own soft character sets for use with the terminal.
You can use the DECDLD control string command to down-line load one or more characters of a specified 94- or 96-character DRCS with a specified logical pixel pattern.
NRCS 7-bit
When this radio button is enabled, you choose to work in the 7-bit environment only. Select one of the 7-bit character sets from the National Replacement Character Sets (NRCS) pull-down list box to allow for country/region's replacement characters to be sent in the 7-bit escape/control sequences (National character transmission mode).
The following NRC sets are available:
● ASCII● DEC Special Graphics● DEC Supplemental● British● Dutch● Finnish● Norwegian/Danish● Swedish● French● French Canadian● German● Italian● Spanish● Swiss
In VT100 mode, VT52 mode, or when 7-bit NRCS characters is selected (through Set-Up or the DECNRCM command), only ASCII, NRC sets, and DEC Special Graphic characters are available.
Default Font
Characters in the Telnet_SSH window appear in the specified font, size, and colors. Options in this group box allow you to change font parameters used to display text in the Telnet_SSH window.
Browse
When you press this button, the Font standard dialog box appears. This dialog box changes the font name, style, and size of text displayed in the Telnet_SSH window. Also, you can choose a desired font script, color, and effects (strikeout and underline).
When you press the Background button, the Color standard dialog box appears. You can define your color for your background. The Colors tab allows you to customize the color of your screen by emulating the color of the host's attributes. The colors you set in this tab are not altered by the colors settings you make in the Windows Control Panel.
7. Telnet_SSH < previous | content | next >
Home | Product | Download | Order Now | Upgrade | Support | Pricing | Company Information | Contact Us
Copyright © 1999 - 2009 LabtamTM Inc.
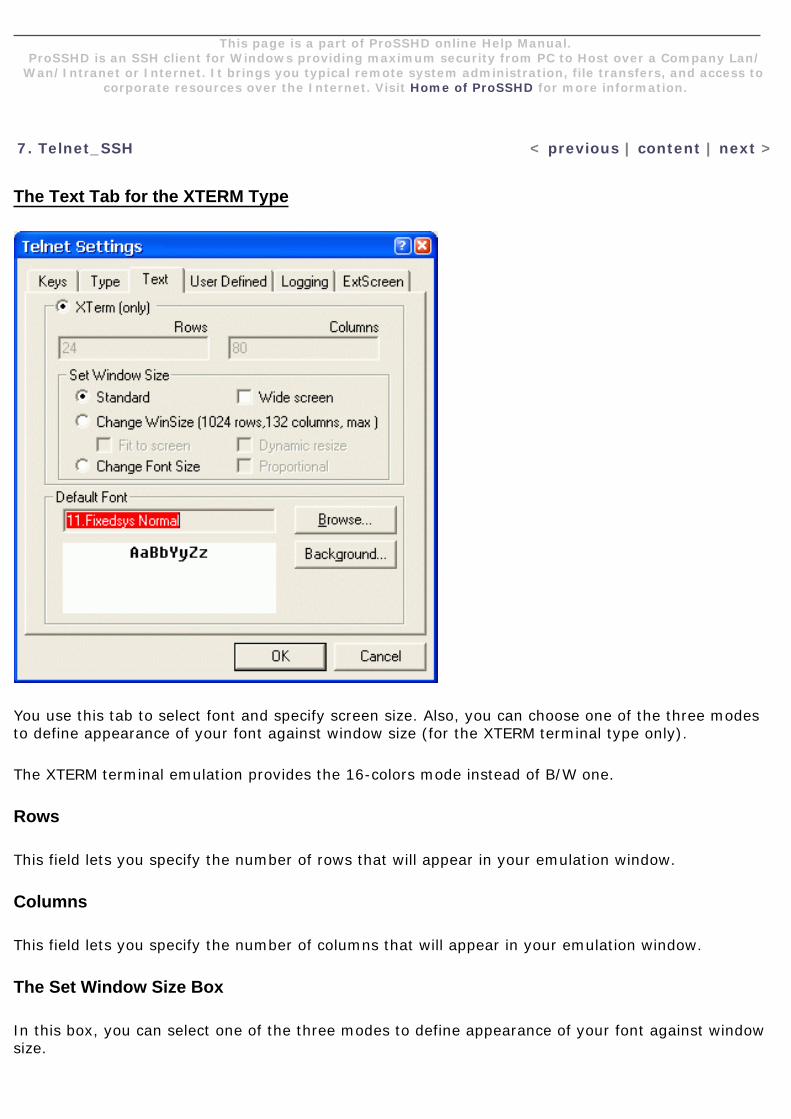
This page is a part of ProSSHD online Help Manual.ProSSHD is an SSH client for Windows providing maximum security from PC to Host over a Company Lan/
Wan/Intranet or Internet. It brings you typical remote system administration, file transfers, and access to corporate resources over the Internet. Visit Home of ProSSHD for more information.
7. Telnet_SSH < previous | content | next >
The Text Tab for the XTERM Type
You use this tab to select font and specify screen size. Also, you can choose one of the three modes to define appearance of your font against window size (for the XTERM terminal type only).
The XTERM terminal emulation provides the 16-colors mode instead of B/W one.
Rows
This field lets you specify the number of rows that will appear in your emulation window.
Columns
This field lets you specify the number of columns that will appear in your emulation window.
The Set Window Size Box
In this box, you can select one of the three modes to define appearance of your font against window size.
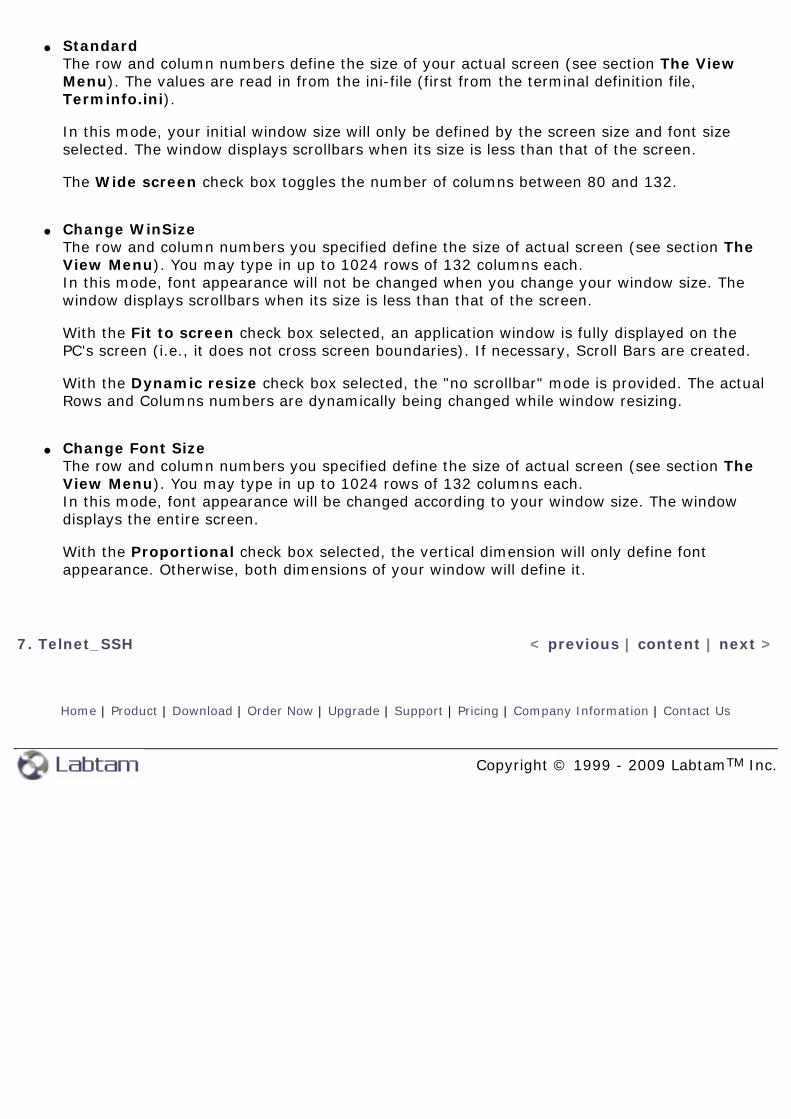
● StandardThe row and column numbers define the size of your actual screen (see section The View Menu). The values are read in from the ini-file (first from the terminal definition file, Terminfo.ini).
In this mode, your initial window size will only be defined by the screen size and font size selected. The window displays scrollbars when its size is less than that of the screen.
The Wide screen check box toggles the number of columns between 80 and 132.
● Change WinSizeThe row and column numbers you specified define the size of actual screen (see section The View Menu). You may type in up to 1024 rows of 132 columns each. In this mode, font appearance will not be changed when you change your window size. The window displays scrollbars when its size is less than that of the screen.
With the Fit to screen check box selected, an application window is fully displayed on the PC's screen (i.e., it does not cross screen boundaries). If necessary, Scroll Bars are created.
With the Dynamic resize check box selected, the "no scrollbar" mode is provided. The actual Rows and Columns numbers are dynamically being changed while window resizing.
● Change Font SizeThe row and column numbers you specified define the size of actual screen (see section The View Menu). You may type in up to 1024 rows of 132 columns each. In this mode, font appearance will be changed according to your window size. The window displays the entire screen.
With the Proportional check box selected, the vertical dimension will only define font appearance. Otherwise, both dimensions of your window will define it.
7. Telnet_SSH < previous | content | next >
Home | Product | Download | Order Now | Upgrade | Support | Pricing | Company Information | Contact Us
Copyright © 1999 - 2009 LabtamTM Inc.
This page is a part of ProSSHD online Help Manual.ProSSHD is an SSH client for Windows providing maximum security from PC to Host over a Company Lan/
Wan/Intranet or Internet. It brings you typical remote system administration, file transfers, and access to corporate resources over the Internet. Visit Home of ProSSHD for more information.
7. Telnet_SSH < previous | content | next >
The User Defined Tab
This tab allows any functional key to be programmed with a user-defined sequence. User-defined keys (UDKs) are a subset of functional keys.
The UDK group box contains a list box with currently defined keys for a current emulation mode. This box allows you to map key symbols to the Unshifted, Shifted, Mode Switched, and Shift-Mode Switched states of the key. You can select a key symbol and then clear (with the Clear button), define or re-define its function value (in the Definition edit field).
You can use UDKs like a macro defined for a functional key: whenever you want to forward a user-defined control string to a host you press the key combination to activate the value. (Also see the List Assigned Functions dialog box in the Keyboard Mapping option below for already defined functional keys.)
Note: some function key combinations are reserved by MS Windows and cannot be redefined.
Upon terminating Telnet_SSH sessions or pressing OK, UDKs are stored in the terminfo.ini file (in the emulation mode section; see Appendix B for details), so they will be defaults for the next session when the file will be read in.
Lock against future definition
Use this check box to lock/unlock UDKs listed against future redefinition (from a remote host).
Definition
This edit field is used to enter new control string codes for UDKs. The string can include any combination of escape sequences, control sequences, or text (without any separating character). The string should be in valid format for the terminal emulation mode. You can scroll the field left or right as needed to allow longer strings to be entered.
Set
This button assigns the value entered in the Definition field to the UDK currently selected in the list box (for the current terminal emulation mode). This key combination will activate the value whenever it is pressed.
Clear
This button removes a value for a currently selected UDK.
Clear All
Click this button to delete the mapping for all UDKs listed.
OK
Pressing OK saves current UDK settings and quits the dialog box.
Cancel
You can cancel any changes you made to the dialog box by clicking on this button.
7. Telnet_SSH < previous | content | next >
Home | Product | Download | Order Now | Upgrade | Support | Pricing | Company Information | Contact Us
Copyright © 1999 - 2009 LabtamTM Inc.
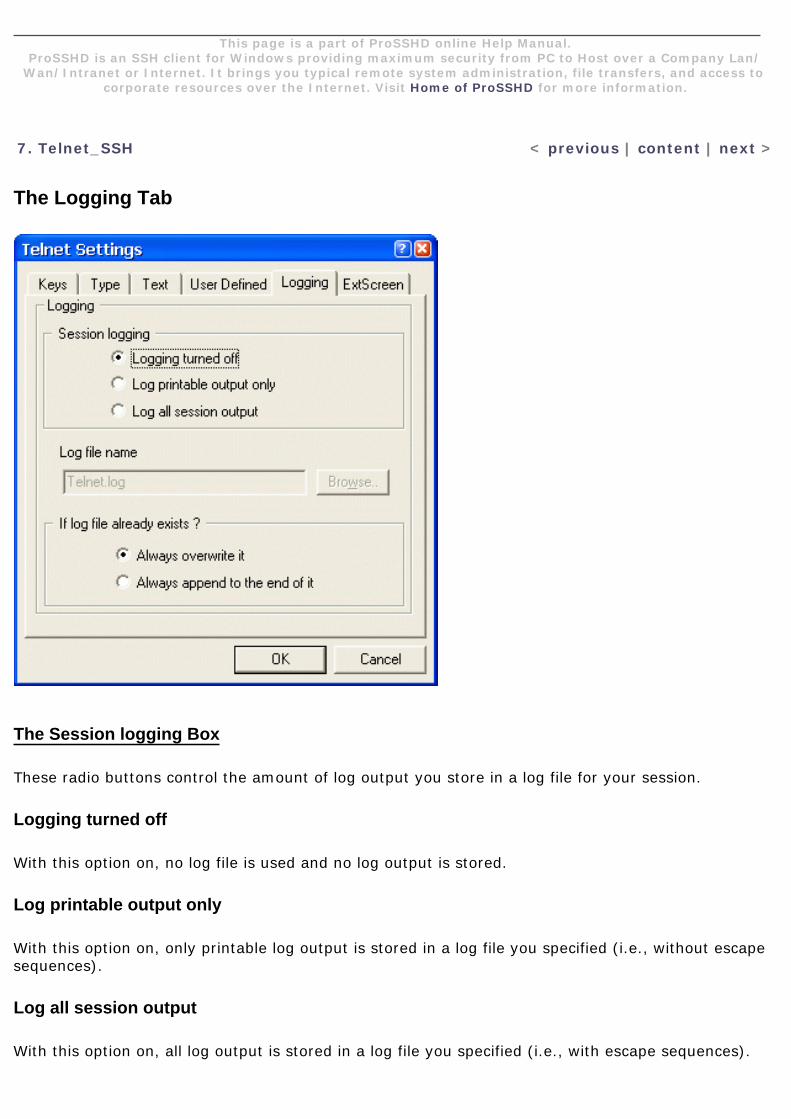
This page is a part of ProSSHD online Help Manual.ProSSHD is an SSH client for Windows providing maximum security from PC to Host over a Company Lan/
Wan/Intranet or Internet. It brings you typical remote system administration, file transfers, and access to corporate resources over the Internet. Visit Home of ProSSHD for more information.
7. Telnet_SSH < previous | content | next >
The Logging Tab
The Session logging Box
These radio buttons control the amount of log output you store in a log file for your session.
Logging turned off
With this option on, no log file is used and no log output is stored.
Log printable output only
With this option on, only printable log output is stored in a log file you specified (i.e., without escape sequences).
Log all session output
With this option on, all log output is stored in a log file you specified (i.e., with escape sequences).
The Log file name Box
This is the actual setting if logging turned on.
In the entry field, you can enter a name for the log file to store data for the session.
The Browse button can help you locate and select a desired file.
The If log file already exists Box
These are the actual radio buttons if logging turned on.
Always overwrite it
With this option on, a new log file for your session will overwrite one that already exists.
Always append to the end of it
With this option on, a new log data will append to the end of the log file that already exists.
7. Telnet_SSH < previous | content | next >
Home | Product | Download | Order Now | Upgrade | Support | Pricing | Company Information | Contact Us
Copyright © 1999 - 2009 LabtamTM Inc.
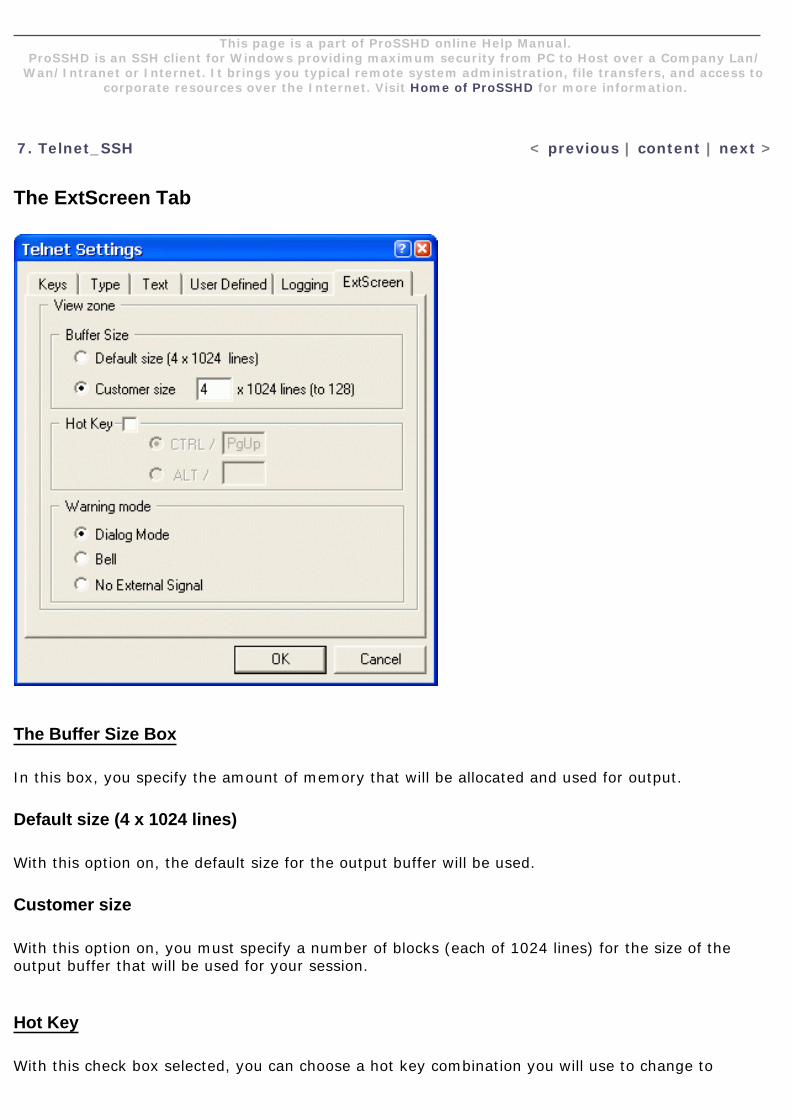
This page is a part of ProSSHD online Help Manual.ProSSHD is an SSH client for Windows providing maximum security from PC to Host over a Company Lan/
Wan/Intranet or Internet. It brings you typical remote system administration, file transfers, and access to corporate resources over the Internet. Visit Home of ProSSHD for more information.
7. Telnet_SSH < previous | content | next >
The ExtScreen Tab
The Buffer Size Box
In this box, you specify the amount of memory that will be allocated and used for output.
Default size (4 x 1024 lines)
With this option on, the default size for the output buffer will be used.
Customer size
With this option on, you must specify a number of blocks (each of 1024 lines) for the size of the output buffer that will be used for your session.
Hot Key
With this check box selected, you can choose a hot key combination you will use to change to
navigation mode to view the output buffer.
Warning mode
These radio buttons control the way the program will let you know that you change to the actual screen while navigating through output buffer.
Dialog Mode
With this option on, a dialog box will appear.
Bell
With this option on, a system bell will sound.
No External Signal
With this option on, the program will not warn you that you change to the actual screen while navigating through output buffer.
7. Telnet_SSH < previous | content | next >
Home | Product | Download | Order Now | Upgrade | Support | Pricing | Company Information | Contact Us
Copyright © 1999 - 2009 LabtamTM Inc.
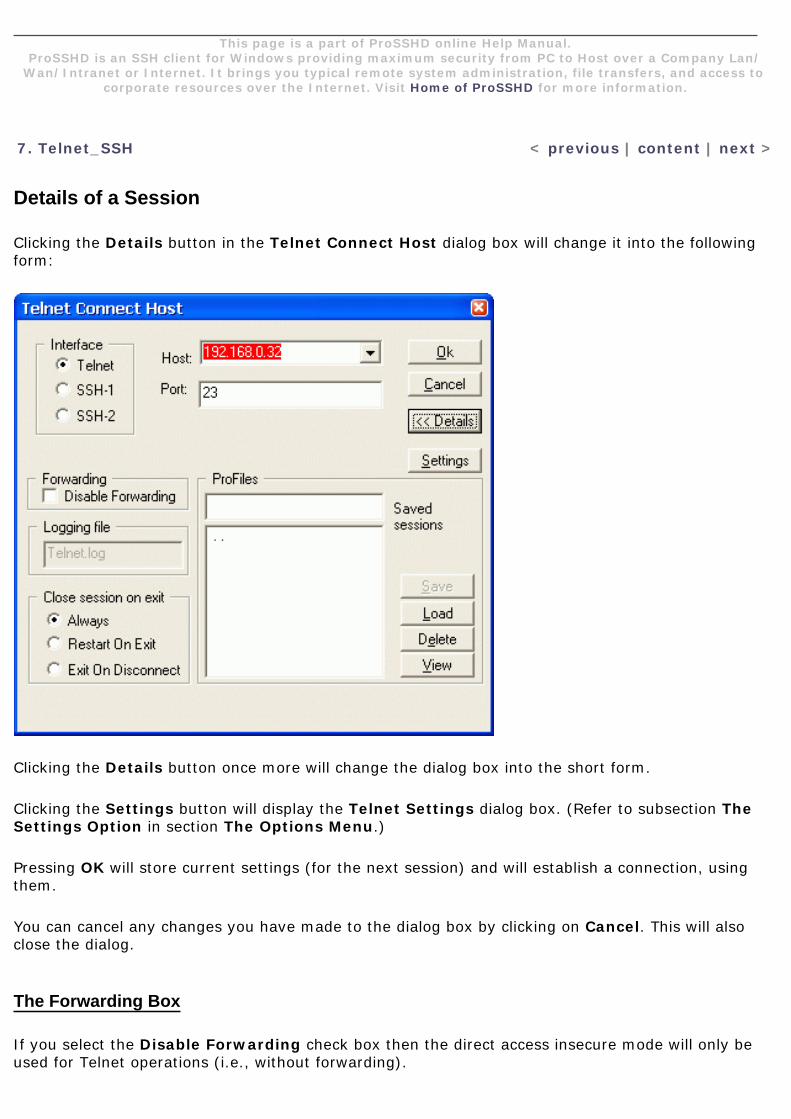
This page is a part of ProSSHD online Help Manual.ProSSHD is an SSH client for Windows providing maximum security from PC to Host over a Company Lan/
Wan/Intranet or Internet. It brings you typical remote system administration, file transfers, and access to corporate resources over the Internet. Visit Home of ProSSHD for more information.
7. Telnet_SSH < previous | content | next >
Details of a Session
Clicking the Details button in the Telnet Connect Host dialog box will change it into the following form:
Clicking the Details button once more will change the dialog box into the short form.
Clicking the Settings button will display the Telnet Settings dialog box. (Refer to subsection The Settings Option in section The Options Menu.)
Pressing OK will store current settings (for the next session) and will establish a connection, using them.
You can cancel any changes you have made to the dialog box by clicking on Cancel. This will also close the dialog.
The Forwarding Box
If you select the Disable Forwarding check box then the direct access insecure mode will only be used for Telnet operations (i.e., without forwarding).
If you want Telnet operations to be done in secure connection mode, clear the Disable Forwarding check box to use forwarding settings during your new SSH1/SSH2 session.
See subsection The Forwarding Option in section The Options Menu for details on how to specify local/remote host/port forwarding.
The Logging file Box
In the entry field, you can enter a name for the log file to store data for the session.
The Close Session on Exit Box
In this box, you choose a mode of closing your session.
Always
In this mode, the session will always be terminated on exit or on Disconnect.
Restart On Exit
In this mode, the session will be restart on exit (i.e., by displaying the Telnet Connect Host dialog box).
Exit on Disconnect
In this mode, the session will be closed on Disconnect.
The ProFiles Box
In this box, you can manipulate with profiles (i.e., saved session settings).
In the ProFiles list, names of available profiles are displayed. In the entry field above, the name of the last loaded (by Load) profile is displayed.
When you start up the program, the settings of the last run are loaded from the ".." profile and are made as current settings. On closing a session, its current settings are automatically stored in the ".." profile. You can Save, Load, and View this profile, but cannot Delete it. Note that Load will change its contents.
Save
In the entry field, you can type in a name for the profile you want to save. The Save button saves current settings in the profile specified and adds its name to the Profiles list.
Load
This button loads the profile you select from the Profiles list, makes its settings as current ones, and
displays its name on the entry field.
Delete
This button will delete the profile selected from the Profiles list.
View
This button displays in Notepad the profile (i.e., its set of settings) you select from the Profiles list.
7. Telnet_SSH < previous | content | next >
Home | Product | Download | Order Now | Upgrade | Support | Pricing | Company Information | Contact Us
Copyright © 1999 - 2009 LabtamTM Inc.
This page is a part of ProSSHD online Help Manual.ProSSHD is an SSH client for Windows providing maximum security from PC to Host over a Company Lan/
Wan/Intranet or Internet. It brings you typical remote system administration, file transfers, and access to corporate resources over the Internet. Visit Home of ProSSHD for more information.
7. Telnet_SSH < previous | content | next >
The "[TELNET]" Section of the ini-file
The "[TELNET]" section of the ini-file may have the following entry lines you can customize for particular needs and applications.
ALTforEMACS=1
This setting allows the ALT key to be used in EMACS.
ExitOnDisconnect=N
This option is used to control the session's restart/completion mode, with N providing the following:
● ExitOnDisconnect=1suppresses starting the new Telnet session;
● ExitOnDisconnect=2suppresses issuing the "Connection lost" message (only writing it into the telnet_s.out file);
● ExitOnDisconnect=3suppresses issuing the "...open forwarded connections..." message (only writing it into the telnet_s.out file).
FineSelectMode=1
This setting is used to set up the Fine Selection mode. In this mode, all "touched" symbols are included in a selection area.
QuickClipBoard=1
This setting is used to set up the Quick Copy to Clipboard mode. In this mode, a selected area is copied to Clipboard immediately on release of the left mouse button.
SelectRect=0
This setting is used to set up the Selection-by-filling mode that provides text highlighting selection in traditional manner.
CtrlCVmode=N
With N=3, this option specifies to use the traditional key combinations, "Ctrl+C"/"Ctrl+V", for Copy/Paste operations in the session.Caution: in this mode, you cannot send another "traditional" key combination, "Ctrl+C" (i.e., Break Event), to remote applications.
With N=5, this option specifies to use the default key combinations, "Ctrl_L+Shift_L+C"/"Ctrl_L+Shift_L+V", for Copy/Paste operations in the session.
7. Telnet_SSH < previous | content | next >
Home | Product | Download | Order Now | Upgrade | Support | Pricing | Company Information | Contact Us
Copyright © 1999 - 2009 LabtamTM Inc.

This page is a part of ProSSHD online Help Manual.ProSSHD is an SSH client for Windows providing maximum security from PC to Host over a Company Lan/
Wan/Intranet or Internet. It brings you typical remote system administration, file transfers, and access to corporate resources over the Internet. Visit Home of ProSSHD for more information.
7. Telnet_SSH < previous | content | next >
Running Telnet_SSH with Command Line Parameters
The 'host' parameter
You can launch Telnet_SSH with the 'host' command line parameter to avoid interactive input of it. 'Host' may be either a host name or IP address for the remote machine you want to connect to.
Examples:
PATH\Telnet_s.exe u2-1
PATH\Telnet_s.exe 192.168.136.223
where PATH indicates your ProSSHD home directory.
The 'xini' parameter
You can launch Telnet_SSH with the 'xini' command line parameter:
PATH\Telnet_s.exe -xini <IniFilePath>
where <IniFilePath> specifies a full path to a specific ini-file.
This feature allows you to run several Telnet_SSH sessions each with its own xwp.ini file (i.e. settings).
In order to do so, you can create a new Telnet_SSH shortcut (e.g., in the ProSSHD Programs' folder) and fill in the Target field in Properties of it with the command. For example, the Target field in Properties of the Telnet_SSH shortcut might contain the following line:
"PATH\Telnet_s.exe" -xini myxwp1.ini
By default, the field contains a call of Telnet_SSH with no arguments, and the xwp.ini file will be used in this case.
To create your specific ini-file, you can copy the xwp.ini file and then change required parameters with the Telnet_SSH utility by starting it with the command line parameter.
The 'trace' parameter
You can launch Telnet_SSH with the 'trace' command line parameter
PATH\Telnet_s.exe -trace
to collect debug information in the telnet_s.out file in the home directory.
The 'ssh1' and 'ssh2' parameters
You can launch Telnet_SSH with the 'ssh1' or 'ssh2' command line parameter
PATH\Telnet_s.exe –ssh1orPATH\Telnet_s.exe –ssh2
to run it using the SSH1 or SSH2 protocol mode respectively over an insecure channel to provide secure communications between your PC and the remote server.
The 'lxdn' parameter
The "-lxdn [<DisplayNumber>]" command line parameter is used to set up the DISPLAY session environment variable if a remote daemon supports it. This provides correct X11-forwarding (if set).
The "-lxdn" option means looking up running XServer (i.e., Telnet_SSH understands the local XServer's "DynamicDisplayNumber" mode and correctly looks up running XServer).
The 'mout' parameter
The "-mout [<outputfile>]" command line option is used to provide a "readable" text-tracing to the "outputfile" log-file for your session.
The 'log' parameter
The "-log <LogLevel>" option is used to set up the level of tracing (0..7).
Also, you can set up SSH-tracing by adding the "LogLevel=7" line in the "[tSSH2Pro]" section of the tsspro.ini file.
The 'prof' parameter
With the "-prof profilename" command line option, you can initialize a session that will first read in the profile specified and then use its data for the session.
7. Telnet_SSH < previous | content | next >
Home | Product | Download | Order Now | Upgrade | Support | Pricing | Company Information | Contact Us
This page is a part of ProSSHD online Help Manual.ProSSHD is an SSH client for Windows providing maximum security from PC to Host over a Company Lan/
Wan/Intranet or Internet. It brings you typical remote system administration, file transfers, and access to corporate resources over the Internet. Visit Home of ProSSHD for more information.
7. Telnet_SSH < previous | content | next >
Terminal Emulation in Telnet_SSH
The Telnet_SSH program can emulate XTERM, AT386, ANSI, VT52, VT100, VT125, VT220 and VT240 terminals. The terminfo.ini file describes the capabilities of these terminals. This description contains control sequences for them and is very similar to the TERMINFO source code of the UNIX system. So users can edit the file to suit to the special environment.
By editing the terminfo.ini file, users can define the terminal type, the screen size (the number of lines and columns), the number of colors, the color palette (i.e. RGB values for each color number), sequences to be transferred to remote hosts for each user-defined key on the keyboard.
Appendix B contains detailed information on how to describe the terminal emulation capabilities.
7. Telnet_SSH < previous | content | next >
Home | Product | Download | Order Now | Upgrade | Support | Pricing | Company Information | Contact Us
Copyright © 1999 - 2009 LabtamTM Inc.
This page is a part of ProSSHD online Help Manual.ProSSHD is an SSH client for Windows providing maximum security from PC to Host over a Company Lan/
Wan/Intranet or Internet. It brings you typical remote system administration, file transfers, and access to corporate resources over the Internet. Visit Home of ProSSHD for more information.
< previous | content | next >
Appendix A Keyboard Mapping File Format
Keyboard Mapping File Format
The Keyboard Mapping file has two sections, [KEYS] and [COMPOSERS_XKK], each consisting of keysym statements and possible comments. Text entered after a ';' sign is ignored and will be treated as a comment.
A keysym specification uses a set of standard X numbers to describe a symbol. For example, a lowercase 'a' has a special number code.
The KEYS Section
In the [KEYS] section, each keysym statement associates a set of one to four keysyms with a physical key.
Synopsis of a statement is:
KEYnn = keysym1 [, keysym2 [, keysym3 [, keysym4]]]
'nn' is the identifying number of a PC's key. Every PC's key has an entry in the section. The entry name is the text KEY followed by the decimal ScanCode number (key_number) and followed by the letter 'E' if the key has the extended flag set.
keysym1 is the keysym associated with the key in a non-shifted state (Normal). This is the only parameter that must be entered.
keysym2 is the keysym associated with the key when the key is Shifted.
keysym3 is the keysym associated with the key when a Mode-Shift key is pressed (Alt-Gr).
keysym4 is the keysym associated with the Shift + Mode-Shift sequence (Shift + Alt-Gr).
A Mode-Shift is a physical key which has a keysym value of 0xFF7E, (predefined as the ModeSwitch symbol), and which is assigned to one of the modifiers MOD1 to MOD5.
A full keysym specification consists of four numbers, each of which is in the range of 0 through 255 decimal (or 0x00 through 0xFF hex). The standard predefined X keysyms use only the third and fourth numbers. The first two numbers are assumed to be zero.
ProSSHD accepts keysyms in the following three formats:
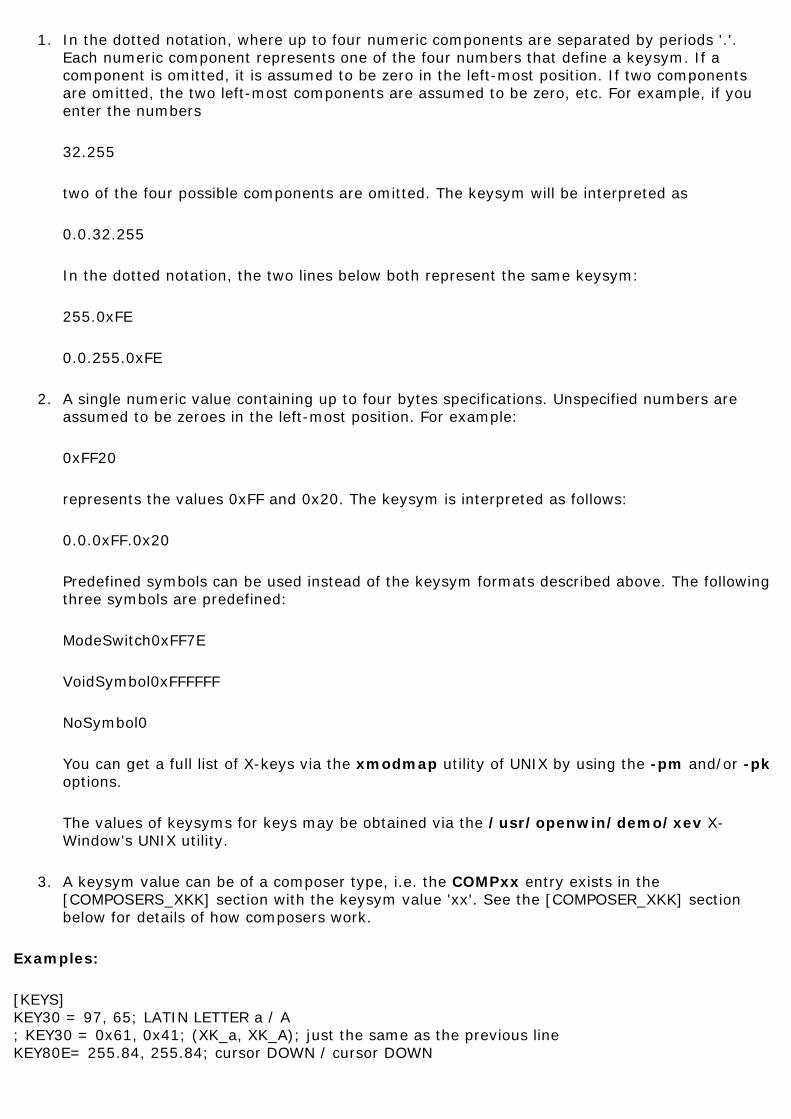
1. In the dotted notation, where up to four numeric components are separated by periods '.'. Each numeric component represents one of the four numbers that define a keysym. If a component is omitted, it is assumed to be zero in the left-most position. If two components are omitted, the two left-most components are assumed to be zero, etc. For example, if you enter the numbers
32.255
two of the four possible components are omitted. The keysym will be interpreted as
0.0.32.255
In the dotted notation, the two lines below both represent the same keysym:
255.0xFE
0.0.255.0xFE
2. A single numeric value containing up to four bytes specifications. Unspecified numbers are assumed to be zeroes in the left-most position. For example:
0xFF20
represents the values 0xFF and 0x20. The keysym is interpreted as follows:
0.0.0xFF.0x20
Predefined symbols can be used instead of the keysym formats described above. The following three symbols are predefined:
ModeSwitch0xFF7E
VoidSymbol0xFFFFFF
NoSymbol0
You can get a full list of X-keys via the xmodmap utility of UNIX by using the -pm and/or -pk options.
The values of keysyms for keys may be obtained via the /usr/openwin/demo/xev X-Window's UNIX utility.
3. A keysym value can be of a composer type, i.e. the COMPxx entry exists in the [COMPOSERS_XKK] section with the keysym value 'xx'. See the [COMPOSER_XKK] section below for details of how composers work.
Examples:
[KEYS]KEY30 = 97, 65; LATIN LETTER a / A; KEY30 = 0x61, 0x41; (XK_a, XK_A); just the same as the previous lineKEY80E= 255.84, 255.84; cursor DOWN / cursor DOWN
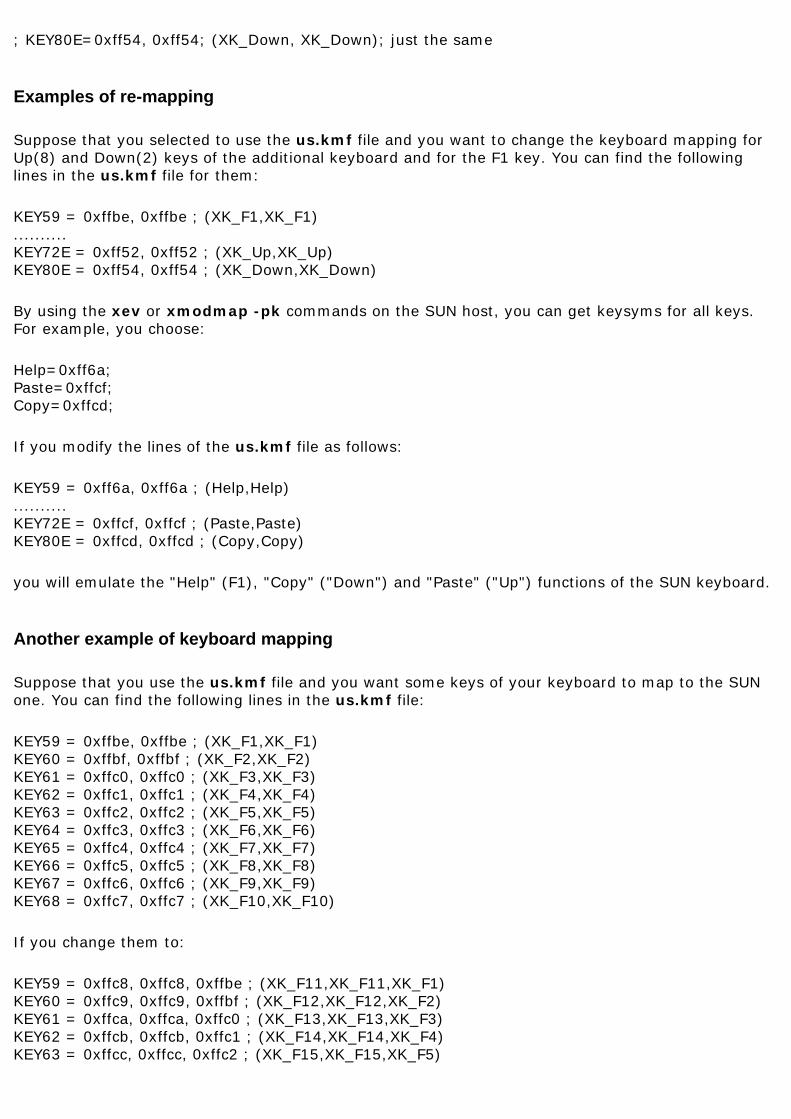
; KEY80E=0xff54, 0xff54; (XK_Down, XK_Down); just the same
Examples of re-mapping
Suppose that you selected to use the us.kmf file and you want to change the keyboard mapping for Up(8) and Down(2) keys of the additional keyboard and for the F1 key. You can find the following lines in the us.kmf file for them:
KEY59 = 0xffbe, 0xffbe ; (XK_F1,XK_F1)..........KEY72E = 0xff52, 0xff52 ; (XK_Up,XK_Up)KEY80E = 0xff54, 0xff54 ; (XK_Down,XK_Down)
By using the xev or xmodmap -pk commands on the SUN host, you can get keysyms for all keys. For example, you choose:
Help=0xff6a;Paste=0xffcf;Copy=0xffcd;
If you modify the lines of the us.kmf file as follows:
KEY59 = 0xff6a, 0xff6a ; (Help,Help)..........KEY72E = 0xffcf, 0xffcf ; (Paste,Paste)KEY80E = 0xffcd, 0xffcd ; (Copy,Copy)
you will emulate the "Help" (F1), "Copy" ("Down") and "Paste" ("Up") functions of the SUN keyboard.
Another example of keyboard mapping
Suppose that you use the us.kmf file and you want some keys of your keyboard to map to the SUN one. You can find the following lines in the us.kmf file:
KEY59 = 0xffbe, 0xffbe ; (XK_F1,XK_F1)KEY60 = 0xffbf, 0xffbf ; (XK_F2,XK_F2)KEY61 = 0xffc0, 0xffc0 ; (XK_F3,XK_F3)KEY62 = 0xffc1, 0xffc1 ; (XK_F4,XK_F4)KEY63 = 0xffc2, 0xffc2 ; (XK_F5,XK_F5)KEY64 = 0xffc3, 0xffc3 ; (XK_F6,XK_F6)KEY65 = 0xffc4, 0xffc4 ; (XK_F7,XK_F7)KEY66 = 0xffc5, 0xffc5 ; (XK_F8,XK_F8)KEY67 = 0xffc6, 0xffc6 ; (XK_F9,XK_F9)KEY68 = 0xffc7, 0xffc7 ; (XK_F10,XK_F10)
If you change them to:
KEY59 = 0xffc8, 0xffc8, 0xffbe ; (XK_F11,XK_F11,XK_F1)KEY60 = 0xffc9, 0xffc9, 0xffbf ; (XK_F12,XK_F12,XK_F2)KEY61 = 0xffca, 0xffca, 0xffc0 ; (XK_F13,XK_F13,XK_F3)KEY62 = 0xffcb, 0xffcb, 0xffc1 ; (XK_F14,XK_F14,XK_F4)KEY63 = 0xffcc, 0xffcc, 0xffc2 ; (XK_F15,XK_F15,XK_F5)
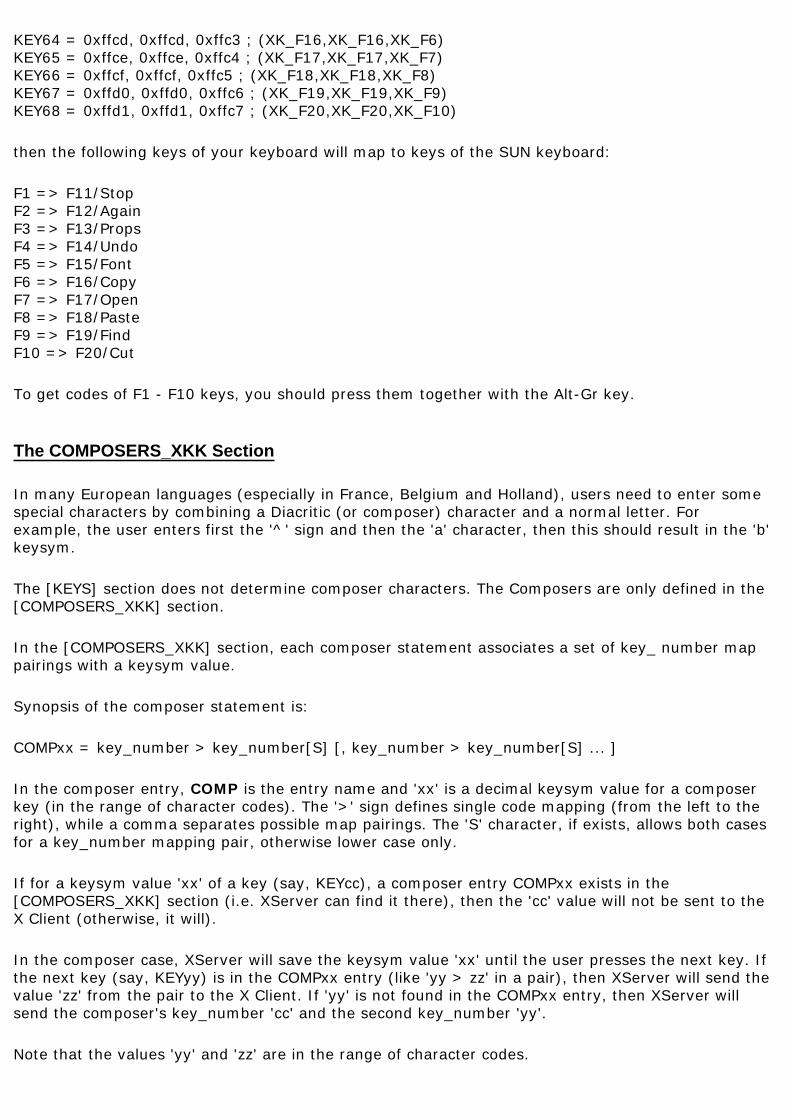
KEY64 = 0xffcd, 0xffcd, 0xffc3 ; (XK_F16,XK_F16,XK_F6)KEY65 = 0xffce, 0xffce, 0xffc4 ; (XK_F17,XK_F17,XK_F7)KEY66 = 0xffcf, 0xffcf, 0xffc5 ; (XK_F18,XK_F18,XK_F8)KEY67 = 0xffd0, 0xffd0, 0xffc6 ; (XK_F19,XK_F19,XK_F9)KEY68 = 0xffd1, 0xffd1, 0xffc7 ; (XK_F20,XK_F20,XK_F10)
then the following keys of your keyboard will map to keys of the SUN keyboard:
F1 => F11/StopF2 => F12/AgainF3 => F13/PropsF4 => F14/UndoF5 => F15/FontF6 => F16/CopyF7 => F17/OpenF8 => F18/PasteF9 => F19/FindF10 => F20/Cut
To get codes of F1 - F10 keys, you should press them together with the Alt-Gr key.
The COMPOSERS_XKK Section
In many European languages (especially in France, Belgium and Holland), users need to enter some special characters by combining a Diacritic (or composer) character and a normal letter. For example, the user enters first the '^' sign and then the 'a' character, then this should result in the 'b' keysym.
The [KEYS] section does not determine composer characters. The Composers are only defined in the [COMPOSERS_XKK] section.
In the [COMPOSERS_XKK] section, each composer statement associates a set of key_ number map pairings with a keysym value.
Synopsis of the composer statement is:
COMPxx = key_number > key_number[S] [, key_number > key_number[S] ... ]
In the composer entry, COMP is the entry name and 'xx' is a decimal keysym value for a composer key (in the range of character codes). The '>' sign defines single code mapping (from the left to the right), while a comma separates possible map pairings. The 'S' character, if exists, allows both cases for a key_number mapping pair, otherwise lower case only.
If for a keysym value 'xx' of a key (say, KEYcc), a composer entry COMPxx exists in the [COMPOSERS_XKK] section (i.e. XServer can find it there), then the 'cc' value will not be sent to the X Client (otherwise, it will).
In the composer case, XServer will save the keysym value 'xx' until the user presses the next key. If the next key (say, KEYyy) is in the COMPxx entry (like 'yy > zz' in a pair), then XServer will send the value 'zz' from the pair to the X Client. If 'yy' is not found in the COMPxx entry, then XServer will send the composer's key_number 'cc' and the second key_number 'yy'.
Note that the values 'yy' and 'zz' are in the range of character codes.
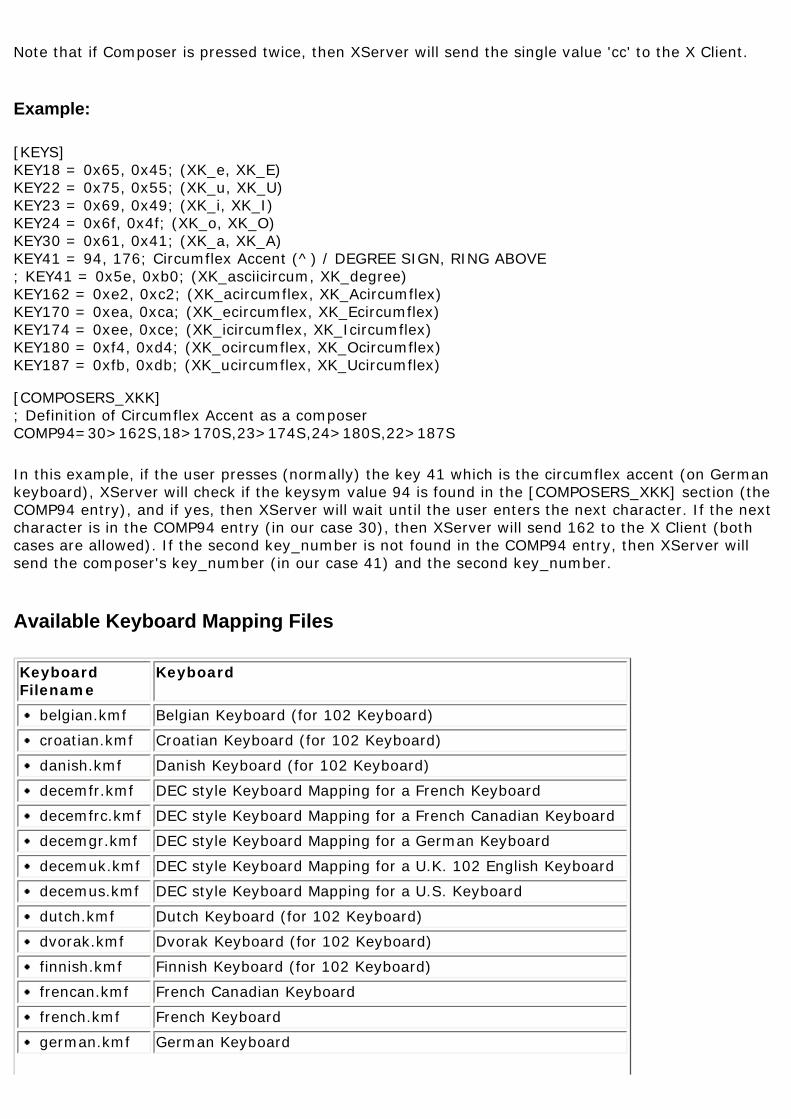
Note that if Composer is pressed twice, then XServer will send the single value 'cc' to the X Client.
Example:
[KEYS]KEY18 = 0x65, 0x45; (XK_e, XK_E)KEY22 = 0x75, 0x55; (XK_u, XK_U)KEY23 = 0x69, 0x49; (XK_i, XK_I)KEY24 = 0x6f, 0x4f; (XK_o, XK_O)KEY30 = 0x61, 0x41; (XK_a, XK_A)KEY41 = 94, 176; Circumflex Accent (^) / DEGREE SIGN, RING ABOVE; KEY41 = 0x5e, 0xb0; (XK_asciicircum, XK_degree)KEY162 = 0xe2, 0xc2; (XK_acircumflex, XK_Acircumflex)KEY170 = 0xea, 0xca; (XK_ecircumflex, XK_Ecircumflex)KEY174 = 0xee, 0xce; (XK_icircumflex, XK_Icircumflex)KEY180 = 0xf4, 0xd4; (XK_ocircumflex, XK_Ocircumflex)KEY187 = 0xfb, 0xdb; (XK_ucircumflex, XK_Ucircumflex)
[COMPOSERS_XKK]; Definition of Circumflex Accent as a composerCOMP94=30>162S,18>170S,23>174S,24>180S,22>187S
In this example, if the user presses (normally) the key 41 which is the circumflex accent (on German keyboard), XServer will check if the keysym value 94 is found in the [COMPOSERS_XKK] section (the COMP94 entry), and if yes, then XServer will wait until the user enters the next character. If the next character is in the COMP94 entry (in our case 30), then XServer will send 162 to the X Client (both cases are allowed). If the second key_number is not found in the COMP94 entry, then XServer will send the composer's key_number (in our case 41) and the second key_number.
Available Keyboard Mapping Files
Keyboard Filename
Keyboard
belgian.kmf Belgian Keyboard (for 102 Keyboard)
croatian.kmf Croatian Keyboard (for 102 Keyboard)
danish.kmf Danish Keyboard (for 102 Keyboard)
decemfr.kmf DEC style Keyboard Mapping for a French Keyboard
decemfrc.kmf DEC style Keyboard Mapping for a French Canadian Keyboard
decemgr.kmf DEC style Keyboard Mapping for a German Keyboard
decemuk.kmf DEC style Keyboard Mapping for a U.K. 102 English Keyboard
decemus.kmf DEC style Keyboard Mapping for a U.S. Keyboard
dutch.kmf Dutch Keyboard (for 102 Keyboard)
dvorak.kmf Dvorak Keyboard (for 102 Keyboard)
finnish.kmf Finnish Keyboard (for 102 Keyboard)
frencan.kmf French Canadian Keyboard
french.kmf French Keyboard
german.kmf German Keyboard
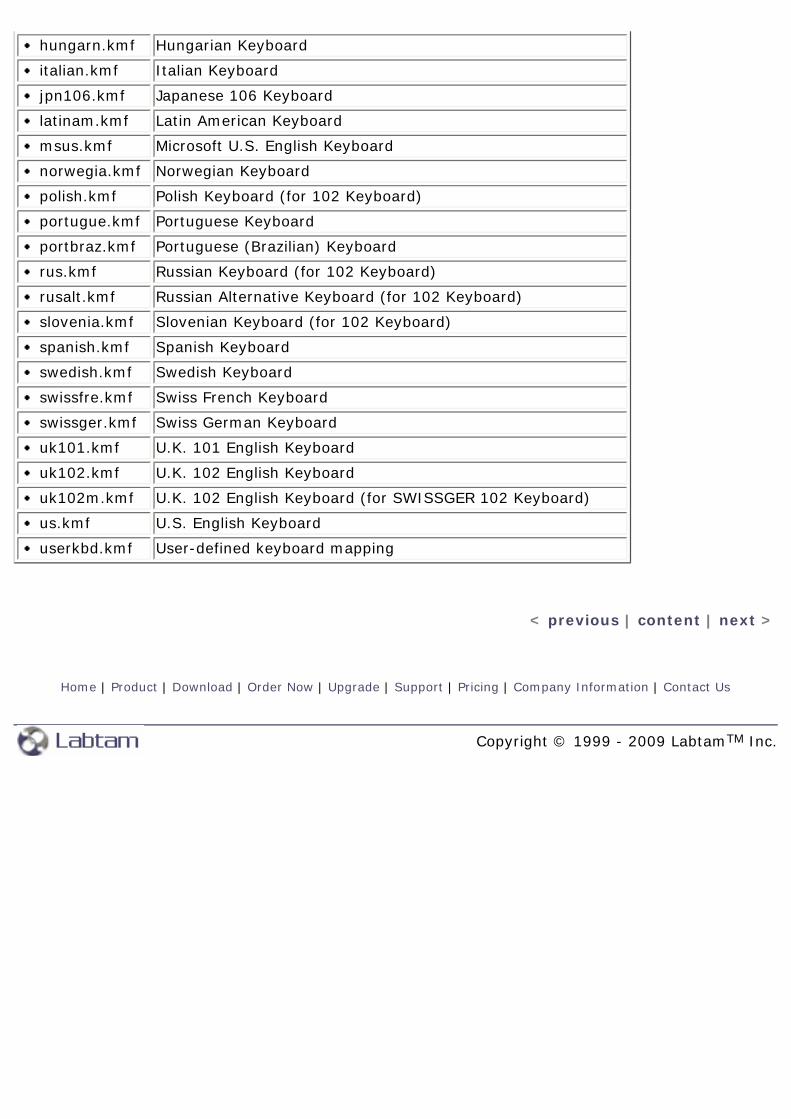
hungarn.kmf Hungarian Keyboard
italian.kmf Italian Keyboard
jpn106.kmf Japanese 106 Keyboard
latinam.kmf Latin American Keyboard
msus.kmf Microsoft U.S. English Keyboard
norwegia.kmf Norwegian Keyboard
polish.kmf Polish Keyboard (for 102 Keyboard)
portugue.kmf Portuguese Keyboard
portbraz.kmf Portuguese (Brazilian) Keyboard
rus.kmf Russian Keyboard (for 102 Keyboard)
rusalt.kmf Russian Alternative Keyboard (for 102 Keyboard)
slovenia.kmf Slovenian Keyboard (for 102 Keyboard)
spanish.kmf Spanish Keyboard
swedish.kmf Swedish Keyboard
swissfre.kmf Swiss French Keyboard
swissger.kmf Swiss German Keyboard
uk101.kmf U.K. 101 English Keyboard
uk102.kmf U.K. 102 English Keyboard
uk102m.kmf U.K. 102 English Keyboard (for SWISSGER 102 Keyboard)
us.kmf U.S. English Keyboard
userkbd.kmf User-defined keyboard mapping
< previous | content | next >
Home | Product | Download | Order Now | Upgrade | Support | Pricing | Company Information | Contact Us
Copyright © 1999 - 2009 LabtamTM Inc.
This page is a part of ProSSHD online Help Manual.ProSSHD is an SSH client for Windows providing maximum security from PC to Host over a Company Lan/
Wan/Intranet or Internet. It brings you typical remote system administration, file transfers, and access to corporate resources over the Internet. Visit Home of ProSSHD for more information.
7. Telnet_SSH < previous | content | next >
The Forwarding Option
Port forwarding is the concept of connecting a logical port on a local machine to a port on a remote machine over a secure (encrypted) channel. All requests for services sent to the local port are then forwarded across the secure channel to the corresponding port on the remote machine.
Port forwarding of arbitrary TCP/IP connections over the secure channel can be used for secure connections to electronic purses or going through firewalls. Port forwarding is a powerful tool that allows you to secure TCP/IP traffic by using Telnet_SSH' SSH1/SSH2 protocol support. This means that you can encrypt application data for insecure network traffic using protocols like SMTP, POP, and IMAP.
Telnet_SSH supports X11 forwarding. This feature allows X Window traffic between the X server and X client (forwarding X Window packets through the SSH session) to be encrypted.
In general, with any port forwarded by Telnet_SSH for an application, the application needs to be configured to use 127.0.0.1 (otherwise known as "localhost" or "loopback") as its application server address. Hostname and port configuration needs to be done in both Telnet_SSH and the client application (e.g., e-mail). After connecting with this session, the client application traffic is encrypted to the SSH server as long as Telnet_SSH is running. If the connection to the SSH server is broken or closed, the forwarded ports will no longer be forwarded, and the client applications may receive an error when they try to connect to the local port.
It is important to understand that the client data is only encrypted between the machine that Telnet_SSH is running on and the SSH server that Telnet_SSH is connected to. Any data moving from the SSH server across the network to another server is not encrypted.
The Forwarding option presents you with the Forwarding Setup window (for the SSH1/SSH2 protocol mode):
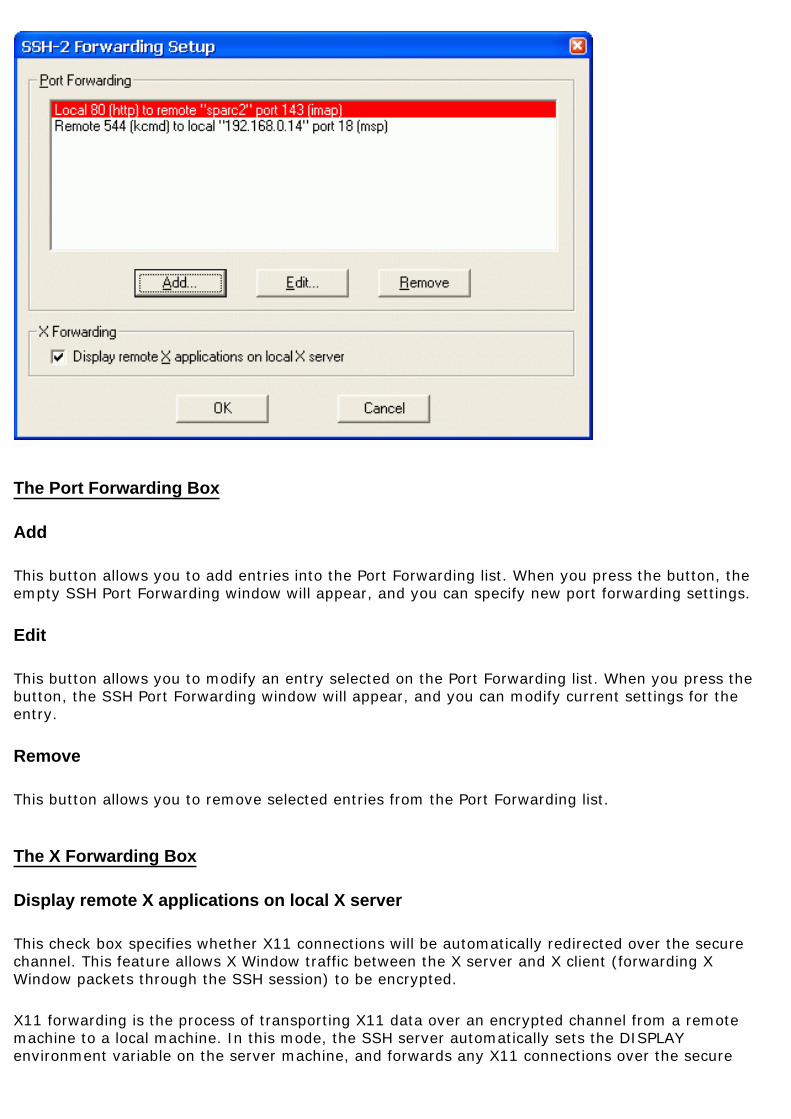
The Port Forwarding Box
Add
This button allows you to add entries into the Port Forwarding list. When you press the button, the empty SSH Port Forwarding window will appear, and you can specify new port forwarding settings.
Edit
This button allows you to modify an entry selected on the Port Forwarding list. When you press the button, the SSH Port Forwarding window will appear, and you can modify current settings for the entry.
Remove
This button allows you to remove selected entries from the Port Forwarding list.
The X Forwarding Box
Display remote X applications on local X server
This check box specifies whether X11 connections will be automatically redirected over the secure channel. This feature allows X Window traffic between the X server and X client (forwarding X Window packets through the SSH session) to be encrypted.
X11 forwarding is the process of transporting X11 data over an encrypted channel from a remote machine to a local machine. In this mode, the SSH server automatically sets the DISPLAY environment variable on the server machine, and forwards any X11 connections over the secure
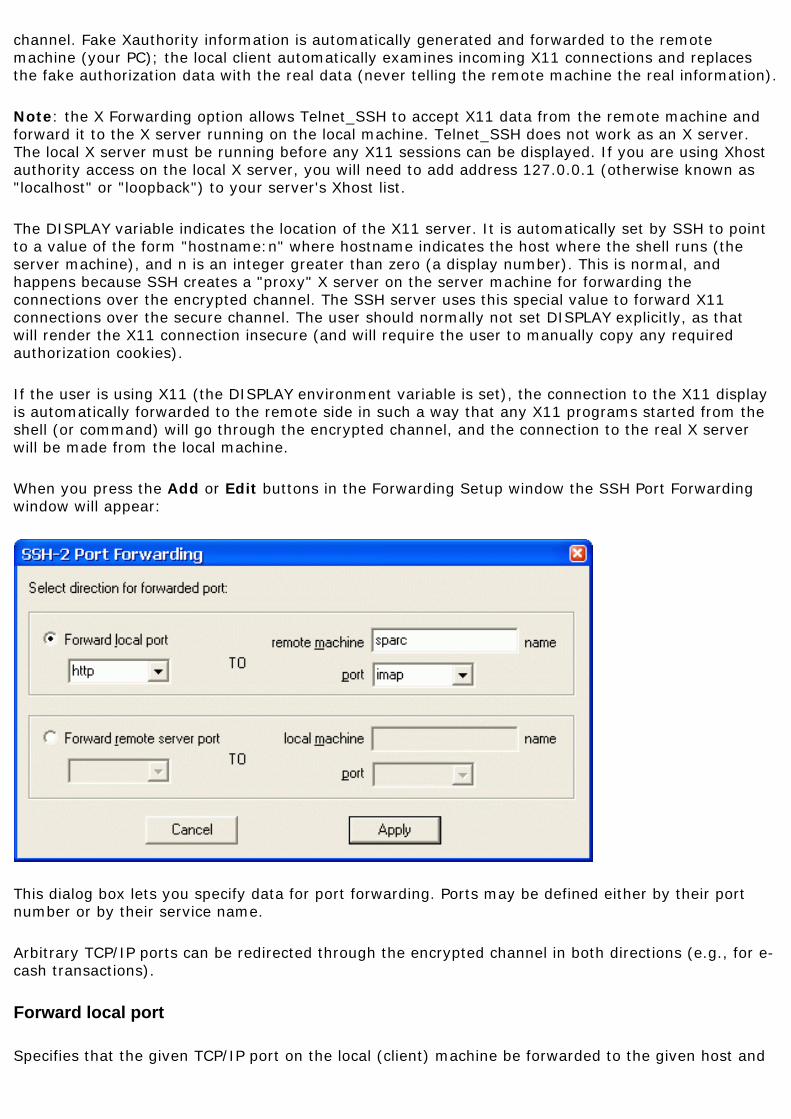
channel. Fake Xauthority information is automatically generated and forwarded to the remote machine (your PC); the local client automatically examines incoming X11 connections and replaces the fake authorization data with the real data (never telling the remote machine the real information).
Note: the X Forwarding option allows Telnet_SSH to accept X11 data from the remote machine and forward it to the X server running on the local machine. Telnet_SSH does not work as an X server. The local X server must be running before any X11 sessions can be displayed. If you are using Xhost authority access on the local X server, you will need to add address 127.0.0.1 (otherwise known as "localhost" or "loopback") to your server's Xhost list.
The DISPLAY variable indicates the location of the X11 server. It is automatically set by SSH to point to a value of the form "hostname:n" where hostname indicates the host where the shell runs (the server machine), and n is an integer greater than zero (a display number). This is normal, and happens because SSH creates a "proxy" X server on the server machine for forwarding the connections over the encrypted channel. The SSH server uses this special value to forward X11 connections over the secure channel. The user should normally not set DISPLAY explicitly, as that will render the X11 connection insecure (and will require the user to manually copy any required authorization cookies).
If the user is using X11 (the DISPLAY environment variable is set), the connection to the X11 display is automatically forwarded to the remote side in such a way that any X11 programs started from the shell (or command) will go through the encrypted channel, and the connection to the real X server will be made from the local machine.
When you press the Add or Edit buttons in the Forwarding Setup window the SSH Port Forwarding window will appear:
This dialog box lets you specify data for port forwarding. Ports may be defined either by their port number or by their service name.
Arbitrary TCP/IP ports can be redirected through the encrypted channel in both directions (e.g., for e-cash transactions).
Forward local port
Specifies that the given TCP/IP port on the local (client) machine be forwarded to the given host and
port on the remote side. This works by allocating a socket to be listened port on the local side, and whenever a connection is made to this port, the connection is forwarded over the secure channel and is made to host:hostport from the remote machine.
When enabled, this radio button allows you to enter the local port in the entry field or select its service name from the corresponding drop-down list box.
To remote machine
Enter the remote host name or IP address.
port
Enter the remote host port in the entry field or select its service name from the corresponding drop-down list box.
Forward remote server port
Specifies that the given TCP/IP port on the remote (server) host be forwarded to the given host and port on the local side. This works by allocating a socket to listen to port on the remote side, and whenever a connection is made to this port, the connection is forwarded over the secure channel, and is made to host:hostport from the local machine.
When enabled, this radio button allows you to enter the remote port in the entry field or select its service name from the corresponding drop-down list box.
To local machine
Enter the local machine name or IP address.
port
Enter the local machine port in the entry field or select its service name from the corresponding drop-down list box.
The Save FWD Settings Option
When you press this button (for SSH1/SSH2 protocol mode), the Forwarding settings you have made will be stored. They will take effect immediately for the current connection, otherwise - with the new session.
7. Telnet_SSH < previous | content | next >
Home | Product | Download | Order Now | Upgrade | Support | Pricing | Company Information | Contact Us
Copyright © 1999 - 2009 LabtamTM Inc.
This page is a part of ProSSHD online Help Manual.ProSSHD is an SSH client for Windows providing maximum security from PC to Host over a Company Lan/
Wan/Intranet or Internet. It brings you typical remote system administration, file transfers, and access to corporate resources over the Internet. Visit Home of ProSSHD for more information.
< previous | content
Appendix B Description of Terminal Capabilities
Description of Terminal Capabilities
terminfo.ini is the ASCII file that describes the emulation capabilities of terminals. The description is very similar to the TERMINFO source code of UNIX system.
The file consists of terminal sections. Each section begins with a header string - a logical terminal name enclosed in brackets. The name is used to select the terminal type in the Telnet_SSH Options/Settings/Type tab.
The section header is followed by a set of entry records that describes the emulation capabilities of the terminal. Each record consists of a capability keyword, a '=' separator, and one or more capability values separated by a ',' delimiter. White spaces are ignored after the ',' separator as well as after the last value.
Any line may contain a comment. A comment begins with a ';' character on a line and lasts to the end of the current line.
Normally there may be several groups of records in each terminal section:
● A group of terminal capability definitions (e.g., Lines, Columns, Colors, UseCRT, MG0, MG1, RGB, UseCSI, Use2W, Use2HW, Tab8, TabSet).
● A group of X-keys definitions (for non-standard keys of keyboards, e.g., auxiliary keypads or function keys). An X-keysym name followed by a '=' separator begins the record. X-keys definitions may have a single value for the PC-layout mode, or a single value for the VT-layout mode, or both. A '/' sign must precede the VT-layout mode value. In case of both modes, the first value is for the PC-layout mode. A value is a code sequence of one or more key codes (separated by a ',' delimiter) to be transmitted when you use the X-key defined. A code is a decimal number (to represent valid escape or control sequences for the terminal).
Examples for VT240:
XK_Home=155,72 / 155,50,126 ; CSI H / CSI 2 ~
XK_KP_Home=155,72/143,119 ; CSI H / SS3 w
XK_KP_Space=/143,117 ; / SS3 u
● A group of user defined keys (UDK) definitions. You can reprogram them in the Telnet_SSH Options/Settings/User Defined tab. A UDK's name followed by a '=' separator begins the record. A value may be a sequence of one or more characters and/or hex codes (without any separator) to be transmitted when you use the UDK defined.
Examples:
Alt-F10=PRINT ; five characters
Shift-F1=0x1bOp ; one hex code 0x1b with two characters O and p
Terminal Parameter Settings
You can set up terminal capabilities by records with the following keywords and values:
Lines=number
The record specifies a number of lines on a screen of a terminal.
(Example: Lines=24)
Columns=number
The record specifies a number of characters in a line.
(Example: Columns=80)
Colors=number
The record specifies the maximum number of colors on the screen.
(Example: Colors=16)
RGB=R.G.B, ...
The record specifies the palette description for colors to be used for color terminals instead of default colors of MS Windows. Each color number (beginning at 0 to Colors-1) is represented by R, G and B - the relative intensities for red, green, and blue primaries (each in the range of 0...255 decimal) to be used for a certain color. The RGB values indicate normal locations in color space. The primaries in a triple are '.' separated while triples are separated by a ',' delimiter.
UseCSI=1
The terminal can (UseCSI=1) or cannot (UseCSI=0) use 8-bit control sequences.
UseCRT=1
The record defines to use the terminal or application mode for arrows keys instead of ANSI mode (as default).
Use2W=1
The terminal can (Use2W=1) or cannot (Use2W=0) use characters with double width. (See the control sequence Esc#6 for DEC terminals.)
Use2HW=1
The terminal can (Use2HW=1) or cannot (Use2HW=0) use characters with double height and width. (See control sequences Esc#3 and Esc#4 for DEC terminals.)
Tab8=1
The terminal can use the 8-space default tab stops (in case the TabSet record below does not exist).
TabSet=n1,n2,...
The record defines the horizontal tabulation stop set that will be used as the default tabulation set for the terminal. Decimal numbers separated by a ',' delimiter (n1,n2,...) are column numbers for horizontal tab stops. No values means the tabulation set is empty.
MG0i=inp.out,...MG1i=inp.out,...
The records define re-mapping tables for the main character set (MG0) and for the alternate character set (MG1). Each table consists of code pairs separated by a ',' delimiter. A code pair has an input code (to be remapped), a '.' sign, and an output code from the character set used to display characters. The codes must be a hex number. Tables may continue onto multiple lines. The 'i' suffix in the keywords (MG0i or MG1i) shows the value for 'line number - 1'.
● Example for AT386 (9 pairs for MG0 on 2 lines):
MG00=0x90.0xC9,0x91.0xBB,0x92.0xBC,0x93.0xC8,0x94.0xCD;
MG01=0x95.0xBA,0x97.0xB9,0x98.0xCA,0x99.0xCC;
● Example for DEC terminals and XTERM (15 pairs for MG1 on 3 lines):
MG10=0x6A.0xD9,0x6B.0xBF,0x6C.0xDA,0x6D.0xC0,0x6E.0xC5;
MG11=0x6F.0xC4,0x70.0xC4,0x71.0xC4,0x72.0xC4,0x73.0xC4;
MG12=0x74.0xC3,0x75.0xB4,0x76.0xC1,0x77.0xC2,0x78.0xB3;
< previous | content
Home | Product | Download | Order Now | Upgrade | Support | Pricing | Company Information | Contact Us
Copyright © 1999 - 2009 LabtamTM Inc.