Embed Size (px)
Citation preview

EMD Millipore is a division of Merck KGaA, Darmstadt, Germany
Protein Blotting HandbookTips and Tricks

About the Sixth Edition
Better membranes, better blots.EMD Millipore has been a leading supplier of
transfer membranes for nearly four decades.
E.M. Southern used these membranes to
develop the first nucleic acid transfer from an
agarose gel in 19751. The first 0.45 µm PVDF
substrate for Western blotting, Immobilon®-P
membrane, was introduced in 1985, and the
first 0.2 µm PVDF substrate for protein blotting
and sequencing, Immobilon®-PSQ membrane,
was introduced in 1988.
In addition to Immobilon® membranes and
reagents, EMD Millipore provides a wide
selection of other tools for protein research,
including gentle protein extraction kits,
rapid protein isolation with PureProteome™
magnetic beads, and fast, effective
concentration with Amicon® Ultra centrifugal
filters.
Where to Get Additional Information If you have questions or need assistance,
please contact an EMD Millipore technical
service specialist, or pose your question online
at: www.emdmillipore.com/techservice
You’ll also find answers to frequently
asked questions (FAQs) concerning Western
blotting and other related methods at:
www.emdmillipore.com/wb_faqs
With the publication of the sixth
edition of the Protein Blotting
Handbook, EMD Millipore continues
to keep researchers up to date on
innovations in protein detection. We’ve
added more comprehensive guidance
on optimizing antibody concentrations
and reducing background, along with
expanded data and protocols for
fluorescence detection.
This handbook represents the
collective experience of our application
scientists, who are actively engaged
in advancing the science of protein
blotting and detection. It also
includes many of the most common
recommendations provided by our
technical service specialists who are
contacted by scientists worldwide for
assistance.
1. Southern E. J Mol Bio 1975;98:503.

1
Table of ContentsIntroduction 3
1 Membrane Selection 4 Immobilon® PVDF Transfer Membranes 6
2 Protein Binding 10 Immobilon®-P vs. Immobilon®-PSQ Transfer Membranes 10 Factors Affecting Protein Binding 11
3 Blotting Methods: Principles and Optimization 12Filtration 12Western Blotting 14 Separation of Complex Protein Mixtures on 1-D or 2-D Gels 14 Molecular Weight Markers 15 Polyacrylamide Concentration 16 Gel Running Buffers 16 Transfer of Proteins from Gel to Membrane 16 Electrotransfer Techniques 16 Transfer Buffers 18 Functions of Methanol in Transfer Buffer 18 Factors Affecting Successful Protein Transfer 19 Presence of SDS 19 Current and Transfer Time 20 Transfer Buffer pH 20 Equilibration Time 20 Developing a New Transfer Protocol 22 Preparing Membrane for Protein Identification 22 For Staining and Immunodetection 22 For Rapid Immunodetection and Visualization by Transillumination 22 Storage 22 Protein Visualization 23 Transillumination 23 Staining 23 Reversible Stains 23 Irreversible Stains 23
4 Protein Identification 25Immunodetection 25 Standard vs. Rapid Immunodetection Procedures 25 Factors Influencing Immunodetection 26 Buffers 26 Blocking 27 Antibodies 27 Washing 29 Double Blotting 29 Detection Substrates 30 Chromogenic Detection 30 Chemiluminescent Detection 30 Fluorescent Detection 31 Reprobing Immobilon® PVDF Transfer Membranes 32Mass Spectrometry 32 Mass Spectrometry with Immobilon® PVDF Transfer Membranes 32

2
Table of Contents (continued)
5 Protocols 341 Protein Transfer Protocols 35
1.1 Electrotransfer: Tank (Wet) Transfer 351.2 Electrotransfer: Semi-dry Transfer 361.3 Dot Blotting/Slot Blotting: Vacuum Filtration Method 391.4 Spot Blotting: Manual Spotting Method 401.5 Optimization of Blocking Reagents Using Spot Blotting Method 411.6 Double Blotting to Eliminate NSB 431.7 Membrane Drying Methods 44
2 Protein Visualization Protocols 452.1 Visualization by Transillumination 452.2 Visualization by Reversible Staining 46
Ponceau-S Red 46 CPTS (Copper Phthalocyanine Tetrasulfonic Acid) 46
2.3 Visualization by Irreversible Staining 47 Coomassie® Brilliant Blue R Dye 47 Amido Black 47
3 Immunodetection Protocols 483.1 Standard Immunodetection Method 483.2 Rapid Immunodetection Method 503.3 Rapid Immunodetection Using the SNAP i.d.® 2.0 System 513.4 High Salt Wash to Remove Persistent Background 54
4 Membrane Stripping Protocols 554.1 Stripping by Heat and Detergent 554.2 Stripping by Low pH 564.3 Stripping with the ReBlot™ Plus Western Blot Recycling Kit 56
5 Protein Digestion Protocol 575.1 On-Membrane Protein Digestion for Mass Spectrometry 57
6 Blot Storage Protocol 586.1 Preparation of Blots for Long-Term Storage 58
6 Appendices 59 Troubleshooting 59 Glossary 66 References 67 Patents 69
7 Recipes 708 Ordering Information 71

3
IntroductionSince its introduction in 1979 (Towbin et al.,
1979), protein blotting has become a routine
tool in research laboratories. It is traditionally
used to detect low amounts of proteins
in complex samples or to monitor protein
expression and purification. The simplest protein
blotting procedure, known as dot blot or slot
blot, uses vacuum filtration to transfer protein
onto a microporous membrane. While this
method may provide qualitative information
about total protein expression levels and can
be performed on multiple samples in parallel, it
lacks information on protein molecular weight.
Also, specificity can be compromised as protein
degradation products or post-translationally
modified isoforms may be detected along with
the intact protein.
A more complex procedure, Western blotting,
involves the separation of a protein mixture
by gel electrophoresis with subsequent
electrotransfer to a suitable membrane (e.g.,
PVDF). After proteins have been transferred
onto a PVDF membrane, they can be stained
for visualization and directly identified by
N-terminal sequencing, mass spectrometry or
immunodetection. Immunodetection involves
the identification of a protein through its
reaction with a specific antibody. Through spatial
resolution, this method provides molecular
weight information on individual proteins and
distinguishes isoforms, alternate processing
products, and other post-translationally
modified forms.
In the clinical laboratory, immunoblotting has
proven useful in fields such as infectious and
autoimmune diseases, allergy and others (Towbin
et al., 1989; Stahl et al., 2000). Western blotting
is considered to be a reliable confirmatory
diagnostic test following a repeatedly reactive
ELISA over the course of viral infection, and
is a sensitive, unequivocal and simple assay,
providing high complexity of information (Bauer,
2001; Mylonakis et al., 2000; Heermann et al.,
1988).
Examples of Western blotting applications
include analysis of protein expression in yeast by
quantitative Western analysis (Ghaemmadami et
al., 2003), determination of protein copy number
and compartmentalization (Rudolph et al., 1999),
study of competitive protein kinase inhibition by
ATP (Wang and Thompson, 2001), and detection
of genetically modified organisms in crops and
foods (Ahmed, 2002).
Clearly, protein blotting remains the platform
of choice for exploratory research, and is
still the standard by which new antibodies
and other protein detection assays (such as
ELISA, bead-based assays, flow cytometry
and immunohistochemistry) are evaluated.
However, the need to analyze more proteins
simultaneously to characterize complex
networks and the associated need to conserve
valuable samples has driven ongoing research
into improving the sensitivity and speed of
blotting techniques. A “double blotting” method
(Lasne, 2001, 2003) eliminates false positives
due to strong nonspecific interactions between
the blotted proteins and unrelated secondary
antibodies. Far-Western blotting enables the
detection of specific protein-protein interactions
(Grasser, 1993) and Southwestern blotting
is used to identify proteins that interact
with specific DNA sequences (Silva, 1987).
Multistrip Western blotting has proved to
increase throughput while minimizing inter-blot
variability (Aksamitiene, 2007). A new generation
of blotting technologies features reductions in
the amounts of protein required to produce a
signal (Swank, 2006) and methods to improve
the quantitative power of Western blotting
(Schilling, 2005a; 2005b).

4
The type of membrane used for blotting can
influence the following factors:
• Protein binding capacity
• Requirement for prewetting with alcohol
• Ability to perform multiple stripping and
reprobing experiments
• Protein visualization
• Long-term blot storage
• Signal-to-noise ratio
Polyvinylidene fluoride (PVDF) and nitrocellulose
are the two membrane types most commonly
used in Western blotting applications.
There are many advantages to electroblotting
onto PVDF membranes rather than onto
nitrocellulose membranes. PVDF membranes
offer better protein retention, physical strength
and broad chemical compatibility (Pluskal, et
al., 1986). The higher mechanical strength and
superior chemical resistance of PVDF membranes
make them ideal for a variety of staining
applications and reprobing in immunodetection.
Another advantage of using PVDF membranes
is that replicate lanes from a single gel can be
used for various applications, such as staining
with Coomassie® Blue dye followed by band
excision and N-terminal sequencing, proteolysis/
peptide separation/internal sequencing, and
immunodetection (Kurien, et al., 2003). Typical
binding capacity of commercially available
nitrocellulose membranes is 80 – 100 µg/cm2
while PVDF membranes offer a binding capacity
of 100 – 200 µg/cm2.
In a direct comparison of PVDF vs.
nitrocellulose membranes in detecting human
immunodeficiency virus (HIV) antigens in serum,
PVDF membrane was shown to have better
retention of total HIV antigens and improved
detection of antibodies to glycosylated envelope
antigens (Lauritzen and Pluskal, 1988). See
Table 1 for a comparison of nitrocellulose and
PVDF membrane attributes.
Membrane Selection 1

5
Mem
brane Selection
Attributes/Applications Nitrocellulose PVDF
Physical strength Poor Good
Protein binding capacity 80 – 100 µg/cm2 100 – 300 µg/cm2
Solvent resistance No Yes
Western transfer Yes Yes
Total protein stain Colloidal gold Colloidal gold
Ponceau-S red Ponceau-S red
Amido black Amido black
India ink India ink
Sypro® blot stains Coomassie® Blue dye
Detection Chromogenic Chromogenic
Chemiluminescent Chemiluminescent
Fluorescent Fluorescent
Radioactive Chemifluorescent
Radioactive
Double-blotting method No Yes
Rapid immunodetection No Yes
Western reprobing Yes Yes
Edman sequencing No Yes
Amino acid analysis Yes Yes
Binding in the presence of SDS Poor Good
On-membrane digestion or mass spectrometry
No Yes
Direct MALDI-TOF MS analysis No Yes
Data can be archived No Yes
Table 1. Comparison of PVDF and nitrocellulose membrane attributes and applications.

6
EMD Millipore offers three PVDF membranes:
• Immobilon®-P membrane (0.45 µm) is a
versatile substrate that is well suited for
common immunoblotting applications
• Immoblion®-PSQ membrane (0.2 µm) is ideal
for protein sequencing and immunoblotting
of low molecular weight proteins. It has a
higher protein binding capacity and a higher
retention than 0.45 µm membranes.
• Immobilon®-FL membrane (0.45 µm)
was developed for fluorescence-based
immunodetection. It has very low background
fluorescence across a wide range of excitation
and emission wavelengths.
Immobilon® PVDF Transfer Membranes
Immobilon® transfer membranes are available
in rolls and cut sheets. Precut membranes
are compatible with all precast gels and most
commercially available gel running systems. See
Table 2 for properties of Immobilon® transfer
membranes. See Table 3 (page 8) to match sizes
of precut Immobilon® membrane with the
most commonly used electrophoresis systems.
See Table 4 (page 9) to match Immobilon®
membrane cut sizes with available precast gels.
Mem
bran
e Se
lect
ion

7
Immobilon®-P transfer membrane
Immobilon®-PSQ
transfer membraneImmobilon®-FL transfer membrane
Description Optimized to bind proteins transferred from a variety of gel matrices
Uniform pore structure results in superior binding of proteins with MW <20 kDa
Optimized for fluorescence immunodetection applications
Composition PVDF PVDF PVDF
Pore size 0.45 µm 0.2 µm 0.45 µm
Phobicity Hydrophobic Hydrophobic Hydrophobic
Applications Western blotting Low molecular weight Western blotting
Binding assays Western blotting Dot/slot blotting
Amino acid analysis Amino acid analysis Fluorescence immunodetectionN-terminal protein
sequencing Mass spectrometry
Dot/slot blotting N-terminal protein sequencingGlycoprotein visualization
Lipopolysaccharide analysis
Mass spectrometry
Detection methods Chromogenic Chromogenic Fluorescent
Chemifluorescent Fluorescent Chromogenic
Chemiluminescent Chemifluorescent Chemifluorescent
Radioactive Chemiluminescent Chemiluminescent
Radioactive
Protein binding capacity Insulin: 160 µg/cm2 Insulin: 262 µg/cm2 Insulin: 155 µg/cm2
BSA: 215 µg/cm2 BSA: 340 µg/cm2 BSA: 205 µg/cm2
Goat IgG: 294 µg/cm2 Goat IgG: 448 µg/cm2 Goat IgG: 300 µg/cm2
Compatible stains reversible
Transillumination Transillumination Transillumination
Ponceau-S Ponceau-S Ponceau-S
CPTS CPTS CPTS
Toluidine blue Toluidine blue Sypro® blot stains
Sypro® blot stains Sypro blot stains
Compatible stains irreversible
Coomassie® Brilliant Blue dye
Coomassie® Brilliant Blue dye
Coomassie® Brilliant Blue dye
Amido black Amido black Amido black
India ink India ink
Colloidal gold Colloidal gold
Table 2. Properties and applications of Immobilon® PVDF transfer membranes.

8
Man
ufac
ture
rVe
rtic
al G
el B
oxGe
l size
(c
m)
Imm
obilo
n® S
ize
(cm
)Im
mob
ilon®
-P
0.45
µm
Imm
obilo
n®-P
SQ
0.2
µmIm
mob
ilon®
-FL
0.
45 µ
m*
GE
Hea
lthca
reSE
250
Mig
hty
Smal
l™8
x 7
8.4
x 7
IPVH
0785
0IS
EQ07
850
SE 2
60 M
ight
y Sm
all™
8 x
9.5
8 x
10IP
VH08
100
ISEQ
0810
0
min
iVE
8 x
9.5
8 x
10IP
VH08
100
ISEQ
0810
0
min
iVE
10 x
10
10 x
10
IPVH
1010
0IS
EQ10
100
IPFL
1010
0
SE 4
0014
x 1
615
x 1
5IP
VH15
150
ISEQ
1515
0
SE 6
0014
x 1
615
x 1
5IP
VH15
150
ISEQ
1515
0
SE 6
0014
x 8
13.5
x 8
.5IP
VH08
130
ISEQ
0813
0
Bio-
Rad
Min
i-PR
OTEA
N®
3, M
ini-
PROT
EAN
® 3
Dode
ca™
8.3
x 7.
38.
4 x
7IP
VH07
850
ISEQ
0785
0
Crite
rion™
, Crit
erio
n™ D
odec
a™13
.3 x
8.7
13.5
x 8
.5IP
VH08
130
ISEQ
0813
0
PROT
EAN
® II
xi16
x 1
615
x 1
5IP
VH15
150
ISEQ
1515
0
PROT
EAN
® II
xi16
x 2
026
.5 x
375
IPVH
0001
0IS
EQ00
010
IPFL
0001
0
PROT
EAN
® II
XL19
.3 x
18.
320
x 2
0IP
VH20
200
ISEQ
2020
0IP
FL20
200
PROT
EAN
® Pl
us D
odec
a™20
x 2
0.5
26 x
26
IPVH
304F
0IS
EQ30
4F0
Min
i-PR
OTEA
N®
II8.
3 x
7.3
8.4
x 7
IPVH
0785
0IS
EQ07
850
Invi
trog
enXC
ell S
ureL
ock™
Min
i-Ce
ll, X
Cell6
™ M
ultiG
el8
x 8
8.4
x 7
IPVH
0785
0IS
EQ07
850
Ther
mo
Scie
ntifi
cP8
1 Pu
ffin™
, P82
Wol
verin
e™, P
8DS
Empe
ror P
engu
in™
10 x
10
10 x
10
IPVH
1010
0IS
EQ10
100
IPFL
1010
0
P8DS
Em
pero
r Pen
guin
™8
x 10
8 x
10IP
VH08
100
ISEQ
0810
0
P9DS
Em
pero
r Pen
guin
™16
x 1
615
x 1
5IP
VH15
150
ISEQ
1515
0
P10D
S Em
pero
r Pen
guin
™20
x 2
020
x 2
0IP
VH20
200
ISEQ
2020
0IP
FL20
200
Tabl
e 3.
Imm
obilo
n® P
VDF
tran
sfer
mem
bran
e cu
ts a
nd m
atch
ing
elec
trop
hore
sis
syst
ems.

9
Man
ufac
ture
rPr
ecas
t Ge
l Nam
eGe
l size
(c
m)
Imm
obilo
n® S
ize
(cm
)Im
mob
ilon®
-P
0.45
µm
Imm
obilo
n®-P
SQ
0.2
µmIm
mob
ilon®
-FL
0.
45 µ
m*
Bio-
Rad
Read
y G
el®
8.3
x 7.
38.
4 x
7IP
VH07
850
ISEQ
0785
0
Crite
rion™
13
.3 x
8.7
13.5
x 8
.5IP
VH08
130
ISEQ
0813
0
PROT
EAN
Rea
dy G
el®
16 x
16
15 x
15
IPVH
1515
0IS
EQ15
150
PROT
EAN
Rea
dy G
el®
19.3
x 1
8.3
20 x
20
IPVH
2020
0IS
EQ20
200
IPFL
2020
0
PROT
EAN
Rea
dy G
el®
20 x
20.
526
x 2
6IP
VH30
4F0
ISEQ
304F
0
Cam
brex
PAG
Er®
9 x
108
x 10
IP
VH08
100
ISEQ
0810
0
PAG
Er®
10 x
10
10 x
10
IPVH
1010
0IS
EQ10
100
IPFL
1010
0
Gra
dipo
reM
icro
Gel
®8
x 2.
58
x 10
(cut
in 1
/2)
IPVH
0810
0IS
EQ08
100
igel
s™8
x 5.
88
x 10
(cut
in 1
/2)
IPVH
0810
0IS
EQ08
100
Long
Life
Gel
s8
x 5.
88
x 10
(cut
in 1
/2)
IPVH
0810
0IS
EQ08
100
Invi
trog
enN
uPAG
E®8
x 8
8.4
x 7
IPVH
0785
0IS
EQ07
850
Nov
ex®
8 x
88.
4 x
7IP
VH07
850
ISEQ
0785
0
Zoom
®8
x 8
8.4
x 7
IPVH
0785
0IS
EQ07
850
E-G
el®
13.5
x 1
0.8
13.5
x 8
.5IP
VH08
130
ISEQ
0813
0
Ther
mo
Scie
ntifi
cPr
ecis
e Pr
otei
n G
els
8 x
5.8
8 x
10 (c
ut in
1/2
)IP
VH08
100
ISEQ
0810
0
Tabl
e 4.
Imm
obilo
n® P
VDF
tran
sfer
mem
bran
e cu
ts a
nd m
atch
ing
pre-
cast
gel
s.
*All
size
s ca
n be
cut
from
rolls
of I
mm
obilo
n®-F
L m
embr
ane
(IPFL
0001
0).

10
PVDF is an inherently hydrophobic polymer and
will not wet out in aqueous solutions. In order
to use PVDF membrane with aqueous buffers
and systems, it must first be wet in a 50% (v/v)
or greater concentration of alcohol. Methanol,
ethanol, and isopropanol are suitable to wet
the membrane. Complete wetting is evident by
a change in the membrane’s appearance from
opaque to semi-transparent. The alcohol must
be removed from the membrane by extensive
rinsing in water, and the membrane can then be
directly equilibrated in transfer buffers.
Binding Differences between Immobilon®-P and Immobilon®-PSQ Transfer Membranes Once the membrane is wet, protein binding can
be achieved by simply bringing the protein into
contact with the membrane. Because binding
occurs throughout the depth of the membrane,
the binding capacity is determined by the
internal surface area of the pores (Mansfield,
1994). Immobilon®-PSQ transfer membrane has
approximately three times the internal surface
area of Immobilon®-P transfer membrane,
resulting in higher adsorptive capacity (Table 2,
page 7). The values listed in Table 2 represent
upper limits for protein binding after saturation
of the membrane surface in a non-denaturing
buffer. In any given application, Immobilon®-PSQ
transfer membrane can be expected to bind more
protein than Immobilon®-P transfer membrane.
However, the maximum binding that can be
achieved will depend on the specific protocols
employed, due to variations in the structural
conformation of the proteins, the chemical
nature of the buffers used, and the limitations
of the methods used to apply the sample.
An example of the binding difference between
Immobilon®-P and Immobilon®-PSQ transfer
membranes is shown in Figure 1, where
protein samples were electrotransferred from a
polyacrylamide gel. A fraction of the proteins
passed through the Immobilon®-P transfer
membrane and were captured on a second
membrane placed behind the first one. In
contrast, all of the proteins were bound to the
Immobilon®- PSQ membrane without passing
through it. In this case, the tighter pore structure
and higher internal surface area of polymer
facilitated complete adsorption of all of the
transferred protein. However, immunodetection
on Immobilon®-PSQ transfer membrane can
result in a higher background and can require
more stringent washing conditions. Thus, the
choice of membrane is dictated by the goal of
the experiment: use Immobilon®-P transfer
membrane for high sensitivity detection of
>20 kDa proteins, but switch to Immobilon®-PSQ
transfer membrane if smaller proteins are being
analyzed or 100% protein capture is necessary
for peptide sequencing.
Protein Binding2

11
Protein Binding
Factors Affecting Protein Binding At the molecular level, protein adsorption
results, at least in part, from the interaction
of hydrophobic amino acid side chains and
hydrophobic domains with the polymer surface.
Matsudaira (1987) observed an 80% decline in
sequencing efficiency of small peptides after
hydrophobic residues were cleaved, presumably
due to washout of the peptide remnants. Also,
in peptide digestions, it has been observed that
peptides characterized as hydrophobic often
do not elute from the membrane as efficiently
as more hydrophilic peptides (e.g., Iwamatsu,
1991; Fernandez et al., 1992). McKeon and
Lyman (1991) demonstrated that addition
of Ca2+ ions to the transfer buffer enhanced
the binding of calmodulin to Immobilon®-P
transfer membrane. Binding of the calcium
causes formation of a hydrophobic pocket in the
molecule’s structure.
Figure 1. Prolonged electrotransfer of proteins using Immobilon®-P and Immobilon®-PSQ transfer membranes. Molecular weight standards (lanes 1,3,5,7) and calf liver lysate (lanes 2,4,6,8) were transferred to Immobilon®-P or Immobilon®-PSQ membranes by the tank transfer method and stained with Coomassie® Blue. A sheet of Immobilon®-PSQ transfer membrane was placed behind the primary membranes to capture proteins that passed through them. (Lanes 5 and 6 behind Immobilon®-P; lanes 7 and 8 behind Immobilon®-PSQ.)
Immobilon®-PMembrane
kDa200
1 2 3 4 5 6 7 8
Immobilon®-PSQ
MembraneImmobilon®-PSQ
Backup Membrane
116976655
3631
21.5
14.4
6
3.5

12
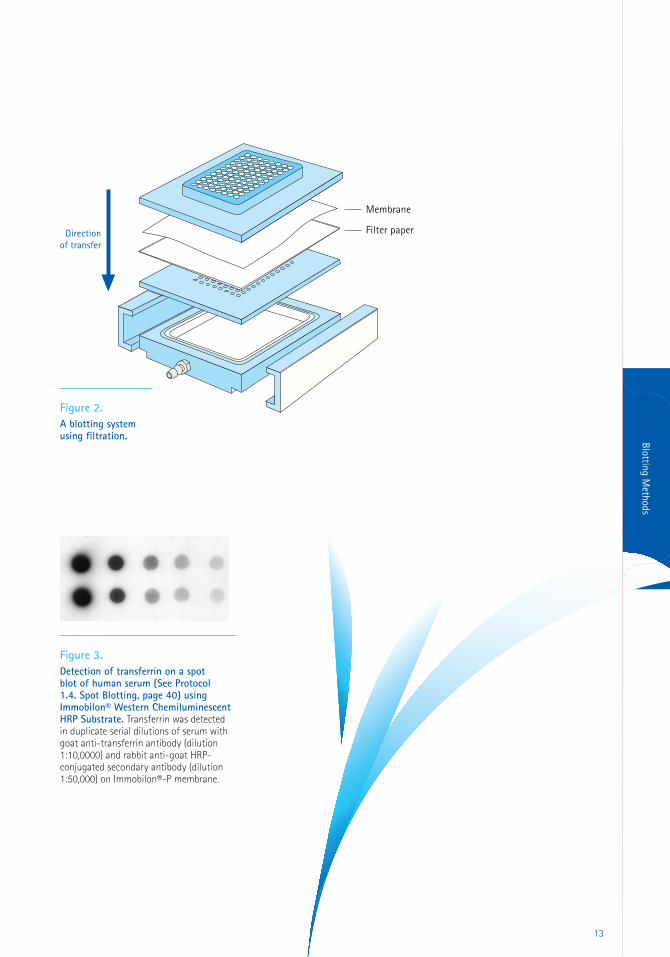
Filtration is a direct method of applying proteins
onto a membrane. A dissolved sample is filtered
through the membrane by applying vacuum.
Proteins adsorb onto the membrane, and the
other sample components are pulled through by
the vacuum (Figure 2). Alternatively, the sample
can be spotted directly onto the surface and
allowed to dry. The proteins immobilized on the
membrane can then be analyzed.
Dot blotting (Figure 3) and slot blotting are two
variations of the filtration method, employing
manifolds that permit application of samples
to the membrane in dot or slot patterns. These
techniques can be used as qualitative method
for rapid screening of a large number of samples
or as a quantitative technique for analysis
of similar samples. It is especially useful for
testing the suitability of experimental design
parameters to be used in more complex analyses.
Another variation of the filtration method is grid
immunoblotting, a technique useful for highly
parallel sample analysis when the amount of
sample is extremely limited and analysis cannot
be performed by conventional techniques such
as ELISA. For example, grid immunoblotting has
been used in the characterization of allergen-
specific antibody response with minimal
amounts of patient serum (Reese et al., 2001).
When preparing blots by filtration, consider the
following:
• Detergents can inhibit the adsorption of
proteins to the membrane. Buffers used
for sample dissolution and washing should
contain no more than 0.05% detergent, and
only if required.
• The sample volume should be large enough to
cover the exposed membrane in each well but
should not contain protein in excess of the
binding capacity of the membrane.
• Samples with high particulate loads may
clog the membrane, while those with high
viscosity will reduce the flow rate. Particles
should be removed by prefiltration or
centrifugation, and only the supernatant
should be applied to the membrane. Viscous
samples should be diluted in buffer.
Blotting Methods: Principles and Optimization
Filtration
3
13
Blotting Methods
Filter paper
Membrane
Directionof transfer
Figure 2. A blotting system using filtration.
Figure 3. Detection of transferrin on a spot blot of human serum (See Protocol 1.4. Spot Blotting, page 40) using Immobilon® Western Chemiluminescent HRP Substrate. Transferrin was detected in duplicate serial dilutions of serum with goat anti-transferrin antibody (dilution 1:10,0000) and rabbit anti-goat HRP-conjugated secondary antibody (dilution 1:50,000) on Immobilon®-P membrane.

14
Western blotting comprises the following steps:
• Resolution of a complex protein sample in a
polyacrylamide gel.
• Transfer of the resolved proteins onto a
membrane.
• Identification of a specific protein on the
membrane.
For a successful Western blot, four requirements must be met:
• Elution from the gel — the protein must elute
from the gel during transfer. If it is retained in
the gel, it will not be available for analysis on
the blot.
• Adsorption to the membrane — the protein
must adsorb to the membrane during
the transfer process. If the protein is not
adsorbed, it will not be available for analysis
on the blot.
• Retention during processing — the protein
must remain adsorbed to the membrane
during post-transfer processing of the blot.
• Accessibility during processing — the
adsorbed protein must be available to the
chemistries used to detect it. If the protein is
masked, it cannot be detected.
The sections that follow discuss theoretical
and practical considerations of the protocols
involved in Western blotting.
Separation of Complex Protein Mixtures in 1-D or 2-D Gels The most common way of separating complex
protein mixtures prior to the blotting is one-
dimensional (1-D) sodium dodecyl sulfate–
polyacrylamide gel electrophoresis (SDS-PAGE),
where proteins are separated on the basis of
their molecular weight (Figure 4). In some
cases, non-denaturing conditions are used to
separate native proteins. Although this method
usually lacks the resolution of denaturing
electrophoresis, it may be particularly useful
when the primary antibody recognizes only
non-denatured proteins or when the protein’s
biological activity has to be retained on the
membrane.
Two-dimensional (2-D) gel electrophoresis
is the technique of choice for analyzing
protein composition of cell types, tissues and
fluids, and is a key technology in proteomics.
Immunoblotting of 2-D gels provides
information on molecular weight and isoelectric
point and can be useful to discriminate protein
isoforms generated by post-translational
modifications (Celis and Gromov, 2000). In some
cases, protein phenotyping can be achieved by
immunoblotting after only a 1-D separation by
isoelectrofocusing (Poland, et al., 2002; Eto et
al., 1990). An example of a 2-D blot is shown in
Figure 5.
Western Blotting
Blot
ting
Met
hods

15
Molecular Weight Markers
The inclusion of molecular weight (MW)
standards, or markers, on the gel facilitates the
estimation of the sizes of the proteins of interest
after resolution by electrophoresis. Two types are
available, unstained and pre-stained. Unstained
MW markers usually consist of a mixture of
purified native or recombinant proteins of
defined molecular weights. Visualizing their
location on a gel or membrane requires a
staining step.
Pre-stained MW markers are shown in Figure 4.
There are both advantages and disadvantages to
using pre-stained markers. Pre-stained markers
allow monitoring of protein separation in the
gel during electrophoresis. They also indicate
transfer efficiency in the subsequent blotting
steps. However, they can be relatively expensive
and the addition of dyes may affect protein
mobility. Pre-stained markers may be less
accurate for molecular weight determination,
as dyes attached to the proteins may alter
their ability to adsorb to the membrane during
blotting.
Figure 4. With three prestained markers and eight unstained markers (which have both His tag and S·Tag), Trail Mix™ protein markers enable direct visualization of protein migration during electrophoresis and accurate sizing on any Western blot.
Figure 5. Chemiluminescent detection of proteins separated by two-dimensional electrophoresis. Silver-stained 2-D gel of rat fibroblast cell line (left) and blot of the same gel (right), probed with a mouse monoclonal antibody and visualized using chemiluminescence on Immobilon®-P membrane.
A Unstained gel and Western transfer
B AP Western blot (S-protein AP conjugate) colorimetric detection
C AP Western blot (S-protein AP conjugate) chemiluminescent detection
~100
A B C225
225
kDakDa kDa
150
10075
50
35
25
15
150
10075
50
35
25
15~16~15

16
Polyacrylamide Concentration
The concentration of polyacrylamide in the gel
can be homogenous or a gradient. The most
common polyacrylamide concentration, 10%, is
best suited for the separation of proteins in the
range of 10 –150 kDa. If unknown proteins are
being analyzed or a broader range of separation
is desired, gradient gels are recommended. For
example, 4 –12% Tris-glycine gels are suitable
for proteins in the range of 30 to 200 kDa, while
10 – 20% gels will successfully separate proteins
from 6 to 150 kDa. SDS-PAGE gels are usually
1.0 and 1.5 mm thick; however, for blotting,
proteins transfer best out of thinner gels
(= 1 mm).
Gel Running Buffers
Most common gel running buffers are composed
of Tris-glycine or Tris-tricine. Buffers may
contain 0.1% detergent, usually SDS. Tris-
glycine buffer systems are useful for separation
of proteins over a wide range of molecular
weights (6 – 200 kDa) and are compatible with
denaturing or non-denaturing conditions.
Tris-tricine systems are best for the separation
of smaller proteins (<10 kDa) that need to be
reduced and denatured prior to loading. Both
buffer systems are compatible with protein
transfer to PVDF membranes. Tris-acetate
buffers are sometimes used for separation of
larger proteins.
Transfer of Proteins from Gel to MembraneThe process of transferring proteins from a gel
to a membrane while maintaining their relative
position and resolution is known as blotting.
Blotting can be achieved in three different ways:
Simple diffusion (Kurien and Scofield, 1997) is
accomplished by laying a membrane on top of
the gel with a stack of dry filter paper on top
of the membrane, and placing a weight on top
of the filter paper to facilitate the diffusion
process (Kurien and Scofield, 2003). This method
can be used to transfer proteins from one gel to
multiple membranes (Kurien and Scofield, 1997),
obtaining several imprints of the same gel. The
major disadvantage of the diffusion method
is that transfer is not quantitative and only
transfers 25 – 50% of the proteins as compared
to electroblotting (Chen and Chang, 2001).
Vacuum-assisted solvent flow (Peferoen et al.,
1982) uses the suction power of a pump to
draw separated proteins from the gel onto the
membrane. Both high and low molecular weight
proteins can be transferred by this method;
however, a smaller pore size membrane (0.2 µm)
may be needed for proteins with MW <20 kDa,
since they are less readily adsorbed by the
0.45 µm membrane (Kurien, 2003). Vacuum
blotting of proteins out of polyacrylamide gels is
uncommon and is mostly used for nucleic acid
transfer from agarose gels.
Electrophoretic elution, or electrotransfer
(Towbin et al., 1979) is by far the most
commonly used transfer method. The principal
advantages are the speed and completeness
of transfer compared to diffusion or vacuum
blotting (Kurien et al., 2003).
Electrotransfer Techniques
The two commonly used electrotransfer
techniques are tank transfer and semi-dry
transfer. Both are based on the same principles
and differ only in the mechanical devices used
to hold the gel/membrane stack and applications
of the electrical field.
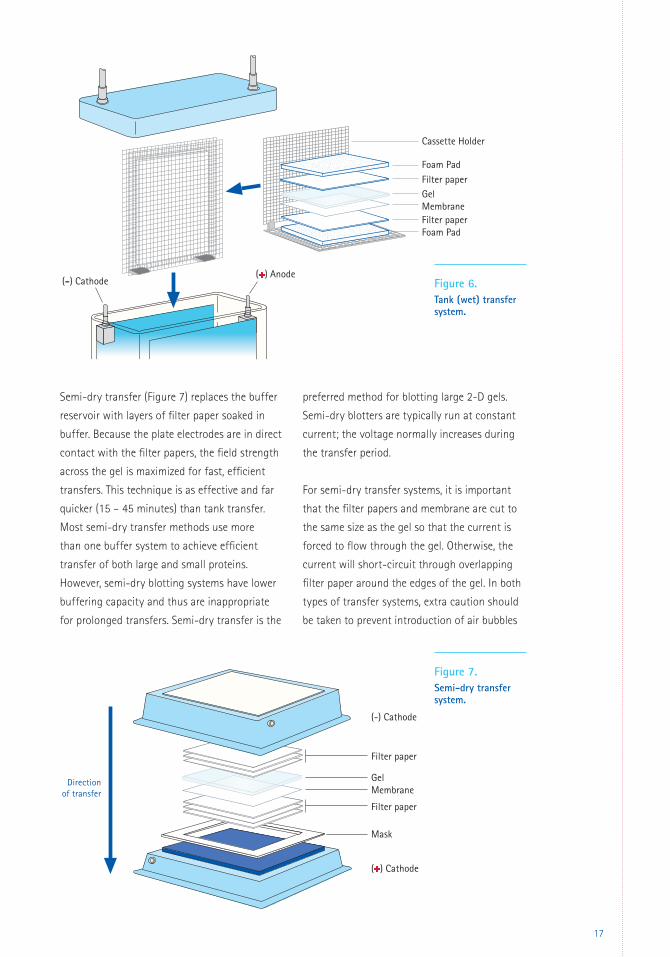
Tank transfer (Figure 6) is the traditional
technique where the gel/membrane stack is
completely immersed in a buffer reservoir and
then current is applied. It is an effective but slow
technique, using large volumes of buffer. Tank
systems are typically run at constant voltage;
mixing of the buffer during transfer keeps the
current relatively constant.
17
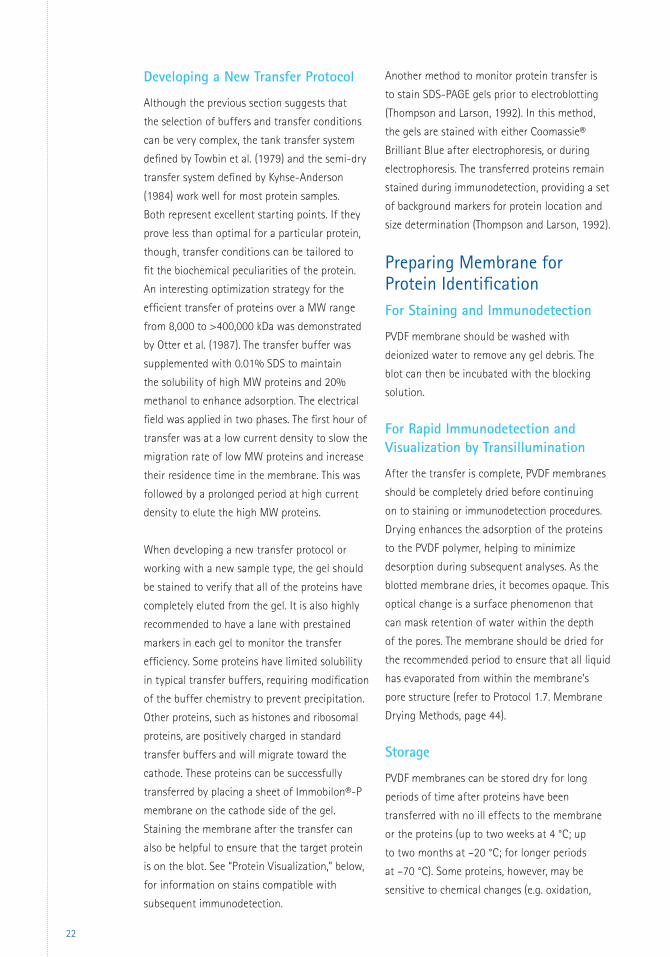
Semi-dry transfer (Figure 7) replaces the buffer
reservoir with layers of filter paper soaked in
buffer. Because the plate electrodes are in direct
contact with the filter papers, the field strength
across the gel is maximized for fast, efficient
transfers. This technique is as effective and far
quicker (15 – 45 minutes) than tank transfer.
Most semi-dry transfer methods use more
than one buffer system to achieve efficient
transfer of both large and small proteins.
However, semi-dry blotting systems have lower
buffering capacity and thus are inappropriate
for prolonged transfers. Semi-dry transfer is the
Figure 6. Tank (wet) transfer system.
Figure 7. Semi-dry transfer system.
Filter paper
Gel
(-) Cathode
(+) Cathode
Directionof transfer Membrane
Filter paper
Mask
preferred method for blotting large 2-D gels.
Semi-dry blotters are typically run at constant
current; the voltage normally increases during
the transfer period.
For semi-dry transfer systems, it is important
that the filter papers and membrane are cut to
the same size as the gel so that the current is
forced to flow through the gel. Otherwise, the
current will short-circuit through overlapping
filter paper around the edges of the gel. In both
types of transfer systems, extra caution should
be taken to prevent introduction of air bubbles
Filter paperGel
Foam Pad
Cassette Holder
(+) Anode(-) Cathode
MembraneFilter paperFoam Pad

18
anywhere between the filter paper, gel and
membrane. Bubbles prevent transfer and cause
“bald spots” (i.e., areas of non-transfer) on the
blot.
Transfer Buffers
The transfer buffer provides electrical continuity
between the electrodes and must be conductive.
It also provides a chemical environment that
maintains the solubility of the proteins without
preventing the adsorption of the proteins
to the membrane during transfer. Common
formulations achieve these functions for the
majority of protein samples. Most buffers
undergo Joule heating during transfer. For this
reason, many tank transfer systems are equipped
with built-in cooling coils. The tanks can also
be placed in a cold room, and the buffer can be
chilled before use. In semi-dry transfer systems,
the electrode plates serve as heat sinks. Their
heat dissipation capacity is limited, and semi-
dry systems are not normally used for prolonged
transfers.
Traditional transfer buffers consist of a buffering
system and methanol. Towbin buffer (1979), a
Tris-glycine buffer, is commonly used in tank
systems. The pH of this buffer is 8.3, which is
higher than the isoelectric point (pI) of most
proteins. The proteins that have been separated
on a gel have a net negative charge and migrate
toward the anode. Because the buffer is mixed in
the tank, the ion distribution remains relatively
constant during the transfer.
Semi-dry systems can be run using either a
single- or a three-buffer system (defined in
Kyhse-Anderson, 1984). Three buffers are used
because the transfer is an isotachophoretic
process, where the proteins are mobilized
between a leading ion and a trailing ion
(Schafer-Nielsen, et al., 1980). In some cases, a
three-buffer system provides better quantitative
transfer. The three buffers are:
• Anode buffer I: 0.3 M Tris at pH 10.4
• Anode buffer II: 25 mM Tris at pH 10.4
• Cathode buffer: 25 mM Tris and 40 mM
e-aminocaproic acid at pH 9.4
Anode buffer I neutralizes excess protons
generated on the surface of the anode plate.
Anode buffer II contains Tris at the same pH as
anode buffer I, but at a reduced concentration
of 25 mM. The cathode buffer contains
e-aminocaproic acid, which serves as the
trailing ion during transfer and is depleted from
the cathode buffer as it migrates through the
gel toward the anode. Review manufacturer’s
recommendations for single buffers in a semi-
dry system.
Although the buffer systems defined above are
suitable for the majority of protein transfers,
the literature contains many variations suited
to different applications. One of the most
significant variations was the recommendation
of 10 mM CAPS buffer at pH 11 for protein
sequencing applications (Matsudaira, 1987).
The glycine used in Towbin buffer and carried
over from the gel running buffer caused high
backgrounds in automated protein sequencers
employing Edman chemistry. By changing the
transfer buffer composition, this artifact was
significantly reduced. Any modification to the
buffer strength and composition should be
made with care to ensure that the transfer unit
does not experience excessive heating.
Functions of Methanol in Transfer Buffer The methanol added to transfer buffers has two
major functions:
• Stabilizes the dimensions of the gel.
• Strips complexed SDS from the protein
molecules.

19
Polyacrylamide is a hydrogel that has the
capacity to absorb water. In pure water, the gel’s
size increases in all dimensions by a considerable
amount. The degree of swelling also depends
on the concentration of acrylamide used in
the gel. High concentration gels expand more
than low concentration gels. Gradient gels
highlight this effect quite dramatically with
the more concentrated zone at the bottom
expanding much more than the top. A gel that
starts out rectangular may become trapezoidal.
The methanol added to the transfer buffer
minimizes gel swelling, and transfer protocols
normally include an equilibration step to
achieve dimensional stability. At methanol
concentrations of 10% to 20%, dimensional
stability can be achieved fairly rapidly. At lower
methanol concentrations, more time is required
for equilibrium to be achieved. If dimensional
changes occur during transfer, the resolution of
the proteins may be lost. For high MW proteins
with limited solubility in methanol, elimination
of the methanol can result in a significant
increase in protein transfer efficiency, but this
may necessitate a longer equilibration time to
ensure dimensional stability.
The second function of the methanol is critical
for transfer of proteins from gels containing
SDS. Methanol helps to strip complexed SDS
from the protein molecules (Mozdzanowski and
Speicher, 1992). Although the SDS is necessary
for resolution of individual proteins on the gel,
it can be extremely detrimental to effective
blotting. First, by imparting a high negative
charge density to a protein molecule, the SDS
causes the protein molecule to move very rapidly
through the membrane, reducing the residence
within the pore structure and minimizing the
opportunity for molecular interaction. Second,
by coating the protein molecule, the SDS limits
the ability of the protein to make molecular
contact with the PVDF. These effects increase
as the MW of the protein decreases. Methanol
reduces both effects by stripping off the SDS
and increasing the probability that a protein
molecule will bind to the membrane.
Factors Affecting Successful Protein Transfer
Presence of SDS Some studies have suggested that proteins, in
the context of an SDS-PAGE gel, bind to SDS
molecules and are therefore unable to bind
efficiently to the transfer membrane. Specifically,
when the transfer of BSA was monitored over
two hours in a standard tank transfer system,
the data suggested that within a single protein
band there is more than one population of
molecules transferring from the gel Figure 8,
page 20). About 90% of the BSA eluted from
the gel during the first 60 minutes, with an
additional 7% eluting in the last 60 minutes.
During the first 15 minutes, part of the eluted
BSA adsorbed to the Immobilon®-P transfer
membrane while the remainder passed through
and adsorbed to the Immobilon®-PSQ transfer
membrane. BSA that eluted after 15 minutes
adsorbed almost exclusively to the sheet of
Immobilon®-P transfer membrane.
Figure 8. Electrotransfer of BSA. 25 picomoles of 125I-labeled BSA were resolved by SDS-PAGE on a 10–20% gradient gel. After equilibration for 5 minutes, the BSA was transferred to Immobilon®-P transfer membrane, backed up with Immobilon®-PSQ transfer membrane, in a tank transfer system using 25 mM Tris, 192 mM glycine, and 10% methanol, as the transfer buffer. The system was run at 8 V/cm interelectrode distance. At 15, 30, 60, and 120 minutes, a gel/membrane cassette was removed and stained. The BSA bands were excised and counted.
100
80
60
40
Tota
l BSA
(%)
Duration of Transfer (min)
20
00 30 60 90 120
Immobilon®-PGel
Immobilon®-PSQ

20
The simplest interpretation is that the BSA
bound to a high level of residual SDS eluted
from the gel rapidly and was unable to adsorb
to Immobilon®-P transfer membrane. BSA that
eluted more slowly was able to adsorb to the
Immobilon®-P transfer membrane.
Although removal of SDS from a gel is generally
the best approach for routine blotting, there are
instances where addition of low amounts of
SDS to the transfer buffer is worth considering.
One instance is when the proteins to be
transferred have low solubility in the absence
of SDS. Proteins associated with or integral to
cellular membranes may be very hydrophobic
and can precipitate within the polyacrylamide
as the SDS is removed. High MW proteins also
may exhibit solubility problems in the absence
of SDS, especially after being exposed to the
denaturing conditions of the gel sample buffer
and the methanol used in the transfer buffer.
Supplementation of the transfer buffer with SDS
can help maintain sufficient solubility to permit
elution from the gel (e.g., Towbin and Gordon,
1984, Otter et al., 1987; Bolt and Mahoney,
1997). The SDS concentration in the transfer
buffer should not exceed 0.05%, and sufficient
equilibration time should be allowed to remove
all excess SDS from the gel.
Other methods employed to improve the transfer
efficiency of high molecular weight proteins
include prolonged blotting time, up to 21 hours
(Erickson et al., 1982), or the use of a composite
agarose polyacrylamide gel containing SDS and
urea (Elkon et al., 1984).
Current and Transfer Time The appropriate current and transfer time are
critical for successful blotting. Insufficient
current and/or time will result in incomplete
transfer. Conversely, if the current is too high,
the protein molecules may migrate through the
membrane too fast to be adsorbed. This can be a
significant problem for smaller proteins. Usually,
blotting systems come with manufacturer’s
recommendations for current and transfer time
that should be used as a guideline.
Optimization may still be required depending
on the percentage of acrylamide, the buffer
composition and the MW of the protein of
interest. Generally, long transfer times are best
suited for tank systems, which normally require
cooling of the unit and internal recirculation
of the transfer buffer. In semi-dry transfer,
however, prolonged blotting may result in buffer
depletion, overheating and gel drying. If too
much drying occurs, the unit can be damaged by
electrical arcing between the electrode plates.
Transfer Buffer pH The pH of the transfer buffer is another
important factor. If a protein has an isoelectric
point equal to the buffer pH, transfer will not
occur. To alleviate this problem, higher pH
buffers such as CAPS or lower pH buffer such as
acetic acid solutions can be used.
Equilibration Time In the early days of protein blotting (late
1970s, early 1980s), most protocols called for
equilibration of the gel for 30 minutes prior to
blotting. Standard gel sizes of 5 inches or more
on a side and minimum thicknesses
>1 mm required extended equilibration to
stabilize the size of the gel. As mini-gels
became more common, equilibration times
were shortened because there was less volume
into which the water and methanol had to
equilibrate.

21
Dimensional equilibrium can be reached in
standard mini-gels within 5 to 10 minutes, but
the kinetics of SDS stripping are significantly
slower, so a minimum equilibration time of 15
minutes is recommended for most mini-gels.
NOTE: For samples containing small peptides,
the rapid migration of peptides can occur
without electrical force. In this instance,
equilibration of the gel in transfer buffer should
be limited to less than 10 minutes.
In SDS-PAGE systems, the running buffer is
supplemented with SDS. This SDS concentrates
from the cathode reservoir and runs into the gel
behind the bromophenol blue tracking dye. Since
most gels are run until the tracking dye is at the
bottom of the gel, all of the excess SDS remains
in the gel and is carried over into the blotting
procedure. If the SDS isn’t allowed to diffuse out
of the gel prior to transfer, it will interfere with
protein adsorption. Equilibration times can be
extended up to 30 minutes, and sufficient buffer
should be used to dilute the SDS to a minimal
level.
The effect of equilibration time on
electrotransfer of BSA is shown in Figure 9.
In this study, radioactively labeled BSA was
resolved by SDS-PAGE, and the gels were
equilibrated in transfer buffer for periods
ranging from 0 to 30 minutes. Protein was
transferred to Immobilon®-P transfer membrane
backed up with a piece of Immobilon®-PSQ
transfer membrane to adsorb any BSA not
retained by the Immobilon®-P transfer
membrane. At the end of the transfer period,
the BSA in the gel, on the primary blot
(Immobilon®-P transfer membrane) and on
the backup blot (Immobilon®-PSQ transfer
membrane) was quantified. Retention improved
to 90% when the duration of the equilibration
period was increased to 30 minutes. Other
proteins have been found to behave similarly.
Figure 9. Effect of equilibration time on electrotransfer of BSA to Immobilon®-P transfer membrane. 125I-labeled BSA was resolved by SDS-PAGE on a 10–20% gradient gel. After equilibration for the times noted, the BSA was transferred to Immobilon®-P transfer membrane, backed up with Immobilon®-PSQ transfer membrane, in a tank transfer system using 25 mM Tris, 192 mM glycine, and 10% methanol, as the transfer buffer. The system was run at 8 V/cm interelectrode distance. At the end of the 2-hour transfer period, the gel and membranes were stained. The BSA bands were excised and counted.
Immobilon®-PGel Immobilon®-PSQ
Back-up
100
80
60
40
Tota
l BSA
(%)
Equilibration Time (min)
0 15 305 0 15 305 0 15 305
20
0
22
Developing a New Transfer Protocol
Although the previous section suggests that
the selection of buffers and transfer conditions
can be very complex, the tank transfer system
defined by Towbin et al. (1979) and the semi-dry
transfer system defined by Kyhse-Anderson
(1984) work well for most protein samples.
Both represent excellent starting points. If they
prove less than optimal for a particular protein,
though, transfer conditions can be tailored to
fit the biochemical peculiarities of the protein.
An interesting optimization strategy for the
efficient transfer of proteins over a MW range
from 8,000 to >400,000 kDa was demonstrated
by Otter et al. (1987). The transfer buffer was
supplemented with 0.01% SDS to maintain
the solubility of high MW proteins and 20%
methanol to enhance adsorption. The electrical
field was applied in two phases. The first hour of
transfer was at a low current density to slow the
migration rate of low MW proteins and increase
their residence time in the membrane. This was
followed by a prolonged period at high current
density to elute the high MW proteins.
When developing a new transfer protocol or
working with a new sample type, the gel should
be stained to verify that all of the proteins have
completely eluted from the gel. It is also highly
recommended to have a lane with prestained
markers in each gel to monitor the transfer
efficiency. Some proteins have limited solubility
in typical transfer buffers, requiring modification
of the buffer chemistry to prevent precipitation.
Other proteins, such as histones and ribosomal
proteins, are positively charged in standard
transfer buffers and will migrate toward the
cathode. These proteins can be successfully
transferred by placing a sheet of Immobilon®-P
membrane on the cathode side of the gel.
Staining the membrane after the transfer can
also be helpful to ensure that the target protein
is on the blot. See “Protein Visualization,” below,
for information on stains compatible with
subsequent immunodetection.
Another method to monitor protein transfer is
to stain SDS-PAGE gels prior to electroblotting
(Thompson and Larson, 1992). In this method,
the gels are stained with either Coomassie®
Brilliant Blue after electrophoresis, or during
electrophoresis. The transferred proteins remain
stained during immunodetection, providing a set
of background markers for protein location and
size determination (Thompson and Larson, 1992).
Preparing Membrane for Protein Identification For Staining and Immunodetection
PVDF membrane should be washed with
deionized water to remove any gel debris. The
blot can then be incubated with the blocking
solution.
For Rapid Immunodetection and Visualization by Transillumination
After the transfer is complete, PVDF membranes
should be completely dried before continuing
on to staining or immunodetection procedures.
Drying enhances the adsorption of the proteins
to the PVDF polymer, helping to minimize
desorption during subsequent analyses. As the
blotted membrane dries, it becomes opaque. This
optical change is a surface phenomenon that
can mask retention of water within the depth
of the pores. The membrane should be dried for
the recommended period to ensure that all liquid
has evaporated from within the membrane’s
pore structure (refer to Protocol 1.7. Membrane
Drying Methods, page 44).
Storage
PVDF membranes can be stored dry for long
periods of time after proteins have been
transferred with no ill effects to the membrane
or the proteins (up to two weeks at 4 °C; up
to two months at –20 °C; for longer periods
at –70 °C). Some proteins, however, may be
sensitive to chemical changes (e.g. oxidation,

23
deamidation, hydrolysis) upon prolonged storage
in uncontrolled environments. Long term storage
at low temperature is recommended. Prior to
further analysis, dried membranes must be
wetted by soaking in 100% methanol.
Protein Visualization Transillumination
Transillumination (Figure 10, page 24) is
a visualization technique unique to PVDF
membranes and was first described for
Immobilon®-P transfer membrane (Reig and
Klein, 1988). This technique takes advantage of a
characteristic unique to PVDF membranes; areas
of PVDF coated with transferred protein are
capable of wetting out in 20% methanol while
the surrounding areas of PVDF are not. In the
areas where the PVDF wets, it becomes optically
transparent, allowing visualization of protein
bands using backlighting and photographic
archiving. The process is fully reversible by
evaporation. Further denaturation of the
proteins is unlikely as the proteins had been
previously exposed to methanol during blotting.
Even though this technique does not allow for
visualization of low abundance proteins, it can
be used to assess the overall transfer efficiency
and the suitability of the blot for further
analysis.
Staining
Staining (Figure 10) is a simple technique to
make proteins visible on a blot. Staining can be
used to:
• Verify that proteins have transferred onto the
membrane.
• Determine if the lanes were loaded equally.
• Evaluate the overall efficiency of the transfer,
especially for a new buffer system or protein.
• Identify and excise bands for peptide
sequencing.
Many types of stains are available, including
organic dyes (Ponceau-S red, amido black, fast
green and Coomassie® Blue), fluorescent dyes
(fluorescamine, coumarin) and colloidal particles
(gold, silver, copper, iron and India ink) (Kurien
et al., 2003). Table 5 lists the most common
stains for detection of total proteins on Western
blots. The dyes are separated into two groups:
reversible and irreversible stains.
Reversible Stains
Reversible stains allow assessment of the blot
and then can be washed from the membrane.
These will not interfere with subsequent
immunodetection or other analysis of the
proteins on the blot. The most commonly used
reversible protein stain is Ponceau-S red.
The major drawnback of reversible stains is that
they are less sensitive than irreversible stains.
Since the staining pattern of more abundant
proteins in a blot is generally a good indicator
of how well low abundance proteins transferred,
this drawback can be minimized in most cases.
Fluorescent blot stains are highly sensitive
and compatible with downstream
immunodetection, Edman-based sequencing
and mass spectrometry (Berggren et al., 1999).
Sypro® Ruby and Sypro® Rose protein blot
stains (Life Technologies) can be used prior
to chromogenic, fluorogenic or chemilumi-
nescent immunostaining procedures and provide
sensitivity of about 1–2 ng/band (Haugland,
2002).
Irreversible Stains
Irreversible stains generally exhibit the best
sensitivity but can interfere with or prevent
further analysis of the proteins. Examples
of irreversible stains are amido black and
Coomassie® Brilliant Blue.

24
Table 5. Common stains used in Western blotting and their attributes.
Figure 10. Calf liver proteins are visualized after electroblotting to Immobilon®-P membranes: (A) Transillumination, (B) Coomassie® Brilliant Blue, (C) Ponceau-S red, (D) Amido black and (E) CPTS total protein stains. Left to right, molecular weight standards and 12.2 µg, 6.1 µg, 3.1 µg of the lysate per lane.
Detection Reagent(protein per spot) Approximate Sensitivity Reference
Reversible Ponceau-S red 5 µg Dunn et al., 1999
Fast green FC 5 µg Dunn et al., 1999
CPTS 1 µg Bickar et al., 1992
Sypro® Ruby 1–2 ng Haugland, 2002
Sypro® Rose 1–2 ng Haugland, 2002
Irreversible Amido black 10B 1 µg Dunn et al., 1999
Coomassie® Brilliant Blue R-250
500 ng Dunn et al., 1999
India ink 100 ng Dunn et al., 1999
Colloidal gold 4 ng Dunn et al., 1999
200kDa A B C D E
116976655
3631
21.5
14.4
6

25
Immunodetection uses a specific antibody to
detect and localize a protein blotted onto the
membrane (Figure 11). The specificity of antigen-
antibody binding permits the identification of a
single protein in a complex sample.
When developing new immunodetection
protocols, all components and their interactions
must be considered. Antibody concentrations,
buffer compositions, blocking agents and
incubation times must be tested empirically to
determine the best conditions. Water quality
is important in all steps—small impurities can
cause big problems. For instance, the enzyme
activity of horseradish peroxidase is inhibited by
pyrogens, a common contaminant of even high
purity water, and azide, a common preservative
in antibody solutions. The quality of the blocking
agents must also be considered relative to
consistency and contaminants.
Standard vs. Rapid Immunodetection Procedures There are two types of protocols for
immunodetection: standard and rapid.
Standard immunodetection methods include the
following steps:
1. Blocking unoccupied membrane sites to
prevent nonspecific binding of antibodies.
2. Incubating the membrane with primary
antibody, which binds to the protein of
interest.
3. Washing to remove any unbound primary
antibody.
4. Incubating the membrane with a conjugated
secondary antibody, which binds the first
antibody.
5. Washing to remove any unbound secondary
antibody.
6. Incubating the membrane with a substrate
that reacts with the conjugated secondary
antibody to reveal the location of the protein.
Protein IdentificationImmunodetection
Figure 11. Membrane-based immunodetection.
Substrate
Protein
SS P
EE
PPPP
P P
SSS
SS
S
SProduct
Primary Antibody
Blocking Agent
Membrane
Secondary Antibody(Enzyme)
4
Protein Identification

26
Rapid immunodetection eliminates the blocking
step and reduces the time necessary for the
washing and incubation steps. The rapid
immunodetection method works well to quickly
visualize higher abundance proteins. Standard
immunodetection, however, offers higher
sensitivity and requires less optimization for new
sample types. Procedures for both standard and
rapid immunodetection methods are outlined in
Protocol 3 (pages 48-54). Table 6 compares the
times required to perform the two protocols.
Factors Influencing Immunodetection
Understanding the concepts presented in the
following sections on immunodetection will help
in optimizing protocols for specific samples.
Buffers
The two most commonly used buffers are
phosphate-buffered saline (PBS) and Tris-
buffered saline (TBS). Many variations on
the compositions of these buffers have been
published. The key requirement of the buffer
is that it should help preserve the biological
activity of the antibodies. Thus, the ionic
strength and pH should be fairly close to
physiological conditions. PBS formulations with
10 mM total phosphate concentration work well
with a wide array of antibodies and detection
substrates.
During incubations, the container holding
the membrane should be gently agitated. A
sufficient volume of buffer should be used to
cover the membrane completely so that it is
floating freely in the buffer. If more than one
blot is placed in a container, insufficient buffer
volume will cause the blots to stick together.
This will limit the accessibility of the incubation
solutions and can cause a variety of artifacts
including high backgrounds, weak signals, and
uneven sensitivity.
StepStandard Immunodetection
Rapid Immunodetection
1. Block the membrane 1 hr None
2. Incubate with primary antibody 1 hr 1 hr
3. Wash the membrane 3 x 10 min 3 x 5 min
4. Incubate with secondary antibody 1 hr 30 min
5. Wash the membrane 3 x 10 min 3 x 5 min
6. Add substrate 5 min 5 min
Total time 4 hr 5 min 2 hr 5 min
Table 6. Standard vs. rapid immunodetection.
Prot
ein
Iden
tifica
tion

27
Blocking
For meaningful results, the antibodies must
bind only to the protein of interest and not
to the membrane. Nonspecific binding (NSB)
of antibodies can be reduced by blocking the
unoccupied membrane sites with an inert
protein, non-ionic detergent, or a protein-free
blocker such as Bløk® noise-canceling reagents.
The blocking agent should have a greater
affinity for the membrane than the antibodies.
It should fill all unoccupied binding sites on the
membrane without displacing the target protein
from the membrane. The most common blocking
agents used are bovine serum albumin (BSA,
0.2–5.0%), non-fat milk, casein, gelatin, dilute
solutions of Tween®-20 detergent (0.05 –0.1%),
and Bløk® reagents. Tween®-20 detergent was
also shown to have a renaturing effect on
antigens, resulting in improved recognition
by specific antibodies (Van Dam et al.,1990;
Zampieri et al., 2000). Other detergents, such
as Triton® X-100 detergent, SDS, and NP-40,
are sometimes used but can be too harsh
and disrupt interaction between proteins. The
blocking agent is usually dissolved in PBS or TBS
buffers.
There are risks associated with blocking; a
poorly selected blocking agent or excessive
blocking can displace or obscure the protein
of interest. Therefore, the correct choice of a
blocking agent can be critical to a successful
immunodetection. For example, dry milk cannot
be used with biotinylated or concanavalin-
labeled antibodies, since milk contains both
glycoproteins and biotin. The analysis of
phosphorylated proteins with phosphospecific
antibodies can be compromised if using crude
protein preparation as a blocking agent. These
preparations may contain phosphatases, and
the phosphorylated proteins on the blot could
become dephosphorylated by these enzymes. It
has been shown that addition of phosphatase
inhibitors to the blocking solution increases the
signal with phospho-specific antibody (Sharma
and Carew, 2002). Finally, a blocking agent that
is found to be suitable for one antigen-antibody
combination may not be suitable for another.
Compatibility between the blocking agent and
the detection reagent can be determined easily
using the Spot Blotting Method described in
Protocol 1.5 (page 41). The blocking solution
gets spotted onto a blank PVDF membrane that
has been wet in methanol and equilibrated in
TBS. Detection reagents are then added to the
blot, the blot is incubated for 5 minutes and
then exposed to X-ray film. Appearance of a
dark spot indicates that the blocking reagent is
incompatible with the detection reagent (Figure
19, page 42). It is important to remember that
Immobilon®-PSQ transfer membrane, with its
higher surface area and smaller pore size than
Immobilon®-P transfer membrane, binds more
protein. If Immobilon®-PSQ transfer membrane is
substituted directly for Immobilon®-P transfer
mem brane in a standard Western blotting
procedure, there may be insufficient blocking
reagent to saturate the membrane surface.
Additional washing steps may also be required
to reduce the back ground. Blocking can be
conveniently optimized using the Spot Blotting
Method (page 40).
Antibodies
After blocking, the blot is incubated with one or
more antibodies. The first antibody binds to the
target protein, and a secondary antibody binds to
the first. The secondary antibody is conjugated
to an enzyme or dye that is used to indicate the
location of the protein.
Although the primary antibody may be labeled
directly, using a secondary antibody has distinct
advantages. First, more than one molecule of
the secondary antibody may be able to bind
to a single molecule of the primary antibody,
resulting in signal amplification. Second, a
labeled secondary antibody (enzyme-antibody

28
conjugate) can be used for a large number of
primary antibodies of different specificities,
thereby eliminating the need to label numerous
primary antibodies.
Either polyclonal or monoclonal primary
antibodies are used. Polyclonal antibodies usually
come in the form of antiserum or affinity-
purified antibody. Monoclonal antibodies are
expressed in ascites fluid or tissue culture fluid
and can be directly used or as an affinity-purified
preparation. It is important to remember that
a denatured protein may not be recognized
by an antibody raised to the native antigen.
In some cases, a nondenaturing gel may be
required for production of the blot. Antibodies
are diluted in buffer and blocking solution to
prevent nonspecific binding to the membrane.
The antibody diluent also normally contains
trace amounts of Tween®-20 or another
detergent to prevent nonspecific aggregation
of the antibodies. Many published protocols for
chemiluminescence require 0.1% (v/v) Tween®-20
in the blocking solution and antibody diluent.
It is important to recognize that concentrations
above 0.05% (v/v) have the potential to wash
some blotted proteins from the membrane.
Figure 12. Optimization of secondary antibody dilution for immunodetection of ERK 1 with Immobilon® Western Chemiluminescent HRP Substrate. Two-fold dilutions of rat liver lysate samples were applied to each gel. Electroblotted proteins were probed with rabbit anti-ERK 1 antibody (1:1,000 dilution) and HRP-conjugated goat anti-rabbit IgG (1:5,000, 1:20,000 and 1:100,000 dilutions, left to right).
Elevating the concentration of Tween®-20
detergent can often reduce the background.
Often, a simpler and more cost-effective strategy
is to reduce the concentration of the antibodies,
especially the secondary antibody (see Figure 12).
In addition to being specific for the protein of
interest, the antibodies must not cross-react
with components of the blocking buffer and
should be relatively pure. Impurities in the form
of other proteins or aggregates can result in
nonspecific binding and increased background.
Immunodetection is an extremely sensitive
method. In order to achieve a high signal-to-
noise ratio and thereby maximum sensitivity,
the concentrations of primary and secondary
antibodies should be optimized for each case.
Generally, nonspecific signal can be reduced
by higher dilution of the primary antibody or
decreased protein load on the original gel. High
overall background can be minimized by higher
dilution of the enzyme-conjugated secondary
antibody.
Optimal concentration of both primary and
secondary antibodies also depends on the
sensitivity of the detection reagents. Up to
twenty times less antibody is required for high-
sensitivity reagents (detection at femtogram
level) as compared to low-sensitivity reagents
(detection at the picogram level). An example
of optimization of antibody concentration
depending on the detection substrate is shown
in Figure 13. When using the most sensitive
detection reagent (Luminata™ Forte reagent),
excessive amounts of antibody led to high
nonspecific and increased overall background
(top left). In this case, increasing the primary
antibody dilution from 1:1,000 to 1:10,000
improved the signal-to-noise ratio. With
progressively less sensitive detection reagents
(middle and bottom rows, respectively),
antibodies need to be more concentrated to
yield the same signal.
1:5000 1:20,000 1:100,000

29
The amount of washing required is best
determined experimentally. Too little washing
will yield excessive background, while
overwashing may elute the antibodies and
reduce the signal. It is recommended that
washing be performed a minimum of three
times for 5 minutes each.
Persistent background can be reduced by adding
up to 0.5 M sodium chloride and up to 0.2% SDS
to the TBS wash buffer and extending wash time
to 2 hours.
Double Blotting
An innovative method to eliminate nonspecific
binding in Western blots was developed by
Dr. Françoise Lasne of the Laboratoire National
de Dépistage du Dopage (National Anti-Doping
Laboratory) in Châtenay-Malabry, France
(Lasne, 2001; Lasne, 2003). While studying
recombinant human erythropoietin (EPO), Dr.
Lasne found that recombinant and naturally
occurring EPO have different isoelectric points
(pI). Recombinant EPO has a pI of 4.42–5.11,
while natural EPO has a more acidic pI of
3.92–4.42. However, when urine samples are
blotted, the very high nonspecific binding (NSB)
Using higher sensitivity HRP substrates was
advantageous in three respects:
1. Better results: It produced stronger bands
for a more quantitative blot (compare the
increase in band intensities for Luminata™
Crescendo & Forte substrates at 1:10,000
dilution)
2. Faster: It took only 10 minutes to wash blot
and add a new substrate relative to the 2.5
hours required to repeat antibody incubations.
3. Cheaper: The HRP substrates are much
cheaper than the price of antibodies.
Washing
Washing the blot removes any unbound
antibodies from the membrane that could cause
high background and poor detection. A dilute
solution of Tween®-20 (0.05% v/v) in PBS or TBS
buffer is commonly used, especially when the
antibody preparations are comparatively crude
or used at high concentrations. As mentioned
previously, concentrated detergent solutions
may cause unwanted elution of the protein of
interest from the membrane. For highly purified
antibodies, buffer alone is often sufficient for
washing.
Figure 13. The more sensitive the detection reagent, the less antibody is needed. Immunoblots containing the indicated amounts of A431 lysate were probed with different concentrations of anti-GAPDH antibody indicated in the top row, followed by an appropriate secondary antibody. Bands were visualized using the indicated Luminata™ HRP substrate and exposed to x-ray film for 5 minutes. Of the three detection reagents shown, Luminata™ Forte reagent is the most sensitive, followed by Luminata™ Cresendo and then Luminata™ Classico reagents.
Strong bands detected
Bands detected
No bands detectedClassico
Crescendo
Forte
10 5 2.5
1.2
0.6
0.3
0.1
0.07
10 5 2.5
1.2
0.6
0.3
0.1
0.07
10 5 2.5
1.2
0.6
0.3
0.1
0.07
1:1,000Antibody Dilution
1:5,000 1:10,000

30
of the secondary antibodies makes it difficult to
distinguish between recombinant and natural
EPO. To eliminate the NSB, Dr. Lasne used
“double blotting.” After the primary antibody
is bound to the blotted protein, the antibodies
are transferred to a second Immobilon®-P
membrane under acidic conditions. The primary
antibody desorbs from its corresponding antigen
and transfers through an intermediate onto
the second (double-blot) mem brane. When
the double-blot membrane is probed with
the secondary antibody, no other proteins are
present to bind nonspecifically, thus eliminating
the background problem (refer to Protocol 1.6.
Double Blotting Procedure, page 43).
“Double blotting” has also been used in the
detection of transthyretin and may be a useful
method in detecting other low concentration
serum or urine proteins.
Detection Substrates
Modern immunodetection methods are based
on enzyme-linked detection, utilizing secondary
antibodies covalently bound to enzymes such
as horseradish peroxidase (HRP) or alkaline
phosphatase (AP). The conjugated enzyme
catalyzes the degradation of specific substrates,
resulting in signal generation. Three types of
substrates are commonly used: chromogenic,
chemiluminescent, and chemifluorescent, as
well as detection with fluorophore-labeled
secondary antibodies. Immobilon® PVDF
membranes have been tested for compatibility
with all commercially available chromogenic and
chemiluminescent substrates.
Chromogenic DetectionChromogenic detection (Figure 14) uses the
conjugated enzyme to catalyze a reaction
resulting in the deposition of an insoluble
colored precipitate, for example, the insoluble
blue compound obtained through the interaction
of 5-bromo-4-chloro-3-indolylphosphate (BCIP)
and nitroblue tetrazolium salt (NBT) (Leary, et
al., 1983). This technique is easy to perform
and requires no special equipment for analysis.
However, the following should be kept in mind:
• Sensitivity of chromogenic detection is
typically at least one order of magnitude
lower than with chemiluminescent reagents.
• Production of the precipitate can interfere
with enzyme activity and limit sensitivity.
• The precipitate is difficult to strip from
membrane, limiting reuse of the blot for
detection of other proteins.
Figure 14. Immunodetection of transferrin in human serum with chromogenic substrate BCIP/NBT (KPL). Left to right, 5 µL human serum dilutions 1:1,000, 1:5,000, 1:25,000, 1:125,000. Electroblotted proteins were probed with goat anti-human transferrin (1:10,000 dilution) and AP-conjugated rabbit anti-goat IgG (1:30,000 dilution).
Chemiluminescent DetectionChemiluminescent detection uses the
conjugated enzyme to catalyze a reaction
that results in the production of visible light.
Some chemiluminescent systems are based
on the formation of peroxides by horseradish
peroxidase; other systems use 1,2-dioxetane
substrates and the enzyme alkaline phosphatase
(Cortese, 2002). This technique has the speed
and safety of chromogenic detection at
sensitivity levels comparable to radioisotopic
detection. Detection is achieved by either
exposing the blot to X-ray film or acquiring
the image directly in a chemiluminescence-
compatible digital imaging system, usually
equipped with highly-cooled CCD cameras to
avoid electronic noise. Reprobing is possible with
chemiluminescent substrates.

31
There are a variety of chemiluminescent
substrates offering researchers different levels
of sensitivity of detection. Traditional or low-
sensitivity substrates allow protein detection
at the picogram level. While these substrates
may be appropriate for routine applications,
they cannot detect low abundance proteins.
New, high-sensitivity substrates, such as
Luminata™ HRP substrates, allow visualization
of proteins at the femtogram level. However,
use of these powerful substrates often requires
optimization of primary and secondary antibody
concentrations (Figure 13, page 29). When
switching from a low-sensitivity to a high-
sensitivity substrate, like Luminata™ Forte
reagent, it is recommended that antibody
dilutions be increased to avoid excessive
background and appearance of nonspecific
bands.
Reagents for ECL immunodetection can be
prepared using p-iodophenol (PIP) and luminol
(Hengen, 1997). PIP is needed for enhancing the
visible light reaction by acting as a co-factor
for peroxidase activity toward luminol. When
phenolic enhancers are used in combination
with HRP, the level of light increases about
100-fold (Van Dyke and Van Dyke, 1990). These
homemade reagents are cited to produce
excellent results, however, the highest purity of
the luminol and PIP is critical (Hengen, 1997).
Fluorescent DetectionFluorescent detection employs either a
fluorophore-conjugated antibody or fluorogenic
substrates that fluoresce at the site of enzyme
activity (chemifluoresence). One advantage of
this method is that the fluorescent signal is
stable for long periods of time, and blots can be
archived and re-imaged. In addition, the wide
variety of fluorophores makes it possible to
simultaneously detect multiple protein targets
in a single sample (multiplex detection). Until
recently, fluorescent detection in Western
blotting was limited by the high fluorescent
background of most blotting membranes.
Immobilon®-FL transfer membrane exhibits low
background fluorescence across a wide range
of excitation/emission wavelengths compared
to other blotting membranes (Figure 15). The
membrane is ideal for any application involving
fluorescence-based immunodetection, including
chemifluorescent substrates and multiplexing
(Figure 16). In addition, Immobilon®-
FL membrane can be used for standard
chemiluminescent or chromogenic detection.
Figure 15. Reverse image demonstrating fluorescent detection of transferrin in human serum on various blotting membranes. Serum dilutions: 1:4,000, 1:8,000, 1:16,000, 1:32,000 and 1:64,000.
Figure 16. Western blots of serial dilutions of E. coli cell lysates over-expressing GST protein with either a cMyc or an HA tag. (A) cMyc tag detected with a primary antibody followed by Qdot® 705 (pseudo-colored blue) anti-mouse conjugate; (B) GST detected with Qdot 565 (green) anti-GST conjugate; (C) HA tag detected with a primary antibody followed by Qdot® 605 (red) anti-mouse conjugate; (D) the blot probed with a combination of all three antibodies (multiplexing). The blots were scanned on a Kodak imager. Data provided by Quantum Dot Corporation.
Immobilon®-FL
Nitrocellulose 1
PVDF 1
A
B
C
D
Nitrocellulose 2
PVDF 2

32
Reprobing Immobilon® PVDF Transfer Membranes
A single blot can be sequentially analyzed
with multiple antibodies by stripping the
first antibody from the blot and incubating
with another. This may be especially useful
for co-localization experiments and method
optimization or when sample amount is limited
(refer to Protocol 5.4 Membrane Stripping
Protocols, page 55.)
Mass Spectrometry with Immobilon® PVDF Transfer MembranesMass spectrometry (MS) is an analytical method
used to identify proteins on a blot. After staining
the proteins on a PVDF membrane with MS-
compatible dye (Coomassie® Blue, Amido black
or Sypro® stains), the band of interest is cut
out of the membrane and subjected to tryptic
digestion. The peptide fragments generated are
then analyzed by mass spectrometry
(Gharahdaghi et al., 1996; Bienvenut,
et al., 1999; Bunai et al., 2003). Figure 17
demonstrates a MALDI-TOF spectrum obtained
for an on-membrane-digested bovine protein
successfully identified as catalase.
Another method to consider is protein mass
spectrometry directly from the blotted
Immobilon® PVDF transfer membrane. This
method usually is applied for 2-D gel separated
proteins. Using a parallel process, all proteins on
a gel are simultaneously digested proteolytically
and electrotransferred onto an Immobilon®
The stripping process disrupts the antigen
antibody bonds and dissolves the antibody in
the surrounding buffer. This is usually achieved
either by a combination of detergent and heat
or by exposure to low pH. Neither method
removes the colored precipitates generated from
chromogenic detection systems (e.g., BCIP, 4CN,
DAB and TMB). However, it is still possible to
analyze the blot with an antibody specific for a
different target protein.
PVDF transfer membrane, which is then scanned
for the presence of the peptides (Binz et al.,
1999; Bienvenut et al., 1999; Bienvenut et
al., 2003). Alternatively, in a method called
“chemical printing” (Wallace et al., 2001; Gooley
et al., 1998), two-dimensionally separated
proteins are first transferred to PVDF membrane
and visualized, and then digested by dispensing
miniscule amounts of trypsin directly onto the
spots (Sloane et al., 2002). In both methods, the
membrane is sprayed with matrix and directly
scanned by MALDI-TOF MS. Protein identification
is obtained by peptide mass fingerprinting.
Figure 18 shows 2-D-separated human plasma
proteins transferred to Immobilon®-PSQ transfer
membrane and two MALDI-TOF spectra obtained
for identification of membrane-immobilized
proteins.
Mass Spectrometry
33
Figure 17. MALDI-TOF spectrum of a band from Coomassie® Blue-stained blot of liver proteins, using Protocol 5.1. On-membrane Protein Digestion, page 57 (Bienvenut et al., 1999). The protein was identified as bovine catalase, with 6.4e+06 MOWSE score and 34% coverage. Data were obtained on a Bruker® Autoflex™ mass spectrometer. The search was done using Protein Prospector.
Figure 18. Human plasma separated by 2-D electrophoresis and transferred to (left) Immobilon®-PSQ transfer membrane and (right) MALDI-TOF mass spectra collected directly from the membrane surface of tryptic digested proteins. Human plasma was separated by 2D electrophoresis, electro-blotted onto Immobilon®-PSQ transfer membrane, and adhered to a MALDI target. Digestion of proteins with the endoproteinase trypsin was performed directly on the membrane surface. Nanoliters of enzyme were required for digestion and were microdispensed with drop-on-demand piezoelectric ink-jet devices onto the membrane surface using a ChIP™ (Proteome Systems and Shimadzu Corp.) instrument. The resultant peptides were analyzed with an AXIMA™-CFR (Shimadzu Corp.) MALDI-TOF MS and identified with peptide mass fingerprinting. The peptides were analyzed directly from the membrane surface, where MALDI matrix was microdispensed on top of the digested protein prior to analysis. Data courtesy of Drs. J.L. Duff, F.G. Hopwood, C.J. Hill, A.A. Gooley (Proteome Systems, Ltd., Sydney, Australia).
15000
10000
5000
01200 1700 2200 2700 m/z
1119.5841046.527
863.439
1479.701
1407.6541285.643
1740.8371502.814 1780.835 1851.884
2205.058 2242.133

34
TIP: Ethanol or isopropanol can be
substituted for methanol in the
transfer buffer.
TIP: SDS in the transfer buffer (up
to 0.05%) can improve transfer
efficiency but may also reduce the
membrane’s protein retention.
TIP: Immobilon® transfer membrane
precut sheets fit all standard
mini-gel sizes and common
electrophoresis systems.
(Tables page 8 and 9.)
Recommendation - Chill transfer
buffers prior to tank transfer.
TIP: Thicker gels or larger proteins may
require longer transfer times or
increased field strength. The actual
transfer conditions should be
optimized for each system.
TIP: Methanol in the transfer buffer
(8 -20%) deceases efficiency of
protein elution from the gel but
improves absorption to PVDF
transfer membrane.
TIP: Because of the hydrophobic nature
of PVDF the membrane requires
wetting with alcohol.
TIP: Tris-glycine buffer will produce
higher background in N-terminal
sequencing. Use CAPS or TBE
buffer for transfer if protein bonds
are to be sequenced by Edman
degradation.
TIP: Replace 0.45 µm Immobilon®-P
transfer membrane with 0.2
µm Immobilon®-PSQ transfer
membrane when analyzing lower
molecular weight proteins.
TIP: Use 0.45 µm Immobilon®-FL
transfer membrane for fluorescent
detection methods.
ProtocolsThis section of the handbook is a compendium of the most frequently used protein blotting protocols. The methods are general enough that they can be used with all commercially available detection reagents. They can be optimized using the numerous tips that are also included in this section. These optimization tips are a product of EMD Millipore’s collective years of experience with transfer membranes and blotting, as well as referenced literature and feedback from our customers.
5

35
Protocols
Protocol 1.1 Electrotransfers: Tank (Wet) Transfer
The following protocol describes the standard
procedure for transferring proteins from
a polyacrylamide gel (SDS-PAGE) onto an
Immobilon® PVDF transfer membrane using
a tank transfer system. Please review the
instructions supplied with your tank transfer
system for additional information.
Required Equipment and Solutions
• Polyacrylamide gel containing the
resolved proteins.
• Immobilon® PVDF transfer membrane, cut
to the same dimensions as the gel (including
notched corner for orientation purposes).
• Two sheets of Whatman® 3MM filter paper
or equivalent, cut to the same dimensions as
the gel.
• Two foam pads (for example, Scotch Brite®
pads).
• Tank transfer system large enough to
accommodate gel.
• Methanol, 100%.
• Milli-Q® water.
• Tris/glycine transfer buffer: 25 mM Tris base,
192 mM glycine, 10% (v/v) methanol, pH 8.3;
or CAPS buffer: 10 mM 3-[Cyclohexylamino]-
1-propanesulfonic acid (CAPS), 10% (v/v)
methanol, pH 11 (adjust with NaOH).
NOTE: Both buffers can be prepared as 10X
stock solutions and mixed with methanol
prior to use.
Setup
1. Prepare sufficient transfer buffer to fill the
transfer tank, plus an additional 200 mL to
equilibrate the gel and membrane, and wet
the filter paper.
2. Remove the gel from its cassette; trim away
any stacking gel and wells.
3. Immerse the gel in transfer buffer for
10 to 30 minutes.
4. Soak filter papers in transfer buffer for at
least 30 seconds.
5. Prepare the membrane:
a. Wet the membrane in methanol for
15 seconds. Membrane should uniformly
change from opaque to semi-transparent.
b. Carefully place the membrane in Milli-Q®
water and soak for 2 minutes.
c. Carefully place the membrane in transfer
buffer and let equilibrate for at least
5 minutes.
Transfer Stack Assembly
1. Open the cassette holder.
IMPORTANT: To ensure an even transfer,
remove air bubbles between layers by
carefully rolling a pipette or a stirring rod over
the surface of each layer in the stack. Do not
apply excessive pressure to prevent damaging
the membrane and gel.
2. Place a foam (fiber) pad on one side of
the cassette.
3. Place one sheet of filter paper on top of
the pad.
1. Protein Transfer

36
4. Place the gel on top of the filter paper.
5. Place the membrane on top of the gel.
6. Place a second sheet of filter paper on top of
the stack.
7. Place second foam pad on top of the
filter paper.
8. Close the cassette holder.
The completed transfer stack should
look like this:
Protein Transfer
1. Place the cassette holder in the transfer tank
so that the gel side of the cassette holder is
facing the cathode (–) and the membrane side
is facing the anode (+).
2. Add adequate buffer into the tank to cover
the cassette holder.
3. Insert the black cathode lead (–) into the
cathode jack and the red anode lead (+) into
the anode jack on the transfer unit.
4. Connect the anode lead and cathode lead to
their corresponding power outputs.
5. If available, set up the cooling unit on
the tank transfer unit according to the
manufacturer’s instructions.
Protocol 1.2 Electrotransfers: Semi-dry Transfer
The following protocol describes the standard
procedure for transferring proteins from
a polyacrylamide gel (SDS-PAGE) onto an
Immobilon® PVDF transfer membrane using a
semi-dry transfer system. It is specific for semi-
dry transfer devices with the anode plate serving
as the base. For devices having the cathode
plate as the base, consult the instruction manual
for recommended buffers and transfer stack
assembly. This protocol describes a three-buffer
system. Single-buffer systems can also be used.
Please consult manufacturer’s recommen-
dations.
6. Turn on the system for 1 to 2 hours at 6 to
8 V/cm inter-electrode distance. Follow the
tank manufacturer’s guidelines, and refer to
Transfer of Proteins from Gel to Membrane,
page 16, for optimization details.
7. After the transfer is complete, remove the
cassette holder from the tank.
8. Using forceps, carefully disassemble the
transfer stack.
For protein visualization protocols, see page 45;
for immunodetection protocols, see page 48.
Prot
ocol
s
Filter paper
Filter paper
GelMembrane
Foam pad
Foam pad
(+) Anode
(-) Cathode
Directionof transfer
TIP: For semi-dry transfer systems, it
is important that the filter papers
and membrane are cut to the same
size as the gel so that the current is
forced to flow through the gel.

37
Required Equipment and Solutions
For single transfers: • Polyacrylamide gel containing the resolved
proteins.
• Immobilon® PVDF transfer membrane, cut
to the same dimensions as the gel (including
notched corner).
• Six pieces of Whatman® 3MM filter paper
or equivalent, cut to the same dimensions as
the gel.
• Semi-dry transfer system large enough to
accommodate gel.
• Anode buffer I: 0.3 M Tris, pH 10.4,
10% (v/v) methanol.
• Anode buffer II: 25 mM Tris, pH 10.4,
10% (v/v) methanol.
• Cathode buffer: 25 mM Tris, 40 mM 6-amino-
n-caproic acid (glycine may be substituted),
10% (v/v) methanol, pH 9.4.
• Methanol, 100%.
• Milli-Q® water.
For multiple transfers, all of the above plus the following: • Dialysis membrane, cut to the same
dimensions as the gel and wet with Milli-Q®
water. (The membrane should have a
molecular weight exclusion small enough to
retain the lowest molecular weight protein in
the gel).
• Additional pieces of filter paper .
Setup
1. Prepare 200 mL of each anode buffer and
400 mL of cathode buffer.
2. Remove the gel from its cassette; trim away
any stacking gel.
3. Immerse the gel in 200 mL of cathode buffer
for 15 minutes.
4. Soak two pieces of filter paper in anode
buffer I for at least 30 seconds.
5. Soak one piece of filter paper in anode buffer
II for at least 30 seconds.
6. Soak three pieces of filter paper in cathode
buffer for at least 30 seconds.
7. Prepare the membrane:
a. Wet the membrane in methanol for
15 seconds. The membrane should
uniformly change from opaque to semi-
transparent.
b. Carefully place the membrane in Milli-Q®
water and soak for 2 minutes.
c. Carefully place the membrane in anode
buffer II and let equilibrate for at least 5
minutes.
TIP: In both types of transfer systems
(tank and semi-dry), extra caution
should be taken to prevent
introduction of air bubbles
anywhere between the filter paper,
gel or membrane.
Recommended - Transfer proteins at
constant current. If transferring at
constant voltage, monitor current to
make sure it doesn’t exceed 0.4 amp.
Start from 100 V and reduce voltage if
current is too high.
TIP: Both sides of Immobilon® transfer
membranes work equally well. The
appearance of either side (shiny or
dull) has no effect on the transfer
and detection efficiency of the
membrane.
TIP: For samples containing small
peptides, equilibration of the gel in
transfer buffer should be limited to
less than 10 minutes.
Gels can be transferred individually or
multiple gels can be transferred in a single
stack.
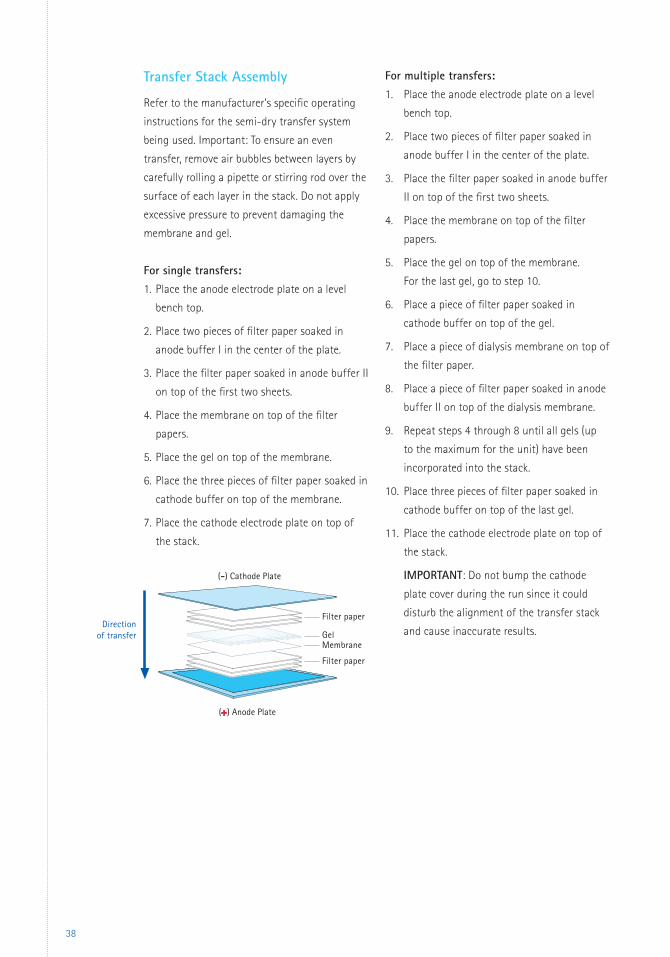
38
Transfer Stack Assembly
Refer to the manufacturer’s specific operating
instructions for the semi-dry transfer system
being used. Important: To ensure an even
transfer, remove air bubbles between layers by
carefully rolling a pipette or stirring rod over the
surface of each layer in the stack. Do not apply
excessive pressure to prevent damaging the
membrane and gel.
For single transfers: 1. Place the anode electrode plate on a level
bench top.
2. Place two pieces of filter paper soaked in
anode buffer I in the center of the plate.
3. Place the filter paper soaked in anode buffer II
on top of the first two sheets.
4. Place the membrane on top of the filter
papers.
5. Place the gel on top of the membrane.
6. Place the three pieces of filter paper soaked in
cathode buffer on top of the membrane.
7. Place the cathode electrode plate on top of
the stack.
For multiple transfers: 1. Place the anode electrode plate on a level
bench top.
2. Place two pieces of filter paper soaked in
anode buffer I in the center of the plate.
3. Place the filter paper soaked in anode buffer
II on top of the first two sheets.
4. Place the membrane on top of the filter
papers.
5. Place the gel on top of the membrane.
For the last gel, go to step 10.
6. Place a piece of filter paper soaked in
cathode buffer on top of the gel.
7. Place a piece of dialysis membrane on top of
the filter paper.
8. Place a piece of filter paper soaked in anode
buffer II on top of the dialysis membrane.
9. Repeat steps 4 through 8 until all gels (up
to the maximum for the unit) have been
incorporated into the stack.
10. Place three pieces of filter paper soaked in
cathode buffer on top of the last gel.
11. Place the cathode electrode plate on top of
the stack.
IMPORTANT: Do not bump the cathode
plate cover during the run since it could
disturb the alignment of the transfer stack
and cause inaccurate results. Filter paper
GelMembrane
Filter paper
(+) Anode Plate
(-) Cathode Plate
Directionof transfer

39
Protocol 1.3 Dot Blotting/Slot Blotting: Vacuum Filtration Method
The following protocol describes a typical
procedure for filtering proteins onto an
Immobilon® PVDF transfer membrane. Please
review the instructions supplied with your
blotting unit for additional information.
Required Equipment and Solutions
• Two sheets of Immobilon® PVDF transfer
membrane, cut to size for blotting unit.
• Filter paper, cut to size for blotting unit.
• Methanol, 100%.
• Milli-Q® water.
• Buffer, for sample loading and washes.
• Blotting unit, dot blot or slot blot format.
Set Up
1. Prepare the membrane:
a. Wet the membrane in methanol for
15 seconds. The membrane should
uniformly change from opaque to semi-
transparent.
b. Carefully place the membrane in Milli-Q®
water and soak for 2 minutes.
c. Carefully place the membrane in buffer
and let equilibrate for at least 5 minutes.
2. Dissolve the sample in buffer. If the sample
solution is cloudy, centrifuge to remove
particles. If the sample is viscous, dilute with
additional buffer.
Protein Transfer
1. Insert the black cathode lead (–) into the
cathode plate jack.
2. Insert the red anode lead (+) into the anode
plate jack.
3. Connect the anode lead and cathode lead to
their corresponding power supply outputs.
4. Turn on the power supply.
5. Set the current and let it run for the time
indicated in the following chart: TIP: Detergents may inhibit the
binding of proteins to the
Immobilon® PVDF transfer
membrane.
Recommended - Viscous samples
must be diluted with buffer to reduce
viscosity.
Current Density Time Limit
0.8 mA/cm2* 1–2 hours
1.2 mA/cm2 1 hour
2.5 mA/cm2 30–45 minutes
4.0 mA/cm2 10–30 minutes
*The surface area (cm2) is calculated from the dimensions of the footprint of the stack on the anode plate. This value is independent of the number of gels in the stack.
6. Turn off the power supply when the transfer
is complete.
7. Disconnect the system leads.
8. Remove the cover.
9. Remove and discard the filter papers.
NOTE: When using graphite plates, graphite
particles from the anode electrode plate
occasionally appear on the filter paper. These
particles do not affect operation.
10. Remove the gel.
11. Remove the blotted membrane with a pair of
forceps.
For protein visualization protocols, see page 45;
for immunodetection protocols, see page 48.

40
Protocol 1.4 Spot Blotting: Manual Spotting Method
Required Equipment and Solutions
• Immobilon® PVDF transfer membrane.
• Filter paper, cut to size of transfer membrane.
• Paper towels.
• Methanol, 100%.
• Buffer.
Setup
1. Prepare the membrane:
a. Wet the membrane in methanol for 15
seconds. The membrane should uniformly
change from opaque to semi-transparent.
b. Carefully place the membrane in Milli-Q®
water and soak for 2 minutes.
c. Carefully place the membrane in buffer
and let equilibrate for at least 5 minutes.
2. If the sample solution is cloudy, centrifuge
to remove particles. If the sample is viscous,
dilute with additional buffer.
Transfer Stack Assembly
Assemble stack as follows (from the bottom up):
1. Place paper towels on work surface.
NOTE: Bottom towels should remain dry
throughout blotting procedure.
2. Place dry filter paper (i.e., Whatman® 3MM
paper) on paper towels.
3. Place filter paper (pre-wet with buffer) on the
dry filter paper.
4. Place the pre-wet membrane on wet
filter paper.
Blotting Unit Assembly
See manufacturer’s instructions for detailed
assembly instructions.
1. Place one sheet of moistened filter paper
on unit. Some units may require more than
one sheet.
2. Place two sheets of the membrane on top of
the filter paper*.
3. Close the unit.
4. Connect to vacuum line.
Protein Transfer
1. Briefly apply the vacuum to remove
excess buffer.
2. With the vacuum off, carefully pipette
samples into the wells.
3. Apply vacuum to the blotting unit.
4. When all of the samples have filtered through
the membrane, turn off the vacuum.
5. Add buffer to each well to wash down the
sides. Apply the vacuum to filter through the
wash buffer.
6. When all of the wash buffer has filtered
through the membrane, turn off the vacuum.
7. To remove the blot, open the blotting unit.
8. Using forceps, carefully remove the
membrane.
For protein visualization protocols, see page 45;
for immunodetection protocols, see page 48.
* To ensure that the microporous structure of
the membrane is not compressed when placed
in the blotting unit, it is recommended that a
second sheet of membrane be placed between
the filter paper and the primary membrane.

41
Protein Transfer
1. Spot 1 – 5 µL of sample onto the membrane.
Sample should wick into membrane.
NOTE: Membrane should be wet enough to
absorb sample, but not so wet that sample
spreads across membrane.
2. After sample is absorbed, place membrane on
clean filter paper to dry.
Protocol 1.5 Optimization of Blocking Reagents
Required Equipment and Solutions
• Small piece of Immobilon® PVDF transfer
membrane.
• Piece of filter paper cut to the dimension of
the membrane.
• Methanol, 100%.
• Wash buffer: Phosphate-buffered saline (PBS)
or Tris-buffered saline (TBS) containing
0.05 –0.1% Tween®-20 surfactant.
• Blocking solution(s) to be tested.
• Detection reagents to be tested.
Set Up
1. Prepare the membrane:
a. Wet PVDF membrane in methanol for
15 seconds. The membrane should
uniformly change from opaque to semi-
transparent.
b. Carefully place the membrane in Milli-Q®
water and soak for 2 minutes.
c. Carefully place the membrane in buffer
and let equilibrate 5 minutes with gentle
shaking.
2. Wet filter paper in wash buffer.
Procedure
1. Place the membrane on wet filter paper.
2. Spot 5 µL of blocking solution onto the
membrane and allow it to absorb completely.
3. Add detection reagents to the blot and
incubate for 5 minutes.
4. Drain the excess reagents.
5. Cover the blot with a clean plastic wrap or
sheet protector and remove any air bubbles.
6. Expose the blot to a suitable X-ray film for a
few minutes. Appearance of a black spot on
the film indicates cross-reactivity between the
blocking reagent and the detection substrate.

42
Figure 19. Bløk® noise-canceling reagents, featuring optimized formulations for chemiluminescence, fluorescence and phosphoprotein detection, can provide superior signal-to-noise ratios and also permit staining of the membrane after detection. (A) Chemiluminescence detection of p53 in EGF-stimulated A431 lysate (10 - 2.5 µg/lane). Blots were blocked with NFDM or Bløk®-CH reagent, then probed with anti-p53 antibody (1:1,000) diluted in Bløk®-CH reagent. Bands were detected using Luminata™ Forte Western HRP substrate (Catalogue No. WBLUF0500). NFDM = Non-fat dry milk. (B) Chemiluminescence detection of pERK in EGF-stimulated A431 lysate (10 – 2.5 µg/lane). Blots were blocked with NFDM or Bløk®-PO reagent, then probed with anti-pERK antibody (1:10,000) diluted in Bløk®-PO reagent. Bands were detected using Luminata™ Forte Western HRP substrate (Catalogue No. WBLUF0500). (C.) Two blots containing different samples of A431 cell lysate, some freshly prepared (lanes 2 - 4) and some old samples (5 - 6), were normalized to 10 µg of total protein per lane. The blots were probed with anti-phosphotyrosine, clone 4G10®, and detected by chemiluminescence (left two blots) and by fluorescence (right two blots). Lanes 5 and 6 showed significantly lower signal than lanes 3 and 4 in both detection methods. Staining with Coomassie® blue right after immunodetection ruled out the possibilities of loading and transfer errors.
NFDM Bløk®-CH Bløk®-PONFDM
Chemiluminescencedetection
A.
C.
B.
Fluorescencedetection
Blot stained after detection
Blot stained after detection
Lane 1: Molecular weight marker; Lane 2: pervanadate-stimulated A431; Lane 3:, non-stimulated A431 control; Lane 4: EGF-stimulated A431; Lane 5: non-stimulated A431 control; Lane 6: EGF-stimulated A431
1 2 3 4 5 6 1 2 3 4 5 6 1 2 3 4 5 6 1 2 3 4 5 6

43
5. Apply a constant intensity of
0.8 mA/cm2 for 10 minutes.
6. Disassemble the sandwich.
7. Rinse the double-blot membrane twice in
PBS using fresh buffer each time.
8. Block the double-blot membrane.
9. If the original blotting membrane (on which
the blotted proteins are retained) will be
reprobed with the same or another primary
antibody, it can be kept in PBS after the
acidic transfer.
10. Proceed with probing of the double-blot
membrane with the appropriate secondary
antibody and protein detection as described
in Protocol 3.1. Standard Immunodetection
Method, page 48.
For an explanation of double blotting,
see pages 29-30.
Protocol 1.6 Double Blotting: An Innovative Procedure for Eliminating the Nonspecific Binding of Secondary Antibodies
Required Equipment and Solutions
• Semi-dry transfer apparatus.
• Two sheets Immobilon®-P membrane (blot
and double-blot membranes).
• Durapore® hydrophilic PVDF
membrane, 0.65 µm pore size
(Catalogue No. DVPP00010).
• Filter paper.
• 0.7% (v/v) acetic acid solution.
• Phosphate-buffered saline (PBS), pH 7.4.
Procedure
1. Blot resolved proteins onto Immobilon®-P
membrane; block; apply primary antibody;
and wash as described in Protocol 3.1.
Standard Immunodetection Method, page 48.
2. Cut two stacks of filter paper and a sheet of
Durapore® membrane to the dimension of the
membranes.
3. Immerse the Durapore® membrane in the
acid solution for at least 10 minutes. Prewet
the double-blot (unblotted) Immobilon®-P
membrane in methanol for 3 seconds; rinse
in water for 2 minutes; and equilibrate in
acid solution for 10 minutes. Wet the stacks
of filter paper in the acetic acid solution by
capillary wicking.
4. Place the blotted membrane onto a stack of
filter paper and cover it with the Durapore®
membrane and the double-blot membrane.
Quickly put a second stack of filter paper
onto the double-blot membrane to prevent
drying. Position this sandwich in the blotting
instrument with the blotted membrane facing
the anode and the double-blot membrane
facing the cathode.
Figure 20. Isoelectric patterns of urinary endogenous erythropoetin (EPO) without (top) and with (bottom) double blotting. Data courtesy of Dr. Françoise Lasne, Laboratoire National de Dépistage du Dopage.
Wet papers
Wet papers
Double-blot Membrane (Immobilon-P)Intermediate Membrane (Durapore)Blotting Membrane (Immobilon-P)
(+) Anode
(-) Cathode
Directionof transfer

44
Protocol 1.7 Membrane Drying Methods
The membrane must be dried before
continuing on to transillumination or rapid
immunodetection procedures. After proteins
have been blotted onto the membrane, rinse the
membrane with Milli-Q® water. As the blotted
membrane dries, it becomes opaque. The table
below details four drying methods and required
times. Always wait the full length of drying time
to ensure that all liquid has evaporated from
within the membrane’s pore structure.
Drying MethodRequired Time*
Soak in 100% methanol for 10 seconds. Remove from 15 minutes methanol and place on piece of filter paper until dry.
1.5 minutes
Secure between two sheets of filter paper and place 30 minutes in a vacuum chamber.
30 minutes
Incubate at 37 °C for 1 hour 1 hours
Place on lab bench and let dry at room temperature.
2 hours
*Longer times required in higher humidity environments.
TIP: Allow the membrane to dry
completely before continuing
on to transillumination or rapid
immunodetection.

45
The following protocols describe typical
procedures for staining proteins immobilized on
an Immobilon® PVDF transfer membrane.
NOTE: When examining a stained blot, the
degree of contrast is best while the membrane
is still wet. For photographic purposes, use a
wet blot and light transmitted through the
membrane.
Required Equipment and Solutions
• 20% (v/v) methanol.
• Shallow tray, large enough to
hold membrane.
• White light box.
• Black paper.
Procedure
1. Dry the blot completely using one of the
drying methods in Protocol 1.7. Membrane
Drying Methods, page 44.
2. Fill the tray with enough 20% methanol to
cover the blot.
3. Place the blot in 20% methanol for 5 minutes.
4. Place the blot on a light box and mask the
areas around the blot with a sheet of black
paper.
5. The bands appear as clear areas against an
opaque background (Figure 10, blot A,
page 24.)
6. If a permanent record is desired, photograph
the wet blot.
7. When all the methanol has dried, the blot will
return to its original appearance.
2. Protein Visualization
Protocol 2.1 Visualization by Transillumination
Transillumination is a nondestructive, reversible
technique (Reig and Klein, 1988). This method
is based on the change of PVDF from opaque to
semi-transparent when wet in methanol. 20%
methanol will wet out regions of the membrane
coated with protein, but not areas without
protein.
The protein bands appear as clear areas when
placed on a light box. Detection sensitivity is
comparable to Coomassie® Brilliant Blue R stain
when used in conjunction with photography.
TIP: Only reversible stains or
transillumination should be used
prior to immunodetection.
TIP: To visualize fainter bands,
increase the methanol
concentration to 40%.
TIP: When developing a new transfer
protocol or working with a new
sample type, stain the gel to
verify that all of the proteins have
eluted from the gel.

46
Protocol 2.2 Visualization by Reversible Staining
Ponceau-S Red
This stain produces pink bands on a light
background.
Required Equipment and Solutions
• Stain: 0.2% Ponceau-S red, 1% acetic acid.
Prepare by diluting stock solution (2% dye in
30% (w/v) trichloroacetic acid and 30% (w/v)
sulfosalicylic acid) 1:10 in 1% (v/v) acetic acid.
• Methanol, 100%.
• 0.1 N NaOH.
• Milli-Q® water.
• Shallow tray, large enough to hold membrane.
Procedure
1. If the blot is dry, wet in 100% methanol.
2. Fill the tray with enough stain to cover
the blot.
3. Place the blot in stain and agitate for
1 minute.
4. Remove the blot and rinse thoroughly with
Milli-Q® water until the desired contrast has
been achieved.
5. To remove the stain completely, wash the blot
with 0.1 N NaOH.
CPTS (Copper Phthalocyanine Tetrasulfonic Acid)
This stain produces turquoise blue bands on a
light background.
Required Equipment and Solutions
• Stain: 0.05% (w/v) CPTS in
12 mM HCl.
• Destain solution I: 12 mM HCl.
• Destain solution II: 20% (v/v) methanol.
• Methanol, 100%.
• Milli-Q® water.
• Protein destain solution: 0.5 M NaHCO3.
• Shallow tray, large enough to hold membrane.
Procedure
1. If the blot is dry, wet in 100% methanol.
2. Fill the tray with enough stain to cover the
blot.
3. Place the blot in stain and agitate for
1 minute.
4. Place the blot in destain solution I to remove
excess stain and achieve the desired contrast.
5. To remove stain from the background
completely, wash the blot with destain
solution II.
6. To completely destain the proteins, agitate the
blot in protein destain until the stain has been
removed.

47
Protocol 2.3 Visualization by Irreversible Staining
Coomassie® Brilliant Blue R Dye
This stain produces dark bands on a light background.
IMPORTANT: This stain will interfere with immunodetection.
Required Equipment and Solutions
• Stain: 0.1% (w/v) Coomassie® Brilliant Blue R in 50% (v/v) methanol, 7% (v/v) acetic acid.
• Destain solution I: 50% (v/v) methanol, 7% (v/v) acetic acid.
• Destain solution II: 90% (v/v) methanol, 10% (v/v) acetic acid.
• Methanol, 100%.
• Milli-Q® water.
• Shallow tray, large enough to hold membrane.
Procedure 1. If the blot is dry, wet in 100% methanol.
2. Fill the tray with enough stain to cover the blot.
3. Place the blot in stain and agitate for 2 minutes.
4. Remove the blot and rinse briefly with Milli-Q® water.
5. Place the blot in destain solution I and agitate for 10 minutes to remove excess stain.
6. Place the blot in destain solution II and agitate for 10 minutes to completely destain the background.
Amido Black
This stain produces dark bands on a light background.
IMPORTANT: This stain will interfere with immunodetection.
Required Equipment and Solutions
• Stain: 0.1% (w/v) amido black in 25% (v/v) isopropanol, 10% (v/v) acetic acid.
• Destain solution: 25% (v/v) isopropanol, 10% (v/v) acetic acid.
• Methanol, 100%.
• Milli-Q® water.
• Shallow tray, large enough to hold membrane.
Procedure 1. If the blot is dry, wet in 100% methanol.
2. Fill the tray with enough stain to cover the blot.
3. Place the blot in stain and agitate for 2 minutes.
4. Remove the blot and rinse briefly with Milli-Q® water.
5. Place the blot in destain solution and agitate for 5 to 10 minutes to remove excess stain.
48
Protocol 3.1 Standard Immunodetection Method Standard immunodetection is performed on
blotted proteins directly after electrotransfer.
(If the membrane was dried after transfer,
thoroughly wet the blot in methanol for 5
minutes before proceeding to immunodetection.)
The unoccupied membrane binding sites on the
wet blot are blocked with optimized reagents
(see Protocol 1.5. Optimization of Blocking
Reagents, page 41). The drawbacks of this
method are the need for blocking and the total
time requirement of over 4 hours. The advantage
is that standard immunodetection may require
less optimization for new sample types.
Required Solutions
• Primary antibody (specific for protein of
interest).
• Secondary antibody (specific for primary
antibody), labeled with alkaline phosphatase
or horseradish peroxidase.
• Substrate appropriate to the enzyme
conjugate.
• Phosphate-buffered saline (PBST): 10 mM
sodium phosphate, pH 7.2, 0.9% (w/v) NaCl,
up to 0.1% Tween®-20 detergent.
• TBST: 10 mM Tris, pH 7.4, 0.9% (w/v) NaCl, up
to 0.1% Tween®-20.
• Blocking solution: 1% (w/v) BSA (bovine
serum albumin), 0.05% Tween®-20.
• Milli-Q® water.
3. Immunodetection
TIP: Immobilon®-PSQ transfer
membrane has a smaller pore
size (0.2 µm) and higher surface
area than Immobilon®-P ransfer
membrane (0.45 µm). Increased
background can be expected on
Immobilon®-PSQ and the blocking
and wash steps will need to be
adjusted accordingly.
TIP: Phosphatases in the blocking
solution may dephosphorylate
blotted proteins
TIP: Do not use sodium azide in the
buffers as it inhibits HRP activity.
Recommended- Do not let the blot
dry out at any time during and after
blocking.
TIP: If more than one blot is placed
in a container, insufficient buffer
volume will cause the blots to stick
together.
TIP: Dry milk powder cannot be used
with biotin-avidin systems.
TIP: Sensitivity of chromogenic
detection is typically at least an
order of magnitude lower than of
chemiluminescent detection.
TIP: High nonspecific signal can be
alleviated by higher dilution of
the primary antibody or reduced
protein load on the gel.
TIP: Immobilon®-FL membrane can be
scanned dry or wet.
TIP: High overall background can be
minimized by higher dilution of
the enzyme-conjugated secondary
antibody.

49
Required Equipment
• Shallow trays, large enough to hold blot.
• Glass plates.
• Plastic wrap (e.g., Saran™ film), freezer bag, or
sheet protector.
• Autoradiography film and cassette.
• Dark room.
• Autoradiography film processing equipment.
Set Up
1. Dilute the primary antibody in the blocking
solution to the desired working concentration.
2. Dilute the secondary antibody in the blocking
solution to the desired working concentration.
NOTE: Enough solution should be prepared to
allow for 0.1 mL of antibody solution (primary
and secondary) per cm2 of membrane.
Antibody Incubations
1. Place the blot in the blocking solution and
incubate with agitation for 1 hour.
2. Place the blot in the primary antibody
solution and incubate with agitation for
1 hour. The solution should move freely
across the surface of the membrane.
3. Place the blot in PBS and wash for
10 minutes. Repeat twice with fresh buffer.
4. Place the blot in the secondary antibody
solution and incubate with agitation for
1 hour at RT or 37 °C.
5. Place the blot in PBS and wash for
10 minutes. Repeat twice with fresh buffer.
6. Proceed with either chromogenic,
chemiluminescent or fluorescent detection.
Chromogenic Detection
1. Prepare the substrate according to
manufacturer’s instructions.
2. Place the blot in a clean container and add
substrate to completely cover the surface of
the membrane. Incubate for 10 minutes with
mild agitation or until signal reaches desired
contrast.
3. Rinse the blot with Milli-Q® water to stop the
reaction.
4. Store the blot out of direct light to minimize
fading. Blot may be stored dry.
Chemiluminescent Detection
Follow manufacturer’s instructions.
1. Prepare the substrate according to
manufacturer’s instructions.
2. Place the blot in a container and add
substrate to completely cover the membrane.
Incubate for 1 minute.
3. Drain excess substrate.
4. Place the blot on a clean piece of glass and
wrap in plastic wrap.
NOTE: A cut-to-size sheet protector or a
freezer bag can also be used.
5. Gently smooth out any air bubbles.
6. In a dark room, place the wrapped membrane
in a film cassette.
7. Place a sheet of autoradiography film on top
and close the cassette.
8. Expose film. Multiple exposures of 15 seconds
to 30 minutes should be done to determine
the optimum exposure time; 1 to 5 minutes is
common.

50
Fluorescent Detection
Required Equipment • Proteins blotted onto Immobilon®-FL transfer
membrane and probed with antibodies.
• Mylar® wrap.
• Fluorescent imaging equipment.
The following is a general protocol for
fluorescent immunodetection. For optimal
results, refer to manufacturer’s protocol
provided with the reagents. NOTE: If using
chemifluorescent reagents, follow reagent
manufacturer’s directions.
1. Place the blot in diluted fluorescent dye-
labeled secondary antibody solution and
incubate for 1 hour with gentle agitation.
2. Wash the blot with wash buffer 3–5 times for
5 minutes each.
3. Place the blot onto a piece of clean filter
paper to dry.
4. If using a wrap, use Mylar®. Do not use
Saran™ wrap because it permits light to shine
through and quench fluorescence.
5. Image the blot using an appropriate
fluorescence scanner.
Protocol 3.2 Rapid Immunodetection MethodRapid immunodetection takes advantage of
the fact that antibodies cannot bind to the
hydrophobic (non-wetted) surface of the
Immobilon®-P transfer membrane, but will bind
to a protein immobilized on the membrane.
Rapid immunodetection is compatible with both
chromogenic and chemiluminescent substrates.
The major advantage of rapid immunodetection
is that blocking is not required, saving time and
eliminating the risks involved (Mansfield, 1994).
Also, because excess antibody won’t bind to a
dry membrane, the amount of washing required
is reduced. As a result, the total time for analysis
is under 2 hours, as opposed to over 4 hours for
the standard method.
IMPORTANT: The blot must be thoroughly dry
before beginning rapid immunodetection. Refer
to Protocol 1.7. Membrane Drying Methods,
page 44.
Required Solutions
• Primary antibody (specific for protein of
interest).
• Secondary antibody (specific for primary
antibody), labeled with alkaline phosphatase
or horseradish peroxidase.
• Substrate appropriate to the enzyme
conjugate.
• Phosphate buffered saline (PBS): 10 mM
sodium phosphate, pH 7.2, 0.9% (w/v) NaCl.
• Antibody dilution buffer: 1% (w/v) BSA
(bovine serum albumin), 0.05% Tween®-20
detergent.
• Methanol, 100%.
• Milli-Q® water.
TIP: Use the Rapid Immunodetection
Method to quickly visualize
higher abundance proteins.
For higher sensitivity, use the
Standard Immunodetection
Method, page 48.

51
Required Equipment
• Shallow trays, large enough to hold blot.
• Plastic wrap (e.g., Saran™), freezer bag, or
sheet protector.
• Autoradiography film and cassette.
• Dark room and autoradiography film
processing equipment.
Set Up
1. Dry the blot completely using one of the
drying methods in Protocol 1.7. Membrane
Drying Methods, page 44. Do not re-wet the
blot in methanol.
2. Dilute the primary antibody in dilution buffer
to the desired working concentration.
3. Dilute the secondary antibody in dilution
buffer to the desired working concentration.
NOTE: Enough solution should be prepared to
allow for 0.1 mL of antibody solution (primary
and secondary) per cm2 of membrane.
Antibody Incubations
1. Place the blot in the primary antibody
solution and incubate with agitation for
1 hour. The solution should move freely across
the surface of the membrane.
2. Place the blot in PBS and wash for 5 minutes.
Repeat twice with fresh buffer.
3. Place the blot in the secondary antibody
solution and incubate with agitation for
30 minutes.
4. Place the blot in PBS and wash for 5 minutes.
Repeat twice with fresh buffer.
5. Proceed with chromogenic, chemiluminescent
or fluorescent protein detection as described
in Protocol 3.1, Standard Immunodetection
Method, page 48.
Protocol 3.3 Rapid Immunodetection Using the SNAP i.d.® 2.0 SystemThe SNAP i.d.® 2.0 Protein Detection System
is the second generation of the SNAP i.d.®
method for detecting immunoreactive
proteins on Western blots. With this unique,
vacuum-driven system, reagents are pulled
through the membrane, increasing contact
between the reagents and the interior of the
membrane, without depending on slow diffusion
and agitation. This improvement in three-
dimensional reagent distribution decreases the
length of time required for immunodetection.
While traditional Western blotting required 4 to
24 hours for the blocking, antibody incubation
and washing steps,the SNAP i.d.® 2.0 protocol
takes only 30 minutes with no loss of signal
intensity or reduction in blot quality. All
immunodetection steps after protein transfer to
a membrane (i.e., blocking, washing, and primary
and secondary antibody incubations) can be
performed with the SNAP i.d.® 2.0 System.
Required Solutions
• Blocking reagent such as non-fat/low fat
dry milk (0.5% or less), casein, bovine serum
albumin (BSA) or other commercially available
blocking agents such as Bløk®-CH reagent.
• Antibodies (monoclonal and/or polyclonal).
• Detection reagents.
• Wash buffer: Tris- or phosphate-buffered
saline solution, pH 7.4, supplemented with
Tween® 20 surfactant (TBST or PBST).

52
Required Equipment
• Vacuum source: Pump or other uniform
vacuum source that can deliver a sustained
minimum pressure of 410 millibar (12 in. Hg)
and 34 L/min.
NOTE: EMD Millipore WP61 series Chemical
Duty Pumps can be used, but may require
longer processing times.
• One liter or larger vacuum flask with
stopper (for waste collection). A Millex®-
FA50 filter (or equivalent) is recommended
between the vacuum flask and the vacuum
source to protect the vacuum source from
contamination.
• Vacuum tubing to connect vacuum flask to
vacuum source.
• Forceps.
• Blot with transferred proteins.
Setup
1. Place the SNAP i.d.® 2.0 base on a level
bench top.
2. Attach the vacuum tubing to the back of
the system by pushing the coupling insert
on the end of the tubing into the quick
disconnect fitting at the back of the system
base until it clicks.
3. Connect the other end of the tubing to a
vacuum source. Use a one-liter vacuum
flask as a trap and a Millex®-FA50 filter
(Catalogue No. SLFA05010) to protect the
vacuum source from contamination.
NOTE: Any vacuum source that can deliver
410 millibar (12 in. Hg) and 34 L/min is
sufficient. If the vacuum source operates
at higher than 410 millibar, the SNAP i.d.®
2.0 system will automatically regulate the
vacuum pressure.
Blot Assembly & General Protocol
1. Hold the blot holder by the support layer
(blue edges) and wet the membrane layer
(white) with distilled water in the wetting
tray provided. Place the wetted blot holder
on the rolling pad.
2. If required, pre-wet the blot in methanol
and water, then place it in the center of the
blot holder with the protein side down.
3. Roll the blot gently to remove air bubbles,
then close the blot holder and roll one more
time.
4. Open the blot holding frame, flip the blot
holder so that it is protein side up, then
place it inside the frame. A notch in the blot
holder ensures correct placement in the
frame.
5. Close and lock the frame. Add
30 mL of blocking solution. Press the frame
down and turn the system knob to apply
vacuum. When frame is completely empty,
TURN VACUUM OFF.
6. Apply 5 mL (for Mini blot) or
10 mL (for Midi blot) of primary antibody
across the surface of the blot holder.
7. Incubate for 10 minutes at room
temperature. Solution will be absorbed into
the blot holder and surface may appear dry.
8. Press the frame down and apply vacuum.
Wait 5–8 seconds until the frame is
completely empty.
9. With vacuum running continuously, add
30 mL of wash buffer. Repeat the washing
step 3 more times (total of 4 washes). When
frame is completely empty, TURN VACUUM
OFF.
10. Apply 5 mL (for Mini blot) or 10 mL (for Midi
blot) of secondary antibody evenly across
the blot holder surface. Incubate for 10
minutes at room temperature with vacuum
off. Again, solution will be absorbed into the
blot holder and surface may appear dry.
53
11. Press frame down and apply vacuum. Wait
5–8 seconds until frame is completely
empty. With vacuum running continuously,
add 30 mL of wash buffer. Repeat the
washing step 3 more times (total of 4
washes).
12. Turn vacuum off and remove blot holder
from frame. Remove blot from blot holder
and incubate with the appropriate detection
reagent.
Extended Primary Antibody
Incubation: One Hour to Overnight
1. Perform steps 1 through 5 of the General
Protocol.
2. Add 5 mL (for Mini blot) or 10 mL (for Midi
blot) of 1X primary antibody (concentration
normally used during standard
immunodetection).
3. Cover the blot holding frame with the lid.
If desired, remove it from the base and
incubate with constant shaking. If overnight
incubation is required, refrigeration is
recommended. Although the surface of
the blot holder may look partially dry, the
blot will not dry out, since the solution is
contained in the frame.
NOTE: If processing more than one blot for
extended period of time, the blot holding
frames can be stacked to reduce the working
space.
4. OPTIONAL: If recovering primary antibody,
place antibody recovery trays into base
before proceeding to step 4.
5. After the extended incubation period, place
the frame back on the base, remove the
lid, and follow steps 8 through 12 of the
General Protocol.
NOTE: Extended incubation periods for the
secondary antibody are not required for the
SNAP i.d.® 2.0 System. A 5X concentration
of secondary antibody for 10 minutes is
recommended.
Antibody Recovery
1. Perform steps 1 through 5 of the General
Protocol, but increase the vacuum time to
2 minutes to ensure that all the blocking
solution has been removed from the
grooves and channels of the frame.
2. Remove the blot holding frame from the
base and wipe any residual liquid from the
bottom of the frame with a paper towel.
3. Place the antibody collection tray into the
base, making sure that the positioning holes
in the antibody collection tray line up with
the positioning pins in the base.
4. Place the blot holding frame back into
position on the base.
5. Apply primary antibody and incubate as
indicated in steps 6 and 7 of the General
Protocol.
6. After the 10-minute incubation, turn the
vacuum on and wait one minute to ensure
that all of the antibody has been collected.
NOTE: When processing two frames at the
same time, apply vacuum first to one side,
then to the other. This ensures full vacuum
force on each frame and improves volume
recovery.
7. Turn the vacuum off and remove the frame.
Remove the antibody collection tray.
8. Transfer the antibody to a suitable container
for storage or analysis.
9. Place the blot holding frame back into
position and continue with step 9 of the
General Protocol.

54
Protocol 3.4 High Salt Wash to Remove Persistent BackgroundRequired Solutions
• High salt buffer: PBS or TBS buffer
supplemented with 0.5M NaCl and 0.2% SDS
Procedure
1. Follow Protocol 3.1. Standard
Immunodetection Method on page 48,
through primary and secondary antibody
incubations.
2. After the secondary antibody incubation,
place the blot in the high salt buffer and
incubate for 30 minutes with gentle shaking.
3. Rinse blot with Milli-Q® water and proceed
with chromogenic, chemiluminescent or
fluorescent protein detection as described
in the Standard Immunodetection Method
section on page 48.
Figure 21. Adding 0.5 M NaCl and 0.2% SDS to the wash buffer reduced the background considerably on the Immobilon®-PSQ membrane, which has a high protein binding capacity.
Immobilon®-P membrane
Immobilon®-PSQ membrane
Standard Method Standard Method High Salt Wash

55
Two protocols for removing antibodies from
blots are presented below. The first is applicable
to any chemiluminescent substrate system and
uses a combination of detergent and heat to
release the antibodies. The second is commonly
used for applications where antibodies have to
be separated from an antigen and employs low
pH to alter the structure of the antibody in such
a way that the binding site is no longer active.
Neither method will remove the colored
precipitates generated from chromogenic
detection systems (e.g., BCIP, 4CN, DAB and
TMB). However, it is still possible to analyze the
blot with another antibody specific to a different
target protein.
IMPORTANT: The blot should not be allowed
to dry between rounds of immunodetection.
Any residual antibody molecules will bind
permanently to the membrane if it is allowed
to dry.
Protocol 4.1 Stripping by Heat and Detergent Required Equipment and Solutions
• Stripping solution: 100 mM
2-mercaptoethanol, 2% (w/v) SDS, 62.5 mM
Tris-HCl, pH 6.7.
• Phosphate buffered saline (PBS): 10 mM
sodium phosphate, pH 7.2, 0.9% (w/v) NaCl.
• Shallow tray, large enough to hold the
membrane.
Procedure
1. In a fume hood, place the blot in stripping
solution and incubate with agitation for
30 minutes at 50 °C.
2. Place the blot in buffer and agitate for
10 minutes. Repeat with fresh buffer.
3. OPTIONAL: Repeat the initial detection
protocol (omitting the primary antibody step)
to make sure that the antibodies have been
inactivated or stripped from the membrane.
4. Place the blot in buffer and agitate for
10 minutes.
5. Proceed to the blocking step for the next
round of immunodetection.
4. Membrane Stripping

56
Protocol 4.2 Stripping by Low pH Required Equipment and Solutions
• Stripping solution: 25 mM glycine-HCl, pH 2,
1% (w/v) SDS.
• Phosphate buffered saline (PBS): 10 mM
sodium phosphate, pH 7.2, 0.9% (w/v) NaCl.
• Shallow tray, large enough to hold the
membrane.
Procedure
1. Place the blot in stripping solution and agitate
for 30 minutes.
2. Place the blot in buffer and agitate for
10 minutes. Repeat with fresh buffer.
3. Proceed to the blocking step for the next
round of immunodetection.
Protocol 4.3 Stripping with the ReBlot™ Plus Western Blot Recycling KitRequired Equipment and Solutions
• Standard blot or blot strips, on nitrocellulose
or PVDF/nylon membrane.
• Blocking solutions.
• Plastic wrap for storage of blots that will not
be reprobed immediately.
• Distilled water, for reagent dilution.
• Plastic trays for incubation of blots or blot
strips in stripping, washing and blocking
solutions.
• Positive and negative stripping controls.
Procedure
NOTE: The blots or individual strips that are
to be reused should be prepared for stripping
immediately after their first usage. If stripping
cannot be performed right away, membranes can
be wrapped in plastic wrap and stored moist in
PBS at 4°C. DO NOT STORE BLOTS IN DRY FORM.
1. Fill a plastic tray with appropriate amount
of 1X Antibody Stripping Solution (supplied
in kit).
2. Using tweezers or forceps, submerge blot
or blot strips in stripping solution. Incubate
with gentle mixing for 15 minutes at room
temperature.
3. Fill a clean plastic tray with an equal amount
of blocking buffer. Conventional blocking
buffers such as 20 mM Tris HCl, pH 8.0;
150 mM NaCl; 0.1% Tween 20; 5% dry milk or
similar are appropriate.
4. Wash blots two times 5 minutes each with
blocking buffer.
5. The blot is now ready for reprobing with
antibodies.

57
Protocol 5.1 On-Membrane Protein Digestion for Mass Spectrometry* This method describes the preparation of
proteins immobilized on Immobilon® PVDF
transfer membrane for analysis by mass
spectrometry.
Required Equipment and Solutions
• 50% methanol in Milli-Q® water.
• 30% acetonitrile, 50 mM ammonium
bicarbonate.
• Trypsin, dissolved in Milli-Q® water at
0.1 mg/mL.
80% acetonitrile in Milli-Q® water.
• Vacuum centrifuge.
• Microcentrifuge tubes.
• MALDI-TOF matrix.
Procedure
1. Transfer protein from the gel to the
membrane (Protein Transfer Protocols,
pages 35-38).
2. Stain the blotted membrane with
Coomassie® Brilliant Blue or amido black
(Protocol 2.3. Visualization by Irreversible
Staining, page 47).
3. Wash the stained membrane with water and
dry.
4. Excise pieces of membrane containing
proteins of interest with a clean scalpel and
place in separate microcentrifuge tubes.
5. Destain membrane pieces with 500 µL of
50% methanol for
2 hours at room temperature.
6. Remove supernatant and dry the
membrane.
7. Add 10 µL of 30% acetonitrile, 50 mM
ammonium bicarbonate, and 4 µL of
0.1 mg/mL trypsin.
8. Incubate overnight at room temperature.
9. Transfer supernatants to clean
microcentrifuge tubes.
10. Extract peptides with 20 µL of 80%
acetonitrile for 15 minutes with sonication.
11. Pool the extracts with the previous
supernatants.
12. Dry the digests in the vacuum centrifuge.
NOTE: Alternatively, EMD Millipore
ZipTip®SCX pipette tips can be used to
purify and concentrate the peptide digest
instead of drying. To do this, acidify the
digest with 0.5% TFA (make sure the pH
is <3) and follow the instructions in the
ZipTip®SCX Pipette Tip User Guide (EMD
Millipore Lit. No. P36444).
13. Resuspend each peptide extract in a small
volume of 30% acetonitrile, 0.1% TFA.
14. Load 1 –2 µL of the digest onto a MALDI
plate, and mix with 1 µL of matrix.
5. Protein Digestion
*Based on Bienvenut, et al. (1999)
TIP: Mass spectrometry-compatible
membrane stains include
Coomassie® Blue, amido black,
and Sypro blot stains.

58
Protocol 6.1 Preparation of Protein Blots for Long-term Storage PVDF is a chemically resistant polymer with
excellent long term stability. For blots that need
to be stored for use at a later date, storage
conditions are determined by the stability
of the proteins bound to the membrane. We
recommend storage at low temperature, room
temperature may be adequate for some proteins.
Required Materials
• Dry blotted Immobilon® PVDF transfer
membrane.
• Two sheets of Whatman® 3MM paper.
• Two sheets of card stock or thin cardboard.
• Paper clips.
• Plastic bag.
Procedure
1. Place the dry blot between two clean sheets
of Whatman® 3MM paper.
2. Place the blot-filter paper sandwich between
two sheets of card stock.
3. Clip the stack together along the edges. The
clips should not overlap the blot.
4. Place the stack into a sealable plastic bag.
5. Close or seal the bag.
6. Store the blot at the desired temperature:
4 °C For up to 2 weeks
20 °C For up to 2 months
70 °C For longer term storage
NOTE: Blots stored in a freezer should not be
subjected to mechanical shock, which can cause
breakage of the membrane. The blot should be
allowed to come to room temperature before
removal from the plastic bag. Blots may also
be stored wet at 4 °C in a plastic bag, but a
bacteriocide such as sodium azide should be
added to prevent bacterial growth. The azide
must be thoroughly washed out of the blot prior
to use as it inhibits HRP activity.
6. Blot Storage

59
1. Dot/Slot (Filtration) Blotting
AppendicesTroubleshooting Blotting Problems
Symptom Possible Cause Remedy
Slow or no filtration of the sample through the membrane
Inadequate vacuum Make sure the blotting unit is closed properly and the seal is intact.
Make sure the vacuum source (e.g. pump) is operating properly.
Seal off any open wells with a high quality laboratory tape. Increase vacuum level.
Membrane pores clogged Centrifuge or filter samples to remove particulates.
Dilute viscous samples with buffer.
Little or no protein observed on the blot
Not enough protein applied to the membrane
Minimize sample dilution and filter more sample through the membrane.
Detergents (e.g., SDS) may inhibit lower molecular weight proteins from binding to the membrane
Eliminate detergents if possible.
Stain not sensitive enough. Use a more sensitive stain.
Stained blot is not uniform
Membrane structure was compressed by filter paper
Place a second membrane in the blotting unit to protect the membrane receiving the samples.
Air bubbles trapped in the interior of the membrane
Pre-wet membrane by laying it on the surface of the methanol. Immersing the membrane can entrap air.
Membrane not pre-wet in methanol Membrane must be pre-wet with methanol; entire membrane should change uniformly from opaque to semi-transparent.
Air bubbles in the sample. Carefully pipette samples into well to avoid the formation of air bubbles.
Not enough sample volume loaded Sample must cover the entire exposed membrane area.
Protein smeared across the top of the membrane
Sample leaked across the wells Make sure the blotting unit is properly assembled, closed and sealed prior to filtration.
Protein smeared across the back of the membrane
Membrane capacity was exceeded Reduce the amount of protein loaded into the well.
6

60
2. Semi-dry or Tank Electrotransfer
Symptom Possible Cause Remedy
Band smeared/distorted
Membrane not uniformly wetted with methanol
The entire membrane must be pre-wet with methanol; the entire membrane should change uniformly from opaque to semi-transparent.
Air bubbles under membrane and between other layers in the stack
Using a pipette or stirring rod, gently roll out any trapped air bubbles while assembling the stack.
Uneven contact between gel and membrane
Make sure entire gel and membrane surfaces are in good contact.
Too much heat generated during the transfer
The temperature of the run should not exceed 20 °C. For a tank transfer, pre-chill the buffer or carry out the transfer in a cold room. For a semi-dry transfer, either shorten the run time, increase the number of filter papers, or reduce the current.
Filter paper dried out during semi-dry transfer
Make sure filter paper is thoroughly drenched prior to transfer or use additional sheets. Be sure the stack is assembled in less than 15 minutes.
Proteins transferred too rapidly; protein buildup on the membrane surface
Reduce the strength of the electrical field.
Weak signal Proteins passing through the membrane
Increase the time the proteins have to interact with membrane by reducing the voltage by as much as 50%.
Highly negatively charged proteins (due to high aspartic acid and glutamic acid content) tend to move very fast in an electric field. Decrease the voltage to slow down migration of these proteins.
Presence of SDS in the gel may inhibit protein binding. Equilibrate the gel in the transfer buffer for at least 15 minutes.
Methanol concentration in transfer buffer is too low to facilitate removal of SDS. Increase the methanol to 15 – 20%, especially for smaller molecular weight proteins.
The membrane must be pre-wet with methanol; the entire membrane should change uniformly from opaque to semi-transparent.
Switch to Immobilon®-PSQ transfer membrane.
Proteins retained in the gel If the methanol concentration in the transfer buffer is too high, it can remove SDS from proteins and lead to protein precipi tation in the gel. This would reduce the transfer of large molecular weight proteins out of the gel. If protein precipi tation is an issue, the transfer buffer can be supplemented with SDS (0.01% – 0.05%) to aid in solubility. In addition, excess methanol can tend to shrink or tighten a gel, thus inhibiting transfer of large molecular weight proteins.

61
2. Semi-dry or Tank Electrotransfer (continued)
Symptom Possible Cause Remedy
Weak signal (continued)
Isoelectric point of the protein is at or close to the pH of the transfer buffer
A protein that has the same isoelectric point as the pH of of the transfer buffer will have no net charge and thus will not migrate in an electric field. To facilitate transfer, try a higher pH buffer such as 10 mM CAPS buffer at pH 11, including 10% methanol or a lower pH buffer such as an acetic acid buffer.
Poor detection when urea is used in the gel and/or transfer buffer
Reduce the temperature by using a circulating buffer setup or run your transfer in a cold room. Urea in the presence of heat can cause carbamylation of proteins, which can change the charge of amino acids in a protein. This could affect the epitopes essential for antibody recognition and binding.
Incomplete transfer of proteins
Stain the gel to check for residual proteins. If transfer was not complete, review your transfer technique.
Poor protein retention Once transfer is complete, be sure to dry the membrane completely to obtain optimal binding and fixation of the proteins. This should be done prior to any downstream detection method.
No signal No transfer of proteins Check for the gel and membrane orientation during the transfer process. Use pre-stained molecular weight standards to monitor transfer.
Poor transfer of small molecular weight proteins
Insufficient protein retention SDS interferes with binding of small molecular weight proteins
Switch to Immobilon®-PSQ transfer membrane. Remove SDS from the transfer solution.
Low methanol concentration in the transfer buffer
Use higher percentage of methanol (15% – 20%) in the transfer buffer.
Insufficient protein binding time
A lower voltage may optimize binding of small proteins to the membrane.
Current doesn’t pass through the membrane
Cut membrane and blotting paper exactly to the gel size; do not allow overhangs.
Poor transfer of large molecular weight proteins (~ >80 kDa)
Methanol concentration is too high
Reducing the methanol concentration to 10% (v/v) or less should help in the transfer of large molecular weight proteins by allowing the gel to swell. Moreover, a lower methanol percentage would also reduce SDS loss from the proteins and reduce protein precipitation in the gel. Proteins >200 kDa are not as sensitive to interference from the SDS in binding to membrane as are proteins <100 kDa.
Poor transfer of positively charged proteins
Protein net charge in the transfer buffer is positive; proteins move toward cathode.
Reverse the transfer stack such that the Immobilon® transfer membrane is on the cathode side of the gel.
Poor semi-dry transfer
Current bypasses the gel stack
Make sure the membrane and blotting paper are cut exactly to the gel size and there are no overhangs.
Poor transfer of a wide range of protein sizes
Different conditions required to transfer large and small proteins
Refer to “Transfer of a broad MW range of proteins may require a multi-step transfer” (T. Otter et al., Anal. Biochem. 162:370-377 (1987).
Use three-buffer system for semi-dry transfer (Protocol 1.2, page 36.)

62
3. Protein Visualization
Symptom Possible Cause Remedy
Poor detection by transillumination
Inappropriate membrane Transillumination works best with Immobilon®-P transfer membrane. It is not recommended for nitrocellulose or Immobilon®-PSQ transfer membrane.
Membrane wasn’t completely dried prior to wetting with methanol
Be sure that the membrane was dried completely after the transfer prior to immersing it in the 20% methanol solution. Make sure to use a 20% methanol solution.
Blot saturated with water only Saturate the blot with 20% methanol.
Insufficiently saturated blot Increase concentration of methanol up to 40%.
Weak or uneven stain
Membrane wasn’t wetted in methanol prior to staining
The membrane must be pre-wet with methanol; the entire membrane should change uniformly from opaque to semi transparent.
Uneven/splotchy results
Use sufficient volume of incubation solutions and ensure that the membrane is completely covered with these solutions during incubation.
The container used should be large enough to allow solution to move freely across the blot. Do not incubate more than one blot at a time in that same container. In addition, the protein side of the blot should be facing up so as not to be interacting with the bottom surface of the container.
Air bubbles The blot should not have any air bubbles on the surface. Gently pull the membrane across the edge of the container to remove bubbles.
Poor reagent quality All of the buffers and reagents should be fresh and free of particulates and contaminants. Filtration of buffers with Millex® syringe filters or Stericup®, Steritop® or Steriflip® filter units and centrifugation of antibody stocks may be required.
High background staining
Nonspecific protein binding to the membrane
Make sure to use clean electrotransfer equipment and components and high quality reagents and Milli-Q® water.

63
Symptom Possible Cause Remedy
Poor detection by transillumination
Inappropriate membrane Transillumination works best with Immobilon®-P transfer membrane. It is not recommended for nitrocellulose or Immobilon®-PSQ transfer membrane.
Membrane wasn’t completely dried prior to wetting with methanol
Be sure that the membrane was dried completely after the transfer prior to immersing it in the 20% methanol solution. Make sure to use a 20% methanol solution.
Blot saturated with water only Saturate the blot with 20% methanol.
Insufficiently saturated blot Increase concentration of methanol up to 40%.
Weak or uneven stain
Membrane wasn’t wetted in methanol prior to staining
The membrane must be pre-wet with methanol; the entire membrane should change uniformly from opaque to semi transparent.
Uneven/splotchy results
Use sufficient volume of incubation solutions and ensure that the membrane is completely covered with these solutions during incubation.
The container used should be large enough to allow solution to move freely across the blot. Do not incubate more than one blot at a time in that same container. In addition, the protein side of the blot should be facing up so as not to be interacting with the bottom surface of the container.
Air bubbles The blot should not have any air bubbles on the surface. Gently pull the membrane across the edge of the container to remove bubbles.
Poor reagent quality All of the buffers and reagents should be fresh and free of particulates and contaminants. Filtration of buffers with Millex® syringe filters or Stericup®, Steritop® or Steriflip® filter units and centrifugation of antibody stocks may be required.
High background staining
Nonspecific protein binding to the membrane
Make sure to use clean electrotransfer equipment and components and high quality reagents and Milli-Q® water.
4. Immunodetection
Symptom Possible Cause Remedy
Weak signal Improper blocking reagent The blocking agent may have an affinity for the protein of interest and thus obscure the protein from detection. Try a different blocking agent and/or reduce both the amount or exposure time of the blocking agent.
Insufficient antibody reaction time Increase the incubation time.
Antibody concentration is too low or antibody is inactive
Multiple freeze-thaw or bacterial contamination of antibody solution can change antibody titer or activity. Increase antibody concentration or prepare it fresh.
Outdated detection reagents Use fresh substrate and store properly. Outdated substrate can reduce sensitivity.
Protein transfer problems Optimize protein transfer (see above).
Dried blot in chromogenic detection If there is poor contrast using a chromogenic detection system, the blot may have dried. Try rewetting the blot in water to maximize the contrast.
Tap water inactivates chromogenic detection reagents
Use Milli-Q® water for reagent preparation.
Azide inhibits HRP Do not use azide in the blotting solutions.
Antigen concentration is too low Load more antigen on the gel prior to the blotting.
No signal Antibody concentration too low Increase concentration of primary and secondary antibodies.
HRP inhibition HRP-labeled antibodies should not be used in solutions containing sodium azide.
Primary antibody was raised against native protein
Separate proteins in non-denaturing gel or use antibody raised against denatured antigen.
Uneven blot Fingerprints, fold marks or forceps imprints on the blot
Avoid touching or folding membrane; use gloves and blunt end forceps
Speckled background
Aggregates in the blocking reagent Filter blocking reagent solution through 0.2 µm or 0.45 µm Millex® syringe filter unit.
Aggregates in HRP-conjugated secondary antibody
Filter secondary antibody solution through 0.2 µm or 0.45 µm Millex® syringe filter unit.
High background Insufficient washes Increase washing volumes and times. Pre-filter all of your solutions including the transfer buffer using Millex® syringe filter units or Steriflip® filter units.
Secondary (enzyme conjugated) antibody concentration is too high
Increase antibody dilution.
Protein-protein interactions Use Tween®-20 (0.05%) in the wash and detection solutions to minimize protein-protein interactions and increase the signal to noise ratio.
Immunodetection on Immobilon®-PSQ transfer membrane
Increase the concentration or volume of the blocking agent used to compensate for the greater surface area of the membrane. Persistent background can be reduced by adding up to 0.5M NaCl and up to 0.2% SDS to the wash buffer and extending the wash time to 2 hours.
Poor quality reagents Use high quality reagents and Milli-Q® water.
Crossreactivity between blocking reagent and antibody
Use different blocking agent or use Tween®-20 detergent in the washing buffer.
Film overexposure Shorten exposure time.
Membrane drying during incubation process
Use volumes sufficient to cover the membrane during incubation.
Poor quality antibodies Use high quality affinity purified antibodies.
Excess detection reagents Drain blots completely before exposure.
Persistent background
Nonspecific binding Use High Salt Wash. (Protocol 3.4, page 54.)

64
4. Immunodetection (continued)
Symptom Possible Cause Remedy
High background (rapid immuno-detection)
Membrane wets out during rapid immunodetection
Reduce the Tween®-20 (<0.04%) detergent in the antibody diluent.
Use gentler agitation during incubations.
Rinse the blot in Milli-Q® water after electrotransfer to remove any residual SDS carried over from the gel. Be sure to dry the blot completely prior to starting any detection protocol.
Membrane was wet in methanol prior to the immunodetection
Do not pre-wet the membrane.
Membrane wasn’t completely dry prior to the immunodetection
Make sure the membrane is completely dry prior to starting the procedure.
Nonspecific binding
Primary antibody concentration too high
Increase primary antibody dilution.
Secondary antibody concentration too high
Increase secondary antibody dilution.
Antigen concentration too high Decrease amount of protein loaded on the gel.
Reverse images on film (white bands on dark background)
Too much HRP-conjugated secondary antibody
Reduce concentration of secondary HRP-conjugated antibody.
Poor detection of small proteins
Small proteins are masked by large blocking molecules such as BSA
Consider casein or a low molecular weight polyvinylpyrrolidone (PVP).
Surfactants such as Tween® and Triton® X-100 may have to be minimized.
Avoid excessive incubation times with antibody and wash solution.
Symptom Possible Cause Remedy
High overall background
High background fluorescence from the blotting membrane
Use Immobilon®-FL PVDF blotting membrane.
Blocking reagents not optimized for fluorescence detection.
Use Bløk®-FL Noise-canceling Reagents, optimized for fluorescent Western blots.
Multiplexing problems
Experimental design The two antibodies must be derived from different host species so that they can be differentiated by secondary antibodies of different specificities. Before combining the two primary antibodies, test the banding pattern on separate blots to determine where bands will appear. Use cross-adsorbed secondary antibodies in two-color detection.
Speckled background
Dust/powder particles on the Handle blots
Handle blots with powder-free gloves and clean surface of the scanner.
Low signal Wet blot Drying the blot may enhance signal strength. The blot can be scanned after re-wetting. Do not wrap the blot in plastic/Saran™ wrap while scanning.
Blot photo-bleached While fluorescent dyes usually provide long-lasting stable signal, some fluorescent dyes can be easily photo-bleached. To prevent photo-bleaching, protect the membrane from light during secondary antibody incubations and washes, and until the membrane is ready to be scanned. Store developed blots in the dark for subsequent imaging.
Wrong excitation wavelength Follow dye manufacturers’ instructions for blot imaging or use an emission filter
5. Fluorescent Detection

65
Splotchy background caused by insufficient washes and/or unfiltered blocking solution. Can be improved by filtering the blocking solution through 0.2 µm Millex®-GP syringe filter and adding extra washes.
Negative (reverse) image on film caused by excess secondary HRP-conjugated antibody. The detection was improved by increasing secondary antibody dilution 10-fold. Blot on left was incubated with a 1:5,000 dilution of secondary antibody, and blot on right was incubated with a 1:50,000 dilution.
High background and dark edges caused by insufficient washing of the blot. Can be alleviated by additional or/and longer washes or a high salt wash (Protocol 3.4, page 54.)
Fingerprints Scratches and forceps imprints
Folded membrane
Bubbles between the membrane and SDS-PAGE gel introduced during the transfer.
Examples and Causes of Blot Failure

66
1-D One-dimensional
2-D Two-dimensional
Adsorption The process whereby molecules or particles (e.g., protein) bind to a surface (e.g., membrane).
Anode Positively charged electrode in an electrophoresis system.
Blocking Technique used to reduce nonspecific binding of antibodies during immunodetection; unoccupied membrane sites are blocked with an inert protein, nonionic detergent, or protein-free blocking reagent.
Blot A microporous membrane with biomolecules adsorbed onto the polymer.
Blotting Process of transferring proteins, nucleic acids or biomolecules from a gel to a membrane. A membrane with proteins immobilized on it is called a Western blot.
Cathode Negatively charged electrode in an electrophoresis system.
Chemiluminescent detection Immunodetection technique that results in the production of visible light at the site of the target protein.
Chromogenic detection Immunodetection technique that results in the deposition of a colored precipitate at the site of the target protein.
Dot blot A blot prepared by filtration of liquid samples through a membrane using a dot blot manifold (see “Filtration”).
Edman Degradation A process that uses the Edman reagent, phenyl isothiocyanate (PITC), to sequen tially remove one amino acid from the N-terminus of a protein. The chemically derivatized amino acid is then analyzed after it is cleaved from the protein. Sequential processing of the protein provides the amino acid sequence of the protein.
Electrotransfer Common method for the transfer of proteins from a gel to a membrane. Proteins elute from the gel and get absorbed onto the membrane when an electrical field is applied perpendicular to the plane of the gel.
ELISA Enzyme-Linked Immunosorbent Assay; a rapid method to determine the presence and quantity of a specific substance. It is based on an antigen-antibody interaction where the antibody or antigen is linked to an enzyme as a means of detecting its presence.
Glossary Filtration Direct application of sample onto a membrane. A dissolved sample is pulled through the membrane by applying a vacuum; proteins bind to the membrane and the other sample components pass through.
Fluorescent detection Immunodetection of a protein using a primary or secondary antibody conjugated to a fluorescent dye.
Gel The substrate, usually polyacrylamide, on which sample proteins have been separated.
Immunoblot A Western blot that has been analyzed for a target protein using a specific antibody.
Immunodetection Method of protein detection using a specific antibody to identify the location of a target membrane-bound protein. The specificity of antigen-antibody binding permits the identification of a specific protein in a complex sample.
Isoelectric focusing Method of protein separation on the basis of isoelectric points. Usually achieved by electrophoresis of proteins in a stabilized pH gradient where proteins migrate to the pH corresponding to their isoelectric points.
Isoelectric point (pI) The pH value at which the net electric charge of a molecule, such as a protein or amino acid, is zero. It is usually the first dimension of a 2-D gel.
Polyacrylamide A branched polymer of acrylamide that is used in gel electrophoresis.
Primary antibody The first antibody used in an immunodetection protocol. The primary antibody is specific for the target antigen.
PVDF Polyvinylidene fluoride; the polymer used to make Immobilon®-P, Immobilon®-PSQ and Immobilon®-FL transfer membranes. (Occasionally this acronym is erroneously defined in the blotting literature as polyvinylidene difluoride.)
Rapid Immunodetection Faster method of immunodetection which eliminates the need for (and the risks of) blocking.
Reprobing The process of sequentially cycling a blot through multiple rounds of immunodetection.
Retention In the context of stripping and reprobing immunoblots, retention refers to the ability of a protein to remain adsorbed to a membrane surface under conditions that disrupt immunocomplexes.

67
SDS Sodium dodecyl sulfate. SDS is a detergent that binds to proteins, giving them a net negative charge. It is used in denaturing protein gel electrophoresis. It is also widely used to disrupt cell walls and dissociate protein complexes. Lithium dodecyl sulfate (LDS) can be substituted for SDS.
SDS-PAGE Sodium dodecyl sulfate-polyacrylamide gel electrophoresis
Secondary antibody The second antibody used in an immunodetection protocol. The secondary antibody is specific for the primary antibody and is typically conjugated to an enzyme used for signal amplification.
Semi-dry transfer Electrotransfer technique where the traditional buffer reservoir is replaced by layers of filter paper soaked in buffer; an equally effective, but faster technique than tank transfer. Multiple buffer systems can be used during the transfer.
Slot blot A blot prepared by the filtration of liquid samples through a membrane using a slot blot manifold.
Spot blotting A blot prepared by manually applying sample to the membrane.
Staining Technique used to make protein bands visible on a gel or blot. The colored stain may be reversible or non-reversible.
Stripping Process of removing an antibody from a membrane prior to a subsequent round of immunodetection.
Substrate The compound that interacts with the enzyme conjugated to the secondary antibody to yield a detectable signal in immunodetection. The signal is typically in the form of a colored precipitate (chromogenic substrates) or electromagnetic radiation (light from chemiluminescent or fluorescent substrates).
Tank transfer Traditional electrotransfer technique where the gel and membrane are completely immersed in a reservoir of buffer; an effective but slow technique.
Transfer buffer(s) The buffer(s) used as the chemical environment to facilitate the transfer of biomolecules from a gel onto a membrane.
Transillumination Non-destructive, reversible visualization technique used to make protein bands visible on a blot. The protein bands appear as clear areas in dark field when placed on a light box.
Vacuum blotting The process of transferring biomolecules from a gel to a membrane using vacuum as the driving force; not typically used for protein gels.
Western blot A blot prepared by transferring protein from a polyacrylamide gel to a membrane.
Ahmed FE. Detection of genetically modified organisms in foods. Trends Biotechnol 2002 May;20(5):215–23.
Aksamitiene E, Hoek JB, Kholodenko B, Kiyatkin A. Multistrip Western blotting to increase quantitative data output. Electrophoresis. 2007;28(18):3163–3173.
Bauer G. Simplicity through complexity: immunoblot with recombinant antigens as the new gold standard in Epstein-Barr virus serology. Clin Lab 2001;47(5–6):223–30.
Beisiegel U. Protein blotting. Electrophoresis 1986;7:1–18.
Berggren K, Steinberg TH, Lauber WM, Carroll JA, Lopez MF, Chernokalskaya E, Zieske L, Diwu Z, Haugland RP, Patton WF. A luminescent ruthenium complex for ultrasensitive detection of proteins immobilized on membrane supports. Anal Biochem 1999;276(2):129–143.
Bickar D, Reid PD. A high-affinity protein stain for Western blots, tissue prints, and electrophor etic gels. Anal Biochem 1992;203(1):109–15.
Bienvenut WV, Sanchez JC, Karmime A, Rouge V, Rose K, Binz PA, Hochstrasser DF. Toward a clinical molecular scanner for proteome research: parallel protein chemical processing before and during Western blot. Anal Chem 1999;71(21):4800–7. Binz PA, Muller M, Walther D, Bienvenut WV, Gras R, Hoogland C, Bouchet G, Gasteiger E, Fabbretti R, Gay S, Palagi P, Wilkins MR, Rouge V, Tonella L, Paesano S, Rossellat G, Karmime A, Bairoch A, Sanchez JC, Appel RD, Hochstrasser DF. A molecular scanner to automate proteomic research and to display proteome images. Anal Chem 1999;71(21):4981–8.
Bollag DM, Rozycki MD, Edelstein SJ. Protein methods. New York: Willey-Liss; 1996. p 195–228.
Bolt MW, Mahoney PA. High-efficiency blotting of proteins of diverse sizes following sodium dodecyl sulfate-polyacrylamide gel electro phoresis. Anal Biochem 1997;247(2):185–92.
Bunai K, Nozaki M, Hamano M, Ogane S, Inoue T, Nemoto T, Nakanishi H, Yamane K. Proteomic analysis of acrylamide gel separated proteins immobilized on polyvinylidene difluoride membranes following proteolytic digestion in the presence of 80% acetonitrile. Proteomics 003;3(9):1738–49.
Celis JE, Gromov P. High-resolution two-dimensional gel electrophoresis and protein identification using Western blotting and ECL detection. EXS 2000;88:55–67.
Cortese JD. Beyond film: laboratory imagers. The Scientist 2002;16(7):41.
Chen H, Chang GD. Simultaneous immuno blotting analysis with activity gel electrophoresis in a single polyacrylamide gel. Electrophoresis 2001;22(10):1894–9.
Dunn MJ. Detection of total proteins on Western blots of 2-D polyacrylamide gels. Methods Mol Biol 1999;112:319–29.
Elkon KB, Jankowski PW, Chu JL. Blotting intact immunoglobulins and other high-molecular weight proteins after composite agarose polyacrylamide gel electrophoresis. Anal Biochem 1984;140(1):208–13.
References

68
Lasne F. Double blotting: a solution to the problem of nonspecific binding of secondary antibodies in immunoblotting procedures. J Immunol Methods 2003;276:223–6.
Lasne, F. et al., Detection of hemoglobin-based oxygen carriers in human serum for doping analysis: screening by electrophoresis. Clin Chem 2004;50:410–415.
Leary JJ, Brigati DJ, Ward DC. Rapid and sensitive colorimetric method for visualizing biotin-labeled DNA probes hybridized to DNA or RNA immobilized on nitrocellulose: bio-blots. Proc Natl Acad Sci USA 1983;80(13):4045–9.
LeGendre N. Immobilon®-P transfer membrane: applications and utility in protein biochemical analysis. BioTechniques 1990;9:788.
Mansfield M. Protein blotting using poly vinylidene fluoride membranes. In: Dunbar B, editor. Protein blotting: a practical approach. Oxford: IRL Press; 1994. p 33–52.
Mansfield M. Rapid immunodetection of polyvinylidene fluoride membrane blots without blocking. Anal Biochem 1995;229(1):140–3.
Matsudaira P. Sequence from picomole quantities of proteins electroblotted onto polyvinylidene difluoride membranes. Biol Chem 1987;262(21):10035–8.
McKeon TA, Lyman ML. Calcium improves electrophoretic transfer of calmodulin and other small proteins. Anal Biochem 1991; 193:125–30.
Mozdzanowshi J, Speicher DW. Microsequence analysis of electroblotted proteins. Anal Biochem 1992;207(1):11–8.
Mylonakis E, Paliou M, Lally M, Flanigan TP, Rich JD. Laboratory testing for infection with the human immunodeficiency virus: established and novel approaches. Am J Med 2000; 109(7):568–76.
Otter T, King SM, Witman GB. A two-step procedure for efficient electrotransfer of both high-molecular-weight (>400,000) and low-molecular-weight (<20,000) proteins. Anal Biochem 1987;162:370–7.
Patton WF, Lam L, Su Q, Lui M, Erdjumentbromage H, Tempst P. Metal chelates as reversible stains for detection of electroblotted proteins: application to protein microsequencing and immunoblotting. Anal Biochem 1994; 220(2):324–35
Peferoen M, Huybrechts R, De Loof A. Vacuum-blotting: a new simple and efficient transfer of proteins from sodium dodecyl sulfate-polyacrylamide gels to nitrocellulose. FEBS Letters 1982;145(2):369–72.
Pluskal M, Przekop M, Kavonian M, Hicks D, Vecoli C. Immobilon® PVDF transfer membrane: a new membrane substrate for Western blotting. Biotechniques 1986;4(3):272–82.
Poland J, Bohme A, Schubert K, Sinha P. Revisiting electroblotting of immobilized pH gradient gels: a new protocol for studying post-translational modification of proteins. Electrophoresis 2002;23(24):4067–71.
EMD Millipore. Immobilon®-P transfer membrane user guide. 2007 Jul. Billerica (MA). EMD Millipore Product Lit. No. PR02531. 24 p.
Erickson PF, Minier LN, Lasher RS. Quantitative electrophoretic transfer of polypeptides from SDS polyacrylamide gels to nitrocellulose sheets: a method for their re-use in immunoautoradio graphic detection of antigens. J Immunol Methods 1982;51(2):241–9.
Eto M, Watanabe K, Moriyama T, Makino I. Apolipoprotein E phenotyping from plasma by isoelectric focusing and immunoblotting. Tohoku J Exp Med 1990;160(4):301–9.
Fernandez J, DeMott M, Atherton D, Mische SM. Internal protein sequence analysis: Enzymatic digestion for less than 10 µg of protein bound to polyvinylidene difluoride or nitrocellulose membranes. Anal Biochem 1992;201(2):255–64.
Gershoni JM. Protein blotting: a manual. Meth Biochem Analysis 1987;33:1–58.
Gharahdaghi F, Kirchner M, Fernandez J, Mische SM. Peptide-mass profiles of polyvinyli dene difluoride-bound proteins by matrix-assisted laser desorption/ionization time-of-flight mass spectrometry in the presence of nonionic detergents. Anal Biochem 1996;233(1):94–9.
Grässer FA, Sauder C, Haiss P, Hille A, König S, Göttel S, Kremmer E, Leinenbach HP, Zeppezauer M, Mueller-Lantzsch N. Immunological detection of proteins associated with the Epstein-Barr virus nuclear antigen 2A. Virology. 1993 Aug;195(2):550-60.
Haugland RP. Handbook of flourescent probes and research products. 9th edition. Eugene (OR): Molecular Probes, Inc.; 2002.
Heermann KH, Gultekin H, Gerlich WH. Protein blotting: techniques and application in virus hepatitis research. Ric Clin Lab 1988;18(2–3):193–221.
Hengeh PN. Chemiluminescent detection methods. TIBS 1997;22:313–14.
Iwamatsu A. S-carboxymethylation of proteins transferred onto polyvinylidene difluoride membranes followed by in situ protease digestion and amino acid sequencing. Electrophoresis 1992;13:142–7. Kurien BT, Scofield RH. Multiple immunoblots after non-electrophoretic bidirectional transfer of a single SDS-PAGE gel with multiple antigens. J Immunol Methods 1997;205(1):91–4.
Kurien BT, Scofield RH. Protein blotting: a review. J Immunol Methods 2003; 274(1–2):1–15.
Kyhse-Anderson J. Electroblotting of multiple gels: a simple apparatus without buffer tank for rapid transfer of proteins from polyacrylamide to nitrocellulose. J Biophys Biochem Methods 1984;10:203–209.
Lasne F. Double blotting: a solution to the problem of nonspecific binding of secondary antibodies in immunoblotting rocedures. J Immunol Methods 2001;253:125–131.
References (continued)
69
Reese G, Schmechel D, Ayuso R, Lehrer SB. Grid-immunoblotting: a fast and simple technique to test multiple allergens with small amounts of antibody for cross-reactivity. J Chromatogr B Biomed Sci Appl. 2001;756(1–2):151–6.
Reig JA, Klein DC. Submicron quantities of unstained proteins are visualized on polyvinylidene difluoride membranes by transillumination. Applied and Theoretical Electrophoresis 1988;1:59–60.
Rudolph C, Adam G, Simm A. Determination of copy number of c-Myc protein per cell by quantitative Western blotting. Anal Biochem 1999;269(1):66–71.
Schafer-Nielsen C, Svendsen PJ, Rose C. Separation of macromolecules in isotacho phoresis involving single or multiple counterions. J Biochem Biophys Methods 1980; 3(2):97–128.
Schilling M, Maiwald T, Bohl S, et al. Quantitative data generation for systems biology: the impact of randomisation, calibrators and normalisers. Syst Biol (Stevenage) 2005;152(4):193–200
Schilling M, Maiwald T, Bohl S, et al. Computational processing and error reduction strategies for standardized quantitative data in biological networks. Febs J. 2005;272(24):6400–6411.
Sharma SK, Carew TJ. Inclusion of phosphatase inhibitors during Western blotting enhances signal detection with phosphospecific anti bodies. Anal Biochem 2002; 307(1):187–9.
Shojaee N, Patton WF, Lim MJ, Shepro D. Pyrogallol red-molybdate: a reversible, metal chelate stain for detection of proteins immobilized on membrane supports. Electrophoresis 1996;17(4):687–93.
Silva CM, Tully DB, Petch LA, Jewell CM, Cidlowski JA. Application of a protein-blotting procedure to the study of human glucocorticoid receptor interactions with DNA. Proc Natl Acad Sci U S A. 1987 Apr;84(7):1744-8.
Sloane AJ, Duff JL, Wilson NL, Gandhi PS, Hill CJ, Hopwood FG, Smith PE, Thomas ML, Cole RA, Packer NH, Breen EJ, Cooley PW, Wallace DB, Williams KL, Gooley AA. High throughput peptide mass fingerprinting and protein macroarray analysis using chemical printing strategies. Mol Cell Proteomics 2002;1(7):490–9.
Stahl D, Lacroix-Desmazes S, Mouthon L Kaveri SV, Kazatchkine MD. Analysis of human self-reactive antibody repertoires by quantitative immunoblotting. J Immunol Methods 2000; 240(1–2):1–14.
Stott DI. Immunoblotting and dot blotting. J Immunol Methods 1989;119(2):153–87.
Swank MW, Kumar V, Zhao J, Wu GY. A novel method of loading samples onto mini-gels for SDS-PAGE: Increased sensitivity and Western blots using sub-microgram quantities of protein. J Neurosci Methods. 2006;158:224–233.
Thompson D, Larson G. Western blots using stained protein gels. BioTechniques 1992; 12(5):656–8.
Towbin H, Staehelin T, Gordon J. Electrophoretic transfer of proteins from polyacrylamide gels to nitrocellulose sheets: procedure and some applications. Proc Natl Acad Sci USA 1979; 76(9):4350–4.
Towbin H, Gordon J. Immunoblotting and dot immunoblotting – current status and outlook. J Immunol Methods 1984;72(2):313–40.
Towbin H, Staehelin T, Gordon J. Immunoblotting in the clinical laboratory. J Clin Chem Clin Biochem 1989;27(8):495–501.
Van Dam AP, Van den Brink HG, Smeenk RJT. Technical problems concerning the use of immunoblots for the detection of antinuclear antibodies. J Immunol Methods 1990;129(1):63–70.
Van Dyke KK, Van Dyke R, editors. Luminescence immunoassay and molecular spplications, Boca Raton (FL): CRC Press; 1990. p 61–5.
Wang R, Thompson JE. Detection of ATP competitive protein kinase inhibition by Western blotting. Anal Biochem 2001;299:110–2.
Zampieri S, Ghirardello A, Doria A, Tonello M, Bendo R , Rossini K , Gambari PF. The use of Tween®-20 in immunoblotting assays for the detection of autoantibodies in connective tissue diseases. J Immunol Methods 2000; 239(1–2):1–11.
Patents U.S. Pat. No. 6,632,339, issued to W.V. Bienvenut et al. on October 14, 2003.
U.S. Pat. App. Pub. No. 2002/0136668 (published September 26, 2002), filed by D. Wallace et al. on December 18, 2001.
International Patent Application No. PCT/AU98/00265 of A. Gooley et al. (published October 22, 1998 as International Publication No. WO 98/47006).
International Patent Application No. PCT/FR01/01331 of Laboratoire National de Dépistage du Dopage with Hospices Civils de Lyon which also holds the patent (2 786 273).
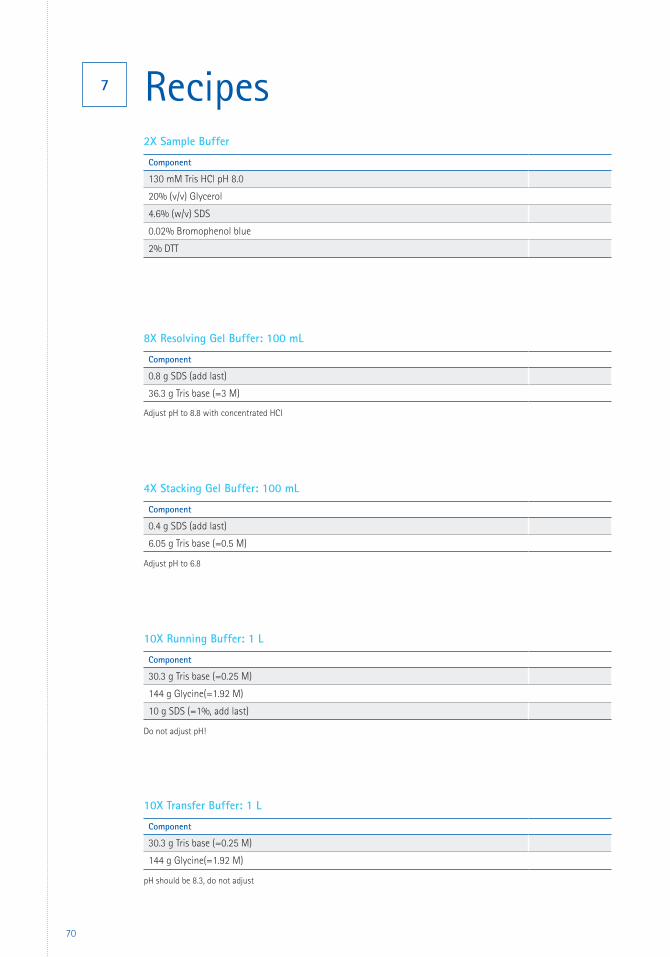
70
RecipesComponent
130 mM Tris HCl pH 8.0
20% (v/v) Glycerol
4.6% (w/v) SDS
0.02% Bromophenol blue
2% DTT
Component
0.8 g SDS (add last)
36.3 g Tris base (=3 M)
Adjust pH to 8.8 with concentrated HCI
Component
0.4 g SDS (add last)
6.05 g Tris base (=0.5 M)
Adjust pH to 6.8
Component
30.3 g Tris base (=0.25 M)
144 g Glycine(=1.92 M)
pH should be 8.3, do not adjust
Component
30.3 g Tris base (=0.25 M)
144 g Glycine(=1.92 M)
10 g SDS (=1%, add last)
Do not adjust pH!
2X Sample Buffer
8X Resolving Gel Buffer: 100 mL
4X Stacking Gel Buffer: 100 mL
10X Transfer Buffer: 1 L
10X Running Buffer: 1 L
7

Description Qty Catalogue No.
Immobilon®-P: PVDF 0.45 µm 7 × 8.4 cm 50/pk IPVH07850
26.5 cm × 3.75 m 1 roll IPVH00010
Immobilon®-FL: PVDF 0.45 µm 7 × 8.4 cm 10/pk IPFL07810
26.5 cm × 3.75 m 1 roll IPFL00010
Immobilon®-PSQ: PVDF 0.2 µm 7 × 8.4 cm 50/pk ISEQ07850
26.5 cm × 3.75 m 1 roll ISEQ00010
Description Detection Method Qty Catalogue No.
Bløk®-CH Reagent Chemiluminescence Detection 500 mL WBAVDCH01
Bløk®-FL Reagent Fluorescence Detection 500 mL WBAVDFL01
Bløk®-PO Reagent Phosphorylated Protein Detection 500 mL WBAVDP001
Description Qty Catalogue No.
Luminata™ Classico Western HRP Substrates 500 mL WBLUC0500
Luminata™ Crescendo Western HRP Substrates 500 mL WBLUR0500
Luminata™ Forte Western HRP Substrates 500 mL WBLUF0500
Immobilon® transfer membranes
Luminata™ Western HRP substrates
Bløk® noise cancelling reagents
SNAP i.d.® 2.0 systemsDescription Catalogue No.
SNAP i.d.® 2.0 System-Mini (7.5 x 8.4 cm) SNAP2MINI
SNAP i.d.® 2.0 System-Midi (8.5 x 13.5 cm) SNAP2MIDI
SNAP i.d.® 2.0 System-Mini and Midi (7.5 x 8.4 cm and 8.5 x 13.5 cm) SNAP2MM
SNAP i.d.® 2.0 consumablesDescription Qty Catalogue No.
SNAP i.d.® 2.0 Mini Blot Holders (7.5 x 8.4 cm) 100/pk SNP2BHMN100
SNAP i.d.® 2.0 Midi Blot Holders (8.5 x 13.5 cm) 100/pk SNP2BHMD100
SNAP i.d.® 2.0 accessoriesDescription Qty Catalogue No.
SNAP i.d.® 2.0 Antibody Collection Tray 20/pk SNAPABTR
SNAP i.d.® 2.0 Blot Roller 1/pk SNAP2RL
SNAP i.d.® 2.0 Mini Blot Holding Frames (double pack) 2/pk SNAP2FRMN02
SNAP i.d.® 2.0 Midi Blot Holding Frames (double pack) 2/pk SNAP2FRMD02
SNAP i.d.® 2.0 Mini Blot Holding Frame (single pack) 1/pk SNAP2FRMN01
SNAP i.d.® 2.0 Midi Blot Holding Frame (single pack) 1/pk SNAP2FRMD01
71
Ordering Information 8

To Receive Technical AssistanceIn the U.S. and Canada, call toll-free 1-800-645-5476,
or please visit: www.emdmillipore.com/techservice
Disclaimer: EMD Millipore does not recommend any particular protocol for your use or application. It is the obligation of each individual researcher to determine which, if any, protocol is appropriate for the selected application and to obtain the necessary license or permission that may be required to use that protocol.
EMD Millipore, SignalBoost, ReBlot, Luminata are trademarks and Amicon, Durapore, Immobilon, Millex, Milli-Q, Stericup, Steritop, SNAP i.d., Bløk, 4G10, OmniPur, and Steriflip are registered trademarks of Merck KGaA, Darmstadt, Germany.All other trademarks are the property of their respective owners.Fisher Lit. No. BN1001122 Lit. No. TP001EN00, Rev. A 09/12 BS-GEN-12-07132 Printed in the USA © 2012 EMD Millipore Corporation, Billerica MA USA.
The world of protein research changes every day.And so does EMD Millipore
For technical assistance, contact Millipore:1-800-MILLIPORE (1-800-645-5476)E-mail: [email protected]
www.fishersci.com/emdmillipore