Embed Size (px)
Citation preview

1
PROTEKT® 600 LIFT
POWER PATIENT LIFT
MODEL: 33600
OWNER’S MANUAL
270 Washington Street
Mount Vernon, NY 10553
855-237-7622
www.proactivemedical.com
2
Thank you for choosing the Protekt® 600 Lift!
To better serve you, please record the following information:
Supplier Name:
Telephone:
Serial #:
Date of Purchase
INSPECT YOUR MERCHANDISE Upon receipt of your patient lift, verify that all merchandise is
complete and free from any shipping damage. Refuse delivery if
the packaging appears to be badly damaged. If the merchandise
is received damaged or is missing components, contact the
shipping company immediately and file a claim.
For further assistance, contact your local dealer or Proactive
Medical Products at the following:
Proactive Medical Products
270 Washington Street
Mount Vernon, NY 10553
Tel: 855-237-7622
www.proactivemedical.com
3
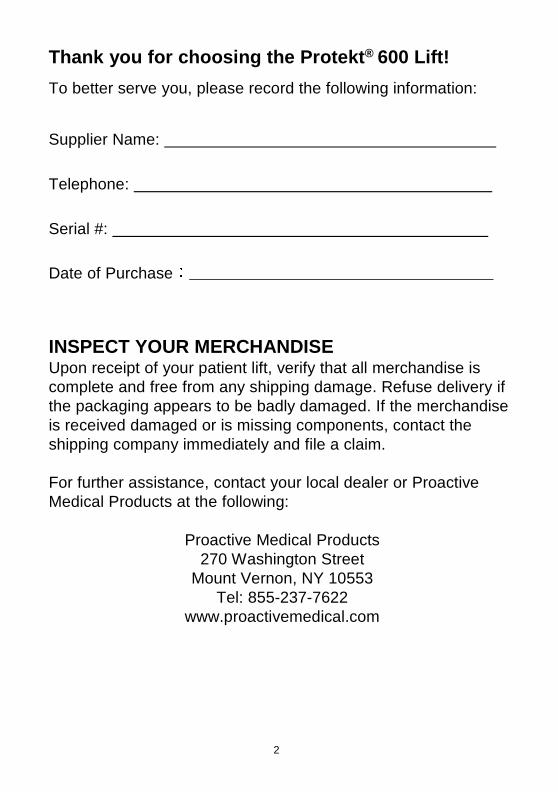
Features Chart:
1. Boom
2. Spreader Bar 3. Mast 4. Actuator 5. Base 6. Pendant 7. Control Box 8. Caster with Brake 9. Front Caster 10.Emergency Lowering Device

4
Diagram of Control Box:
Battery release clip
Control box on/off and emergency stop button Control buttons
LCD screen
Battery pack
Charger connector
Lifting actuator connectorHand pendant connector
5
SAFETY INSTRUCTIONS
The Protekt® 600 Power Patient Lift 33600 reflects innovative
state of the art design to increase user mobility.
The Protekt® 600 Lift will provide years of service if it is properly
maintained as any piece of electrical/mechanical equipment
requires.
Please pay careful attention to the following important information
regarding the care, maintenance, and operation of the Protekt®
600 Lift. Carefully read these instructions before assembling the
lifter, or attempting to lift any user with the device.
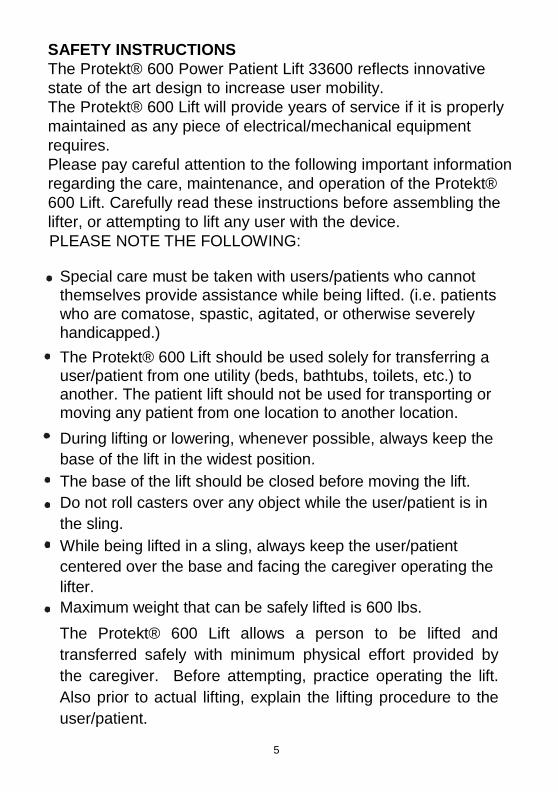
PLEASE NOTE THE FOLLOWING:
Special care must be taken with users/patients who cannot themselves provide assistance while being lifted. (i.e. patients
who are comatose, spastic, agitated, or otherwise severely handicapped.)
The Protekt® 600 Lift should be used solely for transferring a user/patient from one utility (beds, bathtubs, toilets, etc.) to another. The patient lift should not be used for transporting or moving any patient from one location to another location.
During lifting or lowering, whenever possible, always keep the
base of the lift in the widest position.
The base of the lift should be closed before moving the lift.
Do not roll casters over any object while the user/patient is in
the sling.
While being lifted in a sling, always keep the user/patient
centered over the base and facing the caregiver operating the
lifter.
Maximum weight that can be safely lifted is 600 lbs.
The Protekt® 600 Lift allows a person to be lifted and
transferred safely with minimum physical effort provided by
the caregiver. Before attempting, practice operating the lift.
Also prior to actual lifting, explain the lifting procedure to the
user/patient.

6
WARNING!
Do not attempt to transfer a patient without prior approval of the patient's nurse. Also, do not transfer without having studied the instructions and practiced operating the product several times. Together with the patient's doctor, nurse, or medical attendant, select a Proactive Medical Products sling that is both practical and comfortable. The sling selected should be one that serves the needs of the patient, while providing the patient with optimal safety. Never interfere with the lift, unless instructed by the attendant. Have a doctor, nurse, or medical attendant present during the first few times the lift is used to transfer a new user.
WARNING! Proactive Medical slings are specially designed to be used in conjunction with Proactive lifts. Do not use slings manufactured by other companies with any of Proactive Medical's equipment. USING OTHER MANUFACTURER'S SLINGS ON THIS EQUIPMENT IS UNSAFE AND MAY RESULT IN SERIOUS INJURY TO USERS AND CAREGIVERS. PROACTIVE MEDICAL is not responsible for any consequence resulting from the use of non-Proactive slings on this equipment.
WARNING! Do not put anything (e.g. cushion, pad, etc.) between the user and the sling. This may cause the user/patient to slide out of the sling and cause injury.
WARNING!
Avoid personal injury by making sure no children or pets are near the Protekt® 600 Lift while it is in motion.
WARNING!
Avoid personal injury by making sure all extremities (such as fingers, arms, legs, or feet) are clear of the lift mechanism while it is in operation.

7
WARNING!
Avoid personal injury and possible damage to the Protekt®
600 Lift by making sure the maximum weight limit of 600 lbs.
is not exceeded.
WARNING!
Replace any worn parts with only genuine Proactive Medical parts. The patient lift parts are not interchangeable with parts from other patient lift brands. Using other patient lift parts on these products is unsafe and may result in serious injury to user and caregiver. Proactive Medical is not responsible for any consequence resulting from the use of non-Proactive parts and components.
WARNING! Avoid personal injury by making sure the electrical connector is disconnected before conducting any electrical inspection. Contact your dealer if any electrical problem is detected.
WARNING!
Service and repair of this equipment should be performed only by an authorized dealer. Proactive Medical is not responsible for any consequence resulting from any unauthorized service or repair.
CAUTION
Avoid damage to the Protekt® 600 Lift by keeping foreign objects from coming into contact with the lift mechanism.
NOTE
Arrange all necessary items (lift, slings, commode chair or wheel-chair) for a smooth procedure. The user/patient being transferred should be positioned in the center of the bed before being lifted, as well as when he/she is returned to the bed. Keep lifter base widened and brakes locked during lifting.
8
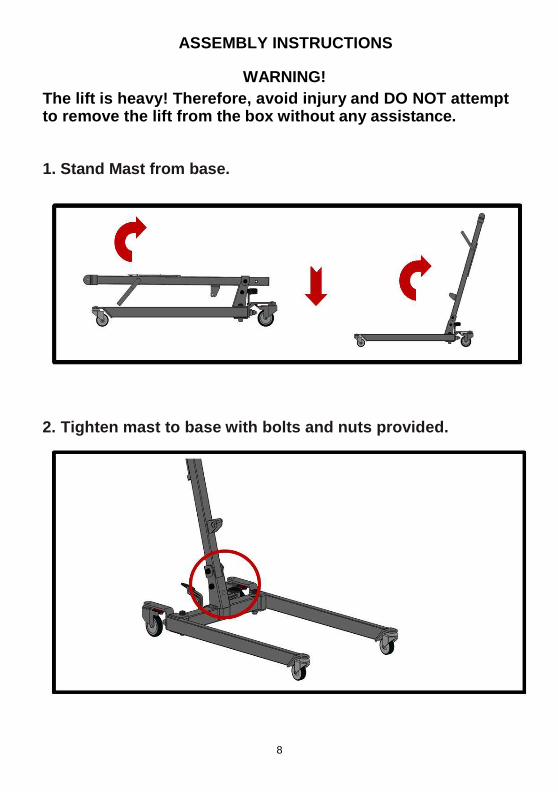
ASSEMBLY INSTRUCTIONS
WARNING!
The lift is heavy! Therefore, avoid injury and DO NOT attempt to remove the lift from the box without any assistance.
1. Stand Mast from base.
2. Tighten mast to base with bolts and nuts provided.

9
3. Attach boom to top of mast.
4. Attach spreader bar to front of boom.
5. Attach Actuator to mast and boom.

10
6. Attach the control box bracket to the mast with the two
screws, then attach the control box to the mast with the two screws, then slide the battery in until it snaps into place, as shown above.
11
MAINTENANCE & INSPECTION CHECK LIST The operator of the lift is to inspect the Protekt® 600 Lift before each use. Check all bolts for tightness. Make sure the base can be easily widened, and that all lift parts are in place. Make sure all casters turn freely, and that the caster brakes can be engaged. Make certain all necessary items (i.e. slings, wheel chairs, etc.) are accessible and ready for use.
Check the battery capacity. See instructions below. At least once a month, the lift should be thoroughly inspected by a person qualified to recognize any signs of wear, and looseness of bolts or parts. Replace any worn parts immediately.
To lubricate, place a drop of oil on the following points when the Protekt® 600 Lift is serviced and every month thereafter- Top of Mast, Spreader Hinge, and Caster Axles.
USER GUIDE
CHARGING THE BATTERY -
The lift can be charged by plugging the charger directly into the
control box while it is attached to the lift
Or
The battery pack can be charged while seated in the (optional)
wall/desk charging caddy.
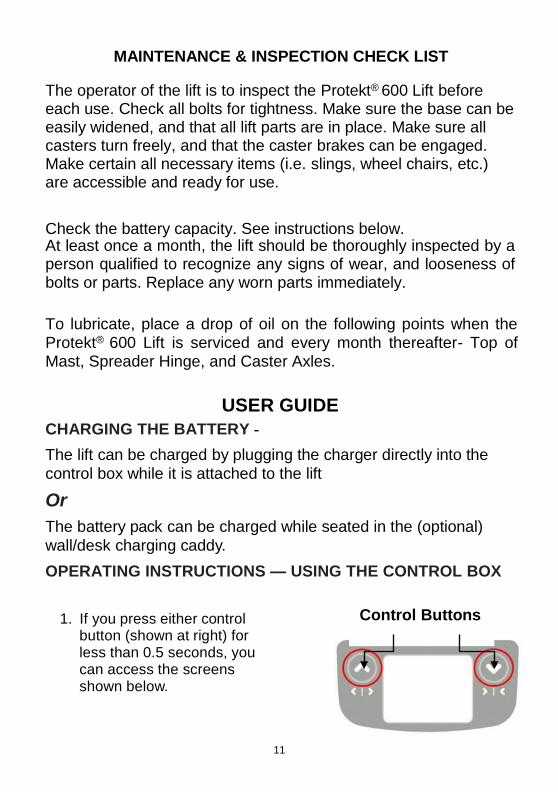
OPERATING INSTRUCTIONS — USING THE CONTROL BOX
1. If you press either control button (shown at right) for less than 0.5 seconds, you can access the screens shown below.
Control Buttons
12
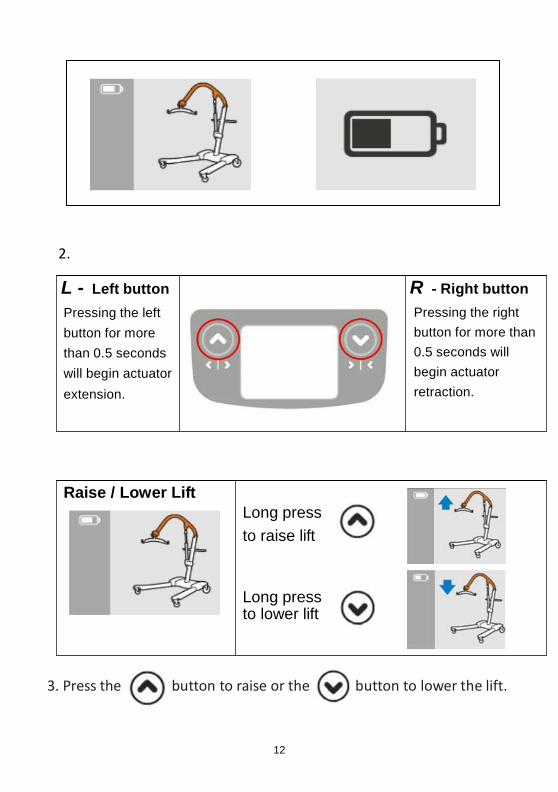
2.
L - Left button
Pressing the left
button for more
than 0.5 seconds
will begin actuator
extension.
R - Right button
Pressing the right
button for more than
0.5 seconds will
begin actuator
retraction.
Raise / Lower Lift
Long press
to raise lift Long press to lower lift
3. Press the button to raise or the button to lower the lift.

13
OPERATING INSTRUCTIONS — USING THE HAND PENDANT
Raise / Lower Lift
Long press
to raise lift
Long press to lower lift
1. Press the bu�on to raise or the bu�on to lower the lift.

14
MAINTENANCE SCHEDULE
Item
In the Beginning
Monthly
Every 3
Months
Boom & Spreader Bar: Check connections between 1) Boom and Spreader Bar and 2) Boom and Mast for improper connection, looseness, or wear. Check the Boom for bending and deflection.
●
●
●
●
Mast: Check the Mast for bending or deflection.
Check the steering bar for damage or loose screws.
●
●
●
●
Base & Foot Peddle: Check bolts and nuts for looseness.
Check casters and axle bolts for tightness.
Check rubber parts on the casters for deflection.
Apply grease to caster ball bearings if needed.
●
● ●
●
●
●
●
Cleaning: As needed.
●
Actuator & Control Box: Make sure the control box is firmly affixed to the mast.
Make sure the pins firmly affix actuator to the Boom and the Mast.
●
●
●
●

15
Make sure the connecting cable of the actuator and the control box is not loose.
Make sure the Battery has capacity
●
●
●
●
Slings & Sling Hardware:
Check sling for wear.
Check sling hardware every time before use.
●
●
●
●
prior to use.
OPERATING INSTRUCTIONS
NOTE: Turn the lift "ON" by turning the red "RESET"
button clockwise. Turn the lift "OFF" by pressing down
the "RESET" button.
Transfer From Bed
User/patient should be in the center of the bed.
Position user onto his/her side by rolling user towards
you.
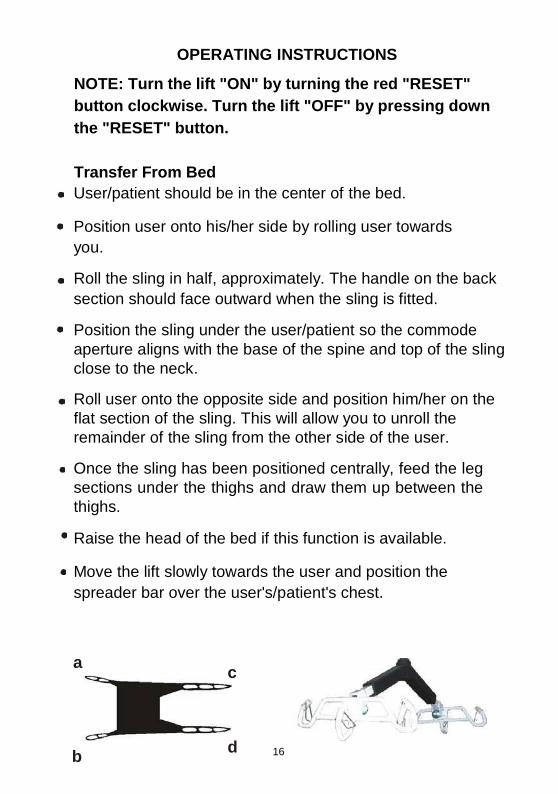
Roll the sling in half, approximately. The handle on the back
section should face outward when the sling is fitted.
Position the sling under the user/patient so the commode
aperture aligns with the base of the spine and top of the sling
close to the neck.
Roll user onto the opposite side and position him/her on the
flat section of the sling. This will allow you to unroll the
remainder of the sling from the other side of the user.
Once the sling has been positioned centrally, feed the leg
sections under the thighs and draw them up between the
thighs.
Raise the head of the bed if this function is available.
Move the lift slowly towards the user and position the
spreader bar over the user's/patient's chest.
a c
b d 16

17
Lift the user above the bed by using the hand control.
Pull lift away from bed. Position user over the
wheelchair or chair then lower the patient onto the
surface.
Note: Reverse the above procedures when returning the
user/patient to bed.
Transfer From Wheelchair
Grasp the sling at each corner of the "U" shape of the
commode aperture.
The sling should be fitted with the handle on the back
section facing outward.
Help the user lean forward slightly, then slide the sling
down between the chair and the user's back.
Position the commode aperture where the buttocks
meets the seat.
Position the sling equally around both sides of the body.
Draw the leg sections to the front along the length of the
user's thigh.
Check the sling's central positioning by comparing the
lengths of the leg sections when they are drawn forward.
Reposition the sling if the leg sections are not equal in
length.
Feed the leg sections under the thighs.
From between the legs, gently pull the leg section up the
inner thigh.

18
Feed as much material as possible under and between the thighs. Ensure the leg sections are positioned midway under the thighs to provide good support and greater comfort.
Move the lift slowly towards the user and position the
spreader bar over the user's chest.
Attach Loop a of sling to Hook A on Spreader Bar; attach
Loop b to Hook B; attach Loop c to Hook C; attach Loop d to
Hook D.
Lift patient above the wheelchair by using the hand
control.
Pull lift away from wheelchair. Position patient over bed and
lower patient onto it.
Note: Reverse the above procedures when returning the
user/patient to a wheelchair.
WARNING!
Use ONLY Proactive Medical slings/products with this equipment.

19
Full Body Mesh Slings ITEM # DESCRIPTION
30110 Medium Mesh full body: medium 600 lb. weight capacity
30111 Large Mesh full body: large 600 lb. weight capacity
30124 X-Large Mesh full body: X-large 600 lb. weight capacity
30118 XX-Large Mesh full body: XX-large 600 lb. weight capacity
Full Body Mesh Slings w/Commode ITEM # DESCRIPTION
30114 Medium Mesh full body: medium w/commode opening 600 lb. weight capacity
30115 Large Mesh full body: large w/commode opening 600 lb. weight capacity
30116 X-Large Mesh full body: X-large w/commode opening 600 lb. weight capacity
30119 XX-Large Mesh full body: XX-large w/commode opening 600 lb. weight capacity
Full Body Solid Slings ITEM # DESCRIPTION
30112 Medium Solid fabric full body: medium 600 lb. weight capacity
30113 Large Solid fabric full body: large 600 lb. weight capacity
30117 X-Large Solid fabric full body: X-large 600 lb. weight capacity
30123 XX-Large Solid fabric full body: XX-large 600 lb. weight capacity

20
Divided leg design is best suited for high level spinal cord injuries or patients where sling removal is more difficult. Support ranges from the upper back to beneath the thighs. Can be positioned with patient seated. Greatly simplifies the use of bathroom facilities.
Divided Leg Slings ITEM # DESCRIPTION
30100P Small Solid divided leg: small 450 lb. weight capacity
30100 Medium Solid divided leg: medium 450 lb. weight capacity
30101 Large Solid divided leg: large 450 lb. weight capacity
30102 X-Large Solid divided leg: X-large 450 lb. weight capacity
30103 XX-Large Solid divided leg: XX-large 600 lb. weight capacity
Padded Divided Leg Slings w/o Head Support ITEM # DESCRIPTION
30100P-NHS Small Solid padded divided leg w/o head support: small 600 lb. weight capacity
30100-NHS Medium Solid padded divided leg w/o head support: medium 600 lb. weight capacity
30101-NHS Large Solid padded divided leg w/o head support: large 600 lb. weight capacity
30102-NHS X-Large Solid padded divided leg w/o head support: X-large 600 lb. weight capacity
Padded Divided Leg Slings w/Head Support ITEM # DESCRIPTION
30100P-HS Small Solid padded divided leg w/head support: small 600 lb. weight capacity
30100-HS Medium Solid padded divided leg w/head support: medium 600 lb. weight capacity
30101-HS Large Solid padded divided leg w/head support: large 600 lb. weight capacity
30102-HS X-Large Solid padded divided leg w/head support: X-large 600 lb. weight capacity
20
Full Body M esh Slings ITEM # DESCRIPTION 30110 Me dium Mesh full body: medium 600 lb. weight capacity 30111 Large Mesh full body: large 600 lb. weight capacity 30124 X-Large Mesh full body: X-large 600 lb. weight capacity 30118 XX-Large Mesh full body: XX-large 600 lb. weight capacity
Full Body M esh Slings w /Comm ode ITEM # DESCRIPTION 30114 Me dium Mesh full body: medium w/commode opening
600 lb. weight capacity 30115 Large Mesh full body: large w/commode opening
600 lb. weight capacity 30116 X-Large Mesh full body: X-large w/commode opening
600 lb. weight capacity 30119 XX-Large Mesh full body: XX-large w/commode opening
600 lb. weight capacity
Full Body Solid Slings ITEM # DESCRIPTION 30112 Me dium Solid fabric full body: medium
600 lb. weight capacity 30113 Large Solid fabric full body: large
600 lb. weight capacity 30117 X-Large Solid fabric full body: X-large
600 lb. weight capacity 30123 XX-Large Solid fabric full body: XX-large
600 lb. weight capacity
21
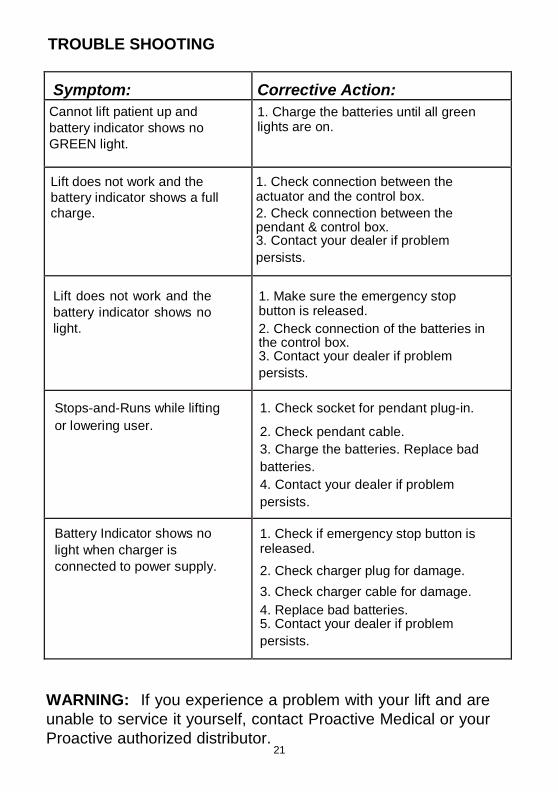
TROUBLE SHOOTING
Symptom:
Corrective Action:
Cannot lift patient up and
battery indicator shows no
GREEN light.
1. Charge the batteries until all green lights are on.
Lift does not work and the
battery indicator shows a full
charge.
1. Check connection between the actuator and the control box.
2. Check connection between the pendant & control box. 3. Contact your dealer if problem
persists.
Lift does not work and the
battery indicator shows no
light.
1. Make sure the emergency stop button is released.
2. Check connection of the batteries in the control box. 3. Contact your dealer if problem
persists.
Stops-and-Runs while lifting
or lowering user.
1. Check socket for pendant plug-in.
2. Check pendant cable.
3. Charge the batteries. Replace bad
batteries.
4. Contact your dealer if problem
persists.
Battery Indicator shows no
light when charger is
connected to power supply.
1. Check if emergency stop button is released.
2. Check charger plug for damage.
3. Check charger cable for damage.
4. Replace bad batteries. 5. Contact your dealer if problem
persists.
WARNING: If you experience a problem with your lift and are
unable to service it yourself, contact Proactive Medical or your
Proactive authorized distributor.

22
LIMITED WARRANTY The Protekt® 600 Lift you purchased is guaranteed to be free from defects in material and workmanship under normal use and service. The warranty period for this product is 2 Years Electronics/3 Years Frame from the date of purchase by the original purchaser. This warranty shall be voided upon transfer of ownership of this product. Proactive Medical agrees to repair or replace this product, at our discretion and at no charge, within the warranty period provided and that Proactive Medical consents the unit is defective. The repaired or replacement unit shall be warranted for a period equal to the balance of the defective unit's warranty period.
NOTE: To ensure the best service to our customers, Proactive Medical requires the following information to be included with the returned unit:
1. Model Name/Number and Serial Number on the packaging. 2. Proof of purchase, i.e. a copy of the original invoice. 3. A Return Authorization number (RA#) obtained by calling
Authorized dealer/distributor prior to the return of the product. The RA# must be clearly indicated on the outside of the packaging.
4. A detailed description of the problem and its symptoms on a note.

23
This warranty shall not apply to any product which has been
repaired or altered in any way so as, in our judgment, to affect its
functionality and durability, nor to any product subject to abuse,
misuse, negligence or accident, improper maintenance, improper
installation, nor to any product used with other parts, components
and/or accessories with quality and/or specifications not compatible
with this product. This warranty does not cover products that have
been impaired by occurrences considered Acts of God over which
authorized dealer has no control. This warranty shall also be voided
if any required periodic maintenance, if applicable, has not been
properly performed on this product.
This warranty and the aforementioned remedies presented are
exclusive and in lieu of all other express or implied warranties. No
other representations or claims shall be binding or obligate
authorized dealer in any way. Any warranty applicable to this
product is limited to the aforementioned period indicated. In no
event shall authorized dealer be liable for any special, incidental, or
consequential damages; loss of revenue; or cost of replacement
goods; resulting from the use or malfunction of this product to the
associated equipment on which and with which it is used. This
warranty gives specific legal rights and you may be entitled to other
rights that vary from state to state.


![EasyLift 600 PromoLine - Tecnomagnete SpA...Aprile 2016 Proprietà di TECNOMAGNETE S.p.A. easy-lift-600-2016-COMM (2).xlsx 0 200 400 600 0,5 0,75 1 1,25 Cari Traferro -Air gap -T [mm]](https://img.pdfslide.net/doc/110x75/60a6558121a8d9494839c938/easylift-600-promoline-tecnomagnete-aprile-2016-propriet-di-tecnomagnete.jpg)