Embed Size (px)
Citation preview
Provider Guide to the Document Vault
Page 2 of 23
Table of Contents
Introduction to the Document Vault ................................................................................................... 3
Key Documents to Maintain in your Document Vault ............................................................ 3
Document Vault Navigation ..................................................................................................... 4
Uploading a New Document ................................................................................................................ 5
Upload Confirmation ................................................................................................................ 8
Filtering your Documents ................................................................................................................... 9
Document Vault Actions ................................................................................................................... 10
Viewing Documents ............................................................................................................... 10
Deleting Documents from your Document Vault .................................................................. 11
Downloading Documents from your Document Vault ......................................................... 12
Sharing Documents from your Document Vault .............................................................................. 13
Un-Sharing your Documents ............................................................................................................ 16
Un-Sharing a Document ......................................................................................................... 17
Un-Sharing Multiple Documents ........................................................................................... 19
Un-Share your Document(s) with All Organizations ............................................................ 19
Un-Share by Organizations .................................................................................................... 20
Accessing Externally Shared Documents ........................................................................................ 22
Page 3 of 23
Introduction to the Document Vault
The Document Vault provides your organization with a secure digital filing cabinet for important organizational documentation. The Document Vault also allows you to upload required documents necessary to obtain and maintain eligibility to conduct business with the City of New York. The Document Vault enables direct and secure transmission of documents to the HHS Accelerator Team, City Agencies, other funders and Client and Community-based Services Providers.
The Document Vault provides:
A secure and paperless system
Document accessibility controls
Easy access to documents required to do business with the City and other funders
Automated system reminders for expiration of critical documents.
By default, when a document is uploaded to the Document Vault, it is private—only members of your organization who have been granted access to your organization’s HHS Accelerator Account can view those documents. However, the Document Vault makes it easy for users to grant permission to other organizations (Foundations, City Agencies, etc.) to view documents.
Please remember to obtain all necessary approval before uploading any of your organization’s documents to the Document Vault. Any material that may be deemed offensive or inappropriate is not to be stored in the Document Vault.
Key Documents to Maintain in your Document Vault
The following are examples of documents that may prove useful to store in your Document Vault. Document names followed by an asterisk (*) are required by the HHS Accelerator Application process.
Corporate Structure Documents
Annual Report
Board List (including officers and length of
term)*
Certificate of Incorporation*
Certificate of Insurance Form
Certificate of Occupancy or Place of
Assembly Permit
Chief Executive Officer (CEO) Resume or
equivalent*
Corporate By-Laws*
IRS Determination Letter*
Lease or Rental Agreement
Organizational Chart*
Reference Letters
W9.
Financial Documents
A-133, OMB Single Audit Report
Board Approved Organization Budget
CHAR500, Annual Filing for Charitable
Organizations*
Independent Audit or Certified Public
Account (CPA) Review Report*
IRS Form 990.
Policy Documents
Fiscal Manual
Policy and Procedures Manual
Human Resources or Personnel Policy
Manual.
Page 4 of 23
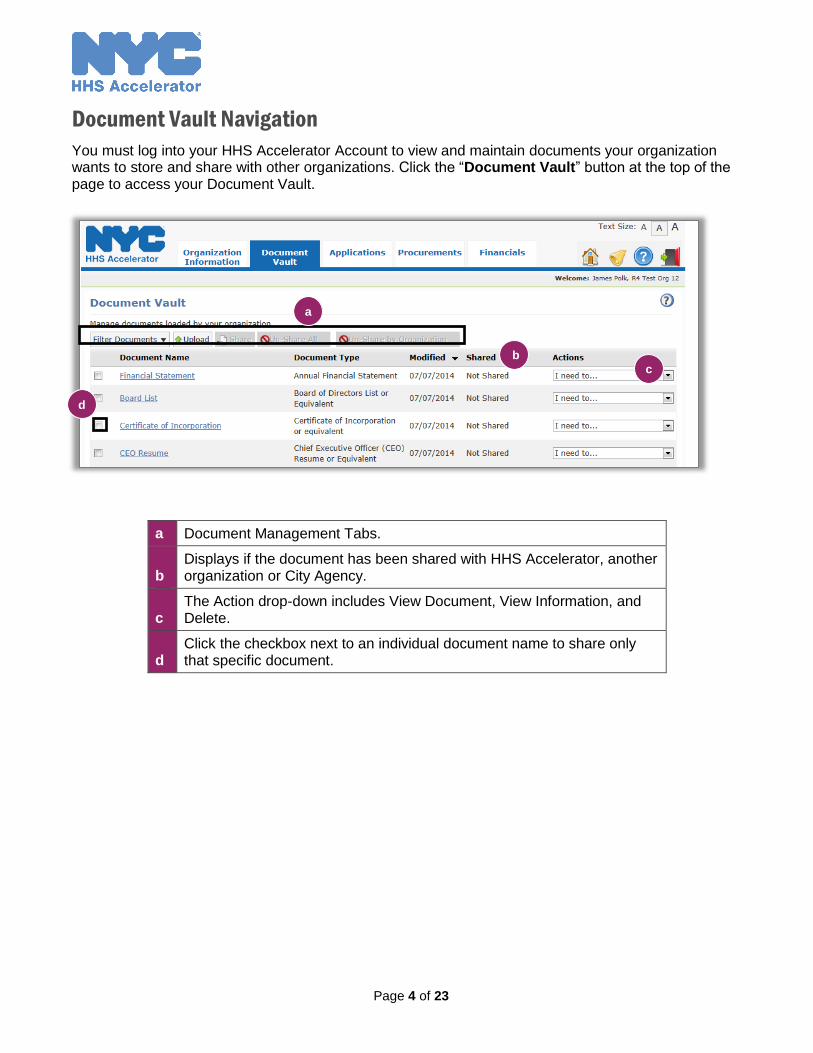
Document Vault Navigation
You must log into your HHS Accelerator Account to view and maintain documents your organization wants to store and share with other organizations. Click the “Document Vault” button at the top of the page to access your Document Vault.
a Document Management Tabs.
b Displays if the document has been shared with HHS Accelerator, another organization or City Agency.
c The Action drop-down includes View Document, View Information, and Delete.
d Click the checkbox next to an individual document name to share only that specific document.
a
b
c
d
Page 5 of 23
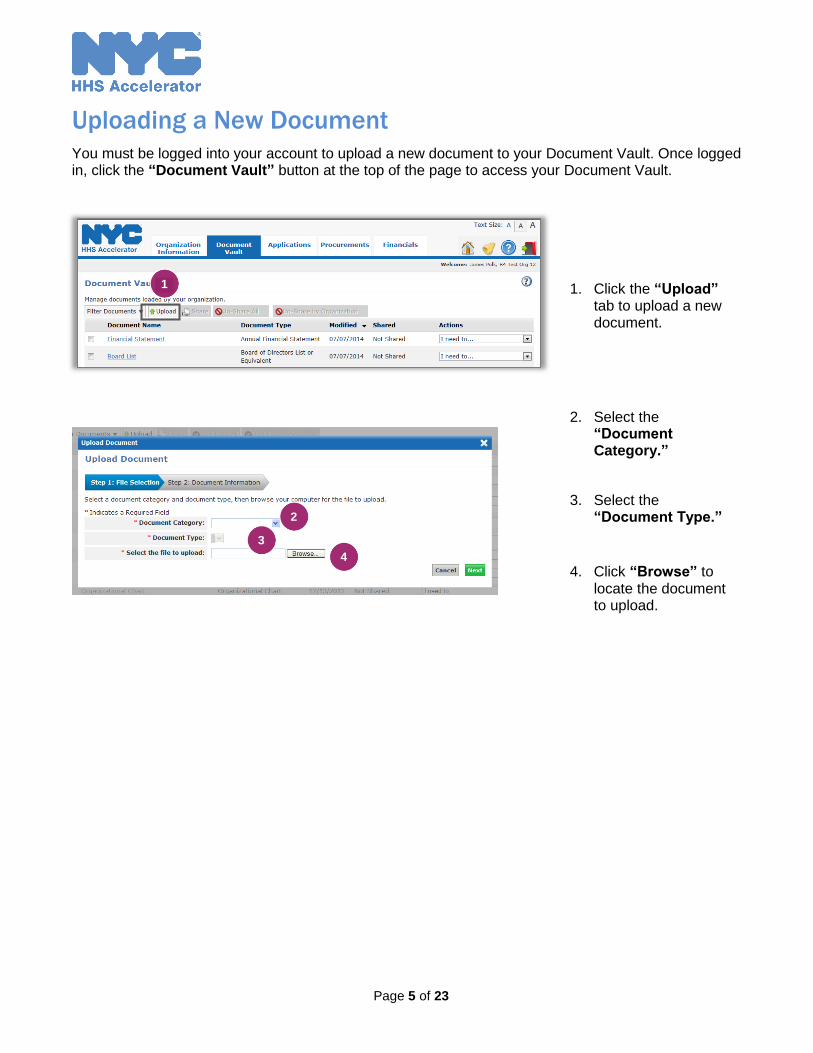
Uploading a New Document
You must be logged into your account to upload a new document to your Document Vault. Once logged in, click the “Document Vault” button at the top of the page to access your Document Vault.
1. Click the “Upload” tab to upload a new document.
2. Select the “Document Category.”
3. Select the “Document Type.”
4. Click “Browse” to locate the document to upload.
1
2
3
4
Page 6 of 23
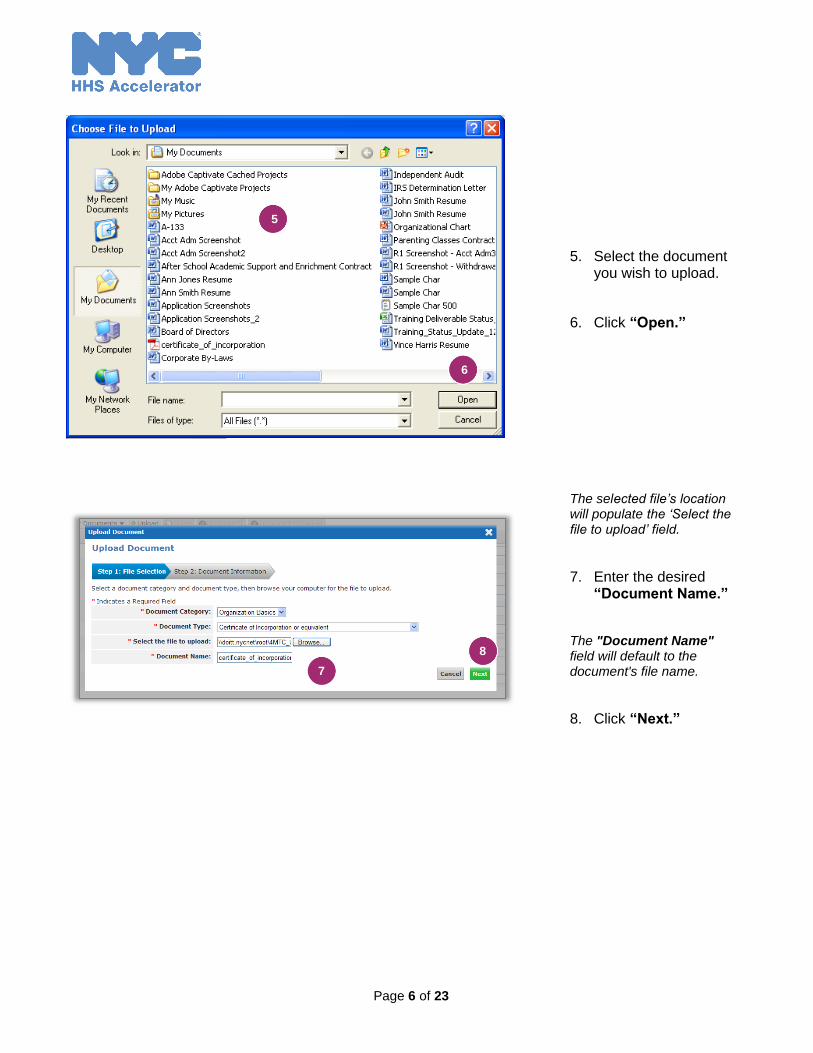
5. Select the document you wish to upload.
6. Click “Open.”
The selected file’s location will populate the ‘Select the file to upload’ field.
7. Enter the desired “Document Name.”
The "Document Name" field will default to the document's file name.
8. Click “Next.”
6
5
7
8

Page 7 of 23
9. Click the calendar icon and select the document’s “Effective Date.”
Where an effective date is not applicable, please enter the date the document was officially approved by your organization for sharing externally.
10. Click “Upload Document.”
The system begins to process your request and upload your document. The time required for your document’s upload will vary based on the size of the file and the speed of your internet connection and may take a few minutes.
It is important that you create unique file names for new files uploaded to your Document Vault, as newly uploaded documents with duplicate file names will overwrite preexisting documents.
9 10
Page 8 of 23
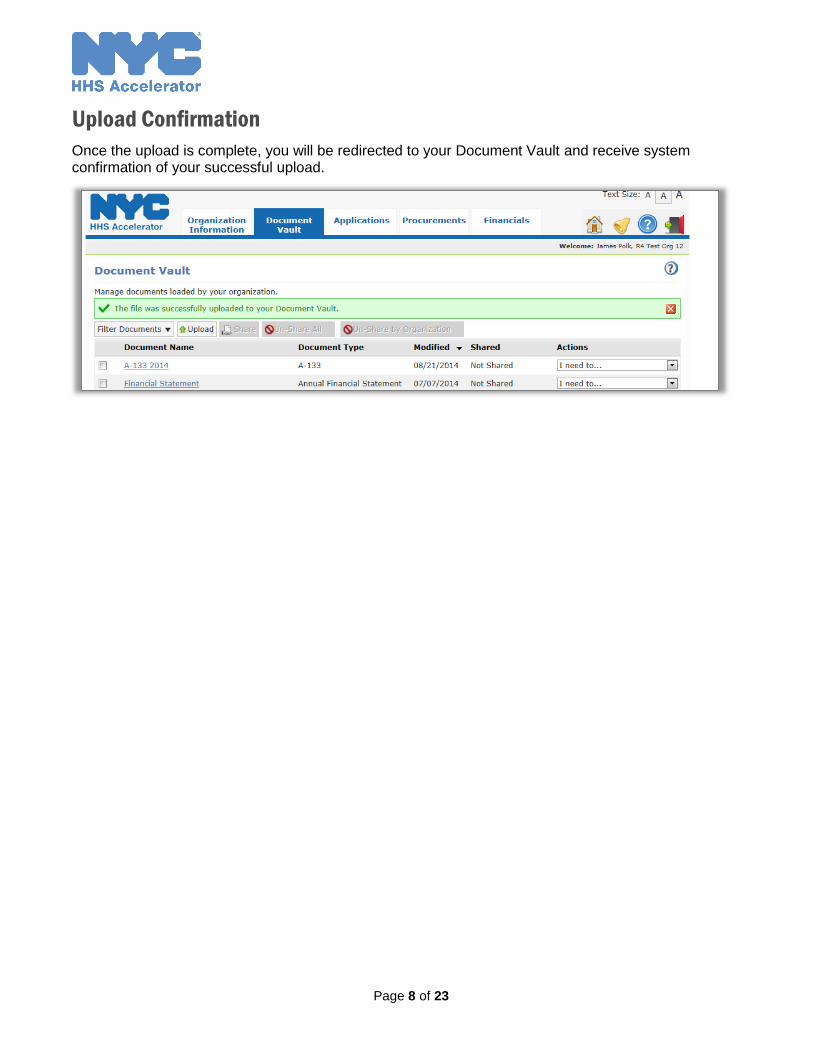
Upload Confirmation
Once the upload is complete, you will be redirected to your Document Vault and receive system confirmation of your successful upload.
Page 9 of 23
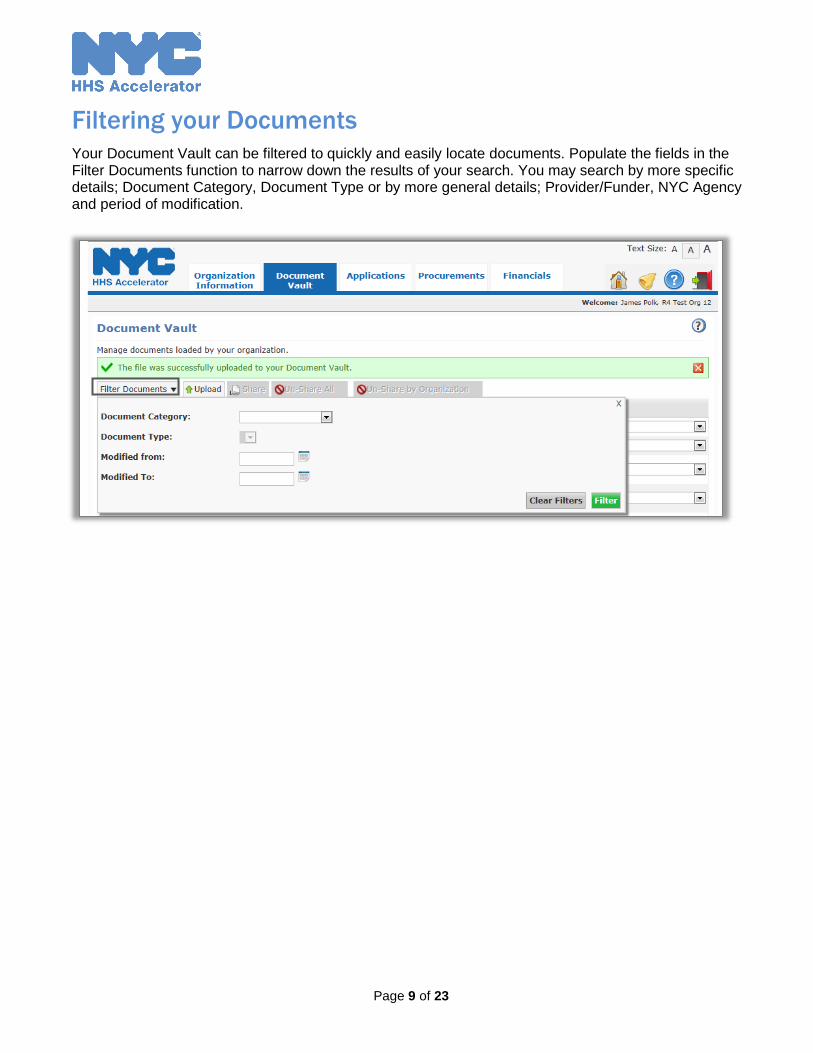
Filtering your Documents
Your Document Vault can be filtered to quickly and easily locate documents. Populate the fields in the Filter Documents function to narrow down the results of your search. You may search by more specific details; Document Category, Document Type or by more general details; Provider/Funder, NYC Agency and period of modification.
Page 10 of 23
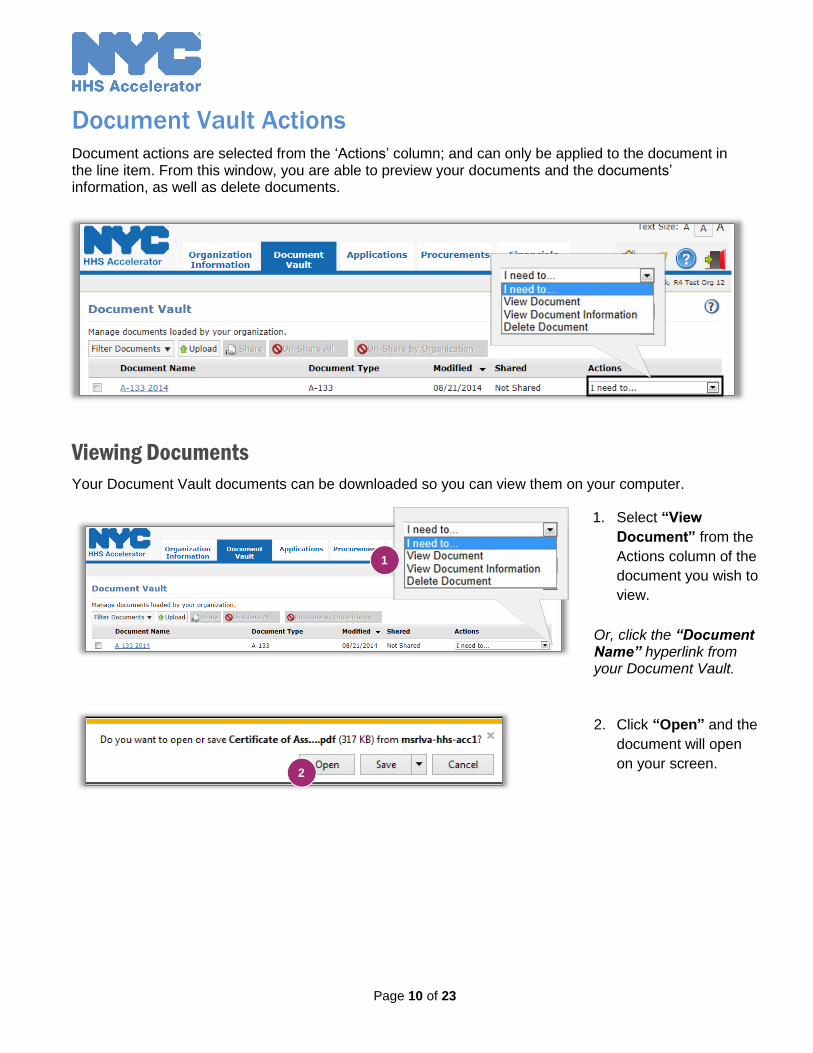
Document Vault Actions
Document actions are selected from the ‘Actions’ column; and can only be applied to the document in the line item. From this window, you are able to preview your documents and the documents’ information, as well as delete documents.
Viewing Documents
Your Document Vault documents can be downloaded so you can view them on your computer.
1. Select “View
Document” from the
Actions column of the
document you wish to
view.
Or, click the “Document Name” hyperlink from your Document Vault.
2. Click “Open” and the
document will open
on your screen.
2
1
Page 11 of 23
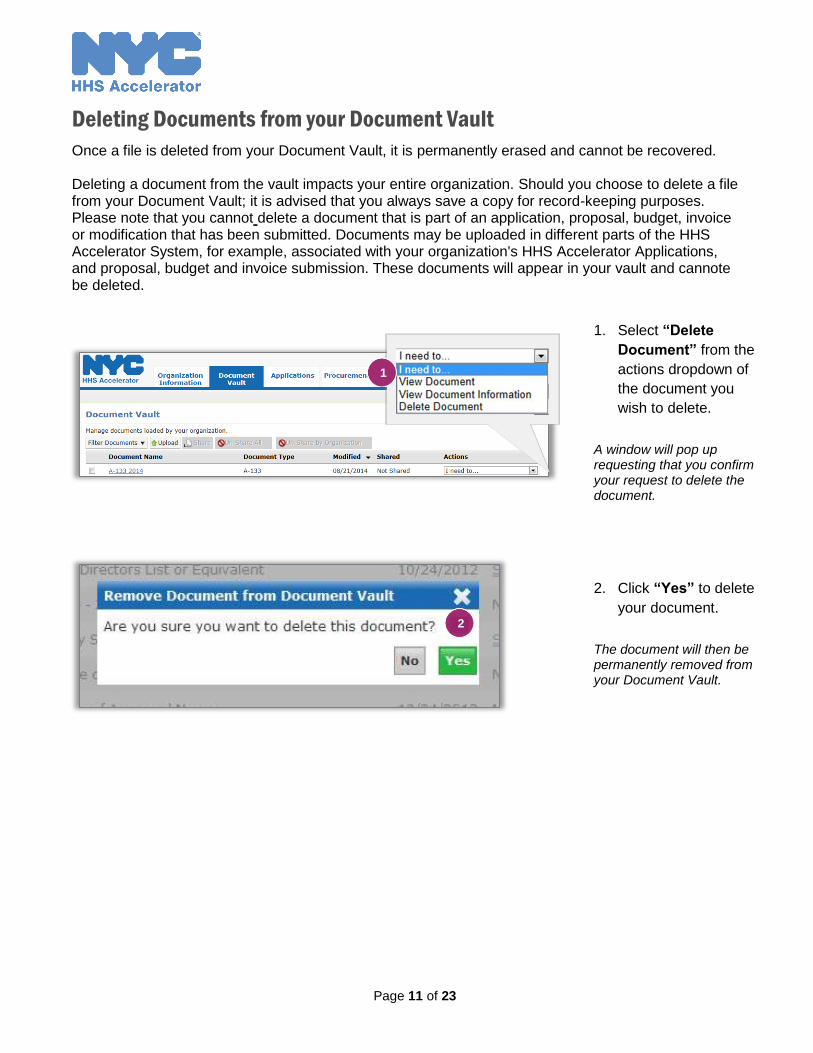
Deleting Documents from your Document Vault
Once a file is deleted from your Document Vault, it is permanently erased and cannot be recovered. Deleting a document from the vault impacts your entire organization. Should you choose to delete a file from your Document Vault; it is advised that you always save a copy for record-keeping purposes. Please note that you cannot delete a document that is part of an application, proposal, budget, invoice or modification that has been submitted. Documents may be uploaded in different parts of the HHS Accelerator System, for example, associated with your organization's HHS Accelerator Applications, and proposal, budget and invoice submission. These documents will appear in your vault and cannote be deleted.
1. Select “Delete
Document” from the
actions dropdown of
the document you
wish to delete.
A window will pop up requesting that you confirm your request to delete the document.
2. Click “Yes” to delete
your document.
The document will then be permanently removed from your Document Vault.
2
1
Page 12 of 23
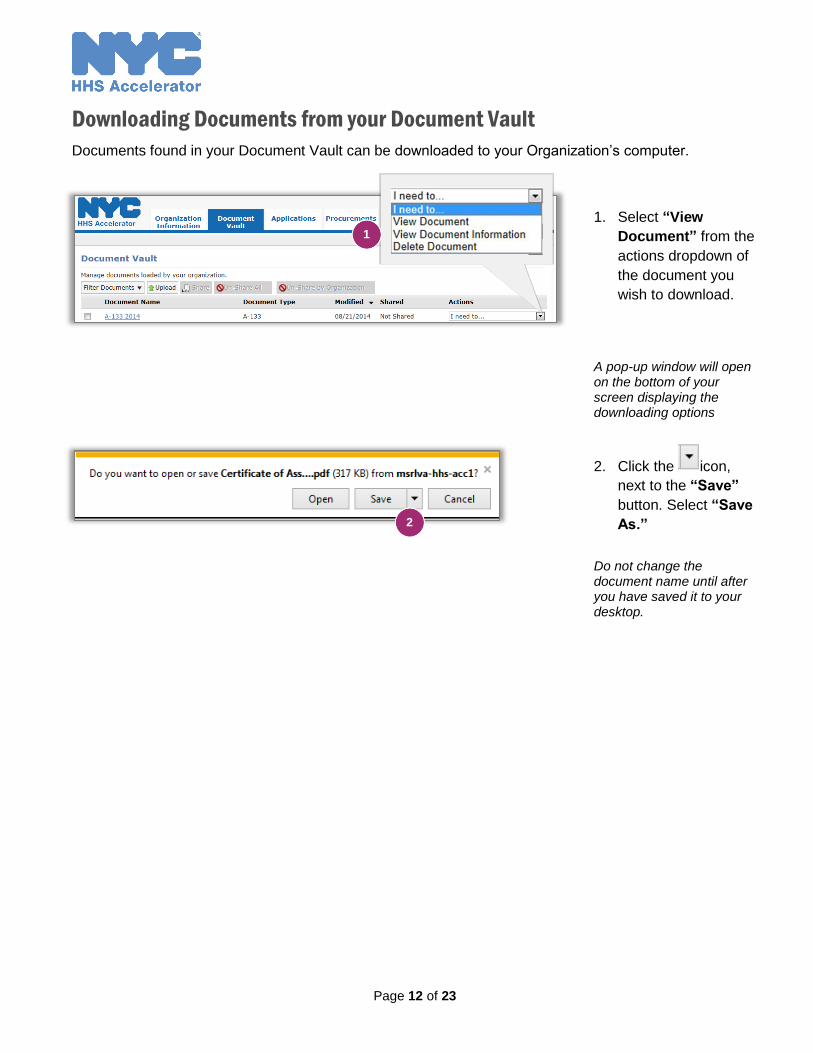
Downloading Documents from your Document Vault
Documents found in your Document Vault can be downloaded to your Organization’s computer.
1. Select “View
Document” from the
actions dropdown of
the document you
wish to download.
A pop-up window will open on the bottom of your screen displaying the downloading options
2. Click the icon,
next to the “Save”
button. Select “Save
As.”
Do not change the document name until after you have saved it to your desktop.
1
2
Page 13 of 23
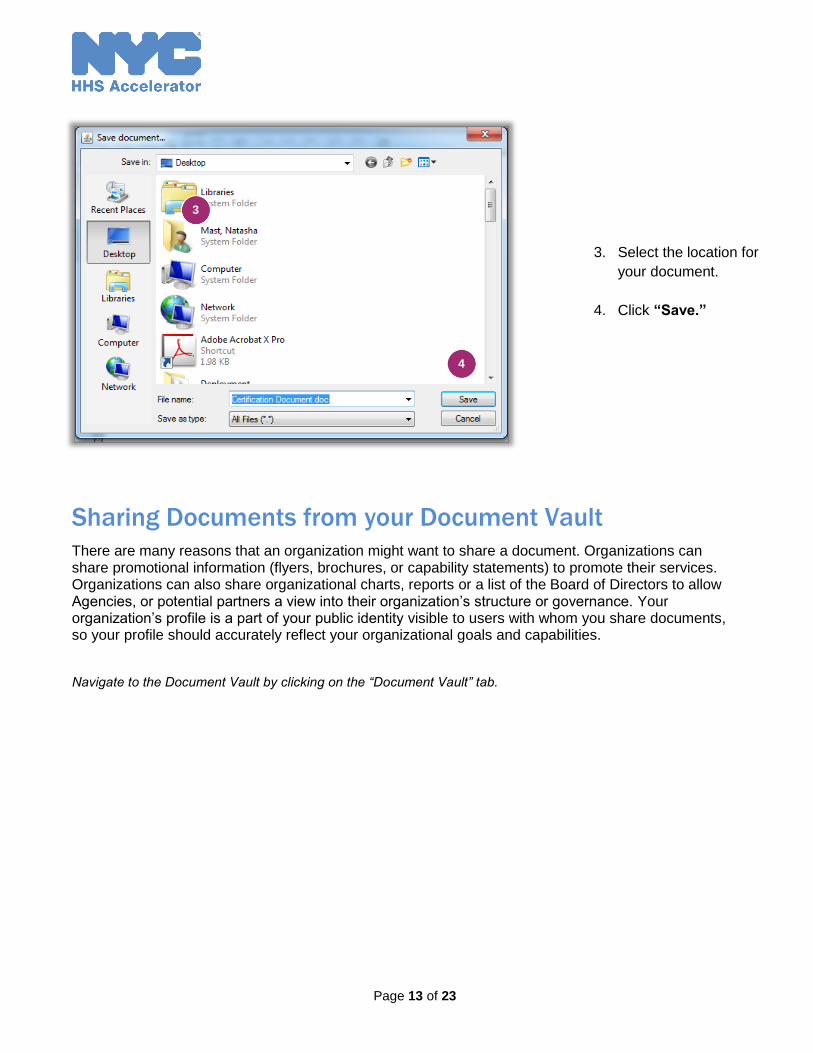
3. Select the location for
your document.
4. Click “Save.”
Sharing Documents from your Document Vault
There are many reasons that an organization might want to share a document. Organizations can share promotional information (flyers, brochures, or capability statements) to promote their services. Organizations can also share organizational charts, reports or a list of the Board of Directors to allow Agencies, or potential partners a view into their organization’s structure or governance. Your organization’s profile is a part of your public identity visible to users with whom you share documents, so your profile should accurately reflect your organizational goals and capabilities.
Navigate to the Document Vault by clicking on the “Document Vault” tab.
4
3
Page 14 of 23
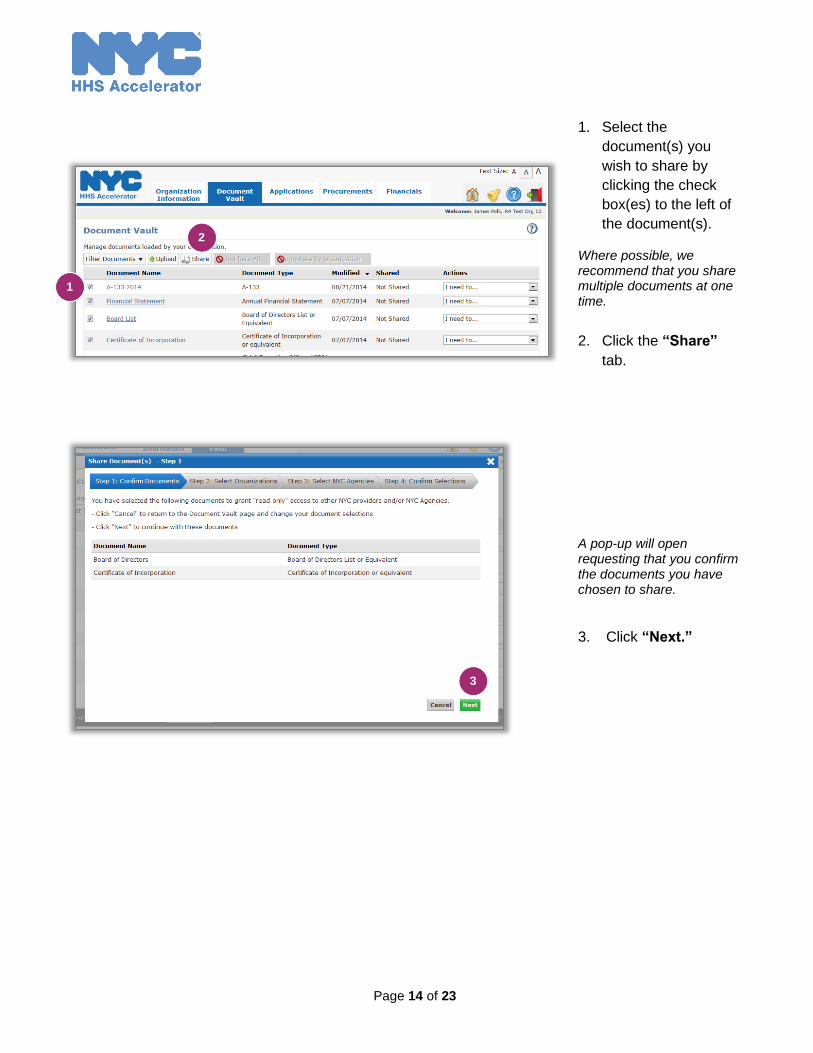
1. Select the
document(s) you
wish to share by
clicking the check
box(es) to the left of
the document(s).
Where possible, we recommend that you share multiple documents at one time.
2. Click the “Share”
tab.
A pop-up will open requesting that you confirm the documents you have chosen to share.
3. Click “Next.”
1
2
3
Page 15 of 23
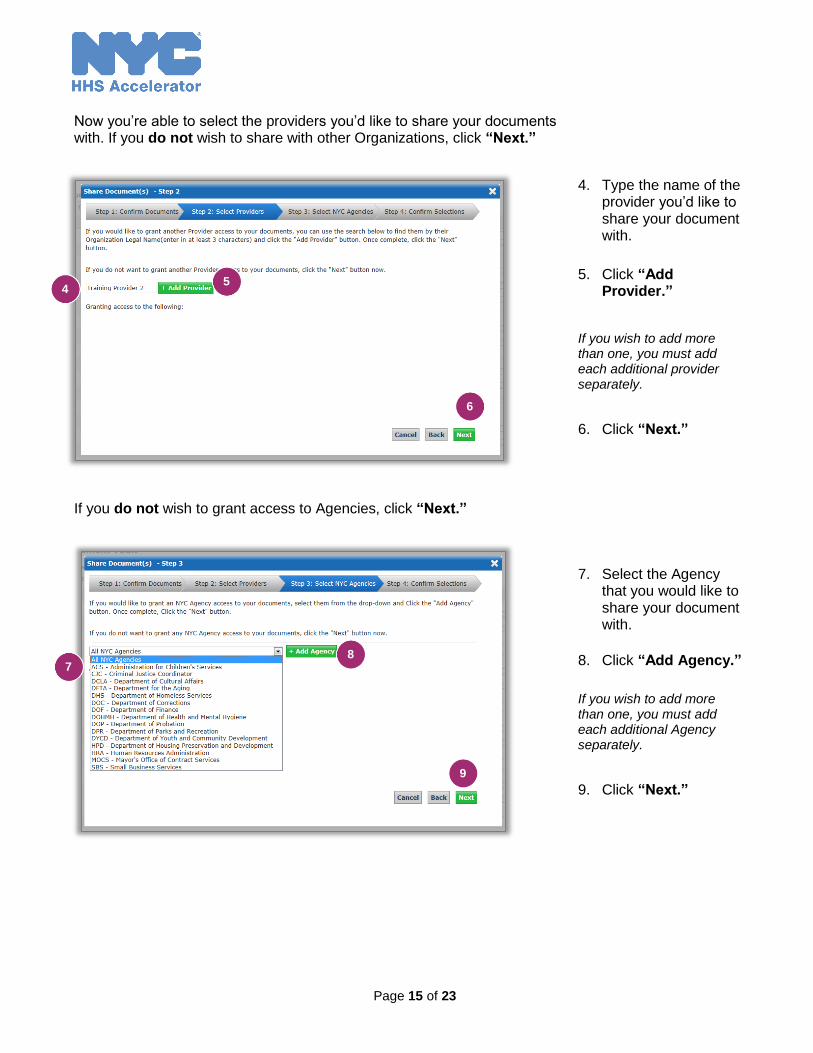
Now you’re able to select the providers you’d like to share your documents with. If you do not wish to share with other Organizations, click “Next.”
4. Type the name of the provider you’d like to share your document with.
5. Click “Add Provider.”
If you wish to add more than one, you must add each additional provider separately.
6. Click “Next.”
If you do not wish to grant access to Agencies, click “Next.”
7. Select the Agency
that you would like to share your document with.
8. Click “Add Agency.”
If you wish to add more than one, you must add each additional Agency separately.
9. Click “Next.”
4 5
7 8
6
9
Page 16 of 23
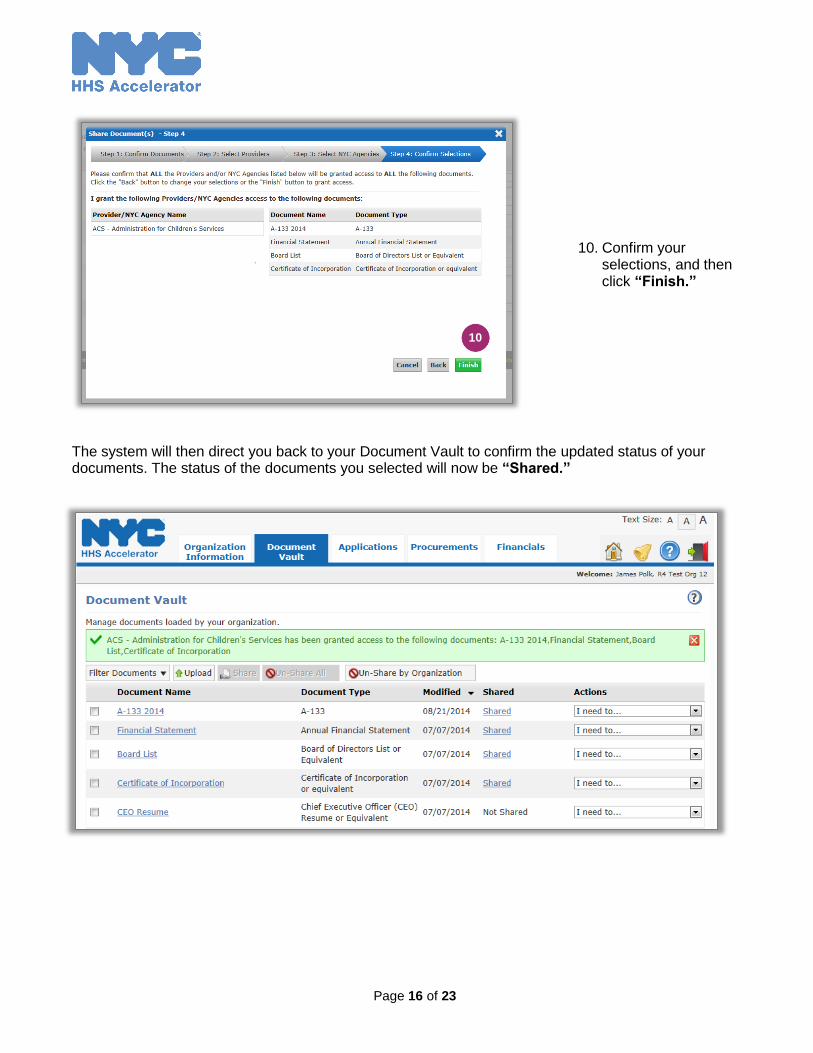
The system will then direct you back to your Document Vault to confirm the updated status of your documents. The status of the documents you selected will now be “Shared.”
10. Confirm your selections, and then click “Finish.”
10
Page 17 of 23
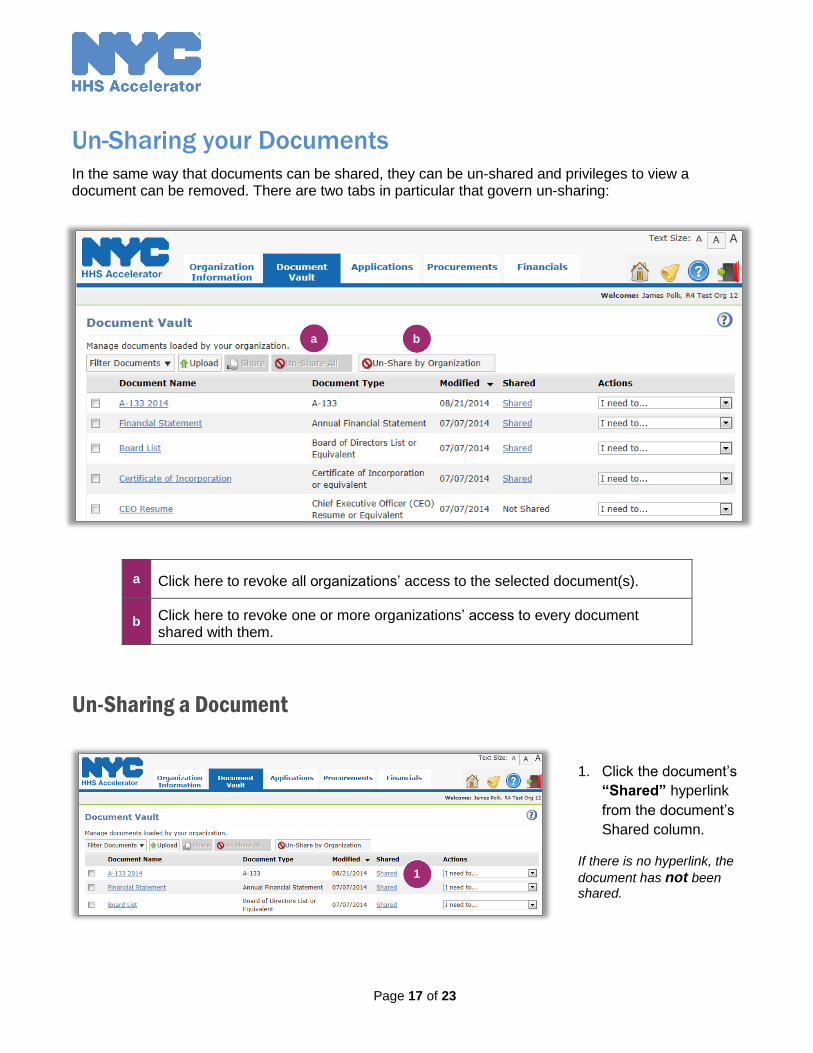
Un-Sharing your Documents
In the same way that documents can be shared, they can be un-shared and privileges to view a document can be removed. There are two tabs in particular that govern un-sharing:
Un-Sharing a Document
a Click here to revoke all organizations’ access to the selected document(s).
b Click here to revoke one or more organizations’ access to every document shared with them.
1. Click the document’s
“Shared” hyperlink
from the document’s
Shared column.
If there is no hyperlink, the
document has not been shared.
1
a b
Page 18 of 23
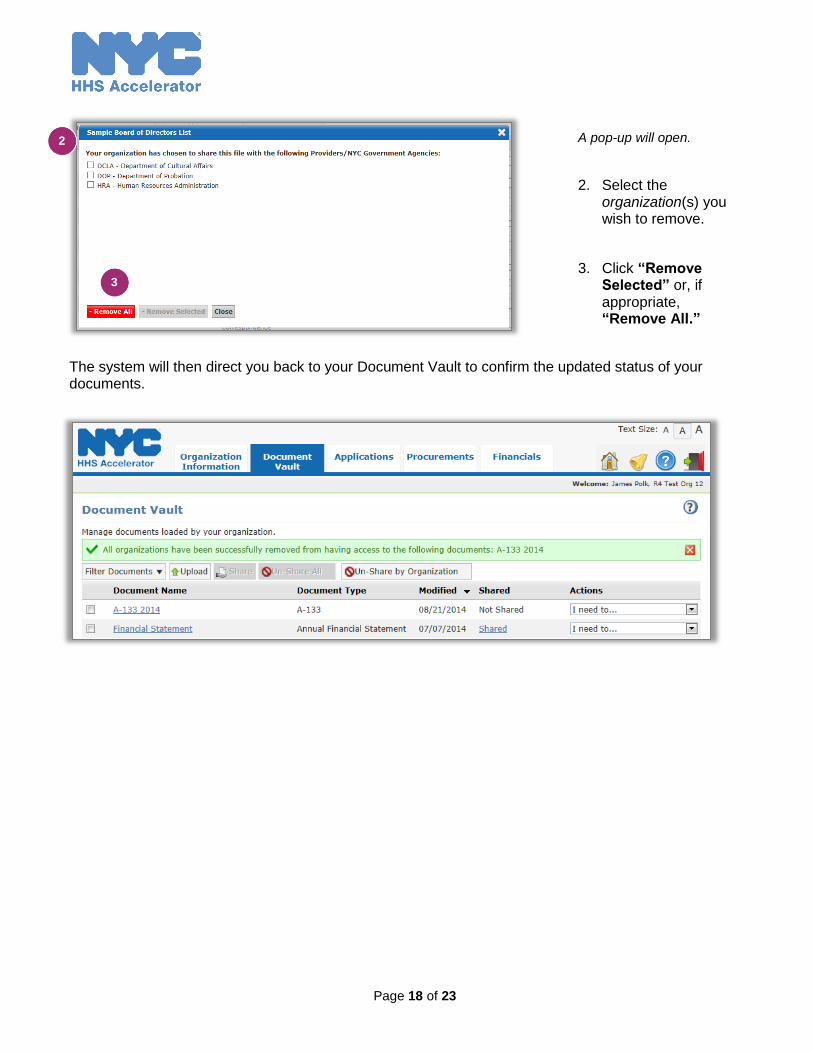
A pop-up will open.
2. Select the organization(s) you wish to remove.
3. Click “Remove Selected” or, if appropriate, “Remove All.”
The system will then direct you back to your Document Vault to confirm the updated status of your documents.
2
3
Page 19 of 23
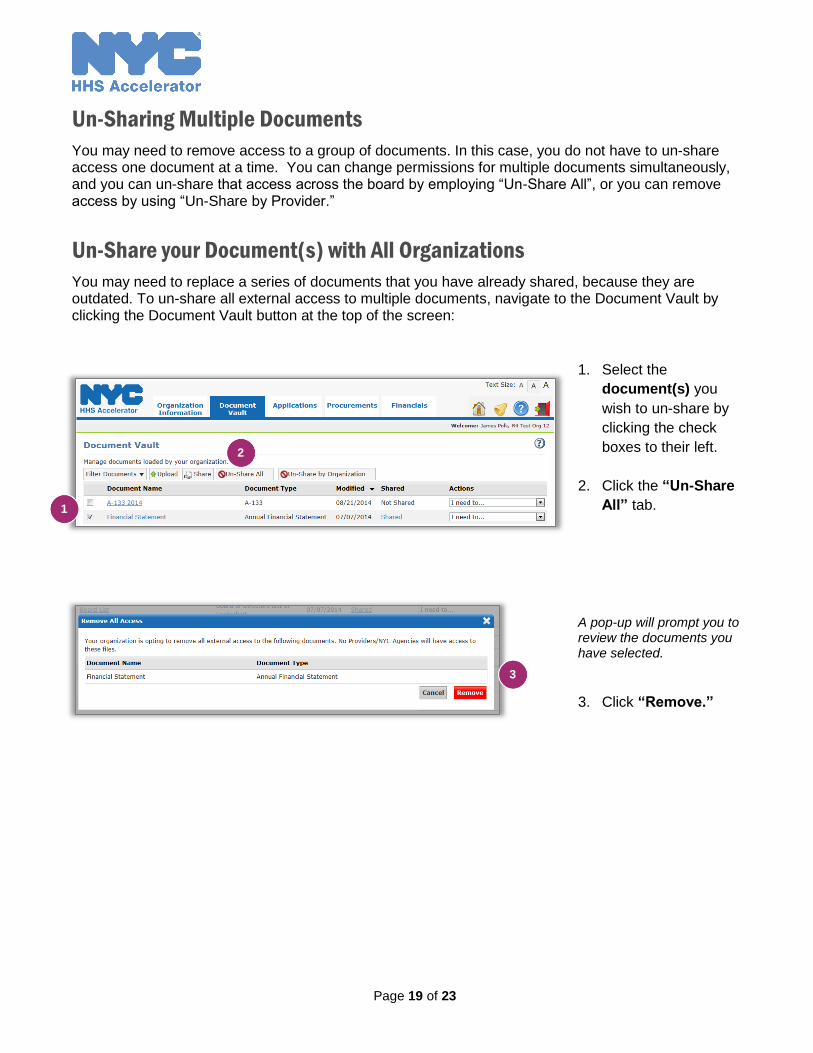
Un-Sharing Multiple Documents
You may need to remove access to a group of documents. In this case, you do not have to un-share access one document at a time. You can change permissions for multiple documents simultaneously, and you can un-share that access across the board by employing “Un-Share All”, or you can remove access by using “Un-Share by Provider.”
Un-Share your Document(s) with All Organizations
You may need to replace a series of documents that you have already shared, because they are outdated. To un-share all external access to multiple documents, navigate to the Document Vault by clicking the Document Vault button at the top of the screen:
1. Select the
document(s) you
wish to un-share by
clicking the check
boxes to their left.
2. Click the “Un-Share
All” tab.
A pop-up will prompt you to review the documents you have selected.
3. Click “Remove.”
3
2
1
Page 20 of 23
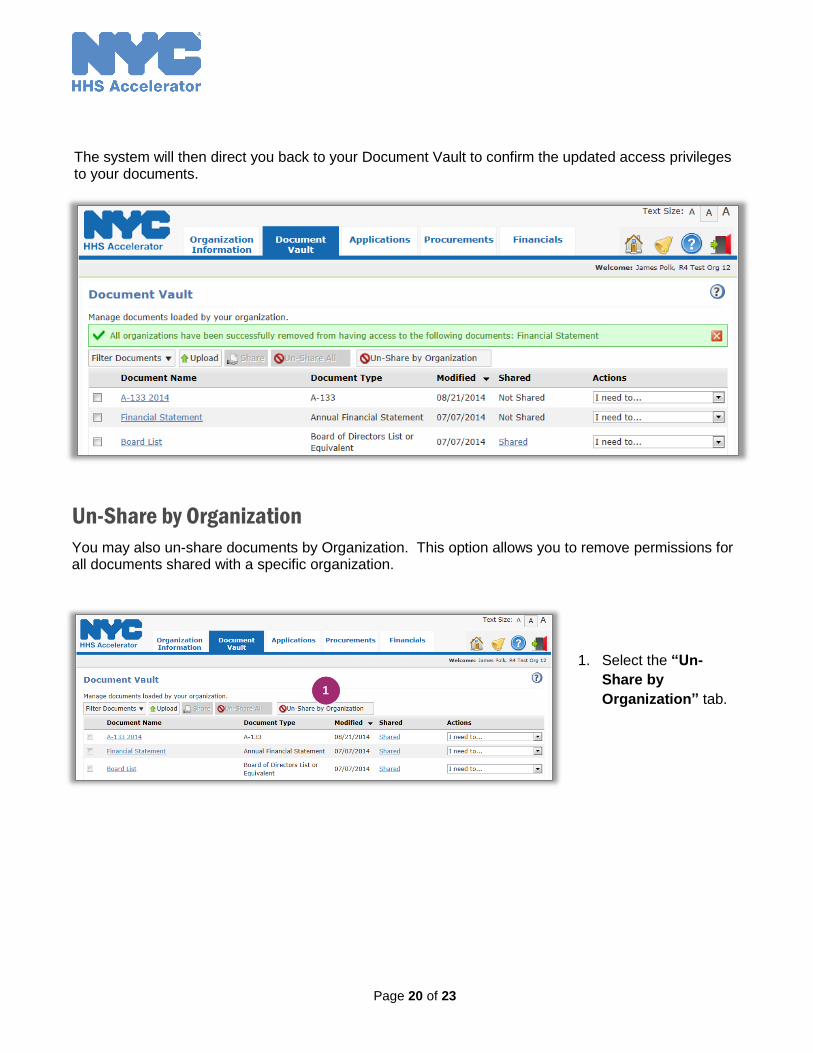
Un-Share by Organization
You may also un-share documents by Organization. This option allows you to remove permissions for all documents shared with a specific organization.
The system will then direct you back to your Document Vault to confirm the updated access privileges to your documents.
1. Select the “Un-
Share by
Organization” tab.
1
Page 21 of 23
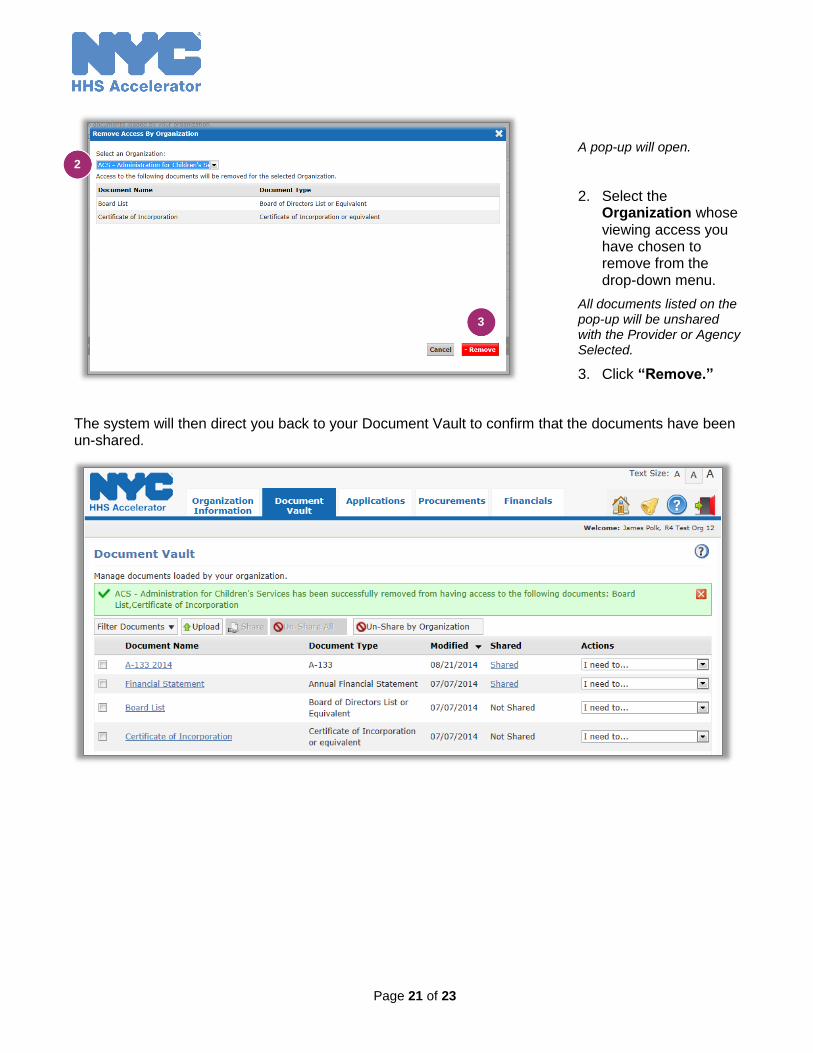
A pop-up will open.
2. Select the Organization whose viewing access you have chosen to remove from the drop-down menu.
All documents listed on the pop-up will be unshared with the Provider or Agency Selected.
3. Click “Remove.”
The system will then direct you back to your Document Vault to confirm that the documents have been un-shared.
2
3
Page 22 of 23
Accessing Externally Shared Documents
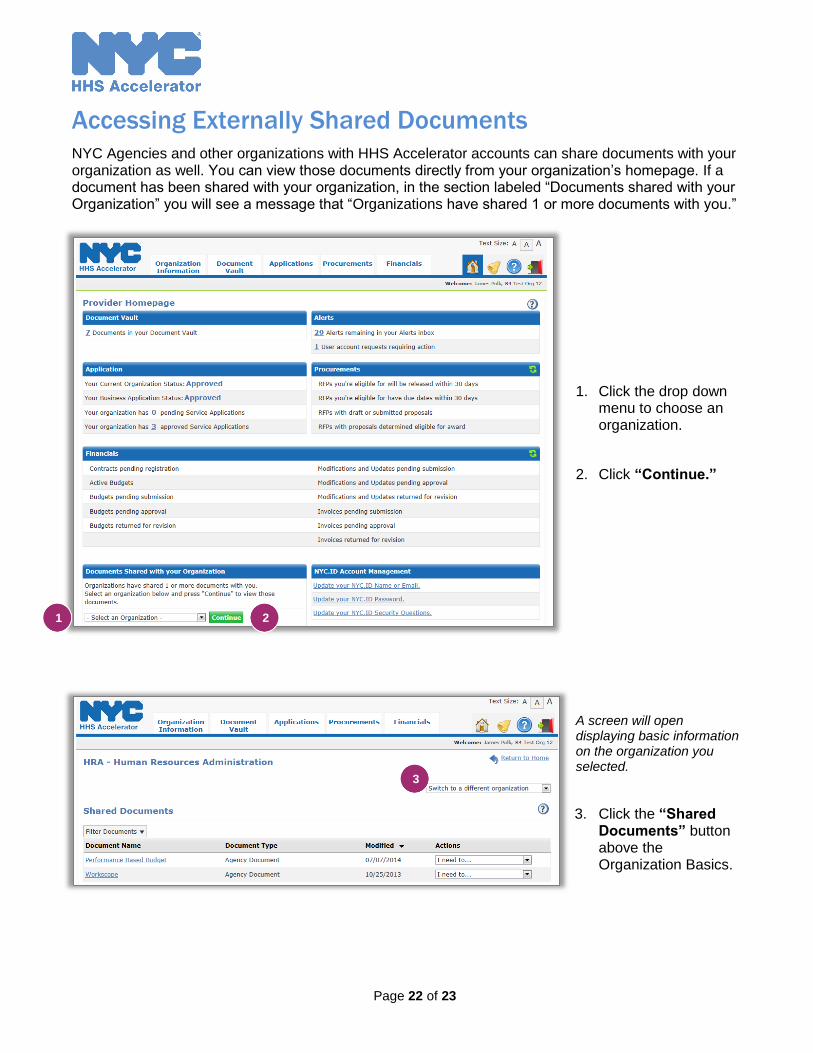
NYC Agencies and other organizations with HHS Accelerator accounts can share documents with your organization as well. You can view those documents directly from your organization’s homepage. If a document has been shared with your organization, in the section labeled “Documents shared with your Organization” you will see a message that “Organizations have shared 1 or more documents with you.”
1. Click the drop down menu to choose an organization.
2. Click “Continue.”
A screen will open displaying basic information on the organization you selected.
3. Click the “Shared Documents” button above the Organization Basics.
3
2 1
Page 23 of 23
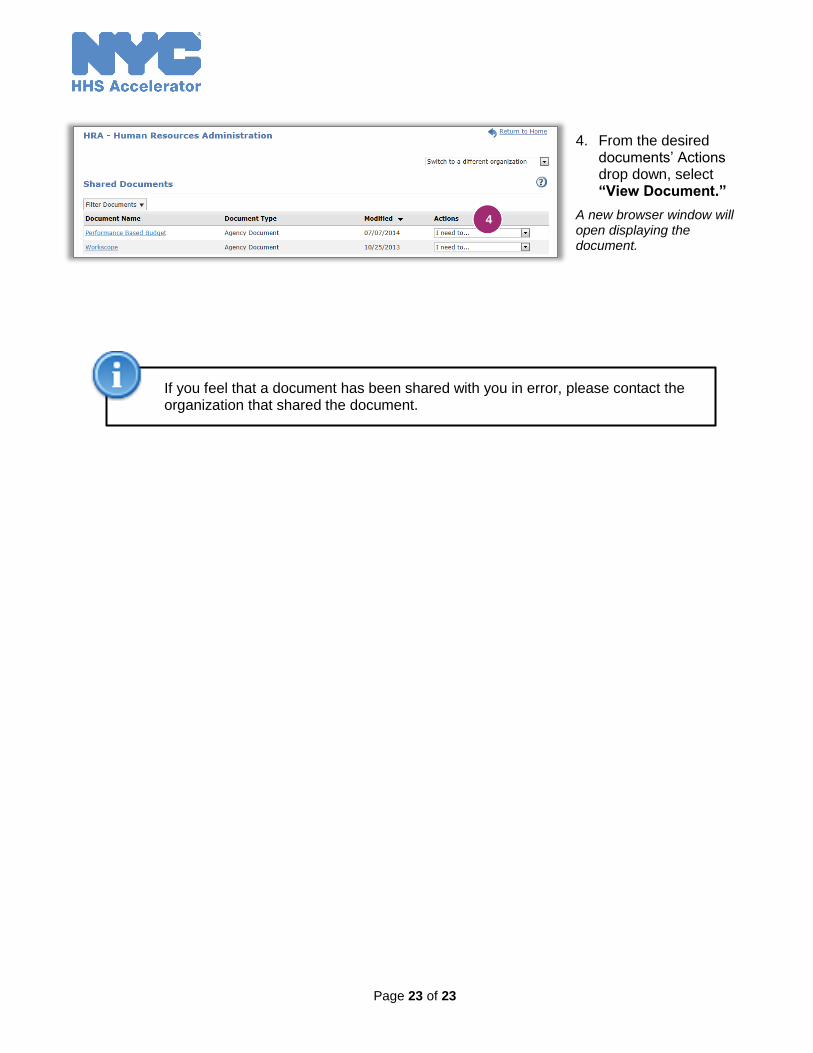
4. From the desired documents’ Actions drop down, select “View Document.”
A new browser window will open displaying the document.
If you feel that a document has been shared with you in error, please contact the organization that shared the document.
4