Embed Size (px)
Citation preview
Provider’s Guide
�
2
3
5
6
7
8
9
10
10
11
13
14
15
17
21
21
21
22
23
Table of Contents
Provider’s Guide
How to Use This Guide
Warnings, Cautions, and Contraindications
Intended Use
What is RUSleeping RTS?
System Contents
Symbols
RUSleeping Display
Instructions for Use
Setup
Before Sleeping
Upon Awakening
Important Steps for Use
Troubleshooting
Specifications
Cleaning
Disinfection
Disposal
Reordering
Limited Warranty
RUSleeping RTS
�
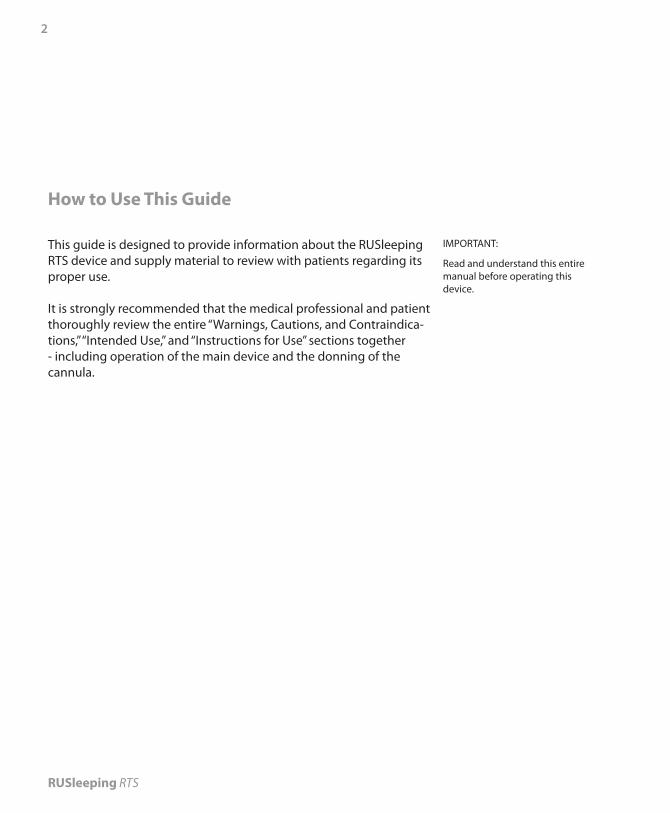
How to Use This Guide
This guide is designed to provide information about the RUSleeping RTS device and supply material to review with patients regarding its proper use.
It is strongly recommended that the medical professional and patient thoroughly review the entire “Warnings, Cautions, and Contraindica-tions,” “Intended Use,” and “Instructions for Use” sections together - including operation of the main device and the donning of the cannula.
IMPORTANT:
Read and understand this entire manual before operating this device.

Provider’s Guide
�
Warnings, Cautions, and Contraindications
NOTE:
Additional warnings, cautions and notes are located throughout this manual.
Caution: US Federal Law restricts this device to sale by or on the order of a physician.
Warnings
A warning indicates the possibility of injury to you or the operator of this device
This manual serves as a reference.
Read and understand the entire manual before using the device.
Discontinue use if skin reddening or inflammation appears.
Do not smoke while wearing the RUSleeping RTS cannula.
Cautions
A caution indicates the possibility of damage to the device.
Avoid exposure to sources of direct airflow such as fans during recording.
Avoid using this device in an MRI environment or in close proximity to a high EMI emission source.
Do not attempt to take the main device apart. No user-serviceable parts are inside.
Do not immerse the main device in water.
Do not use if you are wearing a nasal or full face mask for CPAP or bilevel therapy. This will affect the accuracy of the RUS score.
Do not use if you are wearing a cannula for therapy. This will affect the accuracy of the RUS score.
RUSleeping RTS
�
Cautions (continued)
If you notice any unexplained changes in the performance of this device, if the device is dropped or mishandled, if water is spilled into the enclosure, or if the enclosure is broken, discontinue use and contact Respironics.
Contraindications
No contraindications are known for this device.
Provider’s Guide
�
Intended Use
The RUSleeping RTS is a small monitor designed to assess nasal airflow during sleep. Apnea events are counted based on reduction of airflow.
The RUSleeping RTS device is intended for use as a screening de-vice to determine the need for clinical evaluation and diagnosis of sleep apnea based on the patient’s score.
RUSleeping RTS
�
What is RUSleeping RTS?
The RUSleeping RTS device is a multi-patient, small, lightweight, battery-operated device with a specially designed cannula for detecting apnea events.
RUSleeping RTS provides the following results to the user:
1. The rate of apnea events (AH) occurring during the sleep period2. The total number of apnea events occurring each hour3. Device status
RUSleeping RTS is not a diagnostic tool. Rather, it is an assessment tool for collecting and displaying information about sleep related apnea events.
Because the RUSleeping RTS can be used in the home it is a reli-able, comfortable and cost-effective tool for assessing the need for further patient testing.
Provider’s Guide
�
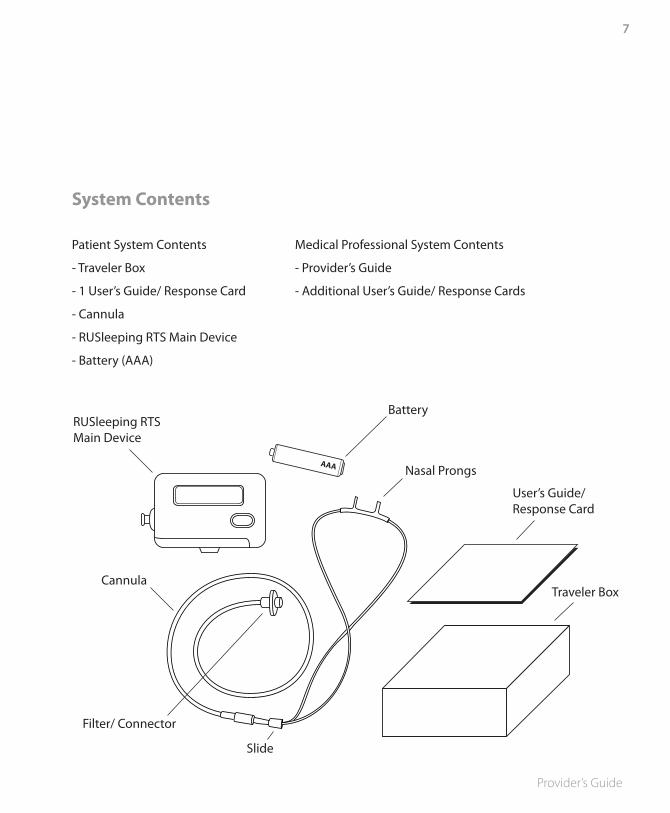
System Contents
Patient System Contents
- Traveler Box
- 1 User’s Guide/ Response Card
- Cannula
- RUSleeping RTS Main Device
- Battery (AAA)
AAA
RUSleeping RTSMain Device
Battery
Nasal Prongs
Cannula
User’s Guide/ Response Card
Traveler Box
Filter/ Connector
Slide
Medical Professional System Contents
- Provider’s Guide
- Additional User’s Guide/ Response Cards
RUSleeping RTS
�
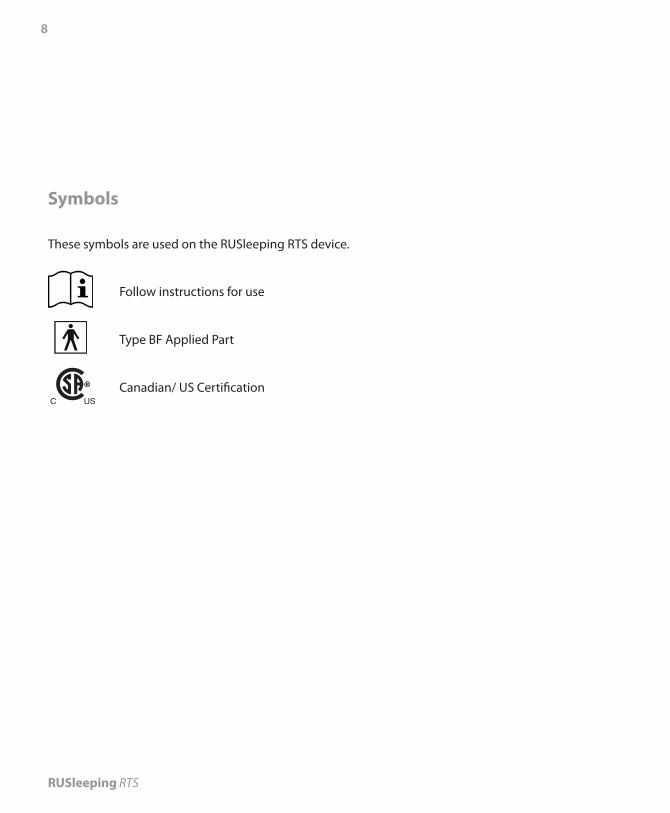
Symbols
These symbols are used on the RUSleeping RTS device.
Follow instructions for use
Type BF Applied Part
Canadian/ US Certification
Provider’s Guide
�
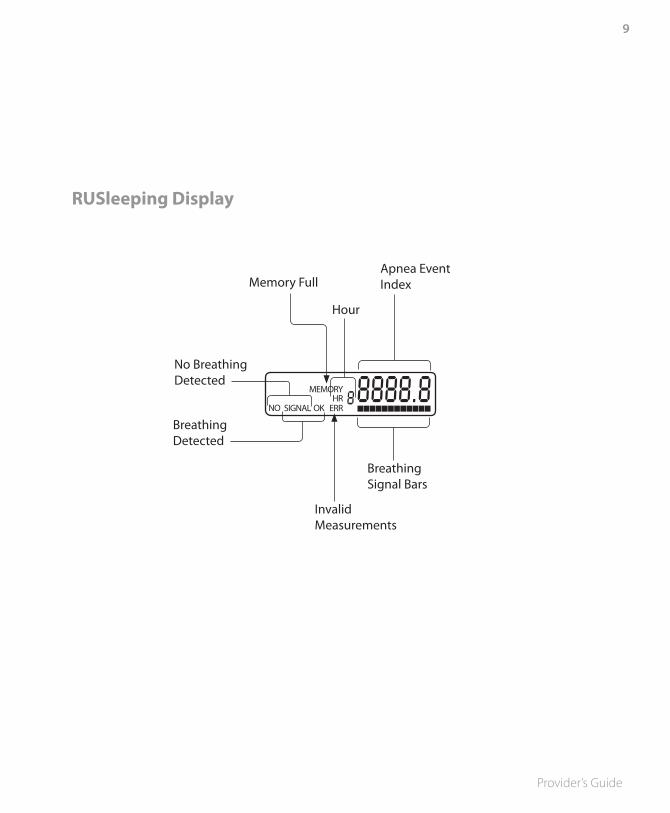
RUSleeping Display
Apnea Event IndexMemory Full
Hour
No Breathing Detected
Breathing Detected
Invalid Measurements
Breathing Signal Bars
HRMEMORY
ERROKSIGNALNO
RUSleeping RTS
�0
Instructions for Use
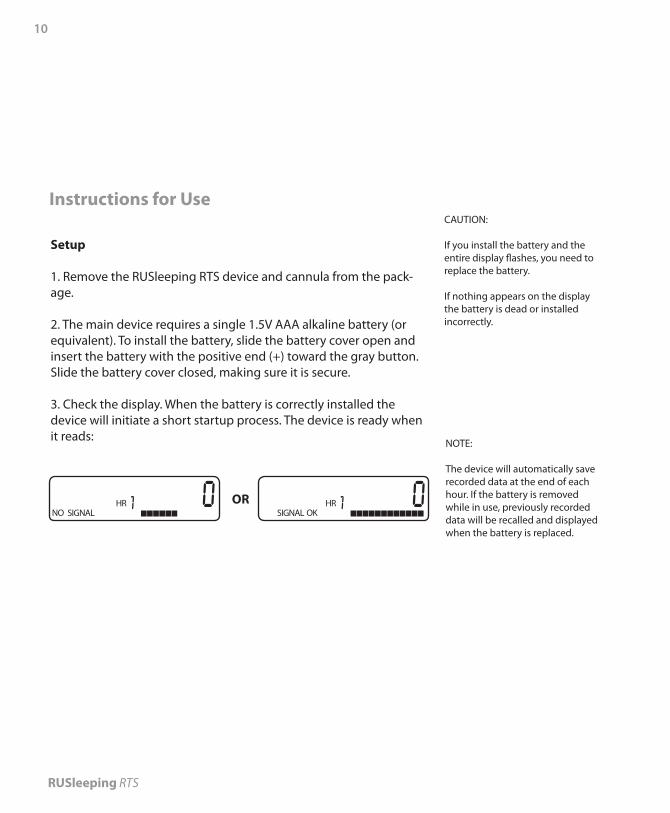
Setup
1. Remove the RUSleeping RTS device and cannula from the pack-age.
2. The main device requires a single 1.5V AAA alkaline battery (or equivalent). To install the battery, slide the battery cover open and insert the battery with the positive end (+) toward the gray button. Slide the battery cover closed, making sure it is secure.
3. Check the display. When the battery is correctly installed the device will initiate a short startup process. The device is ready when it reads: NOTE:
The device will automatically save recorded data at the end of each hour. If the battery is removed while in use, previously recorded data will be recalled and displayed when the battery is replaced.
OR
CAUTION:
If you install the battery and the entire display flashes, you need to replace the battery.
If nothing appears on the display the battery is dead or installed incorrectly.
HRSIGNALNO
HROKSIGNAL
Provider’s Guide
��
Instructions for Use
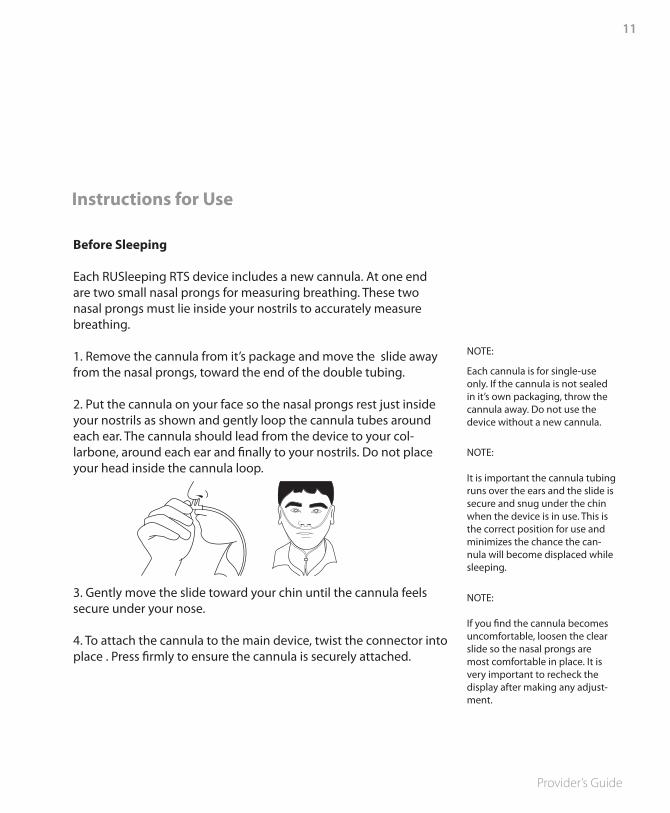
Before Sleeping
Each RUSleeping RTS device includes a new cannula. At one end are two small nasal prongs for measuring breathing. These two nasal prongs must lie inside your nostrils to accurately measure breathing.
1. Remove the cannula from it’s package and move the slide away from the nasal prongs, toward the end of the double tubing.
2. Put the cannula on your face so the nasal prongs rest just inside your nostrils as shown and gently loop the cannula tubes around each ear. The cannula should lead from the device to your col-larbone, around each ear and finally to your nostrils. Do not place your head inside the cannula loop.
NOTE:
Each cannula is for single-use only. If the cannula is not sealed in it’s own packaging, throw the cannula away. Do not use the device without a new cannula.
3. Gently move the slide toward your chin until the cannula feels secure under your nose.
4. To attach the cannula to the main device, twist the connector into place . Press firmly to ensure the cannula is securely attached.
NOTE:
It is important the cannula tubing runs over the ears and the slide is secure and snug under the chin when the device is in use. This is the correct position for use and minimizes the chance the can-nula will become displaced while sleeping.
NOTE:
If you find the cannula becomes uncomfortable, loosen the clear slide so the nasal prongs are most comfortable in place. It is very important to recheck the display after making any adjust-ment.
RUSleeping RTS
��
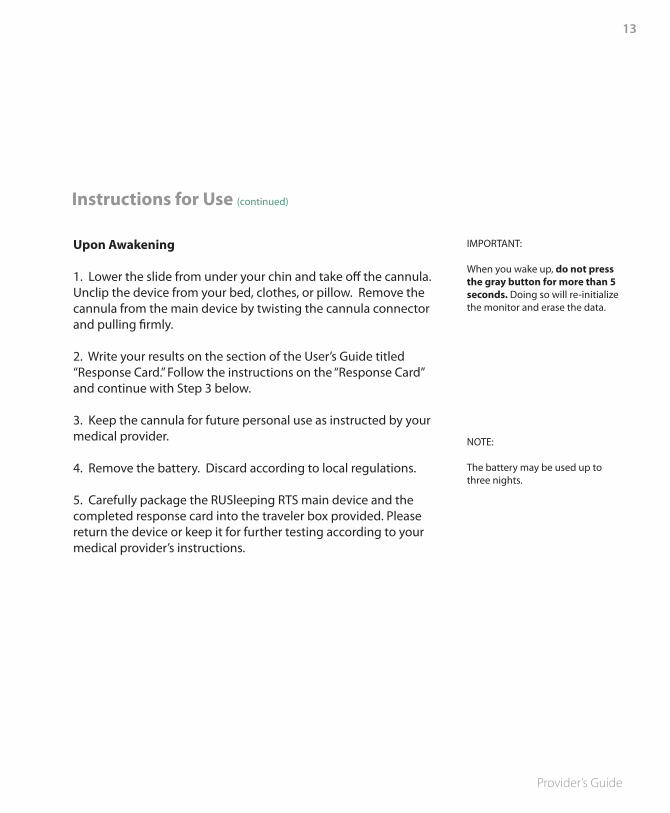
6. To clear the main device’s memory in preparation for the sleep session, press and hold the gray button for five seconds until the display briefly flashes and reads “NO SIGNAL” as shown:
7. When you release the gray button the display should read “SIGNAL OK” and begin recording. If not, rearrange the nasal prongs and breathe normally for three seconds. Continue adjust-ing until the display reads, “SIGNAL OK.” You should also see the bars on the display move with your breathing. 8. Use the clip on the device to attach it to your bed, clothes, or pillow. Relax and go to sleep. Throughout the night, the de-vice will monitor your respiration and record the results in the RUSleeping RTS device.
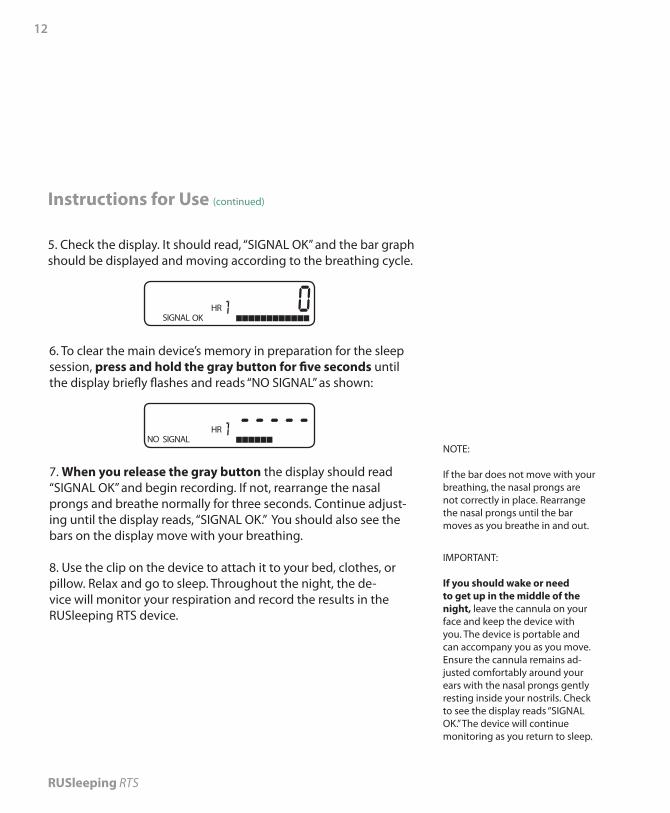
5. Check the display. It should read, “SIGNAL OK” and the bar graph should be displayed and moving according to the breathing cycle.
Instructions for Use (continued)
IMPORTANT:
If you should wake or need to get up in the middle of the night, leave the cannula on your face and keep the device with you. The device is portable and can accompany you as you move. Ensure the cannula remains ad-justed comfortably around your ears with the nasal prongs gently resting inside your nostrils. Check to see the display reads “SIGNAL OK.” The device will continue monitoring as you return to sleep.
NOTE:
If the bar does not move with your breathing, the nasal prongs are not correctly in place. Rearrange the nasal prongs until the bar moves as you breathe in and out.
HROKSIGNAL
HRSIGNALNO
Provider’s Guide
��
Instructions for Use (continued)
Upon Awakening
1. Lower the slide from under your chin and take off the cannula. Unclip the device from your bed, clothes, or pillow. Remove the cannula from the main device by twisting the cannula connector and pulling firmly.
2. Write your results on the section of the User’s Guide titled “Response Card.” Follow the instructions on the “Response Card” and continue with Step 3 below. 3. Keep the cannula for future personal use as instructed by your medical provider.
4. Remove the battery. Discard according to local regulations.
5. Carefully package the RUSleeping RTS main device and the completed response card into the traveler box provided. Please return the device or keep it for further testing according to your medical provider’s instructions.
IMPORTANT:
When you wake up, do not press the gray button for more than 5 seconds. Doing so will re-initialize the monitor and erase the data.
NOTE:
The battery may be used up to three nights.
RUSleeping RTS
��
It is important to check the monitor before sleeping to ensure proper function.
The bar graph on the display should move as you breathe in and out.
If the bar graph does NOT move with your breath-ing, the nasal prongs of the cannula are not correctly in place. Rearrange the nasal prongs until the bar moves as you breathe in and out.
The display should read “SIGNAL OK”.
If after pressing and releasing the gray button (Setup steps 7 & 8) the display reads “NO SIGNAL,” rearrange the nasal prongs of the cannula and breathe normally for three seconds. Continue adjusting the nasal prongs until the display reads, “SIGNAL OK.”
Important Steps for Use
Provider’s Guide
��
Troubleshooting
Problem Why it Happened Solution
The display is flashing.
The display is blank.
The bar on the display does not move.
OR
The display reads “NO SIGNAL”.
The battery is low.
The battery is dead.
OR
The battery is installed incorrectly.
OR
There is no battery installed.
The cannula is not properly positioned.
OR
The cannula is not tightly connected to the main device.
OR
The cannula is pinched/ kinked.
Replace the battery.
Replace the battery.
Install battery correctly.
Install battery.
Adjust the cannula so the nasal prongs rest just inside the nos-trils and re-check the display.
Make sure the cannula is firmly attached to the main device by turning the connector in a clockwise direction.
Replace cannula. Contact medi-cal provider for a replacement.
RUSleeping RTS
��
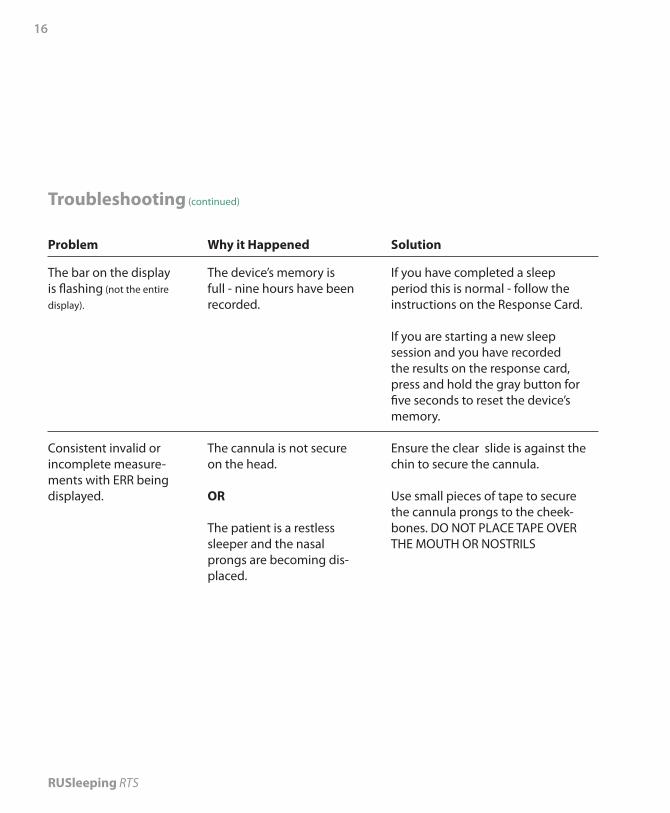
Troubleshooting (continued)
Problem Why it Happened Solution
The bar on the display is flashing (not the entire display).
Consistent invalid or incomplete measure-ments with ERR being displayed.
The device’s memory is full - nine hours have been recorded.
The cannula is not secure on the head.
OR
The patient is a restless sleeper and the nasal prongs are becoming dis-placed.
If you have completed a sleep period this is normal - follow the instructions on the Response Card.
If you are starting a new sleep session and you have recorded the results on the response card, press and hold the gray button for five seconds to reset the device’s memory.
Ensure the clear slide is against the chin to secure the cannula.
Use small pieces of tape to secure the cannula prongs to the cheek-bones. DO NOT PLACE TAPE OVER THE MOUTH OR NOSTRILS
Provider’s Guide
��
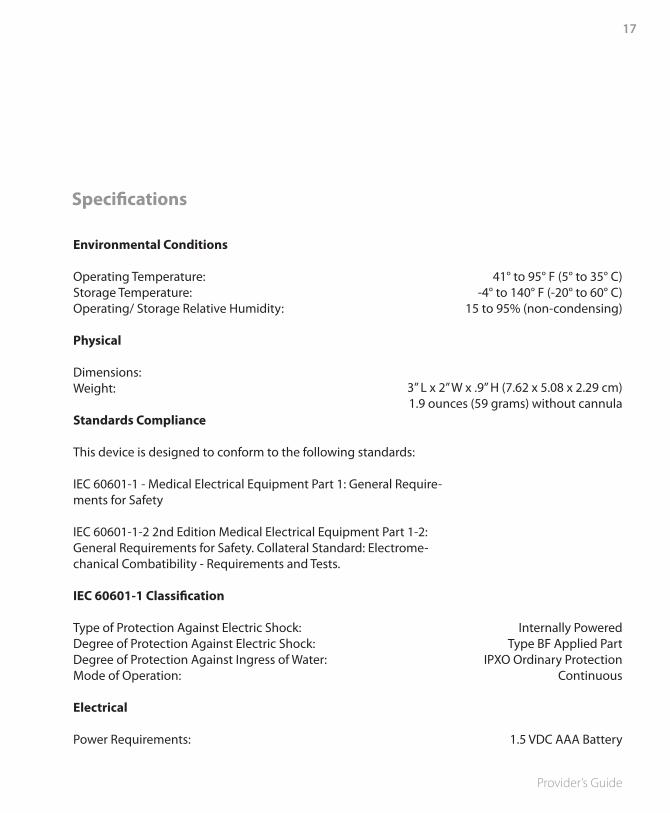
Specifications
Environmental Conditions
Operating Temperature: Storage Temperature: Operating/ Storage Relative Humidity: Physical
Dimensions: Weight:
Standards Compliance
This device is designed to conform to the following standards:
IEC 60601-1 - Medical Electrical Equipment Part 1: General Require-ments for Safety
IEC 60601-1-2 2nd Edition Medical Electrical Equipment Part 1-2: General Requirements for Safety. Collateral Standard: Electrome-chanical Combatibility - Requirements and Tests.
IEC 60601-1 Classification
Type of Protection Against Electric Shock: Degree of Protection Against Electric Shock: Degree of Protection Against Ingress of Water: Mode of Operation:
Electrical
Power Requirements:
41° to 95° F (5° to 35° C)-4° to 140° F (-20° to 60° C)
15 to 95% (non-condensing)
Internally PoweredType BF Applied Part
IPXO Ordinary ProtectionContinuous
1.5 VDC AAA Battery
3” L x 2” W x .9” H (7.62 x 5.08 x 2.29 cm)1.9 ounces (59 grams) without cannula
RUSleeping RTS
��
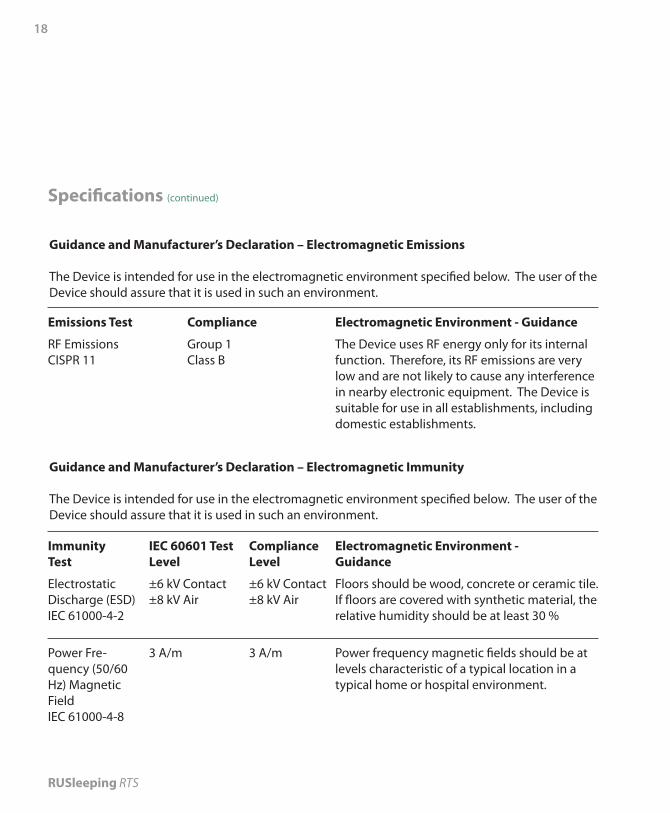
Specifications (continued)
Guidance and Manufacturer’s Declaration – Electromagnetic Emissions
The Device is intended for use in the electromagnetic environment specified below. The user of the Device should assure that it is used in such an environment.
Emissions Test
RF EmissionsCISPR 11
Compliance
Group 1 Class B
Electromagnetic Environment - Guidance
The Device uses RF energy only for its internal function. Therefore, its RF emissions are very low and are not likely to cause any interference in nearby electronic equipment. The Device is suitable for use in all establishments, including domestic establishments.
Guidance and Manufacturer’s Declaration – Electromagnetic Immunity
The Device is intended for use in the electromagnetic environment specified below. The user of the Device should assure that it is used in such an environment.
Immunity Test
Electrostatic Discharge (ESD)IEC 61000-4-2
Compliance Level
±6 kV Contact±8 kV Air
Electromagnetic Environment - Guidance
Floors should be wood, concrete or ceramic tile. If floors are covered with synthetic material, the relative humidity should be at least 30 %
IEC 60601 Test Level
±6 kV Contact±8 kV Air
Power Fre-quency (50/60 Hz) Magnetic FieldIEC 61000-4-8
3 A/m Power frequency magnetic fields should be at levels characteristic of a typical location in a typical home or hospital environment.
3 A/m
Provider’s Guide
��
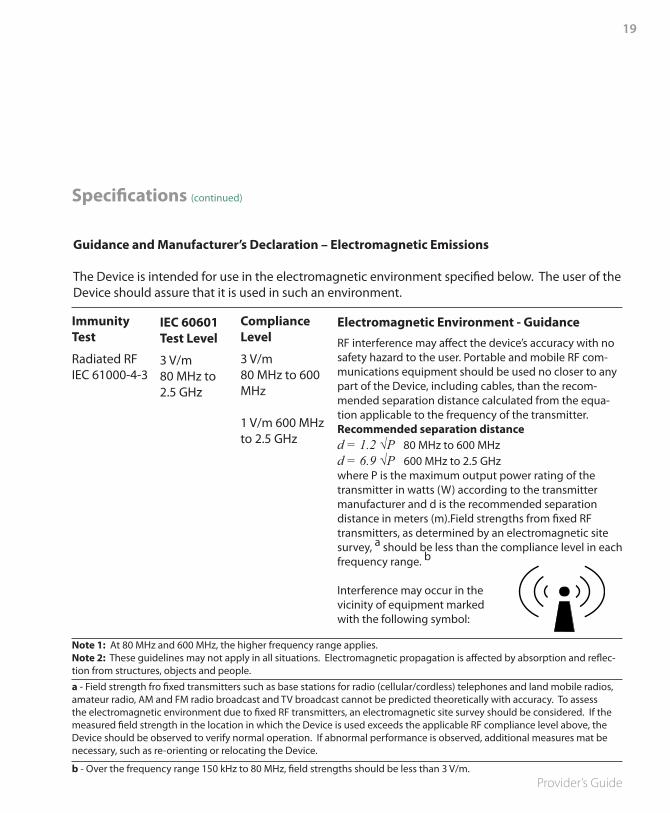
Specifications (continued)
Guidance and Manufacturer’s Declaration – Electromagnetic Emissions
The Device is intended for use in the electromagnetic environment specified below. The user of the Device should assure that it is used in such an environment.
Electromagnetic Environment - GuidanceRF interference may affect the device’s accuracy with no safety hazard to the user. Portable and mobile RF com-munications equipment should be used no closer to any part of the Device, including cables, than the recom-mended separation distance calculated from the equa-tion applicable to the frequency of the transmitter.Recommended separation distanced = 1.2 √P 80 MHz to 600 MHz d = 6.9 √P 600 MHz to 2.5 GHzwhere P is the maximum output power rating of the transmitter in watts (W) according to the transmitter manufacturer and d is the recommended separation distance in meters (m).Field strengths from fixed RF transmitters, as determined by an electromagnetic site survey, a should be less than the compliance level in each frequency range. b
Interference may occur in the vicinity of equipment markedwith the following symbol:
ImmunityTest
Radiated RFIEC 61000-4-3
Compliance Level
3 V/m80 MHz to 600 MHz
1 V/m 600 MHz to 2.5 GHz
Note 1: At 80 MHz and 600 MHz, the higher frequency range applies.Note 2: These guidelines may not apply in all situations. Electromagnetic propagation is affected by absorption and reflec-tion from structures, objects and people.
IEC 60601 Test Level
3 V/m80 MHz to 2.5 GHz
a - Field strength fro fixed transmitters such as base stations for radio (cellular/cordless) telephones and land mobile radios, amateur radio, AM and FM radio broadcast and TV broadcast cannot be predicted theoretically with accuracy. To assess the electromagnetic environment due to fixed RF transmitters, an electromagnetic site survey should be considered. If the measured field strength in the location in which the Device is used exceeds the applicable RF compliance level above, the Device should be observed to verify normal operation. If abnormal performance is observed, additional measures mat be necessary, such as re-orienting or relocating the Device.
b - Over the frequency range 150 kHz to 80 MHz, field strengths should be less than 3 V/m.

RUSleeping RTS
�0
Specifications (continued)
Recommended Separation Distance Between Portable and Mobile RF Communication Equip-ment and the Device.The Device is intended for use in the electromagnetic environment in which radiated RF distur-bances are controlled. The user of the Device can help prevent electromagnetic interference by maintaining a minimum distance between portable and mobile RF communication equipment (transmitters) and the Device as recommended below, according to the maximum output power of the communications equipment.
Rated Maximum Output Power of Transmitter (Watts)
0.01
0.1
1
10
100
80 MHz to 600 MHz
d = 6.9 √P0.12
0.38
1.2
3.8
12
600 MHz to 2.5 GHz
d = 6.9 √P0.69
2.2
6.9
21.8
69
150 kHz to 80 MHz
d = 6.9 √P0.12
0.38
1.2
3.8
12
Separation Distance According to Frequency of Transmitter (meters)
For transmitters rated at a maximum output power not listed above, the recommended separation distance d in meters (m) can be estimated using the equation applicable to the frequency of the transmitter, where P is the maximum output power of the transmitter manufacturer.Note 1: At 80 MHz and 600 MHz, the higher frequency range applies.Note 2: These guidelines may not apply in all situations. Electromagnetic propagation is affected by absorp-tion and reflection from structures, objects and people.
Provider’s Guide
��
Cleaning
CAUTION:
Do not attempt to take the main device apart. No user-service able parts are inside.
The RUSleeping RTS is not intended to be cleaned.
Disinfection
Between patient use the RUSleeping RTS should be surface disin-fected in accordance with established clinical practice.
Disposal
The cannula is a single patient use device intended for use by one person only. Dispose of in accordance with local regulations.
RUSleeping RTS
��
Reordering
Replacement Parts:
RUSleeping RTS System
RUSleeping RTS Traveler Package
User’s Guide/ Response Cards - 75 pk.
RUSleeping RTS Cannulas - 60 pk.
Respironics, Inc.1001 Murry Ridge LaneMurrysville, Pennsylvania 15668 - 64431-800-345-64431-724-387-4000
Part Number
1037683
1036123
1037755
P1259
Provider’s Guide
��
Limited Warranty
Respironics, Inc. warrants that the system shall be free from defects of workmanship and materials and will perform in accordance with the product specifications for a period of one (1) year from the date of sale by Respironics, Inc. to the dealer. If the product fails to per-form in accordance with the product specifications, Respironics, Inc. will repair or replace - at its option- the defective material or part. Respironics, Inc. will pay customary freight charges from Respironics, Inc. to the dealer location only. This warranty does not cover dam-age caused by accident, misuse, abuse, alteration, and other defects not related to material or workmanship.
Respironics, Inc. disclaims all liability for economic loss, loss of prof-its, overhead , or consequential damages which may be claimed to arise from any sale or use of this product. Some states do not allow the exclusion or limitation of incidental or consequential damages, so the above limitation or exclusion may not apply to you.
This warranty is given in lieu of all other express warranties. In addition , any implied warranties - including any warranty of mer-chantability or fitness for the particular purpose - are limited to two years. Some states do not allow limitations on how long an implied warranty lasts, so the above limitation may not apply to you. This warranty gives you specific legal rights, and you may also have other rights which vary from state to state.
To exercise your rights under this warranty, contact your local autho-rized Respironics, Inc. dealer or contact Respironics at:
1001 Murry Ridge LaneMurrysville, Pennsylvania 15668 - 64431-800-345-64431-724-387-4000

RUSleeping RTS
��