Embed Size (px)
Citation preview
Page 1 of 13
The purpose of this document is to provide the necessary instructions regarding the integration ofthe Integral Technologies® digital video recording unit with the Prowatch software suite.
Checklist:? Prowatch R6 is installed and functionality declared by successfully executing the ProWatch.? You have an Integral Technologies® DVR with a programmed static IP address as well as the
MasterControl software installed. Instructions are supplied below for verifying IP addressprogramming.
? An available network connection reserved for the Integral Technologies® DVR.
1.) Verify static IP address programming of the Integral Technologies® DVR byperforming the following.? Log into Windows and right click on My Network Places icon on the desktop of
the operating system and select properties.? Double click on the Local Area Connection icon and select properties. This opens
the Local Area Connection Properties.? Double click on the Internet Protocol (TCP/IP) to verify settings. Apply a static
IP address within the Internet Protocol (TCP/IP) Properties
2.) Execute the “MasterControl” software from the desktop ICON or from the WindowsStart menu - Start\Programs\Integral\MasterControl.
You will be prompted for the username and password in order to gain access to theMasterControl database. Use the following Username and Password.
Username = “Administrator”
Password = “letmein”
This is the default username and password that is used to log into the operating system aswell as the MasterControl database.
Prior to the full execution\load of the MasterControl software, a system check will beperformed to detect any cameras that are physically connected to the Integral DVR unit. Byphysically connecting all cameras to the Integral DVR prior to executing the MasterControlsoftware, you can eliminate extra steps to initiate Camera Detection.
ProWatch 3 Release 6Integral DVXi Digital VideoRecorder Integration
Page 2 of 13
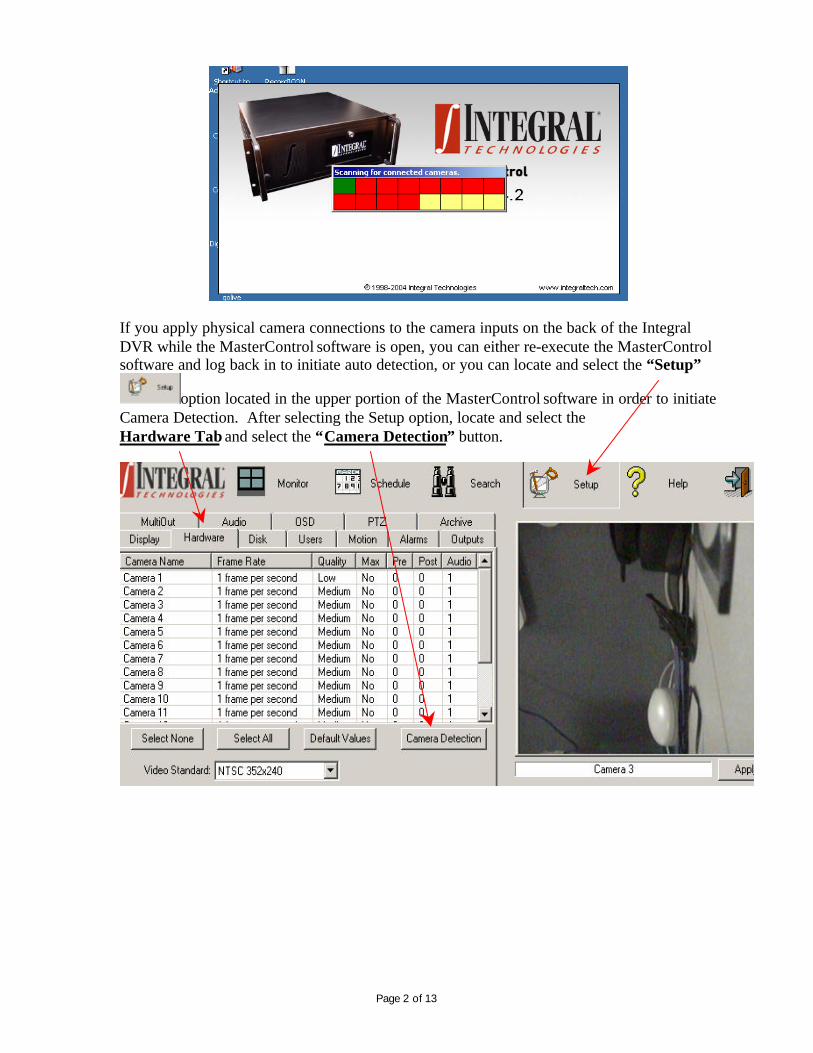
If you apply physical camera connections to the camera inputs on the back of the IntegralDVR while the MasterControl software is open, you can either re-execute the MasterControlsoftware and log back in to initiate auto detection, or you can locate and select the “Setup”
option located in the upper portion of the MasterControl software in order to initiateCamera Detection. After selecting the Setup option, locate and select theHardware Tab and select the “Camera Detection” button.
Page 3 of 13
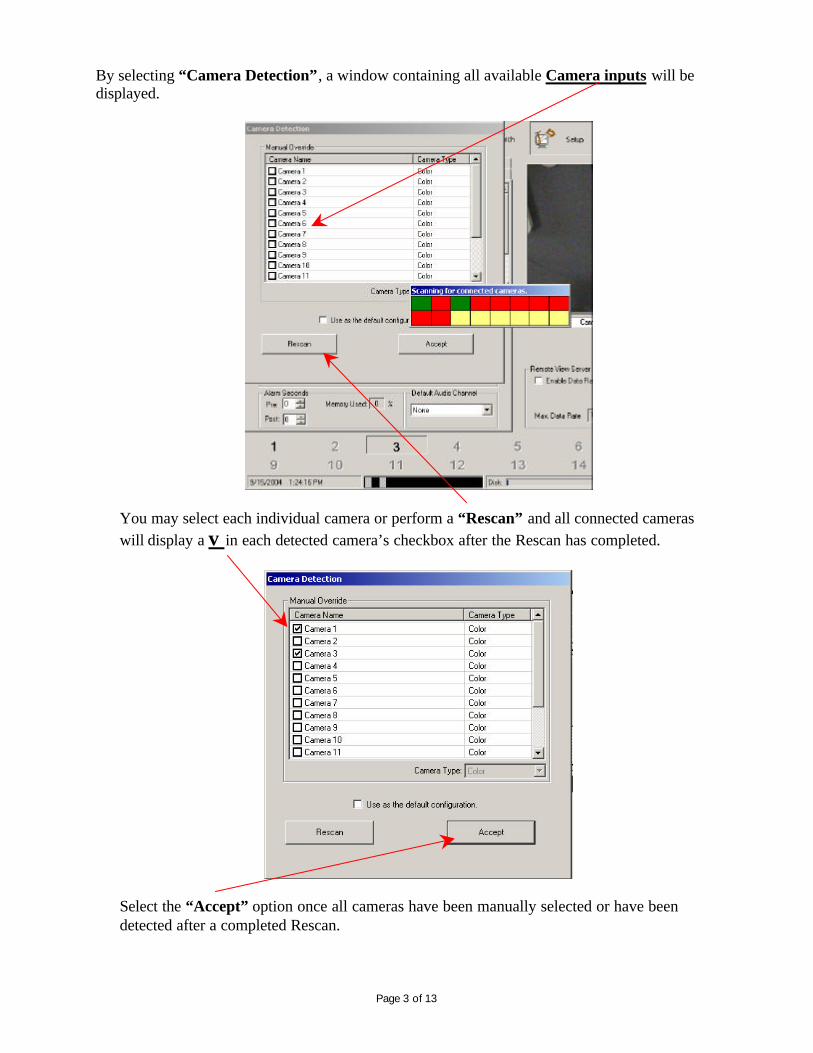
By selecting “Camera Detection”, a window containing all available Camera inputs will bedisplayed.
You may select each individual camera or perform a “Rescan” and all connected cameraswill display a v in each detected camera’s checkbox after the Rescan has completed.
Select the “Accept” option once all cameras have been manually selected or have beendetected after a completed Rescan.
Page 4 of 13
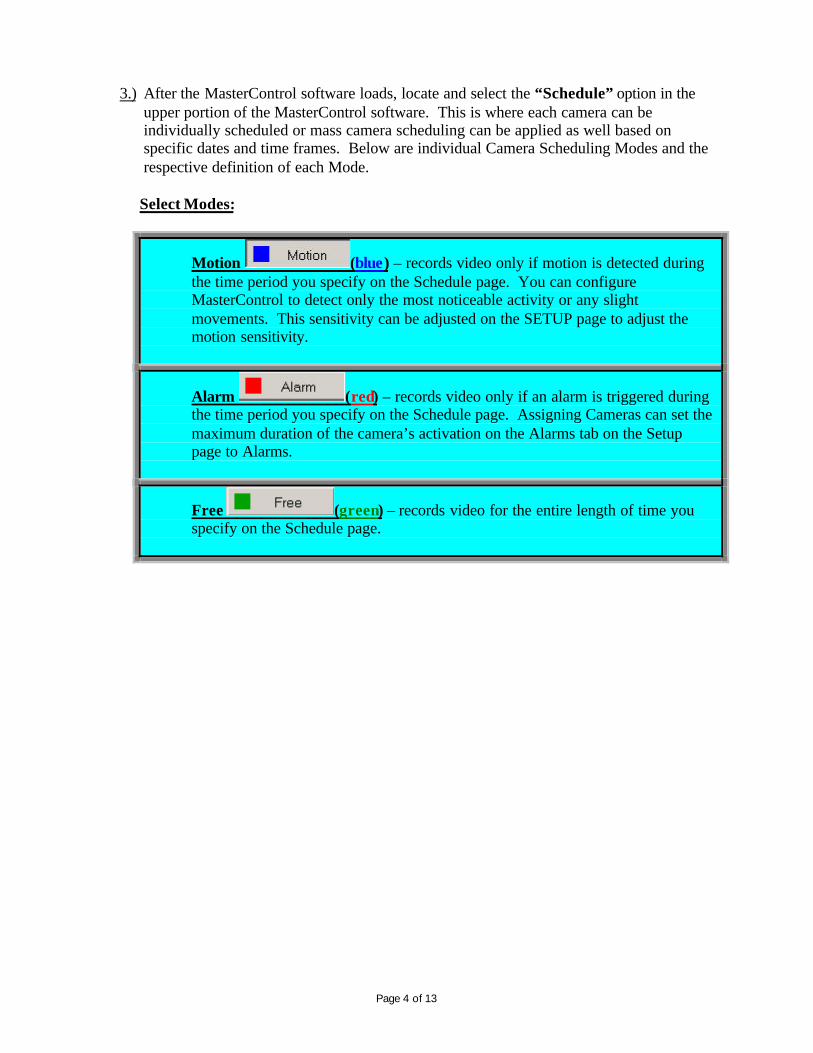
3.) After the MasterControl software loads, locate and select the “Schedule” option in theupper portion of the MasterControl software. This is where each camera can beindividually scheduled or mass camera scheduling can be applied as well based onspecific dates and time frames. Below are individual Camera Scheduling Modes and therespective definition of each Mode.
Select Modes:
Motion (blue) – records video only if motion is detected duringthe time period you specify on the Schedule page. You can configureMasterControl to detect only the most noticeable activity or any slightmovements. This sensitivity can be adjusted on the SETUP page to adjust themotion sensitivity.
Alarm (red) – records video only if an alarm is triggered duringthe time period you specify on the Schedule page. Assigning Cameras can set themaximum duration of the camera’s activation on the Alarms tab on the Setuppage to Alarms.
Free (green) – records video for the entire length of time youspecify on the Schedule page.

Page 5 of 13
4.) Prior to activating recording on the Integral DVR unit, you will need to set up schedulingof cameras before recording is initiated. After camera scheduling has been programmed,locate and select the “Record” option in order to initiate recording.
***Important! *** The Record option must be selected in order to view live video via theProwatch CCTV Camera View(s).
Now that scheduling preferences have been applied and the Integral DVR is inRECORD mode, you are ready to apply the necessary programming to Prowatch.
** If there is a pre-existing site configured within Prowatch Hardware Configurationthat will be used for the Integral DVR integration, then skip the “Adding a new Site”section and follow the instructions for adding a new channel.
Adding a new Site:
1.) Create new site (**if necessary) by right clicking on Prowatch NT HardwareConfiguration within the hardware configuration tree and select New> Site.
Page 6 of 13
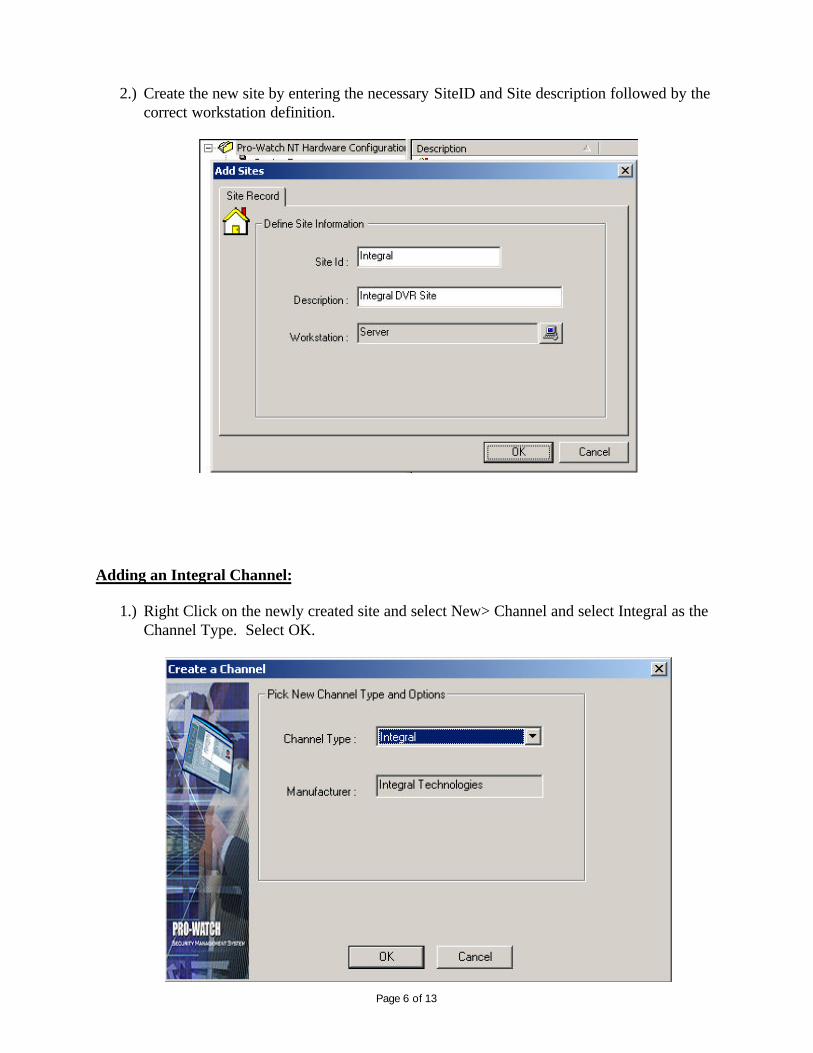
2.) Create the new site by entering the necessary SiteID and Site description followed by thecorrect workstation definition.
Adding an Integral Channel:
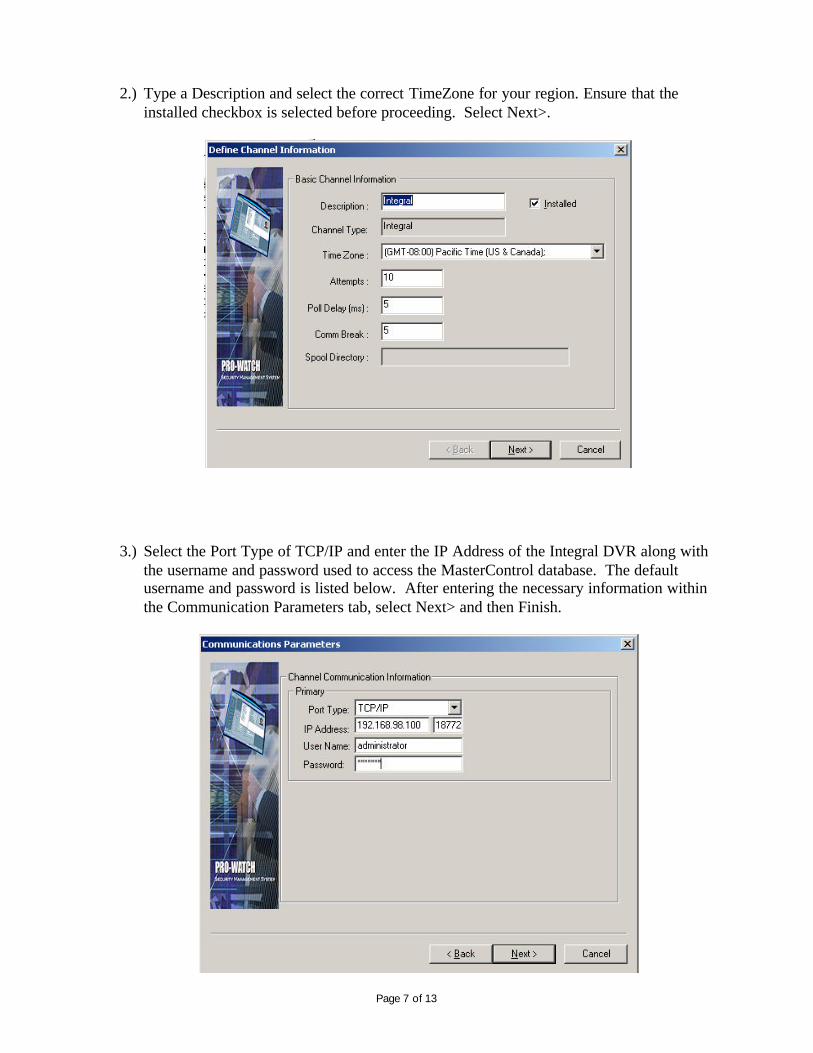
1.) Right Click on the newly created site and select New> Channel and select Integral as theChannel Type. Select OK.
Page 7 of 13
2.) Type a Description and select the correct TimeZone for your region. Ensure that theinstalled checkbox is selected before proceeding. Select Next>.
3.) Select the Port Type of TCP/IP and enter the IP Address of the Integral DVR along withthe username and password used to access the MasterControl database. The defaultusername and password is listed below. After entering the necessary information withinthe Communication Parameters tab, select Next> and then Finish.
Page 8 of 13
Use the following user account information if the default user account hasn’t changed.
Username = “Administrator”
Password = “letmein”
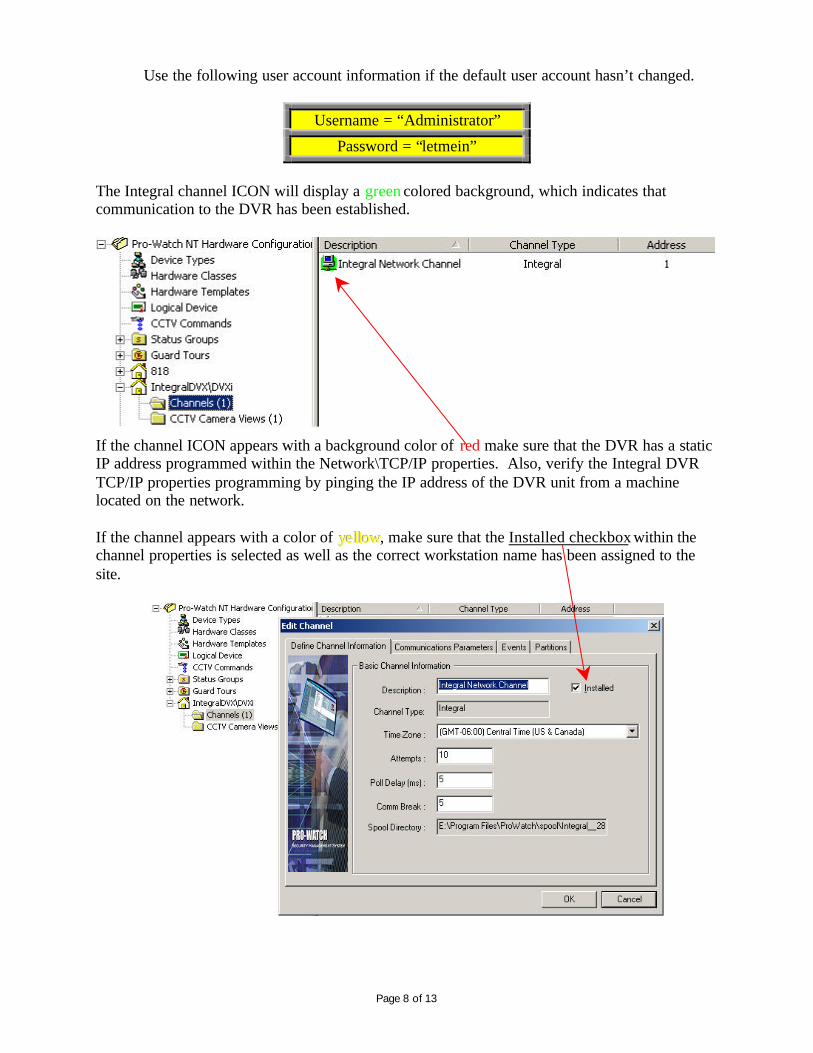
The Integral channel ICON will display a green colored background, which indicates thatcommunication to the DVR has been established.
If the channel ICON appears with a background color of red make sure that the DVR has a staticIP address programmed within the Network\TCP/IP properties. Also, verify the Integral DVRTCP/IP properties programming by pinging the IP address of the DVR unit from a machinelocated on the network.
If the channel appears with a color of yyyeee llllllooowww, make sure that the Installed checkbox within thechannel properties is selected as well as the correct workstation name has been assigned to thesite.
Page 9 of 13
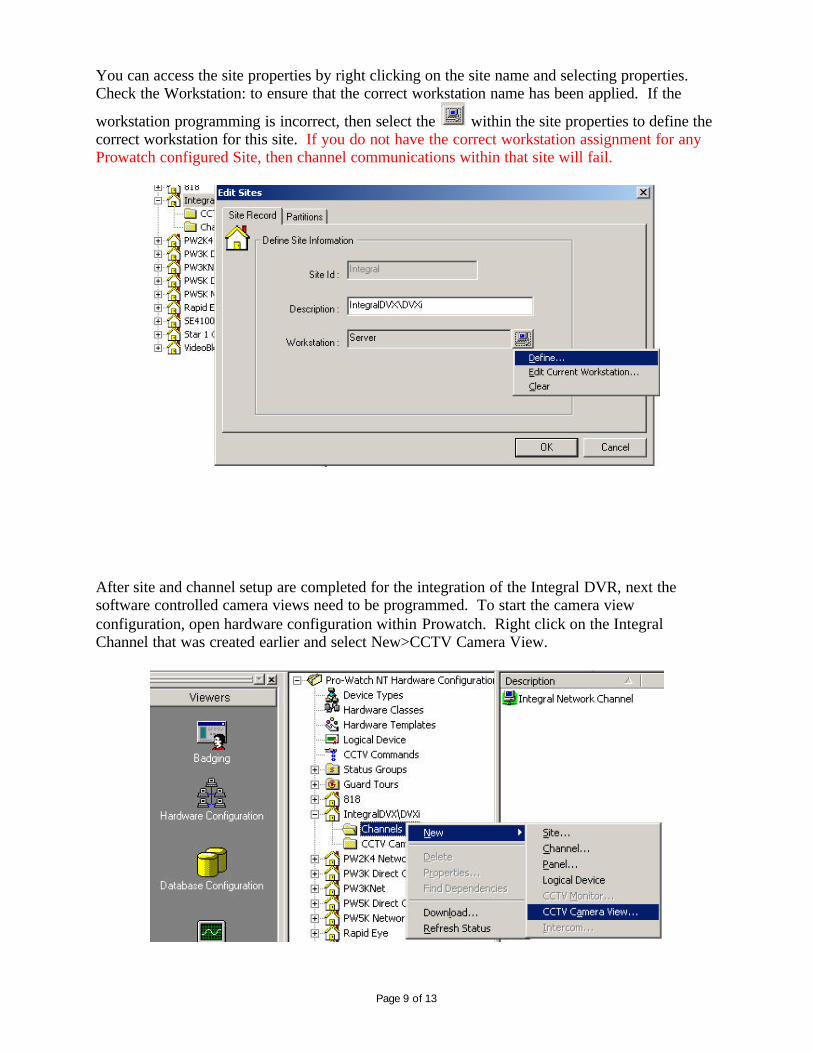
You can access the site properties by right clicking on the site name and selecting properties.Check the Workstation: to ensure that the correct workstation name has been applied. If the
workstation programming is incorrect, then select the within the site properties to define thecorrect workstation for this site. If you do not have the correct workstation assignment for anyProwatch configured Site, then channel communications within that site will fail.
After site and channel setup are completed for the integration of the Integral DVR, next thesoftware controlled camera views need to be programmed. To start the camera viewconfiguration, open hardware configuration within Prowatch. Right click on the IntegralChannel that was created earlier and select New>CCTV Camera View.
Page 10 of 13
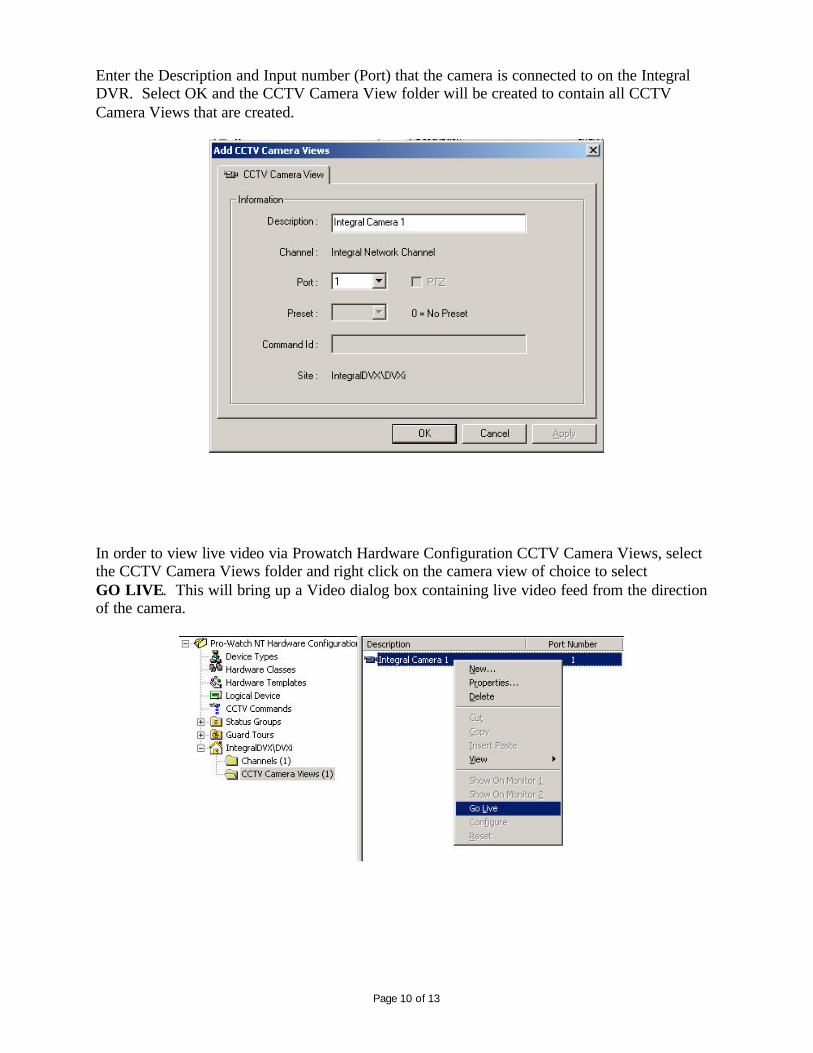
Enter the Description and Input number (Port) that the camera is connected to on the IntegralDVR. Select OK and the CCTV Camera View folder will be created to contain all CCTVCamera Views that are created.
In order to view live video via Prowatch Hardware Configuration CCTV Camera Views, selectthe CCTV Camera Views folder and right click on the camera view of choice to selectGO LIVE. This will bring up a Video dialog box containing live video feed from the directionof the camera.
Page 11 of 13
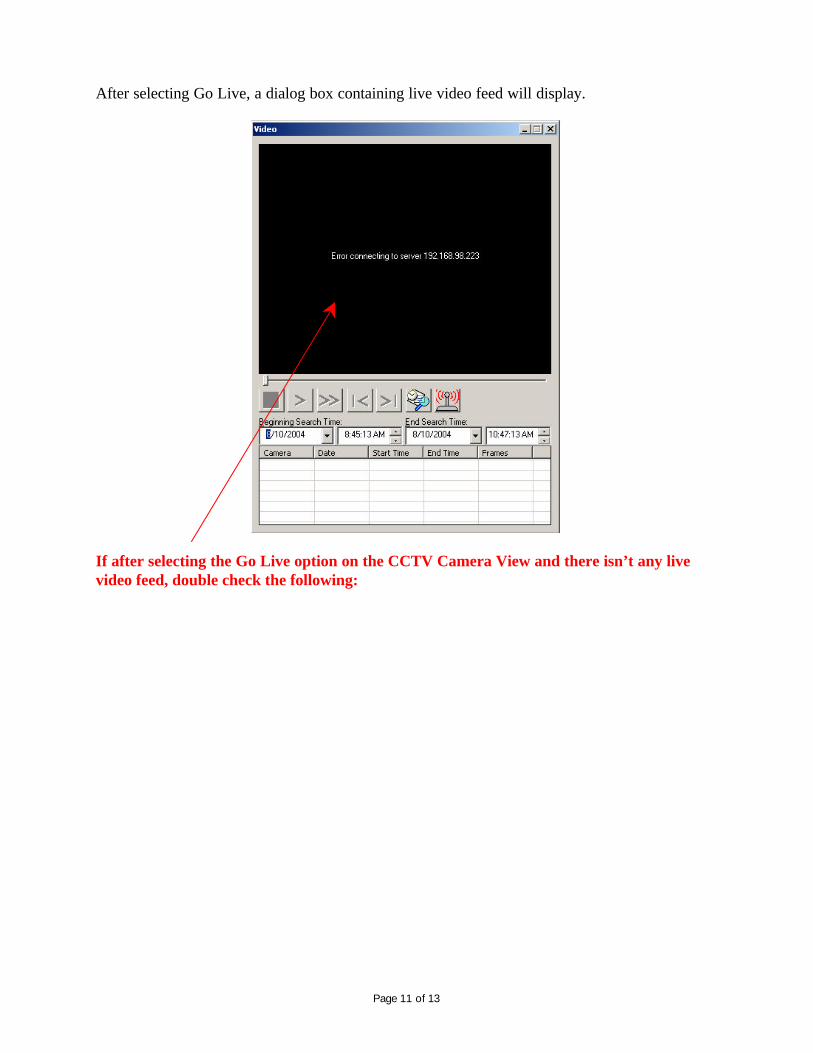
After selecting Go Live, a dialog box containing live video feed will display.
If after selecting the Go Live option on the CCTV Camera View and there isn’t any livevideo feed, double check the following:
Page 12 of 13
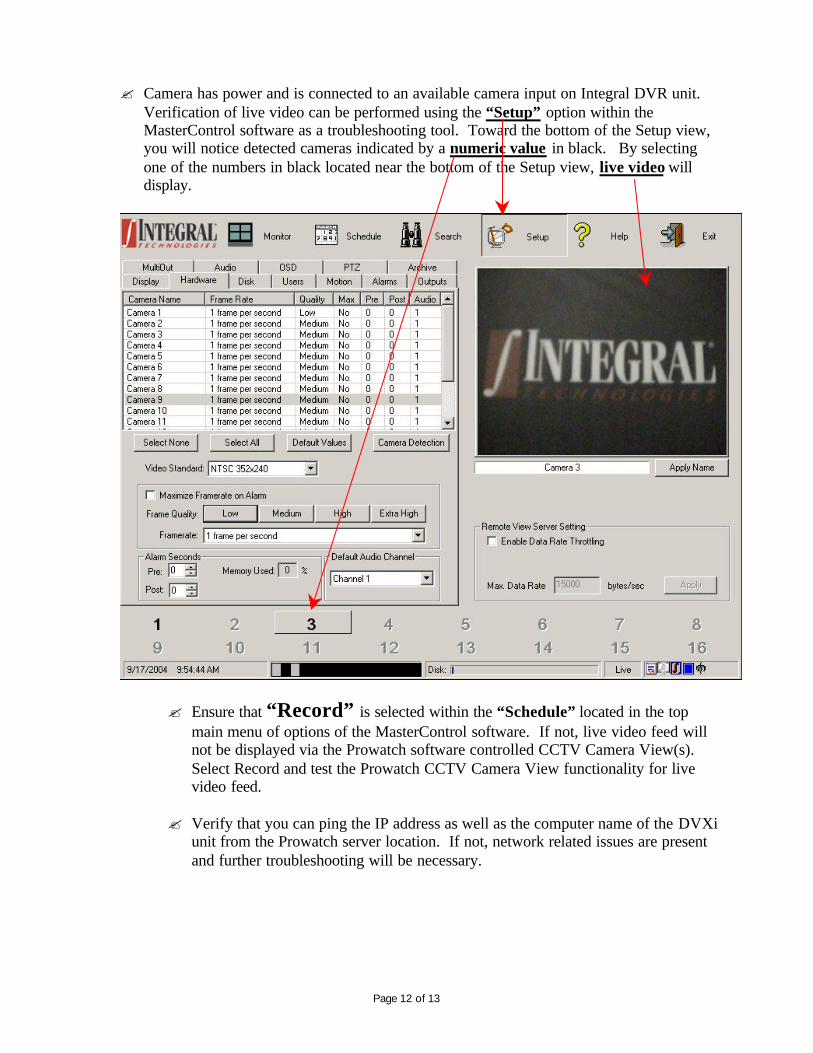
? Camera has power and is connected to an available camera input on Integral DVR unit.Verification of live video can be performed using the “Setup” option within theMasterControl software as a troubleshooting tool. Toward the bottom of the Setup view,you will notice detected cameras indicated by a numeric value in black. By selectingone of the numbers in black located near the bottom of the Setup view, live video willdisplay.
? Ensure that “Record” is selected within the “Schedule” located in the topmain menu of options of the MasterControl software. If not, live video feed willnot be displayed via the Prowatch software controlled CCTV Camera View(s).Select Record and test the Prowatch CCTV Camera View functionality for livevideo feed.
? Verify that you can ping the IP address as well as the computer name of the DVXiunit from the Prowatch server location. If not, network related issues are presentand further troubleshooting will be necessary.

Page 13 of 13
Below is a list of resources for information and technical support regarding IntegralTechnologies® Digital Video Recording Solutions
Integral Technologies® Website: http://www2.integraltech.com/default.cfm
Technical Support Resources:
Email: [email protected] Support by Phone: 866.585.0280 or 317.845.9242