Embed Size (px)
Citation preview

Banner GeneralProxy Access Handbook
Release 8.5.1April 2012
Banner®, Colleague®, PowerCAMPUS®, Luminis® and Datatel® are trademarks of Ellucian or its affiliates and are registered in the U.S. and other countries. Ellucian, Advance, DegreeWorks, fsaATLAS, Course Signals, SmartCall, Recruiter, MOX, ILP, and WCMS are trademarks of Ellucian or its affiliates. Other names may be trademarks of their respective owners.
©2011-2012 Ellucian. All rights reserved. The unauthorized possession, use, reproduction, distribution, display or disclosure of this material or the information contained herein is prohibited.
Contains confidential and proprietary information of Ellucian and its subsidiaries. Use of these materials is limited to Ellucian licensees, and is subject to the terms and conditions of one or more written license agreements between Ellucian and the licensee in question.
In preparing and providing this publication, Ellucian is not rendering legal, accounting, or other similar professional services. Ellucian makes no claims that an institution's use of this publication or the software for which it is provided will insure compliance with applicable federal or state laws, rules, or regulations. Each organization should seek legal, accounting and other similar professional services from competent providers of the organization’s own choosing.
Prepared by: Ellucian4375 Fair Lakes CourtFairfax, Virginia 22033United States of America
Revision History
Publication Date Summary
April 2012 New version that supports Banner General 8.5.1 software.
Contents
Banner General 8.5.1Proxy Access Handbook
Chapter 1 Overview . . . . . . . . . . . . . . . . . . . . . . . . . . . . . . . . . . . . . . . . . . . . . . . . . . . . . . . . . . . . . 1-1
Security concerns . . . . . . . . . . . . . . . . . . . . . . . . . . . . . . . . . . . . 1-2
Banner data. . . . . . . . . . . . . . . . . . . . . . . . . . . . . . . . . . . . . . . . 1-2
What pages can a proxy access? . . . . . . . . . . . . . . . . . . . . . . . . . . . . 1-3
Other uses of Proxy Access . . . . . . . . . . . . . . . . . . . . . . . . . . . . . . . 1-3
Pass phrase functionality. . . . . . . . . . . . . . . . . . . . . . . . . . . . . . . . 1-3
Proxy Access forms . . . . . . . . . . . . . . . . . . . . . . . . . . . . . . . . . . 1-4
Proxy Access process . . . . . . . . . . . . . . . . . . . . . . . . . . . . . . . . . 1-5
Proxy Access roles . . . . . . . . . . . . . . . . . . . . . . . . . . . . . . . . . . . 1-5
Chapter 2 How to Get Started . . . . . . . . . . . . . . . . . . . . . . . . . . . . . . . . . . . . . . . . . . . . . . . . . . 2-1
Validation codes . . . . . . . . . . . . . . . . . . . . . . . . . . . . . . . . . . . . . 2-1
Configure Proxy Access . . . . . . . . . . . . . . . . . . . . . . . . . . . . . . . . 2-2
Proxy Access Process Flow. . . . . . . . . . . . . . . . . . . . . . . . . . . . . . 2-9
Test Proxy Access. . . . . . . . . . . . . . . . . . . . . . . . . . . . . . . . . . . . 2-11
Other considerations . . . . . . . . . . . . . . . . . . . . . . . . . . . . . . . . . . . 2-12
Delete a proxy relationship . . . . . . . . . . . . . . . . . . . . . . . . . . . . . . 2-13
Chapter 3 Use the General Person Load process . . . . . . . . . . . . . . . . . . . . . . . . . . . . 3-1
Individual record loads . . . . . . . . . . . . . . . . . . . . . . . . . . . . . . . . . 3-1
API errors . . . . . . . . . . . . . . . . . . . . . . . . . . . . . . . . . . . . . . . . . 3-3
April 2012 Banner General 8.5.1 iiiProxy Access Handbook
Contents

GOAMTCH processing . . . . . . . . . . . . . . . . . . . . . . . . . . . . . . . . . . 3-3
Using GRAPREL . . . . . . . . . . . . . . . . . . . . . . . . . . . . . . . . . . . . . 3-4
Chapter 4 Configure Communications . . . . . . . . . . . . . . . . . . . . . . . . . . . . . . . . . . . . . . . . 4-1
Customize e-mail communications . . . . . . . . . . . . . . . . . . . . . . . . . 4-2
Sample new proxy e-mail definition . . . . . . . . . . . . . . . . . . . . . . . . . 4-3
Sample new proxy e-mail display . . . . . . . . . . . . . . . . . . . . . . . . . . 4-3
Communication data elements . . . . . . . . . . . . . . . . . . . . . . . . . . . . 4-4
Chapter 5 Define Options on GTVOTYP . . . . . . . . . . . . . . . . . . . . . . . . . . . . . . . . . . . . . . . 5-1
Logging options . . . . . . . . . . . . . . . . . . . . . . . . . . . . . . . . . . . . . 5-2
Profile options . . . . . . . . . . . . . . . . . . . . . . . . . . . . . . . . . . . . . . 5-3
Data Load options . . . . . . . . . . . . . . . . . . . . . . . . . . . . . . . . . . . . 5-10
Miscellaneous options . . . . . . . . . . . . . . . . . . . . . . . . . . . . . . . . . 5-11
Chapter 6 Web Tailor Configuration . . . . . . . . . . . . . . . . . . . . . . . . . . . . . . . . . . . . . . . . . . . 6-1
Display of pages . . . . . . . . . . . . . . . . . . . . . . . . . . . . . . . . . . . . . 6-1
Examples . . . . . . . . . . . . . . . . . . . . . . . . . . . . . . . . . . . . . . . . . 6-3
Appendix A Sample GORRSQL Rules . . . . . . . . . . . . . . . . . . . . . . . . . . . . . . . . . . . . . . . . . . . A-1
Sample GORRSQL Rules to enable Proxy Access Processing. . . . . . . . . A-2
Select SSB users who have signed off on FERPA as defined by a population selection. . . . . . . . . . . . . . . . . . . . . . . . . . . . . . . . . . . A-3
Select SSB users who have the WTAILORPROXYMGMT role . . . . . . . . . . . A-4
Select SSB users who have been coded within TVRAUTH . . . . . . . . . . . . . A-4
Select SSB users who are students . . . . . . . . . . . . . . . . . . . . . . . . . . A-5
Sample GORRSQL Rules to enable specific Proxy selections . . . . . . . . . A-5
SSB users who have an Advancement cross-reference to this person. . . . . . . A-6
iv Banner General 8.5.1 April 2012Proxy Access HandbookContents

SSB users who are the primary advisor . . . . . . . . . . . . . . . . . . . . . . . . A-7
Sample GORRSQL Rules to enable Proxy Access via SSB Access . . . . . . A-8
If a PIDM is part of a population selection . . . . . . . . . . . . . . . . . . . . . . . A-9
SSB users who have WTAILORPROXYACCESS role . . . . . . . . . . . . . . . . A-9
SSB users who have an active proxy relationship . . . . . . . . . . . . . . . . . . A-10
Sample GORRSQL Rules to enable Global Proxy Access. . . . . . . . . . . . A-11
Requires that a PIDM has a PROXY_ACCESS_FERPA population record . . . . A-12
Requires that a PIDM has a STUDENT SSB role . . . . . . . . . . . . . . . . . . . A-12
Any PIDM with an active GOBTPAC record can be selected by a Global Proxy Access User . . . . . . . . . . . . . . . . . . . . . . . . . . . . . . . . . . . A-13
Appendix B Information Text in Web Tailor. . . . . . . . . . . . . . . . . . . . . . . . . . . . . . . . . . . . . . B-1
Appendix C Push Processing . . . . . . . . . . . . . . . . . . . . . . . . . . . . . . . . . . . . . . . . . . . . . . . . . . . . C-1
Appendix D Global Proxy Access . . . . . . . . . . . . . . . . . . . . . . . . . . . . . . . . . . . . . . . . . . . . . . . . D-1
April 2012 Banner General 8.5.1 vProxy Access Handbook
Contents

vi Banner General 8.5.1 April 2012Proxy Access HandbookContents

April 20
1 Overview
Proxy Access allows a person to set up access for a proxy, to designated Self-Service Banner pages.
For example, SunGard University has decided to define two types of proxies, parents and potential employers. Proxy Access enables SunGard University to allow students to authorize parental proxies to view pages such as, but not limited to, student schedules, assessments, final grades, and emergency contacts, and authorize potential employer proxies to view only student schedules and e-mail addresses.
Once these decisions are configured, students will then have the option to set up proxies. Each student can then decide who they want to serve as a parental proxy and who they want as potential employer proxies. Students may also decide to not set up any proxies. For each proxy, a student can select specific pages from the list of available pages to authorize.
For example, a student could set up the following proxies:
• Dad, a parent proxy, who can see assessments and emergency contact information.
• Mom, a parent proxy, who can see student schedule information and emergency contact information.
• Acme Corporation, a potential employer proxy, who can see student schedule information.
NoteIf this student has a sibling at SunGard University, that sibling could set up different proxy information and each parent could have access to different data for each child.
A proxy is a single entity within the system that is identified by their e-mail address. When a proxy logs in to Self-Service Banner, the proxy must specify which person they will be acting as if they serve as a proxy for more than one person. The proxy may switch between persons by selecting the tab for the person that they would like to act as.
NoteProxies are authorized for specific pages, for a specific time frame.
12 Banner General 8.5.1 1-1Proxy Access Handbook
Overview
1-2
Security concerns
When the proxy logs in to Self-Service Banner, the proxy will be literally acting as the person who authorized the proxy access. If your institution includes an update page in the list of potential pages that a proxy may access and this page is authorized for the proxy, the proxy will be able to make updates in the same fashion as the Banner person.
WarningIt is highly recommended that you do not make any Update pages available to proxies. Please limit proxy access to only Inquiry pages
WarningPlease be aware that there may be legal issues surrounding a third party updating pages on behalf of the student. It is up to your institution to be within the guidelines for the various state and federal rules.
The Proxy Access system is only as secure as the proxy e-mail account. For instance, if Student A and Student B have both defined [email protected] as a proxy, and Student A knows how to access Parent C's e-mail account then Student A could gain unauthorized access to Student B’s information.
WarningThere is no record locking within the proxy functionality to prevent multiple updates from being attempted at the same time. As such, if a person and a proxy both attempt to update the same data at the same time, both updates will be allowed, however, only the last update will be retained. Similarly, if two proxies for the same person attempt to update the same data, only the last update will be retained.
Banner data
People who are setting up proxies for themselves need to be a Banner person with an active Self-Service Banner login. However, proxy users do not need to be a Banner person, therefore, your institution will need to make an implementation decision to decide what proxy data should be added to your Banner database, if any.
Although the examples in this guide will focus on baseline Self-Service Banner pages, the proxy access functionality extends to any local Self-Service Banner page that is accessible at your institution and calls twbkwbis.F_ValidUser to validate page security.
Banner General 8.5.1 April 2012Proxy Access HandbookOverview

April 20
What pages can a proxy access?
A proxy will have access to a person's Self-Service Banner pages only when the following is true:
• The person currently has the PROXYMGMT role that is defined on GORRSQL.
• The relationship between the person and the proxy is between the defined start and stop dates. This information can be found in Banner under GPAPRXY.
• The page has been authorized for the proxy by the person. This information can be found on GPAPRXY under the Page Authorization List.
• The page is enabled at the procedure, menu, and menu option levels.
• The person originating the proxy relationship is currently enabled in Banner security, GOBTPAC_PIN_DISABLED_IND is not Y. Please note that this can be removed as a condition if desired.
If you do not normally expire users in GOBTPAC, you may wish to reconsider that decision or remove the PROXYMGMT role from normal processing, as proxies could still access data for people who are no longer associated with your institution due to graduation or perhaps retirement.
Other uses of Proxy Access
Although a number of the tables, forms, and processes have been written for use by Proxy Access, these have been designed for re-use. For example, if your institution wishes to collect data about a population and wants to load this information into Banner, you could define a new system using GTVSYST, add in the system related data in the other validation and rules forms, collect the data in the new General Person temporary tables GENIDEN and GENBPSH, and run the general person match/load and have your person information loaded into Banner.
For example, this process is used with Banner General Events Management 9.0.
Pass phrase functionality
Pass phrase is a method for a proxy to verbally authenticate. For example, if a parent calls to get information about a student, the parent could use a pass phrase to indicate that permission has been given. Or, your institution may require a pass phrase before a pin reset will be performed. There is no other functionality in the system that uses the pass phrase. Proxy Access has simply provided a process to collect a pass phrase that is assigned by the Banner person for a proxy and your institution will need to decide how it will use the optional pass phrase functionality.
12 Banner General 8.5.1 1-3Proxy Access Handbook
Overview
1-4
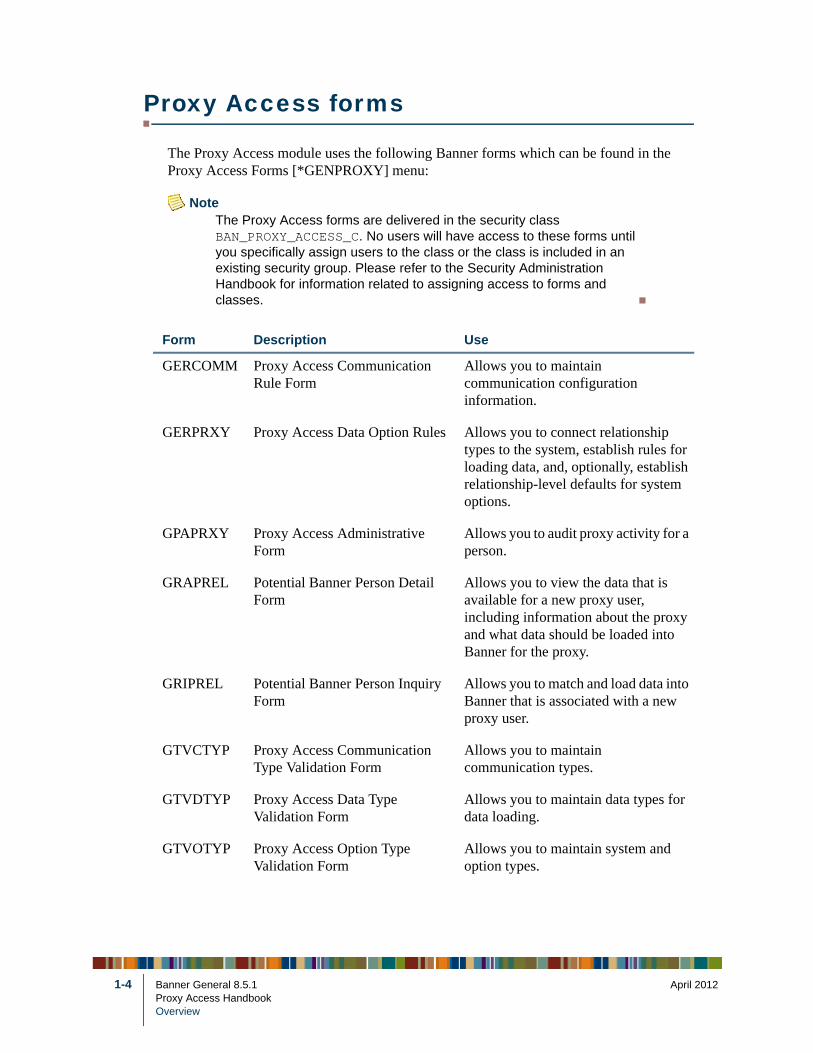
Proxy Access forms
The Proxy Access module uses the following Banner forms which can be found in the Proxy Access Forms [*GENPROXY] menu:
NoteThe Proxy Access forms are delivered in the security class BAN_PROXY_ACCESS_C. No users will have access to these forms until you specifically assign users to the class or the class is included in an existing security group. Please refer to the Security Administration Handbook for information related to assigning access to forms and classes.
Form Description Use
GERCOMM Proxy Access Communication Rule Form
Allows you to maintain communication configuration information.
GERPRXY Proxy Access Data Option Rules Allows you to connect relationship types to the system, establish rules for loading data, and, optionally, establish relationship-level defaults for system options.
GPAPRXY Proxy Access Administrative Form
Allows you to audit proxy activity for a person.
GRAPREL Potential Banner Person Detail Form
Allows you to view the data that is available for a new proxy user, including information about the proxy and what data should be loaded into Banner for the proxy.
GRIPREL Potential Banner Person Inquiry Form
Allows you to match and load data into Banner that is associated with a new proxy user.
GTVCTYP Proxy Access Communication Type Validation Form
Allows you to maintain communication types.
GTVDTYP Proxy Access Data Type Validation Form
Allows you to maintain data types for data loading.
GTVOTYP Proxy Access Option Type Validation Form
Allows you to maintain system and option types.
Banner General 8.5.1 April 2012Proxy Access HandbookOverview
April 20
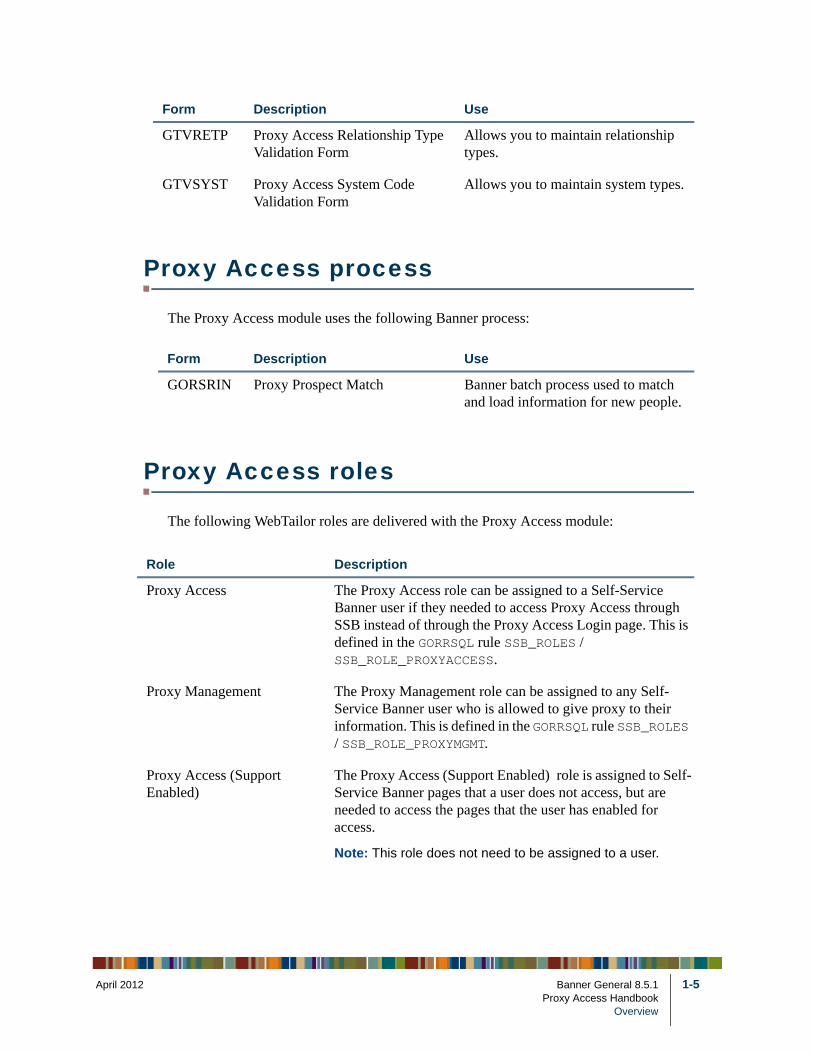
Proxy Access process
The Proxy Access module uses the following Banner process:
Proxy Access roles
The following WebTailor roles are delivered with the Proxy Access module:
GTVRETP Proxy Access Relationship Type Validation Form
Allows you to maintain relationship types.
GTVSYST Proxy Access System Code Validation Form
Allows you to maintain system types.
Form Description Use
GORSRIN Proxy Prospect Match Banner batch process used to match and load information for new people.
Form Description Use
Role Description
Proxy Access The Proxy Access role can be assigned to a Self-Service Banner user if they needed to access Proxy Access through SSB instead of through the Proxy Access Login page. This is defined in the GORRSQL rule SSB_ROLES / SSB_ROLE_PROXYACCESS.
Proxy Management The Proxy Management role can be assigned to any Self-Service Banner user who is allowed to give proxy to their information. This is defined in the GORRSQL rule SSB_ROLES / SSB_ROLE_PROXYMGMT.
Proxy Access (Support Enabled)
The Proxy Access (Support Enabled) role is assigned to Self-Service Banner pages that a user does not access, but are needed to access the pages that the user has enabled for access.
Note: This role does not need to be assigned to a user.
12 Banner General 8.5.1 1-5Proxy Access Handbook
Overview
1-6
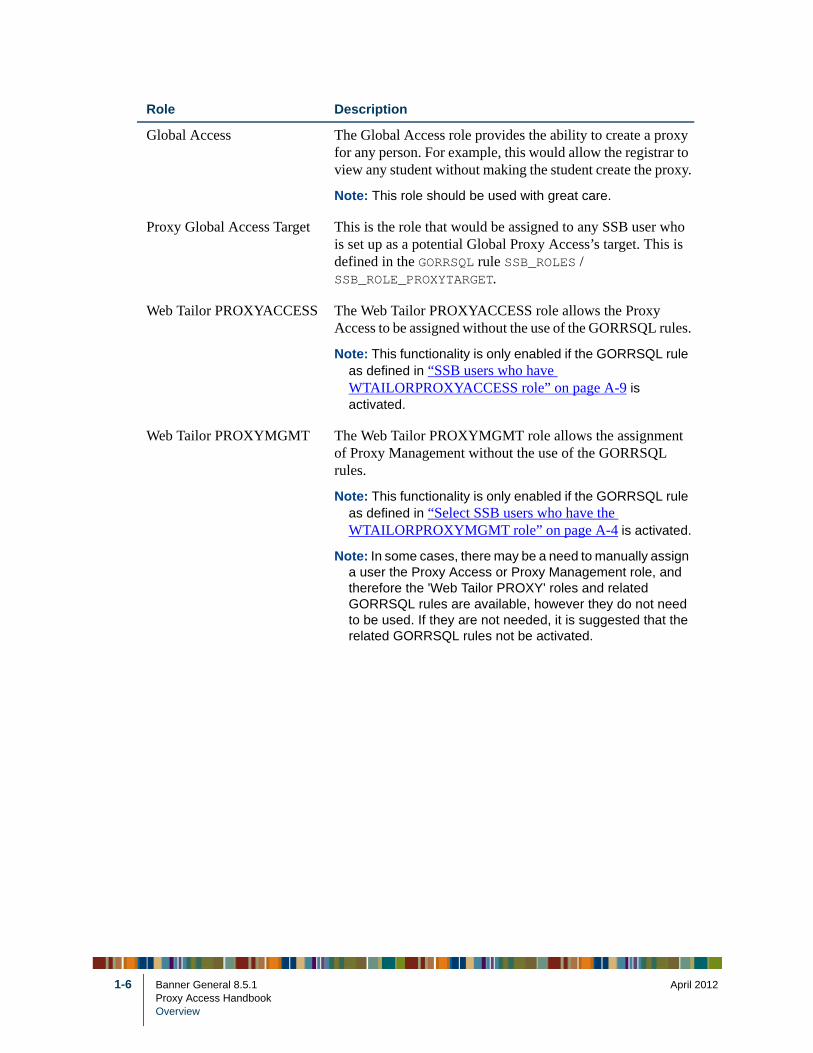
Global Access The Global Access role provides the ability to create a proxy for any person. For example, this would allow the registrar to view any student without making the student create the proxy.
Note: This role should be used with great care.
Proxy Global Access Target This is the role that would be assigned to any SSB user who is set up as a potential Global Proxy Access’s target. This is defined in the GORRSQL rule SSB_ROLES / SSB_ROLE_PROXYTARGET.
Web Tailor PROXYACCESS The Web Tailor PROXYACCESS role allows the Proxy Access to be assigned without the use of the GORRSQL rules.
Note: This functionality is only enabled if the GORRSQL rule as defined in “SSB users who have WTAILORPROXYACCESS role” on page A-9 is activated.
Web Tailor PROXYMGMT The Web Tailor PROXYMGMT role allows the assignment of Proxy Management without the use of the GORRSQL rules.
Note: This functionality is only enabled if the GORRSQL rule as defined in “Select SSB users who have the WTAILORPROXYMGMT role” on page A-4 is activated.
Note: In some cases, there may be a need to manually assign a user the Proxy Access or Proxy Management role, and therefore the 'Web Tailor PROXY' roles and related GORRSQL rules are available, however they do not need to be used. If they are not needed, it is suggested that the related GORRSQL rules not be activated.
Role Description
Banner General 8.5.1 April 2012Proxy Access HandbookOverview
April 20
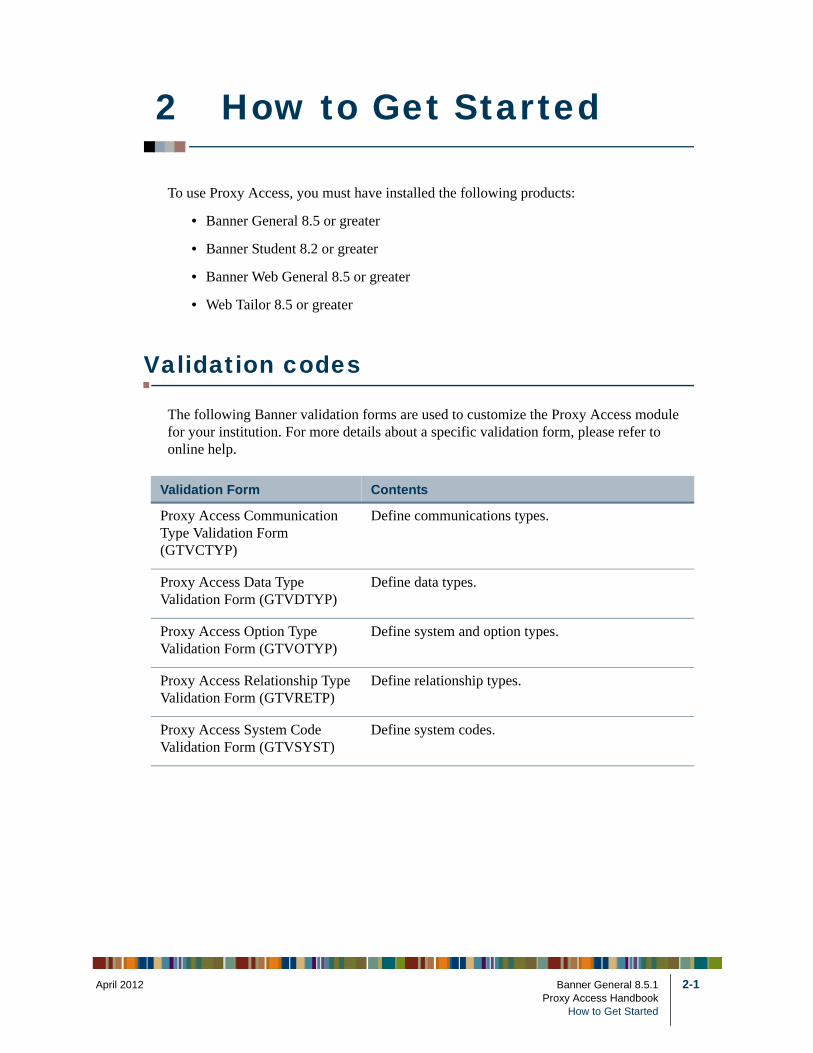
2 How to Get Started
To use Proxy Access, you must have installed the following products:
• Banner General 8.5 or greater
• Banner Student 8.2 or greater
• Banner Web General 8.5 or greater
• Web Tailor 8.5 or greater
Validation codes
The following Banner validation forms are used to customize the Proxy Access module for your institution. For more details about a specific validation form, please refer to online help.
Validation Form Contents
Proxy Access Communication Type Validation Form (GTVCTYP)
Define communications types.
Proxy Access Data Type Validation Form (GTVDTYP)
Define data types.
Proxy Access Option Type Validation Form (GTVOTYP)
Define system and option types.
Proxy Access Relationship Type Validation Form (GTVRETP)
Define relationship types.
Proxy Access System Code Validation Form (GTVSYST)
Define system codes.
12 Banner General 8.5.1 2-1Proxy Access Handbook
How to Get Started
2-2
Configure Proxy Access
To configure Proxy Access, complete the following steps:
Step 1 Review form security
The Proxy Access forms are delivered in the security class BAN_PROXY_ACCESS_C. No users will have access to these forms until you specifically assign users to the class or the class is included in an existing security group. Please refer to the Security Administration Handbook for information related to assigning access to forms and classes.
Step 2 Review system types
Access the Proxy Access System Code Validation Form (GTVSYST) and review following delivered system codes:
• PROXY - Proxy Access
• PROXY_GLOBAL_ACCESS - Proxy Access Global Administrative Access
For additional information Global Proxy Access, please see “Global Proxy Access” on page D-1.
Step 3 Review data load types
Access the Proxy Access Data Type Validation Form (GTVDTYP) and review the following delivered data load types:
• ADVANCEMENT - Banner Advancement
• PERSON - Banner General
• PROXY - Banner Web Proxy Access
For additional information related to these types of data and how your institution can add additional types of data pushes, please see “Push Processing” on page C-1.
Step 4 Configure e-mail communications
Access the Communication Type Validation Form (GTVCTYP) and review the following delivered communication types:
• CANCEL_EMAIL
• CURRENT_AUTHORIZATION
• DELETE_RELATIONSHIP
• NEW_EMAIL
• NEW_PROXY
Banner General 8.5.1 April 2012Proxy Access HandbookHow to Get Started

April 20
• NEW_RELATIONSHIP
• PASSPHRASE
• PIN_RESET
• PROFILE_CHANGE
• UPDATE_RELATIONSHIP
Step 5 Configure relationship types
Access the Proxy Access Relationship Type Validation Form (GTVRETP) and determine what additional relationship types are needed at your institution beyond the following delivered relationship types:
• AAA - Relationship not Selected
• ADVISOR (Optional) - Academic Advisor
• COACH (Optional) - Coach or NCAA Representative
• EMPLOYER (Optional) - Employer or Hiring Agency
• PARENT (Optional) - Parent or Legal Guardian
NoteAAA is a required relationship type and may not be modified or deleted.
Step 6 Update system options
Access the Proxy Access Option Type Validation Form (GTVOTYP) and review all system options. Ensure that you update any options that need to be updated for your institution.
For more information on system options, please see “Define Options on GTVOTYP” on page 5-1.
Step 7 Configure data overrides
Access the Proxy Access Data Option Rules (GERPRXY) and for each relationship type that your institution will be using, review both the data types to be loaded and set up any overrides of the system defaults. GERPRXY is used to associate relationship types with system types.
12 Banner General 8.5.1 2-3Proxy Access Handbook
How to Get Started

2-4
Step 8 Configure communication rules
Access the Proxy Access Communication Rule Form (GERCOMM) and update the rules defined for each communication. For more information, please see “Configure Communications” on page 4-1.
NoteYou will need to update the rules defined for each communication for every relationship type.
NoteYou may configure communications for all proxies or for all proxies of a specific relationship type.
Step 9 Set SQL to implement rules
As an administrative user with the appropriate permissions, access the Business Rules (GORRSQL) form to set up SQL to implement your institution’s rules for the following:
NoteIn most circumstances, a DBA or other technical staff member will most likely need to be involved in making and testing changes made to the GORRSQL rules.
• Determine what populations are eligible to create proxies for themselves. For an active Self-Service Banner user to be able to designate a proxy for themselves, that user must have the Self-Service Banner role of PROXYMGMT (Proxy Management).
• Determine who can act as a proxy via secure Self-Service Banner using the PROXYACCESS role.
• What Self-Service Banner users will display as potential proxies using the PROXYMGMT_ADD_LIST rule.
• Determine which group of Banner persons could be the target of a Global Proxy.
Dynamic role assignment can be performed via rules established on the Business Rules (GORRSQL) form. To implement the rules for your institution, please perform the following steps:
1. Access the Business Rules (GORRSQL) form.
2. Select the SSB_ROLES process and the SSB_ROLE_PROXYMGMT rule and click Next Block.
2.1. Determine what populations are eligible to create proxies for themselves. Some possible populations include the following:
• Select SSB users who have signed off on FERPA as defined by a population selection
• Select SSB users who have WTAILORPROXYMGMT role (staff testing)
Banner General 8.5.1 April 2012Proxy Access HandbookHow to Get Started

April 20
• Select SSB users who have been coded within TVRAUTH
• Select SSB users who are members of a student cohort
NoteSample rules for these populations are delivered as inactive and are not validated. Before the rules can be used at your institution, they must be analyzed, validated, and activated.
To use these rules, you must ensure that the Web Tailor Parameter ENABLE_GORRSQL_SSB_ROLES is set to Y.
These sample rules are documented in “Sample GORRSQL Rules” on page A-1. You can use these as a template for configuring your own populations.
2.2. Decide on the precursor permissions that must be followed before an eligible individual can create proxies.
In the United States, these permissions may be tied to your institution's FERPA policy. For example, as in one of the delivered samples, you may require a student to generically approve sharing information through Proxy Access and record that approval in Banner as an attribute.
• If this permission must be obtained and it is stored online, configure the process SSB_ROLES process and SSB_ROLE_PROXYMGMT rule on GORRSQL to look for this permission.
• If this permission must be obtained and it is not stored online, you may need to revise your business process so that the permission is accessible.
• If this permission is not required, you should not include this logic in GORRSQL.
12 Banner General 8.5.1 2-5Proxy Access Handbook
How to Get Started
2-6
2.3. Decide if a proxy can access information for a person whose Banner access has been disabled.
The SSB_ROLES process and SSB_ROLE_PROXYMGMT rule on GORRSQL determine who is eligible to create a proxy and include the following clause to check if the person's Banner access is enabled:
GOBTPAC_PIN_DISABLED_IND != 'Y'
This clause ensures that once a person is no longer active, a proxy for that person, such as a parent, cannot access any authorized pages for this person either.
NoteYou may have to adjust this type of rule based upon the definition and setting of active at your institution.
If you wish to allow a proxy to access information for a person who does not currently have Banner Self-Service access, this clause should be removed and/or disabled.
3. Access the Business Rules (GORRSQL) form, select the SSB_ROLES process and the SSB_ROLE_PROXYACCESS rule and click Next Block.
Decide if you want to allow proxy access from within secured Self-Service Banner or if you wish to have all proxies use the special access provided for proxies.
NoteYou may want to allow proxy access from within secured Self-Service Banner so that current Self-Service users can act as a proxy without needing to authenticate using two different methods.
If you want to provide this functionality, configure the process SSB_ROLES process and the SSB_ROLE_PROXYACCESS rule to identify these people.
Please consider the following when allowing proxy access from within secured Self-Service Banner:
• Is a PIDM part of a population selection?
• Are there Self-Service Banner users who have the WTAILORPROXYACCESS role used for staff testing?
• Are there Self-Service Banner users who have an active proxy relationship?
NoteSample rules for these populations are not delivered as active, nor are they validated. Before the rules can be used at your institution, they must be analyzed, validated, and activated.
To use these rules, you must ensure that the Web Tailor Parameter ENABLE_GORRSQL_SSB_ROLES is set to Y.
Banner General 8.5.1 April 2012Proxy Access HandbookHow to Get Started

April 20
These sample rules are documented in “Sample GORRSQL Rules” on page A-1. You can use these as a template for configuring your own populations.
NoteIf you will be using Global Proxy Access, “Global Proxy Access” on page D-1 for information on setting up rules for the Banner persons that can be a target for a Global Proxy Access user.
4. Access the Business Rules (GORRSQL) form, select the PROXY_ACCESS process and the PROXYMGMT_ADD_LIST rule and click Next Block.
You may optionally decide to display potential proxies to add and select, in addition to any proxies that are entered manually, such as advisors or coaches.
NoteThese Banner persons must have an active e-mail address and the SQL rule must return a PIDM and an e-mail address.
Potential proxies could include Self-Service Banner users who have an Advancement cross-reference to this person or users who serve as the primary advisor.
NoteSample rules for these populations are not delivered as active, nor are they validated. Before the rules can be used at your institution, they must be analyzed, validated, and activated.
These sample rules are documented in “Sample GORRSQL Rules” on page A-1. You can use these as a template for configuring your own populations.
Step 10 Configure Web Menus and Procedures in Web Tailor
In Web Tailor Administration, enable and establish the Web Tailor menus that are associated with each relationship type using the Customize a Web Menu or Procedure page. For more information, please see “Web Tailor Configuration” on page 6-1.
NoteThis is case sensitive, please use upper case characters when associating Web Tailor menus with relationship types.
Step 11 Configure Menu Items in Web Tailor
In Web Tailor Administration, establish the pages that are associated with the Web Tailor menu using the Reorder or Customize Menu Items page.
12 Banner General 8.5.1 2-7Proxy Access Handbook
How to Get Started
2-8
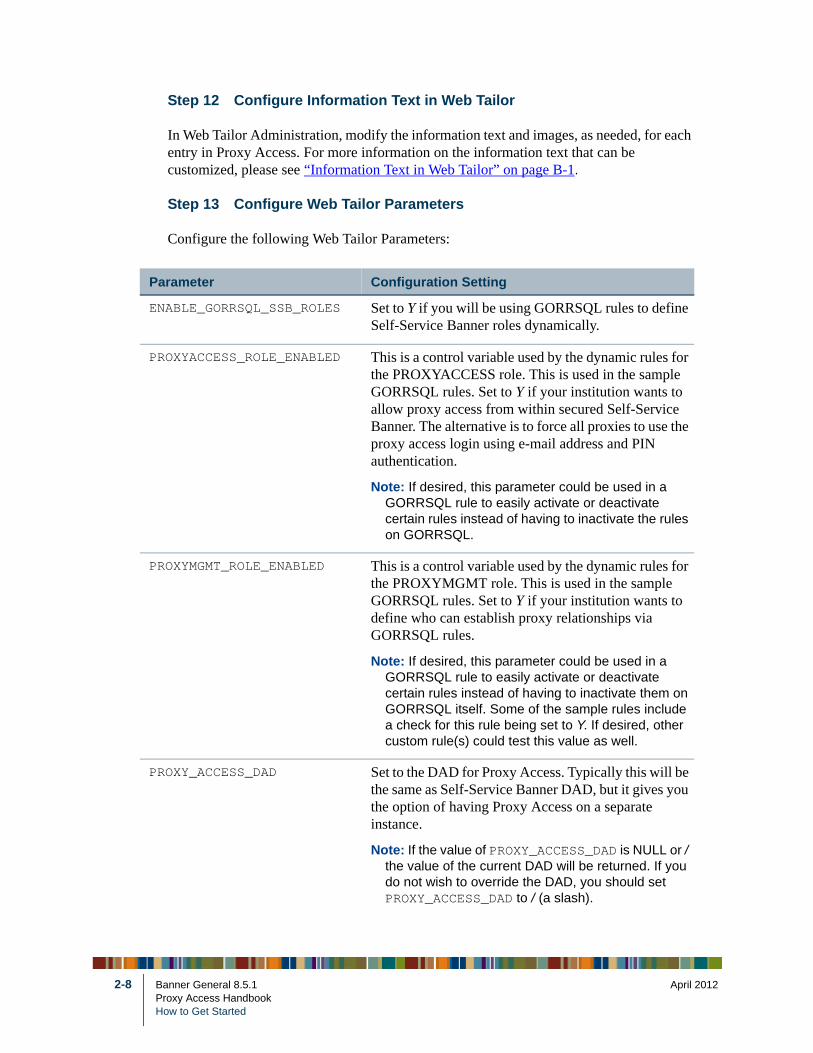
Step 12 Configure Information Text in Web Tailor
In Web Tailor Administration, modify the information text and images, as needed, for each entry in Proxy Access. For more information on the information text that can be customized, please see “Information Text in Web Tailor” on page B-1.
Step 13 Configure Web Tailor Parameters
Configure the following Web Tailor Parameters:
Parameter Configuration Setting
ENABLE_GORRSQL_SSB_ROLES Set to Y if you will be using GORRSQL rules to define Self-Service Banner roles dynamically.
PROXYACCESS_ROLE_ENABLED This is a control variable used by the dynamic rules for the PROXYACCESS role. This is used in the sample GORRSQL rules. Set to Y if your institution wants to allow proxy access from within secured Self-Service Banner. The alternative is to force all proxies to use the proxy access login using e-mail address and PIN authentication.
Note: If desired, this parameter could be used in a GORRSQL rule to easily activate or deactivate certain rules instead of having to inactivate the rules on GORRSQL.
PROXYMGMT_ROLE_ENABLED This is a control variable used by the dynamic rules for the PROXYMGMT role. This is used in the sample GORRSQL rules. Set to Y if your institution wants to define who can establish proxy relationships via GORRSQL rules.
Note: If desired, this parameter could be used in a GORRSQL rule to easily activate or deactivate certain rules instead of having to inactivate them on GORRSQL itself. Some of the sample rules include a check for this rule being set to Y. If desired, other custom rule(s) could test this value as well.
PROXY_ACCESS_DAD Set to the DAD for Proxy Access. Typically this will be the same as Self-Service Banner DAD, but it gives you the option of having Proxy Access on a separate instance.
Note: If the value of PROXY_ACCESS_DAD is NULL or / the value of the current DAD will be returned. If you do not wish to override the DAD, you should set PROXY_ACCESS_DAD to / (a slash).
Banner General 8.5.1 April 2012Proxy Access HandbookHow to Get Started

April 20
Proxy Access Process Flow
Once your system is configured, users will be able to use it as follows:
1. A Banner person who is eligible to create proxies for herself/himself signs into Self-Service Banner and selects the Proxy Access tab or menu.
2. On the Add Proxy page, the person will either provide required preliminary information about the proxy such as First Name, Last Name, and E-mail Address, or select the proxy from a list of presented possibilities if defined with the PROXYMGMT_ADD_LIST process identified earlier in this chapter.
NoteA person can only have a single proxy relationship with another person. For example, if you are a parent proxy, you cannot also be a potential employer proxy for the same person. However, a proxy may have multiple relationships, for example, multiple children may establish a proxy with their parents.
PROXY_ACCESS_EMAIL_FROM Set to the value used as the From address on e-mails sent from Proxy Access. This value is also used as the system default administration e-mail address.
Note: The email could be from a specific person, a generic ID, or a distribution list.
Note: If desired, this value can be overridden on the GERCOMM form for specific communication types.
PROXY_ACCESS_JQUERY The delivered value is /js/jquery-1.6.1.min.js, but you may change this if needed.
PROXY_ACCESS_JQUERY_COOKIE The delivered value is /js/jquery.cookie.js, but you may change this if needed.
PROXY_ACCESS_JQUERY_UI The delivered value is /js/jquery-ui-1.8.13.custom.min.js, but you may change this if needed.
Note: The JQuery UI library must contain support for tabs.
PROXY_ACCESS_JQUERY_UI_CSS The delivered value is /css/ui-lightness/jquery-ui-1.8.13.custom.css, but you may change this if needed.
Parameter Configuration Setting
12 Banner General 8.5.1 2-9Proxy Access Handbook
How to Get Started

2-10
Proxies are uniquely identified by an e-mail address that is not case sensitive.
3. When the person submits the proxy’s information, the new proxy communication is formatted and sent out. The communication sent to the new proxy includes an action URL and an action password. For more information on modifying the communication that is sent out, see “Configure Communications” on page 4-1.
NoteThe action URL is a single use URL, therefore a potential proxy cannot use it to access the system repeatedly. Subsequent uses of the action URL will redirect to the proxy login page.
The proxy PIN is stored in the database as an encrypted value. A proxy or related person who wishes to reset the PIN will receive an e-mail message that must be used to set a new PIN.
4. The Banner person who set up the proxy can change the specific pages or group of pages for their proxy or proxies at any time.
5. The proxy receives the new proxy e-mail, accesses the URL, and enters the action password to authenticate.
6. If the proxy is of a relationship type that will be loaded into Banner, additional information may need to be collected on the proxy profile tab. Once this has been entered, the proxy can select a person tab and view the authorized pages.
NoteThe fields that are required at your institution can be configured. For more information, please see “Define Options on GTVOTYP” on page 5-1.
7. The proxy will be connected to Self-Service Banner and can now begin to access the page(s) that were authorized for them by the Banner person. On the Proxy Profile page, the proxy can request a pin reset, change their associated e-mail address, as well as update other profile information, but the proxy cannot change the pages that they are eligible to access.
If the proxy has been granted access to a page that allows updates, the proxy will be able to update data.
WarningGranting access to a page that allows updates is not recommended. Please see “Security concerns” on page 1-2 for more information.
8. If the proxy is of a relationship type that should be loaded into Banner, the GORSRIN process can be run to match and load the proxy’s data or the GRIPREL form can be used to match and load the proxy’s data.
Banner General 8.5.1 April 2012Proxy Access HandbookHow to Get Started

April 20
9. At any point, the original person may alter the proxy relationship, not only modifying the pages the proxy can access but they can also inactivate the proxy relationship using the start and stop dates.
NoteTerminating a proxy relationship will not remove the proxy from any tables.
At any point the original person may delete the proxy relationship. For more information, see “Delete a proxy relationship” on page 2-13.
10. At any point, authorized staff can use the GPAPRXY form to review the proxies that have been set up for a Banner person, see a list of authorized pages, a history of authorized pages accessed by the proxy, a history of communications sent to the proxy, and view relationship data including description, pass phrase, start, and stop dates.
NoteThe amount of detail available is dependant upon configurable settings. For more information, please see “Logging options” on page 5-2.
Test Proxy Access
The following steps can be used to test that the proxy configuration has been completed successfully:
1. Verify the following configuration settings:
1.1. Ensure that the relationship types that you are testing are defined in GTVRETP.
1.2. Verify that the Proxy Access menu(s) are set up in Web Tailor. The case sensitive naming convention used is PROXY_ACCESS_RELATIONSHIPCODE_OptionalSortParameter where RELATIONSHIPCODE is defined in GTVRETP.
1.3. Ensure that communications are set up for the relationship type you are testing in GERCOMM.
2. Identify in Banner the person who will be initiating the proxy relationship as Person A. If necessary, you can create a new person in Banner.
3. Ensure that Person A is eligible to initiate proxies by ensuring that the rules that have been set up to implement your institution’s FERPA or other privacy policies are followed. This is stored in the SSB_ROLES process and SSB_ROLE_PROXYMGMT rule on GORRSQL.
12 Banner General 8.5.1 2-11Proxy Access Handbook
How to Get Started
2-12
4. Identify the proxy as Proxy B and ensure that this person has an e-mail address that you can use as Proxy B.
NoteYou may search for “The 'Plus' Side of Gmail” for a tip on using a Gmail account for testing. For example, if my Gmail account is [email protected] then I can use [email protected] and [email protected] as unique e-mail addresses that will both get delivered to my standard Gmail inbox.
5. Login into secure Self-Service Banner as Person A.
5.1. Access the Proxy Access menu and select the Proxy Management page.
5.2. Add Proxy B as a proxy and authorize Proxy B for whatever pages you would like to test.
6. Proxy B will receive an e-mail with an action URL and action password. Use the URL and password to authenticate and create proxy PIN credentials for Proxy B.
7. Login to Proxy Access as Proxy B to test Proxy B’s access.
8. If Proxy B is a proxy that needs to go through Common Matching and the load process, Proxy B will need to enter profile information. The required proxy profile data is controlled by option parameters and is cumulative with all the relationship types that the proxy may have.
9. Use GPAPRXY to verify Proxy B’s proxy activity.
10. To test Common Matching and the load process, perform one of the following tasks:
• Run GORSRIN for batch testing.
or
• Use GRIPREL and GRAPREL for online testing.
Other considerations
Depending on what specifically you want to test, you can vary the preceding steps to test items like the following:
• Do you want multiple people to proxy to the same person? If so, you will need Person A1, Person A2, and so on, as well as Proxy B.
• Do you want one person to have multiple proxies? If so, you will need Person A, Proxy B1, Proxy B2, and so on.
Banner General 8.5.1 April 2012Proxy Access HandbookHow to Get Started
April 20
• Do you want to test having the person pick from a list of potential proxies? If so, the rules for this are in the PROXY_ACCESS process and the PROXYMGMT_ADD_LIST rule on GORRSQL.
Delete a proxy relationship
To delete an existing proxy relationship, perform the following steps:
NoteThe Delete Proxy functionality must be enabled via the ENABLE_DELETE_RELATIONSHIP option on GTVOTYP. Additionally, the GTVOTYP option for ENABLE_DELETE_AFTER_DAYS indicates how many days must have passed since the proxy last accessed their account. If either of these conditions are not met, the Delete Proxy Relationship option will not be available.
1. Login to Self-Service Banner with a user account that can access the Proxy Access tab.
2. Select Proxy Access > Proxy Management.
3. Click Expand for the proxy relationship that you would like to delete.
4. Click Delete Proxy Relationship.
5. Click OK to confirm the deletion of this Proxy relationship.
The proxy relationship and all historical information has been deleted and the Delete Proxy Relationship email has been sent to the proxy.
12 Banner General 8.5.1 2-13Proxy Access Handbook
How to Get Started

2-14
Banner General 8.5.1 April 2012Proxy Access HandbookHow to Get Started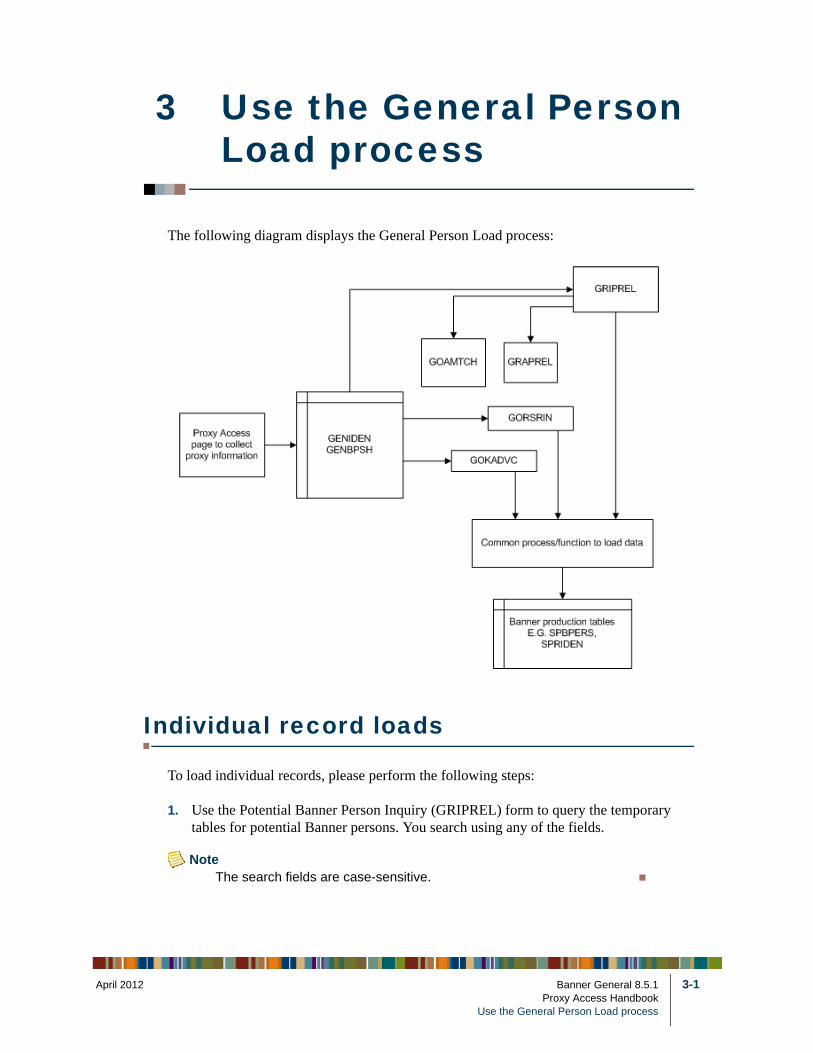
April 20
3 Use the General Person Load process
The following diagram displays the General Person Load process:
Individual record loads
To load individual records, please perform the following steps:
1. Use the Potential Banner Person Inquiry (GRIPREL) form to query the temporary tables for potential Banner persons. You search using any of the fields.
NoteThe search fields are case-sensitive.
12 Banner General 8.5.1 3-1Proxy Access Handbook
Use the General Person Load process
3-2
2. Once a matching record or group of potential matches has been retrieved, select a specific record and select the Detail item in the Options menu to open the Potential Banner Person Detail (GRAPREL) form.
3. The primary tab on this form displays biographical information associated with the record selected on GRIPREL. You can also use the second tab to see what data is eligible to be loaded into Banner as individual records can be turned off and on from this tab.
Once you have the correct person, use the Exit button to return to the Potential Banner Person Inquiry Form (GRIPREL).
4. If the record’s Load Status and Match Status fields are blank, indicating that this record has not been matched or loaded, you must check to see if the person already exists in Banner.
5. Select Match and Update in the Options Menu on GRIPREL to go to GOAMTCH.
6. On GOAMTCH, the ID field will contain GENERATED and the Matching Source field will contain the matching source code that has been assigned to the user ID on GORCMUS.
If no default source code has been assigned on GORCMUS, then you will be able to select any matching source code from the List of Values.
7. Perform a Next Block to populate the Data Entry block with all the data for the incoming person record that is present in the temporary tables.
You can update or adjust the data in the Data Entry block if it does not meet your institution’s data standards. These updates will be copied back to the temporary tables and used when the person's record is created.
8. Perform a Next Block to run the matching algorithm. The algorithm will determine if the incoming record is new, matched, or a potential match. Determine if the record is to be new or matched, and click the appropriate button.
You will be automatically returned to GRIPREL and the match status will always be Match, as the person has now been created in Banner via GOAMTCH.
Banner General 8.5.1 April 2012Proxy Access HandbookUse the General Person Load process

April 20
9. On return from a successful match, the ancillary data will be created and/or loaded.
• If the person has a GENBPSH flag for proxy data and the indicator is set to Y, the match and update process will update the appropriate proxy data and mark the GENBPSH record as loaded.
• If the person has a GENBPSH flag for Advancement data and the indicator is set to Y, the match and update process will create and/or update the appropriate Advancement data and mark the GENBPSH record as loaded.
10. The Match Status field will have been updated and will display Match for this record when a new query is run. Assuming that the common matching updates were successful, the Basic Person Load Status will be set to Complete, indicating that a Banner record has been created and/or updated for this person.
API errors
When the records are loaded manually using GRIPREL, if API errors are encountered, those errors will be displayed and the Match Status will revert back to Suspense. No Banner data will be loaded for these records as the API errors need to be resolved before the record can be re-matched and loaded into Banner.
GOAMTCH processing
GOAMTCH will attempt to insert or update records in the following areas:
• SPRADDR (address)
• SPRTELE (telephone)
• SPBPERS (biographical)
• SPRIDEN (identification)
• GOREMAL (e-mail)
12 Banner General 8.5.1 3-3Proxy Access Handbook
Use the General Person Load process

3-4
Data typ
Advance
Advance
Proxy
Proxy
Person
Person
Using GRAPREL
The Potential Banner Person Detail (GRAPREL) form displays basic biographic and demographic data about the potential Banner person on the Potential Banner Detail tab. This data is display only and cannot be updated on this form.
The Potential Person Load Info displays the information about the loads planned for the selected person. The load status flags can be overridden. Each combination of data type and Banner person can be individually adjusted as each combination will also have its own status flag.
For example, if two students proxy to the same parent, the following entries will display for the parent/proxy:
NoteThe Auxiliary data will only be used for the Advancement load to set up the Advancement cross-reference.
Deselecting an entry will ensure that the load process will not update that combination.
e Create data type?Loadstatus
Loaddate
Auxiliary data Associated ID Associated name
ment Checked (yes) PAR 123234345 Student, Pat
ment Checked (yes) PAR 345234123 Student, Jo
Checked (yes) PAR 123234345 Student, Pat
Checked (yes) PAR 345234123 Student, Jo
Checked (yes) PAR 123234345 Student, Pat
Checked (yes) PAR 345234123 Student, Jo
Banner General 8.5.1 April 2012Proxy Access HandbookUse the General Person Load process
April 20
4 Configure Communications
The communications that Proxy Access can send out include the following:
• CANCEL_EMAIL – Message to the proxy allowing them to cancel an e-mail address change request. This message contains a single-use action URL and action password which should only be sent to the proxy.
NoteTwo e-mail messages are sent when a proxy changes their e-mail address. A cancel e-mail message is sent to the old e-mail address with an action URL that will allow the user to cancel the change and rollback the proxy profile to the original e-mail address.
• CURRENT_AUTHORIZATIONS – Message sent to the proxy indicating the current set of authorized pages for the particular Banner person
• DELETE_RELATIONSHIP - Message sent to the proxy indicating that their proxy relationship has been deleted.
• NEW_EMAIL – Message to the proxy allowing them to confirm an e-mail address change request. This message contains a single-use action URL and action password which should only be sent to the proxy.
NoteTwo e-mail messages are sent when a proxy changes their e-mail address. A confirm e-mail message is sent to the new e-mail address with an action URL that will allow the user to confirm the change.
• NEW_PROXY – Message sent to a new proxy, inviting the proxy to authenticate. The e-mail contains an action URL and action password that allows the proxy to set their PIN. This message contains a single-use action URL and action password which should only be sent to the proxy.
NoteThe NEW_PROXY email is sent the first time a proxy is set up, for the first person. If a second person initiates a relationship with this proxy, only the NEW_RELATIONSHIP email is sent.
• NEW_RELATIONSHIP – Message sent to a proxy to inform the proxy that the Banner person has created a relationship between them.
• PASSPHRASE – Message sent to a proxy to inform the proxy that the Banner person has defined a passphrase and wants to send it to the proxy.
12 Banner General 8.5.1 4-1Proxy Access Handbook
Configure Communications

4-2
• PIN_RESET – Message sent to proxy indicating that a pin reset has been requested. This message contains a single-use action URL and action password which should only be sent to the proxy.
• PROFILE_CHANGE – Message sent to the administrator indicating that the proxy’s profile has been modified.
NoteThis message contains profile change data and should only be sent to the administrator. This may be useful information for a campus that does not load proxy data automatically.
• UPDATE_RELATIONSHIP - Message sent to a proxy to inform the proxy that the Banner person has changed the relationship between them.
Every communication does not need to be sent out and each institution can configure the communications that will be used by setting the appropriate ‘Send e-mail to’, person, admin, or proxy indicators on the GERCOMM form. However, it is recommended that the following communications be used:
• NEW_PROXY – without this, a new proxy cannot set up credentials or login
• PIN_RESET – without this, a proxy cannot reset her/his pin
Customize e-mail communications
If you wish to customize any of the communications, you may do so using the following forms:
• Letter Code Validation (GTVLETR)
• HTML Letter Rules (SOAELTL)
• HTML Letter Module Validation (STVELMT)
• Format HTML Letter Rules (SOAELTR)
For more information on these forms, please see the Banner General 8.5 User Guide, the Banner Student User Guide and the Online Help for each of the forms.
Once the formatted communications have been defined, they need to be associated with a specific communication type on the Proxy Access Communication Rule Form (GERCOMM).
Banner General 8.5.1 April 2012Proxy Access HandbookConfigure Communications

April 20
Sample new proxy e-mail definition
In the following image, please note that the GOVELTR_CTYP_URL and GOVELTR_PROXY_SALT variables are what the proxy will need to access the system for the first time.
Sample new proxy e-mail display
The following is a sample new proxy e-mail:From: [email protected]: parent@my_mail.comSent: Wednesday, September 28, 2011 12:17 AMSubject: New proxy identity
To: Parent Person ( parent@my_mail.com)Student Person has added parent@my_mail.com as a proxy in their school's Banner Web Proxy Access system.The Proxy Access pages are available using the school's Banner Web or through a proxy access login at the following URL:http://domain:port/DAD/bwgkpxya.P_PA_Action?p_token=QUFDdlN5QUFIQUFOZUJYQUFB (Use OU1OS4VK as the action password)
12 Banner General 8.5.1 4-3Proxy Access Handbook
Configure Communications
4-4
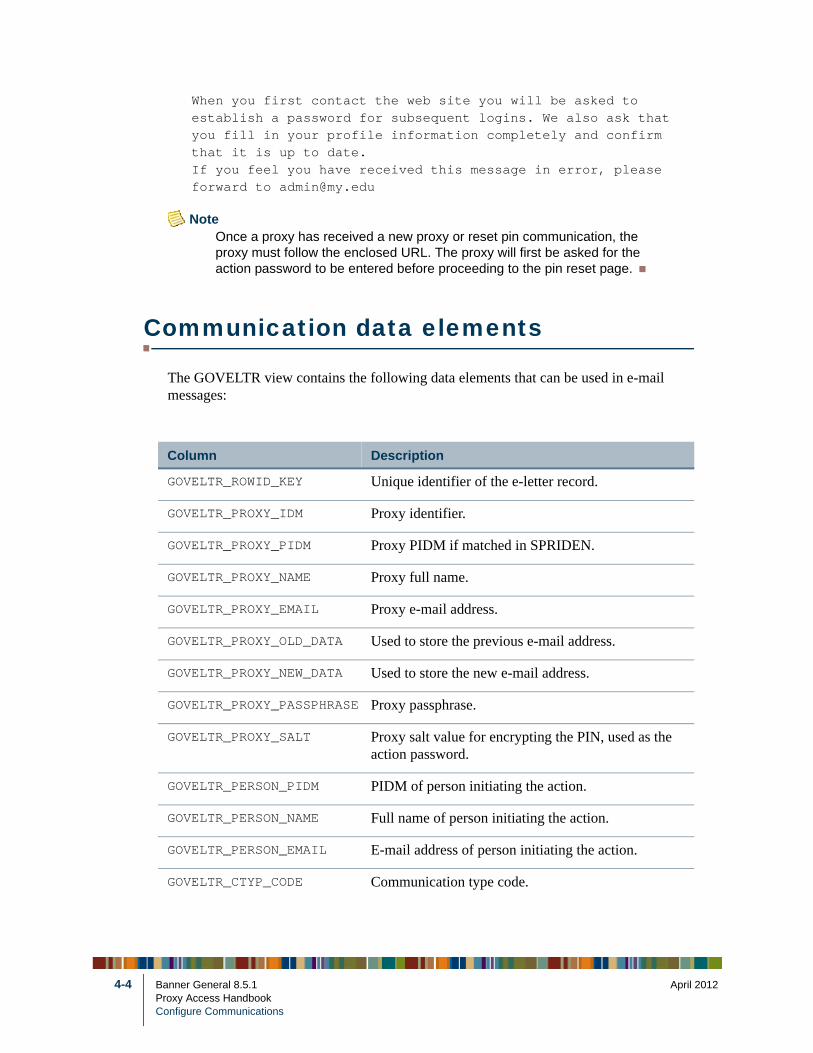
When you first contact the web site you will be asked to establish a password for subsequent logins. We also ask that you fill in your profile information completely and confirm that it is up to date.If you feel you have received this message in error, please forward to [email protected]
NoteOnce a proxy has received a new proxy or reset pin communication, the proxy must follow the enclosed URL. The proxy will first be asked for the action password to be entered before proceeding to the pin reset page.
Communication data elements
The GOVELTR view contains the following data elements that can be used in e-mail messages:
Column Description
GOVELTR_ROWID_KEY Unique identifier of the e-letter record.
GOVELTR_PROXY_IDM Proxy identifier.
GOVELTR_PROXY_PIDM Proxy PIDM if matched in SPRIDEN.
GOVELTR_PROXY_NAME Proxy full name.
GOVELTR_PROXY_EMAIL Proxy e-mail address.
GOVELTR_PROXY_OLD_DATA Used to store the previous e-mail address.
GOVELTR_PROXY_NEW_DATA Used to store the new e-mail address.
GOVELTR_PROXY_PASSPHRASE Proxy passphrase.
GOVELTR_PROXY_SALT Proxy salt value for encrypting the PIN, used as the action password.
GOVELTR_PERSON_PIDM PIDM of person initiating the action.
GOVELTR_PERSON_NAME Full name of person initiating the action.
GOVELTR_PERSON_EMAIL E-mail address of person initiating the action.
GOVELTR_CTYP_CODE Communication type code.
Banner General 8.5.1 April 2012Proxy Access HandbookConfigure Communications

April 20
NoteThe GOVELTR_PERSON and GOVELTR_RETP columns will be empty if the action is initiated by the proxy.
GOVELTR_CTYP_DESC Communication type description that is used as the subject.
GOVELTR_CTYP_URL Action URL.
GOVELTR_ADMIN_EMAIL Reply-to e-mail address of administrator.
GOVELTR_RETP_CODE Relationship code.
GOVELTR_RETP_DESC Relationship description.
Column Description
12 Banner General 8.5.1 4-5Proxy Access Handbook
Configure Communications

4-6
Banner General 8.5.1 April 2012Proxy Access HandbookConfigure Communications
April 20
5 Define Options on GTVOTYP
The Proxy Access Option Type Validation (GTVOTYP) form allows you to define options in the following categories:
• Logging options
• Profile options
• Data load options
• Other options
12 Banner General 8.5.1 5-1Proxy Access Handbook
Define Options on GTVOTYP
5-2
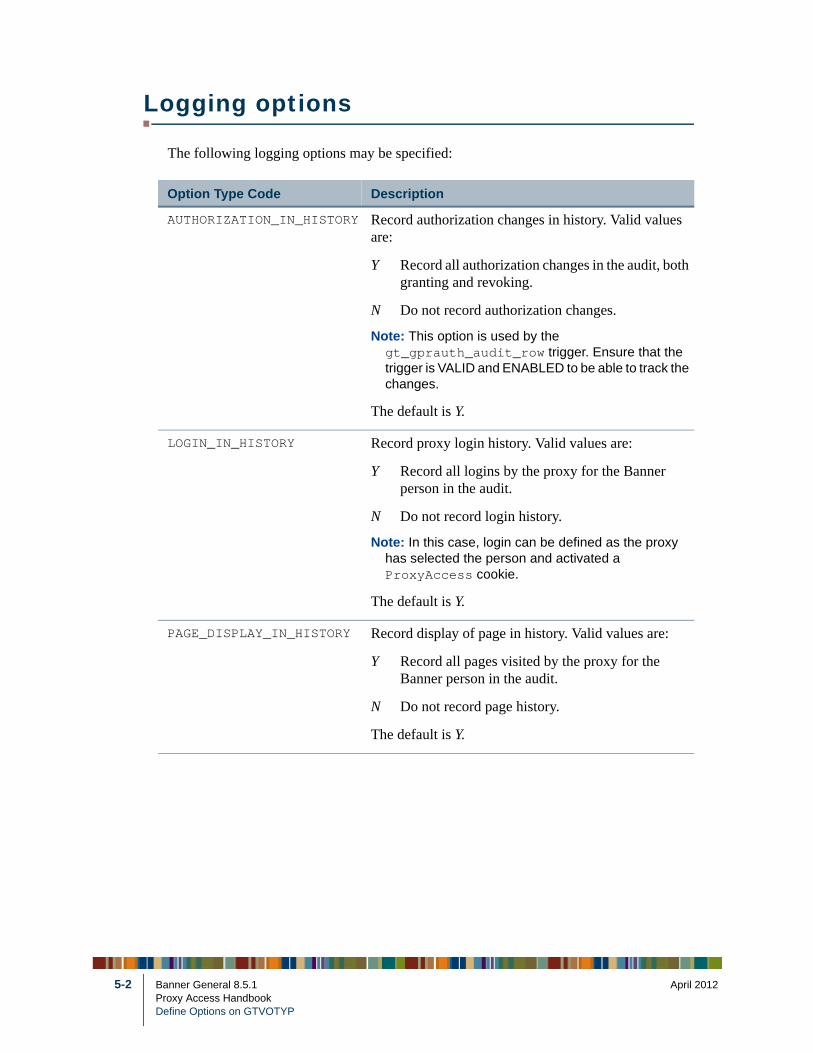
Logging options
The following logging options may be specified:
Option Type Code Description
AUTHORIZATION_IN_HISTORY Record authorization changes in history. Valid values are:
Y Record all authorization changes in the audit, both granting and revoking.
N Do not record authorization changes.
Note: This option is used by the gt_gprauth_audit_row trigger. Ensure that the trigger is VALID and ENABLED to be able to track the changes.
The default is Y.
LOGIN_IN_HISTORY Record proxy login history. Valid values are:
Y Record all logins by the proxy for the Banner person in the audit.
N Do not record login history.
Note: In this case, login can be defined as the proxy has selected the person and activated a ProxyAccess cookie.
The default is Y.
PAGE_DISPLAY_IN_HISTORY Record display of page in history. Valid values are:
Y Record all pages visited by the proxy for the Banner person in the audit.
N Do not record page history.
The default is Y.
Banner General 8.5.1 April 2012Proxy Access HandbookDefine Options on GTVOTYP
April 20
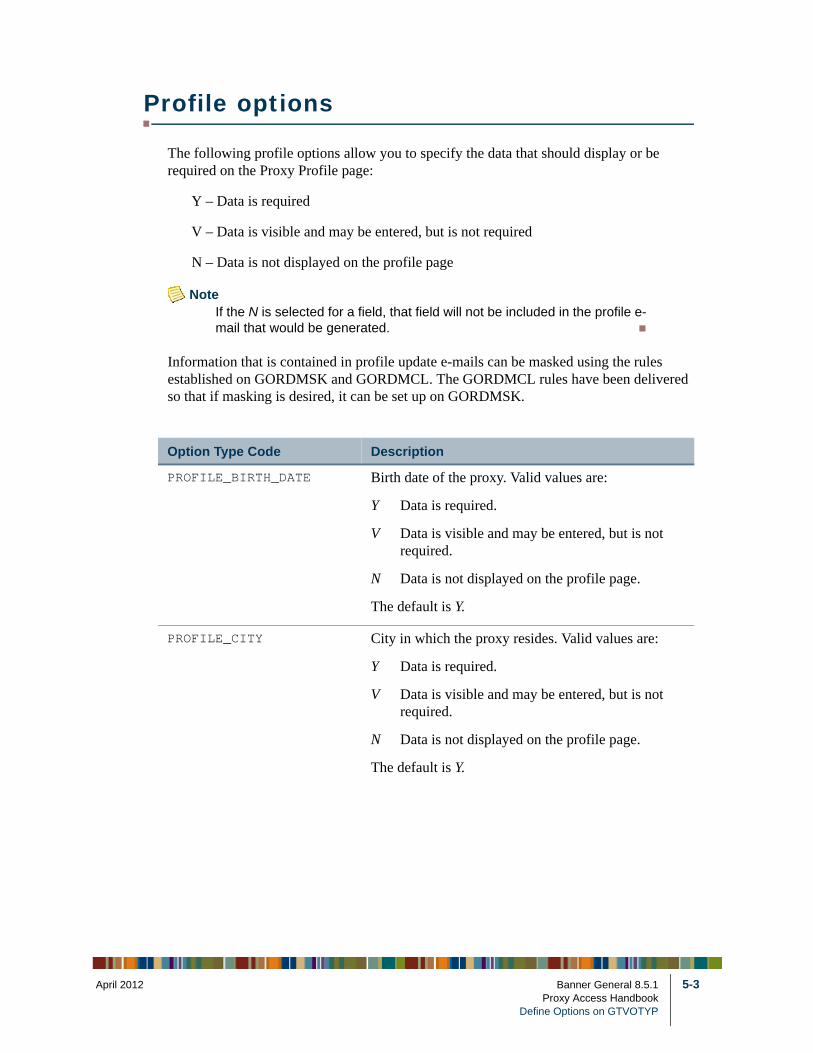
Profile options
The following profile options allow you to specify the data that should display or be required on the Proxy Profile page:
Y – Data is required
V – Data is visible and may be entered, but is not required
N – Data is not displayed on the profile page
NoteIf the N is selected for a field, that field will not be included in the profile e-mail that would be generated.
Information that is contained in profile update e-mails can be masked using the rules established on GORDMSK and GORDMCL. The GORDMCL rules have been delivered so that if masking is desired, it can be set up on GORDMSK.
Option Type Code Description
PROFILE_BIRTH_DATE Birth date of the proxy. Valid values are:
Y Data is required.
V Data is visible and may be entered, but is not required.
N Data is not displayed on the profile page.
The default is Y.
PROFILE_CITY City in which the proxy resides. Valid values are:
Y Data is required.
V Data is visible and may be entered, but is not required.
N Data is not displayed on the profile page.
The default is Y.
12 Banner General 8.5.1 5-3Proxy Access Handbook
Define Options on GTVOTYP
5-4
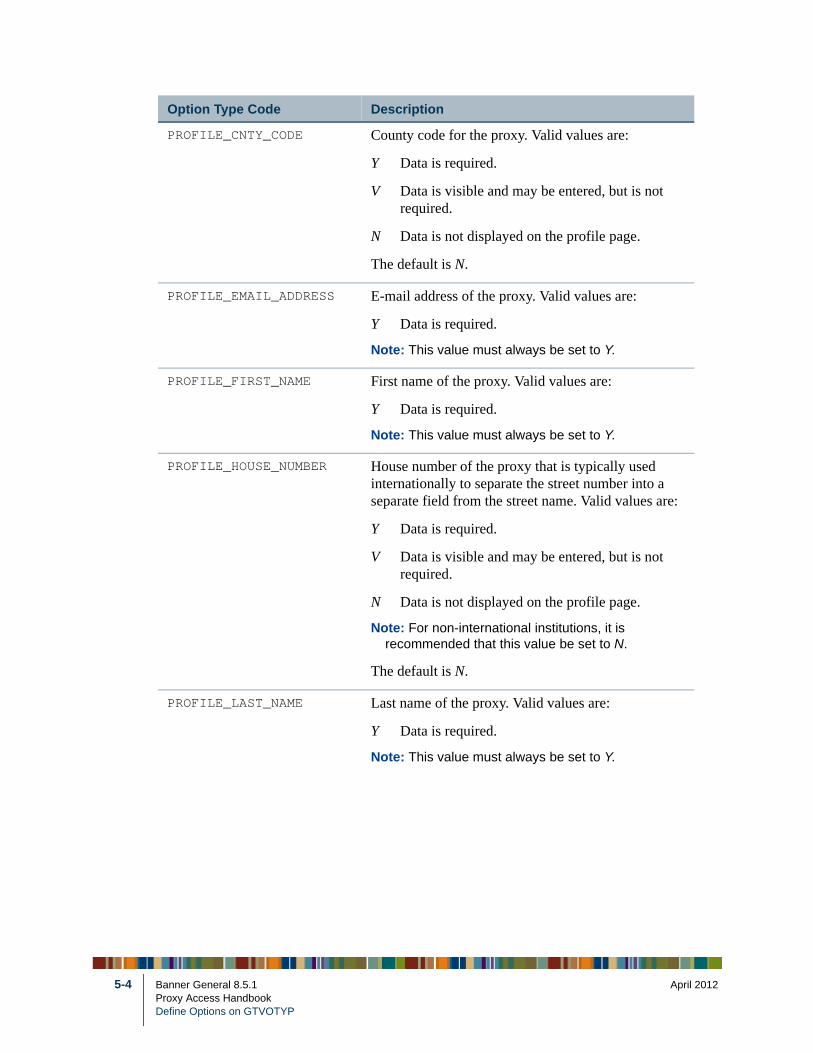
PROFILE_CNTY_CODE County code for the proxy. Valid values are:
Y Data is required.
V Data is visible and may be entered, but is not required.
N Data is not displayed on the profile page.
The default is N.
PROFILE_EMAIL_ADDRESS E-mail address of the proxy. Valid values are:
Y Data is required.
Note: This value must always be set to Y.
PROFILE_FIRST_NAME First name of the proxy. Valid values are:
Y Data is required.
Note: This value must always be set to Y.
PROFILE_HOUSE_NUMBER House number of the proxy that is typically used internationally to separate the street number into a separate field from the street name. Valid values are:
Y Data is required.
V Data is visible and may be entered, but is not required.
N Data is not displayed on the profile page.
Note: For non-international institutions, it is recommended that this value be set to N.
The default is N.
PROFILE_LAST_NAME Last name of the proxy. Valid values are:
Y Data is required.
Note: This value must always be set to Y.
Option Type Code Description
Banner General 8.5.1 April 2012Proxy Access HandbookDefine Options on GTVOTYP
April 20
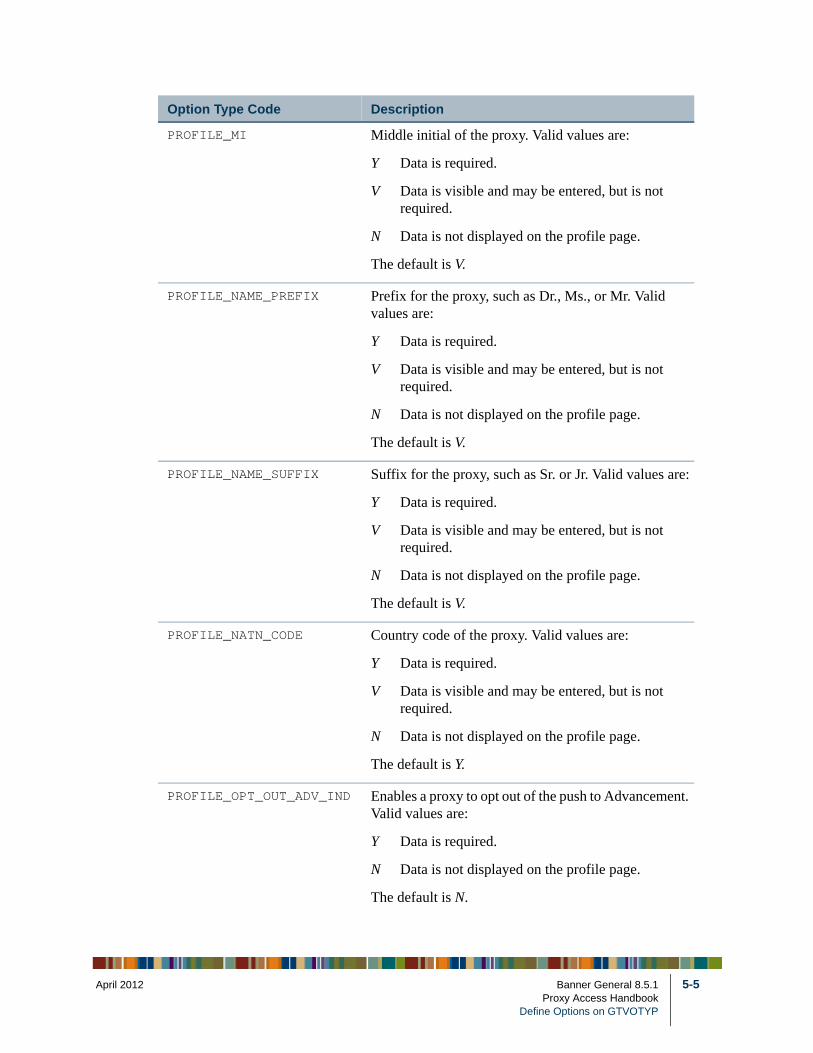
PROFILE_MI Middle initial of the proxy. Valid values are:
Y Data is required.
V Data is visible and may be entered, but is not required.
N Data is not displayed on the profile page.
The default is V.
PROFILE_NAME_PREFIX Prefix for the proxy, such as Dr., Ms., or Mr. Valid values are:
Y Data is required.
V Data is visible and may be entered, but is not required.
N Data is not displayed on the profile page.
The default is V.
PROFILE_NAME_SUFFIX Suffix for the proxy, such as Sr. or Jr. Valid values are:
Y Data is required.
V Data is visible and may be entered, but is not required.
N Data is not displayed on the profile page.
The default is V.
PROFILE_NATN_CODE Country code of the proxy. Valid values are:
Y Data is required.
V Data is visible and may be entered, but is not required.
N Data is not displayed on the profile page.
The default is Y.
PROFILE_OPT_OUT_ADV_IND Enables a proxy to opt out of the push to Advancement. Valid values are:
Y Data is required.
N Data is not displayed on the profile page.
The default is N.
Option Type Code Description
12 Banner General 8.5.1 5-5Proxy Access Handbook
Define Options on GTVOTYP
5-6
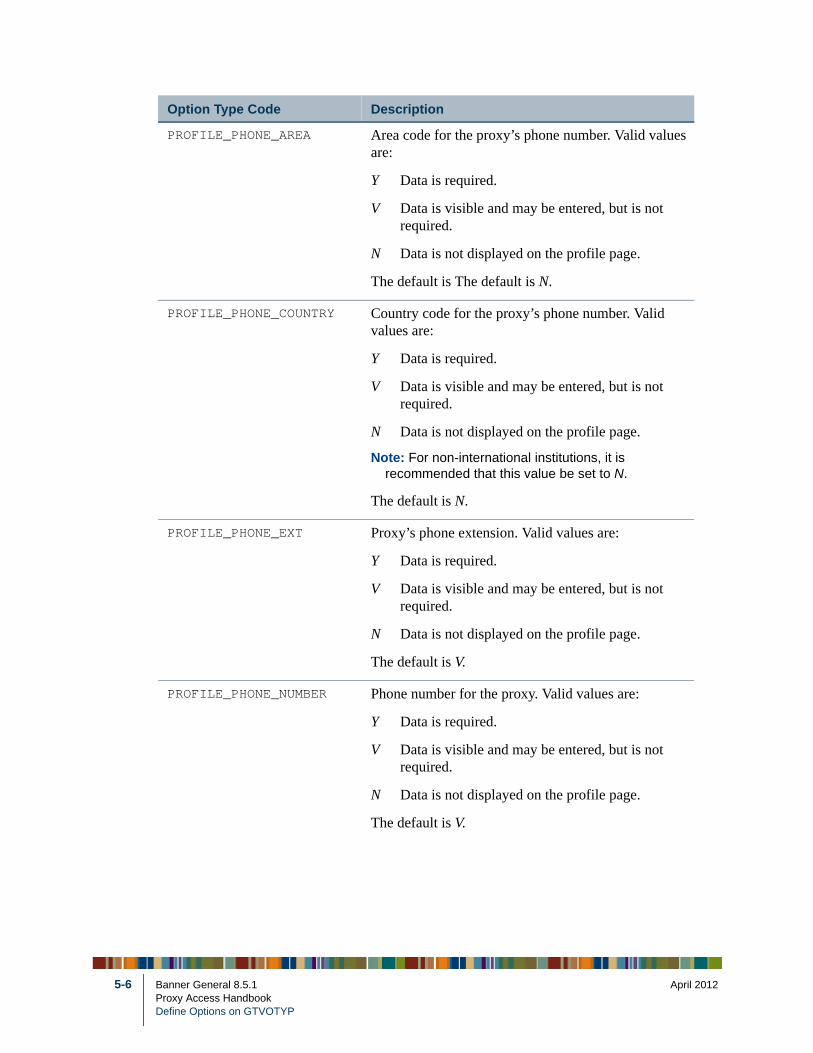
PROFILE_PHONE_AREA Area code for the proxy’s phone number. Valid values are:
Y Data is required.
V Data is visible and may be entered, but is not required.
N Data is not displayed on the profile page.
The default is The default is N.
PROFILE_PHONE_COUNTRY Country code for the proxy’s phone number. Valid values are:
Y Data is required.
V Data is visible and may be entered, but is not required.
N Data is not displayed on the profile page.
Note: For non-international institutions, it is recommended that this value be set to N.
The default is N.
PROFILE_PHONE_EXT Proxy’s phone extension. Valid values are:
Y Data is required.
V Data is visible and may be entered, but is not required.
N Data is not displayed on the profile page.
The default is V.
PROFILE_PHONE_NUMBER Phone number for the proxy. Valid values are:
Y Data is required.
V Data is visible and may be entered, but is not required.
N Data is not displayed on the profile page.
The default is V.
Option Type Code Description
Banner General 8.5.1 April 2012Proxy Access HandbookDefine Options on GTVOTYP

April 20
PROFILE_PREF_FIRST_NAME Preferred first name for the proxy. Valid values are:
Y Data is required.
V Data is visible and may be entered, but is not required.
N Data is not displayed on the profile page.
The default is V.
PROFILE_REQUIRED Blocks display of proxy authorizations. Valid values are:
Y Block the display of proxy authorizations if any required profile data is missing.
N The display of proxy authorizations will not be blocked.
The default is Y.
PROFILE_SEX Gender of the proxy. Valid values are:
Y Data is required.
V Data is visible and may be entered, but is not required.
N Data is not displayed on the profile page.
The default is V.
PROFILE_SSN Social security number or taxpayer ID of the proxy. Valid values are:
Y Data is required.
V Data is visible and may be entered, but is not required.
N Data is not displayed on the profile page.
Note: It is recommended that this value be set to N.
The default is V.
Option Type Code Description
12 Banner General 8.5.1 5-7Proxy Access Handbook
Define Options on GTVOTYP

5-8
PROFILE_STAT_CODE State code for the proxy’s address. Valid values are:
Y Data is required.
V Data is visible and may be entered, but is not required.
N Data is not displayed on the profile page.
The default is Y.
PROFILE_STREET_LINE1 Street line number one of the proxy’s address. Valid values are:
Y Data is required.
V Data is visible and may be entered, but is not required.
N Data is not displayed on the profile page.
The default is Y.
PROFILE_STREET_LINE2 Street line number two of the proxy’s address. Valid values are:
Y Data is required.
V Data is visible and may be entered, but is not required.
N Data is not displayed on the profile page.
The default is V.
PROFILE_STREET_LINE3 Street line number three of the proxy’s address. Valid values are:
Y Data is required.
V Data is visible and may be entered, but is not required.
N Data is not displayed on the profile page.
Note: For non-international institutions, it is recommended that this value be set to N.
The default is V.
Option Type Code Description
Banner General 8.5.1 April 2012Proxy Access HandbookDefine Options on GTVOTYP
April 20
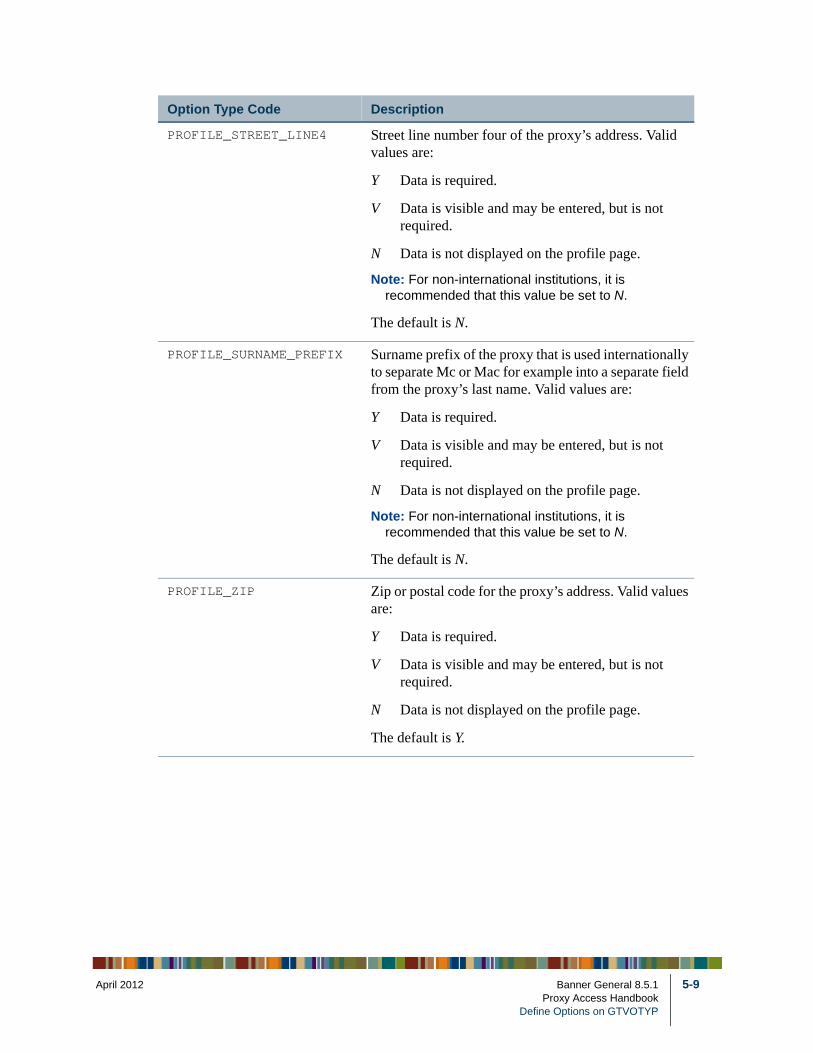
PROFILE_STREET_LINE4 Street line number four of the proxy’s address. Valid values are:
Y Data is required.
V Data is visible and may be entered, but is not required.
N Data is not displayed on the profile page.
Note: For non-international institutions, it is recommended that this value be set to N.
The default is N.
PROFILE_SURNAME_PREFIX Surname prefix of the proxy that is used internationally to separate Mc or Mac for example into a separate field from the proxy’s last name. Valid values are:
Y Data is required.
V Data is visible and may be entered, but is not required.
N Data is not displayed on the profile page.
Note: For non-international institutions, it is recommended that this value be set to N.
The default is N.
PROFILE_ZIP Zip or postal code for the proxy’s address. Valid values are:
Y Data is required.
V Data is visible and may be entered, but is not required.
N Data is not displayed on the profile page.
The default is Y.
Option Type Code Description
12 Banner General 8.5.1 5-9Proxy Access Handbook
Define Options on GTVOTYP
5-10
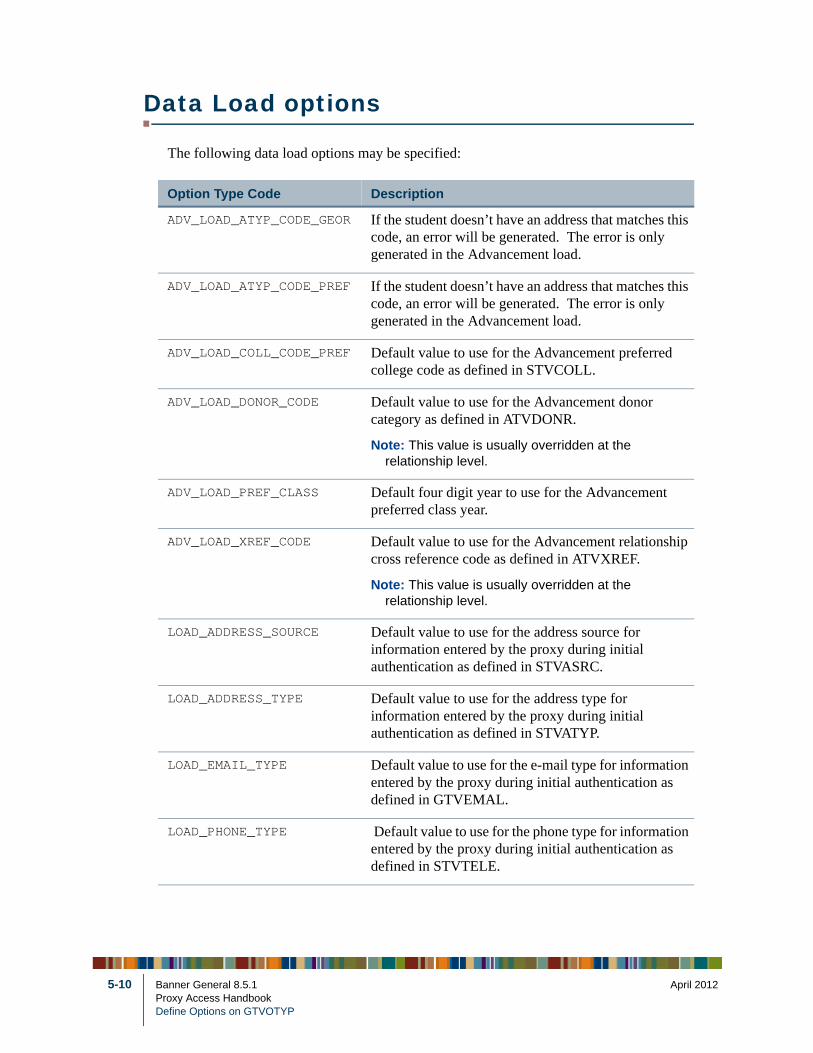
Data Load options
The following data load options may be specified:
Option Type Code Description
ADV_LOAD_ATYP_CODE_GEOR If the student doesn’t have an address that matches this code, an error will be generated. The error is only generated in the Advancement load.
ADV_LOAD_ATYP_CODE_PREF If the student doesn’t have an address that matches this code, an error will be generated. The error is only generated in the Advancement load.
ADV_LOAD_COLL_CODE_PREF Default value to use for the Advancement preferred college code as defined in STVCOLL.
ADV_LOAD_DONOR_CODE Default value to use for the Advancement donor category as defined in ATVDONR.
Note: This value is usually overridden at the relationship level.
ADV_LOAD_PREF_CLASS Default four digit year to use for the Advancement preferred class year.
ADV_LOAD_XREF_CODE Default value to use for the Advancement relationship cross reference code as defined in ATVXREF.
Note: This value is usually overridden at the relationship level.
LOAD_ADDRESS_SOURCE Default value to use for the address source for information entered by the proxy during initial authentication as defined in STVASRC.
LOAD_ADDRESS_TYPE Default value to use for the address type for information entered by the proxy during initial authentication as defined in STVATYP.
LOAD_EMAIL_TYPE Default value to use for the e-mail type for information entered by the proxy during initial authentication as defined in GTVEMAL.
LOAD_PHONE_TYPE Default value to use for the phone type for information entered by the proxy during initial authentication as defined in STVTELE.
Banner General 8.5.1 April 2012Proxy Access HandbookDefine Options on GTVOTYP

April 20
Miscellaneous options
The following miscellaneous options may be specified:
Option Type Code Description
ACCESS_WINDOW_DAYS Default number of days that a proxy is allowed access.
The default is 365.
ACTION_VALID_DAYS Default number of days that an action link is active for a new proxy, pin reset, or e-mail change.
The default is 5.
DEBUG_EMAIL Debug e-mail for testing. Valid values are:
N Send e-mail.
Y View e-mail, but do not send.
I View and send e-mail.
The default is N.
DEBUG_GORSRIN Debug the push process for testing. Valid values are:
0 No log will be created.
1 A log file with minimal detail will be created.
2 A log file with more detail will be created.
3 A log file with the most detail will be created.
The default is 3.
DELETE_HISTORY Delete history when Global Proxy Access is removed. Valid values are:
Y History will be deleted when Global Proxy Access is removed.
N History will not be deleted when Global Proxy Access is removed.
The default is N.
Note: This option is only relevant with a System Code of PROXY_GLOBAL_ACCESS.
12 Banner General 8.5.1 5-11Proxy Access Handbook
Define Options on GTVOTYP
5-12
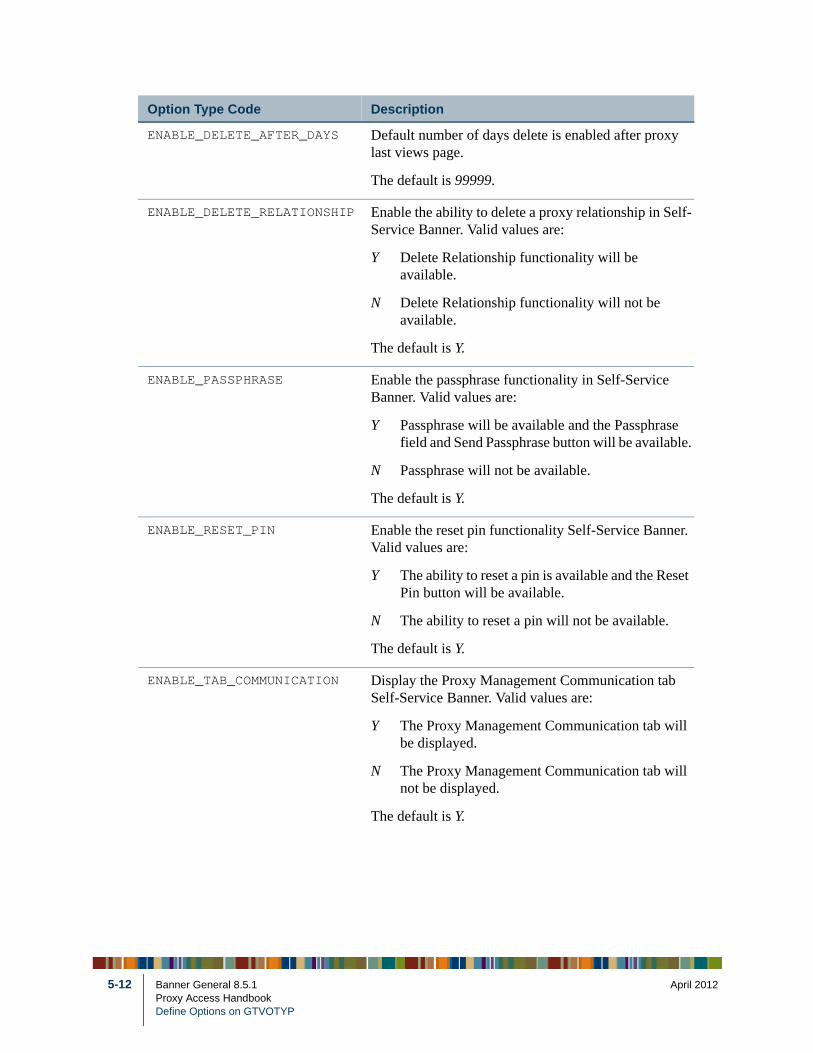
ENABLE_DELETE_AFTER_DAYS Default number of days delete is enabled after proxy last views page.
The default is 99999.
ENABLE_DELETE_RELATIONSHIP Enable the ability to delete a proxy relationship in Self-Service Banner. Valid values are:
Y Delete Relationship functionality will be available.
N Delete Relationship functionality will not be available.
The default is Y.
ENABLE_PASSPHRASE Enable the passphrase functionality in Self-Service Banner. Valid values are:
Y Passphrase will be available and the Passphrase field and Send Passphrase button will be available.
N Passphrase will not be available.
The default is Y.
ENABLE_RESET_PIN Enable the reset pin functionality Self-Service Banner. Valid values are:
Y The ability to reset a pin is available and the Reset Pin button will be available.
N The ability to reset a pin will not be available.
The default is Y.
ENABLE_TAB_COMMUNICATION Display the Proxy Management Communication tab Self-Service Banner. Valid values are:
Y The Proxy Management Communication tab will be displayed.
N The Proxy Management Communication tab will not be displayed.
The default is Y.
Option Type Code Description
Banner General 8.5.1 April 2012Proxy Access HandbookDefine Options on GTVOTYP
April 20
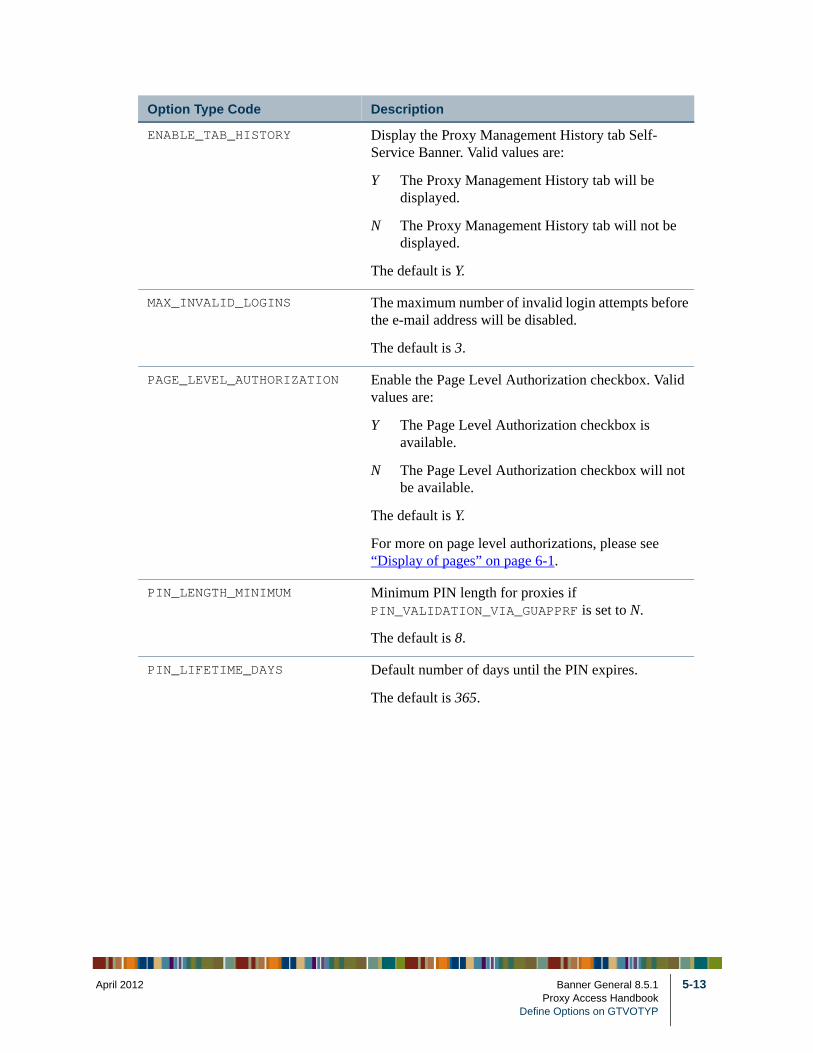
ENABLE_TAB_HISTORY Display the Proxy Management History tab Self-Service Banner. Valid values are:
Y The Proxy Management History tab will be displayed.
N The Proxy Management History tab will not be displayed.
The default is Y.
MAX_INVALID_LOGINS The maximum number of invalid login attempts before the e-mail address will be disabled.
The default is 3.
PAGE_LEVEL_AUTHORIZATION Enable the Page Level Authorization checkbox. Valid values are:
Y The Page Level Authorization checkbox is available.
N The Page Level Authorization checkbox will not be available.
The default is Y.
For more on page level authorizations, please see “Display of pages” on page 6-1.
PIN_LENGTH_MINIMUM Minimum PIN length for proxies if PIN_VALIDATION_VIA_GUAPPRF is set to N.
The default is 8.
PIN_LIFETIME_DAYS Default number of days until the PIN expires.
The default is 365.
Option Type Code Description
12 Banner General 8.5.1 5-13Proxy Access Handbook
Define Options on GTVOTYP

5-14
PIN_VALIDATION_VIA_GUAPPRF Use GUAPPRF for Proxy Pins. Valid values are:
Y Rules for pin length, numeric required in pin, and character required in pin will be based on the rules established on the GUAPPRF form instead of only relying upon the PIN_LENGTH_MINIMUM option type code in GTVOTYP.
N The PIN_LENGTH_MINIMUM option type code in GTVOTYP will be used and no rules for numeric or character requirements will be used.
The default is Y.
PROXY_GIDM_PREFIX Single character to be used as a prefix to be used with the GIDM.
The default is ? (question mark).
VERIFY_CANCEL_EMAIL_ACTION Message to a previous e-mail address will contain a URL and action password that can be used to cancel an e-mail address change.
Y Enforce the use of an action password.
The default is Y.
VERIFY_NEW_EMAIL_ACTION Message to a new e-mail address will contain a URL and action password used to confirm an e-mail address change.
Y Enforce the use of an action password.
The default is Y.
VERIFY_NEW_PROXY_ACTION Message to a new proxy will contain a URL and action password used to update the proxy PIN value.
Y Enforce the use of an action password.
The default is Y.
VERIFY_PIN_RESET_ACTION Message to a proxy about a pin reset will contain a URL and action password used to update proxy PIN value.
Y Enforce the use of an action password.
The default is Y.
Option Type Code Description
Banner General 8.5.1 April 2012Proxy Access HandbookDefine Options on GTVOTYP

April 20
6 Web Tailor Configuration
The pages that a Banner person can authorize are controlled by configuration within Web Tailor. This configuration must be performed for each relationship type that your institution has decided upon. The naming standard for the menu(s), where the relationship type is defined on GTVRETP, are as follows:
PROXY_ACCESS_RELATIONSHIPCODE_OptionalSortParameter
NoteThe PROXY_ACCESS and the RELATIONSHIPCODE (PARENT or ADVISOR) must be uppercase, however, the OptionalSortParameter has no case requirement.Application Server
For example:
• PROXY_ACCESS_PARENT_Slist
• PROXY_ACCESS_PARENT_Glist
• PROXY_ACCESS_ADVISOR
In the above example, the first two menus will both be available for proxies of type PARENT of the Banner person.
Any Web page can be set up as a Proxy Access page, as long as it calls the twbkwbis.F_ValidUser function to validate the user.
NoteThis includes local pages as well as baseline pages.
For more information on setting up a menu, please see steps 6 and 7 in Appendix D, “Global Proxy Access”.
Display of pages
Pages will be displayed to the Banner person in the order determined primarily by the menu description and secondarily by the sequence number within the menu. If a page is in multiple menus, it will only be displayed once in the list, in the first menu in which it is displayed.
12 Banner General 8.5.1 6-1Proxy Access HandbookWeb Tailor Configuration

6-2
One of the configuration options that should be set is whether to allow authorizations to be performed on individual pages or only at a menu level. You can force a menu of pages to be authorized as a unit if the PAGE_LEVEL_AUTHORIZATION option is set to N on GTVOTYP. Depending on this configuration, check boxes next to the list of pages may or may not be updated. The check boxes act as a toggle, whether at the menu level or at the individual page level, switching between authorized and not authorized.
Your institution may want to have multiple menus for a relationship type for the following reasons:
• To allow the Banner person to authorize/un-authorize a group of pages at a single time.
• To group similar pages together, both for the Banner person and for the proxy.
Please note the following:
WarningIt is highly recommended that you do not make any Update pages available to proxies. Please limit proxy access to only Inquiry pages
• If a new page is added to a menu through Web Tailor, it will appear in all the displays for the appropriate proxies, but it will be unauthorized. Banner persons wishing to authorize this page will need to use Self-Service Banner to perform the authorization, so this should be kept in mind when communicating changes to your users.
• If a menu is authorized, only those pages currently displayed will be authorized. Therefore, if a page is defined for two menus, it will only be included in the menu-level authorization for the first displayed menu.
• The check box at the menu will be checked if all the displayed pages are authorized. If a page is in the menu but is not displayed in the list because it was removed from the display list because it was duplicated, it will not matter if it is authorized or not when determining whether the whole group of pages has been authorized.
• If a page is removed from a menu through Web Tailor, it will disappear from that menu’s list, but may appear in another menu. If so, any authorization will stay with the page.
• If a menu is removed through Web Tailor, the pages that had been under it may appear in other menus, with their authorizations. If a page from the removed menu does not appear in any other menu, it will not display and the Banner person will not be able to adjust the authorizations.
NotePages defined as Admin Secured in Web Tailor should not be proxied since these pages use FGAC (Fine Grained Access Control) and require an Oracle account which the proxy users will not have.
Banner General 8.5.1 April 2012Proxy Access HandbookWeb Tailor Configuration
April 20
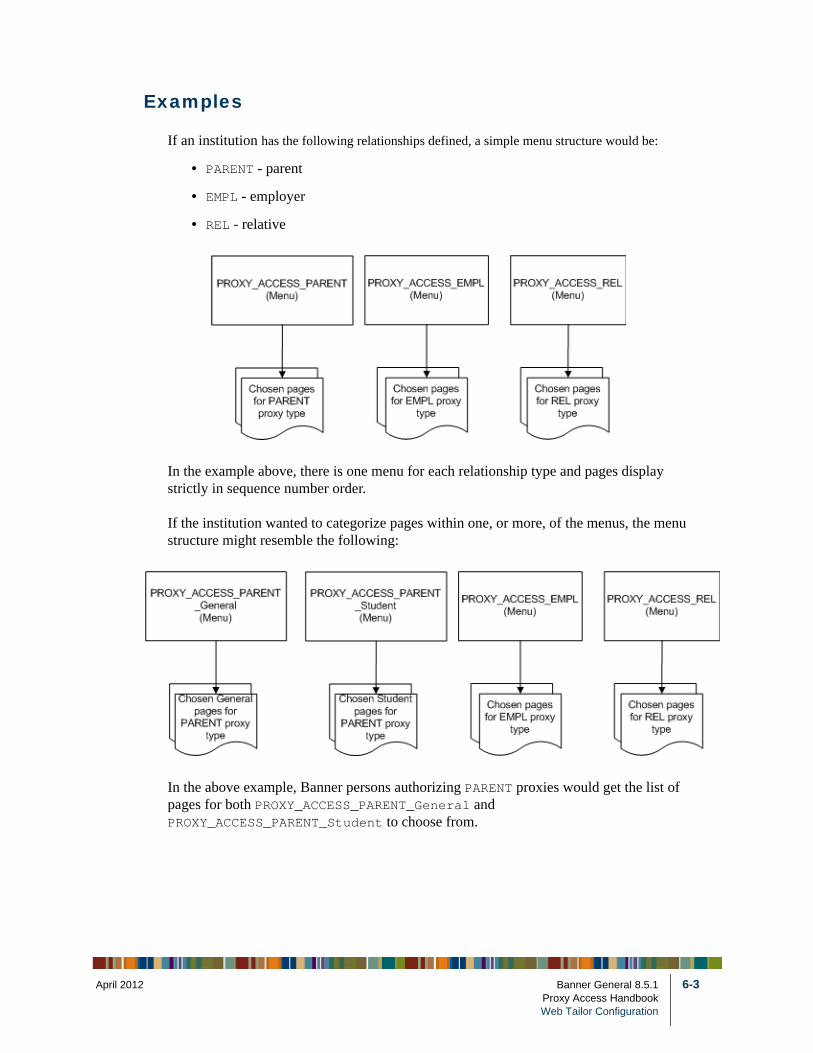
Examples
If an institution has the following relationships defined, a simple menu structure would be:
• PARENT - parent
• EMPL - employer
• REL - relative
In the example above, there is one menu for each relationship type and pages display strictly in sequence number order.
If the institution wanted to categorize pages within one, or more, of the menus, the menu structure might resemble the following:
In the above example, Banner persons authorizing PARENT proxies would get the list of pages for both PROXY_ACCESS_PARENT_General and PROXY_ACCESS_PARENT_Student to choose from.
12 Banner General 8.5.1 6-3Proxy Access HandbookWeb Tailor Configuration
6-4
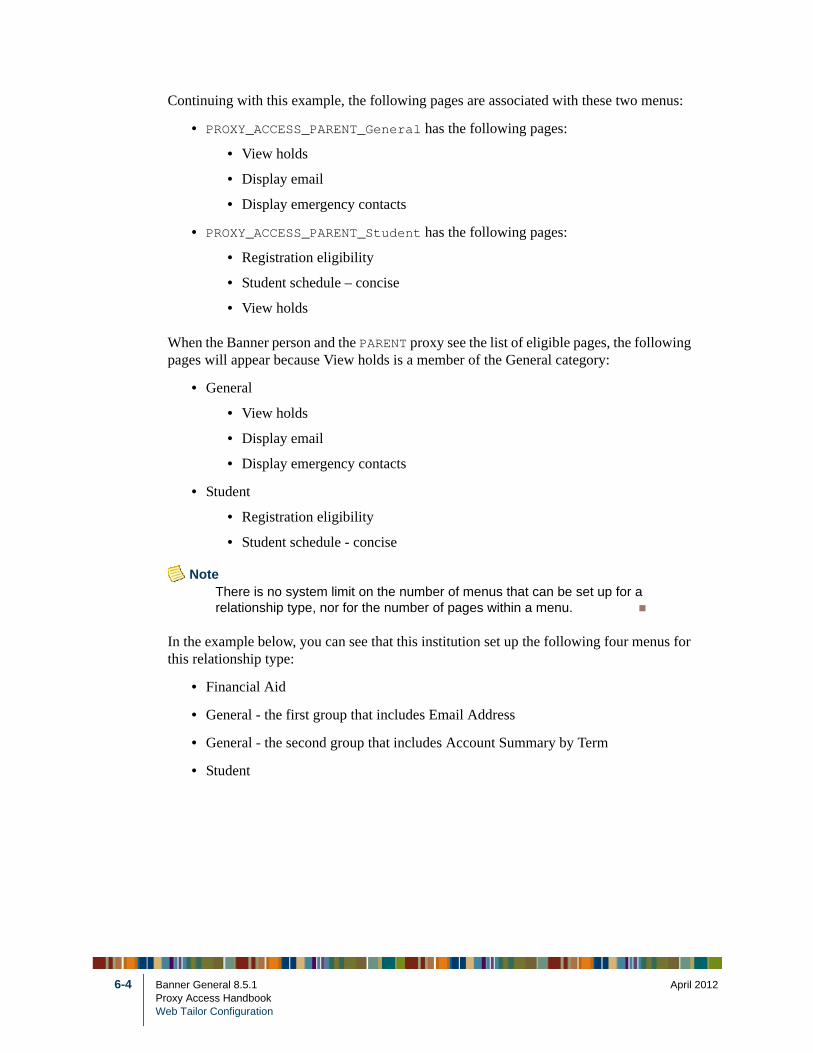
Continuing with this example, the following pages are associated with these two menus:
• PROXY_ACCESS_PARENT_General has the following pages:
• View holds
• Display email
• Display emergency contacts
• PROXY_ACCESS_PARENT_Student has the following pages:
• Registration eligibility
• Student schedule – concise
• View holds
When the Banner person and the PARENT proxy see the list of eligible pages, the following pages will appear because View holds is a member of the General category:
• General
• View holds
• Display email
• Display emergency contacts
• Student
• Registration eligibility
• Student schedule - concise
NoteThere is no system limit on the number of menus that can be set up for a relationship type, nor for the number of pages within a menu.
In the example below, you can see that this institution set up the following four menus for this relationship type:
• Financial Aid
• General - the first group that includes Email Address
• General - the second group that includes Account Summary by Term
• Student
Banner General 8.5.1 April 2012Proxy Access HandbookWeb Tailor Configuration

April 20
12 Banner General 8.5.1 6-5Proxy Access HandbookWeb Tailor Configuration
6-6
Banner General 8.5.1 April 2012Proxy Access HandbookWeb Tailor Configuration
April 2012
ge 2-4
efore d. olicies.
A-1 Banner General 8.5.1Proxy Access HandbookSample GORRSQL Rules
A Sample GORRSQL Rules
For sample GORRSQL rules, please refer the following sections of this appendix:
NotePlease See “Proxy Access roles” on page 1-5 and “Set SQL to implement rules” on pafor an overview of these roles. Typically these rules are updated by a DBA or technical resource with access to the GORRSQL form.
NoteSample rules for these populations are not delivered as active, nor are they validated. Bthe rules can be used at your institution, they must be analyzed, validated, and activatePlease ensure that you adapt these rules as necessary to conform to your institution’s p
To use these rules, you must ensure that the Web Tailor Parameter ENABLE_GORRSQL_SSB_ROLES is set to Y.
• “Sample GORRSQL Rules to enable Proxy Access Processing” on page A-2
• “Sample GORRSQL Rules to enable specific Proxy selections” on page A-5
• “Sample GORRSQL Rules to enable Proxy Access via SSB Access” on page A-8
• “Sample GORRSQL Rules to enable Global Proxy Access” on page A-11
April 2012
ess
MT rule.
y one
A-2 Banner General 8.5.1Proxy Access HandbookSample GORRSQL Rules
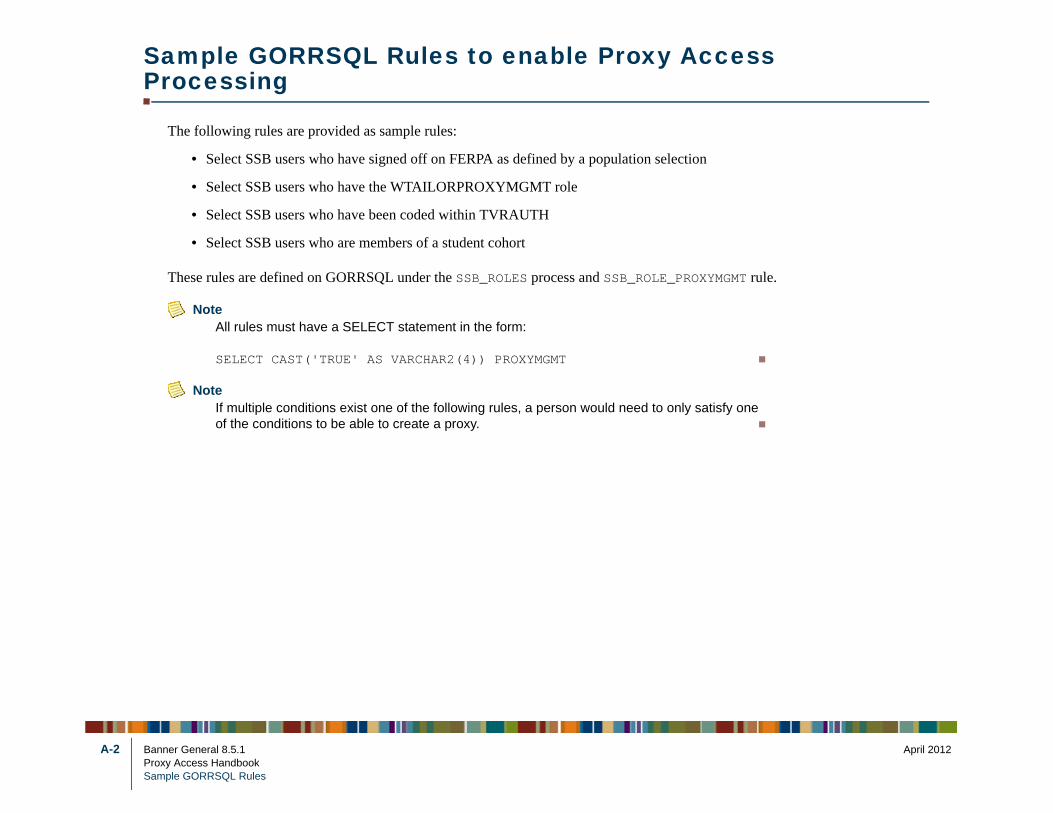
Sample GORRSQL Rules to enable Proxy AccProcessing
The following rules are provided as sample rules:
• Select SSB users who have signed off on FERPA as defined by a population selection
• Select SSB users who have the WTAILORPROXYMGMT role
• Select SSB users who have been coded within TVRAUTH
• Select SSB users who are members of a student cohort
These rules are defined on GORRSQL under the SSB_ROLES process and SSB_ROLE_PROXYMG
NoteAll rules must have a SELECT statement in the form:
SELECT CAST('TRUE' AS VARCHAR2(4)) PROXYMGMT
NoteIf multiple conditions exist one of the following rules, a person would need to only satisfof the conditions to be able to create a proxy.
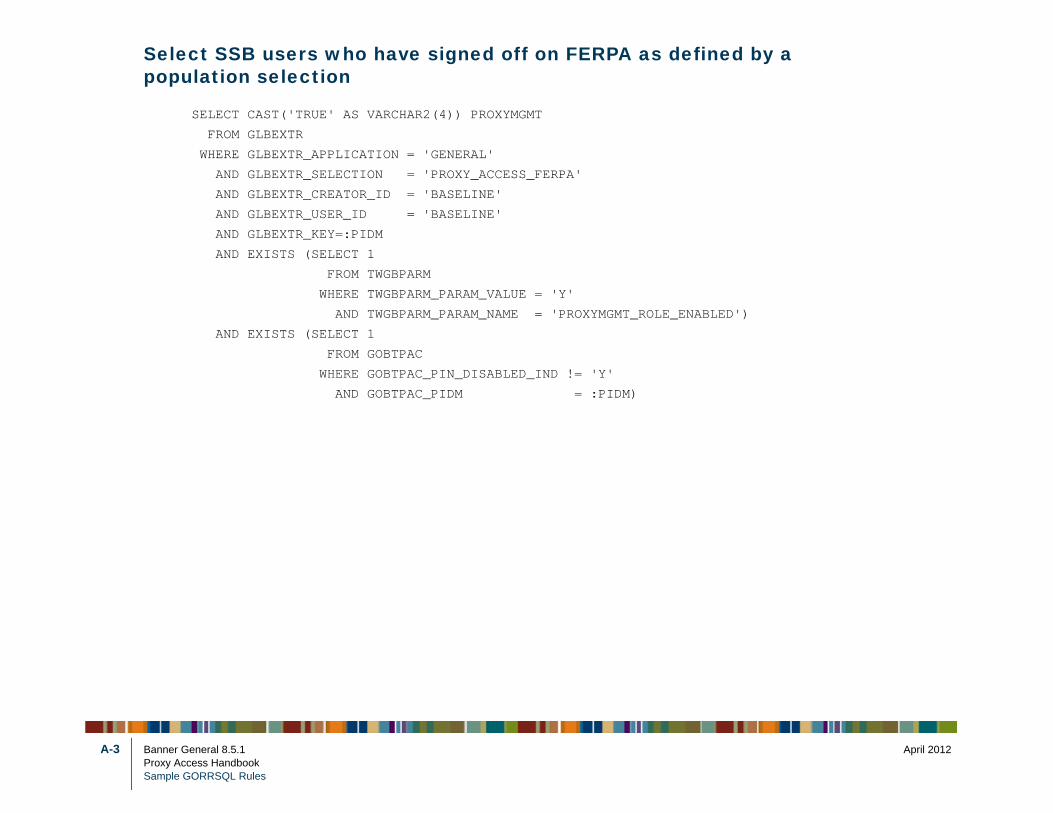
April 2012
d by a
D')
A-3 Banner General 8.5.1Proxy Access HandbookSample GORRSQL Rules
Select SSB users who have signed off on FERPA as definepopulation selection
SELECT CAST('TRUE' AS VARCHAR2(4)) PROXYMGMT
FROM GLBEXTR
WHERE GLBEXTR_APPLICATION = 'GENERAL'
AND GLBEXTR_SELECTION = 'PROXY_ACCESS_FERPA'
AND GLBEXTR_CREATOR_ID = 'BASELINE'
AND GLBEXTR_USER_ID = 'BASELINE'
AND GLBEXTR_KEY=:PIDM
AND EXISTS (SELECT 1
FROM TWGBPARM
WHERE TWGBPARM_PARAM_VALUE = 'Y'
AND TWGBPARM_PARAM_NAME = 'PROXYMGMT_ROLE_ENABLE
AND EXISTS (SELECT 1
FROM GOBTPAC
WHERE GOBTPAC_PIN_DISABLED_IND != 'Y'
AND GOBTPAC_PIDM = :PIDM)
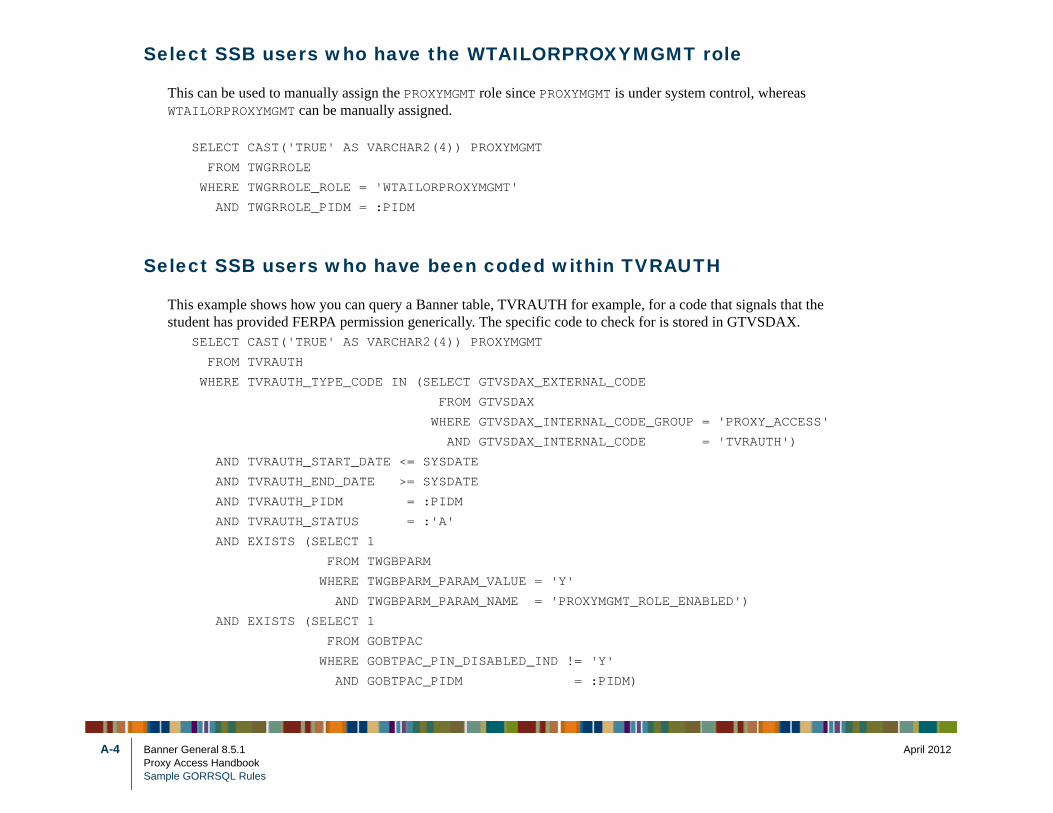
April 2012
e
trol, whereas
t signals that the GTVSDAX.
PROXY_ACCESS'
TVRAUTH')
D')
A-4 Banner General 8.5.1Proxy Access HandbookSample GORRSQL Rules
Select SSB users who have the WTAILORPROXYMGMT rol
This can be used to manually assign the PROXYMGMT role since PROXYMGMT is under system conWTAILORPROXYMGMT can be manually assigned.
SELECT CAST('TRUE' AS VARCHAR2(4)) PROXYMGMT
FROM TWGRROLE
WHERE TWGRROLE_ROLE = 'WTAILORPROXYMGMT'
AND TWGRROLE_PIDM = :PIDM
Select SSB users who have been coded within TVRAUTH
This example shows how you can query a Banner table, TVRAUTH for example, for a code thastudent has provided FERPA permission generically. The specific code to check for is stored in
SELECT CAST('TRUE' AS VARCHAR2(4)) PROXYMGMT
FROM TVRAUTH
WHERE TVRAUTH_TYPE_CODE IN (SELECT GTVSDAX_EXTERNAL_CODE
FROM GTVSDAX
WHERE GTVSDAX_INTERNAL_CODE_GROUP = '
AND GTVSDAX_INTERNAL_CODE = '
AND TVRAUTH_START_DATE <= SYSDATE
AND TVRAUTH_END_DATE >= SYSDATE
AND TVRAUTH_PIDM = :PIDM
AND TVRAUTH_STATUS = :'A'
AND EXISTS (SELECT 1
FROM TWGBPARM
WHERE TWGBPARM_PARAM_VALUE = 'Y'
AND TWGBPARM_PARAM_NAME = 'PROXYMGMT_ROLE_ENABLE
AND EXISTS (SELECT 1
FROM GOBTPAC
WHERE GOBTPAC_PIN_DISABLED_IND != 'Y'
AND GOBTPAC_PIDM = :PIDM)
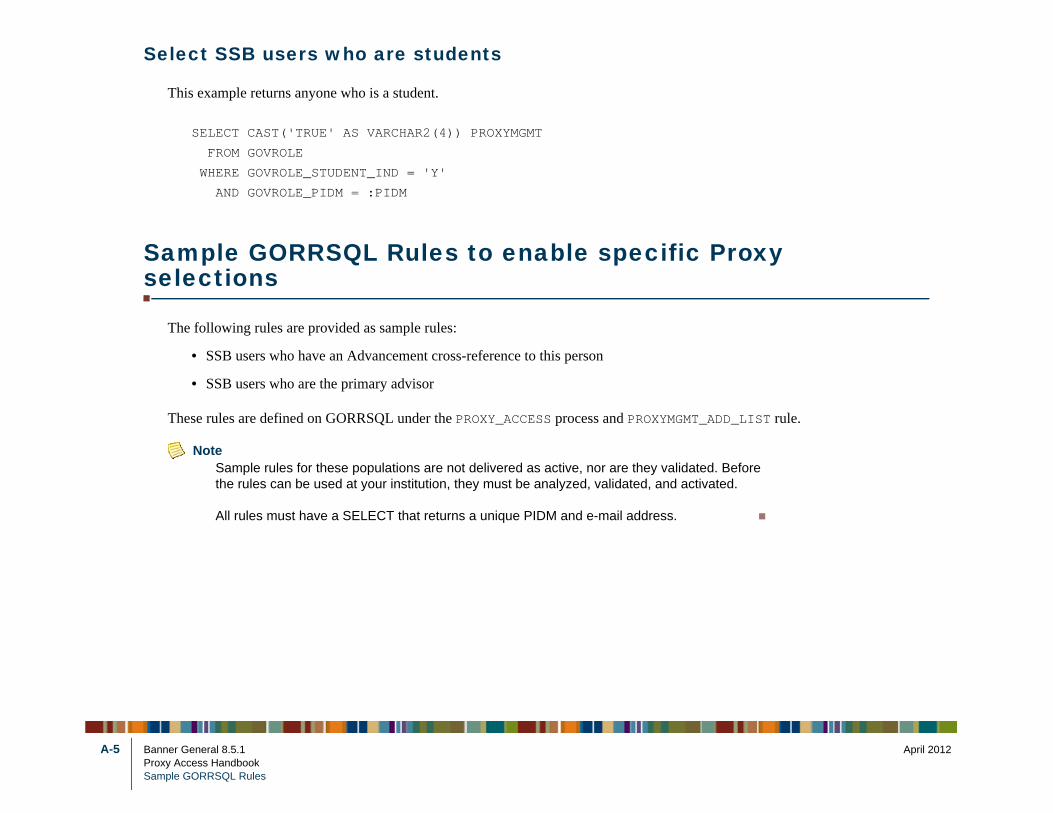
April 2012
roxy
_LIST rule.
efore d.
A-5 Banner General 8.5.1Proxy Access HandbookSample GORRSQL Rules
Select SSB users who are students
This example returns anyone who is a student.
SELECT CAST('TRUE' AS VARCHAR2(4)) PROXYMGMT
FROM GOVROLE
WHERE GOVROLE_STUDENT_IND = 'Y'
AND GOVROLE_PIDM = :PIDM
Sample GORRSQL Rules to enable specific Pselections
The following rules are provided as sample rules:
• SSB users who have an Advancement cross-reference to this person
• SSB users who are the primary advisor
These rules are defined on GORRSQL under the PROXY_ACCESS process and PROXYMGMT_ADD
NoteSample rules for these populations are not delivered as active, nor are they validated. Bthe rules can be used at your institution, they must be analyzed, validated, and activate
All rules must have a SELECT that returns a unique PIDM and e-mail address.
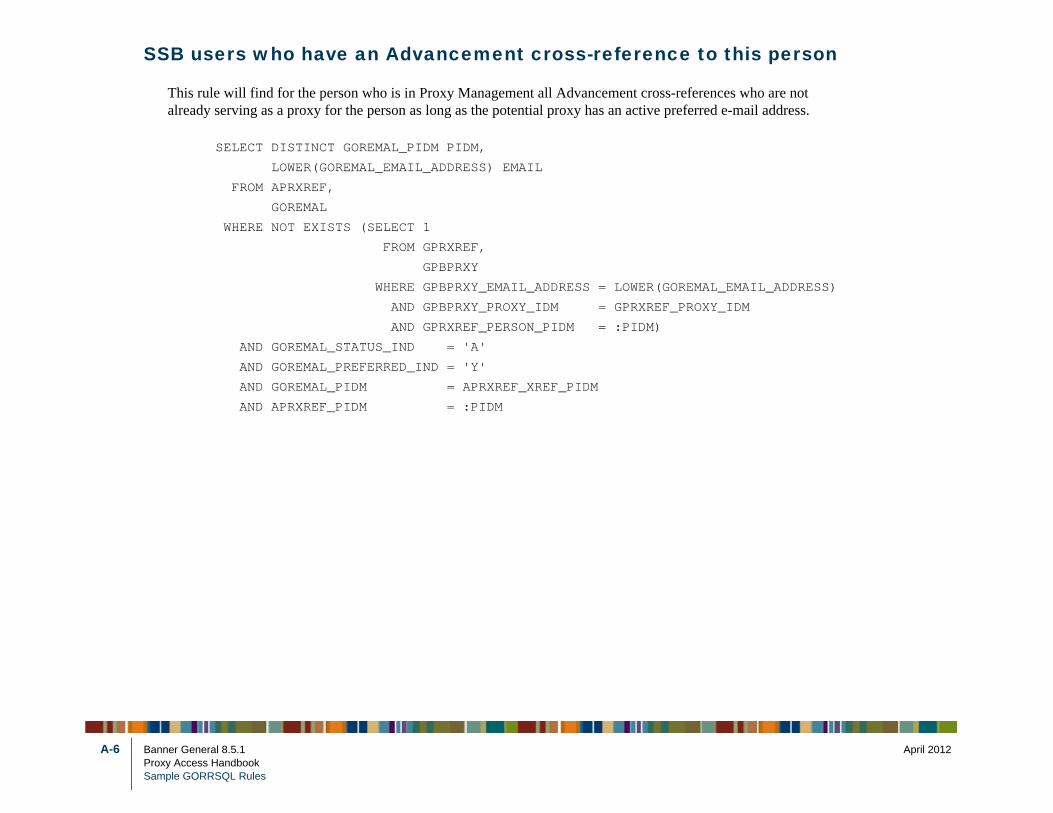
April 2012
his person
s who are not -mail address.
EMAIL_ADDRESS)
IDM
A-6 Banner General 8.5.1Proxy Access HandbookSample GORRSQL Rules
SSB users who have an Advancement cross-reference to t
This rule will find for the person who is in Proxy Management all Advancement cross-referencealready serving as a proxy for the person as long as the potential proxy has an active preferred e
SELECT DISTINCT GOREMAL_PIDM PIDM,
LOWER(GOREMAL_EMAIL_ADDRESS) EMAIL
FROM APRXREF,
GOREMAL
WHERE NOT EXISTS (SELECT 1
FROM GPRXREF,
GPBPRXY
WHERE GPBPRXY_EMAIL_ADDRESS = LOWER(GOREMAL_
AND GPBPRXY_PROXY_IDM = GPRXREF_PROXY_
AND GPRXREF_PERSON_PIDM = :PIDM)
AND GOREMAL_STATUS_IND = 'A'
AND GOREMAL_PREFERRED_IND = 'Y'
AND GOREMAL_PIDM = APRXREF_XREF_PIDM
AND APRXREF_PIDM = :PIDM

April 2012
ho are not already
EMAIL_ADDRESS)
IDM
A-7 Banner General 8.5.1Proxy Access HandbookSample GORRSQL Rules
SSB users who are the primary advisor
This rule will find for the person who is in Proxy Management all primary advisors of type 'A' wserving as a proxy for the person
SELECT DISTINCT GOREMAL_PIDM PIDM,
LOWER(GOREMAL_EMAIL_ADDRESS) EMAIL
FROM SGRADVR,
GOREMAL
WHERE NOT EXISTS (SELECT 1
FROM GPRXREF,
GPBPRXY
WHERE GPBPRXY_EMAIL_ADDRESS = LOWER(GOREMAL_
AND GPBPRXY_PROXY_IDM = GPRXREF_PROXY_
AND GPRXREF_PERSON_PIDM = :PIDM)
AND GOREMAL_STATUS_IND = 'A'
AND GOREMAL_PREFERRED_IND = 'Y'
AND GOREMAL_PIDM = SGRADVR_ADVR_PIDM
AND NVL(SGRADVR_ADVR_CODE,'N') = 'A'
AND NVL(SGRADVR_PRIM_IND,'N') = 'Y'
AND SGRADVR_PIDM = :PIDM
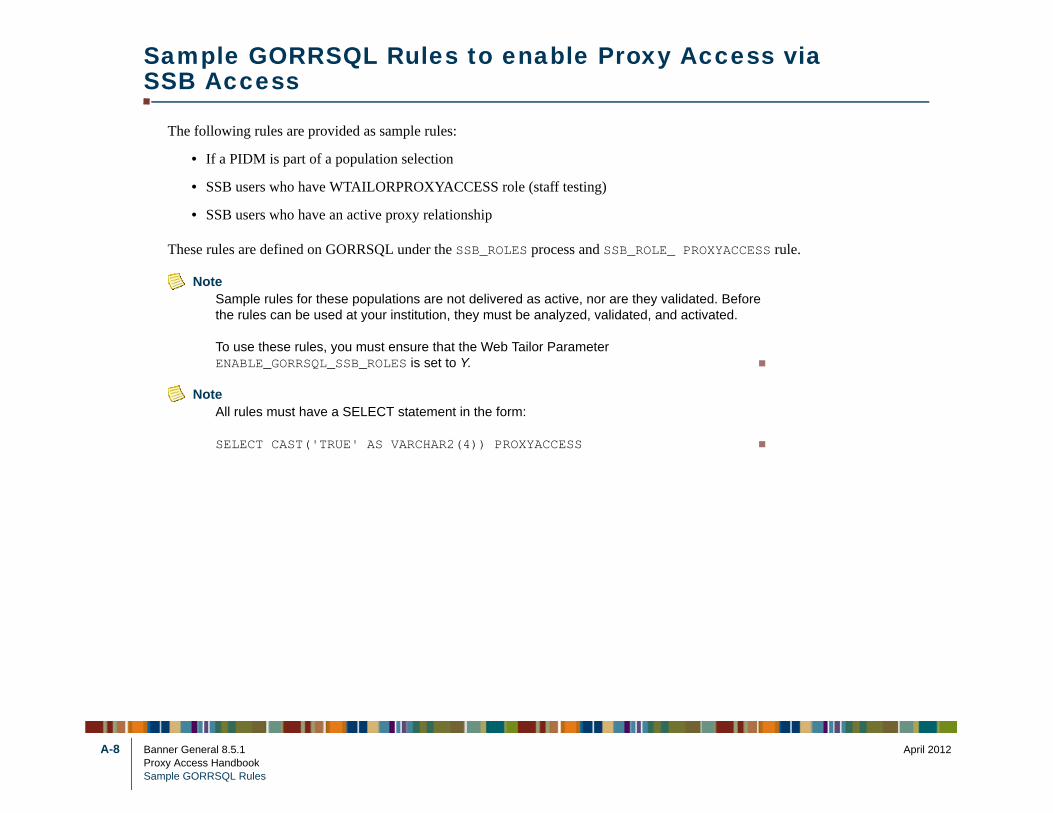
April 2012
ess via
CCESS rule.
efore d.
A-8 Banner General 8.5.1Proxy Access HandbookSample GORRSQL Rules
Sample GORRSQL Rules to enable Proxy AccSSB Access
The following rules are provided as sample rules:
• If a PIDM is part of a population selection
• SSB users who have WTAILORPROXYACCESS role (staff testing)
• SSB users who have an active proxy relationship
These rules are defined on GORRSQL under the SSB_ROLES process and SSB_ROLE_ PROXYA
NoteSample rules for these populations are not delivered as active, nor are they validated. Bthe rules can be used at your institution, they must be analyzed, validated, and activate
To use these rules, you must ensure that the Web Tailor Parameter ENABLE_GORRSQL_SSB_ROLES is set to Y.
NoteAll rules must have a SELECT statement in the form:
SELECT CAST('TRUE' AS VARCHAR2(4)) PROXYACCESS

April 2012
to a population
LED')
.
A-9 Banner General 8.5.1Proxy Access HandbookSample GORRSQL Rules
If a PIDM is part of a population selection
This example assumes that students who have complete the FERPA requirements will be addedselection.
SELECT CAST('TRUE' AS VARCHAR2(4)) PROXYACCESS
FROM GLBEXTR
WHERE GLBEXTR_APPLICATION = 'GENERAL'
AND GLBEXTR_SELECTION = 'PROXY_ACCESS_FERPA'
AND GLBEXTR_CREATOR_ID = 'BASELINE'
AND GLBEXTR_USER_ID = 'BASELINE'
AND GLBEXTR_KEY=:PIDM
AND EXISTS (SELECT 1
FROM TWGBPARM
WHERE TWGBPARM_PARAM_VALUE = 'Y'
AND TWGBPARM_PARAM_NAME = 'PROXYACCESS_ROLE_ENAB
AND EXISTS (SELECT 1
FROM GOBTPAC
WHERE GOBTPAC_PIN_DISABLED_IND != 'Y'
AND GOBTPAC_PIDM = :PIDM)
SSB users who have WTAILORPROXYACCESS role
This rule will allow any SSB user with the WTAILORPROXYACCESS role to manage proxies
NoteThis would be useful for staff testing.
SELECT CAST('TRUE' AS VARCHAR2(4)) PROXYACCESS
FROM TWGRROLE
WHERE TWGRROLE_ROLE = 'WTAILORPROXYACCESS'
AND TWGRROLE_PIDM = :PIDM
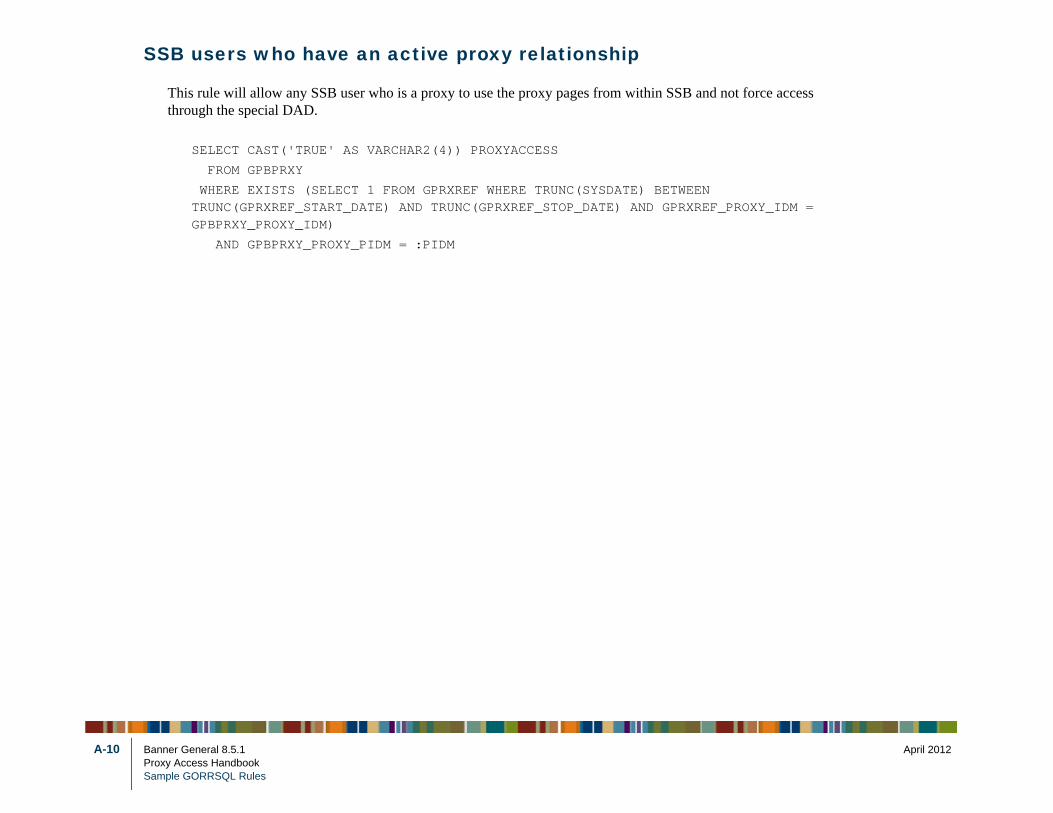
April 2012
ot force access
PROXY_IDM =
A-10 Banner General 8.5.1Proxy Access HandbookSample GORRSQL Rules
SSB users who have an active proxy relationship
This rule will allow any SSB user who is a proxy to use the proxy pages from within SSB and nthrough the special DAD.
SELECT CAST('TRUE' AS VARCHAR2(4)) PROXYACCESS
FROM GPBPRXY
WHERE EXISTS (SELECT 1 FROM GPRXREF WHERE TRUNC(SYSDATE) BETWEEN TRUNC(GPRXREF_START_DATE) AND TRUNC(GPRXREF_STOP_DATE) AND GPRXREF_GPBPRXY_PROXY_IDM)
AND GPBPRXY_PROXY_PIDM = :PIDM

April 2012
xy
ser
RGET rule.
efore d.
y one
A-11 Banner General 8.5.1Proxy Access HandbookSample GORRSQL Rules
Sample GORRSQL Rules to enable Global ProAccess
The following rules are provided as sample rules:
• Requires that a PIDM has a PROXY_ACCESS_FERPA population record
• Requires that a PIDM has a STUDENT SSB role
• Any PIDM with an active GOBTPAC record can be selected by a Global Proxy Access U
These rules are defined on GORRSQL under the SSB_ROLES process and SSB_ROLE_PROXYTA
NoteSample rules for these populations are not delivered as active, nor are they validated. Bthe rules can be used at your institution, they must be analyzed, validated, and activate
To use these rules, you must ensure that the Web Tailor Parameter ENABLE_GORRSQL_SSB_ROLES is set to Y.
NoteAll rules must have a SELECT statement in the form:
SELECT CAST('TRUE' AS VARCHAR2(4)) PROXYMGMT
NoteIf multiple conditions exist one of the following rules, a person would need to only satisfof the conditions to be able to create a proxy.
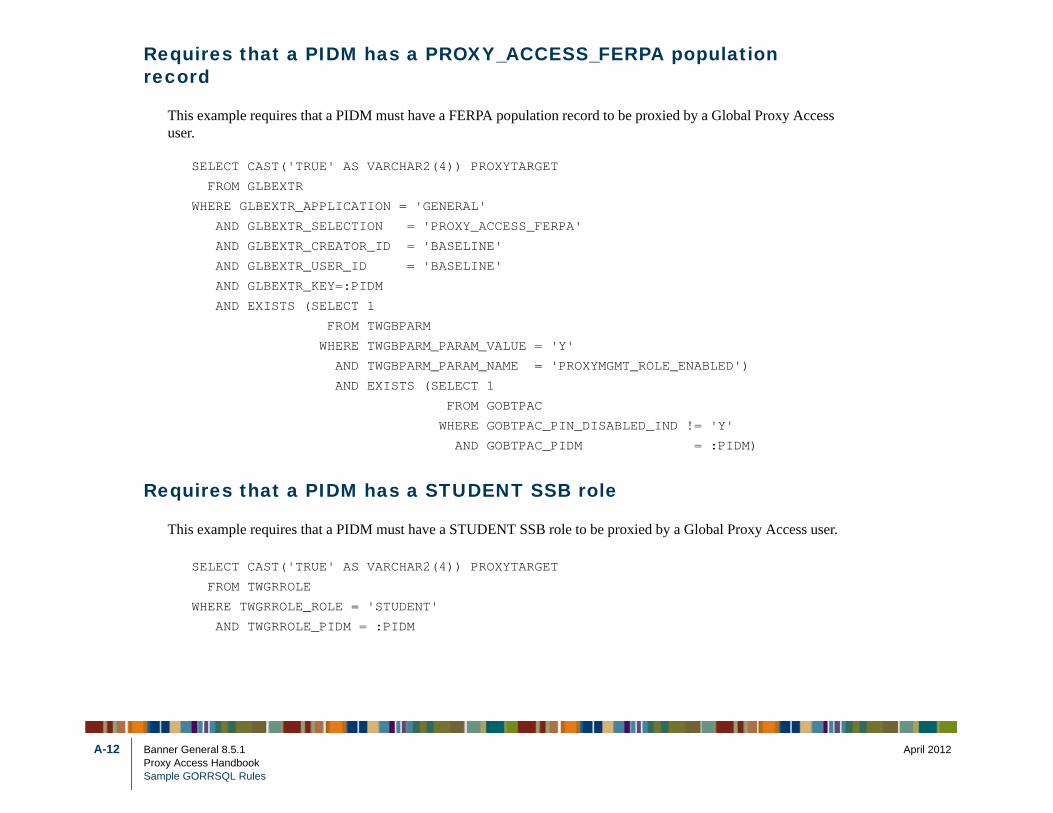
April 2012
ation
obal Proxy Access
D')
'
IDM)
Proxy Access user.
A-12 Banner General 8.5.1Proxy Access HandbookSample GORRSQL Rules
Requires that a PIDM has a PROXY_ACCESS_FERPA populrecord
This example requires that a PIDM must have a FERPA population record to be proxied by a Gluser.
SELECT CAST('TRUE' AS VARCHAR2(4)) PROXYTARGET
FROM GLBEXTR
WHERE GLBEXTR_APPLICATION = 'GENERAL'
AND GLBEXTR_SELECTION = 'PROXY_ACCESS_FERPA'
AND GLBEXTR_CREATOR_ID = 'BASELINE'
AND GLBEXTR_USER_ID = 'BASELINE'
AND GLBEXTR_KEY=:PIDM
AND EXISTS (SELECT 1
FROM TWGBPARM
WHERE TWGBPARM_PARAM_VALUE = 'Y'
AND TWGBPARM_PARAM_NAME = 'PROXYMGMT_ROLE_ENABLE
AND EXISTS (SELECT 1
FROM GOBTPAC
WHERE GOBTPAC_PIN_DISABLED_IND != 'Y
AND GOBTPAC_PIDM = :P
Requires that a PIDM has a STUDENT SSB role
This example requires that a PIDM must have a STUDENT SSB role to be proxied by a Global
SELECT CAST('TRUE' AS VARCHAR2(4)) PROXYTARGET
FROM TWGRROLE
WHERE TWGRROLE_ROLE = 'STUDENT'
AND TWGRROLE_PIDM = :PIDM

April 2012
d by a
xy Access user.
YSDATE))
A-13 Banner General 8.5.1Proxy Access HandbookSample GORRSQL Rules
Any PIDM with an active GOBTPAC record can be selecteGlobal Proxy Access User
This example allows any PIDM with an active GOBTPAC record to be proxied by a Global ProSELECT CAST('TRUE' AS VARCHAR2(4)) PROXYTARGET
FROM DUAL
WHERE EXISTS (SELECT 'Y' FROM GOBTPAC
WHERE GOBTPAC_PIDM = :PIDM
AND GOBTPAC_PIN_DISABLED_IND = 'N'
AND NVL(GOBTPAC_PIN_EXP_DATE,SYSDATE+1) > TRUNC(S

April 2012
A-14 Banner General 8.5.1Proxy Access HandbookSample GORRSQL Rules
April 2012
r
TEXT
Global proxy access requires you to have an active preferred e-mail address.
The “E-mail addresses must have at least 1 character in front of “@” and at least 1 character after “@” before.
The e-mail address has already been used by a different proxy and therefore the proxy has not been added.
The “E-mail address” and “Verify E-mail address” must match to add a proxy.
A new proxy has been successfully added.
To create a Proxy, you must specify an email address, first and last name.
Proxy access requires you to have an active preferred email address, first and last name.
<B><p style=”font-size:15px”>***You are viewing <**VALUE1**>''s information***</p></B>
B-1 Banner General 8.5.1Proxy Access HandbookInformation Text in Web Tailor
B Information Text in Web Tailo
The following Proxy Access Information Text may be customized in Web Tailor:
NAME SEQUENCE LABEL IMAGE
bwgkprxy.P_GlobalProxyAccess 1 NODATA web_stop
bwgkprxy.P_ManageProxy 1 BADEMAIL web_stop
bwgkprxy.P_ManageProxy 1 EMAILINUSE web_stop
bwgkprxy.P_ManageProxy 1 NOEMAILMATCH web_stop
bwgkprxy.P_ManageProxy 1 PROXYADDED web_success
bwgkprxy.P_ManageProxy 1 REQUIRED web_success
bwgkprxy.P_ProxyAccess 1 NODATA web_stop
bwgkprxy.P_ProxyAccess 1 HEADER

April 2012
Your request to change e-mail address has been cancelled and your previous e-mail address has been validated.
Enter the e-mail address that was registered as a Banner Web proxy. Then enter the PIN that you previously defined.
Your PIN has been disabled; you should have an email with directions telling you how to re-enable your PIN.
The new e-mail address that you used when you updated your proxy profile is already in use by another proxy. No action taken.
Your PIN has expired. Use the “Forgot PIN” button to request a new one.
Either the e-mail address or PIN you have entered is not valid. Please retype.
Either the e-mail address or PIN you have entered is not valid. Please retype.
Your updated email address is now in effect. Use your existing PIN credentials.
Your session has timed out due to more than <**VALUE1**> minutes of inactivity.
TEXT
B-2 Banner General 8.5.1Proxy Access HandbookInformation Text in Web Tailor
bwgkprxy.P_ProxyLogin 1 CANCEL_EMAIL web_success
bwgkprxy.P_ProxyLogin 1 DEFAULT web_info
bwgkprxy.P_ProxyLogin 1 DISABLEDPIN web_stop
bwgkprxy.P_ProxyLogin 1 EMAIL_DUPLICATE web_caution
bwgkprxy.P_ProxyLogin 1 EXPIREDPIN web_stop
bwgkprxy.P_ProxyLogin 1 INVALIDPIN web_redflag
bwgkprxy.P_ProxyLogin 1 INVALIDPROXY web_redflag
bwgkprxy.P_ProxyLogin 1 NEW_EMAIL web_success
bwgkprxy.P_ProxyLogin 1 TIMEOUT web_redflag
NAME SEQUENCE LABEL IMAGE

April 2012
Banner Web users can register any e-mail address as a proxy and can then enable individual proxy access to selected Banner Web pages. All Banner Web pages are personal and confidential.
Note: The proxy PIN should never be shared. If you suspect that someone else may know your proxy credentials, enter your e-mail address and then reset your PIN using the Forgot PIN or Reset PIN button.
The e-mail you received contained an Action Link (which you have used to get here) and an Action Password used to verify that you are the intended recipient.
You will also use this value as the “Old Pin” on the following page when establishing your new pin.
A web page link has been sent to your e-mail address. Use the link to reset your PIN.
A new proxy has been added. The proxy is only active for one day. Please remember to delete when processing is complete.
TEXT
B-3 Banner General 8.5.1Proxy Access HandbookInformation Text in Web Tailor
bwgkprxy.P_ProxyLogin 2 DEFAULT
bwgkpxya.P_PA_ActionVerify 1 DEFAULT web_info
bwgkpxya.P_PA_ForgotPin 1 DEFAULT web_info
bwgkpxya.P_PA_GlobalProxyAccess 1 ADDED web_success
NAME SEQUENCE LABEL IMAGE

April 2012
Use the Add tab to populate your proxy tabs. Select a named tab to enter PROXY MODE.
You will then see a list of links for pages available for that user based on the relationship you selected.
While in PROXY MODE the links and tabs above will be disabled. Select the Add tab (or close your browser) to exit proxy mode.
When you activate a link, the focus will change to another browser window dedicated to proxy display. The window title and page content (including links) are only valid for the selected user.
It is suggested that you remove your proxy relationships when finished by selecting the delete icon on each proxy tab.
The proxy delete was successful.
Verify that <**VALUE1**> are enabled before continuing.
You must enter a valid “Banner ID” before continuing
You must select a “Relationship” before continuing.
The operation you requested was not possible in Proxy mode. Proxy mode has been reset, please submit your request again.
TEXT
B-4 Banner General 8.5.1Proxy Access HandbookInformation Text in Web Tailor
bwgkpxya.P_PA_GlobalProxyAccess 1 DEFAULT web_info
bwgkpxya.P_PA_GlobalProxyAccess 1 DELGLOBAL web_success
bwgkpxya.P_PA_GlobalProxyAccess 1 DISABLED web_stop
bwgkpxya.P_PA_GlobalProxyAccess 1 NOPERSON web_stop
bwgkpxya.P_PA_GlobalProxyAccess 1 NORETP web_stop
bwgkpxya.P_PA_GlobalProxyAccess 1 RESETPROXY web_stop
NAME SEQUENCE LABEL IMAGE
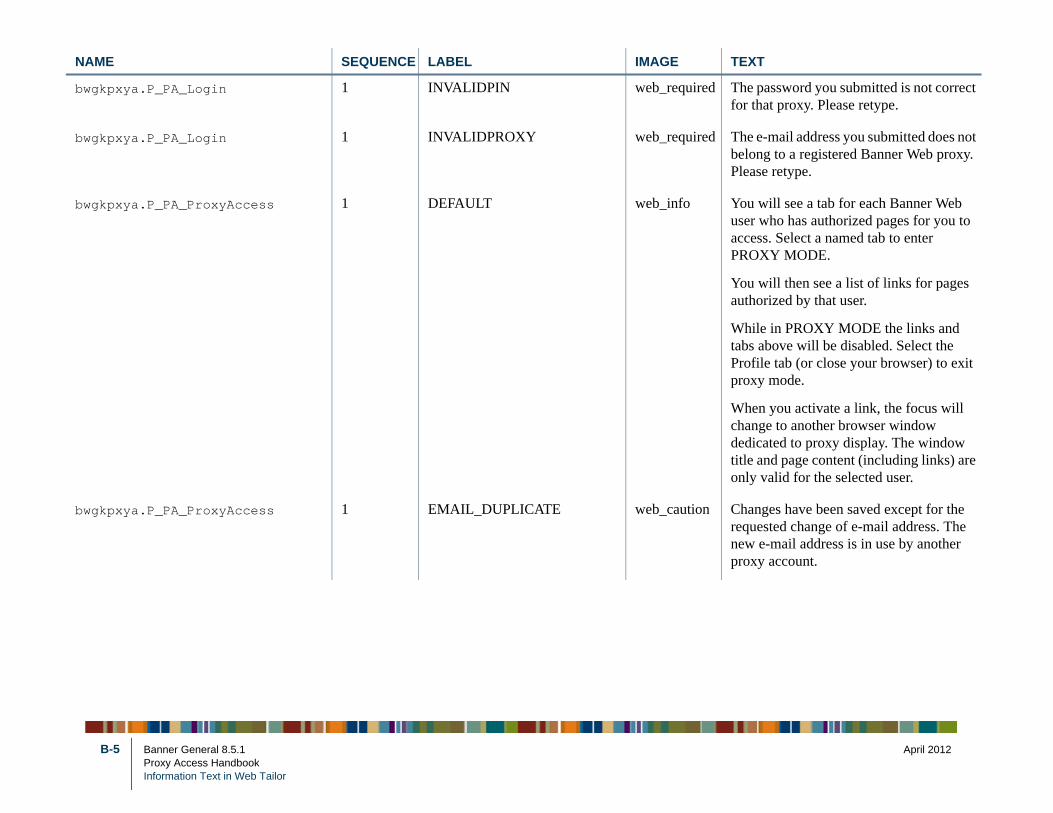
April 2012
The password you submitted is not correct for that proxy. Please retype.
The e-mail address you submitted does not belong to a registered Banner Web proxy. Please retype.
You will see a tab for each Banner Web user who has authorized pages for you to access. Select a named tab to enter PROXY MODE.
You will then see a list of links for pages authorized by that user.
While in PROXY MODE the links and tabs above will be disabled. Select the Profile tab (or close your browser) to exit proxy mode.
When you activate a link, the focus will change to another browser window dedicated to proxy display. The window title and page content (including links) are only valid for the selected user.
Changes have been saved except for the requested change of e-mail address. The new e-mail address is in use by another proxy account.
TEXT
B-5 Banner General 8.5.1Proxy Access HandbookInformation Text in Web Tailor
bwgkpxya.P_PA_Login 1 INVALIDPIN web_required
bwgkpxya.P_PA_Login 1 INVALIDPROXY web_required
bwgkpxya.P_PA_ProxyAccess 1 DEFAULT web_info
bwgkpxya.P_PA_ProxyAccess 1 EMAIL_DUPLICATE web_caution
NAME SEQUENCE LABEL IMAGE

April 2012
Changes have been saved -- including a request to change e-mail address. Two e-mail messages have been sent.
The first message was sent to the old e-mail address allowing you to cancel the change. The second message was sent to the new e-mail address allowing you to validate the change.
You will not be able to login to this proxy account until the link contained in one of the messages is executed.
No e-mail letters were defined for this process (**VALUE1**). Please contact the administration office for additional information.
The STUDENT application has not been installed. This process cannot be completed. Please contact the administration office for additional information.
Changes have been saved but some required data is missing.
Changes have been saved.
Enter your new PIN twice. A PIN can be a number, password or passphrase. For higher security, use a combination of uppercase letters, lowercase letters and numbers.
Failed Validation:<BR><**VALUE1**>
TEXT
B-6 Banner General 8.5.1Proxy Access HandbookInformation Text in Web Tailor
bwgkpxya.P_PA_ProxyAccess 1 NEW_EMAIL web_stop
bwgkpxya.P_PA_ProxyAccess 1 NO_EMAIL_LETTERS web_stop
bwgkpxya.P_PA_ProxyAccess 1 NO_STUDENT web_stop
bwgkpxya.P_PA_ProxyAccess 1 REQUIRED web_caution
bwgkpxya.P_PA_ProxyAccess 1 SAVED web_success
bwgkpxya.P_PA_ResetPin 1 DEFAULT web_info
bwgkpxya.P_PA_ResetPin 1 ERR_GUAPPRF web_redflag
NAME SEQUENCE LABEL IMAGE

April 2012
The new PIN value and the validate PIN value must match. Please retype.
The new PIN value you entered did not meet the minimum length requirements. Please retype.
Invalid e-mail or Old PIN. Please retype.
Minimum PIN length: <**VALUE1**> Maximum PIN length: <**VALUE2**>.
The PIN must contain at least one alphabetic character.
The PIN must contain at least one numeric character.
The PIN must contain at least one numeric character and at least one alphabetic character.
Welcome to the Banner Web proxy access system. Your e-mail address has been verified.
Minimum PIN length: <**VALUE1**>.
The next step is to save your security PIN for proxy access.
TEXT
B-7 Banner General 8.5.1Proxy Access HandbookInformation Text in Web Tailor
bwgkpxya.P_PA_ResetPin 1 ERR_NOMATCH web_redflag
bwgkpxya.P_PA_ResetPin 1 ERR_TOOSHORT web_redflag
bwgkpxya.P_PA_ResetPin 1 ERR_USER web_redflag
bwgkpxya.P_PA_ResetPin 1 GUAPPRF_MINMAX web_info
bwgkpxya.P_PA_ResetPin 1 GUAPPRF_REQ_ALPHA web_info
bwgkpxya.P_PA_ResetPin 1 GUAPPRF_REQ_NUM web_info
bwgkpxya.P_PA_ResetPin 1 GUAPPRF_REQ_NUMALPHA web_info
bwgkpxya.P_PA_ResetPin 1 NEW_PROXY web_success
bwgkpxya.P_PA_ResetPin 1 PIN_LENGTH_MINIMUM web_info
bwgkpxya.P_PA_ResetPin 2 NEW_PROXY
NAME SEQUENCE LABEL IMAGE
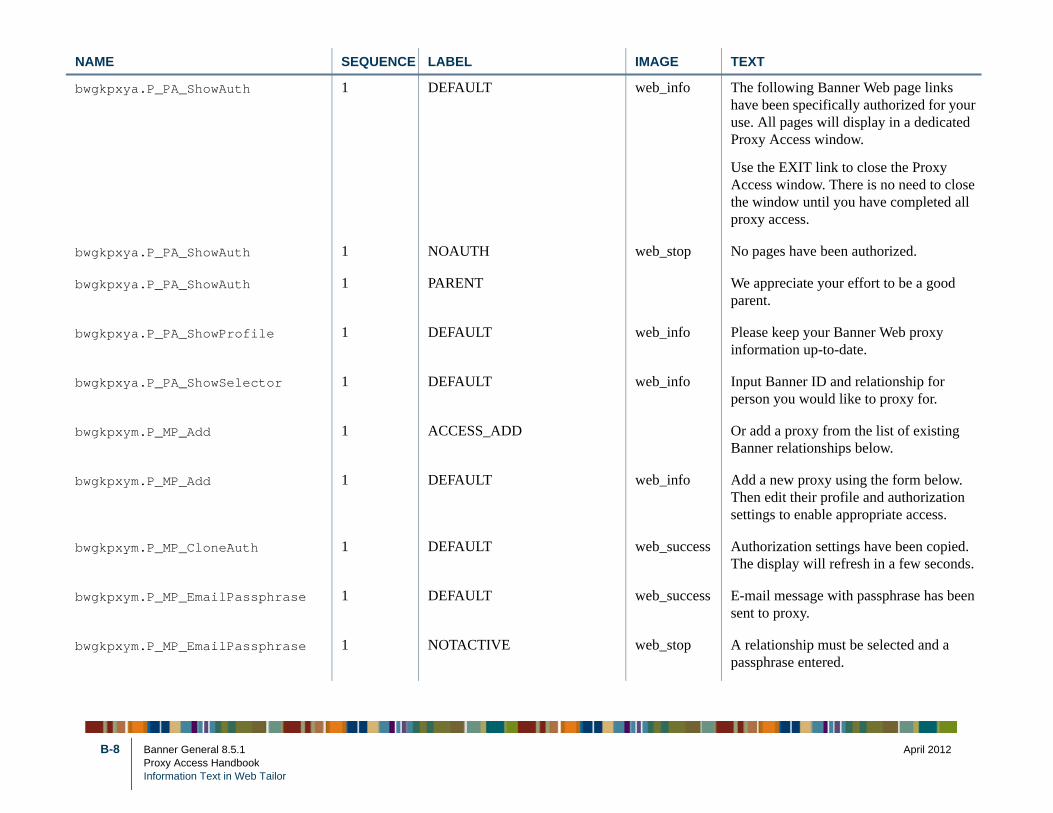
April 2012
The following Banner Web page links have been specifically authorized for your use. All pages will display in a dedicated Proxy Access window.
Use the EXIT link to close the Proxy Access window. There is no need to close the window until you have completed all proxy access.
No pages have been authorized.
We appreciate your effort to be a good parent.
Please keep your Banner Web proxy information up-to-date.
Input Banner ID and relationship for person you would like to proxy for.
Or add a proxy from the list of existing Banner relationships below.
Add a new proxy using the form below. Then edit their profile and authorization settings to enable appropriate access.
Authorization settings have been copied. The display will refresh in a few seconds.
E-mail message with passphrase has been sent to proxy.
A relationship must be selected and a passphrase entered.
TEXT
B-8 Banner General 8.5.1Proxy Access HandbookInformation Text in Web Tailor
bwgkpxya.P_PA_ShowAuth 1 DEFAULT web_info
bwgkpxya.P_PA_ShowAuth 1 NOAUTH web_stop
bwgkpxya.P_PA_ShowAuth 1 PARENT
bwgkpxya.P_PA_ShowProfile 1 DEFAULT web_info
bwgkpxya.P_PA_ShowSelector 1 DEFAULT web_info
bwgkpxym.P_MP_Add 1 ACCESS_ADD
bwgkpxym.P_MP_Add 1 DEFAULT web_info
bwgkpxym.P_MP_CloneAuth 1 DEFAULT web_success
bwgkpxym.P_MP_EmailPassphrase 1 DEFAULT web_success
bwgkpxym.P_MP_EmailPassphrase 1 NOTACTIVE web_stop
NAME SEQUENCE LABEL IMAGE
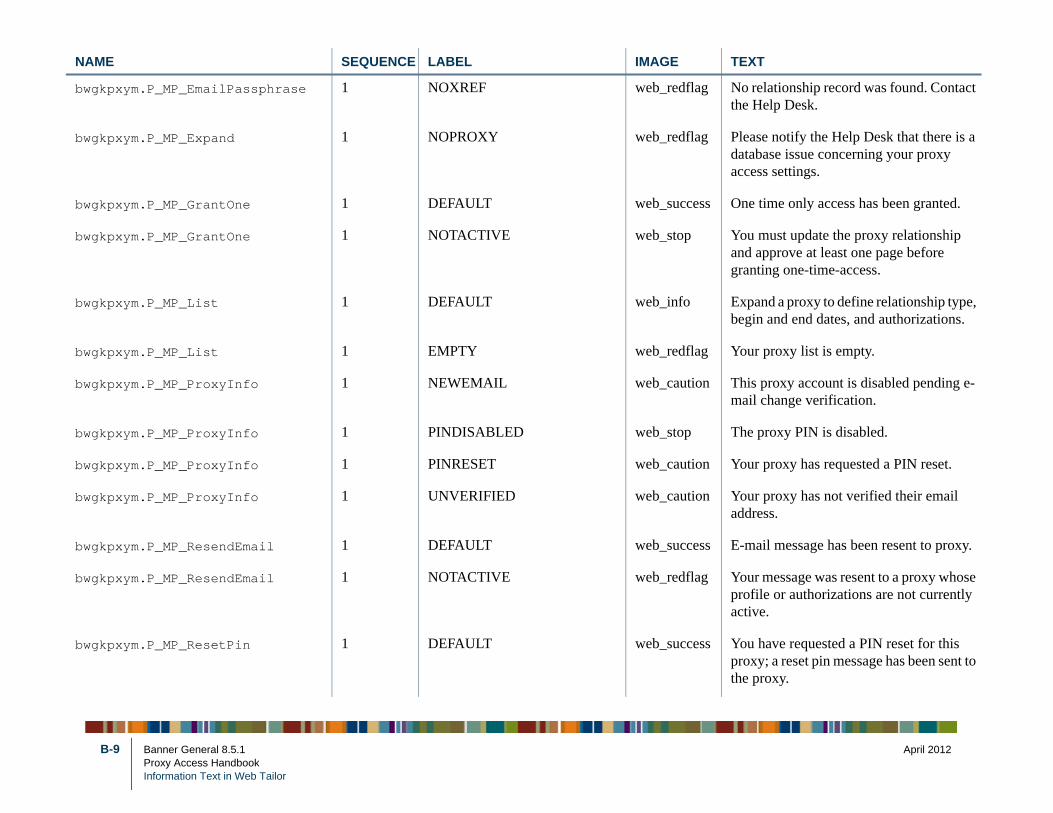
April 2012
No relationship record was found. Contact the Help Desk.
Please notify the Help Desk that there is a database issue concerning your proxy access settings.
One time only access has been granted.
You must update the proxy relationship and approve at least one page before granting one-time-access.
Expand a proxy to define relationship type, begin and end dates, and authorizations.
Your proxy list is empty.
This proxy account is disabled pending e-mail change verification.
The proxy PIN is disabled.
Your proxy has requested a PIN reset.
Your proxy has not verified their email address.
E-mail message has been resent to proxy.
Your message was resent to a proxy whose profile or authorizations are not currently active.
You have requested a PIN reset for this proxy; a reset pin message has been sent to the proxy.
TEXT
B-9 Banner General 8.5.1Proxy Access HandbookInformation Text in Web Tailor
bwgkpxym.P_MP_EmailPassphrase 1 NOXREF web_redflag
bwgkpxym.P_MP_Expand 1 NOPROXY web_redflag
bwgkpxym.P_MP_GrantOne 1 DEFAULT web_success
bwgkpxym.P_MP_GrantOne 1 NOTACTIVE web_stop
bwgkpxym.P_MP_List 1 DEFAULT web_info
bwgkpxym.P_MP_List 1 EMPTY web_redflag
bwgkpxym.P_MP_ProxyInfo 1 NEWEMAIL web_caution
bwgkpxym.P_MP_ProxyInfo 1 PINDISABLED web_stop
bwgkpxym.P_MP_ProxyInfo 1 PINRESET web_caution
bwgkpxym.P_MP_ProxyInfo 1 UNVERIFIED web_caution
bwgkpxym.P_MP_ResendEmail 1 DEFAULT web_success
bwgkpxym.P_MP_ResendEmail 1 NOTACTIVE web_redflag
bwgkpxym.P_MP_ResetPin 1 DEFAULT web_success
NAME SEQUENCE LABEL IMAGE

April 2012
You must update the proxy relationship and approve at least one page before a PIN reset is allowed.
An email message has been sent to the proxy with the current authorized page list.
Select the information pages your proxy should be able to access. Once authorized, your proxy will be able to view and/or update these pages when they log in.
Authorization record(s) are missing or unavailable at this time. The most probable cause is that no pages have been enabled for the proxy relationship selected. Please contact the Help Desk.
Special authorization tab information text dealing with parents.
Action date is when the proxy activated the URL within the message. Expiration date is when the URL within the message will last be active.
Communication record(s) are missing or unavailable at this time. The most probable cause is that you have not taken any action that would send an e-mail to this proxy.
Special communication tab information text dealing with parents.
This list is the history of your authorizations for this proxy (newest to oldest).
TEXT
B-10 Banner General 8.5.1Proxy Access HandbookInformation Text in Web Tailor
bwgkpxym.P_MP_ResetPin 1 NOTACTIVE web_stop
bwgkpxym.P_MP_SendAuthEmail 1 DEFAULT web_success
bwgkpxym.P_MP_ShowAuth 1 DEFAULT
bwgkpxym.P_MP_ShowAuth 1 NOAUTH web_caution
bwgkpxym.P_MP_ShowAuth 1 PARENT
bwgkpxym.P_MP_ShowComm 1 DEFAULT
bwgkpxym.P_MP_ShowComm 1 NOCOMM web_caution
bwgkpxym.P_MP_ShowComm 1 PARENT
bwgkpxym.P_MP_ShowHistory 1 DEFAULT
NAME SEQUENCE LABEL IMAGE

April 2012
History record(s) are missing or unavailable at this time. The most probable cause is that you have not made any authorization changes for this proxy.
Special history tab information text dealing with parents.
Please select your relationship with this proxy.
The list of pages available to the proxy is based on relationship type.
The description field is your personal note about this proxy (dad, mom, soccer coach, company name).
The passphrase can be used to determine FERPA identity for phone calls or other off-line queries by this proxy.
You must communicate the passphrase to your proxy. You can control the start and end dates for proxy access below.
The proxy relationship record is missing or unavailable at this time. Please contact the Help Desk.
Special profile tab information text dealing with parents.
TEXT
B-11 Banner General 8.5.1Proxy Access HandbookInformation Text in Web Tailor
bwgkpxym.P_MP_ShowHistory 1 NOHIST web_caution
bwgkpxym.P_MP_ShowHistory 1 PARENT
bwgkpxym.P_MP_ShowProfile 1 DEFAULT
bwgkpxym.P_MP_ShowProfile 1 NOXREF web_stop
bwgkpxym.P_MP_ShowProfile 1 PARENT
NAME SEQUENCE LABEL IMAGE

April 2012
B-12 Banner General 8.5.1Proxy Access HandbookInformation Text in Web Tailor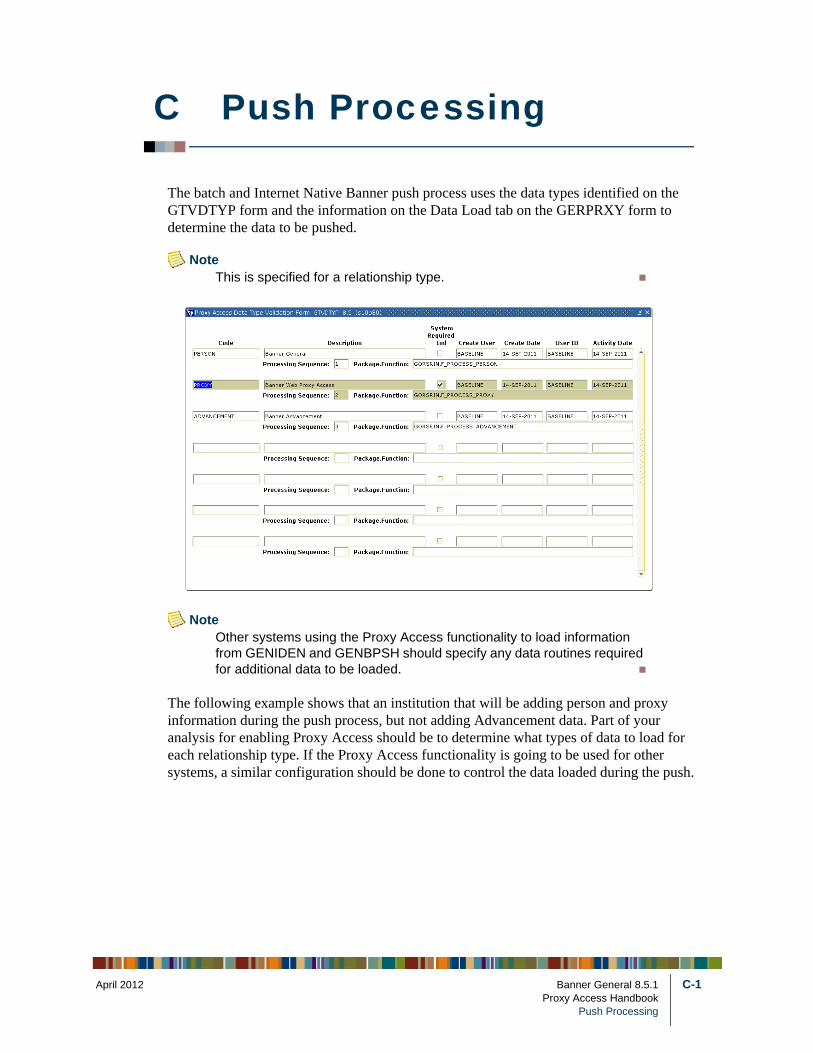
April 20
C Push Processing
The batch and Internet Native Banner push process uses the data types identified on the GTVDTYP form and the information on the Data Load tab on the GERPRXY form to determine the data to be pushed.
NoteThis is specified for a relationship type.
NoteOther systems using the Proxy Access functionality to load information from GENIDEN and GENBPSH should specify any data routines required for additional data to be loaded.
The following example shows that an institution that will be adding person and proxy information during the push process, but not adding Advancement data. Part of your analysis for enabling Proxy Access should be to determine what types of data to load for each relationship type. If the Proxy Access functionality is going to be used for other systems, a similar configuration should be done to control the data loaded during the push.
12 Banner General 8.5.1 C-1Proxy Access Handbook
Push Processing
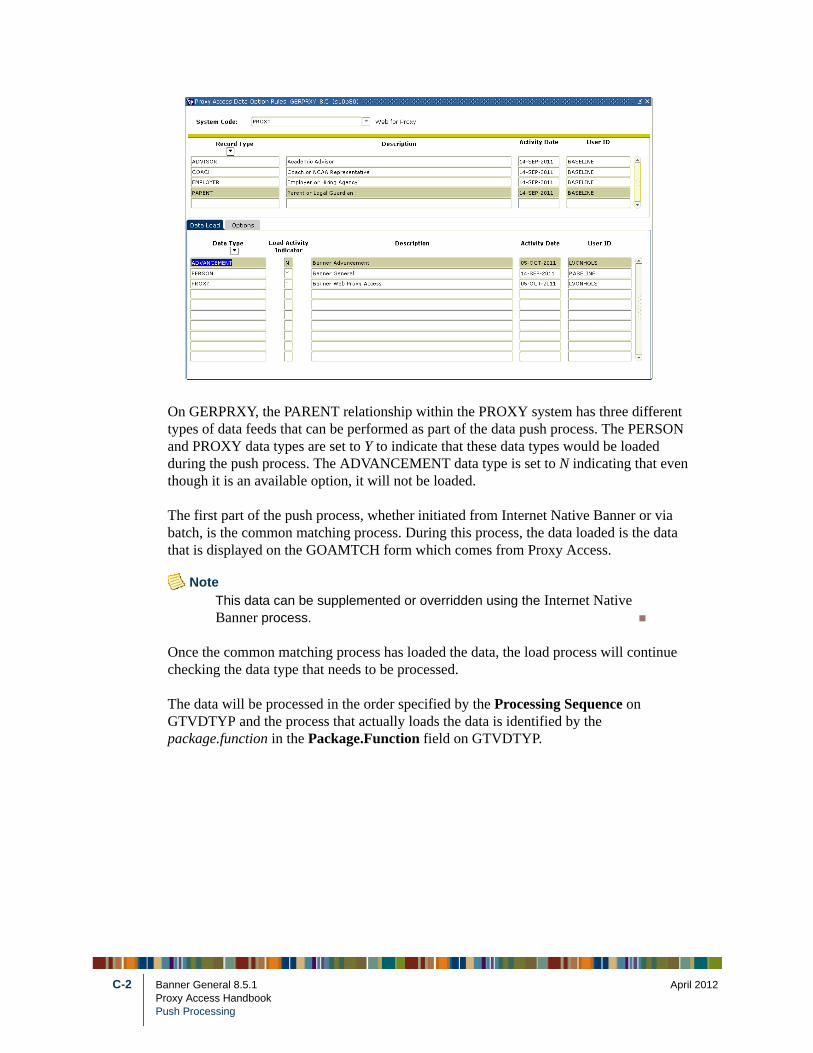
C-2
On GERPRXY, the PARENT relationship within the PROXY system has three different types of data feeds that can be performed as part of the data push process. The PERSON and PROXY data types are set to Y to indicate that these data types would be loaded during the push process. The ADVANCEMENT data type is set to N indicating that even though it is an available option, it will not be loaded.
The first part of the push process, whether initiated from Internet Native Banner or via batch, is the common matching process. During this process, the data loaded is the data that is displayed on the GOAMTCH form which comes from Proxy Access.
NoteThis data can be supplemented or overridden using the Internet Native Banner process.
Once the common matching process has loaded the data, the load process will continue checking the data type that needs to be processed.
The data will be processed in the order specified by the Processing Sequence on GTVDTYP and the process that actually loads the data is identified by the package.function in the Package.Function field on GTVDTYP.
Banner General 8.5.1 April 2012Proxy Access HandbookPush Processing
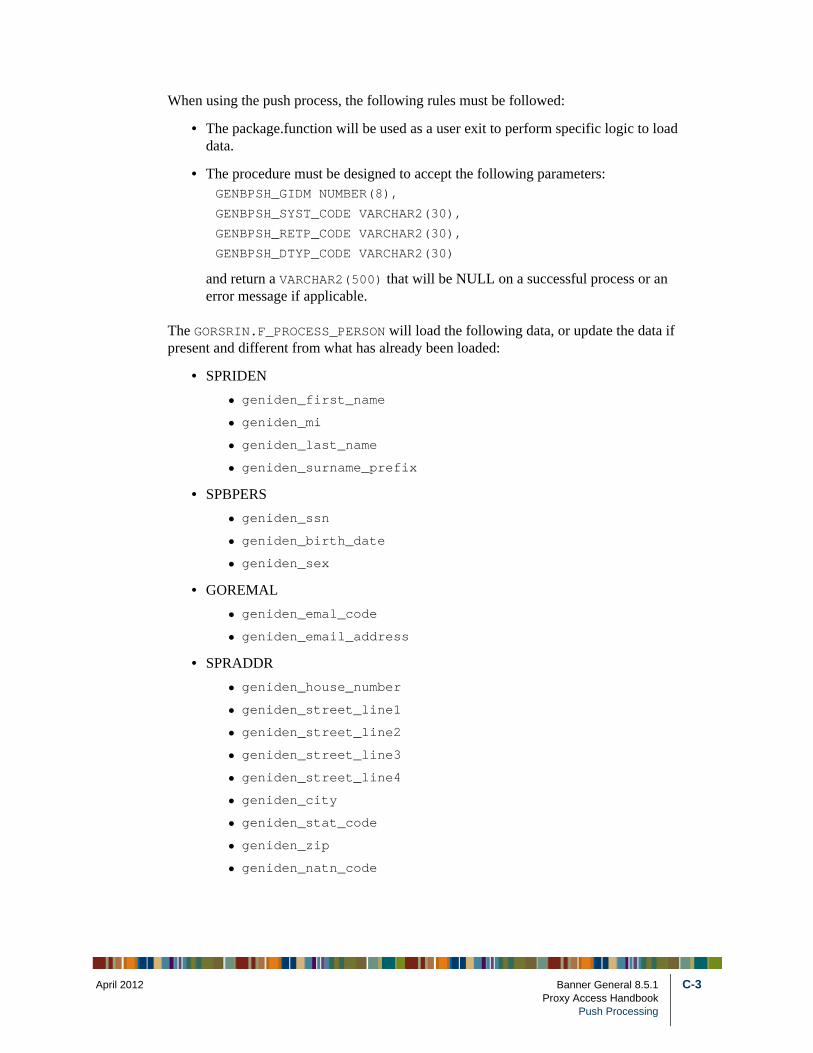
April 20
When using the push process, the following rules must be followed:
• The package.function will be used as a user exit to perform specific logic to load data.
• The procedure must be designed to accept the following parameters: GENBPSH_GIDM NUMBER(8),
GENBPSH_SYST_CODE VARCHAR2(30),
GENBPSH_RETP_CODE VARCHAR2(30),
GENBPSH_DTYP_CODE VARCHAR2(30)
and return a VARCHAR2(500) that will be NULL on a successful process or an error message if applicable.
The GORSRIN.F_PROCESS_PERSON will load the following data, or update the data if present and different from what has already been loaded:
• SPRIDEN
• geniden_first_name
• geniden_mi
• geniden_last_name
• geniden_surname_prefix
• SPBPERS
• geniden_ssn
• geniden_birth_date
• geniden_sex
• GOREMAL
• geniden_emal_code
• geniden_email_address
• SPRADDR
• geniden_house_number
• geniden_street_line1
• geniden_street_line2
• geniden_street_line3
• geniden_street_line4
• geniden_city
• geniden_stat_code
• geniden_zip
• geniden_natn_code
12 Banner General 8.5.1 C-3Proxy Access Handbook
Push Processing
C-4
• SPRTELE
• geniden_tele_code
• geniden_phone_area
• geniden_phone_number
The GORSRIN.F_PROCESS_PROXY will update gpbprxy _proxy_pidm with the PIDM of the user initiating the proxy.
The GORSRIN.F_PROCESS_ADVANCEMENT will make a dynamic call to GOKADVC.f_Ins_Advancement to create the apbcons and aprcatg records using ab_adv_individual.p_create.
In addition a call will be made to apkldrd.p_load_aprxref to create the two way relationship between the proxy and the submitter.
Banner General 8.5.1 April 2012Proxy Access HandbookPush Processing

April 20
D Global Proxy Access
Global Proxy Access, if enabled, will allow authorized users to create a proxy for themselves for any current SPRIDEN ID.
WarningIt is highly recommended that access be restricted to a controlled group of administrative users.
To setup Global Proxy Access, perform the following steps:
1. Access the GTVSYST form and create a new System type named PROXY_GLOBAL_ACCESS.
2. Access the GTVRETP form and create a new relationship type that will only be used by Global Proxy Access. For example, the new relationship type could be named UNIV_ADMINISTRATION.
3. Access the GTVOTYP form and select the PROXY_GLOBAL_ACCESS system code for the DELETE_HISTORY Option Type Code to indicated whether records related to Global Proxy Access will either be deleted or allowed to expire.
Global Proxy relationships will only display if the relationships are active, to improve usability, so the page will not become cluttered with all the proxies that may have been established over time. Once the global_proxy has made themselves a proxy, this will continue to display on the student’s list of proxies forever as students are not able to remove proxies.
4. Access the GERPRXY form and select the PROXY_GLOBAL_ACCESS system code. On the next block, add the new relationship type that you created above to establish the relationship between PROXY_GLOBAL_ACCESS and the Relationship.
Typically there will be no data load or options associated with this relationship.
5. Access the Business Rules (GORRSQL) form, select the SSB_ROLES process and the SSB_ROLE_PROXYTARGET rule and click Next Block.
Determine what populations are eligible to be proxied by a Global Proxy Access user.
NoteSample rules for these populations are delivered as inactive and are not validated. Before the rules can be used at your institution, they must be analyzed, validated, and activated.
12 Banner General 8.5.1 D-1Proxy Access Handbook
Global Proxy Access

D-2
To use these rules, you must ensure that the Web Tailor Parameter ENABLE_GORRSQL_SSB_ROLES is set to Y.
6. In Web Tailor Administration, enable the following pages associated with Global Proxy Access using the Customize a Web Menu or Procedure page:
7. In Web Tailor Administration, enable the Proxy Global Access role for the users that require Global Proxy Access using the Update Users Roles page.
NoteYou may also assign this role using a GORRSQL rule.
8. In Web Tailor Administration, establish the Web Tailor menus that are associated with the new relationship type using the Customize a Web Menu or Procedure page.
9. In Web Tailor Administration, establish the pages that are associated with the Web Tailor menu using the Reorder or Customize Menu Items page.
bwgkpxya.P_PA_DeleteRETP Delete Global Proxy Access Relationshipbwgkpxya.P_PAShowSelector Display Global Proxy Access Person Selector Formbwgkpxya.P_GlobalProxyAccess Global Proxy Access
Banner General 8.5.1 April 2012Proxy Access HandbookGlobal Proxy Access
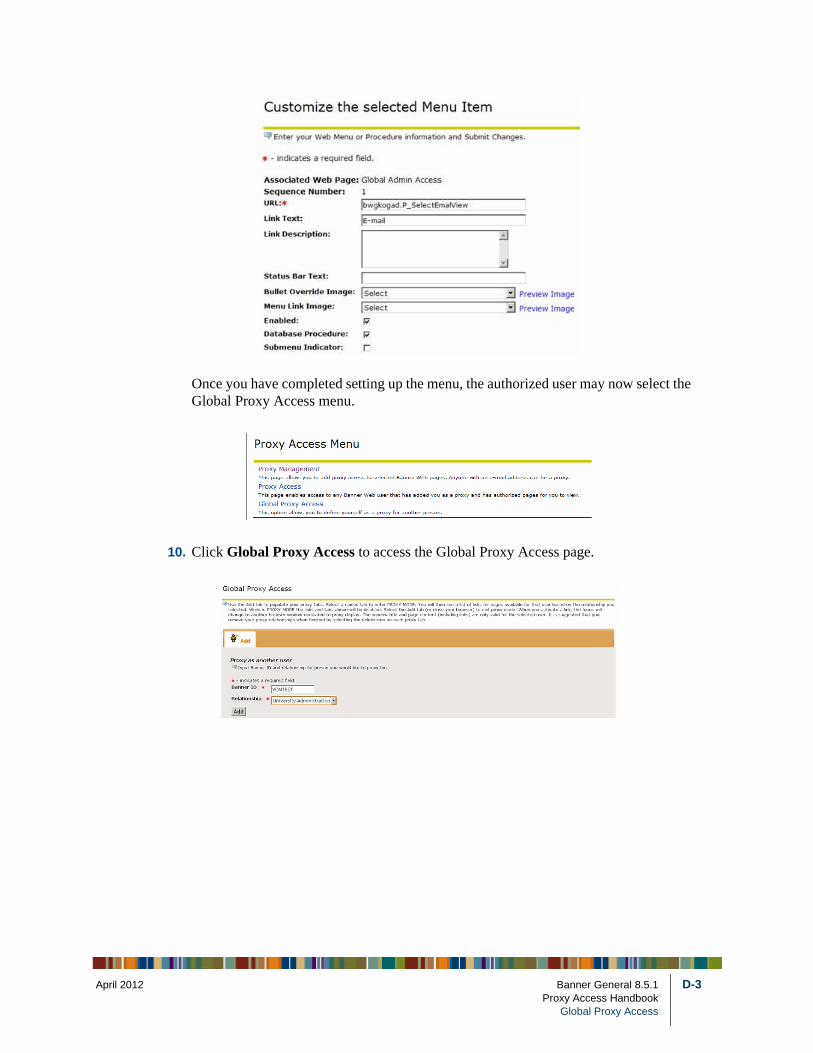
April 20
Once you have completed setting up the menu, the authorized user may now select the Global Proxy Access menu.
10. Click Global Proxy Access to access the Global Proxy Access page.
12 Banner General 8.5.1 D-3Proxy Access Handbook
Global Proxy Access

D-4
11. Enter the Banner ID, select the new relationship, and click Add.
NoteThere is no lookup for the Banner ID, it must match an existing SPRIDEN record.
For each ID defined, a tab will be created that you can select and then access the appropriate pages for that user.
NoteThe same rules are in effect for Global Proxy Access users that are in effect for standard proxy users, the proxy can only access pages that the proxied person has access to on their own. Once access for the proxied person is removed, then the access for the proxy will no longer exist. By default, Global Proxy Access is active for one day.
In this example, when Dixie logs on, she will see that Les von Test has been established as a proxy. Additionally, the relationship of University Administration is protected may not be updated like other proxy relationships can. However, if the dates are changed, the administrator will no longer see that student in their Global Proxy list.
In this example, the student will not be able to change the access type, but the student can view the authorizations, history, and communications. If the user has changed the authorized pages, the administrator would not have access until the administrator changed the relationship, which would reset the access.
Banner General 8.5.1 April 2012Proxy Access HandbookGlobal Proxy Access