Embed Size (px)
Citation preview

PSD & CSD Reporting
Create PSD & CSD Files for Submission
The instructions in this document will assist you in preparing the PSD and CSD files for submission to KDE. The correct format for the files and the steps to submit the files are shown in detail.

Create PSD & CSD Files for Submission
TABLE OF CONTENTS
OVERVIEW.................................................................................................................3
TRANSFERRING SALARY TABLE, PSD AND CSD FILES TO KDE......................3
PREPARE PSD/CSD FILES FOR SUBMISSION......................................................3
PSD/CSD SUBMISSION..............................................................................................5
Salary Table File Submission..............................................................................................................6
PSD File Submission...........................................................................................................................8
CSD File Submission.........................................................................................................................13
Page 1 of 19

Create PSD & CSD Files for Submission
OVERVIEWThe PSD and CSD files created in MUNIS are submitted to KDE through the SEEK Data Web Submission Application. The instructions in this document will assist you in preparing the PSD and CSD files for submission to KDE. The correct format for the files and the steps to submit the files are shown in detail.
The instructions for generating the PSD/CSD files are contained in the following documents:
Professional Staff Data (PSD) Report (PR-STW-4)
Classified Staff Data (CSD) Report (PR-STW-10)
TRANSFERRING SALARY TABLE, PSD AND CSD FILES TO KDE Below are the instructions to prepare the PSD/CSD files for submission. These instructions are used after the PSD and CSD records have been created and corrected. There will be three files submitted to KDE during the SEEK Data Web Submission Application process: a Salary Table File (prkygrst0000.txt), a PSD File (kypsdXXX0000.txt) and a CSD File (kycsdXXX0000.txt). The XXX represents the district number and the 0000 represents the file number.
PREPARE PSD/CSD FILES FOR SUBMISSIONSelect:
System Administration >Miscellaneous Administration >File Transfer (v10.3)
1. Click on Download from spool directory
The following screen will be displayed:
2. There were several files generated when the PSD/CSD records were created. There will only be three files submitted to KDE (prkygrst, kypsd and kycsd).
Choose the prkygrst file (Salary Table File) and make sure it is highlighted.
Page 3

Create PSD & CSD Files for Submission
Helpful hint: You can click on to sort the saved files by name.
3. Double click on the file you want to save. The following screen will appear:
4. Choose the folder to which you want to save the file. KDE suggests you create a folder “KDE Files for Submission”. Select “Make New Folder” if you do not already have this set up.
5. Do not change the name of the file. Click “OK” when you are ready to save the file.
6. Repeat steps 1-5 above to save the PSD (kypsd) and CSD (kycsd) file for submission.
7. You are now ready to proceed with the PSD/CSD web submission.
Page 4

Create PSD & CSD Files for Submission
PSD/CSD Submission
The PSD/CSD submission process has been incorporated into the SEEK Data Web Submission Application process. Districts will be notified of the errors which must be corrected upon submission. There will also be a listing of the less significant errors which are referred to as Notes.
There are three files that encompass a District’s complete PSD/CSD submission. The three files are the Salary Table File, Professional Staff Data (PSD) File and Classified Staff Data (CSD) File. The order of submission is flexible between CSD and PSD; however, the Salary Table File must be submitted prior to the PSD File. Once a file has been successfully submitted the system will prevent you from submitting that specific file again. For example, if you successfully submit a Salary Table File, but have to attempt multiple PSD File submissions before being successful, a Salary Table File submission is not necessary for each PSD File submission and is actually prevented by the system.
Submissions Instructions
I. Salary Table File
II. Professional Staff Data File (PSD)
III. Classified Staff Data File (CSD)
Page 5

Create PSD & CSD Files for Submission
Salary Table File Submission
1. Login to the SEEK Web Application. https://opsupport.education.ky.gov/webforms/2. Click on Financial Forms.
3. Select Salary Data form.
4. Determine if your district reduced values in the salary table from the prior year and notified all staff according to KRS 161.760. If your district meets these criteria, then you should select the corresponding check box. If your district does not meet these criteria then you should not select the check box.
Page 6

Create PSD & CSD Files for Submission
5. Click Browse to locate the Salary Table File created from Munis.
6. Double click the file to select it. The file location will now appear in the Salary Data (KYGR) field. Click Submit.
7. You will see a status message(s) on the screen. The submission will either show successful or errors will indicate the specific problems with the file or data within the file. If there are errors, they must be corrected in MUNIS. After correcting the data in Munis generate and save an updated file and resubmit.
8. After the Salary Table File has been submitted successfully you can proceed to the next submission. Once the file has been accepted you will not be able to submit again. If you are required to complete multiple PSD File submissions you do not need to resubmit a Salary Table File again once there is a successful submission.
Page 7

Create PSD & CSD Files for Submission
PSD File Submission1. Login to the SEEK Web Application. https://opsupport.education.ky.gov/webforms/2. Click on Financial Forms.
3. Select Professional Staff Data.
Note: If you have not successfully completed your Salary File submission you will receive the following message and will be unable to submit your PSD File:
Salary File has not been loaded. Load Salary Data prior to the Professional Staff Data File.
Page 8

Create PSD & CSD Files for Submission
4. Click Browse to locate the PSD File.
5. Double click the file to select it. The file location will now appear in the Professional Staff Data (KYPSD) field. Click Submit.
6. After you submit there are three possible scenarios of results.A. Scenario 1:
- There are Errors that need to be resolved.Outcome: - You will be redirected to the Reports Manager page where the list of errors will
be available for download. Steps: - Review the report by clicking Run.
- Click Open to review the Errors.
Page 9

Create PSD & CSD Files for Submission
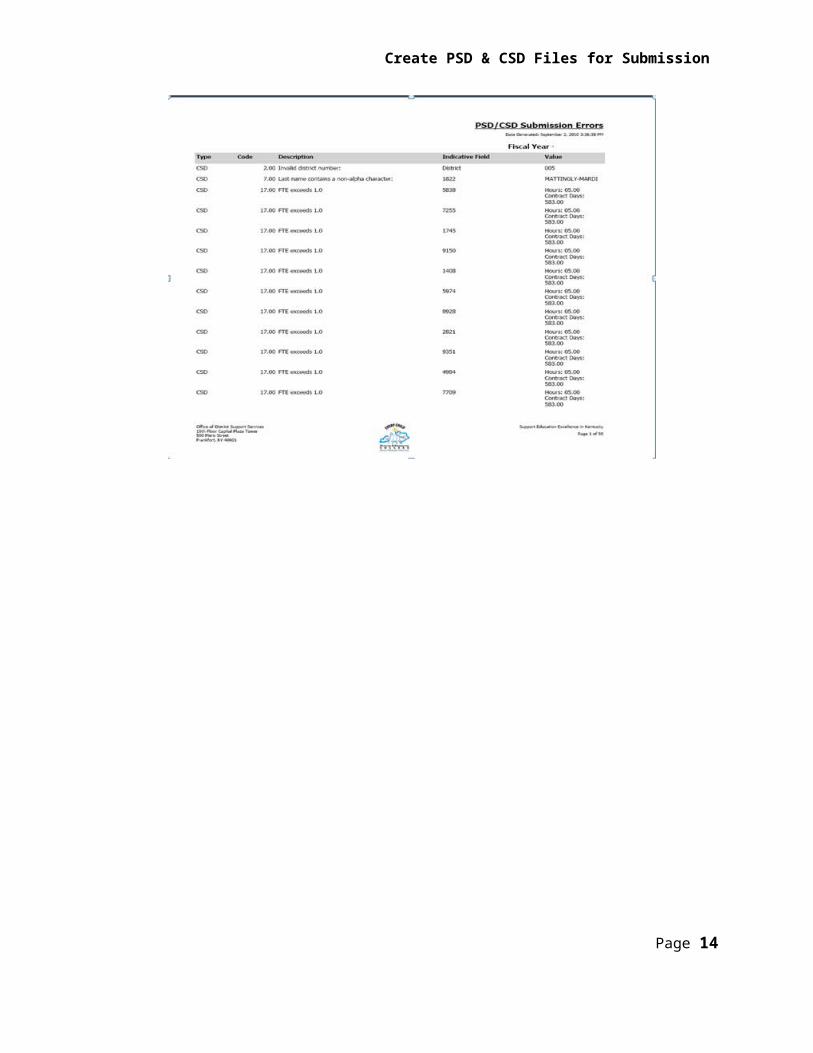
- The Errors will display the ‘Indicative Field’ and the ‘Value’ of the data error and are ordered by Type (CSD/PSD) then Error Code. For cases when the error is specific to a person the Indicative Value will be the last four of their SSN’s. Correct the data in MUNIS and resubmit after generating and saving an updated file.
Page 10

Create PSD & CSD Files for Submission
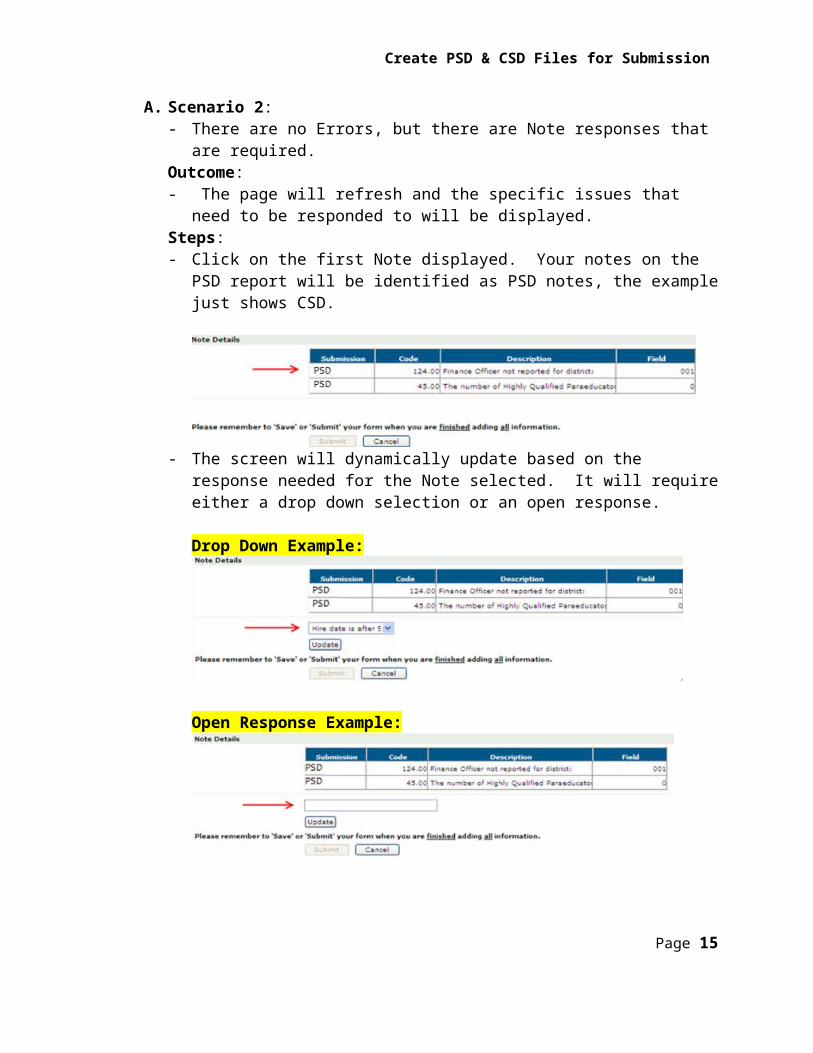
B. Scenario 2: - There are no Errors, but there are Note responses that are required. Outcome:- The page will refresh and the specific issues that need to be responded to will
be displayed. Steps: - Click on the first Note displayed. Your notes on the PSD report will be identified
as PSD notes, the example just shows CSD.
- The screen will dynamically update based on the response needed for the Note selected. It will require either a drop down selection or an open response.
Drop Down Example:
Open Response Example:
- Select or enter the response and click Update and proceed to the next Note in the list. If you do not complete a Note, the system will not permit you to proceed.
- When you have responded to each Note, click Submit to complete your submission. You will receive an on screen notification of your submission.
Page 11

Create PSD & CSD Files for Submission
C. Scenario 3: - There are no Errors and no Notes requiring responses.Outcome:- You will receive a submission confirmation.Steps:- No further action required for this submission.
Page 12

Create PSD & CSD Files for Submission
CSD File Submission
1. Login to the SEEK Web Application. https://opsupport.education.ky.gov/webforms/2. Click on Forms.
3. Select Classified Staff Data.
Page 13
Create PSD & CSD Files for Submission
4. Click Browse to locate the CSD File.
5. Double click the file to select it. The file location will now appear in the Classified Staff Data (KYCSD) field. Click Submit.
6. After you submit there are three possible scenarios of results.A. Scenario 1:
- There are Errors that need to be resolved.Outcome: - You will be redirected to the Reports Manager page where the list of errors will
be available for download. Steps: - Review the report by clicking Run.
- Click Open to review the Errors.
Page 14
Create PSD & CSD Files for Submission
- The Errors will display the ‘Indicative Field’ and the ‘Value’ of the data error and are ordered by Type (CSD/PSD) then Error Code. For cases when the error is specific to a person the Indicative Value will be the last four of their SSN’s. Correct the data in MUNIS and resubmit after generating an updated file.
Page 15

Create PSD & CSD Files for Submission
B. Scenario 2: - There are no Errors, but there are Note responses that are required. Outcome:- The page will refresh and the specific issues that need to be responded to will
be displayed. Steps: - Click on the first Note displayed.
- The screen will dynamically update based on the response needed for the Note selected. It will require either a drop down selection or an open response.
Drop Down Example:
Open Response Example:
Page 16

Create PSD & CSD Files for Submission
- Select or enter the response and click Update and proceed to the next Note in the list. If you do not complete a Note, the system will not permit you to proceed.
- When you have responded to each Note, click Submit to complete your submission. You will receive an on screen notification of your submission.
C. Scenario 3: - There are no Errors and no Notes requiring responses.Outcome: - You will receive an on screen submission confirmation.Steps:- No further action required for this submission.
Page 17

Create PSD & CSD Files for Submission
Page 18