Embed Size (px)
Citation preview
Puppet Documentation(Generated on July 01, 2013, from git revision 46784ac1656bd7b57fcfb51d0865ec7ff65533d9)�
This is the documentation for Puppet, the industry-leading configuration management toolkit. Most�of the content here applies equally to Puppet Enterprise and open source releases of Puppet.
Drive-ThruSmall documents for getting help fast.
Core Types Cheat Sheet — A double-sided reference to the most common resource types. (HTMLversion)Module Cheat Sheet — A one-page reference to Puppet module layout, covering classes anddefined types, files, templates, and plugins. (��HTML version)Frequently Asked QuestionsGlossary
Learning PuppetLearn to use Puppet! New users: start here.
Introduction and Index
IntroductionPart one: Serverless Puppet
Resources and the RALManifestsOrderingVariables, Conditionals, FactsModules and ClassesTemplatesClass ParametersDefined Types�
Part two: Master/Agent PuppetPreparing an Agent VMBasic Agent/Master Puppet
Reference ShelfPuppet 3 Reference ManualPuppet Documentation • Drive-Thru 2/434
A concise reference to Puppet 3ʼs usage and internals. Use the left sidebar of any reference manualpage to navigate between pages.
OverviewLanguageModules
Puppet 2.7 Reference Manual
A concise reference to Puppet 2.7ʼs usage and internals. Use the left sidebar of any referencemanual page to navigate between pages.
Table of ContentsLanguage — A complete reference to the Puppet language.Modules
Miscellaneous References
HTTP API — reference of API-accessible resourcesPuppet Language Guide — an older version of the Puppet reference manualʼs language referencePuppet Manpages — detailed help for each Puppet application
Generated References
Complete and up-to-date references for Puppetʼs resource types, functions, metaparameters,configuration options, indirection termini, and reports, served piping hot directly from the source�code.
Resource Types — all default typesFunctions — all built in functionsMetaparameters — all type-independent resource attributesConfiguration� — all configuration file settings��Report — all available report handlers
These references are automatically generated from the inline documentation in Puppetʼs sourcecode. References generated from each version of Puppet are archived here:
Versioned References — inline reference docs from Puppetʼs past and present
Puppet GuidesLearn about different areas of Puppet, fix problems, and design solutions.��
Components
Learn more about major working parts of the Puppet system.
Puppet commands: master, agent, apply, resource, and more — components of the system
Installing and Configuring�
Puppet Documentation • Puppet Guides 3/434
Get Puppet up and running at your site.
An Introduction to PuppetSupported PlatformsInstalling Puppet — from packages, source, or gemsUpgrading Puppet — general advice and suggestions for upgrading critical infrastructureConfiguring Puppet� — use puppet.conf to configure Puppetʼs behavior�Setting Up Puppet — includes server setup & testing
Basic Features and Use
Puppet Language Guide — all the language detailsModule Fundamentals — nearly all Puppet code should be in modules.Installing Modules from the Puppet Forge — save time by using pre-existing modulesTechniques — common design patterns, tips, and tricksTroubleshooting — avoid common problems and confusionsParameterized Classes — use parameterized classes to write more effective, versatile, and�encapsulated codeModule Smoke Testing — write and run basic smoke tests for your modulesScope and Puppet — understand and banish dynamic lookup warnings with Puppet 2.7Puppet File Serving — serving files with Puppet�Style Guide — Puppet community conventionsBest Practices — use Puppet effectively�
Puppet on Windows
Manage Windows nodes side by side with your *nix infrastructure, with Puppet 2.7 and higher(including Puppet Enterprise ≥ 2.5).
OverviewInstalling Puppet on WindowsRunning Puppet on WindowsWriting Manifests for WindowsTroubleshooting Puppet on WindowsDevelopers Only: Running Puppet from Source on Windows
Tuning and Scaling
Puppetʼs default configuration is meant for prototyping and designing a site. Once youʼre ready for�production deployment, learn how to adjust Puppet for peak performance.
Scaling Puppet — general tips & tricksUsing Multiple Puppet Masters — a guide to deployments with multiple Puppet mastersScaling With Passenger — for Puppet 0.24.6 and laterScaling With Mongrel — for older versions of Puppet
Advanced Features
Puppet Documentation • Puppet Guides 4/434
Go beyond basic manifests.
Templating — template out config files using ERB��Virtual ResourcesExported Resources — share data between hostsEnvironments — separate dev, stage, & productionReporting — learn what your nodes are up toGetting Started With Cloud Provisioner — create and bootstrap new nodes with the experimentalcloud provisioner extensionPublishing Modules on the Puppet Forge — preparing your best modules to go public
Hacking and Extending
Build your own tools and workflows on top of Puppet.�USING THE PUPPET DATA LIBRARY
Puppet Data Library: Overview — Puppet automatically gathers reams of data about yourinfrastructure. Learn where that data is, how to access it, and how to mine it for knowledge.Inventory Service — use Puppetʼs inventory of nodes at your site in your own custom applications
USING APIS AND INTERFACES
HTTP Access Control — secure API access with auth.confExternal Nodes — specify what your machines do using external data sources
USING RUBY PLUGINS
Plugins In Modules — where to put plugins, how to sync to clientsWriting Custom FactsWriting Custom FunctionsWriting Custom Types & ProvidersComplete Resource Example — more information on custom types & providersProvider Development — more about providers
DEVELOPING PUPPET
Running Puppet from Source — preview the leading edgeDevelopment Life Cycle — learn how to contribute codePuppet Internals — understand how Puppet works internally
Other ResourcesPuppet Wiki & Bug TrackerPuppet Patterns (Recipes)
ToolsThis guide covers the major tools that comprise Puppet.
Puppet Documentation • Other Resources 5/434

Single binaryStarting with Puppet 2.6, Puppet uses a single puppet binary with multiple subcommands, in thestyle of Git. Each of the pre-2.6 commands corresponds directly to one of the new subcommands.
Pre-2.6 Post-2.6
puppetmasterd puppet master
puppetd puppet agent
puppet puppet apply
puppetca puppet cert
ralsh puppet resource
puppetrun puppet kick
puppetqd puppet queue
filebucket� puppet filebucket�
puppetdoc puppet doc
pi puppet describe
This also results in a change in the puppet.conf configuration file. The sections, previously things��like [puppetd], now should be renamed to match the new binary names. So [puppetd] becomes[agent]. You will be prompted to do this when you start Puppet. A log message will be generatedfor each section that needs to be renamed. This is merely a warning – existing configuration file will��work unchanged.
Manpage documentationAdditional information about each tool is provided in the relevant manpage. You can consult thelocal version of each manpage, or view the web versions of the manuals.
puppet master (or puppetmasterd)Puppet master is a central management daemon. In most installations, youʼll have one puppetmaster server and each managed machine will run puppet agent. By default, puppet masteroperates a certificate authority, which can be managed using puppet cert.�
Puppet master serves compiled configurations, files, templates, and custom plugins to managed��nodes.
The main configuration file for puppet master, puppet agent, and puppet apply is��/etc/puppet/puppet.conf , which has sections for each application.
Note: As of Puppet 3, the old standalone commands have been removed completely. Notealso that puppet without any subcommand will no longer default to puppet apply.
Puppet Documentation • Other Resources 6/434
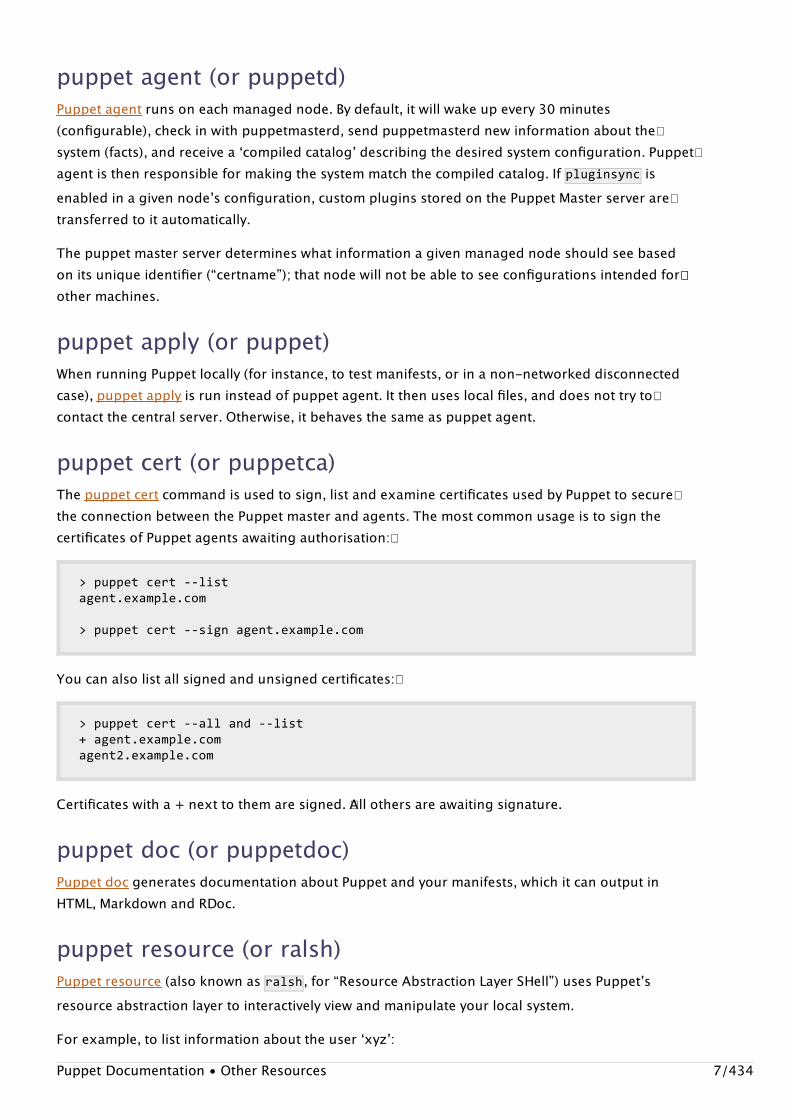
puppet agent (or puppetd)Puppet agent runs on each managed node. By default, it will wake up every 30 minutes(configurable), check in with puppetmasterd, send puppetmasterd new information about the�system (facts), and receive a ʻcompiled catalogʼ describing the desired system configuration. Puppet�agent is then responsible for making the system match the compiled catalog. If pluginsync isenabled in a given nodeʼs configuration, custom plugins stored on the Puppet Master server are�transferred to it automatically.
The puppet master server determines what information a given managed node should see basedon its unique identifier (“certname”); that node will not be able to see configurations intended for��other machines.
puppet apply (or puppet)When running Puppet locally (for instance, to test manifests, or in a non-networked disconnectedcase), puppet apply is run instead of puppet agent. It then uses local files, and does not try to�contact the central server. Otherwise, it behaves the same as puppet agent.
puppet cert (or puppetca)The puppet cert command is used to sign, list and examine certificates used by Puppet to secure�the connection between the Puppet master and agents. The most common usage is to sign thecertificates of Puppet agents awaiting authorisation:�
>puppetcert--listagent.example.com
>puppetcert--signagent.example.com
You can also list all signed and unsigned certificates:�
>puppetcert--alland--list+agent.example.comagent2.example.com
Certificates with a + next to them are signed. �All others are awaiting signature.
puppet doc (or puppetdoc)Puppet doc generates documentation about Puppet and your manifests, which it can output inHTML, Markdown and RDoc.
puppet resource (or ralsh)Puppet resource (also known as ralsh , for “Resource Abstraction Layer SHell”) uses Puppetʼsresource abstraction layer to interactively view and manipulate your local system.
For example, to list information about the user ʻxyzʼ:
Puppet Documentation • Other Resources 7/434
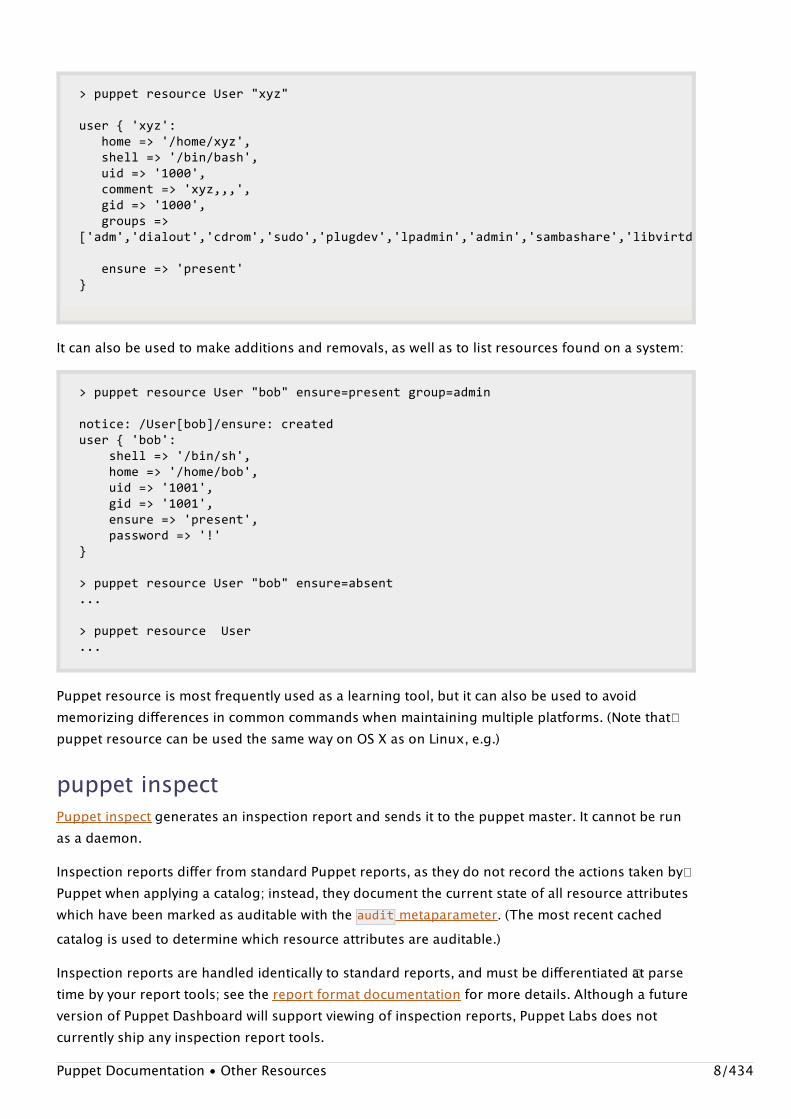
>puppetresourceUser"xyz"
user{'xyz':home=>'/home/xyz',shell=>'/bin/bash',uid=>'1000',comment=>'xyz,,,',gid=>'1000',groups=>['adm','dialout','cdrom','sudo','plugdev','lpadmin','admin','sambashare','libvirtd'],
ensure=>'present'}
It can also be used to make additions and removals, as well as to list resources found on a system:
>puppetresourceUser"bob"ensure=presentgroup=admin
notice:/User[bob]/ensure:createduser{'bob':shell=>'/bin/sh',home=>'/home/bob',uid=>'1001',gid=>'1001',ensure=>'present',password=>'!'}
>puppetresourceUser"bob"ensure=absent...
>puppetresourceUser...
Puppet resource is most frequently used as a learning tool, but it can also be used to avoidmemorizing differences in common commands when maintaining multiple platforms. (Note that�puppet resource can be used the same way on OS X as on Linux, e.g.)
puppet inspectPuppet inspect generates an inspection report and sends it to the puppet master. It cannot be runas a daemon.
Inspection reports differ from standard Puppet reports, as they do not record the actions taken by�Puppet when applying a catalog; instead, they document the current state of all resource attributeswhich have been marked as auditable with the audit metaparameter. (The most recent cachedcatalog is used to determine which resource attributes are auditable.)
Inspection reports are handled identically to standard reports, and must be differentiated �at parsetime by your report tools; see the report format documentation for more details. Although a futureversion of Puppet Dashboard will support viewing of inspection reports, Puppet Labs does notcurrently ship any inspection report tools.
Puppet Documentation • Other Resources 8/434
Puppet inspect was added in Puppet 2.6.5.
facterPuppet agent nodes use a library (and associated front-end tool) called facter to provideinformation about the hardware and OS (version information, IP address, etc) to the puppet masterserver. These facts are exposed to Puppet manifests as global variables, which can be used inconditionals, string expressions, and templates. To see a list of the facts any node offers, simply�open a shell session on that node and run facter . Facter is included with (and required by) allPuppet installations.
Introduction to PuppetWhy PuppetAs system administrators acquire more and more systems to manage, automation of mundanetasks is increasingly important. Rather than develop in-house scripts, it is desirable to share asystem that everyone can use, and invest in tools that can be used regardless of oneʼs employer.Certainly doing things manually doesnʼt scale.
Puppet has been developed to help the sysadmin community move to building and sharing maturetools that avoid the duplication of everyone solving the same problem. It does so in two ways:
It provides a powerful framework to simplify the majority of the technical tasks that sysadminsneed to performThe sysadmin work is written as code in Puppetʼs custom language which is shareable just likeany other code.
This means that your work as a sysadmin can get done much faster, because you can have Puppethandle most or all of the details, and you can download code from other sysadmins to help you getdone even faster. The majority of Puppet implementations use at least one or two modulesdeveloped by someone else, and there are already hundreds of modules developed and shared bythe community.
Learning RecommendationsWeʼre glad you want to learn Puppet. Youʼre free to browse around the documentation as you like,though we generally recommend trying out Puppet locally first (without the daemon and�client/server setup), so you can understand the basic concepts. From there, move on to centrallymanaged server infrastructure. Ralsh is also a great way to get your feet wet exploring the Puppetmodel, after you have read some of the basic information — you can quickly see how the declarativemodel works for simple things like users, services, and file permissions.�
Once youʼve learned the basics, make sure you understand classes and modules, then move on tothe advanced sections and read more about the features that are useful to you. Learning all at onceis definitely not required. If you find something confusing, ��file a ticket� or email us at
Puppet Documentation • Introduction to Puppet 9/434
[email protected] to let us know.
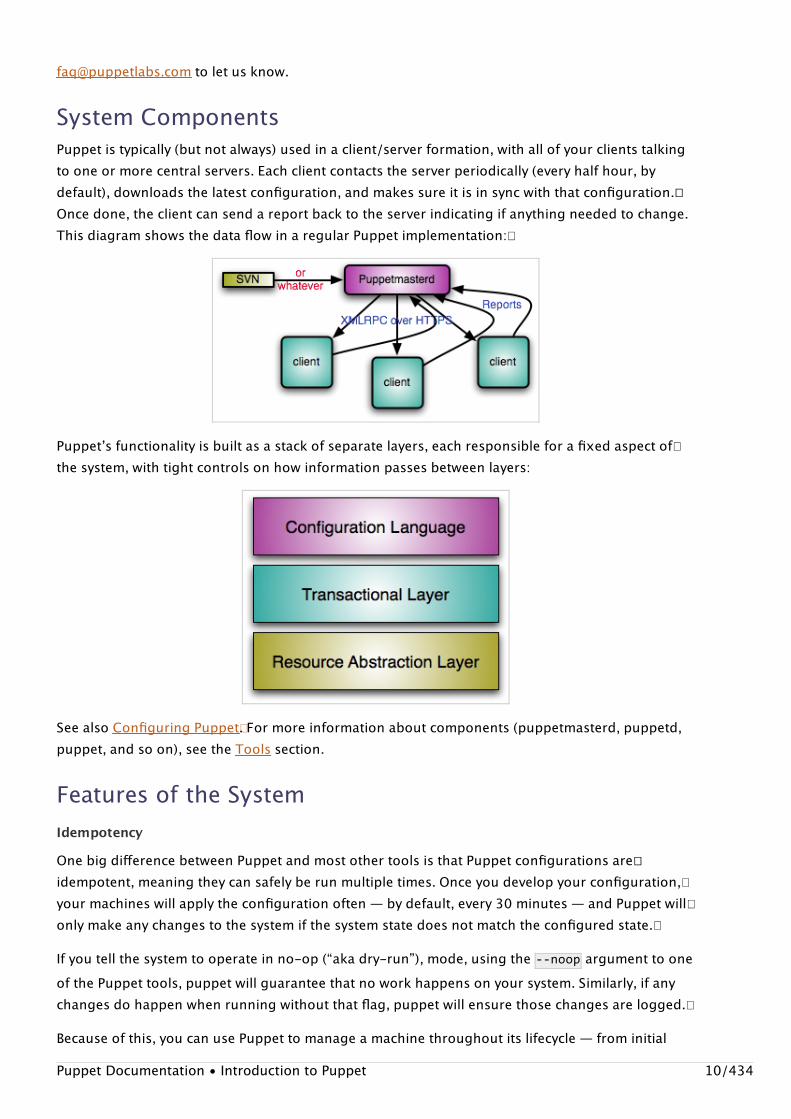
System ComponentsPuppet is typically (but not always) used in a client/server formation, with all of your clients talkingto one or more central servers. Each client contacts the server periodically (every half hour, bydefault), downloads the latest configuration, and makes sure it is in sync with that configuration.��Once done, the client can send a report back to the server indicating if anything needed to change.This diagram shows the data flow in a regular Puppet implementation:�
Puppetʼs functionality is built as a stack of separate layers, each responsible for a fixed aspect of�the system, with tight controls on how information passes between layers:
See also Configuring Puppet�. For more information about components (puppetmasterd, puppetd,puppet, and so on), see the Tools section.
Features of the SystemIdempotency
One big difference between Puppet and most other tools is that Puppet configurations are��idempotent, meaning they can safely be run multiple times. Once you develop your configuration,�your machines will apply the configuration often — by default, every 30 minutes — and Puppet will�only make any changes to the system if the system state does not match the configured state.�
If you tell the system to operate in no-op (“aka dry-run”), mode, using the --noop argument to oneof the Puppet tools, puppet will guarantee that no work happens on your system. Similarly, if anychanges do happen when running without that flag, puppet will ensure those changes are logged.�
Because of this, you can use Puppet to manage a machine throughout its lifecycle — from initial
Puppet Documentation • Introduction to Puppet 10/434
installation, to ongoing upgrades, and finally to end-of-life, where you move services elsewhere.�Unlike system install tools like Sunʼs Jumpstart or Red Hatʼs Kickstart, Puppet configurations can�keep machines up to date for years, rather than just building them correctly only the first time and�then neccessitating a rebuild. Puppet users usually do just enough with their host install tools toboostrap Puppet, then they use Puppet to do everything else.
Cross Platform
Puppetʼs Resource Abstraction Layer (RAL) allows you to focus on the parts of the system you careabout, ignoring implementation details like command names, arguments, and file formats — your�tools should treat all users the same, whether the user is stored in NetInfo or /etc/passwd . We callthese system entities resources .
Ralsh, listed in the Tools section is a fun way to try out the RAL before you get too deep into Puppetlanguage.
Model & Graph BasedRESOURCE TYPES
The concept of each resource (like service, file, user, group, etc) is modelled as a “type”. Puppet�decouples the definition from how that implementation is fulfilled on a particular operating system,��for instance, a Linux user versus an OS X user can be talked about in the same way but areimplemented differently inside of Puppet.�
See the types reference for a list of managed types and information about how to use them.PROVIDERS
Providers are the fulfillment of a resource. �For instance, for the package type, both ʻyumʼ and ʻaptʼare valid ways to manage packages. Sometimes more than one provider will be available on aparticular platform, though each platform always has a default provider. There are currently 17providers for the package type.MODIFYING THE SYSTEM
Puppet resource providers are what are responsible for directly managing the bits on disk. You donot directly modify a system from Puppet language — you use the language to specify a resource,which then modifies the system. �This way puppet language behaves exactly the same way in acentrally managed server setup as it does locally without a server. Rather than tacking a couple oflines onto the end of your fstab , you use the mount type to create a new resource that knows howto modify the fstab , or NetInfo, or wherever mount information is kept.
Resources have attributes called ʻpropertiesʼ which change the way a resource is managed. Forinstance, users have an attribute that specifies whether the home directory should be created.�
ʻMetaparamsʼ are another special kind of attribute, those exist on all resources. This include thingslike the log level for the resource, whether the resource should be in noop mode so it nevermodifies the system, and the relationships between resources.�RESOURCE RELATIONSHIPS
Puppet has a system of modelling relationships between resources — what resources should beevaluated before or after one another. They also are used to determine whether a resource needs
Puppet Documentation • Introduction to Puppet 11/434
to respond to changes in another resource (such as if a service needs to restart if the configuration�file for the service has changed). �This ordering reduces unneccessary commands, such as avoidingrestarting a service if the configuration has �not changed.
Because the system is graph based, itʼs actually possible to generate a diagram (from Puppet) of therelationships between all of your resources.
Learning The LanguageSeeing a few examples in action will greatly help in learning the system.
For information about the Puppet language, see the excellent language guide
Puppet Open Source Supported PlatformsThis page lists supported platforms for the open source version of Puppet. For Puppet Enterpriseʼssupported platforms visit the PE system requirements page.
Please contact Puppet Labs if you are interested in a platform not on this list.
See Installing Puppet for more details about the packages available for your platform(s).
Puppet 2.6, 2.7, and 3 can run on the following platforms:
LinuxRed Hat Enterprise Linux, version 4 and higherCentOS, version 4 and higherScientific Linux, version 4 and higher�Oracle Linux, version 4 and higherDebian, version 5 (Lenny) and higherUbuntu, version 8.04 LTS and higherFedora, version 15 and higherSUSE Linux Enterprise Server, version 11 and higherGentoo LinuxMandriva Corporate Server 4ArchLinux
BSDFreeBSD 4.7 and laterOpenBSD 4.1 and later
Other UnixMac OS X, version 10.5 (Leopard) and higher (Puppet 2.7 and earlier also support 10.4)Oracle Solaris, version 10 and higher
Puppet Documentation • Puppet Open Source Supported Platforms 12/434
AIX, version 5.3 and higherHP-UX
WindowsWindows Server 2003 and 2008 (Puppet version 2.7.6 and higher)Windows 7 (Puppet version 2.7.6 and higher)
Ruby VersionsPuppet requires an MRI Ruby interpreter. Certain versions of Ruby work better with Puppet thanothers, and some versions are not supported at all. Run ruby--version to check the version ofRuby on your system.
Ruby version Puppet 2.6 Puppet 2.7 Puppet 3.x
1.8.5* Supported Supported No
1.8.7 Supported Supported Supported
1.9.3** No No Supported
1.9.2 No No No
1.9.1 No No No
1.9.0 No No No
1.8.6 No No No
1.8.1 No No No
Puppet Enterprise does not rely on the OSʼs Ruby version, as it maintains its own Rubyenvironment. You can install PE alongside any version of Ruby or on systems without Rubyinstalled.
The Windows installers provided by Puppet Labs donʼt rely on the OSʼs Ruby version, andcan be installed alongside any version of Ruby or on systems without Ruby installed.
* Note that although Ruby 1.8.5 is fully supported on Puppet 2.6 and 2.7, Ruby 1.8.7generally gives better performance and memory use. To support the large installed base ofRHEL5 systems which ship with Ruby 1.8.5, Puppet Labs packages a drop-in replacementRuby 1.8.7 package. Read the ʻEnterprise Linux and Derivativesʼ section of the InstallingPuppet guide to learn how to install these packages.
** Ruby 1.9.3-p0 has bugs that cause a number of known issues with Puppet, and youshould use a different release. To the best of our knowledge, these issues were fixed in the��second public release of Ruby 1.9.3 (p125), and we are positive they are resolved in p392(which ships with Fedora 18). Unfortunately, Ubuntu Precise ships with p0 for some reason,and thereʼs not a lot we can do about it. If youʼre using Precise, we recommend using PuppetEnterprise or installing a third-party Ruby package.
Puppet Documentation • Puppet Open Source Supported Platforms 13/434
Versions marked as “Supported” are recommended by Puppet Labs and are under extensiveautomated test coverage. Other versions are not recommended and we make no guarantees abouttheir performance with Puppet.
PrerequisitesPuppet has a very small number of external dependencies:
Dependency Puppet 2.x Puppet 3.x
Facter Required Required
Hiera Optional Required
rgen Optional
Rgen is only needed if you are using Puppet ≥ 3.2 with parser=future enabled. The official��Puppet Labs packages will install it as a dependency.
All other prerequisite Ruby libraries should come with any standard Ruby 1.8.5+ install. Shouldyour OS not come with the complete standard library (or you are using a custom Ruby build), theseinclude:
base64cgidigest/md5etcfileutils�ipaddropenssl (>= 0.9.8o if using a 3.x Puppet master or newer)strscansysloguriwebrickwebrick/httpsxmlrpc
Installing Puppet
Puppet Documentation • Installing Puppet 14/434
Installing Puppet
Pre-InstallCheck the following before you install Puppet.
OS/Ruby Version
See the supported platforms guide.If your OS is older than the supported versions, you may still be able to run Puppet if you installan updated version of Ruby. See the list of supported Ruby versions.
Deployment Type
Decide on a deployment type before installing:
Agent/master
Agent nodes pull their configurations from a puppet master server. Admins must manage�node certificates, but will only have to maintain manifests and modules on the puppet master�server(s), and can more easily take advantage of features like reporting and external datasources.
You must decide in advance which server will be the master; install Puppet on it beforeinstalling on any agents. The master should be a dedicated machine with a fast processor,lots of RAM, and a fast disk.
Standalone
Every node compiles its own configuration from manifests. Admins must regularly sync�Puppet manifests and modules to every node.
Network
In an agent/master deployment, you must prepare your network for Puppetʼs traffic.��
Firewalls: The puppet master server must allow incoming connections on port 8140, and agentnodes must be able to connect to the master on that port.Name resolution: Every node must have a unique hostname. Forward and reverse DNS must bothbe configured correctly. Instructions for configuring DNS are beyond the scope of this guide. If��your site lacks DNS, you must write an /etc/hosts file on each node.�
Installing Puppet
This document covers open source releases of Puppet. See here for instructions on installingPuppet Enterprise.
Note: The default master hostname is puppet . Your agent nodes will be ready sooner if thishostname resolves to your puppet master.
Puppet Documentation • Installing Puppet 15/434
The best way to install Puppet varies by operating system. Use the links below to skip to your OSʼsinstructions.
Enterprise Linux (and Derivatives)Debian and UbuntuFedoraMac OS XWindowsInstalling from Gems (Not Recommended)Installing from a Tarball (Not Recommended)Running Directly from Source (Not Recommended)
Enterprise Linux (and Derivatives)
These instructions apply to Enterprise Linux (EL) variants, including but not limited to:
Red Hat Enterprise Linux 5 and 6CentOS 5 and 6Scientific Linux 5 and 6�Ascendos 5 and 6
These distributions are also supported by Puppet Enterprise.
Users of out-of-production EL systems (i.e. RHEL 4) may need to compile their own copy of Rubybefore installing, or use an older snapshot of EPEL.1. CHOOSE A PACKAGE SOURCE
EL 5 and 6 releases can install Puppet from Puppet Labsʼ official repo, or from ��EPEL.USING PUPPET LABSʼ PACKAGESPuppet Labs provides an official package repo at ��yum.puppetlabs.com. It contains up-to-datepackages, and can install Puppet and its prerequisites without requiring any other externalrepositories.
To use the Puppet Labs repo, follow the instructions here.USING EPELThe Extra Packages for Enterprise Linux (EPEL) repo includes Puppet and its prerequisites. Thesepackages are usually older Puppet versions with security patches. As of April 2012, EPEL wasshipping a Puppet version from the prior, maintenance-only release series.
To install Puppet from EPEL, follow EPELʼs own instructions for enabling their repository on all ofyour target systems.2. INSTALL THE PUPPET MASTER
Skip this step for a standalone deployment.
On your puppet master node, run sudoyuminstallpuppet-server . This will install Puppet andan init script (/etc/init.d/puppetmaster ) for running a test-quality puppet master server.
Puppet Documentation • Installing Puppet 16/434
3. INSTALL PUPPET ON AGENT NODES
On your other nodes, run sudoyuminstallpuppet . This will install Puppet and an init script(/etc/init.d/puppet ) for running the puppet agent daemon.
For a standalone deployment, install this same package on all nodes.4. CONFIGURE AND ENABLE
Continue reading here and follow any necessary post-install steps.
Debian and Ubuntu
These instructions apply to Debian, Ubuntu, and derived Linux distributions, including
Debian 6 “Squeeze” (current stable release) (also supported by Puppet Enterprise)Debian “Wheezy” (current testing distribution)Debian “Sid” (current unstable distribution)Ubuntu 12.04 LTS “Precise Pangolin” (also supported by Puppet Enterprise)Ubuntu 10.04 LTS “Lucid Lynx” (also supported by Puppet Enterprise)Ubuntu 8.04 LTS “Hardy Heron”Ubuntu 12.10 “Quantal Quetzal”Ubuntu 11.10 “Oneiric Ocelot”
Users of out-of-production versions may have vendor packages of Puppet available, but cannot usethe Puppet Labs packages.1. CHOOSE A PACKAGE SOURCE
Debian and Ubuntu systems can install Puppet from Puppet Labsʼ official repo, or from the OS��vendorʼs default repo.USING PUPPET LABSʼ PACKAGESPuppet Labs provides an official package repo at ��apt.puppetlabs.com. It contains up-to-datepackages, and can install Puppet and its prerequisites without requiring any other externalrepositories.
To use the Puppet Labs repo, follow the instructions here.USING VENDOR PACKAGESDebian and Ubuntu distributions include Puppet in their default package repos. No extra steps arenecessary to enable it.
Older OS versions will have outdated Puppet versions, which are updated only with security patches.As of April 2012:
Debian unstableʼs Puppet was current.Debian testingʼs Puppet was nearly current (one point release behind the current version).Debian stableʼs Puppet was more than 18 months old, with additional security patches.The latest Ubuntuʼs Puppet was nearly current (one point release behind).The prior (non-LTS) Ubuntuʼs Puppet was nine months old, with additional security patches.The prior LTS Ubuntuʼs Puppet was more than two years old, with additional security patches.
Puppet Documentation • Installing Puppet 17/434
2. INSTALL THE PUPPET MASTER
Skip this step for a standalone deployment.
On your puppet master node, run sudoapt-getinstallpuppetmaster . This will install Puppet,its prerequisites, and an init script (/etc/init.d/puppetmaster ) for running a test-quality puppetmaster server.
If you are using vendor packages, a puppetmaster-passenger package may be available. If youinstall this package instead of puppetmaster , it will automatically configure a production-capacity�web server for the Puppet master, using Passenger and Apache. In this configuration, do not use�the puppetmaster init script; instead, control the puppet master by turning the Apache web serveron and off or by disabling the puppet master vhost.�3. INSTALL PUPPET ON AGENT NODES
On your other nodes, run sudoapt-getinstallpuppet . This will install Puppet and an init script(/etc/init.d/puppet ) for running the puppet agent daemon.
For a standalone deployment, run sudoapt-getinstallpuppet-common on all nodes instead.This will install Puppet without the agent init script.4. CONFIGURE AND ENABLE
Continue reading here and follow any necessary post-install steps.
Fedora
These instructions apply to Fedora releases, including:
Fedora 17Fedora 16
Users of out-of-production versions may have vendor packages of Puppet available, but cannot usethe Puppet Labs packages.1. CHOOSE A PACKAGE SOURCE
Fedora systems can install Puppet from Puppet Labsʼ official repo, or from the OS vendorʼs default��repo.USING PUPPET LABSʼ PACKAGESPuppet Labs provides an official package repo at ��yum.puppetlabs.com. It contains up-to-datepackages, and can install Puppet and its prerequisites without requiring any other externalrepositories.
To use the Puppet Labs repo, follow the instructions here.USING VENDOR PACKAGESFedora includes Puppet in its default package repos. No extra steps are necessary to enable it.
These packages are usually older Puppet versions with security patches. As of April 2012, bothcurrent releases of Fedora had Puppet versions from the prior, maintenance-only release series.2. INSTALL THE PUPPET MASTER
Puppet Documentation • Installing Puppet 18/434
Skip this step for a standalone deployment.
On your puppet master node, run sudoyuminstallpuppet-server . This will install Puppet andan init script (/etc/init.d/puppetmaster ) for running a test-quality puppet master server.
3. INSTALL PUPPET ON AGENT NODES
On your other nodes, run sudoyuminstallpuppet . This will install Puppet and an init script(/etc/init.d/puppet ) for running the puppet agent daemon.
For a standalone deployment, install this same package on all nodes.4. CONFIGURE AND ENABLE
Continue reading here and follow any necessary post-install steps.
Mac OS X1. DOWNLOAD THE PACKAGE
OS X users should install Puppet with official Puppet Labs packages. ��Download them here. You willneed:
The most recent Facter packageThe most recent Hiera packageThe most recent Puppet package
2. INSTALL FACTER
Mount the Facter disk image, and run the installer package it contains.3. INSTALL HIERA
Mount the Hiera disk image, and run the installer package it contains.4. INSTALL PUPPET
Mount the Puppet disk image, and run the installer package it contains.5. CONFIGURE AND ENABLE
The OS X packages are currently fairly minimal, and do not create launchd jobs, users, or defaultconfiguration or manifest files. You will have to:��
Manually create a puppet group, by running sudopuppetresourcegrouppuppetensure=present .Manually create a puppet user, by running sudopuppetresourceuserpuppetensure=presentgid=puppetshell='/sbin/nologin' .If you intend to run the puppet agent daemon regularly, or if you intend to automatically runpuppet apply at a set interval, you must create and register your own launchd services. See thepost-installation instructions for a model.
Continue reading here and follow any necessary post-install steps.
Windows
See the Windows installation instructions.
Puppet Documentation • Installing Puppet 19/434
Installing from Gems (Not Recommended)
On *nix platforms without native packages available, you can install Puppet with Rubyʼs gempackage manager.1. ENSURE PREREQUISITES ARE INSTALLED
Use your OSʼs package tools to install both Ruby and RubyGems. In some cases, you may need tocompile and install these yourself.
On Linux platforms, you should also ensure that the LSB tools are installed; at a minimum, werecommend installing lsb_release . See your OSʼs documentation for details about its LSB tools.
2. INSTALL PUPPET
To install Puppet and Facter, run:
$sudogeminstallpuppet
3. CONFIGURE AND ENABLE
Installing with gem requires some additional steps:
Manually create a puppet group, by running sudopuppetresourcegrouppuppetensure=present .Manually create a puppet user, by running sudopuppetresourceuserpuppetensure=presentgid=puppetshell='/sbin/nologin' .Create and install init scripts for the puppet agent and/or puppet master services. See the ext/directory in the Puppet source for example init scripts (Red Hat, Debian, SUSE, systemd, FreeBSD,Gentoo, Solaris).Manually create an /etc/puppet/puppet.conf file.�Locate the Puppet source on disk, and manually copy the auth.conf file from the �/confdirectory to /etc/puppet/auth.conf .If you get the error require:nosuchfiletoload when trying to run Puppet, define the�RUBYOPT environment variable as advised in the post-install instructions of the RubyGems UserGuide.
Continue reading here and follow any necessary post-install steps.
Installing from a Tarball (Not Recommended)
This is almost never recommended, but may be necessary in some cases.1. ENSURE PREREQUISITES ARE INSTALLED
Use your OSʼs package tools to install Ruby. In some cases, you may need to compile and install ityourself.
On Linux platforms, you should also ensure that the LSB tools are installed; at a minimum, werecommend installing lsb_release . See your OSʼs documentation for details about its LSB tools.
Puppet Documentation • Installing Puppet 20/434
If you wish to use Puppet ≥ 3.2 with parser=future enabled, you should also install the rgengem.2. DOWNLOAD PUPPET AND FACTER
Download Puppet here.Download Facter here.
3. INSTALL FACTER
Unarchive the Facter tarball, navigate to the resulting directory, and run:
$sudorubyinstall.rb
4. INSTALL PUPPET
Unarchive the Puppet tarball, navigate to the resulting directory, and run:
$sudorubyinstall.rb
5. CONFIGURE AND ENABLE
Installing from a tarball requires some additional steps:
Manually create a puppet group, by running sudopuppetresourcegrouppuppetensure=present .Manually create a puppet user, by running sudopuppetresourceuserpuppetensure=presentgid=puppetshell='/sbin/nologin' .Create and install init scripts for the puppet agent and/or puppet master services. See the ext/directory in the Puppet source for example init scripts (Red Hat, Debian, SUSE, systemd, FreeBSD,Gentoo, Solaris).Manually create an /etc/puppet/puppet.conf file.�
Continue reading here and follow any necessary post-install steps.
Running Directly from Source (Not Recommended)
This is recommended only for developers and testers.
See Running Puppet from Source.
Post-InstallPerform the following tasks after you finish installing Puppet.�
Configure Puppet�
Puppetʼs main configuration file is found at ��/etc/puppet/puppet.conf . See Configuring Puppet� formore details.
Most users should specify the following settings:
Puppet Documentation • Installing Puppet 21/434
ON AGENT NODES
Settings for agent nodes should go in the [agent] or [main] block of puppet.conf .
server : The hostname of your puppet master server. Defaults to puppet .report : Most users should set this to true .pluginsync : Most users should set this to true .certname : The sitewide unique identifier for this node. Defaults to the nodeʼs fully qualified��domain name, which is usually fine.�
ON PUPPET MASTERS
Settings for puppet master servers should go in the [master] or [main] block of puppet.conf .
dns_alt_names : A list of valid hostnames for the master, which will be embedded in itscertificate. Defaults to the puppet masterʼs �certname and puppet , which is usually fine. If you are�using a non-default setting, set it before starting the puppet master for the first time.�
ON STANDALONE NODES
Settings for standalone puppet nodes should go in the [main] block of puppet.conf .
Puppetʼs default settings are generally appropriate for standalone nodes. No additionalconfiguration is necessary unless you intend to use centralized reporting or an �external nodeclassifier�.
Start and Enable the Puppet Services
Some packages do not automatically start the puppet services after installing the software. You mayneed to start them manually in order to use Puppet.WITH INIT SCRIPTS
Most packages create init scripts called puppet and puppetmaster , which run the puppet agent andpuppet master services.
You can start and permanently enable these services using Puppet:
$sudopuppetresourceservicepuppetensure=runningenable=true$sudopuppetresourceservicepuppetmasterensure=runningenable=true
WITH CRON
Note: puppet masters are usually also agent nodes; settings in [main] will be available toboth services, and settings in the [master] and [agent] blocks will override the settings in[main] .
Note: If you have configured puppet master to use a production web server, do not use the�default init script; instead, start and stop the web server that is managing the puppet masterservice.
Puppet Documentation • Installing Puppet 22/434
Standalone deployments do not use services with init scripts; instead, they require a cron task toregularly run puppet apply on a main manifest (usually the same /etc/puppet/manifests/site.ppmanifest that puppet master uses). You can create this cron job with Puppet:
$sudopuppetresourcecronpuppet-applyensure=presentuser=rootminute=30command='/usr/bin/puppetapply$(puppet--configprintmanifest)'
In an agent/master deployment, you may wish to run puppet agent with cron rather than its initscript; this can sometimes perform better and use less memory. You can create this cron job withPuppet:
$sudopuppetresourcecronpuppet-agentensure=presentuser=rootminute=30command='/usr/bin/puppetagent--onetime--no-daemonize--splay'
WITH LAUNCHD
Apple recommends you use launchd to manage the execution of services and daemons. You candefine a launchd service with XML property lists (plists), and manage it with the �launchctlcommand line utility. If youʼd like to use launchd to manage execution of your puppet master oragent, download the following files and copy each into �/Library/LaunchDaemons/ :
com.puppetlabs.puppetmaster.plist (to manage launch of a puppet master)com.puppetlabs.puppet.plist (to manage launch of a puppet agent)
Set the correct owner and permissions on the files. Both must be owned by the root user and both�must be writable only by the root user:
$sudochownroot:wheel/Library/LaunchDaemons/com.puppetlabs.puppet.plist$sudochmod644/Library/LaunchDaemons/com.puppetlabs.puppet.plist$sudochownroot:wheel/Library/LaunchDaemons/com.puppetlabs.puppetmaster.plist$sudochmod644/Library/LaunchDaemons/com.puppetlabs.puppetmaster.plist
Make launchd aware of the new services:
$sudolaunchctlload-w/Library/LaunchDaemons/com.puppetlabs.puppet.plist$sudolaunchctlload-w/Library/LaunchDaemons/com.puppetlabs.puppetmaster.plist
Note that the files we provide here are responsible only for initial launch of a puppet master or�puppet agent at system start. How frequently each conducts a run is determined by Puppetʼsconfiguration, not the plists.�
See the OS X launchctl man page for more information on how to stop, start, and manage launchdjobs.
Sign Node Certificates�
In an agent/master deployment, an admin must approve a certificate request for each agent node�
Puppet Documentation • Installing Puppet 23/434
before that node can fetch configurations. Agent nodes will request certificates the first time they���attempt to run.
Periodically log into the puppet master server and run sudopuppetcertlist to viewoutstanding requests.Run sudopuppetcertsign<NAME> to sign a request, or sudopuppetcertsign--all tosign all pending requests.
An agent node whose request has been signed on the master will run normally on its next attempt.
Change Puppet Masterʼs Web Server
In an agent/master deployment, you must configure the puppet master to run under a scalable web�server after you have done some reasonable testing. The default web server is simpler to configure�and better for testing, but cannot support real-life workloads.
A replacement web server can be configured at any time, and does not affect the configuration of���agent nodes.
NextNow that you have installed and configured Puppet:�
Learn to Use Puppet
If you have not used Puppet before, you should read the Learning Puppet series and experiment,either with the Learning Puppet VM or with your own machines. This series will introduce theconcepts underpinning Puppet, and will guide you through the process of writing Puppet code,using modules, and classifying nodes.
Install Optional Software
You can extend and improve Puppet with other software:
Puppet Dashboard is an open-source report analyzer, node classifier, and web GUI for Puppet.�The stdlib module adds extra functions, an easier way to write custom facts, and more.For Puppet 2.6 and 2.7, the Hiera data lookup tool can help you separate your data from yourPuppet manifests and write cleaner code.User-submitted modules that solve common problems are available at the Puppet Forge. Searchhere first before writing a new Puppet module from scratch; you can often find something that��matches your need or can be quickly hacked to do so.
Upgrading PuppetSince Puppet is likely managing your entire infrastructure, it should be upgraded with care. Thispage describes our recommendations for upgrading Puppet.
Upgrade IntentionallyIf you are using ensure=>latest on the Puppet package or running large-scale package upgrade
Puppet Documentation • Upgrading Puppet 24/434
commands, you might receive a Puppet upgrade you were not expecting, especially if you subscribeto the Puppet Labs package repos, which always contain the most recent version of Puppet. Wehighly recommend avoiding unintentional upgrades. Although we try our best not to break things,especially between minor releases, Puppet has a lot of surface area, and bugs can and do slip in.
We recommend doing one of the following:
Maintain your own package repositories, test new Puppet releases in a dev environment, andonly introduce known-good versions into your production repo. Many sysadmins consider thisto be best practice for any mission-critical packages.Use Aptʼs pinning feature or Yumʼs versionlock plugin to lock Puppet to a specific version, and�only upgrade when you have a roll-out plan in place.
Apt Pinning Example
You can pin package versions by adding special .pref files to your systemʼs�/etc/apt/preferences.d/ directory:
#/etc/apt/preferences.d/00-puppet.prefPackage:puppetpuppet-commonPin:version2.7*Pin-Priority:501
This pref file will lock puppet and puppet-common to the latest 2.7 release — they will be upgraded�when new 2.7.x releases are added, but will not jump a major version. It will also downgrade aPuppet 3 to Puppet 2.7 if the pin-priority of the Puppet 3 is less than 501 (the default is 500). Aseparate file could be used to pin puppetmaster and puppetmaster-common, or they could be�added to the package list.
Yum Versionlock Example
Unfortunately, Yum versionlock is less flexible than Apt pinning: it canʼt allow bugfix upgrades, and��can only lock specific versions. For this reason, maintaining your own repo is a more attractive�option for RPM systems.
$sudoyuminstallyum-versionlock$sudoyuminstallpuppet-2.7.19$sudoyumversionlockpuppet
These commands will install the versionlock plugin and lock Puppet to version 2.7.19. When youwant to upgrade, edit /etc/yum/pluginconf.d/versionlock.list and remove the Puppet lock,then run:
$sudoyuminstallpuppet-<desiredversion>$sudoyumversionlockpuppet
Always Upgrade the Puppet Master FirstOlder agent nodes can get catalogs from a newer puppet master. The inverse is not always true.
Puppet Documentation • Upgrading Puppet 25/434
Use More Care With Major ReleasesUpgrading to a new major release presents more possibility for things to go wrong, and werecommend extra caution.
Additional Precautions
When upgrading to a new major release, we recommend the following:
Avoid jumping over a whole major release. If you are on Puppet 2.6, you should upgrade toPuppet 2.7 before going to 3.x, unless you are prepared to spend a lot of time fixing your�manifests without a net.Read the release notes, in particular any sections that refer to “backwards-incompatiblechanges.” Follow any specific recommendations for the new version. (�Backwards-incompatiblechanges for Puppet 3.0.)If you tend to just upgrade everything for bug fix releases, use a more conservative roll-out plan�for major ones.
The definition of a “major release” has occasionally changed:�
Versioning in Puppet 3 and Later
Starting with Puppet 3, there are three kinds of Puppet release:
Bug fix� releases increment the last segment of the version number. (E.g. 3.0.1.) They areintended to fix bugs without introducing new features or breaking backwards compatibility.�These releases should be safe to upgrade to, but you should test them anyway.Minor releases increment the middle segment of the version number. (E.g. 3.1.0.) They mayintroduce new features, but shouldnʼt break backwards compatibility.Major releases increment the first segment of the version number. (E.g. �3.0.0.) They mayintentionally break backwards compatibility with previous versions, in addition to addingfeatures and fixing bugs.�
Versioning in Puppet 2.x
In the 2.x series:
Minor releases are not distinguished from bug fix releases. A release that increments the last�segment of the version number (e.g. 2.7.18) may or may not add new features or break smallareas of backwards compatibility, and you must check the release notes to find out.�Major releases increment the second segment of the version number. (E.g. 2.7.0.) They mayintentionally break backwards compatibility with previous versions, in addition to addingfeatures and fixing bugs.�
Roll Out In StagesWhen upgrading, especially between major versions, we recommend rolling out the upgrade instages. Use one of the following three options:
Option 1: Spin Up Temporary Puppet Master, or Cull a Master From Your Load Balancer Pool
The best approach is to spin up a temporary puppet master, then point a few test nodes at it.
Puppet Documentation • Upgrading Puppet 26/434
If you run a multi-master site and can pull a puppet master out of the load balancer pool fortemporary test duty, do that. Upgrade Puppet on it, and follow steps 5-10 below.If you run a multi-master site and use Puppet to configure new puppet masters, you can also�spin up a new node and use Puppet to configure it. Upgrade Puppet on it, and follow steps 5-10�below.Otherwise, follow steps 1-10 below.
Option 2: Run Two Instances of Puppet Master at Once
You can also run a second instance of puppet master on your production puppet master server,using the same modules, manifests, data, ENC, and SSL configuration.�
1. Provision a new node and install Puppet on it.2. Set its server setting to the existing puppet master, and use puppetagent--test to request a
certificate; sign the cert.�3. Provision the new puppet master by checking out your latest modules, manifests, and data from
version control. If you use an ENC and/or PuppetDB or storeconfigs, configure the master to talk��to those services.
4. In a terminal window, run puppetmaster--no-daemonize--verbose . This will run a puppetmaster in the foreground so you can easily see log messages and warnings. Use care to limitconcurrent checkins on your test nodes; this WEBrick puppet master cannot handle sustainedload.
5. Choose a subset of your nodes to test with the new master, or spin up new nodes. UpgradePuppet to the new version on them, and change their server setting to point to the temporarypuppet master.
6. Trigger a puppetagent--test run on every test node, so you can see log messages in theforeground. Look for changes to their resources; if you see anything you didnʼt expect,investigate it. If something seems dangerous and you canʼt figure it out, you may want to post to�the Puppet users list or ask other users in #puppet on Freenode.
7. Check the log messages in the terminal window or log file on your puppet master. Look for�warnings and deprecation notices.
8. Check the actual configurations of your test nodes. Make sure everything is still working as�expected.
9. Repeat steps 5-8 with more test nodes if youʼre still not sure.10. Revert the server setting on all test nodes. Decommission the temporary puppet master.
Upgrade your production puppet master(s) by stopping their web server, upgrading the puppetpackage, and restarting their web server. Upgrade all your production nodes. (Most packagingsystems allow you to use Puppet to upgrade Puppet.)
Note: This is generally reliable, but has a small chance of yielding inaccurate results. (Thisproblem would require a major version to remove a given code path but not fail hard whenattempting to access the code path; we are not currently aware of a situation that wouldcause that.)
1. Download a tarball of the Puppet source code for the new version. Unzip it somewhere otherthan your normal Ruby library directory. (tar-xfpuppet-<version> )
2. Open a root shell, which should stay open for the duration of this test. (sudo-i )3. Change directory into the source tarball. (cdpuppet-<version> )4. Add the lib directory to your shellʼs RUBYLIB. (exportRUBYLIB=$(pwd)/lib:$RUBYLIB )5. Run puppetmaster--no-daemonize--verbose--port8141 . This will run a puppet master on
a different port� in the foreground so you can easily see log messages and warnings. Use care toPuppet Documentation • Upgrading Puppet 27/434
Option 3: Upgrade Master and Roll Back if Needed
For minor and bug fix releases,� you can often take a simpler path. This is not universallyrecommended, but many users do it and survive.
Setting Up PuppetOnce Puppet is installed, learn how to set it up for initial operation.
Open Firewall Ports On Server and Agent NodeIn order for the puppet master server to centrally manage agent nodes, you may need to open port8140 for incoming tcp connections on the puppet master. Consult your firewall documentation for�more details.
limit concurrent checkins on your test nodes; this WEBrick puppet master cannot handlesustained load.
6. Choose a subset of your nodes to test with the new master, or spin up new nodes. UpgradePuppet to the new version on them, and change their port setting to point to 8141.
7. Trigger a puppetagent--test run on every test node, so you can see log messages in theforeground. Look for changes to their resources; if you see anything you didnʼt expect,investigate it. If something seems dangerous and you canʼt figure it out, you may want to post to�the Puppet users list or ask other users in #puppet on Freenode.
8. Check the log messages in the terminal window on your puppet master. Look for warnings anddeprecation notices.
9. Check the actual configurations of your test nodes. Make sure everything is still working as�expected.
10. Repeat steps 6-9 with more test nodes if youʼre still not sure.11. Revert the port setting on all test nodes. Kill the temporary puppet master process, delete the
temporary copy of the puppet source. Upgrade your production puppet master(s) by stoppingtheir web server, upgrading the puppet package, and restarting their web server. Upgrade all ofyour production nodes. (Most packaging systems allow you to use Puppet to upgrade Puppet.)
1. Disable puppet agent on all of your production nodes. This is best done with MCollective and thepuppetd plugin, which can stop the agent on all nodes in a matter of seconds.
2. Upgrade your puppet master(s) to the new version of Puppet by stopping their web server,upgrading the puppet package, and restarting their web server.
3. Choose a subset of your nodes to test with the new master, or spin up new nodes. UpgradePuppet to the new version on them.
4. Trigger a puppetagent--test run on every test node, so you can see log messages in theforeground. Look for changes to their resources; if you see anything you didnʼt expect,investigate it. If something seems dangerous and you canʼt figure it out, you may want to post to�the Puppet users list or ask other users in #puppet on Freenode.
5. Check your puppet masterʼs log files. Look for warnings and deprecation notices.�6. Check the actual configurations of your test nodes. Make sure everything is still working as�
expected.7. Repeat steps 3-6 with more test nodes if youʼre still not sure.8. Do one of the following:
Upgrade Puppet and reactivate puppet agent on all of your production nodes.Downgrade Puppet to a known-good version on your Puppet master and any test nodes.
Puppet Documentation • Setting Up Puppet 28/434
Configuration Files�The main configuration file for Puppet is ��/etc/puppet/puppet.conf . A package based installationfile will have created this file automatically. ��Unlisted settings have reasonable defaults. To see allthe possible values, you may run:
$puppet--genconfig
Configure DNS (Optional)�The puppet agent looks for a server named puppet by default. If you choose, you can set up apuppet DNS CNAME record to avoid having to specify your puppet master hostname in theconfiguration of each agent node.�
If you have local DNS zone files, you can add a CNAME record pointing to the server machine in the�appropriate zone file.�
puppetINCNAMEcrabcake.picnic.edu.
See the book “DNS and Bind” by Cricket Liu et al if you need help with CNAME records. After addingthe CNAME record, restart your name server. You can also add a host entry in the /etc/hosts file�on both the server and agent nodes.
For the server:
127.0.0.1localhost.localdomainlocalhostpuppet
For the agent nodes:
192.168.1.67crabcake.picnic.educrabcakepuppet
NOTE: If you can ping the server by the name puppet but Syslog (for example /var/log/messages )on the agent nodes still has entries stating the puppet agent cannot connect to the server, verifyport 8140 is open on the server.
Puppet Language SetupCreate Your Site Manifest
Puppet is a declarative system, so it does not make much sense to speak of “executing” Puppetprograms or scripts. Instead, we choose to use the word manifest to describe our Puppet code, andwe speak of applying those manifests to the managed systems. Thus, a manifest is a text documentwritten in the Puppet language and meant to describe and result in a desired configuration.�
Puppet assumes that you will have one central manifest capable of configuring an entire site, which�we call the site manifest. You could have multiple, separate site manifests if you wanted, though ifPuppet Documentation • Setting Up Puppet 29/434
doing this each of them would need their own puppet servers. Individual system differences can be�separated out, node by node, in the site manifest.
Puppet will start with /etc/puppet/manifests/site.pp as the primary manifest, so create/etc/puppet/manifests and add your manifest, along with any files it includes, to that directory. It�is highly recommended that you use some form of version control (git, svn, etc) to keep track ofchanges to manifests.
Example Manifest
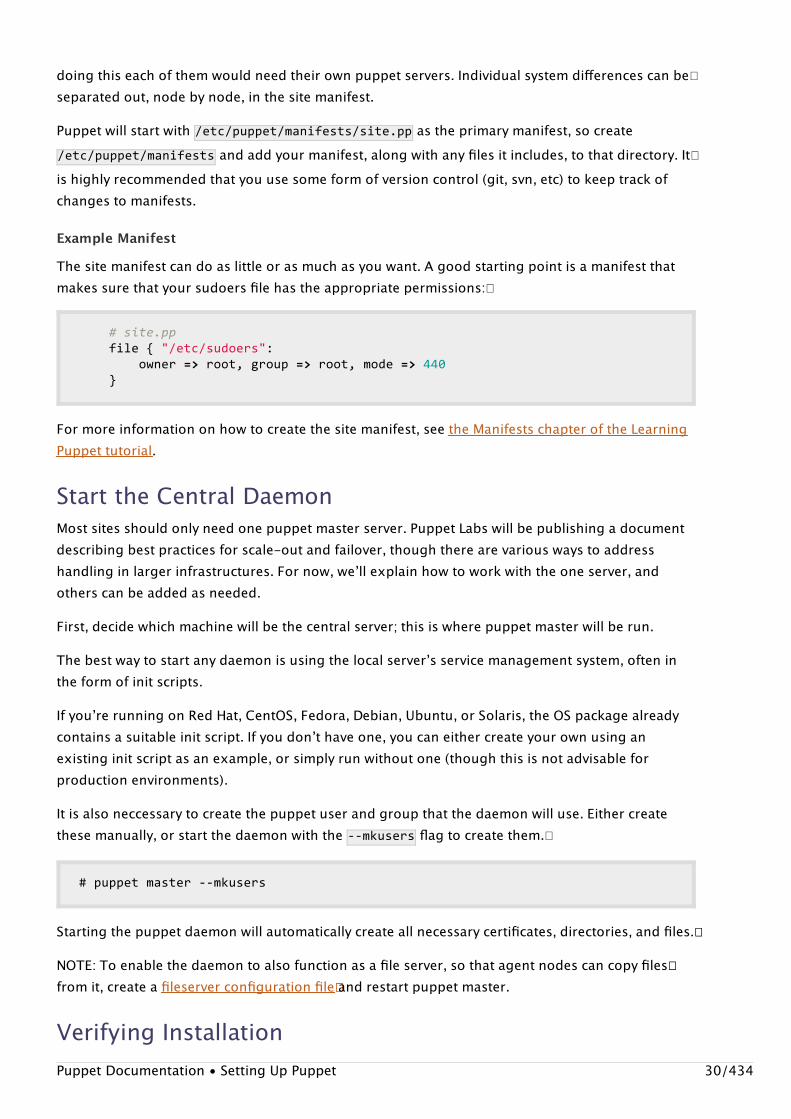
The site manifest can do as little or as much as you want. A good starting point is a manifest thatmakes sure that your sudoers file has the appropriate permissions:�
#site.ppfile{"/etc/sudoers":owner=>root,group=>root,mode=>440}
For more information on how to create the site manifest, see the Manifests chapter of the LearningPuppet tutorial.
Start the Central DaemonMost sites should only need one puppet master server. Puppet Labs will be publishing a documentdescribing best practices for scale-out and failover, though there are various ways to addresshandling in larger infrastructures. For now, weʼll explain how to work with the one server, andothers can be added as needed.
First, decide which machine will be the central server; this is where puppet master will be run.
The best way to start any daemon is using the local serverʼs service management system, often inthe form of init scripts.
If youʼre running on Red Hat, CentOS, Fedora, Debian, Ubuntu, or Solaris, the OS package alreadycontains a suitable init script. If you donʼt have one, you can either create your own using anexisting init script as an example, or simply run without one (though this is not advisable forproduction environments).
It is also neccessary to create the puppet user and group that the daemon will use. Either createthese manually, or start the daemon with the --mkusers flag to create them.�
#puppetmaster--mkusers
Starting the puppet daemon will automatically create all necessary certificates, directories, and files.��
NOTE: To enable the daemon to also function as a file server, so that agent nodes can copy files��from it, create a fileserver configuration file��� and restart puppet master.
Verifying InstallationPuppet Documentation • Setting Up Puppet 30/434
To verify that your daemon is working as expected, pick a single agent node to use as a testbed.Once Puppet is installed on that machine, run the agent against the central server to verify thateverything is working appropriately. You should start the agent in verbose mode the first time and�with the --waitforcert flag enabled:�
#puppetagent--servermyserver.example.com--waitforcert60--test
Adding the –test flag causes the puppet agent to stay in the foreground; print extra output; only�run once, then exit; and to exit immediately if the puppet master fails to compile the configuration�catalog (by default, puppet agent will use a cached configuration if there is a problem with the�remote manifests).
In running the agent, you should see the message:
info:Requestingcertificatewarning:peercertificatewon'tbeverifiedinthisSSLsessionnotice:Didnotreceivecertificate
INFO: This message will repeat every 60 seconds with the above command.
This is normal, since your server is not auto-signing certificates as a security precaution.�
On your server, list the waiting certificates:�
#puppetcert--list
You should see the name of the test agent node. Now go ahead and sign the certificate:�
#puppetcert--signmytestagent.example.com
Within 60 seconds, your test agent should receive its certificate from the server, receive its�configuration, apply it locally, and exit normally.�
NOTE: By default, puppet agent runs with a waitforcert of five minutes; set the value to 0 to disable�this wait-polling period entirely.
Scaling your InstallationFor more about how to tune Puppet for large environments, see Scaling Puppet.
Configuring Puppet�Puppetʼs behavior can be customized with a rather large collection of settings. Most of these can besafely ignored, but youʼll almost definitely have to modify some of them.�
This document describes how Puppetʼs configuration settings work, and describes all of Puppetʼs�
Puppet Documentation • Configuring Puppet 31/434
auxiliary config files.��
Puppetʼs SettingsPuppet is able to automatically generate a reference of all its config settings (�puppetdoc--referenceconfiguration ), and the documentation site includes archived references for everyrecent version of Puppet. You will generally want to consult the the most recent stable versionʼsreference.
When retrieving the value for a given setting, Puppet follows a simple lookup path, stopping at thefirst value it finds. In order, it will check:��
Values specified on the command line�Values in environment blocks in puppet.confValues in run mode blocks in puppet.confValues in the main block of puppet.confThe default values
The settings youʼll have to interact with will vary a lot, depending on what youʼre doing with Puppet.But at the least, you should get familiar with the following:
certname — The locally unique name for this node. If you arenʼt using DNS names to identifyyour nodes, youʼll need to set it yourself.server — The puppet master server to request configurations from. If your puppet master�server isnʼt reachable at the default hostname of puppet , youʼll need to set this yourself.pluginsync — Whether to use plugins from modules. Most users should set this to true on allagent nodes.report — Whether to send reports to the puppet master. Most users should set this to true on allagent nodes.reports — On the puppet master, which report handler(s) to use.modulepath — The search path for Puppet modules. Defaults to/etc/puppet/modules:/usr/share/puppet/modules .environment — On agent nodes, the environment to request configuration in.�node_terminus — How puppet master should get node definitions; if you use an ENC, youʼll�need to set this to “exec” on the master (or on all nodes if running in a standalonearrangement).external_nodes — The script to run for node definitions (if �node_terminus is set to “exec”).confdir — One of Puppetʼs main working directories, which usually contains config files,��manifests, modules, and certificates.�vardir — Puppetʼs other main working directory, which usually contains cached data andconfigurations, reports, and file backups.��
puppet.conf
Puppet Documentation • Configuring Puppet 32/434
Puppetʼs main config file is ��puppet.conf , which is located in Puppetʼs confdir .
Finding puppet.confPERSONAL CONFDIRS
When Puppet is not running as root (*nix) or not running with elevated privileges (Windows), itwill read its config files from the ��.puppet directory in the current userʼs home directory.
*NIX SYSTEMS
Puppet Enterpriseʼs confdir is /etc/puppetlabs/puppet .Most open source Puppet distributions use /etc/puppet as Puppetʼs confdir.If you are unsure where the confdir is, run sudopuppetagent--configprintconfdir tolocate it.
WINDOWS SYSTEMS
On Windows, Puppet Enterprise and open source Puppet use the same confdir.
On Windows 2003, Puppetʼs confdir is %ALLUSERSPROFILE%\PuppetLabs\puppet\etc . This isusually located on disk at C:\DocumentsandSettings\AllUsers\ApplicationData\PuppetLabs\puppet\etc .On Windows 7 and Windows 2008, Puppetʼs confdir is %PROGRAMDATA%\PuppetLabs\puppet\etc .This is usually located on disk at C:\ProgramData\PuppetLabs\puppet\etc .
File Format
puppet.conf uses an INI-like format, with [configblocks] containing indented groups ofsetting=value lines. Comment lines #startwithanoctothorpe ; partial-line comments arenot allowed.
You can interpolate the value of a setting by using its name as a $variable . (Note that$environment has special behavior: most of the Puppet applications will interpolate their ownenvironment, but puppet master will use the environment of the agent node it is serving.)
If a setting has multiple values, they should be a comma-separated list. “Path”-type settings madeup of multiple directories should use the system path separator (colon, on most Unices).
Finally, for settings that accept only a single file or directory, you can set the owner, group, and/or�mode by putting their desired states in curly braces after the value.
Putting that all together:
#ablock:[main]#setting=valuepairs:server=master.example.com
Note: On Windows systems, the puppet.conf file is allowed to use Windows-style CRLF line�endings as well as *nix-style LF line endings.
Puppet Documentation • Configuring Puppet 33/434
certname=005056c00008.localcloud.example.com
#variableinterpolation:rundir=$vardir/runmodulepath=/etc/puppet/modules/$environment:/usr/share/puppet/modules[master]#alist:reports=store,http
#amulti-directorymodulepath:modulepath=/etc/puppet/modules:/usr/share/puppet/modules
#settingownerandmodeforadirectory:vardir=/Volumes/zfs/vardir{owner=puppet,mode=644}
Config Blocks�
Settings in different config blocks take effect under varying conditions. Settings in a more specific����block can override those in a less specific block, as per the lookup path described above.�THE [MAIN] BLOCK
The [main] config block is the least specific. Settings here are always effective, unless overridden���by a more specific block.�[AGENT] , [MASTER] , AND [USER] BLOCKS
These three blocks correspond to Puppetʼs run modes. Settings in [agent] will only be used bypuppet agent; settings in [master] will be used by puppet master and puppet cert; and settings in[user] will only be used by puppet apply. The faces subcommands introduced in Puppet 2.7default to the user run mode, but their mode can be changed at run time with the --mode option.Note that not every setting makes sense for every run mode, but specifying a setting in a blockwhere it is irrelevant has no observable effect.�NOTES ON PUPPET 0.25.5 AND OLDERPrior to Puppet 2.6, blocks were assigned by application name rather than by run mode; e.g.[puppetd] , [puppetmasterd] , [puppet] , and [puppetca] . Although these names still work, theiruse is deprecated, and they interact poorly with the modern run mode blocks. If you have an olderconfig file and are using Puppet 2.6 or later, you should consider changing ��[puppetd] to [agent] ,[puppet] to [user] , and combining [puppetmasterd] and [puppetca] into [master] .
PER-ENVIRONMENT BLOCKS
Blocks named for environments are the most specific, and can override settings in the run mode�blocks. Only a small number of settings (specifically: �modulepath,manifest,manifestdir, andtemplatedir ) can be set in a per-environment block; any other settings will be ignored and readfrom a run mode or main block.
Like with the $environment variable, puppet master treats environments differently from the other�run modes: instead of using the block corresponding to its own environment setting, it will use theblock corresponding to each agent nodeʼs environment. The puppet masterʼs own environmentsetting is effectively inert.�
You may not create environments named main , master , agent , or user , as these are already taken
Puppet Documentation • Configuring Puppet 34/434
by the primary config blocks.�
Command-Line OptionsYou can override any config setting at runtime by specifying it as a command-line option to almost�any Puppet application. (Puppet doc is the main exception.)
Boolean settings are handled a little differently: use a bare option for a true value, and add a prefix��of no- for false:
#Equivalenttolisten=true:$puppetagent--listen#Equivalenttolisten=false:$puppetagent--no-listen
For non-boolean settings, just follow the option with the desired value:
$puppetagent--certnamemagpie.example.com#Anequalssignisoptional:$puppetagent--certname=magpie.example.com
Inspecting SettingsPuppet agent, apply, and master all accept the --configprint<setting> option, which makesthem print their local value of the requested setting and exit. In Puppet 2.7, you can also use thepuppetconfigprint<setting> action, and view values in different run modes with the �--modeflag. Either way, you can view all settings by passing �all instead of a specific setting.�
$puppetmaster--configprintmodulepath#or:$puppetconfigprintmodulepath--modemaster
/etc/puppet/modules:/usr/share/puppet/modules
Puppet agent, apply, and master also accept a --genconfig option, which behaves similarly to --configprintall but outputs a complete puppet.conf file, with descriptive comments for each�setting, default values explicitly declared, and settings irrelevant to the requested run modecommented out. Having the documentation inline and the default values laid out explicitly can behelpful for setting up your config file, or it can be noisy and hard to work with; it comes down to��personal taste.
You can also inspect settings for specific environments with the �--environment option:
$puppetagent--environmenttesting--configprintmodulepath/etc/puppet/testing/modules:/usr/share/puppet/modules
(As implied above, this doesnʼt work in the master run mode, since the master effectively has no�
Puppet Documentation • Configuring Puppet 35/434
environment.)
Other configuration files��In addition to the main configuration file, there are five special-purpose config files you might need�����to interact with: auth.conf , fileserver.conf , tagmail.conf , autosign.conf , and device.conf .
auth.conf
See the auth.conf documentation for more details about this file�.
Access to Puppetʼs HTTP API is configured in �auth.conf , the location of which is determined by therest_authconfig setting. (Default: /etc/puppet/auth.conf .) It consists of a series of ACL stanzas,and behaves quite differently from �puppet.conf .
#Exampleauth.conf:
path/authtrueenvironmentoverrideallowmagpie.example.com
path/certificate_statusauthtrueenvironmentproductionallowmagpie.example.com
path/factsmethodsaveauthtrueallowmagpie.example.com
path/factsauthtruemethodfind,searchallowmagpie.example.com,dashboard.example.com,finch.example.com
puppetdb.conf
The puppetdb.conf file contains the hostname and port of the �PuppetDB server. It is only used ifyou are using PuppetDB and have connected your puppet master to it.
This file uses the same ini-like format as �puppet.conf , but only uses a [main] block and only hastwo settings (server and port ):
[main]server=puppetdb.example.comport=8081
See the PuppetDB manual for more information.
routes.yaml
Puppet Documentation • Configuring Puppet 36/434
This file overrides configuration settings involving indirector termini, and allows termini to be set in��greater detail than puppet.conf allows.
This file should be a YAML hash. Each top level key should be the name of a run mode (master,�agent, user), and its value should be another hash. Each key of these second-level hashes shouldbe the name of an indirection, and its value should be another hash. The only keys allowed in thesethird-level hashes are terminus and cache . The value of each of these keys should be the name ofa valid terminus for the indirection.
Example:
---master:facts:terminus:puppetdbcache:yaml
autosign.conf
The autosign.conf file (located at �/etc/puppet/autosign.conf by default, and configurable with�the autosign setting) is a list of certnames or certname globs (one per line) whose certificate�requests will automatically be signed.
rebuilt.example.com*.scratch.example.com*.local
Note that certname globs do not function as normal globs: an asterisk can only represent one ormore subdomains at the front of a certname that resembles a fully-qualified domain name. (That is,�if your certnames donʼt look like FQDNs, you canʼt use autosign.conf to full effect.�
As any host can provide any certname, autosigning should only be used with great care, and only insituations where you essentially trust any computer able to connect to the puppet master.
device.conf
Puppet device, added in Puppet 2.7, configures network hardware using a catalog downloaded�from the puppet master; in order to function, it requires that the relevant devices be configured in�/etc/puppet/device.conf (configurable with the �deviceconfig setting).
device.conf is organized in INI-like blocks, with one block per device:
[devicecertname]type<type>url<url>[router6.example.com]typeciscourlssh://admin:[email protected]
Puppet Documentation • Configuring Puppet 37/434
fileserver.conf
By default, fileserver.conf isnʼt necessary, provided that you only need to serve files from�modules. If you want to create additional fileserver mount points, you can do so in�/etc/puppet/fileserver.conf (or whatever is set in the fileserverconfig setting).
fileserver.conf consists of a collection of mount-point stanzas, and looks like a hybrid ofpuppet.conf and auth.conf :
#Filesinthe/path/to/filesdirectorywillbeserved#atpuppet:///mount_point/.[mount_point]path/path/to/filesallow*.example.comdeny*.wireless.example.com
See the file serving documentation� for more details.
Note that certname globs do not function as normal globs: an asterisk can only represent one ormore subdomains at the front of a certname that resembles a fully-qualified domain name. (That is,�if your certnames donʼt look like FQDNs, you canʼt use autosign.conf to full effect.�
tagmail.conf
Your puppet master server can send targeted emails to different admin users whenever certain�resources are changed. This requires that you:
Set report=true on your agent nodesSet reports=tagmail on the puppet master (the reports setting accepts a list, so you canenable any number of reports)Set the reportfrom email address and either the smtpserver or sendmail setting on the puppetmasterCreate a tagmail.conf file at the location specified in the ��tagmap setting
More details are available at the tagmail report reference.
The tagmail.conf file (located at �/etc/puppet/tagmail.conf by default, and configurable with the�tagmap setting) is list of lines, each of which consists of:
A comma-separated list of tags and !negated tags; valid tags include:Explicit tagsClass names“all”Any valid Puppet log level (debug , info , notice , warning , err , alert , emerg , crit , orverbose )
A colonA comma-separated list of email addresses
Puppet Documentation • Configuring Puppet 38/434
The list of tags on a line builds the set of resources whose messages will be included in the mailing;each additional tag adds to the set, and each !negated tag subtracts from the set.
So, for example:
all:[email protected],!mailserver:[email protected],crit:[email protected],[email protected],[email protected]
This tagmail.conf file will mail any resource events tagged with �webserver but not withmailserver to the httpadmins group; any emergency or critical events to to James, Zach, and Ben,and all events to the log-archive group.
Language Guide
The purpose of Puppetʼs language is to make it easy to specify the resources you need to manageon the machines youʼre managing.
This guide will show you how the language works, going through some basic concepts.Understanding the Puppet language is key, as itʼs the main driver of how you tell your Puppetmanaged machines what to do.
Ready To Dive In?Puppet language is really relatively simple compared to many programming languages. As you arereading over this guide, it may also be helpful to look over various Puppet modules people havealready written. Complete real world examples can serve as a great introduction to Puppet. See theModules page for more information and some links to list of community developed Puppet content.
Language Feature by ReleaseFeature 0.24.x 0.25.x 2.6.x 2.7.x 3.x
Plusignment operator (+>) X X X X X
Multiple Resource relationships X X X X X
Class Inheritance Overrides X X X X X
Appending to Variables (+=) X X X X X
Important NoteThis page has been superseded by the Puppet 2.7 reference manualʼs language reference.We hope you find the new version more complete and easier to use! �Find the new versionhere, and use the links in its left sidebar to navigate between pages. If you donʼt know whichlanguage feature you are looking for, use the visual language index.
Puppet Documentation • Language Guide 39/434
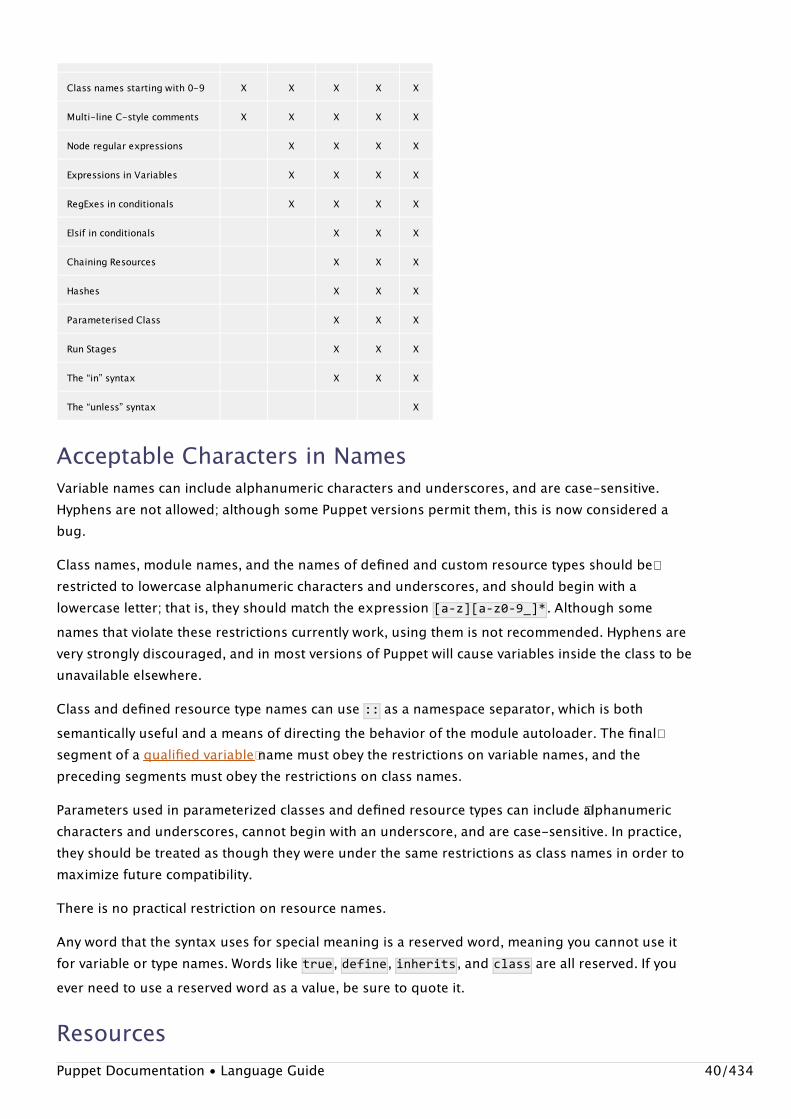
Class names starting with 0-9 X X X X X
Multi-line C-style comments X X X X X
Node regular expressions X X X X
Expressions in Variables X X X X
RegExes in conditionals X X X X
Elsif in conditionals X X X
Chaining Resources X X X
Hashes X X X
Parameterised Class X X X
Run Stages X X X
The “in” syntax X X X
The “unless” syntax X
Acceptable Characters in NamesVariable names can include alphanumeric characters and underscores, and are case-sensitive.Hyphens are not allowed; although some Puppet versions permit them, this is now considered abug.
Class names, module names, and the names of defined and custom resource types should be�restricted to lowercase alphanumeric characters and underscores, and should begin with alowercase letter; that is, they should match the expression [a-z][a-z0-9_]* . Although somenames that violate these restrictions currently work, using them is not recommended. Hyphens arevery strongly discouraged, and in most versions of Puppet will cause variables inside the class to beunavailable elsewhere.
Class and defined resource type names can use �:: as a namespace separator, which is bothsemantically useful and a means of directing the behavior of the module autoloader. The final�segment of a qualified variable� name must obey the restrictions on variable names, and thepreceding segments must obey the restrictions on class names.
Parameters used in parameterized classes and defined resource types can include �alphanumericcharacters and underscores, cannot begin with an underscore, and are case-sensitive. In practice,they should be treated as though they were under the same restrictions as class names in order tomaximize future compatibility.
There is no practical restriction on resource names.
Any word that the syntax uses for special meaning is a reserved word, meaning you cannot use itfor variable or type names. Words like true , define , inherits , and class are all reserved. If youever need to use a reserved word as a value, be sure to quote it.
ResourcesPuppet Documentation • Language Guide 40/434
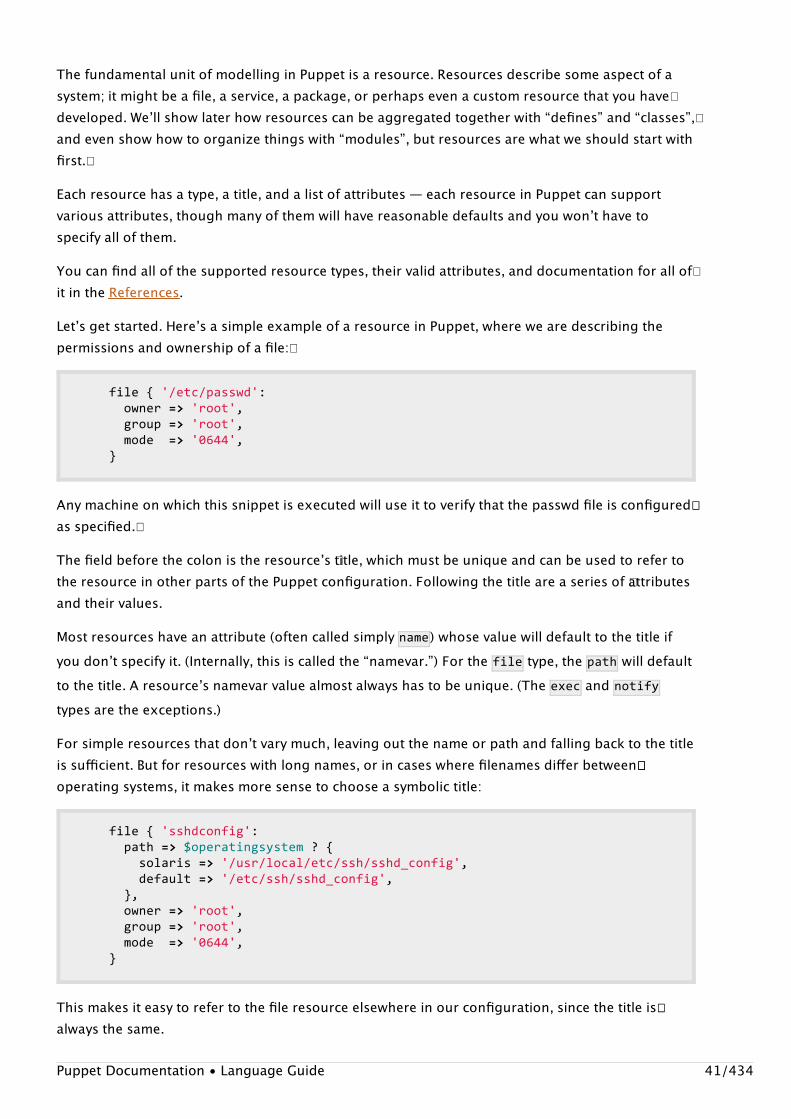
The fundamental unit of modelling in Puppet is a resource. Resources describe some aspect of asystem; it might be a file, a service, a package, or perhaps even a custom resource that you have�developed. Weʼll show later how resources can be aggregated together with “defines” and “classes”,�and even show how to organize things with “modules”, but resources are what we should start withfirst.�
Each resource has a type, a title, and a list of attributes — each resource in Puppet can supportvarious attributes, though many of them will have reasonable defaults and you wonʼt have tospecify all of them.
You can find all of the supported resource types, their valid attributes, and documentation for all of�it in the References.
Letʼs get started. Hereʼs a simple example of a resource in Puppet, where we are describing thepermissions and ownership of a file:�
file{'/etc/passwd':owner=>'root',group=>'root',mode=>'0644',}
Any machine on which this snippet is executed will use it to verify that the passwd file is configured��as specified.�
The field before the colon is the resourceʼs �title, which must be unique and can be used to refer tothe resource in other parts of the Puppet configuration. Following the title are a series of �attributesand their values.
Most resources have an attribute (often called simply name ) whose value will default to the title ifyou donʼt specify it. (Internally, this is called the “namevar.”) For the file type, the path will defaultto the title. A resourceʼs namevar value almost always has to be unique. (The exec and notifytypes are the exceptions.)
For simple resources that donʼt vary much, leaving out the name or path and falling back to the titleis sufficient. But for resources with long names, or in cases where filenames differ between����operating systems, it makes more sense to choose a symbolic title:
file{'sshdconfig':path=>$operatingsystem?{solaris=>'/usr/local/etc/ssh/sshd_config',default=>'/etc/ssh/sshd_config',},owner=>'root',group=>'root',mode=>'0644',}
This makes it easy to refer to the file resource elsewhere in our configuration, since the title is��always the same.
Puppet Documentation • Language Guide 41/434
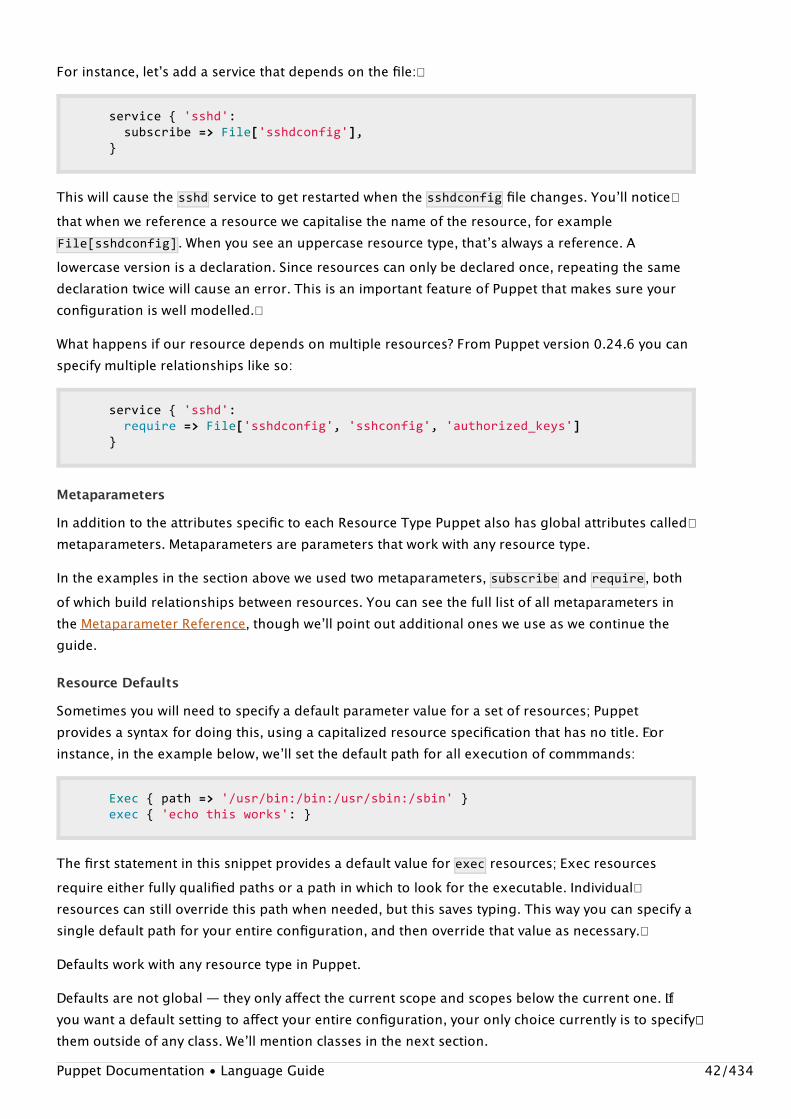
For instance, letʼs add a service that depends on the file:�
service{'sshd':subscribe=>File['sshdconfig'],}
This will cause the sshd service to get restarted when the sshdconfig file changes. Youʼll notice�that when we reference a resource we capitalise the name of the resource, for exampleFile[sshdconfig] . When you see an uppercase resource type, thatʼs always a reference. Alowercase version is a declaration. Since resources can only be declared once, repeating the samedeclaration twice will cause an error. This is an important feature of Puppet that makes sure yourconfiguration is well modelled.�
What happens if our resource depends on multiple resources? From Puppet version 0.24.6 you canspecify multiple relationships like so:
service{'sshd':require=>File['sshdconfig','sshconfig','authorized_keys']}
Metaparameters
In addition to the attributes specific to each Resource Type Puppet also has global attributes called�metaparameters. Metaparameters are parameters that work with any resource type.
In the examples in the section above we used two metaparameters, subscribe and require , bothof which build relationships between resources. You can see the full list of all metaparameters inthe Metaparameter Reference, though weʼll point out additional ones we use as we continue theguide.
Resource Defaults
Sometimes you will need to specify a default parameter value for a set of resources; Puppetprovides a syntax for doing this, using a capitalized resource specification that has no title. �Forinstance, in the example below, weʼll set the default path for all execution of commmands:
Exec{path=>'/usr/bin:/bin:/usr/sbin:/sbin'}exec{'echothisworks':}
The first statement in this snippet provides a default value for �exec resources; Exec resourcesrequire either fully qualified paths or a path in which to look for the executable. Individual�resources can still override this path when needed, but this saves typing. This way you can specify asingle default path for your entire configuration, and then override that value as necessary.�
Defaults work with any resource type in Puppet.
Defaults are not global — they only affect the current scope and scopes below the current one. �Ifyou want a default setting to affect your entire configuration, your only choice currently is to specify��them outside of any class. Weʼll mention classes in the next section.Puppet Documentation • Language Guide 42/434
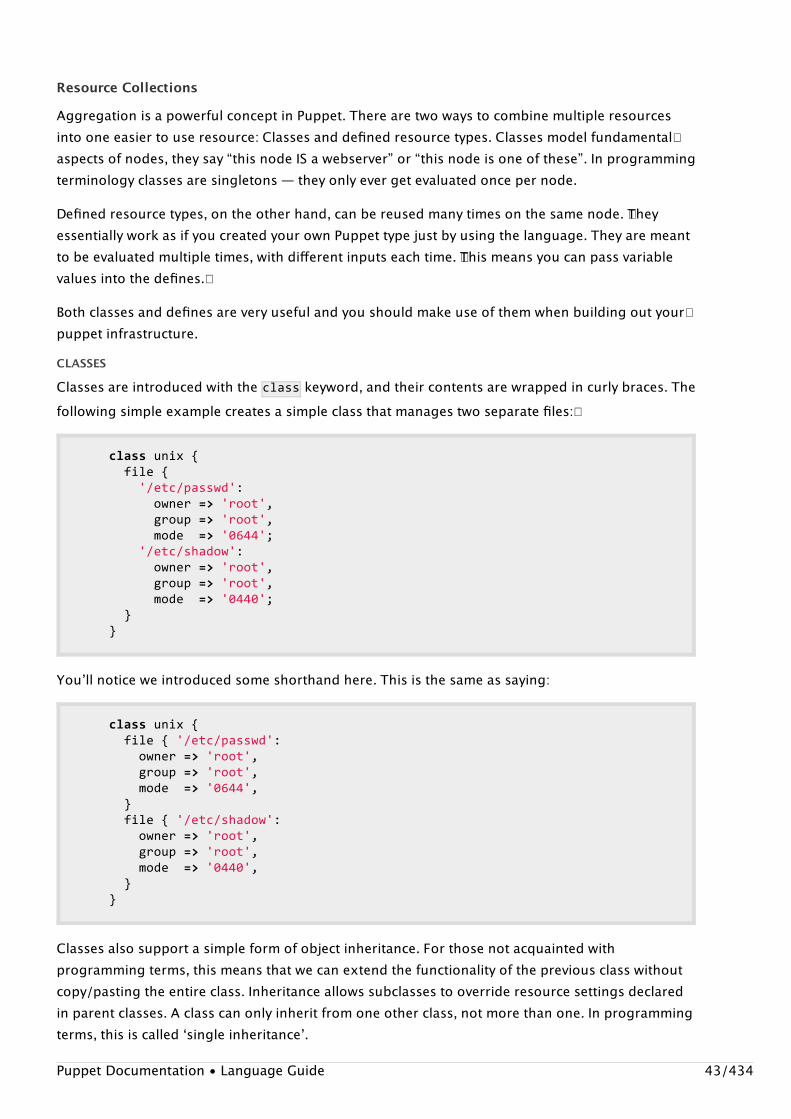
Resource Collections
Aggregation is a powerful concept in Puppet. There are two ways to combine multiple resourcesinto one easier to use resource: Classes and defined resource types. Classes model fundamental�aspects of nodes, they say “this node IS a webserver” or “this node is one of these”. In programmingterminology classes are singletons — they only ever get evaluated once per node.
Defined resource types, on the other hand, can be reused many times on the same node. �Theyessentially work as if you created your own Puppet type just by using the language. They are meantto be evaluated multiple times, with different inputs each time. �This means you can pass variablevalues into the defines.�
Both classes and defines are very useful and you should make use of them when building out your�puppet infrastructure.CLASSES
Classes are introduced with the class keyword, and their contents are wrapped in curly braces. Thefollowing simple example creates a simple class that manages two separate files:�
classunix{file{'/etc/passwd':owner=>'root',group=>'root',mode=>'0644';'/etc/shadow':owner=>'root',group=>'root',mode=>'0440';}}
Youʼll notice we introduced some shorthand here. This is the same as saying:
classunix{file{'/etc/passwd':owner=>'root',group=>'root',mode=>'0644',}file{'/etc/shadow':owner=>'root',group=>'root',mode=>'0440',}}
Classes also support a simple form of object inheritance. For those not acquainted withprogramming terms, this means that we can extend the functionality of the previous class withoutcopy/pasting the entire class. Inheritance allows subclasses to override resource settings declaredin parent classes. A class can only inherit from one other class, not more than one. In programmingterms, this is called ʻsingle inheritanceʼ.
Puppet Documentation • Language Guide 43/434

classfreebsdinheritsunix{File['/etc/passwd']{group=>'wheel'}File['/etc/shadow']{group=>'wheel'}}
If we needed to undo some logic specified in a parent class, we can use undef like so:�
classfreebsdinheritsunix{File['/etc/passwd']{group=>undef}}
In the above example, nodes which include the unix class will have the password fileʼs group set to�root , while nodes including freebsd would have the password file group ownership left�unmodified.�
In Puppet version 0.24.6 and higher, you can specify multiple overrides like so:
classfreebsdinheritsunix{File['/etc/passwd','/etc/shadow']{group=>'wheel'}}
There are other ways to use inheritance. In Puppet 0.23.1 and higher, itʼs possible to add values toresource parameters using the ʻ+>ʼ (ʻplusignmentʼ) operator:
classapache{service{'apache':require=>Package['httpd']}}
classapache-sslinheritsapache{#hostcertificateisrequiredforSSLtofunctionService['apache']{require+>File['apache.pem']}}
The above example makes the service resource in the second class require all the packages in thefirst, as well as the �apache.pem file.�
To append multiple requires, use array brackets and commas:
classapache{service{'apache':require=>Package['httpd']}}
classapache-sslinheritsapache{Service['apache']{require+>[File['apache.pem'],File['/etc/httpd/conf/httpd.conf']]}}
The above would make the require parameter in the apache-ssl class equal to
Puppet Documentation • Language Guide 44/434
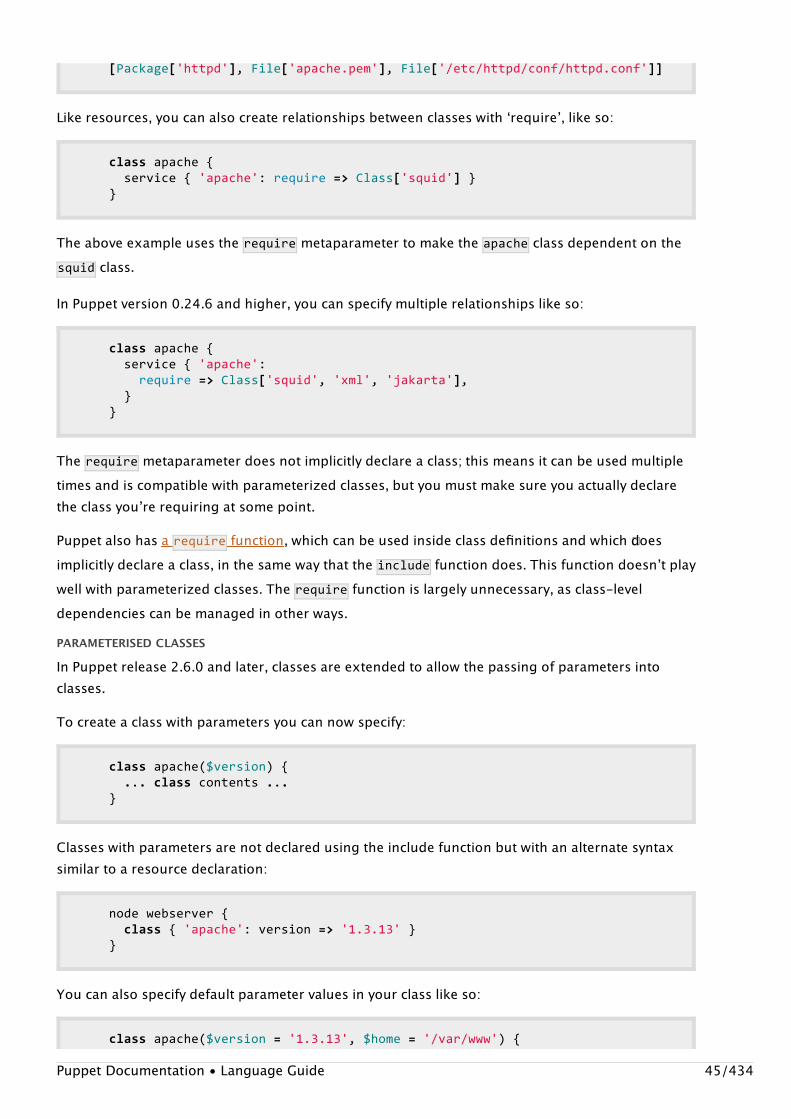
[Package['httpd'],File['apache.pem'],File['/etc/httpd/conf/httpd.conf']]
Like resources, you can also create relationships between classes with ʻrequireʼ, like so:
classapache{service{'apache':require=>Class['squid']}}
The above example uses the require metaparameter to make the apache class dependent on thesquid class.
In Puppet version 0.24.6 and higher, you can specify multiple relationships like so:
classapache{service{'apache':require=>Class['squid','xml','jakarta'],}}
The require metaparameter does not implicitly declare a class; this means it can be used multipletimes and is compatible with parameterized classes, but you must make sure you actually declarethe class youʼre requiring at some point.
Puppet also has a require function, which can be used inside class definitions and which �doesimplicitly declare a class, in the same way that the include function does. This function doesnʼt playwell with parameterized classes. The require function is largely unnecessary, as class-leveldependencies can be managed in other ways.PARAMETERISED CLASSES
In Puppet release 2.6.0 and later, classes are extended to allow the passing of parameters intoclasses.
To create a class with parameters you can now specify:
classapache($version){...classcontents...}
Classes with parameters are not declared using the include function but with an alternate syntaxsimilar to a resource declaration:
nodewebserver{class{'apache':version=>'1.3.13'}}
You can also specify default parameter values in your class like so:
classapache($version='1.3.13',$home='/var/www'){
Puppet Documentation • Language Guide 45/434
...classcontents...}
RUN STAGES
Run stage were added in Puppet version 2.6.0, you now have the ability to specify any number ofstages which provide another method to control the ordering of resource management in puppet. Ifyou have a large number of resources in your catalog it may become tedious and cumbersome toexplicitly manage every relationship between the resources where order is important. In thissituation, run-stages provides you the ability to associate a class to a single stage. Puppet willguarantee stages run in a specific predictable order every catalog run.�
In order to use run-stages, you must first declare additional stages beyond the already present�main stage. You can then configure puppet to manage each stage in a specific order using the��same resource relationship syntax, before, require, “->” and “<-“. The relationship of stages willthen guarantee the ordering of classes associated with each stage.
By default there is only one stage named “main” and all classes are automatically associated withthis stage. Unless explicitly stated, a class will be associated with the main stage. With only onestage the effect of run stages is the same as previous versions of puppet since resources within a�stage are managed in arbitrary order unless they have explicit relationships declared.
In order to declare additional stage resources, follow the same consistent and simple declarativesyntax of the puppet language:
stage{'first':before=>Stage['main']}stage{'last':require=>Stage['main']}
All classes associated with the first stage are to be managed before the classes associated with the�main stage. All classes associated with the last stage are to be managed after the classes associatedwith the main stage.
Once stages have been declared, a class may be associated with a stage other than main using the“stage” class parameter.
class{'apt-keys':stage=>first;'sendmail':stage=>main;'apache':stage=>last;}
Associate all resources in the class apt-keys with the first run stage, all resources in the class�sendmail with the main stage, and all resources in the apache class with the last stage.
This short declaration guarantees resources in the apt-keys class are managed before resources inthe sendmail class, which in turn is managed before resources in the apache class.
Please note that stage is not a metaparameter. The run stage must be specified as a class parameter�and as such classes must use the resource declaration syntax as shown rather than the “include”statement.
Puppet Documentation • Language Guide 46/434
DEFINED RESOURCE TYPES
Defined resource types follow the same basic form as classes, but they are introduced with the�define keyword (not class ) and they support arguments but no inheritance. As mentionedpreviously, defined resource types take parameters and can be reused multiple times on the same�system. Suppose we want to create a resource collection that creates source control repositories.We probably would want to create multiple repositories on the same system, so we would use adefined type, not a class. �Hereʼs an example:
definesvn_repo($path){exec{"/usr/bin/svnadmincreate${path}/${title}":unless=>"/bin/test-d${path}",}}
svn_repo{'puppet_repo':path=>'/var/svn_puppet'}svn_repo{'other_repo':path=>'/var/svn_other'}
Note how parameters specified in the definition (��definesvn_repo($path) ) must appear asresource attributes (path=>'/var/svn_puppet' ) whenever a resource of the new type is declaredand are available as variables (unless=>"/bin/test-d${path}" ) within the definition. Multiple�variables (separated by commas) can be specified. Default values can also be specified for any��parameter with = , and any parameter which has a default becomes non-mandatory when aresource of the new type is declared.
Defined types have a number of built-in variables available, including �$name and $title , which areset to the title of the resource when it is declared. (The reasons for having two identical variableswith this information are outside the scope of this document, and these two special variablescannot be used the same way in classes or other resources.) As of Puppet 2.6.5, the $name and$title variables can also be used as default values for parameters:
definesvn_repo($path="/var/${name}"){...}
Any metaparameters used when a defined resource is declared are also made available in the�definition as variables:�
definesvn_repo($path){exec{"create_repo_${name}":command=>"/usr/bin/svnadmincreate${path}/${title}",unless=>"/bin/test-d${path}",}if$require{Exec["create_repo_${name}"]{require+>$require,}}}
svn_repo{'puppet':path=>'/var/svn',require=>Package['subversion'],
Puppet Documentation • Language Guide 47/434

}
The above is perhaps not a perfect example, as most likely we would know that subversion wasalways required for svn checkouts, but it illustrates how require and other metaparameters can beused in defined types.�
Defined resource types can have namespace separators (�:: ) in their names, just like classes. Whenmaking a resource reference (e.g. File['/etc/motd'] ) to an instance of a defined type, you must�capitalize all segments of the typeʼs name (e.g. Apache::Vhost['wordpress'] ).
CLASSES VS. DEFINED RESOURCE TYPES
Classes and defined types are created similarly, but they are used very differently.��
Defined types are used to define reusable objects which will have multiple instances on a given��host, so they cannot include any resources that will only have one instance. For instance, multipleuses of the same define cannot create the same file.��
Classes, on the other hand, are guaranteed to be singletons — you can include them as many timesas you want and youʼll only ever get one copy of the resources.
Most often, services will be defined in a class, where the serviceʼs package, configuration files, and���running service will all be gathered, because there will normally be one copy of each on a givenhost. (This idiom is sometimes referred to as “service-package-file”).�
Defined types would be used to manage resources like virtual hosts, of which you can have many,�or to encode some simple information in a reusable wrapper to save typing.MODULES
You can (and should!) combine collections of classes, defined types, and resources into modules.�Modules are portable collections of configuration, for example a module might contain all the�resources required to configure Postfix or Apache. You can find out more on the ���Modules Page
Chaining resources
As of puppet version 2.6.0, resources may be chained together to declare relationships betweenand among them.
You can now specify relationships directly as statements in addition to the before and requireresource metaparameters of previous versions:
File['/etc/ntp.conf']->Service['ntpd']
Manage the ntp configuration file before the ntpd service��
You can specify a “notify” relationship by employing the tilde instead of the hyphen:
File['/etc/ntp.conf']~>Service['ntpd']
This manages the ntp configuration file before the ntpd service and notifies the service of changes���to the ntp configuration file.��Puppet Documentation • Language Guide 48/434
You can also do relationship chaining, specifying multiple relationships on a single line:
Package['ntp']->File['/etc/ntp.conf']->Service['ntpd']
Here we first manage the ntp package, second manage the ntp configuration file, and third manage���the ntpd service.
Note that while itʼs confusing, you donʼt have to have all of the arrows be the same direction:
File['/etc/ntp.conf']->Service['ntpd']<-Package['ntp']
Here the ntpd service requires /etc/ntp.conf and the ntp package.
Please note, relationships declared in this manner are between adjacent resources. In this example,the ntp package and the ntp configuration file are not directly related to each other, and puppet��may try to manage the configuration file before the package is even installed, which may not be the��desired behavior.
Chaining in this manner can provide some succinctness at the cost of readability.
You can also specify relationships when resources are declared, in addition to the above resourcereference examples:
package{'ntp':}->file{'/etc/ntp.conf':}
Here we manage the ntp package before the ntp configuration file.��
But wait! Thereʼs more! You can also specify a collection on either side of the relationship marker:
yumrepo{'localyumrepo':....}package{'ntp':provider=>yum,...}Yumrepo<||>->Package<|provider==yum|>
This manages all yum repository resources before managing all package resources that explicitlyspecify the yum provider. (Note that it will not work for package resources that donʼt specify aprovider but end up using Yum — since this relationship is created during catalog compilation, itcan only act on attributes visible to the parser, not properties that must be read from the targetsystem.)
This, finally, provides easy many to many relationships in Puppet, but it also opens the door to�massive dependency cycles. This last feature is a very powerful stick, and you can considerably hurtyourself with it. In particular, watch out when using virtual resources, as the collection operatorrealizes resources as a side-effect.�
Nodes
Having knowledge of resources, classes, defines, and modules gets you to understanding of most�of Puppet. Nodes are a very simple remaining step, which are how we map the what we define (“this�Puppet Documentation • Language Guide 49/434
is what a webserver looks like”) to what machines are chosen to fulfill those instructions.�
Node definitions look just like classes, including supporting inheritance, but they are special in that�when a node (a managed computer running the Puppet client) connects to the Puppet masterdaemon, its name will be looked for in the list of defined nodes. �The information found for thenode will then be evaluated for that node, and then node will be sent that configuration.�
Node names can be the short host name, or the fully qualified domain name (FQDN). �Some names,especially fully qualified ones, need to be quoted, so it is a best practice to quote all of them. Hereʼs�an example:
node'www.testing.com'{includecommonincludeapache,squid}
The previous node definition creates a node called �www.testing.com and includes the common ,apache and squid classes.
You can also specify that multiple nodes receive an identical configuration by separating each with�a comma:
node'www.testing.com','www2.testing.com','www3.testing.com'{includecommonincludeapache,squid}
The previous examples creates three identical nodes: www.testing.com , www2.testing.com , andwww3.testing.com .
MATCHING NODES WITH REGULAR EXPRESSIONS
In Puppet 0.25.0 and later, nodes can also be matched by regular expressions, which is much moreconvenient than listing them individually, one-by-one:
node/^www\d+$/{includecommon}
The above would match any host called www and ending with one or more digits. Hereʼs anotherexample:
node/^(foo|bar)\.testing\.com$/{includecommon}
The above example would match either host foo or bar in the testing.com domain.
What happens if there are multiple regular expressions or node definitions set in the same file?��
Puppet Documentation • Language Guide 50/434
If there is a node without a regular expression that matches the current client connecting, thatwill be used first.�Otherwise the first matching regular expression wins.�
NODE INHERITANCE
Nodes support a limited inheritance model. Like classes, nodes can only inherit from one othernode:
node'www2.testing.com'inherits'www.testing.com'{includeloadbalancer}
In this node definition the �www2.testing.com inherits any configuration specified for the��www.testing.com node in addition to including the loadbalancer class. In other words, it doeseverything “www.testing.com” does, but also takes on some additional functionality.DEFAULT NODES
If you create a node named default , the node configuration for default will be used if no other�node matches are found.EXTERNAL NODES
In some cases you may already have an external list of machines and what roles they perform. Thismay be in LDAP, version control, or a database. You may also need to pass some variables to thosenodes (more on variables later).
In these cases, writing an External Nodes script can help, and that can take the place of your nodedefinitions. �See that section for more information.
Additional Language FeaturesWeʼve already gone over features such as ordering and grouping, though thereʼs still a few morethings to learn.
Puppet is not a programming language, it is a way of describing your IT infrastructure as a model.This is usually quite sufficient to get the job done, and prevents you from having to write a lot of��programming code.
Quoting
Most of the time, you donʼt have to quote strings in Puppet. Any alphanumeric string starting with aletter (hyphens are also allowed), can leave out the quotes, though itʼs a best practice to quotestrings for any non-native value.
Variable Interpolation With Quotes
So far, weʼve mentioned variables in terms of defines. �If you need to use those variables within astring, use double quotes, not single quotes. Single-quoted strings will not do any variableinterpolation, double-quoted strings will. Variables in strings can also be bracketed with {} whichmakes them easier to use together, and also a bit cleaner to read:
Puppet Documentation • Language Guide 51/434
$value="${one}${two}"
To put a quote character or $ in a double-quoted string where it would normally have a specialmeaning, precede it with an escaping \ . For an actual \ , use \\ .
In single-quoted strings only two escape sequences are supported, \' for single quote and \\ forsingle backslash. Except for these two escape sequences, everything else between single quotes istreated literally.
We recommend using single quotes for all strings that do not require variable interpolation. Usedouble quotes for those strings that require variable interpolation. The Style Guide also discussesthis with examples.
Capitalization
Capitalization of resources is used in three major ways:
Referencing: when you want to reference an already declared resource, usually for dependencypurposes, you have to capitalize the name of the resource, for example
require=>File['sshdconfig']
Inheritance. When overwriting the resource settings of a parent class from a subclass, use theuppercase versions of the resource names. Using the lowercase versions will result in an error.See the inheritance section above for an example of this.Setting default attribute values: Resource Defaults. As mentioned previously, using a capitalizedresource with no title works to set the defaults for that resource. Our previous example wassetting the default path for command executions.
Note that when capitalizing a namespaced defined type, you have to capitalize all segments of the�typeʼs name, e.g. Apache::Vhost['wordpress'] .
Arrays
As mentioned in the class and resource examples above, Puppet allows usage of arrays in variousareas. Arrays defined in puppet look like this:�
['one','two','three']
You can access array entries by their index, for example:
$foo=['one','two','three']notice$foo[1]
Would return two .
Several type members, such as ʻaliasʼ in the ʻhostʼ definition accept arrays as their value. A host�resource with multiple aliases would look like this:Puppet Documentation • Language Guide 52/434
host{'one.example.com':ensure=>present,alias=>['satu','dua','tiga'],ip=>'192.168.100.1',}
This would add a host ʻone.example.comʼ to the hosts list with the three aliases ʻsatuʼ, ʻduaʼ, andʻtigaʼ.
Or, for example, if you want a resource to require multiple other resources, the way to do thiswould be like this:
resource{'baz':require=>[Package['foo'],File['bar']],}
Another example for array usage is to call a custom defined resource multiple times, like this:�
definephp::pear(){package{"php-${name}":ensure=>installed}}
php::pear{['ldap','mysql','ps','snmp','sqlite','tidy','xmlrpc']:}
Of course, this can be used for native types as well:
file{['foo','bar','foobar']:owner=>'root',group=>'root',mode=>'0600',}
Hashes
Since Puppet version 2.6.0, hashes have been supported in the language. These hashes are defined�like Ruby hashes using the form:
{key1=>val1,key2=>val2,...}
The hash keys are strings, but hash values can be any possible RHS values allowed in the languagelike function calls, variables, etc.
It is possible to assign hashes to a variable like so:
$myhash={key1=>'myval',key2=>$b}
And to access hash members (recursively) from a variable containing a hash (this also works forarrays too):Puppet Documentation • Language Guide 53/434
$myhash={key=>{subkey=>'b'}}notice($myhash[key][subkey])
You can also use a hash member as a resource title, as a default definition parameter, or potentially�as the value of a resource parameter,
Variables
Puppet supports variables like most other languages you may be familiar with. Puppet variables aredenoted with $ :
$content='somecontent\n'
file{'/tmp/testing':content=>$content}
Puppet language is a declarative language, which means that its scoping and assignment rules aresomewhat different than a normal imperative language. The primary difference is that you cannot��change the value of a variable within a single scope, because that would rely on order in the file to�determine the value of the variable. Order does not matter in a declarative language. Doing so willresult in an error:
$user=rootfile{'/etc/passwd':owner=>$user,}$user=binfile{'/bin':owner=>$user,recurse=>true,}
Rather than reassigning variables, instead use the built in conditionals:
$group=$operatingsystem?{solaris=>'sysadmin',default=>'wheel',}
A variable may only be assigned once per scope. However you still can set the same variable in non-overlapping scopes. For example, to set top-level configuration values:�
nodea{$setting='this'includeclass_using_setting}nodeb{$setting='that'includeclass_using_setting}
Puppet Documentation • Language Guide 54/434
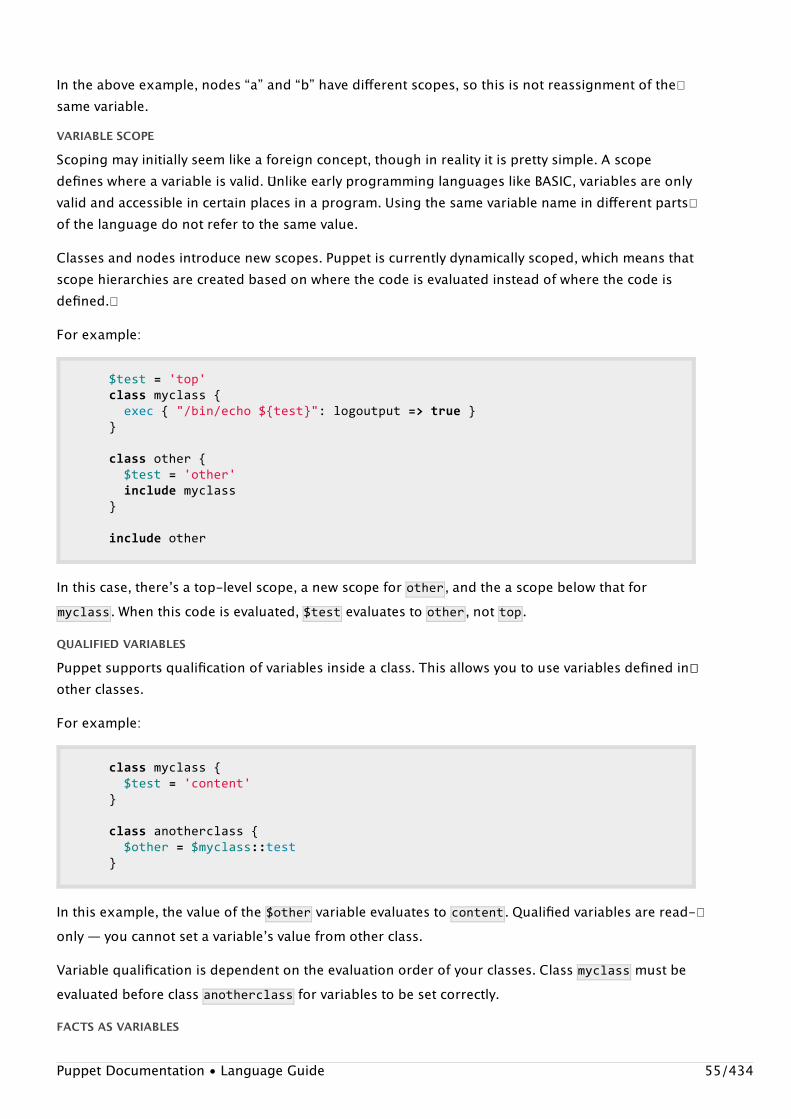
In the above example, nodes “a” and “b” have different scopes, so this is not reassignment of the�same variable.VARIABLE SCOPE
Scoping may initially seem like a foreign concept, though in reality it is pretty simple. A scopedefines where a variable is valid. �Unlike early programming languages like BASIC, variables are onlyvalid and accessible in certain places in a program. Using the same variable name in different parts�of the language do not refer to the same value.
Classes and nodes introduce new scopes. Puppet is currently dynamically scoped, which means thatscope hierarchies are created based on where the code is evaluated instead of where the code isdefined.�
For example:
$test='top'classmyclass{exec{"/bin/echo${test}":logoutput=>true}}
classother{$test='other'includemyclass}
includeother
In this case, thereʼs a top-level scope, a new scope for other , and the a scope below that formyclass . When this code is evaluated, $test evaluates to other , not top .
QUALIFIED VARIABLES
Puppet supports qualification of variables inside a class. This allows you to use variables defined in��other classes.
For example:
classmyclass{$test='content'}
classanotherclass{$other=$myclass::test}
In this example, the value of the $other variable evaluates to content . Qualified variables are read-�only — you cannot set a variableʼs value from other class.
Variable qualification is dependent on the evaluation order of your classes. Class �myclass must beevaluated before class anotherclass for variables to be set correctly.
FACTS AS VARIABLES
Puppet Documentation • Language Guide 55/434
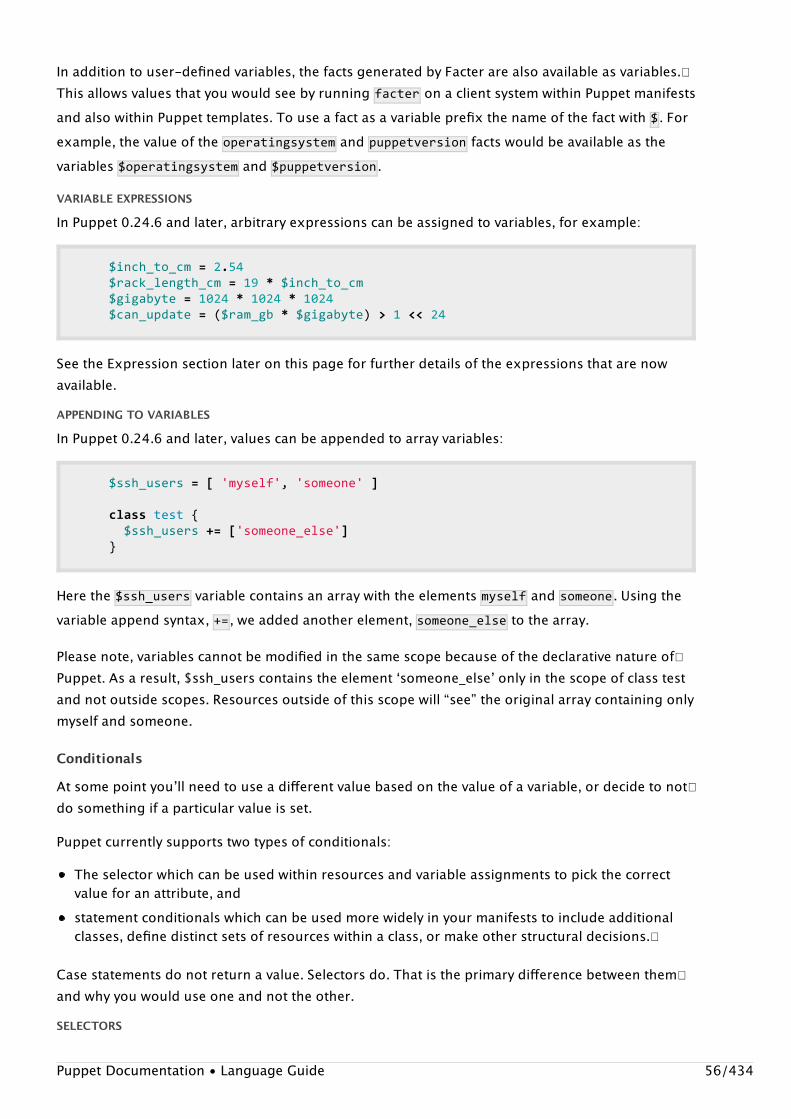
In addition to user-defined variables, the facts generated by Facter are also available as variables.�This allows values that you would see by running facter on a client system within Puppet manifestsand also within Puppet templates. To use a fact as a variable prefix the name of the fact with �$ . Forexample, the value of the operatingsystem and puppetversion facts would be available as thevariables $operatingsystem and $puppetversion .
VARIABLE EXPRESSIONS
In Puppet 0.24.6 and later, arbitrary expressions can be assigned to variables, for example:
$inch_to_cm=2.54$rack_length_cm=19*$inch_to_cm$gigabyte=1024*1024*1024$can_update=($ram_gb*$gigabyte)>1<<24
See the Expression section later on this page for further details of the expressions that are nowavailable.APPENDING TO VARIABLES
In Puppet 0.24.6 and later, values can be appended to array variables:
$ssh_users=['myself','someone']
classtest{$ssh_users+=['someone_else']}
Here the $ssh_users variable contains an array with the elements myself and someone . Using thevariable append syntax, += , we added another element, someone_else to the array.
Please note, variables cannot be modified in the same scope because of the declarative nature of�Puppet. As a result, $ssh_users contains the element ʻsomeone_elseʼ only in the scope of class testand not outside scopes. Resources outside of this scope will “see” the original array containing onlymyself and someone.
Conditionals
At some point youʼll need to use a different value based on the value of a variable, or decide to not�do something if a particular value is set.
Puppet currently supports two types of conditionals:
The selector which can be used within resources and variable assignments to pick the correctvalue for an attribute, andstatement conditionals which can be used more widely in your manifests to include additionalclasses, define distinct sets of resources within a class, or make other structural decisions.�
Case statements do not return a value. Selectors do. That is the primary difference between them�and why you would use one and not the other.SELECTORS
Puppet Documentation • Language Guide 56/434
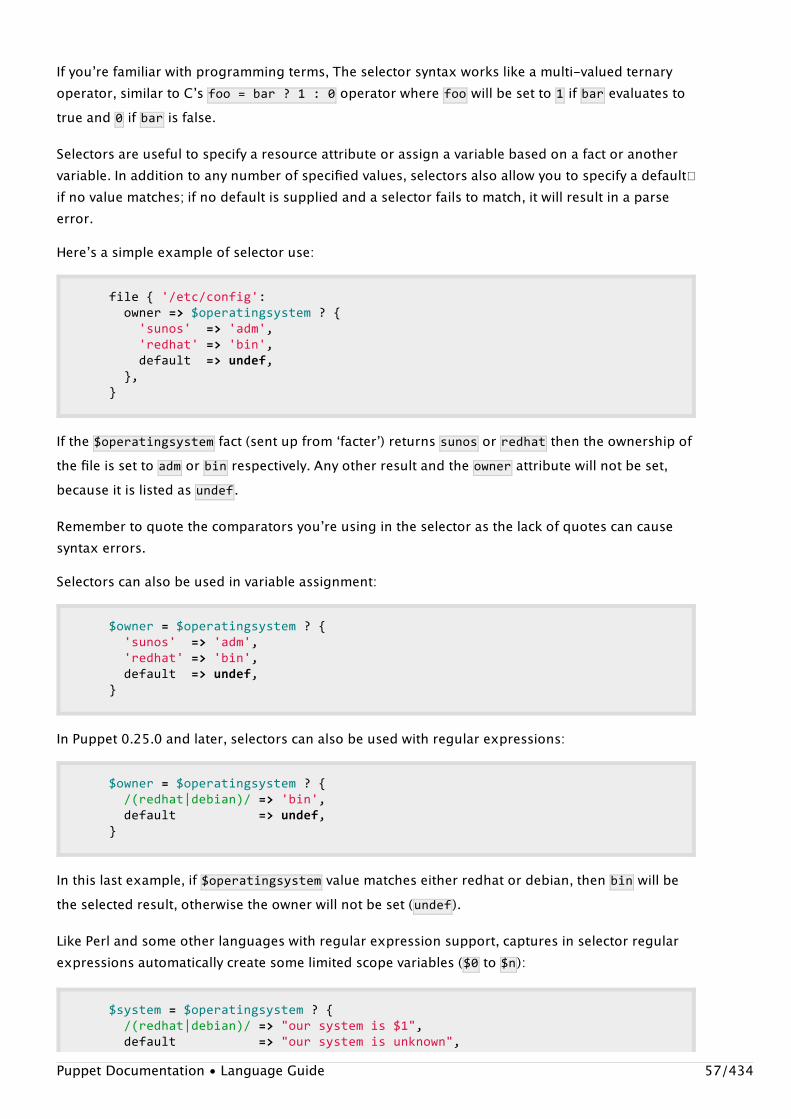
If youʼre familiar with programming terms, The selector syntax works like a multi-valued ternaryoperator, similar to Cʼs foo=bar?1:0 operator where foo will be set to 1 if bar evaluates totrue and 0 if bar is false.
Selectors are useful to specify a resource attribute or assign a variable based on a fact or anothervariable. In addition to any number of specified values, selectors also allow you to specify a default�if no value matches; if no default is supplied and a selector fails to match, it will result in a parseerror.
Hereʼs a simple example of selector use:
file{'/etc/config':owner=>$operatingsystem?{'sunos'=>'adm','redhat'=>'bin',default=>undef,},}
If the $operatingsystem fact (sent up from ʻfacterʼ) returns sunos or redhat then the ownership ofthe file is set to �adm or bin respectively. Any other result and the owner attribute will not be set,because it is listed as undef .
Remember to quote the comparators youʼre using in the selector as the lack of quotes can causesyntax errors.
Selectors can also be used in variable assignment:
$owner=$operatingsystem?{'sunos'=>'adm','redhat'=>'bin',default=>undef,}
In Puppet 0.25.0 and later, selectors can also be used with regular expressions:
$owner=$operatingsystem?{/(redhat|debian)/=>'bin',default=>undef,}
In this last example, if $operatingsystem value matches either redhat or debian, then bin will bethe selected result, otherwise the owner will not be set (undef ).
Like Perl and some other languages with regular expression support, captures in selector regularexpressions automatically create some limited scope variables ($0 to $n ):
$system=$operatingsystem?{/(redhat|debian)/=>"oursystemis$1",default=>"oursystemisunknown",
Puppet Documentation • Language Guide 57/434
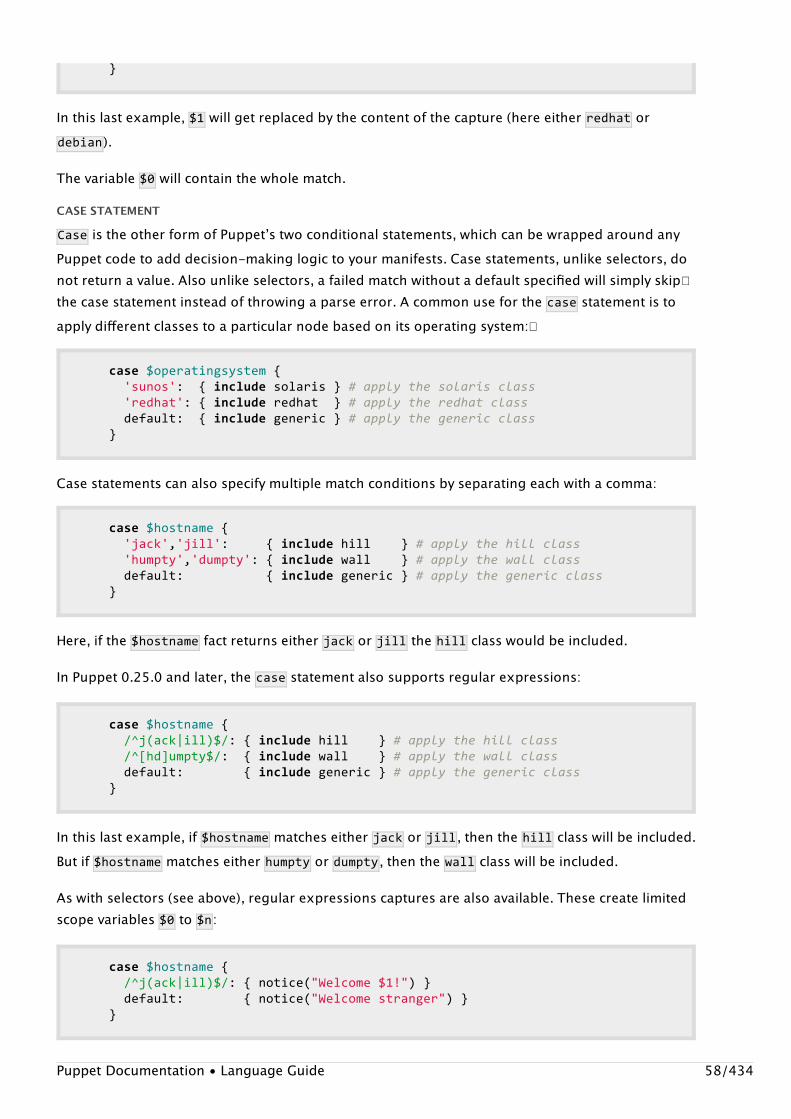
}
In this last example, $1 will get replaced by the content of the capture (here either redhat ordebian ).
The variable $0 will contain the whole match.
CASE STATEMENT
Case is the other form of Puppetʼs two conditional statements, which can be wrapped around anyPuppet code to add decision-making logic to your manifests. Case statements, unlike selectors, donot return a value. Also unlike selectors, a failed match without a default specified will simply skip�the case statement instead of throwing a parse error. A common use for the case statement is toapply different classes to a particular node based on its operating system:�
case$operatingsystem{'sunos':{includesolaris}#applythesolarisclass'redhat':{includeredhat}#applytheredhatclassdefault:{includegeneric}#applythegenericclass}
Case statements can also specify multiple match conditions by separating each with a comma:
case$hostname{'jack','jill':{includehill}#applythehillclass'humpty','dumpty':{includewall}#applythewallclassdefault:{includegeneric}#applythegenericclass}
Here, if the $hostname fact returns either jack or jill the hill class would be included.
In Puppet 0.25.0 and later, the case statement also supports regular expressions:
case$hostname{/^j(ack|ill)$/:{includehill}#applythehillclass/^[hd]umpty$/:{includewall}#applythewallclassdefault:{includegeneric}#applythegenericclass}
In this last example, if $hostname matches either jack or jill , then the hill class will be included.But if $hostname matches either humpty or dumpty , then the wall class will be included.
As with selectors (see above), regular expressions captures are also available. These create limitedscope variables $0 to $n :
case$hostname{/^j(ack|ill)$/:{notice("Welcome$1!")}default:{notice("Welcomestranger")}}
Puppet Documentation • Language Guide 58/434
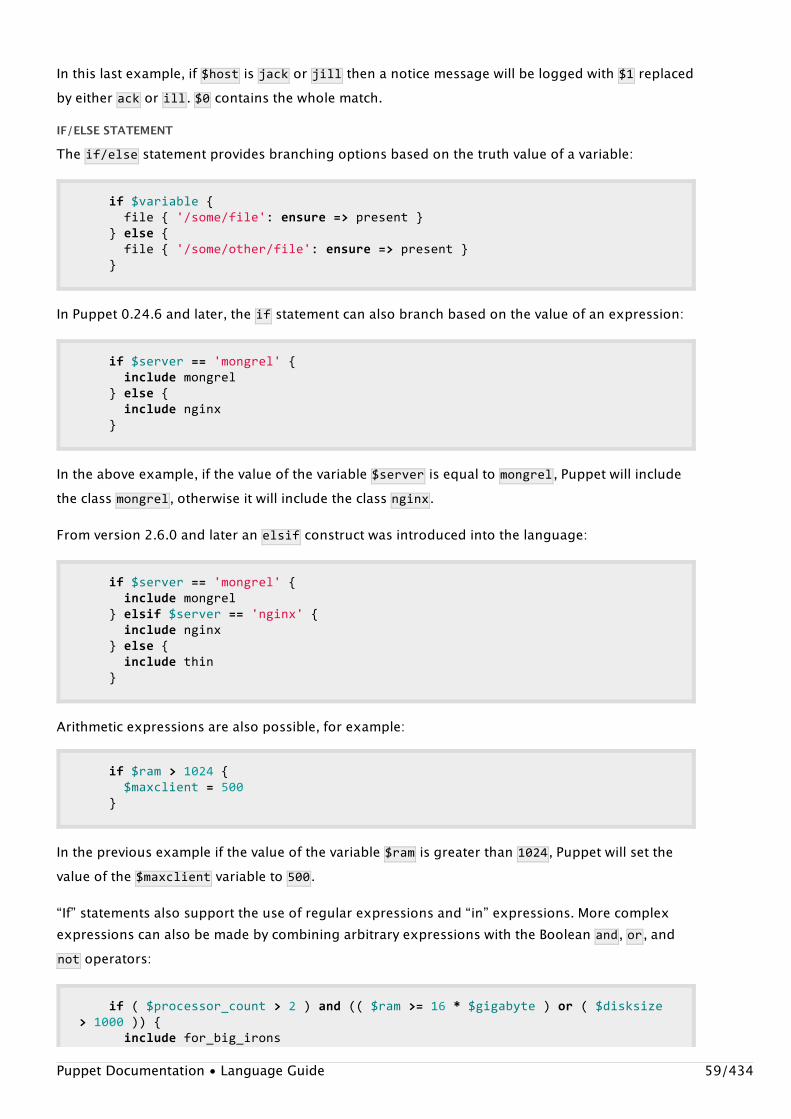
In this last example, if $host is jack or jill then a notice message will be logged with $1 replacedby either ack or ill . $0 contains the whole match.
IF/ELSE STATEMENT
The if/else statement provides branching options based on the truth value of a variable:
if$variable{file{'/some/file':ensure=>present}}else{file{'/some/other/file':ensure=>present}}
In Puppet 0.24.6 and later, the if statement can also branch based on the value of an expression:
if$server=='mongrel'{includemongrel}else{includenginx}
In the above example, if the value of the variable $server is equal to mongrel , Puppet will includethe class mongrel , otherwise it will include the class nginx .
From version 2.6.0 and later an elsif construct was introduced into the language:
if$server=='mongrel'{includemongrel}elsif$server=='nginx'{includenginx}else{includethin}
Arithmetic expressions are also possible, for example:
if$ram>1024{$maxclient=500}
In the previous example if the value of the variable $ram is greater than 1024 , Puppet will set thevalue of the $maxclient variable to 500 .
“If” statements also support the use of regular expressions and “in” expressions. More complexexpressions can also be made by combining arbitrary expressions with the Boolean and , or , andnot operators:
if($processor_count>2)and(($ram>=16*$gigabyte)or($disksize>1000)){includefor_big_irons
Puppet Documentation • Language Guide 59/434
}else{includefor_small_box}
UNLESS STATEMENT
The unless statement, which will be introduced in an upcoming (post-2.7) version of Puppet, is anoptional replacement for the if! or “if not” syntax.
unless$memorysize>1024{$maxclient=500}
Virtual Resources
See Virtual Resources.
Virtual resources are available in Puppet 0.20.0 and later.
Virtual resources are resources that are not sent to the client unless realized .
The syntax for a virtual resource is:
@user{'luke':ensure=>present}
The user luke is now defined virtually. To realize that definition, you can use a ��collection :
User<|title==luke|>
This can be read as ʻthe user whose title is lukeʼ. This is equivalent to using the realize function:
realizeUser['luke']
Realization could also use other criteria, such as realizing Users that match a certain group, orusing a metaparameter like ʻtagʼ.
The motivation for this feature is somewhat complicated; please see the Virtual Resources page formore information.
Exported Resources
Exported resources are an extension of virtual resources used to allow different hosts managed by�Puppet to influence each otherʼs Puppet configuration. ��This is described in detail on the ExportedResources page. As with virtual resources, new syntax was added to the language for this purpose.
The key syntactical difference between virtual and exported resources is that the special sigils (�@and <||> ) are doubled (@@ and <<||>> ) when referring to an exported resource.
Here is an example with exported resources that shares SSH keys between clients:
Puppet Documentation • Language Guide 60/434
classssh{@@sshkey{$hostname:type=>dsa,key=>$sshdsakey}Sshkey<<||>>}
In the above example, notice that fulfillment and exporting are used together, so that any node that�gets the ʻsshkeyʼ class will have all the ssh keys of other hosts. This could be done differently so�that the keys could be realized on different hosts.�
To actually work, the storeconfig parameter must be set to true in puppet.conf. This allowsconfigurations from client to be stored on the central server.�
The details of this feature are somewhat complicated; see the Exported Resources page for moreinformation.
Comments
Puppet supports two types of comments:
Unix shell style comments; they can either be on their own line or at the end of a line.multi-line C-style comments (available in Puppet 0.24.7 and later)
Here is a shell style comment:
#thisisacomment
You can see an example of a multi-line comment:
/*thisisacomment*/
ExpressionsStarting with version 0.24.6 the Puppet language supports arbitrary expressions in if statementboolean tests and in the right hand value of variable assignments.
Puppet expressions can be composed of:
boolean expressions, which are combination of other expressions combined by booleanoperators (and , or and not )comparison expressions, which consist of variables, numerical operands or other expressionscombined with comparison operators ( == , != , < , > , <= , > , >= )arithmetic expressions, which consists of variables, numerical operands or other expressionscombined with the following arithmetic operators: + , - , / , * , << , >>in Puppet 0.25.0 and later, regular expression matches with the help of the regex matchoperator: =~ and !~in Puppet 2.6.0 and later, in expressions, which test whether the right operand contains the left
Puppet Documentation • Language Guide 61/434

operand.
Expressions can be enclosed in parenthesis, () , to group expressions and resolve operatorambiguity.
Operator precedence
The Puppet operator precedence conforms to the standard precedence in most systems, fromhighest to lowest:
!->not*/->timesanddivide-+->minus,plus<<>>->leftshiftandrightshift==!=->equal,notequal>=<=><->greaterequal,lessorequal,greaterthan,lessthanandor
Expression examplesCOMPARISON EXPRESSIONS
Comparison expressions include tests for equality using the == expression:
if$variable=='foo'{includebar}else{includefoobar}
Here if $variable has a value of foo , Puppet will then include the bar class, otherwise it willinclude the foobar class.
Here is another example shows the use of the != (ʻnot equalʼ) comparison operator:
if$variable!='foo'{$othervariable='bar'}else{$othervariable='foobar'}
In our second example if $variable is not equal to a value of foo , Puppet will then set the value ofthe $othervariable variable to bar , otherwise it will set the $othervariable variable to foobar .
Note that comparison of strings is case-insensitive.ARITHMETIC EXPRESSIONS
You can also perform a variety of arithmetic expressions, for example:
$one=1$one_thirty=1.30
Puppet Documentation • Language Guide 62/434
$two=2.034e-2
$result=((($two+2)/$one_thirty)+4*5.45)-(6<<($two+4))+(0x800+-9)
BOOLEAN EXPRESSIONS
Boolean expressions are also possible using or , and and not :
$one=1$two=2$var=($one<$two)and($one+1==$two)
The exclamation mark (! ) can be used as a synonym for not.
REGULAR EXPRESSIONS
In Puppet 0.25.0 and later, Puppet supports regular expression matching using =~ (match) and !~(not-match) for example:
if$host=~/^www(\d+)\./{notice('Welcomewebserver#$1')}
Like case and selectors, the regex match operators create limited scope variables for each regexcapture. In the previous example, $1 will be replaced by the number following www in $host . Thosevariables are valid only for the statements inside the braces of the if clause.“IN” EXPRESSIONS
From Puppet 2.6.0, Puppet supports an “in” syntax. This operator allows you to find if the left�operand is in the right one. The left operand must be a string, but the right operand can be:
a stringan arraya hash (the search is done on the keys)
This syntax can be used in any place where an expression is supported:
$eatme='eat'if$eatmein['ate','eat']{...}
$value='beatgeneration'if'eat'in$value{notice('ontheroad')}
Like other expressions, “in” expressions can be combined or negated with boolean operators:
if!($eatmein['ate','eat']){...}
Puppet Documentation • Language Guide 63/434
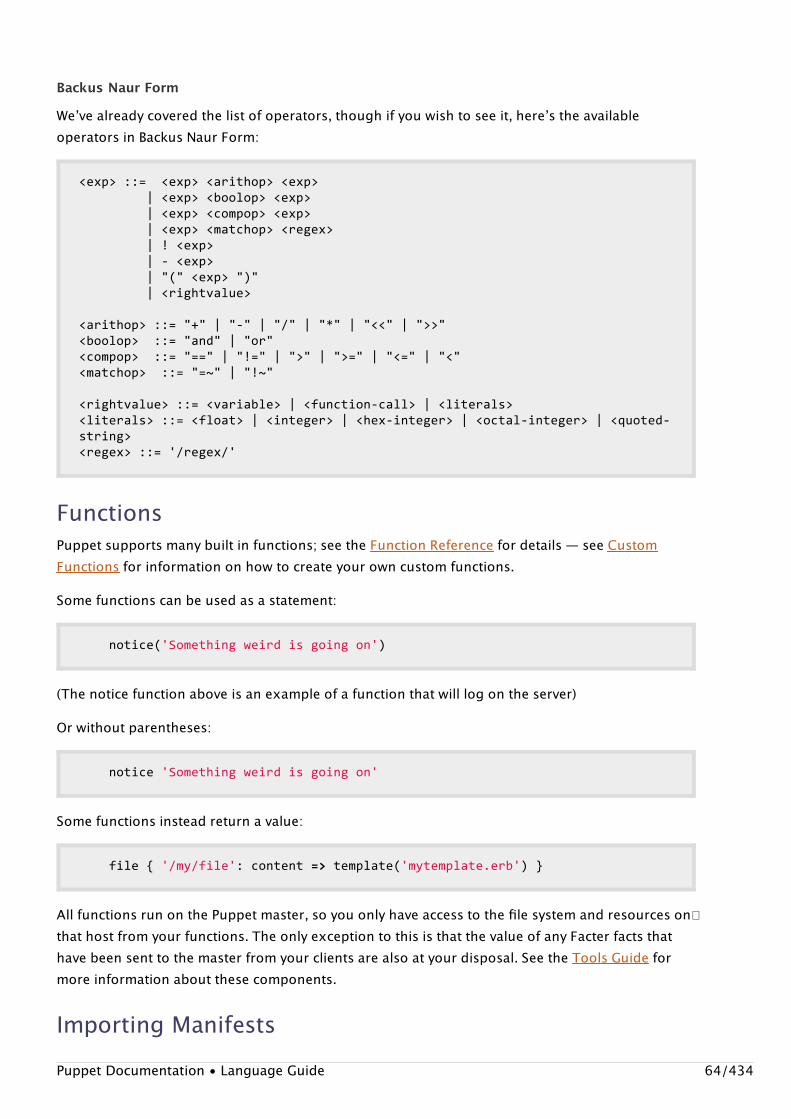
Backus Naur Form
Weʼve already covered the list of operators, though if you wish to see it, hereʼs the availableoperators in Backus Naur Form:
<exp>::=<exp><arithop><exp>|<exp><boolop><exp>|<exp><compop><exp>|<exp><matchop><regex>|!<exp>|-<exp>|"("<exp>")"|<rightvalue>
<arithop>::="+"|"-"|"/"|"*"|"<<"|">>"<boolop>::="and"|"or"<compop>::="=="|"!="|">"|">="|"<="|"<"<matchop>::="=~"|"!~"
<rightvalue>::=<variable>|<function-call>|<literals><literals>::=<float>|<integer>|<hex-integer>|<octal-integer>|<quoted-string><regex>::='/regex/'
FunctionsPuppet supports many built in functions; see the Function Reference for details — see CustomFunctions for information on how to create your own custom functions.
Some functions can be used as a statement:
notice('Somethingweirdisgoingon')
(The notice function above is an example of a function that will log on the server)
Or without parentheses:
notice'Somethingweirdisgoingon'
Some functions instead return a value:
file{'/my/file':content=>template('mytemplate.erb')}
All functions run on the Puppet master, so you only have access to the file system and resources on�that host from your functions. The only exception to this is that the value of any Facter facts thathave been sent to the master from your clients are also at your disposal. See the Tools Guide formore information about these components.
Importing ManifestsPuppet Documentation • Language Guide 64/434
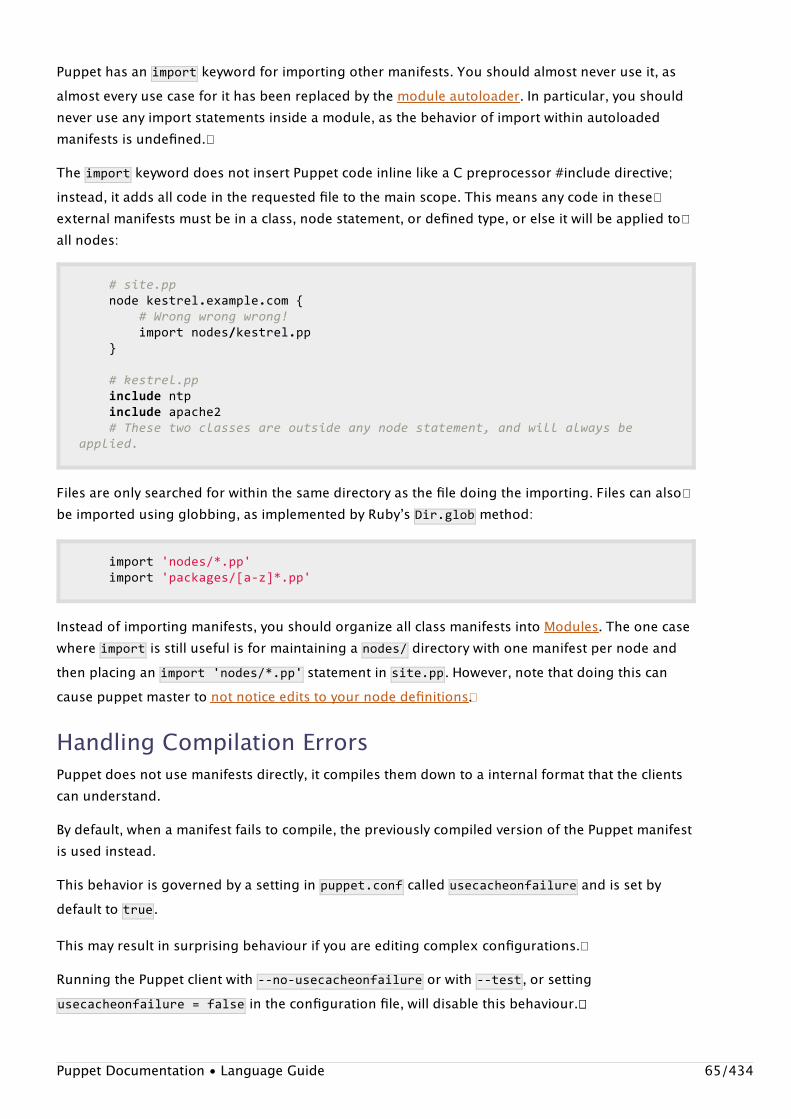
Puppet has an import keyword for importing other manifests. You should almost never use it, asalmost every use case for it has been replaced by the module autoloader. In particular, you shouldnever use any import statements inside a module, as the behavior of import within autoloadedmanifests is undefined.�
The import keyword does not insert Puppet code inline like a C preprocessor #include directive;instead, it adds all code in the requested file to the main scope. This means any code in these�external manifests must be in a class, node statement, or defined type, or else it will be applied to�all nodes:
#site.ppnodekestrel.example.com{#Wrongwrongwrong!importnodes/kestrel.pp}#kestrel.ppincludentpincludeapache2#Thesetwoclassesareoutsideanynodestatement,andwillalwaysbeapplied.
Files are only searched for within the same directory as the file doing the importing. Files can also�be imported using globbing, as implemented by Rubyʼs Dir.glob method:
import'nodes/*.pp'import'packages/[a-z]*.pp'
Instead of importing manifests, you should organize all class manifests into Modules. The one casewhere import is still useful is for maintaining a nodes/ directory with one manifest per node andthen placing an import'nodes/*.pp' statement in site.pp . However, note that doing this cancause puppet master to not notice edits to your node definitions�.
Handling Compilation ErrorsPuppet does not use manifests directly, it compiles them down to a internal format that the clientscan understand.
By default, when a manifest fails to compile, the previously compiled version of the Puppet manifestis used instead.
This behavior is governed by a setting in puppet.conf called usecacheonfailure and is set bydefault to true .
This may result in surprising behaviour if you are editing complex configurations.�
Running the Puppet client with --no-usecacheonfailure or with --test , or settingusecacheonfailure=false in the configuration file, will disable this behaviour.��
Puppet Documentation • Language Guide 65/434
Module Fundamentals
Puppet Documentation • Module Fundamentals 66/434
Puppet ModulesModules are self-contained bundles of code and data. You can write your own modules or you candownload pre-built modules from Puppet Labsʼ online collection, the Puppet Forge.
Nearly all Puppet manifests belong in modules. The sole exception is the main site.pp manifest,which contains site-wide and node-specific code.�
Every Puppet user should expect to write at least some of their own modules.
Continue reading to learn how to write and use Puppet modules.See “Installing Modules” for how to install pre-built modules from the Puppet Forge.See “Publishing Modules” for how to publish your modules to the Puppet Forge.See “Using Plugins” for how to arrange plugins (like custom facts and custom resource types) inmodules and sync them to agent nodes.
Using ModulesModules are how Puppet finds the classes and types it can use� — it automatically loads any class ordefined type� stored in its modules. Within a manifest or from an external node classifier (ENC)�, anyof these classes or types can be declared by name:
#/etc/puppetlabs/puppet/site.ppnodedefault{includeapacheclass{'ntp':enable=>false;}apache::vhost{'personal_site':port=>80,docroot=>'/var/www/personal',options=>'IndexesMultiViews',}}
Likewise, Puppet can automatically load plugins (like custom native resource types or custom facts)from modules; see “Using Plugins” for more details.
To make a module available to Puppet, place it in one of the directories in Puppetʼs modulepath.
The Modulepath
Note: The modulepath is a list of directories separated by the system path-separatorcharacter. On ʻnix systems, this is the colon (:), while Windows uses the semi-colon (;). Themost common default modulepaths are:
/etc/puppetlabs/puppet/modules:/opt/puppet/share/puppet/modules (for Puppet
Puppet Documentation • Puppet Modules 67/434
You can easily install modules written by other users with the puppetmodule subcommand. See“Installing Modules” for details.
Module LayoutOn disk, a module is simply a directory tree with a specific, predictable structure:�
MODULE NAMEmanifestsfiles�templateslibtestsspec
Example
This example module, named “my_module ,” shows the standard module layout in more detail:
my_module — This outermost directoryʼs name matches the name of the module.manifests/ — Contains all of the manifests in the module.
init.pp — Contains a class definition. �This classʼs name must match the moduleʼs name.other_class.pp — Contains a class named my_module::other_class .my_defined_type.pp — Contains a defined type named �my_module::my_defined_type .implementation/ — This directoryʼs name affects the class names beneath it.�
foo.pp — Contains a class named my_module::implementation::foo .bar.pp — Contains a class named my_module::implementation::bar .
files/ — Contains static files, which managed nodes can download.�service.conf — This fileʼs URL would be �puppet:///modules/my_module/service.conf .
lib/ — Contains plugins, like custom facts and custom resource types. See “Using Plugins”for more details.templates/ — Contains templates, which the moduleʼs manifests can use. See “Templates”for more details.
component.erb — A manifest can render this template with
Enterprise)/etc/puppet/modules:/usr/share/puppet/modules (for open source Puppet)
Use puppetconfigprintmodulepath to see your currently configured modulepath.�
If you want both puppet master and puppet apply to have access to the modules, set themodulepath in puppet.conf to go to the [main] block. Modulepath is also one of the settingsthat can be different per �environment.
Puppet Documentation • Puppet Modules 68/434
template('my_module/component.erb') .
tests/ — Contains examples showing how to declare the moduleʼs classes and defined types.�init.pp
other_class.pp — Each class or type should have an example in the tests directory.
spec/ — Contains spec tests for any plugins in the lib directory.
Each of the moduleʼs subdirectories has a specific function, as follows.�
Manifests
Each manifest in a moduleʼs manifests folder should contain one class or defined type.� The file�names of manifests map predictably to the names of the classes and defined types they contain.�
init.pp is special and always contains a class with the same name as the module.
Every other manifest contains a class or defined type named as follows:�
Name of module :: Other directories:: (if any) Name of file (no extension)�
my_module :: other_class
my_module :: implementation:: foo
Thus:
my_module::other_class would be in the file �my_module/manifests/other_class.ppmy_module::implementation::foo would be in the file�my_module/manifests/implementation/foo.pp
The double colon that divides the sections of a classʼs name is called the namespace separator.
Allowed Module Names
Module names should only contain lowercase letters, numbers, and underscores, and should beginwith a lowercase letter; that is, they should match the expression [a-z][a-z0-9_]* . Note that theseare the same restrictions that apply to class names, but with the added restriction that modulenames cannot contain the namespace separator (:: ) as modules cannot be nested.
Although some names that violate these restrictions currently work, using them is notrecommended.
Certain module names are disallowed:
mainsettings
Files
Files in a moduleʼs files directory are automatically served to agent nodes. They can bedownloaded by using puppet:/// URLs in the source attribute of a file resource.
Puppet Documentation • Puppet Modules 69/434
Puppet URLs work transparently in both agent/master mode and standalone mode; in either case,they will retrieve the correct file from a module.�
Puppet URLs are formatted as follows:
Protocol 3 slashes “Modules”/ Name of module/ Name of file�
puppet: /// modules/ my_module/ service.conf
So puppet:///modules/my_module/service.conf would map to my_module/files/service.conf .
Templates
Any ERB template (see “Templates” for more details) can be rendered in a manifest with thetemplate function. The output of the template is a simple string, which can be used as the contentattribute of a file resource or as the value of a variable.
The template function can look up templates identified by shorthand:�
Template function (ʻ Name of module/ Name of template ʼ)
template (' my_module/ component.erb ')
So template('my_module/component.erb') would render the templatemy_module/templates/component.erb .
Writing ModulesTo write a module, simply write classes and defined types and place them in properly named�manifest files as described above.�
See here for more information on classesSee here for more information on defined types�
Best PracticesThe classes, defined types�, and plugins in a module should all be related, and the module shouldaim to be as self-contained as possible.
Manifests in one module should never reference files or templates stored in another module.�
Be wary of having classes declare classes from other modules, as this makes modules harder toredistribute. When possible, itʼs best to isolate “super-classes” that declare many other classes in alocal “site” module.
Installing Modules
Puppet Documentation • Installing Modules 70/434
Installing ModulesThis reference applies to Puppet 2.7.14 and later and Puppet Enterprise 2.5 and later. Earlierversions will not behave identically.
The Puppet Forge is a repository of pre-existing modules, written and contributed by users. Thesemodules solve a wide variety of problems so using them can save you time and effort.�
The puppetmodule subcommand, which ships with Puppet, is a tool for finding and managing new�modules from the Forge. Its interface is similar to several common package managers, and makes iteasy to search for and install new modules from the command line.
Continue reading to learn how to install and manage modules from the Puppet Forge.See “Module Fundamentals” to learn how to use and write Puppet modules.See “Publishing Modules” to learn how to contribute your own modules to the Forge, includinginformation about the puppet module toolʼs build and generate actions.See “Using Plugins” for how to arrange plugins (like custom facts and custom resource types) inmodules and sync them to agent nodes.
Using the Module ToolThe puppetmodule subcommand has several actions. The main actions used for managingmodules are:
install
Install a module from the Forge or a release archive.#puppetmoduleinstallpuppetlabs-apache--version0.0.2
list
List installed modules.#puppetmodulelist
search
The puppet module tool does not currently work on Windows.
Windows nodes which pull configurations from a Linux or Unix puppet master can use�any Forge modules installed on the master. Continue reading to learn how to use themodule tool on your puppet master.On Windows nodes which compile their own catalogs, you can install a Forge module bydownloading and extracting the moduleʼs release tarball, renaming the module directoryto remove the user name prefix, and moving it into place in Puppetʼs �modulepath.
Puppet Documentation • Installing Modules 71/434

Search the Forge for a module.#puppetmodulesearchapache
uninstall
Uninstall a puppet module.#puppetmoduleuninstallpuppetlabs-apache
upgrade
Upgrade a puppet module.#puppetmoduleupgradepuppetlabs-apache--version0.0.3
If you have used a command line package manager tool (like gem , apt-get , or yum ) before, theseactions will generally do what you expect. You can view a full description of each action with puppetmanmodule or by viewing the man page here.
Installing ModulesThe puppetmoduleinstall action will install a module and all of its dependencies. By default, itwill install into the first directory in Puppetʼs modulepath.�
Use the --version option to specify a version. You can use an exact version or a requirementstring like >=1.0.3 .Use the --force option to forcibly re-install an existing module.Use the --environment option to install into a different environment.�Use the --modulepath option to manually specify which directory to install into. Note: To avoidduplicating modules installed as dependencies, you may need to specify the modulepath as a listof directories; see the documentation for setting the modulepath for details.Use the --ignore-dependencies option to skip installing any modules required by this module.
Installing From the Puppet Forge
To install a module from the Puppet Forge, simply identify the desired module by its full name. Thefull name of a Forge module is formatted as “username-modulename.”
#puppetmoduleinstallpuppetlabs-apache
Installing From Another Module Repository
The module tool can install modules from other repositories that mimic the Forgeʼs interface. To dothis, change the module_repository setting in puppet.conf or specify a repository on thecommand line with the --module_repository option. The value of this setting should be the baseURL of the repository; the default value, which uses the Forge, is http://forge.puppetlabs.com .
Puppet Documentation • Installing Modules 72/434
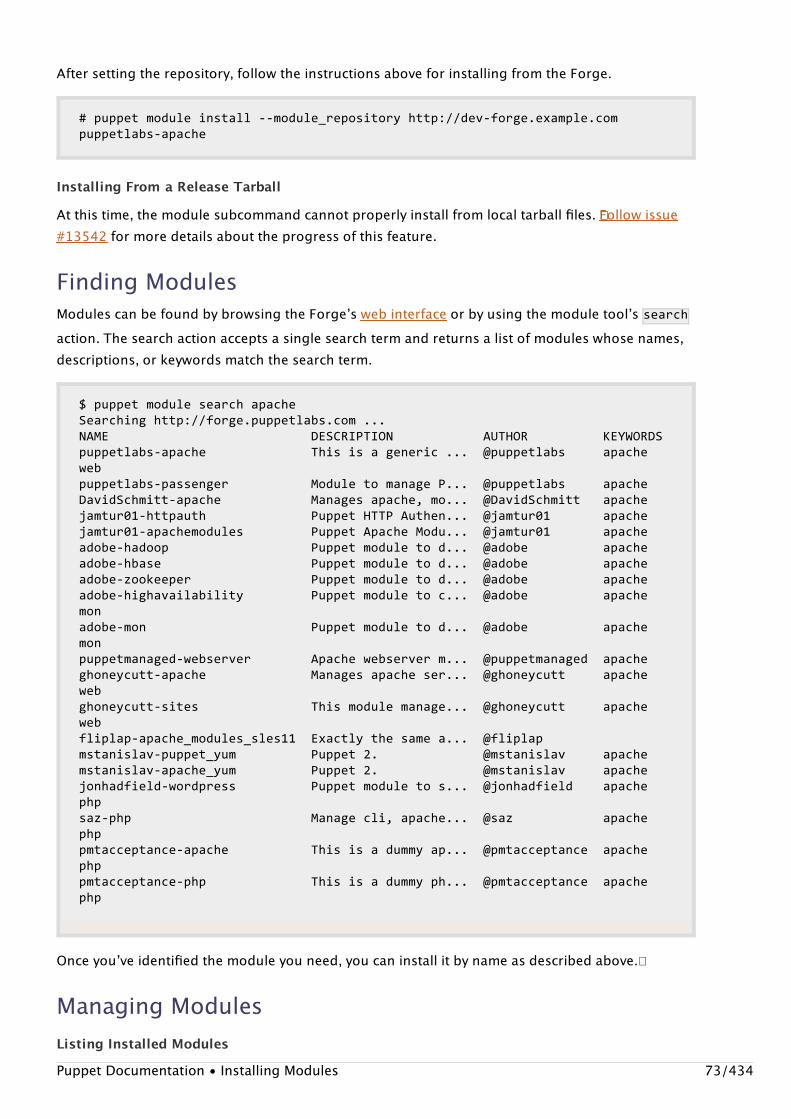
After setting the repository, follow the instructions above for installing from the Forge.
#puppetmoduleinstall--module_repositoryhttp://dev-forge.example.compuppetlabs-apache
Installing From a Release Tarball
At this time, the module subcommand cannot properly install from local tarball files. �Follow issue#13542 for more details about the progress of this feature.
Finding ModulesModules can be found by browsing the Forgeʼs web interface or by using the module toolʼs searchaction. The search action accepts a single search term and returns a list of modules whose names,descriptions, or keywords match the search term.
$puppetmodulesearchapacheSearchinghttp://forge.puppetlabs.com...NAMEDESCRIPTIONAUTHORKEYWORDSpuppetlabs-apacheThisisageneric...@puppetlabsapachewebpuppetlabs-passengerModuletomanageP...@puppetlabsapacheDavidSchmitt-apacheManagesapache,mo...@DavidSchmittapachejamtur01-httpauthPuppetHTTPAuthen...@jamtur01apachejamtur01-apachemodulesPuppetApacheModu...@jamtur01apacheadobe-hadoopPuppetmoduletod...@adobeapacheadobe-hbasePuppetmoduletod...@adobeapacheadobe-zookeeperPuppetmoduletod...@adobeapacheadobe-highavailabilityPuppetmoduletoc...@adobeapachemonadobe-monPuppetmoduletod...@adobeapachemonpuppetmanaged-webserverApachewebserverm...@puppetmanagedapacheghoneycutt-apacheManagesapacheser...@ghoneycuttapachewebghoneycutt-sitesThismodulemanage...@ghoneycuttapachewebfliplap-apache_modules_sles11Exactlythesamea...@fliplapmstanislav-puppet_yumPuppet2.@mstanislavapachemstanislav-apache_yumPuppet2.@mstanislavapachejonhadfield-wordpressPuppetmoduletos...@jonhadfieldapachephpsaz-phpManagecli,apache...@sazapachephppmtacceptance-apacheThisisadummyap...@pmtacceptanceapachephppmtacceptance-phpThisisadummyph...@pmtacceptanceapachephp
Once youʼve identified the module you need, you can install it by name as described above.�
Managing ModulesListing Installed Modules
Puppet Documentation • Installing Modules 73/434
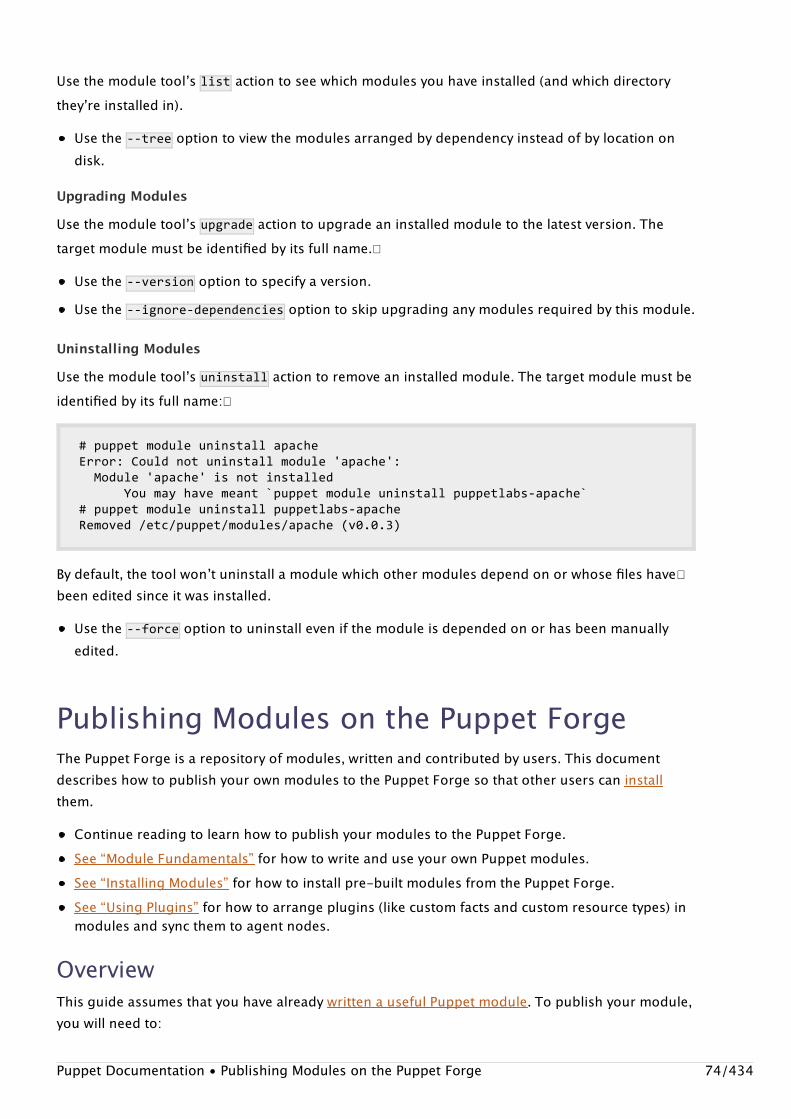
Use the module toolʼs list action to see which modules you have installed (and which directorytheyʼre installed in).
Use the --tree option to view the modules arranged by dependency instead of by location ondisk.
Upgrading Modules
Use the module toolʼs upgrade action to upgrade an installed module to the latest version. Thetarget module must be identified by its full name.�
Use the --version option to specify a version.Use the --ignore-dependencies option to skip upgrading any modules required by this module.
Uninstalling Modules
Use the module toolʼs uninstall action to remove an installed module. The target module must beidentified by its full name:�
#puppetmoduleuninstallapacheError:Couldnotuninstallmodule'apache':Module'apache'isnotinstalledYoumayhavemeant`puppetmoduleuninstallpuppetlabs-apache`#puppetmoduleuninstallpuppetlabs-apacheRemoved/etc/puppet/modules/apache(v0.0.3)
By default, the tool wonʼt uninstall a module which other modules depend on or whose files have�been edited since it was installed.
Use the --force option to uninstall even if the module is depended on or has been manuallyedited.
Publishing Modules on the Puppet ForgeThe Puppet Forge is a repository of modules, written and contributed by users. This documentdescribes how to publish your own modules to the Puppet Forge so that other users can installthem.
Continue reading to learn how to publish your modules to the Puppet Forge.See “Module Fundamentals” for how to write and use your own Puppet modules.See “Installing Modules” for how to install pre-built modules from the Puppet Forge.See “Using Plugins” for how to arrange plugins (like custom facts and custom resource types) inmodules and sync them to agent nodes.
OverviewThis guide assumes that you have already written a useful Puppet module. To publish your module,you will need to:
Puppet Documentation • Publishing Modules on the Puppet Forge 74/434
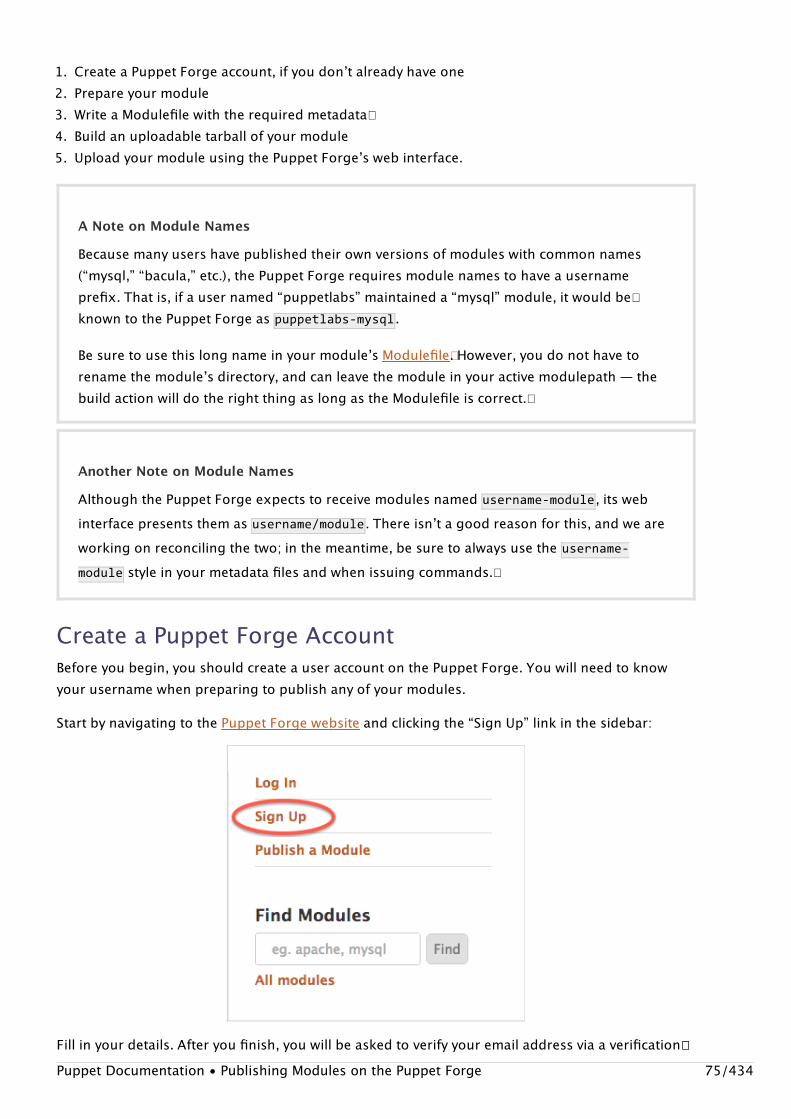
Create a Puppet Forge AccountBefore you begin, you should create a user account on the Puppet Forge. You will need to knowyour username when preparing to publish any of your modules.
Start by navigating to the Puppet Forge website and clicking the “Sign Up” link in the sidebar:
Fill in your details. After you finish, you will be asked to verify your email address via a verification��
1. Create a Puppet Forge account, if you donʼt already have one2. Prepare your module3. Write a Modulefile with the required metadata�4. Build an uploadable tarball of your module5. Upload your module using the Puppet Forgeʼs web interface.
A Note on Module Names
Because many users have published their own versions of modules with common names(“mysql,” “bacula,” etc.), the Puppet Forge requires module names to have a usernameprefix. That is, if a user named “puppetlabs” maintained a “mysql” module, it would be�known to the Puppet Forge as puppetlabs-mysql .
Be sure to use this long name in your moduleʼs Modulefile�. However, you do not have torename the moduleʼs directory, and can leave the module in your active modulepath — thebuild action will do the right thing as long as the Modulefile is correct.�
Another Note on Module Names
Although the Puppet Forge expects to receive modules named username-module , its webinterface presents them as username/module . There isnʼt a good reason for this, and we areworking on reconciling the two; in the meantime, be sure to always use the username-module style in your metadata files and when issuing commands.�
Puppet Documentation • Publishing Modules on the Puppet Forge 75/434
email. Once you have done so, you can publish modules to the Puppet Forge.
Prepare the ModuleIf you already have a Puppet module with the correct directory layout, you may continue to the nextstep.
Alternately, you can use the puppetmodulegenerate action to generate a template layout. This ismostly useful if you need an example Modulefile and README, and also includes a copy of the�spec_helper tool for writing rspec-puppet tests. If you choose to do this, you will need to manuallycopy your moduleʼs files into the template.�
To generate a template, run puppetmodulegenerate<USERNAME>-<MODULENAME> . For example:
#puppetmodulegenerateexamplecorp-mymoduleGeneratingmoduleat/Users/fred/Development/examplecorp-mymoduleexamplecorp-mymoduleexamplecorp-mymodule/testsexamplecorp-mymodule/tests/init.ppexamplecorp-mymodule/specexamplecorp-mymodule/spec/spec_helper.rbexamplecorp-mymodule/READMEexamplecorp-mymodule/Modulefileexamplecorp-mymodule/manifestsexamplecorp-mymodule/manifests/init.pp
Write a Modulefile�In your moduleʼs main directory, create a text file named �Modulefile . If you generated a template,youʼll already have an example Modulefile.�
The Modulefile resembles a configuration or data file, but is actually a simple Ruby domain-specific����language (DSL), which is executed when you build a tarball of the module. This means Rubyʼsnormal rules of string quoting apply:
name'examplecorp-mymodule'version'0.0.1'dependency'puppetlabs/mysql','1.2.3'description"Thisisafulldescriptionofthemodule,andisbeingwrittenasamulti-linestring."
Modulefiles support the following pieces of metadata:�
name — REQUIRED. The full name of the module, including the username (e.g. “username-module” — see note above).version — REQUIRED. The current version of the module. This should be a semantic version.
Note: This action is of limited use when developing a module from scratch, as the modulemust be renamed to remove the username prefix before it can be used with Puppet.�
Puppet Documentation • Publishing Modules on the Puppet Forge 76/434
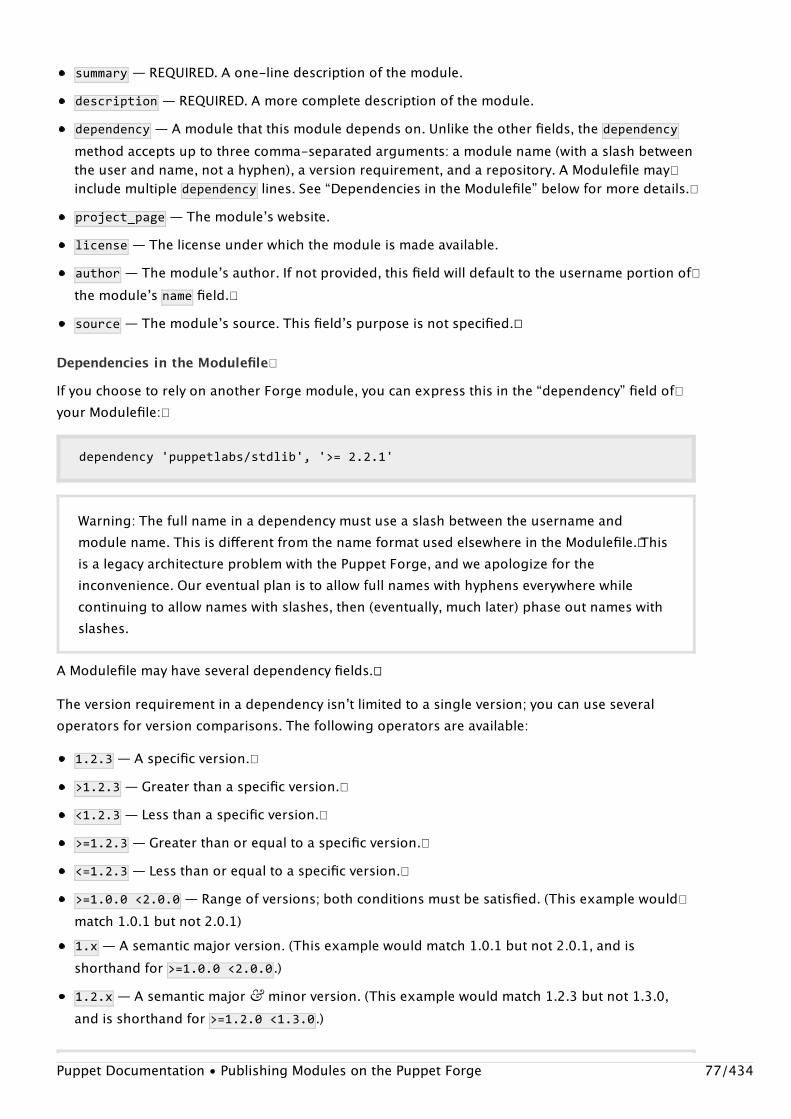
summary — REQUIRED. A one-line description of the module.description — REQUIRED. A more complete description of the module.dependency — A module that this module depends on. Unlike the other fields, the �dependencymethod accepts up to three comma-separated arguments: a module name (with a slash betweenthe user and name, not a hyphen), a version requirement, and a repository. A Modulefile may�include multiple dependency lines. See “Dependencies in the Modulefile” below for more details.�project_page — The moduleʼs website.license — The license under which the module is made available.author — The moduleʼs author. If not provided, this field will default to the username portion of�the moduleʼs name field.�source — The moduleʼs source. This fieldʼs purpose is not specified.��
Dependencies in the Modulefile�
If you choose to rely on another Forge module, you can express this in the “dependency” field of�your Modulefile:�
dependency'puppetlabs/stdlib','>=2.2.1'
A Modulefile may have several dependency fields.��
The version requirement in a dependency isnʼt limited to a single version; you can use severaloperators for version comparisons. The following operators are available:
1.2.3 — A specific version.�>1.2.3 — Greater than a specific version.�<1.2.3 — Less than a specific version.�>=1.2.3 — Greater than or equal to a specific version.�<=1.2.3 — Less than or equal to a specific version.�>=1.0.0<2.0.0 — Range of versions; both conditions must be satisfied. (This example would�match 1.0.1 but not 2.0.1)1.x — A semantic major version. (This example would match 1.0.1 but not 2.0.1, and isshorthand for >=1.0.0<2.0.0 .)1.2.x — A semantic major & minor version. (This example would match 1.2.3 but not 1.3.0,and is shorthand for >=1.2.0<1.3.0 .)
Warning: The full name in a dependency must use a slash between the username andmodule name. This is different from the name format used elsewhere in the Modulefile.�� Thisis a legacy architecture problem with the Puppet Forge, and we apologize for theinconvenience. Our eventual plan is to allow full names with hyphens everywhere whilecontinuing to allow names with slashes, then (eventually, much later) phase out names withslashes.
Puppet Documentation • Publishing Modules on the Puppet Forge 77/434
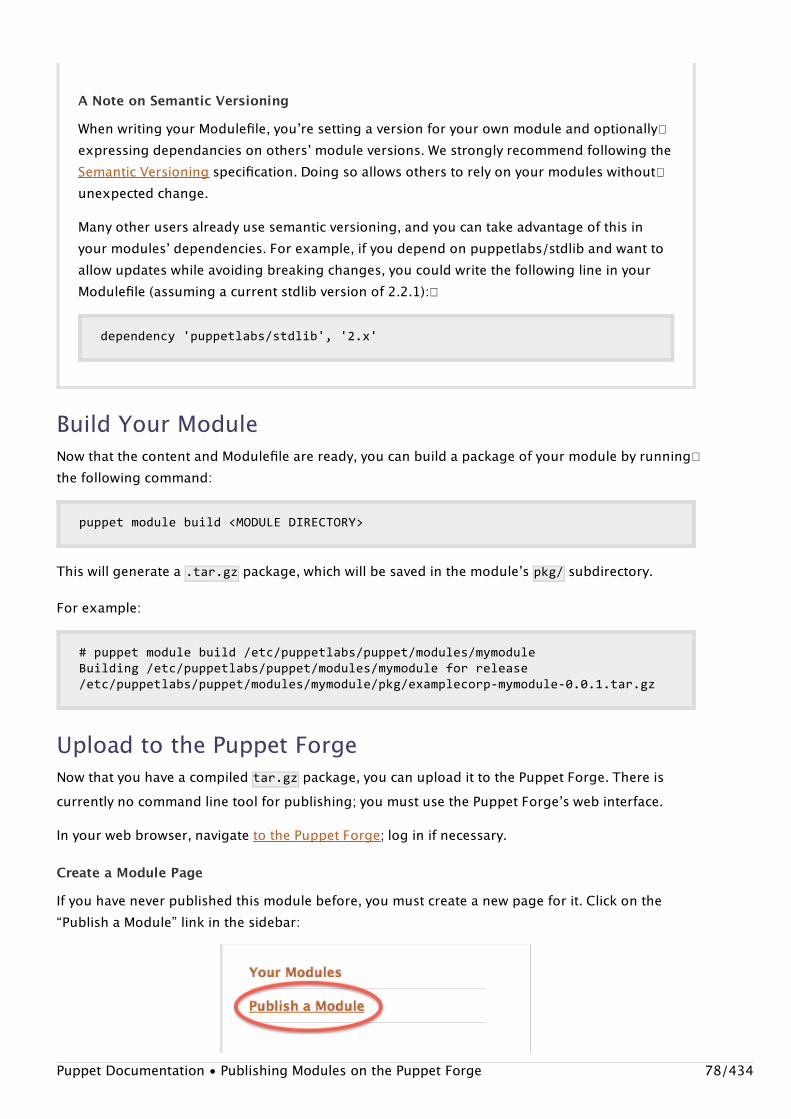
Build Your ModuleNow that the content and Modulefile are ready, you can build a package of your module by running�the following command:
puppetmodulebuild<MODULEDIRECTORY>
This will generate a .tar.gz package, which will be saved in the moduleʼs pkg/ subdirectory.
For example:
#puppetmodulebuild/etc/puppetlabs/puppet/modules/mymoduleBuilding/etc/puppetlabs/puppet/modules/mymoduleforrelease/etc/puppetlabs/puppet/modules/mymodule/pkg/examplecorp-mymodule-0.0.1.tar.gz
Upload to the Puppet ForgeNow that you have a compiled tar.gz package, you can upload it to the Puppet Forge. There iscurrently no command line tool for publishing; you must use the Puppet Forgeʼs web interface.
In your web browser, navigate to the Puppet Forge; log in if necessary.
Create a Module Page
If you have never published this module before, you must create a new page for it. Click on the“Publish a Module” link in the sidebar:
A Note on Semantic Versioning
When writing your Modulefile, youʼre setting a version for your own module and optionally�expressing dependancies on othersʼ module versions. We strongly recommend following theSemantic Versioning specification. Doing so allows others to rely on your modules without�unexpected change.
Many other users already use semantic versioning, and you can take advantage of this inyour modulesʼ dependencies. For example, if you depend on puppetlabs/stdlib and want toallow updates while avoiding breaking changes, you could write the following line in yourModulefile (assuming a current stdlib version of 2.2.1):�
dependency'puppetlabs/stdlib','2.x'
Puppet Documentation • Publishing Modules on the Puppet Forge 78/434
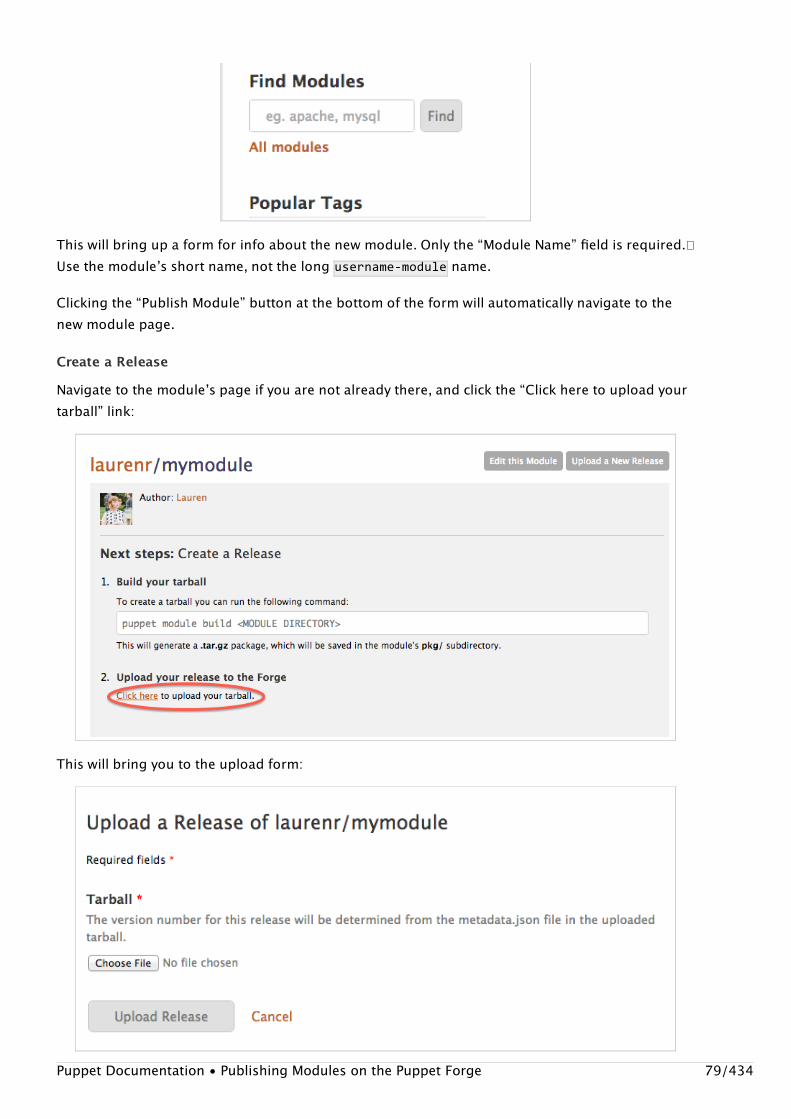
This will bring up a form for info about the new module. Only the “Module Name” field is required.�Use the moduleʼs short name, not the long username-module name.
Clicking the “Publish Module” button at the bottom of the form will automatically navigate to thenew module page.
Create a Release
Navigate to the moduleʼs page if you are not already there, and click the “Click here to upload yourtarball” link:
This will bring you to the upload form:
Puppet Documentation • Publishing Modules on the Puppet Forge 79/434
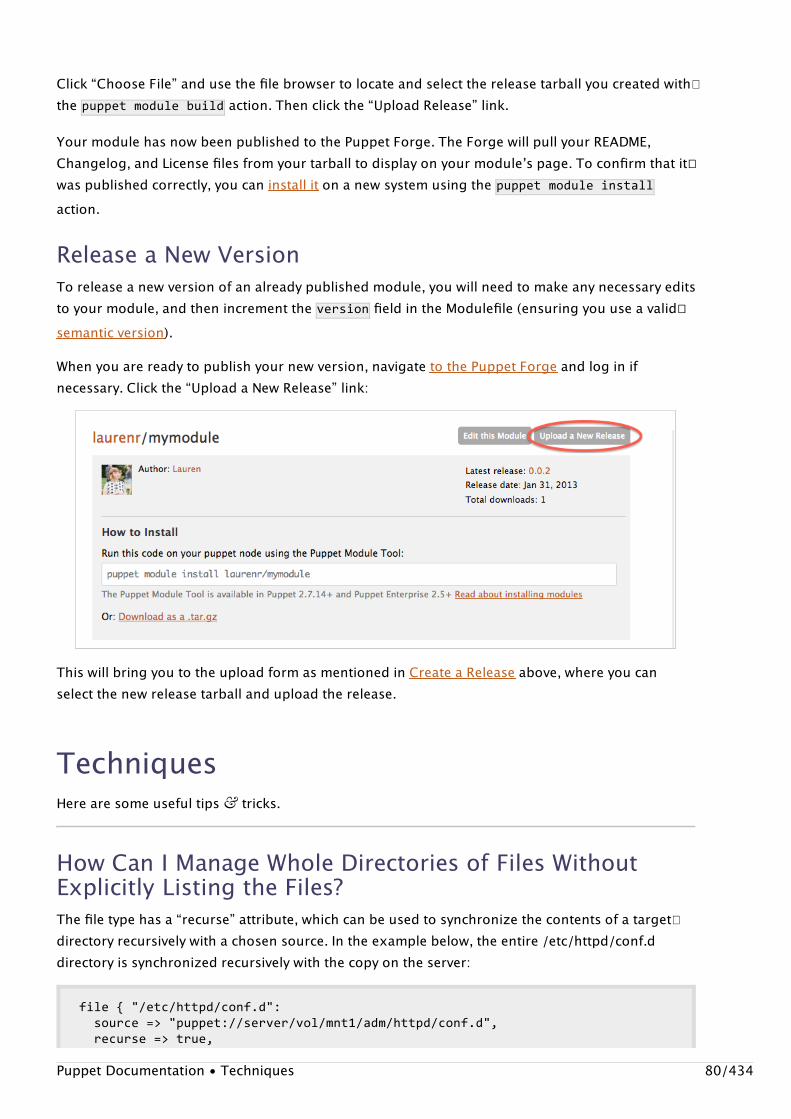
Click “Choose File” and use the file browser to locate and select the release tarball you created with�the puppetmodulebuild action. Then click the “Upload Release” link.
Your module has now been published to the Puppet Forge. The Forge will pull your README,Changelog, and License files from your tarball to display on your moduleʼs page. To confirm that it��was published correctly, you can install it on a new system using the puppetmoduleinstallaction.
Release a New VersionTo release a new version of an already published module, you will need to make any necessary editsto your module, and then increment the version field in the Modulefile (ensuring you use a valid��semantic version).
When you are ready to publish your new version, navigate to the Puppet Forge and log in ifnecessary. Click the “Upload a New Release” link:
This will bring you to the upload form as mentioned in Create a Release above, where you canselect the new release tarball and upload the release.
TechniquesHere are some useful tips & tricks.
How Can I Manage Whole Directories of Files WithoutExplicitly Listing the Files?The file type has a “recurse” attribute, which can be used to synchronize the contents of a target�directory recursively with a chosen source. In the example below, the entire /etc/httpd/conf.ddirectory is synchronized recursively with the copy on the server:
file{"/etc/httpd/conf.d":source=>"puppet://server/vol/mnt1/adm/httpd/conf.d",recurse=>true,
Puppet Documentation • Techniques 80/434
}
You can also set purge=>true to keep the directory clear of all files or directories not managed�by Puppet.
How Do I Run a Command Whenever A File Changes?The answer is to use an exec resource with refreshonly set to true, such as in this case of tellingbind to reload its configuration when it changes:�
file{"/etc/bind":source=>"/dist/apps/bind"}
exec{"/usr/bin/ndcreload":subscribe=>File["/etc/bind"],refreshonly=>true}
The exec has to subscribe to the file so it gets notified of changes.��
How Can I Ensure a Group Exists Before Creating a User?In the example given below, weʼd like to create a user called tim who we want to put in the fearmegroup. By using the require attribute, we can create a dependency between the user tim and thegroup fearme. The result is that user tim will not be created until puppet is certain that the fearmegroup exists.
group{"fearme":ensure=>present,gid=>1000}user{"tim":ensure=>present,gid=>"fearme",groups=>["adm","staff","root"],membership=>minimum,shell=>"/bin/bash",require=>Group["fearme"]}
Note that Puppet will set this relationship up for you automatically, so you should not normallyneed to do this.
How Can I Require Multiple Resources Simultaneously?Give the require attribute an array as its value. In the example given below, weʼre again adding theuser tim (just as we did earlier in this document), but in addition to requiring timʼs primary group,fearme, weʼre also requiring another group, fearmenot. Any reasonable number of resources canbe required in this way.
user{"tim":
Puppet Documentation • Techniques 81/434
ensure=>present,gid=>"fearme",groups=>["adm","staff","root","fearmenot"],membership=>minimum,shell=>"/bin/bash",require=>[Group["fearme"],Group["fearmenot"]]}
Can I use complex comparisons in if statements andvariables?In Puppet version 0.24.6 onwards you can use complex expressions in if statements and variableassignments. You can see examples of how to do this in the language guide.
Can I output Facter facts in YAML?Facter supports output of facts in YAML as well as to standard out. You need to run:
#facter--yaml
To get this output, which you can redirect to a file for further processing.�
Can I check the syntax of my templates?ERB files are easy to syntax check. For a file mytemplate.erb, run:��
$erb-x-T'-'-Pmytemplate.erb|ruby-c
The trim option specified corresponds to what Puppet uses.�
TroubleshootingAnswers to some common problems that may come up.
Basic workflow items are covered in the main section of the documentation. �If youʼre looking forhow to do something unconventional, you may also wish to read Techniques.
GeneralWhy hasnʼt my new node configuration been noticed?�
If youʼre using separate node definition files and import them into site.pp (with an ��import*.node ,for example) youʼll find that new files added wonʼt get noticed until you restart puppetmasterd.��This is due to the fact globs arenʼt evaluated on each run, but only when the ʻparentʼ file is re-read.�
To make sure your new file is actually read, simply ʻtouchʼ the site.pp (or importing file) and the��Puppet Documentation • Troubleshooting 82/434
glob will be re-evaluated.
Why donʼt my certificates show as waiting to be signed on my server when I do a “�puppetcert--list”?
puppet cert must be run with root privileges. If you are not root, then re-run the command withsudo:
sudopuppetcert--list
I keep getting “certificates were not trusted”. Whatʼs wrong?�
Firstly, if youʼre re-installing a machine, you probably havenʼt cleared the previous certificate for�that machine. To correct the problem:
Assuming that youʼre not re-installing, by far the most common cause of SSL problems is that theclock on the client machine is set incorrectly, which confuses SSL because the “validFrom” date inthe certificate is in the future.�
You can figure the problem out by manually verifying the certificate with openssl:��
sudoopensslverify-CAfile/etc/puppet/ssl/certs/ca.pem/etc/puppet/ssl/certs/myhostname.domain.com.pem
This can also happen if youʼve followed the Using Mongrel pattern to alleviate file download�problems. If your set-up is such that the host name differs from the name in the Puppet server�certificate, or there is any other SSL certificate negotiation problem, the SSL handshake between��client and server will fail. In this case, either alleviate the SSL handshake problems (debug usingcURL), or revert to the original Webrick installation.
Agents are failing with a “hostname was not match with the server certificate” error; whatʼs�wrong?
Agent nodes determine the validity of the masterʼs certificate based on hostname; if theyʼre�contacting it using a hostname that wasnʼt included when the certificate was signed, theyʼll reject�the certificate.�
To fix this error, either:�
Modify your agent nodesʼ settings to point to one of the masterʼs certified hostnames. (This may�also require adjusting your siteʼs DNS.) To see the puppet masterʼs certified hostnames, run:�
$sudopuppetmaster--configprintcertname,certdnsnames
…on the puppet master server.
1. Run sudopuppetcert--clean{nodecertname} on the puppet master to clear thecertificates.�
2. Remove the entire SSL directory of the client machine (sudorm-retc/puppet/ssl;rm-r/var/lib/puppet/ssl ).
Puppet Documentation • Troubleshooting 83/434
Re-generate the puppet masterʼs certificate:�
Stop puppet master.Delete the puppet masterʼs certificate, private key, and public key:�
$sudofind$(puppetmaster--configprintssldir)-name"$(puppetmaster--configprintcertname).pem"-delete
Edit the certname and certdnsnames settings in the puppet masterʼs/etc/puppet/puppet.conf file to match the puppet masterʼs actual hostnames.�Start a non-daemonized WEBrick puppet master instance, and wait for it to generate and signa new certificate:�
$sudopuppetmaster--no-daemonize--verbose
You should stop the temporary puppet master with ctrl-C after you see the “notice: StartingPuppet master version 2.6.9” message.Restart the puppet master.
Iʼm getting IPv6 errors; whatʼs wrong?
This can happen if Ruby is not compiled with IPv6 support. The only known solution is to make sureyouʼre running a version of Ruby compiled with IPv6 support.
Iʼm getting tlsv1 alert unknown ca errors; whatʼs wrong?
This problem is caused by puppetmasterd not being able to read its ca certificate. This problem�might occur up to 0.18.4 but has been fixed in 0.19.0. You can probably fix it for versions before��0.19.0 by changing the group ownership of the /etc/puppet/ssl directory to the puppet group, butpuppetd may change the group back. Having puppetmasterd start as the root user should fix the�problem permanently until you can upgrade.
Why does Puppet keep trying to start a running service?
The ideal way to check for a service is to use the hasstatus attribute, which calls the init script withits status command. This should report back to Puppet whether the service is running or stopped.
In some broken scripts, however, the status output will be correct (“Ok” or “not running”), but theexit code of the script will be incorrect. (Most commonly, the script will always blindly return 0.)Puppet only uses the exit code, and so may behave unpredictably in these cases.
There are two workarounds, and one fix. If you must deal with the scriptʼs broken behavior as is,�your resource can either use the “pattern” attribute to look for a particular name in the processtable, or use the “status” attribute to specify a custom script that returns the proper exit code forthe serviceʼs status.
The longer-term fix is to rewrite the serviceʼs init script to use the proper exit codes. When�rewriting them, or submitting bug reports to vendors or upstream, be sure to reference the LSB InitScript Actions standard. This should carry more weight by pointing out an official, published��Puppet Documentation • Troubleshooting 84/434
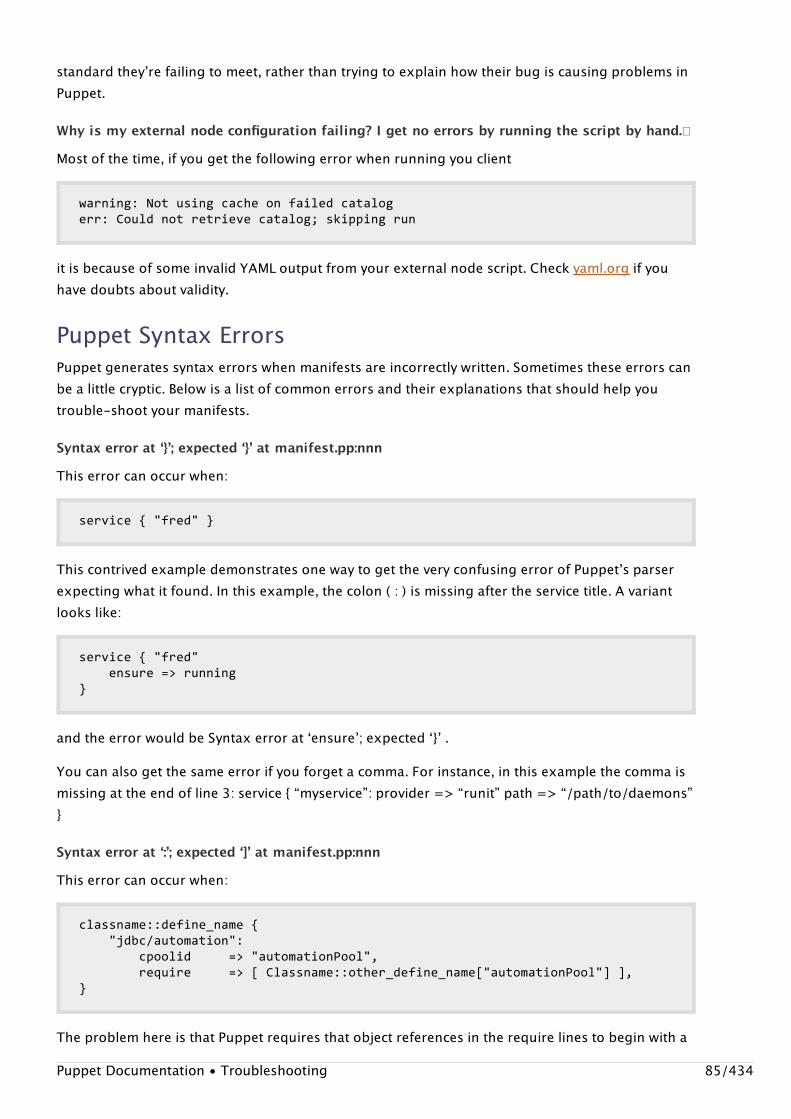
standard theyʼre failing to meet, rather than trying to explain how their bug is causing problems inPuppet.
Why is my external node configuration failing? I get no errors by running the script by hand.�
Most of the time, if you get the following error when running you client
warning:Notusingcacheonfailedcatalogerr:Couldnotretrievecatalog;skippingrun
it is because of some invalid YAML output from your external node script. Check yaml.org if youhave doubts about validity.
Puppet Syntax ErrorsPuppet generates syntax errors when manifests are incorrectly written. Sometimes these errors canbe a little cryptic. Below is a list of common errors and their explanations that should help youtrouble-shoot your manifests.
Syntax error at ʻ}ʼ; expected ʻ}ʼ at manifest.pp:nnn
This error can occur when:
service{"fred"}
This contrived example demonstrates one way to get the very confusing error of Puppetʼs parserexpecting what it found. In this example, the colon ( : ) is missing after the service title. A variantlooks like:
service{"fred"ensure=>running}
and the error would be Syntax error at ʻensureʼ; expected ʻ}ʼ .
You can also get the same error if you forget a comma. For instance, in this example the comma ismissing at the end of line 3: service { “myservice”: provider => “runit” path => “/path/to/daemons”}
Syntax error at ʻ:ʼ; expected ʻ]ʼ at manifest.pp:nnn
This error can occur when:
classname::define_name{"jdbc/automation":cpoolid=>"automationPool",require=>[Classname::other_define_name["automationPool"]],}
The problem here is that Puppet requires that object references in the require lines to begin with a
Puppet Documentation • Troubleshooting 85/434
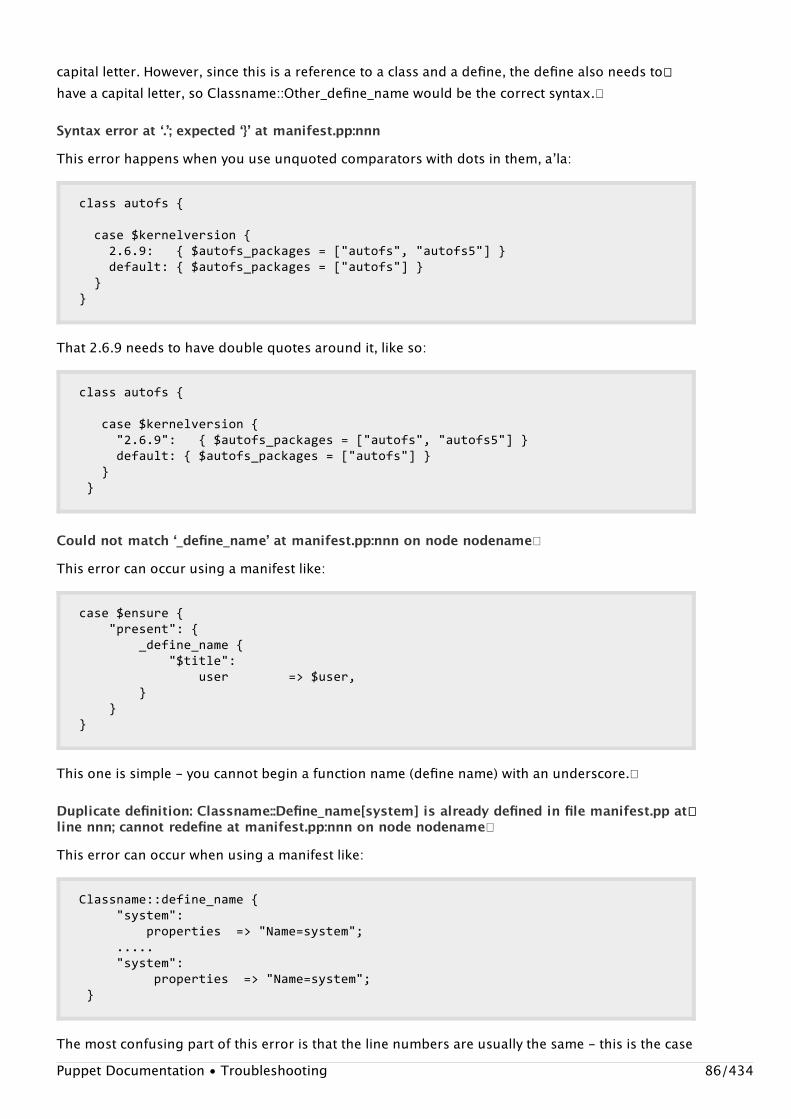
capital letter. However, since this is a reference to a class and a define, the define also needs to��have a capital letter, so Classname::Other_define_name would be the correct syntax.�
Syntax error at ʻ.ʼ; expected ʻ}ʼ at manifest.pp:nnn
This error happens when you use unquoted comparators with dots in them, aʼla:
classautofs{
case$kernelversion{2.6.9:{$autofs_packages=["autofs","autofs5"]}default:{$autofs_packages=["autofs"]}}}
That 2.6.9 needs to have double quotes around it, like so:
classautofs{
case$kernelversion{"2.6.9":{$autofs_packages=["autofs","autofs5"]}default:{$autofs_packages=["autofs"]}}}
Could not match ʻ_define_nameʼ at manifest.pp:nnn on node nodename�
This error can occur using a manifest like:
case$ensure{"present":{_define_name{"$title":user=>$user,}}}
This one is simple - you cannot begin a function name (define name) with an underscore.�
Duplicate definition: Classname::Define_name[system] is already defined in file manifest.pp at����line nnn; cannot redefine at manifest.pp:nnn on node nodename�
This error can occur when using a manifest like:
Classname::define_name{"system":properties=>"Name=system";....."system":properties=>"Name=system";}
The most confusing part of this error is that the line numbers are usually the same - this is the casePuppet Documentation • Troubleshooting 86/434
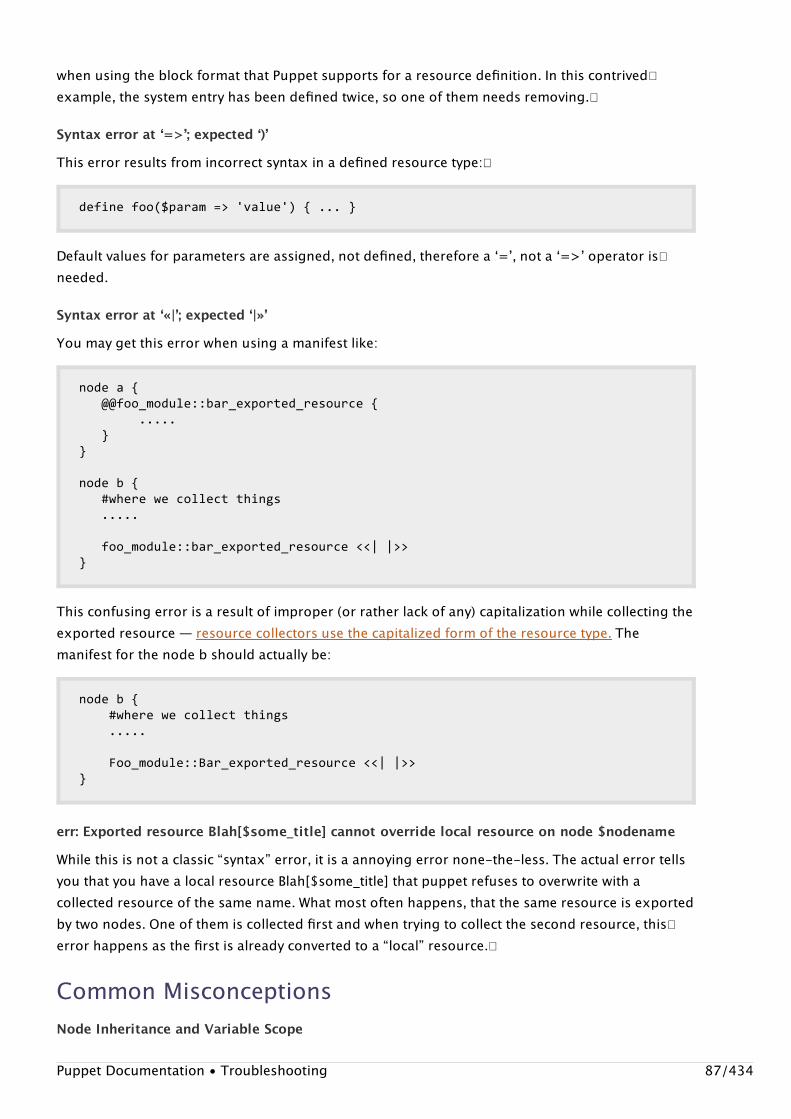
when using the block format that Puppet supports for a resource definition. In this contrived�example, the system entry has been defined twice, so one of them needs removing.�
Syntax error at ʻ=>ʼ; expected ʻ)ʼ
This error results from incorrect syntax in a defined resource type:�
definefoo($param=>'value'){...}
Default values for parameters are assigned, not defined, therefore a ʻ=ʼ, not a ʻ=>ʼ operator is�needed.
Syntax error at ʻ«|ʼ; expected ʻ|»ʼ
You may get this error when using a manifest like:
nodea{@@foo_module::bar_exported_resource{.....}}
nodeb{#wherewecollectthings.....foo_module::bar_exported_resource<<||>>}
This confusing error is a result of improper (or rather lack of any) capitalization while collecting theexported resource — resource collectors use the capitalized form of the resource type. Themanifest for the node b should actually be:
nodeb{#wherewecollectthings.....
Foo_module::Bar_exported_resource<<||>>}
err: Exported resource Blah[$some_title] cannot override local resource on node $nodename
While this is not a classic “syntax” error, it is a annoying error none-the-less. The actual error tellsyou that you have a local resource Blah[$some_title] that puppet refuses to overwrite with acollected resource of the same name. What most often happens, that the same resource is exportedby two nodes. One of them is collected first and when trying to collect the second resource, this�error happens as the first is already converted to a “local” resource.�
Common MisconceptionsNode Inheritance and Variable Scope
Puppet Documentation • Troubleshooting 87/434

It is generally assumed that the following will result in the /tmp/puppet-test.variable file containing�the string ʻmy_nodeʼ:
classtest_class{file{"/tmp/puppet-test.variable":content=>"$testname",ensure=>present,}}
nodebase_node{includetest_class}
nodemy_nodeinheritsbase_node{$testname='my_node'}
Contrary to expectations, /tmp/puppet-test.variable is created with no contents. This is becausethe inherited test_class remains in the scope of base_node, where $testname is undefined.�
Node inheritance is currently only really useful for inheriting static or self-contained classes, and is,as a result, of quite limited value.
A workaround is to define classes for your node types - essentially include classes rather than�inheriting them. For example:
classtest_class{file{"/tmp/puppet-test.variable":content=>"$testname",ensure=>present,}}
classbase_node_class{includetest_class}
nodemy_node{$testname='my_node'includebase_node_class}
/tmp/puppet-test.variable will now contain ʻmy_nodeʼ as desired.
Class Inheritance and Variable Scope
The following would also not work as generally expected:
classbase_class{$myvar='bob'file{"/tmp/testvar":content=>"$myvar",ensure=>present,}
Puppet Documentation • Troubleshooting 88/434
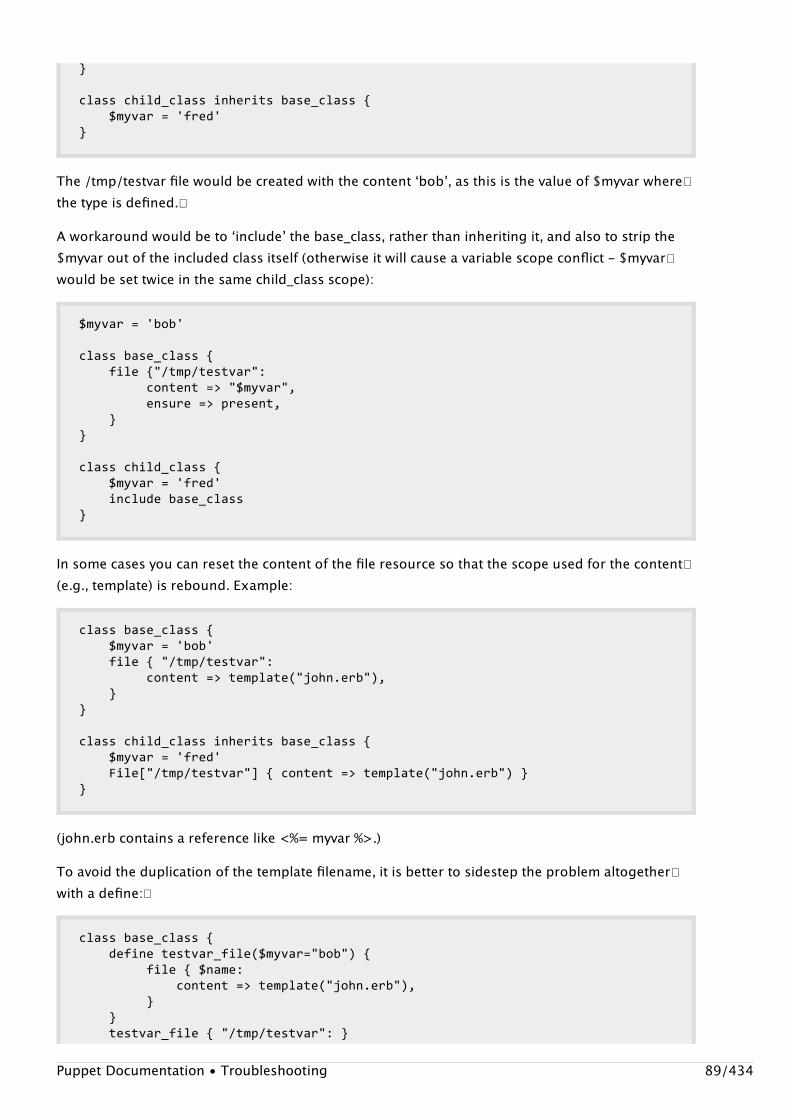
}
classchild_classinheritsbase_class{$myvar='fred'}
The /tmp/testvar file would be created with the content ʻbobʼ, as this is the value of $myvar where�the type is defined.�
A workaround would be to ʻincludeʼ the base_class, rather than inheriting it, and also to strip the$myvar out of the included class itself (otherwise it will cause a variable scope conflict - $myvar�would be set twice in the same child_class scope):
$myvar='bob'
classbase_class{file{"/tmp/testvar":content=>"$myvar",ensure=>present,}}
classchild_class{$myvar='fred'includebase_class}
In some cases you can reset the content of the file resource so that the scope used for the content�(e.g., template) is rebound. Example:
classbase_class{$myvar='bob'file{"/tmp/testvar":content=>template("john.erb"),}}
classchild_classinheritsbase_class{$myvar='fred'File["/tmp/testvar"]{content=>template("john.erb")}}
(john.erb contains a reference like <%= myvar %>.)
To avoid the duplication of the template filename, it is better to sidestep the problem altogether�with a define:�
classbase_class{definetestvar_file($myvar="bob"){file{$name:content=>template("john.erb"),}}testvar_file{"/tmp/testvar":}
Puppet Documentation • Troubleshooting 89/434
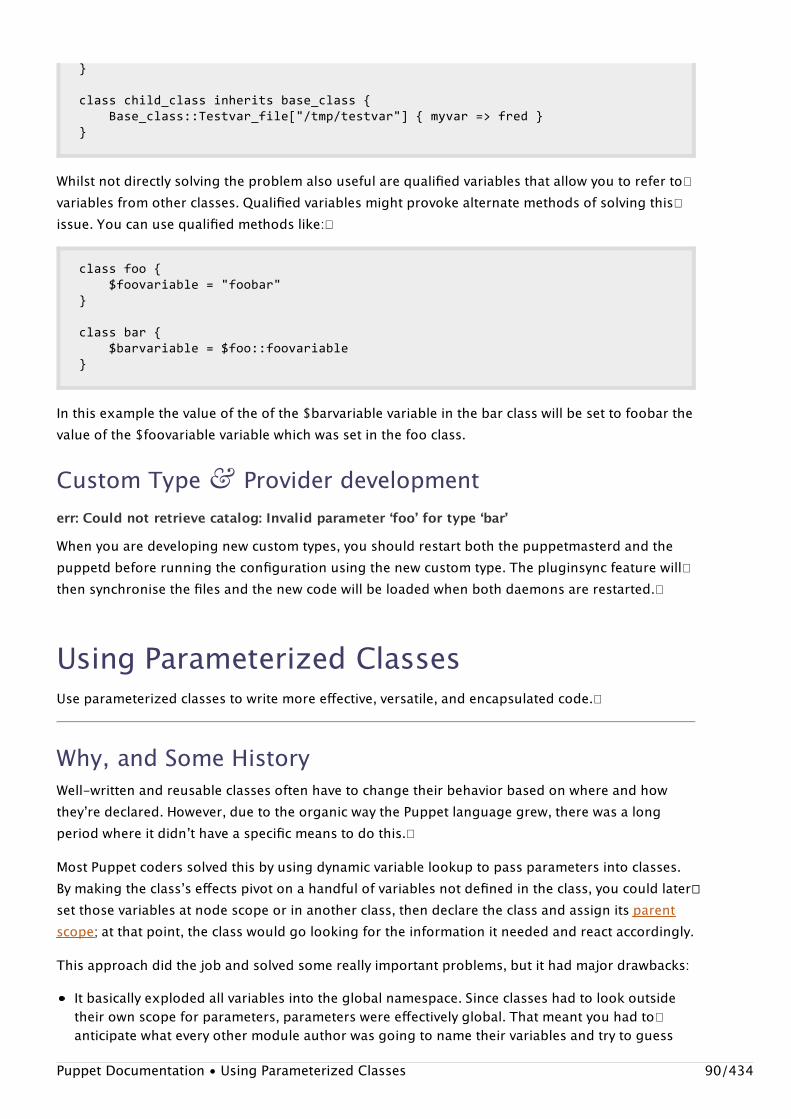
}
classchild_classinheritsbase_class{Base_class::Testvar_file["/tmp/testvar"]{myvar=>fred}}
Whilst not directly solving the problem also useful are qualified variables that allow you to refer to�variables from other classes. Qualified variables might provoke alternate methods of solving this�issue. You can use qualified methods like:�
classfoo{$foovariable="foobar"}
classbar{$barvariable=$foo::foovariable}
In this example the value of the of the $barvariable variable in the bar class will be set to foobar thevalue of the $foovariable variable which was set in the foo class.
Custom Type & Provider developmenterr: Could not retrieve catalog: Invalid parameter ʻfooʼ for type ʻbarʼ
When you are developing new custom types, you should restart both the puppetmasterd and thepuppetd before running the configuration using the new custom type. The pluginsync feature will�then synchronise the files and the new code will be loaded when both daemons are restarted.�
Using Parameterized ClassesUse parameterized classes to write more effective, versatile, and encapsulated code.�
Why, and Some HistoryWell-written and reusable classes often have to change their behavior based on where and howtheyʼre declared. However, due to the organic way the Puppet language grew, there was a longperiod where it didnʼt have a specific means to do this.�
Most Puppet coders solved this by using dynamic variable lookup to pass parameters into classes.By making the classʼs effects pivot on a handful of variables not defined in the class, you could later��set those variables at node scope or in another class, then declare the class and assign its parentscope; at that point, the class would go looking for the information it needed and react accordingly.
This approach did the job and solved some really important problems, but it had major drawbacks:
It basically exploded all variables into the global namespace. Since classes had to look outsidetheir own scope for parameters, parameters were effectively global. That meant you had to�anticipate what every other module author was going to name their variables and try to guess
Puppet Documentation • Using Parameterized Classes 90/434
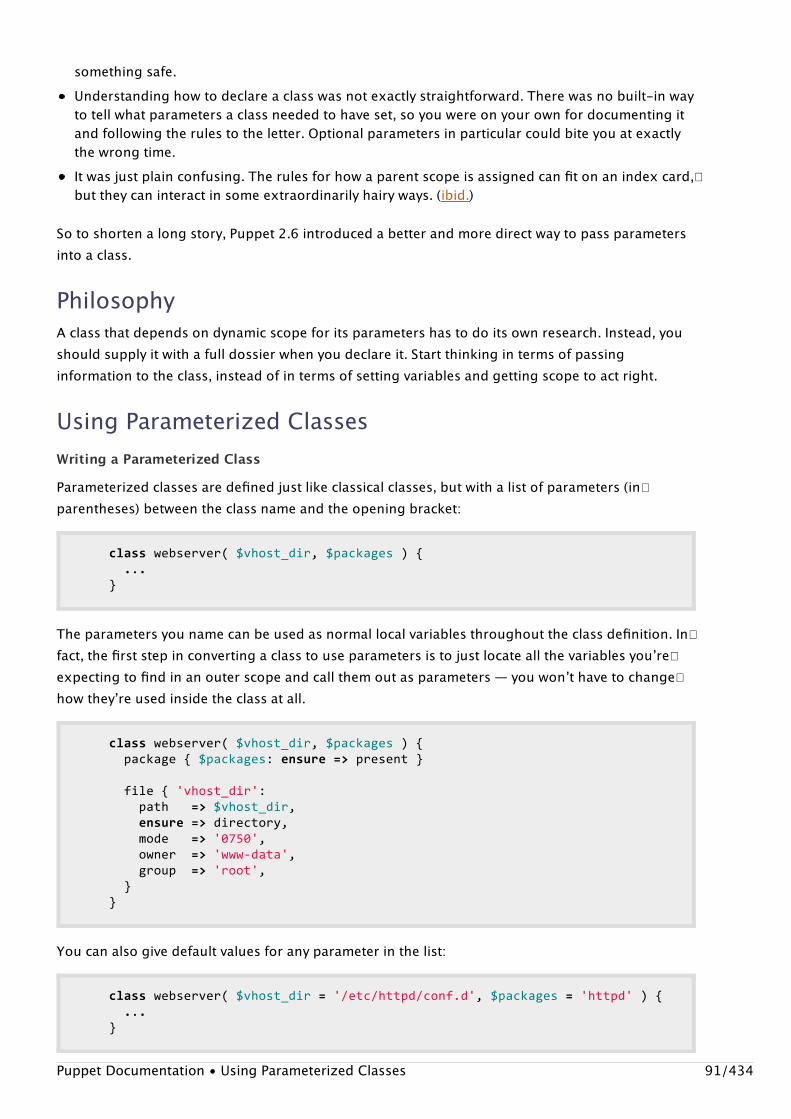
something safe.Understanding how to declare a class was not exactly straightforward. There was no built-in wayto tell what parameters a class needed to have set, so you were on your own for documenting itand following the rules to the letter. Optional parameters in particular could bite you at exactlythe wrong time.It was just plain confusing. The rules for how a parent scope is assigned can fit on an index card,�but they can interact in some extraordinarily hairy ways. (ibid.)
So to shorten a long story, Puppet 2.6 introduced a better and more direct way to pass parametersinto a class.
PhilosophyA class that depends on dynamic scope for its parameters has to do its own research. Instead, youshould supply it with a full dossier when you declare it. Start thinking in terms of passinginformation to the class, instead of in terms of setting variables and getting scope to act right.
Using Parameterized ClassesWriting a Parameterized Class
Parameterized classes are defined just like classical classes, but with a list of parameters (in�parentheses) between the class name and the opening bracket:
classwebserver($vhost_dir,$packages){...}
The parameters you name can be used as normal local variables throughout the class definition. In�fact, the first step in converting a class to use parameters is to just locate all the variables youʼre�expecting to find in an outer scope and call them out as parameters — you wonʼt have to change�how theyʼre used inside the class at all.
classwebserver($vhost_dir,$packages){package{$packages:ensure=>present}file{'vhost_dir':path=>$vhost_dir,ensure=>directory,mode=>'0750',owner=>'www-data',group=>'root',}}
You can also give default values for any parameter in the list:
classwebserver($vhost_dir='/etc/httpd/conf.d',$packages='httpd'){...}
Puppet Documentation • Using Parameterized Classes 91/434
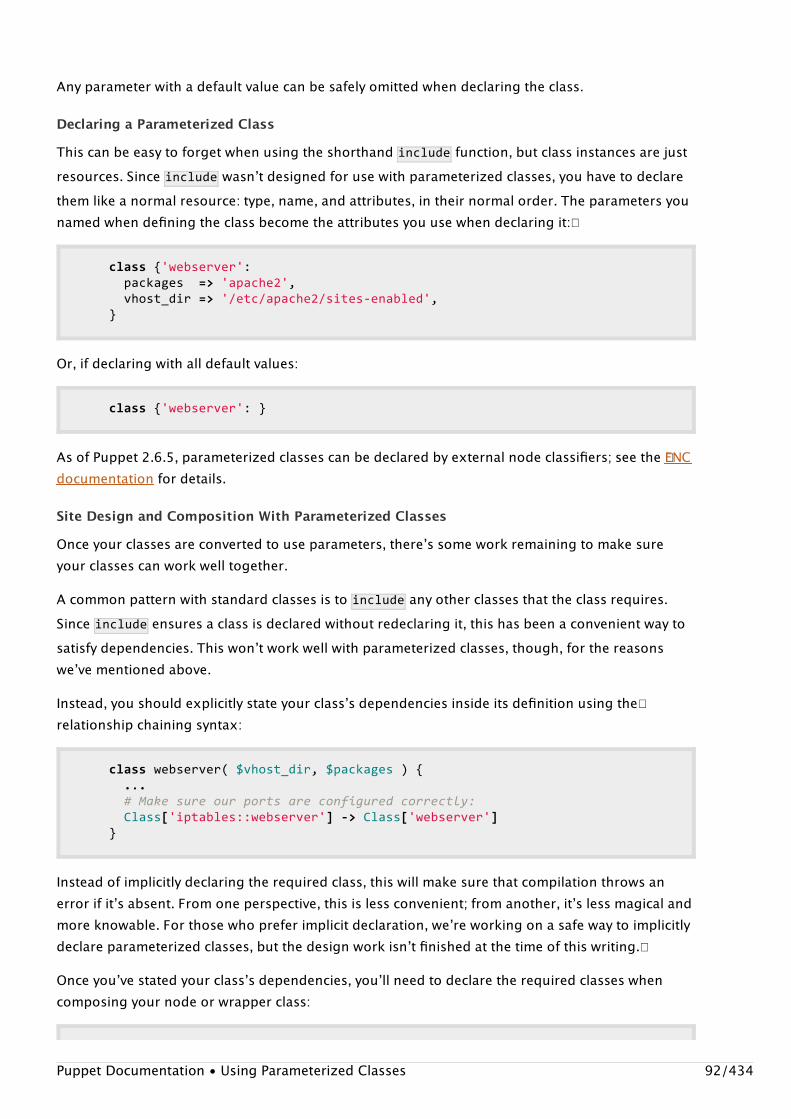
Any parameter with a default value can be safely omitted when declaring the class.
Declaring a Parameterized Class
This can be easy to forget when using the shorthand include function, but class instances are justresources. Since include wasnʼt designed for use with parameterized classes, you have to declarethem like a normal resource: type, name, and attributes, in their normal order. The parameters younamed when defining the class become the attributes you use when declaring it:�
class{'webserver':packages=>'apache2',vhost_dir=>'/etc/apache2/sites-enabled',}
Or, if declaring with all default values:
class{'webserver':}
As of Puppet 2.6.5, parameterized classes can be declared by external node classifiers; see the �ENCdocumentation for details.
Site Design and Composition With Parameterized Classes
Once your classes are converted to use parameters, thereʼs some work remaining to make sureyour classes can work well together.
A common pattern with standard classes is to include any other classes that the class requires.Since include ensures a class is declared without redeclaring it, this has been a convenient way tosatisfy dependencies. This wonʼt work well with parameterized classes, though, for the reasonsweʼve mentioned above.
Instead, you should explicitly state your classʼs dependencies inside its definition using the�relationship chaining syntax:
classwebserver($vhost_dir,$packages){...#Makesureourportsareconfiguredcorrectly:Class['iptables::webserver']->Class['webserver']}
Instead of implicitly declaring the required class, this will make sure that compilation throws anerror if itʼs absent. From one perspective, this is less convenient; from another, itʼs less magical andmore knowable. For those who prefer implicit declaration, weʼre working on a safe way to implicitlydeclare parameterized classes, but the design work isnʼt finished at the time of this writing.�
Once youʼve stated your classʼs dependencies, youʼll need to declare the required classes whencomposing your node or wrapper class:
Puppet Documentation • Using Parameterized Classes 92/434
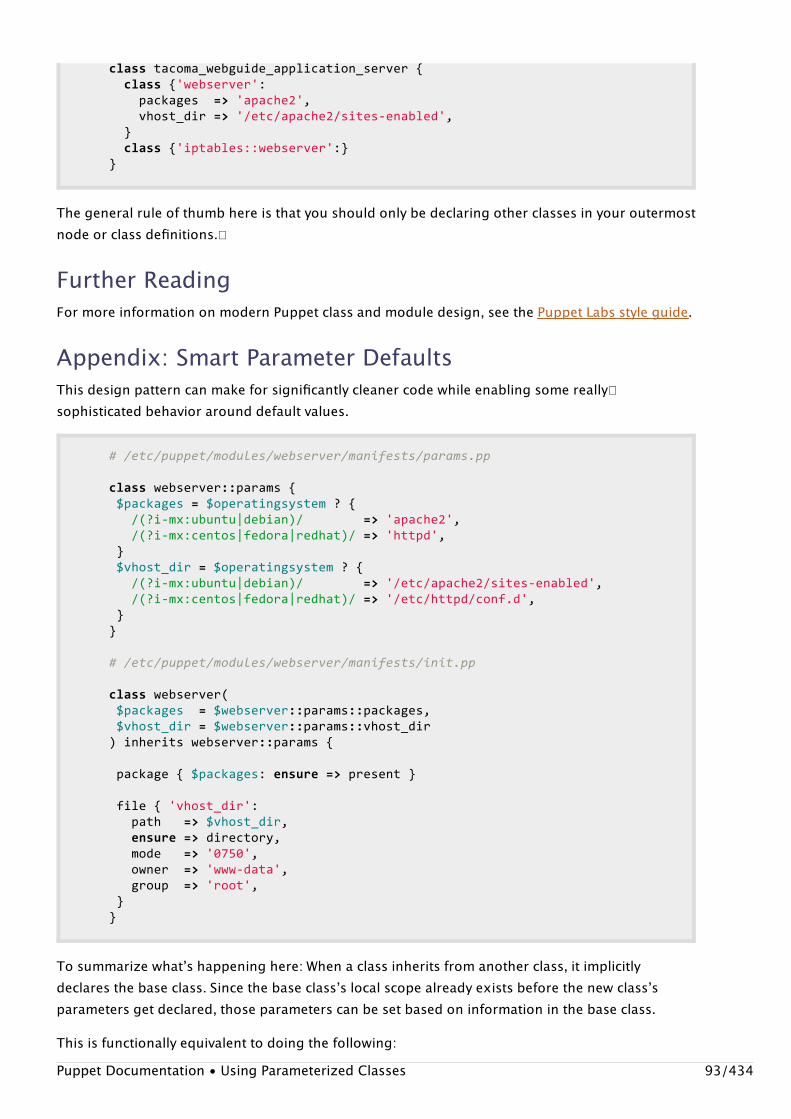
classtacoma_webguide_application_server{class{'webserver':packages=>'apache2',vhost_dir=>'/etc/apache2/sites-enabled',}class{'iptables::webserver':}}
The general rule of thumb here is that you should only be declaring other classes in your outermostnode or class definitions.�
Further ReadingFor more information on modern Puppet class and module design, see the Puppet Labs style guide.
Appendix: Smart Parameter DefaultsThis design pattern can make for significantly cleaner code while enabling some really�sophisticated behavior around default values.
#/etc/puppet/modules/webserver/manifests/params.ppclasswebserver::params{$packages=$operatingsystem?{/(?i-mx:ubuntu|debian)/=>'apache2',/(?i-mx:centos|fedora|redhat)/=>'httpd',}$vhost_dir=$operatingsystem?{/(?i-mx:ubuntu|debian)/=>'/etc/apache2/sites-enabled',/(?i-mx:centos|fedora|redhat)/=>'/etc/httpd/conf.d',}}#/etc/puppet/modules/webserver/manifests/init.ppclasswebserver($packages=$webserver::params::packages,$vhost_dir=$webserver::params::vhost_dir)inheritswebserver::params{package{$packages:ensure=>present}file{'vhost_dir':path=>$vhost_dir,ensure=>directory,mode=>'0750',owner=>'www-data',group=>'root',}}
To summarize whatʼs happening here: When a class inherits from another class, it implicitlydeclares the base class. Since the base classʼs local scope already exists before the new classʼsparameters get declared, those parameters can be set based on information in the base class.
This is functionally equivalent to doing the following:Puppet Documentation • Using Parameterized Classes 93/434
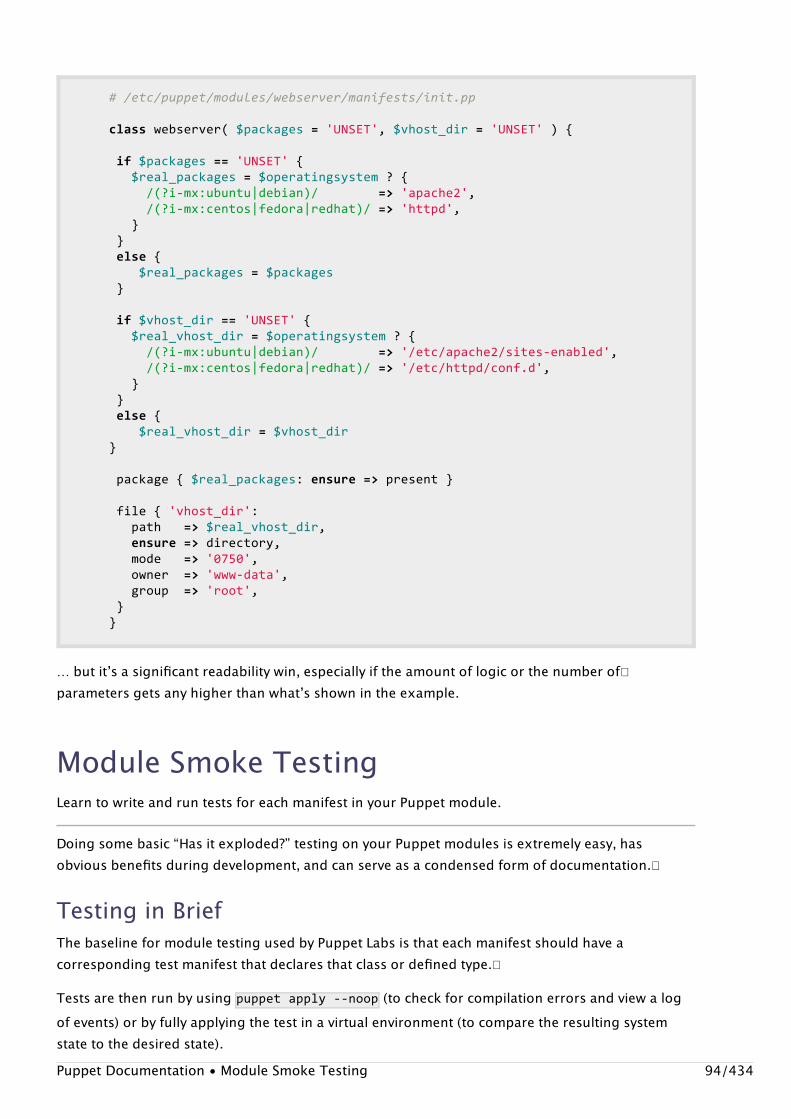
#/etc/puppet/modules/webserver/manifests/init.ppclasswebserver($packages='UNSET',$vhost_dir='UNSET'){if$packages=='UNSET'{$real_packages=$operatingsystem?{/(?i-mx:ubuntu|debian)/=>'apache2',/(?i-mx:centos|fedora|redhat)/=>'httpd',}}else{$real_packages=$packages}if$vhost_dir=='UNSET'{$real_vhost_dir=$operatingsystem?{/(?i-mx:ubuntu|debian)/=>'/etc/apache2/sites-enabled',/(?i-mx:centos|fedora|redhat)/=>'/etc/httpd/conf.d',}}else{$real_vhost_dir=$vhost_dir}package{$real_packages:ensure=>present}file{'vhost_dir':path=>$real_vhost_dir,ensure=>directory,mode=>'0750',owner=>'www-data',group=>'root',}}
… but itʼs a significant readability win, especially if the amount of logic or the number of�parameters gets any higher than whatʼs shown in the example.
Module Smoke TestingLearn to write and run tests for each manifest in your Puppet module.
Doing some basic “Has it exploded?” testing on your Puppet modules is extremely easy, hasobvious benefits during development, and can serve as a condensed form of documentation.�
Testing in BriefThe baseline for module testing used by Puppet Labs is that each manifest should have acorresponding test manifest that declares that class or defined type.�
Tests are then run by using puppetapply--noop (to check for compilation errors and view a logof events) or by fully applying the test in a virtual environment (to compare the resulting systemstate to the desired state).Puppet Documentation • Module Smoke Testing 94/434
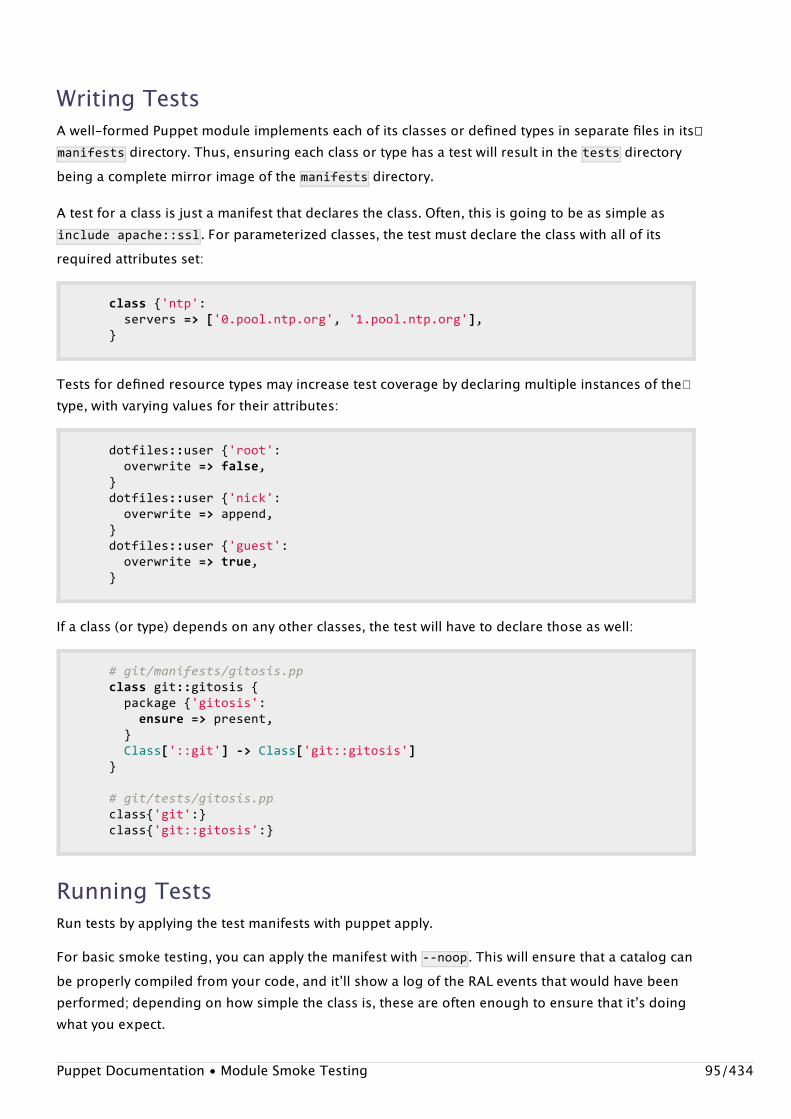
Writing TestsA well-formed Puppet module implements each of its classes or defined types in separate files in its��manifests directory. Thus, ensuring each class or type has a test will result in the tests directorybeing a complete mirror image of the manifests directory.
A test for a class is just a manifest that declares the class. Often, this is going to be as simple asincludeapache::ssl . For parameterized classes, the test must declare the class with all of itsrequired attributes set:
class{'ntp':servers=>['0.pool.ntp.org','1.pool.ntp.org'],}
Tests for defined resource types may increase test coverage by declaring multiple instances of the�type, with varying values for their attributes:
dotfiles::user{'root':overwrite=>false,}dotfiles::user{'nick':overwrite=>append,}dotfiles::user{'guest':overwrite=>true,}
If a class (or type) depends on any other classes, the test will have to declare those as well:
#git/manifests/gitosis.ppclassgit::gitosis{package{'gitosis':ensure=>present,}Class['::git']->Class['git::gitosis']}#git/tests/gitosis.ppclass{'git':}class{'git::gitosis':}
Running TestsRun tests by applying the test manifests with puppet apply.
For basic smoke testing, you can apply the manifest with --noop . This will ensure that a catalog canbe properly compiled from your code, and itʼll show a log of the RAL events that would have beenperformed; depending on how simple the class is, these are often enough to ensure that itʼs doingwhat you expect.
Puppet Documentation • Module Smoke Testing 95/434
For more advanced coverage, you can apply the manifest to a live system, preferably a VM. You canexpand your coverage further by maintaining a stable of snapshotted environments in variousstates, to ensure that your classes do whatʼs expected in all the situations where theyʼre likely to beapplied.
Automating all this is going to depend on your preferred tools and processes, and is thus left as anexercise for the reader.
Reading TestsSince module tests declare their classes with all required attributes and with all prerequisitesdeclared, they can serve as a form of drive-by documentation: if youʼre in a hurry, you can oftenfigure out how to use a module (or just refresh your memory) by skimming through the tests�directory.
This doesnʼt get anyone off the hook for writing real documentation, but itʼs a good reason to write�tests even if your module is already working as expected.
Exploring FurtherThis form of testing is extremely basic, and still requires a human reader to determine whether theright RAL events are being generated or the right system configuration is being enforced. For more�advanced testing, you may want to investigate cucumber-puppet or cucumber-nagios.
Scope and Puppet as of 2.7Puppet 2.7 issues deprecation warnings for dynamic variable lookup. Find out why, and learn howto adapt your Puppet code for the future!
Whatʼs Changing?Dynamic scope will be removed from the Puppet language in a future version. This will be a majorand backwards-incompatible change. Currently, if an unqualified variable isnʼt defined in the local��scope, Puppet looks it up along an unlimited chain of parent scopes, eventually ending at topscope. In the future, Puppet will only examine the local, inherited, node, and top scopes whenresolving an unqualified variable; intervening scopes will be ignored. In effect, all variables will one��of the following:
LocalInherited from a base classNode-levelGlobal
To ease the transition, Puppet 2.7 issues deprecation warnings whenever dynamic variable lookupoccurs. You should strongly consider refactoring your code to eliminate these warnings.
An example of dynamic lookup
Puppet Documentation • Scope and Puppet as of 2.7 96/434
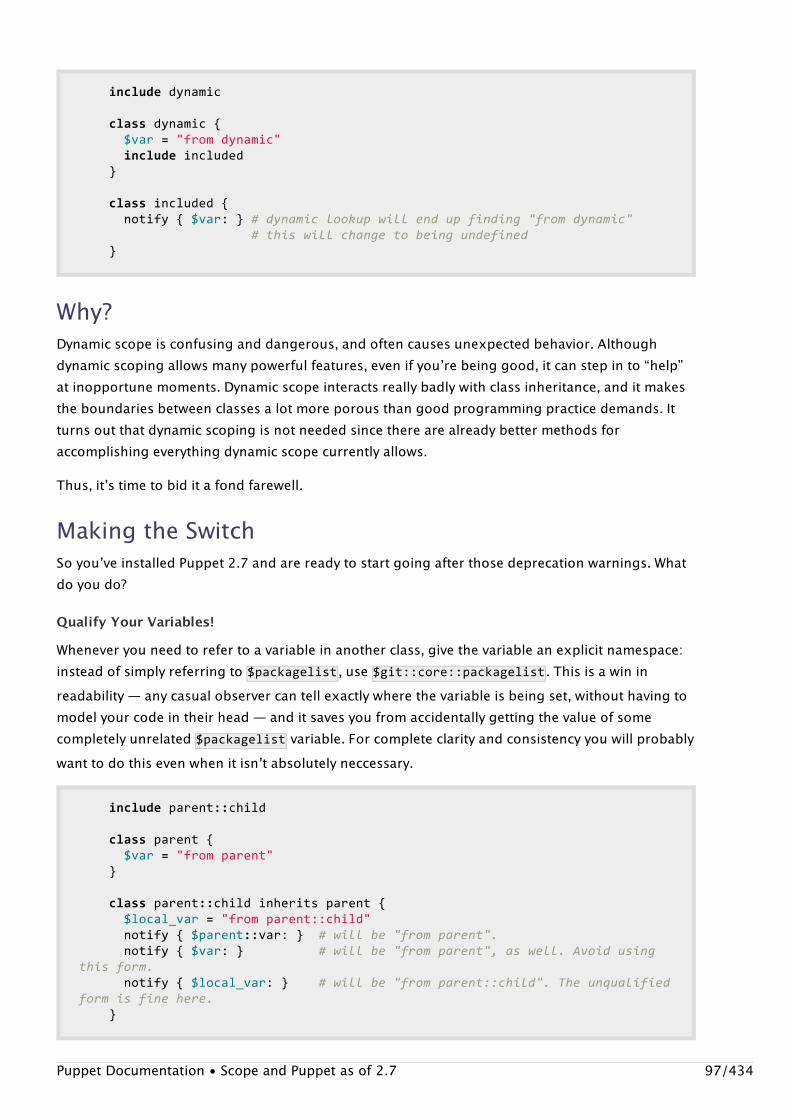
includedynamic
classdynamic{$var="fromdynamic"includeincluded}
classincluded{notify{$var:}#dynamiclookupwillendupfinding"fromdynamic"#thiswillchangetobeingundefined}
Why?Dynamic scope is confusing and dangerous, and often causes unexpected behavior. Althoughdynamic scoping allows many powerful features, even if youʼre being good, it can step in to “help”at inopportune moments. Dynamic scope interacts really badly with class inheritance, and it makesthe boundaries between classes a lot more porous than good programming practice demands. Itturns out that dynamic scoping is not needed since there are already better methods foraccomplishing everything dynamic scope currently allows.
Thus, itʼs time to bid it a fond farewell.
Making the SwitchSo youʼve installed Puppet 2.7 and are ready to start going after those deprecation warnings. Whatdo you do?
Qualify Your Variables!
Whenever you need to refer to a variable in another class, give the variable an explicit namespace:instead of simply referring to $packagelist , use $git::core::packagelist . This is a win inreadability — any casual observer can tell exactly where the variable is being set, without having tomodel your code in their head — and it saves you from accidentally getting the value of somecompletely unrelated $packagelist variable. For complete clarity and consistency you will probablywant to do this even when it isnʼt absolutely neccessary.
includeparent::child
classparent{$var="fromparent"}
classparent::childinheritsparent{$local_var="fromparent::child"notify{$parent::var:}#willbe"fromparent".notify{$var:}#willbe"fromparent",aswell.Avoidusingthisform.notify{$local_var:}#willbe"fromparent::child".Theunqualifiedformisfinehere.}
Puppet Documentation • Scope and Puppet as of 2.7 97/434
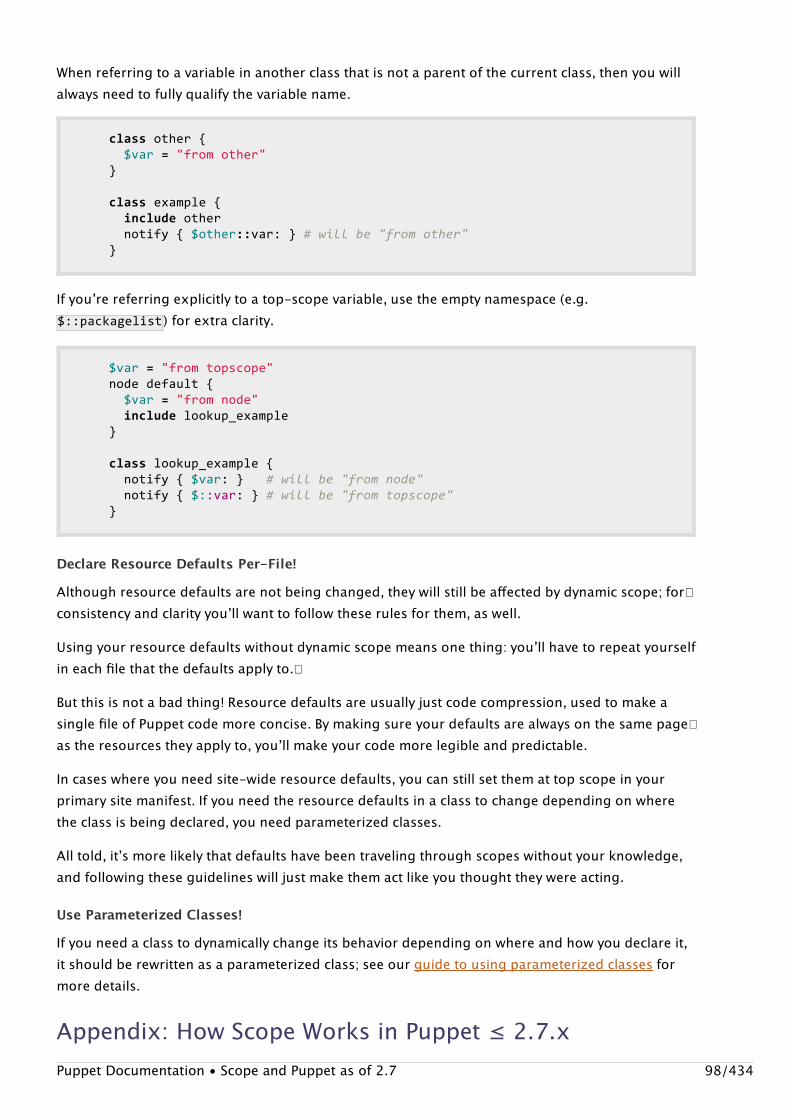
When referring to a variable in another class that is not a parent of the current class, then you willalways need to fully qualify the variable name.
classother{$var="fromother"}
classexample{includeothernotify{$other::var:}#willbe"fromother"}
If youʼre referring explicitly to a top-scope variable, use the empty namespace (e.g.$::packagelist ) for extra clarity.
$var="fromtopscope"nodedefault{$var="fromnode"includelookup_example}
classlookup_example{notify{$var:}#willbe"fromnode"notify{$::var:}#willbe"fromtopscope"}
Declare Resource Defaults Per-File!
Although resource defaults are not being changed, they will still be affected by dynamic scope; for�consistency and clarity youʼll want to follow these rules for them, as well.
Using your resource defaults without dynamic scope means one thing: youʼll have to repeat yourselfin each file that the defaults apply to.�
But this is not a bad thing! Resource defaults are usually just code compression, used to make asingle file of Puppet code more concise. By making sure your defaults are always on the same page�as the resources they apply to, youʼll make your code more legible and predictable.
In cases where you need site-wide resource defaults, you can still set them at top scope in yourprimary site manifest. If you need the resource defaults in a class to change depending on wherethe class is being declared, you need parameterized classes.
All told, itʼs more likely that defaults have been traveling through scopes without your knowledge,and following these guidelines will just make them act like you thought they were acting.
Use Parameterized Classes!
If you need a class to dynamically change its behavior depending on where and how you declare it,it should be rewritten as a parameterized class; see our guide to using parameterized classes formore details.
Appendix: How Scope Works in Puppet ≤ 2.7.xPuppet Documentation • Scope and Puppet as of 2.7 98/434
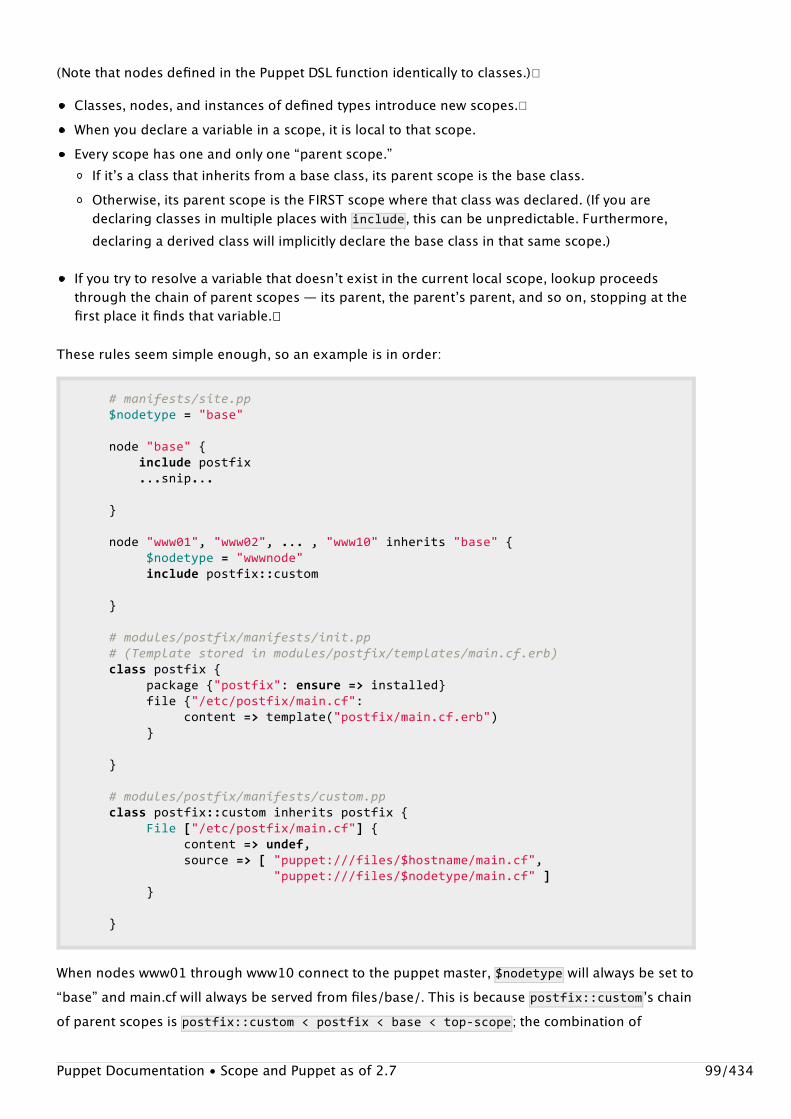
(Note that nodes defined in the Puppet DSL function identically to classes.)�
Classes, nodes, and instances of defined types introduce new scopes.�When you declare a variable in a scope, it is local to that scope.Every scope has one and only one “parent scope.”
If itʼs a class that inherits from a base class, its parent scope is the base class.Otherwise, its parent scope is the FIRST scope where that class was declared. (If you aredeclaring classes in multiple places with include , this can be unpredictable. Furthermore,declaring a derived class will implicitly declare the base class in that same scope.)
If you try to resolve a variable that doesnʼt exist in the current local scope, lookup proceedsthrough the chain of parent scopes — its parent, the parentʼs parent, and so on, stopping at thefirst place it finds that variable.��
These rules seem simple enough, so an example is in order:
#manifests/site.pp$nodetype="base"node"base"{includepostfix...snip...}node"www01","www02",...,"www10"inherits"base"{$nodetype="wwwnode"includepostfix::custom}#modules/postfix/manifests/init.pp#(Templatestoredinmodules/postfix/templates/main.cf.erb)classpostfix{package{"postfix":ensure=>installed}file{"/etc/postfix/main.cf":content=>template("postfix/main.cf.erb")}}#modules/postfix/manifests/custom.ppclasspostfix::custominheritspostfix{File["/etc/postfix/main.cf"]{content=>undef,source=>["puppet:///files/$hostname/main.cf","puppet:///files/$nodetype/main.cf"]}}
When nodes www01 through www10 connect to the puppet master, $nodetype will always be set to“base” and main.cf will always be served from files/base/. This is because �postfix::custom ʼs chainof parent scopes is postfix::custom<postfix<base<top-scope ; the combination of
Puppet Documentation • Scope and Puppet as of 2.7 99/434
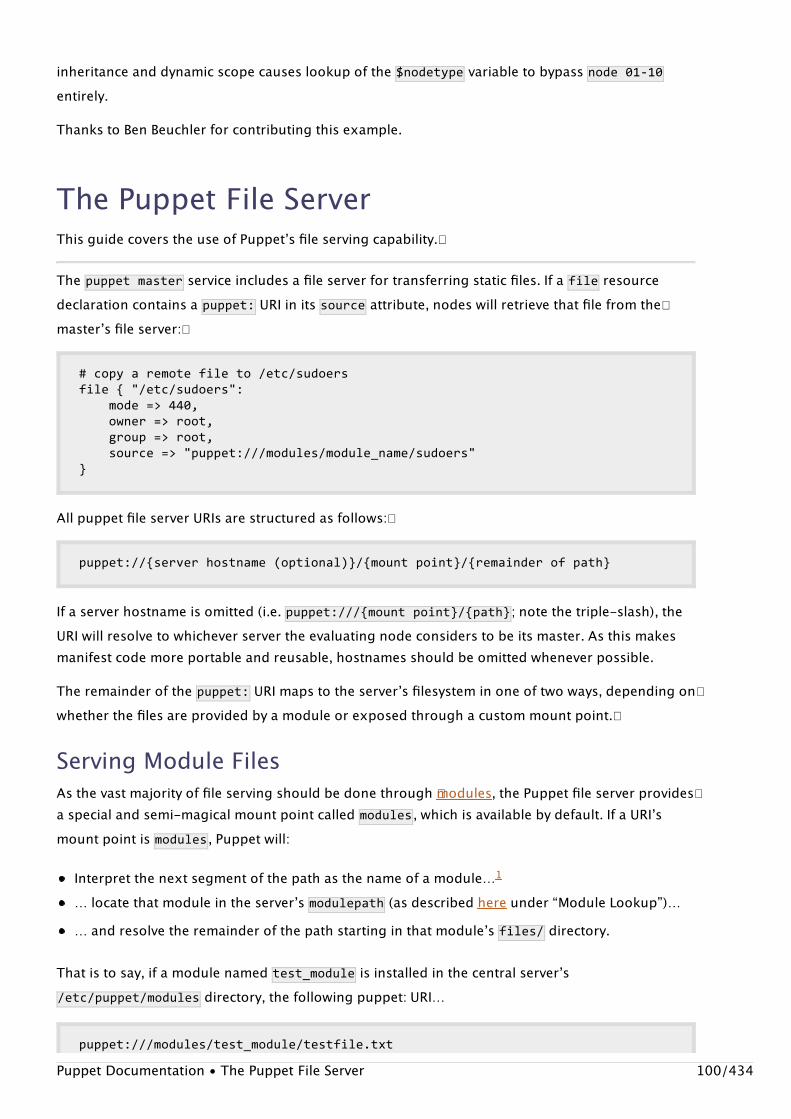
inheritance and dynamic scope causes lookup of the $nodetype variable to bypass node01-10entirely.
Thanks to Ben Beuchler for contributing this example.
The Puppet File ServerThis guide covers the use of Puppetʼs file serving capability.�
The puppetmaster service includes a file server for transferring static files. If a ��file resourcedeclaration contains a puppet: URI in its source attribute, nodes will retrieve that file from the�masterʼs file server:�
#copyaremotefileto/etc/sudoersfile{"/etc/sudoers":mode=>440,owner=>root,group=>root,source=>"puppet:///modules/module_name/sudoers"}
All puppet file server URIs are structured as follows:�
puppet://{serverhostname(optional)}/{mountpoint}/{remainderofpath}
If a server hostname is omitted (i.e. puppet:///{mountpoint}/{path} ; note the triple-slash), theURI will resolve to whichever server the evaluating node considers to be its master. As this makesmanifest code more portable and reusable, hostnames should be omitted whenever possible.
The remainder of the puppet: URI maps to the serverʼs filesystem in one of two ways, depending on�whether the files are provided by a module or exposed through a custom mount point.�
Serving Module FilesAs the vast majority of file serving should be done through �modules, the Puppet file server provides�a special and semi-magical mount point called modules , which is available by default. If a URIʼsmount point is modules , Puppet will:
Interpret the next segment of the path as the name of a module…1
… locate that module in the serverʼs modulepath (as described here under “Module Lookup”)…… and resolve the remainder of the path starting in that moduleʼs files/ directory.
That is to say, if a module named test_module is installed in the central serverʼs/etc/puppet/modules directory, the following puppet: URI…
puppet:///modules/test_module/testfile.txt
Puppet Documentation • The Puppet File Server 100/434
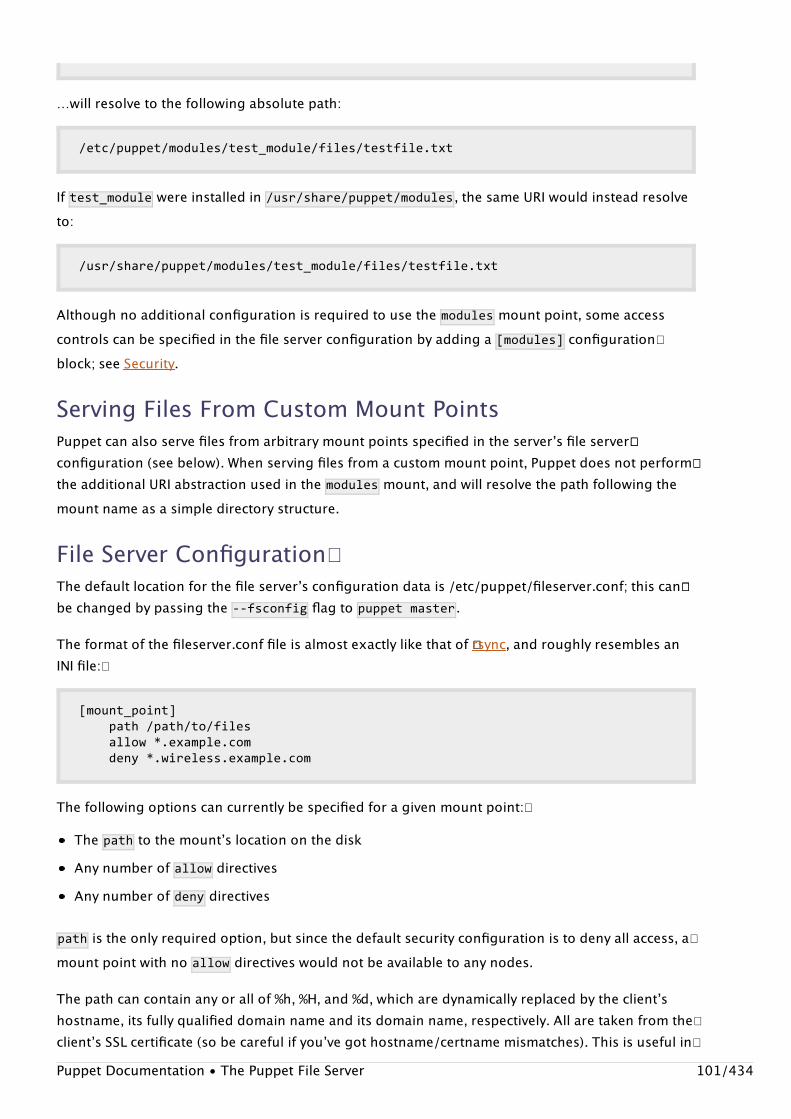
…will resolve to the following absolute path:
/etc/puppet/modules/test_module/files/testfile.txt
If test_module were installed in /usr/share/puppet/modules , the same URI would instead resolveto:
/usr/share/puppet/modules/test_module/files/testfile.txt
Although no additional configuration is required to use the �modules mount point, some accesscontrols can be specified in the file server configuration by adding a ���[modules] configuration�block; see Security.
Serving Files From Custom Mount PointsPuppet can also serve files from arbitrary mount points specified in the serverʼs file server���configuration (see below). When serving files from a custom mount point, Puppet does not perform��the additional URI abstraction used in the modules mount, and will resolve the path following themount name as a simple directory structure.
File Server Configuration�The default location for the file serverʼs configuration data is /etc/puppet/fileserver.conf; this can���be changed by passing the --fsconfig flag to �puppetmaster .
The format of the fileserver.conf file is almost exactly like that of ��rsync, and roughly resembles anINI file:�
[mount_point]path/path/to/filesallow*.example.comdeny*.wireless.example.com
The following options can currently be specified for a given mount point:�
The path to the mountʼs location on the diskAny number of allow directivesAny number of deny directives
path is the only required option, but since the default security configuration is to deny all access, a�mount point with no allow directives would not be available to any nodes.
The path can contain any or all of %h, %H, and %d, which are dynamically replaced by the clientʼshostname, its fully qualified domain name and its domain name, respectively. All are taken from the�clientʼs SSL certificate (so be careful if youʼve got hostname/certname mismatches). This is useful in�Puppet Documentation • The Puppet File Server 101/434
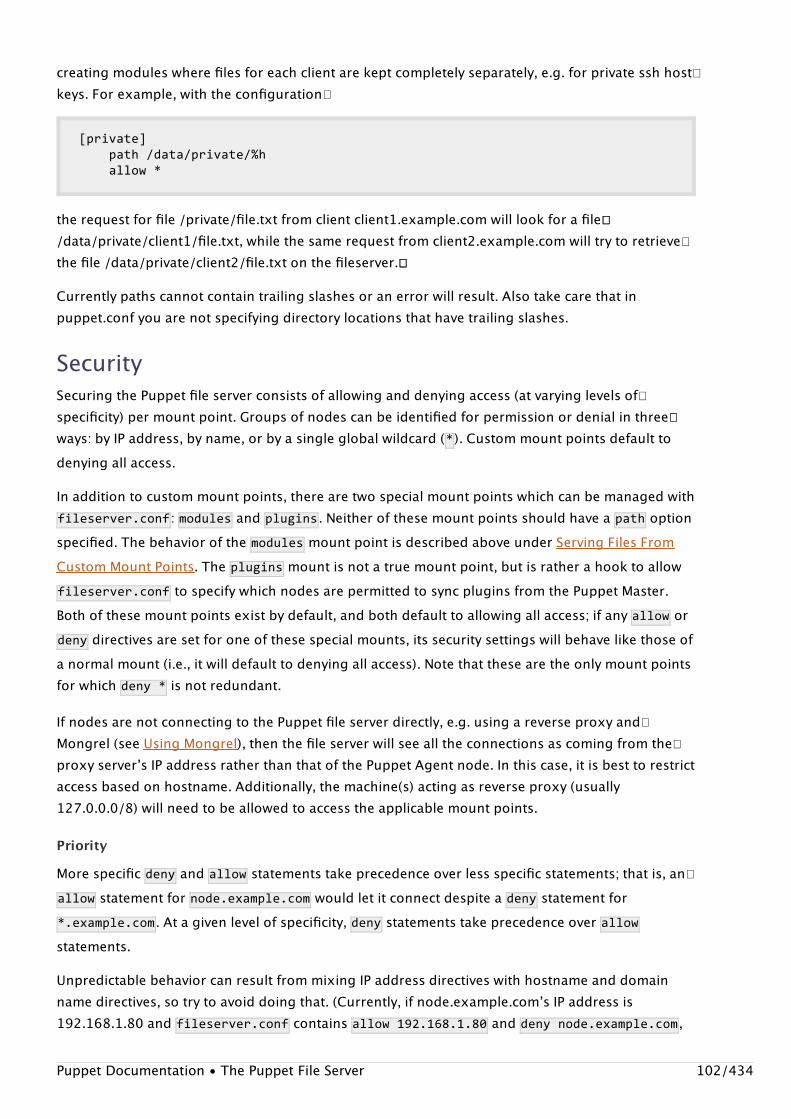
creating modules where files for each client are kept completely separately, e.g. for private ssh host�keys. For example, with the configuration�
[private]path/data/private/%hallow*
the request for file /private/file.txt from client client1.example.com will look for a file���/data/private/client1/file.txt, while the same request from client2.example.com will try to retrieve�the file /data/private/client2/file.txt on the fileserver.���
Currently paths cannot contain trailing slashes or an error will result. Also take care that inpuppet.conf you are not specifying directory locations that have trailing slashes.
SecuritySecuring the Puppet file server consists of allowing and denying access (at varying levels of�specificity) per mount point. Groups of nodes can be identified for permission or denial in three��ways: by IP address, by name, or by a single global wildcard (* ). Custom mount points default todenying all access.
In addition to custom mount points, there are two special mount points which can be managed withfileserver.conf : modules and plugins . Neither of these mount points should have a path optionspecified. The behavior of the �modules mount point is described above under Serving Files FromCustom Mount Points. The plugins mount is not a true mount point, but is rather a hook to allowfileserver.conf to specify which nodes are permitted to sync plugins from the Puppet Master.Both of these mount points exist by default, and both default to allowing all access; if any allow ordeny directives are set for one of these special mounts, its security settings will behave like those ofa normal mount (i.e., it will default to denying all access). Note that these are the only mount pointsfor which deny* is not redundant.
If nodes are not connecting to the Puppet file server directly, e.g. using a reverse proxy and�Mongrel (see Using Mongrel), then the file server will see all the connections as coming from the�proxy serverʼs IP address rather than that of the Puppet Agent node. In this case, it is best to restrictaccess based on hostname. Additionally, the machine(s) acting as reverse proxy (usually127.0.0.0/8) will need to be allowed to access the applicable mount points.
Priority
More specific �deny and allow statements take precedence over less specific statements; that is, an�allow statement for node.example.com would let it connect despite a deny statement for*.example.com . At a given level of specificity, �deny statements take precedence over allowstatements.
Unpredictable behavior can result from mixing IP address directives with hostname and domainname directives, so try to avoid doing that. (Currently, if node.example.comʼs IP address is192.168.1.80 and fileserver.conf contains allow192.168.1.80 and denynode.example.com ,
Puppet Documentation • The Puppet File Server 102/434
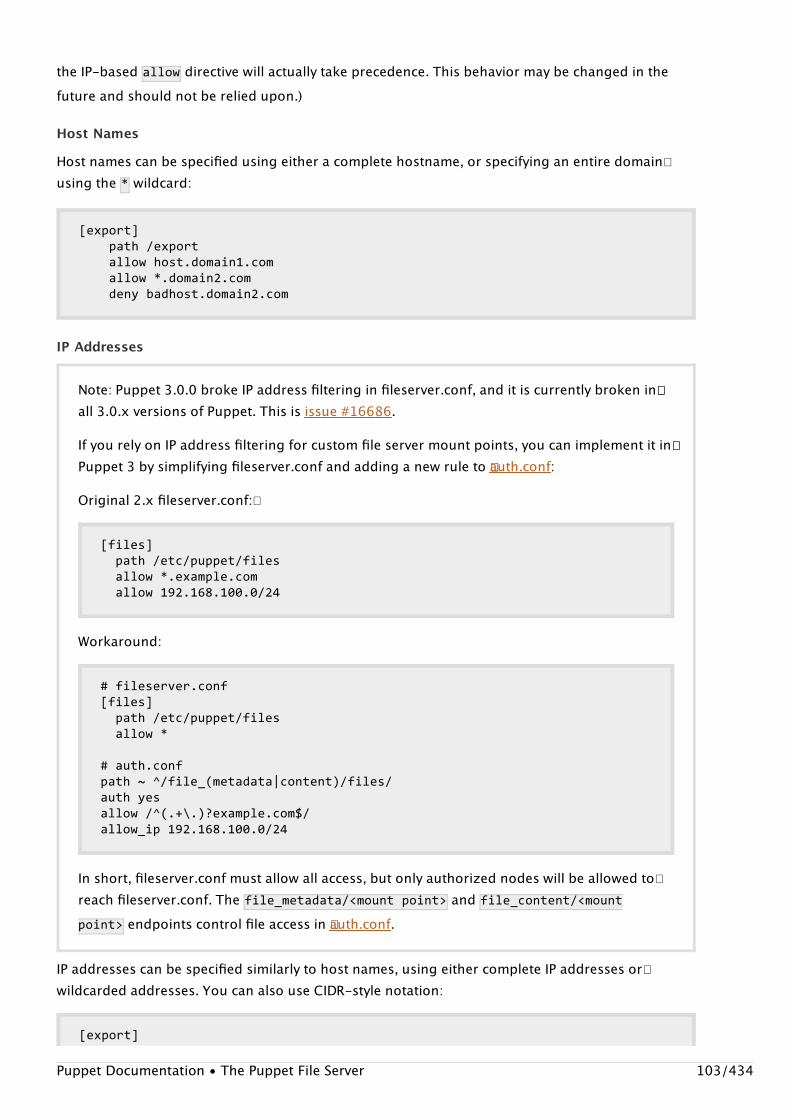
the IP-based allow directive will actually take precedence. This behavior may be changed in thefuture and should not be relied upon.)
Host Names
Host names can be specified using either a complete hostname, or specifying an entire domain�using the * wildcard:
[export]path/exportallowhost.domain1.comallow*.domain2.comdenybadhost.domain2.com
IP Addresses
IP addresses can be specified similarly to host names, using either complete IP addresses or�wildcarded addresses. You can also use CIDR-style notation:
[export]
Note: Puppet 3.0.0 broke IP address filtering in fileserver.conf, and it is currently broken in��all 3.0.x versions of Puppet. This is issue #16686.
If you rely on IP address filtering for custom file server mount points, you can implement it in��Puppet 3 by simplifying fileserver.conf and adding a new rule to �auth.conf:
Original 2.x fileserver.conf:�
[files]path/etc/puppet/filesallow*.example.comallow192.168.100.0/24
Workaround:
#fileserver.conf[files]path/etc/puppet/filesallow*
#auth.confpath~^/file_(metadata|content)/files/authyesallow/^(.+\.)?example.com$/allow_ip192.168.100.0/24
In short, fileserver.conf must allow all access, but only authorized nodes will be allowed to�reach fileserver.conf. The �file_metadata/<mountpoint> and file_content/<mountpoint> endpoints control file access in �auth.conf.
Puppet Documentation • The Puppet File Server 103/434
path/exportallow127.0.0.1allow192.168.0.*allow192.168.1.0/24
Global allow
Specifying a single wildcard will let any node access a mount point:
[export]path/exportallow*
Note that the default behavior for custom mount points is equivalent to deny* .
Style GuideStyle Guide Metadata
Version 1.1.2
1. TerminologyThe key words “MUST”, “MUST NOT”, “REQUIRED”, “SHALL”, “SHALL NOT”, “SHOULD”, “SHOULDNOT”, “RECOMMENDED”, ”MAY”, and “OPTIONAL” in this document are to be interpreted asdescribed in RFC 2119.
2. Puppet VersionThis style guide is largely specific to Puppet versions 2.6.x; some of its recommendations are based�on some language features that became available in version 2.6.0 and later.
3. Why a Style Guide?Puppet Labs develops modules for customers and the community, and these modules shouldrepresent the best known practice for module design and style. Since these modules are developedby many people across the organisation, a central reference was needed to ensure a consistentpattern, design, and style.
4. General PhilosophiesNo style manual can cover every possible circumstance. When a judgement call becomes necessary,keep in mind the following general ideas:
1. Older versions of Puppet generated individual mount points for each installed module; to reduce namespace conflicts, these�were changed to subdirectories of the catch-all modules mount point in version 0.25.0.↩
1. Readability matters. If you have to choose between two equally effective alternatives, pick the�more readable one. This is, of course, subjective, but if you can read your own code three
Puppet Documentation • Style Guide 104/434
5. Module MetadataEvery module must have Metadata defined in the Modulefile data file and outputted as the���metadata.json file. The following Metadata should be provided for all modules:�
name'myuser-mymodule'version'0.0.1'author'Authorofthemodule-forsharedmodulesthisisPuppetLabs'summary'Onelinedescriptionofthemodule'description'Longerdescriptionofthemoduleincludinganexample'license'Thelicensethemoduleisreleaseunder-generallyGPLv2orApache'project_page'TheURLwherethemodulesourceislocated'dependency'otheruser/othermodule','>=1.2.3'
A more complete guide to the Modulefile format can be found in the �puppet-module-tool README.
5.1. Style Versioning
This style guide will be versioned, which will allow modules to comply with a specific version of the�style guide.
A future version of the puppet-module tool may permit the relevant style guide version to beembedded as metadata in the Modulefile, and the metadata in turn may be used for automated�linting.
6. Spacing, Indentation, & WhitespaceModule manifests complying with this style guide:
Must use two-space soft tabsMust not use literal tab charactersMust not contain trailing white spaceShould not exceed an 80 character line widthShould align fat comma arrows (=> ) within blocks of attributes
7. CommentsAlthough the Puppet language allows multiple comment types, we prefer hash/octothorpe
months from now, thatʼs a great start.2. Inheritance should be avoided. In general, inheritance leads to code that is harder to read. Most
use cases for inheritance can be replaced by exposing class parameters that can be used toconfigure resource attributes. See the �Class Inheritance section for more details.
3. Modules must work with an ENC without requiring one. An internal survey yielded nearconsensus that an ENC should not be required. At the same time, every module we write shouldwork well with an ENC.
4. Classes should generally not declare other classes. Declare classes as close to node scope aspossible. Classes which require other classes should not directly declare them and shouldinstead allow the system to fail if they are not declared by some other means. (Although theinclude function allows multiple declarations of classes, it can result in non-deterministicscoping issues due to the way parent scopes are assigned. We might revisit this philosophy in thefuture if class multi-declarations can be made deterministic, but for now, be conservative withdeclarations.)
Puppet Documentation • Style Guide 105/434
Although the Puppet language allows multiple comment types, we prefer hash/octothorpecomments (#Thisisacomment ) because theyʼre generally the most visible to text editors andother code lexers.
8. QuotingAll strings that do not contain variables should be enclosed in single quotes. Double quotes shouldbe used when variable interpolation is required. Double quotes may also be used to make a stringmore readable when it contains single quotes. Quoting is optional when the string is analphanumeric bare word and is not a resource title.
All variables should be enclosed in braces when interpolated in a string. For example:
Good:
"/etc/${file}.conf""${::operatingsystem}isnotsupportedby${module_name}"
Bad:
"/etc/$file.conf""$::operatingsystemisnotsupportedby$module_name"
Variables standing by themselves should not be quoted. For example:
Good:
mode=>$my_mode
Bad:
mode=>"$my_mode"mode=>"${my_mode}"
9. Resources9.1. Resource Names
All resource titles should be quoted. (Puppet supports unquoted resource titles if they do notcontain spaces or hyphens, but you should avoid them in the interest of consistent look-and-feel.)
Good:
package{'openssh':ensure=>present}
1. Should use #... for comments2. Should not use //... or /*...*/ for comments
Puppet Documentation • Style Guide 106/434
Bad:
package{openssh:ensure=>present}
9.2. Arrow Alignment
All of the fat comma arrows (=> ) in a resourceʼs attribute/value list should be aligned. The arrowsshould be placed one space ahead of the longest attribute name.
Good:
exec{'blah':path=>'/usr/bin',cwd=>'/tmp',}
exec{'test':subscribe=>File['/etc/test'],refreshonly=>true,}
Bad:
exec{'blah':path=>'/usr/bin',cwd=>'/tmp',}
exec{'test':subscribe=>File['/etc/test'],refreshonly=>true,}
9.3. Attribute Ordering
If a resource declaration includes an ensure attribute, it should be the first attribute specified.��
Good:
file{'/tmp/readme.txt':ensure=>file,owner=>'0',group=>'0',mode=>'0644',}
(This recommendation is solely in the interest of readability, as Puppet ignores attribute order whensyncing resources.)
9.4. Compression
Within a given manifest, resources should be grouped by logical relationship to each other, ratherthan by resource type. Use of the semicolon syntax to declare multiple resources within a set ofPuppet Documentation • Style Guide 107/434
curly braces is not recommended, except in the rare cases where it would improve readability.
Good:
file{'/tmp/a':content=>'a',}
exec{'changecontentsofa':command=>'sed-i.baks/a/A/g/tmp/a',}
file{'/tmp/b':content=>'b',}
exec{'changecontentsofb':command=>'sed-i.baks/b/B/g/tmp/b',}
Bad:
file{"/tmp/a":content=>"a";"/tmp/b":content=>"b";}
exec{"changecontentsofa":command=>"sed-i.baks/b/B/g/tmp/a";"changecontentsofb":command=>"sed-i.baks/b/B/g/tmp/b";}
9.5. Symbolic Links
In the interest of clarity, symbolic links should be declared by using an ensure value of ensure=>link and explicitly specifying a value for the target attribute. Using a path to the target as theensure value is not recommended.
Good:
file{'/var/log/syslog':ensure=>link,target=>'/var/log/messages',}
Bad:
file{'/var/log/syslog':ensure=>'/var/log/messages',}
Puppet Documentation • Style Guide 108/434
9.6. File Modes
File modes should be represented as 4 digits rather than 3.
In addition, file modes should be specified as single-quoted strings instead of bare word ��numbers.
Good:
file{'/var/log/syslog':ensure=>present,mode=>'0644',}
Bad:
file{'/var/log/syslog':ensure=>present,mode=>644,}
9.7. Resource Defaults
Resource defaults should be used in a very controlled manner, and should only be declared at theedges of your manifest ecosystem. Specifically, they may be declared:�
At top scope in site.ppIn a class which is guaranteed to never declare another class and never be inherited by anotherclass.
This is due to the way resource defaults propagate through dynamic scope, which can haveunpredictable effects far away from where the default was declared.�
Good:
#/etc/puppetlabs/puppet/manifests/site.pp:File{mode=>'0644',owner=>'root',group=>'root',}
Bad:
#/etc/puppetlabs/puppet/modules/ssh/manifests/init.ppFile{mode=>'0600',owner=>'nobody',group=>'nogroup',}
class{'ssh::client':
Puppet Documentation • Style Guide 109/434
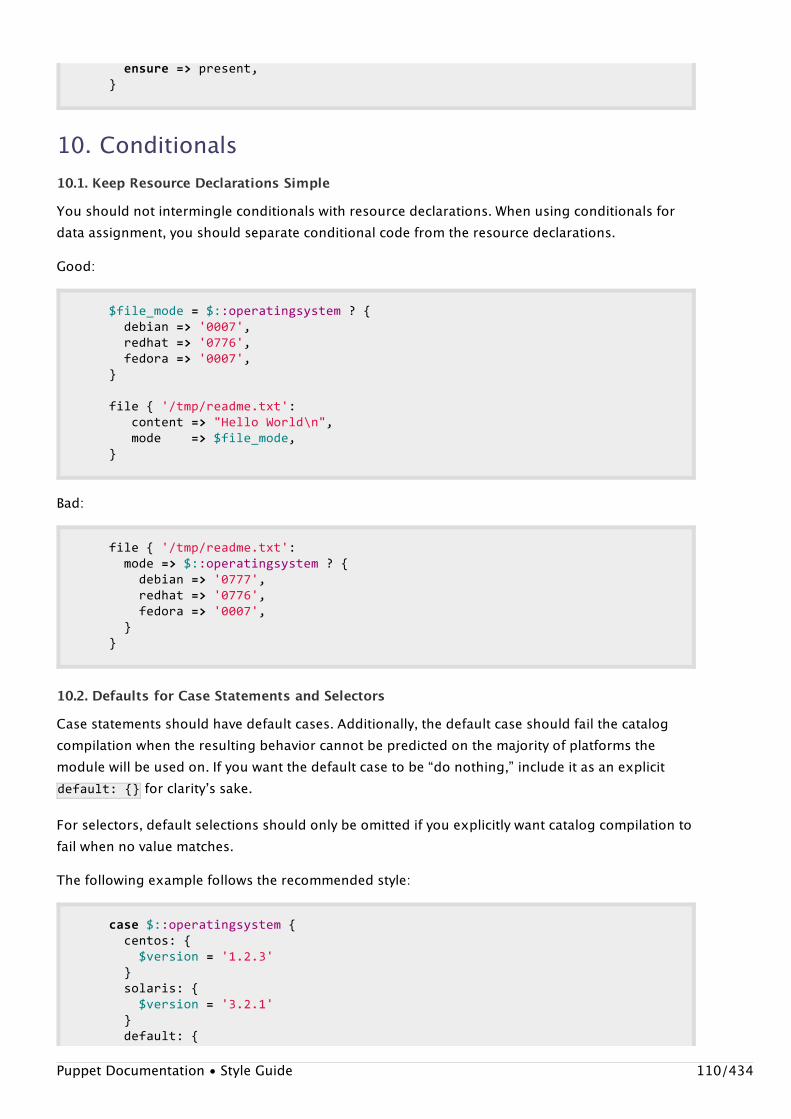
ensure=>present,}
10. Conditionals10.1. Keep Resource Declarations Simple
You should not intermingle conditionals with resource declarations. When using conditionals fordata assignment, you should separate conditional code from the resource declarations.
Good:
$file_mode=$::operatingsystem?{debian=>'0007',redhat=>'0776',fedora=>'0007',}
file{'/tmp/readme.txt':content=>"HelloWorld\n",mode=>$file_mode,}
Bad:
file{'/tmp/readme.txt':mode=>$::operatingsystem?{debian=>'0777',redhat=>'0776',fedora=>'0007',}}
10.2. Defaults for Case Statements and Selectors
Case statements should have default cases. Additionally, the default case should fail the catalogcompilation when the resulting behavior cannot be predicted on the majority of platforms themodule will be used on. If you want the default case to be “do nothing,” include it as an explicitdefault:{} for clarityʼs sake.
For selectors, default selections should only be omitted if you explicitly want catalog compilation tofail when no value matches.
The following example follows the recommended style:
case$::operatingsystem{centos:{$version='1.2.3'}solaris:{$version='3.2.1'}default:{
Puppet Documentation • Style Guide 110/434
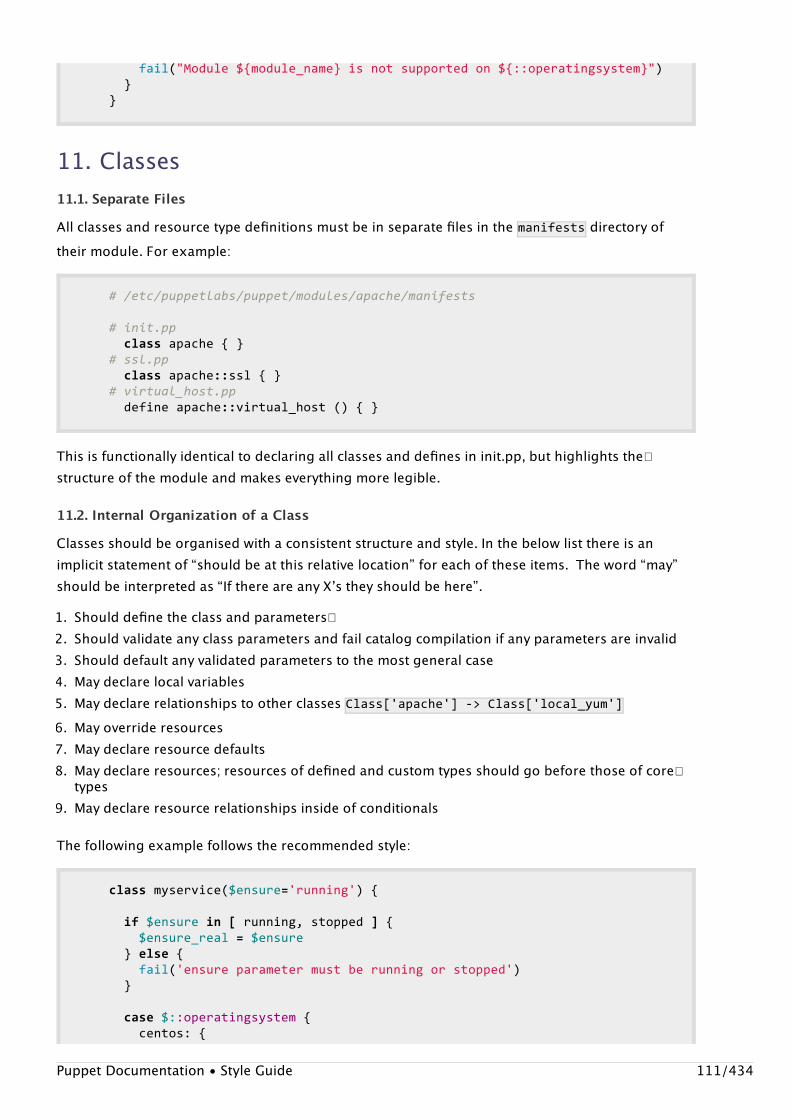
fail("Module${module_name}isnotsupportedon${::operatingsystem}")}}
11. Classes11.1. Separate Files
All classes and resource type definitions must be in separate files in the ��manifests directory oftheir module. For example:
#/etc/puppetlabs/puppet/modules/apache/manifests
#init.ppclassapache{}#ssl.ppclassapache::ssl{}#virtual_host.ppdefineapache::virtual_host(){}
This is functionally identical to declaring all classes and defines in init.pp, but highlights the�structure of the module and makes everything more legible.
11.2. Internal Organization of a Class
Classes should be organised with a consistent structure and style. In the below list there is animplicit statement of “should be at this relative location” for each of these items. The word “may”should be interpreted as “If there are any Xʼs they should be here”.
The following example follows the recommended style:
classmyservice($ensure='running'){
if$ensurein[running,stopped]{$ensure_real=$ensure}else{fail('ensureparametermustberunningorstopped')}
case$::operatingsystem{centos:{
1. Should define the class and parameters�2. Should validate any class parameters and fail catalog compilation if any parameters are invalid3. Should default any validated parameters to the most general case4. May declare local variables5. May declare relationships to other classes Class['apache']->Class['local_yum']6. May override resources7. May declare resource defaults8. May declare resources; resources of defined and custom types should go before those of core�
types9. May declare resource relationships inside of conditionals
Puppet Documentation • Style Guide 111/434
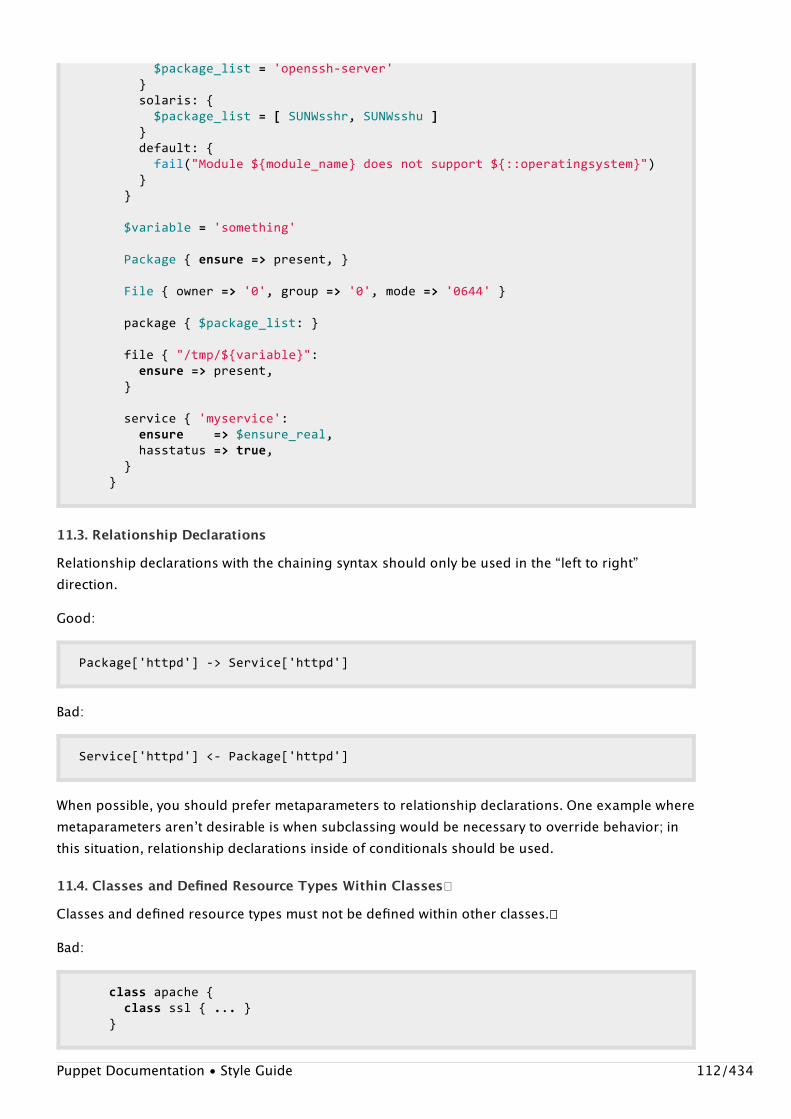
$package_list='openssh-server'}solaris:{$package_list=[SUNWsshr,SUNWsshu]}default:{fail("Module${module_name}doesnotsupport${::operatingsystem}")}}
$variable='something'
Package{ensure=>present,}
File{owner=>'0',group=>'0',mode=>'0644'}
package{$package_list:}
file{"/tmp/${variable}":ensure=>present,}
service{'myservice':ensure=>$ensure_real,hasstatus=>true,}}
11.3. Relationship Declarations
Relationship declarations with the chaining syntax should only be used in the “left to right”direction.
Good:
Package['httpd']->Service['httpd']
Bad:
Service['httpd']<-Package['httpd']
When possible, you should prefer metaparameters to relationship declarations. One example wheremetaparameters arenʼt desirable is when subclassing would be necessary to override behavior; inthis situation, relationship declarations inside of conditionals should be used.
11.4. Classes and Defined Resource Types Within Classes�
Classes and defined resource types must not be defined within other classes.��
Bad:
classapache{classssl{...}}
Puppet Documentation • Style Guide 112/434
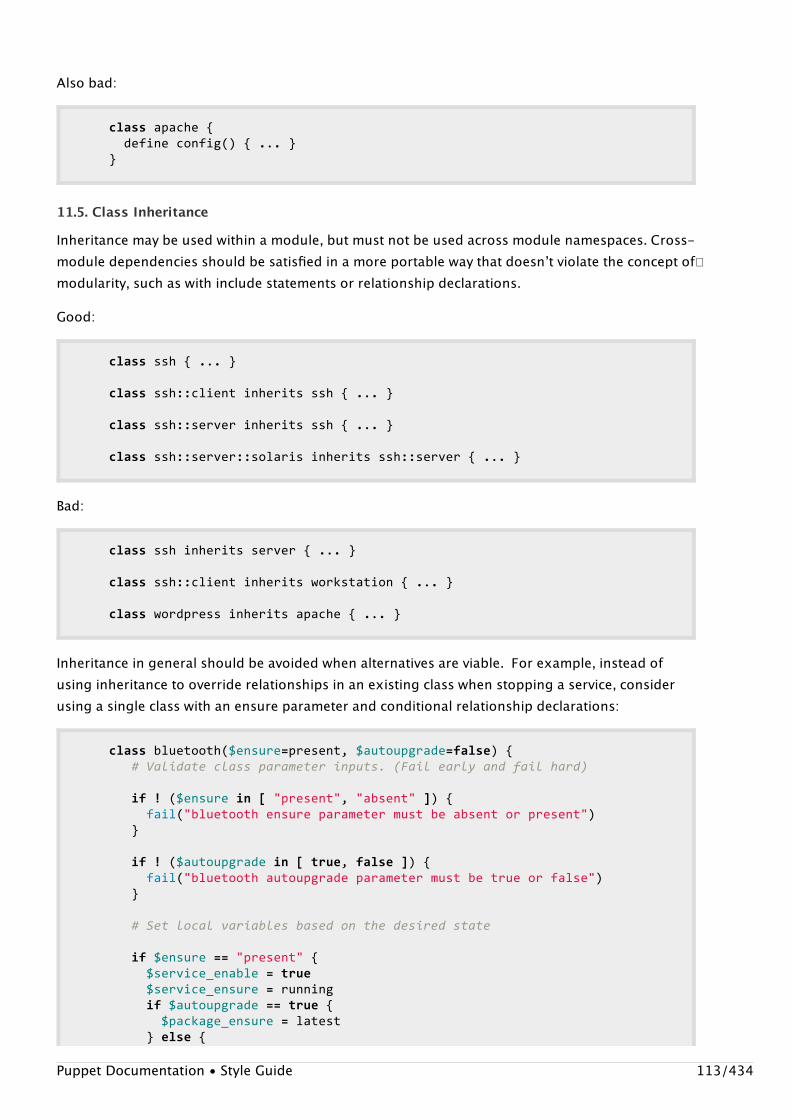
Also bad:
classapache{defineconfig(){...}}
11.5. Class Inheritance
Inheritance may be used within a module, but must not be used across module namespaces. Cross-module dependencies should be satisfied in a more portable way that doesnʼt violate the concept of�modularity, such as with include statements or relationship declarations.
Good:
classssh{...}
classssh::clientinheritsssh{...}
classssh::serverinheritsssh{...}
classssh::server::solarisinheritsssh::server{...}
Bad:
classsshinheritsserver{...}
classssh::clientinheritsworkstation{...}
classwordpressinheritsapache{...}
Inheritance in general should be avoided when alternatives are viable. For example, instead ofusing inheritance to override relationships in an existing class when stopping a service, considerusing a single class with an ensure parameter and conditional relationship declarations:
classbluetooth($ensure=present,$autoupgrade=false){#Validateclassparameterinputs.(Failearlyandfailhard)
if!($ensurein["present","absent"]){fail("bluetoothensureparametermustbeabsentorpresent")}
if!($autoupgradein[true,false]){fail("bluetoothautoupgradeparametermustbetrueorfalse")}
#Setlocalvariablesbasedonthedesiredstate
if$ensure=="present"{$service_enable=true$service_ensure=runningif$autoupgrade==true{$package_ensure=latest}else{
Puppet Documentation • Style Guide 113/434
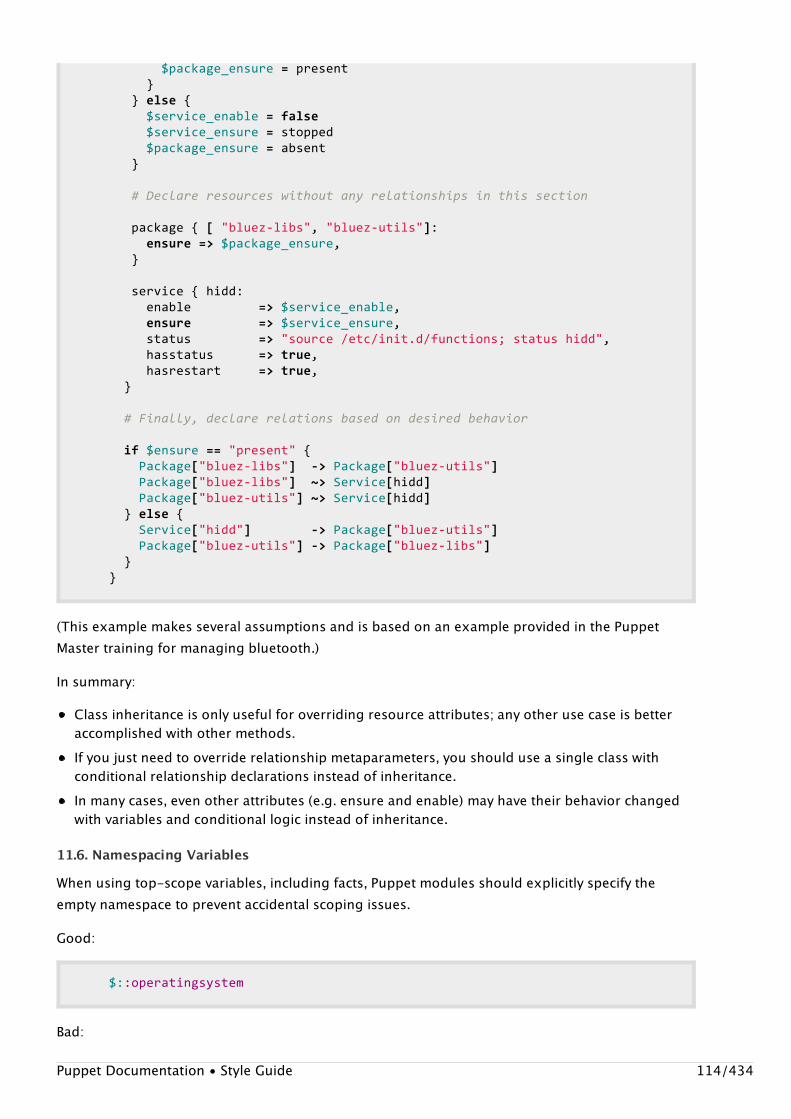
$package_ensure=present}}else{$service_enable=false$service_ensure=stopped$package_ensure=absent}
#Declareresourceswithoutanyrelationshipsinthissection
package{["bluez-libs","bluez-utils"]:ensure=>$package_ensure,}
service{hidd:enable=>$service_enable,ensure=>$service_ensure,status=>"source/etc/init.d/functions;statushidd",hasstatus=>true,hasrestart=>true,}
#Finally,declarerelationsbasedondesiredbehavior
if$ensure=="present"{Package["bluez-libs"]->Package["bluez-utils"]Package["bluez-libs"]~>Service[hidd]Package["bluez-utils"]~>Service[hidd]}else{Service["hidd"]->Package["bluez-utils"]Package["bluez-utils"]->Package["bluez-libs"]}}
(This example makes several assumptions and is based on an example provided in the PuppetMaster training for managing bluetooth.)
In summary:
Class inheritance is only useful for overriding resource attributes; any other use case is betteraccomplished with other methods.If you just need to override relationship metaparameters, you should use a single class withconditional relationship declarations instead of inheritance.In many cases, even other attributes (e.g. ensure and enable) may have their behavior changedwith variables and conditional logic instead of inheritance.
11.6. Namespacing Variables
When using top-scope variables, including facts, Puppet modules should explicitly specify theempty namespace to prevent accidental scoping issues.
Good:
$::operatingsystem
Bad:
Puppet Documentation • Style Guide 114/434
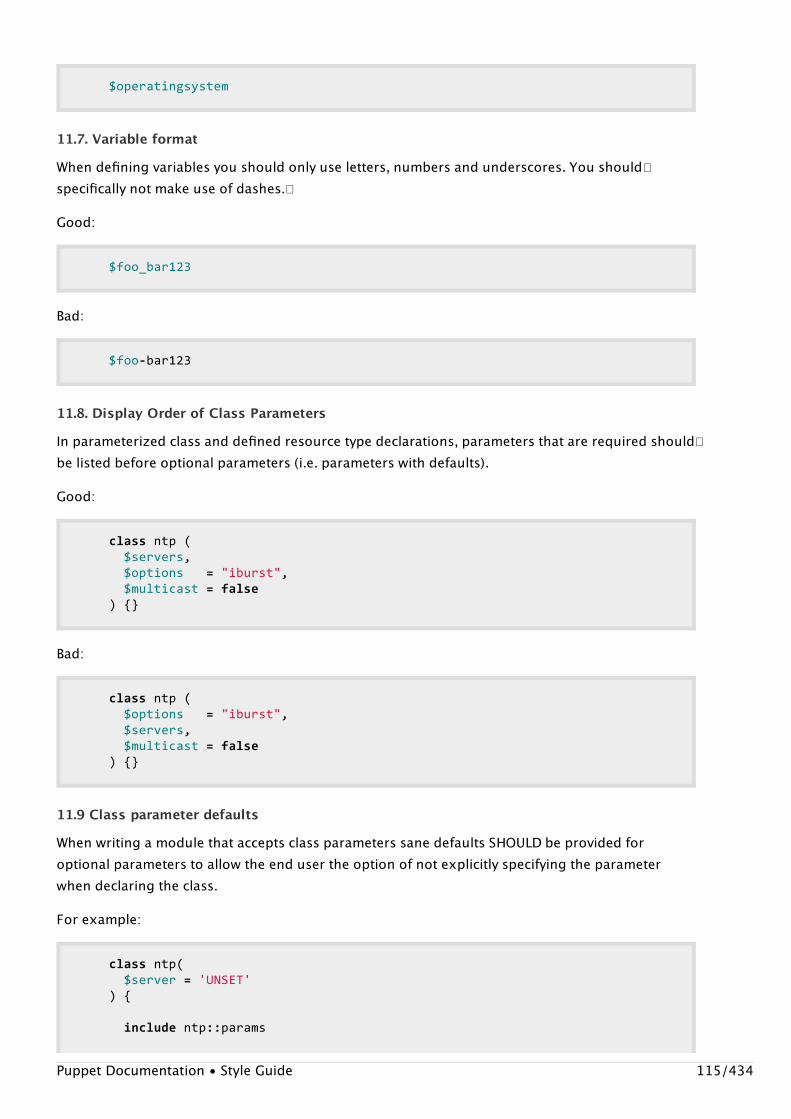
$operatingsystem
11.7. Variable format
When defining variables you should only use letters, numbers and underscores. You should�specifically not make use of dashes.�
Good:
$foo_bar123
Bad:
$foo-bar123
11.8. Display Order of Class Parameters
In parameterized class and defined resource type declarations, parameters that are required should�be listed before optional parameters (i.e. parameters with defaults).
Good:
classntp($servers,$options="iburst",$multicast=false){}
Bad:
classntp($options="iburst",$servers,$multicast=false){}
11.9 Class parameter defaults
When writing a module that accepts class parameters sane defaults SHOULD be provided foroptional parameters to allow the end user the option of not explicitly specifying the parameterwhen declaring the class.
For example:
classntp($server='UNSET'){
includentp::params
Puppet Documentation • Style Guide 115/434
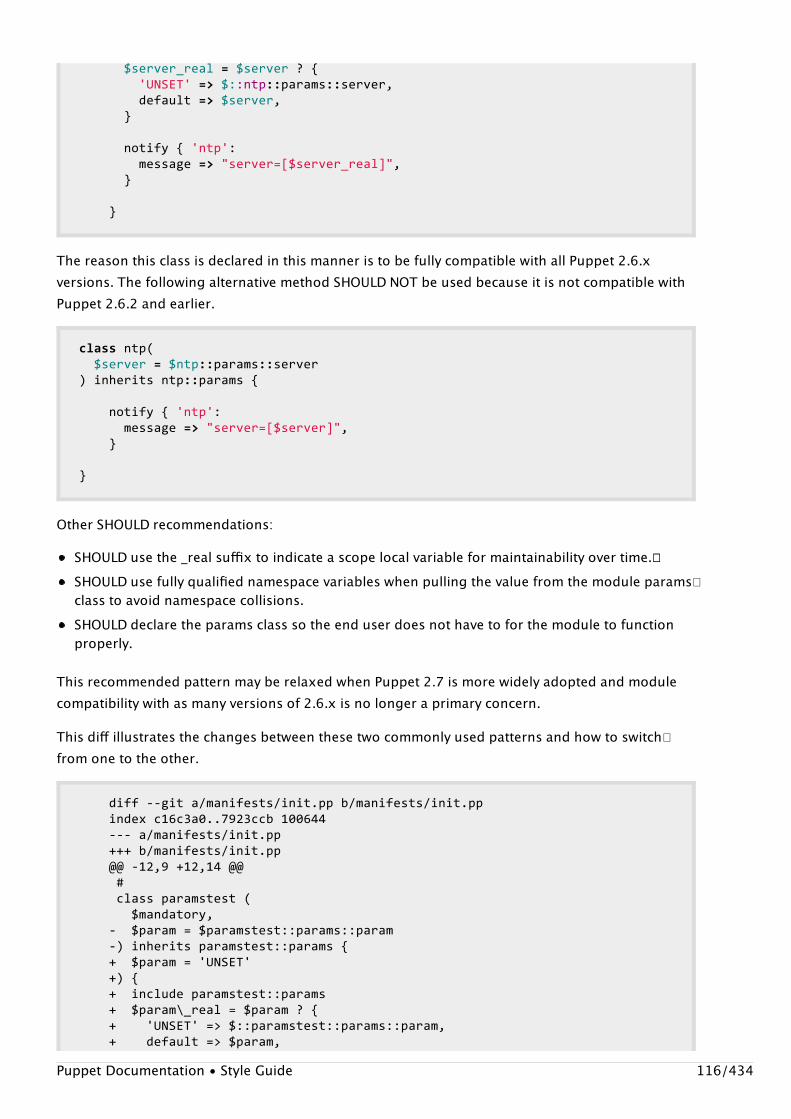
$server_real=$server?{'UNSET'=>$::ntp::params::server,default=>$server,}
notify{'ntp':message=>"server=[$server_real]",}
}
The reason this class is declared in this manner is to be fully compatible with all Puppet 2.6.xversions. The following alternative method SHOULD NOT be used because it is not compatible withPuppet 2.6.2 and earlier.
classntp($server=$ntp::params::server)inheritsntp::params{
notify{'ntp':message=>"server=[$server]",}
}
Other SHOULD recommendations:
SHOULD use the _real suffix to indicate a scope local variable for maintainability over time.��SHOULD use fully qualified namespace variables when pulling the value from the module params�class to avoid namespace collisions.SHOULD declare the params class so the end user does not have to for the module to functionproperly.
This recommended pattern may be relaxed when Puppet 2.7 is more widely adopted and modulecompatibility with as many versions of 2.6.x is no longer a primary concern.
This diff illustrates the changes between these two commonly used patterns and how to switch�from one to the other.
diff--gita/manifests/init.ppb/manifests/init.ppindexc16c3a0..7923ccb100644---a/manifests/init.pp+++b/manifests/init.pp@@-12,9+12,14@@#classparamstest($mandatory,-$param=$paramstest::params::param-)inheritsparamstest::params{+$param='UNSET'+){+includeparamstest::params+$param\_real=$param?{+'UNSET'=>$::paramstest::params::param,+default=>$param,
Puppet Documentation • Style Guide 116/434
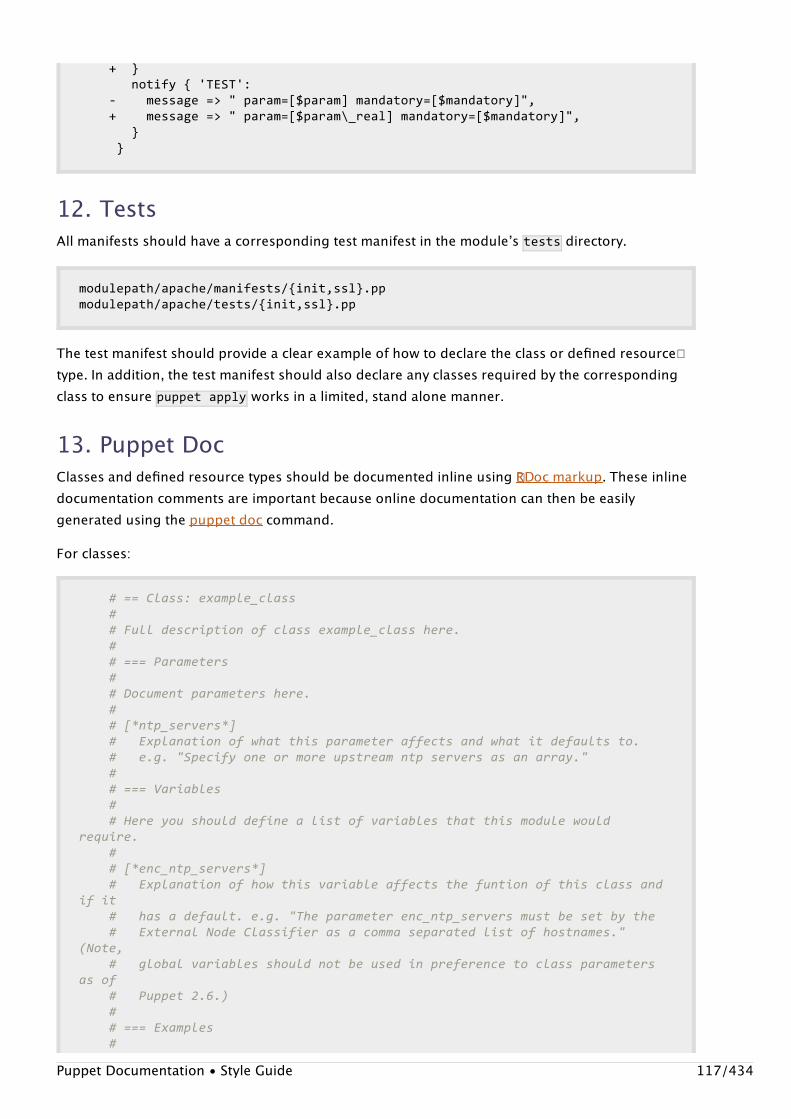
+}notify{'TEST':-message=>"param=[$param]mandatory=[$mandatory]",+message=>"param=[$param\_real]mandatory=[$mandatory]",}}
12. TestsAll manifests should have a corresponding test manifest in the moduleʼs tests directory.
modulepath/apache/manifests/{init,ssl}.ppmodulepath/apache/tests/{init,ssl}.pp
The test manifest should provide a clear example of how to declare the class or defined resource�type. In addition, the test manifest should also declare any classes required by the correspondingclass to ensure puppetapply works in a limited, stand alone manner.
13. Puppet DocClasses and defined resource types should be documented inline using �RDoc markup. These inlinedocumentation comments are important because online documentation can then be easilygenerated using the puppet doc command.
For classes:
#==Class:example_class##Fulldescriptionofclassexample_classhere.##===Parameters##Documentparametershere.##[*ntp_servers*]#Explanationofwhatthisparameteraffectsandwhatitdefaultsto.#e.g."Specifyoneormoreupstreamntpserversasanarray."##===Variables##Hereyoushoulddefinealistofvariablesthatthismodulewouldrequire.##[*enc_ntp_servers*]#Explanationofhowthisvariableaffectsthefuntionofthisclassandifit#hasadefault.e.g."Theparameterenc_ntp_serversmustbesetbythe#ExternalNodeClassifierasacommaseparatedlistofhostnames."(Note,#globalvariablesshouldnotbeusedinpreferencetoclassparametersasof#Puppet2.6.)##===Examples#
Puppet Documentation • Style Guide 117/434
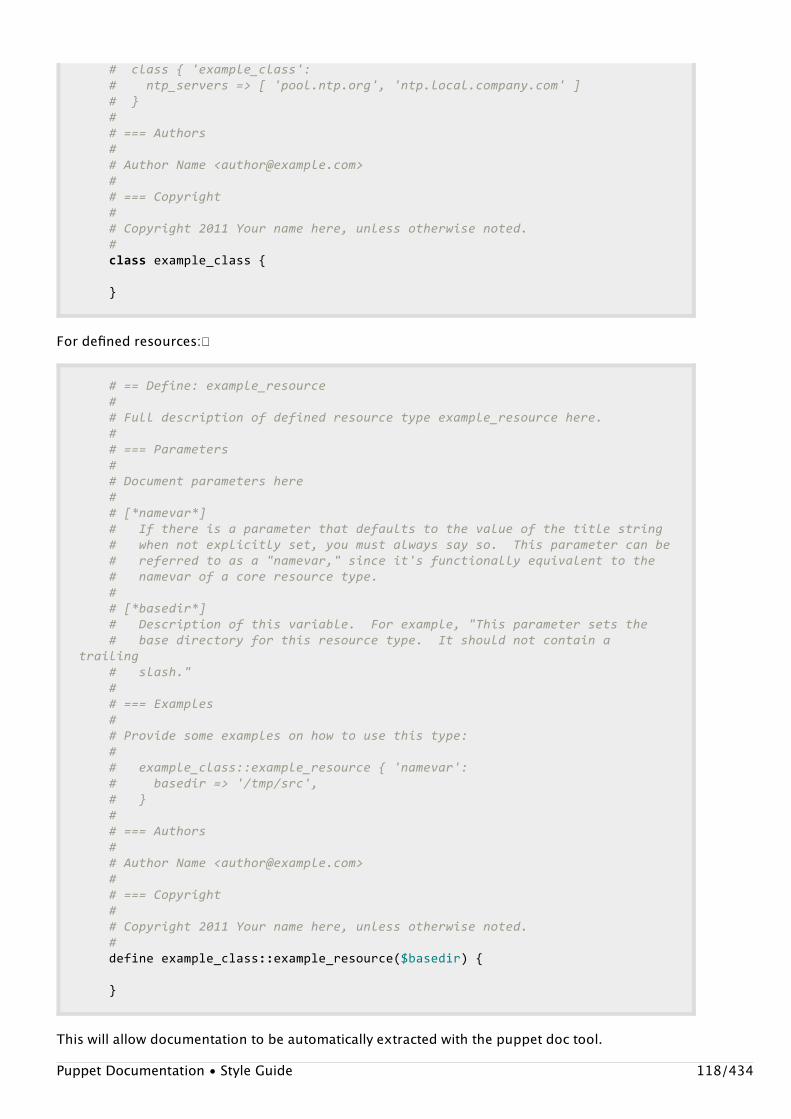
#class{'example_class':#ntp_servers=>['pool.ntp.org','ntp.local.company.com']#}##===Authors##AuthorName<[email protected]>##===Copyright##Copyright2011Yournamehere,unlessotherwisenoted.#classexample_class{
}
For defined resources:�
#==Define:example_resource##Fulldescriptionofdefinedresourcetypeexample_resourcehere.##===Parameters##Documentparametershere##[*namevar*]#Ifthereisaparameterthatdefaultstothevalueofthetitlestring#whennotexplicitlyset,youmustalwayssayso.Thisparametercanbe#referredtoasa"namevar,"sinceit'sfunctionallyequivalenttothe#namevarofacoreresourcetype.##[*basedir*]#Descriptionofthisvariable.Forexample,"Thisparametersetsthe#basedirectoryforthisresourcetype.Itshouldnotcontainatrailing#slash."##===Examples##Providesomeexamplesonhowtousethistype:##example_class::example_resource{'namevar':#basedir=>'/tmp/src',#}##===Authors##AuthorName<[email protected]>##===Copyright##Copyright2011Yournamehere,unlessotherwisenoted.#defineexample_class::example_resource($basedir){
}
This will allow documentation to be automatically extracted with the puppet doc tool.
Puppet Documentation • Style Guide 118/434
Best PracticesThis guide includes some tips to getting the most out of Puppet. It is derived from the best practicessection of the Wiki and other sources. It is intended to cover high-level best practices and may notextend into lower level details.
Use Modules When PossiblePuppet modules are something everyone should use. If you have an application you are managing,add a module for it, so that you can keep the manifests, plugins (if any), source files, and templates�together.
Keep Your Puppet Content In Version ControlKeep your Puppet manifests in version control. You can pick your favorite systems — popularchoices include git and svn.
Naming ConventionsNode names should match the hostnames of the nodes.
When naming classes, a class that disables ssh should be inherited from the ssh class and benamed “ssh::disabled”
StyleFor recommendations on syntax and formatting, follow the Style Guide
Classes Vs Defined Types�Classes are not to be thought of in the ʻobject orientedʼ meaning of a class. This means a machinebelongs to a particular class of machine.
For instance, a generic webserver would be a class. You would include that class as part of anynode that needed to be built as a generic webserver. That class would drop in whatever packages,etc, it needed to do.
Defined types on the other hand (created with ʻdefineʼ) can have many instances on a machine, and��can encapsulate classes and other resources. They can be created using user supplied variables.For instance, to manage iptables, a defined type may wrap each rule in the iptables file, and the��iptables configuration could be built out of fragments generated by those defined types.��
Usage of classes and defined types, in addition to the built-in managed types, is very helpful�towards having a managable Puppet infrastructure.
Work In ProgressPuppet Documentation • Best Practices 119/434

This document is a stub. You can help Puppet by submitting contributions to it.
Puppet on WindowsThis documentation applies to Puppet versions ≥ 2.7.6 and Puppet Enterprise ≥ 2.5. Earlierversions may behave differently.�
Puppet runs on Microsoft Windows® and can manage Windows systems alongside *nix systems.These pages explain how to install and run Puppet on Windows, and describe how it differs from�Puppet on *nix.
InstallingPuppet Labs provides pre-built, standalone .msi packages for installing Puppet on Windows.
Downloads
For Puppet EnterpriseFor open source Puppet
Supported Platforms
Puppet runs on the following versions of Windows :
Windows Server 2003 and 2003 R2Windows Server 2008 and 2008 R2Windows 7
More
For full details, see Installing Puppet on Windows.
RunningPuppet Subcommands and Services
Windows nodes can run the following Puppet subcommands:
Puppet agent, to fetch configurations from a puppet master and apply them�The agent functions as a standard Windows service, and agent runs can also be triggeredmanually.Windows nodes can connect to any *nix puppet master server running Puppet 2.7.6 or higher.
Puppet apply, to apply configurations from local manifest files��Puppet resource, to directly manipulate system resourcesPuppet inspect, to send audit reports for compliance purposes
Because the installer doesnʼt alter the systemʼs PATH variable, you must choose Start CommandPrompt with Puppet from the Start menu to run Puppet commands manually.
Puppet Documentation • Puppet on Windows 120/434
Windows nodes canʼt act as puppet masters or certificate authorities, and most of the ancillary�Puppet subcommands arenʼt supported on Windows.
Puppetʼs Environment on Windows
Puppet runs as a 32-bit process.Puppet has to run with elevated privileges; on systems with UAC, it will request explicit elevationeven when running as a member of the local Administrators group.Puppetʼs configuration and data are stored in �%ALLUSERSPROFILE%\ApplicationData\PuppetLabs on Windows 2003, and in %PROGRAMDATA%\PuppetLabs on Windows 7 and2008.
More
For full details, see Running Puppet on Windows.
Writing Manifests for WindowsResource Types
Some *nix resource types arenʼt supported on Windows, and there are some Windows-onlyresource types.
The following resource types can be managed on Windows:
file�usergroupscheduled_task (Windows-only)packageserviceexechost
More
For full details, see Writing Manifests for Windows.
TroubleshootingThe most common points of failure on Windows systems arenʼt the same as those on *nix. For fulldetails, see Troubleshooting Puppet on Windows.
For Developers and TestersTo test pre-release features, or to hack and improve Puppet on Windows, you can run Puppet fromsource. This requires a fairly specific version of Ruby and several important gems. For full details,�see Running Puppet from Source on Windows.
Puppet Documentation • Puppet on Windows 121/434
Installing Puppet on WindowsThis documentation applies to Puppet versions ≥ 2.7.6 and Puppet Enterprise ≥ 2.5. Earlierversions may behave differently.�
Before InstallingDownloads
Download the Puppet installer for Windows here:
Puppet Enterprise Windows installerStandard Windows installer
If you are using Puppet Enterprise, use the PE-specific installer; otherwise, use the standard�installer.
Supported Platforms
Puppet runs on the following versions of Windows:
Windows Server 2003 and 2003 R2Windows Server 2008 and 2008 R2Windows Server 2012Windows VistaWindows 7 and 8
The Puppet installer bundles all of Puppetʼs prerequisites. There are no additional softwarerequirements.
Puppet Master Requirements
Windows nodes cannot serve as puppet master servers.
If your Windows nodes will be fetching configurations from a puppet master, you will need a *nix�server to run as puppet master at your site.If your Windows nodes will be compiling and applying configurations locally with puppet apply,�you should disable the puppet agent service on them after installing Puppet. See Running Puppeton Windows for details on how to stop the service.
Version note for PE users: Your puppet master should be running PE 2.5 or later. On PE 2.0,the pe_mcollective and pe_accounts modules cause run failures on Windows nodes. If youwish to run Windows agents but have a PE 2.0 puppet master, you can do one of thefollowing:
Upgrade your master to PE 2.5 or laterRemove those modules from the consoleʼs default groupManually hack those modules to be inert on Windows.
Puppet Documentation • Installing Puppet on Windows 122/434
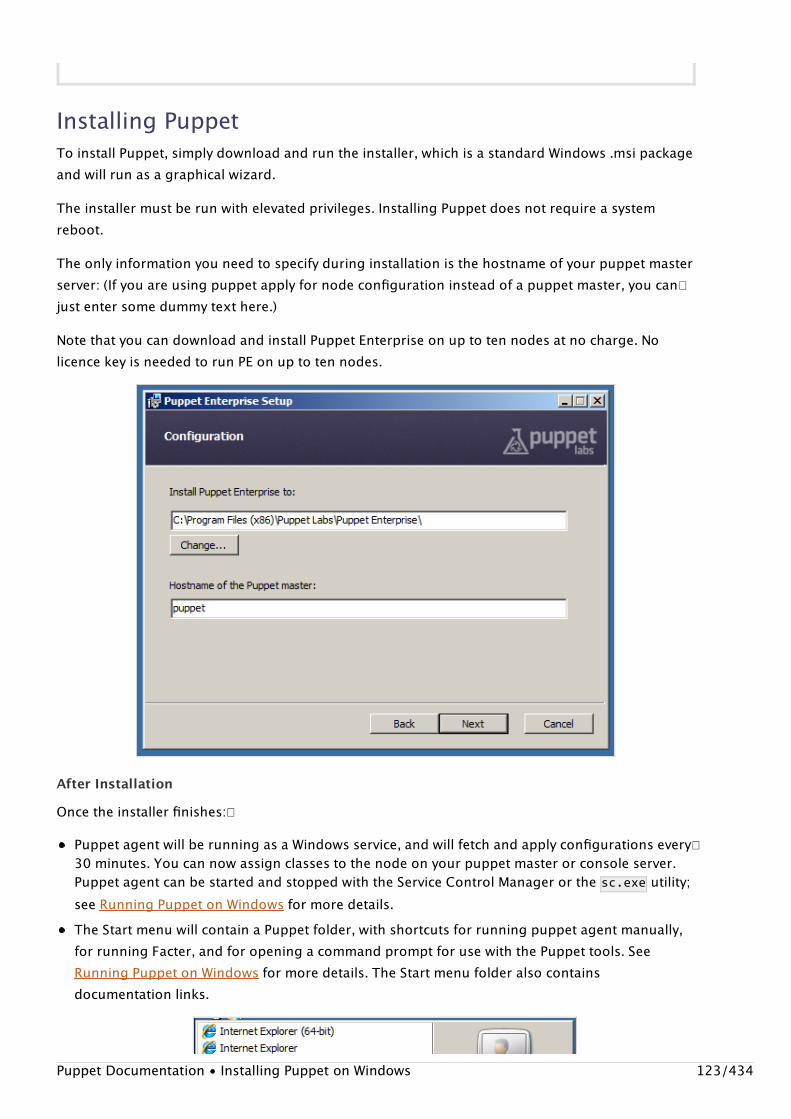
Installing PuppetTo install Puppet, simply download and run the installer, which is a standard Windows .msi packageand will run as a graphical wizard.
The installer must be run with elevated privileges. Installing Puppet does not require a systemreboot.
The only information you need to specify during installation is the hostname of your puppet masterserver: (If you are using puppet apply for node configuration instead of a puppet master, you can�just enter some dummy text here.)
Note that you can download and install Puppet Enterprise on up to ten nodes at no charge. Nolicence key is needed to run PE on up to ten nodes.
After Installation
Once the installer finishes:�
Puppet agent will be running as a Windows service, and will fetch and apply configurations every�30 minutes. You can now assign classes to the node on your puppet master or console server.Puppet agent can be started and stopped with the Service Control Manager or the sc.exe utility;see Running Puppet on Windows for more details.The Start menu will contain a Puppet folder, with shortcuts for running puppet agent manually,for running Facter, and for opening a command prompt for use with the Puppet tools. SeeRunning Puppet on Windows for more details. The Start menu folder also containsdocumentation links.
Puppet Documentation • Installing Puppet on Windows 123/434

Automated InstallationFor automated deployments, Puppet can be installed unattended on the command line as follows:
msiexec/qn/ipuppet.msi
You can also specify /l*vinstall.txt to log the progress of the installation to a file.�
The following public MSI properties can also be specified:�
MSI Property Puppet Setting Default Value
INSTALLDIR n/a Version-dependent, see below
PUPPET_MASTER_SERVER server puppet
PUPPET_CA_SERVER ca_server Value of PUPPET_MASTER_SERVER
PUPPET_AGENT_CERTNAME certname Value of facterfdqn (must be lowercase)
For example:
msiexec/qn/ipuppet.msiPUPPET_MASTER_SERVER=puppet.acme.com
UpgradingPuppet can be upgraded by installing a new version of the MSI package. No extra steps are
Puppet Documentation • Installing Puppet on Windows 124/434
required, and the installer will handle stopping and re-starting the puppet agent service.
When upgrading, the installer will not replace any settings in the main puppet.conf configuration�file, but it can add previously unspecified settings if they are provided on the command line.��
UninstallingPuppet can be uninstalled through Windowsʼ standard “Add or Remove Programs” interface, orfrom the command line.
To uninstall from the command line, you must have the original MSI file or know the �ProductCodeof the installed MSI:
msiexec/qn/x[puppet.msi|product-code]
Uninstalling will remove Puppetʼs program directory, the puppet agent service, and all relatedregistry keys. It will leave the data directory intact, including any SSL keys. To completely removePuppet from the system, the data directory can be manually deleted.
Installation DetailsWhat Gets Installed
In order to provide a self-contained installation, the Puppet installer includes all of Puppetʼsdependencies, including Ruby, Gems, and Facter. (Puppet redistributes the 32-bit Ruby applicationfrom rubyinstaller.org).
These prerequisites are used only for Puppet and do not interfere with other local copies of Ruby.
Program Directory
Unless overridden during installation, Puppet and its dependencies are installed into the standardProgram Files directory for 32-bit applications.
For Puppet Enterprise, the default installation path is:
OS type Default Install Path
32-bit C:\ProgramFiles\PuppetLabs\PuppetEnterprise
64-bit C:\ProgramFiles(x86)\PuppetLabs\PuppetEnterprise
For open source Puppet, the default installation path is:
OS type Default Install Path
32-bit C:\ProgramFiles\PuppetLabs\Puppet
64-bit C:\ProgramFiles(x86)\PuppetLabs\Puppet
The program files directory can be located using the �PROGRAMFILES environment variable on 32-bitversions of Windows or the PROGRAMFILES(X86) variable on 64-bit versions.
Puppetʼs program directory contains the following subdirectories:Puppet Documentation • Installing Puppet on Windows 125/434
Directory Description
bin scripts for running Puppet and Facter
facter Facter source
misc resources
puppet Puppet source
service code to run puppet agent as a service
sys Ruby and other tools
Data Directory
Puppet stores its settings (puppet.conf ), manifests, and generated data (like logs and catalogs) inits data directory. Puppetʼs data directory contains two subdirectories:
etc (the $confdir ) contains configuration files, manifests, certificates, and other important files����var (the $vardir ) contains generated data and logs
When run with elevated privileges, the data directory is located inCOMMON_APPDATA\PuppetLabs\puppet ; see below for more about the COMMON_APPDATA folder. Whenrun without elevated privileges, the data directory will be a .puppet directory in the current userʼshome folder. Puppet on Windows should usually be run with elevated privileges.THE COMMON_APPDATA FOLDER
Windowsʼ COMMON_APPDATA folder contains non-roaming application data for all users. Its locationvaries by Windows version:
OS Version Path Default
7, 2008 %PROGRAMDATA% C:\ProgramData
2003 %ALLUSERSPROFILE%\ApplicationData C:\DocumentsandSettings\AllUsers\ApplicationData
Since the CommonAppData directory is a system folder, it is hidden by default. Seehttp://support.microsoft.com/kb/812003 for steps to show system and hidden files and folders.�
More
For more details about using Puppet on Windows, see:
Running Puppet on WindowsWriting Manifests for Windows
Running Puppet on WindowsThis documentation applies to Puppet versions ≥ 2.7.6 and Puppet Enterprise ≥ 2.5. Earlierversions may behave differently.�
Puppet Documentation • Running Puppet on Windows 126/434
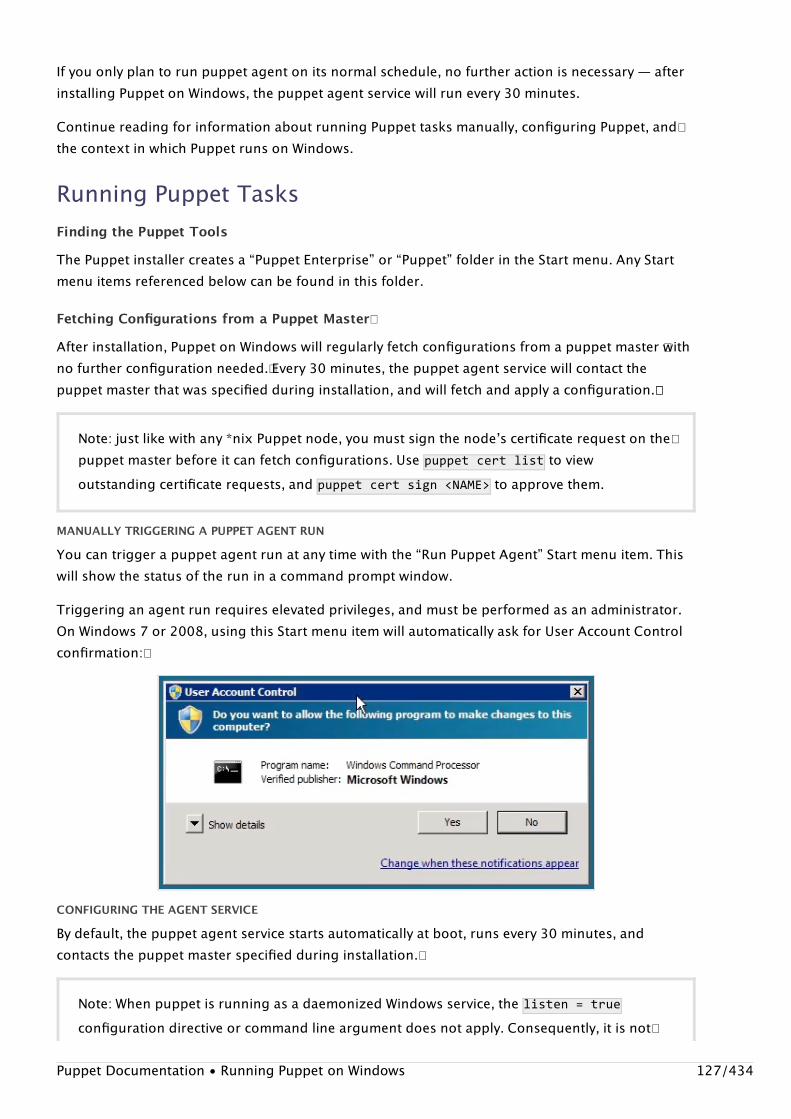
If you only plan to run puppet agent on its normal schedule, no further action is necessary — afterinstalling Puppet on Windows, the puppet agent service will run every 30 minutes.
Continue reading for information about running Puppet tasks manually, configuring Puppet, and�the context in which Puppet runs on Windows.
Running Puppet TasksFinding the Puppet Tools
The Puppet installer creates a “Puppet Enterprise” or “Puppet” folder in the Start menu. Any Startmenu items referenced below can be found in this folder.
Fetching Configurations from a Puppet Master�
After installation, Puppet on Windows will regularly fetch configurations from a puppet master �withno further configuration needed.� Every 30 minutes, the puppet agent service will contact thepuppet master that was specified during installation, and will fetch and apply a configuration.��
MANUALLY TRIGGERING A PUPPET AGENT RUN
You can trigger a puppet agent run at any time with the “Run Puppet Agent” Start menu item. Thiswill show the status of the run in a command prompt window.
Triggering an agent run requires elevated privileges, and must be performed as an administrator.On Windows 7 or 2008, using this Start menu item will automatically ask for User Account Controlconfirmation:�
CONFIGURING THE AGENT SERVICE
By default, the puppet agent service starts automatically at boot, runs every 30 minutes, andcontacts the puppet master specified during installation.�
Note: just like with any *nix Puppet node, you must sign the nodeʼs certificate request on the�puppet master before it can fetch configurations. Use �puppetcertlist to viewoutstanding certificate requests, and �puppetcertsign<NAME> to approve them.
Note: When puppet is running as a daemonized Windows service, the listen=trueconfiguration directive or command line argument does not apply. Consequently, it is not�
Puppet Documentation • Running Puppet on Windows 127/434
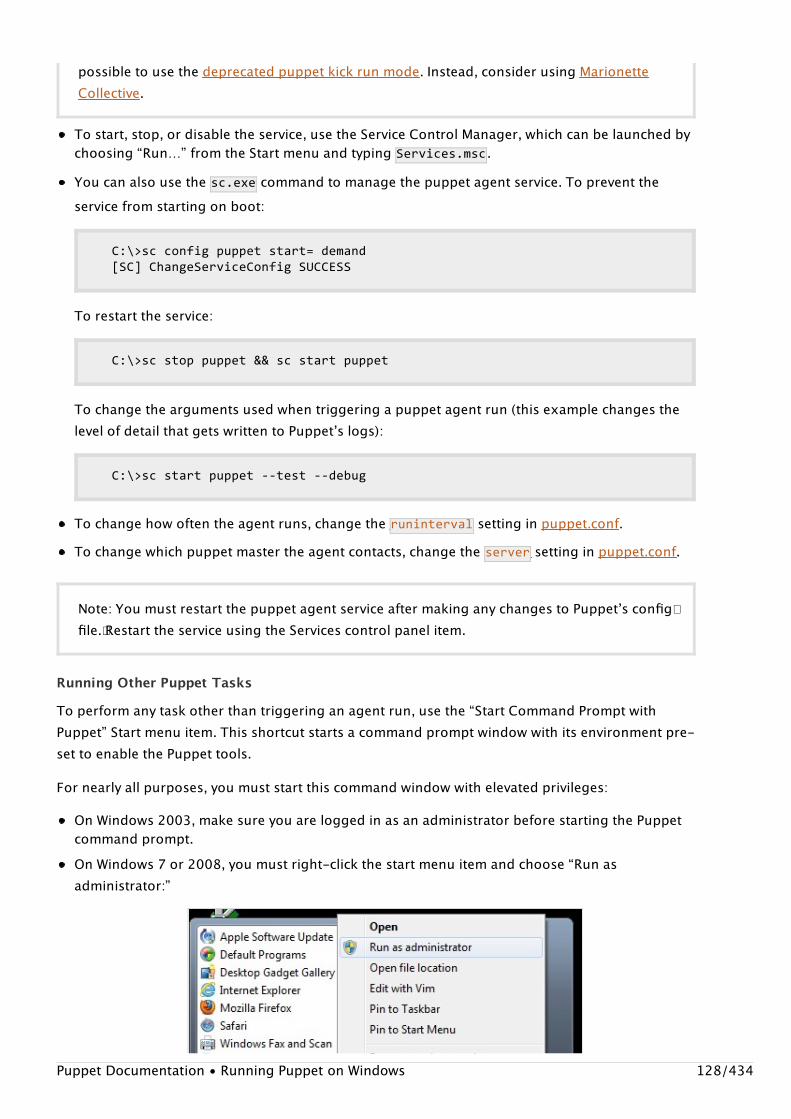
To start, stop, or disable the service, use the Service Control Manager, which can be launched bychoosing “Run…” from the Start menu and typing Services.msc .You can also use the sc.exe command to manage the puppet agent service. To prevent theservice from starting on boot:
C:\>scconfigpuppetstart=demand[SC]ChangeServiceConfigSUCCESS
To restart the service:
C:\>scstoppuppet&&scstartpuppet
To change the arguments used when triggering a puppet agent run (this example changes thelevel of detail that gets written to Puppetʼs logs):
C:\>scstartpuppet--test--debug
To change how often the agent runs, change the runinterval setting in puppet.conf.To change which puppet master the agent contacts, change the server setting in puppet.conf.
Running Other Puppet Tasks
To perform any task other than triggering an agent run, use the “Start Command Prompt withPuppet” Start menu item. This shortcut starts a command prompt window with its environment pre-set to enable the Puppet tools.
For nearly all purposes, you must start this command window with elevated privileges:
On Windows 2003, make sure you are logged in as an administrator before starting the Puppetcommand prompt.On Windows 7 or 2008, you must right-click the start menu item and choose “Run asadministrator:”
possible to use the deprecated puppet kick run mode. Instead, consider using MarionetteCollective.
Note: You must restart the puppet agent service after making any changes to Puppetʼs config�file.� Restart the service using the Services control panel item.
Puppet Documentation • Running Puppet on Windows 128/434
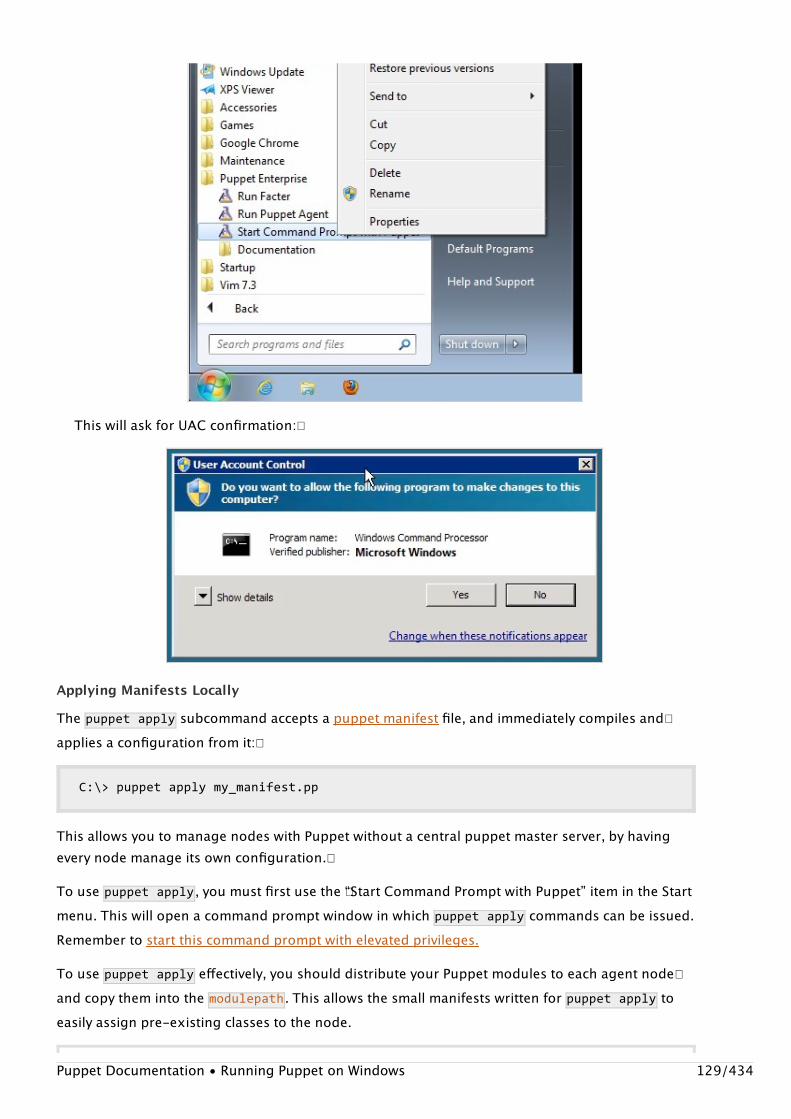
This will ask for UAC confirmation:�
Applying Manifests Locally
The puppetapply subcommand accepts a puppet manifest file, and immediately compiles and�applies a configuration from it:�
C:\>puppetapplymy_manifest.pp
This allows you to manage nodes with Puppet without a central puppet master server, by havingevery node manage its own configuration.�
To use puppetapply , you must first use the �“Start Command Prompt with Puppet” item in the Startmenu. This will open a command prompt window in which puppetapply commands can be issued.Remember to start this command prompt with elevated privileges.
To use puppetapply effectively, you should distribute your Puppet modules to each agent node�and copy them into the modulepath . This allows the small manifests written for puppetapply toeasily assign pre-existing classes to the node.
Puppet Documentation • Running Puppet on Windows 129/434
To learn more about using modules, see Module Fundamentals or Learning Puppet.
Interactively Modifying Puppet Resources
The puppetresource subcommand can interactively view and modify a systemʼs state usingPuppetʼs resource types. (For example, it can be used as an alternate interface for creating ormodifying user accounts.)
To run puppetresource , you must use the “Start Command Prompt with Puppet” item in the Startmenu. This will open a command prompt window in which puppetresource commands can beissued. Remember to start this command prompt with elevated privileges.
The standard format of a puppetresource command is:
C:\>puppetresource<TYPE><NAME><ATTRIBUTE=VALUE><ATTRIBUTE=VALUE>
Specifying attribute=value pairs will modify the resource, leaving them off will print the�resourceʼs current state. Leaving out the resource name will list every resource of the specified type.�
The resources puppetresource can use are the same as those available for Windows manifests.See Writing Manifests for Windows for more details.See the puppetresource man page for more details about the puppet resource subcommand.
Running Facter
When writing manifests for Windows nodes, it can be helpful to see a test systemʼs actual fact data.Use the “Run Facter” Start menu item to do this.
Configuring Puppet�Puppetʼs main puppet.conf configuration file can be found at ��<datadirectory> \etc\puppet.conf .
See Configuring Puppet� for more details about Puppetʼs main config file. (Puppetʼs secondary��config files are not used on Windows.)��See the configuration reference� for a complete list of puppet.conf settings.In a command window opened with the “Start Command Prompt with Puppet” Start menu item,you can use puppet--configprint<SETTING> to see the current value of any setting.
Note: The default modulepath on Windows is <datadirectory> \etc\modules .
Note: When using a multi-directory modulepath, remember to separate the directories with; , rather than : .
Note: You must restart the puppet agent service after making any changes to Puppetʼs config�file.� Restart the service using the Services control panel item.
Puppet Documentation • Running Puppet on Windows 130/434
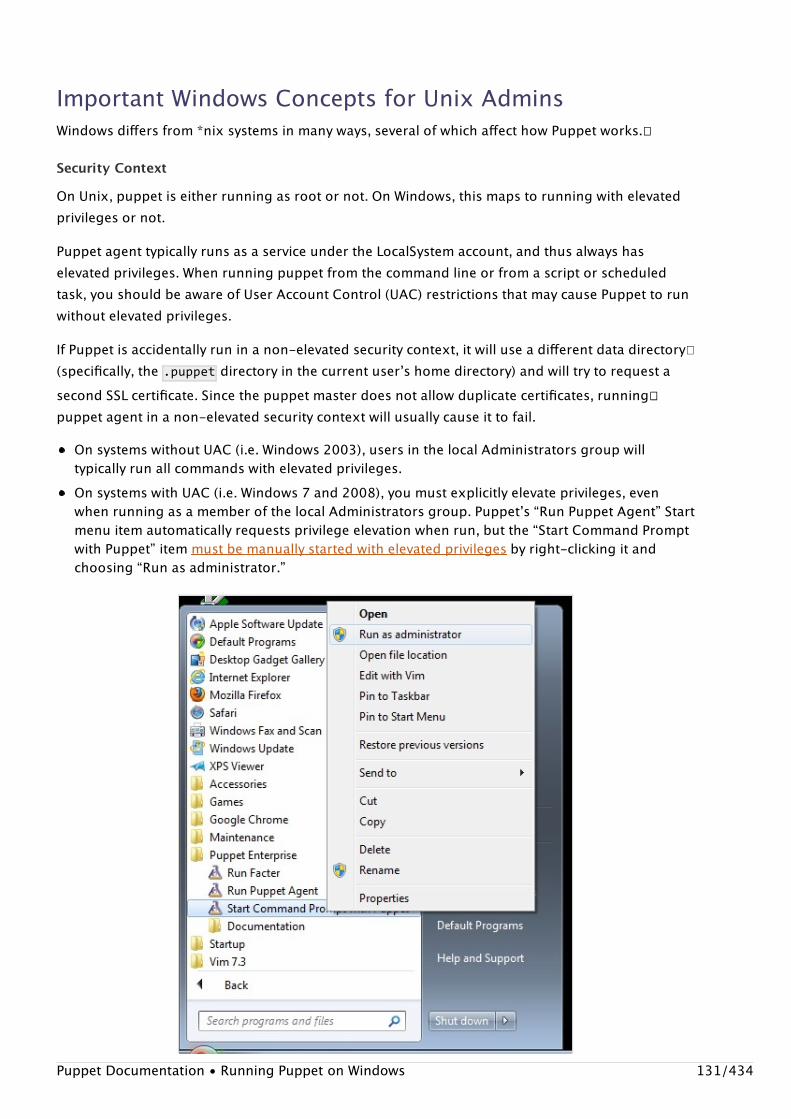
Important Windows Concepts for Unix AdminsWindows differs from *nix systems in many ways, several of which affect how Puppet works.��
Security Context
On Unix, puppet is either running as root or not. On Windows, this maps to running with elevatedprivileges or not.
Puppet agent typically runs as a service under the LocalSystem account, and thus always haselevated privileges. When running puppet from the command line or from a script or scheduledtask, you should be aware of User Account Control (UAC) restrictions that may cause Puppet to runwithout elevated privileges.
If Puppet is accidentally run in a non-elevated security context, it will use a different data directory�(specifically, the �.puppet directory in the current userʼs home directory) and will try to request asecond SSL certificate. Since the puppet master does not allow duplicate certificates, running��puppet agent in a non-elevated security context will usually cause it to fail.
On systems without UAC (i.e. Windows 2003), users in the local Administrators group willtypically run all commands with elevated privileges.On systems with UAC (i.e. Windows 7 and 2008), you must explicitly elevate privileges, evenwhen running as a member of the local Administrators group. Puppetʼs “Run Puppet Agent” Startmenu item automatically requests privilege elevation when run, but the “Start Command Promptwith Puppet” item must be manually started with elevated privileges by right-clicking it andchoosing “Run as administrator.”
Puppet Documentation • Running Puppet on Windows 131/434
File System Redirection in 64-bit Windows Versions
The Puppet agent process runs as a 32-bit process. When run on 64-bit versions of Windows, thereare some issues to be aware of.
The File System Redirector will silently redirect all file system access to �%windir%\system32 to%windir%\SysWOW64 instead. This can be an issue when trying to manage files in the system�directory, e.g., IIS configuration files. In order to prevent redirection, you can use the ��sysnativealias, e.g. C:\Windows\sysnative\inetsrv\config\applicationHost.config .
The Registry Redirector performs a similar function with certain registry keys .
Writing Manifests for WindowsThis documentation applies to Puppet ≥ 2.7.6 and Puppet Enterprise ≥ 2.5. Earlier versions maybehave differently.�
Just as on *nix systems, Puppet manages resources on Windows using manifests written in thePuppet language. There are several major differences to be aware of when writing manifests that�manage Windows resources:
Windows primarily uses the backslash as its directory separator character, and Ruby handles itdifferently in different circumstances. You should ��learn when to use and when to avoidbackslashes.Most classes written for *nix systems will not work on Windows nodes; if you are managing amixed environment, you should use conditionals and Windows-specific facts� to govern thebehavior of your classes.Puppet generally does the right thing with Windows line endings.Puppet supports a slightly different set of resource types on Windows.�
File Paths on WindowsWindows file paths must be written in different ways at different times, due to various toolsʼ���conflicting rules for backslash use.�
Windows file system APIs accept both the backslash (�\ ) and forwardslash (/ ) to separatedirectory and file components in a path.�Some Windows programs only accept backslashes in file paths.�*nix shells and many programming languages — including the Puppet language — use thebackslash as an escape character.
As a result, any system that interacts with *nix and Windows systems as equal peers willunavoidably have complicated behavior around backslashes.
Note: 64-bit Windows Server 2003 requires hotfix �KB942589 to use the sysnative alias.
Puppet Documentation • Writing Manifests for Windows 132/434
The following guidelines will help you use backslashes safely in Windows file paths with Puppet.�
Forward Slashes vs. Backslashes
In many cases, you can use forward slashes instead of backslashes when specifying file paths.�
Forward slashes MUST be used:
In template paths passed to the template function. For example:
file{'C:/warning.txt':ensure=>present,content=>template('my_module/warning.erb'),}
In Puppet URLs in a file resourceʼs source attribute.When part of the modulepath configuration option, e.g. �puppetapply--modulepath="Z:/path/to/my/modules""Z:/path/to/my/site.pp" (This restriction applies onlyto versions of Puppet prior to 3.0.)
Forward slashes SHOULD be used in:
The title or path attribute of a file resourceThe source attribute of a package resourceLocal paths in a file resourceʼs source attributeThe command of an exec resource, unless the executable requires backslashes, e.g. cmd.exe
Forward slashes MUST NOT be used in:
The command of a scheduled_task resource.The install_options of a package resource.
THE RULE
If Puppet itself is interpreting the file path, forward slashes are okay. If the file path is being passed��directly to a Windows program, forward slashes may not be okay.
Using Backslashes in Double-Quoted Strings
Puppet supports two kinds of string quoting. Strings surrounded by double quotes (" ) allowvariable interpretation and many escape sequences (including the common \n for a newline), socare must be taken to prevent backslashes from being mistaken for escape sequences.
When using backslashes in a double-quoted string, you must always use two backslashes for eachliteral backslash. There are no exceptions and no special cases.
Using Backslashes in Single-Quoted Strings
Strings surrounded by single quotes (' ) do not allow variable interpretation, and the only escapesequences permitted are \' (a literal single quote) and \\ (a literal backslash).
Puppet Documentation • Writing Manifests for Windows 133/434

Lone backslashes can usually be used in single-quoted strings. However:
When a backslash occurs at the very end of a single-quoted string, a double backslash must beused instead of a single backslash. For example: path=>'C:\ProgramFiles(x86)\\'When a literal double backslash is intended, a quadruple backslash must be used.
THE RULE
In single-quoted strings:
A double backslash always means a literal backslash.A single backslash usually means a literal backslash, unless it is followed by a single quote oranother backslash.
Notable Windows FactsWindows nodes with a default install of Puppet will return the following notable facts, which can beuseful when writing manifests:
Identifying Facts
The following facts can help you determine whether a given machine is running Windows:
kernel=>windows
operatingsystem=>windows
osfamily=>windows
Windows-Specific Facts�
The following facts are either Windows-only, or have different values on Windows than on *nix:�
env_windows_installdir — This fact will contain the directory in which Puppet was installed.id — This fact will be <DOMAIN>\<USERNAME> . You can use the user name to determine whetherPuppet is running as a service or was triggered manually.
Line Endings in Windows Text FilesWindows uses CRLF line endings instead of *nixʼs LF line endings.
If the contents of a file are specified with the ��content attribute, Puppet will write the content in“binary” mode. To create files with CRLF line endings, the �\r\n escape sequence should bespecified as part of the content.�If a file is being downloaded to a Windows node with the �source attribute, Puppet will transferthe file in “binary” mode, leaving the original newlines untouched.�Non-file resource types that make partial edits to a system file (most notably the �host type,which manages the %windir%\system32\drivers\etc\hosts file) manage their files in text��mode, and will automatically translate between Windows and *nix line endings.
Note: When writing your own resource types, you can get this behavior by using the flatfiletype.�
Puppet Documentation • Writing Manifests for Windows 134/434
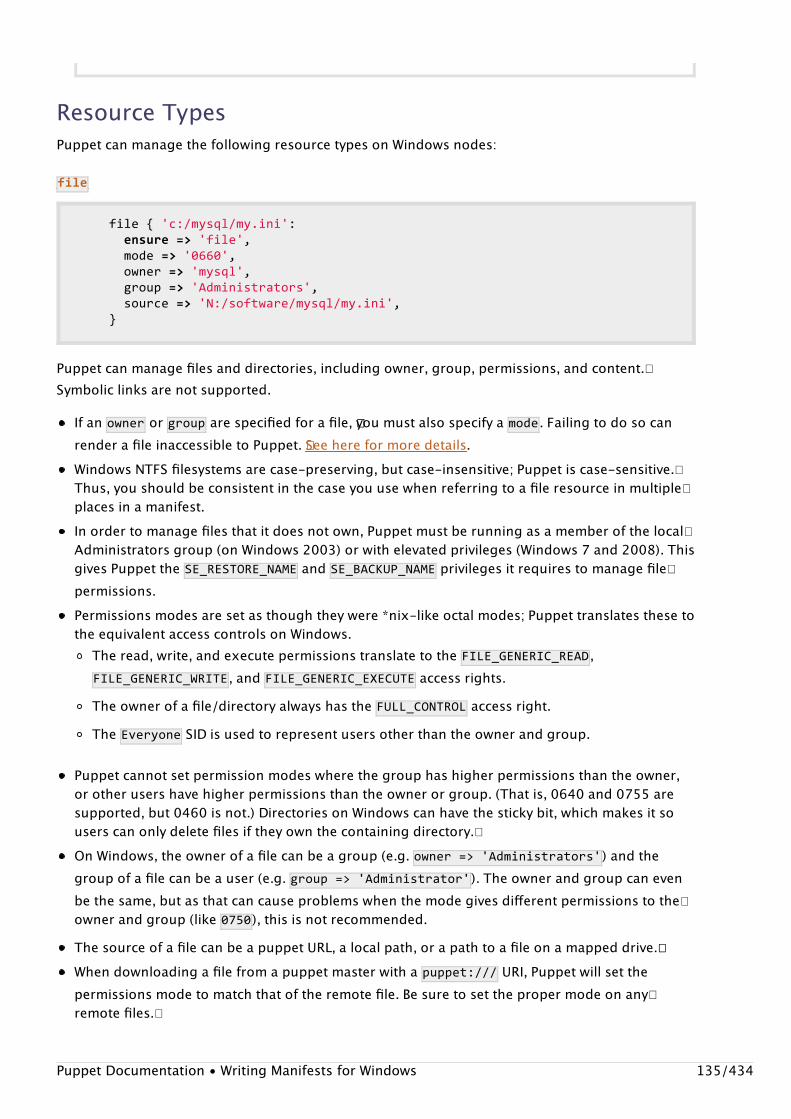
Resource TypesPuppet can manage the following resource types on Windows nodes:
file
file{'c:/mysql/my.ini':ensure=>'file',mode=>'0660',owner=>'mysql',group=>'Administrators',source=>'N:/software/mysql/my.ini',}
Puppet can manage files and directories, including owner, group, permissions, and content.�Symbolic links are not supported.
If an owner or group are specified for a file, ��you must also specify a mode . Failing to do so canrender a file inaccessible to Puppet. �See here for more details.Windows NTFS filesystems are case-preserving, but case-insensitive; Puppet is case-sensitive.�Thus, you should be consistent in the case you use when referring to a file resource in multiple�places in a manifest.In order to manage files that it does not own, Puppet must be running as a member of the local�Administrators group (on Windows 2003) or with elevated privileges (Windows 7 and 2008). Thisgives Puppet the SE_RESTORE_NAME and SE_BACKUP_NAME privileges it requires to manage file�permissions.Permissions modes are set as though they were *nix-like octal modes; Puppet translates these tothe equivalent access controls on Windows.
The read, write, and execute permissions translate to the FILE_GENERIC_READ ,FILE_GENERIC_WRITE , and FILE_GENERIC_EXECUTE access rights.The owner of a file/directory always has the �FULL_CONTROL access right.The Everyone SID is used to represent users other than the owner and group.
Puppet cannot set permission modes where the group has higher permissions than the owner,or other users have higher permissions than the owner or group. (That is, 0640 and 0755 aresupported, but 0460 is not.) Directories on Windows can have the sticky bit, which makes it sousers can only delete files if they own the containing directory.�On Windows, the owner of a file can be a group (e.g. �owner=>'Administrators' ) and thegroup of a file can be a user (e.g. �group=>'Administrator' ). The owner and group can evenbe the same, but as that can cause problems when the mode gives different permissions to the�owner and group (like 0750 ), this is not recommended.The source of a file can be a puppet URL, a local path, or a path to a file on a mapped drive.��When downloading a file from a puppet master with a �puppet:/// URI, Puppet will set thepermissions mode to match that of the remote file. Be sure to set the proper mode on any�remote files.�
Puppet Documentation • Writing Manifests for Windows 135/434

user
Puppet can create, edit, and delete local users. Puppet does not support managing domain useraccounts, but can add (and remove) domain user accounts to local groups.
The comment , home , and password attributes can be managed, as well as groups to which theuser belongs.Passwords can only be specified in cleartext. Windows does not provide an API for setting the�password hash.The user SID is available as a read-only parameter. Attempting to set the parameter will failUser names are case-sensitive in Puppet manifests, but insensitive on Windows. Make sure toconsistently use the same case in manifests.
SECURITY IDENTIFIERS (SID)
On Windows, user and group account names can take multiple forms, e.g. Administrators ,<host>\Administrators , BUILTIN\Administrators , S-1-5-32-544 . When comparing two accountnames, puppet always first transforms account names into their canonical SID form and compares�the SIDs instead.
group
Puppet can create, edit, and delete local groups, and can manage a groupʼs members. Puppet doesnot support managing domain group accounts, but a local group can include both local anddomain users as members.
The group SID is available as a read-only parameter. Attempting to set the parameter will fail.Group names are case-sensitive in puppet manifests, but insensitive on Windows. Make sure toconsistently use the same case in manifests.Nested groups are not supported. (Group members must be users, not other groups.)
scheduled_task
scheduled_task{'Dailytask':ensure=>present,enabled=>true,command=>'C:\path\to\command.exe',arguments=>'/flags/to/pass',trigger=>{schedule=>daily,every=>2,#Defaultsto1start_date=>'2011-08-31',#Defaultsto'today'start_time=>'08:00',#Mustbespecified}}
Puppet can create, edit, and delete scheduled tasks. It can manage the task name, theenabled/disabled status, the command, any arguments, the working directory, the user andpassword, and triggers. For more information, see the reference documentation for thescheduled_task type. This is a Windows-only resource type.
Puppet does not support “every X minutes” type triggers.
Puppet Documentation • Writing Manifests for Windows 136/434

package
package{'mysql':ensure=>installed,provider=>'msi',#deprecatedinPuppet3.0source=>'N:/packages/mysql-5.5.16-winx64.msi',install_options=>{'INSTALLDIR'=>'C:\mysql-5.5'},}
Puppet can install and remove MSI packages, including specifying package-specific install options,�e.g. install directory.IDENTIFYING PACKAGES
The title or name of the package must match the value of the DisplayName property in theregistry, which is also the value displayed in Add/Remove Programs. Alternately, when a packagename is not unique across versions (e.g. VMWare Tools, or where there are 32- and 64-bit versionswith the same name), we provide the ability to specify the packageʼs PackageCode as the packagename. This is a GUID thatʼs unique across all MSI builds. For instance:
package{'{XXXXXXXX-XXXX-XXXX-XXXX-XXXXXXXXXXXX}':ensure=>installed,source=>'the.msi',provider=>windows}
To find the PackageCode from an MSI, you can use Orca, or you can get to it programmatically with�Ruby:
require'win32ole'installer=WIN32OLE.new('WindowsInstaller.Installer')db=installer.OpenDatabase(path,0)#where'path'isthepathtotheMSIputsdb.SummaryInformation.Property(9)
ADDITIONAL NOTES ON WINDOWS PACKAGES
The source parameter is required, and must refer to a local .msi file, a file from a mapped drive,��or a UNC path. You can distribute packages as file resources. Puppet URLs are not currentlysupported for the package typeʼs source attribute.The install_options attribute is package-specific; refer to the documentation for the package�you are trying to install.
Any file path arguments within the �install_options attribute (such as INSTALLDIR ) shoulduse backslashes, not forward slashes.
As of Puppet 3.0, windows is the default provider parameter for all Windows packages. Using msiwill result in a deprecation warning.
service
service{'mysql':ensure=>'running',
Puppet Documentation • Writing Manifests for Windows 137/434
enable=>true,}
Puppet can start, stop, enable, disable, list, query and configure services. It does not support�configuring service dependencies, account to run as, or desktop interaction.�
Use the short service name (e.g. wuauserv ) in Puppet, not the display name (e.g. AutomaticUpdates ).Setting the enable attribute to true will assign a service the “Automatic” startup type; settingenable to manual will assign the “Manual” startup type.
exec
Puppet can execute binaries (exe, com, bat, etc.), and can log the child process output and exitstatus.
If an extension for the command is not specified (for example, �ruby instead of ruby.exe ), Puppetwill use the PATHEXT environment variable to resolve the appropriate binary. PATHEXT is aWindows-specific variable that lists the valid file extensions for executables.��Puppet does not support a shell provider for Windows, so if you want to execute shell built-ins(e.g. echo ), you must provide a complete cmd.exe invocation as the command. (For example,command=>'cmd.exe/cecho"foo"' .)When executing Powershell scripts, you must specify the remotesigned execution policy as partof the powershell.exe invocation:
exec{'test':command=>'C:\Windows\System32\WindowsPowerShell\v1.0\powershell.exe-executionpolicyremotesigned-fileC:\test.ps1',}
host
Puppet can manage entries in the hosts file in the same way that is supported on Unix platforms.�
Troubleshooting Puppet on WindowsTipsProcess Explorer
We recommend installing Process Explorer and configuring it to replace Task Manager. This will�make debugging significantly easier.�
Logging
As of Puppet 2.7.x, messages from the puppetd log file are available via the Windows Event Viewer�(choose “Windows Logs” > “Application”). To enable debugging, stop the puppet service and restart
Puppet Documentation • Troubleshooting Puppet on Windows 138/434

it as:
c:\>scstoppuppet&&scstartpuppet--debug--trace
Puppetʼs windows service component also writes to the windows.log within the same log directoryand can be used to debug issues with the service.
Common IssuesInstallation
The Puppet MSI package will not overwrite an existing entry in the puppet.conf file. �As a result, ifyou uninstall the package, then reinstall the package using a different puppet master hostname,�Puppet wonʼt actually apply the new value if the previous value still exists in <datadirectory> \etc\puppet.conf .
In general, weʼve taken the approach of preserving configuration data on the system when doing an�upgrade, uninstall or reinstall.
To fully clean out a system make sure to delete the <datadirectory> .
Similarly, the MSI will not overwrite the custom facts written to the PuppetLabs\facter\facts.ddirectory.
Unattended installation
Puppet may fail to install when trying to perform an unattended install from the command line, e.g.
msiexec/qn/ipuppet.msi
To get troubleshooting data, specify an installation log, e.g. /l*v install.txt. Look in the log forentries like the following:
MSI(s)(7C:D0)[17:24:15:870]:Rejectingproduct'{D07C45E2-A53E-4D7B-844F-F8F608AFF7C8}':Non-assignedappsaredisabledfornon-adminusers.MSI(s)(7C:D0)[17:24:15:870]:Note:1:1708MSI(s)(7C:D0)[17:24:15:870]:Product:Puppet--Installationfailed.MSI(s)(7C:D0)[17:24:15:870]:WindowsInstallerinstalledtheproduct.ProductName:Puppet.ProductVersion:2.7.12.ProductLanguage:1033.Manufacturer:PuppetLabs.Installationsuccessorerrorstatus:1625.MSI(s)(7C:D0)[17:24:15:870]:MainEngineThreadisreturning1625MSI(s)(7C:08)[17:24:15:870]:NoSystemRestoresequencenumberforthisinstallation.Info1625.Thisinstallationisforbiddenbysystempolicy.Contactyoursystemadministrator.
If you see entries like this you know you donʼt have sufficient privileges to install puppet. Make sure��to launch cmd.exe with the RunasAdministrator option selected, and try again.
File PathsPuppet Documentation • Troubleshooting Puppet on Windows 139/434
Path Separator
Make sure to use a semi-colon (;) as the path separator on Windows, e.g.,modulepath=path1;path2
File Separator
In most resource attributes, the Puppet language accepts either forward- or backslashes as the file�separator. However, some attributes absolutely require forward slashes, and some attributesabsolutely require backslashes. See the relevant section of Writing Manifests for Windows for moreinformation.
Backslashes
When backslashes are double-quoted(“), they must be escaped. When single-quoted (ʻ), they maybe escaped. For example, these are valid file resources:�
file{'c:\path\to\file.txt':}file{'c:\\path\\to\\file.txt':}file{"c:\\path\\to\\file.txt":}
But this is an invalid path, because \p, \t, \f will be interpreted as escape sequences:
file{"c:\path\to\file.txt":}
UNC Paths
UNC paths are not currently supported. However, the path can be mapped as a network drive andaccessed that way.
Case-insensitivity
Several resources are case-insensitive on Windows (file, user, group). When establishing�dependencies among resources, make sure to specify the case consistently. Otherwise, puppet maynot be able to resolve dependencies correctly. For example, applying the following manifest willfail, because puppet does not recognize that FOOBAR and foobar are the same user:
file{'c:\foo\bar':ensure=>directory,owner=>'FOOBAR'}user{'foobar':ensure=>present}...err:/Stage[main]//File[c:\foo\bar]:Couldnotevaluate:CouldnotfinduserFOOBAR
Diffs�
Puppet does not show diffs on Windows (e.g., �puppetagent--show_diff ) unless a third-party diff�
Puppet Documentation • Troubleshooting Puppet on Windows 140/434
utility has been installed (e.g., msys, gnudiff, cygwin, etc) and the �diff property has been setappropriately.
Resource Errors and QuirksFile
If the owner and/or group are specified in a file resource on Windows, the mode must also be��specified. So this is okay:�
file{'c:/path/to/file.bat':ensure=>present,owner=>'Administrator',group=>'Administrators',mode=>0770}
But this is not:
file{'c:/path/to/file.bat':ensure=>present,owner=>'Administrator',group=>'Adminstrators',}
The latter case will remove any permissions the Administrators group previously had to the file,�resulting in the effective permissions of 0700. And since puppet runs as a service under the�“SYSTEM” account, not “Administrator,” Puppet itself will not be able to manage the file the next�time it runs!
To get out of this state, have Puppet execute the following (with an exec resource) to reset the file�permissions:
takeown/fc:/path/to/file.bat&&icaclsc:/path/to/file.bat/reset
Exec
When declaring a Windows exec resource, the path to the resource typically depends on the%WINDIR% environment variable. Since this may vary from system to system, you can use the pathfact in the exec resource:
exec{'cmd.exe/cechohelloworld':path=>$::path}
Shell Builtins
Puppet does not currently support a shell provider on Windows, so executing shell builtins directlywill fail:
Puppet Documentation • Troubleshooting Puppet on Windows 141/434
exec{'echofoo':path=>'c:\windows\system32;c:\windows'}...err:/Stage[main]//Exec[echofoo]/returns:changefromnotrunto0failed:Couldnotfindcommand'echo'
Instead, wrap the builtin in cmd.exe :
exec{'cmd.exe/cechofoo':path=>'c:\windows\system32;c:\windows'}
Or, better still, use the tip from above:
exec{'cmd.exe/cechofoo':path=>$::path}
Powershell
By default, powershell enforces a restricted execution policy which prevents the execution ofscripts. Consequently, make sure to specify the appropriate execution policy in the powershellcommand:
exec{'test':command=>'powershell.exe-executionpolicyremotesigned-fileC:\test.ps1',path=>$::path}
Package
The source of an MSI package must be a file on either a local filesystem or on a network mapped��drive. It does not support URI-based sources, though you can achieve a similar result by defining a�file whose source is the puppet master and then defining a package whose source is the local file.���
Service
Windows services support a short name and a display name. Make sure to use the short name inpuppet manifests. For example use wuauserv , not AutomaticUpdates . You can use scquery toget a list of services and their various names.
Error Messages“Service'PuppetAgent'(puppet)failedtostart.Verifythatyouhavesufficientprivilegestostartsystemservices.”
This can occur when installing puppet on a UAC system from a non-elevated account. Althoughthe installer displays the UAC prompt to install puppet, it does not elevate when trying to start
Puppet Documentation • Troubleshooting Puppet on Windows 142/434
the service. Make sure to run from an elevated cmd.exe process when installing the MSI.“CannotrunonMicrosoftWindowswithoutthesys-admin,win32-process,win32-dir,win32-serviceandwin32-taskschedulergems.”
Puppet requires the indicated Windows-specific gems, which can be installed using �geminstall<gem>
“err:/Stage[main]//Scheduled_task[task_system]:Couldnotevaluate:Theoperationcompletedsuccessfully.”
This error can occur when using version < 0.2.1 of the win32-taskscheduler gem. Run gemupdatewin32-taskscheduler
“err:/Stage[main]//Exec[C:/tmp/foo.exe]/returns:changefromnotrunto0failed:CreateProcess()failed:Accessisdenied.”
This error can occur when requesting an executable from a remote puppet master that cannotbe executed. For a file to be executable on Windows, set the user/group executable bits�accordingly on the puppet master (or alternatively, specify the mode of the file as it should exist�on the Windows host):
file{"C:/tmp/foo.exe":source=>"puppet:///modules/foo/foo.exe",}
exec{'C:/tmp/foo.exe':logoutput=>true}
“err:getaddrinfo:Thestoragecontrolblocksweredestroyed.”
This error can occur when the agent cannot resolve a DNS name into an IP address (for examplethe server , ca_server , etc properties). To verify that there is a DNS issue, check that you canrun nslookup<dns> . If this fails, there is a problem with the DNS settings on the Windows agent(for example, the primary dns suffix is not set). See ��http://technet.microsoft.com/en-us/library/cc959322.aspx“err:/Stage[main]//Group[mygroup]/members:changefromtoAdministratorsfailed:AddOLEerrorcode:8007056Bin<Unknown><NoDescription>HRESULTerror
code:0x80020009Exceptionoccurred.”
This error will occur when attempting to add a group as a member of another local group, i.e.nesting groups. Although Active Directory supports nested groups for certain types of domaingroup accounts, Windows does not support nesting of local group accounts. As a result, youmust only specify user accounts as members of a group.“err:/Stage[main]//Package[7zip]/ensure:changefromabsenttopresentfailed:Executionof'msiexec.exe/qn/norestart/i"c:\\7z920.exe"'returned1620:This
installationpackagecouldnotbeopened.Contac
Puppet Documentation • Troubleshooting Puppet on Windows 143/434

ttheapplicationvendortoverifythatthisisava
lidWindowsInstallerpackage.”
This error can occur when attempting to install a non-MSI package. Puppet only supports MSIpackages. To install non-MSI packages, use an exec resource with an onlyif parameter.“err:Couldnotrequestcertificate:Thecertificateretrievedfromthemasterdoesnotmatchtheagent'sprivatekey.”
This error is usually a sign that the master has already issued a certificate to the agent. This can�occur if the agentʼs SSL directory is deleted after it has retrieved a certificate from the master, or�when running the agent in two different security contexts. For example, running puppet agent�as a service and then trying to run puppetagent from the command line with non-elevatedsecurity. Specifically, this would happen if youʼve selected �StartCommandPromptwithPuppetbut did not elevate privileges using RunasAdministrator .“err:Couldnotevaluate:Couldnotretrieveinformationfromenvironmentproductionsource(s)puppet://puppet.domain.com/plugins.”
This error will be generated when a Windows agent does a pluginsync from the Puppet masterserver, when the latter does not contain any plugins. Note that pluginsync is enabled by defaulton Windows. This is a known bug in 2.7.x, see https://projects.puppetlabs.com/issues/2244.“err:Couldnotsendreport:SSL_connectreturned=1errno=0state=SSLv3readservercertificateB:certificateverifyfailed.Thisisoftenbecausethetimeisoutof
syncontheserverorclient.”
Windows agents that are part of an Active Directory domain should automatically have their timesynchronized with AD. For agents that are not part of an AD domain, you may need to enableand add the Windows time service manually:
w32tm/registernetstartw32timew32tm/config/manualpeerlist:<ntpserver>/syncfromflags:manual/updatew32tm/resync
“err:Youcannotservicearunning64-bitoperatingsystemwitha32-bitversionofDISM.PleaseusetheversionofDISMthatcorrespondstoyourcomputer's
architecture.”
As described in the Installation Guide, 64-bit versions of windows will redirect all file system�access from %windir%\system32 to %windir%\SysWOW64 instead. When attempting to configure�Windows roles and features using dism.exe , make sure to use the 64-bit version. This can bedone by executing c:\windows\sysnative\dism.exe , which will prevent file system redirection.�See https://projects.puppetlabs.com/issues/12980“Error: Could not parse for environment production: Syntax error at ʻ=ʼ; expected ʻ}ʼ”
This error will usually occur if puppetapply-e is used from the command line and the supplied
Puppet Documentation • Troubleshooting Puppet on Windows 144/434
command is surrounded with single quotes (ʻ), which will cause cmd.exe to interpret any => inthe command as a redirect. To solve this surround the command with double quotes (“) instead.See https://projects.puppetlabs.com/issues/20528.
Running Puppet From Source on WindowsThis documentation applies to Puppet versions ≥ 2.7.6 and Puppet Enterprise ≥ 2.5. Earlierversions may behave differently.�
PrerequisitesPlatforms
Puppet Enterprise supports Windows 7, Server 2008, 2008 R2, Server 2003, and 2003 R2.
Ruby
Only Ruby version 1.8.7 is currently supported. It is available from rubyinstaller.org
Puppet does not require Cygwin, Powershell, or any other non-standard shells; it can be run fromWindowsʼ default cmd.exe terminal.
Required Gems
Puppet on Windows requires the following gems be installed:
sys-adminwin32-processwin32-dirwin32-service (>=0.7.1)win32-taskscheduler (>= 0.2.1)
To install them all in two commands:
C:\>geminstallsys-adminwin32-processwin32-dirwin32-taskscheduler--no-rdoc--no-riC:\>geminstallwin32-service--platform=mswin32--no-rdoc--no-ri
(Since win32-service includes native code, you should install it with the --platform=mswin32option. Otherwise, gem will need to compile the extensions at install time, which has additionaldependencies and can be time-consuming.)
Note: Nearly all users should install Puppet from Puppet Labsʼ installer packages, which areprovided free of charge. See here for download links and more information. The followingprocedures are only for advanced users involved in Puppetʼs development.
Puppet Documentation • Running Puppet From Source on Windows 145/434
InstallationObtain zip files of the latest Puppet and Facter source code by clicking the “Downloads” button on�their GitHub pages or by checking out a copy of their repositories.
PuppetFacter
Then, unzip each archive into a temporary directory and run their install.rb scripts. You do notneed to modify your RUBYLIB or PATH environment variables prior to running the install scripts.
C:\>rubyinstall.rb
User Account Control
In general, puppet must be running in an account that is a member of the local Administratorsgroup in order to make changes to the system, (e.g., change file ownership, modify �/etc/hosts ,etc.). On systems where User Account Control (UAC) is enabled, such as Windows 7 and 2008,Puppet must be running with explicitly elevated privileges. It will not ask for elevation automatically;you must specifically start your �cmd.exe terminal window with elevated privileges on theseplatforms. See this blog post (unaffiliated with Puppet Labs)�� for more information about UAC.
Development Tools and TasksGems
If youʼre developing Puppet, youʼll need to install the rspec, rake, and mocha gems in order to runthe tests.
geminstallrspecrakemocha--no-rdoc--no-ri
Git
In addtion, you will likely need the current version of MSYS GIT. You will also want to set thefollowing in your git config so that you donʼt create unnecessary mode bit changes when editing�
Note: When installed from source, Puppet does not install itself as an NT service. Use thestandard installer packages if you want to run Puppet as a service.
Note: The location of Puppetʼs data directory varies depending on the Windows version. Seethis explanation from the installer documentation to find the data directory on your version.�
Note: When installed from source, Puppet does not change the systemʼs PATH or RUBYLIBvariables, nor does it provide Start menu shortcuts for opening a terminal with thesevariables set. You will need to set them yourself before running Puppet.
Puppet Documentation • Running Puppet From Source on Windows 146/434
files on Windows:�
gitconfigcore.filemodefalse
Source
The source code for Puppet and Facter is available in Puppet Labsʼ repositories on GitHub:
PuppetFacter
Testing
Nearly all of the rspec tests are known to work on Windows, with a few exceptions (e.g. due to thelack of a mount provider on Windows). To run the rspec tests on Windows, execute the followingcommand:
C:\>rspec--tag~fails_on_windowsspec
Scaling PuppetTune Puppet for maximum performance in large environments.
Are you using the default webserver?WEBrick, the default web server used to enable Puppetʼs web services connectivity, is essentially areference implementation, and becomes unreliable beyond about ten managed nodes. In any sortof production environment serving many nodes, you should switch to a more efficient web server��implementation such as Passenger or Mongrel. Passenger is the currently recommendedimplementation, on older systems use Mongrel.
Delayed check inPuppetʼs default configuration asks that each node check-in every 30 minutes. �An option calledʻsplayʼ can add a random configurable lag to this check-in time, to further balance out check-in�frequency. Alternatively, do not run puppetd as a daemon. Add a cronjob for puppetagent with --onetime , thus allowing for setting different intervals on different nodes.��
Triggered selective updatesSimilar to the delayed check-in and cron strategies, itʼs possible to trigger node updates ondemand. Managed nodes can be configured to not check-in automatically, but rather to check-in�only when requested. puppetrun (in the ʻextʼ directory of the Puppet checkout) may be used toselectively update hosts. Alternatively, do not run the daemon, instead use a tool like mcollective tolaunch puppetagent with the --onetime option.
Puppet Documentation • Scaling Puppet 147/434
No central hostUsing a central server offers numerous advantages, particularly in the area of security and�enhanced control. In environments that do not need these features, it is possible to use rsync, git,or some other means to transfer Puppet manifests and data to each individual node, and then runpuppetapply locally (usually via cron). This approach scales essentially infinitely, and full usage of�Puppet and facter is still possible.
Minimize recursive file serving�Puppetʼs recursive file serving works well for small directories, but it isnʼt as efficient as rsync or���NFS, and using it for larger directories can take a performance toll on both the client and server.
Using Multiple Puppet MastersTo scale beyond a certain size, or for geographic distribution or disaster recovery, a deploymentmay warrant having more than one puppet master server. This document outlines options fordeployments with multiple masters.
In brief:
Distributing Agent LoadFirst things first; the rest of your configuration will depend on how youʼre planning on distributing��the agent load. You have several options available. Determine what your deployment will look likenow, but implement this as the last step, only after you have the infrastructure in place to supportit.
Option 1: Statically Designate Servers on Agent Nodes
Manually or with Puppet, change the server setting in each agent nodeʼs puppet.conf file such�that the nodes are divided more or less evenly among the available masters.
This option is labor-intensive and will gradually fall out of balance, but it will work withoutadditional infrastructure.
Note: As of this writing, this document does not cover:
How to expand Puppet Enterpriseʼs orchestration or live management featuresHow to use multiple PE console or Puppet Dashboard servers
1. Determine the method you will use to distribute the agent load among the available masters2. Centralize all certificate authority functions�3. Bring up additional puppet master servers4. Centralize reporting, inventory service, and storeconfigs (if necessary)�5. Keep manifests and modules in sync across your puppet masters6. Implement agent load distribution
Puppet Documentation • Using Multiple Puppet Masters 148/434
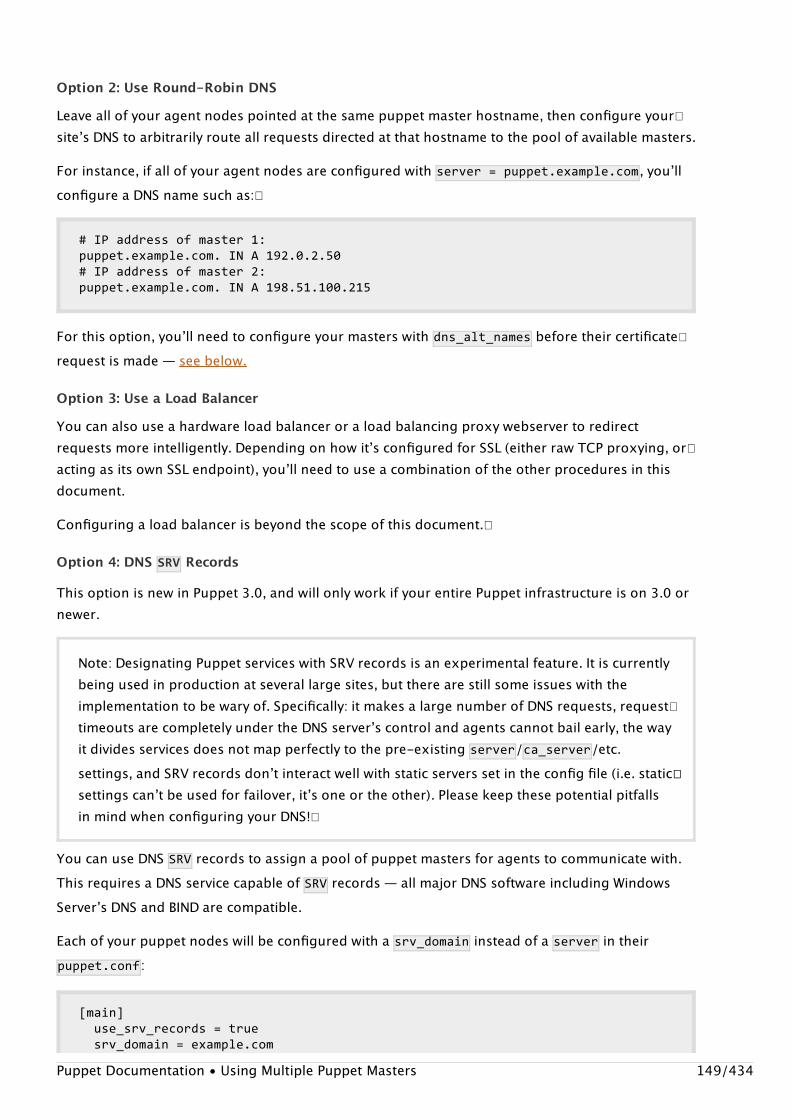
Option 2: Use Round-Robin DNS
Leave all of your agent nodes pointed at the same puppet master hostname, then configure your�siteʼs DNS to arbitrarily route all requests directed at that hostname to the pool of available masters.
For instance, if all of your agent nodes are configured with �server=puppet.example.com , youʼllconfigure a DNS name such as:�
#IPaddressofmaster1:puppet.example.com.INA192.0.2.50#IPaddressofmaster2:puppet.example.com.INA198.51.100.215
For this option, youʼll need to configure your masters with �dns_alt_names before their certificate�request is made — see below.
Option 3: Use a Load Balancer
You can also use a hardware load balancer or a load balancing proxy webserver to redirectrequests more intelligently. Depending on how itʼs configured for SSL (either raw TCP proxying, or�acting as its own SSL endpoint), youʼll need to use a combination of the other procedures in thisdocument.
Configuring a load balancer is beyond the scope of this document.�
Option 4: DNS SRV Records
This option is new in Puppet 3.0, and will only work if your entire Puppet infrastructure is on 3.0 ornewer.
You can use DNS SRV records to assign a pool of puppet masters for agents to communicate with.This requires a DNS service capable of SRV records — all major DNS software including WindowsServerʼs DNS and BIND are compatible.
Each of your puppet nodes will be configured with a �srv_domain instead of a server in theirpuppet.conf :
[main]use_srv_records=truesrv_domain=example.com
Note: Designating Puppet services with SRV records is an experimental feature. It is currentlybeing used in production at several large sites, but there are still some issues with theimplementation to be wary of. Specifically: it makes a large number of DNS requests, request�timeouts are completely under the DNS serverʼs control and agents cannot bail early, the wayit divides services does not map perfectly to the pre-existing server/ca_server/etc.settings, and SRV records donʼt interact well with static servers set in the config file (i.e. static��settings canʼt be used for failover, itʼs one or the other). Please keep these potential pitfallsin mind when configuring your DNS!�
Puppet Documentation • Using Multiple Puppet Masters 149/434
..then they will look up a SRV record at _x-puppet._tcp.example.com when they need to talk to apuppet master.
#Equal-weightloadbalancingbetweenmaster-aandmaster-b:_x-puppet._tcp.example.com.INSRV058140master-a.example.com._x-puppet._tcp.example.com.INSRV058140master-b.example.com.
Advanced configurations are also possible. �For instance, if all devices in site A are configured with a�srv_domain of site-a.example.com and all nodes in site B are configured to �site-b.example.com ,you can configure them to prefer a master in the local site, but fail over to the remote site:�
#SiteAhastwomasters-master-1isbeefier,giveit75%oftheload:_x-puppet._tcp.site-a.example.com.INSRV0758140master-1.site-a.example.com._x-puppet._tcp.site-a.example.com.INSRV0258140master-2.site-a.example.com._x-puppet._tcp.site-a.example.com.INSRV158140master.site-b.example.com.
#ForsiteB,preferthelocalmasterunlessit'sdown,thenfailbacktositeA_x-puppet._tcp.site-b.example.com.INSRV058140master.site-b.example.com._x-puppet._tcp.site-b.example.com.INSRV1758140master-1.site-a.example.com._x-puppet._tcp.site-b.example.com.INSRV1258140master-2.site-a.example.com.
Centralize the Certificate Authority�The additional puppet masters at a site should only share the burden of compiling and servingcatalogs; any certificate authority functions should be delegated to a single server. �Choose oneserver to act as the CA, and ensure that it is reachable at a unique hostname other than (or inaddition to) puppet .
There are two main options for centralizing the CA:
Option 1: Direct agent nodes to the CA MasterMETHOD A: INDIVIDUAL AGENT CONFIGURATION
On every agent node, you must set the ca_server setting in puppet.conf (in the [main]configuration block) to the hostname of the server acting as the certificate authority.��
If you have a large number of existing nodes, it is easiest to do this by managing puppet.confwith a Puppet module and a template.Be sure to pre-set this setting when provisioning new nodes — they will be unable tosuccessfully complete their initial agent run if theyʼre not communicating with the correctca_server .
METHOD B: DNS SRV RECORDS
Puppet Documentation • Using Multiple Puppet Masters 150/434
If you are utilizing SRV records for agents, then you can use the _x-puppet-ca._tcp.$srv_domainDNS name to configure clients to point to a single specific CA server, while the ��_x-puppet._tcp.$srv_domain DNS name will be handling the majority of their requests to masters andcan be a set of puppet masters without CA capabilities.
Option 2: Proxy Certificate Traffic���
Alternately, if your nodes donʼt have direct connectivity to your CA master, you arenʼt using SRVrecords, or you do not wish to change every nodeʼs puppet.conf , you can configure the web server�on the puppet masters other than your CA master to proxy all certificate-related traffic to the���designated CA master.
All certificate related URLs begin with �/<NAMEOFPUPPETENVIRONMENT>/certificate ; simply catchand proxy these requests using whatever capabilities your web server offers.�
Create New Puppet Master ServersInstall Puppet
To add a new puppet master server to your deployment, begin by installing and configuring Puppet�
This method only works if your puppet master servers are using a web server that provides amethod for proxying requests, like Apache with Passenger.
EXAMPLE: APACHE CONFIGURATION WITH MOD_PROXY
In the scope of your puppet master vhost, add the following configuration:�
SSLProxyEngineOn#Proxyallrequeststhatstartwiththingslike/production/certificatetotheCAProxyPassMatch^/([^/]+/certificate.*)$https://puppetca.example.com:8140/$1
This change must be made to the Apache configuration on every puppet master server other�than the one serving as the CA. No changes need to be made to agent nodesʼ configurations.�
Additionally, the CA master must allow the nodes to download the certificate revocation list�via the proxy, without authentication — certificate requests and retrieval of signed�certificates are allowed by default, but not CRLs. �Add the following to the CA masterʼsauth.conf :
path/certificate_revocation_listauthanymethodfindallow*
Puppet Documentation • Using Multiple Puppet Masters 151/434
as per normal.
Installing Puppet (open source versions)Installing Puppet Enterprise
Like with any puppet master, youʼll need to use a production-grade web server rather than thedefault WEBrick server. We generally assume that you know how to do this if youʼre already at thepoint where you need multiple masters, but see Scaling with Passenger for one way to do it.
Before Running puppetagent or puppetmaster
In puppet.conf , do the following:Set ca to false in the [master] config block.�If youʼre using the individual agent configuration method of CA centralization�:
Set ca_server to the hostname of your CA server in the [main] config block.�If an ssldir is configured, make sure itʼs configured in the ��[main] block only.
Request a new certificate by running �puppetagent--test--waitforcert10 .Log into the CA server and run puppetcertsignmaster-2.example.com .
(Youʼll need to add --allow-dns-alt-names to the command if dns_alt_names were in thecertificate request.)�
Centralize Reports, Inventory Service, and CatalogSearching (storeconfigs)�If you are using Puppet Dashboard or another HTTP report processor, you should point all of yourpuppet masters at the same shared Dashboard server; otherwise, you wonʼt be able to see all of
If youʼre using the DNS round robin method of agent load balancing, or a load balancer inTCP proxying mode, your non-CA masters will need certificates with DNS Subject Alternative�Names:
Configure �dns_alt_names in the [main] block of puppet.conf .
It should be configured to cover every DNS name that might be used by a node to access�this master.
dns_alt_names=puppet,puppet.example.com,puppet.site-a.example.com
If the agent or master has been run and already created a certificate, blow it away by�running sudorm-rf$(puppetmaster--configprintssldir) . If a cert has beenrequested from the master, youʼll also need to delete it there to re-issue a new one withthe alt names: puppetcertcleanmaster-2.example.com .
Puppet Documentation • Using Multiple Puppet Masters 152/434
your nodesʼ reports.
If you are using the inventory service or exported resources, itʼs complex and impractical to use anyof the older (activerecord) backends in a multi-master environment. You should definitely switch to�PuppetDB, and point all of your puppet masters at a shared PuppetDB instance. A reasonably robustPuppetDB server can handle many puppet masters and many thousands of agent nodes.
See the PuppetDB manual for instructions on setting up PuppetDB. You will need to deploy aPuppetDB server, then configure each puppet master to use it.�
Keep Manifests and Modules in Sync Across Your PuppetMastersYou will need to find some way to ensure that all of your puppet masters have identical copies of�your manifests, Puppet modules, and external node classifier� data. Some options are:
Use a version control system such as Git, Mercurial, or Subversion to manage and sync yourmanifests, modules, and other data.Run an out-of-band rsync task via cron.Configure puppet agent on each master node to point to a designated model puppet master,�then use Puppet itself to distribute the modules.
Implement Load DistributionNow that your other masters are ready, you can implement the agent load balancing mechanismthat you selected above.
PassengerUsing Passenger instead of WEBrick for web services offers numerous performance advantages.�This guide shows how to set it up in an Apache web server.
Why PassengerTraditionally, the puppetmaster would embed a WEBrick Web Server to serve the Puppet clients. Thismay work well for testing and small deployments, but itʼs recommended to use a more scalableserver for production environments.
What is Passenger?Passenger (AKA mod_rails or mod_rack) is the Apache 2.x module which lets you run Rails or Rackapplications inside a general purpose web server, like Apache httpd or nginx.
Passenger is the recommended deployment method for modern versions of puppet masters, butyou may run into compatibility issues with Puppet versions older than 0.24.6 and Passengerversions older than 2.2.5.Puppet Documentation • Passenger 153/434

Apache and Passenger InstallationMake sure puppetmaster has been run at least once (or puppetagent , if this master is not theCA), so that all required SSL certificates are in place.�
Install Apache 2
Debian/Ubuntu:
$sudoapt-getinstallapache2ruby1.8-devrubygems$sudoa2enmodssl$sudoa2enmodheaders
RHEL/CentOS (needs the Puppet Labs repository enabled, or the EPEL repository):
$sudoyuminstallhttpdhttpd-develmod_sslruby-develrubygemsgcc
Install Rack/Passenger
$sudogeminstallrackpassenger$sudopassenger-install-apache2-module
Apache Configuration�To configure Apache to run the puppet master application, you must:�
Install the puppet master Rack application, by creating a directory for it and copying theconfig.ru file from the Puppet source.�Create a virtual host config file for the puppet master application, and install/enable it.��
Install the Puppet Master Rack Application
Your copy of Puppet includes a config.ru file, which tells Rack how to spawn puppet master�processes. Create a directory for it, then copy the ext/rack/files/config.ru file from the Puppet�source code into that directory:
$sudomkdir-p/usr/share/puppet/rack/puppetmasterd$sudomkdir/usr/share/puppet/rack/puppetmasterd/public/usr/share/puppet/rack/puppetmasterd/tmp$sudocp/usr/share/puppet/ext/rack/files/config.ru/usr/share/puppet/rack/puppetmasterd/$sudochownpuppet/usr/share/puppet/rack/puppetmasterd/config.ru
Note: The chown step is important — the owner of this file is the user the puppet master�process will run under. This should usually be puppet , but may be different in your�deployment.
Puppet Documentation • Passenger 154/434
Create and Enable the Puppet Master Vhost
See “Example Vhost Configuration” below� for the contents of this vhost file. Note that the vhostʼs�DocumentRoot directive refers to the Rack application directory you created above.
Debian/Ubuntu:
See Apache Configuration below for contents of puppetmaster file��
$sudocppuppetmaster/etc/apache2/sites-available/$sudoa2ensitepuppetmaster
RHEL/CentOS:
See Apache Configuration below for contents of puppetmaster.conf file��
$sudocppuppetmaster.conf/etc/httpd/conf.d/
EXAMPLE VHOST CONFIGURATION
This Apache Virtual Host configures the puppet master on the default puppetmaster port (8140).�You can also see a similar file at �ext/rack/files/apache2.conf in the Puppet source.
#You'llneedtoadjustthepathsinthePassengerconfigdependingonwhichOS#you'reusing,aswellastheinstalledversionofPassenger.
#Debian/Ubuntu:#LoadModulepassenger_module/var/lib/gems/1.8/gems/passenger-3.0.x/ext/apache2/mod_passenger.so#PassengerRoot/var/lib/gems/1.8/gems/passenger-3.0.x#PassengerRuby/usr/bin/ruby1.8
#RHEL/CentOS:#LoadModulepassenger_module/usr/lib/ruby/gems/1.8/gems/passenger-3.0.x/ext/apache2/mod_passenger.so#PassengerRoot/usr/lib/ruby/gems/1.8/gems/passenger-3.0.x#PassengerRuby/usr/bin/ruby
#Andthepassengerperformancetuningsettings:PassengerHighPerformanceOnPassengerUseGlobalQueueOn#Setthistoabout1.5timesthenumberofCPUcoresinyourmaster:PassengerMaxPoolSize12#Recyclemasterprocessesaftertheyservice1000requestsPassengerMaxRequests1000#Stopprocessesiftheysitidlefor10minutesPassengerPoolIdleTime600
Listen8140<VirtualHost*:8140>SSLEngineOn#Onlyallowhighsecuritycryptography.Alterifneededforcompatibility.SSLProtocolAll-SSLv2SSLCipherSuiteHIGH:!ADH:RC4+RSA:-MEDIUM:-LOW:-EXP
Puppet Documentation • Passenger 155/434
SSLCertificateFile/var/lib/puppet/ssl/certs/puppet-server.example.com.pemSSLCertificateKeyFile/var/lib/puppet/ssl/private_keys/puppet-server.example.pemSSLCertificateChainFile/var/lib/puppet/ssl/ca/ca_crt.pemSSLCACertificateFile/var/lib/puppet/ssl/ca/ca_crt.pemSSLCARevocationFile/var/lib/puppet/ssl/ca/ca_crl.pemSSLVerifyClientoptionalSSLVerifyDepth1SSLOptions+StdEnvVars+ExportCertData#Theserequestheadersareusedtopasstheclientcertificate#authenticationinformationontothepuppetmasterprocessRequestHeadersetX-SSL-Subject%{SSL_CLIENT_S_DN}eRequestHeadersetX-Client-DN%{SSL_CLIENT_S_DN}eRequestHeadersetX-Client-Verify%{SSL_CLIENT_VERIFY}e
RackAutoDetectOnDocumentRoot/usr/share/puppet/rack/puppetmasterd/public/<Directory/usr/share/puppet/rack/puppetmasterd/>OptionsNoneAllowOverrideNoneOrderAllow,DenyAllowfromAll</Directory></VirtualHost>
If this puppet master is not the certificate authority, you will need to use different paths to the CA��certificate and CRL:�
SSLCertificateChainFile/var/lib/puppet/ssl/certs/ca.pemSSLCACertificateFile/var/lib/puppet/ssl/certs/ca.pemSSLCARevocationFile/var/lib/puppet/ssl/crl.pem
For additional details about enabling and configuring Passenger, see the �Passenger install guide.
Start or Restart the Apache serviceEnsure that any WEBrick puppet master process is stopped before starting the Apache service; onlyone can be bound to TCP port 8140.
Debian/Ubuntu:
$sudo/etc/init.d/apache2restart
RHEL/CentOS:
$sudo/etc/init.d/httpdrestart
If all works well, youʼll want to make sure the WEBrick service no longer starts on boot:
Debian/Ubuntu:
Puppet Documentation • Passenger 156/434
$sudoupdate-rc.d-fpuppetmasterremove
RHEL/CentOS:
$sudochkconfigpuppetmasteroff$sudochkconfighttpdon
Using MongrelPuppet daemons default to using WEBrick for http serving, but puppetmasterd can be used withMongrel instead for performance benefits.�
The mongrel documentation is currently maintained our our Wiki until it can be migrated over.Please see the OS specific setup documents on the Wiki for further information.�
Using Puppet TemplatesLearn how to template out configuration files with Puppet, filling in variables with the managed���nodeʼs facts.
Puppet supports templates written in the ERB templating language, which is part of the Rubystandard library.
Templates can be used to specify the contents of files.�
For a full introduction to using templates with Puppet, see the templates chapter of LearningPuppet.
Evaluating TemplatesTemplates are evaluated via a simple function:
$value=template("my_module/mytemplate.erb")
Template files should be stored in the �templates directory of a Puppet module, which allows thetemplate function to locate them with the simplified path format shown above. For example, the�file referenced by �template("my_module/mytemplate.erb") would be found on disk at/etc/puppet/modules/my_module/templates/mytemplate.erb (assuming the commonmodulepath of /etc/puppet/modules ).
(If a file cannot be located within any module, the �template function will fall back to searchingrelative to the paths in Puppetʼs templatedir . However, using this setting is no longerrecommended.)
Puppet Documentation • Using Mongrel 157/434
Templates are always evaluated by the parser, not by the client. This means that if you are using apuppet master server, then the templates only need to be on the server, and you never need todownload them to the client. The client sees no difference between using a template and specifying�all of the text of the file as a string.�
ERB Template SyntaxERB is part of the Ruby standard library. Full information about its syntax and evaluation is availablein the Ruby documentation. An abbreviated version is presented below.
ERB is Plain Text With Embedded Ruby
ERB templates may contain any kind of text; in the context of Puppet, this is usually some sort ofconfig file. (Outside the context of Puppet, it is usually HTML.)��
Literal text in an ERB file becomes literal text in the processed output. Ruby instructions and�expressions can be embedded in tags; these will be interpreted to help create the processedoutput.
Tags
The tags available in an ERB file depend on the way the ERB processor is configured. Puppet always��uses the same configuration for its templates (see “trim mode” below), which makes the following�tags available:
<%=Rubyexpression%> — This tag will be replaced with the value of the expression itcontains.<%Rubycode%> — This tag will execute the code it contains, but will not be replaced by avalue. Useful for conditional or looping logic, setting variables, and manipulating data beforeprinting it.<%#comment%> — Anything in this tag will be suppressed in the final output.�<%% or %%> — A literal <% or %>, respectively.<%- — Same as <% , but suppresses any leading whitespace in the final output. Useful when�indenting blocks of code for readability.-%> — Same as %> , but suppresses the subsequent line break in the final output. Useful with�many lines of non-printing code in a row, which would otherwise appear as a long stretch ofblank lines.
Trim Mode
Puppet uses ERBʼs undocumented "-" (explicit line trim) mode, which allows tags to suppressleading whitespace and trailing line breaks as described above, and disallows the %lineofcodeshortcut. Although it unfortunately doesnʼt appear in the ERB docs, you can read its effect in the�Ruby source code starting in the initialize method of the ERB::Compiler::TrimScanner class.
Using TemplatesHere is an example for generating the Apache configuration for �Trac sites:
Puppet Documentation • Using Mongrel 158/434
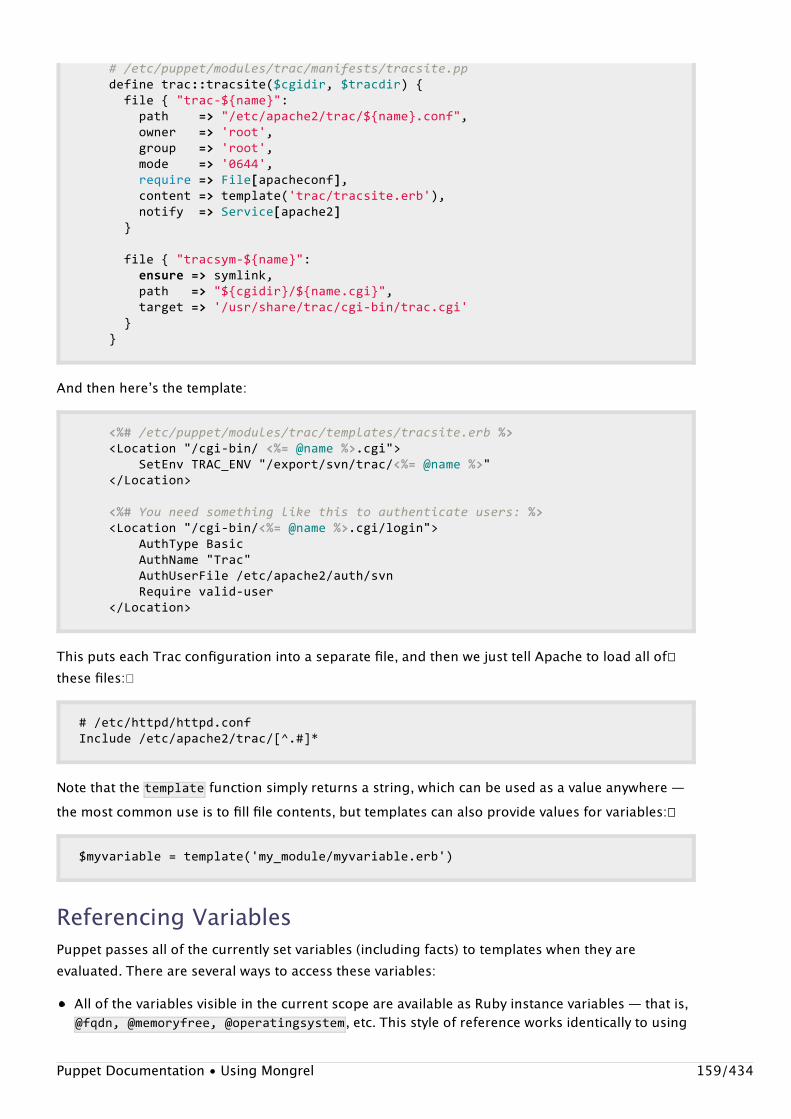
#/etc/puppet/modules/trac/manifests/tracsite.ppdefinetrac::tracsite($cgidir,$tracdir){file{"trac-${name}":path=>"/etc/apache2/trac/${name}.conf",owner=>'root',group=>'root',mode=>'0644',require=>File[apacheconf],content=>template('trac/tracsite.erb'),notify=>Service[apache2]}
file{"tracsym-${name}":ensure=>symlink,path=>"${cgidir}/${name.cgi}",target=>'/usr/share/trac/cgi-bin/trac.cgi'}}
And then hereʼs the template:
<%#/etc/puppet/modules/trac/templates/tracsite.erb%><Location"/cgi-bin/<%=@name%>.cgi">SetEnvTRAC_ENV"/export/svn/trac/<%=@name%>"</Location>
<%#Youneedsomethinglikethistoauthenticateusers:%><Location"/cgi-bin/<%=@name%>.cgi/login">AuthTypeBasicAuthName"Trac"AuthUserFile/etc/apache2/auth/svnRequirevalid-user</Location>
This puts each Trac configuration into a separate file, and then we just tell Apache to load all of��these files:�
#/etc/httpd/httpd.confInclude/etc/apache2/trac/[^.#]*
Note that the template function simply returns a string, which can be used as a value anywhere —the most common use is to fill file contents, but templates can also provide values for variables:��
$myvariable=template('my_module/myvariable.erb')
Referencing VariablesPuppet passes all of the currently set variables (including facts) to templates when they areevaluated. There are several ways to access these variables:
All of the variables visible in the current scope are available as Ruby instance variables — that is,@fqdn,@memoryfree,@operatingsystem , etc. This style of reference works identically to using
Puppet Documentation • Using Mongrel 159/434
short (local) variable names in a Puppet manifest: @fqdn is exactly equivalent to $fqdn .Historically, all of the variables visible in the current scope were also available as Ruby methods— that is, fqdn,memoryfree,operatingsystem , etc., without the prepended @ sign. This styleof reference caused problems when variable names collided with Ruby method names; its useemits deprecation warnings as of Puppet 3 and will be removed in Puppet 4. Please update anyexisting code which uses it and start any new code out with the @fqdn instance-variable syntax.Puppet passes an object named scope to the template. This contains all of the currently setvariables, as well as some other data (including functions), and provides some methods foraccessing them. You can use the scope objectʼs lookupvar method to find �any variable, in anyscope. See “Out-of-Scope Variables” below for more details.
Note that Puppetʼs variable lookup rules changed for Puppet 3.0.
Out-of-Scope Variables
You can access variables in other scopes with the scope.lookupvar method:
<%=scope.lookupvar('apache::user')%>
This can also be used to ensure that you are getting the top-scope value of a variable that may havebeen overridden in a local scope:
<%=scope.lookupvar('::domain')%>
Puppet 3 introduces an easier syntax: you can use the square bracket operator ([] ) on the scopeobject as though it were a hash.
<%=scope['::domain']%>
Testing for Undefined variables�
Instance variables are not created for variables whose values are undefined, so you can easily test�for undefined variables with �if@variable :
<%if@myvar%>myvarhas<%=@myvar%>value<%end%>
Older templates often used the has_variable?("myvar") helper function, but this could yield oddresults when variables were explicitly set to undef , and should usually be avoided.
If you need to test for a variable outside the current scope, you should copy it to a local variable inthe manifest before evaluating the template:
#manifest:$in_var=$outside_scope::outside_var
Puppet Documentation • Using Mongrel 160/434
#template:<%if@in_var%>outside_varhas<%=@in_var%>value<%end%>
Getting a List of All Variables
If you use the scope objectʼs to_hash method, you can get a hash of every variable that is defined in�the current scope. This hash uses the local name (osfamily ) of each variable, rather than thequalified name (�::osfamily ).
This snippet will print all of the variable names defined in the current scope:�
<%scope.to_hash.keys.eachdo|k|-%><%=k%><%end-%>
Combining TemplatesThe template function can concatenate several templates together as follows:
template('my_module/template1.erb','my_module/template2.erb')
This would be rendered as a single string with the content of both templates, in order.
IterationPuppetʼs templates also support array iteration. If the variable you are accessing is an array, you caniterate over it in a loop. Given Puppet manifest code like this:
$values=[val1,val2,otherval]
You could have a template like this:
<%@values.eachdo|val|-%>Somestuffwith<%=val%><%end-%>
This would produce:
Somestuffwithval1Somestuffwithval2Somestuffwithotherval
Note that normally, ERB template lines that just have code on them would get translated into blanklines. This is because ERB generates newlines by default. To prevent this, we use the closing tag -%>instead of %> .
Puppet Documentation • Using Mongrel 161/434
As we mentioned, erb is a Ruby system, but you donʼt need to know Ruby well to use ERB. Internally,Puppetʼs values get translated to real Ruby values, including true and false, so you can be prettyconfident that variables will behave as you might expect.�
ConditionalsThe ERB templating supports conditionals. The following construct is a quick and easy way toconditionally put content into a file:�
<%ifbroadcast!="NONE"%>broadcast<%=broadcast%><%end%>
Access to Tags and Declared Classes
In version 0.24.6 and later, Puppet passes the following extra variables to a template:
classes — an array of all of the classes that have been declared so fartags — an array of all of the tags applied to the current containerall_tags — an array of all of the tags in use anywhere in the catalog
You can iterate over these variables or access their members.
This snippet will print all the classes that have been declared so far:
<%classes.eachdo|klass|-%>Theclass<%=klass%>isdefined<%end-%>
This snippet will print all the tags applied to the current container:
<%tags.eachdo|tag|-%>Thetag<%=tag%>ispartofthecurrentscope<%end-%>
This snippet will print all of the tags in use so far:
<%all_tags.eachdo|tag|-%>Thetag<%=tag%>isdefined<%end-%>
Using Functions Within TemplatesPuppet functions can be used inside templates, but their use is slightly different from their use in�
Note: The lists of tags and declared classes are parse-order dependent — they are only safeto use if you know exactly when in the compilation process the template will be evaluated.Using these variables is not recommended.
Puppet Documentation • Using Mongrel 162/434
manifests:
All functions are methods on the scope object.You must prepend “function_” to the beginning of the function name.The arguments of the function must be provided as an array, even if there is only one argument.(This is mandatory in Puppet 3. Prior to Puppet 3, some functions would succeed when passed astring and some would fail.)
For example, to include one template inside another:
<%=scope.function_template(["my_module/template2.erb"])%>
To log a warning using Puppetʼs own logging system, so that it will appear in reports:
<%=scope.function_warning(["Templatewasmissingsomedata;thisconfigfilemaybemalformed."])%>
Syntax CheckingERB files are easy to syntax check. For a file mytemplate.erb, run��
erb-P-x-T'-'mytemplate.erb|ruby-c
Virtual Resource Design PatternsReferencing an entity from more than one place.
About Virtual ResourcesBy default, any resource you describe in a clientʼs Puppet config will get sent to the client and be�managed by that client. However, resources can be specified in a way that marks them as virtual,�meaning that they will not be sent to the client by default. You mark a resource as virtual byprefixing @ to the resource specification; for instance, the following code defines a virtual user:���
@user{luke:ensure=>present}
If you include this code (or something similar) in your configuration then the user will never get�sent to your clients without some extra effort.�
How This Is UsefulPuppet enforces configuration normalization, meaning that a given resource can only be specified��in one part of your configuration. You canʼt configure user johnny in both the solaris and freebsd��
Puppet Documentation • Virtual Resource Design Patterns 163/434
classes.
For most cases, this is fine, because most resources are distinctly related to a single Puppet class —�they belong in the webserver class, mailserver class, or whatever. Some resources can not becleanly tied to a specific class, though; multiple otherwise-unrelated classes might need a specific��resource. For instance, if you have a user who is both a database administrator and a Unixsysadmin, you want the user installed on all machines that have either database administrators orUnix administrators.
You canʼt specify the user in the dba class nor in the sysadmin class, because that would not get theuser installed for all cases that matter.
In these cases, you can specify the user as a virtual resource, and then mark the user as real in bothclasses. Thus, the user is still specified in only one part of your configuration, but multiple parts of��your configuration verify that the user will be installed on the client.�
The important point here is that you can take a virtual resource and mark it non-virtual as manytimes as you want in a configuration; itʼs only the specification itself that must be normalized to one��specific part of your configuration.��
How to Realize ResourcesThere are two ways to mark a virtual resource so that it gets sent to the agent: You can use a specialsyntax called a collection, or you can use the realize function.
Collections provide a simple syntax (sometimes referred to as the “spaceship” operator) formarking virtual objects as real, such that they should be sent to the agent. Collections require thetype of resource you are collecting and zero or more attribute comparisons to specifically select�resources. For instance, to find our mythical user, we would use:�
User<|title==luke|>
As promised, weʼve got the user type (capitalized, because weʼre performing a type-leveloperation), and weʼre looking for the user whose title is luke. “Title” is special here — it is the valuebefore the colon when you specify the user. This is somewhat of an inconsistency in Puppet,because this value is often referred to as the name, but many types have a name parameter andthey could have both a title and a name.
If no comparisons are specified, all virtual resources of that type will be marked real.�
This attribute querying syntax is currently very simple. The only comparisons available are equalityand non-equality (using the == and != operators, respectively), and you can join thesecomparisons using or and and. You can also parenthesize these statements, as you might expect.So, a more complicated collection might look like:
User<|(groups==dbaorgroups==sysadmin)ortitle==luke|>
Realizing ResourcesPuppet Documentation • Virtual Resource Design Patterns 164/434
Puppet provides a simple form of syntactic sugar for marking resource non-virtual by title, therealize function:
realizeUser[luke]realize(User[johnny],User[billy])
The function follows the same syntax as other functions in the language, except that only resourcereferences are valid values.
Virtual Define-Based Resources�Since version 0.23, define-based resources may also be made virtual. For example:�
definemsg($arg){notify{"$name:$arg":}}@msg{test1:arg=>arg1}@msg{test2:arg=>arg2}
With the above definitions, neither of the msg resources will be applied to a node unless it realizes�them, e.g.:
realize(Msg[test1],Msg[test2])
Remember that when referencing an instance of a namespaced defined type, or when specifying�such a defined type for the collection syntax, you have to capitalize all segments of the typeʼs name�(e.g. Apache::Vhost['wordpress'] or Apache::Vhost<||> ).
Keep in mind that resources inside virtualized define-based resources must have unique names.�The following example will fail, complaining that File[foo] is defined twice:�
definebasket($arg){file{'foo':ensure=>present,content=>"$arg",}}@basket{'fruit':arg=>'apple'}@basket{'berry':arg=>'watermelon'}
realize(Basket[fruit],Basket[berry])
Hereʼs a working example:
definebasket($arg){file{"$name":ensure=>present,content=>"$arg",}}
Puppet Documentation • Virtual Resource Design Patterns 165/434
@basket{'fruit':arg=>'apple'}@basket{'berry':arg=>'watermelon'}
realize(Basket[fruit],Basket[berry])
Note that the working example will result in two File resources, named fruit and berry .
Exported Resource Design PatternsExporting and collecting resources is an extension of Virtual Resources . Puppet provides anexperimental superset of virtual resources, using a similar syntax. In addition to these resourcesbeing virtual, theyʼre also “exported” to other hosts on your network.
About Exported ResourcesWhile virtual resources can only be collected by the host that specified them, exported resources�can be collected by any host. You must set the storeconfigs setting to true to enable this�functionality (you can see information about stored configuration on the �Using StoredConfiguration� wiki page, and Puppet will automatically create a database for storing configurations�(using Ruby on Rails).
[master]storeconfigs=true
This allows one host to configure another host; for instance, a host could configure its services��using Puppet, and then could export Nagios configurations to monitor those services.�
The key syntactical difference between virtual and exported resources is that the special sigils (�@and <||> ) are doubled (@@ and <<||>> ) when referring to an exported resource.
Here is an example with exported resources:
classssh{@@sshkey{$hostname:type=>dsa,key=>$sshdsakey}Sshkey<<||>>}
As promised, we use two @ sigils here, and the angle brackets are doubled in the collection.
The above code would have every host export its SSH public key, and then collect every hostʼs keyand install it in the ssh_known_hosts file (which is what the sshkey type does); this would include�the host doing the exporting.
Itʼs important to mention here that you will only get exported resources from hosts whoseconfigurations have been compiled. If hostB exports a resource but hostB has never connected to�the server, then no host will get that exported resource. The act of compiling a given hostʼsconfiguration puts the resources into the database, and only resources in the database are�Puppet Documentation • Exported Resource Design Patterns 166/434
available for collection.
Letʼs look at another example, this time using a File resource:
nodea{@@file{"/tmp/foo":content=>"fjskfjs\n",tag=>"foofile",}}nodeb{File<<|tag=='foofile'|>>}
This will create /tmp/foo on node b. Note that the tag is not required, it just allows you to controlwhich resources you want to import.
Exported Resources with NagiosPuppet includes native types for managing Nagios configuration files. These types become very��powerful when you export and collect them. For example, you could create a class for somethinglike Apache that adds a service definition on your Nagios host, automatically monitoring the web�server:
classnagios-target{@@nagios_host{$fqdn:ensure=>present,alias=>$hostname,address=>$ipaddress,use=>"generic-host",}@@nagios_service{"check_ping_${hostname}":check_command=>"check_ping!100.0,20%!500.0,60%",use=>"generic-service",host_name=>"$fqdn",notification_period=>"24x7",service_description=>"${hostname}_check_ping"}}classnagios-monitor{package{[nagios,nagios-plugins]:ensure=>installed,}service{nagios:ensure=>running,enable=>true,#subscribe=>File[$nagios_cfgdir],require=>Package[nagios],}#collectresourcesandpopulate/etc/nagios/nagios_*.cfgNagios_host<<||>>Nagios_service<<||>>}
Exported Resources OverrideBeginning in version 0.25, some new syntax has been introduced that allows creation of collectionsof any resources, not just virtual ones, based on filter conditions, and override of attributes in the�created collection. This feature is not constrained to the override in inherited context, as is the case
Puppet Documentation • Exported Resource Design Patterns 167/434
in the usual resource override.
Ordinary resource collections can now be defined by filter conditions, in the same way as��collections of virtual or exported resources. For example:
file{"/tmp/testing":content=>"whatever"}
File<||>{mode=>0600}
The filter condition goes in the middle of the �<||> sigils. In the above example the condition isempty, so all file resources (not just virtual ones) are selected, and all file resources will have their��modes overridden to 0600.
In the past this syntax only collected virtual resources. It now collects all matching resources, virtualor no, and allows you to override attributes in any of the collection so defined.�
As another example, one can write:
file{"/tmp/a":content=>"a"}file{"/tmp/b":content=>"b"}
File<|title!="/tmp/b"|>{require=>File["/tmp/b"]}
This means that every File resource requires /tmp/b, except /tmp/b itself. Moreover, it is nowpossible to define resource overriding without respecting the override on inheritance rule:�
classa{file{"/tmp/testing":content=>"whatever"}}
classb{includeaFile<||>{mode=>0600}}includeb
EnvironmentsManage your module releases by dividing your site into environments.
Puppet Documentation • Environments 168/434
Slice and DicePuppet lets you slice your site up into an arbitrary number of “environments” and serve a different�set of modules to each one. This is usually used to manage releases of Puppet modules by testingthem against scratch nodes before rolling them out completely, but it introduces a lot of otherpossibilities, like separating a DMZ environment, splitting coding duties among multiple sysadmins,or dividing the site by hardware type.
What an Environment IsEvery agent node is configured to have an environment, which is simply a short label specified in��puppet.confʼs environment setting. Whenever that node makes a request, the puppet master getsinformed of its environment. (If you donʼt specify an environment, the agent has the default“production” environment.)
The puppet master can then use that environment several ways:
If the masterʼs puppet.conf file has a �[configblock] for this agentʼs environment, thosesettings will override the masterʼs normal settings when serving that agent.If the values of any settings in puppet.conf reference the $environment variable (likemodulepath=$confdir/environments/$environment/modules:$confdir/modules , forexample), the agentʼs environment will be interpolated into them.Depending on how auth.conf is configured, different requests might be allowed or denied.��The agentʼs environment will also be accessible in Puppet manifests as the top-scope$environment variable.
In short: environments let the master tweak its own configuration on the fly, and offer a way to���completely swap out the set of available modules for certain nodes.
Naming EnvironmentsEnvironment names should only contain alphanumeric characters and underscores, and are case-sensitive.
There are four forbidden environment names:
main
master
agent
user
These names are already taken by the primary config blocks�. If you are using Git branches for yourenvironment names, this may mean youʼll need to rename the master branch to something likeproduction or stable .
CaveatsPuppet Documentation • Environments 169/434

Before you start, be aware that environments have some limitations, most of which are known bugsor vagaries of implementation rather than design choices.
Puppet will only read the modulepath , manifest , manifestdir , and templatedir settings fromenvironment config blocks; other settings in any of these blocks will be ignored in favor of�settings in the [master] or [main] blocks. (Issue 7497)File serving only works well with environments if youʼre only serving files from modules; if youʼve�set up custom mount points in fileserver.conf , they wonʼt work in your custom environments.(Though hopefully youʼre only serving files from modules anyway.)�Prior to Puppet 3, environments set by external node classifiers� were not authoritative. If you areusing Puppet 2.7 or earlier, you must set the environment in the agent nodeʼs config file.��Serving custom types and providers from an environment-specific modulepath sometimes fails.�(Issue 4409)
Configuring Environments on the Puppet Master�In puppet.conf
As mentioned above, puppet.conf lets you use $environment as a variable and create config�blocks for environments.
#/etc/puppet/puppet.conf[master]modulepath=$confdir/environments/$environment/modules:$confdir/modulesmanifest=$confdir/manifests/unknown_environment.pp[production]manifest=$confdir/manifests/site.pp[dev]manifest=$confdir/manifests/site.pp
In the [master] block, this example dynamically sets the modulepath so Puppet will check a per-environment folder for a module before serving it from the main set. Note that this wonʼt complainabout missing directories, so you can create the per-environment folders lazily as you need them.
The example also redirects requests for a non-existent environment to a different site manifest,�which will log an error and fail compilation; this can keep typos or forgetfulness from silentlycausing odd configurations.�
In auth.conf
path/authtrueenvironmentappdevallowlocalhost,customapp.example.com
If you specify an environment in an auth.conf ACL, it will only apply to requests in thatenvironment. This can be useful for developing new applications that integrate with Puppet; theexample above will leave normal requests functioning normally, but allow an app server to accesseverything via the HTTP API.
Puppet Documentation • Environments 170/434
In Manifests
The $environment variable should only rarely be necessary, but itʼs there if you need it.
Configuring Environments for Agent Nodes�In an ENC
Your external node classifier� can set an environment for a node by setting a value for theenvironment key. In Puppet 3 and later, the environment set by the ENC will override theenvironment from the agent nodeʼs config file. If no environment is provided by the ENC, the value��from the nodeʼs config file will be used.��
On the Agent Node
To set an environment agent-side, just specify the environment setting in either the [agent] or[main] block of puppet.conf .
[agent]environment=dev
Note that in Puppet 3 and later, this value will only be used if the ENC does not override it.
As with any config setting, you can also temporarily set it with a command line option:�
#puppetagent--environmentdev
Note: In Puppet 2.7 and earlier, ENC-set environments are not authoritative, and using themresults in nodes using a mixture of two environments — the ENC environment wins duringcompilation, and the agent environment wins during file downloads. If you need to centrally�control your nodes environments, you should upgrade to Puppet 3 as soon as is practical.
As a temporary workaround, you can manage nodesʼ puppet.conf files with a template and�set the environment based on the ENCʼs value; this will allow nodes to use a consistentenvironment on their second (and subsequent) Puppet runs.
Note: If your puppet master is running Puppet 3 but was once running Puppet 2.6, itsauth.conf file� may be missing a rule required for ENC environments. Ensure that thefollowing rule exists somewhere near the top of your auth.conf file:�
#allownodestoretrievetheirownnodedefinitionpath~^/node/([^/]+)$methodfindallow$1
Puppet masters which have only run 2.7 and later should already have this rule in theirauth.conf files.�
Puppet Documentation • Environments 171/434
Compatibility NotesEnvironments were introduced in Puppet 0.24.0.
ReportingHow to learn more about the activity of your nodes.
Reports and ReportingPuppet clients can be configured to send reports at the end of every configuration run. These��reports include all of the log messages generated during the configuration run and metrics related�to what happened on that run.
Logs
The bulk of the report is every log message generated during the transaction. This is a simple wayto send almost all client logs to the Puppet server; you can use the log report to send all of theseclient logs to syslog on the server.
Metrics
The rest of the report contains some basic metrics describing what happened in the transaction.There are three types of metrics in each report, and each type of metric has one or more values:
Time: Keeps track of how long things took.Total: Total time for the configuration run�File:Exec:User:Group:Config Retrieval�: How long the configuration took to retrieve�Service:Package:
Resources: Keeps track of the following stats:Total: The total number of resources being managedSkipped: How many resources were skipped, because of either tagging or schedulingrestrictionsScheduled: How many resources met any scheduling restrictionsOut of Sync: How many resources were out of syncApplied: How many resources were attempted to be fixed�Failed: How many resources were not successfully fixed�Restarted: How many resources were restarted because their dependencies changed
Puppet Documentation • Reporting 172/434
Failed Restarts: How many resources could not be restarted
Changes: The total number of changes in the transaction.
Setting Up ReportingBy default, the agent does not send reports, and the master is only configured to store reports,�which just dumps reports as YAML in the reportdir .
Make Agent Nodes Send Reports
Set the report setting in the puppet.conf file� to true in order to turn on reporting on agent nodes.
##/etc/puppet/puppet.conf#[agent]report=true
With this setting enabled, the agent will then send the report to the puppet master server at the endof every transaction.
Agents default to sending reports to the same server they get their configurations from, but you�can change that by setting reportserver , so if you have load-balanced Puppet servers you cankeep all of your reports consolidated on a single machine. (This is unimportant if the puppetmasters are using report processors like http or puppetdb , which just hand off reports to an�external system.)
Make Masters Process Reports
By default, the puppet master server stores incoming YAML reports to disk in the reportdir . Thereare other report types available that can process each report as it arrives; you can use Puppetʼsbuilt-in report processors, write custom report processor plugins, or write an out-of-band reportanalyzer task that consumes the stored YAML reports on your own schedule.USING BUILT-IN REPORTS
A list of the available built-in report processors
Select the report processors to use with the reports setting in the puppet masterʼs puppet.conffile. This setting should be a comma-separated list of report processors to use; if there is more�than one, Puppet will run all of them.
The most useful one is usually the http processor, which sends reports to an arbitrary URL. PuppetDashboard uses this, and itʼs easy enough to write a web service that consumes reports.
The PuppetDB terminus plugins also include a puppetdb report processor.
WRITING CUSTOM REPORTS
You can easily write your own report processor in place of any of the built-in reports. Put the reportinto the puppet masterʼs lib/puppet/reports directory to make it available.
Puppet Documentation • Reporting 173/434
Documentation of the report plugin API is forthcoming; however, you can use the built-in reportsas a guide, or use and/or hack one of these simple custom reports:
Report failed runs to an IRC channelReport failed runs and logs to PagerDutyReport failed runs to Jabber/XMPPReport failed runs to TwitterReport failed runs and logs to Campfire�Report failed runs to TwilioReport failed runs to BoxcarReport failed runs to HipChatSend metrics to a Ganglia server via gmetricReport failed runs to Growl
These example reports were posted to the Puppet users group by a Puppet Labs employee, and arelinked here for educational purposes.
When writing a report processor, you will need to handle a Puppet::Transaction::Report objectprovided by Puppet. See Report Formats below.USING EXTERNAL REPORT PROCESSORS
Alternately, you can use the default store report and write an external report processor that readsin and analyzes the saved YAML files. This is ideal for analyzing large amounts of reports on�demand, and allows the report processor to be written in any common scripting language.
Report FormatsPuppet creates reports as Puppet::Transaction::Report objects, which have changed format severaltimes over the course of Puppetʼs history. We have report format references for the followingPuppet versions:
Puppet 3.x (report format 3)Puppet 2.7.x (report formats 3 and 2)Puppet 2.6.x (report formats 2 and 1)Puppet 0.25.5 (report format 0)
The report format applies to both the Ruby object handed to a report processor and the YAMLobject written to disk by the default store processor.
Getting Started With Puppet CloudProvisionerLearn how to install and start using Cloud Provisioner, Puppetʼs extension for node bootstrapping.
Puppet Documentation • Getting Started With Puppet Cloud Provisioner 174/434
OverviewPuppet Cloud Provisioner is a Puppet extension that adds new actions for creating and puppetizingnew machines in Amazonʼs EC2.
Cloud Provisioner gives you an easy command line interface to the following tasks:
Create a new Amazon EC2 instanceInstall Puppet on a remote machine of your choiceRemotely sign a nodeʼs certificate�Do all of the above with a single puppetnode_awsbootstrap invocation
PrerequisitesPuppet Cloud Provisioner has several requirements beyond those of Puppet.
Software
Cloud Provisioner can only be used with Puppet 2.7.2 or greater.
Cloud Provisioner requires Fog, a Ruby cloud services library. Youʼll need to ensure that Fog isinstalled on the machine running Cloud Provisioner:
#geminstallfog-v0.7.2
Depending on your operating system and Ruby environment, you may need to manually installsome of Fogʼs dependencies.
Cloud Provisier also requires the GUID library for generating unique identifiers.�
#geminstallguid
Services
Currently, Amazon EC2 is the only supported cloud platform for creating new machine instances;youʼll need a pre-existing Amazon EC2 account to use this feature.
InstallingPuppet Cloud Provisioner should be installed with the puppet module subcommand, which isincluded in Puppet 2.7.14 and later.
$sudopuppetmoduleinstallpuppetlabs-cloud_provisioner
The command will tell you where it is installing the module; take note:
admin@magpie$puppetmoduleinstallpuppetlabs-cloud_provisionerPreparingtoinstallinto/etc/puppet/modules...Downloadingfromhttps://forge.puppetlabs.com...
Puppet Documentation • Getting Started With Puppet Cloud Provisioner 175/434
Installing--donotinterrupt.../etc/puppet/modules└──puppetlabs-cloud_provisioner(v1.0.5)
After installing it, you must add the lib directory of the module to your $RUBYLIB . Add thefollowing to your .profile file (replacing �/etc/puppet/modules with the directory from the installcommand, if necessary), then run source~/.profile to re-load it in the current shell:
exportRUBYLIB=/etc/puppet/modules/cloud_provisioner/lib:$RUBYLIB
You can verify that it is installed and usable by running:
#puppethelpnode_aws
If you are installing the Cloud Provisioner on an older version of Puppet, you will have to do somanually or with the add-on puppet-module gem.
Configuration�Fog
For Cloud Provisioner to work, Fog needs to be configured with your AWS access key ID and secret�access key. Create a ~/.fog file as follows:�
:default::aws_access_key_id:XXXXXXXXXXXXXXXXXXXXX:aws_secret_access_key:Xx+xxXX+XxxXXXXXXxxXxxXXXXxxxXXxXXxxxxXX
You may obtain your AWS Access key id and secret access key using the following information:To view your AWS Secret access key, go to http://aws.amazon.com and click onAccount > Security Credentials. From their, under the "Access Credentials"section of the page, click on the "Access Keys" tab to view your Access Keys.To see your Secret Access Key, just click on the "Show" link under "SecretAccess Key".
From here, you can create new access keys or delete old ones. Just click on"Create a new Access Key" and confirm that you'd like to generate a new pair.This will generate both access and secret access keys. But, keep in mind thatyour account is only able to have two sets of keys at any given time. If youalready have two sets created, you will not see the option to create a new setuntil one has been made inactive and then deleted.
Information from AWS Discussion Forums
To test whether Fog is working, execute the following command:
$ruby-rubygems-e'require"fog"'-e'putsFog::Compute.new(:provider=>"AWS").servers.length>=0'
This should return “true”
Puppet Documentation • Getting Started With Puppet Cloud Provisioner 176/434
If you do not have the ~/.fog configuration file correct, you may receive an error such as the��following:
fog-0.9.0/lib/fog/core/service.rb:155in`validate_options':Missingrequiredarguments:aws_access_key_id,aws_secret_access_key(ArgumentError)from/Users/jeff/.rvm/gems/ruby-1.8.7-p334@puppet/gems/fog-0.9.0/lib/fog/core/service.rb:53:in`new'from/Users/jeff/.rvm/gems/ruby-1.8.7-p334@puppet/gems/fog-0.9.0/lib/fog/compute.rb:13:in`new'from-e:2
In this case, please verify your aws_access_key_id and aws_secret_access_key are properly set inthe ~/.fog file.�
EC2
Your EC2 account will need to have at least one Amazon-managed SSH keypair, and a securitygroup that allows outbound traffic on port 8140 and SSH traffic from the machine running the����Cloud Provisioner actions.
Your puppet master server will also have to be reachable from your newly created instances.
script chosen. Testing has only currently been done on Ubuntu 11.04 (Natty) and CentOS 5.4.
Provisioning
In order to use the install action, any newly provisioned instances will need to have their rootuser enabled, or will need a user account configured to �sudo as root without a password.
puppet master
If you want to automatically sign certificates with the Cloud Provisioner, youʼll have to allow the�computer running the Cloud Provisioner actions to access the puppet masterʼscertificate_status REST endpoint. This can be configured in the masterʼs �auth.conf file:�
path/certificate_statusmethodsaveauthyesallow{certname}
If youʼre running the Cloud Provisioner actions on a machine other than your puppet master, youʼllhave to ensure it can communicate with the puppet master over port 8140.
Certificates and Keys�
Youʼll also have to make sure the control node has a certificate signed by the puppet masterʼs CA. If�the control node is already known to the puppet master (e.g. it is or was a puppet agent node),youʼll be able to use the existing certificate, but we recommend generating a per-user certificate��for a more explicit and readable security policy. On the control node, run:
puppetcertificategenerate{certname}--ca-locationremote
Puppet Documentation • Getting Started With Puppet Cloud Provisioner 177/434
Then sign the certificate as usual on the master (�puppetcertsign{certname} ). On the controlnode again, run:
puppetcertificatefindca--ca-locationremotepuppetcertificatefind{certname}--ca-locationremote
This should let you operate under the new certname when you run puppet commands with the --certname{certname} option.
The control node will also need a private key to allow SSH access to the new machine; for EC2nodes, this is the private key from the keypair used to create the instance. If you are working withnon-EC2 nodes, please note that the install action does not currently support keys withpassphrases.
UsagePuppet Cloud Provisioner provides seven new actions on the node face:
create : Creates a new EC2 machine instance.install : Installʼs Puppet on an arbitrary machine, including non-cloud hardware.init : Perform the install and classify actions, and automatically sign the new agent nodeʼscertificate.�bootstrap : Create a new EC2 machine instance and perform the init action on it.terminate : Tear down an EC2 machine instance.list : List running instances in the specified zone.�fingerprint : Make a best effort to securely obtain the SSH host key fingerprint.��
puppet node_aws create
Argument(s): none.
Options:
--image,-i — The name of the AMI to use when creating the instance. Required.--keyname — The name of the Amazon-managed SSH keypair to use for accessing the instance.Required.--group,-g,--security-group — The security group(s) to apply to the instance. Can be asingle group or a path-separator (colon, on *nix systems) separated list of groups.--region — The geographic region of the instance. Defaults to us-east-1.--type — Type of instance to be launched.
Example:
$puppetnode_awscreate--imageami-XxXXxXXX--keynamepuppetlabs.admin--type
Puppet Documentation • Getting Started With Puppet Cloud Provisioner 178/434
m1.small/CreatesanewEC2machineinstanceandreturnsitsDNSname.Iftheprocessfails,Puppetwillautomaticallycleanupafteritselfandteardowntheinstance.
puppet node_aws install
Argument(s): the hostname of the system to install Puppet on.
Options:
--login,-l,--username — The user to log in as. Required.--keyfile — The SSH private key file to use. This key cannot require a passphrase. �Required.--install-script — The install script that should be used to install Puppet. Currentlysupported options are: gems (default), puppet-enterprise, and puppet-enterprise-s3--installer-payload,--puppet — The location of the Puppet Enterprise universal tarball.(Used with puppet-enterprise install script)--installer-answers — The location of an answers file to use with the PE installer. (Used with�puppet-enterprise and puppet-enterprise-s3 install scripts).--puppet-version — The version of puppet to install with the gems install script.--facter-version — The version of facter to install with the gems install script.--pe-version — The version of PE to install with the puppet-enterprise script (e.g. 1.1 ).Defaults to 1.1 .
Example:
puppetnode_awsinstallec2-XXX-XXX-XXX-XX.compute-1.amazonaws.com\--loginroot--keyfile~/.ssh/puppetlabs-ec2_rsa\--install-scriptgems--puppet-version2.6.9
Installs Puppet on an arbitrary system and returns the new agent nodeʼs certname.
Interactive installation of PE is not supported, so youʼll need an answers file. See the PE manual for�complete documentation of the answers file format. A reasonable default has been supplied in�Cloud Provisionerʼs ext directory.
This action is not restricted to cloud machine instances, and will install Puppet on any machineaccessible by SSH.
puppet node_aws init
Argument(s): the hostname of the system to install Puppet on.
Options: See “install”
Example:
puppetnode_awsinitec2-XXX-XXX-XXX-XX.compute-1.amazonaws.com\--loginroot--keyfile~/.ssh/puppetlabs-ec2_rsa\--certnamecloud_admin
Puppet Documentation • Getting Started With Puppet Cloud Provisioner 179/434
Install Puppet on an arbitrary system (see “install”) and automatically sign its certificate request�(using the certificate faceʼs sign action).
puppet node_aws bootstrap
Argument(s): none.
Options: See “create” and “install”
Example:
puppetnode_awsbootstrap--imageami-XxXXxXXX--keyname\puppetlabs.admin--loginroot--keyfile~/.ssh/puppetlabs-ec2_rsa\--certnamecloud_admin
Create a new EC2 machine instance and pass the new nodeʼs hostname to the init action.
puppet node_aws terminate
Argument(s): the hostname of the machine instance to tear down.
Options:
--region — The geographic region of the instance. Defaults to us-east-1.
Example:
puppetnode_awsterminateec2-XXX-XXX-XXX-XX.compute-1.amazonaws.com
Tear down an EC2 machine instance.
puppet node_aws list
Argument(s): None
Options:
--region — The geographic region of the instance. Defaults to us-east-1.
Example:
puppetnode_awslist--regionus-west-1
List the Amazon EC2 instances in the specified region and report on their status (pending, running,�shutting down, or terminated). This is not limited to instances created by Cloud Provisioner.
Publishing Modules on the Puppet ForgeThe Puppet Forge is a repository of modules, written and contributed by users. This documentPuppet Documentation • Publishing Modules on the Puppet Forge 180/434
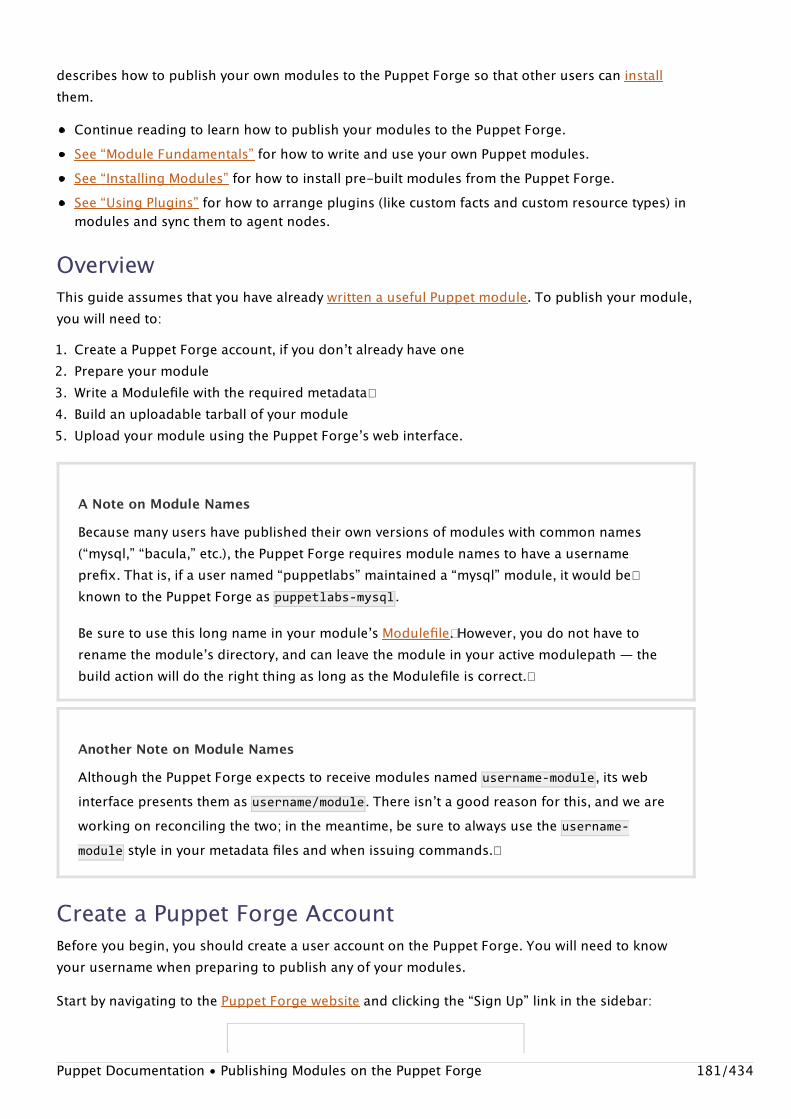
describes how to publish your own modules to the Puppet Forge so that other users can installthem.
Continue reading to learn how to publish your modules to the Puppet Forge.See “Module Fundamentals” for how to write and use your own Puppet modules.See “Installing Modules” for how to install pre-built modules from the Puppet Forge.See “Using Plugins” for how to arrange plugins (like custom facts and custom resource types) inmodules and sync them to agent nodes.
OverviewThis guide assumes that you have already written a useful Puppet module. To publish your module,you will need to:
Create a Puppet Forge AccountBefore you begin, you should create a user account on the Puppet Forge. You will need to knowyour username when preparing to publish any of your modules.
Start by navigating to the Puppet Forge website and clicking the “Sign Up” link in the sidebar:
1. Create a Puppet Forge account, if you donʼt already have one2. Prepare your module3. Write a Modulefile with the required metadata�4. Build an uploadable tarball of your module5. Upload your module using the Puppet Forgeʼs web interface.
A Note on Module Names
Because many users have published their own versions of modules with common names(“mysql,” “bacula,” etc.), the Puppet Forge requires module names to have a usernameprefix. That is, if a user named “puppetlabs” maintained a “mysql” module, it would be�known to the Puppet Forge as puppetlabs-mysql .
Be sure to use this long name in your moduleʼs Modulefile�. However, you do not have torename the moduleʼs directory, and can leave the module in your active modulepath — thebuild action will do the right thing as long as the Modulefile is correct.�
Another Note on Module Names
Although the Puppet Forge expects to receive modules named username-module , its webinterface presents them as username/module . There isnʼt a good reason for this, and we areworking on reconciling the two; in the meantime, be sure to always use the username-module style in your metadata files and when issuing commands.�
Puppet Documentation • Publishing Modules on the Puppet Forge 181/434
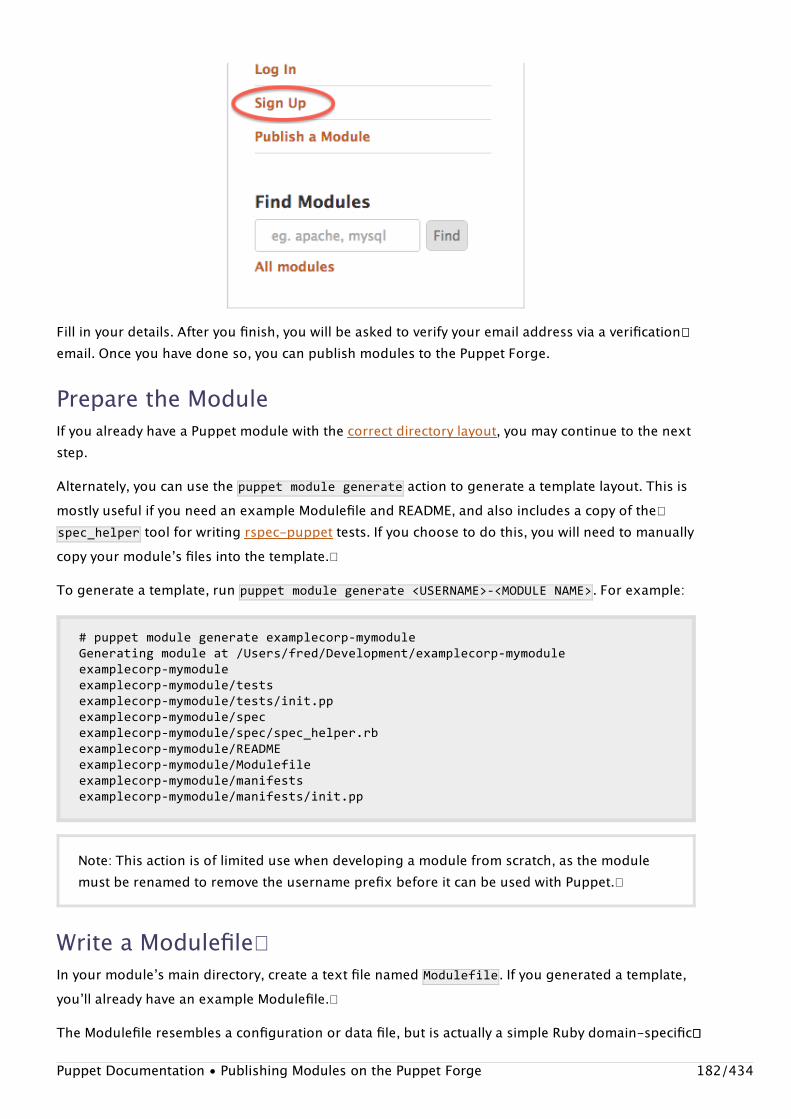
Fill in your details. After you finish, you will be asked to verify your email address via a verification��email. Once you have done so, you can publish modules to the Puppet Forge.
Prepare the ModuleIf you already have a Puppet module with the correct directory layout, you may continue to the nextstep.
Alternately, you can use the puppetmodulegenerate action to generate a template layout. This ismostly useful if you need an example Modulefile and README, and also includes a copy of the�spec_helper tool for writing rspec-puppet tests. If you choose to do this, you will need to manuallycopy your moduleʼs files into the template.�
To generate a template, run puppetmodulegenerate<USERNAME>-<MODULENAME> . For example:
#puppetmodulegenerateexamplecorp-mymoduleGeneratingmoduleat/Users/fred/Development/examplecorp-mymoduleexamplecorp-mymoduleexamplecorp-mymodule/testsexamplecorp-mymodule/tests/init.ppexamplecorp-mymodule/specexamplecorp-mymodule/spec/spec_helper.rbexamplecorp-mymodule/READMEexamplecorp-mymodule/Modulefileexamplecorp-mymodule/manifestsexamplecorp-mymodule/manifests/init.pp
Write a Modulefile�In your moduleʼs main directory, create a text file named �Modulefile . If you generated a template,youʼll already have an example Modulefile.�
The Modulefile resembles a configuration or data file, but is actually a simple Ruby domain-specific����
Note: This action is of limited use when developing a module from scratch, as the modulemust be renamed to remove the username prefix before it can be used with Puppet.�
Puppet Documentation • Publishing Modules on the Puppet Forge 182/434
language (DSL), which is executed when you build a tarball of the module. This means Rubyʼsnormal rules of string quoting apply:
name'examplecorp-mymodule'version'0.0.1'dependency'puppetlabs/mysql','1.2.3'description"Thisisafulldescriptionofthemodule,andisbeingwrittenasamulti-linestring."
Modulefiles support the following pieces of metadata:�
name — REQUIRED. The full name of the module, including the username (e.g. “username-module” — see note above).version — REQUIRED. The current version of the module. This should be a semantic version.summary — REQUIRED. A one-line description of the module.description — REQUIRED. A more complete description of the module.dependency — A module that this module depends on. Unlike the other fields, the �dependencymethod accepts up to three comma-separated arguments: a module name (with a slash betweenthe user and name, not a hyphen), a version requirement, and a repository. A Modulefile may�include multiple dependency lines. See “Dependencies in the Modulefile” below for more details.�project_page — The moduleʼs website.license — The license under which the module is made available.author — The moduleʼs author. If not provided, this field will default to the username portion of�the moduleʼs name field.�source — The moduleʼs source. This fieldʼs purpose is not specified.��
Dependencies in the Modulefile�
If you choose to rely on another Forge module, you can express this in the “dependency” field of�your Modulefile:�
dependency'puppetlabs/stdlib','>=2.2.1'
A Modulefile may have several dependency fields.��
The version requirement in a dependency isnʼt limited to a single version; you can use severaloperators for version comparisons. The following operators are available:
1.2.3 — A specific version.�
Warning: The full name in a dependency must use a slash between the username andmodule name. This is different from the name format used elsewhere in the Modulefile.�� Thisis a legacy architecture problem with the Puppet Forge, and we apologize for theinconvenience. Our eventual plan is to allow full names with hyphens everywhere whilecontinuing to allow names with slashes, then (eventually, much later) phase out names withslashes.
Puppet Documentation • Publishing Modules on the Puppet Forge 183/434
1.2.3 — A specific version.�>1.2.3 — Greater than a specific version.�<1.2.3 — Less than a specific version.�>=1.2.3 — Greater than or equal to a specific version.�<=1.2.3 — Less than or equal to a specific version.�>=1.0.0<2.0.0 — Range of versions; both conditions must be satisfied. (This example would�match 1.0.1 but not 2.0.1)1.x — A semantic major version. (This example would match 1.0.1 but not 2.0.1, and isshorthand for >=1.0.0<2.0.0 .)1.2.x — A semantic major & minor version. (This example would match 1.2.3 but not 1.3.0,and is shorthand for >=1.2.0<1.3.0 .)
Build Your ModuleNow that the content and Modulefile are ready, you can build a package of your module by running�the following command:
puppetmodulebuild<MODULEDIRECTORY>
This will generate a .tar.gz package, which will be saved in the moduleʼs pkg/ subdirectory.
For example:
#puppetmodulebuild/etc/puppetlabs/puppet/modules/mymoduleBuilding/etc/puppetlabs/puppet/modules/mymoduleforrelease/etc/puppetlabs/puppet/modules/mymodule/pkg/examplecorp-mymodule-0.0.1.tar.gz
Upload to the Puppet Forge
A Note on Semantic Versioning
When writing your Modulefile, youʼre setting a version for your own module and optionally�expressing dependancies on othersʼ module versions. We strongly recommend following theSemantic Versioning specification. Doing so allows others to rely on your modules without�unexpected change.
Many other users already use semantic versioning, and you can take advantage of this inyour modulesʼ dependencies. For example, if you depend on puppetlabs/stdlib and want toallow updates while avoiding breaking changes, you could write the following line in yourModulefile (assuming a current stdlib version of 2.2.1):�
dependency'puppetlabs/stdlib','2.x'
Puppet Documentation • Publishing Modules on the Puppet Forge 184/434
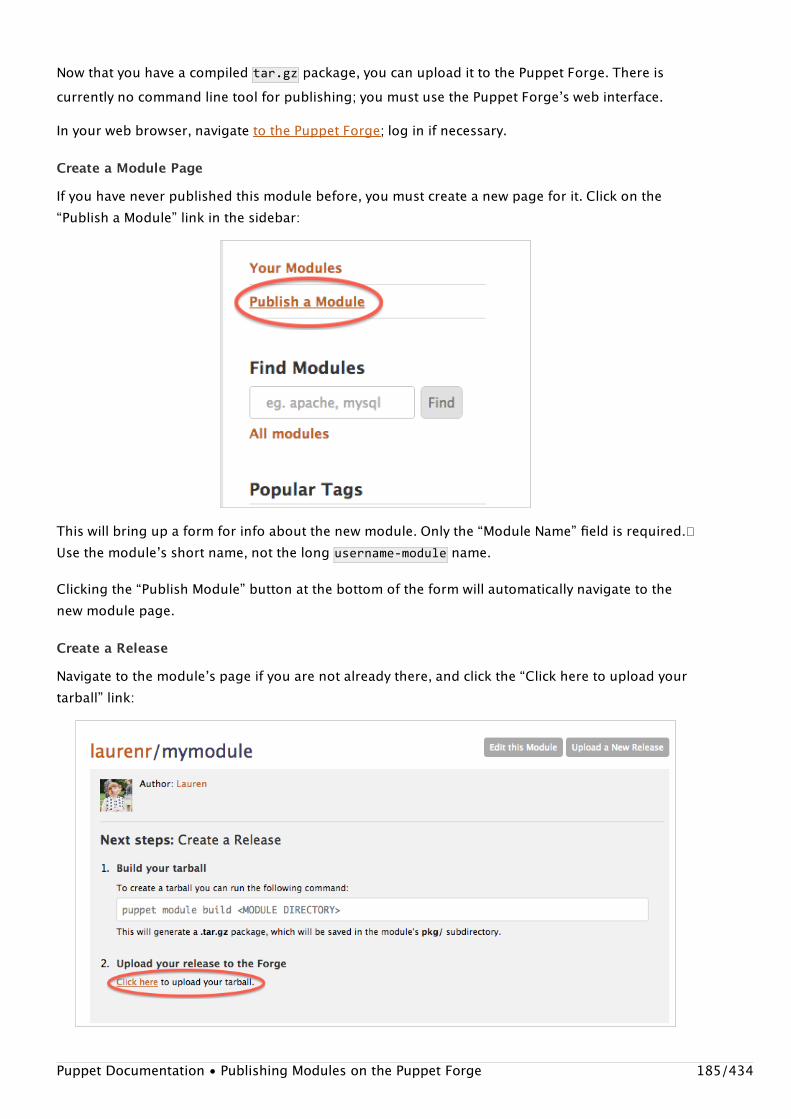
Now that you have a compiled tar.gz package, you can upload it to the Puppet Forge. There iscurrently no command line tool for publishing; you must use the Puppet Forgeʼs web interface.
In your web browser, navigate to the Puppet Forge; log in if necessary.
Create a Module Page
If you have never published this module before, you must create a new page for it. Click on the“Publish a Module” link in the sidebar:
This will bring up a form for info about the new module. Only the “Module Name” field is required.�Use the moduleʼs short name, not the long username-module name.
Clicking the “Publish Module” button at the bottom of the form will automatically navigate to thenew module page.
Create a Release
Navigate to the moduleʼs page if you are not already there, and click the “Click here to upload yourtarball” link:
Puppet Documentation • Publishing Modules on the Puppet Forge 185/434
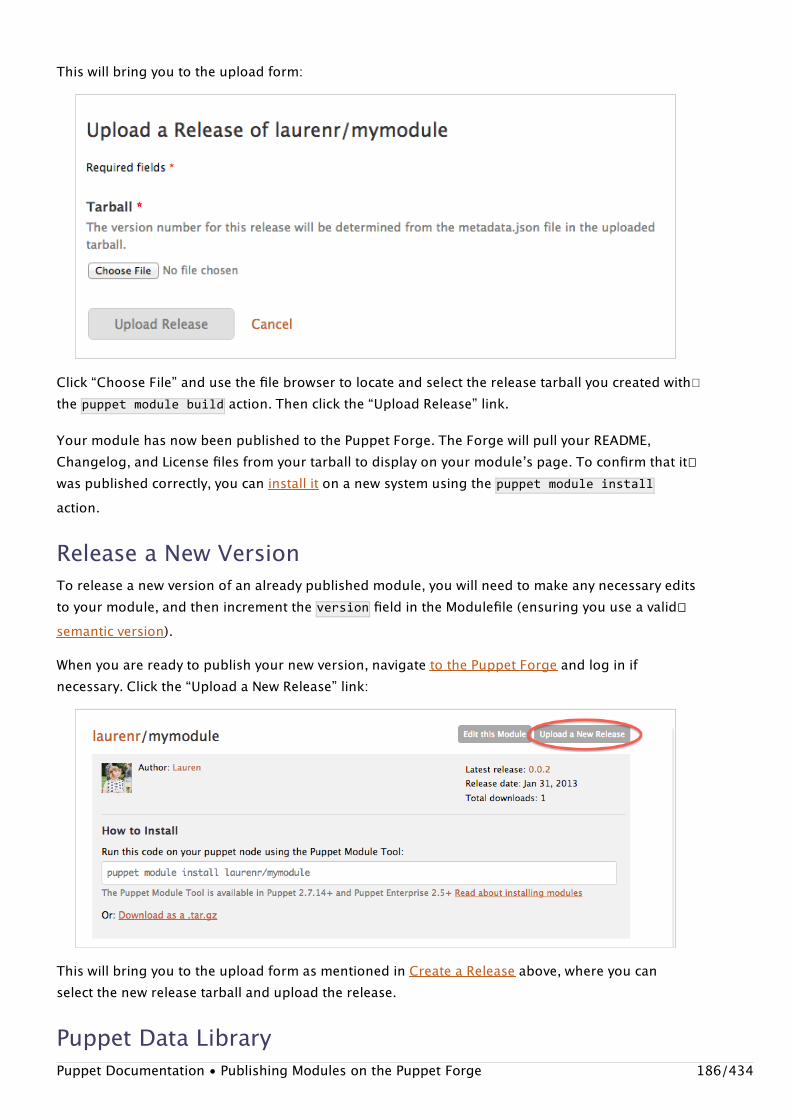
This will bring you to the upload form:
Click “Choose File” and use the file browser to locate and select the release tarball you created with�the puppetmodulebuild action. Then click the “Upload Release” link.
Your module has now been published to the Puppet Forge. The Forge will pull your README,Changelog, and License files from your tarball to display on your moduleʼs page. To confirm that it��was published correctly, you can install it on a new system using the puppetmoduleinstallaction.
Release a New VersionTo release a new version of an already published module, you will need to make any necessary editsto your module, and then increment the version field in the Modulefile (ensuring you use a valid��semantic version).
When you are ready to publish your new version, navigate to the Puppet Forge and log in ifnecessary. Click the “Upload a New Release” link:
This will bring you to the upload form as mentioned in Create a Release above, where you canselect the new release tarball and upload the release.
Puppet Data LibraryPuppet Documentation • Publishing Modules on the Puppet Forge 186/434
The Puppet Data Library (PDL) consists of two elements:
The large amount of data Puppet automatically collects about your infrastructure.The formats and APIs Puppet uses to expose that data.
Sysadmins can access information from the PDL with their choice of tools, including familiarscripting languages like Ruby, Perl, and Python. Use this data to build custom reports, add toexisting data sets, or automate repetitive tasks.
Right now, the Puppet Data Library consists of three different data services:�
Puppet Inventory ServiceThe Puppet Inventory Service provides a detailed inventory of the hardware and software on nodesmanaged by Puppet.
Using a simple RESTful API, you can query the inventory service for a nodeʼs MAC address,operating system version, DNS configuration, etc. The query results are returned as JSON.�Inventory information consists of the facts reported by each node when it requestsconfigurations. By installing �custom facts on your puppet master server, you can extend theinventory service to contain any kind of data that can possibly be extracted from your nodes.
Learn more about the Puppet Inventory Service here.
Puppet Run Report ServiceThe Puppet Run Report Service provides push access to the reports that every node submits aftereach Puppet run. By writing a custom report processor, you can divert these reports to any customservice, which can use them to determine whether a Puppet run was successful, or dig deeply intothe specific changes for each and every resource under management for every node.�
You can also write out-of-band report processors that consume the YAML files written to disk by�the puppet masterʼs default report handler.
Learn more about the Puppet Run Report Service here.
Puppet Resource Dependency GraphThe Puppet Resource Dependency Graph provides a complete, mathematical graph of thedependencies between resources under management by Puppet. These graphs, which are stored in.dot format, can be used with any commercial or open source visualization tool to uncover hiddenlinkages and help understand how your resources interconnect to provide working services.
EXAMPLE: Using the Puppet Inventory Service, a customer automated the validation andreporting of their serversʼ warranty status. Their automation used the Puppet InventoryService to query all servers in the data center on a regular basis and retrieve their serialnumbers. These serial numbers are then checked against the server hardware vendorʼswarranty database using the vendorʼs public API to determine the warranty status for each.
Puppet Documentation • Publishing Modules on the Puppet Forge 187/434

Learn more about the Puppet Resource Dependency Graph here
Inventory ServiceStarting with Puppet 2.6.7, puppet master servers offer API access to the �facts reported by everynode. You can use this API to get complete info about any node, and to search for nodes whosefacts meet certain criteria.
Puppet Dashboard and Puppet Enterpriseʼs console use the inventory service to provide a searchfunction and display each nodeʼs complete facts on the nodeʼs page. (PE does this by default. Seehere for instructions on activating Dashboardʼs inventory support.)Your own custom applications can access any nodeʼs facts via the inventory service.
What It IsThe inventory is a collection of node facts. The inventory service is a retrieval, storage, and searchAPI exposed to the network by the puppet master. The inventory service backend (AKA thefacts_terminus ) is what the puppet master uses to store the inventory and do some of the heavylifting of the inventory service.
The puppet master updates the inventory when agent nodes report their facts, which happens everytime puppet agent requests a catalog. Optionally, additional puppet masters can use the HTTP APIto send facts from their agents to the central inventory.
Other tools, including Puppet Dashboard, can query the inventory via the puppet masterʼs HTTP API.An API call can return:
Complete facts for a single node
or
A list of nodes whose facts meet some search condition
Information in the inventory is never automatically expired, but it is timestamped.
Using the Inventory ServiceThe inventory service is plain vanilla HTTP: Submit HTTP requests, get back structured fact or hostdata.
To read from the inventory, submit secured HTTP requests to the puppet masterʼs facts andfacts_search HTTP endpoints in the appropriate environment. Your API client will have to have anSSL certificate signed by the puppet masterʼs CA.�
EXAMPLE: Using the Puppet Resource Dependency Graph and Gephi, a visualization tool, acustomer identified unknown dependencies within a complicated set of configuration��modules. They used this knowledge to re-write parts of the modules to get betterperformance.
Puppet Documentation • Inventory Service 188/434
Full documentation of these endpoints can be found here, but a summary follows:
To retrieve the facts for testnode.example.com, send a GET request tohttps://puppet:8140/production/facts/testnode.example.com.To retrieve a list of all Ubuntu nodes with two or more processors, send a GET request tohttps://puppet:8140/production/facts_search/search?facts.processorcount.ge=2&facts.operatingsystem=Ubuntu.
In both cases, be sure to specify an Accept:pson or Accept:yaml header.
Directly Accessing the Inventory Service Backend
If you are using the PuppetDB inventory backend, you also have the option of using its public APIinstead of the inventory service API. See the following PuppetDB pages for more info:
The node query APIThe facts query APIThe fact-names query API
Setting Up the Inventory ServiceConfiguring the Inventory Backend�
There are two inventory service backends available: PuppetDB and inventory_active_record .
If you are using Puppet 2.7.12 or later, use PuppetDB. It is faster, easier to configure and�maintain, and also provides resource stashing to enable exported resources. Follow theinstallation and configuration instructions in the PuppetDB manual, and connect every puppet�master to your PuppetDB server:
Install PuppetDBConnect a puppet master to PuppetDB
If you are using an older version of Puppet, you can use the inventory_active_record backendand connect your other puppet masters to the designated inventory master. See the appendixbelow to enable this backend.
You can upgrade to PuppetDB at a later date after upgrading Puppet; since a nodeʼs facts arereplaced every time it checks in, PuppetDB should have the same data as your old inventory ina matter of hours.
Configuring Access�
By default, the inventory service is not accessible! This is a reasonable default. Because theinventory service exposes sensitive information about your infrastructure over the network, youʼllneed to carefully control access with the rest_authconfig (a.k.a. auth.conf ) file.�
For prototyping your inventory application on a scratch puppet master, you can just permit allaccess to the facts endpoint:
path/factsauthanymethodfind,searchallow*
Puppet Documentation • Inventory Service 189/434
(Note that this will allow access to both facts and facts_search , since the path is read as a prefix.)�
For production deployment, youʼll need to allow find and search access for each application that�uses the inventory and deny access to all other machines. (Since agent nodes submit their facts aspart of their request to the catalog resource, they donʼt require access to the facts orfacts_search resources.) One such possible ACL set would be:
path/factsauthyesmethodfind,searchallowdashboard.example.com,custominventoryapp.example.com
Configuring Certificates��
To connect your application securely, youʼll need a certificate signed by your siteʼs puppet CA.�There are two main ways to get this:
On the puppet master:Run puppetcert--generate{certnameforapplication} .Then, retrieve the private key ({ssldir}/certs/{certname}.pem ) and the signed certificate�({ssldir}/private_keys/{certname}.pem ) and move them to your application server.
Manually:Generate an RSA private key: opensslgenrsa-out{certname}.key1024 .Generate a certificate signing request (CSR): �opensslreq-new-key{certname}.key-subj"/CN={certname}"-outrequest.csr .Submit the CSR to the puppet master for signing: curl-k-XPUT-H"Content-Type:text/plain"[email protected]
https://puppet:8140/production/certificate_request/new .Sign the certificate on the puppet master: �puppetcert--sign{certname} .Retrieve the certificate: �curl-k-H"Accept:s"-o{certname}.pemhttps://puppet:8140/production/certificate/{certname}
For one-off applications, generating it on the master is obviously easier, but if youʼre building a�tool for distribution elsewhere, your users will appreciate it if you script the manual method andemulate the way puppet agent gets a cert.
Protect your applicationʼs private key appropriately, since itʼs the gateway to your inventory data.
In the event of a security breach, the applicationʼs certificate is revokable the same way any puppet�agent certificate would be.�
Testing the Inventory ServiceOn a machine that youʼve authorized to access the facts and facts_search resources, you can testthe API using curl , as described in the HTTP API docs. To retrieve facts for a node:Puppet Documentation • Inventory Service 190/434
curl-k-H"Accept:yaml"https://puppet:8140/production/facts/{nodecertname}
To insert facts for a fictional node into the inventory:�
curl-k-XPUT-H'Content-Type:text/yaml'--data-binary@/var/lib/puppet/yaml/facts/hostname.yamlhttps://puppet:8140/production/facts/{nodecertname}
To find out which nodes at your site are Intel Macs:�
curl-k-H"Accept:pson"https://puppet:8140/production/facts_search/search?facts.hardwaremodel=i386&facts.kernel=Darwin
Appendix: Enabling the inventory_active_recordBackendThe inventory_active_record backend works on older puppet masters, all the way back to Puppet2.6.7. It has reasonable speed, but is generally inferior to PuppetDB, on account of being slightlyslower and more difficult to configure.���
Unlike PuppetDB, this backend splits your puppet masters into two groups, which must beconfigured differently:��
The designated inventory puppet master must be configured to access a database. (If you site�only has one puppet master, this is it.)Every other puppet master must be configured to access the designated inventory puppet�master.
Configuring the Inventory Puppet Master�STEP 1: CREATE A DATABASE AND USER
The inventory puppet master will need access to both a database and a user account with allprivileges on that database; setting that up is outside the scope of this document. The databaseserver can be remote or on the local host.
Since database access is mediated by the common ActiveRecord library, you can, in theory, use anylocal or remote database supported by Rails. In practice, MySQL on the same server as the puppetmaster is the best-documented approach. See the documentation for the legacy ActiveRecordstoreconfigs backend� for more details about setting up and configuring a database with Puppet.�
Do not use sqlite except as a proof of concept. It is slow and unreliable.STEP 2: INSTALL THE APPROPRIATE RUBY DATABASE ADAPTER
The copy of Ruby in use by puppet master will need to be able to communicate with your chosentype of database server. This will always entail ensuring that Rails is installed, and will likely requireinstalling a specific Ruby library to interface with the database (e.g. the �libmysql-ruby package onDebian and Ubuntu or the mysql gem on other operating systems). As above, see the old
Puppet Documentation • Inventory Service 191/434
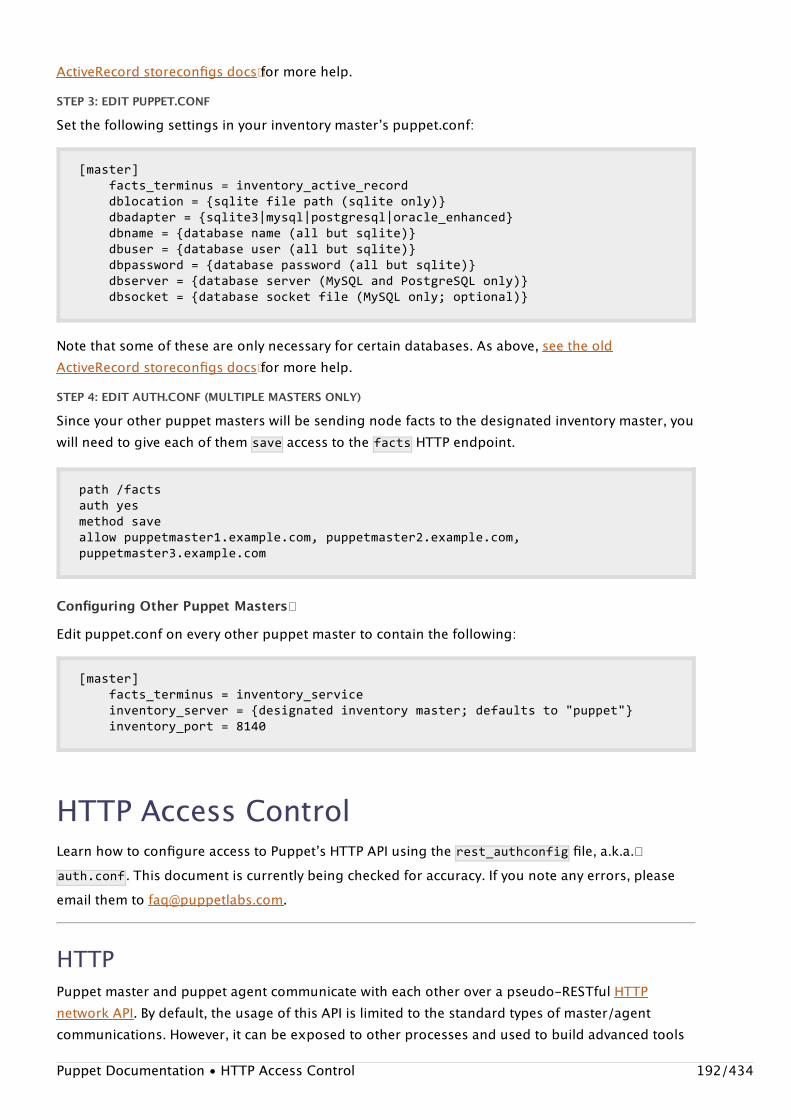
ActiveRecord storeconfigs docs� for more help.STEP 3: EDIT PUPPET.CONF
Set the following settings in your inventory masterʼs puppet.conf:
[master]facts_terminus=inventory_active_recorddblocation={sqlitefilepath(sqliteonly)}dbadapter={sqlite3|mysql|postgresql|oracle_enhanced}dbname={databasename(allbutsqlite)}dbuser={databaseuser(allbutsqlite)}dbpassword={databasepassword(allbutsqlite)}dbserver={databaseserver(MySQLandPostgreSQLonly)}dbsocket={databasesocketfile(MySQLonly;optional)}
Note that some of these are only necessary for certain databases. As above, see the oldActiveRecord storeconfigs docs� for more help.STEP 4: EDIT AUTH.CONF (MULTIPLE MASTERS ONLY)
Since your other puppet masters will be sending node facts to the designated inventory master, youwill need to give each of them save access to the facts HTTP endpoint.
path/factsauthyesmethodsaveallowpuppetmaster1.example.com,puppetmaster2.example.com,puppetmaster3.example.com
Configuring Other Puppet Masters�
Edit puppet.conf on every other puppet master to contain the following:
[master]facts_terminus=inventory_serviceinventory_server={designatedinventorymaster;defaultsto"puppet"}inventory_port=8140
HTTP Access ControlLearn how to configure access to Puppetʼs HTTP API using the �rest_authconfig file, a.k.a.�auth.conf . This document is currently being checked for accuracy. If you note any errors, pleaseemail them to [email protected].
HTTPPuppet master and puppet agent communicate with each other over a pseudo-RESTful HTTPnetwork API. By default, the usage of this API is limited to the standard types of master/agentcommunications. However, it can be exposed to other processes and used to build advanced tools
Puppet Documentation • HTTP Access Control 192/434
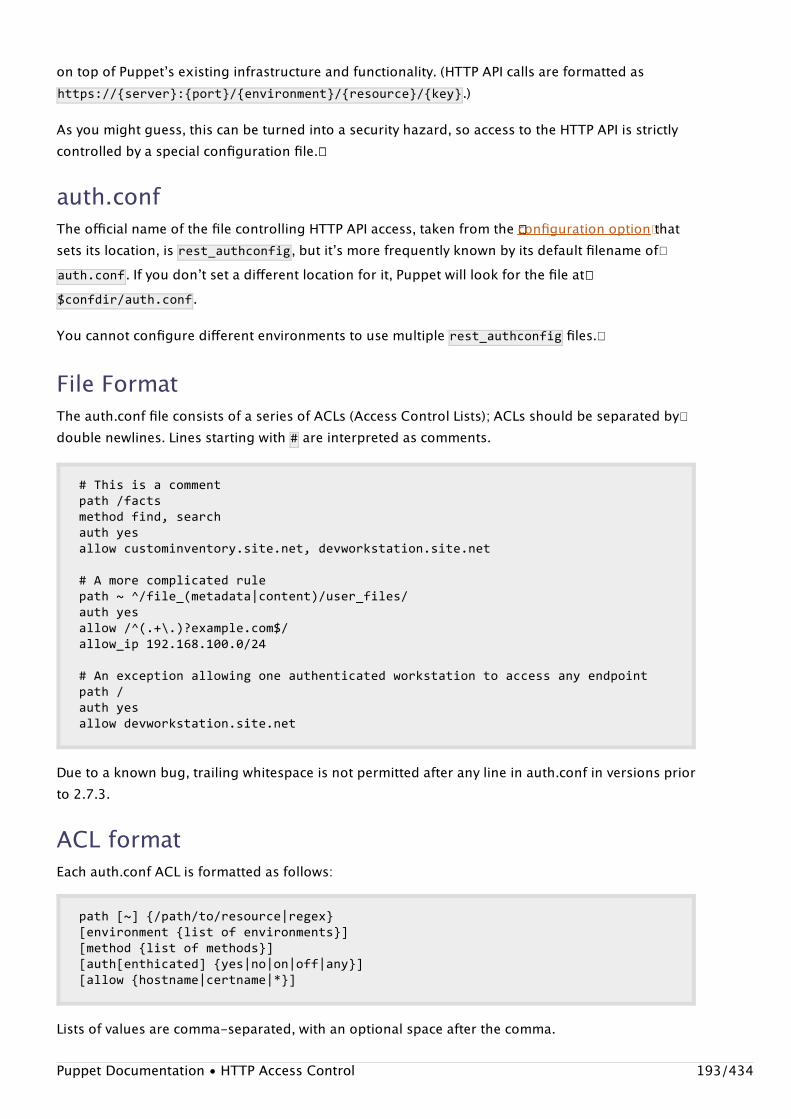
on top of Puppetʼs existing infrastructure and functionality. (HTTP API calls are formatted ashttps://{server}:{port}/{environment}/{resource}/{key} .)
As you might guess, this can be turned into a security hazard, so access to the HTTP API is strictlycontrolled by a special configuration file.��
auth.confThe official name of the file controlling HTTP API access, taken from the ���configuration option� thatsets its location, is rest_authconfig , but itʼs more frequently known by its default filename of�auth.conf . If you donʼt set a different location for it, Puppet will look for the file at��$confdir/auth.conf .
You cannot configure different environments to use multiple ��rest_authconfig files.�
File FormatThe auth.conf file consists of a series of ACLs (Access Control Lists); ACLs should be separated by�double newlines. Lines starting with # are interpreted as comments.
#Thisisacommentpath/factsmethodfind,searchauthyesallowcustominventory.site.net,devworkstation.site.net
#Amorecomplicatedrulepath~^/file_(metadata|content)/user_files/authyesallow/^(.+\.)?example.com$/allow_ip192.168.100.0/24
#Anexceptionallowingoneauthenticatedworkstationtoaccessanyendpointpath/authyesallowdevworkstation.site.net
Due to a known bug, trailing whitespace is not permitted after any line in auth.conf in versions priorto 2.7.3.
ACL formatEach auth.conf ACL is formatted as follows:
path[~]{/path/to/resource|regex}[environment{listofenvironments}][method{listofmethods}][auth[enthicated]{yes|no|on|off|any}][allow{hostname|certname|*}]
Lists of values are comma-separated, with an optional space after the comma.
Puppet Documentation • HTTP Access Control 193/434
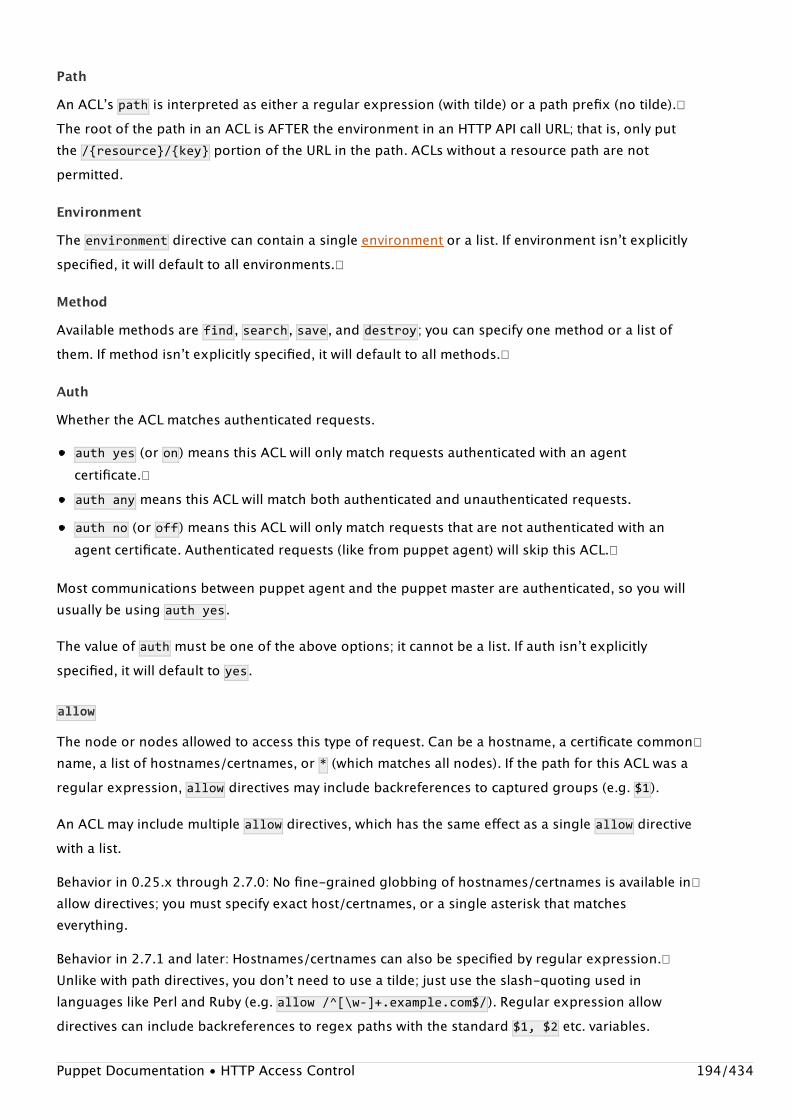
Path
An ACLʼs path is interpreted as either a regular expression (with tilde) or a path prefix (no tilde).�The root of the path in an ACL is AFTER the environment in an HTTP API call URL; that is, only putthe /{resource}/{key} portion of the URL in the path. ACLs without a resource path are notpermitted.
Environment
The environment directive can contain a single environment or a list. If environment isnʼt explicitlyspecified, it will default to all environments.�
Method
Available methods are find , search , save , and destroy ; you can specify one method or a list ofthem. If method isnʼt explicitly specified, it will default to all methods.�
Auth
Whether the ACL matches authenticated requests.
authyes (or on ) means this ACL will only match requests authenticated with an agentcertificate.�authany means this ACL will match both authenticated and unauthenticated requests.authno (or off ) means this ACL will only match requests that are not authenticated with anagent certificate. Authenticated requests (like from puppet agent) will skip this ACL.�
Most communications between puppet agent and the puppet master are authenticated, so you willusually be using authyes .
The value of auth must be one of the above options; it cannot be a list. If auth isnʼt explicitlyspecified, it will default to �yes .
allow
The node or nodes allowed to access this type of request. Can be a hostname, a certificate common�name, a list of hostnames/certnames, or * (which matches all nodes). If the path for this ACL was aregular expression, allow directives may include backreferences to captured groups (e.g. $1 ).
An ACL may include multiple allow directives, which has the same effect as a single �allow directivewith a list.
Behavior in 0.25.x through 2.7.0: No fine-grained globbing of hostnames/certnames is available in�allow directives; you must specify exact host/certnames, or a single asterisk that matcheseverything.
Behavior in 2.7.1 and later: Hostnames/certnames can also be specified by regular expression.�Unlike with path directives, you donʼt need to use a tilde; just use the slash-quoting used inlanguages like Perl and Ruby (e.g. allow/^[\w-]+.example.com$/ ). Regular expression allowdirectives can include backreferences to regex paths with the standard $1,$2 etc. variables.
Puppet Documentation • HTTP Access Control 194/434
Any nodes which arenʼt specifically allowed to access the resource will be denied.�
allow_ip
An IP address or range of IP addresses allowed to access this type of request. Can be:
A single IP addressA glob representing a group of IP addresses (e.g. 192.168.100.* )CIDR notation representing a group of IP addresses (e.g. 192.168.100.0/24 )
Any nodes which arenʼt specifically allowed to access the resource will be denied.�
Deny
A deny directive is syntactically permitted, but has no effect.�
Matching ACLs to RequestsPuppet composes a full list of ACLs by combining auth.conf with a list of default ACLs. When arequest is received, ACLs are tested in their order of appearance, and matching will stop at the first�ACL that matches the request.
An ACL matches a request only if its path, environment, method, and authentication all match thatof the request. These four elements are equal peers in determining the match.
Matching Paths
If an ACLʼs path does not start with a tilde and a space, it matches the beginning of the resourcepath; an ACL with the line:
path/file
…will match both /file_metadata and /file_content resources.
Regular expression paths donʼt have to match from the beginning of the resource path, but itʼsgood practice to use positional anchors.
path~^/catalog/([^/]+)$methodfindallow$1
Captured groups from a regex path are available in the allow directive. The ACL above will allownodes to retrieve their own catalog but prevent them from accessing other catalogs.
Determining Whether a Request is Allowed
Note: The allow_ip directive was added in Puppet 3.0.0. Previous versions of Puppet cannotallow nodes by IP address.
Puppet Documentation • HTTP Access Control 195/434

Once an ACL has been determined to match an incoming request, Puppet consults the allowdirective(s). If the request was unauthenticated, reverse DNS is used to determine the requestingnodeʼs hostname; the request is allowed if that hostname is allowed. If the request wasauthenticated, the certificate common name is read from the SSL certificate, and the hostname is��ignored; the request is allowed if that certname is allowed.
Consequences of ACL Matching BehaviorSince ACLs are matched in linear order, auth.conf has to be manually arranged with the mostspecific paths at the top and the least specific paths at the bottom, lest the whole search get short-��circuited and the (usually restrictive) fallback rule be applied to every request. Furthermore, sincethe default ACLs required for normal Puppet functionality are appended to the ACLs read fromauth.conf, you must manually interleave copies of the default ACLs into your auth.conf if you arespecifying any ACLs that are less specific than any of the default ACLs.�
Default ACLsPuppet appends a list of default ACLs to the ACLs read from auth.conf. However, if any custom ACLshave a path identical to that of a default ACL, that default ACL will be omitted when composing thefull list of ACLs. Note that this is not the same criteria for determining whether the two ACLs matchthe same requests, as only the paths are compared:
#AcustomACLpath/fileauthnoallowmagpie.example.com
#ThisdefaultACLwillnotbeappendedtotherulespath/fileallow*
These two ACLs match completely disjoint sets of requests (unauthenticated for the custom one,authenticated for the default one), but since the mechanism that appends default ACLs is notexamining the authentication/methods/environments of the ACLs, it considers the one to overridethe other, even though theyʼre effectively unrelated. Puppet agent will break if you only declare the�custom ACL, will work if you manually declare the default ACL, and will work if you only declare thecustom one but change its path to /fil . When in doubt, manually re-declare all default ACLs inyour auth.conf file.�
The following is a list of the default ACLs used by Puppet:
#Allowauthenticatednodestoretrievetheirowncatalogs:
path~^/catalog/([^/]+)$methodfindallow$1
#allownodestoretrievetheirownnodedefinition
path~^/node/([^/]+)$
Puppet Documentation • HTTP Access Control 196/434
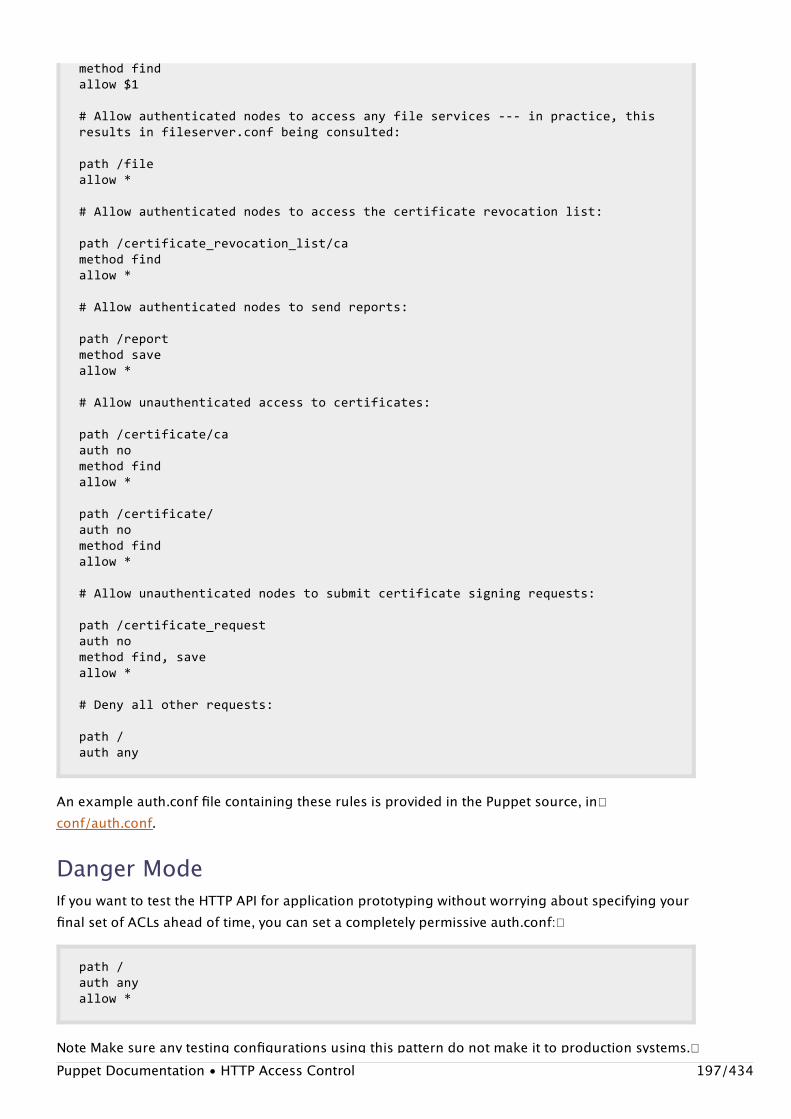
methodfindallow$1
#Allowauthenticatednodestoaccessanyfileservices---inpractice,thisresultsinfileserver.confbeingconsulted:
path/fileallow*
#Allowauthenticatednodestoaccessthecertificaterevocationlist:
path/certificate_revocation_list/camethodfindallow*
#Allowauthenticatednodestosendreports:
path/reportmethodsaveallow*
#Allowunauthenticatedaccesstocertificates:
path/certificate/caauthnomethodfindallow*
path/certificate/authnomethodfindallow*
#Allowunauthenticatednodestosubmitcertificatesigningrequests:
path/certificate_requestauthnomethodfind,saveallow*
#Denyallotherrequests:
path/authany
An example auth.conf file containing these rules is provided in the Puppet source, in�conf/auth.conf.
Danger ModeIf you want to test the HTTP API for application prototyping without worrying about specifying yourfinal set of ACLs ahead of time, you can set a completely permissive auth.conf:�
path/authanyallow*
Note Make sure any testing configurations using this pattern do not make it to production systems.�Puppet Documentation • HTTP Access Control 197/434
Note Make sure any testing configurations using this pattern do not make it to production systems.�
authconfig / namespaceauth.conf�Older versions of Puppet communicated over an XMLRPC interface instead of the current HTTPinterface, and access to these APIs was governed by a file known as �authconfig (after theconfiguration option listing its location) or �namespaceauth.conf (after its default filename). This�legacy file will not be fully documented, but an example namespaceauth.conf file can be found in��the puppet source at conf/namespaceauth.conf.
puppet agent and the HTTP APIIf started with the listen=true configuration option, puppet agent will accept incoming HTTP�API requests. This is most frequently used to trigger puppet runs with the run endpoint. Severalcaveats apply:
A known bug in the 2.6.x releases of Puppet prevents puppet agent from being started with thelisten=true option unless namespaceauth.conf is present, even though the file is never�consulted. The workaround is to create an empty file: �#touch$(puppetagent--configprintauthconfig)
Puppet agent uses the same default ACLs as puppet master, which allow access to severaluseless endpoints while denying access to any agent-specific ones. For best results, you should�short-circuit the defaults by denying access to / at the end of your auth.conf file.�
External Node Classifiers�An external node classifier is an arbitrary script or application which can tell Puppet which classes a�node should have. It can replace or work in concert with the node definitions in the main site�manifest (site.pp ).
Depending on the external data sources you use in your infrastructure, building an external nodeclassifier can be a valuable way to extend Puppet.�
What Is an ENC?An external node classifier is an executable that can be called by puppet master; it doesnʼt have to�be written in Ruby. Its only argument is the name of the node to be classified, and it returns a YAML�document describing the node.
Inside the ENC, you can reference any data source you want, including some of Puppetʼs own datasources, but from Puppetʼs perspective, it just puts in a node name and gets back a hash ofinformation.
ENCs can co-exist with standard node definitions in �site.pp , and the classes declared in eachsource are effectively merged.�
Puppet Documentation • External Node Classifiers 198/434
Considerations and Differences from Node Definitions��The YAML returned by an ENC isnʼt an exact equivalent of a node definition in �site.pp — it canʼtdeclare individual resources, declare relationships, or do conditional logic. The only things anENC can do are declare classes, assign top-scope variables, and set an environment. This meansan ENC is most effective if youʼve done a good job of separating your configurations out into��classes and modules.In Puppet 3 and later, ENCs can set an environment for a node, overriding whatever environmentthe node requested. However, previous versions of Puppet use ENC-set and node-setenvironments inconsistently, with the ENCʼs used during catalog compilation and the nodeʼsused when downloading files. The workaround for Puppet 2.7 and earlier is to use Puppet to�manage puppet.conf on the agent and set the environment for the next run based on what theENC thinks it should be.Even if you arenʼt using node definitions, you can still use site.pp to do things like set global�resource defaults.Unlike regular node definitions, where a node may match a less specific definition if an exactly���matching one isnʼt found (depending on the puppet masterʼs strict_hostname_checkingsetting), an ENC is called only once, with the nodeʼs full name.
How Merging Works
Every node always gets a node object (which may be empty or may contain classes,parameters, and an environment) from the configured �node_terminus . (This setting takeseffect where the catalog is compiled; on the puppet master server when using an�agent/master arrangement, and on the node itself when using puppet apply. The defaultnode terminus is plain , which returns an empty node object; the exec terminus calls an ENCscript to determine what should go in the node object.) Every node may also get a nodedefinition� from the site manifest (usually called site.pp).
When compiling a nodeʼs catalog, Puppet will include all of the following:
Any classes specified in the node object it received from the node terminus�Any classes or resources which are in the site manifest but outside any node definitions�Any classes or resources in the most specific node definition in site.pp that matches the��current node (if site.pp contains any node definitions)�
Note 1: If site.pp contains at least one node definition, it �must have a node definition�that matches the current node; compilation will fail if a match canʼt be found.Note 2: If the node name resembles a dot-separated fully qualified domain name,�Puppet will make multiple attempts to match a node definition, removing the right-�most part of the name each time. Thus, Puppet would first try �agent1.example.com ,then agent1.example , then agent1 . This behavior isnʼt mimicked when calling an ENC,which is invoked only once with the agentʼs full node name.Note 3: If no matching node definition can be found with the nodeʼs name, Puppet will�try one last time with a node name of default ; most users include a nodedefault{}statement in their site.pp file. This behavior isnʼt mimicked when calling an ENC.�
Puppet Documentation • External Node Classifiers 199/434
Connecting an ENCTo tell puppet master to use an ENC, you need to set two configuration� options: node_terminus hasto be set to “exec”, and external_nodes should have the path to the executable.
[master]node_terminus=execexternal_nodes=/usr/local/bin/puppet_node_classifier
ENC Output FormatThere have been three versions of the ENC output format.
Puppet 2.6.5 and Higher
ENCs must return either a YAML hash or nothing. This hash may contain classes , parameters , andenvironment keys, and must contain at least either classes or parameters . ENCs should exit withan exit code of 0 when functioning normally, and may exit with a non-zero exit code if you wishpuppet master to behave as though the requested node was not found.
If an ENC returns nothing or exits with a non-zero exit code, the catalog compilation will fail with a“could not find node” error, and the node will be unable to retrieve configurations.��CLASSES
If present, the value of classes must be either an array of class names or a hash whose keys areclass names. That is, the following are equivalent:
classes:-common-puppet-dns-ntp
classes:common:puppet:dns:ntp:
Parameterized classes cannot be used with the array syntax. When using the hash key syntax, thevalue for a parameterized class should be a hash of the classʼs attributes and values. Each valuemay be a string, number, array, or hash. String values should be quoted, as unquoted strings like“on” may be interpreted as booleans. Non-parameterized classes may have empty values.
classes:common:puppet:ntp:ntpserver:0.pool.ntp.orgaptsetup:additional_apt_repos:
Puppet Documentation • External Node Classifiers 200/434
-deblocalrepo.example.com/ubuntulucidproduction-deblocalrepo.example.com/ubuntulucidvendor
PARAMETERS
If present, the value of the parameters key must be a hash of valid variable names and associatedvalues; these will be exposed to the compiler as top scope variables. Each value may be a string,number, array, or hash.
parameters:ntp_servers:-0.pool.ntp.org-ntp.example.commail_server:mail.example.comiburst:true
ENVIRONMENT
If present, the value of environment must be a string representing the desired environment for thisnode. In Puppet 3 and later, this will become the only environment used by the node in its requestsfor catalogs and files. In Puppet 2.7 and earlier, ENC-set environments are not reliable, �as notedabove.
environment:production
COMPLETE EXAMPLE
---classes:common:puppet:ntp:ntpserver:0.pool.ntp.orgaptsetup:additional_apt_repos:-deblocalrepo.example.com/ubuntulucidproduction-deblocalrepo.example.com/ubuntulucidvendorparameters:ntp_servers:-0.pool.ntp.org-ntp.example.commail_server:mail.example.comiburst:trueenvironment:production
Puppet 0.23.0 through 2.6.4
As above, with the following exception:CLASSES
If present, the value of classes must be an array of class names. Parameterized classes cannot beused with an ENC.
Puppet 0.22.4 and Lower
Puppet Documentation • External Node Classifiers 201/434
ENCs must return two lines of text, separated by a newline (LF). The first line must be the name of a�parent node defined in the main site manifest. The second line must be a space-separated list of�classes. ENCs must exit with exit code 0; Puppetʼs behavior when faced with a non-zero ENC exitcode is undefined.�COMPLETE EXAMPLE
basenodecommonpuppetdnsntp
Tricks, Notes, and Further ReadingAlthough only the node name is directly passed to an ENC, it can make decisions based on otherfacts about the node by querying the inventory service HTTP API or using the puppet factssubcommand shipped with Puppet 2.7.Puppetʼs “exec” node_terminus is just one way for Puppet to build node objects, and itʼsoptimized for flexibility and for the simplicity of its API. There are situations where it can make�more sense to design a native node terminus instead of an ENC, one example being the “ldap”node terminus that ships with Puppet. See the LDAP nodes documentation on the wiki for moreinfo.
Plugins in ModulesLearn how to distribute custom facts and types from the server to managed clients automatically.
DetailsThis page describes the deployment of custom facts and types for use by the client via modules.
Custom types and facts are stored in modules. These custom types and facts are then gatheredtogether and distributed via a file mount on your Puppet master called plugins.�
This technique can also be used to bundle functions for use by the server when the manifest isbeing compiled. Doing so is a two step process which is described further on in this document.
To enable module distribution you need to make changes on both the Puppet master and theclients.
Note: Plugins in modules is supported in 0.24.x onwards and modifies the pluginsync model�supported in releases prior to 0.24.x. It is NOT supported in earlier releases of Puppet but may bepresent as a patch in some older Debian Puppet packages. The older 0.24.x configuration for�plugins in modules is documented at the end of this page.
Module structure for 0.25.x and laterIn Puppet version 0.25.x and later, plugins are stored in the lib directory of a module, using aninternal directory structure that mirrors that of the Puppet code:
Puppet Documentation • Plugins in Modules 202/434
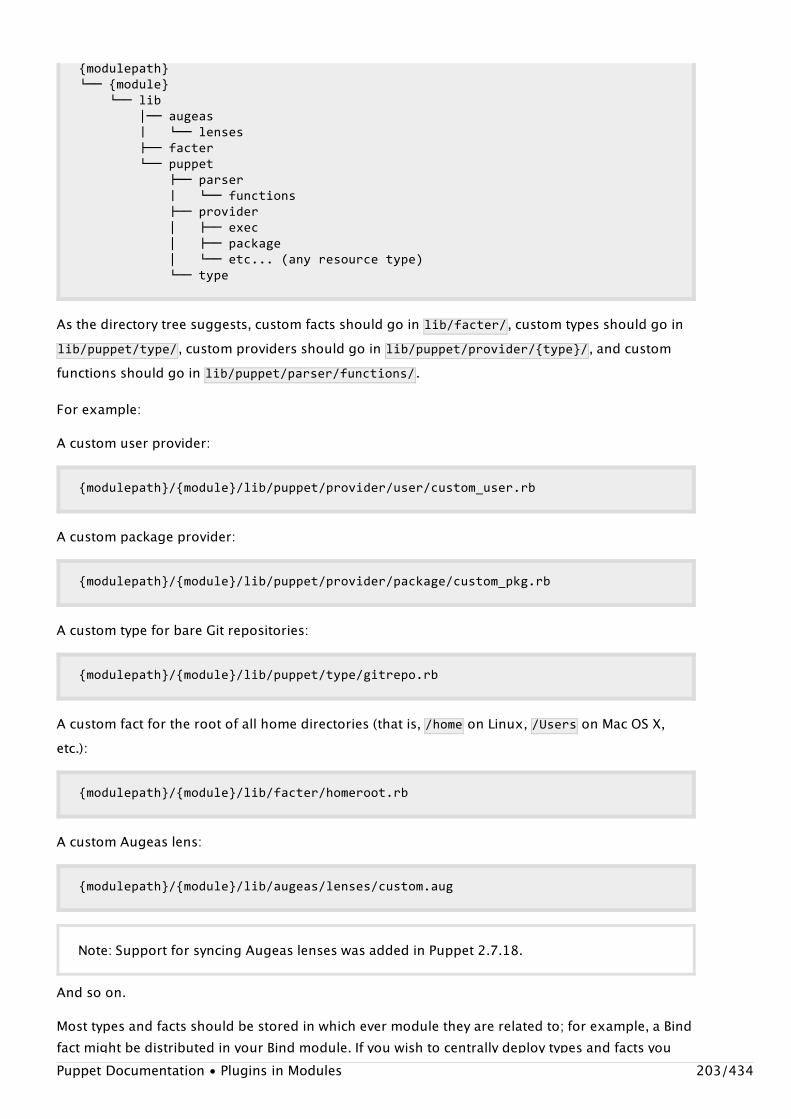
{modulepath}└──{module}└──lib|──augeas│└──lenses├──facter└──puppet├──parser│└──functions├──provider|├──exec|├──package|└──etc...(anyresourcetype)└──type
As the directory tree suggests, custom facts should go in lib/facter/ , custom types should go inlib/puppet/type/ , custom providers should go in lib/puppet/provider/{type}/ , and customfunctions should go in lib/puppet/parser/functions/ .
For example:
A custom user provider:
{modulepath}/{module}/lib/puppet/provider/user/custom_user.rb
A custom package provider:
{modulepath}/{module}/lib/puppet/provider/package/custom_pkg.rb
A custom type for bare Git repositories:
{modulepath}/{module}/lib/puppet/type/gitrepo.rb
A custom fact for the root of all home directories (that is, /home on Linux, /Users on Mac OS X,etc.):
{modulepath}/{module}/lib/facter/homeroot.rb
A custom Augeas lens:
{modulepath}/{module}/lib/augeas/lenses/custom.aug
And so on.
Most types and facts should be stored in which ever module they are related to; for example, a Bindfact might be distributed in your Bind module. If you wish to centrally deploy types and facts you
Note: Support for syncing Augeas lenses was added in Puppet 2.7.18.
Puppet Documentation • Plugins in Modules 203/434
fact might be distributed in your Bind module. If you wish to centrally deploy types and facts youcould create a separate module just for this purpose, for example one called custom . This moduleneeds to be a valid module (with the correct directory structure and an init.pp file).�
So, if we are using our custom module and our modulepath is /etc/puppet/modules then types andfacts would be stored in the following directories:
/etc/puppet/modules/custom/lib/puppet/type/etc/puppet/modules/custom/lib/puppet/provider/etc/puppet/modules/custom/lib/puppet/parser/functions/etc/puppet/modules/custom/lib/facter
Note: 0.25.x versions of Puppet have a known bug whereby plugins are instead loaded from thedeprecated plugins directories of modules when applying a manifest locally with the puppetcommand, even though puppetmasterd will correctly serve the contents of lib/ directories toagent nodes. This bug is fixed in Puppet 2.6.�
Enabling PluginsyncAfter setting up the directory structure, we then need to turn on pluginsync in our puppet.confconfiguration file on both the master and the clients:��
[main]pluginsync=true
Note on Usage for Server Custom FunctionsFunctions are executed on the server while compiling the manifest. A module defined in the�manifest can include functions in the plugins directory. The custom function will need to be placedin the proper location within the manifest first:�
{modulepath}/{module}/lib/puppet/parser/functions
Note that this location is not within the puppetmasterʼs $libdir path. Placing the custom functionwithin the module plugins directory will not result in the puppetmasterd loading the new customfunction. The puppet client can be used to help deploy the custom function by copying it frommodulepath/module/lib/puppet/parser/functions to the proper $libdir location. To do so run thepuppet client on the server. When the client runs it will download the custom function from themoduleʼs lib directory and deposit it within the correct location in $libdir. The next invocation ofthe Puppet master by a client will autoload the custom function.
As always custom functions are loaded once by the Puppet master. Simply replacing a customfunction with a new version will not cause Puppet master to automatically reload the function. Youmust restart the Puppet master.
Legacy 0.24.x and Plugins in Modules
Puppet Documentation • Plugins in Modules 204/434
For older Puppet release the lib directory was called plugins .
So for types you would place them in:
{modulepath}/{module}/plugins/puppet/type
For providers you place them in:
{modulepath}/{module}/plugins/puppet/provider
Similarly, Facter facts belong in the facter subdirectory of the library directory:
{modulepath}/{module}/plugins/facter
If we are using our custom module and our modulepath is /etc/puppet/modules then types andfacts would be stored in the following directories:
/etc/puppet/modules/custom/plugins/puppet/type/etc/puppet/modules/custom/plugins/puppet/provider/etc/puppet/modules/custom/plugins/facter
Enabling pluginsync for 0.24.x versionsFor 0.24.x versions you may need to specify some additional options:
[main]pluginsync=truefactsync=truefactpath=$vardir/lib/facter
Custom FactsExtend facter by writing your own custom facts to provide information to Puppet.
Ruby FactsAdding Custom Facts to FacterSometimes you need to be able to write conditional expressions based on site-specific data that�just isnʼt available via Facter (or use a variable in a template that isnʼt there). A solution can beachieved by adding a new fact to Facter. These additional facts can then be distributed to Puppetclients and are available for use in manifests.
Puppet Documentation • Custom Facts 205/434
The ConceptYou can add new facts by writing a snippet of Ruby code on the Puppet master. We then use PluginsIn Modules to distribute our facts to the client.
An ExampleLetʼs say we need to get the output of uname -i to single out a specific type of workstation. To do�these we create a fact. We start by giving the fact a name, in this case, hardware_platform , andcreate our new fact in a file, �hardware_platform.rb , on the Puppet master server:
#hardware_platform.rb
Facter.add("hardware_platform")dosetcodedoFacter::Util::Resolution.exec('/bin/uname-i')endend
We then use the instructions in Plugins In Modules page to copy our new fact to a module anddistribute it. During your next Puppet run the value of our new fact will be available to use in yourmanifests.
The best place to get ideas about how to write your own custom facts is to look at the existingFacter fact code. You will find lots of examples of how to interpret different types of system data��and return useful facts.
Using other factsYou can write a fact which uses other facts by accessing Facter.value(“somefact”) or simplyFacter.somefact. The former will return nil for unknown facts, the latter will raise an exception. Anexample:
Facter.add("osfamily")dosetcodedodistid=Facter.value('lsbdistid')casedistidwhen/RedHatEnterprise|CentOS|Fedora/"redhat"when"ubuntu""debian"elsedistidendend
Note: Prior to Facter 1.5.8, values returned by Facter::Util::Resolution.exec often hadtrailing newlines. If your custom fact will also be used by older versions of Facter, you mayneed to call chomp on these values. (In the example above, this would look likeFacter::Util::Resolution.exec('/bin/uname-i').chomp .)
Puppet Documentation • Custom Facts 206/434
end
Loading Custom FactsFacter offers a few methods of loading facts:�
$LOAD_PATH, or the ruby library load pathThe environment variable ʻFACTERLIBʼFacts distributed using pluginsync
You can use these methods of loading facts do to things like test files locally before distributing�them, or have a specific set of facts available on certain machines.�
Facter will search all directories in the ruby $LOAD_PATH variable for subdirectories named ʻfacterʼ,and will load all ruby files in those directories. If you had some directory in your $LOAD_PATH like�~/lib/ruby, set up like this:
{~/lib/ruby}└──facter├──rackspace.rb├──system_load.rb└──users.rb
Facter would try to load ʻfacter/system_load.rbʼ, ʻfacter/users.rbʼ, and ʻfacter/rackspace.rbʼ.
Facter also will check the environment variable FACTERLIB for a colon delimited set of directories,and will try to load all ruby files in those directories. This allows you to do something like this:�
$lsmy_factssystem_load.rb$lsmy_other_factsusers.rb$exportFACTERLIB="./my_facts:./my_other_facts"$factersystem_loaduserssystem_load=>0.25users=>thomas,pat
Facter can also easily load fact files distributed using pluginsync. Running �facter-p will load allthe facts that have been distributed via pluginsync, so if youʼre using a lot of custom facts insidepuppet, you can easily use these facts with standalone facter.
Custom facts can be distributed to clients using the Plugins In Modules method.
Configuring Facts�Facts have a few properties that you can use to customize how facts are evaluated.
Confining Facts�
One of the more commonly used properties is the confine statement, which restricts the fact toonly run on systems that matches another given fact.Puppet Documentation • Custom Facts 207/434
An example of the confine statement would be something like the following:�
Facter.add(:powerstates)doconfine:kernel=>"Linux"setcodedoFacter::Util::Resolution.exec('cat/sys/power/states')endend
This fact uses sysfs on linux to get a list of the power states that are available on the given system.Since this is only available on Linux systems, we use the confine statement to ensure that this fact�isnʼt needlessly run on systems that donʼt support this type of enumeration.
Fact precedence
Another property of facts is the weight property. Facts with a higher weight are run earlier, whichallows you to either override or provide fallbacks to existing facts, or ensure that facts areevaluated in a specific order. By default, the weight of a fact is the number of confines for that fact,��so that more specific facts are evaluated first.��
#ChecktoseeifthisserverhasbeenmarkedasapostgresserverFacter.add(:role)dohas_weight100setcodedoifFile.exist?"/etc/postgres_server""postgres_server"endendend
#Guessifthisisaserverbythepresenceofthepg_createbinaryFacter.add(:role)dohas_weight50setcodedoifFile.exist?"/usr/sbin/pg_create""postgres_server"endendend
#Ifthisserverdoesn'tlooklikeaserver,itmustbeadesktopFacter.add(:role)dosetcodedo"desktop"endend
Timing out
If you have facts that are unreliable and may not finish running, you can use the �timeout property.If a fact is defined with a timeout and the evaluation of the setcode block exceeds the timeout,�Facter will halt the resolution of that fact and move on.
Puppet Documentation • Custom Facts 208/434

#SleepFacter.add(:sleep,:timeout=>10)dosetcodedosleep999999endend
Viewing Fact Values[puppetdb]: If your puppet master(s) are configured to use [PuppetDB][] and/or the �inventoryservice, you can view and search all of the facts for any node, including custom facts. See thePuppetDB or inventory service docs for more info.
Legacy Fact DistributionFor Puppet versions prior to 0.24.0:
On older versions of Puppet, prior to 0.24.0, a different method called factsync was used for custom�fact distribution. Puppet would look for custom facts on puppet://$server/facts by default and youneeded to run puppetd with --factsync option (or add factsync=true to puppetd.conf). Thiswould enable the syncing of these files to the local file system and loading them within puppetd.��
Facts were synced to a local directory ($vardir/facts, by default) before facter was run, so theywould be available the first time. If $factsource was unset, the �--factsync option is equivalent to:
file{$factdir:source=>"puppet://puppet/facts",recurse=>true}
After the facts were downloaded, they were loaded (or reloaded) into memory.
Some additional options were available to configure this legacy method:�
The following command line or config file options are available (default options shown):��
factpath ($vardir/facts): Where Puppet should look for facts. Multiple directories should becolon-separated, like normal PATH variables. By default, this is set to the same value as factdest,but you can have multiple fact locations (e.g., you could have one or more on NFS).factdest ($vardir/facts): Where Puppet should store facts that it pulls down from the centralserver.factsource (puppet://$server/facts): From where to retrieve facts. The standard Puppet file type�is used for retrieval, so anything that is a valid file source can be used here.�factsync (false): Whether facts should be synced with the central server.factsignore (.svn CVS): What files to ignore when pulling down facts.�
Remember the approach described above for factsync is now deprecated and replaced by theplugin approach described in the Plugins In Modules page.
External FactsExternal facts are available only in Facter 1.7 and later.
Puppet Documentation • Custom Facts 209/434
What are external facts?
External facts provide a way to use arbitrary executables or scripts as facts, or set facts staticallywith structured data. If youʼve ever wanted to write a custom fact in Perl, C, or a one-line text file,�this is how.
Fact Locations
On Unix/Linux:
/etc/facter/facts.d/#PuppetOpenSource/etc/puppetlab/facter/facts.d/#PuppetEnterprise
On Windows 2003:
C:\DocumentsandSettings\AllUsers\ApplicationData\Puppetlabs\facter\facts.d\
On Windows 2008:
C:\ProgramData\Puppetlabs\facter\facts.d\
Executable facts — Unix
Executable facts on Unix work by dropping an executable file into the standard �external fact pathabove.
You must ensure that the script has its execute bit set:
chmod+x/etc/facter/facts.d/my_fact_script.rb
For Facter to parse the output, the script must return key/value pairs on STDOUT in the format:
key1=value1key2=value2key3=value3
Using this format, a single script can return multiple facts.
Executable facts — Windows
Executable facts on Windows work by dropping an executable file into the external fact path for�your version of Windows. Unlike with Unix, the external facts interface expects Windows scripts toend with a known extension. At the moment the following extensions are supported:
.com and exe : binary executables
.bat : batch scripts
.ps1 : PowerShell scripts
Puppet Documentation • Custom Facts 210/434
As with Unix facts, each script must return key/value pairs on STDOUT in the format:
key1=value1key2=value2key3=value3
Using this format, a single script can return multiple facts in one return.ENABLING POWERSHELL SCRIPTS
For PowerShell scripts (scripts with a ps1 extension) to work, you need to make sure you have thecorrect execution policy set.
See this Microsoft TechNet article for more detail about the impact of changing execution policy. Werecommend understanding any security implications before making a global change to executionpolicy.
The simplest and safest mechanism we have found is to change the execution policy so that onlyremotely downloaded scripts need to be signed. You can set this policy with:
Set-ExecutionPolicyRemoteSigned-ScopeLocalMachine
Here is a sample PowerShell script which outputs facts using the required format:
Write-Host"key1=val1"Write-Host"key2=val2"Write-Host"key3=val3"
You should be able to save and execute this PowerShell script on the command line after changingthe execution policy.
Structured Data Facts
Facter can parse structured data files stored in the external facts directory and set facts based on�their contents.
Structured data files must use one of the supported data types and must have the correct file��extension. At the moment, Facter supports the following extensions and data types:
.yaml : YAML data, in the following format:
---key1:val1key2:val2key3:val3
.json : JSON data, in the following format:
{"key1":"val1","key2":"val2",
Puppet Documentation • Custom Facts 211/434
"key3":"val3"}
.txt : Key value pairs, in the following format:
key1=value1key2=value2key3=value3
As with executable facts, structured data files can set multiple facts at once.�
Troubleshooting
If your external fact is not appearing in Facterʼs output, running Facter in debug mode should giveyou a meaningful reason and tell you which file is causing the problem:�
#facter--debug
An example would be in cases where a fact returns invalid characters. Let say you used a hypheninstead of an equals sign in your script test.sh :
#!/bin/bash
echo"key1-value1"
Running facter--debug should yield a useful error message:
...Factfile/etc/facter/facter.d/sample.txtwasparsedbutreturnedanemptydataset...
If you are interested in finding out where any bottlenecks are, you can run �Facter in timing modeand it will reflect how long it takes to parse your �external facts:
facter--timing
The output should look similar to the timing for Ruby facts, but will name external facts with theirfull paths. For example:
$facter--timingkernel:14.81ms/usr/lib/facter/ext/abc.sh:48.72ms/usr/lib/facter/ext/foo.sh:32.69ms/usr/lib/facter/ext/full.json:104.71ms/usr/lib/facter/ext/sample.txt:0.65ms....
Puppet Documentation • Custom Facts 212/434
EXTERNAL FACTS AND STDLIB
If you find that an external fact does not match what you have configured in your ��facter.ddirectory, make sure you have not defined the same fact using the external facts capabilities found�in the stdlib module.
Drawbacks
While external facts provide a mostly-equal way to create variables for Puppet, they have a fewdrawbacks:
An external fact cannot internally reference another fact. However, due to parse order, you canreference an external fact from a Ruby fact.External executable facts are forked instead of executed within the same process.Although we plan to allow distribution of external facts through Puppetʼs pluginsync capability,this is not yet supported.
Custom FunctionsExtend the Puppet interpreter by writing your own custom functions.
Writing your own functionsThe Puppet language and interpreter is very extensible. One of the places you can extend Puppet isin creating new functions to be executed on the puppet master at the time that the manifest iscompiled. To give you an idea of what you can do with these functions, the built-in template andinclude functions are implemented in exactly the same way as the functions youʼre learning to writehere.
Custom functions are written in Ruby, so youʼll need a working understanding of the languagebefore you begin.
Gotchas
There are a few things that can trip you up when youʼre writing your functions:
Your function will be executed on the server. This means that any files or other resources you�reference must be available on the server, and you canʼt do anything that requires direct accessto the client machine.There are actually two completely different types of functions available — �rvalues (which return avalue) and statements (which do not). If you are writing an rvalue function, you must pass :type=>:rvalue when creating the function; see the examples below.The name of the file containing your function must be the same as the name of function;�otherwise it wonʼt get automatically loaded.To use a fact about a client, use lookupvar('{factname}') instead of Facter['{factname}'].value . If the fact does not exist, lookupvar returns :undefined . See examples below.
Where to put your functions
Puppet Documentation • Custom Functions 213/434
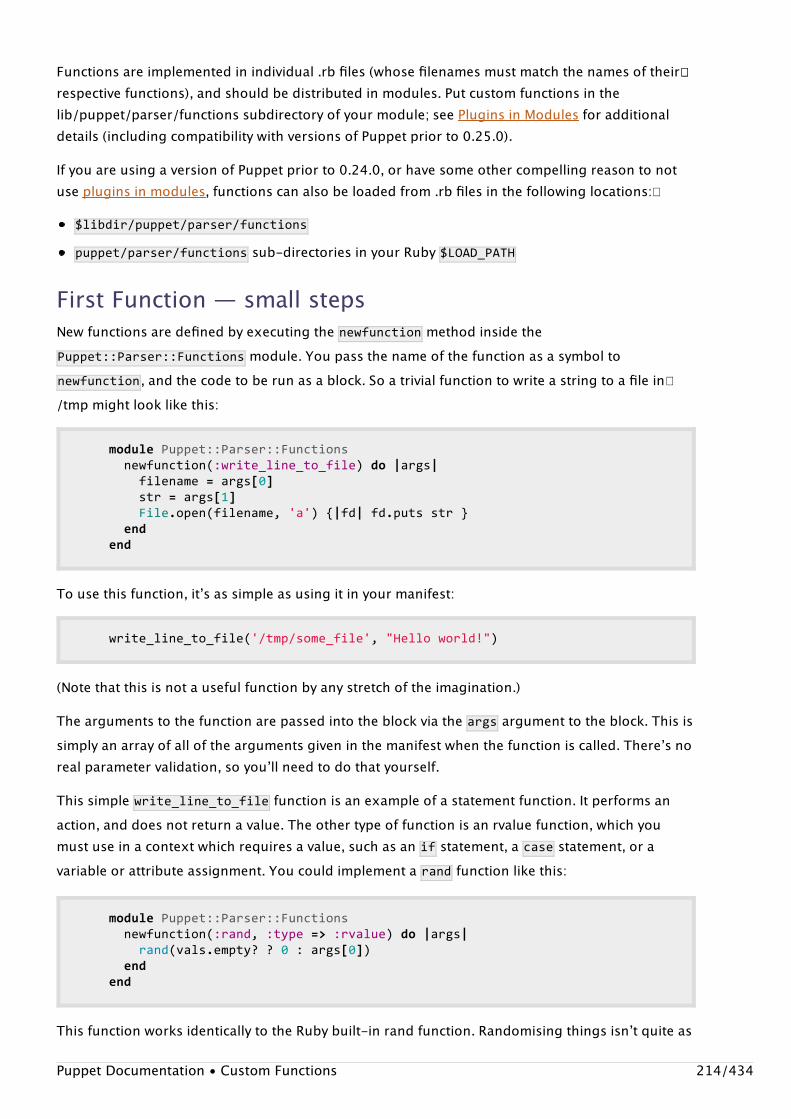
Functions are implemented in individual .rb files (whose filenames must match the names of their��respective functions), and should be distributed in modules. Put custom functions in thelib/puppet/parser/functions subdirectory of your module; see Plugins in Modules for additionaldetails (including compatibility with versions of Puppet prior to 0.25.0).
If you are using a version of Puppet prior to 0.24.0, or have some other compelling reason to notuse plugins in modules, functions can also be loaded from .rb files in the following locations:�
$libdir/puppet/parser/functions
puppet/parser/functions sub-directories in your Ruby $LOAD_PATH
First Function — small stepsNew functions are defined by executing the �newfunction method inside thePuppet::Parser::Functions module. You pass the name of the function as a symbol tonewfunction , and the code to be run as a block. So a trivial function to write a string to a file in�/tmp might look like this:
modulePuppet::Parser::Functionsnewfunction(:write_line_to_file)do|args|filename=args[0]str=args[1]File.open(filename,'a'){|fd|fd.putsstr}endend
To use this function, itʼs as simple as using it in your manifest:
write_line_to_file('/tmp/some_file',"Helloworld!")
(Note that this is not a useful function by any stretch of the imagination.)
The arguments to the function are passed into the block via the args argument to the block. This issimply an array of all of the arguments given in the manifest when the function is called. Thereʼs noreal parameter validation, so youʼll need to do that yourself.
This simple write_line_to_file function is an example of a statement function. It performs anaction, and does not return a value. The other type of function is an rvalue function, which youmust use in a context which requires a value, such as an if statement, a case statement, or avariable or attribute assignment. You could implement a rand function like this:
modulePuppet::Parser::Functionsnewfunction(:rand,:type=>:rvalue)do|args|rand(vals.empty??0:args[0])endend
This function works identically to the Ruby built-in rand function. Randomising things isnʼt quite as
Puppet Documentation • Custom Functions 214/434
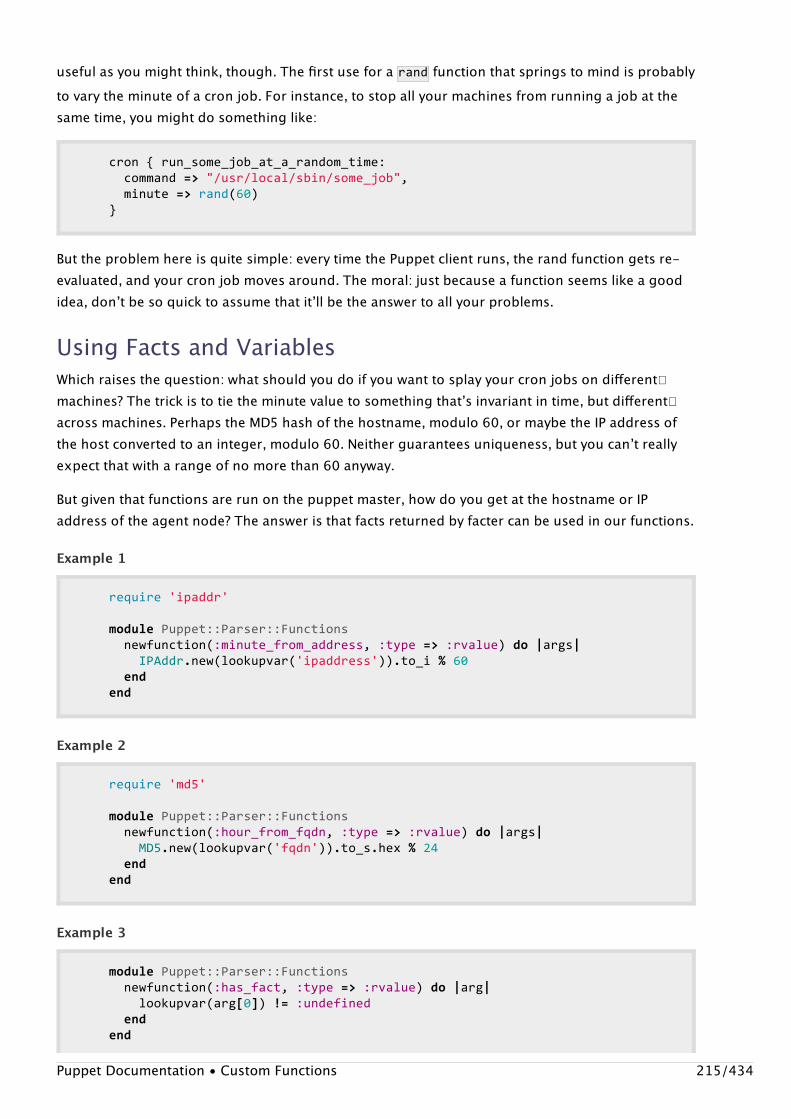
useful as you might think, though. The first use for a �rand function that springs to mind is probablyto vary the minute of a cron job. For instance, to stop all your machines from running a job at thesame time, you might do something like:
cron{run_some_job_at_a_random_time:command=>"/usr/local/sbin/some_job",minute=>rand(60)}
But the problem here is quite simple: every time the Puppet client runs, the rand function gets re-evaluated, and your cron job moves around. The moral: just because a function seems like a goodidea, donʼt be so quick to assume that itʼll be the answer to all your problems.
Using Facts and VariablesWhich raises the question: what should you do if you want to splay your cron jobs on different�machines? The trick is to tie the minute value to something thatʼs invariant in time, but different�across machines. Perhaps the MD5 hash of the hostname, modulo 60, or maybe the IP address ofthe host converted to an integer, modulo 60. Neither guarantees uniqueness, but you canʼt reallyexpect that with a range of no more than 60 anyway.
But given that functions are run on the puppet master, how do you get at the hostname or IPaddress of the agent node? The answer is that facts returned by facter can be used in our functions.
Example 1
require'ipaddr'
modulePuppet::Parser::Functionsnewfunction(:minute_from_address,:type=>:rvalue)do|args|IPAddr.new(lookupvar('ipaddress')).to_i%60endend
Example 2
require'md5'
modulePuppet::Parser::Functionsnewfunction(:hour_from_fqdn,:type=>:rvalue)do|args|MD5.new(lookupvar('fqdn')).to_s.hex%24endend
Example 3
modulePuppet::Parser::Functionsnewfunction(:has_fact,:type=>:rvalue)do|arg|lookupvar(arg[0])!=:undefinedendend
Puppet Documentation • Custom Functions 215/434

Basically, to get a factʼs or variableʼs value, you just call lookupvar('{factname}') .
Calling Functions from FunctionsFunctions can be accessed from other functions by callingPuppet::Parser::Functions.autoloader.loadall at the beginning of your new function, thenprepending function_ to the name of the function you are trying to call. Alternatively, you can loada specific function by calling �Puppet::Parser::Functions.function('myfunc1')
Also keep in mind that when calling a puppet function from the puppet DSL, arguments are allpassed in as an anonymous array. This is not the case when calling the function from within Ruby.To work around this, you must create the anonymous array yourself by putting the arguments (evenif there is only one argument) inside square brackets like this:
[arg1,arg1,arg3]
Example
modulePuppet::Parser::Functionsnewfunction(:myfunc2,:type=>:rvalue)do|args|Puppet::Parser::Functions.autoloader.loadallfunction_myfunc1([arg1,arg2,...])endend
Handling ErrorsTo throw a parse/compile error in your function, in a similar manner to the fail() function:
raisePuppet::ParseError,"myerror"
Troubleshooting FunctionsIf youʼre experiencing problems with your functions loading, thereʼs a couple of things you can doto see what might be causing the issue:
1 - Make sure your function is parsing correctly, by running:
ruby-rpuppetmy_funct.rb
This should return nothing if the function is parsing correctly, otherwise youʼll get an exceptionwhich should help troubleshoot the problem.
2 - Check that the function is available to Puppet:
irb
Puppet Documentation • Custom Functions 216/434
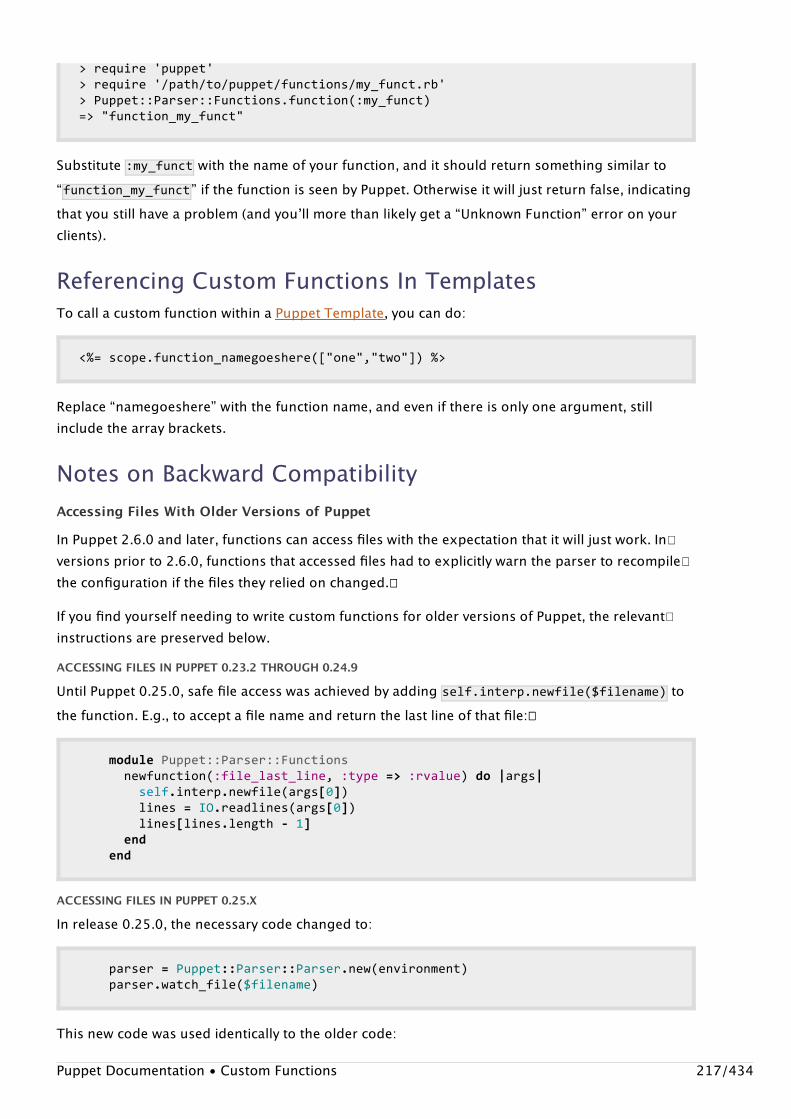
>require'puppet'>require'/path/to/puppet/functions/my_funct.rb'>Puppet::Parser::Functions.function(:my_funct)=>"function_my_funct"
Substitute :my_funct with the name of your function, and it should return something similar to“function_my_funct” if the function is seen by Puppet. Otherwise it will just return false, indicatingthat you still have a problem (and youʼll more than likely get a “Unknown Function” error on yourclients).
Referencing Custom Functions In TemplatesTo call a custom function within a Puppet Template, you can do:
<%=scope.function_namegoeshere(["one","two"])%>
Replace “namegoeshere” with the function name, and even if there is only one argument, stillinclude the array brackets.
Notes on Backward CompatibilityAccessing Files With Older Versions of Puppet
In Puppet 2.6.0 and later, functions can access files with the expectation that it will just work. In�versions prior to 2.6.0, functions that accessed files had to explicitly warn the parser to recompile�the configuration if the files they relied on changed.��
If you find yourself needing to write custom functions for older versions of Puppet, the relevant�instructions are preserved below.ACCESSING FILES IN PUPPET 0.23.2 THROUGH 0.24.9
Until Puppet 0.25.0, safe file access was achieved by adding �self.interp.newfile($filename) tothe function. E.g., to accept a file name and return the last line of that file:��
modulePuppet::Parser::Functionsnewfunction(:file_last_line,:type=>:rvalue)do|args|self.interp.newfile(args[0])lines=IO.readlines(args[0])lines[lines.length-1]endend
ACCESSING FILES IN PUPPET 0.25.X
In release 0.25.0, the necessary code changed to:
parser=Puppet::Parser::Parser.new(environment)parser.watch_file($filename)
This new code was used identically to the older code:
Puppet Documentation • Custom Functions 217/434
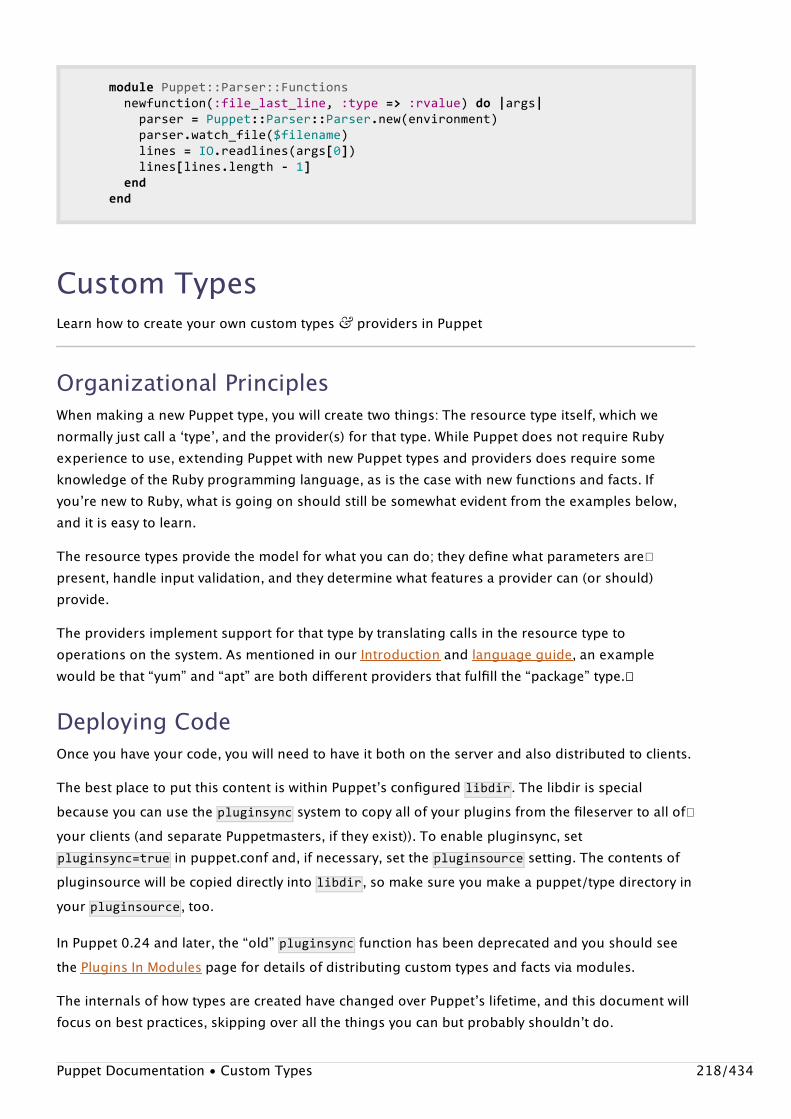
modulePuppet::Parser::Functionsnewfunction(:file_last_line,:type=>:rvalue)do|args|parser=Puppet::Parser::Parser.new(environment)parser.watch_file($filename)lines=IO.readlines(args[0])lines[lines.length-1]endend
Custom TypesLearn how to create your own custom types & providers in Puppet
Organizational PrinciplesWhen making a new Puppet type, you will create two things: The resource type itself, which wenormally just call a ʻtypeʼ, and the provider(s) for that type. While Puppet does not require Rubyexperience to use, extending Puppet with new Puppet types and providers does require someknowledge of the Ruby programming language, as is the case with new functions and facts. Ifyouʼre new to Ruby, what is going on should still be somewhat evident from the examples below,and it is easy to learn.
The resource types provide the model for what you can do; they define what parameters are�present, handle input validation, and they determine what features a provider can (or should)provide.
The providers implement support for that type by translating calls in the resource type tooperations on the system. As mentioned in our Introduction and language guide, an examplewould be that “yum” and “apt” are both different providers that fulfill the “package” type.��
Deploying CodeOnce you have your code, you will need to have it both on the server and also distributed to clients.
The best place to put this content is within Puppetʼs configured �libdir . The libdir is specialbecause you can use the pluginsync system to copy all of your plugins from the fileserver to all of�your clients (and separate Puppetmasters, if they exist)). To enable pluginsync, setpluginsync=true in puppet.conf and, if necessary, set the pluginsource setting. The contents ofpluginsource will be copied directly into libdir , so make sure you make a puppet/type directory inyour pluginsource , too.
In Puppet 0.24 and later, the “old” pluginsync function has been deprecated and you should seethe Plugins In Modules page for details of distributing custom types and facts via modules.
The internals of how types are created have changed over Puppetʼs lifetime, and this document willfocus on best practices, skipping over all the things you can but probably shouldnʼt do.
Puppet Documentation • Custom Types 218/434
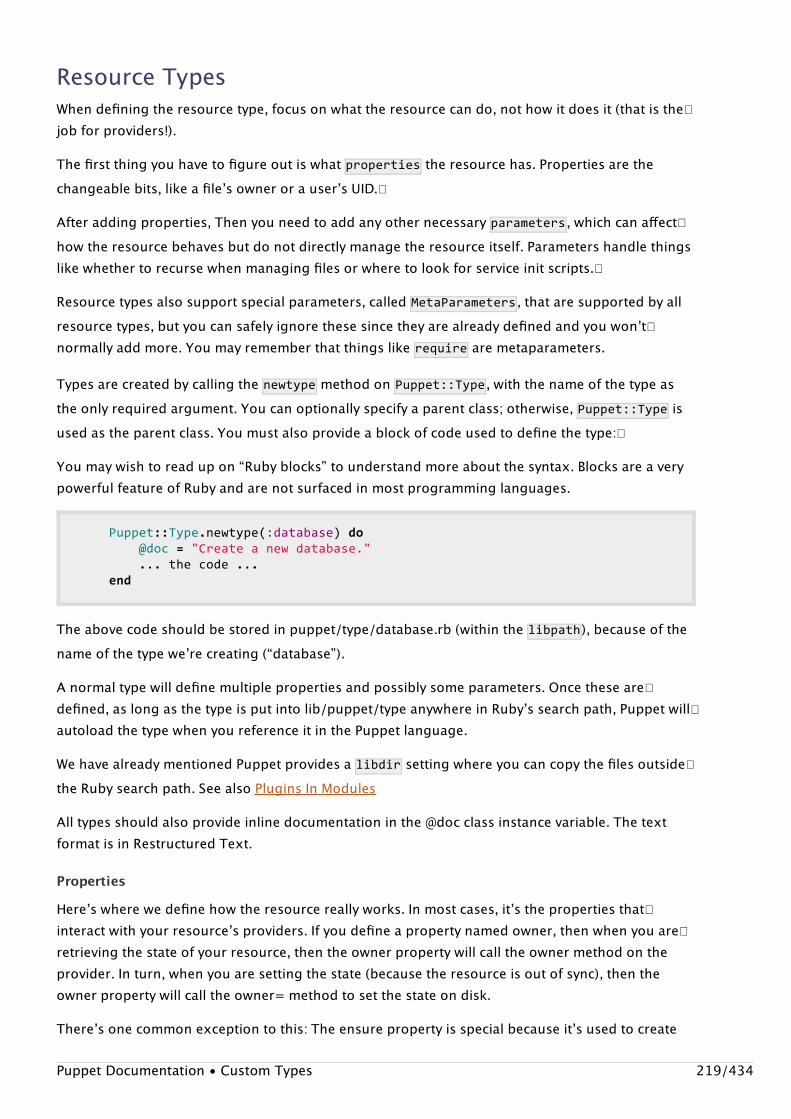
Resource TypesWhen defining the resource type, focus on what the resource can do, not how it does it (that is the�job for providers!).
The first thing you have to figure out is what ��properties the resource has. Properties are thechangeable bits, like a fileʼs owner or a userʼs UID.�
After adding properties, Then you need to add any other necessary parameters , which can affect�how the resource behaves but do not directly manage the resource itself. Parameters handle thingslike whether to recurse when managing files or where to look for service init scripts.�
Resource types also support special parameters, called MetaParameters , that are supported by allresource types, but you can safely ignore these since they are already defined and you wonʼt�normally add more. You may remember that things like require are metaparameters.
Types are created by calling the newtype method on Puppet::Type , with the name of the type asthe only required argument. You can optionally specify a parent class; otherwise, Puppet::Type isused as the parent class. You must also provide a block of code used to define the type:�
You may wish to read up on “Ruby blocks” to understand more about the syntax. Blocks are a verypowerful feature of Ruby and are not surfaced in most programming languages.
Puppet::Type.newtype(:database)do@doc="Createanewdatabase."...thecode...end
The above code should be stored in puppet/type/database.rb (within the libpath ), because of thename of the type weʼre creating (“database”).
A normal type will define multiple properties and possibly some parameters. Once these are�defined, as long as the type is put into lib/puppet/type anywhere in Rubyʼs search path, Puppet will�autoload the type when you reference it in the Puppet language.
We have already mentioned Puppet provides a libdir setting where you can copy the files outside�the Ruby search path. See also Plugins In Modules
All types should also provide inline documentation in the @doc class instance variable. The textformat is in Restructured Text.
Properties
Hereʼs where we define how the resource really works. In most cases, itʼs the properties that�interact with your resourceʼs providers. If you define a property named owner, then when you are�retrieving the state of your resource, then the owner property will call the owner method on theprovider. In turn, when you are setting the state (because the resource is out of sync), then theowner property will call the owner= method to set the state on disk.
Thereʼs one common exception to this: The ensure property is special because itʼs used to create
Puppet Documentation • Custom Types 219/434
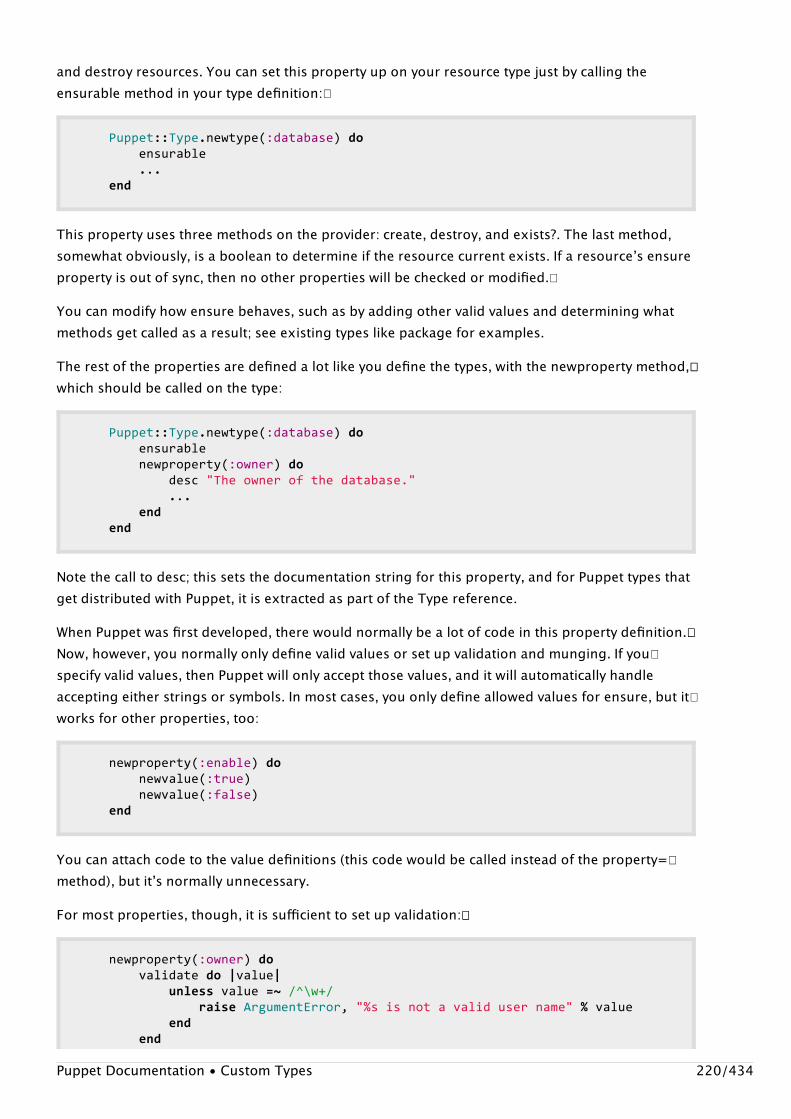
and destroy resources. You can set this property up on your resource type just by calling theensurable method in your type definition:�
Puppet::Type.newtype(:database)doensurable...end
This property uses three methods on the provider: create, destroy, and exists?. The last method,somewhat obviously, is a boolean to determine if the resource current exists. If a resourceʼs ensureproperty is out of sync, then no other properties will be checked or modified.�
You can modify how ensure behaves, such as by adding other valid values and determining whatmethods get called as a result; see existing types like package for examples.
The rest of the properties are defined a lot like you define the types, with the newproperty method,��which should be called on the type:
Puppet::Type.newtype(:database)doensurablenewproperty(:owner)dodesc"Theownerofthedatabase."...endend
Note the call to desc; this sets the documentation string for this property, and for Puppet types thatget distributed with Puppet, it is extracted as part of the Type reference.
When Puppet was first developed, there would normally be a lot of code in this property definition.��Now, however, you normally only define valid values or set up validation and munging. If you�specify valid values, then Puppet will only accept those values, and it will automatically handleaccepting either strings or symbols. In most cases, you only define allowed values for ensure, but it�works for other properties, too:
newproperty(:enable)donewvalue(:true)newvalue(:false)end
You can attach code to the value definitions (this code would be called instead of the property=�method), but itʼs normally unnecessary.
For most properties, though, it is sufficient to set up validation:��
newproperty(:owner)dovalidatedo|value|unlessvalue=~/^\w+/raiseArgumentError,"%sisnotavalidusername"%valueendend
Puppet Documentation • Custom Types 220/434
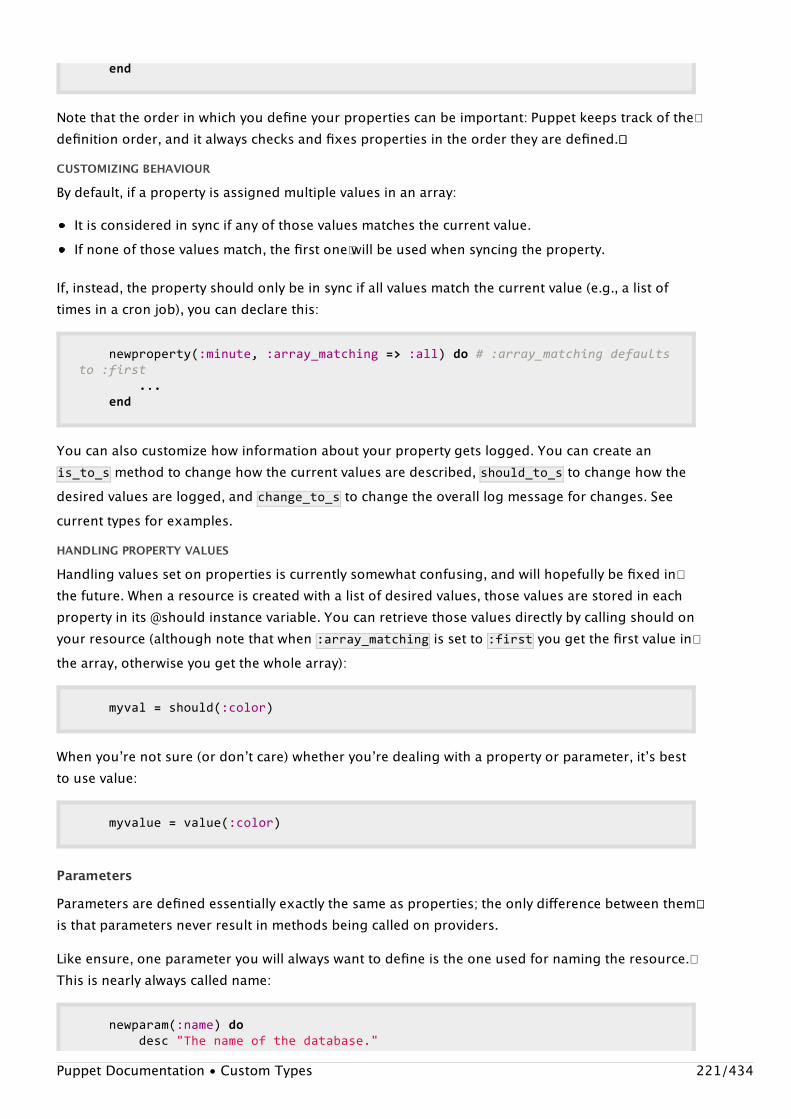
end
Note that the order in which you define your properties can be important: Puppet keeps track of the�definition order, and it always checks and fixes properties in the order they are defined.���CUSTOMIZING BEHAVIOUR
By default, if a property is assigned multiple values in an array:
It is considered in sync if any of those values matches the current value.If none of those values match, the first one� will be used when syncing the property.
If, instead, the property should only be in sync if all values match the current value (e.g., a list oftimes in a cron job), you can declare this:
newproperty(:minute,:array_matching=>:all)do#:array_matchingdefaultsto:first...end
You can also customize how information about your property gets logged. You can create anis_to_s method to change how the current values are described, should_to_s to change how thedesired values are logged, and change_to_s to change the overall log message for changes. Seecurrent types for examples.HANDLING PROPERTY VALUES
Handling values set on properties is currently somewhat confusing, and will hopefully be fixed in�the future. When a resource is created with a list of desired values, those values are stored in eachproperty in its @should instance variable. You can retrieve those values directly by calling should onyour resource (although note that when :array_matching is set to :first you get the first value in�the array, otherwise you get the whole array):
myval=should(:color)
When youʼre not sure (or donʼt care) whether youʼre dealing with a property or parameter, itʼs bestto use value:
myvalue=value(:color)
Parameters
Parameters are defined essentially exactly the same as properties; the only difference between them��is that parameters never result in methods being called on providers.
Like ensure, one parameter you will always want to define is the one used for naming the resource.�This is nearly always called name:
newparam(:name)dodesc"Thenameofthedatabase."
Puppet Documentation • Custom Types 221/434
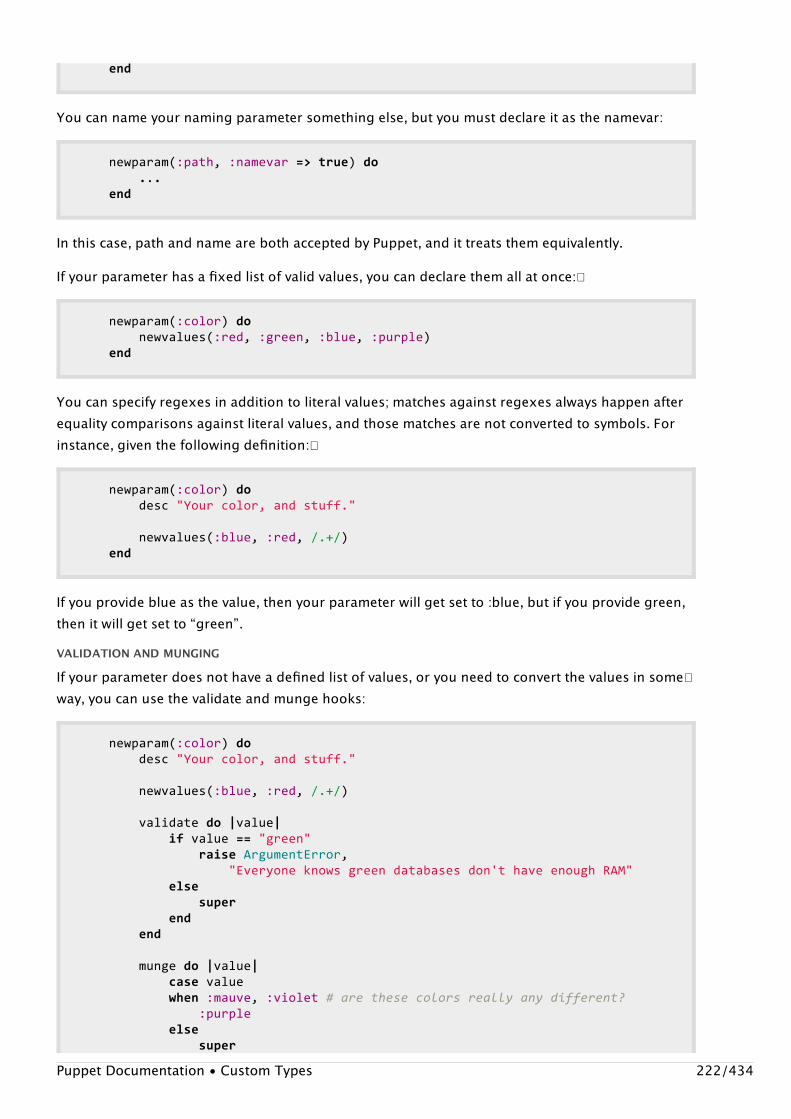
end
You can name your naming parameter something else, but you must declare it as the namevar:
newparam(:path,:namevar=>true)do...end
In this case, path and name are both accepted by Puppet, and it treats them equivalently.
If your parameter has a fixed list of valid values, you can declare them all at once:�
newparam(:color)donewvalues(:red,:green,:blue,:purple)end
You can specify regexes in addition to literal values; matches against regexes always happen afterequality comparisons against literal values, and those matches are not converted to symbols. Forinstance, given the following definition:�
newparam(:color)dodesc"Yourcolor,andstuff."
newvalues(:blue,:red,/.+/)end
If you provide blue as the value, then your parameter will get set to :blue, but if you provide green,then it will get set to “green”.VALIDATION AND MUNGING
If your parameter does not have a defined list of values, or you need to convert the values in some�way, you can use the validate and munge hooks:
newparam(:color)dodesc"Yourcolor,andstuff."
newvalues(:blue,:red,/.+/)
validatedo|value|ifvalue=="green"raiseArgumentError,"Everyoneknowsgreendatabasesdon'thaveenoughRAM"elsesuperendend
mungedo|value|casevaluewhen:mauve,:violet#arethesecolorsreallyanydifferent?:purpleelsesuper
Puppet Documentation • Custom Types 222/434
superendendend
The default validate method looks for values defined using newvalues and if there are any values�defined it accepts only those values (this is exactly how allowed values are validated). The default�munge method converts any values that are specifically allowed into symbols. If you override either�of these methods, note that you lose this value handling and symbol conversion, which youʼll haveto call super for.
Values are always validated before theyʼre munged.
Lastly, validation and munging only* happen when a value is assigned. They have no role to play atall during use of a given value, only during assignment.BOOLEAN PARAMETERS
Boolean parameters are common. To avoid repetition, some utilities are available:
require'puppet/parameter/boolean'#...newparam(:force,:boolean=>true,:parent=>Puppet::Parameter::Boolean)
There are two parts here. The :parent=>Puppet::Parameter::Boolean part configures the�parameter to accept lots of names for true and false, to make things easy for your users. The:boolean=>true creates a boolean method on the type class to return the value of theparameter. In this example, the method would be named force? .
Automatic Relationships
Your type can specify automatic relationships it can have with resources. You use the autorequirehook, which requires a resource type as an argument, and your code should return a list ofresource names that your resource could be related to:
autorequire(:file)do["/tmp","/dev"]end
Note that this wonʼt throw an error if resources with those names do not exist; the purpose of thishook is to make sure that if any required resources are being managed, they get applied before therequiring resource.
ProvidersLook at the Provider Development page for intimate detail; this document will only cover how theresource types and providers need to interact. Because the properties call getter and settermethods on the providers, except in the case of ensure, the providers must define getters and�setters for each property.
Provider Features
Puppet Documentation • Custom Types 223/434
A recent development in Puppet (around 0.22.3) is the ability to declare what features providers canhave. The type declares the features and whatʼs required to make them work, and then theproviders can either be tested for whether they suffice or they can declare that they have the��features. Additionally, individual properties and parameters in the type can declare that theyrequire one or more specific features, and Puppet will throw an error if those parameters are used�with providers missing those features:
newtype(:coloring)dofeature:paint,"Theabilitytopaint.",:methods=>[:paint]feature:draw,"Theabilitytodraw."
newparam(:color,:required_features=>%w{paint})do...endend
The first argument to the feature method is the name of the feature, the second argument is its�description, and after that is a hash of options that help Puppet determine whether the feature isavailable. The only option currently supported is specifying one or more methods that must bedefined on the provider. If no methods are specified, then the provider needs to specifically declare���that it has that feature:
Puppet::Type.type(:coloring).provide(:drawer)dohas_feature:drawend
The provider can specify multiple available features at once with has_features.
When you define features on your type, Puppet automatically defines a bunch of class methods on��the provider:
feature?: Passed a feature name, will return true if the feature is available or false otherwise.features: Returns a list of all supported features on the provider.satisfies?: Passed a list of feature, will return true if they are all available, false otherwise.�
Additionally, each feature gets a separate boolean method, so the above example would result in apaint? method on the provider.
Complete Resource ExampleThis document walks through the definition of a very simple resource type and one provider. Weʼll�build the resource up slowly, and the provider along with it. See Custom Types and ProviderDevelopment for more information on the individual classes. As with creating Custom Facts andCustom Functions, these examples involve Ruby programming.
Resource CreationPuppet Documentation • Complete Resource Example 224/434
Nearly every resource needs to be able to be created and destroyed, and resources have to havenames, so weʼll start with those two features. Puppetʼs property support has a helper method calledensurable that handles modeling creation and destruction; it creates an ensure property and addsabsent and present values for it, which in turn require three methods on the provider, create ,destroy , and exists? . Hereʼs the first start to the resource. �Weʼre going to create one called ʻfileʼ�— this is an example of how weʼd create a resource for something Puppet already has. You can seehow this would be extensible to handle one of your own ideas:
Puppet::Type.newtype(:file)do@doc="Manageafile(thesimpleversion)."
ensurable
newparam(:name)dodesc"Thefullpathtothefile."endend
Here we have provided the resource type name (itʼs file ), a simple documentation string (whichshould be in Restructured Text format), a parameter for the name of the file, and weʼve used the�ensurable method to say that our file is both createable and destroyable.�
To see how we would use this on the provider side, letʼs look at a simple provider:
Puppet::Type.type(:file).provide(:posix)dodesc"NormalUnix-likePOSIXsupportforfilemanagement."
defcreateFile.open(@resource[:name],"w"){|f|f.puts""}#Createanemptyfileend
defdestroyFile.unlink(@resource[:name])end
defexists?File.exists?(@resource[:name])endend
Here you can see that the providers use a different way of specifying their documentation, which is�not something that has been unified in Puppet yet.�
In addition to the docs and the provider name, we provide the three methods that the ensureproperty requires. You can see that in this case weʼre just using Rubyʼs built-in File abilities tocreate an empty file, remove the file, or test whether the file exists.���
Letʼs enhance our resource somewhat by adding the ability to manage the file mode. �Hereʼs thecode we need to add to the resource:
newproperty(:mode)do
Puppet Documentation • Complete Resource Example 225/434
desc"Managethefile'smode."
defaultto"640"end
Notice that weʼre specifying a default value, and that it is a string instead of an integer (file modes�are in octal, and most of us are used to specifying integers in decimal). You can pass a block todefaultto instead of a value, if you donʼt have a simple value. (For more about blocks, see the Rubylanguage documentation).
Hereʼs the code we need to add to the provider to understand modes:
defcreateFile.open(@resource[:name],"w"){|f|f.puts""}#Createanemptyfile#[email protected](:mode)unlessself.mode==should_modeself.mode=should_modeendend
#Returnthemodeasanoctalstring,notasaninteger.defmodeifFile.exists?(@resource[:name])"%o"%(File.stat(@resource[:name]).mode&007777)else:absentendend
#Setthefilemode,convertingfromastringtoaninteger.defmode=(value)File.chmod(Integer("0"+value),@resource[:name])end
Note that the getter method returns the value, it doesnʼt attempt to modify the resource itself. Also,when the setter gets passed the value it is supposed to set; it doesnʼt attempt to figure out the�appropriate value to use. This should always be true of how providers are implemented.
Also notice that the ensure property, when created by the ensurable method, behaves differently�because it uses methods for creation and destruction of the file, whereas normal properties use�getter and setter methods. When a resource is being created, Puppet expects the create method(or, actually, any changes done within ensure) to make any other necessary changes. This isbecause most often resources are created already configured correctly, so it doesnʼt make sense for�Puppet to test it manually (e.g., useradd support is set up to add all specified properties when�useradd is run, so usermod doesnʼt need to be run afterward).
You can see how the absent and present values are defined by looking in the property.rb file;��hereʼs the most important snippet:
newvalue(:present)[email protected]@resource.provider.respond_to?(:create)@resource.provider.create
Puppet Documentation • Complete Resource Example 226/434
[email protected]#returnnilsotheeventisautogeneratedend
newvalue(:absent)[email protected]@resource.provider.respond_to?(:destroy)@[email protected]#returnnilsotheeventisautogeneratedend
There are a lot of other options in creating properties, parameters, and providers, but this shouldprovide a decent starting point.
See AlsoProvider DevelopmentCreating Custom Types
Provider DevelopmentInformation about writing providers to provide implementation for types.
AboutThe core of Puppetʼs cross-platform support is via Resource Providers, which are essentially back-ends that implement support for a specific implementation of a given resource type. For instance,�there are more than 20 package providers, including providers for package formats like dpkg andrpm along with high-level package managers like apt and yum. A providerʼs main job is to wrapclient-side tools, usually by just calling out to those tools with the right information.
Not all resource types have or need providers, but any resource type concerned about portabilitywill likely need them.
We will use the apt and dpkg package providers as examples throughout this document, and theexamples used are current as of 0.23.0.
DeclarationProviders are always associated with a single resource type, so they are created by calling theprovide class method on that resource type. When declarating a provider, you can specify a parentclass — for instance, all package providers have a common parent class:
Puppet::Type.type(:package).provide:dpkg,:parent=>Puppet::Provider::Packagedodesc"..."
Puppet Documentation • Provider Development 227/434
...end
Note the call desc there; it sets the documentation for this provider, and should include everythingnecessary for someone to use this provider.
Providers can also specify another provider (from the same resource type) as their parent:
Puppet::Type.type(:package).provide:apt,:parent=>:dpkg,:source=>:dpkgdo...end
Note that weʼre also specifying that this provider uses the dpkg source; this tells Puppet todeduplicate packages from dpkg and apt, so the same package does not show up in an instance listfrom each provider type. Puppet defaults to creating a new source for each provider type, so youhave to specify when a provider subclass shares a source with its parent class.
SuitabilityThe first question to ask about a new provider is where it will be functional, which Puppet describes�as suitable. Unsuitable providers cannot be used to do any work, although as of Puppet 2.7.8 thesuitability test is late-binding, meaning that you can have a resource in your configuration that�makes a provider suitable. If you start puppetd or puppet in debug mode, youʼll see the results offailed provider suitability tests for the resource types youʼre using.
Puppet providers include some helpful class-level methods you can use to both document anddeclare how to determine whether a given provider is suitable. The primary method is commands,which actually does two things for you: It declares that this provider requires the named binary, andit sets up class and instance methods with the name provided that call the specified binary. The�binary can be fully qualified, in which case that specific path is required, or it can be unqualified, in���which case Puppet will find the binary in the shell path and use that. If the binary cannot be found,�then the provider is considered unsuitable. For example, here is the header for the dpkg provider(as of 0.23.0):
commands:dpkg=>"/usr/bin/dpkg"commands:dpkg_deb=>"/usr/bin/dpkg-deb"commands:dpkgquery=>"/usr/bin/dpkg-query"
In addition to looking for binaries, Puppet can compare Facter facts, test for the existence of a file,�check for a “feature” such as a library, or test whether a given value is true or false. For file�existence, truth, or false, just call the confine class method with exists, true, or false as the name of�the test and your test as the value:
confine:exists=>"/etc/debian_release"confine:true=>/^10\.[0-4]/.match(product_version)confine:false=>(Puppet[:ldapuser]=="")
To test Facter values, just use the name of the fact:Puppet Documentation • Provider Development 228/434
confine:operatingsystem=>[:debian,:solaris]confine:puppetversion=>"0.23.0"
Note that case doesnʼt matter in the tests, nor does it matter whether the values are strings orsymbols. It also doesnʼt matter whether you specify an array or a single value — Puppet does an ORon the list of values.
To test a feature, as defined in �lib/puppet/feature/*.rb , just supply the name of the feature. Thisis preferable to using a confine:true statement that calls Puppet.features because theexpression is only evaluated once. As of 2.7.20, Puppet will enable the provider if the featurebecomes available during a run (i.e. a package is installed).
confine:feature=>:posixconfine:feature=>:rrd
Default ProvidersProviders are generally meant to be hidden from the users, allowing them to focus on resourcespecification rather than implementation details. Toward this end, Puppet does what it can to�choose an appropriate default provider for each resource type.
This is generally done by a single provider declaring that it is the default for a given set of facts,using the defaultfor class method. For instance, this is the apt providerʼs declaration:
defaultfor:operatingsystem=>:debian
The same fact matching functionality is used, so again case does not matter.
Provider/Resource APIProviders never do anything on their own; all of their action is triggered through an associatedresource (or, in special cases, from the transaction). Because of this, resource types are essentiallyfree to define their own provider interface if necessary, and providers were initially developed�without a clear resource/provider API (mostly because it wasnʼt clear whether such an API wasnecessary or what it would look like). At this point, however, there is a default interface between theresource type and the provider.
This interface consists entirely of getter and setter methods. When the resource is retrieving itscurrent state, it iterates across all of its properties and calls the getter method on the provider forthat property. For instance, when a user resource is having its state retrieved and its uid and shellproperties are being managed, then the resource will call uid and shell on the provider to figure out�what the current state of each of those properties is. This method call is in the retrieve method inPuppet::Property.
When a resource is being modified, it calls the equivalent setter method for each property on the�provider. Again using our user example, if the uid was in sync but the shell was not, then the
Puppet Documentation • Provider Development 229/434
resource would call shell=(value) with the new shell value.
The transaction is responsible for storing these returned values and deciding which value toactually send, and it does its work through a PropertyChange instance. It calls sync on each of theproperties, which in turn just call the setter by default.
You can override that interface as necessary for your resource type, but in the hopefully-nearfuture this API will become more solidified.�
Note that all providers must define an instances class method that returns a list of provider�instances, one for each existing instance of that provider. For instance, the dpkg provider shouldreturn a provider instance for every package in the dpkg database.
Provider MethodsBy default, you have to define all of your getter and setter methods. For simple cases, this is�sufficient — you just implement the code that does the work for that property.��
However, because things are rarely so simple, Puppet attempts to help in a few ways.
Prefetching
First, Puppet transactions will prefetch provider information by calling prefetch on each usedprovider type. This calls the instances method in turn, which returns a list of provider instances withthe current resource state already retrieved and stored in a @property_hash instance variable. Theprefetch method then tries to find any matching resources, and assigns the retrieved providers to�found resources. This way you can get information on all of the resources youʼre managing in just afew method calls, instead of having to call all of the getter methods for every property beingmanaged. Note that it also means that providers are often getting replaced, so you cannot maintainstate in a provider.
Resource Methods
For providers that directly modify the system when a setter method is called, thereʼs no substitutefor defining them manually. But for resources that get flushed to disk in one step, such as the��ParsedFile providers, there is a mk_resource_methods class method that creates a getter and setterfor each property on the resource. These methods just retrieve and set the appropriate value in the@property_hash variable.
Flushing
Many providers model files or parts of files, so it makes sense to save all of the writes up and do��them in one run. Providers in need of this functionality can define a flush instance method to do��this. The transaction will call this method after all values are synced (which means that the providershould have them all in its @property_hash variable) but before refresh is called on the resource (ifappropriate).
Running Puppet From SourcePuppet should usually be installed from reliable packages, such as those provided by Puppet LabsPuppet Documentation • Running Puppet From Source 230/434
or your operating system vendor. If you plan to run Puppet in anything resembling a normalfashion, you should leave this page and see Installing Puppet.
However, if you are developing Puppet, helping to resolve a bug, or testing a new feature, you mayneed to run pre-release versions of Puppet. The most flexible way to do this, if you are not being�provided with pre-release packages, is to run Puppet directly from source.
PrerequisitesPuppet requires Ruby.
Ruby 1.8.5 may work, but you should make an effort to use Ruby 1.8.7 or 1.9.2. See the open�source Puppet system requirements for more details.
Puppet requires Facter, a Ruby library. This guide will also describe how to install Facter fromsource, but you can skip those steps and instead install Facter from your operating systemʼspackages or with sudogeminstallfacter .To access every version of the Puppet source code, including the current pre-release status ofevery development branch, you will need Git.If you want to run Puppetʼs tests, you will need rake, rspec, and mocha.If you wish to use Puppet ≥ 3.2 with parser=future enabled, you should also install the rgengem.
Get and Install the SourceUse Git to clone the public code repositories for Puppet and Facter. The examples below assume abase directory of /usr/src ; if you are installing the source elsewhere, substitute the correctlocations when running commands.
$sudomkdir-p/usr/src$cd/usr/src$sudogitclonegit://github.com/puppetlabs/facter$sudogitclonegit://github.com/puppetlabs/puppet
Select a Branch or ReleaseBy default, the instructions above will leave you running the master branch, which contains codefor the next unreleased major version of Puppet. This may or may not be what you want.
To run Puppet from source on Windows, see the equivalent page in the Puppet forWindows documentation.
Note: When running Puppet from source, you should never use the install.rb scriptincluded in the source. The point of running from source is to be able to switch versions ofPuppet with a single command, and the install.rb script removes that capability bycopying the source to several directories across your system.
Puppet Documentation • Running Puppet From Source 231/434

Most development on existing series of releases happens on branches with names like 2.7.x .Explore the repository on GitHub to find the branch you want, then run:�
$cd/usr/src/puppet$sudogitcheckoutorigin/<BRANCHNAME>
…to switch to it. You can also check out:
Released versions, by version number:
$sudogitcheckout2.7.12
Specific commits anywhere on any branch:�
$sudogitcheckout2d51b64
Teaching the complete use of Git is beyond the scope of this guide.
Tell Ruby How to Find Puppet and FacterFor Puppet to be functional, Ruby needs to have Puppet and Facter in its load path. Add thefollowing to your /etc/profile file:�
exportRUBYLIB=/usr/src/puppet/lib:/usr/src/facter/lib:$RUBYLIB
This will make Puppet and Facter available when run from login shells; if you plan to run Puppet asa daemon from source, you must set RUBYLIB appropriately in your init scripts.
Add the Binaries to the PathAdd the following to your /etc/profile file:�
exportPATH=/usr/src/puppet/bin:/usr/src/puppet/sbin:/usr/src/facter/bin:$PATH
This will make the Puppet and Facter binaries runnable from login shells.
At this point, you can run source/etc/profile or log out and back in again; after doing so, youwill be able to run Puppet commands.
Configure Puppet�On systems that have never had Puppet installed, you should do the following:
Copy auth.conf Into Place
Puppet master uses the auth.conf file to control which systems can access which resources. The�
Puppet Documentation • Running Puppet From Source 232/434
source includes an example file that exposes the default rules; starting with this file makes it easier��to tweak the rules if necessary.
$sudocp/usr/src/puppet/conf/auth.conf/etc/puppet/auth.conf
Create a puppet.conf File
$sudotouch/etc/puppet/puppet.conf
The puppet.conf file contains Puppetʼs settings. See �Configuring Puppet� for more details.
You will likely want to set the following settings:
In the [agent] block:certname
server
pluginsync
report
environment
In the [master] block:certname
dns_alt_names
reports
node_terminus
external_nodes
Create the Puppet User and Group
Puppet requires a user and group. By default, these are puppet and puppet , but they can bechanged in puppet.conf with the user and group settings.
Create this user and group using your operating systemʼs normal tools, or run the following:
$sudopuppetresourceuserpuppetensure=present$sudopuppetresourcegrouppuppetensure=present
If you skip this step, puppet master may not start correctly, and Puppet may have problems whencreating some of its run data directories.
Run PuppetYou can now interactively run the main puppet agent, puppet master, and puppet apply commands,as well as any of the additional commands used to manage Puppet.
Puppet Documentation • Running Puppet From Source 233/434
For testing purposes, you will usually want to run puppet master with the --verbose and --no-daemonize options and run puppet agent with the --test option. For day-to-day use, you shouldcreate an init script for puppet agent (see the examples in the sourceʼs conf/ directory) and use aRack server like Passenger or Unicorn to run puppet master.
Periodically Update the Source or Switch VersionsIf you are running from source, it is likely because you need to stay up to date with activity on aspecific development branch. To update your installation to the current point on your chosen�branch, you should periodically run:
$cd/usr/src/puppet$sudogitfetchorigin$sudogitcheckoutorigin/<BRANCHNAME>
Be sure to stop any Puppet processes before doing this.
You can also switch versions or branches of Puppet at any time by running sudogitcheckout<VERSIONORBRANCH> .
Development Lifecycle
Note: You should never attempt to run Puppet or Facter binaries while your current workingdirectory is in /usr/src . This is because Ruby automatically adds the current directory to theload path, which can cause the projectsʼ spec tests to accidentally be loaded as libraries.Facter in particular will usually fail when this is done.
Puppet Documentation • Development Lifecycle 234/434

Contributing to Puppet Labs Projects(Puppet, Dashboard, Facter and more)So you want to contribute to a Puppet Labs project? Awesome!
We would like to make contributing as easy as possible since your contributions are greatlyappreciated.
That said, there are a few guidelines that make reviewing and applying contributions easier. Wehope that the information below will answer any questions you might have about helping out withthe Puppet Labs projects.
If you have any questions about contributing to a Puppet Labs project that arenʼt answered here,the Getting Help page has a list of additional resources for finding those answers.�
Puppet Documentation • Contributing to Puppet Labs Projects (Puppet, Dashboard, Facter and more)235/434
StepsCheck the CONTRIBUTING.md in the root of the project tree:
PuppetFacterPuppet Dashboard
These should all be the same, but there may be some project specific notes in each. �If the projectyou wish to contribute to does not have a CONTRIBUTING.md , then you should follow the one fromthe Puppet repository.
Puppet Internals - How It WorksThe goal of this document is to describe how a manifest you write in Puppet gets converted to workbeing done on the system. This process is relatively complex, but you seldom need to know manyof the details; this document only exists for those who are pushing the boundaries of what Puppetcan do or who donʼt understand why they are seeing a particular error. It can also help those whoare hoping to extend Puppet beyond its current abilities.
High LevelWhen looked at coarsely, Puppet has three main phases of execution – compiling, instantiation, andconfiguration.�
Compiling
Here is where we convert from a text-based manifest into a node-specific specification. Any code��not meant for the host in question is ignored, and any code that is meant for that host is fullyinterpolated, meaning that variables are expanded and all of the results are literal strings.
The only connection between the compiling phase and the library of Puppet resource types is thatall resulting resource specifications are verified that the referenced type is valid and that all��specified attributes are valid for that type. There is no value validation at this point.�
In a networked setup, this phase happens entirely on the server. The output of this phase is acollection of very simplistic resources that closely resemble basic hashes.
Instantiation
This phase converts the simple hashes and arrays into Puppet library objects. Because this phaserequires so much information about the client in order to work correctly (e.g., what type ofpackaging is used, what type of services, etc.), this phase happens entirely on the client.
The conversion from the simpler format into literal Puppet objects allows those objects to dogreater validation on the inputs, and this is where most of the input validation takes place. If youspecified a valid attribute but an invalid value, this is where you will find it out, meaning that you��
Puppet Documentation • Steps 236/434
will find it out when the config is instantiated on the client, not (unfortunately) on the server.��
The output of this phase is the machineʼs entire configuration in memory and in a form capable of�modifying the local system.
Configuration�
This is where Puppet actually modifies the system. Each of resource instance compares its specified��state to the state on the machine and make any modifications that are necessary. If the machine�exactly matches the specified configuration, then no work is done.��
The output of this phase is a correctly configured machine, in one pass.�
Lower LevelThese three high level phases can each be broken down into more steps.
Compile Phase 1: Parsing
Inputs: Manifests written in the Puppet language
Outputs: Parse trees (instances of AST objects)
Entry: Puppet::Parser::Parser#parse
At this point, all Puppet manifests start out as text documents, and itʼs the parserʼs job tounderstand those documents. The parser (defined in parser/grammar.ra and parser/lexer.rb) does�very little work – it converts from text to a format that maps directly back to the text, building parsetrees that are essentially equivalent to the text itself. The only validation that takes place here issyntactic.
This phase takes place immediately for all uses of Puppet. Whether you are using nodes or nonodes, whether you are using the standalone puppet interpreter or the client/server system,parsing happens as soon as Puppet starts.
Compile Phase 2: Interpreting
Inputs: Parse trees (instances of AST objects) and client information (collection of facts output byFacter)
Outputs: Trees of TransObject and TransBucket instances (from transportable.rb)
Entry: Puppet::Parser::AST#evaluate
Exit: Puppet::Parser::Scope#to_trans
Most configurations will rely on client information to make decisions. When the Puppet client starts,�it loads the Facter library, collects all of the facts that it can, and passes those facts to theinterpreter. When you use Puppet over a network, these facts are passed over the network to theserver and the server uses them to compile the clientʼs configuration.�
This step of passing information to the server enables the server to make decisions about the clientbased on things like operating system and hardware architecture, and it also enables the server toinsert information about the client into the configuration, information like IP address and MAC�
Puppet Documentation • Steps 237/434
address.
The interpreter combines the parse trees and the client information into a tree of simpletransportable objects which maps roughly to the configuration as defined in the manifests – it is��still a tree, but it is a tree of classes and the resources contained in those classes.NODES VS. NO NODES
When you use Puppet, you have the option of using node resources or not. If you do not use noderesources, then the entire configuration is interpreted every time a client connects, from the top of�the parse tree down. In this case, you must have some kind of explicit selection mechanism forspecifying which code goes with which node.
If you do use nodes, though, the interpreter precompiles everything except the node-specific code.�When a node connects, the interpreter looks for the code associated with that node name (retrievedfrom the Facter facts) and compiles just that bit on demand.
Configuration Transport�
Inputs: Transportable objects
Outputs: Transportable objects
Entry: Puppet::Network::Server::Master#getconfig�
Exit: Puppet::Network::Client::Master#getconfig�
If you are using the stand-alone puppet executable, there is no configuration transport because�the client and server are in the same process. If you are using the networked puppetd client andpuppetmasterd server, though, the configuration must be sent to the client once it is entirely�compiled.
Puppet currently converts the Transportable objects to YAML, which it then CGI-escapes and sendsover the wire using XMLRPC over HTTPS. The client receives the configuration, unescapes it, caches�it to disk in case the server is not available on the next run, and then uses YAML to convert it backto normal Ruby Transportable objects.
Instantiation Phase
Inputs: Transportable objects
Outputs: Puppet::Type instances
Entry: Puppet::Network::Client::Master#run
Exit: Puppet::Transaction#initialize
To create Puppet library objects (all of which are instances of Puppet::Type subclasses), to_trans iscalled on the top-level transportable object. All container objects get converted toPuppet::Type::Component instances, and all normal objects get converted into the appropriatePuppet resource type instance.
This is where all input validation takes place and often where values get converted into more usableforms. For instance, filesystems always return user IDs, not user names, so Puppet objects convert�them appropriately. (Incidentally, sometimes Puppet is creating the user that itʼs chowning a file to,�Puppet Documentation • Steps 238/434
them appropriately. (Incidentally, sometimes Puppet is creating the user that itʼs chowning a file to,�so whenever possible it ignores validation errors until the last minute).
Once all of the resources are built in a graph-like tree of components and resources, this tree isconverted to a GRATR graph. The graph is then passed to a new transaction instance.
Configuration Phase�
Inputs: GRATR graph
Outputs: Transaction report
Entry: Puppet::Transaction#evaluate
Exit: Puppet::Transaction#generate_report
This is the phase in which all of the work is done, tightly controlled by a transaction.RESOURCE GENERATION
Some resources manage other resource instances, such as recursive file operations. During this�phase, any statically generatable resources are generated. These generated resources are thenadded to the resource graphs.RELATIONSHIPS
The next stage of the configuration process builds a graph to model resource dependencies. One�of the goals of the Puppet language is to make file order matter as little as possible; this means that�a Puppet resource needs to be able to require other resources listed later in the manifest, whichmeans that the required resource will be instantiated after the requiring resource. This dependencygraph is then merged with the original resource graph to build a complete graph of all resourcesand all of their relationships.EVALUATION
The transaction does a topological sort on the final relationship graph and iterates over the�resulting list, evaluating each resource in turn. Each out-of-sync property on each resource resultsin a Puppet::StateChange object, which the transaction uses to tightly control what happens to theresource and when, and also to guarantee that logs are provided.REPORTING
As the transaction progresses, it collects logs and metrics on what it does. At the end of evaluation,it turns this information into a report, which it sends to the server (if requested).
ConclusionThatʼs the entire flow of how a Puppet manifest becomes a complete configuration. There is more��to the Puppet system, such as FileBuckets, but those are more support staff rather than the main�attraction.
Puppet Application ManpagesView documentation for each of the Puppet executables.
Puppet Documentation • Puppet Application Manpages 239/434
puppet agentpuppet applypuppet certpuppet describepuppet devicepuppet docpuppet filebucket�puppet inspectpuppet kickpuppet masterpuppet queuepuppet resourcepuppet module
puppet agent Manual PageNAMEpuppet-agent - The puppet agent daemon
SYNOPSISRetrieves the client configuration from the puppet master and applies it to the local host.�
This service may be run as a daemon, run periodically using cron (or something similar), or runinteractively for testing purposes.
USAGEpuppet agent [--certname name] [-D|--daemonize|--no-daemonize] [-d|--debug] [--detailed-exitcodes] [--digest digest] [--disable [message]] [--enable] [--fingerprint] [-h|--help] [-l|--�logdest syslog|file�|console] [--no-client] [--noop] [-o|--onetime] [--serve handler] [-t|--test] [-v|--verbose] [-V|--version] [-w|--waitforcert seconds]
DESCRIPTIONThis is the main puppet client. Its job is to retrieve the local machine's configuration from a remote�server and apply it. In order to successfully communicate with the remote server, the client musthave a certificate signed by a certificate authority that the server trusts; the recommended method��for this, at the moment, is to run a certificate authority as part of the puppet server (which is the�default). The client will connect and request a signed certificate, and will continue connecting until�it receives one.
Once the client has a signed certificate, it will retrieve its configuration and apply it.��
Puppet Documentation • puppet agent Manual Page 240/434
USAGE NOTES'puppet agent' does its best to find a compromise between interactive use and daemon use. Run�with no arguments and no configuration, it will go into the background, attempt to get a signed�certificate, and retrieve and apply its configuration every 30 minutes.��
Some flags are meant specifically for interactive use -- in particular, 'test', 'tags' or 'fingerprint' are���useful. 'test' enables verbose logging, causes the daemon to stay in the foreground, exits if theserver's configuration is invalid (this happens if, for instance, you've left a syntax error on the�server), and exits after running the configuration once (rather than hanging around as a long-�running process).
'tags' allows you to specify what portions of a configuration you want to apply. Puppet elements are�tagged with all of the class or definition names that contain them, and you can use the 'tags' flag to��specify one of these names, causing only configuration elements contained within that class or�definition to be applied. This is very useful when you are testing new configurations -- for instance,��if you are just starting to manage 'ntpd', you would put all of the new elements into an 'ntpd' class,and call puppet with '--tags ntpd', which would only apply that small portion of the configuration�during your testing, rather than applying the whole thing.
'fingerprint' is a one-time flag. In this mode 'puppet agent' will run once and display on the console��(and in the log) the current certificate (or certificate request) fingerprint. Providing the '--digest'���option allows to use a different digest algorithm to generate the fingerprint. The main use is to��verify that before signing a certificate request on the master, the certificate request the master��received is the same as the one the client sent (to prevent against man-in-the-middle attacks whensigning certificates).�
OPTIONSNote that any configuration parameter that's valid in the configuration file is also a valid long���argument. For example, 'server' is a valid configuration parameter, so you can specify '--server�servername' as an argument.
See the configuration file documentation at��http://docs.puppetlabs.com/references/stable/configuration.html for the full list of acceptable�parameters. A commented list of all configuration options can also be generated by running puppet�agent with '--genconfig'.�
--certname
Set the certname (unique ID) of the client. The master reads this unique identifying string,which is usually set to the node's fully-qualified domain name, to determine which�configurations the node will receive. Use this option to debug setup problems or implement�unusual node identification schemes.�
--daemonize
Send the process into the background. This is the default.
--no-daemonize
Puppet Documentation • puppet agent Manual Page 241/434
Do not send the process into the background.
--debug
Enable full debugging.
--detailed-exitcodes
Provide transaction information via exit codes. If this is enabled, an exit code of '2' meansthere were changes, an exit code of '4' means there were failures during the transaction, andan exit code of '6' means there were both changes and failures.
--digest
Change the certificate fingerprinting digest algorithm. The default is MD5. Valid values��depends on the version of OpenSSL installed, but should always at least contain MD5, MD2,SHA1 and SHA256.
--disable
Disable working on the local system. This puts a lock file in place, causing 'puppet agent' not�to work on the system until the lock file is removed. This is useful if you are testing a�configuration and do not want the central configuration to override the local state until��everything is tested and committed.
Disable can also take an optional message that will be reported by the 'puppet agent' at thenext disabled run.
'puppet agent' uses the same lock file while it is running, so no more than one 'puppet agent'�process is working at a time.
'puppet agent' exits after executing this.
--enable
Enable working on the local system. This removes any lock file, causing 'puppet agent' to�start managing the local system again (although it will continue to use its normal scheduling,so it might not start for another half hour).
'puppet agent' exits after executing this.
--fingerprint�
Display the current certificate or certificate signing request fingerprint and then exit. Use the���'--digest' option to change the digest algorithm used.
--help
Print this help message
--logdest
Where to send messages. Choose between syslog, the console, and a log file. Defaults to�sending messages to syslog, or the console if debugging or verbosity is enabled.
--no-clientPuppet Documentation • puppet agent Manual Page 242/434
Do not create a config client. This will cause the daemon to run without ever checking for its�configuration automatically, and only makes sense when puppet agent is being run with�listen = true in puppet.conf or was started with the --listen option.
--noop
Use 'noop' mode where the daemon runs in a no-op or dry-run mode. This is useful forseeing what changes Puppet will make without actually executing the changes.
--onetime
Run the configuration once. Runs a single (normally daemonized) Puppet run. Useful for�interactively running puppet agent when used in conjunction with the --no-daemonizeoption.
--serve
Start another type of server. By default, 'puppet agent' will start a service handler that allowsauthenticated and authorized remote nodes to trigger the configuration to be pulled down�and applied. You can specify any handler here that does not require configuration, e.g.,�filebucket, ca, or resource. The handlers are in 'lib/puppet/network/handler', and the names�must match exactly, both in the call to 'serve' and in 'namespaceauth.conf'.
--test
Enable the most common options used for testing. These are 'onetime', 'verbose','ignorecache', 'no-daemonize', 'no-usecacheonfailure', 'detailed-exit-codes', 'no-splay', and'show_diff'.�
--verbose
Turn on verbose reporting.
--version
Print the puppet version number and exit.
--waitforcert
This option only matters for daemons that do not yet have certificates and it is enabled by�default, with a value of 120 (seconds). This causes 'puppet agent' to connect to the serverevery 2 minutes and ask it to sign a certificate request. This is useful for the initial setup of a�puppet client. You can turn off waiting for certificates by specifying a time of 0.��
EXAMPLE$puppetagent--serverpuppet.domain.com
DIAGNOSTICSPuppet agent accepts the following signals:
Puppet Documentation • puppet agent Manual Page 243/434
SIGHUP
Restart the puppet agent daemon.
SIGINT and SIGTERM
Shut down the puppet agent daemon.
SIGUSR1
Immediately retrieve and apply configurations from the puppet master.�
AUTHORLuke Kanies
COPYRIGHTCopyright (c) 2011 Puppet Labs, LLC Licensed under the Apache 2.0 License
puppet apply Manual PageNAMEpuppet-apply - Apply Puppet manifests locally
SYNOPSISApplies a standalone Puppet manifest to the local system.
USAGEpuppet apply [-h|--help] [-V|--version] [-d|--debug] [-v|--verbose] [-e|--execute] [--detailed-exitcodes] [-l|--logdest file�] [--apply catalog] [--catalog catalog] file�
DESCRIPTIONThis is the standalone puppet execution tool; use it to apply individual manifests.
When provided with a modulepath, via command line or config file, puppet apply can effectively���mimic the catalog that would be served by puppet master with access to the same modules,although there are some subtle differences. When combined with scheduling and an automated�system for pushing manifests, this can be used to implement a serverless Puppet site.
Most users should use 'puppet agent' and 'puppet master' for site-wide manifests.
OPTIONSNote that any configuration parameter that's valid in the configuration file is also a valid long���argument. For example, 'modulepath' is a valid configuration parameter, so you can specify '--tags�class,tag' as an argument.Puppet Documentation • puppet apply Manual Page 244/434
See the configuration file documentation at��http://docs.puppetlabs.com/references/stable/configuration.html for the full list of acceptable�parameters. A commented list of all configuration options can also be generated by running puppet�with '--genconfig'.�
--debug
Enable full debugging.
--detailed-exitcodes
Provide transaction information via exit codes. If this is enabled, an exit code of '2' meansthere were changes, an exit code of '4' means there were failures during the transaction, andan exit code of '6' means there were both changes and failures.
--help
Print this help message
--loadclasses
Load any stored classes. 'puppet agent' caches configured classes (usually at�/etc/puppet/classes.txt), and setting this option causes all of those classes to be set in yourpuppet manifest.
--logdest
Where to send messages. Choose between syslog, the console, and a log file. Defaults to�sending messages to the console.
--execute
Execute a specific piece of Puppet code�
--verbose
Print extra information.
--apply
Apply a JSON catalog (such as one generated with 'puppet master --compile'). You can eitherspecify a JSON file or pipe in JSON from standard input. Deprecated, please use --catalog�instead.
--catalog
Apply a JSON catalog (such as one generated with 'puppet master --compile'). You can eitherspecify a JSON file or pipe in JSON from standard input.�
EXAMPLE$puppetapply-l/tmp/manifest.logmanifest.pp$puppetapply--modulepath=/root/dev/modules-e"includentpd::server"$puppetapply--catalogcatalog.json
Puppet Documentation • puppet apply Manual Page 245/434
AUTHORLuke Kanies
COPYRIGHTCopyright (c) 2011 Puppet Labs, LLC Licensed under the Apache 2.0 License
puppet cert Manual PageNAMEpuppet-cert - Manage certificates and requests�
SYNOPSISStandalone certificate authority. Capable of generating certificates, but mostly used for signing��certificate requests from puppet clients.�
USAGEpuppet cert action [-h|--help] [-V|--version] [-d|--debug] [-v|--verbose] [--digest digest] [host]
DESCRIPTIONBecause the puppet master service defaults to not signing client certificate requests, this script is�available for signing outstanding requests. It can be used to list outstanding requests and theneither sign them individually or sign all of them.
ACTIONSEvery action except 'list' and 'generate' requires a hostname to act on, unless the '--all' option isset.
clean
Revoke a host's certificate (if applicable) and remove all files related to that host from puppet��cert's storage. This is useful when rebuilding hosts, since new certificate signing requests will�only be honored if puppet cert does not have a copy of a signed certificate for that host. If '--�all' is specified then all host certificates, both signed and unsigned, will be removed.��
fingerprint�
Print the DIGEST (defaults to md5) fingerprint of a host's certificate.��
generate
Generate a certificate for a named client. A certificate/keypair will be generated for each��client named on the command line.
Puppet Documentation • puppet cert Manual Page 246/434
list
List outstanding certificate requests. If '--all' is specified, signed certificates are also listed,���prefixed by '+', and revoked or invalid certificates are prefixed by '-' (the verification outcome����is printed in parenthesis).
Print the full-text version of a host's certificate.�
revoke
Revoke the certificate of a client. The certificate can be specified either by its serial number���(given as a decimal number or a hexadecimal number prefixed by '0x') or by its hostname.�The certificate is revoked by adding it to the Certificate Revocation List given by the 'cacrl'��configuration option. Note that the puppet master needs to be restarted after revoking�certificates.�
sign
Sign an outstanding certificate request.�
verify
Verify the named certificate against the local CA certificate.��
OPTIONSNote that any configuration parameter that's valid in the configuration file is also a valid long���argument. For example, 'ssldir' is a valid configuration parameter, so you can specify '--ssldir�directory' as an argument.
See the configuration file documentation at��http://docs.puppetlabs.com/references/stable/configuration.html for the full list of acceptable�parameters. A commented list of all configuration options can also be generated by running puppet�cert with '--genconfig'.�
--all
Operate on all items. Currently only makes sense with the 'sign', 'clean', 'list', and 'fingerprint'�actions.
--digest
Set the digest for fingerprinting (defaults to md5). Valid values depends on your openssl and�openssl ruby extension version, but should contain at least md5, sha1, md2, sha256.
--debug
Enable full debugging.
--help
Print this help message
Puppet Documentation • puppet cert Manual Page 247/434
--verbose
Enable verbosity.
--version
Print the puppet version number and exit.
EXAMPLE$puppetcertlistculain.madstop.com$puppetcertsignculain.madstop.com
AUTHORLuke Kanies
COPYRIGHTCopyright (c) 2011 Puppet Labs, LLC Licensed under the Apache 2.0 License
puppet describe Manual PageNAMEpuppet-describe - Display help about resource types
SYNOPSISPrints help about Puppet resource types, providers, and metaparameters.
USAGEpuppet describe [-h|--help] [-s|--short] [-p|--providers] [-l|--list] [-m|--meta]
OPTIONS--help
Print this help text
--providers
Describe providers in detail for each type
--list
List all types
Puppet Documentation • puppet describe Manual Page 248/434
--meta
List all metaparameters
--short
List only parameters without detail
EXAMPLE$puppetdescribe--list$puppetdescribefile--providers$puppetdescribeuser-s-m
AUTHORDavid Lutterkort
COPYRIGHTCopyright (c) 2011 Puppet Labs, LLC Licensed under the Apache 2.0 License
puppet device Manual PageNAMEpuppet-device - Manage remote network devices
SYNOPSISRetrieves all configurations from the puppet master and apply them to the remote devices�configured in /etc/puppet/device.conf.�
Currently must be run out periodically, using cron or something similar.
USAGEpuppet device [-d|--debug] [--detailed-exitcodes] [-V|--version]
[-h|--help][-l|--logdestsyslog|<file>|console][-v|--verbose][-w|--waitforcert<seconds>]
DESCRIPTIONOnce the client has a signed certificate for a given remote device, it will retrieve its configuration��and apply it.
USAGE NOTESPuppet Documentation • puppet device Manual Page 249/434
USAGE NOTESOne need a /etc/puppet/device.conf file with the following content:�
[remote.device.fqdn] type type url url
where: * type: the current device type (the only value at this time is cisco) * url: an url allowing toconnect to the device
Supported url must conforms to: scheme://user:password@hostname/?query
with: * scheme: either ssh or telnet * user: username, can be omitted depending on theswitch/router configuration �* password: the connection password * query: this is device specific.�Cisco devices supports an enable parameter whose value would be the enable password.
OPTIONSNote that any configuration parameter that's valid in the configuration file is also a valid long���argument. For example, 'server' is a valid configuration parameter, so you can specify '--server�servername' as an argument.
--debug
Enable full debugging.
--detailed-exitcodes
Provide transaction information via exit codes. If this is enabled, an exit code of '2' meansthere were changes, an exit code of '4' means there were failures during the transaction, andan exit code of '6' means there were both changes and failures.
--help
Print this help message
--logdest
Where to send messages. Choose between syslog, the console, and a log file. Defaults to�sending messages to syslog, or the console if debugging or verbosity is enabled.
--verbose
Turn on verbose reporting.
--waitforcert
This option only matters for daemons that do not yet have certificates and it is enabled by�default, with a value of 120 (seconds). This causes +puppet agent+ to connect to the serverevery 2 minutes and ask it to sign a certificate request. �This is useful for the initial setup of apuppet client. You can turn off waiting for certificates by specifying a time of 0.��
EXAMPLE$puppetdevice--serverpuppet.domain.com
Puppet Documentation • puppet device Manual Page 250/434
AUTHORBrice Figureau
COPYRIGHTCopyright (c) 2011 Puppet Labs, LLC Licensed under the Apache 2.0 License
puppet doc Manual PageNAMEpuppet-doc - Generate Puppet documentation and references
SYNOPSISGenerates a reference for all Puppet types. Largely meant for internal Puppet Labs use.
USAGEpuppet doc [-a|--all] [-h|--help] [-o|--outputdir rdoc-outputdir] [-m|--mode text|pdf|rdoc] [-r|--reference reference-name] [--charset charset] [manifest-file�]
DESCRIPTIONIf mode is not 'rdoc', then this command generates a Markdown document describing all installedPuppet types or all allowable arguments to puppet executables. It is largely meant for internal useand is used to generate the reference document available on the Puppet Labs web site.
In 'rdoc' mode, this command generates an html RDoc hierarchy describing the manifests that are in'manifestdir' and 'modulepath' configuration directives. The generated documentation directory is�doc by default but can be changed with the 'outputdir' option.
If the command is run with the name of a manifest file as an argument, puppet doc will output a�single manifest's documentation on stdout.
OPTIONS--all
Output the docs for all of the reference types. In 'rdoc' mode, this also outputsdocumentation for all resources.
--help
Print this help message
--outputdir
Used only in 'rdoc' mode. The directory to which the rdoc output should be written.Puppet Documentation • puppet doc Manual Page 251/434
--mode
Determine the output mode. Valid modes are 'text', 'pdf' and 'rdoc'. The 'pdf' mode createsPDF formatted files in the /tmp directory. The default mode is 'text'. In 'rdoc' mode you must�provide 'manifests-path'
--reference
Build a particular reference. Get a list of references by running 'puppet doc --list'.
--charset
Used only in 'rdoc' mode. It sets the charset used in the html files produced.�
--manifestdir
Used only in 'rdoc' mode. The directory to scan for stand-alone manifests. If not supplied,puppet doc will use the manifestdir from puppet.conf.
--modulepath
Used only in 'rdoc' mode. The directory or directories to scan for modules. If not supplied,puppet doc will use the modulepath from puppet.conf.
--environment
Used only in 'rdoc' mode. The configuration environment from which to read the modulepath�and manifestdir settings, when reading said settings from puppet.conf. Due to a known bug,this option is not currently effective.�
EXAMPLE$puppetdoc-rtype>/tmp/type_reference.markdown
or
$puppetdoc--outputdir/tmp/rdoc--moderdoc/path/to/manifests
or
$puppetdoc/etc/puppet/manifests/site.pp
or
$puppetdoc-mpdf-rconfiguration
AUTHORLuke Kanies
Puppet Documentation • puppet doc Manual Page 252/434
COPYRIGHTCopyright (c) 2011 Puppet Labs, LLC Licensed under the Apache 2.0 License
puppet filebucket Manual Page�NAMEpuppet-filebucket - Store and retrieve files in a filebucket��
SYNOPSISA stand-alone Puppet filebucket client.�
USAGEpuppet filebucket �mode [-h|--help] [-V|--version] [-d|--debug] [-v|--verbose] [-l|--local] [-r|--remote] [-s|--server server] [-b|--bucket directory] file� file� ...
Puppet filebucket can operate in three modes, with only one mode per call:�
backup: Send one or more files to the specified file bucket. Each sent file is ����printed with its resultingmd5 sum.
get: Return the text associated with an md5 sum. The text is printed to stdout, and only one file can�be retrieved at a time.
restore: Given a file path and an md5 sum, store the content associated with �the sum into thespecified file path. You can specify an entirely new ��path to this argument; you are not restricted torestoring the content to its original location.
DESCRIPTIONThis is a stand-alone filebucket client for sending files to a local or central filebucket.���
Note that 'filebucket' defaults to using a network-based filebucket available on the server named��'puppet'. To use this, you'll have to be running as a user with valid Puppet certificates. Alternatively,�you can use your local file bucket by specifying '--local'.�
OPTIONSNote that any configuration parameter that's valid in the configuration file is also a valid long���argument. For example, 'ssldir' is a valid configuration parameter, so you can specify '--ssldir�directory' as an argument.
See the configuration file documentation at��http://docs.puppetlabs.com/references/stable/configuration.html for the full list of acceptable�parameters. A commented list of all configuration options can also be generated by running puppet�
Puppet Documentation • puppet filebucket Manual Page 253/434
with '--genconfig'.�
--debug
Enable full debugging.
--help
Print this help message
--local
Use the local filebucket. This will use the default configuration information.��
--remote
Use a remote filebucket. This will use the default configuration information.��
--server
The server to send the file to, instead of locally.�
--verbose
Print extra information.
--version
Print version information.
EXAMPLE$puppetfilebucketbackup/etc/passwd/etc/passwd:429b225650b912a2ee067b0a4cf1e949$puppetfilebucketrestore/tmp/passwd429b225650b912a2ee067b0a4cf1e949
AUTHORLuke Kanies
COPYRIGHTCopyright (c) 2011 Puppet Labs, LLC Licensed under the Apache 2.0 License
puppet inspect Manual PageNAMEpuppet-inspect - Send an inspection report
SYNOPSISPuppet Documentation • puppet inspect Manual Page 254/434
Prepares and submits an inspection report to the puppet master.
USAGEpuppet inspect [--archive_files] [--archive_file_server]��
DESCRIPTIONThis command uses the cached catalog from the previous run of 'puppet agent' to determine whichattributes of which resources have been marked as auditable with the 'audit' metaparameter. It thenexamines the current state of the system, writes the state of the specified resource attributes to a�report, and submits the report to the puppet master.
Puppet inspect does not run as a daemon, and must be run manually or from cron.
OPTIONSAny configuration setting which is valid in the configuration file is also a valid long argument, e.g. '-���-server=master.domain.com'. See the configuration file documentation at��http://docs.puppetlabs.com/references/latest/configuration.html for the full list of acceptable�settings.
--archive_files�
During an inspect run, whether to archive files whose contents are audited to a file bucket.��
--archive_file_server�
During an inspect run, the file bucket server to archive files to if archive_files is set. ���Thedefault value is '$server'.
AUTHORPuppet Labs
COPYRIGHTCopyright (c) 2011 Puppet Labs, LLC Licensed under the Apache 2.0 License
puppet kick Manual PageNAMEpuppet-kick - Remotely control puppet agent
SYNOPSISTrigger a puppet agent run on a set of hosts.
Puppet Documentation • puppet kick Manual Page 255/434
USAGEpuppet kick [-a|--all] [-c|--class class] [-d|--debug] [-f|--foreground] [-h|--help] [--host host] [--no-fqdn] [--ignoreschedules] [-t|--tag tag] [--test] [-p|--ping] host [host [...]]
DESCRIPTIONThis script can be used to connect to a set of machines running 'puppet agent' and trigger them torun their configurations. The most common usage would be to specify a class of hosts and a set of�tags, and 'puppet kick' would look up in LDAP all of the hosts matching that class, then connect toeach host and trigger a run of all of the objects with the specified tags.�
If you are not storing your host configurations in LDAP, you can specify hosts manually.�
You will most likely have to run 'puppet kick' as root to get access to the SSL certificates.�
'puppet kick' reads 'puppet master''s configuration file, so that it can copy things like LDAP settings.��
USAGE NOTESPuppet kick is useless unless puppet agent is listening for incoming connections and allowingaccess to the run endpoint. This entails starting the agent with listen=true in its puppet.conffile, and allowing access to the �/run path in its auth.conf file; see�http://docs.puppetlabs.com/guides/rest_auth_conf.html for more details.
Additionally, due to a known bug, you must make sure a namespaceauth.conf file exists in puppet�agent's $confdir. This file will not be consulted, and may be left empty.�
OPTIONSNote that any configuration parameter that's valid in the configuration file is also a valid long���argument. For example, 'ssldir' is a valid configuration parameter, so you can specify '--ssldir�directory' as an argument.
See the configuration file documentation at��http://docs.puppetlabs.com/references/latest/configuration.html for the full list of acceptable�parameters. A commented list of all configuration options can also be generated by running puppet�master with '--genconfig'.�
--all
Connect to all available hosts. Requires LDAP support at this point.
--class
Specify a class of machines to which to connect. This only works if you have LDAP configured,�at the moment.
--debug
Enable full debugging.
Puppet Documentation • puppet kick Manual Page 256/434
--foreground
Run each configuration in the foreground; that is, when connecting to a host, do not return�until the host has finished its run. The default is false.�
--help
Print this help message
--host
A specific host to which to connect. This flag can be specified more than once.���
--ignoreschedules
Whether the client should ignore schedules when running its configuration. This can be used�to force the client to perform work it would not normally perform so soon. The default isfalse.
--parallel
How parallel to make the connections. Parallelization is provided by forking for each client towhich to connect. The default is 1, meaning serial execution.
--tag
Specify a tag for selecting the objects to apply. Does not work with the --test option.
--test
Print the hosts you would connect to but do not actually connect. This option requires LDAPsupport at this point.
--ping
Do a ICMP echo against the target host. Skip hosts that don't respond to ping.
EXAMPLE$sudopuppetkick-p10-tremotefile-twebserverhost1host2
AUTHORLuke Kanies
COPYRIGHTCopyright (c) 2011 Puppet Labs, LLC Licensed under the Apache 2.0 License
puppet master Manual Page
Puppet Documentation • puppet master Manual Page 257/434
NAMEpuppet-master - The puppet master daemon
SYNOPSISThe central puppet server. Functions as a certificate authority by default.�
USAGEpuppet master [-D|--daemonize|--no-daemonize] [-d|--debug] [-h|--help] [-l|--logdestfile�|console|syslog] [-v|--verbose] [-V|--version] [--compile node-name]
DESCRIPTIONThis command starts an instance of puppet master, running as a daemon and using Ruby's built-inWebrick webserver. Puppet master can also be managed by other application servers; when this isthe case, this executable is not used.
OPTIONSNote that any configuration parameter that's valid in the configuration file is also a valid long���argument. For example, 'ssldir' is a valid configuration parameter, so you can specify '--ssldir�directory' as an argument.
See the configuration file documentation at��http://docs.puppetlabs.com/references/stable/configuration.html for the full list of acceptable�parameters. A commented list of all configuration options can also be generated by running puppet�master with '--genconfig'.�
--daemonize
Send the process into the background. This is the default.
--no-daemonize
Do not send the process into the background.
--debug
Enable full debugging.
--help
Print this help message.
--logdest
Where to send messages. Choose between syslog, the console, and a log file. Defaults to�sending messages to syslog, or the console if debugging or verbosity is enabled.
--verbose
Enable verbosity.Puppet Documentation • puppet master Manual Page 258/434
--version
Print the puppet version number and exit.
--compile
Compile a catalogue and output it in JSON from the puppet master. Uses facts contained inthe $vardir/yaml/ directory to compile the catalog.
EXAMPLEpuppet master
DIAGNOSTICSWhen running as a standalone daemon, puppet master accepts the following signals:
SIGHUP
Restart the puppet master server.
SIGINT and SIGTERM
Shut down the puppet master server.
AUTHORLuke Kanies
COPYRIGHTCopyright (c) 2011 Puppet Labs, LLC Licensed under the Apache 2.0 License
puppet queue Manual PageNAMEpuppet-queue - Queuing daemon for asynchronous storeconfigs�
SYNOPSISRetrieves serialized storeconfigs records from a queue and processes them in order.�
USAGEpuppet queue [-d|--debug] [-v|--verbose]
DESCRIPTIONThis application runs as a daemon and processes storeconfigs data, retrieving the data from a�
Puppet Documentation • puppet queue Manual Page 259/434
stomp server message queue and writing it to a database.
For more information, including instructions for properly setting up your puppet master andmessage queue, see the documentation on setting up asynchronous storeconfigs at:�http://projects.puppetlabs.com/projects/1/wiki/Using_Stored_Configuration�
OPTIONSNote that any configuration parameter that's valid in the configuration file is also a valid long���argument. For example, 'server' is a valid configuration parameter, so you can specify '--server�servername' as an argument.
See the configuration file documentation at��http://docs.puppetlabs.com/references/stable/configuration.html for the full list of acceptable�parameters. A commented list of all configuration options can also be generated by running puppet�queue with '--genconfig'.�
--debug
Enable full debugging.
--help
Print this help message
--verbose
Turn on verbose reporting.
--version
Print the puppet version number and exit.
EXAMPLE$puppetqueue
AUTHORLuke Kanies
COPYRIGHTCopyright (c) 2011 Puppet Labs, LLC Licensed under the Apache 2.0 License
puppet resource Manual PageNAMEpuppet-resource - The resource abstraction layer shellPuppet Documentation • puppet resource Manual Page 260/434
SYNOPSISUses the Puppet RAL to directly interact with the system.
USAGEpuppet resource [-h|--help] [-d|--debug] [-v|--verbose] [-e|--edit] [-H|--host host] [-p|--paramparameter] [-t|--types] type [name] [attribute=value ...]
DESCRIPTIONThis command provides simple facilities for converting current system state into Puppet code, alongwith some ability to modify the current state using Puppet's RAL.
By default, you must at least provide a type to list, in which case puppet resource will tell youeverything it knows about all resources of that type. You can optionally specify an instance name,and puppet resource will only describe that single instance.
If given a type, a name, and a series of attribute=value pairs, puppet resource will modify the stateof the specified resource. Alternately, if given a type, a name, and the '--edit' flag, puppet resource��will write its output to a file, open that file in an editor, and then apply the saved file as a Puppet���transaction.
OPTIONSNote that any configuration parameter that's valid in the configuration file is also a valid long���argument. For example, 'ssldir' is a valid configuration parameter, so you can specify '--ssldir�directory' as an argument.
See the configuration file documentation at��http://docs.puppetlabs.com/references/stable/configuration.html for the full list of acceptable�parameters. A commented list of all configuration options can also be generated by running puppet�with '--genconfig'.�
--debug
Enable full debugging.
--edit
Write the results of the query to a file, open the file in an editor, and read the file back in as���an executable Puppet manifest.
--host
When specified, connect to the resource server on the named host and retrieve the list of�resouces of the type specified.�
--help
Print this help message.
Puppet Documentation • puppet resource Manual Page 261/434

--param
Add more parameters to be outputted from queries.
--types
List all available types.
--verbose
Print extra information.
EXAMPLEThis example uses puppetresource to return a Puppet configuration for the user �luke :
$puppetresourceuserlukeuser{'luke':home=>'/home/luke',uid=>'100',ensure=>'present',comment=>'LukeKanies,,,',gid=>'1000',shell=>'/bin/bash',groups=>['sysadmin','audio','video','puppet']}
AUTHORLuke Kanies
COPYRIGHTCopyright (c) 2011 Puppet Labs, LLC Licensed under the Apache 2.0 License
Puppet Module Manual PageNAMEpuppet-module - Creates, installs and searches for modules on the Puppet Forge.
SYNOPSISpuppet module action
DESCRIPTIONThis subcommand can find, install, and manage modules from the Puppet Forge, a repository of�user-contributed Puppet code. It can also generate empty modules, and prepare locally developedmodules for release on the Forge.
Puppet Documentation • Puppet Module Manual Page 262/434
OPTIONSNote that any configuration parameter that's valid in the configuration file is also a valid long���argument, although it may or may not be relevant to the present action. For example, server is avalid configuration parameter, so you can specify �--server<servername> as an argument.
See the configuration file documentation at��http://docs.puppetlabs.com/references/stable/configuration.html� for the full list of acceptableparameters. A commented list of all configuration options can also be generated by running puppet�with --genconfig .
--mode MODE
The run mode to use for the current action. Valid modes are user , agent , and master .
--render-as FORMAT
The format in which to render output. The most common formats are json , s (string), yaml ,and console , but other options such as dot are sometimes available.
--verbose
Whether to log verbosely.
--debug
Whether to log debug information.
ACTIONSbuild - Build a module release package.
SYNOPSIS
puppet module build path
DESCRIPTION
Prepares a local module for release on the Puppet Forge by building a ready-to-uploadarchive file. Before using this action, make sure that the module directory's name is in the�standard username-module format.
This action uses the Modulefile in the module directory to set metadata used by the Forge.�See http://links.puppetlabs.com/modulefile� for more about writing modulefiles.�
After being built, the release archive file can be found in the module's �pkg directory.
RETURNS
Pathname object representing the path to the release archive.
changes - Show modified files of an installed module.��
SYNOPSIS
Puppet Documentation • Puppet Module Manual Page 263/434
puppet module changes path
DESCRIPTION
Shows any files in a module that have been modified since it was installed. This action��compares the files on disk to the md5 checksums included in the module's metadata.�
RETURNS
Array of strings representing paths of modified files.��
clean - Clean the module download cache.
SYNOPSIS
puppet module clean
DESCRIPTION
Cleans the module download cache.
RETURNS
A status Hash:
{ :status => "success", :msg => "Cleaned module cache." }
generate - Generate boilerplate for a new module.
SYNOPSIS
puppet module generate name
DESCRIPTION
Generates boilerplate for a new module by creating the directory structure and files�recommended for the Puppet community's best practices.
A module may need additional directories beyond this boilerplate if it provides plugins, files,�or templates.
RETURNS
Array of Pathname objects representing paths of generated files.�
install - Install a module from a repository or release archive.
SYNOPSIS
puppet module install [--force | -f] [--dir DIR | -i DIR] [--module-repository REPO | -r REPO][--ignore-dependencies] [--modulepath MODULEPATH] [--version VER | -v VER] name
DESCRIPTION
Installs a module from the Puppet Forge, from a release archive file on-disk, or from a private�Puppet Documentation • Puppet Module Manual Page 264/434
Forge-like repository.
The specified module will be installed into the directory specified with the --dir option, which��defaults to /Users/nick/Documents/modules.
OPTIONS
--dir DIR | -i DIR - The directory into which modules are installed; defaults to the first�directory in the modulepath. Explicitly setting this option will re-set the modulepath; if youneed the install to check for dependencies in other directories, you must set the --modulepath option on the command line.
--force | -f - Force overwrite of existing module, if any.
--ignore-dependencies - Do not attempt to install dependencies
--module-repository REPO | -r REPO - The module repository to use, as a URL. Defaults tohttp://forge.puppetlabs.com.
--modulepath MODULEPATH - The directory into which modules are installed; defaults to thefirst directory in the modulepath. �If the dir option is also given, it is prepended to themodulepath.
--version VER | -v VER - Module version to install; can be an exact version or a requirementstring, eg '>= 1.0.3'. Defaults to latest version.
RETURNS
Pathname object representing the path to the installed module.
list - List installed modules
SYNOPSIS
puppet module list [--env ENVIRONMENT] [--modulepath MODULEPATH] [--tree]
DESCRIPTION
Lists the installed puppet modules. By default, this action scans the modulepath frompuppet.conf's [main] block; use the --modulepath option to change which directories arescanned.
The output of this action includes information from the module's metadata, including versionnumbers and unmet module dependencies.
OPTIONS
--env ENVIRONMENT - Which environments' modules to list
--modulepath MODULEPATH - Which directories to look for modules in; use the system pathseparator character (: on Unix-like systems) to specify multiple directories.
--tree - Whether to show dependencies as a tree view
Puppet Documentation • Puppet Module Manual Page 265/434
RETURNS
hash of paths to module objects
search - Search a repository for a module.
SYNOPSIS
puppet module search [--module-repository= | -r=] search_term
DESCRIPTION
Searches a repository for modules whose names, descriptions, or keywords match theprovided search term.
OPTIONS
--module-repository= | -r= - The module repository to use. Defaults tohttp://forge.puppetlabs.com.
RETURNS
Array of module metadata hashes
uninstall - Uninstall a puppet module.
SYNOPSIS
puppet module uninstall [--force | -f] [--environment=NAME | --env=NAME] [--version=] [--modulepath=] name
DESCRIPTION
Uninstalls a puppet module from the modulepath (or a specific target directory).�
OPTIONS
--environment=NAME | --env=NAME - The target environment to search for modules.
--force | -f - Force the uninstall of an installed module even if there are local changes or thepossibility of causing broken dependencies.
--modulepath= - The target directory to search for modules.
--version= - The version of the module to uninstall. When using this option a module thatmatches the specified version must be installed or an error is raised.�
RETURNS
Hash of module objects representing uninstalled modules and related errors.
upgrade - Upgrade a puppet module.
SYNOPSIS
Puppet Documentation • Puppet Module Manual Page 266/434
puppet module upgrade [--force | -f] [--ignore-dependencies] [--environment=NAME | --env=NAME] [--version=] name
DESCRIPTION
Upgrades a puppet module.
OPTIONS
--environment=NAME | --env=NAME - The target environment to search for modules.
--force | -f - Force the upgrade of an installed module even if there are local changes or thepossibility of causing broken dependencies.
--ignore-dependencies - Do not attempt to install dependencies
--version= - The version of the module to upgrade to.
RETURNS
Hash
EXAMPLESbuild
Build a module release:
$ puppet module build puppetlabs-apache notice: Building /Users/kelseyhightower/puppetlabs-apache for release puppetlabs-apache/pkg/puppetlabs-apache-0.0.1.tar.gz
changes
Show modified files of an installed module:��
$ puppet module changes /etc/puppet/modules/vcsrepo/ warning: 1 files modified��lib/puppet/provider/vcsrepo.rb
clean
Clean the module download cache:
$ puppet module clean Cleaned module cache.
generate
Generate a new module in the current directory:
$ puppet module generate puppetlabs-ssh notice: Generating module at/Users/kelseyhightower/puppetlabs-ssh puppetlabs-ssh puppetlabs-ssh/tests puppetlabs-ssh/tests/init.pp puppetlabs-ssh/spec puppetlabs-ssh/spec/spec_helper.rb puppetlabs-ssh/spec/spec.opts puppetlabs-ssh/README puppetlabs-ssh/Modulefile puppetlabs-�ssh/metadata.json puppetlabs-ssh/manifests puppetlabs-ssh/manifests/init.pp
Puppet Documentation • Puppet Module Manual Page 267/434
install
Install a module from the default repository:
$ puppet module install puppetlabs/vcsrepo notice: Installing puppetlabs-vcsrepo-0.0.4.tar.gz to/etc/puppet/modules/vcsrepo
Install a specific module version from a repository:�
$ puppet module install puppetlabs/vcsrepo -v 0.0.4 notice: Installing puppetlabs-vcsrepo-0.0.4.tar.gz to /etc/puppet/modules/vcsrepo
Install a module into a specific directory:�
$ puppet module install puppetlabs/vcsrepo --dir=/usr/share/puppet/modules notice: Installingpuppetlabs-vcsrepo-0.0.4.tar.gz to /usr/share/puppet/modules/vcsrepo
Install a module into a specific directory and check for dependencies in other directories:�
$ puppet module install puppetlabs/vcsrepo --dir=/usr/share/puppet/modules --modulepath/etc/puppet/modules notice: Installing puppetlabs-vcsrepo-0.0.4.tar.gz to/usr/share/puppet/modules/vcsrepo Install a module from a release archive:
$ puppet module install puppetlabs-vcsrepo-0.0.4.tar.gz notice: Installing puppetlabs-vcsrepo-0.0.4.tar.gz to /etc/puppet/modules/vcsrepo
list
List installed modules:
$ puppet module list /etc/puppet/modules ├── bodepd-create_resources (v0.0.1) ├──puppetlabs-bacula (v0.0.2) ├── puppetlabs-mysql (v0.0.1) ├── puppetlabs-sqlite (v0.0.1)└── puppetlabs-stdlib (v2.2.1) /usr/share/puppet/modules (no modules installed)
List installed modules in a tree view:
$ puppet module list --tree /etc/puppet/modules └─┬ puppetlabs-bacula (v0.0.2)
├──puppetlabs-stdlib(v2.2.1)├─┬puppetlabs-mysql(v0.0.1)│└──bodepd-create_resources(v0.0.1)└──puppetlabs-sqlite(v0.0.1)
/usr/share/puppet/modules (no modules installed)
List installed modules from a specified environment:�
$ puppet module list --env 'production' /etc/puppet/modules ├── bodepd-create_resources(v0.0.1) ├── puppetlabs-bacula (v0.0.2) ├── puppetlabs-mysql (v0.0.1) ├── puppetlabs-sqlite (v0.0.1) └── puppetlabs-stdlib (v2.2.1) /usr/share/puppet/modules (no modules installed)
List installed modules from a specified modulepath:�
$ puppet module list --modulepath /usr/share/puppet/modules /usr/share/puppet/modules (noPuppet Documentation • Puppet Module Manual Page 268/434
modules installed)
search
Search the default repository for a module:
$ puppet module search puppetlabs NAME DESCRIPTION AUTHOR KEYWORDS bacula This is ageneric Apache module @puppetlabs backups
uninstall
Uninstall a module from all directories in the modulepath:
$ puppet module uninstall ssh Removed /etc/puppet/modules/ssh (v1.0.0)
Uninstall a module from a specific directory:�
$ puppet module uninstall --modulepath /usr/share/puppet/modules ssh Removed/usr/share/puppet/modules/ssh (v1.0.0)
Uninstall a module from a specific environment:�
$ puppet module uninstall --environment development Removed/etc/puppet/environments/development/modules/ssh (v1.0.0)
Uninstall a specific version of a module:�
$ puppet module uninstall --version 2.0.0 ssh Removed /etc/puppet/modules/ssh (v2.0.0)
upgrade
upgrade an installed module to the latest version
$ puppet module upgrade puppetlabs-apache /etc/puppet/modules └── puppetlabs-apache(v1.0.0 -> v2.4.0)
upgrade an installed module to a specific version�
$ puppet module upgrade puppetlabs-apache --version 2.1.0 /etc/puppet/modules └──puppetlabs-apache (v1.0.0 -> v2.1.0)
upgrade an installed module for a specific environment�
$ puppet module upgrade puppetlabs-apache --env test/usr/share/puppet/environments/test/modules └── puppetlabs-apache (v1.0.0 -> v2.4.0)
COPYRIGHT AND LICENSECopyright 2011 by Puppet Labs Apache 2 license; see COPYING
HTTP APIBoth puppet master and puppet agent have pseudo-RESTful HTTP APIʼs that they use to
Puppet Documentation • HTTP API 269/434
communicate. The basic structure of the url to access this API is
https://yourpuppetmaster:8140/{environment}/{resource}/{key}https://yourpuppetclient:8139/{environment}/{resource}/{key}
Details about what resources are available and the formats they return are below.
HTTP API SecurityPuppet usually takes care of security and SSL certificate management for you, but if you want to use�the HTTP API outside of that youʼll need to manage certificates yourself when you connect. This can�be done by using a pre-existing signed agent certificate, by generating and signing a certificate on��the puppet master and manually distributing it to the connecting host, or by re-implementingpuppet agentʼs generate / submit signing request / received signed certificate behavior in your�custom app.
The security policy for the HTTP API can be controlled through the rest_authconfig file. For�testing purposes, it is also possible to permit unauthenticated connections from all hosts or asubset of hosts; see the rest_authconfig documentation for more details.
Testing the HTTP API using curlAn example of how you can use the HTTP API to retrieve the catalog for a node can be seen usingcurl.
curl--cert/etc/puppet/ssl/certs/mymachine.pem--key/etc/puppet/ssl/private_keys/mymachine.pem--cacert/etc/puppet/ssl/ca/ca_crt.pem-H'Accept:yaml'https://puppetmaster:8140/production/catalog/mymachine
Most of this command consists of pointing curl to the appropriate SSL certificates, which will be�different depending on your ssldir location and your nodeʼs certname. For simplicity and brevity,�future invocations of curl will be provided in insecure mode, which is specified with the �-k or --insecure flag. Insecure connections can be enabled for one or more nodes in the�rest_authconfig file. The above curl invocation without certificates would be as follows:��
curl--insecure-H'Accept:yaml'https://puppetmaster:8140/production/catalog/mymachine
Basically we just send a header specifying the format or formats we want back, and the HTTP URI forgetting a catalog for mymachine in the production environment. Hereʼs a snippet of the output youmight get back:
---&id001!ruby/object:Puppet::Resource::Catalogaliases:{}applying:falseclasses:[]...
Puppet Documentation • HTTP API 270/434
Another example to get back the CA Certificate of the puppetmaster doesnʼt require you to be�authenticated with your own signed SSL Certificates, since thatʼs something you would need before�you authenticate.
curl--insecure-H'Accept:s'https://puppetmaster:8140/production/certificate/ca
-----BEGINCERTIFICATE-----MIICHTCCAYagAwIBAgIBATANBgkqhkiG9w0BAQUFADAXMRUwEwYDVQQDDAxwdXBw
The master and agent shared APIResources
Returns a list of resources, like executing puppetresource (ralsh ) on the command line.
GET /{environment}/resource/{resource_type}/{resource_name}
GET /{environment}/resources/{resource_type}
Example:
curl-k-H"Accept:yaml"https://puppetmaster:8140/production/resource/user/puppetcurl-k-H"Accept:yaml"https://puppetclient:8139/production/resources/user
Certificate�
Get a certficate or the masterʼs CA certificate.��
GET /certificate/{ca,other}
Example:
curl-k-H"Accept:s"https://puppetmaster:8140/production/certificate/cacurl-k-H"Accept:s"https://puppetclient:8139/production/certificate/puppetclient
The master HTTP APIA valid and signed certificate is required to retrieve these resources.�
Catalogs
Get a catalog from the node.
GET /{environment}/catalog/{nodecertificatename}
Example:
Puppet Documentation • HTTP API 271/434
curl-k-H"Accept:pson"https://puppetmaster:8140/production/catalog/myclient
Certificate Revocation List�
Get the certificate revocation list.�
GET /certificate_revocation_list/ca
Example:
curl-k-H"Accept:s"https://puppetmaster:8140/production/certificate_revocation_list/ca
Certificate Request�
Retrieve or save certificate requests.�
GET /{environment}/certificate_requests/no_key
GET /{environment}/certificate_request/{nodecertificatename}
PUT /{environment}/certificate_request/no_key
Example:
curl-k-H"Accept:yaml"https://puppetmaster:8140/production/certificate_requests/allcurl-k-H"Accept:yaml"https://puppetmaster:8140/production/certificate_request/{agentcertname}curl-k-XPUT-H"Content-Type:text/plain"--data-binary@cert_request.csrhttps://puppetmaster:8140/production/certificate_request/no_key
To manually generate a CSR from an existing private key:
opensslreq-new-keyprivate_key.pem-subj"/CN={nodecertname}"-outrequest.csr
The subject can only include a /CN=, nothing else. Puppet master will determine the certname fromthe body of the cert, so the request can be pointed to any key for this endpoint.
Certificate Status�
Puppet 2.7.0 and later.
Read or alter the status of a certificate or pending certificate request. This endpoint is roughly��equivalent to the puppet cert command; rather than returning complete certificates, signing�requests, or revocation lists, this endpoint returns information about the various certificates (and�potential and former certificates) known to the CA.�
GET /{environment}/certificate_status/{certname}
Puppet Documentation • HTTP API 272/434
Retrieve a PSON hash containing information about the specified hostʼs certificate. Similar to��puppetcert--list{certname} .
GET /{environment}/certificate_statuses/no_key
Retrieve a list of PSON hashes containing information about all known certificates. Similar to �puppetcert--list--all .
PUT /{environment}/certificate_status/{certname}
Change the status of the specified hostʼs certificate. The desired state is sent in the body of the PUT��request as a one-item PSON hash; the two allowed complete hashes are{"desired_state":"signed"} (for signing a certificate signing request; similar to �puppetcert--sign ) and {"desired_state":"revoked"} (for revoking a certificate; similar to �puppetcert--revoke ); see examples below for details.
When revoking certificates, you may wish to use a DELETE request instead, which will also clean up�other info about the host.
DELETE /{environment}/certificate_status/{hostname}
Cause the certificate authority to discard all SSL information regarding a host (including any�certificates, certificate requests, and keys). This ��does not revoke the certificate if one is present; if�you wish to emulate the behavior of puppetcert--clean , you must PUT a desired_state ofrevoked before deleting the hostʼs SSL information.
Examples:
curl-k-H"Accept:pson"https://puppetmaster:8140/production/certificate_status/testnode.localdomaincurl-k-H"Accept:pson"https://puppetmaster:8140/production/certificate_statuses/allcurl-k-XPUT-H"Content-Type:text/pson"--data'{"desired_state":"signed"}'https://puppetmaster:8140/production/certificate_status/client.network.addresscurl-k-XPUT-H"Content-Type:text/pson"--data'{"desired_state":"revoked"}'https://puppetmaster:8140/production/certificate_status/client.network.addresscurl-k-XDELETE-H"Accept:pson"https://puppetmaster:8140/production/certificate_status/client.network.address
Reports
Submit a report.
PUT /{environment}/report/{nodecertificatename}
Example:
curl-k-XPUT-H"Content-Type:text/yaml"-d"{key:value}"https://puppetclient:8139/production/report/puppetclient
Puppet Documentation • HTTP API 273/434
Resource Types
Return a list of resources from the master
GET /{environment}/resource_type/{hostclass,definition,node}
GET /{environment}/resource_types/*
Example:
curl-k-H"Accept:yaml"https://puppetmaster:8140/production/resource_type/puppetclientcurl-k-H"Accept:yaml"https://puppetmaster:8140/production/resource_types/*
File Bucket
Get or put a file into the file bucket.��
GET /{environment}/file_bucket_file/md5/{checksum}
PUT /{environment}/file_bucket_file/md5/{checksum}
GET /{environment}/file_bucket_file/md5/{checksum}?diff_with={checksum} (diff 2 files;��Puppet 2.6.5 and later)
HEAD /{environment}/file_bucket_file/md5/{checksum} (determine if a file is present; �Puppet2.6.5 and later)
Examples:
curl-k-H"Accept:s"https://puppetmaster:8140/production/file_bucket_file/md5/e30d4d879e34f64e33c10377e65bbce6
curl-k-XPUT-H"Content-Type:text/plain"Accept:s"https://puppetmaster:8140/production/file_bucket_file/md5/[email protected]"Accept:s"https://puppetmaster:8140/production/file_bucket_file/md5/e30d4d879e34f64e33c10377e65bbce6?diff_with=6572b5dc4c56366aaa36d996969a8885curl-k-I-H"Accept:s"https://puppetmaster:8140/production/file_bucket_file/md5/e30d4d879e34f64e33c10377e65bbce6
File Server
Get a file from the file server.��
GET /file_{metadata,content}/{file}
File serving is covered in more depth in the fileserver configuration documentation��
Node
Returns the Puppet::Node information (including facts) for the specified node�
Puppet Documentation • HTTP API 274/434
GET /{environment}/node/{nodecertificatename}
Example:
curl-k-H"Accept:yaml"https://puppetmaster:8140/production/node/puppetclient
Status
Just used for testing
GET /{environment}/status/no_key
Example:
curl-k-H"Accept:pson"https://puppetmaster:8140/production/status/puppetclient
Facts
GET /{environment}/facts/{nodecertname}
curl-k-H"Accept:yaml"https://puppetmaster:8140/production/facts/{nodecertname}
PUT /{environment}/facts/{nodecertname}
curl-k-XPUT-H'Content-Type:text/yaml'--data-binary@/var/lib/puppet/yaml/facts/hostname.yamlhttps://localhost:8140/production/facts/{nodecertname}
Facts Search
GET /{environment}/facts_search/search?{factssearchstring}
curl-k-H"Accept:pson"https://puppetmaster:8140/production/facts_search/search?facts.processorcount.ge=2&facts.operatingsystem=Ubuntu
Facts search strings are constructed as a series of terms separated by & ; if there is more than oneterm, the search combines the terms with boolean AND. There is currently no API for searching withboolean OR. Each term is composed as follows:
facts.{nameoffact}.{comparisontype}={stringforcomparison}
If you leave off the �.{comparisontype} , the comparison will default to simple equality. Thefollowing comparison types are available:
Puppet Documentation • HTTP API 275/434
STRING/GENERAL COMPARISON
eq — == (default)ne — !=
NUMERIC COMPARISON
lt — <le — <=gt — >ge — >=
The agent HTTP APIBy default, puppet agent is set not to listen to HTTP requests. To enable this you must set listen=true in the puppet.conf or pass --listentrue to puppet agent when starting. Due to a knownbug in the 2.6.x releases of Puppet, puppet agent will not start with listen=true unless anamespaceauth.conf file exists, even though this file is not consulted. The nodeʼs ��rest_authconfig�file must also allow access to the agentʼs resources, which isnʼt permitted by default.�
Facts
GET /{environment}/facts/no_key
Example:
curl-k-H"Accept:yaml"https://puppetclient:8139/production/facts/no_key
Run
Cause the client to update like puppetrun or puppet kick
PUT /{environment}/run/no_key
Example:
curl-k-XPUT-H"Content-Type:text/pson"-d"{}"https://puppetclient:8139/production/run/no_key
Type Reference
Puppet Documentation • Type Reference 276/434
Type ReferenceThis page is autogenerated; any changes will get overwritten (last generated on Tue Jun 1816:59:01 -0700 2013)
Resource TypesThe namevar is the parameter used to uniquely identify a type instance. This is the parameterthat gets assigned when a string is provided before the colon in a type declaration. In general,only developers will need to worry about which parameter is the namevar .
In the following code:
file{"/etc/passwd":owner=>root,group=>root,mode=>644}
/etc/passwd is considered the title of the file object (used for things like dependency handling),�and because path is the namevar for file , that string is assigned to the path parameter.Parameters determine the specific configuration of the instance. ��They either directly modify thesystem (internally, these are called properties) or they affect how the instance behaves (e.g.,�adding a search path for exec instances or determining recursion on file instances).Providers provide low-level functionality for a given resource type. This is usually in the form ofcalling out to external commands.
When required binaries are specified for providers, fully qualifed paths indicate that the binary�must exist at that specific path and unqualified binaries indicate that Puppet will search for the��binary using the shell path.Features are abilities that some providers might not support. You can use the list of supportedfeatures to determine how a given provider can be used.
Resource types define features they can use, and providers can be tested to see which features�they provide.
augeas
Apply a change or an array of changes to the filesystem using the augeas tool.�
Requires:
AugeasThe ruby-augeas bindings
Sample usage with a string:
Puppet Documentation • Type Reference 277/434
augeas{"test1":context=>"/files/etc/sysconfig/firstboot",changes=>"setRUN_FIRSTBOOTYES",onlyif=>"matchother_valuesize>0",}
Sample usage with an array and custom lenses:
augeas{"jboss_conf":context=>"/files",changes=>["setetc/jbossas/jbossas.conf/JBOSS_IP$ipaddress","setetc/jbossas/jbossas.conf/JAVA_HOME/usr",],load_path=>"$/usr/share/jbossas/lenses",}
FEATURES
execute_changes: Actually make the changesneed_to_run?: If the command should runparse_commands: Parse the command string
Provider execute changes need to run? parse commands
augeas X X X
PARAMETERS
changes
The changes which should be applied to the filesystem. This can be a command or an array�of commands. The following commands are supported:
set<PATH><VALUE>
Sets the value VALUE at loction PATH
setm<PATH><SUB><VALUE>
Sets multiple nodes (matching SUB relative to PATH ) to VALUE
rm<PATH>
Removes the node at location PATH
remove<PATH>
Synonym for rm
clear<PATH>
Sets the node at PATH to NULL , creating it if needed
Puppet Documentation • Type Reference 278/434
clearm<PATH><SUB>
Sets multiple nodes (matching SUB relative to PATH ) to NULL
ins<LABEL>(before|after)<PATH>
Inserts an empty node LABEL either before or after PATH .
insert<LABEL><WHERE><PATH>
Synonym for ins
mv<PATH><OTHERPATH>
Moves a node at PATH to the new location OTHERPATH
move<PATH><OTHERPATH>
Synonym for mv
defvar<NAME><PATH>
Sets Augeas variable $NAME to PATH
defnode<NAME><PATH><VALUE>
Sets Augeas variable $NAME to PATH , creating it with VALUE if needed
If the context parameter is set, that value is prepended to any relative PATHs.
context
Optional context path. This value is prepended to the paths of all changes if the path isrelative. If the incl parameter is set, defaults to /files+incl ; otherwise, defaults to theempty string.
force
Optional command to force the augeas type to execute even if it thinks changes will not bemade. This does not overide the onlyif parameter.
incl
Load only a specific file, e.g. ��/etc/hosts . This can greatly speed up the execution theresource. When this parameter is set, you must also set the lens parameter to indicate whichlens to use.
lens
Use a specific lens, e.g. �Hosts.lns . When this parameter is set, you must also set the inclparameter to indicate which file to load.�
load_path
Puppet Documentation • Type Reference 279/434
Optional colon-separated list or array of directories; these directories are searched forschema definitions. The agentʼs �$libdir/augeas/lenses path will always be added tosupport pluginsync.
name
The name of this task. Used for uniqueness.
onlyif
Optional augeas command and comparisons to control the execution of this type. Supportedonlyif syntax:
get<AUGEAS_PATH><COMPARATOR><STRING>
match<MATCH_PATH>size<COMPARATOR><INT>
match<MATCH_PATH>include<STRING>
match<MATCH_PATH>not_include<STRING>
match<MATCH_PATH>==<AN_ARRAY>
match<MATCH_PATH>!=<AN_ARRAY>
where:
AUGEAS_PATH is a valid path scoped by the contextMATCH_PATH is a valid match synatx scoped by the contextCOMPARATOR is one of >,>=,!=,==,<=, or <STRING is a stringINT is a numberAN_ARRAY is in the form ['astring','another']
provider
The specific backend to use for this �augeas resource. You will seldom need to specify this —Puppet will usually discover the appropriate provider for your platform. Available providersare:
augeas
Supported features: execute_changes , need_to_run? , parse_commands .
returns
The expected return code from the augeas command. Should not be set.
root
A file system path; all files loaded by Augeas are loaded underneath ��root .
type_check
Whether augeas should perform typechecking. Defaults to false. Valid values are true , false .
Puppet Documentation • Type Reference 280/434
computer
Computer object management using DirectoryService on OS X.
Note that these are distinctly different kinds of objects to ʻhostsʼ, as they require a MAC address and�can have all sorts of policy attached to them.
This provider only manages Computer objects in the local directory service domain, not in remotedirectories.
If you wish to manage /etc/hosts file on Mac OS X, then simply use the host type as per other�platforms.
This type primarily exists to create localhost Computer objects that MCX policy can then beattached to.
Autorequires: If Puppet is managing the plist file representing a Computer object (located at�/var/db/dslocal/nodes/Default/computers/{name}.plist ), the Computer resource willautorequire it.PARAMETERS
en_address
The MAC address of the primary network interface. Must match en0.
ensure
Control the existences of this computer record. Set this attribute to present to ensure thecomputer record exists. Set it to absent to delete any computer records with this name Validvalues are present , absent .
ip_address
The IP Address of the Computer object.
name
The authoritative ʻshortʼ name of the computer record.
provider
The specific backend to use for this �computer resource. You will seldom need to specify this— Puppet will usually discover the appropriate provider for your platform. Available providersare:
directoryservice
Computer object management using DirectoryService on OS X. Note that these aredistinctly different kinds of objects to ʻhostsʼ, as they require a MAC address and can�have all sorts of policy attached to them.
This provider only manages Computer objects in the local directory service domain,not in remote directories.
If you wish to manage /etc/hosts on Mac OS X, then simply use the host type as per
Puppet Documentation • Type Reference 281/434
other platforms.
Default for operatingsystem == darwin .
realname
The ʻlongʼ name of the computer record.
cron
Installs and manages cron jobs. Every cron resource requires a command and user attribute, as wellas at least one periodic attribute (hour, minute, month, monthday, weekday, or special). While thename of the cron job is not part of the actual job, it is used by Puppet to store and retrieve it.
If you specify a cron resource that duplicates the scheduling and command used by an existingcrontab entry, then Puppet will take no action and defers to the existing crontab entry. If theduplicate cron resource specifies �ensure=>absent , all existing duplicated crontab entries will beremoved. Specifying multiple duplicate cron resources with different �ensure states will result inundefined behavior.�
Example:
cron{logrotate:command=>"/usr/sbin/logrotate",user=>root,hour=>2,minute=>0}
Note that all periodic attributes can be specified as an array of values:�
cron{logrotate:command=>"/usr/sbin/logrotate",user=>root,hour=>[2,4]}
…or using ranges or the step syntax */2 (although thereʼs no guarantee that your cron daemonsupports these):
cron{logrotate:command=>"/usr/sbin/logrotate",user=>root,hour=>['2-4'],minute=>'*/10'}
An important note: the Cron type will not reset parameters that are removed from a manifest. Forexample, removing a minute=>10 parameter will not reset the minute component of theassociated cronjob to * . These changes must be expressed by setting the parameter to minute=>
Puppet Documentation • Type Reference 282/434
absent because Puppet only manages parameters that are out of sync with manifest entries.
PARAMETERS
command
The command to execute in the cron job. The environment provided to the command variesby local system rules, and it is best to always provide a fully qualified command. �The userʼsprofile is not sourced when the command is run, so if the userʼs environment is desired it�should be sourced manually.
All cron parameters support absent as a value; this will remove any existing values for thatfield.�
ensure
The basic property that the resource should be in. Valid values are present , absent .
environment
Any environment settings associated with this cron job. They will be stored between theheader and the job in the crontab. There can be no guarantees that other, earlier settings willnot also affect a given cron job.�
Also, Puppet cannot automatically determine whether an existing, unmanaged environmentsetting is associated with a given cron job. If you already have cron jobs with environmentsettings, then Puppet will keep those settings in the same place in the file, but will not�associate them with a specific job.�
Settings should be specified exactly as they should appear in the crontab, e.g.,�PATH=/bin:/usr/bin:/usr/sbin .
hour
The hour at which to run the cron job. Optional; if specified, must be between 0 and 23,�inclusive.
minute
The minute at which to run the cron job. Optional; if specified, must be between 0 and 59,�inclusive.
month
The month of the year. Optional; if specified must be between 1 and 12 or the month name�(e.g., December).
monthday
The day of the month on which to run the command. Optional; if specified, must be between�1 and 31.
name
The symbolic name of the cron job. This name is used for human reference only and isgenerated automatically for cron jobs found on the system. This generally wonʼt matter, asPuppet will do its best to match existing cron jobs against specified jobs (and Puppet adds a�comment to cron jobs it adds), but it is at least possible that converting from unmanaged
Puppet Documentation • Type Reference 283/434
jobs to managed jobs might require manual intervention.
provider
The specific backend to use for this �cron resource. You will seldom need to specify this —Puppet will usually discover the appropriate provider for your platform. Available providersare:
crontab
Required binaries: crontab .
special
A special value such as ʻrebootʼ or ʻannuallyʼ. Only available on supported systems such asVixie Cron. Overrides more specific time of day/week settings.�
target
The username that will own the cron entry. Defaults to the value of $USER for the shell thatinvoked Puppet, or root if $USER is empty.
user
The user to run the command as. This user must be allowed to run cron jobs, which is notcurrently checked by Puppet.
The user defaults to whomever Puppet is running as.
weekday
The weekday on which to run the command. Optional; if specified, must be between 0 and 7,�inclusive, with 0 (or 7) being Sunday, or must be the name of the day (e.g., Tuesday).
exec
Executes external commands. It is critical that all commands executed using this mechanism can berun multiple times without harm, i.e., they are idempotent. One useful way to create idempotentcommands is to use the checks like creates to avoid running the command unless some conditionis met.
Note that you can restrict an exec to only run when it receives events by using the refreshonlyparameter; this is a useful way to have your configuration respond to events with arbitrary�commands.
Note also that if an exec receives an event from another resource, it will get executed again (orexecute the command specified in �refresh , if there is one).
There is a strong tendency to use exec to do whatever work Puppet canʼt already do; while this isobviously acceptable (and unavoidable) in the short term, it is highly recommended to migrate workfrom exec to native Puppet types as quickly as possible. If you find that you are doing a lot of work�with exec , please at least notify us at Puppet Labs what you are doing, and hopefully we can workwith you to get a native resource type for the work you are doing.
Puppet Documentation • Type Reference 284/434
Autorequires: If Puppet is managing an execʼs cwd or the executable file used in an execʼs�command, the exec resource will autorequire those files. If Puppet is managing the user that an�exec should run as, the exec resource will autorequire that user.PARAMETERS
command
(Namevar: If omitted, this parameterʼs value defaults to the resourceʼs title.)
The actual command to execute. Must either be fully qualified or a search path for the�command must be provided. If the command succeeds, any output produced will be loggedat the instanceʼs normal log level (usually notice ), but if the command fails (meaning itsreturn code does not match the specified code) then any output is logged at the �err loglevel.
creates
A file to look for before running the command. The command will only run if the file ��doesnʼtexist.
This parameter doesnʼt cause Puppet to create a file; it is only useful if �the command itselfcreates a file.�
exec{"tar-xf/Volumes/nfs02/important.tar":cwd=>"/var/tmp",creates=>"/var/tmp/myfile",path=>["/usr/bin","/usr/sbin"]}
In this example, myfile is assumed to be a file inside �important.tar . If it is ever deleted, theexec will bring it back by re-extracting the tarball. If important.tar does not actuallycontain myfile , the exec will keep running every time Puppet runs.
cwd
The directory from which to run the command. If this directory does not exist, the commandwill fail.
environment
Any additional environment variables you want to set for a command. Note that if you usethis to set PATH, it will override the path attribute. Multiple environment variables should bespecified as an array.�
group
The group to run the command as. This seems to work quite haphazardly on different�platforms – it is a platform issue not a Ruby or Puppet one, since the same variety exists whenrunning commands as different users in the shell.�
logoutput
Whether to log command output in addition to logging the exit code. Defaults to
Puppet Documentation • Type Reference 285/434
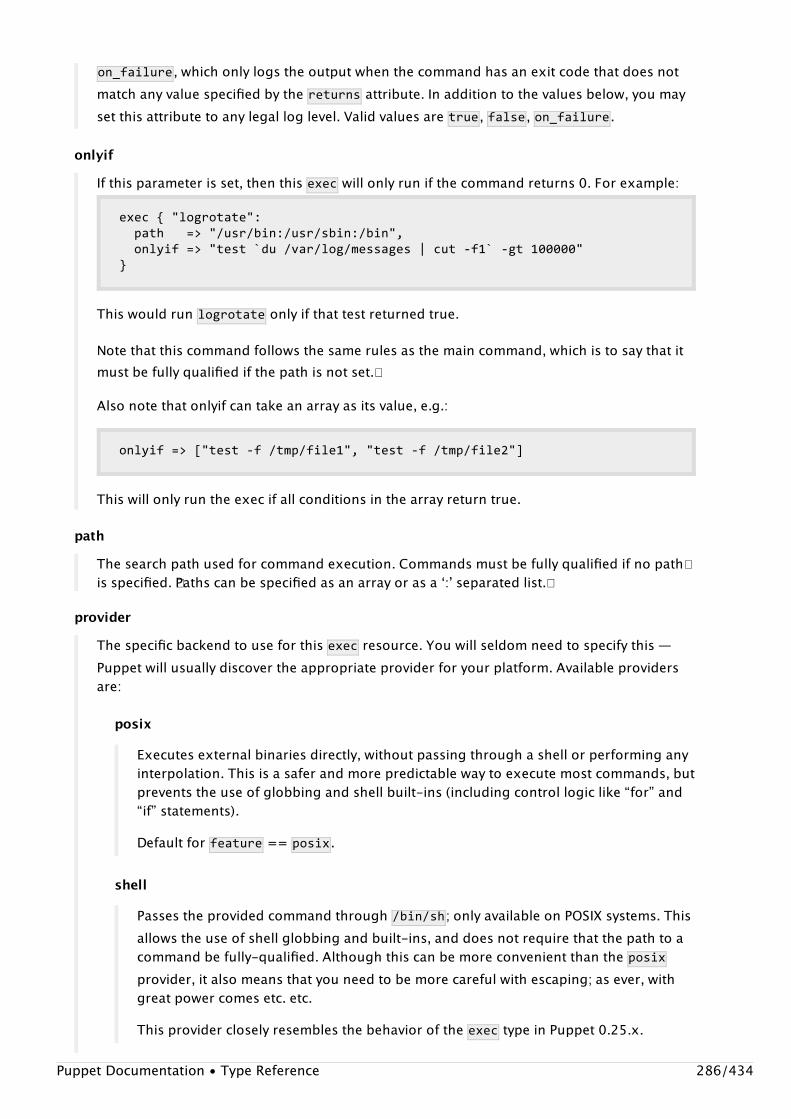
on_failure , which only logs the output when the command has an exit code that does notmatch any value specified by the �returns attribute. In addition to the values below, you mayset this attribute to any legal log level. Valid values are true , false , on_failure .
onlyif
If this parameter is set, then this exec will only run if the command returns 0. For example:
exec{"logrotate":path=>"/usr/bin:/usr/sbin:/bin",onlyif=>"test`du/var/log/messages|cut-f1`-gt100000"}
This would run logrotate only if that test returned true.
Note that this command follows the same rules as the main command, which is to say that itmust be fully qualified if the path is not set.�
Also note that onlyif can take an array as its value, e.g.:
onlyif=>["test-f/tmp/file1","test-f/tmp/file2"]
This will only run the exec if all conditions in the array return true.
path
The search path used for command execution. Commands must be fully qualified if no path�is specified. �Paths can be specified as an array or as a ʻ:ʼ separated list.�
provider
The specific backend to use for this �exec resource. You will seldom need to specify this —Puppet will usually discover the appropriate provider for your platform. Available providersare:
posix
Executes external binaries directly, without passing through a shell or performing anyinterpolation. This is a safer and more predictable way to execute most commands, butprevents the use of globbing and shell built-ins (including control logic like “for” and“if” statements).
Default for feature == posix .
shell
Passes the provided command through /bin/sh ; only available on POSIX systems. Thisallows the use of shell globbing and built-ins, and does not require that the path to acommand be fully-qualified. Although this can be more convenient than the �posixprovider, it also means that you need to be more careful with escaping; as ever, withgreat power comes etc. etc.
This provider closely resembles the behavior of the exec type in Puppet 0.25.x.
Puppet Documentation • Type Reference 286/434
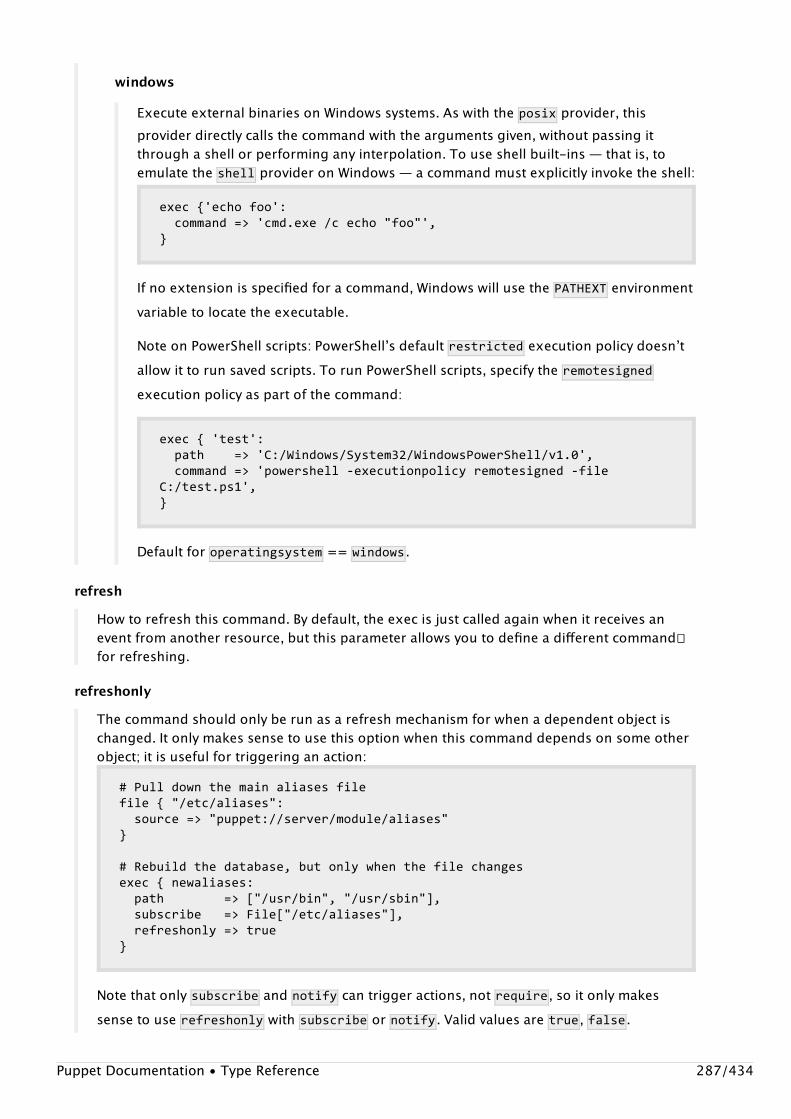
windows
Execute external binaries on Windows systems. As with the posix provider, thisprovider directly calls the command with the arguments given, without passing itthrough a shell or performing any interpolation. To use shell built-ins — that is, toemulate the shell provider on Windows — a command must explicitly invoke the shell:
exec{'echofoo':command=>'cmd.exe/cecho"foo"',}
If no extension is specified for a command, Windows will use the �PATHEXT environmentvariable to locate the executable.
Note on PowerShell scripts: PowerShellʼs default restricted execution policy doesnʼtallow it to run saved scripts. To run PowerShell scripts, specify the remotesignedexecution policy as part of the command:
exec{'test':path=>'C:/Windows/System32/WindowsPowerShell/v1.0',command=>'powershell-executionpolicyremotesigned-fileC:/test.ps1',}
Default for operatingsystem == windows .
refresh
How to refresh this command. By default, the exec is just called again when it receives anevent from another resource, but this parameter allows you to define a different command��for refreshing.
refreshonly
The command should only be run as a refresh mechanism for when a dependent object ischanged. It only makes sense to use this option when this command depends on some otherobject; it is useful for triggering an action:
#Pulldownthemainaliasesfilefile{"/etc/aliases":source=>"puppet://server/module/aliases"}
#Rebuildthedatabase,butonlywhenthefilechangesexec{newaliases:path=>["/usr/bin","/usr/sbin"],subscribe=>File["/etc/aliases"],refreshonly=>true}
Note that only subscribe and notify can trigger actions, not require , so it only makessense to use refreshonly with subscribe or notify . Valid values are true , false .
Puppet Documentation • Type Reference 287/434
returns
The expected return code(s). An error will be returned if the executed command returnssomething else. Defaults to 0. Can be specified as an array of acceptable return codes or a�single value.
timeout
The maximum time the command should take. If the command takes longer than thetimeout, the command is considered to have failed and will be stopped. The timeout isspecified in seconds. The default timeout is 300 seconds and you can set it to 0 to disable the�timeout.
tries
The number of times execution of the command should be tried. Defaults to ʻ1ʼ. This manyattempts will be made to execute the command until an acceptable return code is returned.Note that the timeout paramater applies to each try rather than to the complete set of tries.
try_sleep
The time to sleep in seconds between ʻtriesʼ.
unless
If this parameter is set, then this exec will run unless the command returns 0. For example:
exec{"/bin/echoroot>>/usr/lib/cron/cron.allow":path=>"/usr/bin:/usr/sbin:/bin",unless=>"greproot/usr/lib/cron/cron.allow2>/dev/null"}
This would add root to the cron.allow file (on Solaris) unless �grep determines itʼs alreadythere.
Note that this command follows the same rules as the main command, which is to say that itmust be fully qualified if the path is not set.�
user
The user to run the command as. Note that if you use this then any error output is notcurrently captured. This is because of a bug within Ruby. If you are using Puppet to createthis user, the exec will automatically require the user, as long as it is specified by name.�
file�
Manages files, including their content, ownership, and permissions.�
The file type can manage normal files, directories, and symlinks; the type should be specified in��the ensure attribute. Note that symlinks cannot be managed on Windows systems.
File contents can be managed directly with the content attribute, or downloaded from a remotesource using the source attribute; the latter can also be used to recursively serve directories (whenthe recurse attribute is set to true or local ). On Windows, note that file contents are managed in�binary mode; Puppet never automatically translates line endings.Puppet Documentation • Type Reference 288/434

Autorequires: If Puppet is managing the user or group that owns a file, the file resource will��autorequire them. If Puppet is managing any parent directories of a file, the file resource will��autorequire them.PARAMETERS
backup
Whether (and how) file content should be backed up before being replaced. This attribute�works best as a resource default in the site manifest (File{backup=>main} ), so it canaffect all file resources.��
If set to false , file content wonʼt be backed up.�If set to a string beginning with . (e.g., .puppet-bak ), Puppet will use copy the file in the�same directory with that value as the extension of the backup. (A value of true is asynonym for .puppet-bak .)If set to any other string, Puppet will try to back up to a filebucket with that title. See the�filebucket resource type for more details. (This is the preferred method for backup,since it can be centralized and queried.)
Default value: puppet , which backs up to a filebucket of the same name. (Puppet�automatically creates a local filebucket named �puppet if one doesnʼt already exist.)
Backing up to a local filebucket isnʼt particularly useful. If you want to make organized use of�backups, you will generally want to use the puppet master serverʼs filebucket service. This�requires declaring a filebucket resource and a resource default for the �backup attribute insite.pp:
#/etc/puppet/manifests/site.ppfilebucket{'main':path=>false,#Thisisrequiredforremotefilebuckets.server=>'puppet.example.com',#Optional;defaultstotheconfiguredpuppetmaster.}
File{backup=>main,}
If you are using multiple puppet master servers, you will want to centralize the contents ofthe filebucket. Either configure your load balancer to direct all filebucket traffic to a single�����master, or use something like an out-of-band rsync task to synchronize the content on allmasters.
checksum
The checksum type to use when determining whether to replace a fileʼs contents.�
The default checksum type is md5. Valid values are md5 , md5lite , mtime , ctime , none .
content
The desired contents of a file, as a string. This attribute is mutually exclusive with �source andPuppet Documentation • Type Reference 289/434
target .
Newlines and tabs can be specified in double-quoted strings using standard escaped syntax�— \n for a newline, and \t for a tab.
With very small files, you can construct content strings directly in the manifest…�
defineresolve(nameserver1,nameserver2,domain,search){$str="search$searchdomain$domainnameserver$nameserver1nameserver$nameserver2"
file{"/etc/resolv.conf":content=>"$str",}}
…but for larger files, this attribute is more useful when combined with the �template function.
ctime
A read-only state to check the file ctime.�
ensure
Whether to create files that donʼt currently exist. Possible values are �absent, present, file�, anddirectory. Specifying present will match any form of file existence, and if the file is missing��will create an empty file. Specifying �absent will delete the file (or directory, if �recurse=>true ).
Anything other than the above values will create a symlink; note that symlinks cannot bemanaged on Windows. In the interest of readability and clarity, symlinks should be created bysetting ensure=>link and explicitly specifying a target; however, if a target attribute isnʼtprovided, the value of the ensure attribute will be used as the symlink target. The followingtwo declarations are equivalent:
#(UsefulonSolaris)
#Lessmaintainable:file{"/etc/inetd.conf":ensure=>"/etc/inet/inetd.conf",}
#Moremaintainable:file{"/etc/inetd.conf":ensure=>link,target=>"/etc/inet/inetd.conf",}Validvaluesare`absent`(alsocalled`false`),`file`,`present`,`directory`,`link`.Valuescanmatch`/./`.
force
Puppet Documentation • Type Reference 290/434
Perform the file operation even if it will destroy one or more directories. You must use �forcein order to:
purge subdirectoriesReplace directories with files or links�Remove a directory when ensure=>absent Valid values are true , false .
group
Which group should own the file. �Argument can be either a group name or a group ID.
On Windows, a user (such as “Administrator”) can be set as a fileʼs group and a group (such�as “Administrators”) can be set as a fileʼs owner; however, a fileʼs owner and group shouldnʼt��be the same. (If the owner is also the group, files with modes like �0640 will cause log churn,as they will always appear out of sync.)
ignore
A parameter which omits action on files matching specified patterns during recursion. ��UsesRubyʼs builtin globbing engine, so shell metacharacters are fully supported, e.g. [a-z]* .Matches that would descend into the directory structure are ignored, e.g., */* .
links
How to handle links during file actions. �During file copying, �follow will copy the target file�instead of the link, manage will copy the link itself, and ignore will just pass it by. When notcopying, manage and ignore behave equivalently (because you cannot really ignore linksentirely during local recursion), and follow will manage the file to which the link points.�Valid values are follow , manage .
mode
The desired permissions mode for the file, in symbolic or numeric notation. Puppet uses�traditional Unix permission schemes and translates them to equivalent permissions forsystems which represent permissions differently, including Windows.�
Numeric modes should use the standard four-digit octal notation of<setuid/setgid/sticky><owner><group><other> (e.g. 0644). Each of the “owner,” “group,”and “other” digits should be a sum of the permissions for that class of users, where read = 4,write = 2, and execute/search = 1. When setting numeric permissions for directories, Puppetsets the search permission wherever the read permission is set.
Symbolic modes should be represented as a string of comma-separated permission clauses,in the form <who><op><perm> :
“Who” should be u (user), g (group), o (other), and/or a (all)“Op” should be = (set exact permissions), + (add select permissions), or - (remove selectpermissions)“Perm” should be one or more of:
r (read)w (write)x (execute/search)
Puppet Documentation • Type Reference 291/434
t (sticky)s (setuid/setgid)X (execute/search if directory or if any one user can execute)u (userʼs current permissions)g (groupʼs current permissions)o (otherʼs current permissions)
Thus, mode 0664 could be represented symbolically as either a=r,ug+w or ug=rw,o=r . Seethe manual page for GNU or BSD chmod for more details on numeric and symbolic modes.
On Windows, permissions are translated as follows:
Owner and group names are mapped to Windows SIDsThe “other” class of users maps to the “Everyone” SIDThe read/write/execute permissions map to the FILE_GENERIC_READ ,FILE_GENERIC_WRITE , and FILE_GENERIC_EXECUTE access rights; a fileʼs owner always has�the FULL_CONTROL right“Other” users canʼt have any permissions a fileʼs group lacks, and its group canʼt have any�permissions its owner lacks; that is, 0644 is an acceptable mode, but 0464 is not.
mtime
A read-only state to check the file mtime.�
owner
The user to whom the file should belong. �Argument can be a user name or a user ID.
On Windows, a group (such as “Administrators”) can be set as a fileʼs owner and a user (such�as “Administrator”) can be set as a fileʼs group; however, a fileʼs owner and group shouldnʼt��be the same. (If the owner is also the group, files with modes like �0640 will cause log churn,as they will always appear out of sync.)
path
(Namevar: If omitted, this parameterʼs value defaults to the resourceʼs title.)
The path to the file to manage. �Must be fully qualified.�
On Windows, the path should include the drive letter and should use / as the separatorcharacter (rather than \\ ).
provider
The specific backend to use for this �file resource. You will seldom need to specify this —Puppet will usually discover the appropriate provider for your platform. Available providersare:
posix
Uses POSIX functionality to manage file ownership and permissions.�
Puppet Documentation • Type Reference 292/434
windows
Uses Microsoft Windows functionality to manage file ownership and permissions.�
purge
Whether unmanaged files should be purged. This option only makes sense when managing�directories with recurse=>true .
When recursively duplicating an entire directory with the source attribute, purge=>truewill automatically purge any files that are not in the source directory.�When managing files in a directory as individual resources, setting �purge=>true willpurge any files that arenʼt being specifically managed.��
If you have a filebucket configured, the purged files will be uploaded, but if you do not, this���will destroy data. Valid values are true , false .
recurse
Whether and how deeply to do recursive management. Options are:inf,true — Regular style recursion on both remote and local directory structure.remote — Descends recursively into the remote directory but not the local directory.Allows copying of a few files into a directory containing many unmanaged files without��scanning all the local files.�false — Default of no recursion. Valid values are true , false , inf , remote .
recurselimit
How deeply to do recursive management. Values can match /^[0-9]+$/ .
replace
Whether to replace a file or symlink that already exists on the local system but whose content�doesnʼt match what the source or content attribute specifies. �Setting this to false allows file�resources to initialize files without overwriting future changes. �Note that this only affects�content; Puppet will still manage ownership and permissions. Defaults to true . Valid valuesare true (also called yes ), false (also called no ).
selinux_ignore_defaults
If this is set then Puppet will not ask SELinux (via matchpathcon) to supply defaults for theSELinux attributes (seluser, selrole, seltype, and selrange). In general, you should leave thisset at its default and only set it to true when you need Puppet to not try to fix SELinux labels�automatically. Valid values are true , false .
selrange
What the SELinux range component of the context of the file should be. Any valid SELinux�range component is accepted. For example s0 or SystemHigh . If not specified it defaults to�the value returned by matchpathcon for the file, if any exists. �Only valid on systems withSELinux support enabled and that have support for MCS (Multi-Category Security).
selrole
What the SELinux role component of the context of the file should be. Any valid SELinux role�Puppet Documentation • Type Reference 293/434
component is accepted. For example role_r . If not specified it defaults to the value returned�by matchpathcon for the file, if any exists. �Only valid on systems with SELinux supportenabled.
seltype
What the SELinux type component of the context of the file should be. Any valid SELinux type�component is accepted. For example tmp_t . If not specified it defaults to the value returned�by matchpathcon for the file, if any exists. �Only valid on systems with SELinux supportenabled.
seluser
What the SELinux user component of the context of the file should be. Any valid SELinux user�component is accepted. For example user_u . If not specified it defaults to the value returned�by matchpathcon for the file, if any exists. �Only valid on systems with SELinux supportenabled.
show_diff�
Whether to display differences when the file changes, defaulting to true. ��This parameter isuseful for files that may contain passwords or other secret data, which might otherwise be�included in Puppet reports or other insecure outputs. If the global ``show_diff�configurationparameterisfalse,thennodiffswillbeshownevenifthis
parameteristrue.Validvaluesaretrue,false`.
source
A source file, which will be copied into place on the local system. Values can be URIs pointing�to remote files, or fully qualified paths to files available on the local system (including files on����NFS shares or Windows mapped drives). This attribute is mutually exclusive with content andtarget .
The available URI schemes are puppet and file�. Puppet URIs will retrieve files from Puppetʼs�built-in file server, and are usually formatted as:�
puppet:///modules/name_of_module/filename
This will fetch a file from a module on the puppet master (or from a local module when using�puppet apply). Given a modulepath of /etc/puppetlabs/puppet/modules , the exampleabove would resolve to/etc/puppetlabs/puppet/modules/name_of_module/files/filename .
Unlike content , the source attribute can be used to recursively copy directories if therecurse attribute is set to true or remote . If a source directory contains symlinks, use thelinks attribute to specify whether to recreate links or follow them.
Multiple source values can be specified as an array, and Puppet will use the first source that��exists. This can be used to serve different files to different system types:���
file{"/etc/nfs.conf":source=>["puppet:///modules/nfs/conf.$host",
Puppet Documentation • Type Reference 294/434
"puppet:///modules/nfs/conf.$operatingsystem","puppet:///modules/nfs/conf"]}
Alternately, when serving directories recursively, multiple sources can be combined by settingthe sourceselect attribute to all .
sourceselect
Whether to copy all valid sources, or just the first one. �This parameter only affects recursive�directory copies; by default, the first valid source is the only one used, but if this parameter is�set to all , then all valid sources will have all of their contents copied to the local system. If agiven file exists in more than one source, the version from the earliest source in the list will�be used. Valid values are first , all .
target
The target for creating a link. Currently, symlinks are the only type supported. This attributeis mutually exclusive with source and content .
Symlink targets can be relative, as well as absolute:
#(UsefulonSolaris)file{"/etc/inetd.conf":ensure=>link,target=>"inet/inetd.conf",}
Directories of symlinks can be served recursively by instead using the source attribute,setting ensure to directory , and setting the links attribute to manage . Valid values arenotlink . Values can match /./ .
type
A read-only state to check the file type.�
filebucket�
A repository for storing and retrieving file content by MD5 checksum. Can be local to each agent�node, or centralized on a puppet master server. All puppet masters provide a filebucket service that�agent nodes can access via HTTP, but you must declare a filebucket resource before any agents will�do so.
Filebuckets are used for the following features:
Content backups. If the file typeʼs backup attribute is set to the name of a filebucket, Puppet�will back up the old content whenever it rewrites a file; see the documentation for the �file typefor more details. These backups can be used for manual recovery of content, but are morecommonly used to display changes and differences in a tool like Puppet Dashboard.�Content distribution. The optional static compiler populates the puppet masterʼs filebucket with�
Puppet Documentation • Type Reference 295/434
the desired content for each file, then instructs the agent to retrieve the content for a specific��checksum. For more details, see the static_compiler section in the catalog indirection docs.
To use a central filebucket for backups, you will usually want to declare a filebucket resource and a��resource default for the backup attribute in site.pp:
#/etc/puppet/manifests/site.ppfilebucket{'main':path=>false,#Thisisrequiredforremotefilebuckets.server=>'puppet.example.com',#Optional;defaultstotheconfiguredpuppetmaster.}
File{backup=>main,}
Puppet master servers automatically provide the filebucket service, so this will work in a default�configuration. If you have a heavily restricted �auth.conf file, you may need to allow access to the�file_bucket_file endpoint.
PARAMETERS
name
The name of the filebucket.�
path
The path to the local filebucket; defaults to the value of the �clientbucketdir setting. To usea remote filebucket, you �must set this attribute to false .
port
The port on which the remote server is listening. Defaults to the value of the masterportsetting, which is usually 8140.
server
The server providing the remote filebucket service. Defaults to the value of the �server setting(that is, the currently configured puppet master server).�
This setting is only consulted if the path attribute is set to false .
group
Manage groups. On most platforms this can only create groups. Group membership must bemanaged on individual users.
On some platforms such as OS X, group membership is managed as an attribute of the group, notthe user record. Providers must have the feature ʻmanages_membersʼ to manage the ʻmembersʼproperty of a group record.FEATURES
libuser: Allows local groups to be managed on systems that also use some other remote NSS
Puppet Documentation • Type Reference 296/434
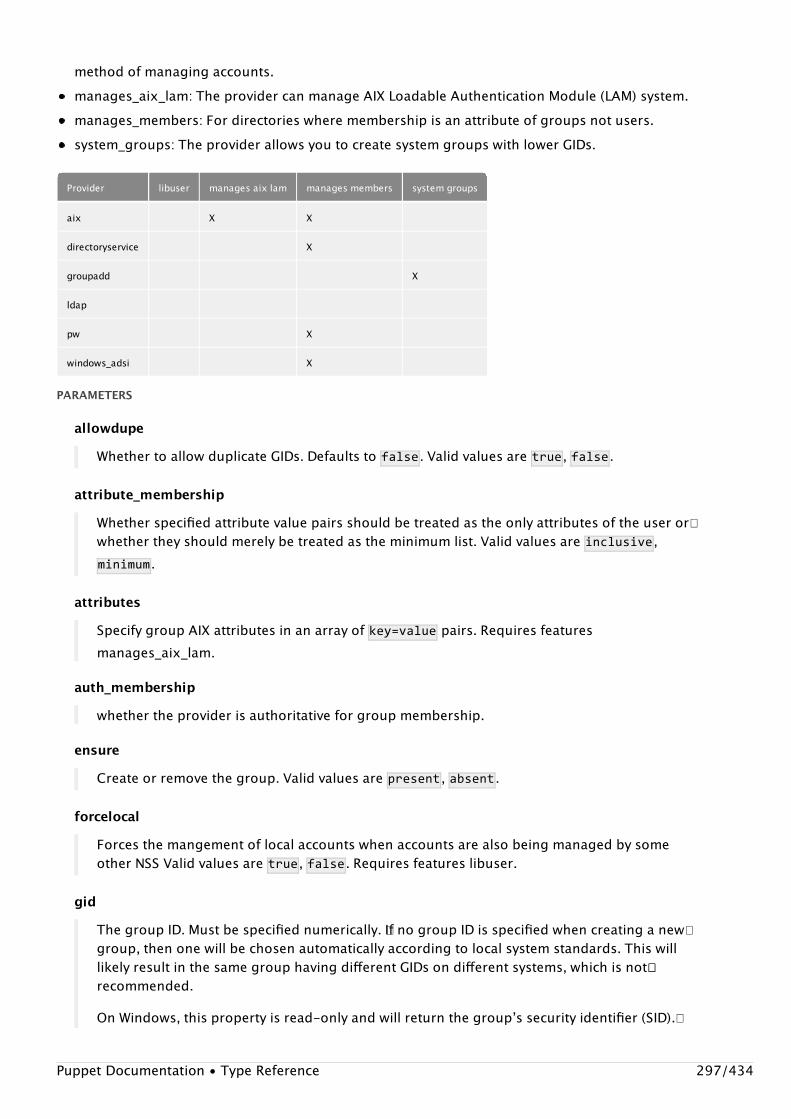
method of managing accounts.manages_aix_lam: The provider can manage AIX Loadable Authentication Module (LAM) system.manages_members: For directories where membership is an attribute of groups not users.system_groups: The provider allows you to create system groups with lower GIDs.
Provider libuser manages aix lam manages members system groups
aix X X
directoryservice X
groupadd X
ldap
pw X
windows_adsi X
PARAMETERS
allowdupe
Whether to allow duplicate GIDs. Defaults to false . Valid values are true , false .
attribute_membership
Whether specified attribute value pairs should be treated as the only attributes of the user or�whether they should merely be treated as the minimum list. Valid values are inclusive ,minimum .
attributes
Specify group AIX attributes in an array of key=value pairs. Requires featuresmanages_aix_lam.
auth_membership
whether the provider is authoritative for group membership.
ensure
Create or remove the group. Valid values are present , absent .
forcelocal
Forces the mangement of local accounts when accounts are also being managed by someother NSS Valid values are true , false . Requires features libuser.
gid
The group ID. Must be specified numerically. �If no group ID is specified when creating a new�group, then one will be chosen automatically according to local system standards. This willlikely result in the same group having different GIDs on different systems, which is not��recommended.
On Windows, this property is read-only and will return the groupʼs security identifier (SID).�
Puppet Documentation • Type Reference 297/434
ia_load_module
The name of the I&A module to use to manage this user Requires featuresmanages_aix_lam.
members
The members of the group. For directory services where group membership is stored in thegroup objects, not the users. Requires features manages_members.
name
The group name. While naming limitations vary by operating system, it is advisable to restrictnames to the lowest common denominator, which is a maximum of 8 characters beginningwith a letter.
Note that Puppet considers group names to be case-sensitive, regardless of the platformʼsown rules; be sure to always use the same case when referring to a given group.
provider
The specific backend to use for this �group resource. You will seldom need to specify this —Puppet will usually discover the appropriate provider for your platform. Available providersare:
aix
Group management for AIX.
Required binaries: /usr/bin/chgroup , /usr/sbin/lsgroup , /usr/sbin/rmgroup ,/usr/bin/mkgroup . Default for operatingsystem == aix . Supported features:manages_aix_lam , manages_members .
directoryservice
Group management using DirectoryService on OS X.
Required binaries: /usr/bin/dscl . Default for operatingsystem == darwin .Supported features: manages_members .
groupadd
Group management via groupadd and its ilk. The default for most platforms.
Required binaries: groupmod , groupdel , lgroupadd , groupadd . Supported features:system_groups .
ldap
Group management via LDAP.
This provider requires that you have valid values for all of the LDAP-related settings inpuppet.conf , including ldapbase . You will almost definitely need settings for�ldapuser and ldappassword in order for your clients to write to LDAP.
Puppet Documentation • Type Reference 298/434
Note that this provider will automatically generate a GID for you if you do not specifyone, but it is a potentially expensive operation, as it iterates across all existing groupsto pick the appropriate next one.
pw
Group management via pw on FreeBSD and DragonFly BSD.
Required binaries: pw . Default for operatingsystem == freebsd,dragonfly .Supported features: manages_members .
windows_adsi
Local group management for Windows. Nested groups are not supported.
Default for operatingsystem == windows . Supported features: manages_members .
system
Whether the group is a system group with lower GID. Valid values are true , false .
host
Installs and manages host entries. For most systems, these entries will just be in /etc/hosts , butsome systems (notably OS X) will have different solutions.�PARAMETERS
comment
A comment that will be attached to the line with a # character.
ensure
The basic property that the resource should be in. Valid values are present , absent .
host_aliases
Any aliases the host might have. Multiple values must be specified as an array.�
ip
The hostʼs IP address, IPv4 or IPv6.
name
The host name.
provider
The specific backend to use for this �host resource. You will seldom need to specify this —Puppet will usually discover the appropriate provider for your platform. Available providersare:
parsed
Puppet Documentation • Type Reference 299/434
target
The file in which to store service information. �Only used by those providers that write to disk.On most systems this defaults to /etc/hosts .
interface
This represents a router or switch interface. It is possible to manage interface mode (access ortrunking, native vlan and encapsulation) and switchport characteristics (speed, duplex).PARAMETERS
allowed_trunk_vlans
Allowed list of Vlans that this trunk can forward. Valid values are all . Values can match /./ .
description
Interface description.
device_url
The URL at which the router or switch can be reached.
duplex
Interface duplex. Valid values are auto , full , half .
encapsulation
Interface switchport encapsulation. Valid values are none , dot1q , isl .
ensure
The basic property that the resource should be in. Valid values are present (also calledno_shutdown ), absent (also called shutdown ).
etherchannel
Channel group this interface is part of. Values can match /^\d+/ .
ipaddress
IP Address of this interface. Note that it might not be possible to set an interface IP address; itdepends on the interface type and device type.
Valid format of ip addresses are:
IPV4, like 127.0.0.1IPV4/prefixlength like 127.0.1.1/24�IPV6/prefixlength like FE80::21A:2FFF:FE30:ECF0/128�an optional suffix for IPV6 addresses from this list: ��eui-64 , link-local
It is also possible to supply an array of values.
mode
Puppet Documentation • Type Reference 300/434
Interface switchport mode. Valid values are access , trunk .
name
The interfaceʼs name.
native_vlan
Interface native vlan (for access mode only). Values can match /^\d+/ .
provider
The specific backend to use for this �interface resource. You will seldom need to specify this— Puppet will usually discover the appropriate provider for your platform. Available providersare:
cisco
Cisco switch/router provider for interface.
speed
Interface speed. Valid values are auto . Values can match /^\d+/ .
k5login
Manage the .k5login file for a user. �Specify the full path to the .k5login file as the name, and an�array of principals as the principals attribute.
PARAMETERS
ensure
The basic property that the resource should be in. Valid values are present , absent .
mode
The desired permissions mode of the .k5login file. Defaults to �644 .
path
(Namevar: If omitted, this parameterʼs value defaults to the resourceʼs title.)
The path to the .k5login file to manage. �Must be fully qualified.�
principals
The principals present in the .k5login file. This should be specified as an array.��
provider
The specific backend to use for this �k5login resource. You will seldom need to specify this —Puppet will usually discover the appropriate provider for your platform. Available providersare:
k5login
Puppet Documentation • Type Reference 301/434
The k5login provider is the only provider for the k5login type.
macauthorization
Manage the Mac OS X authorization database. See the Apple developer site for more information.
Note that authorization store directives with hyphens in their names have been renamed to useunderscores, as Puppet does not react well to hyphens in identifiers.�
Autorequires: If Puppet is managing the /etc/authorization file, each macauthorization resource�will autorequire it.PARAMETERS
allow_root
Corresponds to allow-root in the authorization store. Specifies whether a right should be�allowed automatically if the requesting process is running with uid==0 .AuthorizationServices defaults this attribute to false if not specified. �Valid values are true ,false .
auth_class
Corresponds to class in the authorization store; renamed due to ʻclassʼ being a reservedword in Puppet. Valid values are user , evaluate-mechanisms , allow , deny , rule .
auth_type
Type — this can be a right or a rule . The comment type has not yet been implemented. Validvalues are right , rule .
authenticate_user
Corresponds to authenticate-user in the authorization store. Valid values are true , false .
comment
The comment attribute for authorization resources.
ensure
The basic property that the resource should be in. Valid values are present , absent .
group
A group which the user must authenticate as a member of. This must be a single group.
k_of_n
How large a subset of rule mechanisms must succeed for successful authentication. If thereare ʻnʼ mechanisms, then ʻkʼ (the integer value of this parameter) mechanisms must succeed.The most common setting for this parameter is 1 . If k-of-n is not set, then every mechanism— that is, ʻn-of-nʼ — must succeed.
mechanisms
Puppet Documentation • Type Reference 302/434
An array of suitable mechanisms.
name
The name of the right or rule to be managed. Corresponds to key in Authorization Services.The key is the name of a rule. A key uses the same naming conventions as a right. TheSecurity Server uses a ruleʼs key to match the rule with a right. Wildcard keys end with a ʻ.ʼ.The generic rule has an empty key value. Any rights that do not match a specific rule use the�generic rule.
provider
The specific backend to use for this �macauthorization resource. You will seldom need tospecify this — Puppet will usually discover the appropriate provider for your platform.Available providers are:
macauthorization
Manage Mac OS X authorization database rules and rights.
Required binaries: /usr/bin/sw_vers , /usr/bin/security . Default foroperatingsystem == darwin .
rule
The rule(s) that this right refers to.
session_owner
Whether the session owner automatically matches this rule or right. Corresponds tosession-owner in the authorization store. Valid values are true , false .
shared
Whether the Security Server should mark the credentials used to gain this right as shared.The Security Server may use any shared credentials to authorize this right. For maximumsecurity, set sharing to false so credentials stored by the Security Server for one applicationmay not be used by another application. Valid values are true , false .
timeout
The number of seconds in which the credential used by this rule will expire. For maximumsecurity where the user must authenticate every time, set the timeout to 0. For minimumsecurity, remove the timeout attribute so the user authenticates only once per session.
tries
The number of tries allowed.
mailalias
Creates an email alias in the local alias database.PARAMETERS
ensure
Puppet Documentation • Type Reference 303/434
The basic property that the resource should be in. Valid values are present , absent .
name
The alias name.
provider
The specific backend to use for this �mailalias resource. You will seldom need to specify this— Puppet will usually discover the appropriate provider for your platform. Available providersare:
aliases
recipient
Where email should be sent. Multiple values should be specified as an array.�
target
The file in which to store the aliases. �Only used by those providers that write to disk.
maillist
Manage email lists. This resource type can only create and remove lists; it cannot currentlyreconfigure them.�PARAMETERS
admin
The email address of the administrator.
description
The description of the mailing list.
ensure
The basic property that the resource should be in. Valid values are present , absent , purged .
mailserver
The name of the host handling email for the list.
name
The name of the email list.
password
The admin password.
provider
The specific backend to use for this �maillist resource. You will seldom need to specify this— Puppet will usually discover the appropriate provider for your platform. Available providersare:
Puppet Documentation • Type Reference 304/434
mailman
Required binaries: /var/lib/mailman/mail/mailman , list_lists , rmlist , newlist .
webserver
The name of the host providing web archives and the administrative interface.
mcx
MCX object management using DirectoryService on OS X.
The default provider of this type merely manages the XML plist as reported by the dscl-mcxexportcommand. This is similar to the content property of the file type in Puppet.�
The recommended method of using this type is to use Work Group Manager to manage users andgroups on the local computer, record the resulting puppet manifest using the command puppetresourcemcx , then deploy it to other machines.
Autorequires: If Puppet is managing the user, group, or computer that these MCX settings refer to,the MCX resource will autorequire that user, group, or computer.FEATURES
manages_content: The provider can manage MCXSettings as a string.
Provider manages content
mcxcontent X
PARAMETERS
content
The XML Plist used as the value of MCXSettings in DirectoryService. This is the standardoutput from the system command:
dscllocalhost-mcxexport/Local/Default/<ds_type>/ds_name
Note that ds_type is capitalized and plural in the dscl command. Requires featuresmanages_content.
ds_name
The name to attach the MCX Setting to. (For example, localhost when ds_type=>computer .) This setting is not required, as it can be automatically discovered when theresource name is parseable. (For example, in /Groups/admin , group will be used as thedstype.)
ds_type
The DirectoryService type this MCX setting attaches to. Valid values are user , group ,computer , computerlist .
ensurePuppet Documentation • Type Reference 305/434
Create or remove the MCX setting. Valid values are present , absent .
name
The name of the resource being managed. The default naming convention follows DirectoryService paths:
/Computers/localhost/Groups/admin/Users/localadmin
The ds_type and ds_name type parameters are not necessary if the default namingconvention is followed.
provider
The specific backend to use for this �mcx resource. You will seldom need to specify this —Puppet will usually discover the appropriate provider for your platform. Available providersare:
mcxcontent
MCX Settings management using DirectoryService on OS X.
This provider manages the entire MCXSettings attribute available to some directoryservices nodes. This management is ʻall or nothingʼ in that discrete application domainkey value pairs are not managed by this provider.
It is recommended to use WorkGroup Manager to configure Users, Groups, Computers,�or ComputerLists, then use ʻralsh mcxʼ to generate a puppet manifest from theresulting configuration.�
Original Author: Jeff McCune ([email protected])��
Required binaries: /usr/bin/dscl . Default for operatingsystem == darwin .Supported features: manages_content .
mount
Manages mounted filesystems, including putting mount information into the mount table. The�actual behavior depends on the value of the ʻensureʼ parameter.
Note that if a mount receives an event from another resource, it will try to remount the filesystems if�ensure is set to mounted .
FEATURES
refreshable: The provider can remount the filesystem.�
Provider refreshable
parsed X
Puppet Documentation • Type Reference 306/434
PARAMETERS
atboot
Whether to mount the mount at boot. Not all platforms support this.
blockdevice
The device to fsck. This is property is only valid on Solaris, and in most cases will default tothe correct value.
device
The device providing the mount. This can be whatever device is supporting by the mount,including network devices or devices specified by UUID rather than device path, depending�on the operating system.
dump
Whether to dump the mount. Not all platform support this. Valid values are 1 or 0 . or 2 onFreeBSD, Default is 0 . Values can match /(0|1)/ , /(0|1)/ .
ensure
Control what to do with this mount. Set this attribute to unmounted to make sure thefilesystem is in the filesystem table but not mounted (if the filesystem is currently mounted, it���will be unmounted). Set it to absent to unmount (if necessary) and remove the filesystem�from the fstab. Set to mounted to add it to the fstab and mount it. Set to present to add tofstab but not change mount/unmount status. Valid values are defined (also called present ),unmounted , absent , mounted .
fstype
The mount type. Valid values depend on the operating system. This is a required option.
name
The mount path for the mount.
options
Mount options for the mounts, as they would appear in the fstab.
pass
The pass in which the mount is checked.
provider
The specific backend to use for this �mount resource. You will seldom need to specify this —Puppet will usually discover the appropriate provider for your platform. Available providersare:
parsed
Required binaries: mount , umount . Supported features: refreshable .
remounts
Puppet Documentation • Type Reference 307/434
Whether the mount can be remounted mount-oremount . If this is false, then the filesystem�will be unmounted and remounted manually, which is prone to failure. Valid values are true ,false .
target
The file in which to store the mount table. �Only used by those providers that write to disk.
nagios_command
The Nagios type command. This resource type is autogenerated using the model developed inNaginator, and all of the Nagios types are generated using the same code and the same library.
This type generates Nagios configuration statements in Nagios-parseable configuration files. ���Bydefault, the statements will be added to /etc/nagios/nagios_command.cfg , but you can send themto a different file by setting their ��target attribute.
You can purge Nagios resources using the resources type, but only in the default file locations.�This is an architectural limitation.PARAMETERS
command_line
Nagios configuration file parameter.��
command_name
(Namevar: If omitted, this parameterʼs value defaults to the resourceʼs title.)
The name of this nagios_command resource.
ensure
The basic property that the resource should be in. Valid values are present , absent .
poller_tag
Nagios configuration file parameter.��
provider
The specific backend to use for this �nagios_command resource. You will seldom need tospecify this — Puppet will usually discover the appropriate provider for your platform.Available providers are:
naginator
target
The target.
use
Nagios configuration file parameter.��
Puppet Documentation • Type Reference 308/434
nagios_contact
The Nagios type contact. This resource type is autogenerated using the model developed inNaginator, and all of the Nagios types are generated using the same code and the same library.
This type generates Nagios configuration statements in Nagios-parseable configuration files. ���Bydefault, the statements will be added to /etc/nagios/nagios_contact.cfg , but you can send themto a different file by setting their ��target attribute.
You can purge Nagios resources using the resources type, but only in the default file locations.�This is an architectural limitation.PARAMETERS
address1
Nagios configuration file parameter.��
address2
Nagios configuration file parameter.��
address3
Nagios configuration file parameter.��
address4
Nagios configuration file parameter.��
address5
Nagios configuration file parameter.��
address6
Nagios configuration file parameter.��
alias
Nagios configuration file parameter.��
can_submit_commands
Nagios configuration file parameter.��
contact_name
(Namevar: If omitted, this parameterʼs value defaults to the resourceʼs title.)
The name of this nagios_contact resource.
contactgroups
Nagios configuration file parameter.��
Nagios configuration file parameter.��
Puppet Documentation • Type Reference 309/434
ensure
The basic property that the resource should be in. Valid values are present , absent .
host_notification_commands�
Nagios configuration file parameter.��
host_notification_options�
Nagios configuration file parameter.��
host_notification_period�
Nagios configuration file parameter.��
host_notifications_enabled�
Nagios configuration file parameter.��
pager
Nagios configuration file parameter.��
provider
The specific backend to use for this �nagios_contact resource. You will seldom need tospecify this — Puppet will usually discover the appropriate provider for your platform.Available providers are:
naginator
register
Nagios configuration file parameter.��
retain_nonstatus_information
Nagios configuration file parameter.��
retain_status_information
Nagios configuration file parameter.��
service_notification_commands�
Nagios configuration file parameter.��
service_notification_options�
Nagios configuration file parameter.��
service_notification_period�
Nagios configuration file parameter.��
service_notifications_enabled�
Nagios configuration file parameter.��
target
Puppet Documentation • Type Reference 310/434
The target.
use
Nagios configuration file parameter.��
nagios_contactgroup
The Nagios type contactgroup. This resource type is autogenerated using the model developed inNaginator, and all of the Nagios types are generated using the same code and the same library.
This type generates Nagios configuration statements in Nagios-parseable configuration files. ���Bydefault, the statements will be added to /etc/nagios/nagios_contactgroup.cfg , but you can sendthem to a different file by setting their ��target attribute.
You can purge Nagios resources using the resources type, but only in the default file locations.�This is an architectural limitation.PARAMETERS
alias
Nagios configuration file parameter.��
contactgroup_members
Nagios configuration file parameter.��
contactgroup_name
(Namevar: If omitted, this parameterʼs value defaults to the resourceʼs title.)
The name of this nagios_contactgroup resource.
ensure
The basic property that the resource should be in. Valid values are present , absent .
members
Nagios configuration file parameter.��
provider
The specific backend to use for this �nagios_contactgroup resource. You will seldom need tospecify this — Puppet will usually discover the appropriate provider for your platform.Available providers are:
naginator
register
Nagios configuration file parameter.��
target
The target.
Puppet Documentation • Type Reference 311/434
use
Nagios configuration file parameter.��
nagios_host
The Nagios type host. This resource type is autogenerated using the model developed in Naginator,and all of the Nagios types are generated using the same code and the same library.
This type generates Nagios configuration statements in Nagios-parseable configuration files. ���Bydefault, the statements will be added to /etc/nagios/nagios_host.cfg , but you can send them toa different file by setting their ��target attribute.
You can purge Nagios resources using the resources type, but only in the default file locations.�This is an architectural limitation.PARAMETERS
action_url
Nagios configuration file parameter.��
active_checks_enabled
Nagios configuration file parameter.��
address
Nagios configuration file parameter.��
alias
Nagios configuration file parameter.��
business_impact
Nagios configuration file parameter.��
check_command
Nagios configuration file parameter.��
check_freshness
Nagios configuration file parameter.��
check_interval
Nagios configuration file parameter.��
check_period
Nagios configuration file parameter.��
contact_groups
Nagios configuration file parameter.��
contacts
Puppet Documentation • Type Reference 312/434
Nagios configuration file parameter.��
display_name
Nagios configuration file parameter.��
ensure
The basic property that the resource should be in. Valid values are present , absent .
event_handler
Nagios configuration file parameter.��
event_handler_enabled
Nagios configuration file parameter.��
failure_prediction_enabled
Nagios configuration file parameter.��
first_notification_delay��
Nagios configuration file parameter.��
flap_detection_enabled�
Nagios configuration file parameter.��
flap_detection_options�
Nagios configuration file parameter.��
freshness_threshold
Nagios configuration file parameter.��
high_flap_threshold�
Nagios configuration file parameter.��
host_name
(Namevar: If omitted, this parameterʼs value defaults to the resourceʼs title.)
The name of this nagios_host resource.
hostgroups
Nagios configuration file parameter.��
icon_image
Nagios configuration file parameter.��
icon_image_alt
Nagios configuration file parameter.��
initial_state
Puppet Documentation • Type Reference 313/434
Nagios configuration file parameter.��
low_flap_threshold�
Nagios configuration file parameter.��
max_check_attempts
Nagios configuration file parameter.��
notes
Nagios configuration file parameter.��
notes_url
Nagios configuration file parameter.��
notification_interval�
Nagios configuration file parameter.��
notification_options�
Nagios configuration file parameter.��
notification_period�
Nagios configuration file parameter.��
notifications_enabled�
Nagios configuration file parameter.��
obsess_over_host
Nagios configuration file parameter.��
parents
Nagios configuration file parameter.��
passive_checks_enabled
Nagios configuration file parameter.��
poller_tag
Nagios configuration file parameter.��
process_perf_data
Nagios configuration file parameter.��
provider
The specific backend to use for this �nagios_host resource. You will seldom need to specifythis — Puppet will usually discover the appropriate provider for your platform. Availableproviders are:
naginator
Puppet Documentation • Type Reference 314/434
realm
Nagios configuration file parameter.��
register
Nagios configuration file parameter.��
retain_nonstatus_information
Nagios configuration file parameter.��
retain_status_information
Nagios configuration file parameter.��
retry_interval
Nagios configuration file parameter.��
stalking_options
Nagios configuration file parameter.��
statusmap_image
Nagios configuration file parameter.��
target
The target.
use
Nagios configuration file parameter.��
vrml_image
Nagios configuration file parameter.��
nagios_hostdependency
The Nagios type hostdependency. This resource type is autogenerated using the model developedin Naginator, and all of the Nagios types are generated using the same code and the same library.
This type generates Nagios configuration statements in Nagios-parseable configuration files. ���Bydefault, the statements will be added to /etc/nagios/nagios_hostdependency.cfg , but you cansend them to a different file by setting their ��target attribute.
You can purge Nagios resources using the resources type, but only in the default file locations.�This is an architectural limitation.PARAMETERS
_naginator_name
(Namevar: If omitted, this parameterʼs value defaults to the resourceʼs title.)
The name of this nagios_hostdependency resource.
Puppet Documentation • Type Reference 315/434
dependency_period
Nagios configuration file parameter.��
dependent_host_name
Nagios configuration file parameter.��
dependent_hostgroup_name
Nagios configuration file parameter.��
ensure
The basic property that the resource should be in. Valid values are present , absent .
execution_failure_criteria
Nagios configuration file parameter.��
host_name
Nagios configuration file parameter.��
hostgroup_name
Nagios configuration file parameter.��
inherits_parent
Nagios configuration file parameter.��
notification_failure_criteria�
Nagios configuration file parameter.��
provider
The specific backend to use for this �nagios_hostdependency resource. You will seldom needto specify this — Puppet will usually discover the appropriate provider for your platform.Available providers are:
naginator
register
Nagios configuration file parameter.��
target
The target.
use
Nagios configuration file parameter.��
nagios_hostescalation
The Nagios type hostescalation. This resource type is autogenerated using the model developed inNaginator, and all of the Nagios types are generated using the same code and the same library.Puppet Documentation • Type Reference 316/434
This type generates Nagios configuration statements in Nagios-parseable configuration files. ���Bydefault, the statements will be added to /etc/nagios/nagios_hostescalation.cfg , but you cansend them to a different file by setting their ��target attribute.
You can purge Nagios resources using the resources type, but only in the default file locations.�This is an architectural limitation.PARAMETERS
_naginator_name
(Namevar: If omitted, this parameterʼs value defaults to the resourceʼs title.)
The name of this nagios_hostescalation resource.
contact_groups
Nagios configuration file parameter.��
contacts
Nagios configuration file parameter.��
ensure
The basic property that the resource should be in. Valid values are present , absent .
escalation_options
Nagios configuration file parameter.��
escalation_period
Nagios configuration file parameter.��
first_notification��
Nagios configuration file parameter.��
host_name
Nagios configuration file parameter.��
hostgroup_name
Nagios configuration file parameter.��
last_notification�
Nagios configuration file parameter.��
notification_interval�
Nagios configuration file parameter.��
provider
The specific backend to use for this �nagios_hostescalation resource. You will seldom needto specify this — Puppet will usually discover the appropriate provider for your platform.
Puppet Documentation • Type Reference 317/434
Available providers are:
naginator
register
Nagios configuration file parameter.��
target
The target.
use
Nagios configuration file parameter.��
nagios_hostextinfo
The Nagios type hostextinfo. This resource type is autogenerated using the model developed inNaginator, and all of the Nagios types are generated using the same code and the same library.
This type generates Nagios configuration statements in Nagios-parseable configuration files. ���Bydefault, the statements will be added to /etc/nagios/nagios_hostextinfo.cfg , but you can sendthem to a different file by setting their ��target attribute.
You can purge Nagios resources using the resources type, but only in the default file locations.�This is an architectural limitation.PARAMETERS
ensure
The basic property that the resource should be in. Valid values are present , absent .
host_name
(Namevar: If omitted, this parameterʼs value defaults to the resourceʼs title.)
The name of this nagios_hostextinfo resource.
icon_image
Nagios configuration file parameter.��
icon_image_alt
Nagios configuration file parameter.��
notes
Nagios configuration file parameter.��
notes_url
Nagios configuration file parameter.��
provider
Puppet Documentation • Type Reference 318/434
The specific backend to use for this �nagios_hostextinfo resource. You will seldom need tospecify this — Puppet will usually discover the appropriate provider for your platform.Available providers are:
naginator
register
Nagios configuration file parameter.��
statusmap_image
Nagios configuration file parameter.��
target
The target.
use
Nagios configuration file parameter.��
vrml_image
Nagios configuration file parameter.��
nagios_hostgroup
The Nagios type hostgroup. This resource type is autogenerated using the model developed inNaginator, and all of the Nagios types are generated using the same code and the same library.
This type generates Nagios configuration statements in Nagios-parseable configuration files. ���Bydefault, the statements will be added to /etc/nagios/nagios_hostgroup.cfg , but you can sendthem to a different file by setting their ��target attribute.
You can purge Nagios resources using the resources type, but only in the default file locations.�This is an architectural limitation.PARAMETERS
action_url
Nagios configuration file parameter.��
alias
Nagios configuration file parameter.��
ensure
The basic property that the resource should be in. Valid values are present , absent .
hostgroup_members
Nagios configuration file parameter.��
hostgroup_name
Puppet Documentation • Type Reference 319/434

(Namevar: If omitted, this parameterʼs value defaults to the resourceʼs title.)
The name of this nagios_hostgroup resource.
members
Nagios configuration file parameter.��
notes
Nagios configuration file parameter.��
notes_url
Nagios configuration file parameter.��
provider
The specific backend to use for this �nagios_hostgroup resource. You will seldom need tospecify this — Puppet will usually discover the appropriate provider for your platform.Available providers are:
naginator
realm
Nagios configuration file parameter.��
register
Nagios configuration file parameter.��
target
The target.
use
Nagios configuration file parameter.��
nagios_service
The Nagios type service. This resource type is autogenerated using the model developed inNaginator, and all of the Nagios types are generated using the same code and the same library.
This type generates Nagios configuration statements in Nagios-parseable configuration files. ���Bydefault, the statements will be added to /etc/nagios/nagios_service.cfg , but you can send themto a different file by setting their ��target attribute.
You can purge Nagios resources using the resources type, but only in the default file locations.�This is an architectural limitation.PARAMETERS
_naginator_name
(Namevar: If omitted, this parameterʼs value defaults to the resourceʼs title.)
Puppet Documentation • Type Reference 320/434
The name of this nagios_service resource.
action_url
Nagios configuration file parameter.��
active_checks_enabled
Nagios configuration file parameter.��
business_impact
Nagios configuration file parameter.��
check_command
Nagios configuration file parameter.��
check_freshness
Nagios configuration file parameter.��
check_interval
Nagios configuration file parameter.��
check_period
Nagios configuration file parameter.��
contact_groups
Nagios configuration file parameter.��
contacts
Nagios configuration file parameter.��
display_name
Nagios configuration file parameter.��
ensure
The basic property that the resource should be in. Valid values are present , absent .
event_handler
Nagios configuration file parameter.��
event_handler_enabled
Nagios configuration file parameter.��
failure_prediction_enabled
Nagios configuration file parameter.��
first_notification_delay��
Nagios configuration file parameter.��
Puppet Documentation • Type Reference 321/434
flap_detection_enabled�
Nagios configuration file parameter.��
flap_detection_options�
Nagios configuration file parameter.��
freshness_threshold
Nagios configuration file parameter.��
high_flap_threshold�
Nagios configuration file parameter.��
host_name
Nagios configuration file parameter.��
hostgroup_name
Nagios configuration file parameter.��
icon_image
Nagios configuration file parameter.��
icon_image_alt
Nagios configuration file parameter.��
initial_state
Nagios configuration file parameter.��
is_volatile
Nagios configuration file parameter.��
low_flap_threshold�
Nagios configuration file parameter.��
max_check_attempts
Nagios configuration file parameter.��
normal_check_interval
Nagios configuration file parameter.��
notes
Nagios configuration file parameter.��
notes_url
Nagios configuration file parameter.��
notification_interval�
Nagios configuration file parameter.��Puppet Documentation • Type Reference 322/434
notification_options�
Nagios configuration file parameter.��
notification_period�
Nagios configuration file parameter.��
notifications_enabled�
Nagios configuration file parameter.��
obsess_over_service
Nagios configuration file parameter.��
parallelize_check
Nagios configuration file parameter.��
passive_checks_enabled
Nagios configuration file parameter.��
poller_tag
Nagios configuration file parameter.��
process_perf_data
Nagios configuration file parameter.��
provider
The specific backend to use for this �nagios_service resource. You will seldom need tospecify this — Puppet will usually discover the appropriate provider for your platform.Available providers are:
naginator
register
Nagios configuration file parameter.��
retain_nonstatus_information
Nagios configuration file parameter.��
retain_status_information
Nagios configuration file parameter.��
retry_check_interval
Nagios configuration file parameter.��
retry_interval
Nagios configuration file parameter.��
service_description
Puppet Documentation • Type Reference 323/434
Nagios configuration file parameter.��
servicegroups
Nagios configuration file parameter.��
stalking_options
Nagios configuration file parameter.��
target
The target.
use
Nagios configuration file parameter.��
nagios_servicedependency
The Nagios type servicedependency. This resource type is autogenerated using the modeldeveloped in Naginator, and all of the Nagios types are generated using the same code and thesame library.
This type generates Nagios configuration statements in Nagios-parseable configuration files. ���Bydefault, the statements will be added to /etc/nagios/nagios_servicedependency.cfg , but youcan send them to a different file by setting their ��target attribute.
You can purge Nagios resources using the resources type, but only in the default file locations.�This is an architectural limitation.PARAMETERS
_naginator_name
(Namevar: If omitted, this parameterʼs value defaults to the resourceʼs title.)
The name of this nagios_servicedependency resource.
dependency_period
Nagios configuration file parameter.��
dependent_host_name
Nagios configuration file parameter.��
dependent_hostgroup_name
Nagios configuration file parameter.��
dependent_service_description
Nagios configuration file parameter.��
ensure
The basic property that the resource should be in. Valid values are present , absent .
Puppet Documentation • Type Reference 324/434
execution_failure_criteria
Nagios configuration file parameter.��
host_name
Nagios configuration file parameter.��
hostgroup_name
Nagios configuration file parameter.��
inherits_parent
Nagios configuration file parameter.��
notification_failure_criteria�
Nagios configuration file parameter.��
provider
The specific backend to use for this �nagios_servicedependency resource. You will seldomneed to specify this — Puppet will usually discover the appropriate provider for yourplatform. Available providers are:
naginator
register
Nagios configuration file parameter.��
service_description
Nagios configuration file parameter.��
target
The target.
use
Nagios configuration file parameter.��
nagios_serviceescalation
The Nagios type serviceescalation. This resource type is autogenerated using the model developedin Naginator, and all of the Nagios types are generated using the same code and the same library.
This type generates Nagios configuration statements in Nagios-parseable configuration files. ���Bydefault, the statements will be added to /etc/nagios/nagios_serviceescalation.cfg , but youcan send them to a different file by setting their ��target attribute.
You can purge Nagios resources using the resources type, but only in the default file locations.�This is an architectural limitation.PARAMETERS
Puppet Documentation • Type Reference 325/434
_naginator_name
(Namevar: If omitted, this parameterʼs value defaults to the resourceʼs title.)
The name of this nagios_serviceescalation resource.
contact_groups
Nagios configuration file parameter.��
contacts
Nagios configuration file parameter.��
ensure
The basic property that the resource should be in. Valid values are present , absent .
escalation_options
Nagios configuration file parameter.��
escalation_period
Nagios configuration file parameter.��
first_notification��
Nagios configuration file parameter.��
host_name
Nagios configuration file parameter.��
hostgroup_name
Nagios configuration file parameter.��
last_notification�
Nagios configuration file parameter.��
notification_interval�
Nagios configuration file parameter.��
provider
The specific backend to use for this �nagios_serviceescalation resource. You will seldomneed to specify this — Puppet will usually discover the appropriate provider for yourplatform. Available providers are:
naginator
register
Nagios configuration file parameter.��
service_description
Nagios configuration file parameter.��
Puppet Documentation • Type Reference 326/434
servicegroup_name
Nagios configuration file parameter.��
target
The target.
use
Nagios configuration file parameter.��
nagios_serviceextinfo
The Nagios type serviceextinfo. This resource type is autogenerated using the model developed inNaginator, and all of the Nagios types are generated using the same code and the same library.
This type generates Nagios configuration statements in Nagios-parseable configuration files. ���Bydefault, the statements will be added to /etc/nagios/nagios_serviceextinfo.cfg , but you cansend them to a different file by setting their ��target attribute.
You can purge Nagios resources using the resources type, but only in the default file locations.�This is an architectural limitation.PARAMETERS
_naginator_name
(Namevar: If omitted, this parameterʼs value defaults to the resourceʼs title.)
The name of this nagios_serviceextinfo resource.
action_url
Nagios configuration file parameter.��
ensure
The basic property that the resource should be in. Valid values are present , absent .
host_name
Nagios configuration file parameter.��
icon_image
Nagios configuration file parameter.��
icon_image_alt
Nagios configuration file parameter.��
notes
Nagios configuration file parameter.��
notes_url
Nagios configuration file parameter.��Puppet Documentation • Type Reference 327/434
provider
The specific backend to use for this �nagios_serviceextinfo resource. You will seldom needto specify this — Puppet will usually discover the appropriate provider for your platform.Available providers are:
naginator
register
Nagios configuration file parameter.��
service_description
Nagios configuration file parameter.��
target
The target.
use
Nagios configuration file parameter.��
nagios_servicegroup
The Nagios type servicegroup. This resource type is autogenerated using the model developed inNaginator, and all of the Nagios types are generated using the same code and the same library.
This type generates Nagios configuration statements in Nagios-parseable configuration files. ���Bydefault, the statements will be added to /etc/nagios/nagios_servicegroup.cfg , but you can sendthem to a different file by setting their ��target attribute.
You can purge Nagios resources using the resources type, but only in the default file locations.�This is an architectural limitation.PARAMETERS
action_url
Nagios configuration file parameter.��
alias
Nagios configuration file parameter.��
ensure
The basic property that the resource should be in. Valid values are present , absent .
members
Nagios configuration file parameter.��
notes
Nagios configuration file parameter.��
Puppet Documentation • Type Reference 328/434
notes_url
Nagios configuration file parameter.��
provider
The specific backend to use for this �nagios_servicegroup resource. You will seldom need tospecify this — Puppet will usually discover the appropriate provider for your platform.Available providers are:
naginator
register
Nagios configuration file parameter.��
servicegroup_members
Nagios configuration file parameter.��
servicegroup_name
(Namevar: If omitted, this parameterʼs value defaults to the resourceʼs title.)
The name of this nagios_servicegroup resource.
target
The target.
use
Nagios configuration file parameter.��
nagios_timeperiod
The Nagios type timeperiod. This resource type is autogenerated using the model developed inNaginator, and all of the Nagios types are generated using the same code and the same library.
This type generates Nagios configuration statements in Nagios-parseable configuration files. ���Bydefault, the statements will be added to /etc/nagios/nagios_timeperiod.cfg , but you can sendthem to a different file by setting their ��target attribute.
You can purge Nagios resources using the resources type, but only in the default file locations.�This is an architectural limitation.PARAMETERS
alias
Nagios configuration file parameter.��
ensure
The basic property that the resource should be in. Valid values are present , absent .
exclude
Puppet Documentation • Type Reference 329/434
Nagios configuration file parameter.��
friday
Nagios configuration file parameter.��
monday
Nagios configuration file parameter.��
provider
The specific backend to use for this �nagios_timeperiod resource. You will seldom need tospecify this — Puppet will usually discover the appropriate provider for your platform.Available providers are:
naginator
register
Nagios configuration file parameter.��
saturday
Nagios configuration file parameter.��
sunday
Nagios configuration file parameter.��
target
The target.
thursday
Nagios configuration file parameter.��
timeperiod_name
(Namevar: If omitted, this parameterʼs value defaults to the resourceʼs title.)
The name of this nagios_timeperiod resource.
tuesday
Nagios configuration file parameter.��
use
Nagios configuration file parameter.��
wednesday
Nagios configuration file parameter.��
notify
Sends an arbitrary message to the agent run-time log.
Puppet Documentation • Type Reference 330/434
PARAMETERS
message
The message to be sent to the log.
name
An arbitrary tag for your own reference; the name of the message.
withpath
Whether to show the full object path. Defaults to false. Valid values are true , false .
package
Manage packages. There is a basic dichotomy in package support right now: Some package types(e.g., yum and apt) can retrieve their own package files, while others (e.g., rpm and sun) cannot. �Forthose package formats that cannot retrieve their own files, you can use the �source parameter topoint to the correct file.�
Puppet will automatically guess the packaging format that you are using based on the platform youare on, but you can override it using the provider parameter; each provider defines what it�requires in order to function, and you must meet those requirements to use a given provider.
Autorequires: If Puppet is managing the files specified as a packageʼs ��adminfile , responsefile , orsource , the package resource will autorequire those files.�
FEATURES
holdable: The provider is capable of placing packages on hold such that they are notautomatically upgraded as a result of other package dependencies unless explicit action is takenby a user or another package. Held is considered a superset of installed.install_options: The provider accepts options to be passed to the installer command.installable: The provider can install packages.purgeable: The provider can purge packages. This generally means that all traces of the packageare removed, including existing configuration files. ��This feature is thus destructive and shouldbe used with the utmost care.uninstall_options: The provider accepts options to be passed to the uninstaller command.uninstallable: The provider can uninstall packages.upgradeable: The provider can upgrade to the latest version of a package. This feature is usedby specifying latest as the desired value for the package.versionable: The provider is capable of interrogating the package database for installedversion(s), and can select which out of a set of available versions of a package to install if asked.
Provider holdable installoptions
installable purgeable uninstalloptions
uninstallable upgradeable versionable
aix X X X X
appdmg X
apple X
Puppet Documentation • Type Reference 331/434
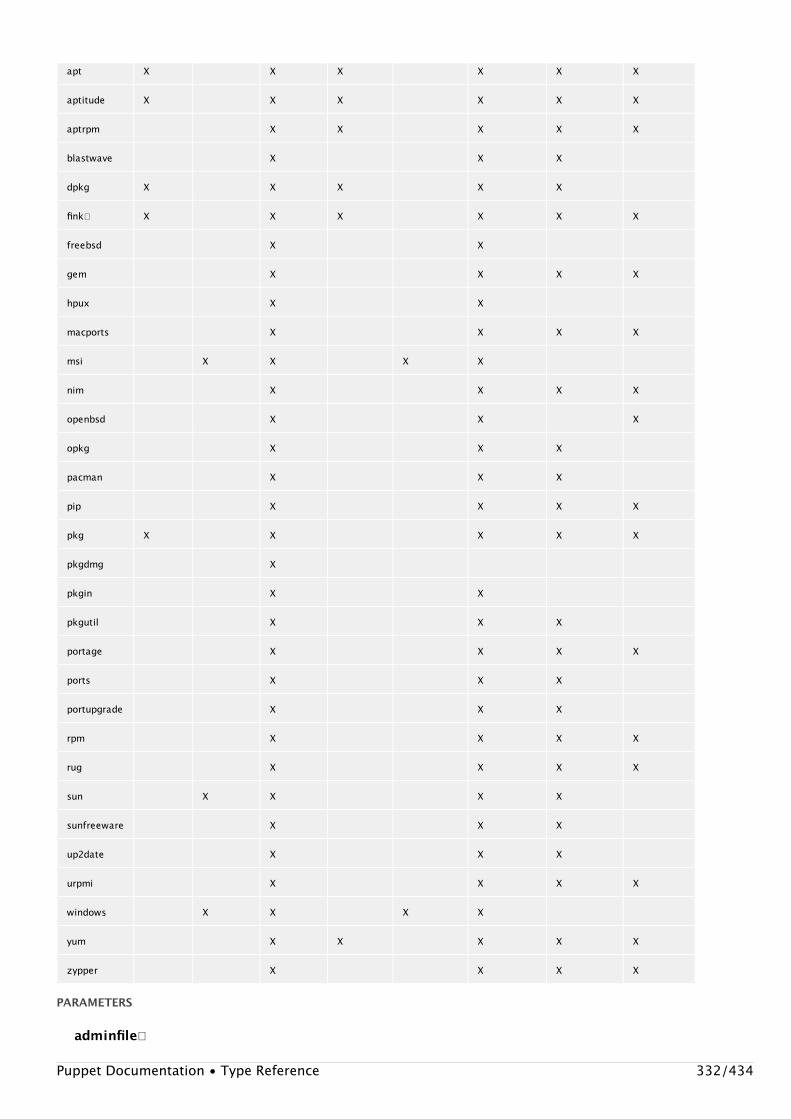
apt X X X X X X
aptitude X X X X X X
aptrpm X X X X X
blastwave X X X
dpkg X X X X X
fink� X X X X X X
freebsd X X
gem X X X X
hpux X X
macports X X X X
msi X X X X
nim X X X X
openbsd X X X
opkg X X X
pacman X X X
pip X X X X
pkg X X X X X
pkgdmg X
pkgin X X
pkgutil X X X
portage X X X X
ports X X X
portupgrade X X X
rpm X X X X
rug X X X X
sun X X X X
sunfreeware X X X
up2date X X X
urpmi X X X X
windows X X X X
yum X X X X X
zypper X X X X
PARAMETERS
adminfile�
Puppet Documentation • Type Reference 332/434
A file containing package defaults for installing packages. This is currently only used on�Solaris. The value will be validated according to system rules, which in the case of Solarismeans that it should either be a fully qualified path or it should be in�/var/sadm/install/admin .
allowcdrom
Tells apt to allow cdrom sources in the sources.list file. Normally apt will bail if you try this.�Valid values are true , false .
category
A read-only parameter set by the package.
configfiles��
Whether configfiles should be kept or replaced. ��Most packages types do not support thisparameter. Defaults to keep . Valid values are keep , replace .
description
A read-only parameter set by the package.
ensure
What state the package should be in. On packaging systems that can retrieve new packageson their own, you can choose which package to retrieve by specifying a version number orlatest as the ensure value. On packaging systems that manage configuration files separately��from “normal” system files, you can uninstall config files by specifying ���purged as the ensurevalue. Valid values are present (also called installed ), absent , purged , held , latest .Values can match /./ .
flavor�
Newer versions of OpenBSD support ʻflavorsʼ, which are further specifications for which type��of package you want.
install_options
An array of additional options to pass when installing a package. These options are package-specific, and should be documented by the software vendor. �One commonly implementedoption is INSTALLDIR :
package{'mysql':ensure=>installed,source=>'N:/packages/mysql-5.5.16-winx64.msi',install_options=>['/S',{'INSTALLDIR'=>'C:\mysql-5.5'}],}
Each option in the array can either be a string or a hash, where each key and value pair areinterpreted in a provider specific way. �Each option will automatically be quoted when passedto the install command.
On Windows, this is the only place in Puppet where backslash separators should be used.Note that backslashes in double-quoted strings must be double-escaped and backslashes insingle-quoted strings may be double-escaped. Requires features install_options.
Puppet Documentation • Type Reference 333/434
instance
A read-only parameter set by the package.
name
The package name. This is the name that the packaging system uses internally, which issometimes (especially on Solaris) a name that is basically useless to humans. If you want toabstract package installation, then you can use aliases to provide a common name topackages:
#Inthe'openssl'class$ssl=$operatingsystem?{solaris=>SMCossl,default=>openssl}
#Itisnotanerrortosetanaliastothesamevalueasthe#objectname.package{$ssl:ensure=>installed,alias=>openssl}
.etc..
$ssh=$operatingsystem?{solaris=>SMCossh,default=>openssh}
#Usethealiastospecifyadependency,ratherthan#havinganotherselectortofigureitoutagain.package{$ssh:ensure=>installed,alias=>openssh,require=>Package[openssl]}
platform
A read-only parameter set by the package.
provider
The specific backend to use for this �package resource. You will seldom need to specify this —Puppet will usually discover the appropriate provider for your platform. Available providersare:
aix
Installation from an AIX software directory, using the AIX installp command. Thesource parameter is required for this provider, and should be set to the absolute path(on the puppet agent machine) of a directory containing one or more BFF packagefiles.�
The installp command will generate a table of contents file (named �.toc ) in this
Puppet Documentation • Type Reference 334/434
directory, and the name parameter (or resource title) that you specify for your packageresource must match a package name that exists in the .toc file.�
Note that package downgrades are not supported; if your resource specifies a specific��version number and there is already a newer version of the package installed on themachine, the resource will fail with an error message.
Required binaries: /usr/bin/lslpp , /usr/sbin/installp . Default foroperatingsystem == aix . Supported features: installable , uninstallable ,upgradeable , versionable .
appdmg
Package management which copies application bundles to a target.
Required binaries: /usr/bin/hdiutil , /usr/bin/curl , /usr/bin/ditto . Supportedfeatures: installable .
apple
Package management based on OS Xʼs builtin packaging system. This is essentially thesimplest and least functional package system in existence – it only supportsinstallation; no deletion or upgrades. The provider will automatically add the .pkgextension, so leave that off when specifying the package name.�
Required binaries: /usr/sbin/installer . Supported features: installable .
apt
Package management via apt-get .
Required binaries: /usr/bin/apt-cache , /usr/bin/debconf-set-selections ,/usr/bin/apt-get . Default for operatingsystem == debian,ubuntu . Supportedfeatures: holdable , installable , purgeable , uninstallable , upgradeable ,versionable .
aptitude
Package management via aptitude .
Required binaries: /usr/bin/apt-cache , /usr/bin/aptitude . Supported features:holdable , installable , purgeable , uninstallable , upgradeable , versionable .
aptrpm
Package management via apt-get ported to rpm .
Required binaries: apt-cache , apt-get , rpm . Supported features: installable ,purgeable , uninstallable , upgradeable , versionable .
blastwave
Puppet Documentation • Type Reference 335/434
Package management using Blastwave.orgʼs pkg-get command on Solaris.
Required binaries: pkg-get . Supported features: installable , uninstallable ,upgradeable .
dpkg
Package management via dpkg . Because this only uses dpkg and not apt , you mustspecify the source of any packages you want to manage.
Required binaries: /usr/bin/dpkg-deb , /usr/bin/dpkg , /usr/bin/dpkg-query .Supported features: holdable , installable , purgeable , uninstallable ,upgradeable .
fink�
Package management via fink .
Required binaries: /sw/bin/apt-cache , /sw/bin/dpkg-query , /sw/bin/apt-get ,/sw/bin/fink . Supported features: holdable , installable , purgeable ,uninstallable , upgradeable , versionable .
freebsd
The specific form of package management on FreeBSD. �This is an extremely quirkypackaging system, in that it freely mixes between ports and packages. Apparently all ofthe tools are written in Ruby, so there are plans to rewrite this support to directly usethose libraries.
Required binaries: /usr/sbin/pkg_delete , /usr/sbin/pkg_info , /usr/sbin/pkg_add .Supported features: installable , uninstallable .
gem
Ruby Gem support. If a URL is passed via source , then that URL is used as the remotegem repository; if a source is present but is not a valid URL, it will be interpreted as thepath to a local gem file. �If source is not present at all, the gem will be installed from thedefault gem repositories.
Required binaries: gem . Supported features: installable , uninstallable ,upgradeable , versionable .
hpux
HP-UXʼs packaging system.
Required binaries: /usr/sbin/swremove , /usr/sbin/swinstall , /usr/sbin/swlist .Default for operatingsystem == hp-ux . Supported features: installable ,uninstallable .
macportsPuppet Documentation • Type Reference 336/434
Package management using MacPorts on OS X.
Supports MacPorts versions and revisions, but not variants. Variant preferences may bespecified using �the MacPorts variants.conf file�.
When specifying a version in the Puppet DSL, only specify the version, not the revision.Revisions are only used internally for ensuring the latest version/revision of a port.
Required binaries: /opt/local/bin/port . Supported features: installable ,uninstallable , upgradeable , versionable .
msi
Windows package management by installing and removing MSIs.
The msi provider is deprecated. Use the windows provider instead.
Supported features: install_options , installable , uninstall_options ,uninstallable .
nim
Installation from an AIX NIM LPP source. The source parameter is required for thisprovider, and should specify the name of a NIM lpp_source resource that is visible tothe puppet agent machine. This provider supports the management of bothBFF/installp and RPM packages.
Note that package downgrades are not supported; if your resource specifies a specific��version number and there is already a newer version of the package installed on themachine, the resource will fail with an error message.
Required binaries: /usr/sbin/nimclient , /usr/bin/lslpp , rpm . Supported features:installable , uninstallable , upgradeable , versionable .
openbsd
OpenBSDʼs form of pkg_add support.
Required binaries: pkg_delete , pkg_info , pkg_add . Default for operatingsystem ==openbsd . Supported features: installable , uninstallable , versionable .
opkg
Opkg packaging support. Common on OpenWrt and OpenEmbedded platforms
Required binaries: opkg . Default for operatingsystem == openwrt . Supportedfeatures: installable , uninstallable , upgradeable .
pacman
Support for the Package Manager Utility (pacman) used in Archlinux.
Puppet Documentation • Type Reference 337/434
Required binaries: /usr/bin/pacman . Default for operatingsystem == archlinux .Supported features: installable , uninstallable , upgradeable .
pip
Python packages via pip .
Supported features: installable , uninstallable , upgradeable , versionable .
pkg
OpenSolaris image packaging system. See pkg(5) for more information
Required binaries: /usr/bin/pkg . Default for osfamily == solaris andkernelrelease == 5.11 . Supported features: holdable , installable ,uninstallable , upgradeable , versionable .
pkgdmg
Package management based on Appleʼs Installer.app and DiskUtility.app. This packageworks by checking the contents of a DMG image for Apple pkg or mpkg files. Any�number of pkg or mpkg files may exist in the root directory of the DMG file system.��Subdirectories are not checked for packages. See the wiki docs on this provider formore detail.
Required binaries: /usr/bin/hdiutil , /usr/bin/curl , /usr/sbin/installer . Defaultfor operatingsystem == darwin . Supported features: installable .
pkgin
Package management using pkgin, a binary package manager for pkgsrc.
Required binaries: pkgin . Default for operatingsystem == dragonfly . Supportedfeatures: installable , uninstallable .
pkgutil
Package management using Peter Bonivartʼs pkgutil command on Solaris.
Required binaries: pkgutil . Supported features: installable , uninstallable ,upgradeable .
portage
Provides packaging support for Gentooʼs portage system.
Required binaries: /usr/bin/emerge , /usr/bin/eix , /usr/bin/eix-update . Defaultfor operatingsystem == gentoo . Supported features: installable , uninstallable ,upgradeable , versionable .
ports
Puppet Documentation • Type Reference 338/434
Support for FreeBSDʼs ports. Note that this, too, mixes packages and ports.
Required binaries: /usr/local/sbin/portupgrade , /usr/local/sbin/portversion ,/usr/local/sbin/pkg_deinstall , /usr/sbin/pkg_info . Default for operatingsystem== freebsd . Supported features: installable , uninstallable , upgradeable .
portupgrade
Support for FreeBSDʼs ports using the portupgrade ports management software. Usethe portʼs full origin as the resource name. eg (ports-mgmt/portupgrade) for theportupgrade port.
Required binaries: /usr/local/sbin/portupgrade , /usr/local/sbin/portversion ,/usr/local/sbin/portinstall , /usr/local/sbin/pkg_deinstall ,/usr/sbin/pkg_info . Supported features: installable , uninstallable ,upgradeable .
rpm
RPM packaging support; should work anywhere with a working rpm binary.
Required binaries: rpm . Supported features: installable , uninstallable ,upgradeable , versionable .
rug
Support for suse rug package manager.
Required binaries: /usr/bin/rug , rpm . Default for operatingsystem == suse,sles .Supported features: installable , uninstallable , upgradeable , versionable .
sun
Sunʼs packaging system. Requires that you specify the source for the packages youʼremanaging.
Required binaries: /usr/sbin/pkgrm , /usr/bin/pkginfo , /usr/sbin/pkgadd . Defaultfor osfamily == solaris . Supported features: install_options , installable ,uninstallable , upgradeable .
sunfreeware
Package management using sunfreeware.comʼs pkg-get command on Solaris. At thispoint, support is exactly the same as blastwave support and has not actually beentested.
Required binaries: pkg-get . Supported features: installable , uninstallable ,upgradeable .
up2date
Puppet Documentation • Type Reference 339/434
Support for Red Hatʼs proprietary up2date package update mechanism.
Required binaries: /usr/sbin/up2date-nox . Default for lsbdistrelease == 2.1,3,4 and osfamily == redhat . Supported features: installable , uninstallable ,upgradeable .
urpmi
Support via urpmi .
Required binaries: urpmi , urpmq , rpm . Default for operatingsystem == mandriva,mandrake . Supported features: installable , uninstallable , upgradeable ,versionable .
windows
Windows package management.
This provider supports either MSI or self-extracting executable installers.
This provider requires a source attribute when installing the package. It accepts pathspaths to local files, mapped drives, or UNC paths.�
If the executable requires special arguments to perform a silent install or uninstall,then the appropriate arguments should be specified using the �install_options oruninstall_options attributes, respectively. Puppet will automatically quote any optionthat contains spaces.
Default for operatingsystem == windows . Supported features: install_options ,installable , uninstall_options , uninstallable .
yum
Support via yum .
Using this providerʼs uninstallable feature will not remove dependent packages. Toremove dependent packages with this provider use the purgeable feature, but notethis feature is destructive and should be used with the utmost care.
Required binaries: python , yum , rpm . Default for operatingsystem == fedora,centos,redhat . Supported features: installable , purgeable , uninstallable ,upgradeable , versionable .
zypper
Support for SuSE zypper package manager. Found in SLES10sp2+ and SLES11
Required binaries: /usr/bin/zypper . Supported features: installable ,uninstallable , upgradeable , versionable .
Puppet Documentation • Type Reference 340/434
responsefile�
A file containing any necessary answers to questions asked by the package. �This is currentlyused on Solaris and Debian. The value will be validated according to system rules, but itshould generally be a fully qualified path.�
root
A read-only parameter set by the package.
source
Where to find the actual package. �This must be a local file (or on a network file system) or a��URL that your specific packaging type understands; Puppet will not retrieve files for you,��although you can manage packages as file resources.
status
A read-only parameter set by the package.
uninstall_options
An array of additional options to pass when uninstalling a package. These options arepackage-specific, and should be documented by the software vendor. �For example:
package{'VMwareTools':ensure=>absent,uninstall_options=>[{'REMOVE'=>'Sync,VSS'}],}
Each option in the array can either be a string or a hash, where each key and value pair areinterpreted in a provider specific way. �Each option will automatically be quoted when passedto the uninstall command.
On Windows, this is the only place in Puppet where backslash separators should be used.Note that backslashes in double-quoted strings must be double-escaped and backslashes insingle-quoted strings may be double-escaped. Requires features uninstall_options.
vendor
A read-only parameter set by the package.
resources
This is a metatype that can manage other resource types. Any metaparams specified here will be�passed on to any generated resources, so you can purge umanaged resources but set noop to trueso the purging is only logged and does not actually happen.PARAMETERS
name
The name of the type to be managed.
purge
Purge unmanaged resources. This will delete any resource that is not specified in your�Puppet Documentation • Type Reference 341/434

configuration and is not required by any specified resources. ��Valid values are true , false .
unless_system_user
This keeps system users from being purged. By default, it does not purge users whose UIDsare less than or equal to 500, but you can specify a different UID as the inclusive limit. �Validvalues are true , false . Values can match /^\d+$/ .
router
Manages connected router.PARAMETERS
url
(Namevar: If omitted, this parameterʼs value defaults to the resourceʼs title.)
An SSH or telnet URL at which to access the router, in the formssh://user:pass:enable@host/ or telnet://user:pass:enable@host/ .
schedule
Define schedules for Puppet. Resources can be limited to a schedule by using the �schedulemetaparameter.
Currently, schedules can only be used to stop a resource from being applied; they cannot cause aresource to be applied when it otherwise wouldnʼt be, and they cannot accurately specify a timewhen a resource should run.
Every time Puppet applies its configuration, it will apply the set of resources whose schedule does�not eliminate them from running right then, but there is currently no system in place to guaranteethat a given resource runs at a given time. If you specify a very restrictive schedule and Puppethappens to run at a time within that schedule, then the resources will get applied; otherwise, thatwork may never get done.
Thus, it is advisable to use wider scheduling (e.g., over a couple of hours) combined with periodsand repetitions. For instance, if you wanted to restrict certain resources to only running once,between the hours of two and 4 AM, then you would use this schedule:
schedule{'maint':range=>"2-4",period=>daily,repeat=>1,}
With this schedule, the first time that Puppet runs between 2 and 4 AM, all resources with this�schedule will get applied, but they wonʼt get applied again between 2 and 4 because they will havealready run once that day, and they wonʼt get applied outside that schedule because they will beoutside the scheduled range.
Puppet Documentation • Type Reference 342/434
Puppet automatically creates a schedule for each of the valid periods with the same name as thatperiod (e.g., hourly and daily). Additionally, a schedule named puppet is created and used as thedefault, with the following attributes:
schedule{'puppet':period=>hourly,repeat=>2,}
This will cause resources to be applied every 30 minutes by default.PARAMETERS
name
The name of the schedule. This name is used to retrieve the schedule when assigning it to anobject:
schedule{'daily':period=>daily,range=>"2-4",}
exec{"/usr/bin/apt-getupdate":schedule=>'daily',}
period
The period of repetition for a resource. The default is for a resource to get applied every timePuppet runs.
Note that the period defines how often a given resource will get applied but not when; if you�would like to restrict the hours that a given resource can be applied (e.g., only at night duringa maintenance window), then use the range attribute.
If the provided periods are not sufficient, you can provide a value to the ��repeat attribute,which will cause Puppet to schedule the affected resources evenly in the period the specified��number of times. Take this schedule:
schedule{'veryoften':period=>hourly,repeat=>6,}
This can cause Puppet to apply that resource up to every 10 minutes.
At the moment, Puppet cannot guarantee that level of repetition; that is, it can run up toevery 10 minutes, but internal factors might prevent it from actually running that often (e.g.,long-running Puppet runs will squash conflictingly scheduled runs).�
See the periodmatch attribute for tuning whether to match times by their distance apart orby their specific value. �Valid values are hourly , daily , weekly , monthly , never .
Puppet Documentation • Type Reference 343/434

periodmatch
Whether periods should be matched by number (e.g., the two times are in the same hour) orby distance (e.g., the two times are 60 minutes apart). Valid values are number , distance .
range
The earliest and latest that a resource can be applied. This is always a hyphen-separatedrange within a 24 hour period, and hours must be specified in numbers between 0 and 23,�inclusive. Minutes and seconds can optionally be provided, using the normal colon as aseparator. For instance:
schedule{'maintenance':range=>"1:30-4:30",}
This is mostly useful for restricting certain resources to being applied in maintenancewindows or during off-peak hours. Multiple ranges can be applied in array context. As a�convenience when specifying ranges, you may cross midnight (e.g.: range => “22:00 -04:00”).
repeat
How often a given resource may be applied in this scheduleʼs period . Defaults to 1; must bean integer.
weekday
The days of the week in which the schedule should be valid. You may specify the full dayname (Tuesday), the three character abbreviation (Tue), or a number corresponding to theday of the week where 0 is Sunday, 1 is Monday, etc. You may pass an array to specifymultiple days. If not specified, the day of the week will not be considered in the schedule.�
If you are also using a range match that spans across midnight then this parameter willmatch the day that it was at the start of the range, not necessarily the day that it is when itmatches. For example, consider this schedule:
schedule { ʻmaintenance_windowʼ: range => ʻ22:00 - 04:00ʼ, weekday => ʻSaturdayʼ, }
This will match at 11 PM on Saturday and 2 AM on Sunday, but not at 2 AM on Saturday.
scheduled_task
Installs and manages Windows Scheduled Tasks. All attributes except name , command , and triggerare optional; see the description of the trigger attribute for details on setting schedules.
PARAMETERS
arguments
Any arguments or flags that should be passed to the command. Multiple arguments should�be specified as a space-separated string.�
command
Puppet Documentation • Type Reference 344/434
The full path to the application to run, without any arguments.
enabled
Whether the triggers for this task should be enabled. This attribute affects every trigger for�the task; triggers cannot be enabled or disabled individually. Valid values are true , false .
ensure
The basic property that the resource should be in. Valid values are present , absent .
name
The name assigned to the scheduled task. This will uniquely identify the task on the system.
password
The password for the user specified in the ʻuserʼ attribute. This is only used if specifying a�user other than ʻSYSTEMʼ. Since there is no way to retrieve the password used to set theaccount information for a task, this parameter will not be used to determine if a scheduledtask is in sync or not.
provider
The specific backend to use for this �scheduled_task resource. You will seldom need tospecify this — Puppet will usually discover the appropriate provider for your platform.Available providers are:
win32_taskscheduler
This provider uses the win32-taskscheduler gem to manage scheduled tasks onWindows.
Puppet requires version 0.2.1 or later of the win32-taskscheduler gem; previousversions can cause “Could not evaluate: The operation completed successfully” errors.
Default for operatingsystem == windows .
trigger
One or more triggers defining when the task should run. A single trigger is represented as a�hash, and multiple triggers can be specified with an array of hashes.�
A trigger can contain the following keys:
For all triggers:schedule (Required) — The schedule type. Valid values are daily , weekly , monthly , oronce .start_time (Required) — The time of day when the trigger should first become active.�Several time formats will work, but we suggest 24-hour time formatted as HH:MM.start_date — The date when the trigger should first become active. Defaults to�“today.” Several date formats will work, including special dates like “today,” but wesuggest formatting dates as YYYY-MM-DD.
For daily triggers:
Puppet Documentation • Type Reference 345/434
every — How often the task should run, as a number of days. Defaults to 1. (“2” meansevery other day, “3” means every three days, etc.)
For weekly triggers:every — How often the task should run, as a number of weeks. Defaults to 1. (“2”means every other week, “3” means every three weeks, etc.)day_of_week — Which days of the week the task should run, as an array. Defaults to alldays. Each day must be one of mon , tues , wed , thurs , fri , sat , sun , or all .
For monthly-by-date triggers:months — Which months the task should run, as an array. Defaults to all months. Eachmonth must be an integer between 1 and 12.on (Required) — Which days of the month the task should run, as an array. Each daymust beeither an integer between 1 and 31, or the special value last, which is alwaysthe last day of the month.
For monthly-by-weekday triggers:months — Which months the task should run, as an array. Defaults to all months. Eachmonth must be an integer between 1 and 12.day_of_week (Required) — Which day of the week the task should run, as an array withonly one element. Each day must be one of mon , tues , wed , thurs , fri , sat , sun , orall .which_occurrence (Required) — The occurrence of the chosen weekday when the taskshould run. Must be one of first , second , third , fourth , fifth , or last .
Examples:
#Runat8amonthe1st,15th,andlastdayofthemonthinJanuary,March,#May,July,September,andNovember,startingafterAugust31st,2011.trigger=>{schedule=>monthly,start_date=>'2011-08-31',#Defaultsto'today'start_time=>'08:00',#Mustbespecifiedmonths=>[1,3,5,7,9,11],#Defaultstoallon=>[1,15,last],#Mustbespecified}
#Runat8amonthefirstMondayofthemonthforJanuary,March,andMay,#startingafterAugust31st,2011.trigger=>{schedule=>monthly,start_date=>'2011-08-31',#Defaultsto'today'start_time=>'08:00',#Mustbespecifiedmonths=>[1,3,5],#Defaultstoallwhich_occurrence=>first,#Mustbespecifiedday_of_week=>[mon],#Mustbespecified}
user
Puppet Documentation • Type Reference 346/434
The user to run the scheduled task as. Please note that not all security configurations will�allow running a scheduled task as ʻSYSTEMʼ, and saving the scheduled task under theseconditions will fail with a reported error of ʻThe operation completed successfullyʼ. It isrecommended that you either choose another user to run the scheduled task, or alter thesecurity policy to allow v1 scheduled tasks to run as the ʻSYSTEMʼ account. Defaults toʻSYSTEMʼ.
Please also note that Puppet must be running as a privileged user in order to managescheduled_task resources. Running as an unprivileged user will result in ʻaccess deniedʼerrors.
working_dir
The full path of the directory in which to start the command.
selboolean
Manages SELinux booleans on systems with SELinux support. The supported booleans are any ofthe ones found in /selinux/booleans/ .
PARAMETERS
name
The name of the SELinux boolean to be managed.
persistent
If set true, SELinux booleans will be written to disk and persist accross reboots. The default isfalse . Valid values are true , false .
provider
The specific backend to use for this �selboolean resource. You will seldom need to specifythis — Puppet will usually discover the appropriate provider for your platform. Availableproviders are:
getsetsebool
Manage SELinux booleans using the getsebool and setsebool binaries.
Required binaries: /usr/sbin/getsebool , /usr/sbin/setsebool .
value
Whether the the SELinux boolean should be enabled or disabled. Valid values are on , off .
selmodule
Manages loading and unloading of SELinux policy modules on the system. Requires SELinuxsupport. See man semodule(8) for more information on SELinux policy modules.
Autorequires: If Puppet is managing the file containing this SELinux policy module (which is either�explicitly specified in the �selmodulepath attribute or will be found at {selmoduledir }/{name }.pp),
Puppet Documentation • Type Reference 347/434
the selmodule resource will autorequire that file.�PARAMETERS
ensure
The basic property that the resource should be in. Valid values are present , absent .
name
The name of the SELinux policy to be managed. You should not include the customarytrailing .pp extension.
provider
The specific backend to use for this �selmodule resource. You will seldom need to specify this— Puppet will usually discover the appropriate provider for your platform. Available providersare:
semodule
Manage SELinux policy modules using the semodule binary.
Required binaries: /usr/sbin/semodule .
selmoduledir
The directory to look for the compiled pp module file in. Currently defaults to�/usr/share/selinux/targeted . If the selmodulepath attribute is not specified, Puppet will�expect to find the module in �<selmoduledir>/<name>.pp , where name is the value of thename parameter.
selmodulepath
The full path to the compiled .pp policy module. You only need to use this if the module file is�not in the selmoduledir directory.
syncversion
If set to true , the policy will be reloaded if the version found in the on-disk file differs from��the loaded version. If set to false (the default) the the only check that will be made is if thepolicy is loaded at all or not. Valid values are true , false .
service
Manage running services. Service support unfortunately varies widely by platform — someplatforms have very little if any concept of a running service, and some have a very codified and�powerful concept. Puppetʼs service support is usually capable of doing the right thing, but the moreinformation you can provide, the better behaviour you will get.
Puppet 2.7 and newer expect init scripts to have a working status command. If this isnʼt the case forany of your servicesʼ init scripts, you will need to set hasstatus to false and possibly specify acustom status command in the status attribute.
Puppet Documentation • Type Reference 348/434
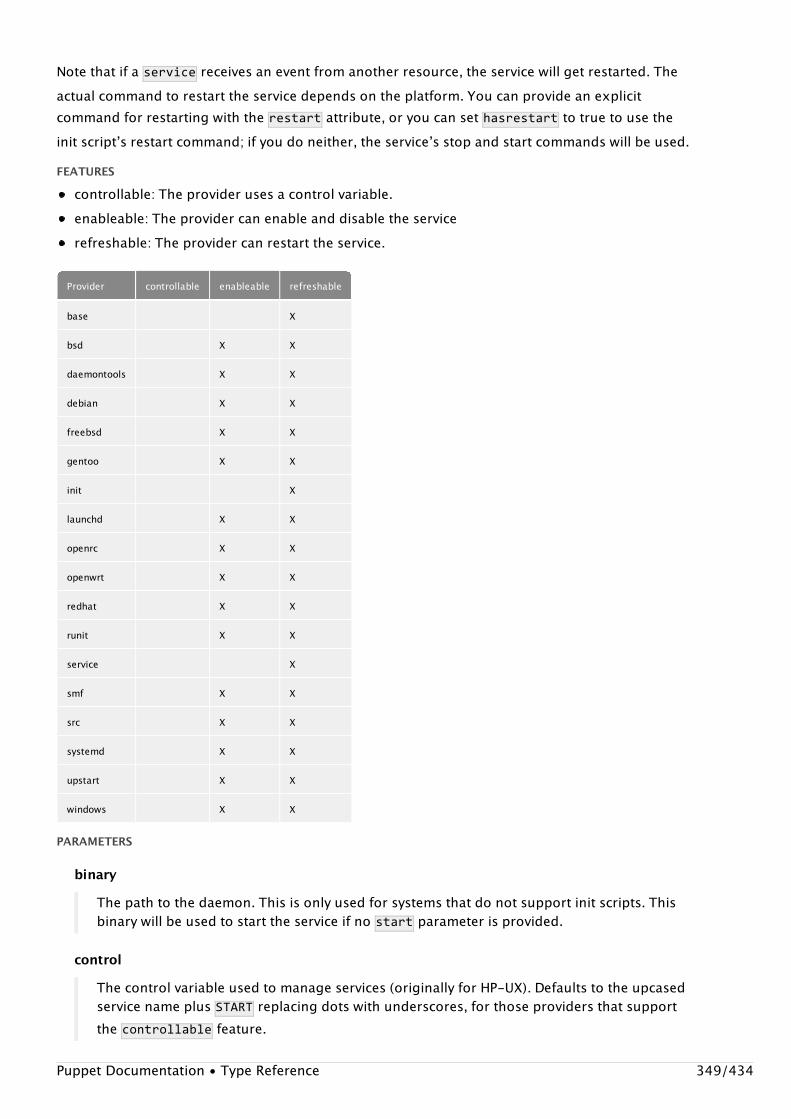
Note that if a service receives an event from another resource, the service will get restarted. Theactual command to restart the service depends on the platform. You can provide an explicitcommand for restarting with the restart attribute, or you can set hasrestart to true to use theinit scriptʼs restart command; if you do neither, the serviceʼs stop and start commands will be used.FEATURES
controllable: The provider uses a control variable.enableable: The provider can enable and disable the servicerefreshable: The provider can restart the service.
Provider controllable enableable refreshable
base X
bsd X X
daemontools X X
debian X X
freebsd X X
gentoo X X
init X
launchd X X
openrc X X
openwrt X X
redhat X X
runit X X
service X
smf X X
src X X
systemd X X
upstart X X
windows X X
PARAMETERS
binary
The path to the daemon. This is only used for systems that do not support init scripts. Thisbinary will be used to start the service if no start parameter is provided.
control
The control variable used to manage services (originally for HP-UX). Defaults to the upcasedservice name plus START replacing dots with underscores, for those providers that supportthe controllable feature.
Puppet Documentation • Type Reference 349/434
enable
Whether a service should be enabled to start at boot. This property behaves quite differently�depending on the platform; wherever possible, it relies on local tools to enable or disable agiven service. Valid values are true , false , manual . Requires features enableable.
ensure
Whether a service should be running. Valid values are stopped (also called false ), running(also called true ).
hasrestart
Specify that an init script has a restart command. If this is false and you do not specify acommand in the restart attribute, the init scriptʼs stop and start commands will be used.
Defaults to false. Valid values are true , false .
hasstatus
Declare whether the serviceʼs init script has a functional status command; defaults to true .This attributeʼs default value changed in Puppet 2.7.0.
The init scriptʼs status command must return 0 if the service is running and a nonzero valueotherwise. Ideally, these exit codes should conform to the LSBʼs specification� for init scriptstatus actions, but Puppet only considers the difference between 0 and nonzero to be�relevant.
If a serviceʼs init script does not support any kind of status command, you should sethasstatus to false and either provide a specific command using the �status attribute orexpect that Puppet will look for the service name in the process table. Be aware that ʻvirtualʼinit scripts (like ʻnetworkʼ under Red Hat systems) will respond poorly to refresh events fromother resources if you override the default behavior without providing a status command.Valid values are true , false .
manifest
Specify a command to config a service, or a path to a manifest to do so.�
name
The name of the service to run.
This name is used to find the service; on platforms where services have short system names�and long display names, this should be the short name. (To take an example from Windows,you would use “wuauserv” rather than “Automatic Updates.”)
path
The search path for finding init scripts. �Multiple values should be separated by colons orprovided as an array.
pattern
The pattern to search for in the process table. This is used for stopping services on platforms
Puppet Documentation • Type Reference 350/434

that do not support init scripts, and is also used for determining service status on thoseservice whose init scripts do not include a status command.
Defaults to the name of the service. The pattern can be a simple string or any legal Rubypattern.
provider
The specific backend to use for this �service resource. You will seldom need to specify this —Puppet will usually discover the appropriate provider for your platform. Available providersare:
base
The simplest form of Unix service support.
You have to specify enough about your service for this to work; the minimum you canspecify is a binary for starting the process, and this same binary will be searched for inthe process table to stop the service. As with init-style services, it is preferable tospecify start, stop, and status commands.
Required binaries: kill . Supported features: refreshable .
bsd
FreeBSDʼs (and probably NetBSDʼs?) form of init-style service management.
Uses rc.conf.d for service enabling and disabling.
Supported features: enableable , refreshable .
daemontools
Daemontools service management.
This provider manages daemons supervised by D.J. Bernstein daemontools. Whendetecting the service directory it will check, in order of preference:
/service
/etc/service
/var/lib/svscan
The daemon directory should be in one of the following locations:
/var/lib/service
/etc
…or this can be overriden in the resourceʼs attributes:
service{"myservice":provider=>"daemontools",path=>"/path/to/daemons",
Puppet Documentation • Type Reference 351/434
}
This provider supports out of the box:
start/stop (mapped to enable/disable)enable/disablerestartstatus
If a service has ensure=>"running" , it will link /path/to/daemon to /path/to/service,which will automatically enable the service.
If a service has ensure=>"stopped" , it will only shut down the service, not removethe /path/to/service link.
Required binaries: /usr/bin/svc , /usr/bin/svstat . Supported features: enableable ,refreshable .
debian
Debianʼs form of init-style management.
The only differences from �init are support for enabling and disabling services viaupdate-rc.d and the ability to determine enabled status via invoke-rc.d .
Required binaries: /usr/sbin/invoke-rc.d , /usr/sbin/update-rc.d . Default foroperatingsystem == debian,ubuntu . Supported features: enableable ,refreshable .
freebsd
Provider for FreeBSD and DragonFly BSD. Uses the rcvar argument of init scripts andparses/edits rc files.�
Default for operatingsystem == freebsd,dragonfly . Supported features:enableable , refreshable .
gentoo
Gentooʼs form of init-style service management.
Uses rc-update for service enabling and disabling.
Required binaries: /sbin/rc-update . Supported features: enableable , refreshable .
init
Standard init-style service management.
Supported features: refreshable .
Puppet Documentation • Type Reference 352/434
launchd
This provider manages jobs with launchd , which is the default service framework forMac OS X (and may be available for use on other platforms).
For launchd documentation, see:
http://developer.apple.com/macosx/launchd.htmlhttp://launchd.macosforge.org/
This provider reads plists out of the following directories:
/System/Library/LaunchDaemons
/System/Library/LaunchAgents
/Library/LaunchDaemons
/Library/LaunchAgents
…and builds up a list of services based upon each plistʼs “Label” entry.
This provider supports:
ensure => running/stopped,enable => true/falsestatusrestart
Here is how the Puppet states correspond to launchd states:
stopped — job unloadedstarted — job loadedenabled — ʻDisableʼ removed from job plist file�disabled — ʻDisableʼ added to job plist file�
Note that this allows you to do something launchctl canʼt do, which is to be in a stateof “stopped/enabled” or “running/disabled”.
Note that this provider does not support overriding ʻrestartʼ or ʻstatusʼ.
Required binaries: /bin/launchctl , /usr/bin/sw_vers , /usr/bin/plutil . Default foroperatingsystem == darwin . Supported features: enableable , refreshable .
openrc
Support for Gentooʼs OpenRC initskripts
Uses rc-update, rc-status and rc-service to manage services.
Required binaries: /sbin/rc-service , /bin/rc-status , /sbin/rc-update . Default foroperatingsystem == funtoo . Supported features: enableable , refreshable .
Puppet Documentation • Type Reference 353/434
openwrt
Support for OpenWrt flavored init scripts.�
Uses /etc/init.d/service_name enable, disable, and enabled.
Default for operatingsystem == openwrt . Supported features: enableable ,refreshable .
redhat
Red Hatʼs (and probably many othersʼ) form of init-style service management. Useschkconfig for service enabling and disabling.
Required binaries: /sbin/chkconfig , /sbin/service . Default for osfamily ==redhat,suse . Supported features: enableable , refreshable .
runit
Runit service management.
This provider manages daemons running supervised by Runit. When detecting theservice directory it will check, in order of preference:
/service
/var/service
/etc/service
The daemon directory should be in one of the following locations:
/etc/sv
or this can be overriden in the service resource parameters::
service{"myservice":provider=>"runit",path=>"/path/to/daemons",}
This provider supports out of the box:
start/stopenable/disablerestartstatus
Required binaries: /usr/bin/sv . Supported features: enableable , refreshable .
service
The simplest form of service support.Puppet Documentation • Type Reference 354/434
Supported features: refreshable .
smf
Support for Sunʼs new Service Management Framework.
Starting a service is effectively equivalent to enabling it, so there is only support for�starting and stopping services, which also enables and disables them, respectively.
By specifying manifest=>"/path/to/service.xml" , the SMF manifest will beimported if it does not exist.
Required binaries: /usr/sbin/svccfg , /usr/sbin/svcadm , /usr/bin/svcs . Default forosfamily == solaris . Supported features: enableable , refreshable .
src
Support for AIXʼs System Resource controller.
Services are started/stopped based on the stopsrc and startsrc commands, andsome services can be refreshed with refresh command.
Enabling and disabling services is not supported, as it requires modifications to�/etc/inittab . Starting and stopping groups of subsystems is not yet supported.
Required binaries: /usr/bin/stopsrc , /usr/sbin/chitab , /usr/bin/startsrc ,/usr/bin/refresh , /usr/bin/lssrc , /usr/sbin/lsitab , /usr/sbin/mkitab ,/usr/sbin/rmitab . Default for operatingsystem == aix . Supported features:enableable , refreshable .
systemd
Manages systemd services using systemctl .
Required binaries: systemctl . Default for osfamily == archlinux . Supportedfeatures: enableable , refreshable .
upstart
Ubuntu service management with upstart .
This provider manages upstart jobs, which have replaced initd services on Ubuntu.For upstart documentation, see http://upstart.ubuntu.com/.
Required binaries: /sbin/start , /sbin/status , /sbin/restart , /sbin/stop ,/sbin/initctl . Default for operatingsystem == ubuntu . Supported features:enableable , refreshable .
windows
Support for Windows Service Control Manager (SCM). This provider can start, stop,Puppet Documentation • Type Reference 355/434
enable, and disable services, and the SCM provides working status methods for allservices.
Control of service groups (dependencies) is not yet supported, nor is running servicesas a specific user.�
Required binaries: net.exe . Default for operatingsystem == windows . Supportedfeatures: enableable , refreshable .
restart
Specify a restart command manually. If left unspecified, the service will be stopped and then�started.
start
Specify a start command manually. Most service subsystems support a start command, sothis will not need to be specified.�
status
Specify a status command manually. This command must return 0 if the service is runningand a nonzero value otherwise. Ideally, these exit codes should conform to the LSBʼsspecification� for init script status actions, but Puppet only considers the difference between 0�and nonzero to be relevant.
If left unspecified, the status of the service will be determined automatically, usually by�looking for the service in the process table.
stop
Specify a stop command manually.
ssh_authorized_key
Manages SSH authorized keys. Currently only type 2 keys are supported.
Autorequires: If Puppet is managing the user account in which this SSH key should be installed, thessh_authorized_key resource will autorequire that user.
PARAMETERS
ensure
The basic property that the resource should be in. Valid values are present , absent .
key
The public key itself; generally a long string of hex characters. The key attribute may notcontain whitespace: Omit key headers (e.g. ʻssh-rsaʼ) and key identifiers (e.g.�ʻ[email protected]ʼ) found in the public key file.�
name
The SSH key comment. This attribute is currently used as a system-wide primary key andtherefore has to be unique.
Puppet Documentation • Type Reference 356/434
options
Key options, see sshd(8) for possible values. Multiple values should be specified as an array.�
provider
The specific backend to use for this �ssh_authorized_key resource. You will seldom need tospecify this — Puppet will usually discover the appropriate provider for your platform.Available providers are:
parsed
Parse and generate authorized_keys files for SSH.�
target
The absolute filename in which to store the SSH key. This property is optional and should�only be used in cases where keys are stored in a non-standard location (i.e.notin~user/.ssh/authorized_keys`).
type
The encryption type used: ssh-dss or ssh-rsa. Valid values are ssh-dss (also called dsa ),ssh-rsa (also called rsa ), ecdsa-sha2-nistp256 , ecdsa-sha2-nistp384 , ecdsa-sha2-nistp521 .
user
The user account in which the SSH key should be installed. The resource will automaticallydepend on this user.
sshkey
Installs and manages ssh host keys. At this point, this type only knows how to install keys into/etc/ssh/ssh_known_hosts . See the ssh_authorized_key type to manage authorized keys.
PARAMETERS
ensure
The basic property that the resource should be in. Valid values are present , absent .
host_aliases
Any aliases the host might have. Multiple values must be specified as an array.�
key
The key itself; generally a long string of hex digits.
name
The host name that the key is associated with.
provider
The specific backend to use for this �sshkey resource. You will seldom need to specify this —
Puppet Documentation • Type Reference 357/434
Puppet will usually discover the appropriate provider for your platform. Available providersare:
parsed
Parse and generate host-wide known hosts files for SSH.�
target
The file in which to store the ssh key. �Only used by the parsed provider.
type
The encryption type used. Probably ssh-dss or ssh-rsa. Valid values are ssh-dss (also calleddsa ), ssh-rsa (also called rsa ), ecdsa-sha2-nistp256 , ecdsa-sha2-nistp384 , ecdsa-sha2-nistp521 .
stage
A resource type for specifying run stages. The actual stage should be specified on resources:�
class{foo:stage=>pre}
And you must manually control stage order:
stage{pre:before=>Stage[main]}
You automatically get a ʻmainʼ stage created, and by default all resources get inserted into thatstage.
You can only set stages on class resources, not normal builtin resources.PARAMETERS
name
The name of the stage. This will be used as the ʻstageʼ for each resource.
tidy
Remove unwanted files based on specific criteria. ��Multiple criteria are ORʼd together, so a file that is�too large but is not old enough will still get tidied.
If you donʼt specify either age or size , then all files will be removed.�
This resource type works by generating a file resource for every file that should be deleted and then��letting that resource perform the actual deletion.PARAMETERS
age
Tidy files whose age is equal to or greater than the specified time. ��You can choose seconds,Puppet Documentation • Type Reference 358/434
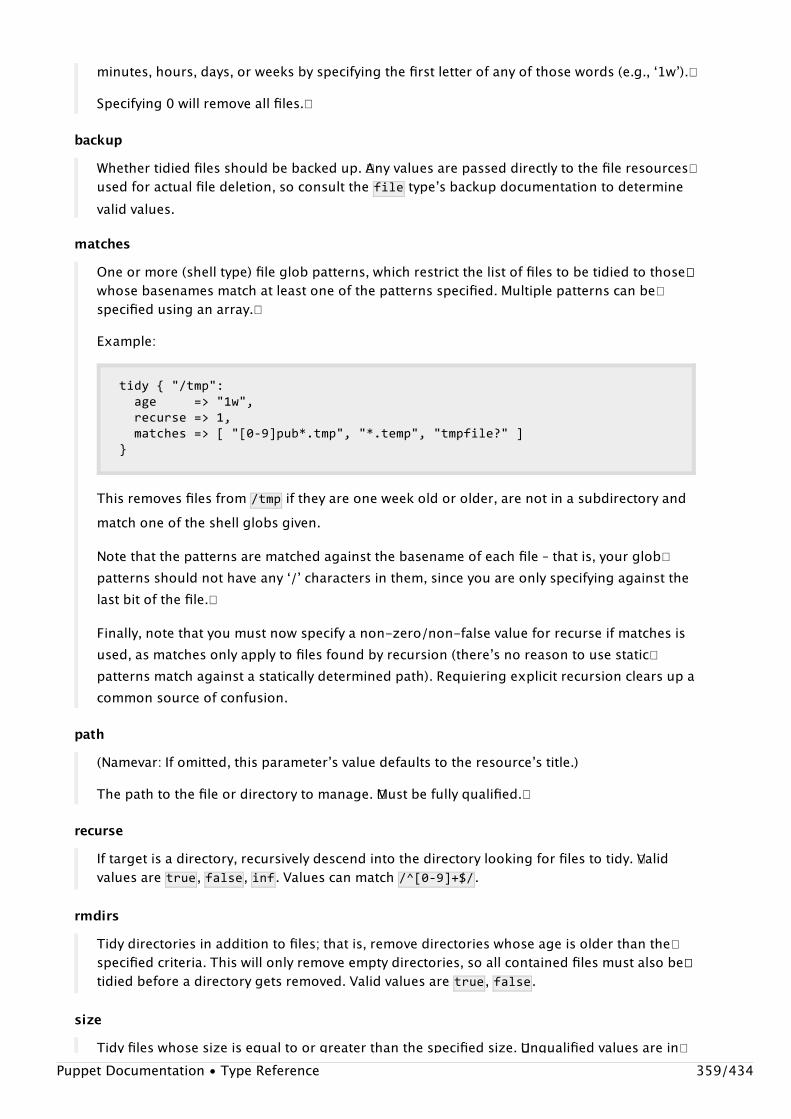
minutes, hours, days, or weeks by specifying the first letter of any of those words (e.g., ʻ1wʼ).�
Specifying 0 will remove all files.�
backup
Whether tidied files should be backed up. �Any values are passed directly to the file resources�used for actual file deletion, so consult the �file typeʼs backup documentation to determinevalid values.
matches
One or more (shell type) file glob patterns, which restrict the list of files to be tidied to those��whose basenames match at least one of the patterns specified. Multiple patterns can be�specified using an array.�
Example:
tidy{"/tmp":age=>"1w",recurse=>1,matches=>["[0-9]pub*.tmp","*.temp","tmpfile?"]}
This removes files from �/tmp if they are one week old or older, are not in a subdirectory andmatch one of the shell globs given.
Note that the patterns are matched against the basename of each file – that is, your glob�patterns should not have any ʻ/ʼ characters in them, since you are only specifying against thelast bit of the file.�
Finally, note that you must now specify a non-zero/non-false value for recurse if matches isused, as matches only apply to files found by recursion (thereʼs no reason to use static�patterns match against a statically determined path). Requiering explicit recursion clears up acommon source of confusion.
path
(Namevar: If omitted, this parameterʼs value defaults to the resourceʼs title.)
The path to the file or directory to manage. �Must be fully qualified.�
recurse
If target is a directory, recursively descend into the directory looking for files to tidy. �Validvalues are true , false , inf . Values can match /^[0-9]+$/ .
rmdirs
Tidy directories in addition to files; that is, remove directories whose age is older than the�specified criteria. This will only remove empty directories, so all contained files must also be��tidied before a directory gets removed. Valid values are true , false .
size
Tidy files whose size is equal to or greater than the specified size. ��Unqualified values are in�Puppet Documentation • Type Reference 359/434
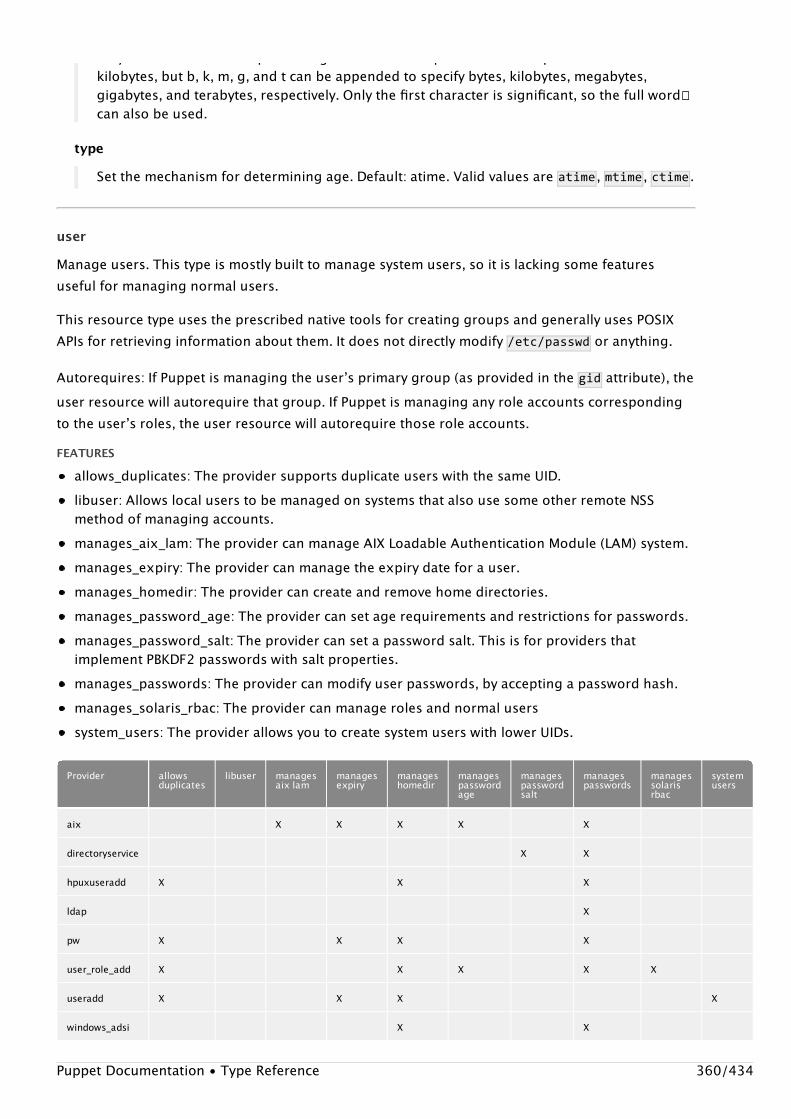
Tidy files whose size is equal to or greater than the specified size. ��Unqualified values are in�kilobytes, but b, k, m, g, and t can be appended to specify bytes, kilobytes, megabytes,gigabytes, and terabytes, respectively. Only the first character is significant, so the full word��can also be used.
type
Set the mechanism for determining age. Default: atime. Valid values are atime , mtime , ctime .
user
Manage users. This type is mostly built to manage system users, so it is lacking some featuresuseful for managing normal users.
This resource type uses the prescribed native tools for creating groups and generally uses POSIXAPIs for retrieving information about them. It does not directly modify /etc/passwd or anything.
Autorequires: If Puppet is managing the userʼs primary group (as provided in the gid attribute), theuser resource will autorequire that group. If Puppet is managing any role accounts correspondingto the userʼs roles, the user resource will autorequire those role accounts.FEATURES
allows_duplicates: The provider supports duplicate users with the same UID.libuser: Allows local users to be managed on systems that also use some other remote NSSmethod of managing accounts.manages_aix_lam: The provider can manage AIX Loadable Authentication Module (LAM) system.manages_expiry: The provider can manage the expiry date for a user.manages_homedir: The provider can create and remove home directories.manages_password_age: The provider can set age requirements and restrictions for passwords.manages_password_salt: The provider can set a password salt. This is for providers thatimplement PBKDF2 passwords with salt properties.manages_passwords: The provider can modify user passwords, by accepting a password hash.manages_solaris_rbac: The provider can manage roles and normal userssystem_users: The provider allows you to create system users with lower UIDs.
Provider allowsduplicates
libuser managesaix lam
managesexpiry
manageshomedir
managespasswordage
managespasswordsalt
managespasswords
managessolarisrbac
systemusers
aix X X X X X
directoryservice X X
hpuxuseradd X X X
ldap X
pw X X X X
user_role_add X X X X X
useradd X X X X
windows_adsi X X
Puppet Documentation • Type Reference 360/434
PARAMETERS
allowdupe
Whether to allow duplicate UIDs. Defaults to false . Valid values are true , false .
attribute_membership
Whether specified attribute value pairs should be treated as the �complete list (inclusive ) orthe minimum list (minimum ) of attribute/value pairs for the user. Defaults to minimum . Validvalues are inclusive , minimum .
attributes
Specify AIX attributes for the user in an array of attribute = value pairs. Requires featuresmanages_aix_lam.
auth_membership
Whether specified auths should be considered the �complete list (inclusive ) or the minimumlist (minimum ) of auths the user has. Defaults to minimum . Valid values are inclusive ,minimum .
auths
The auths the user has. Multiple auths should be specified as an array. �Requires featuresmanages_solaris_rbac.
comment
A description of the user. Generally the userʼs full name.
ensure
The basic state that the object should be in. Valid values are present , absent , role .
expiry
The expiry date for this user. Must be provided in a zero-padded YYYY-MM-DD format —e.g. 2010-02-19. If you want to make sure the user account does never expire, you can passthe special value absent . Valid values are absent . Values can match /^\d{4}-\d{2}-\d{2}$/ . Requires features manages_expiry.
forcelocal
Forces the mangement of local accounts when accounts are also being managed by someother NSS Valid values are true , false . Requires features libuser.
gid
The userʼs primary group. Can be specified numerically or by name.�
Note that users on Windows systems do not have a primary group; manage groups with thegroups attribute instead.
groups
The groups to which the user belongs. The primary group should not be listed, and groupsPuppet Documentation • Type Reference 361/434
should be identified by name rather than by GID. �Multiple groups should be specified as an�array.
home
The home directory of the user. The directory must be created separately and is not currentlychecked for existence.
ia_load_module
The name of the I&A module to use to manage this user. Requires featuresmanages_aix_lam.
iterations
This is the number of iterations of a chained computation of the password hash(http://en.wikipedia.org/wiki/PBKDF2). This parameter is used in OS X Requires featuresmanages_password_salt.
key_membership
Whether specified key/value pairs should be considered the �complete list (inclusive ) or theminimum list (minimum ) of the userʼs attributes. Defaults to minimum . Valid values areinclusive , minimum .
keys
Specify user attributes in an array of key = value pairs. Requires featuresmanages_solaris_rbac.
managehome
Whether to manage the home directory when managing the user. This will create the homedirectory when ensure=>present , and delete the home directory when ensure=>absent .Defaults to false . Valid values are true , false .
membership
Whether specified groups should be considered the �complete list (inclusive ) or theminimum list (minimum ) of groups to which the user belongs. Defaults to minimum . Validvalues are inclusive , minimum .
name
The user name. While naming limitations vary by operating system, it is advisable to restrictnames to the lowest common denominator, which is a maximum of 8 characters beginningwith a letter.
Note that Puppet considers user names to be case-sensitive, regardless of the platformʼs ownrules; be sure to always use the same case when referring to a given user.
password
The userʼs password, in whatever encrypted format the local system requires.Most modern Unix-like systems use salted SHA1 password hashes. You can use Puppetʼsbuilt-in sha1 function to generate a hash from a password.
Puppet Documentation • Type Reference 362/434
Mac OS X 10.5 and 10.6 also use salted SHA1 hashes.Mac OS X 10.7 (Lion) uses salted SHA512 hashes. The Puppet Labs stdlib module containsa str2saltedsha512 function which can generate password hashes for Lion.Windows passwords can only be managed in cleartext, as there is no Windows API forsetting the password hash.
Be sure to enclose any value that includes a dollar sign ($) in single quotes (ʻ) to avoidaccidental variable interpolation. Requires features manages_passwords.
password_max_age
The maximum number of days a password may be used before it must be changed. Requiresfeatures manages_password_age.
password_min_age
The minimum number of days a password must be used before it may be changed. Requiresfeatures manages_password_age.
profile_membership�
Whether specified roles should be treated as the �complete list (inclusive ) or the minimumlist (minimum ) of roles of which the user is a member. Defaults to minimum . Valid values areinclusive , minimum .
profiles�
The profiles the user has. �Multiple profiles should be specified as an array. ��Requires featuresmanages_solaris_rbac.
project
The name of the project associated with a user. Requires features manages_solaris_rbac.
provider
The specific backend to use for this �user resource. You will seldom need to specify this —Puppet will usually discover the appropriate provider for your platform. Available providersare:
aix
User management for AIX.
Required binaries: /usr/sbin/lsgroup , /usr/bin/chuser , /bin/chpasswd ,/usr/sbin/lsuser , /usr/sbin/rmuser , /usr/bin/mkuser . Default foroperatingsystem == aix . Supported features: manages_aix_lam , manages_expiry ,manages_homedir , manages_password_age , manages_passwords .
directoryservice
User management on OS X.
Required binaries: /usr/bin/dscl , /usr/bin/uuidgen , /usr/bin/dsimport ,
Puppet Documentation • Type Reference 363/434
/usr/bin/plutil , /usr/bin/dscacheutil . Default for operatingsystem == darwin .Supported features: manages_password_salt , manages_passwords .
hpuxuseradd
User management for HP-UX. This provider uses the undocumented -F switch to HP-UXʼs special usermod binary to work around the fact that its standard usermod cannotmake changes while the user is logged in.
Required binaries: /usr/sam/lbin/usermod.sam , /usr/sam/lbin/userdel.sam ,/usr/sam/lbin/useradd.sam . Default for operatingsystem == hp-ux . Supportedfeatures: allows_duplicates , manages_homedir , manages_passwords .
ldap
User management via LDAP.
This provider requires that you have valid values for all of the LDAP-related settings inpuppet.conf , including ldapbase . You will almost definitely need settings for�ldapuser and ldappassword in order for your clients to write to LDAP.
Note that this provider will automatically generate a UID for you if you do not specifyone, but it is a potentially expensive operation, as it iterates across all existing users topick the appropriate next one.
Supported features: manages_passwords .
pw
User management via pw on FreeBSD and DragonFly BSD.
Required binaries: pw . Default for operatingsystem == freebsd,dragonfly .Supported features: allows_duplicates , manages_expiry , manages_homedir ,manages_passwords .
user_role_add
User and role management on Solaris, via useradd and roleadd .
Required binaries: roleadd , usermod , roledel , rolemod , userdel , passwd , useradd .Default for osfamily == solaris . Supported features: allows_duplicates ,manages_homedir , manages_password_age , manages_passwords ,manages_solaris_rbac .
useradd
User management via useradd and its ilk. Note that you will need to install Rubyʼsshadow password library (often known as ruby-libshadow ) if you wish to manage userpasswords.
Puppet Documentation • Type Reference 364/434
Required binaries: usermod , userdel , luseradd , chage , useradd . Supported features:allows_duplicates , manages_expiry , manages_homedir , system_users .
windows_adsi
Local user management for Windows.
Default for operatingsystem == windows . Supported features: manages_homedir ,manages_passwords .
role_membership
Whether specified roles should be considered the �complete list (inclusive ) or the minimumlist (minimum ) of roles the user has. Defaults to minimum . Valid values are inclusive ,minimum .
roles
The roles the user has. Multiple roles should be specified as an array. �Requires featuresmanages_solaris_rbac.
salt
This is the 32 byte salt used to generate the PBKDF2 password used in OS X Requires featuresmanages_password_salt.
shell
The userʼs login shell. The shell must exist and be executable.
This attribute cannot be managed on Windows systems.
system
Whether the user is a system user, according to the OSʼs criteria; on most platforms, a UIDless than or equal to 500 indicates a system user. Defaults to false . Valid values are true ,false .
uid
The user ID; must be specified numerically. If no user ID is specified when creating a new��user, then one will be chosen automatically. This will likely result in the same user havingdifferent UIDs on different systems, which is not recommended. This is especially noteworthy��when managing the same user on both Darwin and other platforms, since Puppet does UIDgeneration on Darwin, but the underlying tools do so on other platforms.
On Windows, this property is read-only and will return the userʼs security identifier (SID).�
vlan
Manages a VLAN on a router or switch.PARAMETERS
description
Puppet Documentation • Type Reference 365/434
The VLANʼs name.
device_url
The URL of the router or switch maintaining this VLAN.
ensure
The basic property that the resource should be in. Valid values are present , absent .
name
The numeric VLAN ID. Values can match /^\d+/ .
provider
The specific backend to use for this �vlan resource. You will seldom need to specify this —Puppet will usually discover the appropriate provider for your platform. Available providersare:
cisco
Cisco switch/router provider for vlans.
yumrepo
The client-side description of a yum repository. Repository configurations are found by parsing�/etc/yum.conf and the files indicated by the �reposdir option in that file (see �yum.conf(5) fordetails).
Most parameters are identical to the ones documented in the yum.conf(5) man page.
Continuation lines that yum supports (for the baseurl , for example) are not supported. This typedoes not attempt to read or verify the exinstence of files listed in the �include attribute.
PARAMETERS
baseurl
The URL for this repository. Set this to absent to remove it from the file completely. �Validvalues are absent . Values can match /.*/ .
cost
Cost of this repository. Set this to absent to remove it from the file completely. �Valid valuesare absent . Values can match /\d+/ .
descr
A human-readable description of the repository. This corresponds to the name parameter inyum.conf(5) . Set this to absent to remove it from the file completely. �Valid values areabsent . Values can match /.*/ .
enabled
Whether this repository is enabled, as represented by a 0 or 1 . Set this to absent to remove itPuppet Documentation • Type Reference 366/434
from the file completely. �Valid values are absent . Values can match /(0|1)/ .
enablegroups
Whether yum will allow the use of package groups for this repository, as represented by a 0or 1 . Set this to absent to remove it from the file completely. �Valid values are absent . Valuescan match /(0|1)/ .
exclude
List of shell globs. Matching packages will never be considered in updates or installs for thisrepo. Set this to absent to remove it from the file completely. �Valid values are absent . Valuescan match /.*/ .
failovermethod
The failover methode for this repository; should be either roundrobin or priority . Set thisto absent to remove it from the file completely. �Valid values are absent . Values can match/roundrobin|priority/ .
gpgcheck
Whether to check the GPG signature on packages installed from this repository, asrepresented by a 0 or 1 . Set this to absent to remove it from the file completely. �Valid valuesare absent . Values can match /(0|1)/ .
gpgkey
The URL for the GPG key with which packages from this repository are signed. Set this toabsent to remove it from the file completely. �Valid values are absent . Values can match /.*/ .
http_caching
What to cache from this repository. Set this to absent to remove it from the file completely.�Valid values are absent . Values can match /packages|all|none/ .
include
The URL of a remote file containing additional yum configuration settings. Puppet does not��check for this fileʼs existence or validity. Set this to �absent to remove it from the file�completely. Valid values are absent . Values can match /.*/ .
includepkgs
List of shell globs. If this is set, only packages matching one of the globs will be consideredfor update or install from this repo. Set this to absent to remove it from the file completely.�Valid values are absent . Values can match /.*/ .
keepalive
Whether HTTP/1.1 keepalive should be used with this repository, as represented by a 0 or 1 .Set this to absent to remove it from the file completely. �Valid values are absent . Values canmatch /(0|1)/ .
Puppet Documentation • Type Reference 367/434
metadata_expire
Number of seconds after which the metadata will expire. Set this to absent to remove it fromthe file completely. �Valid values are absent . Values can match /[0-9]+/ .
mirrorlist
The URL that holds the list of mirrors for this repository. Set this to absent to remove it fromthe file completely. �Valid values are absent . Values can match /.*/ .
name
The name of the repository. This corresponds to the repositoryid parameter inyum.conf(5) .
priority
Priority of this repository from 1-99. Requires that the priorities plugin is installed andenabled. Set this to absent to remove it from the file completely. �Valid values are absent .Values can match /[1-9][0-9]?/ .
protect
Enable or disable protection for this repository. Requires that the protectbase plugin isinstalled and enabled. Set this to absent to remove it from the file completely. �Valid valuesare absent . Values can match /(0|1)/ .
proxy
URL to the proxy server for this repository. Set this to absent to remove it from the file�completely. Valid values are absent . Values can match /.*/ .
proxy_password
Password for this proxy. Set this to absent to remove it from the file completely. �Valid valuesare absent . Values can match /.*/ .
proxy_username
Username for this proxy. Set this to absent to remove it from the file completely. �Valid valuesare absent . Values can match /.*/ .
sslcacert
Path to the directory containing the databases of the certificate authorities yum should use to�verify SSL certificates. Set this to �absent to remove it from the file completely. �Valid values areabsent . Values can match /.*/ .
sslclientcert
Path to the SSL client certificate yum should use to connect to repos/remote sites. Set this to�absent to remove it from the file completely. �Valid values are absent . Values can match /.*/ .
sslclientkey
Puppet Documentation • Type Reference 368/434
Path to the SSL client key yum should use to connect to repos/remote sites. Set this to absentto remove it from the file completely. �Valid values are absent . Values can match /.*/ .
sslverify
Should yum verify SSL certificates/hosts at all. Possible values are ʻTrueʼ or ʻFalseʼ. Set this to�absent to remove it from the file completely. �Valid values are absent . Values can match/True|False/ .
timeout
Number of seconds to wait for a connection before timing out. Set this to absent to remove itfrom the file completely. �Valid values are absent . Values can match /[0-9]+/ .
zfs
Manage zfs. Create destroy and set properties on zfs instances.
Autorequires: If Puppet is managing the zpool at the root of this zfs instance, the zfs resource willautorequire it. If Puppet is managing any parent zfs instances, the zfs resource will autorequirethem.PARAMETERS
aclinherit
The aclinherit property. Valid values are discard , noallow , restricted , passthrough ,passthrough-x .
aclmode
The aclmode property. Valid values are discard , groupmask , passthrough .
atime
The atime property. Valid values are on , off .
canmount
The canmount property. Valid values are on , off , noauto .
checksum
The checksum property. Valid values are on , off , fletcher2 , fletcher4 , sha256 .
compression
The compression property. Valid values are on , off , lzjb , gzip , gzip-[1-9] , zle .
copies
The copies property. Valid values are 1 , 2 , 3 .
dedup
The dedup property. Valid values are on , off .
Puppet Documentation • Type Reference 369/434
devices
The devices property. Valid values are on , off .
ensure
The basic property that the resource should be in. Valid values are present , absent .
exec
The exec property. Valid values are on , off .
logbias
The logbias property. Valid values are latency , throughput .
mountpoint
The mountpoint property. Valid values are <path> , legacy , none .
name
The full name for this filesystem (including the zpool).�
nbmand
The nbmand property. Valid values are on , off .
primarycache
The primarycache property. Valid values are all , none , metadata .
provider
The specific backend to use for this �zfs resource. You will seldom need to specify this —Puppet will usually discover the appropriate provider for your platform. Available providersare:
zfs
Provider for zfs.
Required binaries: zfs .
quota
The quota property. Valid values are <size> , none .
readonly
The readonly property. Valid values are on , off .
recordsize
The recordsize property. Valid values are powers of two between 512 and 128k.
refquota
The refquota property. Valid values are <size> , none .Puppet Documentation • Type Reference 370/434
refreservation
The refreservation property. Valid values are <size> , none .
reservation
The reservation property. Valid values are <size> , none .
secondarycache
The secondarycache property. Valid values are all , none , metadata .
setuid
The setuid property. Valid values are on , off .
shareiscsi
The shareiscsi property. Valid values are on , off , type=<type> .
sharenfs
The sharenfs property. Valid values are on , off , share(1M) options
sharesmb
The sharesmb property. Valid values are on , off , sharemgr(1M) options
snapdir
The snapdir property. Valid values are hidden , visible .
version
The version property. Valid values are 1 , 2 , 3 , 4 , current .
volsize
The volsize property. Valid values are <size>
vscan
The vscan property. Valid values are on , off .
xattr
The xattr property. Valid values are on , off .
zoned
The zoned property. Valid values are on , off .
zone
Manages Solaris zones.
Autorequires: If Puppet is managing the directory specified as the root of the zoneʼs filesystem��
Puppet Documentation • Type Reference 371/434
(with the path attribute), the zone resource will autorequire that directory.
PARAMETERS
autoboot
Whether the zone should automatically boot. Valid values are true , false .
clone
Instead of installing the zone, clone it from another zone. If the zone root resides on a zfs file�system, a snapshot will be used to create the clone; if it resides on a ufs filesystem, a copy of�the zone will be used. The zone from which you clone must not be running.
create_args
Arguments to the zonecfg create command. This can be used to create branded zones.
dataset
The list of datasets delegated to the non-global zone from the global zone. All datasets mustbe zfs filesystem names which are different from the mountpoint.��
ensure
The running state of the zone. The valid states directly reflect the states that �zoneadmprovides. The states are linear, in that a zone must be configured , then installed , and onlythen can be running . Note also that halt is currently used to stop zones. Valid values areabsent , configured , installed , running .
id
The numerical ID of the zone. This number is autogenerated and cannot be changed.
inherit
The list of directories that the zone inherits from the global zone. All directories must be fullyqualified.�
install_args
Arguments to the zoneadm install command. This can be used to create branded zones.
ip
The IP address of the zone. IP addresses must be specified with the interface, separated by a�colon, e.g.: bge0:192.168.0.1. For multiple interfaces, specify them in an array.
iptype
The IP stack type of the zone. Valid values are shared , exclusive .
name
The name of the zone.
path
The root of the zoneʼs filesystem. �Must be a fully qualified file name. ��If you include %s in the
Puppet Documentation • Type Reference 372/434

path, then it will be replaced with the zoneʼs name. Currently, you cannot use Puppet to movea zone. Consequently this is a readonly property.
pool
The resource pool for this zone.
provider
The specific backend to use for this �zone resource. You will seldom need to specify this —Puppet will usually discover the appropriate provider for your platform. Available providersare:
solaris
Provider for Solaris Zones.
Required binaries: /usr/sbin/zoneadm , /usr/sbin/zonecfg . Default for osfamily ==solaris .
realhostname
The actual hostname of the zone.
shares
Number of FSS CPU shares allocated to the zone.
sysidcfg
The text to go into the sysidcfg file when the zone is first booted. ��The best way is to use atemplate:
#$confdir/modules/site/templates/sysidcfg.erbsystem_locale=en_UStimezone=GMTterminal=xtermssecurity_policy=NONEroot_password=<%=password%>timeserver=localhostname_service=DNS{domain_name=<%=domain%>name_server=<%=nameserver%>}network_interface=primary{hostname=<%=realhostname%>ip_address=<%=ip%>netmask=<%=netmask%>protocol_ipv6=nodefault_route=<%=defaultroute%>}nfs4_domain=dynamic
And then call that:
zone{myzone:ip=>"bge0:192.168.0.23",sysidcfg=>template("site/sysidcfg.erb"),path=>"/opt/zones/myzone",realhostname=>"fully.qualified.domain.name"}
Puppet Documentation • Type Reference 373/434
The sysidcfg only matters on the first booting of the zone, so Puppet only checks for it at�that time.
zpool
Manage zpools. Create and delete zpools. The provider WILL NOT SYNC, only report differences.�
Supports vdevs with mirrors, raidz, logs and spares.PARAMETERS
disk
The disk(s) for this pool. Can be an array or a space separated string.
ensure
The basic property that the resource should be in. Valid values are present , absent .
log
Log disks for this pool. This type does not currently support mirroring of log disks.
mirror
List of all the devices to mirror for this pool. Each mirror should be a space separated string:mirror=>["disk1disk2","disk3disk4"],
pool
(Namevar: If omitted, this parameterʼs value defaults to the resourceʼs title.)
The name for this pool.
provider
The specific backend to use for this �zpool resource. You will seldom need to specify this —Puppet will usually discover the appropriate provider for your platform. Available providersare:
zpool
Provider for zpool.
Required binaries: zpool .
raid_parity
Determines parity when using the raidz parameter.
raidz
List of all the devices to raid for this pool. Should be an array of space separated strings:raidz=>["disk1disk2","disk3disk4"],
Puppet Documentation • Type Reference 374/434
spare
Spare disk(s) for this pool.
This page autogenerated on Tue Jun 18 16:59:03 -0700 2013
Function Reference
Puppet Documentation • Function Reference 375/434
Function ReferenceThis page is autogenerated; any changes will get overwritten (last generated on Tue Jun 1816:58:31 -0700 2013)
There are two types of functions in Puppet: Statements and rvalues. Statements stand on their ownand do not return arguments; they are used for performing stand-alone work like importing.Rvalues return values and can only be used in a statement requiring a value, such as an assignmentor a case statement.
Functions execute on the Puppet master. They do not execute on the Puppet agent. Hence they onlyhave access to the commands and data available on the Puppet master host.
Here are the functions available in Puppet:
alertLog a message on the server at level alert.
Type: statement
collectApplies a parameterized block to each element in a sequence of entries from the first argument and�returns an array with the result of each invocation of the parameterized block.
This function takes two mandatory arguments: the first should be an Array or a Hash, and the�second a parameterized block as produced by the puppet syntax:
$a.collect $x { … }
When the first argument is an Array, the block is called with each entry in turn. When the first��argument is a hash the entry is an array with [key,value] .
Examples
# Turns hash into array of values $a.collect |$x|{ $x[1] }
# Turns hash into array of keys $a.collect |$x| { $x[0] }
Since 3.2
Type: rvalue
create_resourcesConverts a hash into a set of resources and adds them to the catalog.
This function takes two mandatory arguments: a resource type, and a hash describing a set ofresources. The hash should be in the form {title=>{parameters}} :
#Ahashofuserresources:
Puppet Documentation • Function Reference 376/434

$myusers={'nick'=>{uid=>'1330',group=>allstaff,groups=>['developers','operations','release'],}'dan'=>{uid=>'1308',group=>allstaff,groups=>['developers','prosvc','release'],}}
create_resources(user,$myusers)
A third, optional parameter may be given, also as a hash:
$defaults={'ensure'=>present,'provider'=>'ldap',}
create_resources(user,$myusers,$defaults)
The values given on the third argument are added to the parameters of each resource present inthe set given on the second argument. If a parameter is present on both the second and thirdarguments, the one on the second argument takes precedence.
This function can be used to create defined resources and classes, as well as native resources.�
Virtual and Exported resources may be created by prefixing the type name with @ or @@�respectively. For example, the $myusers hash may be exported in the following manner:
create_resources("@@user",$myusers)
The $myusers may be declared as virtual resources using:
create_resources("@user",$myusers)
Type: statement
critLog a message on the server at level crit.
Type: statement
debugLog a message on the server at level debug.
Type: statement
defined�Determine whether a given class or resource type is defined. This function can also determine�Puppet Documentation • Function Reference 377/434
whether a specific resource has been declared. Returns true or false. Accepts class names, type�names, and resource references.
The defined function checks both native and defined types, including types provided as plugins via�modules. Types and classes are both checked using their names:
defined("file")defined("customtype")defined("foo")defined("foo::bar")
Resource declarations are checked using resource references, e.g. defined(File['/tmp/myfile']) . Checking whether a given resource has been declared is, unfortunately, dependent on the parseorder of the configuration, and the following code will not work:�
ifdefined(File['/tmp/foo']){notify("Thisconfigurationincludesthe/tmp/foofile.")}file{"/tmp/foo":ensure=>present,}
However, this order requirement refers to parse order only, and ordering of resources in theconfiguration graph (e.g. with �before or require ) does not affect the behavior of �defined .
Type: rvalue
eachApplies a parameterized block to each element in a sequence of selected entries from the first�argument and returns the first argument.�
This function takes two mandatory arguments: the first should be an Array or a Hash, and the�second a parameterized block as produced by the puppet syntax:
$a.each { $x … }
When the first argument is an Array, the parameterized block should define one or two block��parameters. For each application of the block, the next element from the array is selected, and it ispassed to the block if the block has one parameter. If the block has two parameters, the first is the�elements index, and the second the value. The index starts from 0.
$a.each { $index, $value … }
When the first argument is a Hash, the parameterized block should define one or two parameters.��When one parameter is defined, the iteration is performed with each entry as an array of �[key,value] , and when two parameters are defined the iteration is performed with key and value.�
$a.each { $entry …“key ${$entry[0]}, value ${$entry[1]}” }
$a.each { $key, $value …“key ${key}, value ${value}” }
Puppet Documentation • Function Reference 378/434
Since 3.2
Type: rvalue
emergLog a message on the server at level emerg.
Type: statement
errLog a message on the server at level err.
Type: statement
extlookupThis is a parser function to read data from external files, this version uses CSV files but the concept��can easily be adjust for databases, yaml or any other queryable data source.
The object of this is to make it obvious when itʼs being used, rather than magically loading data inwhen an module is loaded I prefer to look at the code and see statements like:
$snmp_contact=extlookup("snmp_contact")
The above snippet will load the snmp_contact value from CSV files, this in its own is useful but a�common construct in puppet manifests is something like this:
case$domain{"myclient.com":{$snmp_contact="JohnDoe<[email protected]>"}default:{$snmp_contact="MySupport<[email protected]>"}}
Over time there will be a lot of this kind of thing spread all over your manifests and adding anadditional client involves grepping through manifests to find all the places where you have�constructs like this.
This is a data problem and shouldnʼt be handled in code, a using this function you can do just that.
First you configure it in site.pp:�
$extlookup_datadir="/etc/puppet/manifests/extdata"$extlookup_precedence=["%{fqdn}","domain_%{domain}","common"]
The array tells the code how to resolve values, first it will try to find it in web1.myclient.com.csv then��in domain_myclient.com.csv and finally in common.csv�
Now create the following data files in /etc/puppet/manifests/extdata:�
Puppet Documentation • Function Reference 379/434

domain_myclient.com.csv:snmp_contact,JohnDoe<[email protected]>root_contact,support@%{domain}client_trusted_ips,192.168.1.130,192.168.10.0/24
common.csv:snmp_contact,MySupport<[email protected]>root_contact,[email protected]
Now you can replace the case statement with the simple single line to achieve the exact sameoutcome:
$snmp_contact=extlookup("snmp_contact")
The above code shows some other features, you can use any fact or variable that is in scope bysimply using %{varname} in your data files, you can return arrays by just having multiple values in�the csv after the initial variable name.
In the event that a variable is nowhere to be found a critical error will be raised that will preventyour manifest from compiling, this is to avoid accidentally putting in empty values etc. You canhowever specify a default value:
$ntp_servers=extlookup("ntp_servers","1.${country}.pool.ntp.org")
In this case it will default to “1.${country}.pool.ntp.org” if nothing is defined in any data file.��
You can also specify an additional data file to search first before any others at use time, for��example:
$version=extlookup("rsyslog_version","present","packages")package{"rsyslog":ensure=>$version}
This will look for a version configured in packages.csv and then in the rest as configured by��$extlookup_precedence if itʼs not found anywhere it will default to present , this kind of use casemakes puppet a lot nicer for managing large amounts of packages since you do not need to edit aload of manifests to do simple things like adjust a desired version number.
Precedence values can have variables embedded in them in the form %{fqdn}, you could forexample do:
$extlookup_precedence=["hosts/%{fqdn}","common"]
This will result in /path/to/extdata/hosts/your.box.com.csv being searched.
This is for back compatibility to interpolate variables with %. % interpolation is a workaround for aproblem that has been fixed: Puppet variable interpolation at top scope used to only happen on�each run.
Type: rvaluePuppet Documentation • Function Reference 380/434
Type: rvalue
failFail with a parse error.
Type: statement
file�Return the contents of a file. �Multiple files can be passed, and the first file that exists will be read in.���
Type: rvalue
foreachApplies a parameterized block to each element in a sequence of selected entries from the first�argument and returns the first argument.�
This function takes two mandatory arguments: the first should be an Array or a Hash, and the�second a parameterized block as produced by the puppet syntax:
$a.foreach { $x … }
When the first argument is an Array, the parameterized block should define one or two block��parameters. For each application of the block, the next element from the array is selected, and it ispassed to the block if the block has one parameter. If the block has two parameters, the first is the�elements index, and the second the value. The index starts from 0.
$a.foreach { $index, $value … }
When the first argument is a Hash, the parameterized block should define one or two parameters.��When one parameter is defined, the iteration is performed with each entry as an array of �[key,value] , and when two parameters are defined the iteration is performed with key and value.�
$a.foreach { $entry …“key ${$entry[0]}, value ${$entry[1]}” }
$a.foreach { $key, $value …“key ${key}, value ${value}” }
Since 3.2
Type: rvalue
fqdn_randGenerates random numbers based on the nodeʼs fqdn. Generated random values will be a rangefrom 0 up to and excluding n, where n is the first parameter. The second argument specifies a��number to add to the seed and is optional, for example:
$random_number=fqdn_rand(30)$random_number_seed=fqdn_rand(30,30)
Type: rvalue
Puppet Documentation • Function Reference 381/434
generateCalls an external command on the Puppet master and returns the results of the command. Anyarguments are passed to the external command as arguments. If the generator does not exit withreturn code of 0, the generator is considered to have failed and a parse error is thrown. Generatorscan only have file separators, alphanumerics, dashes, and periods in them. �This function willattempt to protect you from malicious generator calls (e.g., those with ʻ..ʼ in them), but it can neverbe entirely safe. No subshell is used to execute generators, so all shell metacharacters are passeddirectly to the generator.
Type: rvalue
hieraPerforms a standard priority lookup and returns the most specific value for a given key. The�returned value can be data of any type (strings, arrays, or hashes).
In addition to the required key argument, hiera accepts two additional arguments:
a default argument in the second position, providing a value to be returned in the absence ofmatches to the key argumentan override argument in the third position, providing a data source to consult for matchingvalues, even if it would not ordinarily be part of the matched hierarchy. If Hiera doesnʼt find a�matching key in the named override data source, it will continue to search through the rest ofthe hierarchy.
More thorough examples of hiera are available at:http://docs.puppetlabs.com/hiera/1/puppet.html#hiera-lookup-functions
Type: rvalue
hiera_arrayReturns all matches throughout the hierarchy — not just the first match — as a flattened array of��unique values. If any of the matched values are arrays, theyʼre flattened and included in the results.�
In addition to the required key argument, hiera_array accepts two additional arguments:
a default argument in the second position, providing a string or array to be returned in theabsence of matches to the key argumentan override argument in the third position, providing a data source to consult for matchingvalues, even if it would not ordinarily be part of the matched hierarchy. If Hiera doesnʼt find a�matching key in the named override data source, it will continue to search through the rest ofthe hierarchy.
If any matched value is a hash, puppet will raise a type mismatch error.
More thorough examples of hiera are available at:http://docs.puppetlabs.com/hiera/1/puppet.html#hiera-lookup-functions
Puppet Documentation • Function Reference 382/434
Type: rvalue
hiera_hashReturns a merged hash of matches from throughout the hierarchy. In cases where two or morehashes share keys, the hierarchy order determines which key/value pair will be used in the returnedhash, with the pair in the highest priority data source winning.
In addition to the required key argument, hiera_hash accepts two additional arguments:
a default argument in the second position, providing a hash to be returned in the absence ofany matches for the key argumentan override argument in the third position, providing a data source to insert at the top of thehierarchy, even if it would not ordinarily match during a Hiera data source lookup. If Hieradoesnʼt find a match in the named override data source, it will �continue to search through therest of the hierarchy.
hiera_hash expects that all values returned will be hashes. If any of the values found in the datasources are strings or arrays, puppet will raise a type mismatch error.
More thorough examples of hiera_hash are available at:http://docs.puppetlabs.com/hiera/1/puppet.html#hiera-lookup-functions
Type: rvalue
hiera_includeAssigns classes to a node using an array merge lookup that retrieves the value for a user-specified�key from a Hiera data source.
To use hiera_include , the following configuration is required:�
A key name to use for classes, e.g. classes .A line in the puppet sites.pp file (e.g. �/etc/puppet/manifests/sites.pp ) readinghiera_include('classes') . Note that this line must be outside any node definition and below�any top-scope variables in use for Hiera lookups.Class keys in the appropriate data sources. In a data source keyed to a nodeʼs role, one mighthave:
---classes:-apache-apache::passenger
In addition to the required key argument, hiera_include accepts two additional arguments:
a default argument in the second position, providing an array to be returned in the absence ofmatches to the key argumentan override argument in the third position, providing a data source to consult for matching
Puppet Documentation • Function Reference 383/434
an override argument in the third position, providing a data source to consult for matchingvalues, even if it would not ordinarily be part of the matched hierarchy. If Hiera doesnʼt find a�matching key in the named override data source, it will continue to search through the rest ofthe hierarchy.
More thorough examples of hiera_include are available at:http://docs.puppetlabs.com/hiera/1/puppet.html#hiera-lookup-functions
Type: statement
includeEvaluate one or more classes.
Type: statement
infoLog a message on the server at level info.
Type: statement
inline_templateEvaluate a template string and return its value. See the templating docs for more information. Notethat if multiple template strings are specified, their output is all concatenated and returned as the�output of the function.
Type: rvalue
md5Returns a MD5 hash value from a provided string.
Type: rvalue
noticeLog a message on the server at level notice.
Type: statement
realizeMake a virtual object real. This is useful when you want to know the name of the virtual object anddonʼt want to bother with a full collection. It is slightly faster than a collection, and, of course, is abit shorter. You must pass the object using a reference; e.g.: realizeUser[luke] .
Type: statement
reduceApplies a parameterized block to each element in a sequence of entries from the first argument�(the collection) and returns the last result of the invocation of the parameterized block.Puppet Documentation • Function Reference 384/434
This function takes two mandatory arguments: the first should be an Array or a Hash, and the last a�parameterized block as produced by the puppet syntax:
$a.reduce $memo, $x { … }
When the first argument is an Array, the block is called with each entry in turn. When the first��argument is a hash each entry is converted to an array with [key,value] before being fed to theblock. An optional ʻstart memoʼ value may be supplied as an argument between the array/hash andmandatory block.
If no ʻstart memoʼ is given, the first invocation of the parameterized block will be given the first and��second elements of the collection, and if the collection has fewer than 2 elements, the first element�is produced as the result of the reduction without invocation of the block.
On each subsequent invocations, the produced value of the invoked parameterized block is givenas the memo in the next invocation.
Examples
# Reduce an array $a = [1,2,3] $a.reduce |$memo, $entry| { $memo + $entry } #=> 6
# Reduce hash values $a = {a => 1, b => 2, c => 3} $a.reduce |$memo, $entry| { [sum,$memo[1]+$entry[1]] } #=> [sum, 6]
It is possible to provide a starting ʻmemoʼ as an argument.
Examples # Reduce an array $a = [1,2,3] $a.reduce(4) |$memo, $entry| { $memo + $entry } #=> 10
# Reduce hash values $a = {a => 1, b => 2, c => 3} $a.reduce([na, 4]) |$memo, $entry| { [sum,$memo[1]+$entry[1]] } #=> [sum, 10]
Since 3.2
Type: rvalue
regsubstPerform regexp replacement on a string or array of strings.
Parameters (in order):target The string or array of strings to operate on. If an array, the replacement will beperformed on each of the elements in the array, and the return value will be an array.regexp The regular expression matching the target string. If you want it anchored at the startand or end of the string, you must do that with ^ and $ yourself.replacement Replacement string. Can contain backreferences to what was matched using \0(whole match), \1 (first set of parentheses), and so on.�flags� Optional. String of single letter flags for how the regexp is interpreted:�
E Extended regexpsI Ignore case in regexpsM Multiline regexpsG Global replacement; all occurrences of the regexp in each target string will be replaced.
Puppet Documentation • Function Reference 385/434
Without this, only the first occurrence will be replaced.�
encoding Optional. How to handle multibyte characters. A single-character string with thefollowing values:
N NoneE EUCS SJISU UTF-8
Examples
Get the third octet from the nodeʼs IP address:
$i3=regsubst($ipaddress,'^(\d+)\.(\d+)\.(\d+)\.(\d+)$','\3')
Put angle brackets around each octet in the nodeʼs IP address:
$x=regsubst($ipaddress,'([0-9]+)','<\1>','G')
Type: rvalue
rejectApplies a parameterized block to each element in a sequence of entries from the first argument and�returns an array with the entires for which the block did not evaluate to true.
This function takes two mandatory arguments: the first should be an Array or a Hash, and the�second a parameterized block as produced by the puppet syntax:
$a.reject $x { … }
When the first argument is an Array, the block is called with each entry in turn. When the first��argument is a hash the entry is an array with [key,value] .
The returned filtered object is of the same type as the receiver.�
Examples
# selects all that does not end with berry $a = [“rasberry”, “blueberry”, “orange”] $a.reject |$x| { $x=~ /berry$/ }
Since 3.2
Type: rvalue
requireEvaluate one or more classes, adding the required class as a dependency.
The relationship metaparameters work well for specifying relationships between individualresources, but they can be clumsy for specifying relationships between classes. This function is aPuppet Documentation • Function Reference 386/434
superset of the ʻincludeʼ function, adding a class relationship so that the requiring class dependson the required class.
Warning: using require in place of include can lead to unwanted dependency cycles.
For instance the following manifest, with ʻrequireʼ instead of ʻincludeʼ would produce a nastydependence cycle, because notify imposes a before between File[/foo] and Service[foo]:
classmyservice{service{foo:ensure=>running}}
classotherstuff{includemyservicefile{'/foo':notify=>Service[foo]}}
Note that this function only works with clients 0.25 and later, and it will fail if used with earlierclients.
Type: statement
searchAdd another namespace for this class to search. This allows you to create classes with sets ofdefinitions and add those classes to another classʼs search path.�
Type: statement
selectApplies a parameterized block to each element in a sequence of entries from the first argument and�returns an array with the entires for which the block evaluates to true.
This function takes two mandatory arguments: the first should be an Array or a Hash, and the�second a parameterized block as produced by the puppet syntax:
$a.select $x { … }
When the first argument is an Array, the block is called with each entry in turn. When the first��argument is a hash the entry is an array with [key,value] .
The returned filtered object is of the same type as the receiver.�
Examples
# selects all that end with berry $a = [“raspberry”, “blueberry”, “orange”] $a.select |$x| { $x =~/berry$/ }
Since 3.2
Type: rvalue
Puppet Documentation • Function Reference 387/434

sha1Returns a SHA1 hash value from a provided string.
Type: rvalue
shellquoteQuote and concatenate arguments for use in Bourne shell.
Each argument is quoted separately, and then all are concatenated with spaces. If an argument isan array, the elements of that array is interpolated within the rest of the arguments; this makes itpossible to have an array of arguments and pass that array to shellquote instead of having tospecify each argument individually in the call.
Type: rvalue
sliceApplies a parameterized block to each slice of elements in a sequence of selected entries from thefirst argument and returns the first argument, or if no block is given returns a new array with a��concatenation of the slices.
This function takes two mandatory arguments: the first should be an Array or a Hash, and the�second the number of elements to include in each slice. The optional third argument should be a aparameterized block as produced by the puppet syntax:
|$x|{...}
The parameterized block should have either one parameter (receiving an array with the slice), orthe same number of parameters as specified by the slice size (each parameter receiving its part of�the slice). In case there are fewer remaining elements than the slice size for the last slice it willcontain the remaining elements. When the block has multiple parameters, excess parameters areset to :undef for an array, and to empty arrays for a Hash.
$a.slice(2)|$first,$second|{...}
When the first argument is a Hash, each key,value entry is counted as one, e.g, a slice size of 2 will�produce an array of two arrays with key, value.
$a.slice(2)|$entry|{notice"first${$entry[0]},second${$entry[1]}"}$a.slice(2)|$first,$second|{notice"first${first},second${second}"}
When called without a block, the function produces a concatenated result of the slices.
slice($[1,2,3,4,5,6],2)#produces[[1,2],[3,4],[5,6]]
Puppet Documentation • Function Reference 388/434
Since 3.2
Type: rvalue
splitSplit a string variable into an array using the specified split regexp.�
Example:
$string='v1.v2:v3.v4'$array_var1=split($string,':')$array_var2=split($string,'[.]')$array_var3=split($string,'[.:]')
$array_var1 now holds the result ['v1.v2','v3.v4'] , while $array_var2 holds ['v1','v2:v3','v4'] , and $array_var3 holds ['v1','v2','v3','v4'] .
Note that in the second example, we split on a literal string that contains a regexp meta-character(.), which must be escaped. A simple way to do that for a single character is to enclose it in squarebrackets; a backslash will also escape a single character.
Type: rvalue
sprintfPerform printf-style formatting of text.
The first parameter is format string describing how the rest of the parameters should be formatted.�See the documentation for the Kernel::sprintf function in Ruby for all the details.
Type: rvalue
tagAdd the specified tags to the containing class or definition. ��All contained objects will then acquirethat tag, also.
Type: statement
taggedA boolean function that tells you whether the current container is tagged with the specified tags.�The tags are ANDed, so that all of the specified tags must be included for the function to return�true.
Type: rvalue
templateEvaluate a template and return its value. See the templating docs for more information.
Puppet Documentation • Function Reference 389/434
Note that if multiple templates are specified, their output is all concatenated and returned as the�output of the function.
Type: rvalue
versioncmpCompares two version numbers.
Prototype:
$result=versioncmp(a,b)
Where a and b are arbitrary version strings.
This function returns:
1 if version a is greater than version b0 if the versions are equal-1 if version a is less than version b
Example:
ifversioncmp('2.6-1','2.4.5')>0{notice('2.6-1is>than2.4.5')}
This function uses the same version comparison algorithm used by Puppetʼs package type.
Type: rvalue
warningLog a message on the server at level warning.
Type: statement
This page autogenerated on Tue Jun 18 16:58:31 -0700 2013
Metaparameter Reference
Puppet Documentation • Metaparameter Reference 390/434
Metaparameter ReferenceThis page is autogenerated; any changes will get overwritten (last generated on Tue Jun 1816:58:45 -0700 2013)
Puppet Documentation • Metaparameter Reference 391/434
MetaparametersMetaparameters are parameters that work with any resource type; they are part of the Puppetframework itself rather than being part of the implementation of any given instance. Thus, anydefined metaparameter can be used with any instance in your manifest, including defined��components.
Available Metaparametersalias
Creates an alias for the object. Puppet uses this internally when you provide a symbolic title:
file{'sshdconfig':path=>$operatingsystem?{solaris=>"/usr/local/etc/ssh/sshd_config",default=>"/etc/ssh/sshd_config"},source=>"..."}
service{'sshd':subscribe=>File['sshdconfig']}
When you use this feature, the parser sets sshdconfig as the title, and the library sets that as analias for the file so the dependency lookup in �Service['sshd'] works. You can use thismetaparameter yourself, but note that only the library can use these aliases; for instance, thefollowing code will not work:
file{"/etc/ssh/sshd_config":owner=>root,group=>root,alias=>'sshdconfig'}
file{'sshdconfig':mode=>644}
Thereʼs no way here for the Puppet parser to know that these two stanzas should be affecting the�same file.�
See the Language Guide for more information.
audit
Marks a subset of this resourceʼs unmanaged attributes for auditing. Accepts an attribute name, anarray of attribute names, or all .
Auditing a resource attribute has two effects: First, whenever a catalog is applied with puppet apply�
Puppet Documentation • Metaparameters 392/434
or puppet agent, Puppet will check whether that attribute of the resource has been modified,�comparing its current value to the previous run; any change will be logged alongside any actionsperformed by Puppet while applying the catalog.
Secondly, marking a resource attribute for auditing will include that attribute in inspection reportsgenerated by puppet inspect; see the puppet inspect documentation for more details.
Managed attributes for a resource can also be audited, but note that changes made by Puppet willbe logged as additional modifications. (I.e. if a user manually edits a file whose contents are audited��and managed, puppet agentʼs next two runs will both log an audit notice: the first run will log the�userʼs edit and then revert the file to the desired state, and the second run will log the edit made by�Puppet.)
before
References to one or more objects that depend on this object. This parameter is the opposite ofrequire — it guarantees that the specified object is applied later than the specifying object:�
file{"/var/nagios/configuration":source=>"...",recurse=>true,before=>Exec["nagios-rebuid"]}
exec{"nagios-rebuild":command=>"/usr/bin/make",cwd=>"/var/nagios/configuration"}
This will make sure all of the files are up to date before the make command is run.�
loglevel
Sets the level that information will be logged. The log levels have the biggest impact when logs aresent to syslog (which is currently the default). Valid values are debug , info , notice , warning , err ,alert , emerg , crit , verbose .
noop
Boolean flag indicating whether work should actually be done. �Valid values are true , false .
notify
References to one or more objects that depend on this object. This parameter is the opposite ofsubscribe — it creates a dependency relationship like before, and also causes the dependentobject(s) to be refreshed when this object is changed. For instance:
file{"/etc/sshd_config":source=>"....",notify=>Service['sshd']}
service{'sshd':ensure=>running
Puppet Documentation • Metaparameters 393/434
}
This will restart the sshd service if the sshd config file changes.��
require
References to one or more objects that this object depends on. This is used purely for guaranteeingthat changes to required objects happen before the dependent object. For instance:
#Createthedestinationdirectorybeforeyoucopythingsdownfile{"/usr/local/scripts":ensure=>directory}
file{"/usr/local/scripts/myscript":source=>"puppet://server/module/myscript",mode=>755,require=>File["/usr/local/scripts"]}
Multiple dependencies can be specified by providing a comma-separated list of resources, enclosed�in square brackets:
require=>[File["/usr/local"],File["/usr/local/scripts"]]
Note that Puppet will autorequire everything that it can, and there are hooks in place so that itʼseasy for resources to add new ways to autorequire objects, so if you think Puppet could be smarterhere, let us know.
In fact, the above code was redundant — Puppet will autorequire any parent directories that arebeing managed; it will automatically realize that the parent directory should be created before thescript is pulled down.
Currently, exec resources will autorequire their CWD (if it is specified) plus any fully qualified paths��that appear in the command. For instance, if you had an exec command that ran the myscriptmentioned above, the above code that pulls the file down would be automatically listed as a�requirement to the exec code, so that you would always be running againts the most recentversion.
schedule
On what schedule the object should be managed. You must create a schedule object, and thenreference the name of that object to use that for your schedule:
schedule{'daily':period=>daily,range=>"2-4"}
exec{"/usr/bin/apt-getupdate":schedule=>'daily'
Puppet Documentation • Metaparameters 394/434
}
The creation of the schedule object does not need to appear in the configuration before objects�that use it.
stage
Which run stage a given resource should reside in. This just creates a dependency on or from thenamed milestone. For instance, saying that this is in the ʻbootstrapʼ stage creates a dependency onthe ʻbootstrapʼ milestone.
By default, all classes get directly added to the ʻmainʼ stage. You can create new stages asresources:
stage{['pre','post']:}
To order stages, use standard relationships:
stage{'pre':before=>Stage['main']}
Or use the new relationship syntax:
Stage['pre']->Stage['main']->Stage['post']
Then use the new class parameters to specify a stage:
class{'foo':stage=>'pre'}
Stages can only be set on classes, not individual resources. This will fail:
file{'/foo':stage=>'pre',ensure=>file}
subscribe
References to one or more objects that this object depends on. This metaparameter creates adependency relationship like require, and also causes the dependent object to be refreshed whenthe subscribed object is changed. For instance:
classnagios{file{'nagconf':path=>"/etc/nagios/nagios.conf"source=>"puppet://server/module/nagios.conf",}service{'nagios':ensure=>running,subscribe=>File['nagconf']}}
Puppet Documentation • Metaparameters 395/434
Currently the exec , mount and service types support refreshing.
tag
Add the specified tags to the associated resource. �While all resources are automatically tagged withas much information as possible (e.g., each class and definition containing the resource), it can be�useful to add your own tags to a given resource.
Multiple tags can be specified as an array:�
file{'/etc/hosts':ensure=>file,source=>'puppet:///modules/site/hosts',mode=>0644,tag=>['bootstrap','minimumrun','mediumrun'],}
Tags are useful for things like applying a subset of a hostʼs configuration with �the tags setting:
puppetagent--test--tagsbootstrap
This way, you can easily isolate the portion of the configuration youʼre trying to test.�
This page autogenerated on Tue Jun 18 16:58:47 -0700 2013
Configuration Reference�
Puppet Documentation • Configuration Reference 396/434
Configuration Reference�This page is autogenerated; any changes will get overwritten (last generated on Tue Jun 1816:58:23 -0700 2013)
Configuration Settings�Each of these settings can be specified in �puppet.conf or on the command line.When using boolean settings on the command line, use --setting and --no-setting instead of--setting(true|false) .Settings can be interpolated as $variables in other settings; $environment is special, in thatpuppet master will interpolate each agent nodeʼs environment instead of its own.Multiple values should be specified as comma-separated lists; multiple directories should be�separated with the system path separator (usually a colon).Settings that represent time intervals should be specified in duration format: an integer�immediately followed by one of the units ʻyʼ (years of 365 days), ʻdʼ (days), ʻhʼ (hours), ʻmʼ(minutes), or ʻsʼ (seconds). The unit cannot be combined with other units, and defaults toseconds when omitted. Examples are ʻ3600ʼ which is equivalent to ʻ1hʼ (one hour), and ʻ1825dʼwhich is equivalent to ʻ5yʼ (5 years).Settings that take a single file or directory can optionally set the owner, group, and mode for�their value: rundir=$vardir/run{owner=puppet,group=puppet,mode=644}The Puppet executables will ignore any setting that isnʼt relevant to their function.
See the configuration guide� for more details.
agent_catalog_run_lockfile�
A lock file to indicate that a puppet agent catalog run is currently in progress. �The file contains the�pid of the process that holds the lock on the catalog run.
Default: $statedir/agent_catalog_run.lock
agent_disabled_lockfile�
A lock file to indicate that puppet agent runs have been administratively disabled. �File contains aJSON object with state information.
Default: $statedir/agent_disabled.lock
allow_duplicate_certs
Whether to allow a new certificate request to overwrite an existing certificate.��
Default: false
allow_variables_with_dashes
Permit hyphens (- ) in variable names and issue deprecation warnings about them. This settingshould always be false ; setting it to true will cause subtle and wide-ranging bugs. It will beremoved in a future version. Hyphenated variables caused major problems in the language, butPuppet Documentation • Configuration Reference 397/434
were allowed between Puppet 2.7.3 and 2.7.14. If you used them during this window, we apologizefor the inconvenience — you can temporarily set this to true in order to upgrade, and can renameyour variables at your leisure. Please revert it to false after you have renamed all affected�variables.
Default: false
archive_file_server�
During an inspect run, the file bucket server to archive files to if archive_files is set.���
Default: $server
archive_files�
During an inspect run, whether to archive files whose contents are audited to a file bucket.��
Default: false
async_storeconfigs�
Whether to use a queueing system to provide asynchronous database integration. Requires thatpuppetqueue be running.
Default: false
autoflush�
Whether log files should always flush to disk.��
Default: true
autosign
Whether to enable autosign. Valid values are true (which autosigns any key request, and is a verybad idea), false (which never autosigns any key request), and the path to a file, which uses that�configuration file to determine which keys to sign.��
Default: $confdir/autosign.conf
bindaddress
The address a listening server should bind to.
Default: 0.0.0.0
bucketdir
Where FileBucket files are stored.�
Default: $vardir/bucket
ca
Whether the master should function as a certificate authority.�
Default: true
Puppet Documentation • Configuration Reference 398/434
ca_name
The name to use the Certificate Authority certificate.��
Default: Puppet CA: $certname
ca_port
The port to use for the certificate authority.�
Default: $masterport
ca_server
The server to use for certificate authority requests. �Itʼs a separate server because it cannot and doesnot need to horizontally scale.
Default: $server
ca_ttl
The default TTL for new certificates. If this setting is set, ca_days is ignored. Can be specified as a��duration.
Default: 5y
cacert
The CA certificate.�
Default: $cadir/ca_crt.pem
cacrl
The certificate revocation list (CRL) for the CA. Will be used if present but otherwise ignored.�
Default: $cadir/ca_crl.pem
cadir
The root directory for the certificate authority.�
Default: $ssldir/ca
cakey
The CA private key.
Default: $cadir/ca_key.pem
capass
Where the CA stores the password for the private key
Default: $caprivatedir/ca.pass
caprivatedir
Where the CA stores private certificate information.�
Default: $cadir/privatePuppet Documentation • Configuration Reference 399/434
capub
The CA public key.
Default: $cadir/ca_pub.pem
catalog_cache_terminus
How to store cached catalogs. Valid values are ʻjsonʼ and ʻyamlʼ. The agent application defaults toʻjsonʼ.
Default:
catalog_format
(Deprecated for ʻpreferred_serialization_formatʼ) What format to use to dump the catalog. Onlysupports ʻmarshalʼ and ʻyamlʼ. Only matters on the client, since it asks the server for a specific�format.
catalog_terminus
Where to get node catalogs. This is useful to change if, for instance, youʼd like to pre-compilecatalogs and store them in memcached or some other easily-accessed store.
Default: compiler
cert_inventory
A Complete listing of all certificates�
Default: $cadir/inventory.txt
certdir
The certificate directory.�
Default: $ssldir/certs
certdnsnames
The certdnsnames setting is no longer functional, after CVE-2011-3872. We ignore the valuecompletely. For your own certificate request you can set �dns_alt_names in the configuration and it�will apply locally. There is no configuration option to set DNS alt names, or any other�subjectAltName value, for another nodes certificate. Alternately you can use the �--dns_alt_namescommand line option to set the labels added while generating your own CSR.
certificate_expire_warning�
The window of time leading up to a certificateʼs expiration that a notification will be logged. This��applies to CA, master, and agent certificates. Can be specified as a duration.��
Default: 60d
certificate_revocation�
Whether certificate revocation should be supported by downloading a Certificate Revocation List��
Puppet Documentation • Configuration Reference 400/434
(CRL) to all clients. If enabled, CA chaining will almost definitely not work.�
Default: true
certname
The name to use when handling certificates. �Defaults to the fully qualified domain name.�
Default: (the systemʼs fully qualified domain name)�
classfile�
The file in which puppet agent stores a list of the classes associated with the retrieved�configuration. �Can be loaded in the separate puppet executable using the --loadclasses option.
Default: $statedir/classes.txt
client_datadir
The directory in which serialized data is stored on the client.
Default: $vardir/client_data
clientbucketdir
Where FileBucket files are stored locally.�
Default: $vardir/clientbucket
clientyamldir
The directory in which client-side YAML data is stored.
Default: $vardir/client_yaml
code
Code to parse directly. This is essentially only used by puppet , and should only be set if youʼrewriting your own Puppet executable
color
Whether to use colors when logging to the console. Valid values are ansi (equivalent to true ),html , and false , which produces no color. Defaults to false on Windows, as its console does notsupport ansi colors.
Default: ansi
confdir
The main Puppet configuration directory. �The default for this setting is calculated based on theuser. If the process is running as root or the user that Puppet is supposed to run as, it defaults to asystem directory, but if itʼs running as any other user, it defaults to being in the userʼs homedirectory.
Default: /etc/puppet
config�
Puppet Documentation • Configuration Reference 401/434
The configuration file for the current puppet application��
Default: $confdir/${config_file_name}��
config_file_name��
The name of the puppet config file.��
Default: puppet.conf
config_version�
How to determine the configuration version. �By default, it will be the time that the configuration is�parsed, but you can provide a shell script to override how the version is determined. The output ofthis script will be added to every log message in the reports, allowing you to correlate changes onyour hosts to the source version on the server.
configprint�
Print the value of a specific configuration setting. ��If the name of a setting is provided for this, thenthe value is printed and puppet exits. Comma-separate multiple values. For a list of all values,specify ʻallʼ.
configtimeout�
How long the client should wait for the configuration to be retrieved before considering it a failure.�This can help reduce flapping if too many clients contact the server at one time. Can be specified as��a duration.
Default: 2m
couchdb_url
The url where the puppet couchdb database will be created
Default: http://127.0.0.1:5984/puppet
csrdir
Where the CA stores certificate requests�
Default: $cadir/requests
daemonize
Whether to send the process into the background. This defaults to true on POSIX systems, and tofalse on Windows (where Puppet currently cannot daemonize).
Default: true
data_binding_terminus
Where to retrive information about data.
Default: hiera
dbadapter
Puppet Documentation • Configuration Reference 402/434
The type of database to use.
Default: sqlite3
dbconnections
The number of database connections for networked databases. Will be ignored unless the value is apositive integer.
dblocation
The database cache for client configurations. �Used for querying within the language.
Default: $statedir/clientconfigs.sqlite3�
dbmigrate
Whether to automatically migrate the database.
Default: false
dbname
The name of the database to use.
Default: puppet
dbpassword
The database password for caching. Only used when networked databases are used.
Default: puppet
dbport
The database password for caching. Only used when networked databases are used.
dbserver
The database server for caching. Only used when networked databases are used.
Default: localhost
dbsocket
The database socket location. Only used when networked databases are used. Will be ignored if thevalue is an empty string.
dbuser
The database user for caching. Only used when networked databases are used.
Default: puppet
default_file_terminus�
The default source for files if no server is given in a uri, e.g. puppet:///file. The default of ��restcauses the file to be retrieved using the �server setting. When running apply the default isfile_server , causing requests to be filled locally.�
Puppet Documentation • Configuration Reference 403/434
Default: rest
deviceconfig�
Path to the device config file for puppet device��
Default: $confdir/device.conf
devicedir
The root directory of devicesʼ $vardir
Default: $vardir/devices
diff�
Which diff command to use when printing differences between files. This setting has no default���value on Windows, as standard diff is not available, but Puppet can use many third-party diff�tools.
Default: diff�
diff_args�
Which arguments to pass to the diff command when printing differences between files. The���command to use can be chosen with the diff setting.
Default: -u
dns_alt_names
The comma-separated list of alternative DNS names to use for the local host. When the nodegenerates a CSR for itself, these are added to the request as the desired subjectAltName in thecertificate: additional DNS labels that the certificate is also valid answering as. This is generally��required if you use a non-hostname certname , or if you want to use puppetkick or puppetresource-H and the primary certname does not match the DNS name you use to communicatewith the host. This is unnecessary for agents, unless you intend to use them as a server for puppetkick or remote puppetresource management. It is rarely necessary for servers; it is usuallyhelpful only if you need to have a pool of multiple load balanced masters, or for the same master torespond on two physically separate networks under different names.�
document_all
Document all resources
Default: false
dynamicfacts
(Deprecated) Facts that are dynamic; these facts will be ignored when deciding whether changedfacts should result in a recompile. Multiple facts should be comma-separated.
Default: memorysize,memoryfree,swapsize,swapfree
environment
Puppet Documentation • Configuration Reference 404/434

The environment Puppet is running in. For clients (e.g., puppetagent ) this determines theenvironment itself, which is used to find modules and much more. �For servers (i.e., puppetmaster )this provides the default environment for nodes we know nothing about.
Default: production
evaltrace
Whether each resource should log when it is being evaluated. This allows you to interactively seeexactly what is being done.
Default: false
external_nodes
An external command that can produce node information. The commandʼs output must be a YAMLdump of a hash, and that hash must have a classes key and/or a parameters key, where classesis an array or hash and parameters is a hash. For unknown nodes, the command should exit with anon-zero exit code. This command makes it straightforward to store your node mappinginformation in other data sources like databases.
Default: none
factpath
Where Puppet should look for facts. Multiple directories should be separated by the system pathseparator character. (The POSIX path separator is ʻ:ʼ, and the Windows path separator is ʻ;ʼ.)
Default: $vardir/lib/facter:$vardir/facts
facts_terminus
The node facts terminus.
Default: facter
fileserverconfig��
Where the fileserver configuration is stored.��
Default: $confdir/fileserver.conf�
filetimeout�
The minimum time to wait between checking for updates in configuration files. ��This timeoutdetermines how quickly Puppet checks whether a file (such as manifests or templates) has changed�on disk. Can be specified as a duration.�
Default: 15s
freeze_main
Freezes the ʻmainʼ class, disallowing any code to be added to it. This essentially means that youcanʼt have any code outside of a node, class, or definition other than in the site manifest.�
Default: false
Puppet Documentation • Configuration Reference 405/434
genconfig�
Whether to just print a configuration to stdout and exit. �Only makes sense when used interactively.Takes into account arguments specified on the CLI.�
Default: false
genmanifest
Whether to just print a manifest to stdout and exit. Only makes sense when used interactively.Takes into account arguments specified on the CLI.�
Default: false
graph
Whether to create dot graph files for the different configuration graphs. ���These dot files can be�interpreted by tools like OmniGraffle or dot (which is part of ImageMagick).��
Default: false
graphdir
Where to store dot-outputted graphs.
Default: $statedir/graphs
group
The group puppet master should run as.
Default: puppet
hiera_config�
The hiera configuration file. Puppet only reads this file on startup, so you must restart the puppet���master every time you edit it.
Default: $confdir/hiera.yaml
hostcert
Where individual hosts store and look for their certificates.�
Default: $certdir/$certname.pem
hostcrl
Where the hostʼs certificate revocation list can be found. This is distinct from the certificate��authorityʼs CRL.
Default: $ssldir/crl.pem
hostcsr
Where individual hosts store and look for their certificate requests.�
Default: $ssldir/csr_$certname.pem
Puppet Documentation • Configuration Reference 406/434
hostprivkey
Where individual hosts store and look for their private key.
Default: $privatekeydir/$certname.pem
hostpubkey
Where individual hosts store and look for their public key.
Default: $publickeydir/$certname.pem
http_compression
Allow http compression in REST communication with the master. This setting might improveperformance for agent -> master communications over slow WANs. Your puppet master needs tosupport compression (usually by activating some settings in a reverse-proxy in front of the puppetmaster, which rules out webrick). It is harmless to activate this settings if your master doesnʼtsupport compression, but if it supports it, this setting might reduce performance on high-speedLANs.
Default: false
http_proxy_host
The HTTP proxy host to use for outgoing connections. Note: You may need to use a FQDN for theserver hostname when using a proxy.
Default: none
http_proxy_port
The HTTP proxy port to use for outgoing connections
Default: 3128
httplog
Where the puppet agent web server logs.
Default: $logdir/http.log
ignorecache
Ignore cache and always recompile the configuration. �This is useful for testing new configurations,�where the local cache may in fact be stale even if the timestamps are up to date - if the facts changeor if the server changes.
Default: false
ignoreimport
If true, allows the parser to continue without requiring all files referenced with �import statementsto exist. This setting was primarily designed for use with commit hooks for parse-checking.
Default: false
ignoremissingtypes
Puppet Documentation • Configuration Reference 407/434

Skip searching for classes and definitions that were missing during a prior compilation. The list of�missing objects is maintained per-environment and persists until the environment is cleared or themaster is restarted.
Default: false
ignoreschedules
Boolean; whether puppet agent should ignore schedules. This is useful for initial puppet agentruns.
Default: false
inventory_port
The port to communicate with the inventory_server.
Default: $masterport
inventory_server
The server to send facts to.
Default: $server
inventory_terminus
Should usually be the same as the facts terminus
Default: $facts_terminus
keylength
The bit length of keys.
Default: 4096
lastrunfile�
Where puppet agent stores the last run report summary in yaml format.
Default: $statedir/last_run_summary.yaml
lastrunreport
Where puppet agent stores the last run report in yaml format.
Default: $statedir/last_run_report.yaml
ldapattrs
The LDAP attributes to include when querying LDAP for nodes. All returned attributes are set asvariables in the top-level scope. Multiple values should be comma-separated. The value ʻallʼ returnsall attributes.
Default: all
ldapbase
Puppet Documentation • Configuration Reference 408/434
The search base for LDAP searches. Itʼs impossible to provide a meaningful default here, althoughthe LDAP libraries might have one already set. Generally, it should be the ʻou=Hostsʼ branch underyour main directory.
ldapclassattrs
The LDAP attributes to use to define Puppet classes. �Values should be comma-separated.
Default: puppetclass
ldapparentattr
The attribute to use to define the parent node.�
Default: parentnode
ldappassword
The password to use to connect to LDAP.
ldapport
The LDAP port. Only used if node_terminus is set to ldap .
Default: 389
ldapserver
The LDAP server. Only used if node_terminus is set to ldap .
Default: ldap
ldapssl
Whether SSL should be used when searching for nodes. Defaults to false because SSL usuallyrequires certificates to be set up on the client side.�
Default: false
ldapstackedattrs
The LDAP attributes that should be stacked to arrays by adding the values in all hierarchy elementsof the tree. Values should be comma-separated.
Default: puppetvar
ldapstring
The search string used to find an LDAP node.�
Default: (&(objectclass=puppetClient)(cn=%s))
ldaptls
Whether TLS should be used when searching for nodes. Defaults to false because TLS usuallyrequires certificates to be set up on the client side.�
Default: false
Puppet Documentation • Configuration Reference 409/434
ldapuser
The user to use to connect to LDAP. Must be specified as a full DN.�
libdir
An extra search path for Puppet. This is only useful for those files that Puppet will load on demand,�and is only guaranteed to work for those cases. In fact, the autoload mechanism is responsible formaking sure this directory is in Rubyʼs search path
Default: $vardir/lib
listen
Whether puppet agent should listen for connections. If this is true, then puppet agent will acceptincoming REST API requests, subject to the default ACLs and the ACLs set in the rest_authconfigfile. Puppet agent can respond usefully to requests on the �run , facts , certificate , and resourceendpoints.
Default: false
localcacert
Where each client stores the CA certificate.�
Default: $certdir/ca.pem
localconfig�
Where puppet agent caches the local configuration. �An extension indicating the cache format isadded automatically.
Default: $statedir/localconfig�
logdir
The directory in which to store log files�
Default:
manage_internal_file_permissions�
Whether Puppet should manage the owner, group, and mode of files it uses internally�
Default: true
manifest
The entry-point manifest for puppet master.
Default: $manifestdir/site.pp
manifestdir
Where puppet master looks for its manifests.
Default: $confdir/manifests
masterhttplog
Puppet Documentation • Configuration Reference 410/434
Where the puppet master web server logs.
Default: $logdir/masterhttp.log
masterlog
Where puppet master logs. This is generally not used, since syslog is the default log destination.
Default: $logdir/puppetmaster.log
masterport
The port for puppet master traffic. For puppet master, this is the port to listen on; for puppet agent,��this is the port to make requests on. Both applications use this setting to get the port.
Default: 8140
max_deprecations
Sets the max number of logged/displayed parser validation deprecation warnings in case multipleerrors have been detected. A value of 0 is the same as value 1. The count is per manifest.
Default: 10
max_errors
Sets the max number of logged/displayed parser validation errors in case multiple errors havebeen detected. A value of 0 is the same as value 1. The count is per manifest.
Default: 10
max_warnings
Sets the max number of logged/displayed parser validation warnings in case multiple errors havebeen detected. A value of 0 is the same as value 1. The count is per manifest.
Default: 10
maximum_uid
The maximum allowed UID. Some platforms use negative UIDs but then ship with tools that do notknow how to handle signed ints, so the UIDs show up as huge numbers that can then not be fedback into the system. This is a hackish way to fail in a slightly more useful way when that happens.
Default: 4294967290
mkusers
Whether to create the necessary user and group that puppet agent will run as.
Default: false
module_repository
The module repository
Default: https://forge.puppetlabs.com
Puppet Documentation • Configuration Reference 411/434
module_working_dir
The directory into which module tool data is stored
Default: $vardir/puppet-module
modulepath
The search path for modules, as a list of directories separated by the system path separatorcharacter. (The POSIX path separator is ʻ:ʼ, and the Windows path separator is ʻ;ʼ.)
Default: $confdir/modules:/usr/share/puppet/modules
name
The name of the application, if we are running as one. The default is essentially $0 without the pathor .rb .
Default:
node_cache_terminus
How to store cached nodes. Valid values are (none), ʻjsonʼ, ʻyamlʼ or write only yaml(ʻwrite_only_yamlʼ). The master application defaults to ʻwrite_only_yamlʼ, all others to none.
Default:
node_name
How the puppet master determines the clientʼs identity and sets the ʻhostnameʼ, ʻfqdnʼ and ʻdomainʼfacts for use in the manifest, in particular for determining which ʻnodeʼ statement applies to theclient. Possible values are ʻcertʼ (use the subjectʼs CN in the clientʼs certificate) and ʻfacterʼ (use the�hostname that the client reported in its facts)
Default: cert
node_name_fact
The fact name used to determine the node name used for all requests the agent makes to themaster. WARNING: This setting is mutually exclusive with node_name_value. Changing this settingalso requires changes to the default auth.conf configuration on the Puppet Master. �Please seehttp://links.puppetlabs.com/node_name_fact for more information.
node_name_value
The explicit value used for the node name for all requests the agent makes to the master.WARNING: This setting is mutually exclusive with node_name_fact. Changing this setting alsorequires changes to the default auth.conf configuration on the Puppet Master. �Please seehttp://links.puppetlabs.com/node_name_value for more information.
Default: $certname
node_terminus
Where to find information about nodes.�
Default: plain
Puppet Documentation • Configuration Reference 412/434
noop
Whether puppet agent should be run in noop mode.
Default: false
onetime
Run the configuration once, rather than as a long-running daemon. This is useful for interactively�running puppetd.
Default: false
parser
Selects the parser to use for parsing puppet manifests (in puppet DSL language/ʼ.ppʼ files).�Available choices are ʻcurrentʼ (the default), and ʻfutureʼ. The ʻcurentʼ parser means that thereleased version of the parser should be used. The ʻfutureʼ parser is a “time travel to the future”allowing early exposure to new language features. What these fatures are will vary from release torelease and they may be invididually configurable. Available Since Puppet 3.2.�
Default: current
passfile�
Where puppet agent stores the password for its private key. Generally unused.
Default: $privatedir/password
path
The shell search path. Defaults to whatever is inherited from the parent process.
Default: none
pidfile�
The file containing the PID of a running process. �This file is intended to be used by service�management frameworks and monitoring systems to determine if a puppet process is still in theprocess table.
Default: $rundir/${run_mode}.pid
plugindest
Where Puppet should store plugins that it pulls down from the central server.
Default: $libdir
pluginsignore
What files to ignore when pulling down plugins.�
Default: .svn CVS .git
pluginsource
From where to retrieve plugins. The standard Puppet file type is used for retrieval, so anything
Puppet Documentation • Configuration Reference 413/434
that is a valid file source can be used here.�
Default: puppet://$server/plugins
pluginsync
Whether plugins should be synced with the central server.
Default: true
postrun_command
A command to run after every agent run. If this command returns a non-zero return code, theentire Puppet run will be considered to have failed, even though it might have performed workduring the normal run.
preferred_serialization_format
The preferred means of serializing ruby instances for passing over the wire. This wonʼt guaranteethat all instances will be serialized using this method, since not all classes can be guaranteed tosupport this format, but it will be used for all classes that support it.
Default: pson
prerun_command
A command to run before every agent run. If this command returns a non-zero return code, theentire Puppet run will fail.
privatedir
Where the client stores private certificate information.�
Default: $ssldir/private
privatekeydir
The private key directory.
Default: $ssldir/private_keys
profile�
Whether to enable experimental performance profiling�
Default: false
publickeydir
The public key directory.
Default: $ssldir/public_keys
puppetdlog
The log file for puppet agent. �This is generally not used.
Default: $logdir/puppetd.log
Puppet Documentation • Configuration Reference 414/434
puppetport
Which port puppet agent listens on.
Default: 8139
queue_source
Which type of queue to use for asynchronous processing. If your stomp server requiresauthentication, you can include it in the URI as long as your stomp client library is at least 1.1.1
Default: stomp://localhost:61613/
queue_type
Which type of queue to use for asynchronous processing.
Default: stomp
rails_loglevel
The log level for Rails connections. The value must be a valid log level within Rails. Productionenvironments normally use info and other environments normally use debug .
Default: info
railslog
Where Rails-specific logs are sent�
Default: $logdir/rails.log
report
Whether to send reports after every transaction.
Default: true
report_port
The port to communicate with the report_server.
Default: $masterport
report_server
The server to send transaction reports to.
Default: $server
reportdir
The directory in which to store reports received from the client. Each client gets a separatesubdirectory.
Default: $vardir/reports
reportfrom
The ʻfromʼ email address for the reports.
Puppet Documentation • Configuration Reference 415/434
Default: report@(the systemʼs fully qualified domain name)�
reports
The list of reports to generate. All reports are looked for in puppet/reports/name.rb , and multiplereport names should be comma-separated (whitespace is okay).
Default: store
reporturl
The URL used by the http reports processor to send reports
Default: http://localhost:3000/reports/upload
req_bits
The bit length of the certificates.�
Default: 4096
requestdir
Where host certificate requests are stored.�
Default: $ssldir/certificate_requests�
resourcefile�
The file in which puppet agent stores a list of the resources associated with the retrieved�configuration.�
Default: $statedir/resources.txt
rest_authconfig�
The configuration file that defines the rights to the different rest indirections. ����This can be used as afine-grained authorization system for �puppetmaster .
Default: $confdir/auth.conf
route_file�
The YAML file containing indirector route configuration.��
Default: $confdir/routes.yaml
rrddir
The directory where RRD database files are stored. Directories for each reporting host will be�created under this directory.
Default: $vardir/rrd
rrdinterval
How often RRD should expect data. This should match how often the hosts report back to theserver. Can be specified as a duration.�
Puppet Documentation • Configuration Reference 416/434
Default: $runinterval
rundir
Where Puppet PID files are kept.�
Default:
runinterval
How often puppet agent applies the client configuration; in seconds. Note that a runinterval of 0�means “run continuously” rather than “never run.” If you want puppet agent to never run, youshould start it with the --no-client option. Can be specified as a duration.�
Default: 30m
sendmail
Where to find the sendmail binary with which to send email.�
Default: /usr/sbin/sendmail
serial
Where the serial number for certificates is stored.�
Default: $cadir/serial
server
The server to which the puppet agent should connect
Default: puppet
server_datadir
The directory in which serialized data is stored, usually in a subdirectory.
Default: $vardir/server_data
show_diff�
Whether to log and report a contextual diff when files are being replaced. ��This causes partial file�contents to pass through Puppetʼs normal logging and reporting system, so this setting should beused with caution if you are sending Puppetʼs reports to an insecure destination. This featurecurrently requires the diff/lcs Ruby library.
Default: false
signeddir
Where the CA stores signed certificates.�
Default: $cadir/signed
smtpserver
The server through which to send email reports.
Puppet Documentation • Configuration Reference 417/434
Default: none
splay
Whether to sleep for a pseudo-random (but consistent) amount of time before a run.
Default: false
splaylimit
The maximum time to delay before runs. Defaults to being the same as the run interval. Can bespecified as a duration.�
Default: $runinterval
srv_domain
The domain which will be queried to find the SRV records of servers to use.�
Default: (the systemʼs own domain)
ssl_client_ca_auth
Certificate authorities who issue server certificates. ��SSL servers will not be considered authenticunless they posses a certificate issued by an authority �listed in this file. �If this setting has no valuethen the Puppet masterʼs CA certificate (localcacert) will be used.�
Default:
ssl_client_header
The header containing an authenticated clientʼs SSL DN. This header must be set by the proxy to theauthenticated clientʼs SSL DN (e.g., /CN=puppet.puppetlabs.com ). Puppet will parse out theCommon Name (CN) from the Distinguished Name (DN) and use the value of the CN field for�authorization. Note that the name of the HTTP header gets munged by the web server commongateway inteface: an HTTP_ prefix is added, dashes are converted to underscores, and all letters are�uppercased. Thus, to use the X-Client-DN header, this setting should be HTTP_X_CLIENT_DN .
Default: HTTP_X_CLIENT_DN
ssl_client_verify_header
The header containing the status message of the client verification. This header must be set by the�proxy to ʻSUCCESSʼ if the client successfully authenticated, and anything else otherwise. Note thatthe name of the HTTP header gets munged by the web server common gateway inteface: an HTTP_prefix is added, dashes are converted to underscores, and all letters are uppercased. �Thus, to usethe X-Client-Verify header, this setting should be HTTP_X_CLIENT_VERIFY .
Default: HTTP_X_CLIENT_VERIFY
ssl_server_ca_auth
Certificate authorities who issue client certificates. ��SSL clients will not be considered authenticunless they posses a certificate issued by an authority �listed in this file. �If this setting has no valuethen the Puppet masterʼs CA certificate (localcacert) will be used.�
Puppet Documentation • Configuration Reference 418/434

Default:
ssldir
Where SSL certificates are kept.�
Default: $confdir/ssl
statedir
The directory where Puppet state is stored. Generally, this directory can be removed withoutcausing harm (although it might result in spurious service restarts).
Default: $vardir/state
statefile�
Where puppet agent and puppet master store state associated with the running configuration. �Inthe case of puppet master, this file reflects the state discovered through interacting with clients.��
Default: $statedir/state.yaml
storeconfigs�
Whether to store each clientʼs configuration, including catalogs, facts, and related data. �This alsoenables the import and export of resources in the Puppet language - a mechanism for exchangeresources between nodes. By default this uses ActiveRecord and an SQL database to store andquery the data; this, in turn, will depend on Rails being available. You can adjust the backend usingthe storeconfigs_backend setting.�
Default: false
storeconfigs_backend�
Configure the backend terminus used for StoreConfigs. By default, this uses the ActiveRecord store,��which directly talks to the database from within the Puppet Master process.
Default: active_record
strict_hostname_checking
Whether to only search for the complete hostname as it is in the certificate when searching for node�information in the catalogs.
Default: false
summarize
Whether to print a transaction summary.
Default: false
syslogfacility
What syslog facility to use when logging to syslog. Syslog has a fixed list of valid facilities, and you�must choose one of those; you cannot just make one up.
Default: daemon
Puppet Documentation • Configuration Reference 419/434
tagmap
The mapping between reporting tags and email addresses.
Default: $confdir/tagmail.conf
tags
Tags to use to find resources. �If this is set, then only resources tagged with the specified tags will�be applied. Values must be comma-separated.
templatedir
Where Puppet looks for template files. �Can be a list of colon-separated directories.
Default: $vardir/templates
thin_storeconfigs�
Boolean; whether Puppet should store only facts and exported resources in the storeconfigs�database. This will improve the performance of exported resources with the older active_recordbackend, but will disable external tools that search the storeconfigs database. Thinning catalogs is�generally unnecessary when using PuppetDB to store catalogs.
Default: false
trace
Whether to print stack traces on some errors
Default: false
use_cached_catalog
Whether to only use the cached catalog rather than compiling a new catalog on every run. Puppetcan be run with this enabled by default and then selectively disabled when a recompile is desired.
Default: false
use_srv_records
Whether the server will search for SRV records in DNS for the current domain.
Default: false
usecacheonfailure
Whether to use the cached configuration when the remote configuration will not compile. ��Thisoption is useful for testing new configurations, where you want to fix the broken configuration���rather than reverting to a known-good one.
Default: true
user
The user puppet master should run as.
Default: puppet
Puppet Documentation • Configuration Reference 420/434
vardir
Where Puppet stores dynamic and growing data. The default for this setting is calculated specially,like confdir_.
Default: /var/lib/puppet
waitforcert
The time interval ʻpuppet agentʼ should connect to the server and ask it to sign a certificate request.�This is useful for the initial setup of a puppet client. You can turn off waiting for certificates by��specifying a time of 0. Can be specified as a duration.�
Default: 2m
yamldir
The directory in which YAML data is stored, usually in a subdirectory.
Default: $vardir/yaml
zlib
Boolean; whether to use the zlib library
Default: true
This page autogenerated on Tue Jun 18 16:58:23 -0700 2013
Report Reference
Puppet Documentation • Report Reference 421/434
Report ReferenceThis page is autogenerated; any changes will get overwritten (last generated on Tue Jun 1816:58:54 -0700 2013)
Puppet clients can report back to the server after each transaction. This transaction report is sent asa YAML dump of the Puppet::Transaction::Report class and includes every log message that wasgenerated during the transaction along with as many metrics as Puppet knows how to collect. SeeReports and Reporting for more information on how to use reports.
Currently, clients default to not sending in reports; you can enable reporting by setting the reportparameter to true.
To use a report, set the reports parameter on the server; multiple reports must be comma-separated. You can also specify none to disable reports entirely.
Puppet provides multiple report handlers that will process client reports:
httpSend reports via HTTP or HTTPS. This report processor submits reports as POST requests to theaddress in the reporturl setting. The body of each POST request is the YAML dump of aPuppet::Transaction::Report object, and the Content-Type is set as application/x-yaml .
logSend all received logs to the local log destinations. Usually the log destination is syslog.
rrdgraphGraph all available data about hosts using the RRD library. You must have the Ruby RRDtool libraryinstalled to use this report, which you can get from the RubyRRDTool RubyForge page. Thispackage may also be available as ruby-rrd or rrdtool-ruby in your distributionʼs packagemanagement system. The library and/or package will both require the binary rrdtool packagefrom your distribution to be installed.
This report will create, manage, and graph RRD database files for each of the metrics generated�during transactions, and it will create a few simple html files to display the reporting hostʼs graphs.�At this point, it will not create a common index file to display links to all hosts.�
All RRD files and graphs get created in the �rrddir directory. If you want to serve these publicly, youshould be able to just alias that directory in a web server.
If you really know what youʼre doing, you can tune the rrdinterval , which defaults to theruninterval .
storePuppet Documentation • Report Reference 422/434
Store the yaml report on disk. Each host sends its report as a YAML dump and this just stores thefile on disk, in the �reportdir directory.
These files collect quickly – one every half hour – so it is a good idea to perform some maintenance�on them if you use this report (itʼs the only default report).
tagmailThis report sends specific log messages to specific email addresses based on the tags in the log��messages.
See the documentation on tags for more information.
To use this report, you must create a tagmail.conf file in the location specified by the ��tagmapsetting. This is a simple file that maps tags to email addresses: �Any log messages in the report thatmatch the specified tags will be sent to the specified email addresses.��
Lines in the tagmail.conf file consist of a comma-separated list of tags, a colon, and a comma-�separated list of email addresses. Tags can be !negated with a leading exclamation mark, which willsubtract any messages with that tag from the set of events handled by that line.
Puppetʼs log levels (debug , info , notice , warning , err , alert , emerg , crit , and verbose ) can alsobe used as tags, and there is an all tag that will always match all log messages.
An example tagmail.conf :
all:[email protected],!mailserver:[email protected]
This will send all messages to [email protected] , and all messages from webservers that are not alsofrom mailservers to [email protected] .
If you are using anti-spam controls such as grey-listing on your mail server, you should whitelistthe sending email address (controlled by reportfrom configuration option) to ensure your email is�not discarded as spam.
This page autogenerated on Tue Jun 18 16:58:54 -0700 2013
Indirection Reference
Puppet Documentation • Indirection Reference 423/434
Indirection ReferenceThis page is autogenerated; any changes will get overwritten (last generated on Tue Jun 1816:58:37 -0700 2013)
Puppet Documentation • Indirection Reference 424/434
About IndirectionPuppetʼs indirector support pluggable backends (termini) for a variety of key-value stores(indirections). Each indirection type corresponds to a particular Ruby class (the “Indirected Class”below) and values are instances of that class. Each instanceʼs key is available from its name method.The termini can be local (e.g., on-disk files) or remote (e.g., using a REST interface to talk to a�puppet master).
An indirector has five methods, which are mapped into HTTP verbs for the REST interface:�
find(key) - get a single value (mapped to GET or POST with a singular endpoint)search(key) - get a list of matching values (mapped to GET with a plural endpoint)head(key) - return true if the key exists (mapped to HEAD)destroy(key) - remove the key van value (mapped to DELETE)save(instance) - write the instance to the store, using the instanceʼs name as the key (mappedto PUT)
These methods are available via the indirection class method on the indirected classes. Forexample::
foo_cert = Puppet::SSL::Certificate.indirection.find(ʻfoo.example.comʼ)��
At startup, each indirection is configured with a terminus. In most cases, this is the default terminus�defined by the indirected class, but it can be overridden by the application or face, or overridden�with the route_file configuration. The available termini differ for each indirection, and are listed��below.
Indirections can also have a cache, represented by a second terminus. This is a write-throughcache: modifications are written both to the cache and to the primary terminus. Values fetched from�the terminus are written to the cache.
Interaction with RESTREST endpoints have the form /{environment}/{indirection}/{key} , where the indirection canbe singular or plural, following normal English spelling rules. On the server side, REST responsesare generated from the locally-configured endpoints.�
Indirections and TerminiBelow is the list of all indirections, their associated terminus classes, and how you select betweenthem.
In general, the appropriate terminus class is selected by the application for you (e.g., puppetagentwould always use the rest terminus for most of its indirected classes), but some classes aretunable via normal settings. These will have terminussetting documentation listed with them.
Puppet Documentation • About Indirection 425/434
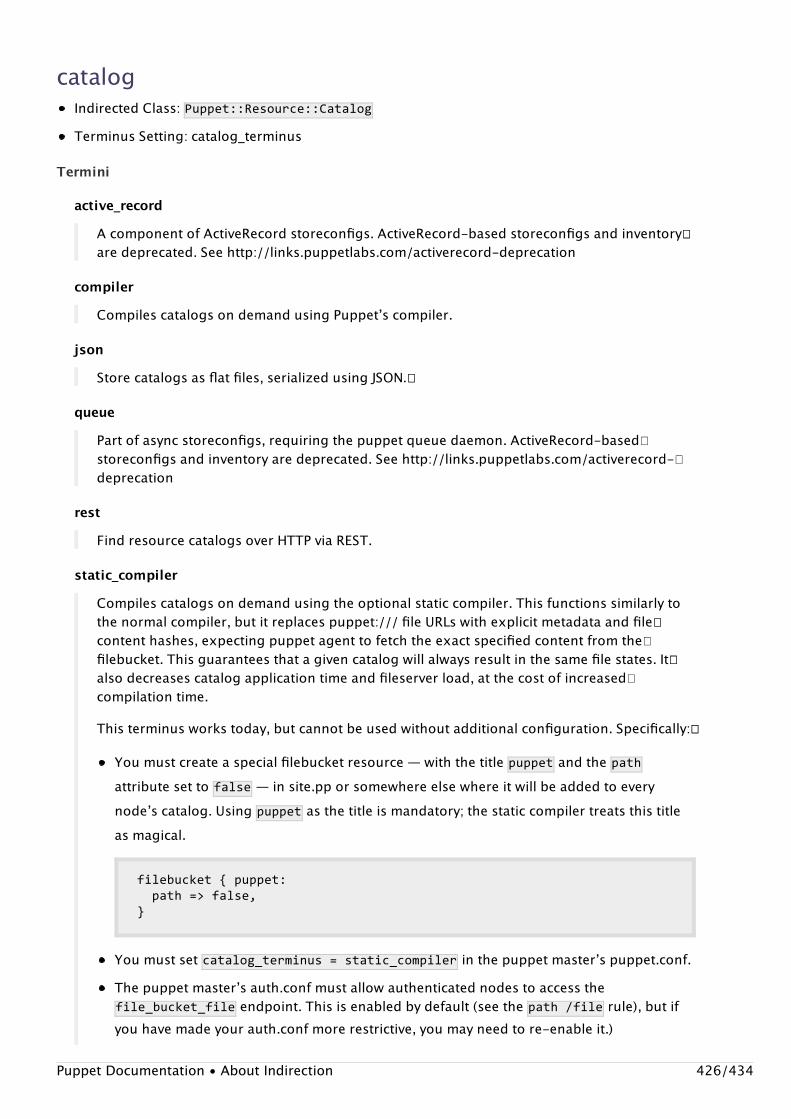
catalogIndirected Class: Puppet::Resource::CatalogTerminus Setting: catalog_terminus
Termini
active_record
A component of ActiveRecord storeconfigs. ActiveRecord-based storeconfigs and inventory��are deprecated. See http://links.puppetlabs.com/activerecord-deprecation
compiler
Compiles catalogs on demand using Puppetʼs compiler.
json
Store catalogs as flat files, serialized using JSON.��
queue
Part of async storeconfigs, requiring the puppet queue daemon. ActiveRecord-based�storeconfigs and inventory are deprecated. See http://links.puppetlabs.com/activerecord-�deprecation
rest
Find resource catalogs over HTTP via REST.
static_compiler
Compiles catalogs on demand using the optional static compiler. This functions similarly tothe normal compiler, but it replaces puppet:/// file URLs with explicit metadata and file��content hashes, expecting puppet agent to fetch the exact specified content from the�filebucket. This guarantees that a given catalog will always result in the same file states. It��also decreases catalog application time and fileserver load, at the cost of increased�compilation time.
This terminus works today, but cannot be used without additional configuration. Specifically:��
You must create a special filebucket resource — with the title �puppet and the pathattribute set to false — in site.pp or somewhere else where it will be added to everynodeʼs catalog. Using puppet as the title is mandatory; the static compiler treats this titleas magical.
filebucket{puppet:path=>false,}
You must set catalog_terminus=static_compiler in the puppet masterʼs puppet.conf.The puppet masterʼs auth.conf must allow authenticated nodes to access thefile_bucket_file endpoint. This is enabled by default (see the path/file rule), but ifyou have made your auth.conf more restrictive, you may need to re-enable it.)
Puppet Documentation • About Indirection 426/434
If you are using multiple puppet masters, you must configure load balancer affinity for���agent nodes. This is because puppet masters other than the one that compiled a givencatalog may not have stored the required file contents in their filebuckets.��
store_configs�
Part of the “storeconfigs” feature. Should not be directly set by end users.�
yaml
Store catalogs as flat files, serialized using YAML.��
certificate�This indirection wraps an OpenSSL::X509::Certificate object, representing a certificate (signed�public key). The indirection key is the certificate CN (generally a hostname).�
Indirected Class: Puppet::SSL::Certificate
Termini
ca
Manage the CA collection of signed SSL certificates on disk.�
disabled_ca
Manage SSL certificates on disk, but reject any remote access to the SSL data store. �Usedwhen a master has an explicitly disabled CA to prevent clients getting confusing ʻsuccessʼbehaviour.
file�
Manage SSL certificates on disk.�
rest
Find and save certificates over HTTP via REST.�
certificate_request�This indirection wraps an OpenSSL::X509::Request object, representing a certificate signing�request (CSR). The indirection key is the certificate CN (generally a hostname).�
Indirected Class: Puppet::SSL::CertificateRequest
Termini
ca
Manage the CA collection of certificate requests on disk.�
disabled_ca
Manage SSL certificate requests on disk, but reject any remote access to the SSL data store.�Used when a master has an explicitly disabled CA to prevent clients getting confusingʻsuccessʼ behaviour.
Puppet Documentation • About Indirection 427/434
file�
Manage the collection of certificate requests on disk.�
rest
Find and save certificate requests over HTTP via REST.�
certificate_revocation_list�This indirection wraps an OpenSSL::X509::CRL object, representing a certificate revocation list�(CRL). The indirection key is the CA name (usually literally ca ).
Indirected Class: Puppet::SSL::CertificateRevocationList
Termini
ca
Manage the CA collection of certificate requests on disk.�
disabled_ca
Manage SSL certificate revocation lists, but reject any remote access to the SSL data store.�Used when a master has an explicitly disabled CA to prevent clients getting confusingʻsuccessʼ behaviour.
file�
Manage the global certificate revocation list.�
rest
Find and save certificate revocation lists over HTTP via REST.�
certificate_status�This indirection represents the host that ties a key, certificate, and certificate request together. The��indirection key is the certificate CN (generally a hostname).�
Indirected Class: Puppet::SSL::Host
Termini
file�
Manipulate certificate status on the local filesystem. Only functional on the CA.��
rest
Sign, revoke, search for, or clean certificates �& certificate requests over HTTP.�
data_bindingWhere to find external data bindings.�
Indirected Class: Puppet::DataBinding
Puppet Documentation • About Indirection 428/434
Terminus Setting: data_binding_terminus
Termini
hiera
Retrieve data using Hiera.
none
A Dummy terminus that always returns nil for data lookups.
factsIndirected Class: Puppet::Node::FactsTerminus Setting: facts_terminus
Termini
active_record
A component of ActiveRecord storeconfigs and inventory. ActiveRecord-based storeconfigs��and inventory are deprecated. See http://links.puppetlabs.com/activerecord-deprecation
couch
Store facts in CouchDB. This should not be used with the inventory service; it is for moreobscure custom integrations. If you are wondering whether you should use it, you shouldnʼt;use PuppetDB instead.
facter
Retrieve facts from Facter. This provides a somewhat abstract interface between Puppet andFacter. Itʼs only somewhat abstract because it always returns the local hostʼs facts, regardlessof what you attempt to find.�
inventory_active_record
Medium-performance fact storage suitable for the inventory service. Most users should usePuppetDB instead. Note: ActiveRecord-based storeconfigs and inventory are deprecated. See�http://links.puppetlabs.com/activerecord-deprecation
inventory_service
Find and save facts about nodes using a remote inventory service.
memory
Keep track of facts in memory but nowhere else. This is used for one-time compiles, such aswhat the stand-alone puppet does. To use this terminus, you must load it with the data youwant it to contain.
network_device
Retrieve facts from a network device.
rest
Find and save facts about nodes over HTTP via REST.Puppet Documentation • About Indirection 429/434
store_configs�
Part of the “storeconfigs” feature. Should not be directly set by end users.�
yaml
Store client facts as flat files, serialized using YAML, or return deserialized facts from disk.��
file_bucket_file��Indirected Class: Puppet::FileBucket::File
Termini
file�
Store files in a directory set based on their checksums.�
rest
This is a REST based mechanism to send/retrieve file to/from the filebucket��
selector
Select the terminus based on the request
file_content�Indirected Class: Puppet::FileServing::Content
Termini
file�
Retrieve file contents from disk.�
file_server�
Retrieve file contents using Puppetʼs fileserver.��
rest
Retrieve file contents via a REST HTTP interface.�
selector
Select the terminus based on the request
file_metadata�Indirected Class: Puppet::FileServing::Metadata
Termini
file�
Retrieve file metadata directly from the local filesystem.��
Puppet Documentation • About Indirection 430/434
file_server�
Retrieve file metadata using Puppetʼs fileserver.��
rest
Retrieve file metadata via a REST HTTP interface.�
selector
Select the terminus based on the request
instrumentation_dataIndirected Class: Puppet::Util::Instrumentation::Data
Termini
local
Undocumented.
rest
Undocumented.
instrumentation_listenerIndirected Class: Puppet::Util::Instrumentation::Listener
Termini
local
Undocumented.
rest
Undocumented.
instrumentation_probeIndirected Class: Puppet::Util::Instrumentation::IndirectionProbe
Termini
local
Undocumented.
rest
Undocumented.
keyThis indirection wraps an `OpenSSL::PKey::RSA object, representing a private key. The indirectionkey is the certificate CN (generally a hostname).�
Puppet Documentation • About Indirection 431/434
Indirected Class: Puppet::SSL::Key
Termini
ca
Manage the CAʼs private on disk. This terminus only works with the CA key, because thatʼsthe only key that the CA ever interacts with.
disabled_ca
Manage the CA private key, but reject any remote access to the SSL data store. Used when amaster has an explicitly disabled CA to prevent clients getting confusing ʻsuccessʼ behaviour.
file�
Manage SSL private and public keys on disk.
nodeWhere to find node information. A node is composed of its name, its facts, and its environment.�
Indirected Class: Puppet::NodeTerminus Setting: node_terminus
Termini
active_record
A component of ActiveRecord storeconfigs. ActiveRecord-based storeconfigs and inventory��are deprecated. See http://links.puppetlabs.com/activerecord-deprecation
exec
Call an external program to get node information. See the External Nodes page for moreinformation.
ldap
Search in LDAP for node configuration information. �See the LDAP Nodes page for moreinformation. This will first search for whatever the certificate name is, then (if that name��contains a . ) for the short name, then default .
memory
Keep track of nodes in memory but nowhere else. This is used for one-time compiles, such aswhat the stand-alone puppet does. To use this terminus, you must load it with the data youwant it to contain; it is only useful for developers and should generally not be chosen by anormal user.
plain
Always return an empty node object. Assumes you keep track of nodes in flat file manifests.��You should use it when you donʼt have some other, functional source you want to use, as thecompiler will not work without a valid node terminus.
Note that class is responsible for merging the nodeʼs facts into the node instance before it is
Puppet Documentation • About Indirection 432/434
returned.
rest
Get a node via REST. Puppet agent uses this to allow the puppet master to override itsenvironment.
store_configs�
Part of the “storeconfigs” feature. Should not be directly set by end users.�
write_only_yaml
Store node information as flat files, serialized using YAML, does not deserialize (write only).��
yaml
Store node information as flat files, serialized using YAML, or deserialize stored YAML nodes.��
reportIndirected Class: Puppet::Transaction::Report
Termini
processor
Puppetʼs report processor. Processes the report with each of the report types listed in theʻreportsʼ setting.
rest
Get server report over HTTP via REST.
yaml
Store last report as a flat file, serialized using YAML.��
resourceIndirected Class: Puppet::Resource
Termini
active_record
A component of ActiveRecord storeconfigs. ActiveRecord-based storeconfigs and inventory��are deprecated. See http://links.puppetlabs.com/activerecord-deprecation
ral
Manipulate resources with the resource abstraction layer. Only used internally.
rest
Maniuplate resources remotely? Undocumented.
store_configs�
Part of the “storeconfigs” feature. Should not be directly set by end users.�Puppet Documentation • About Indirection 433/434
resource_typeIndirected Class: Puppet::Resource::Type
Termini
parser
Return the data-form of a resource type.
rest
Retrieve resource types via a REST HTTP interface.
statusIndirected Class: Puppet::Status
Termini
local
Get status locally. Only used internally.
rest
Get puppet masterʼs status via REST. Useful because it tests the health of both the web serverand the indirector.
This page autogenerated on Tue Jun 18 16:58:38 -0700 2013© 2010 Puppet Labs [email protected] 411 NW Park Street / Portland, OR 97209 1-877-575-9775
Puppet Documentation • About Indirection 434/434