Embed Size (px)
Citation preview

PWIMS: User Manual
1 | Confidential Hewlett Packard India Sales Private Limited ©
PWIMS USER MANUAL
Hewlett-Packard India Sales Private Limited Version: 1.1 , 07th Aug 2010

PWIMS: User Manual
2 | Confidential Hewlett Packard India Sales Private Limited ©
TABLE OF CONTENTS
1 PWIMS Overview................................................................................................................... 8
2 System Flow........................................................................................................................... 9
3 PWIMS Modules...................................................................................................................... 10
3.1 Supplier Registration..................................................................................................... 10
3.2 Work Estimate Management......................................................................................... 10
3.3 Contract Management................................................................................................... 10
3.4 User Management......................................................................................................... 11
3.5 System Administration................................................................................................... 11
3.6 MIS................................................................................................................................ 11
4 Interface Description............................................................................................................ 11
4.1 How to login................................................................................................................. 12
5 Roll Groups, Designation and Functions............................................................................ 14
5.1 Scheme Administration............................................................................................ 17
5.1.1 Create Scheme.......................................................................................................... 18
5.1.2 Search Scheme.......................................................................................................... 19
5.1.3 Edit Scheme............................................................................................................... 20
5.1.4 View Scheme.............................................................................................................. 20
5.2 Project Administration.............................................................................................. 21
5.2.1 Project Creation.......................................................................................................... 23
5.2.2 Search Project............................................................................................................. 23
5.2.2.1 View the Detail of Project.......................................................................................................................... 24
5.2.2.2 Generate Report (PDF)............................................................................................................................ . 24
5.2.2.3 Edit Project...................................................................................................................... .......................... 25
5.2.2.4 Generate UC.............................................................................................................................. ............... 25
5.3 Create Work Estimate Management........................................................................... 26
5.3.1 Work Estimate Preparations.......................................................................................... 26
5.3.2 Schedule Category......................................................................................................... 32
5.3.2.1 Create Item...................................................................................................................... 33
5.3.2.2 Edit item................................................................................................................................... 34
5.3.2.3 Create Material........................................................................................................................... 34
5.3.2.4 Edit Material........................................................................................................................... 35
5.3.2.5 Create Linkages........................................................................................................................ 35

PWIMS: User Manual
3 | Confidential Hewlett Packard India Sales Private Limited ©
5.3.3 Rate Analysis .................................................................................................................... 36
5.3.3.1 How to add material attributes ........................................................................................ 37
5.3.4 Search Estimate ............................................................................................................... 39
5.3.5 My Estimate ...................................................................................................................... 39
5.3.5.1 View Estimate ................................................................................................................. 39
5.3.5.2 Edit Estimate .................................................................................................................. 40
5.3.6 Estimate Approval............................................................................................................. 40
5.3.6.1 Forward Estimate for Approval ........................................................................................ 40
5.3.6.2 Check Estimate for Approve /Review .............................................................................. 41
5.3.6.3 View Estimate ................................................................................................................. 42
5.3.6.4 View/Update Provision Slip…………………………………………………………………….42
5.3.6.5 Edit estimate before approving ....................................................................................... 43
5.3.6.6 Change Log for Estimate ................................................................................................ 44
5.3.6.7 Approval Decision ........................................................................................................... 45
5.3.6.7.1 Approve Estimate……………………………………………………………………………..45
5.4 Contract Management............................................................................................................. 46
5.4.1 Create Work Contract ....................................................................................................... 46
5.4.1.1 Create Work Flow ........................................................................................................... 47
5.4.1.2 Create Contract Items ..................................................................................................... 48
5.4.1.3 Create Milestones and activities ..................................................................................... 49
5.4.2 Edit Contract ..................................................................................................................... 51
5.4.3 View Contract ................................................................................................................... 52
5.4.3.1 View the detail of the contract ......................................................................................... 52
5.4.3.2 View Inspection Logs ...................................................................................................... 52
5.4.3.3 View Change Logs for Contract ...................................................................................... 53
5.4.3.4 Generate Reports for the Contract .................................................................................. 54
5.4.4 Edit Mile stones for contract .............................................................................................. 54
5.4.5 Create Variation Order ...................................................................................................... 56
5.4.6 Contract Approval ............................................................................................................. 59
5.4.6.1 Forward Contract for Approval /Review........................................................................... 59
5.4.6.2 Check Contract to Approve ............................................................................................. 60
5.4.6.3 Edit Contract before approving ....................................................................................... 60
5.4.6.4 Attach Documents .......................................................................................................... 61
5.4.6.5 Contract Approval Decision............................................................................................. 62
5.4.6.5.1 Approve Contract……………………………………………………………………………. 62
5.4.7 Measurement Book ........................................................................................................... 63
5.4.7.1 Create MB ...................................................................................................................... 63
5.4.7.2 Edit MB ........................................................................................................................... 66
5.4.7.3 View MB ......................................................................................................................... 67
5.4.7.4 Delete MB ...................................................................................................................... 68
5.4.7.5 MB finalizing/forwarding.................................................................................................. 68
5.4.7.6 Forward MB for Approval ................................................................................................ 68
5.4.7.7 Review MB ..................................................................................................................... 70
5.4.7.8 Check MB ....................................................................................................................... 71
5.4.7.9 Edit MB before approving/forwarding .............................................................................. 73

PWIMS: User Manual
4 | Confidential Hewlett Packard India Sales Private Limited ©
5.4.7.10 MB Approval options………………………………………………………………………….75
5.4.7.10.1 Review / Approve MB………………………………………………………………………75
5.5 Billing…………………………………………………………………………………………………….77
5.5.1 Create Bill………………………………………………………………………………………….77
5.5.2 Edit Bill……………………………………………………………………………………………..81
5.5.3 View Bill……………………………………………………………………………………………81
5.5.4 Bill Approval……………………………………………………………………………………….83
5.5.4.1 Forward Bill for Approval………………………………………………………………………83
5.5.4.2 Check Bill to Approve…………………………………………………………………………..84
5.5.4.3 Edit Bill before approving......................................................................................…........88
5.5.5 Attach Documents .......................................................................................................... 89
5.5.6 Bill Approval Decision ..................................................................................................... 89
5.5.6.1 Approve …………………………………………………………………………………….......89
5.5.6.2 Release bill for payment……………………………………………………………………….90
5.5.6.3 Sample Bill’s…………………………………………………………………………………….91
5.6 Vigilance…………………………………………………………………………………………………91
5.6.1 Create Memo………………………………………………………………………………………92
5.6.2 Edit Memo………………………………………………………………………………………….93
5.6.3 Send Memo………………………………………………………………………………………..93
5.6.4 View & Response Memo………………………………………………………………………….94
5.6.5 Closure……………………………………………………………………………………………...95

PWIMS: User Manual
5 | Confidential Hewlett Packard India Sales Private Limited ©
TABLE OF FIGURES Figure 1: System view of PWIMS .................................................................................................... 9 Figure 2 how to log in ...................................................................................................................... 12 Figure 3: Departmental Hierarchy ................................................................................................... 16 Figure 4 Scheme Creation .............................................................................................................. 18 Figure 5 Scheme Saved .................................................................................................................. 18 Figure 6 Search Scheme ................................................................................................................ 19 Figure 7 Edit Scheme...................................................................................................................... 20 Figure 8 View Scheme .................................................................................................................... 21 Figure 9 Create Project ................................................................................................................... 23 Figure 10: Search Project ............................................................................................................... 23 Figure 11 Search Project ................................................................................................................ 23 Figure 12 How to View Project ........................................................................................................ 24 Figure 13: View of List of Contract under a Project ......................................................................... 24 Figure 14 How to generate document (pdf) Project ......................................................................... 24 Figure 15 How to edit a Project ....................................................................................................... 25 Figure 16: Project editing ................................................................................................................ 25 Figure 17: Generate UC .................................................................................................................. 25 Figure 18 How to generate Utilization Certificate ............................................................................. 26 Figure 19 Create work estimate Step 1 ........................................................................................... 27 Figure 20: Work Location details entry ............................................................................................ 28 Figure 21: Estimate items entry options .......................................................................................... 28 Figure 22 How to Select CSR ......................................................................................................... 29 Figure 23 Add items ........................................................................................................................ 29 Figure 24 item description…………………………………………………………………………………..29 Figure 25 How to add Premium, Qty, LBD ...................................................................................... 30 Figure 26 How to add LBD .............................................................................................................. 30 Figure 27 Add Non CSR Items ........................................................................................................ 31 Figure 28 How to Upload Work Estimate......................................................................................... 31 Figure 29 How to create Overheads ................................................................................................ 31 Figure 30: Overhead Details ........................................................................................................... 32 Figure 31: Finish estimate ............................................................................................................... 32 Figure 32 Create Category (Own Schedule) ................................................................................... 33 Figure 33 Save Item (Own Schedule) ............................................................................................. 33 Figure 34 Edit Item (Own Schedule) ............................................................................................... 34 Figure 35: Edit /save item (own schedule) ....................................................................................... 34 Figure 36: Create Material............................................................................................................... 35 Figure 37: Edit Material ................................................................................................................... 35 Figure 38 Create Linkages .............................................................................................................. 36 Figure 39: Mapping material with Items ........................................................................................... 36 Figure 40: Materials Creation & Editing ........................................................................................... 37 Figure 41: How to add Royalties ..................................................................................................... 37 Figure 42: How to add Loading/Unloading ...................................................................................... 37 Figure 43: How to Add Lead Charges ............................................................................................. 38 Figure 44: Viewing/editing/creating Lead Changes ......................................................................... 38 Figure 45: How to Search Estimate ................................................................................................. 39 Figure 46: View List of Estimate ...................................................................................................... 39 Figure 47: How to view Estimate ..................................................................................................... 40 Figure 48: How to edit estimate ....................................................................................................... 40 Figure 49 How to forward Estimate for Approval ............................................................................. 40 Figure 50: Sending for Approval of Estimate ................................................................................... 41 Figure 51 How to Check Estimate for Approval ............................................................................... 42

PWIMS: User Manual
6 | Confidential Hewlett Packard India Sales Private Limited ©
Figure 52 Estimate Approval .................................................................................................................... 42 Figure 53: How to view update provision slip .......................................................................................... 43
Figure 54: How to edit estimate before approving .................................................................................. 44
Figure 55: View Change Log's Estimate.................................................................................................. 44 Figure 56 How to Approve Estimate ........................................................................................................ 45
Figure 57: Adding comments & approving Estimate .............................................................................. 46
Figure 58: How to create Contract /Work ................................................................................................ 47
Figure 59: How to Create Work flow ........................................................................................................ 47 Figure 60: How to Add Contract Items ..................................................................................................... 48 Figure 61: How to add Addition/Deduction in a contract ........................................................................ 49
Figure 62: How to Add Mile stones .......................................................................................................... 50 Figure 63: How to Add milestones Activity .............................................................................................. 50
Figure 64: How to Edit a Contract ............................................................................................................ 51
Figure 65: How to View Contract.............................................................................................................. 52
Figure 66: How to create view inspection logs ........................................................................................ 53 Figure 67: How to view change logs for contract .................................................................................... 54
Figure 68: How Generate Contract PDF ................................................................................................. 54
Figure 69: How to edit Milestone .............................................................................................................. 55 Figure 70: How to create Variation order ................................................................................................. 56
Figure 71: Add items to Variation order ................................................................................................... 57
Figure 72: Variation order Send of Approval ........................................................................................... 58 Figure 73: How to Approve Variation Order ............................................................................................ 59
Figure 74: How to Forward Contract for Approval .................................................................................. 59 Figure 75: How to edit Contract before Approving.................................................................................. 61
Figure 76: How to Approve Contract ........................................................................................................ 62 Figure 77: How to create MB .................................................................................................................... 63
Figure 78: How to Edit MB ........................................................................................................................ 66 Figure 79: MB list View............................................................................................................................................. 67
Figure 79.1: MB View ................................................................................................................................ 67
Figure 80: Delete MB ................................................................................................................................ 68 Figure 81: Forwarding MB ........................................................................................................................ 69
Figure 82: MB Edit/View during review/approval .................................................................................... 72 Figure 83: MB List during review /edit...................................................................................................... 72
Figure 84: Edit LBD of MB ........................................................................................................................ 73 Figure 85: Message for MB approval ....................................................................................................... 75
Figure 86: MB review/Approval ................................................................................................................ 76
Figure 87 Create Bill .................................................................................................................................. 79
Figure 88 How to add Payable Rates and Addition Deductions ............................................................ 79 Figure 89 How to Edit the Bill ................................................................................................................... 81
Figure 90 How to View the Bill ............................................................................................................... . 82 Figure 91 Forward Bill for Approval....................................................................................................... . 84
Figure 92 How to Send Bill to Contractor for Review.........................................................................85 Figure 93 How to Edit Bill before Approval……………………………………………………………………………88
Figure 94 How to Approve a Bill………………………………………………………………………………………..90
Figure 95 How to Release the Bill for Payment…………(Pending)……………………………………….…………90
Figure 96 Sample Bill MB 1……………………………………………………………………………………………..91
Figure 97 How to Create Memo ........................................................................................................................... .93
Figure 98 How to Edit Memo ................................................................................................................................ .93
Figure 99 How to Send Memo .............................................................................................................................. .94
Figure 100 How to Add /Update Response in Memo.......................................................................................... .95 Figure 101 How to Close Memo ........................................................................................................................... .95
PWIMS: User Manual
7 | Confidential Hewlett Packard India Sales Private Limited ©
Document Management
Contributors
Role Name
Project Manager Jain, Sanjeev
Other document contributors Singh, Jasbir
Version Control
Date Version Author Section Amendment
23/07/2011 1.0 Pawan/Anupam 7/08/2011 1.1 Pawan/Anupam 5.1, 5.2 Scheme and Project
Description elaborated 5.5 Billing Updated With
Application Update 5.6 Vigilance added

PWIMS: User Manual
8 | Confidential Hewlett Packard India Sales Private Limited ©
1 PWIMS Overview
The key objective of the PWIMS Project is to transform the functioning of the Department with a
business process perspective and creation of data of various end to end activities from award of
contract/work order to execution and completion of project/works at various levels and divisions as
per organization structure, to transform the means of rendering services to its various stakeholders
and to ensure transparency in the system.
The key project objectives envisaged through PWIMS following:
Accurate and efficient project management.
Reduced project cycle time as well as improved access to information for better decision
making / improved cost management.
Reduction in travel of engineers/officers within the state for frequent meetings and
submission of reports.
Transparency in the activities of department.
Improved services to the public.
The implementation of Public Works Information Management System (PWIMS) is a comprehensive
web based project which envisages creation of data regarding the work going in all divisions and all
steps from award of contract/work order to execution as well as the official involved. The PWIMS
application suite is expected to handle end-to-end various project related processes / activities from
award of contract to final closure of project including creation and maintenance of category wise
Contractor database, management and maintenance of estimate details including common schedule
of rates (CSR), Bills of Quantity (BOQ), approval details, work order / contract details, creation and
tracking of milestones, measurement (entry, checking and verification). Integration of quality
assurance and control, generation and verification of bills, payment and MIS reports. The PWIMS is
expected to improve effectiveness and efficiency of department staff, to provide improved and cost-
effective services to its users and help improve access to information, transparency and
collaborative working.
Developed / customized and Implement the PWIMS Solution as per the requirements of Department.
Supplying and implementing the database and related software, integration tools and describing the process to be followed for installing the same.
Integration of all the application modules for seamless sharing of data across department.
MIS Reports: To provide / facilitate centralized MIS reports to meet the reporting requirements of Department. That will also ensure anytime-anywhere availability of these MIS reports.
The MIS reports would be dynamic in nature and should provide the user the freedom to select the data fields as per his / her requirements.

PWIMS: User Manual
9 | Confidential Hewlett Packard India Sales Private Limited ©
The books of accounts and other statutory reports should be available for audit by the CAG /
State Government or its agencies.
It will map the default reports of the selected PWIMS Solution with the actual requirements of the project during project initiation stage and will develop the additional reports which are not
available as part of PWIMS / solution.
Carry out the intermediate and final testing of the configured solution and obtaining sign-offs from Heads of various Circles & project Committee/s.
Coordinate and provide necessary support for acceptance testing and systems audit (functionality, process, performance & security controls) to be performed by a third party to be nominated by Department,
Implement necessary access security and data validation controls during the development of the software application
Preparation of necessary User and Trouble Shooting manuals for the Solution
2 System Flow
Figure 1: System view of PWIMS

PWIMS: User Manual
10 | Confidential Hewlett Packard India Sales Private Limited ©
3 PWIMS Modules The solution will broadly support Supplier – online supplier registration, viewing of contract management. Government – Estimate management and approval, preparation & uploading of contracts, preparation and approval of measurement books and generating bills.
3.1 Supplier Registration The system will enable the department to maintain a clear picture of its execution activities on a real-
time basis and the supplier community to participate in the application. Transparency in public works
will be enhanced as all in the supplier community have equal and unbiased access to opportunities
advertised online.
The solution will also support the use of PKI for digitally signing the related documents. Suppliers have
provision to self register into system to participate in work executions. All of the contracts against
registered suppliers are managed in a unified platform and available for reporting requirements.
3.2 Work Estimate Management The system follows a hierarchy of Scheme >Project > and Work/Contract. Scheme is aggregation of
various project under it, Similarly Project is aggregation of different works/contract under it. Each
Work/Contract is a separate entity. Estimate is created for each work
The Estimate Management (Works) module is built to create estimate for approved /not approved
program of works. The hierarchy and the approval matrix specific to each Department are mapped to
form the workflow. The Engineer first prepares the Abstract works estimate. These works estimates
are then sent for administrative and technical sanctions by the workflow engine.
A technical sanction by a competent authority is the last stage in the workflow. After the technical
sanction, the approved work estimates are seamlessly transferred to the contract management
module for further processing
3.3 Contract Management Contract Management module is built to manage the works that are new, in progress and closed.
This module facilitates the user to create contracts under various projects and send for review and
approval process. Once contracts are approved the following activities can be performed, Creating contracts Creating mile stones under contracts Defining activities under each mile stone Generating measurement book entries Verifying and approving measurement book entries Generating bills for verified and billable measurement book entries
Generating payment statements for each bill approved.

PWIMS: User Manual
11 | Confidential Hewlett Packard India Sales Private Limited ©
3.4 User Management User management module facilitates the following, Creating new users Editing existing users Assigning or removing roles to users Assigning or deactivating the digital certificates
While administrator registering the user, he shall be notified on his email id about his user id and
password. These credentials can be used to login to PWIMS system to work on the various activities.
3.5 System Administration System administration module allows system administrator to configure the system with the following data, Roles which can be assigned to users registered into system Menu’s those are available in system Mapping menu to Roles Department hierarchy
Uploading new process definitions which may be used by workflow engine while business
process implementation is triggered.
By configuring the above data, system administrators can the change the functional behavior of the system.
3.6 MIS Management Information system (MIS) module caters the following facilities to users, Generating textual reports based on the criterion selected by the user Generating ad-hoc reports based on the parameters supplier by the user Generating various graphical reports
Reporting needs to generate reports on, Schemes
Projects
Contract / works
Milestones/Activities
4 Interface Descriptions
It will allow you to familiar with PWIMS system. We would cover How to login in an application, but
before using the application following are the prerequisite Digital Signatures
Java Run Time Environment installed in your system
(Click on the mentioned link http://www.java.com/en/download/index.jsp to install java)

PWIMS: User Manual
12 | Confidential Hewlett Packard India Sales Private Limited ©
Internet explorer 8 or higher After setup the prerequisites. Let’s follow the below and see how to login
4.1 How to login Open the internet Explorer > Type http://202.138.102.2/
Press Enter Button
Type the user Name and password in login area and click on login or Press enter
Please refer to the below screen (Figure 2)
Figure 2 How to Log In
Note: “Users can login with login id according to his/her designation and the appropriate menu will
be display. You can see it in the next Section under User Operations

PWIMS: User Manual
13 | Confidential Hewlett Packard India Sales Private Limited ©
Buttons Description
Icon/Button Definition
View
It is used to View in details
Edit
It is used to edit /Modify
Delete It is used to delete
Change Log’s It is used to track or see the Change’s or events
Inspection Log’s It is used to view Change Log’s
Measurement Book It is used to work on Measurement Book
Bill It is used to work on Bill’s
Send For Approval It is used to send estimate, contract, MB, etc .for approval
Create Variation Order It is used to create the variation order.
Start/Stop Contract It is used to start or stop a contract
Print Pdf It is used get the information in Pdf
Generate Pdf
It is used to generate the pdf report
Generate UC It is used to generate the utilization certificate
Milestone Activities
It is used to work on milestone activities
View Activity It is used to view milestones activities
Rate Analysis Change Log’s It is used to View Rate Analysis change log’s
Royalties It is used to add royalties under Create material
Loading/Unloading
It is used to define Loading/Unloading Rates in Create Material
Lift Charges It is used to define Lift Charged
User Operations Under the user operations we will cover the following in details Scheme Administration
Project Administration
Estimate Management
Contract management
Billing

PWIMS: User Manual
14 | Confidential Hewlett Packard India Sales Private Limited ©
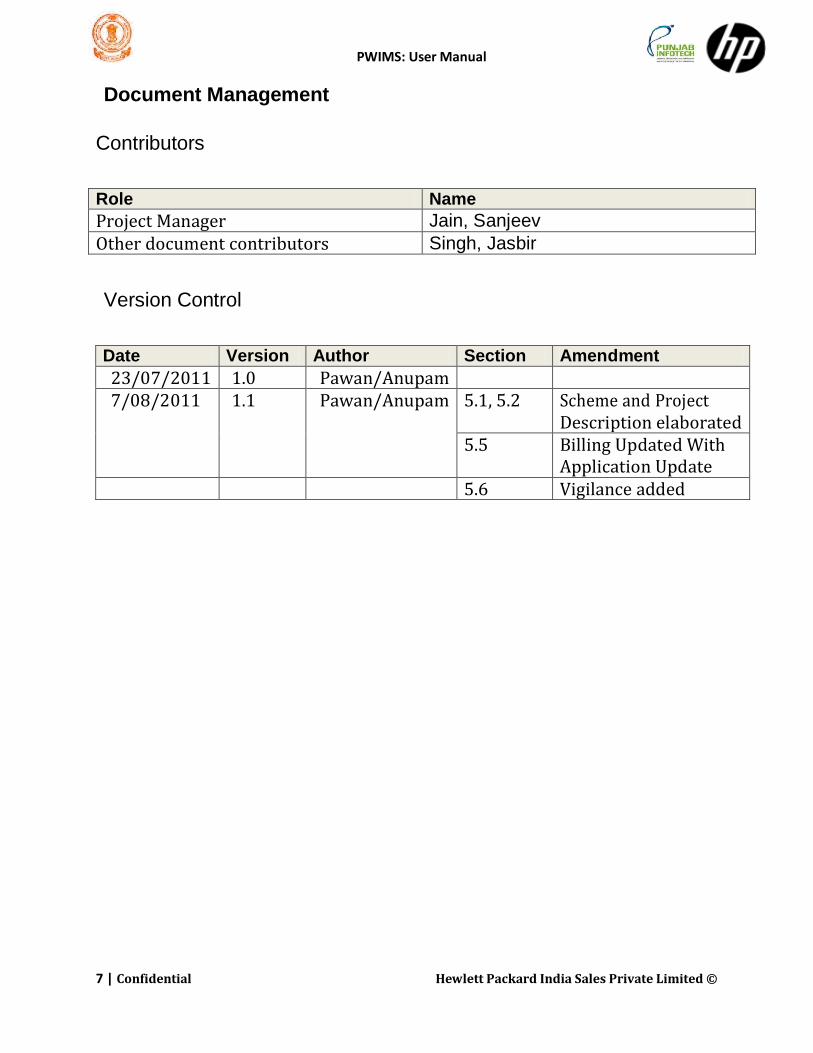
5 Roll Groups, Designation and Functions Designation
Application functions Role Groups
EE MB Approval Bill approval Estimate reviewer Contract Approval Provision Slip Creator Project stop/renew/close Inspection Log creation and view Up 5% cost breach approver VO reviewer View All under the division View All contractor of the dept
XEN
PWIMS: User Manual
15 | Confidential Hewlett Packard India Sales Private Limited ©
Designation
Application functions Role Groups
SE View everything of the administration Inspection Log creation and view Review Estimation VO reviewer Project UC data entry Registrar for Contractor View All contractor of the dept Estimate reviewer/Approver (as per the limit) Change contract schedule.(only dates)
SE
CE View everything of the administration Inspection Log creation and view Approve Estimation Create Scheme & project VO approval View All contractor of the dept
CE
AE Create Bill, MB,VO and estimate creator View work/contract under him
Inspection Log creation and view
AE
JE Create Bill, MB,VO and estimate creator View work/contract under him Inspection Log creation and view
JE
SDO Review Bill, MB, VO Estimate reviewer Inspection Log creation and view
View All contractor of the dept
SDO
DAO Create Contract XEN can delegate for any Estimate/bill query
DAO
CHD SE delegates the review of estimate & MB Drawing Branch
Contractor Review Bill( only comments ) View respective contract, Bill and MB Register Inspection Log creation and view
Contractor
EE HQ Create Scheme & Project View
Work under delegation from CE
Executive Engineer HQ
Principal Secretary Inspection Log creation and view
View all Secretary
Minister Inspection Log creation and view View all
Minister
Nodal Officer Inspection Log creation and view Nodal

PWIMS: User Manual
16 | Confidential Hewlett Packard India Sales Private Limited ©
Departmental Hierarchy and Function Diagram
Figure 3 Departmental Hierarchy
PWIMS: User Manual
17 | Confidential Hewlett Packard India Sales Private Limited ©
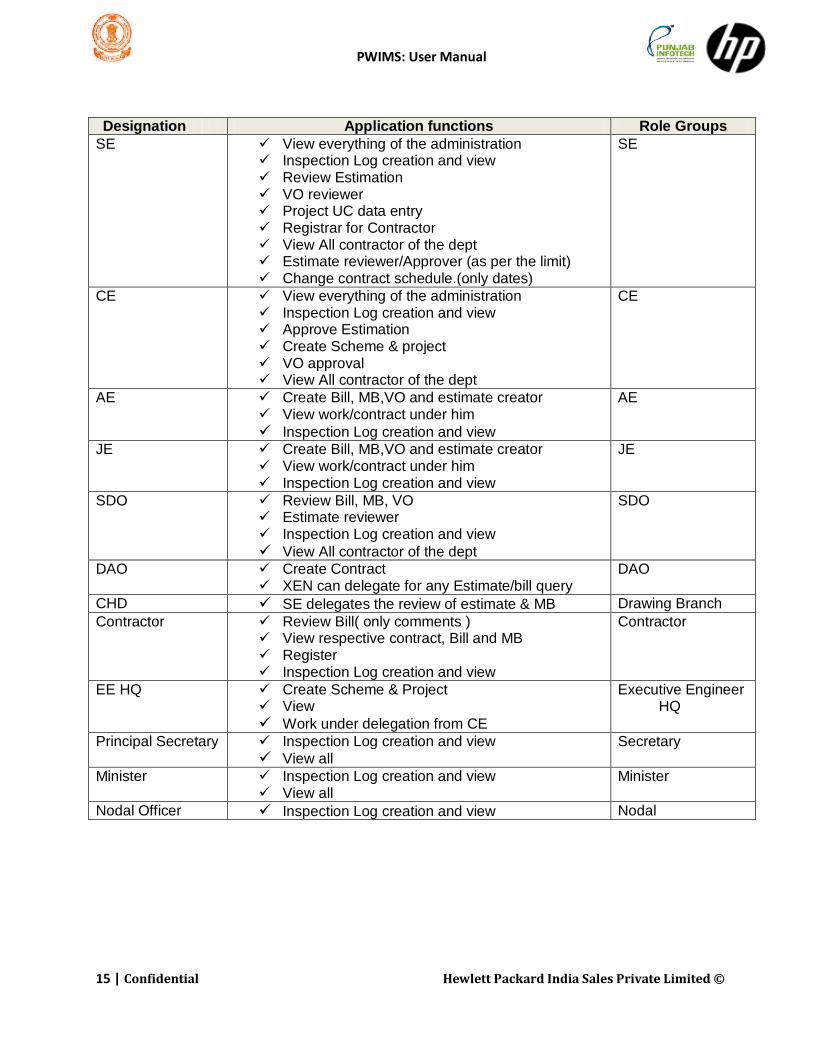
5.1 Scheme Administration Scheme: The hierarchy deployed in the system is Scheme> Project> Works. Thus scheme is the
super set of all the projects under it and project is comprises of all the works under it.
A scheme can be a Union Govt. or State Govt. or Combine funded. Scheme once created in the system can be edited till a project is created under it. The objective here is not to capture the ongoing fund received and expenditure incurred, but to create head under which the project and work would fall. Now we are under the scheme administration and cover the followings in detail Create scheme
Search scheme
Edit scheme
View Scheme
Scheme 1
Work 1
Project 1
Project 2
Project 3
Work 2
Work 3
Work 1
Work 2
Work 3
Work 1
Work 2
Work 3
Scheme 1
Project 1
Project 2
Scheme 1
Project 1
Scheme 1
Project 1

PWIMS: User Manual
18 | Confidential Hewlett Packard India Sales Private Limited ©
Note: - Since we are going to start scheme administration it is important to understand who can create, edit, and modify the scheme “. 1 Chief Engineer can create, edit, modify the scheme
2 EE HQ can create, edit modify the scheme (visible to all in the dept) 5.1.1 Create Scheme
Let’s start with scheme creation Step 1: Login with User id i.e. (ce_cnl) chief engineer Step 2: Click on Scheme administration>scheme creation
Figure 4 Scheme Creation
Step 3 Enter the values Step 4 Click on save Button Note: - The Name of the scheme will be more than 50 character. Any details should be entered in description filed.” After clicking on “Save “Button .A message will be appear “Scheme saved successfully “
Figure 5 Scheme Saved
So far we have learned to create a scheme. In our next section we will search scheme

PWIMS: User Manual
19 | Confidential Hewlett Packard India Sales Private Limited ©
5.1.2 Search Scheme
Click on scheme administration
Click on search Scheme (search scheme window will appear) We can search the scheme with different ways like by name, scheme start date, scheme end
date, status (new, in progress, completed) Click on search You will find the list of all schemes that are presently running in PWIMS
(Refer to the below screen Figure 6)
Figure 6 Search Scheme
We can see the list of schemes with name, status, and etc. We can also see an action button at right
side of the screen as below
These buttons will allow taking more action Like, View scheme Edit Scheme, Generate the Pdf of the
scheme. In our next section we will see how to edit, view a scheme.
These buttons will allow taking more action Like, View scheme Edit Scheme, Generate the Pdf of the scheme. In our next section we will see how to edit, view a scheme

PWIMS: User Manual
20 | Confidential Hewlett Packard India Sales Private Limited ©
5.1.3 Edit Scheme
To edit as scheme follow the same steps as describes in Search scheme Go to the “Action” option
Click on edit button After click an edit Scheme screen will appear and you can edit it
Figure 7 Edit Scheme After edit the scheme it’s mandatory to save and the changes will occur whatever we have edited in
the scheme
5.1.4 View Scheme
View scheme will allow viewing the details of particular scheme ie.Scheme name, Start date end
date, etc .And List of projects running under a scheme
To view the scheme follow the below steps Go to the “Action” option in search scheme Click on view button

PWIMS: User Manual
21 | Confidential Hewlett Packard India Sales Private Limited ©
Following screen will appear (Figure 8)
Figure 8 View Scheme
Under the Scheme Administration we have covered the followings
Create scheme
Search Scheme
Edit scheme
View Scheme
Let’s see Project administration in our Next Chapter
5.2 Project Administration Project: The hierarchy deployed in the system is Scheme> Project> Works. Thus Project can be
defined under a scheme and work will be recorded under the project that is created. Project
comprises of all the works under it.

PWIMS: User Manual
22 | Confidential Hewlett Packard India Sales Private Limited ©
A scheme can be a Union Govt. or State Govt. or Combine funded. While creating the project the scheme is selected. Project once created in the system can be edited till a work is created under it. The objective here is not to capture the ongoing fund received and expenditure incurred, but to create head under which the work would fall. In project administration we will cover the followings in details Project Creation
Search Project
Edit Project
View Project
Note: - “Since we are going to start project administration it is very important to understand who can create, edit, and modify the project”.
Work 3
Work 1
Work 2
Work 3
Work 1
Work 2
Work 3
Work 1
Work 2 Project 3
Project 2
Scheme 1
Project 1

PWIMS: User Manual
23 | Confidential Hewlett Packard India Sales Private Limited ©
Chief Engineer can create, edit, modify the project
EE HQ can create, edit modify the project (visible to all in the dept) 5.2.1 Project Creation Under the project creation we will learn how to create a project in Pwims Step 1: login with the user id i.e. (ce_cnl)
Step 2: Click on project administration> project creation
Figure 9 Create Project After clicking on save button a message will appear “Project saved successfully” .And here we have
created a project
5.2.2 Search Project
To Search project followings steps are required Click on project administration> Search project
Figure 10: Search Project
Click on Search button and the following screen will appear.
Figure 11 Search Project

PWIMS: User Manual
24 | Confidential Hewlett Packard India Sales Private Limited ©
5.2.2.1 View the Detail of Project View Project detail will allow you to see the project details to view project details take the following steps Click on View button from Action tab
Figure 12 How to View Project
After clicking view button following screen will appear
Figure 13: View of List of Contract under a Project Here we can view the detail of the project and also we can see what the works are going on in this
particular project.
5.2.2.2 Generate Report (PDF)
Generate pdf report is use for documents or print purpose .If we want to see the details as document
format do the following action
Click on generate pdf button see the following screen.
Figure 14 How to generate document (pdf) Project
After click on button we can generate the PDF for document purpose.

PWIMS: User Manual
25 | Confidential Hewlett Packard India Sales Private Limited ©
5.2.2.3 Edit Project
Edit Project is used to edit/modify an existing project .Let see how to edit a
project Click on Edit button see the below screen (select a project to edit)
Figure 15 How to edit a Project
After click on edit button the project screen will appear
Figure 16: Project editing
5.2.2.4 Generate UC
Generate UC Is used to Generate the utilization certificate (UC) for a particular project .To generate the UC followings step are required
Click on Generate UC button see the below screen (select a project to generate UC)
Figure 17: Generate UC After clicking on UC button following screen will appear

PWIMS: User Manual
26 | Confidential Hewlett Packard India Sales Private Limited ©
Figure 18 How to generate Utilization Certificate We can fill the details and click on save a utilization certificate will be generated for that particular project So far we have done though followings in project administration Project Creation
Search Project
Edit Project
View Project
How to generate pdf
How to generate utilization certificate Next we will learn Estimate management module.
5.3 Create Work Estimate Management The system follows a hierarchy of Scheme >Project > and Work/Contract. Scheme is aggregation of
various project under it, Similarly Project is aggregation of different works/contract under it. Each
Work/Contract is a separate entity. Estimate is created for each work
The Estimate Management (Works) module is built to create estimate for approved /not approved
program of works. The hierarchy and the approval matrix specific to each Department are mapped to
form the workflow. The Engineer first prepares the Abstract works estimate. These works estimates
are then sent for administrative and technical sanctions by the workflow engine.
A technical sanction by a competent authority is the last stage in the workflow. After the technical
sanction, the approved work estimates are seamlessly transferred to the contract management
module for further processing
Estimate Creator – JE
Estimate Reviewer – SDO, XEN,SE
Estimate Approver – Chief Engineer, (as per the limit)
5.3.1 Work Estimate Preparations
User can create Estimation for administrative approval along with technical sanction or only for
technical sanction. The technical sanction can only be sought of the estimate Administrative
approval has Already Been Taken for the respective work. In such case the user only needs to
select the „Technical Sanction‟ from the Type of Estimate drop box.
PWIMS: User Manual
27 | Confidential Hewlett Packard India Sales Private Limited ©
If the Administrative Approval is also required then the estimate will undergo the full cycle of
approval for complete approval cycle twice. First for Admin approval and then for technical sanction.
We will Learn How to create an estimate.
We will Learn How to create an estimate
We can create the items for estimate from following ways
By CSR,
Non-CSR
Upload from excel
Through own schedule (we create item, Material and linkages in it.)
From Previous estimates
Step 1: login in to PWIMS
Step 2: Click on Estimate Management >Create work estimate
Step 3: Fill the necessary information, Select a proper type of work (Admin approval and technical
sanction or Technical sanction only), and proper project
Step 4: Click on Save and continue
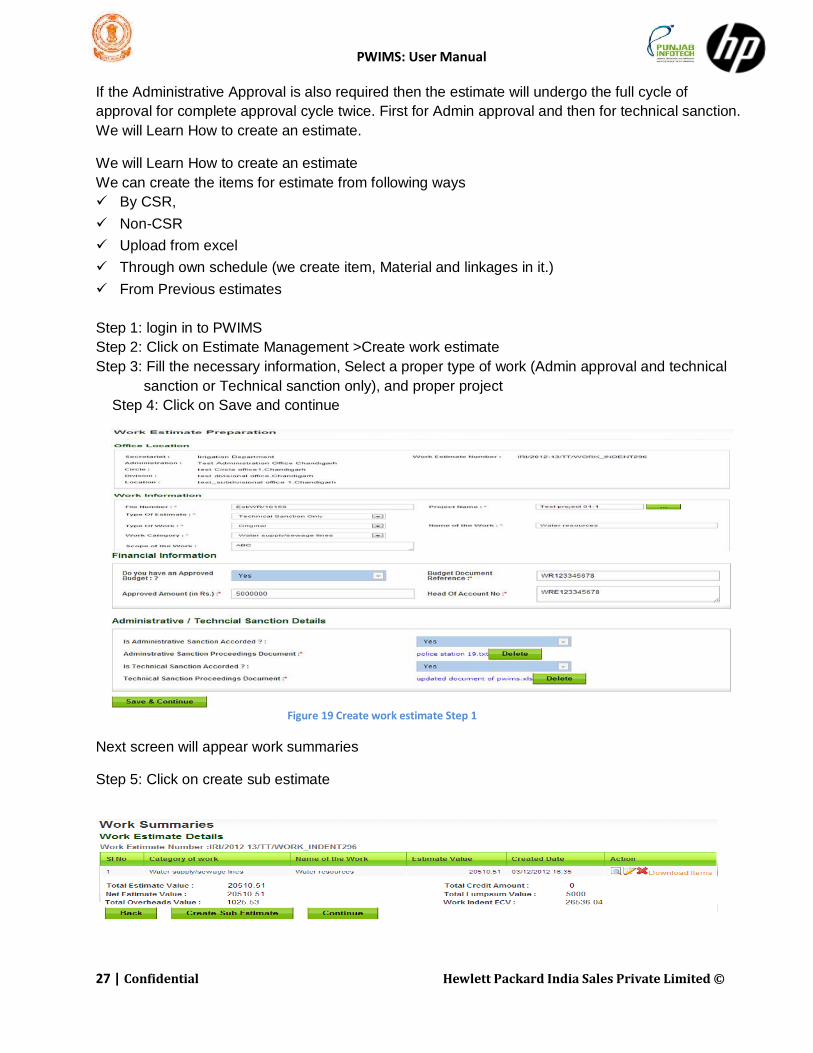
Figure 19 Create work estimate Step 1
Next screen will appear work summaries
Step 5: Click on create sub estimate

PWIMS: User Manual
28 | Confidential Hewlett Packard India Sales Private Limited ©
Here at the next page will open estimate preparation .Following window will open and you can give
the geographical information (optional), after filling the geographical information. click on add work
location if you want to add the locations. This is not mandatory.
See the below screen
Figure 20: Work Location details entry
Click on save and continue. Following screen will open.
Figure 21: Estimate items entry options
Note:”In this section we will prepare the estimate through CSR, Non CSR, upload items from excel
and later on from next chapter we will see schedule category (create item, Material, and Linkages)”
Now we will start with CSR
Step 6: Select CSR from menu >click on load csr >select the chapters to create estimate>then click search Please see the below screen

PWIMS: User Manual
29 | Confidential Hewlett Packard India Sales Private Limited ©
Figure 22 How to Select CSR
Step 7: Select chapter from field “Search items from schedule of rates”> click on search .Below
screen will open
Figure 23 Add items
Select the items from item description> click on adds selected items and then saves and
Continue.
Figure 24 item description
Next screen will appear as below

PWIMS: User Manual
30 | Confidential Hewlett Packard India Sales Private Limited ©
Here we can add premium, Qty, and more action like edit item description, LBD, and rate analysis.
Figure 25 How to add Premium, Qty, LBD
How to add LBD In below screen (Figure 18) we will learn how to add the entry through
LBD
Click on LBD Button
Enter the Particulars
Enter the Qty
Select the value from (Calculate, Direct, Formula) then enter the LBD
Select Addition/Deduction
Enter the LBD Values
Click on Save
Figure 26 How to add LBD
We can also upload multiple LBD from upload LBD option.
After clicking on save the LBD will be saved. As below. Further you can also edit or delete LBD from
action.

PWIMS: User Manual
31 | Confidential Hewlett Packard India Sales Private Limited ©
Now click on back button
Let’s get back to Estimate Preparation now.
Step 9: Click on save and continue Next screen will open. In this screen you can add non-CSR items and upload work estimate from Excel file (Upload template has been given in help Menu) Enter the details in given fields
Click on add Button. And the items will be added
Figure 27 Add Non CSR Items
We can also upload work estimate through (Upload Work Estimates) option Click on browse button and select the estimate file which you want to upload
Click on save and continue.
Figure 28 How to Upload Work Estimate
So far we have created the estimate through CSR, non CSR and upload estimate .Now we can
create overhead in the estimate see the below screen
Figure 29 How to create Overheads

PWIMS: User Manual
32 | Confidential Hewlett Packard India Sales Private Limited ©
Step10: select the item and click on create overheads Below screen will open. Enter the required details Click on save and continue
Figure 30: Overhead Details Enter the details and click on save and continue
Enter the details or you can also upload any type of file, document and click on Finish Button
Figure 31: Finish estimate
Now we have successfully made an estimate refer to the below screen and click on close.
Now this estimate is ready to send for approval.
5.3.2 Schedule Category
Schedule category is used manage your own or customize items as per requirement of the work

PWIMS: User Manual
33 | Confidential Hewlett Packard India Sales Private Limited ©
5.3.2.1 Create Item Under the create item we will see how to create or manage item as below Click on CSR administration>Manage CSR items
Click on Create Category (enter the category name)
Click on save button
Click on create item (enter the work item details) click on save
Click on save button (an item will be created) refer the screen below.
Figure 32 Create Category (Own Schedule)
Figure 33 Save Item (Own Schedule)

PWIMS: User Manual
34 | Confidential Hewlett Packard India Sales Private Limited ©
5.3.2.2 Edit item Here we will see how to edit an item which has been made Click on CSR Administration >manage CSR items
Select schedule (which you want to edit)
Click on search (it will show you the list of items)
Select the item to edit
Figure 34 Edit Item (Own Schedule)
Edit or make necessary changes and click on save button.
Figure 35: edit /save item (own schedule)
5.3.2.3 Create Material Click on CSR Administration>Manage Material Data Select the category Click on Create New and enter the material master detail Click on save button

PWIMS: User Manual
35 | Confidential Hewlett Packard India Sales Private Limited ©
Figure 36: Create Material 5.3.2.4 Edit Material
Click on CSR Administration>Manage Material Data
Select the category
Click on search
Click on edit button
Figure 37: Edit Material After click on edit button .Screen will open as below
5.3.2.5 Create Linkages
As we have created the items now we will see how to establish the linkages Click on CSR Administration> Manage material requirements
Select the schedule category
Click on search
Click on add/edit material requirement Button
Refer to the Screen below

PWIMS: User Manual
36 | Confidential Hewlett Packard India Sales Private Limited ©
Figure 38 Create Linkages
After clicking on Button screen will appear. Enter the material name in text box and click on search.
Select the material from the list and click on Map Material.
Figure 39: Mapping material with Items
After clicking on Map material button. A message will display “Material mapped successfully” We have created the item and establish the link for material. Now we will see how to create material items 5.3.3 Rate Analysis Under the Rate analysis part we will do the followings How to add royalties for materials if any How to loading / unloading charges How to add Lead charges Let’s see how Click on CSR Administration>Manage Material Data Select the category Click on Create New and enter the material detail Click on save button.

PWIMS: User Manual
37 | Confidential Hewlett Packard India Sales Private Limited ©
After click on save button material has been created and saved.
Click on search
Figure 40: Materials Creation & Editing
After clicking on search a list will appear. Choose the material to perform RA for example we will take (Sr.1 “Cement OPC (Unit per Bag),
c/o of cement from Hoshiarpur to site of work lead 4.90 kms.) 5.3.3.1 How to add material attributes Click on Royalties button. A screen will open as below Enter the value click on save button (We have successfully added Royalties).
Figure 41: How to add Royalties
Click on Loading/Unloading button. A screen will open as below Enter the value click on save button then back
(We have successfully added loading unloading charges).
Figure 42: How to add Loading/Unloading

PWIMS: User Manual
38 | Confidential Hewlett Packard India Sales Private Limited ©
Click on Lead Charges button . A screen will open as below
Figure 43: How to Add Lead Charges
Select the lead category master button
Select the category from category master (Please refer to the below screen)
Click on Copy Lead Rate.
A screen will appear as below.
Figure 44: Viewing/editing/creating Lead Changes
Click on save and continue.
We can also add Lift charges .Once the RA is completed we can Use it Estimate management.

PWIMS: User Manual
39 | Confidential Hewlett Packard India Sales Private Limited ©
5.3.4 Search Estimate
In Search Estimate we will see how to search an estimate .We can search estimate by File number,
name of work, between the dates, by project and status .Followings are the steps to search an
estimate.
Click on Estimate Management >Search work estimate
Select the type or click on search (refer to the below screen)
Figure 45: How to Search Estimate
See the search result below (Also see action button it will allow to take more controls).
Figure 46: View List of Estimate
5.3.5 My Estimate
My estimate will enable you to see the estimate made with your own login .It will also allow you to do the followings View estimate Edit estimate Print estimate Download estimate document Estimate Send for approval
5.3.5.1 View Estimate
To view the estimate followings steps are required
Click on Estimate management>my estimates
PWIMS: User Manual
40 | Confidential Hewlett Packard India Sales Private Limited ©
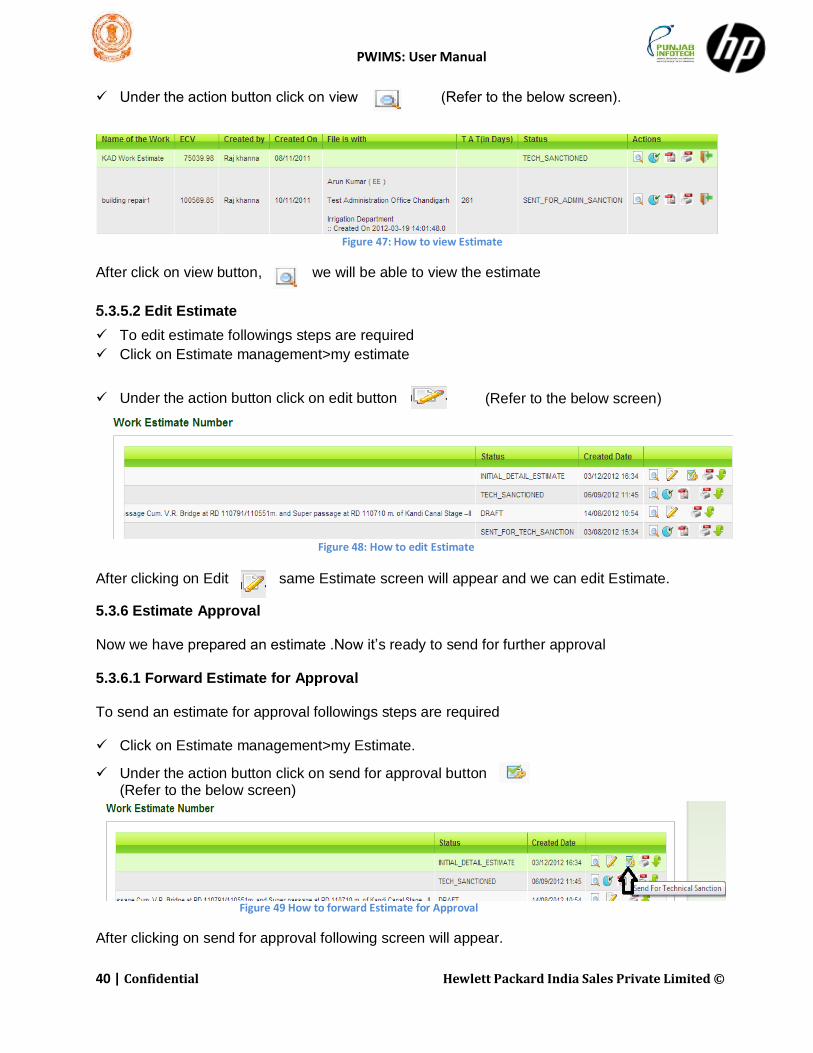
Under the action button click on view (Refer to the below screen).
Figure 47: How to view Estimate
After click on view button, we will be able to view the estimate
5.3.5.2 Edit Estimate
To edit estimate followings steps are required
Click on Estimate management>my estimate
(Refer to the below screen) Under the action button click on edit button
Figure 48: How to edit Estimate
After clicking on Edit same Estimate screen will appear and we can edit Estimate.
5.3.6 Estimate Approval
Now we have prepared an estimate .Now it’s ready to send for further approval 5.3.6.1 Forward Estimate for Approval To send an estimate for approval followings steps are required Click on Estimate management>my Estimate.
Under the action button click on send for approval button (Refer to the below screen)
Figure 49 How to forward Estimate for Approval
After clicking on send for approval following screen will appear.

PWIMS: User Manual
41 | Confidential Hewlett Packard India Sales Private Limited ©
Click on sign then click send for administrative Approval.
Figure 50: Sending for Approval of Estimate
It will show a display message as below.
Now we have sent the estimate for approval. Refer to the below screen of approval cycle.
5.3.6.2 Check Estimate for Approve /Review To check the estimate followings steps are required Login with an appropriate id i.e (SDO)
Click on dash board and you will see the link under the Estimate tasks
Click on the link mentioned under Estimate task (see the below screen)
PWIMS: User Manual
42 | Confidential Hewlett Packard India Sales Private Limited ©
Figure 51 How to Check Estimate for Approval
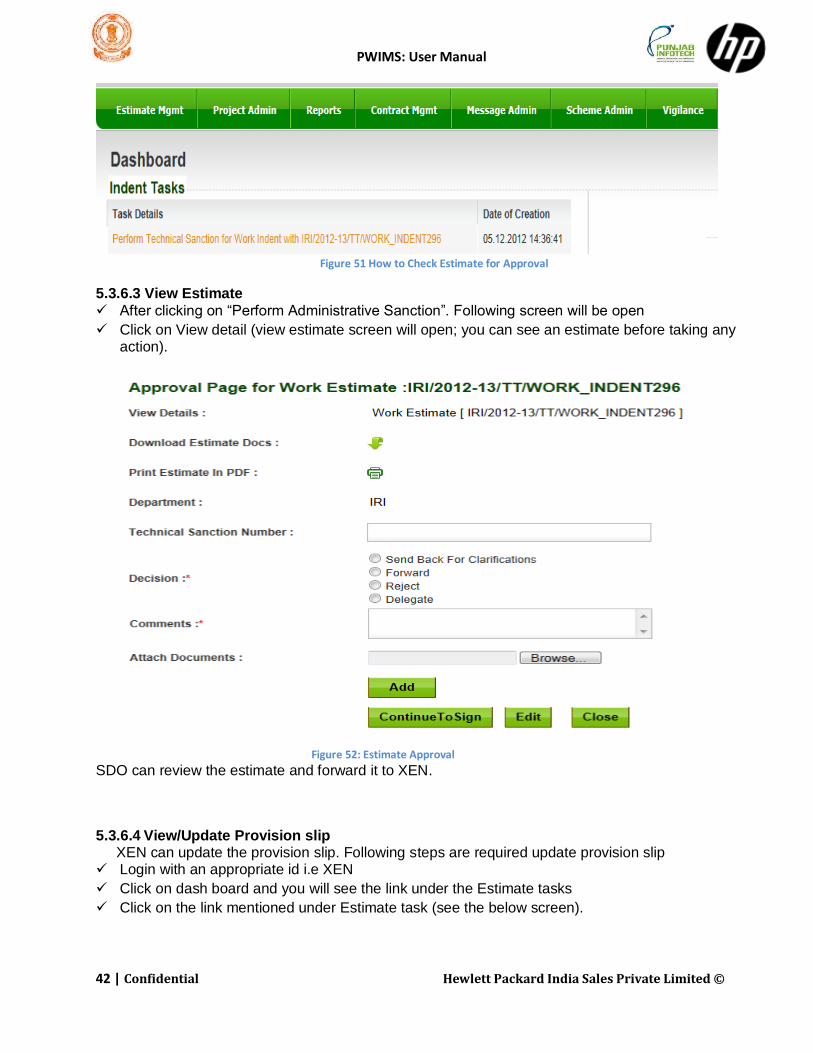
5.3.6.3 View Estimate
After clicking on “Perform Administrative Sanction”. Following screen will be open
Click on View detail (view estimate screen will open; you can see an estimate before taking any action).
Figure 52: Estimate Approval SDO can review the estimate and forward it to XEN.
5.3.6.4 View/Update Provision slip XEN can update the provision slip. Following steps are required update provision slip Login with an appropriate id i.e XEN
Click on dash board and you will see the link under the Estimate tasks
Click on the link mentioned under Estimate task (see the below screen).

PWIMS: User Manual
43 | Confidential Hewlett Packard India Sales Private Limited ©
Click on view update provision Slip.
After click on view update provision slip as screen will appear as below.
Enter the details and click on save button.
Figure 53: How to view update provision slip Provision slip will be update. 5.3.6.5 Edit estimate before approving
Before taking any action or approving we can also edit the estimate. Login with an appropriate id i.e. (SDO) Click on dash board and you will see the link under the Estimate tasks After clicking on “Perform Administrative Sanction”. Following screen will be open Click on Edit (edit screen will open, you can edit an estimate)

PWIMS: User Manual
44 | Confidential Hewlett Packard India Sales Private Limited ©
Figure 54: How to edit estimate before approving
We can see the log notes under process history.
5.3.6.6 Change Log for Estimate
Change log is used to see the logs. You can track the changes when changes happen in the estimate Followings are the steps to see change logs Click on Estimate Management >Search work estimate
Select the type or click on search (refer to the below screen)
Figure 55 View Change Log's Estimate

PWIMS: User Manual
45 | Confidential Hewlett Packard India Sales Private Limited ©
See the search result below (Also see action button it will allow to take more controls)
Click on view change button (refer to the below screen)
Also see the Change log's for LBD and change logs for Rate analysis 5.3.6.7 Approval Decision 5.3.6.7.1 Approve Estimate
Login with an appropriate id
Click on dash board and you will see the link under the Estimate tasks
Click on the link mentioned under Estimate task (see the below screen)
After clicking on “Perform Sanction”. Following screen will be open.
Figure 56 How to Approve Estimate
Select approve

PWIMS: User Manual
46 | Confidential Hewlett Packard India Sales Private Limited ©
Click on continue to sign Next screen will open as below Click on sign (A message will be displayed signing completed)
Click on send button
Figure 57: Adding comments & approving Estimate
5.4 Contract Management
Contract Management module is built to manage the works that are new, in progress and closed. This
module facilitates the user to create contracts under various projects and send for review and approval process. Once contracts are approved the following activities can be performed,
i. Creating contracts ii. Creating mile stones under contracts iii. Defining activities under each mile stone iv. Generating measurement book entries v. Verifying and approving measurement book entries vi. Generating bills for verified and billable measurement book entries
vii. Generating payment statements for each bill approved.
5.4.1 Create Work Contract As we are aware DAO will create the contract. If any estimate get approve DAO will get information
in his information list. We can create the contract with following steps
Login with DAO id
Click on contract management > create contract
Create contract screen will be open (enter the necessary details)

PWIMS: User Manual
47 | Confidential Hewlett Packard India Sales Private Limited ©
Refer to the bellow screen
Figure 58: How to create Contract /Work
5.4.1.1 Create Work Flow
After filling the detail user needs to fill contract activity user details & define the activity and staff. It is
mandatory to select actors for all activities.
Refer to the below screen
Figure 59: How to Create Work flow
Click on save button
5.4.1.2 Create Contract Items

PWIMS: User Manual
48 | Confidential Hewlett Packard India Sales Private Limited ©
Now we have created the work flow and will see how to add contract items Click on add contract items (At bottom of the first work /Contract creation screen)
It will open the next screen and give you an option to select the item from previous estimate, schedule of rates, add rates approved manually and upload from excel Here we will choose previous work estimate (see the below screen) Click on add from estimate
In the next window click on search
Select the estimate
Click on save work Estimate item
Following screen will appear and you can see the items below.
Figure 60: How to Add Contract Items

PWIMS: User Manual
49 | Confidential Hewlett Packard India Sales Private Limited ©
As we have added items in to contract. Now we will add standard deduction and royalties refer to the screen below Click on add standard deduction
Enter the description and percentage
Select type addition/deduction
Click on save
Click on back (after adding all)
Figure 61: How to add Addition/Deduction in a contract
Note: “Royalties can also be added on clicking add royalties. After clicking on the back you will reach to the same screen now we can add mille stones in it also as
below.
5.4.1.3 Create Milestones and activities
To add mile stones following steps are required Click on add mile stones
Enter the milestone details
Click on add update mile stone

PWIMS: User Manual
50 | Confidential Hewlett Packard India Sales Private Limited ©
See the screen below
Figure 62: How to Add Mile stones
Please note that the Dates of milestone will be between the dates of the project. Also the sum of all weightage of all the milestone will be the project. The weightage will be from 100.
We have added the milestone successfully. Now after adding the mile stone it’s necessary to add
activity
To add an activity takes the followings steps.
Click on activity button Enter the activity details Click on add milestone activity. The weightage will be from 100. Sum of all activity under the milestone should be 100. Also the dates will be between that of respective milestones.
Figure 63: How to Add milestones Activity
PWIMS: User Manual
51 | Confidential Hewlett Packard India Sales Private Limited ©
Following screen will open and activity will be added.
Click back button
Click on finish It will display a message “contract modify successfully “
5.4.2 Edit Contract
We have made the contract now and it’s on initial stage. Now we will see how to edit contract
Click on contract management >my contract
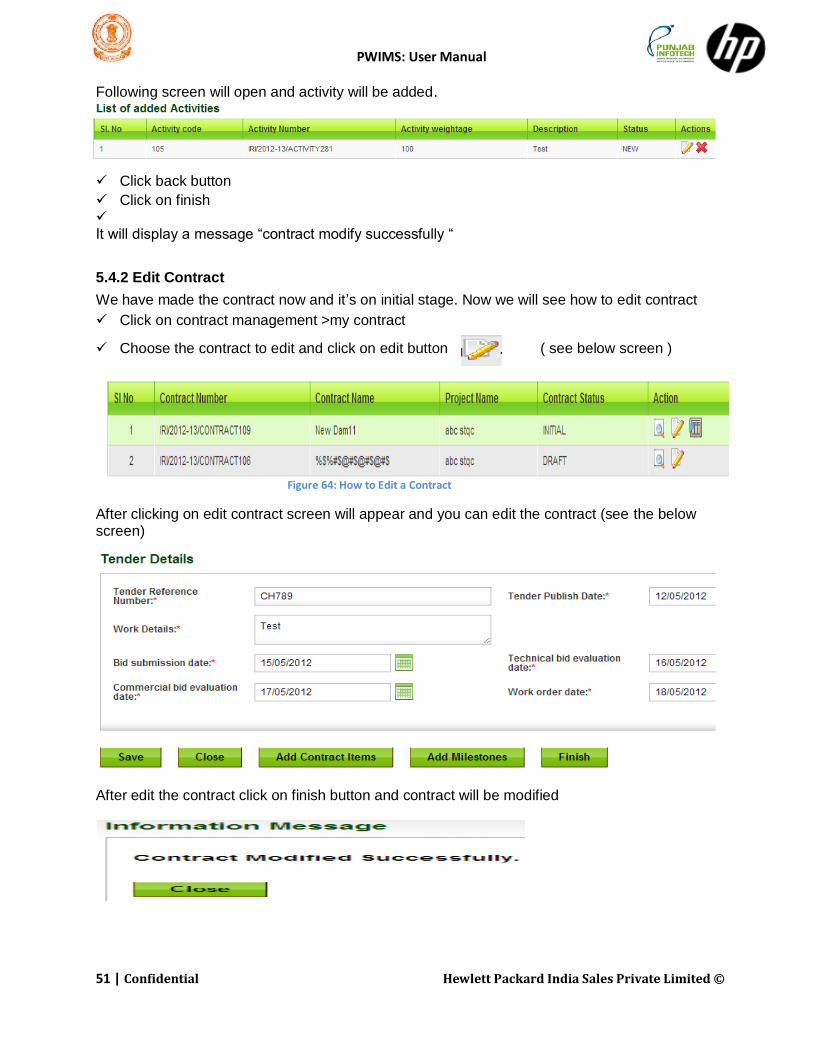
Choose the contract to edit and click on edit button ( see below screen )
Figure 64: How to Edit a Contract
After clicking on edit contract screen will appear and you can edit the contract (see the below screen)
After edit the contract click on finish button and contract will be modified

PWIMS: User Manual
52 | Confidential Hewlett Packard India Sales Private Limited ©
5.4.3 View Contract
5.4.3.1 View the detail of the contract
To view the detail of contract followings steps are required Click on contract management >search contract
Click on search (after click on search a list of contracts will be appear)
Click on view contract button
Please see the below screen
Figure 65: How to View Contract
After click on view button .We can view the contract as below.
5.4.3.2 View Inspection Log’s
To view the inspection log’s followings steps are required
Click on contract management >search contract
Click on search (after click on search a list of contracts will be appear)
Click on view inspection log’s button

PWIMS: User Manual
53 | Confidential Hewlett Packard India Sales Private Limited ©
Please see the below screen
After click on view inspection log’s button .We can view the logs as below.
Figure 66: How to create view inspection logs
One can also create the inspection logs (see also more action edit, view delete)
5.4.3.3 View Change Log’s For Contract
Change log will help us to track the log’s if any changes happen in the contract it’s provide all the
information about the changes like what are the changes made, who made the changes?, etc .
To view the change log’s followings steps are required
Click on contract management >search contract
Click on search (after click on search a list of contracts will be appear)
Click on view change log’s button

PWIMS: User Manual
54 | Confidential Hewlett Packard India Sales Private Limited ©
Please see the below screen
Figure 67: How to view change logs for contract
After clicking on view change log’s button following screen will appear and you can see the change logs for it.
5.4.3.4 Generate Reports for the Contract We can also generate the report of contract as pdf (document).To generate the pdf followings steps are required To generate pdf report followings steps are required Click on contract management >search contract
Click on search (after click on search a list of contracts will be appear)
Click on generate pdf button
Please see the below screen
Figure 68: How Generate Contract PDF
After clicking on pdf button. A report will be generated.
5.4.4 Edit Mile stones for contract To edit mile stones followings steps are required Click on contract management >my contract
Choose the contract to edit and click on edit button See Below Screen

PWIMS: User Manual
55 | Confidential Hewlett Packard India Sales Private Limited ©
After clicking on Edit contract screen will appear (see the below screen)
Click on add mile stones
Enter the milestone details Click on add update mile stone
See the screen below
Figure 69: How to edit Milestone
We have added the milestone successfully. Now after adding the mile stone it’s necessary to add activity.

PWIMS: User Manual
56 | Confidential Hewlett Packard India Sales Private Limited ©
To add an activity takes the followings steps Click on activity button
Enter the activity details
Click on add milestone activity
Following screen will open and activity will be added.
Click back button
Click on finish It will display a message “contract modify successfully “
5.4.5 Create Variation Order
Variation Order (VO): Variation Order is to create revised requirement for any contract. The VO can is raised in following conditions When any of the existing contract items is required in for work execution is exhausted and more
than what is provisioned for in the contract.
When any new item needs to be introduced in the contract. The contract is approved and if any variation occurs in the contract .JE can generate the variation order and Chief Engineer can approve it as below Click on contract administration> search contract Click on variation order button
Figure 70: How to create Variation order

PWIMS: User Manual
57 | Confidential Hewlett Packard India Sales Private Limited ©
After clicking on Variation button a screen will open as below
Click on create variation order Select item source of variation (for example schedule of rates) Click on save and continue
After clicking on save and continue screen will appear as below Select a category and click on search
Select the item’s and click on add selected items
Enter the material qty and click on save
Figure 71: Add items to Variation order

PWIMS: User Manual
58 | Confidential Hewlett Packard India Sales Private Limited ©
A message will appear as below
Click on close button
Back to the variation order screen will appear as below
Click on send for approval button
Figure 72: Variation order Send of Approval
After clicking on send for approval button a screen will appear as below Select the officer from send to
Click on sign
Click on send for approval
Now variation order has been sent for approval to XEN .XEN will farward Variation to SE. SE will review the VO and forward to CE .Now we will login with Chief engineer id and send it for approve Login with CE ID. A message will appear as below
Click on the link under Contract Management –Variation Order Approval tasks i.e. “Pending Approval for
Variation order”

PWIMS: User Manual
59 | Confidential Hewlett Packard India Sales Private Limited ©
Click on approve Radio button
Enter the comments in comment box
Click on sign (after clicking on sign a message will display Signing complete)
Click on submit button
Figure 73: How to Approve Variation Order
After submit VO will be approved by CE which will be similar to estimation approval. Note: VO items once approved will be added to the existing contract and appear in the updated contract. The same can be used/selected while creating the MB.
5.4.6 Contract Approval We have created the contract successfully. Now we will see how to send for approval 5.4.6.1 Forward Contract for Approval /Review Click on contract management > my contract
Click on search contract
Click on send for approval button Refer to the below screen)
Figure 74: How to Forward Contract for Approval
After clicking on the approve button screen will appear as below. Select the person name whom you want to send ( from send to option )

PWIMS: User Manual
60 | Confidential Hewlett Packard India Sales Private Limited ©
Click on sign button Click on send for approval Now our contract has been send for approval. 5.4.6.2 Check Contract to Approve
As XEN can approve the contract login with XEN id. A screen will open as below.
Click on “Pending Approval Contract”. A window will open you can check the contract there. For more details please refer the contract approval decision.
5.4.6.3 Edit Contract before approving
Login with the appropriate id
Click on “pending approval contract “(refer to the below screen)

PWIMS: User Manual
61 | Confidential Hewlett Packard India Sales Private Limited ©
A screen will appear as below.
Figure 75: How to edit Contract before Approving
Click on Edit button and screen will appear below .Make the necessary changes and click on finish.
5.4.6.4 Attach Documents
We can also attach any document in attach documents .To attach the document followings step are required in the contract approval page Browse the file and attach document Click on add button ( an attachment will be attached automatically)

PWIMS: User Manual
62 | Confidential Hewlett Packard India Sales Private Limited ©
5.4.6.5 Contract Approval Decision 5.4.6.5.1 Approve Contract
Login with the appropriate id
Click on “pending approval contract “(refer to the below screen)
A screen will appear as below Click on Approve Enter the comments Click on sign button Click on send button
Figure 76: How to Approve Contract
Now we have approved the contract here.

PWIMS: User Manual
63 | Confidential Hewlett Packard India Sales Private Limited ©
5.4.7 Measurement Book Measurement Book is used to track the work progress and the entire Bill‟s get generated on the base of MB (Measurement Book). As the contract get approved JE will get the notification of approval.JE can create the measurement book .We will see how to create the MB 5.4.7.1 Create MB
Click on contract management>Search contract
Click on MB Button from status (Refer to the below screen)
After clicking on after clicking on button. A screen will open as below.
Click on create measurement book
Figure 77: How to create MB
After clicking on create measurement book .A screen will open as below Enter the date and description
Click on save button

PWIMS: User Manual
64 | Confidential Hewlett Packard India Sales Private Limited ©
A message will display “Measurement Book details are saved successfully”
Click on contract items
Select the contract items (see the blow screen)
After selecting the items click on add items
If the measurement date is more than 3 days old the user need to enter the reason for delay.
Update the quantity >click one edit button (edit button is available under action) LBD window will open (as below)

PWIMS: User Manual
65 | Confidential Hewlett Packard India Sales Private Limited ©
Enter the LBD details or you can enter the direct LBD.
Click on save button
Click on back button
MB will be saved and you will return to below screen
Click on save and continue
Next screen will appear as below Click on show activity

PWIMS: User Manual
66 | Confidential Hewlett Packard India Sales Private Limited ©
Select the activity and click add (refer to the below screen)
Click on finish button A message will appear as below and we have saved the measurement book .Later on we will also see how to send it for approval
5.4.7.2 Edit MB Note: “We can only edit the MB before sending it for approval. If the Mb has been sent for approval we can't edit it “ Once we have created the MB and wish to edit following step are required Search the contract.
Click on MB button. (A screen will appear as below)
Click on edit button.
Figure 78: How to Edit MB

PWIMS: User Manual
67 | Confidential Hewlett Packard India Sales Private Limited ©
After clicking an edit button .A screen will appear as below and you can edit the MB 5.4.7.3 View MB
Once we have created the MB and wish to view following step are required Search the contract
Click on MB button.(A screen will appear as below)
Click on edit button
After clicking on view button. A screen will appear as below.
Figure 79: MB View

PWIMS: User Manual
68 | Confidential Hewlett Packard India Sales Private Limited ©
5.4.7.4 Delete MB
Once we have created the MB and wish to view following step are required Search the contract
Click on MB button
Click on delete button
It will open a pop-up and ask “Delete this item?”
Click on ok and MB will be deleted
Figure 80: Delete MB
5.4.7.5 MB finalizing/forwarding
After creating the MB we can send it for approval and approval authority can take followings decisions. Forward MB for approval/Review View Mb Check Mb Edit MB before Approving Change logs for MB 5.4.7.6 Forward MB for Approval
Followings steps are required to forward MB.

PWIMS: User Manual
69 | Confidential Hewlett Packard India Sales Private Limited ©
Search the contract
Click on MB button
Click on send for approval button
After clicking on send for approval button below screen will appear. Click on send to drop down and select officer Click on sign button Click on send for approval
Figure 81: Forwarding MB
A Message will appear below
Now the Measurement Book has been sent for approval

PWIMS: User Manual
70 | Confidential Hewlett Packard India Sales Private Limited ©
5.4.7.7 Review MB
As JE created the MB and send to SDO. Now we will login with SDO id and see. Login with SDO id Click on Pending Approval for Measurement book (refer to the below screen)
After clicking on Pending Approval for Measurement Book a screen will open as below

PWIMS: User Manual
71 | Confidential Hewlett Packard India Sales Private Limited ©
Refer to the above screen and click on the link at right of view details
5.4.7.8 Check MB With Check MB SDO/XEN can review and verify measurement book .Followings is the steps to check MB. Login with the appropriate id (SDO,XEN) Click on Pending Approval for Measurement book (refer to the below screen)
After clicking on Pending Approval for Measurement Book a screen will open as below

PWIMS: User Manual
72 | Confidential Hewlett Packard India Sales Private Limited ©
Click on edit button
Figure 82: MB Edit/View during review/approval
After clicking on edit button a screen will appear as below
Figure 83: MB List during review /edit

PWIMS: User Manual
73 | Confidential Hewlett Packard India Sales Private Limited ©
Choose the item and click on edit button
A screen will appear as below Click on the check box under Verification
Click on save verification details
Figure 84: Edit LBD of MB
After clicking on save verification details. Click on save and continue Click on finish button MB has been successfully checked and can be processed further. 5.4.7.9 Edit MB before approving/forwarding Login with the appropriate id (SDO,XEN) Click on Pending Approval for Measurement book (refer to the below screen)
After clicking on Pending Approval for Measurement Book a screen will open as below.
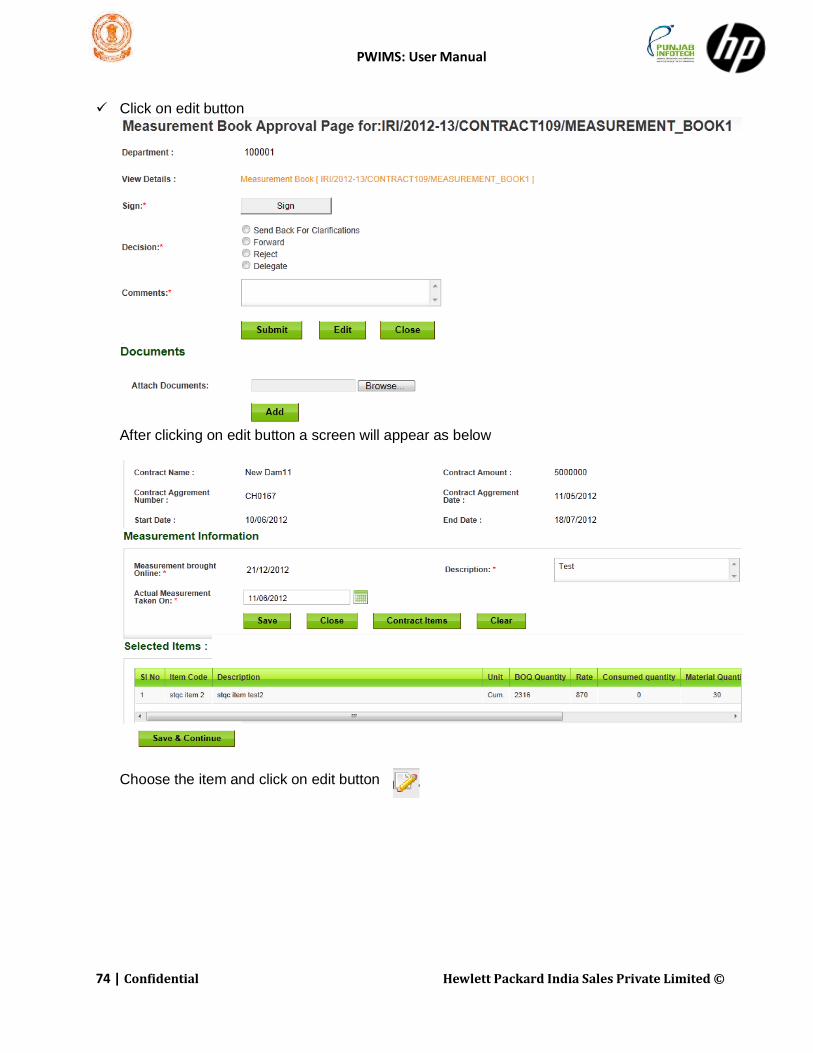
PWIMS: User Manual
74 | Confidential Hewlett Packard India Sales Private Limited ©
Click on edit button
After clicking on edit button a screen will appear as below
Choose the item and click on edit button

PWIMS: User Manual
75 | Confidential Hewlett Packard India Sales Private Limited ©
A screen will appear below
Make the necessary changes Click on save or verification details Click on Save and continue Click on Finish 5.4.7.10 MB Approval options
5.4.7.10.1 Review / Approve MB Login with the appropriate id (SDO,XEN) Click on Pending Approval for Measurement book (refer to the below screen)
Figure 85: message for MB approval
After clicking on Pending Approval for Measurement Book a screen will open as below If you are login with SDO id follow the below procedure

PWIMS: User Manual
76 | Confidential Hewlett Packard India Sales Private Limited ©
Check the radio button Forward Select the officer Enter the comment in text box Click on sign button Click on submit
Figure 86: MB review/Approval
After clicking on submit Mb will be sent to XEN Now login with XEN ID Click on Pending Approval for Measurement book (refer to the below screen)
After clicking on Pending Approval for Measurement Book a screen will open as below If you are login with SDO id follow the below procedure

PWIMS: User Manual
77 | Confidential Hewlett Packard India Sales Private Limited ©
Check the radio Approve Enter the comment in text box Click on sign button Click on submit
After clicking on submit button MB will be approved 5.5 Billing
After MB approval JE can create the bill and send to authority for approval .In Billing section we will learn following Create bill Edit bill View bill Delete bill 5.5.1 Create Bill
Note: Under the bill creation we will create the bills for following MB

PWIMS: User Manual
78 | Confidential Hewlett Packard India Sales Private Limited ©
MB 1
MB 2
Click on contract management>Search contract
Click on Bill's Button from status ( Refer to the below screen)

PWIMS: User Manual
79 | Confidential Hewlett Packard India Sales Private Limited ©
After clicking on button. A screen will open as below
Click on create bill
Figure 87 Create Bill
After clicking on create bill. Below screen will appear
Enter the details like, Bill no, Bill date, Bill type etc.
Click on save button & Continue
After clicking on save & continue button a screen will appear as below
An approved measurement book l will appear
Enter the payable rates
Click on apply addition /deduction
Figure 88 How to add Payable Rates and Addition Deductions

PWIMS: User Manual
80 | Confidential Hewlett Packard India Sales Private Limited ©
After clicking on apply addition /deduction. A screen will appear as below
Check the addition/deductions
Click on apply
Click on back button
A screen will appear as below. It will show the bill summary
Click on finish button
After clicking on finish button. A message will appear as below and we have success fully made the bill
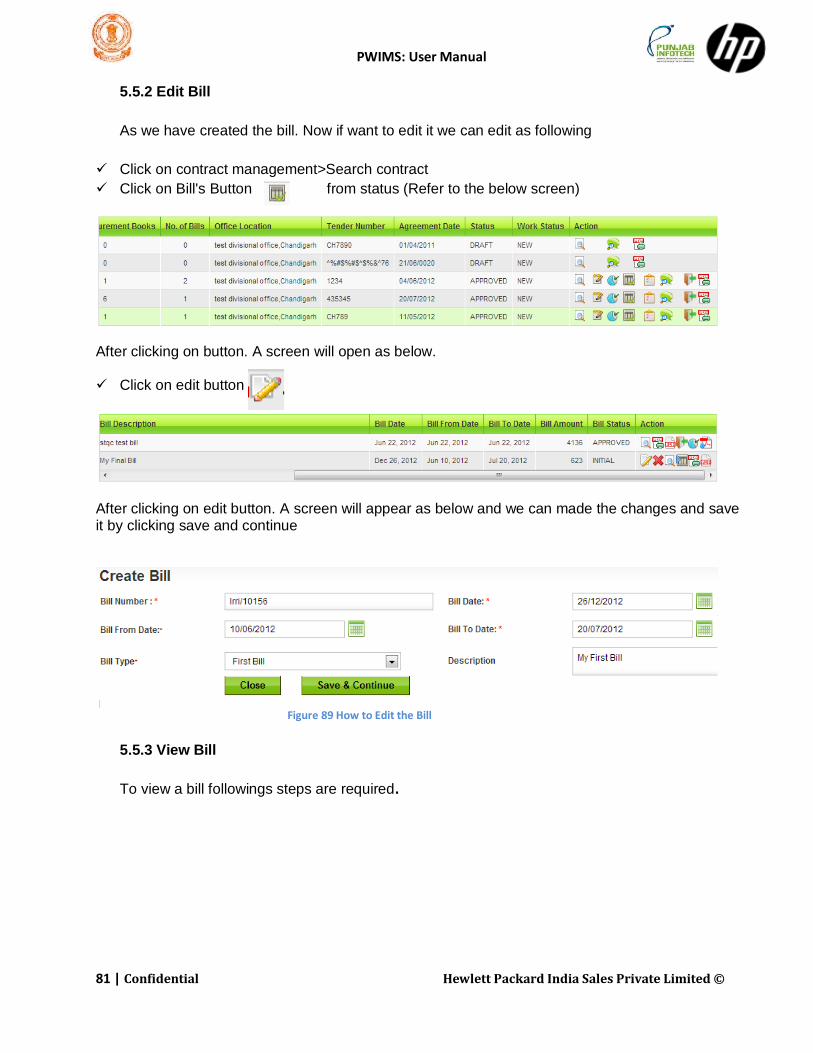
PWIMS: User Manual
81 | Confidential Hewlett Packard India Sales Private Limited ©
5.5.2 Edit Bill
As we have created the bill. Now if want to edit it we can edit as following
Click on contract management>Search contract
Click on Bill's Button from status (Refer to the below screen)
After clicking on button. A screen will open as below. Click on edit button
After clicking on edit button. A screen will appear as below and we can made the changes and save it by clicking save and continue
Figure 89 How to Edit the Bill
5.5.3 View Bill
To view a bill followings steps are required.

PWIMS: User Manual
82 | Confidential Hewlett Packard India Sales Private Limited ©
Click on contract management>Search contract
Click on Bill's Button from status ( Refer to the below screen)
After clicking on button. A screen will open as below Click on button
Figure 90 How to View the Bill
After clicking on view button. A screen will appear as below and we can view the bill in detail

PWIMS: User Manual
83 | Confidential Hewlett Packard India Sales Private Limited ©
5.5.4 Bill Approval
Once the bill has been made JE can send it to higher authorities for approval. Under the Bill approval
we will do the followings
Forward bill for approval Check bill to approve View bill Edit bill before approving Attach documents with bill 5.5.4.1 Forward Bill for Approval
To forward bill for approval followings steps are required Click on contract management>Search contract Click on Bill's Button from status ( Refer to the below screen)
After clicking on button. A screen will open as below Click on send for approval button
After clicking on edit button. A screen will appear below

PWIMS: User Manual
84 | Confidential Hewlett Packard India Sales Private Limited ©
Click on send to drop down and select the officer name
Click on sign button
Click on send for approval
Figure 91 Forward Bill for Approval
After clicking on send for approval .Screen will appear as below
5.5.4.2 Check Bill to Approve
Once JE send the bill for approval by default it goes to SDO
Login with SDO id
A screen will appear as below .Click on Link (Review the Bill) under contract management -activity
approval task

PWIMS: User Manual
85 | Confidential Hewlett Packard India Sales Private Limited ©
After clicking on the above link. Screen will open as below
Bill will forwarded to XEN
Click on review bill under Contract management activity
After clicking on review bill a screen will be appear as below
Figure 92 How to Send Bill to Contractor for Review

PWIMS: User Manual
86 | Confidential Hewlett Packard India Sales Private Limited ©
EE either can send the bill back for clarification to je or can send to contractor review (for contractor
comments on it) .Now we will forward the bill to contractor.
Click on send to contractor for review ( bill will sent to contractor)
Now login as contractor and check the bill .Refer to the below screen.
Enter the contractor user name and password.
After clicking on user and password a screen will appear as below.
Click on dashboard
Click on review bill
After clicking on review bill a screen will appear as below.

PWIMS: User Manual
87 | Confidential Hewlett Packard India Sales Private Limited ©
Contractor can review the bill and submit it with his comments .To view the bill detail see the below
screen.
Click on view bill details ( screen will appear as below)
Click on view item bill summary
Here contractor can see the bill details also .After submitting the bill. Bill will goes to EE he can
approve it further.
Will see in the next section of bill approval.

PWIMS: User Manual
88 | Confidential Hewlett Packard India Sales Private Limited ©
5.5.4.3 Edit Bill before approving
Approval authorities can edit the bill before approving as below
Login with an appropriate id (XEN, and SDO)
A screen will appear as below .Click on Link (Review the Bill) under contract management -
activity approval task.
After clicking on the above link. Screen will open as below
Click on edit button.
Figure 93 How to Edit Bill before Approval
After clicking on edit button a screen will appear as below .Edit the bill and click on save and continue.
Now we can edit the bill.

PWIMS: User Manual
89 | Confidential Hewlett Packard India Sales Private Limited ©
5.5.5 Attach Documents
We can also attach the documents before approving as below
Click on browse button select the path.
5.5.6 Bill Approval Decision
5.5.6.1 Approve
After Contractor bill review .Contractor will submit the bill to XEN for approval.
Login with an appropriate id ( XEN)
A screen will appear as below .Click on Link (Review the Bill) under contract management -activity
approval task.
Click on review bill link ( under Contract management activity approval tasks)

PWIMS: User Manual
90 | Confidential Hewlett Packard India Sales Private Limited ©
A screen will appear as below.
Figure 94 How to Approve a Bill
5.5.6.2 Release bill for payment
After bill approval je can release the bill. Please refer to the followings steps.
Login with JE
Click on contract management>Search contract
Click on Bill's Button from status ( Refer to the below screen)
After clicking on bill button. A screen will open as below.

PWIMS: User Manual
91 | Confidential Hewlett Packard India Sales Private Limited ©
After clicking on release for payment bill a message will appear as below
5.5.6.3 Sample Bill’s
Bill 1
Figure 96 Sample Bill MB 1
Click on Send back for the clarification radio button Select a person from category Click on send button Bill will be sent for clarification .Same way we can send the bill to contractor for review. Next we will be Vigilance module.
5.6 Vigilance
Once MB / Bill are created and approved, attached vigilance official is informed by alert. The official
can review them and provide comment if required.
Vigilance comments can be Informational or Action Required.
Vigilance shall be providing the comments upon approved MB / Bill, & shall be able to send it to
different officers (by default XEN of Division , along the optional to creator, Reviewers or CE
vigilance) If comments are “Informational”, no action is required and all the parties involved can view
and raise questions or comments .
If comments are “Action Required”, then Approver of the item (MB / Bill) is responsible for acting
upon them and responds back to vigilance officer for the closure. Vigilance officer shall be having the
option to close those comments.

PWIMS: User Manual
92 | Confidential Hewlett Packard India Sales Private Limited ©
Following are the activities which can be carried out through vigilance module.
Create Memo
Edit Memo
Send memo
View & response by XEN
Closure
5.6.1 Create Memo
Memo can be created by XEN Vigilance. The XEN vigilance is attached to the respective office while
creating the offices. Steps for creating the Memo.
Login as XEN Vigilance
Select MB/Bill for which you want to create Memo.
Search and select the MB/Bill on which the comments are to be provided.
Enter the date of inspection. If the dates of inspection are older than three days then the system
would ask for reason for delay
Select the type of memo (Informational/ Action required).
Enter the memo description.
Attach any document with the memo. (not mandatory)
Save the Memo.

PWIMS: User Manual
93 | Confidential Hewlett Packard India Sales Private Limited ©
Figure 97 How to Create Memo
5.6.2 Edit Memo
Memo can be edited till they are not sending for response. The Vigilance Official who has created
the memo can edit it. Steps for editing the Memo are.
Login as XEN Vigilance
Search and select the MB/Bill on which the comments have been given. Click on the edit button
Edit the content of the memo and save.
Figure 98 How to Edit Memo
5.6.3 Send Memo
Once the memo has been created, it can now be send to the desired actors/officials. The steps are
as follows.
Login as XEN Vigilance
Search and select the MB/Bill on which the comments have been given. Click on the send
button.
Select the actors to which the memo is to be send for information. The memo will be
automatically submitted to the respective XEN.

PWIMS: User Manual
94 | Confidential Hewlett Packard India Sales Private Limited ©
Figure 99 How to Send Memo
5.6.4 View & Response Memo
The memo alert will be highlighted has been created, it can now be send to the desired
actors/officials. The steps are as follows.
Login as XEN.
Go to dash board.
Click the message for response to memo.
XEN should enter the comments/reply and attach any document if required.
If you want to delegate, select delegate and select the user for delegation.
If XEN wishes to reply back to XEN vigilance, the select send response.
Click send.
The comments can be viewed by clicking the link at the top of the screen.

PWIMS: User Manual
95 | Confidential Hewlett Packard India Sales Private Limited ©
Figure 100 How to Add /Update Response in Memo
5.6.5 Closure
The steps are as follows.
Login as XEN Vigilance.
Go to dash board.
Click the message for response to memo.
Enter the comments/ request for closure. Attach any document if required.
If you want to send back for response to XEN then select re-send memo. The cycle can be
repeated as many times.
XEN vigilance is satisfied & wishes to close the Memo, then select request closure.
The comment will go to ce_vig for closure.
Click send.
Figure 101 How to Close Memo
CE Vigilance needs to close the same. The steps are as follows.