Embed Size (px)
Citation preview
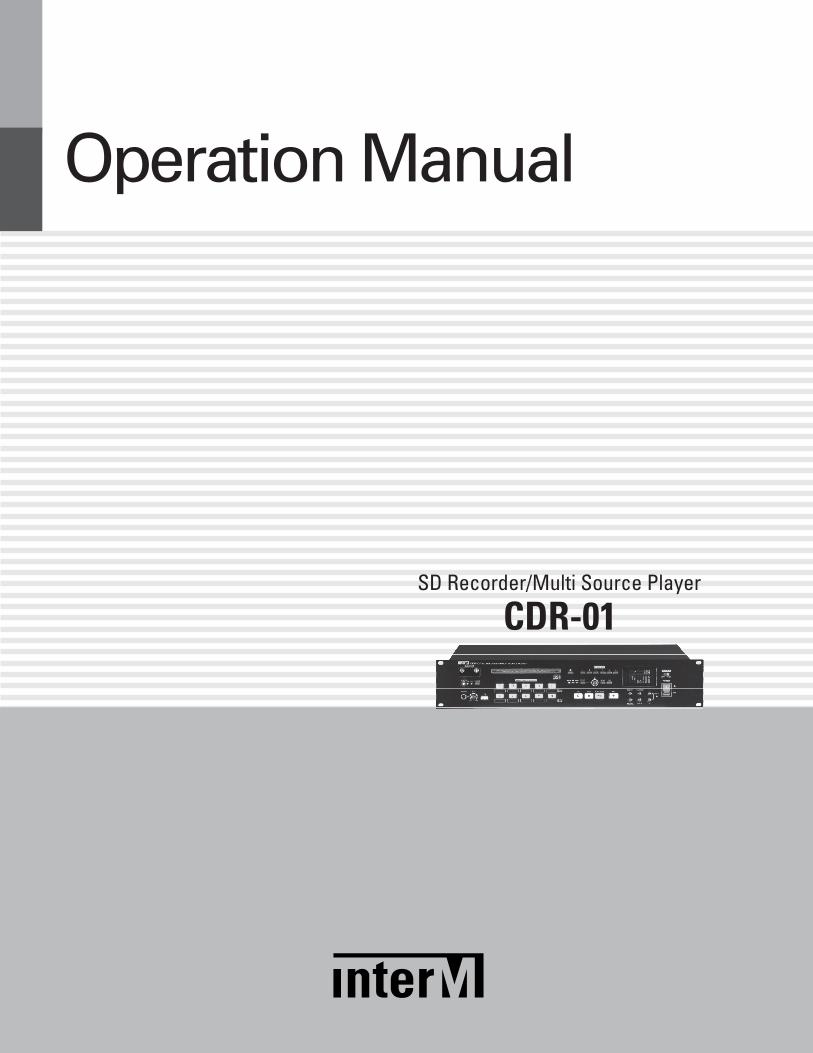
Operation Manual
SD Recorder/Multi Source Player
CDR-01
SD RECORDER/MULTI SOURCE PLAYER
WelcomeWelcomeA personal welcome to you from the management and employees of Inter-M
All of the co-workers here at Inter-M are dedicated to providing excellent products with inherently good value,and we are delighted you have purchased one of our products.
We sincerely trust this product will provide years of satisfactory service, but if anything is not to your completesatisfaction, we will endeavor to make things right.
Welcome to Inter-M, and thank you for becoming part of our worldwide extended family!
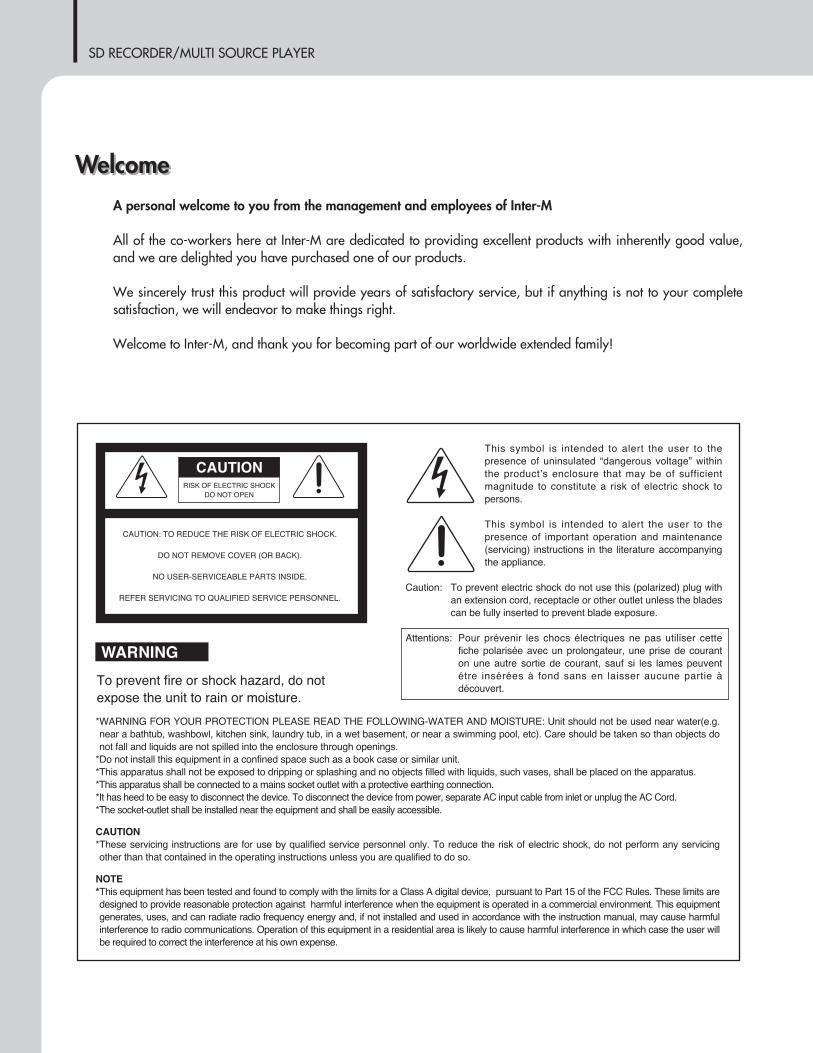
RISK OF ELECTRIC SHOCK
DO NOT OPEN
CAutION
CAUTION: TO REDUCE THE RISK OF ELECTRIC SHOCK.
DO NOT REMOVE COVER (OR BACK).
NO USER-SERVICEABLE PARTS INSIDE.
REFER SERVICING TO QUALIFIED SERVICE PERSONNEL.
WARNING
To prevent fire or shock hazard, do not
expose the unit to rain or moisture.
*WARNING FOR YOUR PROTECTION PLEASE READ THE FOLLOWING-WATER AND MOISTURE: Unit should not be used near water(e.g.
near a bathtub, washbowl, kitchen sink, laundry tub, in a wet basement, or near a swimming pool, etc). Care should be taken so than objects do
not fall and liquids are not spilled into the enclosure through openings.
*Do not install this equipment in a confined space such as a book case or similar unit.
*This apparatus shall not be exposed to dripping or splashing and no objects filled with liquids, such vases, shall be placed on the apparatus.
*This apparatus shall be connected to a mains socket outlet with a protective earthing connection.
*It has heed to be easy to disconnect the device. To disconnect the device from power, separate AC input cable from inlet or unplug the AC Cord.
*The socket-outlet shall be installed near the equipment and shall be easily accessible.
CAutION
*These servicing instructions are for use by qualified service personnel only. To reduce the risk of electric shock, do not perform any servicing
other than that contained in the operating instructions unless you are qualified to do so.
NOtE
*This equipment has been tested and found to comply with the limits for a Class A digital device, pursuant to Part 15 of the FCC Rules. These limits are
designed to provide reasonable protection against harmful interference when the equipment is operated in a commercial environment. This equipment
generates, uses, and can radiate radio frequency energy and, if not installed and used in accordance with the instruction manual, may cause harmful
interference to radio communications. Operation of this equipment in a residential area is likely to cause harmful interference in which case the user will
be required to correct the interference at his own expense.
This symbol is intended to alert the user to the
presence of uninsulated “dangerous voltage” within
the product’s enclosure that may be of sufficient
magnitude to constitute a risk of electric shock to
persons.
This symbol is intended to alert the user to the
presence of important operation and maintenance
(servicing) instructions in the literature accompanying
the appliance.
Caution: To prevent electric shock do not use this (polarized) plug with
an extension cord, receptacle or other outlet unless the blades
can be fully inserted to prevent blade exposure.
Attentions: Pour prévenir les chocs électriques ne pas utiliser cette
fiche polarisée avec un prolongateur, une prise de courant
on une autre sortie de courant, sauf si les lames peuvent
étre insérées à fond sans en laisser aucune partie à
découvert.
SD RECORDER/MULTI SOURCE PLAYER
1CDR-01
ContentsContentsUnpacking .......................................................................................................................................2
InstallationEnvironment....................................................................................................................................2Important Safety Instructions.............................................................................................................2
Features............................................................................................................................................3
Additional Descriptions .................................................................................................................4
Method to treat Compact Disc (CD) .............................................................................................5
Front Panel ......................................................................................................................................6
Rear Panel .......................................................................................................................................9
Operating Method .......................................................................................................................101. PLAYBACK
1) CD Function ..........................................................................................................................102) USB Function.........................................................................................................................113) Memory Disc Function............................................................................................................12
2. REPEAT ....................................................................................................................................153. INSTANT PLAY .........................................................................................................................154. AUTO PLAY ..............................................................................................................................165. RECORDING ............................................................................................................................176. DELETE .....................................................................................................................................187. CUE .........................................................................................................................................198. PITCH.......................................................................................................................................209. EJECT.......................................................................................................................................2010. DISPLAY MODE ......................................................................................................................2011. CAUTION...............................................................................................................................21
Block Diagram ..............................................................................................................................22
Specifications ................................................................................................................................23
ServiceProcedures....................................................................................................................................25Schematic .....................................................................................................................................25Parts List .......................................................................................................................................25
Variations and Options ...............................................................................................................25
Warranty .......................................................................................................................................25
SD RECORDER/MULTI SOURCE PLAYER
Unpacking
2 CDR-01
UnpackingPlease take a few minutes to read this manual to familiarize yourself with important information regardinginstallation, product features, and operation.
As with most electronic devices, ORIGINAL PACKAGING (OR EQUAL) IS REQUIRED in the unlikely event thatthe product needs to be returned for servicing.
InstallationInstallationEnvironmentNever place this product in an environment which could alter its performance or reduce its service life. Suchenvironments usually include high levels of heat, dust, moisture, and vibration.
IMPORTANT SAFETY INSTRUCTIONS1. Read these instructions.2. Keep these instructions.3. Heed all warnings.4. Follow all instructions.5. Do not use this apparatus near water.6. Clean only with dry cloth.7. Do not block any ventilation openings. Install in accordance with the manufacturer’s instructions.8. Do not install near any heat sources such as radiators, heat registers, stoves, or other apparatus (including
amplifiers) that produce heat.9. Do not defeat the safety purpose of the polarized or grounding-type plug. A polarized plug has two blades
with one wider than the other. A grounding type plug has two blades and a third grounding prong. The wideblade or the third prong are provided for your safety. If the provided plug does not fit into your outlet, consultan electrician for replacement of the obsolete outlet.
10. Protect the power cord from being walked on or pinched particularly at plugs, convenience receptacles, andthe point where they exit from the apparatus.
11. Only use attachments/accessories specified by the manufacturer.12. Use only with the cart, stand, tripod, bracket, or table specified by the manufacturer, or sold with the apparatus.
When a cart is used, use caution when moving the cart/apparatus combination to avoid injury from tip-over.13. Unplug this apparatus during lightning storms or when unused for long periods of time.14. Refer all servicing to qualified service personnel. Servicing is required when the
apparatus has been damaged in any way, such as power-supply cord or plug isdamaged, liquid has been spilled or objects have fallen into the apparatus, theapparatus has been exposed to rain or moisture, does not operate normally, or hasbeen dropped. S3125A
S3125A
SD RECORDER/MULTI SOURCE PLAYER
3CDR-01
FeaturesFeatures- HIGH PERFORMANCE DACOne of the best-sounding D/A chip, PCM1796 of Burr Brown is used.
- AUX RECORDING FUNCTIONCan record external sound source into the memory disc in MP3 format.
- SD MEMORY DISC FUNCTIONCan save the MP3, WMA, or WAV audio files in the SD memory (8GB) using a computer and play the audiofiles in the unit. Using SD memory function instead of CD playback can greatly save the lifetime of the CDmechanism.
- USBMP3, WMA or WAV audio files in a USB can be played directly.
- INSTANT PLAY FUNCTIONCan be set 10 tracks in 6 memory discs into 10 instant play buttons and it can play the track directly using 10 instant play buttons.
- MP3/WMA/WAVCan play CD-DA, MP3, WMA and WAV audio formats.
- AUTO PLAYAutomatically play the preset source when the unit is turned on.
- PITCH CONTROLControls play speed rapidly or slowly as your preference.
- DIGITAL AUDIO OUTPUTSOptical and coaxial output provides the S/PDIF digital audio.
- PROFESSIONAL DIGITAL AUDIO OUTPUTSAES/EBU output provides the professional digital audio output.
- ANTI SHOCK FUNCTIONStrong anti-shock function.
- RS-232CCan be controlled by a remote controller such as AMX or CRESTRON system.
SD RECORDER/MULTI SOURCE PLAYER
4 CDR-01
Additional DescriptionsAdditional Descriptions- MP3 (MPEG AUDIO LAYER-3)MP3 is a type of MPEG as audio, video compression standards.MP3 is one of music file formats that can contain stereo sound quality as good as audio CD. Compression rateis 1MB by 1, and about 3~5MB are sufficient if recording a music of 3~5 minutes or so. Different from audioCD, MP3 can contain over 130 tracks for popular songs or folk songs. One MP3 CD can play for about 10hours. MP3 can compress the music to 1/12 in its size with maintaining the CD sound quality because mp3removes the frequency range which human being can not discernible. If compress a CD of 50MB to MP3format, then it is about 4~5MB maintaining CD sound quality.
- WMA (WINDOW MEDIA AUDIO)WMA is a multimedia compression method developed by Microsoft Corporation and is technology compressonly music from ‘Window Media Technologies’. WMA can provide the same sound quality with the MP3 formatwith a half file size compared to MP3. WMA file of 64kbps has the same audio sound quality with the MP3 of128kbps.
- WAV (WAVEFORM AUDIO FORMAT)WAV or WAVE stands for the waveform audio format. It is the standard format of audio playback in acomputer which is Microsoft or IBM. There are PCM, DM, DPCM, or ADPCM formats. PCM is non-compressedaudio format and is used to rip a CD with the same sound quality with the CD.
- DIGITAL OUTPUT AND STANDARDSAudio signal is recorded in a CD with a digitalized signal. Usually digital audio signal is converted to analogsignal with a Digital-Analog Converter (DAC) in a player. Optical output delivers the digital audio signal withoptical signal. Coaxial output delivers the digital audio signal with digital data. The digital interface used in Optical and coaxial output is S/PDIF (Sony/Philips Digital Interface) format whichcomplies with the standards called as IEC60958.
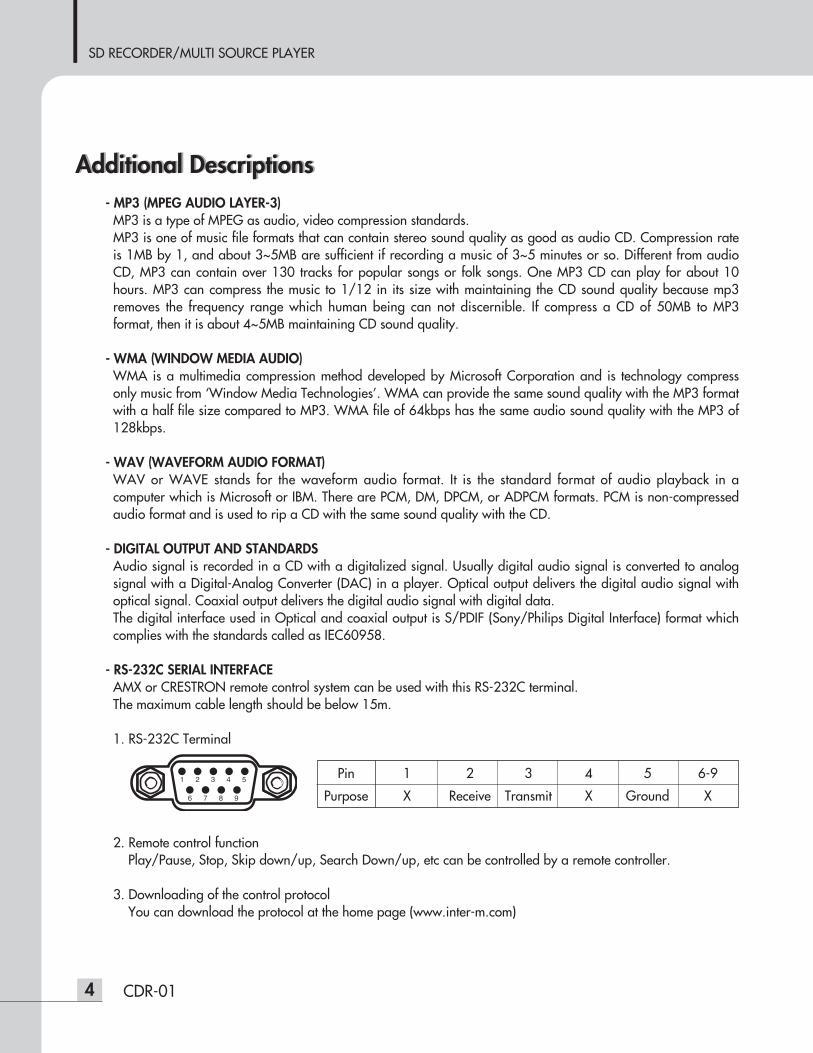
- RS-232C SERIAL INTERFACEAMX or CRESTRON remote control system can be used with this RS-232C terminal.The maximum cable length should be below 15m.
1. RS-232C Terminal
2. Remote control functionPlay/Pause, Stop, Skip down/up, Search Down/up, etc can be controlled by a remote controller.
3. Downloading of the control protocolYou can download the protocol at the home page (www.inter-m.com)
Pin 1 2 3 4 5 6-9
Purpose X Receive Transmit X Ground X
SD RECORDER/MULTI SOURCE PLAYER
5CDR-01
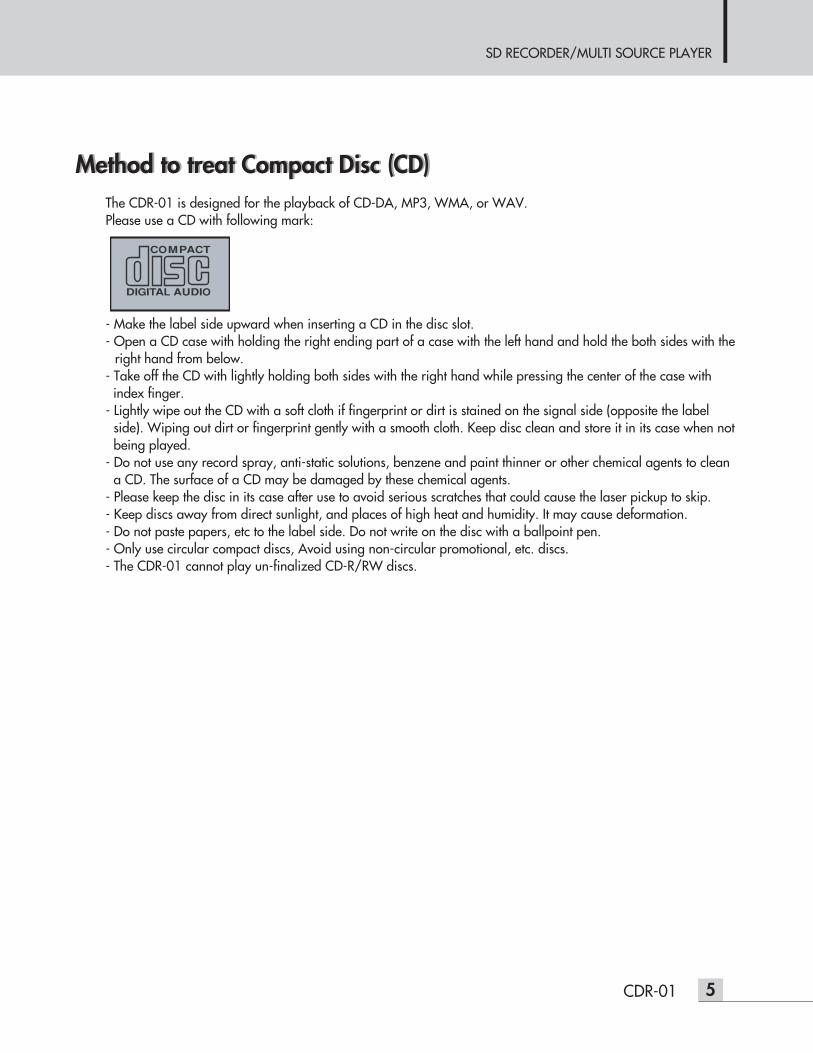
Method to treat Compact Disc (CD)Method to treat Compact Disc (CD)The CDR-01 is designed for the playback of CD-DA, MP3, WMA, or WAV.Please use a CD with following mark:
- Make the label side upward when inserting a CD in the disc slot.- Open a CD case with holding the right ending part of a case with the left hand and hold the both sides with the
right hand from below.- Take off the CD with lightly holding both sides with the right hand while pressing the center of the case withindex finger.
- Lightly wipe out the CD with a soft cloth if fingerprint or dirt is stained on the signal side (opposite the labelside). Wiping out dirt or fingerprint gently with a smooth cloth. Keep disc clean and store it in its case when notbeing played.
- Do not use any record spray, anti-static solutions, benzene and paint thinner or other chemical agents to cleana CD. The surface of a CD may be damaged by these chemical agents.
- Please keep the disc in its case after use to avoid serious scratches that could cause the laser pickup to skip.- Keep discs away from direct sunlight, and places of high heat and humidity. It may cause deformation.- Do not paste papers, etc to the label side. Do not write on the disc with a ballpoint pen.- Only use circular compact discs, Avoid using non-circular promotional, etc. discs.- The CDR-01 cannot play un-finalized CD-R/RW discs.
SD RECORDER/MULTI SOURCE PLAYER
6 CDR-01
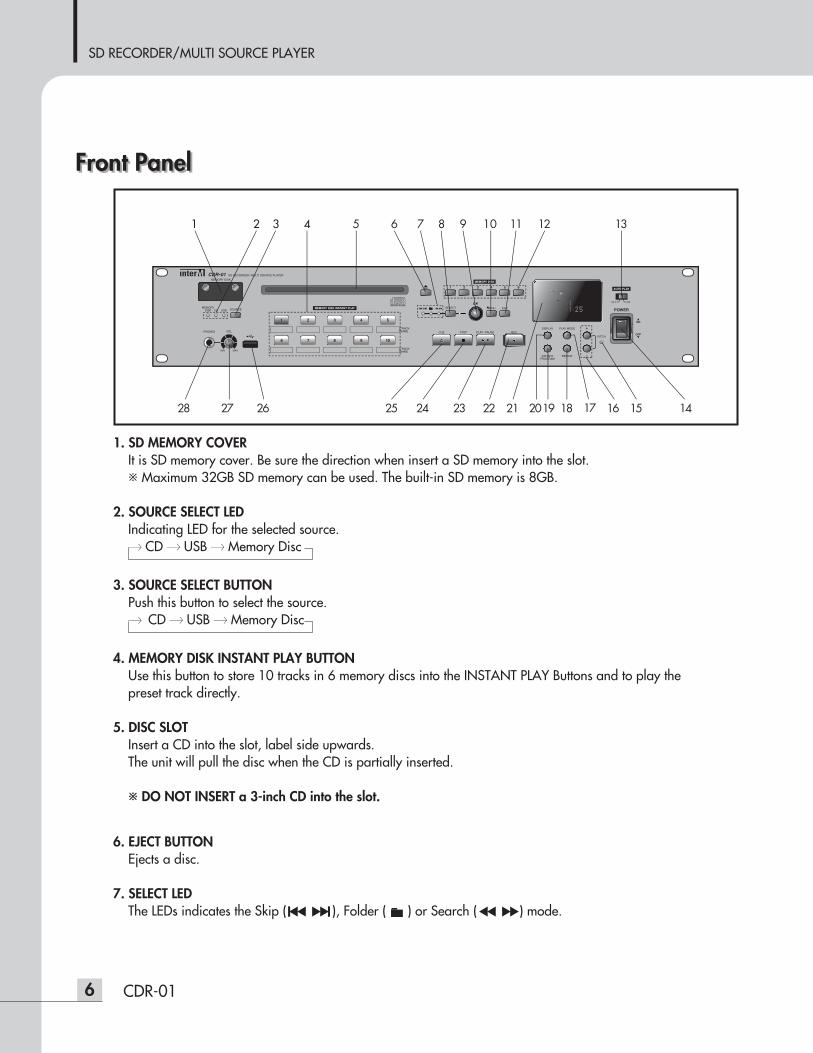
Front PanelFront Panel
1. SD MEMORY COVERIt is SD memory cover. Be sure the direction when insert a SD memory into the slot.※ Maximum 32GB SD memory can be used. The built-in SD memory is 8GB.
2. SOURCE SELECT LEDIndicating LED for the selected source.→ CD → USB → Memory Disc
3. SOURCE SELECT BUTTONPush this button to select the source.→ CD → USB → Memory Disc
4. MEMORY DISK INSTANT PLAY BUTTONUse this button to store 10 tracks in 6 memory discs into the INSTANT PLAY Buttons and to play the preset track directly.
5. DISC SLOTInsert a CD into the slot, label side upwards.The unit will pull the disc when the CD is partially inserted.
※ DO NOT INSERT a 3-inch CD into the slot.
6. EJECT BUTTONEjects a disc.
7. SELECT LEDThe LEDs indicates the Skip (II), Folder (111) or Search () mode.
5 76 8 129 10 11 13
1415161819202223242528 27 26 1721

SD RECORDER/MULTI SOURCE PLAYER
7CDR-01
8. SELECT BUTTONUse this button to select the Skip (II), Folder (111) or Search () mode.After select the mode, skip, folder or search function can be performed using the ENCODER switch.- Skip (II) : skips a track or a folder.- Folder (111) : skips a folder.
- Search () : turning the switch to the clockwise, then it searches forward continuously.
turning the switch to the counter clockwise, then it searches backward
continuously. Press the button to stop searching and to play the track.
9. ENCODER SWITCH / OK BUTTON
Rotates this switch to perform skip, folder change or search function after select the
Skip (II), Folder ( ) or Search (II) mode. In menu mode, turning this switchcan change the menu and pushing this button can change the setting.
10. MENU BUTTONUse this button to select the menu, DELETE MDISK, AUTO PLAY, DELETE INSTANT or PITCH setting.※MENU button can be used when the unit is in stop mode.
11. ESC BUTTONUse this button to move back the menu in menu mode.
12. MEMORY DISC SELECT BUTTONUse this button to select the one of the 6 memory discs.
13. AUTO PLAY SWITCHUse this switch to set the auto play function.By setting this switch on, the preset source of a CD, USB or Memory Disc is automatically played when the unit is turned on. Playback starts from the first track of the preset source.
14. POWER SWITCHUse this switch to turn the power on or off.
15. PITCH LEDThis LED indicates that the pitch function is on.※ In PITCH mode, the AES/EBU output is off.
16. PITCH CONTROL BUTTON (+/-)Use this button to control the pitch function.
SD RECORDER/MULTI SOURCE PLAYER
8 CDR-01
17. PLAY MODEUse this button to stop the playback after 1 track is played.When the PLAY mode button is pressed during the playback, playback is stopped after the playback of the track is end.
18. REPEAT BUTTONUse this button to select repeat mode, REPEAT 1, REPEAT GROUP, or REPEAT ALL.
19. INSTANT PROGRAM BUTTONUse this button to store 10 tracks in 6 memory discs into 10 instant play buttons.※ In CD or USB function, the Instant Program button or the Instant Play function can not be used.
20. DISPLAY BUTTONUse this button to select time mode, playback time or remaining time.
21. DISPLAY WINDOWThe display shows the current status of the unit or the current menu setting.
22. RECORD BUTTONUse this button to record the AUX audio into the SD memory.The built-in SD memory is 8GB. AUX audio is recorded into the memory disk6.
23. PLAY / PAUSE BUTTONUse this button to play or pause.
24. STOP BUTTONUse this button to stop playback or recording.Also this button can exit all the menu mode.
25. CUE BUTTONIf the CUE is on and a track is selected, then the track is located to the point where music begins and the unit is entered into pause mode. At that time press the play button, then playback begins at exactly that point.
26. USB Use this terminal to mount a USB memory.MP3, WMA or WAV files in the USB memory can be played .Maximum 32GB USB memory can be used.The unit supports USB 1.1.
27. HEADPHONE VOLUMEAdjust the output level of the headphones.
28. HEADPHONE JACKUse a standard pair of stereo headphones.※When using headphones, be sure not to turn the headphone volume too high.
Listening at high volumes for extended periods of time may result in permanent hearing damage.
SD RECORDER/MULTI SOURCE PLAYER
9CDR-01
Rear PanelRear Panel
1. AC INLETConnect the power cable supplied with the CDR-01.
2. RS-232C TERMINALThis terminal allows control by a remote controller such as AMX /CRESTRON etc.The control protocol can be downloaded from the home page. (www.inter-m.com)
3. COAXIAL OUTPUTThis terminal provides the digital audio signal in S/PDIF format.
4. OPTICAL OUTPUTThis terminal provides the digital audio signal in S/PDIF format.
5. AES/EBU OUTPUTThis terminal provides the professional digital audio signal.※ In PITCH mode, the AES/EBU output is off.
6. ANALOG MONO OUTPUT MONO output terminal provides the mixed signal of L and R channel outputs.The maximum output level is +8dBu.
7. ANALOG R CHANNEL OUTPUT (XLR)This terminal provides R channel signal output. The maximum output level is +8dBu.
8. ANALOG L CHANNEL OUTPUT (XLR)This terminal provides L channel signal output. The maximum output level is +8dBu.
9. XLR OUTPUT LEVEL SELECT SWITCHThis switch selects the output level maximum +8dBu or +20dBu of the XLR L/R audio output.
10. ANALOG L/R OUTPUT (RCA)These terminals provide L and R channel signal output. The maximum output level is +8dBu.
1 2 3 4 5 9
6 7 12118 10
SD RECORDER/MULTI SOURCE PLAYER
10 CDR-01
Operating Method
11. AUX RECORDING INPUT (RCA)These terminals are for the aux recording.The maximum input level is +8dBu.
12. AUX RECORDING INPUT (XLR)These terminals are for the aux recording.The maximum input level is +20dBu.
Operating Method1. PLAYBACK
(1) Push the power switch to turn the power on.The display will indicate NO DISC.
(2) Insert a disc into the slot, label side upwards.Do not forces the disc into the slot, The unit will pulls the disc when the CD is partially inserted.
※DO NOT INSERT a 3-inch CD into the slot.
1) CD function- Playback disc is a ordinary audio CD, CD-R or CD-RW disc recorded in CD-DA format and properlyfinalized.
(1) Select CD mode by pressing the SOURCE button when the source is not in CD mode
(2) After a disc is inserted, the display will indicate the information as below.- CD-DA : displays total number of tracks and total playback time.
→ Track : 27 tracksTotal Playback Time: 1hour 19min. 10sec.
- CD-MP3 : displays total number of folders and total number of files.
→ Folder : 64 foldersTrack : 257 tracks.
(3) Select a track to play using the SELECT button and the switch.
SD RECORDER/MULTI SOURCE PLAYER
11CDR-01
- CD-DA : select II using the SELECT button and select the track to play by turning the
switch.
- MP3 : • select 111 using the SELECT button and select the folder by turning the switch. • select II using the SELECT button and select the track to play by turning the
switch.
(4) Press the 11111 button to play.
To skip the track during playback, select II using the SELECT button and select the track
to play by turning the switch.
(5) Press the 111111button again to pause.
Press the 111111button to stop.
※Note: 1. A disc which surface status is not good or a disc which format is not compatible
cannot be played and is stopped.2. When a disc format is not compatible, the window displays ‘READING ERROR’
or ‘NO FILE’.3. When a disc is inserted upside down, then the window displays ‘READING ERROR’.4. DO NOT INSERT a 3-inch CD into the slot.
Check the disc status and format because these are not failure of this unit.
2) USB function(1) Insert a USB memory to the USB terminal.
(2) Press the SOURCE select button to select the USB mode.
(3) Total numbers of the folders and total numbers of files to play are displayed.
→ Folder : 64 foldersTrack : 257 tracks
If no files to play, then “NO FILE” is displayed.If a USB memory is not inserted “NO USB” is displayed.
SD RECORDER/MULTI SOURCE PLAYER
12 CDR-01
(4) Select a track to play using the SELECT button and the switch.
- select 11 using the SELECT button and select a folder by turning the switch. 11 can be selected only when the USB have folders.
- select II using the SELECT button and select a track to play by turning theswitch.
(5) Press the 111111 button to play.
To skip the track during playback, select II using the SELECT button and select
the track to play by turning the switch.
(6) Press the 111111button again to pause.
Press the 111111button to stop.
※Note: When the track which status is not good or which format is not compatible, the window displays “PLAY ERROR”. The error track is skipped and the next track is played.
3) Memory Disc functionThe CDR-01 has internal memory of 8GB.Maximum 32GB SD memory can be used.Take out the SD memory from the unit and save music files into the disk1 ~ disk5 folders in the SD memory using a computer. Plug the SD memory into the unit and play the music. Disk1 ~ disk6 folders are the same with the memory disc 1 ~ disc6 respectively. Aux recording is stored in memory disk6.
※Using memory function instead of CD playback can greatly save the lifetime of the CD mechanism.
(1) Take out the SD memory from the unit.The window displays ‘NO CARD’.
Screw off the cover. Push and release the center of the SD memory and then take out the SD memory.
(2-1) Storing music files
① SD memory has 6 folders as disk1, disk2, disk3, disk4, disk5, and disk6.Disk1, disk2, disk3, disk4, disk5, and disk6 are the same with memory disc 1, memory
SD RECORDER/MULTI SOURCE PLAYER
13CDR-01
disc2, memory disc3, memory disc4, memory disc5, and memory disc6, respectively.
② Save music files into each folders of disk1 ~ disk5.③ Maximum 499 music files can be saved in disk1 ~ disk5, respectively.
Maximum 100 tracks can be recorded in disk6. Disk6 is for the AUX recording.Maximum music files in disk1 ~ disk6 are 1800 files.
④ The track number of each memory disc is the order that files are saved to the folder.If playback sequence is needed, then copy music files to the folder in the order of wanted playback sequence respectively.
⑤ If disk1 ~ disk5 folders uses all the built-in 8GB memory, then disk6 can not be used. The window does not display the number of the memory disk 6.
⑥ Maximum 3GB can be used in memory disc6.⑦ If disk6 folder have music files which were copied from a computer and record
the AUX music source, then the track order of the memory disc6 can be changed. Use the memory disc6 only for the AUX recording.
(2-2) Making folders in SD memory
① The built-in SD memory has 6 folders. If you use the built-in SD memory as it is, then there is no need to make folders in the SD memory.
② If the folders in the built-in SD memory are deleted or if a new SD memory is needed, then have to make folders in the SD memory as below.
a. Make 6 folders in the SD memory.b. The order to make folders is the order of the memory disc.c. Make a folder and name it and then make a folder repeatedly.d. The folder name of 1 ~ 5 folders can be named as your preference.e. The folder name of the 6th folder must be disk6.
The folder of disk6 is the same with the memory disc6 and the memory disc6 is used to record the AUX music source.
※ If you do not follow the above instructions when making folders in the SD memory, then some memory disc may not be recognized or the order of the folders may not be matched with the order of the memory discs.
③ If you do not want to make folders in a computer but want to make folders inthe unit automatically, then follow the instructions below.
a. Plug the SD memory into the slot.b. Select Memory Disk using the SOURCE select button.
c. Press the button.
d. Press the button when the window displays ‘AUX->REC’.Recording starts after the window displays ‘INIT’.
e. Press the button after 1 or 2 seconds since recording starts.
SD RECORDER/MULTI SOURCE PLAYER
14 CDR-01
The unit makes 6 folders when records the AUX music source into the memory disc6.
f. Take out the SD memory and plug it into a computer.g. Copy music files into the disk1, disk2, disk3, disk4, and disk5 which
are made in the unit.h. Delete the MP3 file in the disk6 folder.i. Plug the SD memory into the unit.
It is possible to make folders automatically as above.
(3) Plug the SD memory into the slotBe sure the direction when insert a SD memory into the slot.Follow the direction silk under the slot.Plug the SD memory into the slot until it is locked.Screw the cover on the slot.
※If SD memory is mounted during CD or USB playback, playback is stopped andthe function is changed to Memory Disc mode.
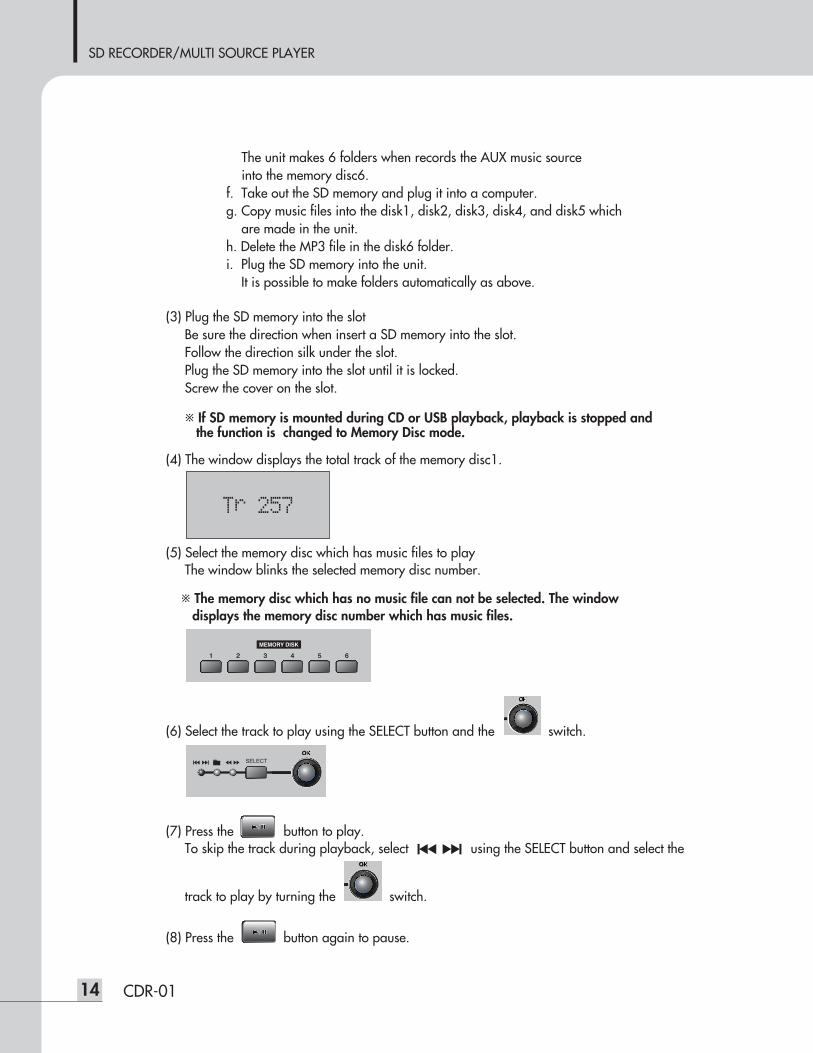
(4) The window displays the total track of the memory disc1.
(5) Select the memory disc which has music files to playThe window blinks the selected memory disc number.
※ The memory disc which has no music file can not be selected. The window displays the memory disc number which has music files.
(6) Select the track to play using the SELECT button and the switch.
(7) Press the button to play.To skip the track during playback, select II using the SELECT button and select the
track to play by turning the switch.
(8) Press the button again to pause.
SD RECORDER/MULTI SOURCE PLAYER
15CDR-01
Press the button to stop.
2. REPEAT
Press the 111111 button to change the repeat mode. (1) REPEAT 1: Playback the file selected repeatedly.(2) REPEAT GROUP: Playback the GROUP selected repeatedly.(3) REPEAT ALL: Playback the disc, USB, or a memory disc repeatedly.(4) OFF mode: Playback the disc without repeats and then stops.
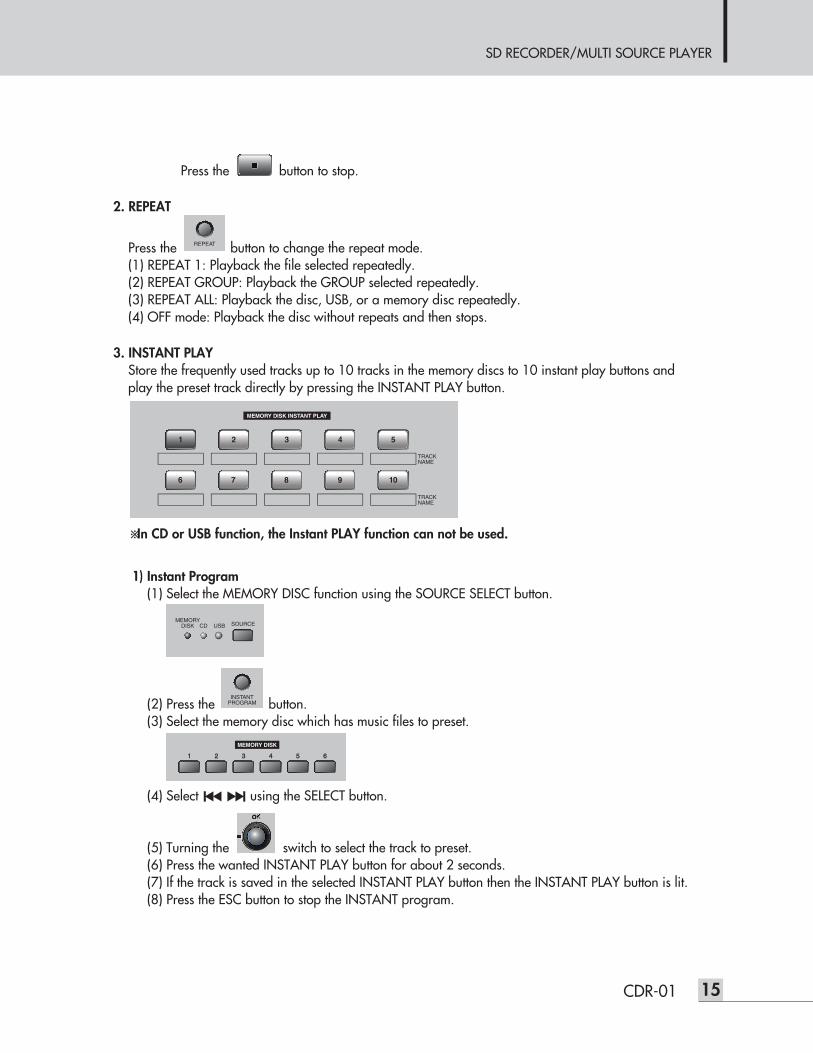
3. INSTANT PLAYStore the frequently used tracks up to 10 tracks in the memory discs to 10 instant play buttons andplay the preset track directly by pressing the INSTANT PLAY button.
※In CD or USB function, the Instant PLAY function can not be used.
1) Instant Program(1) Select the MEMORY DISC function using the SOURCE SELECT button.
(2) Press the 111111 button.(3) Select the memory disc which has music files to preset.
(4) Select II using the SELECT button.
(5) Turning the 111111 switch to select the track to preset.(6) Press the wanted INSTANT PLAY button for about 2 seconds.(7) If the track is saved in the selected INSTANT PLAY button then the INSTANT PLAY button is lit.(8) Press the ESC button to stop the INSTANT program.
SD RECORDER/MULTI SOURCE PLAYER
16 CDR-01
2) Instant PlayPress the INSTANT PLAY button to play.After playback the track, playback stops.
3) Delete INSTANT PLAY setting
(1) Press the button.
(2) Turning the switch to select ‘DELETE INSTANT’ menu and then press the button.
(3) Turning the switch to select the INSTANT PLAY button to delete and then press the
button.
(4) Press the button when ‘DELETE?’ is displayed on the window.The LED of the INSANT PLAY button which is selected to delete is off.
(5) To delete all the INSTANT PLAY buttons, then select the ‘DEL ALL’ menu using the
switch then press the button.
※Note: 1. If you delete the track which is memorized in a memory disc, all the tracks preset
in the INSTANT PLAY buttons which are in the same memory disc with the deleted track are deleted.
2. In CD or USB function, the Instant Program button or the Instant Play function can not be used. 3. If take out the SD memory with the power on state, all the preset settings of the INSTANT
PLAY buttons are deleted and all the LEDs of the INSTANT PLAY buttons are off.4. If take out the SD memory with the power off state and delete tracks and add tracks in the
SD memory using a computer, and plug into the unit. The tracks which are preset in the INSTANT PLAY buttons may be changed to other tracks.Be sure to check whether all the tracks preset in the INSTANT PLAY buttons are changed or not.
4. AUTO PLAYAUTO Play is the function to preset the source (CD, USB or Memory disc) to play and to play thepreset source when the power of the CDR-01 is turned on.Playback starts from the first track of the selected source.
1) AUTO PLAY setting
To set the AUTO PLAY function, set the AUTO PLAY switch to ON position.
SD RECORDER/MULTI SOURCE PLAYER
17CDR-01
2) Setting the AUTO PLAY source
(1) Press the button.
(2) Turn the switch to select the AUTO PLAY menu,
and then press the button.
(3) Select the source (CD, USB or DISK 1~DISK 6) to preset and then press the button.
※Note:When the Auto Play switch is in off position, CD function is the default function when the power is turned on. The window displays the total tracks and the unit is in stop mode. If no disc, then the window displays ‘NO DISC’.
5. RECORDINGAux music source can be recorded in the internal memory disk6.
(1) Connect the AUX music source to the recording input terminals (XLR or RCA inputs).The maximum input level of RCA input is +8dBu.The maximum input level of XLR input is +20dBu.
(2) Press the button, then the REC button is lit in red. The window displays ‘AUX -> REC’.
※ If do not press the button, then recording function will be stopped after 7 seconds since the REC button is pressed.
(3) Press the button.The window displays ‘INIT’ and then start recording.
(4) Press the button long to stop recording.
When the button is pressed during recording, the recorded music is saved as a track.
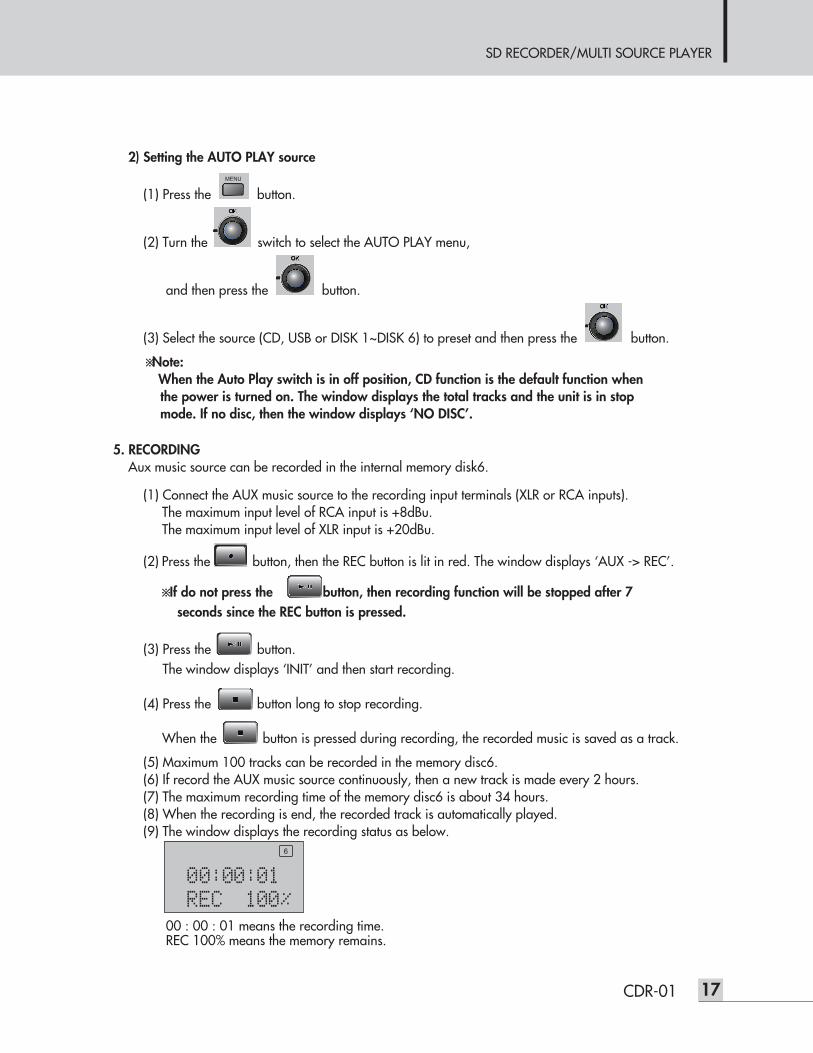
(5) Maximum 100 tracks can be recorded in the memory disc6.(6) If record the AUX music source continuously, then a new track is made every 2 hours.(7) The maximum recording time of the memory disc6 is about 34 hours.(8) When the recording is end, the recorded track is automatically played.(9) The window displays the recording status as below.
00 : 00 : 01 means the recording time.REC 100% means the memory remains.
6
SD RECORDER/MULTI SOURCE PLAYER
18 CDR-01
※Note:1. During recording, there are no analog and digital outputs.2. CDR-01 can play the MP3, WMA or WAV format as below.
MP3 : 44.1kHz sampling frequency, 16bit and 64kbps~320kbps bit rates.WMA : 44.1kHz sampling frequency, 16bit and 64kbps~320kbps bit rates.
48kHz sampling frequency, 16bit and 64kbps~192kbps bit rates.WAV : 44.1kHz sampling frequency, 16bit, PCM and stereo format.
3. The built-in SD memory is 8GB. Maximum 32GB SD memory can be used.4. It may be a little difference between the displayed memory size and the
practical memory size.5. If disk1 ~ disk5 folders uses all the built-in 8GB memory, then disk6 can not be used.
The window does not display the number of the memory disk 6.6. Maximum 3GB memory can be used in the memory disc6.
Please assign 3GB memory to the memory disc6 for the AUX recording.If the memory assigned to the memory disc6 is not 3GB, then the display of the memory remains is not matched with the practical memory remains because thedisplay of the memory remains is refer to 3GB.
7. If the memory size of the memory disc6 is over 3GB or there is no memory remains forrecording, then the window displays ‘DISK6 OVERFLOW’ and recording is stopped.
8. If copy some music files to the disk6 folder in a computer and record the AUX music source, then the track order is changed. Please use the disk6 folder only for the AUX recording.
9. If 100 tracks are recorded in the memory disc6, then the window displays ‘REC FULL’ and recording is stopped.
6. DELETEDelete function is used to delete the files in the memory discs.
1) Delete all the memory discs.
(1) Press the button.
(2) Press the button to select the DELETE MDISK menu.
(3) Turn the switch to select DISK FORMAT menu and press the button.
(4) Press button again when ‘OK?’ is displayed on the window.
All the folders are deleted. 6 folders have to be made to use the SD memory. ( see page 12)
※ DO NOT TURN OFF THE POWER during formatting the memory disc, it causes the memory disc fault.
SD RECORDER/MULTI SOURCE PLAYER
19CDR-01
2) Delete all the files in a memory disc
(1) Press the button.
(2) Press the button to select the DELETE MDISK menu.
(3) Turn the switch to select a memory disc to delete and press the button.
(4) Press the button to select the ALL menu.
(5) Press button again when ‘ALL?’ is displayed on the window.All the files in the memory disc are deleted.
3) Delete a file in a memory disc
(1) Press the button.
(2) Press the button to select the DELETE MDISK menu.
(3) Turn the switch to select a memory disc which has the file to delete and press the
button.
(4) Turn the switch to select the TRACK menu and press the button.
(5) Turn the switch to select the track to delete and press the button.
(6) Press button again when ‘DELETE?’ is displayed on the window.The selected track in the memory disc is deleted.
7. CUEPress the CUE button and select a track, then the track is located to the point where music begins(not where the track begins) and enters into pause mode.
Press the button to start playback at exactly that point.When the CUE button is pressed during playback, then it goes to the point where music begins onthe track and enters into pause mode.
Press the button to start playback.
SD RECORDER/MULTI SOURCE PLAYER
20 CDR-01
8. PITCHPitch can control the playback speed rapidly or slowly for your preference.Pitch setting is not released even if turn the power off and on.※ If PITCH is on, then the AES/EBU output is off.
1) PITCH ON
(1) Press the button.
(2) Turn the switch to select the PITCH menu and press the button.
(3) Press the button when the window displays ‘PITCH ON’.The PITCH LED is lit.
(4) Press the PITCH ‘+’ or ‘–‘ button to set the pitch.The window displays +/–10 steps.Pitch varies ±15%.
2) PITCH OFF
(1) Press the button.
(2) Turn the switch to select the PITCH menu and press the button.
(3) Press the button when the window displays ‘PITCH OFF’.The window displays ‘OK’.The PITCH LED is off.
9. EJECTPress EJECT button to eject a disc.
10. DISPLAY MODE
Press the button to select the time mode which is the played time or the remaining time.
※Note:1. The maximum display of CD-DA is 99 tracks.2. The maximum display of MP3 CD is 499 files.3. The maximum display of a USB is 499 files.4. The maximum files of a memory disc are 499 files.

SD RECORDER/MULTI SOURCE PLAYER
21CDR-01
11. CAUTION1. DO NOT TURN OFF THE POWER during formatting the memory disc, it causes the
memory disc fault.2. If you delete a track which is in a memory disc, all the tracks preset in the INSTANT PLAY
buttons which are in the same memory disc with the deleted track are deleted.3. If take out the SD memory with the power on state, all the preset settings of the INSTANT
PLAY buttons are deleted and all the LEDs of the INSTANT PLAY buttons are off.4. If take out the SD memory with the power off state and delete tracks and add tracks in the
SD memory using a computer, and plug into the unit. The tracks which are preset in theINSTANT PLAY buttons may be changed to other tracks.Be sure to check whether all the tracks preset in the INSTANT PLAY buttons are changed or not.
5. During recording, there are no analog and digital audio outputs.6. If 100 tracks are recorded in the memory disc6, then the window displays ‘REC FULL’ and
recording is stopped.7. Maximum music files in disk1 ~ disk6 are 1800 files.8. If disk1 ~ disk5 folders use all the built-in 8GB memory, then disk6 can not be used.
The window does not display the number of the memory disk 6.9. Maximum 3GB memory can be used in the memory disc6.
Please assign 3GB memory to the memory disc6 for the AUX recording.If the memory assigned to the memory disc6 is not 3GB, then the display of the memory remains is not matched with the practical memory remains because the display of the memory remains is refer to 3GB.
10. If the memory size of the memory disc6 is over 3GB or there is no memory remains for recording, then the window displays ‘DISK6 OVERFLOW’ and recording is stopped.
11. If copy some music files to the disk6 folder in a computer and record the AUX musicsource, then the track order is changed. Please use the disk6 folder only for the AUX recording.
12. If 100 tracks are recorded in the memory disc6, then the window displays ‘REC FULL’ and recording is stopped.
13. The track number of each memory disc is the order that files are saved to the folder.If playback sequence is needed, then copy music files to the folder in the order of wanted playback sequence respectively.
14. If SD memory is mounted during CD or USB playback, playback is stopped and thefunction is changed to Memory Disc mode.
15. CDR-01 can play the MP3, WMA, or WAV format as below.MP3 : 44.1kHz sampling frequency, 16bit and 64kbps~320kbps bit rates.WMA : 44.1kHz sampling frequency, 16bit and 64kbps~320kbps bit rates.
48kHz sampling frequency, 16bit and 64kbps~192kbps bit rates.WAV : 44.1kHz sampling frequency, 16bit, PCM and stereo format.
16. If PITCH is on, then the AES/EBU output is off.17. Maximum 32GB USB memory can be used.18. The built-in SD memory is 8GB. Maximum 32GB SD memory can be used.19. DO NOT INSERT a 3-inch CD into the slot.20. If the memory disc failure happens, then ‘ERROR 2’ or ‘NO CARD’ displays on the window.
In this case, take out the SD memory and format the SD memory in a computer or replacethe SD memory to the new one. If the error does not cleared even if formatting or replacingto new one, then consult with the service personal.
SD RECORDER/MULTI SOURCE PLAYER
22 CDR-01
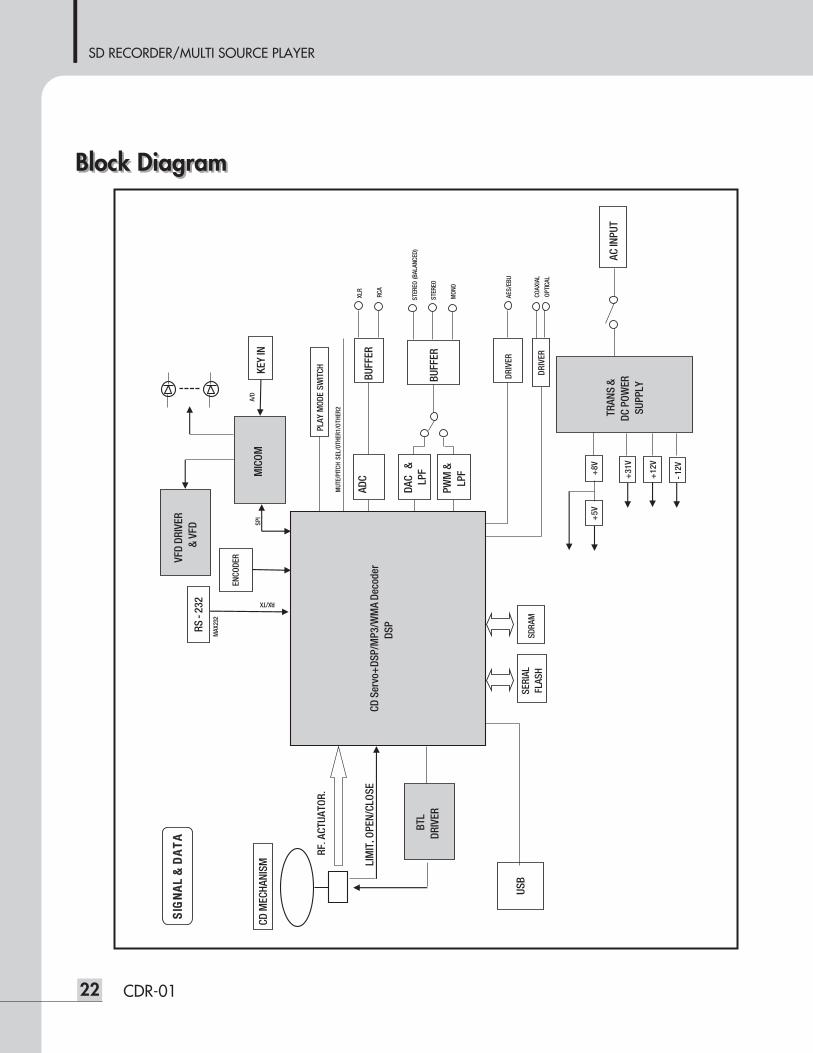
Block DiagramBlock Diagram
SS
IIGGNN
AALL
&& DD
AATT
AA
CD S
ervo
+DS
P/M
P3/W
MA
Deco
der
DSP
SERI
ALFL
ASH
SDRA
M
BTL
DRIV
ER
CD M
ECHA
NISM LI
MIT
, OPE
N/CL
OSE
RF, A
CTUA
TOR.
VFD
DRIV
ER&
VFD
KEY
IN
USB
PWM
&
LPF
BUFF
ER
DAC
& LP
F
RS-2
32 RX/TX
ENCO
DER
PLAY
MOD
E SW
ITCH
MUT
E/PI
TCH
SEL/
OTHE
R1/O
THER
2
AC IN
PUT
TRAN
S &
DC P
OWER
SUPP
LY
MIC
OMA/
D
MAX
232
SPI
STER
EO
STER
EO (B
ALAN
CED)
MON
O
BUFF
ERAD
CXL
R
RCA
AES/
EBU
+12
V
-12V
+31
V
+8V
+5V
DRIV
ERCO
AXIA
L
OPTI
CAL
DRIV
ER

SD RECORDER/MULTI SOURCE PLAYER
23CDR-01
SpecificationsSpecifications
CDR-01
Disc 12cm (4.7 inch) CD, CD-R, CD-RW
Formats Audio CD (CD-DA), MP3, WMA, WAV
Number of channels 3 channels (L,R,Mono)
Analog Output Connectors RCA: L / R, XLR: L / R / Mono
Frequency Response (20Hz ~ 20kHz) +0.5/-1dB
– CD, Pitch off
T.H.D. (20kHz LPF) Less than 0.002% (Nor), 0.005% (Lim)
– CD, Pitch off
S/N (20kHz LPF, A-WTD) Better than 100dB (Nor), 95dB (Lim)– CD, Pitch off
Analog Output Level (MAX) XLR +20dBu
RCA +8dBu
AUX Analog Input Level (MAX) XLR +20dBu
RCA +8dBu
Channel separation (1kHz, +8dBu, 20kHz LPF) Better than 90dB (Nor), 80dB (Lim)
– CD, Pitch offHeadphone Output
20mW + 20mW- 1kHz, 0dBFS, 32Ω, Vol. Max
Professional Digital Audio Output AES/EBU
Optical Output S/PDIF
Coaxial Output (RCA) S/PDIF
Operation Temperature -10°C ~ +40°C
Power Source USA/CANADA 120VAC, 60HzUK/Europe 230VAC, 50HzAustralia 240VAC, 50Hz
Power Consumption 27W
Weight (SET) 5.3kg / 11.7lb
Dimensions (SET) 482(W)x88(H)x280(D) mm19(W)x3.5(H)x11(D) in

SD RECORDER/MULTI SOURCE PLAYER
24 CDR-01
※ DIMENSIONS
440
482
8828
0
SD RECORDER/MULTI SOURCE PLAYER
25CDR-01
ServiceService
ProceduresTake steps to insure the problem is not related to operator error or other products within the system. Informationprovided in the troubleshooting portion of this manual may help with this process. Once it is certain that theproblem is related to the product contact your warranty provider as described in the warranty section of thismanual.
SchematicA Schematic is available by contacting your warranty provider.
Parts ListA Parts List is available by contacting your warranty provider.
WarrantyWarranty
Warranty terms and conditions vary by country and may not be the same for all products. Terms and conditionsof warranty for a given product may be determined first by locating the appropriate country which the productwas purchased in, then by locating the product type.
To obtain specific warranty information and available service locations contact Inter-M directly or theauthorized Inter-M Distributor for your specific country or region.
Variations and OptionsVariations and Options
VariationsProducts supplied through legitimate sources are compatible with local AC power requirements.
Options No optional items are available for this product.
MADE IN KOREAwww.inter-m.comJanuary 2014 135595
Inter-M, Ltd. (Korea) began operations in 1983.
Since then, Inter-M has grown to become one of the largest manufacturers of professional audio and commercial sound electronics equipment in the world.
Inter-M has gained worldwide recognition for its own branded products, as well as private label manufacturing of electronics sold under other names (OEM).
The company is no longer just a Korean company, but rather a global company that is truly international in scope, with factories and offices in Korea and China, and sales and marketing operations located in Japan, Europe, and the U.S.A.
With more than 850 employees around the globe,Inter-M is well-poised for further growth and expansion.
Inter-M Americas, Inc. 13875 Artesia Blvd. Cerritos, CA 90703 USATEL : +1-562-921-0313, FAX : +1-562-921-0370Home Page : http://www.inter-m.net, E-mail : [email protected]
Inter-M Corporation719, Dobong-ro, Dobong-gu, Seoul, KoreaTEL : +82-2-2289-8140~8, FAX : +82-2-2289-8149Home Page : http://www.inter-m.com, E-mail : [email protected]


![Owner’s Manual - static.roland.com · Printing Conventions in This Manual • Text or numerals enclosed in square brackets [ ] indicate buttons. [PLAY] PLAY button [REC] REC button](https://img.pdfslide.net/doc/110x75/5e7d9a005b73a238487e1886/owneras-manual-printing-conventions-in-this-manual-a-text-or-numerals-enclosed.jpg)