Embed Size (px)
Citation preview
Pymol– Tutorial Go to www.rcsb.org. This is the Protein Data Bank (PDB) -‐ a database for protein structures.
The first thing we are doing now is to search for “Adrenergic Receptor”. You will find various entries, all representing structures of the adrenergic receptors. We are interested in the structure with the PDB code 2RH1. Instead of “adrenergic receptor” and then selecting “2RH1” you could have searched for “2RH1” or any other PDB code directly.
This is a summary of 2RH1 -‐ for more details you need to click on the PDB code or on the entry title.
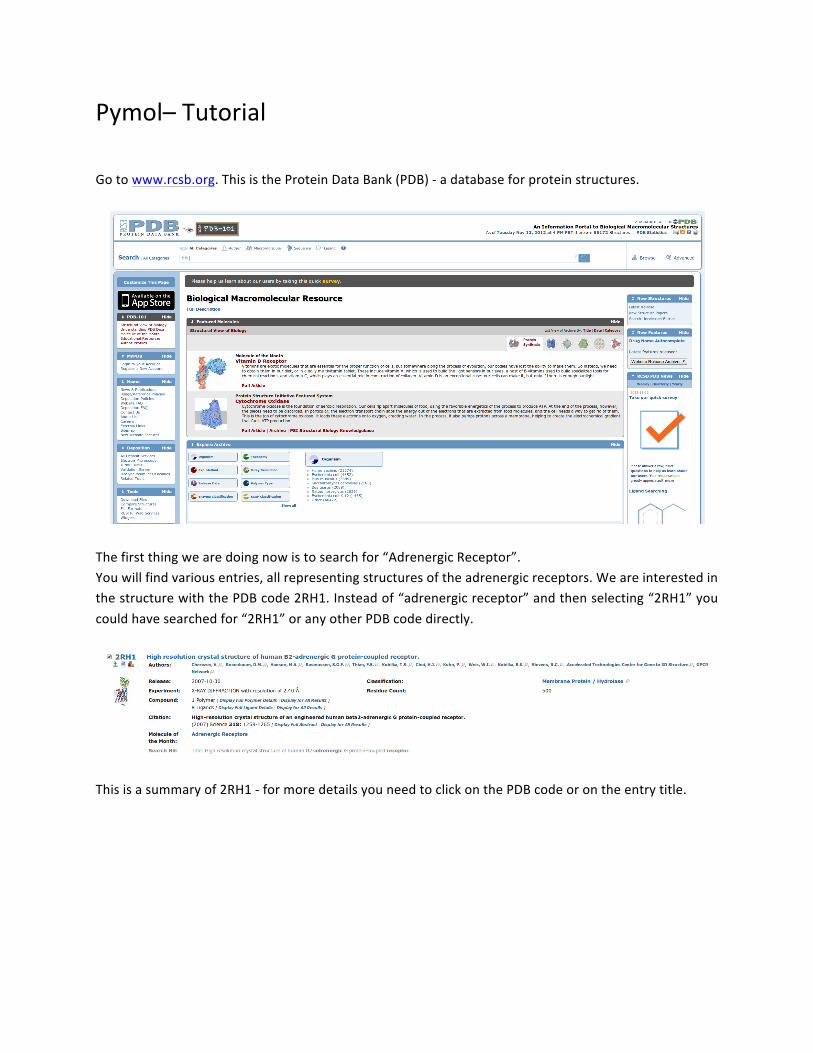
Here you can find all details about the protein and how the protein’s structure was obtained. To download the structure click on “Download Files” (next to the PDB code) and “PDB File (Text)”. When you saved the file to your computer, open it with PyMOL-‐ a program to look at protein structures.
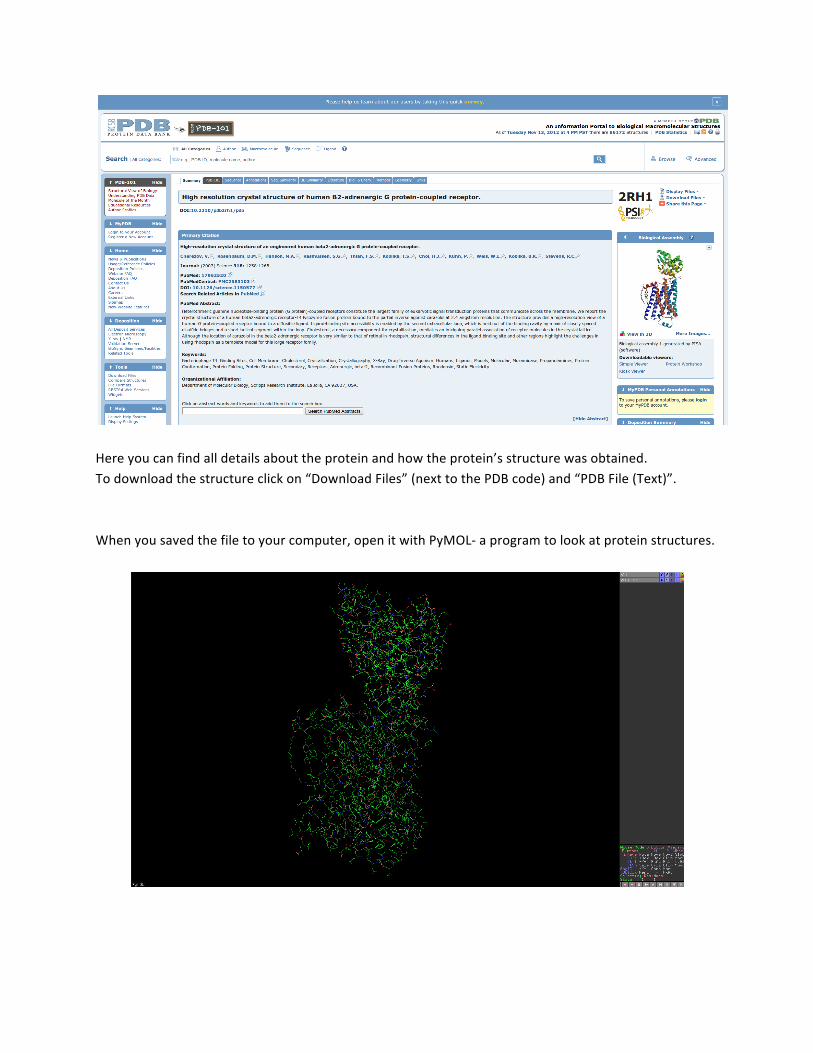
As always, you have to save your work. We do this through “File –> Save Session As...”. Don’t forget to save your progress regularly through “File –> Save Session”
PyMOL also offers you to use scripts. The easiest way to do start with the automatic log that saves every of your steps. Therefore go to “File -‐> Log”. After saving you can forget about this for now and continue with the tutorial. Later we will come back to your saved log file.
For a better overview click on “S”, “Show as” and “cartoon”. This hides all sidechains and shows only the protein’s backbone representation.
Now start to “experiment” with your mouse. PyMOL is very easy to use and you will soon understand how it works. Try how the different buttons (left, right, wheel) work; what happens if you keep them pressed?
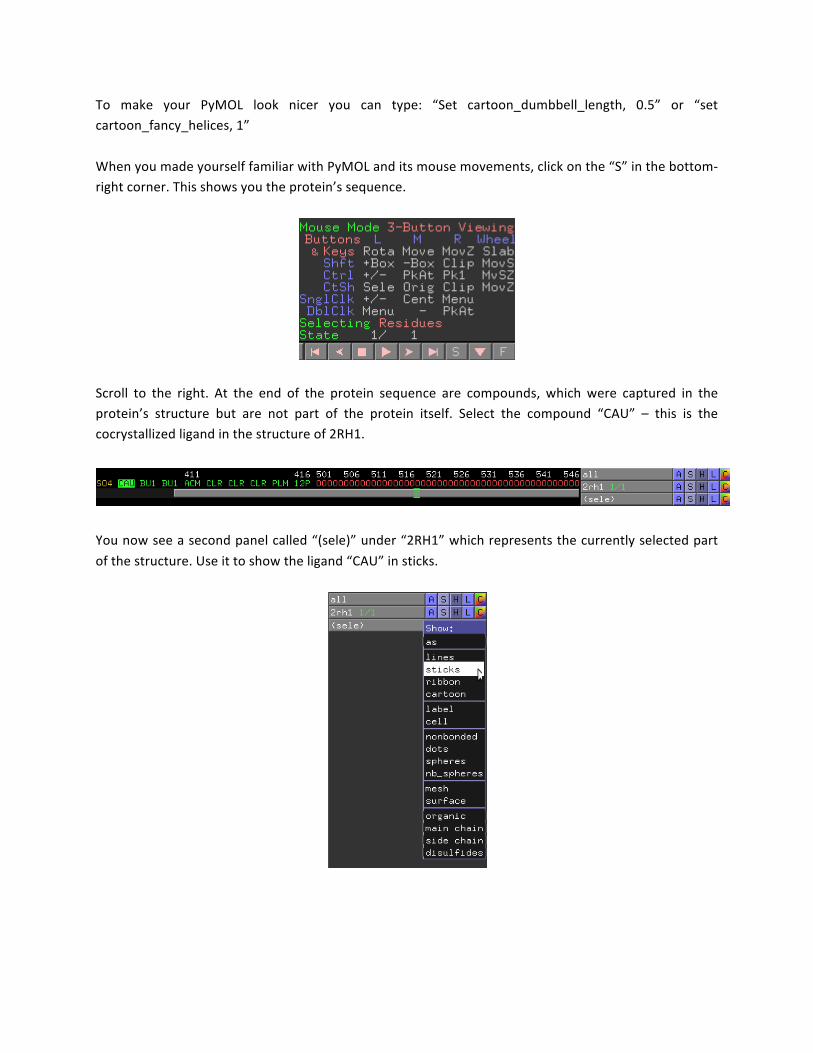
To make your PyMOL look nicer you can type: “Set cartoon_dumbbell_length, 0.5” or “set cartoon_fancy_helices, 1” When you made yourself familiar with PyMOL and its mouse movements, click on the “S” in the bottom-‐right corner. This shows you the protein’s sequence.
Scroll to the right. At the end of the protein sequence are compounds, which were captured in the protein’s structure but are not part of the protein itself. Select the compound “CAU” – this is the cocrystallized ligand in the structure of 2RH1.
You now see a second panel called “(sele)” under “2RH1” which represents the currently selected part of the structure. Use it to show the ligand “CAU” in sticks.
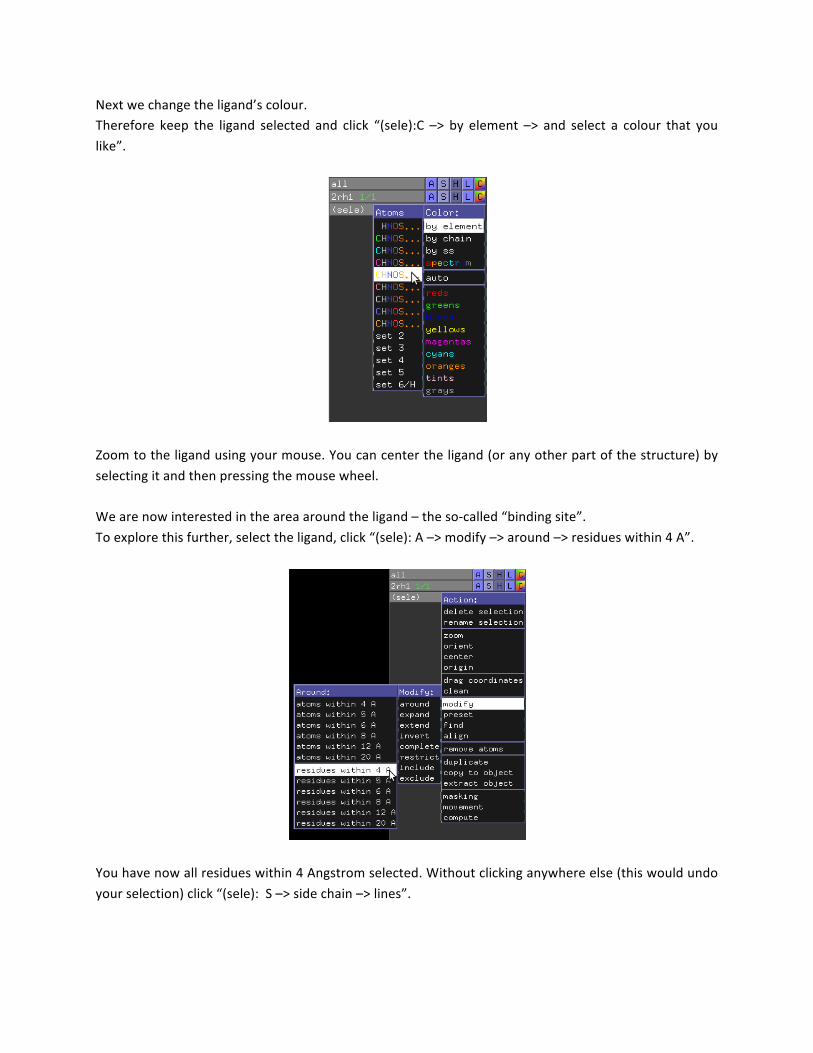
Next we change the ligand’s colour. Therefore keep the ligand selected and click “(sele):C –> by element –> and select a colour that you like”.
Zoom to the ligand using your mouse. You can center the ligand (or any other part of the structure) by selecting it and then pressing the mouse wheel. We are now interested in the area around the ligand – the so-‐called “binding site”. To explore this further, select the ligand, click “(sele): A –> modify –> around –> residues within 4 A”.
You have now all residues within 4 Angstrom selected. Without clicking anywhere else (this would undo your selection) click “(sele): S –> side chain –> lines”.
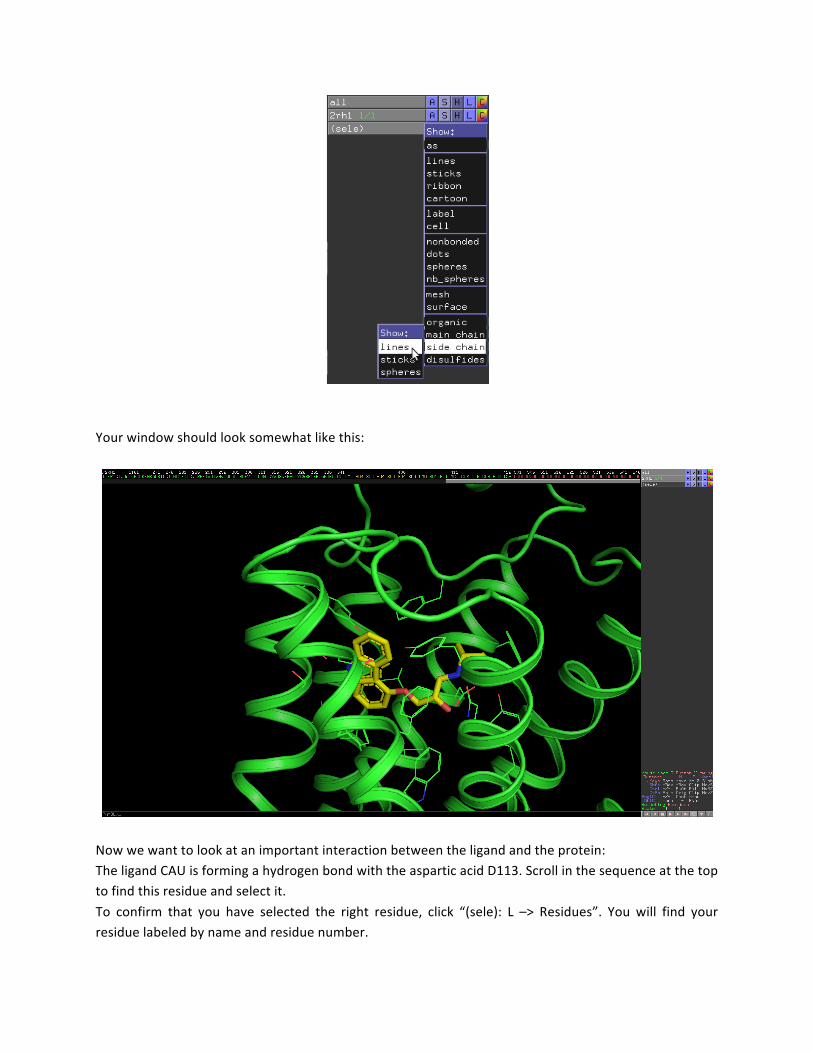
Your window should look somewhat like this:
Now we want to look at an important interaction between the ligand and the protein: The ligand CAU is forming a hydrogen bond with the aspartic acid D113. Scroll in the sequence at the top to find this residue and select it. To confirm that you have selected the right residue, click “(sele): L –> Residues”. You will find your residue labeled by name and residue number.
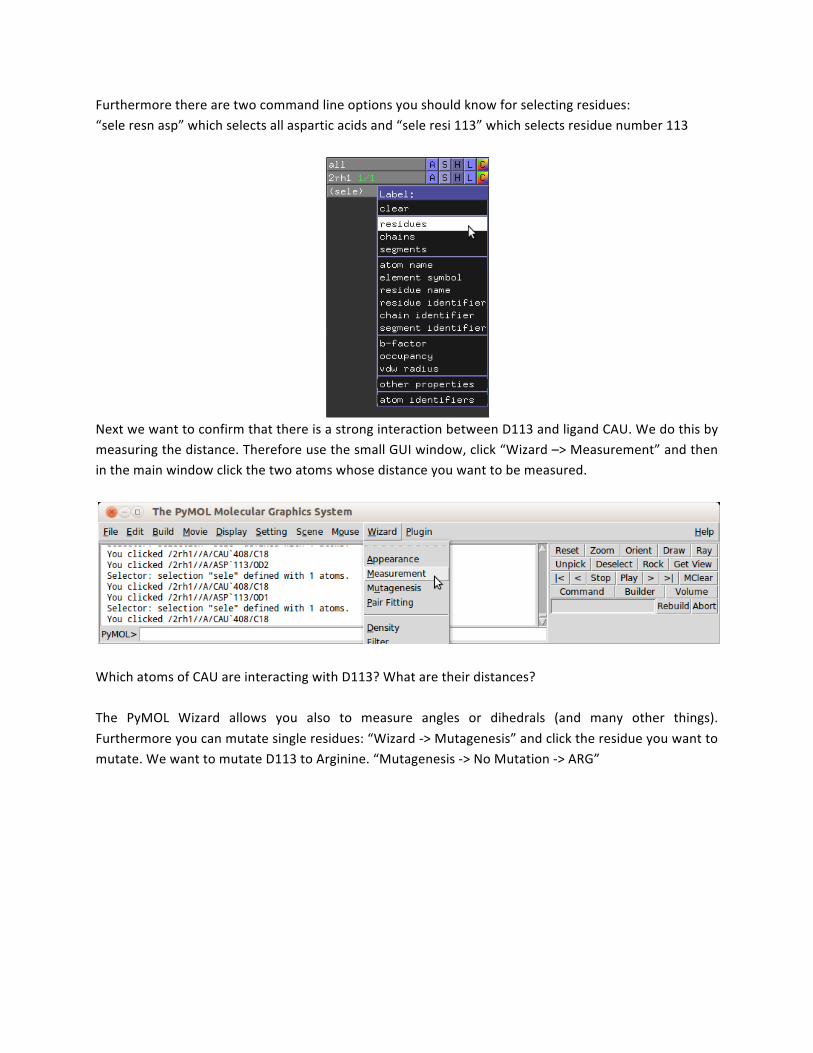
Furthermore there are two command line options you should know for selecting residues: “sele resn asp” which selects all aspartic acids and “sele resi 113” which selects residue number 113
Next we want to confirm that there is a strong interaction between D113 and ligand CAU. We do this by measuring the distance. Therefore use the small GUI window, click “Wizard –> Measurement” and then in the main window click the two atoms whose distance you want to be measured.
Which atoms of CAU are interacting with D113? What are their distances? The PyMOL Wizard allows you also to measure angles or dihedrals (and many other things). Furthermore you can mutate single residues: “Wizard -‐> Mutagenesis” and click the residue you want to mutate. We want to mutate D113 to Arginine. “Mutagenesis -‐> No Mutation -‐> ARG”
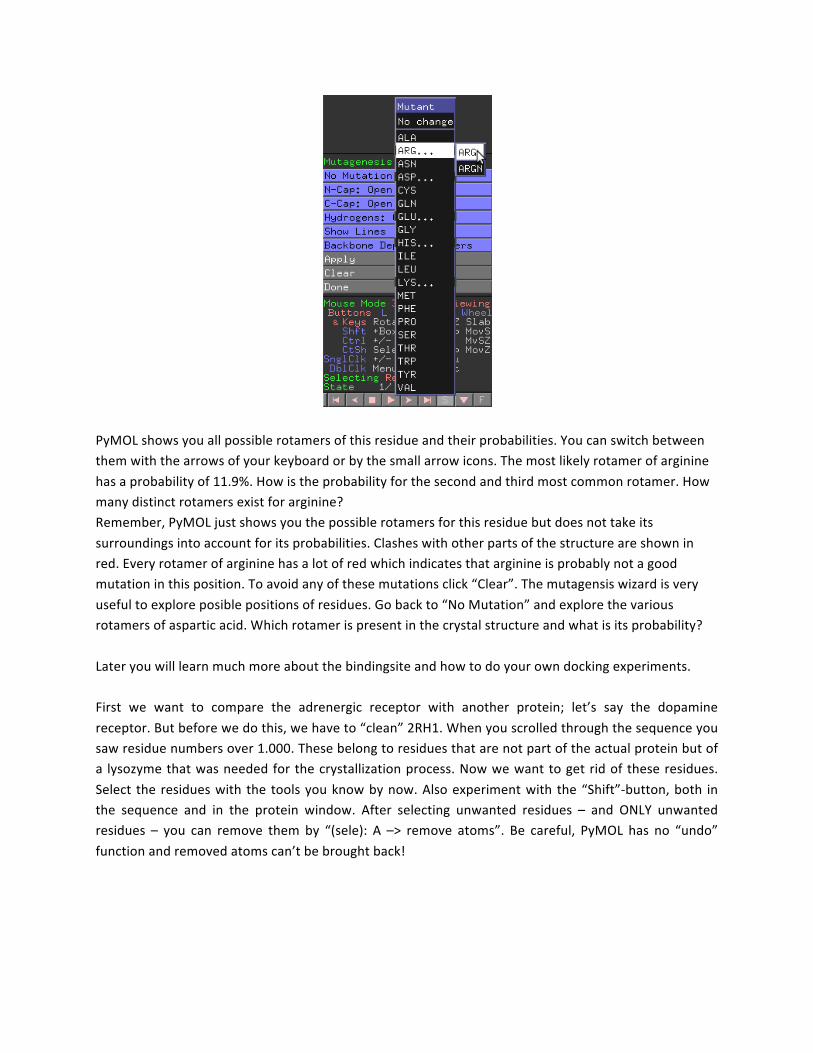
PyMOL shows you all possible rotamers of this residue and their probabilities. You can switch between them with the arrows of your keyboard or by the small arrow icons. The most likely rotamer of arginine has a probability of 11.9%. How is the probability for the second and third most common rotamer. How many distinct rotamers exist for arginine? Remember, PyMOL just shows you the possible rotamers for this residue but does not take its surroundings into account for its probabilities. Clashes with other parts of the structure are shown in red. Every rotamer of arginine has a lot of red which indicates that arginine is probably not a good mutation in this position. To avoid any of these mutations click “Clear”. The mutagensis wizard is very useful to explore posible positions of residues. Go back to “No Mutation” and explore the various rotamers of aspartic acid. Which rotamer is present in the crystal structure and what is its probability? Later you will learn much more about the bindingsite and how to do your own docking experiments. First we want to compare the adrenergic receptor with another protein; let’s say the dopamine receptor. But before we do this, we have to “clean” 2RH1. When you scrolled through the sequence you saw residue numbers over 1.000. These belong to residues that are not part of the actual protein but of a lysozyme that was needed for the crystallization process. Now we want to get rid of these residues. Select the residues with the tools you know by now. Also experiment with the “Shift”-‐button, both in the sequence and in the protein window. After selecting unwanted residues – and ONLY unwanted residues – you can remove them by “(sele): A –> remove atoms”. Be careful, PyMOL has no “undo” function and removed atoms can’t be brought back!
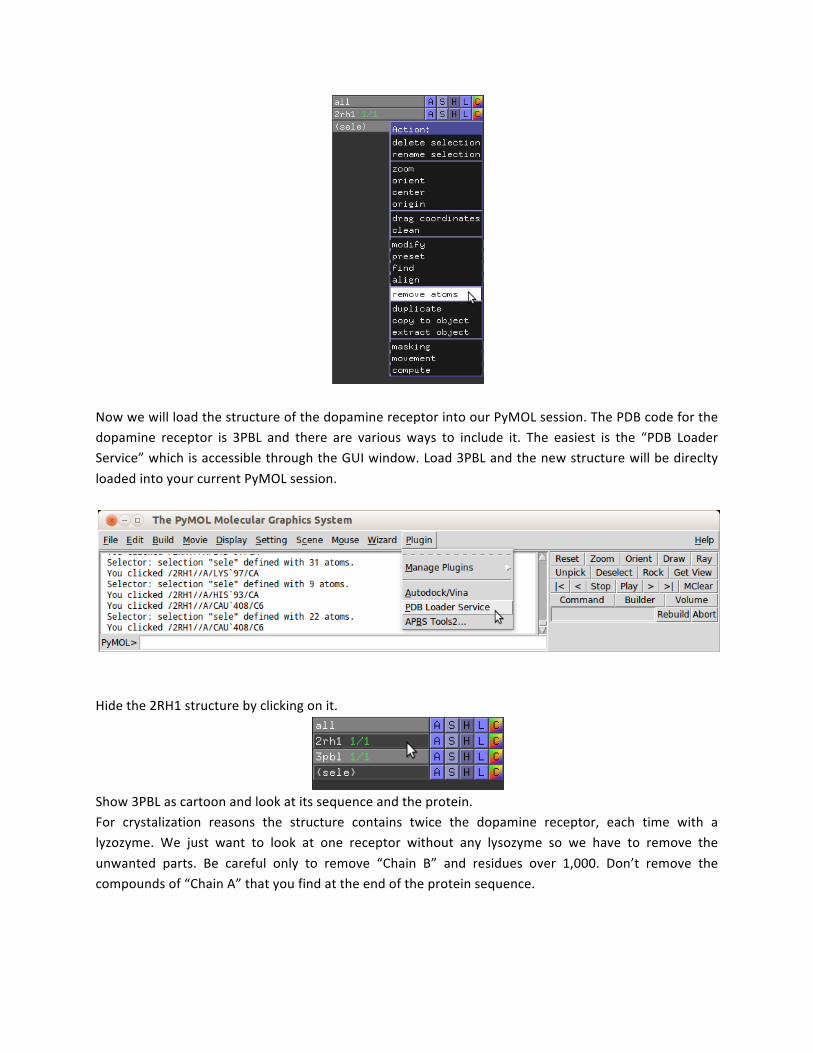
Now we will load the structure of the dopamine receptor into our PyMOL session. The PDB code for the dopamine receptor is 3PBL and there are various ways to include it. The easiest is the “PDB Loader Service” which is accessible through the GUI window. Load 3PBL and the new structure will be direclty loaded into your current PyMOL session.
Hide the 2RH1 structure by clicking on it.
Show 3PBL as cartoon and look at its sequence and the protein. For crystalization reasons the structure contains twice the dopamine receptor, each time with a lyzozyme. We just want to look at one receptor without any lysozyme so we have to remove the unwanted parts. Be careful only to remove “Chain B” and residues over 1,000. Don’t remove the compounds of “Chain A” that you find at the end of the protein sequence.
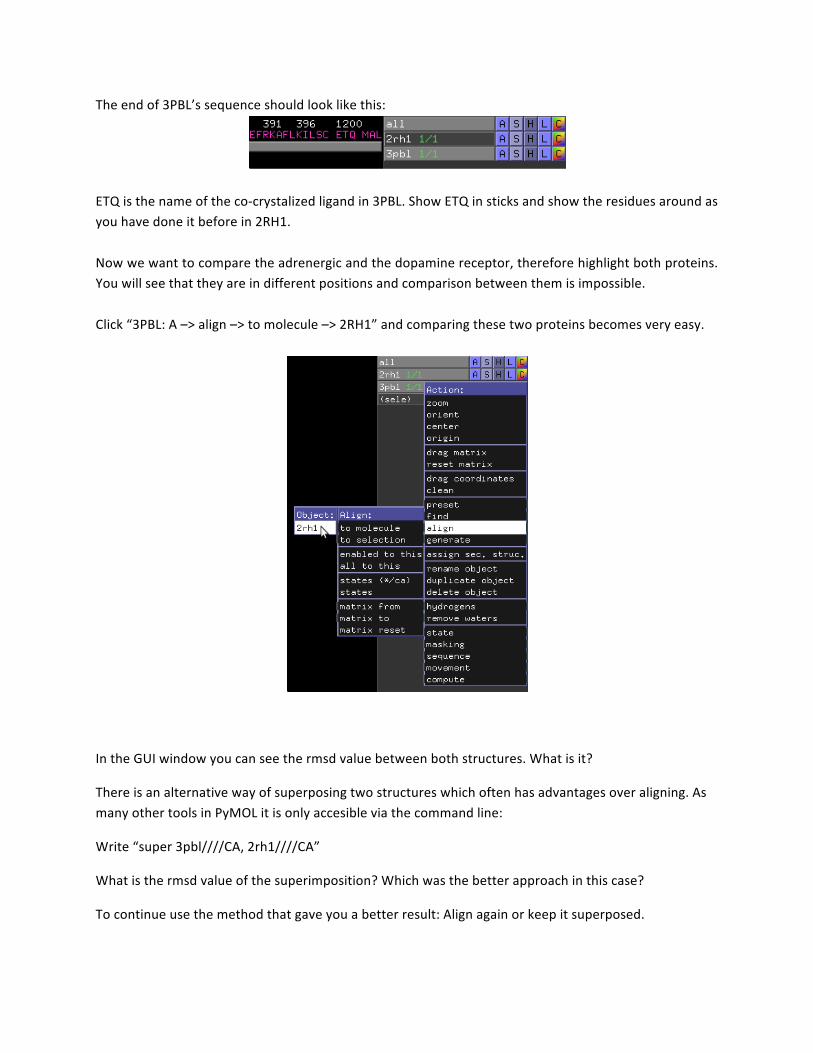
The end of 3PBL’s sequence should look like this:
ETQ is the name of the co-‐crystalized ligand in 3PBL. Show ETQ in sticks and show the residues around as you have done it before in 2RH1. Now we want to compare the adrenergic and the dopamine receptor, therefore highlight both proteins. You will see that they are in different positions and comparison between them is impossible. Click “3PBL: A –> align –> to molecule –> 2RH1” and comparing these two proteins becomes very easy.
In the GUI window you can see the rmsd value between both structures. What is it?
There is an alternative way of superposing two structures which often has advantages over aligning. As many other tools in PyMOL it is only accesible via the command line:
Write “super 3pbl////CA, 2rh1////CA”
What is the rmsd value of the superimposition? Which was the better approach in this case?
To continue use the method that gave you a better result: Align again or keep it superposed.
Now we come back to the script we started in the beginning. Therefore go to “File -‐> Close Log” and save the session. Then delete 3pbl (don’t delete 2rh1 because you started to save your steps AFTER you loaded 2rh1 –> 2rh1 is not saved in your script). Then type “@log.pml” and see what happens. All your steps should be reproduced.
PyMOL allows you to look at things in many different ways. One of them is the “surface” option. Select all residues within 8A of CAU and show them as surface. Maybe you want the surface to be more transparent. Type: “set transparency, 0.5” you can also set it to 0.7 or any other value between 0 and 1. Look how small the entry to the binding site is from above. After this go back to the cartoon representation.
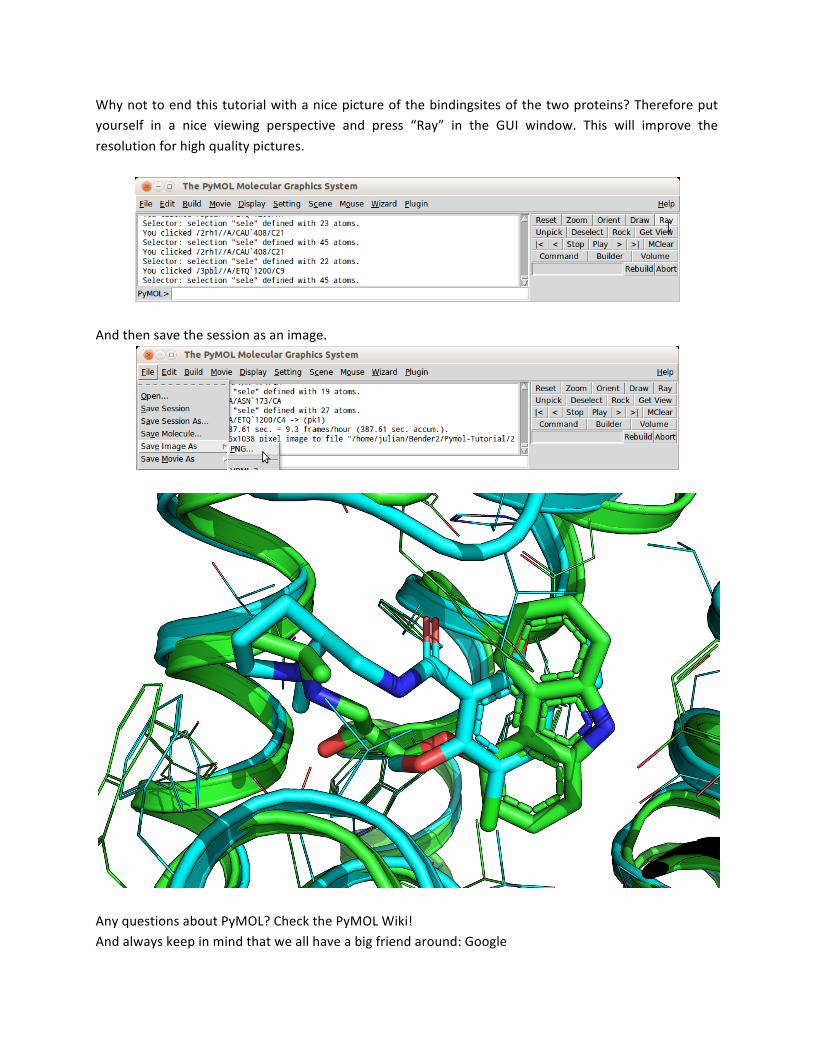
Why not to end this tutorial with a nice picture of the bindingsites of the two proteins? Therefore put yourself in a nice viewing perspective and press “Ray” in the GUI window. This will improve the resolution for high quality pictures.
And then save the session as an image.
Any questions about PyMOL? Check the PyMOL Wiki! And always keep in mind that we all have a big friend around: Google

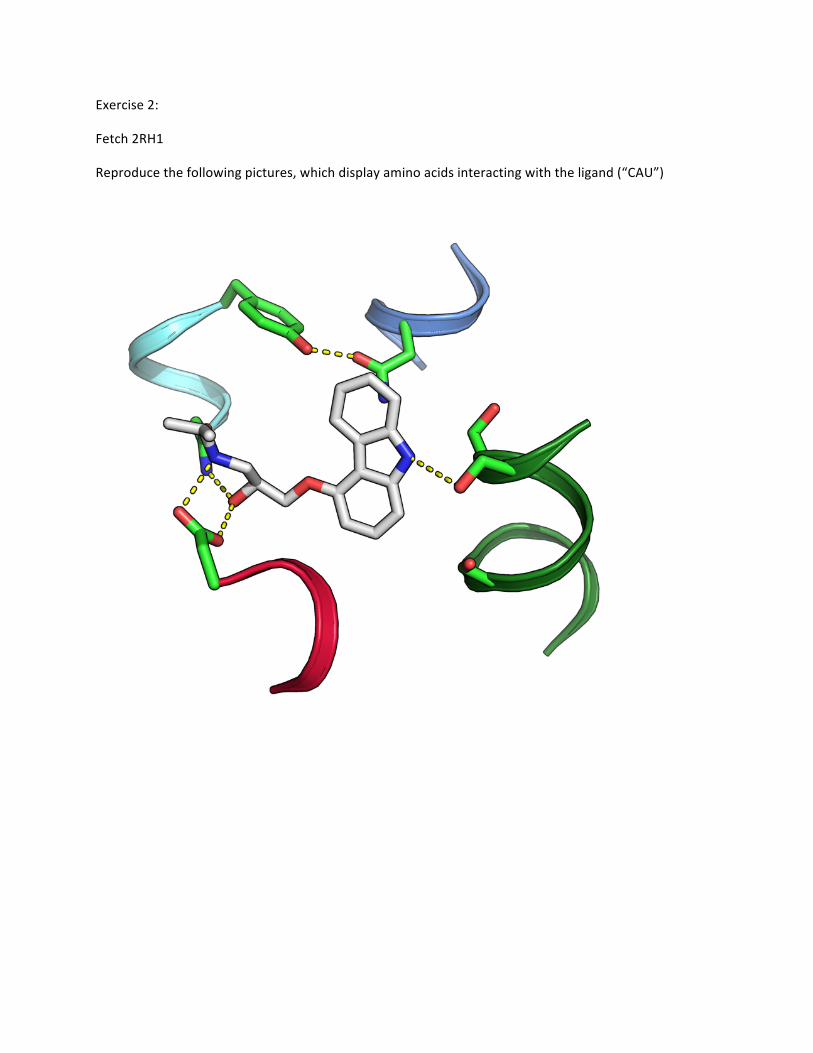
Exercise 2:
Fetch 2RH1
Reproduce the following pictures, which display amino acids interacting with the ligand (“CAU”)
Exercise 3:
Fetch 2RH1
Copy residues from 29 to 341 to a new object
Remove 2RH1
Rename the new object to “beta2”
Set Surface Cavities & Pockets (Culled)
Show surface
Set Surface Exterior normal
Set the transparency of the surface to 40%
Exercise 4:
Build the following sequence “KEHKALKTLGIIMGTFTLCWLPFFIVNIVHVI” as an α-‐helix using the Build -‐> Residue -‐> Helix command
Rename the build helix to “TM6”
Fetch 2RH1
Display only helix 6 from K267 to I298
Superimpose K2-‐I33 of the build helix “TM6” to K267-‐I298 of 2RH1
Do they superimpose properly? What is the rmsd?
Superimpose K2-‐L19 of the build helix “TM6” to K267-‐L284 of 2RH1
Do they superimpose properly? What is the rmsd?


![Die Analyse des Metatranskriptoms einer Biogasanlage und ... · Abbildung 1.4: Das Protein Hemolysin in PyMOL aus der Vogelperspektive. [IMG-3] Kapitel 1: Einleitung und Zielstellung](https://img.pdfslide.net/doc/110x75/5d50e2c588c993cb1f8b6732/die-analyse-des-metatranskriptoms-einer-biogasanlage-und-abbildung-14.jpg)


![ProteinShop: A Tool for Interactive Protein Manipulation and …/67531/metadc782994/... · Molden, PyMol, Chimera and O are visualization and modeling tools [7-10]. However, the modeling](https://img.pdfslide.net/doc/110x75/6043caee3e671623895c57c2/proteinshop-a-tool-for-interactive-protein-manipulation-and-67531metadc782994.jpg)