Embed Size (px)
Citation preview
1
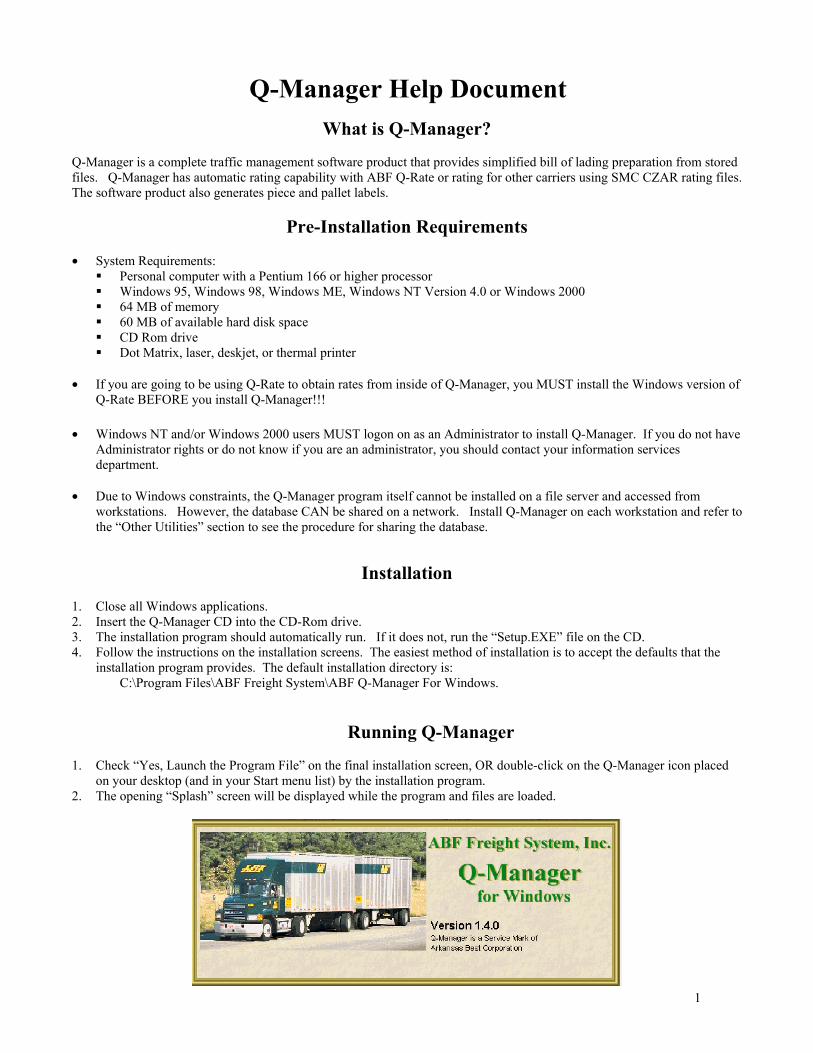
Q-Manager Help Document
What is Q-Manager? Q-Manager is a complete traffic management software product that provides simplified bill of lading preparation from stored files. Q-Manager has automatic rating capability with ABF Q-Rate or rating for other carriers using SMC CZAR rating files. The software product also generates piece and pallet labels.
Pre-Installation Requirements • System Requirements:
Personal computer with a Pentium 166 or higher processor Windows 95, Windows 98, Windows ME, Windows NT Version 4.0 or Windows 2000 64 MB of memory 60 MB of available hard disk space CD Rom drive Dot Matrix, laser, deskjet, or thermal printer
• If you are going to be using Q-Rate to obtain rates from inside of Q-Manager, you MUST install the Windows version of
Q-Rate BEFORE you install Q-Manager!!!
• Windows NT and/or Windows 2000 users MUST logon on as an Administrator to install Q-Manager. If you do not have Administrator rights or do not know if you are an administrator, you should contact your information services department.
• Due to Windows constraints, the Q-Manager program itself cannot be installed on a file server and accessed from
workstations. However, the database CAN be shared on a network. Install Q-Manager on each workstation and refer to the “Other Utilities” section to see the procedure for sharing the database.
Installation
1. Close all Windows applications. 2. Insert the Q-Manager CD into the CD-Rom drive. 3. The installation program should automatically run. If it does not, run the “Setup.EXE” file on the CD. 4. Follow the instructions on the installation screens. The easiest method of installation is to accept the defaults that the
installation program provides. The default installation directory is: C:\Program Files\ABF Freight System\ABF Q-Manager For Windows.
Running Q-Manager 1. Check “Yes, Launch the Program File” on the final installation screen, OR double-click on the Q-Manager icon placed
on your desktop (and in your Start menu list) by the installation program. 2. The opening “Splash” screen will be displayed while the program and files are loaded.
2
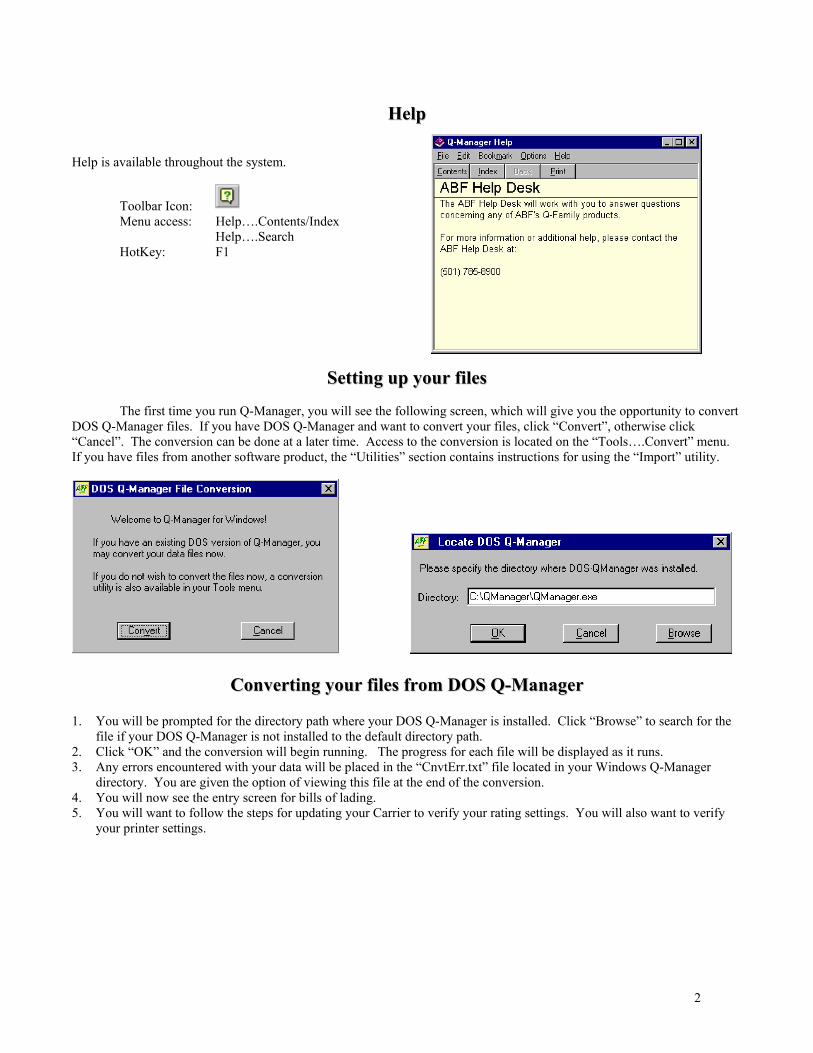
HHeellpp Help is available throughout the system.
Toolbar Icon: Menu access: Help….Contents/Index
Help….Search HotKey: F1
SSeettttiinngg uupp yyoouurr ffiilleess
The first time you run Q-Manager, you will see the following screen, which will give you the opportunity to convert DOS Q-Manager files. If you have DOS Q-Manager and want to convert your files, click “Convert”, otherwise click “Cancel”. The conversion can be done at a later time. Access to the conversion is located on the “Tools….Convert” menu. If you have files from another software product, the “Utilities” section contains instructions for using the “Import” utility.
CCoonnvveerrttiinngg yyoouurr ffiilleess ffrroomm DDOOSS QQ--MMaannaaggeerr 1. You will be prompted for the directory path where your DOS Q-Manager is installed. Click “Browse” to search for the
file if your DOS Q-Manager is not installed to the default directory path. 2. Click “OK” and the conversion will begin running. The progress for each file will be displayed as it runs. 3. Any errors encountered with your data will be placed in the “CnvtErr.txt” file located in your Windows Q-Manager
directory. You are given the option of viewing this file at the end of the conversion. 4. You will now see the entry screen for bills of lading. 5. You will want to follow the steps for updating your Carrier to verify your rating settings. You will also want to verify
your printer settings.
3
CCrreeaattiinngg yyoouurr ffiilleess ffrroomm ssccrraattcchh oorr uuppddaattiinngg yyoouurr ccoonnvveerrtteedd DDOOSS QQ--MMaannaaggeerr ffiilleess:: Consignee, Shipper, Commodity, Carrier, and Bill To records are all located on one “User Table Maintenance” screen, a tabbed dialogue accessed from the primary “Q-Manager” screen.
Toolbar Icon: Menu access: Edit….Edit/Add Records HotKey: F5 The basic procedure for adding and updating information is the same for each of the tabs. Adding records • Click on the relevant tab. • Click “New”. • Enter a unique code for particular record you are adding. This code allows you to “lookup” the record later on. • Enter the information relevant to that tab. • Click “Save” and repeat the process to add additional records. Modifying records • Click on the relevant tab. • Type in the unique “Code” of the record you want to modify and press the “TAB” key. If you do not know the code,
refer to the section in “Utilities” about using the “Record List View” screen to view and select records. • The record will display. Make the appropriate modifications. • Click “Save” and repeat the process for additional records. Navigating through the files The arrows allow you to ”move to the first record”, “move to the previous record”, “move to the next record”, and “move to the last record” respectively.
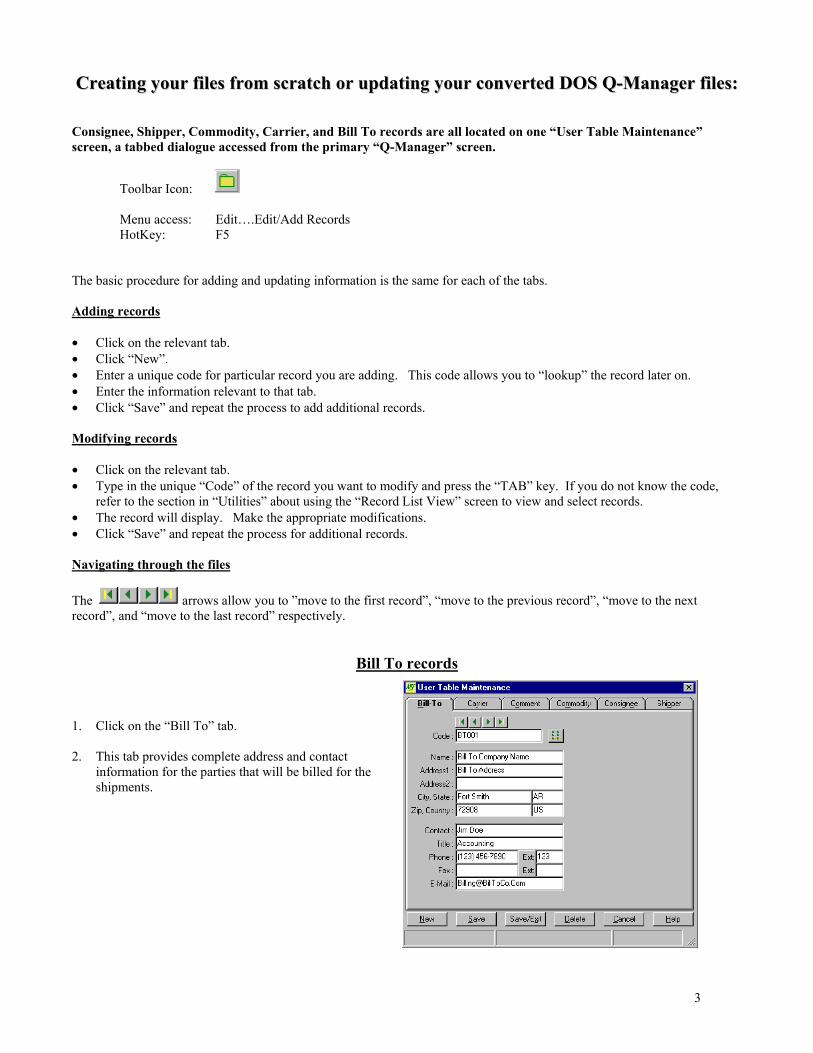
Bill To records
1. Click on the “Bill To” tab. 2. This tab provides complete address and contact
information for the parties that will be billed for the shipments.
4
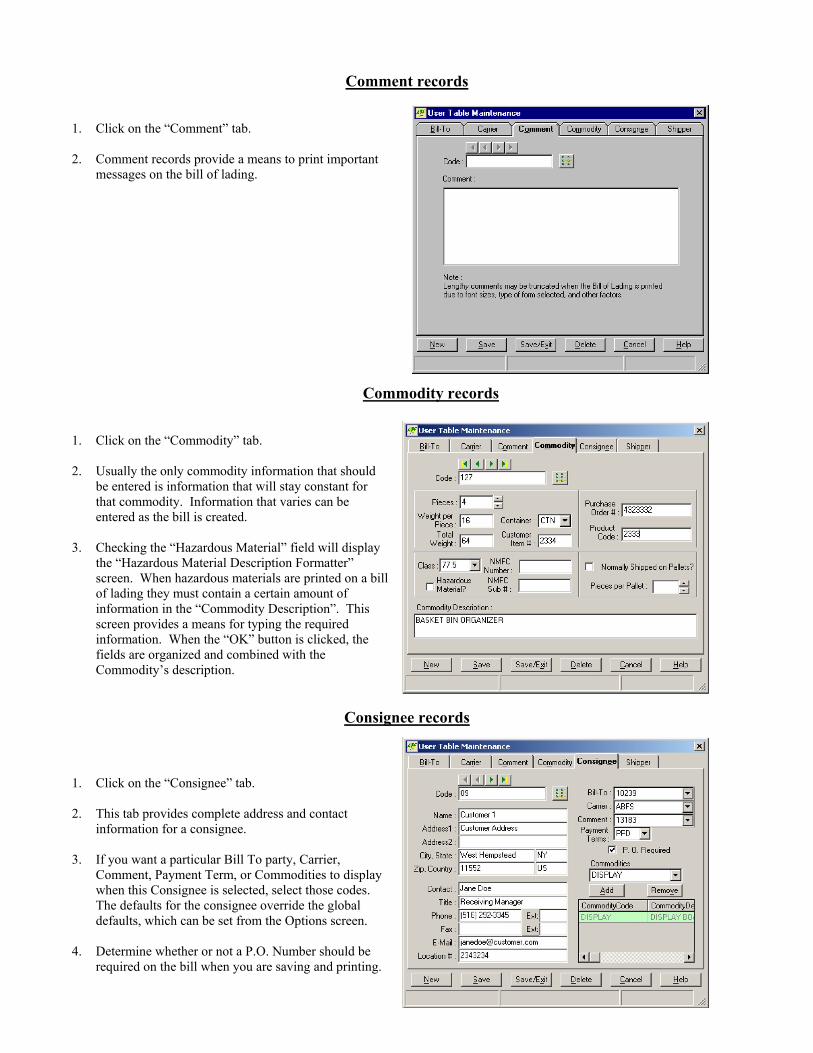
Comment records 1. Click on the “Comment” tab. 2. Comment records provide a means to print important
messages on the bill of lading.
Commodity records
1. Click on the “Commodity” tab. 2. Usually the only commodity information that should
be entered is information that will stay constant for that commodity. Information that varies can be entered as the bill is created.
3. Checking the “Hazardous Material” field will display
the “Hazardous Material Description Formatter” screen. When hazardous materials are printed on a bill of lading they must contain a certain amount of information in the “Commodity Description”. This screen provides a means for typing the required information. When the “OK” button is clicked, the fields are organized and combined with the Commodity’s description.
Consignee records
1. Click on the “Consignee” tab. 2. This tab provides complete address and contact
information for a consignee. 3. If you want a particular Bill To party, Carrier,
Comment, Payment Term, or Commodities to display when this Consignee is selected, select those codes. The defaults for the consignee override the global defaults, which can be set from the Options screen.
4. Determine whether or not a P.O. Number should be
required on the bill when you are saving and printing.
5
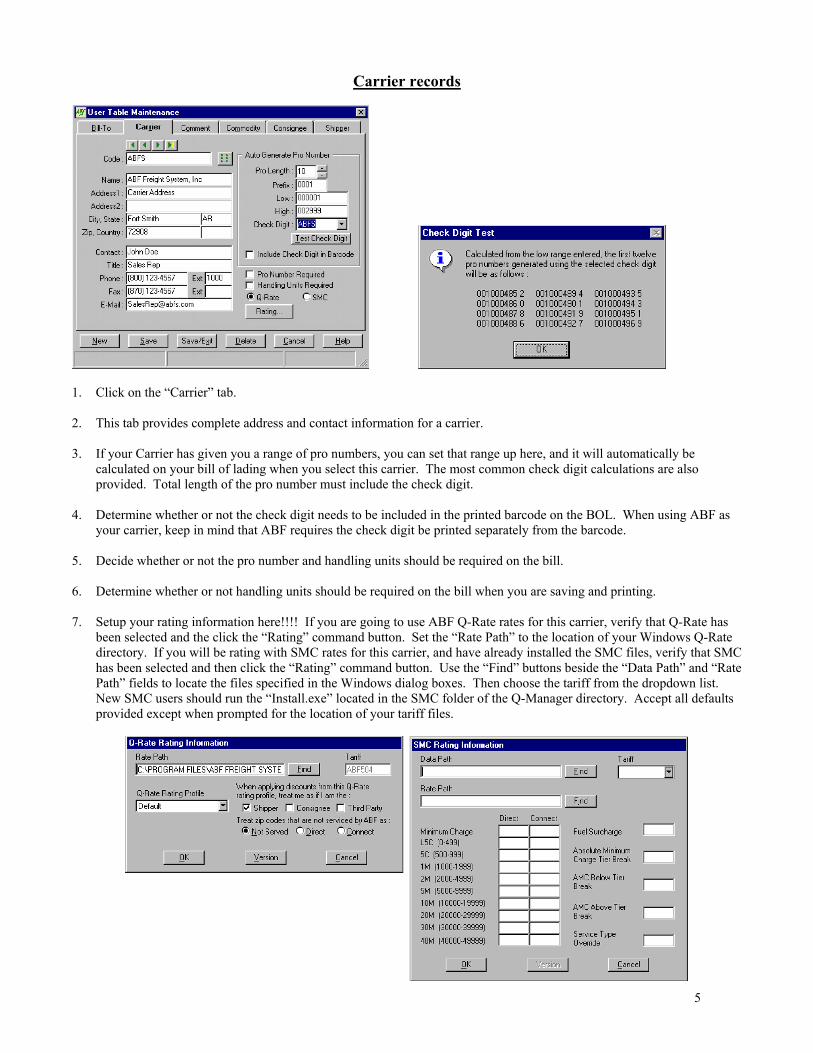
Carrier records
1. Click on the “Carrier” tab. 2. This tab provides complete address and contact information for a carrier. 3. If your Carrier has given you a range of pro numbers, you can set that range up here, and it will automatically be
calculated on your bill of lading when you select this carrier. The most common check digit calculations are also provided. Total length of the pro number must include the check digit.
4. Determine whether or not the check digit needs to be included in the printed barcode on the BOL. When using ABF as
your carrier, keep in mind that ABF requires the check digit be printed separately from the barcode. 5. Decide whether or not the pro number and handling units should be required on the bill. 6. Determine whether or not handling units should be required on the bill when you are saving and printing. 7. Setup your rating information here!!!! If you are going to use ABF Q-Rate rates for this carrier, verify that Q-Rate has
been selected and the click the “Rating” command button. Set the “Rate Path” to the location of your Windows Q-Rate directory. If you will be rating with SMC rates for this carrier, and have already installed the SMC files, verify that SMC has been selected and then click the “Rating” command button. Use the “Find” buttons beside the “Data Path” and “Rate Path” fields to locate the files specified in the Windows dialog boxes. Then choose the tariff from the dropdown list. New SMC users should run the “Install.exe” located in the SMC folder of the Q-Manager directory. Accept all defaults provided except when prompted for the location of your tariff files.
6
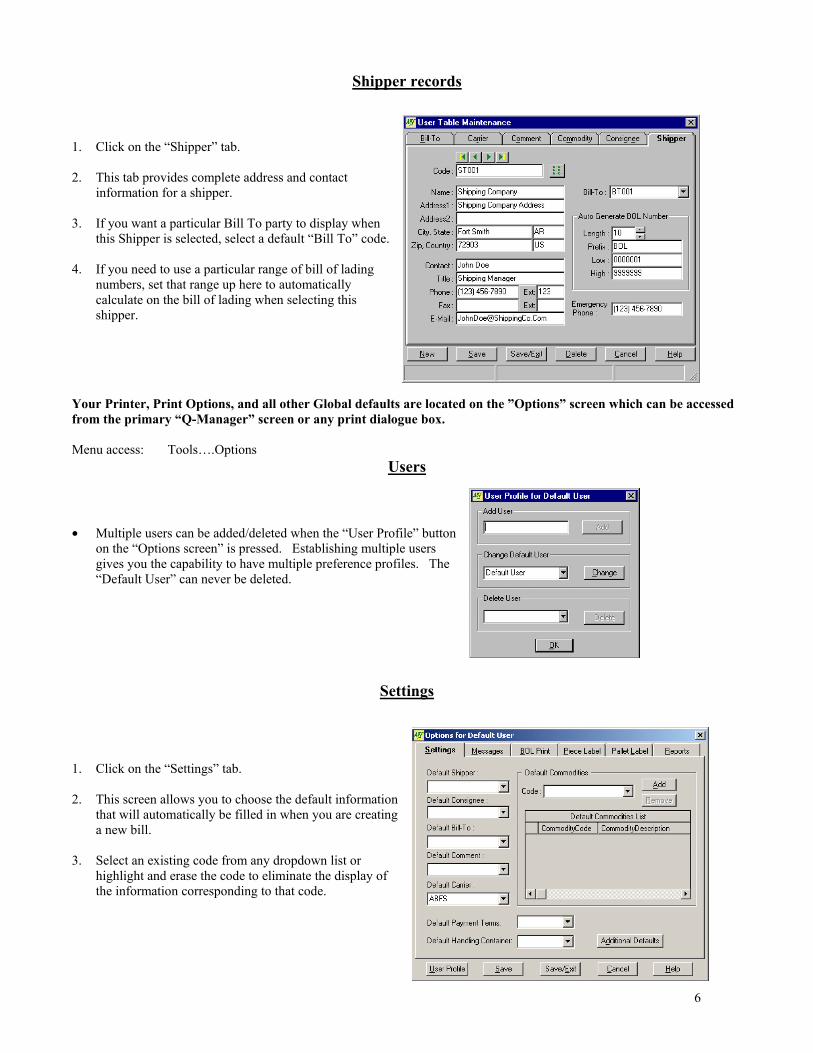
Shipper records
1. Click on the “Shipper” tab. 2. This tab provides complete address and contact
information for a shipper. 3. If you want a particular Bill To party to display when
this Shipper is selected, select a default “Bill To” code. 4. If you need to use a particular range of bill of lading
numbers, set that range up here to automatically calculate on the bill of lading when selecting this shipper.
Your Printer, Print Options, and all other Global defaults are located on the ”Options” screen which can be accessed from the primary “Q-Manager” screen or any print dialogue box. Menu access: Tools….Options
Users
• Multiple users can be added/deleted when the “User Profile” button
on the “Options screen” is pressed. Establishing multiple users gives you the capability to have multiple preference profiles. The “Default User” can never be deleted.
Settings
1. Click on the “Settings” tab. 2. This screen allows you to choose the default information
that will automatically be filled in when you are creating a new bill.
3. Select an existing code from any dropdown list or
highlight and erase the code to eliminate the display of the information corresponding to that code.
7
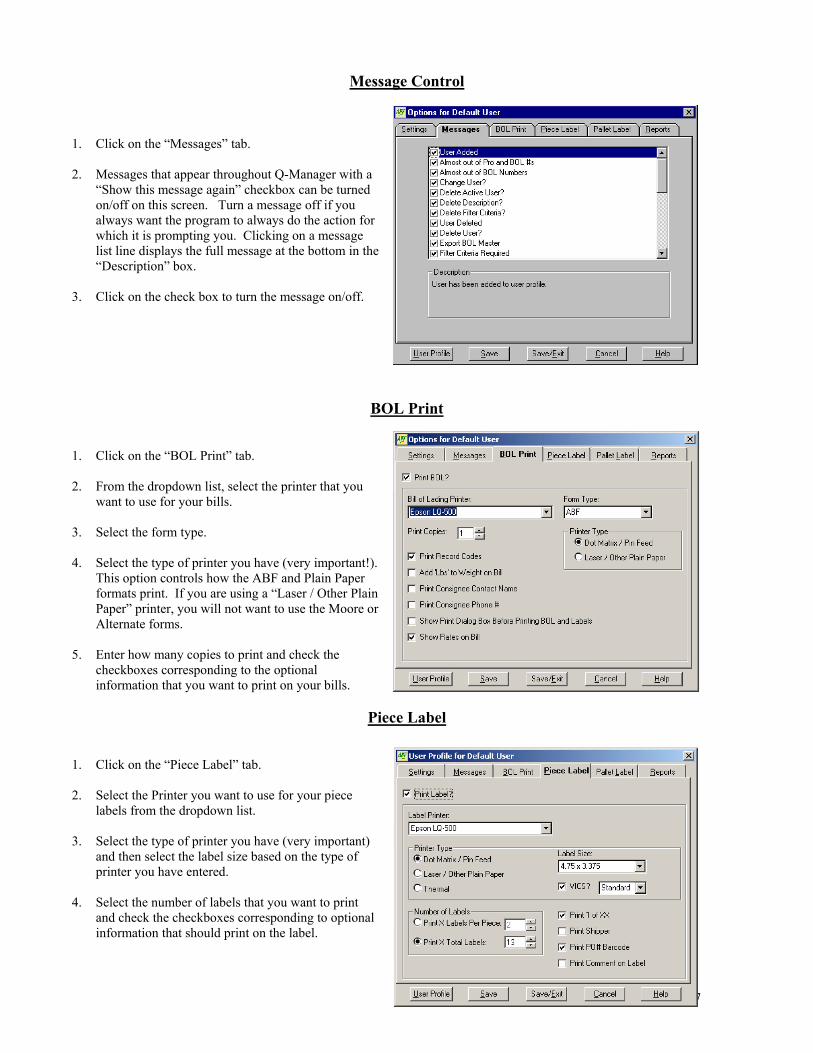
Message Control
1. Click on the “Messages” tab. 2. Messages that appear throughout Q-Manager with a
“Show this message again” checkbox can be turned on/off on this screen. Turn a message off if you always want the program to always do the action for which it is prompting you. Clicking on a message list line displays the full message at the bottom in the “Description” box.
3. Click on the check box to turn the message on/off.
BOL Print
1. Click on the “BOL Print” tab. 2. From the dropdown list, select the printer that you
want to use for your bills. 3. Select the form type. 4. Select the type of printer you have (very important!).
This option controls how the ABF and Plain Paper formats print. If you are using a “Laser / Other Plain Paper” printer, you will not want to use the Moore or Alternate forms.
5. Enter how many copies to print and check the
checkboxes corresponding to the optional information that you want to print on your bills.
Piece Label
1. Click on the “Piece Label” tab. 2. Select the Printer you want to use for your piece
labels from the dropdown list. 3. Select the type of printer you have (very important)
and then select the label size based on the type of printer you have entered.
4. Select the number of labels that you want to print
and check the checkboxes corresponding to optional information that should print on the label.

8
Pallet Label
1. Click on the “Pallet Label” tab. 2. Select the printer that you want to use for your pallet
labels from the dropdown list. 3. Select the number of labels that you want to print. 4. Select whether or not you want the label count to
appear on the pallet label.
Report Print (Includes Bill of Lading Reports and Table Maintenance Listings)
1. Click on the “Reports” tab. 2. Select the printer that you want your reports and
listings to print to from the dropdown list. 3. Select all other settings that are relevant to the
reports you will be printing
Click “Save/Exit” to exit the “Options” screen when you have finished setting all of your options.
9
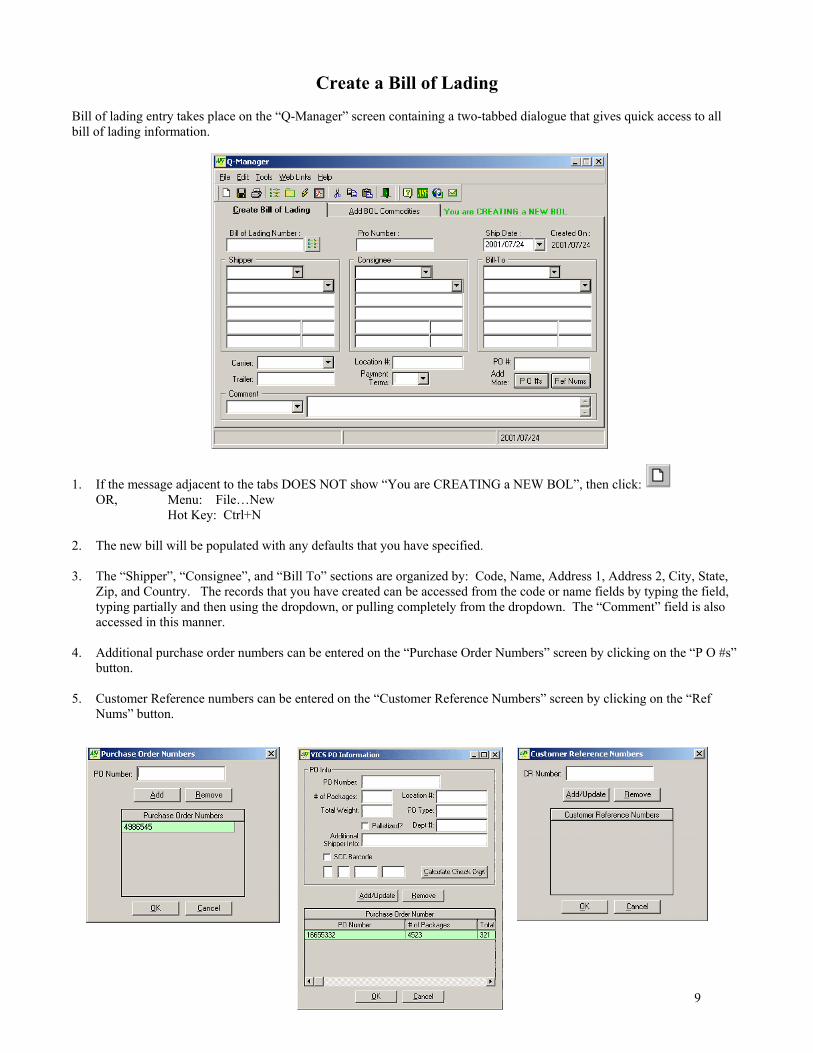
Create a Bill of Lading Bill of lading entry takes place on the “Q-Manager” screen containing a two-tabbed dialogue that gives quick access to all bill of lading information.
1. If the message adjacent to the tabs DOES NOT show “You are CREATING a NEW BOL”, then click: OR, Menu: File…New
Hot Key: Ctrl+N
2. The new bill will be populated with any defaults that you have specified. 3. The “Shipper”, “Consignee”, and “Bill To” sections are organized by: Code, Name, Address 1, Address 2, City, State,
Zip, and Country. The records that you have created can be accessed from the code or name fields by typing the field, typing partially and then using the dropdown, or pulling completely from the dropdown. The “Comment” field is also accessed in this manner.
4. Additional purchase order numbers can be entered on the “Purchase Order Numbers” screen by clicking on the “P O #s”
button. 5. Customer Reference numbers can be entered on the “Customer Reference Numbers” screen by clicking on the “Ref
Nums” button.

10
6. The commodities in your Commodities file can be accessed by clicking on the first column of the commodities grid and then clicking on the dropdown that appears.
7. If you are going to use a flat rate for
rating, you can click on the “Flat Rate” button which will bring up an additional information screen to record the flat rate amount and quote id.
8. If you have Q-Rate or SMC rates for
the carrier that you can select, you can preview those rates by clicking on the “Get Rate” button.
9. Some additional services require
additional information. You will be prompted for that information once you have selected that item.
10. To save the bill:
Toolbar Icon: Menu: File…Save
Hot Key: Ctrl+S 11. To print the bill:
Toolbar Icon: Menu: File…Print File…Print Preview
Hot Key: Ctrl+P Ctrl+V Record List View: “Print” command 12. The following dialog will appear if you checked the “Show Print Dialog Box Before Printing BOLs and Labels”
checkbox on the “BOL Print” tab of your “Options” screen.
A new concept incorporated into Q-Manager is “Open” bills and “Closed” bills. A bill is considered “Closed” when the “Final Copy” option has been chosen on the “Q-Manager Print” Screen and the bill has been rated and printed. You should choose “Test Copy” if you have further modifications to make to the bill. The section covering the topic of managing your bills (the “Record List View” screen) will explain this concept further.

11
Manage Your Bills And Table Maintenance Files
From the “Q-Manager” screen:
Toolbar Icon and button beside the “Bill of Lading Number” field: Menu: Edit…BOL Record List
Hot Key: F4 From the “User Table Maintenance” screen:
Button beside the “Code” field: “Record List View” Features: • The grid provides the advantage of being able to view all columns of information for a bill. Updates are not allowed on
this screen. • Sort by a particular column by clicking on that column’s heading. • Customize the order of columns according to your preference by dragging and dropping the columns. • You can select multiple documents to print (using the “Shift” key). • To delete a bill of lading record, use the Database Utilities delete function explained in the “Other Utilities” section. • Find, Repeat Find Next, Repeat Find First dialogue/functionality is accessed through standard Windows binocular icons.
12
• Command buttons (not all of these functions are available for user table maintenance records): 1. “Clone” – Create a new bill of lading or table maintenance record with general information copied from the selected
bill of lading or table maintenance code. 2. “Modify” – Modify an existing bill of lading or table maintenance record. If the selected bill of lading is closed, a
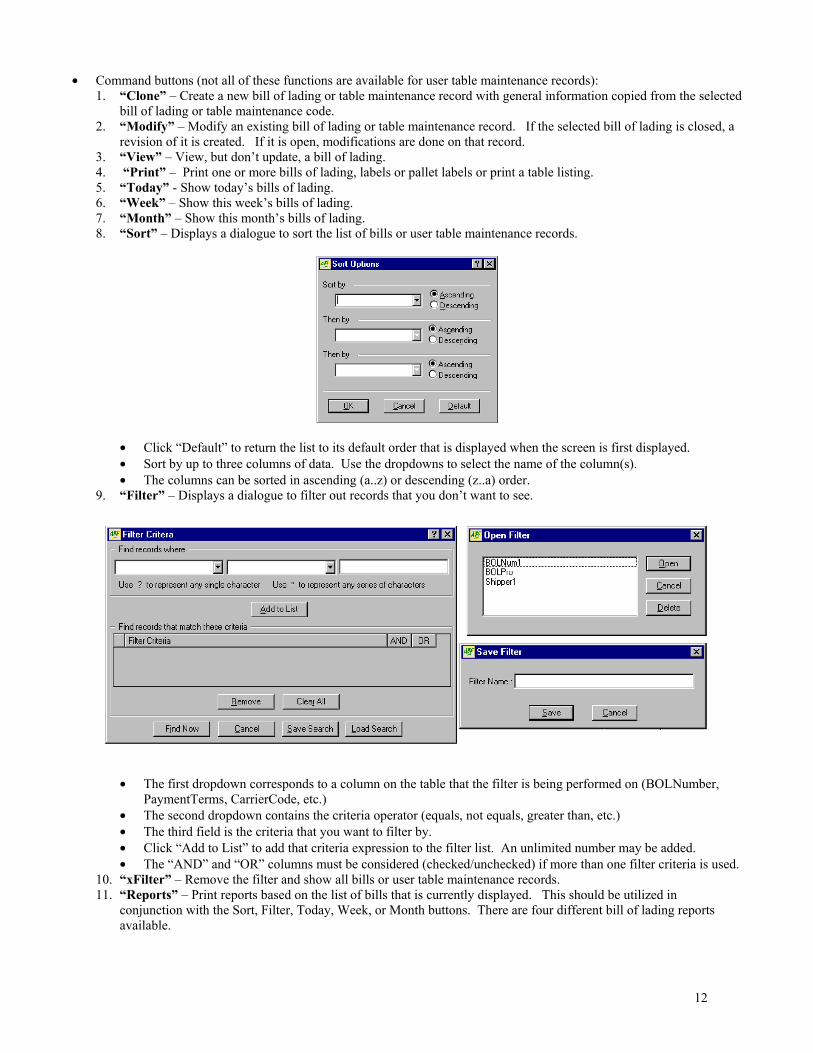
revision of it is created. If it is open, modifications are done on that record. 3. “View” – View, but don’t update, a bill of lading. 4. “Print” – Print one or more bills of lading, labels or pallet labels or print a table listing. 5. “Today” - Show today’s bills of lading. 6. “Week” – Show this week’s bills of lading. 7. “Month” – Show this month’s bills of lading. 8. “Sort” – Displays a dialogue to sort the list of bills or user table maintenance records.
• Click “Default” to return the list to its default order that is displayed when the screen is first displayed. • Sort by up to three columns of data. Use the dropdowns to select the name of the column(s). • The columns can be sorted in ascending (a..z) or descending (z..a) order.
9. “Filter” – Displays a dialogue to filter out records that you don’t want to see.
• The first dropdown corresponds to a column on the table that the filter is being performed on (BOLNumber, PaymentTerms, CarrierCode, etc.)
• The second dropdown contains the criteria operator (equals, not equals, greater than, etc.) • The third field is the criteria that you want to filter by. • Click “Add to List” to add that criteria expression to the filter list. An unlimited number may be added. • The “AND” and “OR” columns must be considered (checked/unchecked) if more than one filter criteria is used.
10. “xFilter” – Remove the filter and show all bills or user table maintenance records. 11. “Reports” – Print reports based on the list of bills that is currently displayed. This should be utilized in
conjunction with the Sort, Filter, Today, Week, or Month buttons. There are four different bill of lading reports available.
13
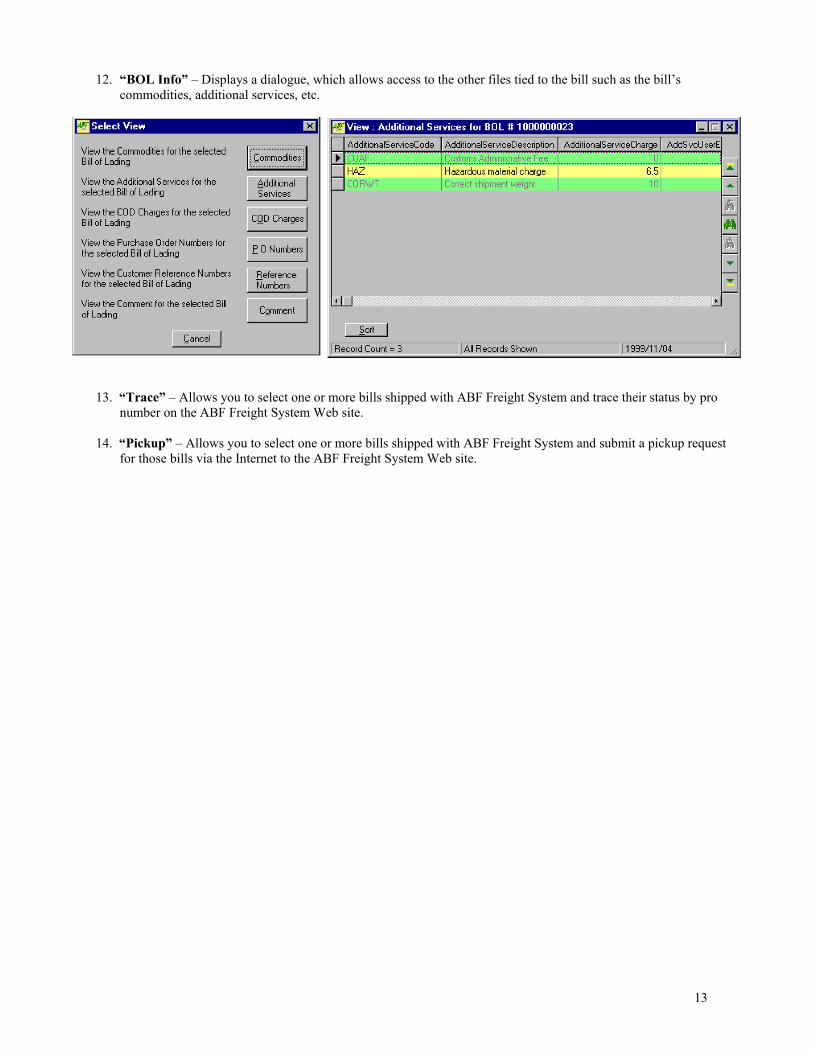
12. “BOL Info” – Displays a dialogue, which allows access to the other files tied to the bill such as the bill’s commodities, additional services, etc.
13. “Trace” – Allows you to select one or more bills shipped with ABF Freight System and trace their status by pro number on the ABF Freight System Web site.
14. “Pickup” – Allows you to select one or more bills shipped with ABF Freight System and submit a pickup request
for those bills via the Internet to the ABF Freight System Web site.
14
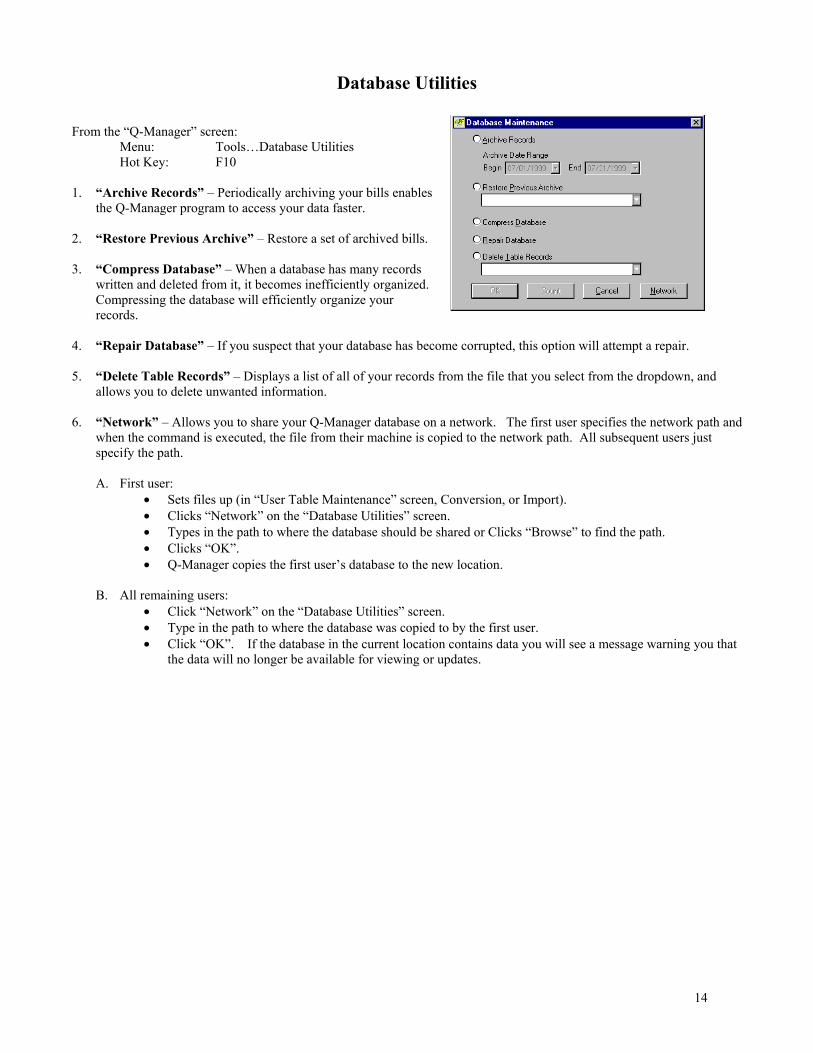
Database Utilities
From the “Q-Manager” screen:
Menu: Tools…Database Utilities Hot Key: F10
1. “Archive Records” – Periodically archiving your bills enables
the Q-Manager program to access your data faster.
2. “Restore Previous Archive” – Restore a set of archived bills.
3. “Compress Database” – When a database has many records written and deleted from it, it becomes inefficiently organized. Compressing the database will efficiently organize your records.
4. “Repair Database” – If you suspect that your database has become corrupted, this option will attempt a repair.
5. “Delete Table Records” – Displays a list of all of your records from the file that you select from the dropdown, and
allows you to delete unwanted information. 6. “Network” – Allows you to share your Q-Manager database on a network. The first user specifies the network path and
when the command is executed, the file from their machine is copied to the network path. All subsequent users just specify the path.
A. First user:
• Sets files up (in “User Table Maintenance” screen, Conversion, or Import). • Clicks “Network” on the “Database Utilities” screen. • Types in the path to where the database should be shared or Clicks “Browse” to find the path. • Clicks “OK”. • Q-Manager copies the first user’s database to the new location.
B. All remaining users:
• Click “Network” on the “Database Utilities” screen. • Type in the path to where the database was copied to by the first user. • Click “OK”. If the database in the current location contains data you will see a message warning you that
the data will no longer be available for viewing or updates.
15
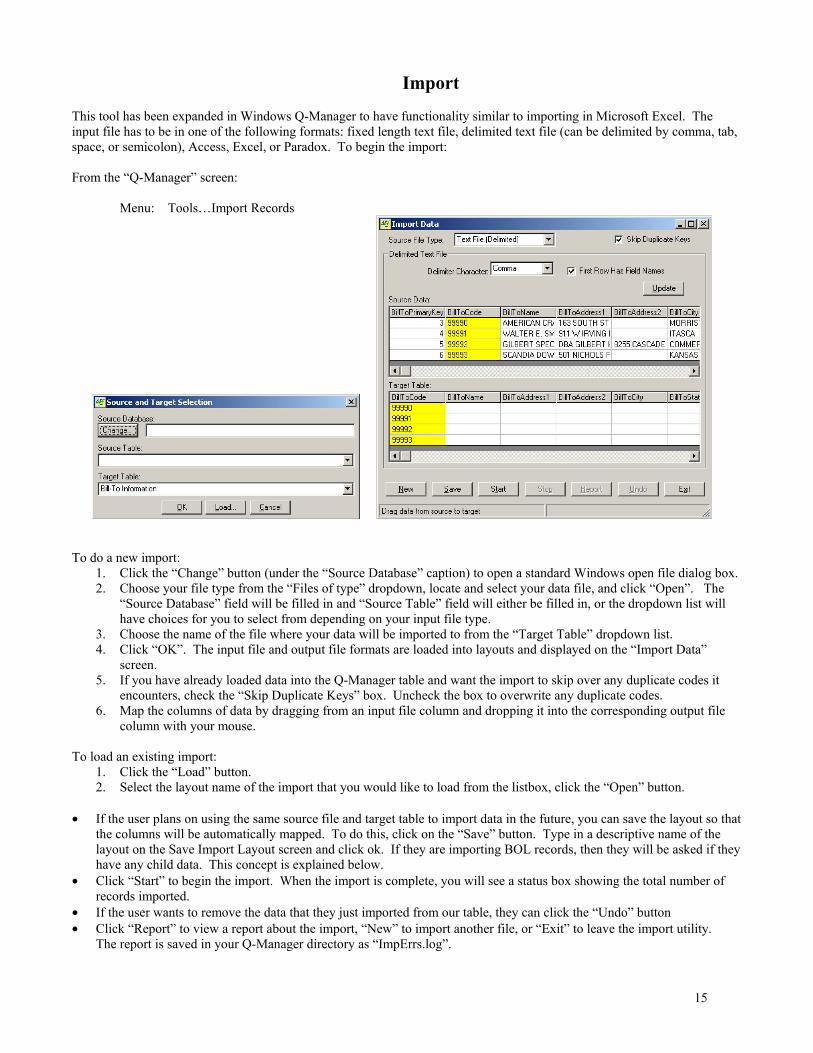
Import
This tool has been expanded in Windows Q-Manager to have functionality similar to importing in Microsoft Excel. The input file has to be in one of the following formats: fixed length text file, delimited text file (can be delimited by comma, tab, space, or semicolon), Access, Excel, or Paradox. To begin the import:
From the “Q-Manager” screen:
Menu: Tools…Import Records
To do a new import:
1. Click the “Change” button (under the “Source Database” caption) to open a standard Windows open file dialog box. 2. Choose your file type from the “Files of type” dropdown, locate and select your data file, and click “Open”. The
“Source Database” field will be filled in and “Source Table” field will either be filled in, or the dropdown list will have choices for you to select from depending on your input file type.
3. Choose the name of the file where your data will be imported to from the “Target Table” dropdown list. 4. Click “OK”. The input file and output file formats are loaded into layouts and displayed on the “Import Data”
screen. 5. If you have already loaded data into the Q-Manager table and want the import to skip over any duplicate codes it
encounters, check the “Skip Duplicate Keys” box. Uncheck the box to overwrite any duplicate codes. 6. Map the columns of data by dragging from an input file column and dropping it into the corresponding output file
column with your mouse.
To load an existing import: 1. Click the “Load” button. 2. Select the layout name of the import that you would like to load from the listbox, click the “Open” button.
• If the user plans on using the same source file and target table to import data in the future, you can save the layout so that
the columns will be automatically mapped. To do this, click on the “Save” button. Type in a descriptive name of the layout on the Save Import Layout screen and click ok. If they are importing BOL records, then they will be asked if they have any child data. This concept is explained below.
• Click “Start” to begin the import. When the import is complete, you will see a status box showing the total number of records imported.
• If the user wants to remove the data that they just imported from our table, they can click the “Undo” button • Click “Report” to view a report about the import, “New” to import another file, or “Exit” to leave the import utility.
The report is saved in your Q-Manager directory as “ImpErrs.log”.
16
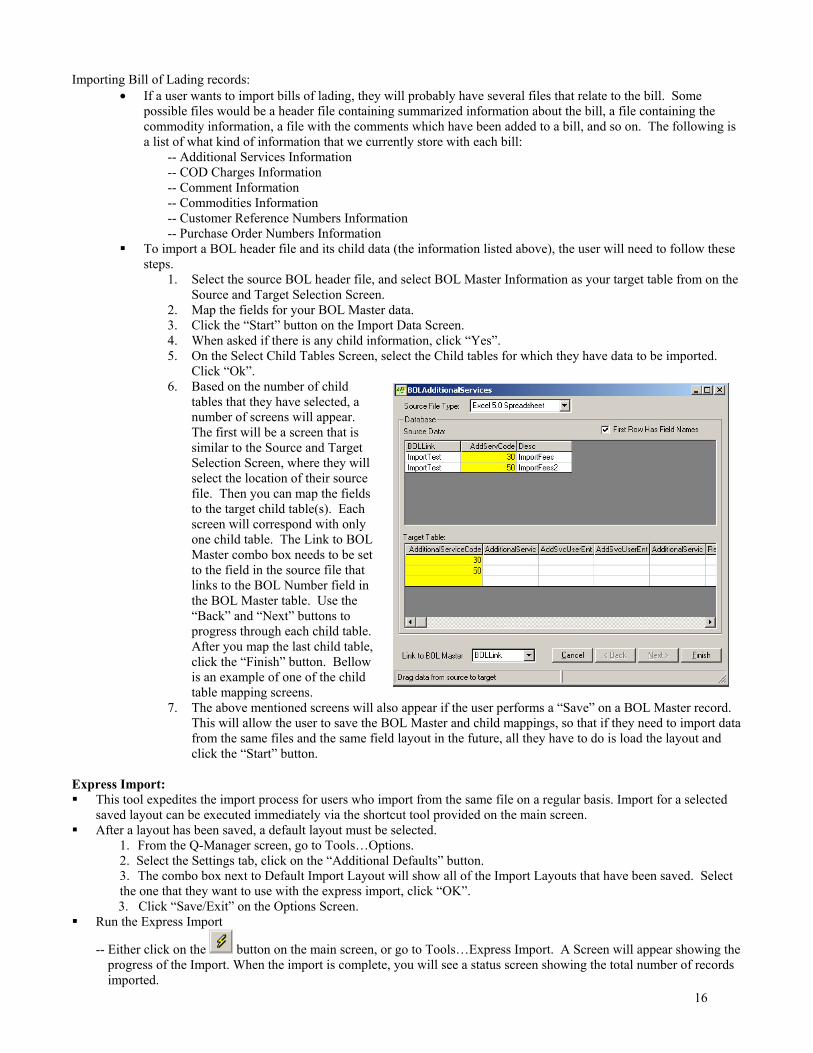
Importing Bill of Lading records: • If a user wants to import bills of lading, they will probably have several files that relate to the bill. Some
possible files would be a header file containing summarized information about the bill, a file containing the commodity information, a file with the comments which have been added to a bill, and so on. The following is a list of what kind of information that we currently store with each bill:
-- Additional Services Information -- COD Charges Information -- Comment Information -- Commodities Information -- Customer Reference Numbers Information -- Purchase Order Numbers Information
To import a BOL header file and its child data (the information listed above), the user will need to follow these steps.
1. Select the source BOL header file, and select BOL Master Information as your target table from on the Source and Target Selection Screen.
2. Map the fields for your BOL Master data. 3. Click the “Start” button on the Import Data Screen. 4. When asked if there is any child information, click “Yes”. 5. On the Select Child Tables Screen, select the Child tables for which they have data to be imported.
Click “Ok”. 6. Based on the number of child
tables that they have selected, a number of screens will appear. The first will be a screen that is similar to the Source and Target Selection Screen, where they will select the location of their source file. Then you can map the fields to the target child table(s). Each screen will correspond with only one child table. The Link to BOL Master combo box needs to be set to the field in the source file that links to the BOL Number field in the BOL Master table. Use the “Back” and “Next” buttons to progress through each child table. After you map the last child table, click the “Finish” button. Bellow is an example of one of the child table mapping screens.
7. The above mentioned screens will also appear if the user performs a “Save” on a BOL Master record. This will allow the user to save the BOL Master and child mappings, so that if they need to import data from the same files and the same field layout in the future, all they have to do is load the layout and click the “Start” button.
Express Import: This tool expedites the import process for users who import from the same file on a regular basis. Import for a selected
saved layout can be executed immediately via the shortcut tool provided on the main screen. After a layout has been saved, a default layout must be selected.
1. From the Q-Manager screen, go to Tools…Options. 2. Select the Settings tab, click on the “Additional Defaults” button. 3. The combo box next to Default Import Layout will show all of the Import Layouts that have been saved. Select
the one that they want to use with the express import, click “OK”. 3. Click “Save/Exit” on the Options Screen. Run the Express Import
-- Either click on the button on the main screen, or go to Tools…Express Import. A Screen will appear showing the progress of the Import. When the import is complete, you will see a status screen showing the total number of records imported.
17
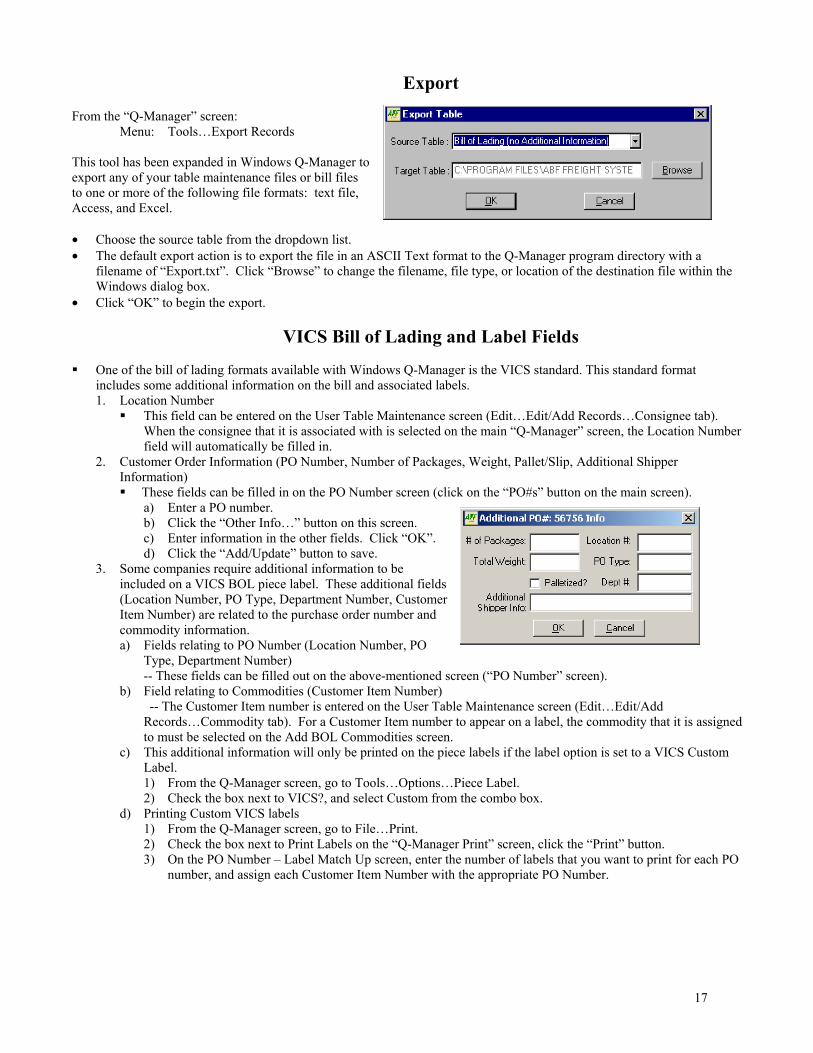
Export
From the “Q-Manager” screen: Menu: Tools…Export Records
This tool has been expanded in Windows Q-Manager to export any of your table maintenance files or bill files to one or more of the following file formats: text file, Access, and Excel. • Choose the source table from the dropdown list. • The default export action is to export the file in an ASCII Text format to the Q-Manager program directory with a
filename of “Export.txt”. Click “Browse” to change the filename, file type, or location of the destination file within the Windows dialog box.
• Click “OK” to begin the export.
VICS Bill of Lading and Label Fields One of the bill of lading formats available with Windows Q-Manager is the VICS standard. This standard format
includes some additional information on the bill and associated labels. 1. Location Number
This field can be entered on the User Table Maintenance screen (Edit…Edit/Add Records…Consignee tab). When the consignee that it is associated with is selected on the main “Q-Manager” screen, the Location Number field will automatically be filled in.
2. Customer Order Information (PO Number, Number of Packages, Weight, Pallet/Slip, Additional Shipper Information) These fields can be filled in on the PO Number screen (click on the “PO#s” button on the main screen).
a) Enter a PO number. b) Click the “Other Info…” button on this screen. c) Enter information in the other fields. Click “OK”. d) Click the “Add/Update” button to save.
3. Some companies require additional information to be included on a VICS BOL piece label. These additional fields (Location Number, PO Type, Department Number, Customer Item Number) are related to the purchase order number and commodity information. a) Fields relating to PO Number (Location Number, PO
Type, Department Number) -- These fields can be filled out on the above-mentioned screen (“PO Number” screen).
b) Field relating to Commodities (Customer Item Number) -- The Customer Item number is entered on the User Table Maintenance screen (Edit…Edit/Add
Records…Commodity tab). For a Customer Item number to appear on a label, the commodity that it is assigned to must be selected on the Add BOL Commodities screen.
c) This additional information will only be printed on the piece labels if the label option is set to a VICS Custom Label. 1) From the Q-Manager screen, go to Tools…Options…Piece Label. 2) Check the box next to VICS?, and select Custom from the combo box.
d) Printing Custom VICS labels 1) From the Q-Manager screen, go to File…Print. 2) Check the box next to Print Labels on the “Q-Manager Print” screen, click the “Print” button.
3) On the PO Number – Label Match Up screen, enter the number of labels that you want to print for each PO number, and assign each Customer Item Number with the appropriate PO Number.
18
PDF Creation • This feature allows the user to create a Bill of Lading in a PDF file format, based on an existing BOL. The PDF file can
be saved, which offers additional flexibility in the distribution options of the Bills of Lading.
• Requirements: 1. A PDF can only be created from a bill of lading that has been saved. 2. If a BOL has more than 5 commodities, only the first 5 will be shown on the PDF. 3. In order to view the PDF, they must have Adobe Acrobat Reader installed.
Creating a PDF
1. Create and save a BOL (or open an existing one).
2. Go to Tools…Create PDF (or click the button on the toolbar). An Internet browser will open with the PDF displayed. From this window, the file can be saved or printed.
Links
Web Links
From the “Q-Manager” screen: Menu: Web Links Link to your favorite ABF tool on ABF’s website. ABF Home Page
From the “Q-Manager” screen:
Toolbar Icon: Menu: Help…ABF Web
Connect to ABF’s home page on the internet. Q-Rate
From the “Q-Manager” screen:
Toolbar Icon:
Runs the Q-Rate program.
Email Q-Manager support personnel
From the “Q-Manager” screen:
Toolbar Icon:
Send an email to Q-Manager support personnel.
19
Electronic Bill of Lading (EBL) The Electronic Bill of Lading features are available on Q-Manager for Windows version 1.2.0 and greater. It allows the user to send/transmit their Bill of Lading directly to ABF via the Internet. The EBL feature is inactive until the user is provided with the necessary information to login. How it Works
When a BOL is created, the user will have the option of transmitting the bill by using the EBL. Once the BOL is transmitted, it will be marked as a CLOSED bill. For pickup, the user can choose to print either the BOL itself, or the trailer manifest to give to the ABF driver. Please note that Q-Manager will not automatically print a copy of the BOL when the transmission is completed.
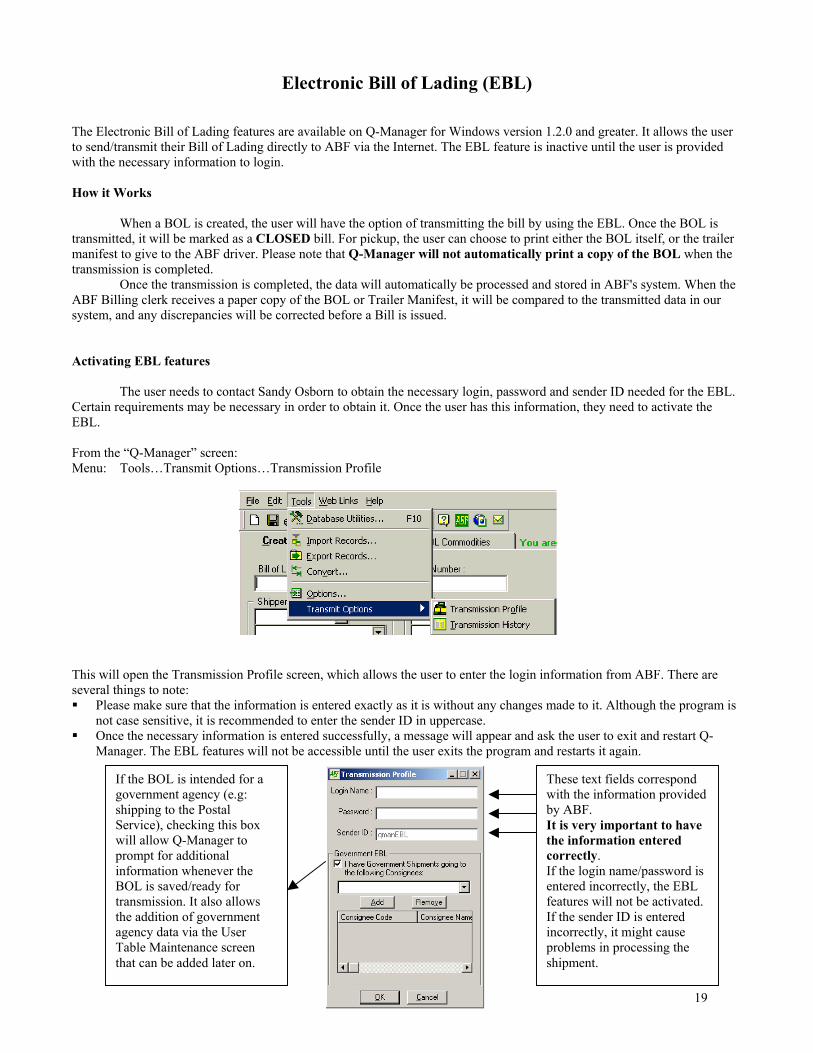
Once the transmission is completed, the data will automatically be processed and stored in ABF's system. When the ABF Billing clerk receives a paper copy of the BOL or Trailer Manifest, it will be compared to the transmitted data in our system, and any discrepancies will be corrected before a Bill is issued. Activating EBL features The user needs to contact Sandy Osborn to obtain the necessary login, password and sender ID needed for the EBL. Certain requirements may be necessary in order to obtain it. Once the user has this information, they need to activate the EBL. From the “Q-Manager” screen: Menu: Tools…Transmit Options…Transmission Profile
This will open the Transmission Profile screen, which allows the user to enter the login information from ABF. There are several things to note: Please make sure that the information is entered exactly as it is without any changes made to it. Although the program is
not case sensitive, it is recommended to enter the sender ID in uppercase. Once the necessary information is entered successfully, a message will appear and ask the user to exit and restart Q-
Manager. The EBL features will not be accessible until the user exits the program and restarts it again.
These text fields correspond with the information provided by ABF. It is very important to have the information entered correctly. If the login name/password is entered incorrectly, the EBL features will not be activated.If the sender ID is entered incorrectly, it might cause problems in processing the shipment.
If the BOL is intended for a government agency (e.g: shipping to the Postal Service), checking this box will allow Q-Manager to prompt for additional information whenever the BOL is saved/ready for transmission. It also allows the addition of government agency data via the User Table Maintenance screen that can be added later on.
20
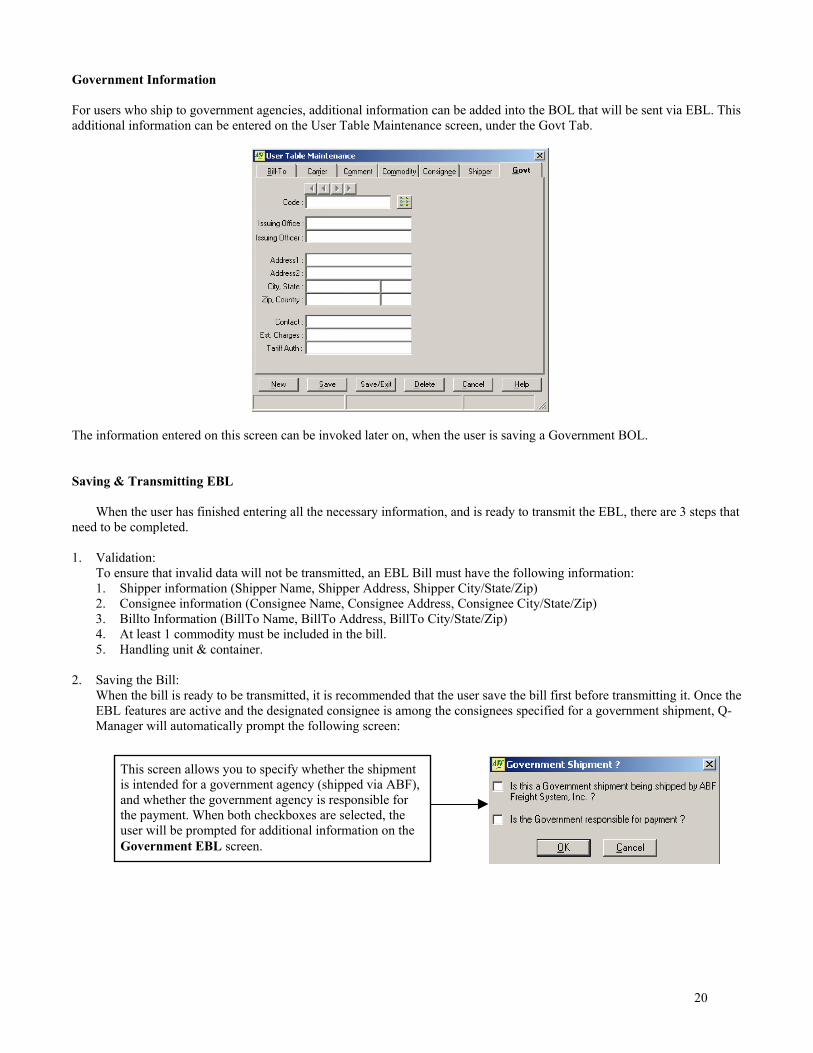
Government Information For users who ship to government agencies, additional information can be added into the BOL that will be sent via EBL. This additional information can be entered on the User Table Maintenance screen, under the Govt Tab.
The information entered on this screen can be invoked later on, when the user is saving a Government BOL. Saving & Transmitting EBL
When the user has finished entering all the necessary information, and is ready to transmit the EBL, there are 3 steps that need to be completed. 1. Validation:
To ensure that invalid data will not be transmitted, an EBL Bill must have the following information: 1. Shipper information (Shipper Name, Shipper Address, Shipper City/State/Zip) 2. Consignee information (Consignee Name, Consignee Address, Consignee City/State/Zip) 3. Billto Information (BillTo Name, BillTo Address, BillTo City/State/Zip) 4. At least 1 commodity must be included in the bill. 5. Handling unit & container.
2. Saving the Bill:
When the bill is ready to be transmitted, it is recommended that the user save the bill first before transmitting it. Once the EBL features are active and the designated consignee is among the consignees specified for a government shipment, Q-Manager will automatically prompt the following screen:
This screen allows you to specify whether the shipment is intended for a government agency (shipped via ABF), and whether the government agency is responsible for the payment. When both checkboxes are selected, the user will be prompted for additional information on the Government EBL screen.
21
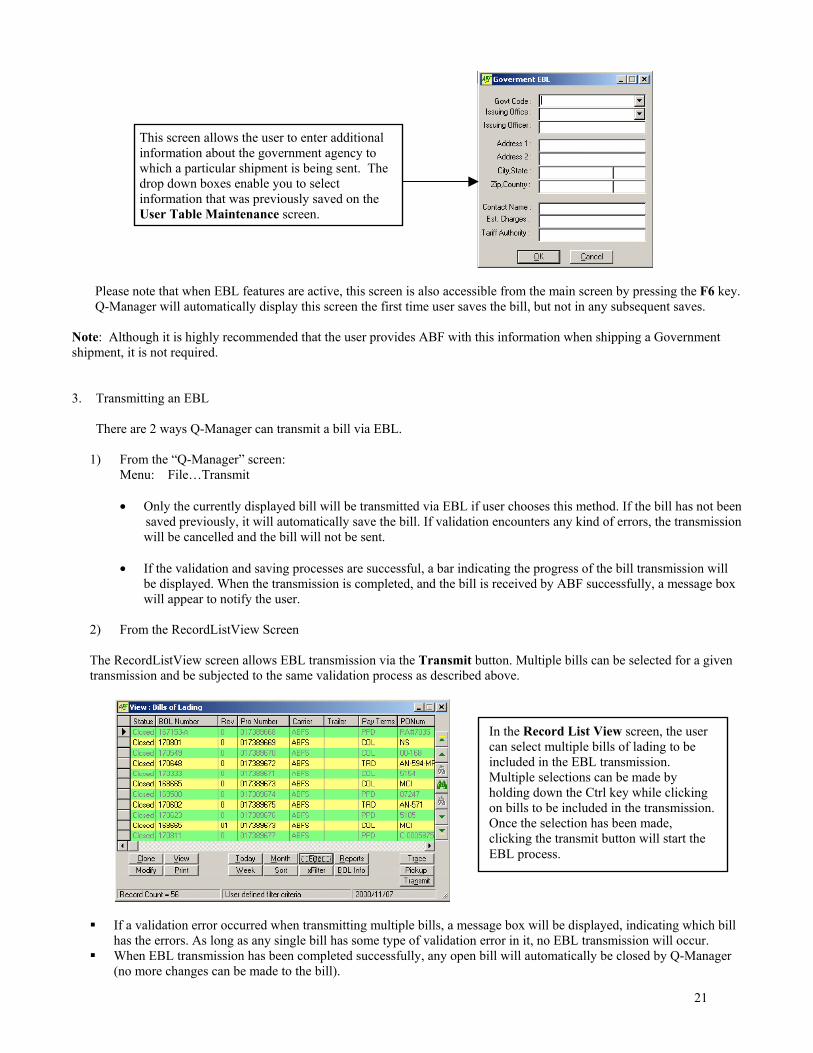
Please note that when EBL features are active, this screen is also accessible from the main screen by pressing the F6 key. Q-Manager will automatically display this screen the first time user saves the bill, but not in any subsequent saves. Note: Although it is highly recommended that the user provides ABF with this information when shipping a Government shipment, it is not required. 3. Transmitting an EBL
There are 2 ways Q-Manager can transmit a bill via EBL.
1) From the “Q-Manager” screen: Menu: File…Transmit
• Only the currently displayed bill will be transmitted via EBL if user chooses this method. If the bill has not been
saved previously, it will automatically save the bill. If validation encounters any kind of errors, the transmission will be cancelled and the bill will not be sent.
• If the validation and saving processes are successful, a bar indicating the progress of the bill transmission will
be displayed. When the transmission is completed, and the bill is received by ABF successfully, a message box will appear to notify the user.
2) From the RecordListView Screen The RecordListView screen allows EBL transmission via the Transmit button. Multiple bills can be selected for a given transmission and be subjected to the same validation process as described above.
If a validation error occurred when transmitting multiple bills, a message box will be displayed, indicating which bill
has the errors. As long as any single bill has some type of validation error in it, no EBL transmission will occur. When EBL transmission has been completed successfully, any open bill will automatically be closed by Q-Manager
(no more changes can be made to the bill).
This screen allows the user to enter additional information about the government agency to which a particular shipment is being sent. The drop down boxes enable you to select information that was previously saved on the User Table Maintenance screen.
In the Record List View screen, the user can select multiple bills of lading to be included in the EBL transmission. Multiple selections can be made by holding down the Ctrl key while clicking on bills to be included in the transmission. Once the selection has been made, clicking the transmit button will start the EBL process.
22
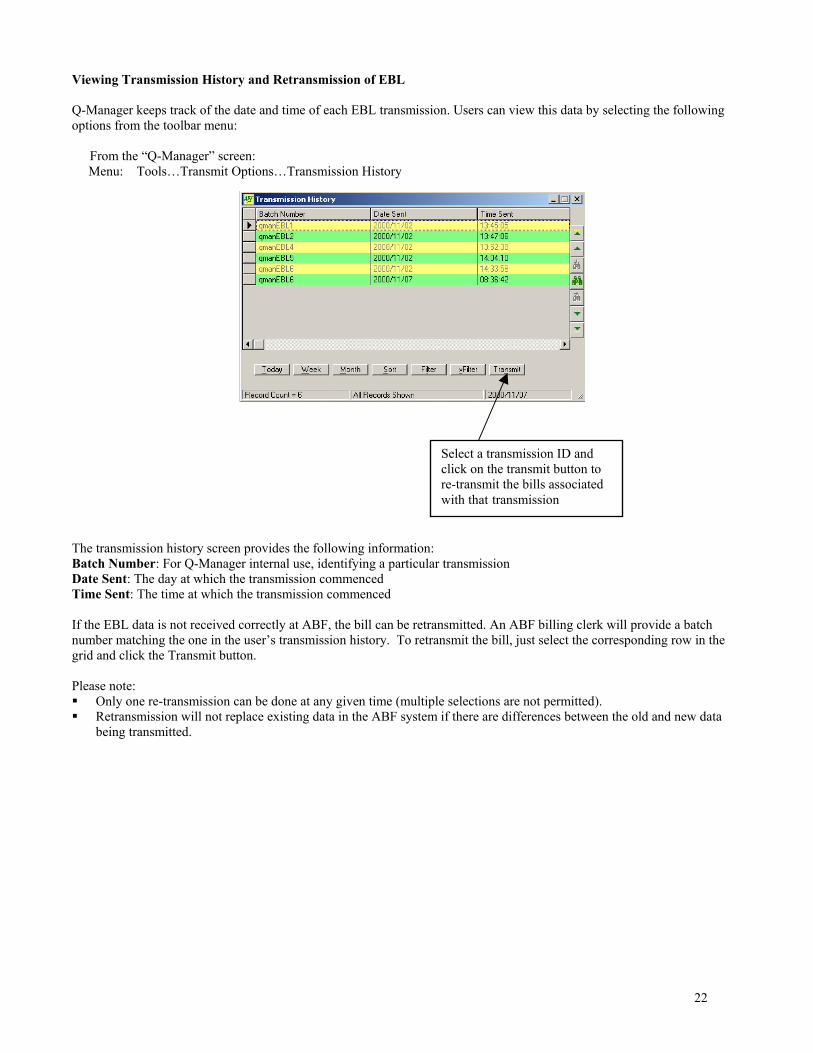
Viewing Transmission History and Retransmission of EBL Q-Manager keeps track of the date and time of each EBL transmission. Users can view this data by selecting the following options from the toolbar menu:
From the “Q-Manager” screen: Menu: Tools…Transmit Options…Transmission History
The transmission history screen provides the following information: Batch Number: For Q-Manager internal use, identifying a particular transmission Date Sent: The day at which the transmission commenced Time Sent: The time at which the transmission commenced If the EBL data is not received correctly at ABF, the bill can be retransmitted. An ABF billing clerk will provide a batch number matching the one in the user’s transmission history. To retransmit the bill, just select the corresponding row in the grid and click the Transmit button. Please note: Only one re-transmission can be done at any given time (multiple selections are not permitted). Retransmission will not replace existing data in the ABF system if there are differences between the old and new data
being transmitted.
Select a transmission ID and click on the transmit button to re-transmit the bills associated with that transmission