Embed Size (px)
DESCRIPTION
A document which is a guide on the Standard processes on Quality Center
Citation preview
Quality Center – Standard Processes and Templates
Quality Center Standard Processes and Templates
- 1 -
Quality Center – Standard Processes and Templates
CONTENTS
1 INTRODUCTION.......................................................................................................7
1.1 Purpose................................................................................................................................................................7
1.2 Objectives............................................................................................................................................................7
1.3 Scope....................................................................................................................................................................7
1.4 Approach.............................................................................................................................................................7
1.5 Quality Center Workflows...............................................................................................................................8
1.6 Quality Center Relationships.........................................................................................................................9
1.7 Acronyms and abbreviations.......................................................................................................................10
2 SYSTEM CONFIGURATION...................................................................................11
2.1 Version Control................................................................................................................................................11
2.2 Naming Conventions......................................................................................................................................11
2.3 User Registration............................................................................................................................................11
2.4 Quality Center Naming Conventions.........................................................................................................11
2.5 Terminology......................................................................................................................................................11
2.6 Quality Center Repository Registration....................................................................................................13
2.7 Access Levels..................................................................................................................................................14
3 RELEASES FUNCTION..........................................................................................16
3.1 Releases – Workflow Process.....................................................................................................................16
3.2 Roles and Responsibilities...........................................................................................................................16
3.3 Setting up a Release Folder.........................................................................................................................17
3.4 Release Details Screen..................................................................................................................................18
3.5 Cycles Details Screen....................................................................................................................................20
3.6 Major ‘Releases’ to Live................................................................................................................................21
4 REQUIREMENTS....................................................................................................22
4.1 Requirements Workflow Process...............................................................................................................22
4.2 Roles and Responsibilities...........................................................................................................................22
4.3 Requirement Types.........................................................................................................................................22
4.4 Importing Requirements................................................................................................................................23
4.5 Requirements Folders & Grouping............................................................................................................23
- 2 -
Quality Center – Standard Processes and Templates
4.6 Creating Requirements Folders & Grouping...........................................................................................23
4.7 Requirements Details Screen (Manual).....................................................................................................24
4.8 Requirements Grid..........................................................................................................................................26
4.9 Requirements Traceability – Relationships.............................................................................................26
4.10 Test Coverage..................................................................................................................................................27
4.11 Risk Based Testing – Overview...................................................................................................................28
4.12 Risk Based Testing – Business Criticality...............................................................................................28
4.13 Risk Based Testing – Failure Probability..................................................................................................29
4.14 Risk Based Testing – Analyse results.......................................................................................................30
4.15 Requirements Details – Linked Defects....................................................................................................31
4.16 Requirements Review Process...................................................................................................................31
5 TEST PLAN.............................................................................................................33
5.1 Test Plan Workflow Process........................................................................................................................33
5.2 Roles and Responsibilities...........................................................................................................................33
5.3 Test Cycles & Roles........................................................................................................................................34
5.4 Test Plan – Create Test Folders..................................................................................................................34
5.5 Test Plan – Test Details Screen...................................................................................................................35
5.6 Test Plan – Test Grid......................................................................................................................................36
5.7 Test Plan - Test Case Design.......................................................................................................................36
5.8 Test Plan – Test Case Requirements Coverage.....................................................................................36
5.9 Test Plan – Test Case Linked Defects.......................................................................................................37
6 TEST LAB...............................................................................................................38
6.1 Roles & Responsibilities...............................................................................................................................38
6.2 Test Set Details................................................................................................................................................38
6.3 Test Set Execution Grid.................................................................................................................................39
6.4 Test Run – Execution Flow...........................................................................................................................39
6.5 Test Run – Manual Runner...........................................................................................................................40
6.6 Test Run – Manual Runner- Run Sets........................................................................................................41
6.7 Submit a Defect from a manual run............................................................................................................41
6.8 Test Set - Linked Defects..............................................................................................................................43
7 DEFECTS................................................................................................................44
- 3 -
Quality Center – Standard Processes and Templates
7.1 Defects Workflow Process............................................................................................................................44
7.2 Roles and Responsibilities...........................................................................................................................44
7.3 Add New Defect...............................................................................................................................................44
7.4 Defect Details Screen.....................................................................................................................................45
7.5 Defect Grid........................................................................................................................................................48
7.6 Business Impact..............................................................................................................................................48
7.7 Defect Status & Flow......................................................................................................................................49
7.8 Defect Process Flow Diagram......................................................................................................................51
7.9 Defect Category...............................................................................................................................................52
7.10 Document Defect Type..................................................................................................................................53
7.11 Fix Priority.........................................................................................................................................................54
7.12 Linked Entities.................................................................................................................................................54
8 E-MAIL NOTIFICATIONS.......................................................................................55
8.1 Manual E-mail Notification............................................................................................................................55
8.2 Automated E-mail Notification.........................................................................................................................55
- 4 -
Quality Center – Standard Processes and Templates
1 Introduction
1.1 Purpose
This document will help Global Testing Services define the use of the Quality Center throughout GRCB by proposing standard processes and templates to end-users. Once these processes and templates are agreed among the testing community, these will be rolled out to Quality Center and every change in the processes and / or templates will be controlled by Governance.
1.2 Objectives
The objective of the Quality Center implementation and specifically this document is to gain agreement from all stakeholders on the standard processes and templates to be implemented in Quality Center moving forwards. In setting a global standard GTS are looking to increase the quality of the testing process and to drive forward best practices. Currently, the main focus of testing and the use of Test Director within that process are to capture and manage defects; however the implementation of Quality Center and common standards will offer the opportunity to expand this focus more widely and drive full usage of the Quality Center functionality.
1.3 Scope
Within ScopeThe scope of the document is to explain and detail the functionality and field configurations that are to be set up within the new implementation of Quality Center. Within scope of this document are the areas of functionality that are used on a day to day basis;
Releases (& Cycles) Requirements Test Plan Test Lab Defects
Additionally the document provides information on some functionality that is available within Quality Center and as such will be configured during this implementation but isn’t currently used within the Barclays framework; Risk based testing and business component testing being two of these.
Out of ScopeSet up and configuration of users, infrastructures, databases, domains and projects is outside the scope of this document and as such is detailed within the Quality Centre user & system administration process
Quality Center reporting and metrics are defined and documented within the QC Delivery Dashboard document.
1.4 Approach
The approach taken in creating this document has been to present the reader with an understanding and feel for Quality Center together with additional supporting information relevant to the application and usage. To meet this purpose, the document presents a mixture of high level processes, screen shots together with some more detailed data and field definitions to support the final technical deployment. It should be noted that this document is focused on an end to end development cycle and does not in this version cover Fast track projects, Agile or Lean developments.
- 5 -
Quality Center – Standard Processes and Templates
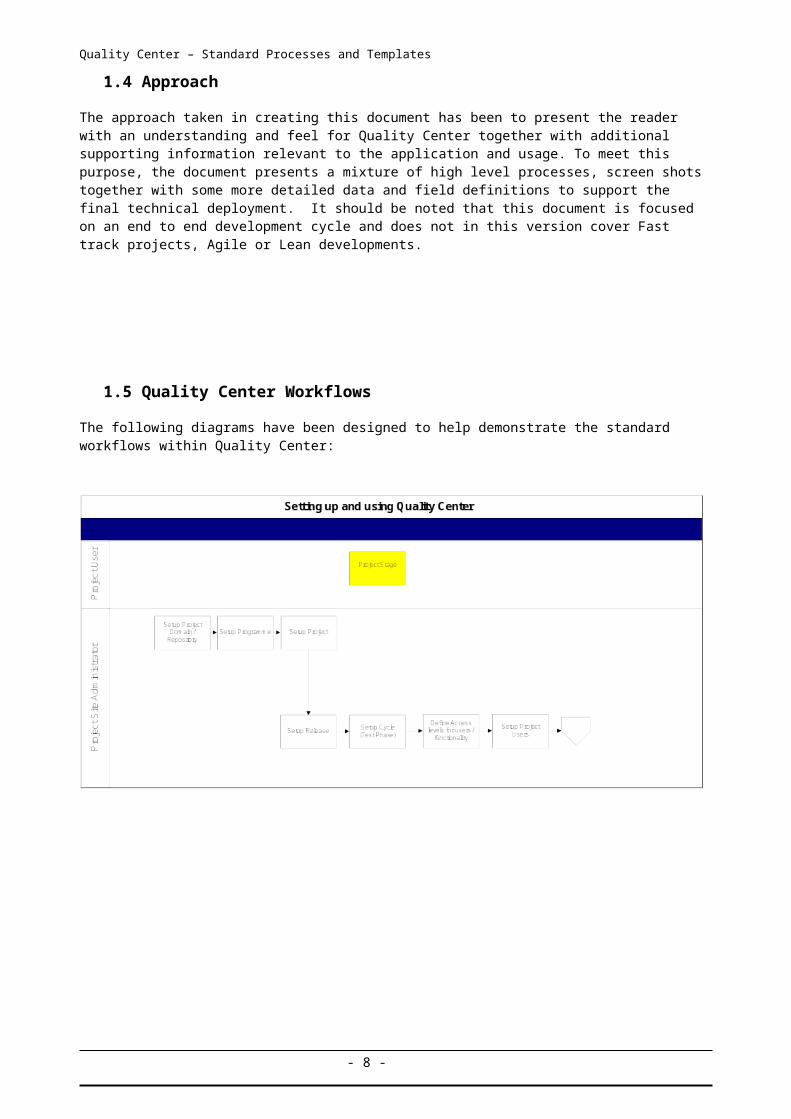
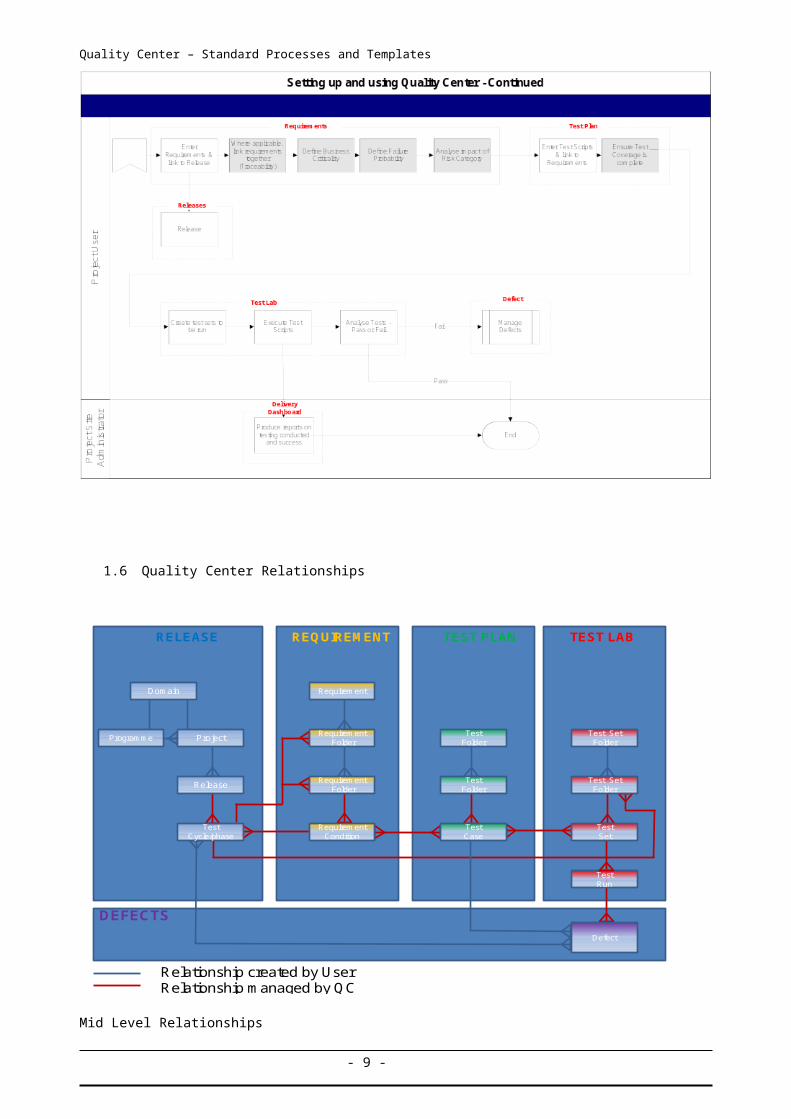
1.5 Quality Center Workflows
The following diagrams have been designed to help demonstrate the standard workflows within Quality Center:
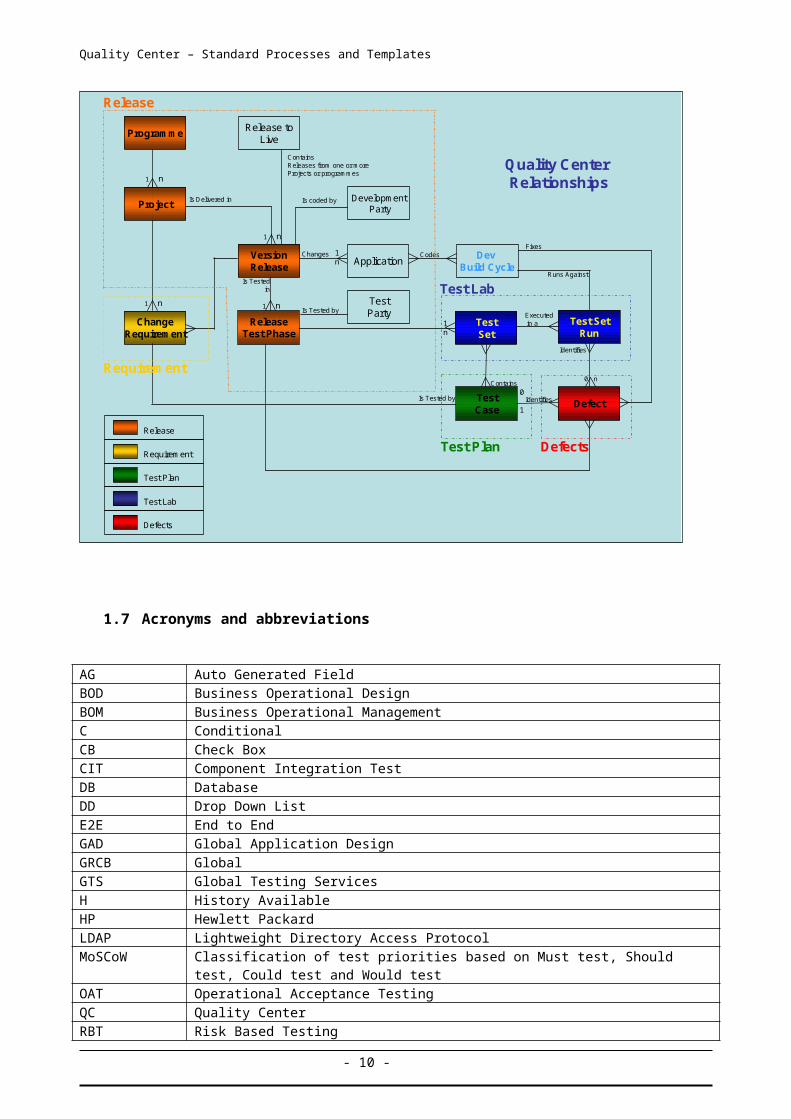
1.6 Quality Center Relationships
- 6 -
Quality Center – Standard Processes and Templates
Domain R equirement
P rogramme
R equirement C ondition
T est S etF older
T est S etF older
T estF older
T estF older
R equirementF older
R equirementF older
R elease
P roject
R E L E AS E R E QUIR E ME NT TE S T P L AN TE S T L AB
T estC ase
DE F E C T S
Relationship managed by QCRelationship created by User
T estS et
T estR un
T est C ycle/phase
Defect
Mid Level Relationships
ChangeRequirement
Dev Build Cycle
Application
ProgrammeRelease to
Live
TestParty
1n
Changes CodesFixes
Identifies
Runs Against
Contains0 n
Is Tested by Identifies
Executedin a
Requirement
Release
Test Plan
Test Lab
Defects
Is Delivered in
ContainsReleases from one or more Projects or programmes
DevelopmentParty
Is coded by
Is Tested by
Release
Test Lab
Test Plan Defects
Quality CenterRelationships
Project
Requirement
1 n
1 n
1 n
VersionRelease
TestCase
Test SetRun
1 n
Is Testedin
TestSet
1n
0
1
ReleaseTest Phase
Defect
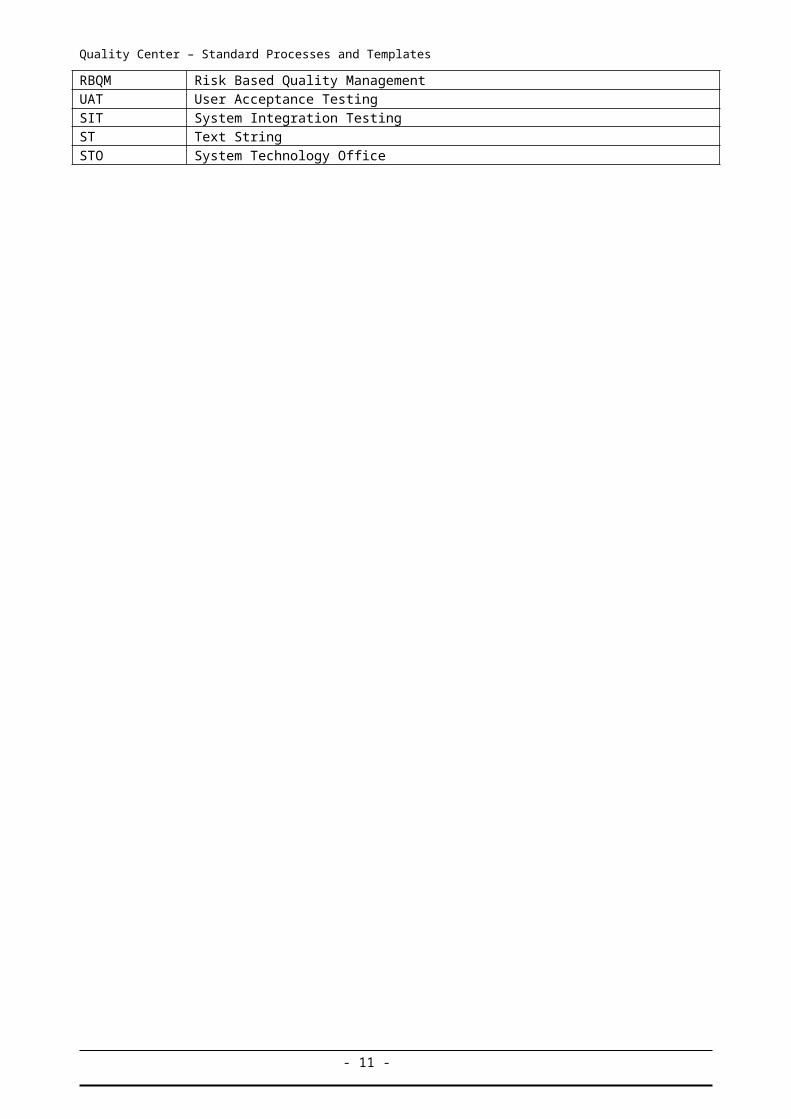
1.7 Acronyms and abbreviations
- 7 -
Quality Center – Standard Processes and Templates
AG Auto Generated FieldBOD Business Operational DesignBOM Business Operational Management C ConditionalCB Check BoxCIT Component Integration TestDB DatabaseDD Drop Down ListE2E End to EndGAD Global Application DesignGRCB Global GTS Global Testing ServicesH History AvailableHP Hewlett PackardLDAP Lightweight Directory Access ProtocolMoSCoW Classification of test priorities based on Must test, Should test, Could test and Would
testOAT Operational Acceptance TestingQC Quality CenterRBT Risk Based TestingRBQM Risk Based Quality ManagementUAT User Acceptance TestingSIT System Integration TestingST Text StringSTO System Technology Office
- 8 -
Quality Center – Standard Processes and Templates
2 System Configuration
1.8 Version Control
It will be possible in the future to configure Quality Center to use version control. This is done by selecting one of the available version control add-ins and installing it. After you integrate Requisite Pro with Quality Center, you will then be able to create a version control enabled project in Quality Center. You can then update and revise your tests, while maintaining previous versions of each test. This allows you to keep track of the changes made to each test in your Quality Center project, to see how and when a test was modified, or to return to a previous version of the test
1.9 Naming Conventions
The following naming conventions and criteria will be applied to the system and must be adhered to moving forwards.
1.10 User Registration
A users QC log on will conform to their PC and network logon.E.g. For BDS+ which is formatted: y00021089, y00022026, etc. Other standards may vary. It is intended that LDAP will be introduced and used in the near future with this application and therefore will be supported by this approach.
Where LDAP is available then the password will default to the users network password Where LDAP is not available then the system administrator will advise the user of their password
Note: It is intended that LDAP will be introduced and used in the near future with this application.
1.11 Quality Center Naming Conventions
Throughout this document you will see the naming conventions detailed in the following table used. It is acknowledged that the use of some of these fields may not be consistent with the understanding and common usage of that name by users of the system. Therefore we have provided a definition for each name in the context that must be presently used in QC. It is the intention that these be reviewed and agreement reached on the final usage.
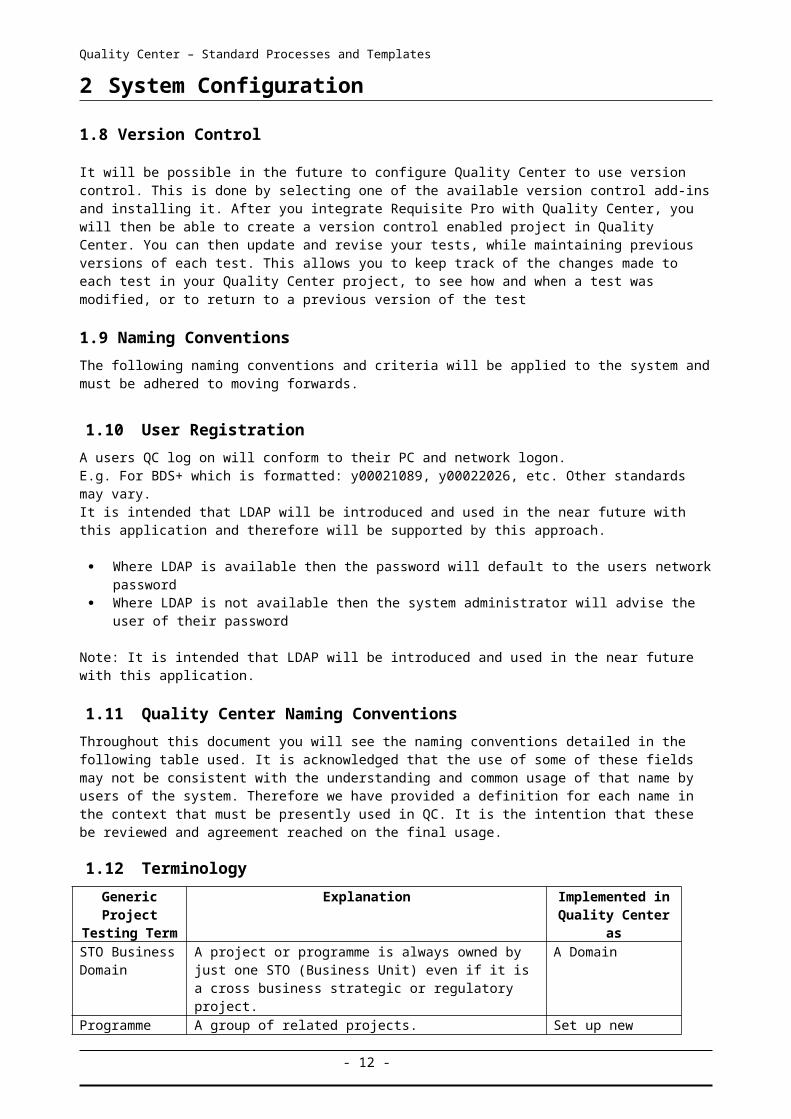
1.12 Terminology
Generic Project Testing Term
Explanation Implemented in Quality Center as
STO Business Domain
A project or programme is always owned by just one STO (Business Unit) even if it is a cross business strategic or regulatory project.
A Domain
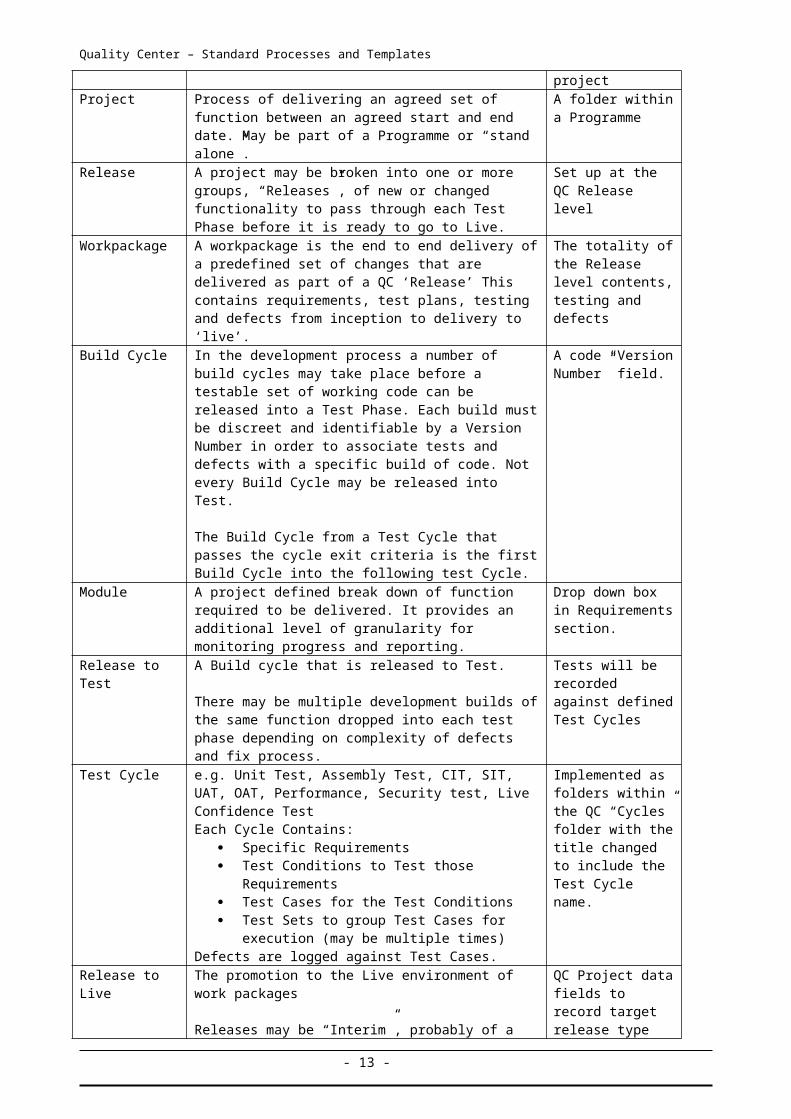
Programme A group of related projects. Set up new projectProject Process of delivering an agreed set of function between
an agreed start and end date. May be part of a Programme or “stand alone”.
A folder within a Programme
Release A project may be broken into one or more groups, “Releases”, of new or changed functionality to pass through each Test Phase before it is ready to go to Live.
Set up at the QC Release level
Workpackage A workpackage is the end to end delivery of a predefined set of changes that are delivered as part of a QC ‘Release’ This contains requirements, test plans, testing and defects from inception to delivery to ‘live’.
The totality of the Release level contents, testing and defects
Build Cycle In the development process a number of build cycles may take place before a testable set of working code can be released into a Test Phase. Each build must be discreet and identifiable by a Version Number in order to associate tests and defects with a specific build of code. Not every Build Cycle may be released into Test.
The Build Cycle from a Test Cycle that passes the cycle exit criteria is the first Build Cycle into the following test
A code “Version Number” field.
- 9 -
Quality Center – Standard Processes and Templates
Cycle.Module A project defined break down of function required to be
delivered. It provides an additional level of granularity for monitoring progress and reporting.
Drop down box in Requirements section.
Release to Test A Build cycle that is released to Test.
There may be multiple development builds of the same function dropped into each test phase depending on complexity of defects and fix process.
Tests will be recorded against defined Test Cycles
Test Cycle e.g. Unit Test, Assembly Test, CIT, SIT, UAT, OAT, Performance, Security test, Live Confidence TestEach Cycle Contains:
Specific Requirements Test Conditions to Test those Requirements Test Cases for the Test Conditions Test Sets to group Test Cases for execution (may
be multiple times)Defects are logged against Test Cases.
Implemented as folders within the QC “Cycles” folder with the title changed to include the Test Cycle name.
Release to Live The promotion to the Live environment of work packages
Releases may be “Interim”, probably of a single project being promoted to Live independently of a Major Release.
Releases may be “Major” – containing a number of workpackages from different Programmes or Projects – e.g. A Quarterly Release.
In this instance they may combine workpackages from across a number of business areas / STOs – but are “owned” by a single STO.
QC Project data fields to record target release type and date.
Test Case A description of inputs, execution instructions, and expected results, which are created for the purpose of determining whether a specific software features work correctly or a specific requirement has been satisfied
Defined as a Test Case within the Test plan function
Test Script The step-by-step instructions that realise a test, enabling its execution. Test scripts may take the form of either documented textual instructions that are executed manually or computer readable instructions for automated test execution.
Defined within the Test plan function
- 10 -
Quality Center – Standard Processes and Templates
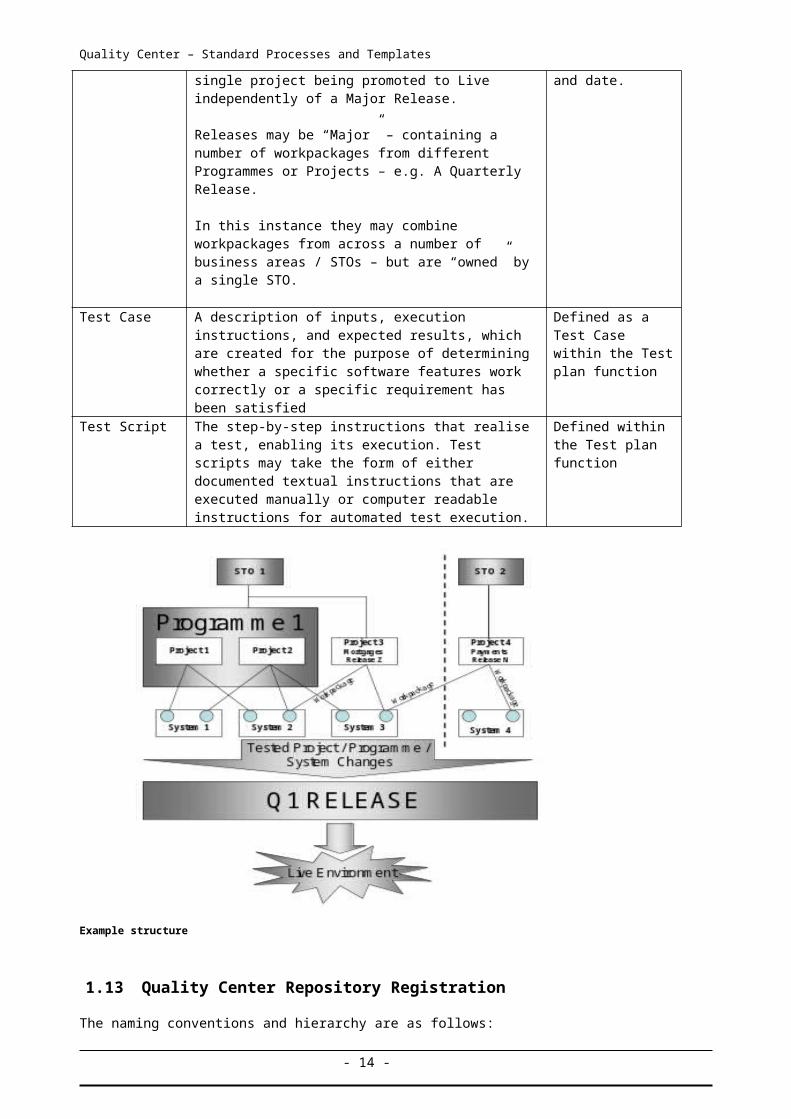
Example structure
1.13 Quality Center Repository Registration
The naming conventions and hierarchy are as follows:
For the repository: <Domain>_<Programme>_db
Domain = STO Name, 6 characters maximum.
All existing STO’s will have a Domain set up using their name in accordance with the field restrictions. New Domains may be set up by the system administrator upon receipt of a formal request.
Programme = Agreed Programme Name, 15 characters maximum
Programmes will be set up by the system administrator at the request of the respective STO and assigned to the relevant domain.
For Example: UKRB_GPU_db
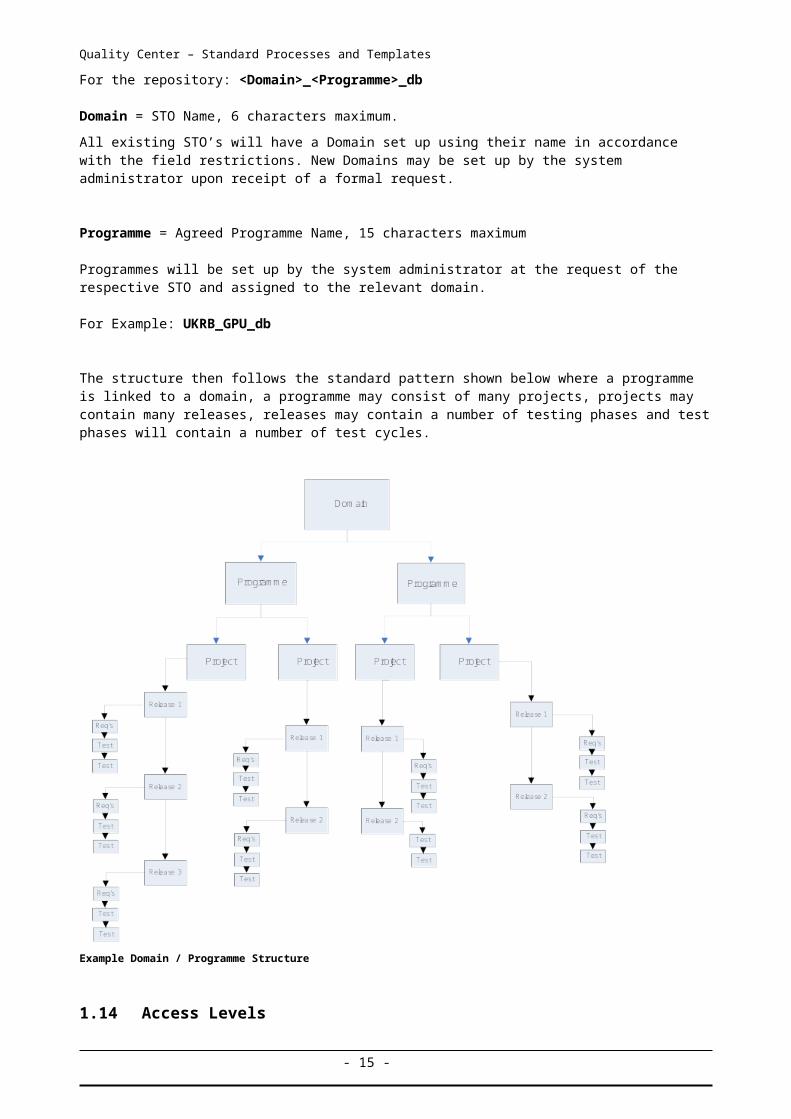
The structure then follows the standard pattern shown below where a programme is linked to a domain, a programme may consist of many projects, projects may contain many releases, releases may contain a number of testing phases and test phases will contain a number of test cycles.
- 11 -
Quality Center – Standard Processes and Templates
Example Domain / Programme Structure
1.14 Access Levels
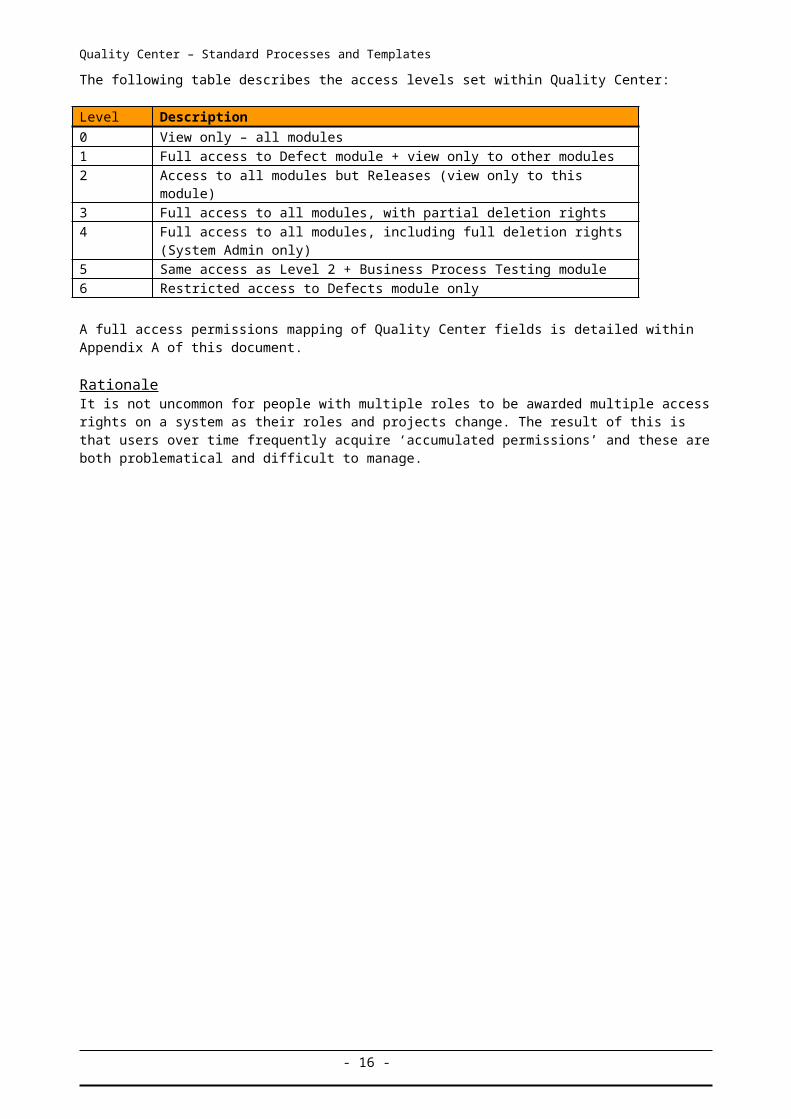
The following table describes the access levels set within Quality Center:
Level Description0 View only – all modules1 Full access to Defect module + view only to other modules2 Access to all modules but Releases (view only to this module) 3 Full access to all modules, with partial deletion rights4 Full access to all modules, including full deletion rights (System Admin only)5 Same access as Level 2 + Business Process Testing module6 Restricted access to Defects module only
A full access permissions mapping of Quality Center fields is detailed within Appendix A of this document.
RationaleIt is not uncommon for people with multiple roles to be awarded multiple access rights on a system as their roles and projects change. The result of this is that users over time frequently acquire ‘accumulated permissions’ and these are both problematical and difficult to manage.
- 12 -
Quality Center – Standard Processes and Templates
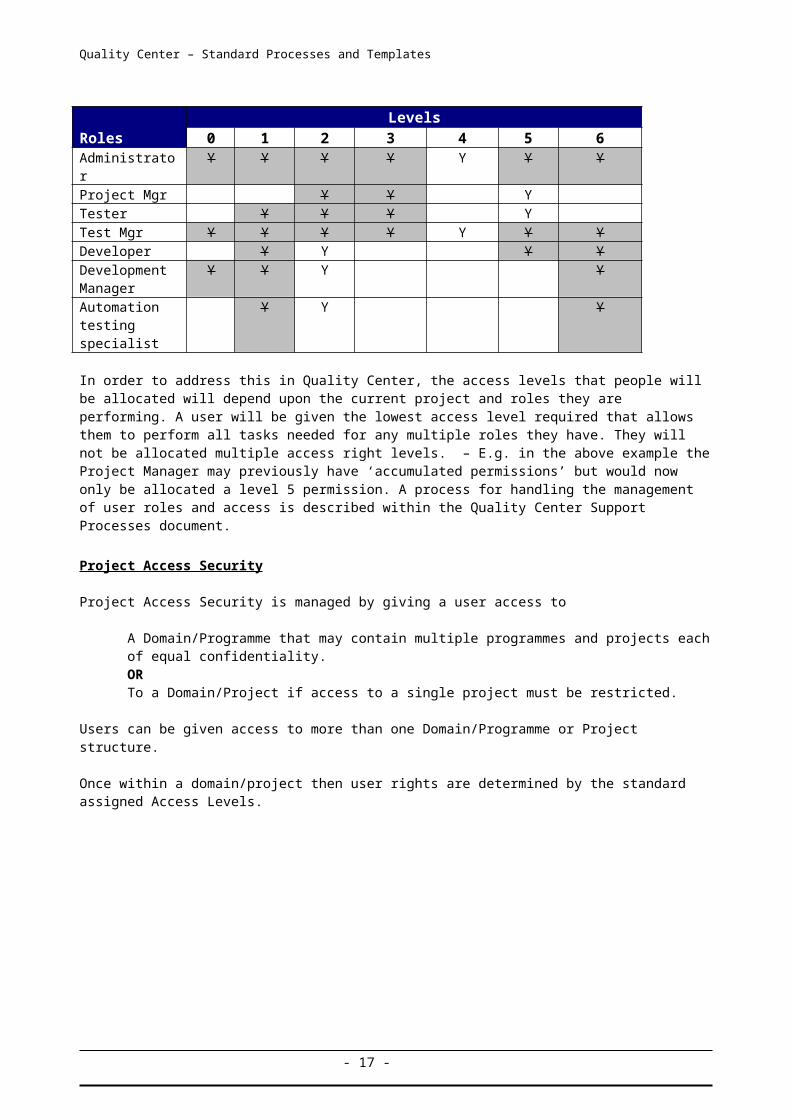
RolesLevels
0 1 2 3 4 5 6Administrator Y Y Y Y Y Y YProject Mgr Y Y YTester Y Y Y YTest Mgr Y Y Y Y Y Y YDeveloper Y Y Y YDevelopment Manager
Y Y Y Y
Automation testing specialist
Y Y Y
In order to address this in Quality Center, the access levels that people will be allocated will depend upon the current project and roles they are performing. A user will be given the lowest access level required that allows them to perform all tasks needed for any multiple roles they have. They will not be allocated multiple access right levels. – E.g. in the above example the Project Manager may previously have ‘accumulated permissions’ but would now only be allocated a level 5 permission. A process for handling the management of user roles and access is described within the Quality Center Support Processes document.
Project Access Security
Project Access Security is managed by giving a user access to
A Domain/Programme that may contain multiple programmes and projects each of equal confidentiality. ORTo a Domain/Project if access to a single project must be restricted.
Users can be given access to more than one Domain/Programme or Project structure.
Once within a domain/project then user rights are determined by the standard assigned Access Levels.
- 13 -
Quality Center – Standard Processes and Templates
3 RELEASES Function
1.15 Releases – Workflow Process
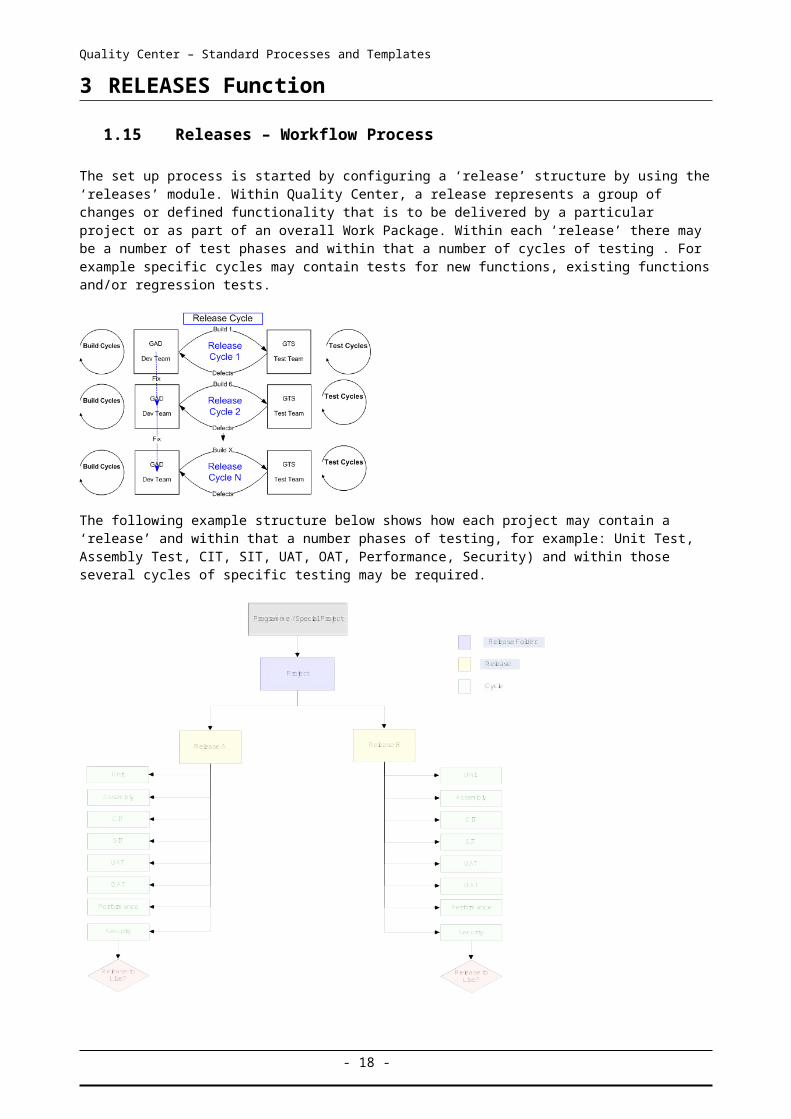
The set up process is started by configuring a ‘release’ structure by using the ‘releases’ module. Within Quality Center, a release represents a group of changes or defined functionality that is to be delivered by a particular project or as part of an overall Work Package. Within each ‘release’ there may be a number of test phases and within that a number of cycles of testing . For example specific cycles may contain tests for new functions, existing functions and/or regression tests.
The following example structure below shows how each project may contain a ‘release’ and within that a number phases of testing, for example: Unit Test, Assembly Test, CIT, SIT, UAT, OAT, Performance, Security) and within those several cycles of specific testing may be required.
1.16 Roles and Responsibilities
The release name will be defined within Quality Center by the Test Manager in association with the programme management and development teams and will conform to the naming conventions detailed within section 2.1 – Naming Conventions.
- 14 -
Quality Center – Standard Processes and Templates
The project “Test Strategy” document will state how the project will be tested including which Test Phases are required and how they are conducted. QC set up should conform to either the global standard or whatever variation has been agreed and signed off in the Strategy document.
The Test Manager is responsible for identifying and agreeing the test phases required for each Release and for ensuring that these are added to the applicable release The QC “Cycles” folders must be created to include the appropriate Test Phase name.
. Common Release Functions
Level Add Release
Modify Release
Delete Release
Add Release folder
Delete Release folder
Add Cycle
Modify Cycle
Delete Cycle
0123 4 56
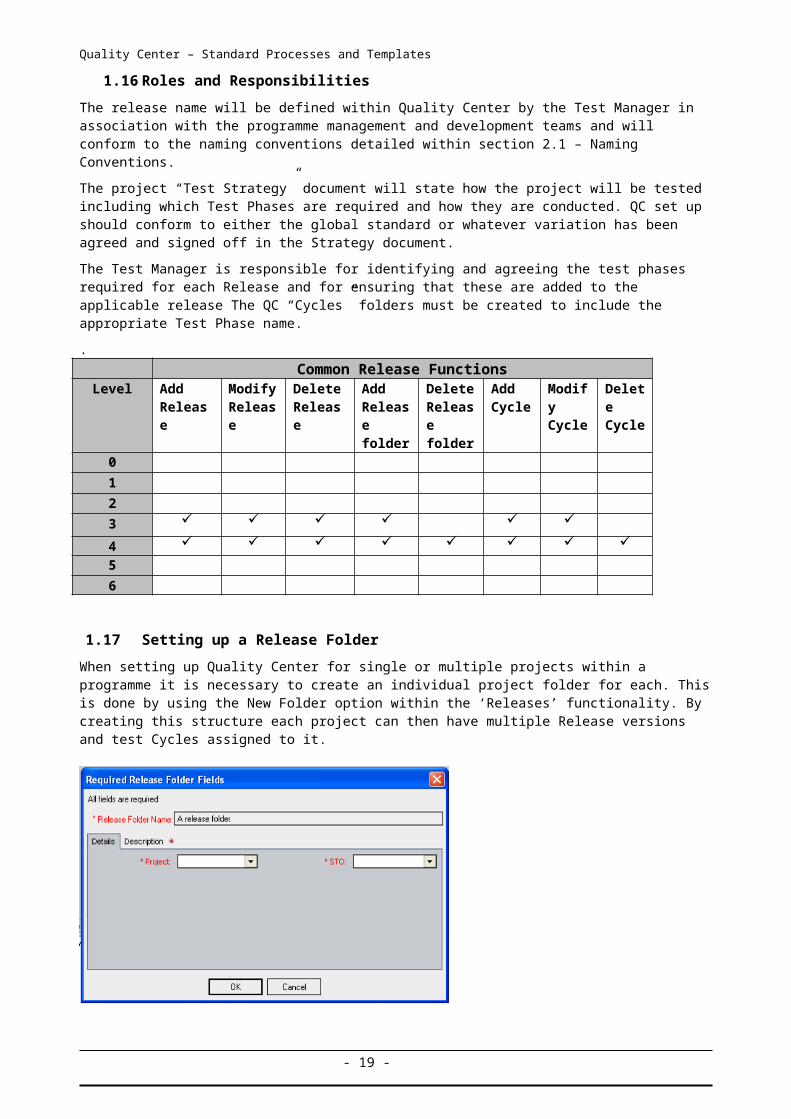
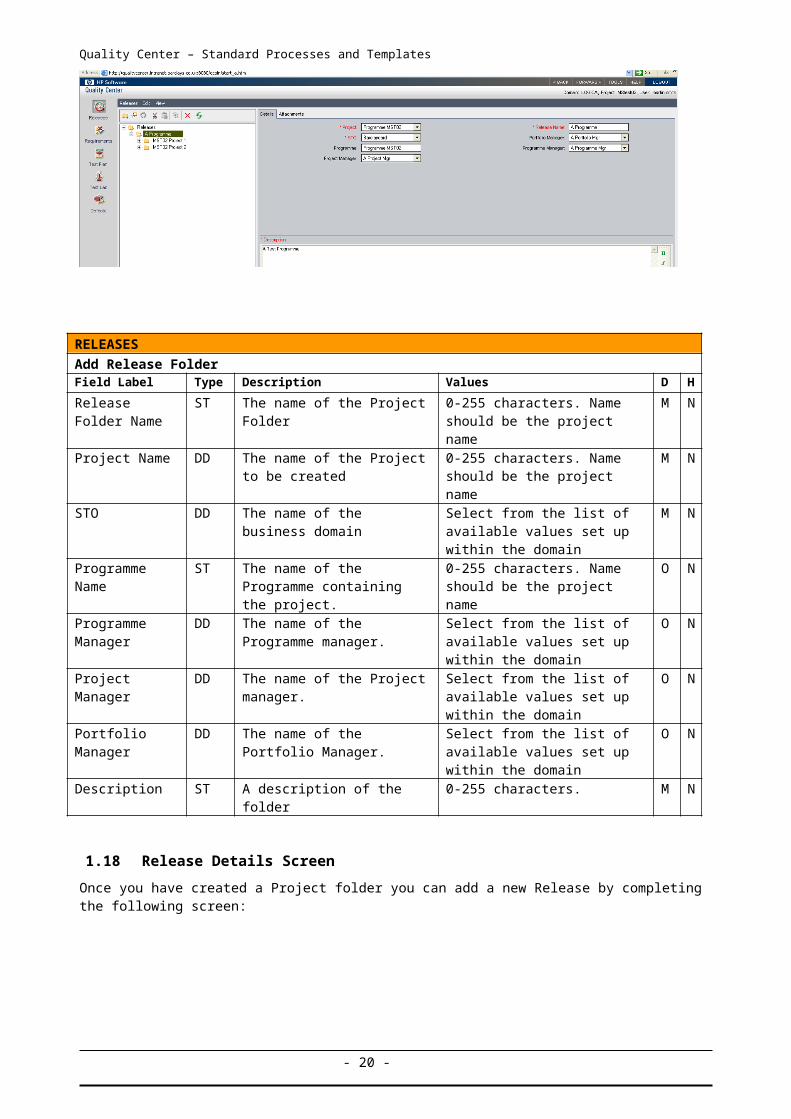
1.17 Setting up a Release Folder
When setting up Quality Center for single or multiple projects within a programme it is necessary to create an individual project folder for each. This is done by using the New Folder option within the ‘Releases’ functionality. By creating this structure each project can then have multiple Release versions and test Cycles assigned to it.
RELEASES
- 15 -
Quality Center – Standard Processes and Templates
Add Release FolderField Label Type Description Values D H
Release Folder Name
ST The name of the Project Folder 0-255 characters. Name should be the project name
M N
Project Name DD The name of the Project to be created
0-255 characters. Name should be the project name
M N
STO DD The name of the business domain
Select from the list of available values set up within the domain
M N
Programme Name
ST The name of the Programme containing the project.
0-255 characters. Name should be the project name
O N
Programme Manager
DD The name of the Programme manager.
Select from the list of available values set up within the domain
O N
Project Manager DD The name of the Project manager.
Select from the list of available values set up within the domain
O N
Portfolio Manager DD The name of the Portfolio Manager.
Select from the list of available values set up within the domain
O N
Description ST A description of the folder 0-255 characters. M N
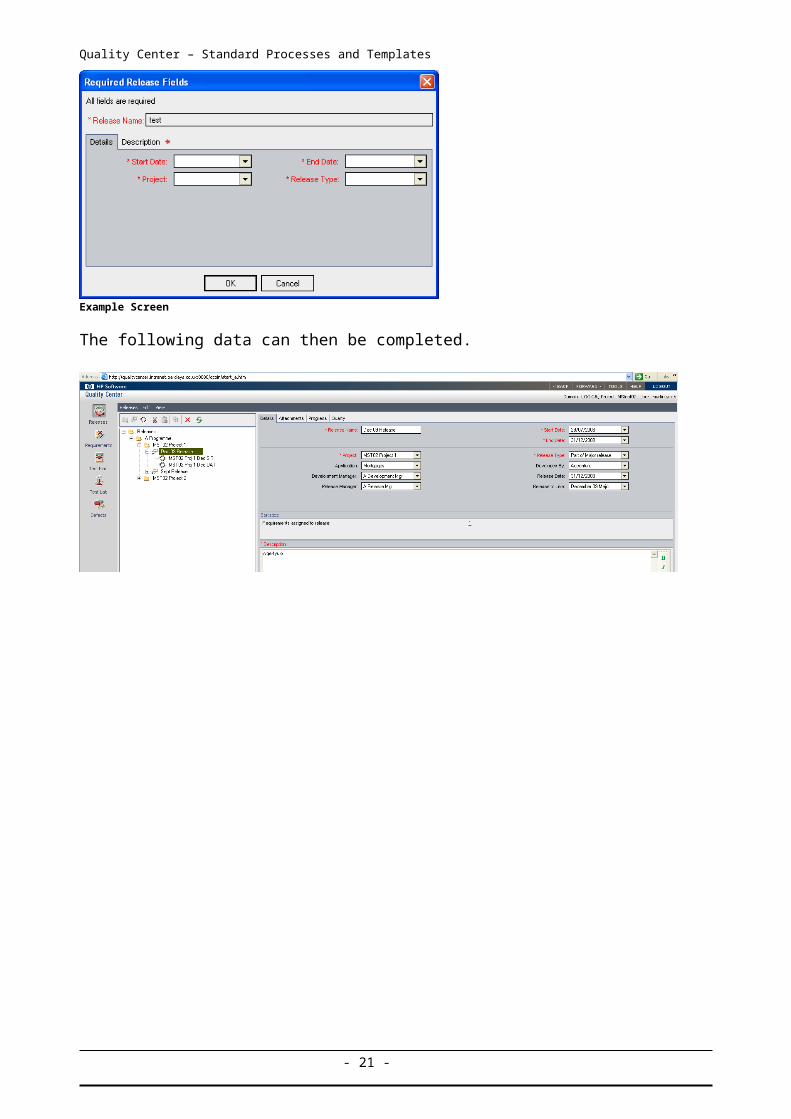
1.18 Release Details Screen
Once you have created a Project folder you can add a new Release by completing the following screen:
Example Screen
The following data can then be completed.
- 16 -
Quality Center – Standard Processes and Templates
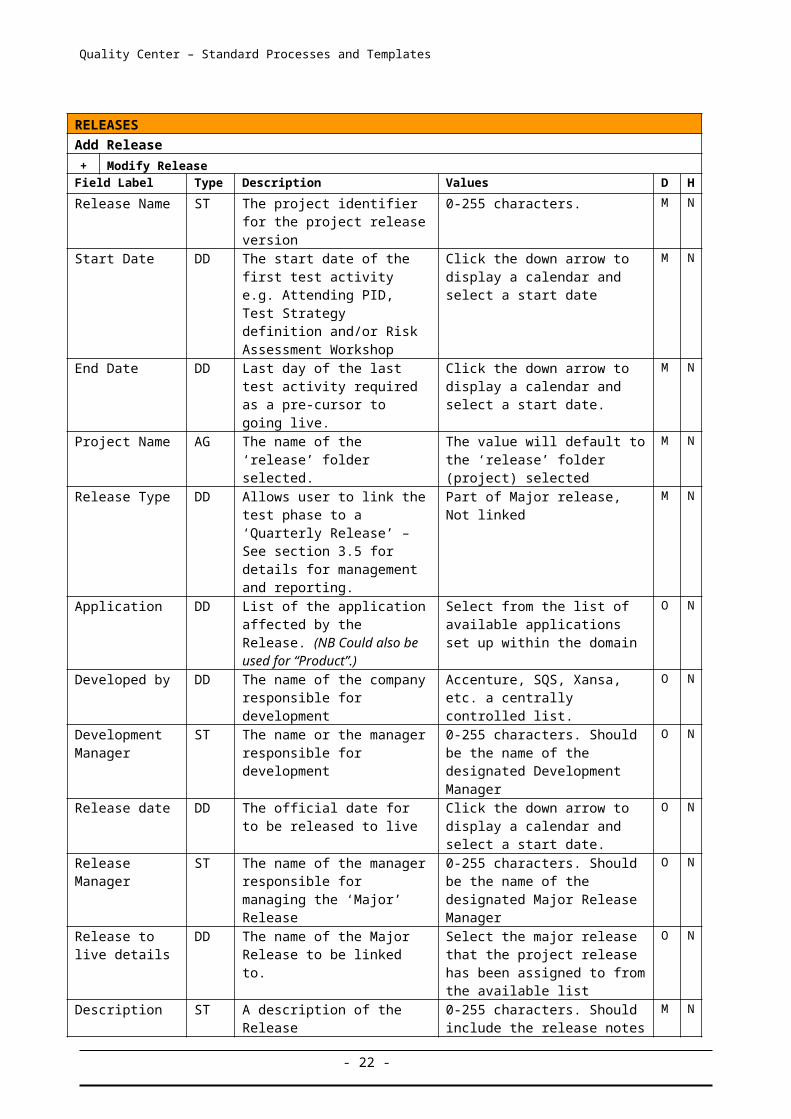
RELEASES
Add Release
+ Modify ReleaseField Label Type Description Values D H
Release Name ST The project identifier for the project release version
0-255 characters. M N
Start Date DD The start date of the first test activity e.g. Attending PID, Test Strategy definition and/or Risk Assessment Workshop
Click the down arrow to display a calendar and select a start date
M N
End Date DD Last day of the last test activity required as a pre-cursor to going live.
Click the down arrow to display a calendar and select a start date.
M N
Project Name AG The name of the ‘release’ folder selected.
The value will default to the ‘release’ folder (project) selected
M N
Release Type DD Allows user to link the test phase to a ‘Quarterly Release’ – See section 3.5 for details for management and reporting.
Part of Major release, Not linked M N
Application DD List of the application affected by the Release. (NB Could also be used for “Product”.)
Select from the list of available applications set up within the domain
O N
Developed by DD The name of the company responsible for development
Accenture, SQS, Xansa, etc. a centrally controlled list.
O N
Development Manager
ST The name or the manager responsible for development
0-255 characters. Should be the name of the designated Development Manager
O N
Release date DD The official date for to be released to live
Click the down arrow to display a calendar and select a start date.
O N
Release Manager ST The name of the manager responsible for managing the ‘Major’ Release
0-255 characters. Should be the name of the designated Major Release Manager
O N
Release to live details
DD The name of the Major Release to be linked to.
Select the major release that the project release has been assigned to from the available list
O N
Description ST A description of the Release 0-255 characters. Should include the release notes for the release
M N
DD = Drop Down Box, ST = Text String, AG = Auto GeneratedD = Display Type – Values: M = Mandatory, O = Optional, R = Read Only, C = Conditional. H = History retained Yes / No
- 17 -
Quality Center – Standard Processes and Templates
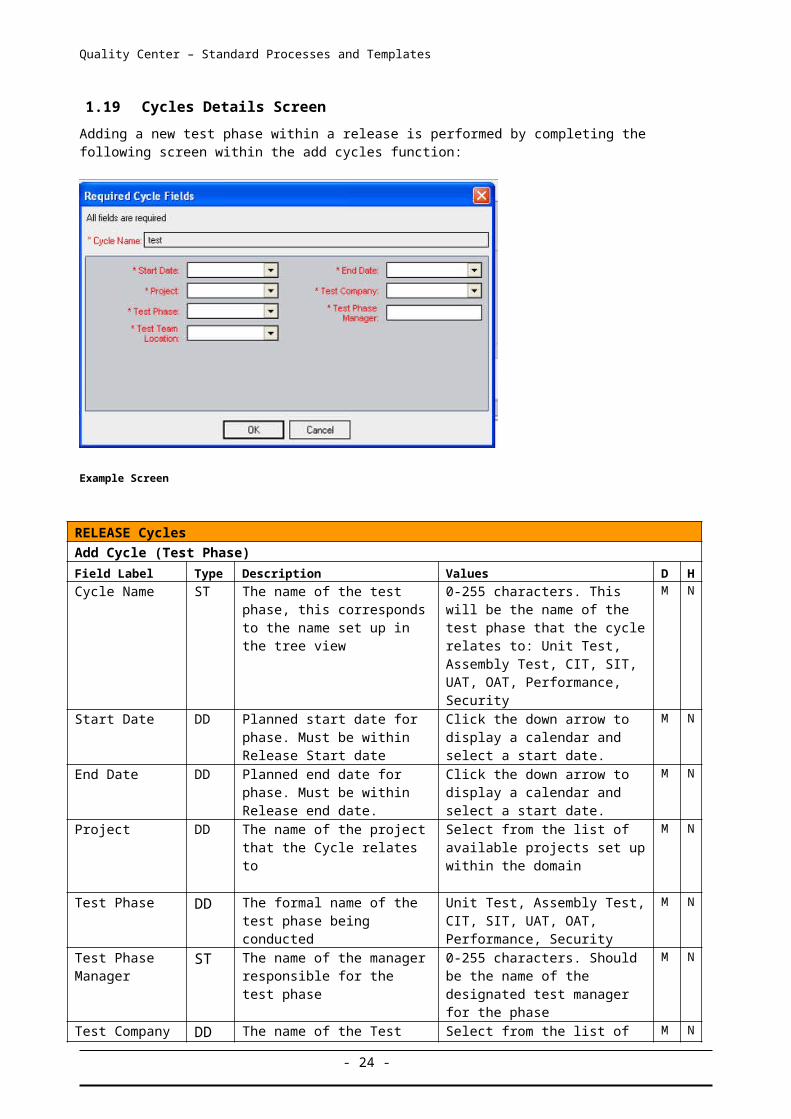
1.19 Cycles Details Screen
Adding a new test phase within a release is performed by completing the following screen within the add cycles function:
Example Screen
RELEASE Cycles
Add Cycle (Test Phase)
Field Label Type Description Values D HCycle Name ST The name of the test phase,
this corresponds to the name set up in the tree view
0-255 characters. This will be the name of the test phase that the cycle relates to: Unit Test, Assembly Test, CIT, SIT, UAT, OAT, Performance, Security
M N
Start Date DD Planned start date for phase. Must be within Release Start date
Click the down arrow to display a calendar and select a start date.
M N
End Date DD Planned end date for phase. Must be within Release end date.
Click the down arrow to display a calendar and select a start date.
M N
Project DD The name of the project that the Cycle relates to
Select from the list of available projects set up within the domain
M N
Test Phase DD The formal name of the test phase being conducted
Unit Test, Assembly Test, CIT, SIT, UAT, OAT, Performance, Security
M N
Test Phase Manager
ST The name of the manager responsible for the test phase
0-255 characters. Should be the name of the designated test manager for the phase
M N
Test Company DD The name of the Test Company used for this test Phase (includes GRCB)
Select from the list of available companies set up within the domain
M N
Test Team Location
DD The location of the team conducting the testing within the phase
On Shore, Off Shore M N
DD = Drop Down Box, ST = Text String, AG = Auto GeneratedD = Display Type – Values: M = Mandatory, O = Optional, R = Read Only, C = Conditional. H = History retained Yes / No
- 18 -
Quality Center – Standard Processes and Templates
1.20 Major ‘Releases’ to Live
It is recognised that QC must support the management and reporting of ‘major releases’ within its configuration set up. A major release differs from a ‘Release’ (Test Phase) as stated within Quality Center (see Section 2.1 for definition) in that it may be made up of a number of projects technical deployments (often across multiple programmes and domains) that are brought together and deployed to the Live Environment as a single entity. Each project will manage its own test phases and cycles end to end but visibility of their status and defects may be required for reporting and management purposes.
The target ‘Release to Live’ for the tested project will be entered when the Project/Programme is set up. This can be either a Major (e.g. Quarterly) release involving multiple programmes and projects or an Interim release of one or two projects. Project data can then be aggregated to a target ‘Release to Live’ within the Reporting Process.”
- 19 -
Quality Center – Standard Processes and Templates
4 Requirements
1.21 Requirements Workflow Process
Requirements describe in detail what needs to be tested in your application, and provide the test team with the foundation on which the entire testing process is based. After specifying requirements, you assign them to the releases and cycles defined in the Releases module, you can assign requirements to one or more releases or cycles. You can associate the tests in the Test Plan module to your assigned requirements to create coverage. By defining coverage, you can keep track of the relationship between the tests in your test plan and your requirements.
1.22 Roles and Responsibilities
The following table details the role levels that would typically generate data and perform the actions associated with requirements:
Common Requirement FunctionsLevel Define
reqAdd req details
Modify req details
Delete req details
Add / remove tests to coverage
Risk ass’ment
Assign Req
AddTraceability
012 * 3 4 5 * 6
* Where document owner
1.23 Requirement Types
Type Description Identifier
Business A business process requirement. B
Design A system design requirement D
Folder A Folder for organizing requirements. FD
Functional A system behavioural requirement. FC
Group A collection of related requirements GP
Non Functional Testing of reliability, integration etc NF
Performance A system performance requirement. P
Testing A testing requirement TS
Security A Security requirement. S
Undefined An undefined Requirement. A QC default that can not be removed but recommended not to be used.
U
* Requisite Pro: Any requirements to be imported from Req Pro must match these Types..
- 20 -
Quality Center – Standard Processes and Templates
1.24 Importing Requirements
Once project requirements have been defined, reviewed and signed off these will need to be input into your Quality Center project. This may be done manually into the Requirements screens or using the option to import requirements directly from Microsoft Word, Excel, or IBM Rationale Requisite Pro into the project.
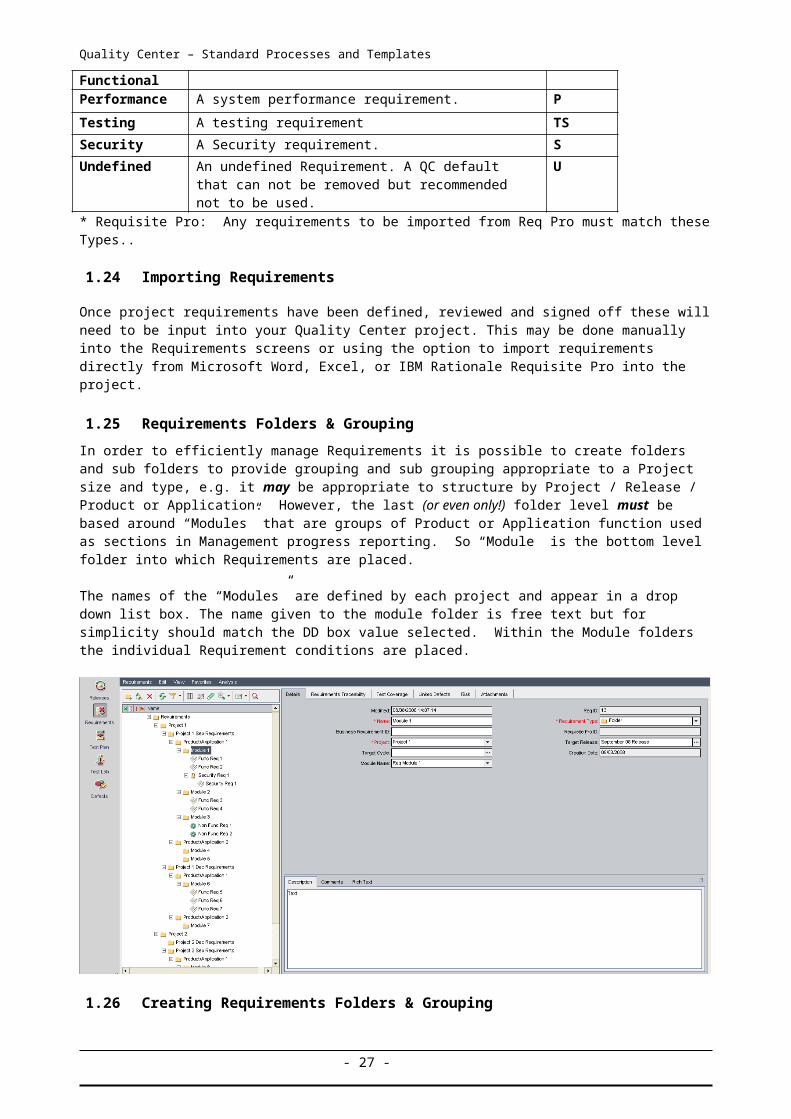
1.25 Requirements Folders & Grouping
In order to efficiently manage Requirements it is possible to create folders and sub folders to provide grouping and sub grouping appropriate to a Project size and type, e.g. it may be appropriate to structure by Project / Release / Product or Application. However, the last (or even only!) folder level must be based around “Modules” that are groups of Product or Application function used as sections in Management progress reporting. So “Module” is the bottom level folder into which Requirements are placed.
The names of the “Modules” are defined by each project and appear in a drop down list box. The name given to the module folder is free text but for simplicity should match the DD box value selected. Within the Module folders the individual Requirement conditions are placed.
1.26 Creating Requirements Folders & Grouping
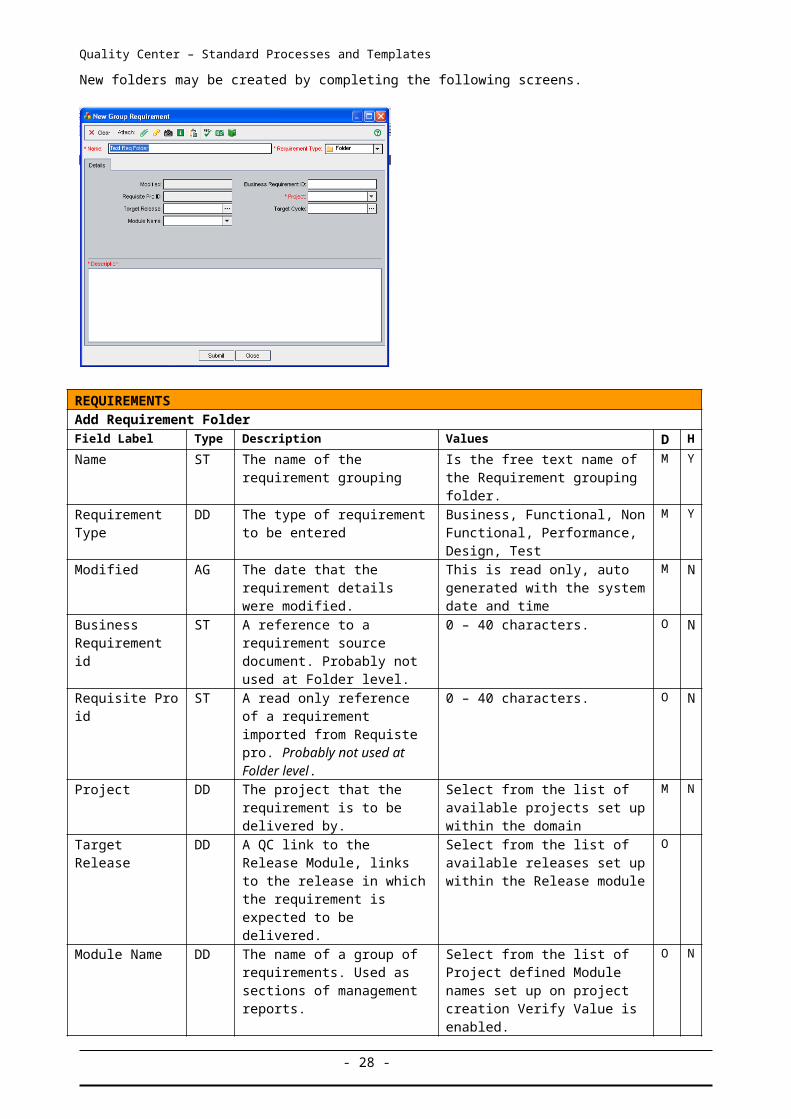
New folders may be created by completing the following screens.
REQUIREMENTS Add Requirement Folder
- 21 -
Quality Center – Standard Processes and Templates
Field Label Type Description Values D H
Name ST The name of the requirement grouping
Is the free text name of the Requirement grouping folder.
M Y
Requirement Type
DD The type of requirement to be entered
Business, Functional, Non Functional, Performance, Design, Test
M Y
Modified AG The date that the requirement details were modified.
This is read only, auto generated with the system date and time
M N
Business Requirement id
ST A reference to a requirement source document. Probably not used at Folder level.
0 – 40 characters. O N
Requisite Pro id ST A read only reference of a requirement imported from Requiste pro. Probably not used at Folder level.
0 – 40 characters. O N
Project DD The project that the requirement is to be delivered by.
Select from the list of available projects set up within the domain
M N
Target Release DD A QC link to the Release Module, links to the release in which the requirement is expected to be delivered.
Select from the list of available releases set up within the Release module
O
Module Name DD The name of a group of requirements. Used as sections of management reports.
Select from the list of Project defined Module names set up on project creation Verify Value is enabled.
O N
Description ST A description of the Release 0-255 characters. Should include the release notes for the release
M N
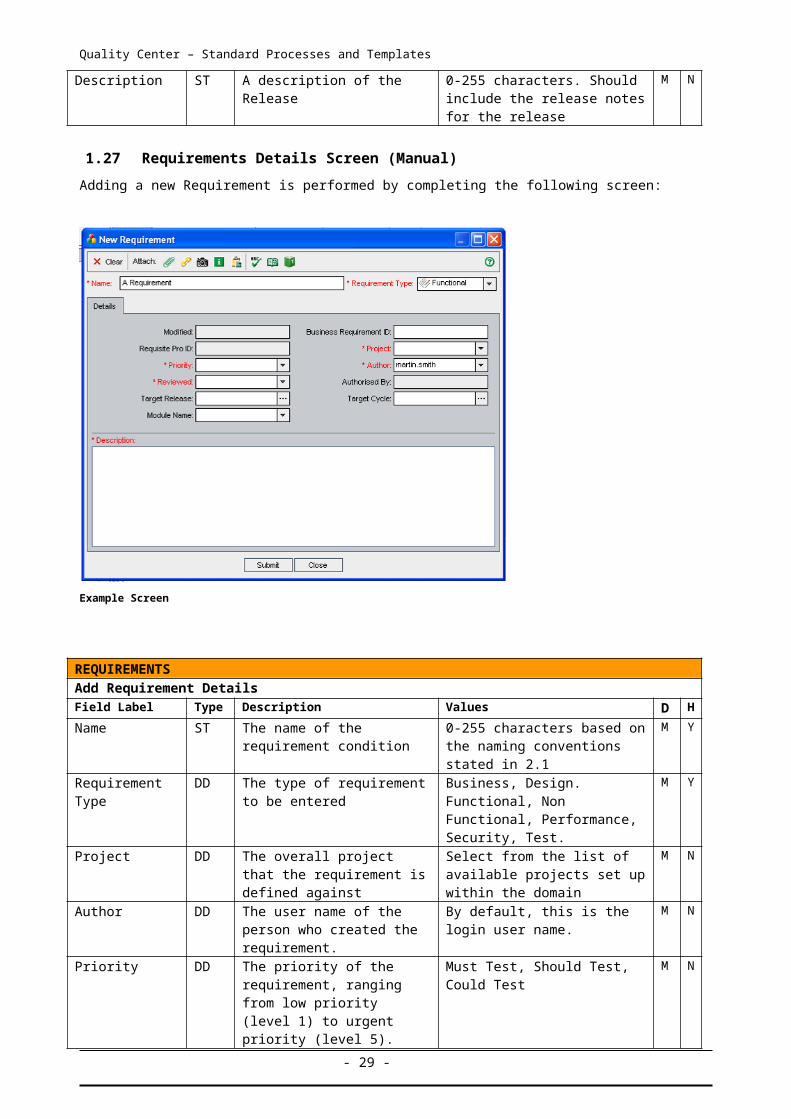
1.27 Requirements Details Screen (Manual)
Adding a new Requirement is performed by completing the following screen:
Example Screen
REQUIREMENTS
- 22 -
Quality Center – Standard Processes and Templates
Add Requirement Details
Field Label Type Description Values D H
Name ST The name of the requirement condition
0-255 characters based on the naming conventions stated in 2.1
M Y
Requirement Type
DD The type of requirement to be entered
Business, Design. Functional, Non Functional, Performance, Security, Test.
M Y
Project DD The overall project that the requirement is defined against
Select from the list of available projects set up within the domain
M N
Author DD The user name of the person who created the requirement.
By default, this is the login user name.
M N
Priority DD The priority of the requirement, ranging from low priority (level 1) to urgent priority (level 5).
Must Test, Should Test, Could Test
M N
Business Requirement Id (non Req Pro)
ST The business requirement Id 0-255 characters. Searchable. O N
Requisite Pro id ST A read only reference of a requirement imported from Requiste pro. Probably not used at Folder level.
O N
Reviewed DD Indicates whether the requirement has been reviewed and approved by the person responsible.
Reviewed, Not Reviewed, In Review, Signed Off.When changed to “Signed Off” the Authorised field becomes Mandatory and a “Comment” required.
M Y
Authorised by DD The name of the person signing off the Requirement Review.
Defaults to user name, select the drop down to change user
C Y
Creation Date DD The date on which the requirement was created
By default, the creation date is set to the current database server date.Click the down arrow to display a calendar and select a different creation date.
O N
Creation Time AG The time at which the requirement was created.
By default, the creation time is set to the current database server time.
R N
Modified AG Indicates the date the requirement was last changed.
N/A View Only R Y
Description ST A description of the requirement 0-255 characters O N
Comments ST Displays comments about the requirement.
0-255 O N
Target Release DD Links a Requirement back to the “Release” in the Release Module.
System generated drop down from Release module.
O N
Target Cycle DD Links a Requirement back to the Test Cycle in the Release Module.
System generated drop down from Release module.
O N
Module Name DD The name of a group of requirements
Select from the list of available Modules set up within the domain Verify Value is enabled.
O N
DD = Drop Down Box, ST = Text String, AG = Auto GeneratedD = Display Type – Values: M = Mandatory, O = Optional, R = Read Only, C = Conditional. H = History retained Yes / No
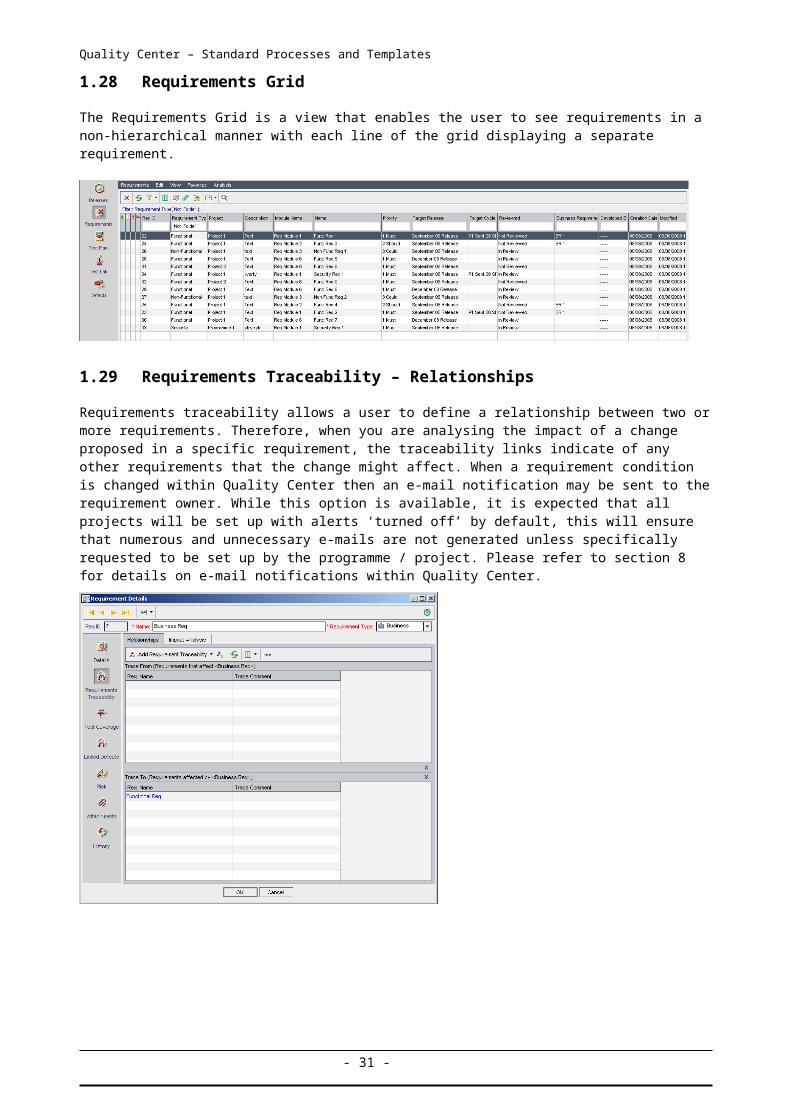
1.28 Requirements Grid
The Requirements Grid is a view that enables the user to see requirements in a non-hierarchical manner with each line of the grid displaying a separate requirement.
- 23 -
Quality Center – Standard Processes and Templates
1.29 Requirements Traceability – Relationships
Requirements traceability allows a user to define a relationship between two or more requirements. Therefore, when you are analysing the impact of a change proposed in a specific requirement, the traceability links indicate of any other requirements that the change might affect. When a requirement condition is changed within Quality Center then an e-mail notification may be sent to the requirement owner. While this option is available, it is expected that all projects will be set up with alerts ‘turned off’ by default, this will ensure that numerous and unnecessary e-mails are not generated unless specifically requested to be set up by the programme / project. Please refer to section 8 for details on e-mail notifications within Quality Center.
- 24 -

Quality Center – Standard Processes and Templates
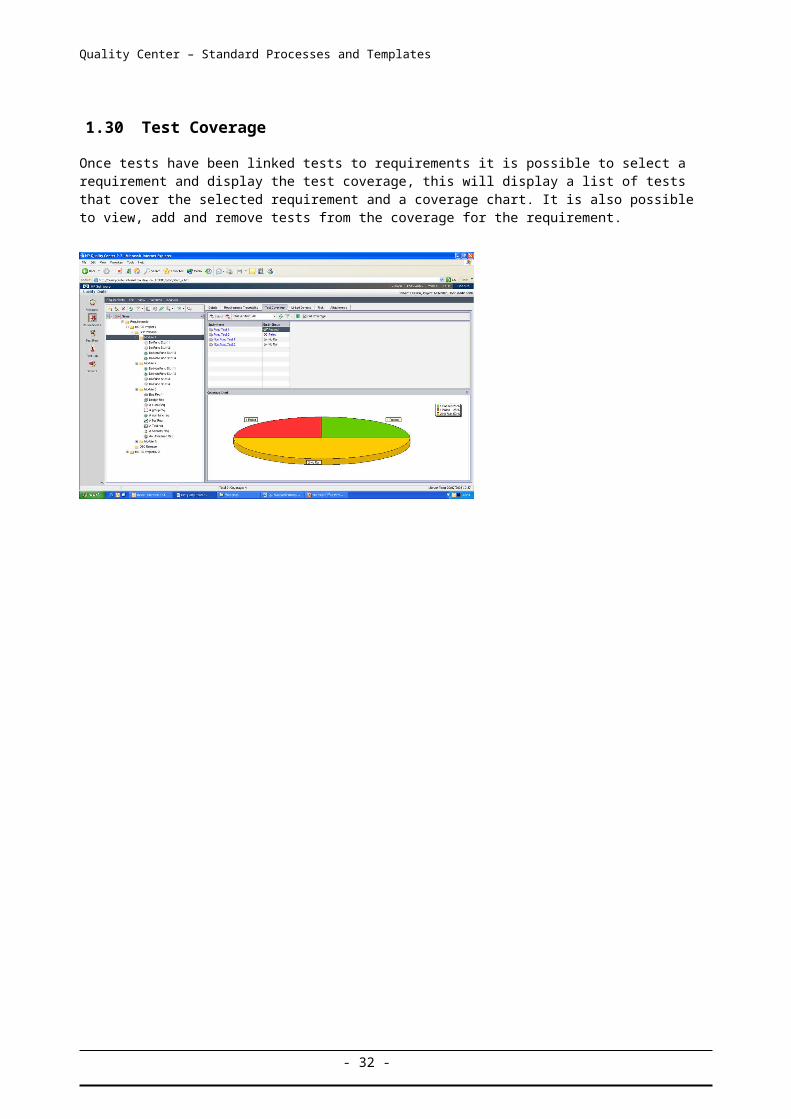
1.30 Test Coverage
Once tests have been linked tests to requirements it is possible to select a requirement and display the test coverage, this will display a list of tests that cover the selected requirement and a coverage chart. It is also possible to view, add and remove tests from the coverage for the requirement.
- 25 -
Quality Center – Standard Processes and Templates
1.31 Risk Based Testing – Overview
Note – This section defines how RBT should work in GTS. Problems with the software prevent this from being implemented and the RBT function is as it comes from the box, similar in concept but NOT exactly as described here until a fix implemented.
When you start to plan how you are going to test your requirements you need to consider what resources and time you have available and how this can be best used to perform the testing. It is unlikely that within your plan you will be able to fully test every requirement and therefore you need a mechanism to help you understand where to focus your efforts.
In order to do this Quality Center offers the opportunity to use it’s Risk Based Testing functionality to assess your requirements and to calculate the level of risk associated with it. From this evaluation you can determine how much focus should be placed upon that requirement in terms of testing effort. It is sensible that for a low risk requirement you may only want to perform partial testing whereas on a high risk requirement you would plan to test this fully. You can then plan your testing strategy based on these recommendations.
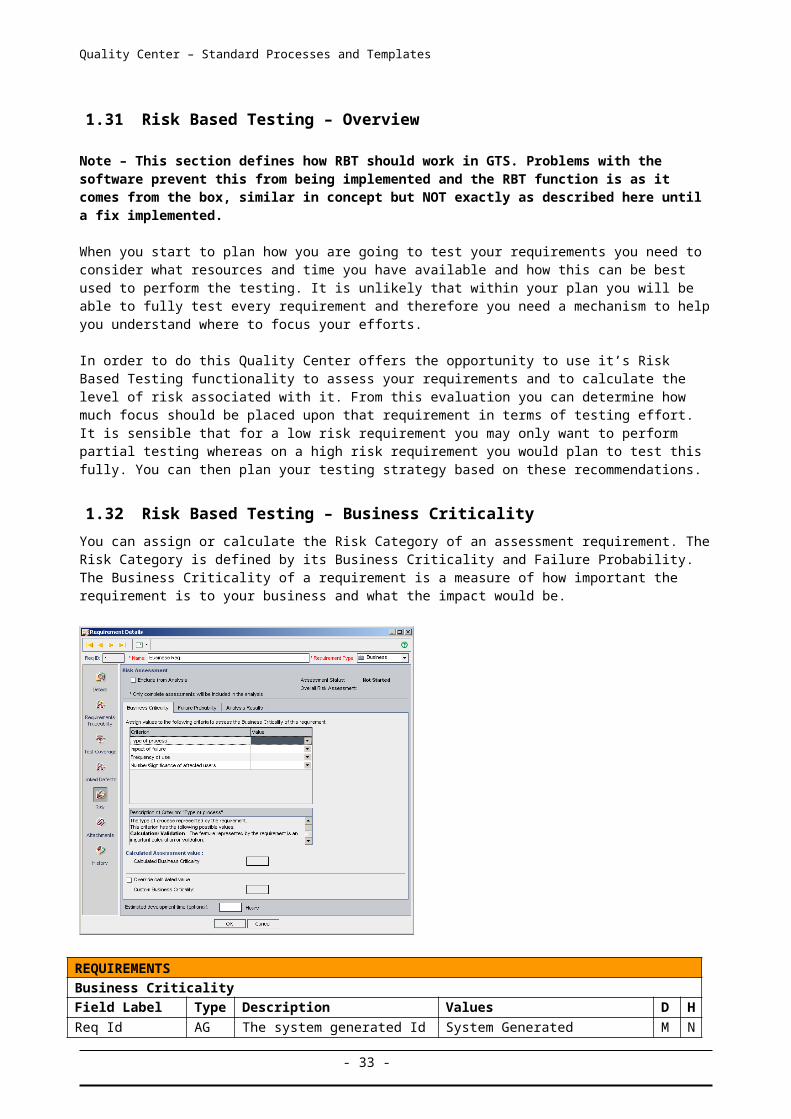
1.32 Risk Based Testing – Business Criticality
You can assign or calculate the Risk Category of an assessment requirement. The Risk Category is defined by its Business Criticality and Failure Probability. The Business Criticality of a requirement is a measure of how important the requirement is to your business and what the impact would be.
REQUIREMENTSBusiness CriticalityField Label Type Description Values D H
Req Id AG The system generated Id for the selected requirement
System Generated M N
Name AG The name of the requirement 0-255 characters based on the naming conventions stated in 2.1
M Y
Requirement Type
AG The type of requirement to be entered
Business, Functional, Non Functional, Performance Test, Development, Testing
M N
Exclude from Analysis
CB Allows a requirement to be removed from analysis
Checked, Unchecked O N
Criterion – Type of Attribute
DD The type of process that is affected by the requirement
Functionality, Reliability, Efficiency, Maintainability,
M N
- 26 -
Quality Center – Standard Processes and Templates
PortabilityCriterion – Impact of failure
DD The impact on the business if the requirement is not met
Cannot use, Incorrect Information, Reputation, No Impact
M N
Criterion – Frequency of use
DD How often the feature represented by the requirement is used
High, Medium, Low M N
Criterion – Number / Significance of affected users
DD How many users are affected by the requirement and how important are these users to the business
Significant, Some/Medium, Minimal
M N
Calculated business criticality
AG The system generated score derived from the values added under the criterion
A (High), B (Medium) C (Low) M N
Estimated Development time
ST The development time required to satisfy the requirement
0 – 255 characters O N
DD = Drop Down Box, ST = Text String, AG = Auto GeneratedD = Display Type – Values: M = Mandatory, O = Optional, R = Read Only, C = Conditional. H = History retained Yes / No
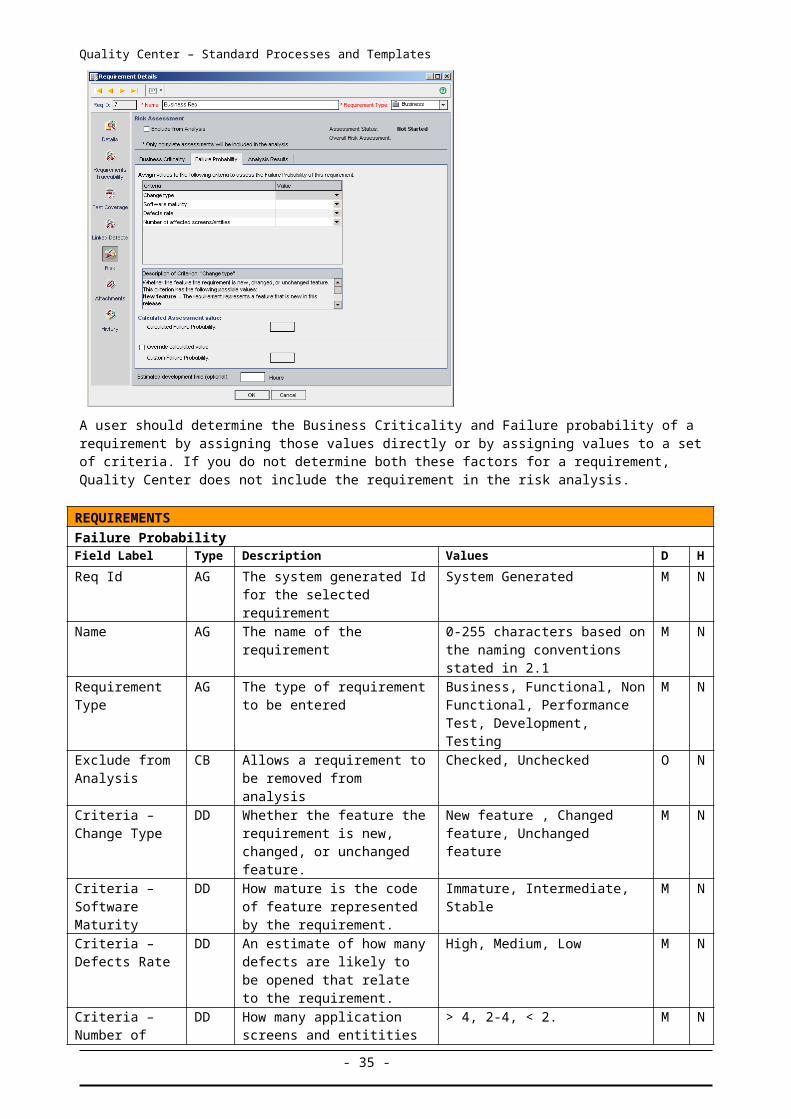
1.33 Risk Based Testing – Failure Probability
The Failure Probability of a requirement is a measure of how likely a test on the requirement is to fail, based on the technical complexity of the requirement’s implementation, without consideration of the requirement’s impact on the business.
A user should determine the Business Criticality and Failure probability of a requirement by assigning those values directly or by assigning values to a set of criteria. If you do not determine both these factors for a requirement, Quality Center does not include the requirement in the risk analysis.
REQUIREMENTS
Failure ProbabilityField Label Type Description Values D H
Req Id AG The system generated Id for the selected requirement
System Generated M N
Name AG The name of the requirement 0-255 characters based on the naming conventions stated in 2.1
M N
Requirement Type
AG The type of requirement to be entered
Business, Functional, Non Functional, Performance Test, Development, Testing
M N
Exclude from CB Allows a requirement to be Checked, Unchecked O N
- 27 -
Quality Center – Standard Processes and Templates
Analysis removed from analysisCriteria – Change Type
DD Whether the feature the requirement is new, changed, or unchanged feature.
New feature , Changed feature, Unchanged feature
M N
Criteria – Software Maturity
DD How mature is the code of feature represented by the requirement.
Immature, Intermediate, Stable M N
Criteria – Defects Rate
DD An estimate of how many defects are likely to be opened that relate to the requirement.
High, Medium, Low M N
Criteria – Number of affected entities
DD How many application screens and entitities are affected by the requirement.
> 4, 2-4, < 2. M N
Calculated failure probability
AG The system generated score derived from the values added under the criterion
1 High, 2 Medium, 3 Low M N
Estimated Dev Time
ST The development time required to satisfy the requirement
0 – 255 characters M N
DD = Drop Down Box, ST = Text String, AG = Auto GeneratedD = Display Type – Values: M = Mandatory, O = Optional, R = Read Only, C = Conditional. H = History retained Yes / No
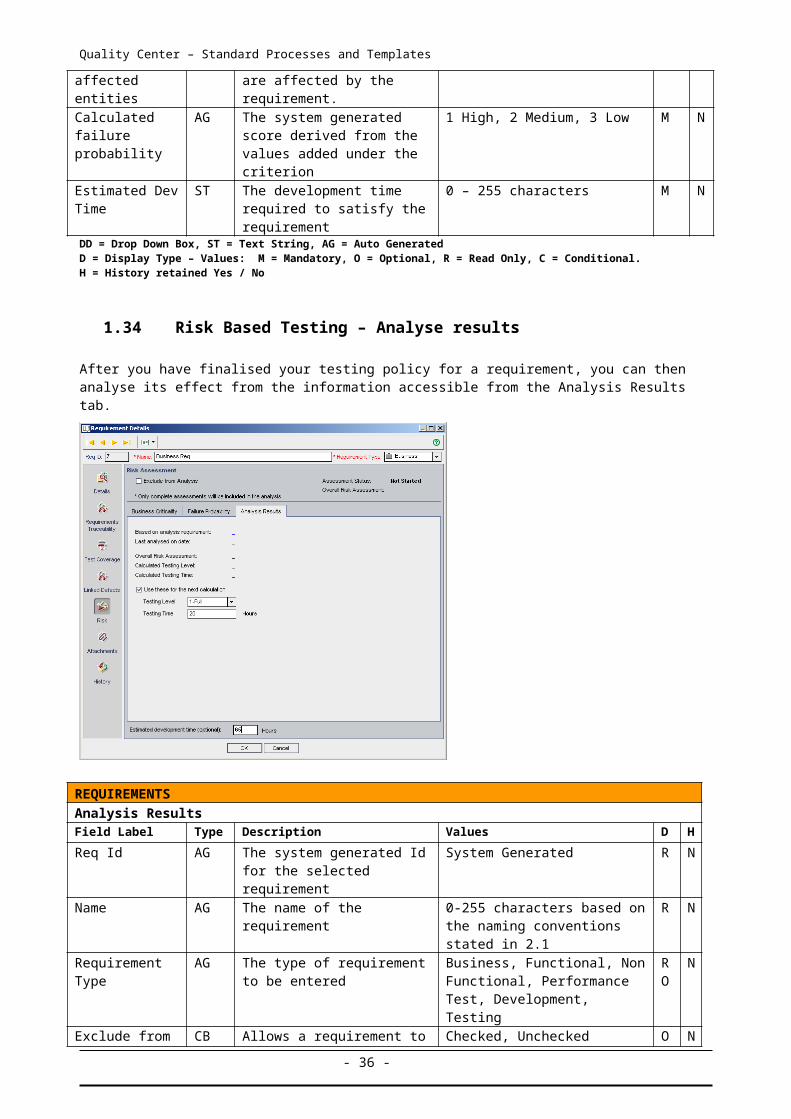
1.34 Risk Based Testing – Analyse results
After you have finalised your testing policy for a requirement, you can then analyse its effect from the information accessible from the Analysis Results tab.
REQUIREMENTSAnalysis ResultsField Label Type Description Values D H
Req Id AG The system generated Id for the selected requirement
System Generated R N
Name AG The name of the requirement 0-255 characters based on the naming conventions stated in 2.1
R N
Requirement Type
AG The type of requirement to be entered
Business, Functional, Non Functional, Performance Test, Development, Testing
RO
N
Exclude from Analysis
CB Allows a requirement to be removed from analysis
Checked, Unchecked O N
- 28 -
Quality Center – Standard Processes and Templates
Use these for the next calculation
CB Allows the user to add additional information to the calculation
Checked, Unchecked O N
Testing Level DD Define the testing level included in the calculation
Must Test, Should Test, Could Test, Won’t Test
O N
Testing Time ST The length of time that testing is expected to take
0 – 255 characters O N
Estimated Development time
ST The development time required to satisfy the requirement
0 – 255 characters O N
DD = Drop Down Box, ST = Text String, AG = Auto GeneratedD = Display Type – Values: M = Mandatory, O = Optional, R = Read Only, C = Conditional. H = History retained Yes / No
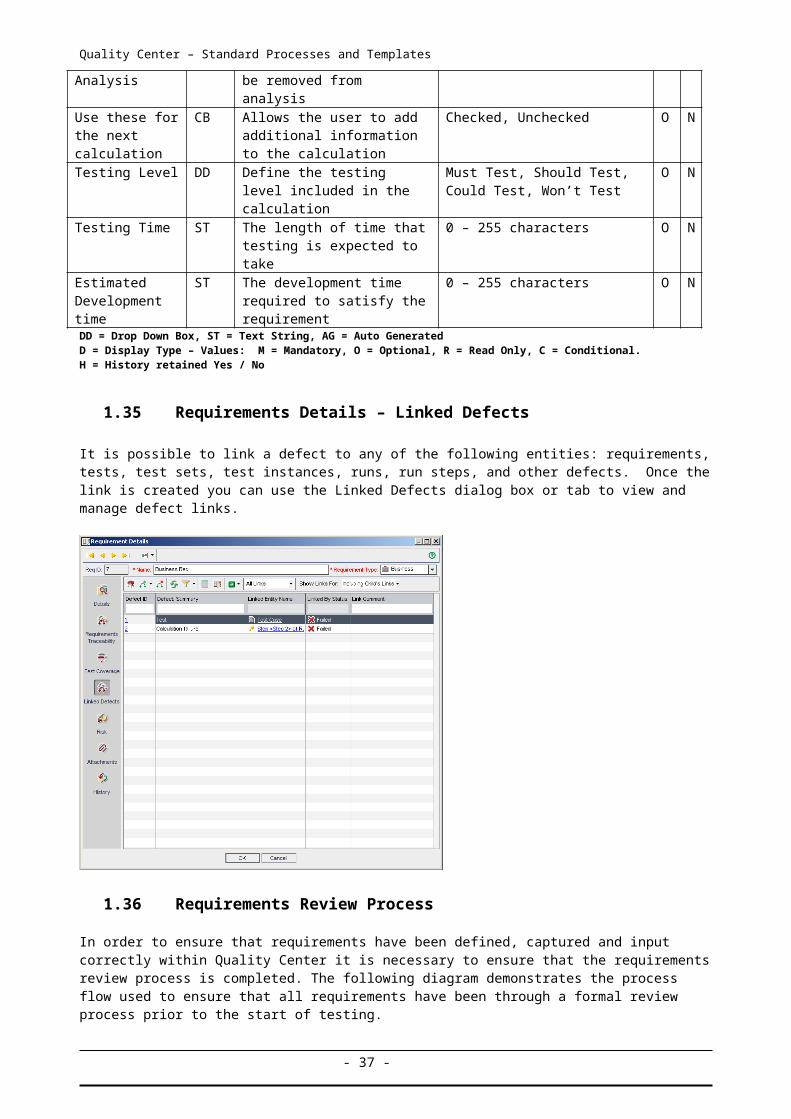
1.35 Requirements Details – Linked Defects
It is possible to link a defect to any of the following entities: requirements, tests, test sets, test instances, runs, run steps, and other defects. Once the link is created you can use the Linked Defects dialog box or tab to view and manage defect links.
1.36 Requirements Review Process
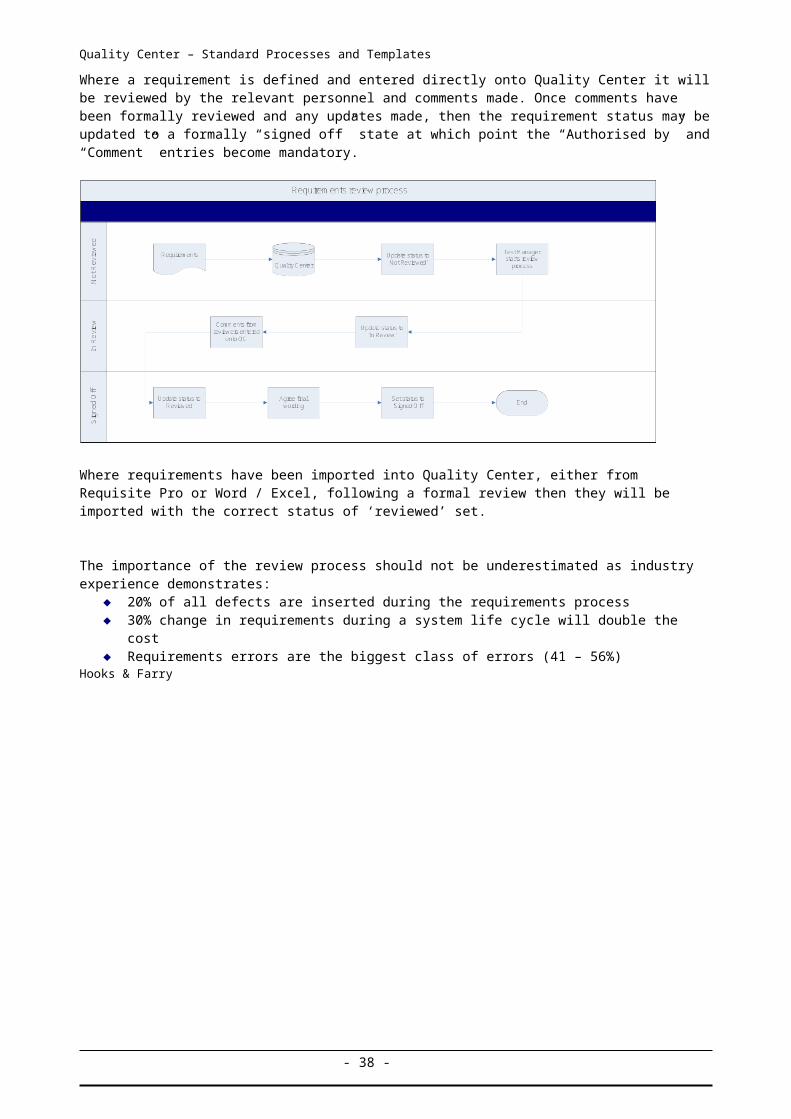
In order to ensure that requirements have been defined, captured and input correctly within Quality Center it is necessary to ensure that the requirements review process is completed. The following diagram demonstrates the process flow used to ensure that all requirements have been through a formal review process prior to the start of testing.
Where a requirement is defined and entered directly onto Quality Center it will be reviewed by the relevant personnel and comments made. Once comments have been formally reviewed and any updates made, then the requirement status may be updated to a formally “signed off” state at which point the “Authorised by” and “Comment” entries become mandatory.
- 29 -
Quality Center – Standard Processes and Templates
Where requirements have been imported into Quality Center, either from Requisite Pro or Word / Excel, following a formal review then they will be imported with the correct status of ‘reviewed’ set.
The importance of the review process should not be underestimated as industry experience demonstrates: 20% of all defects are inserted during the requirements process 30% change in requirements during a system life cycle will double the cost Requirements errors are the biggest class of errors (41 – 56%)
Hooks & Farry
- 30 -
Quality Center – Standard Processes and Templates
5 Test Plan
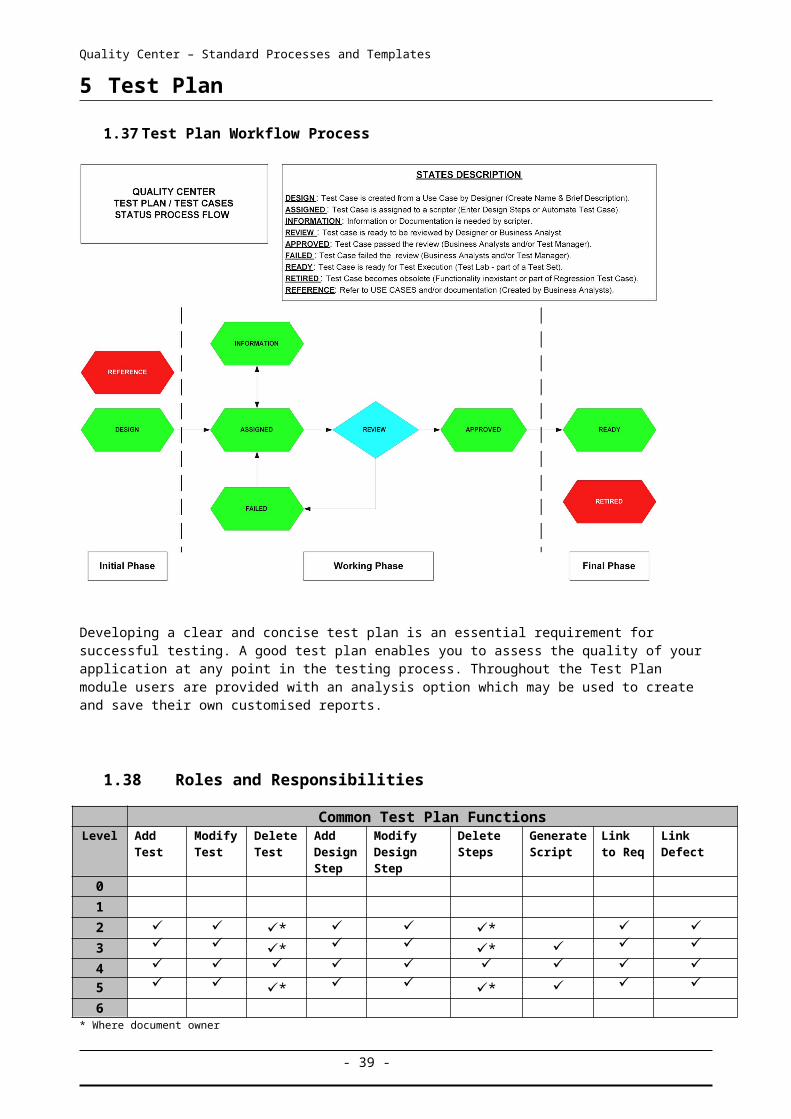
1.37 Test Plan Workflow Process
Developing a clear and concise test plan is an essential requirement for successful testing. A good test plan enables you to assess the quality of your application at any point in the testing process. Throughout the Test Plan module users are provided with an analysis option which may be used to create and save their own customised reports.
1.38 Roles and Responsibilities
Common Test Plan FunctionsLevel Add
TestModify Test
Delete Test
Add Design Step
Modify Design Step
DeleteSteps
Generate Script
Link to Req
Link Defect
012 * * 3 * * 4 5 * * 6
* Where document owner
1.39 Test Cycles & Roles
Defined Standard Test Phases
- 31 -
Quality Center – Standard Processes and Templates
Standard Cycles Phase Owner
Definition
Review (Static Testing)
Business with support from GTS & QA
Testing of documents by using a review and sign off process. All “key” documents need to be reviewed, defects raised where necessary and redrafts produced. Typically “Requirement Errors” are the biggest class of errors (41-56%) so the objective of reviews is to remove the potential for defects before they are coded.
A Defect Type of Requirement and Test Cycle of Review will display an additional conditional Document Defect Type list box.
Unit Test Application Development
The testing of each part (unit) of code in isolation
Assembly Test Application Development
The testing of the whole part (unit) of code but in isolation from any other components
Component Integration Test (CIT)
Application Development
Testing functionality of individual software components, including the integration and interfaces between integrated components
System Integration Test (SIT)
GTS Testing of integrated systems to verify that it meets specific requirements. Testing the integration of system packages; testing interfaces to external organisations. Covers both functional system testing and non functional system testing (including regression testing)
User Acceptance Test (UAT)
Business with support from GTS
Testing that the system supports the business processes as required. Customers or end users perform or are closely involved with the tests.
Operational Acceptance Test (OAT)
Global Infrastructure & Service Delivery
Testing to ensure that new and changed technical infrastructure components can be implemented reliably into the live environment and supported in BAU.
Performance Test a test that evaluates the performance of actual or simulated work activities. The test measures performance as opposed to other factors.
Security Test Tests focused on ensuring the target-of-test, data, (or systems) is accessible to only those intended
Live Confidence Test
Business with support from GTS
An additional phase of testing that continues in the live environment. Not used in all projects.
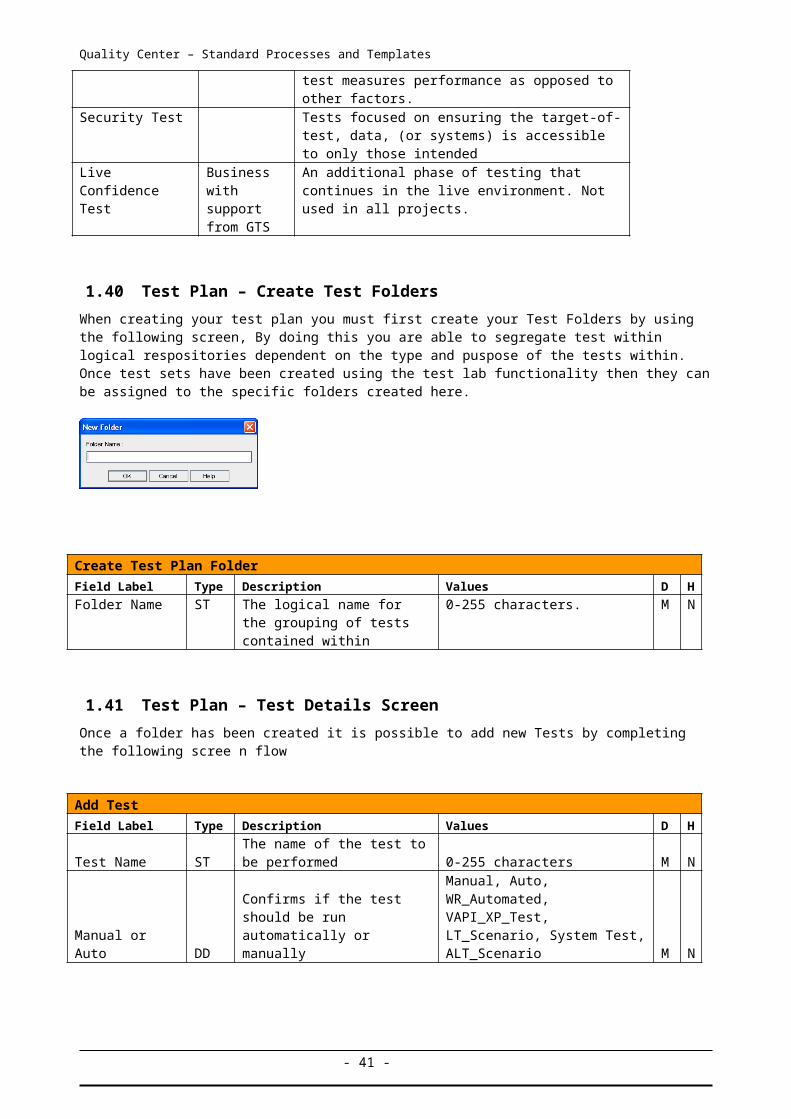
1.40 Test Plan – Create Test Folders
When creating your test plan you must first create your Test Folders by using the following screen, By doing this you are able to segregate test within logical respositories dependent on the type and puspose of the tests within. Once test sets have been created using the test lab functionality then they can be assigned to the specific folders created here.
Create Test Plan Folder
Field Label Type Description Values D HFolder Name ST The logical name for the
grouping of tests contained 0-255 characters. M N
- 32 -

Quality Center – Standard Processes and Templates
within
1.41 Test Plan – Test Details Screen
Once a folder has been created it is possible to add new Tests by completing the following scree n flow
Add Test
Field Label Type Description Values D H
Test Name STThe name of the test to be performed 0-255 characters M N
Manual or Auto DDConfirms if the test should be run automatically or manually
Manual, Auto, WR_Automated, VAPI_XP_Test, LT_Scenario, System Test, ALT_Scenario M N
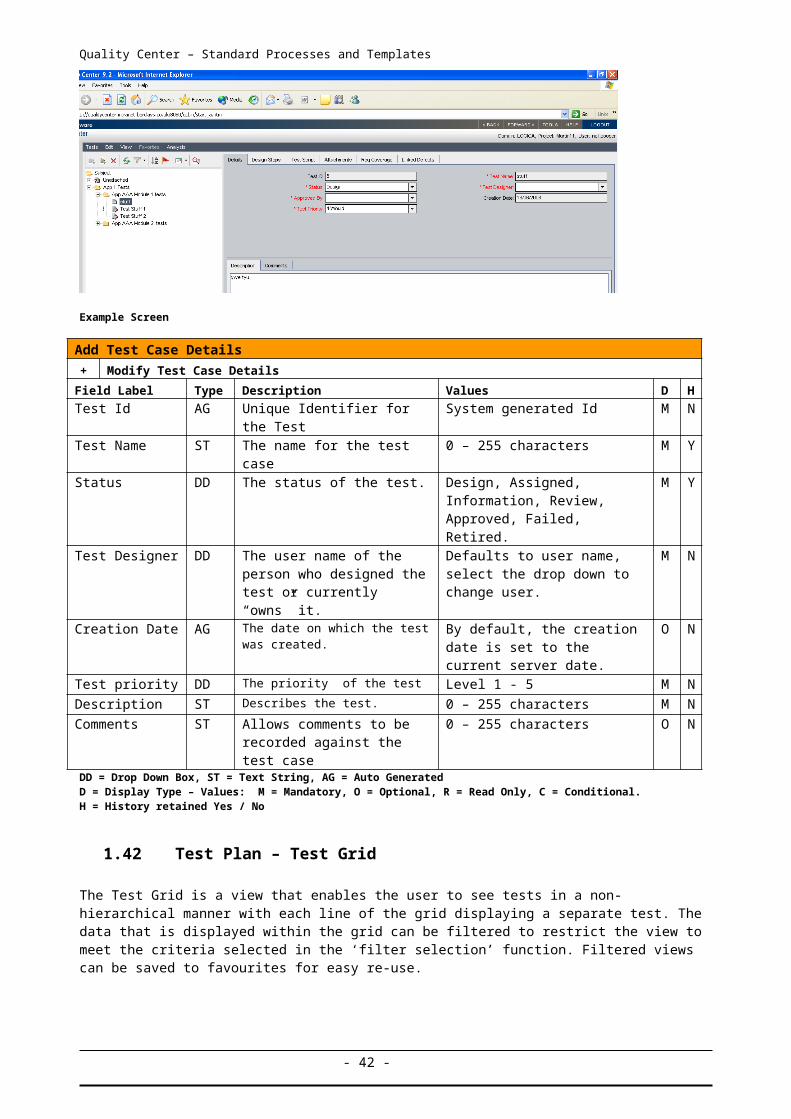
Example Screen
Add Test Case Details
+ Modify Test Case Details
Field Label Type Description Values D HTest Id AG Unique Identifier for the Test System generated Id M N
Test Name ST The name for the test case 0 – 255 characters M Y
Status DD The status of the test. Design, Assigned, Information, Review, Approved, Failed, Retired.
M Y
Test Designer DD The user name of the person who designed the test or currently “owns” it.
Defaults to user name, select the drop down to change user.
M N
Creation Date AG The date on which the test was created.
By default, the creation date is set to the current server date.
O N
Test priority DD The priority of the test Level 1 - 5 M N
Description ST Describes the test. 0 – 255 characters M N
Comments ST Allows comments to be recorded against the test case
0 – 255 characters O N
DD = Drop Down Box, ST = Text String, AG = Auto GeneratedD = Display Type – Values: M = Mandatory, O = Optional, R = Read Only, C = Conditional. H = History retained Yes / No
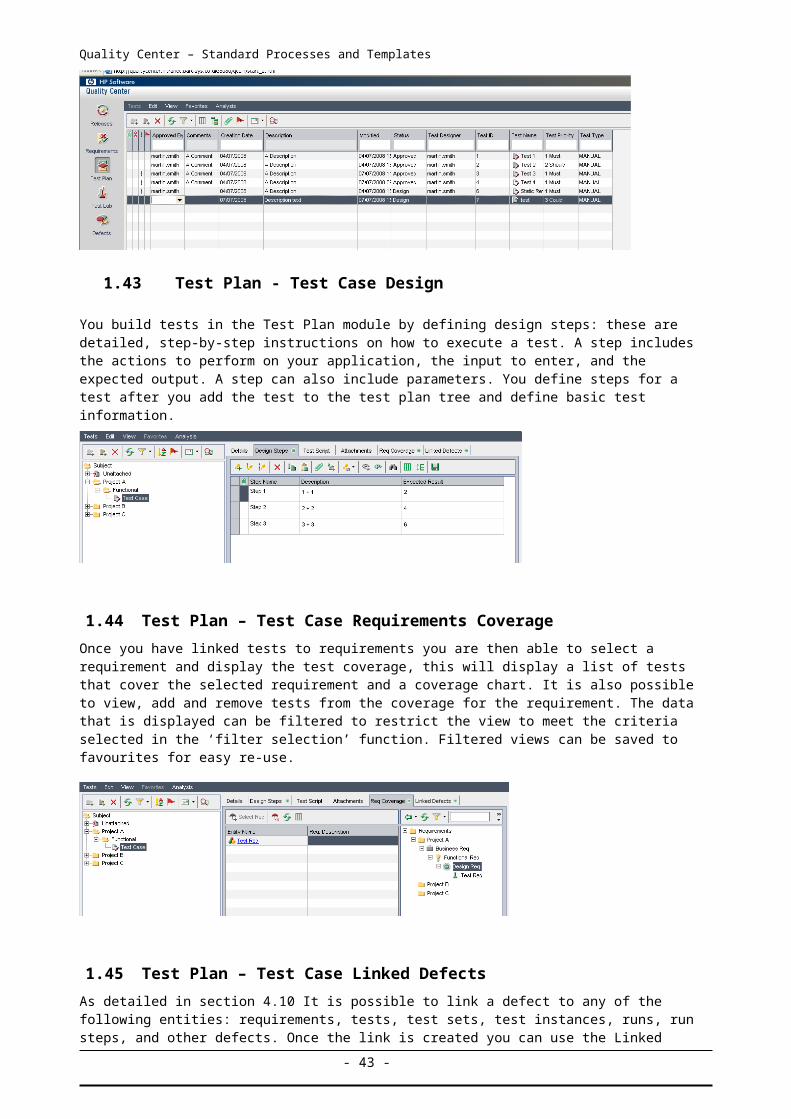
1.42 Test Plan – Test Grid
The Test Grid is a view that enables the user to see tests in a non-hierarchical manner with each line of the grid displaying a separate test. The data that is displayed within the grid can be filtered to restrict the view
- 33 -
Quality Center – Standard Processes and Templates
to meet the criteria selected in the ‘filter selection’ function. Filtered views can be saved to favourites for easy re-use.
1.43 Test Plan - Test Case Design
You build tests in the Test Plan module by defining design steps: these are detailed, step-by-step instructions on how to execute a test. A step includes the actions to perform on your application, the input to enter, and the expected output. A step can also include parameters. You define steps for a test after you add the test to the test plan tree and define basic test information.
1.44 Test Plan – Test Case Requirements Coverage
Once you have linked tests to requirements you are then able to select a requirement and display the test coverage, this will display a list of tests that cover the selected requirement and a coverage chart. It is also possible to view, add and remove tests from the coverage for the requirement. The data that is displayed can be filtered to restrict the view to meet the criteria selected in the ‘filter selection’ function. Filtered views can be saved to favourites for easy re-use.
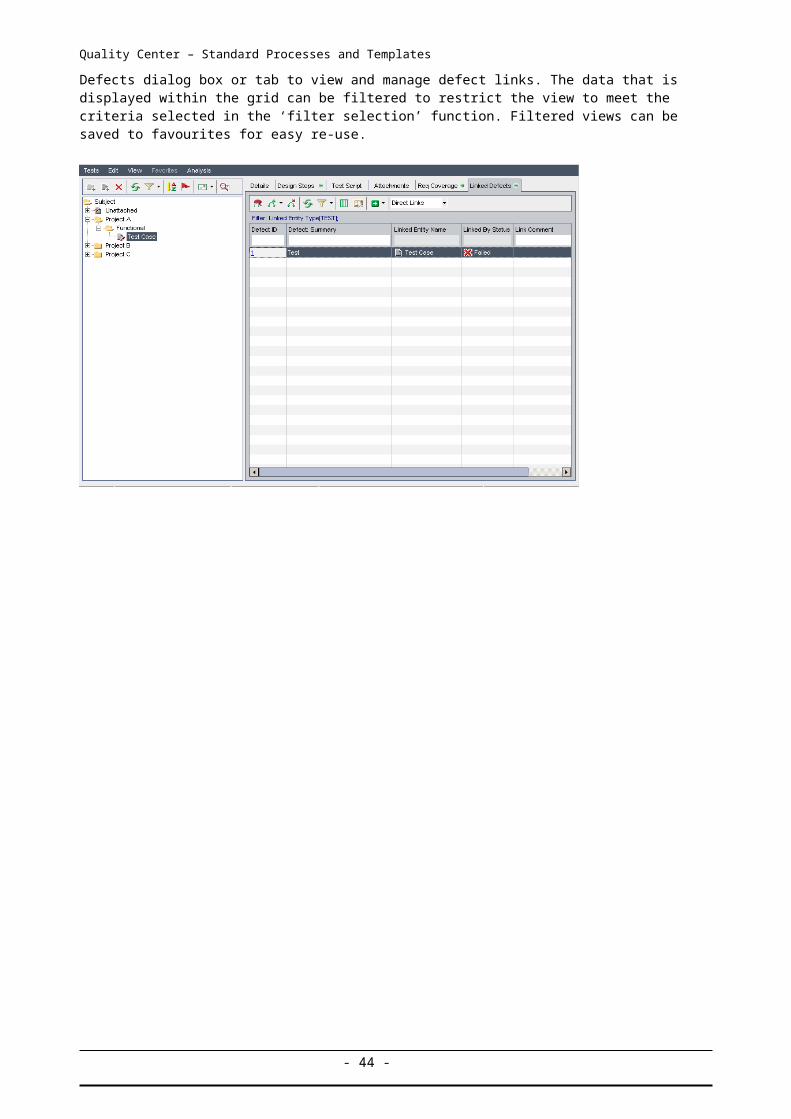
1.45 Test Plan – Test Case Linked Defects
As detailed in section 4.10 It is possible to link a defect to any of the following entities: requirements, tests, test sets, test instances, runs, run steps, and other defects. Once the link is created you can use the Linked Defects dialog box or tab to view and manage defect links. The data that is displayed within the grid can be filtered to restrict the view to meet the criteria selected in the ‘filter selection’ function. Filtered views can be saved to favourites for easy re-use.
- 34 -
Quality Center – Standard Processes and Templates
- 35 -
Quality Center – Standard Processes and Templates
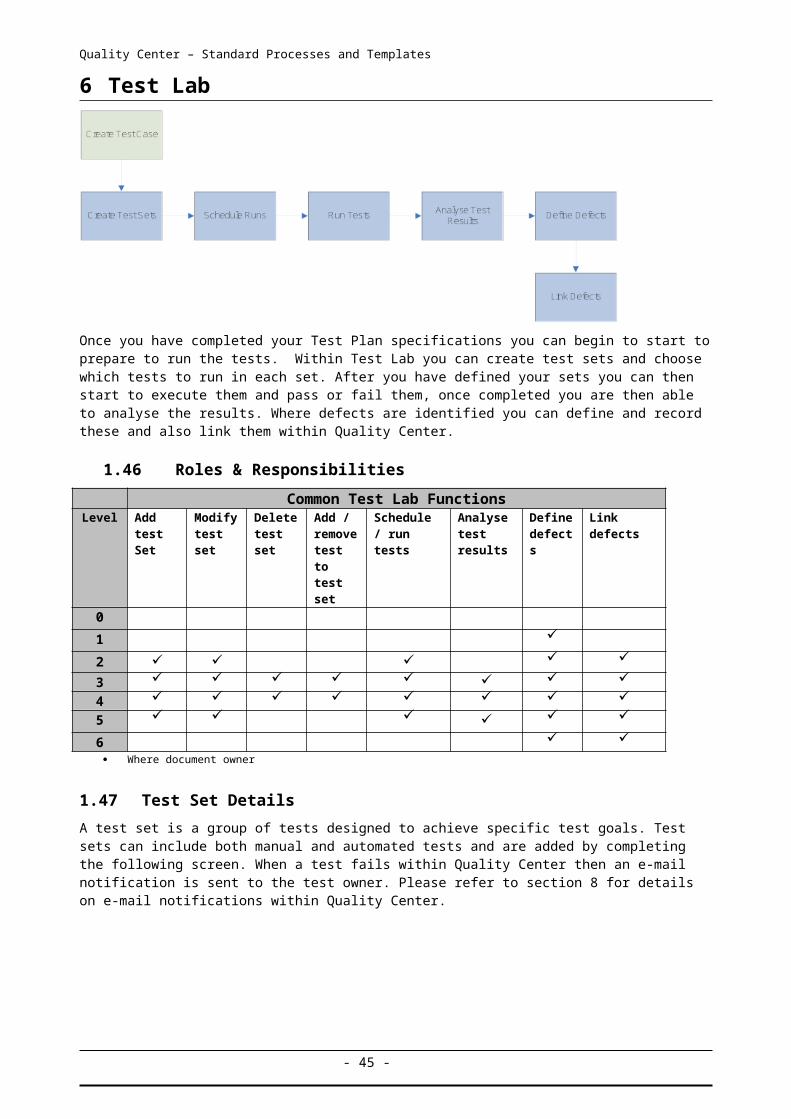
6 Test Lab
Once you have completed your Test Plan specifications you can begin to start to prepare to run the tests. Within Test Lab you can create test sets and choose which tests to run in each set. After you have defined your sets you can then start to execute them and pass or fail them, once completed you are then able to analyse the results. Where defects are identified you can define and record these and also link them within Quality Center.
1.46 Roles & Responsibilities
Common Test Lab FunctionsLevel Add
test SetModify test set
Delete test set
Add / remove test to test set
Schedule / run tests
Analyse test results
Define defects
Link defects
0
1 2 3 4 5 6 Where document owner
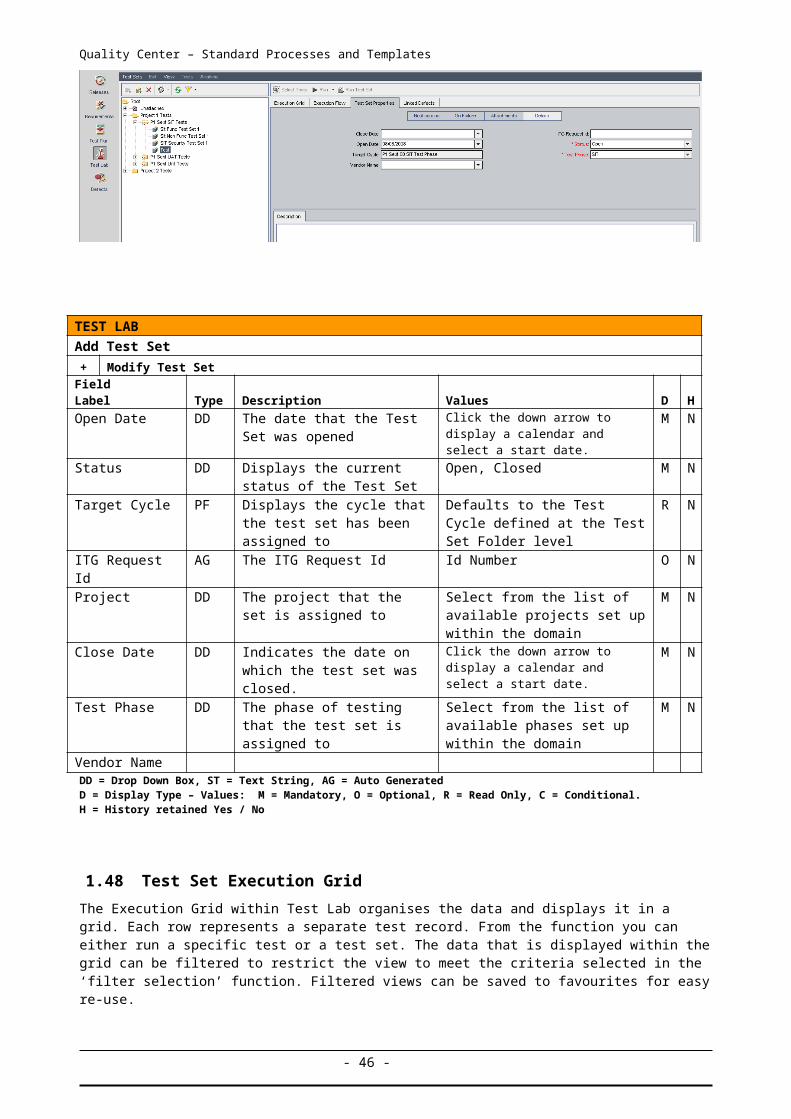
1.47 Test Set Details
A test set is a group of tests designed to achieve specific test goals. Test sets can include both manual and automated tests and are added by completing the following screen. When a test fails within Quality Center then an e-mail notification is sent to the test owner. Please refer to section 8 for details on e-mail notifications within Quality Center.
TEST LAB
- 36 -
Quality Center – Standard Processes and Templates
Add Test Set
+ Modify Test SetField Label Type Description Values D HOpen Date DD The date that the Test Set was
openedClick the down arrow to display a calendar and select a start date.
M N
Status DD Displays the current status of the Test Set
Open, Closed M N
Target Cycle PF Displays the cycle that the test set has been assigned to
Defaults to the Test Cycle defined at the Test Set Folder level
R N
ITG Request Id AG The ITG Request Id Id Number O N
Project DD The project that the set is assigned to
Select from the list of available projects set up within the domain
M N
Close Date DD Indicates the date on which the test set was closed.
Click the down arrow to display a calendar and select a start date.
M N
Test Phase DD The phase of testing that the test set is assigned to
Select from the list of available phases set up within the domain
M N
Vendor NameDD = Drop Down Box, ST = Text String, AG = Auto GeneratedD = Display Type – Values: M = Mandatory, O = Optional, R = Read Only, C = Conditional. H = History retained Yes / No
1.48 Test Set Execution Grid
The Execution Grid within Test Lab organises the data and displays it in a grid. Each row represents a separate test record. From the function you can either run a specific test or a test set. The data that is displayed within the grid can be filtered to restrict the view to meet the criteria selected in the ‘filter selection’ function. Filtered views can be saved to favourites for easy re-use.
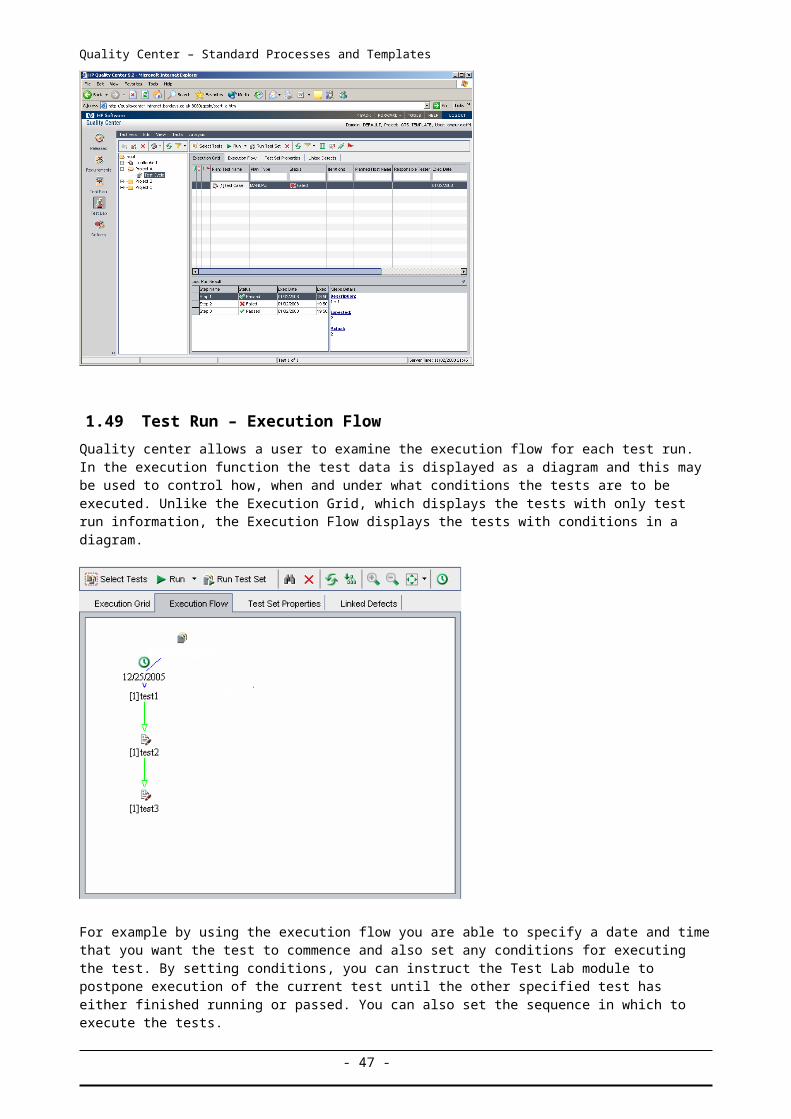
1.49 Test Run – Execution Flow
Quality center allows a user to examine the execution flow for each test run. In the execution function the test data is displayed as a diagram and this may be used to control how, when and under what conditions the tests are to be executed. Unlike the Execution Grid, which displays the tests with only test run information, the Execution Flow displays the tests with conditions in a diagram.
- 37 -
Quality Center – Standard Processes and Templates
For example by using the execution flow you are able to specify a date and time that you want the test to commence and also set any conditions for executing the test. By setting conditions, you can instruct the Test Lab module to postpone execution of the current test until the other specified test has either finished running or passed. You can also set the sequence in which to execute the tests.
1.50 Test Run – Manual Runner
When you run a test manually, you execute the test steps you defined in test planning. You pass or fail each step, depending on whether the actual results match the expected output.You can execute a manual test as many times as needed. The results are stored separately for each run.
- 38 -
Quality Center – Standard Processes and Templates
TEST LAB
Test Runner – Manual Runner
Field Label Type Description Values D HRun Name AG The identifier for the test run System generated R N
Exec date AG The date that the test is started System generated defaults to system date
R N
Tester DD The name of the resource starting the run
System defaults to the current logged in user, however by selecting the down arrow this may be changed from the list of authorised users
R N
Project DD The name of the project. Click the down arrow to display a list of projects.
O N
Test Phase DD Type of test phases Click the down arrow to display a list of test phases
O N
Exec Time AG The time that the test is started System generated defaults to system time
R N
Status AG The status of the test run Defaults to Not Completed R N
Target Cycle AG The target cycle that the test set is assigned to
Pre-filled with the target cycle R N
Test Details ST Comments or details to be recorded about the Test Run
0 -255 Characters O N
DD = Drop Down Box, ST = Text String, AG = Auto GeneratedD = Display Type – Values: M = Mandatory, O = Optional, RO = Read Only, C = Conditional. H = History retained Yes / No
1.51 Test Run – Manual Runner- Run Sets
As the test set is run the user can update each step with the actual result and set a pass or fail status.
1.52 Submit a Defect from a manual run
If a defect is identified during a test run it should be recorded by the tester. The following screen allows users to record details from within the Test Lab functionality. A full field and data summary is provided within section 7.3 Defects
- 39 -
Quality Center – Standard Processes and Templates
TEST LAB
New Defect
Field Label Type Description Values D HSummary ST A brief summary of the defect. 0 – 255 Characters M N
Type DD The type of defect See defect category definitions in the category section of 7.6
M Y
Sub Type DD A sub category of the defect type
See defect category definitions in the category section of 7.6
M Y
Status DD The current status of the defect. See defect status level definitions in section 7.7
M N
Sub Status DD The sub status of the defect See defect sub status level definitions in section 7.7
M N
Project DD The name of the project where the defect occurs.
Click the down arrow to display a list of projects.
M N
Test Phase DD The test phase in which the defect was observed
Unit, Link, CIT, SIT, UAT, OAT, Performance Test, Security Test, Live Confidence Test
M N
Detected by ST The user name of the person who found the defect.
By default the system will default to the user logged in. By selecting the down arrow this may be changed.
M N
Detected on Date ST The date on which the defect was detected.
By default this is set to the current system data
M N
Environment DD The test environment that the defect was identified
Drop down will contain test environments defined locally by Programme
O N
Reproducible DD Can the defect be reproduced Yes, No M N
Document Defect Type
DD Static review of documents Drop down will contain list of document defect type
O N
Business Severity
DD The business severity of the defect
Severity 1 – 4 M N
Application DD The name of the application that the defect relates to
Drop down will contain applications defined locally by Programme
M N
Detected in Release
DD Indicates the Release in which the defect was detected.
Select from the list of currently configured releases in Release module.
M N
Detected in Cycle DD Indicates the Cycle in which the defect was detected.
Select from the list of currently configured cycles in Release module.
M Y
Detected in Version
DD Indicates the build version in which the defect was detected.
Drop down will contain code versions defined locally by the Programme
M N
Description ST A full description of the defect 0 – 255 Characters M N
- 40 -
Quality Center – Standard Processes and Templates
DD = Drop Down Box, ST = Text String, AG = Auto GeneratedD = Display Type – Values: M = Mandatory, O = Optional, R = Read Only, C = Conditional. H = History retained Yes / No
1.53 Test Set - Linked Defects
As seen in Sections 4.10 & 5.6 of this document it is possible to Link a defect to other entities and these links are displayed in the following screen:
- 41 -
Quality Center – Standard Processes and Templates
7 DEFECTS
1.54 Defects Workflow Process
Defect Management is the process of identifying, assessing, documenting, tracking, and communicating problems that arise over the course of systems development and the lifespan of the system in Production. This usually specifies that there should be an adequate process to handle and resolve unplanned incidents and proactively reduce occurrence of unplanned incidents.
The Defect Management workflow enables the capturing and reporting of metrics for defects, and can be used to determine the quality of the system under development.
1.55 Roles and Responsibilities
Common Defects FunctionsLevel Add
defectReview defect
Update defect
Delete defect
Link defect
Link entities
Analyse defect data
0 Defects cannot be
deleted within
Quality Center (even if
entered in error)
1 2 3 4 5 6
* Where document owner
1.56 Add New Defect
When a defect is identified it may be added by completing the following screen from Test Lab function:
- 42 -
Quality Center – Standard Processes and Templates
DEFECTS
New Defect
Field Label Type Description Values D HSummary ST A brief summary of the defect. 0 – 255 Characters M N
Type DD The type of defect See defect category definitions in the category section of 7.6
M Y
Sub Type DD A sub category of the defect type
See defect category definitions in the category section of 7.6
M Y
Status DD The current status of the defect. See defect status level definitions in section 7.7
M Y
Sub Status DD The sub status of the defect See defect sub status level definitions in section 7.7
M Y
Project DD The name of the project where the defect occurs.
Click the down arrow to display a list of projects.
M N
Test Phase DD The test phase in which the defect was observed
Unit, Link, CIT, SIT, UAT, OAT, Performance Test, Security Test, Live Confidence Test
M N
Detected by ST The user name of the person who found the defect.
By default the system will default to the user logged in. By selecting the down arrow this may be changed.
M N
Detected on Date ST The date on which the defect was detected.
By default this is set to the current system data
M N
Environment DD The test environment that the defect was identified
Drop down will contain test environments defined locally by Programme
O N
Reproducible DD Can the defect be reproduced Yes, No M N
Document Defect Type
DD Static review of documents Drop down will contain list of document defect type
O N
Business Severity
DD The business severity of the defect
Severity 1 - 4 M N
Application DD The name of the application that the defect relates to
Drop down will contain applications defined locally by Programme
M N
Detected In Release
DD The name that the release was identified in
Select from the list of currently configured releases
M N
Detected in Cycle DD Indicates the cycle in which the defect was detected.
Select from the list of currently configured cycles
M Y
Detected in version
DD Indicates the application version in which the defect was detected.
Select from the list of currently configured versions
M N
Description ST A full description of the defect and any associated screen shots
0 – 255 Characters M N
1.57 Defect Details Screen
When a defect has been recorded, the following screen allows the user to update the defect and add / update details relevant to it:
- 43 -
Quality Center – Standard Processes and Templates
DEFECTS
Defect DetailsField Label Type Description Values D H
Description ST A description of the defect 0-255 characters. This will be pre-filled from initial creation of the defect
M N
Defect Id SG An auto generated ID System Generated M N
Type DD The type of defect See defect category definitions in the category section of 7.8
M Y
Sub Type DD The second level status of the defect type
See defect category sub type definitions in the category section of 7.8
M Y
Status DD The current status of the defect. See defect status level definitions in section 7.9
M Y
Sub Status DD The second level status of the defect
See defect sub status level definitions in section 7.9
M Y
Project DD The name of the project where the defect occurs.
Click the down arrow to display a list of projects.
M N
Detected by DD The user name of the person who found the defect.
By default the system will default to the user logged in. By selecting the down arrow this may be changed.
M N
Detected on date DD The date on which the defect was detected.
By default this is set to the current system data
M N
Environment DD The test environment that the defect was identified in
Drop down will contain test environments defined locally by Programme
O N
Reproducible DD Indicates whether the defect can be recreated under thesame conditions by which it was detected.
Yes, No M N
Document Defect Type
DD Static review of documents Drop down will contain list of document defect type
O N
Business Severity
ST The business severity of the defect.
1 – 4 M Y
Fix priority DD The priority of the defect, ranging from low priority to high priority. The fix priority is the
Must; Should; Could; Would fix. M Y
- 44 -
Quality Center – Standard Processes and Templates
primary driver for determining when fixes should be completed.
Application DD The name of the application that the defect relates to. By association, this may also indicate the “Product”
Drop down will contain applications defined locally by Programme
M N
Assigned to DD The user name of the person who is assigned to fix the defect
Click the down arrow to display a list displaying the name and full name of each user.
O Y
Last modified AG Indicates the date and time when this defect was lastchanged.
System displays the date and time of last update
O Y
Detected in Release
DD Indicates the Release in which the defect was detected.
Select from the list of currently configured Releases in the Release module.
M N
Detected in Cycle DD Indicates the Cycle in which the defect was detected.
Select from the list of currently configured Cycles in the release Module
M Y
Detected in Version
ST Indicates the code build version in which the defect was detected.
Drop down will contain build versions defined locally by Programme
M N
Planned Closed in Version
DD Indicates the code build version in which the defect is planned to be fixed in.
Drop down will contain build versions defined locally by Programme
O N
Closed in Version DD Indicates the code build version in which the defect was closed.
Drop down will contain build versions defined locally by Programme
O N
Change Request Number
ST The CR number to resolve the defect. Mandatory when Closed with Defect sub type Change Request.
0 -255 characters C Y
Defect Leakage DD Drop down list to indicate if the incident could have been found out in earlier testing phases
Yes / NoDefault is “No”
M Y
Defect Leakage Origination Phase
DD Drop down list to indicate the phase from which incident had leaked. Conditional on “Defect Leakage” being “Y”.
Test Phase values: Requirements, Analysis, Design Build, Unit, Link, CIT, SIT, UAT, OAT, Performance Test, Security Test, Live Confidence Test
O Y
Target Release DD Indicates in which Release the defect is targeted to be closed. Should be the same as that found in.
Click the down arrow to display a list of releases.
O N
Target Cycle DD Indicates in which Cycle the defect is targeted to be closed.Should be the same as that found in but may “leak” into a later test cycle.
Click the down arrow to display a list of cycles.
O N
Estimated fix time ST Indicates the estimated number of days required for fixing the defect
0-255 characters O N
Actual fix time ST Indicates the actual number of days needed to fix the defect.
If this field is left blank, Quality Center automatically calculates the Actual Fix Time as Closing
O N
Closing date AG Indicates the date on which the defect was closed.
Read only System date when status changes to ”Closed”
C N
- 45 -
Quality Center – Standard Processes and Templates
DD = Drop Down Box, ST = Text String, AG = Auto Generated, D = Display Type – Values: M = Mandatory, O = Optional, R = Read Only, C = Conditional. H = History retained Yes / No
1.58 Defect Grid
The Defect Grid is a view that enables the user to see defects in a non-hierarchical manner with each line of the grid displaying a separate defect. The data that is displayed within the grid can be filtered to restrict the view to meet the criteria selected in the ‘filter selection’ function. Filtered views can be saved to favourites for easy re-use. The defects grid also provides users with an analysis option which may be used to create and save their own customised reports.
1.59 Business Impact
Impact Severity 1 (Severe Business Impact)
A Severity 1 defect will result from the identification of a risk to the organisation of an individual situation in terms of;
Potential to adversely affect the image of the organisation and / or result in adverse media comment.
Potential for significant financial loss to the Bank.
Identification of significant impact to any service provided to an internal or external customer where;
It is a critical point in the customer's business day.
Critical client deliverable(s) are impacted.
Significant infrastructure failures.
Data is lost or corrupted (including the provision of incorrect information to customers).
The potential for any of the above exists.
Inability of the Bank to meet its own, or causing widespread impact to its customer base in meeting their, statutory requirements.
A Major defect will be a severity 1 defect displaying one or more of the following characteristics;
An unknown recovery path.
Protracted recovery.
Failed recovery.
- 46 -
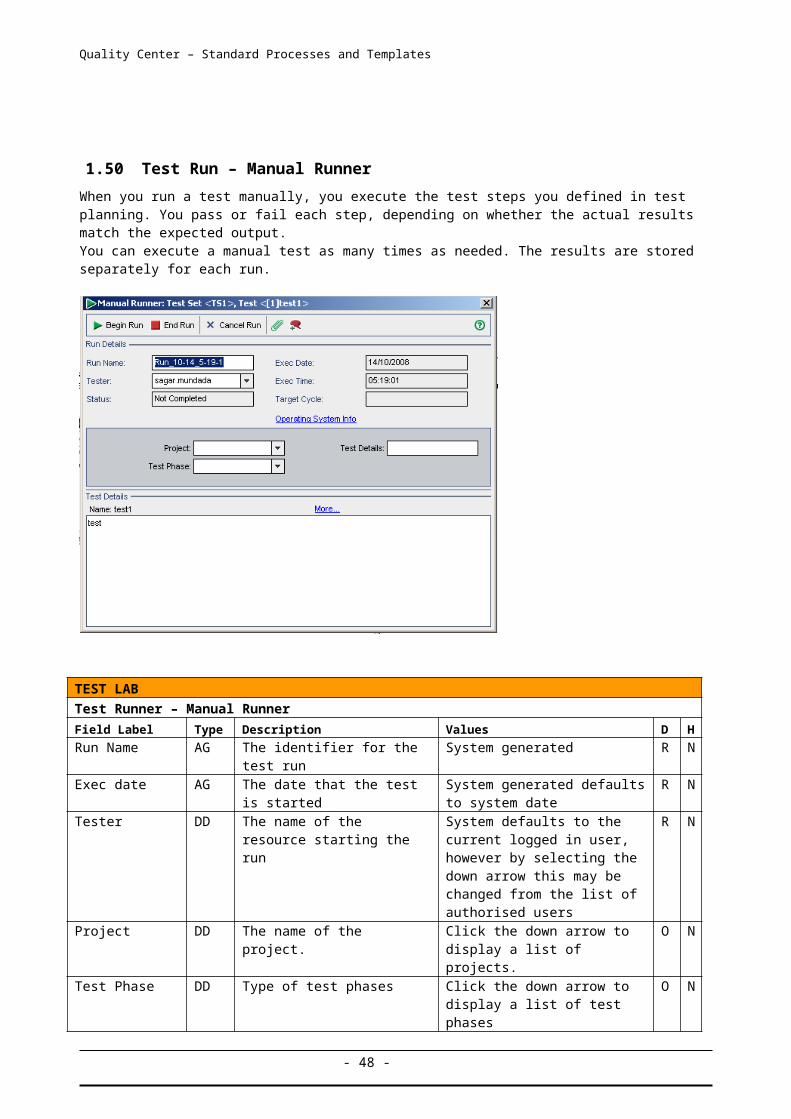
Quality Center – Standard Processes and Templates
Severity 2 (Considerable Business Impact)
Potential to threaten individual customer relationships / generate customer complaints.
Potential for financial loss to the Bank.
Identification of significant impact to any service provided to an internal or external customer where it is a non-critical point in the customer's business day.
High volume/ dispersed infrastructure failures, not yet causing significant impact
Severity 3 (Limited Business Impact)
Non critical impact with visibility to clients and/or customers, including procedural / documentation clarification
Severity 4 (Minor Business Impact)
Non critical impact with no visibility to clients and/or customers, including non-critical enquiries.
1.60 Defect Status & Flow
The different States a Defect can pass through are:Status Sub-status Comment OwnerNew Raised Just raised, nothing yet happened to the
defect. Owned by the person who raised itTester
Open Under Review Being evaluated by PM / TM / BA / etc… Test / Defect Manager
Assigned Assigned to someone believed qualified to fix the defect – a developer, a DBA, a BA, etc….
Deferred Defect will not be fixed immediately but will be at some point. Remains Open but no action being taken on it. Until the end of the Project at which time all defects will be set to Closed. This is the only case which may by-pass Fixed state
Test / Defect Manager
Clarification Reviewer / Assignee could not decide what to do based on the information provided. Passed to someone else to clarify – the original tester, a specialist, more senior BA, etc…
Test / Defect Manager
Fixed Not Released (to Test)
Defect has been fixed by developer but the Build Cycle incorporating the “Fix” has not yet been released to Test.
Developer
Released (to Test)
Waiting for tester to rerun script / test case. Tester
Passed Re Test has taken place and Passed. (See Reopen in failed.)
Tester
Closed Duplicate Identified as a duplicate of an existing defect. Test / Defect Manager
Error Defect was raised in error – e.g. by Tester. Test / Defect Manager
Passed Defect has been fixed, retested and Passed the test case.
Test / Defect Manager
Exemption The Project is ending. ALL defects must be Closed but this defect is unresolved. An exemption to go live with the defect is needed with an email attachment as proof. The Comments field must show where the defect has gone – e.g. to a Production Incident log in Service Center, the next project, etc.
Test / Defect Manager
- 47 -
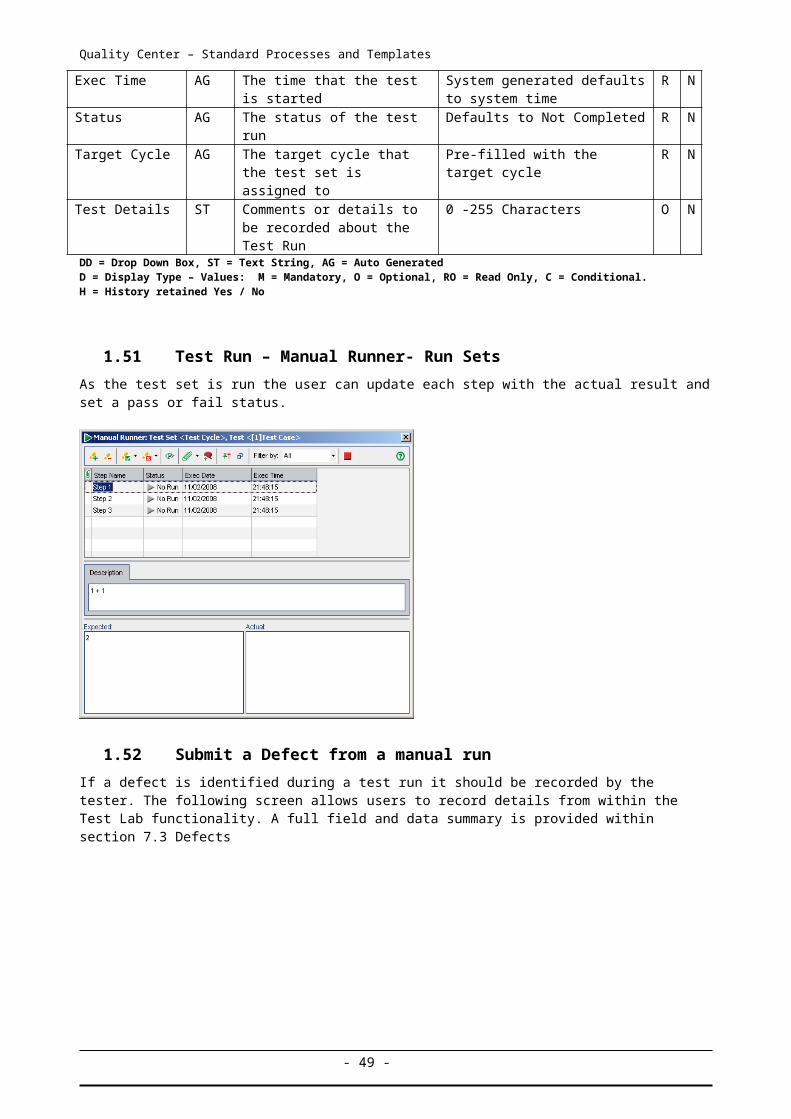
Quality Center – Standard Processes and Templates
Status Sub-status Comment OwnerReopen A defect has Failed the retest and is sent back
through the appropriate investigation / fix cycle. Also, a Defect that has already been “Closed” in an earlier Test Cycle, or even an earlier test Phase, but has re-emerged. NB This requires recognition by the Raiser, Reviewer, etc. or a search of old Defects when a new one is raised (process needed…..). In this instance the “new” defect is “closed” and the old defect is reopened. So a defect can go to the “Reopen” state at anytime it has been recognised as an old defect……
Tester
Under Review As above Test / Defect Manager
Assigned As above DeveloperDeferred As above Test / Defect
ManagerClarification As above Test / Defect
Manager
The relationship between defects, Status and responsibility areas is shown in the following Defect Process State Flow diagram.
- 48 -
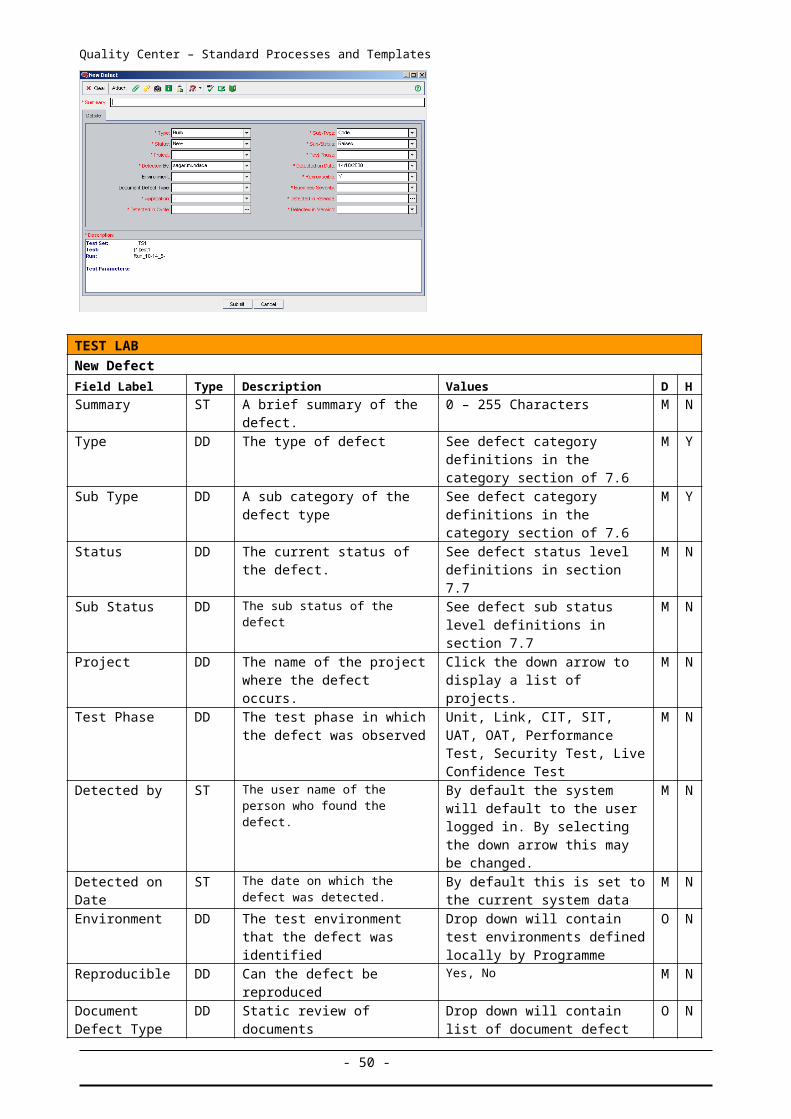
Quality Center – Standard Processes and Templates
1.61 Defect Process Flow Diagram
- 49 -
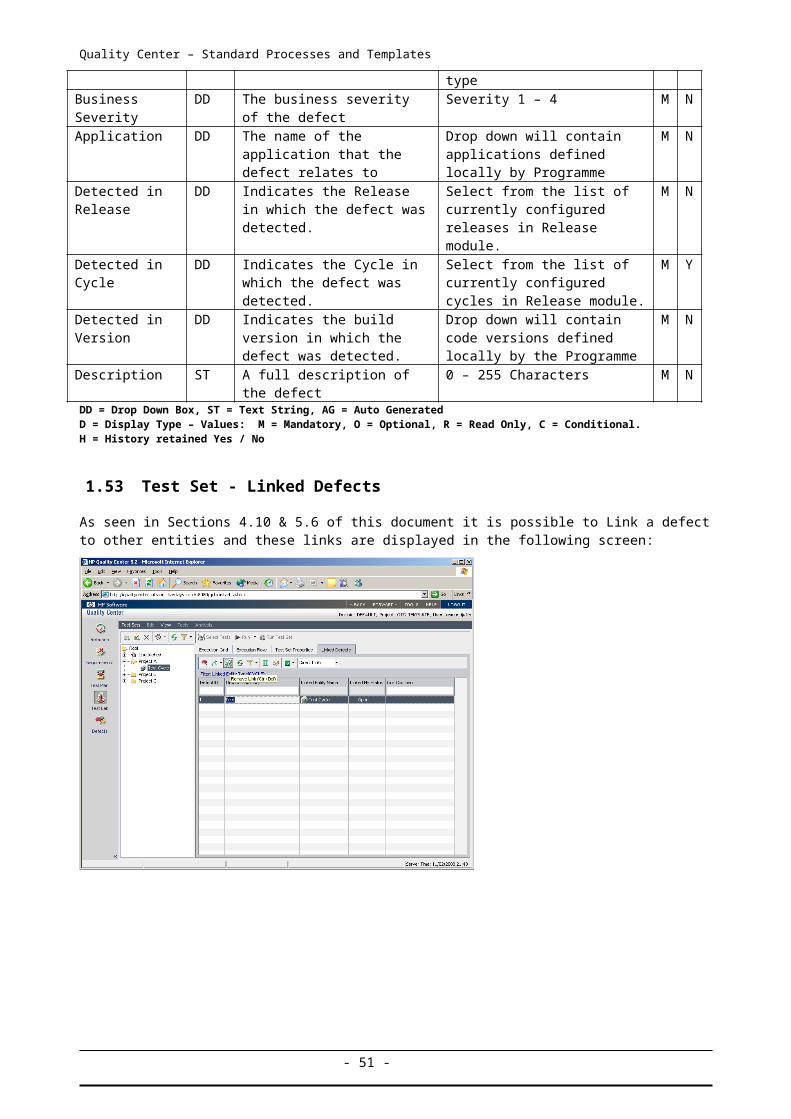
Quality Center – Standard Processes and Templates
1.62 Defect Category
Category Sub Level Sub Level Definitiontbc tbc A Defect type permissible only for defects with a
state of “New/Raised”; “Open/Clarification” or “Open/Under Review”. See next table. Use when the defect category is not yet clear and “to be confirmed”.
BuildCode
Configuration
The result of incorrect application coding.
Error identified within the build documentation
Data
Local to Appl
Mainframe
Reference
Incorrect data contained within local databases (e.g. EPAT, E Services, IDT)
Incorrect data contained within mainframe databases (e.g. DB2, IMS)
Incorrect reference data contained on mainframe and/or local database
Environment
Hardware
Connectivity
Network
Hardware fault.
Problem with the applications connectivity/comms between the applications being tested.
Network problems (e.g. IMSA, CICS)
ImplementationDeploy - Test Env
Deploy - Live Env
Incorrect implementation into the test environment. Problems with deployment into a live environment
Requirements
Design
Operational
Performance Test
Business
Technical
E2E
Change Raised
Incorrect Design requirements
Incorrect Operational requirements
Incorrect Performance Test requirements
Faults found in Business Design (e.g. BOM, BOD)
Faults found in the Technical specifications (e.g. System or Detailed design)
Faults found in the High Level design (e.g E2E design)
The defect has identified a functional problem in design which requires a change request
Test
No Fault Found
User Error
Un reproducible
Duplicate Defect
Defect raised but found not to be a problem
Tester or user error (i.e. incorrect script)
Defect raised but the problem could not be re produced.
Defect raised but found to be a duplicate.
- 50 -
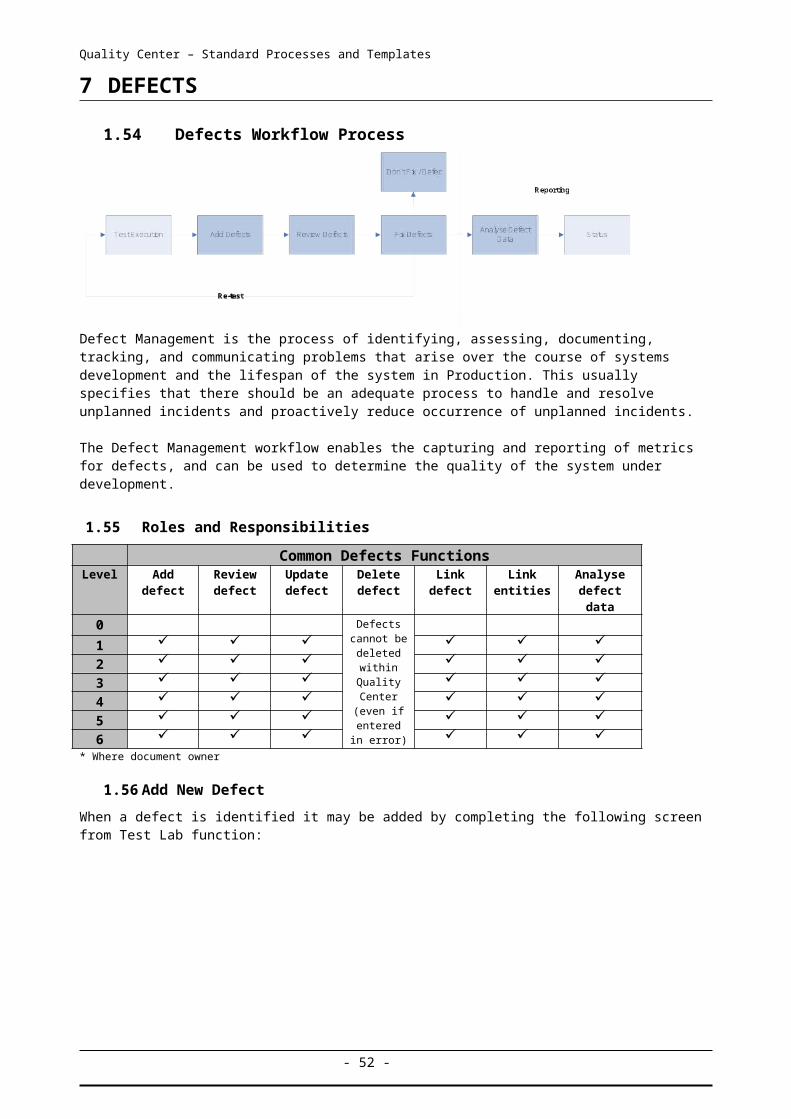
Quality Center – Standard Processes and Templates
Defect Type and Sub Type for a New Defect.
When a Defect has just been raised it may not be possible to determine an accurate “category”. For an initial stage of the defect life cycle a type of “tbc” is permitted.
Defect Status Sub Status Defect Type Sub Type OwnerDefect is first raised.
New Raised tbc tbc Raising TA
Defect is being evaluated
Open Under Review
tbc tbc Test / Defect Manager
Additional information needed.
Open Clarification tbc tbc TA/BA, specialist, …
The defect Type and Sub Type is NOT restricted to “tbc” i.e. other values are permitted if an early decision is made.
For ALL other defect states a defect Type and Sub Type become mandatory as a value OTHER THAN “tbc” – i.e. a decision has to be made.
1.63 Document Defect Type
Quality Center supports the static review of documents and enables specific defect types to be used for analysis.
When the Defect Category is Requirements and the Test Phase is “Review” an additional drop down list box appears
Defect Classification
Definition
Ambiguous The word or phrase may be interpreted with more than one meaning
Incomplete A phrase should contain enough information to fulfil its purpose.
Untraceable All requirements/components/items must have unique identifiers
Untestable It must possible to prove that a requirement has been achieved
Mistake The document author has made a factual or technical error
Cosmetic Spelling mistakes etc which do NOT affect the meaning of the document
OtherAny defects not clearly covered in the above defect classifications A classification of “Other” would not normally be acceptable. Can it be removed?
- 51 -
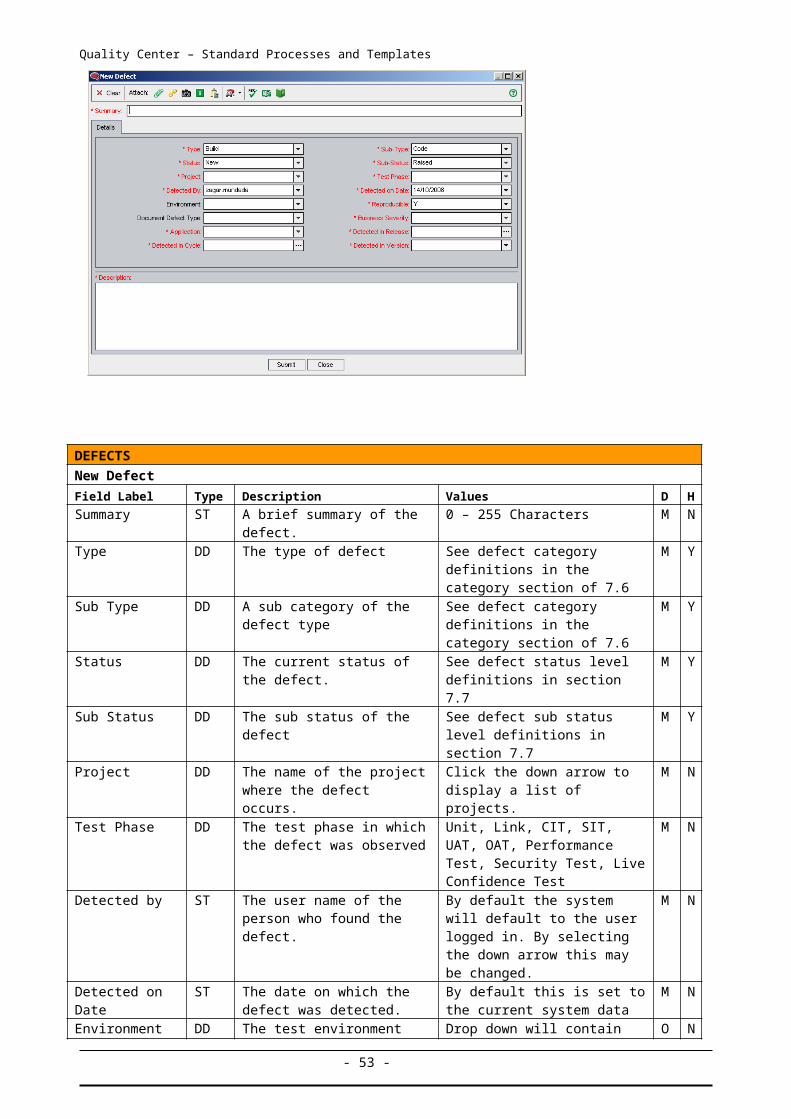
Quality Center – Standard Processes and Templates
1.64 Fix Priority
Priority
A Must
This has a severe impact on testing. This must be fixed immediately. A critical set of functionality scoped to be tested cannot be completed and needs this issue fixed before testing can be continued.
B Should
This has a major impact on testing. This should within fixed within a day of the defect being logged A major set of Functionality can only be tested by use of a complicated work-around which is slowing down test progress.
C Could
This has a medium impact on testing. The problem could be fixed before release of the current version in development.The Bug affects pass success on some tests but the issue can be by-passed for other tests by means of a simple work-around
D Would
This has a minor impact on testing. The defect would be fixed if there is time, but it could be deferred until another release.This defect is normally cosmetic in nature and does not affect the key delivery of the Business requirements.
1.65 Linked Entities
A defect can be linked directly or indirectly to an entity. When you add a defect link to an entity, Quality Center adds a direct link to this entity and direct links to other related entities.
In addition, during a manual test run, if you add a defect, Quality Center automatically creates a linkage between he test run and the new defect.
(DEFECT => RUN => STEP RUN => TEST SET => STEP => TEST CASE => REQUIREMENT => RELEASE => FULL TRACEABILITY)
- 52 -
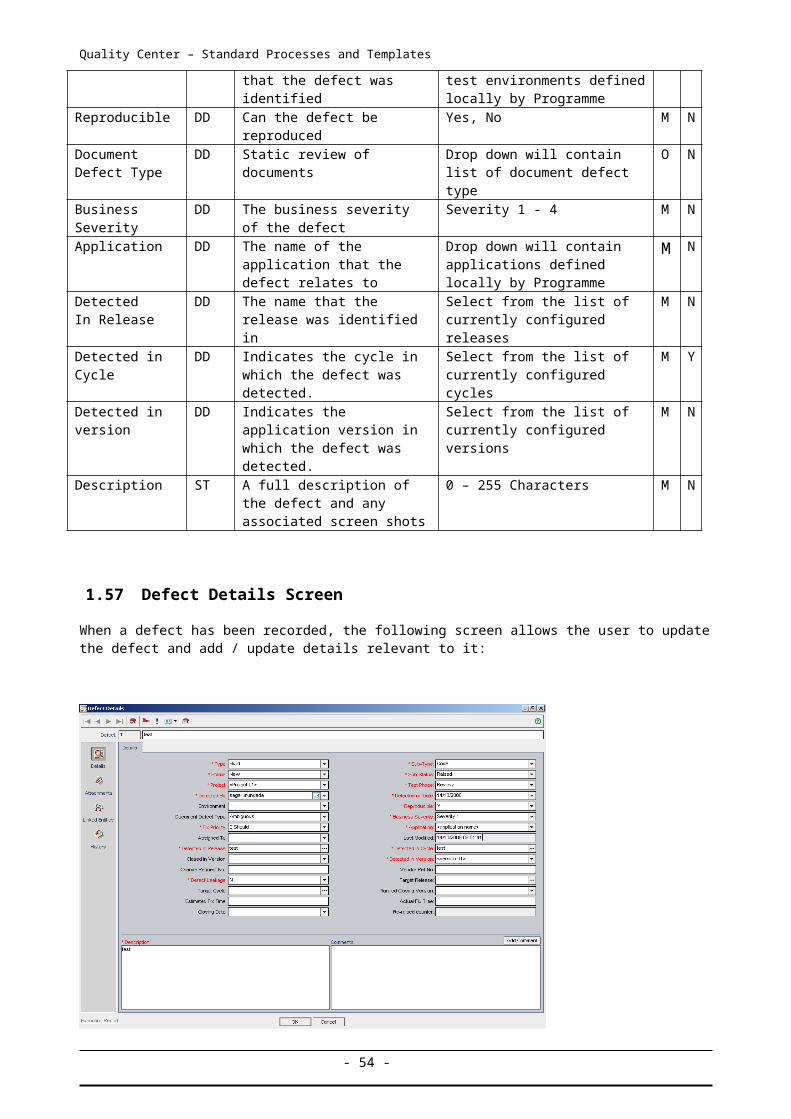
Quality Center – Standard Processes and Templates
8 E-mail Notifications
It is possible to use and configure the system to provide e-mail notifications, these can be either manual or in some cases automated. The following sections provide further detail on where and how these can be used.
1.66 Manual E-mail Notification
RequirementsWithin the requirements functionality you are able to send an e-mail to other users in the (Quality Center) project. By doing this you are able to inform development, quality assurance and project members about the status of a requirement. The e-mail that is generated contains a link to the requirement and enables the recipient to go straight to that specific requirement and view its content. In order to create an e-mail the user just selects the Send by E-mail button from the requirements screen and the e-mail dialogue box is opened.
Defects
Within the defects functionality you are also able to manually send an e-mail regarding a defect to another user. Typically this may be used to advise the relevant people within a project of the defect status and repair activity. Again the functionality is accessed by the Send E-mail function and the above dialogue box opens allowing the user to create the e-mail containing a link.
1.67 Automated E-mail Notification
When setting up and running a project it is possible to activate Alert rules for the project. By doing this the administrator can configure the system to send notification e-mails and set up automatic alerts to inform of changes that may occur within the project that may affect the overall testing process. By default these notifications are ‘turned off’ but can be configured by Testers with Access level 3, e.g. a Test Project Manager.
Where agreed, the project administrator can configure these settings from the customisation function within Quality Center, this Auto mail function allows the user to define the circumstances and changes that will trigger when alerts or notifications should be sent, the information provided and who it should go to. This functionality may be used to update a Project Manager if requirements are updated or changed or to notify an individual that a defect has been assigned to them.
It is advised that Testers use customised views to regularly monitor all tasks that have been assigned to them and NOT rely on multiple emails.
- 53 -
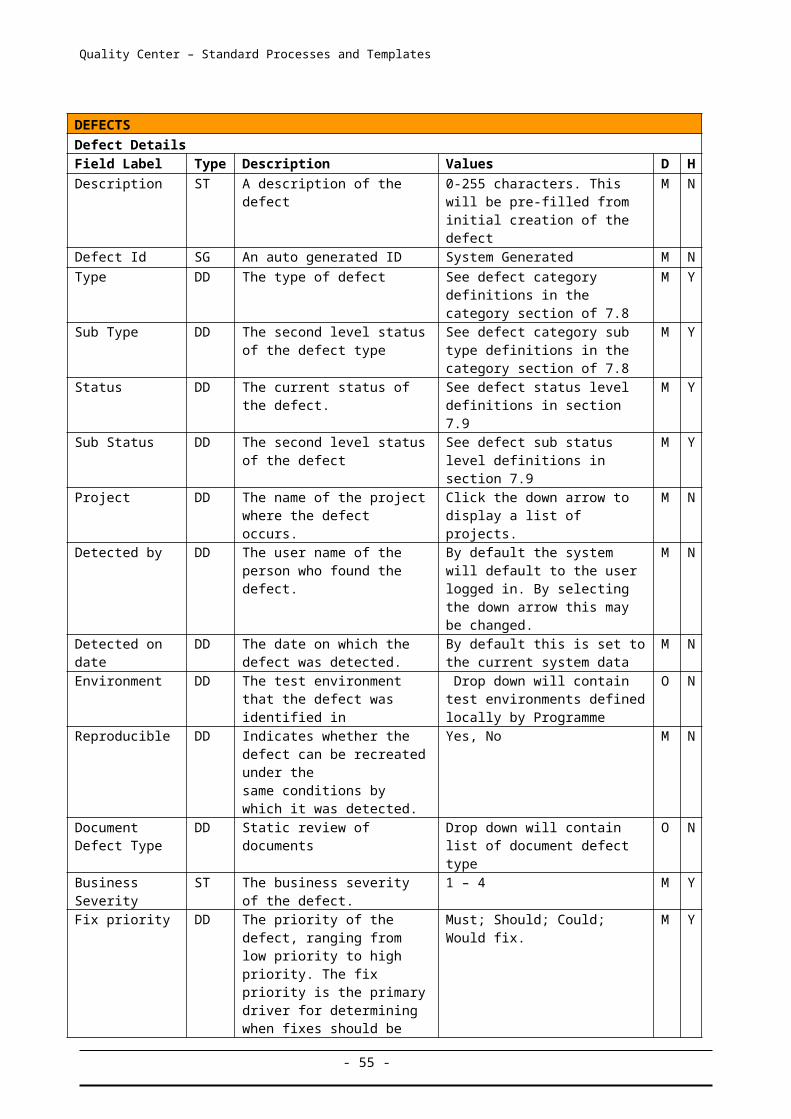
Quality Center – Standard Processes and Templates
Alert RulesAs mentioned it is possible to set Alert rules up within Quality Center. These alerts will allow the project team to keep track or requirements, tests and defects as the testing process is undertaken. The Alert Rules are set up from within the customisation functionality and may be configured to best suit the project needs.
- 54 -

Quality Center – Standard Processes and Templates
Appendix A – Access Permissions
Key:
Level Description0 View only – all modules1 Full access to Defect module + view only to other modules2 Access to all modules but Releases (view only to this module) 3 Full access to all modules, with partial deletion rights4 Full access to all modules, including full deletion rights5 Same access as Level 2 + Business Process Testing module6 Restricted access to Defects module onlyx Full rights accessx* Document owner only
RELEASES Level Permissions 0 1 2 3 4 5 6
Add Release x x
Modify Release
+ Application x x
+ Attachment x x
+ Description x x
+ End Date x x
+ Major Release Details x x
+ Project x x
+ Release Name x x
+ Release Type x x
+ Start Date x x
+ STO x x
+ Test Environment x x
+ Test Manager x x
+ Test Phase x x
+ Test Team x x
+ Vendor Manager x x
+ Vendor Name x x
Delete Release x
Add Release Folder x x
Modify Release Folder
+ Attachment x x
+ Description x x
+ Developed By x x
+ Programme x x
+ Programme Manager x x
+ Project x x
+ Project Manager x x
+ Release Date x x - 55 -
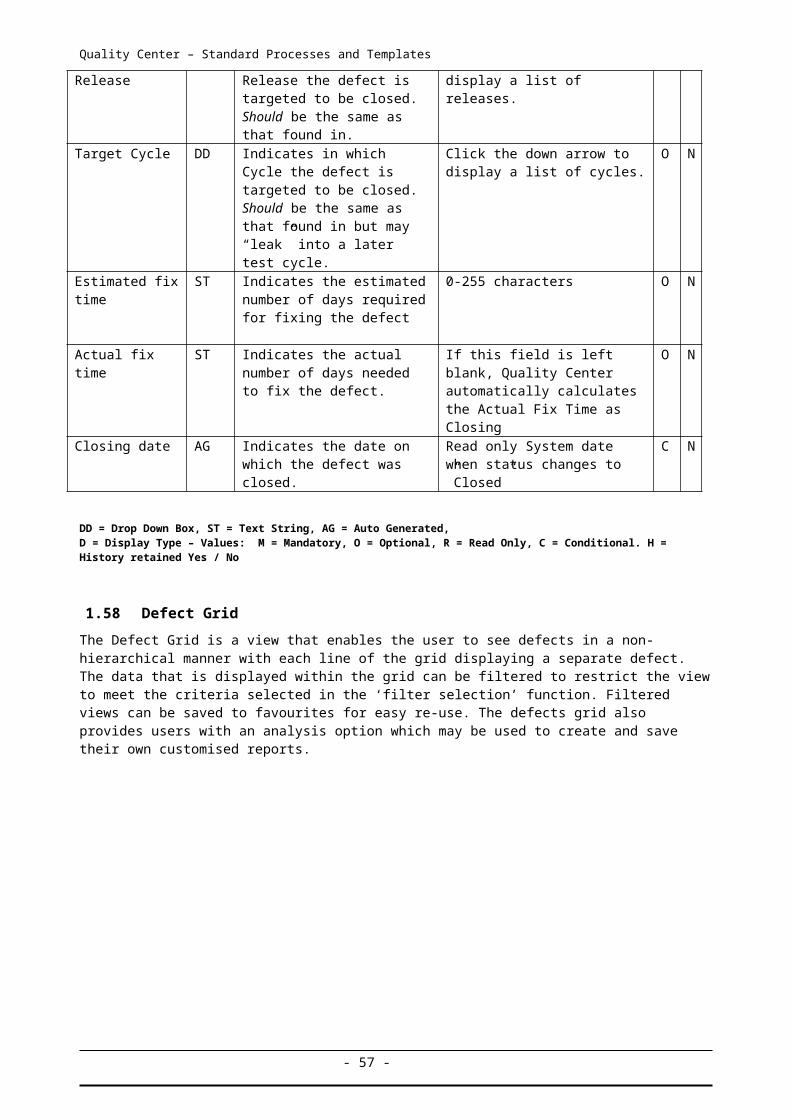
Quality Center – Standard Processes and Templates
RELEASES Level Permissions 0 1 2 3 4 5 6
+ Release Manager x x
+ Release Name x x
+ Release Type x x
+ STO x x
+ Vendor Name x x
Delete Release Folder x
Add Cycle x x
Modify Cycle
+ 3rd Party x x
+ Attachment x x
+ Description x x
+ End Date x x
+ Name x x
+ Project x x
+ Project Manager x x
+ Release Name x x
+ Start Date x x
+ STO x x
+ Test Environment x x
+ Test Phase x x
+ Vendor Name x x
Delete Cycle x
- 56 -
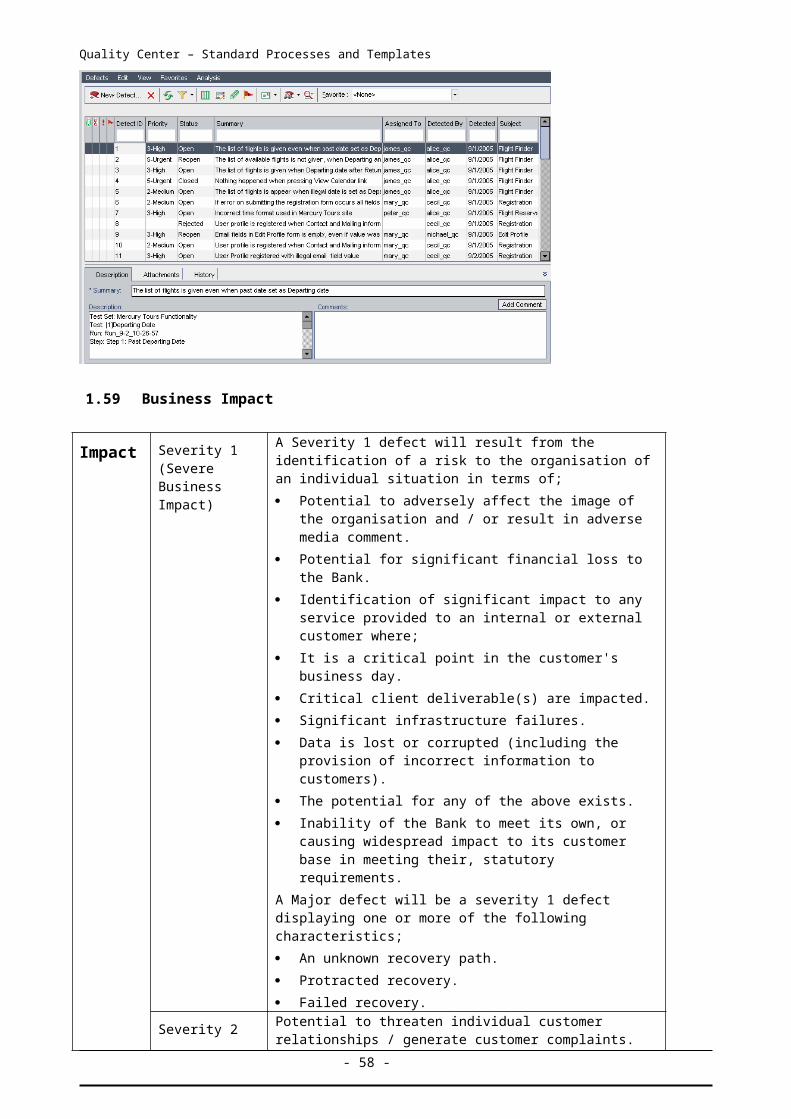
Quality Center – Standard Processes and Templates
REQUIREMENTS Level Permissions 0 1 2 3 4 5 6
Add Requirement x x x x
Modify Requirement
+ Attachment x* x x x*
+ Author x x x x
+ Authorised By x x x x
+ Business Requirement ID x x x x
+ Comments x* x x x*
+ Creation Date x x
+ Creation Time x x
+ Description x* x x x*
+ Developed By x x
+ Direct Cover Status x x
+ Module Name x x x x
+ Name x x x x
+ Old Type (obsolete) x x
+ Priority x x x
+ Project x x x
+ RBQM xxxxx x x
+ Release Name x x
+ Requisite Pro ID x x x x
+ Requirement Type x x x x
+ Reviewed x x x x
+ Rich Text x x x x
+ STO x x
+ Target Cycle x x
+ Target Release x x
Delete Requirement x* x x*
Add Tests To Coverage x x x x
Remove Tests From Coverage x x x x
Add Requirement Traceability x x x x
Modify Requirement Traceability
+ Trace Comment x* x x x*
Remove Requirement Traceability x* x x x*
Risk-Based Quality Management
+ Assess Business Criticality x x
+ Assess Failure Probability x x
+ Analyze x x x x
TEST PLAN Level Permissions 0 1 2 3 4 5 6
- 57 -
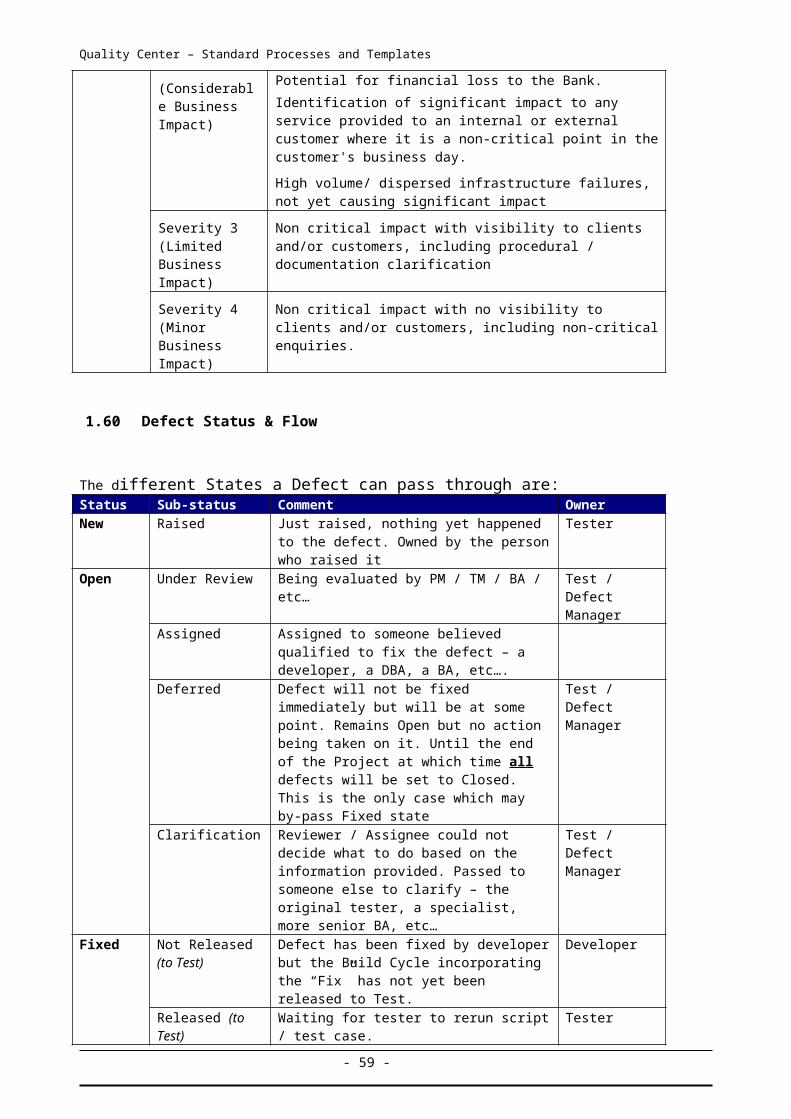
Quality Center – Standard Processes and Templates
Add Test x x x x
Modify Test
+ Approved By x* x x x*
+ Attachment x* x x x*
+ Comments x* x x x*
+ Creation Date x x
+ Description x* x x x*
+ Designer x x x x
+ Estimated DevTime x x
+ Execution Status x x x x
+ Path x x x
+ Release Date x x x x
+ Reviewed x x x x
+ Reviewed By x x x x
+ Status x x x x
+ Subject x x x
+ Template x x
+ Test Designer x x x x
+ Test Name x x x x
+ Test Priority x x x x
+ Test Type x x x x
Delete Test x* x* x x*
Add Design Step x x x x
Modify Design Step
+ Attachment x x x x
+ Description x x x x
+ Expected x x x x
+ Step Name x x x x
Delete Design Step x* x x x*
Add Folder x* x x x*
Modify Folder
+ Attachment x x x x
+ Description x x x x
+ Name x x
Delete Folder x
Move Folder x x x
Copy Folder x x x
Generate Script x x x
TEST LAB Level Permissions 0 1 2 3 4 5 6
Add Test Set x x x x
Modify Test Set
- 58 -
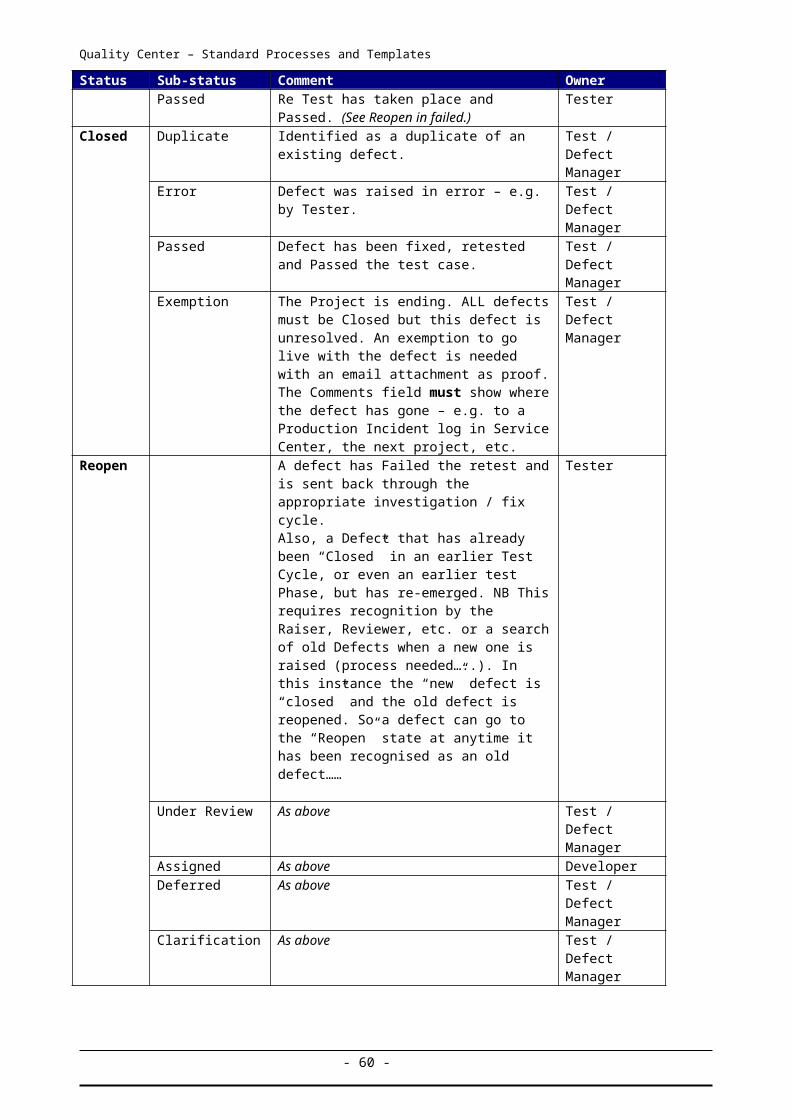
Quality Center – Standard Processes and Templates
TEST LAB Level Permissions 0 1 2 3 4 5 6
+ "On Failure" Settings x x
+ Attachment x x x x
+ Close Date x x
+ Description x x x x
+ Execution Flow x x x x
+ ITG Request Id x x x x
+ Open Date x x x x
+ Project x x x x
+ Release Name x x x x
+ Status x x x x
+ STO x x x x
+ Test Phase x x x x
+ Test Set x x x x
+ Test Set Notification Settings x x x x
+ Vendor Name x x x x
Delete Test Set x x
Move Test Set x x
Copy Test Set x x x x
Add Folder x x
Modify Folder
+ Attachment x x x x
+ Description x x x x
+ Name x x
+ Target Cycle x x x x
Delete Folder x
Move Folder x x x
Copy Folder x x x
Add Tests To Test Set x x x x
Modify Test in Test Set
+ "On Failure" Settings x x
+ Attachment x* x x x*
+ Exec Date x* x x x*
+ Order Tests In Test Set x x x x
+ Planned Exec Date x x x x
+ Planned Exec Time x x x x
+ Planned Host Name x x x x
+ Project x x x x
+ Release Date x x x x
+ Responsible Tester x x x x
+ Reviewed x x x x
+ Reviewed By x x x x
+ Run Configuration x* x x x* - 59 -
Quality Center – Standard Processes and Templates
TEST LAB Level Permissions 0 1 2 3 4 5 6
+ Status x x x x
+ Test Phase x x x x
+ Test Priority x x x x
+ Test Version x x x x
+ Time x x x
Remove Test From Test Set x x x x
Run Test x x x x
Modify Run
+ Actual [STEP] x x
+ Attachment [RUN] x* x x x*
+ Attachment [STEP] x x x x
+ Description [STEP] x x x x
+ Duration [RUN] x x x x
+ Exec Date [RUN] x x x x
+ Exec Date [STEP] x x x x
+ Exec Time [RUN] x x x x
+ Exec Time [STEP] x x x x
+ Expected [STEP] x x x x
+ Host [RUN] x x
+ Operating System [RUN] x x
+ OS Build Number [RUN] x x
+ OS Service Pack [RUN] x x
+ Project [RUN] x x x x
+ Run Name [RUN] x x
+ Source Test [STEP] x x
+ Status [RUN] x x x x
+ Status [STEP] x x x x
+ Step Name [STEP] x x
+ Test Details [RUN] x* x x x*
+ Test Phase [RUN] x x x x
+ Test Version [RUN] x x
+ Tester [RUN] x x
Delete Run x* x
Reset Test Set x x
Add Hosts x x x x
Modify Hosts x x x x
Delete Hosts x
Add Host Group x x x x
Modify Host Group x x x x
Delete Host Group x
- 60 -
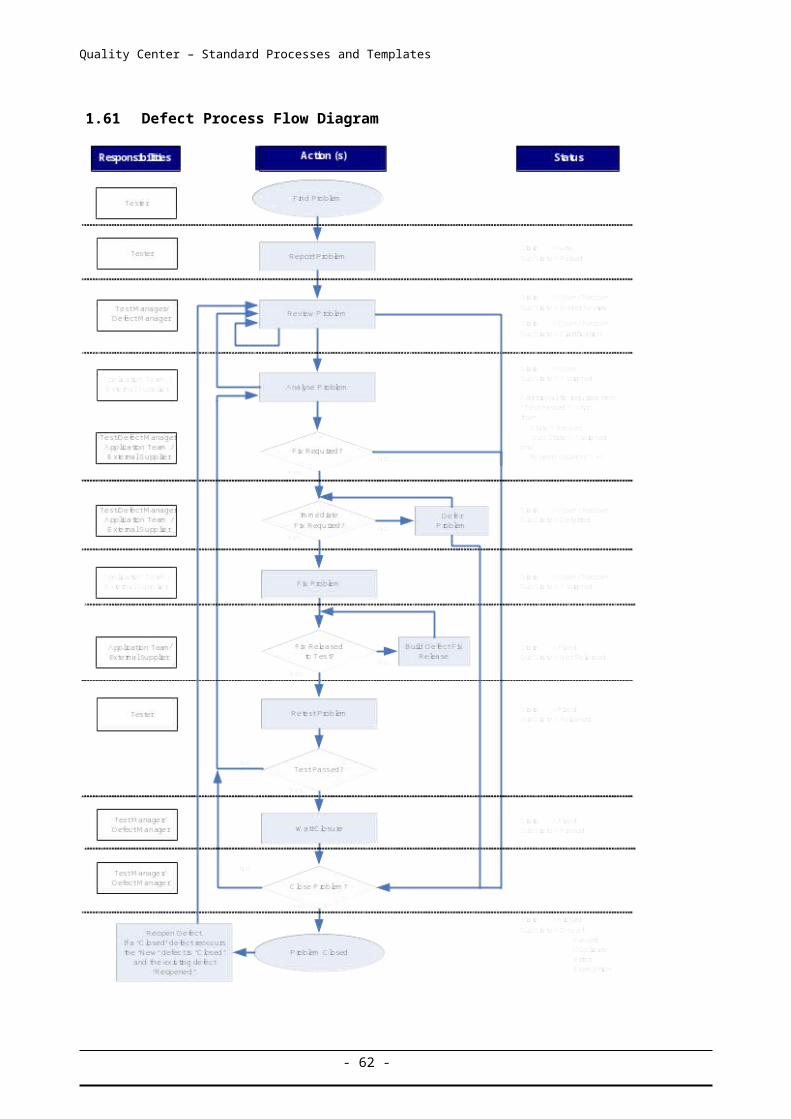
Quality Center – Standard Processes and Templates
- 61 -
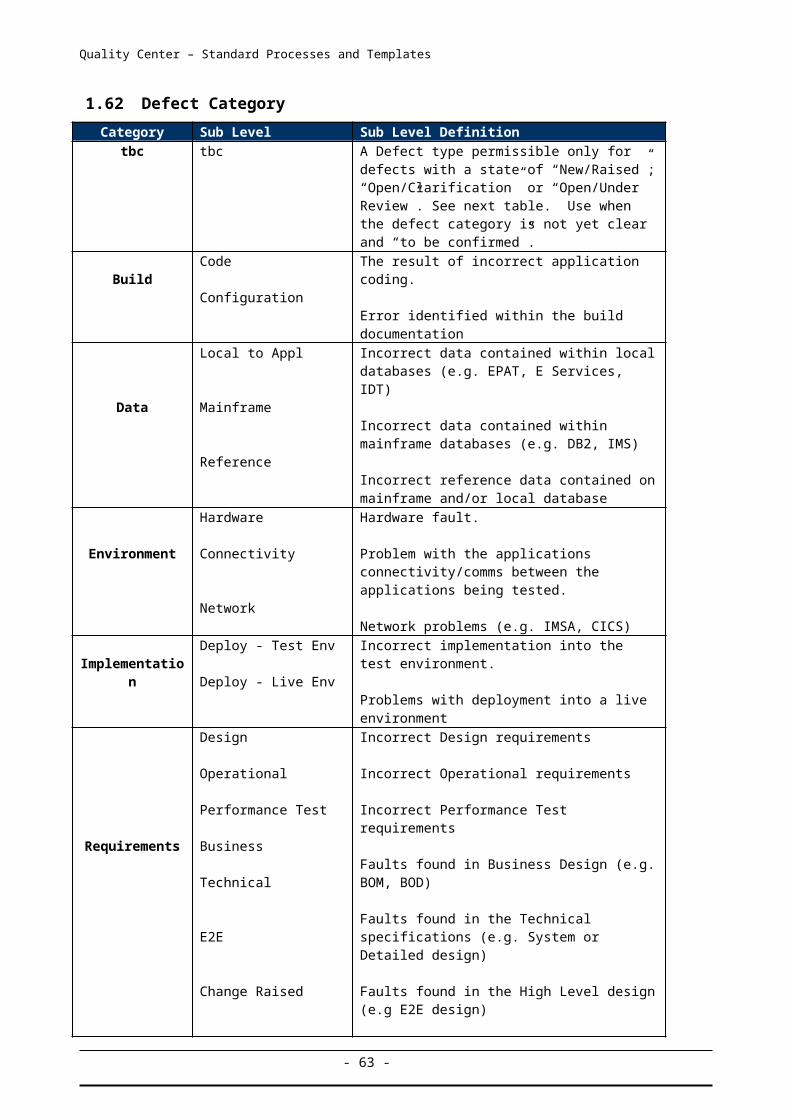
Quality Center – Standard Processes and Templates
DEFECTS Level Permissions 0 1 2 3 4 5 6
Add Defect x x x x x x
Modify Defect
+ Actual fix time x x x x
+ Application x x x x x x
+ Assigned to x x x x x x
+ Attachment x x x x x x
+ Business Severity x x x x x x
+ Change Request No. x x x x x x
+ Closed in Version x x
+ Closing Date x x
+ Comments x x x x x x
+ Defect Leakage x x x x x x
+ Defect Leakage Organisation Phase x x x x x x
+ Description x x x x x x
+ Detected By x x x x x x
+ Detected in Cycle x x x x x x
+ Detected in Release x x x x x x
+ Detected in Version x x x x x x
+ Detected on Date x x x x x x
+ Environment x x x x x x
+ Estimated Fix Time x x
+ Fix Priority x x x
+ GRCB_nn x x x x x x
+ GTS_nn x x x x x x
+ Planned Closing Version x x x x x
+ Project x x x x x x
+ Project_nn x x x x x x
+ Release Name x x x x x x
+ Reproducible x x x x x x
+ Re-raised counter x x x x x x
+ Status x x x x x x
+ Subject x x x x x x
+ Sub-Status x x x x x x
+ Sub-Type x x x x x x
+ Summary x x x x x x
+ Target Cycle x x x x x x
+ Target Release x x x x x x
+ Technical Component x x x x x x
+ Test Phase x x x x x x
+ Type x x x x x x
Delete Defect x
- 62 -
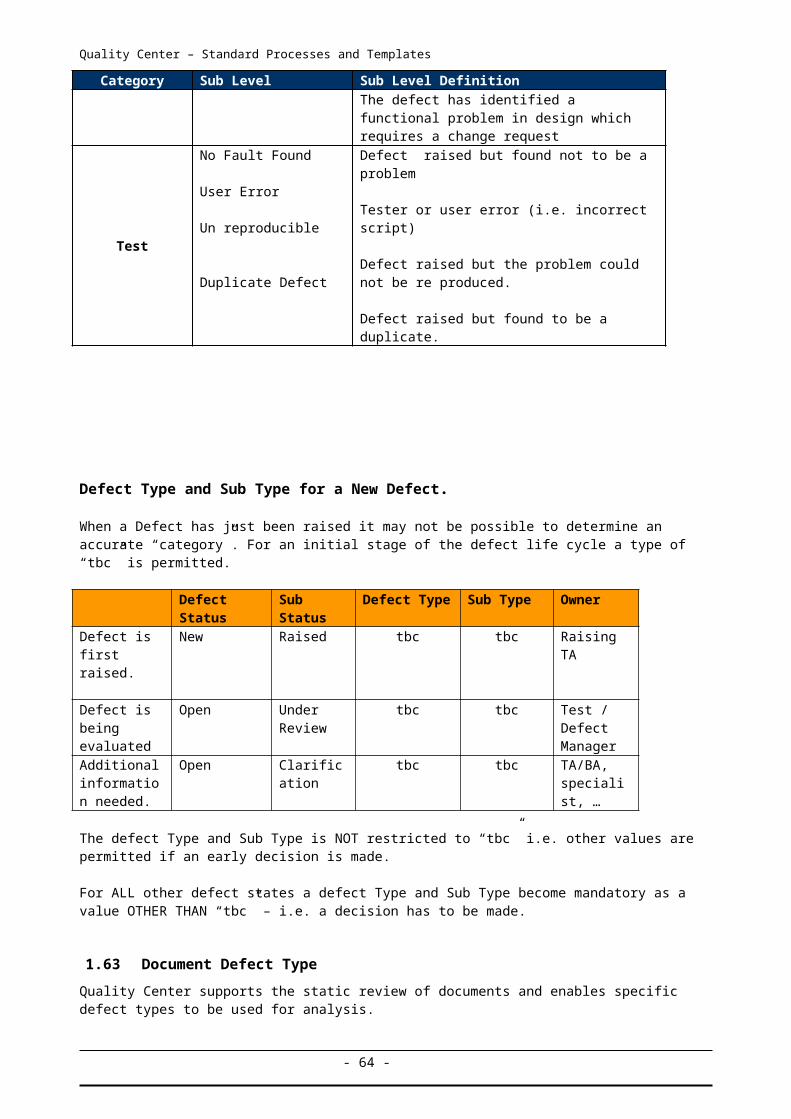
Quality Center – Standard Processes and Templates
DEFECTS Level Permissions 0 1 2 3 4 5 6
Add Defect Link x x x x x x
Modify Defect Link
+ Link Comment x x x x x x
+ Link Type x* x x x x x
Remove Defect Link x* x* x* x x* x
- 63 -