Embed Size (px)
Citation preview

QCVS Getting Started Guide
1 Introduction
QorIQ Configuration and Validation Suite (QCVS) is a suite of softwareconfiguration and validation tools for the NXP QorIQ processors. QCVS isbased on a development framework, called ProcessorExpert.
The QCVS product bundles a set of components that allow you to configuredifferent intellectual property (IP) blocks or functions found in NXP QorIQdevices. Each QCVS component targets a specific software or hardwaremodule and provides a graphical user interface to configure the module easily.For some modules, you can also validate the configuration on your targetboard.
The QCVS components also allow you to perform offline validation of the configured data; therefore, helping you create a validconfiguration. Your configuration is validated against constraints documented in the reference manual and errata for the processor.
This document explains how to create a new QorIQ configuration project and generate a component output. It also describes howyou can view the component properties and introduces the validation support offered by QCVS.
2 Creating a new QorIQ configuration project
This section explains how to create a new QorIQ configuration project.
To create a new QorIQ configuration project, perform these steps:
1. Run the Eclipse environment.
2. Choose File > New > QorIQ Configuration Project from the IDE menu bar.
The New QorIQ Configuration Project wizard starts, displaying the Create a QorIQ Configuration Project page.
3. Enter a name for the project in the Project name field, as shown in the figure below.
Contents
1 Introduction..........................................1
2 Creating a new QorIQconfiguration project........................ 1
3 QCVS components.............................. 7
4 Generating component code.............. 8
5 Target connection................................9
6 Validation support..............................11
NXP Semiconductors Document Number: QCVS_GettingStarted_Guide
Rev. 4.x, 07/2018
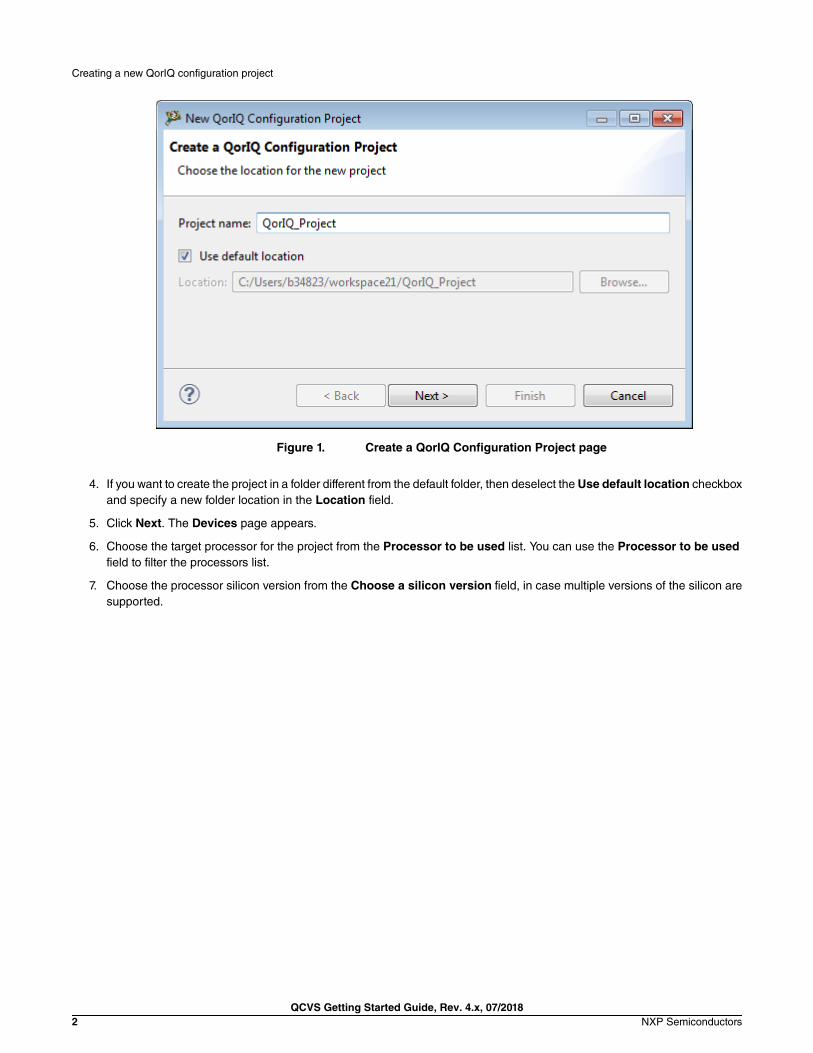
Figure 1. Create a QorIQ Configuration Project page
4. If you want to create the project in a folder different from the default folder, then deselect the Use default location checkboxand specify a new folder location in the Location field.
5. Click Next. The Devices page appears.
6. Choose the target processor for the project from the Processor to be used list. You can use the Processor to be usedfield to filter the processors list.
7. Choose the processor silicon version from the Choose a silicon version field, in case multiple versions of the silicon aresupported.
Creating a new QorIQ configuration project
QCVS Getting Started Guide, Rev. 4.x, 07/20182 NXP Semiconductors

Figure 2. Devices page
Creating a new QorIQ configuration project
QCVS Getting Started Guide, Rev. 4.x, 07/2018NXP Semiconductors 3

8. Click Next. The Toolset selection page appears.
9. Choose the QCVS component(s) you want to configure, from the Components to be selected list, as shown in the figurebelow.
Figure 3. Toolset selection page
The Toolset selection page only displays components that you can configure for the processor you selected on
the Devices page.
NOTE
10. Click Next.
A configuration page appears based on the component(s) you selected on the Toolset selection page. The figure belowshows the configuration page for the DDR component. If you selected multiple components on the Toolset selectionpage, then you may get multiple configuration pages.
Creating a new QorIQ configuration project
QCVS Getting Started Guide, Rev. 4.x, 07/20184 NXP Semiconductors
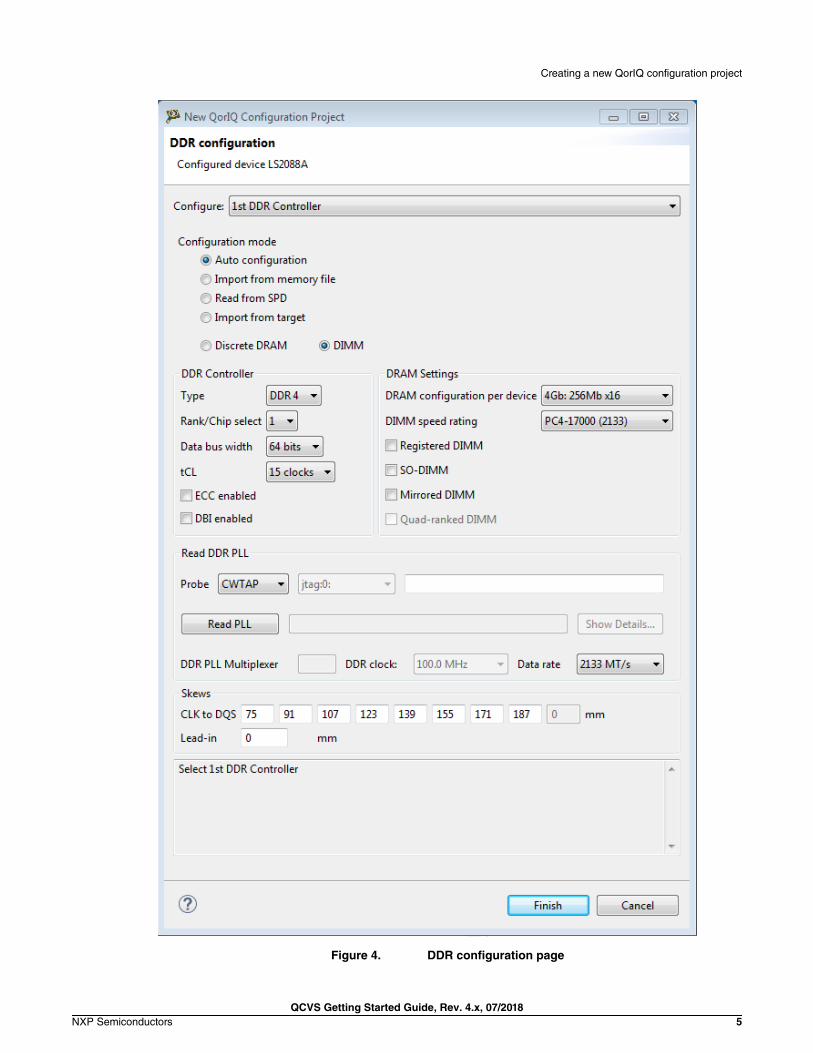
Figure 4. DDR configuration page
Creating a new QorIQ configuration project
QCVS Getting Started Guide, Rev. 4.x, 07/2018NXP Semiconductors 5

11. Click Finish.
The project is created and displays in the different views of the QCVS perspective. A perspective defines the initial settingsand layout of views in the Workbench window. As shown in the figure below, the QCVS icon toward the top-right cornerof the Workbench window indicates that the QCVS perspective is enabled currently.
Figure 5. QCVS perspective
The main views in the Processor Expert perspective are:
• Project Explorer
• Connections View
• Components View
• Component Inspector
• Components Library
• Problems View
To know more about the QCVS perspective and its views, see QCVS Processor Expert User Guide.
Creating a new QorIQ configuration project
QCVS Getting Started Guide, Rev. 4.x, 07/20186 NXP Semiconductors

3 QCVS components
This section describes how to configure QCVS components.
The table below lists the QCVS components and the documents you can refer to for more information on them.
Table 1. QCVS components
QCVS component Described in
PBL QCVS PBL Tool User Guide
DDR QCVS DDR Tool User Guide
SerDes QCVS SerDes Tool User Guide
PinMuxing QCVS PinMuxing Tool User Guide
The Component Inspector view allows you view and configure properties of a QCVS component. Right-click a QCVS componentunder the Components folder of the Components view and choose Inspector from the shortcut menu. The properties of thecomponent are displayed in the Component Inspector view, as shown in the figure below. You can configure the component bychanging its properties in the Component Inspector view.
Figure 6. Component Inspector
QCVS components
QCVS Getting Started Guide, Rev. 4.x, 07/2018NXP Semiconductors 7

For more information on how to configure or work with an embedded component of QCVS, see the corresponding document listedin the table above.
4 Generating component code
After defining a configuration, you can generate the code (output) for the QCVS component.
The generated code for a QCVS component can be one of the following:
• Register values that map to the configured module in case of embedded hardware devices
• Source code in different programming languages or calls to different software application programming interfaces (APIs)that you can copy within your software system
• Other configuration data files, such as pre-boot loader (PBL) image file
Perform one of the following steps to generate component code:
• Click the Generate Processor Expert Code icon in the Components view (see figure below)
• Right-click ProcessorExpert.pe in Project Explorer and choose Generate Processor Expert Code (see figure below)
• Choose Project > Generate Processor Expert Code from the Eclipse IDE menu bar
Figure 7. Generate Processor Expert code
Generating component code
QCVS Getting Started Guide, Rev. 4.x, 07/20188 NXP Semiconductors

The code generation starts and the progress is indicated in the Generating code dialog, as shown in the figure below.
Figure 8. Code generation
The Generating code dialog closes after completion of code generation and the generated code files are added under theGenerated_Code folder of Project Explorer, as shown in the figure below.
Figure 9. Generated code files
5 Target connection
Each validation tool uses a client–server architecture to allow validation on both local and remote systems. If you have a targetboard connected to your computer using a probe, then you can validate it locally. By default, validation is performed on the localsystem.
Target connection
QCVS Getting Started Guide, Rev. 4.x, 07/2018NXP Semiconductors 9

With a new QCVS project, a default target connection is created using a CodeWarrior TAP probe with an empty connection string.You can set up (create new, edit, or delete) a target connection using the Connections View.
To open the Connections View, follow these steps:
1. Choose Window > Show View > Other. The Show View dialog appears.
2. Choose Processor Expert > Connections and click OK. The Connections View appears, as shown in the figurebelow.
Figure 10. Setting up target connection
As shown in the figure above, the Connections View displays a connections table, with details of all the available connections.The active connection is displayed in bold in the connections table. The Connections View also displays New, Edit, and Deletebuttons for creating a new connection and editing or deleting the connection selected in the connections table.
A button to verify the status of the active target connection, along with a status indicator for the active target connection, is displayedat the top-right corner of the Connections View. You can click the button to verify whether or not the active target connection isworking properly. The connection status indicator shows:
• A chain with a red mark to indicate a failed connection
• A chain with no red mark to indicate a working connection
Each time you select a different connection in the connections table, the connection status gets verified and it is indicated by theconnection status indicator. The button shows either a green or red icon on it. The green icon indicates that you can click thebutton to verify the active target connection status. The red icon indicates that the connection status is getting verified and youcan click the button to abort the verification process.
To create a new connection, follow these steps:
1. Click the New button in the Connections View. The New connection dialog appears (see figure below) that allows tospecify details for the new connection.
Target connection
QCVS Getting Started Guide, Rev. 4.x, 07/201810 NXP Semiconductors
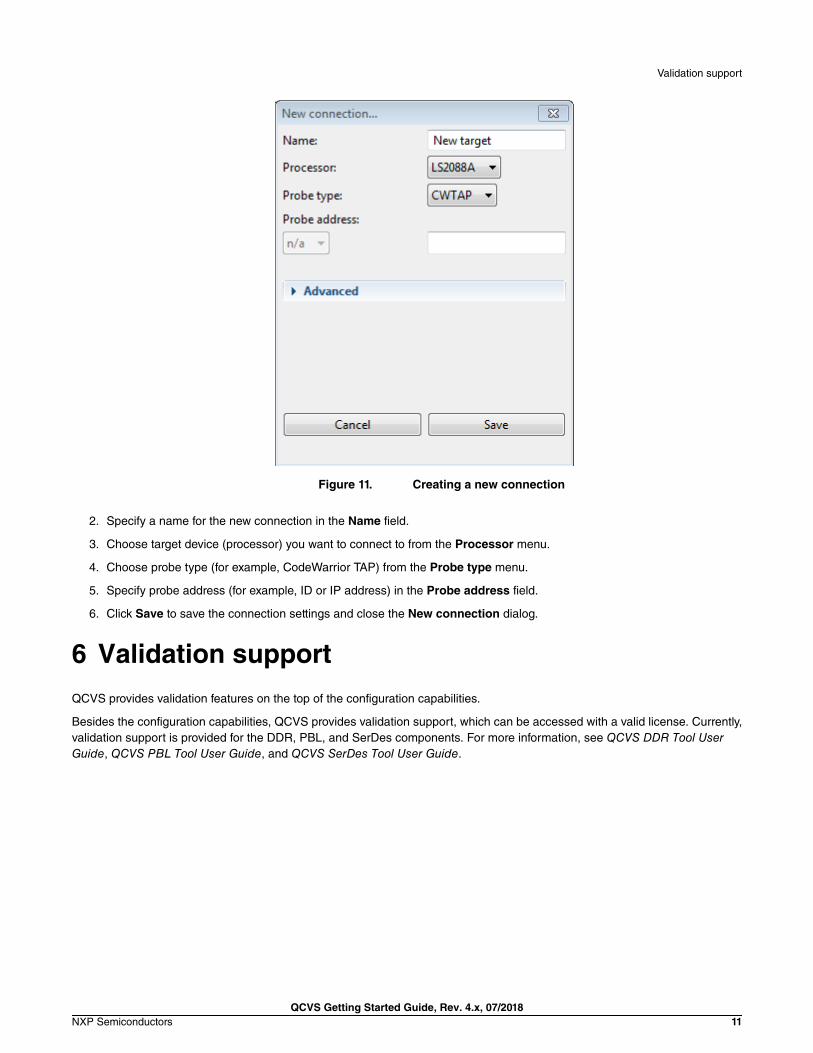
Figure 11. Creating a new connection
2. Specify a name for the new connection in the Name field.
3. Choose target device (processor) you want to connect to from the Processor menu.
4. Choose probe type (for example, CodeWarrior TAP) from the Probe type menu.
5. Specify probe address (for example, ID or IP address) in the Probe address field.
6. Click Save to save the connection settings and close the New connection dialog.
6 Validation support
QCVS provides validation features on the top of the configuration capabilities.
Besides the configuration capabilities, QCVS provides validation support, which can be accessed with a valid license. Currently,validation support is provided for the DDR, PBL, and SerDes components. For more information, see QCVS DDR Tool UserGuide, QCVS PBL Tool User Guide, and QCVS SerDes Tool User Guide.
Validation support
QCVS Getting Started Guide, Rev. 4.x, 07/2018NXP Semiconductors 11

How To Reach Us
Home Page:
nxp.com
Web Support:
nxp.com/support
Information in this document is provided solely to enable system and software implementers to
use NXP products. There are no express or implied copyright licenses granted hereunder to
design or fabricate any integrated circuits based on the information in this document. NXP
reserves the right to make changes without further notice to any products herein.
NXP makes no warranty, representation, or guarantee regarding the suitability of its products for
any particular purpose, nor does NXP assume any liability arising out of the application or use
of any product or circuit, and specifically disclaims any and all liability, including without limitation
consequential or incidental damages. “Typical” parameters that may be provided in NXP data
sheets and/or specifications can and do vary in different applications, and actual performance
may vary over time. All operating parameters, including “typicals,” must be validated for each
customer application by customer's technical experts. NXP does not convey any license under
its patent rights nor the rights of others. NXP sells products pursuant to standard terms and
conditions of sale, which can be found at the following address: nxp.com/
SalesTermsandConditions.
While NXP has implemented advanced security features, all products may be subject to
unidentified vulnerabilities. Customers are responsible for the design and operation of their
applications and products to reduce the effect of these vulnerabilities on customer’s applications
and products, and NXP accepts no liability for any vulnerability that is discovered. Customers
should implement appropriate design and operating safeguards to minimize the risks associated
with their applications and products.
NXP, the NXP logo, Freescale, the Freescale logo, CodeWarrior, QorIQ, and Processor Expert
are trademarks of NXP B.V. All other product or service names are the property of their respective
owners. All rights reserved.
Ⓒ 2018 NXP B.V.
Document Number: QCVS_GettingStarted_GuideRev. 4.x, 07/2018


![Windows Advanced Audit Policy Configuration · 3/2/2020 · Windows Advanced Audit Policy Configuration [Subtitle] 1. Account Logon 1.1 Audit Credential Validation (Enable/Enable)](https://img.pdfslide.net/doc/110x75/603c6c9c450286770531d2ef/windows-advanced-audit-policy-configuration-322020-windows-advanced-audit-policy.jpg)