Embed Size (px)
Citation preview
© 2013 QNAP Systems, Inc. All Rights Reserved.
V1.1
QNAP SMI-S Provider for
System Center Virtual Machine Manager 2012
Application Notes October 2013
© 2013 QNAP Systems, Inc. All Rights Reserved.
V1.1
2
QNAP SMI-S Provider for System Center Virtual Machine
Manager 2012
About QNAP SMI-S Provider
QNAP SMI-S Provider is a required component for the support of System Center Virtual Machine Manager (SCVMM 2012). It
requires a SMI-S Provider to communicate with the storage. QNAP SMI-S Provider can be used to allow the communication between
SCVMM 2012 and QNAP Turbo NAS.
Audience
This guide is intended to be used by Microsoft System Center administrators and storage administrators during the installation of
QNAP SMI-S Provider for SCVMM 2012. A quick start guide is also included to describe how to start using SCVMM 2012.
Contents About QNAP SMI-S Provider ................................................................................................................................................ 2
Audience .......................................................................................................................................................................... 2
1. Installation .......................................................................................................................................................... 3
Installation Requirements ............................................................................................................................................. 3
Install Process ............................................................................................................................................................. 3
2. Add a NAS to be managed ..................................................................................................................................... 6
3. Connect SCVMM to QNAP SMI-S Provider ................................................................................................................ 8
Using SCVMM Console .................................................................................................................................................. 8
Using Command Line (PowerShell) ............................................................................................................................... 17
Annex: How to start with SCVMM 2012 .............................................................................................................................. 20
Connect the Hyper-V hosts to the NAS .......................................................................................................................... 20
Allocate Storage Pool to Hyper-V Host Groups ............................................................................................................... 22
Create a LUN for a standalone Hyper-V host. ................................................................................................................. 25
Create a LUN for the Hyper-V Cluster. .......................................................................................................................... 29
Use a Cluster Disk as a Cluster Shared Volume for High Availability .................................................................................. 34
Create a LUN on the NAS and allocate it from SCVMM 2012 ............................................................................................ 36
References ...................................................................................................................................................................... 38
© 2013 QNAP Systems, Inc. All Rights Reserved.
V1.1
3
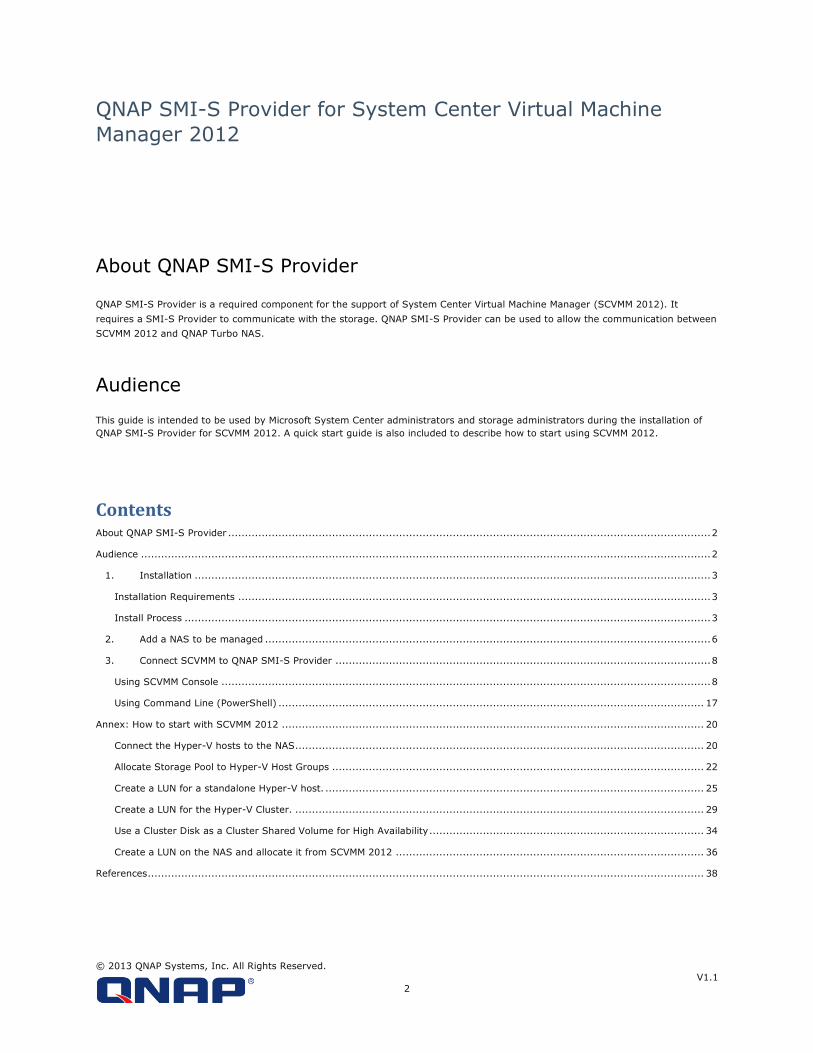
1. Installation
Installation Requirements
- System Center Virtual Machine Manager 2012 with SP1
- QTS 4.0 SMB and above. QTS 4.0 for Home and SOHO are not supported
- The SMI-S Provider must not be installed on the server where SCVMM 2012 is running.
(http://technet.microsoft.com/en-us/library/gg610563.aspx)
- QNAP SMI-S Provider supports Windows Server 2008 R2 and Windows Server 2012
-
Install Process
Download the software QNAP SMI-S Provider from www.qnap.com/utility and install it on an independent Windows server.
The SMI-S Provider must not be installed on the server where SCVMM 2012 is running. (http://technet.microsoft.com/en-
us/library/gg610563.aspx)
© 2013 QNAP Systems, Inc. All Rights Reserved.
V1.1
4
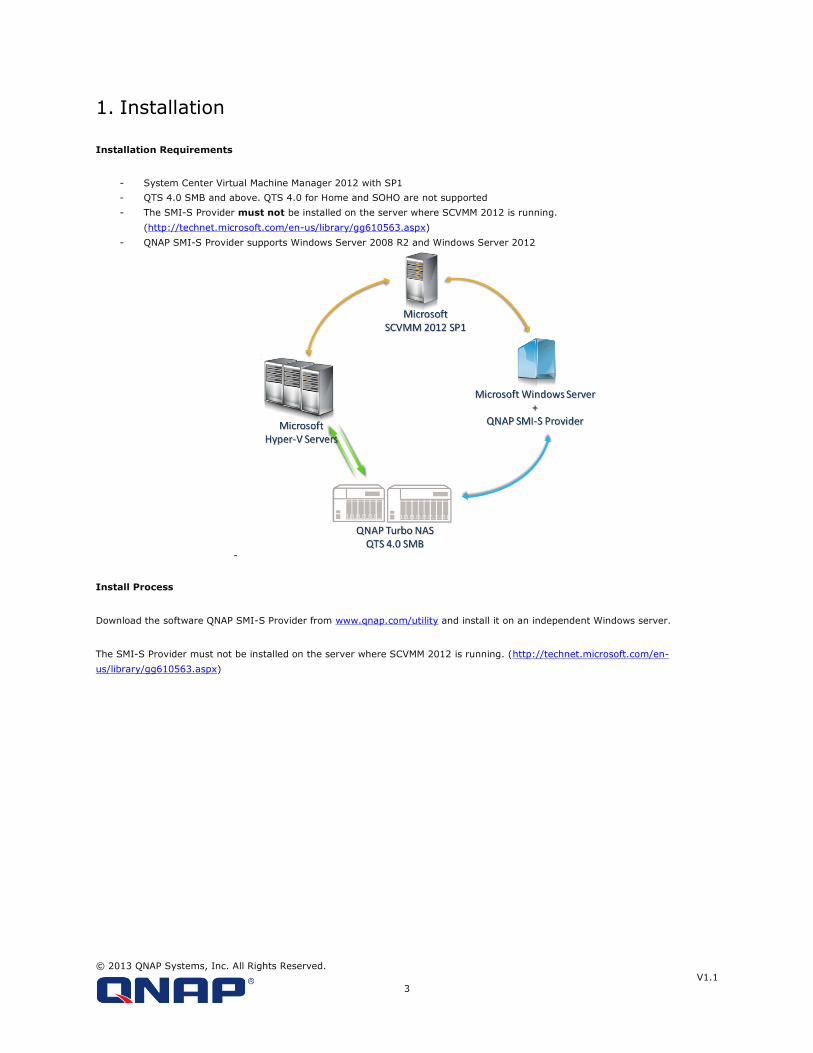
Start the installation software.
(Optional) Follow the installation wizard until you receive a prompt for user authentication. If left untouched, all local administrator
accounts on the Windows server will be able to control the SMI-S provider through SCVMM. To limit the access to only one user,
please specify the user account and password.
© 2013 QNAP Systems, Inc. All Rights Reserved.
V1.1
5
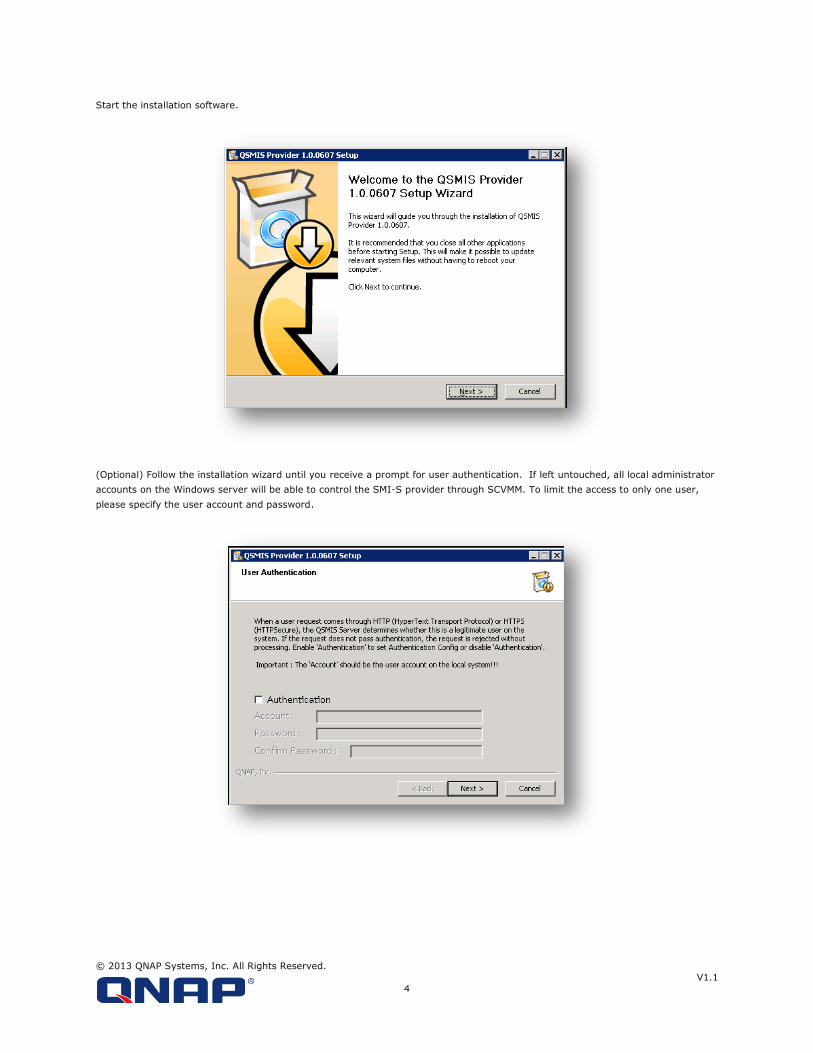
Once the SMI-S Provider is installed, it will open the folder containing the documentation and start the management console.
© 2013 QNAP Systems, Inc. All Rights Reserved.
V1.1
6
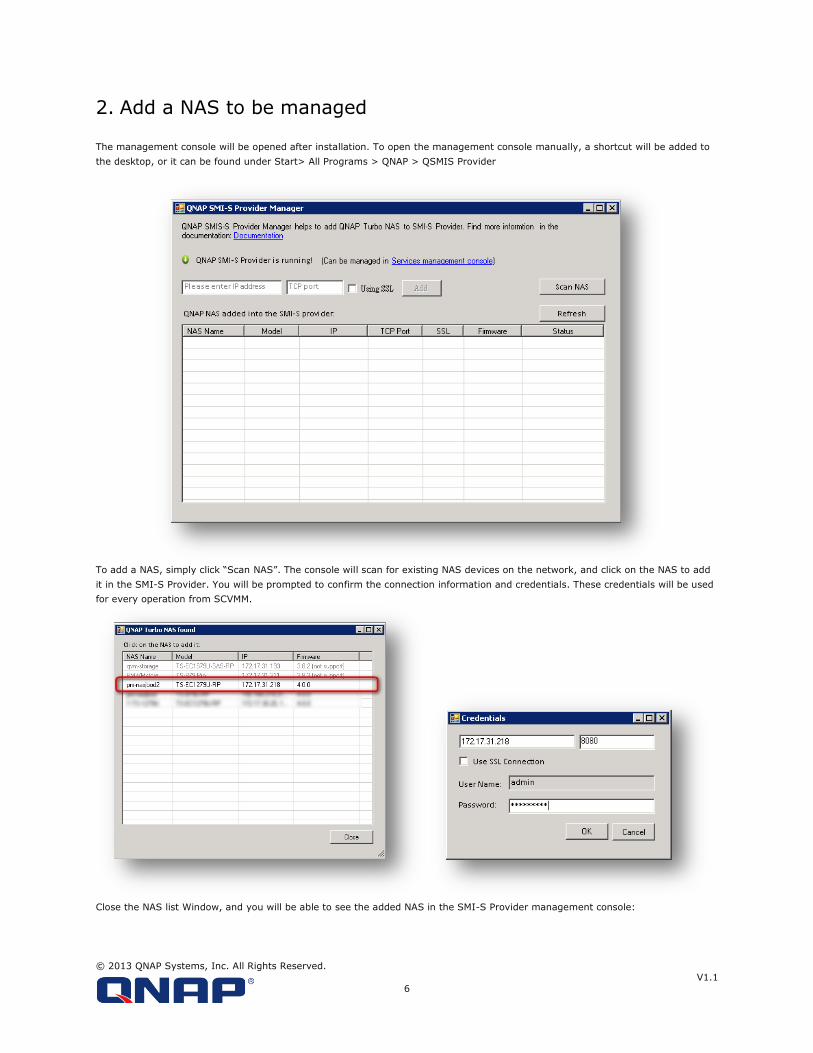
2. Add a NAS to be managed
The management console will be opened after installation. To open the management console manually, a shortcut will be added to
the desktop, or it can be found under Start> All Programs > QNAP > QSMIS Provider
To add a NAS, simply click “Scan NAS”. The console will scan for existing NAS devices on the network, and click on the NAS to add
it in the SMI-S Provider. You will be prompted to confirm the connection information and credentials. These credentials will be used
for every operation from SCVMM.
Close the NAS list Window, and you will be able to see the added NAS in the SMI-S Provider management console:
© 2013 QNAP Systems, Inc. All Rights Reserved.
V1.1
7
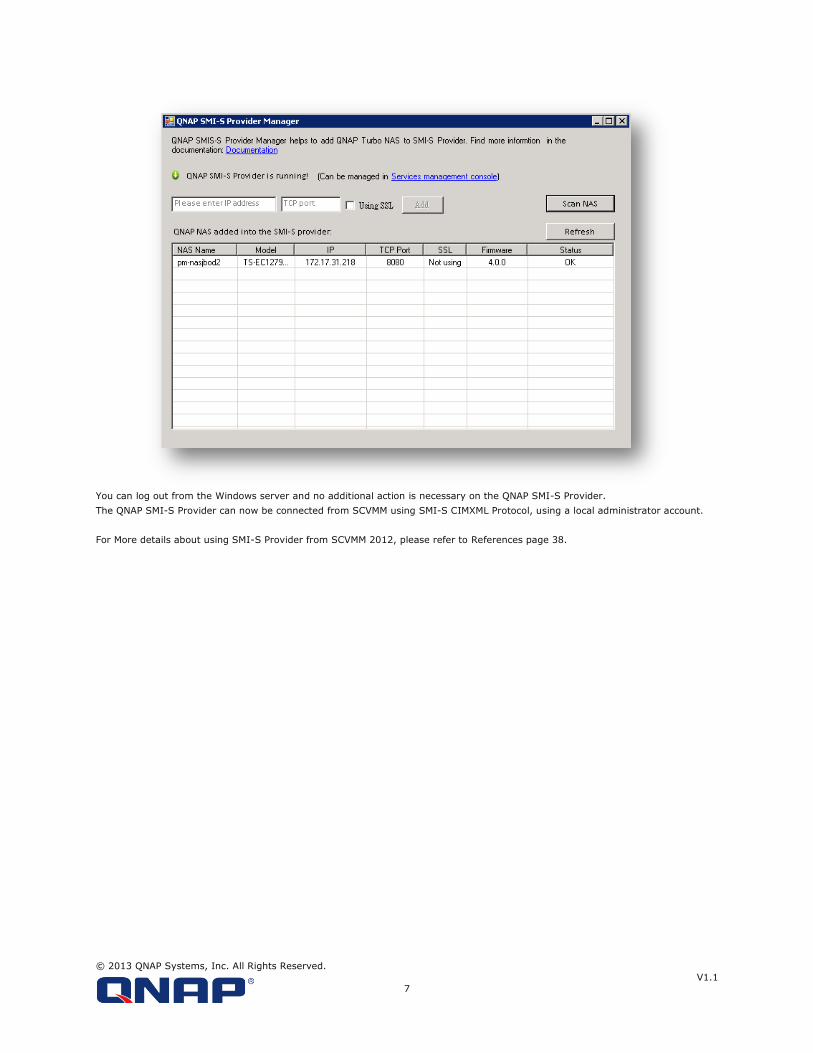
You can log out from the Windows server and no additional action is necessary on the QNAP SMI-S Provider.
The QNAP SMI-S Provider can now be connected from SCVMM using SMI-S CIMXML Protocol, using a local administrator account.
For More details about using SMI-S Provider from SCVMM 2012, please refer to References page 38.
© 2013 QNAP Systems, Inc. All Rights Reserved.
V1.1
8
3. Connect SCVMM to QNAP SMI-S Provider
Configured Environment:
- Active Directory is already installed and functional
- SCVMM 2012 Server is already installed and functional
- SCVMM 2012 Administration console is already installed and functional
- Hyper-V hosts are installed and working properly
- iSCSI Initiator service is enabled and start automatically on each Hyper-V host
- MPIO Feature is installed on each Hyper-V host
Using SCVMM Console
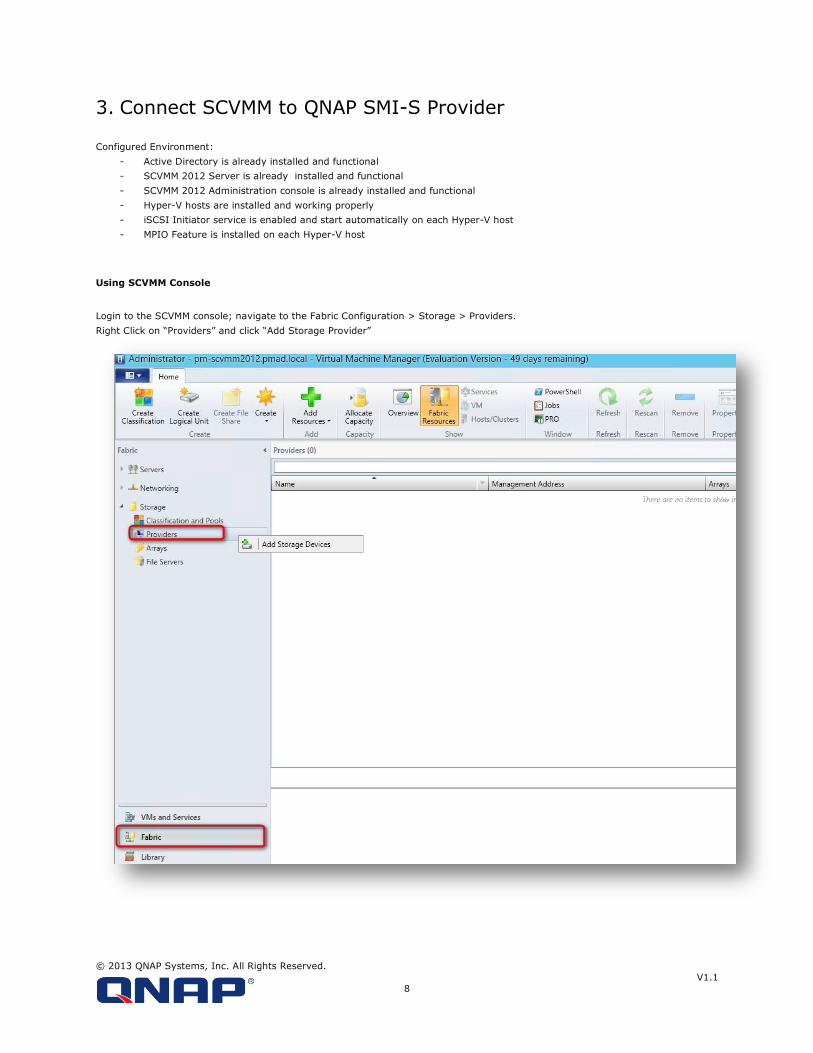
Login to the SCVMM console; navigate to the Fabric Configuration > Storage > Providers.
Right Click on “Providers” and click “Add Storage Provider”
© 2013 QNAP Systems, Inc. All Rights Reserved.
V1.1
9
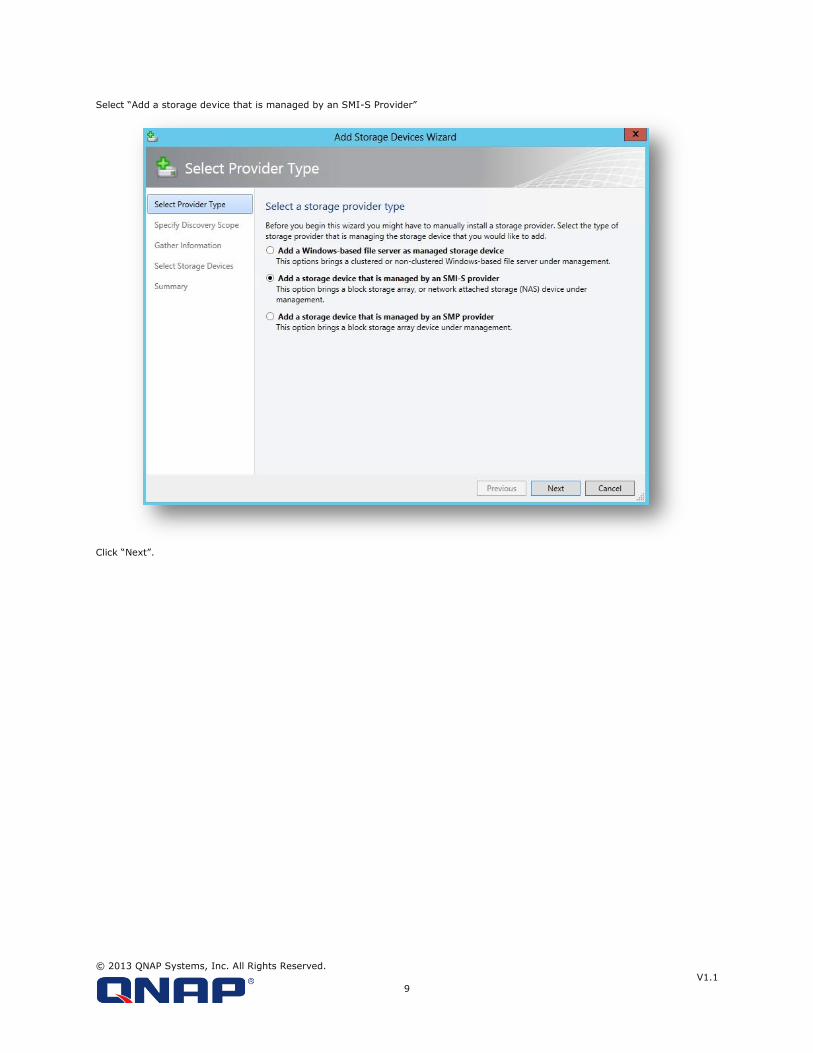
Select “Add a storage device that is managed by an SMI-S Provider”
Click “Next”.
© 2013 QNAP Systems, Inc. All Rights Reserved.
V1.1
10
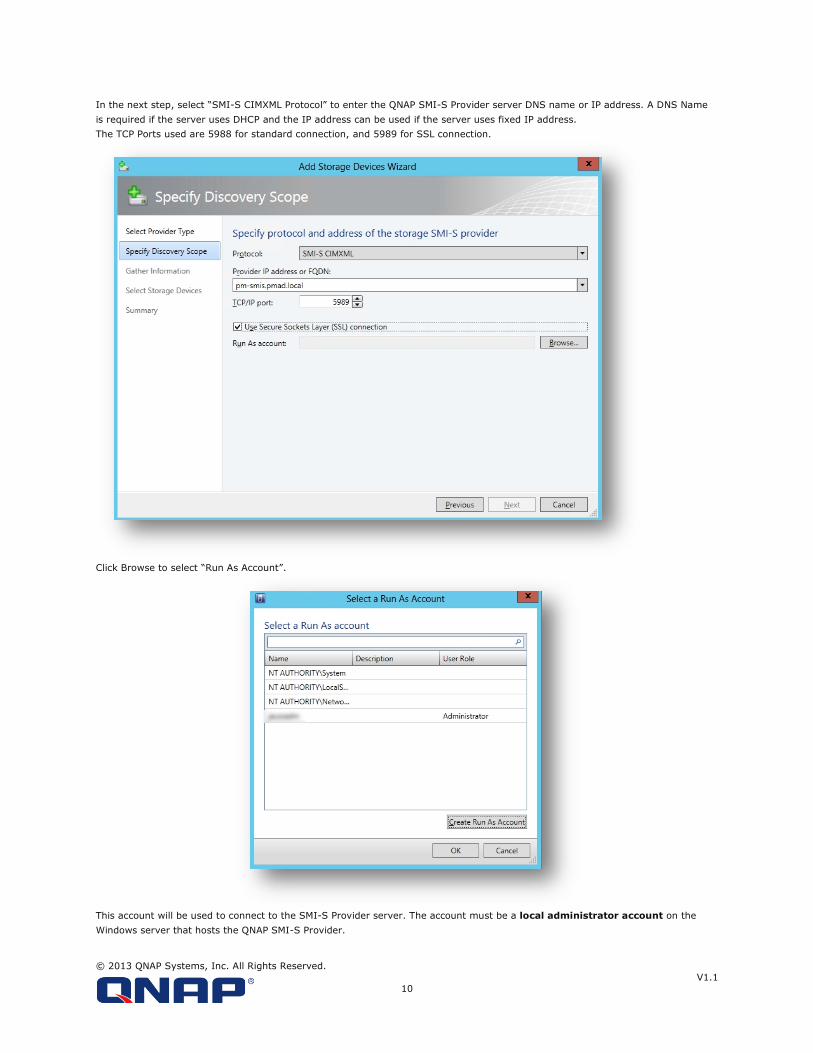
In the next step, select “SMI-S CIMXML Protocol” to enter the QNAP SMI-S Provider server DNS name or IP address. A DNS Name
is required if the server uses DHCP and the IP address can be used if the server uses fixed IP address.
The TCP Ports used are 5988 for standard connection, and 5989 for SSL connection.
Click Browse to select “Run As Account”.
This account will be used to connect to the SMI-S Provider server. The account must be a local administrator account on the
Windows server that hosts the QNAP SMI-S Provider.
© 2013 QNAP Systems, Inc. All Rights Reserved.
V1.1
11
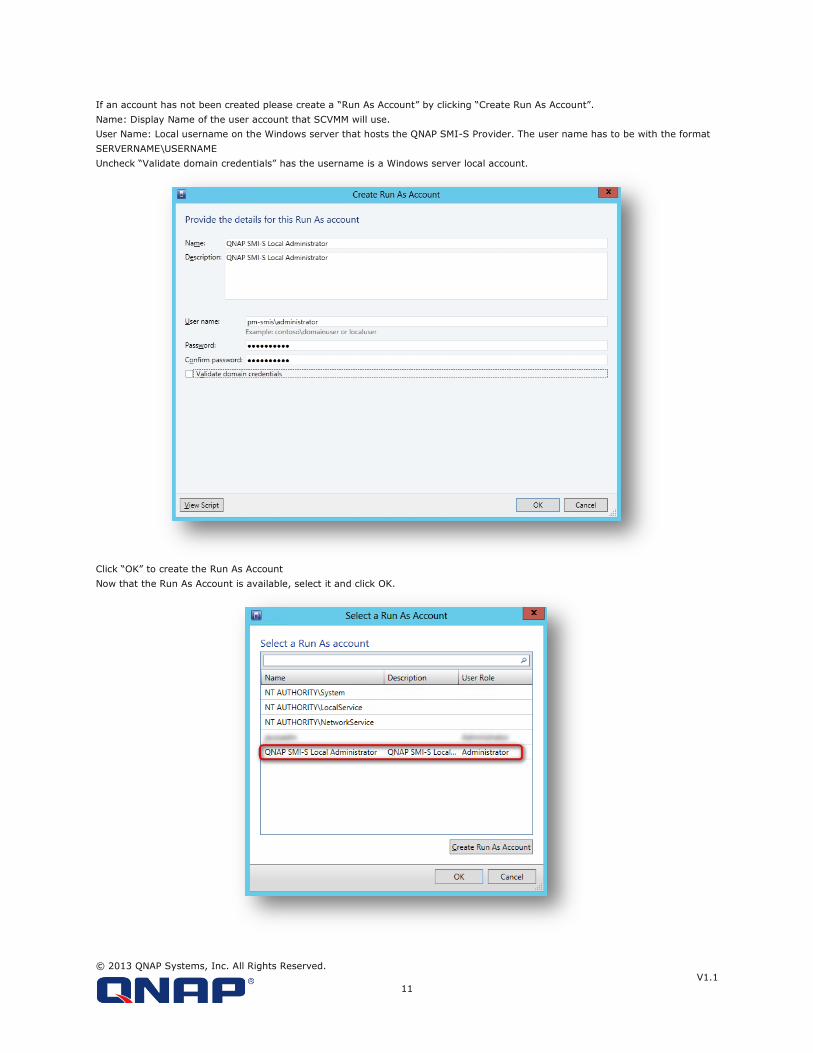
If an account has not been created please create a “Run As Account” by clicking “Create Run As Account”.
Name: Display Name of the user account that SCVMM will use.
User Name: Local username on the Windows server that hosts the QNAP SMI-S Provider. The user name has to be with the format
SERVERNAME\USERNAME
Uncheck “Validate domain credentials” has the username is a Windows server local account.
Click “OK” to create the Run As Account
Now that the Run As Account is available, select it and click OK.

© 2013 QNAP Systems, Inc. All Rights Reserved.
V1.1
12
The selected Run As Account will be displayed :
Click “Next” to start the connection and discovery of the QNAP SMI-S Provider:
© 2013 QNAP Systems, Inc. All Rights Reserved.
V1.1
13
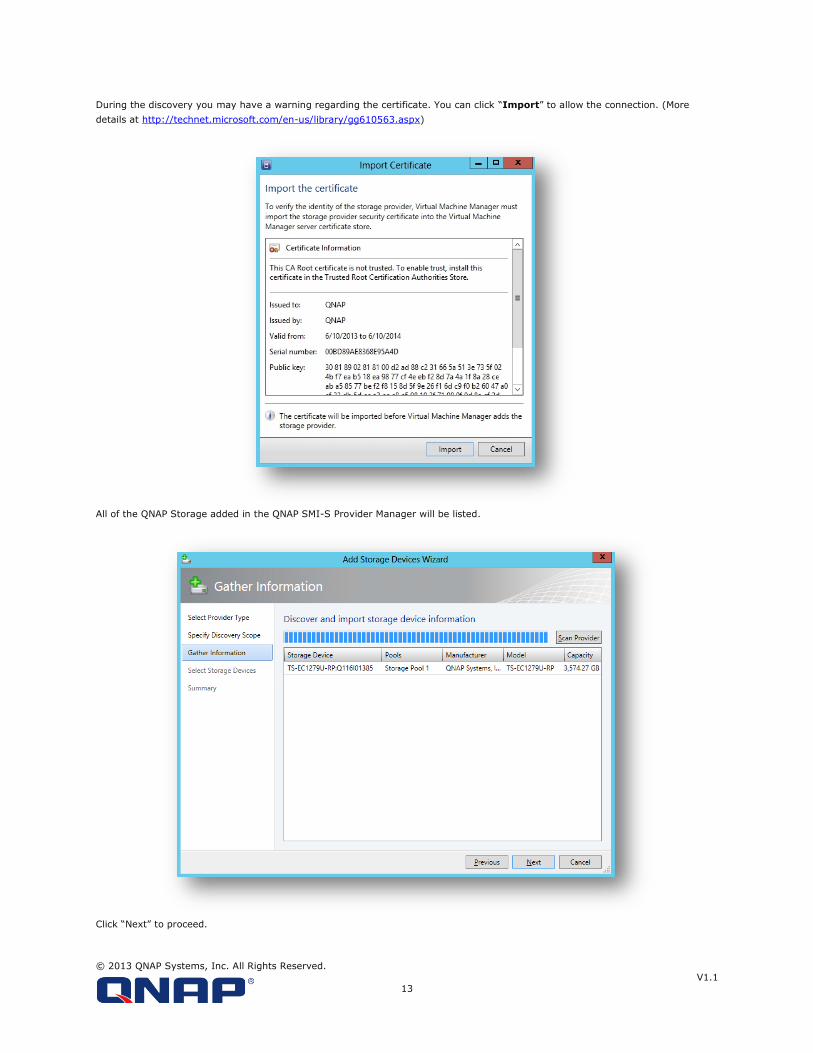
During the discovery you may have a warning regarding the certificate. You can click “Import” to allow the connection. (More
details at http://technet.microsoft.com/en-us/library/gg610563.aspx)
All of the QNAP Storage added in the QNAP SMI-S Provider Manager will be listed.
Click “Next” to proceed.
© 2013 QNAP Systems, Inc. All Rights Reserved.
V1.1
14
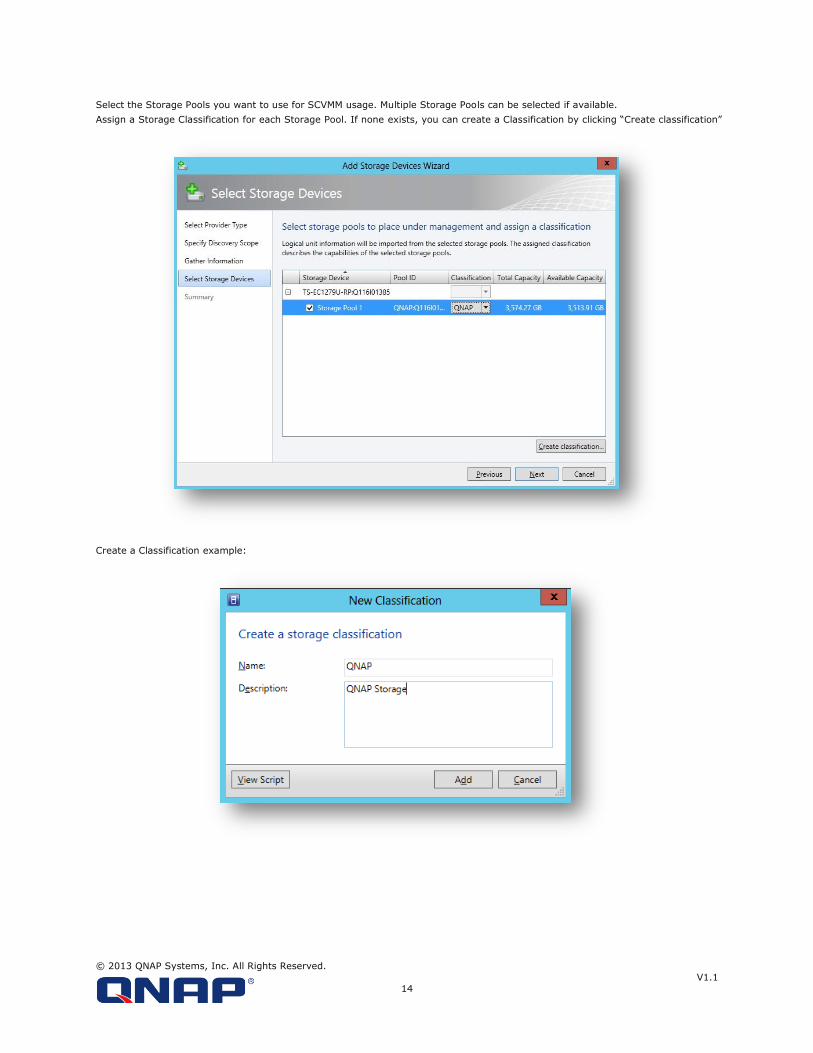
Select the Storage Pools you want to use for SCVMM usage. Multiple Storage Pools can be selected if available.
Assign a Storage Classification for each Storage Pool. If none exists, you can create a Classification by clicking “Create classification”
Create a Classification example:
© 2013 QNAP Systems, Inc. All Rights Reserved.
V1.1
15
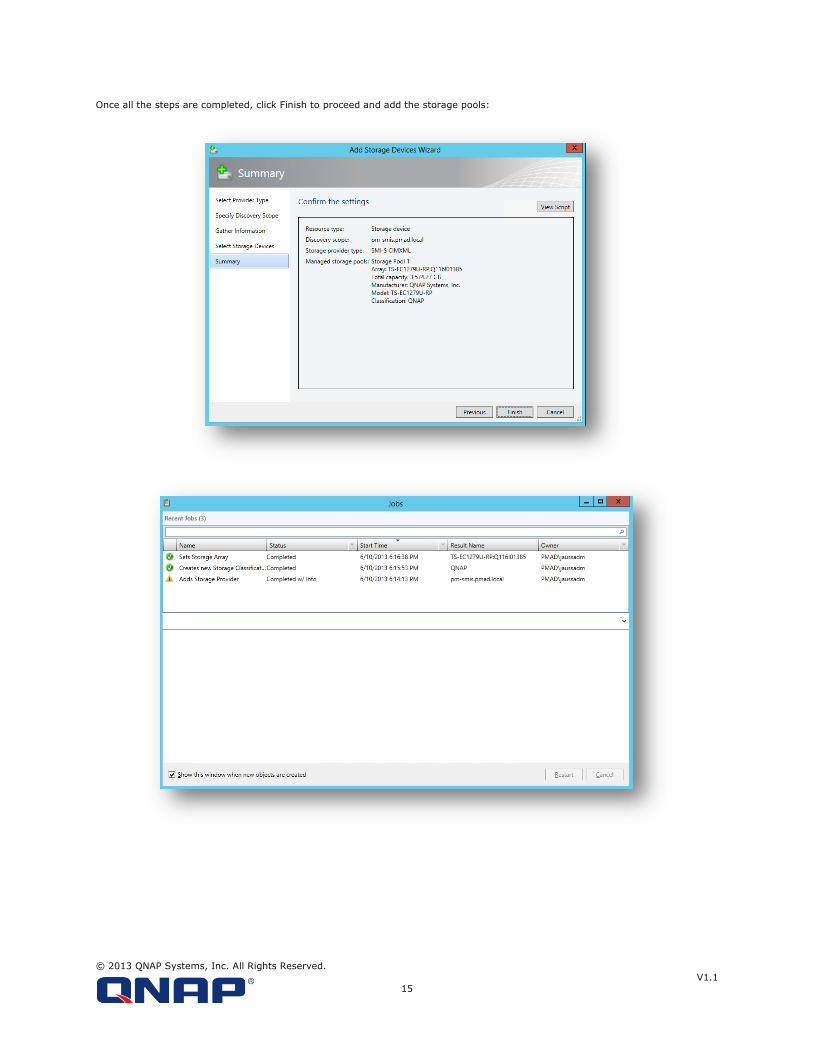
Once all the steps are completed, click Finish to proceed and add the storage pools:
© 2013 QNAP Systems, Inc. All Rights Reserved.
V1.1
16
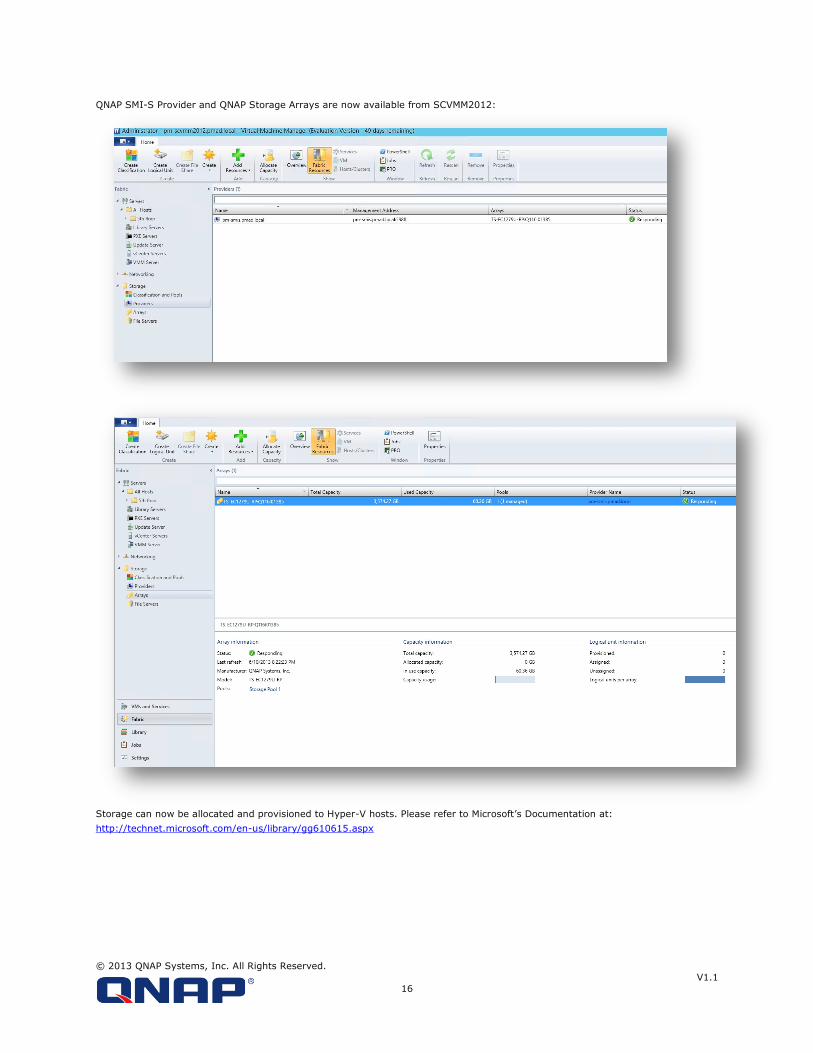
QNAP SMI-S Provider and QNAP Storage Arrays are now available from SCVMM2012:
Storage can now be allocated and provisioned to Hyper-V hosts. Please refer to Microsoft’s Documentation at:
http://technet.microsoft.com/en-us/library/gg610615.aspx
© 2013 QNAP Systems, Inc. All Rights Reserved.
V1.1
17
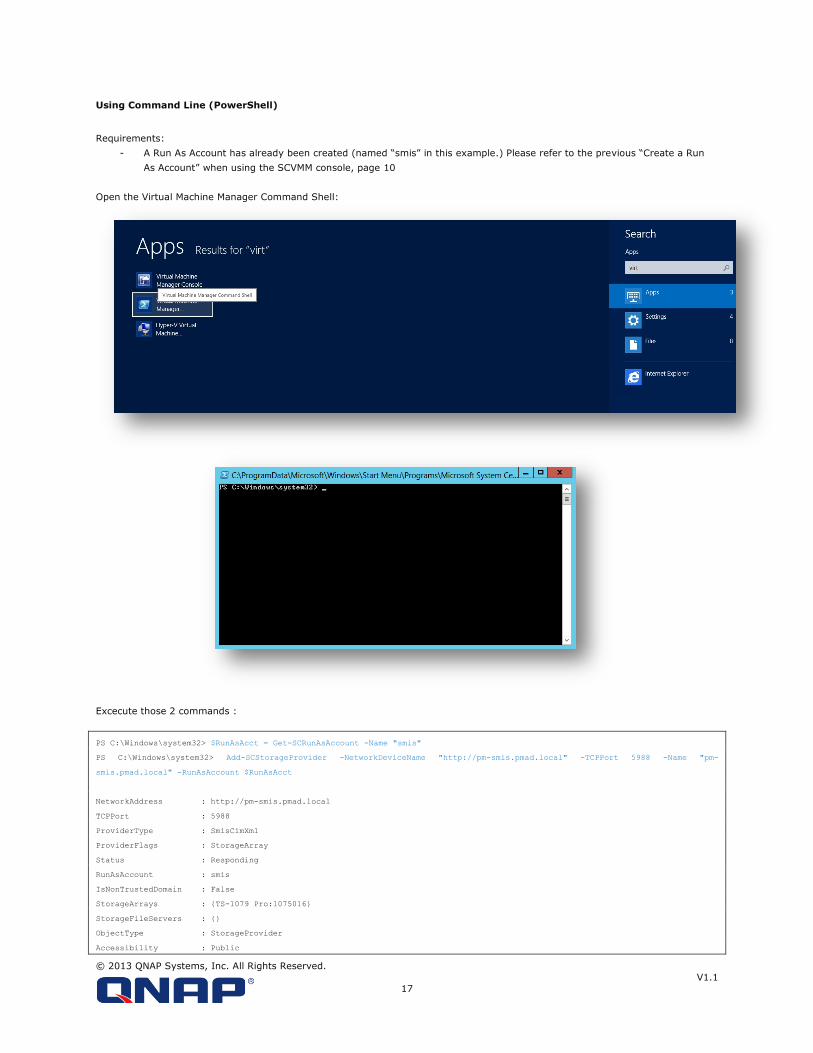
Using Command Line (PowerShell)
Requirements:
- A Run As Account has already been created (named “smis” in this example.) Please refer to the previous “Create a Run
As Account” when using the SCVMM console, page 10
Open the Virtual Machine Manager Command Shell:
Excecute those 2 commands :
PS C:\Windows\system32> $RunAsAcct = Get-SCRunAsAccount -Name "smis"
PS C:\Windows\system32> Add-SCStorageProvider -NetworkDeviceName "http://pm-smis.pmad.local" -TCPPort 5988 -Name "pm-
smis.pmad.local" -RunAsAccount $RunAsAcct
NetworkAddress : http://pm-smis.pmad.local
TCPPort : 5988
ProviderType : SmisCimXml
ProviderFlags : StorageArray
Status : Responding
RunAsAccount : smis
IsNonTrustedDomain : False
StorageArrays : {TS-1079 Pro:1075016}
StorageFileServers : {}
ObjectType : StorageProvider
Accessibility : Public

© 2013 QNAP Systems, Inc. All Rights Reserved.
V1.1
18
Name : pm-smis.pmad.local
IsViewOnly : False
Description :
AddedTime : 10/18/2013 12:27:26 PM
ModifiedTime : 10/18/2013 12:27:43 PM
Enabled : True
MostRecentTask : Adds Storage Provider
ServerConnection : Microsoft.SystemCenter.VirtualMachineManager.Remoting.ServerConnection
ID : 99d8514c-f693-4d19-bc73-1693a9b20052
MarkedForDeletion : False
IsFullyCached : True
MostRecentTaskIfLocal : Adds Storage Provider
PS C:\Windows\system32>
Once executed, the Storage Provider will be available in SCVMM, in Fabric > Storage > Providers.

© 2013 QNAP Systems, Inc. All Rights Reserved.
V1.1
19
The provider has been added using HTTP. It is possible to add the SMI-S Provider with SSL connection.
In this example:
- "smis" is the RunAsAccount
- "pm-smis.pmad.local" is the the SMI-S Provider FQDN.
PS C:\Windows\system32> $RunAsAcct = Get-SCRunAsAccount -Name "smis"
PS C:\Windows\system32> $CRT = Get-SCCertificate -Computername "pm-smis.pmad.local" -TCPPort 5989
PS C:\Windows\system32> Add-SCStorageProvider -NetworkDeviceName "https://pm-smis.pmad.local:5989" -TCPPort 5989 -Name "pm-
smis.pmad.local" -RunAsAccount $RunAsAcct -Certificate $CRT
NetworkAddress : https://pm-smis.pmad.local
TCPPort : 5989
ProviderType : SmisCimXml
ProviderFlags : StorageArray
Status : Responding
RunAsAccount : smis
IsNonTrustedDomain : False
StorageArrays : {TS-1079 Pro:1075016}
StorageFileServers : {}
ObjectType : StorageProvider
Accessibility : Public
Name : pm-smis.pmad.local
IsViewOnly : False
Description :
AddedTime : 10/18/2013 2:18:06 PM
ModifiedTime : 10/18/2013 2:18:21 PM
Enabled : True
MostRecentTask : Adds Storage Provider
ServerConnection : Microsoft.SystemCenter.VirtualMachineManager.Remoting.ServerConnection
ID : 9d9dc08c-64ab-47c0-a211-aae4be7c8efb
MarkedForDeletion : False
IsFullyCached : True
MostRecentTaskIfLocal : Adds Storage Provider
PS C:\Windows\system32>

© 2013 QNAP Systems, Inc. All Rights Reserved.
V1.1
20
Annex: How to start with SCVMM 2012
Please refer to Microsoft’s Documentation for a complete description of SCVMM functionalities and usage:
http://technet.microsoft.com/en-us/library/gg610615.aspx
You can use the following guide to help you start using SCVMM with QNAP SMI-S Provider.
Connect the Hyper-V hosts to the NAS
Connect all the Hyper-V hosts to the newly added managed storage: Your QNAP Turbo NAS
Now that the Turbo NAS has been added to the SMI-S Provider, it can be managed directly from SCVMM 2012. The next step is to
give access to the Hyper-V hosts to the storage array by creating a iSCSI Session on each Hyper-V host.
- Open SCVMM console, in the Fabric
- Select the first Hyper-V host in Servers > All Hosts
-
- Right Click on the host and select “Properties”
- In Storage, click “Add” then select “Add iSCSI Array”
-
© 2013 QNAP Systems, Inc. All Rights Reserved.
V1.1
21
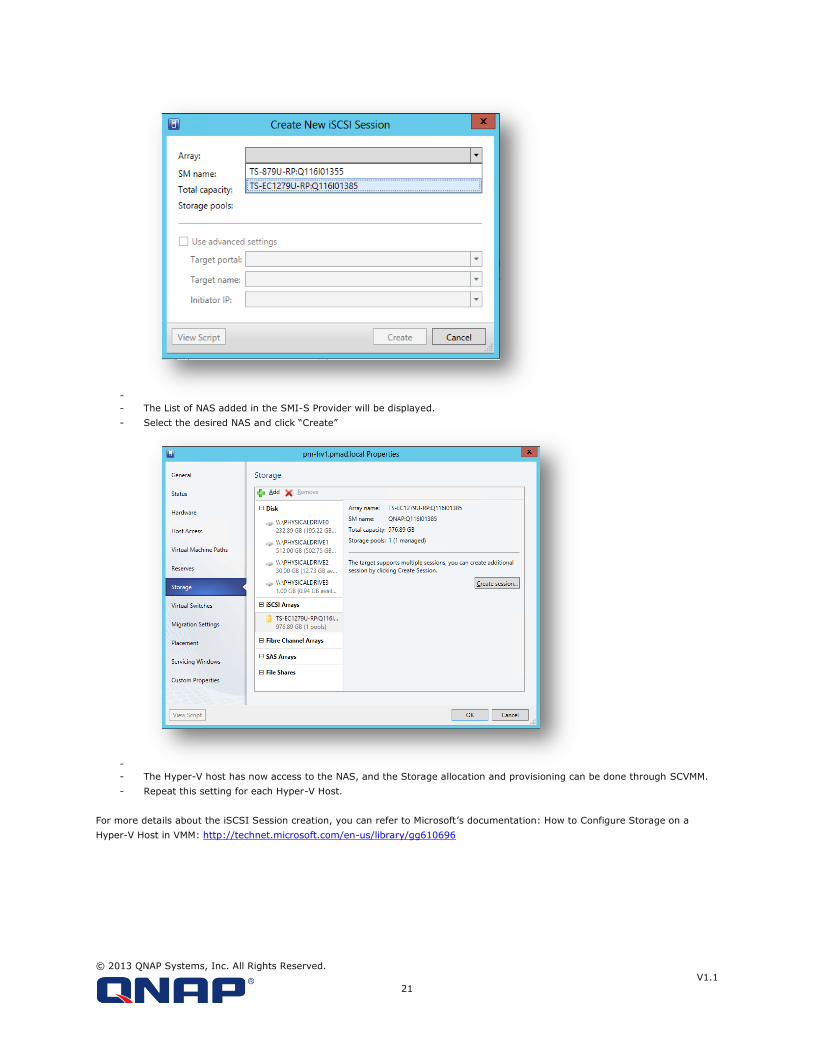
-
- The List of NAS added in the SMI-S Provider will be displayed.
- Select the desired NAS and click “Create”
-
- The Hyper-V host has now access to the NAS, and the Storage allocation and provisioning can be done through SCVMM.
- Repeat this setting for each Hyper-V Host.
For more details about the iSCSI Session creation, you can refer to Microsoft’s documentation: How to Configure Storage on a
Hyper-V Host in VMM: http://technet.microsoft.com/en-us/library/gg610696
© 2013 QNAP Systems, Inc. All Rights Reserved.
V1.1
22
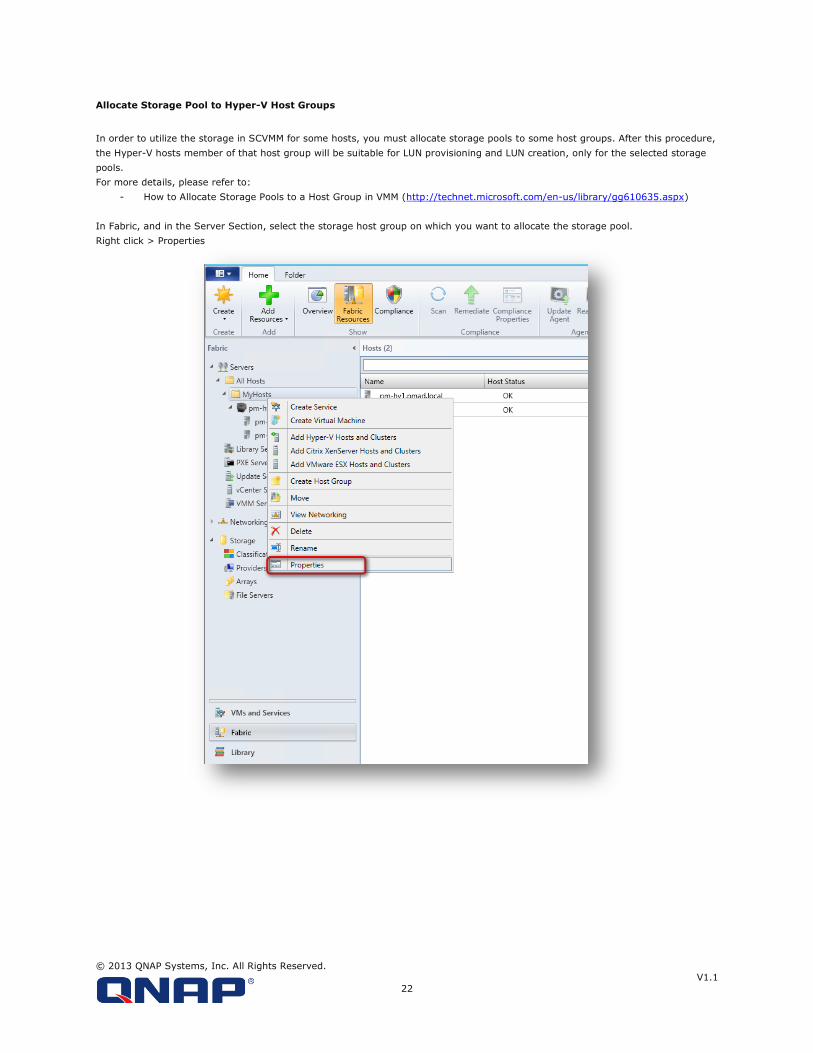
Allocate Storage Pool to Hyper-V Host Groups
In order to utilize the storage in SCVMM for some hosts, you must allocate storage pools to some host groups. After this procedure,
the Hyper-V hosts member of that host group will be suitable for LUN provisioning and LUN creation, only for the selected storage
pools.
For more details, please refer to:
- How to Allocate Storage Pools to a Host Group in VMM (http://technet.microsoft.com/en-us/library/gg610635.aspx)
In Fabric, and in the Server Section, select the storage host group on which you want to allocate the storage pool.
Right click > Properties
© 2013 QNAP Systems, Inc. All Rights Reserved.
V1.1
23
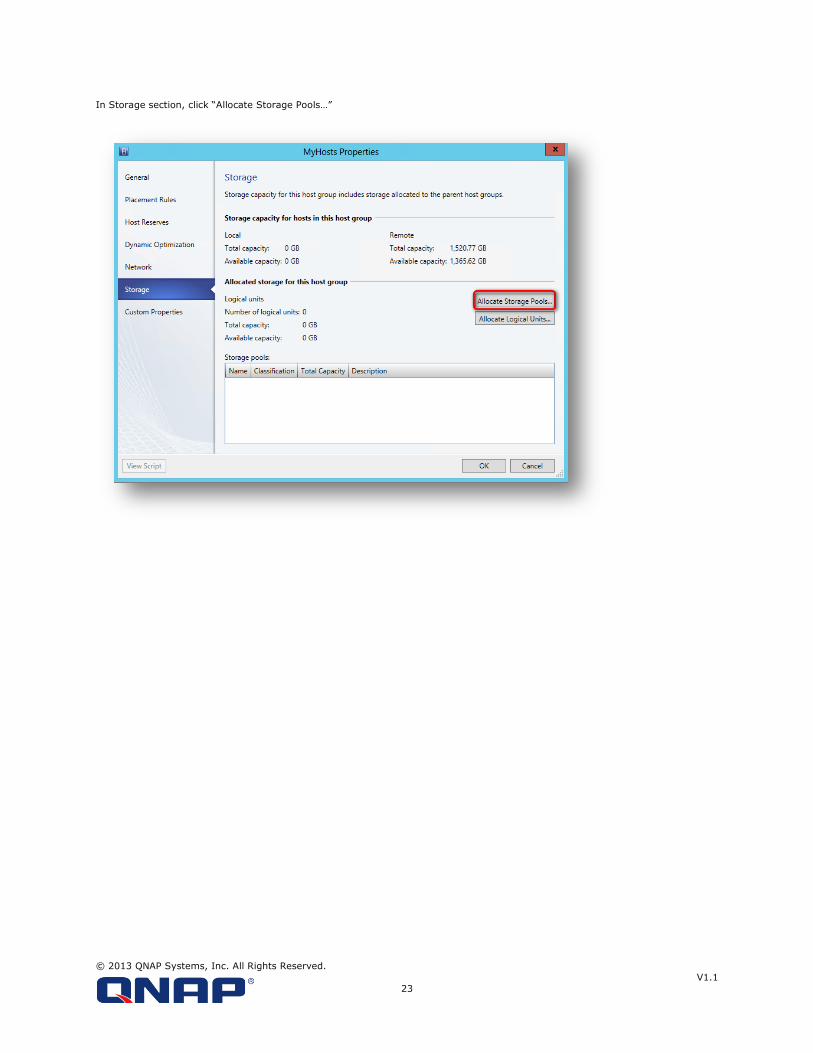
In Storage section, click “Allocate Storage Pools…”
© 2013 QNAP Systems, Inc. All Rights Reserved.
V1.1
24
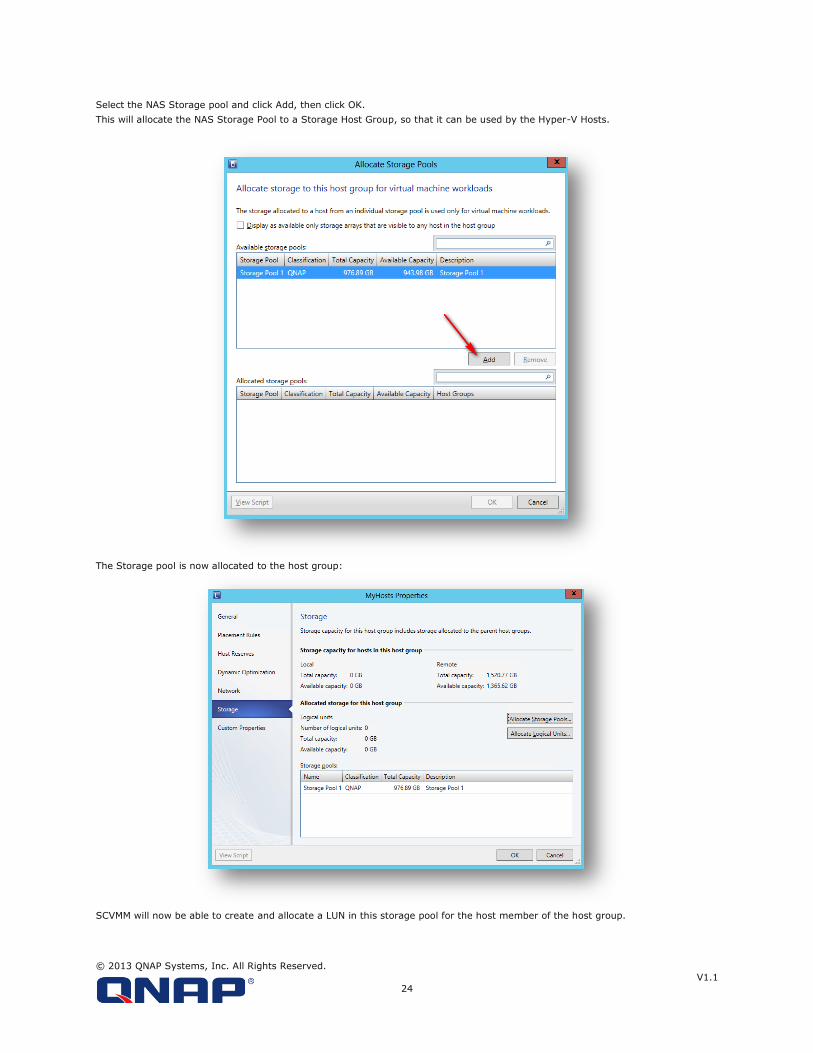
Select the NAS Storage pool and click Add, then click OK.
This will allocate the NAS Storage Pool to a Storage Host Group, so that it can be used by the Hyper-V Hosts.
The Storage pool is now allocated to the host group:
SCVMM will now be able to create and allocate a LUN in this storage pool for the host member of the host group.
© 2013 QNAP Systems, Inc. All Rights Reserved.
V1.1
25
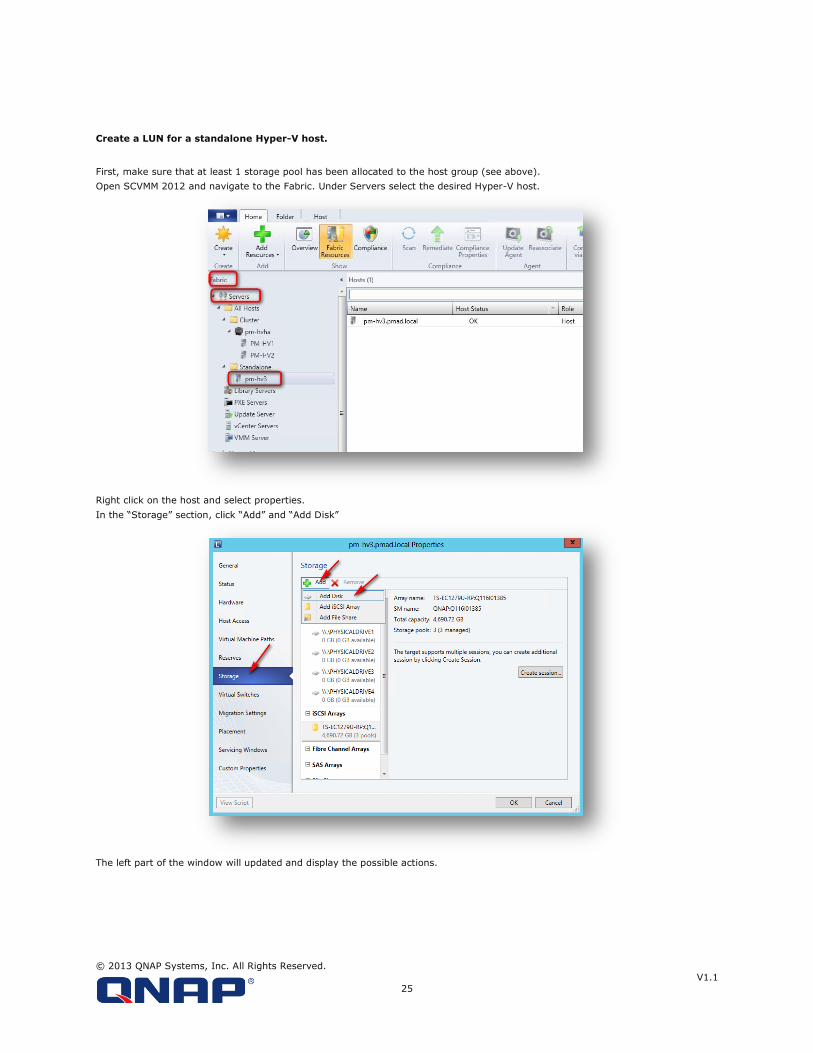
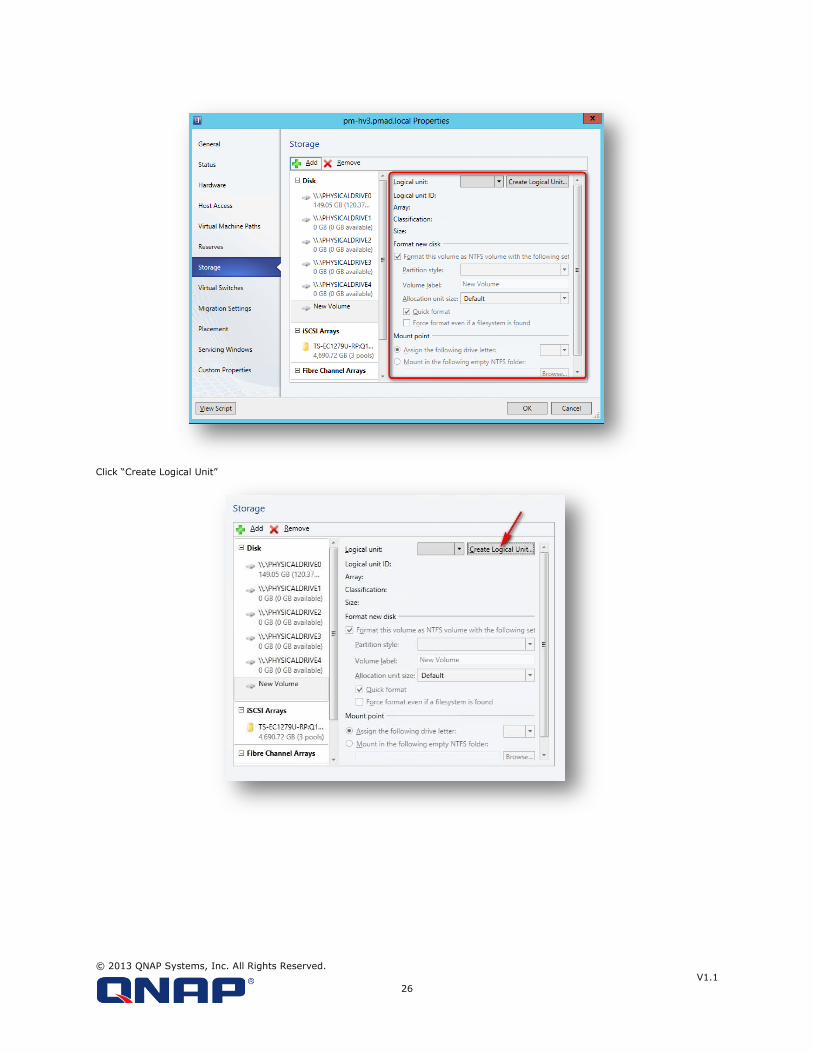
Create a LUN for a standalone Hyper-V host.
First, make sure that at least 1 storage pool has been allocated to the host group (see above).
Open SCVMM 2012 and navigate to the Fabric. Under Servers select the desired Hyper-V host.
Right click on the host and select properties.
In the “Storage” section, click “Add” and “Add Disk”
The left part of the window will updated and display the possible actions.
© 2013 QNAP Systems, Inc. All Rights Reserved.
V1.1
26
Click “Create Logical Unit”
© 2013 QNAP Systems, Inc. All Rights Reserved.
V1.1
27
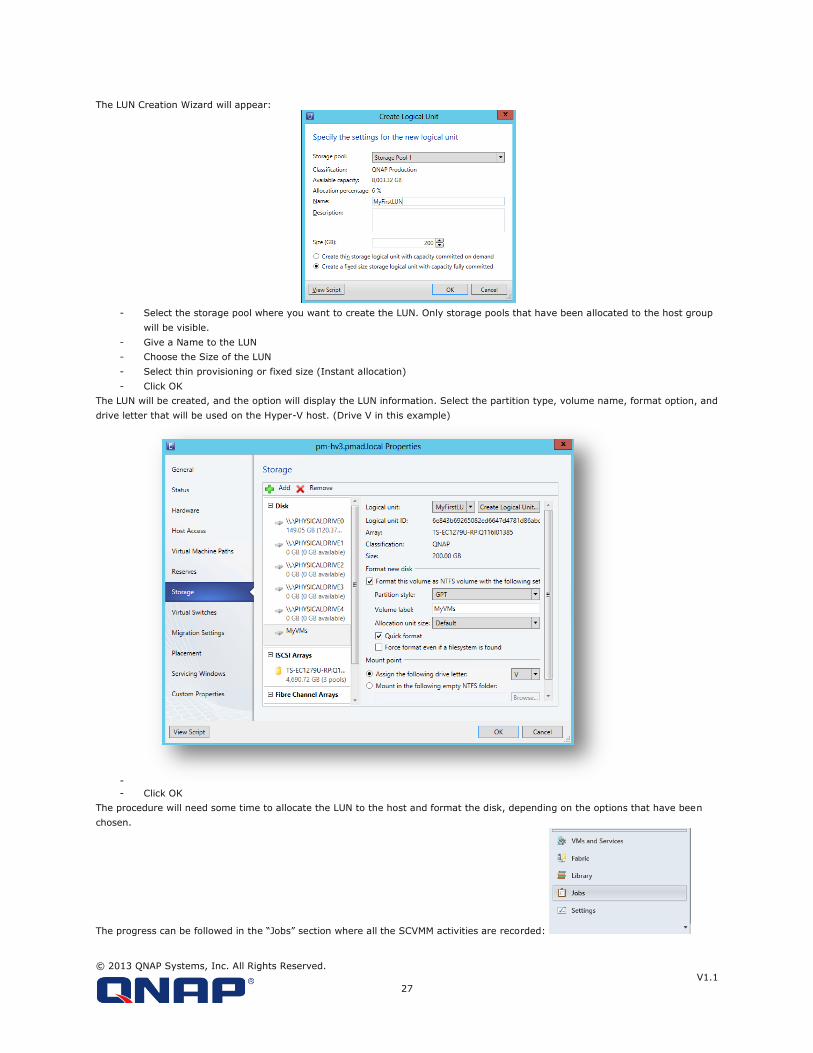
The LUN Creation Wizard will appear:
- Select the storage pool where you want to create the LUN. Only storage pools that have been allocated to the host group
will be visible.
- Give a Name to the LUN
- Choose the Size of the LUN
- Select thin provisioning or fixed size (Instant allocation)
- Click OK
The LUN will be created, and the option will display the LUN information. Select the partition type, volume name, format option, and
drive letter that will be used on the Hyper-V host. (Drive V in this example)
-
- Click OK
The procedure will need some time to allocate the LUN to the host and format the disk, depending on the options that have been
chosen.
The progress can be followed in the “Jobs” section where all the SCVMM activities are recorded:

© 2013 QNAP Systems, Inc. All Rights Reserved.
V1.1
28
Once the new disk has been created, the LUN can be seen in the Fabric, Storage, Classification and Pools:
A remote login on the Hyper-V host can help to verify that the disk has been created and is available:
New disk V: , 200 GB, as were the option when the LUN has been created from SCVMM 2012.
© 2013 QNAP Systems, Inc. All Rights Reserved.
V1.1
29
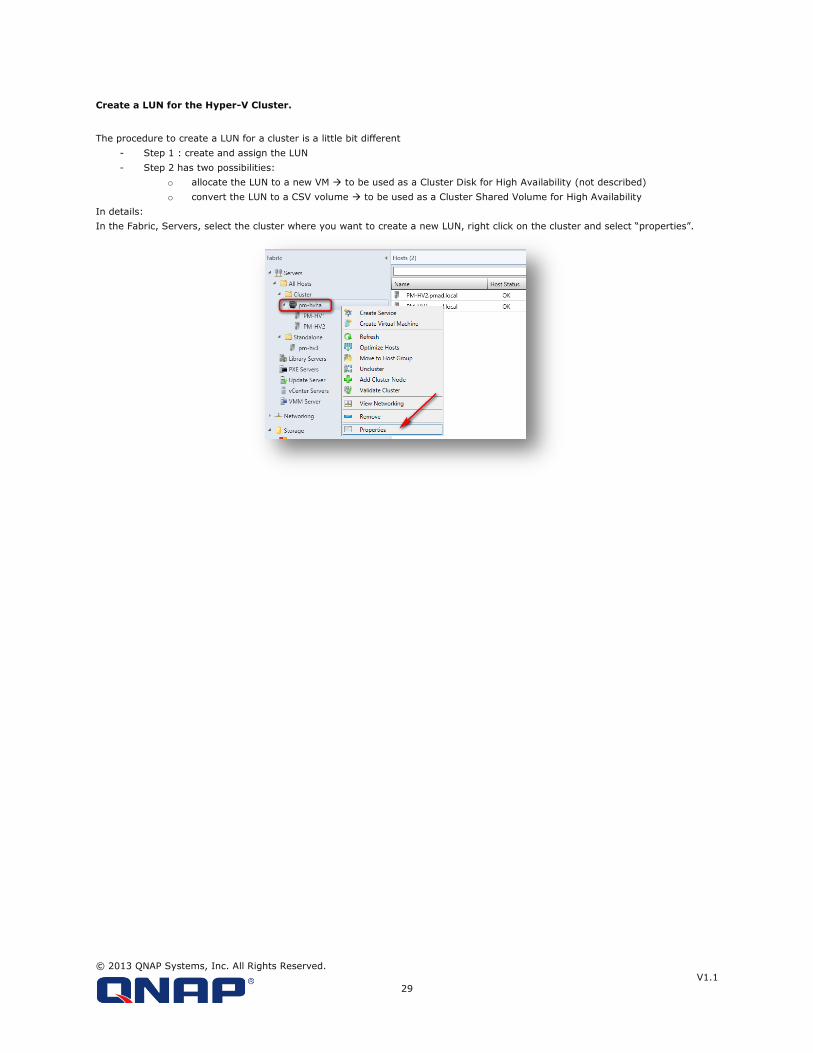
Create a LUN for the Hyper-V Cluster.
The procedure to create a LUN for a cluster is a little bit different
- Step 1 : create and assign the LUN
- Step 2 has two possibilities:
o allocate the LUN to a new VM to be used as a Cluster Disk for High Availability (not described)
o convert the LUN to a CSV volume to be used as a Cluster Shared Volume for High Availability
In details:
In the Fabric, Servers, select the cluster where you want to create a new LUN, right click on the cluster and select “properties”.

© 2013 QNAP Systems, Inc. All Rights Reserved.
V1.1
30
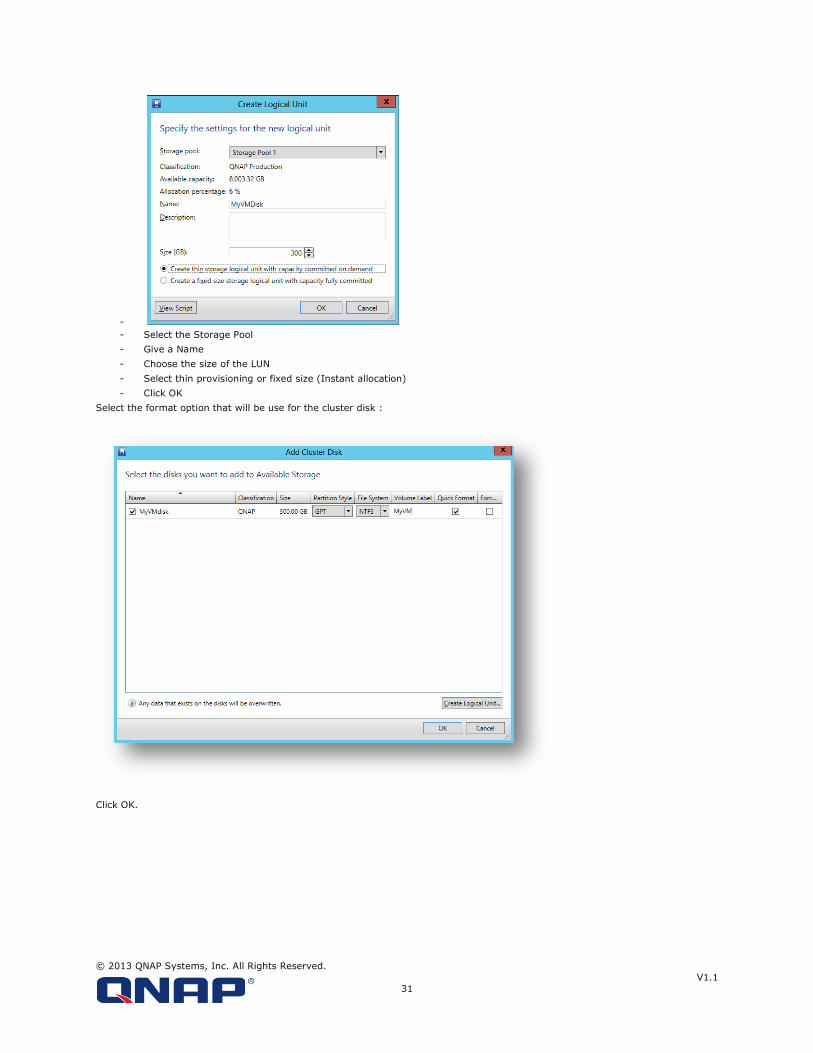
In “Available Storage” click “Add…”
In the Cluster Disk wizard, click “Create Logical Unit…”:
© 2013 QNAP Systems, Inc. All Rights Reserved.
V1.1
31
-
- Select the Storage Pool
- Give a Name
- Choose the size of the LUN
- Select thin provisioning or fixed size (Instant allocation)
- Click OK
Select the format option that will be use for the cluster disk :
Click OK.

© 2013 QNAP Systems, Inc. All Rights Reserved.
V1.1
32
Click OK
The progress can be followed in the “Jobs” section where all the SCVMM activities are recorded:
© 2013 QNAP Systems, Inc. All Rights Reserved.
V1.1
33
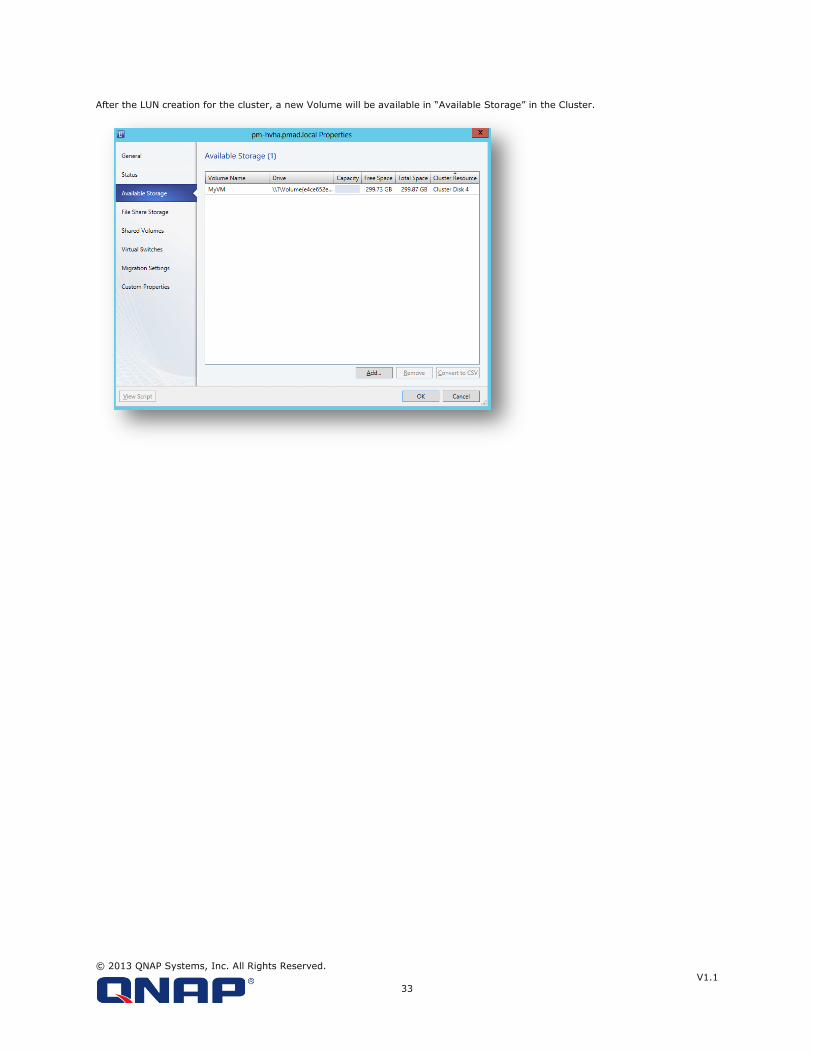
After the LUN creation for the cluster, a new Volume will be available in “Available Storage” in the Cluster.
© 2013 QNAP Systems, Inc. All Rights Reserved.
V1.1
34
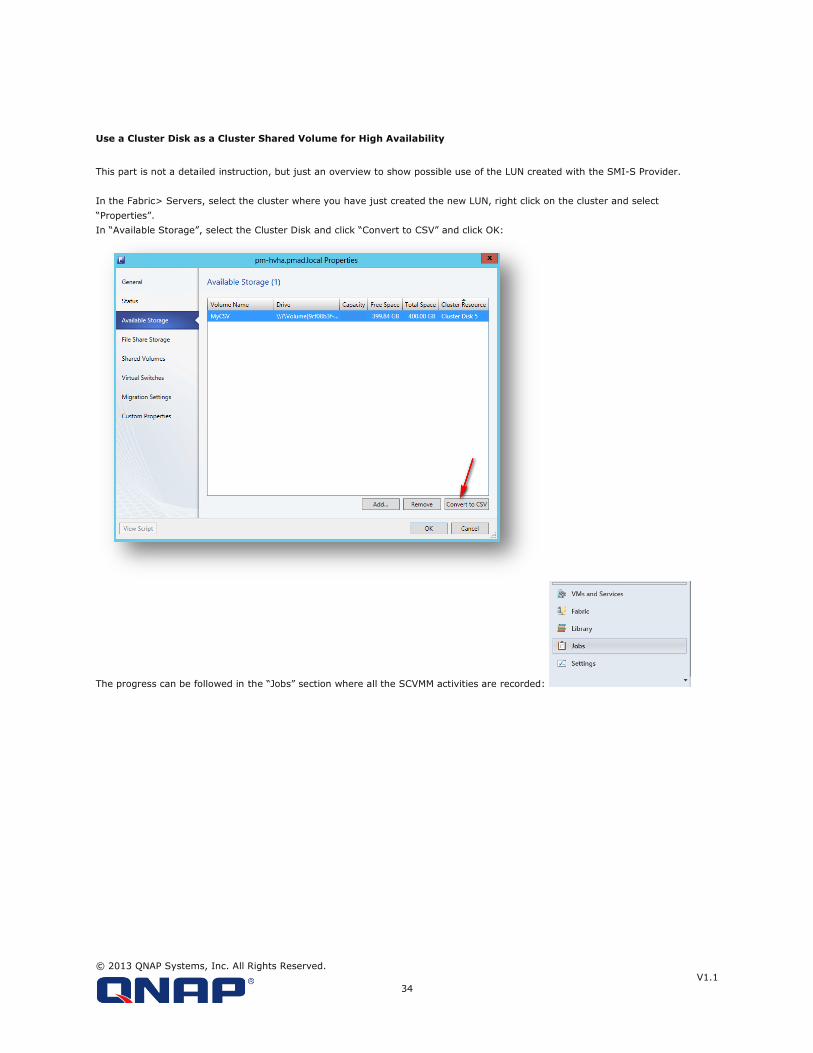
Use a Cluster Disk as a Cluster Shared Volume for High Availability
This part is not a detailed instruction, but just an overview to show possible use of the LUN created with the SMI-S Provider.
In the Fabric> Servers, select the cluster where you have just created the new LUN, right click on the cluster and select
“Properties”.
In “Available Storage”, select the Cluster Disk and click “Convert to CSV” and click OK:
The progress can be followed in the “Jobs” section where all the SCVMM activities are recorded:
© 2013 QNAP Systems, Inc. All Rights Reserved.
V1.1
35
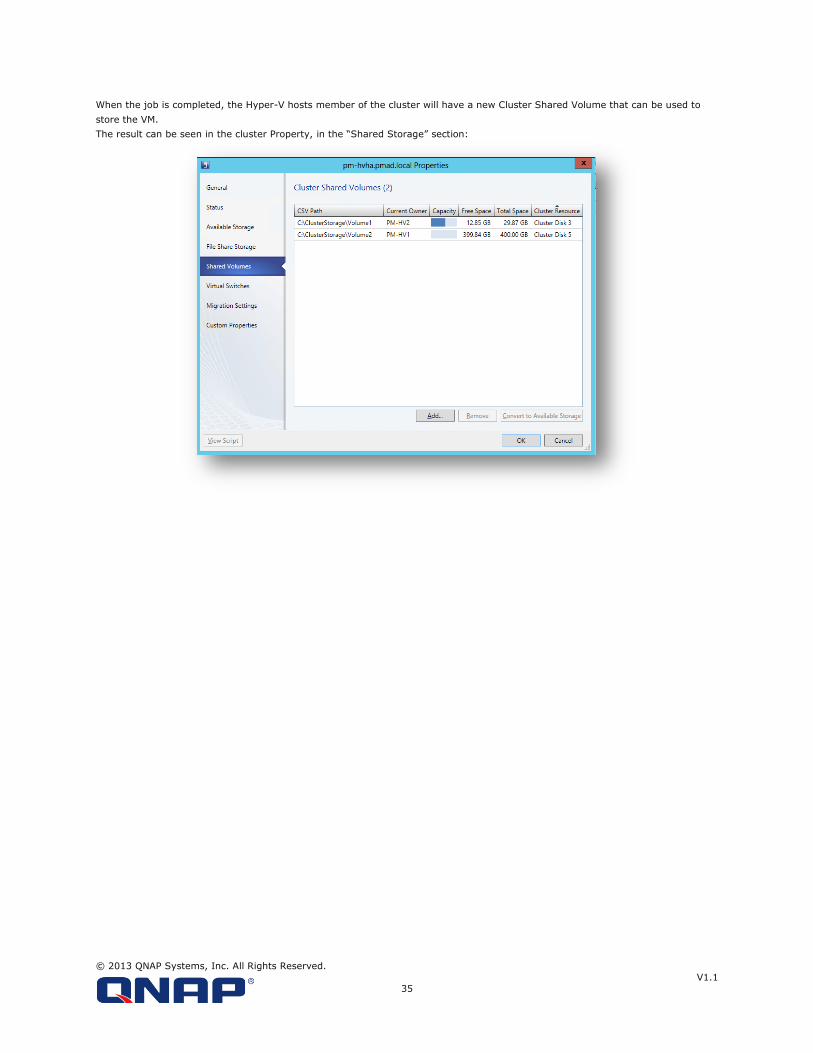
When the job is completed, the Hyper-V hosts member of the cluster will have a new Cluster Shared Volume that can be used to
store the VM.
The result can be seen in the cluster Property, in the “Shared Storage” section:

© 2013 QNAP Systems, Inc. All Rights Reserved.
V1.1
36
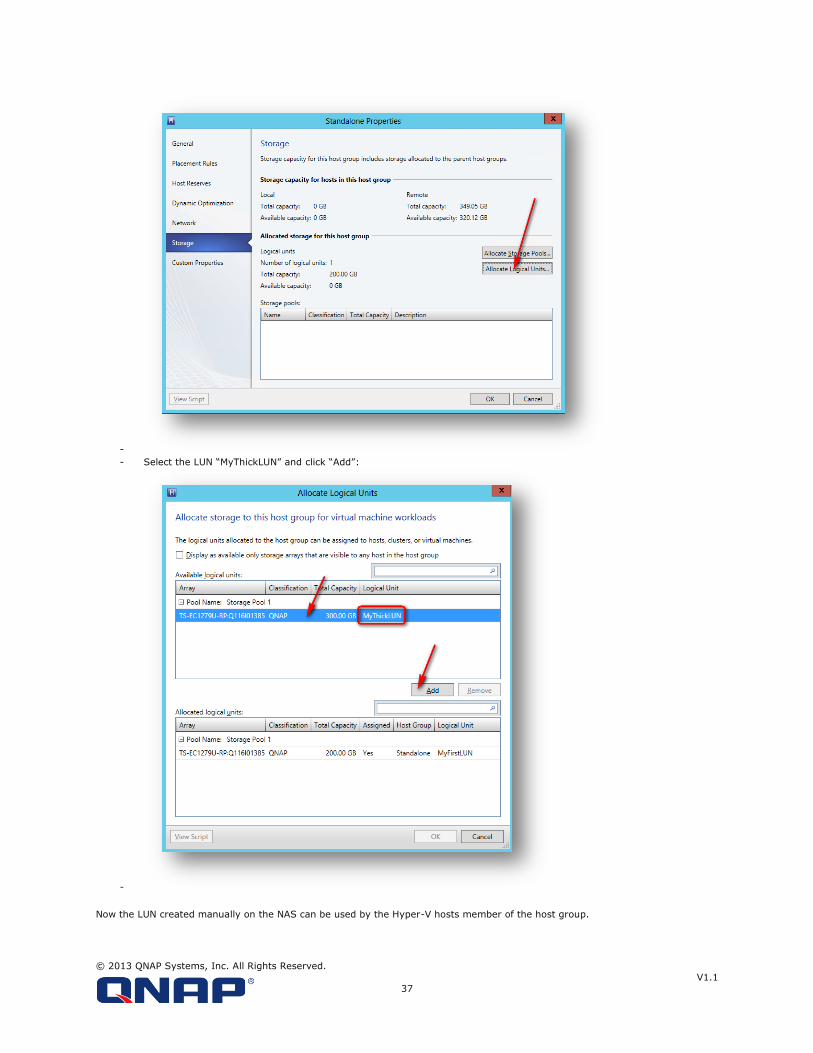
Create a LUN on the NAS and allocate it from SCVMM 2012
The LUN can be created on the NAS first. SCVMM will be able to allocate and connect the LUN created on the NAS to the
hypervisors.
- Login to the NAS as an administrator
- Create an “iSCSI LUN only” on the NAS, and do not map it to any target. The LUN can use Thin Provisioning or Thick
Provisioning
- In this example we will create an Instant Allocation LUN named “MyThickLUN”.
-
- Login into SCVMM 2012
- In the Fabric > Servers, right click on a host group , select “Properties”
- In Storage, Click “Allocate Logical Units…”
- Right click on the QNAP SMI-S Provider and rescan the SMIS Provider :
-
- In the Fabric, on a host group, allocate the LUN :
© 2013 QNAP Systems, Inc. All Rights Reserved.
V1.1
37
-
- Select the LUN “MyThickLUN” and click “Add”:
-
Now the LUN created manually on the NAS can be used by the Hyper-V hosts member of the host group.
© 2013 QNAP Systems, Inc. All Rights Reserved.
V1.1
38
References
- QNAP SMI-S Provider at www.qnap.com/utility
- How to Add and Classify SMI-S and SMP Storage Devices in VMM : http://technet.microsoft.com/en-
us/library/gg610563.aspx
- Administering System Center 2012 - Virtual Machine Manager : http://technet.microsoft.com/en-
us/library/gg610615.aspx
- Configuring Storage in VMM Overview (http://technet.microsoft.com/en-us/library/gg610600.aspx)
- How to Add and Classify SMI-S and SMP Storage Devices in VMM (http://technet.microsoft.com/en-
us/library/gg610563.aspx)
- How to Provision Storage Logical Units in VMM (http://technet.microsoft.com/en-us/library/gg696973.aspx)
- How to Allocate Storage Logical Units to a Host Group in VMM (http://technet.microsoft.com/en-
us/library/gg610686.aspx)
- How to Allocate Storage Pools to a Host Group in VMM (http://technet.microsoft.com/en-us/library/gg610635.aspx)
- How to Configure Storage on a Hyper-V Host in VMM: http://technet.microsoft.com/en-us/library/gg610696


![VioStor QVR 5 - QNAPeu1.qnap.com/Surveillance/presentation/[QNAP]Presentation_QVR 5.1.0_ENG... · 01/07/2015 · Vmobile 3.1 Live view, playback and event notifications Brand new](https://img.pdfslide.net/doc/110x75/5e7c1134cb122944bf248bb2/viostor-qvr-5-qnappresentationqvr-510eng-01072015-vmobile-31-live.jpg)