Embed Size (px)
Citation preview
QPS 9.1 ReadMe
Contents
QPS 9.1 ReadMe...............................................................................5
QPS components...............................................................................6Components updated in this version......................................................................6
Compatibility matrix...............................................................................................6
Server components.................................................................................................7
Other optional components....................................................................................8
Client components..................................................................................................8
System requirements........................................................................9QPS Server: Mac OS...............................................................................................9
Hardware ........................................................................................................................9
Software..........................................................................................................................9
Supported platforms*....................................................................................................10
QPS Server: Windows...........................................................................................10
Hardware.......................................................................................................................10
Software........................................................................................................................10
Supported platforms*....................................................................................................10
QPS Database*.....................................................................................................11
QPS File Server: Mac OS.......................................................................................11
Hardware options..........................................................................................................11
Software........................................................................................................................11
Supported platforms*....................................................................................................11
QPS File Server: Windows....................................................................................12
Hardware.......................................................................................................................12
Software........................................................................................................................12
Supported platforms*....................................................................................................12
QPS File Server: Solaris........................................................................................12
Hardware.......................................................................................................................12
Software........................................................................................................................13
QPS Connect Client: Mac OS................................................................................13
Hardware ......................................................................................................................13
Software........................................................................................................................13
Supported platforms*....................................................................................................13
QPS Connect Client: Windows..............................................................................13
ii | QPS 9.1 README
CONTENTS
Hardware.......................................................................................................................13
Software........................................................................................................................13
Supported platforms*....................................................................................................14
QPS Web Hub.......................................................................................................14
Suggested hardware configurations...............................................15Low-volume QPS traffic........................................................................................15
Medium volume QPS traffic (option 1).................................................................16
Medium volume QPS traffic (option 2).................................................................16
High-volume QPS traffic.......................................................................................17
Installing QPS software...................................................................19Installing QPS Server............................................................................................19
Mac OS..........................................................................................................................19
Windows........................................................................................................................20
QPS Script Manager......................................................................................................22
Installing QuarkXPress Server..............................................................................22
Installing QPS XTensions software for QuarkXPress Server................................22
Mac OS..........................................................................................................................23
Windows........................................................................................................................23
Installing QPS Database........................................................................................23
Installing QPS Database — HSQL DB...........................................................................23
Installing QPS Database on Windows — MS SQL Server.............................................23
Installing QPS Database on Windows — Oracle...........................................................24
Configuring QPS schema for Oracle on Linux...............................................................25
Installing QPS Connect Client...............................................................................26
Mac OS..........................................................................................................................26
Windows........................................................................................................................26
Manually installing QPS XTensions software........................................................27
Mac OS..........................................................................................................................27
Windows........................................................................................................................29
Making changes after installation.........................................................................30
Identifying QuarkXPress Server locale..........................................................................30
Updating QuarkXPress Server.......................................................................................30
Updating a QPS Connect Client installation: Windows.................................................30
Allocating RAM for QPS Server.....................................................................................31
Updating QPS software..................................................................33Updating QPS Server (Mac OS)............................................................................33
Updating QPS Server (Windows)..........................................................................34
Updating QPS Connect Client (Mac OS)...............................................................34
Updating QPS Connect Client (Windows).............................................................35
QPS 9.1 README | iii
CONTENTS
Updating QPS XTensions software for QuarkXPress Server................................35
Upgrading to QPS 9.1.....................................................................36Upgrading QPS XTensions software for QuarkXPress Server..............................36
Upgrading QPS Server (Mac OS)..........................................................................36
Upgrading QPS Server (Windows)........................................................................37
Upgrading the QPS database...............................................................................38
Upgrading QPS database (Windows): MS SQL Server or Oracle..................................38
Upgrading QPS database (Linux): Oracle......................................................................38
QPS XDK documentation................................................................39
Starting QPS Server........................................................................40Mac OS..................................................................................................................40
Windows...............................................................................................................40
Automating QXP Server restarts..........................................................................41
Uninstalling......................................................................................42Uninstalling QPS Server........................................................................................42
Mac OS..........................................................................................................................42
Windows........................................................................................................................42
Uninstalling QPS Connect Client and QPS XTensions software............................42
Mac OS..........................................................................................................................42
Windows........................................................................................................................44
Changes in this version...................................................................45General changes....................................................................................................45
Changes to QPS Web Hub....................................................................................49
App Studio changes..............................................................................................50
Known and resolved issues.............................................................51
Contacting Quark............................................................................52In the Americas.....................................................................................................52
Outside the Americas...........................................................................................52
In Australia............................................................................................................53
Legal notices...................................................................................54
iv | QPS 9.1 README
CONTENTS
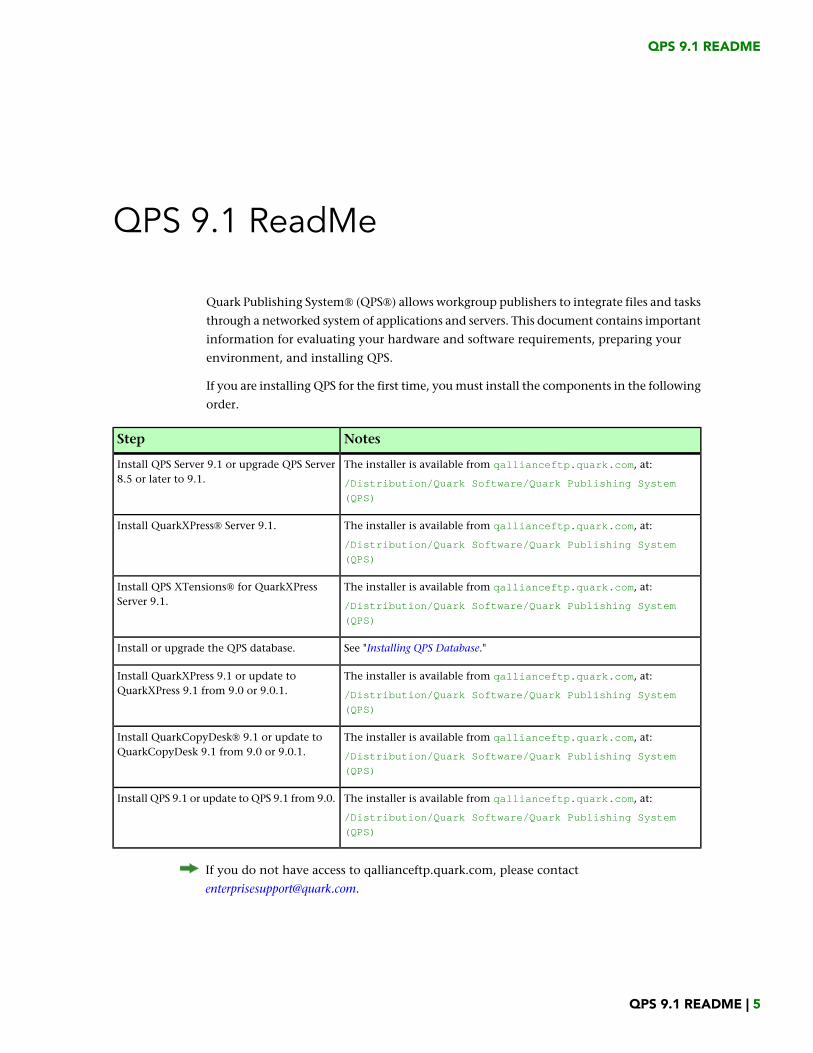
QPS 9.1 ReadMe
Quark Publishing System® (QPS®) allows workgroup publishers to integrate files and tasks
through a networked system of applications and servers. This document contains important
information for evaluating your hardware and software requirements, preparing your
environment, and installing QPS.
If you are installing QPS for the first time, you must install the components in the following
order.
NotesStep
The installer is available from qallianceftp.quark.com, at:Install QPS Server 9.1 or upgrade QPS Server8.5 or later to 9.1. /Distribution/Quark Software/Quark Publishing System
(QPS)
The installer is available from qallianceftp.quark.com, at:Install QuarkXPress® Server 9.1.
/Distribution/Quark Software/Quark Publishing System
(QPS)
The installer is available from qallianceftp.quark.com, at:Install QPS XTensions® for QuarkXPressServer 9.1. /Distribution/Quark Software/Quark Publishing System
(QPS)
See "Installing QPS Database."Install or upgrade the QPS database.
The installer is available from qallianceftp.quark.com, at:Install QuarkXPress 9.1 or update toQuarkXPress 9.1 from 9.0 or 9.0.1. /Distribution/Quark Software/Quark Publishing System
(QPS)
The installer is available from qallianceftp.quark.com, at:Install QuarkCopyDesk® 9.1 or update toQuarkCopyDesk 9.1 from 9.0 or 9.0.1. /Distribution/Quark Software/Quark Publishing System
(QPS)
The installer is available from qallianceftp.quark.com, at:Install QPS 9.1 or update to QPS 9.1 from 9.0.
/Distribution/Quark Software/Quark Publishing System
(QPS)
If you do not have access to qallianceftp.quark.com, please contact
QPS 9.1 README | 5
QPS 9.1 README
QPS components
QPS includes server and client components. These components have been tested on the
hardware and software configurations listed below.
Components updated in this version
This section indicates which components are updated in this release. Components that
are not listed here are not affected by this release.
• QPS Server
• QuarkCopyDesk
• QuarkXPress
• QuarkXPress Server
• QPS XTensions for QuarkXPress Server
• QPS XTensions for QuarkXPress
• QPS XTensions for QuarkCopyDesk
• QPS Connect Client
• QPS Server XDK
• QPS Client XDK
• QPS XTensions XDK
• QPS Connect for InDesign® and InCopy® CS4
• QPS Adapter for SharePoint® 2010
• Automation Services
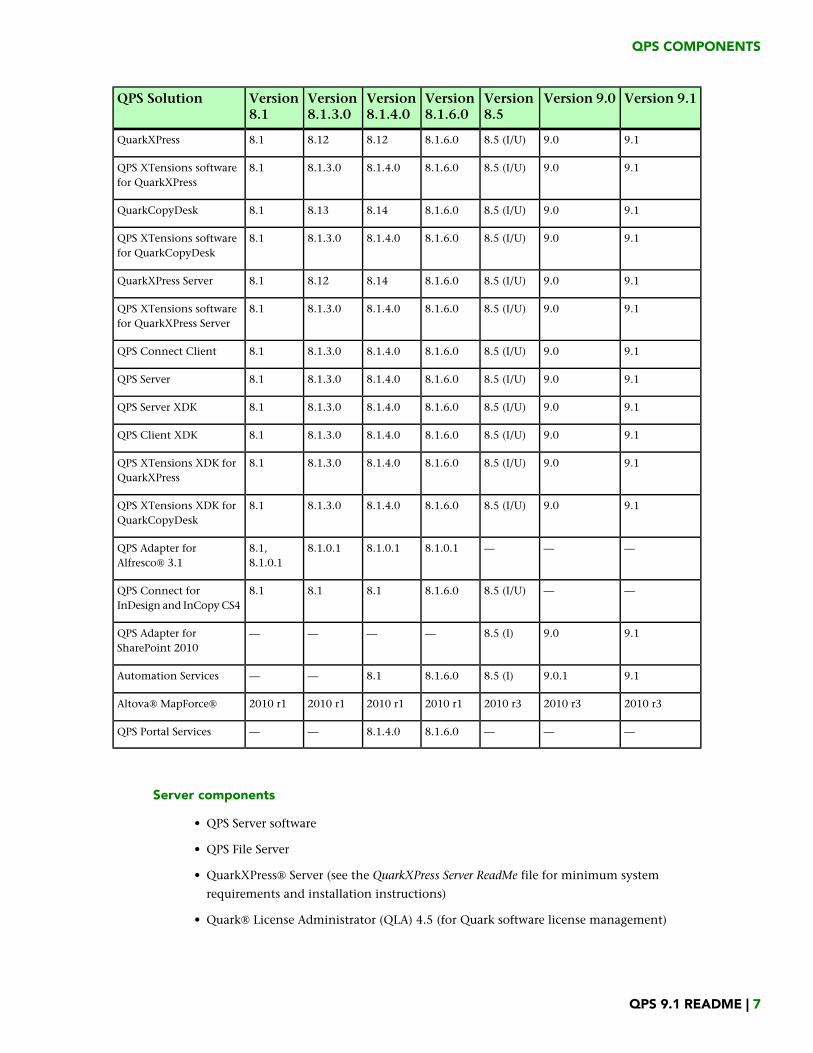
Compatibility matrix
The following table indicates which versions of Quark software are compatible with QPS
8.1 through 9.1. I=Installer available, U=Updater available.
6 | QPS 9.1 README
QPS COMPONENTS
Version 9.1Version 9.0Version8.5
Version8.1.6.0
Version8.1.4.0
Version8.1.3.0
Version8.1
QPS Solution
9.19.08.5 (I/U)8.1.6.08.128.128.1QuarkXPress
9.19.08.5 (I/U)8.1.6.08.1.4.08.1.3.08.1QPS XTensions softwarefor QuarkXPress
9.19.08.5 (I/U)8.1.6.08.148.138.1QuarkCopyDesk
9.19.08.5 (I/U)8.1.6.08.1.4.08.1.3.08.1QPS XTensions softwarefor QuarkCopyDesk
9.19.08.5 (I/U)8.1.6.08.148.128.1QuarkXPress Server
9.19.08.5 (I/U)8.1.6.08.1.4.08.1.3.08.1QPS XTensions softwarefor QuarkXPress Server
9.19.08.5 (I/U)8.1.6.08.1.4.08.1.3.08.1QPS Connect Client
9.19.08.5 (I/U)8.1.6.08.1.4.08.1.3.08.1QPS Server
9.19.08.5 (I/U)8.1.6.08.1.4.08.1.3.08.1QPS Server XDK
9.19.08.5 (I/U)8.1.6.08.1.4.08.1.3.08.1QPS Client XDK
9.19.08.5 (I/U)8.1.6.08.1.4.08.1.3.08.1QPS XTensions XDK forQuarkXPress
9.19.08.5 (I/U)8.1.6.08.1.4.08.1.3.08.1QPS XTensions XDK forQuarkCopyDesk
———8.1.0.18.1.0.18.1.0.18.1,8.1.0.1
QPS Adapter forAlfresco® 3.1
——8.5 (I/U)8.1.6.08.18.18.1QPS Connect forInDesign and InCopy CS4
9.19.08.5 (I)————QPS Adapter forSharePoint 2010
9.19.0.18.5 (I)8.1.6.08.1——Automation Services
2010 r32010 r32010 r32010 r12010 r12010 r12010 r1Altova® MapForce®
———8.1.6.08.1.4.0——QPS Portal Services
Server components
• QPS Server software
• QPS File Server
• QuarkXPress® Server (see the QuarkXPress Server ReadMe file for minimum system
requirements and installation instructions)
• Quark® License Administrator (QLA) 4.5 (for Quark software license management)
QPS 9.1 README | 7
QPS COMPONENTS
Other optional components
• QPS database using Oracle® 10.2.0.4 (Windows® or Linux).
• QPS database using Microsoft® SQL Server® 2005 with service pack 2 (SP2) or Microsoft
SQL Server 2008 with SP1
• QPS Script Manager (for automating tasks)
• QPS Adapter for InDesign CS4
• QPS Adapter for SharePoint 2010
• Automation Services
Client components
• QPS Connect Client
• QuarkCopyDesk 9.1 with QPS XTensions® software for QuarkCopyDesk
• QuarkXPress 9.1 with QPS XTensions software for QuarkXPress
• QPS Web Hub
8 | QPS 9.1 README
QPS COMPONENTS
System requirements
The QPS system requirements listed below are baseline requirements, but your number of
users, number of assets, and number of asset revisions affect system performance. The
requirements with an asterisk are affected by these variables. See "Suggested hardware
configurations" for guidance considering these variables. RAM requirements do not include
other third-party application requirements on the computer, so factor accordingly. Also,
the requirements for QuarkXPress Server, QuarkXPress, and QuarkCopyDesk are not listed
below. See the ReadMe files for these applications for system requirements (stored in the
"Documents" folder at the root level of the application folder).
The operating system requirements listed in this document include the most current
patches and service packs.
QPS is certified on VMWare ESXi. QuarkXPress Server is certified on VMWare ESXi only
as part of QPS.
QPS works with Citrix Presentation Server 4.5 and Citrix XenApp 5.0.
QPS Server: Mac OS
Hardware
• 4GB total RAM (Quark recommends allocating at least 50% of the total RAM available to
the QPS Server.)*
• 1GB hard disk space*
• TCP/IP network (Gigabit Ethernet recommended)
Quark does not recommend using low-end desktop computers and laptops as server
computers.
Software
• Mac OS® 10.4.11, 10.5.8, 10.6.6, 10.6.8, or 10.7
• Mac OS Server 10.4.11, 10.5.8, 10.6.6, 10.6.8, or 10.7
QPS 9.1 README | 9
SYSTEM REQUIREMENTS

• Java™ Development Kit (JDK™) 1.5 or 1.6
• Quark License Administrator (QLA) 4.5 (required for QPS Server and QuarkXPress Server)
• QuarkXPress Server (QuarkXPress Server is required for QPS Server. Quark recommends
improving performance by installing and running QuarkXPress Server on a different
computer from the computer on which you install and run your QPS Server.)
Supported platforms*
• Intel processor (recommended)
• Intel® Xserve computer running Mac OS X Server software
• G5 PowerPC® processor (supported, but not recommended)
• G5 Xserve® running Mac OS X Server software
• Mac Pro running Mac OS X Server software
QPS Server: Windows
Hardware
• 4GB total RAM (Quark recommends allocating as much RAM as possible for QPS Server.
However, you cannot allocate more than approximately 1.6GB on Windows®.)*
• 1GB hard disk space*
• TCP/IP network (Gigabit Ethernet recommended)
Quark does not recommend using low-end desktop computers and laptops as server
computers.
Software
• Microsoft® Windows Server 2003 (Standard Edition or Enterprise Edition; 32-bit or 64-bit)
• Microsoft Windows Server 2008 or 2008 R2 (Standard Edition or Enterprise Edition; 32-bit
or 64-bit)
• .NET Framework 3.5 SP1
• Java Development Kit (JDK) 1.6
• Quark License Administrator (QLA) 4.5 (required for QPS Server and QuarkXPress Server)
• QuarkXPress Server (QuarkXPress Server is required for QPS Server. Quark recommends
improving performance by installing and running QuarkXPress Server on a different
computer from the computer on which you install and run your QPS Server.)
Supported platforms*
• Servers based on multi-core Xeon® processors
10 | QPS 9.1 README
SYSTEM REQUIREMENTS
• Intel® Core™ 2 Duo
• VMware ESXi (virtualization platform)
QPS Database*
• HSQL DB 1.8 in embedded mode (The QPS Server installer installs this database in embedded
mode if you choose HSQL DB during installation.)
• Microsoft SQL Server 2005 with SP2, Microsoft SQL Server 2008 with SP1, Microsoft SQL
Server 2008 with SP2 (Standard Edition or Enterprise Edition), or Microsoft SQL Server
2008 R2
• Oracle Database 10g Release 2 (10.2.0.4) on Red Hat Enterprise Linux 5 or Microsoft
Windows Server 2003 or Microsoft Windows Server 2008
If you plan to use a Microsoft SQL Server database, you must first install Microsoft SQL
Server. If you plan to use an Oracle database on Windows, you must first install Oracle.
Then run the "QPS Server.exe" installer on Windows, click Install QPS Database, and
follow instructions on the screen to create QPS schema in your Microsoft SQL Server
database or Oracle database.
QPS File Server: Mac OS
Hardware options
• 2GB total RAM*
• 5GB–150GB hard disk space (depending on number of assets)*
• TCP/IP network (Gigabit Ethernet recommended)
Quark does not recommend using low-end desktop computers and laptops as server
computers.
Software
• Mac OS X Server 10.4.11, Mac OS X Server 10.5.8, Mac OS 10.6.6, Mac OS X 10.6.8, or
Mac OS X 10.7
Supported platforms*
• Intel processor (recommended)
• Intel® Xserve computer running Mac OS X Server software
• G5 PowerPC® processor (supported, but not recommended)
• G5 Xserve® running Mac OS X Server software (supported, but not recommended)
QPS 9.1 README | 11
SYSTEM REQUIREMENTS
• Mac Pro running Mac OS X Server software
You can use a separate computer as your QPS File Server, but Quark recommends installing
and running your QPS Server on the same computer as your QPS File Server because it
optimizes read/write operations. If you combine your QPS Server and QPS File Server on
the same computer, add the 1GB estimate for QPS Server files to the 5GB–150GB required
for your QPS File Server.
QPS File Server: Windows
Hardware
• 2GB total RAM*
• 5GB–150GB hard disk space (depending on number of assets)*
• TCP/IP network (Gigabit Ethernet recommended)
Quark does not recommend using low-end desktop computers and laptops as server
computers.
Software
• Microsoft Windows Server 2003 (Standard Edition or Enterprise Edition; 32-bit or 64-bit)
• Microsoft Windows Server 2008 (Standard Edition or Enterprise Edition; 32-bit or 64-bit)
Supported platforms*
• Intel vPro™ technology and Intel Core 2 Duo running Windows 2003 Server SP2, Standard
Edition or Enterprise Edition (recommended)
• Single processor Intel® Pentium® 4/Pentium D/Dual-processor Xeon running Windows
2003 Server SP2, Standard Edition or Enterprise Edition
You can use a separate computer as your QPS File Server, but Quark recommends installing
and running your QPS Server on the same computer as your QPS File Server because it
optimizes read/write operations. If you combine your QPS Server and QPS File Server on
the same computer, add the 1GB estimate for QPS Server files to the 5GB–150GB required
for your QPS File Server.
QPS File Server: Solaris
Hardware
• SPARC™-based or x64/x86-based system
• 2GB total RAM
12 | QPS 9.1 README
SYSTEM REQUIREMENTS
• 5GB–150GB hard disk space (depending on the number of assets)*
Quark does not recommend using low-end desktop computers and laptops as server
computers.
Software
• Sun™ Solaris™ 8 or later
QPS Connect Client: Mac OS
Hardware
• 1GB total RAM*
• 500MB hard disk space for program files and enough hard disk space to store checked-out
assets*
• TCP/IP network
Software
• Mac OS X 10.5.8, 10.6.6, 10.6.8, or 10.7
Supported platforms*
• iMac with Intel Core Duo or Intel Core 2 Duo processor
• MacBook or MacBook Pro with Intel Core Duo or Intel Core 2 Duo processor running
Mac OS X client software
• Mac Pro running Mac OS X client software
• Mac mini with Intel Core Duo or Intel Core 2 Duo processor
QPS Connect Client: Windows
Hardware
• 1GB total RAM*
• 500MB hard disk space for program files and enough hard disk space to store checked-out
assets*
Software
• Microsoft Windows XP Professional Edition, Windows Vista Business or Ultimate Edition,
or Windows 7 Business or Ultimate
QPS 9.1 README | 13
SYSTEM REQUIREMENTS
• .NET Framework 3.5 SP1
Supported platforms*
• Intel Core 2 Duo processor running Windows XP Professional Edition, Windows Vista
Business or Ultimate Edition, or Windows 7 Professional Edition
• Intel Xeon processor running Windows XP Professional Edition, Windows Vista Business
or Ultimate Edition, or Windows 7 Professional Edition
• Intel vPro technology and Intel Core 2 Duo running Windows Vista Business or Ultimate
Edition or Windows 7 Professional Edition
• Intel Pentium 4 processor running Windows XP Professional Edition, Windows Vista
Business or Ultimate Edition, or Windows 7 Professional edition
QPS Web Hub
• Mozilla Firefox 4.x and 5.x for Mac OS or Windows, Microsoft Internet Explorer 9.x for
Windows, Microsoft Internet Explorer 8.x for Windows, Safari 5.x for Mac OS, or Google
Chrome 12.x for Mac OS and Windows
* See "Suggested hardware configurations" for details.
14 | QPS 9.1 README
SYSTEM REQUIREMENTS
Suggested hardware configurations
Use the parameters below to help determine the hardware needs for your organization.
Variables include your number of users, number of assets, kinds of assets (for example,
small text files or large picture files), and your number of asset revisions. When you search
for assets, QPS Server performance depends on the number of master files (that is, the
current version of each asset). The number of revisions does not affect QPS Server
performance, but the revision number variable affects the amount of disk space required
for your QPS File Server. An increased number of search operations from multiple users
can also affect QPS Server performance.
Contact your account manager to specify your organization's needs based on the suggested
configurations below. The low-volume, medium volume, and high-volume configurations
are approximations based on the number of logged-on users displayed in the User Activity
screen of the QPS Connect Client window (also called "user sessions").
Quark does not recommend using low-end desktop computers and laptops as server
computers.
Low-volume QPS traffic
The configuration below can adequately serve a smaller QPS workflow (approximately 30
users and 5,000 assets). You can install the QPS Database, QPS Server, and QPS File Server
on one computer, but Quark recommends using a second computer for QuarkXPress Server.
Computer 1: QPS Database (HSQL), QPS Server, QPS File Server
• RAM: 4GB (1GB allocated to Java Virtual Machine)
• Hard disk: 1GB free space (in addition to 5–150GB needed for assets)
• RAID: Not required
• CPU: Dual Core Intel (recommended)
QPS 9.1 README | 15
SUGGESTED HARDWARE CONFIGURATIONS
• Network: Gigabit NIC (recommended)
Computer 2: QuarkXPress Server (two subrenderers)
• RAM: 4GB
• Hard disk: 10GB–20GB required for document pool
• RAID: Not required
• CPU: Dual Core Intel (recommended)
• Network: Gigabit NIC (recommended)
Medium volume QPS traffic (option 1)
The configuration below can adequately serve a mid-sized QPS workflow (approximately
50 users and 20,000 assets). Although you can install the QPS Database, QPS Server, and
QPS File Server on one computer, you will need to allocate more RAM for the
QuarkXPress Server computer. This option suggests two server computers.
Computer 1: QPS Database (HSQL), QPS Server, QPS File Server
• RAM: 8GB (2GB allocated to Java Virtual Machine)
• Hard disk: 1GB free space (in addition to 5–150GB needed for assets)
• RAID: 1+0 recommended
• CPU: 4 Core Intel Xeon, 64-bit (recommended)
• Network: Gigabit NIC (recommended)
Computer 2: QuarkXPress Server (four subrenderers)
• RAM: 8GB
• Hard disk: 10GB–20GB required for document pool
• RAID: Not required
• CPU: 4 Core Intel Xeon, 64-bit (recommended)
• Network: Gigabit NIC (recommended)
Medium volume QPS traffic (option 2)
The configuration below can adequately serve a mid-sized QPS workflow (approximately
50 users and 20,000 assets). A redundant array of independent drives (RAID) for your QPS
Database can improve performance for accessing assets. This option suggests three server
computers.
Computer 1: QPS Database (Microsoft SQL Server or Oracle)
16 | QPS 9.1 README
SUGGESTED HARDWARE CONFIGURATIONS

• RAM: 8GB
• Hard disk: 20GB free space
• RAID: RAID 1+0
• CPU: 4 Core Intel Xeon, 64-bit (recommended)
• Network: Gigabit NIC (recommended)
Computer 2: QPS Server, QPS File Server
• RAM: 8GB (1.5GB allocated to Java Virtual Machine)
• Hard disk: 1GB free space (in addition to 5–150GB needed for assets)
• RAID: Not required
• CPU: 4 Core Intel Xeon, 64-bit (recommended)
• Network: Gigabit NIC (recommended)
Computer 3: QuarkXPress Server (four subrenderers)
• RAM: 8GB
• Hard disk: 10GB–20GB required for document pool
• RAID: Not required
• CPU: 4 Core Intel Xeon, 64-bit (recommended)
• Network: Gigabit NIC (recommended)
High-volume QPS traffic
The configuration below can adequately serve a large QPS workflow (more than 150 users
and 60,000 assets). For requirements beyond this size, contact [email protected].
Computer 1: QPS Database (Microsoft SQL Server or Oracle)
• RAM: 8GB
• Hard disk: 40GB free space
• RAID: RAID 1+0
• CPU: 8 Core Intel Xeon, 64-bit (recommended)
• Network: Gigabit NIC (recommended)
Computer 2: QPS Server, QPS File Server
• RAM: 8GB (1.5GB allocated to Java Virtual Machine)
• Hard disk: 1GB free space (in addition to 5–150GB needed for assets)
• RAID: Not required
QPS 9.1 README | 17
SUGGESTED HARDWARE CONFIGURATIONS

• CPU: 8 Core Intel Xeon, 64-bit (recommended)
• Network: Gigabit NIC (recommended)
Computer 3: QuarkXPress Server (eight subrenderers)
• RAM: 8GB
• Hard disk: 10GB–20GB required for document pool
• RAID: Not required
• CPU: 8 Core Intel Xeon, 64-bit (recommended)
• Network: Gigabit NIC (recommended)
18 | QPS 9.1 README
SUGGESTED HARDWARE CONFIGURATIONS
Installing QPS software
QPS includes multiple installers for server and client components. These installers must
be run in the sequence below. If you do not follow the sequence below, you will need to
copy files manually after completing all the QPS software installations.
1 Install QuarkXPress Server.
2 Install QPS XTensions software for QuarkXPress Server (included with the QPS Server
installer).
3 Install QPS Database.
If you set up a Microsoft SQL Server database to use with QPS, do not use Windows
authentication when you install Microsoft SQL Server software.
4 Install QPS Server.
5 Install QuarkCopyDesk.
6 Install QuarkXPress.
7 Install QPS Connect Client (this installer also installs QPS XTensions software for
QuarkCopyDesk and QuarkXPress).
Installing QPS Server
Mac OS
1 Disable any virus protection software. If you are concerned about a virus infecting your
computer, run a virus check on the Installer files, and then disable your virus detection
software before installing.
You will need to enter a validation code during the installation process.
2 Double-click QPS Server Installer.
The QPS Server window displays.
3 Click Install QPS Server.
QPS 9.1 README | 19
INSTALLING QPS SOFTWARE
The Authenticate screen displays. Enter your name and password.
4 Click Continue, read the license agreement, click Next, and then click Agree.
The Software Verification screen displays.
5 Enter your validation code and click Next.
The License Server Information screen displays with your serial number and date of
installation.
6 Enter the IP address or hostname of your Quark License Administrator (QLA) computer
in the Host Name or IP Address field.
7 Enter the port number in the Port field.
8 If you use a QLA backup server, enter the IP address or hostname and port number in the
Backup Host Name or IP Address and Port fields.
9 Click Next.
The Database Information screen displays.
10 The validation code you entered in step 5 corresponds to your database choice, which
displays in gray in the Choose Database control. The other options vary according to your
choice.
• If you chose to embed an HSQL database and schema, Default (HSQL DB in embedded
mode) displays in gray.
• If you chose to use a Microsoft SQL Server database that you have already installed, SQL
Server displays in gray. Enter the host name, port, instance name, database user name,
and database user password for the Microsoft SQL Server database server. See "Installing
QPS Database on Windows — MS SQL Server" for details.
• If you chose to use an Oracle database, Oracle displays in gray. Enter the host name,
instance name, database user name, and database user password for the Oracle server. See
"Configuring QPS schema for Oracle on Linux" for details.
11 To run your QPS Server as a service, check Install Quark Publishing System (Server) as
a Service. Click Next to continue with the installation.
The QuarkXPress Server Information screen displays.
12 Enter your QuarkXPress Server IP address and port number, and then click Next.
The Select Destination screen displays.
13 Choose a location for QPS Server, click Continue, and then click Install.
The QPS Server console launches after installation.
14 You can start the server by clicking Start QPS Server.
Windows
To install the QPS Server application:
20 | QPS 9.1 README
INSTALLING QPS SOFTWARE

1 Disable any virus protection software. If you are concerned about a virus infecting your
computer, run a virus check on the Installer files and then disable your virus detection
software before installing.
You will need to enter a validation code during the installation process. Your validation
code is tied to your database choice (embedded HSQL DB, Microsoft SQL Server, or Oracle).
2 Double-click the "QPS Server.exe" file. The Quark Publishing System Installer screen
displays with three options: Install QPS XTensions Software for QuarkXPress Server,
Install QPS Database, and Install QPS Server.
3 Click Install QPS Server, and then click Next.
The License Agreement screen displays.
4 Click I accept the terms in the license agreement, then click Next.
The Software Verification screen displays.
5 Enter your validation code and click Next.
The License Server Information screen displays with your serial number and date of
installation.
6 Enter the IP address or hostname of your Quark License Administrator (QLA) computer
in the Host Name or IP Address field.
7 Enter the port number in the Port field.
8 If you use a QLA backup server, enter the hostname or IP address and port number in the
Backup Host Name or IP Address and Port fields.
9 Click Next.
The Database Information screen displays.
10 The validation code you entered in step 5 corresponds to your database choice, which
displays in gray in the Choose Database control. The other options vary according to your
choice.
• If your validation code specifies an HSQL database and schema, Default (HSQL DB in
embedded mode) displays in gray.
• If you chose to use a Microsoft SQL Server database that you have already installed, SQL
Server displays in gray. Enter the host name, instance name, port number, database user
name, and database user password for the Microsoft SQL Server database server. See
"Installing QPS Database on Windows — MS SQL Server" for details.
The default port for such a database is 1433, but yours may be different. To find out, check
the database instance in SQL Server Configuration Manager.
• If you chose to use an Oracle database, Oracle displays in gray. Enter the host name,
instance name, port number, database user name, and database user password for the
Oracle server. See "Installing QPS Database on Windows — Oracle" for details.
QPS 9.1 README | 21
INSTALLING QPS SOFTWARE
11 Click Next.
The Destination Folder screen displays.
12 For QPS Server Windows Service configuration, choose an option from the Choose System
drop-down menu.
• To specify local system account control, choose Local.
• To specify domain user control, choose Domain and enter a domain name, user name,
and password.
If you choose Domain, enter an account name that has administrative rights on the
computer.
13 Click Next.
The QuarkXPress Server Information screen displays.
14 Enter your QuarkXPress Server IP address and port number and click Next.
The Ready to Install the Application screen displays.
15 Click Install.
The QPS Server console launches after installation.
16 You can start the server by clicking Start QPS Server.
QPS Script Manager
QPS Script Manager enables you to automate QPS Server tasks with scripting. QPS Script
Manager is installed in the "ScriptManager" folder in the "QPS Server" application folder.
If you want to install QPS Script Manager on another computer, copy the QPS
"ScriptManager" folder to the other computer.
As of QPS 8.1, you must be licensed to use Script Manager. If you are, Script Manager is
enabled by default.
Installing QuarkXPress Server
For information on installing QuarkXPress Server, see the QuarkXPress Server ReadMe file
in the "Documents" folder at the root level of your QuarkXPress Server application folder.
When the Port and Folder Settings screen displays, check Enable HTTP Interface, enter
a port number, and record the port number because you will need it when you install QPS
Server. Also, check Enable the File System Document Pool, click Browse, and specify a
location.
Installing QPS XTensions software for QuarkXPress Server
Make sure you run the installer file for QPS XTensions software for QuarkXPress Server on
the QuarkXPress Server computer.
22 | QPS 9.1 README
INSTALLING QPS SOFTWARE
Mac OS
To install the QPS XTensions software for QuarkXPress Server:
1 Disable any virus protection software. If you are concerned about a virus infecting your
computer, run a virus check on the Installer files, and then disable your virus detection
software before installing.
2 Double-click QPS Server Installer.
The QPS Server window displays.
3 Click Install QPS XTensions Software for QuarkXPress Server.
The Authenticate screen displays. Enter your name and password.
4 Click Continue, read the license agreement, click Continue, click Agree, and then click
Install.
The Installer copies the XTensions software files.
5 Click Quit to conclude the installation.
Windows
To install the QPS XTensions software for QuarkXPress Server:
1 Disable any virus protection software. If you are concerned about a virus infecting your
computer, run a virus check on the Installer files and then disable your virus detection
software before installing.
2 Double-click the "QPS Server.exe" file. The Quark Publishing System Installer screen
displays with three options: Install QPS XTensions Software for QuarkXPress Server,
Install QPS Database, and Install QPS Server.
3 Click Install QPS XTensions Software for QuarkXPress Server and then follow the
instructions on the screen.
Installing QPS Database
You have three options for installing your QPS Database: HSQL DB, MS SQL Server, and
Oracle. Follow the instructions below.
Installing QPS Database — HSQL DB
Installing an HSQL QPS Database is the easiest option because QPS embeds the database
for you when you run the QPS Server installer. You do not need to run a separate Database
installer to install QPS Schema on HSQL DB. See "Installing QPS Server" for details.
Installing QPS Database on Windows — MS SQL Server
You must install and configure Microsoft SQL Server on Windows before you can install
the QPS Database for MS SQL Server. You can install the QPS Database with the QPS
QPS 9.1 README | 23
INSTALLING QPS SOFTWARE

Database installer ("Setup.exe" in the "Installer > Database" folder) or the QPS Server Installer
("QPS Server.exe"). To install the QPS Database for MS SQL Server:
1 Disable any virus protection software. If you are concerned about a virus infecting your
computer, run a virus check on the Installer files and then disable your virus detection
software before installing.
2 Double-click the "Setup.exe" file in the "Installer > Database" folder.
The Quark Publishing System Database — Setup dialog box displays.
You can also access the Quark Publishing System Database — Setup dialog box by
double-clicking the "QPS Server.exe" file and then clicking Install QPS Database.
3 Click Next.
The License Agreement screen displays.
4 Click I accept the terms in the license agreement and click Next.
The Database Information screen displays.
5 Choose SQL Server from the Select Database Type drop-down menu, and click Next.
A screen for entering your MS SQL Server information displays.
6 Enter [host name]\[instance name] in the Host/Instance Name field. The instance
name is necessary only if you are not using the default instance (MSSQLSERVER).
7 Enter the name of the QPS Database you want to create in the Database User Name field.
The installer creates a database with this name, then creates a login with the same name
and gives that login the db_owner role.
8 Enter a password for the login in the Database Password field.
9 Click Browse in the Database Destination Folder area to specify the path for storing
database data files.
10 Click Next.
The Ready to Install the Application screen displays.
11 Click Install.
12 When the installation concludes, click Finish.
Installing QPS Database on Windows — Oracle
You must install and configure Oracle before you can install the QPS Database for Oracle.
You can install the QPS Database for Oracle on Windows with the QPS Database installer
("Setup.exe" in the "Installer > Database" folder) or the QPS Server installer ("QPS Server.exe").
See "Configuring QPS schema for Oracle on Linux" for information about installing the QPS
Database for Oracle on Linux.
To install the QPS Database for Oracle:
24 | QPS 9.1 README
INSTALLING QPS SOFTWARE
1 Disable any virus protection software. If you are concerned about a virus infecting your
computer, run a virus check on the Installer files and then disable your virus detection
software before installing.
2 Double-click the "Setup.exe" file in the "Installer > Database" folder.
The Quark Publishing System Database — Setup dialog box displays.
You can also access the Quark Publishing System Database — Setup dialog box by
double-clicking the "QPS Server.exe" file and then clicking Install QPS Database.
3 Click Next.
The License Agreement screen displays.
4 Click I accept the terms in the license agreement and click Next.
The Database Information screen displays.
5 Choose Oracle from the Select Database Type drop-down menu, and click Next.
A screen for entering your Oracle Database information displays.
6 Enter the Oracle Service Name in the Instance Name field.
7 Enter the password of the database SYS user in the SYS Password field.
8 Enter the name of the QPS schema that you want to create in the Schema Name field.
9 Enter the password of the QPS schema in the Schema Password field.
10 Select the paths for storing data files, index files, and LOB files in the Destination Folder
for area.
11 Click Next.
The Ready to Install the Application screen displays.
12 Click Install.
13 When the installation concludes, click Finish.
Configuring QPS schema for Oracle on Linux
Before setting up the QPS schema, make sure that Oracle software is already installed on
the computer with a database on which you will configure your QPS schema. Available as
part of the QPS package, the scripts for creating the QPS schema for Oracle do not create
the database.
1 Open the "Create" folder in the "Oracle" folder.
2 To create the QPS schema, run "CreateAndSetup.sh" (Mac OS/Linux) or "CreateAndSetup.bat"
(Windows) with the following arguments:
• SysPwd: password of the SYS user in the database
• QPPUser: name of the QPS schema that you want to create
• QPPPwd: password for the QPS schema
QPS 9.1 README | 25
INSTALLING QPS SOFTWARE

• ServiceName: Oracle Service Name
• DataDest: Path where data files are to be created
• IdxDest: Path where index files are to be created
• LobDest: Path where lob files are to be created
3 The script performs the following:
• Create Tablespaces
• Create Schema/User
• Create Tables
• Create Indexes
• Create Procedures
• Initialize Setup data
• Initialize User data
• Create Foreign Keys
• Create Quartz Schema
4 Although you can use individual scripts provided for each of the tasks listed above, Quark
recommends following the prompts and providing information while running
"CreateAndSetup.sh" or "CreateAndSetup.bat."
Installing QPS Connect Client
Mac OS
To install the QPS Connect Client application:
1 Disable any virus protection software. If you are concerned about a virus infecting your
computer, run a virus check on the Installer files and then disable your virus detection
software before installing.
2 Double-click the "QPS Connect Client 9 Installer.app" file and follow the instructions on
the screen.
You do not need to enter a validation code during the installation process.
Windows
To install the QPS Connect Client application:
1 Disable any virus protection software. If you are concerned about a virus infecting your
computer, run a virus check on the Installer files and then disable your virus detection
software before installing.
26 | QPS 9.1 README
INSTALLING QPS SOFTWARE
2 Double-click the "Setup.exe" file and follow the instructions on the screen.
You do not need to enter a validation code during the installation process.
Manually installing QPS XTensions software
On client computers, you must install QuarkXPress and QuarkCopyDesk before you run
the QPS Connect Client installer. Follow the instructions in the QuarkXPress and
QuarkCopyDesk ReadMe files. Launch the applications to verify a successful installation,
and then exit the applications.
The QPS Connect Client installer searches for compatible installations of QuarkXPress and
QuarkCopyDesk on your computer and attempts to install QPS XTensions software in
each program's application folder.
The QPS Connect Client installer also disables the Dejavu XT XTensions software for
QuarkXPress and QuarkCopyDesk. Dejavu XT XTensions software lists recently used files
in the Open submenu (File menu), but it can degrade performance in a QPS environment.
If the QPS Connect Client installer cannot locate your copies of QuarkXPress and
QuarkCopyDesk, it copies the XTensions software to the root level of the "QPS Client"
folder. If this is the case, use the following procedure to install the QPS XTensions software:
Mac OS
To manually install the QPS XTensions software for QuarkXPress and QuarkCopyDesk:
1 Exit QuarkXPress and QuarkCopyDesk.
2 Open the "XTensions" folder in the "For QuarkCopyDesk" folder at the root level of your
"QPS Client" folder and copy the XTensions software files to the "XTensions" folder in
your QuarkCopyDesk application folder.
3 Move the Dejavu XT XTensions software file from the "XTensions" folder in your
QuarkCopyDesk application folder to "XTensions Disabled" folder.
4 Open the "Help" folder in the "For QuarkCopyDesk" folder at the root level of your "QPS
Client" folder and copy the contents to the "Help" folder in your QuarkCopyDesk
application folder.
5 Open the "Documents" folder in the "For QuarkCopyDesk" folder at the root level of your
"QPS Client" folder and copy the contents to the corresponding folders in the "Documents"
folder in your QuarkCopyDesk application folder.
6 Control-click the QuarkCopyDesk application icon, choose Show Package Contents, and
then open the "Frameworks" folder in the "Contents" folder.
QPS 9.1 README | 27
INSTALLING QPS SOFTWARE
7 Open the "Frameworks" folder in the "App" folder in the "For QuarkCopyDesk" folder at
the root level of your "QPS Client" folder and copy the contents to the "Frameworks" folder
in your QuarkCopyDesk application package.
8 Open the "App" folder in the "For QuarkCopyDesk" folder at the root level of your "QPS
Client" folder, and copy the "Certificates" folder into the QuarkCopyDesk application
package.
9 Open the "App" folder in the "For QuarkCopyDesk" folder at the root level of your "QPS
Client" folder, and replace the files in the "QPPPlugins" folder in the QuarkCopyDesk
application folder. For new installations, add the "QPPPlugins" folder to the QuarkCopyDesk
application folder.
10 Open the "App" folder in the "For QuarkCopyDesk" folder at the root level of your "QPS
Client" folder, and replace the files in the "QPSLog" folder in the QuarkCopyDesk
application folder. For new installations, add the "QPSLog" folder to the QuarkCopyDesk
application folder.
11 Open the "XTensions" folder in the "For QuarkXPress" folder at the root level of your "QPS
Client" folder and copy the XTensions software files to the "XTensions" folder in your
QuarkXPress application folder.
12 Move the Dejavu XT XTensions software file from the "XTensions" folder in your
QuarkXPress application folder to the "XTensions Disabled" folder.
13 Open the "Help" folder in the "For QuarkXPress" folder at the root level of your "QPS Client"
folder and copy the contents to the "Help" folder in your QuarkXPress application folder.
14 Open the "Documents" folder in the "For QuarkXPress" folder at the root level of your
"QPS Client" folder and copy the contents to the corresponding folders in the "Documents"
folder in your QuarkXPress application folder.
15 Control-click the QuarkXPress application icon, choose Show Package Contents, and
then open the "Frameworks" folder in the "Contents" folder.
16 Open the "Frameworks" folder in the "App" folder in the "For QuarkXPress" folder at the
root level of your "QPS Client" folder and copy the contents to the "Frameworks" folder
in your QuarkXPress application package.
17 Open the "App" folder in the "For QuarkXPress" folder at the root level of your "QPS Client"
folder, and copy the "Certificates" folder into the QuarkXPress application package.
18 Open the "App" folder in the "For QuarkXPress" folder at the root level of your "QPS Client"
folder, and replace the files in the "QPPPlugins" folder in the QuarkXPress application
folder. For new installations, add the "QPPPlugins" folder to the QuarkXPress application
folder.
19 Open the "App" folder in the "For QuarkXPress" folder at the root level of your "QPS Client"
folder, and replace the files in the "QPSLog" folder in the QuarkXPress application folder.
For new installations, add the "QPSLog" folder to the QuarkXPress application folder.
28 | QPS 9.1 README
INSTALLING QPS SOFTWARE
Windows
To manually install the QPS XTensions software for QuarkXPress and QuarkCopyDesk:
1 Exit QuarkXPress and QuarkCopyDesk.
2 Open the "XTensions" folder in the "For QuarkCopyDesk" folder at the root level of your
"QPS Client" folder and copy the XTensions software files to the "XTensions" folder in
your QuarkCopyDesk application folder.
3 Open the "Help" folder in the "For QuarkCopyDesk" folder at the root level of your "QPS
Client" folder and copy the contents to the "Help" folder in your QuarkCopyDesk
application folder.
4 Open the "Documents" folder in the "For QuarkCopyDesk" folder at the root level of your
"QPS Client" folder and copy the contents to the corresponding folders in the "Documents"
folder in your QuarkCopyDesk application folder.
5 Open the "Symbols" folder in the "For QuarkCopyDesk" folder at the root level of your
"QPS Client" folder and copy the contents to the corresponding folders in the "Symbols"
folder in your QuarkCopyDesk application folder.
6 Copy all of the remaining files and folders from the "For QuarkCopyDesk" folder at the
root level of your "QPS Client" folder to the root level of your QuarkCopyDesk application
folder.
7 Move the Dejavu XT XTensions software file from the "XTensions" folder in your
QuarkCopyDesk application folder to the "XTensions Disabled" folder.
8 Open the "XTensions" folder in the "For QuarkXPress" folder at the root level of your "QPS
Client" folder and copy the XTensions software files to the "XTensions" folder in your
QuarkXPress application folder.
9 Open the "Help" folder in the "For QuarkXPress" folder at the root level of your "QPS Client"
folder and copy the contents to the "Help" folder in your QuarkXPress application folder.
10 Open the "Documents" folder in the "For QuarkXPress" folder at the root level of your
"QPS Client" folder and copy the contents to the corresponding folders in the "Documents"
folder in your QuarkXPress application folder.
11 Open the "Symbols" folder in the "For QuarkXPress" folder at the root level of your "QPS
Client" folder and copy the contents to the corresponding folders in the "Symbols" folder
in your QuarkXPress application folder.
12 Copy all of the remaining files and folders from the "For QuarkXPress" folder at the root
level of your "QPS Client" folder to the root level of your QuarkXPress application folder.
13 Move the Dejavu XT XTensions software file from the "XTensions" folder in your
QuarkXPress application folder to the "XTensions Disabled" folder.
QPS 9.1 README | 29
INSTALLING QPS SOFTWARE
Making changes after installation
To access the instance of QuarkXPress Server Manager running inside QPS Server, launch
a Web browser, navigate to http://[QPS server]:[port]/qxpsmadmin.
Identifying QuarkXPress Server locale
To ensure consistent locale settings, such as formatting for date and numbers, QPS Server
must recognize the locale setting for your QuarkXPress Server computer. The locale setting
for the QuarkXPress Server computer determines the format for date, time, and numbers.
To specify the QuarkXPress Server computer locale for QPS Server:
1 Open the "conf" folder in the QPS Server application folder.
2 Open “ServerApp.properties” in a text-editing application.
3 Scroll to the “qxps.locale=” entry.
4 Enter the locale setting for your QuarkXPress Server computer. Enter en for English, fr
for French, or de for German.
5 Save and close "ServerApp.properties."
Updating QuarkXPress Server
If you need to move your QuarkXPress Server to a different computer, you don't have to
re-install QPS Server. Instead, you can edit the "ManagerConfig.xml" file located in the
"conf" folder in the QPS Server application folder.
1 Open the "conf" folder in the QPS Server application folder.
2 Open the "ManagerConfig.xml" file.
3 Locate the <connectioninfo> element (manager/hosts/host/connectioninfo).
4 Change the <name> element value to the IP address of the new QuarkXPress Server.
5 Change the <port> element value to the port number you specified for the new
QuarkXPress Server.
6 Save the "ManagerConfig.xml" and launch QPS Server.
7 To verify the change, search through the "QpsServer.log" file for the line "Successfully
registered with QXPS."
Updating a QPS Connect Client installation: Windows
To make changes to QPS Connect Client software after installation:
1 Double-click the "setup.exe" file. The QPS — Setup dialog box displays.
2 Click Next. The Program Maintenance screen displays.
30 | QPS 9.1 README
INSTALLING QPS SOFTWARE

• Click Modify to choose the QPS Connect Client files to install. You can install new files
or remove previously installed files.
• Click Repair to correct minor issues related to QPS Connect Client files. Use this option
if you experience issues with missing or damaged QPS Connect Client files, shortcuts, or
registry entries.
• Click Remove to uninstall the QPS Connect Client application.
3 Click Next.
If you clicked Modify in the previous dialog box, the Custom Setup screen displays. Make
the appropriate modifications and then click Next. The Ready to Modify the Program
screen displays. Click Install.
If you clicked Repair in the previous dialog box, the Ready to Repair the Program screen
displays. Click Install.
4 Click Finish when the installer notifies you that the process is complete.
Allocating RAM for QPS Server
You can change the amount of memory allocated to your JVM. Quark recommends not
exceeding 50 percent of available memory on Mac OS or Windows, and you should not
allocate more than 1536 MB on 32-bit computers.
Mac OS
To adjust the amount of memory allocated to QPS Server on Mac OS:
1 Stop QPS Server.
2 Locate the "ServerStartup.command" file in the "QPS Server" application folder and open
it in a text-editing application.
3 Search for "java -server -Xmx512m -classpath." "512M" represents 512 MB of RAM allocated
to QPS Server.
4 Adjust the value up to 1536, unless this exceeds 50 percent of the available memory.
On 32-bit computers, you cannot exceed 1536. QPS supports 64-bit computers, which
allows you to increase the memory to 3072.
5 Save and close "ServerStartup.command," and restart QPS Server.
Windows
On Windows, you can specify memory allocation in different locations, depending on
how you start QPS Server.
1 Stop QPS Server.
QPS 9.1 README | 31
INSTALLING QPS SOFTWARE
2 If you start QPS Server with QPS Server Console or QPS Server Windows service, open the
"wrapper.conf" file.
3 Search for the "wrapper.java.maxmemory" property.
4 Adjust the value up to 1536, unless this exceeds 50 percent of the available memory.
On 32-bit computers, you cannot exceed 1536. QPS supports 64-bit computers, which
allows you to increase the memory to 3072.
5 Save your changes and restart QPS Server.
6 If you use "Serverstartup.bat," follow the steps below:
7 Stop QPS Server.
8 Open "ServerStartup.bat" in a text-editing application.
9 Search for "java -server -Xmx512m -classpath." "512M" represents 512 MB of RAM allocated
to QPS Server.
10 Adjust the value up to 1536, unless this exceeds 50 percent of the available memory.
On 32-bit computers, you cannot exceed 1536. QPS supports 64-bit computers, which
allows you to increase the memory to 3072.
11 Save your changes and restart QPS Server.
32 | QPS 9.1 README
INSTALLING QPS SOFTWARE
Updating QPS software
If you are updating to QPS 9.1, check in all your assets before you update QPS Server. You
can retain your QPS File Server. Each QuarkXPress project and QuarkCopyDesk article
converts to QPS 9.1 format when you check out the asset and check it back in.
If you manage Quark software with Quark License Administrator (QLA), check in your
licenses before upgrading.
You must install all server and client components for QPS 9.0 or later before updating to
QPS 9.1. To update QuarkCopyDesk and QuarkXPress, refer to the respective ReadMe files
for instructions.
Updating QPS Server (Mac OS)
If you installed HSQL DB when you installed QPS, the updater automatically updates your
HSQL DB database while updating QPS Server.
To update QPS Server, perform the following steps:
1 To ensure consistency and user availability with an HSQL DB installation before you
upgrade, stop QPS Server, restart QPS Server, and then stop QPS Server again.
2 Exit QPS Server Console and QPS Server StatusMenu.
3 Create a backup of your current QPS Server installation folder. In particular, make sure
you have copies of your "conf" folder, scripts, database, Quark Job Jackets files, FTS Index
files, and log files.
4 Double-click QPS Server Updater.
The Authenticate screen displays. Enter your name and password.
5 Click Continue.
6 Click Quit when the process concludes.
7 Start QPS Server.
QPS 9.1 README | 33
UPDATING QPS SOFTWARE

Updating QPS Server (Windows)
If you installed HSQL DB when you installed QPS, the updater automatically updates your
HSQL DB database while updating QPS Server.
If you selected Microsoft SQL Server or Oracle when you installed QPS 9.0, then you must
run the separate QPS Database updater to update the database. For more information, see
"Upgrading the QPS database."
To update QPS Server, perform the following steps:
1 To ensure consistency and user availability with an HSQL DB installation before you
upgrade, stop QPS Server, restart QPS Server, and then stop QPS Server again.
2 Exit QPS Server Console.
3 Create a backup of your current QPS Server installation folder. In particular, make sure
you have copies of your "conf" folder, scripts, database, Quark Job Jackets files, FTS Index
files, and log files.
4 Double-click the "QPS Server.exe" file and then choose Install QPS Server, or double-click
the "Setup.exe" file in the QPS Server folder. The installer automatically detects your QPS
installation and switches to update mode.
5 Click Next.
6 Follow instructions on-screen.
7 Click Finish when the process concludes.
8 Start QPS Server.
Updating QPS Connect Client (Mac OS)
To update QPS Connect Client on Mac OS, perform the following steps. The update process
includes replacing the QPS XTensions software for QuarkXPress and QuarkCopyDesk.
If you want to install multiple versions of QPS Connect Client on the same computer,
contact [email protected].
1 Disable any virus protection software. If you are concerned about a virus infecting your
computer, run a virus check on the Updater files and then disable your virus detection
software before updating.
2 Double-click the "QPS Connect Client 9 Installer.mpkg" file and follow the instructions
on the screen.
34 | QPS 9.1 README
UPDATING QPS SOFTWARE
Updating QPS Connect Client (Windows)
To update QPS Connect Client on Windows, perform the following steps. The update
process includes replacing the QPS XTensions software for QuarkXPress and
QuarkCopyDesk.
1 Disable any virus protection software. If you are concerned about a virus infecting your
computer, run a virus check on the Updater files and then disable your virus detection
software before updating.
2 Double-click the "setup.exe" file and follow the instructions on the screen.
Updating QPS XTensions software for QuarkXPress Server
To update your QPS XTensions software for QuarkXPress Server:
1 On Windows, use the Windows uninstaller to uninstall the existing QPS XTensions software
for QuarkXPress Server.
2 On Windows, use the Windows uninstaller to uninstall the existing instance of QuarkXPress
Server. On Mac OS, drag the existing QuarkXPress Server application folder to the trash.
3 Install QuarkXPress Server 9.1. For more information, see the QuarkXPress Server ReadMe.
4 Update QPS Server as described in "Updating QPS Server (Mac OS)" or "Upgrading QPS Server
(Windows)."
5 To install QPS Server XTensions software for QuarkXPress Server, run the installer in the
"QuarkXPress Server XTensions" folder.
QPS 9.1 README | 35
UPDATING QPS SOFTWARE

Upgrading to QPS 9.1
If you are upgrading to QPS 9.1, check in all your assets before you update QPS Server.
You can retain your QPS File Server. Each QuarkXPress project and QuarkCopyDesk article
converts to QPS 9.1 format when you check out the asset and check it back in.
If you manage Quark software with Quark License Administrator (QLA), check in your
licenses before upgrading.
To install the new version of QuarkCopyDesk or QuarkXPress, refer to the respective ReadMe
file.
There is no upgrader for QPS Connect client. To upgrade, simply install the new version
as described in "Installing QPS Connect Client."
Upgrading QPS XTensions software for QuarkXPress Server
To upgrade your QPS XTensions software for QuarkXPress Server:
1 On Windows, use the Windows uninstaller to uninstall the existing QPS XTensions software
for QuarkXPress Server.
2 On Windows, use the Windows uninstaller to uninstall the existing instance of QuarkXPress
Server. On Mac OS, drag the existing QuarkXPress Server application folder to the trash.
3 Install QuarkXPress Server 9.1. For more information, see the QuarkXPress Server ReadMe.
4 Upgrade QPS Server as described in "Upgrading QPS Server (Mac OS)" or "Upgrading QPS
Server (Windows)."
5 To install QPS Server XTensions software for QuarkXPress Server, run the installer in the
"QuarkXPress Server XTensions" folder.
Upgrading QPS Server (Mac OS)
If you installed HSQL DB when you installed QPS, the updater automatically updates your
HSQL DB database while updating QPS Server.
36 | QPS 9.1 README
UPGRADING TO QPS 9.1
To upgrade QPS Server, perform the following steps:
1 To ensure consistency and user availability with an HSQL DB installation before you
upgrade, stop QPS Server, restart QPS Server, and then stop QPS Server again.
2 Exit QPS Server Console and QPS Server StatusMenu.
3 Create a backup of your current QPS Server installation folder. In particular, make sure
you have copies of your "conf" folder, scripts, database, Quark Job Jackets files, FTS Index
files, and log files.
4 Double-click QPS Server Upgrader. The Authenticate screen displays. Enter your name
and password.
5 Enter your valcode.
6 Click Next.
7 If you have more than one installation of QPS Server on this computer, cilck Select and
choose the installation you want to upgrade. Otherwise, click Continue.
8 Click Quit when the process concludes.
9 Start QPS Server.
Upgrading QPS Server (Windows)
If you installed HSQL DB when you installed QPS, the updater automatically upgrades
your HSQL DB database while updating QPS Server.
If you installed Microsoft SQL Server or Oracle when you installed QPS, you must run a
separate QPS Database upgrader to upgrade the database. For more information, see
"Upgrading QPS database (Windows): MS SQL Server or Oracle."
To update QPS Server, perform the following steps:
1 To ensure consistency and user availability with an HSQL DB installation before you
upgrade, stop QPS Server, restart QPS Server, and then stop QPS Server again.
2 Exit QPS Server Console.
3 Create a backup of your current QPS Server installation folder. In particular, make sure
you have copies of your "conf" folder, scripts, database, Quark Job Jackets files, FTS Index
files, and log files.
4 Double-click the "QPS Server.exe" file and then choose Install QPS Server, or double-click
the "Setup.exe" file in the QPS Server folder. The installer automatically detects your QPS
installation and switches to upgrade mode
5 Enter your valcode.
6 Click Next.
QPS 9.1 README | 37
UPGRADING TO QPS 9.1
7 Follow instructions on-screen.
8 Click Finish when the process concludes.
9 Start QPS Server.
Upgrading the QPS database
The topics below explain how to upgrade the QPS database.
You must upgrade the QPS database only if you are using MS SQL Server on Windows,
Oracle on Windows, or Oracle on Linux. The HSQL QPS Database is the upgraded when
you run the QPS Server upgrader.
Upgrading QPS database (Windows): MS SQL Server or Oracle
If you use MS SQL Server or Oracle on Windows for your QPS database, perform the manual
steps described below.
1 Shut down QPS Server.
2 On the computer where you installed the database, navigate to the Upgrader/QPS
Server/Database directory.
3 Double-click the "Update.exe" file. and follow the instructions on the screen.
4 Select Oracle/SQL from the drop-down menu.
5 Follow the instructions on the screen.
Upgrading QPS database (Linux): Oracle
If you use Oracle on Linux for your QPS database, perform the manual steps described
below to upgrade the QPS database.
1 Shut down QPS Server.
2 Navigate to the Upgrader/QPS Server/Database/Oracle directory.
3 Copy the "Update" folder to the local hard drive on the computer where you installed
Oracle. This folder contains the database update scripts.
4 Display a command prompt and navigate to the "Update" folder on the local hard drive.
5 To execute the "Upgrade.sh" script, enter sh Upgrade.sh followed by these arguments:
• SysPwd: The password of the SYS user in the database.
• QPPUser: The name of the QPS schema.
• QPPPwd: The password for the QPS schema.
• ServiceName: The Oracle service name.
38 | QPS 9.1 README
UPGRADING TO QPS 9.1
QPS XDK documentation
The XDKs for QPS Server and QPS Connect Client are included in a separate installer, and
install with their documentaiton. Documentation for the XDKs for QPS XTensions software
for QuarkXPress and QuarkCopyDesk is available at qdr.quark.com.
QPS 9.1 README | 39
QPS XDK DOCUMENTATION
Starting QPS Server
Starting QPS Server is different on Mac OS and Windows. On Mac OS, when the QPS Server
installation completes, the QPS Server Console displays and you can click Start QPS
Server. Also, if you install QPS Server as a service or check Start Automatically When
Machine Reboots, it will start automatically when you restart the QPS Server computer.
Mac OS
To start QPS Server on Mac OS:
1 Choose Apple menu > System Preferences.
The System Preferences window displays.
2 Click QPS Server under Other at the bottom of the System Preferences window.
The QPS Server Console displays.
3 Click Start QPS Server.
The Server Status field displays Starting, followed by Running.
Windows
If you have installed QPS on Windows Server 2008 R2 with UAC on, you must do the
following things as an administrator.
To start QPS Server on Windows:
1 Choose Start > All Programs > QPS Server > QPS Server Console.
The QPS Server Console displays.
2 Click Start QPS Server.
The Server Status field displays Starting, followed by Running.
40 | QPS 9.1 README
STARTING QPS SERVER
Automating QXP Server restarts
After you install QuarkXPress Server, specify the following parameters to launch
QuarkXPress Server with subrender monitoring functionality. The QuarkXPress Server
master process monitors the subrender process and restarts the subrenderer when necessary.
You specify the monitoring intervals with the "-queryinterval" parameter, and the
"-noofretries" parameter specifies the number of retries.
1 Using a text editing application, open the file [QuarkXPress Server application
folder]/conf/ServerApp.properties.
2 Set qxpservercore.monitorrenderers.value=true.
3 Set qxpservercore.monitorrenderers.queryinterval.value=60.
4 Set qxpservercore.monitorrenderers.noofretries.value=3.
QPS 9.1 README | 41
STARTING QPS SERVER
Uninstalling
Uninstalling QPS Server
Mac OS
To uninstall QPS Server, begin by shutting down QPS Server and exiting QPS Server Console
and QPS Server StatusMenu. Then open the QPS Server application folder and double-click
QPS Server Uninstaller. Follow the instructions on the screen.
Windows
To uninstall QPS Server:
1 Stop QPS Server and exit QPS Server Console.
2 Choose Start > All Programs > QPS Server > Uninstall QPS Server.
3 Click Yes. The uninstaller gathers the information necessary for uninstalling.
4 Click Yes to continue or No to cancel.
The uninstaller concludes automatically without a message.
You can also remove QPS Server software by using Control Panel > Add or Remove
Programs.
Uninstalling QPS Connect Client and QPS XTensions software
Mac OS
To uninstall the QPS Connect Client application:
1 Open the "Applications" folder on your hard drive (or the folder in which you installed
the QPS Connect Client application) and drag the "QPS Client" folder to the Trash.
2 Remove the following folders from the QuarkXPress application folder:
• QPPPlugins
42 | QPS 9.1 README
UNINSTALLING
• QPSLog
3 Control-click the QuarkXPress application icon, choose Show Package Contents, and
then open the "Frameworks" folder in the "Contents" folder.
4 Remove the following files and folders:
• QPPCore.framework
• QPPLogging.framework
• QPPPluginInterface.framework
• QPPServiceProxy.framework
• QPPUIExtensions.framework
• QPSXTControls.framework
• UIAccessLayer.framework
5 Remove the following XTensions software modules from the "XTensions" folder in your
QuarkXPress application folder:
• Notes.xnt
• NotesUI.xnt
• QCDImportFilter.xnt
• QPS XT.xnt
• QPSDataProvider.xnt
• QPSPlaceholderXT.xnt
• RedlineXT.xnt
6 Remove the following folders from the QuarkCopyDesk application folder:
• QPPPlugins
• QPSLog
7 Control-click the QuarkCopyDesk application icon, choose Show Package Contents, and
then open the "Frameworks" folder in the "Contents" folder.
8 Remove the following files and folders:
• QPPCore.framework
• QPPLogging.framework
• QPPPluginInterface.framework
• QPPServiceProxy.framework
• QPPUIExtensions.framework
QPS 9.1 README | 43
UNINSTALLING
• QPSXTControls.framework
• UIAccessLayer.framework
9 Remove the following XTensions software modules from the "XTensions" folder in your
QuarkCopyDesk application folder:
• QPS XT.xnt
• QPSPlaceholdersXT.xnt
Windows
To uninstall the QPS Connect Client application:
1 Quit QPS Connect Client.
2 Choose Start > Programs > QPS Client > Uninstall QPS Client.
3 Click Yes. The uninstaller gathers the information necessary for uninstalling and displays
an alert to notify you that the contents of the QPS Connect Client application folder will
be deleted.
4 Click Yes to continue or No to cancel.
If you used the QPS Connect Client installer to install QPS XTensions software for
QuarkCopyDesk and QuarkXPress, the QPS Connect Client uninstaller also removes these
XTensions software modules.
44 | QPS 9.1 README
UNINSTALLING

Changes in this version
Changes to the this version of QPS include the following.
General changes
You can now attach QPS assets to Composition Zones layouts and shared boxes.
You can check digital assets (audio, video, and XML files) into QPS. You can create separate
storage rules for digital assets, and you can specify whether a workflow applies to video
and audio files.
New privileges have been added for the Audio, Video, and XML asset types.
If you attach an asset to a box, then add that box to the Shared Content palette and use
it elsewhere in a project, the asset is listed in QPS as being attached only to the box where
it was originally attached. However, you can check out and edit the attachment using any
instance of the box.
You can attach the same asset to multiple layouts in the same project file. Once you do
so, you can edit that asset from any of the layouts to which it is attached (unless it is an
article, in which case you can edit it only from the layout where it is a primary attachment).
Even if an asset is attached to multiple layouts, it is listed only once in the Workspace
Browser window. If you detach such an article in the Workspace Browser window, it is
detached only from the active layout.
The Preview window now includes a sidebar. For articles, this sidebar displays a flatplan
view. For projects, this sidebar displays a flatplan view of each Print, Interactive, and App
Studio layout in the active project, with tabs at the top that let you switch between the
layouts in the project.
You can now create a favorite from a collection by dragging it from the Subcollection or
Search Results pane to the Favorites area.
You can now add an asset to a collection by dragging it from the Subcollection or Search
Results pane to the Collections tree, or by dragging it from the file system to a collection
in the Subcollection pane.
You can now change the location of a collection by dragging it to a new location in the
Collections tree. You can also create a copy of a collection by Option-dragging/Ctrl-dragging
QPS 9.1 README | 45
CHANGES IN THIS VERSION
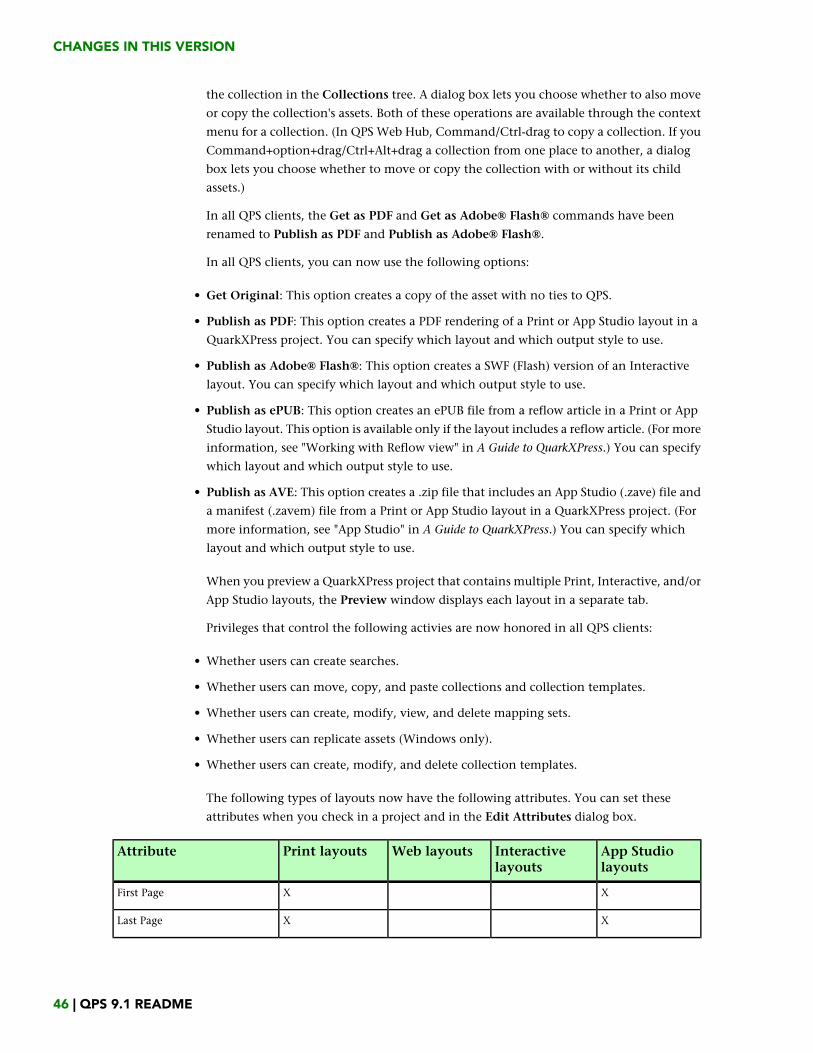
the collection in the Collections tree. A dialog box lets you choose whether to also move
or copy the collection's assets. Both of these operations are available through the context
menu for a collection. (In QPS Web Hub, Command/Ctrl-drag to copy a collection. If you
Command+option+drag/Ctrl+Alt+drag a collection from one place to another, a dialog
box lets you choose whether to move or copy the collection with or without its child
assets.)
In all QPS clients, the Get as PDF and Get as Adobe® Flash® commands have been
renamed to Publish as PDF and Publish as Adobe® Flash®.
In all QPS clients, you can now use the following options:
• Get Original: This option creates a copy of the asset with no ties to QPS.
• Publish as PDF: This option creates a PDF rendering of a Print or App Studio layout in a
QuarkXPress project. You can specify which layout and which output style to use.
• Publish as Adobe® Flash®: This option creates a SWF (Flash) version of an Interactive
layout. You can specify which layout and which output style to use.
• Publish as ePUB: This option creates an ePUB file from a reflow article in a Print or App
Studio layout. This option is available only if the layout includes a reflow article. (For more
information, see "Working with Reflow view" in A Guide to QuarkXPress.) You can specify
which layout and which output style to use.
• Publish as AVE: This option creates a .zip file that includes an App Studio (.zave) file and
a manifest (.zavem) file from a Print or App Studio layout in a QuarkXPress project. (For
more information, see "App Studio" in A Guide to QuarkXPress.) You can specify which
layout and which output style to use.
When you preview a QuarkXPress project that contains multiple Print, Interactive, and/or
App Studio layouts, the Preview window displays each layout in a separate tab.
Privileges that control the following activies are now honored in all QPS clients:
• Whether users can create searches.
• Whether users can move, copy, and paste collections and collection templates.
• Whether users can create, modify, view, and delete mapping sets.
• Whether users can replicate assets (Windows only).
• Whether users can create, modify, and delete collection templates.
The following types of layouts now have the following attributes. You can set these
attributes when you check in a project and in the Edit Attributes dialog box.
App Studiolayouts
Interactivelayouts
Web layoutsPrint layoutsAttribute
XXFirst Page
XXLast Page
46 | QPS 9.1 README
CHANGES IN THIS VERSION

App Studiolayouts
Interactivelayouts
Web layoutsPrint layoutsAttribute
XXXXLayout Type
XXNumber of Pages
XXOrientation
XXXPage Height
XXXPage Width
XXStory Direction
XDevice
You can now use the following text component types. These are the same text component
types used in QuarkXPress reflow articles.
• Body
• Byline
• Byline (Author)
• Figure Caption
• Figure Credit
• Headline
• Headline 2
• Indented Paragraph
• Pullquote
• Section/Chapter Name
• Title
• TItle 2
• Ordered List
• Unordered List
You can now use the following picture component types. These are the same picture
component types used in QuarkXPress reflow articles.
• Body
• Byline
• Figure
• Headline
QPS 9.1 README | 47
CHANGES IN THIS VERSION
Attachment information for images now includes a list of the articles through which the
picture is attached to layouts.
When you make changes to a collection's configuration in the Edit Collection dialog box,
you can now propagate those changes into the collection's subcollections. When you make
such changes to a parent collection, choose one of the following options from the Apply
settings to child Collections drop-down menu in each pane:
• None: No changes are made to child collections.
• Merge: This option adds the parent collection's settings to all of its child collections. Only
settings that are not already present in child collections are added to the child collections.
For example, if a child collection has a workflow named "W1," and you assign a workflow
named "W2" to the parent collection, then after the operation the child collection has
both the "W1" and "W2" workflows. If a user has different roles assigned in the child
collection and the parent collection, the role assignment for the child collection is not
changed.
• Override: This option overrides all settings for child collections with the new settings for
the parent collection. For example, if a child collection has a workflow named "W1," and
you assign a workflow named "W2" to the parent collection, then after the operation the
child collection has only the "W2" workflow.
You can choose a different option from the Apply to child collections drop-down menu
in each pane. When you click OK, each pane's setting is honored for that pane's settings.
On Windows, you can now replicate assets from one QPS server to another based on
pre-defined mappings. You can also set privileges for a role to create, modify, view, and
delete mapping sets and replicate assets.
(Mac OS only) All configurable .plist files have been moved out of the application bundle
and can now be found at the following locations. For more information, see the QPS System
Administration Guide. Note that if you have made changes to settings in these files for a
previous version, you must transfer those changes to the .plist files in the locations listed
below.
• com.quark.qpp.client.[Application Name].config.plist:
~/Library/Preferences/Quark/QPS/[QPS Framework Version]
• com.quark.qpp.client.[Application Name].config.plist:
~/Library/Application Support/Quark/QPS/[QPS Framework Version]
• com.quark.qpp.client.icon.config.plist:
~/Library/Preferences/Quark/QPS/[QPS Framework Version]
QPS XTensions developers can now enable and disable the menu items that allow end
users to create, modify, duplicate, and delete collection templates in QuarkXPress,
QuarkCopyDesk, and QPS Connect Client.
If you open a project that contains QPS article attachments, then choose View > Reflow
View, any attached QPS articles are automatically copied into reflow articles. If you
48 | QPS 9.1 README
CHANGES IN THIS VERSION
subsequently add additional articles or components, you can append their content to
Reflow view by choosing Append New Articles & Components from Active Layout (to
append new articles and components from the active layout) or Append New Articles &
Components from Active Layout Family (to append new articles and components from
all active layouts).
Changes to QPS Web Hub
You can now edit App Studio layouts in Web Hub and check in audio and video assets for
use with App Studio. Such assets display in the Asset Attachments dialog box and the
Preview pane.
You can now undo and redo the application of type styles.
You can now remove local formatting from text. To remove all local character and
paragraph formatting from selected text, Option+click/right-click the applied paragraph
style sheet's name and choose Apply Style Sheet & Remove Local Formatting.
The View Revisions dialog box now shows thumbnail previews of asset revisions.
In a Web browser that supports HTML 5, you can now check an asset into the selected
collection by dragging the asset from the file system to the Subcollections pane or the
Search Results pane.
In Web browsers that support HTML 5, you can select and check in multiple files at the
same time. You can also drag and drop multiple files into Web Hub.
You can now move or copy and paste a collection into another collection. When you paste
a collection, you can choose to paste only the collection or both the collection and its
assets.
You can now drag an asset from the Search Results pane to a collection in the Collections
tree in the navigation pane.
You can specify a different selection and arrangement of toolbar items and context menus
for each user role. To specify a selection and arrangement of toolbar items and context
menus for a role, edit the following file: \Server
(Standalone)\webapps\WebHub\WEB-INF\workspace-ui-config.xml. If this file
does not contain an entry for a particular role, the default toolbar and context menus
display for that role.
The following new privileges have been added for Web Hub:
• Publish Project as AVE output
• Publish Project as ePUB output
QPS 9.1 README | 49
CHANGES IN THIS VERSION
App Studio changes
You can attach digital assets (audio, video, and XML files) to picture boxes using the App
Studio palette.
Attachments that have been attached through the App Studio palette do not display in
the Project Attachments palette.
In the QuarkXPress Usage dialog box (Utilities menu), digital assets added from QPS are
identified with a QPS in the Source column.
The Preview pane now displays information about digital assets attached to a layout.
You can attach a picture asset and one or more digital assets to the same box. For example,
if you want a picture box to display a static picture until the user taps it, and then you
want it to display a slideshow when tapped, you must attach not only the static picture
but all of the pictures in the slidehow to that picture box. To accomplish this, attach the
picture asset to the box the usual way, then attach the digital asset or assets (in this case,
the pictures in the slideshow) to the box using the App Studio palette. Once you have
checked in or saved a revision of the project, theWorkspace Browser will show that
multiple assets are attached to the box. (Digital assets that are attached to a layout are
referred to as overlay assets, and are identified with an icon.)
The Preview pane now display information about App Studio assets attached to a layout.
All of the privileges under General > Assets and General > Attributes are honored for
audio and video assets.
For more information about App Studio, see A Guide to QuarkXPress.
50 | QPS 9.1 README
CHANGES IN THIS VERSION
Known and resolved issues
For lists of known issues and issues resolved in this version of the software, visit the Quark
Web site at www.quark.com or euro.quark.com.
QPS 9.1 README | 51
KNOWN AND RESOLVED ISSUES
Contacting Quark
If you have questions about installing, configuring, or using this software, please contact
Quark Software Inc.
In the Americas
For enterprise product technical support (QPS and QuarkXPress Server), please call
800.788.0045 between 7:00 a.m. and 6:00 p.m. Mountain Time, Monday through Friday,
or send an e-mail message to [email protected].
For desktop product technical support (QuarkXPress and QuarkCopyDesk®), please visit
the Quark Web site at www.quark.com. Live online chat is available between 12:00 a.m.
Monday and 11:59 p.m. Friday (Mountain Time), or send an e-mail message to
For product information, please visit the Quark Web site at www.quark.com, or send an
e-mail message to [email protected].
Outside the Americas
English technical support is available by phone between 8.30 and 17.30 Central European
Time, Monday to Friday, or by sending an e-mail message to [email protected].
From Austria, Belgium, Denmark, France, Germany, Ireland, Luxembourg, The Netherlands,
and the United Kingdom, please call 00800 1787 8275. From all other countries outside
the Americas, please call:
• Belgium: 0800.77.296
• France: 0800.91.3457
• Germany: 0800.180.0101
• Ireland: 1800.55.0241
• Italy: 800.87.4591
• Japan: 00531.13.1492
• Luxembourg: 8002.3861
52 | QPS 9.1 README
CONTACTING QUARK

• Norway: 800.1.4398
• Spain: 900.941.328
• Sweden: 020.790.091
• Switzerland: 0800.55.7440
• United Kingdom: 0808.101.7082
For product information, please visit the Quark Web site at euro.quark.com, or send an
e-mail message to [email protected].
In Australia
For technical support, please call 1 800.670.973 between 10:00 a.m. and 7:00 p.m. Sydney
Time (AEST), Monday through Friday, or send an e-mail message to [email protected].
QPS 9.1 README | 53
CONTACTING QUARK

Legal notices
© 1986-2011 Quark Software Inc. and its licensors. All rights reserved.
Protected by the following United States Patents: 5,541,991; 5,907,704; 6,005,560;
6,052,514; 6,081,262; 6,633,666 B2; 6,947,959 B1; 6,940,518 B2; 7,116,843; and other
patents pending.
Quark, the Quark logo, Quark Publishing System, and QPS are trademarks or registered
trademarks of Quark Software Inc. and its affiliates in the U.S. and/or other countries. All
other marks are the property of their respective owners.
54 | QPS 9.1 README
LEGAL NOTICES