Embed Size (px)
Citation preview

Quantum DXi-Series: Backup Application Specific
Path to Tape Configuration Guide
Introduction 3
Backup Applications 3Symantec NetBackup and Backup Exec . . . . . . . . . . . . . . . . . . . . . . . . . . . . . . . 3EMC NetWorker . . . . . . . . . . . . . . . . . . . . . . . . . . . . . . . . . . . . . . . . . . . . . . . . 5Oracle Secure Backup . . . . . . . . . . . . . . . . . . . . . . . . . . . . . . . . . . . . . . . . . . . . 5ASG-Time Navigator . . . . . . . . . . . . . . . . . . . . . . . . . . . . . . . . . . . . . . . . . . . . . 5
DXi Personalities 6
Creating Backup Images on Virtual Tape 6
Virtual Tape to Physical Tape 7NetBackup, Backup Exec, and Time Navigator. . . . . . . . . . . . . . . . . . . . . . . . . . 7NetWorker. . . . . . . . . . . . . . . . . . . . . . . . . . . . . . . . . . . . . . . . . . . . . . . . . . . . . 7Secure Backup. . . . . . . . . . . . . . . . . . . . . . . . . . . . . . . . . . . . . . . . . . . . . . . . . . 8
Device Path Requirements 9NetBackup, Backup Exec, Time Navigator, and Secure Backup . . . . . . . . . . . . . 9NetWorker. . . . . . . . . . . . . . . . . . . . . . . . . . . . . . . . . . . . . . . . . . . . . . . . . . . . . 9
Configuring the DXi for Path to Tape 10
Configuring Symantec NetBackup 13Setting Up Symantec NetBackup Direct to Tape . . . . . . . . . . . . . . . . . . . . . . . 13
Document 6-67211-06 Rev A, January 2015 *6-67211-05 A*

Quantum DXi-Series: Backup Application Specific Path to Tape Configuration GuideDocument 6-67211-06 Rev AJanuary 2015
Using Symantec NetBackup Direct to Tape . . . . . . . . . . . . . . . . . . . . . . . . . . . 14Configuring NetBackup for Backup Application Specific Path to Tape . . . . . . 15
Configuring Symantec Backup Exec 18Installing the NDMP Option in Backup Exec . . . . . . . . . . . . . . . . . . . . . . . . . . 18Adding a Backup Application Specific Library to Backup Exec . . . . . . . . . . . . . 18Sharing The Devices On An NDMP Server Between Multiple Media Servers. . . 20Testing the Backup Exec Path to Tape Configuration . . . . . . . . . . . . . . . . . . . 21
Configuring EMC NetWorker 24Verifying Prerequisites. . . . . . . . . . . . . . . . . . . . . . . . . . . . . . . . . . . . . . . . . . . 24Configuring the SCSI Paths for the Tape Drives and Library . . . . . . . . . . . . . . 25Configuring the Storage Node . . . . . . . . . . . . . . . . . . . . . . . . . . . . . . . . . . . . 25
Configuring Oracle Secure Backup 30Verifying Prerequisites. . . . . . . . . . . . . . . . . . . . . . . . . . . . . . . . . . . . . . . . . . . 31Configuring OSB Administrator Privileges . . . . . . . . . . . . . . . . . . . . . . . . . . . . 31Determine the SCSI Tape Device Parameters . . . . . . . . . . . . . . . . . . . . . . . . . . 31Linux Attach Points . . . . . . . . . . . . . . . . . . . . . . . . . . . . . . . . . . . . . . . . . . . . . 32Assigning Oracle Secure Backup Logical Unit Numbers to Devices . . . . . . . . . 32Configuring your Physical Tape library in OSB . . . . . . . . . . . . . . . . . . . . . . . . . 32Configuring an NDMP Copy Enabled Virtual Tape Library (VTL) . . . . . . . . . . . 33
Configuring ASG-Time Navigator 35Configuring the VTL in Time Navigator . . . . . . . . . . . . . . . . . . . . . . . . . . . . . . 35Configuring Time Navigator . . . . . . . . . . . . . . . . . . . . . . . . . . . . . . . . . . . . . . 37Running a Test Backup to the VTL. . . . . . . . . . . . . . . . . . . . . . . . . . . . . . . . . . 43Cloning Media from the VTL to the Physical Tape Library . . . . . . . . . . . . . . . . 44
2 Contents
This document is for DXi 3.X Software. Made in the USA. Quantum Corporation provides this publication “as is” without warranty of any kind, either express or implied, including but not limited to the implied warranties of merchantability or fitness for a particular purpose. Quantum Corporation may revise this publication from time to time without notice.
COPYRIGHT STATEMENT
© 2015 Quantum Corporation. All rights reserved. Your right to copy this manual is limited by copyright law. Making copies or adaptations without prior written authorization of Quantum Corporation is prohibited by law and constitutes a punishable violation of the law.
TRADEMARK STATEMENT
Quantum, the Quantum logo, DLT, DLTtape, the DLTtape logo, SuperLoader, Scalar, StorNext, and DXi are registered trademarks of Quantum Corporation, registered in the U.S. and other countries. Preserving the World's Most Important Data. Yours., Backup. Recovery. Archive. It’s What We Do., the DLT logo, DLTSage, Dynamic Powerdown, FastSense, FlexLink, GoVault, MediaShield, Optyon, Pocket-sized. Well-armored, SDLT, SiteCare, SmartVerify, StorageCare, Super DLTtape, and Vision are trademarks of Quantum. LTO and Ultrium are trademarks of HP, IBM, and Quantum in the U.S. and other countries. All other trademarks are the property of their respective companies. Specifications are subject to change without notice.
Quantum DXi-Series: Backup Application Specific Path to Tape Configuration GuideDocument 6-67211-06 Rev A
January 2015
Introduction
Backup Application Specific Path to Tape is a licensable feature of the DXi4700 Multi-Protocol, DXi6700, DXi6800, DXi6900 (DXi-Series), and DXi8500 (DXi-Series) enhanced data protection systems platforms. The Path to Tape feature allows the export of data to an attached physical tape library. When the Path to Tape feature is enabled on a DXi system, a physical library that is attached to the same storage network can be recognized and configured on the DXi.
Once configured, virtual images that exists on the DXi can be copied or duplicated to the physical library and written to physical tape cartridges. The tape cartridges can then be exported out of the physical library and stored off-site as part of your backup and recovery plan.
This document includes the following sections:
• Backup Applications
• DXi Personalities
• Creating Backup Images on Virtual Tape
• Virtual Tape to Physical Tape
• Device Path Requirements
• Configuring the DXi for Path to Tape
• Configuring Symantec NetBackup
• Configuring Symantec Backup Exec
• Configuring EMC NetWorker
• Configuring Oracle Secure Backup
• Configuring ASG-Time Navigator
Backup Applications
The following backup applications support the Quantum DXi-Series Backup Application Specific Path to Tape feature:
• Symantec NetBackup and Backup Exec
• EMC NetWorker
• Oracle Secure Backup
• ASG-Time Navigator
Symantec NetBackup and Backup Exec
Quantum provides support for Symantec’s Open Storage API as well as Symantec NetBackup 7.x Direct to Tape and Symantec Backup Exec 2010 (or later) DirectCopy to Tape features.
Introduction 3
Quantum DXi-Series: Backup Application Specific Path to Tape Configuration GuideDocument 6-67211-06 Rev AJanuary 2015
With NetBackup or Backup Exec support:
• The DXi can duplicate images directly to tape without going through a media server. This allows much better performance with less media server and network bandwidth required.
• The duplication process is controlled by NetBackup or Backup Exec so the images on the physical tape are cataloged by NetBackup or Backup Exec.
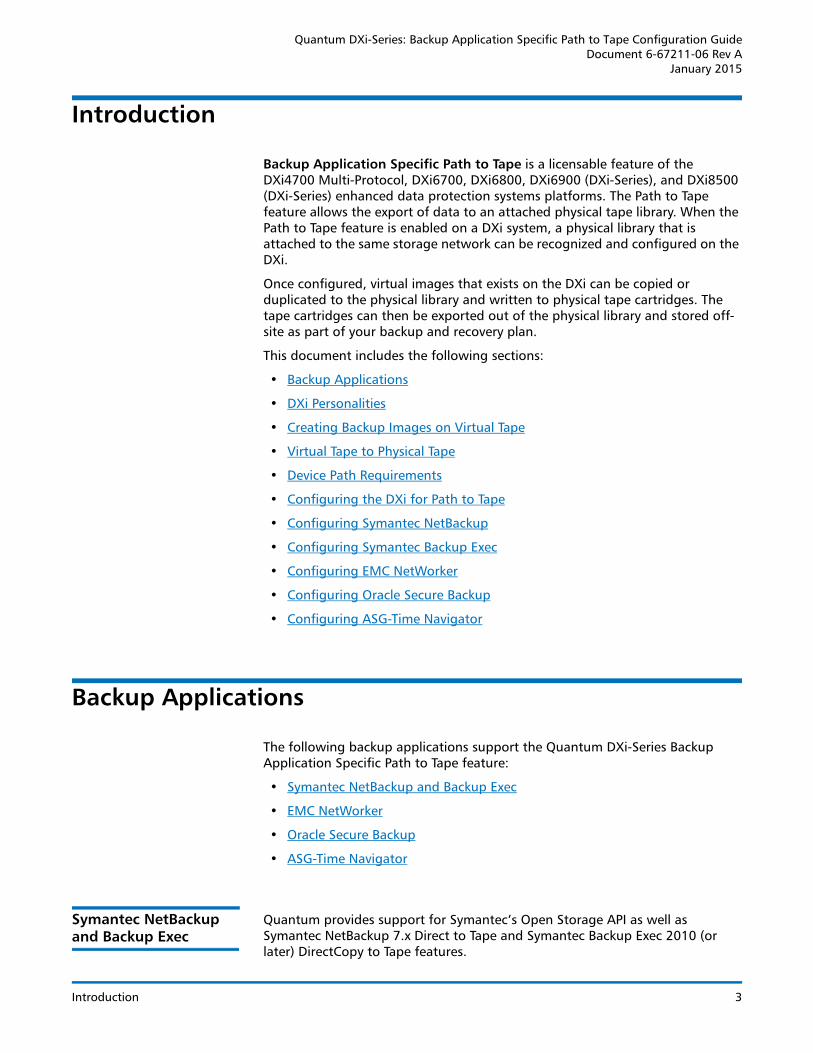
The DXi easily integrates with either NetBackup or Backup Exec to enable duplication of images to a physical tape library (see Figure 1).
Figure 1 NetBackup Direct to Tape and Backup Exec DirectCopy Support
Note: Backup data flows through the Fibre Channel connection in all cases.
1 NetBackup or Backup Exec prepares the DXi to copy images from a virtual tape cartridge to a physical tape cartridge.
2 NetBackup or Backup Exec mounts the required tape cartridges (physical and virtual). NetBackup or Backup Exec can do this by interacting directly with the physical and virtual media changer or through the DXi.
3 NetBackup or Backup Exec selects the DXi that can provide access to the virtual drive and establishes a session with it for the purpose of duplicating images between the drives.
4 The DXi copies the image from the virtual tape cartridge to the designated physical tape cartridge under the direction of NetBackup or Backup Exec.
5 A copy of the image on the virtual tape cartridge is now on physical tape.
4 Backup Applications

Quantum DXi-Series: Backup Application Specific Path to Tape Configuration GuideDocument 6-67211-06 Rev A
January 2015
EMC NetWorker EMC NetWorker supports the Quantum DXi-Series Backup Application Specific path to tape option for cloning operations, utilizing the Quantum device to handle data movement. The Quantum and NetWorker feature allows cloning, with the data movement directly between the VTL and PTL when the Quantum Backup Application Specific feature is enabled and the physical library and drives are attached to the DXi.
Note: EMC NetWorker 8.1 and later are not supported for Backup Application Specific Path to Tape.
Oracle Secure Backup Oracle Secure Backup (OSB) delivers unified data protection for heterogeneous environments. Highly scalable, Oracle Secure Backup domains (environments) are centrally managed using a single console and common management interface across spectrum of servers and NAS devices. Oracle Secure Backup delivers centralized tape backup management for the entire IT environment:
• Oracle database integration with Recovery Manager (RMAN) supporting versions Oracle9i to Oracle Database 11g.
• OSB provides the media management interface for Oracle database backups to tape utilizing RMAN.
• File system data protection: UNIX / Windows / Linux servers.
• Network Attached Storage (NAS) protection leveraging the Network Data Management Protocol (NDMP).
With a highly scalable client/server architecture, Oracle Secure Backup provides local and remote data protection leveraging Secure Socket Layer (SSL) technology for secure intra-domain communication and two-way server authentication. Addressing the complexity of enterprise data protection, Oracle Secure Backup provides advanced media and device management such as:
• Backup encryption and key management.
• Automated tape vaulting and duplication.
• Dynamic drive sharing in Storage Area Network (SAN) environments.
• Server-less tape duplication using NDMP direct copy functionality as supported by Virtual Tape Libraries (VTL).
• For more detailed information regarding installation, configuration, and management of OSB, please refer to the OSB web site on Oracle Technical Network (OTN) for white papers, presentations, data sheet, support matrixes, tutorials etc: http://www.oracle.com/technology/products/secure-backup/index.htm.
ASG-Time Navigator With ASG-Time Navigator:
• The DXi can duplicate images directly to tape without going through a media server. This allows much better performance with less media server and network bandwidth required.
Backup Applications 5

Quantum DXi-Series: Backup Application Specific Path to Tape Configuration GuideDocument 6-67211-06 Rev AJanuary 2015
• The duplication process is controlled by Time Navigator so the images on the physical tape are cataloged by Time Navigator.
DXi Personalities
The DXi can appear differently depending on the interface in which it is viewed. If the DXi is viewed though the Fibre Channel interface, it appears as a virtual tape library. When the DXi virtual medium changer is viewed through a TCP/IP interface, it appears as an NDMP host. The virtual tape library is used to create a backup image on the virtual tape cartridges. The NDMP host interface is used to duplicate a virtual tape image to a physical tape.
Creating Backup Images on Virtual Tape
The Quantum DXi contain partitions or VTLs that present the virtual media changer and virtual tape drives to the host exactly as it would to a physical tape library. This allows the same drivers to be used for both virtual and physical tape libraries. Existing backup processes are identical, and creating a backup image on a virtual tape is no different from creating a backup image on a physical tape. The backup functionality and data path are unchanged (see Figure 2).
Figure 2 Backup Scenario to a VTL
Application Server
Fibre Channel connection
6 DXi Personalities

Quantum DXi-Series: Backup Application Specific Path to Tape Configuration GuideDocument 6-67211-06 Rev A
January 2015
Virtual Tape to Physical Tape
After the normal backup process has completed, each application implements its own technique to transfer the backed up information to physical tape.
NetBackup, Backup Exec, and Time Navigator
Symantec NetBackup, Symantec Backup Exec, and ASG-Time Navigator (referred to as the backup application in the following text) can perform a copy operation using NDMP to transfer data directly from the virtual tape library (VTL) to the physical tape library. The data movement is over a Fibre Channel connection. The backup media server controls this copy process, but does not read or write the data, freeing it to do other tasks. Because this is a normal duplication job, the physical tape copy is cataloged in the backup application’s database.
Both the VTL and the physical tape library are visible to the backup application; therefore restores can be performed directly from either copy (virtual or physical). To duplicate the virtual tape image, the backup application selects an NDMP device path to the VTL and creates an NDMP control session for this device. The backup application selects a tape volume from the physical tape library and selects an NDMP device path from this library. It creates a second NDMP control session for this device. NDMP messages are then sent via the control sessions to move data and to monitor the data transfer. The backup application writes headers as needed and handles tape spanning, tape errors, and so forth. The diagram below shows the control and data flow (see Device Path Requirements on page 9).
NetWorker EMC NetWorker supports the Quantum DXi-Series Backup Application Specific path to tape option for cloning operations utilizing the Quantum device to handle data movement. The Quantum and NetWorker feature allows cloning with the data movement directly between the VTL and PTL when the Quantum Backup Application Specific feature is enabled and the physical library and drives are attached to the DXi. The Quantum DXi-Series VTL presentation layer allows for both FC devices for the Virtual library and a second path accessible via NDMP (via FC) to support the enhanced VTL to PTL clone operations with NetWorker. The NetWorker storage node manages the clone process with the Quantum DXI-Series managing the actual data transfer. NetWorker automatically catalogs the physical tape barcode in its database.
The Quantum Backup Application Specific path to tape option allows both the VTL and the Quantum physical tape library to be visible to NetWorker enabling restores directly from either copy (virtual or physical). The Quantum Backup Application Specific option operationally allows NetWorker to select the NDMP device paths (via FC) to the VTL and PTL. This allows for addressing via NDMP with a source and destination for the data movement within the DXi. It creates another NDMP control session for this device. NDMP messages are sent via the control session to manage the overall process. Sessions also monitor the data transfer taking place at the back end of the DXi-Series appliance. NetWorker updates the headers on the physical tape to track the manage the new barcodes. The diagram below shows the control and data flow (see Device Path Requirements on page 9).
Virtual Tape to Physical Tape 7

Quantum DXi-Series: Backup Application Specific Path to Tape Configuration GuideDocument 6-67211-06 Rev AJanuary 2015
Note: This feature is only available for VTL presentations.
Figure 3 Duplicating a Virtual Tape Cartridge to a Physical Tape Cartridge
Note: The data paths shown in the Device Path Requirements on page 9 are over a Fibre Channel connection. The management path is over TCP/IP.
Secure Backup Oracle Secure Backup can duplicate or migrate virtual to physical tapes on a one-off basis or per user-defined policy. The differences between tape duplication and migration are:
• Duplication - Creates a tape copy with identical backup data but unique tape ID for tracking purposes.
After duplication operation completes, two copies of the backup data exist.
• Migration - Creates identical tape copy with unique tape ID but then deletes the original tape thereby freeing up space on the VTL.
After migration operation completes, one copy of the backup data exists on tape.
Configuring tape duplication or migration can be accomplished using the Oracle Secure Backup web tool, command line (obtool) or Oracle Enterprise Manager (EM) Grid Control 10.2.0.5.
Perform a one-off duplication or migration from the OSB web tool, volumes page as depicted below (see Figure 4).
8 Virtual Tape to Physical Tape

Quantum DXi-Series: Backup Application Specific Path to Tape Configuration GuideDocument 6-67211-06 Rev A
January 2015
Figure 4 Manage Volumes
Select the desired volume(s), and then click the duplicate button, which will provide options for migrate or duplication and device restrictions (if any).
Device Path Requirements
The following sections present the device paths that must be visible to the backup applications.
NetBackup, Backup Exec, Time Navigator, and Secure Backup
The following device paths must be visible to Symantec NetBackup, Symantec Backup Exec, ASG-Time Navigator, and Oracle Secure Backup:
• Fibre Channel device paths (emulating tape) to the VTL storage for backup data from the primary storage device.
• NDMP device paths (emulating tape) to the VTL storage. This Fibre Channel device path access is required either for reading from a VTL for duplicating to a physical tape library or reading from a physical library to a VTL.
Note: The DXi virtual medium changer must be viewed through TCP/IP, and will appear as an NDMP host.
• NDMP device paths to the attached physical tape devices to read or restore data directly from a physical tape.
Note: The backup application controls the virtual tape library backups and the NDMP duplication from virtual tape library to the physical tape library.
NetWorker The following device paths must be visible to EMC NetWorker:
• Fibre Channel (FC) or SAN device paths (emulating tape) to the VTL storage for backup data from the primary storage device.
Device Path Requirements 9

Quantum DXi-Series: Backup Application Specific Path to Tape Configuration GuideDocument 6-67211-06 Rev AJanuary 2015
• Fibre Channel (FC) or SAN device path connected to the tape library from the DXi (used for data backups).
• Fibre Channel (FC) or SAN device path connected to the tape library from the backup host (used for data restores).
• NDMP device paths (emulating tape) to the VTL storage. This Fibre Channel device path access is required either for reading from a VTL for duplicating to a physical tape library or reading from a physical library to a VTL.
Note: The DXi virtual medium changer must be viewed through TCP/IP, and will appear as an NDMP host.
• These may be the same devices as the FC/SAN devices because NetWorker supports sharing of drives among media servers and NDMP hosts.
• NDMP device paths to the attached physical tape devices to read or restore data directly from a physical tape.
Note: Restoring data from a physical tape drive can take longer to complete than restoring from a virtual tape drive.
Note: NetWorker controls the virtual tape library backups and the NDMP duplication from virtual tape library to the physical tape library.
Configuring the DXi for Path to Tape
For all backup applications, a physical tape library that is connected to the same network as the DXi can be recognized and configured for the Path to Tape feature (see Table 1, and Table 2 for a list of supported tape libraries and tape drives). This task can be done when appropriate.
Note: Refer to the appropriate vendor’s documentation for a complete list of supported libraries for your backup application.
Table 1 Supported Tape Libraries Vendor Tape Library
Quantum Scalar i500
Scalar i2000 and i6000
Scalar 24
Scalar 50 (PX502)
Scalar i40 and i80
PX500
PX720
10 Configuring the DXi for Path to Tape

Quantum DXi-Series: Backup Application Specific Path to Tape Configuration GuideDocument 6-67211-06 Rev A
January 2015
Table 2 Supported Tape DrivesVendor Tape Drive
Quantum SDLT320, SDLT600, DLT-S4, LTO-2 and LTO-3(In addition to the previously listed drives, Oracle Secure Backup also supports VS80, VS160, SDLT220, and LTO.)
HP LTO-2, LTO-3, LTO-4, LTO-5, and LTO-6
IBM LTO-2, LTO-3, LTO-4, LTO-5, and LTO-6
To configure the DXi for Backup Application Specific Path to Tape:
Note: The physical library must be properly cabled, zoned, and mapped to the DXi node so it can be detected. A reboot may be necessary before the library is successfully detected.
1 On the DXi, make sure you have created at least one user account on the Configuration > PTT > Backup Application Specific page (see Figure 5).
The Backup Application Specific username and password should match the credentials used by the backup application.
Dell PV132T
PVT136T
ML6000
HP ESL E Series
EML Series
IBM TS3500
Sun/STK L180 (FC only)
L700 (FC only)
SL500 (FC only)
SL3000 (FC only)
Vendor Tape Library
Configuring the DXi for Path to Tape 11

Quantum DXi-Series: Backup Application Specific Path to Tape Configuration GuideDocument 6-67211-06 Rev AJanuary 2015
Figure 5 Configuring Backup Application Specific Path to Tape
2 On the Configuration > PTT > Physical Device Discovery page, click Scan to discover attached libraries (see Figure 6).
Make sure the changer and all of its drives are enabled. If necessary, select a changer or drive and click Enable
Figure 6 Configuring Physical Tape Libraries
3 Continue with configuring your backup application:
• Configuring Symantec NetBackup
• Configuring Symantec Backup Exec
• Configuring EMC NetWorker
• Configuring Oracle Secure Backup
• Configuring ASG-Time Navigator
12 Configuring the DXi for Path to Tape
Quantum DXi-Series: Backup Application Specific Path to Tape Configuration GuideDocument 6-67211-06 Rev A
January 2015
Configuring Symantec NetBackup
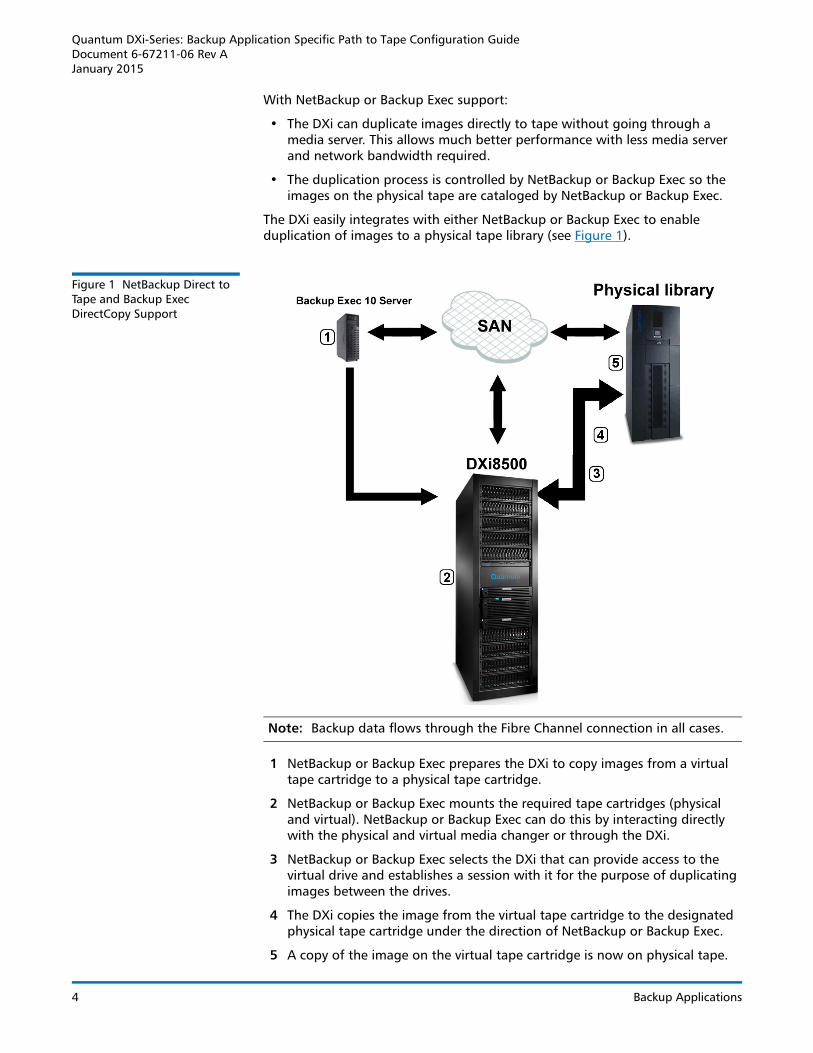
Configuring Symantec NetBackup for Path to Tape consists of the following major steps:
Note: You must dedicate a partition within the DXi for use with NetBackup. The partition cannot be shared with another backup application.
• Setting Up Symantec NetBackup Direct to Tape
• Using Symantec NetBackup Direct to Tape
• Configuring NetBackup for Backup Application Specific Path to Tape
Setting Up Symantec NetBackup Direct to Tape
Setting up Symantec NetBackup Direct to Tape consists of the following steps:
Note: To support large numbers of tape drives in a VTL, you must have NetBackup 7.x.
• Prerequisites
• Configuring Direct Path to Tape
Prerequisites
The following items must be available and configured before setting up Symantec NetBackup Direct to Tape:
• The DXi must be installed and configured.
• Fibre Channel connectivity configured.
• The Backup Application Specific Path to Tape license must be installed on the DXi on the Utilities > License Keys page.
A separate license is required on DXi systems to support Backup Application Specific Path to Tape (also known as NDMP Path to Tape). The Backup Application Specific license is pre-installed on all DXi6700, DXi6800, and DXi8500 systems.
Configuring Direct Path to Tape
To configure direct path to tape from backups made to the DXi:
1 Authorize NetBackup access to the DXi.
2 Configure the DXi as a host using the following steps:
a On the Configuration > PTT > Physical Device Discovery page, click Scan.
A list of attached changers are displayed. Select a changer to display all of its tape drives.
Configuring Symantec NetBackup 13

Quantum DXi-Series: Backup Application Specific Path to Tape Configuration GuideDocument 6-67211-06 Rev AJanuary 2015
b Make sure the changer and drives are enabled. If necessary, select a changer or drive and click Enable.
c On the Configuration > PTT > Backup Application Specific page, click Add to add the username and password that is used by the NetBackup NDMP credentials in order to establish an NDMP connection.
3 In NetBackup, under NDMP Credentials, you must create a new NDMP host using the DXi IP address as the name and using the username and password entered in the previous step.
4 In NetBackup, when running the Configure Storage Devices wizard, the user must select the host and set the NDMP option.
5 Continue with the remaining configuration steps in the wizard.
Using Symantec NetBackup Direct to Tape
NetBackup uses NDMP direct copy when you duplicate a backup image. Certain conditions apply to the duplication, explained in the section.
To run a duplication, you can use any of the following methods:
• The Duplicate option in the Catalog node of the NetBackup Administration Console.
• NetBackup Vault. Refer to the NetBackup Vault Administrators Guide.
• The bpduplicate command. Refer to the NetBackup Commands Guide.
• A Netbackup Storage Life-cycle Policy.
Requirements
For NetBackup to use NDMP direct copy when you duplicate an image:
• As the destination for the duplication, you must designate an NDMP storage unit in a DXi.
• An NDMP tape drive must be available to mount the source image. The NDMP tape drive can be one that was defined in the DXi or it can be a physical tape drive in a tape library
If these two requirements are met, NDMP direct copy is enabled. NetBackup copies the image directly to the designated storage unit without using media server I/O or network bandwidth.
Initiate NDMP Direct to Tape with the Administration Console
To initiate a NDMP Direct to Tape with the Administration Console:
1 In the NetBackup Administration Console, expand the NetBackup Management, Catalog.
2 Set up the search criteria for the image you want to duplicate. Click Search Now.
3 Right-click the image(s) you want to duplicate and select Duplicate from the shortcut menu.
14 Configuring Symantec NetBackup

Quantum DXi-Series: Backup Application Specific Path to Tape Configuration GuideDocument 6-67211-06 Rev A
January 2015
Note: You must designate an NDMP storage unit as the destination for the duplication. Use the Storage Unit field in the Setup Duplication Variables dialog box.
For more information, refer to Duplicating backup images in the NetBackup Administrator’s Guide.
Configuring NetBackup for Backup Application Specific Path to Tape
To configure NetBackup 7.x for Backup Application Specific Path to Tape:
1 Make sure the DXi has been properly configured for path to tape (see Configuring the DXi for Path to Tape on page 10).
2 On the NetBackup Server, open the NetBackup Administration Console. Start the Configure Storage Devices wizard and click Next.
3 Select your Master Server and click Change (see Figure 7).
Figure 7 Starting the Configure Storage Devices Wizard
4 Select NDMP Server (see Figure 8).
Figure 8 Changing the Device Host
5 Click OK and then Next.
Configuring Symantec NetBackup 15

Quantum DXi-Series: Backup Application Specific Path to Tape Configuration GuideDocument 6-67211-06 Rev AJanuary 2015
6 To add the DXi as an NDMP host, click New (see Figure 9).
Figure 9 Adding a DXi as an NDMP Host
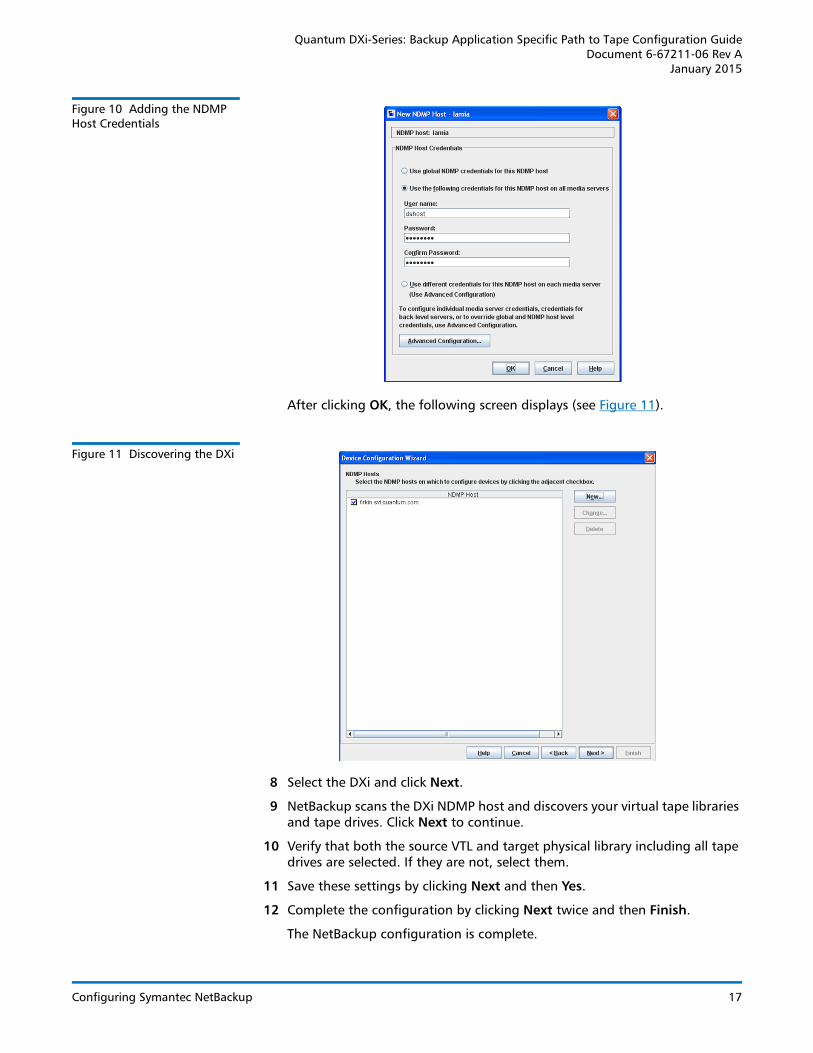
7 Enter the hostname or IP address of your DXi and click OK (see Figure 10). For segmented network configurations, you should enter the data IP address.
Note: If one of the following steps fails, make sure your NetBackup host has network access to your DXi and recognizes the network name or IP you have entered.
Note: Depending on your environment you may want to choose a specific one of the options in the next dialog. For this example, the second option is selected. In the Username, Password, and Confirm Password fields fill in the user account credentials added on the DXi Configuration > PTT > Backup Application Specific section above.
16 Configuring Symantec NetBackup
Quantum DXi-Series: Backup Application Specific Path to Tape Configuration GuideDocument 6-67211-06 Rev A
January 2015
Figure 10 Adding the NDMP Host Credentials
After clicking OK, the following screen displays (see Figure 11).
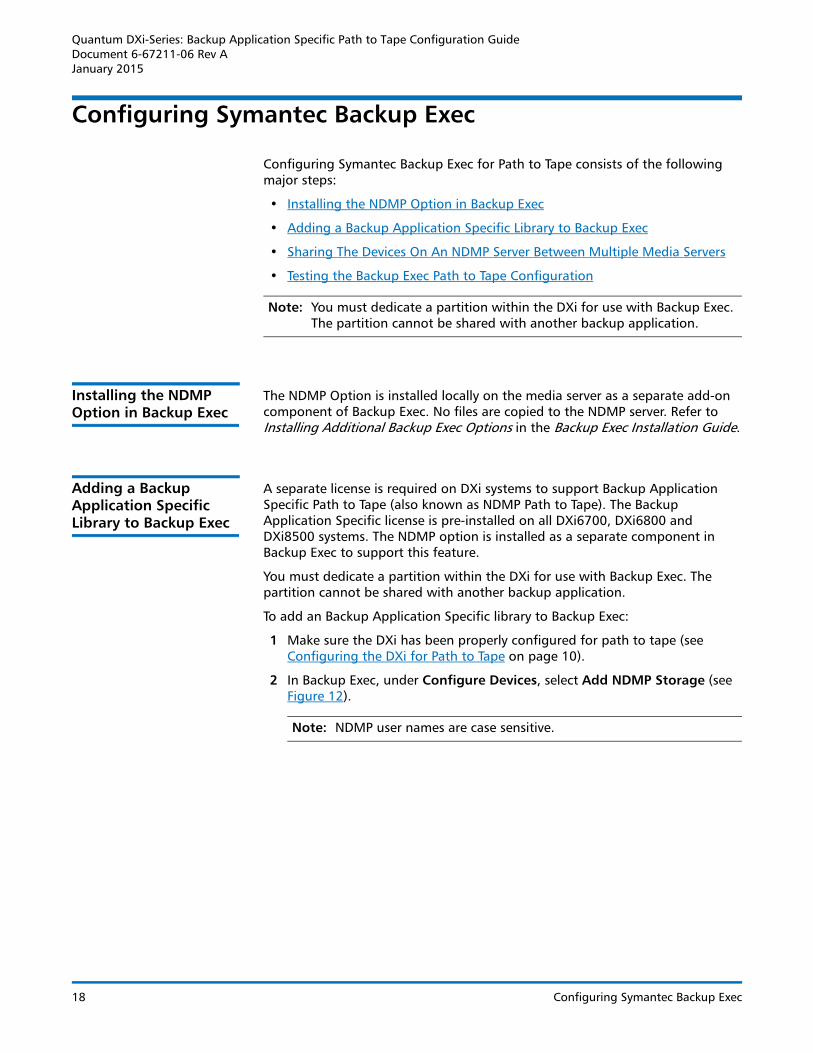
Figure 11 Discovering the DXi
8 Select the DXi and click Next.
9 NetBackup scans the DXi NDMP host and discovers your virtual tape libraries and tape drives. Click Next to continue.
10 Verify that both the source VTL and target physical library including all tape drives are selected. If they are not, select them.
11 Save these settings by clicking Next and then Yes.
12 Complete the configuration by clicking Next twice and then Finish.
The NetBackup configuration is complete.
Configuring Symantec NetBackup 17
Quantum DXi-Series: Backup Application Specific Path to Tape Configuration GuideDocument 6-67211-06 Rev AJanuary 2015
Configuring Symantec Backup Exec
Configuring Symantec Backup Exec for Path to Tape consists of the following major steps:
• Installing the NDMP Option in Backup Exec
• Adding a Backup Application Specific Library to Backup Exec
• Sharing The Devices On An NDMP Server Between Multiple Media Servers
• Testing the Backup Exec Path to Tape Configuration
Note: You must dedicate a partition within the DXi for use with Backup Exec. The partition cannot be shared with another backup application.
Installing the NDMP Option in Backup Exec
The NDMP Option is installed locally on the media server as a separate add-on component of Backup Exec. No files are copied to the NDMP server. Refer to Installing Additional Backup Exec Options in the Backup Exec Installation Guide.
Adding a Backup Application Specific Library to Backup Exec
A separate license is required on DXi systems to support Backup Application Specific Path to Tape (also known as NDMP Path to Tape). The Backup Application Specific license is pre-installed on all DXi6700, DXi6800 and DXi8500 systems. The NDMP option is installed as a separate component in Backup Exec to support this feature.
You must dedicate a partition within the DXi for use with Backup Exec. The partition cannot be shared with another backup application.
To add an Backup Application Specific library to Backup Exec:
1 Make sure the DXi has been properly configured for path to tape (see Configuring the DXi for Path to Tape on page 10).
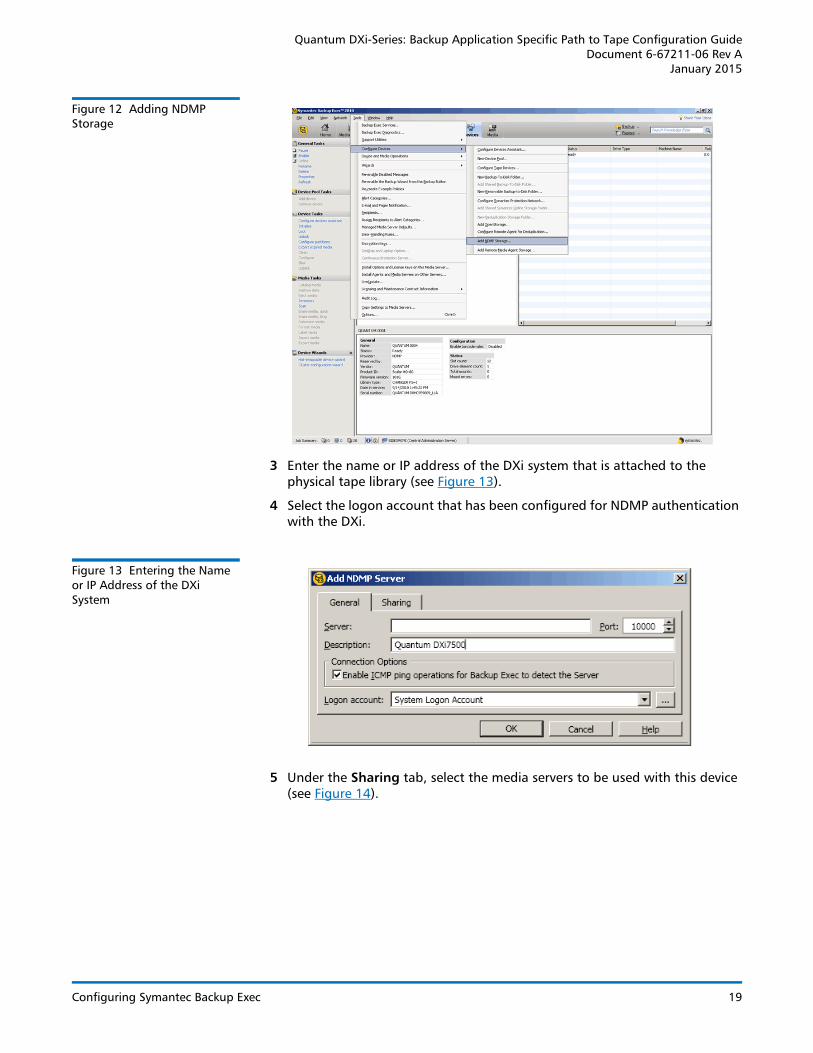
2 In Backup Exec, under Configure Devices, select Add NDMP Storage (see Figure 12).
Note: NDMP user names are case sensitive.
18 Configuring Symantec Backup Exec
Quantum DXi-Series: Backup Application Specific Path to Tape Configuration GuideDocument 6-67211-06 Rev A
January 2015
Figure 12 Adding NDMP Storage
3 Enter the name or IP address of the DXi system that is attached to the physical tape library (see Figure 13).
4 Select the logon account that has been configured for NDMP authentication with the DXi.
Figure 13 Entering the Name or IP Address of the DXi System
5 Under the Sharing tab, select the media servers to be used with this device (see Figure 14).
Configuring Symantec Backup Exec 19

Quantum DXi-Series: Backup Application Specific Path to Tape Configuration GuideDocument 6-67211-06 Rev AJanuary 2015
Figure 14 Selecting the Media Servers
6 Restart Backup Exec services for each media server that is selected to share this device.
7 Label the media you wish to use (see Figure 15).
Figure 15 Labeling the Media
Configuring the system for Backup Specific Path to Tape is complete.
Sharing The Devices On An NDMP Server Between Multiple Media Servers
If you use the Backup Exec Central Admin Server Option or the SAN Shared Storage Option, you can select which media servers can share the devices that are attached to an NDMP server. When you add an NDMP server, the media server that you used to add the server is automatically selected for sharing.
Note: If you upgraded from an earlier version of Backup Exec, your existing configuration is preserved, so you do not have to set up sharing for existing configurations.
20 Configuring Symantec Backup Exec
Quantum DXi-Series: Backup Application Specific Path to Tape Configuration GuideDocument 6-67211-06 Rev A
January 2015
To share the devices on an NDMP server between multiple media servers:
1 On the Backup Exec Navigation bar, click Devices.
2 In the Devices view, right-click the NDMP server that has the devices you want media servers to access.
3 Select Manage Sharing.
Note: The Manage Sharing Option appears only if you have the Backup Exec Central Admin Server option or the SAN Shared Storage option installed. You must also have more than one media server.
4 Select the NDMP server that has the devices you want to share.
5 Under Media Servers, select the media servers that you want to use with the devices that are attached to the selected NDMP server.
6 Click OK.
7 Restart the services on the media servers that you selected in Step 5.
Testing the Backup Exec Path to Tape Configuration
After you have completed the path to tape configuration, you can test the configuration.
Testing the Backup Exec Path to Tape Configuration
To test the Backup Exec Path to Tape configuration:
1 Create a job to duplicate a backup from the DXi system to a physical tape (see Figure 16).
Configuring Symantec Backup Exec 21

Quantum DXi-Series: Backup Application Specific Path to Tape Configuration GuideDocument 6-67211-06 Rev AJanuary 2015
Figure 16 Labeling the Media
2 Choose a resource to back up (see Figure 17).
Figure 17 Choosing a Backup Resource
3 Select the physical tape library as the destination (see Figure 18).
22 Configuring Symantec Backup Exec

Quantum DXi-Series: Backup Application Specific Path to Tape Configuration GuideDocument 6-67211-06 Rev A
January 2015
Figure 18 Selecting the Physical Tape Library
Note: Verify that the Enable DirectCopy to Tape feature is selected.
4 Use the Job Monitor to check progress on duplication job (see Figure 19).
Figure 19 Using the Job Monitor
For the example shown below, QUANTUM 0001 is the virtual tape library and QUANTUM 0002 is the physical tape library. A Scalar i40 is used as the physical tape library (see Figure 20).
Configuring Symantec Backup Exec 23

Quantum DXi-Series: Backup Application Specific Path to Tape Configuration GuideDocument 6-67211-06 Rev AJanuary 2015
Figure 20 Viewing the Job Progress
Configuring EMC NetWorker
Configuring EMC NetWorker for Path to Tape consists of the following major steps:
• Verifying Prerequisites
• Configuring the Storage Node
• Configuring the SCSI Paths for the Tape Drives and Library
Note: EMC NetWorker 8.1 and later are not supported for Backup Application Specific Path to Tape.
Verifying Prerequisites Before attempting to configure NetWorker for path to tape, ensure that you have the required licenses from EMC such as: License to perform basic backups to the DXi in VTL mode.
A separate license is required on DXi systems to support Backup Application Specific Path to Tape (also known as NDMP Path to Tape). The Backup Application Specific license is pre-installed on all DXi6700, DXi6800, and DXi8500 systems.
• NDMP client connection license for enabling the path to tape feature.
• Autochanger license for the physical tape library based on the number of cartridge slots.
• License for the drive sharing feature, one license per logical shared drive in the DXi.
24 Configuring EMC NetWorker

Quantum DXi-Series: Backup Application Specific Path to Tape Configuration GuideDocument 6-67211-06 Rev A
January 2015
For Example: A physical library with two physical drives will require two DDS licenses so the two physical NDMP drives can be shared, plus two DDS licenses so the two VTL NDMP drives can be shared.
• Storage Node License
• Contact EMC for license specific license information.
Note: During device configuration you must configure SCSI and NDMP devices separately. For example, configure SCSI devices first and save, then configure NDMP devices. These two operations cannot be run simultaneously.
Configuring the SCSI Paths for the Tape Drives and Library
You must configure the SCSI paths for the physical tape drives and library and the virtual tape drives and library before configuring the NDMP storage node.
To configure the SCSI path for the tape drives and library:
1 Make sure the DXi has been properly configured for path to tape (see Configuring the DXi for Path to Tape on page 10).
1 In NetWorker, scan devices on the SCSI storage node. Ensure that you select SCSI as the device scan type. Ensure that you can see for both virtual and physical tape library.
2 Right-click the library and click Configure Library.
3 Select the remaining SCSI paths to the tape drives and click Start Configuration (see Figure 21).
Figure 21 Start Configuration Screen
4 Repeat the library configuration steps on the connected physical library.
Configuring the Storage Node
In addition to the currently configured Storage Node for NetWorker, you must configure a second storage node for the DXi. This is done from the Device page of the NetWorker Administration GUI (see Figure 22).
Configuring EMC NetWorker 25

Quantum DXi-Series: Backup Application Specific Path to Tape Configuration GuideDocument 6-67211-06 Rev AJanuary 2015
Figure 22 NetWorker Administration GUI
Storage node option
To configure the storage node:
1 Right-click on the Storage Node option and select New.
The Create Storage Node screen displays (see Figure 23).
Figure 23 Create Storage Node Screen
2 Enter the fully qualified device name for the DXi in the storage node Name field and select NDMP for the Type of Storage Node.
3 Enter the username and password for the NDMP user account in the Remote User section.
26 Configuring EMC NetWorker

Quantum DXi-Series: Backup Application Specific Path to Tape Configuration GuideDocument 6-67211-06 Rev A
January 2015
Note: The NDMP username and password were created on the DXi (see Configuring the DXi for Path to Tape on page 10).
4 Click OK.
The storage node is created.
5 Right click the DXi Storage Node, and click scan for devices.
The Scan for Devices screen displays (see Figure 24).
Figure 24 Scan for Devices Screen
6 Ensure the DXi Storage Node is selected. The Device Scan Type should be set to NDMP.
7 Click Start Scan.
The DXi displays both the VTL and the physical library in an un-configured state (see Figure 25).
Configuring EMC NetWorker 27

Quantum DXi-Series: Backup Application Specific Path to Tape Configuration GuideDocument 6-67211-06 Rev AJanuary 2015
Figure 25 VTL and Physical Library in Un-configured State
8 Once the NDMP paths for the VTL and physical tape library are visible, on the SCSI storage node, one at a time, right-click the VTL and physical tape library and click Re-configure Library.
9 Select the remaining NDMP paths to the tape drives and click Start Configuration (see figure 26).
Figure 26 Start Configuration Screen
10 Configure the clone storage node in the client resource. This is accomplished in the Configuration section of the NetWorker Administration GUI (see Figure 27).
28 Configuring EMC NetWorker
Quantum DXi-Series: Backup Application Specific Path to Tape Configuration GuideDocument 6-67211-06 Rev A
January 2015
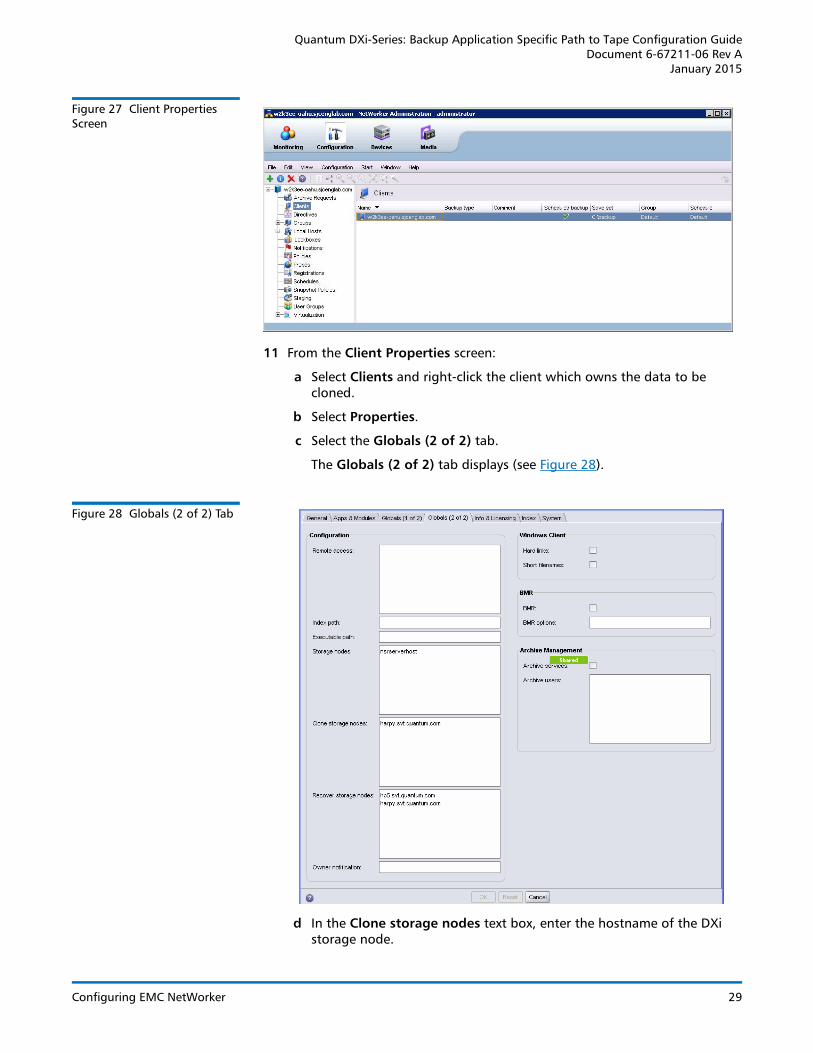
Figure 27 Client Properties Screen
11 From the Client Properties screen:
a Select Clients and right-click the client which owns the data to be cloned.
b Select Properties.
c Select the Globals (2 of 2) tab.
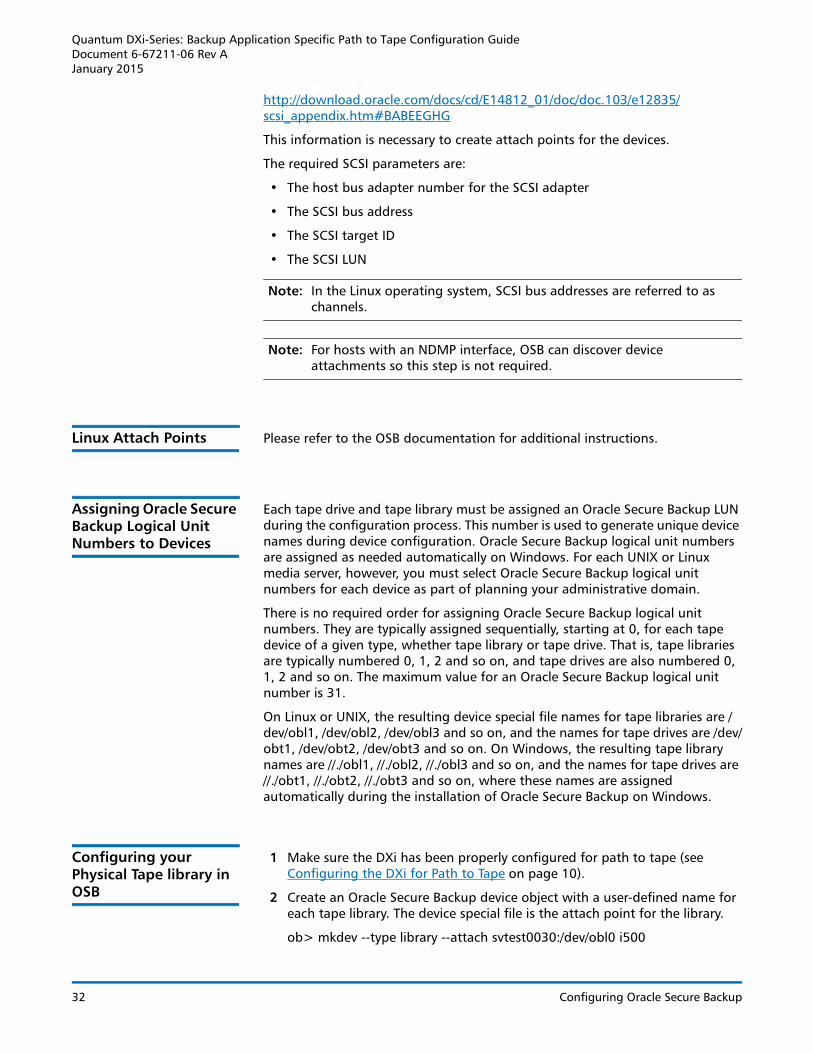
The Globals (2 of 2) tab displays (see Figure 28).
Figure 28 Globals (2 of 2) Tab
d In the Clone storage nodes text box, enter the hostname of the DXi storage node.
Configuring EMC NetWorker 29

Quantum DXi-Series: Backup Application Specific Path to Tape Configuration GuideDocument 6-67211-06 Rev AJanuary 2015
e In the Recover storage nodes text box, enter the SCSI storage node and the DXi storage node.
f Select OK.
12 Perform backups as usual with scheduled groups or manually.
13 To clone the data, determine if you would like to clone an entire tape volume or a single save set.
Caution: Cloning to bad physical media will cause NetWorker to report Waiting for 1 writable volume(s) to backup pool. The work around is to issue a CTRL-Z to the CLI to cancel the clone operation, remove the known bad physical media, and restart the clone operation.
The necessary information can be obtained at the CLI with the mminfo command (refer to the EMC NetWorker documentation for more information on CLI options), or in the remote management pages under the Media section.
The NDMP cloning operation can only be initiated via CLI.
• To clone a save set: nsrndmp_clone -v -p -J <DXi Hostname> -S <SSID number>
• To clone an entire volume: nsrndmp_clone -v -p -J <DXi Hostname> <volume name
• To restore data from physical tape, use the networker recover command specifying saveset/cloneid.
Prior to starting a clone operation it is best to have tapes labeled into the Default Clone pool to avoid having to label them during the cloning operation.
Consult the NetWorker manual or online help for more options related to the nsrndmp_clone command.
Configuring Oracle Secure Backup
Configuring Oracle Secure Backup for Path to Tape consists of the following major steps:
Note: You must dedicate a partition within the DXi for use with OSB. The partition cannot be shared with another backup application.
• Verifying Prerequisites
• Configuring OSB Administrator Privileges
• Determine the SCSI Tape Device Parameters
• Linux Attach Points
• Assigning Oracle Secure Backup Logical Unit Numbers to Devices
• Configuring your Physical Tape library in OSB
30 Configuring Oracle Secure Backup

Quantum DXi-Series: Backup Application Specific Path to Tape Configuration GuideDocument 6-67211-06 Rev A
January 2015
• Configuring an NDMP Copy Enabled Virtual Tape Library (VTL)
Verifying Prerequisites The following items must be available and configured before setting up OSB:
• The DXi must be installed, configured and accessible via Fibre Channel.
• The Backup Application Specific Path to Tape license must be installed on the DXi.
A separate license is required on DXi systems to support Backup Application Specific Path to Tape (also known as NDMP Path to Tape). The Backup Application Specific license is pre-installed on all DXi6700, DXi6800, and DXi8500 systems.
Configuring OSB Administrator Privileges
Note: Before starting to configure your devices on OSB you must have Admin privileges within OSB.
To configure tape devices within OSB, you must have OSB administrative privileges. To configure OSB administrator privileges:
1 Install Oracle Secure Backup software on the hosts to be protected.
2 Assigned the appropriate host role within OSB:
• Administrative Server - The administrator server houses the OSB catalog and scheduling information. One administrative server per backup domain.
• Media Server - The media server host is directly attached to the tape devices.
• Client - The client host that contains data to be backed up.
Note: All hosts will have a minimum of client role, then select hosts will be configured as media server. The Administrative Server may also have the media server role as desired.
3 Determine the device address from the host (as described later in this document).
4 Configure the tape devices and assign attach points.
Note: Devices may be automatically discovered on hosts with an NDMP interface.
Determine the SCSI Tape Device Parameters
Oracle Secure Backup supports both SCSI and Fibre Channel devices for Linux, Windows, and UNIX. To configure a media server to communicate with its attached tape devices, you must have the SCSI parameters for each tape device.
During installation on Windows, the SCSI addresses are provided, however; with Linux and UNIX environments, you must query the host to determine these parameters. Please refer to the OSB documentation for instruction per platform:
Configuring Oracle Secure Backup 31
Quantum DXi-Series: Backup Application Specific Path to Tape Configuration GuideDocument 6-67211-06 Rev AJanuary 2015
http://download.oracle.com/docs/cd/E14812_01/doc/doc.103/e12835/scsi_appendix.htm#BABEEGHG
This information is necessary to create attach points for the devices.
The required SCSI parameters are:
• The host bus adapter number for the SCSI adapter
• The SCSI bus address
• The SCSI target ID
• The SCSI LUN
Note: In the Linux operating system, SCSI bus addresses are referred to as channels.
Note: For hosts with an NDMP interface, OSB can discover device attachments so this step is not required.
Linux Attach Points Please refer to the OSB documentation for additional instructions.
Assigning Oracle Secure Backup Logical Unit Numbers to Devices
Each tape drive and tape library must be assigned an Oracle Secure Backup LUN during the configuration process. This number is used to generate unique device names during device configuration. Oracle Secure Backup logical unit numbers are assigned as needed automatically on Windows. For each UNIX or Linux media server, however, you must select Oracle Secure Backup logical unit numbers for each device as part of planning your administrative domain.
There is no required order for assigning Oracle Secure Backup logical unit numbers. They are typically assigned sequentially, starting at 0, for each tape device of a given type, whether tape library or tape drive. That is, tape libraries are typically numbered 0, 1, 2 and so on, and tape drives are also numbered 0, 1, 2 and so on. The maximum value for an Oracle Secure Backup logical unit number is 31.
On Linux or UNIX, the resulting device special file names for tape libraries are /dev/obl1, /dev/obl2, /dev/obl3 and so on, and the names for tape drives are /dev/obt1, /dev/obt2, /dev/obt3 and so on. On Windows, the resulting tape library names are //./obl1, //./obl2, //./obl3 and so on, and the names for tape drives are //./obt1, //./obt2, //./obt3 and so on, where these names are assigned automatically during the installation of Oracle Secure Backup on Windows.
Configuring your Physical Tape library in OSB
1 Make sure the DXi has been properly configured for path to tape (see Configuring the DXi for Path to Tape on page 10).
2 Create an Oracle Secure Backup device object with a user-defined name for each tape library. The device special file is the attach point for the library.
ob> mkdev --type library --attach svtest0030:/dev/obl0 i500
32 Configuring Oracle Secure Backup
Quantum DXi-Series: Backup Application Specific Path to Tape Configuration GuideDocument 6-67211-06 Rev A
January 2015
For each tape drive attached to the library you defined in the previous step, create an Oracle Secure Backup device object with a user-defined name for the tape drive. The library for the drive is referenced using the library name that you created in the previous step.
1 ob> mkdev --type tape --library i500 --dte 1 --attach svtest0030:/dev/obt0 IBMLTO3A
2 ob> mkdev --type tape --library i500 --dte 2 --attach svtest0030:/dev/obt1 IBMLTO3B
3 ob> mkdev --type tape --library i500 --dte 3 --attach svtest0030:/dev/obt2 IBMLTO3C
You can verify the configuration information for your devices using the lsdev command in obtool. For example:
ob> lsdev
Oracle Secure Backup displays the following output:
library i500 in service
drive 1 IBMLTO3Ain service
drive 2 IBMLTO3B in service
drive 3 IBMLTO3C in service
To attach your VTL's, they must be configured as device and NDMP host to utilize NDMP tape copy. OSB's detailed instructions on their web site can guide you through this procedure.
Configuring an NDMP Copy Enabled Virtual Tape Library (VTL)
An NDMP copy-enabled virtual tape library (example: Quantum DXi) is a virtual tape library with an embedded NDMP server and multiple access paths. The embedded NDMP server allows off loading the I/O associated with volume duplication from the application running on the media server to the VTL.
See also: Oracle Secure Backup Administrator's Guide for more information on NDMP copy-enabled virtual tape libraries
An NDMP copy-enabled virtual tape library (VTL) must be represented in Oracle Secure Backup as a group of tape devices with multiple attach specifications. This ensures that the inventory data coming through the multiple access paths is identical.
Two Oracle Secure Backup host objects must be created to represent the VTL. One of these host objects must be associated with the media server to which the VTL is attached. The other host object must be associated with the VTL's embedded NDMP server. Both of these host objects must be assigned the media server role in Oracle Secure Backup.
One Oracle Secure Backup library device object with two attach specifications must be created for the virtual library. One access path is through the media server to which the VTL is attached. The other access path is through the embedded NDMP server.
An Oracle Secure Backup tape device object with two access paths must also be created for each virtual drive contained within the virtual library. As in the virtual library case, one access path is through the media server, and the other is through the embedded NDMP server.
Configuring Oracle Secure Backup 33
Quantum DXi-Series: Backup Application Specific Path to Tape Configuration GuideDocument 6-67211-06 Rev AJanuary 2015
One Oracle Secure Backup library device object with a single attach specification must be created for the physical library. The access path is through the VTL's embedded NDMP server. An Oracle Secure Backup tape device object with a single attach specification must also be created for each physical drive contained within the physical library. As in the physical library case, the access path is through the VTL's embedded NDMP server.
Note: Multiple media servers might be able to access the physical library and its drives if they are all connected to a shared storage area network. In that case the Oracle Secure Backup device objects for the physical library and its drives must be created with multiple attach points.
Here is an example of the obtool commands that would be used to configure an NDMP copy-enabled VTL. Many of the options that would be specified in a real environment have been omitted for clarity. Also, the device names shown are simply placeholders that may differ from the actual names in a real environment.
• The following command creates the Oracle Secure Backup host object associated with the media server to which the VTL is attached.
mkhost --access ob --ip ipname osb_media_server
• The following command creates the Oracle Secure Backup host object associated with the embedded NDMP server contained within the VTL.
mkhost --access ndmp --ip ipname ndmp_server
• The following command configures an Oracle Secure Backup device object that is associated with the virtual library vlib.
mkdev --type library --class vtl
-attach osb_media_server:/dev/obl0,ndmp_media_server:/dev/sg0 vlib
This library and its drives are accessible through the Oracle Secure Backup media server and the embedded NDMP server.
• The following command configures an Oracle Secure Backup device object that is associated with virtual tape drive vdrive1, which is contained in the virtual library vlib.
mkdev --type tape --library vlib --dte 1
-attach osb_media_server:/dev/obt0,ndmp_media_server:/dev/nst0 vdrive1
This command must be repeated for each tape drive in the virtual tape library.
mkdev --type tape --library vlib --dte 2
-attach osb_media_server:/dev/obt1,ndmp_media_server:/dev/nst1 vdrive2
mkdev --type tape --library vlib --dte 3
-attach osb_media_server:/dev/obt2,ndmp_media_server:/dev/nst2 vdrive3
After configuring your devices, you will see the attached configured devices within the Oracle secure backup Configure Devices Tab as shown in Figure 29.
34 Configuring Oracle Secure Backup

Quantum DXi-Series: Backup Application Specific Path to Tape Configuration GuideDocument 6-67211-06 Rev A
January 2015
Figure 29 Configure Devices Tab
OSB implementation of NDMP tape copy does not require the physical tape drive to be dedicated to the VTL. User could configure a physical tape drive to be shared between VTL for direct tape copy and an OSB media server for backup/restore and traditional duplication operations.
Configuring ASG-Time Navigator
Configuring ASG-Time Navigator for Path to Tape consists of the following major steps:
Note: You must dedicate a partition within the DXi for use with Time Navigator. The partition cannot be shared with another backup application.
• Configuring the VTL in Time Navigator
• Configuring Time Navigator
• Running a Test Backup to the VTL
• Cloning Media from the VTL to the Physical Tape Library
Configuring the VTL in Time Navigator
To configure the VTL in Time Navigator:
Note: The DXi must be installed and configured and Fibre Channel connectivity established before completing this procedure.
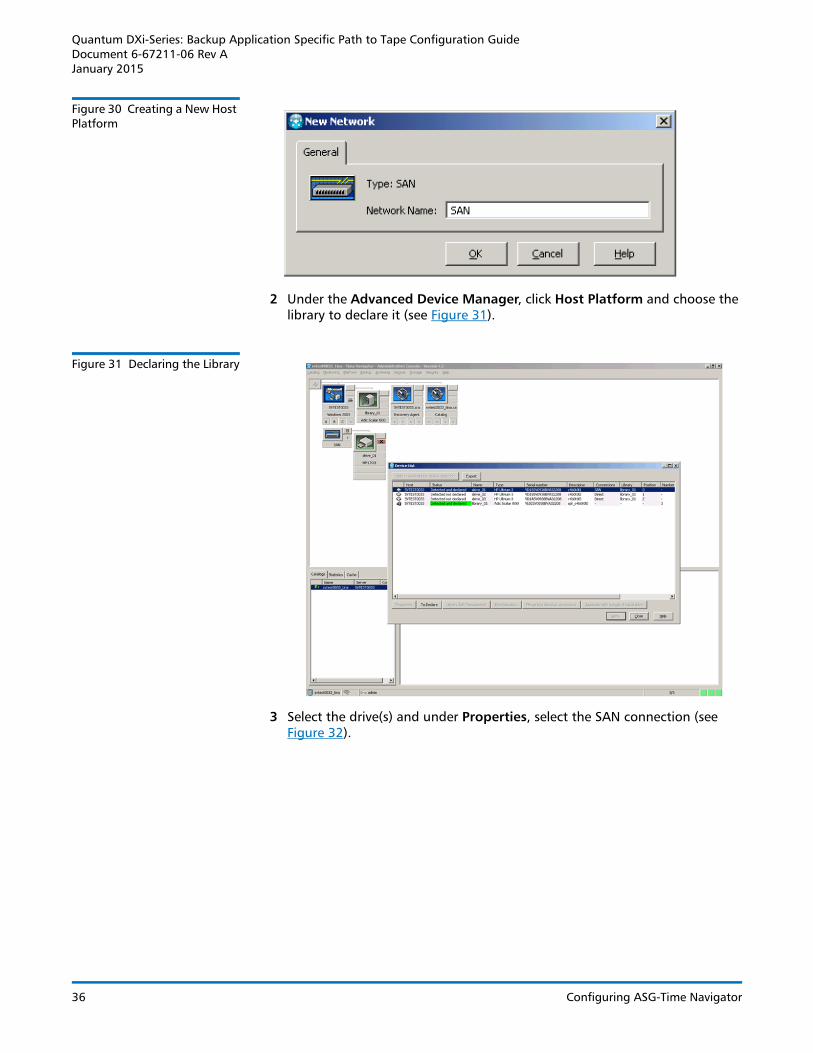
1 Click Host Platform and create a new platform of type Network (see Figure 30).
Configuring ASG-Time Navigator 35
Quantum DXi-Series: Backup Application Specific Path to Tape Configuration GuideDocument 6-67211-06 Rev AJanuary 2015
Figure 30 Creating a New Host Platform
2 Under the Advanced Device Manager, click Host Platform and choose the library to declare it (see Figure 31).
Figure 31 Declaring the Library
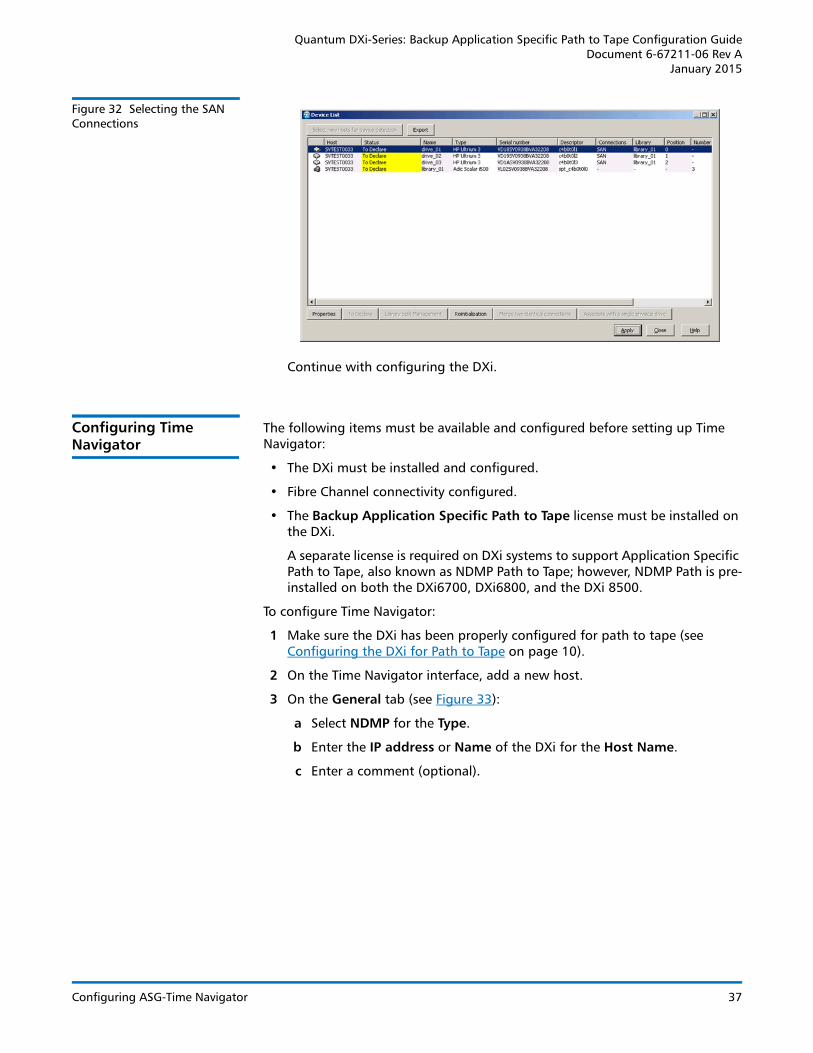
3 Select the drive(s) and under Properties, select the SAN connection (see Figure 32).
36 Configuring ASG-Time Navigator
Quantum DXi-Series: Backup Application Specific Path to Tape Configuration GuideDocument 6-67211-06 Rev A
January 2015
Figure 32 Selecting the SAN Connections
Continue with configuring the DXi.
Configuring Time Navigator
The following items must be available and configured before setting up Time Navigator:
• The DXi must be installed and configured.
• Fibre Channel connectivity configured.
• The Backup Application Specific Path to Tape license must be installed on the DXi.
A separate license is required on DXi systems to support Application Specific Path to Tape, also known as NDMP Path to Tape; however, NDMP Path is pre-installed on both the DXi6700, DXi6800, and the DXi 8500.
To configure Time Navigator:
1 Make sure the DXi has been properly configured for path to tape (see Configuring the DXi for Path to Tape on page 10).
2 On the Time Navigator interface, add a new host.
3 On the General tab (see Figure 33):
a Select NDMP for the Type.
b Enter the IP address or Name of the DXi for the Host Name.
c Enter a comment (optional).
Configuring ASG-Time Navigator 37

Quantum DXi-Series: Backup Application Specific Path to Tape Configuration GuideDocument 6-67211-06 Rev AJanuary 2015
Figure 33 Adding a NDMP Host in Time Navigator (General Tab)
4 On the Protocol tab (see Figure 34):
a Select 4.0 for Version.
b Enter the NDMP password that is used on the DXi GUI for the User.
Figure 34 Adding a NDMP Host in Time Navigator (Protocol Tab)
5 Click OK.
6 Now that the new NDMP host has been created, add a tape library to the host (see Figure 35).
a Enter the Device Descriptor. In the following example, the Device Descriptor is /dev/alias/mc/ADICATEMPO_NDMP.
Note: After the NDMP library is configured, you can find the device descriptor on the DXi GUI on the Configuration > PTT page. In the device descriptor, the initial part of the path will be /dev/alias/mc/ for a medium changer device and /dev/alias/nst/ for a tape device. The final part of the path (ADICATEMPO_NDMP in this example) is the device’s serial number, which is found in the Serial Number column on the PTT page.
b Enter the Library Name.
c Click OK.
38 Configuring ASG-Time Navigator

Quantum DXi-Series: Backup Application Specific Path to Tape Configuration GuideDocument 6-67211-06 Rev A
January 2015
Figure 35 Adding a Tape Library to the NDMP Host
7 Add the tape drives that are associated with the tape library. On the General tab (see Figure 36).
a Enter the Drive Name.
b Enter the Cartridge Life Cycle (use 500000).
c Enter the Device Descriptor.
Note: After the NDMP library is configured, you can find the device descriptor on the DXi GUI on the Configuration > PTT page. In the device descriptor, the initial part of the path will be /dev/alias/mc/ for a medium changer device and /dev/alias/nst/ for a tape device. The final part of the path is the device’s serial number, which is found in the Serial Number column on the PTT page.
Figure 36 Adding a Tape Drive to the Tape Library (General Tab)
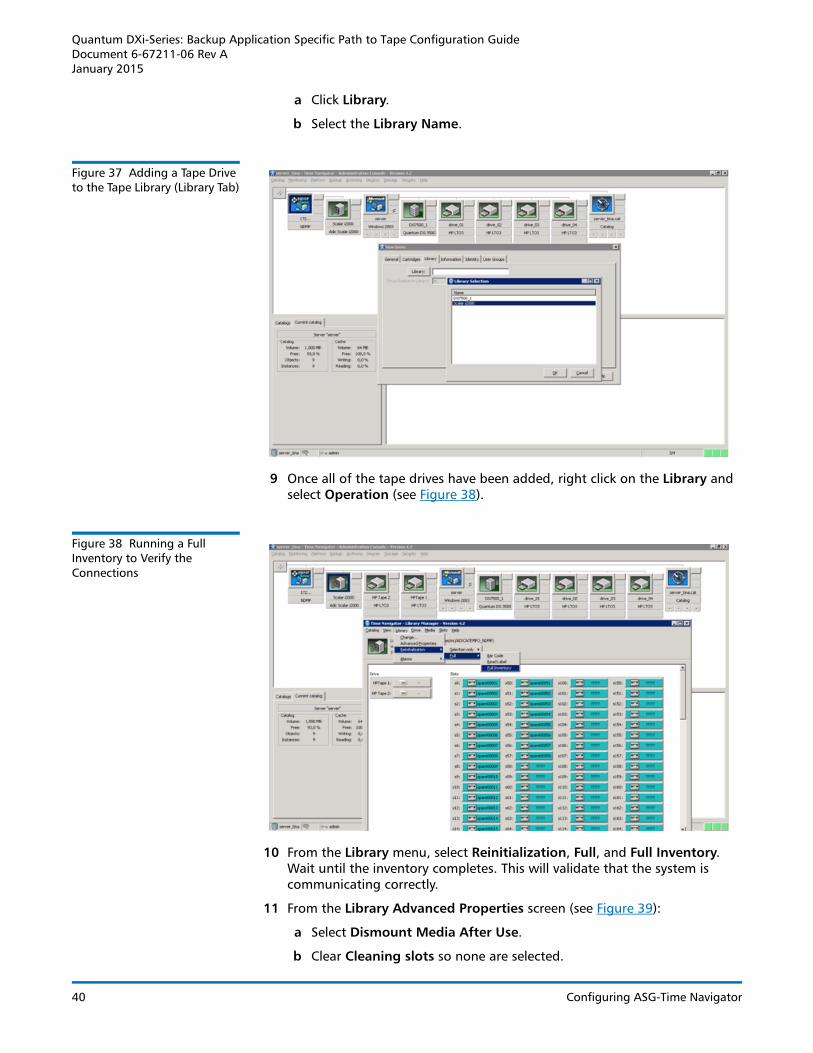
8 On the Library tab (see Figure 37).
Configuring ASG-Time Navigator 39
Quantum DXi-Series: Backup Application Specific Path to Tape Configuration GuideDocument 6-67211-06 Rev AJanuary 2015
a Click Library.
b Select the Library Name.
Figure 37 Adding a Tape Drive to the Tape Library (Library Tab)
9 Once all of the tape drives have been added, right click on the Library and select Operation (see Figure 38).
Figure 38 Running a Full Inventory to Verify the Connections
10 From the Library menu, select Reinitialization, Full, and Full Inventory. Wait until the inventory completes. This will validate that the system is communicating correctly.
11 From the Library Advanced Properties screen (see Figure 39):
a Select Dismount Media After Use.
b Clear Cleaning slots so none are selected.
40 Configuring ASG-Time Navigator

Quantum DXi-Series: Backup Application Specific Path to Tape Configuration GuideDocument 6-67211-06 Rev A
January 2015
Figure 39 Selecting Dismount Media After Use
12 Select the Host Platform and add a new platform of type Application. Select the NDMP application (see Figure 40).
Figure 40 Selecting the Application Host Platform
13 Configure the login credentials for the NDMP application properties (see Figure 41).
Configuring ASG-Time Navigator 41

Quantum DXi-Series: Backup Application Specific Path to Tape Configuration GuideDocument 6-67211-06 Rev AJanuary 2015
Figure 41 Configuring the Login Credentials
14 Add the following environment variable (see Figure 42).
Figure 42 Adding an Environment Variable
15 Verify the configuration by running a full inventory on the NDMP attached library.
16 Associate the NDMP drives with the Clone media pool under Media Management (see Figure 43).
42 Configuring ASG-Time Navigator

Quantum DXi-Series: Backup Application Specific Path to Tape Configuration GuideDocument 6-67211-06 Rev A
January 2015
Figure 43 Associating NDMP Drives with Clone Media Pool
17 Label the media in the NDMP attached library.
ASG-Time Navigator is ready for use.
Running a Test Backup to the VTL
To test the configuration, run a backup to the VTL. To run a backup using the Backup Wizard:
1 Launch the Backup Wizard in Time Navigator (see Figure 44).
Figure 44 Launching the Backup Wizard
2 Click Next.
3 Select the files to backup and set the other backup operations using the wizard. Click Finish to begin the backup.
Configuring ASG-Time Navigator 43

Quantum DXi-Series: Backup Application Specific Path to Tape Configuration GuideDocument 6-67211-06 Rev AJanuary 2015
Cloning Media from the VTL to the Physical Tape Library
To clone media from the VTL to the physical tape library:
1 Under Media Management (see Figure 45):
a Select the media pool where the DXi media is managed.
b Choose a tape and then select Duplicate.
c Select the Clone pool as the Media Pool selection.
Figure 45 Cloning Media from VTL to the Physical Tape LIbrary
2 Click Start to begin the replication.
44 Configuring ASG-Time Navigator


![DXi-Series Configuration and Best Practices Guide for Tivoli Storage Manager From IBM [BPG00014A]](https://img.pdfslide.net/doc/110x75/55cf9d59550346d033ad40bc/dxi-series-configuration-and-best-practices-guide-for-tivoli-storage-manager.jpg)