Embed Size (px)
Citation preview
Quick Guide – Creating a Connect@UPMC Account
© 2008 University of Pittsburgh Medical Center. All Rights Reserved 1 of 13
Quick Guide – Creating a Connect@UPMC
Account
Subject: Connect@UPMC Account Utility
Intent: Instructions for creating a Connect@UPMC account.

Quick Guide – Creating a Connect@UPMC Account
2 of 13 UPMC University of PittsburghMedical Center
Overview
The Identity Management System (IMS) online Account Request form enables UPMC managers
to submit online user account requests to the Information Security Group for specific UPMC
computer applications. Online Account Requests use a series of Web-based forms available on
the IMS Web site.
One of the accounts for which requests can be made is a Connect@UPMC account. With a
Connect@UPMC account, you can log into your UPMC network account from a computer that is
not your primary UPMC workstation. This will let you perform work-related functions remotely
such as checking e-mail or accessing data and applications.
In this Quick Guide, you will learn how to:
Register a New Connect@UPMC account
Log in to a Connect@UPMC Account after Initial Registration
Log in to Connect@UPMC from a Different PC

Quick Guide – Creating a Connect@UPMC Account
3 of 13 UPMC University of PittsburghMedical Center
Registering a New Connect@UPMC Account
If you do not have a Connect@UPMC account, you must register for a new account. To register
a new Connect@UPMC account, perform the following:
1. Go to the Connect@UPMC Web site (http://connect.upmc.com), and apply for
Connect@UPMC access.
a. To apply for an account, click the Request an account link and follow the application instructions.
b. After successful application, you will receive an IMS Activation Code via e-mail.
When you receive the IMS Activation Code, return to http://connect.upmc.com to
complete the registration process.
2. Type your UPMC Network Username and click Submit.

Quick Guide – Creating a Connect@UPMC Account
4 of 13 UPMC University of PittsburghMedical Center
3. Type your UPMC Network Username, UPMC Network Password, and IMS Activation
Code in the corresponding fields and click Submit.
4. Upon your initial login to Connect@UPMC, you must choose three Challenge
Questions and Responses. Remember your questions/responses. As an added
security measure, you will be asked to provide them when you attempt to log in to
Connect@UPMC from a computer the system does not recognize.
To select your three questions, click the drop-down boxes for the Challenge Question
fields and select a question for each. The choices are the same for all three fields, but
you may not select the same question multiple times. Type your answers to the
questions in the Challenge Answer fields, and click Submit.
Quick Guide – Creating a Connect@UPMC Account
5 of 13 UPMC University of PittsburghMedical Center
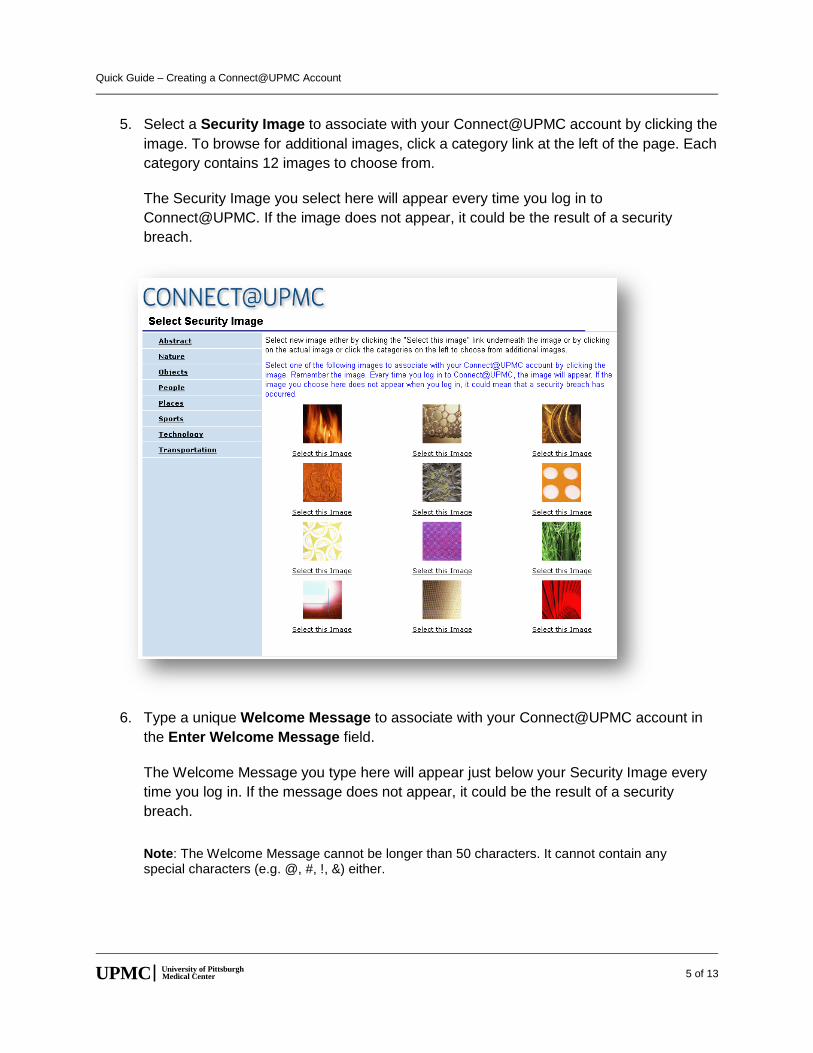
5. Select a Security Image to associate with your Connect@UPMC account by clicking the
image. To browse for additional images, click a category link at the left of the page. Each
category contains 12 images to choose from.
The Security Image you select here will appear every time you log in to
Connect@UPMC. If the image does not appear, it could be the result of a security
breach.
6. Type a unique Welcome Message to associate with your Connect@UPMC account in
the Enter Welcome Message field.
The Welcome Message you type here will appear just below your Security Image every
time you log in. If the message does not appear, it could be the result of a security
breach.
Note: The Welcome Message cannot be longer than 50 characters. It cannot contain any special characters (e.g. @, #, !, &) either.
Quick Guide – Creating a Connect@UPMC Account
6 of 13 UPMC University of PittsburghMedical Center
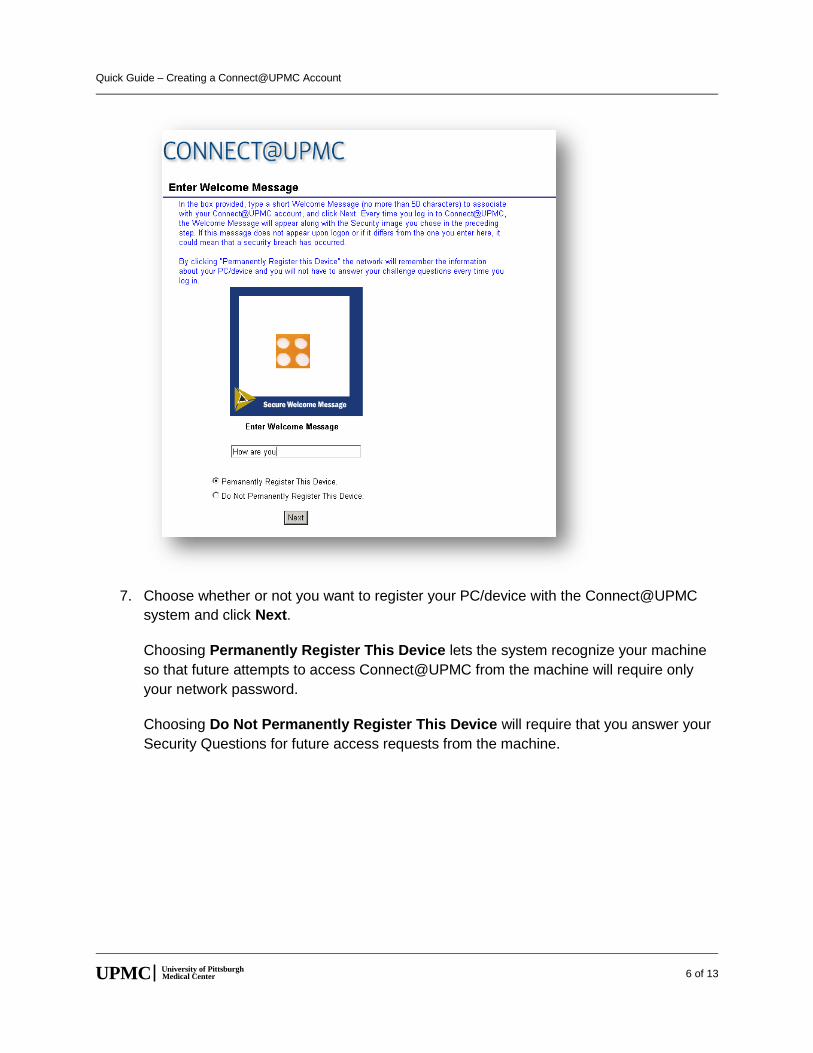
7. Choose whether or not you want to register your PC/device with the Connect@UPMC
system and click Next.
Choosing Permanently Register This Device lets the system recognize your machine
so that future attempts to access Connect@UPMC from the machine will require only
your network password.
Choosing Do Not Permanently Register This Device will require that you answer your
Security Questions for future access requests from the machine.

Quick Guide – Creating a Connect@UPMC Account
7 of 13 UPMC University of PittsburghMedical Center
8. You will be delivered to the Connect@UPMC applications page. The applications you
have access to will be located in the Applications box in the left window of the screen.
Quick Guide – Creating a Connect@UPMC Account
8 of 13 UPMC University of PittsburghMedical Center
Logging in to a Connect@UPMC Account after
Initial Registration
If you already have a Connect@UPMC account and are using a machine that you registered
with the system, you can log into your account by performing the following steps:
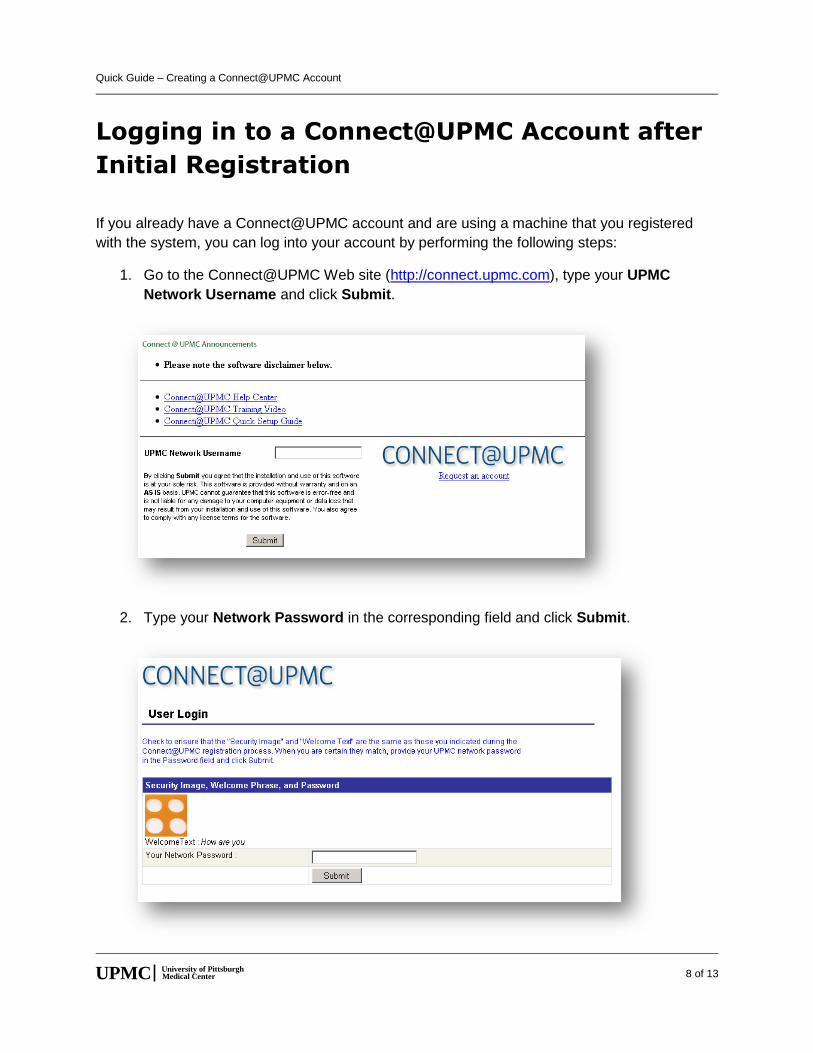
1. Go to the Connect@UPMC Web site (http://connect.upmc.com), type your UPMC
Network Username and click Submit.
2. Type your Network Password in the corresponding field and click Submit.
Quick Guide – Creating a Connect@UPMC Account
9 of 13 UPMC University of PittsburghMedical Center
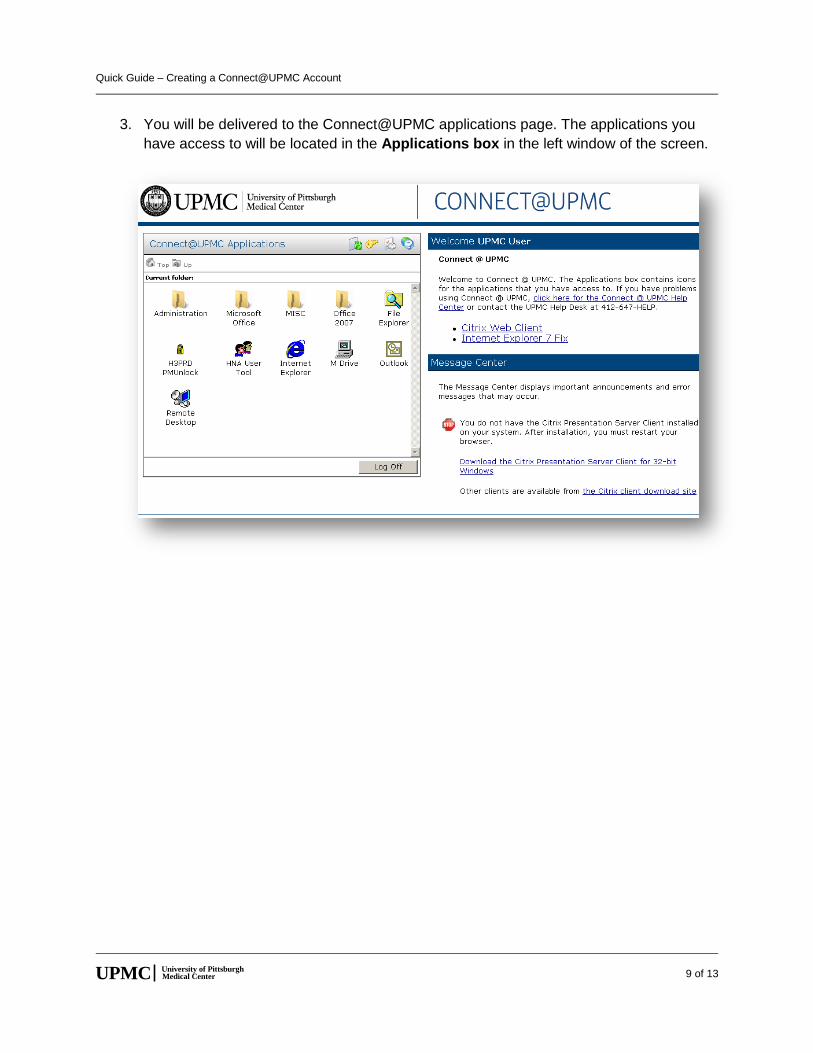
3. You will be delivered to the Connect@UPMC applications page. The applications you
have access to will be located in the Applications box in the left window of the screen.
Quick Guide – Creating a Connect@UPMC Account
10 of 13 UPMC University of PittsburghMedical Center
Logging in to Connect@UPMC from a Different
PC
If you already have a Connect@UPMC account, but are logging in from a machine that you
have never used to access Connect@UPMC, you will be required to answer the Security
Questions you chose during registration. This is an added security function performed by the
Connect@UPMC system when it receives log in requests from an unrecognized machines.
You will still be able to log in, but two extra steps are added to the process:
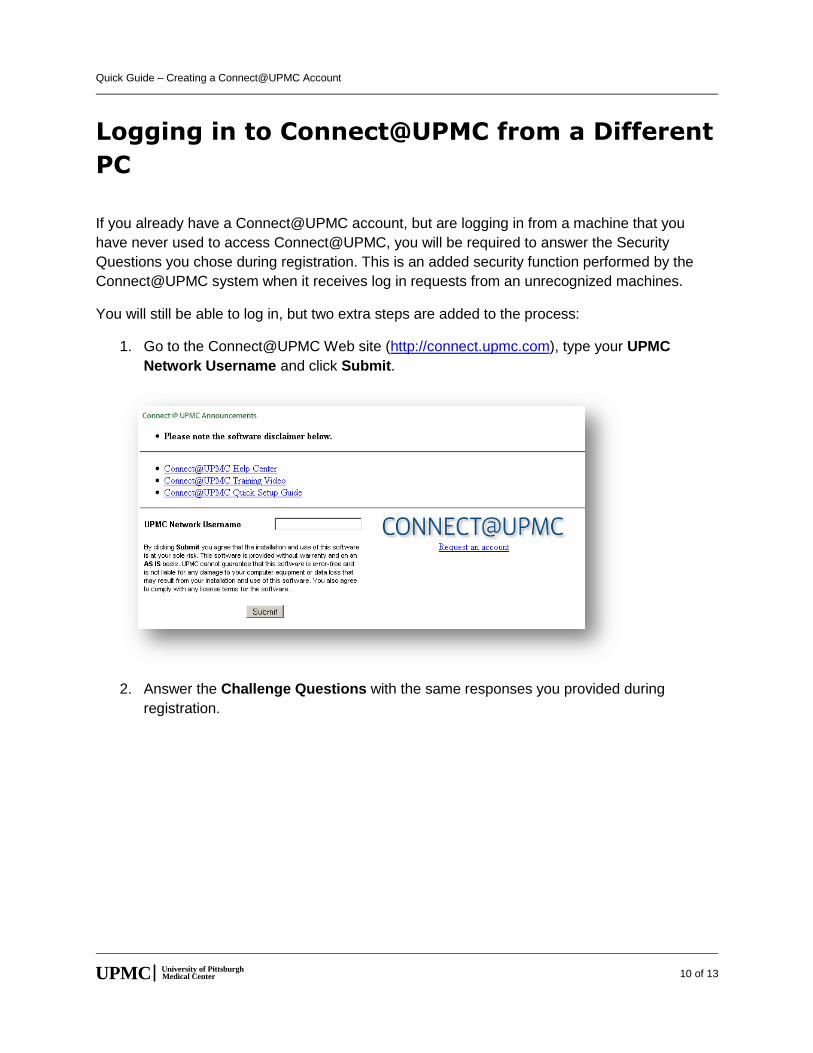
1. Go to the Connect@UPMC Web site (http://connect.upmc.com), type your UPMC
Network Username and click Submit.
2. Answer the Challenge Questions with the same responses you provided during
registration.
Quick Guide – Creating a Connect@UPMC Account
11 of 13 UPMC University of PittsburghMedical Center
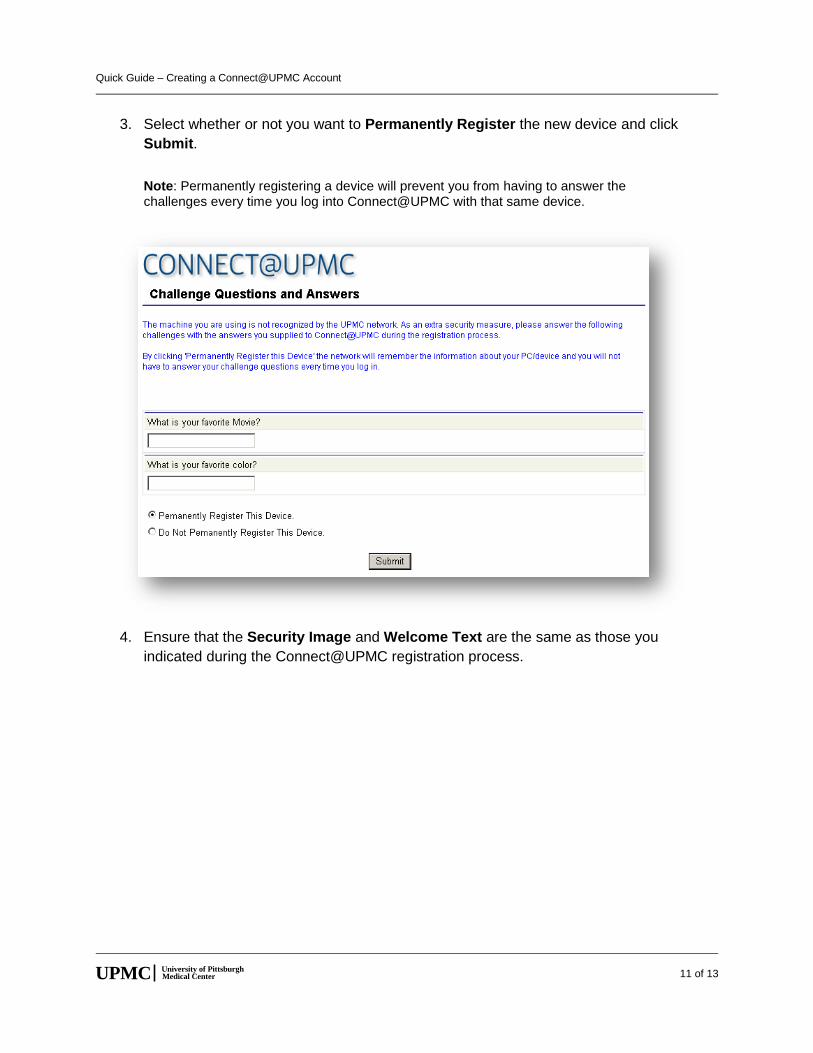
3. Select whether or not you want to Permanently Register the new device and click
Submit.
Note: Permanently registering a device will prevent you from having to answer the challenges every time you log into Connect@UPMC with that same device.
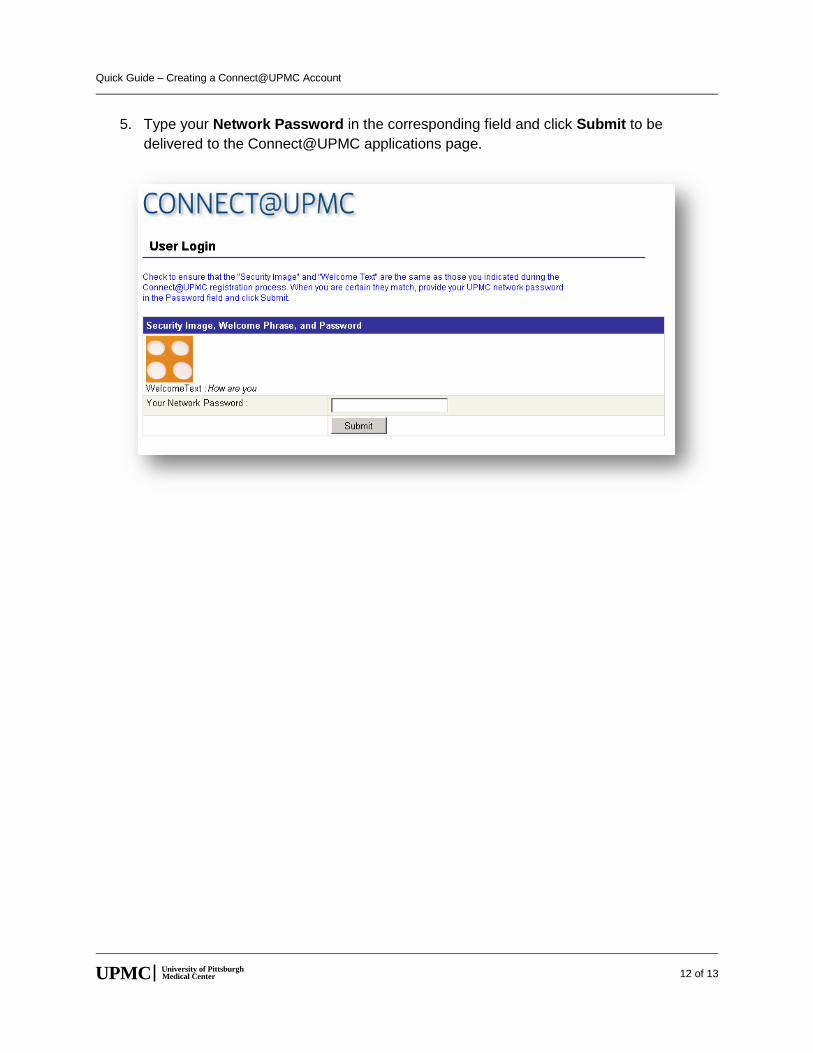
4. Ensure that the Security Image and Welcome Text are the same as those you
indicated during the Connect@UPMC registration process.
Quick Guide – Creating a Connect@UPMC Account
12 of 13 UPMC University of PittsburghMedical Center
5. Type your Network Password in the corresponding field and click Submit to be
delivered to the Connect@UPMC applications page.
Quick Guide – Creating a Connect@UPMC Account
13 of 13 UPMC University of PittsburghMedical Center
Additional Help
For further help, please e-mail your request to [email protected]. An IMS representative will
contact you within one business day.
Document Information
Subject: IMS Account Request Utility
Title: Quick Guide – Creating a Connect@UPMC Account
Date/Revision: 05/03/2010; Rev: 2.0
Audience: Connect@UPMC users.
Intent: Instructions for creating a Connect@UPMC account.