Embed Size (px)
Citation preview
Quick Guide Manual
Before Operation, please read entire Manual thoroughly and retain for future reference.
opticum_axodin_manual_rev08.indd 1 2013-11-13 08:43:11

QUICK GUIDE MANUAL
QUICK START1. First time instalation using wizard1.1. Please press OK if you can see this screen on your TV (if not – select a different input).
1.2. Video mode selection. 1.3. Language selection.
1.4 Set up basic features. 1.5 Set up tuner – simply choose the automatic option.
opticum_axodin_manual_rev08.indd 2 2013-11-13 08:43:12

QUICK GUIDE MANUAL
The tuner automatically finds the satellite itself.
1.6. Service searching. After a few minutes (depending on the amount of scanned satellites) should be completed.
1.7 We can now set a parental lock.
For example – there was found HB 13E and Astra 19,2E.
Another way is to select manual settings - of course we need to know the name of the satellite.
opticum_axodin_manual_rev08.indd 3 2013-11-13 08:43:12

QUICK GUIDE MANUAL
1.8. The last step – Network Wizard. You can use DHCP option. Some network we have to enter parameters manual – it depends on the operator.
Now we finish the Wizard and we can enjoy watching TV.
2.2. Volume ControlYou can adjust the audio volume by pressing VOL+/- key. You can also mute or unmute the audio by pressing MUTE key.
2. Basic operations2.1. Switching channels.
CHANNEL +/- key Press to move to next channel. There are various channel zapping methods.
Press / key – if you choose this option – will call up the Channel Selection Menu.
Press CH+/CH – if you use this option – will call up the Channel Selection Menu.
Press / – if you use this option you – go to the previous or next channel
opticum_axodin_manual_rev08.indd 4 2013-11-13 08:43:12

QUICK GUIDE MANUAL
2.3. Selecting Audio TrackYou can choose what audio tracks are available to choose by pressing AUDIO key. By using UP/DOWN key and COLOR key, you can select a different audio language or Stereo sound.
NOTE: Available option in this menu will defer depending on the service.
2. 4. SubtitleYou can see subtitle of the current program if the program provides the subtitle. Press SUBT key and Subtitle Selection menu appears as below.
2. 5. TeletextYou can call up Teletext information by pressing TTX key. It will take some time to load all the information.
opticum_axodin_manual_rev08.indd 5 2013-11-13 08:43:12

QUICK GUIDE MANUAL
2. 6. Program Information (Infobar)Whenever you change the channel, infobar is always displayed for 5 seconds (default setting). Infobar is designed to provide you comprehensive information of the channel that you currently watching. Press OK to call up infobar.
2. 7. Channel List (Channel Selection Menu) Press UP/DOWN or CH+/CH- key,this will active Channel Selection Menu as below.
GREEN displays the list of satellites scanned. Per each satellite, channels are arranged according to Services, Provider and New.
YELLOW displays the list od providers.BLUE displays the list of your favorite channels. In order of you to add certain channels to this Favourites list.
Four types of the channel lists are available to help you manage your channel selection. RED displays the list of all scanned channels
opticum_axodin_manual_rev08.indd 6 2013-11-13 08:43:13

QUICK GUIDE MANUAL
1. Call up the Channel Selection list by Pressing UP or DOWN key.
2. Go to All list by pressing RED key. 3. Select the channel that you want to add to the Favourites list.
4. Press MENU key on the selected channel and thefollowing menu appears.
5. Choose ‘add service to bouquet’ and press OK.
6. Go to the Favourites list by pressing BLUE key toconfirm that the selected channel is correctly included in thelist. 7. Electronic Program Guide - (Eventview)Press EPG.
The Electronic Program Guide (EPG) displays the program information of each channel, if provided, in time anddate order. You can view the detailed program information by pressing GUIDE key and the menu, Eventview appears.Detailed information of the current channel will be displayed on EPG. On this menu, three options are provided.
opticum_axodin_manual_rev08.indd 7 2013-11-13 08:43:13

QUICK GUIDE MANUAL
(A) Safety Instructions
This product should not be disposed with other house hold wastes at the end of its working life. Please separate
this from other types of wastes and recycle it responsibly to promote the sustainable reuse of material resources.
This will help prevent harm to the environment or human health from uncontrolled waste disposal.
● This product operates only in the range of AC 100V~250V and 50Hz/60Hz.
Please check first your power supply to see if it fits this range.
Please be noted that you need to disconnect from the mains before you start any
maintenance or installation procedures.
● Make sure that the power cord is placed in a position where it is easy to unplug it from
the mains in an emergency.
● Do not overload a wall outlet, extension cord or adapter as this may cause electrical
fire or shock.
● This product is not water-proof and should not be exposed to dripping, splashing,
or any type of liquid.
● No objects filled with liquid such as base shall be placed on the product.
● Please do not clean the product with wet cloth, which may cause a short circuit.
● No wet objects should be placed near the product.
● Disconnect the power of the product before you connect the satellite cable
to the product. Otherwise, it may cause damage to the LNB.
● The LNB must be earthed to the system earth for the satellite dish.
● Unplug the product and disconnect the antenna cable during a thunderstorm
or lightening, especially when left unattended and unused for a long period of time.
This will prevent possible damages from power surges or lightening
● Place the product indoor.
● Do not expose the product to rain, sun or lightening.
● Do not place the product near any heat appliances as a radiator.
● Ensure that there is more than 10 cm distance from any electrical devices & wall.
opticum_axodin_manual_rev08.indd 8 2013-11-13 08:43:13

QUICK GUIDE MANUAL
(B) Packing Contents
(C) Product Descriptions
Please check all package contents before using your product.
● Set Top Box
● Remote Control
● Batteries
● HDMI cable (Optional)
● D/C Power Adaptor
● User Manual
Buttons: Standby
Navigation Keys: Press to navigate up/down and left/right
USB: Connects the USB memory stick or external HDD
Smartcard reader slot: One smartcard slots are provided.
Insert smartcard with the IC chip pointing down.
Front Panel
2 3 41
1
2
3
4
opticum_axodin_manual_rev08.indd 9 2013-11-13 08:43:24

QUICK GUIDE MANUAL
Rear Panel
1 2 3 4
5 84
6 7 9
ON : Powers On/Off
DC-IN: Connects the detachable D/C power adapter.
LNB-IN : One satellite cable can be connected
Audio output : Connects to TV using RCA cable
Video output : Connects to TV using RCA cable
COAXIAL : Connects to a digital audio system using S/PDIF cable
HDMI : Connects to TV using a HDMI cable for both audio and video signals
Ethernet : Connects the set top box to network
USB : Connects the USB memory stick or external HDD
(D) Remote Control
1
5
2
6
3
7
4
8
9
2
1
43
8 7 11 1315
1620
22
24 2827
32 34
33
19
21 23
25
26
29
3031 35
36
17
18
1412
109
65
opticum_axodin_manual_rev08.indd 10 2013-11-13 08:43:29
QUICK GUIDE MANUAL
Power : To switch the receiver in and out of stand-by mode.
Mute : Mutes the audio.
V/RADIO : Switches between TV and radio.
HD : Set the HDMI mode - optional.
V SIZE : Switches Display Format.
PORTAL : Press go to the Portal Menu – optional.
AUDIO : Press to select available audio language and audio type.
SUBT : Press to display the subtitle of the current channel if provided.
TXT : Press to display the teletext information of the current channel if provided.
Numeric Keys : Enters a service number for service change
or to specify values for menu options
FAV : Display favourites channels – optional.
SAT : Select satellite – optional.
Menu : To enter to the main menu or to move to previous menu.
i : Show the information box of the current program.
^: Navigates up on the menu options and use to call up channel list.
< : Navigates left on the menu options and use to call up channel list.
OK : Confirms the selected menu option.
> : Navigates right on the menu options and use to call up channel list.
: Navigates down on the menu and use to call up channel list.
Exit : Exits the current menu option into the live mode, or switches one step back
of the menu.
EPG : Display the Electronic Program Guide information if provided.
LIST : Display the list of recordings stored on the internal HDD if any – optional.
CH+/- : Navigates through the scanned channel list.
VOL +/- : Adjusts the audio volume.
Recall : One step backword.
Playback keys.
OPT+ : optional.
Sleep : optional.
: optional.
DELAY : optional.
Color keys : Each key is assigned a specific function that maybe different in each
menu.
TIMER: optional.
MEDIA : optional.
REC LIST : optional.
PAGE UP : Move the channel list in pages.
PAGE Down: Move the channel list in pages.
1
10
17
12
20
19
15
22
26
11
18
14
21
25
13
16
23
27
5
2
6
3
7
4
8
9
24
28
31
29
32
34
30
33
35
36
←
opticum_axodin_manual_rev08.indd 11 2013-11-13 08:43:29
QUICK GUIDE MANUAL
(E) Main Features
● 500MHz DMIPS Processor
● Linux Operating System
● Media Player
● Downloadable Plug-ins supported
● 1 x Smartcard Reader
● MPEG2/H.264 Hardware Decoding
● 1 x DVB-S2 Tuner
● Status Indicator
● 256MB NAND Flash/512MB DDR Memory
● 10/100MB Ethernet Interface
● 2 x USB 2.0
● HDMI
● Composite Video
● EPG supported
● Automatic & Manual Service Scan supported
● Multiple LNB control (DiSEqC) supported
● Skin change supported
● Power Supply by External SMPS
(F) Installation of Set Box
This chapter will guide you through the whole installation process of Set Top Box. Please read each section carefully to make sure
that the system runs properly
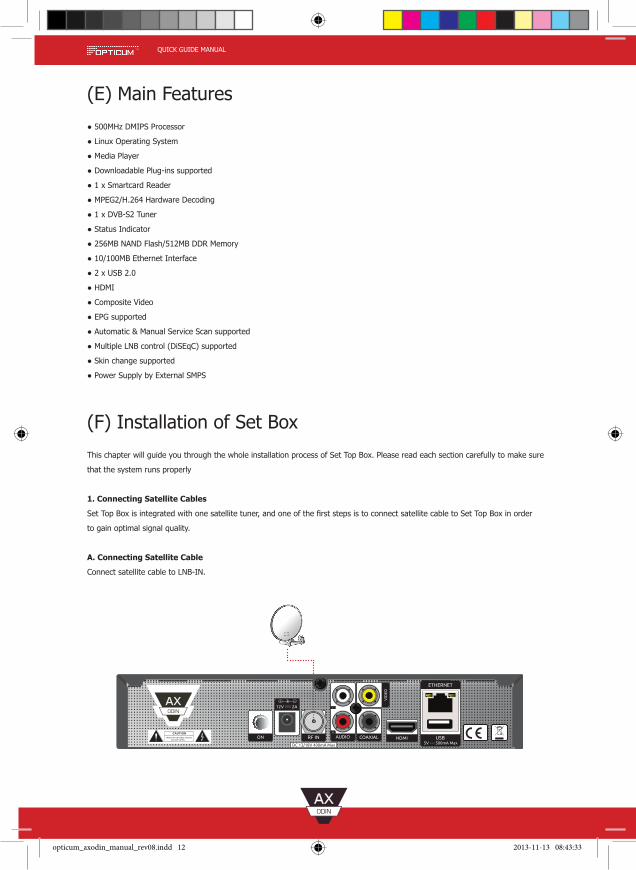
1. Connecting Satellite Cables
Set Top Box is integrated with one satellite tuner, and one of the first steps is to connect satellite cable to Set Top Box in order
to gain optimal signal quality.
A. Connecting Satellite Cable
Connect satellite cable to LNB-IN.
opticum_axodin_manual_rev08.indd 12 2013-11-13 08:43:33

QUICK GUIDE MANUAL
2. Connecting the TV
Set Top Box provides a variety of audio/video connection methods.
A. Connecting TV via HDMI Cable
For the sake of the best picture quality, especially for digital TV, HDMI connection is recommended. Most HDTVs have HDMI
connectors to ensure the highest picture quality. In the rear panel of Set Top Box one HDMI connector is available for this purpose.
Connect your TV to Set Top Box using a HDMI cable as follows.
B. Connecting TV via A/V cable
This secondly recommended TV connection for TV is via Composite cable. Set top box provides Composite video has normally
three connectors at the both end; one Video (Yellow) and two Audio (White / Red). Connect your TV to Set top box as follows.
opticum_axodin_manual_rev08.indd 13 2013-11-13 08:43:39

QUICK GUIDE MANUAL
3. Power ON/OFF
[ : Press or Press ‘Standby/Reset’]
There are several ways to turn your Set Top Box ON or OFF
● Complete Power Shutdown
There is a Power Switch in the rear panel and once it is ON, you do not need to turn
it on or off each time.
It takes a longer time to boot the system if you turned it off by this switch.
● Standby Mode
POWER key is normally used to turn the power of Set Top Box on or off.
If you press POWER,
it instantly switches your Set Top Box off or on. In this mode, the system is not completely
shutdown and thus it takes a shorter time to turn it on and off.
● Deep Standby Mode
Deep Standby is used to reduce the standby power consumption.
Set Top Box is designed to be energy efficient and to guarantee the power consumption
to be under 1W in the deep standby mode
opticum_axodin_manual_rev08.indd 14 2013-11-13 08:43:40

Schnell Start Anleitung
Vor Inbetriebnahme lesen Sie das Manuel bitte ganz durch und bewahren Sie es gut auf um zukünftig nachzuschlagen.
opticum_axodin_manual_rev08.indd 15 2013-11-13 08:43:40

QUICK GUIDE MANUAL
Erstinstallation1. Verwendung des Assistenden1.1. Bitte drücken Sie OK, wenn Sie diesen Bildschirm auf Ihrem TV sehen können (wenn nicht - wählen Sie einen anderen Eingang).
1.2. Auswahl Videomodus. 1.3. Sprachauswahl.
1.4. Einrichten Basis Installation. 1.5. Tunereinstellungen – Wählen sie Automatisch.
opticum_axodin_manual_rev08.indd 16 2013-11-13 08:43:41

QUICK GUIDE MANUAL
Der Tuner findet automatisch die Satelliten.
1.6. Satellitensuchlauf sollte nach ein paar Minuten abgeschlossen sein, abhängig von den gescannten Satelliten.
1.7 Einstellung Kindersicherung.
Zum Beispiel – gefunden wurde HB 13E und Astra 19,2E
Ein anderer Weg ist die manuelle Einstellung – Hier sollten sie den Namen des Satelliten wissen.
opticum_axodin_manual_rev08.indd 17 2013-11-13 08:43:41

QUICK GUIDE MANUAL
1.8. Letzter Schritt – Netzwerk Assistent. Wählen sie DHCP. In einigen Netzwerken muss dies manuell eingestellt werden, abhängig vom Netzwerk.
Jetzt können sie den Assistenten beenden und ihr TV Programm ansehen.
2.2. Lautstärke regulierenSie können die Lautstärke durch Drücken der Taste VOL+/- verändern. Ton Stumm schalten können sie durch Drücken der MUTE Taste.
2. Grundlegende Bedienung2.1. Kanäle umschalten.
Kanal +/- Taste drücken um zum nächsten Kanal zu schalten. Es gibt verschiedene Umschaltmethoden.
Drücke / Taste – Wenn sie diese Option wählen –Rufen sie das Menü Kanal umschalten auf.
Drücken CH+/CH- - Wenn sie diese Option wählen –Rufen sie das Menü Kanal umschalten auf.
Drücke / - Wenn sie diese Option wählen-Gelangen sie zum nächsten oder vorherigen Kanal
opticum_axodin_manual_rev08.indd 18 2013-11-13 08:43:42
QUICK GUIDE MANUAL
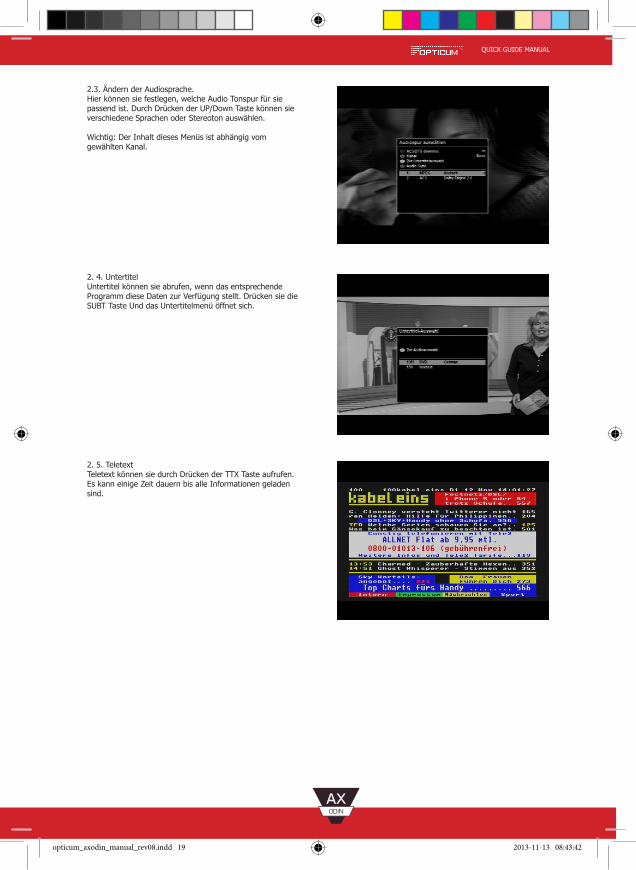
2.3. Ändern der Audiosprache.Hier können sie festlegen, welche Audio Tonspur für sie passend ist. Durch Drücken der UP/Down Taste können sie verschiedene Sprachen oder Stereoton auswählen.
Wichtig: Der Inhalt dieses Menüs ist abhängig vom gewählten Kanal.
2. 4. UntertitelUntertitel können sie abrufen, wenn das entsprechende Programm diese Daten zur Verfügung stellt. Drücken sie die SUBT Taste Und das Untertitelmenü öffnet sich.
2. 5. TeletextTeletext können sie durch Drücken der TTX Taste aufrufen. Es kann einige Zeit dauern bis alle Informationen geladen sind.
opticum_axodin_manual_rev08.indd 19 2013-11-13 08:43:42

QUICK GUIDE MANUAL
2. 6. Programm Information (Infobar) Die Infobar erscheint beim Programmwechsel und zeigt Ihnen die folgenden Informationen an. DurchDrücken der OK - Taste lässt sie sich jederzeit anzeigen.
2. 7. Kanal-Liste Drücken sie UP/DOWN oder CH+/CH- Taste,Um das Kanal Menü aufzurufen. Ihnen beim Managen der Kanäle hilft.
Grün Zeigt die gescannten Satelliten. Rot zeigt die gescannten Sender an.
Rot zeigt die gescannten Sender an. Blau zeigt ihnen die Favoritenliste, die sie beim Bearbeiten der Kanäle anlegen können.
Hier können sie vier Typen der Listen auswählen, die ihnen beim Managen der Liste hilft.
opticum_axodin_manual_rev08.indd 20 2013-11-13 08:43:43

QUICK GUIDE MANUAL
1. Rufen Sie die Kanal Auswahlliste durch Drücken der Up - oder Down –Taste auf.
2. Gehen sie zu Alle mit der roten Taste. 3. Wählen sie den Kanal aus, den sie in die Favoritenliste hinzufügen wollen.
4. Drücken sie Menü für folgende Optionen.
5. Wählen Sie “Zu Bouquet hinzufügen” und drücken Sie OK.
6. Gehen sie zur Favoritenliste und drücken sie die blaue Taste um den ausgewählten Kanal hinzuzufügen. 7. Electronic Program Guide - (Eventview)
Der Electronic Program Guide (EPG) (zu deutsch elektronischer Programmführer) zeigt Ihnen ähnlich einer Fernsehzeitschrift, Informationen zum Fernsehprogramm an. Durch Drücken der GUIDE Taste erhalten sie Programminformationen. Drücken sie nun die Menütaste erhalten sie ausführliche Informationen zur Sendung.
opticum_axodin_manual_rev08.indd 21 2013-11-13 08:43:43

QUICK GUIDE MANUAL
(A) Sicherheitshinweise
Dieses Gerät soll nach Gebrauchsende nicht mit dem Hausmüll entsorgt werden. Bitte trennen Sie dieses
entsprechend von anderen Abfällen, um eine Belastung der Umwelt zu vermeiden, eine Wiederverwendung von
wertvollen Materialien sicherzustellen.
● Dieses Produkt funktioniert nur in den Bereichen AC100V-250V und 50Hz/60Hz.
● Das Gerät muss vom Netz getrennt werden, bevor eventuelle Wartungen oder Installationen vorgenommen werden.
● Stellen Sie sicher, dass der Netzstecker das Anschlusskabel in Notsituationen schnell vom Netz getrennt werden kann.
● Stellen Sie sicher, dass Steckdosen, Verlängerungskabel, etc., nicht überlastet werden, dies kann zu einem Brand
und/oder Kurzschluss führen.
● Dieses Produkt ist nicht wassergeschützt und soll nicht Tropf- und Spritzwasser oder jeglicher anderer Flüssigkeit ausgesetzt
werden.
● Stellen Sie keine Vasen oder andere mit Flüssigkeit gefüllten Behälter auf das Gerät.
● Bitte reinigen Sie das Gerät nicht mit einem nassen Tuch, dieses kann einen Kurzschluss hervorrufen.
● Stellen Sie in die Nähe des Gerätes keine Behältnisse mit Flüssigkeiten.
● Trenne Sie das Gerät vom Netz bevor Sie das Satellitenkabel anschliessen. Ansonsten ist eine Beschädigung des LNB nicht
ausgeschlossen.
● LNB/Satellitenantenne müssen nach den gültigen Vorschriften geerdet sein.
● Trennen Sie das Gerät vom, Antennenkabel während eines Sturmes oder Gewitters, vor allem wenn das Gerät für einen längere
Zeit unbeaufsichtigt ist. Dieses schützt vor möglichen Schäden durch Blitz und/oder Überspannungen.
● Das Gerät ist im Haus aufzustellen.
● Das Gerät nicht Regen, Sonne oder Gewittern aussetzen
● Das Gerät nicht in der Nähe von Hitzequellen, z.B. Heizungen aufstellen.
opticum_axodin_manual_rev08.indd 22 2013-11-13 08:43:44

QUICK GUIDE MANUAL
(B) Packing Contents
(C) Produktbeschreibung
Bitte überprüfen Sie die Vollständigkeit des Lieferumfanges:
● Receiver
● Fernbedienung
● Batterien
● HDMI Kabel (Optional)
● A/C Adapter
● Schnell Start Anleitung
Taste: Power AN/Aus
Tasten: Zum Navigieren Hoch/Runter und links/rechts
USB: Verbindet USB Stick oder externe Festplatten
Smartcard Einschub: Ein Smartcard Slot ist vorhanden
Vorderseite
2 3 41
1
2
3
4
opticum_axodin_manual_rev08.indd 23 2013-11-13 08:43:51

QUICK GUIDE MANUAL
Rear Panel
1 2 3 4
5 84
6 7 9
ON : Netzschalter
DC-IN: Verbindet extern D/C Netzadapter.
LNB-IN : Anschluss des Satelliten Antennen Kabels
Audio Ausgang : Verbindet TV über RCA Kabel
Video Ausgang : Verbindet TV über RCA Kabel
COAXIAL : Anschluss eines Dolby Digital Verstärkers über ein S/PDIF Kabel
HDMI : Verbindet TV mit einem HDMI Kabel für Audio und Video Signal
Ethernet : Verbindet PC oder andere STB mit AX ODIN
USB : Verbindet USB Stick oder externe Festplatte
(D) Fernbedienung
1
5
2
6
3
7
4
8
9
2
1
43
8 7 11 1315
1620
22
24 2827
32 34
33
19
21 23
25
26
29
3031 35
36
17
18
1412
109
65
opticum_axodin_manual_rev08.indd 24 2013-11-13 08:43:56

QUICK GUIDE MANUAL
Power : Ein/Aus – Standy Modus
Mute : Stummschaltung
TV/RADIO : Schalten zwischen TV und Radio
HD. Taste :Einstellen des HDMI Bildmodus
V SIZE : Formatumschaltung.
PORTAL : Zeigt den Inhalt vom TV Portal Service an– optional.
AUDIO : Zeigt die auswählbare Audio Option an (z.B. AC3, Stereo)
SUBT :Zeigt, falls angeboten, Untertitel des aktuellen Programmes an.
Informationen des aktuellen Senders, wenn angeboten.
Zifferntasten : Zifferntasten zur Direkteingabe
FAV : Anzeige FAV Liste – optional.
SAT : Auswahl Satellit – optional.
Menu : Hauptmenü
i : Zeigt die Informationsbox an.
^: Navigiert auf in den Menüoptionen
< : Navigiert nach links in den Menüoptionen
OK : Bestätigen von Menüinhalten.
> : Navigiert nach rechts in den Menüoptionen.
: Navigiert ab in den Menüoptionen
Exit : Menü gänzlich verlassen, oder nur einen Schritt im Menü zurückgehen
EPG : Electronic Program Guide zeigt Informationen zum Programm.
LIST : Zeigt Liste der Aufzeichnungen – optional.
CH+/-: Zwischen den Sendern blättern.
VOL +/- : Lautstärkeregelung
Recall : Zurück zum letzten Kanal.
REC Aufnahmetaste.
OPT+ : optional.
Sleep : optional.
: optional.
DELAY : optional.
Farbige Tasten : Jede Taste übernimmt eine bestimmte, je nach Menü unter-
schiedliche Funktion
TIMER: Sleep Timer Einstellung (optional)
MEDIA : optional.
Playlist : Zeigt Senderliste während der aktuellen Wiedergabe. (optional)
Seite hoch : Bewegen der Kanallisten auf Seiten
Seite runter: Bewegen der Kanallisten auf Seiten
1
10
17
12
20
19
15
22
26
11
18
14
21
25
13
16
23
27
5
2
6
3
7
4
8
9
24
28
31
29
32
34
30
33
35
36
opticum_axodin_manual_rev08.indd 25 2013-11-13 08:43:56

QUICK GUIDE MANUAL
(E) Hauptfunktionen● 500MHz MIPS Prozessor● Linux Operating System● Media Player● Plug-ins herunterladbar● 1 x Smartcard Reader● MPEG2/H.264 Hardware Decoding● 1 x DVB-S2 Tuner● Status Indikator● 128MB NAND Flash/512MB DDR Memory● 10/100MB Ethernet Interface● 2 x USB 2.0● HDMI● S/PDIF für digitalen bit stream out (optional)● EPG unterstützt● Automatic & Manual Service Scan unterstützt● Multiple LNB control (DiSEqC) unterstützt● Oberflächenwechsel (skin) unterstützt● Netzversorgung durch externes Netzteil und Netzschalter● OSD 3D● RCA● Sleep Timer● Composite Video (RGB)● Schnelle und einfache Installation und benutzerfreundliche Bedienungsanleitung
● Wenig Stromverbrauch
(F) Installation des AX ODIN
Dieses Kapitel wird Sie durch den gesamten Installationsprozess des Receivers führen.
Bitte lesen Sie jedes Kapitel sorgfältig, damit das System dann auch einwandfrei funktioniert.
1. Anschluss Satellitenkabel
Der Receiver ist ausgestattet mit einem Satellitentuner, und einer der ersten Schritte ist, die Verbindung mit dem Satellitenkabel,
dass eine optimale Signalqualität erreicht wird.
A. Verbindung mit dem Satellitenkabel
Satellitenkabel an LNB-IN.
opticum_axodin_manual_rev08.indd 26 2013-11-13 08:44:00

QUICK GUIDE MANUAL
2. Anschluss TV
Der Receiver bietet unterschiedliche Anschlussmöglichkeiten für Audio/Video
A. Anschluss TV über HDMI Kabel
Um beste Bildqualität zu erreichen, besonders für Digital TV, wird ein HDMI Anschluss empfohlen. Die gängigen HDTVs haben
HDMI Anschlüsse für hohe Bildansprüche. An der Rückseite des Receivers ist ein solcher Anschluss verfügbar. Verbinden Sie TV
und Receiver mit einem HDMI Kabel wie folgt.
B. Anschluss TV über RCA (Video) Kabel
Der Receiver verfügt ebenso über Composite Video Anschlüsse. Das Composite Kabel hat normalerweise drei Anschlüsse an beiden
Enden; Video (gelb) und zwei für Audio (weiß/rot). Verbinden Sie es am TV wie folgt.
opticum_axodin_manual_rev08.indd 27 2013-11-13 08:44:07

QUICK GUIDE MANUAL
3. Power ON/OFF
[ : Drücken ‘Standby/Reset’]
Dies ist der einfachste Weg, den AX Odin Ein oder Aus zu schalten
● Komplette Abschaltung
Wenn der Netzschalter an der Rückseite eingeschaltet ist,, brauchen sie nicht den Schalter betätigen um das gerät ein oder aus zu
schalten.
Es braucht eine lange Zeit im zu Booten, wenn sie das Gerät am Netzschalter ausschalten.
● Standby Mode
POWER-Taste wird normalerweise verwendet, um die Set-Top-Box ein-oder auszuschalten.
Hier können sie den Receiver ein oder aus Schalten. Er ist nicht komplett heruntergefahren. Somit wird der Einschaltvorgang
verkürzt.
● Deep Standby Mode
Deep - Standby wird erwendet, um den Standby-Stromverbrauch zu reduzieren.
Der Receiver ist so konzipiert, das er im Stand By Mode nicht mehr wie 1 W Strom verbraucht. Er arbeitet somit Energieeffizienz.
opticum_axodin_manual_rev08.indd 28 2013-11-13 08:44:08

QUICK GUIDE MANUAL
opticum_axodin_manual_rev08.indd 29 2013-11-13 08:44:08

opticum_axodin_manual_rev08.indd 30 2013-11-13 08:44:08