Embed Size (px)
Citation preview

Prop On/Off
Increase Speed
Decrease Speed
Steer Right
Steer Left
High Speed Bypass
AutoPilot
Spot-Lock
Spot-Lock Press to enable Spot-Lock. When Spot-Lock is enabled from the Micro Remote, use either the i-Pilot or i-Pilot Link remote, or the fish finder if you want to save it.
AutoPilot Press to enable AutoPilot. The selection between Legacy AutoPilot and Advanced AutoPilot must be made from either the i-Pilot or i-Pilot Link remote.
Speed Down & Speed Up Press to decrease or increase motor speed.
Prop On/Off Pressing this button will turn the Prop on and off.
Steer Left & Steer Right Press to steer the motor to the left or to the right.
High Speed Bypass Bypasses the current motor speed to speed 10. Double press to engage. Single press to disengage.
NOTICE: If your motor is connected to a Heading Sensor, the Speed Down (backwards), Speed Up (forward), Steer Right and Steer Left buttons function change to Jog the boat while in Spot-Lock.
NOTICE: When the remote is being paired to the i-Pilot Controller, the High Speed Bypass button and the AutoPilot button need to be held down simultaneously. Make sure to also hold the Pair PAIR button on the Control Head to successfully pair the remote to the controller.
NOTICE: A remote can be paired to one controller at a time. A controller can have multiple remotes paired to it.
4. While holding the Pair PAIR button on the Control Head, push and hold the High Speed Bypass button and AutoPilot button on the remote simultaneously.
NOTICE: Make sure the remote stays within range of the Control Head during the pairing process.
An i-Pilot controller may pair up to 5 remotes. These five remotes can be a combination of standard i-Pilot remotes and Micro Remotes. Any additional remotes can be paired using the following steps. Once the maximum number of remotes have been paired, the controller will start replacing the oldest paired remote in memory with the new remote.
1. Power up the trolling motor.
2. Locate the Pair PAIR button at the top of the Control Head.
3. Push and hold the Pair PAIR button down. A consistent tone will be emitted from the Control Head.
5. Once successfully paired, 3 longer beeps will be emitted from the Control Head and the remote will be paired.
Scan to view the complete Micro Remote Owner’s Manual online. The Owner's Manual is available at minnkotamotors.com and includes informaton on compatibility, safety considerations, compliance, maintenance, parts and more.
MICRO REMOTEQUICK REFERENCE GUIDE
Compatible with all Bluetooth® enabled i-Pilot® LinkTM and i-Pilot systems only.
REMOTE
PAIRING
minnkotamotors.com©2018 Johnson Outdoors Marine Electronics, Inc.
MANUAL CONTROL BUTTONS
NAVIGATION BUTTONS
Pairing the Micro Remote to your Controller
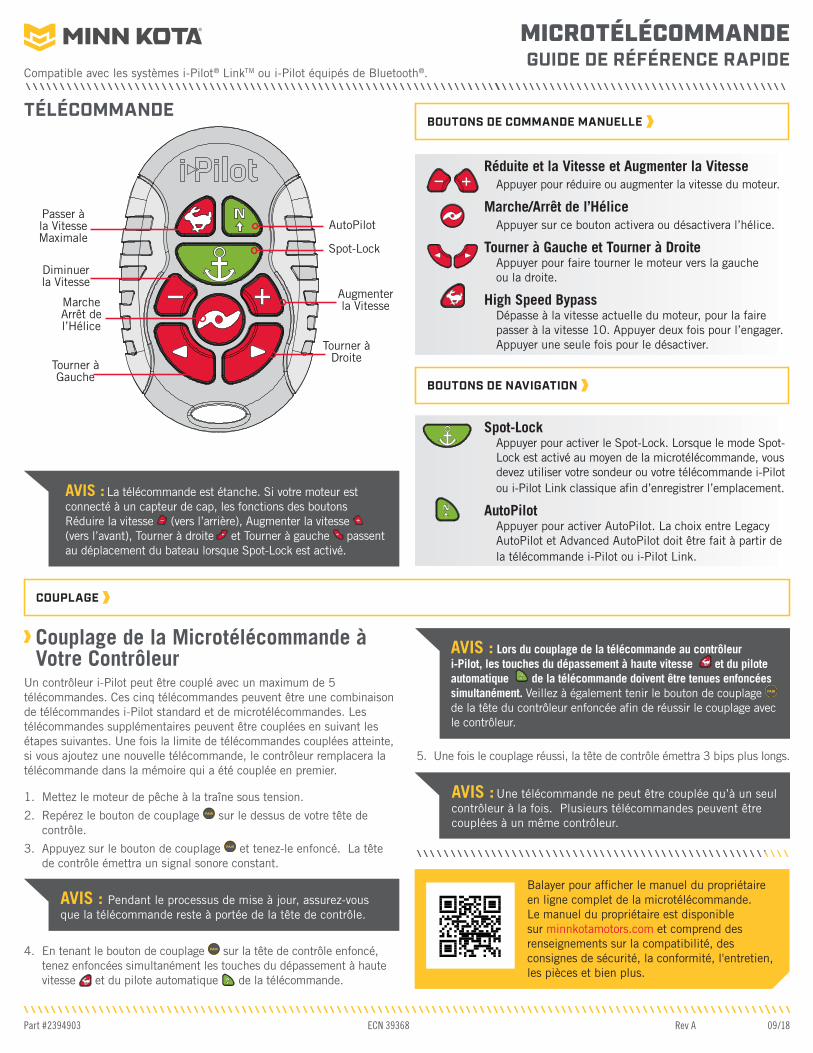
Marche Arrêt de l’Hélice
Augmenter la Vitesse
Diminuer la Vitesse
Tourner à Droite
Tourner à Gauche
Passer à la Vitesse Maximale
AutoPilot
Spot-Lock
Part #2394903 Rev A 09/18ECN 39368
Spot-Lock Appuyer pour activer le Spot-Lock. Lorsque le mode Spot-Lock est activé au moyen de la microtélécommande, vous devez utiliser votre sondeur ou votre télécommande i-Pilot ou i-Pilot Link classique afin d’enregistrer l’emplacement.
AutoPilot Appuyer pour activer AutoPilot. La choix entre Legacy AutoPilot et Advanced AutoPilot doit être fait à partir de la télécommande i-Pilot ou i-Pilot Link.
Réduite et la Vitesse et Augmenter la Vitesse Appuyer pour réduire ou augmenter la vitesse du moteur.
Marche/Arrêt de l’Hélice Appuyer sur ce bouton activera ou désactivera l’hélice.
Tourner à Gauche et Tourner à Droite Appuyer pour faire tourner le moteur vers la gauche ou la droite.
High Speed Bypass Dépasse à la vitesse actuelle du moteur, pour la faire passer à la vitesse 10. Appuyer deux fois pour l’engager. Appuyer une seule fois pour le désactiver.
AVIS : La télécommande est étanche. Si votre moteur est connecté à un capteur de cap, les fonctions des boutons Réduire la vitesse (vers l’arrière), Augmenter la vitesse (vers l’avant), Tourner à droite et Tourner à gauche passent au déplacement du bateau lorsque Spot-Lock est activé.
AVIS : Lors du couplage de la télécommande au contrôleur i-Pilot, les touches du dépassement à haute vitesse et du pilote automatique de la télécommande doivent être tenues enfoncées simultanément. Veillez à également tenir le bouton de couplage PAIR de la tête du contrôleur enfoncée afin de réussir le couplage avec le contrôleur.
AVIS : Une télécommande ne peut être couplée qu’à un seul contrôleur à la fois. Plusieurs télécommandes peuvent être couplées à un même contrôleur.
4. En tenant le bouton de couplage PAIR sur la tête de contrôle enfoncé, tenez enfoncées simultanément les touches du dépassement à haute vitesse et du pilote automatique de la télécommande.
AVIS : Pendant le processus de mise à jour, assurez-vous que la télécommande reste à portée de la tête de contrôle.
Un contrôleur i-Pilot peut être couplé avec un maximum de 5 télécommandes. Ces cinq télécommandes peuvent être une combinaison de télécommandes i-Pilot standard et de microtélécommandes. Les télécommandes supplémentaires peuvent être couplées en suivant les étapes suivantes. Une fois la limite de télécommandes couplées atteinte, si vous ajoutez une nouvelle télécommande, le contrôleur remplacera la télécommande dans la mémoire qui a été couplée en premier.
1. Mettez le moteur de pêche à la traîne sous tension.
2. Repérez le bouton de couplage PAIR sur le dessus de votre tête de contrôle.
3. Appuyez sur le bouton de couplage PAIR et tenez-le enfoncé. La tête de contrôle émettra un signal sonore constant.
5. Une fois le couplage réussi, la tête de contrôle émettra 3 bips plus longs.
Balayer pour afficher le manuel du propriétaire en ligne complet de la microtélécommande. Le manuel du propriétaire est disponible sur minnkotamotors.com et comprend des renseignements sur la compatibilité, des consignes de sécurité, la conformité, l'entretien, les pièces et bien plus.
MICROTÉLÉCOMMANDEGUIDE DE RÉFÉRENCE RAPIDE
Compatible avec les systèmes i-Pilot® LinkTM ou i-Pilot équipés de Bluetooth®.
TÉLÉCOMMANDE
COUPLAGE
BOUTONS DE COMMANDE MANUELLE
BOUTONS DE NAVIGATION
Couplage de la Microtélécommande à Votre Contrôleur


![New York City’s Vehicle Pilot Deployment Project · Connected Vehicle Pilot Deployment Project Quick Overview This is a DEPLOYMENT project [driven by R&D]! “After more than a](https://img.pdfslide.net/doc/110x75/5f1645a49e1ef05ebc0668a2/new-york-cityas-vehicle-pilot-deployment-project-connected-vehicle-pilot-deployment.jpg)