Embed Size (px)
Citation preview

ACTIVITY PACKET
TOPSpro Enterprise Basics Quick Start!
CASAS Technology Support Team
[email protected] 7:00 am – 5:00 pm (Pacific), M – F Toll Free: (800) 255-1036, option 2
(858) 292-2900, option 2

Contents
© 2018 CASAS. All rights reserved. Return to Table of Contents Training and Support 1
Table of Contents
Session Description ................................................................................................................................................. 2
Navigating TE .......................................................................................................................................................... 3
Install and Open TE Online ........................................................................................................................... 3
Explore Menus and Submenus ..................................................................................................................... 4
Finding Information ............................................................................................................................................... 7
Understanding the Relationship of Records in TE ..................................................................................... 7
Customizing Lists of Records ........................................................................................................................ 7
Using the Navigator ..................................................................................................................................... 12
Editing Student Information ....................................................................................................................... 15
Adding Records Manually................................................................................................................................... 17
Steps to Add Sites ............................................................................................................................................. 17
Steps to Add and Manage Users ..................................................................................................................... 20
Defining Group Access Rights .................................................................................................................... 23
Steps to Add and Link Personnel Records .................................................................................................... 25
Personnel Registration .................................................................................................................................. 25
Functional Roles ............................................................................................................................................ 27
Steps to Add Student Records ......................................................................................................................... 31
Steps to Add Test Records ............................................................................................................................... 32
Steps to Exit TE ...................................................................................................................................................... 35
CASAS Contact Information ............................................................................................................................... 36
Download this Activity Packet from the Summer Institute Presentations web page at Home > Training and Support > National Summer Institute > Presentations

Overview
2 Return to Table of Contents © 2018 CASAS. All rights reserved. Training and Support
Session Description
Welcome to TOPSpro Enterprise (TE) Online! This session jump-starts your familiarity and use of this nationally recognized learner management and accountability system. It is important that you gain a fundamental understanding of the theoretical basis for TE Online before examining specific applications of the software. You will learn how this powerful database system works by experiencing first-hand how the features operate. This session will teach you the essentials of the application in this hands-on lab setting. System fundamentals include:
This session is appropriate for those who have little or no experience using TE Online.
• Navigation • Finding & Editing Data • Add New Records Manually • User Access

Access TE
© 2018 CASAS. All rights reserved. Return to Table of Contents Training and Support 3
Navigating TE
To use the many features of TOPSpro Enterprise (TE), you will need to know how to find them by navigating through the menus. TE uses the same type of menu system that you see in most Windows-based applications.
Install and Open TE Online
To access TOPSpro Enterprise Online (TE) for the first time, launch the web browser and enter the URL for the CASAS Online System your program uses.*
Server Use any modern web browser *Global https://etestsonline.org/html5/#/ *California https://ca.etestsonline.org/html5/#/ *LARAEC https://laraec.etestsonline.org/html5/#/ *Miami Dade https://etestsonline.org/MiamiDade/html5/#/ *Washington https://etestsonline.org/Washington/html5/#/
For Training, go to Rolling Hills Simulation – https://etestsonline.org/rollinghills/html5#/
Step Screen Description 1.
• Access TE in one of three ways, from the –
1. Web browser
• Click Install TE Client if first access on local machine.
2. Taskbar icon
3. Desktop icon
2.
• Click the Server field down-arrow and from the drop-down menu,
o Select the Server for your online account.*
o Enter your Agency ID. o Enter your User name. o Enter your Password.
• Click Connect.
1
2
3

Navigation
4 Return to Table of Contents © 2018 CASAS. All rights reserved. Training and Support
Explore Menus and Submenus
TE opens with an empty screen and a menu bar along the top. Not all agencies using the CASAS Online System have access to all menus and data functions, and not all users have access to data or rights to edit records.
Visit the CASAS website for more information about Assessment and Database Management Features to understand ‘basic’ vs. ‘enhanced’ access to the CASAS Online System.
Take a Highlights Tour to look at some menu features and to see how TE organizes menus.
Step Screen Description 1.
• All data and reports display on the screen from accessing the Menu bar along top left.
2.
• Top right displays,
o Logged-on User.
o Application Version.
o General screen Controls.
o Pages tab to clear your screen(s).
3.
• Click the TE Icon at top left of your screen.
• Before exiting TE, it’s best to –
o Disconnect your TE Client to close connection with the server on your local machine.
• Click Options…
Navigation
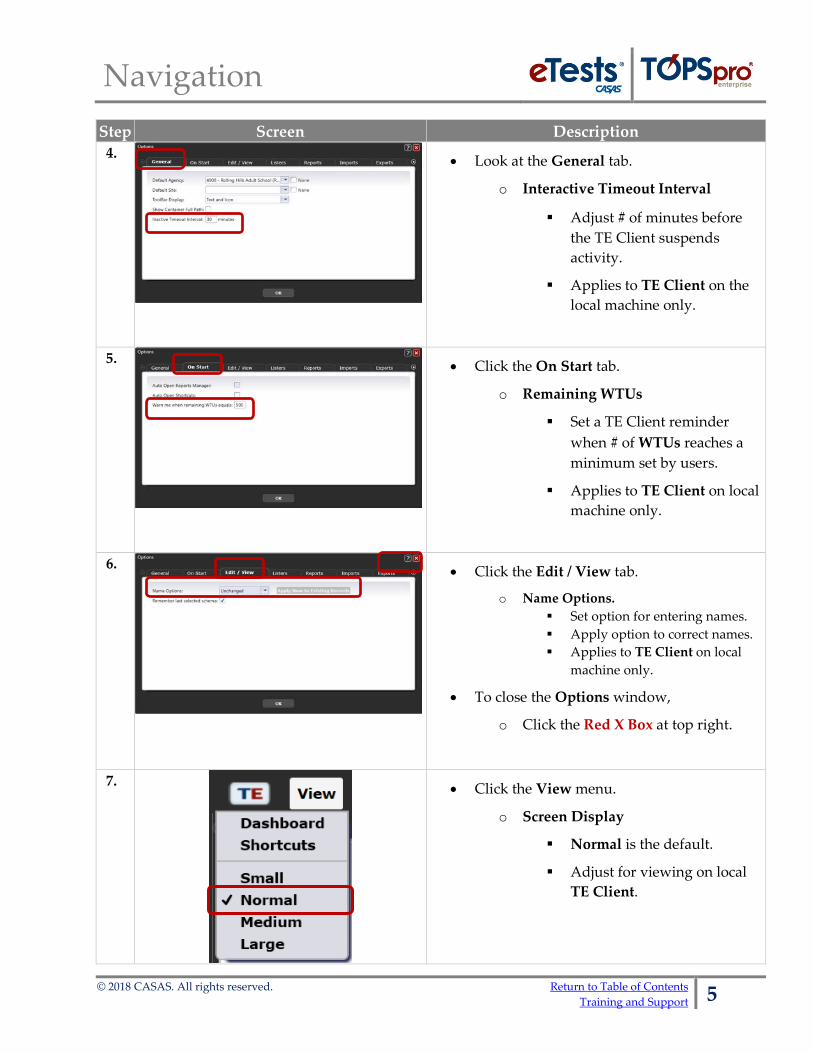
© 2018 CASAS. All rights reserved. Return to Table of Contents Training and Support 5
Step Screen Description 4.
• Look at the General tab.
o Interactive Timeout Interval
Adjust # of minutes before the TE Client suspends activity.
Applies to TE Client on the local machine only.
5.
• Click the On Start tab.
o Remaining WTUs
Set a TE Client reminder when # of WTUs reaches a minimum set by users.
Applies to TE Client on local machine only.
6.
• Click the Edit / View tab.
o Name Options. Set option for entering names. Apply option to correct names. Applies to TE Client on local
machine only.
• To close the Options window,
o Click the Red X Box at top right.
7.
• Click the View menu.
o Screen Display
Normal is the default.
Adjust for viewing on local TE Client.

Navigation
6 Return to Table of Contents © 2018 CASAS. All rights reserved. Training and Support
Step Screen Description 8.
• Highlight or click the Organization menu.
o Sub-menus contain detailed information about the organizational setup of an online account.
• Click the Records menu.
o Menu Categories identify groups of lists with records for tracking program and student activity.
o Sub-menus identify the type of records.
9.
• Highlight or click the Reports menu.
o Menu Categories identify groups of reports that help programs meet a wide variety of reporting needs.
o Sub-menus identify the type of report.
10.
• Highlight or click the Tools menu.
o Sub-menus list operations for managing data.
• Highlight or click the Help menu.
o Release Notes are included with each update to the Online System.
o Review Notes for important new features and enhancements as well as any necessary fixes.

Finding Information
© 2018 CASAS. All rights reserved. Return to Table of Contents Training and Support 7
Finding Information
The online system functions like a web browser to fetch information and display on the screen in tabbed pages. Using tabs as a navigational tool is a feature that allows you to switch between multiple pages of information.
Understanding the Relationship of Records in TE
TOPSpro Enterprise is a relational database that contains a collection of interrelated records, which stores information and relates records by a common element. In TE, that element is the identification field. For a student, that field contains the identification code unique to the learner that links all records related to the learner. The graphic below presents this concept.
The Student Identification (ID) code provides the minimum information for TE to add a student record. The student Demographics record is the "parent" record for all other learner-related records. Every time you add another record, TE links the ID to the corresponding student, and creates a new record. These other records contribute additional information to the student and are the “child” records in the database. TE connects the parent and child records by ensuring that they all include one common variable – the Student Identification (ID) code.
Customizing Lists of Records
TE uses Listers to display lists of records. Each lister name indicates the information that it contains. Listers are like spreadsheets but in electronic form. You may sort, filter, add, hide, and organize columns, set advanced filtering options, print, and export the information displayed.

Finding Information
8 Return to Table of Contents © 2018 CASAS. All rights reserved. Training and Support
Using the student as an example, let’s customize the Demographics lister.
Step Screen Description 1.
• From the Menu bar at top,
• Click Records.
o Select Students.
o Click Demographics.
2.
• A tabbed page opens to the list of Demographics records with a Toolbar along the top.
o Records display for students having activity in the Current Program Year (July 1 – June 30).
o Sorts on Student ID.
• Most Column Headers have Up/Down arrows and Filter icons.
3.
• To sort by Name,
o Click the Name column UP arrow.
• By default, the Name column sorts by First name.
4.
• Each list of records has its own default Schema, or Column Configuration.
• You may change the configuration of columns and save the Schema on your TE Client.
• To split the Name column into First, Middle, and Last name columns,
o Point your mouse in the Name column header.
o Right mouse-click.
• From the drop-down menu listing all columns available in the Demographics lister,
o Click Show First Name.

Finding Information
© 2018 CASAS. All rights reserved. Return to Table of Contents Training and Support 9
Step Screen Description 5.
• Now you will see the First name has its own column.
• Repeat these steps to add a Middle name and Last name column.
6.
• Now that the Name column is split in to three columns for First, Middle, and Last name, you no longer need the column.
• Right mouse-click in the Name column header.
o Select Hide Full Name.
7.
• The Name column is now hidden from the list.
• You may unhide any column to display again in the list of records.
• Lister may be Reset to Defaults at any time.
8.
• Reordering columns will further customize the list of Demographics records for your TE Client.
o Left click-and-hold your mouse in the Last Name column header.
o While holding, drag the Last Name column left of the First Name, and then release your mouse.
9.
• The Demographics lister now displays names in a Last, First, and Middle name column configuration.

Finding Information
10 Return to Table of Contents © 2018 CASAS. All rights reserved. Training and Support
Step Screen Description 10.
• In the Last Name column header
o Click the UP arrow to sort alphabetically.
11.
1. First, sort on Last Name.
2. Second, sort on First Name.
3. Third, sort on Middle Name.
Note! Adding Gender and DOB columns helps with identifying any duplicate records of the same student.
• Suggestion: Configure and presort columns:
1. Click the UP arrow in the Last Name column header.
2. Click and hold the Shift key on your keyboard, and then click the UP arrow in the First Name column header.
3. Click and hold the Shift key again, and click the UP arrow in the Middle Name column header.
• Release the Shift key.
12.
• To save the configuration of your columns,
o Click the More button from the Toolbar at top right for ‘more’ buttons.
o Click Edit Schema.
o Click Save.
Remember! You can always reset listers to their default column configuration.
13.
• Check to confirm that your TE Client will display the Demographics lister in ‘your’ default Schema next time you open it.
• To close the Demographics lister,
o Click the Red X Box on the Demographics tab.

Finding Information
© 2018 CASAS. All rights reserved. Return to Table of Contents Training and Support 11
Step Screen Description 14.
• You can also close several pages at the same time by clicking Pages at top right.
• From the drop-down menu,
o Click Close All Pages.
o Or click individual Pages listed at bottom of the menu.
15.
• To reopen the Demographics lister, go to
Records > Students > Demographics
• The list of Demographics records should display as the saved default Schema on your TE Client.
16.
Note!
• You may also name different Schemas and access them from the Toolbar at top of the list
o Click the (Default) window down arrow and select a saved Schema.

Navigator
12 Return to Table of Contents © 2018 CASAS. All rights reserved. Training and Support
Using the Navigator
Let the TE Navigator be your guide! In listers, the Navigator links all ‘child’ records related to the ‘parent’ record and displays them in a list to navigate easily between them. The report setup Navigator gives quick access to listers to refine information to include in the report.
The Navigator will also guide you to adding ‘child’ records to ‘parent’ records by prepopulating key fields from the ‘parent’ record. When entering data manually, it is recommended to use the Navigator for data-entry accuracy.
Using the student as an example, let’s explore ‘child’ records and see how many are linked to the student’s ‘parent’ Demographic record through the Navigator.
Step Screen Description 1.
• Filter for a Student with your First or Last Name.
o Click the First or Last Name column Filter icon.
o Enter your First Name.
o Click OK.
2.
• The Demographics lister may or may not display a record of a student having your First or Last Name. That’s Ok!
o Filter for a friend or any other name instead.
o Double click to open the Highlighted record.
3.
• A new tabbed page opens to a split screen with the –
o Record Navigator at left.
o Student Information at right.
• Edit/View contains the ‘parent record’ data for the student.
• Remaining selections on the Navigator represent ‘child records.’

Navigator
© 2018 CASAS. All rights reserved. Return to Table of Contents Training and Support 13
Step Screen Description 4.
• Clicking the different options from the Navigator provides views of a variety of information about that student.
Remember!
• The student’s unique Identification (ID) code is what links all of the records assigned to the student, and supplies the minimum information TE needs to create a student Demographic record.
5.
• From the Navigator at left,
o Click In Program Years.
• At right lists records for each program year in which the student has dated activity.
• A Program Year is defined as July 1 through June 30.
6.
• From the Navigator at left,
o Click Student Records.
• The records listed at right are of all dated activity that occurred for the student during the program year.
7.
• From the Navigator at left,
o Click Class Enrollments.
• This list will only include one record for each class in which the student is enrolled.

Navigator
14 Return to Table of Contents © 2018 CASAS. All rights reserved. Training and Support
Step Screen Description 8.
• From the Navigator at left,
o Click Class Records.
• This section includes separate records of all class related activity for the student.
9.
• From the Navigator at left,
o Click Program Enrollments
• This section will only include one listing for each program in which the student is enrolled.
10.
• From the Navigator at left,
o Click Program Records.
• This list includes separate records of all program related activity for the student.
11.
• From the Navigator at left,
o Click Tests.
• This is a list of tests taken by the student.
12.
• Return to Edit/View to edit Student Information.

Editing Data
© 2018 CASAS. All rights reserved. Return to Table of Contents Training and Support 15
Editing Student Information
Step Screen Description 13.
• By default, the Edit/View page opens in View mode.
• To edit a student ID,
o Click the Pencil icon in the Identification section and Change to Edit Mode.
14.
• Type in the Student ID field and change the ID.
• From the Toolbar at top.
o Click Save.
Note! A change to the Student ID will simultaneously edit all ‘child’ records linked to the student.
15.
• To see how that works,
o Click Tests from the Navigator.
• You may notice that the ID does not appear to have changed.
• Continue on to solve the mystery!...

Editing Data
16 Return to Table of Contents © 2018 CASAS. All rights reserved. Training and Support
Step Screen Description 16.
• At top right of the student’s Tests lister,
o Click Refresh.
• This will ‘refresh’ the page on your TE Client.
17.
• Voila!
o Now you see that the ID on all Tests linked to the student are changed.
18.
• To clear your screen,
o Click Pages at top right.
Select Close all Pages.

Sites
© 2018 CASAS. All rights reserved. Return to Table of Contents Training and Support 17
Adding Records Manually
The CASAS Online System offers four methods for adding records to your online account through both applications – eTests Online together with TE Online.
eTests Online
1. Sessions – for testing and collecting demographic information
TE Online
2. Manual data entry – using the keyboard and mouse 3. Scanning – using an optical mark scanner 4. Importing – from a 3rd Party System or fillable Import Template
Steps to Add Sites
Sites are part of the organizational structure of an online account and represent physical locations where instruction and training take place. Sites may serve learners in multiple instructional programs. Agencies may add Sites to their online account at any time.
eTests Site
Any Site using eTests Online must comply with all testing requirements in each lab within a Site as outlined in the Online Implementation Agreement training.
• Web-test units (WTUs) must be available in an online account to enable an eTests Site. • Sites must be enabled for eTests to register computers and administer tests.
Step Screen Description 1.
• From the Menu bar at top,
o Click Organization.
Select Sites.

Sites
18 Return to Table of Contents © 2018 CASAS. All rights reserved. Training and Support
Step Screen Description 2.
• A new tabbed page opens listing the Sites setup in the online account.
• Sites that use eTests Online are identified as an eTests Site.
• To be an eTests Site, agencies complete a "Going Live" Checklist , which includes:
o Online Implementation Agreement o Coordinator Certification o Proctor Certification o Order web-test units (WTUs)
• From the Toolbar at top left, o Click New.
3.
• A new tabbed Page opens to add information about the new Site for your agency.
• Sites are added to Containers, which ‘contain’ records of activity occurring at that site.
o Your Agency is the ‘parent’ container for your online account.
4.
• Sites are ‘child’ records of your Agency.
• Sites are typically added to the ‘parent’ container but may also be a Sub-Site.
• The determination of ‘where’ to add a new Site depends on How? you plan to track and record outcomes.
• Click the Container field down-arrow.
o Select the Container to add the new Site.

Sites
© 2018 CASAS. All rights reserved. Return to Table of Contents Training and Support 19
Step Screen Description 5.
• For Site Identification,
o Enter the Site ID.
o Enter the Site Name.
o Check eTests Site –
Only check if you plan to use CASAS eTests Online at the Site and WTUs are available for online test administration.
6.
• To close the new Site record,
o Click the Red X Box on the Site tab.
7.
• This returns you to the Sites lister where you will see the new Site in the list of records.
8.
• Click the Red X Box on the Sites tab and close the lister.

User Access
20 Return to Table of Contents © 2018 CASAS. All rights reserved. Training and Support
Steps to Add and Manage Users
Access to the CASAS Online System requires a User record with login credentials. Users are part of the organizational structure of your online account. When setting up a new account, CASAS establishes one User for the agency with rights to manage data and grant User access to TE Online and/or eTests Online for other staff as appropriate. When adding Users to your online account, CASAS recommends adding records at the agency level for ease with managing records and user access.
Access to TE Online
Access to eTests Online
Step Screen Description 1.
• From the Menu bar,
o Click Organization.
Select Users.
2.
• A tabbed page opens to the list of User records.
• From the Toolbar at top left of the list.
o Click New.
• May be granted to any staff as appropriate. • eTests Online coordinator and proctor certification is not required for staff access TE Online.
• May only be granted upon confirmation of coordinator and/or proctor certification. • The agency must maintain copies of certificates on file.
o Coordinator Certification – Staff responsible for online testing management. o Proctor Certification – Staff responsible for online test administration.

User Access
© 2018 CASAS. All rights reserved. Return to Table of Contents Training and Support 21
Step Screen Description 3.
• Check Link with existing personnel –
o When a Personnel record exists in your online account.
o If a record does not exist, you will have the option to link accounts when adding the Personnel record.
4.
• Click the Container field down-arrow.
o Select the container to add the new User record.
Note! Add Users at the Agency level when linking accounts with Personnel records.
5.
• User Identification will be the login credentials for the new User.
o Enter a Work e-mail address as the user name (recommended).
o Enter a temporary Password.
Users are prompted to change their password the first time they log in.
6.
• Add the new User to an Access Group.
o You have three options to do this.
• Click the Group field down-arrow, 1. Type to Search for the Group. 2. Scroll to Select the Group. 3. Select [Group] from Lister.
7.
• After selecting an Access Group,
o Click Add at right of the selected Group.
1
2
3

User Access
22 Return to Table of Contents © 2018 CASAS. All rights reserved. Training and Support
Step Screen Description 8.
• If the new User will need access to eTests Online to:
o Manage online testing (Coordinator).
o Administer online tests (Proctor).
Add the new user to the access group that matches with their certification.
9.
• Add Contact Information for the new User.
• The minimum information required for adding an account is:
o First Name.
o Last Name.
o Email
10.
• No other setup is needed for the new User when added to Access Groups.
o Click Save from the Toolbar at top.
11.
• Click the Red X Box on the User record tab and return to the lister..
12.
• Use the First/Last Name column filter to locate the new User among the list of records.

User Access
© 2018 CASAS. All rights reserved. Return to Table of Contents Training and Support 23
Step Screen Description 13.
• Click the Red X Box and close the Users lister.
Defining Group Access Rights
For ease with managing Users through Access Groups, establish and maintain groups at the agency level (i.e., parent container).
Step Screen Description 1.
• From the Menu bar,
o Click Organization.
Select Access Groups.
2.
• The tabbed page opens listing Groups for Agencies to manage User Access to TE.
• TE Data Managers may –
o Edit, Rename, or Duplicate the default set of groups added by CASAS when setting up a new online account.
3.
• TE Data Managers may also –
o Add new TE Access Groups to manage users based on their role at the Agency, such as a School Counselor or the Registrar.

User Access
24 Return to Table of Contents © 2018 CASAS. All rights reserved. Training and Support
Step Screen Description 4.
• Groups have access to TE according to the rights enabled in three areas:
1. Menu Access Rights
o Defines access to menus and submenus.
2. Container Access Rights
o Defines access to sites and sub-sites.
3. Data Access Rights
o Defines read-only access, or rights to create, update, and/or delete data.
5.
• Granting Teachers access to TE requires having a User record linked with a Personnel record to identify their Functional Role as the teacher for their classes.
• Teachers may,
o Generate Reports for their own classes.
o Manage their Class Enrollment.
o Record Attendance.
o View Test results taken by students enrolled in their class.
Ask CASAS! To apply the default set of Access Groups to your online account
For more information about Access Groups is available from the training materials library on the CASAS website at Home > Training and Support.

Personnel
© 2018 CASAS. All rights reserved. Return to Table of Contents Training and Support 25
Steps to Add and Link Personnel Records
Personnel records are part of the organizational structure of an online account and include Registration, Functional Role, Employment Record, and Professional Status information.
Personnel Registration
Step Screen Description 1.
• From the Menu bar.
o Select Personnel.
Click Registration.
2.
• To add a new Personnel record,
o Click Registration.
3.
• A tabbed page opens to the list of Personnel records in your online account.
• From the Toolbar at top left of the list,
o Click New.

Personnel
26 Return to Table of Contents © 2018 CASAS. All rights reserved. Training and Support
Step Screen Description 4.
• When a User record exists in your online account,
o Check Link with existing user.
5.
• Click the Container field down-arrow.
o Select the Agency level (recommended)
o Or Site level.
6.
• You have three options to select an existing User.
• Click the User field down-arrow,
1. Type to Search for the User.
2. Scroll to Select the User.
3. Select [User] from Lister.
7.
• When the User is located,
o Click on the User to select.
1
2
3

Personnel
© 2018 CASAS. All rights reserved. Return to Table of Contents Training and Support 27
Step Screen Description 8.
• Personnel Information fields auto-populate after selecting and linking the User.
o Enter an Agency Personnel ID.
9.
• From the Toolbar at top,
o Click Save.
10.
• The new Personnel record page splits automatically with
o Personnel Information at right
o Navigator at left to add and access Personnel records.
• Click the Red X Box on the Registration tab and return to the Personnel record.
Functional Roles
Functional Roles identify personnel involved in the administration and teaching of adult learners. Personnel may have more than one Functional Role within the agency. Adding Functional Roles for teachers gives them access to their classes at any time from any location with Internet connection.
Step Screen Description 1.
• From Navigator at left of the Personnel Information record,
o Click Functional Roles.
• To add a Functional Role for the Personnel member,
o Click New at right.

Personnel
28 Return to Table of Contents © 2018 CASAS. All rights reserved. Training and Support
Step Screen Description 2.
• A new tab opens to input Functional Role Information in three sections.
1. Personnel information,
2. Container to associate the role.
3. Role Identification.
• Personnel and Container fields auto-populate when using the Navigator to add records.
3.
• To link the Personnel member with a Class,
o Click the Class Definition field down-arrow and
Type to search.
Scroll to select.
Select from Lister
o Select the Class.
4.
• If the Personnel member is not a teacher,
o Leave “No selection” in the Cass Definition field.
• Special Program will auto-populate if defined for the selected class.
5.
• For Role Identification,
o Select Administrator, Scorer, or Teacher.
o Select the Start Date when the role begins.
o Leave End Date empty if the role will continue across program years.

Personnel
© 2018 CASAS. All rights reserved. Return to Table of Contents Training and Support 29
Step Screen Description 6.
• From the Toolbar at top,
o Click Save.
7.
• Return to the Personnel record.
o Click the Red X Box on the Functional Role tab and return to the Personnel record.
8.
• The Functional Role record is now listed with the Personnel record.
Note! Personnel may have more than one Functional Role at the agency.
Employment Records The next record to add for Personnel is information about their employment. Personnel may have more than one Employment Record to identify different types of employment within the agency.
Professional Status The last record to add for Personnel is information about their professional status.
Detailed steps for adding Personnel Employment and Professional Status records are available from the training materials library on the CASAS website at Home > Training and Support.

Personnel
30 Return to Table of Contents © 2018 CASAS. All rights reserved. Training and Support
ACTIVITY: Access the New Teacher’s Class
Step Screen Description 1.
• At top left of your screen,
o Click the TE icon.
o Click Disconnect.
2.
• Log in as the Teacher.
o Enter Credentials.
o Click Connect.
3.
• From the Menu Bar at top,
o Click Organization.
o Click Classes.
o Click Instances.
4.
• The teacher’s Class will display in the list.
• Double-click on the Class to open the record.
5.
• With access to Classes, teachers can –
o Record Attendance.
o Enroll students and update their Status in class.
o View Tests taken by students enrolled in the class.
o Generate Student & Class Reports.
6. • Note! For training, you will need to Disconnect from TE and then Connect again with
your Admin account to proceed with the next steps.

Student Records
© 2018 CASAS. All rights reserved. Return to Table of Contents Training and Support 31
Steps to Add Student Records
The recommended approach to adding and editing Student records is from the Demographics list of records. Using the Navigator to add or edit ‘child’ records will ensure data entry accuracy with prepopulated ‘parent’ information.
Step Screen Description 1.
• From the Menu bar,
o Click Records.
Select Students.
Click Demographics.
2.
• From the Toolbar at top left of the Demographics page,
o Click New.
3.
Note! Use eTests Online to collect and ‘fill-in’ remaining Demographics, or add students in TE automatically.
• A new tabbed page opens to input Student Information.
o Select the Site where the student will have activity.
• Enter the minimum (recommended) Identification.
o Student ID.
o First/Last Name.
o Gender.
o Birth Date.

Student Records
32 Return to Table of Contents © 2018 CASAS. All rights reserved. Training and Support
Step Screen Description 4.
• Click Save from the Toolbar at top.
• If adding no other record for the Student at this time, the new record will not display in the list of Demographic records automatically.
o This is because the Student has no activity in the current program year (i.e., no In Program Years record.)
• Adding any record from the Navigator, such as results from a paper Test, will add the In Program Years record automatically.
• Adding paper Test results also prepares the online system to give the student the next assigned test in eTests Online automatically.
5. • Continue with steps to add a Test record for the new student.
Steps to Add Test Records
Use the Navigator from the student’s Demographics record to add a Test record. Again, this recommended approach will ensure data entry accuracy with prepopulated ‘parent’ information about the student.
Step Screen Description 1.
• From the Navigator at left,
o Click Tests.
• From the student’s Tests lister,
o Click New.

Student Records
© 2018 CASAS. All rights reserved. Return to Table of Contents Training and Support 33
Step Screen Description 2.
Note! Assigning a Class to the Test Record is no longer necessary or required because TE tracks student activity through their ‘unique’ ID.
• A new tabbed page opens to input Test information.
• The Test record prepopulates with Site, Program Year and Student fields automatically.
• Enter the Assessment Date.
o Use the drop-down calendar
o Or type the Date.
3.
• For Assessment Information,
o Click the Form field down-arrow, and select a Test Form.
Type to Search. Scroll to Select. Select from Lister.
Scoring Option #1
• Check Score Override.
o Enter the Raw Score.
• Scale Score auto-populates after saving the record.
Scoring Option #2 4.
• You also have the option of entering item responses if you plan to generate performance reports from test results.
o Leave Score Override unchecked
o Enter Responses to each test item.
• Raw and Score Scale auto-populate after saving the record.
• Click Save from the Toolbar at top.
1
2

Student Records
34 Return to Table of Contents © 2018 CASAS. All rights reserved. Training and Support
Step Screen Description 5.
• Click the Red X Box on the Test record tab and return to the student’s Demographics record.
6.
• You will now see the new record in the student’s Tests lister.
o Click Refresh in the Tests lister Toolbar if needed to display Tests.
7.
• Click the Red X Box on the Student record tab and return to the Demographics lister.
• Click the Filter icon in the Student ID column.
o Enter the Student ID.
o Click OK.
8.
• The new Student record is now in the Demographics list of records for the current program year.
ACTIVITY: Sign back on as your fictitious Teacher to Enroll the Student in your Class and see the student’s Test record. Note: Student record must be at the Class Site to enroll and see Tests taken at any site.

Exit TE
© 2018 CASAS. All rights reserved. Return to Table of Contents Training and Support 35
Steps to Exit TE
To ensure data is secure and confidential and that unauthorized personnel are unable to gain access to personal data, it is important to disconnect from the server before exiting TE.
Step Screen Description 1.
• When you are finished working in TE, or at any time you have several tabbed pages open,
o Click Pages at top right.
• From the drop-down menu,
o Click Close All Pages.
2.
• At top left of your screen,
o Click the TE icon.
o Click Disconnect.
3.
• Click the TE icon again.
o Click Exit.
o Or click the Red X Box at top right of your screen.

Contact Information
36 Return to Table of Contents © 2018 CASAS. All rights reserved. Training and Support
CASAS Contact Information
Mail:
CASAS 5151 Murphy Canyon Rd., Suite 220 San Diego, CA 92123-4339
Website: www.casas.org
Telephone: (858) 292-2900 or toll free (800) 255-1036
Fax: (858) 292-2910
E-mail:
General questions: [email protected]
Training questions: [email protected]
Ordering questions: [email protected]
Field Testing Opportunities [email protected]
California Accountability: [email protected]
California AEBG - Adult Ed Block Grant: [email protected]
CASAS Technology Support Team: [email protected]
Training Support
Help documentation is available at CASAS Home > Training and Support > • eTests Online Help • TOPSpro Enterprise Help
Enroll in a complimentary workshop at: CASAS Training Registration.
Technical Support
The CASAS Technology Support Team is available to provide technical assistance for successful online implementation and uninterrupted test delivery.
• 7:00 am – 5:00 pm (Pacific Time) • Monday – Friday • [email protected] • (858) 292-2900 or toll free (800) 255-1036, option 2

Thank you for attending!