Embed Size (px)
Citation preview

Quick Start Guide
August 2020, Edition 1.1Sold by: KDDI CORPORATION,
OKINAWA CELLULAR TELEPHONE COMPANYManufactured by: SHARP CORPORATION
The company names and product names appearing in this manual are trademarks or registered trademarks of their respective holders.
For exemptions, refer to “Notes on Usage” available on the au homepage.
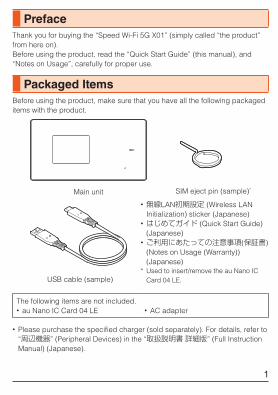
PrefaceThank you for buying the “Speed Wi-Fi 5G X01” (simply called “the product” from here on).Before using the product, read the “Quick Start Guide” (this manual), and “Notes on Usage”, carefully for proper use.
Packaged ItemsBefore using the product, make sure that you have all the following packaged items with the product.
Main unit SIM eject pin (sample)*
USB cable (sample)
The following items are not included. • au Nano IC Card 04 LE • AC adapter
• Please purchase the specified charger (sold separately). For details, refer to “周辺機器” (Peripheral Devices) in the “取扱説明書 詳細版” (Full Instruction Manual) (Japanese).
• 無線LAN初期設定 (Wireless LAN Initialization) sticker (Japanese)
• はじめてガイド (Quick Start Guide) (Japanese)
• ご利用にあたっての注意事項(保証書) (Notes on Usage (Warranty)) (Japanese)
* Used to insert/remove the au Nano IC Card 04 LE.
1

◎ The battery is built into the product. ◎ Illustrations in this manual are shown as examples. They may differ from the actual product.
About Descriptions • Symbols representing keys in this manual are as below.
Power key
• The following operations are abbreviated in this manual.
Description MeaningSwipe left on home screen → [Settings] → [Display].
From the home screen, swipe left and tap “Settings”. Then, tap “Display”.
f (hold down for at least 2 seconds).
Hold f down for at least 2 seconds.
* Tap refers to using your finger to lightly touch keys and icons displayed on the screen to select.
◎ In this manual, descriptions are based on the screen display and operations of the product with au Nano IC Card 04 LE installed.
◎ Illustrations and screens shown in this manual may look different from those on the actual product. In some cases, minor details or a part of a screen may be omitted.
◎ Menu items, hierarchies, and icons used in this manual may differ depending on the functions used and upon usage conditions.
2

◎ In this manual, “au Nano IC Card 04 LE” is abbreviated to “au IC Card”. ◎ Company names and product names described in this manual are trademarks or registered trademarks of their respective companies. This manual may also omit marks such as ™ and ®.
What You Can Do with This ProductThe product can be connected to multiple wireless LAN (Wi-Fi®)-supported devices such as PCs, smartphones, tablets, etc. via wireless LAN (Wi-Fi®) and connect a PC etc. using a LAN cable (commercially available) or USB cable (sample). Also, data communication using Internet access using 5G, LTE or UMTS systems is available on devices connected to the product.
Connecting via Wireless LAN (Wi-Fi®)You can connect wireless LAN (Wi-Fi®)-supported devices (such as PCs, smartphones, tablets, etc.) to this product to carry out data communications. • Up to 16 devices supporting wireless LAN (Wi-Fi®) can be connected to the product at the same time.
Wi-Fi®
Wi-Fi®
Wi-Fi®
Wireless base station
3

Connecting with USB Cable (sample)You can connect this product to a PC with a USB cable (sample) for data communication. Additionally, you can also use the USB connection at the same time as Wi-Fi® connections.
Wi-Fi®
Wi-Fi®
Wireless base station
4

Connecting with a LAN Cable (Commercially Available)
You can perform data communication by connecting the product to a PC or other device using a LAN cable (commercially available). You can also use the wired LAN connection at the same time as wireless LAN (Wi-Fi®) connections.
Wi-Fi®LAN cable (commercially available)
Wi-Fi® Wireless base station
◎ Depending on radio wave reception, overloading of access points, or the volume of the content, normal communications may not be possible. Furthermore, depending on the connected devices, normal communications may not be possible.
◎ Connection to the network automatically determines and selects the most suitable network at that time.
◎ The product will automatically connect to the Internet when it is turned on.
5

◎ The wired LAN function of the product will be stopped if the communication with connected devices using a LAN cable (commercially available) is not be performed for a set period of time. If you reconnect the product to the Internet after the wired LAN function is stopped, press f to turn the screen on.
◎ If a LAN cable (commercially available) is left connected to the product while using, electric power may be consumed even though you do not use the wired LAN function. Unplug the LAN cable (commercially available) from the product to save the battery when not using the function.
Support for au World ServiceUsing the au World Service, you can use your products that are used in Japan overseas as well. This product can be used on either UMTS or LTE networks depending on your destination. • No special procedures for application or fixed monthly charges are required, with usage charges being combined with fees for usage within Japan, making payment easy.* Customers with new accounts can use these overseas from the day following
purchase. However, customers who have purchased this product from an online shop can use it from 2 days after starting communications within Japan.
• Please check with the au website or Customer Center for details as to countries in which this can be used, pricing, and other services.
■Covered areas and charges(https://www.au.com/mobile/service/global/au-world-service/area-charge/)(Japanese)
■How to use data communications overseas, and applicable data communication charges
(https://www.au.com/mobile/service/global/au-world-service/check/) (Japanese)
■Customers using this product overseas *Please read before traveling
(https://www.au.com/information/notice_mobile/global/) (Japanese)
6

◎ Various discount services as well as data communication charges/discount services available within Japan cannot be used overseas.
◎ Consumption tax is not added to usage fees for international services.
Setting Communication Mode/Performance
Communication ModeYou can use the product to perform data communication with wireless base station via 5G, LTE or UMTS systems. You can select from the following communication modes to use.
5G LTE UMTS*
5G/LTE (Auto) ○ ○ ○LTE - ○ ○
* During international roaming
By default, the product is set to “5G/LTE (Auto)”. Note that additional charges may be applied depending on your billing plan.
7

Performance SettingYou can make settings for the balance of the product's communication speed and the electric power consumption.
A Swipe left on home screen → [Settings] → [Performance Settings]
B Performance Set a performance to use. • If you set “Communication Mode” to “5G/LTE (Auto)”, Performance is automatically changed to “High Performance”.
In Charging Mode Switch
If you set it to “ON”, Performance is automatically changed to “High Performance” while charging.
Useful Functionality of This Product
QR Codes and WPS ConnectionYou can easily connect your smartphone or other device to the product over wireless LAN (Wi-Fi®) by displaying a QR code on the product screen, and reading it with the camera on the smartphone or other device. WPS connections are also supported to allow you to connect your smartphone to the product via wireless LAN (Wi-Fi®), using a WPS key. If the wireless LAN (Wi-Fi®)-supported device supports the WPS push button method, you can easily set the SSID and security method required for the connection. • For details on the connection method, refer to “Connecting by Using QR Code” (zP. 41) and “Connecting by Using WPS” (zP. 36).
8

About the Manuals
■ “Quick Start Guide” (this manual) and “Notes on Usage”The “Quick Start Guide” (this manual) and “Notes on Usage” available on the au homepage describe information and precautions required for the first time use.(https://www.au.com/english/support/manual/)
■ “Full Instruction Manual” (Japanese)You can check “取扱説明書 詳細版”(Full Instruction Manual) (Japanese) that describes detailed of various functions on the au homepage.(https://www.au.com/support/service/mobile/guide/manual/) (Japanese)
Mobile Consideration
■Usage is prohibited in the following locations • Since using the product on airplanes is restricted, follow the instructions given by the respective airlines.
■Be very aware of people nearby • When in town, do not use in locations that obstruct passers-by. • Looking at your product screen while walking is very dangerous. Do not use this product while walking, or suddenly stop to use it.
• When using this product on the bullet train or in hotel lobbies, move to a location that will not bother other people.
• Crowded locations such as in full trains may have people using pacemakers nearby. Please turn off the product before entering these areas.
• Abide by instructions regarding prohibitions on usage or restrictions on bringing items in that have been put in place by hospitals and other medical institutions.
9

Part Names and Functions
Front
Right sideLeft side
A Heat exhaust ventB RESET button
The product settings can be restored to the factory default settings by pressing this button with the SIM eject pin (sample) when the power to the product is on.
C f Power keyTurn the screen on/off. Hold down to turn the power on/off and to reboot.
D au IC Card trayE Ethernet port
Use when connecting LAN cables (commercially available).
10
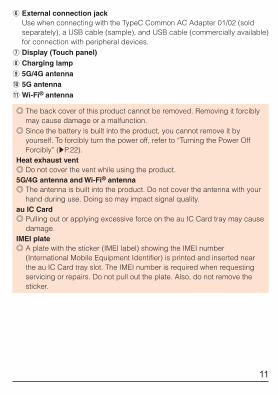
F External connection jackUse when connecting with the TypeC Common AC Adapter 01/02 (sold separately), a USB cable (sample), and USB cable (commercially available) for connection with peripheral devices.
G Display (Touch panel)H Charging lampI 5G/4G antennaJ 5G antennaK Wi-Fi® antenna
◎ The back cover of this product cannot be removed. Removing it forcibly may cause damage or a malfunction.
◎ Since the battery is built into the product, you cannot remove it by yourself. To forcibly turn the power off, refer to “Turning the Power Off Forcibly” (zP. 22).
Heat exhaust vent ◎ Do not cover the vent while using the product.
5G/4G antenna and Wi-Fi® antenna ◎ The antenna is built into the product. Do not cover the antenna with your hand during use. Doing so may impact signal quality.
au IC Card ◎ Pulling out or applying excessive force on the au IC Card tray may cause damage.
IMEI plate ◎ A plate with the sticker (IMEI label) showing the IMEI number (International Mobile Equipment Identifier) is printed and inserted near the au IC Card tray slot. The IMEI number is required when requesting servicing or repairs. Do not pull out the plate. Also, do not remove the sticker.
11

Pulling out the IMEI plateA Turn the display side down, pull out the au IC Card tray, and remove the
au IC Card. (For details on pulling out the au IC Card tray, refer to the step A and B of “Inserting the au IC Card” (zP. 15).)
B Turn the display side down, hook the tab on the rear of the au IC Card tray (side without text), and pull out the IMEI plate. (Do not fully pull out the IMEI plate.)
Catch Catch (au IC Card tray underside)
au IC Card tray underside
au IC Card tray
Hole ofthe IMEI plate
IMEI plate
◎ Note that pulling out the IMEI plate forcibly or applying force to it may damage the plate.
◎ If the IMEI plate comes fully out, carefully return the IMEI plate while taking care not to insert it too far in.
◎ IMEI information can also be checked by operating the product. Swipe left on home screen → [About Device].
12

Main Unit Keys and ButtonsUse keys and buttons on the main unit to carry out the following operations.
■ Power key
Power on f (hold down for at least 2 seconds).
Power off f (hold down for at least 2 seconds) → [Power Off].
Reboot f (hold down for at least 2 seconds) → [Reboot].
Turn screen on f while the screen is off.
Turn screen off f while the screen is on.
Forcibly power off f (hold down for at least 8 seconds).
■RESET button
Reset the product to the factory default
Use the SIM eject pin (sample) to hold down for at least 2 seconds → [OK].
13

au IC Card (SIM Card)Your phone number etc. is recorded in the au IC Card.The product is compatible with au Nano IC Card 04 LE.
IC (metal) part
au Nano IC Card 04 LE
Front Back
◎ Note the following points, otherwise handling the au IC Card may cause malfunction or damage. • Do not touch the IC (metal) part of the au IC Card. • Insert in the correct direction. • Before inserting/removing the au IC Card, turn off the product . • Do not forcefully insert or remove.
◎ An error message will be displayed if the au IC Card is not correctly inserted, or if the au IC Card has a malfunction.
◎ Be careful not to lose the au IC Card after it is removed. ◎ Also, do not insert an au IC Card that is inserted into a conversion adapter. Doing so might cause a malfunction.
◎ When inserting/removing the au IC Card, ensure that any USB Type-C plugs such as the TypeC Common AC Adapter 01/02 are removed from the product.
◎ The included SIM eject pin (sample) is required to insert and remove the au IC Card.
◎ Although the phone number is stored to the au IC Card, making/receiving calls etc. is not available with the product.
14

Inserting/Removing the au IC CardBefore inserting/removing the au IC Card, ensure you turn off the product. Insert/remove the card with the display side of the product turned down.
Inserting the au IC Card
A Insert the tip of the SIM eject pin (sample) into the au IC Card tray hole.Push the tool firmly straight in until the au IC Card tray comes out.Pushing this other than straight in may cause damage or malfunction.
SIM eject pin (sample)
15

B Pull out the au IC Card tray.
C Put the au IC Card into the au IC Card tray with the IC (metal) side facing down.Check the direction of the au IC Card, and place it securely in the au IC Card tray.Take care so that the au IC Card does not come out of the IC Card tray.Inserting the tray with the card not properly seated within may result in damage.
Notches
IC (metal) side
16

D Insert the au IC Card tray fully into the product straight and horizontally with the display side facing down.Push the areas indicated with ○ securely and make sure there is no space between the product and the au IC Card tray.
Inserting/removing the au IC Card tray ◎ Do not insert the au IC Card into the product directly. Place the au IC Card in the au IC Card tray, and then insert the whole tray into the product.
◎ Do not misplace or damage the au IC Card tray once it is removed. ◎ When removing the au IC Card tray from the main unit, pull out the card tray slowly and horizontally with the display side facing down. • Pulling out the au IC Card tray forcefully or at an angle may cause damage.
• When pulling out the au IC Card tray with the display side turned up or the product stood upright, the au IC Card will fall out of the au IC Card tray, and may be lost.
◎ When inserting the au IC Card tray into the main unit, insert the card tray slowly and horizontally with the display side facing down, and confirm that there are no space between the main unit and the au IC Card tray. • Do not insert the au IC Card tray the other way around. Doing so might cause damage to the au IC Card tray.
17

Removing the au IC Card
A Using the SIM eject pin (sample), pull out the au IC Card tray.When pulling this out, take care that the au IC Card does not come out of the IC Card tray and get lost.
B Remove the au IC Card from the au IC Card tray.
C Insert the au IC Card tray fully into the product straight and horizontally with the display side facing down.
Charging
ChargingThe internal battery is not fully charged at the time of purchase. Charge the battery before using the product. • If the performance of a battery does not recover even after charging (e.g. the usable time after each charge has become extremely short), the internal battery may be at the end of its service life. You can check battery charging performance by swiping left on home screen → [Settings] → [Battery Performance].
• While charging, the charging lamp is illuminated in red and the battery icon appears with superimposed. When charging is completed, the charging lamp is turned off.
18

◎ The product may become warm during charging, but this is not a malfunction.
◎ The interior of the product may get warm or hot depending on operation methods and the environment in which it is used. If this happens, charging may stop for safety reasons.
◎ Operating the product with the specified charger (sold separately) plugged in may result in repeated charge/discharge cycles in a short time. Frequent repeated charging shortens the internal battery life.
◎ Do not charge for a long time with the power left turned on. If the product is left turned on after charging is complete, the internal battery charge level decreases.In these cases, charge again with the specified charger (sold separately). However, depending on the time when the product is disconnected from the charger, the battery charge level may be low or the battery may only be usable for a short time.
◎ If the product is left for a long time even after the charging is completed, the battery capacity may decrease.
◎ If the battery empty alert is displayed and the power cannot be turned on, charge the battery for a while.
◎ When the battery becomes warm, charging may automatically stop even if the battery has not been fully charged. Charging automatically resumes after the temperature lowers to an appropriate temperature.
◎ If the charging lamp flashes in red, force the power off (zP. 22) and turn the product on again. If the lamp continues to flash, stop charging the internal battery and contact an au shop or the Repair and Delivery Support Center.
19

Charging with the Specified AC AdapterThis explains connecting the TypeC Common AC Adapter 02 (sold separately) and charging the product. For details on the specified AC adapter (sold separately), refer to the “取扱説明書 詳細版” (Full Instruction Manual) (Japanese).
A Insert the TypeC Common AC Adapter 02 (sold separately) power plug into an 100V AC outlet.
B Insert the USB Type-C plug of the TypeC Common AC Adapter 02 (sold separately) into the external connection jack of the product in the direction of the arrow.
100V ACoutlet
TypeC Common AC Adapter 02 (sold separately)
Externalconnection jack
USB Type-C plug
20

C When charging is completed, pull out the USB Type-C plug of the TypeC Common AC Adapter 02 (sold separately) straight from the external connection jack of the product.
D Remove the power plug of the TypeC Common AC Adapter 02 from the outlet.
◎ Charging while the product is turned on will still charge the product, however charging will take longer.
Charging with a PCThis explains how to charge the product by connecting this to a USB port on a PC that is capable of charging.
A Once the PC is fully started, connect the USB Type-A plug of the USB cable (sample) to the USB port on the PC.
B Connect the USB cable (sample) to the external connection jack on the product.If the product is connected to the PC while the product is turned on, the USB connection function will start and the PC will automatically connect to the Internet. Note that data communications may result in data communication charges being incurred.
External connection jack
USB Type-A plug
USB Type-C plug USB cable (sample)
21

◎ Charging over USB may take longer than when using the specified AC adapter (sold separately).
◎ If the USB cable (sample) is disconnected from the PC during data communications, data communications will be interrupted which may cause a malfunction or loss of data. Ensure care is taken.
◎ If you charge the internal battery when the battery has run out, the charging lamp may not illuminate. In this case, use the specified AC adapter (sold separately).
Turning the Power On/Off
Turning the Power On
A f (hold down for at least 2 seconds) when the power is turned off.
Turning the Power Off
A f (hold down for at least 2 seconds).
B [Power Off].
Rebooting the ProductThe product will turn off, and then restart.
A f (hold down for at least 2 seconds).
B [Reboot].
■ Turning the Power Off ForciblyTurn off the product forcibly when the screen becomes unresponsive, or will not turn off.
A f (hold down for at least 8 seconds).
22

◎ Note that settings and other content may be deleted if the power is turned off forcibly. Do not use this except when the product cannot be operated.
Locking/Unlocking the ScreenThe product will turn off if you either press f, or do not operate the product for a set period of time. When the screen is turned on, the lock screen is displayed.
■Unlocking the screen
A f while the screen is off.
B Slide to the right.
Configuring Initial SettingsWhen you turn the power on for the first time after purchasing the product, the screen of “初期設定ウィザード” (Easy Setting Wizard) is displayed automatically.* You can make settings for “初期設定ウィザード” (Easy Setting Wizard) by following
steps below as well. Swipe left on home screen → [Settings] → [Easy Setting Wizard].
■ STEP1: ようこそ (Welcome to Use)
A On the “ようこそ” (Welcome to Use), [スタート] (Start).When not making initial settings, tap “スキップ” (Skip) or “戻る” (Back).
■ STEP2: データ通信量 (Data Usage)
A Tap the current option of “データ通信量表示” (Show usage), “1ヶ月” (1 Month)/“3日” (3 Days)/“表示しない” (OFF).
B “1ヶ月” (1 Month)/“3日” (3 Days)/“表示しない” (OFF).
C Tap at the top left of the screen.
D “設定(1ヶ月)” (Settings (1 Month)) of “データ通信量設定” (Data Usage Settings).
23

E 最大通信量 (Max Data Usage)
Set for the data usage limit that you use this month. • Tap “TB”/“GB”/“MB” to set a unit.
自動リセット日 (毎月) (Auto Reset Date)
Set the date when data usage is reset automatically.
強制通信停止を許可 (Allow Communication Stop)
Stop performing communication when you set it to “ON” and data usage exceeds the limit.
F Tap at the top left of the screen.
G “設定(3日)” (Settings (3 Days)) of “データ通信量設定” (Data Usage Settings).
H 最大通信量 (Max Data Usage)
Set for the data usage limit that you use for three days. • Tap “TB”/“GB”/“MB” to set a unit.
I Tap at the top left of the screen.
J [次へ] (Next)
◎ Since the data usage is measured by the product, the amount of data is an approximation and it may differ from the actual.
◎ When “自動リセット日(毎月)” (Auto Reset Date) is set to “31”, the measured data is reset at 0:00 on 1st of next month.
■ STEP3: 省電力設定 (Power Saving Settings)Configure settings for saving the power. • When "Wi-Fi Sleep Mode" is set to "ON", if the wireless LAN (Wi-Fi®)-supported device is not connected and the product is not in use for a set period of time, the Wi-Fi® function will automatically Set to "OFF".
• If you set “Fast boot” to “ON”, the product will start faster the next time the power is turned on. However, compared to when “Fast boot” is set to “OFF”, the power consumption during powering off is higher.
24

A [Wi-Fiスリープ設定] (Wi-Fi Sleep Mode)
B スリープ設定 (Sleep Mode)
Set whether to use the sleep mode.
オフまでの時間 (Timeout)
Set the time until the Wi-Fi® function turns “OFF” automatically while “スリープ設定” (Sleep Mode) is set to “ON”.
C Tap at the top left of the screen.
D [クイック起動] (Fast Boot)
E Select / for the [クイック起動] (Fast Boot)
F Tap at the top left of the screen.
G [次へ] (Next)
■ STEP4: ソフトウェア更新の設定 (Software Update Settings)
A Select [はい] (Yes)/[いいえ] (No) of “自動更新” (Auto Update).
■ STEP5:Wi-Fi接続 (Wi-Fi Guide)
A Tap a connection method to use (“QRコードで接続” (QR Code Connection)/“WPS”/“手動接続”(Manual Connection)) in “Wi-Fi接続” (Wi-Fi Guide). • For details on “QRコードで接続” (QR Code Connection), refer to the steps after C of “Connecting by Using QR Code” (zP. 41).
• For details on “WPS”, refer to the steps after D of “Connecting by Using WPS” (zP. 36).
• For details on “手動接続” (Manual Connection), refer to the steps after D of “Connecting to the Device by Searching for the Access Point” (zP. 38).
B Tap at the top left of the screen.
C [終了] (Done)The home screen appears.
25

Switching the Display Language to English
A On the home screen → [設定] (Settings).
B [Language Setting].
C [English].
Resetting to Factory DefaultsYou can restore the product to its factory default settings.
■Resetting the Product to Factory Defaults
A With the product powered on, insert the tip of the SIM eject pin (sample) into the RESET button hole.
B Hold down the RESET button for at least 2 seconds.
C [OK].
SIM eject pin (sample)
◎ Resetting the product will clear all settings (with the exception of the PIN code). Prior to resetting, we recommend that you back up all data of this product. For details on backing up, refer to the “取扱説明書 詳細版” (Full Instruction Manual) (Japanese).
26

Using the Touch PanelThe product uses a touch panel, operated with your finger. • In the following cases, the touch panel may not work even if you touch it. These may also cause a malfunction. ・ Operation with a gloved finger ・ Operation with the tip of a fingernail ・ Operation with foreign object placed on the operation pad ・ Operation with a protective film or sticker applied ・ Operation with water droplets or condensation on the display ・ Operation using wet or sweaty fingers
■ TapTouch the screen and immediately release your finger. • Select items or icons displayed on the screen.
■ Slide/SwipeKeep touching the screen, and move your finger to the desired direction or position. • Scroll the screen or switch pages by tracing your finger in the desired direction.
27

Screen DisplayThe following information is shown on the home screen.
A Status icon display areaB Wi-Fi Guide
Connect devices supporting wireless LAN (Wi-Fi®) to the product by following the instructions on the screen. • For details, refer to “Connecting via Wireless LAN (Wi-Fi®)” (zP. 35).
C Switching PagesSwitch pages on the home screen. • Alternatively, you can switch pages by swiping left or right on home screen.
D Data UsageDisplays details of the amount of data used. Set the data usage display to show on the lock screen and home screen.
E Client ListCheck the number of devices currently connected to the product.
F Data usage displayThe data usage is displayed in accordance with the settings in “Data Usage”.
28
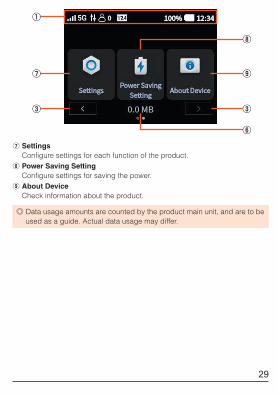
G SettingsConfigure settings for each function of the product.
H Power Saving SettingConfigure settings for saving the power.
I About DeviceCheck information about the product.
◎ Data usage amounts are counted by the product main unit, and are to be used as a guide. Actual data usage may differ.
29

IconsThe status icon display area displays status icons to show product status, including signal status and remaining battery capacity.
■Main Status Icons
Icon Overview to Signal strength (received signal)
to : Level : Searching • A small “R” is displayed at the upper left of the signal mark during international roaming.
“Communication Mode” indicator •
will be displayed to the right of the icon if the product is
currently communicating. • When there is no service, “OUT” is displayed.
Number of devices in connections indicator
“Wi-Fi Mode” indicator
DFS check indicator
USB connection indicator
Ethernet port connection indicator
Software update available indicator
Software update running to Battery level status
to : Remaining capacity : Charging error • While charging, the battery icon appears with superimposed.
• The remaining battery capacity is displayed with a percentage to the left of the battery mark.
• The current time is displayed to the right of the battery mark.
30

Message DisplayIn this product, communication status and information regarding failures are notified using messages.
Label Description
Please insert the SIM card. Displayed when there is no au IC Card inserted.
Enter PUK code. Displayed when the PIN code is locked.
Reach to max PUK retry. Please contact with customer service.
This message is displayed if the wrong PUK (PIN Unlock Key) code is input 10 times in a row.
5GHz is not available because the device is not in Japan.
Displayed when switching to 5 GHz mode when overseas.
5GHz is not available because the device is out of service.
Displayed when switching to 5 GHz mode when there is no service.
The connector is too hot.Please unplug the USB cable.
Displayed when the external connection jack becomes hot.
Communication is restricted because the device is hot. If the temperature continues higher, it may shut down.
Displayed when the main unit becomes hot.
31

Basic Operation
■ To Return to the Previous ScreenTap
at the top left of the screen.
■ To Return to the Home ScreenTap at the top right of the screen.
32

■ To Select ItemsTap the items to select.
If / are displayed, tap to select.
33
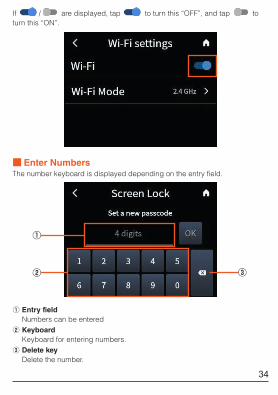
If / are displayed, tap to turn this “OFF”, and tap to turn this “ON”.
■ Enter NumbersThe number keyboard is displayed depending on the entry field.
A Entry fieldNumbers can be entered
B KeyboardKeyboard for entering numbers.
C Delete keyDelete the number.
34

Connecting via Wireless LAN (Wi-Fi®)
Using Wireless LAN (Wi-Fi®)This product is compliant with IEEE802.11a/b/g/n/ac/ax wireless LAN (Wi-Fi®), and supports wireless LAN (Wi-Fi®) connection with wireless LAN (Wi-Fi®) devices (PCs, smartphones, tablets, etc.) for data communications.Also, the product supports WPS, and if your wireless LAN (Wi-Fi®) device is compatible with the WPS function, wireless LAN (Wi-Fi®) connection is possible with a few simple steps.Even wireless LAN (Wi-Fi®) devices not compatible with the WPS function can connect easily by inputting the SSID and security key (password) set on this product.You can check the network names (SSID) and security key (password) for this product on the 無線LAN初期設定 (Wireless LAN Initialization) sticker (Japanese) included with the product, or using “SSID Information”. Furthermore, the network names (SSID) set as the factory default for this product are indicated with “SPW5_S01_XXXXXX_a” and “SPW5_S01_XXXXXX_b” (XXXXXX are the last 6 characters of the MAC address). Unless this is changed by the customer, any other displayed networks are nearby wireless LAN (Wi-Fi®) networks, therefore do not connect to these.
◎ If your wireless LAN (Wi-Fi®)-supported device is not compatible with Security (Encryption Mode) “WPA3”, “WPA2/WPA” is required for wireless LAN (Wi-Fi®) connection. Refer to the instruction manual for your wireless LAN (Wi-Fi®)-supported device to determine if it supports Security (Encryption Mode) “WPA3”. • For details on Security (Encryption Mode), refer to the “取扱説明書 詳細版” (Full Instruction Manual) (Japanese).
35

Using 5 GHzThis product is legally required by the Radio Law to include DFS functionality in order to prevent radio interference in the wireless LAN (Wi-Fi®) 5-GHz band. The wireless LAN (Wi-Fi®) 5-GHz frequency band used by the product is also used by weather radars and other radio equipment, therefore depending where it is used, the product may interfere with these.Accordingly, if weather radar or other similar frequencies are detected when this product is using the wireless LAN (Wi-Fi®) 5-GHz band, then the DFS function will operate and switch the product to use a different wireless LAN (Wi-Fi®) 5-GHz channel in order to prevent radio interference.For details on the 5-GHz band being used, refer to the “取扱説明書 詳細版” (Full Instruction Manual) (Japanese).
Connecting by Using WPSIf the wireless LAN (Wi-Fi®)-supported device supports the WPS push button method, you can easily set the SSID and security method required for the connection. Refer to the instruction manual for your wireless LAN (Wi-Fi®)-supported device to determine if it supports the WPS push button method. • To use WPS, you must set “Security (Encryption Mode)” on the product to “WPA2-PSK(AES)” or “WPA/WPA2-PSK(AES+TKIP)”.
■Use on this product
A f (power key) (for at least 2 seconds).The product power will turn on. Wi-Fi® functionality will turn “ON”, and the product will automatically connect to the Internet with the default settings.
will be displayed if the product successfully connects to the Internet.
■Use on wireless devices supporting wireless LAN (Wi-Fi®)
B Open the connection settings screen and set up the WPS connection as necessary.Operating methods will differ depending on the device supporting wireless LAN (Wi-Fi®). For details, refer to the instruction manual for your device supporting wireless LAN (Wi-Fi®).
36

■Use on this product
C On the home screen → [Wi-Fi Guide] → [WPS].
D [Start WPS].
37

■Use on wireless devices supporting wireless LAN (Wi-Fi®)
E Push the WPS button. • Operating methods will differ depending on the device supporting wireless LAN (Wi-Fi®). For details, refer to the instruction manual for your device supporting wireless LAN (Wi-Fi®).
• It will take about two minutes until the setup procedures is completed. • The setup procedure is completed when “WPS connected successful.” is displayed on the product.
Connecting to the Device by Searching for the Access Point
You can manually connect your device supporting wireless LAN (Wi-Fi®) to this product if it does not support WPS or if the WPS connection does not work.
■Use on this product
A f (power key) (for at least 2 seconds).The product power will turn on. Wi-Fi® functionality will turn “ON”, and the product will automatically connect to the Internet with the default settings.
will be displayed if the product successfully connects to the Internet.
B On the home screen → [Wi-Fi Guide].
38

C [Manual Connection] . • The SSID, password, and security (encryption mode) of the product will be displayed.
• If using “SSID B”, turn “Enabled” to “ON”.
■Use on wireless devices supporting wireless LAN (Wi-Fi®)
D Open the connection settings screen and search for the access point. • If you turn “ON” the Wi-Fi® function on your device supporting wireless LAN (Wi-Fi®), and select the menu item with a label similar to “Connect to access point” or “Search”, the list of nearby access points will be displayed.
• Operating methods will differ depending on the device supporting wireless LAN (Wi-Fi®). For details, refer to the instruction manual for your device supporting wireless LAN (Wi-Fi®).
E Select the item that displays the SSID of the product from the list of access points.
F Enter the password and save the settings. • Depending on the device supporting wireless LAN (Wi-Fi®), a security (encryption mode) selection screen may be displayed. Select the same encryption mode that was set for “Security (Encryption Mode)” on the product. For details on the “Security (Encryption Mode)”, refer to the “取扱説明書 詳細版” (Full Instruction Manual) (Japanese).
39

■無線LAN初期設定 (Wireless LAN Initialization) sticker (Japanese)To connect the product to devices (PCs, smartphones, tablets, etc.) supporting wireless LAN (Wi-Fi®) (below: Wi-Fi® devices) via wireless LAN (Wi-Fi®), entry of the network name (SSID) and the security key (password) is required.*
The network name (SSID) and security key (password) are printed on the 無線LAN初期設定 (Wireless LAN Initialization) sticker (Japanese) (default settings).The sticker is needed to connect the product to Wi-Fi® devices after you purchased the product or reset the product, therefore ensure this is kept safe.* If using the WPS function to connect the product to Wi-Fi® devices, then entry of the
network name (SSID) and security key (password) is not required.
40

Connecting by Using QR CodeYou can automatically connect devices supporting wireless LAN (Wi-Fi®) to this product by reading the QR code displayed on this product with the camera on the connecting device. Supported operating systems are Android™ 10 or later, and iOS 11 or later.This example describes the procedure for Android 10.
■Use on this product
A f (power key) (for at least 2 seconds).The product power will turn on. Wi-Fi® functionality will turn “ON”, and the product will automatically connect to the Internet with the default settings.
will be displayed if the product successfully connects to the Internet.
B On the home screen → [Wi-Fi Guide] → [QR Code Connection].A QR code will be displayed on the product.
■Operation on Android
C On the App list screen, [Settings]→[Network & internet]→[Wi-Fi].
D Set “Use Wi-Fi” to ON.
41

E Tap .
F Read the QR code displayed on the product with the camera → Follow the instructions on the screen.The device will be connected to the product.
◎ As for the model of Android 9 Pie and earlier, the QR code reader installed on your Android™ smartphone may not be able to automatically perform Wi-Fi® settings. Install the QR code reader from the link below. (http://k-tai.sharp.co.jp/support/a/x01/peripherals/qrapl.html) (Japanese)
42

Communicating via a connected LAN cable (commercially available)
You can use the product as a wired router (compatible with 2.5GBASE-T). You can connect it to the Internet via wired LAN connection by connecting the product and an Ethernet port installed device such as your PC with a LAN cable (commercially available). • You can connect a wireless LAN (Wi-Fi®) compatible device to the product at the same time that you connect a LAN cable (commercially available) to it.
• Check the direction of the LAN cable (commercially available) connector and insert it horizontally into the product.
A f (power key) (for at least 2 seconds).The product power will turn on. Wi-Fi® functionality will turn “ON”, and the product will automatically connect to the Internet with the default settings.
will be displayed if the product successfully connects to the Internet.
B Insert connectors of a LAN cable (commercially available) into the Ethernet port of the product and the Ethernet port of a PC.
LAN cable (commercially available)
Connector of LAN cable (commercially available)
Ethernet port
To Ethernet port of PC
43

◎ The wired LAN function of the product will be stopped if the communication with connected devices using a LAN cable (commercially available) is not be performed for a set period of time. If you reconnect the cable after the wired LAN function is stopped, press f to turn the screen on.
Setting ToolYou can configure the various functions of the product using a web browser from a PC or mobile device connected to the product.This example describes the procedure for connecting a PC via Wi-Fi®. The screens may differ depending on your operating system and web browser. • When using the setting tool, turn off the screen of the product. If a screen other than the touch panel lock screen is displayed when using the setting tool, the settings may be canceled and you may be logged out of the setting tool.
Displaying the Setting Tool
A Start the PC and connect to the product.
B Start a web browser and enter “http://(host IP address of the product)” or “(http://web.setting) ” in the address bar. • The default setting for “Host IP Address” is “192.168.128.1”. • The setting tool “Home” screen will be displayed.
C Click “Login” → enter password → click “Login”. • Enter uppercase and lowercase characters correctly. • The default password is the last 6 digits of the IMEI information (international mobile equipment identity number).
• You can check the IMEI information (international mobile equipment identity number) by operating the product as follows. Swipe left on home screen → [About Device].
44
• When you use the last 6 digits of the IMEI information (international mobile equipment identity number) for the password, you need to change the password before logging in. Follow the instructions on the screen to change the password, and keep the password secret. 8 to 32 single-byte upper- and lower-case alphanumeric characters/symbols (except “,” “"” “:” “;” “¥” “\” “&” “%” “+” “'” “<” “>” “?”) can be set.
• Log out: In the setting tool screen → click “Logout” → “Yes”.
◎ You will be logged out automatically if no operations are performed for approximately 10 minutes. Be aware that any items that were entered will be deleted.
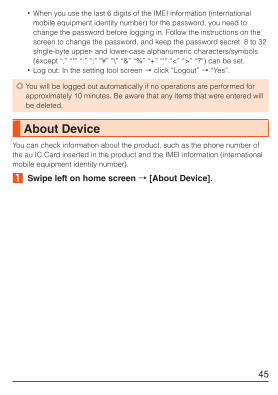
About DeviceYou can check information about the product, such as the phone number of the au IC Card inserted in the product and the IMEI information (international mobile equipment identity number).
A Swipe left on home screen → [About Device].
45

Updating SoftwareThis product supports updates to its software. To start update, use one of the following methods.
■Updating the Software AutomaticallyThe product will update its software automatically when it receives update information.
A Swipe left on home screen → [Settings] → [Software Update] → [Auto Update], set to “ON”.To specify the time to update, tap “Update Time”, and select the time to carry out the update.
■Updating the Software Immediately
A Swipe left on home screen → [Settings] → [Software Update] → [Software Update].
B [Update] When the confirmation screen is displayed, check the content and select “OK”. • “The software is up to date.” will be displayed if the software does not require updating.
◎ You can also use the same operations to update the software from the setting tool. For details, refer to the “取扱説明書 詳細版” (Full Instruction Manual) (Japanese).
■Cautions in Usage • When connecting the product to the Internet for data communications, data charges will be incurred.
• Regardless of automatic update settings, the product will automatically check if its software is up to date at the following times. ・ When starting the product ・ During start-up of the product ・ When updating software
46

• When software update is required, you will be notified of this on the au website and through other means. For details, contact an au shop or Customer Center (call toll-free 157).
• You are recommended to back up your setting contents before performing an update.
• Completion of software update requires that the product be restarted. • If software update fails or is interrupted, perform software update again. • If the software update fails, it may become impossible to operate the product. If this happens, bring it to an au shop or Toyota store (not accepted by some shops).
• Fully charge the battery before performing an update. Update will fail if the battery capacity is low or will drop to low levels during update.
• Check signal status. Software update may fail if performed in a location where the signal is weak.
• Even if a software update is performed, settings information registered on the product will be changed. However, please be aware that depending on product status (malfunction, damage, water, etc.), saving of data cannot be guaranteed.
• When used overseas, the software update function is not available. • During software update, the product is not available.
47

Troubleshooting
If this happens Check thisWi-Fi® doesn't connect • Is the Wi-Fi® signal strong enough?
• Has Wi-Fi® been set up? • Check the product and the wireless LAN (Wi-Fi®)-supported device to determine that their Wi-Fi functionality have been turned “ON”.
• Check if the correct password has been entered.
“OUT” is displayed • Is the signal strong enough? • Are you outside of the service area? • Is the correct au IC Card inserted?
“5G”is not displayed/ Connected with LTE
• Is the signal strong enough? • Is your hand off the area around the 5G/4G antenna or 5G antenna?
• Make sure “Communication Mode” is not set to “LTE”.
• Does the product become warm? The product may become warm when using the product continuously or while charging. If the product becomes warm, the communication will be restricted and switched to LTE communication for safety. It may also shut down if the product remains warm.
The PC connected with a USB cable does not recognize the product
• Check if the product is correctly connected to the PC with a USB cable (sample)
• Disconnect the USB cable (sample) from the PC, restart the PC, and then reconnect the cable.
• Make sure a USB hub or conversion plug is not used. Using a USB hub or conversion plug may prevent the product from working normally.
48
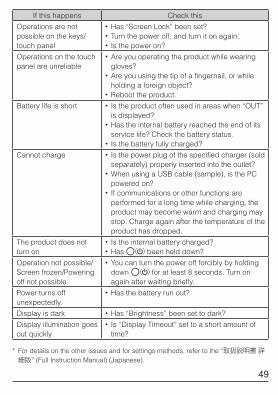
If this happens Check thisOperations are not possible on the keys/touch panel
• Has “Screen Lock” been set? • Turn the power off, and turn it on again. • Is the power on?
Operations on the touch panel are unreliable
• Are you operating the product while wearing gloves?
• Are you using the tip of a fingernail, or while holding a foreign object?
• Reboot the product.Battery life is short • Is the product often used in areas when “OUT”
is displayed? • Has the internal battery reached the end of its service life? Check the battery status.
• Is the battery fully charged?Cannot charge • Is the power plug of the specified charger (sold
separately) properly inserted into the outlet? • When using a USB cable (sample), is the PC powered on?
• If communications or other functions are performed for a long time while charging, the product may become warm and charging may stop. Charge again after the temperature of the product has dropped.
The product does not turn on
• Is the internal battery charged? • Has f been held down?
Operation not possible/Screen frozen/Powering off not possible
• You can turn the power off forcibly by holding down f for at least 8 seconds. Turn on again after waiting briefly.
Power turns off unexpectedly.
• Has the battery run out?
Display is dark • Has “Brightness” been set to dark?Display illumination goes out quickly
• Is “Display Timeout” set to a short amount of time?
* For details on the other issues and for settings methods, refer to the “取扱説明書 詳細版” (Full Instruction Manual) (Japanese).
49
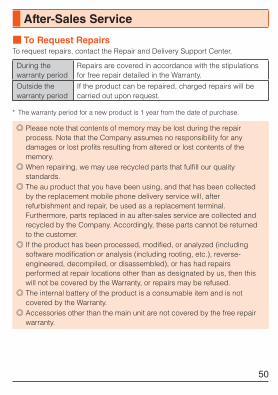
After-Sales Service
■ To Request RepairsTo request repairs, contact the Repair and Delivery Support Center.
During the warranty period
Repairs are covered in accordance with the stipulations for free repair detailed in the Warranty.
Outside the warranty period
If the product can be repaired, charged repairs will be carried out upon request.
* The warranty period for a new product is 1 year from the date of purchase.
◎ Please note that contents of memory may be lost during the repair process. Note that the Company assumes no responsibility for any damages or lost profits resulting from altered or lost contents of the memory.
◎ When repairing, we may use recycled parts that fulfill our quality standards.
◎ The au product that you have been using, and that has been collected by the replacement mobile phone delivery service will, after refurbishment and repair, be used as a replacement terminal. Furthermore, parts replaced in au after-sales service are collected and recycled by the Company. Accordingly, these parts cannot be returned to the customer.
◎ If the product has been processed, modified, or analyzed (including software modification or analysis (including rooting, etc.), reverse-engineered, decompiled, or disassembled), or has had repairs performed at repair locations other than as designated by us, then this will not be covered by the Warranty, or repairs may be refused.
◎ The internal battery of the product is a consumable item and is not covered by the Warranty.
◎ Accessories other than the main unit are not covered by the free repair warranty.
50

■Replacement PartsWe guarantee availability of replacement parts for our Speed Wi-Fi 5G X01 main unit and its peripheral devices for a period of 4 years after the end of production. Replacement parts are those required to maintain the functionality of the product.
■WarrantyAt the store at which you purchase the product, confirm that the Warranty has been filled in with the date of purchase and name of the store, read its contents carefully, and ensure that you keep the Warranty in a safe location.
■Repair and Delivery SupportIn order that you can use the au device with peace of mind for a long period of time, au provides an after-sales service called “Repair and Delivery Support” with a monthly subscription. This service provides compensation to cover a range of issues including damage, theft, and loss. For details on the monthly pricing and services provided, refer to the au website.(https://www.au.com/mobile/service/kosho-funshitsu/) (Japanese)
◎ Subscription to this service is only available at the time of purchase of an au device.
◎ If you cancel your subscription, recommencing subscription will not be possible until the next time you purchase an au device.
◎ If you change your device or increase the number of devices you own, then this service will only cover the most recently purchased au device.
◎ If ownership of the au device is transferred or otherwise passed on, then the membership of the Repair and Delivery Support will also be transferred or passed on.
◎ If you purchase a new au device, thus changing your device or increasing the number of devices you own, then the Repair and Delivery Support that applied to the previous au device will automatically be canceled.
◎ Details of the service are subject to change without prior notice.
51

■ au IC CardThe au IC Card is lent to you by au. In case of loss or damage, the card will be replaced at your expense. When malfunction is suspected, or in case of theft or loss, contact an au shop or Toyota store.
Main specifications and peripheral devices
For details of main specifications and the peripheral devices, please refer to the “取扱説明書 詳細版” (Full Instruction Manual) (Japanese) on the au website.(https://www.au.com/support/service/mobile/guide/manual/) (Japanese)
52

Regulatory information
Hereby, SHARP CORPORATION declares that the radio equipment type SHR01 is in compliance with Directive 2014/53/EU.The full text of the EU declaration of conformity is available at the following internet address:(https://jp.sharp/k-tai/) (Japanese)
Manufacturer's Address:SHARP CORPORATION,1 Takumi-cho, Sakai-ku, Sakai-shi, Osaka 590-8522, Japan
• Description of accessoriesUSB cable For charging, peripherals, etc.
nano IC card au Nano IC Card 04 LE/non-au Nano IC Cardsnon-au Nano IC Cards can be used after SIM-unlocking the device.
53

• Frequency range of supported bands in EU
WCDMA FDD Ⅰ Tx 1922.4 to 1977.6 MHzRx 2112.4 to 2167.6 MHz
WCDMA FDD Ⅷ Tx 882.4 to 912.6 MHzRx 927.4 to 957.6 MHz
LTE Band 1Tx 1922.5 to 1977.5 MHzRx 2112.5 to 2167.5 MHz
LTE Band 3Tx 1710.7 to 1784.3 MHzRx 1805.7 to 1879.3 MHz
LTE Band 7Tx 2502.5 to 2567.5 MHzRx 2622.5 to 2687.5 MHz
LTE Band 8Tx 880.7 to 914.3 MHzRx 925.7 to 959.3 MHz
LTE Band 20Tx 834.5 to 859.5MHz Rx 793.5 to 818.5MHz
LTE Band 28Tx 704.5 to 746.5 MHzRx 759.5 to 801.5 MHz
LTE Band 38Tx 2572.5 to 2617.5 MHzRx 2572.5 to 2617.5 MHz
WLAN 2.4 GHzTx/Rx 2412 to 2472 MHz (BW:20MHz)Tx/Rx 2422 to 2462 MHz (BW:40MHz)
54

• Maximum transmit powerWCDMA FDD Ⅰ +24 dBm (Power Class3)
WCDMA FDD Ⅷ +24 dBm (Power Class3)
LTE Band 1 +23 dBm (Power Class3)
LTE Band 3 +23 dBm (Power Class3)
LTE Band 7 +23 dBm (Power Class3)
LTE Band 8 +23 dBm (Power Class3)
LTE Band 20 +23 dBm (Power Class3)
LTE Band 28 +23 dBm (Power Class3)
LTE Band 38 +23 dBm (Power Class3)
WLAN 2.4 GHz +18 dBm (ANT0 + ANT1)
■Battery - CAUTIONUse specified Charger only.Non-specified equipment use may cause malfunctions, electric shock or fire due to battery leakage, overheating or bursting.
The battery is embedded inside the product. Avoid removing the embedded battery since this may cause overheating or bursting.
Do not dispose of the product with ordinary refuse. Take the product to an au Shop, or follow the local disposal regulations.
Charge battery in ambient temperatures between 5°C and 35°C; outside this range, battery may leak/overheat and performance may deteriorate.
■ European RF Exposure InformationYour mobile device is a radio transmitter and receiver. It is designed not to exceed the limits for exposure to radio waves recommended by international guidelines. These guidelines were developed by the independent scientific organization ICNIRP and include safety margins designed to assure the protection of all persons, regardless of age and health.
55

The guidelines use a unit of measurement known as the Specific Absorption Rate, or SAR.The SAR limit for mobile devices is 2 W/kg and the highest SAR value for this device when worn on the body is 1.90 W/kg*.For body-worn operation, this mobile device has been tested and meets the RF exposure guidelines when used with an accessory containing no metal and positioning the device a minimum of 5 mm from the body. Use of other accessories may not ensure compliance with RF exposure guidelines.As SAR is measured utilizing the devices highest transmitting power the actual SAR of this device while operating is typically below that indicated above. This is due to automatic changes to the power level of the device to ensure it only uses the minimum level required to reach the network.The World Health Organization has stated that present scientific information does not indicate the need for any special precautions for the use of mobile devices. They note that if you want to reduce your exposure then you can do so by limiting the length of calls or using a hands-free device to keep the mobile phone away from the head.
* The tests are carried out in accordance with international guidelines for testing.
FCC Notice־ This device complies with part 15 of the FCC Rules. Operation is subject to
the following two conditions: (1) This device may not cause harmful interference, and (2) this device must accept any interference received, including interference that may cause undesired operation.
־ Changes or modifications not expressly approved by the manufacturer responsible for compliance could void the user's authority to operate the equipment.
־ The device is electronically labeled and the FCC ID can be displayed in the About Device menu.
56

■ Information to UserThis equipment has been tested and found to comply with the limits of a Class B digital device, pursuant to Part 15 of the FCC Rules. These limits are designed to provide reasonable protection against harmful interference in a residential installation. This equipment generates, uses and can radiate radio frequency energy and, if not installed and used in accordance with the instructions, may cause harmful interference to radio communications.
However, there is no guarantee that interference will not occur in a particular installation; if this equipment does cause harmful interference to radio or television reception, which can be determined by turning the equipment off and on, the user is encouraged to try to correct the interference by one or more of the following measures:
1. Reorient/relocate the receiving antenna.2. Increase the separation between the equipment and receiver.3. Connect the equipment into an outlet on a circuit different from
that to which the receiver is connected.4. Consult the dealer or an experienced radio/TV technician for
help and for additional suggestions.
WarningThe user is cautioned that changes or modifications not expressly approved by the manufacturer could void the user's authority to operate the equipment.
57

■ FCC RF Exposure InformationYour device is a radio transmitter and receiver. It is designed and manufactured not to exceed the emission limits for exposure to radio frequency (RF) energy set by the Federal Communications Commission of the U.S. Government.
The guidelines are based on standards that were developed by independent scientific organizations through periodic and thorough evaluation of scientific studies. The standards include a substantial safety margin designed to assure the safety of all persons, regardless of age and health.
The exposure standard for wireless devices employs a unit of measurement known as the Specific Absorption Rate, or SAR. The SAR limit set by the FCC is 1.6 W/kg.
Highest SAR value:
Model SHR01
FCC ID APYHRO00283
On the Body 1.38W/kg
This device was tested for typical body-worn operations with the back of the device kept 1.0 cm from the body. To maintain compliance with FCC RF exposure requirements, use accessories that maintain a 1.0 cm separation distance between the user's body and the back of the device. The use of belt clips, holsters and similar accessories should not contain metallic components in its assembly.
The use of accessories that do not satisfy these requirements may not comply with FCC RF exposure requirements, and should be avoided.
The FCC has granted an Equipment Authorization for this model device with all reported SAR levels evaluated as in compliance with the FCC RF emission guidelines. SAR information on this model device is on file with the FCC and can be found at (https://www.fcc.gov/oet/ea/fccid) under the Display Grant section after searching on the corresponding FCC ID (see table above).
Additional information on Specific Absorption Rates (SAR) can be found on the FCC website at (https://www.fcc.gov/general/radio-frequency-safety-0).
58

【Dear customers】
Thank you for buying the Speed Wi-Fi 5G X01.We would like to announce the following change made to the content in Quick Start Guide of the Speed Wi-Fi 5G X01.
■Changes in Edition 1.1
• “Setting Communication Mode/Performance” - “Performance Setting” (P.8)old) Performance Set a performance to use.
4x4MIMO Setting If you set it to “ON”, the antenna setting is changed and communication speed is increased. However, more electric power than usual is used. • You cannot set it to “ON” in “ECO” mode.
New) Performance Set a performance to use. • If you set “Communication Mode” to “5G/LTE (Auto)”, Performance is automatically changed to “High Performance”.
• “Configuring Initial Settings” - “STEP3” (P.24)old) ■ STEP3: Wi-Fiスリープ設定 (Wi-Fi Sleep Mode)
Set whether to automatically set Wi-Fi® function to “OFF” when the wireless LAN (Wi-Fi®)-supported device is not connected and the product is not in use for a set period of time.
A [Wi-Fiスリープ設定] (Wi-Fi Sleep Mode)

B スリープ設定 (Sleep Mode)
Set whether to use the sleep mode.
オフまでの時間 (Timeout)
Set the time until the Wi-Fi® function turns “OFF” automatically while “スリープ設定” (Sleep Mode) is set to “ON”.
C Tap at the top left of the screen.
D [次へ] (Next)
New) ■ STEP3: 省電力設定 (Power Saving Settings)Configure settings for saving the power. • When "Wi-Fi Sleep Mode" is set to "ON", if the wireless LAN (Wi-Fi®)-supported device is not connected and the product is not in use for a set period of time, the Wi-Fi® function will automatically Set to "OFF".
• If you set “Fast boot” to “ON”, the product will start faster the next time the power is turned on. However, compared to when “Fast boot” is set to “OFF”, the power consumption during powering off is higher.
A [Wi-Fiスリープ設定] (Wi-Fi Sleep Mode)
B スリープ設定 (Sleep Mode)
Set whether to use the sleep mode.
オフまでの時間 (Timeout)
Set the time until the Wi-Fi® function turns “OFF” automatically while “スリープ設定” (Sleep Mode) is set to “ON”.
C Tap at the top left of the screen.
D [クイック起動] (Fast Boot)
E Select / for the [クイック起動] (Fast Boot)
F Tap at the top left of the screen.
G [次へ] (Next)

• “Screen Display” (P.28, P.29)Change the home screen.
• “Screen Display” - “Icons” - “Main Status Icons” (P.30)old) Icon Overview
“Wi-Fi Mode” indicator
New) Icon Overview “Wi-Fi Mode” indicator
• “Connecting via Wireless LAN (Wi-Fi®)” - “Using Wireless LAN (Wi-Fi®)” (P.35)old) You can check the network names (SSID) and security key
(password) for this product on the 無線LAN初期設定 (Wireless LAN Initialization) sticker (Japanese) included with the product, or using “SSID Information”. Furthermore, the network names (SSID) set as the factory default for this product are indicated with “SPW5_S01_XXXXXX_a” (XXXXXX are the last 6 characters of the MAC address). Unless this is changed by the customer, any other displayed networks are nearby wireless LAN (Wi-Fi®) networks, therefore do not connect to these.
New) You can check the network names (SSID) and security key (password) for this product on the 無線LAN初期設定 (Wireless LAN Initialization) sticker (Japanese) included with the product, or using “SSID Information”. Furthermore, the network names (SSID) set as the factory default for this product are indicated with “SPW5_S01_XXXXXX_a” and “SPW5_S01_XXXXXX_b” (XXXXXX are the last 6 characters of the MAC address). Unless this is changed by the customer, any other displayed networks are nearby wireless LAN (Wi-Fi®) networks, therefore do not connect to these.

• “Connecting via Wireless LAN (Wi-Fi®)” - “Connecting to the Device by Searching for the Access Point” Step No.C (P.39)old) • The SSID, password, and security (encryption mode) of the
product will be displayed.
New) • The SSID, password, and security (encryption mode) of the product will be displayed.
• If using “SSID B”, turn “Enabled” to “ON”.
• “Troubleshooting” (P.48)old) not listed
New) If this happens Check this“5G”is not displayed/ Connected with LTE
• Is the signal strong enough? • Is your hand off the area around the 5G/4G antenna or 5G antenna?
• Make sure “Communication Mode” is not set to “LTE”.
• Does the product become warm? The product may become warm when using the product continuously or while charging. If the product becomes warm, the communication will be restricted and switched to LTE communication for safety. It may also shut down if the product remains warm.
• “After-Sales Service” - “To Request Repairs” (P.50)old) ◎ The internal battery of the product is not covered by the free
repair warranty, except where attributable to defects in the battery materials or manufacturing.
New) ◎ The internal battery of the product is a consumable item and is not covered by the Warranty.

Cell phone and PHS operators collect and recycle unused telephones, batteries and battery chargers at stores bearing the logo regardless of brand and manufacturer to protect the environment and reuse valuable resources.
For inquiries, call:
In case of theft, loss, or malfunction (7 days a week / toll free)
In case above numbers are not available, call toll-free:
0120-925-314
From au mobile phones: From non-au mobile phones / general subscriber phones:
Customer CenterFor general information (7 days a week / toll free)From au mobile phones: From non-au mobile phones / general subscriber phones:
In case above numbers are not available, call toll-free:
0120-977-033 (except Okinawa) 0120-977-699 (Okinawa)
Corporate Customer Center (For corporate contractors)For general information (toll free)Business hours: 9:00 to 19:00 (Weekday), 9:00 to 18:00 (Saturday, Sunday, Holiday) *Except during the year change period
From au mobile phones:
0077-7-113113
0077-7-111157
Business hours: 24 hours
Business hours: 9:00 to 20:00
area code not required
Repair and Delivery Support CenterFor theft, loss, or malfunction (toll free)Business hours: 9:00 to 20:00 (7 days a week)
From non-au mobile phones / general subscriber phones:
0120-925-0410077-7041
area code not required
From au mobile phones / non-au mobile phones / general subscriber phones:
0120-925-919