Embed Size (px)
Citation preview

QUICK-START INSTALLATION GUIDE
Axia® QuasarAoIP Mixing Console
Welcome to Axia Quasar
Setup of a networked audio mixing console, though we have made it as easy as possible, is challenging to condense into a few pages. The following material is intended to help the busy engineer get up and running in a few minutes.
This Quickstart Guide assumes a few things:
• That the reader has some knowledge of network basics and terminology • That the reader is familiar with other Axia Livewire products • And that the reader has a network switch correctly configured for Livewire
We will take you through the basic steps to configure your new Quasar and have you up and running in no time. But before we get started, let’s make sure you are familiar with the Quasar System anatomy.
TelosAlliance.com
QUICK-START INSTALLATION GUIDE
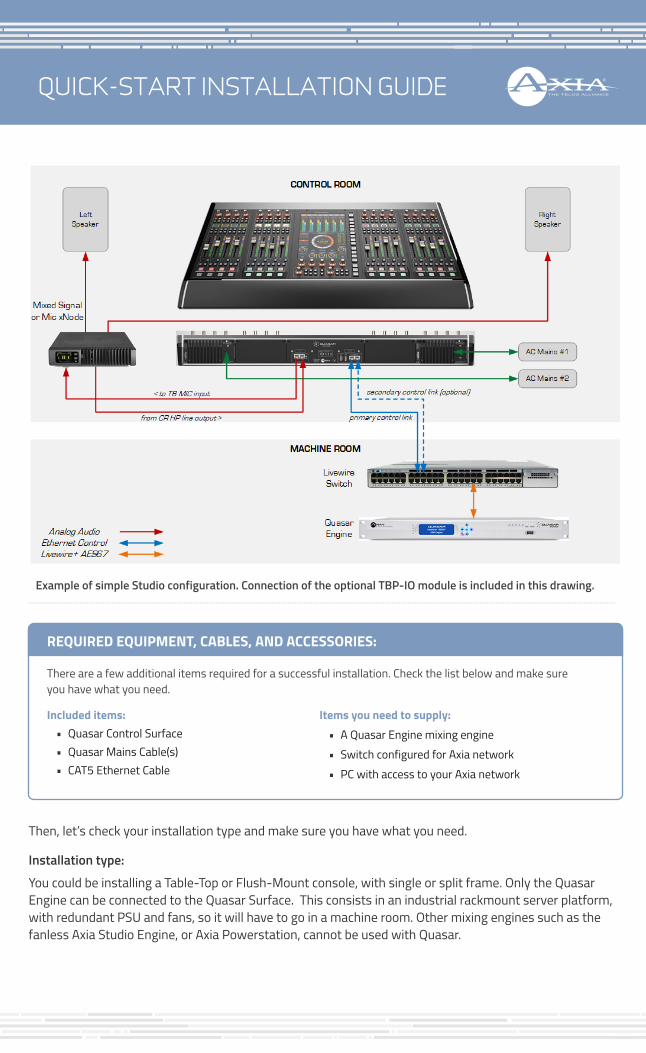
Example of simple Studio configuration. Connection of the optional TBP-IO module is included in this drawing.
Items you need to supply: • A Quasar Engine mixing engine • Switch configured for Axia network • PC with access to your Axia network
REQUIRED EQUIPMENT, CABLES, AND ACCESSORIES:
There are a few additional items required for a successful installation. Check the list below and make sure you have what you need.
Included items: • Quasar Control Surface • Quasar Mains Cable(s) • CAT5 Ethernet Cable
Then, let’s check your installation type and make sure you have what you need.
Installation type: You could be installing a Table-Top or Flush-Mount console, with single or split frame. Only the Quasar Engine can be connected to the Quasar Surface. This consists in an industrial rackmount server platform, with redundant PSU and fans, so it will have to go in a machine room. Other mixing engines such as the fanless Axia Studio Engine, or Axia Powerstation, cannot be used with Quasar.
QUICK-START INSTALLATION GUIDE
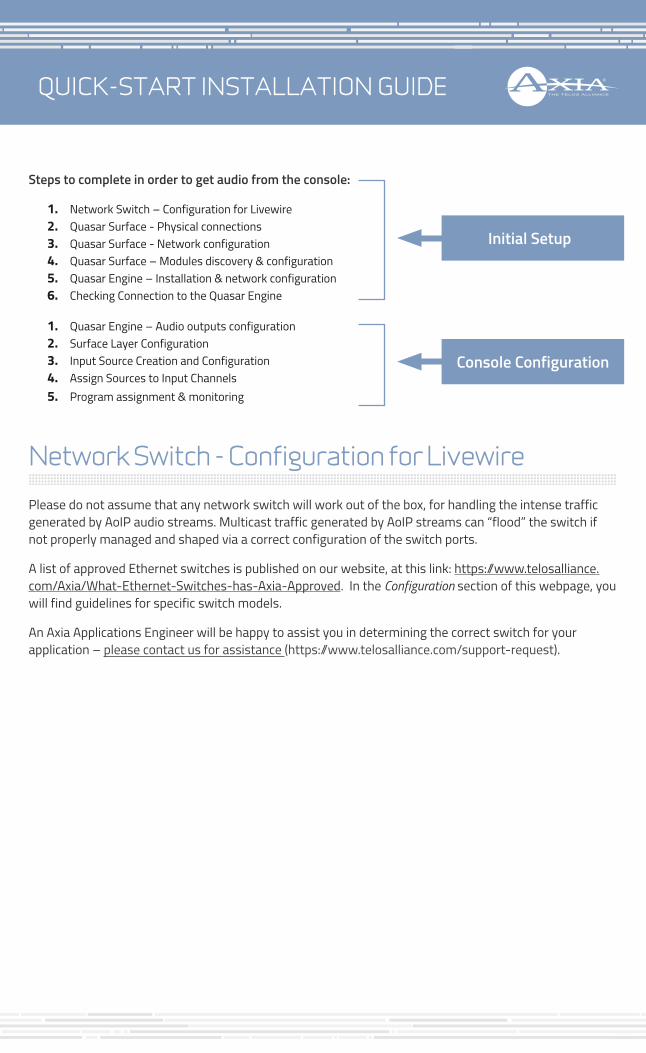
Steps to complete in order to get audio from the console:
1. Network Switch – Configuration for Livewire2. Quasar Surface - Physical connections3. Quasar Surface - Network configuration4. Quasar Surface – Modules discovery & configuration5. Quasar Engine – Installation & network configuration6. Checking Connection to the Quasar Engine
1. Quasar Engine – Audio outputs configuration2. Surface Layer Configuration3. Input Source Creation and Configuration4. Assign Sources to Input Channels5. Program assignment & monitoring
Network Switch - Configuration for Livewire
Please do not assume that any network switch will work out of the box, for handling the intense traffic generated by AoIP audio streams. Multicast traffic generated by AoIP streams can “flood” the switch if not properly managed and shaped via a correct configuration of the switch ports.
A list of approved Ethernet switches is published on our website, at this link: https://www.telosalliance.com/Axia/What-Ethernet-Switches-has-Axia-Approved. In the Configuration section of this webpage, you will find guidelines for specific switch models.
An Axia Applications Engineer will be happy to assist you in determining the correct switch for your application – please contact us for assistance (https://www.telosalliance.com/support-request).
Initial Setup
Console Configuration
QUICK-START INSTALLATION GUIDE
Quasar Surface - Physical connections
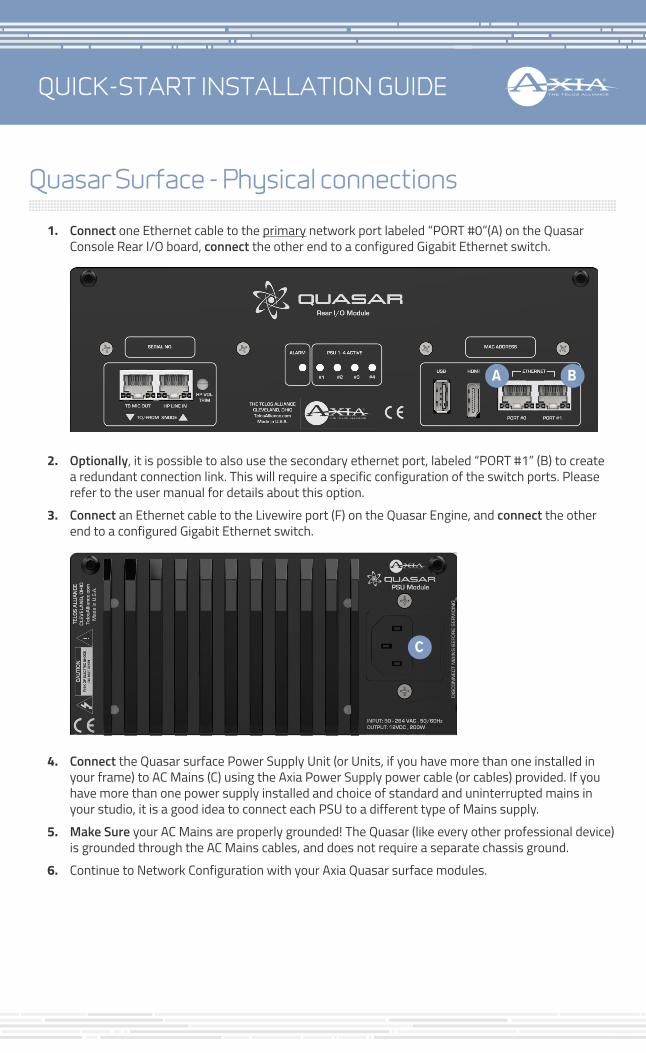
1. Connect one Ethernet cable to the primary network port labeled “PORT #0”(A) on the Quasar Console Rear I/O board, connect the other end to a configured Gigabit Ethernet switch.
A B
2. Optionally, it is possible to also use the secondary ethernet port, labeled “PORT #1” (B) to create a redundant connection link. This will require a specific configuration of the switch ports. Please refer to the user manual for details about this option.
3. Connect an Ethernet cable to the Livewire port (F) on the Quasar Engine, and connect the other end to a configured Gigabit Ethernet switch.
C
4. Connect the Quasar surface Power Supply Unit (or Units, if you have more than one installed in your frame) to AC Mains (C) using the Axia Power Supply power cable (or cables) provided. If you have more than one power supply installed and choice of standard and uninterrupted mains in your studio, it is a good idea to connect each PSU to a different type of Mains supply.
5. Make Sure your AC Mains are properly grounded! The Quasar (like every other professional device) is grounded through the AC Mains cables, and does not require a separate chassis ground.
6. Continue to Network Configuration with your Axia Quasar surface modules.
QUICK-START INSTALLATION GUIDE
Quasar Surface - Network configuration
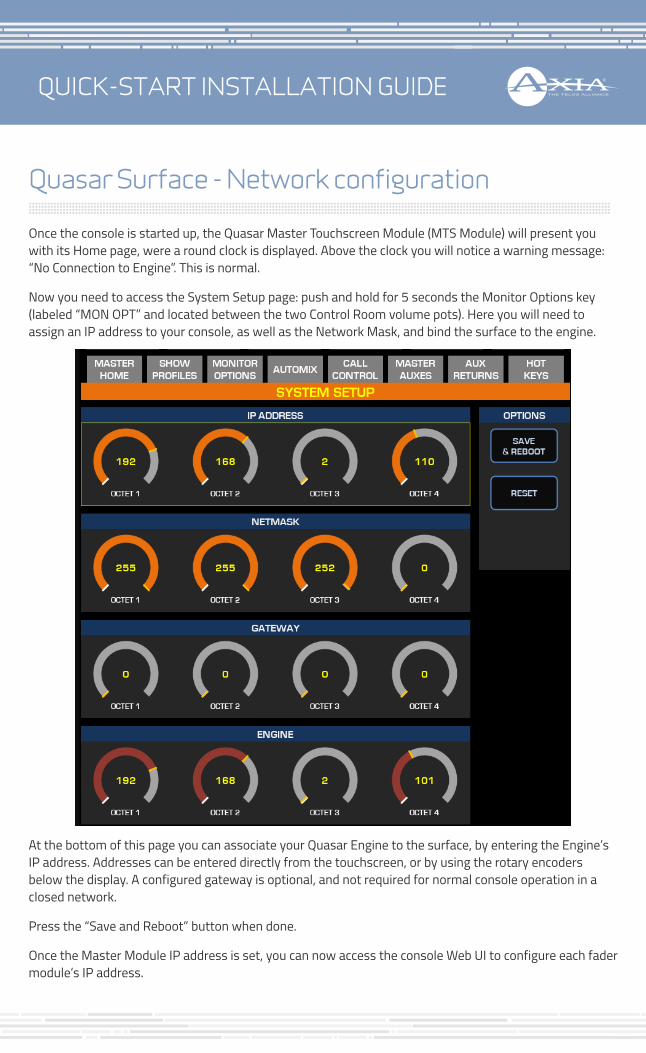
Once the console is started up, the Quasar Master Touchscreen Module (MTS Module) will present you with its Home page, were a round clock is displayed. Above the clock you will notice a warning message: “No Connection to Engine”. This is normal.
Now you need to access the System Setup page: push and hold for 5 seconds the Monitor Options key (labeled “MON OPT” and located between the two Control Room volume pots). Here you will need to assign an IP address to your console, as well as the Network Mask, and bind the surface to the engine.
At the bottom of this page you can associate your Quasar Engine to the surface, by entering the Engine’s IP address. Addresses can be entered directly from the touchscreen, or by using the rotary encoders below the display. A configured gateway is optional, and not required for normal console operation in a closed network.
Press the “Save and Reboot” button when done.
Once the Master Module IP address is set, you can now access the console Web UI to configure each fader module’s IP address.
QUICK-START INSTALLATION GUIDE
Quasar Surface – Modules’ discovery & configuration
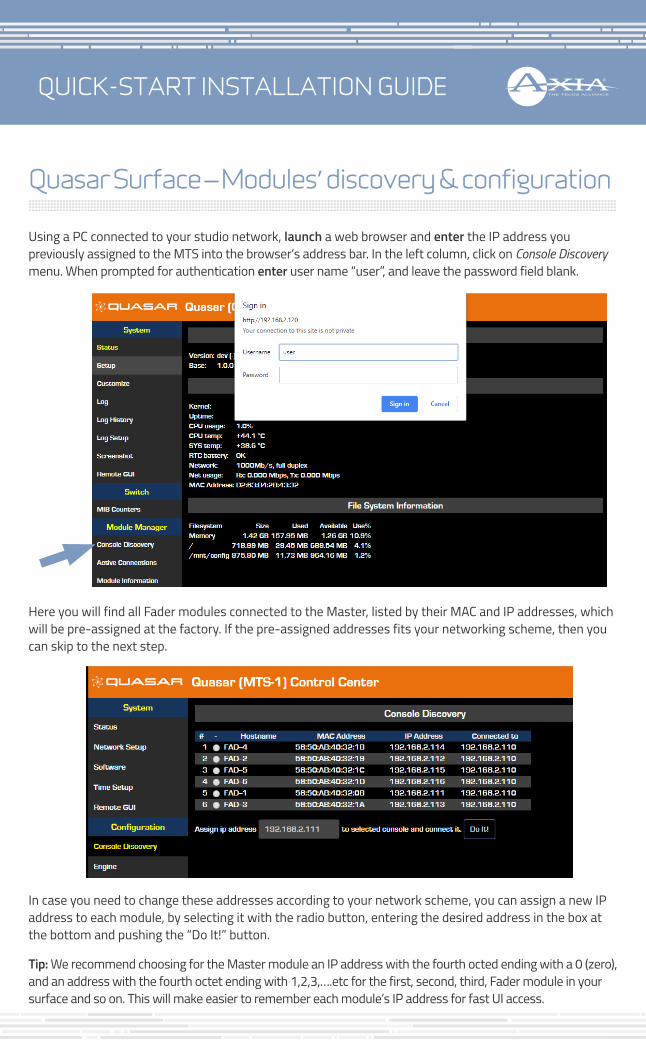
Using a PC connected to your studio network, launch a web browser and enter the IP address you previously assigned to the MTS into the browser’s address bar. In the left column, click on Console Discovery menu. When prompted for authentication enter user name “user”, and leave the password field blank.
Here you will find all Fader modules connected to the Master, listed by their MAC and IP addresses, which will be pre-assigned at the factory. If the pre-assigned addresses fits your networking scheme, then you can skip to the next step.
In case you need to change these addresses according to your network scheme, you can assign a new IP address to each module, by selecting it with the radio button, entering the desired address in the box at the bottom and pushing the “Do It!” button.
Tip: We recommend choosing for the Master module an IP address with the fourth octed ending with a 0 (zero), and an address with the fourth octet ending with 1,2,3,….etc for the first, second, third, Fader module in your surface and so on. This will make easier to remember each module’s IP address for fast UI access.
QUICK-START INSTALLATION GUIDE
Once all addresses have been set, please check access to each fader module by entering its IP address in your browser and by navigating each module’s Web UI. You can also click the IP address directly from the list you see in the Console Discovery.
The default access credentials will be the same used for the MTS Module: user – no password.
Quasar Engine – Installation & configuration
D
E
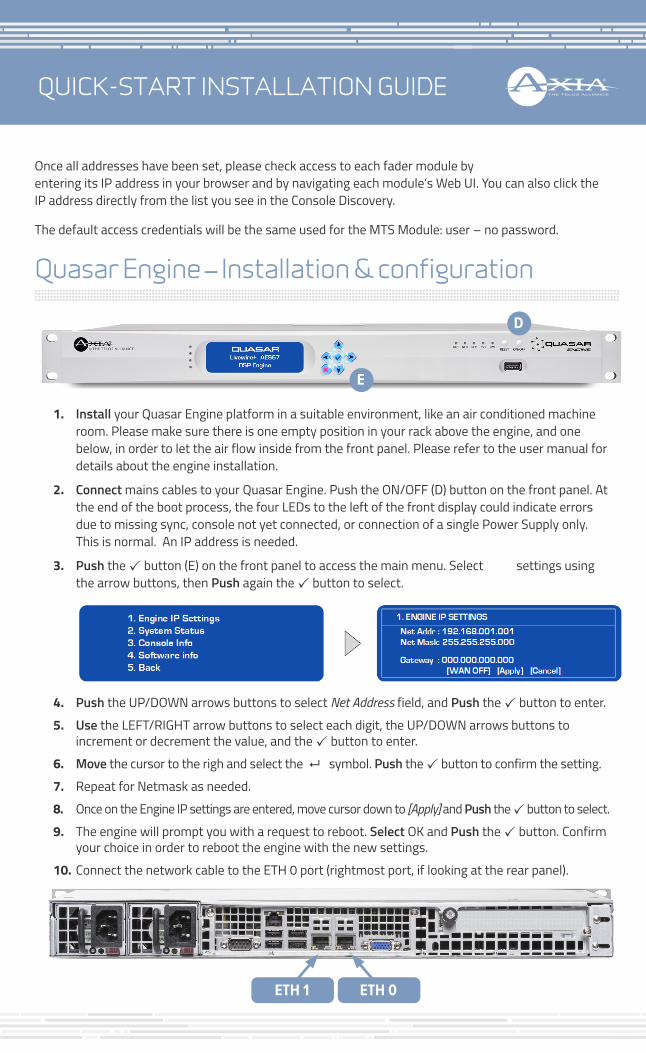
1. Install your Quasar Engine platform in a suitable environment, like an air conditioned machine room. Please make sure there is one empty position in your rack above the engine, and one below, in order to let the air flow inside from the front panel. Please refer to the user manual for details about the engine installation.
2. Connect mains cables to your Quasar Engine. Push the ON/OFF (D) button on the front panel. At the end of the boot process, the four LEDs to the left of the front display could indicate errors due to missing sync, console not yet connected, or connection of a single Power Supply only. This is normal. An IP address is needed.
3. Push the button (E) on the front panel to access the main menu. Select settings using the arrow buttons, then Push again the button to select.
4. Push the UP/DOWN arrows buttons to select Net Address field, and Push the button to enter.5. Use the LEFT/RIGHT arrow buttons to select each digit, the UP/DOWN arrows buttons to
increment or decrement the value, and the button to enter.6. Move the cursor to the righ and select the symbol. Push the button to confirm the setting.7. Repeat for Netmask as needed.8. Once on the Engine IP settings are entered, move cursor down to [Apply] and Push the button to select.9. The engine will prompt you with a request to reboot. Select OK and Push the button. Confirm
your choice in order to reboot the engine with the new settings.10. Connect the network cable to the ETH 0 port (rightmost port, if looking at the rear panel).
ETH 1 ETH 0
QUICK-START INSTALLATION GUIDE
Checking connection to the Quasar Engine
OK!
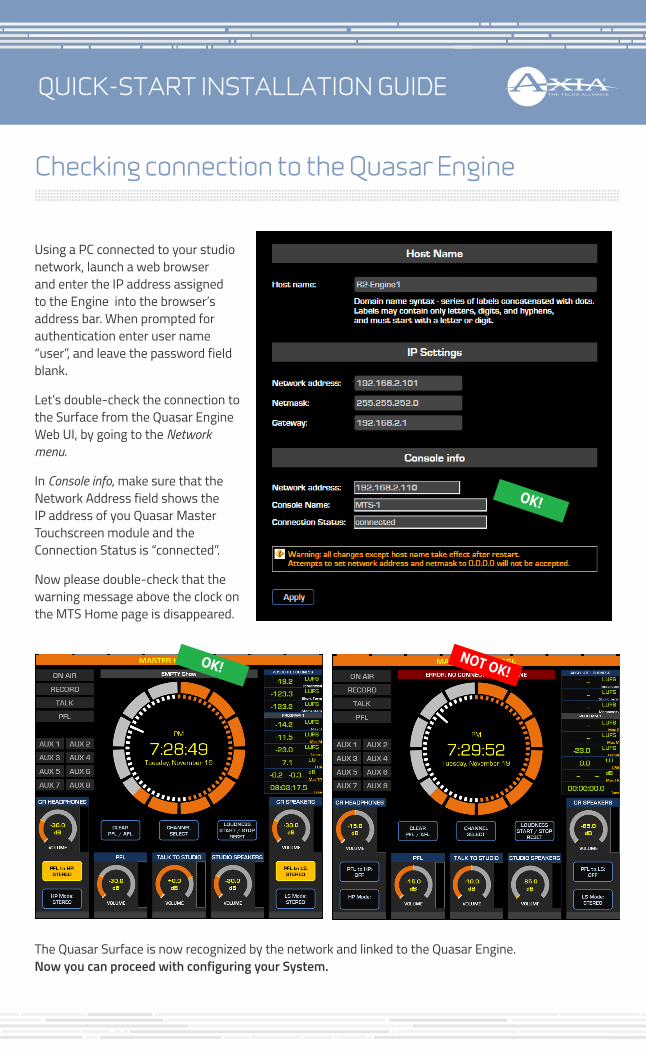
Using a PC connected to your studio network, launch a web browser and enter the IP address assigned to the Engine into the browser’s address bar. When prompted for authentication enter user name “user”, and leave the password field blank.
Let’s double-check the connection to the Surface from the Quasar Engine Web UI, by going to the Network menu.
In Console info, make sure that the Network Address field shows the IP address of you Quasar Master Touchscreen module and the Connection Status is “connected”.
Now please double-check that the warning message above the clock on the MTS Home page is disappeared.
OK!NOT OK!
The Quasar Surface is now recognized by the network and linked to the Quasar Engine. Now you can proceed with configuring your System.
QUICK-START INSTALLATION GUIDE
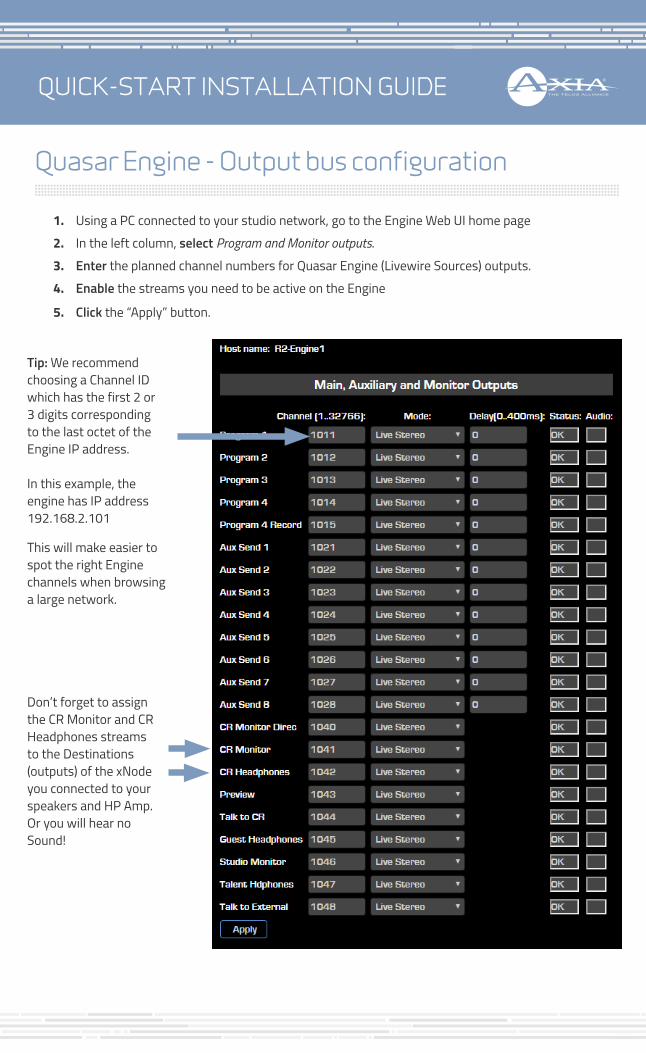
Quasar Engine - Output bus configuration
1. Using a PC connected to your studio network, go to the Engine Web UI home page2. In the left column, select Program and Monitor outputs.3. Enter the planned channel numbers for Quasar Engine (Livewire Sources) outputs.4. Enable the streams you need to be active on the Engine
5. Click the “Apply” button.
Tip: We recommend choosing a Channel ID which has the first 2 or 3 digits corresponding to the last octet of the Engine IP address. In this example, the engine has IP address 192.168.2.101
This will make easier to spot the right Engine channels when browsing a large network.
Don’t forget to assign the CR Monitor and CR Headphones streams to the Destinations (outputs) of the xNode you connected to your speakers and HP Amp. Or you will hear no Sound!
QUICK-START INSTALLATION GUIDE
Surface Layer Configuration
Layers are useful when you need to access a number of DSP input channels on your engine which is larger than the number of faders (or physical channel strips) available on your Quasar surface.
Since any fader on any module could access any input channel on the Quasar Engine, you will need to assign four input channel to each of the 4 layers available, on every Fader Module.
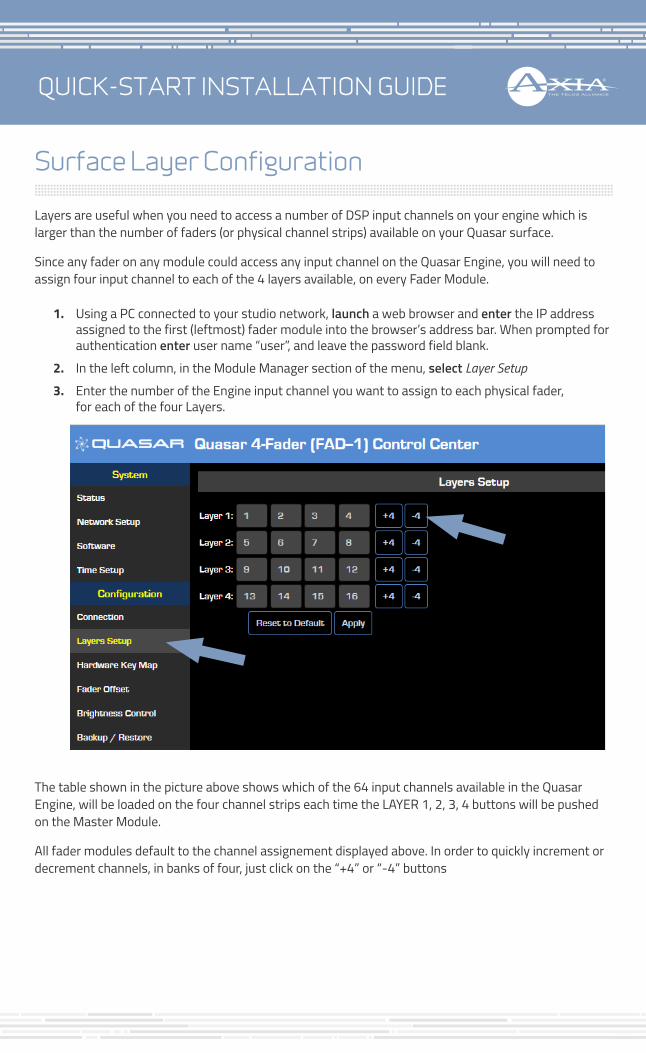
1. Using a PC connected to your studio network, launch a web browser and enter the IP address assigned to the first (leftmost) fader module into the browser’s address bar. When prompted for authentication enter user name “user”, and leave the password field blank.
2. In the left column, in the Module Manager section of the menu, select Layer Setup3. Enter the number of the Engine input channel you want to assign to each physical fader,
for each of the four Layers.
The table shown in the picture above shows which of the 64 input channels available in the Quasar Engine, will be loaded on the four channel strips each time the LAYER 1, 2, 3, 4 buttons will be pushed on the Master Module.
All fader modules default to the channel assignement displayed above. In order to quickly increment or decrement channels, in banks of four, just click on the “+4” or “-4” buttons
QUICK-START INSTALLATION GUIDE
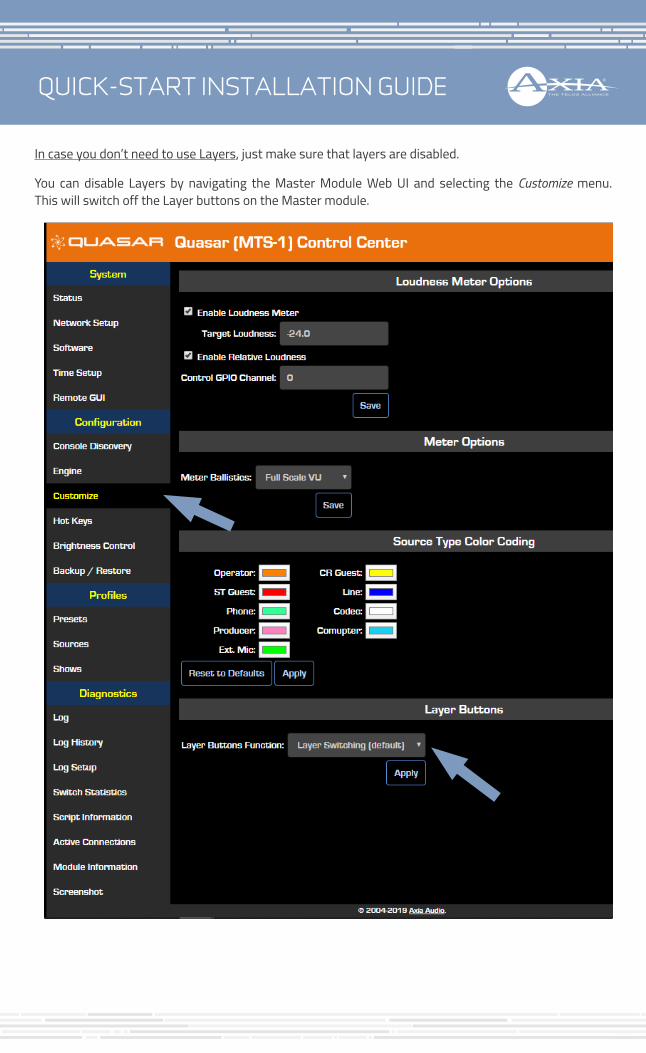
In case you don’t need to use Layers, just make sure that layers are disabled.
You can disable Layers by navigating the Master Module Web UI and selecting the Customize menu. This will switch off the Layer buttons on the Master module.
QUICK-START INSTALLATION GUIDE
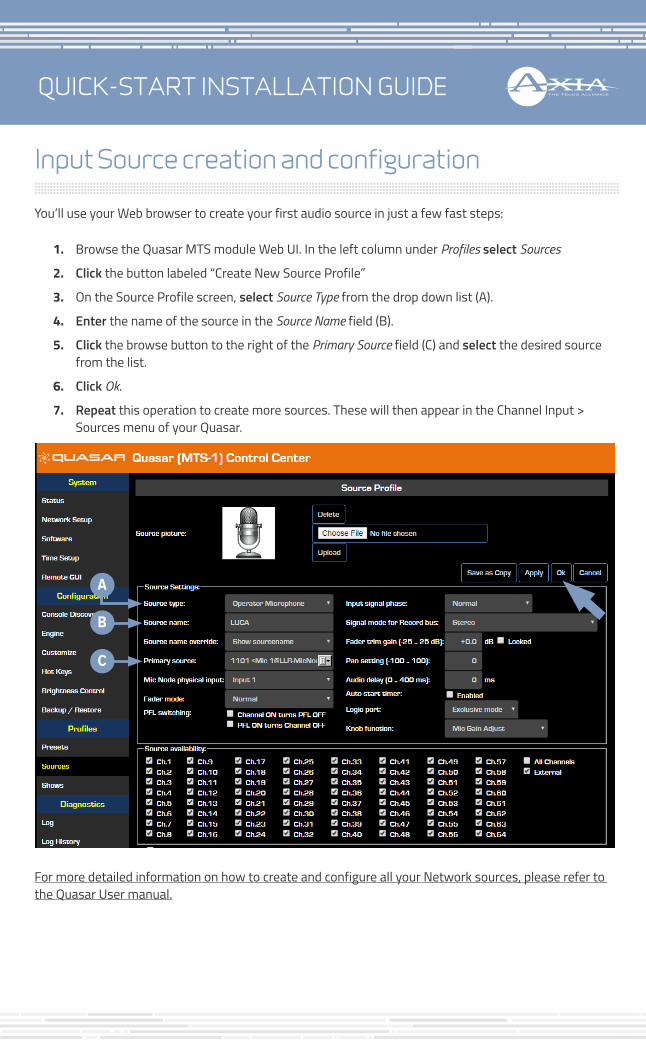
Input Source creation and configuration
You’ll use your Web browser to create your first audio source in just a few fast steps:
1. Browse the Quasar MTS module Web UI. In the left column under Profiles select Sources
2. Click the button labeled “Create New Source Profile”
3. On the Source Profile screen, select Source Type from the drop down list (A).
4. Enter the name of the source in the Source Name field (B).
5. Click the browse button to the right of the Primary Source field (C) and select the desired source from the list.
6. Click Ok.
7. Repeat this operation to create more sources. These will then appear in the Channel Input > Sources menu of your Quasar.
For more detailed information on how to create and configure all your Network sources, please refer to the Quasar User manual.
A
B
C
QUICK-START INSTALLATION GUIDE
Assign Sources to Input Channels
Once all the required Sources are created, you need to assign them to the input channels of your Quasar Engine, and save this configuration in what we call “Show Profile”.
You can do so in two ways:
1. Assigning Sources directly from the console, and capturing your configuration into a Show2. Creating a Show Profile from the Web UI and assigning sources to your channels from within
this page
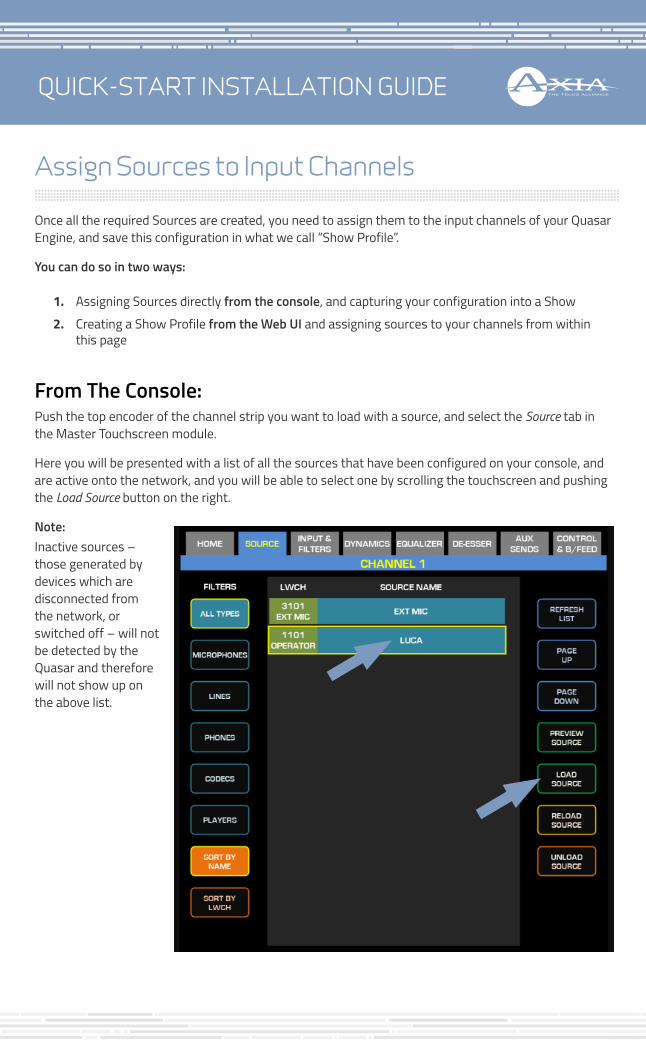
From The Console:Push the top encoder of the channel strip you want to load with a source, and select the Source tab in the Master Touchscreen module.
Here you will be presented with a list of all the sources that have been configured on your console, and are active onto the network, and you will be able to select one by scrolling the touchscreen and pushing the Load Source button on the right.
Note: Inactive sources – those generated by devices which are disconnected from the network, or switched off – will not be detected by the Quasar and therefore will not show up on the above list.
QUICK-START INSTALLATION GUIDE
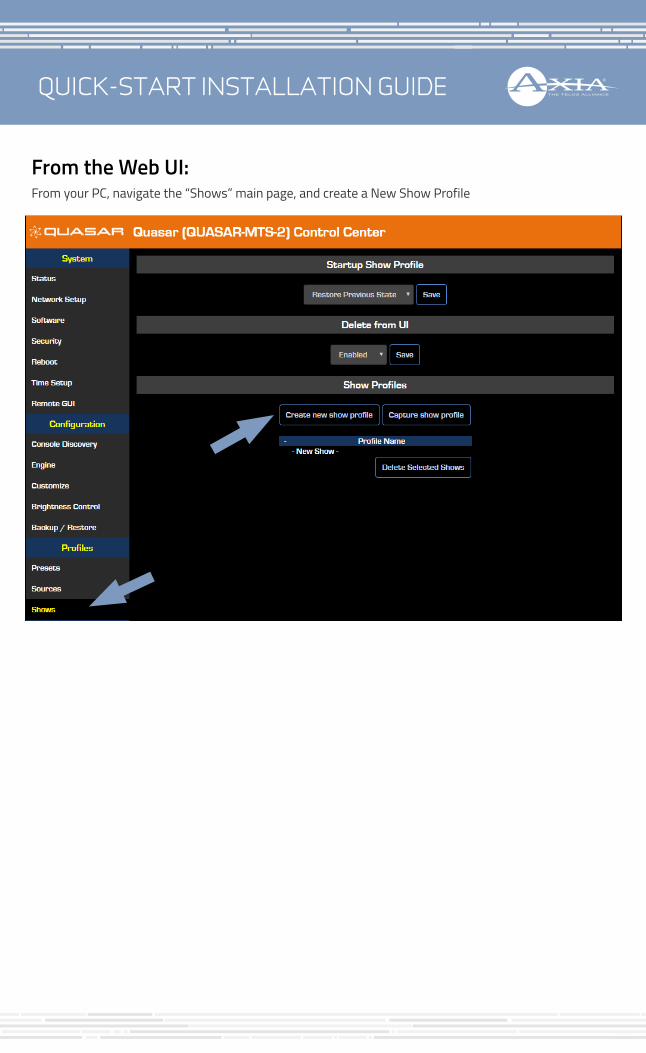
From the Web UI: From your PC, navigate the “Shows” main page, and create a New Show Profile
QUICK-START INSTALLATION GUIDE
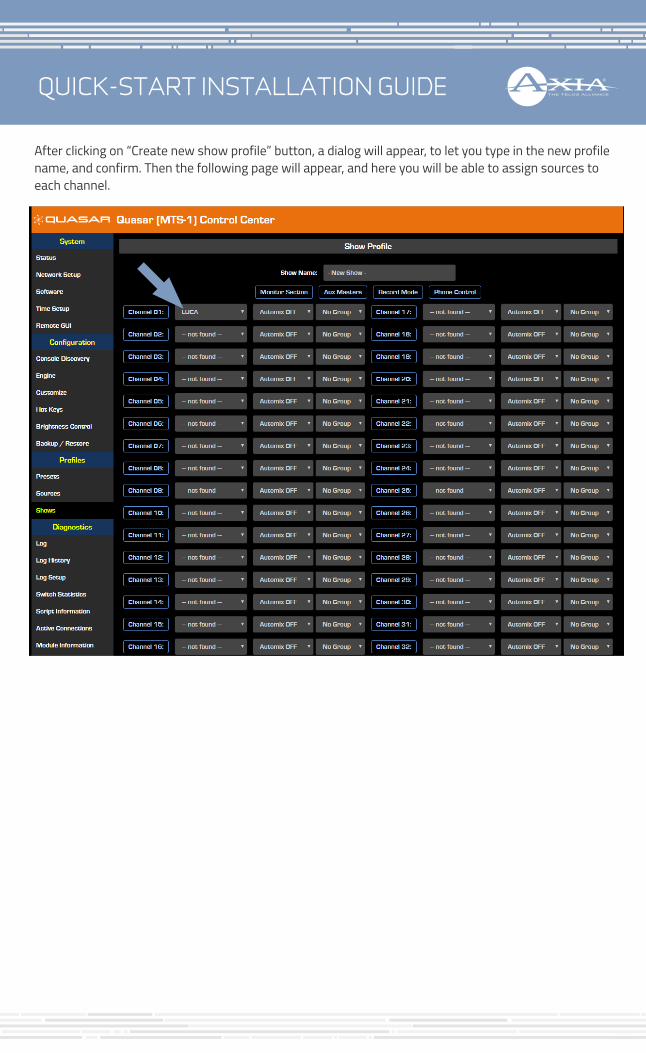
After clicking on “Create new show profile” button, a dialog will appear, to let you type in the new profile name, and confirm. Then the following page will appear, and here you will be able to assign sources to each channel.

QUICK-START INSTALLATION GUIDE
Program assignment & monitoring
Press the Program 1 key on the fader strip; it will illuminate to show you’ve assigned that fader to PGM-1. Press the ON key at the bottom of the fader strip and move the fader up.
Congratulations: you’ve got audio! The meters on your display should be active, as shown below.
To hear the audio, make sure you have selected Program 1 as source to your CR Headphones or Speakers, using the controls on your Monitor module, and that the volume is at an appropriate level (the level meters onscreen will show the relative volume you’ve set). Also, make sure the xNode feeding your speaker has been configured to the CR Monitor source channel number.
Your setup is complete!
That’s it! You’re ready to Rock with Quasar!!! Now, sit back and enjoy some music. Try exploring the intuitive UI of the Quasar channel strip…. And have fun!

QUICK-START INSTALLATION GUIDE
This page intentionally blank

QUICK-START INSTALLATION GUIDE
This page intentionally blank

QUICK-START INSTALLATION GUIDE
This page intentionally blank

QUICK-START INSTALLATION GUIDE
1241 Superior Ave. • Cleveland, Ohio, 44114, USA • +1.216.241.7225 • TelosAlliance.com© 2020 TLS Corp. The Telos Alliance®. All Rights Reserved. C20/1/16083. P/N 1490-00223-001 QUASAR QUICK START GUIDE
Subscribe to DirectCurrentWeekly updates on all things broadcast via email
TelosAlliance.com/directcurrent
Social MediaFacebook: /TelosAllianceTwitter: @TelosAllianceLinkedIn: /TelosAlliance
YouTube: TelosAllianceTVGoogle+: +TelosAlliance
Product CatalogTelosAlliance.com/now
24/7 Tech SupportRadio: +1 (216) 622-0247
TV: +1 (717) 735-3611
Radio: [email protected]: [email protected]
Quick Links