Embed Size (px)
Citation preview

Quickstart
LV - Atlas 8.7
Lauterbach Verfahrenstechnik GmbH
1 / 2011


Lauterbach Verfahrenstechnik GmbH -1-
Contents
Overview 2 Options Version 8.7....................................................................................................................................... 2 Free LV Modules included............................................................................................................................. 2 FEEZING (pay per use)................................................................................................................................ 2
Start the program 3 Program start ................................................................................................................................................ 3 Selecting the calculation program.................................................................................................................. 3 Terminology .................................................................................................................................................. 4 Toolbar.......................................................................................................................................................... 4 Basic data input............................................................................................................................................. 5 Entering values ............................................................................................................................................. 5
Standard input .................................................................................................................................. 5 Enter value ranges............................................................................................................................ 6 Use definition files / Predefine variables............................................................................................ 6 Two-dimensional parameter study on input mask.............................................................................. 7 Input of geometrical data in graphics................................................................................................. 7 The DOKU module............................................................................................................................ 8
Conversion of units........................................................................................................................................ 8 General............................................................................................................................................. 8 Entering a value in a different unit ..................................................................................................... 8 Change displayed unit ...................................................................................................................... 8 Setting the unit system (SI units / US units)....................................................................................... 9
Changing values ........................................................................................................................................... 9 Connect modules by drag&drop .................................................................................................................... 9 Expert mode................................................................................................................................................ 10 Stop / resume calculation ............................................................................................................................ 10 Cancel running calculation .......................................................................................................................... 10 Graphics...................................................................................................................................................... 10 Help – menu ...... with loads of possibilities.................................................................................................. 10 Extended Info Area...................................................................................................................................... 11
Saving 13 Standard ..................................................................................................................................................... 13 Saving as database file '*.mdb'.................................................................................................................... 13
Printing 14 Print options ................................................................................................................................................ 14
Basic settings.................................................................................................................................. 14 Format ............................................................................................................................................ 16 Print to (Print as RTF) ..................................................................................................................... 16

Lauterbach Verfahrenstechnik GmbH -2-
Overview
Options Version 8.7
1. Extended Info Area
2. Variable monitor for monitoring specific variables and their changes
3. Predefine variables at module start / Use definition files
4. Free conversion of units for calculation and documentation can now be set globally.
5. Input of geometrical data in graphics directly on the input mask. Graphics can be printed for documentation.
6. Print / Don’t print Equations
7. Create an editable RTF file with automatic table of contents. (MS WORD Standard)
8. ZOOM in input mask
9. Value range for variables in input mask (slide control ).
10. Mathematical relations of variables can be displayed graphically
11. Parameter study directly from target variable on input mask
12. Calculation made easy by 'Quicksheets'
Free LV Modules included ZUSA module Summary of text and figures in your project
DOKU module Integrate additional text into your documentation
EQU module Use your own equations
FEEZING (pay per use) Our ‚Feezing ‘ licensing model means that you do not have to purchase the modules that are required for a specific project. Simply pay a fee for using them. The FEEZING basic package is required. You may also mix purchased program modules with ‚Feezing’ module s: Purchase modules you need to use frequently and use all other modules by ‚Feezing’. The fee is billed for a performed action (starting, saving, printing) not for the period of usage. The fee is a percentage of the current list price.
...now possible at LV
Use FEEZING with a smart card if you do not have an Internet connection or if you are using a strict firewall. Work locally with the software and bill the smart card.

Lauterbach Verfahrenstechnik GmbH -3-
Start the program
Program start
Open the Windows 'Start' menu and start the program by choosing 'Programs' / 'Atlas' / 'ATLAS' .
Selecting the calculation program By selecting 'ATLAS / chapter' you will find a structured list with all modules contained in the program package.
The modules are sorted by topic.
You will also find an alphabetical listing of all modules.
A double click on the entry in the tree view activates the according module.
Keyword search: Enter a prominent search term and click on 'Search'.
If more than one module is found, you can switch to the next search result by clicking the 'search' button again.
After 10 seconds inactivity the program offers an instant help.
Click the Question mark
By pressing F1 or „Help / Help for…“ the help file is launched.

Lauterbach Verfahrenstechnik GmbH -4-
Terminology Module A module is a stand alone program dealing with a specific subject, e.g. the GA module 'Heat
transfer for flow in tubes' or B1 module 'Cylindrical and spherical shells under internal pressure'. A module comprises all necessary variables for the solution of a partial problem. The according equations are documented.
Module package
A module package is a combination of several modules, which exchange information (related variables) dynamically. That means when you enter for example the inlet temperature in a module, this information is transferred to all relevant modules.
Event An event happens if you enter or change a value: An event starts the immediate calculation within a module or complete module package.
Statement
Important:
A statement can be made for any variable.
If a value is not existent, e.g. there is no nozzle in a torispherical head, you need to make a statement! No nozzle => Nozzle diameter = 0.
Skipping this input field would mean not to make a statement. The module would try to calculate this value by using other statements.
Toolbar
Function keys 'Options' menu 'ATLAS' menu
F 1 Help
F 3
Display Graphics
F 4
Display material database
New material can be selected or documentation of material can be displayed or printed
F 5
Reset module
All data is deleted and module is restarted
F 7
Refresh module
All equations in the module are recomputed
F10 Key shortcuts are displayed
'Module' menu
The 'Toolbar' can be switched on or of in the menu 'Options' / Settings / Appearance .

Lauterbach Verfahrenstechnik GmbH -5-
Basic data input Many modules require a selection of one or more basic options before you can enter design values.
The DROS module (Flow measurement with pressure difference devices according to EN-ISO 5167-1/A.) for example needs to know if you want to calculate orifices or a Venturi nozzle.
Entering values
Standard input Fundamentals : Due to the modular structure of the LV ATLAS there is a unified user interface in every module. There are no specific input values and defined output values. Every value on the mask can be input value. After each input the program checks if it can calculate other values by using the last input data. To distinguish between the values entered values are displayed in black and calculated values are displayed in blue . Example: Calculation of a rectangular area.
The file ZZQS.ATL is included in the scope of delivery.
Load this file to see the interactive example.
Given is a rectangle with width a and length b.
As soon as you have entered both values and left the input field, the area of the rectangle is calculated.
If you change one of your input values a or b at any location on the input mask, the new value of the area is calculated immediately. If you overwrite the result of a calculation, in this case the area of the rectangle, a list with all dependent variables is displayed. In this list you can select which value you want to define as a new target value. Example: Area is given, and the width is our new target value:
The unique Equation Solver by Lauterbach Verfahrenstechnik is an essential part of the LV ATLAS program system. At first sight, the operating procedure of the equation solver might be unfamiliar. However it provides the user with a state-of-the-art tool for designing and optimizing all kinds of process engineering apparatuses and equipment.

Lauterbach Verfahrenstechnik GmbH -6-
Enter value ranges You can also enter ranges of values directly into the input fields. Format must be 'NUMBER to NUMBER' (Ex: 1 to 4).
The individual values can be changed by using the slide control with the left and right arrow keys. All dependent values are calculated instantly.
Use definition files / Predefine variables Frequently used variables may be predefined at module start.
Save the module as definition file after having entered the variable.
Next time the module is started the variables are preallocated with the values you have saved.
Please note:
‚Use definition file’ must be activated.

Lauterbach Verfahrenstechnik GmbH -7-
Two-dimensional parameter study on input mask You can start a two dimensional parameter study directly from the target variable on the input mask. Enter the parameter vales in the following way:
Example: 1,1.1…2
It means:
1 = starting value
1.1= second value
IMPORTANT:
The dot (.) is the decimal separator.
This leads to the size of the steps. In this case 0.1."…" = Etc. i.e. all further steps until the end value.
2 = end value
A parameter study is performed automatically for all dependent values.
Input of geometrical data in graphics In many modules, the geometrical data can be entered in the graphics directly on the input mask. The graphic can be printed for documentation. This feature serves also as input control as predefined values are displayed in the graphic.
With this feature, the LV modules fulfill the
requirements of the EN 13445 for the documentation of pressure vessel calculations.

Lauterbach Verfahrenstechnik GmbH -8-
The DOKU module
The DOKU module allows you to integrate as many additional text as you want into your documentation for later printing.
Complete RTF files can be included.
Conversion of units
General The conversion of units of a value is activated by
� Single mouse-click on the unit on the input mask � Double mouse-click on an input field � Key combination SHIFT - Cursor Up / Down � Right mouse-click menu 'Conversion of units' on an input field
Entering a value in a different unit Activate the conversion of units as described before and enter the value in your desired unit. The conversion is done automatically. The displayed unit on the mask does not change.
Change displayed unit Use the option buttons to change the unit that is displayed on the input mask.
The checked button determines the unit in which this variable is always displayed.

Lauterbach Verfahrenstechnik GmbH -9-
Setting the unit system (SI units / US units) Via 'Options / Settings / Appearance you can set the unit system. Changes require a restart of the program .
Changing values 1. Input values (displayed in black) may be changed at any time. All equations related directly or indirectly
with this value are calculated at once. 2. Calculated values (displayed in blue) may be overwritten, but then the equation system is over-
determined. If this equation consists of only two variables, the system calculates the other and treats the changed value as input value.
If more than two variables determine the equation, the user has to decide which former input value shall be calculated from now on. A new window 'Clear variable' is opening.
In this window all values which are related by equations and rules to the last input value.
The value which has to be cleared for calculation is selected with the mouse (double click) or with the cursor (up and down key plus ENTER)
Connect modules by drag&drop Every module requires several input data before the calculation is performed. With LV software you need to enter these data only once. You can connect the variables of different modules. / B1 to B9.
Drag the tab from B1 to the input mask of B9. You will see a connection cursor. Only suitable units are automatically connected.
Let go the mouse button and drop the values into the B9 module. The modules are now connected.
If you now change the values in one module, the values are automatically updated in the other module.

Lauterbach Verfahrenstechnik GmbH -10-
Expert mode After program installation the expert mode is inactive by default. In 'standard mode ' only standard input fields are displayed. Calculated values or values from a database cannot be changed. Advantage of Standard Mode: As a newcomer user you are not able to make many mistakes. The equation system is always defined. Advantage of Expert Mode: You can overwrite calculated variables with an input value to enable the program system to compute backwards to a value which was an input value before.
By selecting 'Options' / 'Settings' / Calculation you can activate or deactivate the 'expert mode' or single components.
Stop / resume calculation The program calculates all equations after the input of a new value. If you want to change multiple values without the program calculating immediately, use the calculator icon to stop the calculation for the moment and resume it when you are ready. Stop calculation Resume calculation
A complete new calculation of all values of the module can be started by pressing the [F7] function key or selecting 'Module' / Refresh' .
Cancel running calculation With the <ESC> key you can cancel a running calculation. As there are my iteration steps to cancel you should hold the escape key down until the program lets you enter a new value.
Graphics To explain several input variables, the modules include graphics, which you can display by pressing the F3 function key. The size of the graphics can be increased with the right mouse key and decreased with the left mouse key. The zoom factor can be adjusted using the [+], [++] or [-]‚ [- -] buttons.
Help – menu ...... with loads of possibilities Many modules have their own help file which you can find in the 'Help' menu under 'Help for...'.
Help for the general features of the ATLAS program system you can find under 'Help / Help topics' .
An Internet connection is required!
Call LV consultant
If an LV user has complex questions concerning a calculation which are difficult to describe on the phone he can call an LV consultant. An engineer dealing with your subject will connect to your PC. A PC to PC connection will almost always result in a solution presented by LV.
About Here you will find information about your version number.
LV Tutorial
We show you how to enter values, to clear variables and what a wrong input can cause.
Update... 24 hours Within a service contract you can update your software by pressing one single button. You can decide when or if you want to be reminded to update your software. Before starting the download the available version number is displayed.

Lauterbach Verfahrenstechnik GmbH -11-
Extended Info Area Next to the input mask you can display an area with additional program information.
This additional information is displayed according to he active variable. Program messages and the variable monitor are displayed in this area as well.
You can switch this area on or off by using the blue light bulb symbol.
The html page can contain links to other pages or pdf files . They are displayed in the browser if the plug-in respectively the Acrobat reader is installed.
Messages
Program messages are classified in two categories: Critical messages and hints
By default these messages are displayed as a popup window in the program and must be closed individually with a mouse click. You can summarize all messages in the message list.
Variablen-Monitor While designing an apparatus you can now observe changes in a variable with the 'Variable Monitor' (right mouse click on the variable).
CAD (LV strength calculation software only) This tab activates the CAD interface. Alibre Design is started (if installed) and displaed in the info area. There is an interactive dynamic link. Changes in the program alter the model, changes at the model effect the calculation.
Lauterbach Verfahrenstechnik GmbH -12-
Materials (LV strength calculation software only)
Materials used in the project are listed. The listed material can be used in a new module by a double-click!
Navigator
Here you will find information on the active variable. All linked variables are displayed as well.
Lauterbach Verfahrenstechnik GmbH -13-
Saving
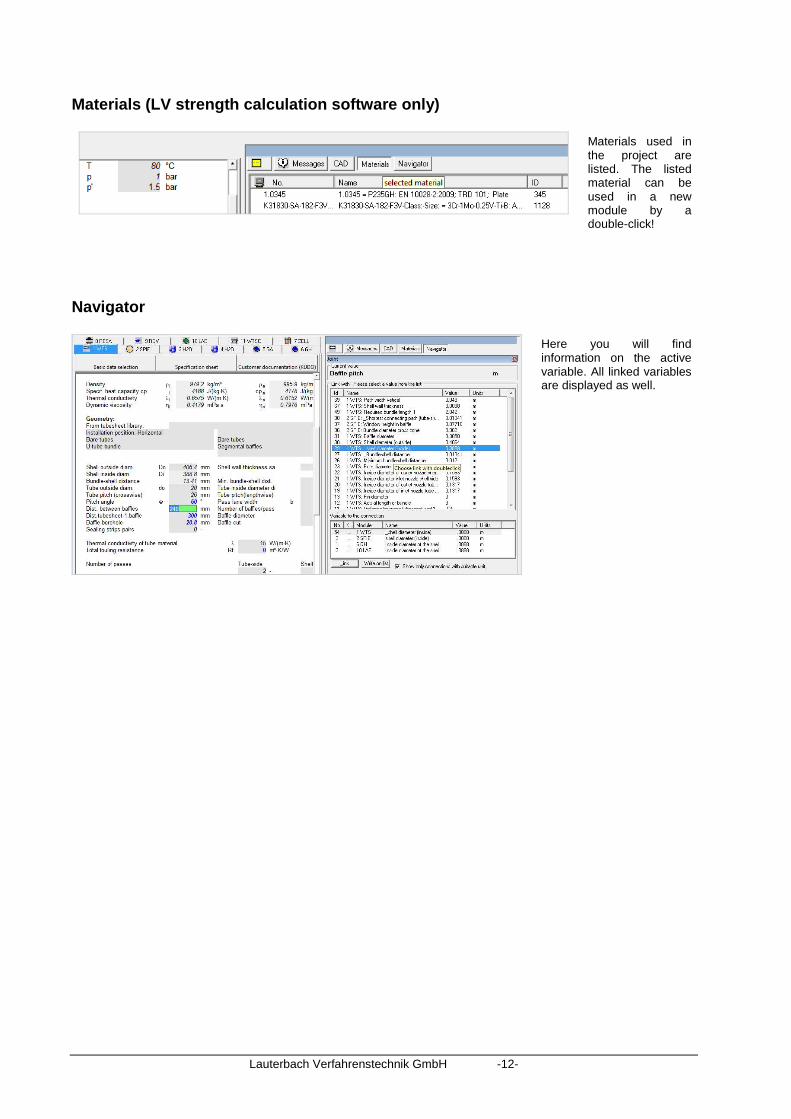
Standard All started modules including their alternatives and comments are saved with the menu item "Save" in the "File" menu. The dialog 'Save file' is displayed:
You can enter a comment concerning the file into the "Comment" field. If you want to enter a new line you have to press CTRL + ENTER – as it is standard under MS-Windows. The data backup is started with the "Save" button. The comment is displayed in the comment field after having selected the file. Backup files get the extension "ATL". Files can be saved as sample files (extension "ATM"). In a sample file it's only possible to enter values for those variables that have been defined as input variables in the sample file. The resulting calculated values cannot be changed.
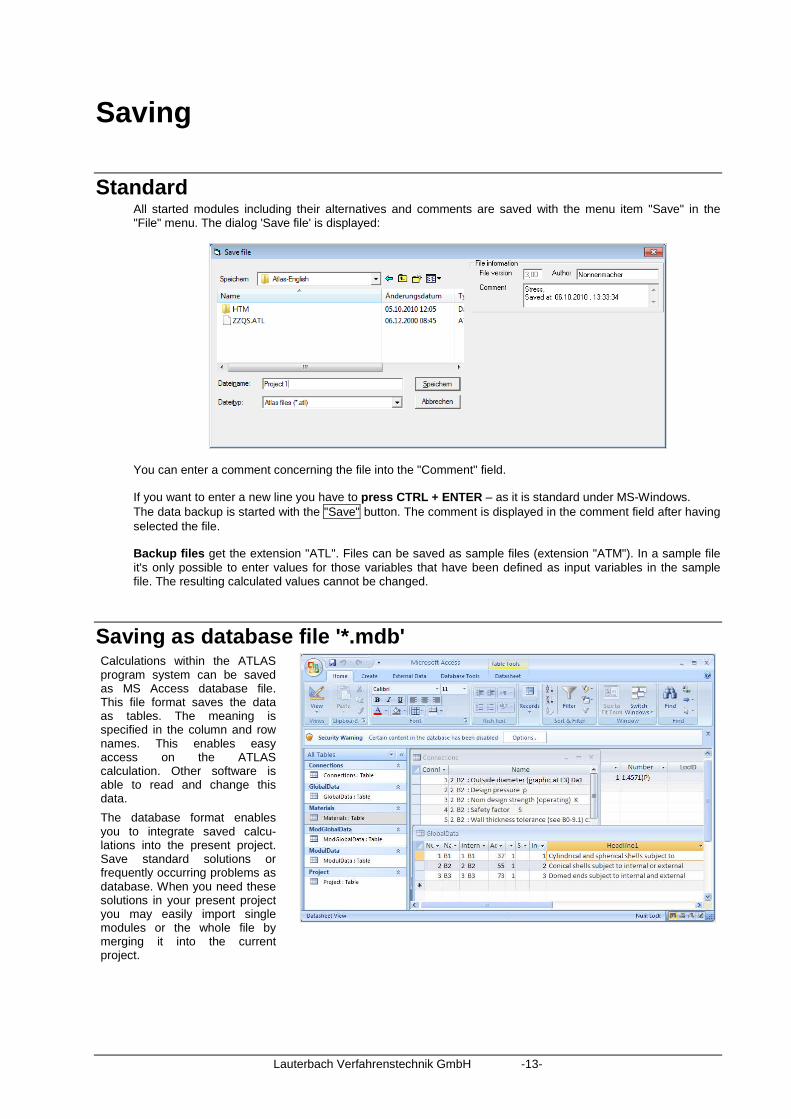
Saving as database file '*.mdb' Calculations within the ATLAS program system can be saved as MS Access database file. This file format saves the data as tables. The meaning is specified in the column and row names. This enables easy access on the ATLAS calculation. Other software is able to read and change this data.
The database format enables you to integrate saved calcu-lations into the present project. Save standard solutions or frequently occurring problems as database. When you need these solutions in your present project you may easily import single modules or the whole file by merging it into the current project.

Lauterbach Verfahrenstechnik GmbH -14-
Printing
Print options
Basic settings
Selection of the chapters to be printed Mark the chapters with CTRL + pressed left mouse button.
Print tables
Table of Contents Selecting "Table of contents" creates a table of contents in the printout. It consists of the headlines of all the chapters to be printed, indicating the page numbers. Remarks from the notepad are used as prior headlines. The module name and description are quoted in brackets. The Table of Contents contains also a legend, which shows how the different type of values are displayed. Input values, calculated values and estimated values are displayed differently for an easy identification. Program annotations A table of annotations is created on the last page of the document. it comprises all annotations and messages displayed by the program during the calculation.

Lauterbach Verfahrenstechnik GmbH -15-
Material documentation If material data has been integrated from the database into a project, theses data is documented in the annex. A separate documentation sheet is created for every material, different geometrical data, temperature or operating pressure.
Comment in page heading Comment from notepad, first line? If this option is enabled the first line of the notepad of the corresponding chapter/alternative will be printed (the notepad can be activated with Ctrl B or via Module/Notepad). If this option is not marked you can enter any text of up to 60 characters into the “Comment” line. This text will appear on all pages printed.
Commission number Any text of up to 14 characters can be entered in this field and it appears on every printout.
Printing range The printout normally shows input and results on the first page and equations on the second page. According to the selected option all sheets of the project, selected pages of a chapter or specific sheets of the document are printed. The table of contents is always treated as page 1.
Graphics from the input mask may be printed.
Equations from the input mask may be printed on demand.
Language Select the printout language. You can choose between ‘German’ , ‘English’ or ‘French’ for the printout, if the according masks are available.
Start printing The marked chapters / tables are printed starting with the first one in the tree view. The printing order is the same as the order of the tabs in the program.
Create PDF The button Pdf creates a pdf file by means of using the additional software PDF creator
Save options All selected options are saved in the file Lauter.ini in the Windows directory.

Lauterbach Verfahrenstechnik GmbH -16-
Format
Logo in print header
Choose an image file (bmp, gif or jpg format) which is printed in the header on every page. The image will be resized automatically.
Not valid for printing to RTF!
Print values in black By default the values are printed in the corresponding colours and font styles (see next Section "Mask fonts”). If you print on a black/white printer it is recommended to print all colours in black to avoid unreadable gray tones. Group headlines When this option is selected, the calculation rules which are usually printed to the footer will be printed as headline. Font size Font size which is used for the print out. Font size cannot be greater than 9 to make sure that the printout is correct.
Print to (Print as RTF) You can choose to print to an RTF file or to a standard Windows printer.
Only update values in existing document An RTF document can be processed with e.g. MS Word. If the calculation has changed, the values in the existing document can be updated without having to change the rest of the document. Start RTF program This menu item is displayed only if the file extension RTF is connected to an application. In this case the application for the edition of the RTF file can be started automatically after saving.

Lauterbach Verfahrenstechnik GmbH -17-
Use pattern file for header and footer Here you can enter the name of an existing pattern file, which already contains your letter-head and footer. The calculation data are written to the text body. Header and footer stay untouched. Headline 1 / Headline 2 These lines are printed to the header of the document. Create automatic table of contents with WORD With MS WORD you can create an automatic Table of Contents. You may then add any desired text or graphics and let MS Word update your TOC. Add text and graphics to your documentation (RTF fi le) The documentaton can be written to an RTF file, which can be processed with MS Word. LV programs write an editable RTF format in which you can include additional texts or graphics. With the option 'Only update values in existing document' these texts and graphics stay untouched.