Embed Size (px)
Citation preview

R-Link 2Quick guide

1
WELCOME TO THE R-LINK 2 WORLD
Congratulations on your choice.In order to ensure you make the most of your integrated touch screen device, we recommend that you read this document to find out about the main functions, the settings for your multimedia system and the advantages of connectivity.
Find the full user manual for your R-Link multimedia system directly on your system by pressing the pop-up menu button from the main menu screen, then “User manual”.
Translated from French. Copying or translation, in part or in full, is forbidden unless prior written permission has been obtained from the vehicle manufacturer.
This document does not replace the driver’s handbook.Please read the driver’s handbook for more detailed information on the features mentioned in the “References” guide for your multimedia system.The “References” guide covers all the functions (standard and optional) available; their presence in the R - Link navigation system depends on the version, the options selected and the marketing country. Depending on the make and model of your telephone, some functions may be partially or completely incompatible with your vehicle’s multimedia system.
For more details, please consult an Authorised Dealer.
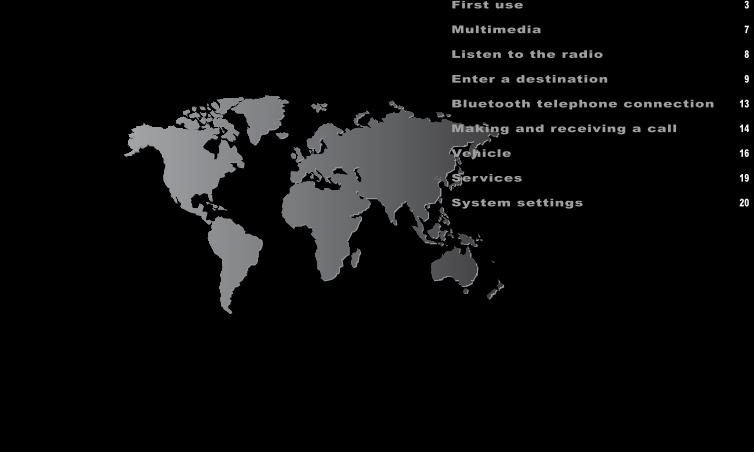
First use 3
Multimedia 7
Listen to the radio 8
Enter a destination 9
Bluetooth telephone connection 13
Making and receiving a call 14
Vehicle 16
Services 19
System settings 20

3F I R S T U S E ( 1 / 4 )
Switching onThe multimedia system starts:– when the vehicle is started;– when the multimedia panel on/off switch is
pressed;– when the screen is touched.
CONNECT YOUR SYSTEMActivate your connected services by pressing the “Connect” button from the main menu of your mul-timedia system to obtain the applications from the R-Link Store.
10
B
789
1
2
3
4
56
A ControlsThe multimedia system is fitted with screen con-trols A, B or C, a central control D and a steering column control E which can be used equally to in-teract with the system.
SCREEN CONTROLS A 1 Short press: On/Off. Long press: restarts the system. 2 Volume up. 3 Volume down. 4 Access to home pages. 5 Access to the settings menu for driving assist-
ance devices. 6 Access to the settings menu for the displays.
SCREEN CONTROLS B 7 Direct access to the “Easy park assist” function
screen. 8 Direct access to the “Driving aids” settings
screen or access to user settings. 9 Access to home pages.10 Short press: On/Off. Long press: restarts the system. Rotation: adjust the volume of the source cur-
rently in use.
Switching offThe multimedia system switches off:– when the multimedia panel on/off switch is
pressed;– when the opening elements of your vehicle are
locked.
Multifunction capacitive touchscreenThe multimedia system is fitted with a touch-screen A, B or C. Select a function or a button on the screen by touching it.

4F I R S T U S E ( 2 / 4 )
15 Movement: – navigation in the selected area; – up/down: move around the various areas (top
bar, central area, bottom bar) of a menu; – left/right: move to different tabs on a menu. Rotate: – move around the various elements of a zone; – move around a list; – modify the scale of the navigation map
(ZOOM mode). Press: to confirm.16 Go to the Multi-Sense system menu or change
the mode previously defined in favourites.
1213
14
16
15
D
9 11 10 5 6
C
SCREEN CONTROLS C 5 Access to the driving aids settings menu. 6 Access to the settings menu for the displays. 9 Access to home pages.10 Short press: On/Off. Long press: restarts the system. Rotation: adjusting the volume.11 Displaying a blank screen.
CENTRAL CONTROL D12 Short press: back to the previous page. Long press: back to the home page.13 Access to home pages.14 Access to the pop-up menu.
STEERING COLUMN CONTROL E17 Select the audio source.18 Access to telephone functions.19 Increase the volume of the source currently in
use.20 – Mute/unmute the sound using the radio or
switch off voice recognition. – Pause/play an audio track.21 Decrease the volume of the source currently in
use.22 Short press:– Change radio scrolling mode (preset/list/fre-
quency).– Confirmation. Long press: exit the lists (folders/audio tracks).23 Browse the radio stations/audio tracks/directo-
ries.
E 17 18
19
20
21
2223

5F I R S T U S E ( 3 / 4 )
Menu
Camille
27 31 30 29
39
3334 34
32
3534
32
3335
31
Menu
2938
Camille
39
27 28
Your multimedia system has four home pages, three of which are customisable, including a number of widgets leading to various functions. Move from one page to another by sliding your finger horizontally.Depending on the function, there are one or two sizes of widget. On a home page, depending on the size of the screen, you can insert up to:– four small widgets;– two large widgets;– two small widgets and one large widget.You can change the configuration of the home page as well as the clock format. See the system’s user manual.
Home screens27 Time.28 Exterior temperature.29 Phone information (network and battery).30 Notifications (telephone and apps).31 Page indicator.32 Time and date display.33 Access to the welcome screen options (pop-up
menu).34 Air-conditioning information.35 Access to main menu.36 Selected user profile information.37 “Audio source” shortcut.38 “Connectivity” shortcut.39 Page content.
36
37 30
38 37 28
36
Navigation
Menu
Connect
Multimedia
Phone
Vehicle System
Apps
24 25 26
Menu screen
There is a menu bar made up of two or three but-tons at the bottom of each screen:
24 “Back” (always shown): – pressing this button briefly takes you back to
the previous screen; – a long press on this button takes you back to
the home page.
25 “Function”: this button is dedicated to the screen’s main action (it disappears or is greyed out if not active).
26 “Options” (button is greyed out if it is not active): this is used for accessing the pop-up menu.

6
UpdatesUpdates (especially of maps) are published regu-larly. In some cases, it is possible that roads alter and that the mapping is not yet up to date.
– prepare a USB key or a SD card to FAT32 format with at least 2GB, for updating the system and applications;
– prepare a USB key or a SD card to FAT32 format with at least 16GB, for updating the maps;
– connect it to your computer and download the updates at the R-Link Store or the manufactur-er's website;
– start the vehicle and do not switch off the engine while updating the system;
– insert the USB key into the USB port of your ve-hicle, or the SD card into the SD port and follow the on-screen instructions.
Once the installation is finished, your system re-starts. A message is displayed on-screen to tell you that the installation completed successfully.
Press “Yes” to delete the update file from your USB key or SDcard, or "No” to keep it.Note: We recommend creating an R-Link Store ac-count on your computer and updating your system regularly.
Voice recognition
The button on the steering wheel allows you to use the voice recognition on your multimedia system and/or your phone if it is connected to the system. For more information, see the multimedia system user manual.
For more information, see the user manual avai-lable in your system by pressing the pop-up menu button from the main menu screen, then “User manual”.
F I R S T U S E ( 4 / 4 )
Home pages configuration
Take Care Take Care Driving eco2
Driving eco2 Favourite Multi-Sense
Multi-Sense Multimedia Multimedia
F
ADD WIDGETSPress the pop-up menu button on the main screen, then select “Change home pages”. Via the screen F, you can add a widget. Press and hold your finger on the widget to be added, then slide and drop it over the location of your choice at the top of the screen.
DELETE WIDGETSTo delete a widget, press “X” at the top right of this latter. A confirmation message is displayed on the screen. Press “Yes” to confirm the deletion.

7M U L T I M E D I A
Photo slideshows and video playback are only available when the vehicle is stationary.
«Multimedia» menu
Your vehicle is fitted with a multimedia system. From the main menu, press “Multimedia” and select from the following list:– «Radio»;– «Media»;– «Photo»;– «Video»;– «Settings».
Several input sources are available:– “USB-1" (USB port);– “USB-2" (USB port);– “SD” (SD card);– “CD" (audio CD or MP3);– “AUX-1" (Jack socket);– «AUX-2" (Jack socket);– Bluetooth® connection.
«RADIO»
Please refer to the “Radio” section in this do-cument.
«MEDIA»
Press the “Media” button, then select an input source connected to the system to get the audio files you want.
Note: Only available sources can be selected. Unavailable sources will be greyed out.Note: some formats may not be readable by the system.
«PHOTO»
Press the “Photo” button, then select the connected source (SD card or USB port) to get the photos. The system offers you two options:– Show a photo;– Show a slideshow.Note: some formats may not be readable by the system.
«VIDEO»
Press the “Video” button, then select a con-nected source (SD card or USB port) to get the videos. To start playing a video, select the video to view.
Note: some formats may not be readable by the system.
«SETTINGS»
This menu lets you set the various functions of the “Multimedia” menu.Please see the system manual for further in-formation.

8L I S T E N I N G T O T H E R A D I O
“Radio”
From the main menu, press “Multimedia” then “Radio”.
SELECTING A WAVEBANDSelect the required waveband by pressing button 4 “Band”.
"AM" and “FM"
“FREQUENCIES” MODEManually search for a station by pressing the “Frequencies” tab. Two search modes are avail-able:– manual search - press 1 or 2;– semi-automatic search – press buttons 3 or 7.
“STATIONS” MODE (FM ONLY)To go to the list of stations, press the “Stations” tab, then select the station you want.
Channels Stations Presets
DR
Band 56Band
Frequencies Stations Presets
9 8
1
7
6
2
3
5
“PRESETS” MODEGo to the list of saved radio stations by pressing the “Presets” tab, then select the station you want. To add the current station, make a long press on the required number.
Note: the button 5 takes you to the options (“Change source”, “Settings”, etc.). The button 6 takes you back to the previous page.
“DR” (digital radio)Digital radio permits a greater choice of radio sta-tions, better sound quality and additional informa-tion.
“CHANNELS” MODEThis mode lets you listen to the available radios. Go from one channel to another by pressing 8 or 9.
“STATIONS” MODEThis mode displays a list of available radio stations.
“PRESETS” MODERefer to the previous paragraph.
Please refer to the system instructions for fur-ther information.
4

9
Press the “Intersection” button from the “Address” screen and select an intersec-tion.
“Previous destinations”
This menu lets you select a destination from the list of addresses recently used. These are automatically stored.
E N T E R I N G A D E S T I N A T I O N ( 1 / 4 )
Refer to your multimedia system’s user manual by pressing the pop-up menu button from the “Navigation” menu screen, then “User manual”.
B
City selection
A
Menu “Navigation”
From the home screen, press “Menu”, then “Navigation” to access the following menus:– “Destination”;– “Itinerary”;– “Traffic”;– “Map”;– “Settings”.
“DESTINATION”
This menu gives you different ways to enter a destination.
“Address”
This menu lets you enter a full or par-tial address (country, town, street, house number or intersection).
To enter an address:
– Enter the name or postcode of the town or city using the on-screen keypad B. The system may suggest several town names in the area A;
– select the town or city;– follow the same procedure for “Street”
and “House number” screens;
If you don’t want to enter a house number or if the system doesn’t recognise your number, you can enter a road junction.
During guidance, when you launch the search for a new destination you have the choice be-tween setting it as a waypoint, a new destination or a final step.

10E N T E R I N G A D E S T I N A T I O N ( 2 / 4 )
“Points of interest”
This menu lets you search for points of interest. You can search by:
– name;– location (“In a city”, “Nearby”, “on the
route”);– Categories (service station, parking, res-
taurant, accommodation)
The system will offer you a list of points of interest, from closest to your position to furthest away.
“Favourite”
This menu allows you to select a destina-tion stored previously in your multimedia system (“Home”, “Work” and “Address book”).
“Home”
This menu lets you start the guidance to your pre-set home destination.
“Work”
This menu lets you start the guidance to your pre-set work destination.Note: to reset your home or work address, press the pop-up menu button from the “Favourite” menu, then press “Reset work/home address”.
“Address book”
This menu lets you save addresses into the address book and use them later as destinations.
“Coordinate”
This menu lets you define a destination using latitude and longitude.
“On map”
This menu lets you define a destination from the map. On the “Navigation” menu, select “Destination” then “On map”. Move around the map to position the cursor on your destination, then confirm by pressing “Select”: the system calculates the route.Note: you can add the selected address to the address book by pressing the button on the pop-up menu then “Add to address book”

11E N T E R I N G A D E S T I N A T I O N ( 3 / 4 )
Voice recognition Use the voice command system to enter a destina-tion without using the screen. Press 1 and follow the instructions provided by the system and on the screen.
Route summaryOnce your destination has been entered, the system calculates the route. The screen has two areas:– zone 2 shows the calculation method used;– the journey zone 3 shows a route summary (dis-
tance, journey time, traffic and restrictions af-fecting your journey).
Go
2
Note: if you do not confirm, this page closes after about ten seconds and the guidance starts auto-matically in the default route mode (fast, economi-cal, or short).
NAVIGATION SETTINGSYou can configure different settings by selecting the following shortcuts:– 4: allows you to zoom in on the map;– 5: allows you to deactivate/activate the guidance
instructions;– 6: allows you to change the display mode
(2D/3D).
Confirming the destinationOnce your destination information has been en-tered, the system displays a route summary for confirmation.At the end of the calculation, the system displays a summary of the route and offers three options:– “Previous”: go back to the previous screen;– “Go” the guidance starts;– “Options”: lets you choose a route, set a route or
add the route to the address book.Note: via the button on the pop-up menu, you can change the settings for the route selected, or add it to the address book.
Nav
Guidance map
4
Overview
1
56
Short.
3
12
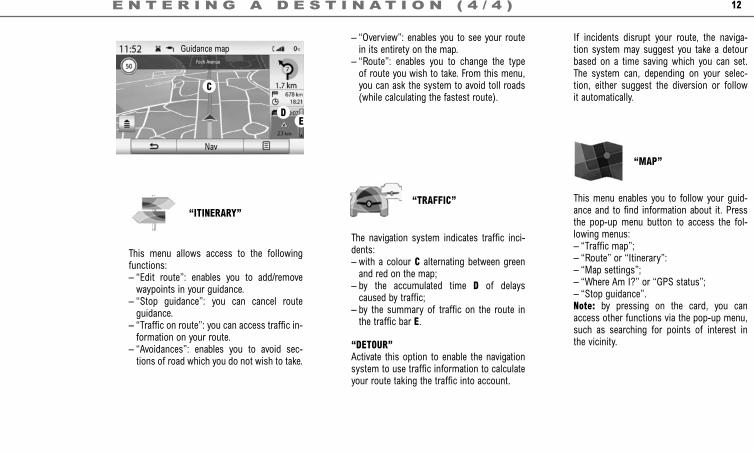
If incidents disrupt your route, the naviga-tion system may suggest you take a detour based on a time saving which you can set. The system can, depending on your selec-tion, either suggest the diversion or follow it automatically.
“MAP”
This menu enables you to follow your guid-ance and to find information about it. Press the pop-up menu button to access the fol-lowing menus:– “Traffic map”;– “Route” or “Itinerary”:– “Map settings”;– “Where Am I?” or “GPS status”;– “Stop guidance”.Note: by pressing on the card, you can access other functions via the pop-up menu, such as searching for points of interest in the vicinity.
E N T E R I N G A D E S T I N A T I O N ( 4 / 4 )
“ITINERARY”
This menu allows access to the following functions:– “Edit route”: enables you to add/remove
waypoints in your guidance.– “Stop guidance”: you can cancel route
guidance.– “Traffic on route”: you can access traffic in-
formation on your route.– “Avoidances”: enables you to avoid sec-
tions of road which you do not wish to take.
– “Overview”: enables you to see your route in its entirety on the map.
– “Route”: enables you to change the type of route you wish to take. From this menu, you can ask the system to avoid toll roads (while calculating the fastest route).
“TRAFFIC”
The navigation system indicates traffic inci-dents:– with a colour C alternating between green
and red on the map;– by the accumulated time D of delays
caused by traffic;– by the summary of traffic on the route in
the traffic bar E.
“DETOUR”Activate this option to enable the navigation system to use traffic information to calculate your route taking the traffic into account.
Nav
Guidance mapFoch Avenue
E
C
D

13
Your phone may ask for authorisation to share your contacts, call logs and media. Accept sharing to find this information on the multimedia system. For other pairing methods, please refer to the system handbook.
CONNECTING A TELEPHONEOnce the system is initiated, the hands-free phone system searches for any paired phones with Bluetooth® activated nearby. The system automa-tically downloads the data for the last telephone connected (directory, music, etc). To deactivate this option, please refer to the section on “Making/receiving a call”.
NB: If a call is ongoing while the telephone is being connected, it will automatically be transferred to the vehicle loudspeakers.
Note: For more information on compatible phones, contact an authorised dealer or visit the manufac-turer’s website if available.
B L U E T O O T H ® T E L E P H O N E C O N N E C T I O N
“Phone” Menu
PAIRING THE FIRST TELEPHONETo use your hands-free system, pair your Bluetooth® mobile phone with the vehicle. Check that the Bluetooth® of your mobile is ac-tivated and its status set to “visible”.On your system’s main menu:– press “Phone”.A message is displayed on the screen asking you to pair a phone.– Press “OK”. The multimedia system searches
for nearby phones with Bluetooth® activated;– select your phone from the list and follow the
instructions.Your phone is now paired to the system.Depending on the model, and if the system asks, enter the Bluetooth® code on your phone to pair it to the system, or confirm the pairing.
CHANGING A CONNECTED TELEPHONEThe system can store up to six mobile phones but only one at a time can be connected for calling. You can connect/disconnect any of these telephones at any time. To do this, on the main menu:– press “Phone”, “Settings” and “Paired devices
list”;– select the phone to be connected or disconnec-
ted.If your phone is not on the list, refer to the system user manual to add it.
Menu
To use the hands-free features, you need to establish a Bluetooth connection between your phone and your system. Do you want to do that now ?
No
You can pair two phones simultaneously: one for multimedia and another for calling.
Searching device
«Warning: Please make sure your Bluetooth’s device parameter is switched on and your device is visible over bluetooth»
Yes
Vehicle System
Connect

14M A K I N G A N D R E C E I V I N G A C A L L ( 1 / 2 )
“Phone” Menu
From the main menu, select “Phone”. You can make a call by selecting:– a contact from the phonebook;– a number from the call log;– the keypad to dial the number.
“PHONEBOOK”
This menu lets you make a call using the con-tacts already saved in your phone. Select the contact (if the contact has several numbers, select the number required); the call is auto-matic when you press the contact’s number.Note: the contacts saved on the SIM card are not visible. Only contacts saved on the phone are visible.
«CALL LOGS»
This menu lets you go to:– all calls (incoming, outgoing, missed);– incoming calls;– missed calls;– outgoing calls.Select the tab required and press the contact to make the call. Note: For each list, the contacts are displayed from newest to oldest.
“DIAL NUMBER”
This menu lets you dial the number on the keypad. After the number is entered, press “Call” to make the call.
“SMS”
This system allows you to view your mobile phone messages or to have your messages read aloud by a voice synthesizer only when your vehicle is stationary. Only texts (SMS) received when your telephone is connected to the multimedia system are accessible.Note: authorise data sharing on your phone to access texts (SMS) on the system.Note: only SMS can be read via the multi-media system. Other types of message may not be read.
“VOICE MAIL”
This menu lets you hear the voice messages received on your phone. To configure the voicemail on first use, enter your voicemail number on the digital keypad, then confirm.
For more detailed information, refer to the manual for your multimedia system.

15M A K I N G A N D R E C E I V I N G A C A L L ( 2 / 2 )
“SETTINGS”
This menu enables you to:– activate/deactivate Bluetooth®;– go to the list of paired devices;– change the access code;– adjust the levels of the different sounds of
the paired phone;– configure the voicemail;– activate/deactivate automatic call holding;– access the tutorial on use of your tele-
phone with the multimedia system;– activate/deactivate SMS mode.
"BLUETOOTH®"Press “ON” or “OFF” to activate/deactivate Bluetooth®.
“PAIRED DEVICES LIST”Access a list of devices paired with the multi-media system and add/delete devices.
“CHANGE PASS CODE”This option lets you change the password. The cur-rent password is displayed.
“SOUND LEVELS”This option lets you adjust the sound level of the hands-free system, the ringtone and the micro-phone’s sensitivity.
“VOICE MAIL SETTINGS”Enter the voicemail number on the digital keypad, then press «Save».
“AUTOMATIC HOLD”To activate/deactivate putting incoming calls on hold automatically, press “ON” or “OFF”.
“SMS”Press «ON"/"OFF" to activate/deactivate the func-tion.
You can answer/end a call by pressing directly on control 1 on the steering wheel.
1
2
Voice recognition
You can use the voice control of the multimedia system or your telephone to dial a number or call a contact from your phonebook without touching the screen.Tap button 2, then wait until a beep sounds before speaking. Follow the audio and visual instructions provided by the system and on the screen.

16V E H I C L E ( 1 / 3 )
“Vehicle” menu
This menu lets you access the following menus.
“AMBIENT LIGHT”
This menu is for customising the ambience lighting inside the vehicle.The following choices are offered:– “Ambient light” (“On”/”Off”);– Ambience colour;– “Intensity”;– Dashboard and front/rear passenger com-
partment areas.
Note: when the ambient lighting is off, the settings are not available.
Note: to save the desired ambient lighting, make these adjustments from the “Multi-Sense" menu.
“SEATS”
This menu lets you access the following op-tions.
“Massage”
This menu allows you to adjust the massage seat:– of the “Driver” or the “Passenger”;– in on/off mode;– the programme wanted;– in “Intensity” and “Speed”;Note: when the massage seats are off, the settings are not available.
“One-touch folding”
This menu allows you to fold down one or all of the seats to the rear of the vehi-cle. The number of seats fitted in the ve-hicle varies.
Press the seats on-screen that you want to fold down then “Fold”. Press “Yes” to confirm.To fold all the seats press “All” then “Fold”. When folding down the seats, make sure that the seats are empty. This option is only ac-cessible with the vehicle stopped and the seat belts unlocked.
“Settings”
This menu allows you to adjust the po-sition of the front passenger and driver seats and ensure easy access to the vehi-cle. The settings available are:– «Easy access for passenger»;– «Courtesy for passenger seat»;– «Position».To reset your selection, press the pop-up menu button, then “Reset”.

17V E H I C L E ( 2 / 3 )
«MULTI-SENSE»
This menu lets you customise the behaviour of some on-board systems. From this menu, select one or two favourite modes from the following five modes:– «Comfort»;– «Sport»;– «Eco»;– «Neutral»;– «Perso».To configure the selected mode, press the pop-up menu button, then “Current mode configuration ”. Depending on the selected mode, the customisable setting values are displayed:– «Steering»;– «4Control»;– «Damping»;– «Powertrain»;– «Thermal comfort»;– “Display”;– «Engine sound design»;– «Ambient light»;– “Driver massage”.
Note: to customise the different modes, touch the centre of the multimedia screen to access the settings.
«DRIVING ASSISTANCE»
This menu lets you access and set the fol-lowing items:– «Lane departure warning»;– “Lane keeping assistance”;– «Lane departure warning setting»;– “Lane keeping assistance” settings;– «Distance warning»;– «Active braking»;– «Blind spot alert»;– «Speed alert settings»;– «Traction control»;– «Automatic high beams».
Note: to reset your selection, press the pop-up menu button, then “Reset”.
«PARKING ASSISTANCE»
This menu lets you access and set the fol-lowing items:– «Parking sensors»;– «Rear view camera»;– «Easy park assist».
«Obstacle detection»
Select this menu to set the different op-tions linked to obstacle detection.
«Rear view camera»
Select this menu to set the different op-tions for the reversing camera.
To see a demo of the “Multi-Sense" mode, press the pop-up menu button on the mode selection screen, then "About”.

18
“Easy park assist”
Select this menu to configure the options related to the “Easy park assist” function.
«DRIVING ECO2»
This menu allows you to evaluate your driv-ing style.
«ON BOARD COMPUTER»
This menu allows you to access information about your journey.
«TAKE CARE»
This menu lets you view the air quality.
V E H I C L E ( 3 / 3 )
Refer to your multimedia system’s user manual by pressing the pop-up menu button from the «Vehicle» menu screen, then «User manual».
«Air quality»
This menu lets you view the air quality.
«TYRE PRESSURE»
This menu controls alerts to the driver in cases of low air pressure or leakages in the tyres. To launch a reset, press “Reset”. A con-firmation message is displayed on the screen.
«USER SETTINGS»
This menu lets you activate/deactivate the fol-lowing options:– unlock driver’s door only;– Auto door lock while driving;– Hand free function;– volume of the indicator sound (press “+” or
“-”);– internal welcome sound;– external welcome;– automatic cabin lights;– rear screen wiper for reversing (when re-
verse gear is engaged);– setting of the driving style indicator on the
instrument panel;– free wheel mode in ECO mode;– ...To reset your data, press the pop-up menu button, then “Reset”.The order of displaying of the menus may vary.
19S E R V I C E S
«Apps»
This service lets you access the services described below. From the main menu, press “Apps”.Some services are freely accessible during the trial period. You can extend your sub-scription online via the manufacturer’s web-site or directly online from your vehicle.
«MY APPS»
This service lets you see the installed apps. Press “My apps”, then on the selected app icon to run it.Note: to uninstall an app, press the pop-up menu button, then “Organise apps”. Press the “x” at the top right of the app that you want to delete.
«R-LINK STORE»
This menu allows you to buy applications, features and services directly from your ve-hicle via a secure online system.Note: access to the R-Link Store is only available if the services have been activated beforehand and the vehicle is stationary.
«APP MANAGER»
This service lets you manage your apps and displays:– memory used;– amount of free memory;– list of installed apps and related informa-
tion;– app running.Note: to stop an app that is running, select the app, then press “Stop” at the screen bottom.
“PRIVACY”
This menu enables you to activate/deactivate data sharing.Note: if this function is deactivated, certain applications may not operate correctly.
Refer to your multimedia system’s user manual by pressing the pop-up menu button from the “Apps” menu screen, then “User manual”.
“Android Auto™"/"Carplay™": connect your smartphone to the USB port of your vehicle to access applications from your smartphone on your multimedia system.
“MY Renault" is an application available on your smartphone which allows you to receive infor-mation relating to your vehicle via your smart-phone.

20
– the driver’s seat position;– the position of the rear-view mirrors.
“DISPLAY”
This menu lets you access the following in-formation.
“Central display”
This menu lets you change the appear-ance of the touch screen. Select your de-sired theme, then adjust its brightness by pressing “+” or “-”.
Note: “Dimming day mode” mode is disa-bled at night and “Dimming night mode” mode is disabled in the daytime.
S Y S T E M S E T T I N G S ( 1 / 3 )
Menu “System”
From the main menu, press “System” to go to the following setting menus.
Note: to go to the system’s virtual manual, press the the pop-up menu button, then “User manual”.
“HOME PAGE”
This menu lets you adjust the layout of the home screen. The three available home pages are displayed at the top of the screen to let you preview your selection. The available widgets are found at the bottom of the screen and can be displayed on several pages. To add or delete widgets, refer to the “First use” section in this manual.
“USER PROFILE”
This menu lets you choose a user profile to apply to the system from six available pro-files. The the pop-up menu button lets you:– rename a profile;– change the photo of a profile;– duplicate a profile;– reset a profile;
The settings saved in a user profile are:– system language;– selected distance unit;– layout of the home page;– radio presets;– navigation history;– navigation favourites;– confidentiality settings;
and the settings for the:– display;– “Multi-Sense";– ambient lighting;– selected distance unit;

21S Y S T E M S E T T I N G S ( 2 / 3 )
Note: these settings are available when the “Head-up display” function is activated and the engine running.
“DIMMING”
This menu allows you to adjust the bright-ness of the instrument panel, multimedia screen and head-up display.
“VOLUME”
This menu lets you adjust the volume of the following settings by pressing “+” or “-”:
– Main audio;– Phone ringtone;– telephone communications;– Navigation;– warning sounds;– button sound;– indicator volume:– Obstacle detection;
– Lane departure warning;– voice controls.
Note: “0” adjustment is mute.
« LANGUAGE »
This menu lets you select a language to be applied to the vehicle. Select the desired lan-guage.
“KEYBOARD”
This menu lets you choose which virtual keypad is used by the system from those given (“Azerty”, “Qwerty”, “Qwertz”, etc.).
“Cockpit display”
This menu is for changing the appear-ance of the instrument panel. Select a style from the four given, then adjust the “Dimming night mode” by pressing “+” or “-”.
Note: the “Dimming night mode” func-tion only activates when the lights are switched on.
“Head-up display”
This menu enables you to adjust the fol-lowing settings:– activation or deactivation of the
“Head-up display” function;– activation or deactivation of the auto-
matic brightness setting;– screen brightness;– height of head-up display. Refer to your multimedia system’s user manual
by pressing the pop-up menu button from the “System” menu screen, then “User manual”.

22S Y S T E M S E T T I N G S ( 3 / 3 )
“GENERAL RESET”
This menu lets you reset all the system set-tings to the initial state. All your data, applica-tions and layout will be deleted. Confirm the reset by pressing “Yes”.
Note: after a reset, the system restarts in the factory set language. To change it, see the relevant paragraph in this section.
Note: to recover your applications, synchro-nise your system with the R-Link Store. Large applications can only be recovered by using your computer connected to the R-Link Store.
Note: resetting the system by pressing and holding the on/off button on the front panel does not result in loss of data unlike the “General reset” function.
“SYSTEM INFORMATION”
This menu lets you see certain system infor-mation (software version, navigation informa-tion, current language, licence etc.).
« SUGGESTION BAR »
This menu lets you display notifications whilst driving. You can activate or deacti-vate these notifications, which are listed by categories (“Navigation”, “Multimedia” and “Phone”).
Note: when the “Notifications” function is deactivated, all of the sub-categories are de-activated automatically.
The order of displaying of the menus may vary.
“DATE AND TIME”
This menu lets you manually set the system clock and its display format. It is recom-mended that you keep the automatic setting.
« UNITS »
This menu enables you to choose the type of distance unit (“km” or “miles”).
“VOICE COMMAND”
This menu lets you select and assign to the system a male or female voice.

Renault s.a.s. société paR actions simplifiée au capital de 533 941 113 € / 13/15, quai le Gallo 92100 BouloGne/BillancouRt R.c.s. nanteRRe 780 129 987 — siRet 780 129 987 03591 / tél. : 0810 40 50 60
Rp 1194-7 – 25 91 012 89R – 12/2016 – edition anglaise
à259101289Rîúîä Y8
( www.renault-multimedia.com )