Embed Size (px)
Citation preview
R4E Documentation
2
1. Installing R4E1. 1) Provision Software Sites2. 2) Install Version Control System Features3. 3) Install R4E feature4. 4) Install Versions Connectors
2. Getting Started1. Overview
1. R4E main interfaces2. Starting R4E3. R4E Configuration
1. R4E General Preferences1. User Tab2. Groups Tab3. Rule Sets Tab4. Filter Tabs
2. R4E LDAP Settings3. SMTP Hosts Definitions4. R4E Capabilities5. Version Compatibility
4. Eclipse Project Configuration5. Tutorials
1. Configuration and Set-up2. Running the Tutorials
1. Tutorial 1: Performing a Basic Review2. Tutorial 2: Performing an Informal Review3. Tutorial 3: Performing a Formal Review
3. Concepts1. Basic and Informal Reviews workflows
1. Create new review2. Identify what needs to be reviewed3. Items ready for review4. Review item examination, anomaly/time logging5. Progress notification6. Examine and fix/reject anomalies7. Completion notification8. Examine and fix/reject anomalies9. Mark review completed
2. Formal Review workflow1. Planning Phase2. Preparation Phase3. Decision Phase4. Rework Phase
3. Author4. Anomaly5. Comment6. Commit Review Item7. Delta8. File Context9. Global Anomaly10.Lead11.Organizer12.Participant13.Participants List14.Postponed Anomaly15.Resource Review Item

3
16.Reviewer17.Review Group18.Review19.Review Item20.Rule21.Rule Set22.Rule Area23.Rule Violation24.Selection
4. Tasks1. Working with the Navigator View
1. Disabling and Restoring Elements2. Sorting Review Navigator Elements3. Filtering Review Navigator Elements4. Setting Elements Reviewed State5. Setting Elements Due Date6. Other Review Navigator Commands
2. Handling Review Groups and Reviews1. Creating a Review Group2. Opening an Existing Review Group3. Creating a Review4. Opening and Closing of Review Groups and Reviews5. Adding Participants to a Review6. Creating a Review Item
1. Creating a Resource Review Item2. Creating a Commit Review Item
7. Comparing Review Items8. Assigning Review Elements9. Creating an Anomaly10.Cloning an existing Anomaly11.Creating Comments on an existing Anomaly12.Cloning existing Comments to an Anomaly13.Importing Postponed Anomalies
3. Handling Design Rules1. Creating a Rule Set2. Importing an Existing Rule Set3. Creating a Rule Area4. Creating a Rule Violation5. Creating a Rule
4. Working with Editors1. Opening files in editors2. Using Review Annotations and Inline Comments3. Navigating through and using R4E Annotations
5. Working with R4E Properties1. Working with Review Groups Properties2. Working with Reviews Properties3. Working with Review Items Properties4. Working with File Contexts Properties5. Working with Selections and Deltas Properties6. Working with Anomalies Properties7. Working with Comments Properties8. Working with Participant Properties9. Working with Rule Sets Properties10.Working with Rule Areas and Rule Violations Properties11.Working with Rules Properties

4
6. Using Key Bindings and Hotkeys1. Keys2. Bindings
7. Using Notifications1. Using Email Notifications2. Using Meeting Notifications
8. Using Statistical Reports1. Generating Reports2. Report Contents
1. Report Summary2. Review Anomaly Statistics3. Review Efficiency Statistics
1. Review Items2. Review Anomalies3. Average Time Line4. Average Effort per Participant5. Total Review Effort6. List of Anomalies
9. Performing Reviews1. Performing Basic Reviews2. Performing Informal Reviews3. Performing Formal Reviews
1. Planning Phase2. Preparation Phase3. Decision Phase4. Rework Phase5. Other Considerations
5. Advanced Topics1. Working with multiple patch set of the same commit in a review
Installing R4E
1) Provision Software Sites
R4E uses some Mylyn components so you will need to add the Mylyn Release update site.
Add the following Software Sites to the Eclipse workspace (Help -> Install New Software -> Add)
Mylyn Release: http://download.eclipse.org/mylyn/releases/latest [http://download.eclipse.org/mylyn/releases/latest]
Mylyn Reviews R4E Updates: http://download.eclipse.org/r4e/updates/ [http://download.eclipse.org/r4e/updates/]
if Subversion is to be used, add the subclipse site of the subclipse version you want to use e.g. http://subclipse.tigris.org/update_1.6.x [http://subclipse.tigris.org/update_1.6.x]
2) Install Version Control System Features
R4E uses Mylyn Versions to interact with different version control systems.
• Git: Git support is provided by interfacing with Egit/Jgit, Installing the R4E feature automatically installs Egit/Jgitif it's not yet available in the Eclipse installation.So no specific action is needed for Egit installation in this step.
• Subversion (SVN): If there is a need to interact with an SVN repository, install the subclipse feature.Help ->Install New Software, and select the subclipse site provisioned above.

5

6
3) Install R4E feature
Help -> Install New Software, and select the Mylyn Reviews site provisioned above.
4) Install Versions Connectors
Help -> Install New Software, and select the Mylyn Versions site provisioned above.Select the connector(s) needed to interface your version control system(s).currently, R4E supports Git and Subclipse connectors.

7

8
Getting Started
Overview
Review for Eclipse (R4E) is a set of Eclipse plugins that provide eclipse-integrated code and text reviewfunctionality. R4E supports reviewing files associated to Eclipse projects and optionally included under a VersionControl System. Three review workflows are included (Basic, Informal and IEEE standard 1028-compatible Formalreviews).
The main purpose of R4E is to review Source Code, especially Java and C/C++ Source code. Eventually, supportfor reviewing Data Models (based on EMF) will be included. R4E also aims to support multiple Version ControlSystems (via Eclipse Team Providers). Git (implemented in Eclipse through EGit/JGit), and SVN (implemented inEclipse through Subclipse) are the ones currently supported.
The R4E User Interface includes three main components: R4E Review Navigator View, R4E Properties Viewand R4E Context Menus
The R4E Review Navigator View is the main interface to R4E. It shows all the R4E elements in a hierarchicaltree structure, or alternatively in a table-like structure for the elements under the currently active Review only. TheR4E Properties view, using the generic Eclipse Properties View, presents the properties and attributes attached toeach R4E element represented in the Review Navigator view. Some elements values can be altered after creation,and some other are read-only and settable at creation time. The R4E Context Menu appears in Eclipse Contextmenus whenever it is possible to use R4E command is this particular context. Please refer to section 3 ("Tasks")below for more information.
9
Take note that it is strongly recommended to use the layout shown above for optimal user experience. Thismeans the R4E Review Navigator should be positioned on one side of the screen, the editor in the central position,and the R4E Properties view at the bottom. For instance, it is not recommended to use the Review Navigator andthe Properties view as tabbed view together, as selecting an element on the Review Navigation will automaticallyset the focus on the Properties view.
R4E main interfaces
R4E interacts with the following features/plugins:
• Mylyn Versions Connectors for Egit and Svn (via Subclipse)• C/C++ Language support: CDT (Optional)• Java Language support: JDT (Optional)• LDAP Connector: R4E LDAP plugin• Email support: R4E SMTP connector• Meeting support: R4E VCalendar connector• General: EMF (for the Review meta-data)
Starting R4E
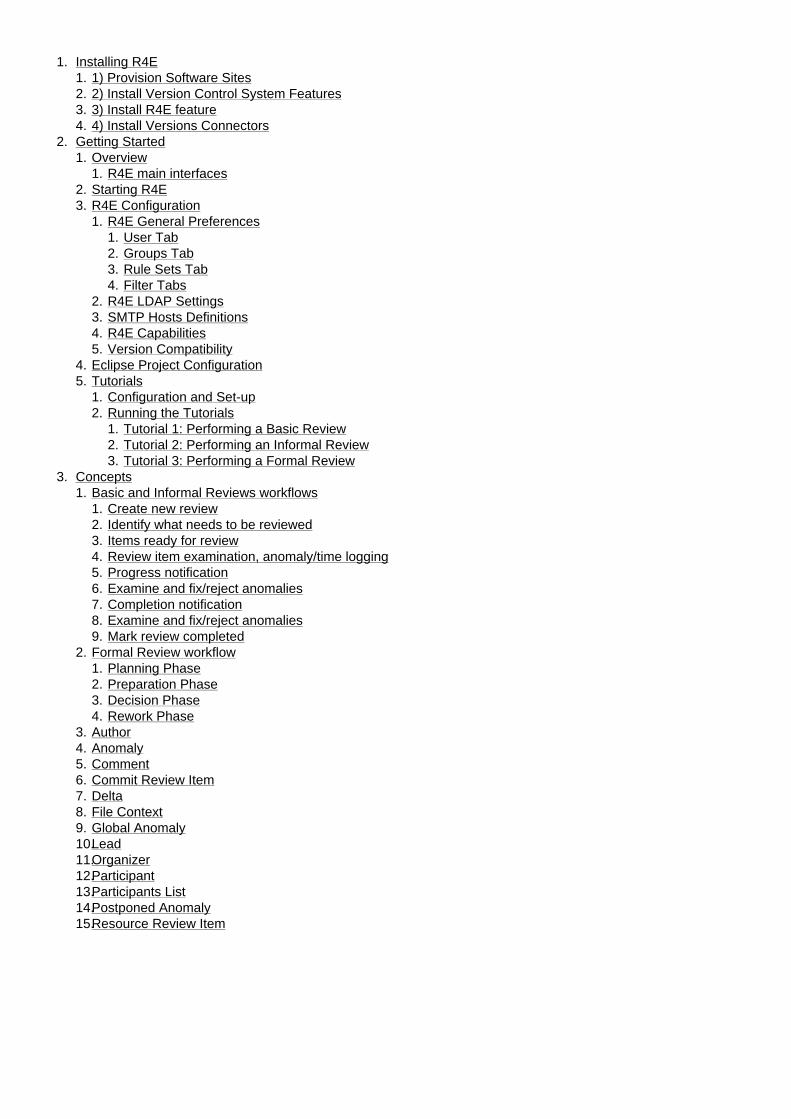
To start up R4E, show the Review Navigator View e.g. using the Eclipse Window->Show View menu:To associate existing review groups see Opening an Existing Review Group
R4E Configuration
The R4E Configuration can be entered by accessing the R4E Preferences Pages, which are part of the EclipseGlobal Preferences. There are three R4E Preference Pages: R4E General Preferences, R4E LDAP Settings, andSMTP Hosts Definitions.

10
R4E General Preferences
R4E General Preferences page is split up into four tab sections. Take note that the Restore Defaults and Applybuttons apply to the values displayed in all the tabs
User Tab
This is used to enter the current user details.
The following elements are configurable
• User ID: The User ID is set by default to the login ID of the current session and can be modified to any Stringthat can be used to identify the user. This field is mandatory.
• UserEmail: The User Email should be set to a valid email for the current user. The E-mail address is used tonotify the user information about the reviews he is currently part of by Email, as configured in the SMTP HostsDefinitions section. Take note that if the LDAP Preferences are filled-in (see below) and a corresponding LDAPdatabase can be resolved, then this field will be automatically be set based on the User ID entered. This field isalso mandatory.
• Participants Lists and Participants: Participants Lists are a group of users that can be added together asparticipant to a review. To create a new Participant List, use the Add button for the Participant List table. TheRemove button can be used to remove a Participant List. Once a participant List is created, specific participantscan be added to the selected list and removed by using the Add and Remove buttons of the Participantstable, respectively . Using the Add button will open a New Participant dialog that can be used to specify theusers to add. Refer to the Adding Participants to a Review section for more information on using the NewParticipants dialog. After it is set up, a participant list can be used in any New Participant dialog and adding it as

11
a participant will instead add all its participants values to the review. Take note that participant lists are optionaland participants can be added separately to reviews.
• Checkboxes:• Create Delta Elements... checkbox is used to control the display of file differences as elements in the Review
Navigator.• Import Postponed Global Anomalies... checkbox is used to specify that global anomalies (i.e. anomalies
not attached to a particular file) that are in state POSTPONED in all other reviews included in the parentReview Group should also be imported to the currently active Review, in addition to the local anomalies,when the Import Postponed Anomalies command is used. See Postponed Anomalies section below for moreinformation.
Groups Tab
This is used to specify the location of the data files that contain Review Group information. See below for moreinformation on Review Groups. The Name and Description fields show additional information attached to theselected Review Group file. Typically, all R4E data files will be located on a shared network drive. Users canadd one or multiple references to Group files to their workspace as needed using the ''Add ''button. Files canbe removed from the workspace by pressing the ''Remove ''button. Files can be moved up or down in the listby clicking the corresponding button. This will affect the order in which the Groups are displayed in the ReviewNavigator.
If there is a version compatibility problem between the version of the Group file and the current R4E pluginversion, where the R4E version is older than the Group file version, then this group cannot be used and thedescription field will show a version mismatch error. Such errors can typically be fixed by upgrading the R4Eplugins to their later version.
Note: Make sure the defined directory location is accessible and configured with read/write permissions forthe team members involved in the review.

12
Rule Sets Tab
This is used to specify the location of the data files that contain Rule Set information. See below for moreinformation on Rule Sets. The Name and Version fields show additional information attached to the selectedRule Set file. Typically, all R4E data files will be located on a shared network drive. Users can add one ormultiple references to Rule Set files to their workspace as needed using the Add ''button. Files can be removedfrom the workspace by pressing the ''Remove button. Files can be moved up or down in the list by clicking thecorresponding button. This will affect the order in which the Rule Sets are displayed in the Review Navigator.
If there is a version compatibility problem between the version of the Rule Set file and the current R4E pluginversion, where the R4E version is older than the Rule Set file version, then this ruleset cannot be used and thedescription field will show a version mismatch error. Such errors can typically be fixed by upgrading the R4Eplugins to their later version.

13
Filter Tabs
This is used to set-up default filters that will be applied to the Review Navigator view. See the Filters sectionbelow for the various filters descriptions.

14
R4E LDAP Settings
This is used the specify configuration for an available LDAP database server that contains information aboutthe users. The Server Information part contains LDAP server information (Host, Port, DN (Distinguished Name),and Login User Name and Password) to use. The Mandatory Parameters part contains mapping values for LDAPattributes that maps the User Id, Name and E-Mail parameters The Optional Parameters part contains mappingvalues for LDAP attributes that maps optional parameters that could exists in the database.
This is optional. If no information is entered, LDAP functionality will be unavailable, but will not affect R4E otherwise

15
SMTP Hosts Definitions
This is used to specify the mail server(s) that will be used to send manual and automatic email notifications to theusers. More than one server can be specified. Users can add one or multiple servers to their workspace as neededusing the ''Add ''button. Servers can be removed from the workspace by pressing the ''Remove ''button. Serverscan be moved up or down in the list by clicking the corresponding button. The primary server should always be thefirst on the list.
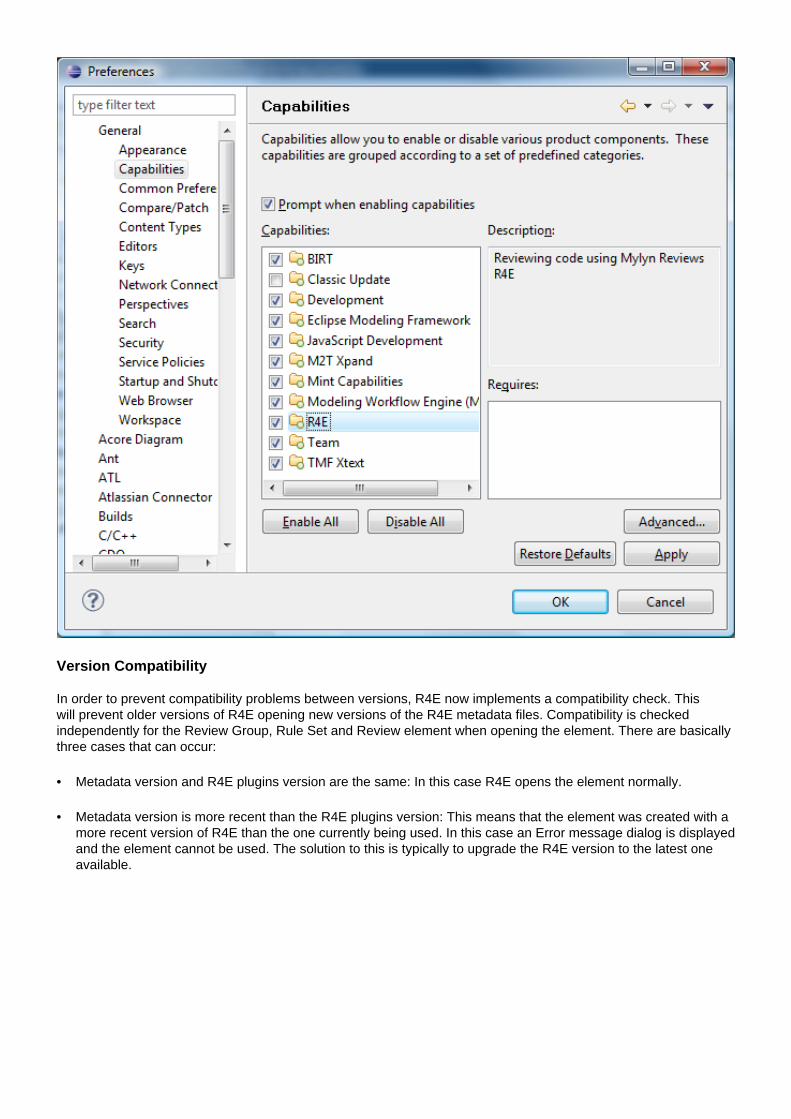
R4E Capabilities
R4E uses Eclipse Capabilities to manage its functionalities. In order to use R4E, its capabilities must be enabled.This can be done by enabling R4E in the Eclipse Preferences->General->Capabilities preference page.
16
Version Compatibility
In order to prevent compatibility problems between versions, R4E now implements a compatibility check. Thiswill prevent older versions of R4E opening new versions of the R4E metadata files. Compatibility is checkedindependently for the Review Group, Rule Set and Review element when opening the element. There are basicallythree cases that can occur:
• Metadata version and R4E plugins version are the same: In this case R4E opens the element normally.
• Metadata version is more recent than the R4E plugins version: This means that the element was created with amore recent version of R4E than the one currently being used. In this case an Error message dialog is displayedand the element cannot be used. The solution to this is typically to upgrade the R4E version to the latest oneavailable.

17
• Metadata version is older than the R4E plugins version: This means that the element was created with an olderversion of R4E than the one currently being used. In this case an information dialog is displayed to highlight thefact and ask the user how to proceed. The user can then choose to cancel the action, upgrade the file versionto the current R4E version, which will permanently change the file version for all users, or keep the older fileversion and open the element in read-only mode. When the element is open in read-only mode it is displayedwith a top-right lock decorator in the Review Navigator View.
Eclipse Project Configuration
• R4E can be used to create reviews that include files present in given Eclipse Projects.
• While R4E can operate on stand-alone Eclipse projects (i.e. outside of any Version Control System), it isrecommended that it is used in conjunction with projects that are held within Revision Control. Currently, R4Esupports Version-Controlled projects that are associated with Egit and Subclipse as team provider., For Git,the "EGit/User Guide" [http://wiki.eclipse.org/EGit/User_Guide] is the best place to find the information on howto create new repositories, work with existing repositories and importing Eclipse projects under and existingrepositories into the Eclipse workspace.
• Once the project is associated/connected to the team provider the project will display the project name andassociated branch between brackets.

18
Tutorials
To familiarize yourself with how R4E operates, three tutorials are provided, which focus on the different reviewtypes and their respective workflows. As we progress in doing the tutorials, more common functionalities areintroduced (such as Notifications, Meeting Requests, Setting reviewed state, Disabling elements, Assigningparticipants etc.).
Configuration and Set-up
Before doing any of the tutorials, we will set-up R4E and configure it to do reviews.
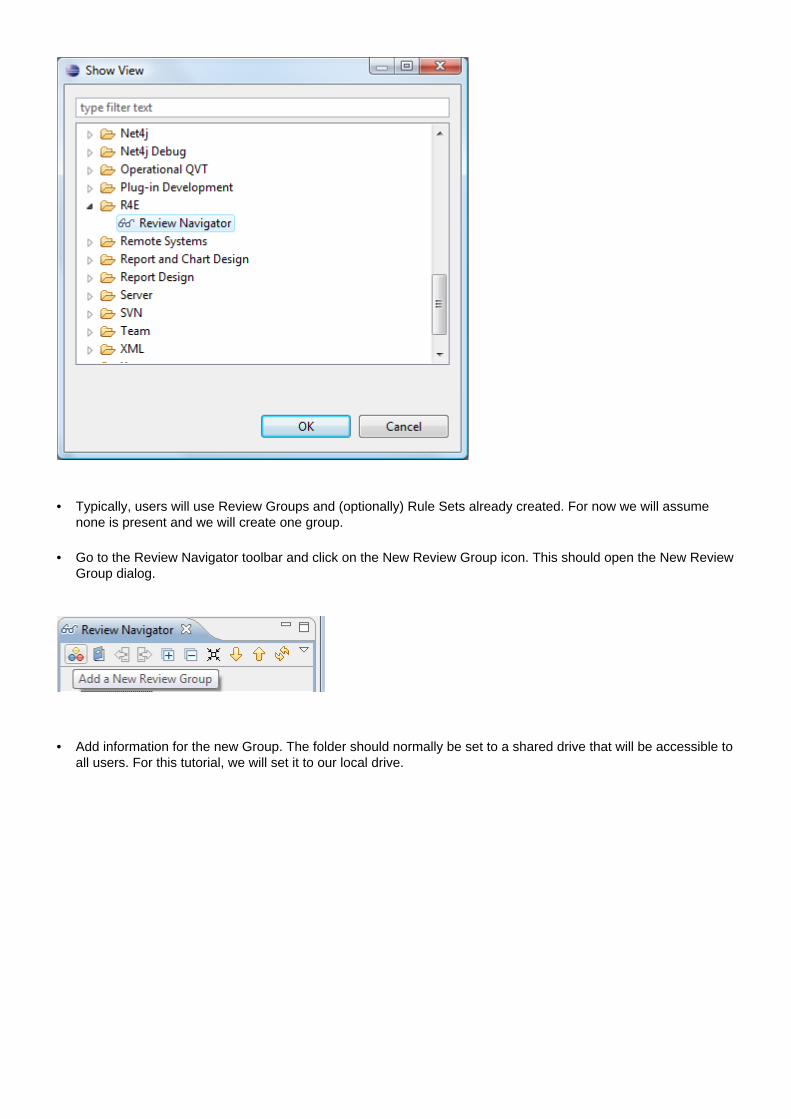
• Open the R4E Review Navigator view by going to the Window->Show View->Other... dialog.
• Select the R4E->Review Navigator view. An empty Review Navigator view should now be visible
19
• Typically, users will use Review Groups and (optionally) Rule Sets already created. For now we will assumenone is present and we will create one group.
• Go to the Review Navigator toolbar and click on the New Review Group icon. This should open the New ReviewGroup dialog.
• Add information for the new Group. The folder should normally be set to a shared drive that will be accessible toall users. For this tutorial, we will set it to our local drive.

20
• Once the Group is created it should show in the Review Navigator View tree. It will automatically be added toyour tracking groups in the R4E preferences so that it will appear again next time you open Eclipse to use R4E.
• You can now open the Review Group by right-clicking on it and selecting the Open Element command. TheGroup icon should change from a grayed out icon to a multi-colored one.
• Go to the Eclipse R4E preferences and make sure your user identity is set correctly.

21
• We will now create some Design rules that can be used during reviews. First create a new Rule Set by selectingthe New Rule Set icon in the Review Navigator toolbar. This should open the New Rule Set dialog.
• Add information for the new Rule Set. The folder should normally be set to a shared drive that will be accessibleto all users. For this tutorial, we will set it to our local drive

22
• Now let's create a Rule Area for this rule set by right-clicking on the Rule Set we just created and selecting theNew Rule Area from the context menu.
• In the dialog shown, set the Area Name

23
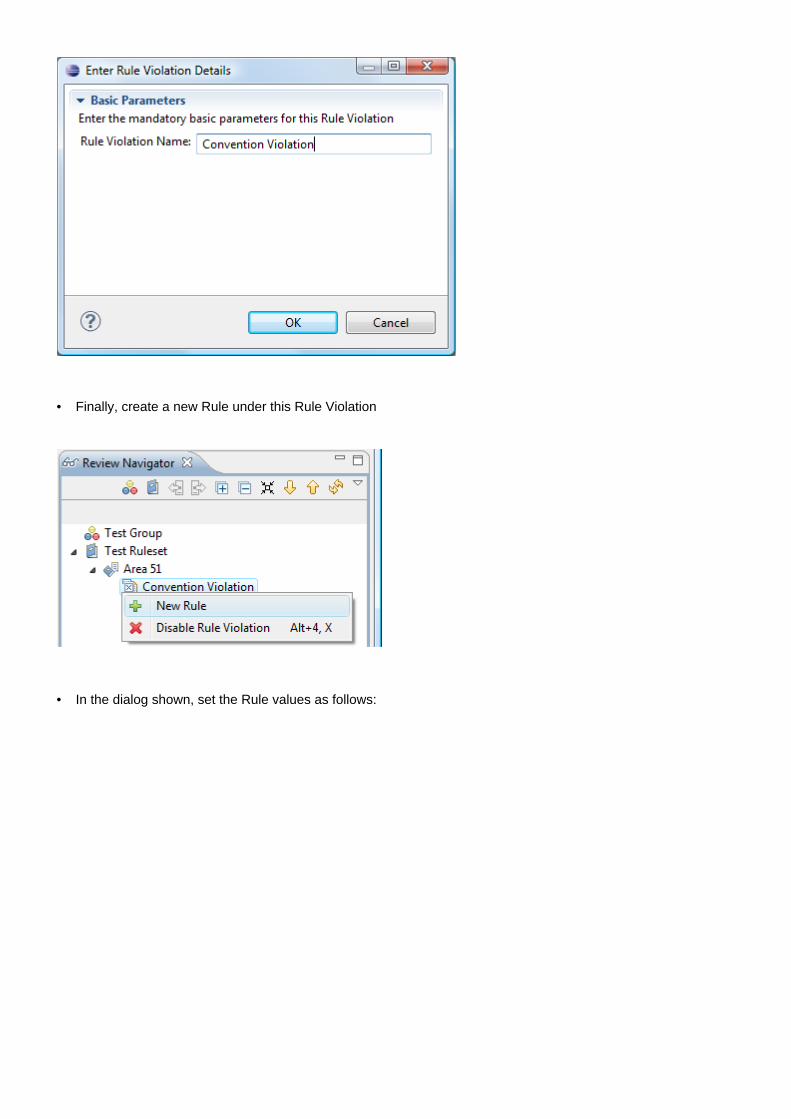
• Now create a Rule Violation under the Rule Are we just created
• In the dialog shown, set the Violation Name
24
• Finally, create a new Rule under this Rule Violation
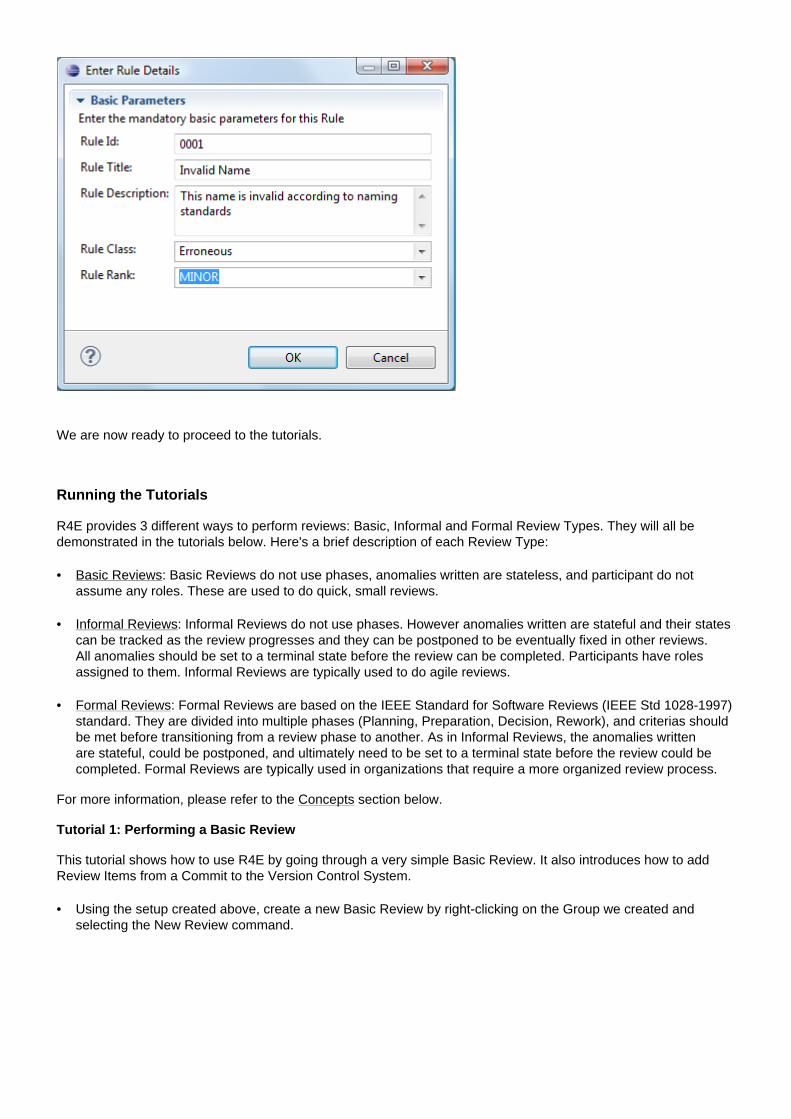
• In the dialog shown, set the Rule values as follows:
25
We are now ready to proceed to the tutorials.
Running the Tutorials
R4E provides 3 different ways to perform reviews: Basic, Informal and Formal Review Types. They will all bedemonstrated in the tutorials below. Here's a brief description of each Review Type:
• Basic Reviews: Basic Reviews do not use phases, anomalies written are stateless, and participant do notassume any roles. These are used to do quick, small reviews.
• Informal Reviews: Informal Reviews do not use phases. However anomalies written are stateful and their statescan be tracked as the review progresses and they can be postponed to be eventually fixed in other reviews.All anomalies should be set to a terminal state before the review can be completed. Participants have rolesassigned to them. Informal Reviews are typically used to do agile reviews.
• Formal Reviews: Formal Reviews are based on the IEEE Standard for Software Reviews (IEEE Std 1028-1997)standard. They are divided into multiple phases (Planning, Preparation, Decision, Rework), and criterias shouldbe met before transitioning from a review phase to another. As in Informal Reviews, the anomalies writtenare stateful, could be postponed, and ultimately need to be set to a terminal state before the review could becompleted. Formal Reviews are typically used in organizations that require a more organized review process.
For more information, please refer to the Concepts section below.
Tutorial 1: Performing a Basic Review
This tutorial shows how to use R4E by going through a very simple Basic Review. It also introduces how to addReview Items from a Commit to the Version Control System.
• Using the setup created above, create a new Basic Review by right-clicking on the Group we created andselecting the New Review command.

26
• This will show the New Review dialog
• Once the Review is created, you will notice that new elements were added to the Navigator tree: The reviewitself, the global anomaly container, and the current user as a new participant to the review.
• You can now browse through the R4E property view, which will appear as soon as you select a new element inthe Navigator tree. You will notice that the General Properties tab for the review has the start date property setto when the review was created and that the end date property is set to (In Progress) to indicate that the reviewis still going on.
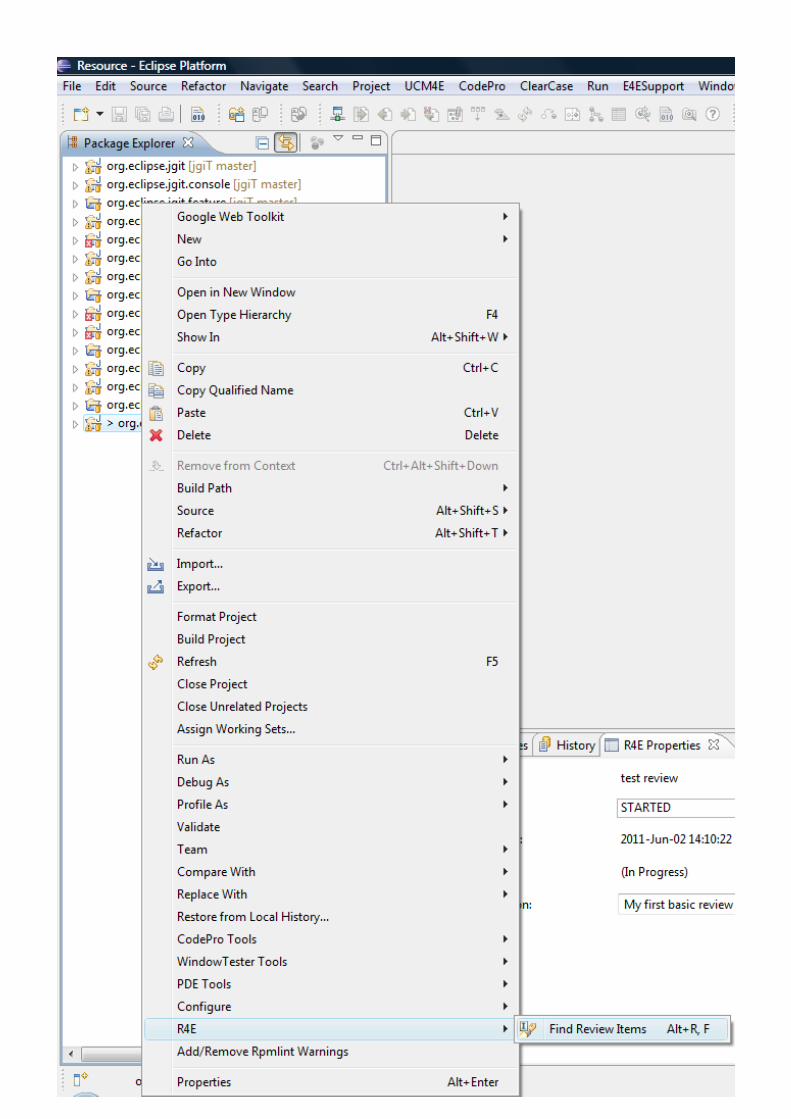
• It is now time to add contents to be reviewed. Contents can be added by selecting whole resources (e.g. filesdirectly) or by using the Find Review Items command on Eclipse project if the project is connected to a VersionControl System. Here we will assume that the Eclipse projects are connected to Git (using EGit) and we will usethe Find Review Items command for the R4E context menu on a given project. Select a project connected to Gitand right-click on it to use the R4E->FindReviewItems command.

27

28
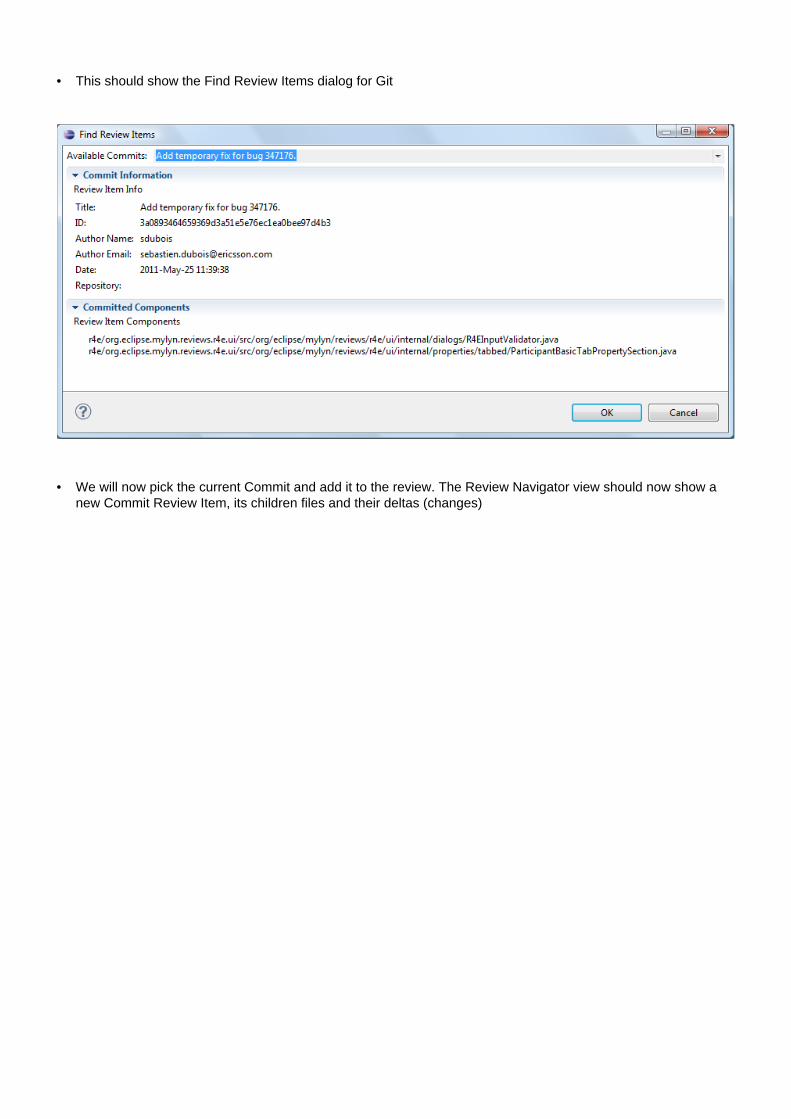
• This should show the Find Review Items dialog for Git
• We will now pick the current Commit and add it to the review. The Review Navigator view should now showa new Commit Review Item, its children files and their deltas (changes). Take note that if you do not see thedeltas, make sure that the Hide Deltas filter is not set in the Review Navigator Drop-Down menu, Filters sub-menu.

29
• Let's say we are now done adding review items. At this point we could add new reviewers to the review andnotify them that the items are ready for reviews. However, since this is a simple tutorial, we will pretend that weare also the reviewer for this review.
30
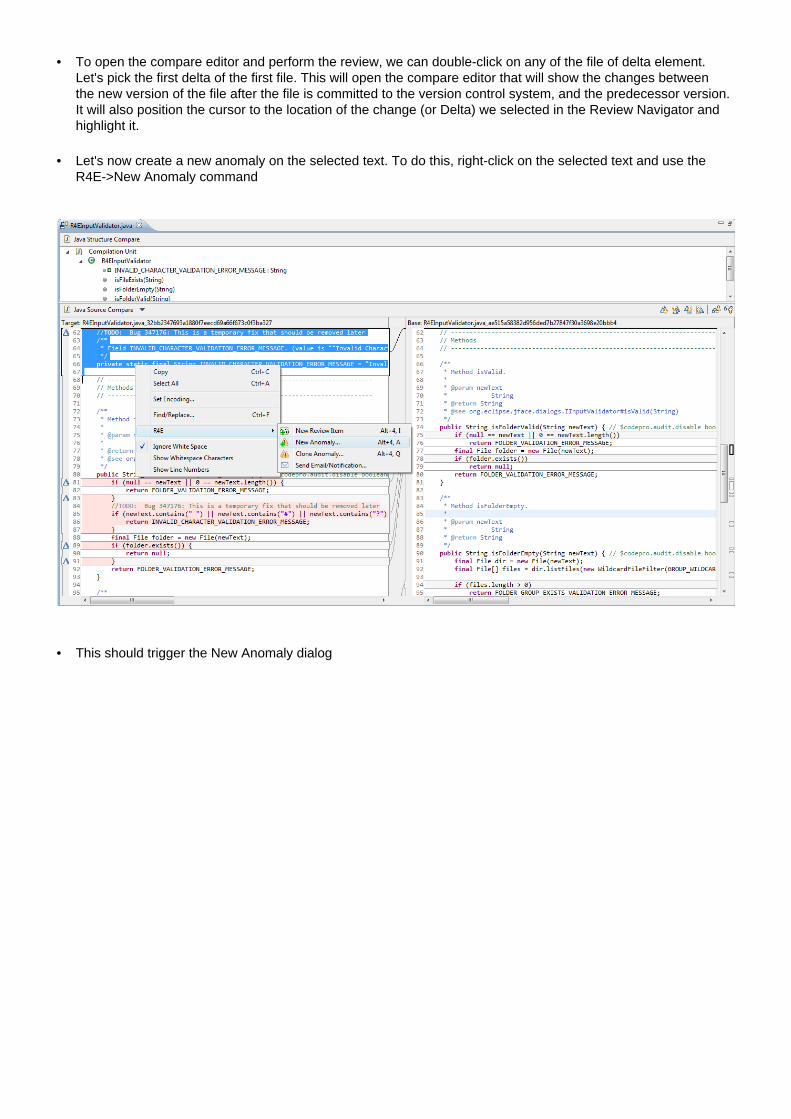
• To open the compare editor and perform the review, we can double-click on any of the file of delta element.Let's pick the first delta of the first file. This will open the compare editor that will show the changes betweenthe new version of the file after the file is committed to the version control system, and the predecessor version.It will also position the cursor to the location of the change (or Delta) we selected in the Review Navigator andhighlight it.
• Let's now create a new anomaly on the selected text. To do this, right-click on the selected text and use theR4E->New Anomaly command
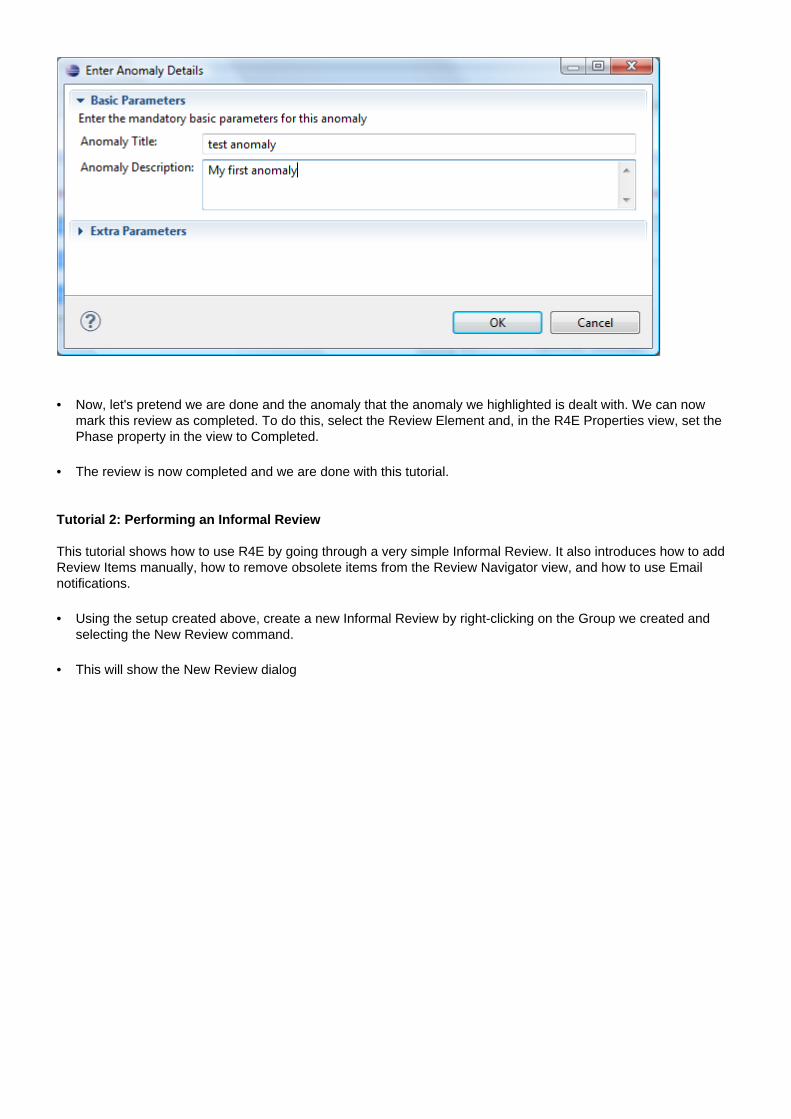
• This should trigger the New Anomaly dialog
31
• Now, let's pretend we are done and the anomaly that the anomaly we highlighted is dealt with. We can nowmark this review as completed. To do this, select the Review Element and, in the R4E Properties view, set thePhase property in the view to Completed.
• The review is now completed and we are done with this tutorial.
Tutorial 2: Performing an Informal Review
This tutorial shows how to use R4E by going through a very simple Informal Review. It also introduces how to addReview Items manually, how to remove obsolete items from the Review Navigator view, and how to use Emailnotifications.
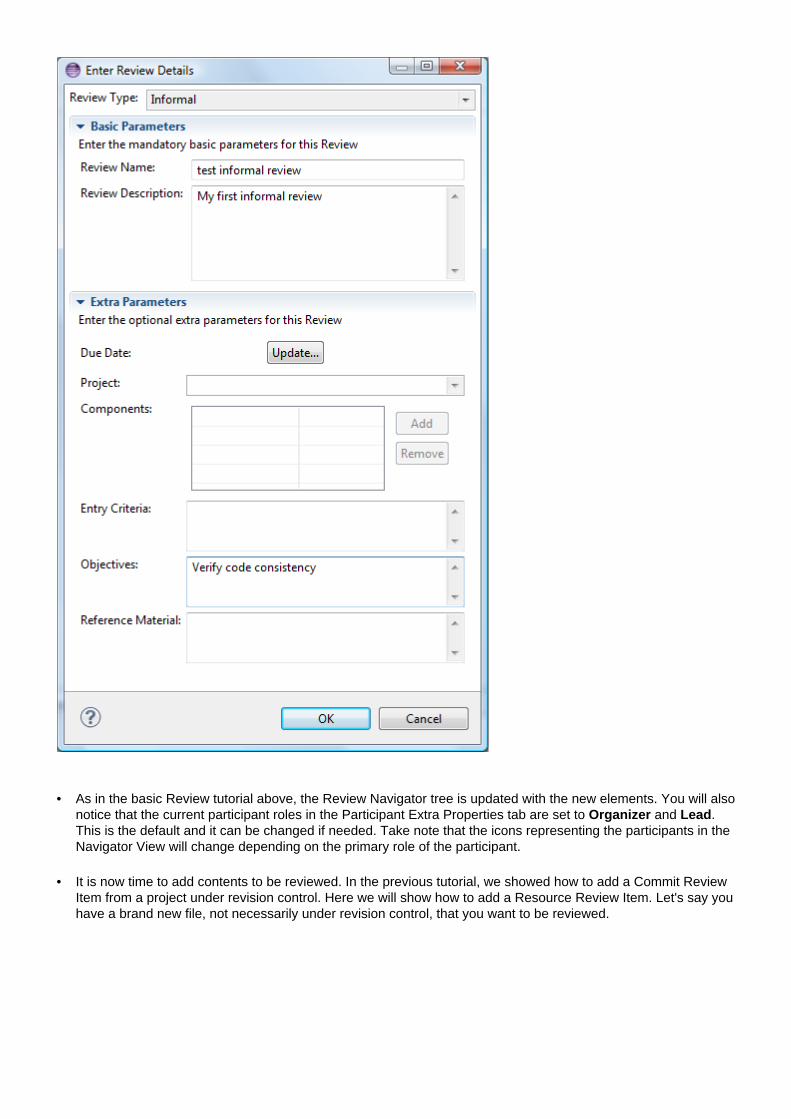
• Using the setup created above, create a new Informal Review by right-clicking on the Group we created andselecting the New Review command.
• This will show the New Review dialog
32
• As in the basic Review tutorial above, the Review Navigator tree is updated with the new elements. You will alsonotice that the current participant roles in the Participant Extra Properties tab are set to Organizer and Lead.This is the default and it can be changed if needed. Take note that the icons representing the participants in theNavigator View will change depending on the primary role of the participant.
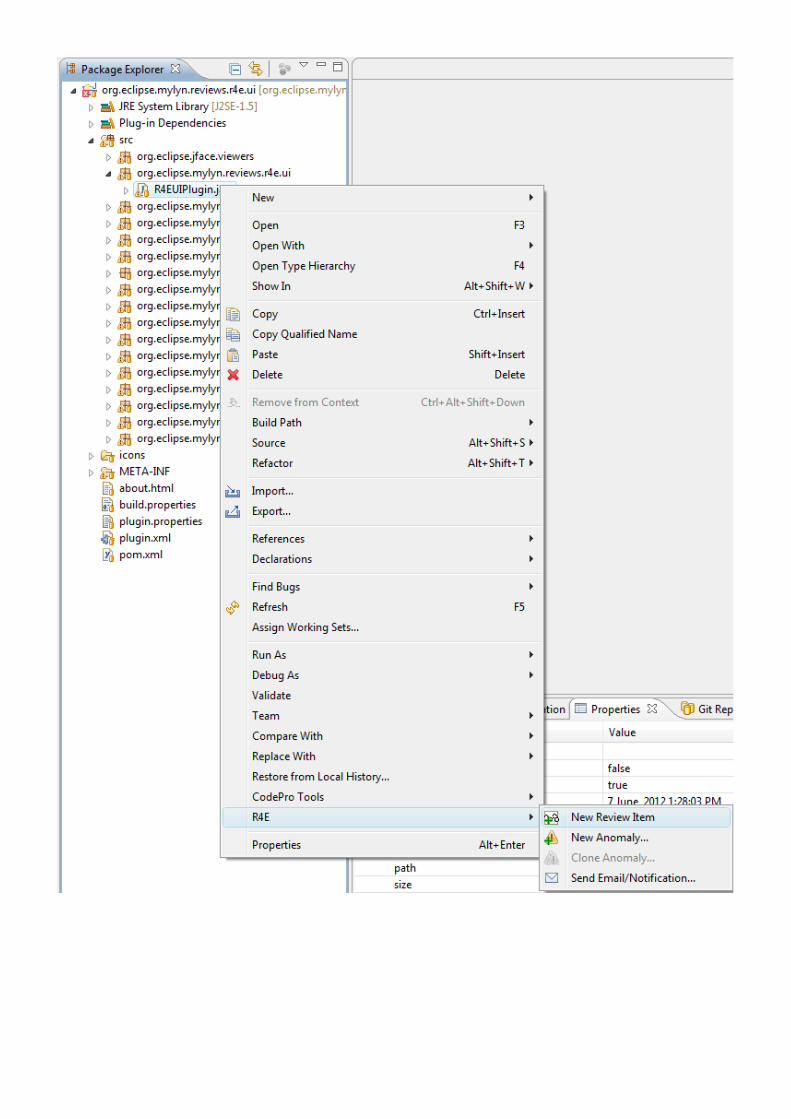
• It is now time to add contents to be reviewed. In the previous tutorial, we showed how to add a Commit ReviewItem from a project under revision control. Here we will show how to add a Resource Review Item. Let's say youhave a brand new file, not necessarily under revision control, that you want to be reviewed.

33
• Assume we use a Java project. Open the Package Explorer view, right-click on a file within the target projectand trigger the Add Review Item command from the R4E context menu.
34

35
The Review Navigator view should now show a new Resource Review Item, its children file and the selection,which in this case will span the whole file from the first to the last lines.
• Now let's add another reviewer to this review by right-clicking on the participants container icon in the reviewnavigator and selecting the New Participants command from the context menu
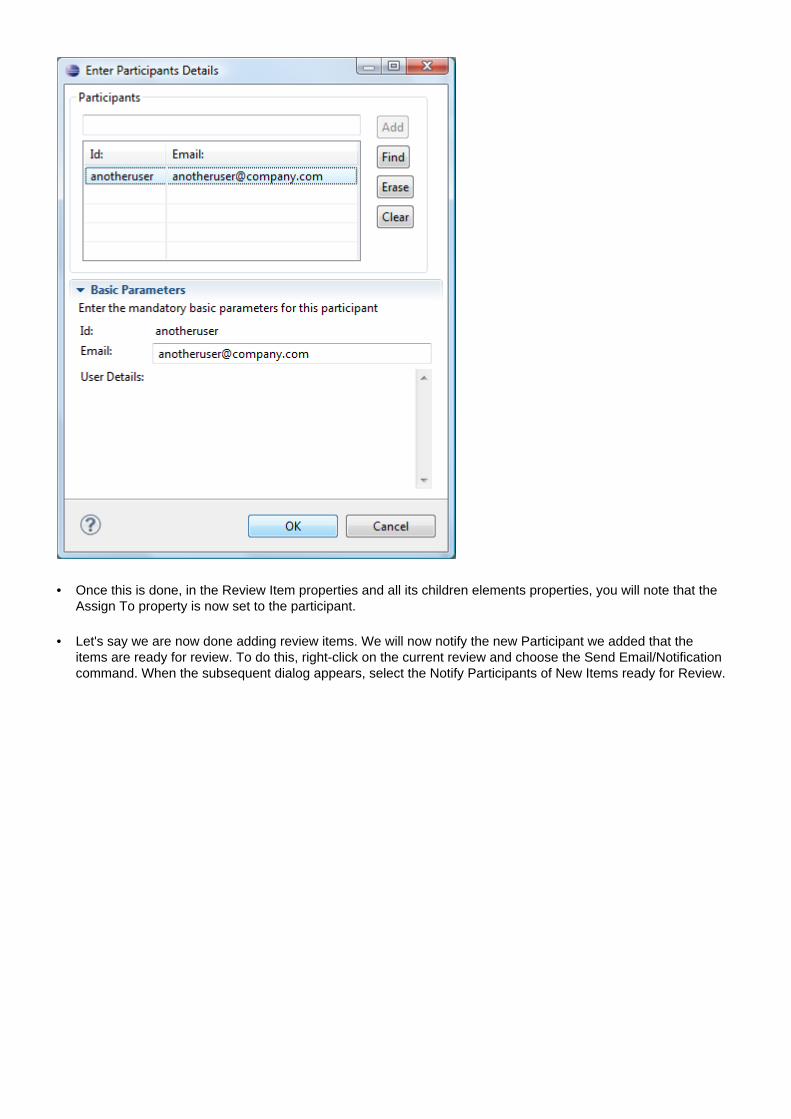
• This will show the New Participants dialog.

36
• Let's fill in our participant ID in the top field and press the Add button. The participant is added to the participantlist
• We now select the participant entry in the list and we see all the parameters associated to this participant in theBasic and Extra Parameters sections. Fill in the information field as shown and press OK to add the user as aparticipant to the current review.
• Note that we added this Participant as a reviewer only. We've also set the optional focus area.
• Now that we have added a participant, we will assign the review item we imported for him to review. To do this,right-click on the Review Item and select Assign to Participant command.

37
• This will trigger the Assign Participant dialog, which is similar to the previous Add Participant dialog and works inthe same way. We will enter the participant details. Take note that assigning review elements to participants isoptional.
38
• Once this is done, in the Review Item properties and all its children elements properties, you will note that theAssign To property is now set to the participant.
• Let's say we are now done adding review items. We will now notify the new Participant we added that theitems are ready for review. To do this, right-click on the current review and choose the Send Email/Notificationcommand. When the subsequent dialog appears, select the Notify Participants of New Items ready for Review.
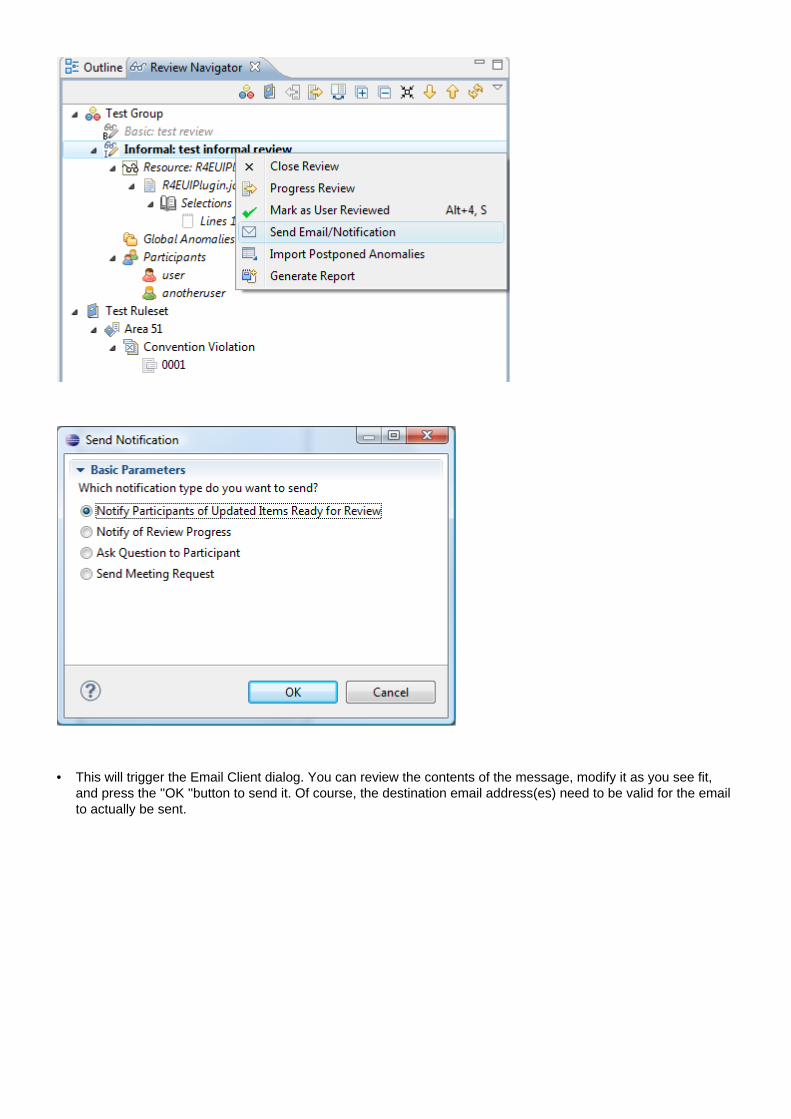
39
• This will trigger the Email Client dialog. You can review the contents of the message, modify it as you see fit,and press the ''OK ''button to send it. Of course, the destination email address(es) need to be valid for the emailto actually be sent.

40
• Once this is done, the reviewer should receive the email and can start reviewing the code. So, let's say we arenow the reviewer. If we want, we can change the display of the Navigator View to show the current review ina more compact and table-like fashion. To do this, select the Change Display command, located in the viewmenu.

41
• The view should now look like this:
• We see now that the Review elements to be reviewed are shown in an alternate way, with columns displayingfile paths, assignees, number of changes and number of anomalies written on the review elements. This displaycould be used at any time. For now, we will return the original default Tree display using the same commandagain.
• We now want to log a general anomaly on the review. We right-click on the Global anomaly container icon in theReview Navigator view and we select the New Anomaly command from the context menu

42
• This will trigger the New Anomaly dialog.
• Now we should see that the Anomaly was added to the Review Navigator view, prepended with the Anomalystate (which is ASSIGNED at this point). If we do not have any other anomalies to enter, we can indicate thatwe are done reviewing by setting the review as reviewed by us. To do so, right-click on the Review icon in theReview Navigator and use the Mark as User Reviewed command.

43
• Since we are done reviewing, a popup dialog appears to ask us to send a Completion Notification to the ReviewOwner (Lead). Click OK and send the notification email out. The Review Navigator view should now look likethis (notice the little checkmarks that appeared on the Review and its children elements):
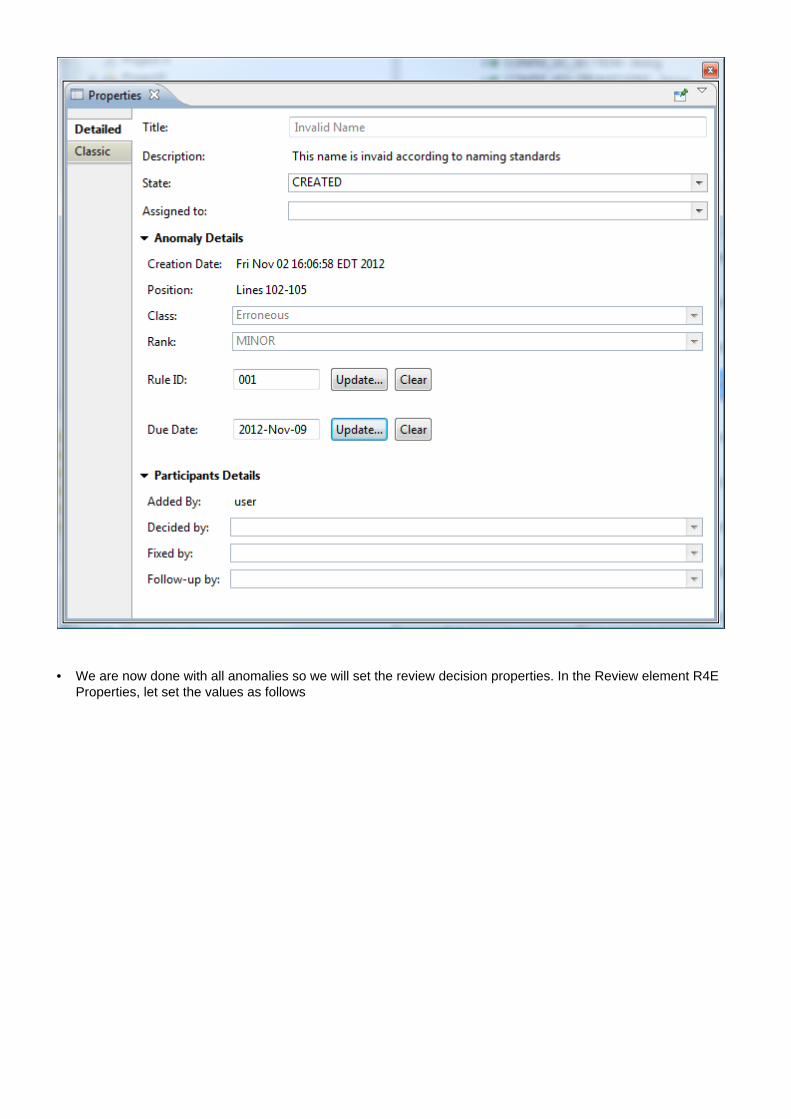
• Now, in order to complete the review, we need to resolve the anomaly that was raised. Select the anomaly iconin the Review Navigator view and look at the R4E Properties view detailed tab. We should see the following:

44
• We see that the optional class and rank are not set for this anomaly, we could have set them after creation, orwe can set them here if we want. In order to resolve the anomaly, the author of the code should be notified andthe reviewer, lead and author should work together in resolving the issue.
• Once the anomaly is resolved, we can set the Anomaly state to FIXED by changing the State ''combo box valuein the R4E Properties view. Note that the ''Fixed by property (in the Participant Details expandable section) getsautomatically set to the current user. This can be changed to any of the participants if needed.
• Let's pretend that the anomaly is resolved and add a comment to it saying so. Right-click on the Anomaly iconon the Review Navigator view and add a Comment by using the New Comment command from the contextmenu.

45
• This will trigger the New Comment dialog.
• We can now complete the review as we've done in the previous tutorial, by setting the Exit Decision field in theReview R4E Properties view->Detailed tab/Decision Information expandable section to Accepted and the Phasefield in the Review R4E Properties view->Detailed tab to COMPLETED. Alternatively, we can also complete thereview by selecting it in the Review Navigator and using the Progress Review Toolbar command:

46
• To remove this completed review from the Review Navigator tree so that is does not clutters the view, we canDisable it. To do that, first close the review by right-clicking on the Review element from the Review Navigatorview and selecting the Close Element command form the context menu. Then, once the review element isclosed, disable it by selecting the Disable element command in the same fashion.
• We are now done with this tutorial.
Tutorial 3: Performing a Formal Review
This tutorial shows how to use R4E by going through a very simple Formal Review. It also introduces how towork with Linked Anomalies, Design Rules, Optional Review Parameters, Review time tracking, and how to useMeetings Notifications.
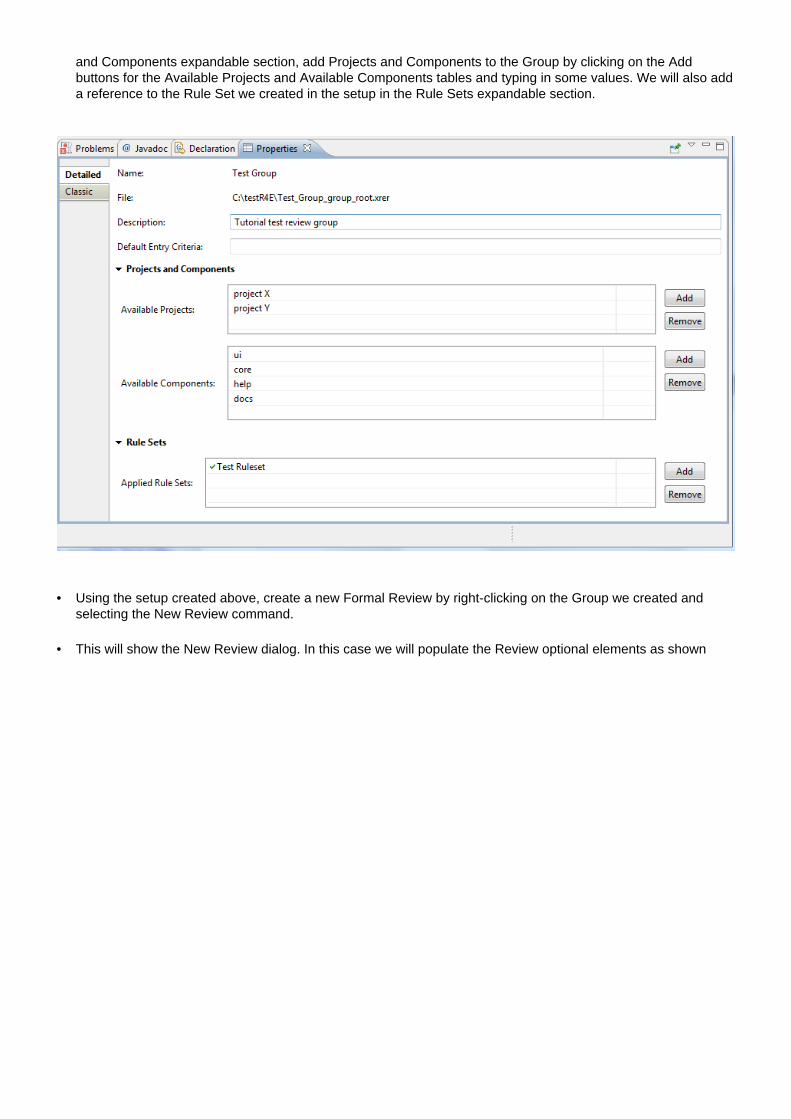
• First we will add default projects and components to our review group. Select the Review Group icon in theReview Navigator view and go to the Group Detailed properties tab in the R4E Properties view. In the Project
47
and Components expandable section, add Projects and Components to the Group by clicking on the Addbuttons for the Available Projects and Available Components tables and typing in some values. We will also adda reference to the Rule Set we created in the setup in the Rule Sets expandable section.
• Using the setup created above, create a new Formal Review by right-clicking on the Group we created andselecting the New Review command.
• This will show the New Review dialog. In this case we will populate the Review optional elements as shown

48
• As in the other Review tutorials above, the Review Navigator tree is updated with the new elements.
• If you look at the Review Properties Detailed tab, you will notice that is display a Phase Map table. The phasemap is only displayed for formal reviews and is used to track the progress of the review. At review creation, the''PLANNING ''phase is the active one (highlighted in blue).
• It is now time to add contents to be reviewed. As in the basic tutorial review, we will add a Commit Review Itemusing the Find Review Items command.
49
50
• This should show the Find Review Items dialog for Git
• We will now pick the current Commit and add it to the review. The Review Navigator view should now show anew Commit Review Item, its children files and their deltas (changes)

51
• Now, as in the Informal review tutorial, let's add another reviewer to this review by right-clicking on theparticipants container icon in the review navigator and selecting the New Participants command from thecontext menu

52
• This will show the New Participants dialog.

53
• The participant is added exactly the same way it was done in the previous tutorial
• Let's say that we are done adding new items and participants for this review, we can now transition the reviewphase from PLANNING to PREPARATION by selecting the Phase combo box in the R4E Properties to theReview. Note that phases can only be changed if we are the phase owner, which we are in this case. We willnow automatically be asked to set up a decision meeting by entering meeting details.

54
• Once the details are entered, the Email client dialog is shown, and upon clicking the ''OK ''button, a newnotification of items ready for review, bundled with a meeting invitation will be sent to all participants.
• Now, in PREPARATION phase, the users can review the included items. Reviewers can send progressnotification or ask questions to other participant by right-clicking on a Review Navigator element and usingthe Send Email/Notification command. Anybody can also add new Review Items to the review, which willautomatically notify other participants with a New Item Ready for Review notification.
• Let's say we found that part of the new code is not correct, we can select the appropriate change (Delta) in theReview Navigator and directly write an Anomaly on it by right-clicking on the Delta and using the New LinkedAnomaly command.

55
• This will show the New Anomaly dialog. For this anomaly, we will refer to an existing design rule. Expand theExtra parameters section and select the first design rule from the tree. Note that the text fields are set to thevalue of the anomaly selected. We will also assign the anomaly and set a due date for it.

56
• We are finished reviewing the files and we will now add the time we spent reviewing the files. We do this byselecting the participant element in the Review Navigator and going to its R4E Properties view Detailed tab,Time Management expandable section. In the Time Spent table, add the time we spent.

57
• As in the informal review tutorial, we now mark the review as User completed, which will trigger the sending ofthe completion notification to the review lead.
• The review lead can now move the Review Phase to DECISION in the same way the previous transition wasdone.
• In the decision phase, it is time to assess anomalies and if necessary assign them to participants so that theycan be handled and fixed. Let's set our Anomaly to ACCEPTED and assign it to a participant. We do this bysetting the appropriate values the R4E Properties Extra tab for the selected anomaly.
58
• We are now done with all anomalies so we will set the review decision properties. In the Review element R4EProperties, let set the values as follows

59
• We set the Exit decision to Accepted with follow-up, since some anomalies need to be fixed. We also enter thedecision participants and decision time spent values. We now move the Review phase to REWORK in the sameway we moved it previously. The author can now start working on the anomaly raised.
• Once the anomaly is fixed, we can change its state to FIXED in the R4E Properties. The fix can now bereviewed by the reviewer, who can set it to VERIFIED. Its properties should now look like this:

60
• At this point all anomalies are covered and we can complete the review by setting its phase to COMPLETED.
• We are now done with this tutorial.
61
Concepts
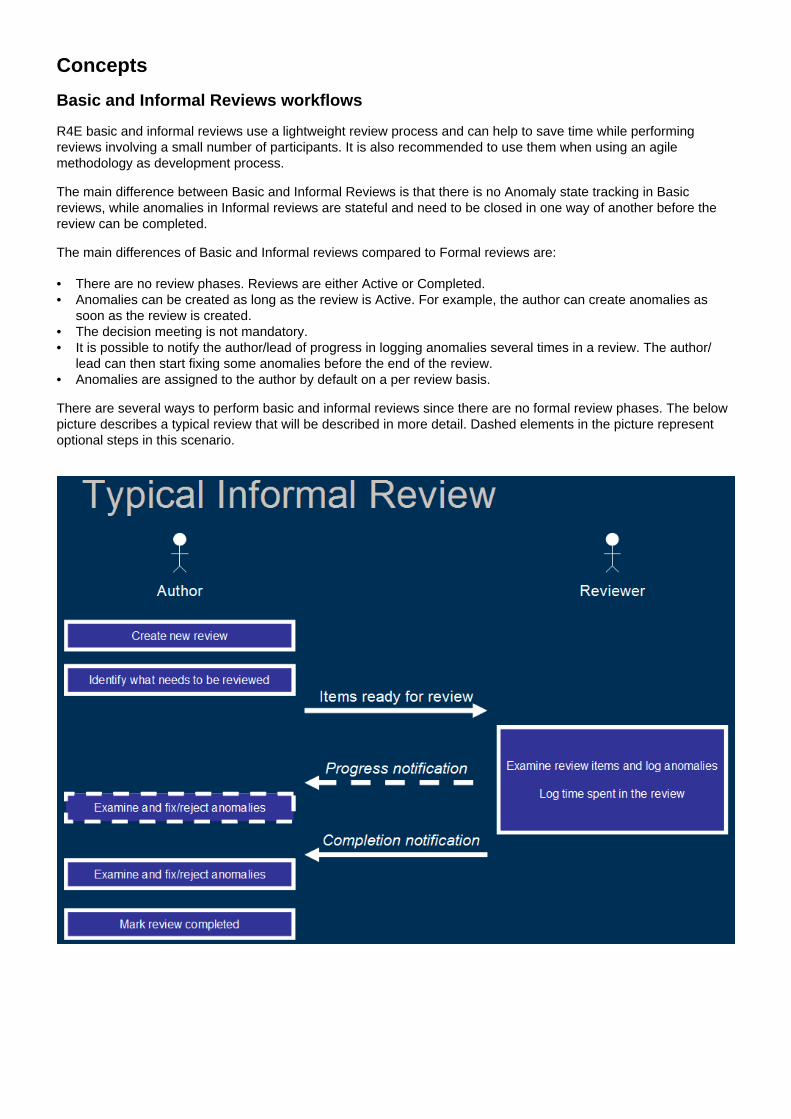
Basic and Informal Reviews workflows
R4E basic and informal reviews use a lightweight review process and can help to save time while performingreviews involving a small number of participants. It is also recommended to use them when using an agilemethodology as development process.
The main difference between Basic and Informal Reviews is that there is no Anomaly state tracking in Basicreviews, while anomalies in Informal reviews are stateful and need to be closed in one way of another before thereview can be completed.
The main differences of Basic and Informal reviews compared to Formal reviews are:
• There are no review phases. Reviews are either Active or Completed.• Anomalies can be created as long as the review is Active. For example, the author can create anomalies as
soon as the review is created.• The decision meeting is not mandatory.• It is possible to notify the author/lead of progress in logging anomalies several times in a review. The author/
lead can then start fixing some anomalies before the end of the review.• Anomalies are assigned to the author by default on a per review basis.
There are several ways to perform basic and informal reviews since there are no formal review phases. The belowpicture describes a typical review that will be described in more detail. Dashed elements in the picture representoptional steps in this scenario.

62
Create new review
In this scenario, the organizer wants artifacts to be reviewed by one colleague. The author first needs to createthe review in R4E. As in formal reviews, this step involves naming the review, identifying participants/roles andidentifying relevant input documentation. During the creation of the review, the organizer needs to specify that thereview type is basic or informal.
Identify what needs to be reviewed
The organizer uses R4E to specify what needs to be reviewed. This step is performed like for formal reviews usingR4E tools to automatically find artifact changes or by manually specifying portions of artifacts that need to bereviewed. The result is a collection of review items.
Items ready for review
The author notifies the reviewer that items are ready to be reviewed. This is done via an email notification that isgenerated from R4E. In this scenario, no formal meeting is scheduled.
Review item examination, anomaly/time logging
The reviewer examines review items and logs anomalies. The time spent doing this activity can be logged in R4E inan iterative way (e.g. every day).
Progress notification
In this scenario, the reviewer has completed a significant portion of the review (for example, a module/subsystem/feature) and wants to immediately inform the author about it. R4E is used to send a progress notification via anemail containing the progress details to the author. Several progress notifications can be sent in a given review.
Examine and fix/reject anomalies
The author relies on the progress notification information to start the anomaly examination. As a result, anomaliescan either be accepted or rejected. Accepted anomalies can then be fixed.
Completion notification
When the reviewer has completed the review item examination, R4E is used to send a completion notification viaemail.
Examine and fix/reject anomalies
The author relies on the completion notification information to complete the anomaly examination. As a result,anomalies can either be accepted or rejected. Accepted anomalies can then be fixed.
Mark review completed
When all anomalies have been fixed, the author can specify the exit decision and mark the review as completed.
Formal Review workflow
R4E uses the IEEE Standard for Software Reviews (IEEE Std 1028-1997) for formal reviews. The process isbroken down into four phases.
This process can be adapted to your organization. It is possible to use R4E to perform large reviews with severalparticipants and formal meetings. It is also possible to use R4E for smaller one-on-one reviews with no formalmeetings.
63
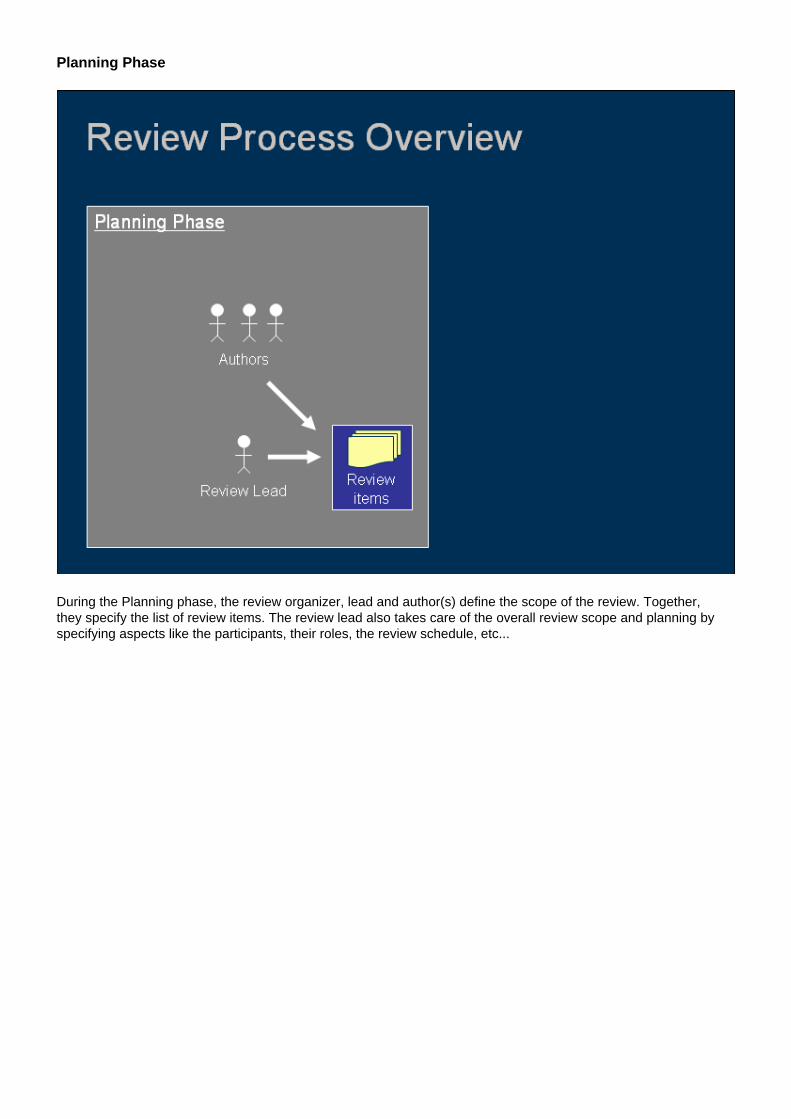
Planning Phase
During the Planning phase, the review organizer, lead and author(s) define the scope of the review. Together,they specify the list of review items. The review lead also takes care of the overall review scope and planning byspecifying aspects like the participants, their roles, the review schedule, etc...

64
Preparation Phase
During the Preparation phase, reviewers individually examine review items and record detected anomalies. Thisactivity needs to be performed as preparation for the Decision phase.

65
Decision Phase
During the Decision phase, review participants meet and analyze all submitted anomalies. Together they agree onwhich anomalies should be accepted and fixed in this particular phase of the project. Anomalies can be rejectedbecause they are invalid or duplicated. They can also be postponed to another project. All accepted anomalies areassigned to the relevant authors for the Rework phase.

66
Rework Phase
During the Rework phase, authors fix all accepted anomalies assigned to them during the Decision phase.
Author
An Author is an R4E Participant that wrote the code being reviewed. Typically, authors are involved in fixing raisedAnomalies.
Anomaly
An Anomaly is any condition that deviates from expectations based on requirements specifications, designdocuments, user documents, standards, etc., or from someone's perceptions of experiences. R4E Anomalies aretypically created by reviewers during the review. They can also be found during test, analysis, compilation, or byusers of software products or applicable documentation.
Comment
In the context of R4E, Comments are user commentaries that are associated to Anomalies as follow-up, or toprovide complementary information.
Commit Review Item
A Commit Review Item is a review item that represents the file versions included together in a commit to a Version-Controlled Repository. A commit review item includes the ancestor version (base) and committed version (target)

67
of the files. Commit Review Items are added to a review by Using the R4E Find Review Items command on anEclipse project.
Delta
A Delta represents a single difference in a File Context between the base and target versions. A Delta can refer tocontent that was modified, added or removed within the file and can span one or multiple lines.
File Context
A File Context represents a File included in the review. A file context includes references to the base (ancestor)and target (current) versions of the affected file.
Global Anomaly
In the context of R4E, Global Anomalies are Anomalies that do not tie to a specific file or part of a file, but arerather applicable to the whole review or are general comments.
Lead
A Lead is an R4E Participant that is responsible to monitor the progress of the review and coordinate the work ofthe various participants. It should also be the person that has the final say on the closure of the review.
Organizer
An Organizer is an R4E Participant that create the review and puts together the Review contents. Most of the time,the lead and the organizer are the same person.
Participant
A Participant is a user that is part at any given point of a review. A Participant can have one or more roles withinthe review. Possible roles includes Author, Lead, Organizer, or Reviewer
Participants List
A Participant List is a collection of multiple potential users, with their IDs and emails, which can be groupedtogether and added as a unit to a review.
Postponed Anomaly
A Postponed Anomaly is an Anomaly that has been written in a previous review and that was set to statePOSTPONED (i.e. it was not fixed/addressed then). Postponed anomalies can be imported in subsequent reviewsto be addressed.
Resource Review Item
A Resource Review Item is a review item that represents a single Eclipse resource (typically a File). ResourceReview Items are added to a review by manually selecting the affected file in the workspace
Reviewer
A Reviewer is an R4E Participant that reviews the code under review. Typically, reviewers are involved in raisingAnomalies and following up on their resolution.
Review Group
A Review Group is a set of Reviews bundled together under the same directory and that have common factor(s) asdetermined by the user (e.g. Same Project, Product, Design Team, Organization, Time Span, etc.)

68
Review
A Review is a collection of Review Items that are to be reviewed together, by the same reviewers, within a giventime period.
Review Item
A Review Item is a collection of file contexts that will be reviewed as part of the current review. There are two typesof Review Items currently supported: Commit Review Items and Resource Review Items.
Rule
A Rule represents a Design Rule that is to be enforced in the code. Design Rules should be enforced by thereviewers at review time. When a Rule is used in creating an anomaly, its values become the default values for theanomaly.
Rule Set
A Rule Set is a collection of Design Rules that are bundled together as a unit. Rule Sets are associated to theReview Group in which they can be used
Rule Area
A Rule Area is a container for Design Rules related to the same area. E.g. Java, C++, Testing etc.
Rule Violation
A Rule Violation is a Container for the multiple design rules associated to a category. E.g. Format, Performance,Syntax, etc.
Selection
A Selection represents the part of a File that was manually added to a review. A Selection can span one or multiplelines within a file, or could refer to the whole file itself.

69
Tasks
Working with the Navigator View
The R4E Navigator View is the main component of R4E. It shows all the information that is available to the userand it is also the place where most user commands are available. The Review Navigator information is organizedin a hierarchical tree structure and is presented in a Navigator panel. Elements shown in red are read-only.Commands are available in the view toolbar and in context menus that appear when right-clicking the navigatorelements.
When a Review is open, the Navigator view can focus on and display the Review elements in an alternate displaythat show them in a more compact and table-like way. Both representations can be toggled on by using theChange Display toolbar command.

70
Disabling and Restoring Elements
When Review Navigator elements are not relevant anymore (e.g. completed reviews), they can be removed fromthe view by using the ''Disable ''command from the element's context menu.
Disabled elements data is kept, but they will not appear in the navigator view anymore. Take note that currently it isnot possible to completely remove references to an element once it is created.
To see disabled elements in the Navigator view, go to the R4E Preferences Filter Tab andselect the Show Disabled Elements checkbox and apply the preferences. The disabledelements will show in the Navigator grayed out and with the little disabled decorator icon
Ideally, disabled elements should never be shown, but there could be a need to restore mistakenly disabledelements. To do so, first go to the Eclipse preferences R4E page, on the Filters tab and enable the Show DisabledElements filter, then return to the Navigator view and select the ''Restore ''command from the disabled elementcontext menu
Sorting Review Navigator Elements
The Navigator elements can currently be sorted alphabetically or by review type, by selecting the appropriate sorterin the Review Navigator Toolbar menu.

71
Filtering Review Navigator Elements
The Navigator view provides different filters that can be used to limit the visibility of elements within the navigatortree. Filters are available in the Review Navigator Toolbar menu.

72
The filters available are:
• Show Reviews Only: Show only Review Groups and Review elements• Show My Reviews: Show only Review Groups and Review elements in which the current user is a Participant• Show Reviews for Participant...: Opens a dialog box where a User ID can be specified. The Navigator will then
show only Reviews in which this User is a Participant• Show My Assigned Elements: Show review elements that are unassigned or assigned to the current User• Show Assigned Elements for Participant...: Opens a dialog box where a User ID can be specified. The
Navigator will then show only Review elements that are unassigned or assigned to the specified participant.• Show Unassigned Elements: Show only review elements that are not currently assigned to any participant.• Show Anomalies Only: Only show the Anomalies for the currently open Review and their parent containers• Show My Anomalies: Only show the Anomalies for the currently open Review that the current User created and
their parent containers• Hide Completed Reviews: Hide all the reviews that are in phase COMPLETED• Hide Reviewed Elements: This filter will hide all elements that have been marked as Review by the current User• Hide Rule Sets: This filter will hide all Rule Sets elements and their children• Hide Deltas: This filter will hide all Selection and Delta elements.• Remove All Filters: Remove all currently applied filters and restores the full display of all enabled elements in
the Navigator tree.

73
Setting Elements Reviewed State
To help Users to keep track of the content that was reviewed it is possible tomark relevant Review Navigator elements as reviewed using the context menuMark/Unmark as User Reviewed command. This will put a little done decorator
icon. The marking can be removed by using the same command to toggle the state.
Setting Elements Due Date
A due date can be set for the Review and Anomalies elements to specify a latest date after which the review (oranomaly) should be completed (i.e. set to a terminal state). After this date has passed, if the elements are still notcompleted, they will be highlighted in the Review Navigator, using icon decorators, red text and additional info intheir respective tooltips, so that the review participants are aware of the situation and can take action quickly. Takenote that does not apply to anomalies in basic reviews, since they are stateless.
Other Review Navigator Commands
These other commands are also available from the Navigator view toolbar and/or drop-down menu:
• Progress Element
:Change the state of a stateful element (e.g. Review, Anomaly) to its next logical state. This is a shortcut and canalso be done through the R4E Properties view for the element.
• Regress Element
:Change the state of a stateful element (e.g. Review, Anomaly) to its previous logical state. This is a shortcut andcan also be done through the R4E Properties view for the element. Take note that this is the only way to changethe state of a COMPLETED Review.
• Go Into
:This is a special filter that will take the selected element of the Navigator and put it at the root of the Navigatortree. This is useful to focus on a particular element and its children.
• Collapse Navigator tree
:Collapse the current Navigator tree.
• Expand Navigator tree
:Expand the current Navigator tree to the lowest level.
• Select and Open Next Element
:Move the selection to the next (lower) element in the tree and opens it in an editor if possible (for File Contextselements and children)
• Select and Open Previous Element
:Move the selection to the previous (higher) element in the tree and opens it in an editor if possible (for FileContexts elements and children)
• Refresh Navigator Data
:

74
Fetches data from disk and rebuilds the Navigator tree. This will also show new data that has been added byother users.
• Show UI Legend
:Shows a legend that displays and explains all R4E icons in a pop-up dialog.
<div></div>
Take note that not all filters and toolbar commands are available on all Review Navigator representations.
Handling Review Groups and Reviews
Creating a Review Group
When using R4E for the first time, the first thing to do is to create Review Groups that will hold the R4E reviewdata. Typically, Review Groups include common settings that will be used for multiple reviews. For instance, onecan create a Review Group for a design organization, for a given project or task etc.
A given Review Groups is created only once, typically by a "super-user" selected among people that are part of thegroup.
In order to create the Group, select the New Group icon in the Review Navigator Toolbar.
This opens the New Review Group dialog.

75
• Add the Review Group Name and (optionally) a brief description in the appropriate text fields.• Select a shared folder location where team members have access and write permissions (i.e. Review Group
shared folder)• Under the Extra Parameters section, more information can optionally be entered to further characterize the
Group: Default Project, Default Components and Default Entry Criteria values will be available for all Reviewscreated under this Review Group. Rule Sets defines the available Rule Sets for Review created under thisReview Group (see Rule Sets below).

76
Opening an Existing Review Group
When you create a new Review Group, its references are automatically included in your workspace. To add otherReview Group references, open the R4E Preference Group Tab (Window->Preferences->R4E, then switch to tab"Groups")
• Add a new Review Group reference file by clicking the ''Add ''button and select the appropriate Group File. Takenote that all Review Group filename end with "_group_root.xrer" suffix.
• The Review Group Name and Description are also shown in the Preferences Group tab.
Creating a Review
The Review is the main element of R4E. It is used to group together file that are to be reviewed. There are threetype of reviews, Basic, Informal and Formal review (See concepts section for an explanation of the different typesof reviews).
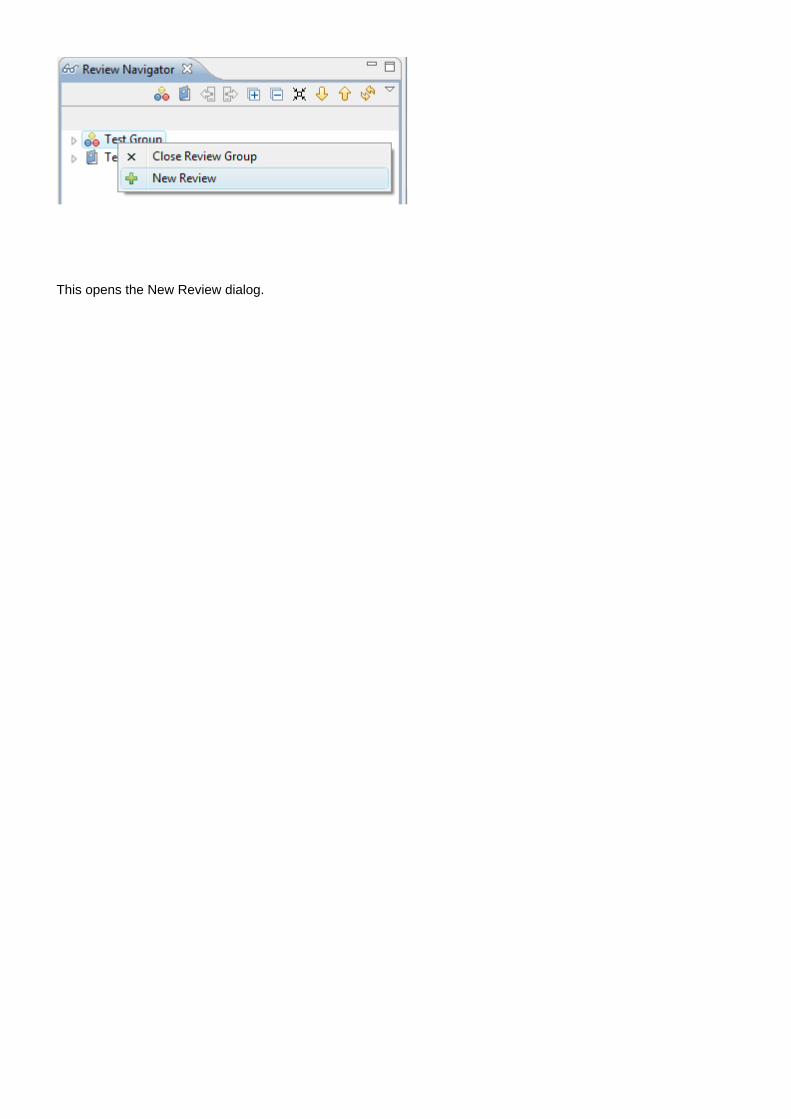
To create a new Review, right-click on the parent Review Group under which you want to create the review andselect the New Review Command from the R4E Context Menu.
77
This opens the New Review dialog.

78
• Add the Review Name and a brief description in the appropriate text fields.• Under the Extra Parameters section, more information can optionally be entered to further characterize the
Review:• A due date can be set to specify a date before which the review should be completed• Project and Components values can be selected from the values entered in the parent Review Group Default
Projects and Default Components respectively• Entry Criteria is taken by default from the parent Review Group value• Objectives and Reference Materials can be set by the Review creator
79
Opening and Closing of Review Groups and Reviews
In order to be able to see the Review Group child Reviews, a Review Group must be open. Closed Review Groupare shown with hollow Group icons. You can open a closed Review Group by right-clicking on it and selecting theOpen Element command, or simply by double-clicking on it. Closing unused Review Groups make navigationeasier and free up memory and resources, so the Groups should be closed when they are unused.
Likewise, reviews can also be open and closed using the same mechanism. The only difference is that only onereview (called the Active Review) can be open at any given time. Opening another Review closes the currentlyopen one.
Take note that Review Groups and Reviews are automatically open after they are first created.
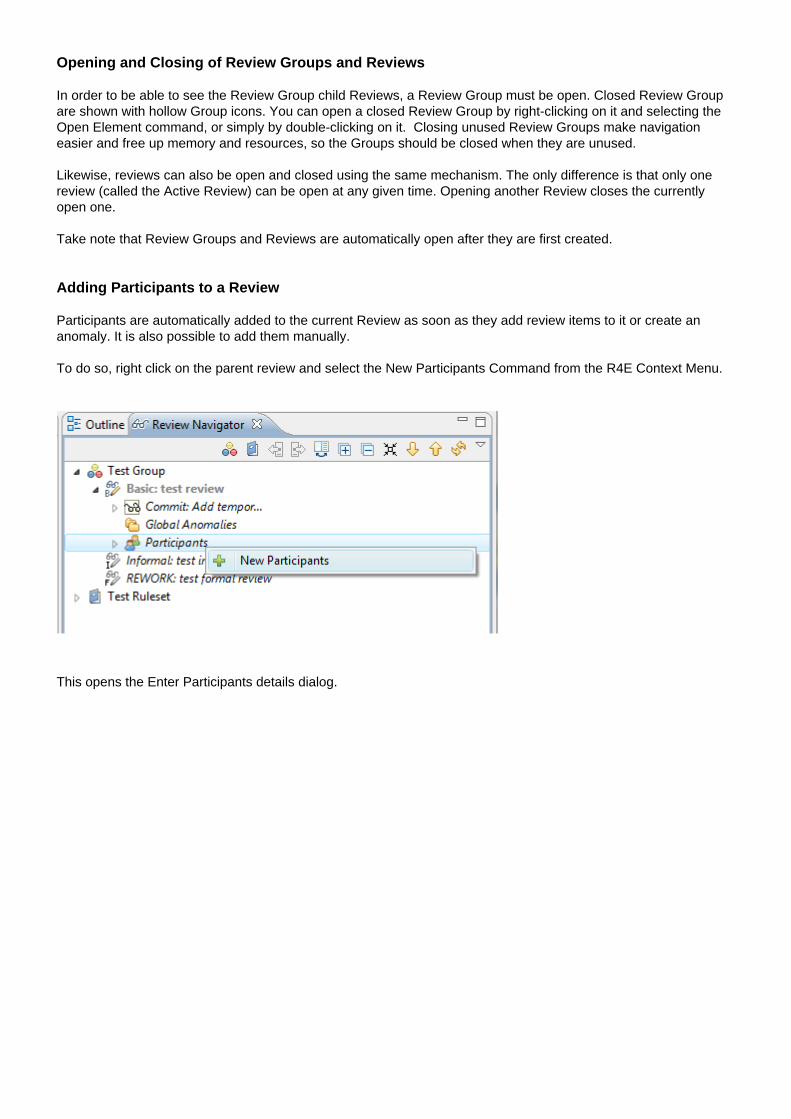
Adding Participants to a Review
Participants are automatically added to the current Review as soon as they add review items to it or create ananomaly. It is also possible to add them manually.
To do so, right click on the parent review and select the New Participants Command from the R4E Context Menu.
This opens the Enter Participants details dialog.

80
The dialog is divided into 2 sections:
• Participants: This is where the participants are added. Use the field above to enter the IDs on the participantsto add, separated by semicolons (;). If you defined Participants Lists in the preferences, the list name can beadded here. Once the participants are entered, hit the return key, or use the Add button to add them to the listof participants. The participants will now appear in the participants list just below. If present, participants listsfrom Preferences are resolved and their contents is added to the list as well. If an LDAP database is setupup and configured in the preferences, R4E will also try to resolve the added users and automatically fetch theinformation from the database. Participants can be removed from the list by using the Erase button, and the listcan be reset by using the Clear button. If an LDAP database is set up, it can also be accessed using the Findbutton (see below). The participant id entered within the R4E review data will be in lower case and R4E willenforce that (this to prevent duplicated users Ids for the same user).
• Basic Parameters: Once participants are added to the participants list. This section displays the basicinformation for the currently selected entry in the list. The email address can be edited, but not the Id or theparticipant details field (which in only filled if an LDAP database is set up and there is information about the userin it).
If an LDAP database is configured and connected, the user information could be searched and filled-inautomatically using the Find button, which will open the Find User Dialog

81
Any field can be entered in the Search Filters section and by clicking the Search button, an LDAP query will besent to the database. If any matches are found, the results will be displayed in the Query Results section. Once theresults are in, users can be added by double-clicking on them in the results table, or by selecting them and usingthe Add Users button. Pressing the OK button will result in the users being added to the New Participants dialogparticipant list.
Creating a Review Item
In R4E, Review Items are a collection of one or more files, or parts of files, that are to be reviewed. There are twotypes of Review Items that exist: Commit Review Items and Resource Review Items.
Creating a Resource Review Item
This item type is created by manually selecting a workspace resource (i.e. File) or a portion of a resource (i.e. lineranges within a given file).
• To create Resource review items for a whole file, right-click a File on a Package Explorer, Navigator or ProjectView and select the Add Review Item command from the R4E context menu.

82

83
• To create Resource review items for a portion of a file, right click a line range selection in an editor or compareeditor, or on an element of the outline view and select the Add Review Item command from the R4E contextmenu.
Once a Resource Review Item is created, it will be shown in the Review Navigator. If you expand the Review Item,you will see the child elements: The file on which the Review Item is applied and the line range selection that is partof the item.

84
Creating a Commit Review Item
This item type is created by selecting files that were committed to a Version Control System repository. Currently,the only Version Control System supported is Git.
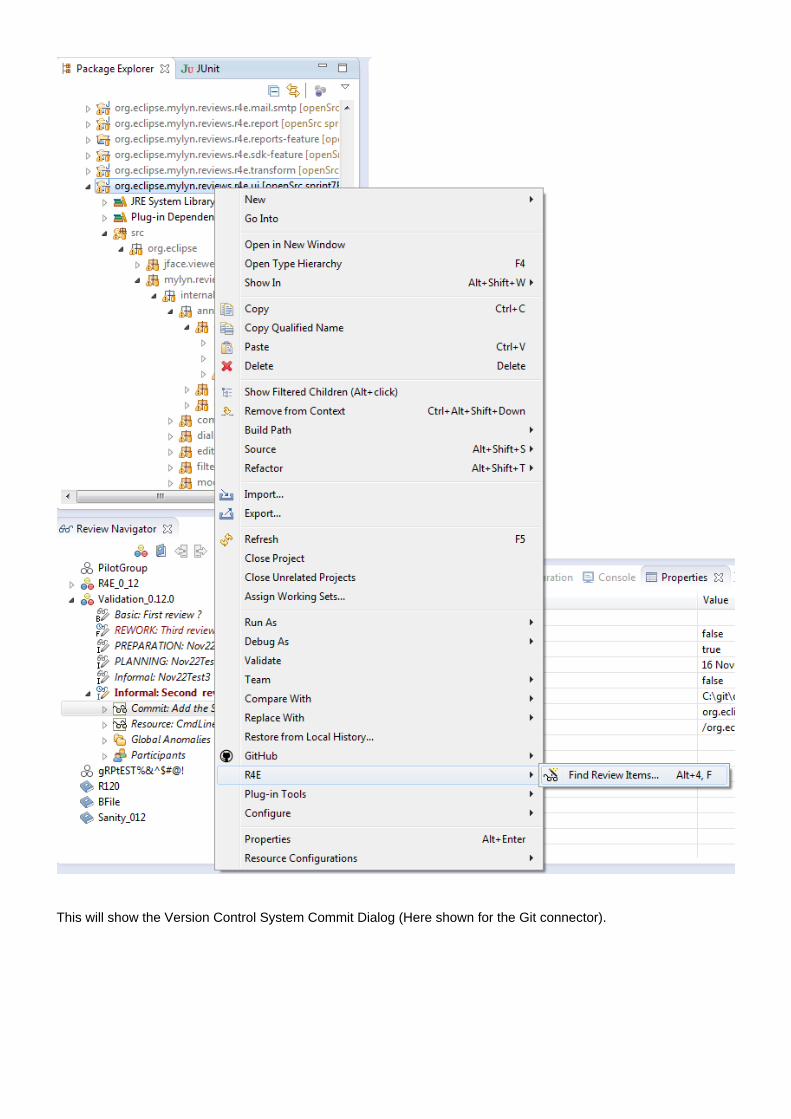
To create a Commit Review Item, right click on a project attached to the Egit team provider (see ProjectConfiguration) and select the Find Review Items command from the R4E Context menu.
85
This will show the Version Control System Commit Dialog (Here shown for the Git connector).

86
Use the Available Commits combo box to browse through all available commits and select one. For the selectedcommit, the commit information and affected files appear in the Commit Information and Committed Componentssections respectively.
Once a Commit Review Item is created, it will be shown in the Review Navigator. If you expand the Review Item,you will see the child elements: The file on which the Review Item is applied and, optionally if the option is selectedin the preferences, the line ranges for the Deltas (or differences between the committed file and its direct ancestor)that are part of the Item.
The icons for the files that are new and were added in the commit will be shown decorated with a little
icon The icons for the files that were removed in the commit will be shown decorated with a little
icon Files in the commit that are out of sync i.e. for which the version to review and the version present in the

87
users workspace differ will be shown with the > sign prepended to the filename. Such files can be reviewed, butto use the full navigatability provided by the editors, it is strongly recommended that the files be in sync with theworkspace whenever possible.
When two Review Items have the same first line description, their displayed name in the Review Navigator will include a version number just after the Review Item type (e.g. Commit 1:... and Commit 2:..., where ... are two identical strings). This will show the users that the two Review Items are two different versions of the same code change. Of course, the first line of the Review Item description must not be changed for this function to work.
Comparing Review Items
Is is possible to compare two arbitrary Review Items that are included in the same Review. Typically this will beused to see the differences between two versions of a given code change.
In order to do this, select two Review Items in the Review Navigator (using Ctrl-Left click or Shift-Left click) andthen right click on one of the items and select the "Compare Review Items" command from the context menu
This will open a Structural Compare Editor that will show the files versions that are different. The file that belong tothe most recently committed Review Item will always be the target files (on the left side) and the files belonging tothe oldest Review Item will be the base files (on the right side).
Little + decorators show the files that were added in the newest Review Item, whereas - decorators show removedfiles.
To see the differences within a specific file, just double click on it and the lower side of the compare editor will bepopulated with the content differences between the files. From the Compare Editor, it is also possible to modify theR4E annotation markers (see R4E Annotations), on either side.
For instance, one could verify that anomalies that were written on a previous version of the code change areindeed corrected and change the state of the anomalies on the base version (right side) accordingly, as shownbelow.

88
Assigning Review Elements
It is possible to assign specific review elements (i.e. Review Items, File Contexts, Selections and Deltas) to specificparticipants. To do so, use the context command Assign to Participant for the desired elements.

89
To remove an assignment, use the context command Unassign Participant.
Take note that if a parent is assigned to given participants, then all its children will also be assigned. It is possibleto override the parent's values and to change the children's assignments by operating on the child element directly.
Assignments can also be managed by using the Properties view for the selected element.
Creating an Anomaly
R4E Anomalies are raised by reviewers to flag problems or add comments on specific parts of the contents as partof the review process.
Anomalies are added in a similar way Resource Review Items are, either from a selected Resource or from aportion/range of a resource, by selecting the Add Anomaly command from the R4E context menu.

90
Anomalies that are directly tied to a specific selection/delta range can also be created by selecting the Add LinkedAnomaly command from the context menu of the affected selection/delta in the Review Navigation View

91
Anomalies can also be created at the review level. This is useful to flag problems that are not specifically tied to agiven file or file part. To do this, use the Add Anomaly Command from the context menu of the Global Anomalieselement in the Review Navigator view.

92
This opens the New Anomaly dialog.
• Add the Anomaly Title and Description in the appropriate text fields.• Under the Extra Parameters section, you can also specify the class, rank, due date and participant that will be
assigned to this anomaly. If Rule Sets are associated to the parent Review Group, the Rule Sets hierarchy willbe shown and, optionally, a design rule can be toggled selected/de-selected and if selected its values will beapplied to this anomaly. This will override the previous Anomaly values.
Cloning an existing Anomaly
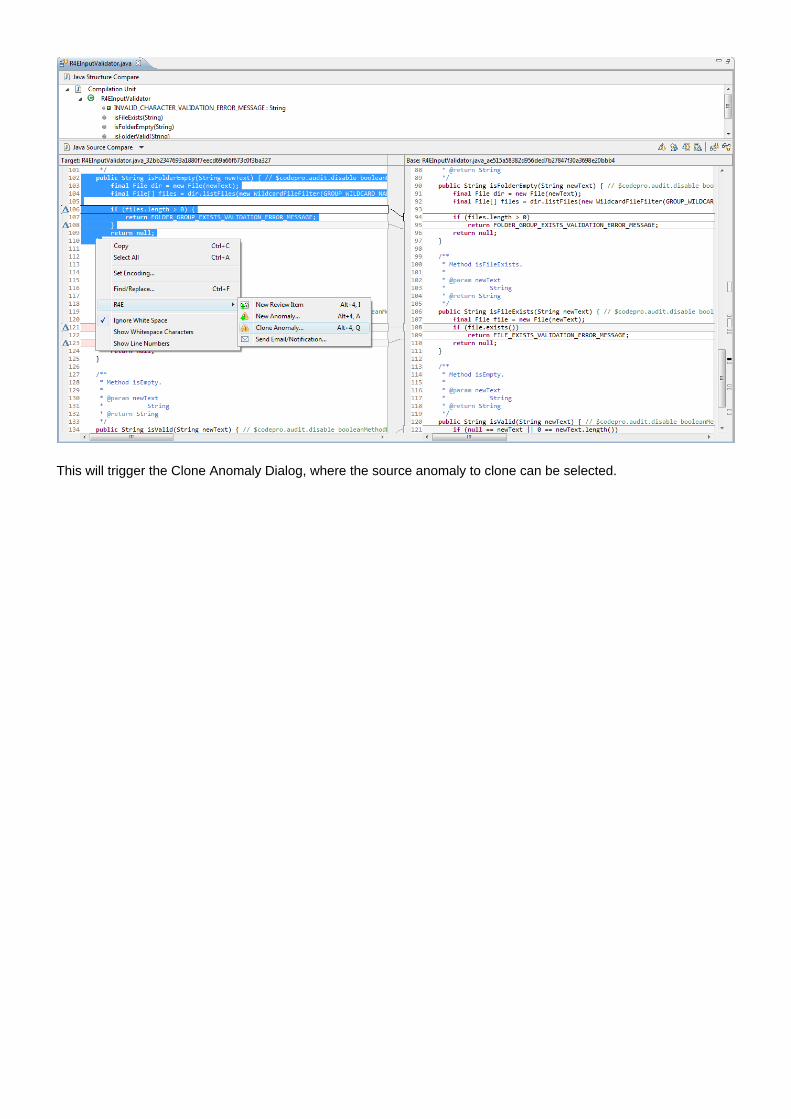
Anomalies can be duplicated so that their information is applied to a new location and/or file. Anomalies are clonedbe selecting a new range in an editor and using the Clone Anomaly contextual command
93
This will trigger the Clone Anomaly Dialog, where the source anomaly to clone can be selected.

94
Once this is done, a new Anomaly will appear at the new location with the same information as the source one.
Anomalies can also be cloned to a specific Delta or Selection element by dragging and dropping them over thedesired Delta or Selection, by using the Copy and Paste Review Navigator Contextual commands or by using thegeneric Copy (CTRL+C) and Paste (CTRL+V) hotkeys.
95

96

97
Take note that the child comments on the source anomaly are not copied to the new cloned anomaly. It is howeverpossible to copy the comments manually (see below).
Creating Comments on an existing Anomaly
It is possible to add comments to an existing anomaly. This could be useful in discussing the anomaly or fortracking purposes. To create a Comment, use the Add Comment command on the context menu on the selectedAnomaly.

98
This opens the New Comment dialog, where the comment can be added.

99
Cloning existing Comments to an Anomaly
As for anomalies, it is also possible to copy comment information to another anomaly. It is done in a similar waythan for cloning anomalies, by dragging and dropping the source comment(s) unto the target anomaly, by usingthe Copy and Paste Review Navigator contextual commands or by using the generic Copy (CTRL+C) and Paste(CTRL+V) hotkeys

100

101
Importing Postponed Anomalies
Postponed Anomalies are Anomalies that were written in previous Informal/Formal Reviews, but were not handledthen and were instead set to POSTPONED state. If the current Review include files on which these anomalies werewritten, whether it is the same or a different version of a file, it is possible to import them in the current review sothat they can be addressed. Currently, only Postponed Anomalies that belong to Reviews under the same Review

102
Group can be imported. Global Anomalies that were written in other Reviews in the same Review Group can alsooptionally be imported.
To import Postponed Anomalies, just select the current Review in the Navigator View and use the context menu:
R4E will scan all Reviews under the current Review Group and will copy all Anomalies in POSTPONED state thatwere written on files also included in the current Review, and also Global Anomalies in POSTPONED state writtenin other Reviews, if the option is selected in the preferences. Once the command is done, the imported elementswill appear on their own container elements under the Review element in the Review Navigator tree.
From then on, Postponed anomalies will behave like any other Anomaly and can be handled in the same way. Allchanges except the state changes will be local to the imported anomaly i.e. changing the imported anomaly willnot change the original one. When a Postponed Anomaly is modified, the state changes will also be reflected inthe original Anomaly (i.e. the one filed in the previous Review). For instance if the imported anomaly is fixed, theoriginal one will be marked as fixed to convey the fact that the postponed issue is now closed.
Take note that Postponed Anomalies that have their state changed from POSTPONED will be disabled. If they areset back to Postponed, they will be restored as Postponed elements.
Handling Design Rules
Creating a Rule Set
R4E support the use of Design Rules, to help reviewers enforce consistent design conventions and rules. A RuleSet is a container that includes multiple related Rules. Rule Sets are independently defined and can be sharedamong multiple Review Groups. Take note that the use of Design Rules is completely optional.
To create a new Rule Set, select the New Group icon in the Review Navigator Toolbar.

103
This opens the New Rule Set dialog.
• Add the Rule Set Version and Name in the appropriate text fields.• Select a shared folder location where team members have access and write permissions (i.e. Rule Set shared
folder)
Importing an Existing Rule Set
When you create a new Rule Set, its references are automatically included in your workspace. To import other RuleSet references, open the R4E Preference Rule Sets Tab

104
• Add a new Rule Set reference file by clicking the ''Add ''button and select the appropriate Rule Set File. Takenote that all Review Group filename end with "_rule_set.xrer" suffix.
• The Rule Set Version and Name are also shown in the Preferences Group tab.
Creating a Rule Area
In order to create Design Rules, a Rule Area et a Rule Violation containers first need to be created.
Rule Areas represent a logical grouping of Rule Violations. They can, for instance refer to a specific language ofelement of the architecture. To create a Rule Area, right-click on the parent Rule Set and select the New Rule Areacommand.
This opens the New Rule Area dialog.
105
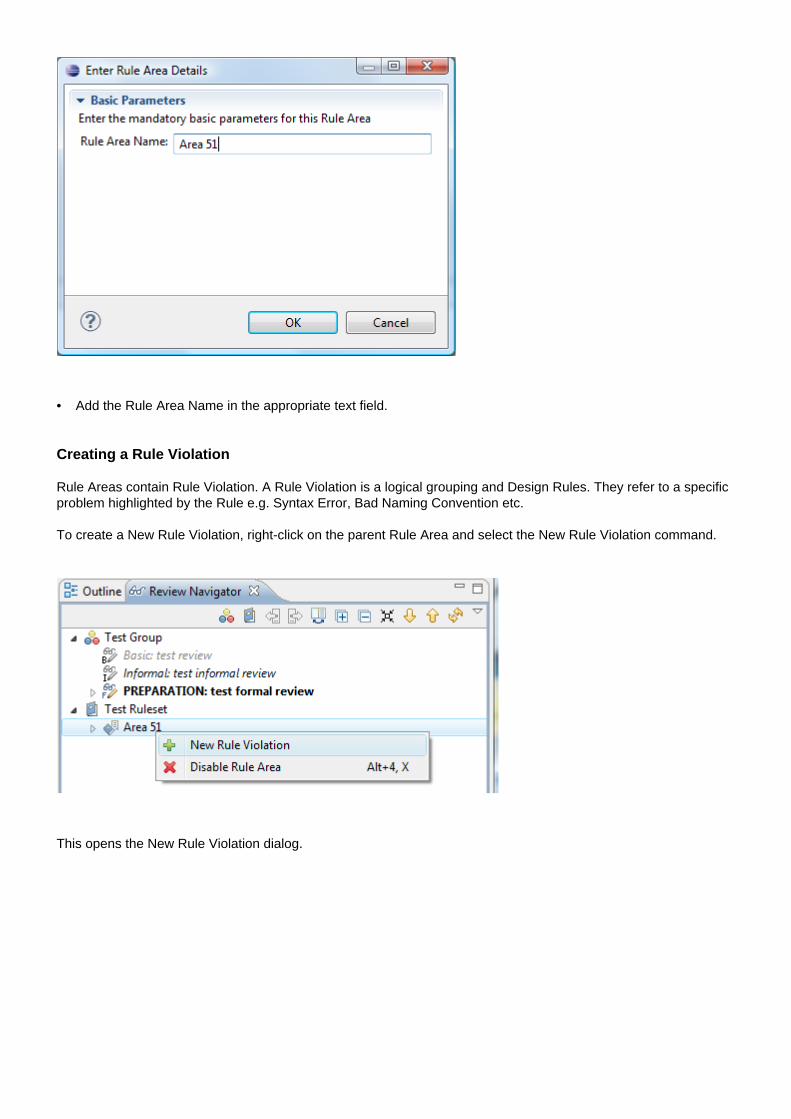
• Add the Rule Area Name in the appropriate text field.
Creating a Rule Violation
Rule Areas contain Rule Violation. A Rule Violation is a logical grouping and Design Rules. They refer to a specificproblem highlighted by the Rule e.g. Syntax Error, Bad Naming Convention etc.
To create a New Rule Violation, right-click on the parent Rule Area and select the New Rule Violation command.
This opens the New Rule Violation dialog.

106
• Add the Rule Violation Name in the appropriate text field.
Creating a Rule
A Rule is the smallest unit in the Design Rule hierarchy. It refers to a specific code convention that is to befollowed. The values of the rules are automatically set in anomalies that are created using the Rule as a reference.This can speed up and put some consistency in the review process.
To create a New Rule, right-click on the parent Rule Violation and select the New Rule command.
This opens the New Rule dialog.

107
• Add the Rule Violation Id, Title and Description in the appropriate text fields.• Select the Rule Class and Rank in the appropriate combo boxes.
Working with Editors
Opening files in editors
Once the Navigator view is open and Review Items are present. The items can be reviewed. Files are reviewedusing various editor views to browse the content. Currently R4E is fully integrated with the Java JDT and C/C++CDT editors and will take advantage of the special features these editors provide.
Files can be open in editors by double-clicking on them or their children in the Review Navigator. By default, filesbelonging to resource review items will be open in single-file editors, whereas files belonging to commit reviewitems will be open in a compare editor. If the file is open using the child Selection/Delta/Anomaly element, then thecursor will automatically be positioned to the start of the line range that corresponds to the element. Files and alsobe open in the single-file editor by using the Open File in Editor command from the selected element context menu.
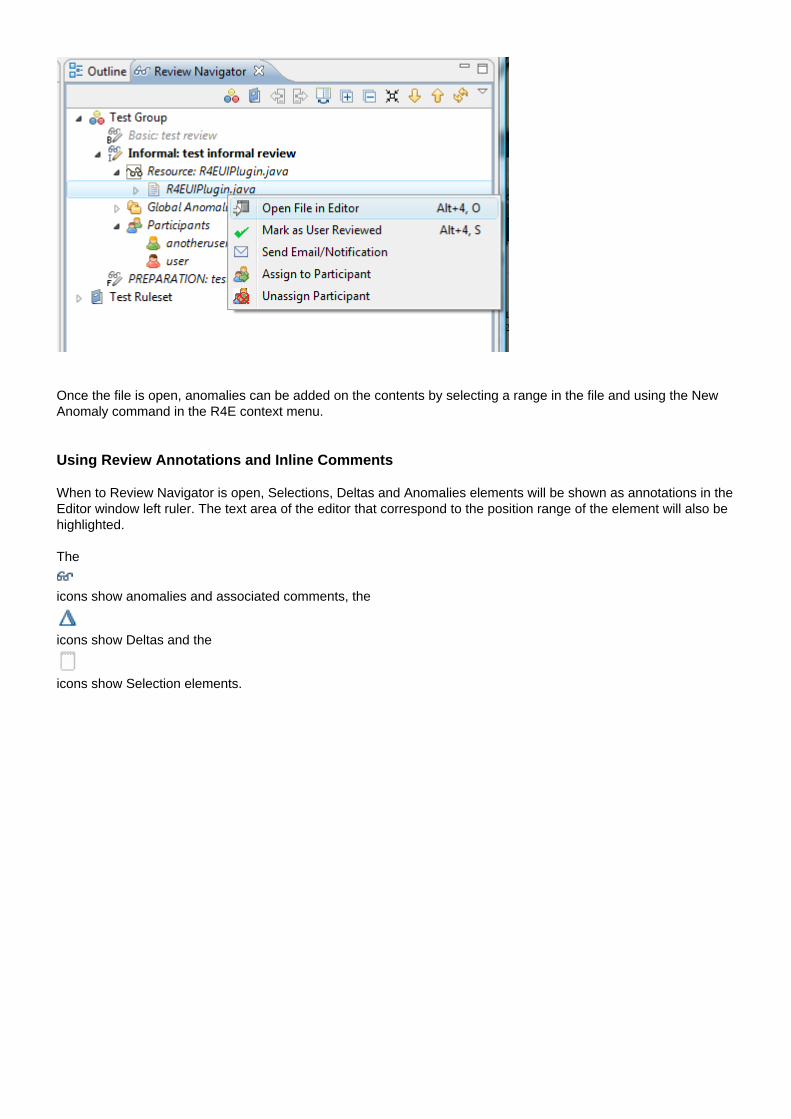
108
Once the file is open, anomalies can be added on the contents by selecting a range in the file and using the NewAnomaly command in the R4E context menu.
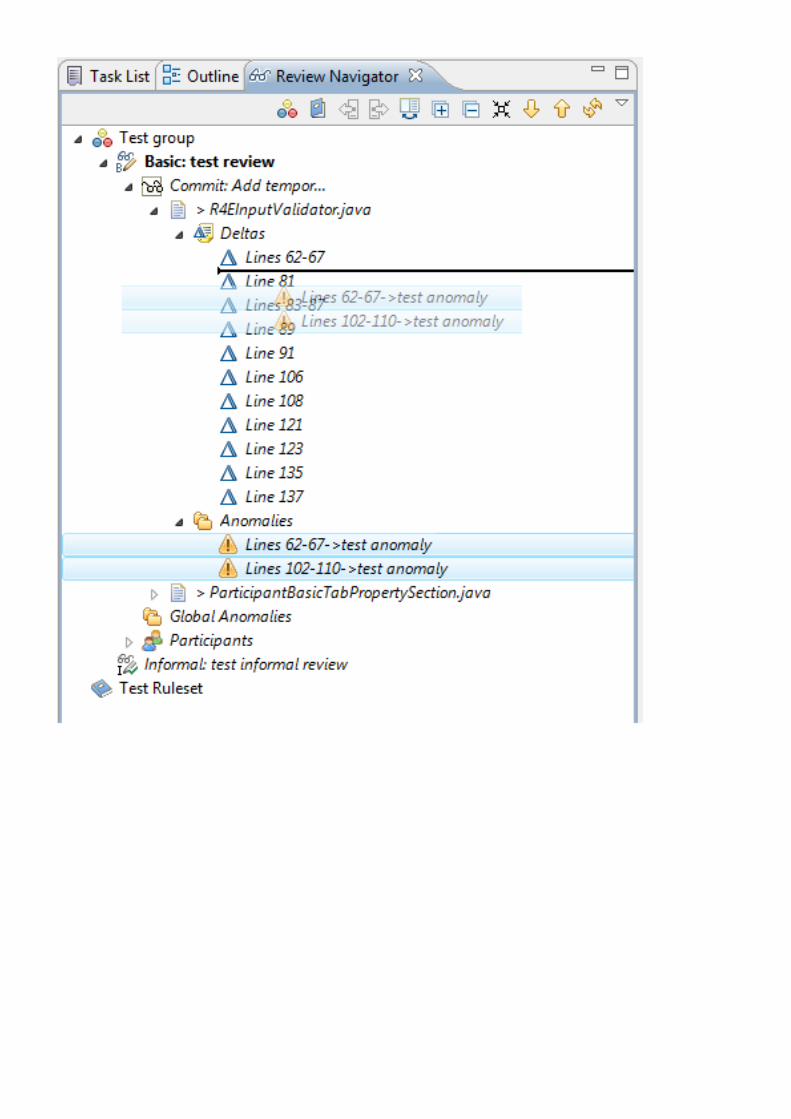
Using Review Annotations and Inline Comments
When to Review Navigator is open, Selections, Deltas and Anomalies elements will be shown as annotations in theEditor window left ruler. The text area of the editor that correspond to the position range of the element will also behighlighted.
The
icons show anomalies and associated comments, the
icons show Deltas and the
icons show Selection elements.

109
Additionally, the single editor will also show them as markers in the overview ruler on the right side.

110
The appearance of the annotations (highlighting colors, widgets etc.) can be chaged by going to the Window->Preferences under the General->Editors->Text Editors->Annotations preferences page
Navigating through and using R4E Annotations
In the compare editor, it is possible to navigate through the R4E Annotations by using the Goto Next Anomaly andGoto Previous Anomaly commands
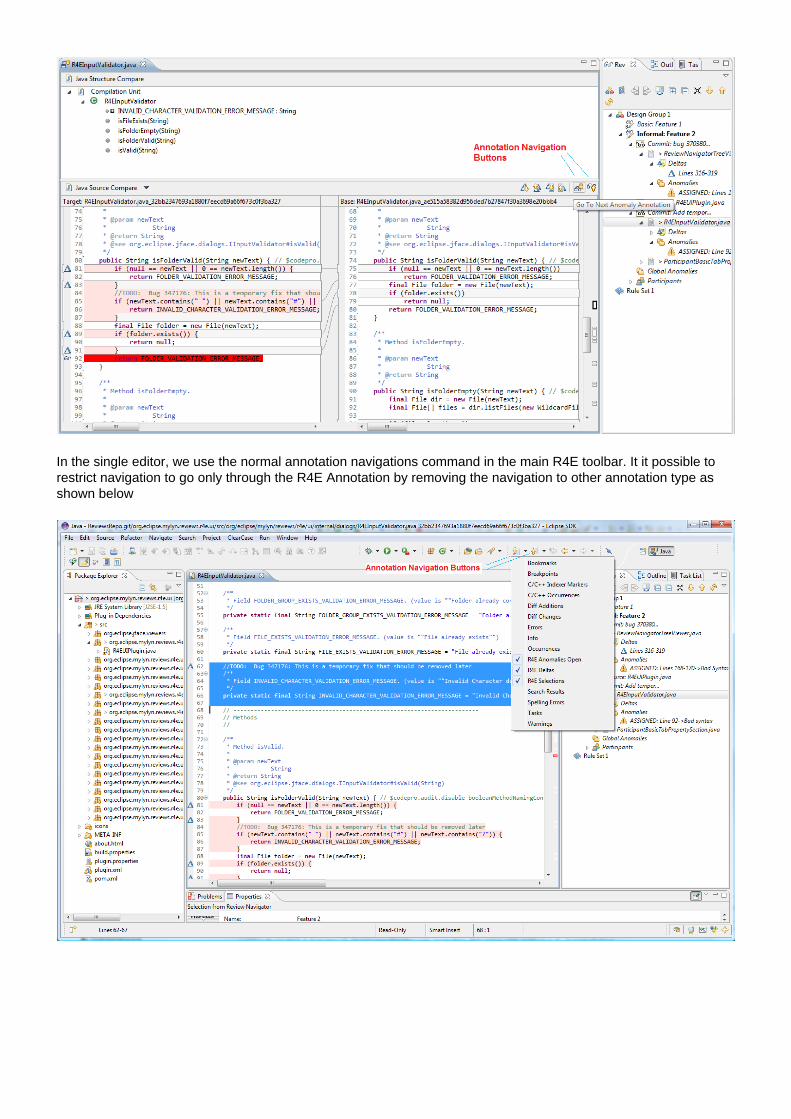
111
In the single editor, we use the normal annotation navigations command in the main R4E toolbar. It it possible torestrict navigation to go only through the R4E Annotation by removing the navigation to other annotation type asshown below
112
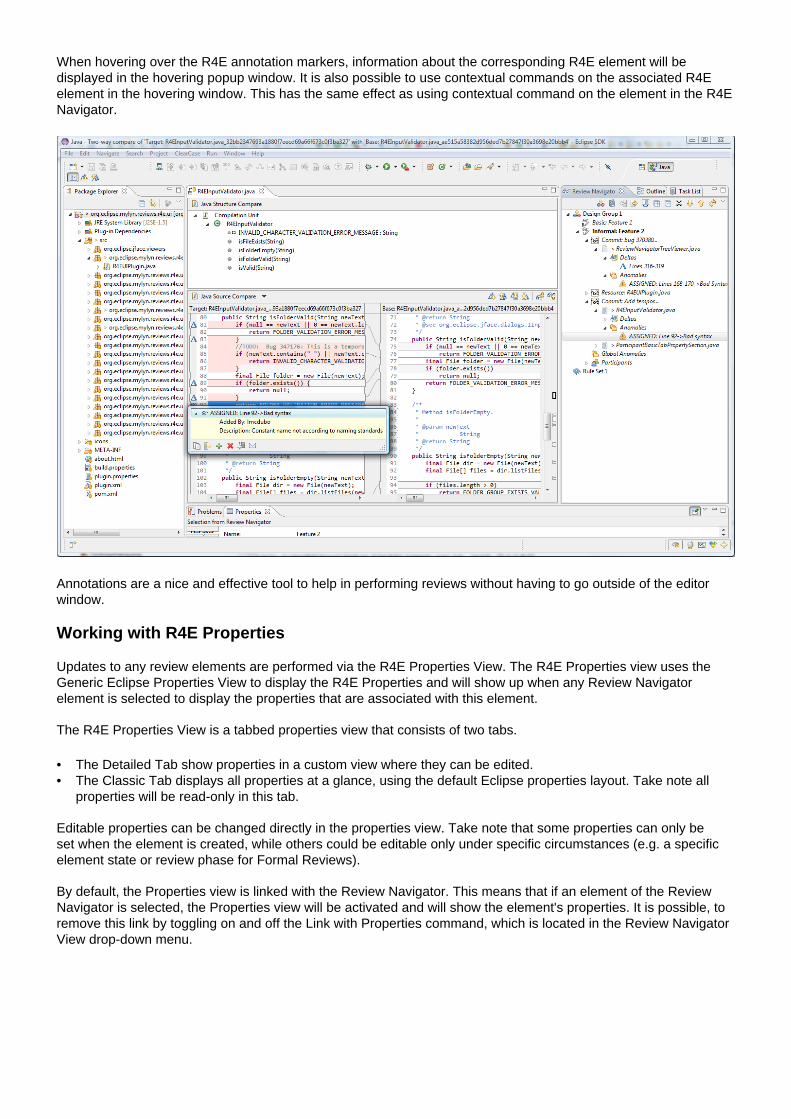
When hovering over the R4E annotation markers, information about the corresponding R4E element will bedisplayed in the hovering popup window. It is also possible to use contextual commands on the associated R4Eelement in the hovering window. This has the same effect as using contextual command on the element in the R4ENavigator.
Annotations are a nice and effective tool to help in performing reviews without having to go outside of the editorwindow.
Working with R4E Properties
Updates to any review elements are performed via the R4E Properties View. The R4E Properties view uses theGeneric Eclipse Properties View to display the R4E Properties and will show up when any Review Navigatorelement is selected to display the properties that are associated with this element.
The R4E Properties View is a tabbed properties view that consists of two tabs.
• The Detailed Tab show properties in a custom view where they can be edited.• The Classic Tab displays all properties at a glance, using the default Eclipse properties layout. Take note all
properties will be read-only in this tab.
Editable properties can be changed directly in the properties view. Take note that some properties can only beset when the element is created, while others could be editable only under specific circumstances (e.g. a specificelement state or review phase for Formal Reviews).
By default, the Properties view is linked with the Review Navigator. This means that if an element of the ReviewNavigator is selected, the Properties view will be activated and will show the element's properties. It is possible, toremove this link by toggling on and off the Link with Properties command, which is located in the Review NavigatorView drop-down menu.

113
When the Review Navigator view in unlinked, the Properties view will not be started automatically upon elementselection. To activate the Properties view and see the element's properties in this case, right-click on the elementand use the Show Properties contextual command.

114
A more detailed description of the properties for each element is shown below.
Working with Review Groups Properties
Properties for the Review Group Element includes:
• Directly in the property view:• The Group name• The location of the root folder where the information is stored on disk• The Group description• The Default Entry Criteria that will be set when creating child reviews

115
• In the Projects and Components expandable section:• The Available Projects that can be used in child reviews• The Available Components that can be used in child reviews
• In the Rule Sets expandable section:• The Applied Rule Sets that specify Design Rules that can be used when creating anomalies in child reviews.
If the ruleset is not loaded, a little disabled icon will appear besides its name in the table. Otherwise a littlecheckmark icon will be displayed.
Working with Reviews Properties
Properties for the Review Element includes:
• Directly in the property view• The Review name.• The current Review phase. Basic and Informal reviews can have only 2 phases, Started ''and ''Completed.
Formal reviews have multiple phases. Refer to the formal review section for more information.• A brief description of the review.
• In the Review Details expandable section• The review start (or creation) date.• The review due date (i.e. the date the review should be completed by).• The review end (or completion) date. If the review is not completed, this will show as In Progress.• Project Id. The value is taken for the list of possible values from the parent Review Group• Components. The values are taken for the list of possible values from the parent Review Group• The Entry Criteria that has to be met for the review to start. The default value is taken from the parent Review
Group but can be modified here.• The Objectives for the review.• The Reference Materials (documents etc.) that can be used during the review

116
• In the Decision Information expandable section (Informal/Formal reviews only)• Meeting data for the decision meeting (Subject, Time, Duration, Location). This can be updated at any time
using the Update ''button. The data can be fetched using the ''Refresh button• The Exit Decision that tell whether the review is accepted or if some rework has to be done• Participants that were part of the exit decision• The Total Time spent in the decision meeting.
• For formal reviews only, a phase map that show all phases and the progress of the review. Completed phasesare highlighted in green and the current phase is highlighted in cyan. It also show the state and end date for thephase as well as the participant that is the phase owner. Only the phase owner can change the current phaseand can thus update progress on the review.
Working with Review Items Properties
Properties for the Review Item Element includes:
• The Participant Id of the participant that added the Item• The Email address of the participant that added the Item• The Project(s) Id(s) the file(s) included in this Item belong to• The Id of the change e.g. he commit Id. This is only applicable for Commit Review Items.• The date the change was included e.g. the commit date. This is only applicable for Commit Review Items.• A brief description of the changes. For Commit Review Items, this is set to the commit message.• The participants this Review Item is assigned to for review purposes.

117
Working with File Contexts Properties
Properties for the File Context Element include a section for the base (predecessor) and target (current) files. Eachsection contains:
• The Name of the file.• The Version tag or Id for the file.• The Path Information for the file.
• The Repository path show the path to the remote version-controlled repository where the file is located.• The Absolute path show the local absolute path to the file.• The Project Relative Path show the relative path to the file in the Eclipse workspace.
• The participants this File is assigned to for review purposes.
Working with Selections and Deltas Properties
Properties for the Selection and Delta Elements include the Position (i.e. the line range) where the selection ordelta is located within the parent file and the participants it is assigned to for review purposes.

118
Working with Anomalies Properties
Properties for the Anomaly Element includes:
• Directly in the properties view• The Anomaly title. If this anomaly includes a design rule, this will be set to the title of the design rule by
default.• The Description of the Anomaly. If this anomaly includes a design rule, this will be set to the description of the
design rule by default.• The Anomaly current state (Informal and Formal reviews only).• The participant this Anomaly is assigned to for rework purposes.
• In the Anomaly Details expandable section• The Creation Date for this Anomaly.• The Position (i.e. the line range) where this Anomaly is located within its parent file. This is not applicable for
Global Anomalies.• The Anomaly Class. The class describes the type of problem that is highlighted by this Anomaly (Informal
and Formal reviews only).• The Anomaly rank. The rank sets the seriousness of the problem highlighted by this Anomaly (Informal and
Formal reviews only).

119
• The Rule ID that Anomaly uses, if any (Informal and Formal reviews only).• The Due Date for this anomaly to be resolved or addressed (Informal and Formal reviews only).• The Reason for Rejection. This is only applicable for anomaly that are rejected (Informal and Formal reviews
only).
• In the Participant Details expandable section• The Id of the participant that added this Anomaly.• The Id of the participant that decided how to handle this Anomaly (Informal and Formal reviews only).• The Id of the participant that fixed this Anomaly (Informal and Formal reviews only).• The Id of the participant that does the follow-up of this Anomaly (Informal and Formal reviews only).
Working with Comments Properties
Properties for the Comment Element includes:
• The Participant Id of the participant that added the Comment• The Time when the Comment was created• The Comment contents
Working with Participant Properties
Properties for the Participant Element includes:

120
• Directly in the properties view• The Participant Id.• The Participant Email address.• The Number of anomalies that were added by this Participant.• The Number of comments to anomalies that were added by this Participant.• The Focus Area for the Participant for this review.
• In the User Details expandable section• Extra User details. This will show the raw information returned by a query to the LDAP database, if one is
configured.
• In the Role Management expandable section• The Participant roles for the current review. A participant can have more than one role concurrently.
• In the Time Management expandable section• A table that tracks the Time Spent by the participant reviewing the file. Entries can be added (or removed)
by the participant at any time by using the Add ''(or ''Remove) button. The table will also show the cumulativetime spent in its header.
Working with Rule Sets Properties
Properties for the Rule Set Element includes:
• The Rule Set version• The Rule Set name• The Path to the file that contains the Rule Set data
Working with Rule Areas and Rule Violations Properties

121
Properties for the Rule Are and Rule Violation Elements only include the name of the Area or Violation.
Working with Rules Properties
Properties for the Rule Element includes:
• An Identifier that uniquely identifies this Rule.• The Title. The Anomaly that include this rule will have its title set to this by default.• The Description. The Anomaly that include this rule will have its description set to this by default.• The Class. The Anomaly that include this rule will have its class set to this by default.• The Rank. The Anomaly that include this rule will have its rank set to this by default.
Using Key Bindings and Hotkeys
Keys
Eclipse allows you to customize your keyboard using General>Keys preference page. Within Eclipse, key strokesand key sequences are assigned to invoke a command.
Bindings
R4E defines some keys as accelerator keys to help the user to perform reviews. Each command starts with ALT +4as below:
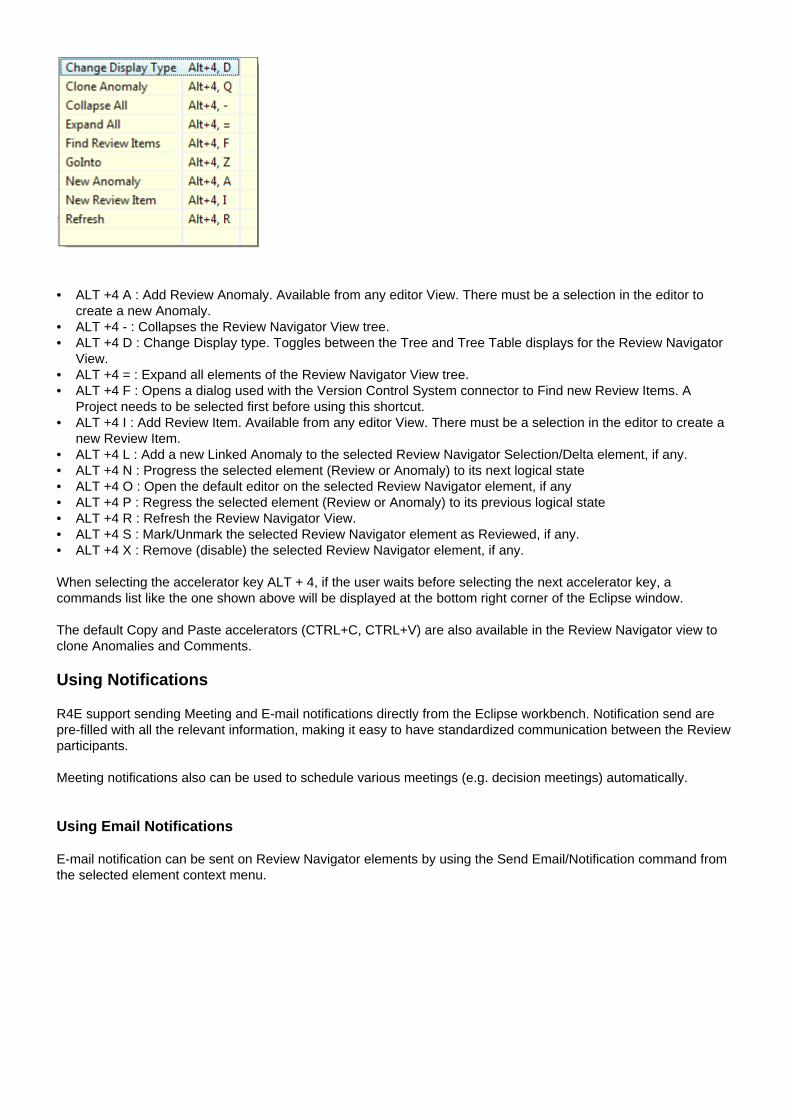
122
• ALT +4 A : Add Review Anomaly. Available from any editor View. There must be a selection in the editor tocreate a new Anomaly.
• ALT +4 - : Collapses the Review Navigator View tree.• ALT +4 D : Change Display type. Toggles between the Tree and Tree Table displays for the Review Navigator
View.• ALT +4 = : Expand all elements of the Review Navigator View tree.• ALT +4 F : Opens a dialog used with the Version Control System connector to Find new Review Items. A
Project needs to be selected first before using this shortcut.• ALT +4 I : Add Review Item. Available from any editor View. There must be a selection in the editor to create a
new Review Item.• ALT +4 L : Add a new Linked Anomaly to the selected Review Navigator Selection/Delta element, if any.• ALT +4 N : Progress the selected element (Review or Anomaly) to its next logical state• ALT +4 O : Open the default editor on the selected Review Navigator element, if any• ALT +4 P : Regress the selected element (Review or Anomaly) to its previous logical state• ALT +4 R : Refresh the Review Navigator View.• ALT +4 S : Mark/Unmark the selected Review Navigator element as Reviewed, if any.• ALT +4 X : Remove (disable) the selected Review Navigator element, if any.
When selecting the accelerator key ALT + 4, if the user waits before selecting the next accelerator key, acommands list like the one shown above will be displayed at the bottom right corner of the Eclipse window.
The default Copy and Paste accelerators (CTRL+C, CTRL+V) are also available in the Review Navigator view toclone Anomalies and Comments.
Using Notifications
R4E support sending Meeting and E-mail notifications directly from the Eclipse workbench. Notification send arepre-filled with all the relevant information, making it easy to have standardized communication between the Reviewparticipants.
Meeting notifications also can be used to schedule various meetings (e.g. decision meetings) automatically.
Using Email Notifications
E-mail notification can be sent on Review Navigator elements by using the Send Email/Notification command fromthe selected element context menu.
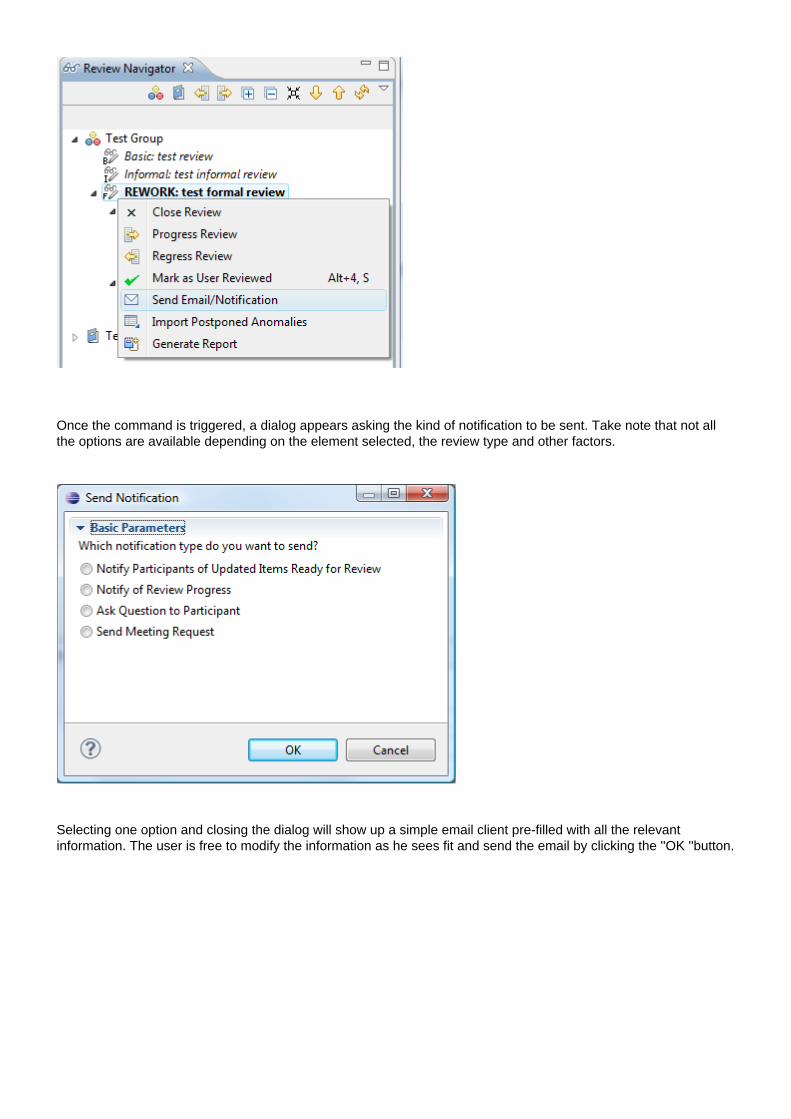
123
Once the command is triggered, a dialog appears asking the kind of notification to be sent. Take note that not allthe options are available depending on the element selected, the review type and other factors.
Selecting one option and closing the dialog will show up a simple email client pre-filled with all the relevantinformation. The user is free to modify the information as he sees fit and send the email by clicking the ''OK ''button.

124
Using Meeting Notifications
Meeting can also be scheduled directly in the workbench using R4E. Meeting data generated is in a VCalendarformat that is attached to the Email that will be sent. Meeting data for decision meeting is mandatory for FormalReviews and optional for other review types.
To add meeting data, use the ''Update ''button in the Extra property tab, under the Decision Information section, forthe selected Review element. This will open the Meeting Information dialog.

125
The meeting information to enter include the time of the meeting, the duration and location where the meeting willtake place. To make the time entry easier, you can use the date selector button (the "..." button on the right side ofthe Starts text field).
The meeting info stored in the system can be retrieved at all times by using the ''Refresh ''button in the Extraproperty tab, under the Decision Information section, for the selected Review element.
Using Statistical Reports
Statistical reports provide useful information to analyze the efficiency of one or several reviews. To have thisfunctionality available, you need to install the report feature on top of the R4E feature.
Generating Reports
To generate a statistical report, select in the Review Navigator view one or more review, the right click and select"Generate Report"

126
Two types of report can be generated.
• Inspection record: when you select only one review to generate a report, this type of report will be initiated. Youwill see a list of anomalies at the end of the report.
• Global report: when two or more review are selected. It gives a summary of information based on the selectedreviews.
The report folder is located under the group folder. The group folder is specified in the R4E Preferences,
If the user is not allowed to create a report in the existing group report directory, a new pop-up allows the user toselect or to create a new directory to save the requested report. The user can enter a path or select the Browsebutton to select a location where to store the report.
When the report generation is completed, a pop-up window will indicate where the report was stored.

127
Once the OK button is clicked, the HTML report will be displayed in the default web browser or in the Eclipse webbrowser depending on the Eclipse web browsing preferences.
Report Contents

128

129
Report Summary
This section lists the reviews that were selected for the report. The review name, group, component, reviewitem type, review type and project information are displayed for each review. The total number of reviews is alsodisplayed at the bottom of this section when more than one review was selected.
Review Anomaly Statistics
This section provides the following anomaly counts.
• Totals: Total number of anomalies.• Ranking: Breakdown of minor and major anomalies.• Class: Breakdown of anomalies per class.• State: Breakdown of anomalies per state.
Review Efficiency Statistics
This section provides several interesting review efficiency statistics divided in the following groups.
Review Items
• Total number of files: Total number of files for which review items have been specified.• Total Review Items: Total number of review items.• Total LOC: Total number of reviewed lines of code as specified by the review items. This total includes blank
lines and lines with comments.• Number of Participants: Total number of participants.• LOC / Participant: Number of reviewed lines of code per participant.• Preparation Review Rate: Number of reviewed lines of code per hour spent to perform the examination of
review items (preparation time).• Decision Review Rate: Number of reviewed lines of code per hour spent at the decision meeting.
Review Anomalies
• Preparation Review Rate: Number of created anomalies per hour spent to perform the examination of reviewitems (preparation time).
• Decision Review Rate: Number of created and imported anomalies per hour spent at the decision meeting. Thedecision time is based on the meeting time multiplied by the number of meeting participants. For example, if adecision meeting lasts 1 hour and has 3 participants, the decision time is 3 hours.
• Defect Density: Number of accepted anomalies (in states Accepted, Fixed and Verified) per reviewed lines ofcode.
• Anomaly / Participant: Number of created anomalies per participant.
Average Time Line
• Review Start: Review start date. This is only valid when only one review was selected for the report.• Review Completion: Review completion date. This is only valid when only one review was selected for the
report.• Review Cycle: Average number of days for a review cycle (all review phases).• Planning Phase: Average number of days spent in the planning phase. This statistic is only valid for formal
reviews.• Preparation Phase: Average number of days spent in the preparation phase. This statistic is only valid for formal
reviews.• Decision Phase: Average number of days spent in the decision phase. This statistic is only valid for formal
reviews.• Rework Phase: Average number of days spent in the rework phase. This statistic is only valid for formal
reviews.

130
Average Effort per Participant
• Preparation Time: Average time spent to perform examination of review items per participant.• Decision Time: Average time spent at the decision meeting in hours per participant who participated in the
meeting.• Average Review Time: Average review time spent per participant.
Total Review Effort
• Preparation Time: Total time spent to perform examination of review items (preparation time).• Decision Time: Total time spent at the decision meeting. The decision time is based on the meeting time
multiplied by the number of meeting participants. For example, if a decision meeting lasts 1 hour and has 3participants, the decision time is 3 hours.
• Total Review Time: Total review time.
List of Anomalies
This section is only available for the inspection record. The list of anomalies raised during the review with thefollowing information: File Name, line range, tile of the anomaly, class, ranking and the due date.
Performing Reviews
Performing Basic Reviews
In R4E, basic reviews are the simplest form of reviews available. Basic reviews are stateless and the anomaliesthat are raised are also stateless. This means the participants must track progress of the Review and of the raisedAnomaly externally.
Typically, the workflow of a basic review will go as follows:
1. Review is created2. Review Items are added, either by manually selecting resources or by automatically selecting files committed
using the Find Review Items command on the target project .3. Optionally, review elements are assigned to specific participants.4. Organizer/Lead notifies reviewers that the items are ready for review. his can be done externally or by using the
Email notification functionality provided by R4E5. Reviewers review their items and raise anomalies as they encounter them.6. At any time there could be communication between the reviewers and the authors of the code under review.
Since there is no anomaly state tracking, they will have to agree on how to handle the anomalies raised.7. Once all the reviewers are done and the anomalies are fixed, the review can be set as completed.
Performing Informal Reviews
Informal Review workflow is pretty much the same as the Basic Review workflow, so the steps described abovestill apply. However, the main difference is the fact that anomalies are now stateful and they need to be addressed/resolved before the review can be closed.
The state diagram for the anomaly workflow is as follows:

131
• Assigned: This is the state set when the anomalies are created. This is the only non-terminal state• Deferred: The Anomaly will is valid but will not be fixed now, but at a later time• Duplicated: The Anomaly is a duplicate of another one• Rejected: The Anomaly is invalid and will not be fixed• Fixed: The Anomaly is valid and was fixed. This is normally a terminal state, unless the Review Exit Decision is
set to Accepted with Follow-up, in which case the Verified state is the terminal one.• Verified: The Anomaly was fixed and verified by the participant that raised it. This state is normally optional, but
all Anomalies that are fixed should be subsequently set to verified is the Review Exit Decision is set to Acceptedwith Follow-up.
Once all the Anomalies are in a terminal state, the review can then be closed as it is done for Basic Reviews.
Performing Formal Reviews
Formal Review follow the IEEE 1028-1997 standard. They are stateful and divided into Review Phases. As inInformal Reviews, anomalies created are also stateful.
The state diagram for Formal review workflow is as follows:

132
Planning Phase
The Planning phase is the active phase when the review is initially created. In this phase, the Review Organizerand/or Lead adds the contents that is to be reviewed, either manually or by selecting items from the VersionControl System and adds participant that will be part of the review. Optionally, review elements are assigned tospecific participants. At the end of this phase, a notification is sent to the participant that the items are ready to bereviewed, and an invitation to a decision meeting set-up by the Organizer/Lead. Once this phase is completed, it isimpossible to go back to it.
Preparation Phase
The Preparation phase is the phase where participants review the items included in the review and potentially raiseanomalies. Once all reviewers have completed their tasks (and notified the Organizer/Lead), then the review canprogress to the next phase.

133
Decision Phase
The Decision phase is where all the anomalies that were logged are analyzed and a decision is made on eachof them on how to handle them. Potential outcomes include fixing the problem flagged by the anomaly, deferringit, or rejecting it if it is not valid. Once all the Anomalies are examined, a decision can be taken on how to closethe review. The possible outcomes for the review at this stage is that it could be rejected and more reviewing/rework is necessary, it could be accepted as is, or it could be conditionally accepted, provided that the outstandinganomalies are fixed.
Rework Phase
The Rework phase is an optional phase, only used when a review is conditionally accepted, in which validanomalies are fixed. Once the fixed are included, the anomalies will need to be re-checked to verify that the fixesare acceptable. When all the fixes are verified, the Review can be completed.
Other Considerations
Take note that there is a slight difference between the anomaly states in Informal Reviews and the ones used inFormal Reviews, as it can be seen below:
A new Anomaly in a Formal Review is set to CREATED ''by default. During the decision phase, it could be set tothe same values as in Informal Reviews, and it can also be set to ''ACCEPTED, which means that the anomaly is

134
deemed valid and will be handled and fixed. There is no ''ASSIGNED ''state for Anomalies in Formal Reviews. Therest of the anomaly flow is essentially the same as with Informal Reviews.

135
Advanced Topics
Working with multiple patch set of the same commit in a review
When creating a review, it is possible to add multiple commits. The commit might refer to different patch set orcommit versions depending of the version control being used. If someone modified some files and generated asecond commit review Item, (generating a patch set based on the initial commit) some files are modified but notnecessary all files.
When a reviewer creates a new anomaly on files not impacted yet in the second commit review item, we arereferring to the same file version, whether the reviewer is using the file in the first or second commit review item,the anomaly is only associated to the last one. See image below:
If you raised an anomaly on a file having different version in each commit review item, then the anomaly will showon the one having the file version it is referring to. See image below:
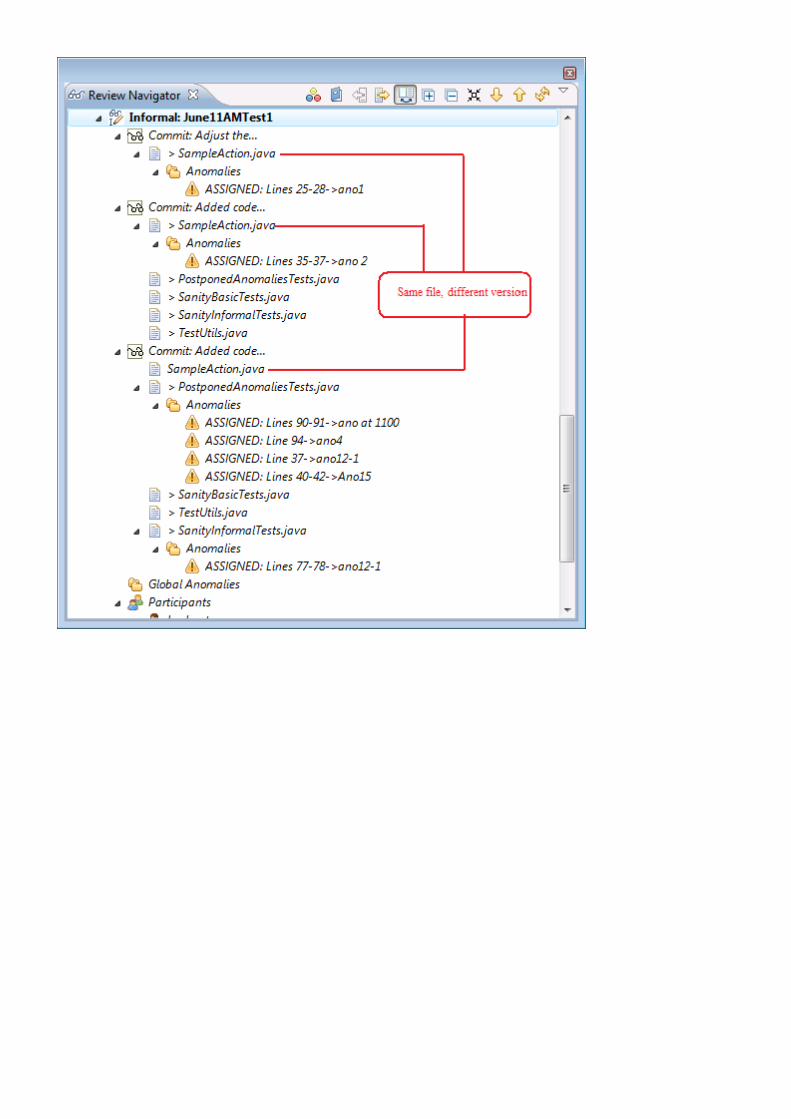
136