Embed Size (px)
Citation preview

Radeon ProRender plug-in
for Blender
User Guide v2.4
This document is a user and set up guide with tips and tricks on how
render photorealistic images in real-time, set materials and lighting.

Radeon ProRender plug-in for Blender User Guide ©2018 Advanced Micro Devices, Inc. All rights reserved.
DISCLAIMER
The information contained herein is for informational purposes only and is subject to change without
notice. While every precaution has been taken in the preparation of this document, it may contain
technical inaccuracies, omissions, and typographical errors, and AMD is under no obligation to update
or otherwise correct this information. Advanced Micro Devices, Inc. makes no representations or
warranties with respect to the accuracy or completeness of the contents of this document, and
assumes no liability of any kind, including the implied warranties of non- infringement, merchantability
or fitness for particular purposes, with respect to the operation or use of AMD hardware, software or
other products described herein. No license, including implied or arising by estoppel, to any intellectual
property rights is granted by this document. Terms and limitations applicable to the purchase or use of
AMD’s products are as set forth in a signed agreement between the parties or in AMD's Standard Terms
and Conditions of Sale.
©2018 Advanced Micro Devices, Inc. All rights reserved. AMD, the AMD arrow, FirePro, Radeon Pro,
Radeon ProRender and combinations thereof are trademarks of Advanced Micro Devices, Inc. in the
United States and/or other jurisdictions. Blender is a trademark of Blender Foundation, Inc. in the United
States and/or other jurisdictions. Unity is a registered trademark of Unity Technologies, Inc. in the
United States and/or other jurisdictions. Windows is a registered trademark of Microsoft Corporation in
the United States and/or other jurisdictions. Other names are for informational purposes only and may
be trademarks of their respective owners. OpenCL and the OpenCL logo are trademarks of Apple Inc.
used by permission by Khronos. macOS is a registered trademark of Apple Inc. Linux is the registered
trademark of Linus Torvalds in the United States and other countries.

Radeon ProRender plug-in for Blender User Guide ©2018 Advanced Micro Devices, Inc. All rights reserved.
Table of Contents
What’s New in Radeon ProRender for Blender v1.6 ........................................................ 2
Supported Platforms ...................................................................................................... 4
Software ............................................................................................................................................. 4
Operating System .............................................................................................................................. 4
Join the Discussion ............................................................................................................................ 4
Install Radeon ProRender plug-in ................................................................................... 5
Radeon ProRender for Microsoft Windows ....................................................................................... 5
Radeon ProRender for Ubuntu .......................................................................................................... 8
Radeon ProRender for macOS .......................................................................................................... 9
Switching to Radeon ProRender ................................................................................... 12
Scene Settings ............................................................................................................. 13
Render .............................................................................................................................................. 14
Dimensions ...................................................................................................................................... 14
Output .............................................................................................................................................. 15
Render Resources ............................................................................................................................ 15
Tone Mapping .................................................................................................................................. 15
Simple ........................................................................................................................................... 15
Linear ............................................................................................................................................ 16
Non linear ...................................................................................................................................... 16
White Balance ................................................................................................................................... 16
Colour Picker ................................................................................................................................ 16
Gamma Correction .......................................................................................................................... 17
Depth of Field ................................................................................................................................... 17
Motion Blur ....................................................................................................................................... 18
Sampling ........................................................................................................................................... 18
Anti-Aliasing ................................................................................................................................. 18
Material Preview Settings ................................................................................................................ 19
Mode/Quality ................................................................................................................................... 20
Render Mode ................................................................................................................................ 21
Max Ray Depth .................................................................................................................................. 22
Stamp Settings ................................................................................................................................ 23
Developer Diagnostics .................................................................................................................... 23
About ................................................................................................................................................ 24

Radeon ProRender plug-in for Blender User Guide ©2018 Advanced Micro Devices, Inc. All rights reserved.
Render Layers Settings ................................................................................................ 25
Layers ............................................................................................................................................... 25
Render Layers/Passes & AOVs ....................................................................................................... 26
Denoiser ........................................................................................................................................... 27
World Settings ............................................................................................................. 28
Environment IBLs and Sun & Sky ..................................................................................................... 28
IBLS ............................................................................................................................................... 28
Sun & Sky ...................................................................................................................................... 29
Object Settings ............................................................................................................ 30
Settings ............................................................................................................................................ 31
Motion Blur ....................................................................................................................................... 32
Working with Materials ................................................................................................ 33
Radeon ProRender Material Library ................................................................................................ 34
Material Browser .............................................................................................................................. 35
Converter ......................................................................................................................................... 35
AxF .................................................................................................................................................... 36
Setting Object Material in Node Editor ........................................................................................... 37
Textures ........................................................................................................................................... 43

OVERVIEW 1
Radeon ProRender plug-in for Blender User Guide ©2018 Advanced Micro Devices, Inc. All rights reserved.
OVERVIEW Radeon™ ProRender is a free rendering plug-in for your design and animation needs
in Blender™. Using accurate ray-tracing technology, Radeon ProRender can produce
stunning photorealistic images and animations of your scene while providing real-
time interactive rendering and continuous effects adjustments to create the perfect
rendered image. Supporting real-time changes to the scene, Radeon ProRender
allows you to preview the changes you have applied to the object in the viewport
before the final render.
This user manual will describe how to use and set up Radeon ProRender for Blender
from the install to the final save of the rendered image. This guide will also explain the
additional features such as post render image adjustments, applying materials from
Radeon ProRender Material Library and how to incorporate Radeon ProRender into
your design workflow.

Radeon ProRender plug-in for Blender User Guide ©2018 Advanced Micro Devices, Inc. All rights reserved.
WHAT’S NEW
2
What’s New in Radeon ProRender for Blender v1.6 Physically based lighting controls – Lights can be set to the value and units of real world lights for
accurately matching physical properties.
Easier Subsurface Scattering in shaders.

Radeon ProRender plug-in for Blender User Guide ©2018 Advanced Micro Devices, Inc. All rights reserved.
WHAT’S NEW
3
Volumes – Smoke created in Blender can now be rendered.
Adaptive subdivision – A new subdivision mode which will calculate how fine to subdivide objects based
on their size in the render.

Radeon ProRender plug-in for Blender User Guide ©2018 Advanced Micro Devices, Inc. All rights reserved.
SUPPORTED PLATFORMS
4
Supported Platforms Radeon ProRender for Blender v1.6 runs on both GPUs and CPUS. OpenCL™ 1.2 is required for GPUs.
Software • Blender™ 2.78+
Operating System
• Microsoft Windows® 7 (64-bit)
• Microsoft Windows® 10 (64-bit)
• Ubuntu® 16.04.3
• macOS® High Sierra 10.13.3+
Join the Discussion
Provide feedback here for all Radeon ProRender plug-ins.

INSTALL RADEON PRORENDER 5
Radeon ProRender plug-in for Blender User Guide ©2018 Advanced Micro Devices, Inc. All rights reserved.
Install Radeon ProRender plug-in
Radeon ProRender for Microsoft Windows
Download the Radeon ProRender plug-in for Blender on Microsoft Windows®, and launch the installer and
agreeing to the license.
Radeon ProRender will check your hardware and software to ensure requirements, before letting you
select your installer settings.
Note: Not all hardware has been whitelisted yet. Should Radeon ProRender not pass the
hardware check, it will give an error message. You can halt the installation or continue at your
own risk. On a failed hardware check, especially on your GPU, Radeon ProRender will default to
CPU rendering when you start the plugin in Blender.

INSTALL RADEON PRORENDER 6
Radeon ProRender plug-in for Blender User Guide ©2018 Advanced Micro Devices, Inc. All rights reserved.
Click the Register button – it will take you to an AMD website to obtain an activation key by registering.
Register using your information. You will receive your activation key after clicking Request Download.
Enter it into the installer and continue the installation.

INSTALL RADEON PRORENDER 7
Radeon ProRender plug-in for Blender User Guide ©2018 Advanced Micro Devices, Inc. All rights reserved.

INSTALL RADEON PRORENDER 8
Radeon ProRender plug-in for Blender User Guide ©2018 Advanced Micro Devices, Inc. All rights reserved.
Radeon ProRender for Ubuntu
1. Download and install the amdgpu or amdgpu-pro driver and include OpenCL™.
Show help options: ./amdgpu-install -h
There should be an option for --opencl that needs to be used.
For example: ./amdgpu-install -y --opencl=legacy,rocm
2. If the non-pro driver was installed then run the following:
sudo apt install libgl1-amdgpu-mesa-dev
sudo ldconfig
The pro driver already executes this and the sudo ldconfig command is required.
3. Install the Blender addon
./RadeonProRenderForBlender.1.6.run $absolutePathToBlender # such as
~/Downloads/blender-2.78c-linux-glibc219-x86_64
Follow prompts to register and enter the registration key. A link is provided in the terminal with a web
page that will provide the key. Finally, accept the EULA.
When running the installer, you will be prompted to enter the root password from sudo so that the
required libraries are installed.
Note: The installer requires the path to Blender so that the Radeon ProRender plug-in is
autoloaded and available when Blender runs.

INSTALL RADEON PRORENDER 9
Radeon ProRender plug-in for Blender User Guide ©2018 Advanced Micro Devices, Inc. All rights reserved.
Radeon ProRender for macOS
Download ProRenderForBlender-XX.dmg. Click to open.
Open the RadeonProRenderBlenderInstaller.

INSTALL RADEON PRORENDER 10
Radeon ProRender plug-in for Blender User Guide ©2018 Advanced Micro Devices, Inc. All rights reserved.
Copy and paste the website into browser to obtain the registration key.
Enter the registration key that will be emailed to you.

INSTALL RADEON PRORENDER 11
Radeon ProRender plug-in for Blender User Guide ©2018 Advanced Micro Devices, Inc. All rights reserved.
Continue through the installation
Select the Blender installation directory. Unless you installed Blender in a non-standard place, click ok.
Point to the usual location of the Blender app (/Applications), else just click Choose.

RADEON PRORENDER SET UP
12
Radeon ProRender plug-in for Blender User Guide ©2018 Advanced Micro Devices, Inc. All rights reserved.
Switching to Radeon ProRender Launch Blender. In the Info header, select Radeon ProRender in the renderer dropdown. If you don’t see it
in the dropdown, check Add-ons, and activate it there.
If Radeon ProRender is activated, the content in the Render Panel/Render Setup should change to
Radeon ProRender -specific settings.

SCENE SETTINGS 13
Radeon ProRender plug-in for Blender User Guide ©2018 Advanced Micro Devices, Inc. All rights reserved.
Scene Settings Once you’ve changed your renderer to Radeon ProRender, you will have access to the following render
settings.

SCENE SETTINGS 14
Radeon ProRender plug-in for Blender User Guide ©2018 Advanced Micro Devices, Inc. All rights reserved.
Render
Under Render, the output can be a still image, or an animation without or without audio.
Note: Radeon ProRender follows the Blender standard, meaning renders will be are displayed in
the UV/Image Editor, and the display options are the same as in Blender native, meaning that
clicking the lock next to the dropdown will lock the interface at rendertime to give more memory
to the renderer.
The display dropdown will let you select between:
• Keep UI – The image is rendered to the UV/Image Editor, but the UI remains the same. You will need to
open the UV/Image Editor manually to see the render result.
• Image Editor – A new floating window opens up, displaying the render.
• New Window - One of the existing editors is replaced with the UV/Image Editor, showing the render.
• Full Screen - The UV/Image Editor replaces the UI, showing the render.
Dimensions
Set the sizing and resolution for your render output. You can choose between custom settings and
presets from the dropdown. This is also where you define your frames and framerate for animation.

SCENE SETTINGS 15
Radeon ProRender plug-in for Blender User Guide ©2018 Advanced Micro Devices, Inc. All rights reserved.
Output
Lets you define where and how to save your render output.
Render Resources
Render Resources lets you define your rendering device(s). First select your rendering mode – CPU or
GPU. Then select your devices in the dropdown. You can use multiple GPUs or CPUs.
If your GPU(s) are incompatible, Radeon ProRender will usually default to CPU-rendering. If it doesn’t,
you will need to set it manually.
Tone Mapping
Tone Mapping allows you to change the brightness and/or contrast of your image or animation based on
real life camera settings or algorithms. Radeon ProRender provides three settings for this.
Simple
This is a simple exposure tweak and contrast option. You can brighten or darken the image by controlling
the exposure, or having brighter or darker contrast.

SCENE SETTINGS 16
Radeon ProRender plug-in for Blender User Guide ©2018 Advanced Micro Devices, Inc. All rights reserved.
Linear
This is based on real-life camera settings. ISO is film speed – the higher the value, the more light is let
into the image. F-Stop is aperture width, and follows regular camera settings – the smaller the number,
the wider the aperture, and the more light will be transmitted to the film. Shutter Speed is how long the
shutter stays open to let in light, also known as exposure.
Non linear
This is also known as Reinhard which is aimed at adapting the high dynamic range of real world lighting to
your screen.
Note: It does this by letting you set values for Burn, Post Scale and Pre Scale Pre Scale and Post
Scale work together, this means that if you tweak one, you’ll probably have to tweak the others.
Pre Scale controls the brightness of darker areas (i.e. shadows). Post Scale controls the final brightness
of the image and Burn is used to tweak the brightness of highlights in your image based on its darker
areas.
White Balance White Balance follows the basic settings of a digital camera – lets you set the color temperature of the
light in the image.
Note: A color temperature is set in Kelvin – a lower value will turn your light a cold blue and a
higher value will give it a warmer tone. The default is 6500 which will give you nice white light and
highlights.
Note: Whenever a white box is apparent, you can set a specific color and you can choose
between several colour spaces.
Colour Space: Rec. 2020, DCI P3, Adobe RGB, Srgb
Colour Picker
Specify the colour using the RGB (Red, Green, Blue), HSV (Hue, Saturation, Value/Brightness) or Hex
colour space.
Note: Whenever you see the white rectangle, you are able to choose a color using this color
palette.

SCENE SETTINGS 17
Radeon ProRender plug-in for Blender User Guide ©2018 Advanced Micro Devices, Inc. All rights reserved.
Gamma Correction
This will make the scene look brighter or more faded out. You can choose to set this in the render
window, or in the viewport only.
Note: Radeon ProRender for Blender follows the Gamma 2.2 standard, meaning it will look
correct out of the box. If you decide to tweak your Gamma settings, remember you may need to
tweak your tone mapping as well.
Depth of Field
This will let you focus on an object in the scene and blur the foreground or background surrounding it via
the camera settings.
Once you’ve checked the checkbox to activate it, Radeon ProRender will show a Focus dropdown listing
scene items the camera can focus on, as well as giving you the option to pick a camera.
• F-stop – In this context, the F-stop controls the blur in the image. If you stop down to low settings, you will
get more blur in the areas that don’t have focus.
• Distance – If you chose to just use the camera, the Distance parameter defines which area in your 3D
space will be the focus based on the distance you define here – the focused area defined by distance will be
clear, the rest blurry.
• Blades – Blades define the amount of bokeh in your image, if any. Low settings will give you hexagons, high
settings will give you circles.
Note: This changes the DOF from the active camera view. Press Num Pad 0 to shift to the active
camera view.

SCENE SETTINGS 18
Radeon ProRender plug-in for Blender User Guide ©2018 Advanced Micro Devices, Inc. All rights reserved.
Motion Blur
As with other cameras, Radeon ProRender’s Motion Blur will make object appear as if it’s in motion, in
stills as well as animations. You can select whether to use Geometry – an object in your scene – to blur, or
the image or frames themselves.
• Exposure - longer exposure means more motion blur
• Scale – the scale of the motion blur
Sampling
Limit the rendering samples by time or the number of iterations.
Anti-Aliasing
Like with Blender’s native Anti-Aliasing, Radeon ProRender’s anti-aliasing smooths the pixels in an
image, by oversampling single pixels as if they were five pixels or more, and calculating the average. This
will in many cases get rid of the harsh edges you can see in some renders with no AA set. There are
several algorithms to calculate this, and Radeon ProRender has added Lanczos and Blackman/Harris as
well as some of the standard ones.
A high number of samples gives you a better render at the cost of render time. The width changes the
width of the filter and the grid refers to grid pattern for the AA grid – the smaller the grid the higher the
render time.
SCENE SETTINGS 19
Radeon ProRender plug-in for Blender User Guide ©2018 Advanced Micro Devices, Inc. All rights reserved.
FILTERS DESCRIPTION
TRIANGLE equivalent to Blender’s Tent – for sharp results
MITCHELL default filter, good for all-round rendering on images with no major high
contrasts
LANCZOS a second good all-round filter
GAUSSIAN provides blurry Anti-Aliasing
BOX the lowest quality Anti-Aliasing filter
BLACKMAN HARRIS complements the Box and Gaussian filters, and is especially effective for
Wireframe renders, as it makes edges look smoother
Material Preview Settings
This will preview the material’s Radeon ProRender thumbnails. Useful for mixing different shaders and
previewing the color in the NodeEditor. Click on the object in the viewport. Apply a material by selecting
the Material tab and clicking New.The material preview iterations will be evident in this section.

SCENE SETTINGS 20
Radeon ProRender plug-in for Blender User Guide ©2018 Advanced Micro Devices, Inc. All rights reserved.
In the node editor, there is also a material preview option, such as using the RPR Shader Blend. Check
the RPR Thumbnails checkbox and choose to have a large preview or a small one.
Mode/Quality
This is used for the final shot, or for the viewport and they are set independently.

SCENE SETTINGS 21
Radeon ProRender plug-in for Blender User Guide ©2018 Advanced Micro Devices, Inc. All rights reserved.
Render Mode
Render Mode changes the look of the 3D model in the viewport.
MODE DESCRIPTION
WIREFRAME shows the wireframe of the mesh
TEXCOORD shows the current texture coordinates UV’d or not
NORMAL renders the normals of the scene – not to be confused with baking
MATERIAL ID renders the whole scene in non-bordering colors to ease
postwork/processing
GLOBAL ILLUMINATION the full scene with full GI lighting and shadows.
DIRECT ILLUMINATION
NO SHADOW
direct light, no GI, gives sharper renders without any shadows or semi-
shadows
DIRECT ILLUMINATION renders the scene with shadows, but no GI – gives “harsher” renders.
DIFFUSE renders the scene with textures only
AMBIENT OCCLUSION standard pass to do anything from showing off your models without
textures to using it as an overlay for contact shadows, which GI doesn’t
always catch

SCENE SETTINGS 22
Radeon ProRender plug-in for Blender User Guide ©2018 Advanced Micro Devices, Inc. All rights reserved.
Max Ray Depth
Max Ray Depth changes the number of times that a ray bounces off a surface to capture reflections.
Notice the image quality of the model when using number of ray bounces of 1 (left) and of 5 (middle) and
of 20 (right). The transparency and colour of the object is improved with more ray bounces. In the left
most photo, the object is black, since the surrounding light is unable to reach the inner surfaces due to a
low ray bounce setting.
Tip: When using glass or other translucent appearances, use a high number of Ray Bounces to
fully capture all reflections (generally, a good number is 6 unless there are complex, translucent
parts).
New in v1.6: Max ray depth can also be controlled for diffuse and specular ray depths separately.
Thus for scenes with many nested transparent objects, set a high specular ray depth. Diffuse
ray depth is usually fine to leave at 1 or two.
Improved image quality comes at a cost to other factors. The right render took more time than the left
render to produce qualitatively, the same image quality.

SCENE SETTINGS 23
Radeon ProRender plug-in for Blender User Guide ©2018 Advanced Micro Devices, Inc. All rights reserved.
Stamp Settings
This will create stamp on final rendered image showing details of hardware and Blender scene
information.
This is the stamp on the rendered image.
Developer Diagnostics
Should you be so unfortunate as to experience crashes, please turn on the Trace Dump. The Trace Dump
will not store any kind of personal information, it will simply enable the developers to pinpoint how and
why the crash occurred based on the data present in the scene – and hence the trace file.

SCENE SETTINGS 24
Radeon ProRender plug-in for Blender User Guide ©2018 Advanced Micro Devices, Inc. All rights reserved.
About
This section displays developer information.

RENDER LAYERS SETTINGS 25
Radeon ProRender plug-in for Blender User Guide ©2018 Advanced Micro Devices, Inc. All rights reserved.
Render Layers Settings Render Layers allow you to render your scene, or items in your scene in layers. This is handy if you are
compositing or doing postwork.
Layers
The RPR Layers settings follow the Blender standard setup, where you add layers containing scene
elements and their render settings to the layer list.
Only visible layers will be rendered.
• Scene shows the scene layers currently visible.
• Layer shows the scene layers associated with Radeon ProRender, and they will render the objects and
materials associated with Radeon ProRender.

RENDER LAYERS SETTINGS 26
Radeon ProRender plug-in for Blender User Guide ©2018 Advanced Micro Devices, Inc. All rights reserved.
Render Layers/Passes & AOVs
Radeon ProRender supports both Render Layers and AOVs to support post work and compositing.
PASSES DESCRIPTION
COMBINED PASS color of the object – default
OBJECT ID equivalent to Blender native’s Object Index. It creates a mask of the material
which can be read by the ID Mask Node in the compositor
DEPTH equivalent to the Z or Mist pass, and renders the depth in the image in
greyscale
SHADING NORMAL equivalent to Blender native’s surface Normal for shading
GEOMETRIC NORMAL renders normals based on camera angle
MATERIAL IDX it creates a mask of the material which can be read by the ID Mask Node in
the compositor
UV renders the UV coordinates
WORLD COORDINATE used for compositing, the RGB values in this pass correspond to the XYZ axii
on the object(s) or in the scene
GROUP INDEX An ID color set for groups. Not currently used.
SHADOW CATCHER Output from shadow catcher objects
BACKGROUND The background color
EMISSION Output from emissive objects
VELOCITY Direction of motion

RENDER LAYERS SETTINGS 27
Radeon ProRender plug-in for Blender User Guide ©2018 Advanced Micro Devices, Inc. All rights reserved.
Denoiser
New in v1.5+: Enable the checkbox, select the filter type and how fine or wide you want to filter
the image with the settings. Using a finer filter will preserve more image detail, while a wider
filter will give less noise. This should allow you to get noise from your render while keeping
samples and render times low.
The image on the right has denoiser turned on.

Radeon ProRender plug-in for Blender User Guide ©2018 Advanced Micro Devices, Inc. All rights reserved.
OBJECT SETTINGS
28
World Settings
Environment IBLs and Sun & Sky
IBLS
You can just use the native, single color setup for completely neutral GI lighting or you can pick the color
via RGB, HSV, or Hex.
You control the intensity of the lighting via the Intensity slider, or you can load an HDR or EXR to
illuminate your scene without showing the IBL itself. If you opt to use the latter, the intensity will also be
controlled via the intensity slider.
If you set override background, you can set the background color or IBL map independently of the world
lighting. the Transparent Background option allows you to give the background a 0 alpha while still
showing the color/map.
Cool fact: If you render a scene using an HDR with an HDR, you get a stacked HDR you can re-
use for other scenes – just mind your copyright.

Radeon ProRender plug-in for Blender User Guide ©2018 Advanced Micro Devices, Inc. All rights reserved.
OBJECT SETTINGS
29
Your IBL will determine how the lighting in your render is reflected or refracted onto the surfaces of the
model. You can use alternate images or colours to change this. One way to fake soft reflections, for
example, is to use a blurred copy of your lighting IBL to generate this without having to tweak your
settings too much.
Sun & Sky
Radeon ProRender can simulate a sun & sky background. You can even set the environment depending
on a location in the world by clicking the Date, Time and Location toggle.

Radeon ProRender plug-in for Blender User Guide ©2018 Advanced Micro Devices, Inc. All rights reserved.
OBJECT SETTINGS
30
Object Settings Radeon ProRender has a few options under Object:

Radeon ProRender plug-in for Blender User Guide ©2018 Advanced Micro Devices, Inc. All rights reserved.
OBJECT SETTINGS
31
Settings
Shadow Catcher – Follows the general 3D workflow of setting up a plane or object capable of receiving
shadows and becoming transparent, so it can be seamlessly incorporated into i.e a backplate or an IBL.
New in v1.4+: Objects can be marked as shadow catchers for compositing rendered shadows to
a background.
Casts Shadows – enables shadows

Radeon ProRender plug-in for Blender User Guide ©2018 Advanced Micro Devices, Inc. All rights reserved.
OBJECT SETTINGS
32
Portal Light - Placed in windows or near the main light sources in your scene, a Portal Light is
typically used to boost incoming GI/Environment light (from windows) in interior scenes. It does this
to speed up rendering by sampling and boosting light more efficiently, thereby also reducing the
noise in the render after less passes.
Camera Visibility: Make objects visible/invisible to main render. You could turn this off to make an
object only show up in reflections for example.
Subdivisons: This subdivides your geometry at render time to give you finer and smoother mesh.
There are two different modes:
• Level Mode - subdivides your geometry N times always.
• Adaptive Mode - Use this to adaptively subdivide your geometry. The setting is how fine geometry
should be divided in pixel size. Thus, setting it to 1.0 will subdivide geometry to 1 pixel in size based on
how close to the camera the object is. The advantage is and item that is far away from the camera will
not be overly subdivided as it might with Level mode.
Motion Blur
Set the scale of the motion blur. This will need to be enabled under the Scene Settings for you to adjust.

RENDER IMAGE EFFECTS 33
Radeon ProRender plug-in for Blender User Guide ©2018 Advanced Micro Devices, Inc. All rights reserved.
Working with Materials The Radeon ProRender Materials Panel will let you define options for a single, or multiple shaders, and
follows the standard Blender workflow.
Access the Material by clicking the Material icon in the Object’s properties editor. Add a new material by
clicking the + sign next to the Active Material box, and the new material will display, ready for editing, as
will the Radeon ProRender specific material options, such as:
• Shader selection and Shader settings
• Custom Properties
• Material Preview
• RPR Material Browser for Radeon ProRender specific materials
• RPR Converter, which converts Cycles Materials into Radeon ProRender Materials
• RPR AxF™ ImporteR

RENDER IMAGE EFFECTS 34
Radeon ProRender plug-in for Blender User Guide ©2018 Advanced Micro Devices, Inc. All rights reserved.
Radeon ProRender Material Library
Radeon ProRender Materials Breakdown:
MATERIALS DESCRIPTION
RPR DIFFUSE either be a solid color, blends or texture map inputs
RPR EMISSIVE used to emit glow or lighting cast on surrounding objects
RPR MICROFACET used for metals and glossy surfaces
RPR SHADER BLENDER used for blending two shaders together
RPR DIFFUSE
REFRACTION
for light that goes through an object and bends at an angle. Diffuse
refraction will scatter light in many angles
RPR OREN NAYAR used for diffuse reflections on rough surfaces, like sand, rocks, cloth or
plaster
RPR WARD used for plastic and metal
RPR REFLECTION used to generate only reflection. Will be used with Blend material to make
more advanced materials such as glass and water
RPR PBR SHADER a simplified version of Uber with the inputs set to match common PBR
textures
RPR UBER SHADER a more robust Uber shader that allows users to use a metallic material
workflow common to many PBR Shaders. (Recommended to use this)
RPR SUBSURFACE used for surfaces that does not reflect light off the surface like a mirror or
water, but penetrates it a little, like candles, milk, skin or fruit, like grapes
RPR VOLUME used for streetlights at night, fog or mist
RPR DISPLACEMENT displaces vertices in a mesh based on an input texture’s intensity
New in v1.5+: Area lights, as well as point lights, can use IES profiles.
Without IES
With IES – modifies light scattering

RENDER IMAGE EFFECTS 35
Radeon ProRender plug-in for Blender User Guide ©2018 Advanced Micro Devices, Inc. All rights reserved.
Material Browser
To help you get started, the RPR Material Browser contains several libraries of import-ready, and ready-
made materials to speed up your work.
Simply browse to the Category or Material you want to use, or use the Search function, and click RPR
Import Selected Material. Remember to copy textures locally if you plan on working offline.
Converter
The RPR Cycles Converter lets you select single Cycles Materials, or all Materials available in a scene, and
converts them to a Radeon ProRender Material.

RENDER IMAGE EFFECTS 36
Radeon ProRender plug-in for Blender User Guide ©2018 Advanced Micro Devices, Inc. All rights reserved.
AxF
The Appearance Exchange Format is a vendor neutral “material” format which supports anything from
single spectrums to full BSSRDF (i.e often used in CAD applications and other renderers).
In order to use an AxF Material in Radeon ProRender, click the importer, select your AxF format file, and
tweak your settings on import, if needed.

RENDER IMAGE EFFECTS 37
Radeon ProRender plug-in for Blender User Guide ©2018 Advanced Micro Devices, Inc. All rights reserved.
Setting Object Material in Node Editor
Click on an object. In the materials tab, click New to create a new Material.
Click on Add Material NodeTree to view in the Node Editor.

RENDER IMAGE EFFECTS 38
Radeon ProRender plug-in for Blender User Guide ©2018 Advanced Micro Devices, Inc. All rights reserved.
In the Node Editor, there should be a default RPR Shader and RPR Material Output.
Note: You are viewing Radeon ProRender Material Nodes. You can tell since the material toggle
is enabled.
Here you have access to the various Radeon ProRender Material Shaders.

RENDER IMAGE EFFECTS 39
Radeon ProRender plug-in for Blender User Guide ©2018 Advanced Micro Devices, Inc. All rights reserved.
For example, to set a glass material for the object using the RPR Material Browser.

RENDER IMAGE EFFECTS 40
Radeon ProRender plug-in for Blender User Guide ©2018 Advanced Micro Devices, Inc. All rights reserved.
Go to the RPR Material Browser. In the Materials region, select the glass materials OR click on the
picture to display a visual picture of all the materials.

RENDER IMAGE EFFECTS 41
Radeon ProRender plug-in for Blender User Guide ©2018 Advanced Micro Devices, Inc. All rights reserved.
After selecting a material, click on RPR Import Selected Material to import material into the Node Editor.
Note: You have to click RPR Import Selected Material every time to update the Node Editor.
Else the material will not update.
RENDER IMAGE EFFECTS 42
Radeon ProRender plug-in for Blender User Guide ©2018 Advanced Micro Devices, Inc. All rights reserved.
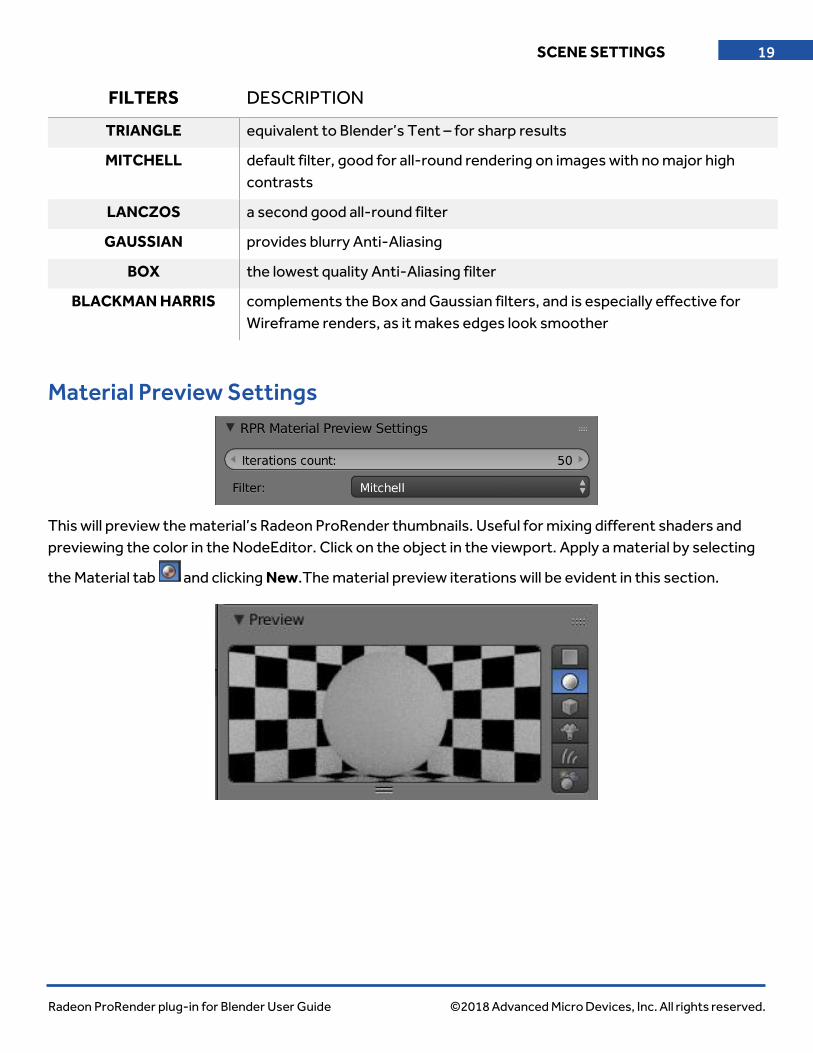
After importing, the Node Editor will automatically connect the RPR Shaders to the RPR Material Output
that will result in a glass material for the object.
The glass material is immediately rendered in the viewport.

RENDER IMAGE EFFECTS 43
Radeon ProRender plug-in for Blender User Guide ©2018 Advanced Micro Devices, Inc. All rights reserved.
Textures
You can import a picture to simulate a material or texture. In the Node Editor, click Add (Shift + A) >
Texture > RPR Image Map.
Tip: RPR Image Map nodes have a “Texture Gamma” setting as of v1.6. Normally, set this to
“sRGB” for color maps (such as diffuse color) and leave as “linear” for black and white values,
normal maps, etc..

RENDER IMAGE EFFECTS 44
Radeon ProRender plug-in for Blender User Guide ©2018 Advanced Micro Devices, Inc. All rights reserved.
Import an image.
Click Add (Shift + A) > Input > RPR BumpMap.

RENDER IMAGE EFFECTS 45
Radeon ProRender plug-in for Blender User Guide ©2018 Advanced Micro Devices, Inc. All rights reserved.
Connect to original Macrofacet Shader.
Add texture mapping.

Radeon ProRender plug-in
for Blender
User Guide v2.4
Written by: Annie Yu
05/09/2018
©2018 Advanced Micro Devices, Inc.
All rights reserved.


![[2017 GDC] Radeon ProRender and Radeon Rays in a Gaming Rendering Workflow](https://img.pdfslide.net/doc/110x75/58ed5b341a28abc26e8b4613/2017-gdc-radeon-prorender-and-radeon-rays-in-a-gaming-rendering-workflow.jpg)