Embed Size (px)
Citation preview
Diversus Integrated User Guide v.01.08
Radiant Diversus POS Terminal
User Guide v.01.08
© 2011‐2012 Radiant Systems, Inc.
All Rights Reserved
No part of this document may be reproduced, stored in a retrieval system, or transmitted in any form or by any means, electronic or mechanical, including photocopying and recording for any purpose, without the prior written permission of Radiant.
INFORMATION IN THIS USER DOCUMENT IS SUBJECT TO CHANGE BY RADIANT WITHOUT NOTICE.
Microsoft and Windows are registered trademarks and NT is a trademark of Microsoft Corporation.
17 July 2012 Page 1 of 43

Diversus Integrated User Guide v.01.08
Using this Guide
This User Guide is designed as reference to help you set up and use Diversus Point of Sale. All steps and overviews in this guide can serve as an on‐site functional reference for setting up the system.
This User Guide describes procedures and methods of setting up and using Diversus Point of Sale in all its configurations.
This symbol indicates any additional information that you might want to know about a certain function. This information is outside of the flow of the current process.
Certificates
Warnings:
QS710 Models Containing Internal NiMH Batteries:
Proper disposal
Dispose of used NiMH batteries by recycling and/or according to local regulations.
Do not dispose of batteries in fire.
QS710 Models Containing Extended Li‐Ion Batteries:
Proper disposal
Dispose of the Li‐Ion batteries in accordance with local regulations
Page 2 of 43 17 July 2012

Diversus Integrated User Guide v.01.08
17 July 2012 Page 3 of 43
Shipping requirements
Do not ship faulty Li‐Ion batteries
Follow regulations for shipping Li‐Ion batteries
Cautions/Warnings required by regulation
Do not disassemble, crush, heat above 65°C (149F) or incinerate
Do not short terminals
Misuse may lead to fire, explosion or burns
Risk of explosion if battery is replaced by an incorrect type.
QS710 Models Containing 802.11abgn Wireless Radio
The maximum rated transmit power of the Diversus Air is 1188 mW. This translates to a power
density of 0.05mW per square centimeter, while configured to the IEEE wireless protocol 802.11b
and operating half a meter away from the terminal. The Federal Communications Commission
(FCC) place limits on the maximum allowable transmission power based on recommendations from
the National Council on Radiation Protection and Measurements (NCRP). Maximum permissible
exposure limits deemed as acceptable in the 2.4 to 5GHz bands for occupational / controlled
exposures are power densities of 5mW per square centimetre. The Diversus Air wireless power
levels are thus well within this limit and is safe for consumer use.
The Diversus air also operates under a Class License and shares the same spectrum as other users
operating with the same frequencies and thus no protection from interference is guaranteed.
Servicing
Warning: This product does not contain user serviceable parts. Servicing should only be performed by a qualified service technician.
Attention: Ce produit ne contient pas de components reparable par l’utilisateur. Le service
ne doit être fait que par un technicien qualifié.
Warnung: Dieses Produkt enthält keine verbrauchbaren Teile. Service nur durch einen
qualifizierten Fachmann.

Diversus Integrated User Guide v.01.08
Page 4 of 43 17 July 2012
Lithium Battery Warning
Warning: Danger of explosion if battery is incorrectly replaced. Replace only with the same or equivalent type as recommended by the manufacturer. Discard used batteries according to the manufacturer′s instructions.
Attention: Il y a danger d′explosion s′il y a remplacement incorrect de la batterie. Remplacer
uniquement avec une batterie du même type ou d′un type recommandé par le constructeur.
Mettre au rebute les batteries usagées conformément aux instructions du fabricant.
Warnung:: Gefahr von Explosionen wenn die Batterie falsch eingelegt wird. Ersetzen Sie
nur mit gleichen oder gleichwertigen Batterien wie vom Hersteller empfohlen. Entsorgen Sie
die Batterien wie vom Hersteller empfohlen.
Battery Disposal (Switzerland)
Refer to Annex 4.10 of SR814.013 for battery disposal.
State of California Perchlorate Material Notification
Perchlorate Material — special handling may apply.
See www.dtsc.ca.gov/hazardouswaste/perchlorate.
The lithium coin cell batteries in this product contain Perchlorate and are subject to the State of
California’s Best Management Practices (BMP) Regulations for Perchlorate Materials.
Please visit the above website for more information.
UPS Battery Warning (if applicable) UPS
Warning: To prevent an unsafe condition and to insure proper operation of the UPS feature, replace only with the same battery or an equivalent type recommended by NCR. Discard used

Diversus Integrated User Guide v.01.08
17 July 2012 Page 5 of 43
batteries according to the manufacturer’s instructions and local regulations. Please contact an authorized NCR service representative regarding battery replacement.
Power Supply Cord Used as Disconnect Means
Caution: The power supply cord is used as the main disconnect device. Ensure that the socket outlet is located/installed near the equipment and is easily accessible.
Attention: Le cordon dʹalimentation est utilisé comme interrupteur général. La prise de courant doit être située ou installée à proximité du matériel et être facile à acceder.
Environmental Consciousness
Do not discard the unit or its parts (e.g. batteries) with general household waste; recycle or
dispose in accordance with your local regulations.

Diversus Integrated User Guide v.01.08
Page 6 of 43 17 July 2012
Table of Contents
Using this Guide ........................................................................................................... 2
Certificates ................................................................................................................... 2
Warnings: ..................................................................................................................... 2
1. Introducing the Radiant Diversus POS Terminal ................................................ 8
Diversus Every‐Unit‐Item Features and Benefits ............................................................. 9
Diversus Memory Option ............................................................................................... 10
Diversus Air Integrated Options ..................................................................................... 10
Diversus Accessories ....................................................................................................... 10
Specifications .................................................................................................................. 11
2. Installing Diversus ........................................................................................... 13
Diversus Pedestal Mount option .................................................................................... 13
VESA Mounting ............................................................................................................... 15
3. Setting up the Diversus ................................................................................... 16
Diversus Network Configuration .................................................................................... 16
CableStrap™ Cable Management System ...................................................................... 16
I/O Panel ......................................................................................................................... 17
Terminal Model Number Labels ..................................................................................... 17
4. Configuring the Diversus ................................................................................. 18
Touch Screen Elements .................................................................................................. 18
Setup configuration ........................................................................................................ 20
Connecting to a network ................................................................................................ 22
Connecting to a TCP/IP network .................................................................................... 22

Diversus Integrated User Guide v.01.08
17 July 2012 Page 7 of 43
Connecting to a QuestNet network ................................................................................ 27
Connecting Peripheral Devices ....................................................................................... 27
Starting Up the Diversus ................................................................................................. 30
Shutting Down the Diversus ........................................................................................... 30
Touch Screen Calibration ................................................................................................ 30
5. Upgrading/Replacing Components .................................................................. 32
Replacing a Power Supply .............................................................................................. 32
Maintaining and replacing the internal NiMH battery ................................................... 32
6. The Diversus Integrated options...................................................................... 35
Diversus Integrated Options – Features and Specifications .......................................... 35
Barcode Scanner ............................................................................................................. 35
Built‐In Printer ................................................................................................................ 36
Wireless support ............................................................................................................. 36
Li‐Ion Batteries ................................................................................................................ 38
7. Maintenance ................................................................................................... 40
8. Hardware Certifications .................................................................................. 41

Diversus Integrated User Guide v.01.08
1. Introducing the Radiant Diversus POS Terminal
The Radiant Systems QS710 Diversus Point‐of‐Sale terminal is a member of the Quest Solution family and Quest’s first POS terminal to integrate touch screen and membrane for ultimate user operating flexibility. The terminal, utilizing the Atmel SAM9 embedded processor and Flash ROM Technology, boasts an advanced combination of innovation, speed and flexibility. With its wide operating temperature specification, low power consumption and fanless design, the Diversus is a highly reliable platform suitable for indoor and outdoor operation.
Highlights of Diversus include:
• “Instant On” technology. • Purpose built software and firmware for
POS applications, which is protected from malicious 3rd party software
• Highly flexible and easy to configure • Reliable: Low power, Fan less operation • Rated for indoor or outdoor operation • Optional Integrated Peripherals
Figure 1‐1
Among the many benefits of the Diversus is the combination of touch screen and membrane keypad functionality delivering fast and seamless operation. The color main display is a 7” active matrix color LCD with 800x480 resolution and LED backlight enabling sunlight readability with reduced power consumption. The touch interface is fast and sensitive to touch even with a gloved hand or stylus.
Included in all Diversus models are a 2x20 character customer display and an encrypted magnetic stripe reader. To avoid service interruptions, Diversus also comes equipped with a two‐hour backup internal battery.
Connectivity includes two USB 2.0 ports, two DB9 connectors, one of which can be split into two ports for RS232 peripherals, and one dedicated cash drawer port capable of supporting two cash drawers. The integrated peripherals are powered from the terminal, eliminating the need for additional power connections.
The sturdy design offers a spill resistant, high impact enclosure built to withstand tough operating conditions. The fanless design provides an extra measure of reliability, minimizing potential points of failure.
Diversus offers connectivity using QuestNet RS485 twisted pair cabling or support for TCP/IP networking on a 10/100 Base‐T Ethernet network. Using the same network plug the Terminal is capable of auto‐detecting which mode of communication is enabled. The CableStrap™ cable management system provides for ease of installation, controlled access to connectors, and concealed cable routing for better reliability.
Integrated peripheral options further extend the capability of this terminal allowing the standard configuration to be upgraded into a totally portable solution. The following enhancements can be included to tailor a solution to your needs:
Page 8 of 43 17 July 2012

Diversus Integrated User Guide v.01.08
17 July 2012 Page 9 of 43
• ABGN wireless (dual internal antenna, extended coverage, easy configuration, diversity)
• Thermal printer
• Extended power Lithium Ion batteries for up to 10 hours battery life.
Diversus Every‐Unit‐Item Features and Benefits
Hardware components Benefits
Atmel SAM9 Fast performance and very low power.
Countertop enclosure Fully integrated, low‐profile, water and tamper resistant* housing for high functional retail interaction.
7” Active Color Matrix, WVGA LCD primary display with LED backlight
Excellent brightness, contrast, and color depth. LED backlight is low power, long life and with heightened sunlight readability.
Integrated resistive touch screen controller Ease of operation makes for limited training requirements.
2 lines x 20 characters Customer display with LED backlight
Built‐in design not requiring additional connections. LED backlit offers heightened sunlight readability.
Encrypted Magnetic Stripe Reader (MSR) Integrated 3‐Track encrypted MSR for credit and loyalty cards for increased Credit Card data security.
3 serial ports (2 x DB9 powered at 5V @ 500mA or 12V @ 200mA; split‐port functionality available on port two)
Supports multiple RS‐232 peripherals and power.
Dedicated Cash Drawer Port (RJ12 24V) Provides port for direct drive cash drawers (24 Volt) Can be split to drive two drawers.
2 USB2.0 ports (2 x USB powered at 5V @ 500mA) Supports full speed and low speed USB peripheral devices.
CableStrap™ System Cable management system that uses a cable strap to secure cable connections for better reliability.
Internal battery Backup 2 hours of internal battery runtime allows keeping the terminal and the terminal‐powered peripherals operational during power outages.
Auto detect either Ethernet or QuestNet networking Supports both types of network solutions.
Secure Mounting Pedestal and VESA mounting options. In addition, you can lock the terminal with a laptop locking cable.
*While Diversus is designed to be resistant to accidental spills from the top, do not install this model in areas where it might be exposed to direct water spray.

Diversus Integrated User Guide v.01.08
Diversus Memory Option
Memory
Diversus offers two options with Memory. All units are shipped with base memory. You can order a memory expansion option which allows for greater Price Levels, PLU and Sales Storage data.
See also The Diversus Integrated Options.
Diversus Air Integrated Options
The Diversus Integrated options provide an optimal solution to those sites that depend on POS Terminal portability. See also The Diversus Integrated Options.
Diversus Accessories
Pedestal Mount Configuration
If you want to use the pedestal mount configuration of the Diversus unit, you can order a pedestal (Part # MP11905, shown below) for from the factory.
Figure 1‐2
Page 10 of 43 17 July 2012
Diversus Integrated User Guide v.01.08
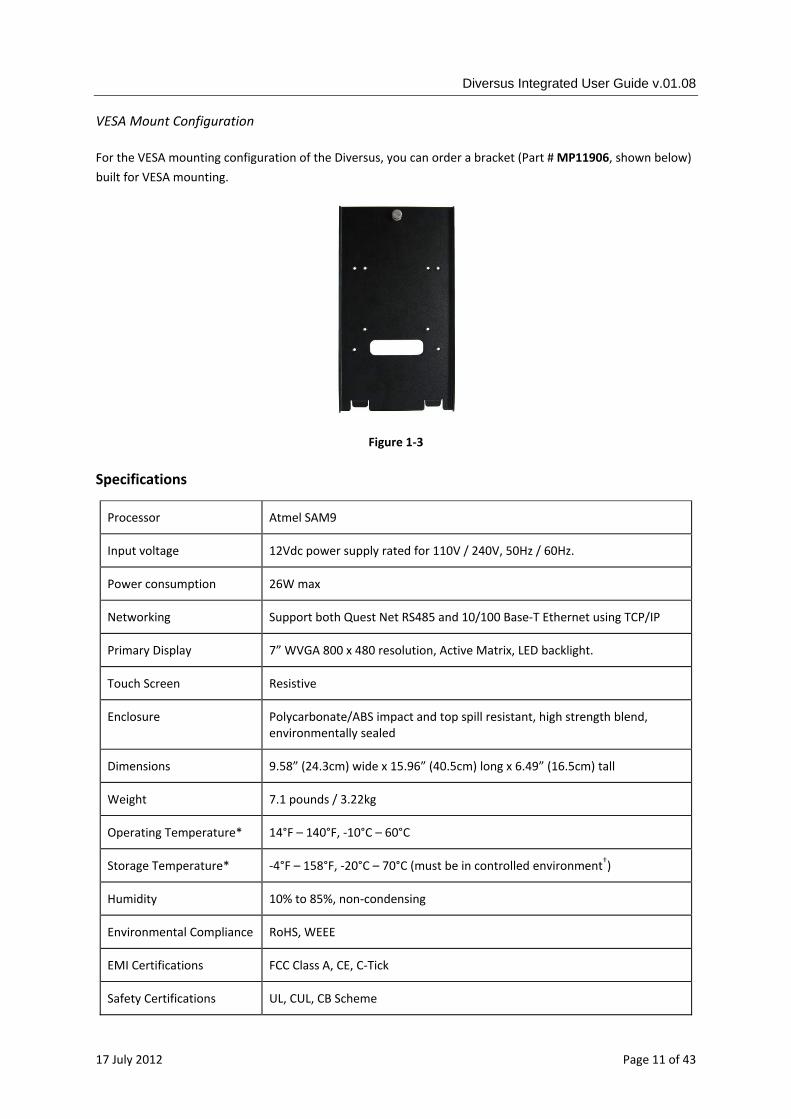
VESA Mount Configuration
For the VESA mounting configuration of the Diversus, you can order a bracket (Part # MP11906, shown below) built for VESA mounting.
Figure 1‐3
Specifications
Processor Atmel SAM9
Input voltage 12Vdc power supply rated for 110V / 240V, 50Hz / 60Hz.
Power consumption 26W max
Networking Support both Quest Net RS485 and 10/100 Base‐T Ethernet using TCP/IP
Primary Display 7” WVGA 800 x 480 resolution, Active Matrix, LED backlight.
Touch Screen Resistive
Enclosure Polycarbonate/ABS impact and top spill resistant, high strength blend, environmentally sealed
Dimensions 9.58” (24.3cm) wide x 15.96” (40.5cm) long x 6.49” (16.5cm) tall
Weight 7.1 pounds / 3.22kg
Operating Temperature* 14°F – 140°F, ‐10°C – 60°C
Storage Temperature* ‐4°F – 158°F, ‐20°C – 70°C (must be in controlled environment†)
Humidity 10% to 85%, non‐condensing
Environmental Compliance RoHS, WEEE
EMI Certifications FCC Class A, CE, C‐Tick
Safety Certifications UL, CUL, CB Scheme
17 July 2012 Page 11 of 43

Diversus Integrated User Guide v.01.08
*This product contains rechargeable batteries which will eventually require replacement. To maximize the life of these batteries avoid charging operation outside the 0°C – 45°C range, and avoid storing the product outside the ‐20°C – 45°C range. The battery powered operational range is ‐10°C – 60°C.
†The Diversus should not be stored in an environment where water could fall or condense on it, or where temperatures could fall outside of the specified Storage Temperature range.
Page 12 of 43 17 July 2012

Diversus Integrated User Guide v.01.08
2. Installing Diversus
Follow these steps to install a Diversus unit:
1. Place the Diversus unit in a point of sale area (storefront).
2. Carefully turn the terminal upside down and plug the power cord into the Mains socket of the power supply.
3. Connect the peripheral devices to the appropriate ports (see connectivity diagram below).
4. Connect the network cable to the network port.
5. Plug the power cord into the Mains socket.
6. Secure the cables using the CableStrap™.
7. Switch the unit on.
Figure 2‐1
Diversus Pedestal Mount option
What you need for pedestal mounting
To mount the Diversus terminal to the pedestal you will need:
• MP11905 pedestal
• 4 x screws to attach the pedestal to the surface (e.g. the counter top).
Figure 2‐2
17 July 2012 Page 13 of 43

Diversus Integrated User Guide v.01.08
Pedestal Mount Installation Instructions
1. Use four screws to attach the pedestal to the surface on which you want to use the Diversus unit.
2. Make sure the Mains outlet is close to the equipment and easily accessible.
3. Unplug the unit from the Mains outlet.
4. Unplug any other cables plugged into the Diversus I/O panel.
5. Route the cables through the pedestal shaft using the cable slit.
6. Latch the two mounting points on the pedestal to the corresponding grooves on the bottom of the Diversus.
7. Use the thumb screw on the pedestal to secure the Diversus unit in place.
Figure 2‐3
Special Notes about the Power Supply Cord in the Pedestal Mounting
• Bundle any excess cord and keep it inside the recess at the bottom of the unit. Do not leave the
excess cord exposed.
• Do NOT attach cord to the wall or any building structure.
• Cord must NOT pass through walls, ceilings, floors, or similar openings in the building structure.
• Route cord away from any edges that can damage the cord and use wire ties to support the cord
in its position.
Page 14 of 43 17 July 2012

Diversus Integrated User Guide v.01.08
VESA Mounting
The VESA bracket provides the VESA mounting points. If you need to purchase a VESA bracket, contact your local Radiant supplier.
Figure 2‐4
17 July 2012 Page 15 of 43

Diversus Integrated User Guide v.01.08
3. Setting up the Diversus To begin using the Diversus for your POS operations, you need to set up various peripheral components, including connecting the power source, connecting the Diversus to your network. This section outlines these setup processes.
Diversus Network Configuration
Most business configurations will require you to connect your Diversus to a network. For network details please see Section 4 “Configuring the Diversus”.
CableStrap™ Cable Management System
The CableStrap™ Cable Management System on the Diversus provides for ease of installation, controlled access to connectors, concealed cable routing, and cable restraint for better reliability.
1. Turn the unit upside down.
2. Plug cables in the input/output connectors.
3. Secure cables using CableStrap™ system.
4. Return the unit to user operating position.
Figure 3‐1
Page 16 of 43 17 July 2012

Diversus Integrated User Guide v.01.08
I/O Panel
The Diversus offers several peripheral interface options including two DB9, two USB 2.0 ports, an Ethernet socket and one dedicated cash drawer port, as shown in figure below.
1
5
6
3
42
8
7
Figure 3‐2 – Diversus I/O Panel
1‐ Power Supply Input (12Vdc)
2‐ Network (QuestNet or LAN)
3‐ Splittable Cash Drawer port
4‐ Reset button
5‐ Serial port 1 (DB9)
6‐ Serial port 2, splittable into serial port 2 and serial port 3 (DB9)
7‐ USB 2.0 port 1
8‐ USB 2.0 port 2
Terminal Model Number Labels
The QS710 / Diversus model will be labeled using the Model number (QS710 ‐xxxxK) and unique Serial number. The QS710 ‐xxxxK will identify the product configuration.
17 July 2012 Page 17 of 43

Diversus Integrated User Guide v.01.08
4. Configuring the Diversus
Touch Screen Elements
The default Diversus touch screen will display the following elements:
6
4
2
1
3
5
Figure 4‐1 – Default Touch Screen configuration
1 – Sale Window Header 2 – Sale Window 3 – Sale Window Footer 4 – Clock Panel 5 – Default Keys 6 – System Tray
Sale Window Header
The Sale Window Header can display information such as:
• Terminal ID
• Clerk
• Member
The Sale Window Header also serves as the Previous Sale key when the user needs to scroll through the sales.
Sale Window
The Sale Window displays the information relevant to the current sale: the Stock Items, their price and quantity, terminal prompts, the Table number, and other relevant information.
Page 18 of 43 17 July 2012

Diversus Integrated User Guide v.01.08
Figure 4‐2 – an example of Sale Window data
For easier identification of voided, credited and printed items, the system labels them as follows:
Green: Printed Item
Red: Credited Item, i.e. the value is negative
Orange: Voided Item
Green/Red: Credited item that has also been printed
Sale Window Footer
Depending on the settings, the Sale Window Footer can display information such as:
• Subtotal • Change • Tax amounts
The Sale Window Footer also serves as the Next Sale key when the user needs to scroll through the sales.
Clock Panel
The Clock Panel shows the current time, and also serves as a Setup key. By pressing on the Clock Panel, the user can open the Setup screen and adjust the Buzzer, LCD Backlight, Customer Display Backlight and Customer Display Contrast.
17 July 2012 Page 19 of 43

Diversus Integrated User Guide v.01.08
Default Keys
The default touch screen configuration includes five default keys:
• PAGE UP
• ITEM UP
• ITEM DOWN
• PAGE DOWN
• OK
The user, however, can configure a different set of Default Menu keys, which are fully programmable. For details please refer to the Diversus Functionality sub‐section of the POS Operations section in the back office software manual.
System Tray
This area of the display serves two purposes:
• Indication of the network connection status; and
• As a key to open the TCP/IP Settings screen.
Setup configuration
To view or edit the current setup of your Diversus terminal, press on the Clock Panel in the top right corner of the display. The system will open the setup screen.
The Diversus current Setup indication:
• Product Version
• POS Logic Version
• ROM Version
• Serial ID
• Broadcast ID
• Maintenance Date
Figure 4‐3 – the Diversus Setup Screen
Page 20 of 43 17 July 2012

Diversus Integrated User Guide v.01.08
The configurable settings are:
• Buzzer
• LCD Backlit
• Customer Display Backlit
• Customer Display Setup
To adjust a setting, highlight it by pressing on its label. Use the “+” or the “‐“ key to increase or decrease the percentage at which the setting operates.
Additionally, this screen allows you to initiate the unit calibration. For more information refer to the Touch Screen Calibration section of this document.
QWERTY and Numeric keypads
Some of the Diversus terminal functions may require data entry and will automatically open the QWERTY keypad or the numeric keypad. Additionally, you can configure a QWERTY key on the keypad, which would allow you to open the QWERTY keypad whenever you need.
From Firmware version 7‐09‐065X build 3, the text field in the QWERTY keypad scrolls across when the inputting text exceeds the maximum width of the field. For some strings (String PLUs, Barcode numbers, etc) the length of the string is limited to 16 characters. An attempt to enter more than that number will result in an error beep that sounds different from the normal beep.
From Firmware version 7‐09‐065X build 3, the Symbol key on the QWERTY keypad allows the user to toggle between the alpha‐numeric and the symbols.
Examples of such data entry may be Seat Details, Loyalty, Table Name, etc.
Figure 4‐4 – the Diversus QWERTY keypad
17 July 2012 Page 21 of 43

Diversus Integrated User Guide v.01.08
Figure 4‐5 – the Diversus numeric keypad
Connecting to a network
Diversus terminals can connect to both TCP/IP network and QuestNet. The Diversus auto detects the network type when the RJ45 cable is connected to the network.
If you need to switch between the Ethernet and QuestNet, you will have to power cycle the terminal.
Connecting to a TCP/IP network
To view or edit current TCP/IP settings press the status indicator in the System Tray. Use the ITEM UP / ITEM DOWN keys to scroll to the required setting in the list.
Diversus current TCP/IP indication
• MAC Address
• Current IP
• Current Host
• Current Gateway
• Current Netmask
Figure 4‐6 – the Diversus TCP/IP Setup Screen
Page 22 of 43 17 July 2012

Diversus Integrated User Guide v.01.08
17 July 2012 Page 23 of 43
Configurable settings:
• Static IP
• Fixed Host IP
• Gateway
• NetMask
• DNS Server
• Search for Host (ON/OFF)
• DHCP assigned (ON/OFF)
• Encryption (ON/OFF)
• SSL (ON/OFF)
To change any of the settings, touch and highlight the setting you want to change, or use the ITEM UP / ITEM DOWN keys to scroll to the setting, and press the MODIFY key. Use the numeric keypad to enter the new setting.
You can assign an IP address to your terminal either manually or by using DHCP (Dynamic Host Configuration Protocol).
To use DHCP, scroll down to the DHCP option and press MODIFY. On its next power‐up your terminal will attempt to acquire an IP address from the DHCP server.
If you wish to use the DHCP method of assigning an IP address to your terminal, disregard the instructions on configuring a Static IP as these will no longer apply.
Additionally, you can search for a Host when connected to a TCP/IP network. This feature may be useful when Communications software is running on multiple machines. If the TCP/IP terminal loses it connection with the communications software on one PC, it can attempt to connect to a back‐up Host.
Configuring the Static IP for your terminal
1. On the keypad of your terminal, press on the system tray.
2. Using the ITEM UP / ITEM DOWN keys, scroll to the Static IP setting and highlight it.
3. Press the MODIFY key.
4. Using the numeric keypad, enter the new Static IP and press OK.

Diversus Integrated User Guide v.01.08
Page 24 of 43 17 July 2012
Configuring the Fixed Host IP for your terminal
1. On the keypad of your terminal, press on the system tray.
2. Using the ITEM UP / ITEM DOWN keys, scroll to the Fixed Host IP setting and highlight it.
3. Press the MODIFY key.
4. Using the numeric keypad, enter the new Fixed Host IP and press OK.
Configuring the Backup Host IP for your terminal
1. On the keypad of your terminal, press on the system tray.
2. Using the ITEM UP / ITEM DOWN keys, scroll to the Backup Host IP setting and highlight it.
3. Press the MODIFY key.
4. Using the numeric keypad, enter the new Backup Host IP and press OK.
Configuring the Gateway of your terminal
By Default, the Gateway configured for a terminal would be the same as the Gateway configured for other units on the Local Area Network. This setting is used when the Host PC is running on a separate network, including access over the Internet.
1. On the keypad of your terminal, press on the system tray.
2. Using the ITEM UP / ITEM DOWN keys, scroll to the Gateway setting and highlight it.
3. Press the MODIFY key.
4. Using the numeric keypad, enter the new Gateway setting and press OK.
Configuring the NetMask of your terminal
This is the netmask for the site LAN. By default the subnet mask will be 255.0.0.0 but can be changed to suit the requirements of various networks. Before making any changes to this setting, please check with the System Administrator for the site.
1. On the keypad of your terminal, press on the system tray.
2. Using the ITEM UP / ITEM DOWN keys, scroll to the NetMask setting and highlight it.
3. Press the MODIFY key.
4. Using the numeric keypad, enter the new NetMask setting and press OK.

Diversus Integrated User Guide v.01.08
Configuring Encryption on your terminal
The Diversus has an encryption option that will encrypt the data transmitted between the Terminal and the Host PC. Recommended for securing date transmitted over networks.
1. On the keypad of your terminal, press on the system tray.
2. Using the ITEM UP / ITEM DOWN keys, scroll to the Encryption setting and highlight it. It would be
either On or Off.
3. To toggle the Encryption setting, touch the Encrypted line.
After configuring your terminal, it is necessary to perform a Power Cycle on the unit.
Power the unit down and back up to finalise the configuration of the settings and to re‐establish connection with the Host PC.
About the TCP/IP Connection indicators on your Terminal
The TCP/IP indicators in the System Tray of your display show the network connection status. The icons indicate the network status as follows:
Connected to host
Communicating to host
Connected to host via SSL
Communicating to host via SSL
Ethernet LAN connection exists (but not connected to host)
Communication error
TCP/IP Web Configuration
The Web Configuration screen allows you to use an Internet browser to configure the Terminal details. The Terminal must be configured for TCP/IP and plugged directly into the TCP/IP network.
17 July 2012 Page 25 of 43

Diversus Integrated User Guide v.01.08
Using the Web Configuration screen
1. Open the Internet Explorer.
2. In the address window of the browser, enter http:// immediately followed by the IP address of your
TCP/IP Terminal.
For example, http://10.0.0.64
3. The system will prompt you for a Username and Password. Enter them and press OK. By default, the
Username will be Quest (case‐sensitive) and the Password will be quest (case‐sensitive).
4. If you have logged on successfully, the browser will display the Terminal Details (Device Description, etc)
at the top of the page, and configurable fields underneath them (Local IP Configuration, etc).
5. Change the configurations as required. When you change a configuration within any section of the web
page, remember to press the Set button for this section before proceeding.
6. Press the Refresh Page button.
7. When the page reloads, check that all new configurations are in place.
Figure 4‐7
Page 26 of 43 17 July 2012

Diversus Integrated User Guide v.01.08
Connecting to a QuestNet network
To connect to the QuestNet you will need to use an ECM (Ethernet Control Module). If the terminal has a connection to the ECM, the status indicator will display a connection.
An indicator in the bottom right corner of the sale window on your Diversus shows the network connection status. The icons indicate the network status as follows:
Connected to ECM
Communicating to ECM
Connected to host via SSL
Communicating to host via SSL
LAN connection exists (but not connected to host)
Communication error with ECM
Connecting Peripheral Devices
The Diversus is compatible with standard POS Peripherals, including printers, scanners, as well as many other devices. This section of the guide covers some of the common peripherals that you may want to connect to the Diversus.
Using the USB 2.0 Ports
Peripherals that are commonly supported by the USB ports include scanners and printers. The Diversus model has two USB 2.0 connections which support Low‐speed and Full‐speed data transfer.
USB Ports are both powered and rated at 5V @ 500mA.
Using the RS‐232 Ports
Scanners and printers are the peripherals that are commonly supported by the RS‐232 ports. The RS232 ports use DB9 connectors. Depending on the H/W Handshaking setting in the back office, the DB9 are powered at:
• 5V @ 500mA each, or • 12V @ 200mA each
Serial Port 2 on the Diversus can be split into two standalone serial ports using a QQ00185 / CAB‐DPA cable available from Radiant (NA Part # QQ00185 / Aus Part # CAB‐DPA).
17 July 2012 Page 27 of 43
Diversus Integrated User Guide v.01.08
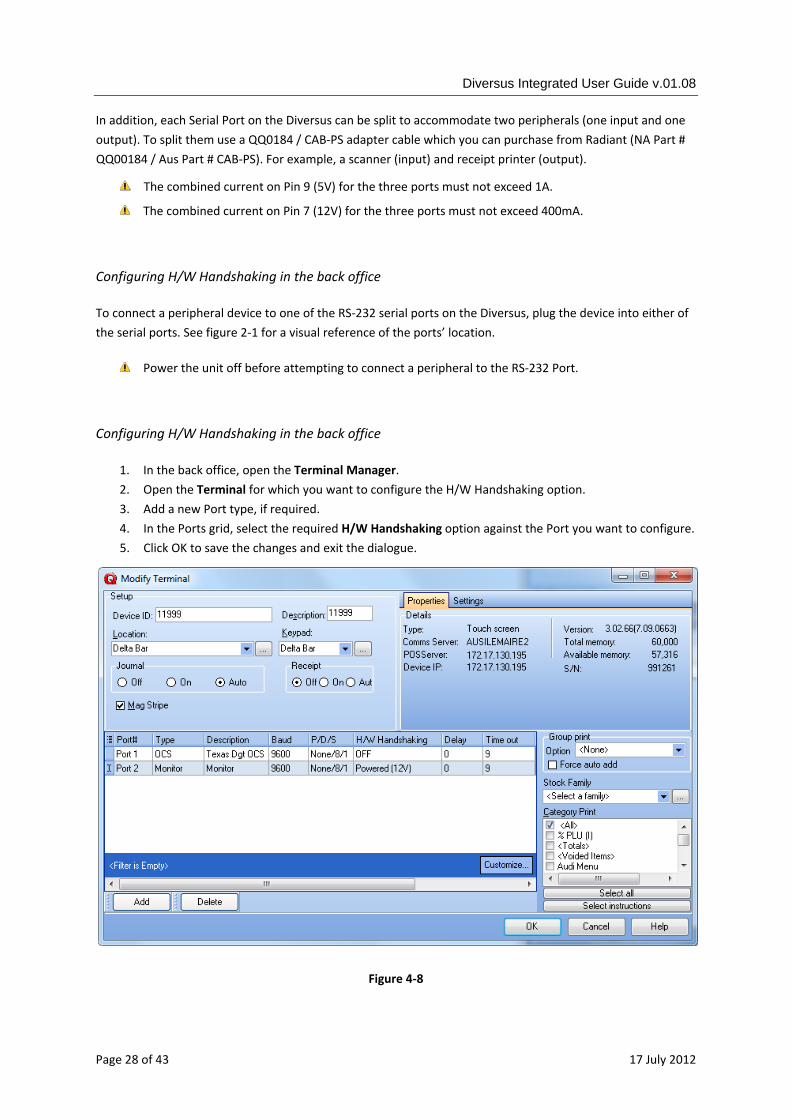
In addition, each Serial Port on the Diversus can be split to accommodate two peripherals (one input and one output). To split them use a QQ0184 / CAB‐PS adapter cable which you can purchase from Radiant (NA Part # QQ00184 / Aus Part # CAB‐PS). For example, a scanner (input) and receipt printer (output).
The combined current on Pin 9 (5V) for the three ports must not exceed 1A.
The combined current on Pin 7 (12V) for the three ports must not exceed 400mA.
Configuring H/W Handshaking in the back office
To connect a peripheral device to one of the RS‐232 serial ports on the Diversus, plug the device into either of the serial ports. See figure 2‐1 for a visual reference of the ports’ location.
Power the unit off before attempting to connect a peripheral to the RS‐232 Port.
Configuring H/W Handshaking in the back office
1. In the back office, open the Terminal Manager. 2. Open the Terminal for which you want to configure the H/W Handshaking option. 3. Add a new Port type, if required. 4. In the Ports grid, select the required H/W Handshaking option against the Port you want to configure. 5. Click OK to save the changes and exit the dialogue.
Figure 4‐8
Page 28 of 43 17 July 2012

Diversus Integrated User Guide v.01.08
17 July 2012 Page 29 of 43
RS‐232 Ports Pin Outs
DB9 Serial Port 1 Pin Out:
Pin Name Direction Description
1 NC No Connection
2 RXD1 Receive Data
3 TXD1 Transmit Data
4 NC No Connection
5 GND System Ground
6 NC No Connection
7 RTS* or 12V Request to Send or 12V power
8 CTS* Clear to Send
9 PWR 5V Power
DB9 Serial Port 2 Pin Out:
Pin Name Direction Description
1 CTS3 Clear to Send on ComPort3
2 RXD2 Receive Data
3 TXD2 Transmit Data
4 TXD3* Transmit Data
5 GND System Ground
6 RXD3* Receive Data
7 RTS2 / RTS3 or 12V Request to Send on ComPort2 / Request to Send on ComPort3 or 12V power
8 CTS2 Clear to Send on ComPort2
9 PWR 5V Power

Diversus Integrated User Guide v.01.08
Using the Direct Drive Cash Drawer (DDCD) Ports
The Diversus has one direct drive cash drawer port with RJ12 (6 pin) connectors labeled “CASH DRAWER” on the bottom I/O panel. The terminal can drive a second cash drawer using a splitter cable (NA Part # CB00675 / Aus Part # CTSPLIT), available from Radiant.
Pinout for DDCD ports
Figure 4‐9
(Orientation: looking into the connector with tab on BOTTOM, then pin 1 is on the right side):
Pin 1 – Cash Drawer 1 FIRE Pin 2 – Ground Pin 3 – Cash Drawer Detect Pin 4 – Cash Drawer 2 FIRE Pin 5 – Ground Pin 6 – Ground
Starting Up the Diversus
To start up the Diversus set the power switch to the “1” position. The unit will power up and be ready for use.
Shutting Down the Diversus
To shut down the Diversus set the power switch to the “0” position. The unit will power down safely.
Touch Screen Calibration
Radiant ships the Diversus with the resistive touch screen already calibrated. However, if calibration issues arise, we recommend that the user attempts a re‐calibration before returning the terminal.
Page 30 of 43 17 July 2012

Diversus Integrated User Guide v.01.08
17 July 2012 Page 31 of 43
There are three ways to initiate a calibration:
a. from the back office software;
b. from the terminal; or
c. by powering on the terminal.
Initiating Touch Calibration from the back office software
To initiate this feature your Diversus must be online and active in your system.
1. Right‐click on the Activity Window of the software and select the Terminal Manager option.
2. Select the Data Updates tab from the Terminal Manager dialogue box.
3. Highlight the relevant Terminal from the available terminal listing (this will activate the Calibration checkbox).
4. Flag the Calibration checkbox and click Apply or OK to send this request to the terminal.
5. Use a blunt object with a small tip (e.g. stylus) to press in the middle of every cross ( ) that appears on the Diversus screen. If the contact is not accurate the Diversus will continue to display the cross for up to 30 seconds until you press it correctly. If you don’t press it correctly within that time, the unit will revert to its original settings.
Initiating Touch Calibration from the terminal
1. To activate Touch Calibration from the terminal, press on the clock in the top right corner of the display. The setup screen will open.
2. Press the Calibration key.
3. Use a blunt object with a small tip (e.g. stylus) to press in the middle of every cross ( ) that appears on the Diversus screen. If the contact is not accurate the Diversus will continue to display the cross for up to 30 seconds until you press it correctly. If you don’t press it correctly within that time, the unit will revert to its original settings.
How to initiate Touch Calibration by powering on the terminal
1. Switch the terminal off.
2. Keep pressing on the Touch Screen while switching the terminal power back on.
3. Use a blunt object with a small tip (e.g. stylus) to press in the middle of every cross ( ) that appears on the Diversus screen. If the contact is not accurate the Diversus will continue to display the cross for up to 30 seconds until you press it correctly. If you don’t press it correctly within that time, the unit will revert to its original settings.

Diversus Integrated User Guide v.01.08
Page 32 of 43 17 July 2012
5. Upgrading/Replacing Components
Upgrading and replacing parts to be done by trained Service Personnel only!
Replacing a Power Supply
The below section describes how to upgrade or replace a power supply module.
1. Power down the unit.
2. Important: UNPLUG power cord from the Mains socket.
3. Turn the unit upside down.
4. Twist and turn the Power Supply output Connector to remove it from the I/O Panel (see Figure 3‐3).
5. Release the Power Supply from the strap.
6. Gently pull the Power Supply out of the base.
7. Install the new Power Supply into the base.
8. Secure the Power Supply in place with the strap.
9. Insert the Power Supply output connector into the power socket on the I/O Panel, and twist it in the socket to secure it.
10. Return the unit to its operating position.
11. Plug the power connector into the Mains socket.
Maintaining and replacing the internal NiMH battery
An internal NiMH battery pack comes with some Diversus models. This rechargeable internal battery will provide approximately two hours of operating power to the unit. As a general rule, rechargeable batteries deteriorate depending on the usage pattern and operating environment, and will eventually require replacement. To maximize the life of these batteries operate the product at ‐10°C – 60°C, and store it at ‐20°C – 45°C. Prolonged use or storage outside of these temperatures will reduce the internal battery life.
The optimal ambient temperature for charging operation of Ni‐MH Batteries is 0°C‐45°C. Avoid charging the batteries outside this temperature range.
Non‐operating batteries gradually discharge. To ensure maximum battery life, charge non‐operating batteries fully as per the NiMH battery recharge schedule below.

Diversus Integrated User Guide v.01.08
Storage Temperature NiMH Battery Recharge Schedule*
‐20°C to 10°C 180 Days
20°C 90 Days
30°C 40 Days
40°C 14 Days
50°C 10 Days
*The recharge period assumes beginning with a fully charged battery.
Please note that the system will not charge internal batteries unless you connect the Diversus unit to the AC Mains first. To replace the internal battery, follow the steps below.
1. Disconnect the Diversus terminal from the Mains power.
2. Turn the unit upside down.
3. Unscrew the MSR unit.
Figure 5‐1
4. Detach the MSR from the Diversus terminal.
5. Carefully unplug the old internal battery from the connector.
17 July 2012 Page 33 of 43

Diversus Integrated User Guide v.01.08
Figure 5‐2
6. Remove the old internal battery from the battery compartment.
7. Slide the new internal battery into the battery compartment.
8. Plug the internal battery connector into the socket.
9. Re‐attach the MSR to the terminal.
10. Plug the Diversus into the Mains.
11. Switch the unit on.
Page 34 of 43 17 July 2012

Diversus Integrated User Guide v.01.08
6. The Diversus Integrated options The Diversus Integrated options provide an optimal solution to those sites that depend on POS Terminal portability. The following Diversus Integrated options are available:
Diversus Integrated Options – Features and Specifications
Hardware components Benefits
2D Barcode Scanner 60fps image captures with heightened motion tolerance. Reads at any orientation. Supporting both 1D and 2D barcodes.
Built‐In 2’’ Panel Thermal printer 48mm (1.89") printing width, 384 dot positions, 16.6lps.
Wireless Support 802.11abgn, WPA and WPA2 security.
2 Rechargeable Li‐Ion Batteries 11.1VDC 8800mAh (97.7 Watt Hours) capable of supporting up to 10 hours of continuous operation.
Carrying handle A sturdy carrying handle for easy transportation.
Barcode Scanner
The 1D and 2D Barcode Scanner module (Part # XXXXXX, shown below) is located on the right hand side of the Diversus, behind the MSR unit.
Figure 6‐1
17 July 2012 Page 35 of 43

Diversus Integrated User Guide v.01.08
Built‐In Printer
The built‐in 2’’ Panel Thermal printer (Part # XXXXXX, shown below) module is located on the left hand side of the Diversus. From Firmware version 7‐09‐065X build 3, the printer powers down 5 seconds after Diversus is turned off.
From Firmware version 7‐09‐065X build 3, if the printer over‐heats, the Diversus generates an error message in the panel above the sale window. The message switches on and off in 5 second intervals.
Figure 6‐2
Wireless support
The configuration of the Diversus POS Terminal with an in‐built Wireless module is called Diversus Air. The major advantage of the Diversus Air is that it does not have to rely on hard‐wired network for operation. When the system detects the wireless card, the following wireless settings become available in the network settings. You will need to configure them in addition to configuring the network as described in Chapter 4 of this document.
From Firmware version 7‐09‐065X build 3, the Wireless powers down 5 seconds after Diversus is turned off.
To display the current wireless configuration
1. From the main screen, press the bottom‐right corner of the screen to open the TCPIP dialog.
2. In the TCPIP Settings screen, press the Wireless button.
On this screen you should see the details of the current wireless configuration.
From Firmware version 7‐09‐065X build 3, the Wireless dialogue on the Diversus displays the signal strength, details on whether the wireless module is associated to the access point, and firmware version of the wireless module.
Page 36 of 43 17 July 2012

Diversus Integrated User Guide v.01.08
Figure 6‐3
To modify any of the wireless settings
1. From the main screen, press the bottom‐right corner of the screen to open the TCPIP dialog.
2. In the “TCPIP Settings” screen, press the “Wireless” button.
3. In the “Wireless Settings” screen, press the “Modify” button.
4. In this screen you will see a scrollable list of properties that may be modified. Select the property that you wish to edit and press “Modify”.
5. Depending on the setting that is being changed, this should now open either a QWERTY keypad or selection list screen that allows you to modify your selected wireless setting. Enter the value that you wish to change the setting to, then press “OK”.
6. If more than one property needs to be changed, repeat steps 4 and 5.
7. Once all properties have been modified, press “OK”.
8. After all settings have been saved, power‐cycle the Diversus.
Figure 6‐4
17 July 2012 Page 37 of 43

Diversus Integrated User Guide v.01.08
Li‐Ion Batteries
While the internal NiMH battery pack can supply a Diversus POS Terminal for up to two hours during power outages, those sites that want to operate their Diversus on a battery during the business hours may purchase the extended Li‐Ion Battery option.
With the Li‐Ion option, your site can run the Diversus entirely from the extended battery during the business hours after recharging the extended battery overnight.
Please note that the units purchased with the Li‐Ion battery option do not include the Ni‐MH battery.
The extended battery indicator in the system tray of the display will show how much charge is remaining.
The optimal ambient temperature for charging Li‐Ion Batteries is 0°C‐45°C. Avoid charging the batteries outside this temperature range.
Non‐operating batteries gradually discharge. To ensure maximum battery life, charge non‐operating batteries fully at least every three months.
Changing extended batteries
The extended batteries will eventually require replacement. To maximize the life of these batteries avoid storing the product outside the ‐20°C – 45°C range. The battery powered operational range is ‐10°C – 60°C.
If one of the batteries needs replacing, we recommend changing both batteries. Unscrew the four screws to remove the extended battery / power supply cover as shown below.
Screws to remove:
(underneath the DC input socket cover)
Figure 6‐5
Page 38 of 43 17 July 2012

Diversus Integrated User Guide v.01.08
17 July 2012 Page 39 of 43
Charging batteries
To charge the Li‐Ion batteries plug Diversus POS Terminal into the Mains through the power cord with a 12V power that comes with the unit, and leave it plugged overnight.
You can judge the status of the charging batteries from the LEDs on the right side of the Terminal, next to the 12VDC socket. The LED indication is as follows:
Solid Red – Charging
Solid Green – Charging complete
Flashing Red – Delay charging (high temperature warning)
Alternate flashing Red then Green – Defective Extended battery Extended battery 1 Error sequence: RGRGRGR RGRGRGR Extended battery 2 Error sequence: RGRGRGRR RGRGRGRR

Diversus Integrated User Guide v.01.08
Page 40 of 43 17 July 2012
7. Maintenance
Touch Screen Cleaning: To clean the touch screen use water or any ammonia‐free glass cleaner. Apply the cleaning agent to a piece of soft cloth and wipe the screen. Never spray the touch screen with any liquid that may run down the glass and on the front bezel.
Magnetic Stripe Reader (MSR) Cleaning: Periodically, you will need to clean the MSR. You can buy pre‐saturated MSR cleaning cards from Radiant (50 per box, Part # ZZ00299). If cleaning cards are unavailable, soak a paper towel in glass cleaner, wrap a card in the paper towel, and swipe them gently through the slot.

Diversus Integrated User Guide v.01.08
8. Hardware Certifications
The certification label is located on the Diversus plastic bottom panel.
UL Certificate
A sample of the product was tested and found to be in conformity with IEC 60950-1 (ed. 2).
A sample of product was additionally evaluated to EN60950‐1 (2006) with Am. 11 (2009) to include Group and National Differences for European countries.
FCC Information
FCC ID: N6C‐SX10WAGIT
This equipment complies with Part 15 of the FCC Rules.
IC Notice
IC ID: 4908B‐SX10WAGIT
This Class B digital apparatus meets all requirements of the Canadian Interference‐Causing Regulations.
Sample of Certifications Label
Safety Warnings
17 July 2012 Page 41 of 43

Diversus Integrated User Guide v.01.08
Page 42 of 43 17 July 2012
Radio Frequency Interference Statements
Federal Communications Commission (FCC)
Information to User
This equipment has been tested and found to comply with the limits for a Class A digital device, pursuant to Part
15 of FCC Rules. These limits are designed to provide reasonable protection against harmful interference when
the equipment is operated in a commercial environment. This equipment generates, uses, and can radiate radio
frequency energy and, if not installed and used in accordance with the instruction manual, may cause harmful
interference to radio communications. Operation of this equipment in a residential area is likely to cause
interference in which case the user will be required to correct the interference at his own expense.
NCR is not responsible for any radio or television interference caused by unauthorized modification of this
equipment or the substitution or attachment of connecting cables and equipment other than those specified by
NCR. The correction of interference caused by such unauthorized modification, substitution or attachment will be
the responsibility of the user. The user is cautioned that changes or modifications not expressly approved by
NCR may void the user′s authority to operate the equipment.
Canadian Department of Communications
These digital apparatuses are Class A digital apparatuses that comply with Canadian ICES‐003. These digital
apparatuses do not exceed the Class A limits for radio noise emissions from digital apparatus set out in the Radio
Interference Regulations of the Canadian Department of Communications. Cet appareil numérique de la classe A
est conforme à la norme NMB‐003 du Canada.
Le présent appareil numérique n′émet pas de bruits radioélectriques dépassant les limites applicables aux
appareils numériques de la classe A prescrites dans le règlement sur le brouillage radioélectriques édicté par le
ministère des Communications du Canada.

Diversus Integrated User Guide v.01.08
17 July 2012 Page 43 of 43
Declaration of Conformity Manufacturer's Name NCR Corporation
Manufacturer's Address NCR Corporation
Retail Solutions Division – Atlanta
2651 Satellite Boulevard
Duluth, GA 30096‐5810
Type of Equipment Information Technology Equipment—
Point of sale Terminals
Model Number QS710-1XXX
NCR Corporation, 3097 Satellite Blvd., Duluth, GA 30096 USA, declares that the equipment
specified above conforms to the referenced EU Directives and Harmonized Standards.
EU Directive Harmonized Standard
Applicable EU Directives Harmonized Standards
EMC Directive: 2004/108/EC EN 55022: 2006/A1:2001
EN 55024: 1998 + A1:2001 + A2:2003
EN 61000-3-2:2006
EN 61000-3-3: 2008
Low Voltage Directive: 2006/95/EC EN 60950-1:2006/A1:2010
EN 60 825-1:2007
CE Mark Directive: 93/68/EEC