Embed Size (px)
Citation preview
Radware’s AppDirector and Genesys Desktop
Integration Guide v1.01
Products: Radware AppDirector Software: AppDirector version 2.11.20 Platform: On-Demand Switch VL http://www.radware.com/Products/ApplicationDelivery/AppDirector/default_TechSpec.aspx Genesys Desktop Software: Genesys Desktop Version 7.6.205.05 Platform: N/A
9/14/2010 PAGE 2 OF 56
Table of Contents
JOINT SOLUTION OVERVIEW ........................... ........................................................... 3
Purpose .............................................................................................................................. 3
Intended Audience .............................................................................................................. 3
References ......................................................................................................................... 3
Glossary and Acronyms ..................................................................................................... 4
LOAD BALANCING OVERVIEW ........................... ........................................................ 4
Methods of Load Balancing ................................................................................................ 4
Persistence ......................................................................................................................... 5
GENESYS DESKTOP AND LOAD BALANCING ................ ........................................... 7
Genesys Desktop ............................................................................................................... 9
Radware AppDirector Overview ....................................................................................... 10
APPDIRECTOR AND GENESYS DESKTOP INTEGRATION ....... ............................... 12
Diagram 1.0 – Genesys Desktop and AppDirector Validation Topology.......................... 12
Tests Conducted for Solution Validation .......................................................................... 13
Table 1.0 - Tests Conducted for Solution Validation ........................................................ 13
Deployment strategy ......................................................................................................... 13
SUBSYSTEM CONFIGURATIONS AND DEPLOYMENT NOTES ..... .......................... 14
Genesys Desktop Configuration ....................................................................................... 14
PRIMARY APPDIRECTOR CONFIGURATION ................. ........................................... 14
IP Configuration ................................................................................................................ 15
Farm Configuration ........................................................................................................... 16
Create Cache Policy ......................................................................................................... 17
Create Cache URL Exceptions Rule-Lists ....................................................................... 19
Create Layer 7 Modification Policy ................................................................................... 21
Create Compression Policy .............................................................................................. 23
Create HTTP 1.1 Policy .................................................................................................... 24
Create SSL Certificate (optional) ...................................................................................... 25
Create SSL Policy............................................................................................................. 26
Create Layer 4 Policy ....................................................................................................... 27
Configure Dynamic L7 Persistency .................................................................................. 30
Adding Servers to the Farms ............................................................................................ 31
Enabling Client NAT ......................................................................................................... 33
Health Monitoring.............................................................................................................. 34
Create the Health Monitoring Checks. ............................................................................. 35
Binding Health Checks to Servers .................................................................................... 38
GENERAL REDUNDANT CONFIGURATION NOTES ............. .................................... 39 Primary AppDirector VRRP Configuration ........................................................................ 39
Primary Virtual Routers .................................................................................................... 40
Primary Associated IP Addresses .................................................................................... 41
Primary Mirroring .............................................................................................................. 43
AUTO-GENERATE THE BACKUP APPDIRECTOR CONFIGURATION ..................... 44 Setting up basic IP connectivity on the Backup AppDirector ........................................... 44
Auto Generating the Backup Configuration from the Primary AppDirector ...................... 45
Upload the Backup Configuration file to the Backup AppDirector .................................... 47
Appendix 1 - Primary AppDirector Configuration File....................................................... 48
Appendix 2 - Backup AppDirector Configuration File ....................................................... 51
9/14/2010 PAGE 3 OF 56
Joint Solution Overview
The Radware and Genesys Desktop joint solution ensures Genesys Desktop customer’s solution resilience, efficiency and scale. Radware’s AppDirector guarantees Genesys Desktop software maximum availability, scalability, performance and security, managing traffic for Genesys services. AppDirector works in conjunction with Genesys Desktop servers to offload resource intensive processing, providing advanced health monitoring, compression, caching and encrypted traffic offload. It avoids system down time to deliver a best of breed subsystem. With a pay as you grow platform licensing model, AppDirector ensures long term investment protection facilitating incremental growth demanded by today’s Business.
This document provides a description of the integration of the Radware AppDirector with Genesys Desktop. An overview of load balancing principles and implementation details are included. This document is intended as a guide only and is not a substitute for the Radware and Genesys deployment guides. It is a supplement to be used in conjunction with the deployment guides.
Purpose
This document is a guide to configuring web server load balancing for GD using the Radware AppDirector.
Intended Audience
The document is primarily intended for technical teams tasked with deploying web server load balancing for GD. This includes, but is not limited to: systems integrators, customers, and Genesys and Radware field personnel. This document assumes that you have a basic understanding of:
• Web server concepts • Network design and operation • Your own network configurations
References
All related resources listed in the Genesys Desktop Deployment Guide and Radware AppDirector User Guide should be referenced as necessary. Consult the third party manuals for the web servers as needed.
9/14/2010 PAGE 4 OF 56
Glossary and Acronyms
Term Definition
GD Genesys Desktop
GAD Genesys Agent Desktop
GSD Genesys Supervisor Desktop
AD AppDirector
DNS Domain Name Server
VIP Virtual IP
NAT Network Address Translation
JSP JavaServer Pages
Load Balancing Overview
Load Balancing is used to optimize resource utilization and to decrease processing time. For web servers in particular, the number of web pages that can be served concurrently is limited by the network bandwidth and the performance of the web server itself.
In addition, load balancing provides a method of failover support not available when using only one web server. A load balancer monitors the server farm, thus when server failure or planned downtime occurs it will continue to balance the load across the remaining web servers left in the group. Failure of one server does not result in downtime, although it may result in longer processing times for the entire system.
Methods of Load Balancing
A load balancing solution manages the selection of the appropriate physical server in a group. This group of servers may be called a “server farm” or a “server pool”. There are three types of load balancing solutions available: software, hardware, and clustering or session replication.
Software Load Balancing
A software load balancing solution can be loaded on hardware of the user’s choice. A very simple example of a software solution would be “DNS Round Robin”. Many web servers and web application servers have load balancing functionality included. Software solutions tend to be less expensive and
9/14/2010 PAGE 5 OF 56
typically work best for smaller, less complex applications with a lower network complexity. Some software products can provide high complexity configuration and customization; however, they usually require a significant hardware base to run on.
Hardware Load Balancing
Hardware load balancers use virtual IP addresses for a group of servers and rewrite source and destination IP’s as they route traffic. There are two types of load balancing solutions that could be classified as hardware load balancers. The first is switch or router based which balances at the network level using layer 2 and 3 functionality. It is typically the most robust; however, it does not provide the ability to direct traffic based on cookies or URLs. The second type is really a software solution that is packaged with specific hardware and sold as a unit. This type of solution provides more functionality and flexibility with switching based on layers 4 through 7, but is more complicated to configure.
Radware ADC solution delivers a complete set of availability, acceleration, and security service engines that are dynamically allocated based on user demand without altering network configuration or adding devices. This unique architecture, called OnDemand, accommodates the future growth requirements of an enterprise, while offering cost-effective scalability and full protection of existing investments. It offers state-of-the-art capabilities such as: TCP multiplexing, SSL offloading, Caching, pipeline message parsing for guaranteed load granularity, Local and Global server availability, advanced Health Monitoring that optimizes CPU with predictable load factors, device redundancy with seamless failover or Layer 7 modification capabilities and Application Security.
Clustering or Session Replication
Clustering or Session Replication can be used as an alternative to hardware load balancing when sticky sessions or persistence is required. It consists of a farm or cluster of web application servers which have the ability to replicate and maintain session state in memory on all servers or using a common database. Traffic can then be directed to any server in the cluster even if persistence is required since all servers have current session state for all sessions. Clustering offers the advantage of high availability and failover support. When one server fails or is taken out of service, the other servers are still aware of session states for sessions on the failed server and are therefore able to seamlessly take over. Clustering does not in actuality replace load balancing. The traffic still has to be directed to the servers in an ordered manner by some process. However it does solve the problem of maintaining session stickiness.
Persistence
9/14/2010 PAGE 6 OF 56
Depending on how the state of a client session is managed, persistence of dynamic content may be required. This can be accomplished using a shared database, session replication in memory on the web servers as described above, or by sending all dynamic requests for a session to the same web server. If the latter option is used, it can be realized either by using source IP persistence where all requests from one client are always serviced by the same web server. Another method of achieving persistence is session persistence, where all parts of a session are identified by a unique identifier and forwarded to the same web server. There are no persistence requirements for static content.
9/14/2010 PAGE 7 OF 56
Genesys Desktop and Load Balancing
In GD, the web servers host the web applications that generate JSP pages. The clients invoking the JSP pages receive content from the web servers. The state of the client transaction is managed on the web servers. Therefore, when software or hardware load balancing is implemented, the same web server must handle all transactions that are part of the same client or agent daily activity. Otherwise, the agent could be disconnected and require to re-login.
Genesys Desktop greatly benefits from the implementation of web server load balancing. Without load balancing, the load across the servers can be widely varied over time, limiting the performance of GD.
If load balancing is used, the traffic across the web servers can be optimized. This results in consistently equal utilization of the servers’ resources, independent of an individual application’s volume of traffic and therefore increased overall system throughput.
Another advantage is Genesys Desktop complexity reduction. In order to maintain persistency between agents and GD runtime, a front-end is used. They run on Tomcat and Apache web servers respectively. Utilizing load balancers will remove the need for a front-end to do traffic dispatch and persistency while providing advanced backend health-monitoring, advanced caching, compression and SSL offload.
Pipelining
When information is required from the web servers, the browser’s agent opens a TCP connection to a web server. Instead of tearing down the connection after every request, GD leaves the connection open (HTTP 1.1), allowing for fewer delays due to the setting up and tearing down of connections and therefore resulting in better performance. Additional TCP connections are opened as dictated by load – a new connection is opened once all current connections are full. For continuous and uniform traffic, this improves efficiency. However, it introduces a level of complexity in the area of load balancing.
Due to the pipelining feature that can be activated, a “many-to-one” ratio can exist between agents’ sessions and TCP connections towards GD. The requests belonging to many sessions can be aggregated into one TCP connection that can contain requests from many agents’ sessions. Therefore, you are removing subsequent load from backend.
IP Persistence
9/14/2010 PAGE 8 OF 56
IP persistence is realized when the load balancer assigns each agent to one web server. All TCP connections from one agent will be persisted to a single web server. Since all requests for a session originate from the same agent, this ensures that all parts of a working session are served from the same web server where the state of the session is maintained.
One downside to this method of load balancing is that uneven usage of the web servers may occur. If there are three agents and two web servers, one web server will serve two of the agents and the other web server will only serve one agent. This results in one web server having twice the traffic of the other one. As well, it will never be possible, using this persistence method, to have more active web servers than agents, as each agent must be persisted to a single web server and additional web servers would not be used. Additional web servers could exist as backups, but would not be utilized until a web server failed or was removed from service.
Another negative result of this method of implementing load balancing is that a web server cannot be added dynamically to the farm or pool. Since all agents are already persisted to a web server, there are none to persist to a new web server when it is added. Unless one of the clients ceases to have traffic and becomes unstuck from its web server, allowing it to select a new web server with which to persist when traffic resumes, the web server will remain unused. Removing a web server for maintenance also poses a problem as once a web server is disabled, the load balancer will no longer send new traffic –i.e. new HTTP connections- to it. Any TCP connections from the agents previously connected to this dropped server will have to switchover and require agents to reconnect. A mechanism implemented in AppDirector called Administrative Shutdown allows to gracefully shutdown a server, keeping new agents who login away from the server required for maintenance. The conjunction of this functionality and the long living sessions required for agents using Genesys Desktop prevented us from fully using this functionality1.
Because agents represent hundreds or thousands of, they are reasonably balanced across the GD, and there are a proportionally higher number of agents than web servers, then balancing based on client IP address could be sufficient. It represents basic scenario for load balancing describes hereafter in this document. It will be further enhanced with application-based mechanism.
1 When agent initially logins to GD, his session gets linked to the server elected by AppDirector. All further activities need to reach the same server, reusing the same HTTP/TCP connection or not. Because the initial HTTP/TCP connections don’t last forever –network and browsers’ optimizations actually try to limit their duration- AppDirector will distribute new connections to any other server when user’s session server is administrative down, breaking the agent’s session. A future release of AppDirector will introduce a new parameter to allow keeping existing sessions –currently existing connections- on administratively shutdown servers.
9/14/2010 PAGE 9 OF 56
Session Persistence
The optimal load balancing mode for GD involves agents’ persistence across multiple sessions or connections. Instead of balancing the individual client session as discrete units by assigning them a web server, each agent should be load balanced.
Session persistence is executed as follows. As each web application request reaches the load balancing interface, it is examined for a unique ID. Tomcat implements the JSessionID. The packet is then routed to a web server based on this information. If the packet is the first in a string of requests from a call it will not have an identifier and a web server is chosen according to the load balancing solution’s algorithm. The web server will assign a unique identifier to the session and on the return answer from the web server, the load balancer will store this unique identifier in a dynamic table along with the web server that the session was sent to. Alternatively, if the unique identifier exists, the dynamic table is accessed to determine the web server that it should be sent to and the packet is forwarded to that web server. All web application requests for a single call session are sent to the same web server. The static requests will not contain a unique identifier and will always be load balanced according to the selected load balancing algorithm.
The downside to this method of load balancing is that opening and examining every packet increases overhead and can cause performance issues and delays. This latency that is introduced may be able to be minimized with proper optimization of the load balancing solution.
Session persistence is however required (versus IP persistence) when agents do not appear as individual IPs, typically in NATted environments where agents connect to GD via long ride network that hide agents source IPs behind one or multiple source IPs. Application-based information is then required to identify and persist agents’ sessions to the proper GD servers.
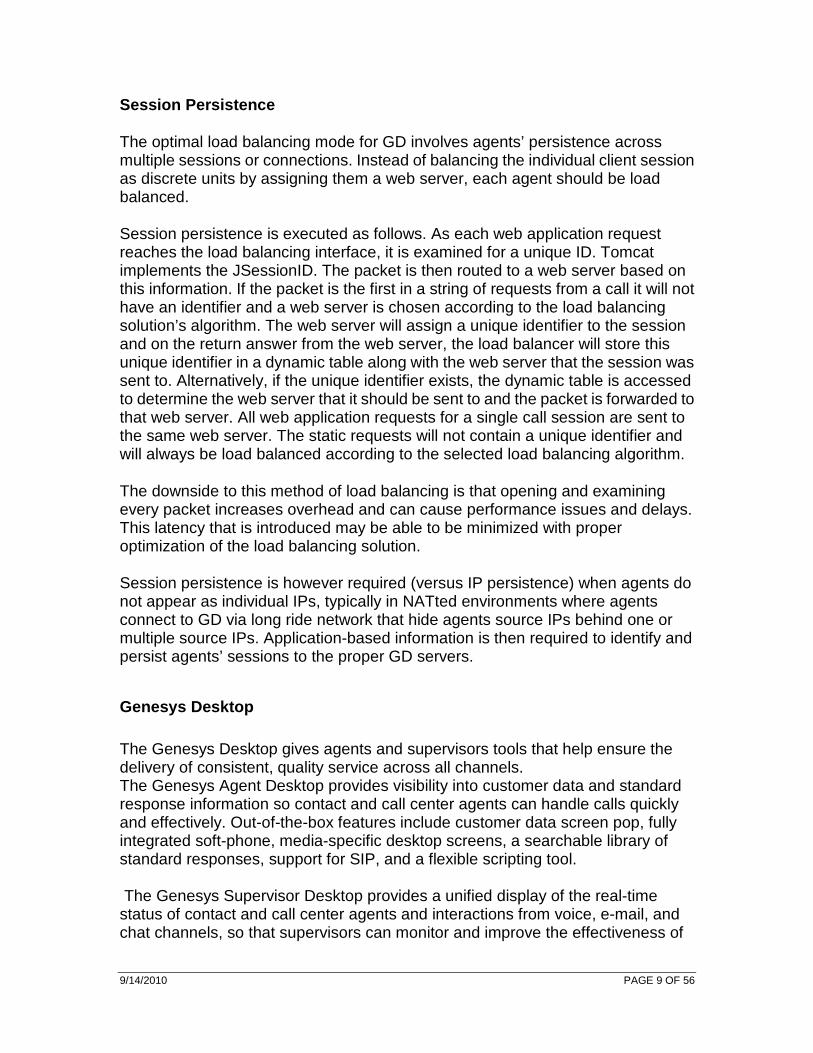
Genesys Desktop
The Genesys Desktop gives agents and supervisors tools that help ensure the delivery of consistent, quality service across all channels. The Genesys Agent Desktop provides visibility into customer data and standard response information so contact and call center agents can handle calls quickly and effectively. Out-of-the-box features include customer data screen pop, fully integrated soft-phone, media-specific desktop screens, a searchable library of standard responses, support for SIP, and a flexible scripting tool. The Genesys Supervisor Desktop provides a unified display of the real-time status of contact and call center agents and interactions from voice, e-mail, and chat channels, so that supervisors can monitor and improve the effectiveness of
9/14/2010 PAGE 10 OF 56
agents and the contact center. It also allows contact and call center planners to test hypothetical agent skill combinations, working rules, and skill prioritization without affecting current configurations or schedules.
Advantages:
• Enables a new level of strategic planning • Improves agent efficiency and effectiveness across all channels, with a
minimum of training • Presents real-time customer data for all interactions • Simplifies queue management and provides a view into agent productivity
and quality • Provides alerts and tools for dealing with changing contact center
conditions • Enables increased revenues through automatic launch of appropriate
cross-sell and up-sell scripts For more information, visit: http://www.genesyslab.com/products/genesys_desktop
Radware AppDirector Overview
Radware’s AppDirector is an intelligent application delivery controller (ADC) that provides scalability and application-level security for service infrastructure optimization, fault tolerance and redundancy. Radware combined its next-generation, OnDemand Switch multi-gigabit hardware platform with the powerful capabilities of the company’s APSolute™ operating system “classifier” and “flow management” engine. The result – AppDirector – enables accelerated application performance; local and global server availability; and application security and infrastructure scalability for fast, reliable and secure delivery of applications over IP networks.

9/14/2010 PAGE 11 OF 56
AppDirector is powered by the innovative OnDemand Switch platform. OnDemand Switch, which has established a new price/performance standard in the industry, delivers breakthrough performance and superior scalability to meet evolving network and business requirements. Based on its on demand, “pay-as-you-grow” approach, no forklift upgrade is required even when new business requirements arise. This helps companies guarantee short-term and long-term savings on CAPEX and OPEX for full investment protection. Radware’s OnDemand Switch enables customers to pay for the exact capacity currently required, while allowing them to scale their ADC throughput capacity and add advanced application-aware services or application acceleration services on demand to meet new or changing application and infrastructure needs. And it does it without compromising on performance. AppDirector lets you get the most out of your service investments by maximizing the utilization of service infrastructure resources and enabling seamless consolidation and high scalability. AppDirector’s throughput licensing options allows pay as you grow investment protection. Make your network adaptive and more responsive to your dynamic services and business needs with AppDirector’s fully integrated traffic classification and flow management, health monitoring and failure bypassing, traffic redirection, bandwidth management, intrusion prevention and DoS protection.
For more information, please visit: http://www.radware.com/
9/14/2010 PAGE 12 OF 56
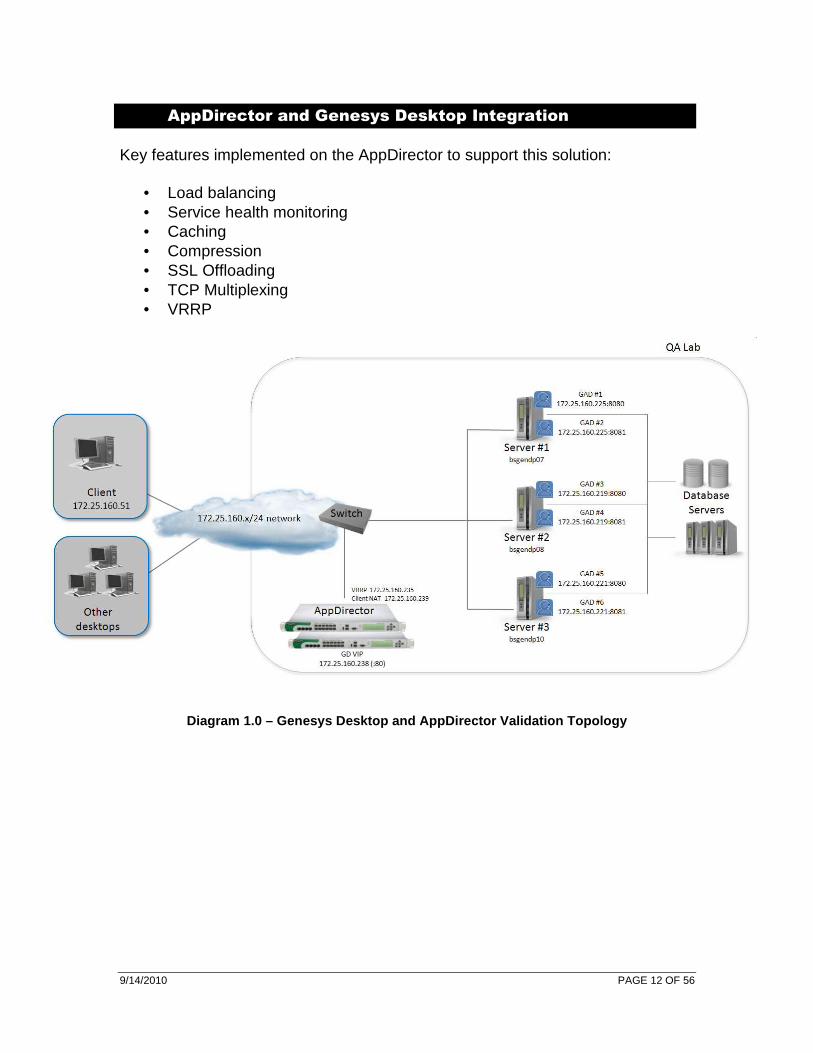
AppDirector and Genesys Desktop Integration
Key features implemented on the AppDirector to support this solution:
• Load balancing • Service health monitoring • Caching • Compression • SSL Offloading • TCP Multiplexing • VRRP
Diagram 1.0 – Genesys Desktop and AppDirector Valid ation Topology
9/14/2010 PAGE 13 OF 56
Tests Conducted for Solution Validation
The following tests were conducted to ensure the most appropriate solution was defined and validated. All tests were successfully completed using the AppDirector and Genesys Desktop configurations following Table 1.0.
Load Distribution Tests
Test Case Status
Genesys Desktop Traffic Management (Load-balancing) Pass
Genesys Desktop Frontend bypass (optimization) Pass
Genesys Desktop Application Health Monitoring Pass
Load-balancing with
• Multiplexing • SSL Offloading
• Caching • Compression
Pass Pass
Pass Pass
Genesys Desktop multi-browser access Pass1
1 For Safari, we need to remove compression for multipart responses (multipart/x-mixed-replace)
Failover Tests
Test Case Status
Genesys Desktop Multiple Server Failover Pass
AppDirector Failover and Session State Mirroring Pass
AppDirector Master cable disconnection Pass
Table 1.0 - Tests Conducted for Solution Validation
Deployment strategy
Diagram 1.0 is a depiction of the recommended deployment model, known as the ‘one-leg’ or ‘one-arm’ design. It provides the following advantages:
1. Flawless integration: easy integration/removal from transaction path; no need for subnet creation; no changes in IP both for clients and servers
2. Easy support: servers remain directly accessible from clients, thus simplifying network troubleshooting
Even though Client NAT is required with one-leg design, AppDirector will preserve client persistency even if clients are already NATted when reaching AppDirector. Indeed load-balancing mechanism uses L7 policies looking for information contained in HTTP cookies in order to send all client connections to the same

9/14/2010 PAGE 14 OF 56
Genesys Desktop instance. Another deployment strategy would be to have AppDirector inserted directly between clients and servers, sandwiched between multiple switches. This topology requires 2 subnets, 1 between clients and pair of AppDirector and 1 between AppDirectors and servers. The choice between these 2 deployment strategies depend on whether existing networking or architect preferences. The same policies, Virtual IPs, services definition remain usable. Performances for both solutions remain the same.
Subsystem Configurations and Deployment Notes
The deployment notes section is meant to focus on the modification for Radware and Genesys Desktop deviations from default settings. Where not specifically stated please follow normal installation instructions of the system.
Genesys Desktop Configuration
Default settings from Genesys QA Lab were used for the Genesys Desktop installation. 6 instances of Genesys Desktop (GAD1, GAD2, GAD3, GAD4, GAD5 and GAD6) running on 3 different hosts (bsgendp07, bsgendp08 and bsgendp10) were used during the tests. 2 instances of Genesys Desktop were running on each physical host, listening on ports 8080 and 8081. The primary objective of the tests campaign has been to remove Apache listening on port 80 and behaving as a front-end for Genesys Desktop runtime executed on Tomcat servers, represented by GAD1:8080, GAD2:8081, GAD3:8080, etc.
Primary AppDirector Configuration
Using a serial cable and a terminal emulation program, connect to the AppDirector.
The default console port settings are:
• Bits per Second: 19200 • Data Bits: 8 • Parity: None • Stop Bits: 1 • Flow Control: None
1. Using the following Command line, assign IP address 172.25.160.226/24 to
9/14/2010 PAGE 15 OF 56
interface G-1 of the AppDirector:
net ip-interface create 172.25.160.226 255.255.255. 0 G-1 –pa 172.25.160.227
Note : Dedicated management interfaces are available on the AppDirector and should be used in best practice designs. For the sake of address consolidation, the production interface is also used for management in the validation testing design. To reference the dedicated management interface replace G-1 with MNG-1 or MNG-2. The switch value “-pa” represents the peer IP address used in auto creation of the backup/peer configuration file.
2. Create a default gateway route entry on the AppDirector:
net route table create 0.0.0.0 0.0.0.0 172.25.160. 1 -i 1
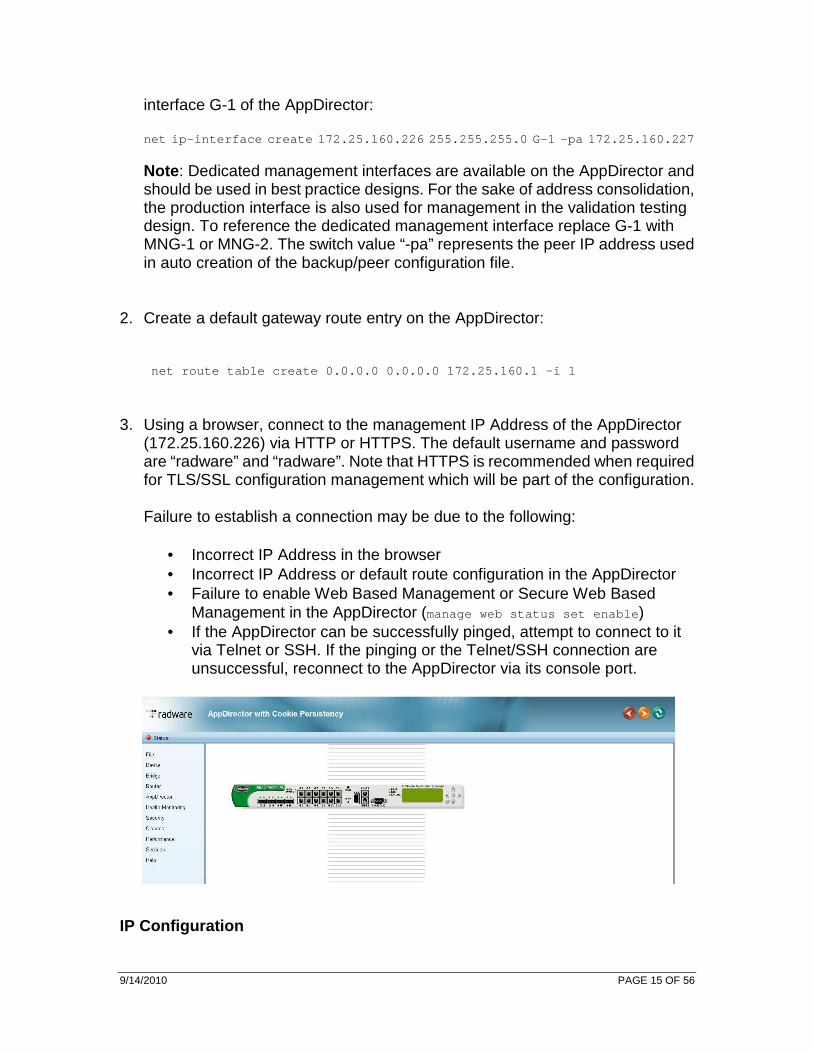
3. Using a browser, connect to the management IP Address of the AppDirector (172.25.160.226) via HTTP or HTTPS. The default username and password are “radware” and “radware”. Note that HTTPS is recommended when required for TLS/SSL configuration management which will be part of the configuration.
Failure to establish a connection may be due to the following:
• Incorrect IP Address in the browser • Incorrect IP Address or default route configuration in the AppDirector • Failure to enable Web Based Management or Secure Web Based
Management in the AppDirector (manage web status set enable ) • If the AppDirector can be successfully pinged, attempt to connect to it
via Telnet or SSH. If the pinging or the Telnet/SSH connection are unsuccessful, reconnect to the AppDirector via its console port.
IP Configuration
9/14/2010 PAGE 16 OF 56
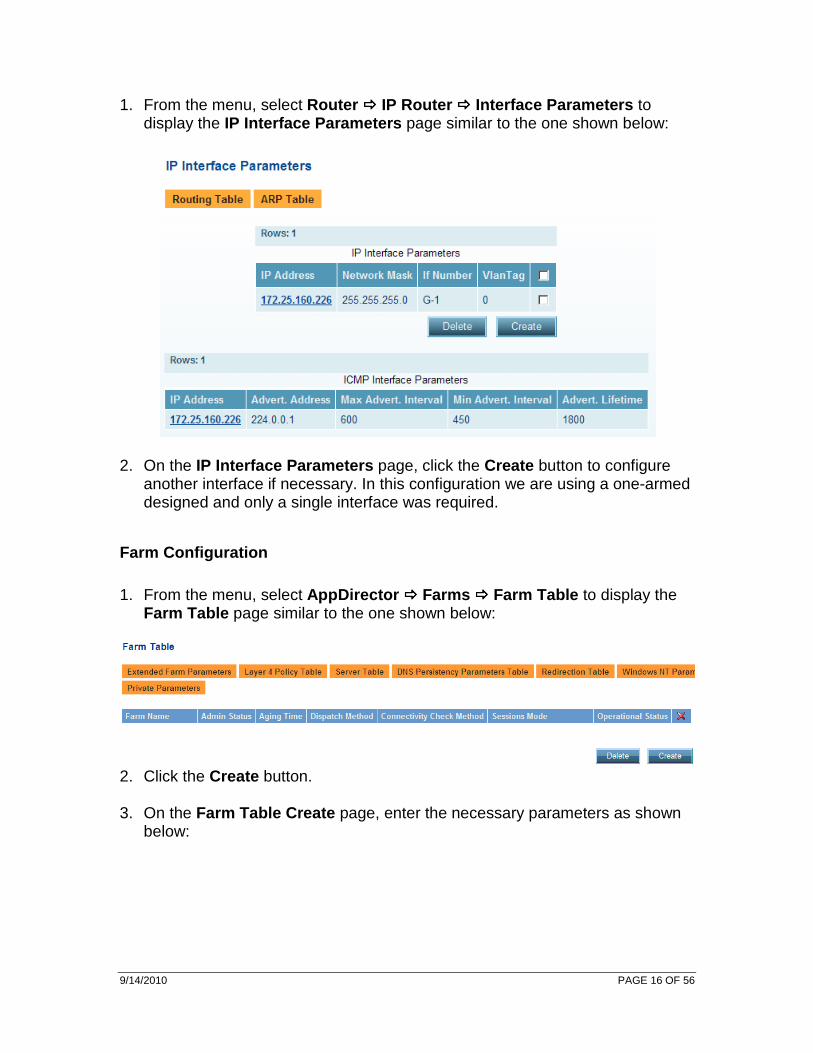
1. From the menu, select Router ���� IP Router ���� Interface Parameters to display the IP Interface Parameters page similar to the one shown below:
2. On the IP Interface Parameters page, click the Create button to configure another interface if necessary. In this configuration we are using a one-armed designed and only a single interface was required.
Farm Configuration
1. From the menu, select AppDirector ���� Farms ���� Farm Table to display the Farm Table page similar to the one shown below:
2. Click the Create button. 3. On the Farm Table Create page, enter the necessary parameters as shown
below:
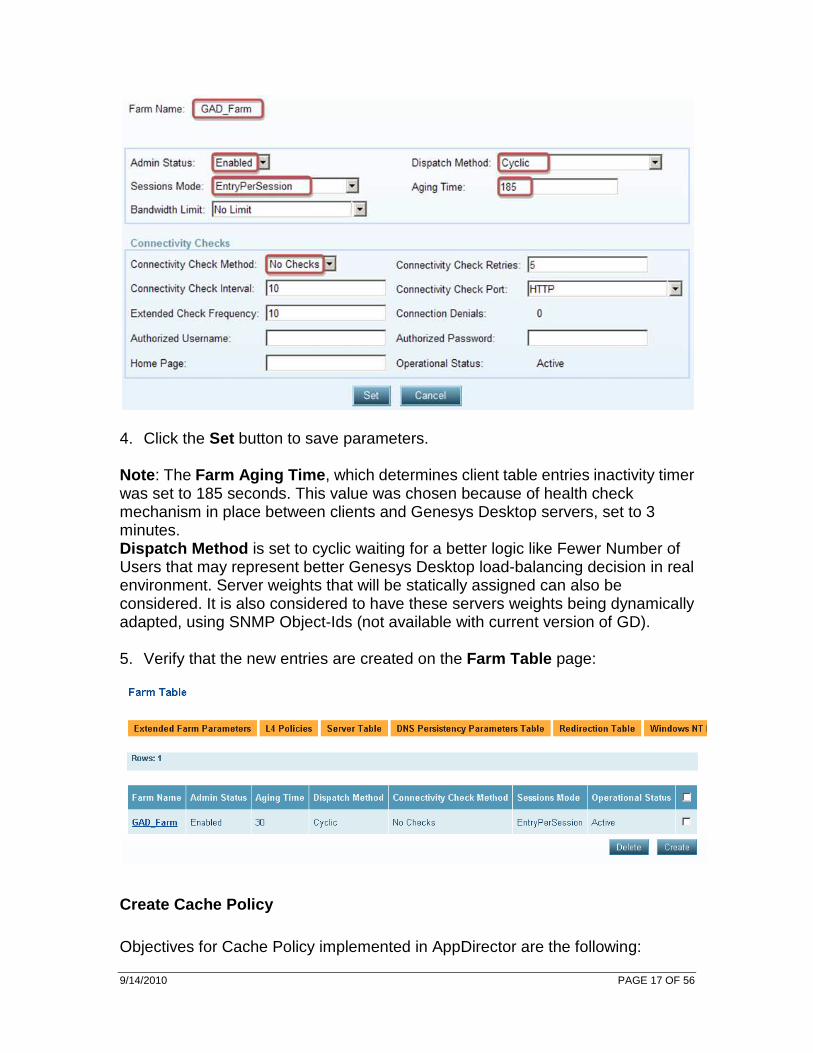
9/14/2010 PAGE 17 OF 56
4. Click the Set button to save parameters. Note : The Farm Aging Time , which determines client table entries inactivity timer was set to 185 seconds. This value was chosen because of health check mechanism in place between clients and Genesys Desktop servers, set to 3 minutes. Dispatch Method is set to cyclic waiting for a better logic like Fewer Number of Users that may represent better Genesys Desktop load-balancing decision in real environment. Server weights that will be statically assigned can also be considered. It is also considered to have these servers weights being dynamically adapted, using SNMP Object-Ids (not available with current version of GD). 5. Verify that the new entries are created on the Farm Table page:
Create Cache Policy
Objectives for Cache Policy implemented in AppDirector are the following:
9/14/2010 PAGE 18 OF 56
1. Remove Apache as a front-end for Tomcat servers delivering cached objects
2. Cache static contents from Tomcat (pictures and scripts) 3. Remove hits and load from Tomcat 4. Manage cached objects cache header to force client browser to use their
local cache to limit bandwidth consumed between clients and GD servers’ location
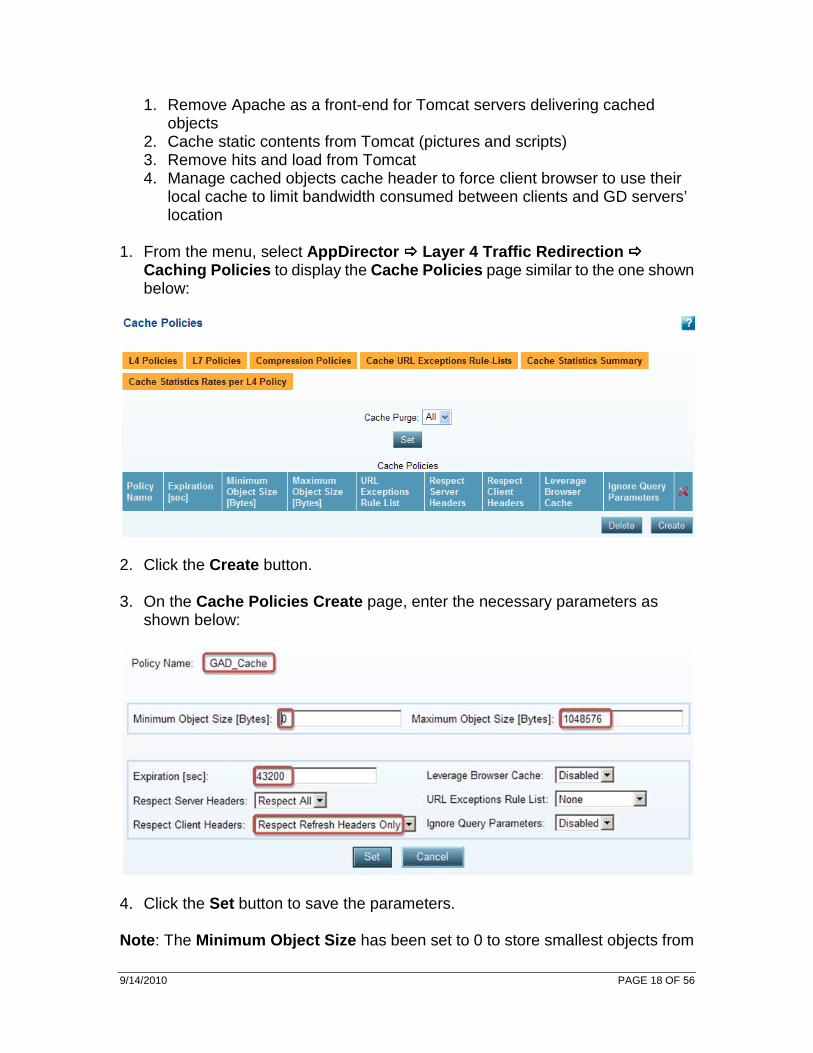
1. From the menu, select AppDirector ���� Layer 4 Traffic Redirection ����
Caching Policies to display the Cache Policies page similar to the one shown below:
2. Click the Create button. 3. On the Cache Policies Create page, enter the necessary parameters as
shown below:
4. Click the Set button to save the parameters. Note : The Minimum Object Size has been set to 0 to store smallest objects from
9/14/2010 PAGE 19 OF 56
hitting Tomcat server to remove hits and load associated with transaction. Maximum Object Size should be increased to match biggest objects to cache. Caching space is approximately 600MB and should easily match volume of objects from Genesys Desktop to be cached. Caching space can be seen and tuned in AppDirector, with a current maximum of approximately 1.5GB. Expiration has been changed to 12h to reflect previous settings from Apache. Respect Client Headers has been changed from Respect All to Respect Refresh Headers Only in order to remove unnecessary load on Tomcat under If-Modified-Since – and like – headers coming from client browser. In some occasions and versions of browsers, even if they contain a cached version of required objects, browsers continue sending GET requests to web servers with If-Modified-Since header. These requests should fly through cache servers, like AppDirector does. When reaching web server, it compares date provided in If-Modified-Since header with date of local object. If older or same, it replies with 304 Unmodified. Under such configuration, AppDirector avoids these requests from hitting Tomcat to remove unnecessary network connections establishment, processing and checking. AppDirector still respects Max-age=0, No-Cache and Pragma=no-cache instructions.
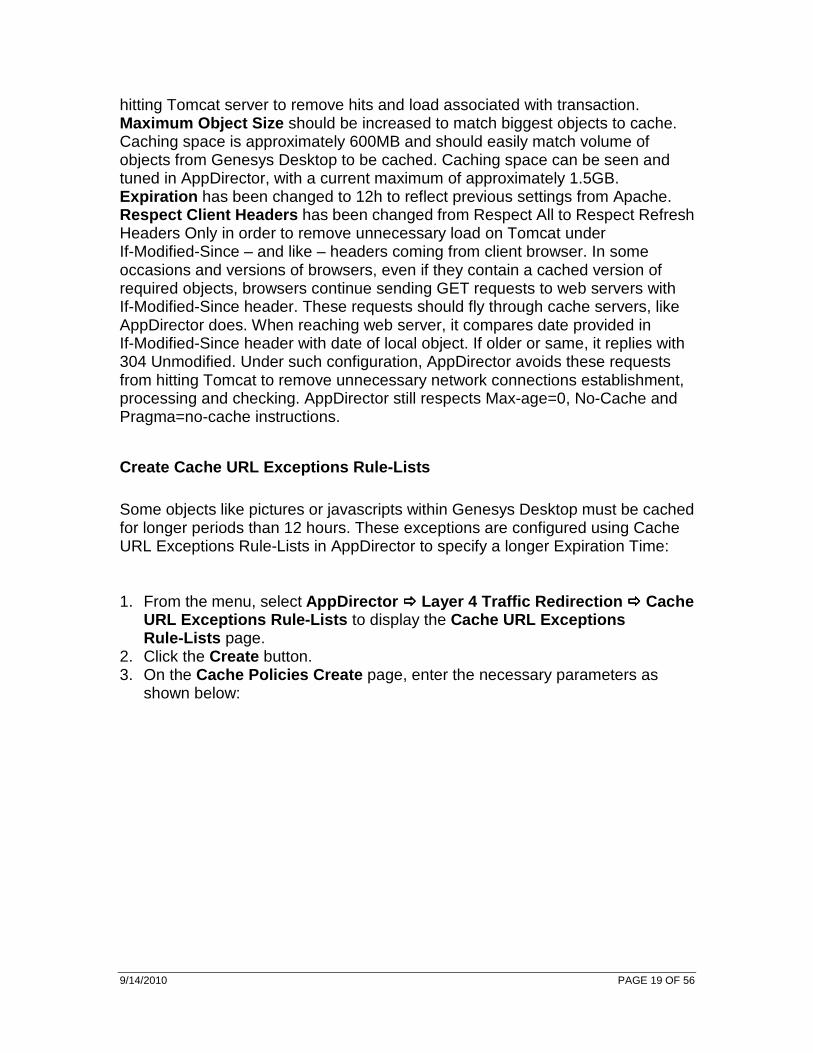
Create Cache URL Exceptions Rule-Lists
Some objects like pictures or javascripts within Genesys Desktop must be cached for longer periods than 12 hours. These exceptions are configured using Cache URL Exceptions Rule-Lists in AppDirector to specify a longer Expiration Time:
1. From the menu, select AppDirector ���� Layer 4 Traffic Redirection ���� Cache URL Exceptions Rule-Lists to display the Cache URL Exceptions Rule-Lists page.
2. Click the Create button. 3. On the Cache Policies Create page, enter the necessary parameters as
shown below:
9/14/2010
4. Click the Set button to save 5. Click the Create button.6. On the Cache Policies Create
shown below:
button to save the parameters. button.
Cache Policies Create page, enter the necessary parameters as
PAGE 20 OF 56
page, enter the necessary parameters as
9/14/2010
7. Click the Set button to save 8. Verify that the new entries
Rule-Lists page:
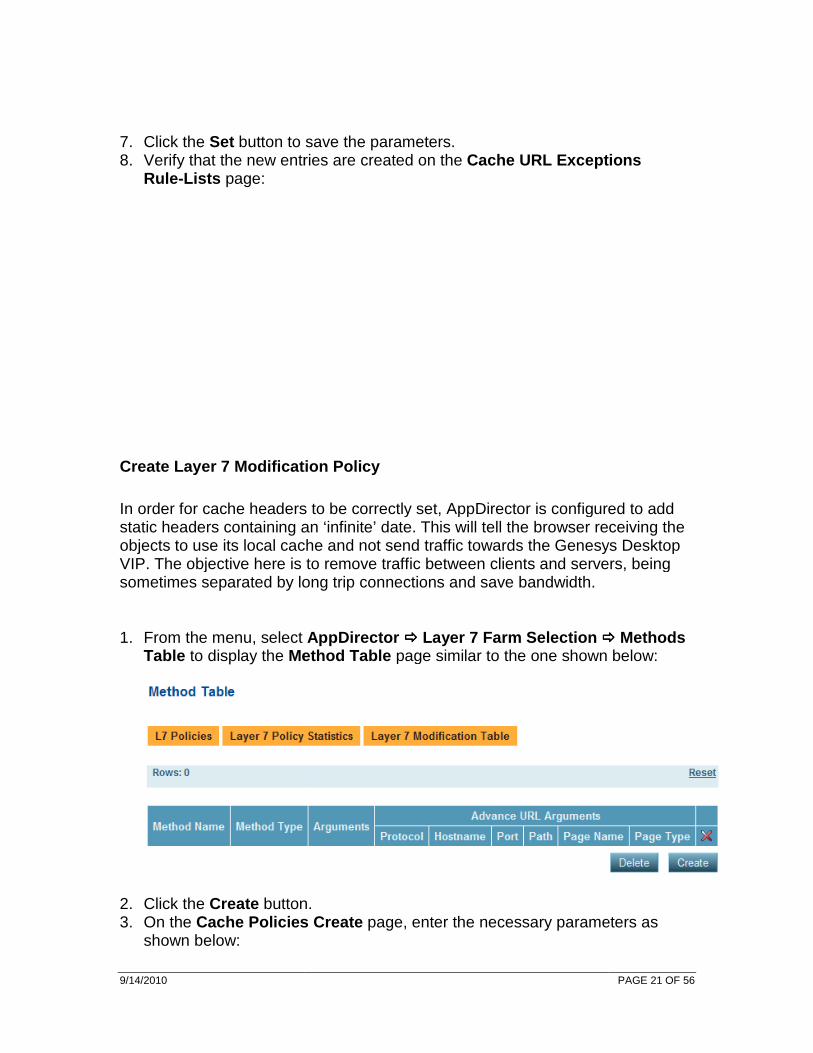
Create Layer 7 Modification Policy
In order for cache headers to be correctly set, AppDirector is configured to add static headers containing an ‘infinite’ date. This wiobjects to use its local cache and not send traffic towards the Genesys Desktop VIP. The objective here is to remove traffic between clients and servers, being sometimes separated by long trip connections and save bandwidt
1. From the menu, select Table to display the Method Table
2. Click the Create button.3. On the Cache Policies Create
shown below:
button to save the parameters. Verify that the new entries are created on the Cache URL Exceptions
Create Layer 7 Modification Policy
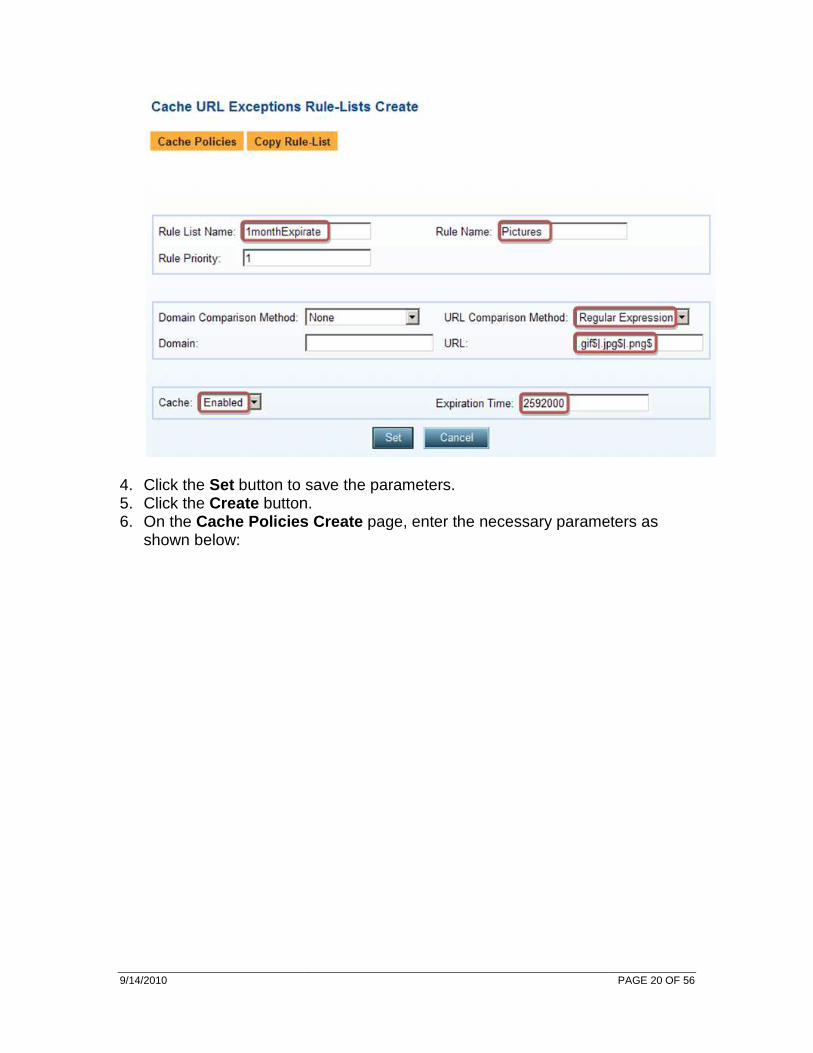
In order for cache headers to be correctly set, AppDirector is configured to add static headers containing an ‘infinite’ date. This will tell the browser receiving the objects to use its local cache and not send traffic towards the Genesys Desktop VIP. The objective here is to remove traffic between clients and servers, being sometimes separated by long trip connections and save bandwidth.
From the menu, select AppDirector ���� Layer 7 Farm Selection ����
Method Table page similar to the one shown below:
button. Cache Policies Create page, enter the necessary parameters as
PAGE 21 OF 56
Cache URL Exceptions
In order for cache headers to be correctly set, AppDirector is configured to add ll tell the browser receiving the
objects to use its local cache and not send traffic towards the Genesys Desktop VIP. The objective here is to remove traffic between clients and servers, being
���� Methods page similar to the one shown below:
page, enter the necessary parameters as

9/14/2010 PAGE 22 OF 56
4. Click on the Arguments button, enter the necessary parameters as shown below:
5. Click the Set button twice to save the parameters. 6. Verify that the new entry is created on the Method Table page:
7. From the menu, select AppDirector ���� Layer 7 Modification ���� Rules to display the Layer 7 Modification Table page similar to the one shown below:
9/14/2010 PAGE 23 OF 56
8. Click the Create button. 9. On the Layer 7 Modification Table Create page, enter the necessary
parameters as shown below:
10. Click the Set button to save the parameters.
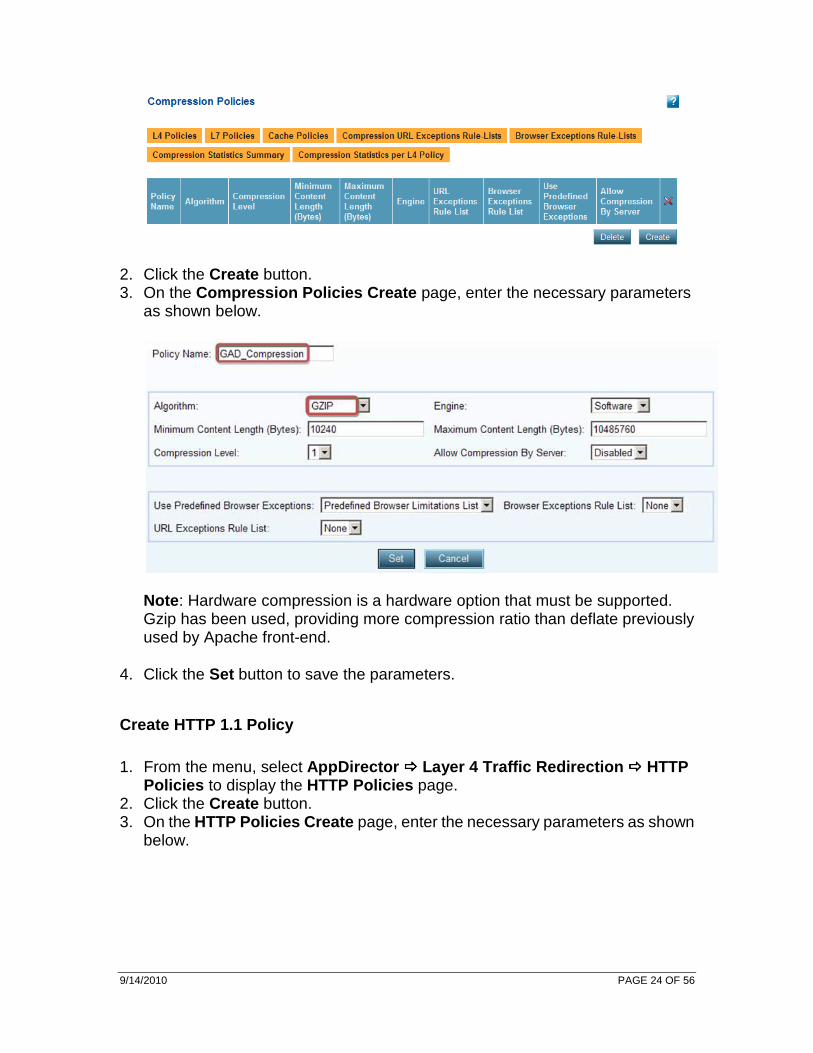
Create Compression Policy
1. From the menu, select AppDirector ���� Layer 4 Traffic Redirection ���� Compression Policies to display the Compression Policies page similar to the one shown below:
9/14/2010 PAGE 24 OF 56
2. Click the Create button. 3. On the Compression Policies Create page, enter the necessary parameters
as shown below.
Note : Hardware compression is a hardware option that must be supported. Gzip has been used, providing more compression ratio than deflate previously used by Apache front-end.
4. Click the Set button to save the parameters.
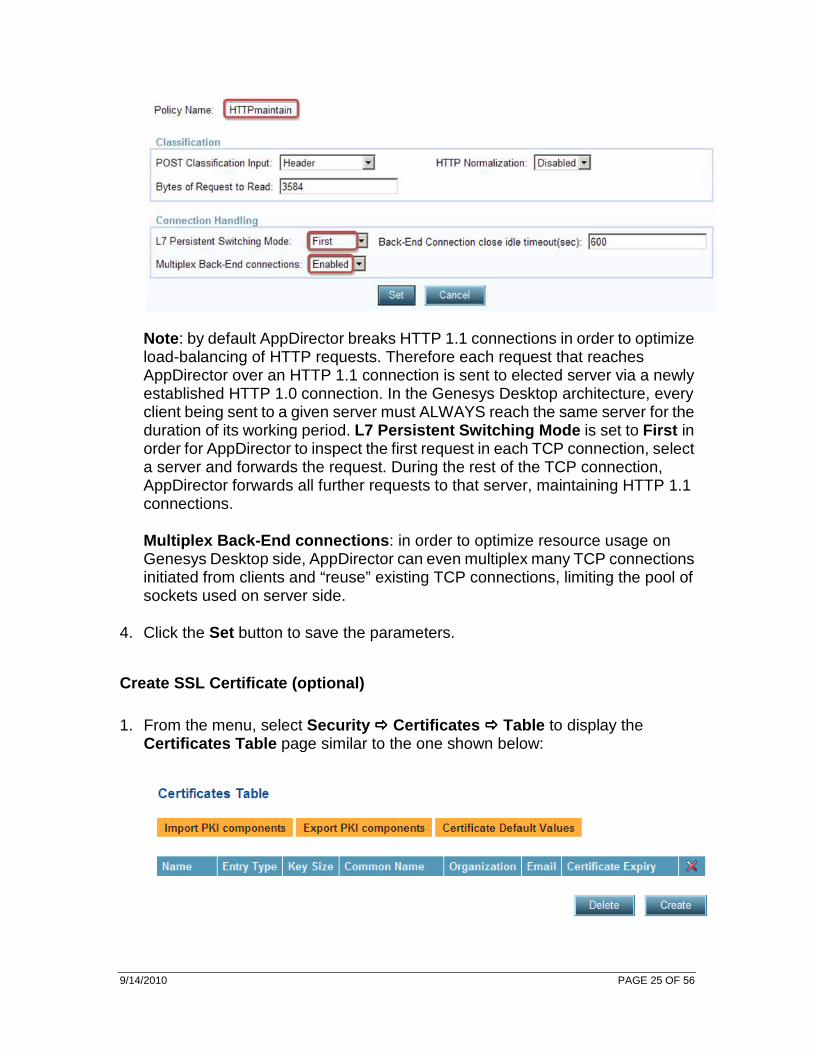
Create HTTP 1.1 Policy
1. From the menu, select AppDirector ���� Layer 4 Traffic Redirection ���� HTTP Policies to display the HTTP Policies page.
2. Click the Create button. 3. On the HTTP Policies Create page, enter the necessary parameters as shown
below.
9/14/2010 PAGE 25 OF 56
Note : by default AppDirector breaks HTTP 1.1 connections in order to optimize load-balancing of HTTP requests. Therefore each request that reaches AppDirector over an HTTP 1.1 connection is sent to elected server via a newly established HTTP 1.0 connection. In the Genesys Desktop architecture, every client being sent to a given server must ALWAYS reach the same server for the duration of its working period. L7 Persistent Switching Mode is set to First in order for AppDirector to inspect the first request in each TCP connection, select a server and forwards the request. During the rest of the TCP connection, AppDirector forwards all further requests to that server, maintaining HTTP 1.1 connections.
Multiplex Back-End connections : in order to optimize resource usage on Genesys Desktop side, AppDirector can even multiplex many TCP connections initiated from clients and “reuse” existing TCP connections, limiting the pool of sockets used on server side.
4. Click the Set button to save the parameters.
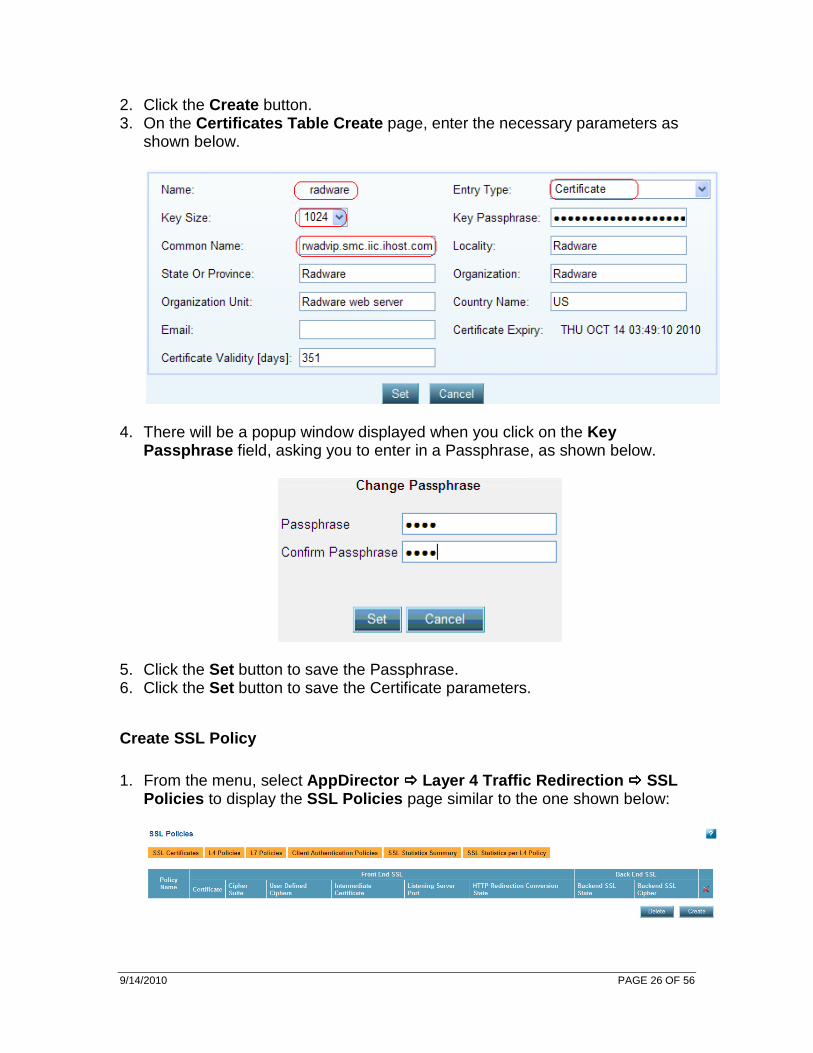
Create SSL Certificate (optional)
1. From the menu, select Security ���� Certificates ���� Table to display the Certificates Table page similar to the one shown below:
9/14/2010 PAGE 26 OF 56
2. Click the Create button. 3. On the Certificates Table Create page, enter the necessary parameters as
shown below.
4. There will be a popup window displayed when you click on the Key Passphrase field, asking you to enter in a Passphrase, as shown below.
5. Click the Set button to save the Passphrase. 6. Click the Set button to save the Certificate parameters.
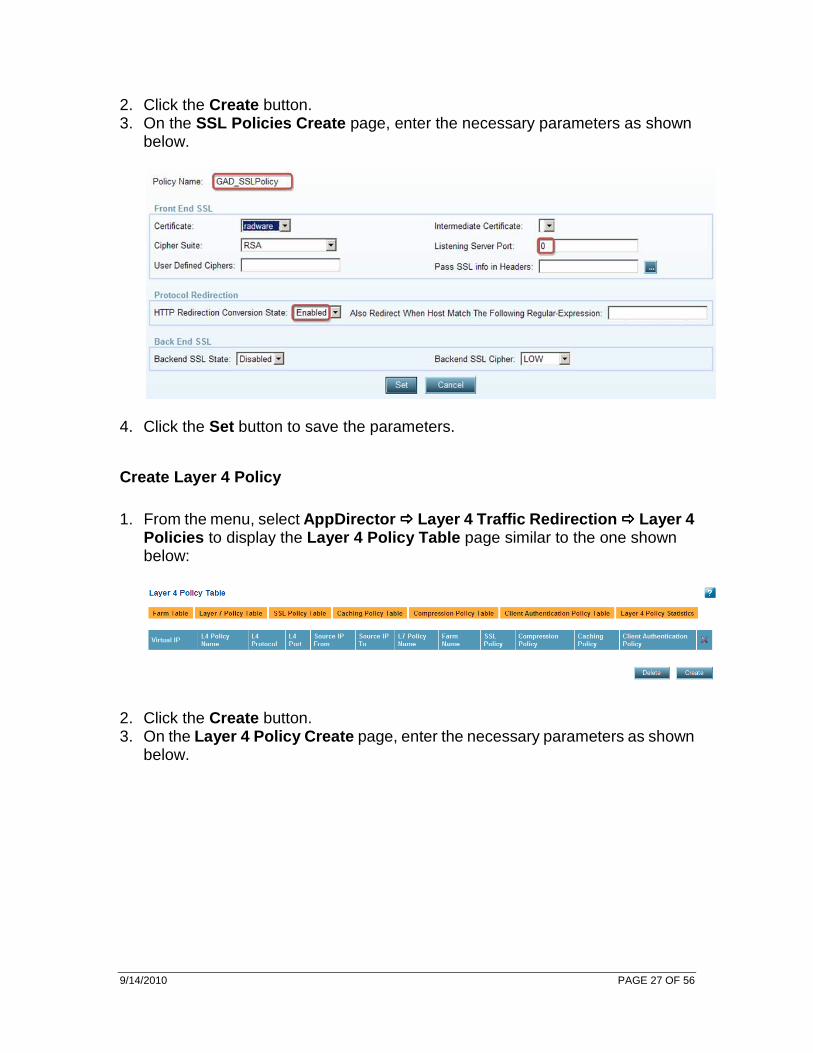
Create SSL Policy
1. From the menu, select AppDirector ���� Layer 4 Traffic Redirection ���� SSL Policies to display the SSL Policies page similar to the one shown below:
9/14/2010 PAGE 27 OF 56
2. Click the Create button. 3. On the SSL Policies Create page, enter the necessary parameters as shown
below.
4. Click the Set button to save the parameters.
Create Layer 4 Policy
1. From the menu, select AppDirector ���� Layer 4 Traffic Redirection ���� Layer 4 Policies to display the Layer 4 Policy Table page similar to the one shown below:
2. Click the Create button. 3. On the Layer 4 Policy Create page, enter the necessary parameters as shown
below.
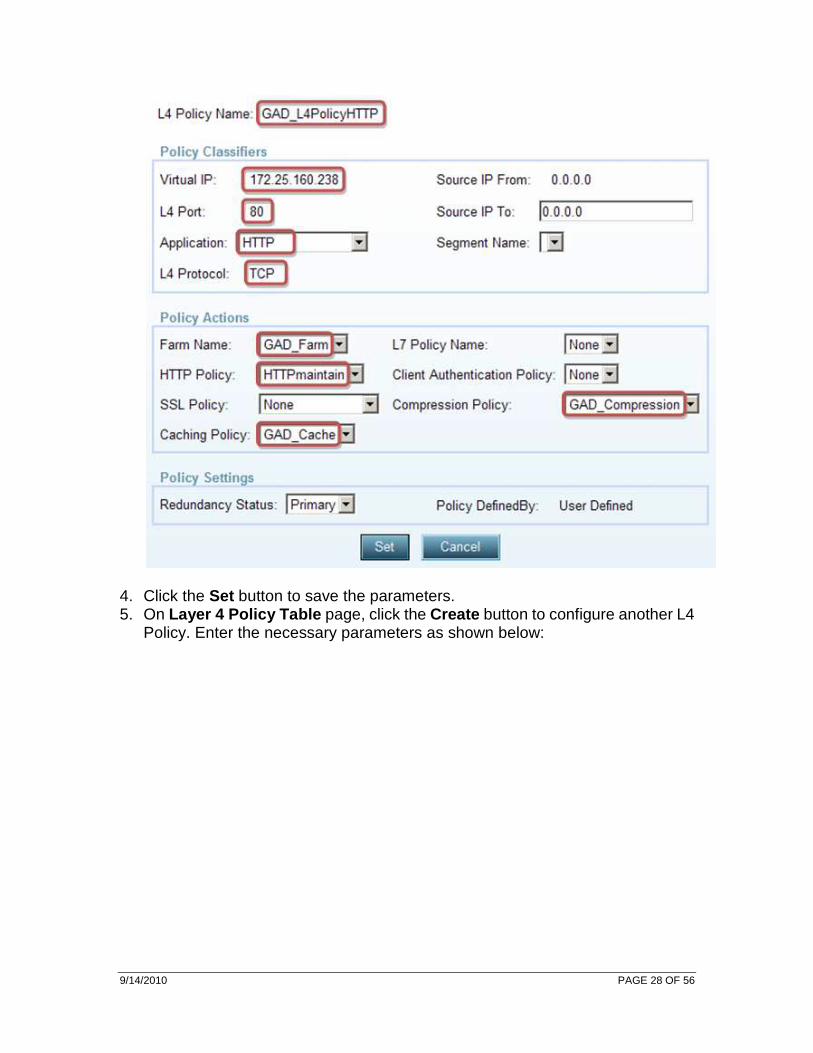
9/14/2010 PAGE 28 OF 56
4. Click the Set button to save the parameters. 5. On Layer 4 Policy Table page, click the Create button to configure another L4
Policy. Enter the necessary parameters as shown below:
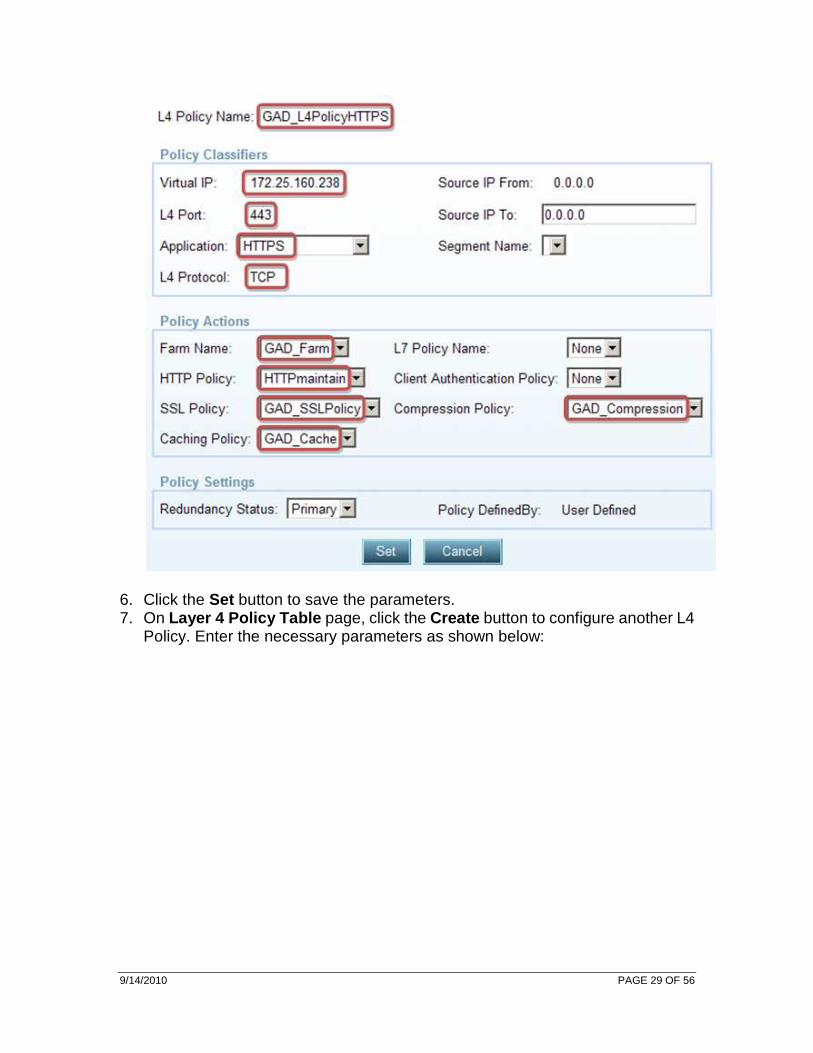
9/14/2010 PAGE 29 OF 56
6. Click the Set button to save the parameters. 7. On Layer 4 Policy Table page, click the Create button to configure another L4
Policy. Enter the necessary parameters as shown below:
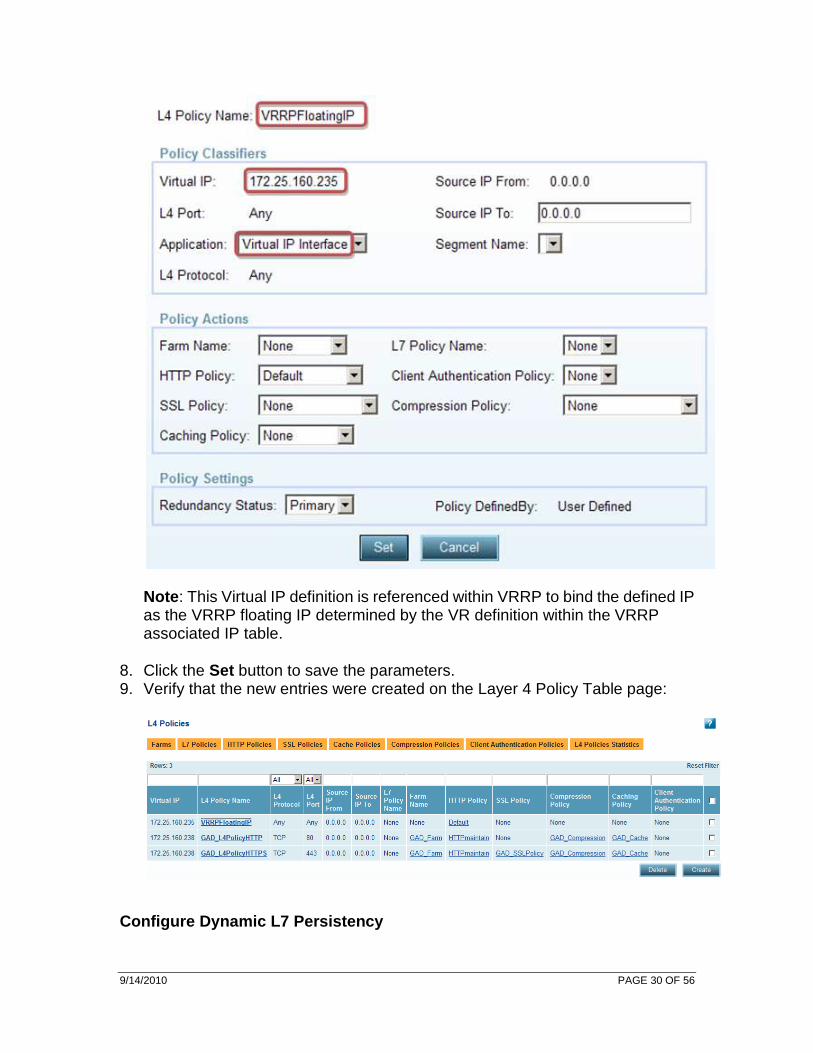
9/14/2010 PAGE 30 OF 56
Note : This Virtual IP definition is referenced within VRRP to bind the defined IP as the VRRP floating IP determined by the VR definition within the VRRP associated IP table.
8. Click the Set button to save the parameters. 9. Verify that the new entries were created on the Layer 4 Policy Table page:
Configure Dynamic L7 Persistency
9/14/2010 PAGE 31 OF 56
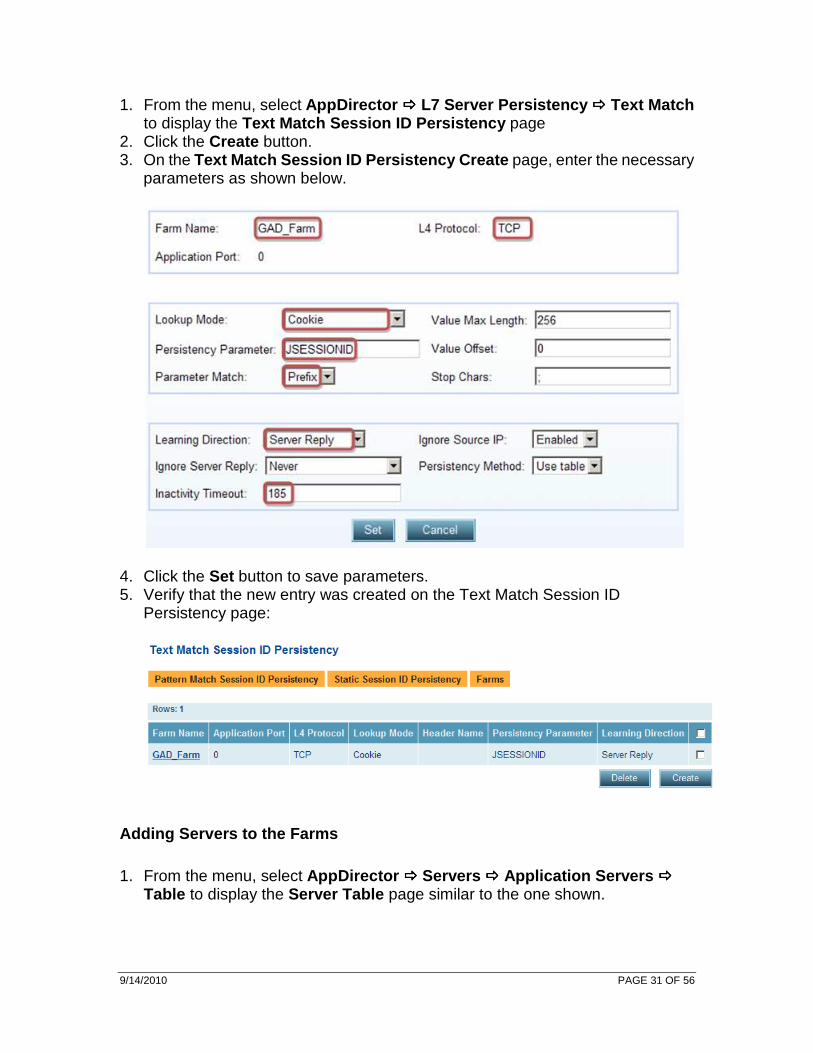
1. From the menu, select AppDirector ���� L7 Server Persistency ���� Text Match to display the Text Match Session ID Persistency page
2. Click the Create button. 3. On the Text Match Session ID Persistency Create page, enter the necessary
parameters as shown below.
4. Click the Set button to save parameters. 5. Verify that the new entry was created on the Text Match Session ID
Persistency page:
Adding Servers to the Farms
1. From the menu, select AppDirector ���� Servers ���� Application Servers ���� Table to display the Server Table page similar to the one shown.
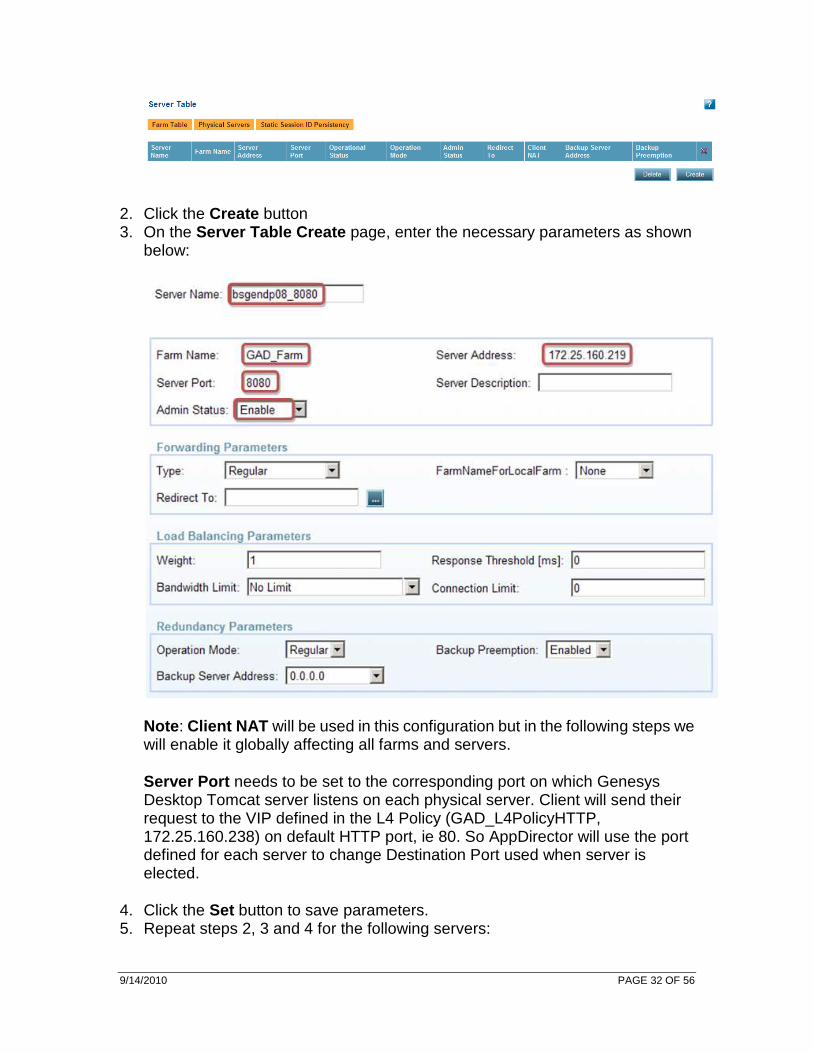
9/14/2010 PAGE 32 OF 56
2. Click the Create button 3. On the Server Table Create page, enter the necessary parameters as shown
below:
Note : Client NAT will be used in this configuration but in the following steps we will enable it globally affecting all farms and servers.
Server Port needs to be set to the corresponding port on which Genesys Desktop Tomcat server listens on each physical server. Client will send their request to the VIP defined in the L4 Policy (GAD_L4PolicyHTTP, 172.25.160.238) on default HTTP port, ie 80. So AppDirector will use the port defined for each server to change Destination Port used when server is elected.
4. Click the Set button to save parameters. 5. Repeat steps 2, 3 and 4 for the following servers:
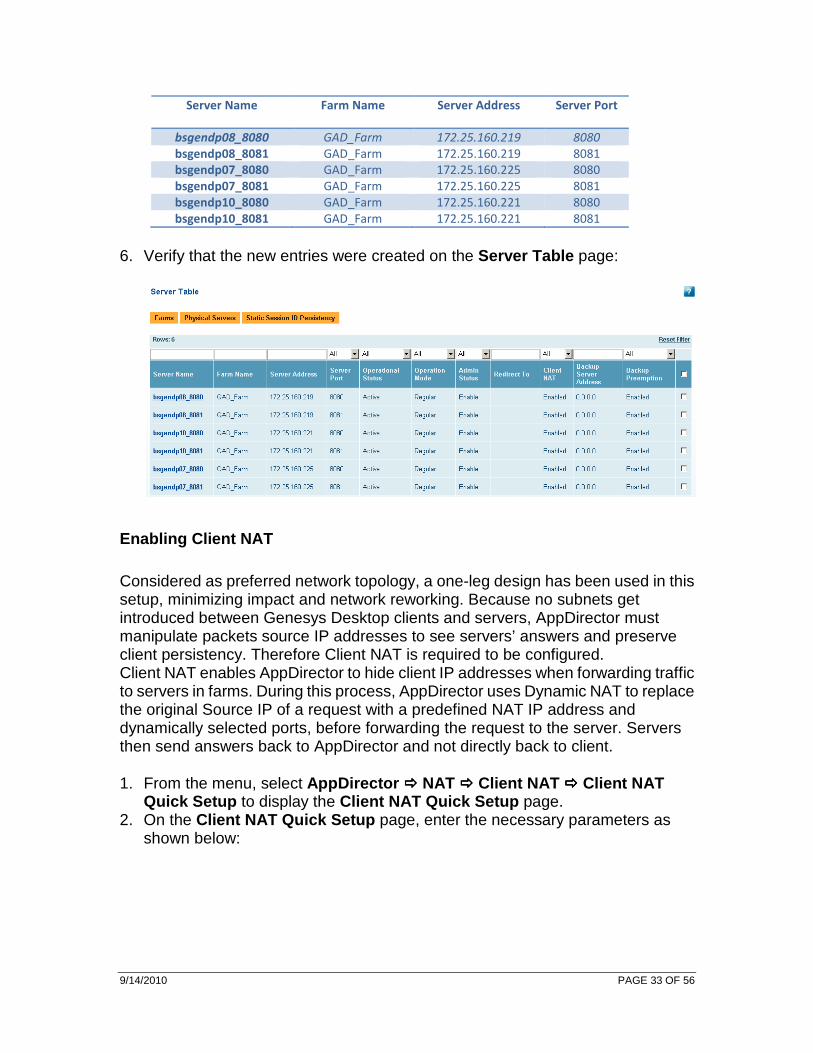
9/14/2010 PAGE 33 OF 56
Server Name Farm Name Server Address Server Port
bsgendp08_8080 GAD_Farm 172.25.160.219 8080
bsgendp08_8081 GAD_Farm 172.25.160.219 8081
bsgendp07_8080 GAD_Farm 172.25.160.225 8080
bsgendp07_8081 GAD_Farm 172.25.160.225 8081
bsgendp10_8080 GAD_Farm 172.25.160.221 8080
bsgendp10_8081 GAD_Farm 172.25.160.221 8081
6. Verify that the new entries were created on the Server Table page:
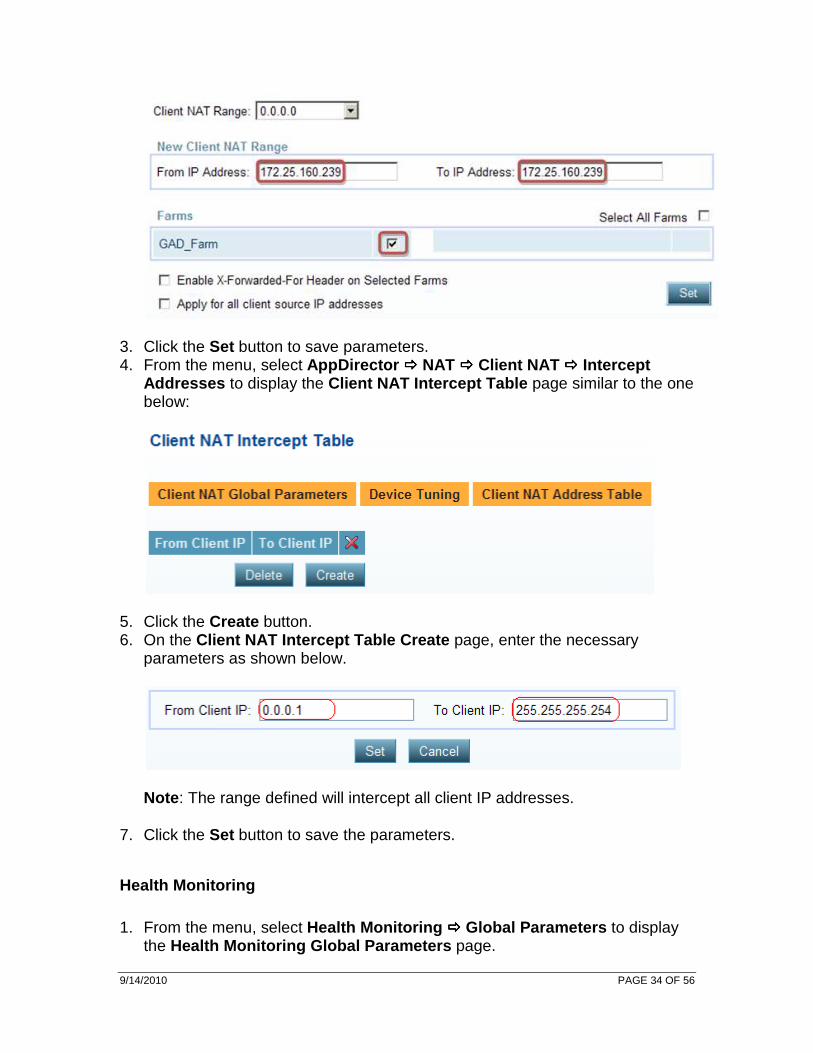
Enabling Client NAT
Considered as preferred network topology, a one-leg design has been used in this setup, minimizing impact and network reworking. Because no subnets get introduced between Genesys Desktop clients and servers, AppDirector must manipulate packets source IP addresses to see servers’ answers and preserve client persistency. Therefore Client NAT is required to be configured. Client NAT enables AppDirector to hide client IP addresses when forwarding traffic to servers in farms. During this process, AppDirector uses Dynamic NAT to replace the original Source IP of a request with a predefined NAT IP address and dynamically selected ports, before forwarding the request to the server. Servers then send answers back to AppDirector and not directly back to client.
1. From the menu, select AppDirector ���� NAT ���� Client NAT ���� Client NAT Quick Setup to display the Client NAT Quick Setup page.
2. On the Client NAT Quick Setup page, enter the necessary parameters as shown below:
9/14/2010 PAGE 34 OF 56
3. Click the Set button to save parameters. 4. From the menu, select AppDirector ���� NAT ���� Client NAT ���� Intercept
Addresses to display the Client NAT Intercept Table page similar to the one below:
5. Click the Create button. 6. On the Client NAT Intercept Table Create page, enter the necessary
parameters as shown below.
Note : The range defined will intercept all client IP addresses.
7. Click the Set button to save the parameters.
Health Monitoring
1. From the menu, select Health Monitoring ���� Global Parameters to display the Health Monitoring Global Parameters page.

9/14/2010 PAGE 35 OF 56
2. On the Health Monitoring Global Parameters page, change the parameters as shown below:
3. Click the Set button to save parameters.
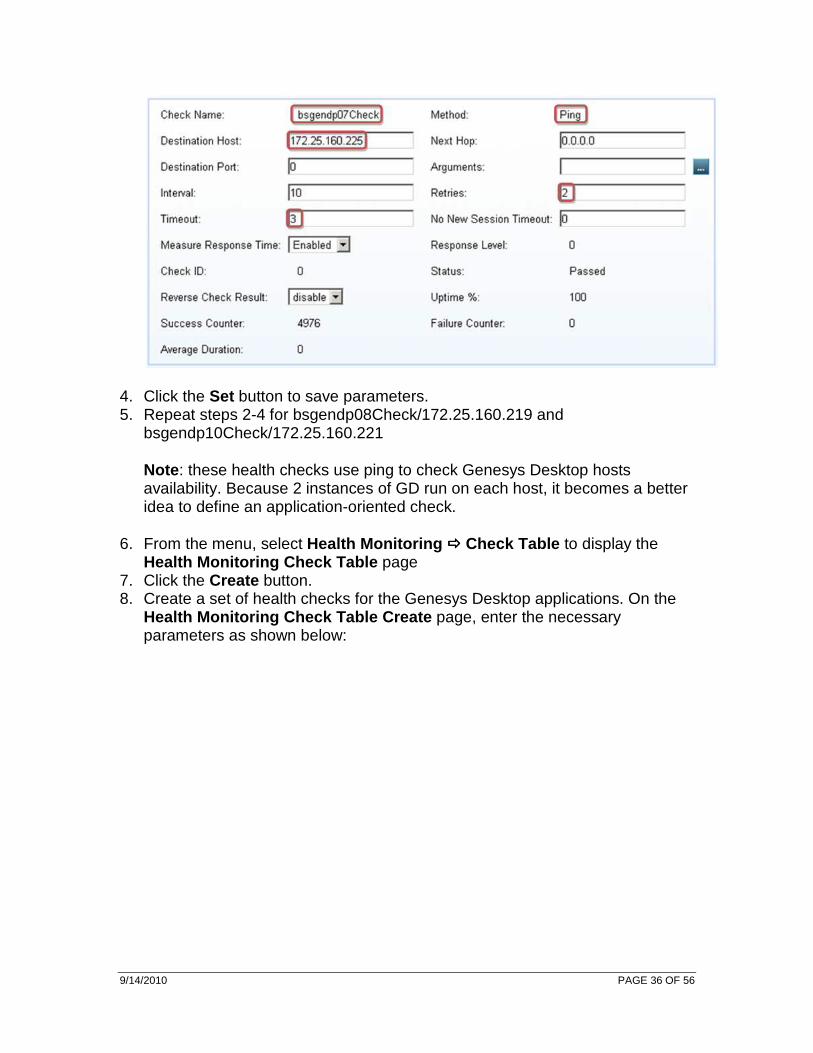
Create the Health Monitoring Checks.
1. From the menu, select Health Monitoring ���� Check Table to display the Health Monitoring Check Table page similar to the one shown below:
2. Click the Create button. 3. Create a set of health checks for the Genesys Desktop servers. On the Health
Monitoring Check Table Create page, enter the necessary parameters as shown below:
9/14/2010 PAGE 36 OF 56
4. Click the Set button to save parameters. 5. Repeat steps 2-4 for bsgendp08Check/172.25.160.219 and
bsgendp10Check/172.25.160.221
Note : these health checks use ping to check Genesys Desktop hosts availability. Because 2 instances of GD run on each host, it becomes a better idea to define an application-oriented check.
6. From the menu, select Health Monitoring ���� Check Table to display the Health Monitoring Check Table page
7. Click the Create button. 8. Create a set of health checks for the Genesys Desktop applications. On the
Health Monitoring Check Table Create page, enter the necessary parameters as shown below:
9/14/2010 PAGE 37 OF 56
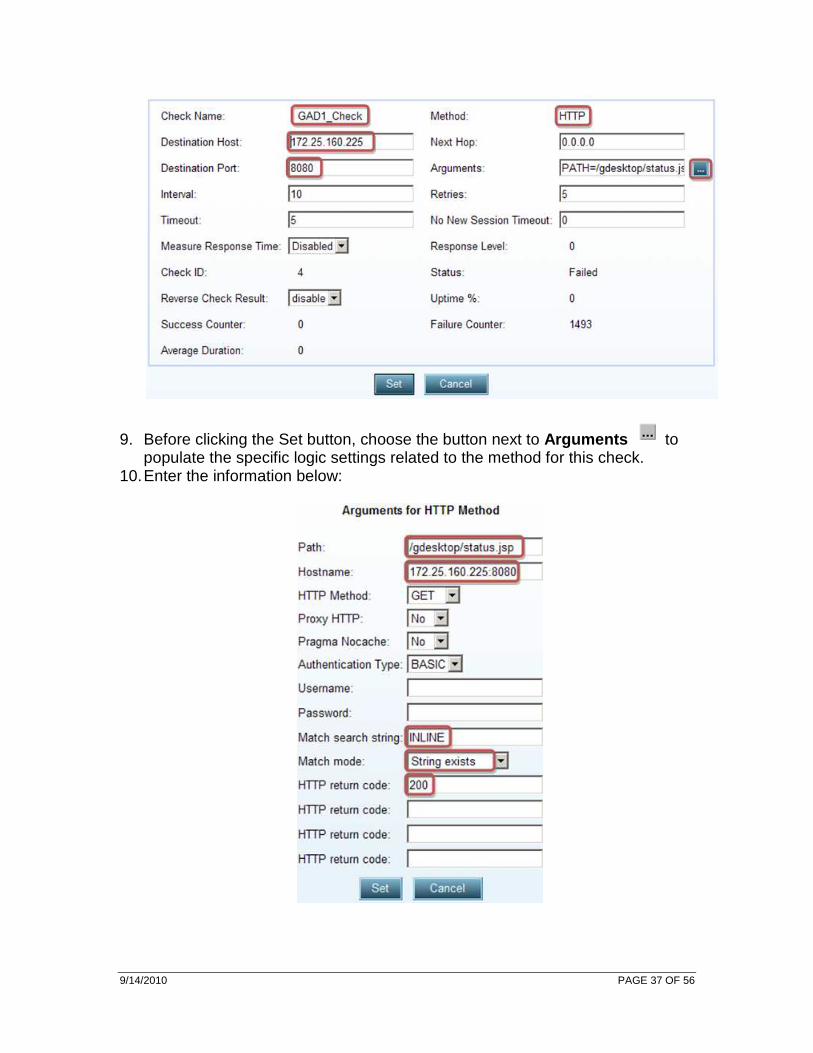
9. Before clicking the Set button, choose the button next to Arguments to populate the specific logic settings related to the method for this check.
10. Enter the information below:

9/14/2010 PAGE 38 OF 56
Note : a customized script (status.jsp) has been written for the purpose of this test. It returns either ‘INLINE’ when Genesys Desktop instance is running properly or ‘OFFLINE’ otherwise.
11. Click the Set button for the Method Arguments and click the Set button again in the Health Monitoring Check Table Create window.
Note : All Servers health checks are configured logically alike.
12. Verify the new entries were created on the Health Monitoring Check Table
Note : The status of this check may display “Unknown” until the server replies successfully to the AppDirector’s check.
Binding Health Checks to Servers
1. From the menu, select Health Monitoring ���� Binding Table to display the Health Monitoring Binding Table page similar to the one shown below:
2. Click the Create button. 3. Create the health check binding for the Genesys Desktop servers. On the
Health Monitoring Binding Table Create page, enter the necessary parameters as shown below:
4. Click the Set button to save parameters. 5. Repeat steps 2-4 to bind the health checks for the remaining Desktop
Farm/Servers.
9/14/2010 PAGE 39 OF 56
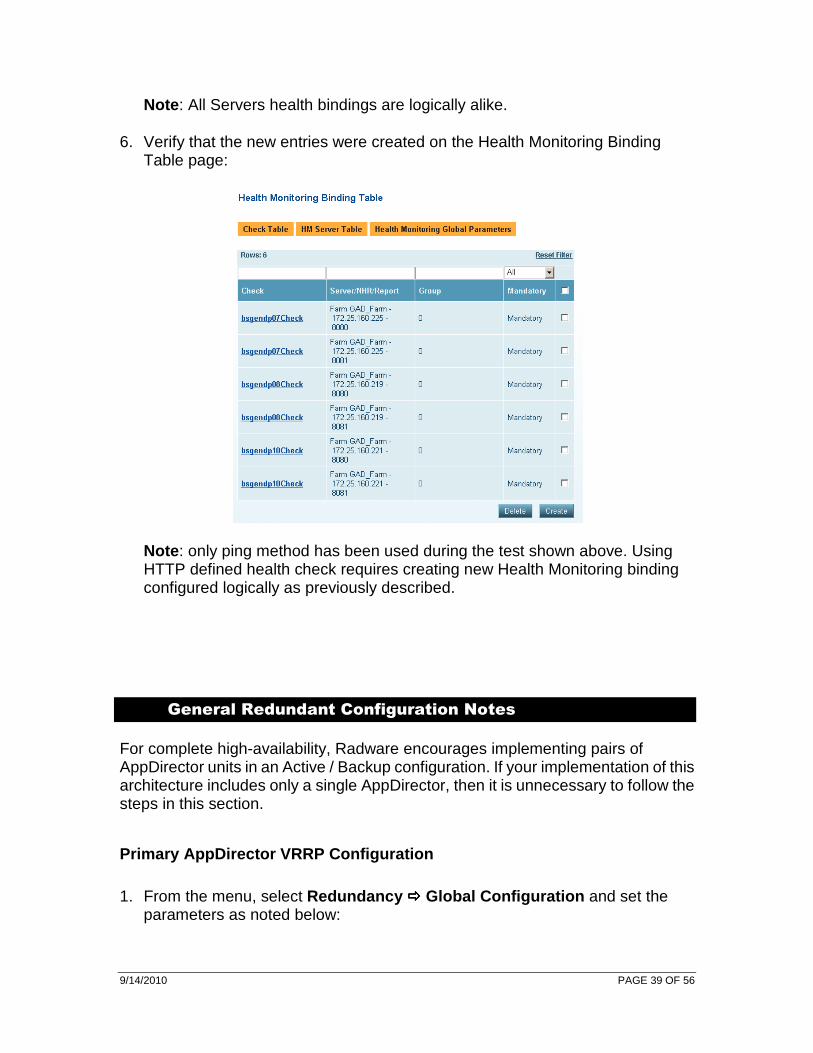
Note : All Servers health bindings are logically alike.
6. Verify that the new entries were created on the Health Monitoring Binding Table page:
Note : only ping method has been used during the test shown above. Using HTTP defined health check requires creating new Health Monitoring binding configured logically as previously described.
General Redundant Configuration Notes
For complete high-availability, Radware encourages implementing pairs of AppDirector units in an Active / Backup configuration. If your implementation of this architecture includes only a single AppDirector, then it is unnecessary to follow the steps in this section.
Primary AppDirector VRRP Configuration
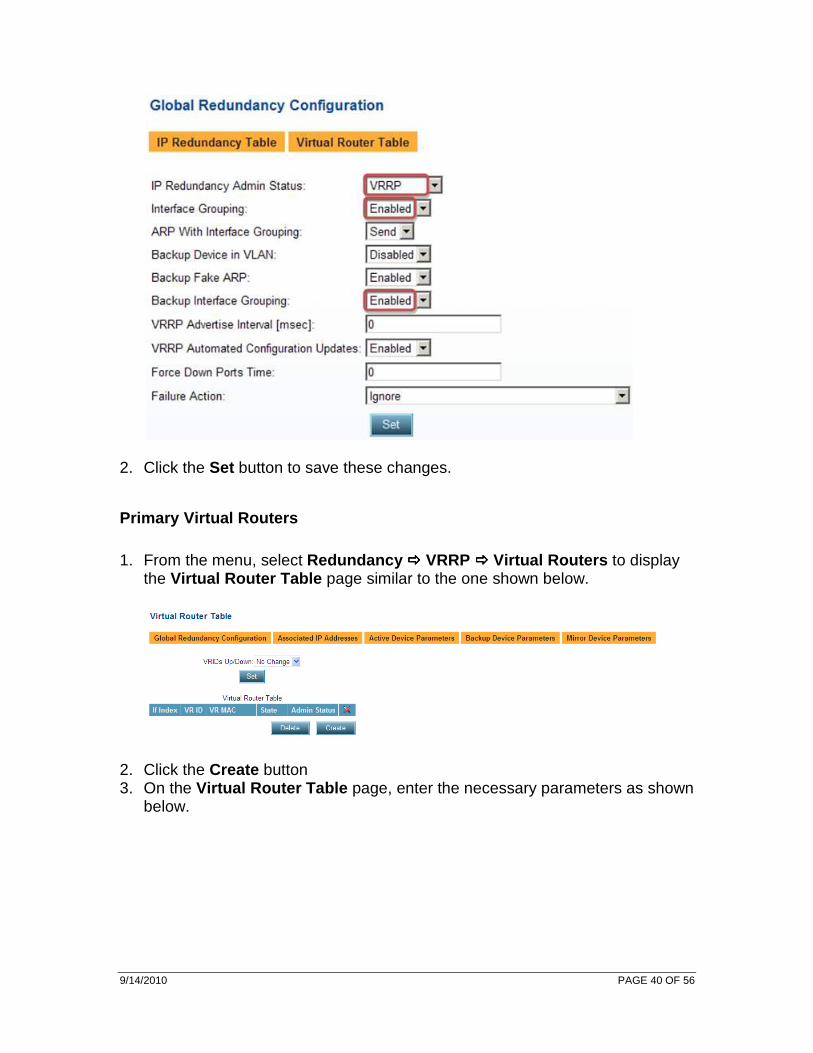
1. From the menu, select Redundancy ���� Global Configuration and set the parameters as noted below:
9/14/2010 PAGE 40 OF 56
2. Click the Set button to save these changes.
Primary Virtual Routers
1. From the menu, select Redundancy ���� VRRP ���� Virtual Routers to display the Virtual Router Table page similar to the one shown below.
2. Click the Create button 3. On the Virtual Router Table page, enter the necessary parameters as shown
below.
9/14/2010 PAGE 41 OF 56
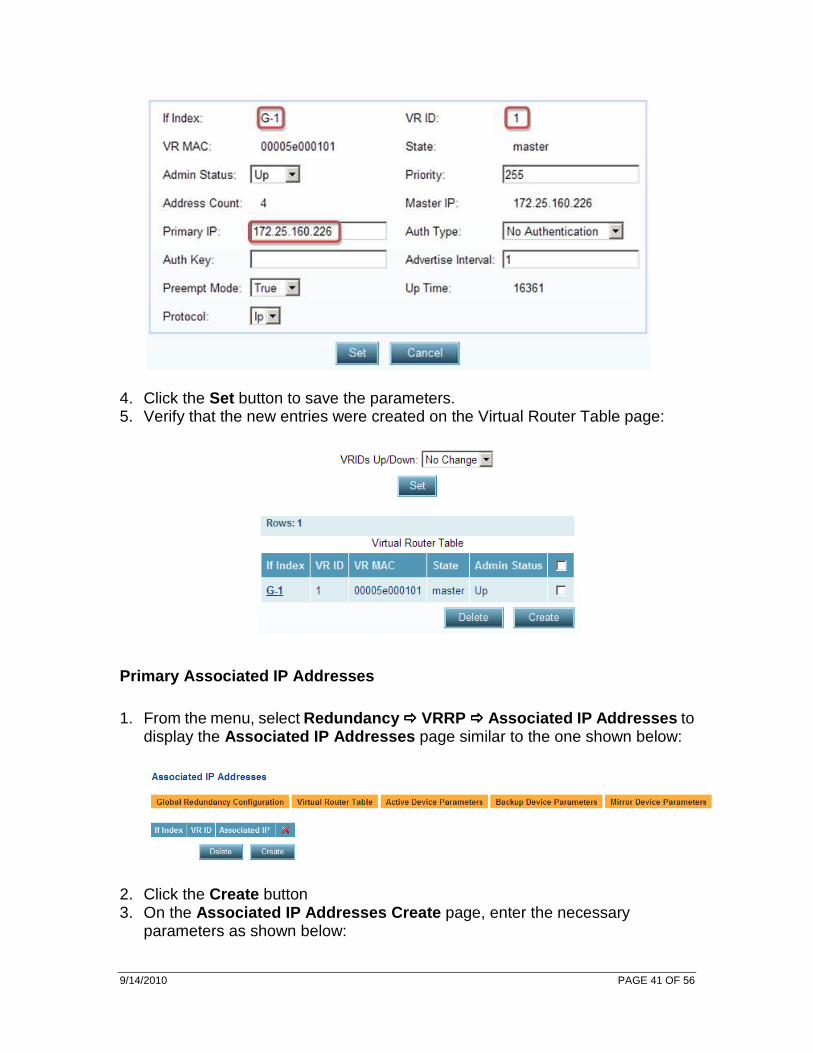
4. Click the Set button to save the parameters. 5. Verify that the new entries were created on the Virtual Router Table page:
Primary Associated IP Addresses
1. From the menu, select Redundancy ���� VRRP ���� Associated IP Addresses to display the Associated IP Addresses page similar to the one shown below:
2. Click the Create button 3. On the Associated IP Addresses Create page, enter the necessary
parameters as shown below:
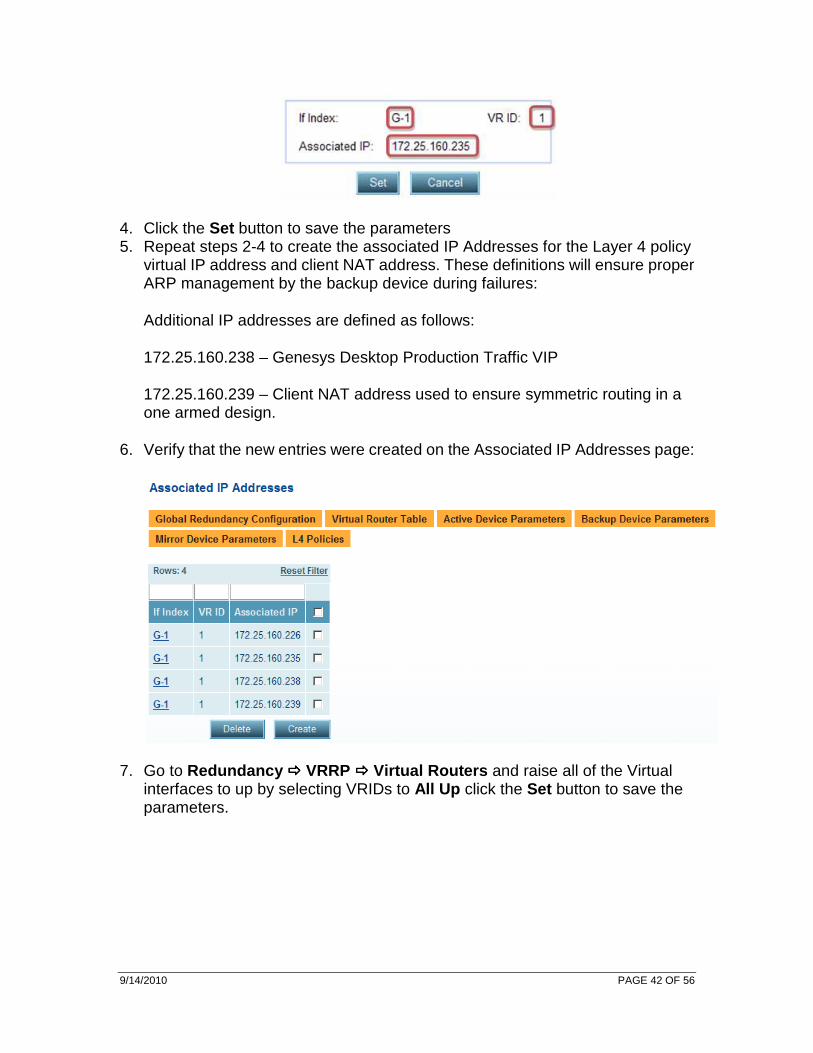
9/14/2010 PAGE 42 OF 56
4. Click the Set button to save the parameters 5. Repeat steps 2-4 to create the associated IP Addresses for the Layer 4 policy
virtual IP address and client NAT address. These definitions will ensure proper ARP management by the backup device during failures:
Additional IP addresses are defined as follows:
172.25.160.238 – Genesys Desktop Production Traffic VIP
172.25.160.239 – Client NAT address used to ensure symmetric routing in a one armed design.
6. Verify that the new entries were created on the Associated IP Addresses page:
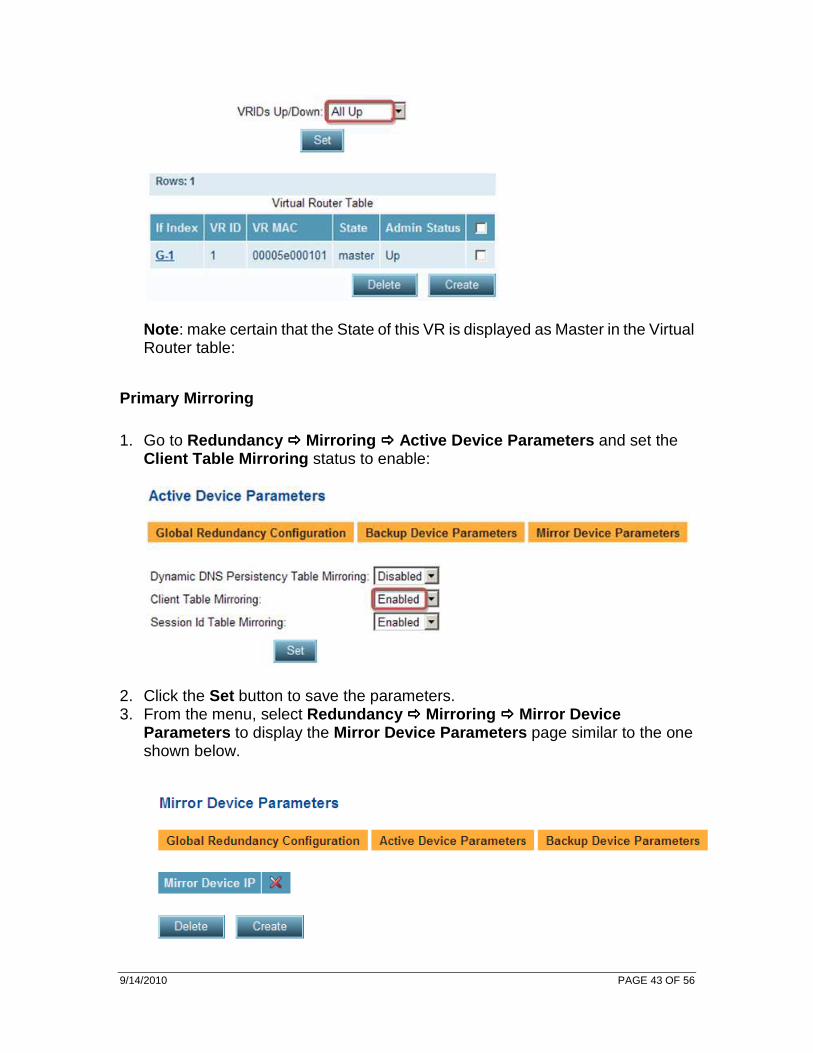
7. Go to Redundancy ���� VRRP ���� Virtual Routers and raise all of the Virtual interfaces to up by selecting VRIDs to All Up click the Set button to save the parameters.
9/14/2010 PAGE 43 OF 56
Note : make certain that the State of this VR is displayed as Master in the Virtual Router table:
Primary Mirroring
1. Go to Redundancy ���� Mirroring ���� Active Device Parameters and set the Client Table Mirroring status to enable:
2. Click the Set button to save the parameters. 3. From the menu, select Redundancy ���� Mirroring ���� Mirror Device
Parameters to display the Mirror Device Parameters page similar to the one shown below.

9/14/2010 PAGE 44 OF 56
4. Click the Create button 5. On the Mirror Device Parameters page, enter the necessary parameters as
shown below:
Note : This sets the Backup AD IP used as the target address for mirroring traffic.
6. Click the Set button to save the parameters.
This completes the configuration of the Primary AppDirector.
Auto-Generate the Backup AppDirector Configuration
Once the Backup AppDirector is configured for basic IP connectivity and is available to the network, simply export the Backup Configuration file from the Primary AppDirector and upload it to the Backup AppDirector. The steps are defined below.
Setting up basic IP connectivity on the Backup AppD irector
Using a serial cable and a terminal emulation program, connect to the AppDirector. The default console port settings are:
• Bits per Second: 19200 • Data Bits: 8 • Parity: None • Stop Bits: 1 • Flow Control: None
4. Using the following Command line, assign IP address 172.25.160.227/ 24 to
interface G-1 of the AppDirector:
net ip-interface create 172.25.160.227 255.255.255. 0 G-1 –pa 172.25.160.226
Note : Dedicated management interfaces are available on the AppDirector and should be used in best practice designs. For the sake of address consolidation, the production interface is also used for management in the validation testing
9/14/2010 PAGE 45 OF 56
design. To reference the dedicated management interface replace G-1 with MNG-1 or MNG-2. The switch value “-pa” represents the peer IP address used in auto creation of the backup/peer configuration file.
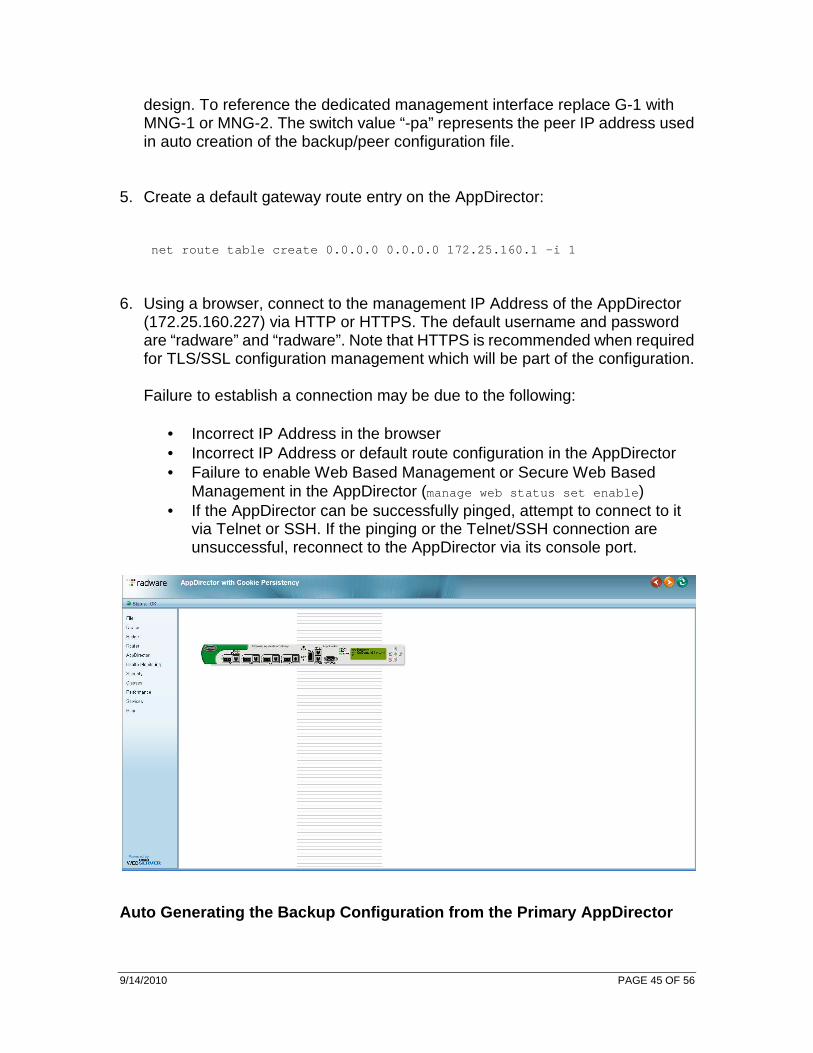
5. Create a default gateway route entry on the AppDirector:
net route table create 0.0.0.0 0.0.0.0 172.25.160. 1 -i 1
6. Using a browser, connect to the management IP Address of the AppDirector (172.25.160.227) via HTTP or HTTPS. The default username and password are “radware” and “radware”. Note that HTTPS is recommended when required for TLS/SSL configuration management which will be part of the configuration.
Failure to establish a connection may be due to the following:
• Incorrect IP Address in the browser • Incorrect IP Address or default route configuration in the AppDirector • Failure to enable Web Based Management or Secure Web Based
Management in the AppDirector (manage web status set enable ) • If the AppDirector can be successfully pinged, attempt to connect to it
via Telnet or SSH. If the pinging or the Telnet/SSH connection are unsuccessful, reconnect to the AppDirector via its console port.
Auto Generating the Backup Configuration from the P rimary AppDirector
9/14/2010 PAGE 46 OF 56
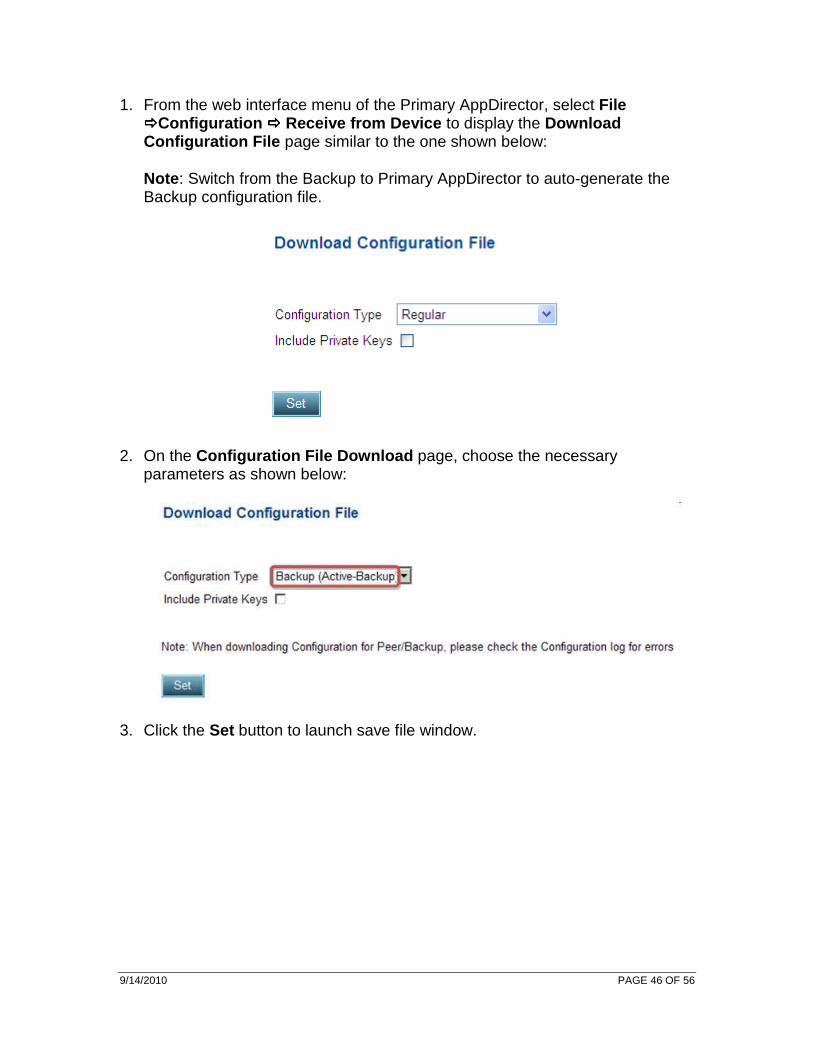
1. From the web interface menu of the Primary AppDirector, select File ����Configuration ���� Receive from Device to display the Download Configuration File page similar to the one shown below:
Note : Switch from the Backup to Primary AppDirector to auto-generate the Backup configuration file.
2. On the Configuration File Download page, choose the necessary parameters as shown below:
3. Click the Set button to launch save file window.
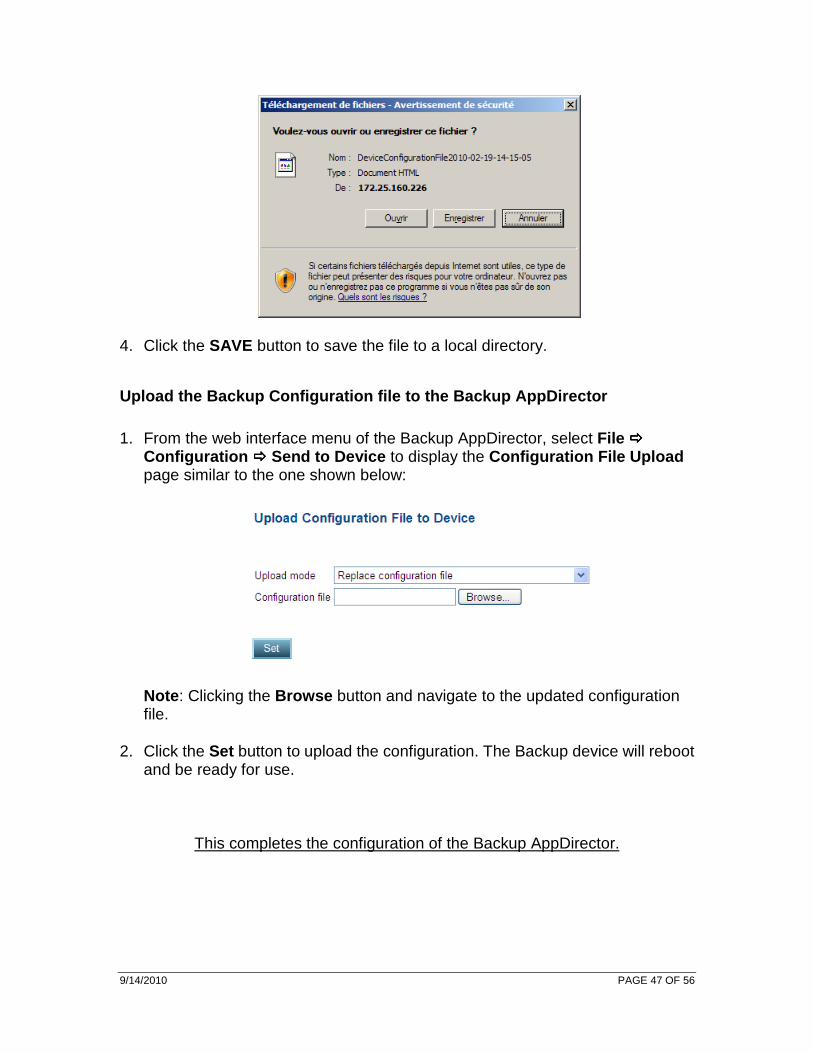
9/14/2010 PAGE 47 OF 56
4. Click the SAVE button to save the file to a local directory.
Upload the Backup Configuration file to the Backup AppDirector
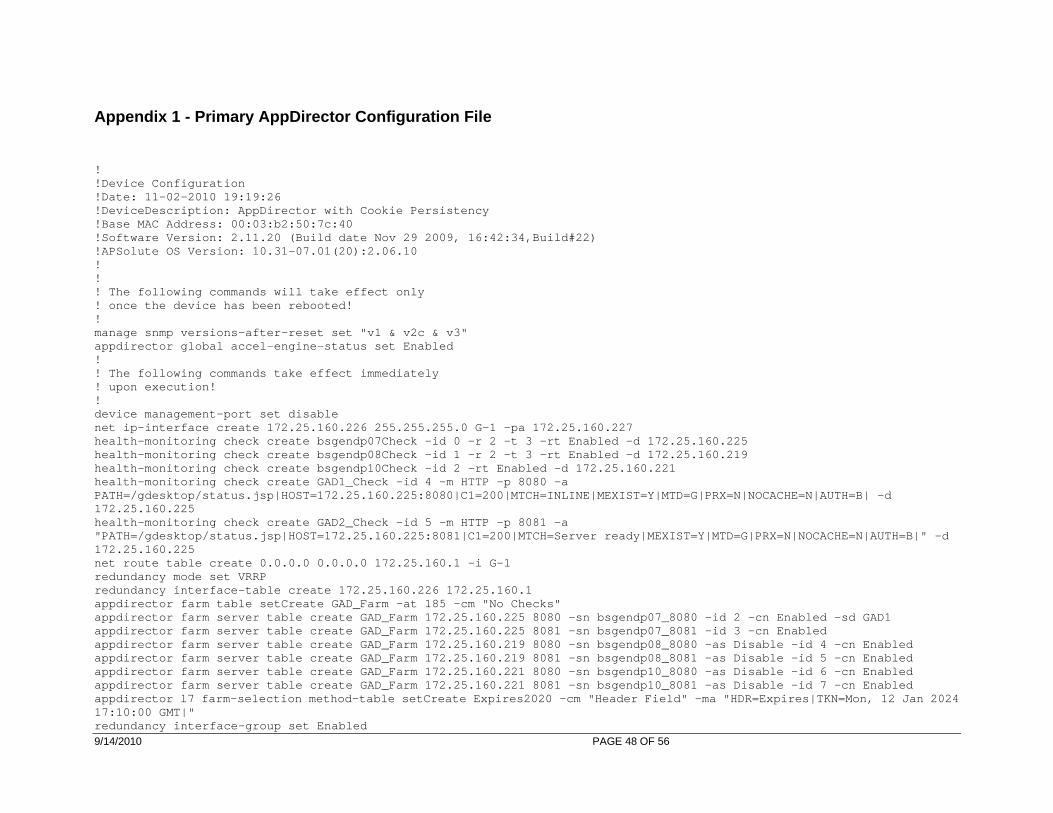
1. From the web interface menu of the Backup AppDirector, select File ���� Configuration ���� Send to Device to display the Configuration File Upload page similar to the one shown below:
Note : Clicking the Browse button and navigate to the updated configuration file.
2. Click the Set button to upload the configuration. The Backup device will reboot and be ready for use.
This completes the configuration of the Backup AppDirector.
9/14/2010 PAGE 48 OF 56
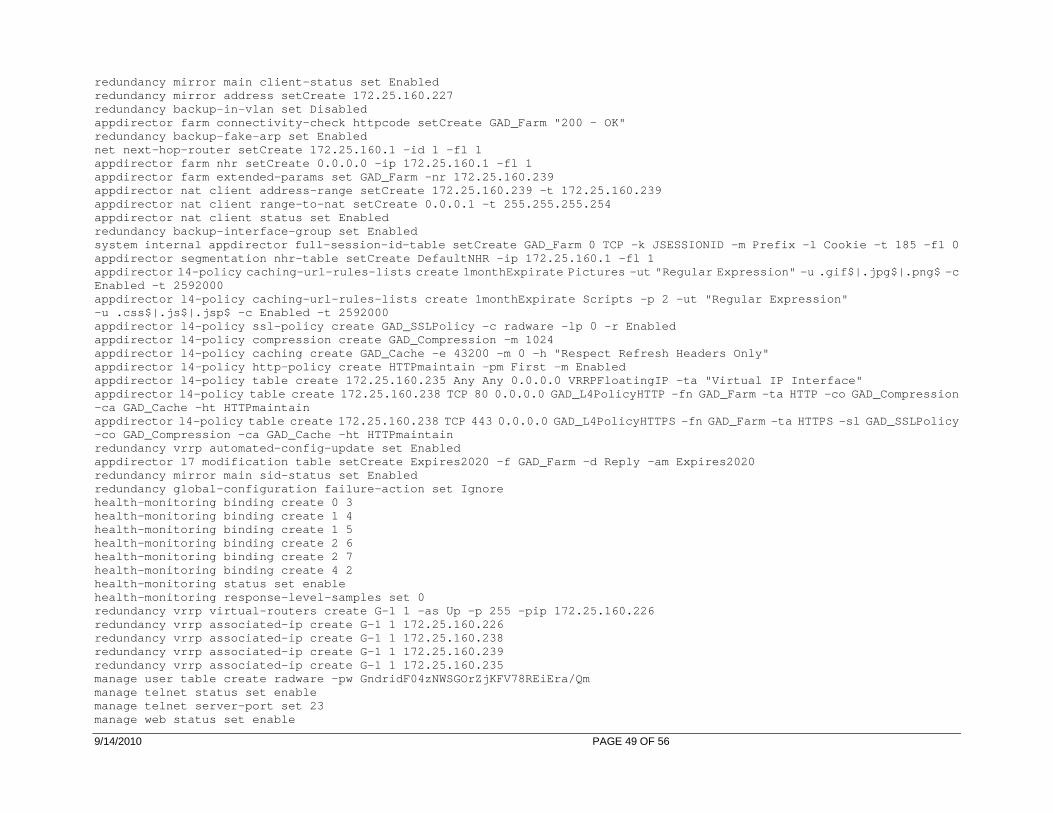
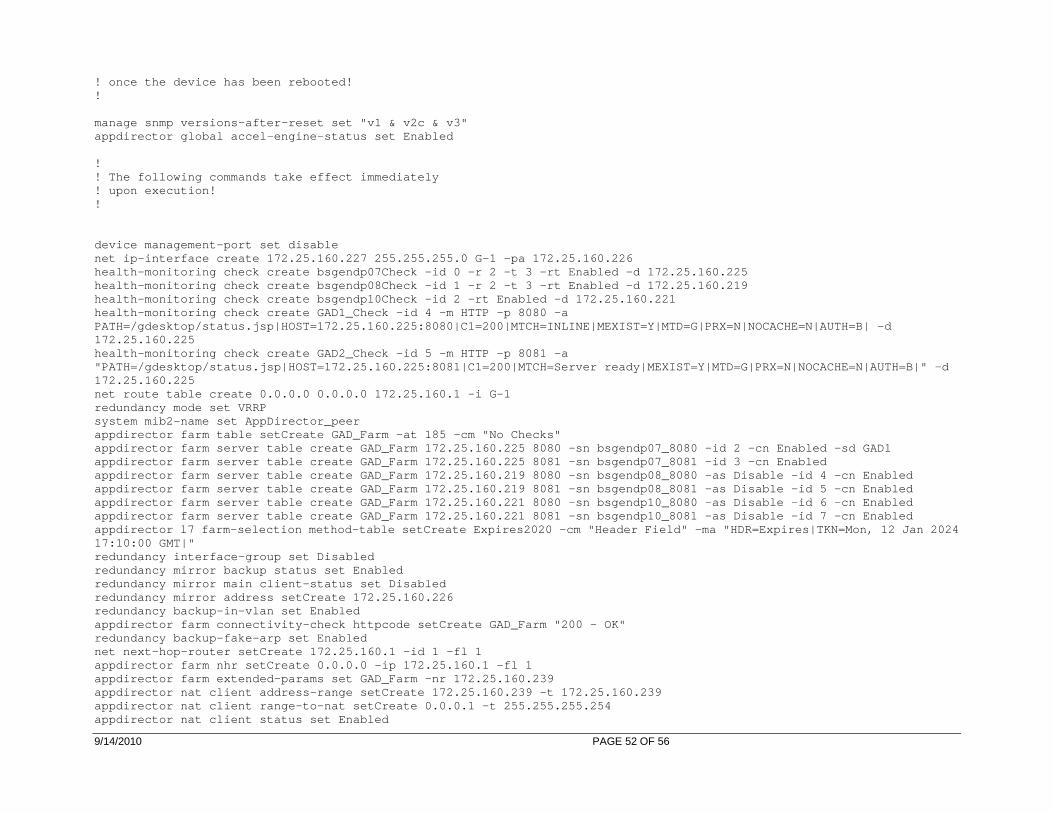
Appendix 1 - Primary AppDirector Configuration File
! !Device Configuration !Date: 11-02-2010 19:19:26 !DeviceDescription: AppDirector with Cookie Persist ency !Base MAC Address: 00:03:b2:50:7c:40 !Software Version: 2.11.20 (Build date Nov 29 2009, 16:42:34,Build#22) !APSolute OS Version: 10.31-07.01(20):2.06.10 ! ! ! The following commands will take effect only ! once the device has been rebooted! ! manage snmp versions-after-reset set "v1 & v2c & v3 " appdirector global accel-engine-status set Enabled ! ! The following commands take effect immediately ! upon execution! ! device management-port set disable net ip-interface create 172.25.160.226 255.255.255. 0 G-1 -pa 172.25.160.227 health-monitoring check create bsgendp07Check -id 0 -r 2 -t 3 -rt Enabled -d 172.25.160.225 health-monitoring check create bsgendp08Check -id 1 -r 2 -t 3 -rt Enabled -d 172.25.160.219 health-monitoring check create bsgendp10Check -id 2 -rt Enabled -d 172.25.160.221 health-monitoring check create GAD1_Check -id 4 -m HTTP -p 8080 -a PATH=/gdesktop/status.jsp|HOST=172.25.160.225:8080| C1=200|MTCH=INLINE|MEXIST=Y|MTD=G|PRX=N|NOCACHE=N|AUTH=B| -d 172.25.160.225 health-monitoring check create GAD2_Check -id 5 -m HTTP -p 8081 -a "PATH=/gdesktop/status.jsp|HOST=172.25.160.225:8081 |C1=200|MTCH=Server ready|MEXIST=Y|MTD=G|PRX=N|NOCA CHE=N|AUTH=B|" -d 172.25.160.225 net route table create 0.0.0.0 0.0.0.0 172.25.160.1 -i G-1 redundancy mode set VRRP redundancy interface-table create 172.25.160.226 17 2.25.160.1 appdirector farm table setCreate GAD_Farm -at 185 - cm "No Checks" appdirector farm server table create GAD_Farm 172.2 5.160.225 8080 -sn bsgendp07_8080 -id 2 -cn Enabled -sd GAD1 appdirector farm server table create GAD_Farm 172.2 5.160.225 8081 -sn bsgendp07_8081 -id 3 -cn Enabled appdirector farm server table create GAD_Farm 172.2 5.160.219 8080 -sn bsgendp08_8080 -as Disable -id 4 -cn Enabled appdirector farm server table create GAD_Farm 172.2 5.160.219 8081 -sn bsgendp08_8081 -as Disable -id 5 -cn Enabled appdirector farm server table create GAD_Farm 172.2 5.160.221 8080 -sn bsgendp10_8080 -as Disable -id 6 -cn Enabled appdirector farm server table create GAD_Farm 172.2 5.160.221 8081 -sn bsgendp10_8081 -as Disable -id 7 -cn Enabled appdirector l7 farm-selection method-table setCreat e Expires2020 -cm "Header Field" -ma "HDR=Expires|T KN=Mon, 12 Jan 2024 17:10:00 GMT|" redundancy interface-group set Enabled
9/14/2010 PAGE 49 OF 56
redundancy mirror main client-status set Enabled redundancy mirror address setCreate 172.25.160.227 redundancy backup-in-vlan set Disabled appdirector farm connectivity-check httpcode setCre ate GAD_Farm "200 - OK" redundancy backup-fake-arp set Enabled net next-hop-router setCreate 172.25.160.1 -id 1 -f l 1 appdirector farm nhr setCreate 0.0.0.0 -ip 172.25.1 60.1 -fl 1 appdirector farm extended-params set GAD_Farm -nr 1 72.25.160.239 appdirector nat client address-range setCreate 172. 25.160.239 -t 172.25.160.239 appdirector nat client range-to-nat setCreate 0.0.0 .1 -t 255.255.255.254 appdirector nat client status set Enabled redundancy backup-interface-group set Enabled system internal appdirector full-session-id-table s etCreate GAD_Farm 0 TCP -k JSESSIONID -m Prefix -l Cookie -t 185 -fl 0 appdirector segmentation nhr-table setCreate Defaul tNHR -ip 172.25.160.1 -fl 1 appdirector l4-policy caching-url-rules-lists creat e 1monthExpirate Pictures -ut "Regular Expression" -u .gif$|.jpg$|.png$ -c Enabled -t 2592000 appdirector l4-policy caching-url-rules-lists creat e 1monthExpirate Scripts -p 2 -ut "Regular Expressi on" -u .css$|.js$|.jsp$ -c Enabled -t 2592000 appdirector l4-policy ssl-policy create GAD_SSLPoli cy -c radware -lp 0 -r Enabled appdirector l4-policy compression create GAD_Compre ssion -m 1024 appdirector l4-policy caching create GAD_Cache -e 4 3200 -m 0 -h "Respect Refresh Headers Only" appdirector l4-policy http-policy create HTTPmainta in -pm First -m Enabled appdirector l4-policy table create 172.25.160.235 A ny Any 0.0.0.0 VRRPFloatingIP -ta "Virtual IP Inter face" appdirector l4-policy table create 172.25.160.238 T CP 80 0.0.0.0 GAD_L4PolicyHTTP -fn GAD_Farm -ta HTT P -co GAD_Compression -ca GAD_Cache -ht HTTPmaintain appdirector l4-policy table create 172.25.160.238 T CP 443 0.0.0.0 GAD_L4PolicyHTTPS -fn GAD_Farm -ta H TTPS -sl GAD_SSLPolicy -co GAD_Compression -ca GAD_Cache -ht HTTPmaintain redundancy vrrp automated-config-update set Enabled appdirector l7 modification table setCreate Expires 2020 -f GAD_Farm -d Reply -am Expires2020 redundancy mirror main sid-status set Enabled redundancy global-configuration failure-action set Ignore health-monitoring binding create 0 3 health-monitoring binding create 1 4 health-monitoring binding create 1 5 health-monitoring binding create 2 6 health-monitoring binding create 2 7 health-monitoring binding create 4 2 health-monitoring status set enable health-monitoring response-level-samples set 0 redundancy vrrp virtual-routers create G-1 1 -as Up -p 255 -pip 172.25.160.226 redundancy vrrp associated-ip create G-1 1 172.25.1 60.226 redundancy vrrp associated-ip create G-1 1 172.25.1 60.238 redundancy vrrp associated-ip create G-1 1 172.25.1 60.239 redundancy vrrp associated-ip create G-1 1 172.25.1 60.235 manage user table create radware -pw GndridF04zNWSG OrZjKFV78REiEra/Qm manage telnet status set enable manage telnet server-port set 23 manage web status set enable
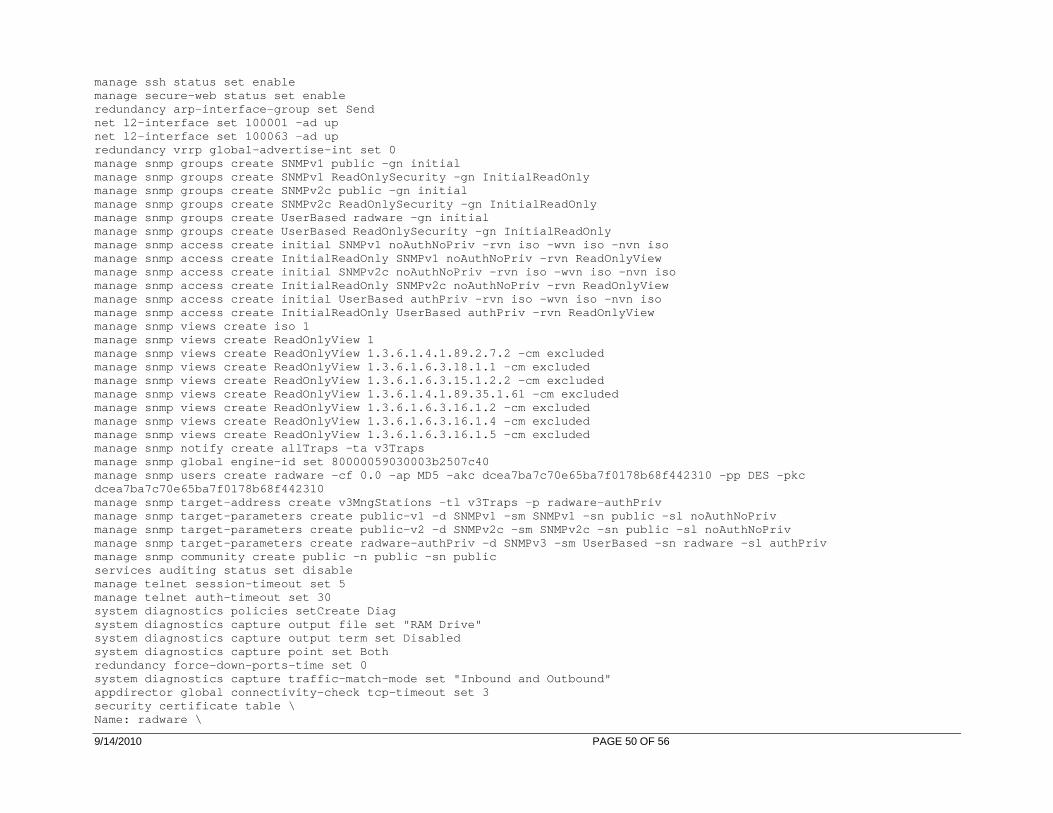
9/14/2010 PAGE 50 OF 56
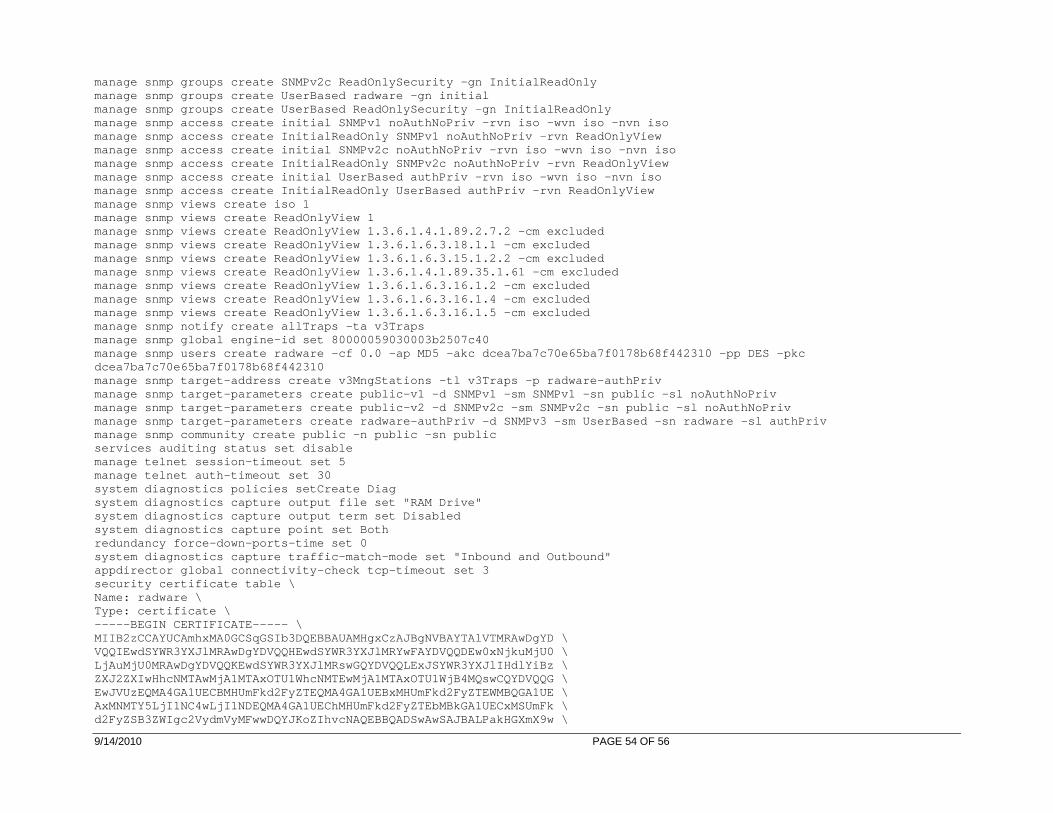
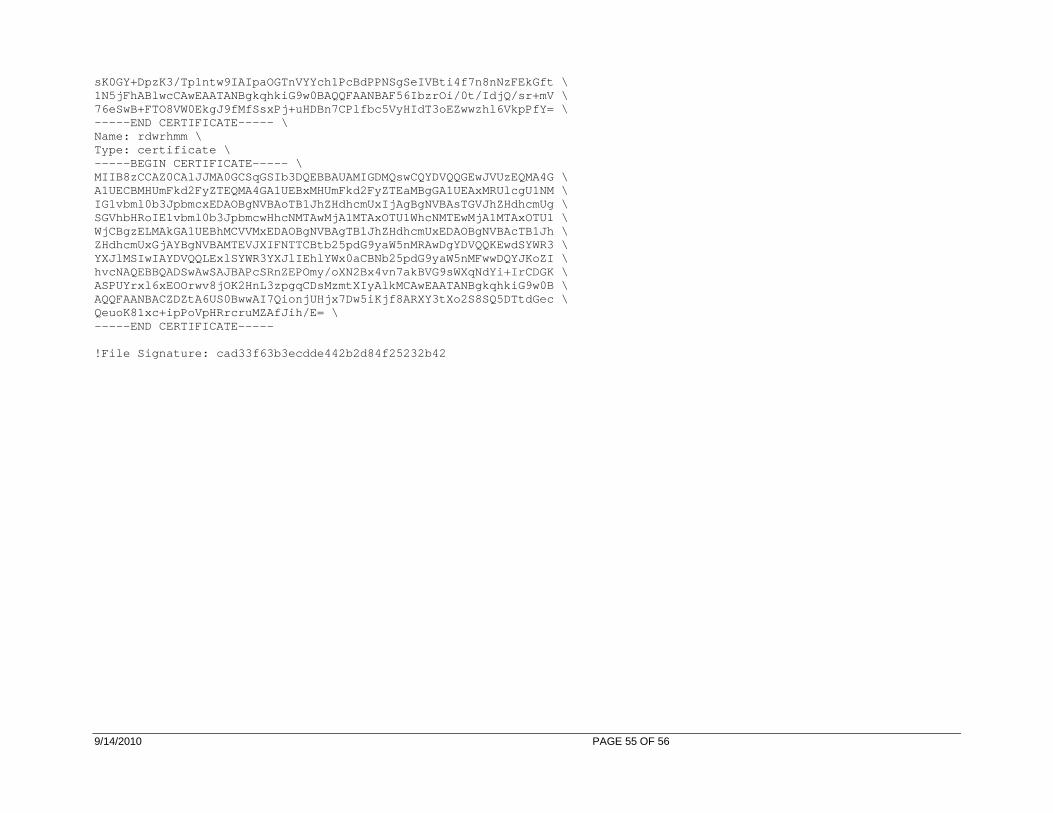
manage ssh status set enable manage secure-web status set enable redundancy arp-interface-group set Send net l2-interface set 100001 -ad up net l2-interface set 100063 -ad up redundancy vrrp global-advertise-int set 0 manage snmp groups create SNMPv1 public -gn initial manage snmp groups create SNMPv1 ReadOnlySecurity - gn InitialReadOnly manage snmp groups create SNMPv2c public -gn initia l manage snmp groups create SNMPv2c ReadOnlySecurity -gn InitialReadOnly manage snmp groups create UserBased radware -gn ini tial manage snmp groups create UserBased ReadOnlySecurit y -gn InitialReadOnly manage snmp access create initial SNMPv1 noAuthNoPr iv -rvn iso -wvn iso -nvn iso manage snmp access create InitialReadOnly SNMPv1 no AuthNoPriv -rvn ReadOnlyView manage snmp access create initial SNMPv2c noAuthNoP riv -rvn iso -wvn iso -nvn iso manage snmp access create InitialReadOnly SNMPv2c n oAuthNoPriv -rvn ReadOnlyView manage snmp access create initial UserBased authPri v -rvn iso -wvn iso -nvn iso manage snmp access create InitialReadOnly UserBased authPriv -rvn ReadOnlyView manage snmp views create iso 1 manage snmp views create ReadOnlyView 1 manage snmp views create ReadOnlyView 1.3.6.1.4.1.8 9.2.7.2 -cm excluded manage snmp views create ReadOnlyView 1.3.6.1.6.3.1 8.1.1 -cm excluded manage snmp views create ReadOnlyView 1.3.6.1.6.3.1 5.1.2.2 -cm excluded manage snmp views create ReadOnlyView 1.3.6.1.4.1.8 9.35.1.61 -cm excluded manage snmp views create ReadOnlyView 1.3.6.1.6.3.1 6.1.2 -cm excluded manage snmp views create ReadOnlyView 1.3.6.1.6.3.1 6.1.4 -cm excluded manage snmp views create ReadOnlyView 1.3.6.1.6.3.1 6.1.5 -cm excluded manage snmp notify create allTraps -ta v3Traps manage snmp global engine-id set 80000059030003b250 7c40 manage snmp users create radware -cf 0.0 -ap MD5 -a kc dcea7ba7c70e65ba7f0178b68f442310 -pp DES -pkc dcea7ba7c70e65ba7f0178b68f442310 manage snmp target-address create v3MngStations -tl v3Traps -p radware-authPriv manage snmp target-parameters create public-v1 -d S NMPv1 -sm SNMPv1 -sn public -sl noAuthNoPriv manage snmp target-parameters create public-v2 -d S NMPv2c -sm SNMPv2c -sn public -sl noAuthNoPriv manage snmp target-parameters create radware-authPr iv -d SNMPv3 -sm UserBased -sn radware -sl authPriv manage snmp community create public -n public -sn p ublic services auditing status set disable manage telnet session-timeout set 5 manage telnet auth-timeout set 30 system diagnostics policies setCreate Diag system diagnostics capture output file set "RAM Dri ve" system diagnostics capture output term set Disabled system diagnostics capture point set Both redundancy force-down-ports-time set 0 system diagnostics capture traffic-match-mode set " Inbound and Outbound" appdirector global connectivity-check tcp-timeout s et 3 security certificate table \ Name: radware \

9/14/2010 PAGE 51 OF 56
Type: certificate \ -----BEGIN CERTIFICATE----- \ MIIB2zCCAYUCAmhxMA0GCSqGSIb3DQEBBAUAMHgxCzAJBgNVBAYTAlVTMRAwDgYD \ VQQIEwdSYWR3YXJlMRAwDgYDVQQHEwdSYWR3YXJlMRYwFAYDVQQDEw0xNjkuMjU0 \ LjAuMjU0MRAwDgYDVQQKEwdSYWR3YXJlMRswGQYDVQQLExJSYWR3YXJlIHdlYiBz \ ZXJ2ZXIwHhcNMTAwMjA1MTAxOTU1WhcNMTEwMjA1MTAxOTU1WjB4MQswCQYDVQQG \ EwJVUzEQMA4GA1UECBMHUmFkd2FyZTEQMA4GA1UEBxMHUmFkd2FyZTEWMBQGA1UE \ AxMNMTY5LjI1NC4wLjI1NDEQMA4GA1UEChMHUmFkd2FyZTEbMBkGA1UECxMSUmFk \ d2FyZSB3ZWIgc2VydmVyMFwwDQYJKoZIhvcNAQEBBQADSwAwSAJBALPakHGXmX9w \ sK0GY+DpzK3/Tp1ntw9IAIpaOGTnVYYch1PcBdPPNSgSeIVBti4 f7n8nNzFEkGft \ 1N5jFhABlwcCAwEAATANBgkqhkiG9w0BAQQFAANBAF56IbzrOi/ 0t/IdjQ/sr+mV \ 76eSwB+FTO8VW0EkgJ9fMfSsxPj+uHDBn7CPlfbc5VyHIdT3oEZ wwzhl6VkpPfY= \ -----END CERTIFICATE----- \ Name: rdwrhmm \ Type: certificate \ -----BEGIN CERTIFICATE----- \ MIIB8zCCAZ0CAlJJMA0GCSqGSIb3DQEBBAUAMIGDMQswCQYDVQQGEwJVUzEQMA4G \ A1UECBMHUmFkd2FyZTEQMA4GA1UEBxMHUmFkd2FyZTEaMBgGA1UEAxMRUlcgU1NM \ IG1vbml0b3JpbmcxEDAOBgNVBAoTB1JhZHdhcmUxIjAgBgNVBAs TGVJhZHdhcmUg \ SGVhbHRoIE1vbml0b3JpbmcwHhcNMTAwMjA1MTAxOTU1WhcNMTEwMjA1MTAxOTU1 \ WjCBgzELMAkGA1UEBhMCVVMxEDAOBgNVBAgTB1JhZHdhcmUxEDAOBgNVBAcTB1Jh \ ZHdhcmUxGjAYBgNVBAMTEVJXIFNTTCBtb25pdG9yaW5nMRAwDgYDVQQKEwdSYWR3 \ YXJlMSIwIAYDVQQLExlSYWR3YXJlIEhlYWx0aCBNb25pdG9yaW5 nMFwwDQYJKoZI \ hvcNAQEBBQADSwAwSAJBAPcSRnZEPOmy/oXN2Bx4vn7akBVG9sWXqNdYi+IrCDGK \ ASPUYrxl6xEOOrwv8jOK2HnL3zpgqCDsMzmtXIyAlkMCAwEAATA NBgkqhkiG9w0B \ AQQFAANBACZDZtA6US0BwwAI7QionjUHjx7Dw5iKjf8ARXY3tXo 2S8SQ5DTtdGec \ QeuoK81xc+ipPoVpHRrcruMZAfJih/E= \ -----END CERTIFICATE----- !File Signature: 4e5994e0ad114bc5ce2498276099f632
Appendix 2 - Backup AppDirector Configuration File
! !Device Configuration !Date: 11-02-2010 19:19:37 !DeviceDescription: AppDirector with Cookie Persist ency !Base MAC Address: 00:03:b2:50:7c:40 !Software Version: 2.11.20 (Build date Nov 29 2009, 16:42:34,Build#22) !APSolute OS Version: 10.31-07.01(20):2.06.10 ! ! ! The following commands will take effect only
9/14/2010 PAGE 52 OF 56
! once the device has been rebooted! ! manage snmp versions-after-reset set "v1 & v2c & v3 " appdirector global accel-engine-status set Enabled ! ! The following commands take effect immediately ! upon execution! ! device management-port set disable net ip-interface create 172.25.160.227 255.255.255. 0 G-1 -pa 172.25.160.226 health-monitoring check create bsgendp07Check -id 0 -r 2 -t 3 -rt Enabled -d 172.25.160.225 health-monitoring check create bsgendp08Check -id 1 -r 2 -t 3 -rt Enabled -d 172.25.160.219 health-monitoring check create bsgendp10Check -id 2 -rt Enabled -d 172.25.160.221 health-monitoring check create GAD1_Check -id 4 -m HTTP -p 8080 -a PATH=/gdesktop/status.jsp|HOST=172.25.160.225:8080| C1=200|MTCH=INLINE|MEXIST=Y|MTD=G|PRX=N|NOCACHE=N|AUTH=B| -d 172.25.160.225 health-monitoring check create GAD2_Check -id 5 -m HTTP -p 8081 -a "PATH=/gdesktop/status.jsp|HOST=172.25.160.225:8081 |C1=200|MTCH=Server ready|MEXIST=Y|MTD=G|PRX=N|NOCA CHE=N|AUTH=B|" -d 172.25.160.225 net route table create 0.0.0.0 0.0.0.0 172.25.160.1 -i G-1 redundancy mode set VRRP system mib2-name set AppDirector_peer appdirector farm table setCreate GAD_Farm -at 185 - cm "No Checks" appdirector farm server table create GAD_Farm 172.2 5.160.225 8080 -sn bsgendp07_8080 -id 2 -cn Enabled -sd GAD1 appdirector farm server table create GAD_Farm 172.2 5.160.225 8081 -sn bsgendp07_8081 -id 3 -cn Enabled appdirector farm server table create GAD_Farm 172.2 5.160.219 8080 -sn bsgendp08_8080 -as Disable -id 4 -cn Enabled appdirector farm server table create GAD_Farm 172.2 5.160.219 8081 -sn bsgendp08_8081 -as Disable -id 5 -cn Enabled appdirector farm server table create GAD_Farm 172.2 5.160.221 8080 -sn bsgendp10_8080 -as Disable -id 6 -cn Enabled appdirector farm server table create GAD_Farm 172.2 5.160.221 8081 -sn bsgendp10_8081 -as Disable -id 7 -cn Enabled appdirector l7 farm-selection method-table setCreat e Expires2020 -cm "Header Field" -ma "HDR=Expires|T KN=Mon, 12 Jan 2024 17:10:00 GMT|" redundancy interface-group set Disabled redundancy mirror backup status set Enabled redundancy mirror main client-status set Disabled redundancy mirror address setCreate 172.25.160.226 redundancy backup-in-vlan set Enabled appdirector farm connectivity-check httpcode setCre ate GAD_Farm "200 - OK" redundancy backup-fake-arp set Enabled net next-hop-router setCreate 172.25.160.1 -id 1 -f l 1 appdirector farm nhr setCreate 0.0.0.0 -ip 172.25.1 60.1 -fl 1 appdirector farm extended-params set GAD_Farm -nr 1 72.25.160.239 appdirector nat client address-range setCreate 172. 25.160.239 -t 172.25.160.239 appdirector nat client range-to-nat setCreate 0.0.0 .1 -t 255.255.255.254 appdirector nat client status set Enabled
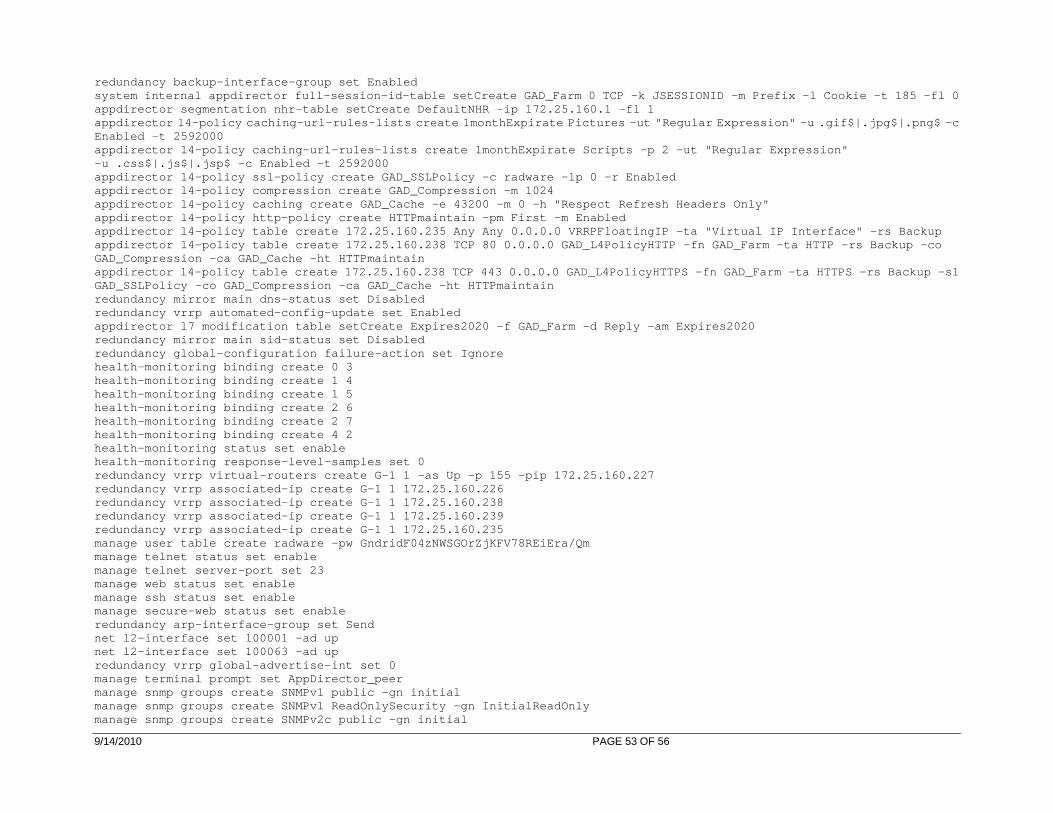
9/14/2010 PAGE 53 OF 56
redundancy backup-interface-group set Enabled system internal appdirector full-session-id-table s etCreate GAD_Farm 0 TCP -k JSESSIONID -m Prefix -l Cookie -t 185 -fl 0 appdirector segmentation nhr-table setCreate Defaul tNHR -ip 172.25.160.1 -fl 1 appdirector l4-policy caching-url-rules-lists creat e 1monthExpirate Pictures -ut "Regular Expression" -u .gif$|.jpg$|.png$ -c Enabled -t 2592000 appdirector l4-policy caching-url-rules-lists creat e 1monthExpirate Scripts -p 2 -ut "Regular Expressi on" -u .css$|.js$|.jsp$ -c Enabled -t 2592000 appdirector l4-policy ssl-policy create GAD_SSLPoli cy -c radware -lp 0 -r Enabled appdirector l4-policy compression create GAD_Compre ssion -m 1024 appdirector l4-policy caching create GAD_Cache -e 4 3200 -m 0 -h "Respect Refresh Headers Only" appdirector l4-policy http-policy create HTTPmainta in -pm First -m Enabled appdirector l4-policy table create 172.25.160.235 A ny Any 0.0.0.0 VRRPFloatingIP -ta "Virtual IP Inter face" -rs Backup appdirector l4-policy table create 172.25.160.238 T CP 80 0.0.0.0 GAD_L4PolicyHTTP -fn GAD_Farm -ta HTT P -rs Backup -co GAD_Compression -ca GAD_Cache -ht HTTPmaintain appdirector l4-policy table create 172.25.160.238 T CP 443 0.0.0.0 GAD_L4PolicyHTTPS -fn GAD_Farm -ta H TTPS -rs Backup -sl GAD_SSLPolicy -co GAD_Compression -ca GAD_Cache -ht HTTPmaintain redundancy mirror main dns-status set Disabled redundancy vrrp automated-config-update set Enabled appdirector l7 modification table setCreate Expires 2020 -f GAD_Farm -d Reply -am Expires2020 redundancy mirror main sid-status set Disabled redundancy global-configuration failure-action set Ignore health-monitoring binding create 0 3 health-monitoring binding create 1 4 health-monitoring binding create 1 5 health-monitoring binding create 2 6 health-monitoring binding create 2 7 health-monitoring binding create 4 2 health-monitoring status set enable health-monitoring response-level-samples set 0 redundancy vrrp virtual-routers create G-1 1 -as Up -p 155 -pip 172.25.160.227 redundancy vrrp associated-ip create G-1 1 172.25.1 60.226 redundancy vrrp associated-ip create G-1 1 172.25.1 60.238 redundancy vrrp associated-ip create G-1 1 172.25.1 60.239 redundancy vrrp associated-ip create G-1 1 172.25.1 60.235 manage user table create radware -pw GndridF04zNWSG OrZjKFV78REiEra/Qm manage telnet status set enable manage telnet server-port set 23 manage web status set enable manage ssh status set enable manage secure-web status set enable redundancy arp-interface-group set Send net l2-interface set 100001 -ad up net l2-interface set 100063 -ad up redundancy vrrp global-advertise-int set 0 manage terminal prompt set AppDirector_peer manage snmp groups create SNMPv1 public -gn initial manage snmp groups create SNMPv1 ReadOnlySecurity - gn InitialReadOnly manage snmp groups create SNMPv2c public -gn initia l
9/14/2010 PAGE 54 OF 56
manage snmp groups create SNMPv2c ReadOnlySecurity -gn InitialReadOnly manage snmp groups create UserBased radware -gn ini tial manage snmp groups create UserBased ReadOnlySecurit y -gn InitialReadOnly manage snmp access create initial SNMPv1 noAuthNoPr iv -rvn iso -wvn iso -nvn iso manage snmp access create InitialReadOnly SNMPv1 no AuthNoPriv -rvn ReadOnlyView manage snmp access create initial SNMPv2c noAuthNoP riv -rvn iso -wvn iso -nvn iso manage snmp access create InitialReadOnly SNMPv2c n oAuthNoPriv -rvn ReadOnlyView manage snmp access create initial UserBased authPri v -rvn iso -wvn iso -nvn iso manage snmp access create InitialReadOnly UserBased authPriv -rvn ReadOnlyView manage snmp views create iso 1 manage snmp views create ReadOnlyView 1 manage snmp views create ReadOnlyView 1.3.6.1.4.1.8 9.2.7.2 -cm excluded manage snmp views create ReadOnlyView 1.3.6.1.6.3.1 8.1.1 -cm excluded manage snmp views create ReadOnlyView 1.3.6.1.6.3.1 5.1.2.2 -cm excluded manage snmp views create ReadOnlyView 1.3.6.1.4.1.8 9.35.1.61 -cm excluded manage snmp views create ReadOnlyView 1.3.6.1.6.3.1 6.1.2 -cm excluded manage snmp views create ReadOnlyView 1.3.6.1.6.3.1 6.1.4 -cm excluded manage snmp views create ReadOnlyView 1.3.6.1.6.3.1 6.1.5 -cm excluded manage snmp notify create allTraps -ta v3Traps manage snmp global engine-id set 80000059030003b250 7c40 manage snmp users create radware -cf 0.0 -ap MD5 -a kc dcea7ba7c70e65ba7f0178b68f442310 -pp DES -pkc dcea7ba7c70e65ba7f0178b68f442310 manage snmp target-address create v3MngStations -tl v3Traps -p radware-authPriv manage snmp target-parameters create public-v1 -d S NMPv1 -sm SNMPv1 -sn public -sl noAuthNoPriv manage snmp target-parameters create public-v2 -d S NMPv2c -sm SNMPv2c -sn public -sl noAuthNoPriv manage snmp target-parameters create radware-authPr iv -d SNMPv3 -sm UserBased -sn radware -sl authPriv manage snmp community create public -n public -sn p ublic services auditing status set disable manage telnet session-timeout set 5 manage telnet auth-timeout set 30 system diagnostics policies setCreate Diag system diagnostics capture output file set "RAM Dri ve" system diagnostics capture output term set Disabled system diagnostics capture point set Both redundancy force-down-ports-time set 0 system diagnostics capture traffic-match-mode set " Inbound and Outbound" appdirector global connectivity-check tcp-timeout s et 3 security certificate table \ Name: radware \ Type: certificate \ -----BEGIN CERTIFICATE----- \ MIIB2zCCAYUCAmhxMA0GCSqGSIb3DQEBBAUAMHgxCzAJBgNVBAYTAlVTMRAwDgYD \ VQQIEwdSYWR3YXJlMRAwDgYDVQQHEwdSYWR3YXJlMRYwFAYDVQQDEw0xNjkuMjU0 \ LjAuMjU0MRAwDgYDVQQKEwdSYWR3YXJlMRswGQYDVQQLExJSYWR3YXJlIHdlYiBz \ ZXJ2ZXIwHhcNMTAwMjA1MTAxOTU1WhcNMTEwMjA1MTAxOTU1WjB4MQswCQYDVQQG \ EwJVUzEQMA4GA1UECBMHUmFkd2FyZTEQMA4GA1UEBxMHUmFkd2FyZTEWMBQGA1UE \ AxMNMTY5LjI1NC4wLjI1NDEQMA4GA1UEChMHUmFkd2FyZTEbMBkGA1UECxMSUmFk \ d2FyZSB3ZWIgc2VydmVyMFwwDQYJKoZIhvcNAQEBBQADSwAwSAJBALPakHGXmX9w \
9/14/2010 PAGE 55 OF 56
sK0GY+DpzK3/Tp1ntw9IAIpaOGTnVYYch1PcBdPPNSgSeIVBti4 f7n8nNzFEkGft \ 1N5jFhABlwcCAwEAATANBgkqhkiG9w0BAQQFAANBAF56IbzrOi/ 0t/IdjQ/sr+mV \ 76eSwB+FTO8VW0EkgJ9fMfSsxPj+uHDBn7CPlfbc5VyHIdT3oEZ wwzhl6VkpPfY= \ -----END CERTIFICATE----- \ Name: rdwrhmm \ Type: certificate \ -----BEGIN CERTIFICATE----- \ MIIB8zCCAZ0CAlJJMA0GCSqGSIb3DQEBBAUAMIGDMQswCQYDVQQGEwJVUzEQMA4G \ A1UECBMHUmFkd2FyZTEQMA4GA1UEBxMHUmFkd2FyZTEaMBgGA1UEAxMRUlcgU1NM \ IG1vbml0b3JpbmcxEDAOBgNVBAoTB1JhZHdhcmUxIjAgBgNVBAs TGVJhZHdhcmUg \ SGVhbHRoIE1vbml0b3JpbmcwHhcNMTAwMjA1MTAxOTU1WhcNMTEwMjA1MTAxOTU1 \ WjCBgzELMAkGA1UEBhMCVVMxEDAOBgNVBAgTB1JhZHdhcmUxEDAOBgNVBAcTB1Jh \ ZHdhcmUxGjAYBgNVBAMTEVJXIFNTTCBtb25pdG9yaW5nMRAwDgYDVQQKEwdSYWR3 \ YXJlMSIwIAYDVQQLExlSYWR3YXJlIEhlYWx0aCBNb25pdG9yaW5 nMFwwDQYJKoZI \ hvcNAQEBBQADSwAwSAJBAPcSRnZEPOmy/oXN2Bx4vn7akBVG9sWXqNdYi+IrCDGK \ ASPUYrxl6xEOOrwv8jOK2HnL3zpgqCDsMzmtXIyAlkMCAwEAATA NBgkqhkiG9w0B \ AQQFAANBACZDZtA6US0BwwAI7QionjUHjx7Dw5iKjf8ARXY3tXo 2S8SQ5DTtdGec \ QeuoK81xc+ipPoVpHRrcruMZAfJih/E= \ -----END CERTIFICATE----- !File Signature: cad33f63b3ecdde442b2d84f25232b42
9/14/2010 PAGE 56 OF 56
Radware Technical Support
Radware offers technical support for all of its products through the Radware Certainty Support Program. Please refer to your Certainty Support contract, or the Radware Certainty Support Guide available at: http://www.radware.com/content/support/supportprogram/default.asp. For more information, please contact your Radware Sales representative or: U.S. and Americas: (866) 234-5763 International: +972(3) 766-8666 © 2008-10 Radware, Ltd. All Rights Reserved. Radware and all other Radware product and service names are registered trademarks or trademarks of Radware in the U.S. and other countries. All other trademarks and names are the property of their respective owners.