Embed Size (px)
Citation preview

M o d e l : R A M V 2
Designed in Australia by
I n s t r u c t i o n M a n u a l
Automotive Security System with
2-Way GSM Communication
Via SMS Messaging Version 7.1
Document:RamV7.1 Release:10 October 2008
2
Contents
Contents......................................................................................................................... 2
Quick Reference Guide ................................................................................................. 4
1. Introduction ............................................................................................................... 5
1.1. Mobile Features.................................................................................................. 5
1.2. Alarm Features ................................................................................................... 6
1.3. Selectable System Features ................................................................................ 6
1.4. What You Get..................................................................................................... 7
1.5. Mobile Phone Unit Safety Precautions .............................................................. 8
1.5.1. Aircraft Safety ............................................................................................. 8
1.5.2. Electronics in Medical Equipment .............................................................. 8
1.5.3. Precautions in the Event of Loss/Theft ....................................................... 8
1.5.4. Important Information ................................................................................. 8
2. Installation & Operation............................................................................................ 9
2.1. Planning the Installation..................................................................................... 9
2.2. Installing and Wiring The Main Unit............................................................... 10
2.2.1. Extended Wiring Descriptions .................................................................. 11
2.2.2. Installing the Glass Break Microphone..................................................... 12
2.3. Installing & Wiring the Siren........................................................................... 12
2.4. Installing The Antenna..................................................................................... 14
2.5. Sim Card Setup And Functionality .................................................................. 14
2.6. Accessibility Note ............................................................................................ 15
2.7. Alarm Messages ............................................................................................... 15
2.8. SMS Command Messages................................................................................ 16
2.8.1. To Arm The Alarm.................................................................................... 16
2.8.2. To Dis-Arm The Alarm............................................................................. 17
2.8.2.1. If Your Keys Are Locked in the Vehicle ........................................... 17
2.8.3. Emergency Panic....................................................................................... 18
2.8.4. System Status Report ................................................................................ 18
2.8.5. Car Battery Low Warning......................................................................... 19
2.8.6. Boot Release.............................................................................................. 19
2.8.7. Built-in Torch............................................................................................ 19
2.8.8. Auto Bypass .............................................................................................. 20
2.8.9. Door Ajar Warning.................................................................................... 20
2.8.10. Auto Immobilise...................................................................................... 20
2.8.11. Passive Arming ....................................................................................... 20
2.8.12. Automatic Re-Arm.................................................................................. 20
2.8.13. Pre-Alert Impact Warning With ETS TM
................................................ 21
2.8.14. Glass Break Sensor.................................................................................. 21
2.8.15. PAT TM
– Past Alarm Trigger Memory/History .................................... 22
2.8.16. SMS Controlled Relay Output ................................................................ 22

3
3. Programming & Setup .............................................................................................23
3.1. Learning New Remotes.....................................................................................23
3.1.1. Learn a new Remote Control By SMS ......................................................23
3.1.2. Learn a new Remote Control with Remote ............................................24
3.2. Programming PIN Numbers .............................................................................25
3.3. Remote Control Programmable Features..........................................................26
3.3.1. Changing REGISTER 1.............................................................................27
3.3.2. Changing REGISTER 2.............................................................................28
3.3.3. Changing REGISTER 3.............................................................................29
3.4. Phone Number Memory....................................................................................30
3.4.1. To Read Phone Numbers From The System .............................................30
3.4.2. To Erase Phone Numbers From The System.............................................30
3.4.3. To Add Phone Numbers To The System...................................................31
3.4.4. To Change Your Pin Number ....................................................................31
3.4.5. To Change The ID Of The System ............................................................32
4. Warranty...................................................................................................................33
4.1. Warning Limitations & Warranty.....................................................................33
5. SMS Commands Reference .....................................................................................35

4
Quick Reference Guide
STEPS TO QUICKLY SETUP THE RAM
1. Setup the SIM card for operation in the system.
(ref. 2.5. SIM Card Setup And Functionality – Page: 14)
2. Setup the PIN Number.
(ref. 3.4.4. To Change Your PIN Number – Page: 29)
3. Setup the Identification of the alarm system.
This ‘Identification’ is a description for the system that appears at the start of
every SMS message you will receive from the alarm system.
(ref. 3.4.5 To Change The ID Of The SMS message – Page: 30)
4. Setup the Phone Numbers that the system will send messages to. Refer to the
sections Adding/Erasing Phone Numbers from the systems memory.
(ref. 3.4. Phone Number Memory – Page: 29)
NOTE: To receive a FULL list of all commands, send just your PIN number to the
RAM.
Please note down the relevant details for the alarm system. i.e. The phone numbers that
have been programmed into the system, Car Rego Number and the Phone number of the
actual RAM.
PROGRAMMED PHONE NUMBERS REFERENCE
Vehicle ID (Eg. Registration Plates)
RAM SIM Card Phone Number This is the phone number of the RAM alarm system.
Stored Phone Numbers
Telephone 1
Telephone 2
Telephone 3
Telephone 4
Telephone 5

5
1. Introduction
As Australia's leading designer & manufacturer of quality car security systems we are
proud to release our latest model that enables 2-way communication between you and
your vehicle via your mobile phone. The RhinoCo model RAM is based on our
Australian Standards Approved and Insurance Approved RA “Split System” including
Two Point Engine Immobilisation, Backup Battery, Black Wiring Harness, Glass Break
Sensor, Selectable Passive Arming, and the advanced PRE-ALERT car body impact
sensors.
1.1. Mobile Features
� Arm and disarm the alarm from your
mobile phone via SMS
� Lock and Unlock your doors from your
mobile phone via SMS
� Remote notification by SMS if the alarm
has been triggered and why
� Detailed notification of the cause of alarm
trigger
� Up to 5 mobiles can be stored & sent
notifications (programmable)
� Optional ring if no response to SMS
alarm notification
� Low battery notification by SMS
i.e. if you leave your headlights on in
your car.
� Programmable 6 digit PIN code for
secure operation
� 1 Relay output remotely controlled via
SMS (negative outputs)
� Positive acknowledgement of ALL SMS
commands sent to the RAM.
� Request a status report from the vehicles
alarm via SMS
� Learn new remote controls using SMS
commands (i.e. used if you lose both
remote controls)
� Remote SMS panic that notifies all
programmed mobiles
� Warning of no phone coverage on arming
(i.e. no GSM service/coverage)

6
1.2. Alarm Features ���� Advanced All-in-1 design
���� Remote controls have Code Hopping Technology (Anti-Scanning, Anti-Code
Grabbing)
���� SSR™ Solid State Remote Controls (2 supplied)
���� Long Life Lithium Cell Remote Control Batteries
���� Ultra-Bright Red Flashing Dash LED Light
���� Personal Panic Button Via Remote Control
���� Automatic Siren Reset Period (30 Seconds)
���� Visual arming and disarming via blinkers
���� All Points Of Entry Protection
���� PAT™ Past Alarm Trigger Memory History Reporting Mode
���� Service And Siren Override Mechanical Key Switch
���� Safety Circuit Prevents Arming While Ignition On
���� Learning Mode For Optional Transmitters (Remote Controls)
���� Negative Pulse Central Locking Outputs
���� Two Point Engine Immobilisation (Optional 3rd
point)
���� Siren Battery Backup System
���� Auto Bypass
���� Glass Break Sensor
���� Auto Immobilise
���� Two Stage Car Body Impact Sensor
���� Test / Fault Finding Mode
1.3. Selectable System Features ���� Arming And Disarming Confirmation Beep
���� Passive Arming Programmable Via Remote Control
���� Door Ajar Warning (If A Door Is Left Open)
���� Automatic Re-Arm In Case Of Accidental Disarm
���� Auto Re-Lock For Accidental Disarm Where Central Locking Is Connected
���� Quiet Arming Selectable Via Remote Control
���� Impact Sensor And Ultrasonic Isolation Programmable Via Remote Control
���� Electric Boot Release Output Via Remote Control
���� Lock Pulse On Alarm Trigger
���� Multiple Vehicle Remote Controls
���� Silent Operation
���� Valet Mode
���� Central Closure
���� Door Lock On Ignition
���� 2 Second Exit Delay
���� Perimeter Night Light
���� External Pre-Warn Output
���� Shock Sensor Sensitivity Adjustment
���� TransRAM mode for vehicles with factory keyless entry systems. Allows for factory
remote controls to arm/disarm the system. (Part No: TRANSTX)
���� Wireless Keypad mode to allow arm/disarm of the system without remote controls.
(Part No: WKPB)

7
1.4. What You Get
Below is a list of parts included with system.
Item Description Quantity Image
1. Main control unit
This All-In-One unit incorporates the mobile phone
engine, the SIM card holder, and the main security alarm
electronics module. The main wiring harness plugs into
the main control unit securely via the 24 way connector. .
1
2. Remote controls
2 x High Security Code Hopping Remote Controls.
These allow you to easily arm & disarm the system from
the area surrounding your vehicle. In case of duress, you
can trigger the alarm at any time from the remote control.
2
3. GSM Antenna
The phone antenna plugs directly into the main control
unit. The antenna enables the phone signals to be
transmitted and received via the mobile network used.
1
4. Back Up Battery Siren
This high frequency siren generates an intolerable noise
to the human ear, and is designed to help repel intruders
from your vehicle. It mounts into the engine bay of your
vehicle, and is simply cabled back to the main control
unit (2m of cable is provided).
1
5. Wiring Harness
The all black security wiring harness plugs directly into
the main control unit. These wires connect the module to
the sensors in the vehicle and other accessories.
1
6. High Security – Override keys
Used for turning off the RAM’s backup battery siren.
2
7. Mounting materials
The bonnet switch and mounting accessories are supplied
along with the siren mounting bracket and associated
screws, washers and nuts.
1

8
1.5. Mobile Phone Unit Safety Precautions
Important notes about on-board GSM phones.
1.5.1. Aircraft Safety
Mobile phones can interfere with an aircraft’s navigation system and its mobile network.
The use of the Mobile Phone Units on board aircraft is forbidden by law and should be
switched off.
1.5.2. Electronics in Medical Equipment
Radio transmitters, including mobile phones can interfere with the operation of
inadequately protected medical devices. Please address all questions to a doctor or
manufacturer of the medical device.
1.5.3. Precautions in the Event of Loss/Theft
If your Mobile Phone / Mobile Phone Unit , your SIM card or both go missing, notify
your network operator immediately in order to avoid misuse.
1.5.4. Important Information
Under no circumstances shall RhinoCo be responsible for any loss of data or income or
any special, incidental, consequential or indirect damages howsoever caused.

9
2. Installation & Operation
2.1. Planning the Installation
Each separate component of the RAM should be placed in strategic locations. Below is a
guide to where you should locate the main unit, the phone antenna & the siren.
It is important to remember that the GSM antenna must be located high, but just
underneath the centre of the dashboard out of sight. An external antenna is not used for
security purposes.
Planning and Wire Routing
Figure 1
Main
Unit
The RAM main unit should be located under the dashboard; out of sight from
any would be thief. The main module does not have to be on the driver’s
side, but is probably more convenient to install on the drivers side as most of
the wires used will be found on the driver’s side
Siren
Route the black wires from the BBS Siren through the firewall of the vehicle.
Use an existing hole if possible & seal with silicone if required.
GSM
Antenna
The phone antenna must be placed under the dashboard at the very top, or in
the pillar, preferably furthest away from any metal as the phone signal
transmits and receives through the windscreen. The antenna should be
straight with no bends. The antenna is the last 8.3cm of the antenna wire,
which has been stripped.
I.e. The antenna should be placed under the dash and stuck to the very top of
the underside of the dash above the speedometer or as high as possible
14
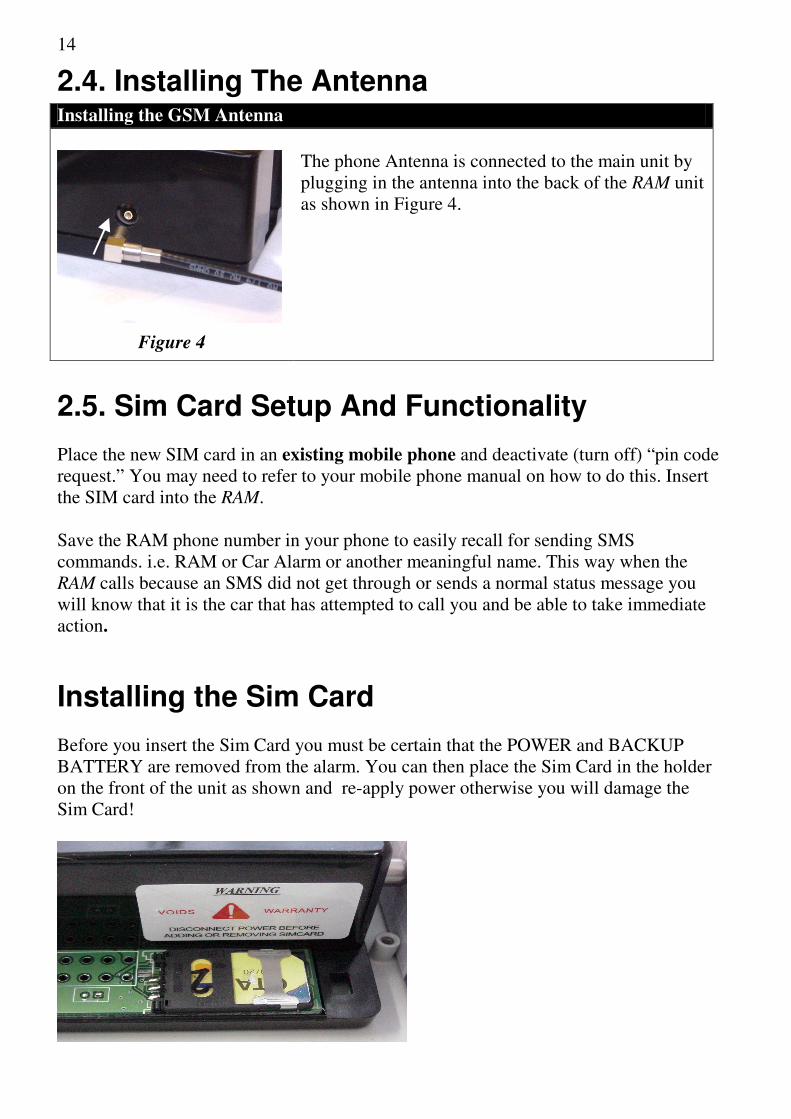
2.4. Installing The Antenna
Installing the GSM Antenna
Figure 4
The phone Antenna is connected to the main unit by
plugging in the antenna into the back of the RAM unit
as shown in Figure 4.
2.5. Sim Card Setup And Functionality
Place the new SIM card in an existing mobile phone and deactivate (turn off) “pin code
request.” You may need to refer to your mobile phone manual on how to do this. Insert
the SIM card into the RAM.
Save the RAM phone number in your phone to easily recall for sending SMS
commands. i.e. RAM or Car Alarm or another meaningful name. This way when the
RAM calls because an SMS did not get through or sends a normal status message you
will know that it is the car that has attempted to call you and be able to take immediate
action.
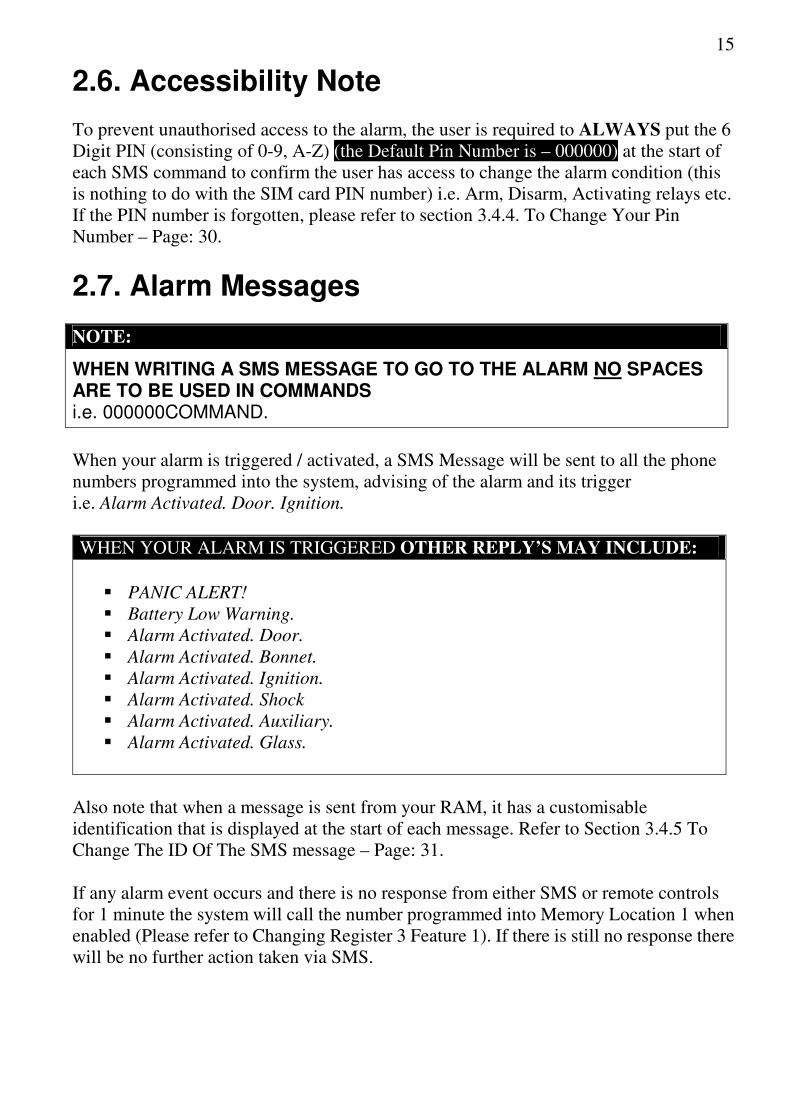
Installing the Sim Card
Before you insert the Sim Card you must be certain that the POWER and BACKUP
BATTERY are removed from the alarm. You can then place the Sim Card in the holder
on the front of the unit as shown and re-apply power otherwise you will damage the
Sim Card!
15
2.6. Accessibility Note
To prevent unauthorised access to the alarm, the user is required to ALWAYS put the 6
Digit PIN (consisting of 0-9, A-Z) (the Default Pin Number is – 000000) at the start of
each SMS command to confirm the user has access to change the alarm condition (this
is nothing to do with the SIM card PIN number) i.e. Arm, Disarm, Activating relays etc.
If the PIN number is forgotten, please refer to section 3.4.4. To Change Your Pin
Number – Page: 30.
2.7. Alarm Messages
NOTE:
WHEN WRITING A SMS MESSAGE TO GO TO THE ALARM NO SPACES ARE TO BE USED IN COMMANDS i.e. 000000COMMAND.
When your alarm is triggered / activated, a SMS Message will be sent to all the phone
numbers programmed into the system, advising of the alarm and its trigger
i.e. Alarm Activated. Door. Ignition.
WHEN YOUR ALARM IS TRIGGERED OTHER REPLY’S MAY INCLUDE:
� PANIC ALERT!
� Battery Low Warning.
� Alarm Activated. Door.
� Alarm Activated. Bonnet.
� Alarm Activated. Ignition.
� Alarm Activated. Shock
� Alarm Activated. Auxiliary.
� Alarm Activated. Glass.
Also note that when a message is sent from your RAM, it has a customisable
identification that is displayed at the start of each message. Refer to Section 3.4.5 To
Change The ID Of The SMS message – Page: 31.
If any alarm event occurs and there is no response from either SMS or remote controls
for 1 minute the system will call the number programmed into Memory Location 1 when
enabled (Please refer to Changing Register 3 Feature 1). If there is still no response there
will be no further action taken via SMS.

16
123456ARM or
123456A
2.8. SMS Command Messages
Refer to your mobile phones user manual on how to write SMS messages.
2.8.1. To Arm The Alarm
NOTE: From the siren you will hear:
� 1 Beep for Normal Arming
� 3 Beeps for No Coverage warning
� Constant Beeps for 3 seconds for Door Ajar warning
BY SMS BY REMOTE CONTROL
ARM: Type your PIN number and
ARM from a mobile phone, and send it
to the alarm.
(WHERE 123456 = YOUR PIN NUMBER)
NOTE: For the ARM command you can
use the letter ‘A’ instead of ‘ARM’.
You will receive a reply SMS message
back informing you of the state of the
alarm.
OTHER REPLY’S MAY INCLUDE:
� Alarm already armed
� Alarm unable to arm. Ignition on!
� Alarm armed. Door Ajar
warning!
� Alarm armed. Boot warning!
� Alarm armed. Bonnet warning!
� Alarm armed. Aux warning!
Pressing the Bottom button on the remote
control arms the alarm. The blinkers will
flash once, and the siren will beep once.
The dash LED-light will stay on for 20
seconds then flash, THE ALARM IS
NOW ON.
NOTE:
For audible arm / disarm press the Bottom
button.
For silent arm / disarm press BOTH
Bottom & Left buttons.
ALARM ARMED ALARM ARMED

17
123456DISARM or
123456D
ALARM TURNED OFF
2.8.2. To Dis-Arm The Alarm
BY SMS BY REMOTE CONTROL
DISARM: Type your PIN number and
DISARM from a mobile phone, and
send it to the alarm.
(WHERE 123456 = YOUR PIN NUMBER)
NOTE: For the DISARM command you
can use the letter ‘D’ instead of
‘DISARM’.
You will receive a reply SMS message
back informing you of the state of the
alarm.
OTHER REPLY’S MAY INCLUDE:
� Alarm already disarmed
To disarm the alarm, press the Bottom
button again. The blinkers will flash twice
and the siren will beep twice. THE
ALARM IS NOW OFF.
NOTE:
For audible arm / disarm press the Bottom
button.
For silent arm / disarm press BOTH
Bottom & Left buttons.
NOTE:
If an intruder triggered the alarm while your alarm was set, it will beep the siren and
flash the blinkers four times on disarm. The system will also store the ten last times
the alarm has been activated in its memory, and can tell you what has triggered the
system. Refer to section 2.8.14 Past Alarm Trigger Memory / History – Page: 21.
2.8.2.1. If Your Keys Are Locked in the Vehicle
IMPORTANT!
IF YOUR KEYS ARE LOCKED IN THE CAR AND THE RAM IS DISARMED,
SIMPLY RE-ARM THE ALARM AND THEN DISARM THE ALARM VIA SMS.
123456DISARM OR
123456D
ALARM TURNED OFF

18
2.8.3. Emergency Panic
BY SMS BY REMOTE CONTROL
PANIC: Type your PIN number and
PANIC from a mobile phone, and send
it to the alarm. Once the message is sent
the alarm will go into
“PANIC ALERT.”
This will sets off the siren and sends an
SMS message to ALL phone numbers
alerting them that panic is activated.
(WHERE 123456 = YOUR PIN NUMBER)
The reply message below will be sent to
all mobile phone numbers.
� PANIC ALERT!
If the cars ignition is on, the alarm
will NOT go into PANIC mode and
you will not receive an SMS
response.
To SET the alarm into “PANIC mode”,
press the Right button. This will sets off
the siren & blinkers, and sends an SMS
message to all phone numbers alerting
them that the alarm is in “PANIC
ALERT.”
To CANCEL “PANIC ALERT” press the
same button again on the remote control.
You can also cancel the “PANIC ALERT”
by press the Arm/Disarm button.
NOTE: Panic does not work when the ignition is
turned on by requirement of Australian
Law. (EPA - Environmental Protection Agency)
2.8.4. System Status Report
STATUS: Type your PIN number and STATUS from a mobile phone, and send it to
your alarm and you will receive the alarm systems current status.
(WHERE 123456 = IS YOUR PIN NUMBER)
The SMS message that you will receive
back will inform you of:
ALARM on/off.
Phone Signal good/bad.
Car Battery good/low
123456PANIC
123456STATUS
123456PANIC
123456STATUS

19
Battery low
warning!
2.8.5. Car Battery Low Warning
The system will send you an SMS when your car battery voltage reaches a critical
level i.e. if you leave your lights on & drain
your battery. The message sent is “Battery
Low Warning”. The message will only be sent
once in a low battery condition.
This message will be sent to all mobile phone
numbers programmed into the RAM.
2.8.6. Boot Release
The alarm is fitted with remote boot release
capability. This feature enables the user to unlock
the boot by pressing the Left button for 3
seconds. The boot will unlock and the alarm will
disarm with audible beeps. NOTE: For safety
reasons the remote boot release will not work
when the ignition is on.
This feature is not supported by the sending of an
SMS message.
2.8.7. Built-in Torch
Your remote control has a built-in torch. You can
enable the torch by press and holding the Top
button. The torch will switch off when you
release the button.
You alarm system will not respond to this
function.
BATTERY LOW WARNING!

20
2.8.8. Auto Bypass
Auto bypass is designed to reduce false alarms caused by faulty switches or external
sensors. If the alarm is triggered 3 times by the same sector then the particular sector
will be bypassed. (i.e. The sector will become inactive.)
The sector will only be bypassed for one arming period. The next time the system is
armed the sector that was bypassed will become active again.
2.8.9. Door Ajar Warning
If the vehicles doors are not properly closed
when you try to activate your alarm system
with remote controls, the blinkers will flash and
the siren will continuously beep for 3 seconds
to alert you that the vehicle is not secure.
When trying to ARM the alarm by sending the
message “ARM” from your mobile phone, the alarm will still arm. Though the
message that will be sent back will read “Alarm armed. Door ajar warning.”
2.8.10. Auto Immobilise
The immobiliser activates 60 seconds after the ignition is turned off. The dash
mounted LED will stay on constantly to confirm the system’s special status. The
vehicle cannot be started unless the remote is pressed. If the remote is pressed again,
the alarm will arm as per normal operation.
2.8.11. Passive Arming
The alarm can automatically arm itself one minute after you leave your vehicle
provided that the ignition is turned off, and that at least one door has been opened
and closed i.e. the owner has parked and has exited the vehicle. This feature will not
lock the vehicle where central locking is connected.
2.8.12. Automatic Re-Arm
This feature prevents accidental disarming by the owner i.e. the owner turns the
alarm off but is then distracted and forgets that they have deactivated the system. If a
door is not opened within one minute from when the system is turned off by the
remote, the system will re-arm and if central locking is connected it will re-lock the
vehicle.
ALARM ARMED
DOOR AJAR WARNING

21
2.8.13. Pre-Alert Impact Warning With ETS TM
This special feature provides a two-stage impact sensing system. It gives the security
conscious owner a sensitive car body impact sensor that will give a potential thief
prior warning that the vehicle is protected by this most formidable alarm system.
On detection of a low level impact i.e. from a tyre kick, the siren will simply beep for
a few seconds to warn away the would-be thief. If the vehicle is attacked any further,
the system will move into full siren mode.
Every phone number that is programmed into the
alarm system will receive a SMS message stating
the Alarm has been activated by the shock
sensor.
The unique ETS™ Environment Tuned Sensor is able to distinguish between
environmental shocks caused by aircraft, trucks, or extreme weather conditions, and
the impact caused by any thief attempting to break in or other heavy impacts.
Furthermore the system features the unique Rhino "Auto Adjust” process, where
during the 20 sec. arming delay, the alarm samples the background noise where the
vehicle is parked, and will if necessary automatically reduce the sensitivity of the
impact sensor to an appropriate level. This process allows a trouble free sensitivity
that ordinary alarms simply cannot provide. The sensitivity level reference point can
be adjusted to suit your particular needs. Please refer to the programming section
contained later in this manual.
2.8.14. Glass Break Sensor
The RAM incorporates an intelligent glass break
sensing system. This inbuilt device will trigger
the alarm system, provided it registers the
correct sound frequency parameters for breaking
glass & that the impact sensor also registers a
corresponding vibration to the vehicle. This
ensures accurate detection of glass breakage.
When the alarm registers the correct sound frequency it will sound the alarm and will
alert all programmed mobile phone numbers by SMS stating the cause.
ALARM ACTIVATED.
GLASS
ALARM ACTIVATED.
SHOCK.
ALARM ACTIVATED.
GLASS.

22
2.8.15. PAT TM
– Past Alarm Trigger Memory/History
REMOTE CONTROL
To identify the cause of the last TEN reasons why the alarm has triggered, you can
follow the steps described in Section 3.3.3. Changing Register 3 – Page: 28. Or type
your PIN number and HISTORY from a mobile phone, and send it to the alarm. Once
the message is sent the alarm you will receive an SMS back saying
ALARM HISTORY:
Oldest XXX. XXX. XXX. XXX. … Latest (where XXX is the cause of the alarm being triggered)
2.8.16. SMS Controlled Relay Output
The RAM incorporates 3 onboard SMS controlled relay output that can be switched on
and off with a simple message.
ONOUT1/OFFOUT1: Type your PIN number and ONOUT1 from a mobile phone,
and send it to the alarm to activate the relay output. Once the message is sent the alarm
will respond with “Output1 turned on.” To turn the relay output off send OFFOUT1
and the alarm will respond the with “Output1 turned off.”
To activate outputs two and three simply substitute the number accordingly i.e.
onout2, offout2, onout3 and offout3. There is also a command “test” i.e. 000000test
which turns on all three outputs and returns the status of the alarm.
123456OFFOUT1
123456ONOUT1
123456ONOUT1 123456OFFOUT1

23
3. Programming & Setup
3.1. Learning New Remotes
3.1.1. Learn a new Remote Control By SMS SMS - To add remotes if all remotes are lost a combination of SMS and beeps can add a new
remote.
A. Send the command “LEARN”
You will receive a SMS saying:
If you receive a SMS saying
“Unable to activate learn mode Ignition on” or
“Unable to activate learn mode System Armed”
Disarm the alarm and turn the ignition to the off position and repeat step ‘A’ again.
B. Within 15 seconds the alarm will begin to beep and flash the blinkers.
C. Press and hold down the Bottom button on a remote when the beeps begin keep holding until
the beeps stop.
D. The new remote control is now programmed into the alarm.
E. Test that the remote now works.

24
3.1.2. Learn a new Remote Control with Remote
To add a new transmitter to your alarm, simply follow the procedure below:
A. Turn the vehicle’s ignition on.
B. Immediately press and hold the Bottom button on the Original remote control
until the siren starts to beep (approximately 4 seconds) and then release the button.
C. Immediately press and hold the same (Bottom) button on the New remote control
for at least 4 seconds.
D. Turn the vehicle’s ignition off.
E. The new remote control is now programmed into the alarm.
F. Test to see if that remote works with the alarm.

25
3.2. Programming PIN Numbers
NEWPIN – In the case of loosing your PIN number for the RAM alarm system.
Simply send a message to your alarm: NEWPINXXXXXX – where XXXXXX is the
new pin number you want to have consisting of 0-9, a-Z. (Not case sensitive)
When you send the message and the unit has received it the siren will start beeping 9
times and the indicators will flash. Within the time of the indicators flashing and the
siren beeping, you have to press the Bottom button on the remote to confirm you want
to change the PIN number.
If the system does not receive confirmation, (i.e. if the Bottom button on the remote
was not pressed) you will receive a message stating: ”PIN change” fail.
Valid characters are 0-9 a-Z. If a confirmation is received you will receive a SMS
stating your new pin number. An example is shown above.
NEWPIN123456
NEWPIN123456
NEWPIN098765

26
3.3. Remote Control Programmable Features
Your Rhino Security system incorporates the latest in high security features. It is
possible to customise your security system so that it suits your requirements perfectly.
Detailed below is the full list of programmable features that can either be turned on or
turned off.
We have set at the factory the most common configuration chosen and these settings are
listed in the REGISTER Settings listed below. Once the desired features have been
selected, the selection is permanently retained in memory, even if power is removed, or
the override key switch is turned to off. This includes the Past Alarm Trigger Memory.
To turn on or turn off any feature use the following procedure: eg to disable passive
arming.
1. Find the REGISTER (1, 2 or 3) in which the feature is located. (Eg: passive arming is
located in REGISTER 1).
2. Set the vehicle up as described to access REGISTER 1, (doors closed, bonnet closed,
turning the ignition on last).
3. Press the remote control button an equal number of times to the selected feature’s
code number (eg 5 times for passive arming).
4. Turn the ignition to off.
5. The system will then confirm which features are activated via audible readout. If a
feature is enabled the siren will chirp out its code in beeps from the siren corresponding
to the number shown in the column “Press Remote This Many Times”. The siren in
this example will beep in order Once, then Twice, etc. up to Eight times. The system
misses the passive arming code of 5 Beeps as this feature has been disabled. Please note
that feature 9 is excluded from the confirming number of beeps on all 3 Registers.

27
3.3.1. Changing REGISTER 1
Vehicle Set Up: ALL DOORS CLOSED, BONNET CLOSED, AND THE IGNITION TURNED ON LAST Remote Key action : TURN ON / OFF FEATURES VIA THE BOTTOM BUTTON ON THE REMOTE
PROGRAMMABLE
FEATURE
Press Remote
This Many Times
INITIAL FACTOR
Y SETTIN
G
DESCRIPTION
Arming Beep 1 ON 1 Beep on Arm Disarm Beep 2 ON 2 Beeps on Disarm
Auxiliary Detection 3 ON Activate Ultrasonics, Microwave if fitted.
Shock Sensor 4 ON Activate Two Stage Shock Sensor.
Passive Arm 5 OFF System arms automatically 90 seconds after exit - the doors will not lock.
Auto Re-arm 6 OFF If system is disarmed and a door is not opened within 60 seconds, the system will rearm & relock.
Lock Pulse on Alarm Trigger
7 OFF When the alarm is triggered, the doors will be sent a lock pulse. ie the would be thief picks the door lock, the alarm triggers on voltage drop due to the central locking operating, then the doors immediately re-lock to foil the would be thief.
Not Used 8 OFF
Shock Sensor Adjustment
9 6 SELECT the level required.
After pressing the remote 9 times to enter this mode, turn the ignition to off. There are 8 levels of adjustment. The factory default setting is level 6. Pressing the remote once will increase the sensitivity by one level ie to level 7. The LED will then flash seven times to confirm the new level. Pressing the remote again will increase the sensitivity to level 8 (max). Pressing the remote again will return the adjustment to level 1(least sensitive). Once you have adjusted the sensitivity level to the desired setting, turn the ignition on to exit this mode.

28
3.3.2. Changing REGISTER 2
Vehicle Set Up: DRIVER’S DOOR OPEN, BONNET CLOSED, AND THE IGNITION TURNED ON LAST Remote Key action : TURN ON / OFF FEATURES VIA THE BOTTOM BUTTON ON THE REMOTE
PROGRAMMABLE FEATURE
Press Remote
This Many Times
INITIAL FACTORY SETTING
DESCRIPTION
Left Button Used For Another Vehicle
1 OFF Allows your remote keys to be divided to act like two separate single button remote keys to control two separate vehicles, i.e. left button controls vehicle "A", Bottom button controls vehicle "B". Simply “learn” the remote into the other vehicle as detailed in section “learning new transmitters”. Only right button features can be accessed. (i.e. boot release control is unavailable).
Second Button Used To Arm/Disarm This Vehicle
2 OFF Turn this feature on in your second vehicle (not this alarm system) if you are utilising the above feature.
Auto Immobilise Override
3 OFF Turn this feature on to disable auto immobilise when the vehicle is left disarmed for 40 seconds after the ignition is turned off.
TransRAM mode
4 OFF When this feature is turned on then the TransTX module may be interfaced to allow the user to arm and disarm their vehicle via the factory remote control. See the TransTX instructions for further details. NOTE: If the TransTX was supplied with the unit, then this feature is already turned ON by default.
Silent Operation 5 OFF When on, this feature stops the siren from sounding. The alarm will still trigger, flashing the indicators etc. Indication via optional paging system may be desired instead of siren noise.
Valet Mode 6 OFF When on, this feature allows five engine starts before the system returns to its normal operation. Ie. If you take the vehicle to valet parking, and you normally use passive arming, they will be able to start the car 5 times before passive arming re-engages.
Central Closure 7 OFF When on, the lock outputs become a 15 second negative pulse instead of 0.5 seconds. This feature is for certain vehicles with vacuum central locking or those with a central closure wire (some BMW, Mercedes) i.e. doors lock, electric windows wind up, sunroof closes automatically.
Wireless Keypad Mode
8 OFF When this feature is turned on then the Wireless Keypad may be used to disarm the system while still using the standard factory remotes to lock and unlock the vehicle. See the Wireless Keypad instructions for further details.
Installer Mode 9 SELECT The Mode Required
After pressing the remote 9 times to enter this mode, turn the ignition to off. This mode allows the installer / owner to verify that each trigger of the alarm system is working, without having to arm & disarm the system each time & set off the siren. The siren will beep and the blinkers will flash to indicate a trigger eg push the bonnet switch, open a door, hit the vehicle. The siren will beep four times to indicate a pre-warning impact sensor detection, or once to indicate full alarm trigger level. Turn the ignition on to exit this mode.

29
3.3.3. Changing REGISTER 3
Vehicle Set Up: DRIVER’S DOOR OPEN, BONNET OPEN , AND THE IGNITION TURNED ON LAST Remote Key action : TURN ON / OFF FEATURES VIA THE BOTTOM BUTTON ON THE REMOTE
PROGRAMMABLE FEATURE
Press Remote This Many Times
INITIAL FACTORY SETTING
DESCRIPTION
Call Phone 1 on no response within 1 minute
1 ON Call phone number in memory location 1 if there was known response to an alarm condition i.e. If the system goes into alarm and you do not respond with a message or disarm the alarm.
Door Lock on Ignition
2 OFF When this feature is on, the doors will lock when the ignition is turned to on, and unlock when the ignition is turned to off.
2 Second Exit Delay 3 OFF When this feature is on, the normal 45 second exit delay is reduced to 2 seconds ie the alarm is fully armed 2 seconds after pressing the remote.
No Door Ajar Warning
4 OFF When this feature is on, the door ajar warning feature is removed (the siren & indicators will not beep & flash for 3 sec. if a door is not closed properly).
Perimeter Night Light
6 OFF When this feature is on, the indicators will stay on constantly for 20 seconds on disarm, or until the ignition is turned on. This allows for illumination around the vehicle at night.
Instant Boot Release 7 OFF When this feature is on, the boot release button (left) will only require to be pressed once rather than held down for 3 seconds to open an electric boot.
External Pre-Warn Output
8 OFF When on, the internal alarm pre-warn is disabled & a two second output from the boot wire is given.
PAT™ Past Alarm Trigger Memory
9 SELECT to replay memory.
After pressing the remote 9 times to enter this mode, turn the ignition off. Your Rhino Alarm offers a unique memory that stores the ten last reasons why the alarm was triggered. This memory cannot be erased. 1 Beep, 1 Flash - Voltage Drop Alarm 2 Beep, 2 Flashes - Glass Break Alarm 3 Beep, 3 Flashes - Shock Sensor Alarm 4 Beep, 4 Flashes - Power Fail Alarm 5 Beep, 5 Flashes - Ignition Alarm 6 Beep, 6 Flashes - Aux Alarm 7 Beep, 7 Flashes - Door Alarms 8 Beep, 8 Flashes - Bonnet / Boot Alarm If two previous alarms were recorded i.e. voltage drop and shock sensor the LED will flash and the siren will beep once for voltage drop, then no noise for 1 second then beep three times for shock sensor sensor. The last memory heard is the most recent alarm sector triggered. Turn the ignition to on to exit this mode.

30
3.4. Phone Number Memory
The Rhino RAM alarm is able to be programmed with up to 5 different mobile phones,
so when the alarm is armed or put in to panic mode and activates it will send a SMS
message to each of the phone numbers in the systems memory.
3.4.1. To Read Phone Numbers From The System
BY SMS ONLY
Type your PIN number and READPHONE, and send it to your alarm you can find
out the different mobile numbers that are programmed into the system.
(WHERE 123456 = YOUR PIN NUMBER)
You will then receive a reply SMS message
back stating all the phone numbers in the alarm
systems memory.
E.G.
Phone Numbers:
1: 0409986655, 2: 040411689, 3: Not Used, 4: Not Used, 5: 0414222345
3.4.2. To Erase Phone Numbers From The System
BY SMS ONLY
There are 5 memory locations for mobile phones. Type your PIN number and
ERASEPHONEX, and send it to your alarm you can erase the mobile phone number
that is stored in the location identified by ‘X’ in the alarm system.
EG: 123456ERASEPHONE3 – will erase the phone number stored in location 3 in the
alarm memory.
You will then receive a reply SMS message
back stating all the phone numbers that are
stored in the alarm systems.
E.G.
Phone Numbers: 1: 0409986655, 2: Not Used, 3: Not Used, 4: Not Used, 5: 0414222345
123456READPHONE
123456 ERASEPHONE4
123456 READPHONE
123456 ERASEPHONE4
31
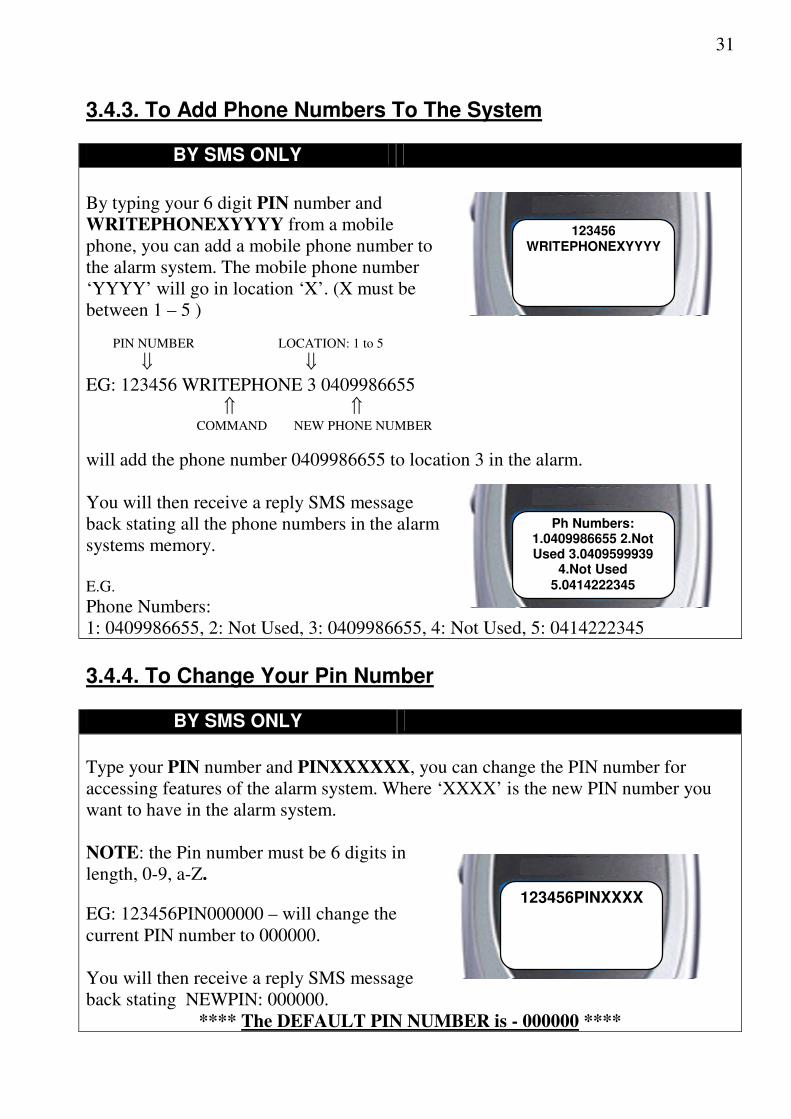
3.4.3. To Add Phone Numbers To The System
BY SMS ONLY
By typing your 6 digit PIN number and
WRITEPHONEXYYYY from a mobile
phone, you can add a mobile phone number to
the alarm system. The mobile phone number
‘YYYY’ will go in location ‘X’. (X must be
between 1 – 5 )
PIN NUMBER LOCATION: 1 to 5
⇓ ⇓
EG: 123456 WRITEPHONE 3 0409986655
⇑ ⇑ COMMAND NEW PHONE NUMBER
will add the phone number 0409986655 to location 3 in the alarm.
You will then receive a reply SMS message
back stating all the phone numbers in the alarm
systems memory.
E.G.
Phone Numbers:
1: 0409986655, 2: Not Used, 3: 0409986655, 4: Not Used, 5: 0414222345
3.4.4. To Change Your Pin Number
BY SMS ONLY
Type your PIN number and PINXXXXXX, you can change the PIN number for
accessing features of the alarm system. Where ‘XXXX’ is the new PIN number you
want to have in the alarm system.
NOTE: the Pin number must be 6 digits in
length, 0-9, a-Z.
EG: 123456PIN000000 – will change the
current PIN number to 000000.
You will then receive a reply SMS message
back stating NEWPIN: 000000.
**** The DEFAULT PIN NUMBER is - 000000 ****
123456 WRITEPHONEXYYYY
123456PINXXXXX
Ph Numbers: 1: 0409986655 2: Not
Used 3: 0409986655 4: Not Used
5: 0414222345
123456PINXXXX
Ph Numbers: 1.0409986655 2.Not Used 3.0409599939
4.Not Used 5.0414222345
123456 WRITEPHONEXYYYY

32
3.4.5. To Change The ID Of The System
BY SMS ONLY
You can change the ID Message that is displayed
at the start of the SMS messages you receive.
Where XXXXXX is a code to distinguish the
alarm from another system. i.e. The car’s rego
number. Up to 19 characters can be used for the
ID.
You will then receive a reply SMS message back
saying:
ABC123. ID change passed.
EG: 123456IDABC123 – will change the current
ID to ABC123.
123456IDXXXXX
ABC123: ID CHANGE PASSED.
ABC123: ALARM ACTIVATED
SHOCK. GLASS.
123456IDXXXX
ABC123: ID CHANGE PASSED.
ABC123: ALARM ACTIVATED SHOCK.
GLASS.

33
4. Warranty
4.1. Warning Limitations & Warranty While this system is an advanced security system, it does not offer guaranteed protection against
burglary or any other emergency. Any alarm system, whether commercial or residential, is subject to
compromise or failure to warn for a variety of reasons. For example:
• Intruders may gain access through unprotected openings, or have the technical sophistication to
bypass an alarm or disconnect an alarm warning device.
• Intrusion detectors (e.g., microwave detectors), and many other sensing devices will not work
without power. Battery operated devices will not work without batteries, with dead batteries or if
the batteries are not put in properly. Devices powered solely by AC will not work if their AC
power supply is cut off for any reason, however briefly.
• Signals sent by wireless transmitters may be blocked or reflected by metal before they reach the
alarm receiver. Even if the signal path has been recently checked during a weekly test, blockage
can occur if a metal object is moved into the path.
• Microwave Detectors can only detect intrusion within the designed ranges as set out in their
installation manual.
• Alarm warning devices such as sirens, bells or horns may not alert people or wake up sleepers
who are located on the other side of closed or partly open doors. Even persons who are awake
may not hear the warning if the alarm is muffled by noise from a stereo, radio, air conditioner or
other appliances, or by passing traffic. Finally, alarm warning devices, however loud, may not
warn hearing-impaired people or waken deep sleepers.
• This equipment, like other electrical devices, is subject to component failure. Even though this
equipment is designed to last as long as 10 years, the electronic components could fail at any
time.
• The most common cause of an alarm system not functioning when an intrusion occurs is
inadequate maintenance. This alarm system should be tested weekly to make sure all devices are
working properly.
• Installing an alarm system may make one eligible for lower insurance rates, but an alarm system
is not a substitute for insurance. Owners should continue to act prudently in protecting
themselves and continue to insure their property.
We continue to develop new and improved protection devices. Users of alarm systems owe it to
themselves and their loved ones to learn about these developments.

34
LIMITED WARRANTY
Cornick Pty Ltd (ABN 74 001 621 610) (Seller), warrants its products to be in conformance with its own plans and specifications and to be free from defects in materials and workmanship under normal use and service for twelve months from the date of original purchase. Sellers obligation shall be limited to repairing or replacing, at its option, free of charge for materials or labor, any part which is proved not in compliance with Sellers specifications or proves defective in materials or workmanship under normal use and service. Seller shall have no obligation under this Limited Warranty or otherwise if the product is altered or improperly repaired or serviced by anyone other than Seller. For warranty service, return transportation prepaid, to 9 Hannabus Place McGraths Hill NSW 2756. Seller has no obligation to attend the buyer’s location to retrieve the goods or make repairs onsite. There are no warranties, expressed or implied, of merchant ability, or fitness for a particular purpose or otherwise, which extend beyond the description on the face hereof. In no case shall seller be liable to anyone for any consequential or incidental damages for breach of this or any other warranty, express or implied, or upon any other basis of liability whatsoever, even the loss or damage is caused by its own negligence or fault. Seller does not represent that the products it sells may not be compromised or circumvented; that the products will prevent any personal injury or property loss by burglary, robbery, fire or otherwise; or that the products will in all cases provide adequate warning or protection. Customer understands that a properly installed and maintained alarm system may only reduce the risk of a burglary, robbery, or fire without warning, but it is not insurance or a guarantee that such will not occur or that there will be no personal injury or property loss as a result. Consequently, seller shall have no liability for any personal injury; property damage or other loss based on a claim the product failed to give any warning. However, if seller is held liable, whether directly or indirectly, for any loss or damage arising under this limited warranty or otherwise, regard less of cause or origin, seller's maximum liability shall not in any case exceed the purchase price of the product, which shall be the complete and exclusive remedy against seller. This warranty replaces any previous warranties and is the only warranty made by Seller on this product. No increase or alteration, written or verbal, of the obligations of this Limited Warranty is authorised.
NOTE: In addition to the warranty conditions, warranty will not be given where a
product has been immersed in water under any circumstances, or where damage has
been caused by hosing the unit, without all due care taken by the owner to protect the
unit by covering with some sort of plastic sheeting.

35
5. SMS Commands Reference
1. Not case sensitive i.e. 000000DiSaRm (the software converts it all to uppercase internally)
2. Limit to SMS is 25 messages in 8.5 minutes (the system automatically overrides the sending of to
many messages)
3. Default pin code is 000000 (all zero’s)
4. Messages that contain no valid PIN code that are sent to the RAM will not get responded to (ref
NEWPIN)
5. Messages that contain a valid PIN with a command that is not recognised will have a list of
messages that are available sent to them i.e.
< Unknown command. Commands are: ARM DISARM PANIC ONOUT1 OFFOUT1
READPHONE WRITEPHONE ERASEPHONE ID PIN
6. Boot and Bonnet are identical i.e. History and normal alarm conditions will be known as bonnet
for both.
7. There is no voltage drop.
8. Six digit PIN MUST be in front of all commands.
9. The ID (identification) is at the start of every SMS received from the RAM.
>Send this to RAM.
<Receive this from RAM.
>ARM or A (i.e. 123456ARM or 123456A for short)
<Alarm armed.
<Alarm armed. Door Ajar warning! (Other responses are all other triggers i.e. Boot warning!, Bonnet
warning!, Aux warning!)
<Alarm already armed.
<Alarm unable to arm. Ignition on!
>DISARM or D
<Alarm disarmed.
<Alarm already disarmed.
>PANIC
<PANIC ALERT!
(Does not send PANIC ALERT! When ignition is on.)
>ONOUT1 (these are the same for outputs 1, 2 and 3 just the number changes)
<Output1 turned on.
>OFFOUT1
<Output1 turned off.
> READPHONE (read phone memory number one is the only one that it will call
if no response within 4 minutes)
<Phone numbers. 1:xxxx 2:xxxxx 3:xxxxx 4:xxxx 5:xxxxx
> ERASEPHONEX (x = 1 to 5 erase phone memory 3 and puts “3: Not used” in blank locations on
reply)
<Phone numbers. 1:0407123001 2:0407123002 3:Not Used 4:0407123003 5:0407123006

36
>WRITEPHONExyyyyyyy (phone memory location x = (1-5) with phone number = y )
>WRITEPHONE30414221331 (example)
<Phone numbers. 1:0407123001 2:0407123002 3:0414221331 4:0407123003 5:0407123006
<Failed to update phone number, memory location error (if location 0,6,7,8,9 was entered as the
location.)
> IDxxxxx (write rego or other message to be at the start of every message received from RAM =<
19 characters)
< xxxxxx. ID change passed.
i.e. 123456IDXBU-458 replies with XBU-458. ID change passed.
If you have forgotten your pin number then
>NEWPINxxxxxx
<New PIN number xxxxxxx (replies with new pin)
<Remote confirmation not received
<PIN change fail. Valid characters are 0-9 a-Z
(you must press the remote control to confirm as no pin is used)
To change the PIN if you know your PIN
>xxxxxxPINxxxxxx (write new pin) i.e. 123456PIN345678
<New PIN number xxxxxxx (replies with new pin)
<PIN change fail. Valid characters are 0-9 a-Z
>HISTORY (Similar to Past alarm trigger memory)
<ALARM HISTORY. OLDEST. xxxxx. xxxxx. xxxx. xxxx. LATEST. (list alarm triggers up to 10
long)
>STATUS
<ALARM DISARMED. xxxx. xxxxx. xxxxxx. Phone signal good/bad. Car Battery good/low.
<ALARM ARMED. xxxx. xxxxx. xxxxx. Phone signal good/bad. Car Battery good/low.
<ALARM ACTIVATED. xxxx. xxxxx. Phone signal good/bad. Car Battery good/low.
>LEARN
<Learn mode activated successfully.
<Unable to activate learn mode ignition on.
<Unable to activate learn mode system armed.
Messages sent by alarm.
<PANIC ALERT!
<ALARM ACTIVATED. xxxx. (Siren is on now and what caused it)
<Battery low warning!
xxxx is: Bonnet, Shock, Ignition, Door, Auxiliary, Glass
>GSMOFF
<PHONE POWER OFF
This will turn power off until an arm disarm event occurs.

37
This page intentionally blank.

38
This page intentionally blank.

39
This page intentionally blank.

40