Embed Size (px)
DESCRIPTION
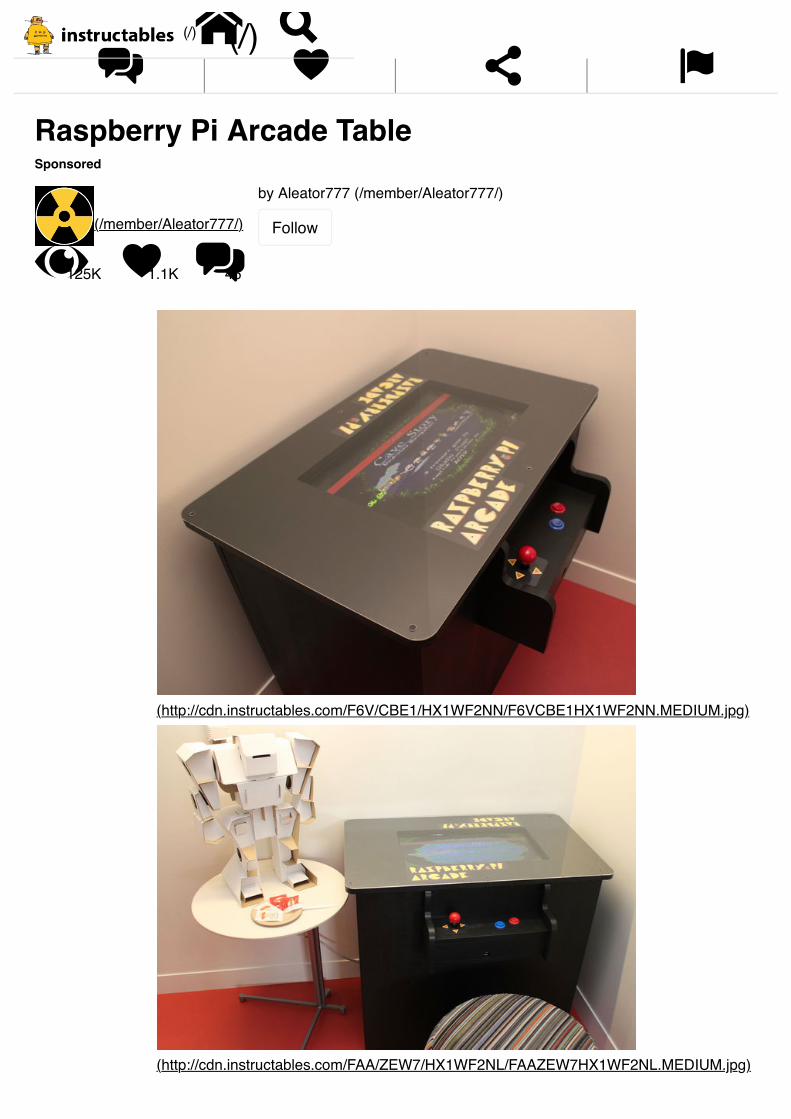
Plans for a Pi Fueled Arcade Table
Citation preview
Raspberry Pi Arcade TableSponsored
(/member/Aleator777/)
by Aleator777 (/member/Aleator777/)
Follow
125K 1.1K 46
(http://cdn.instructables.com/F6V/CBE1/HX1WF2NN/F6VCBE1HX1WF2NN.MEDIUM.jpg)
(http://cdn.instructables.com/FAA/ZEW7/HX1WF2NL/FAAZEW7HX1WF2NL.MEDIUM.jpg)
! " #
# " $ % (/) &' (/)
In this Instructable I'll show you how to make your very own "classic" arcade tablewith a Raspberry Pi for hours of retro-gaming goodness.
STEP 1: PARTS AND MATERIALS

(http://cdn.instructables.com/F9B/G3YA/HX1WF36X/F9BG3YAHX1WF36X.MEDIUM.jpg)
(http://cdn.instructables.com/FGU/94N5/HX1WF36W/FGU94N5HX1WF36W.MEDIUM.jpg)
Raspberry Pi model B (RadioShack #: 277-196(http://www.radioshack.com/product/index.jsp?productId=28925486))
8 GB SD card (RadioShack #: 44-201 (http://www.radioshack.com/product/index.jsp?productId=3374882))
HD televison (RadioShack (http://www.radioshack.com/product/index.jsp?productId=23556446))
HDMI cable (RadioShack #: 15-480 (http://www.radioshack.com/product/index.jsp?productId=30546426))
power strip (RadioShack #: 61-003 (http://www.radioshack.com/product/index.jsp?productId=10912267))
keyboard
mouse
arcade joystick (https://www.adafruit.com/products/480)
(2x) arcade buttons (http://www.amazon.com/Arcade-game-Pushbutton-Horizontal-Microswitch/dp/B00F1YQIEW/ref=sr_1_2?s=toys-and-games&ie=UTF8&qid=1401664609&sr=1-2&keywords=arcade+buttons)
wire (RadioShack #: 278-1224 (http://www.radioshack.com/product/index.jsp?productId=2049745&filterName=Cable+type&filterValue=22+gauge))
female jumpers (RadioShack #: 276-157(http://www.radioshack.com/product/index.jsp?productId=12825864))
angle brackets (http://www.mcmaster.com/#corner-brackets/=sd6kh2)
inside corner brackets
screws
(2x) 12 inch hinge
paint
3/4 inch plywood
1/8 inch clear acrylic
STEP 2: DESIGN OVERVIEW
(http://cdn.instructables.com/FKI/X1XZ/HW8T1E7D/FKIX1XZHW8T1E7D.MEDIUM.jpg)
(http://cdn.instructables.com/FNZ/R5QX/HX1W6FN5/FNZR5QXHX1W6FN5.MEDIUM.jpg)
The design for the table is inspired from 1980's cocktail arcade tables, the kind youmight still find in the dark corner of a pizza parlor. These tables were rather bulky andincredibly heavy due to the clunky power systems and hefty CRT. Thankfully,electronics have slimmed down to the point where we can easily recreate the arcadewithout the bulk.
Before making anything, I made a 3D model in Fusion 360. The final cabinet is solidblack, but I changed the appearance of the model to more easily distinguish theseparate components. From this model I was able to create accurate dimensions thatI would be able to easily cut with woodworking tools.
STEP 3: BUILD THE FRAME: CUTTING
(http://cdn.instructables.com/FJM/3IGQ/HWAAZYCD/FJM3IGQHWAAZYCD.MEDIUM.jpg)
(http://cdn.instructables.com/FID/OM8G/HWAB04C7/FIDOM8GHWAB04C7.MEDIUM.jpg)
(http://cdn.instructables.com/FLV/IYS5/HX1WIEB9/FLVIYS5HX1WIEB9.MEDIUM.jpg)
The entire body is made out of 3/4" ply, which is really .715" or 17.6 mm thick. Thecabinet is designed in such a way that every piece can be cut from a single 4' x 8'sheet with a some room to spare. The top of the table measures just a hair over 20" x33". The top plate is 3mm thick abrasive resistant acrylic with rounded edges. If youhappen to live on the U.S. west coast, TAP Plastics (http://www.tapplastics.com/) willcut-to-size many different kinds of acrylic, and you can even specify a corner radiusto match your design.
Here are the dimensions for the main components:
table top acrylic 840 x 510
table top wood 840 x 510 mm (See picture 4)
front panel 780 x 760 mm (See picture 2)
(2x) side panel 760 x 415 mm
back panel 780 x 760 mm
base panel 745 x 415 mm
front center panel 350 x 123 mm
console top panel 350 x 150 mm (See picture 3)
console front panel 350 x 70 mm
console bottom panel 350 x 150 mm
(2x) console side panel 229 x 168 mm (See picture 2)
The holes for the controls are in standard units; .75" for the arcade joystick and1.125" for the buttons.
For the majority of the pieces, you can use a table saw to cut down the panels. I hadaccess to ShopBot CNC to cut the tabletop, but it's equally possible to do with handtools. I also used a vertical band saw to cut the curves for the console sides as well.
STEP 4: BUILD THE FRAME: MAIN BODY
(http://cdn.instructables.com/F8Z/MT3I/HX42QRGO/F8ZMT3IHX42QRGO.MEDIUM.jpg)
(http://cdn.instructables.com/FN8/VWLJ/HX42QRGP/FN8VWLJHX42QRGP.MEDIUM.jpg)
(
(

(http://cdn.instructables.com/F2I/SB5L/HX42QRGQ/F2ISB5LHX42QRGQ.MEDIUM.jpg)
(http://cdn.instructables.com/FCX/QLYS/HX42QRGT/FCXQLYSHX42QRGT.MEDIUM.jpg)
(http://cdn.instructables.com/F69/Q0OP/HX42QRGU/F69Q0OPHX42QRGU.MEDIUM.jpg)
(

(http://cdn.instructables.com/FN8/YOO0/HX42QRGV/FN8YOO0HX42QRGV.MEDIUM.jpg)
(http://cdn.instructables.com/F5B/O99T/HX42QRJE/F5BO99THX42QRJE.MEDIUM.jpg)
(
(

(http://cdn.instructables.com/FMR/ED0W/HX42QRJJ/FMRED0WHX42QRJJ.MEDIUM.jpg)
(http://cdn.instructables.com/FOU/7CWF/HX42QRGW/FOU7CWFHX42QRGW.MEDIUM.jpg)

(http://cdn.instructables.com/FZM/KS6S/HX42QRGX/FZMKS6SHX42QRGX.MEDIUM.jpg)
(http://cdn.instructables.com/FFA/8E8S/HX42QRGZ/FFA8E8SHX42QRGZ.MEDIUM.jpg)
(http://cdn.instructables.com/F9N/474W/HX42QRJC/F9N474WHX42QRJC.MEDIUM.jpg)
(
(http://cdn.instructables.com/F9G/ZPUH/HX42QRJD/F9GZPUHHX42QRJD.MEDIUM.jpg)
For these next steps I highly recommend an excess of large clamps and the help of afriend. We'll also need the eight inside corner braces and matching screws.
Screw the right side panel and back panel together with two of the inside cornerbraces.
Screw the left side panel to the back panel.
Take the power strip and slide two screws into the slots on the back to mark theinside of the left panel. Slide the screws out and partially drill them into the markeddivots. You should be able to slide the strip onto them. Remove the power strip fornow.
Screw the front panel to the left and right panels with the remaining four inside cornerbraces.
Flip the body over and center it over the table top.
Place the hinges along the back panel and table top and mark them with a pencil forlater assembly.
STEP 5: BUILD THE FRAME: CONSOLE BASE
(

(http://cdn.instructables.com/F3E/YSGK/HX42QRHG/F3EYSGKHX42QRHG.MEDIUM.jpg)
(http://cdn.instructables.com/FUR/ENTQ/HX42QRHH/FURENTQHX42QRHH.MEDIUM.jpg)
(http://cdn.instructables.com/FK2/1G55/HX42QRHL/FK21G55HX42QRHL.MEDIUM.jpg)
(
(
(http://cdn.instructables.com/FGA/JDF2/HX42QRHM/FGAJDF2HX42QRHM.MEDIUM.jpg)
(http://cdn.instructables.com/FCX/R4SD/HX42QRHN/FCXR4SDHX42QRHN.MEDIUM.jpg)
(http://cdn.instructables.com/FTV/DB16/HX42QRHP/FTVDB16HX42QRHP.MEDIUM.jpg)
(
(http://cdn.instructables.com/FN4/9TBQ/HX42QRHQ/FN49TBQHX42QRHQ.MEDIUM.jpg)
(http://cdn.instructables.com/FCO/T7Q5/HX42QRHT/FCOT7Q5HX42QRHT.MEDIUM.jpg)
Next, we'll begin assembling the arcade console. For this we'll need the two curvedside panels, six angle brackets and matching screw.
Take one of the console sides and clamp it to the side.
Attach the two brackets to the piece, making sure to leave enough clearance for thebottom of the console.
Slide the bottom console piece into place and fasten with two more brackets.
Place the opposite side panel into place and fasten it as well.
Place the front piece of the console in place and glue down the base. Make sure todrill the 3/4 inch hole for the USB ports. You may wish to trace around the RasPi as itdoesn't lay flush to the base of the board.
STEP 6: BUILD THE FRAME : TV MOUNT

(http://cdn.instructables.com/F4B/49NT/HX42QRH0/F4B49NTHX42QRH0.MEDIUM.jpg)
(http://cdn.instructables.com/F08/ZYBR/HX42QRH1/F08ZYBRHX42QRH1.MEDIUM.jpg)
(

(http://cdn.instructables.com/F3L/7P63/HX42QRH6/F3L7P63HX42QRH6.MEDIUM.jpg)
(http://cdn.instructables.com/FYP/ZF7W/HX42QRH7/FYPZF7WHX42QRH7.MEDIUM.jpg)
(http://cdn.instructables.com/FXQ/D45B/HX42QRH8/FXQD45BHX42QRH8.MEDIUM.jpg)
(
(

(http://cdn.instructables.com/FTZ/T9SU/HX42QRHA/FTZT9SUHX42QRHA.MEDIUM.jpg)
(http://cdn.instructables.com/FIQ/Q3Q9/HX42QRHC/FIQQ3Q9HX42QRHC.MEDIUM.jpg)
(http://cdn.instructables.com/FUV/CM2I/HX42QRHD/FUVCM2IHX42QRHD.MEDIUM.jpg)
(http://cdn.instructables.com/FYV/0K6V/HX42QRHF/FYV0K6VHX42QRHF.MEDIUM.jpg)
Now we'll need to attach the TV.
Take the table top and and lay the TV flat and centered over the main hole.
Cut out six 2"x4" blocks and lay two on either side of the TV. Screw these into placetowards the outer length of the spacer blocks. Be sure to countersink these screwsso that the next level of spacers can lay flush.
Lay the remaining blocks on top of the now fastened stack.
Lay a long strip of 4" wood across the stacks over the TV, then mark and cut it downto size.
Centered on the new board (and with the TV removed!), mark and drill four 4mmholes that are 100mm apart.
Check to make sure the holes line up with those on the back of the TV.
Towards the inner length of the spacers, screw in the new cross piece to the spacers.
As far near the base of the TV you can go, drill holes deep enough for your T-nut onboth sides of the TV.
Hammer the T-nuts into place with a mallet.
Cut down two 1"x4" pieces and drill a 1/4" hole for the screw.
Put the TV back into place and screw it to the cross piece with four 35mm M4screws.
Slide the 1/4x20 screws through the two sticks and tighten to the back of the TV.
Turn the assembly over to check that the TV doesn't droop. There should be enoughgive to align it with the hole if a bit off.
STEP 7: BUILD THE FRAME: CONSOLE TOP AND ELECTRONICS
(http://cdn.instructables.com/FAT/NL71/HX42QRI0/FATNL71HX42QRI0.MEDIUM.jpg)
(http://cdn.instructables.com/F67/5X6I/HX42QRI2/F675X6IHX42QRI2.MEDIUM.jpg)

(http://cdn.instructables.com/FCH/4D0Z/HX42QRI9/FCH4D0ZHX42QRI9.MEDIUM.jpg)
(http://cdn.instructables.com/FGG/E17H/HX42QRIB/FGGE17HHX42QRIB.MEDIUM.jpg)
(http://cdn.instructables.com/F94/S72H/HX42QRIE/F94S72HHX42QRIE.MEDIUM.jpg)

(http://cdn.instructables.com/FDS/G6TB/HX42QRIJ/FDSG6TBHX42QRIJ.MEDIUM.jpg)
(http://cdn.instructables.com/F1O/24X8/HX42QRIK/F1O24X8HX42QRIK.MEDIUM.jpg)
(http://cdn.instructables.com/FCH/N5QP/HX42QRIS/FCHN5QPHX42QRIS.MEDIUM.jpg)
(http://cdn.instructables.com/FCW/FHSS/HX42QRIT/FCWFHSSHX42QRIT.MEDIUM.jpg)
(http://cdn.instructables.com/F9O/OIY0/HX42QRIZ/F9OOIY0HX42QRIZ.MEDIUM.jpg)
We're nearly done!
Take the console top plate and front top panel and fasten them with two morebrackets.
Unscrew the ball of the joystick and slide it into the hole from below. There are manyholes, but a screw in each corner should do.
Pop out the micro switches from the bottom of the arcade buttons (there are twoplastic nubs that pop in) and unscrew the large black nut.
Slide the arcade buttons into the console top and slide the nut back on to tighten it.
Pop the micro switches back in.
Referring to the diagram on the next page, plug in the proper wires from the joystickand buttons into the RasPi.
STEP 8: SETTING UP THE RASPBERRY PI: CONFIGURING ARCADECONTROLS
(http://cdn.instructables.com/FJ5/KOEC/HX1WBHOF/FJ5KOECHX1WBHOF.MEDIUM.jpg)
(http://cdn.instructables.com/FO3/F9JI/HX42TBJL/FO3F9JIHX42TBJL.MEDIUM.jpg)
This step is optional. If you wish to add arcade buttons to your systems, read along.If you're fine with a standard mouse and keyboard, you can skip ahead to the nextstep. Credit for this update goes to Adafruit for making this wonderful tutorial(https://learn.adafruit.com/retro-gaming-with-raspberry-pi/buttons) on how to connectarcade buttons to the RaspberryPi. This is perhaps the simplest method for addingdirect control through the GPIO and is easily configurable for different buttons. TheAdafruit tutorial is based around the Raspbian OS which is just fine since RetroPie isalso just a modified version of Rasbian.
STEP 9: SET UP THE RASPBERRY PI: OS
(http://cdn.instructables.com/FAZ/V5YL/HX42TAH9/FAZV5YLHX42TAH9.MEDIUM.jpg)
The heart of the machine is the wondrous Raspberry Pi. The Pi is so popular achoice for arcade emulation, there's even a custom operating system dedicated toemulation: RetroPie. You can download the RetroPie image here(http://blog.petrockblock.com/retropie/retropie-downloads/). I recommend using anSD card with at least 8GB of space.
Make sure your SD card is properly formatted. You can grab the official SD formatterhere (https://www.sdcard.org/downloads/formatter_4/eula_windows/).
Write the RetroPie image to the SD card with the Win32 Disk Imager(http://sourceforge.net/projects/win32diskimager/).
That's it! With the RetroPie OS, you don't need to do any extra work to get startedgaming. All you need is a keyboard and mouse to interface with the Pi. If you want toplay with custom arcade controls, head over to the next step.
STEP 10: FINAL TOUCHES

(http://cdn.instructables.com/FZA/43QN/HX42QRJ0/FZA43QNHX42QRJ0.MEDIUM.jpg)
(http://cdn.instructables.com/F2J/2Y8N/HX42QRJ6/F2J2Y8NHX42QRJ6.MEDIUM.jpg)
(http://cdn.instructables.com/FEN/X4VT/HX42QRJ7/FENX4VTHX42QRJ7.MEDIUM.jpg)
(http://cdn.instructables.com/F7M/UTK7/HX42SN0B/F7MUTK7HX42SN0B.MEDIUM.jpg)
Arcade ART Complete.svg(http://www.instructables.com/files/orig/FS9/N7LN/HX42RR1Y/FS9N7LNHX42RR1Y.svg)
A solid wood arcade with a nice finish would look great, but I decided to go with asolid black coat of eggshell paint. I wanted the arcade to shine, but not be outrightglossy.
The only structural element left is the acrylic table top. For this, I marked six holesaround the edge and counter-sunk a 1/2" screw in each.
In order to complete the classic look I was aiming for, I designed some customdecals. I didn't end up using them all, but you can find the vector files and a big ol'raster image if you like to use the art too. I had access to a large format printer/cutterwhich allowed me to make custom vinyl stickers, but you can easily print scaleddown versions with sticker paper on a standard printer. The profiles of the images arebasic shapes so that it would be easy to cut by hand too.
STEP 11: USAGE
(http://cdn.instructables.com/FZM/AXT3/HX1WF36Z/FZMAXT3HX1WF36Z.MEDIUM.jpg)
(http://cdn.instructables.com/F1F/QRB3/HX1WF36Y/F1FQRB3HX1WF36Y.MEDIUM.jpg)
By default, the RetroPie OS comes with a few games "pre-installed," but what if youwant to add your own? You can find your favorite legal copy of old games at theMAME website (http://www.mamedev.org/roms/).
Installing games is easy with a flash/jump/thumb drive of your choice. With thesystem powered and running, plug in the external usb memory drive. You canremove the drive after about ten seconds (some drives will have pulsing LEDs to ledyou know data transfer has completed). Now when you plug the drive into yourregular computer, you should see a new file system on it simply titled: "roms."Browsing through this folder you'll see sub folders related to nearly every old consoleor emulator. Drag and drop your roms into the appropriate folders and plug the driveback into the RasPi. The RetroPie will automatically copy over your game data to thesystem. Reboot the Pi and you should see you games pop up. Enjoy your newcocktail arcade table!
Reply (/member/ThereIs0nly0ne/)
Reply (/member/xxxxandrewxxxx/)
Reply (/member/eightbittrip/)
"
(https://twitter.com/intent/tweet?text=Raspberry%20Pi%20Arcade%20Table&url=http%3A%2F%2Fwww.instructables.com%2Fid%2FRaspberry-
Pi-Arcade-Table%2F) (https://plus.google.com/share?
url=http%3A%2F%2Fwww.instructables.com%2Fid%2FRaspberry-Pi-Arcade-Table%2F) )(http://www.tumblr.com/share?url=http%3A//www.instructables.com/id/Raspberry-Pi-Arcade-
Table/&body=http%3A%2F%2Fwww.instructables.com%2Fid%2FRaspberry-Pi-Arcade-Table%2F) (mailto:?
subject=Raspberry%20Pi%20Arcade%20Table&body=http%3A//www.instructables.com/id/Raspberry-Pi-Arcade-Table/)
46 comments
*+,
-
Comment.I Made It! /
ThereIs0nly0ne (/member/ThereIs0nly0ne)
Nice going with this project. I'd love a cocktail cabinet butunfortunately I have too many projects taking up too much space.
2 months ago
xxxxandrewxxxx (/member/xxxxandrewxxxx)
I Love this Project! is there anyway i could go about making thiswith a two player setup? If so how would i do this?
3 months ago
eightbittrip (/member/eightbittrip)
Thank you again aleator777 for this instructable. I got everythingworking good with a bunch of nes roms. I'm a very happy nerd now lol.
4 months ago
Reply (/member/duane.francis.739/)
Reply (/member/eightbittrip/)
Reply (/member/Aleator777/)
Reply (/member/eightbittrip/)
Reply (/member/eightbittrip/)
duane.francis.739 (/member/duane.francis.739)
If you were to make this a two player console, would the gamerotate on the screen to the player if you put the controllers on each end?
4 months ago
eightbittrip (/member/eightbittrip)
this project is very awesome and I intend to build a traditional full sizecabinet for it. I have some issues moving forward though. I have added about
600 nes roms that do work however when I play them it changes my keyboard layout from what Ihad previously configured to the zx up down left right and enter layout and when I exit the game andgo back to choose another game the keyboard stops working all together. any ideas? I have found aarcade type joystick and buttons that has a usb encoder with it and I would like to use it if possiblebut I need to get a default configuration to save before I can. this evening I plan on trying to find ageneric usb game controller and try to get it to work the same every time the pi boots before I moveon. any help would be greatly appreciated.
4 months ago
Aleator777 (author) (/member/Aleator777)
Thank you very much. With regard to your keyboard problem, I'mnot sure what might be happening. The different key mapping per game
might be harder to get around, but I don't see why that should make the keyboard stop runningaltogether. Have you read about other people encountering the same problem?
4 months ago
eightbittrip (/member/eightbittrip)
Thank you ALeator777, I did find some people having similarissues, however I haven't found anyone who seems to have solved it.
I haven't used the gpio header for the controls becuase the adafruit tutorial on that goes over myhead. I felt like the best solution for me was to use the usb keyboard encoder and match thecontrols to what the nes emulator changes it to when it starts.
I have the retropie running good now, and as soon as I figure out what button is select on the nesemulator I will be building a full size cabinet with the arcade controls :)
Thank you for sharing this project. I have always wanted a full size arcade game. I may even puta coin slot in connected to an arduino that allows a certain amount of play time lol.4 months ago
eightbittrip (/member/eightbittrip)
the keymap seems to be changing on me when I run the nesemulator. I took the encoder out of a logitech usb keyboard and mapped the
circuit paths on the keyboard to make a remote control with the buttons I need. I don't know if thiswill work the same for everyone, but it seemed to be a good solution for me. Only one smallproblem remains, I don't know which key on the keyboard represents the select button on the nesemulator. If anyone knows, please reply :) thank you.4 months ago
glos10 (/member/glos10)
Do you think this could be modified to have 2 sets of joysticks and buttons?
Reply (/member/glos10/)
Reply (/member/Aleator777/)
Reply (/member/juanmacrescente/)
Reply (/member/Aleator777/)
Reply (/member/Taytay208/)
Reply (/member/Aleator777/)
Reply (/member/laurentmarie1968/)
Reply (/member/Aleator777/)
Reply (/member/RoyS3/)
4 months ago
Aleator777 (author) (/member/Aleator777)
Yes absolutely! The number of buttons/switches is only limited bythe GPIO on the Raspberry Pi. If you look at the script that actually maps the
key presses it'll make more sense.4 months ago
juanmacrescente (/member/juanmacrescente)
Hi!
the joystick movements are analogue? Or just up down left right?
6 months ago
Aleator777 (author) (/member/Aleator777)
These kinds of sticks use mechanical switches since the RasPidoesn't have a built in analog to digital converter, and the sticks are mapped
to keyboard presses anyhow.
5 months ago
Taytay208 (/member/Taytay208)
Sorry if you said this somewhere and I missed it, but do you have anyidea how much this cost? Thanks, you did an amazing job! This looks so
professional (:
5 months ago
Aleator777 (author) (/member/Aleator777)
Thanks, it was really fun to make! Total cost breakdown comes toabout $400 depending on what you've got. The TV was ~$100, Raspi +
switches and cables ~$80, wood and hardware bits ~$60, and scratch resistant acrylic sheet~$90. I accidentally broke my first acrylic sheet, so I had to spend a bit more!
5 months ago
laurentmarie1968 (/member/laurentmarie1968)
Excellent, très beau projet, bravo.......je pense faire pareil ;)
5 months ago
Aleator777 (author) (/member/Aleator777)
Merci beaucoup!
5 months ago
RoyS3 (/member/RoyS3)
This is fantastic. Have you considered packaging the PI, pre-installed/configured software, Joystick and Buttons and offering them for sale. I
would be very interested for sure. Could do the woodwork but not the electronics so a pre-built
Reply (/member/jasonrmarquette/)
Reply (/member/Aleator777/)
Reply (/member/bedwards1226/)
Reply (/member/Aleator777/)
Reply (/member/bedwards1226/)
Reply (/member/Aleator777/)
solution that could be simply added to a wood cabinet and just as simply plugged into a tv fitted inthe cabinet would be awesome. Thx Roy
6 months ago
jasonrmarquette (/member/jasonrmarquette)
Awesome article. Question: On two player games does the piflip the rotation of the screen for the second player? Or is this a single
player only.
7 months ago
Aleator777 (author) (/member/Aleator777)
This hardware is only set up for single player controls, but youcould certainly just add double the controls for a two player game! The game
would automatically display it's native mode, so if it was made for a two player table top, it shouldwork just the same as a regular game. Most games I would imagine would be split screen though.
7 months ago
bedwards1226 (/member/bedwards1226)
This is awesome!!! Thanks for sharing! I'm very new to RasPi andwould love to complete this project. I've gotten most of they way: formatted
the SD card, wrote the image, installed RetroPie, and hooked up the buttons and joystick. However, Iam stuck trying to get the controls to work. The Adafruit article runs through installing their"retrogame" utility. Is that what you did to get the arcade controls to work? Would you mind runningthrough how to do this process?
Thanks again for posting this and appreciate any help you can offer!
8 months ago
Aleator777 (author) (/member/Aleator777)
Thanks, I'm really glad you enjoy it :) I am using the retrogameutility for the arcade controls. I used the default settings that Adafruit
provided. Have you intstalled it? PM me if you need any more help!
8 months ago
bedwards1226 (/member/bedwards1226)
Thanks for the reply! I was able to spend some time on theproject this weekend and got it all figured out!
8 months ago
Aleator777 (author) (/member/Aleator777)
As for ROMs, I did have some difficulty installing my own. There's noclear-cut solution that I found, it's just trial and error and making sure you've put
the files in the right directory. Are you using RetroPie? It's a bit hard to make out in the photos, butthere is a hole that allows access to the RasPi's USB ports on the front console for plugging in akeyboard. I haven't tried this with a traditional controller (xbox, ps, nintendo etc.), but if you use thearcade buttons, you can remap them to any keyboard press with a quick edit to the configuration file(See the Adafruit tutorial I linked to on step 8). Hope that helps! Post photos of any progress youmake in the comments. I love to see what you make!
9 months ago
Reply (/member/powers_j/)
Reply (/member/powers_j/)
Reply (/member/jcameron-1/)
Reply (/member/Aleator777/)
Reply (/member/jtaormina1/)
Reply (/member/Aleator777/)
Reply (/member/jtaormina1/)
powers_j (/member/powers_j)
Yes I am using retroPi. I started to realize that maybe you are notrunning retropi on the machine and only the MAME emulator. I think I am going
to solder wires to the escape key on the keyboard and allow for an external button that can bepushed to bring the user back to emulation station. Without this, the user can't exit a game toselect a different one. We are using a ps3 controller for now + keyboard just for escape key, butthat is temp. I am hoping I can map the arcade joystick and buttons to the retropi software similarto how you did it, that is the next adventure.
Cheers Justin
9 months ago
powers_j (/member/powers_j)
I am working on this excellent project right now. I do have a questioncouple of questions... 1.) It appears the MAME emulator and or Roms I am
downloading do not work at all. They try to execute in shell and return to GUI emulatorstation. Anyidea about this? 2.) As I am still bench testing... I have a wireless ps3 controller and a keyboardplugged in at the moment. I noticed I can't exit a game without using the escape key on thekeyboard. How did you solve that problem?
Thanks Justin Powers.
might have some questions about arcade button/joystick interface too. That is my next step in benchtesting.
9 months ago
jcameron-1 (/member/jcameron-1)
Awesome build! Just curious if you know pricing for the clear acrylicsheet? I got a quote locally but seemed a bit high
10 months ago
Aleator777 (author) (/member/Aleator777)
Thanks! For 3mm thick abrasion-resistant acrylic I believe I paidabout $60
10 months ago
jtaormina1 (/member/jtaormina1)
are you able to us the rasberry pi b plus model?
a year ago
Aleator777 (author) (/member/Aleator777)
Yup! The RasPi B+ would be even better if you wanted to takeadvantage of the extra GPIO to add a lot of arcade controls.
a year ago
jtaormina1 (/member/jtaormina1)
Ok thank you!
Reply (/member/matt.e.jenkins/)
Reply (/member/Aleator777/)
Reply (/member/bstott/)
Reply (/member/Aleator777/)
Reply (/member/Ironbull/)
Reply (/member/Aleator777/)
Reply (/member/crank_girl/)
Reply (/member/Aleator777/)
Reply (/member/Dain Unicorn/)
10 months ago
matt.e.jenkins (/member/matt.e.jenkins)
Very well done!
a year ago
Aleator777 (author) (/member/Aleator777)
Thank you!
a year ago
bstott (/member/bstott)
Excellent!
A versatility feature can also be added to use the TV as a TV with stand. Add a hinge under the frontof the table, a latch in the back of the table top to hold it down while game playing and a desksupport on the inside to hold the TV upright when viewing as a TV.. When you are not playing gamesand want it as a TV and Stand simply un-latch the back of the table top. Lift the table top forward andsupport. :-)
a year ago
Aleator777 (author) (/member/Aleator777)
Wow, that's a really good idea. I love the versatility! If I ever makeanother, I'll definitely keep this in mind!
a year ago
Ironbull (/member/Ironbull)
Nicea year ago
Aleator777 (author) (/member/Aleator777)
Thanks!
a year ago
crank_girl (/member/crank_girl)
Brilliant! :)a year ago
Aleator777 (author) (/member/Aleator777)
Thank you!
a year ago
Dain Unicorn (/member/Dain Unicorn)
Very Awesome!
a year ago

Reply (/member/Aleator777/)
Reply (/member/sdidwania/)
Reply (/member/Aleator777/)
Reply (/member/bjohnson3/)
Reply (/member/Aleator777/)
Reply (/member/phookdk/)
Reply (/member/Aleator777/)
RelatedRelated
Aleator777 (author) (/member/Aleator777)
Thank you very much!
a year ago
sdidwania (/member/sdidwania)
well done. it came out really well.
a year ago
Aleator777 (author) (/member/Aleator777)
Thanks! I enjoyed making it.
a year ago
bjohnson3 (/member/bjohnson3)
I really like this but find it really limiting. I would, and have donesomething similar but have made the control panel interchangeable with some
pop on connectors with 16 to 24 pins times 2. That way you can increase your playable range ofgames and make 2 player games doable. A little latch to hold it down, and a release to pop up thecontrols and put down a new one. Also, options for track balls, for centipede and the like could thenbe realized. Overall, very well done.
a year ago
Aleator777 (author) (/member/Aleator777)
Thanks! Great idea. You could definitely customize the console tohave many more inputs. I had considered duel-sided controls for the table,
but decided against it for the sake of time.
a year ago
phookdk (/member/phookdk)
No speakers? Or does the television play the sound? Consideringmaking a version using the RCA output since I have an old non HDMI television
lying around.
a year ago
Aleator777 (author) (/member/Aleator777)
The TV I used had built-in speakers which were decently loud. Noreason you couldnt a couple more to make it even louder!
a year ago
#Post Comment
(/id/Kids-Build-Raspberry-Pi-Arcade-Cabinet/ )
Kids Build - Raspberry Pi Arcade Cabinetby coventrymakerspace
(/id/Build-your-own-Mini-Arcade-Cabinet-with-Raspberry-/ )
Build your own Mini Arcade Cabinet withRaspber... by rbates4
(/id/Turn-an-old-CRT-Television-into-a-Raspberry-Pi-Pow/ )
Turn an old CRT Television into aRaspberry Pi ... by Spartan 117
(/id/Donkey-Kong-Bartop-Arcade-Powered-By-RPi/ )
Donkey Kong Bartop Arcade Powered ByRPi by jhawkins14
(/id/Portable-Wireless-MAME-Controller/ )
Portable Wireless MAME Controller by steverleroux
Share what you make
0 Get the App (https://itunes.apple.com/app/instructables/id586765571)
About (/about/) Contact (/contact/) Advertise (/advertise/)
TOS (http://usa.autodesk.com/adsk/servlet/item?siteID=123112&id=21959721) | Privacy
1 - 2

(http://www.autodesk.com/privacy) | Legal (http://usa.autodesk.com/legal-notices-trademarks/) | Full Site(http://www.instructables.com)
© 2014