Embed Size (px)
Citation preview
Rave Reports
Borland Edition 5.0
Developers Guide
Tutorial and Reference
This manual and all material accompanying it is Copyright (C) 1995-2002, Nevrona Designs, All Rights Reserved (rev BE50a)
DEMO : Purchase from www.A-PDF.com to remove the watermark

RAVE Reference Manual
Page 1
Table of Contents Getting Started .......................................................7
Single User License Agreement ..........................................................................................7 Limited Warranty ...............................................................................................................7 Technical Support ..............................................................................................................8
Chapter 1 - Introduction.........................................9 What's All the RAVE About?...............................................................................................9 Report Authoring Visual Environment ..................................................................................9 First Glance.....................................................................................................................10 Navigation Area...............................................................................................................10 The Page (Foundation of Rave)........................................................................................11 Project Tree Panel ...........................................................................................................11 Property Panel.................................................................................................................12
Chapter 2 - Toolbars and Tool Windows.............15 Toolbars ..........................................................................................................................15 Toolbar Placement ...........................................................................................................15 Toolbar Palette................................................................................................................15 Hiding Toolbars ...............................................................................................................16 Component vs. Utility Toolbars .........................................................................................16 Tool Windows ..................................................................................................................16 Property Panel.................................................................................................................16 Project Tree ....................................................................................................................17
Chapter 3 - Components Overview......................19 What is a Component.......................................................................................................19 The Component Toolbars .................................................................................................20 Standard Components .....................................................................................................20 Bar Code Components.....................................................................................................20 Drawing Components.......................................................................................................21 Report Components.........................................................................................................21
Chapter 4 - Page Designer ...................................23 Overview.........................................................................................................................23 The Basic Component: The Page & it's Panels ..................................................................23 Selecting Components .....................................................................................................24 Sizing and Moving Components........................................................................................25 Cutting and Pasting..........................................................................................................25 Exercise: Selecting, Sizing, and Moving Components ........................................................25 Exercise: Cutting and Pasting ...........................................................................................26
Chapter 5 - Project Tree Panel .............................27 Overview.........................................................................................................................27 Expanding and Right-Clicking ...........................................................................................27 Parent-Child Relationship .................................................................................................28 Report Library .................................................................................................................28 Global Page Catalog ........................................................................................................28
RAVE Reference Manual
Page 2
Loading and Unloading Global Pages ...............................................................................28 Data View Dictionary ........................................................................................................29 Ctrl- (Control) Drag and Drop............................................................................................29 Alt-Drag ..........................................................................................................................29 Exercise: Navigating the Project Tree................................................................................29 Exercise: Naming Components.........................................................................................30 Exercise: Loading and Unloading Global Pages .................................................................30 Exercise: Dragging a Component (Ctrl-Drag) .....................................................................31 Exercise: Changing the Parent of a Component (Alt-Drag) .................................................32
Chapter 6 - Property Panel ...................................35 What is the Property Panel ...............................................................................................35 Types of Properties ..........................................................................................................37 Property Editors ...............................................................................................................37 Right -Click Menu .............................................................................................................37 Exercise: Navigating the Property Panel............................................................................37
Chapter 7 - Generating Output.............................39 Overview.........................................................................................................................39 Executing Reports ...........................................................................................................39 Preferences Dialog ..........................................................................................................39 Report Preview ................................................................................................................40 Executing to the Printer....................................................................................................42 NDR & PRN Files ............................................................................................................42 HTML..............................................................................................................................43 PDF ................................................................................................................................43 RTF ................................................................................................................................43 Exercise: Changing Printing Preferences...........................................................................44 Exercise: Preview and Creating Portable Files ...................................................................45 Exercise: Printing a Report through the Preview ................................................................47 Exercise: Printing to a File (NDR & PRN) ..........................................................................47
Chapter 8 - Utility Toolbars ..................................49 Tools are Tools................................................................................................................49 Using Tools .....................................................................................................................49 Alignment Toolbar............................................................................................................49 Designer Toolbar .............................................................................................................50 Color Palette ...................................................................................................................51 Font Editor ......................................................................................................................52 Line Editor.......................................................................................................................52 Project Toolbar ................................................................................................................53 Zoom Toolbar ..................................................................................................................54 Exercise: Aligning Components ........................................................................................55 Exercise: Ordering Components .......................................................................................57 Exercise: Snapping to the grid ..........................................................................................59 Exercise: Changing Line Size and Color of a Rectangle .....................................................60 Exercise: Changing Fonts ................................................................................................60
RAVE Reference Manual
Page 3
Chapter 9 - Standard Components ......................61 Overview.........................................................................................................................61 Text ................................................................................................................................61 Memo .............................................................................................................................61 Section............................................................................................................................62 Bitmap and Meta File .......................................................................................................62 Exercise: Text vs Memo ...................................................................................................62 Exercise: Section.............................................................................................................63 Exercise: Placing and Resizing Bitmaps ............................................................................64
Chapter 10 - Drawing Components......................65 Drawing Component Basics .............................................................................................65 Pixels vs Points ...............................................................................................................66 Exercise: Creating Drawing Components ..........................................................................66 Exercise: Alignment .........................................................................................................68
Chapter 11 - Database 101 ...................................71 Overview.........................................................................................................................71 What is a database? ........................................................................................................71 Terms .............................................................................................................................72 Relational Table...............................................................................................................73 Reporting ........................................................................................................................74
Chapter 12 - Connecting to Data..........................75 Database Connections .....................................................................................................75 Creating a Database Connection ......................................................................................75 Direct DataViews (BE only) ..............................................................................................76 Driver DataViews .............................................................................................................76 Status Bar .......................................................................................................................77
Chapter 13 - Wizards............................................79 Wizards...........................................................................................................................79 Exercise: Simple Wizard ..................................................................................................79 Exercise: Master Detail Wizard .........................................................................................80
Chapter 14 - Report Components ........................81 Overview.........................................................................................................................81 Region ............................................................................................................................82 DataBand ........................................................................................................................82 Band ...............................................................................................................................82 DataText .........................................................................................................................83 DataMemo ......................................................................................................................84 CalcText .........................................................................................................................85
Chapter 15 - Project Components........................87 Overview.........................................................................................................................87 Project Manager ..............................................................................................................87 Report .............................................................................................................................88 Page ...............................................................................................................................88

RAVE Reference Manual
Page 4
Global Page ....................................................................................................................88 Data Objects ...................................................................................................................88 Database Connection.......................................................................................................88 Security Components.......................................................................................................89 SQL Data View ................................................................................................................89
Chapter 16 - Bar Code Components ....................91 Bar Code Component Basics............................................................................................91 Brief Bar Code Descriptions .............................................................................................91
Chapter 17 - Advanced Components...................93 FontMaster ......................................................................................................................93 PageNumInit ...................................................................................................................94 DataCycle .......................................................................................................................94 DataMirror Section ...........................................................................................................95 CalcOp............................................................................................................................95 CalcController .................................................................................................................97 CalcTotal.........................................................................................................................97 Exercise: Using Font Master.............................................................................................97 Exercise: Setting up PageNumInit for Page Numbering......................................................99
Chapter 18 - Adaptable Reports.........................101 Overview.......................................................................................................................101 Anchors ........................................................................................................................101 Waste Fit.......................................................................................................................102 Editor Anchor ................................................................................................................102
Chapter 19 - Batch and Chain Reporting...........105 Batch Pages ..................................................................................................................105 Calling Pages ................................................................................................................105 Chain Pages..................................................................................................................105 Different First Page Format ............................................................................................106 Different Odd/Even Page format .....................................................................................106 Batch / Chain Reports ....................................................................................................106 Exercise: Calling Pages .................................................................................................106 Exercise: Chain Pages ..................................................................................................107\ Exercise: Different First Page .........................................................................................108 Exercise: Different Odd/Even Page.................................................................................108
Chapter 20 - Preferences ...................................111 Getting to the Preferences Dialog ...................................................................................111 Defaults Tab..................................................................................................................111 Designer Tab.................................................................................................................111 Environment Tab ...........................................................................................................112 Shortcuts Tab ................................................................................................................112
Appendix A - Formatting....................................113 AlphaNumeric Items.......................................................................................................113 Date / Time items ..........................................................................................................114
RAVE Reference Manual
Page 5
Appendix B - Keyboard / Mouse Shortcuts .......117 Page Designer or Project Tree........................................................................................117 Page Designer Only.......................................................................................................117 Project Tree Only...........................................................................................................117
Appendix C - Property Descriptions..................119

RAVE Reference Manual
Page 6
RAVE Reference Manual
Page 7
Getting Started
Technical Information
Single User License Agreement This is a legal Agreement between you, as the end user, and Nevrona Designs. By opening the enclosed sealed disk package, or by using the disk, you are agreeing to be bound by the terms of this Agreement. If you do not agree with the terms of this Agreement, promptly return the unopened disk package and accompanying items, (including written materials), to the place you obtained them for a full refund.
1. Grant of License - Nevrona Designs grants to you the right to use one copy of the enclosed Nevrona Designs program, (the Software), on a single terminal connected to a single computer (i.e. CPU). You may make one copy of the Software for back-up purposes for use on your own computer. You must reproduce and include the copyright notice on the back-up copy. You may not network the Software or use it on more than a single computer or computer terminal at any time, unless a copy is purchased for each computer or terminal on the network that will use the Software. You may transfer this Software from one computer to another, provided that the Software is used on only one computer at a time. You may not rent or lease the Software, but you may transfer the Software and accompanying written material and this license to another person on a permanent basis provided you retain no copies and the other person agrees to accept the terms and conditions of this Agreement. THIS SOFTWARE MAY NOT BE DISTRIBUTED, IN MODIFIED OR UNMODIFIED FORM, AS PART OF ANY APPLICATION PROGRAM OR OTHER SOFTWARE THAT IS A LIBRARY-TYPE PRODUCT, DEVELOPMENT TOOL OR OPERATING SYSTEM, OR THAT MAY BE COMPETITIVE WITH, OR USED IN LIEU OF, THE PROGRAM PRODUCT, WITHOUT THE EXPRESS WRITTEN PERMISSION OF NEVRONA DESIGNS. This license does include the right to distribute applications using the enclosed software provided the above requirements are met.
2. Term - This Agreement is effective until you terminate it by destroying the Software, together with all copies. It will also terminate if you fail to follow this agreement. You agree upon termination to destroy the Software, together with all copies thereof.
3. Copyright - The software is owned by Nevrona Designs and is protected by United States laws and international treaty provisions. Therefore, you must treat the Software like any other copyrighted material (e.g. a book or musical recording) EXCEPT that you may either (a) make one copy of the Software solely for back-up or archival purposes, or (b) transfer the Software to a single hard disk provided you keep the original solely for back-up or archival purposes. You may not copy the written materials accompanying the Software.
Limited Warranty 1. Limited Warranty - Nevrona Designs warrants that the disks on which the Software is furnished to be free from defects in material and workmanship, under normal use, for a period of 90 days after the date of the original purchase. If, during this 90-day period, a defect in the disk should occur, the disk may be returned with proof of purchase to Nevrona Designs, which will replace the disk without charge. Nevrona Designs warrants that the Software will perform substantially in accordance with the accompanying written materials. Nevrona Designs does not warrant that the functions contained in the Software will meet your requirements, or any operation of the Software will be uninterrupted or error-free. However, Nevrona Designs will, after being notified of significant errors during the 90-day period, correct demonstrable and significant Software or documentation errors within a reasonable period of time, or refund all or a fair portion of the price you have paid for the Software at Nevrona Designs' option.
2. Disclaimer of Warranties - Nevrona Designs disclaims all other warranties, either
RAVE Reference Manual
Page 8
expressed or implied, including but not limited to implied warranties of merchantability of fitness from particular purpose, with respect to the Software and accompanying written materials. This limited warranty gives you specific legal rights, you may have others, varying from state to state. Nevrona Designs will have no consequential damages. In no event, shall Nevrona Designs or its suppliers be liable for damages whatsoever, (including without limitation, damages for loss of business profits, business interruption, loss of business information, or any pecuniary loss), arising out of the use or the inability to this Nevrona Designs product, even if Nevrona Designs has been advised of the possibility of such damages. Some states do not allow the exclusion of limitation of liability for consequential or incidental damages, and this limitation may not apply to you.
3. Sole Remedy - Nevrona Designs' entire liability in your inclusive remedy shall be, at Nevrona Designs' option, either: (1) The return of the purchase price paid; or (2) Repair or replacement of the Software that does not meet Nevrona Designs' limited warranty, which is returned to Nevrona Designs with a copy of your receipt.
4. Governing Law - This Agreement will be construed and governed in accordance with laws of the State of Arizona.
5. U.S. Government Restricted Rights - This Software and documentation are provided with restrictive rights. Use, duplication or disclosure by the Government is subject to restrictions set forth in Section c(1)(ii) of the Rights and Technical Data in Computer Software clause at 52.227-7013.
Technical Support Technical support, product updates, addons and other information relating to Rave Reports can be found at the Nevrona Designs web site. Please visit one of the following web pages for more information:
Technical Support - http:/www.nevrona.com/support
Addons, Tips and Tricks and other information - http:/www.nevrona.com/rave
Updates - http:/www.nevrona.com/rave/download.html
RAVE Reference Manual
Page 9
Chapter 1
Introduction
In this Section: • Rave is introduced and related to reporting needs. • Navigation of toolbars is introduced. • Introduction of the main component, the Page. • Brief overviews of the Toolbars, Project Tree Panel, and Property Panel are given.
What's All the RAVE About? Reporting can be one of the most complex, yet most important tasks for anyone dealing with a database. Reports are the primary visual means to express information retrieved from a body of data. To solve the problems associated with presenting a visual report of data in a meaningful and informative manner, traditional visual reporting tools have offered banded layout tools geared towards table-style listings of data. Today, however, much more complex reporting requirements exist and are not easily handled by banded layout tools.
Welcome to the next level in visual reporting! The Rave visual designer offers many unique features that help to make the reporting process simpler, quicker and more efficient. Rave is an intuitive page based visual design environment that can easily handle a wide variety of report formats, much more than a purely banded style tool. Rave also includes mirroring and other technologies to encourage you to reuse the contents of your reports for quicker changes and easier maintenance. In general though, Rave has been designed to offer the most flexibility and functionality in an easy to learn format.
Where do you begin? Since Rave is page-based designer, many of its features should make sense and be easy to use with only a little practice. There are a lot of options and some might not be obvious when just starting. However, remember that many of these options can be ignored in the beginning, but as your needs and knowledge increases these options are readily available. In fact, Wizards generate "standard" reports without having to know behind-the-scene details. However, we do recommend that you take some time and do a quick read of this manual.
Included with the Rave installs is a project called "RaveDemo" that contains several report samples. To see several common designs, start the RaveDemo.exe and open the RaveDemo project to access the different report types. Exploring the RaveDemo project and other samples are excellent ways to learn Rave.
Report Authoring Visual Environment A report might be described as data presented in a visual manner, whether it is printed on paper or displayed electronically. Typically, there are sets of database tables that provide data to create a report. For example, suppose there are: a Customer table, a Products table, and an Items Sold table. These tables could be combined to produce form letters, invoices or customer lists.
Let's begin with a quick overview of Rave. The first step to using Rave is to start the program. The first thing seen will be a sheet representing a page on the screen as well as two windows on the side of the page and toolbars across the top of the page. On a first impression, there appears to be many items in the Rave designer, so where do you start?
Let's start with what is shown when Rave is running. First, understand that there are two groups
RAVE Reference Manual
Page 10
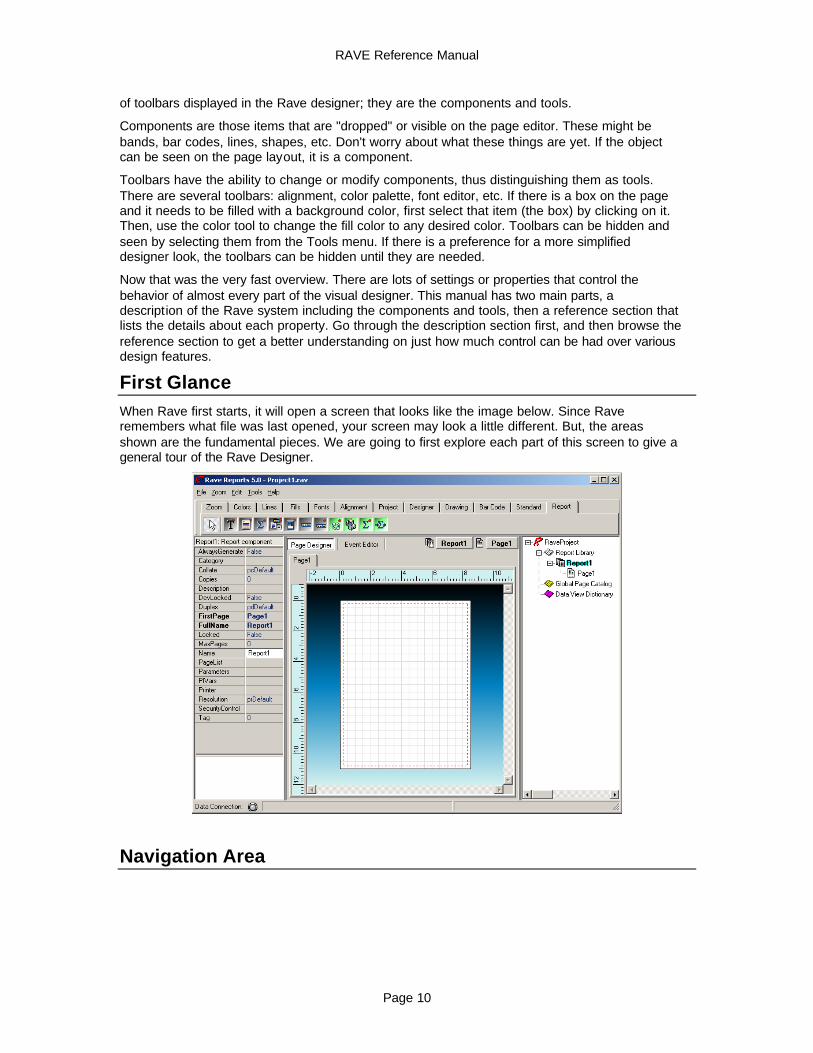
of toolbars displayed in the Rave designer; they are the components and tools.
Components are those items that are "dropped" or visible on the page editor. These might be bands, bar codes, lines, shapes, etc. Don't worry about what these things are yet. If the object can be seen on the page layout, it is a component.
Toolbars have the ability to change or modify components, thus distinguishing them as tools. There are several toolbars: alignment, color palette, font editor, etc. If there is a box on the page and it needs to be filled with a background color, first select that item (the box) by clicking on it. Then, use the color tool to change the fill color to any desired color. Toolbars can be hidden and seen by selecting them from the Tools menu. If there is a preference for a more simplified designer look, the toolbars can be hidden until they are needed.
Now that was the very fast overview. There are lots of settings or properties that control the behavior of almost every part of the visual designer. This manual has two main parts, a description of the Rave system including the components and tools, then a reference section that lists the details about each property. Go through the description section first, and then browse the reference section to get a better understanding on just how much control can be had over various design features.
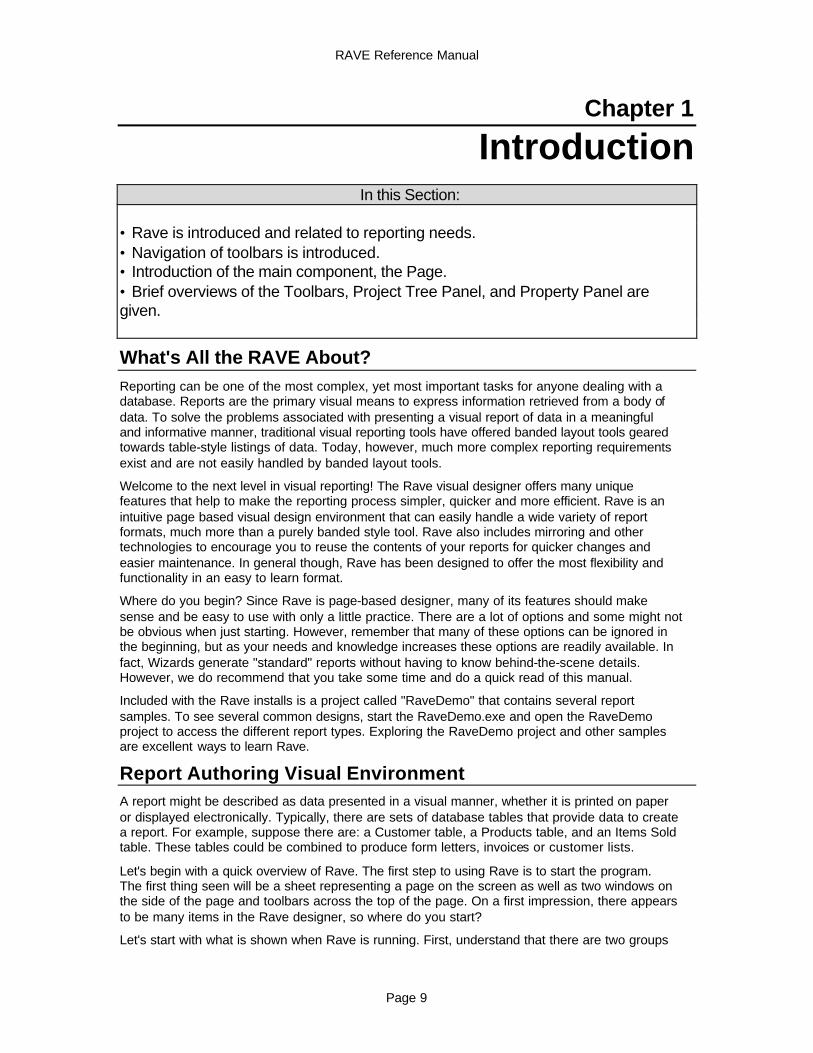
First Glance When Rave first starts, it will open a screen that looks like the image below. Since Rave remembers what file was last opened, your screen may look a little different. But, the areas shown are the fundamental pieces. We are going to first explore each part of this screen to give a general tour of the Rave Designer.
Navigation Area
RAVE Reference Manual
Page 11
The top of the visual designer is the Rave Navigation area. This is where toolbars can be docked individually, and can also be tab docked. Individually docking the toolbars will allow the user to see all the buttons on the toolbar and to see more than one toolbar at a time. Tab docking will allow easy access to each toolbar, but only one toolbar can be seen at a time.
The toolbars contain both tools and components. A tool is a feature that will be used to modify an object already on the page, like the Font Editor or the Color Palette. A component is an object that will be placed on the page like a band, line, text, region, or section.
To find out the name of the button control on a toolbar, simply move the mouse pointer over a button, and a popup window will appear with the name of the tool or component. Also, notice the raising of the button when it is about to be selected. It will become 'depressed' when the button is clicked on.
Each toolbar can also be hidden. To hide or view a toolbar, go to the tool menu and select the desired toolbar from Toolbars menu.
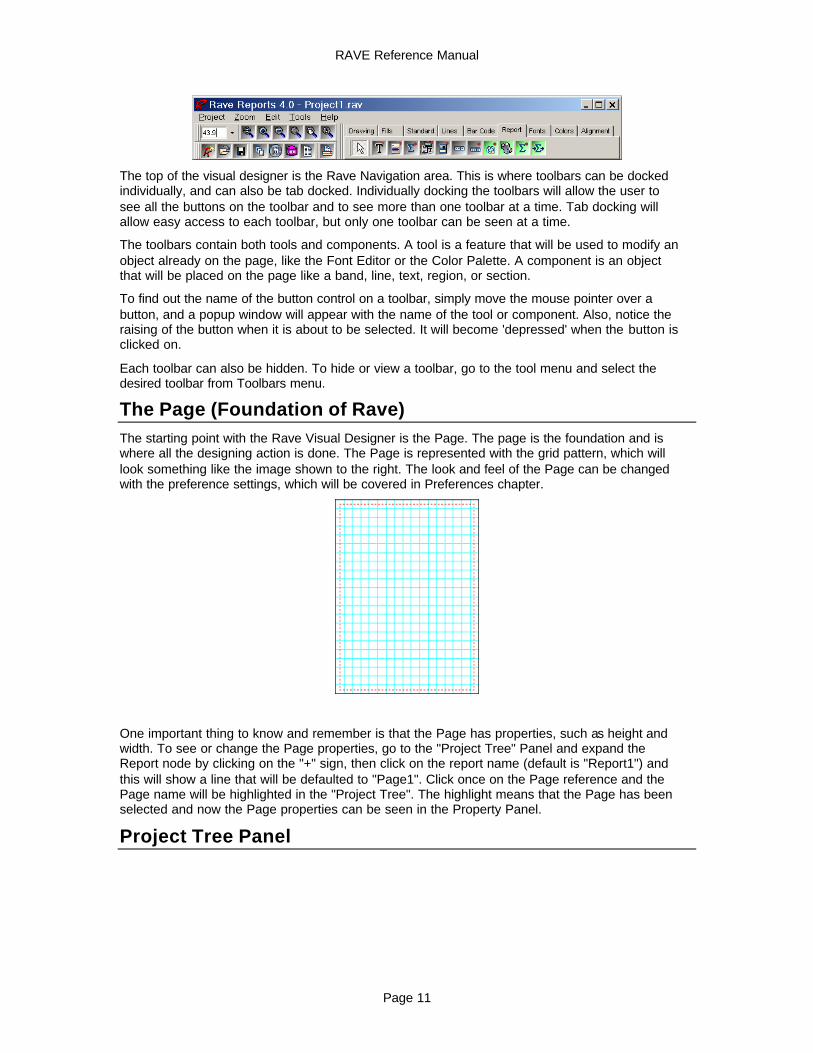
The Page (Foundation of Rave) The starting point with the Rave Visual Designer is the Page. The page is the foundation and is where all the designing action is done. The Page is represented with the grid pattern, which will look something like the image shown to the right. The look and feel of the Page can be changed with the preference settings, which will be covered in Preferences chapter.
One important thing to know and remember is that the Page has properties, such as height and width. To see or change the Page properties, go to the "Project Tree" Panel and expand the Report node by clicking on the "+" sign, then click on the report name (default is "Report1") and this will show a line that will be defaulted to "Page1". Click once on the Page reference and the Page name will be highlighted in the "Project Tree". The highlight means that the Page has been selected and now the Page properties can be seen in the Property Panel.
Project Tree Panel
RAVE Reference Manual
Page 12
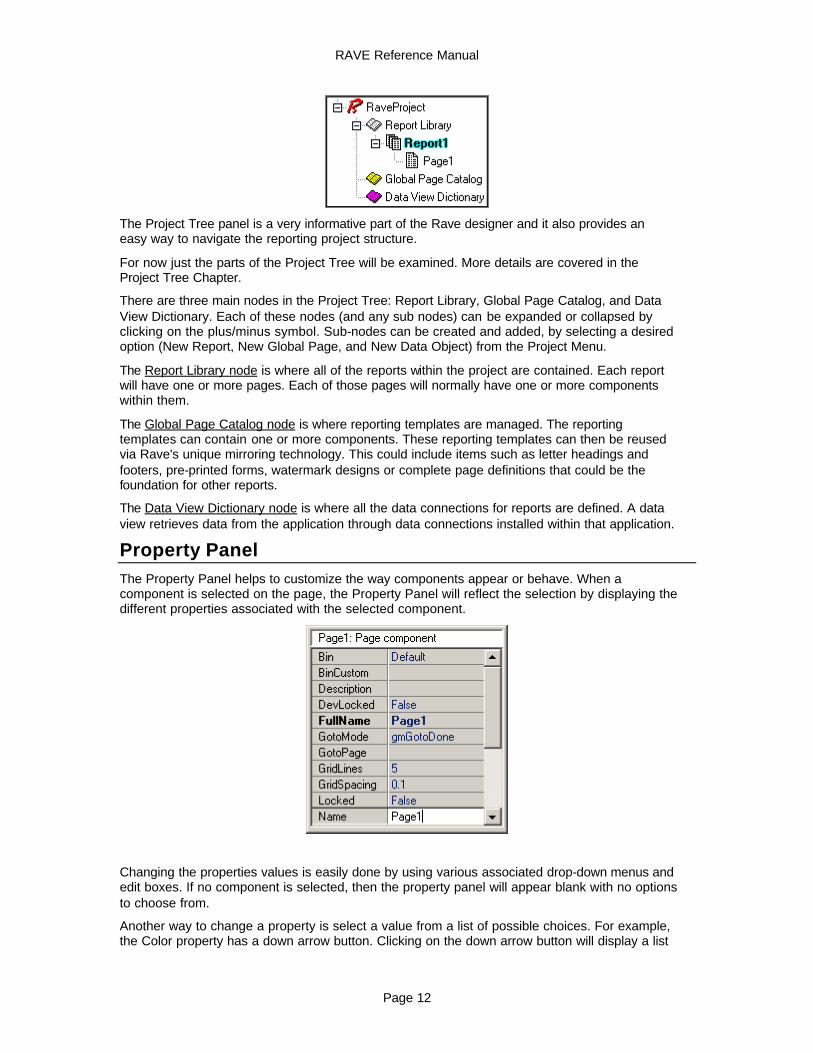
The Project Tree panel is a very informative part of the Rave designer and it also provides an easy way to navigate the reporting project structure.
For now just the parts of the Project Tree will be examined. More details are covered in the Project Tree Chapter.
There are three main nodes in the Project Tree: Report Library, Global Page Catalog, and Data View Dictionary. Each of these nodes (and any sub nodes) can be expanded or collapsed by clicking on the plus/minus symbol. Sub-nodes can be created and added, by selecting a desired option (New Report, New Global Page, and New Data Object) from the Project Menu.
The Report Library node is where all of the reports within the project are contained. Each report will have one or more pages. Each of those pages will normally have one or more components within them.
The Global Page Catalog node is where reporting templates are managed. The reporting templates can contain one or more components. These reporting templates can then be reused via Rave's unique mirroring technology. This could include items such as letter headings and footers, pre-printed forms, watermark designs or complete page definitions that could be the foundation for other reports.
The Data View Dictionary node is where all the data connections for reports are defined. A data view retrieves data from the application through data connections installed within that application.
Property Panel The Property Panel helps to customize the way components appear or behave. When a component is selected on the page, the Property Panel will reflect the selection by displaying the different properties associated with the selected component.
Changing the properties values is easily done by using various associated drop-down menus and edit boxes. If no component is selected, then the property panel will appear blank with no options to choose from.
Another way to change a property is select a value from a list of possible choices. For example, the Color property has a down arrow button. Clicking on the down arrow button will display a list
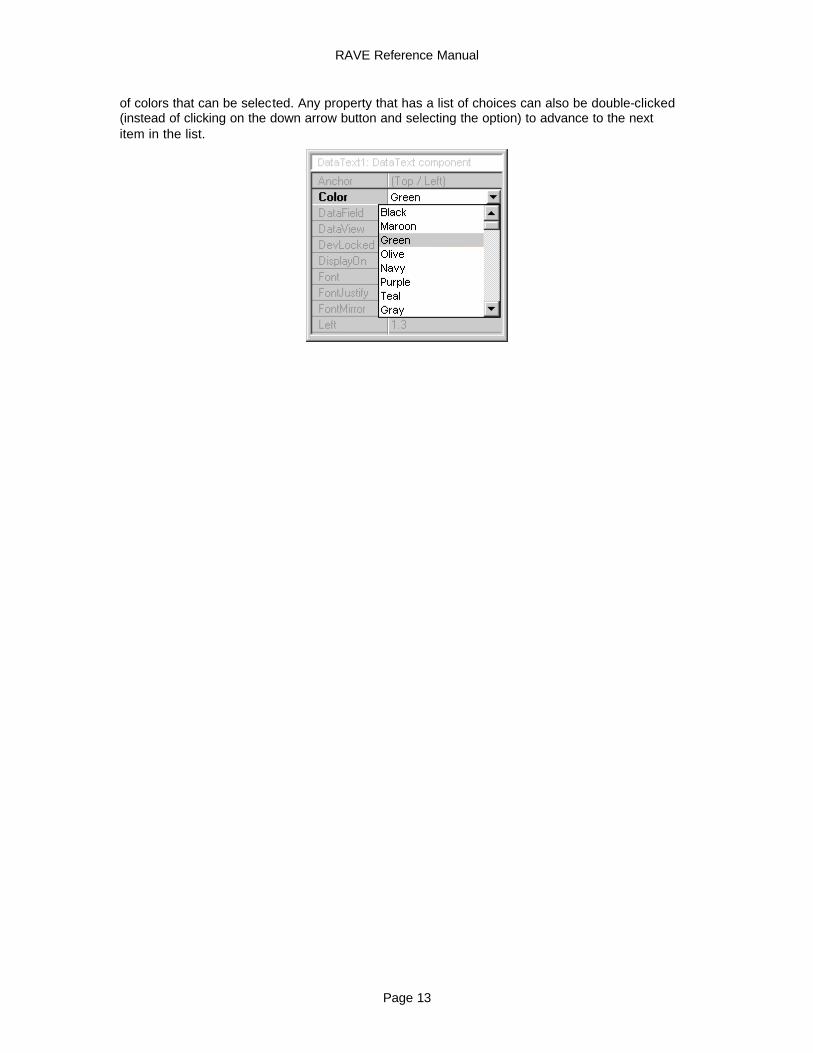
RAVE Reference Manual
Page 13
of colors that can be selected. Any property that has a list of choices can also be double-clicked (instead of clicking on the down arrow button and selecting the option) to advance to the next item in the list.

RAVE Reference Manual
Page 14
RAVE Reference Manual
Page 15
Chapter 2
Toolbars and Tool Windows
In this Section: • General information about the toolbars • Toolbar placement in the Visual Designer environment • How to manipulate Toolbars within the environment • Introduction to Tool Windows and their movement
Toolbars A toolbar is a collection of icons that relate in their function. Rave has several toolbars that can be docked to any side of the designer window, tab docked, or hidden to stay out of the way until they are needed.
To access the toolbars, go to the Tools menu, and then from Toolbars select the toolbar that is desired. Selecting a toolbar will place a check mark next to the toolbar.
The toolbars are designed to remember their last placement position. When a toolbar is closed and then opened again, the toolbar will be in the same position on the screen that it was in before it was closed.
Toolbar Placement When a toolbar is visible it can be in one of two states: tab-docked or single docked. A tab-docked toolbar is docked with tabs displayed. A single docked toolbar has a ribbed section on the left of the toolbar. To change the toolbar state, right-click on one of its icons. This will reveal a small button with either a "dock" or "undock" label. Click on that button to change that toolbar's state.
When a toolbar is undocked, the "toolbar handle" is the ribbed section in docked style. To move a toolbar, place the mouse cursor somewhere on the "toolbar handle", press and hold the left mouse button while dragging the toolbar to a new location in the top portion of the designer window. The best way to get familiar with this is to try docking and undocking toolbars.
Below is an example of docked and tab docked. As previously mentioned, the single docked toolbars can only be placed at the top of the designer window. The user can practice docking and undocking the toolbars to get familiar with this process.
Toolbar Palette The toolbar palette has a number of special features, which are worth mentioning in more detail. The region on the upper right hand corner of the visual designer and allows one or more toolbars to be docked. When the toolbars are docked, tabs are formed with the name of the toolbar as the name of the tab. As toolbars are placed in the tab docking area, a new tab will be created to reflect the current toolbar.
There is a tab grabber that allows the tabs to be moved to the left or to the right. When the tabs are moved to the far right, double arrows appear to allow movement through the tabs. The entire tabs area can be emptied by moving all the toolbars away from the tab area, or by closing the toolbars from the tool menu. The tab area can also be moved off to the every edge of the screen (moved to the far right) to allow room in the upper area of the visual designer. Use the Tab Grabber to move the Tab area (it can be filled or emptied) off to the far right.
RAVE Reference Manual
Page 16
Hiding Toolbars There are a couple ways to hide toolbars. Hiding Toolbars allow the user to 'clean' up the Rave Designer. This is also helpful to get unused toolbars, or less frequently used toolbars, out of the way or out of the designer environment.
The method to do this is to use the Tools menu to uncheck, and thus hide, the toolbar.
Component vs. Utility Toolbars There are two types of toolbars: Component toolbars and Utility toolbars.
The component toolbars are used for placing components that work and have function within a report; see the Components Overview Chapter for more details about components. Most of the components appear visually when placed on the page, however there are a few components that are non-visual. Non-visual means that the components only appear in the Project Tree, there will be no visual record of the component on the Page.
Utility toolbars are used to set properties that affect the look of components in a report. For example, the Utility Toolbar Color can change the color of text in a DataText component.
Below is a list of the toolbars classified by type: Component Toolbars Utility Toolbars Standard Alignment Report Colors Bar Code Fills Drawing Fonts Lines Zoom Project Designer
Tool Windows Rave has two very helpful windows, which are generally called the Tool Windows. They are called this because the user will use them as tools to complete and navigate a report. The two Tool Windows are the Project Tree and the Property Panel.
These windows will most likely be displayed when Rave is started. But, if it is not displayed, then go to the Tools menu and select these windows to be opened by placing a check mark in front of them.
Property Panel The Property Panel gives information about the characteristics of a project and the components within the project. It will be most helpful when designing reports because it gives easy access to component properties, and thus easy visual access to modifying the properties. More detailed information is given in the Property Panel Chapter.
The Property Panel displays and allows modification of values of any component that is placed on the Page, which includes non-visual components. To get property information about a certain component, remember to select that component before looking at the Property Panel (see Selecting a Component in the Page Designer Chapter for more information on how to select an object).
RAVE Reference Manual
Page 17
Project Tree The Project Tree is a very informative part of the Rave designer. It provides an easy way to navigate the reporting project structure.
The Project Tree is composed of three main branches: Report Library, Global Page Catalog and Data View Dictionary. For more information about the functionality of each of these components, please see the Project Tree Panel chapter and the Project Components chapter.
Items within the Project Tree can be selected by clicking on the item. Also, remember that the components seen in the tree are also the components that are on the Page.
Note: the non-visual components are in the Project Tree and are usually a green color.
The details of navigating through the Project Tree are saved for a chapter in itself. For now just a general overview of the Project Tree is given.

RAVE Reference Manual
Page 18
RAVE Reference Manual
Page 19
Chapter 3
Components Overview
In this Section: • Introduction to Components in general • Lists Component Toolbars • Overview of each Component toolbar is given
What is a Component A component is defined as something placed on the page, such as a barcode, line, region, shape, etc. The components available in Rave can be found on any of the component toolbars (e.g. Standard, Drawing, Report and Barcode).
The toolbars are made available by clicking on the Tools menu followed by the Toolbars menu. The available toolbars will then be shown in another submenu and will have checkmarks showing the toolbars that are currently visible. Once a component toolbar is active and selected, a component can be selected and placed on the page. The Page is a special base component, and more details are given in the Page Designer chapter.
Special properties are associated with each component. These component properties can be seen using the Property Panel. Set the properties of each component to the desired setting by either typing the setting in a text dialog, using a drop down menu, or
by using the special ellipse (…) button to get to the property dialog box.
There are many properties associated with each component, but don't be intimidated by the number of properties. The properties are there to allow adjustment for a component's behavior and in many cases the default settings are adequate. Also, please note that the number of properties listed with each component may vary depending on the user level that has been set under preferences. To adjust the user's level, please visit the environment tab in the preferences dialog. See the Preferences chapter for more details.
Since there are many properties associated with each component, this chapter will focus mainly on the component toolbars rather than their associated properties. The current chapter provides a good overview of what each component toolbar does without too much detail about the property specifics. Do note that many components share common properties, so once the common properties are learned for one component, they can be applied to other properties.
Components are also defined by their relationship relative to other components. This relationship is defined by a parent-child relationship. When a text component is placed on the page, the parent is the page component and the child is the text component. Another way to look at it is that the page contains the text component, thus the parent component contains the child component.
The parent-child relationship also extends into the positioning of the components. All positions are relative to the upper left corner of the parent, thus the Left property and Top property are used to define the relative position of a component. If the parent is like a Section component, which can contain any number of other components; then as the parent component is moved around, it's children components will move accordingly. If the parent component is deleted, all of its children will also be deleted.
A parent-child relationship is defined when the child component is initially created. If the child component is dropped within the parent component, then it will become the child of that parent. If the component is dropped on the page, then dragged on top of another component (such as a
RAVE Reference Manual
Page 20
Band or Section), it will still be considered a child of the page.
The Project Tree, which will be explained in more detail in a later chapter, visually shows the parent-child relationships of the components. In general, the Project component is the master parent of all reports, global pages and data objects. Reports are parents to the report pages. Pages are parents to the components that are placed on them. There are still other components that can be parents to components, such as Regions, Bands and Sections.
The Component Toolbars There are four standard component toolbars. Other component toolbars may be present if add-on packages have been included. The normal set of component toolbars is: "Standard", "Drawing", "Report", and "Bar Code". There is one particular property that applies to all components, so it will be mentioned here.
The "Name" property is used to assign a new name to that control or to designate the name of the control to give it a unique meaning. By default, Rave assigns sequential names based on the type of the component, such as 'Section1', 'Section2', and so on. Change these to more meaningful names to make the Project Tree more readable and the reporting project easier to maintain. The "Name" property must not contain any spaces or special characters. This is the name that will be used in the Project Tree Panel.
The next several sections will give an overview of the four component toolbars. This will serve as an introduction, and more detail will be covered in later chapters.
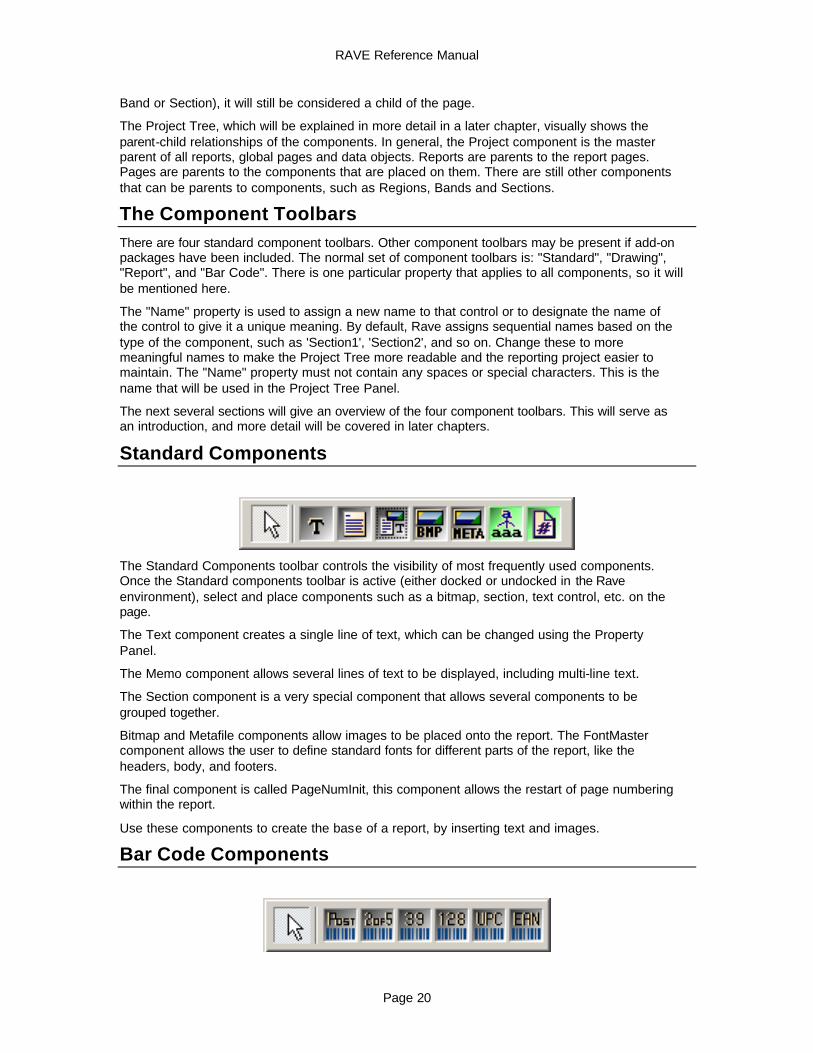
Standard Components
The Standard Components toolbar controls the visibility of most frequently used components. Once the Standard components toolbar is active (either docked or undocked in the Rave environment), select and place components such as a bitmap, section, text control, etc. on the page.
The Text component creates a single line of text, which can be changed using the Property Panel.
The Memo component allows several lines of text to be displayed, including multi-line text.
The Section component is a very special component that allows several components to be grouped together.
Bitmap and Metafile components allow images to be placed onto the report. The FontMaster component allows the user to define standard fonts for different parts of the report, like the headers, body, and footers.
The final component is called PageNumInit, this component allows the restart of page numbering within the report.
Use these components to create the base of a report, by inserting text and images.
Bar Code Components
RAVE Reference Manual
Page 21
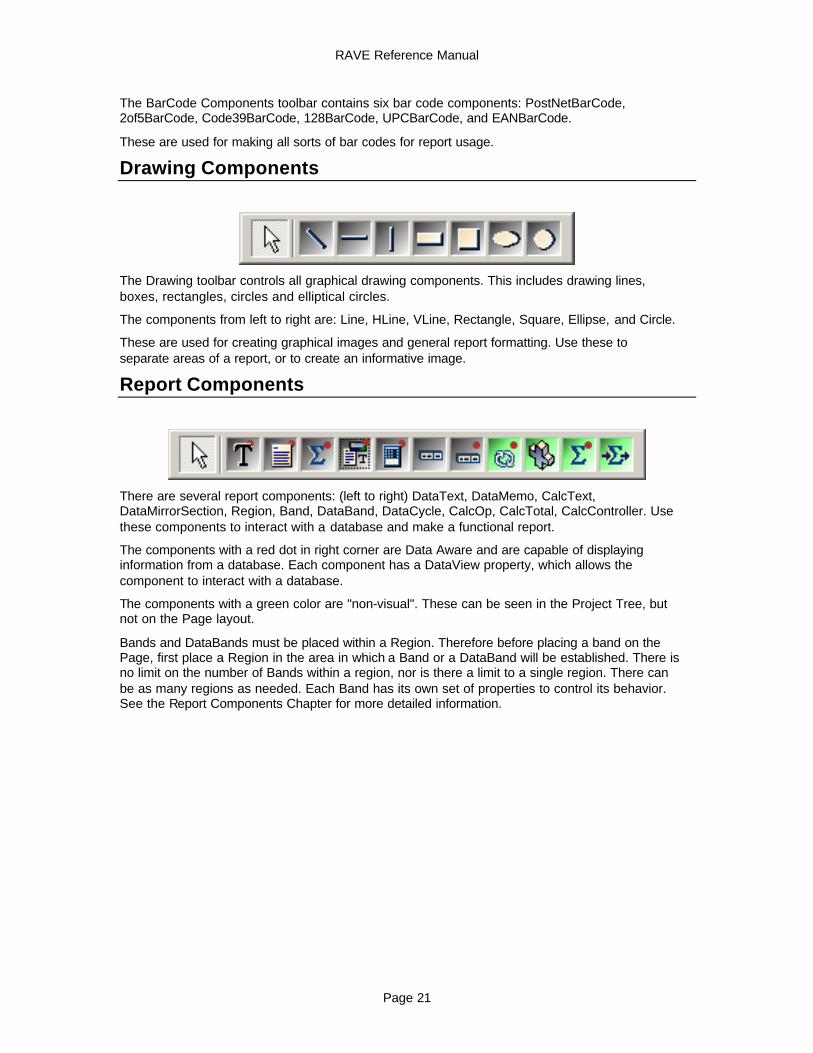
The BarCode Components toolbar contains six bar code components: PostNetBarCode, 2of5BarCode, Code39BarCode, 128BarCode, UPCBarCode, and EANBarCode.
These are used for making all sorts of bar codes for report usage.
Drawing Components
The Drawing toolbar controls all graphical drawing components. This includes drawing lines, boxes, rectangles, circles and elliptical circles.
The components from left to right are: Line, HLine, VLine, Rectangle, Square, Ellipse, and Circle.
These are used for creating graphical images and general report formatting. Use these to separate areas of a report, or to create an informative image.
Report Components
There are several report components: (left to right) DataText, DataMemo, CalcText, DataMirrorSection, Region, Band, DataBand, DataCycle, CalcOp, CalcTotal, CalcController. Use these components to interact with a database and make a functional report.
The components with a red dot in right corner are Data Aware and are capable of displaying information from a database. Each component has a DataView property, which allows the component to interact with a database.
The components with a green color are "non-visual". These can be seen in the Project Tree, but not on the Page layout.
Bands and DataBands must be placed within a Region. Therefore before placing a band on the Page, first place a Region in the area in which a Band or a DataBand will be established. There is no limit on the number of Bands within a region, nor is there a limit to a single region. There can be as many regions as needed. Each Band has its own set of properties to control its behavior. See the Report Components Chapter for more detailed information.

RAVE Reference Manual
Page 22


![1[1].00060 A - Flexmate K500 Service Manual New Version 2 ... · warranties, express or implied, or statutory, including but not limited to the implied warranties of merchantability](https://img.pdfslide.net/doc/110x75/60292420e6bf5616904c5710/1100060-a-flexmate-k500-service-manual-new-version-2-warranties-express.jpg)