Embed Size (px)
Citation preview
RealtiWeb® Ontario Basic User GuideThis guide is for the basic tasks to open and complete a real estate deal.
Other guides available include:
Advanced User GuideMore advanced features like editing master documents and exporting to e-reg
Administrator User GuideFor Administrators of LDD RealtiWeb Accounts
Accounting Integration GuidesSetup and manage imports and exports to/from accounting packages, including PCLaw and CosmoLex
Title and Writ Search GuideUse Teranet capabilities without leaving your RealtiWeb screens
© 2021 LawyerDoneDeal Corp.

RealtiWeb Ontario Basic User Guide
Table of ContentsTable of Contents 1
Main Screen 3File List 3Calendar 3Inbox 3Control Panel 3
How to Create a File 4File Creation Screen 4
File Orientation 4Databases 5Overwrite (Field turns Pink) 6
Working in Your File 6Basic Button 6
Basic Information tab 6Adding Purchaser/Transferee 6Adding Seller/Transferor 7Adding Client Identification Verification Information 7Adding Other Parties in the Real Property Transaction 8
Property and Legal Description tab 8Contract Details tab 8
Real Estate Broker 8Title Search and Writ Search tabs 9
Mortgage Button 9Lender selection 9Select Type of Mortgage 10
Calculating Mortgage Advance 10Add a Mortgage Schedule 10Specifics for TitlePLUS® deal 11
Issues Button 11Master Issues List tab 11
How to create an issue 11Manual Entry 11Title Search Matching using Teranet Connect 12
Carrying out actions from the Action List 12Clauses 12Dra�ing Documents 13Adjust/Payout and Calendar Action 13
Inquiry Status, Requisition, Checklist, and Report tabs 13Financial Button 14
© 2021 LawyerDoneDeal Corp. Return to Table of Contents 1
RealtiWeb Ontario Basic User Guide
Statement of Adjustments 14LTT 14LTT Refund 14Account to Client tab 15Trust Statement 15Closing Funds Summary 15
Docs Button 16Document Control Items 16Document Organization 16
Searching for a Specific Document 16Document Merging Tool 16
Document Colour Legend 16Multiple Document Merging 16
Creating Documents 17Editing documents 17Saving and Printing Documents 17
Specialty Tools 17Label/Envelope/Fax 17OREA Forms 18
Title Insurance Button 18
Uploading to Teraview and Teranet Express 18Prescribed Information for the Purposes of Section 5.0.1 Form Info to Teranet Express 18Upload Transfers, Charges/Mortgages, Discharges and Document Generals to Teraview 19
Further Help and Support 20
© 2021 LawyerDoneDeal Corp. Return to Table of Contents 2

RealtiWeb Ontario Basic User Guide
Main ScreenA�er logging in and selecting Ontario, you will be brought to the Main page of RealtiWeb. This is whereyou will manage your files and see what is coming up.
File ListThe Main page will show your file list. The Recent files will show the last 20 files you have viewed onyour computer. However, you can select Active files or Archived files across the bottom of the Filesportion of the screen to view all active or archived files, respectfully.
The Filter on the Files portion allows you to specifically search for a file, either by File No., Clientname, Reference Line, Closing Date, etc. To sort your files differently for the session only, click on thecolumn headings (such as File No. or PSM).
Note: PSM is an acronym in RealtiWeb, that is used for identifying the file type.P: Purchase fileS: Sale fileM: Mortgage file
Later in the Docs Button and Master Documents Settings you will see P, S, M, PS, PM, SM, PSM. Inthis context, the syntax is identifying the file types applicable to each document.
From the Main page you will see your firm’s files. This list can be customized by clicking the cog iconEdit List. Any change to the file list display will be reflected for all users.
Note: Changing the list view will change it for all users.
CalendarThe Calendar feature reminds you of important dates in the current week, day or month. Your accountadministrator is able to setup what is shown here and if any reminders are sent out. More about thisfeature will be covered in the Issues button.
InboxThe Inbox is how LawyerDoneDeal sends documents between LawyerDoneDeal users. If you are usingLDD WebDocumentRetrieval® your files will appear here.
Control PanelThese controls allow you to create or find a file. Find a File will open a popup with fields you can fillout to search for your file.
© 2021 LawyerDoneDeal Corp. Return to Table of Contents 3
RealtiWeb Ontario Basic User Guide
How to Create a FileThere are 3 ways to create a file:
● File → Create New File (or you can click Create a New File in the Controls area)● File → Create New File From Template● File → Copy Existing File
For this training session, we will focus on creating a purchase file from Create New File.
File Creation ScreenA�er clicking Create a New File in the Controls panel, you will see a blank file.
It is recommended to complete all known fields, especially the following fields:
● Responsible Lawyer● Firm Contact● Title insurer using for the transaction● Whether this is a new home being
purchased from a builder● Purchasers● Vendors
● Property Type● Property Address● Closing Date● Contract Date● Interim Closing Date (if applicable)● Requisition Date● Contract Price● Deposits
Note: Screen content will vary depending on Deal Type and if it is a Condominium or Freehold.
To finish creating your file, you must enter a File # and Deal Type for the Continue button to appear.
If you indicate TitlePLUS is being used for the deal, a series of questions will appear above theCONTRACT DETAILS section.
A�er entering information on this screen, click the Continue button. A new screen will appear with 6buttons located at the top of the screen.
File OrientationThere are multiple buttons across the top of the file, as well as tabs depending on the selected button.This will vary depending on the file type chosen. In this particular case we are focusing on aPurchase transaction.
The buttons being covered in this guide are: Basic, Mortgages, Issues, Financial, and Docs.
If you want to return to the Main screen (where the file list is located), click Main (across the top of thescreen, beside Log Off).
© 2021 LawyerDoneDeal Corp. Return to Table of Contents 4
RealtiWeb Ontario Basic User Guide
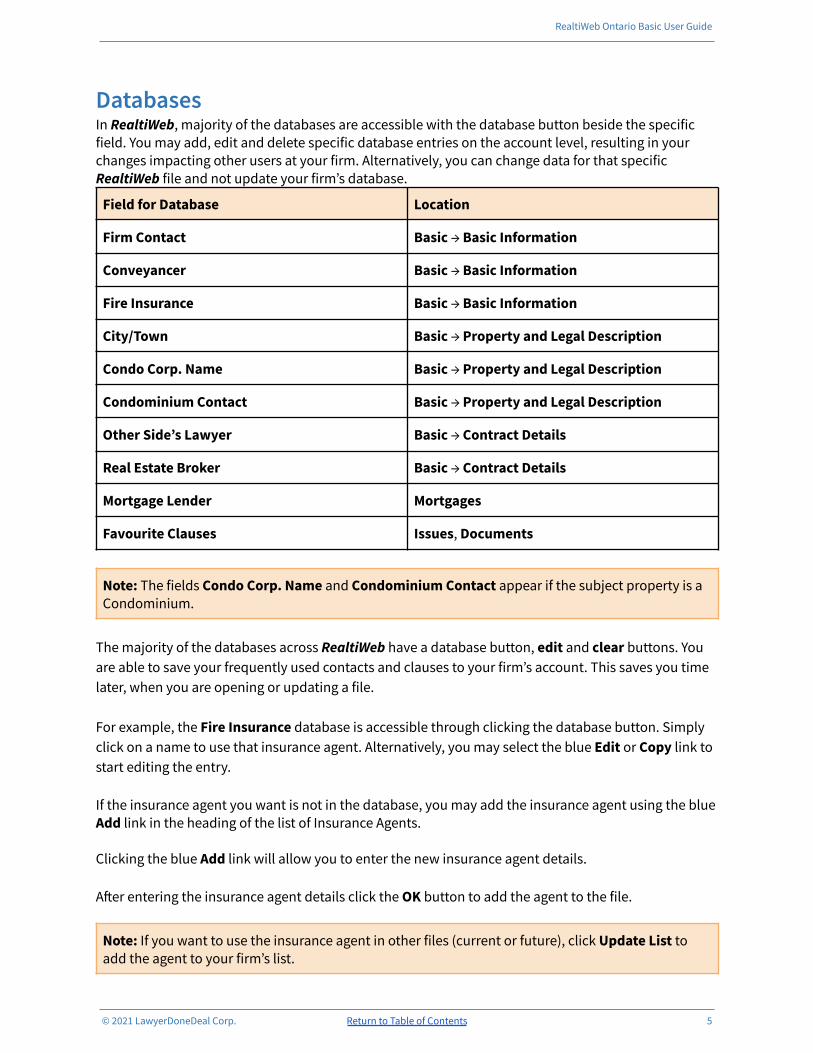
DatabasesIn RealtiWeb, majority of the databases are accessible with the database button beside the specificfield. You may add, edit and delete specific database entries on the account level, resulting in yourchanges impacting other users at your firm. Alternatively, you can change data for that specificRealtiWeb file and not update your firm’s database.
Field for Database Location
Firm Contact Basic → Basic Information
Conveyancer Basic → Basic Information
Fire Insurance Basic → Basic Information
City/Town Basic → Property and Legal Description
Condo Corp. Name Basic → Property and Legal Description
Condominium Contact Basic → Property and Legal Description
Other Side’s Lawyer Basic → Contract Details
Real Estate Broker Basic → Contract Details
Mortgage Lender Mortgages
Favourite Clauses Issues, Documents
Note: The fields Condo Corp. Name and Condominium Contact appear if the subject property is aCondominium.
The majority of the databases across RealtiWeb have a database button, edit and clear buttons. Youare able to save your frequently used contacts and clauses to your firm’s account. This saves you timelater, when you are opening or updating a file.
For example, the Fire Insurance database is accessible through clicking the database button. Simplyclick on a name to use that insurance agent. Alternatively, you may select the blue Edit or Copy link tostart editing the entry.
If the insurance agent you want is not in the database, you may add the insurance agent using the blueAdd link in the heading of the list of Insurance Agents.
Clicking the blue Add link will allow you to enter the new insurance agent details.
A�er entering the insurance agent details click the OK button to add the agent to the file.
Note: If you want to use the insurance agent in other files (current or future), click Update List toadd the agent to your firm’s list.
© 2021 LawyerDoneDeal Corp. Return to Table of Contents 5
RealtiWeb Ontario Basic User Guide
Overwrite (Field turns Pink)If a field is pink, it means the default text has been overwritten (meaning someone has manually typedin the field). If you want to change the text back to the default (and thus any changes will be removed),right click and select the Remove Overwrite option.
Working in Your FileBasic ButtonThe Basic button is the screen all files show a�er they are created (or a�er opening a file from your filelist).
Under the Basic button there are 5 tabs: Basic Information, Property and Legal Description,Contract Details, Title Search, and Writ Search.
As information is entered into RealtiWeb, the system will be able to generate documents with theappropriate information. Inserting as much information as possible throughout your file will save youtime.
Basic Information tabThe first tab, Basic Information is where the Transferee(s), Transferor(s), Firm Contact,Conveyancer, Fire Insurance and other basic information are added to or edited in the file.
Some of the fields may have been completed during file creation, such as Transferee(s), FirmContact, etc. Complete any fields that have not been completed. The more information included inyour file, the more complete your documents will be throughout the transaction. You can always comeback and add it.
The edit button to the right of some fields allows you to edit the information in that database record,for example a lawyer. Clicking on this button will open a screen that allows you to edit or enter thisinformation.
Adding Purchaser/TransfereeTo add a new Transferee, click the edit button beside the Transferee(s) field.
This will open the Purchaser/Title Information popup. Fill in the information from the Agreement ofPurchase and Sale until you receive title instructions.
The On Title and As per Agreement checkboxes impact many of the documents in RealtiWeb.Completing these checkboxes will assist the system in determining the appropriate signatures to use,who to address various documents to, etc.
The Main Contact checkbox will show the client’s name on the Basic Information tab along with theentered contact information. In addition, the Ongoing Relationship checkbox will activate clauses indocuments specific for when a client has a long-term relationship with the firm.
© 2021 LawyerDoneDeal Corp. Return to Table of Contents 6
RealtiWeb Ontario Basic User Guide
The Entitled to Provincial LTT Refund checkbox will change how land transfer tax is calculated underthe Financial Button (this will be covered in more detail under the Financial Button section of thisguide). The Joint Declaration/Capacity Statement checkbox will add another data field to add theappropriate joint declaration/capacity of the purchasers.
As information is gathered regarding title you can enter information at a later time. Click on the closebutton when you have finished entering all required information.
Adding Seller/TransferorAdding a transferor is similar to adding a transferee. From the Basic Information tab, click the editbutton beside the Transferor(s) field. This will open the Vendor/Transferor Information popup,which looks similar to the Purchaser/Title Information popup. Complete the information you knowabout the transferor.
Adding Client Identification Verification InformationA�er adding your client(s) to the file, you can add their identification into the system by clicking theClient ID button. For the purposes of this guide a Purchase file is used, and therefore the Client IDbutton is next to the edit button for the Transferee(s).
A�er clicking the Client ID button the Identification Verification Information popup will appear. Thispopup lists all the individuals listed in the file (signing officers, guarantor(s), etc) and thetransferee(s)/transferor(s)/mortgagor(s) listed in the file (both individuals and corporations),depending on file type.
Follow these steps to add applicable identification for individuals into your file:1. Enter the Occupation(s) for each person.2. The Birth Date will pre-populate provided you have entered it under your client details.3. Enter the Verification Date the individual’s identification was verified.4. Where there is a mortgage in your transaction, there is the ability to use either the Single
Process Method or Dual Process Method for ID verification.a. Single Process Method:
i. By default this method is already expanded.ii. Enter the Type of Identification (use the database button to select commonly
used documents) and application information regarding the ID. If you want toadd more than two pieces of ID, click the Add New button to add more IDs.
b. Dual Process Method:i. Click the plus icon ( ) beside the Dual Process Method to expand the
section.ii. Use the database button underneath Identification Document to select
commonly used documents, and complete the applicable informationregarding the ID. If you want to add more than two pieces of ID, click the AddNew button to add more IDs.
If you have a corporation as a client, the Corporate Information section will show underneath theIndividual Information section. Enter in the applicable fields (for example Type of Entity, Reg #,Type of Record referred to, and Source of Electronic Version) identifying the corporation.
At the top of the screen Documents are available for Client Identification Information. CreateDocument - Bank Forms - Identification Verification Form - PDF will provide you with the Lenders
© 2021 LawyerDoneDeal Corp. Return to Table of Contents 7
RealtiWeb Ontario Basic User Guide
specific document (if available). Create Document - Client Identification Information is a LDD sourcedocument which you may use for your file if there is no Mortgage.
Adding Other Parties in the Real Property TransactionPlease refer to the Database section for completing Firm Contact, Conveyancer, and Fire Insurance.
Property and Legal Description tabThe following tab, Property and Legal Description is where you enter the subject property address,type and legal description.
By clicking the edit button beside the City/Town field, a popup will open for information to be enteredregarding the costs of tax certificates, building and zoning reports, etc.
The City/Town field impacts other RealtiWeb features and fields, such as automatically selecting LandRegistry Office, Assessment Roll No., Condo Corp Names, Plan Numbers, and fields in the LegalDescription box.
Note: It is possible to bring in the property information from the Title Search tab, refer to the Title &Writ Search User Guide (found in the Title Search tab).
The Property Type dropdown is important to complete. The field indicates to RealtiWeb if the subjectproperty is a freehold or condominium, and will impact what is displayed on each screen (similar tohow Purchase files are slightly different from Sale files).
Note: If you want to indicate a Parcel of Tied Land (POTL) for a freehold, checkoff the t/w CommonElements? checkbox.
Contract Details tabThis tab includes all information pertaining to the Agreement of Purchase and Sale, with some overlapfrom the previously completed tabs, such as Contract Date, Closing Date, Contract Price,Transferee(s), and Transferor(s).
New or Resale PropertyThe radio button ‘Is this a new home purchased from a builder?’ will help the program to determinewhat should be shown.
For example, if the home is being purchased from a builder, answering ‘yes’ will show all the importantfields pertaining to new homes, such as GST/HST rebate, TARION, etc.
If the subject property is not a new home (a.k.a. resale) then, a question regarding vacant land willappear.
Real Estate BrokerEnter the real estate agent or broker using the database button. Complete the Real EstateCommission information.
© 2021 LawyerDoneDeal Corp. Return to Table of Contents 8
RealtiWeb Ontario Basic User Guide
Title Search and Writ Search tabsThe last two tabs (Title Search and Writ Search) are available to use, if you (or your firm) have aTeranet Connect account. This is a subset of Teraview on the Web. You are able to search Land Titlesand bring the information into RealtiWeb.
Refer to the Teranet Connect Guide for set up, and the RealtiWeb Title Search Guide for training onthe Title Search (or Writ Search) tab. Both guides are accessible at the bottom of the page.
Mortgage ButtonThe Mortgage button is used to add new mortgages to the file. Existing mortgage on title are handledvia the Issues button.
Lender selectionThe first field that should be completed when adding a mortgage is the Lender, using the databasebutton.
Note: The Lender that is selected affects what Type of Mortgage can be chosen.
The database button will open the Mortgage Lender Database.
The Mortgage Lender Database separates the lenders into two categories based on if the lender is aconfirmed TitlePLUS lender or not. Any lender listed under TitlePLUS Confirmed Lenders is a lenderwho accepts TitlePLUS policies notwithstanding any absence of a reference to TitlePLUS titleinsurance in their instructions. If the lender is not listed under TitlePLUS Confirmed Lenders then seeif it is listed under Other Lenders (or add it).
Click on the plus icon beside the name of the mortgage lender to expand the list of branches. Thebranch name you are hovering over will be highlighted.
You have two options for adding a lender to your file: adding a new lender branch, or editing anexisting lender branch.
Method 1: Add a New LenderClick on the blue Add… link under your selected lender to open the LawyerDoneDeal WebPage Dialog box. Enter the mortgage lender branch information in accordance with theinstructions from the mortgage lender.
Click Save to add the branch to the firm’s database. If your entry is to create a duplicate of anexisting branch, click Save as New . This will create another entry with your amendedinformation.
The branch of the mortgage lender you added will be added to the list for that mortgagelender.
© 2021 LawyerDoneDeal Corp. Return to Table of Contents 9
RealtiWeb Ontario Basic User Guide
Method 2: Editing an Existing Branch in the Lender DatabaseIf you want to edit a branch entry, click the blue pencil (beside the trash bin icon). This willopen the current branch information in a popup for editing.
Note: The blue trash bin icon will delete the branch entry from the Mortgage LenderDatabase. Caution - this action is not recoverable.
The lender’s name and mortgage position will appear. Note: If you need to add more than 1 mortgage,click the Add tab to include additional mortgages.
Select Type of MortgageRealtiWeb includes the capability to pre-populate some of the Charge Provisions and Schedules forselected mortgage lenders (such as the big 5 banks), as well as bank forms such as request for fundsand report to lender.
Select from the list of mortgage lenders (for example, Bank of Montreal).
Select a Type of Mortgage by clicking on the database button to the right of the Type of Mortgagefield.
The Select Mortgage Type box opens. Click on the type of Charge/Mortgage in accordance with theinstructions from the mortgage lender.
The applicable Charge/Mortgage Provisions will be pre-populated (if available). Note that in thisexample, the Interest Rate, Calculation Period, Standard Charge Terms, Insurance and additionalprovision fields have been pre-populated.
Enter the rest of the mortgage details in accordance with the instructions from the mortgage lender.
Calculating Mortgage AdvanceClick the edit button next to Mtg Adv $, to open up a blank window. Enter the applicable fees, and theiramounts. By default Debit is selected.
Click Set Advance to update the Mtg Adv field on the previous screen and close this window. If theapplicable fees are unknown, you may also type the Mtg Adv directly into the Mtg Adv field.
Add a Mortgage ScheduleTo add a Charge/Mortgage Schedule, click on either Additional Terms or Click here to go to LenderSchedules.
The LawyerDoneDeal™ Web Page Dialog box opens. Click on the Add button.
If there are available schedules, you are able to click on the database button to start selecting aschedule from the list.
If the database button is not shown, then you will have to click on the text underneath the e-reg PDFbutton, and either manually type or paste the schedule.
© 2021 LawyerDoneDeal Corp. Return to Table of Contents 10

RealtiWeb Ontario Basic User Guide
The Select Mortgage Type box opens a popup. Click on the type of Charge/Mortgage in accordancewith the mortgage instructions. If you do not see the type of Charge/Mortgage required for yourtransaction, then close the Select Mortgage Type box and add in manually.
The selected Schedule will appear on the screen.
Note: Any empty data fields (a.k.a. grey boxes) need to be completed. When possible RealtiWeb willpull data into the data fields.
A�er entering the Charge/Mortgage provisions in accordance with the instructions from the mortgagelender, click Close at the bottom of the Schedule.
The Schedule will be included with the e-reg™ export the Charge/Mortgage to e-reg.
Specifics for TitlePLUS® dealIf the file is a TitlePLUS deal, the question Is this Mortgage TP Insured? will be displayed.
If using TitlePLUS and the mortgage is TitlePLUS insured, check off the checkbox to indicate “yes”. Thecheckbox will be checked off if you have indicated this deal is a TitlePLUS deal on the BasicInformation tab.
The TitlePLUS wallpaper will appear with TitlePLUS related questions and fields to be completed.
Issues ButtonThe Issues button has five tabs: Master Issues List, Inquiry Status, Requisition, Checklist, Report.
Master Issues List tabThe Masters Issues List tab is for you to add any action items or issues with the transaction. For thepurposes of this guide, we will be doing a non-TitlePLUS deal.
How to create an issueThere are two ways to add issues:
1. Manual entry2. Title search matching
Manual EntryThe issues are divided into categories. Click on the applicable category, such as Mortgages(Discharge/Assumed/Remaining/Postpone).
A new window will appear with specific issues related to the selected category. As you hover overTitlePLUS specific issues (on the le� side), text will appear on the right side.
Click on the appropriate issue name. A new screen will open, the Issues WorkBench. This is meant tobe used for assisting in creating your documents, such as inquiry letters and undertakings. The IssuesWorkBench brings in data from elsewhere in the file (or Title Search) and provides text for yourreports, closing checklist, etc. for the particular issue.
© 2021 LawyerDoneDeal Corp. Return to Table of Contents 11
RealtiWeb Ontario Basic User Guide
You have the ability to edit the default text and add your own (right click the clause you want to saveand select Save current text as new clause in the clause list).
Each issue works in a similar manner.
Title Search Matching using Teranet ConnectAlternatively, you can use the matching feature on the Title Search tab a�er you have completed theinitial title search (for how to complete a title search, please refer to our full RealtiWeb Title SearchGuide: https://www.lawyerdonedeal.com/rplus/ON5/pdf/TitleSearchUserGuide.pdf). Specifically, referto Activate Instruments in RealtiWeb Issues List (page 15) as it is the most relevant for importingTeranet Connect search results into the Issues List.
If you return to the Issues tab, you will see the created issue. The name of the issue will use the type ofissue, instrument number (from Teranet Connect), and the registered date.
Carrying out actions from the Action ListThe Action List changes dynamically based on the specific actions to be carried out for the specificissue. There are a possibility of 9 items:
● Letter Inquiry● Requisition● Checklist● Reporting Letter● Undertaking● Adjust/Payout
● Calendar● TitlePLUS - only appears if TitlePLUS is
part of the deal● Similar Name - only if outstanding
Executions
Majority of each item listed in the Action List has a corresponding document. Clicking on an item inthe Action List will change which clause you are editing.
ClausesEach clause consists of the description and action clause.
The data fields in the text will be completed if the data has been entered throughout RealtiWeb orfrom the title search import. You may overwrite the text if needed. If manually entering an issue, theissue may have additional fields to be completed.
If you right click on the clause, you will see the various editing options for the text. This is what thevarious options do:
Cut The text is removed from the clause and able to be pastedelsewhere.
Copy This copies the text to your computer’s clipboard.
Paste This pastes the text on your computer’s clipboard (with noformatting) to the clause.
© 2021 LawyerDoneDeal Corp. Return to Table of Contents 12
RealtiWeb Ontario Basic User Guide
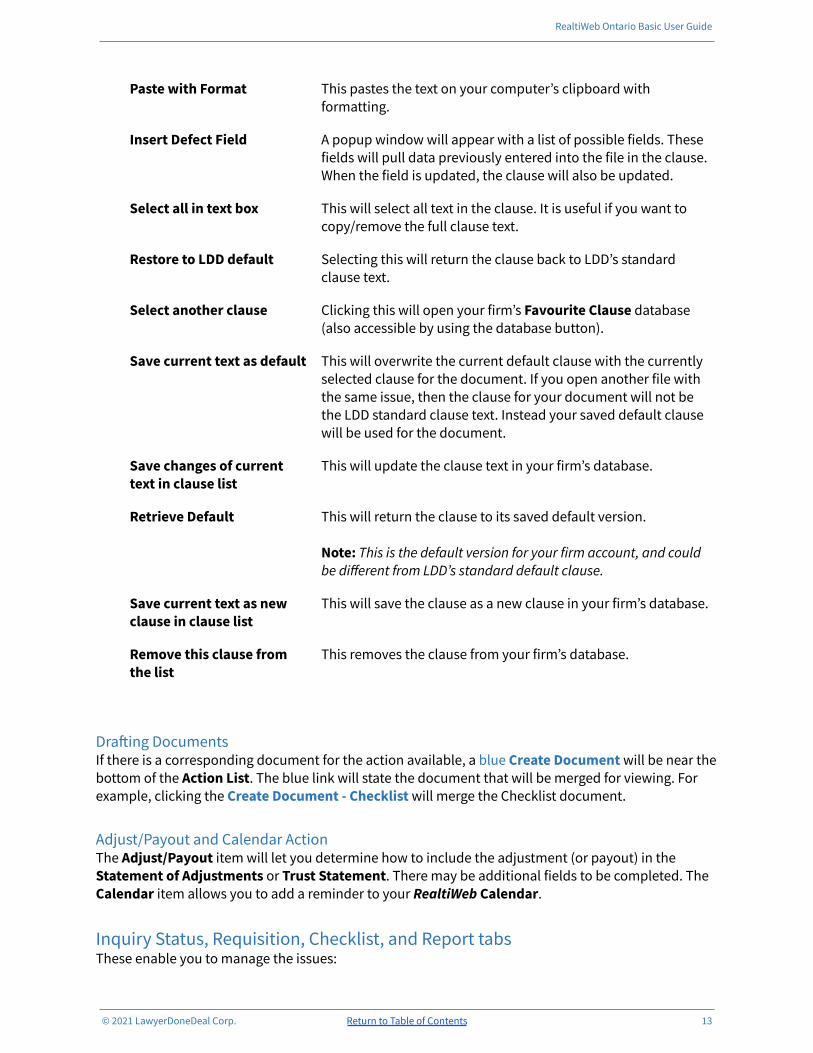
Paste with Format This pastes the text on your computer’s clipboard withformatting.
Insert Defect Field A popup window will appear with a list of possible fields. Thesefields will pull data previously entered into the file in the clause.When the field is updated, the clause will also be updated.
Select all in text box This will select all text in the clause. It is useful if you want tocopy/remove the full clause text.
Restore to LDD default Selecting this will return the clause back to LDD’s standardclause text.
Select another clause Clicking this will open your firm’s Favourite Clause database(also accessible by using the database button).
Save current text as default This will overwrite the current default clause with the currentlyselected clause for the document. If you open another file withthe same issue, then the clause for your document will not bethe LDD standard clause text. Instead your saved default clausewill be used for the document.
Save changes of currenttext in clause list
This will update the clause text in your firm’s database.
Retrieve Default This will return the clause to its saved default version.
Note: This is the default version for your firm account, and couldbe different from LDD’s standard default clause.
Save current text as newclause in clause list
This will save the clause as a new clause in your firm’s database.
Remove this clause fromthe list
This removes the clause from your firm’s database.
Dra�ing DocumentsIf there is a corresponding document for the action available, a blue Create Document will be near thebottom of the Action List. The blue link will state the document that will be merged for viewing. Forexample, clicking the Create Document - Checklist will merge the Checklist document.
Adjust/Payout and Calendar ActionThe Adjust/Payout item will let you determine how to include the adjustment (or payout) in theStatement of Adjustments or Trust Statement. There may be additional fields to be completed. TheCalendar item allows you to add a reminder to your RealtiWeb Calendar.
Inquiry Status, Requisition, Checklist, and Report tabsThese enable you to manage the issues:
© 2021 LawyerDoneDeal Corp. Return to Table of Contents 13
RealtiWeb Ontario Basic User Guide
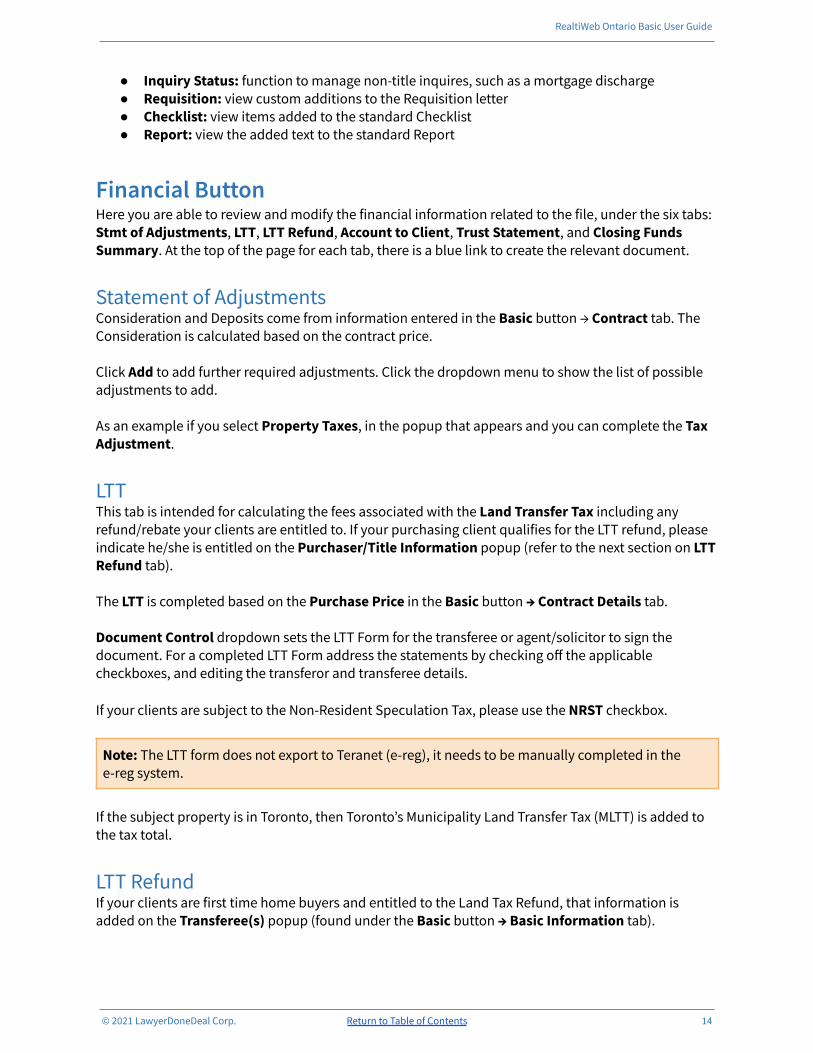
● Inquiry Status: function to manage non-title inquires, such as a mortgage discharge● Requisition: view custom additions to the Requisition letter● Checklist: view items added to the standard Checklist● Report: view the added text to the standard Report
Financial ButtonHere you are able to review and modify the financial information related to the file, under the six tabs:Stmt of Adjustments, LTT, LTT Refund, Account to Client, Trust Statement, and Closing FundsSummary. At the top of the page for each tab, there is a blue link to create the relevant document.
Statement of AdjustmentsConsideration and Deposits come from information entered in the Basic button → Contract tab. TheConsideration is calculated based on the contract price.
Click Add to add further required adjustments. Click the dropdown menu to show the list of possibleadjustments to add.
As an example if you select Property Taxes, in the popup that appears and you can complete the TaxAdjustment.
LTTThis tab is intended for calculating the fees associated with the Land Transfer Tax including anyrefund/rebate your clients are entitled to. If your purchasing client qualifies for the LTT refund, pleaseindicate he/she is entitled on the Purchaser/Title Information popup (refer to the next section on LTTRefund tab).
The LTT is completed based on the Purchase Price in the Basic button → Contract Details tab.
Document Control dropdown sets the LTT Form for the transferee or agent/solicitor to sign thedocument. For a completed LTT Form address the statements by checking off the applicablecheckboxes, and editing the transferor and transferee details.
If your clients are subject to the Non-Resident Speculation Tax, please use the NRST checkbox.
Note: The LTT form does not export to Teranet (e-reg), it needs to be manually completed in thee-reg system.
If the subject property is in Toronto, then Toronto’s Municipality Land Transfer Tax (MLTT) is added tothe tax total.
LTT RefundIf your clients are first time home buyers and entitled to the Land Tax Refund, that information isadded on the Transferee(s) popup (found under the Basic button → Basic Information tab).
© 2021 LawyerDoneDeal Corp. Return to Table of Contents 14
RealtiWeb Ontario Basic User Guide
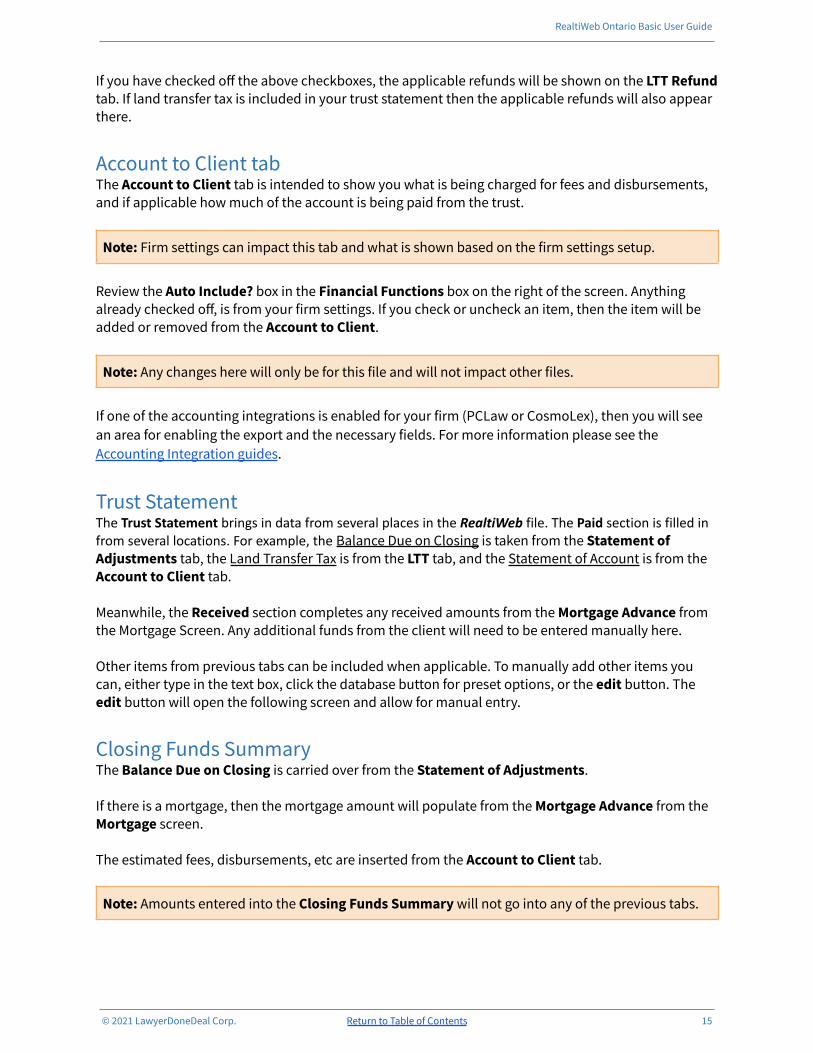
If you have checked off the above checkboxes, the applicable refunds will be shown on the LTT Refundtab. If land transfer tax is included in your trust statement then the applicable refunds will also appearthere.
Account to Client tabThe Account to Client tab is intended to show you what is being charged for fees and disbursements,and if applicable how much of the account is being paid from the trust.
Note: Firm settings can impact this tab and what is shown based on the firm settings setup.
Review the Auto Include? box in the Financial Functions box on the right of the screen. Anythingalready checked off, is from your firm settings. If you check or uncheck an item, then the item will beadded or removed from the Account to Client.
Note: Any changes here will only be for this file and will not impact other files.
If one of the accounting integrations is enabled for your firm (PCLaw or CosmoLex), then you will seean area for enabling the export and the necessary fields. For more information please see theAccounting Integration guides.
Trust StatementThe Trust Statement brings in data from several places in the RealtiWeb file. The Paid section is filled infrom several locations. For example, the Balance Due on Closing is taken from the Statement ofAdjustments tab, the Land Transfer Tax is from the LTT tab, and the Statement of Account is from theAccount to Client tab.
Meanwhile, the Received section completes any received amounts from the Mortgage Advance fromthe Mortgage Screen. Any additional funds from the client will need to be entered manually here.
Other items from previous tabs can be included when applicable. To manually add other items youcan, either type in the text box, click the database button for preset options, or the edit button. Theedit button will open the following screen and allow for manual entry.
Closing Funds SummaryThe Balance Due on Closing is carried over from the Statement of Adjustments.
If there is a mortgage, then the mortgage amount will populate from the Mortgage Advance from theMortgage screen.
The estimated fees, disbursements, etc are inserted from the Account to Client tab.
Note: Amounts entered into the Closing Funds Summary will not go into any of the previous tabs.
© 2021 LawyerDoneDeal Corp. Return to Table of Contents 15
RealtiWeb Ontario Basic User Guide
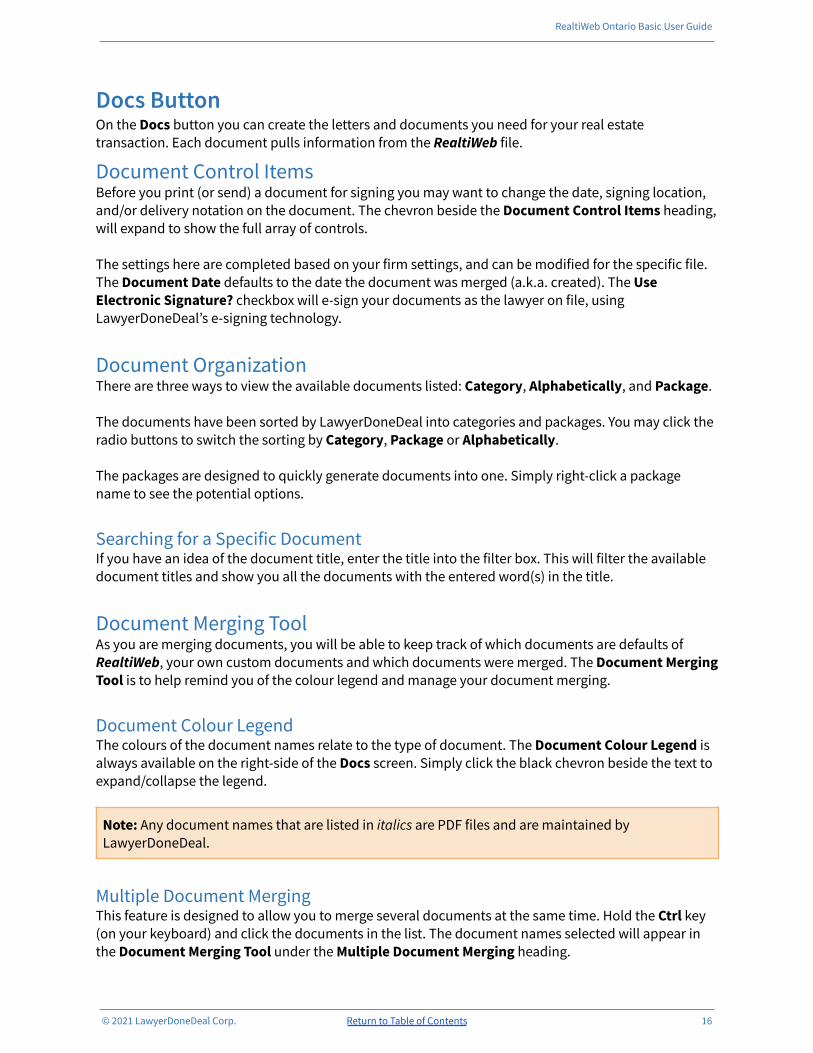
Docs ButtonOn the Docs button you can create the letters and documents you need for your real estatetransaction. Each document pulls information from the RealtiWeb file.
Document Control ItemsBefore you print (or send) a document for signing you may want to change the date, signing location,and/or delivery notation on the document. The chevron beside the Document Control Items heading,will expand to show the full array of controls.
The settings here are completed based on your firm settings, and can be modified for the specific file.The Document Date defaults to the date the document was merged (a.k.a. created). The UseElectronic Signature? checkbox will e-sign your documents as the lawyer on file, usingLawyerDoneDeal’s e-signing technology.
Document OrganizationThere are three ways to view the available documents listed: Category, Alphabetically, and Package.
The documents have been sorted by LawyerDoneDeal into categories and packages. You may click theradio buttons to switch the sorting by Category, Package or Alphabetically.
The packages are designed to quickly generate documents into one. Simply right-click a packagename to see the potential options.
Searching for a Specific DocumentIf you have an idea of the document title, enter the title into the filter box. This will filter the availabledocument titles and show you all the documents with the entered word(s) in the title.
Document Merging ToolAs you are merging documents, you will be able to keep track of which documents are defaults ofRealtiWeb, your own custom documents and which documents were merged. The Document MergingTool is to help remind you of the colour legend and manage your document merging.
Document Colour LegendThe colours of the document names relate to the type of document. The Document Colour Legend isalways available on the right-side of the Docs screen. Simply click the black chevron beside the text toexpand/collapse the legend.
Note: Any document names that are listed in italics are PDF files and are maintained byLawyerDoneDeal.
Multiple Document MergingThis feature is designed to allow you to merge several documents at the same time. Hold the Ctrl key(on your keyboard) and click the documents in the list. The document names selected will appear inthe Document Merging Tool under the Multiple Document Merging heading.
© 2021 LawyerDoneDeal Corp. Return to Table of Contents 16
RealtiWeb Ontario Basic User Guide
If you want to remove a document, then hold the Ctrl key and click the document in the list again.
The four buttons are:● Post: This will initiate posting the selected documents to the other side’s lawyer.● Merge: This will generate the chosen documents.● Clear: This will deselect the chosen documents.● More: This opens a list of options available. Specifically, useful if you want a group of
documents to be emailed or saved as an MS Word or PDF file.
Creating DocumentsA�er finding the document you want to dra�, click the title and it will merge the document in a newwindow. On the main Docs button screen the file will have a green checkmark at the end of the name.If you click the green checkmark, you will be able to see the history of the document.
Editing documentsYou can edit the document from the opened window, similar to how you edit a MS Word document. Ifyou right click a clause, you will see additional editing options.
If you want to change the text of a clause, double click the clause. This will open with a border aroundthe section the clause is in. You can start typing your changes. Once finished, click outside of thebordered section.
Note: If you do not click outside of the box before saving or printing, the box lines will be frozen inyour file. To remove the box lines, you will have to restore the document back to its default. You willlose all your changes.
Saving and Printing DocumentsThe top of the opened document will have the following options: Save, Save As, Print, Print Preview,Share, PDF, MS Word and OpenOffice.
The Save option will freeze your document in the RealtiWeb file. This will prevent the specificdocument from updating as more information is added to the RealtiWeb file. The Save As option willallow you to save a different version of the document using a name you decide. All saved documentswill have a document icon at the end of the title in RealtiWeb.
The Share allows you to email the document (up to 5 people) or post to LDD’s Web DocumentRetrieval to other lawyers.
The options PDF, MS Word and OpenOffice allow you to open and/or save a version of the documentin the respective program.
Specialty ToolsLabel/Envelope/FaxThe Label/Envelope/Fax button will easily produce labels, envelopes and fax cover sheets for yourfiles. This uses contact information in a file to create the labels, envelopes and fax cover sheets yourequire.
© 2021 LawyerDoneDeal Corp. Return to Table of Contents 17
RealtiWeb Ontario Basic User Guide
If you change the contact information in RealtiWeb, the information will automatically be updatedhere. You may add additional parties that are not in RealtiWeb, by adding their name under ExtraContacts.
If you want more details, please see our guide accessible from the Help button (beside the Setupbutton).
OREA FormsIf you have subscribed to the OREA Standard Forms with LawyerDoneDeal, you will be able tocomplete your transaction from the creation of your Agreement of Purchase and Sale to finishing yourFinal Reports a�er the close of your transaction all using RealtiWeb. If you click on the button OREAForms and you have subscribed you will see a popup window, allowing you to complete the pertinentdetails of your Agreements, Schedules, etc.
The forms will pre-populate with information you have entered into your file and you may add otherclauses, etc to your agreement from the OREA forms area. All the standard OREA clauses with regard toconditions, mortgages, etc are available through LDD. These documents are trademarked by theOntario Real Estate Board and are available to LDD users for the yearly license fee charged by OREA.
If you click on the OREA Forms button and receive a popup message indicating you are notsubscribed, clicking “OK” will send you to a new page where you can subscribe to the OREA StandardForms through LawyerDoneDeal. To subscribe to the OREA Standard Forms, click Purchase to start theprocess of subscribing.
Title Insurance ButtonOn the Title Insurance button, select the title insurance provider for the transaction, or select “N/A”.This is where title insurance provider details are accessed in RealtiWeb. Refer to our title insurancepage for help.
Uploading to Teraview and Teranet ExpressRealtiWeb allows exporting information from your file into Teraview and Teranet Express. Someone atthe firm with administrative rights should save the firm’s Teraview account name and TV numberunder 3rd Party Account Information in Firm Settings. Individual users of the firm should save theirTeraview credentials under their User Settings (under the Tools dropdown menu across the top).
Prescribed Information for the Purposes of Section 5.0.1Form Info to Teranet ExpressIf the Teraview account name and TV number of the firm are saved under Firm Settings, thenRealtiWeb will log into Teranet Express and create/access the Prescribed Information for the Purposesof Section 5.0.1 Form (PIPS).
In the file you want to create the PIPS form for, click on the chevron next to the Basic button and clickExport to e-reg to open a popup. In the popup, click the Create button beside PIPS Form.
© 2021 LawyerDoneDeal Corp. Return to Table of Contents 18
RealtiWeb Ontario Basic User Guide
Teranet Express will open, and RealtiWeb will go through the process of uploading the applicableinformation, including PIN(s), Transferee(s) (Individuals or Corporations), and Date of Birth.
You will then complete the form as required on the Teranet Express site.
The Form ID field (on the Export to e-reg popup) will automatically come in from Teranet Express.
Note: Remember to save your file a�er clicking Create.
If you have not yet submitted the form, clicking on the Open PIPS button will launch the TeranetExpress and bring you the correct form (assuming the Form ID is filled in).
Upload Transfers, Charges/Mortgages, Discharges andDocument Generals to TeraviewRealtiWeb has the ability to export to Teraview, accessed from the Export to e-reg menu option underthe Basic button dropdown.
Important: Go to User Settings (under the Tools menu) to set up your Teraview credentials beforetrying to upload to Teraview.
When you are ready to send information to Teraview. Click Export to e-reg from the Basic buttondropdown menu (accessed by clicking the chevron beside the Basic button).
In the Export To e-reg popup, it shows the Docket ID, Docket Name and LRO # fields for the docket inTeraview. These can be changed as necessary.
Select the instruments and document general items you want to send to Teraview. For example, thetransfer, charge(s), discharge(s) or any of the numerous document general options available inRealtiWeb.
A�er selecting what to send to Teraview, click on the TVWeb button. This will open a new browserwindow with Teraview loaded. RealtiWeb will go through the process of uploading everythingselected.
When RealtiWeb is finished, there will be a notification that it’s finished. However, Teraview is stillupdating. You can check the status of your upload in Teraview under Projects.
Note: Record the Request ID number from Teraview for future reference.
© 2021 LawyerDoneDeal Corp. Return to Table of Contents 19
RealtiWeb Ontario Basic User Guide
Further Help and SupportWe want to ensure your complete satisfaction with our products. Should you have any questions orexperience any problems or difficulties with using RealtiWeb, please do not hesitate to contact ourSupport team. You can contact us as shown below:
Phone 800-363-2253 ext. 0416-367-0600 ext. 0
Email [email protected]
© 2021 LawyerDoneDeal Corp. Return to Table of Contents 20