Embed Size (px)
Citation preview
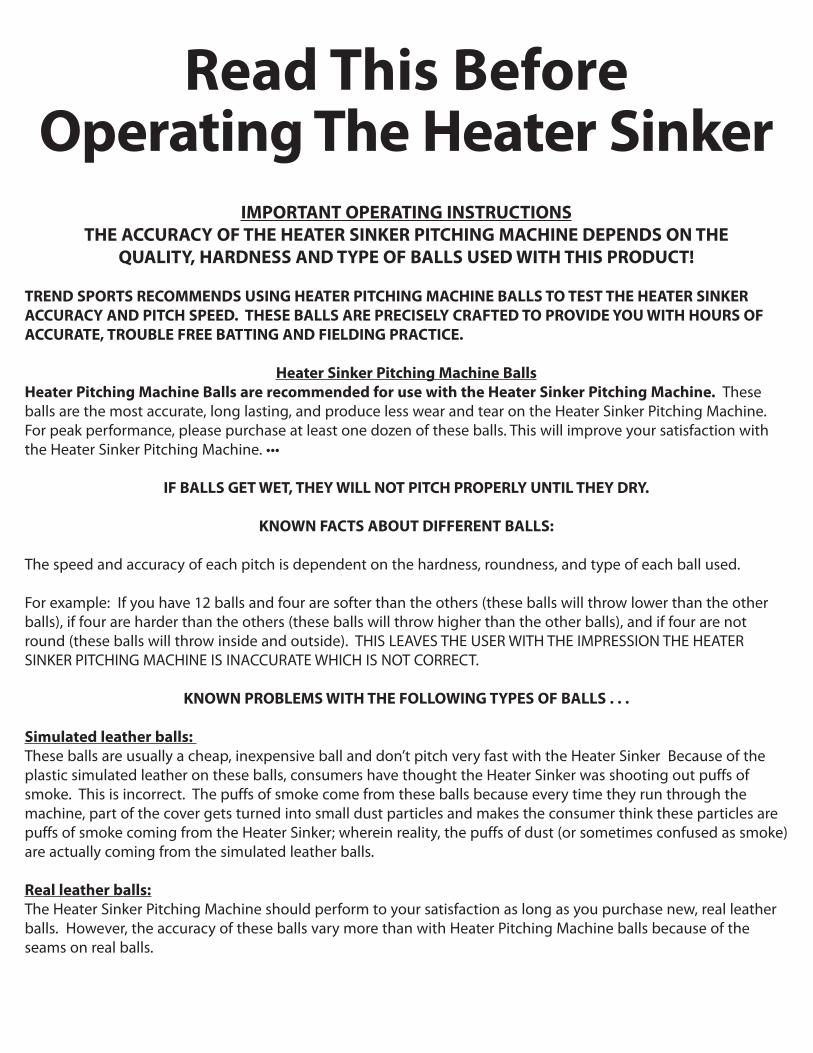
Read This BeforeOperating The Heater Sinker
IMPORTANT OPERATING INSTRUCTIONS THE ACCURACY OF THE HEATER SINKER PITCHING MACHINE DEPENDS ON THE
QUALITY, HARDNESS AND TYPE OF BALLS USED WITH THIS PRODUCT!
TREND SPORTS RECOMMENDS USING HEATER PITCHING MACHINE BALLS TO TEST THE HEATER SINKER ACCURACY AND PITCH SPEED. THESE BALLS ARE PRECISELY CRAFTED TO PROVIDE YOU WITH HOURS OF ACCURATE, TROUBLE FREE BATTING AND FIELDING PRACTICE.
Heater Sinker Pitching Machine BallsHeater Pitching Machine Balls are recommended for use with the Heater Sinker Pitching Machine. These balls are the most accurate, long lasting, and produce less wear and tear on the Heater Sinker Pitching Machine. For peak performance, please purchase at least one dozen of these balls. This will improve your satisfaction with the Heater Sinker Pitching Machine. •••
IF BALLS GET WET, THEY WILL NOT PITCH PROPERLY UNTIL THEY DRY.
KNOWN FACTS ABOUT DIFFERENT BALLS:
The speed and accuracy of each pitch is dependent on the hardness, roundness, and type of each ball used.
For example: If you have 12 balls and four are softer than the others (these balls will throw lower than the other balls), if four are harder than the others (these balls will throw higher than the other balls), and if four are not round (these balls will throw inside and outside). THIS LEAVES THE USER WITH THE IMPRESSION THE HEATER SINKER PITCHING MACHINE IS INACCURATE WHICH IS NOT CORRECT.
KNOWN PROBLEMS WITH THE FOLLOWING TYPES OF BALLS . . .
Simulated leather balls: These balls are usually a cheap, inexpensive ball and don’t pitch very fast with the Heater Sinker Because of the plastic simulated leather on these balls, consumers have thought the Heater Sinker was shooting out puffs of smoke. This is incorrect. The puffs of smoke come from these balls because every time they run through the machine, part of the cover gets turned into small dust particles and makes the consumer think these particles are puffs of smoke coming from the Heater Sinker; wherein reality, the puffs of dust (or sometimes confused as smoke) are actually coming from the simulated leather balls.
Real leather balls:The Heater Sinker Pitching Machine should perform to your satisfaction as long as you purchase new, real leather balls. However, the accuracy of these balls vary more than with Heater Pitching Machine balls because of the seams on real balls.
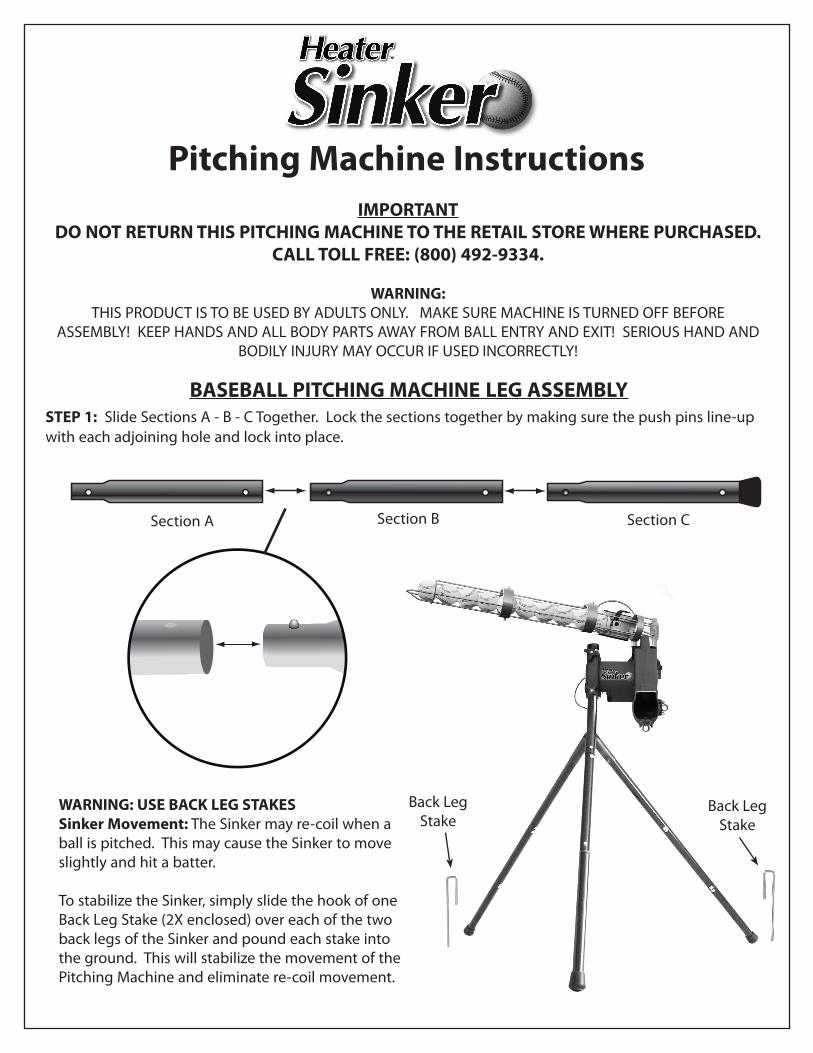
Pitching Machine InstructionsIMPORTANT
DO NOT RETURN THIS PITCHING MACHINE TO THE RETAIL STORE WHERE PURCHASED. CALL TOLL FREE: (800) 492-9334.
WARNING:THIS PRODUCT IS TO BE USED BY ADULTS ONLY. MAKE SURE MACHINE IS TURNED OFF BEFORE
ASSEMBLY! KEEP HANDS AND ALL BODY PARTS AWAY FROM BALL ENTRY AND EXIT! SERIOUS HAND AND BODILY INJURY MAY OCCUR IF USED INCORRECTLY!
BASEBALL PITCHING MACHINE LEG ASSEMBLYSTEP 1: Slide Sections A - B - C Together. Lock the sections together by making sure the push pins line-up with each adjoining hole and lock into place.
Section A Section B Section C
WARNING: USE BACK LEG STAKESSinker Movement: The Sinker may re-coil when a ball is pitched. This may cause the Sinker to move slightly and hit a batter.
To stabilize the Sinker, simply slide the hook of one Back Leg Stake (2X enclosed) over each of the two back legs of the Sinker and pound each stake into the ground. This will stabilize the movement of the Pitching Machine and eliminate re-coil movement.
Back LegStake
Back LegStake
HEATER
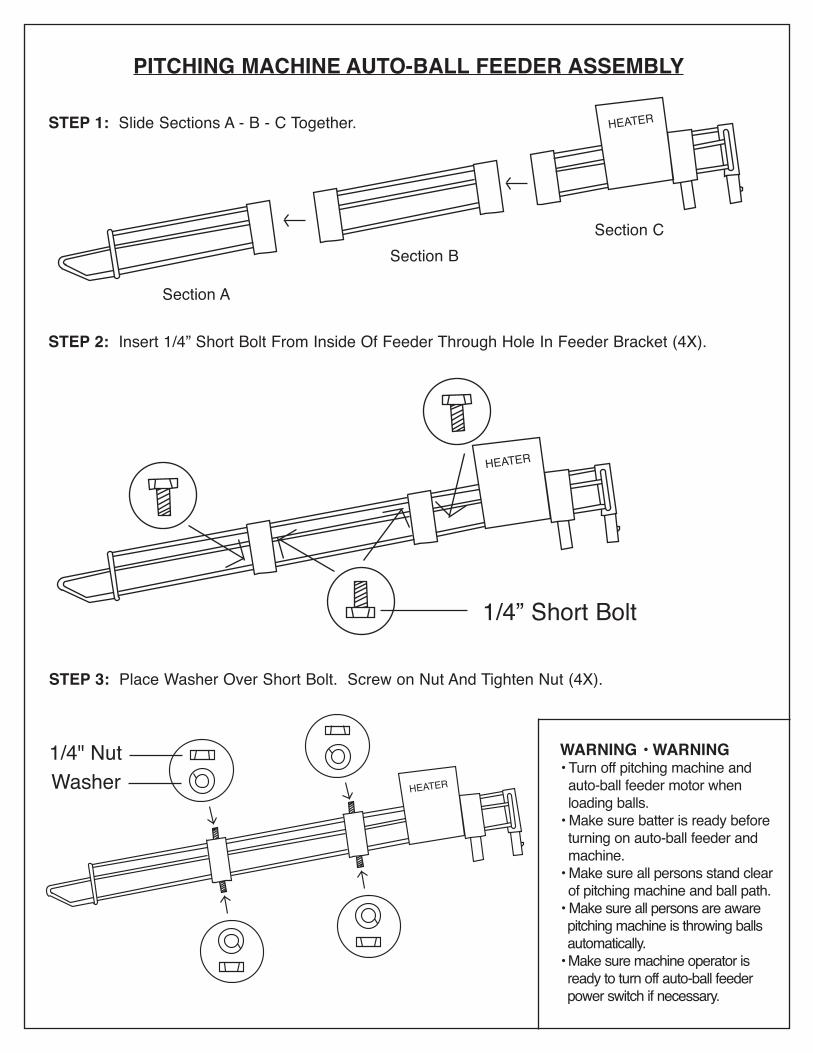
PITCHING MACHINE AUTO-BALL FEEDER ASSEMBLY
STEP 1: Slide Sections A - B - C Together.
Section A
Section BSection C
HEATER
STEP 2: Insert 1/4” Short Bolt From Inside Of Feeder Through Hole In Feeder Bracket (4X).
1/4” Short Bolt
HEATER
1/4" NutWasher
STEP 3: Place Washer Over Short Bolt. Screw on Nut And Tighten Nut (4X).
WARNING • WARNING• Turn off pitching machine and auto-ball feeder motor when loading balls.• Make sure batter is ready before turning on auto-ball feeder and machine.• Make sure all persons stand clear of pitching machine and ball path.• Make sure all persons are aware pitching machine is throwing balls automatically.• Make sure machine operator is ready to turn off auto-ball feeder power switch if necessary.
WARNING! WARNING! WARNING!USE REAL BASEBALLS IN THIS MACHINE AT YOUR OWN RISK!
IT IS RECOMMENDED THAT YOU ONLY USE DIMPLED PITCHING MACHINE BASEBALLS TO PITCH TO BATTERS. PITCHING MACHINES THAT USE A WHEEL TO THROW BASEBALLS WILL THROW REAL BASEBALLS INACCURATELY BECAUSE OF THE SEAMS ON THE BALL AND MAY HIT A BATTER AND CAUSE PHYSICAL INJURY!
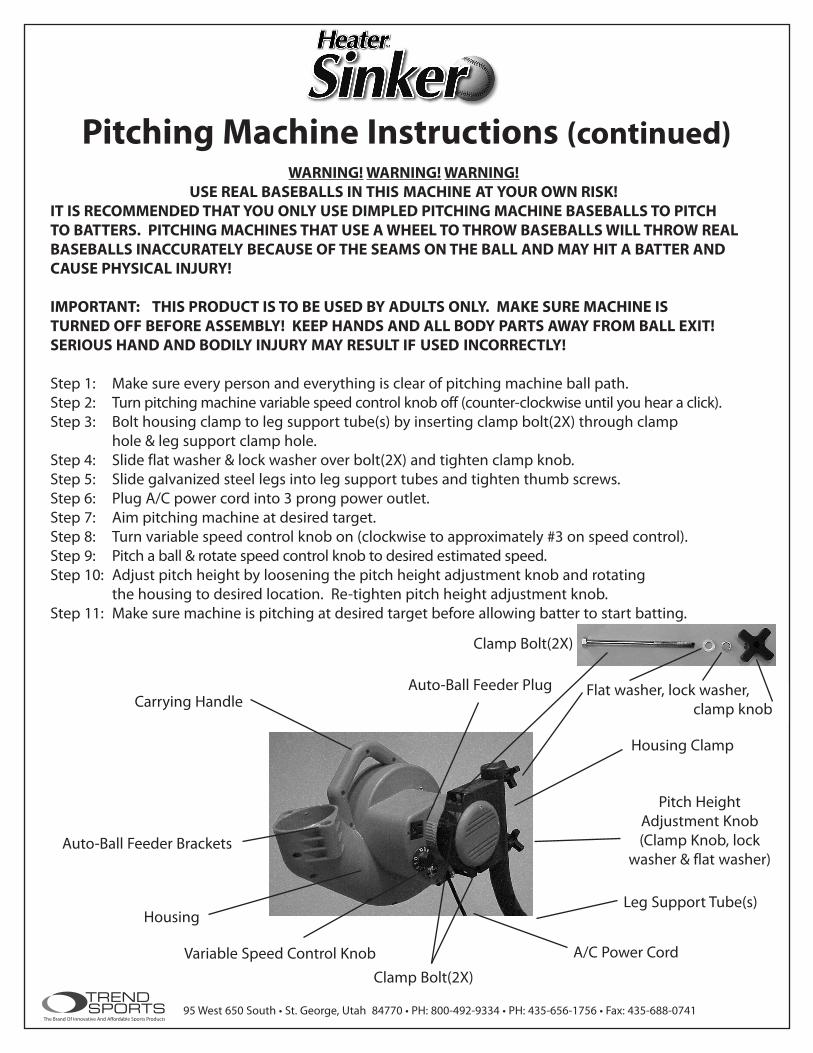
IMPORTANT: THIS PRODUCT IS TO BE USED BY ADULTS ONLY. MAKE SURE MACHINE IS TURNED OFF BEFORE ASSEMBLY! KEEP HANDS AND ALL BODY PARTS AWAY FROM BALL EXIT! SERIOUS HAND AND BODILY INJURY MAY RESULT IF USED INCORRECTLY! Step 1: Make sure every person and everything is clear of pitching machine ball path.Step 2: Turn pitching machine variable speed control knob off (counter-clockwise until you hear a click).Step 3: Bolt housing clamp to leg support tube(s) by inserting clamp bolt(2X) through clamp hole & leg support clamp hole. Step 4: Slide flat washer & lock washer over bolt(2X) and tighten clamp knob.Step 5: Slide galvanized steel legs into leg support tubes and tighten thumb screws.Step 6: Plug A/C power cord into 3 prong power outlet. Step 7: Aim pitching machine at desired target.Step 8: Turn variable speed control knob on (clockwise to approximately #3 on speed control).Step 9: Pitch a ball & rotate speed control knob to desired estimated speed.Step 10: Adjust pitch height by loosening the pitch height adjustment knob and rotating the housing to desired location. Re-tighten pitch height adjustment knob.Step 11: Make sure machine is pitching at desired target before allowing batter to start batting.
95 West 650 South • St. George, Utah 84770 • PH: 800-492-9334 • PH: 435-656-1756 • Fax: 435-688-0741
Auto-Ball Feeder Brackets
Leg Support Tube(s)
Pitch Height Adjustment Knob(Clamp Knob, lock
washer & flat washer)
Carrying Handle
Variable Speed Control Knob
Auto-Ball Feeder Plug
A/C Power Cord
Housing
Housing Clamp
Flat washer, lock washer, clamp knob
Clamp Bolt(2X)
Pitching Machine Instructions (continued)
Clamp Bolt(2X)
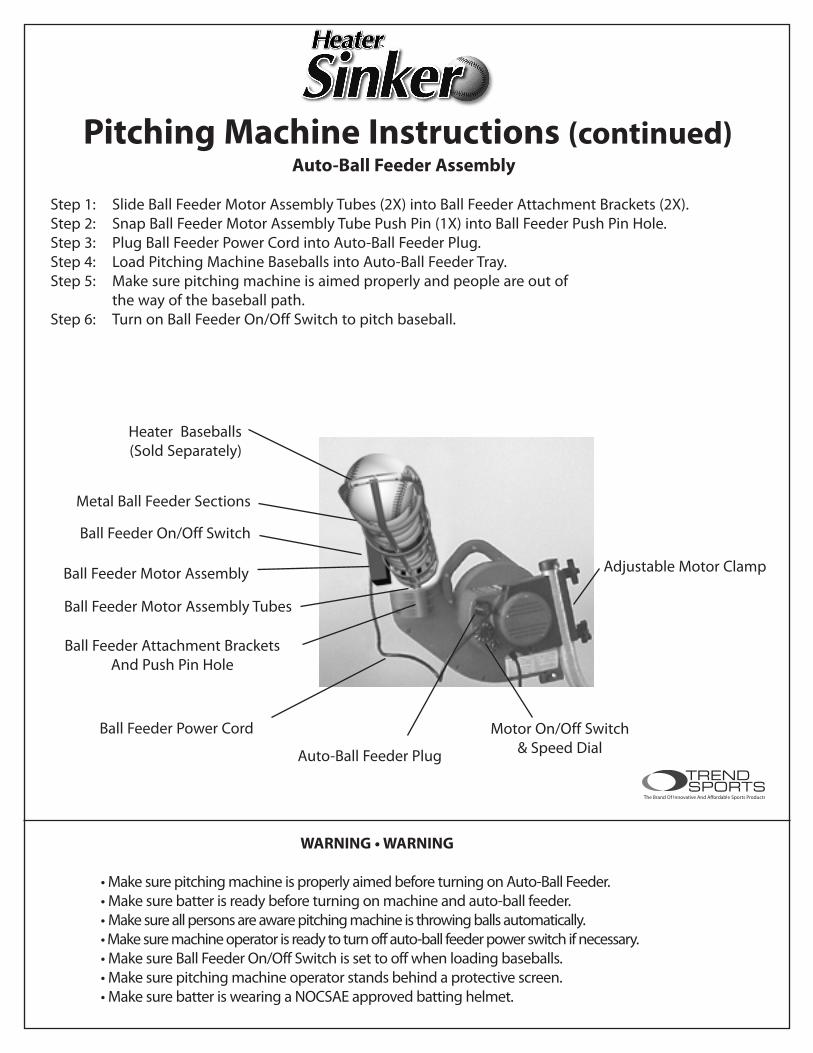
Auto-Ball Feeder Assembly Step 1: Slide Ball Feeder Motor Assembly Tubes (2X) into Ball Feeder Attachment Brackets (2X). Step 2: Snap Ball Feeder Motor Assembly Tube Push Pin (1X) into Ball Feeder Push Pin Hole. Step 3: Plug Ball Feeder Power Cord into Auto-Ball Feeder Plug.Step 4: Load Pitching Machine Baseballs into Auto-Ball Feeder Tray.Step 5: Make sure pitching machine is aimed properly and people are out of the way of the baseball path. Step 6: Turn on Ball Feeder On/Off Switch to pitch baseball.
Ball Feeder Motor Assembly
Heater Baseballs(Sold Separately)
Ball Feeder Power Cord
Metal Ball Feeder Sections
Ball Feeder Attachment BracketsAnd Push Pin Hole
Auto-Ball Feeder Plug
Ball Feeder Motor Assembly Tubes
WARNING • WARNING
• Make sure pitching machine is properly aimed before turning on Auto-Ball Feeder.• Make sure batter is ready before turning on machine and auto-ball feeder.• Make sure all persons are aware pitching machine is throwing balls automatically.• Make sure machine operator is ready to turn off auto-ball feeder power switch if necessary.• Make sure Ball Feeder On/Off Switch is set to off when loading baseballs.• Make sure pitching machine operator stands behind a protective screen.• Make sure batter is wearing a NOCSAE approved batting helmet.
Pitching Machine Instructions (continued)
Adjustable Motor Clamp
Ball Feeder On/Off Switch
Motor On/Off Switch& Speed Dial
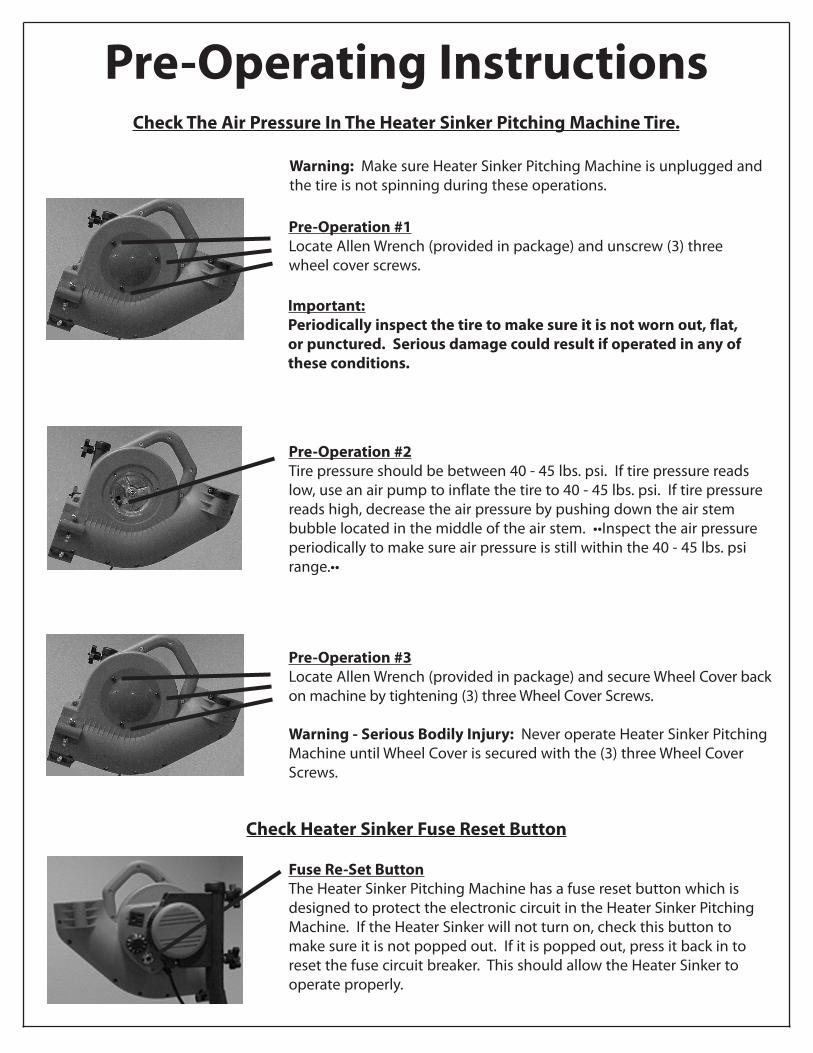
Pre-Operating Instructions
Pre-Operation #1Locate Allen Wrench (provided in package) and unscrew (3) three wheel cover screws.
Pre-Operation #2Tire pressure should be between 40 - 45 lbs. psi. If tire pressure reads low, use an air pump to inflate the tire to 40 - 45 lbs. psi. If tire pressure reads high, decrease the air pressure by pushing down the air stem bubble located in the middle of the air stem. ••Inspect the air pressure periodically to make sure air pressure is still within the 40 - 45 lbs. psi range.••
Check The Air Pressure In The Heater Sinker Pitching Machine Tire.
Warning: Make sure Heater Sinker Pitching Machine is unplugged and the tire is not spinning during these operations.
Pre-Operation #3Locate Allen Wrench (provided in package) and secure Wheel Cover back on machine by tightening (3) three Wheel Cover Screws.
Warning - Serious Bodily Injury: Never operate Heater Sinker Pitching Machine until Wheel Cover is secured with the (3) three Wheel Cover Screws.
Check Heater Sinker Fuse Reset Button
Fuse Re-Set ButtonThe Heater Sinker Pitching Machine has a fuse reset button which is designed to protect the electronic circuit in the Heater Sinker Pitching Machine. If the Heater Sinker will not turn on, check this button to make sure it is not popped out. If it is popped out, press it back in to reset the fuse circuit breaker. This should allow the Heater Sinker to operate properly.
Important: Periodically inspect the tire to make sure it is not worn out, flat, or punctured. Serious damage could result if operated in any of these conditions.
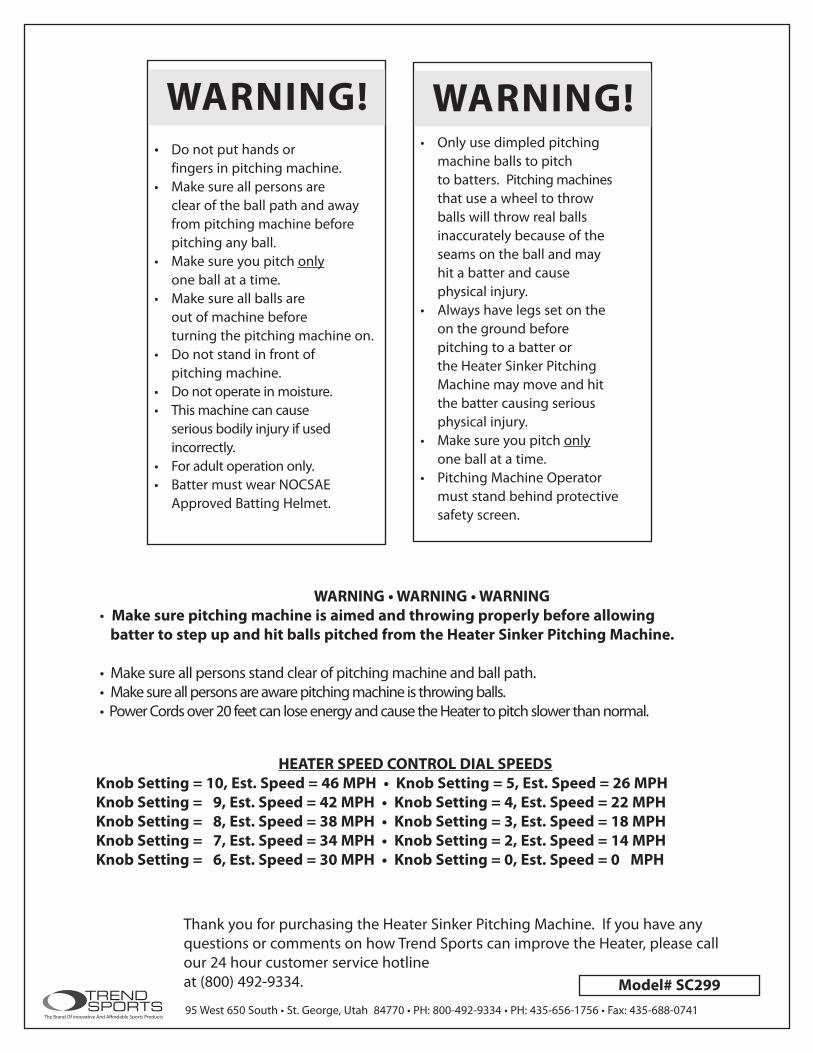
Thank you for purchasing the Heater Sinker Pitching Machine. If you have any questions or comments on how Trend Sports can improve the Heater, please call our 24 hour customer service hotline at (800) 492-9334.
WARNING!• Do not put hands or fingers in pitching machine.• Make sure all persons are clear of the ball path and away from pitching machine before pitching any ball.• Make sure you pitch only one ball at a time.• Make sure all balls are out of machine before turning the pitching machine on.• Do not stand in front of pitching machine.• Do not operate in moisture.• This machine can cause serious bodily injury if used incorrectly. • For adult operation only. • Batter must wear NOCSAE Approved Batting Helmet.
WARNING!• Only use dimpled pitching machine balls to pitch to batters. Pitching machines that use a wheel to throw balls will throw real balls inaccurately because of the seams on the ball and may hit a batter and cause physical injury.• Always have legs set on the on the ground before pitching to a batter or the Heater Sinker Pitching Machine may move and hit the batter causing serious physical injury.• Make sure you pitch only one ball at a time.• Pitching Machine Operator must stand behind protective safety screen.
95 West 650 South • St. George, Utah 84770 • PH: 800-492-9334 • PH: 435-656-1756 • Fax: 435-688-0741
WARNING • WARNING • WARNING• Make sure pitching machine is aimed and throwing properly before allowing batter to step up and hit balls pitched from the Heater Sinker Pitching Machine.
• Make sure all persons stand clear of pitching machine and ball path.• Make sure all persons are aware pitching machine is throwing balls.• Power Cords over 20 feet can lose energy and cause the Heater to pitch slower than normal.
HEATER SPEED CONTROL DIAL SPEEDSKnob Setting = 10, Est. Speed = 46 MPH • Knob Setting = 5, Est. Speed = 26 MPHKnob Setting = 9, Est. Speed = 42 MPH • Knob Setting = 4, Est. Speed = 22 MPHKnob Setting = 8, Est. Speed = 38 MPH • Knob Setting = 3, Est. Speed = 18 MPHKnob Setting = 7, Est. Speed = 34 MPH • Knob Setting = 2, Est. Speed = 14 MPHKnob Setting = 6, Est. Speed = 30 MPH • Knob Setting = 0, Est. Speed = 0 MPH
Model# SC299